

Page 1

Page 2

DSM-120 User’s Manual
Table of Contents
Safety Information .....................................................................................................4
Introduction .............................................................................................................7
Package Contents ......................................................................................................8
System Requirements .................................................................................................8
Features & Benefits ...................................................................................................9
Hardware Overview ................................................................................................. 10
Front Panel ..................................................................................................... 10
Back Panel Connections ...................................................................................... 11
Getting Started ....................................................................................................... 12
Using the Remote Control .......................................................................................... 13
Installing the D-Link® Media Server Software .................................................................. 15
Choosing Music Files to Share ................................................................................... 19
Using the D-Link® Media Server Software ....................................................................... 23
Accessing the Media on your PCs ........................................................................... 23
Sharing Media Content in Folders .......................................................................... 24
Refreshing Folder Contents .................................................................................. 24
Naming the Media Server .................................................................................... 25
Stopping the D-Link Media Server .......................................................................... 26
Using Windows® Media Connect Software ...................................................................... 27
Configuring Windows® Media Connect ..................................................................... 27
Installing the File Manager Software ............................................................................. 31
Transferring Music with Mini-USB ................................................................................ 34
Disconnecting the Mini-USB ................................................................................. 35
Connecting the DSM-120 ........................................................................................... 37
Audio Connections ............................................................................................. 37
Network Connections .......................................................................................... 38
USB Connection ................................................................................................ 39
The DSM-120 Setup Wizard ........................................................................................ 40
Welcome Screen ............................................................................................... 40
Connection Mode .............................................................................................. 42
Windows Connect Now Configuration ............................................................................. 44
DSM-120 Menu ....................................................................................................... 48
Menu Basics .................................................................................................... 48
Menu Home ..................................................................................................... 48
Now Playing .................................................................................................... 48
PC Music .............................................................................................................. 49
Music Quality ................................................................................................... 49
Supported Music Formats .................................................................................... 49
Organizing Music Files ....................................................................................... 50
Playing a Track ................................................................................................. 51
Shuffle and Repeat ............................................................................................ 52
Local Music ........................................................................................................... 53
Online Music ......................................................................................................... 54
Live365™ ....................................................................................................... 54
Setup .................................................................................................................. 56
Network Wizard ................................................................................................ 56
EQ Mode ......................................................................................................... 57
System .......................................................................................................... 57
Clock ............................................................................................................. 58
Version .......................................................................................................... 59
Hard Disk ........................................................................................................ 59
LCD Logo Displays .................................................................................................. 60
2.5” Hard Drive ...................................................................................................... 61
Installing an optional 2.5” Hard Drive ..................................................................... 61
Partition your 2.5” Hard Drive ............................................................................... 62
Create a Partition Larger than 32GB ........................................................................ 64
Using the File Manager ............................................................................................. 65
Volume ................................................................................................................ 68
Table of Contents
D-Link Systems, Inc.
2
Page 3

DSM-120 User’s Manual
Copy ................................................................................................................... 69
Frequently Asked Questions ....................................................................................... 70
Troubleshooting ...................................................................................................... 72
Technical Specifications ............................................................................................ 77
Appendix .............................................................................................................. 79
Setting Microsoft Windows Power Options ................................................................ 79
Wireless Installation Considerations ....................................................................... 80
Partition a FAT32 Hard Drive ................................................................................. 81
Glossary ............................................................................................................... 82
Networking ...................................................................................................... 82
Music ............................................................................................................ 83
Technical Support .................................................................................................... 84
Warranty .............................................................................................................. 85
Registration .......................................................................................................... 88
Table of Contents
D-Link Systems, Inc.
3
Page 4

DSM-120 User’s Manual
Safety Information
For optimum performance, please read the following information carefully.
Safety Precautions
Safety Information
The lightning flash with arrowhead symbol, within an equilateral triangle,
is intended to alert users to the presence of uninsulated “dangerous
voltage” within the product’s enclosure that may be of sufficient
magnitude to constitute a risk of electric shock to persons.
The exclamation point within an equilateral triangle is intended to alert
the user to the presence of important operating and maintenance
(servicing) instructions in the literature accompanying the appliance.
CAUTION!
THE POWER ADAPTER IS USED AS THE MAIN DISCONNECT DEVICE. ENSURE THAT
THE SOCKET-OUTLET IS LOCATED/INSTALLED NEAR THE EQUIPMENT AND IS EASILY
ACCESSIBLE.
CAUTION!
TO REDUCE THE RISK OF FIRE, ELECTRIC SHOCK, OR PRODUCT DAMAGE, DO NOT EXPOSE
THE UNIT TO RAIN, MOISTURE, DRIPPING, OR SPLASHING. DO NOT PLACE OBJECTS FILLED
WITH LIQUIDS UPON THE UNIT.
D-Link Systems, Inc.
4
Page 5

DSM-120 User’s Manual
• DO NOT INSTALL OR PLACE THIS UNIT IN A BOOKCASE, BUILT-IN CABINET OR IN
ANOTHER CONFINED SPACE. ENSURE THE UNIT IS WELL VENTILATED. TO PREVENT RISK
OF ELECTRIC SHOCK OR FIRE HAZARD DUE TO OVERHEATING, ENSURE THAT CURTAINS
AND ANY OTHER MATERIALS DO NOT OBSTRUCT THE VENTILATION VENTS.
• DO NOT OBSTRUCT THE UNIT’S VENTILATION OPENINGS WITH NEWSPAPERS,
TABLECLOTHS, CURTAINS, AND SIMILAR ITEMS.
• DO NOT PLACE SOURCES OF NAKED FLAMES, SUCH AS LIGHTED CANDLES, ON THE
UNIT.
• DISPOSE OF BATTERIES IN AN ENVIRONMENTALLY-FRIENDLY MANNER.
TO PREVENT ELECTRIC SHOCK, MATCH THE WIDE BLADE OF THE PLUG TO THE WIDE
SLOT OF THE ELECTRICAL OUTLET AND FULLY INSERT.
Safety Information
CAUTION!
CAUTION!
This device is designed and manufactured to assure personal safety. Improper
use can result in electric shock or fire hazard. The safeguards incorporated in
this unit will protect you if you observe the following procedures for installation,
use, and servicing. This device does not contain any user serviceable parts.
• Carefully read and follow the Manual and Quick Install Guide.
• Do not place the product near heat sources such as radiators, heat registers, stoves, or
other products that produce heat.
• Do not use this product near water.
• Unplug the unit from the wall outlet before cleaning. Do not use liquid cleaners or aerosol
cleaners. Use a damp cloth for cleaning.
• Power Adapter cords should be routed so that they are not likely to be walked on or pinched
by items placed upon or against them.
• Do not overload wall outlets.
• Do not use this product during a storm. Unplug the unit from the wall outlet. If the product
is to be left unattended for a long period of time. This will prevent damage to the product
due to lightning and power-line surges.
• Do not attempt to service this product yourself. Opening the cover may expose you to
dangerous voltage or other hazards. For service, please contact a qualified service
technician.
D-Link Systems, Inc.
5
Page 6

DSM-120 User’s Manual
Radio and TV Interference:
This equipment has been tested and found to comply with the limits for a Class B digital
device, pursuant to Part 15 of the FCC Rules. These limits are designed to provide reasonable
protection against harmful interference in a residential installation. This equipment generates,
uses and can radiate radio frequency energy and, if not installed and used in accordance with
the instructions, may cause harmful interference to radio communications. However, there
is no guarantee that interference will not occur in a particular installation. If this equipment
does cause harmful interference to radio or television reception, which can be determined
by turning the equipment off and on, the user is encouraged to try to correct the interference
by one or more of the following measures:
• Reorient or relocate the receiving antenna.
• Increase the separation between the equipment and receiver.
• Connect the equipment into an outlet on a circuit different from that to which the receiver is connected.
• Consult the dealer or an experienced radio/TV technician for help.
Any unauthorized changes or modifications to this equipment would void the user’s authority
to operate this device. This device complies with Part 15 of the FCC Rules. Operation is
subject to the following two conditions: (1) This device may not cause harmful interference,
and (2) this device must accept any interference received, including interference that may
cause undesired operation.
Safety Information
D-Link Systems, Inc.
6
Page 7

DSM-120 User’s Manual
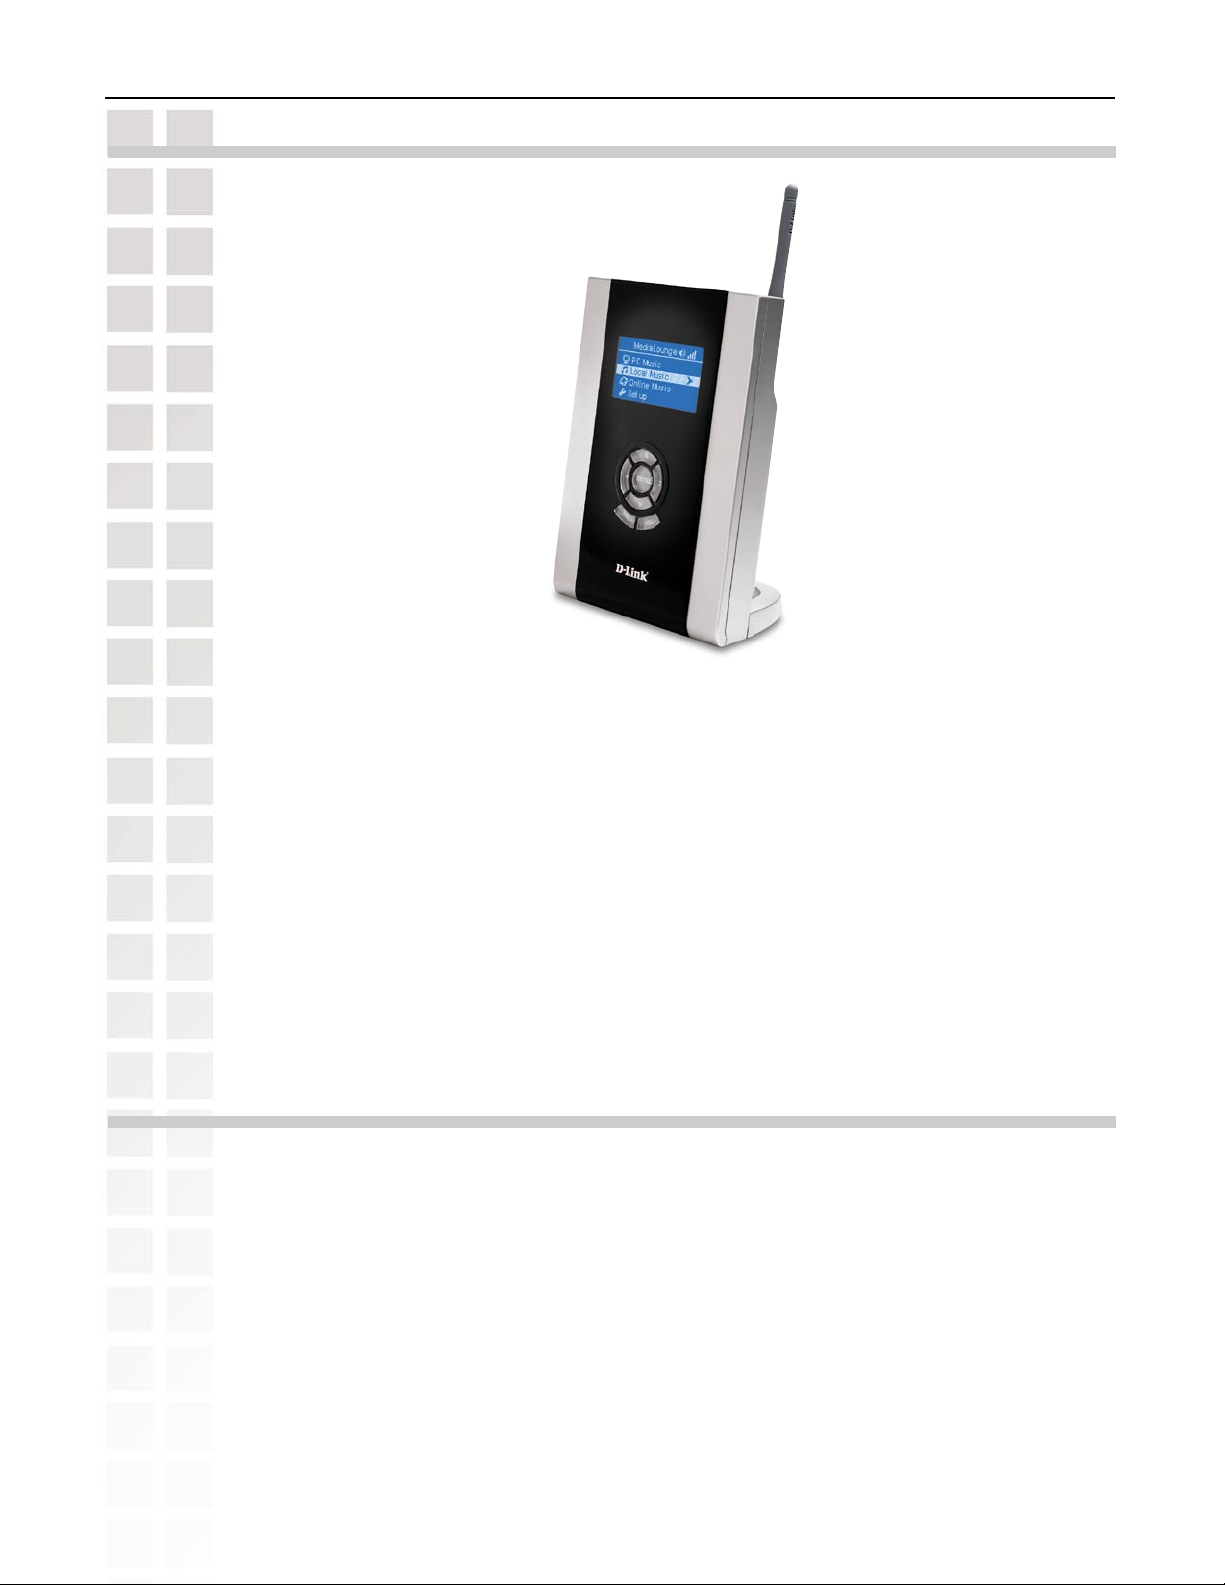
Introduction
D-Link® introduces the latest addition to its multimedia family of products: the D-Link®
MediaLoungeTM DSM-120 Wireless Music Player. The DSM-120 integrates personal computers
and home entertainment centers, so that your digital music can be enjoyed anywhere
throughout the house. The DSM-120 connects easily to a wired or wireless network. The
DSM-120 features 802.11g wireless technology for transfer speeds of up to 54Mbps on a
wireless network and can connect to a wired network at speeds up to 100Mbps. These options
provide you with the maximum throughput for sharing and transferring digital media.
Simple to setup with a sleek design that makes it a natural addition to any home entertainment
center. The Audio jacks on the back panel of the DSM-120 allow for direct connection to a pair
of PC speakers or to your stereo. Use the included remote control to access media content
stored on your PC or optional local storage. The DSM-120 lets you browse music files and
access online music content through an existing broadband Internet connection.
With support for Windows® Connect Now, configuring the wireless settings is easier than ever
before. Windows Connect Now allows you to run the Wireless Network Setup Wizard from
Windows® XP and transfer the wireless settings to the DSM-120 using a USB thumbdrive.
Introduction
D-Link® MediaLoungeTM File Manager allows you to transfer music files to your Hard Drive via
the network. The File Manager software allows you to point to the folders on your PC’s hard
drive that contain the music files you want to copy. The D-Link® MediaLounge™ File Manager
software then copies the information to the optional Hard Drive on your DSM-120 via your
wired/wireless network connection.
The DSM-120 adheres to the Universal Plug-&-Play AV specification, allowing it to communicate
with other UPnP AV media devices.
You can stream MP3 and WMA files from your computer to the DSM-120 and enjoy them on
your home stereo system.
Local Hard Drive playback and USB direct playback is available on the DSM-120. Simply
insert a 2.5” Hard Drive into the DSM-120, or insert your USB thumbdrive for local music
playback, no network or PC is needed!
A Mini-USB connection for direct transfer of music files to and from a PC.
Experience digital media like never before with the MediaLoungeTM DSM-120 Wireless Music
Player. The DSM-120 includes everything you need to instantly access and play music using
your home entertainment center.
D-Link Systems, Inc.
7
Page 8
DSM-120 User’s Manual
Package Contents
Package Contents
D-Link DSM-120 Wireless Music Player
Printed Install Guide
CD-ROM with Manual (Contains D-Link Media Server Software, File Manager
Software, Install Guide, and Manual)
Ethernet (CAT5-UTP/Straight-Through) Cable
Standard Composite RCA Audio Cable
Remote Control with Batteries
Back Stand
Mini-USB Cable
Energy Star certified Power Adapter
System Requirements
A wireless (802.11g or 802.11b) or Ethernet network.
Minimum to run the Media Server software: PC with 500MHz processor, 128MB
RAM and 50MB of available hard disk space.
Windows
®
XP/2000.
D-Link Systems, Inc.
A CD-ROM drive.
8
Page 9

DSM-120 User’s Manual
Features and Benefits
Stream music from a PC or D-Link Network Attached Storage to your entertainment center.
Listen to digital music on your stereo system.
Support for Windows
Easily connect to your wireless network using 802.11g at up to 54Mbps.
802.11b compatible at 11Mbps.
Connect using an Ethernet network cable at up to 100Mbps.
UPnP AV and INMPR compliant for maximum compatibility.
Support for most popular digital music formats.
Sleek design complements your existing audio equipment.
64- or 128-bit WEP security.
Convenient one-touch access to copy music.
®
Connect Now for easy wireless setup.
Features and Benefits
Supports DHCP for easy connection to your home network.
Easy setup wizard.
Direct playback from external USB media.
2.5” HDD Enclosure for local playback without a computer.
Set the alarm to wake/sleep to your selected music track.
Built-in clock.
Transfer music through a USB connection or Network.
High-Fidelity Audio via optical S/PDIF
D-Link Systems, Inc.
9
Page 10

DSM-120 User’s Manual
Hardware Overview
Front Panel
Hardware Overview
Built-in display
Power Button
Navigation
To navigate through
the menu press the
arrow buttons.
Enter
Press Enter to make
selections.
Volume Control
Press to adjust the volume
output on the DSM-120.
D-Link Systems, Inc.
10
Page 11

DSM-120 User’s Manual
Hardware Overview
Back
Panel Connections
Antenna
Optional 2.5”
HDD Enclosure
USB Host
For Windows® Connect Now,
or local music playback from
your USB Media device.
Power
Reset
Ethernet
Composite Audio
Optical Digital Audio
USB Client
For transferring
music from your
PC.
Head Phone/Speaker
D-Link Systems, Inc.
11
Page 12

DSM-120 User’s Manual
Getting Started
To begin using the DSM-120 Wireless Music Player, you will need:
An existing home network (including a wireless 802.11b or 802.11g router or a router/
hub with an available Ethernet port).
The DSM-120 Media Server software installed on the PC you will be sharing files
from. This computer will collect music content from local sources and from the Internet
(downloaded MP3 music).
The DSM-120 Wireless Music Player connected to your standard PC speakers or
audio system.
Optional: The 2.5” HDD can be used to play local music, but it must be partitioned in
order to work with the DSM-120 (see page 62).
Getting Started
D-Link Systems, Inc.
12
Page 13
DSM-120 User’s Manual
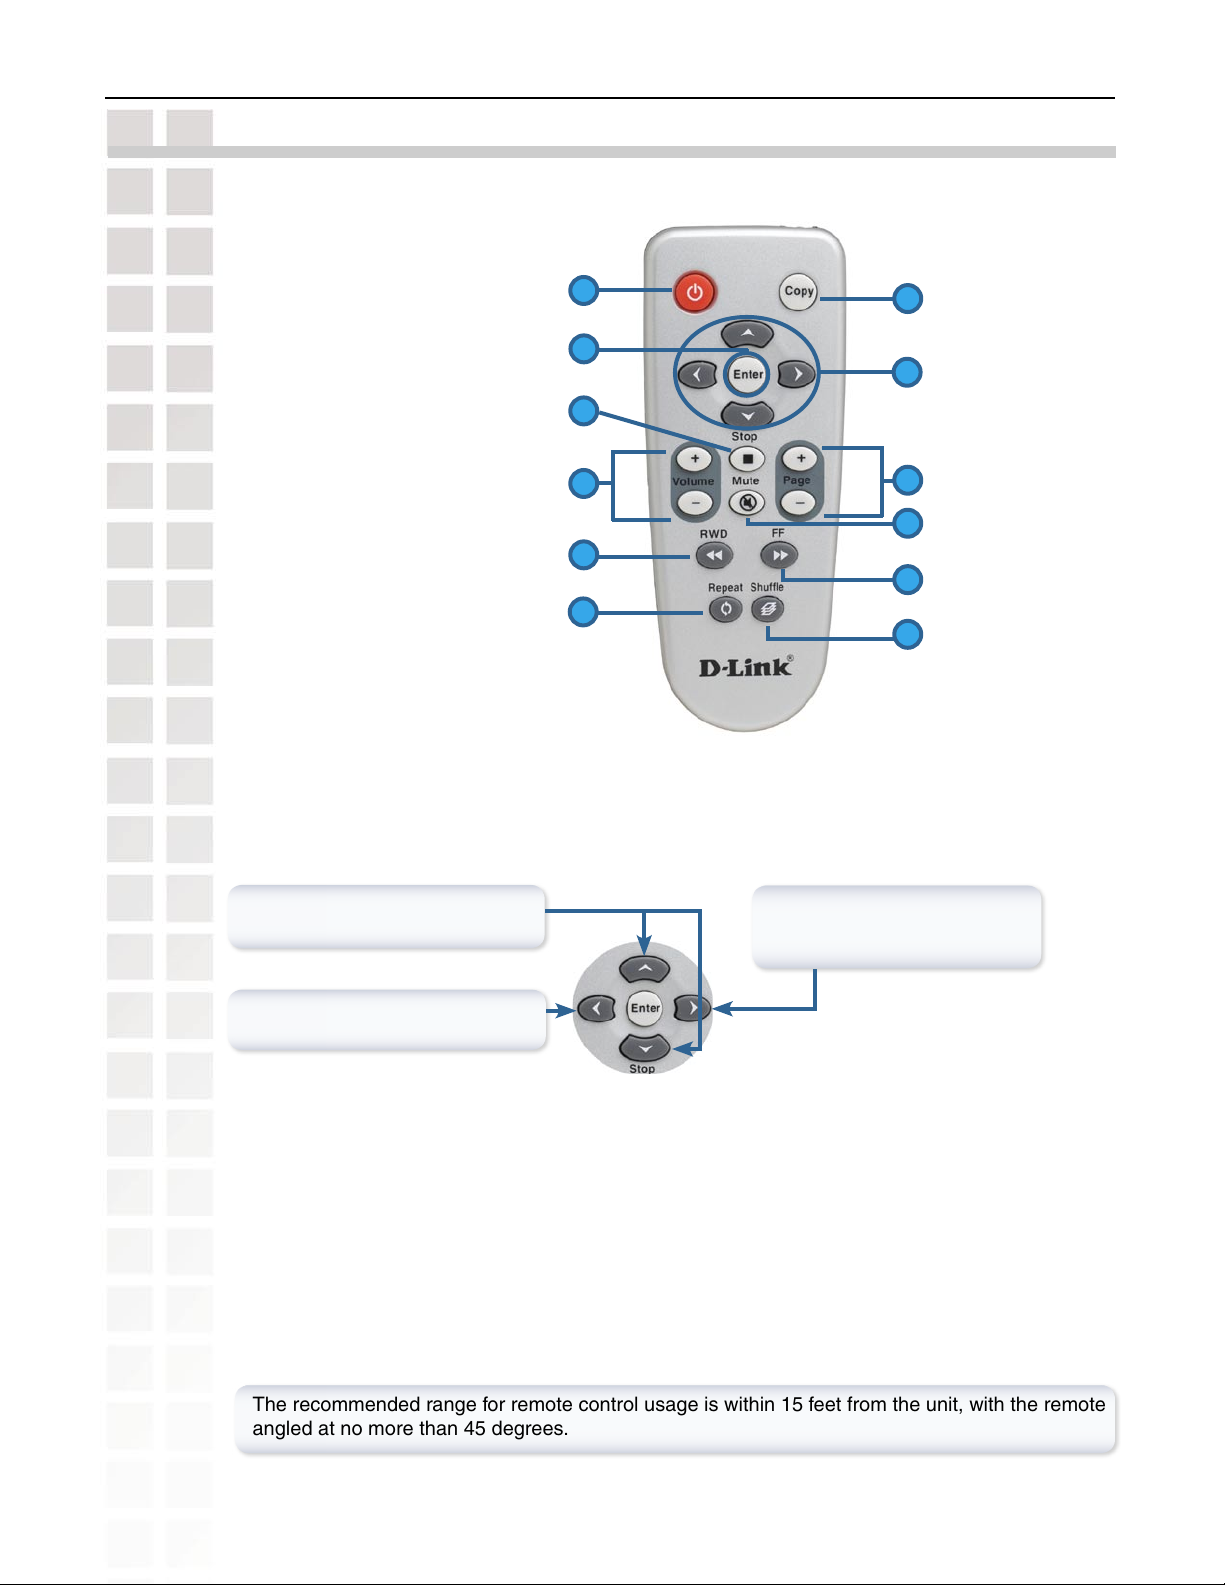
Using the Remote Control
1. Power
2. Copy
3. Enter & Play/Pause
4. Navigation Buttons
up arrow = Previous
down arrow = Next
5. Stop
6. PAGE + & -
7. VOLUME + & -
8. Mute
9. RWD
10. FF
11. Repeat
12. Shuffle
11
Using the Remote Control
1
3
5
7
9
2
4
6
8
10
12
You may be required to enter alphanumeric characters. To edit information on a screen, press the Enter
button. To enter letters and/or numbers, use the navigation buttons (see below):
Toggle Up & Down allows you to
view all alphanumeric characters.
Toggle R
instance of an alphanumeric
ight creates a new
character.
Toggle Left deletes an alphanumeric
character.
The recommended range for remote control usage is within 15 feet from the unit, with the remote
angled at no more than 45 degrees.
D-Link Systems, Inc.
13
Page 14

DSM-120 User’s Manual
Power Turn the DSM-120 ON or OFF.
Copy Copy files from an optional attached USB drive to an optional Hard
Enter and Play/Pause Submit entries and Play/Pause music files.
Navigation Buttons Navigate through the DSM-120 menu. While playing music, the up
Stop Stop a music file that is playing.
PAGE UP/DOWN Page Up to scroll up a page, and Page Down to scroll down a page.
VOLUME + Increase the volume.
VOLUME - Decrease the volume.
Mute Mute the volume of the music file.
RWD Rewind through a music file that is playing.
FF Fast Forward through a music file that is playing.
Repeat Repeat a music file or playlist.
Shuffle Shuffle through a playlist.
Using the Remote Control
Drive inserted into the DSM-120.
arrow returns to the previous track and the down arrow continues
to the next track.
D-Link Systems, Inc.
14
Page 15

DSM-120 User’s Manual
Installing the D-Link® Media Server Software
To share audio files from your computer, it is necessary to install the D-Link® Media
Server software on the PC that contains the files you want to share. The D-Link® Media
Server software allows you to point to the folders on your PC’s hard drive that contain the
audio files you want to share. The D-Link® Media Server software then streams the information
to your DSM-120 via your wired/wireless network connection.
Currently the DSM-120 only connects to one Media Server at a time. If more than one PC
contains files you want to share, you can select one of the following options:
1. Copy all of the files to one computer designated to run the D-Link® Media Server
Software.
2. Map network drives from the computer with the D-Link® Media Server software to
additional computers that contain files you want to share. This method also allows you
to share files from computers that cannot run the D-Link® Media Server software such
as Macintosh systems. The computer running the D-Link® Media Server software must
always be on when streaming content from any computer.
3. Install the D-Link® Media Server software on each computer. You can only connect to one
server at a time. To connect to another server, you must go into the Setup and change
the Default Server.
To install the D-Link® Media Server software, follow the steps on the following pages.
Installing the D-Link® Media Server Software
Note: If you have a version of the D-Link® Media Server already installed on your system, please
uninstall the software and restart your system before installing a newer version of the software.
D-Link Systems, Inc.
15
Page 16

DSM-120 User’s Manual
Insert the DSM-120 CD-ROM into the CD-ROM
drive and the following screen will appear.
Click on Install D-Link® Media Server
If the screen on the right does not appear,
go to My Computer and double-click on the
CD-ROM drive. The DSM-120 Autorun will
execute.
Installing the D-Link® Media Server Software
The D-Link® Media Server Setup Wizard will
appear.
Click Next
D-Link Systems, Inc.
16
Page 17

DSM-120 User’s Manual
The D-Link license agreement screen appears.
Click Next
Choose a Destination location or accept the
default location. This is where the D-Link Media
Server software will be copied to on your
system.
Installing the D-Link® Media Server Software
Click Next
Choose a Start Menu folder or accept the default
location.
Click Next
D-Link Systems, Inc.
17
Page 18

DSM-120 User’s Manual
Select the icons you want created.
Select Create a desktop icon to access the program
from your desktop.
Select Create a Quick Launch icon to access the
program from your taskbar.
Select Create a startup icon so the program
launches on startup.
Click Next
The necessary software will be copied to the
specified locations on your computer.
Installing the D-Link® Media Server Software
Click Install
Check Lau nch D-Li nk
Media Server
Click Finish
The D-Link® Media Server software installation has been completed!
D-Link Systems, Inc.
18
Page 19

DSM-120 User’s Manual
Choosing Music Files to Share
The D-Link® Media Server software enables you to share the files from your computer with
the DSM-120. By sharing the files, there is no need to copy the files from your computer to
the unit before they can play. The data is streamed directly from the files on your computer
over the network to your DSM-120. Follow the steps on the following pages to choose the
music files to share.
If you chose to create a desktop or Quick Launch icon during the software installation, click
on the icon to launch the D-Link Media Server software application.
D-Link Media Server
desktop icon
Choosing Music Files to Share
D-Link Media Server
Quick Launch icon
If you chose not to create a desktop or Quick Launch icon during the software installation,
then you can launch the application by going to your Start Menu, selecting All Programs, and
then clicking on D-Link Media Server icon within the D-Link Media Server folder.
D-Link Systems, Inc.
19
Page 20

DSM-120 User’s Manual
The File Types tab is where
you select the types of
audio files that you want to
share.
Note: The DSM-120 only supports MP3 and
WMA file types.
Choosing Music Files to Share
The Shared Folder tab
is where you select the
folders that contain your
audio files.
Click Add a folder
D-Link Systems, Inc.
20
Page 21

DSM-120 User’s Manual
Select the folder containing
the files you wish to share.
Choosing Music Files to Share
Click OK
Repeat the steps until all of the folders
containing audio you want to share have
been added.
D-Link Systems, Inc.
21
Page 22

DSM-120 User’s Manual
The Media Files tab will
show all your audio files as
well as display important
file information.
Choosing Music Files to Share
The D-Link® Media Server software configuration is complete!
D-Link Systems, Inc.
22
Page 23

DSM-120 User’s Manual
Using the D-Link® Media Server Software
Accessing the Media on your PCs
Before you can access the media from a PC, you must install the D-Link® Media Server software
(See page 15). Simply install the included software on each PC where music is stored.
If you selected the option to Create a startup icon during the Media Server software
installation (See page 18), the D-Link® Media Server software will automatically start whenever
you power on your PC.
Whenever you close the Media Server configuration window, you can return to the Media
Server configuration window by clicking on the Media Server icon in your system tray.
Using the D-Link® Media Server Software
D-Link Systems, Inc.
DSM-120 System Tray Icon
23
Page 24

DSM-120 User’s Manual
Sharing Media Content in Folders
The D-Link Media Server will share media content
from selected directory folders. All subfolders within a
shared folder are shared as well.
The Shared Folders tab displays the list of shared
folders.
Add folders where your music is stored, or remove
folders you no longer wish to share. Depending on the
number of files in your folders, there may be a slight
delay before the path appears in the window.
Using the D-Link® Media Server Software
Refreshing Folder Content
The D-Link Media Server software scans the folders
you share when you initially Add a folder. If you copy
additional files into these folders, they will be seen by
the DSM-120 when you refresh the folder contents.
Refresh a folder: To refresh a folder’s contents, select a
folder and then click the Refresh a folder button.
Refresh multiple folders: Multiple folders can be
selected if you hold down the Ctrl key while clicking
on each folder. Click on the Refresh a folder button
after you’ve selected all the folders to refresh.
Refresh all folders: All folders can be refreshed by
clicking on the Refresh all button.
Scheduler: You can schedule the D-Link Media Server
software to automatically refresh the contents of all
of your folders.
D-Link Systems, Inc.
24
Page 25

DSM-120 User’s Manual
Click Scheduler if you want to setup
an automatic refresh interval.
Using the D-Link® Media Server Software
Click Time and select a time
period. This is how often the server
will refresh the folder contents.
Naming the Media Server
The Media Server name is entered here. This is the
server name that is displayed when searching for
available media servers in the DSM-120 interface.
D-Link Systems, Inc.
25
Page 26

DSM-120 User’s Manual
Stopping the D-Link Media Server
To stop the D-Link® Media Server (and stop sharing your music on your PC), right-click on
the server icon and select Exit from the server menu.
Note: The music files stored on your computer will be available to your DSM-120 only if
the D-Link® Media Server is running. Online Music content that does not require PC-based
software (such as Live365) can still be accessed from the DSM-120 without running the
D-Link® Media Server software.
Using the D-Link® Media Server Software
D-Link Media Server Menu
To open the D-Link Media
Server menu, right click
on the system tray icon.
The server menu will then
be displayed.
D-Link Systems, Inc.
26
Page 27

DSM-120 User’s Manual
Using Windows® Media Connect Software
Windows® XP users with Service Pack 2 can utilize the Windows® Media Connect
software in addition to or instead of using the D-Link Media Server software. The
Windows® Media Connect software allows the DSM-120 to playback DRM (Digital
Rights Management) protected files. The Windows® Media Connect software is
available via Windows Update if you are using Windows® XP with Service Pack 2.
Configuring Windows® Media Connect
Launch the Windows® Media Connect software and the window below will appear:
The Devices tab is where you
add the DSM-120 to the list
of devices that interact with
Windows Media Connect.
Using Windows® Media Connect Software
Click Add
Select your Media
Player from the list.
Click Close
D-Link Systems, Inc.
27
Page 28

DSM-120 User’s Manual
The Sharing tab is where
you configure the folders
that you want to share
with your DSM-120.
Click Add
Using Windows® Media Connect Software
Click Browse
Select the folder that
you want to share
Click OK
D-Link Systems, Inc.
28
Page 29

DSM-120 User’s Manual
Click Make this content
available to all devices
Click OK
The Shared Folders will appear
in the window. Repeat the
steps until you’ve shared all of
the folders that you want the
DSM-120 to access.
Using Windows® Media Connect Software
Click Automatically start
fo lde r shari ng when
Windows starts
The Settings tab allows you to
automatically start folder sharing
when Windows starts. You can
also Stop/Start sharing.
Click Close
D-Link Systems, Inc.
29
Page 30

DSM-120 User’s Manual
The DSM-120 supports additional file types that are not supported by the Windows® Media
Connect software. The file types shown below are supported by both Windows® Media
Connect and the DSM-120.
Using Windows® Media Connect Software
File Type File Extension Details
Audio
Windows Media Audio .wma Does not suppor t WMA lossless, WMA Pro
MP3 .mp3 Up to 320kbps
Playlists
M3U .m3u, .pls MPEG Playlist File
Be sure to select the Windows® Media Connect server as the default
server in the DSM-120 System Setup if you want to access the
Windows® Media Connect software. To do so, select Setup on the
Home screen and navigate to System by using the down arrow and
then pressing Enter. Navigate to Music Server and press Enter to
view a list of available servers.
Note: Windows® Media Connect currently does not support Fast
Forward and Rewind with protected files.
D-Link Systems, Inc.
30
Page 31

DSM-120 User’s Manual
Installing the File Manager Software
In order to transfer music files from a personal computer to the DSM-120’s optional 2.5” Hard
Drive (a 2.5” hard drive must be installed prior to transferring music files, see page 61), it is
necessary to install the D-Link® MediaLounge™ File Manager software on the PC containing
the files you want to transfer. The File Manager software allows you to point to folders on your
personal computer’s hard drive that contains music files, and then allows you to copy the files
to the DSM-120’s optional 2.5” Hard Drive via a wired/wireless network connection.
Insert the DSM-120 CD-ROM into the CD-ROM
drive and the following screen will appear.
Click on Install D-Link® File Manager
Installing the File Manager Software
The
D-Link® MediaLounge™ File Manager Setup
Wizard will appear.
Click Next
If you accept the terms of the License Agreement,
select the option I accept the agreement. Click
Next to continue with the installation.
Click Next
D-Link Systems, Inc.
31
Page 32

DSM-120 User’s Manual
Choose a Destination location or accept the
default location. This is where the File Manager
software will be copied to on your system.
Click Next
Installing the File Manager Software
Choose a Start Menu folder or accept the default
location.
Click Next
Select Create a desktop icon to access the program
from your desktop.
Click Next
D-Link Systems, Inc.
32
Page 33

DSM-120 User’s Manual
Click Install
The File Manager software will be copied to the
specified locations on your computer.
Installing the File Manager Software
Check Launch File Manager
Click Finish
To use the D-Link® MediaLounge™ File Manager, see page 64.
D-Link Systems, Inc.
33
Page 34

DSM-120 User’s Manual
Transferring Music with Mini-USB
The DSM-120 can easily transfer music files from your PC to your enclosed 2.5” Hard Drive
via the supplied Mini-USB cable. Simply insert the Mini-USB cable into it’s proper port on the
backside of the DSM-120 (see the section on “Mini-USB Connection” on page 39), and insert
the opposite end into a USB port on your PC. While connected, the DSM-120 will be unable
to play music. The image below will continue to show on your DSM-120 until you decide to
disconnect the Mini-USB cable.
WARNING: You must choose to safely remove the USB storage device on your PC before
disconnecting your Mini-USB cable, or you may damage your Hard Drive (see “Disconnecting
the Mini-USB cable” on page 35).
After the DSM-120 has detected
your Mini-USB connection, the
image on the right will be shown,
and you will be unable to play
music.
Transferring Music with Mini-USB
After your PC has detected your Mini-USB connection and the DSM-120 2.5” Hard Drive,
simply drag and drop music files from your PC over to the DSM-120.
Note: Please remember to plug in the power adapter if you wish to transfer content via the
Mini-USB port..
D-Link Systems, Inc.
34
Page 35

DSM-120 User’s Manual
Disconnecting the Mini-USB cable
Before you disconnect the Mini-USB cable from your PC and the DSM-120, pay close attention
to the system tray near the right corner of your monitor. There should be an icon that allows
you to Safely Remove Hardware.
Mouse over the icon and you
should see the functionality title as
Safely Remove Hardware.
Transferring Music with Mini-USB
After double-clicking the Safely Remove Hardware icon, you should see the Safely Remove
Hardware screen. At this point you can click the Stop button, or you can continue to verify
which USB storage device you would like to stop by checking the Display device components
checkbox. This will provide you with a hierarchy of attached USB devices in which you can
stop.
Check the Display device components
checkbox, and you should see the
DSM-120 USB Device.
D-Link Systems, Inc.
35
Page 36

DSM-120 User’s Manual
Disconnecting the Mini-USB cable (continued)
After clicking Stop, the Stop a Hardware Device screen will appear to confirm your request
to stop the DSM-120. Click OK.
Click OK
Transferring Music with Mini-USB
After you click OK, the Safely Remove Hardware screen will appear again and the USB Mass
Storage device that was shown initially will eventually disappear. Also, the Safely Remove
Hardware icon will inform you that it is now safe to remove the DSM-120. Click Close on the
Safely Remove Hardware screen and disconnect the Mini-USB cable.
Click Close
D-Link Systems, Inc.
36
Page 37

DSM-120 User’s Manual
Connecting the DSM-120
Audio Connections
Select one of three ways to connect audio to your DSM-120:
• Composite Audio
Plug the supplied red and white
connectors into the AUDIO R and
AUDIO L (color-coded matching) jacks
on the DSM-120.
Plug the opposite ends to the matching
jacks on your audio system.
Connecting the DSM-120
• Optical Digital Audio
Connect an optical audio connector
into the S/PDIF connector on the
DSM-120, and connect the matching
opposite end of the cable to the audio
input of your audio system.
Note: This cable is not supplied.
• Head Phone
Plug a standard mini-plug head phone
jack into the HEAD PHONE connector
on the DSM-120.
You can also connect standard PC
speakers to the head phone jack.
Note: Head Phones and Speakers
D-Link Systems, Inc.
37
Page 38

DSM-120 User’s Manual
Network Connections
Select one of two ways to connect your DSM-120 to your network:
• Wireless Connection
If you are connecting wireless using the
built-in antenna, then you do not need to
connect the supplied Ethernet cable.
For an optimal wireless connection,
place the antenna at a 90o angle as
shown in the image to the right.
Connecting the DSM-120
• RJ-45 Ethernet Connector
If you are connecting wired, insert the
supplied Ethernet cable into the Ethernet
network cable connector. Attach the other
end to a router or hub on your network.
Note: You may have an Ethernet cable plugged into the unit and also connect wirelessly.
Neither will interfere with the other, but only one network can be accessed at a time (wired
or wireless). The network connection type is selected in the Setup Wizard and can also
be changed by going to the Setup Menu. To access the Setup Menu, select Setup on the
menu and press Enter on the remote control.
D-Link Systems, Inc.
38
Page 39

DSM-120 User’s Manual
USB Connections
Select one of two ways to connect your DSM-120 with USB:
• USB Connection
Connect a USB drive for local playback
of music and to easily conf i gure
wireless network settings by using
Windows Connect Now.
Connecting the DSM-120
• Mini-USB Connection
You can directly transfer music files
from your PC to the DSM-120 using
the included Mini-USB cable to connect
the DSM-120 to the USB port on the
PC. You can also directly transfer music
files from your DSM-120 to your PC.
In order to use the Mini-USB connection, you must have a standard IDE 2.5” Hard Drive
installed in your DSM-120. Please see the section on Installing an optional 2.5” Hard Drive
on page 61.
D-Link Systems, Inc.
39
Page 40

DSM-120 User’s Manual
The DSM-120 Setup Wizard
The DSM-120 Setup Wizard is navigated using the navigation arrows and the Enter button
on the remote control. To toggle between the configuration options, use the up and down
arrows on the remote control. To toggle between the Back, Next, and Rescan buttons, use
the left and right arrows on the remote control. Press Enter to select a field or confirm a
selection.
Welcome Screen
During the initial startup, the DSM-120
displays the Setup Wizard Welcome screen.
Press the right arrow on the remote control
to proceed to the next screen.
To skip the Setup Wizard, select No.
Select Yes to continue.
The DSM-120 Setup Wizard
Note: You do not have to setup your device
if you simply want to playback local music
content from your USB drive or hard disk
drive.
To enter a Device Name press Enter.
To enter alphanumeric characters,
please see page 13.
Select your network Connection Type.
Select Site Survey or Manually Enter SSID.
D-Link Systems, Inc.
40
Page 41

DSM-120 User’s Manual
For the wireless network connection, please
select the SSID of the network.
Select your Wireless Mode. Your options
are either Ad-Hoc or Infrastructure.
Select your encryption setting. Your options
are Disable , 64Bit H EX, 128B i tHE X ,
64BitASCII, and 128BitASCII.
The DSM-120 Setup Wizard
Encryption 64-bit 128-bit
HEX
ASCII
Character
Length
10 12345678FA 26 456FBCDF123400122225271730
5 DMODE 13 2005PIECAKES1
Example
Character
Length
Select your Index Key. You can select
numbers between 1 and 4.
Provide a WEP key. The key you enter here
must match the key of the wireless network
exactly.
Example
Note: This screen is only available if you do not select Disable at the WEP screen.
D-Link Systems, Inc.
41
Page 42

DSM-120 User’s Manual
Connection Mode
A DHCP-enabled router automatically
assigns IP addresses to devices on your
network. If you have a DHCP-enabled router,
select DHCP.
If selecting DHCP,
skip to page 43.
Provide an IP Address if you selected
Static IP.
The DSM-120 Setup Wizard
Provide a Subnet Mask if you selected
Static IP.
Provide a Gateway if you selected Static IP.
Provide a DNS if you selected Static IP.
D-Link Systems, Inc.
42
Page 43

DSM-120 User’s Manual
Your MediaLounge™ DSM-120 is now
ready to stream music content for
enjoyment on your home entertainment
center.
The DSM-120 Setup Wizard
D-Link Systems, Inc.
43
Page 44

DSM-120 User’s Manual
Windows® Connect Now Configuration
If you already have wireless settings configured on your PC, instead of using the setup wizard,
you can use Windows® Connect Now to configure the wireless settings on your DSM-120.
Note: Windows Connect Now is only available on PCs running Windows® XP with Service
Pack 2 installed.
In the menu bar, go to Start > All Programs
> Accessories > Communications and click
Wireless Network Setup Wizard.
Windows® Connect Now Configuration
Your system will display the Setup Wizard
Welcome screen. Click Next to continue.
Select to add a new device to your
existing wireless network and click
Next to continue.
D-Link Systems, Inc.
44
Page 45

DSM-120 User’s Manual
The wizard provides two methods for setting
up a wireless network. Using a USB flash
drive is recommended. Select to use a USB
flash drive to save your wireless network
settings and click Next to continue.
Plug your flash drive into a USB port on
this computer. The drive letter will appear
in the pull down menu. You can choose
to use this drive or select another drive.
Click Next to save your wireless settings
to the USB flash drive. This may take a
few seconds.
Windows® Connect Now Configuration
This screen will appear when the wireless
settings have been saved to the USB flash
drive.
D-Link Systems, Inc.
45
Page 46

DSM-120 User’s Manual
Next, remove the USB Flash Drive from your
PC and insert into the USB port on top of
the DSM-120.
The following screen will appear, prompting
you to apply your wireless settings. Click
OK to continue.
Windows® Connect Now Configuration
The following screen confirms that your
wireless settings have been applied. Click
OK.
D-Link Systems, Inc.
46
Page 47

DSM-120 User’s Manual
Next, remove the USB Flash Drive from the
DSM-120 and insert it back into the USB
port on your PC. Click Next to continue.
Windows® Connect Now Configuration
Wireless configuration using Windows
Connect Now is now complete. The setup
wizard will display the devices that have
been setup with your wireless network.
Click Finish.
D-Link Systems, Inc.
47
Page 48

DSM-120 User’s Manual
DSM-120 Menu
Menu Basics
The DSM-120 uses an on-screen menu interface. As you move through the menus, you
will use the navigation buttons on the remote control to move up, down, right and left. The
highlight bar moves from item to item as you press the navigation buttons. In some instances
you can press Enter on the remote control to access the menu within an item. You may see
arrows running along the right side of the screen pointing up or down. These arrows allow you
to uncover more information. For example, a down arrow hints that more items are available
if you move the down arrow button. To move to the next menu screen, use the right arrow.
Similarly, use the left arrow to move to the previous screen. See page 13 for more information
on navigation arrows on the remote control.
Menu Home
From this home screen, you can access PC Music, Local Music, Online Music, or Setup.
The DSM-120 Home screen is the top level menu.
DSM-120 Menu
Now Playing
If you are playing a music track and decide to return to the main menu, the music track will
continue to play in the background and a fifth menu option will appear. Scroll down the main
menu and you should see the Now Playing option. After selecting Now Playing the user will
be returned to the playback screen that displays the title of the music track that is currently
playing.
Note: The Now Playing option will only appear during playback of a music track.
D-Link Systems, Inc.
48
Page 49

DSM-120 User’s Manual
PC Music
Music Quality
Your music listening experience on the media player depends upon the quality of your digital
music files. Avoid quality settings below 48kbps as they are unsupported. For CD quality
music, rip your MP3s at 128kbps or higher, with a sample rate of 44.1kHz.
Supported Music Formats
The following music file formats are supported:
MP3 (up to 320 kbps)
MPEG-1, Layer 3 Audio file -The standard Internet music file format. This is the
most commonly used audio format.
WMA (Does not support WMA lossless, WMA Pro)
Windows Media Audio file - Supported by the Microsoft Windows Media
player and some music jukebox programs. Also supports WMDRM protected WMA
files when using Windows Media Connect.
PC Music
D-Link Systems, Inc.
49
Page 50

DSM-120 User’s Manual
Organizing Music Files
Music files are located on your PC and can be contained in one directory folder, or organized
in several subfolders.
PC Music
The DSM-120 automatically organizes your music files by genres, artists, albums, and
tracks. This information is obtained from the ID3 tags in each of your music files. The ID3
tag is created for you when you rip (copy) your music from your CD. However, if your music
files have incorrect or incomplete tags, the tracks may not appear where they should in your
music categories.
D-Link Systems, Inc.
50
Page 51

DSM-120 User’s Manual
Playing a Track
Once you enter the PC Music menu, there are several ways that you can view tracks:
All Tracks
Playlist
Genres
Artists
Albums
Folders
Use the navigation arrows to navigate to the track you wish to play. Once you have located
the appropriate track, highlight it and press Enter on the remote control. The track will begin
playing on your stereo speakers.
To play a track starting from the main home screen:
PC Music
1. Select the PC Music category from the Home screen.
2. Select a viewing category. Use the down arrow
and up arrow on the remote control to navigate
to a viewing category (by All Tracks, Playlist,
Genres, Artists, Albums, or Folders). Select
the option by clicking Enter or the right arrow
on the remote control.
3. Select a Track. Use the up arrow and down
arrow buttons to navigate one track at a time.
The PAGE UP and PAGE DOWN buttons can be
used to navigate through the track list one page
at a time.
Artist
4. After the appropriate track is highlighted, press
Enter on the remote control. You should hear
your selected music track playing.
Current Time
Total Time
D-Link Systems, Inc.
Title
51
Page 52

DSM-120 User’s Manual
Shuffle and Repeat
When you are playing or repeating a group of tracks, you can randomize the play order by
pressing the Shuffle button on the remote control.
Pressing Shuffle will allow
you to toggle between
OFF and ON.
When Shuffle is selected
you should see this image.
PC Music
To repeat a track or a group of tracks, click Repeat on the remote control. When the icon
with the text REPEAT ONE appears, this will repeat the music track that is currently playing.
When the icon with the text REPEAT ALL appears, this will repeat all of the tracks within
your currently selected folder or playlist.
When Repeat One is
selected you should see
this image.
Wh en R ep ea t Al l i s
selected you should see
this image.
D-Link Systems, Inc.
52
Page 53

DSM-120 User’s Manual
Local Music
If you have a 2.5” hard drive connected in your
DSM-120 (see page 61), you may select Local
Music. After selecting Local Music, you should
see Hard Drive as the option available.
If you have a USB thumbdrive connected in your
DSM-120, you may select Local Music. After
selecting Local Music, you should see USB as the
option available to you.
Local Music
After selecting Hard Drive or USB, you should see
all of your music files. In this example, USB was
selected from Local Music.
Press the Enter or right arrow button to start the
playback of your selected music file.
Note: You must partition your 2.5” Hard Drive before you can use it in your DSM-120. Please
see page 62 for instructions on partitioning the Hard Drive.
Note: The DSM-120 only supports a 2.5” Hard Drive with a FAT or FAT32 file system.
Note: Please set your 2.5” Hard Drive in “Master” mode. If you leave the settings in “Cable
Select” or “Slave” mode, the DSM-120 will be unable to detect your hard drive..
Note: Playlists are not supported when playing music files from Local Music.
D-Link Systems, Inc.
53
Page 54

DSM-120 User’s Manual
Online Music
Currently the DSM-120 supports Live365™ online services.
New services will be added in the future and made available via firmware upgrades. If your
DSM-120 is configured to perform firmware upgrades automatically (see Version on page
59 for details), then you will see new options as soon as they become available.
To access the Online Music section, select Online Music from the Home screen.
Online Music
Live365
Live365™ is an Internet radio service that provides
unlimited on-demand access to thousands of
radio stations. The audio is streamed directly over
the Internet. Live365™ allows you to select your
own preset stations and provides custom station
recommendations.
Select Online Music from the Home screen. Press
Enter on the remote control to select Live365™.
Use the up and down arrows on the remote control
to navigate through the options. Press the Enter
or the right arrow button on the remote control to
make a selection.
ALL Broadcasts: Displays all available internet radio
stations.
™
My Presets: Displays your preset stations.
Recommendations: Lists recommended stations based on your preset stations.
Editor’s Station Picks: Lists recommended stations based on your preset stations.
Genres: Lists stations according to genre.
D-Link Systems, Inc.
54
Page 55

DSM-120 User’s Manual
Live365™ (continued)
Before you are able to search and play for music files, you will need to login to Live365™.
Use the down arrow to navigate towards the bottom of the list and select Setup. After you
select Setup, you should see the option Login. After you login to Live365™ you will be able
to play music
Click Login to enter in your
Login information. If you do not
have a Live365 account, use
you PC to sign up for one.
Online Music
Enter in your Name (username)
and Pswd (password), and
select OK.
D-Link Systems, Inc.
55
Page 56

DSM-120 User’s Manual
Setup
If you want to change the configuration of your setup you can select Setup from the Home
screen.
For an explanation of the terminology used in the Setup functions, please see the
Glossary.
Using the up arrow and down arrow buttons on
your remote control, scroll down the list to highlight
your selection then press Enter or the right arrow
to select your choice.
Navigating the menus
Use the up and down arrow buttons on the remote control to navigate between the
options. Press Enter on the remote to select the highlighted item. Use the up and down
arrows to toggle through the settings. Press Enter to make a selection.
Setup
Network Wizard
Press the right arrow to begin the Network
Wizard.
To setup the Network, please see page 40 of this
manual.
D-Link Systems, Inc.
56
Page 57

DSM-120 User’s Manual
EQ Mode
Use the up and down arrow buttons on the remote
control to navigate between the following options:
Normal
Rock
Pop
Jazz
Full Bass
Full Treble
Full Bass/Treble
Setup
System
Use the up and down arrow buttons on the remote
control to navigate between the following options:
Music Server: Displays all available music servers
and allows the user to change servers.
Reset System: Resets to system defaults.
Restart System: Restarts your music player.
Check Connection: Select this option to check the validity of your network connection.
Some firmware updates may display an informational message telling you to upgrade
your version of the D-Link Media Server software. Your current version of the software
should still work, but to utilize all of the latest firmware features you should upgrade your
Media Server software.
Please visit http://support.dlink.com for the latest version of the Media Server software.
Note: If you have a version of the D-Link Media Server already installed on your system,
please uninstall the software and restart your system before installing a newer version
of the D-Link Media Server software.
D-Link Systems, Inc.
57
Page 58

DSM-120 User’s Manual
Clock
Use the up and down arrow buttons on the remote
control to navigate between the following options:
“Current Time”: Set the DSM-120 to the current time.
After clicking the right arrow or the Enter button
on the remote control, you can begin to change
the date and time.
Note: the date and time are displayed on the
DSM-120 when the unit is powered off.
Setup
Time Zone: Displays all available time zones.
Sleep Timer: The options are OFF, 5 Min, 10 Min,
15 Min, 20 Min, 25 Min, 30 Min, 40 Min, 50 Min,
60 Min, 70 Min, 80 Min, and 90 Min.
Alarm Clock: The DSM-120 is equipped with an
alarm clock feature. To set the alarm clock, please
do the following:
1. Select Set Alarm Clock. Use the navigation buttons
on the remote control to enter a time that you
would like the alarm to start.
2. Select Enable/Disable, this will give you the choice to turn the alarm clock on or off.
To turn the alarm clock on, select Enable.
3. Before selecting Set Alarm Music, play a music file from Local Music first. When the song
is playing, return to this menu and select Set Alarm Music.
Note: Alarm music only works with music files from Local Music.
D-Link Systems, Inc.
58
Page 59

DSM-120 User’s Manual
Version
Use the up and down arrow buttons on the remote
control to navigate between the following options:
Device Info: Displays infor mation about your
connection and DSM-120 firmware.
Auto Update: You can Enable or Disable DSM-120
to automatically look for updates.
Update Version: Selecting this option allows you to manually update your DSM-120.
Hard Disk
Use the up and down arrow buttons on the remote control to navigate between the following
options:
Setup
Selecting this option will provide information on the attached hard drive.
Use the right-arrow or press Enter to check the
Hard Drive Capacity.
The information on your Hard Drive will be displayed
here.
D-Link Systems, Inc.
59
Page 60

DSM-120 User’s Manual
LCD Logo Displays
The DSM-120 contains several logos that are displayed in the upper right hand corner of
the DSM-120.
LCD Logo Displays
Mute
Volume
Stop
Pause
WLAN (wireless signal)
Wired (ethernet cable)
No Network
Shuffle
D-Link Systems, Inc.
Repeat All
Repeat One
60
Page 61

DSM-120 User’s Manual
2.5” Hard Drive
Installing an optional 2.5” Hard Drive
In order to use the Local Music option, you must have a standard IDE 2.5” Hard Drive installed
in your DSM-120. The Hard Drive Enclosure is located on the back of your DSM-120, simply
depress the locking tab and slide the cover off. Insert your 2.5” Hard Drive as shown in the
picture below, and close the cover. Your DSM-120 should be ready to play music from your
installed 2.5” Hard Drive.
Note: Hard Drive is not included with the DSM-120.
WARNING: You must unplug the
power from the DSM-120 before
inserting the Hard Drive.
2.5” Hard Drive
Note: You must partition your 2.5” Hard Drive before you can use it in your DSM-120. Please
see page 62 for instructions on partitioning the Hard Drive.
Note: The DSM-120 only supports a 2.5” Hard Drive with a FAT or FAT32 file system.
Note: Please set your 2.5” Hard Drive in “Master” mode. If you leave the settings in “Cable
Select” or “Slave” mode, the DSM-120 will be unable to detect your hard drive..
D-Link Systems, Inc.
61
Page 62

DSM-120 User’s Manual
Partition your 2.5” Hard Drive
For Windows XP/2000 computers:
1. Right-click on “My Computer” and choose Manage.
2. Under “Storage” on the Left pane, select Disk
Management.
2.5” Hard Drive
3. Windows should now give you the option to
initialize the disk. If not, locate the new drive,
right-click on the new disk (where it reads
“Disk#”) and choose Initialize. (This step may
not be required for some hard drives.)
4. Go through the wizard.
5. Once complete, locate your hard drive in the
bottom-right pane. Right-click on the area with
a status bar (to the right of the “Disk#”) and
choose New Partition.
D-Link Systems, Inc.
62
Page 63

DSM-120 User’s Manual
6. Follow the directions of the partition wizard. The recommended partition type is “primary”
and the recommended file system is “FAT32”. Please note that Windows XP/2000 limits
FAT32 partitions to 32GB.
1. 2.
2.5” Hard Drive
3. 4.
5. 6.
7. Once you’ve finished with the wizard, you should now be able to see the drive in Windows
Explorer.
Note: Your DSM-120 only works with FAT or FAT32 file systems. You cannot create a
partition larger than 32GB in size with the FAT32 file system by using the Format tool in
Windows® 2000/XP (see page 64).
D-Link Systems, Inc.
63
Page 64

DSM-120 User’s Manual
Create a Partition Larger than 32GB
To create a partition larger than 32GB for a DSM-120, there are three options:
1. There are tools that you may purchase or download from the Internet to partition the hard
drive in FAT32 beyond 32GB.
2. Often a hard drive vendor includes partition software in the package for you to partition
the hard drive.
3. Start from a Microsoft Windows 98/ME Startup disk and use the Fdisk tool included on the
disk to partition your hard drive. For additional information about how to use a Microsoft
Windows 98/ME Startup disk to format a hard disk, you can fnd an article in the Microsoft
Knowledge Base, “How to Use Fdisk and Format to Partition/Repartition a Hard Disk”.
Note: The DSM-120 does not support multiple partitions.
2.5” Hard Drive
D-Link Systems, Inc.
64
Page 65

DSM-120 User’s Manual
Using the File Manager
After clicking Finish, and only if you selected Launch File Manager at the end of the Setup
Wizard, the File Manager program will automatically open.
To manually open the File Manager Program, select Start > All Programs > D-Link
MediaLounge > File Manager > File Manager.
To establish a connection
with your DSM-120, browse
and double-click the device
listed here.
Using the File Manager
After double-clicking your DSM-120 device, represented on the left window pane of the File
Manager, the next screen will verify if you would like to connect to your DSM-120 Wireless
Music Player.
Note: After selecting Yes, the screen to
your left will be displayed on your DSM-120.
Once you’ve completed transferring files,
the DSM-120 will be able to playback music
again.
D-Link Systems, Inc.
65
Page 66

DSM-120 User’s Manual
After a connection has been established to your DSM-120, browse through your Destination
area, the bottom window pane of the File Manager, and select a folder location. In the Origin
area, the top window pane of the File Manager, browse through your computer’s folders and
select a music file. On the File Manager’s menu bar, click Transfer and select Upload.
S e l e c t U p l o a d fr o m
the Tr a nsfe r menu , to
uplo ad a mu sic fil e to
the DSM -12 0.
Using the File Manager
Note: You can also transfer music from the DSM-120 to your computer by selecting a music
track from the Destination area, and then selecting Download from the Transfer menu.
After the file has completely copied over, you should notice the music file appears in the
Destination area of the File Manager. Also, pay close attention to the Status message located
near the bottom of the File Manager.
S t a t u s d i s p l a y s t h e
cur re nt ac ti on of th e
File Ma nag er.
D-Link Systems, Inc.
66
Page 67

DSM-120 User’s Manual
If you need to disconnect or connect to your device, simply select Connect or Disconnect
from the Device menu. Select Refresh to refresh the lists.
Using the File Manager
To delete a music file, simply right-click on the music file and you should see a sub-menu.
The options of the sub-menu are Download, Delete, Rename, and New Folder. Selecting
Delete will remove the file permanently from the DSM-120.
Rig h t-c lick the mus ic
file to de lete .
Note: Deleting a file from the DSM-120 will not delete it from the PC!
D-Link Systems, Inc.
67
Page 68

DSM-120 User’s Manual
Volume
Press the Volume (+) and Volume (-) buttons on the remote control to higher and lower the
volume respectively on the DSM-120. When pressing the Volume buttons, the DSM-120
screen should change to a Set Volume screen (see image below) that displays a decibel
output level.
Volume
Pressing the Mute button on the remote control will mute the sound from the DSM-120 (see
image below).
D-Link Systems, Inc.
68
Page 69

DSM-120 User’s Manual
Copy
Use the Copy button on the remote control to
copy music files from your USB thumbdrive over
to the attached optional 2.5” Hard Drive on the
DSM-120.
Press Copy to copy files from
your USB thumbdrive to your
attached Hard Drive.
Copy
After you have selected your file and pressed the
Copy button on the remote control, you will see the
following screen on your DSM-120.
As your file is being copied, the
percentage of transfer should
be displayed here.
Note: Do not unplug the DSM-120 during the copy process. D-Link is not responsible for
hardware failure caused by user error.
D-Link Systems, Inc.
69
Page 70

DSM-120 User’s Manual
Frequently Asked Questions
What kind of files are supported by the DSM-120?
Audio - MP3 and WMA
What do I need to setup D-Link’s DSM-120?
You must have a Microsoft Windows-based home network in place, with at least one
PC running Microsoft Windows XP/2000.
Will any software need to be installed on my computer?
Frequently Asked Questions
Yes, the D-Link Media Server Software, Windows
compliant media server software needs to be installed on a networked Windows-based
PC.
®
Media Connect, or any UPnP AV
What operating system do I need to run the server software?
Windows XP/2000
How does the D-Link DSM-120 get its files from my computer?
As soon as you have installed the D-Link
server software will be launched, allowing you to add media files. You may then select
folders that contain music that you want to play.
®
Media Server software on your PC, the
Can I access Live365 without the Media Server software running?
Yes, by selecting the Online Music option from the Home screen.
If I am running Windows® Media Connect, do I need to run the D-Link®
Media Server software?
No, you may run both applications but it is not necessary to run both at the same
time.
What about Copy Protection and DRM support?
The most common method of copy protection is WMA DRM (Digital Rights
Can I use my Universal remote control?
No, the DSM-120 is not compatible with a universal remote but you can use a remote
D-Link Systems, Inc.
Management). The DSM-120 can play these types of files if you are using the Windows®
Media Connect software. For instructions on configuring Windows® Media Connect,
please see page 23.
with learning ability.
70
Page 71

DSM-120 User’s Manual
Can I connect the DSM-120 directly to a PC without using a router or
a hub?
Yes, please make note of the following:
Wireless Users: Set the Mode to Ad-Hoc in the wireless settings.
Wired Users: Connect an Ethernet cable directly from the DSM-120’s Ethernet port to
the Ethernet port on your PC. The DSM-120’s Ethernet port is Auto MDI/MDI-X, so
a special Ethernet cable is not required.
All Users: If DHCP software isn’t running on your computer, you will need to assign a
static IP address to the DSM-120.
Note: Online Music and firmware upgrades are not available without an Internet
connection.
How do I change the bit rate of an audio file?
Frequently Asked Questions
There are various conversion programs available for download on the Internet.
How do I copy files from my PC?
You can copy files from your PC by using the D-Link
Software, please see page 31. You can also copy files from your PC to your USB
thumbdrive and then use the Copy button while your thumbdrive is connected to your
DSM-120. Another alternative to copying files is using the Mini-USB cable to transfer
files directly from your PC.
®
MediaLounge File Manager
Can I transfer files to my DSM-120 via network connection?
Yes you can transfer files to your DSM-120 by using the D-Link
Manager Software, please see page 31.
®
MediaLounge File
Why is the volume not adjustable via digital optical output?
The digital optical output is pass-through only. The volume is controlled by your
receiver.
D-Link Systems, Inc.
71
Page 72

DSM-120 User’s Manual
Troubleshooting
I cannot see the Setup Wizard when I turn on my DSM-120 player for
the first time.
Make sure you have firmly attached the power adapter plug to the back of the player.
Also, verify the power adapter is plugged into a working power outlet and that the
outlet is not controlled by a light switch.
I’ve updated the firmware on my DSM-120 but all of the features do
not work.
Be sure you’ve updated to the latest version of the D-Link Media Server software as
well.
You can download the latest version at http://support.dlink.com
My remote control isn’t working.
Troubleshooting
Make sure the batteries are inserted correctly.
Try removing the batteries and reinserting them without touching any buttons on the
remote control.
Replace the batteries with new ones.
I can’t use my HDD or USB device that I just installed.
Please make sure that it is a FAT or FAT32 File System. Reformatting your Hard Drive
to this File System may be required.
Note: Reformatting your drive will wipe out everything.
How do I turn on the LCD backlight when the DSM-120 is turned off
so that I may be able to read the time?
Press any key (other than the power key) on the remote, or on the device, to turn on
the backlight. The backlight will stay lit for five seconds before turning off again.
D-Link Systems, Inc.
72
Page 73

DSM-120 User’s Manual
I can’t find any of my music.
Make sure your computer is powered on and that it has not entered standby mode.
You may need to change your computer’s power settings if you want your content to
be available all the time.
Make sure the Media Server software is running on your computer. Look for the Media
Server icon in your system tray. If necessary, start the Media Server software again.
Click on the Media Server icon and select Show Media Server to verify you are sharing
the correct directories.
If using a wired network, verify the Ethernet cable is properly attached to your DSM-120
and to a network switch, hub or router. Verify that the switch, hub or router is powered
on.
If you are using static IP addresses, verify the IP address and netmask are in the same
range as other addresses on your network. Verify that the address is not already in
use by another PC or device.
Troubleshooting
Make sure the files you are sharing use a supported file format and encoding
scheme.
I can’t hear any sound when I’m playing music.
Make sure the audio cables are properly connected.
If the audio cables are connected to your TV, the TV must be on to hear any music.
If the audio cables are connected to your stereo, make sure the stereo is on and you
have the correct stereo input source selected. If you are having trouble selecting the
correct audio source, refer to the instructions that came with your stereo.
D-Link Systems, Inc.
73
Page 74

DSM-120 User’s Manual
Some of my MP3 and WMA files don’t appear.
The DSM-120 supports the most common music file formats. However, there are
almost an infinite variety of bit rates and sample rates. If a file does not appear on
the receiver, it most likely uses an unsupported rate.
The files may be copy protected. To share your files, turn copy protection off when
you rip them
Note: WMA DRM files can be played by using Windows® Media Connect Server
software, see page 23 for details.
The following MP3 sample rates are supported:
4, 8, 16, 22.05, 24, 32, 44.1, 48, 88.2 and 96 kHz.
For best results, rip your MP3 files at 320 kbps or higher, with a sample rate of 44.1 kHz.
Troubleshooting
I am not able to play certain media files.
The DSM-120 supports most industry standard file formats but even supported file
formats can be encoded in ways that are not supported. Try exporting media with
Checking the bit and sample rates of a music file.
To check the bit and sample rates of a music
file:
1. Right-click on the file and select Properties.
2. Select the Summary tab and click the
Advanced button. Scroll to the bottom of the
list.
The file to the right has a bit rate of 128
kbps and a sample rate of 44 kHz.
In most cases, the sample rate does not
matter unless you come across a file that
will not play or appear on your player.
Use the above procedure to check the file
settings for supported rates.
D-Link Systems, Inc.
74
Page 75

DSM-120 User’s Manual
I created a playlist on my computer, but it doesn’t appear on my
music player.
Make sure the playlist file is located in a folder shared by your music player. Copy
the playlist to your shared music folder or click on the Media Server icon to add or
change your folder options.
How do I reset my DSM-120?
Under normal circumstances, you should not need to reset your music player. However,
to fully reset the music player, lightly insert a paper clip into the reset opening on the
unit’s rear panel for ten seconds.
What version of firmware do I have?
Troubleshooting
From the main home screen, select Setup and then select Version. Under the Version
menu, select the option Device Info. The firmware version will be listed here.
I am unable to access Napster™ content.
Make sure you have Windows
folder that contains the Napster™ audio files.
Make sure you have validated the D-Link
Connect.
®
Media Connect running and that you are sharing the
®
player from within Windows® Media
I was able to browse and play content from my music player, but now
I can no longer browse or play any content from my media server.
This is a problem we have noticed with Norton Anti-Virus 2005. Your music player
caches the available media server for 30 minutes. During this time, if the connection
between your PC media server and the media player was disconnected, you will need
to restart your PC to solve this issue.
D-Link Systems, Inc.
75
Page 76

DSM-120 User’s Manual
When sharing files with the D-Link Media Server, my PC is very
slow.
If you are sharing gigabytes of content, please make sure that you are not running
any other software that requires high CPU usage.
It takes a long time to share files with the D-Link Media Server.
If you are sharing gigabytes of content with your media server software, it may take
several minutes depending on the size of the content you are sharing.
The list of music tracks show up as either blank fields or strange
characters.
Make sure you have english only in your file’s metadata. Unicode is not supported at
this time.
Troubleshooting
What is the largest single file size that a DSM-120 can support from
the local hard disk?
The largest possible file for a FAT32 volume is 4GB.
D-Link Systems, Inc.
76
Page 77

DSM-120 User’s Manual
Technical Specifications
Network*
• TCP/IP (DHCP or Static IP Address)
• 802.11g Wireless (Supports up to 54Mbps transfer rate)
• 802.11b Wireless (Supports up to 11Mbps transfer rate)
• Wired LAN: 10/100Mbps
Media Streaming Protocol
• HTTP
Supported Audio Formats:
• MP3 (up to 320 kbps)
• WMA (Does not support WMA lossless, WMA Pro)
Audio Playlist Formats:
• M3U
• PLS
Outputs:
• RCA Audio Jacks
• Optical Digital Audio
• Head Phones Jack
Antenna:
• Type: 2.4GHz swivel-type monopole antenna
• Frequency: 2.4GHz to 2.5GHz
• Impedance: 50 ohms
• Gain: 2dBi
Dimensions
• H x W x L: 1.5” x 11.25” x 16.75”
• Weight: 5.5 pounds
Security:
• Hardware based WEP (Wired Equivalent Privacy)
• Up to 128-bit encryption
Configuration:
• UPnP-AV 1.0 Enabled
• INMPR Compliant
Technical Specifications
* Maximum wireless signal rate derived from IEEE Standard 802.11a and 802.11g specifications. Actual data throughput will
vary. Network conditions and environmental factors, including volume of network traffic, building materials and construction,
and network overhead, lower actual data throughput rate.
** Environmental conditions may adversely affect wireless signal range.
D-Link Systems, Inc.
77
Page 78

DSM-120 User’s Manual
PC System Requirements
• Connection to 802.11g wireless or Ethernet network
• Windows 2000 or XP
• 500MHz processor
• 128MB memory
• 20MB available hard disk space
• CD-ROM drive
• Broadband Internet Service (For online music access and firmware updates)
Power Source:
• 12V, 1.25A.
Environmental specification
• Operating temperature: 0°C to 45°C
• Storage temperature:-25°C to 55°C
• Operating relative humidity: 10% to 95% non-condensing
Warranty:
• 1 Year
Technical Specifications
D-Link Systems, Inc.
78
Page 79

DSM-120 User’s Manual
Appendix
Setting Microsoft Windows Power Options
If you want access to your music all the time from your PC, make sure to configure your PC’s
power settings. Do not allow your computer to enter a standby power state, or you will have
to “wake up” your PC to view music on your DSM-120. However, your monitor can be in a
low power state or turned off.
To change your power settings on Windows XP:
1. Click on Start.
2. Select Control Panel.
3. Select Performance and Maintenance.
4. Select Power Options.
5. Change both System standby and System hibernates to Never.
6. Click OK.
Appendix
To change your power settings on Windows 2000:
1. Click on Start.
2. Select Settings.
3. Select Control Panel.
4. Select Power Options.
5. Change both System standby and System hibernates to Never.
6. Click OK.
D-Link Systems, Inc.
79
Page 80

DSM-120 User’s Manual
Wireless Installation Considerations
The D-Link® DSM-120 can be integrated into a wireless network from virtually anywhere within
its operating range. However, the range can be limited by the number of walls, thickness of
walls, and location of the walls that the wireless signal must pass through. Typical ranges vary
depending on the types of materials and background RF (radio frequency) noise in your home
or business. The key to maximizing wireless range is to follow these basic guidelines:
Keep the number of walls and ceilings between the DSM-120 and other network
devices to a minimum. Each wall or ceiling can reduce your DSM-120’s range from
3-90 feet (1-30 meters).
Be aware of the direct line between network devices. A wall that is 1.5 feet thick (.5
meters), at a 45-degree angle appears to be almost 3 feet (1 meter) thick. At a 2-degree
angle it looks over 42 feet (14 meters) thick! Position devices so that the signal will
travel straight through a wall or ceiling (instead of at an angle) for better reception.
Building materials can impede the wireless signal. A solid metal door or aluminum
studs may have a negative effect on the range. Try to position wireless devices and
computers with wireless adapters so that the signal passes through drywall or open
doorways and not other materials.
Appendix
Keep your product away (at least 3-6 feet or 1-2 meters) from electrical devices or
appliances that generate RF noise.
You can also add a directional antenna to help with range and sensitivity issues.
D-Link Systems, Inc.
80
Page 81

DSM-120 User’s Manual
Partitioning a FAT32 Hard Drive
The 127.5 GB limit on FAT32 volumes imposed in Windows 98 no longer applies to Windows
ME. In Windows ME, using a cluster size of 32 KB, a FAT32 volume can theoretically be
about 8 terabytes. However, the 32-bit fields in the partition table (and in the FAT32 boot
sector) limit the size of an individual volume (regardless of file system) on a basic MBR
disk using a sector size of 512 bytes to approximately 2 terabytes.
Appendix
FAT32 file system cluster sizes
Partition Size Cluster Size
less than 260MB 512 Bytes
260MB through 8GB 4KB
8GB through 16GB 8KB
16GB through 32GB 16KB
32GB through 2TB 32KB
However, as Windows 2000 or Windows XP fully supports using a FAT32 partition over
32GB, and only does not permit formatting a FAT drive over 32GB, it is possible to use a
Windows 98 or Windows Me boot diskette to get a larger FAT partition formatted. Just be
extremely careful that the correct partition is formatted when booting from a diskette.
D-Link Systems, Inc.
81
Page 82

DSM-120 User’s Manual
Glossary
Networking
802.11b: A wireless networking standard that supports data encryption and up to 11Mbps
bandwidth.
802.11g: A wireless networking standard that supports data encryption and up to 54Mbps
bandwidth.
Ad-Hoc: This wireless networking mode means that two PC’s are communicating in a Peerto-Peer network, without a router or an access point.
Bandwidth: A measure of the rate at which data can be sent and received through the network.
This value is usually given in bits per second (bps) or Megabits per second (Mbps).
DHCP (Dynamic Host Configuration Protocol): A protocol that network devices use to obtain an
IP address, subnet mask, gateway, and DNS addresses automatically. A DHCP server can
be a router, ISP server, or PC running Internet Connection Sharing software. If you are using
a DHCP-capable device in your network, you will not need to assign a static IP address to
your DSM-120. However, if you do not have a DHCP-capable device in your network, you
will need to assign a static IP address to your DSM-120.
Glossary
DNS (Domain Name System): A system used to translate computer names into IP addresses.
For example, a DNS server would translate www.dlink.com into 64.7.210.132
Ethernet: The most commonly used wired network technology. Standard Ethernet supports
up to 10Mbps. Fast Ethernet supports up to 100Mbps.
Gateway: This is the IP address of the device that connects you to another network such as a
router. A router would be the gateway between your local area network and the Internet.
Infrastructure: This wireless networking mode is used by wireless networks with a router or
an access point.
IP Address (Internet Protocol Address): An IP address consists of four groups of digits separated
by periods. Each group of digits contain an 8-bit value as a number ranging from 0 to 255.
Each computer must have it’s own unique IP address. The IP addresses on your network
must be within the same range. For example, if one PC or device has an IP address of
192.168.0.2, the other devices should have IP addresses that are sequential, like 192.168.0.3
and 192.168.0.4.
ISP (Internet Service Provider): A commercial organization that provides subscribers with
access to the Internet.
Key: Encryption keys allow you to easily change wireless encryption settings to maintain a
secure network. The DSM-120 supports 64-bit and 128-bit keys.
Netmask: Commonly referred to as subnet mask, this is used to determine what subnet an
IP address belongs to.
RJ-45: RJ-45 is the standard connector for Ethernet cabling. It looks like a phone cable
connector, but is slightly larger. RJ-45 connectors have 8 pins, 4 of which are used for
transmitting and receiving data.
D-Link Systems, Inc.
82
Page 83

DSM-120 User’s Manual
SSID (Service Set Identifier): The name designated for a specific wireless local area network
(WLAN). The SSID can be easily changed to connect to an existing wireless network.
Static IP: A static IP address is configured manually on the device that will be using it. A static
IP address remains the same constantly and must be a unique address.
WEP (Wired Equivalent Privacy): A security protocol for wireless local area networks (WLAN)
that is designed to provide the same level of security as a wired network. WEP provides
security by encrypting the data sent over the WLAN. The DSM-120 supports 64-bit and 128bit encryption.
Wired: Devices networked via Ethernet cabling.
Wireless: Devices networked using radio frequencies instead of physical cabling.
Music
M3U is a playlist format and is the default playlist format of WinAMP and most other media
player software. It allows multiple files to be queued in a program in a specific format.
Glossary
MP3 is the file extension for MPEG-1, audio layer 3. Layer 3 is one of three coding schemes
(layer 1, layer 2 and layer 3) for the compression of audio signals. Layer 3 removes the
redundant and irrelevant parts of a sound signal, which the human ear does not hear. It uses
Modified Discrete Cosine Transform to implement a filter bank, increasing the frequency
resolution 18 times higher than that of layer 2.
PLS is a proprietary playlist format used for playing Shoutcast and other audio streams.
WMA is short for Windows Media Audio and is an audio format that was created by Microsoft.
It is similar to MP3, although WMA can compress at a higher rate than MP3.
D-Link Systems, Inc.
83
Page 84

DSM-120 User’s Manual
Technical Support
You can find software updates and user documentation on the D-Link website.
D-Link provides free technical support for customers within the United States and
within Canada for the duration of the warranty period on this product.
U.S. and Canadian customers can contact D-Link Technical Support through our
website, or by phone.
Tech Support for customers within the United States:
D-Link Technical Support over the Telephone:
(877) 453-5465
24 hours a day, seven days a week.
D-Link Technical Support over the Internet:
http://support.dlink.com
e-mail:support@dlink.com
Technical Support
Technical Support
Tech Support for customers within Canada:
D-Link Technical Support over the Telephone:
(800) 361-5265
Monday to Friday 7:30am to 9:00pm EST
D-Link Technical Support over the Internet:
http://support.dlink.ca
e-mail:support@dlink.ca
D-Link Systems, Inc.
84
Page 85

DSM-120 User’s Manual
Warranty
Subject to the terms and conditions set forth herein, D-Link Systems, Inc. (“D-Link”) provides this Limited Warranty:
· Only to the person or entity that originally purchased the product from D-Link or its authorized reseller or distributor, and
· Only for products purchased and delivered within the fifty states of the United States, the District of Columbia, U.S. Possessions
or Protectorates, U.S. Military Installations, or addresses with an APO or FPO.
Limited Warranty: D-Link warrants that the hardware portion of the D-Link product described below (“Hardware”) will be free
from material defects in workmanship and materials under normal use from the date of original retail purchase of the product,
for the period set forth below (“Warranty Period”), except as otherwise stated herein.
· Hardware (excluding power supplies and fans): One (1) year
· Power supplies and fans: One (1) year
· Spare parts and spare kits: Ninety (90) days
The customer’s sole and exclusive remedy and the entire liability of D-Link and its suppliers under this Limited Warranty will be,
at D-Link’s option, to repair or replace the defective Hardware during the Warranty Period at no charge to the original owner or
to refund the actual purchase price paid. Any repair or replacement will be rendered by D-Link at an Authorized D-Link Service
Office. The replacement hardware need not be new or have an identical make, model or part. D-Link may, at its option, replace
the defective Hardware or any part thereof with any reconditioned product that D-Link reasonably determines is substantially
equivalent (or superior) in all material respects to the defective Hardware. Repaired or replacement hardware will be warranted
for the remainder of the original Warranty Period or ninety (90) days, whichever is longer, and is subject to the same limitations
and exclusions. If a material defect is incapable of correction, or if D-Link determines that it is not practical to repair or replace
the defective Hardware, the actual price paid by the original purchaser for the defective Hardware will be refunded by D-Link upon
return to D-Link of the defective Hardware. All Hardware or part thereof that is replaced by D-Link, or for which the purchase
price is refunded, shall become the property of D-Link upon replacement or refund.
Warranty
Limited Software Warranty: D-Link warrants that the software portion of the product (“Software”) will substantially conform to
D-Link’s then current functional specifications for the Software, as set forth in the applicable documentation, from the date of
original retail purchase of the Software for a period of ninety (90) days (“Software Warranty Period”), provided that the Software
is properly installed on approved hardware and operated as contemplated in its documentation. D-Link further warrants that,
during the Software Warranty Period, the magnetic media on which D-Link delivers the Software will be free of physical defects.
The customer’s sole and exclusive remedy and the entire liability of D-Link and its suppliers under this Limited Warranty will
be, at D-Link’s option, to replace the non-conforming Software (or defective media) with software that substantially conforms to
D-Link’s functional specifications for the Software or to refund the portion of the actual purchase price paid that is attributable
to the Software. Except as otherwise agreed by D-Link in writing, the replacement Software is provided only to the original
licensee, and is subject to the terms and conditions of the license granted by D-Link for the Software. Replacement Software
will be warranted for the remainder of the original Warranty Period and is subject to the same limitations and exclusions. If
a material non-conformance is incapable of correction, or if D-Link determines in its sole discretion that it is not practical to
replace the non-conforming Software, the price paid by the original licensee for the non-conforming Software will be refunded
by D-Link; provided that the non-conforming Software (and all copies thereof) is first returned to D-Link. The license granted
respecting any Software for which a refund is given automatically terminates.
Non-Applicability of Warranty: The Limited Warranty provided hereunder for Hardware and Software portions of D-Link’s products
will not be applied to and does not cover any refurbished product and any product purchased through the inventory clearance
or liquidation sale or other sales in which D-Link, the sellers, or the liquidators expressly disclaim their warranty obligation
pertaining to the product and in that case, the product is being sold “As-Is” without any warranty whatsoever including, without
limitation, the Limited Warranty as described herein, notwithstanding anything stated herein to the contrary.
Submitting A Claim: The customer shall return the product to the original purchase point based on its return policy. In case
the return policy period has expired and the product is within warranty, the customer shall submit a claim to D-Link as outlined
below:
D-Link Systems, Inc.
85
Page 86

DSM-120 User’s Manual
· The customer must submit with the product as part of the claim a written description of the Hardware defect or Software
nonconformance in sufficient detail to allow D-Link to confirm the same, along with proof of purchase of the product (such as
a copy of the dated purchase invoice for the product) if the product is not registered.
· The customer must obtain a Case ID Number from D-Link Technical Support at 1-877-453-5465, who will attempt to assist the
customer in resolving any suspected defects with the product. If the product is considered defective, the customer must obtain
a Return Material Authorization (“RMA”) number by completing the RMA form and entering the assigned Case ID Number at
https://rma.dlink.com/.
· After an RMA number is issued, the defective product must be packaged securely in the original or other suitable shipping
package to ensure that it will not be damaged in transit, and the RMA number must be prominently marked on the outside of
the package. Do not include any manuals or accessories in the shipping package. D-Link will only replace the defective portion
of the product and will not ship back any accessories.
· The customer is responsible for all in-bound shipping charges to D-Link. No Cash on Delivery (“COD”) is allowed. Products
sent COD will either be rejected by D-Link or become the property of D-Link. Products shall be fully insured by the customer
and shipped to D-Link Systems, Inc., 17595 Mt. Herrmann, Fountain Valley, CA 92708. D-Link will not be held responsible for
any packages that are lost in transit to D-Link. The repaired or replaced packages will be shipped to the customer via UPS
Ground or any common carrier selected by D-Link. Return shipping charges shall be prepaid by D-Link if you use an address
in the United States, otherwise we will ship the product to you freight collect. Expedited shipping is available upon request and
provided shipping charges are prepaid by the customer.
D-Link may reject or return any product that is not packaged and shipped in strict compliance with the foregoing requirements, or
for which an RMA number is not visible from the outside of the package. The product owner agrees to pay D-Link’s reasonable
handling and return shipping charges for any product that is not packaged and shipped in accordance with the foregoing
requirements, or that is determined by D-Link not to be defective or non-conforming.
Warranty
What Is Not Covered: The Limited Warranty provided herein by D-Link does not cover: Products that, in D-Link’s judgment, have
been subjected to abuse, accident, alteration, modification, tampering, negligence, misuse, faulty installation, lack of reasonable
care, repair or service in any way that is not contemplated in the documentation for the product, or if the model or serial number
has been altered, tampered with, defaced or removed; Initial installation, installation and removal of the product for repair, and
shipping costs; Operational adjustments covered in the operating manual for the product, and normal maintenance; Damage
that occurs in shipment, due to act of God, failures due to power surge, and cosmetic damage; Any hardware, software,
firmware or other products or services provided by anyone other than D-Link; and Products that have been purchased from
inventory clearance or liquidation sales or other sales in which D-Link, the sellers, or the liquidators expressly disclaim their
warranty obligation pertaining to the product. While necessary maintenance or repairs on your Product can be performed
by any company, we recommend that you use only an Authorized D-Link Service Office. Improper or incorrectly performed
maintenance or repair voids this Limited Warranty.
Disclaimer of Other Warranties: EXCEPT FOR THE LIMITED WARRANTY SPECIFIED HEREIN, THE PRODUCT IS PROVIDED
“AS-IS” WITHOUT ANY WARRANTY OF ANY KIND WHATSOEVER INCLUDING, WITHOUT LIMITATION, ANY WARRANTY OF
MERCHANTABILITY, FITNESS FOR A PARTICULAR PURPOSE AND NON-INFRINGEMENT. IF ANY IMPLIED WARRANTY
CANNOT BE DISCLAIMED IN ANY TERRITORY WHERE A PRODUCT IS SOLD, THE DURATION OF SUCH IMPLIED
WARRANTY SHALL BE LIMITED TO THE DURATION OF THE APPLICABLE WARRANTY PERIOD SET FORTH ABOVE.
EXCEPT AS EXPRESSLY COVERED UNDER THE LIMITED WARRANTY PROVIDED HEREIN, THE ENTIRE RISK AS TO
THE QUALITY, SELECTION AND PERFORMANCE OF THE PRODUCT IS WITH THE PURCHASER OF THE PRODUCT.
D-Link Systems, Inc.
86
Page 87

DSM-120 User’s Manual
Limitation of Liability: TO THE MAXIMUM EXTENT PERMITTED BY LAW, D-LINK IS NOT LIABLE UNDER ANY
CONTRACT, NEGLIGENCE, STRICT LIABILITY OR OTHER LEGAL OR EQUITABLE THEORY FOR ANY LOSS OF
USE OF THE PRODUCT, INCONVENIENCE OR DAMAGES OF ANY CHARACTER, WHETHER DIRECT, SPECIAL,
INCIDENTAL OR CONSEQUENTIAL (INCLUDING, BUT NOT LIMITED TO, DAMAGES FOR LOSS OF GOODWILL,
LOSS OF REVENUE OR PROFIT, WORK STOPPAGE, COMPUTER FAILURE OR MALFUNCTION, FAILURE OF
OTHER EQUIPMENT OR COMPUTER PROGRAMS TO WHICH D-LINK’S PRODUCT IS CONNECTED WITH, LOSS OF
INFORMATION OR DATA CONTAINED IN, STORED ON, OR INTEGRATED WITH ANY PRODUCT RETURNED TO D-LINK
FOR WARRANTY SERVICE) RESULTING FROM THE USE OF THE PRODUCT, RELATING TO WARRANTY SERVICE,
OR ARISING OUT OF ANY BREACH OF THIS LIMITED WARRANTY, EVEN IF D-LINK HAS BEEN ADVISED OF THE
POSSIBILITY OF SUCH DAMAGES. THE SOLE REMEDY FOR A BREACH OF THE FOREGOING LIMITED WARRANTY
IS REPAIR, REPLACEMENT OR REFUND OF THE DEFECTIVE OR NON-CONFORMING PRODUCT. THE MAXIMUM
LIABILITY OF D-LINK UNDER THIS WARRANTY IS LIMITED TO THE PURCHASE PRICE OF THE PRODUCT COVERED
BY THE WARRANTY. THE FOREGOING EXPRESS WRITTEN WARRANTIES AND REMEDIES ARE EXCLUSIVE AND
ARE IN LIEU OF ANY OTHER WARRANTIES OR REMEDIES, EXPRESS, IMPLIED OR STATUTORY.
Governing Law: This Limited Warranty shall be governed by the laws of the State of California. Some states do not allow
exclusion or limitation of incidental or consequential damages, or limitations on how long an implied warranty lasts, so the
foregoing limitations and exclusions may not apply. This Limited Warranty provides specific legal rights and you may also
have other rights which vary from state to state.
Trademarks: D-Link is a registered trademark of D-Link Systems, Inc. Other trademarks or registered trademarks are the
property of their respective owners.
Copyright Statement: No part of this publication or documentation accompanying this product may be reproduced in
any form or by any means or used to make any derivative such as translation, transformation, or adaptation without
permission from D-Link Corporation/D-Link Systems, Inc., as stipulated by the United States Copyright Act of 1976 and any
amendments thereto. Contents are subject to change without prior notice. Copyright 2005 by D-Link Corporation/D-Link
Systems, Inc. All rights reserved.
CE Mark Warning: This is a Class B product. In a domestic environment, this product may cause radio interference, in which
case the user may be required to take adequate measures.
FCC Statement: This equipment has been tested and found to comply with the limits for a Class B digital device, pursuant
to part 15 of the FCC Rules. These limits are designed to provide reasonable protection against harmful interference in a
residential installation. This equipment generates, uses, and can radiate radio frequency energy and, if not installed and used
in accordance with the instructions, may cause harmful interference to radio communication. However, there is no guarantee
that interference will not occur in a particular installation. If this equipment does cause harmful interference to radio or
television reception, which can be determined by turning the equipment off and on, the user is encouraged to try to correct
the interference by one or more of the following measures:
· Reorient or relocate the receiving antenna.
· Increase the separation between the equipment and receiver.
· Connect the equipment into an outlet on a circuit different from that to which the receiver is connected.
· Consult the dealer or an experienced radio/TV technician for help.
Warranty
For detailed warranty information applicable to products purchased outside the United States, please contact the
corresponding local D-Link office.
D-Link Systems, Inc.
87
Page 88

DSM-120 User’s Manual
Registration
Registration
Product registration is entirely voluntary and failure to complete or return this
form will not diminish your warranty rights.
09/21/05
D-Link Systems, Inc.
88
 Loading...