

Page 1
Version 1.00 | 10/31/2018
User Manual
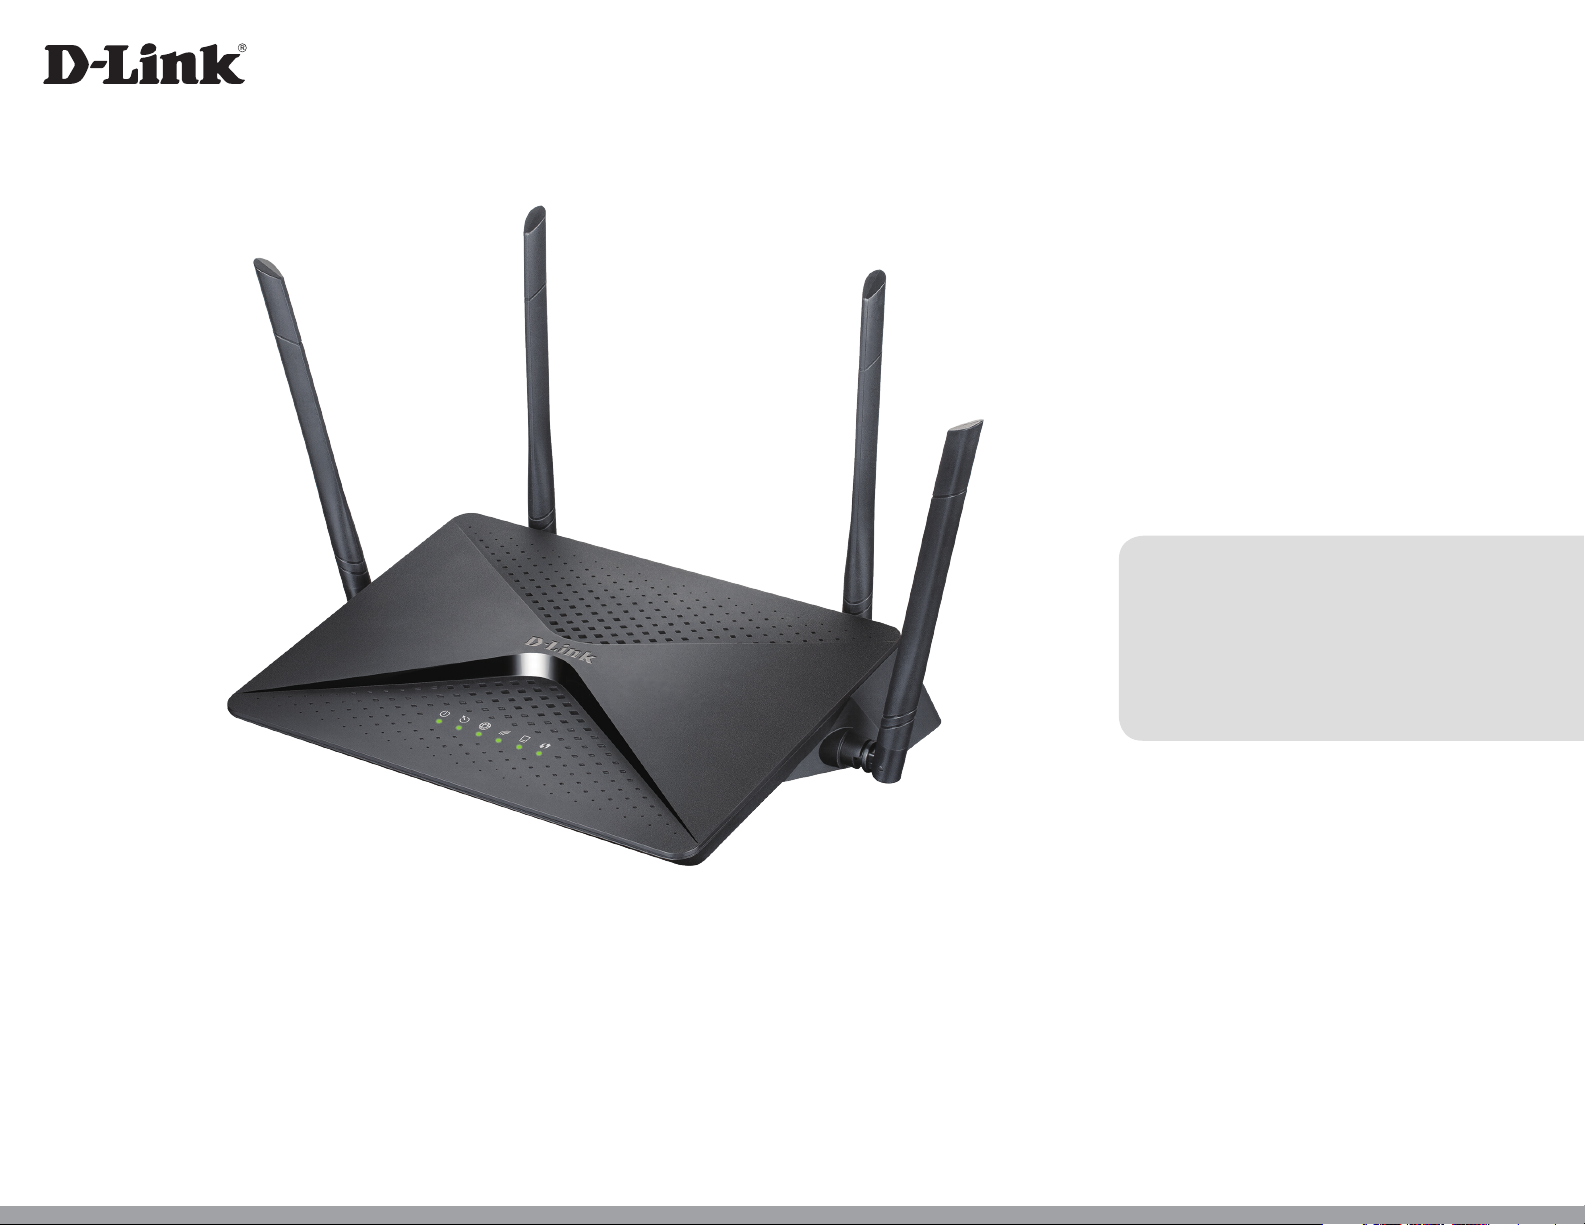
Wireless AC2600 Dual-Band Gigabit ADSL2+/VDSL2
Modem Router
DSL-3900
Page 2
Preface
D-Link reserves the right to revise this publication and to make changes in the content hereof without obligation to notify any
person or organization of such revisions or changes.
Manual Revisions
Revision Date Description
1.00 October 30th, 2018 Initial release
Trademarks
D-Link and the D-Link logo are trademarks or registered trademarks of D-Link Corporation or its subsidiaries in the United States or other countries.
All other company or product names mentioned herein are trademarks or registered trademarks of their respective companies.
Apple®, Apple logo®, Safari®, iPhone®, iPad®, iPod touch® and Macintosh® are trademarks of Apple Inc., registered in the U.S. and other countries.
App Store
Chrome™ browser, Google Play™ and Android™ are trademarks of Google Inc.
SM
is a service mark of Apple Inc.
Internet Explorer®, Windows® and the Windows logo are trademarks of the Microsoft group of companies.
Copyright © 2018 by D-Link Corporation, Inc.
All rights reserved. This publication may not be reproduced, in whole or in part, without prior expressed written permission from D-Link Corporation, Inc.
iD-Link DSL-3900 User Manual
Page 3

Table of Contents
Table of Contents
Preface ................................................................................. i
Product Overview ..............................................................1
Package Contents .........................................................................1
System Requirements ................................................................. 2
Introduction ................................................................................... 3
Features ............................................................................................4
Hardware Overview .....................................................................5
Back Panel ...............................................................................5
Side Panel ................................................................................ 6
LEDs ........................................................................................... 7
Installation ......................................................................... 8
Before you Begin ...........................................................................8
Wireless Installation Considerations ......................................9
Manual Setup ...............................................................................10
Getting Started ................................................................ 12
Setup Wizard ................................................................................13
Settings ..........................................................................................26
Wizard .....................................................................................26
Internet ...................................................................................26
ADSL ...................................................................................27
VDSL ...................................................................................29
Ethernet .............................................................................30
WAN Settings ...................................................................31
Dynamic IP (DHCP) ..................................................31
Static IP ........................................................................32
PPPoE............................................................................33
PPPoA ...........................................................................35
Bridge Mode ..............................................................37
Wireless ..................................................................................38
Advanced Settings .............................................................39
Guest Zone .......................................................................44
Network ..................................................................................45
USB ...........................................................................................48
Features ..........................................................................................49
Conguration ................................................................... 19
Home ..............................................................................................19
Internet ...................................................................................20
IPv4 .....................................................................................21
DSL ......................................................................................22
DSL-3785 ................................................................................23
Connected Clients ..............................................................24
USB Device ............................................................................25
Firewall ...................................................................................49
Application ............................................................................50
ACL ........................................................................................... 51
Port Forwarding ..................................................................52
DMZ (Exposed Host) .....................................................54
IP/MAC/Web Filtering ........................................................55
IP Filter ...............................................................................55
MAC Filter .........................................................................57
iiD-Link DSL-3900 User Manual
Page 4

Table of Contents
Website Filter ...................................................................58
Static Route ...........................................................................59
Dynamic DNS .......................................................................60
IGMP ........................................................................................61
Management ................................................................................62
Time & Schedule .................................................................62
Time ....................................................................................62
Schedule ...........................................................................64
Log Info ..................................................................................65
System Log .......................................................................66
System Settings ...................................................................67
Admin.................................................................................68
Firmware Upgrade ..............................................................69
Statistics .................................................................................70
Diagnostics ...........................................................................71
Connect and Share a USB Device....................................72
Connect and Share a USB Storage Device .........................72
Windows Vista® ............................................................................93
WPA/WPA2 ............................................................................94
Troubleshooting .............................................................. 96
Wireless Basics ...............................................................100
What is Wireless? ...................................................................... 101
Tips ................................................................................................103
Wireless Modes .........................................................................104
Networking Basics .........................................................105
Check your IP address ............................................................ 105
Statically Assign an IP address ............................................ 106
Wireless Security ......................................................... 107
What is WPA? ................................................................ 107
Technical Specications ................................................ 108
Regulatory Statements .................................................109
Connecting from a Windows-Based PC ......................73
Connecting from a Mac ....................................................78
Connect a Wireless Client to Your Router .......................82
WPS Button ...................................................................................82
Windows® 10 ................................................................................83
Windows® 8 ...................................................................................85
WPA/WPA2 ............................................................................85
Windows® 7 ...................................................................................87
WPA/WPA2 ............................................................................87
WPS ..........................................................................................89
iiiD-Link DSL-3900 User Manual
Page 5
Section 1 - Product Overview
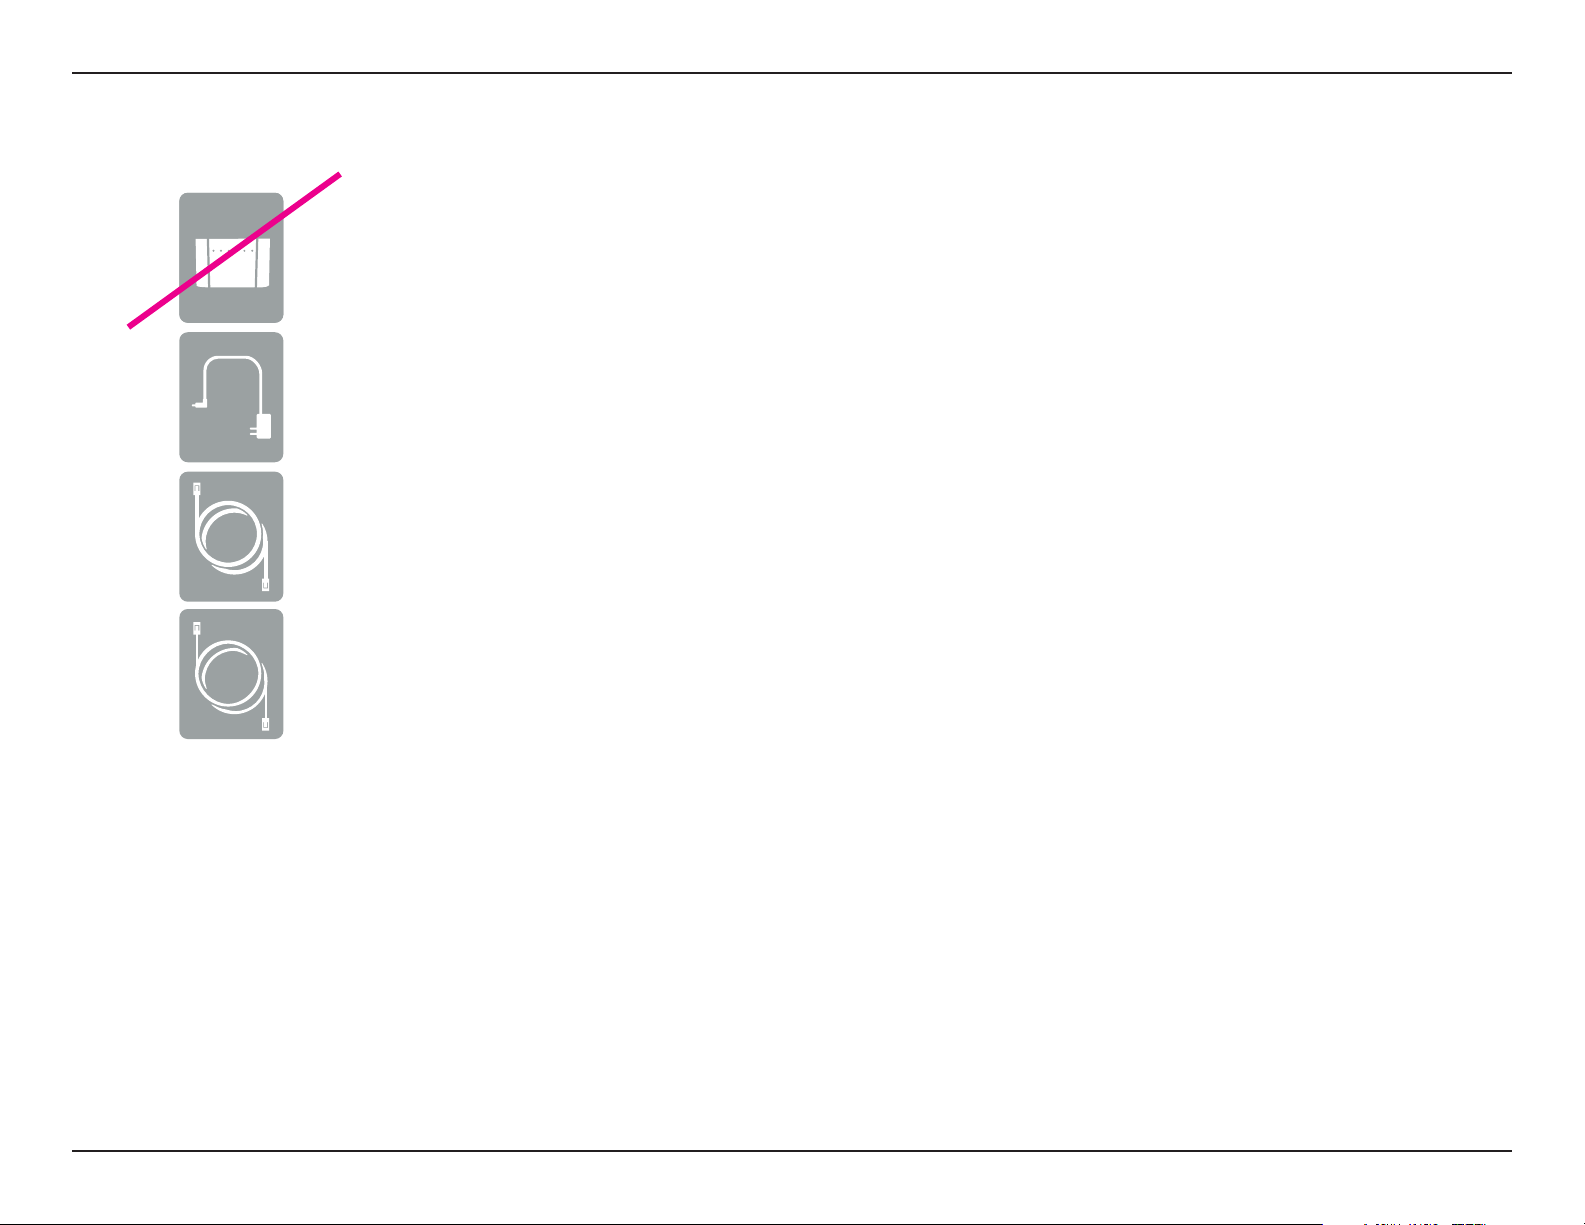
DSL-3900
Wireless AC2600 Dual-Band Gigabit ADSL2+/VDSL2 Modem Router
Power Adapter
Ethernet Cable
Product Overview
Package Contents
Phone Cable
If any of the above items are missing, please contact your reseller.
Note: Using a power supply other than the one included with the DSL-3900 may cause damage and void the warranty for this product.
1D-Link DSL-3900 User Manual
Page 6
Section 1 - Product Overview
Network Requirements
Web-based Conguration
Utility Requirements
System Requirements
• An active subscription with an Internet Service Provider using one of the
following connection types:
• A VDSL/ADSL connection to a telephone line using the DSL port
• An 802.11ac/n/g/b/a wireless or Ethernet port
Computer with the following:
• Microsoft Windows® 10/8/7/Vista/XP SP3 or Mac with OS X 10.7 or higher
• An installed Ethernet adapter
Browser Requirements:
• Internet Explorer 8 or higher
• EDGE Browser 20 or higher
• Firefox 20 or higher
• Safari 4 or higher
• Chrome 17 or higher
Windows® Users: Make sure you have the latest version of Java installed. Visit
www.java.com to download the latest version.
2D-Link DSL-3900 User Manual
Page 7

Section 1 - Product Overview
Introduction
The D-Link DSL-3900 Wireless AC2600 Dual-Band Gigabit ADSL2+/VDSL2 Modem Router shares your DSL Internet connection
over blazing fast Wireless AC. It also comes equipped with a USB port, and four Gigabit Ethernet 10/100/1000 ports.
The DSL-3900's USB sharing technology lets you take advantage of le sharing. Simply plug in a USB storage drive into the USB
port on the back of your DSL-3900 and you can access les, stream videos, view photos, or listen to music on your laptop or
mobile devices. The intuitive interface lets anyone immediately connect to a variety of entertainment options stored on your
own storage device.
The DSL-3900 provides incredible speeds, smart antenna technology, and fast ports.
3D-Link DSL-3900 User Manual
Page 8

Section 1 - Product Overview
• Faster Wireless Networking - The DSL-3900 features the updated 802.11ac Wave 2 specication, which
improves on the bandwidth, range, and speed of 802.11ac Wave 1, and can deliver up to 2600 Mbps
wireless devices. It operates on both the 2.4 GHz and 5 GHz bands to allow separation of trac so users can
participate in high-bandwidth activities, such as video streaming, online gaming, and real-time audio, without
aecting low-priority trac like email and web surng.
• Compatible with 802.11n/g/b/a Devices - The DSL-3900 is still fully backwards compatible with the 802.11n,
802.11g, and 802.11a standards, so it can connect with existing 802.11n, 802.11g, 802.11b, and 802.11a wireless
devices.
• Advanced Features - The web-based user interface displays a number of advanced network management
features including:
• Filtering - Easily apply content ltering based on IP address, MAC address, URL, and/or domain
name.
• Scheduling - The rewall, wireless, and port forwarding features can be scheduled to be active on a
schedule you dene.
Features
*
to your
• User-friendly Setup Wizard - Through its easy-to-use web-based user interface, the DSL-3900 lets you control
what information is accessible to those on the wireless network, whether from the Internet, or from your
company’s server. Congure your router to your specic settings within minutes.
* Maximum wireless signal rate derived from IEEE Standard 802.11a, 802.11b, 802.11g, 802.11n, and 802.11ac specications. Actual data throughput will vary. Network conditions
and environmental factors, including volume of network trac, building materials and construction, and network overhead, lower actual data throughput rate. Environmental
conditions will adversely aect wireless signal range.
4D-Link DSL-3900 User Manual
Page 9
Section 1 - Product Overview
Hardware Overview
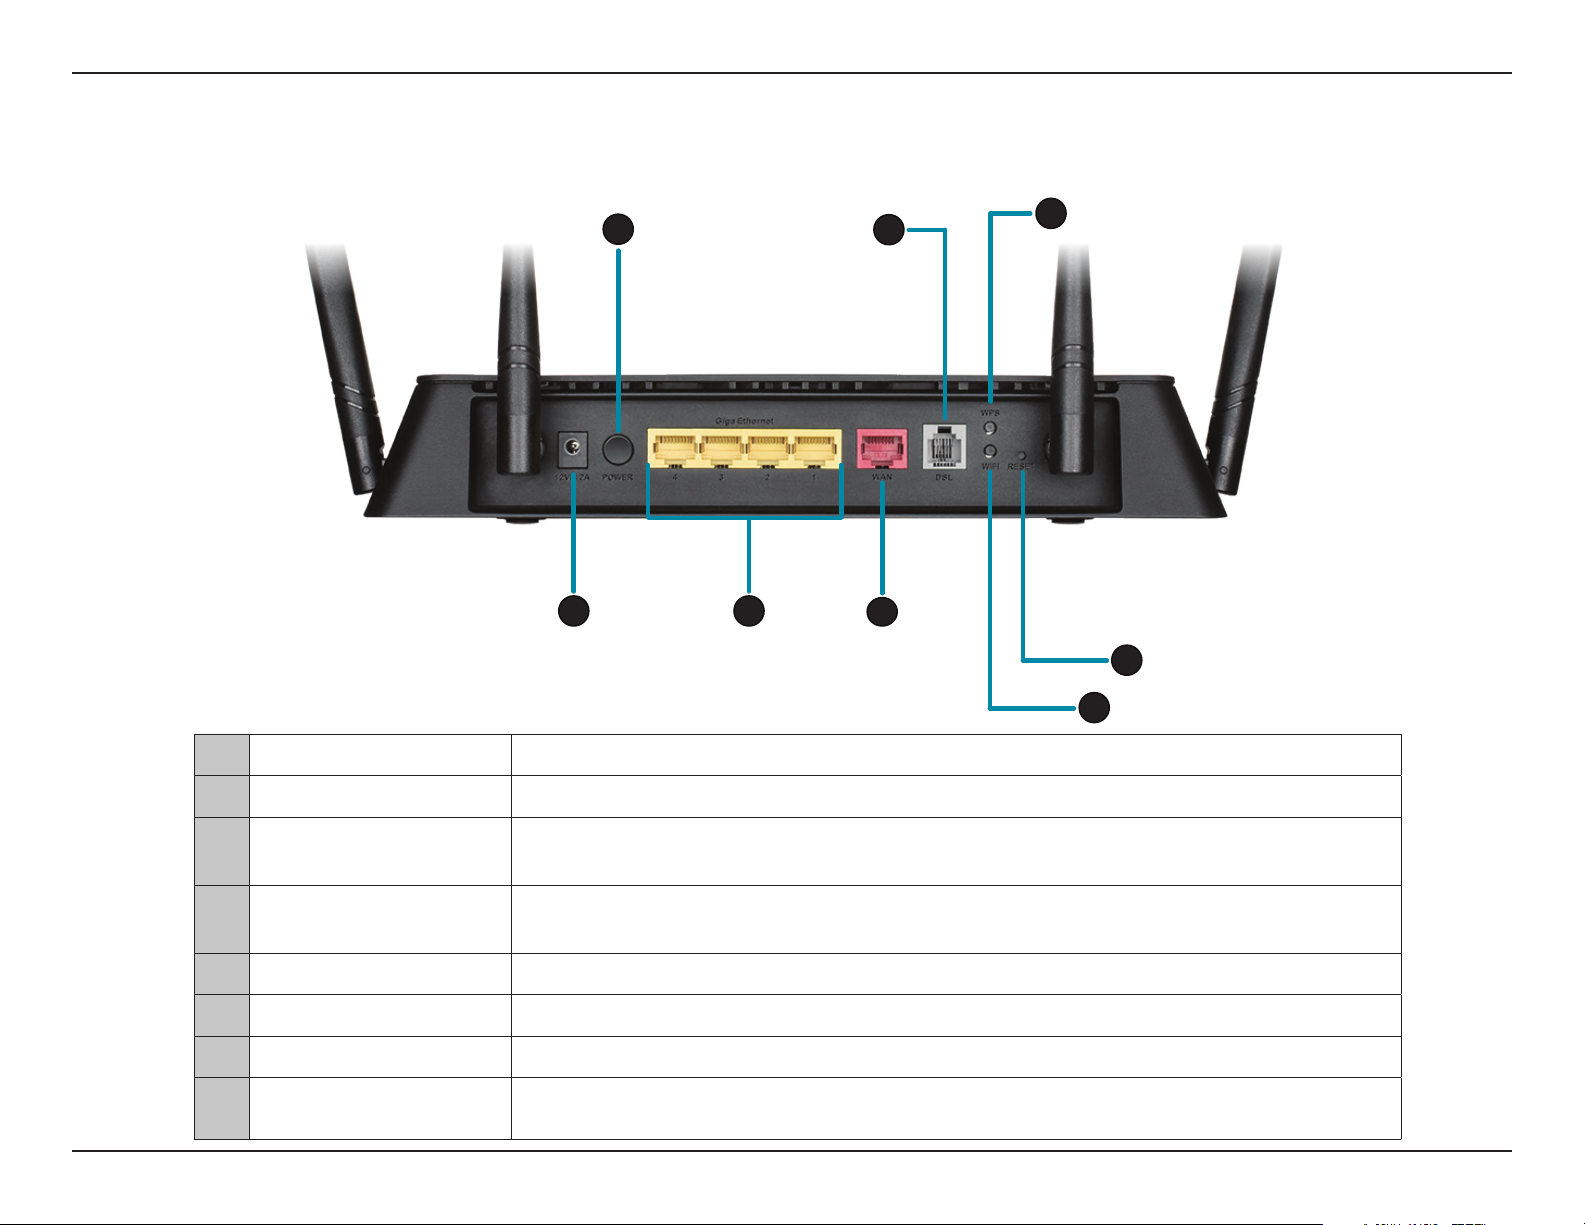
Back Panel
2
1
1 Power Port Connector for the supplied power adapter.
3
5
4
6
8
7
2 Power Button Press to power on / power o the device.
3 Gigabit LAN Ports
4 Gigabit WAN Port Connect an Ethernet cable that is connected to a WAN or modem here.
5 DSL port Connects to an DSL-enabled telephone line.
6 WPS Button Press to start WPS pairing mode.
7 Wi-Fi Button Press to enable/disable Wi-Fi.
8 Reset Button
Connects to network devices such as computers, switches, storage (NAS) devices and
game consoles at speeds of up to 1000 Mbps.
To reset the device to its factory default settings, use a paper clip to press and hold the
reset button for 5 seconds.
5D-Link DSL-3900 User Manual
Page 10
Section 1 - Product Overview
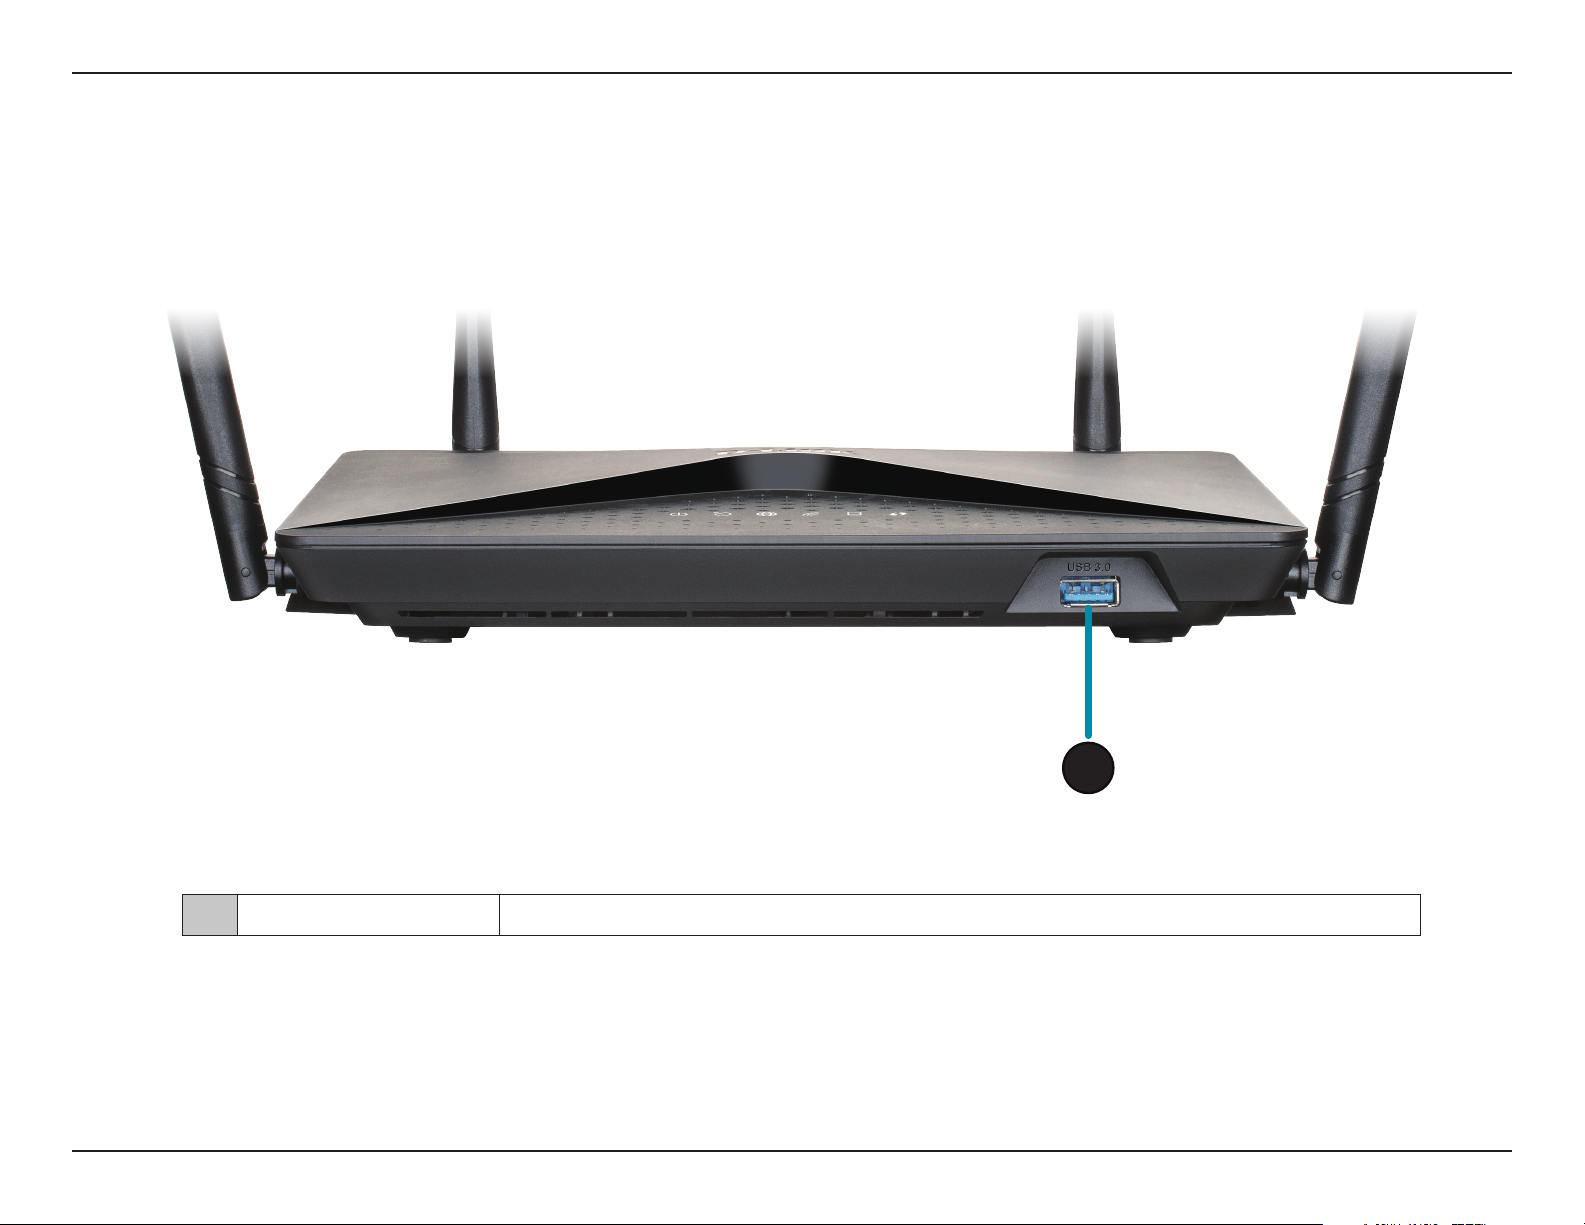
Front Panel
1 USB 3.0 port Connects to USB ash drives to share content.
1
6D-Link DSL-3900 User Manual
Page 11
Section 1 - Product Overview
Hardware Overview
LEDs
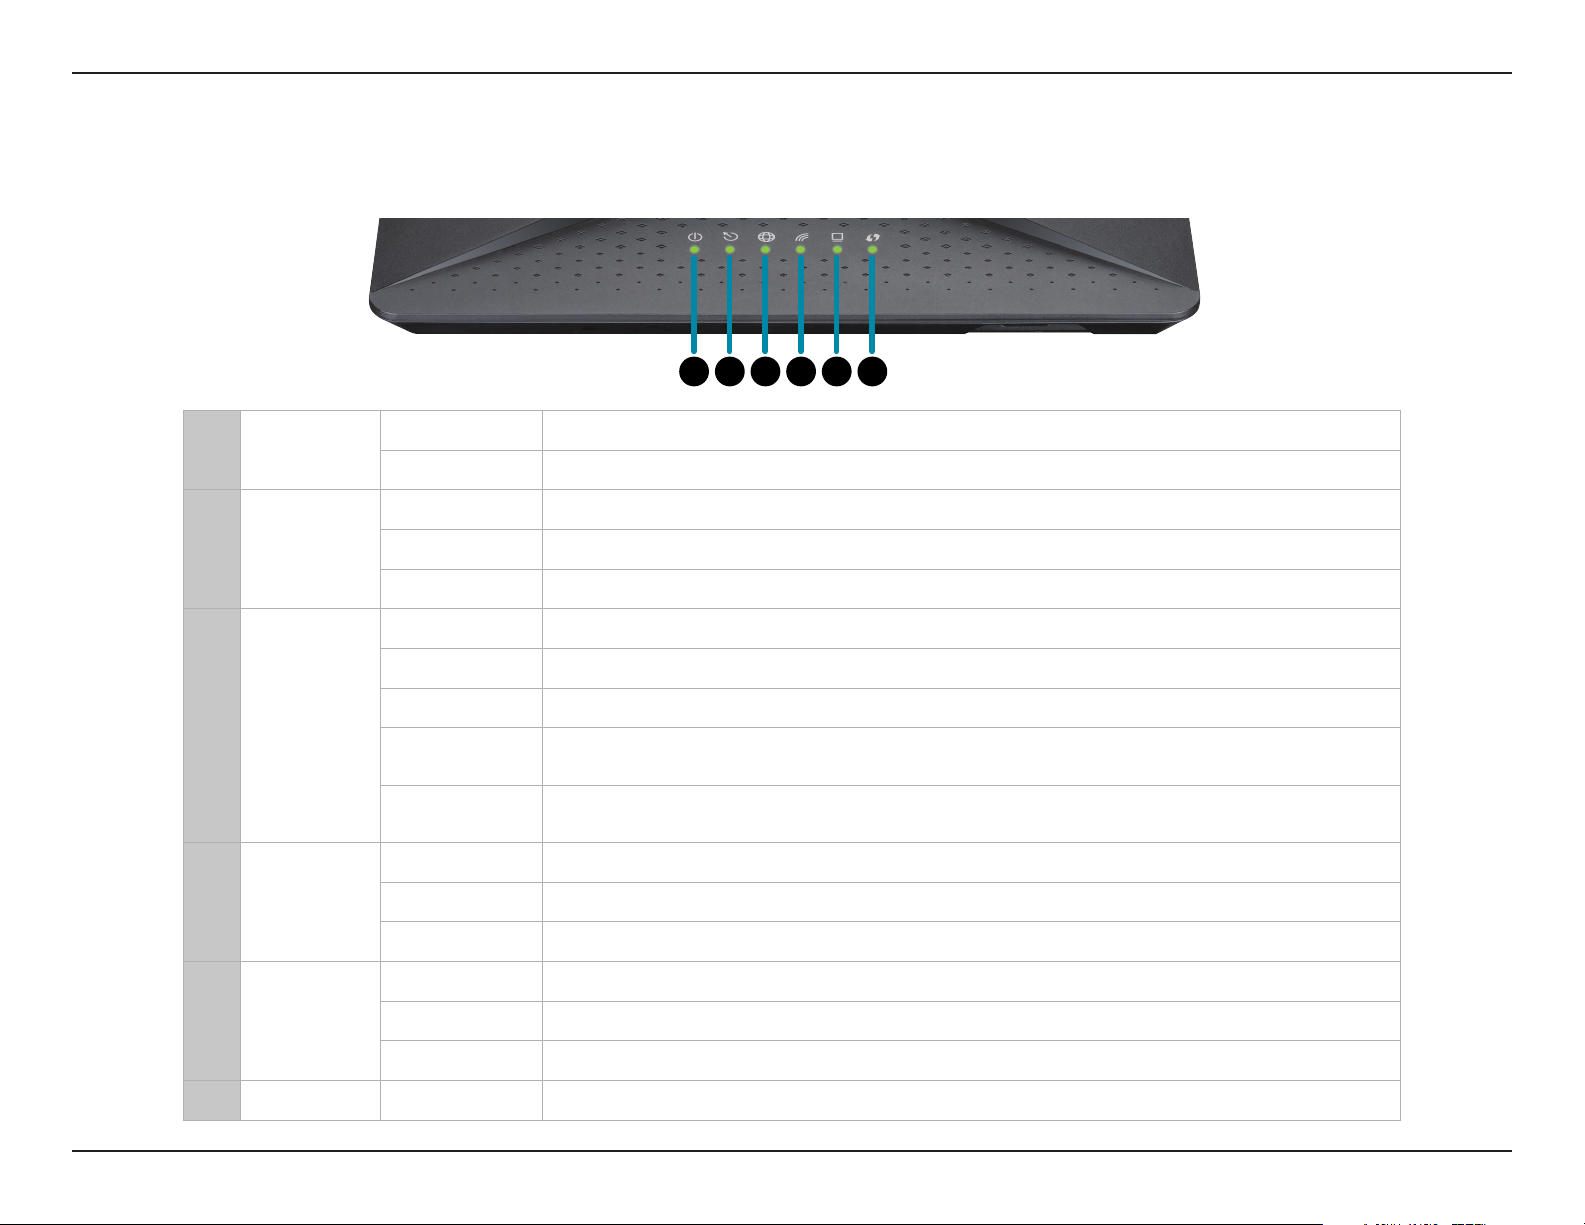
1 2 3 4 5 6
1 Power
2 Broadband
3 Internet
4 Wireless
Solid green A solid green light indicates the device is powered on and working properly.
Solid red A solid red light indicates that the device is booting or an error has occurred.
Solid green A solid green light indicates a proper connection to a DSL-enabled telephone line.
Blinking green A blinking red turning to green light indicates the DSL port is negotiating a connection.
O An unlit light indicates no connection to a DSL enabled-telephone line.
Solid green A solid green light indicates an Internet connection.
Blinking green A blinking green light indicates Internet activity.
Solid red A solid red light indicates a PPP or DHCP failure. Check your username and password.
Blinking Red/
Green
O
Solid green A solid green light indicates that either of the 2.4/5 GHz wireless networks are enabled.
Blinking green A blinking green light indicates wireless activity.
O An unlit light indicates that the wireless functionality is disabled.
Solid green A solid green light indicates a device is connected to the respective LAN port.
A blinking LED that alternates between red for 1 second then green for 1 second
indicates that the rmware is currently being updated.
An unlit light indicates there is no broadband connection available, or the Internet
connection attempt timed out.
5 Ethernet
6 WPS Blinking green A blinking green light indicates the WPS process is active.
Blinking green A blinking green light indicates LAN port activity.
O An unlit light indicates that no Ethernet devices are connected.
7D-Link DSL-3900 User Manual
Page 12

Section 2 - Installation
Installation
This section will walk you through the installation process. Placement of the router is very important. Do not place the router in
an enclosed area such as a closet, cabinet, attic, or garage.
Note: This installation section is written for users who are setting up their home Internet service with a new or factory reset
Wireless AC2600 Dual-Band Gigabit ADSL2+/VDSL2 Modem Router. If you are replacing an existing DSL modem and/or router,
you may need to modify these steps.
Before you Begin
• Make sure to have your DSL service information provided by your Internet Service Provider handy. This
information is likely to include your DSL account's username and password. Your ISP may also supply you with
additional WAN conguration settings which are necessary to establish a connection. This information may
include the connection type (DHCP IP, Static IP, PPPoE, or PPPoA) and/or ATM PVC details.
• If you are connecting a considerable amount of networking equipment, it may be a good idea to take the time to
label each cable or take a picture of your existing setup before making any changes.
• We suggest setting up your DSL-3900 from a single device and verifying that it is connected to the Internet before
connecting additional devices.
• If you have DSL and are connecting via PPPoE, make sure you disable or uninstall any PPPoE connection software
such as WinPoET, BroadJump, or EnterNet 300 from your computer as the DSL-3900 will be providing this
functionality.
8D-Link DSL-3900 User Manual
Page 13

Section 2 - Installation
Wireless Installation Considerations
The D-Link wireless router lets you access your network using a wireless connection from virtually anywhere within the
operating range of your wireless network. Keep in mind that the number, thickness and location of walls, ceilings, or other
objects that the wireless signals must pass through may limit the range. Typical ranges vary depending on the types of
materials and background RF (radio frequency) noise in your home or business. The key to maximizing wireless range is to
follow these basic guidelines:
1. Keep the number of walls and ceilings between the D-Link router and other network devices to a minimum -
each wall or ceiling can reduce your adapter’s range from 3 to 90 feet (1 to 30 meters.) Position your devices so
that the number of walls or ceilings is minimized.
2. Be aware of the direct line between network devices. A wall that is 1.5 feet (0.5 meters) thick, at a 45-degree
angle appears to be almost 3 feet (1 meter) thick. At a 2-degree angle it looks over 42 feet (14 meters) thick!
Position devices so that the signal will travel straight through a wall or ceiling (instead of at an angle) for better
reception.
3. Building materials make a dierence. A solid metal door or aluminum studs may have a negative eect on
range. Try to position access points, wireless routers, and computers so that the signal passes through drywall or
open doorways. Materials and objects such as glass, steel, metal, walls with insulation, water (sh tanks), mirrors,
le cabinets, brick, and concrete will degrade your wireless signal.
4. Keep your product away (at least 3 to 6 feet or 1 to 2 meters) from electrical devices or appliances that generate
RF noise.
5. If you are using 2.4 GHz cordless phones or X-10 (wireless products such as ceiling fans, lights, and home
security systems), your wireless connection may degrade dramatically or drop completely. Make sure your 2.4
GHz phone base is as far away from your wireless devices as possible. The base transmits a signal even if the
phone is not in use.
9D-Link DSL-3900 User Manual
Page 14
Section 2 - Installation
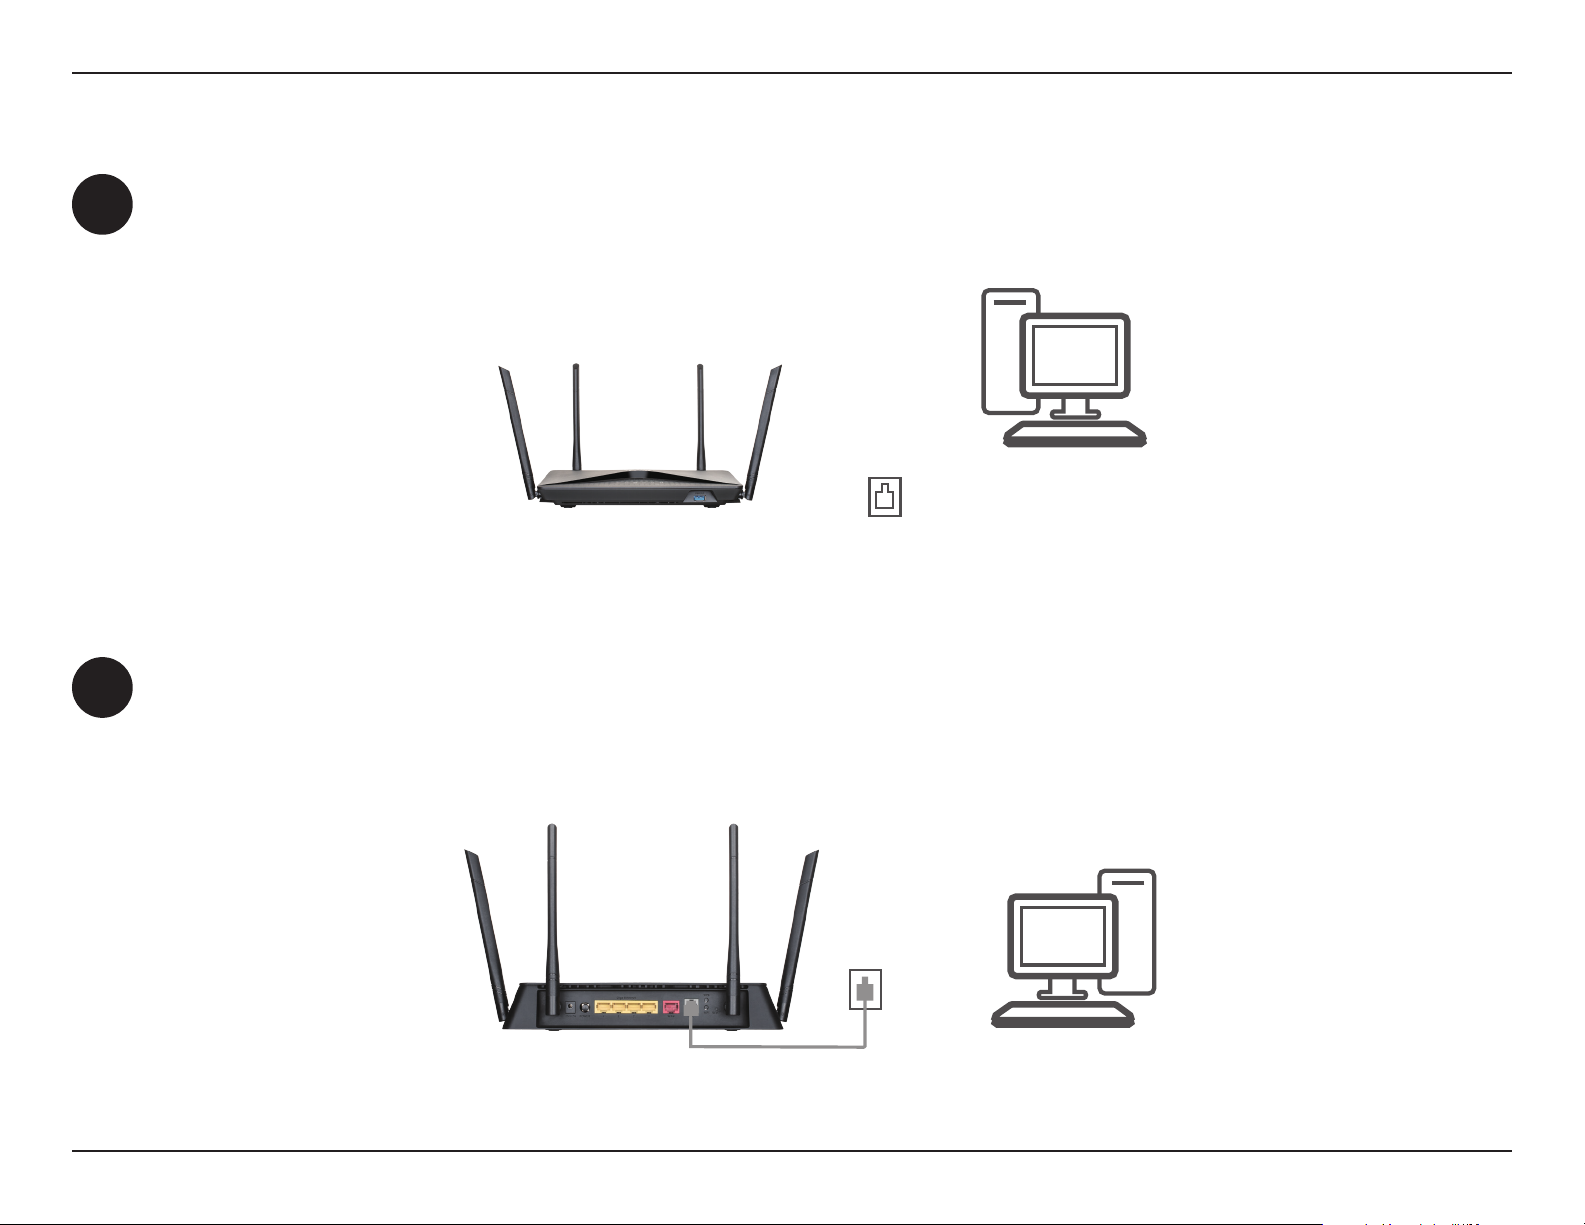
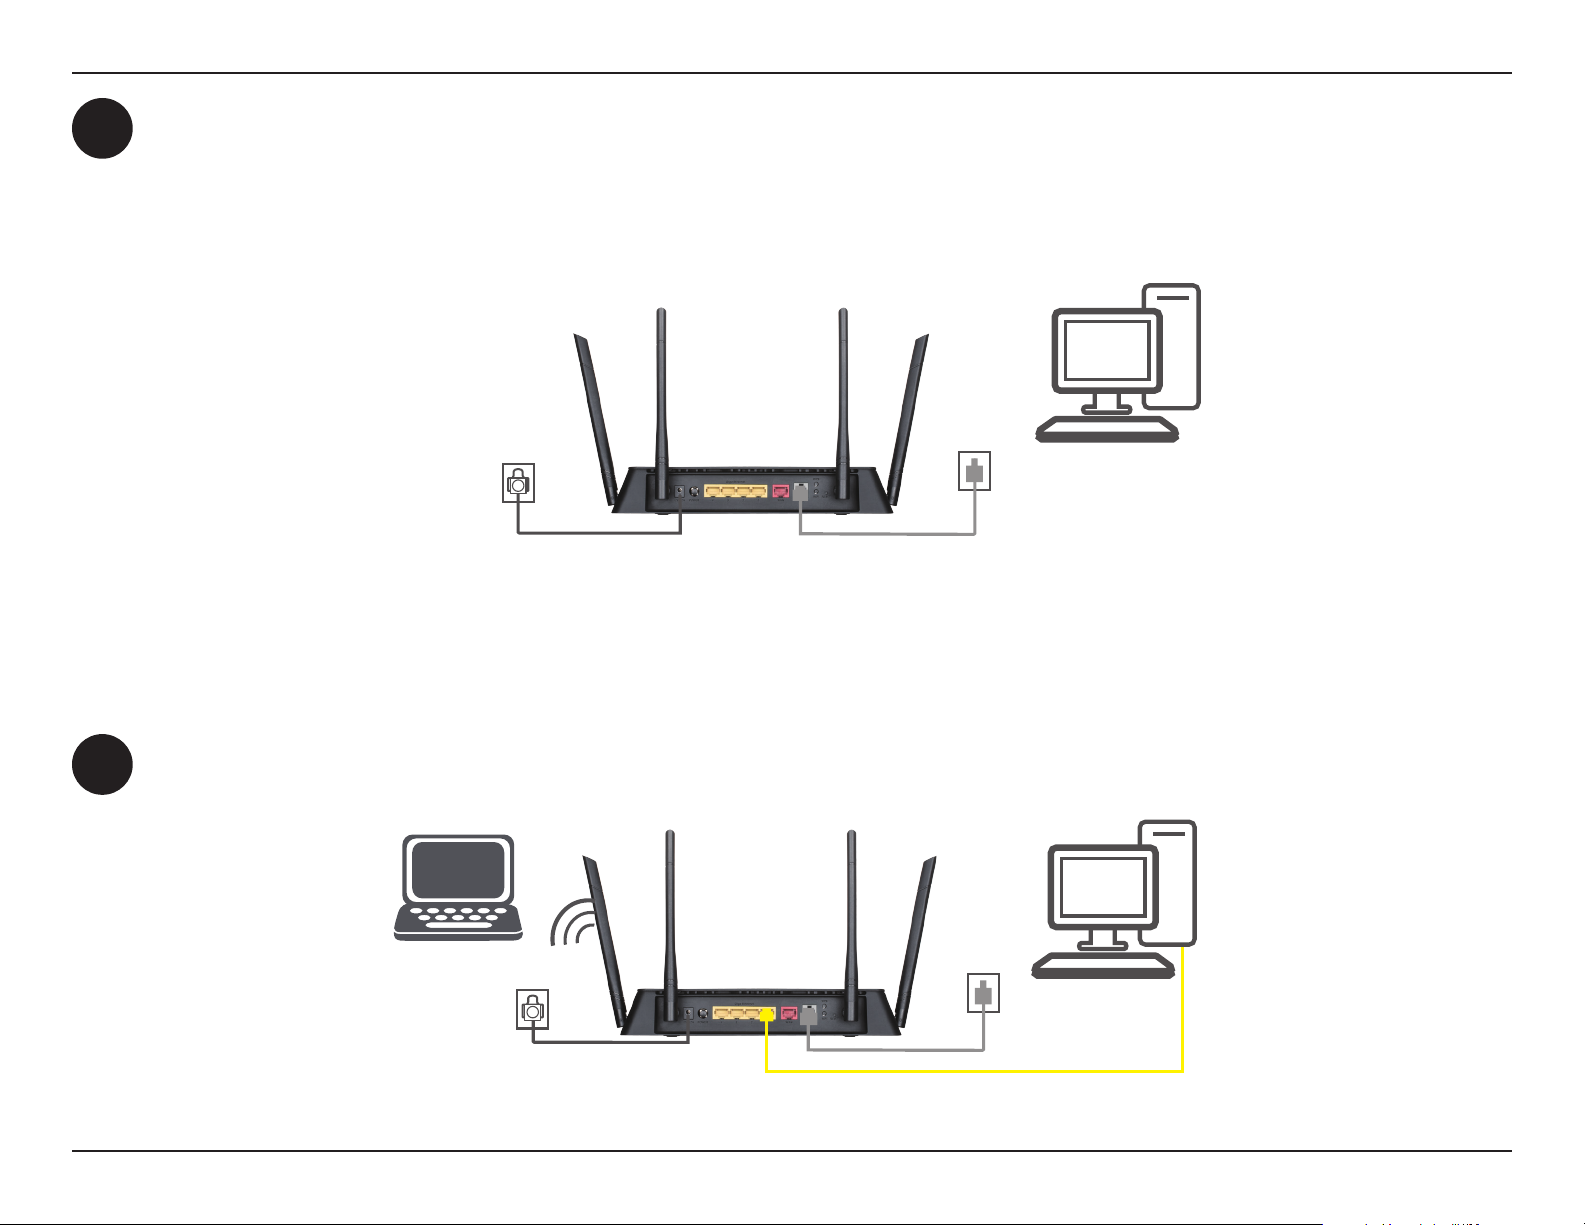
Position your DSL-3900 near your PC and a telephone wall jack which provides DSL service. Keep the modem router in
1
an open area for better wireless coverage.
Manual Setup
PC
Phone
DSL-3900
2
Plug one end of the supplied DSL phone cable into the DSL port on the back of the modem router, and the other end
into the telephone wall jack.
Note: If a DSL microsplitter/microlter is included in the package contents, install it in line with your telephone wall
jack.
PC
DSL-3900
Phone
10D-Link DSL-3900 User Manual
Page 15
Section 2 - Installation
Connect the supplied power adapter to the modem router and a power outlet, and press the power button. The
3
device LEDs will light up. Wait approximately three minutes before moving on to step 4.
Caution: Use only the included power adapter with this product.
Phone
PC
4
Power
Plug one end of the supplied Ethernet cable into a yellow Ethernet port on the back of the modem router, and the
other end into the Ethernet port on your computer.
If you are setting up the DSL-3900 using a laptop or mobile device, connect to it using the Wi-Fi network name
and password printed on the label attached to the back of your router.
PC
Power
DSL-3900
Phone
PC
DSL-3900
11D-Link DSL-3900 User Manual
Page 16

Section 3 - Getting Started
Getting Started
There are two ways you can congure your router to connect to the Internet and connect to your clients:
• D-Link Setup Wizard - This wizard will launch when you log into the router for the rst time. Refer to Setup Wizard on
page 13.
• Manual Setup - Log into the router and manually congure your router. Refer to Conguration on page 20.
12D-Link DSL-3900 User Manual
Page 17
Section 3 - Getting Started
Setup Wizard
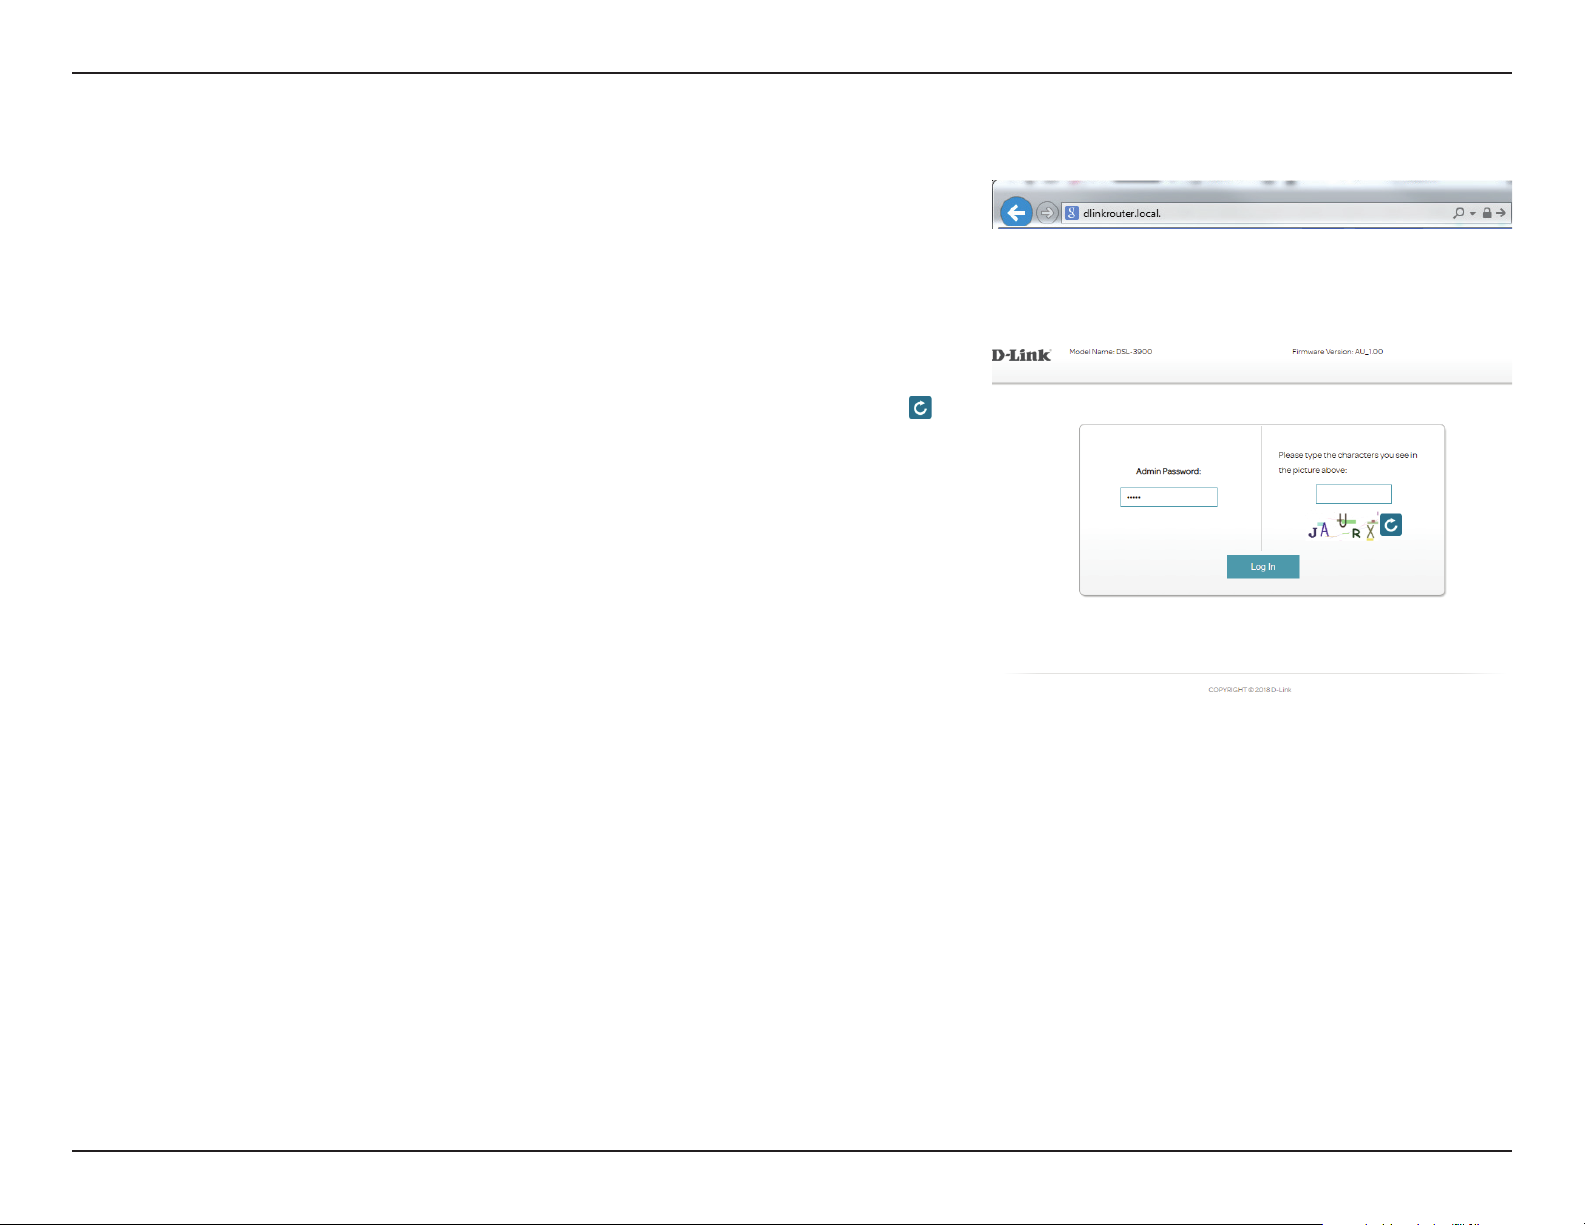
If this is your rst time using the router, open your web browser and enter
http://dlinkrouter.local./ in the address bar. Alternatively, enter the IP address
of the router (default: http://192.168.1.1).
If this is your rst time using the router, the router the default admin password
is printed on the product label sticker on the bottom. The enter the letters in
the picture below into the second box. If you cannot read the letters, click
generate a new picture.
Click Log In.
to
13D-Link DSL-3900 User Manual
Page 18
Section 3 - Getting Started
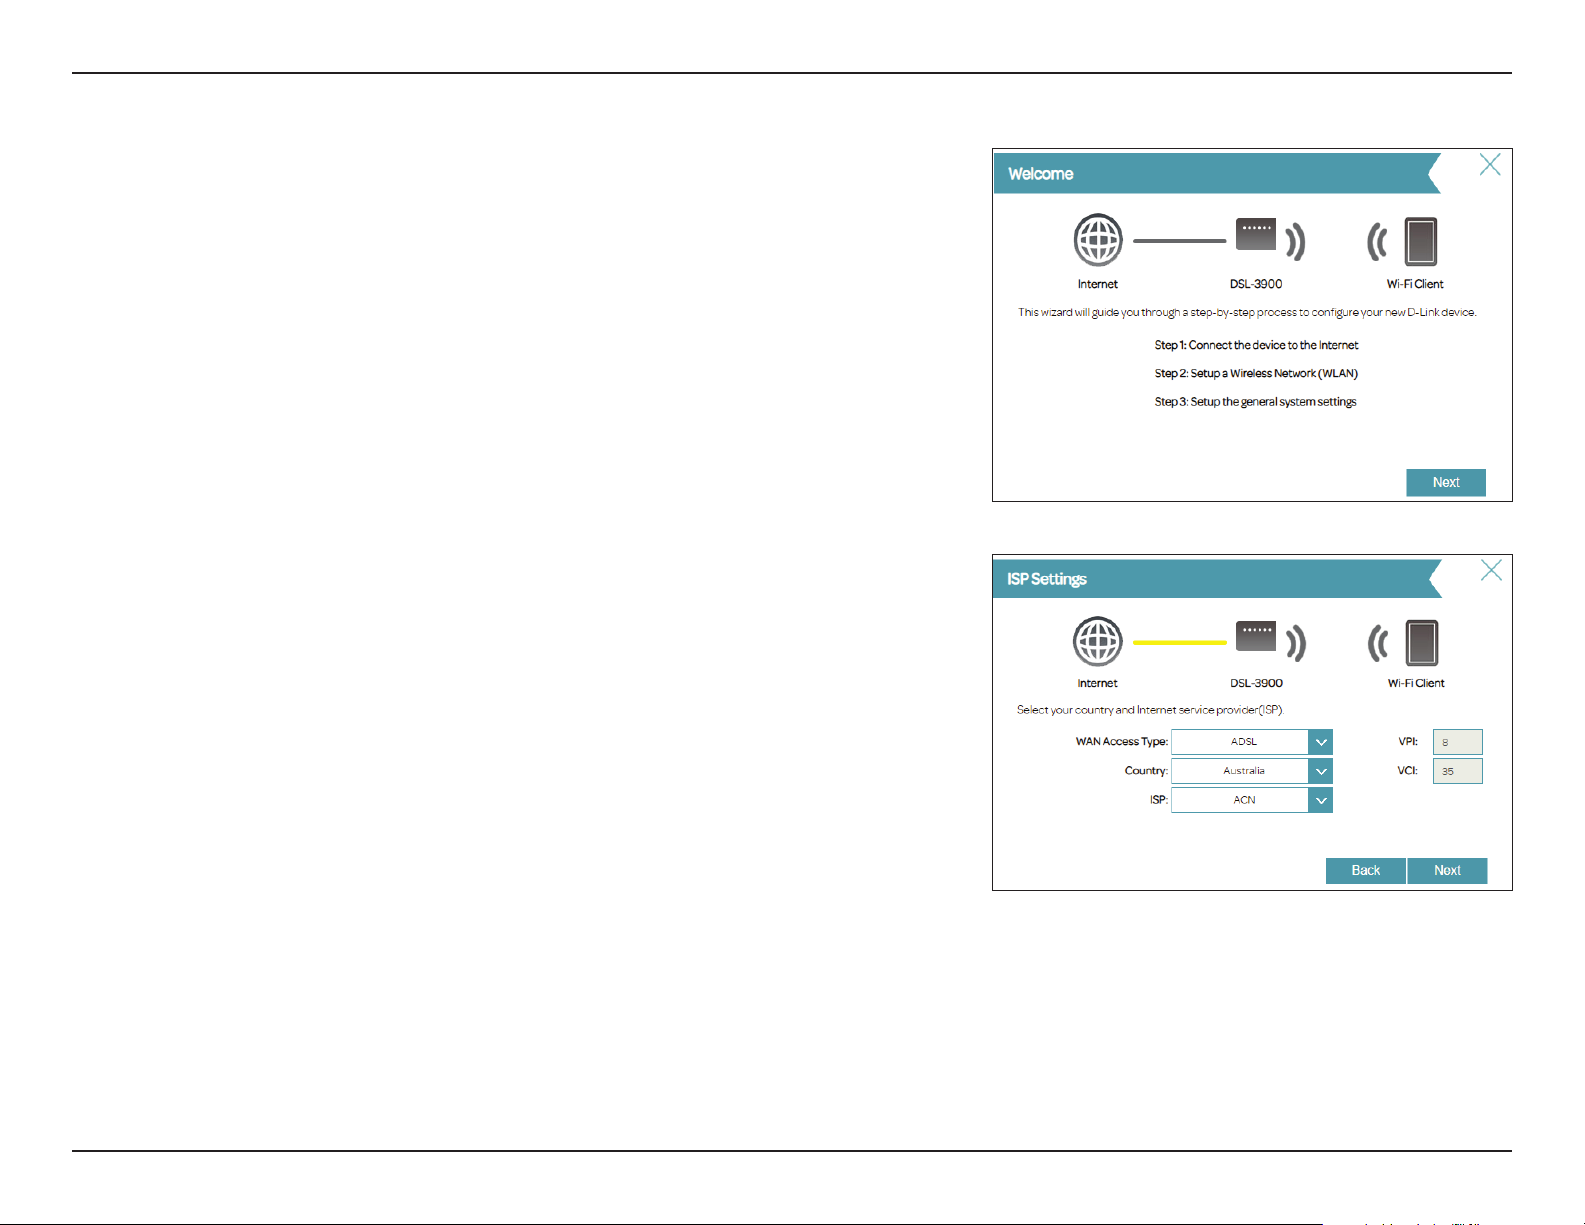
The wizard is designed to guide you through a step-by-step process to congure
your new D-Link router and connect to the Internet. Ensure that your DSL phone
cable is connected to both the router and the wall jack.
Click Next to continue.
First, you must select your WAN Access Type. The options are ADSL, VDSL, or
Ethernet. To quickly nd your ISP's settings, select your Country and ISP. The
VPI and VCI values will automatically be congured.
Click Next to continue.
14D-Link DSL-3900 User Manual
Page 19
Section 3 - Getting Started
Setup Wizard (continued)
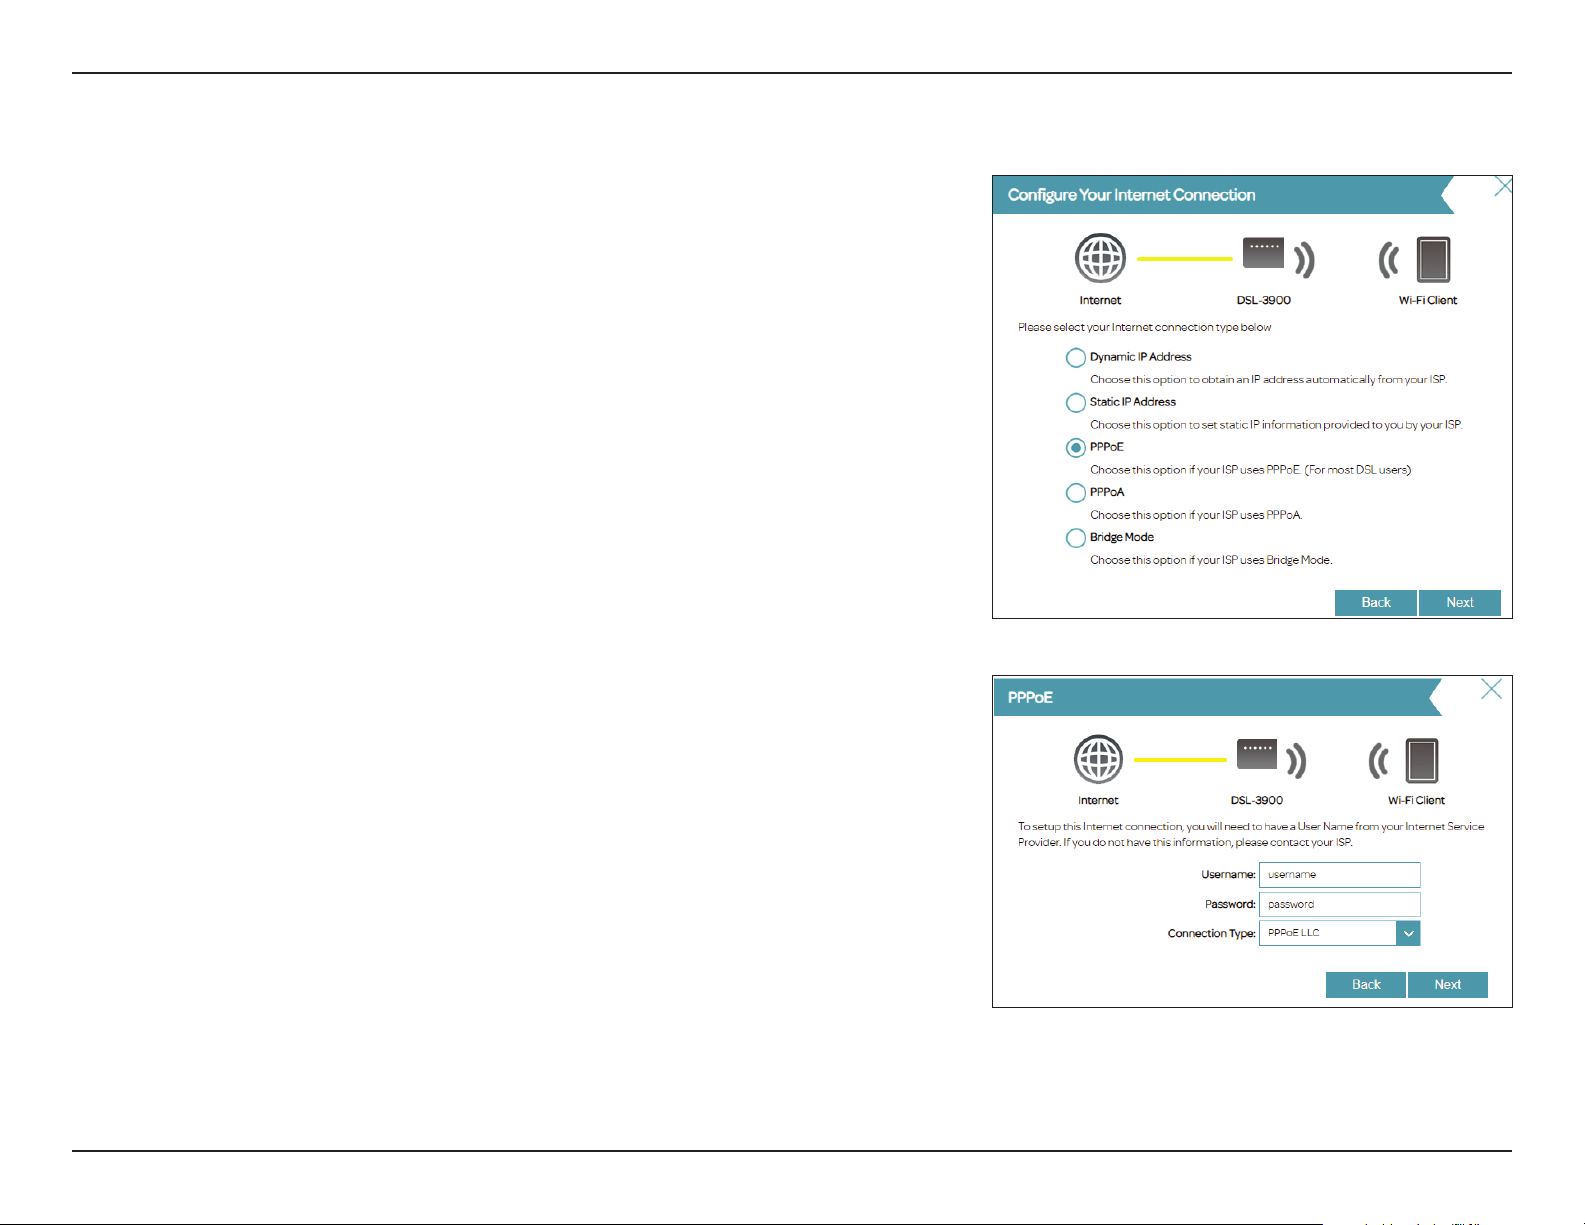
If the router cannot determine your connection type, a list of connection types
to choose from will be displayed. Select your Internet connection type (this
information can be obtained from your Internet Service Provider) and click
Next to continue.
If the router detected or you selected PPPoE, enter your PPPoE username and
password, choose the Connection Type if asked, and click Next to continue.
Note: Make sure to remove your PPPoE software from your computer. The software
is no longer needed and will not work through a router.
15D-Link DSL-3900 User Manual
Page 20
Section 3 - Getting Started
Setup Wizard (continued)
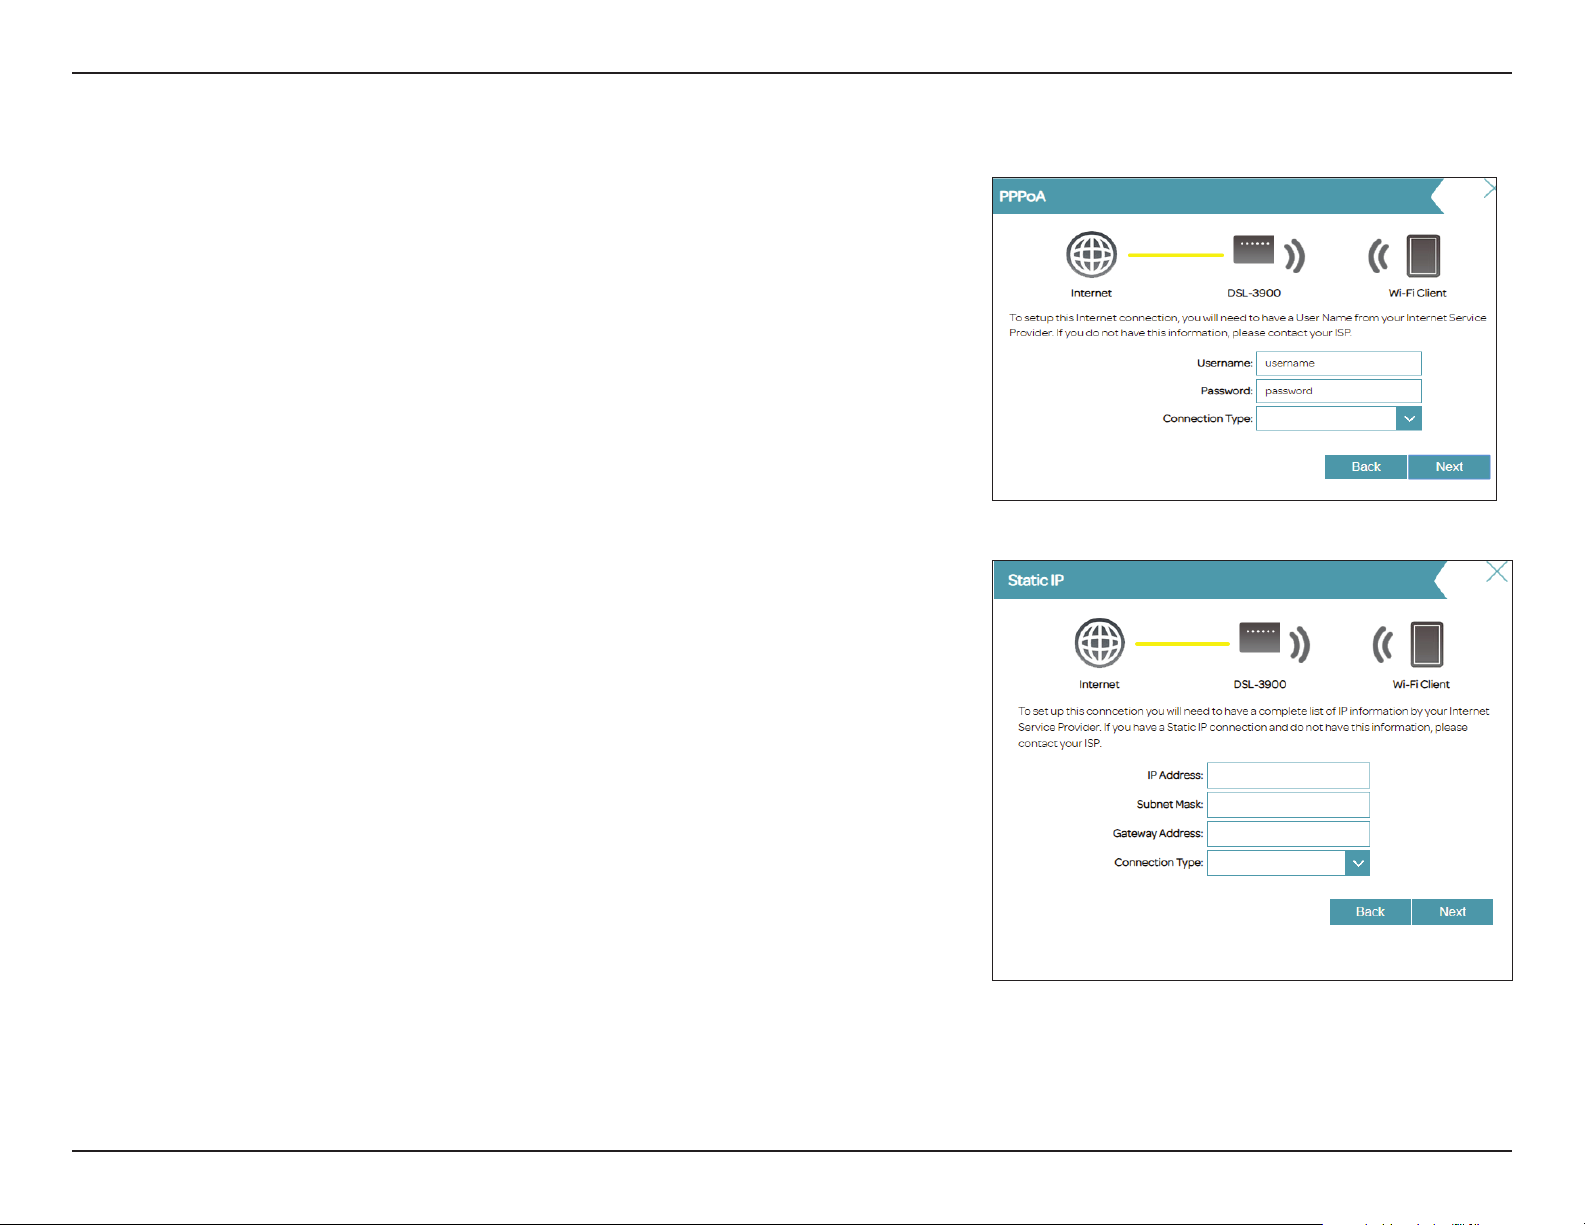
If the router detected or you selected PPPoA, enter your PPPoA username and
password, choose the Connection Type if asked, and click Next to continue.
Note: Make sure to remove your PPPoA software from your computer. The software
is no longer needed and will not work through a router.
PPPoA connection type is only available for ADSL connections.
If you selected Static IP, enter the IP address, subnet mask, gateway address,
and DNS servers provided by your ISP, then choose the Connection Type if
asked. Click Next to continue.
16D-Link DSL-3900 User Manual
Page 21
Section 3 - Getting Started
Setup Wizard (continued)
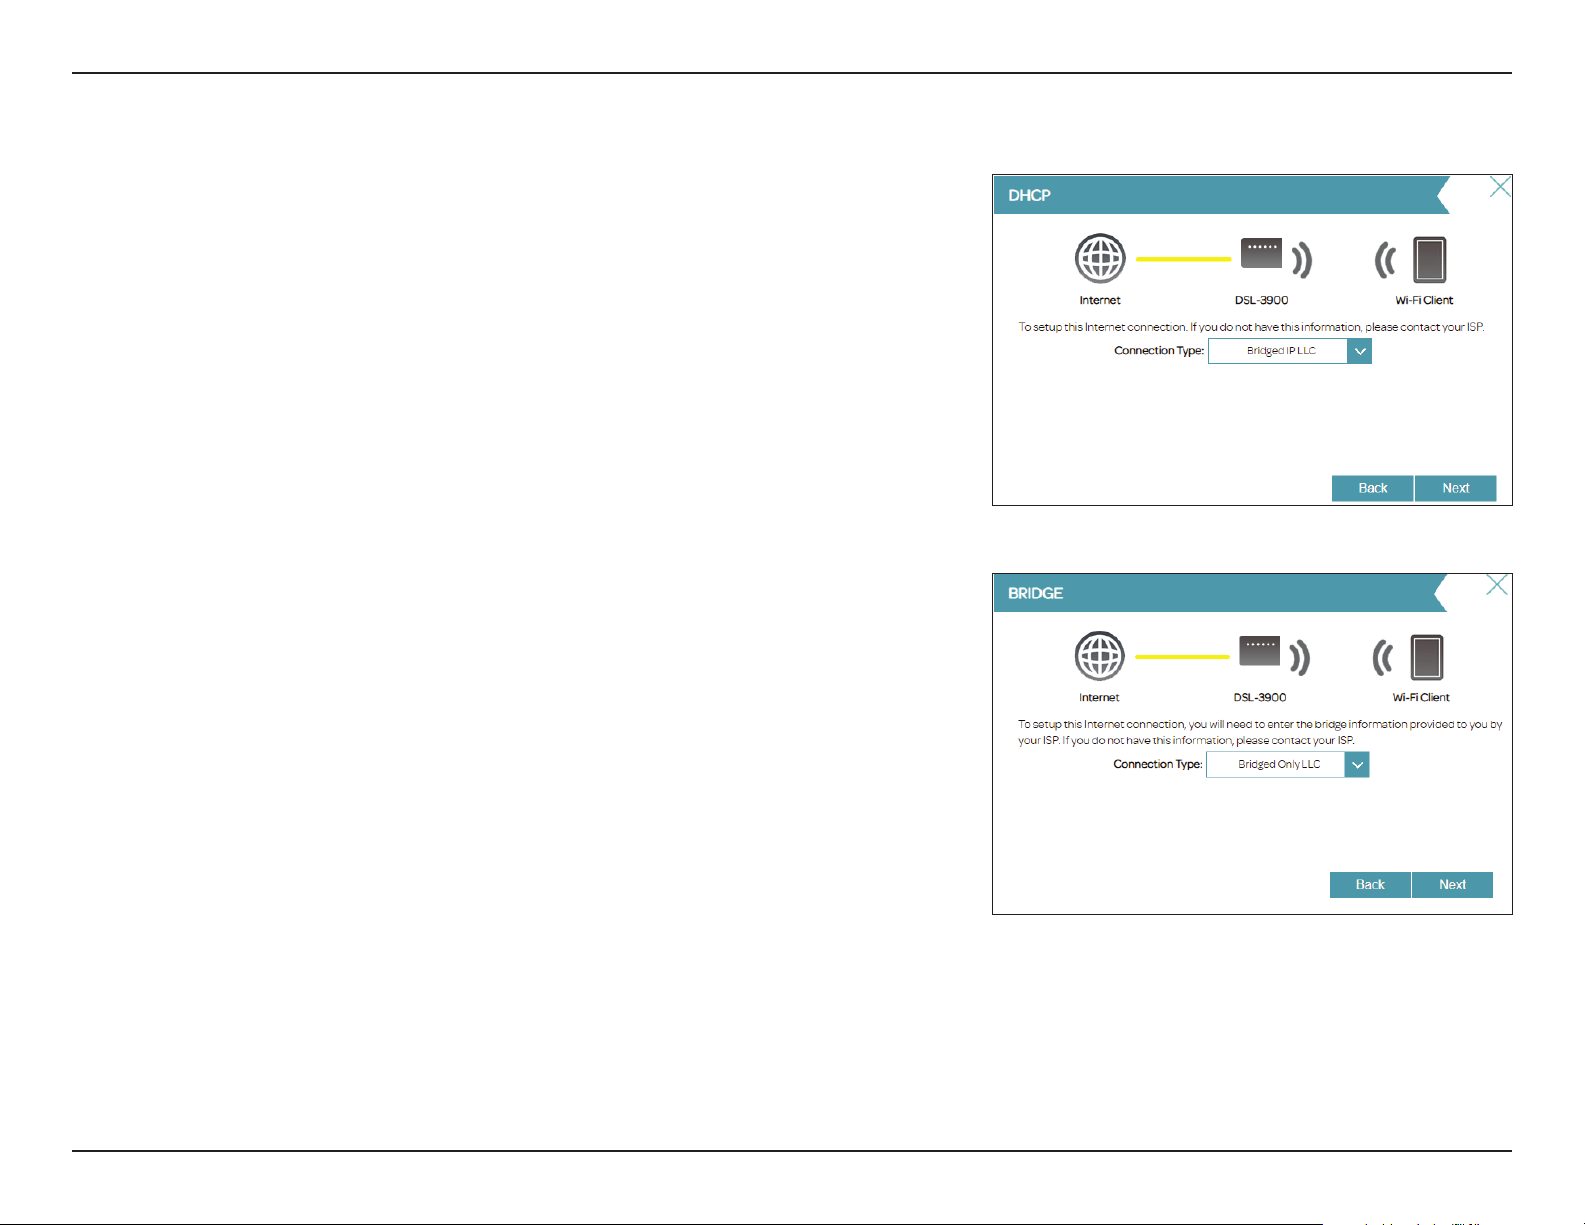
If the router detected or you selected Dynamic IP Address (DHCP), choose
the Connection Type if asked. Click Next to continue.
If you selected Bridge, choose the Connection Type if asked. Click Next to
continue.
17D-Link DSL-3900 User Manual
Page 22
Section 3 - Getting Started
Setup Wizard (continued)
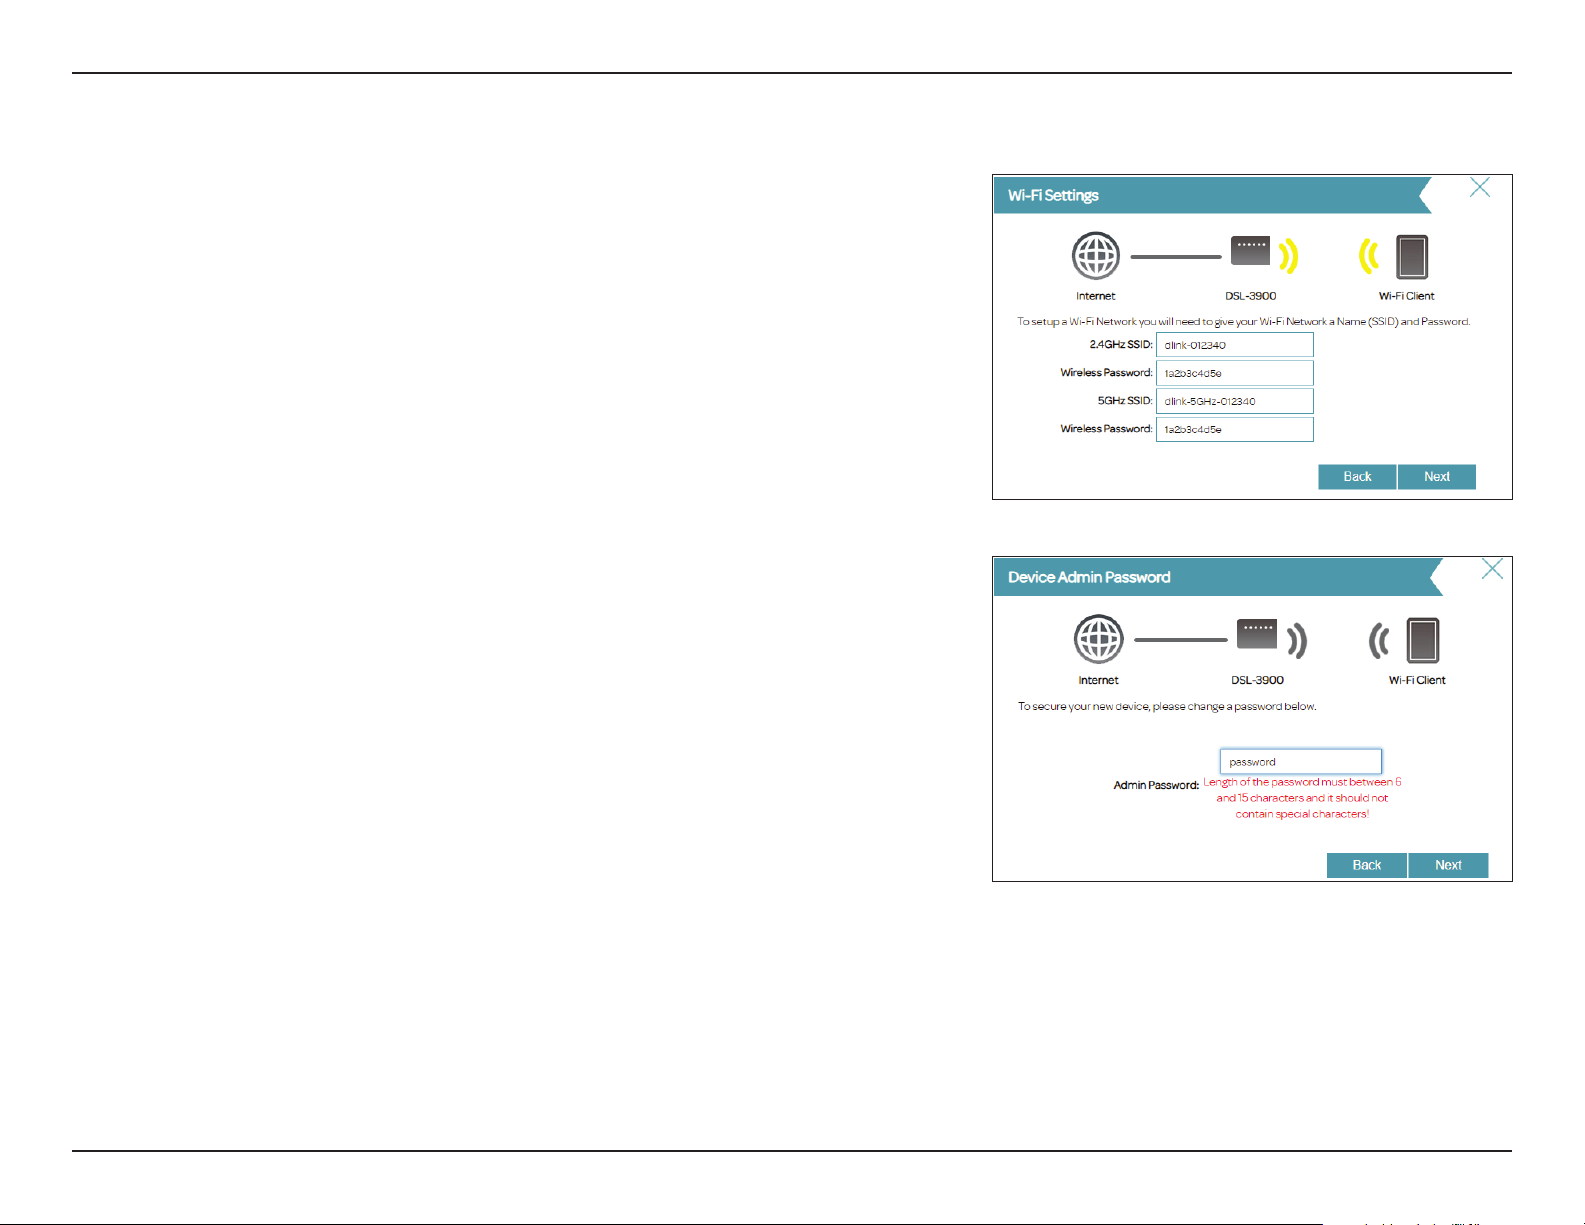
Create a Wi-Fi SSID and password for both the 2.4 GHz and 5 GHz wireless
networks. The SSIDs must be between 3 and 32 alphanumeric characters in
length and may include hyphens, underscores, periods, and the @ symbol.
The passwords must be between 8 and 63 alphanumeric characters in length.
Your wireless clients must use these SSIDs and passwords in order to connect
to your wireless networks.
Click Next to continue.
To help protect your router, please enter a new password. You will be prompted
for this password every time you want to use the router’s web conguration
utility. This password must be between 6 and 15 characters and not include
special characters. Click Next to continue.
18D-Link DSL-3900 User Manual
Page 23
Section 3 - Getting Started
Setup Wizard (continued)
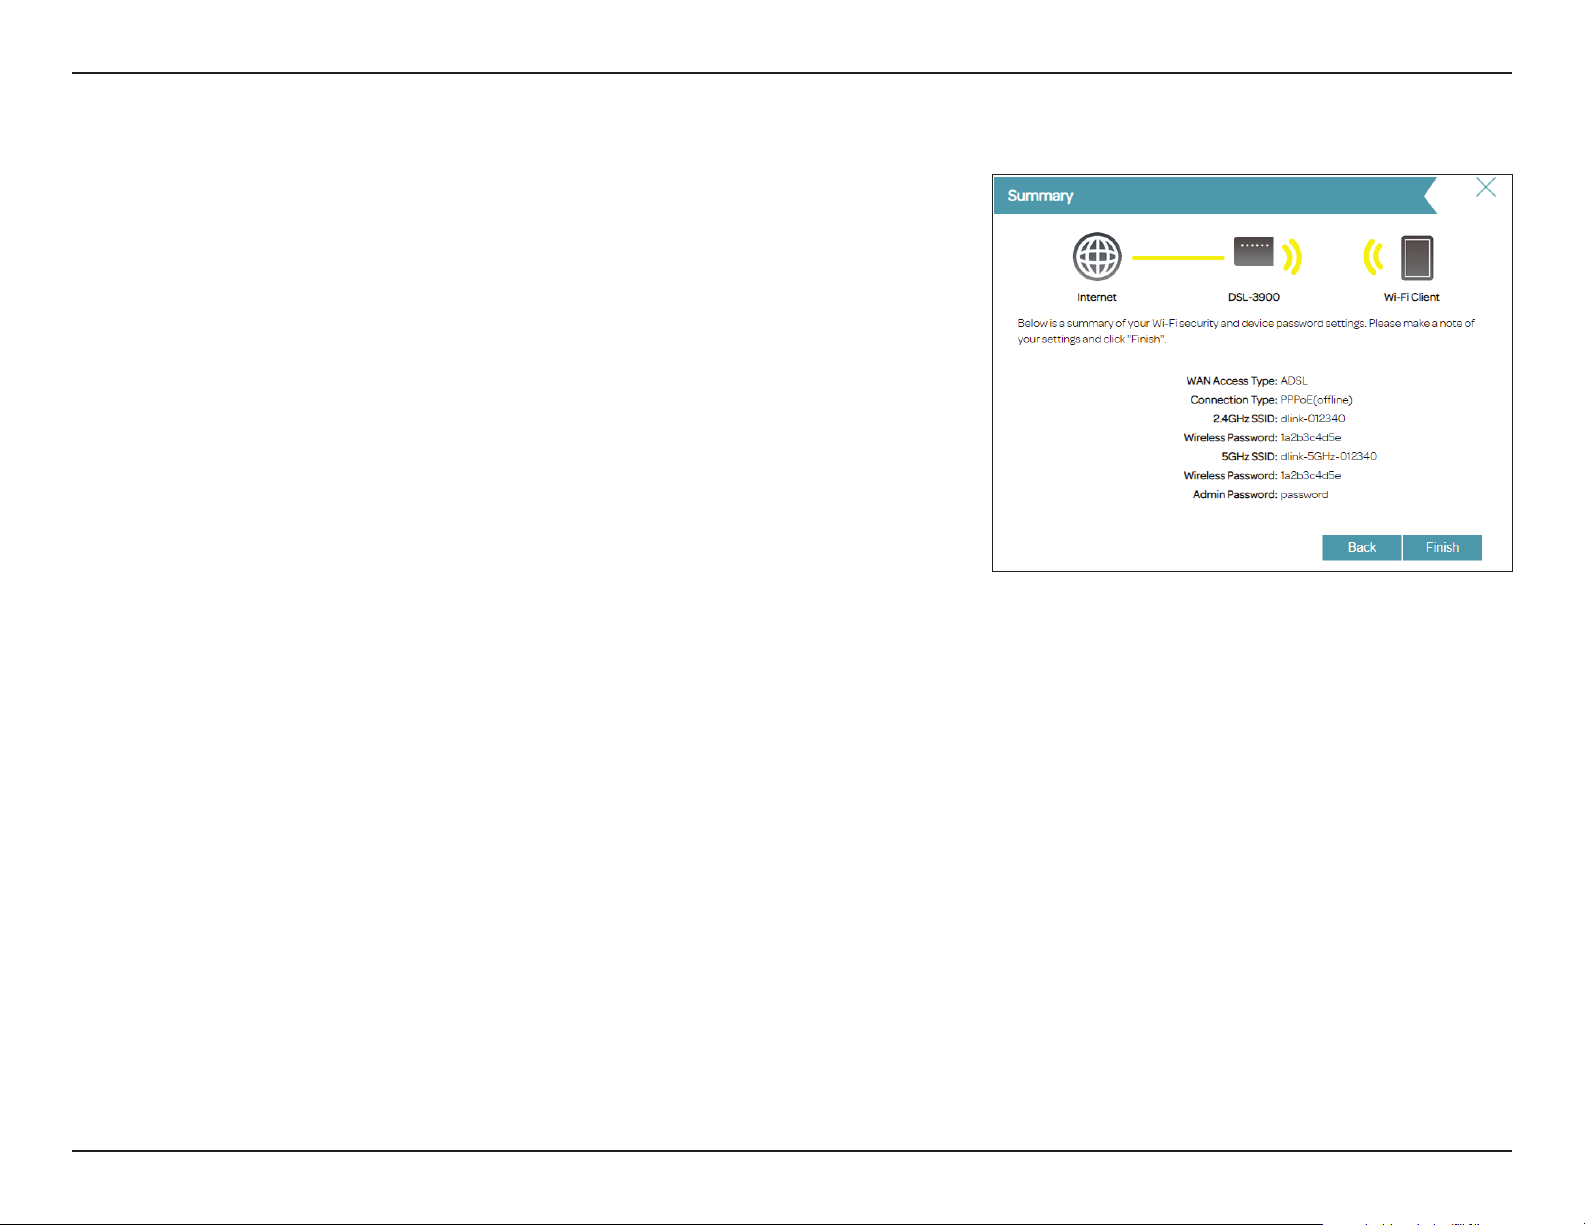
The Summary window will display your settings. Click Next if you are satised,
or click Back to make changes to them. The wizard will close and your settings
will be saved.
Congratulations, setup is complete.
19D-Link DSL-3900 User Manual
Page 24
Section 4 - Conguration
Conguration
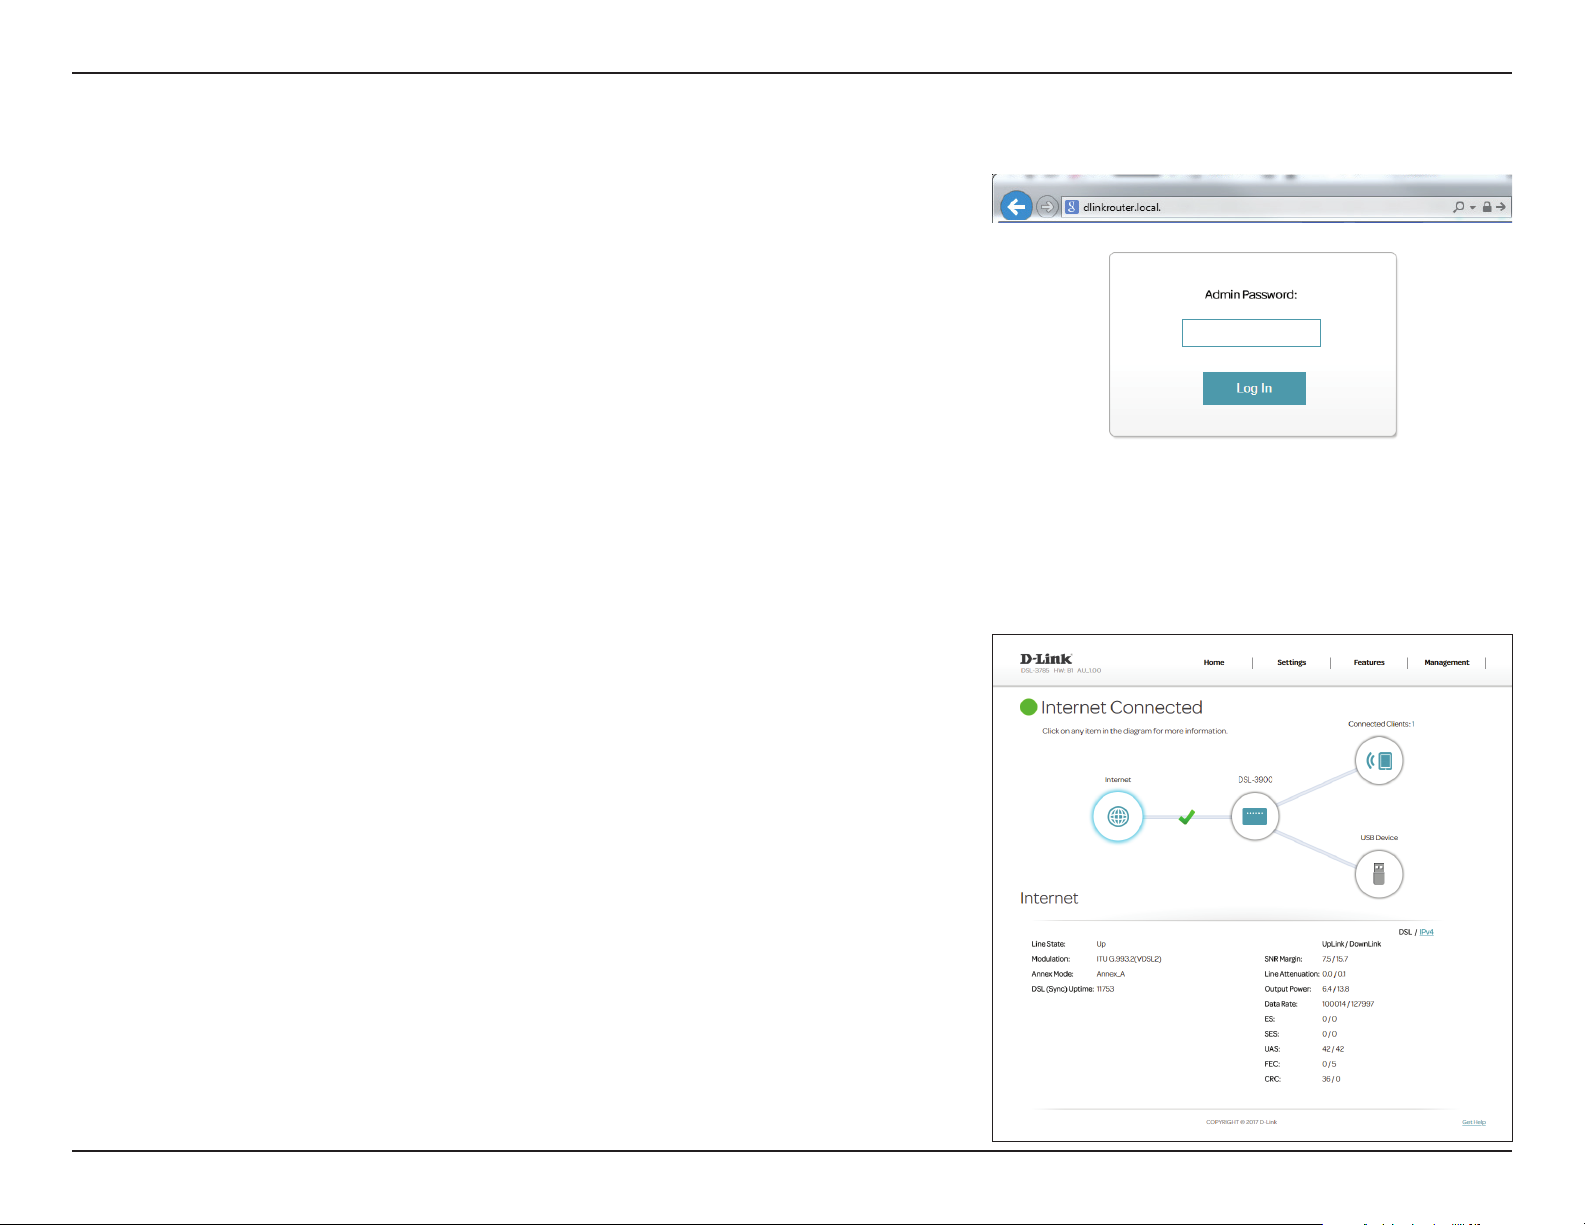
To access the conguration utility, open a web browser such as Internet
Explorer and enter http://dlinkrouter.local./
Windows and Mac users may also connect by typing the IP address of the
router (by default this is http://192.168.1.1) in the address bar.
Input the default password as what is printed on the product label sticker
on the bottom. If you previously followed the Setup Wizard (see page 13),
please use the admin password you entered during the wizard. Click Log In to
proceed.
Note: If you cannot remember your password and cannot log in, press the reset
button (see page 5) to restore the router to its default settings.
Home
The Home page displays the current status of the router in the form of an
interactive diagram. There are four main sections: Internet, D-Link, Connected
Clients, and USB Device. You can click each icon to display information about
each section at the bottom of the screen. The menu bar at the top of the
page will allow you to quickly navigate to the Settings and Management
functions. You may quickly jump back Home at any time.
Note: The system will automatically log out after a period of inactivity.
20D-Link DSL-3900 User Manual
Page 25
Section 4 - Conguration
Internet
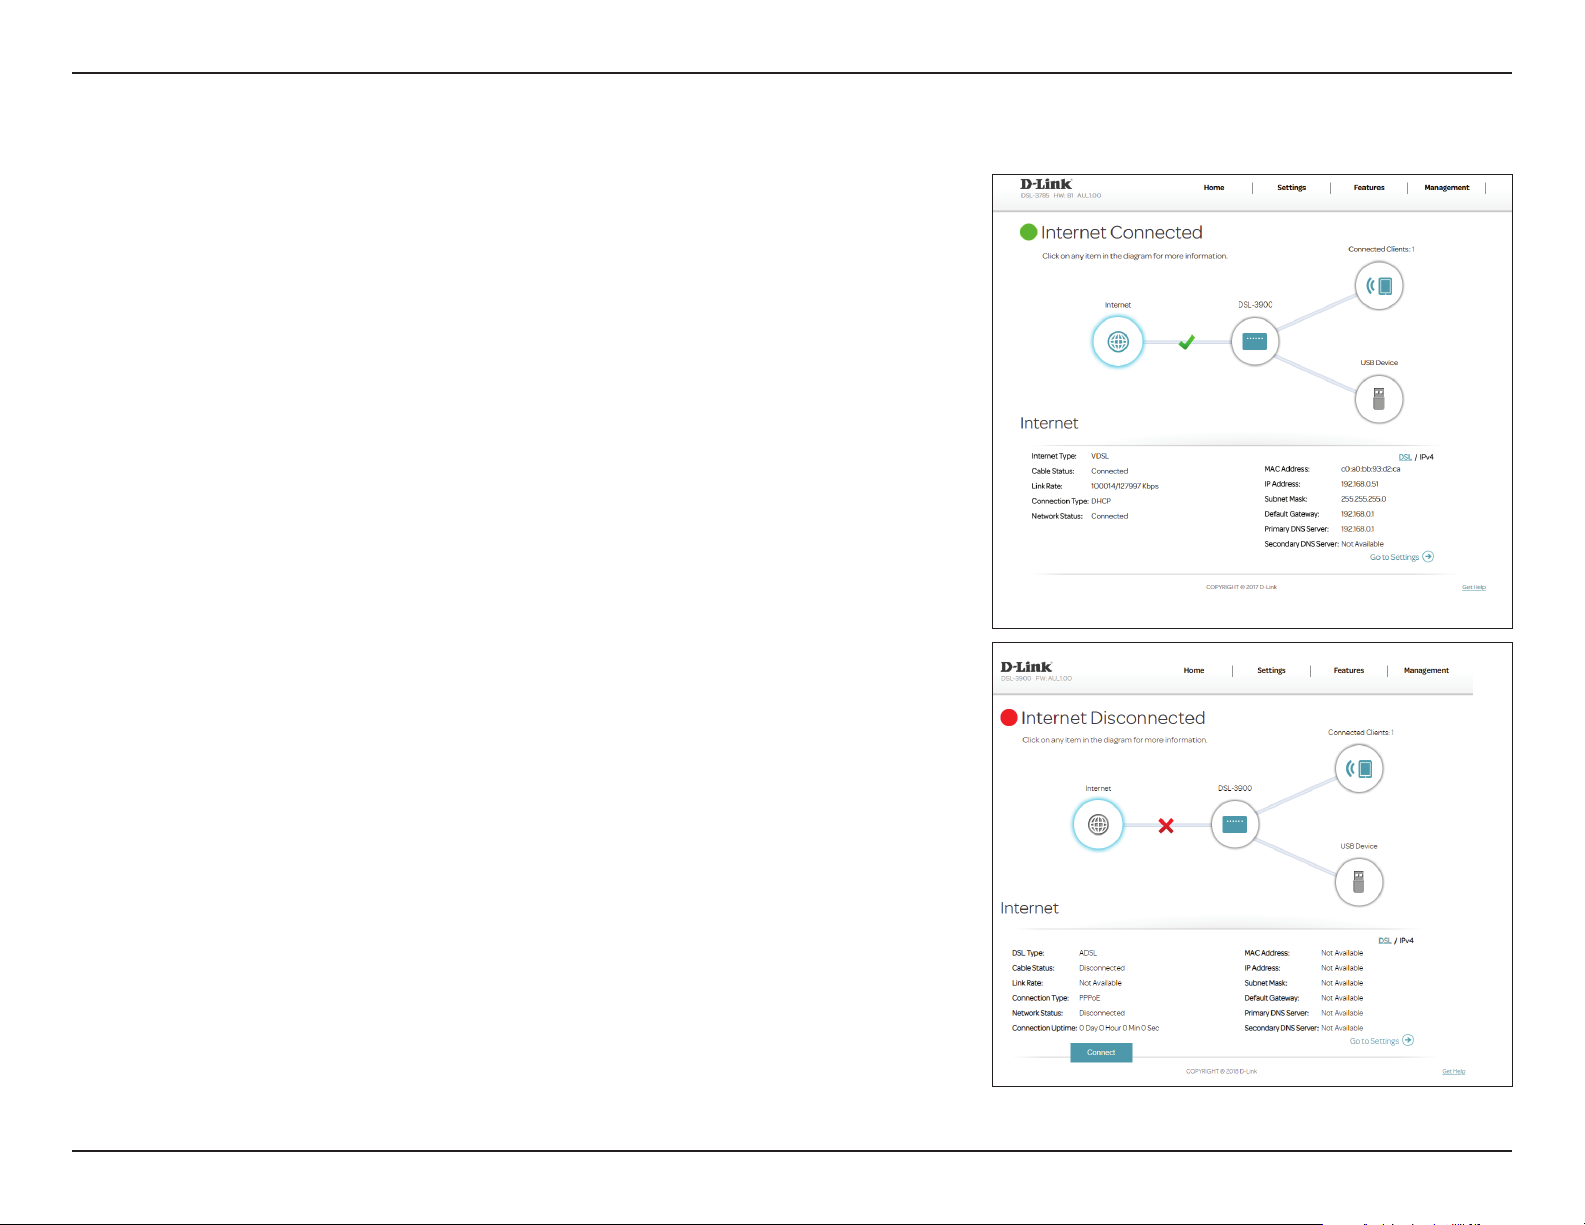
To bring up more details about your Internet connection, click on the Internet
icon. The Internet Connection status at the top of the diagram will reect the
status of the currently selected WAN interface.
If your Internet is disconnected, indicated by a red X, you can launch the Setup
Wizard to correct the issue by clicking Wizard from the Settings menu on
the bar on the top of the page.
You can see the DSL connection status and IPv4 information at the bottom of
the page. Clicking the DSL button will display DSL port information.
21D-Link DSL-3900 User Manual
Page 26
Section 4 - Conguration
IPv4
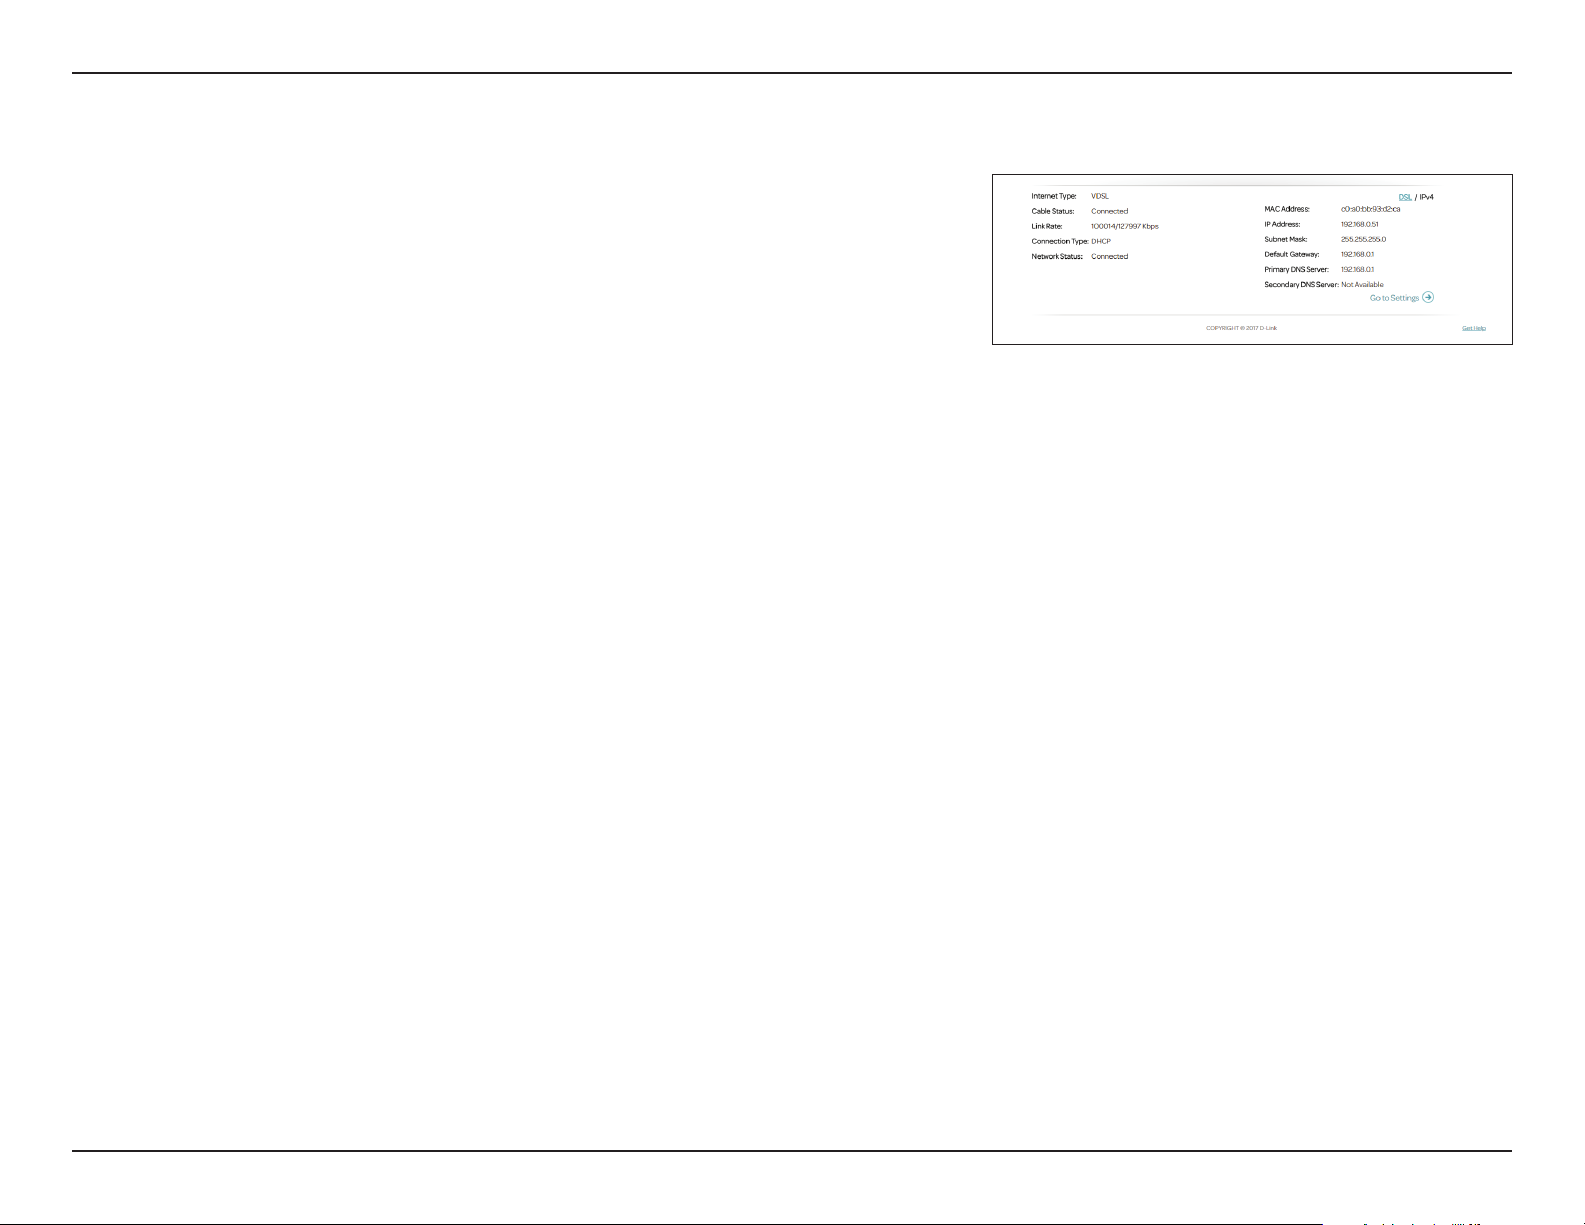
Click the IPv4 button to see the IPv4 information for the DSL interface. If you
have congured your ADSL/VDSL connection to use PPPoE with On-Demand
or Manual settings, you can connect to or disconnect from the Internet by
pressing the Connect or Disconnect buttons.
IPv4
DSL Type: Displays the current DSL type, either ADSL or VDSL.
Cable Status: Displays the current cable connection status.
Link Rate: Displays the currently negotiated connection speed.
Connection Type: Displays the network protocol used to obtain an IP address.
Network Status: Displays the current network connection status.
Connection
Uptime:
MAC Address: Displays the MAC address of this interface.
IP Address: Displays the current WAN IPv4 address.
Subnet Mask: Displays the current subnet mask.
Default Gateway: Displays the current IPv4 default gateway.
Primary DNS
Server:
Secondary DNS
Server:
Displays the amount of time the connection has been connected.
Displays the current primary DNS server.
Displays the current secondary DNS server.
22D-Link DSL-3900 User Manual
Page 27
Section 4 - Conguration
DSL
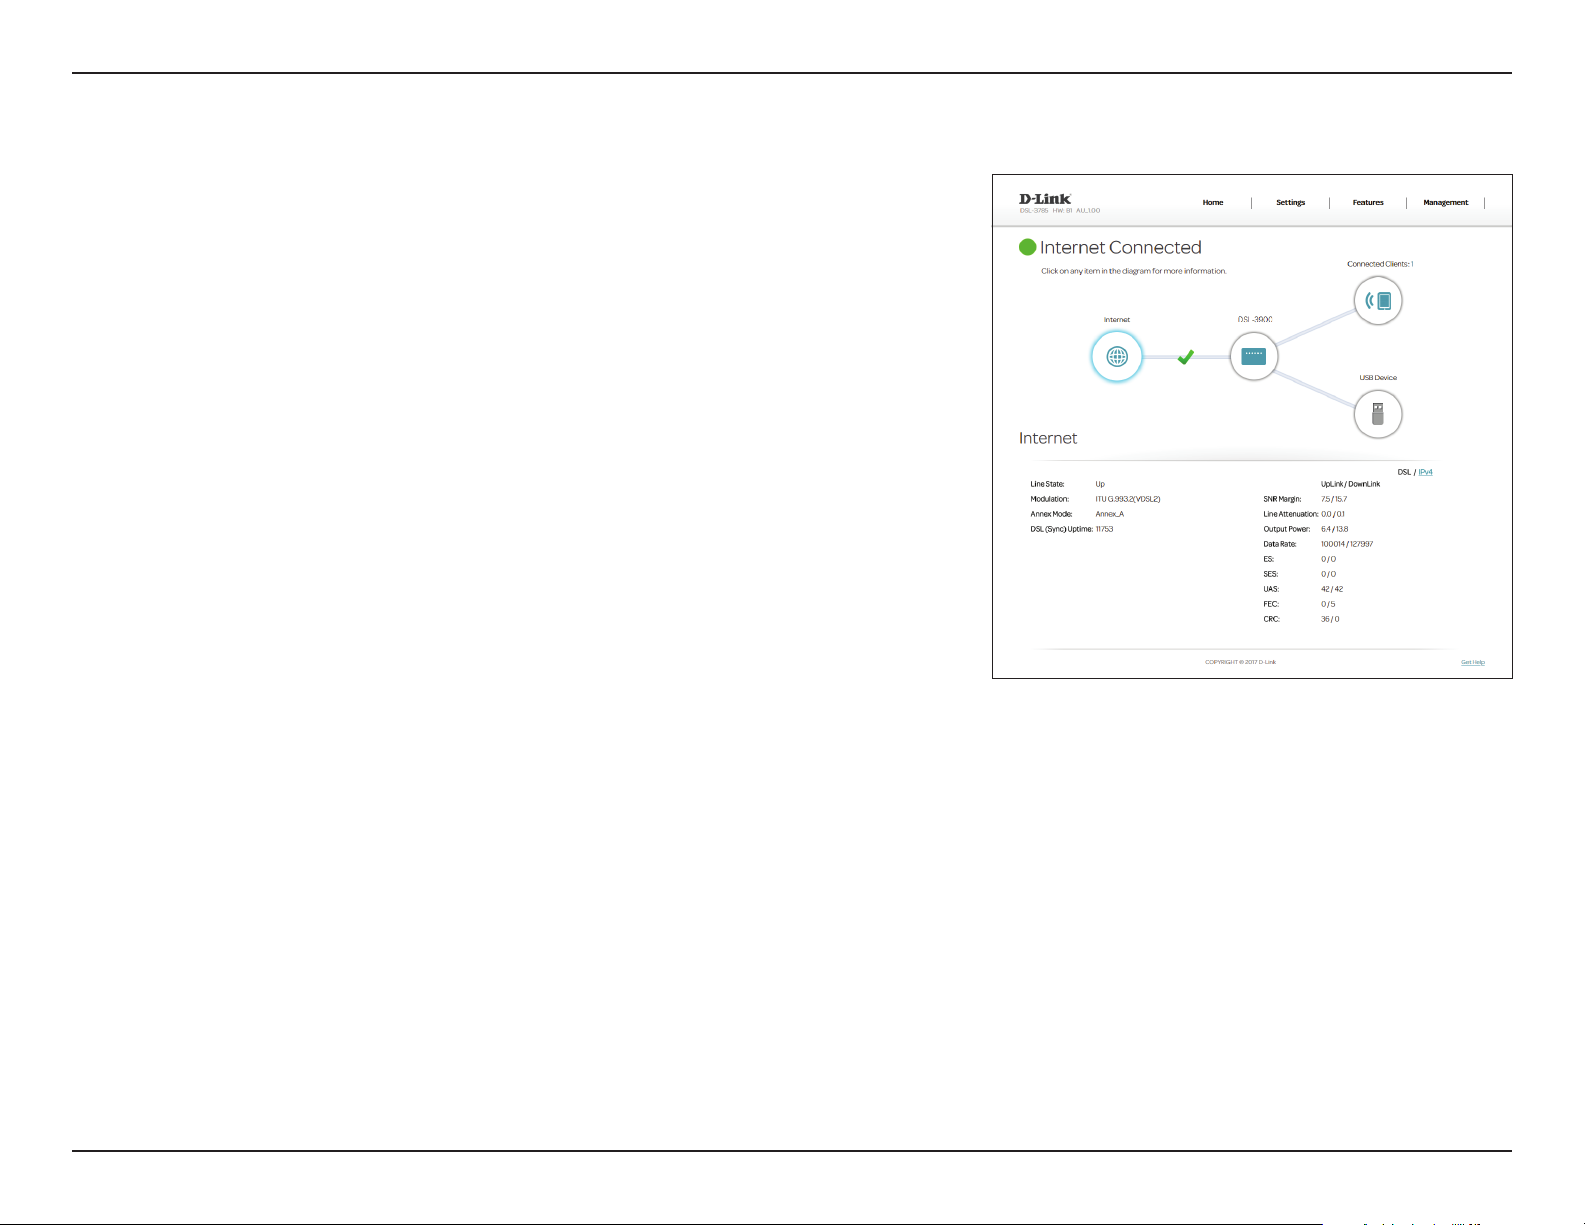
Click the DSL button to see the DSL port connection information. The DSL tab
displays information regarding the DSL data connection.
DSL
Line State: Displays the current status of the data link connection to your ISP.
Modulation: Displays the current DSL standard in use.
Annex Mode: Displays the current Annex mode in use.
DSL (Sync)
Uptime:
SNR Margin: Displays the Signal-to-noise margin.
Line Attenuation: Displays the current signal attenuation.
Output Power: Displays the output power of the DSL modem.
ES, SES, UAS, FEC,
CRC:
Displays the DSL connection uptime.
These error correction counts are used for diagnostic purposes. If
you are having trouble with your ISP, these values may provide useful
information for technicians.
23D-Link DSL-3900 User Manual
Page 28
Section 4 - Conguration
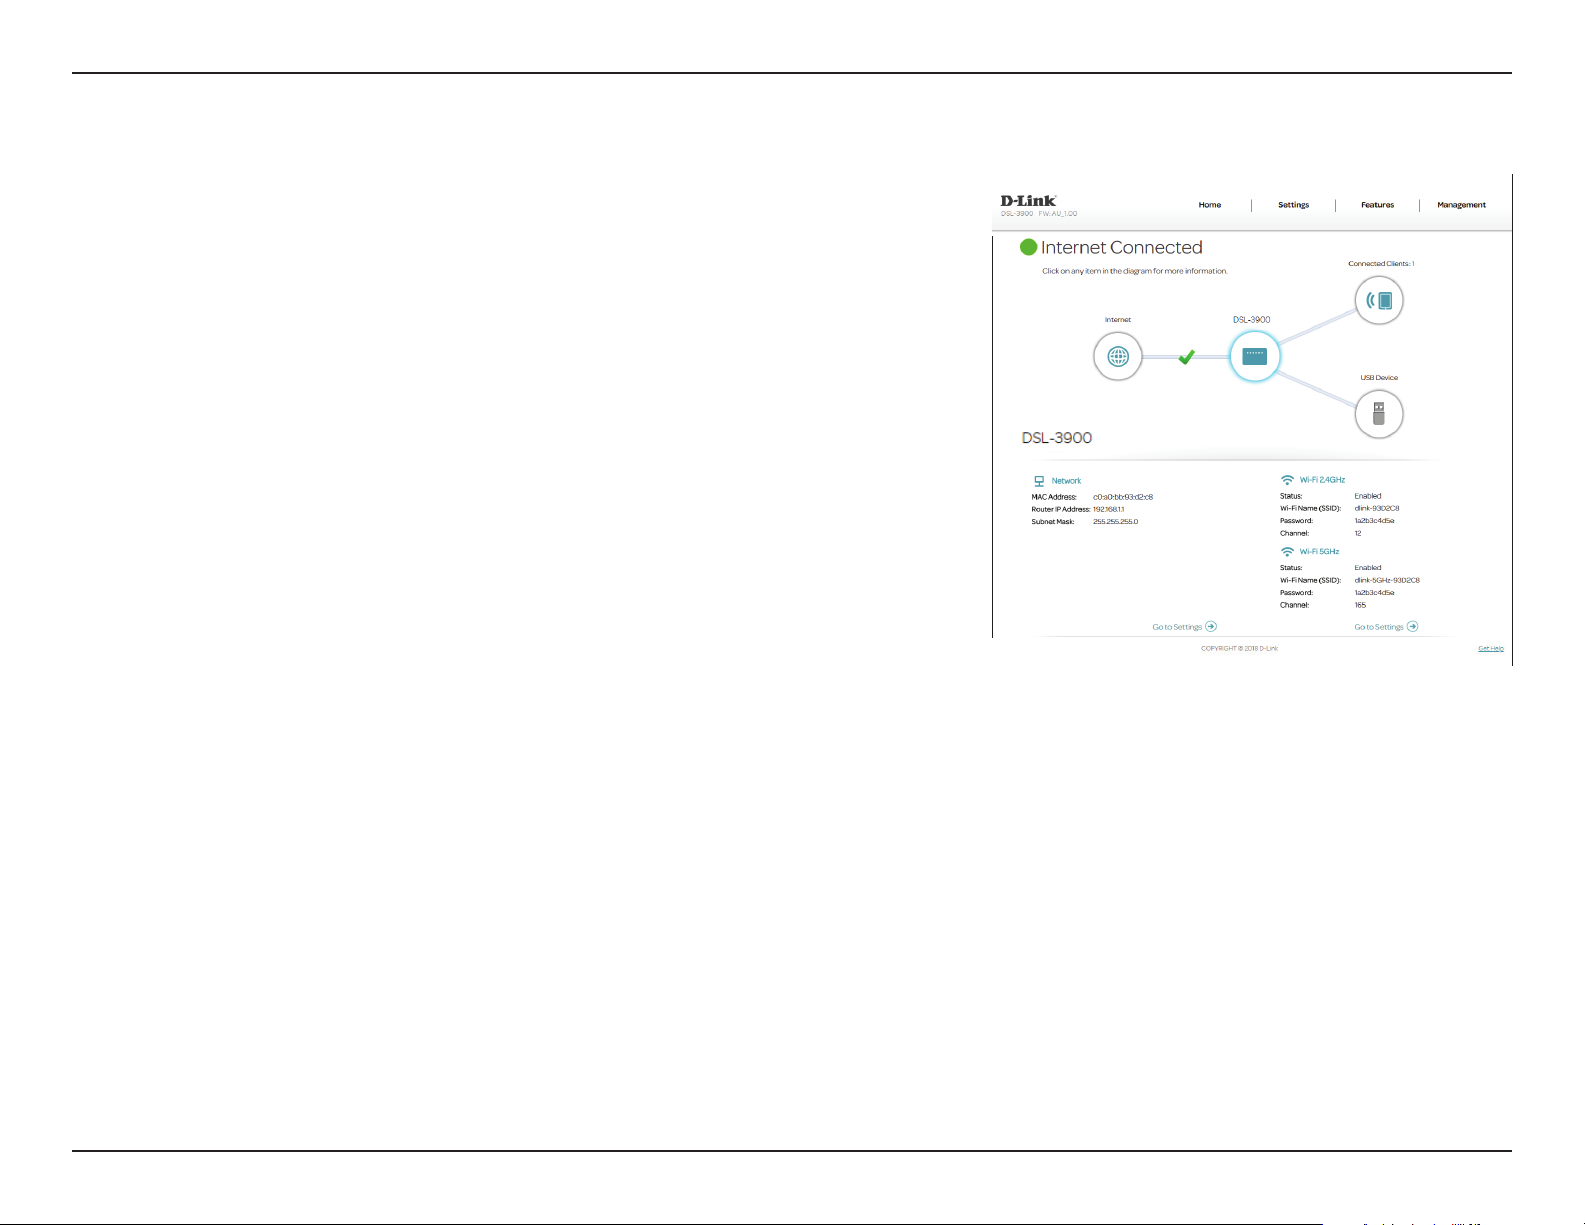
DSL-3900
Click on the DSL-3900 icon to view details about the router and its wireless
settings.
Here you can see the router’s current wireless networks and passwords, as well
as the local area network MAC and IPv4 addresses.
To recongure the network settings, click the Go to settings link, from the
Settings menu at the top of the page, select Network. Refer to page Network
on page 46 for more information.
To recongure the wireless settings, click the Go to settings link, from the
Settings menu at the top of the page, select Wireless. Refer to Wireless on
page 39 for more information.
24D-Link DSL-3900 User Manual
Page 29
Section 4 - Conguration
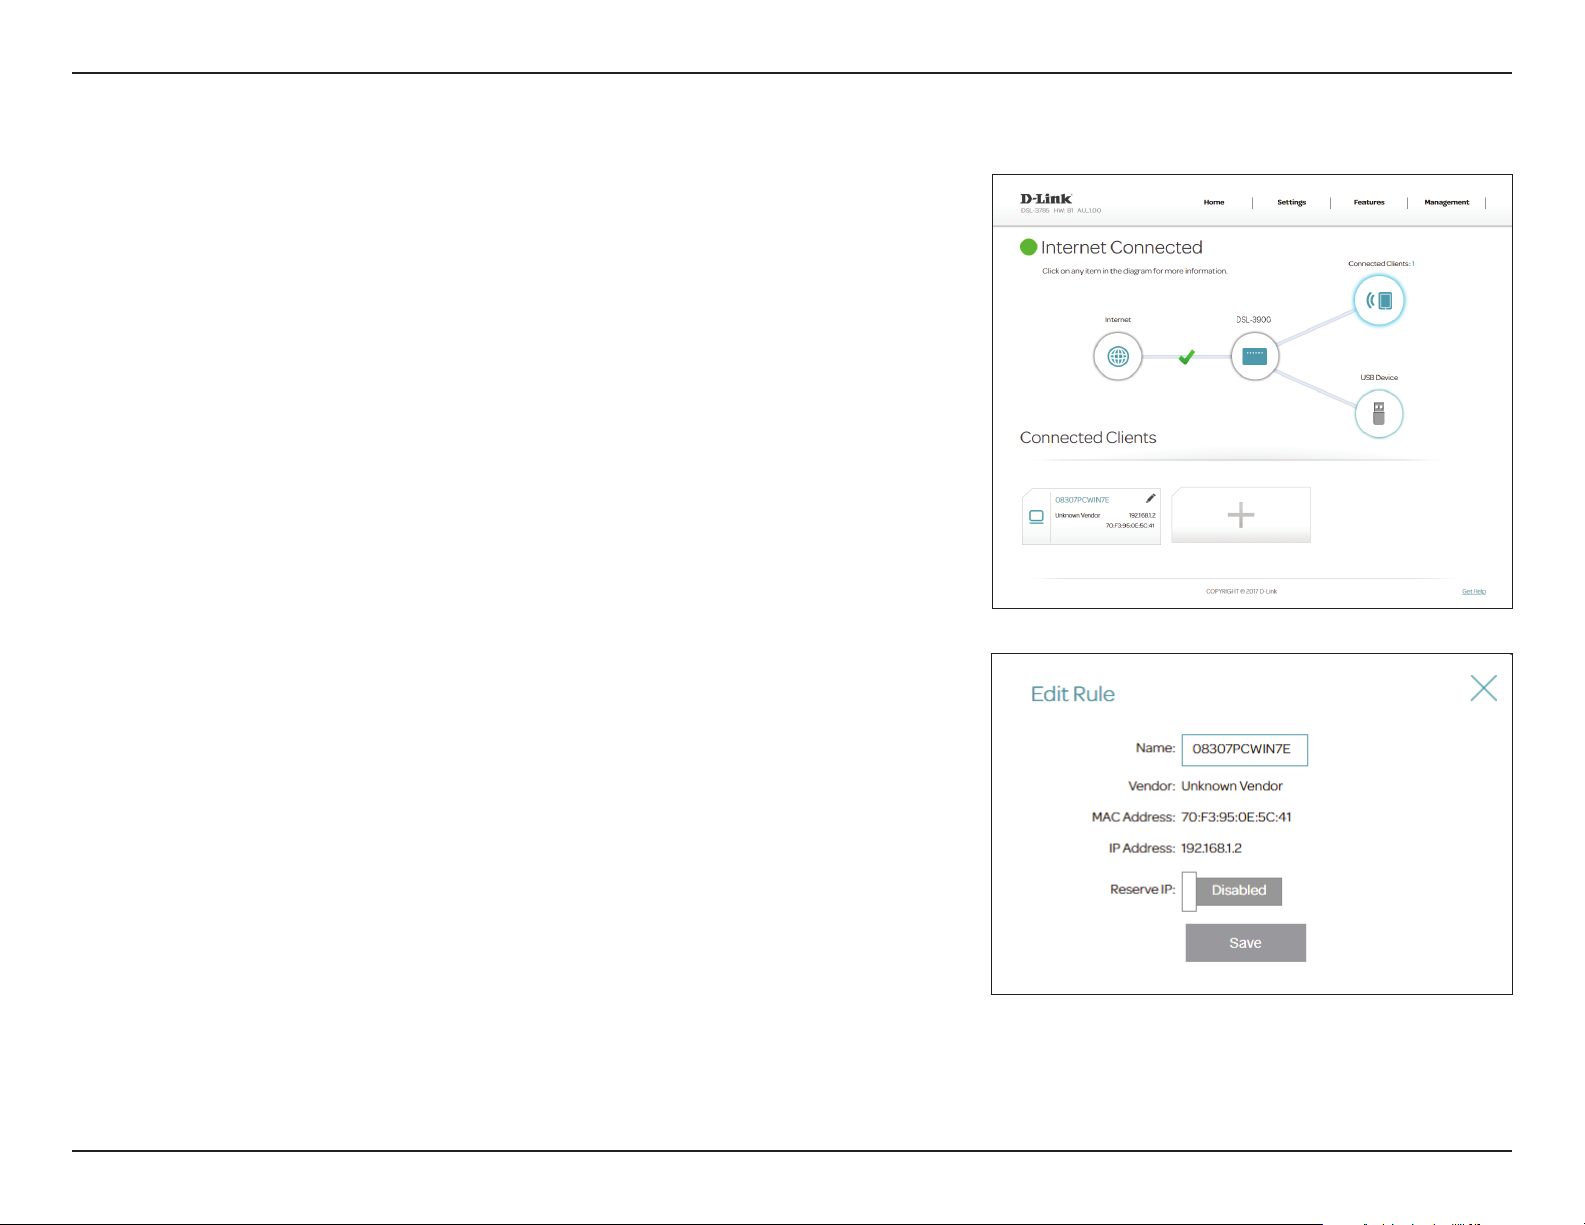
Connected Clients
Click on the Connected Clients icon to view details about the clients currently
connected to the router and their IP addresses.
To edit each client’s settings, click the pencil icon on the client you want to
edit.
Edit Rule
Name: Enter a custom name for this client.
Vendor: Displays the vendor of the device.
MAC Address: Displays the MAC address of the device.
IP Address: Enter a specic IP address for this client if Reserve IP is enabled.
Reserve IP: Enable to reserve this IP address for this client.
Click Save when you are done.
25D-Link DSL-3900 User Manual
Page 30
Section 4 - Conguration
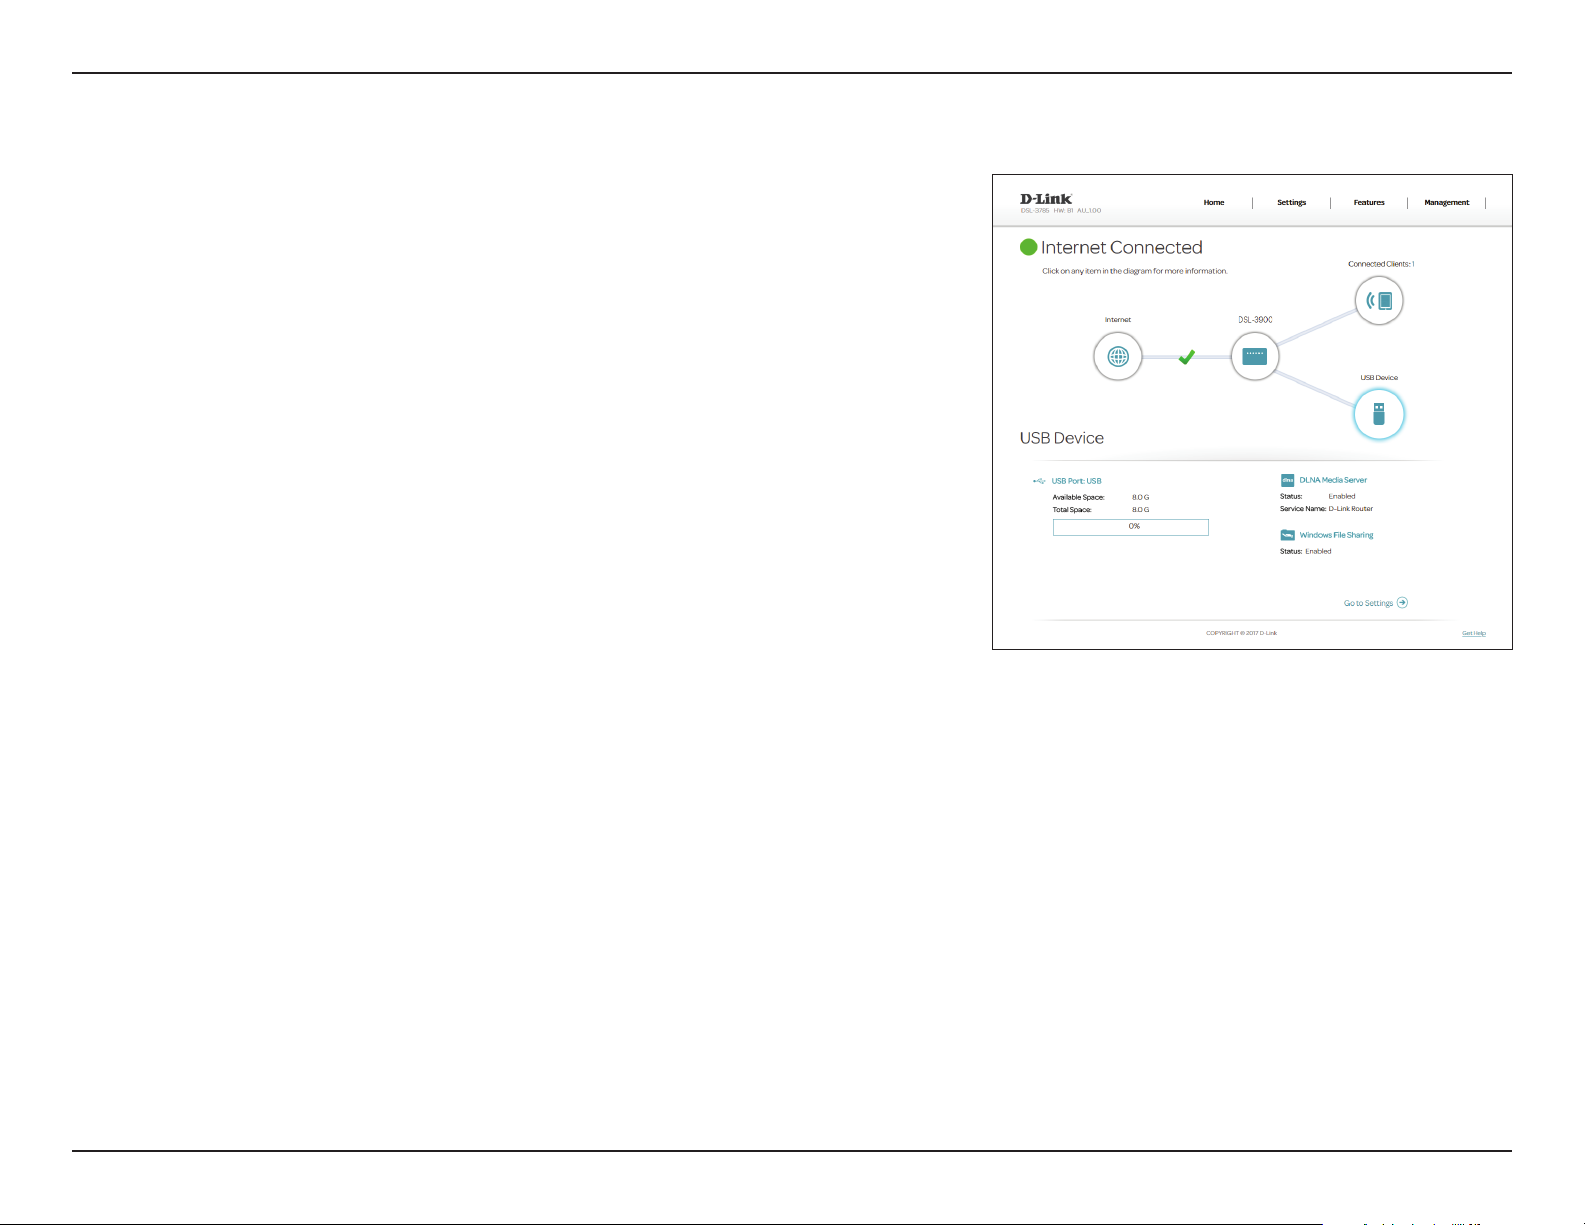
USB Device
Click on the USB Device icon to view details about the currently connected
USB device, DLNA Media Server, SharePort, and Windows File Sharing settings.
If you have a USB device connected, you can see its name and how much free
space it has.
To congure your USB settings, click Go to settings and refer to page USB
Device on page 26 for more information.
For information on how to access your USB drive from a Windows-based PC
refer to Connect and Share a USB Storage Device on page 73.
26D-Link DSL-3900 User Manual
Page 31
Section 4 - Conguration
Settings
Wizard
To access the Setup Wizard page, click Wizard from the Settings menu on the bar on the top of the page. This is the same
wizard that appears when you start the router for the rst time. Refer to Setup Wizard on page 13 for more information.
Internet
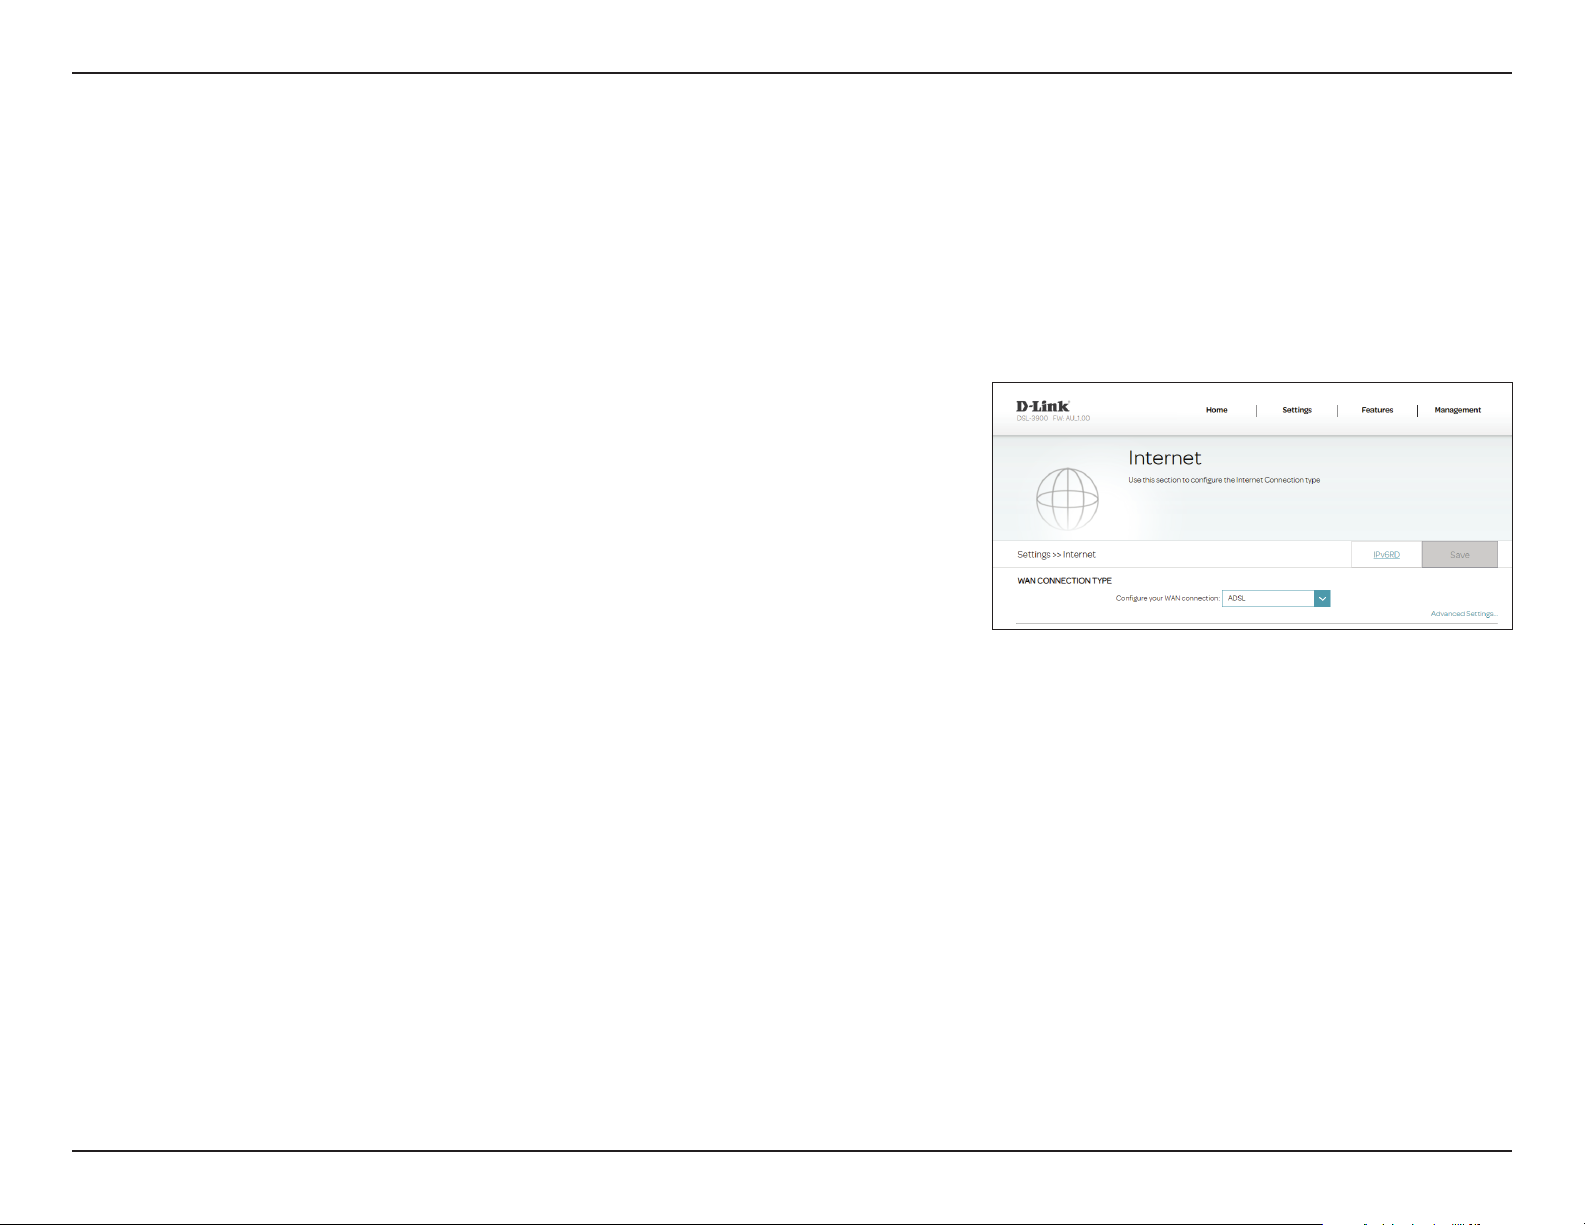
The following pages will describe how to manually congure how your
DSL-3900 connects to the Internet. To access this page, click Internet from the
Settings menu on the bar on the top of the page. The DSL-3900 supports
multiple WAN connection types and WAN failover. We recommend setting up
Internet WAN connections one at a time, Save the conguration, and conrm
the connection works before returning to this section to add additional WAN
connections.
The following conguration pages are divided by WAN Access Type.
WAN CONNECTION TYPE
Congure your
WAN Connection:
Select a WAN Connection and refer to its conguration page for setup
information.
For ADSL, refer to ADSL on page 28.
For VDSL, refer to VDSL on page 30.
For Ethernet, refer to Ethernet on page 31.
Auto refers to the Internet connection congured by the Setup Wizard.
Select WAN interface to congure. The options are Auto, ADSL, VDSL,
or Ethernet.
27D-Link DSL-3900 User Manual
Page 32
Section 4 - Conguration
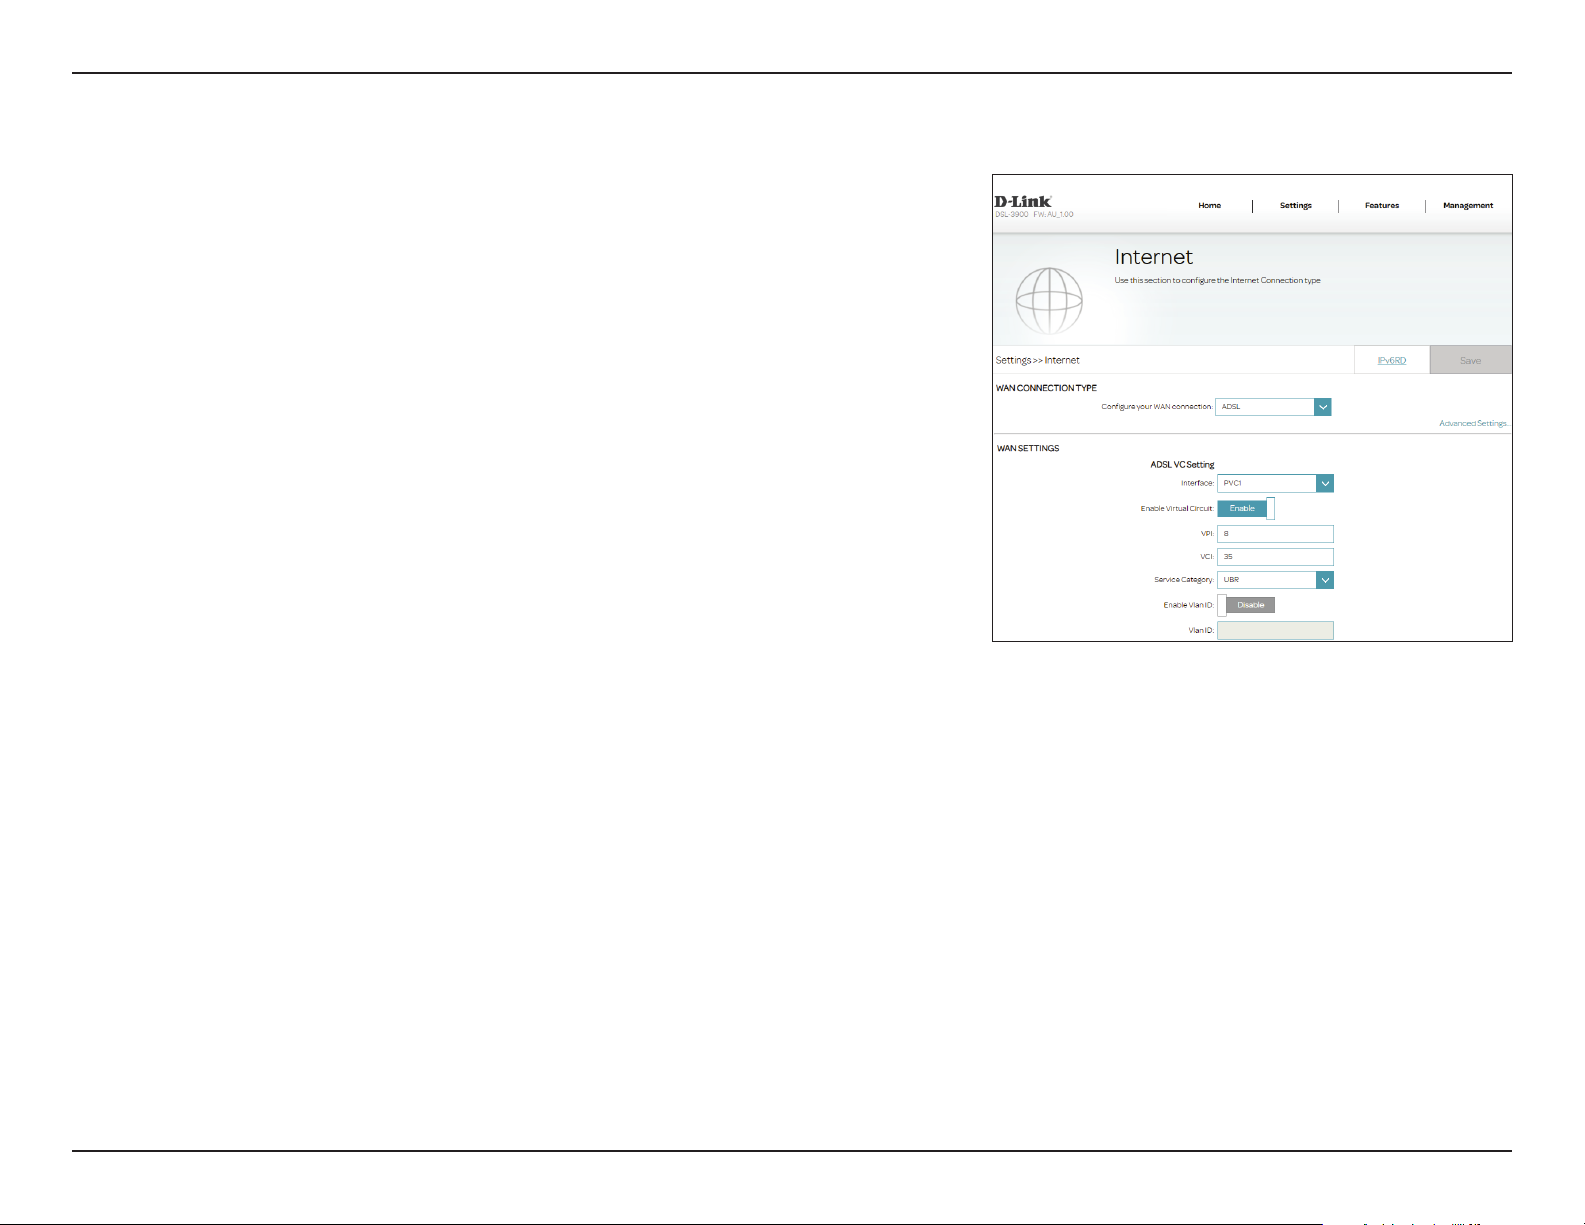
ADSL
ADSL is one of the rst home broadband technologies introduced. ADSL uses
the DSL port on your DSL-3900 to connect to the Internet. In order for your
DSL-3900 to use ADSL, you must congure the WAN Connection Type and
your WAN Settings.
WAN Connection Type
Congure your
WAN connection:
Select ADSL to congure ADSL connection settings.
ADSL VC Setting
Interface: Select the interface from the drop-down menu.
Enable Virtual
Circuit:
If you Enabled the selected interface, the following options are available:
Service Category: Select the type of ATM trac contract, UBR, CBR, NRT-VBR, or RT-
If you selected UBR, CBR, NRT-VBR, or RT-VBR. the following option is available:
Select whether to enable or disable this Virtual Circuit.
VPI: Enter the Virtual Path Indicator (0 - 255).
VCI: Enter the Virtual Channel Indicator (32 - 65535).
VBR.
Vlan ID: Enter the VLAN ID. Enter a value from 10 - 4096. The default value is
835.
28D-Link DSL-3900 User Manual
Page 33
Section 4 - Conguration
ADSL (continued)
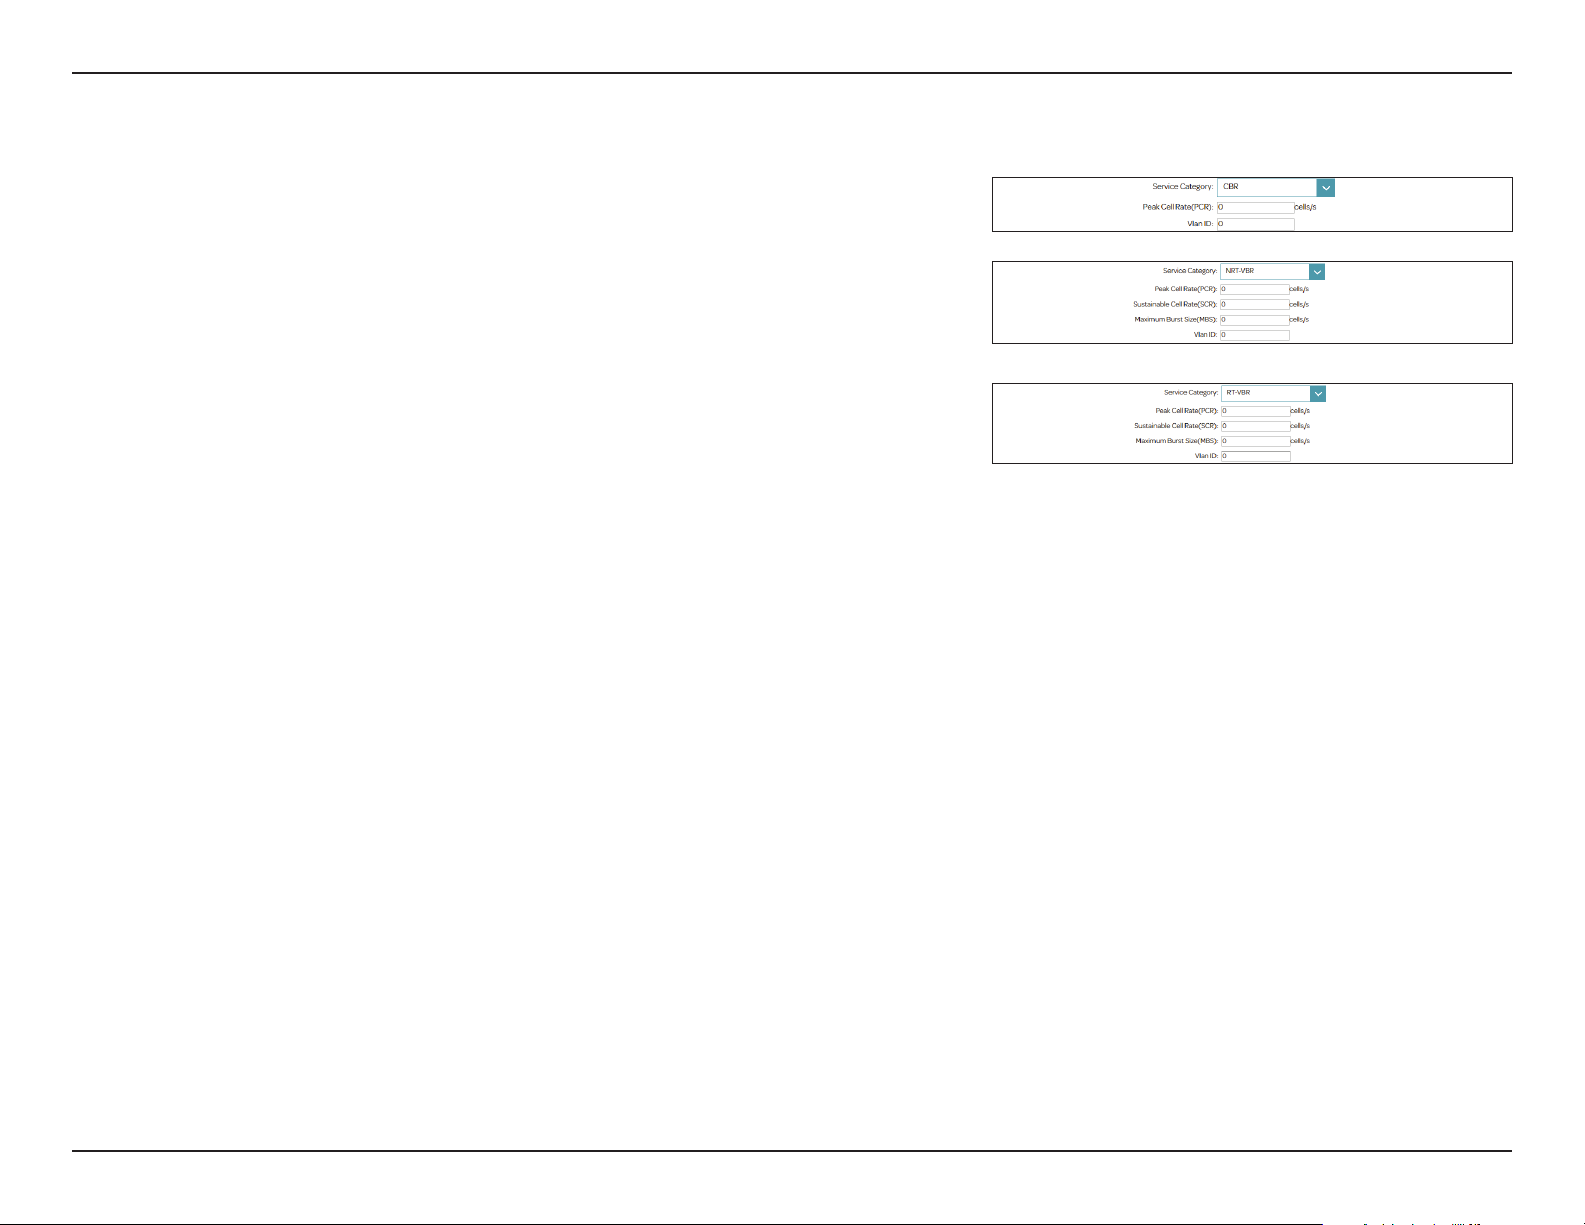
If you selected CBR, NRT-VBR, or RT-VBR, the additional following options are available:
Peak Cell Rate
(PCR):
If you selected NRT-VBR or RT-VBR, the additional following options are available:
Sustainable Cell
Rate(SCR):
Maximum Burst
Size(MB/s):
Enter the Peak Cell Rate in cells per second.
Enter the Sustainable Cell Rate in cells per second.
Enter the Maximum Burst Size in MB per second.
To set your IPv4 connection parameters of WAN Settings, refer to WAN
Settings on page 32.
29D-Link DSL-3900 User Manual
Page 34
Section 4 - Conguration
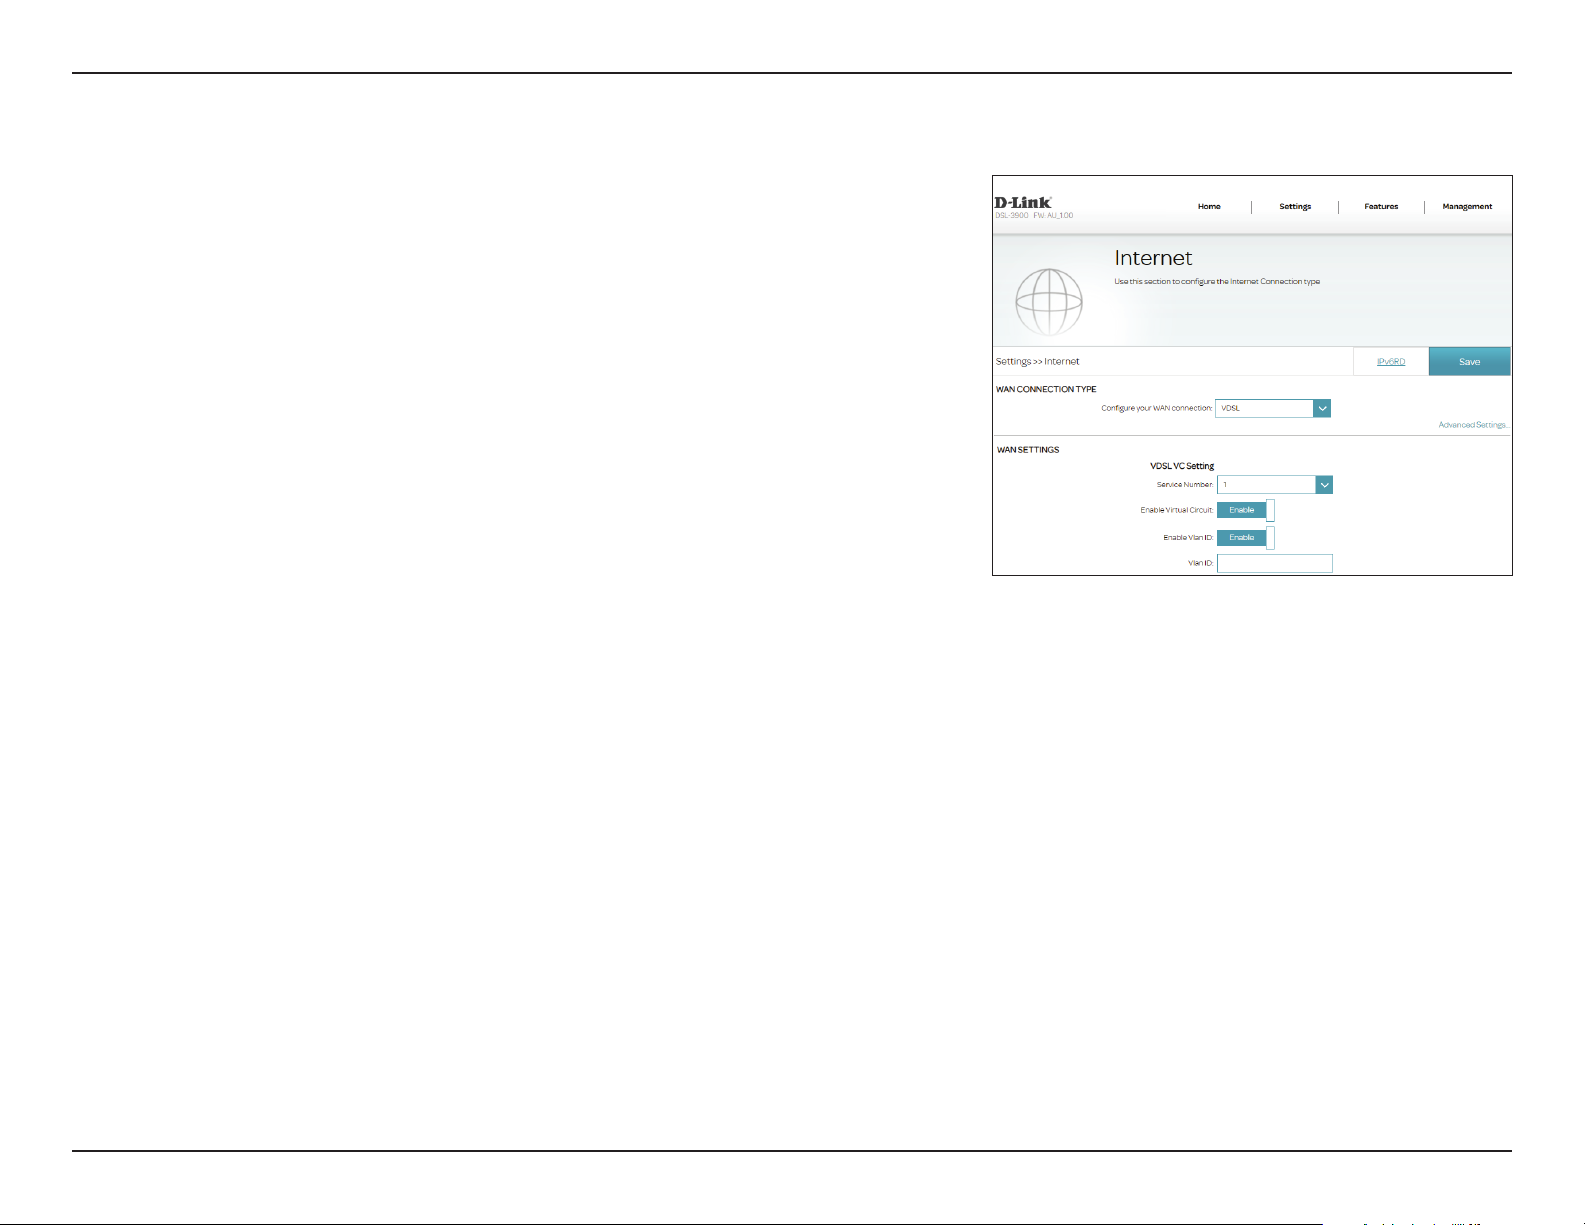
VDSL
VDSL is one of the latest and fastest home broadband technologies. VDSL uses
the DSL port on your DSL-3900 to connect to the Internet. In order for your
DSL-3900 to use VDSL, you must congure the ATM VC Settings and your WAN
Settings.
Congure your
WAN connection:
If you click on Advanced Settings, the following WAN Settings are available:
Select VDSL to congure ADSL connection settings.
VDSL VC Setting
Service Number: Select the service number from the drop-down menu. If no service
has previously been added, or you wish to add a new one, select Add.
Enable Virtual
Circuit:
Enable Vlan ID: Select whether to enable or disable this Vlan ID.
Vlan ID: Enter the VLAN ID. Enter a value from 10 - 4096. The default value is
Select whether to enable or disable this Virtual Circuit.
835.
To set your IPv4 connection parameters of WAN Settings, refer to WAN
Settings on page 32.
30D-Link DSL-3900 User Manual
Page 35
Section 4 - Conguration
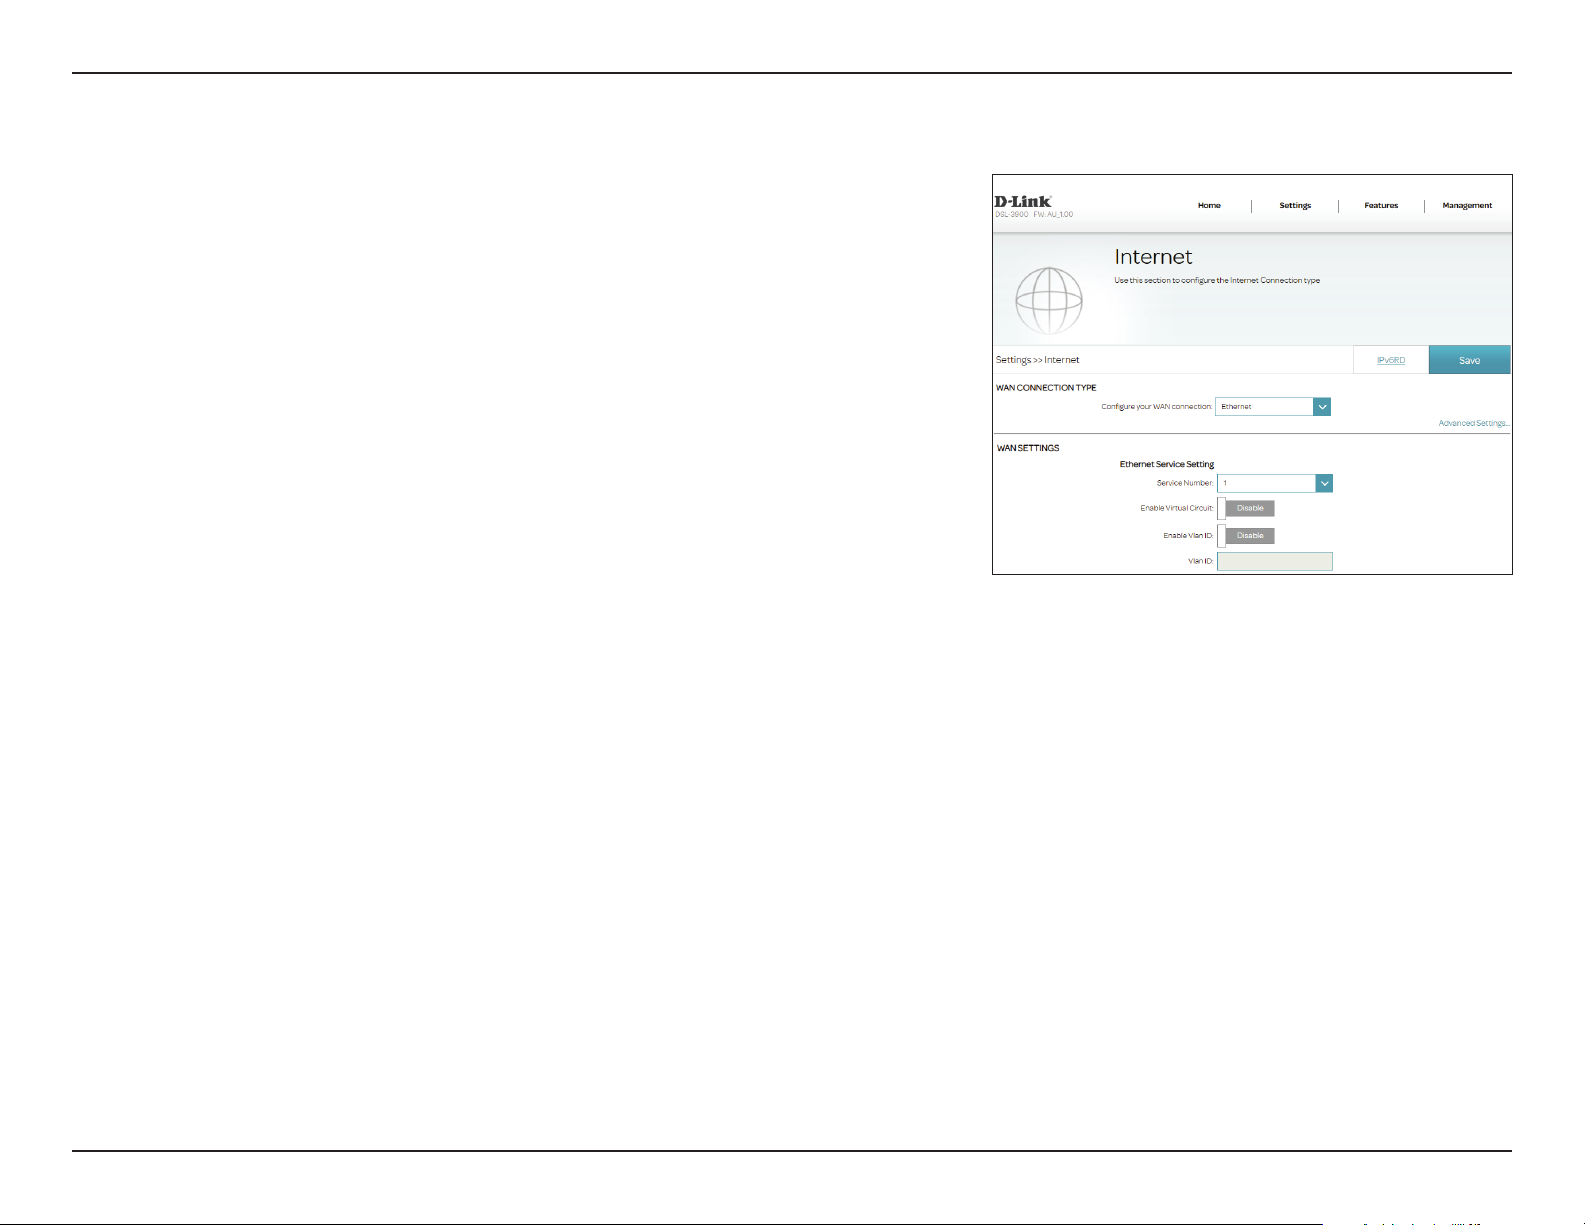
Ethernet
Your DSL-3900 is equipped with a multi-purpose Gigabit Ethernet LAN/WAN port which
can be used to connect to the Internet. This port may be used to connect to other Ethernet
based networks. In order for your DSL-3900 to use Ethernet, you must congure the Ethernet
Settings and your WAN Settings.
Congure your
WAN connection:
Select Ethernet to congure Ethernet connection settings.
WAN Settings
Service Number: Select a service number from the drop-down menu, or to create a
new service number, click Add.
Enable Virtual
Circuit
Enable Vlan ID Enable or disable Vlan ID.
VLAN ID: Enter the VLAN ID. The value should be 0, or 0-4079.
Proceed to IPv4 Settings on page 32 or IPv6 Settings on page 83.
Enable or disable virtual circuit, also referred to as VLAN tagging.
31D-Link DSL-3900 User Manual
Page 36
Section 4 - Conguration
WAN Settings
From this page you can congure your WAN settings. To access this page, click Internet from the Settings menu on the bar on
the top of the page. Then click Advanced Settings... on the right side, then scroll down to WAN Settings
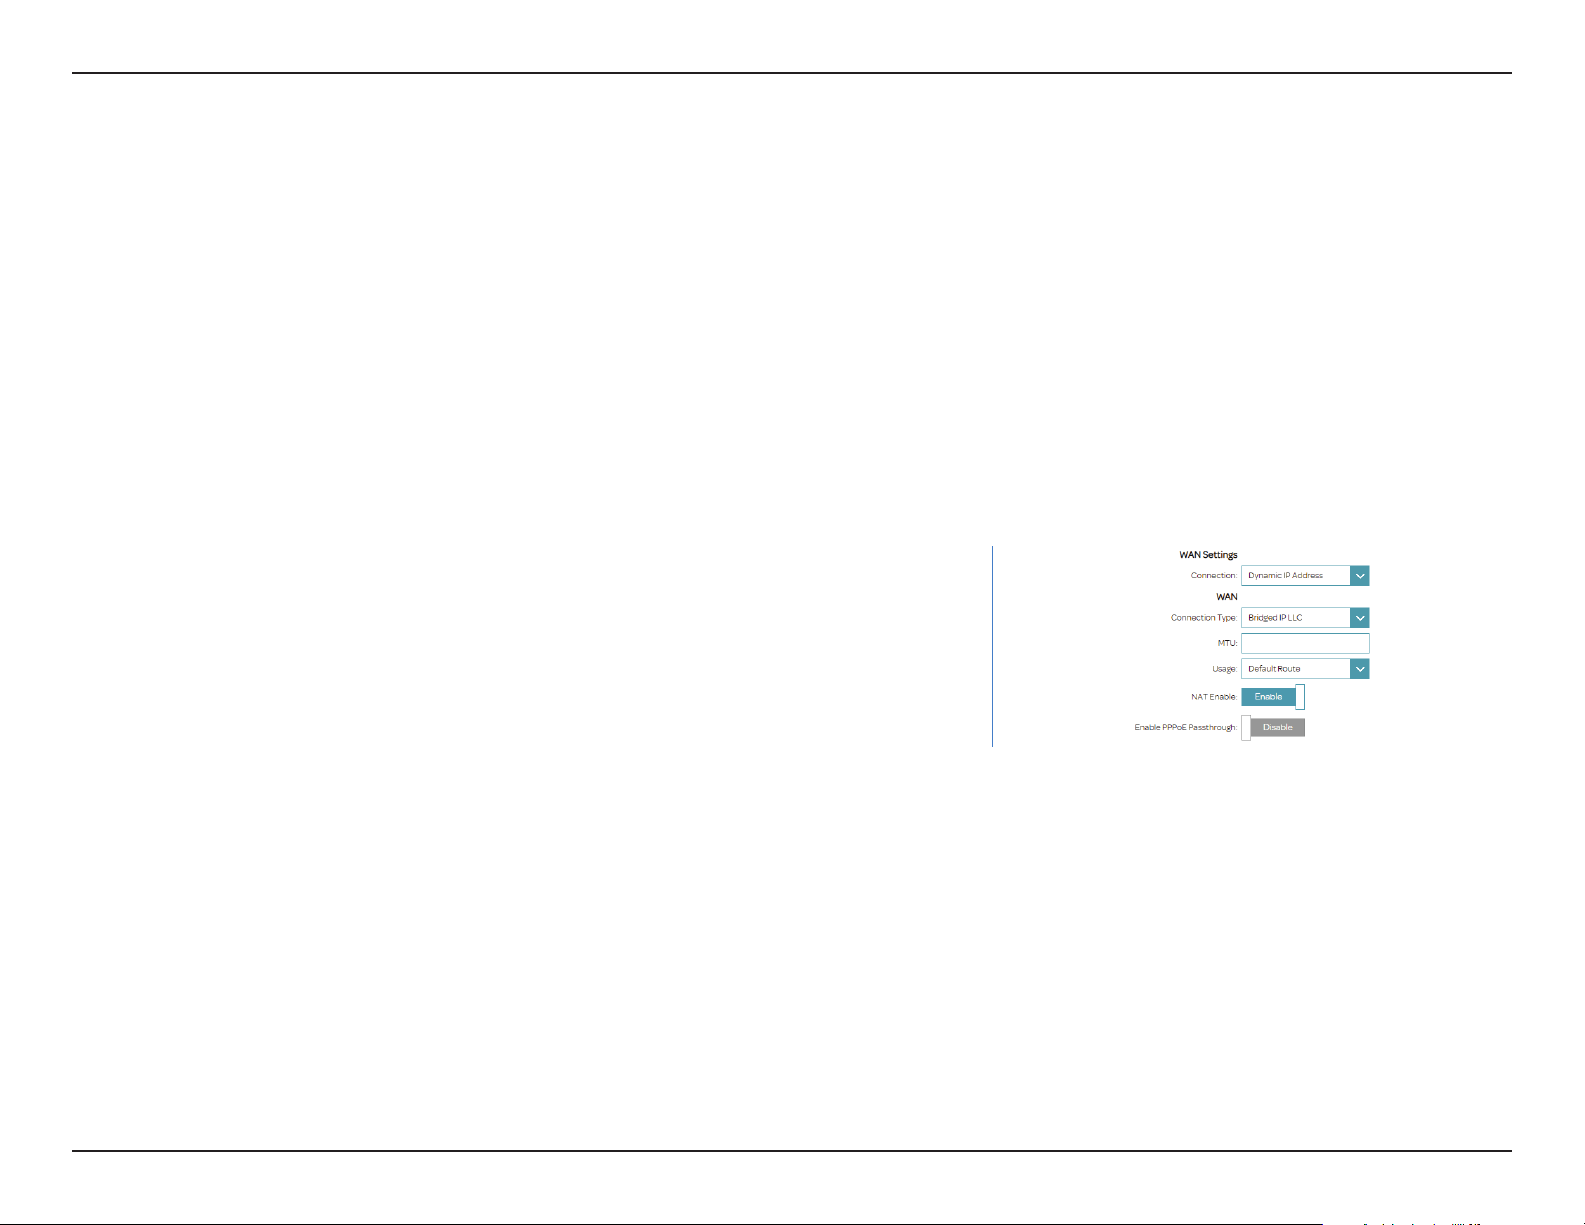
Dynamic IP (DHCP)
Select Dynamic IP Address (DHCP) to obtain an IP address automatically
from your ISP. Select this option if your ISP does not provide you with a specic
IP address.
WAN Settings
Connection: Select Dynamic IP Address (DHCP).
Connection Type: Select Bridged IP LLC, Bridged IP VC-MUX, Routed IP LLC, or Routed
IP VC-Mux.
MTU: Maximum Transmission Unit - you may need to change the MTU for
optimal performance with your ISP.
NAT Enable Enable or disable NAT.
Enable PPPoE
Passthrough
Enable or disable PPPoE Passthrough.
Click Save when you are done.
32D-Link DSL-3900 User Manual
Page 37
Section 4 - Conguration
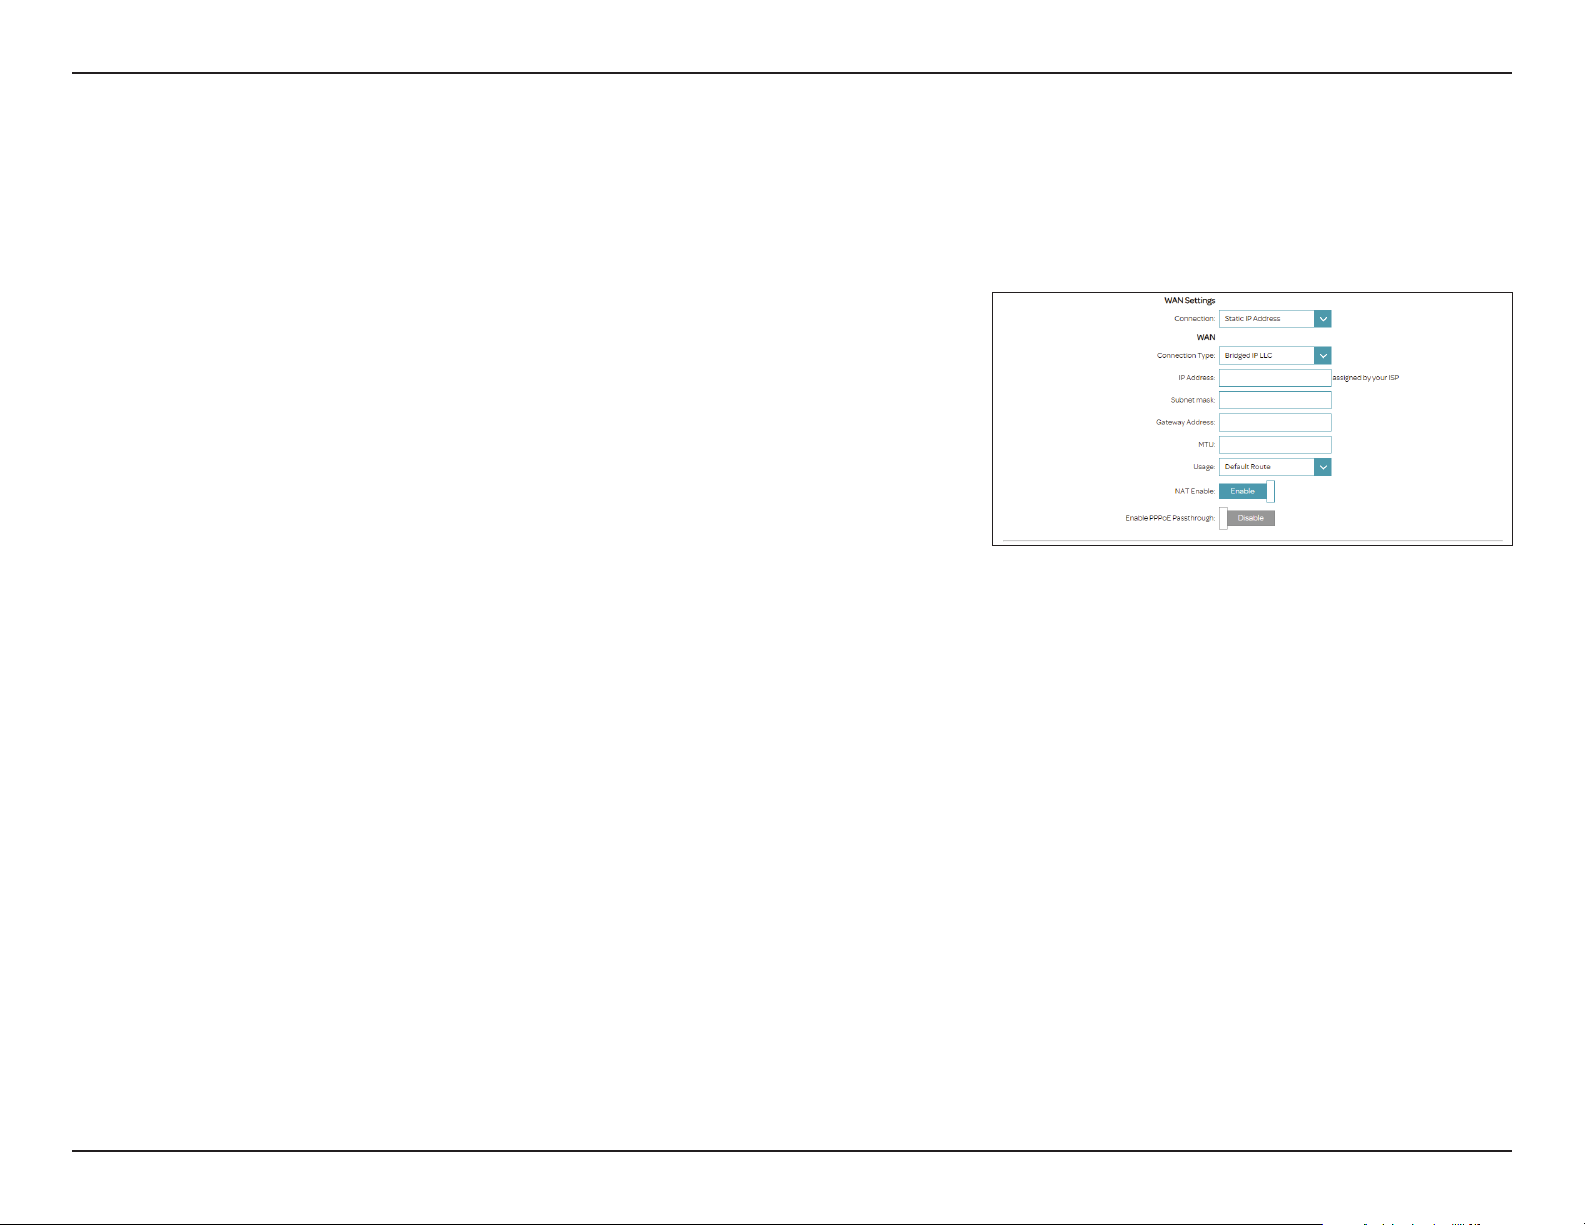
Static IP
Select Static IP if your ISP provides you with a specic IP address.
WAN Settings
Connection: Select Static IP Address.
WAN Service Type: Select a service type from the list. Choose from INTERNET, TR069,
or TR069_INTERNET. This information should be provided by your
ISP. If you are conguring your connection manually and your ISP
has not specied this setting, selecting INTERNET is recommended.
Connection Type: Select Bridged IP LLC, Bridged IP VC-MUX, Routed IP LLC, or Routed
IP VC-Mux.
IP Address: Enter the IP address provided by your ISP.
Subnet Mask: Enter the subnet mask provided by your ISP.
Gateway Address: Enter the default gateway address provided by your ISP.
MTU: Maximum Transmission Unit - you may need to change the MTU for
optimal performance with your ISP.
NAT Enable: Enable or disable Network Address Translation.
Enable PPPoE
Passthrough
Enable or disable PPPoE Passthrough.
Click Save when you are done.
33D-Link DSL-3900 User Manual
Page 38
Section 4 - Conguration
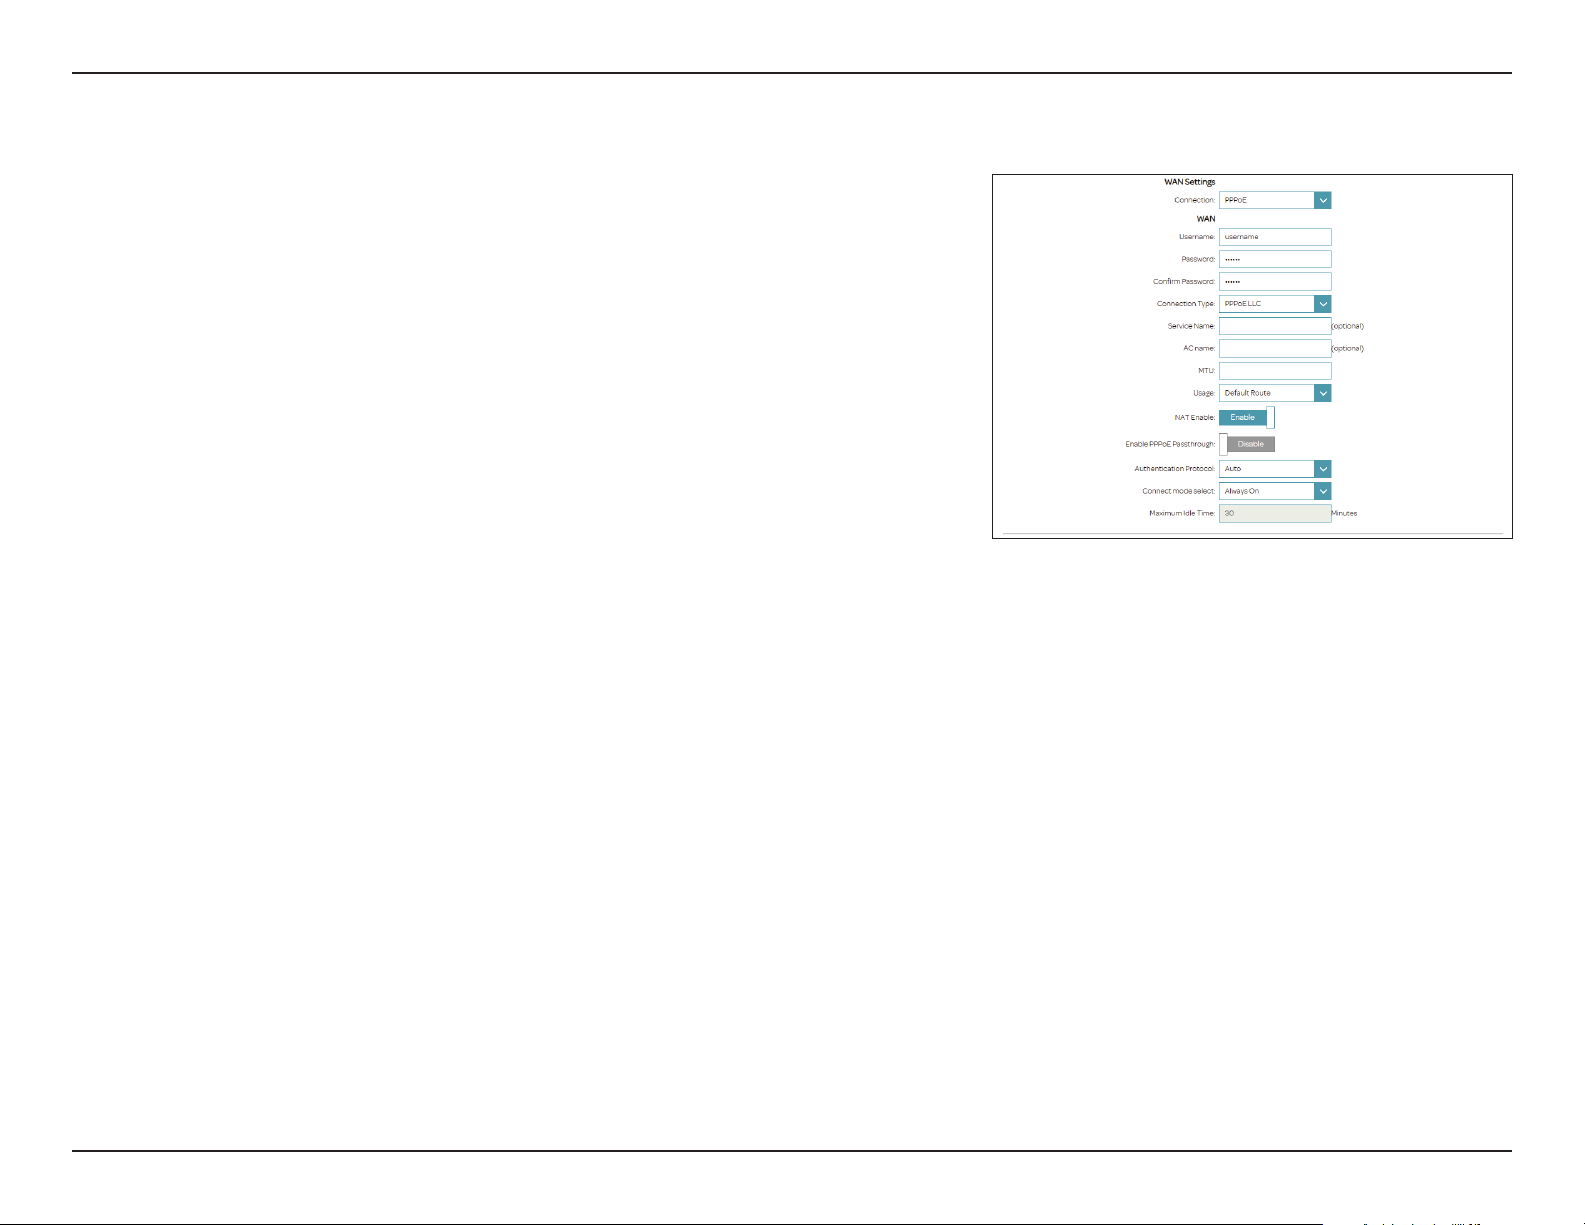
PPPoE
Select PPPoE if your ISP provides and requires you to enter a PPPoE username
and password in order to connect to the Internet.
WAN Settings
Connection: Select PPPoE.
WAN
Username: Enter the username provided by your ISP.
Password: Enter the password provided by your ISP.
Conrm Password: Enter the password provided by your ISP again.
Connection Type: Select PPPoE LLC or PPPoE VC-Mux.
Service Name: optional
AC Name: optional
MTU: Maximum Transmission Unit - you may need to change the MTU for
optimal performance with your ISP.
Usage Select Default Route or None.
NAT Enable: Enable or disable Network Address Translation.
Enable PPPoE
Passthrough
Enable or disable PPPoE Passthrough.
34D-Link DSL-3900 User Manual
Page 39
Section 4 - Conguration
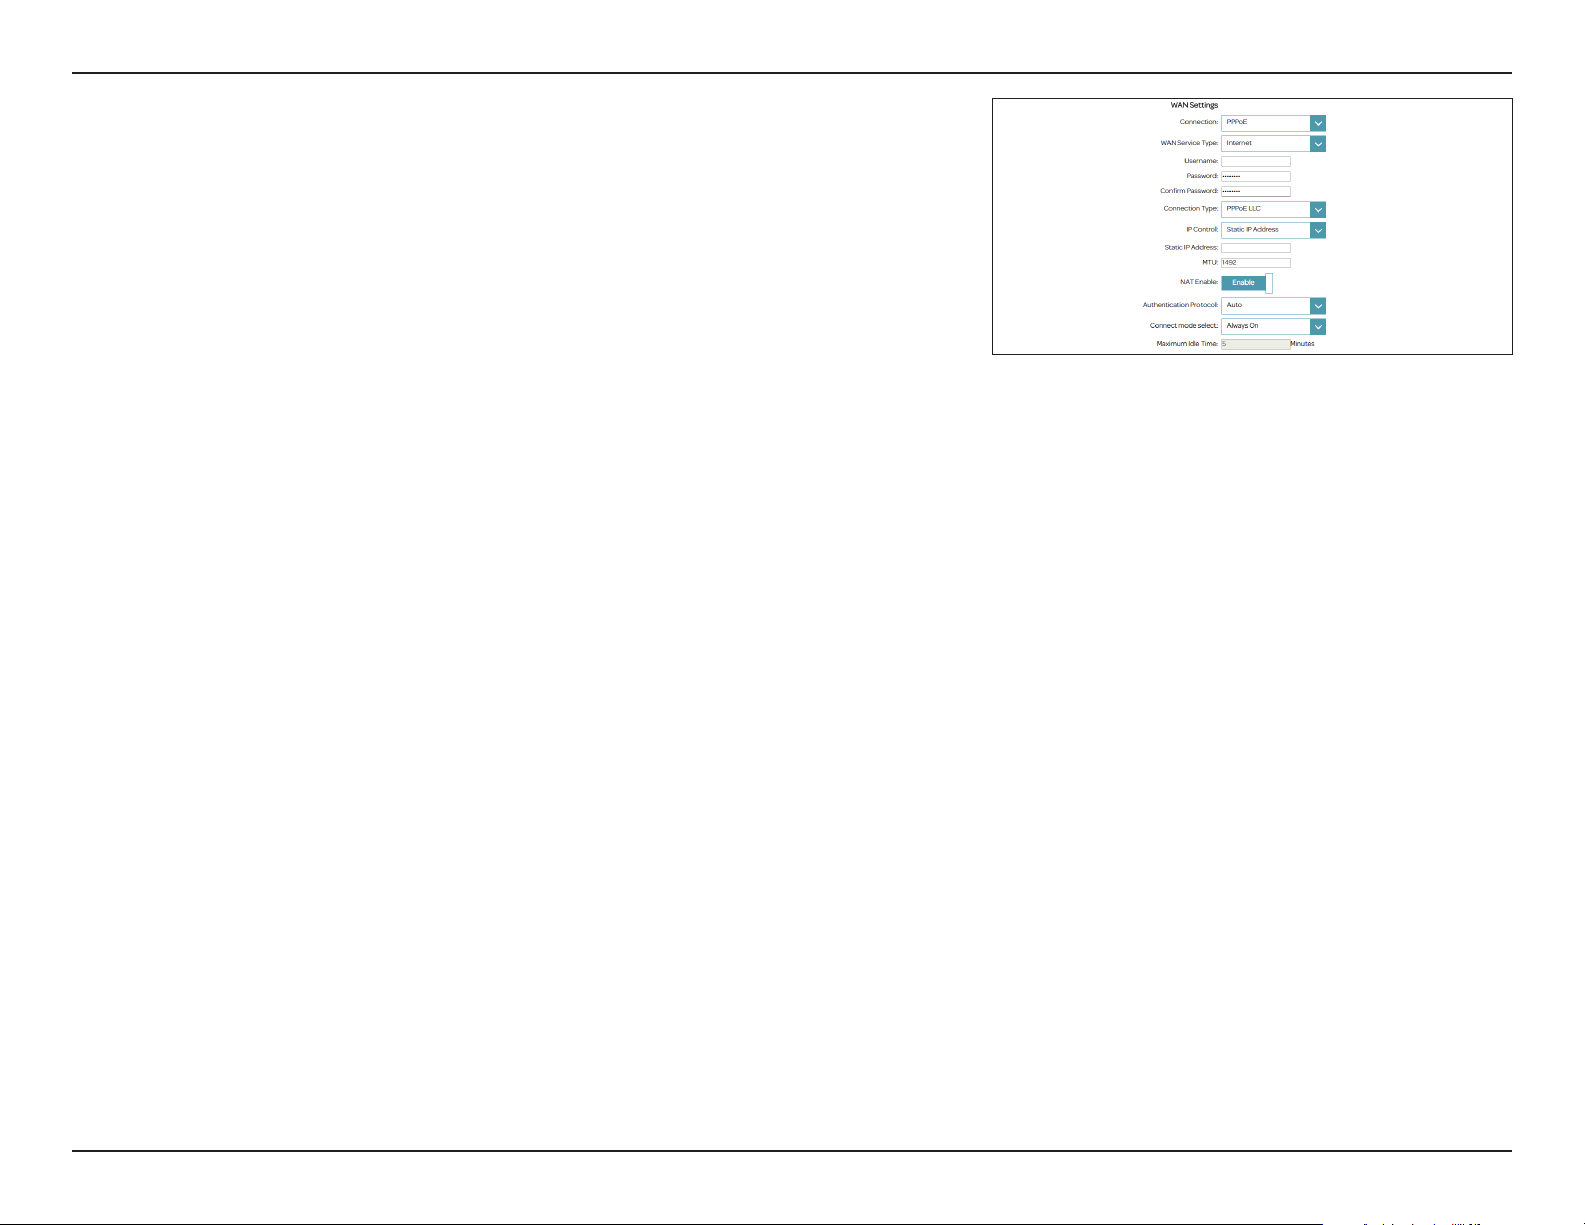
Authentication
Protocol:
Connect mode
select:
If you selected Connect-On-Demand, the following option is available:
Maximum Idle
Time:
Select the authentication protocol your ISP uses. The options are
Auto, PAP, or CHAP.
Set the connection to be Always-on, Connect-On-Demand, or
Manual.
Enter the amount of time the router will maintain the Internet
connection before disconnecting if there is no activity.
Click Save when you are done.
35D-Link DSL-3900 User Manual
Page 40
Section 4 - Conguration
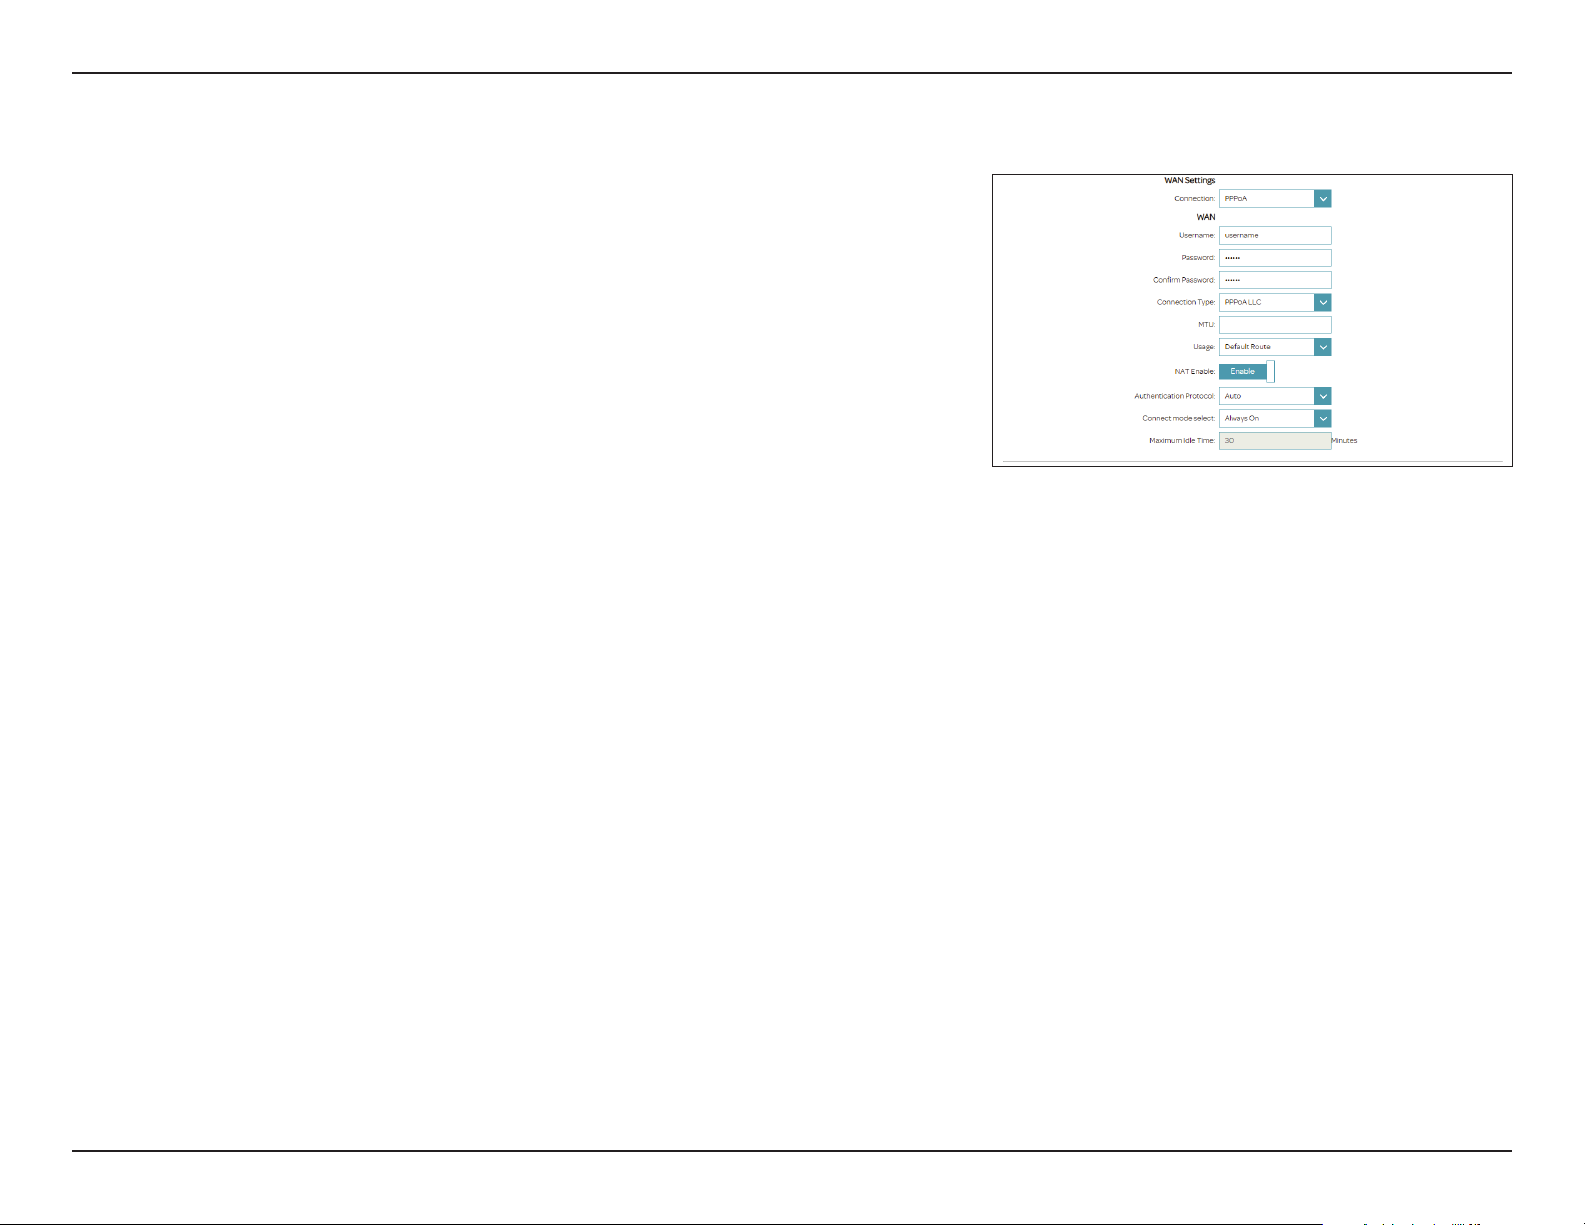
PPPoA
Select PPPoA if your ISP provides and requires you to enter a PPPoA username
and password in order to connect to the Internet. For ADSL connections only.
WAN Settings
Connection: Select PPPoA.
Username: Enter the username provided by your ISP.
Password: Enter the password provided by your ISP.
Conrm Password: Enter the password provided by your ISP again.
Connection Type: Select PPPoA LLC or PPPoA VC-Mux.
MTU: Maximum Transmission Unit - you may need to change the MTU for
optimal performance with your ISP.
Usage Select Default Route or None.
NAT Enable: Enable or disable Network Address Translation.
Authentication
Protocol:
Connect mode
select:
If you selected Connect-On-Demand, the following option is available:
Select the authentication protocol your ISP uses. The options are
Auto, PAP, or CHAP.
Set the connection to be Always-on, Connect-On-Demand, or
Manual.
36D-Link DSL-3900 User Manual
Page 41
Section 4 - Conguration
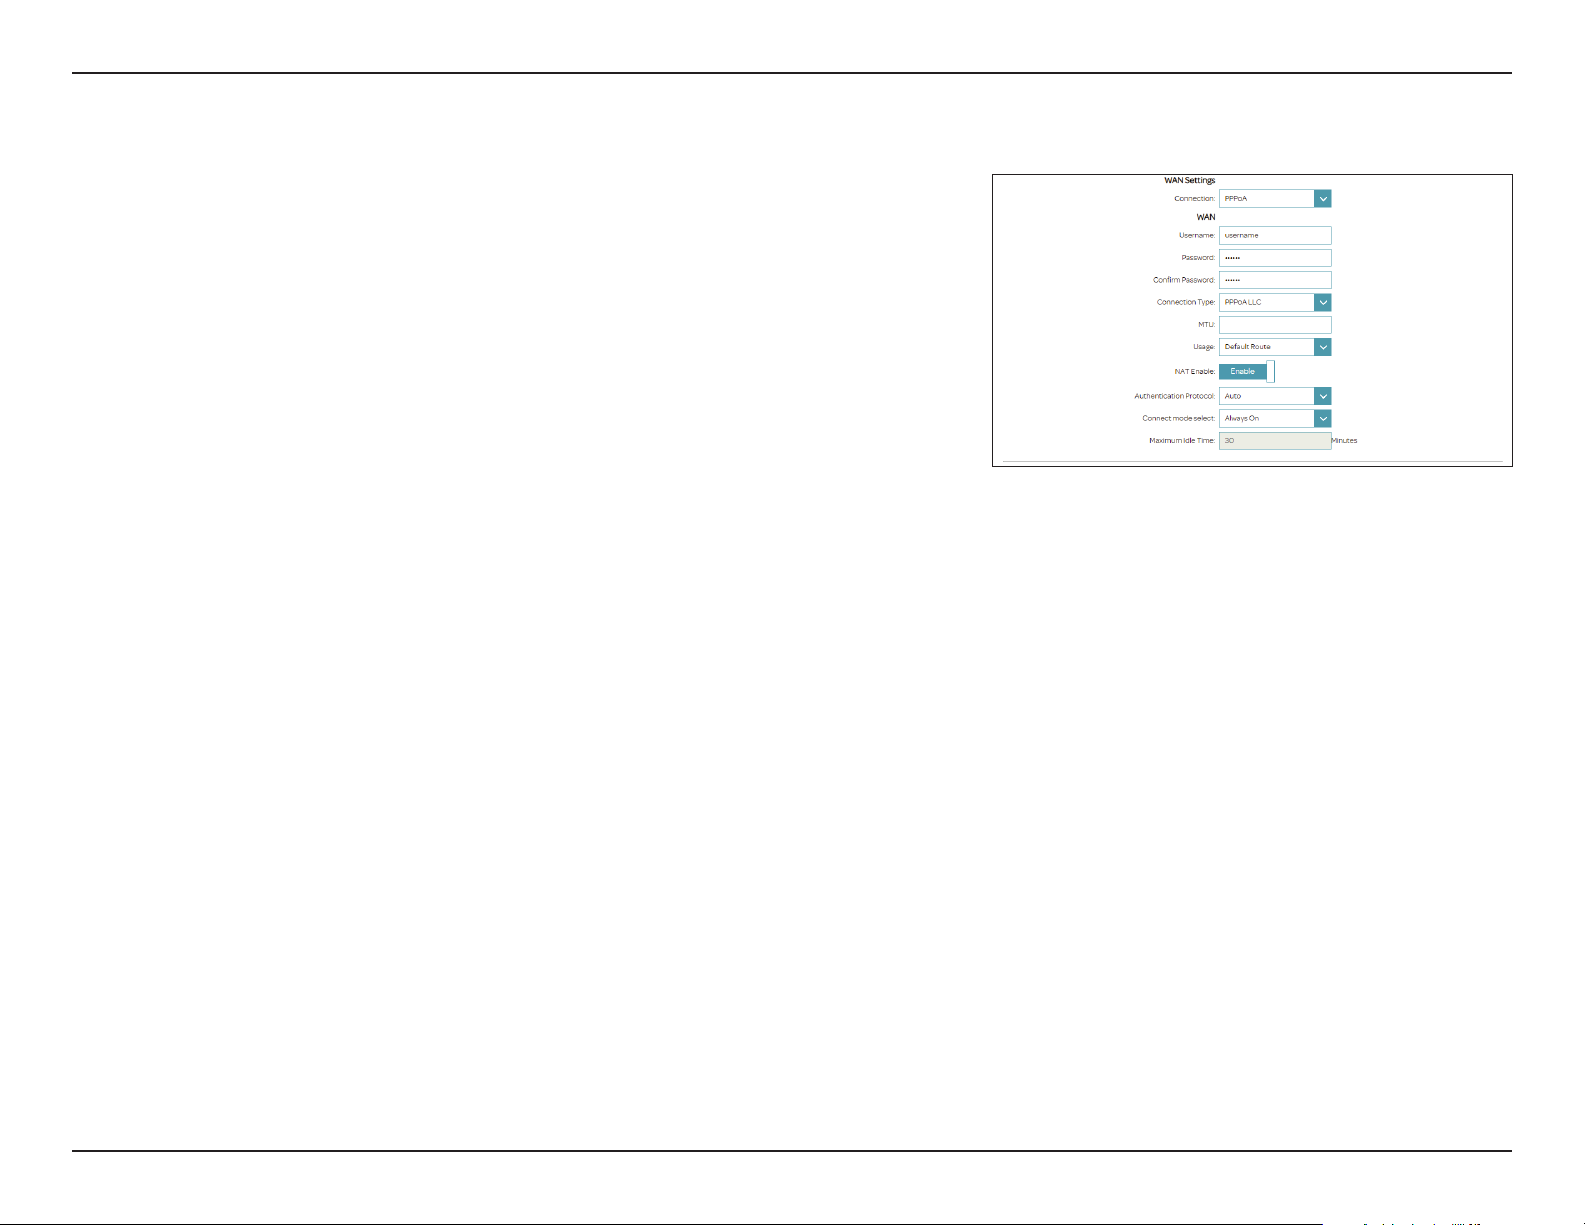
Maximum Idle
Time:
Enter the amount of time the router will maintain the Internet
connection before disconnecting if there is no activity.
Click Save when you are done.
37D-Link DSL-3900 User Manual
Page 42
Section 4 - Conguration
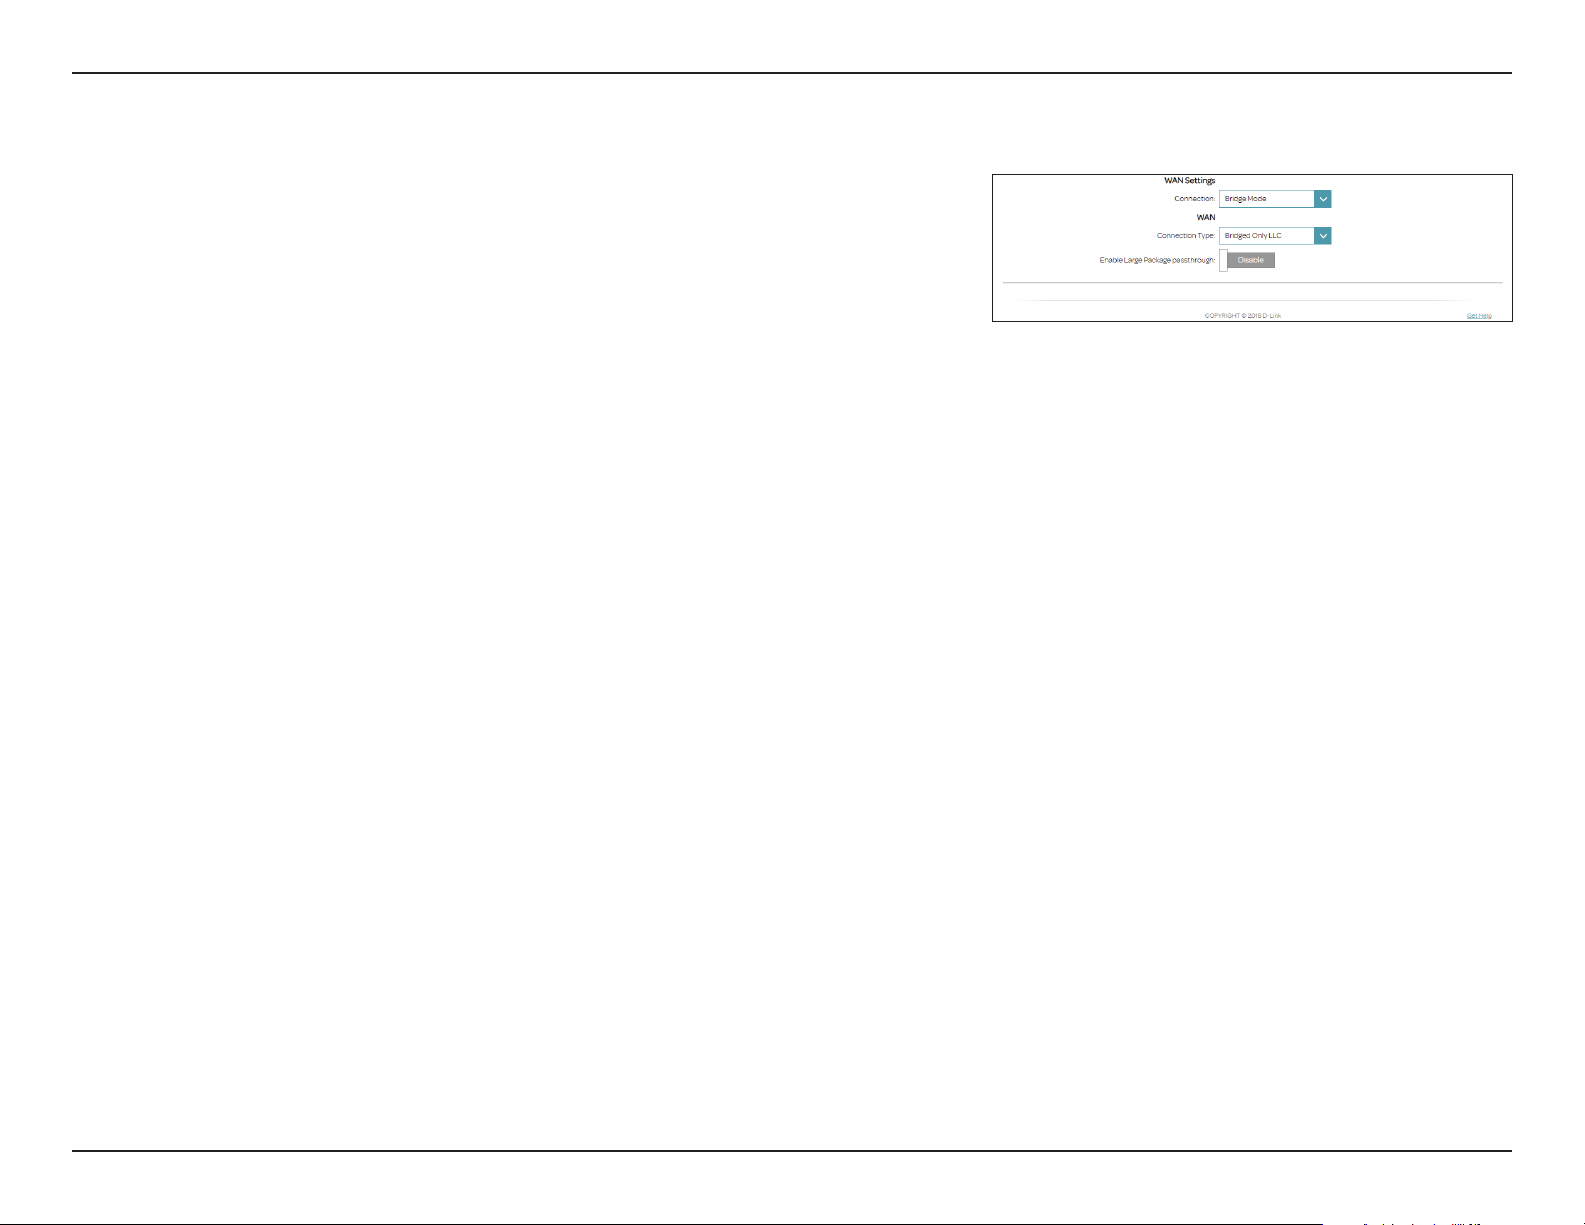
Bridge Mode
Select Bridge Mode to use the DSL-3900 as a network bridge.
WAN Settings
Connection: Select Bridge.
WAN
Connection Type: Select from Bridged Only LLC or Bridged Only VC-Mux.
Enable Large
Package
passthrough
Enable or disable Large Package passthrough.
Click Save when you are done. You will need to connect and congure
another device to connect to your ISP.
38D-Link DSL-3900 User Manual
Page 43
Section 4 - Conguration
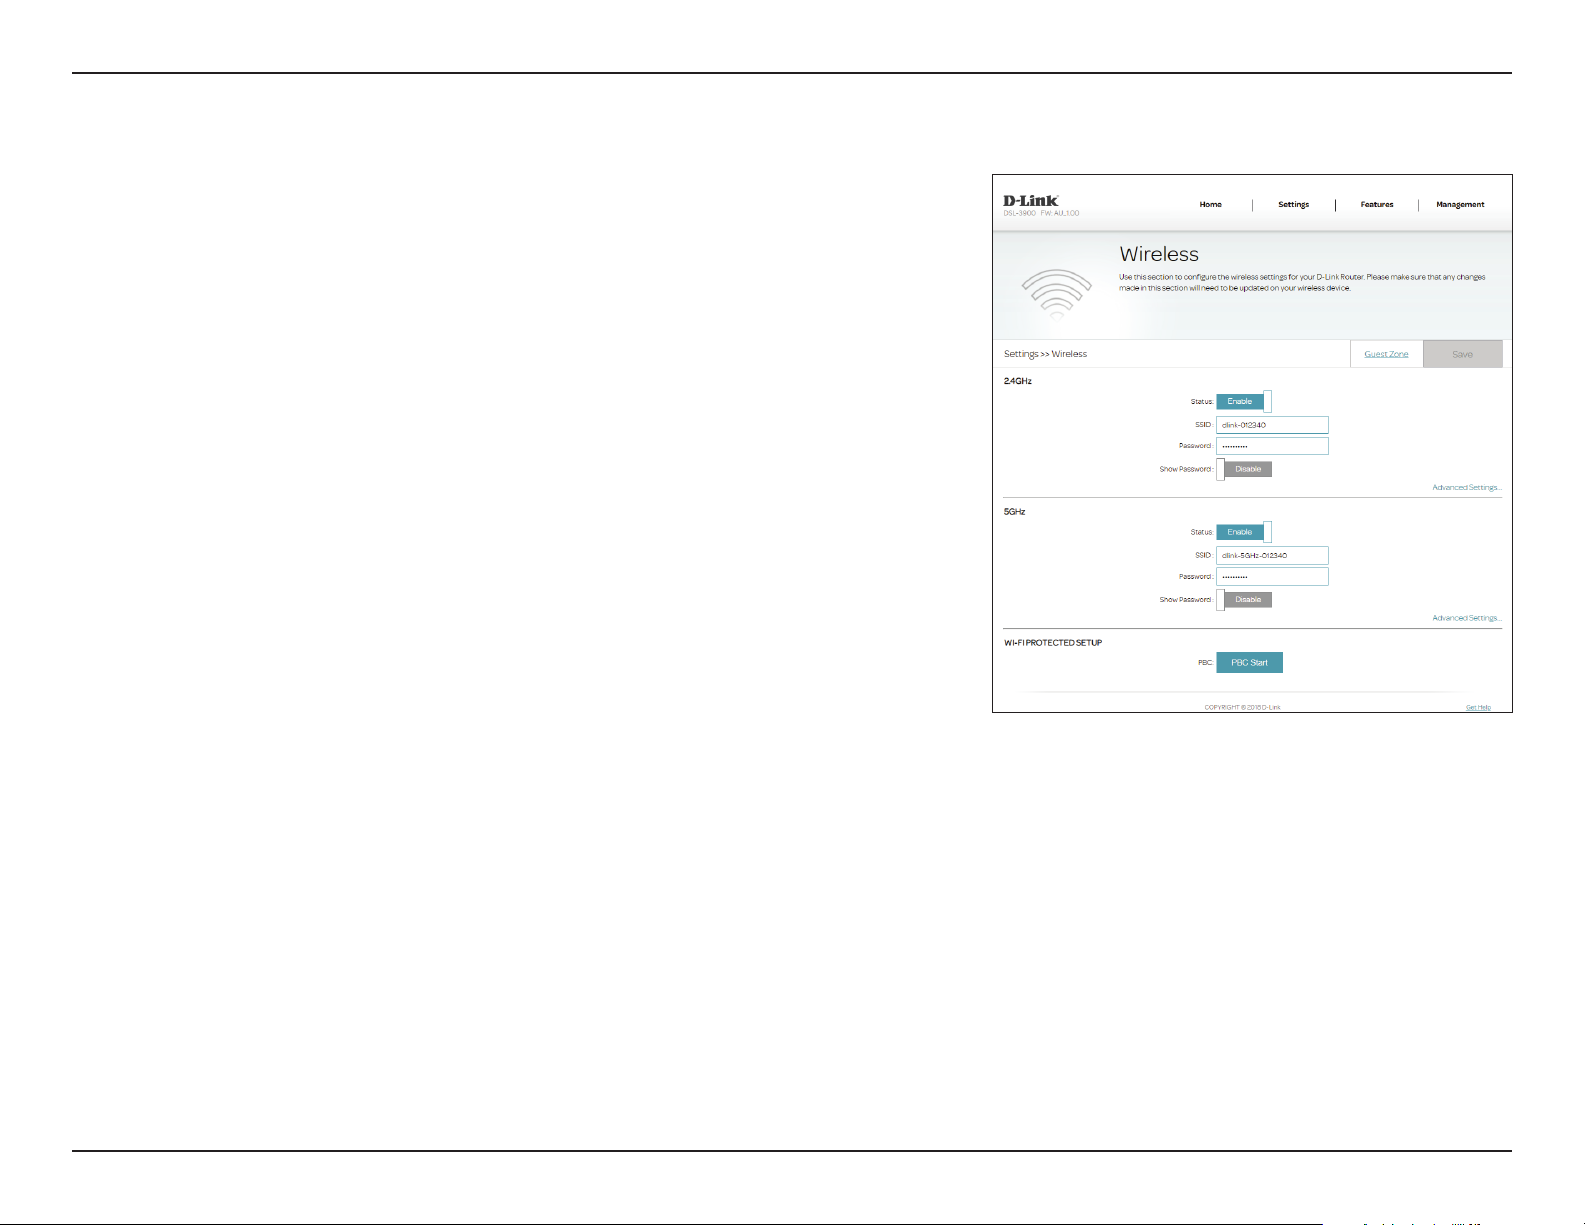
Wireless
From this page you can congure your wireless network settings. To access this
page, click Wireless from the Settings menu on the bar on the top of the
page.
2.4 GHz
Status: Enable or disable the 2.4 GHz wireless network.
SSID: Create a name for your wireless network using up to 32 characters.
Password: Create a password to use for wireless security.
Show Password: Enable or disable to show the password on the screen.
5 GHz
Status: Enable or disable the 5 GHz wireless network.
SSID: Create a name for your wireless network using up to 32 characters.
Password: Create a password to use for wireless security.
Show Password: Enable or disable to show the password on the screen.
Wi-Fi Protected Setup
PBC Start: This triggers the WPS pairing process. Refer to WPS Button on page
83 for more information about WPS.
Click Save when you are done. The following pages describe the Advanced
Settings conguration options in detail.
39D-Link DSL-3900 User Manual
Page 44
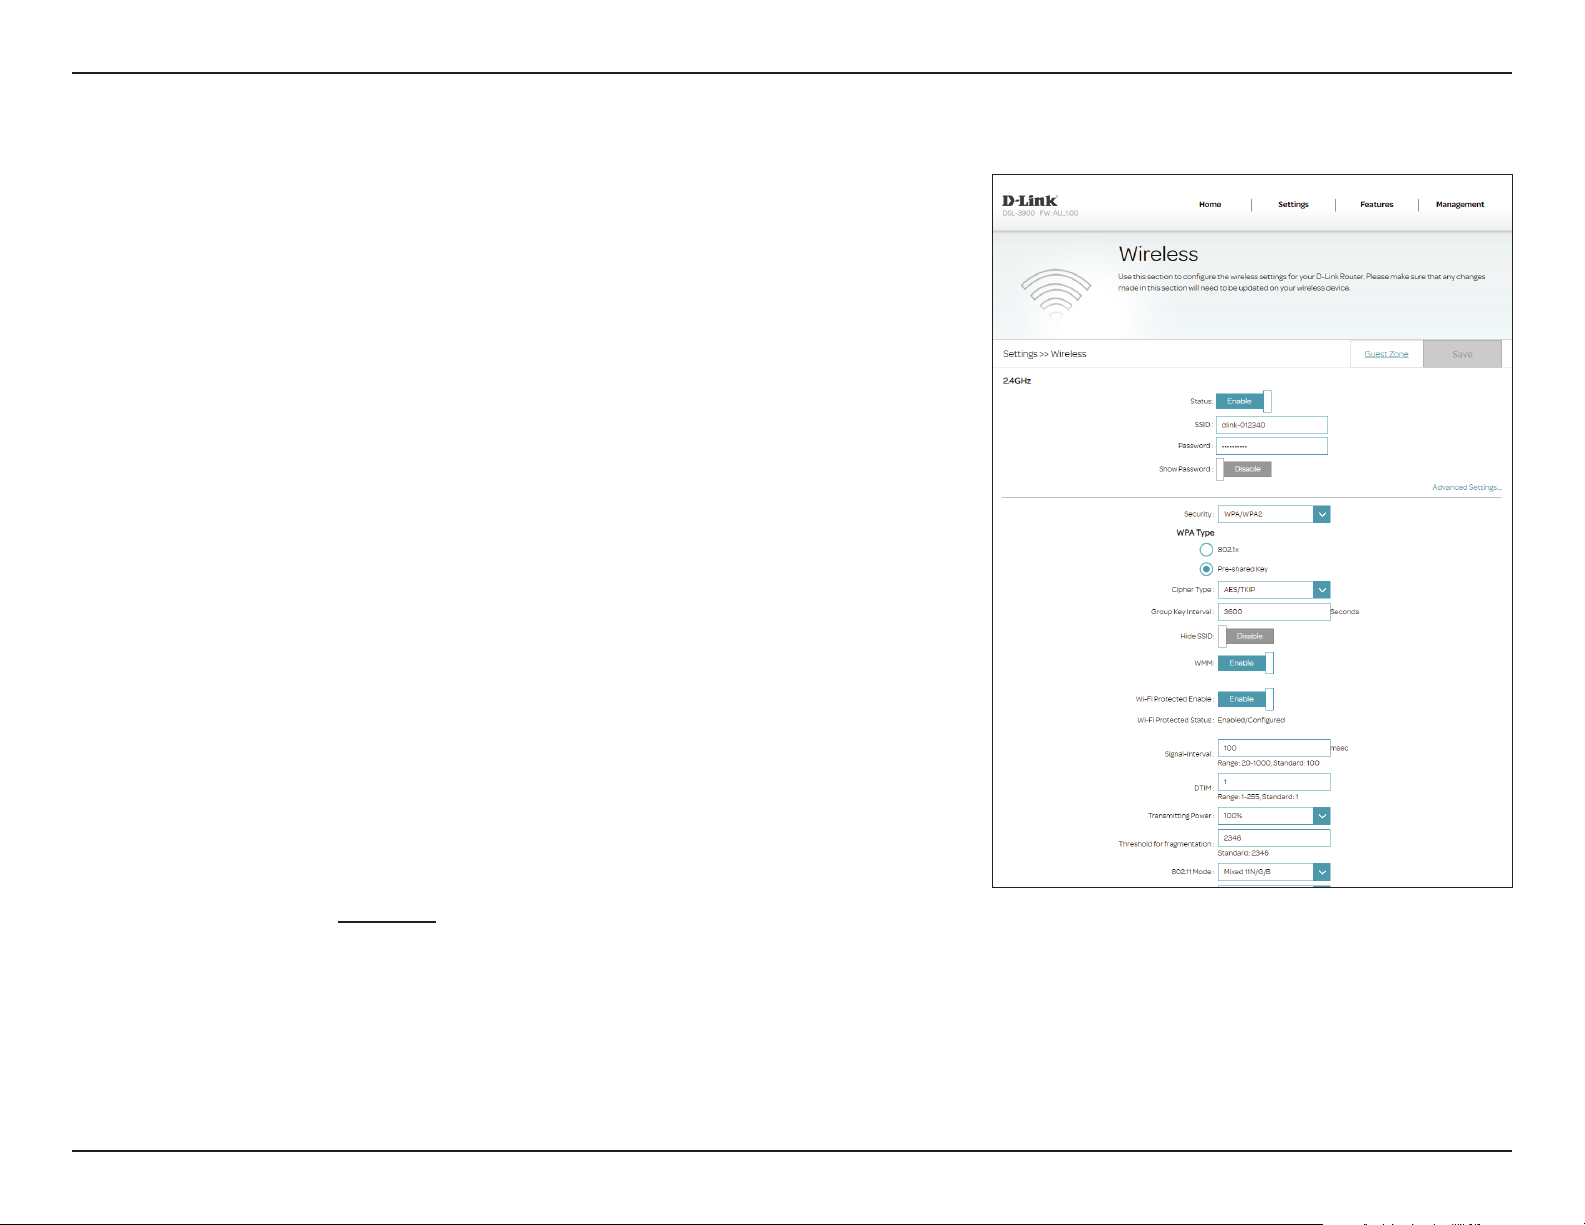
Section 4 - Conguration
Advanced Settings
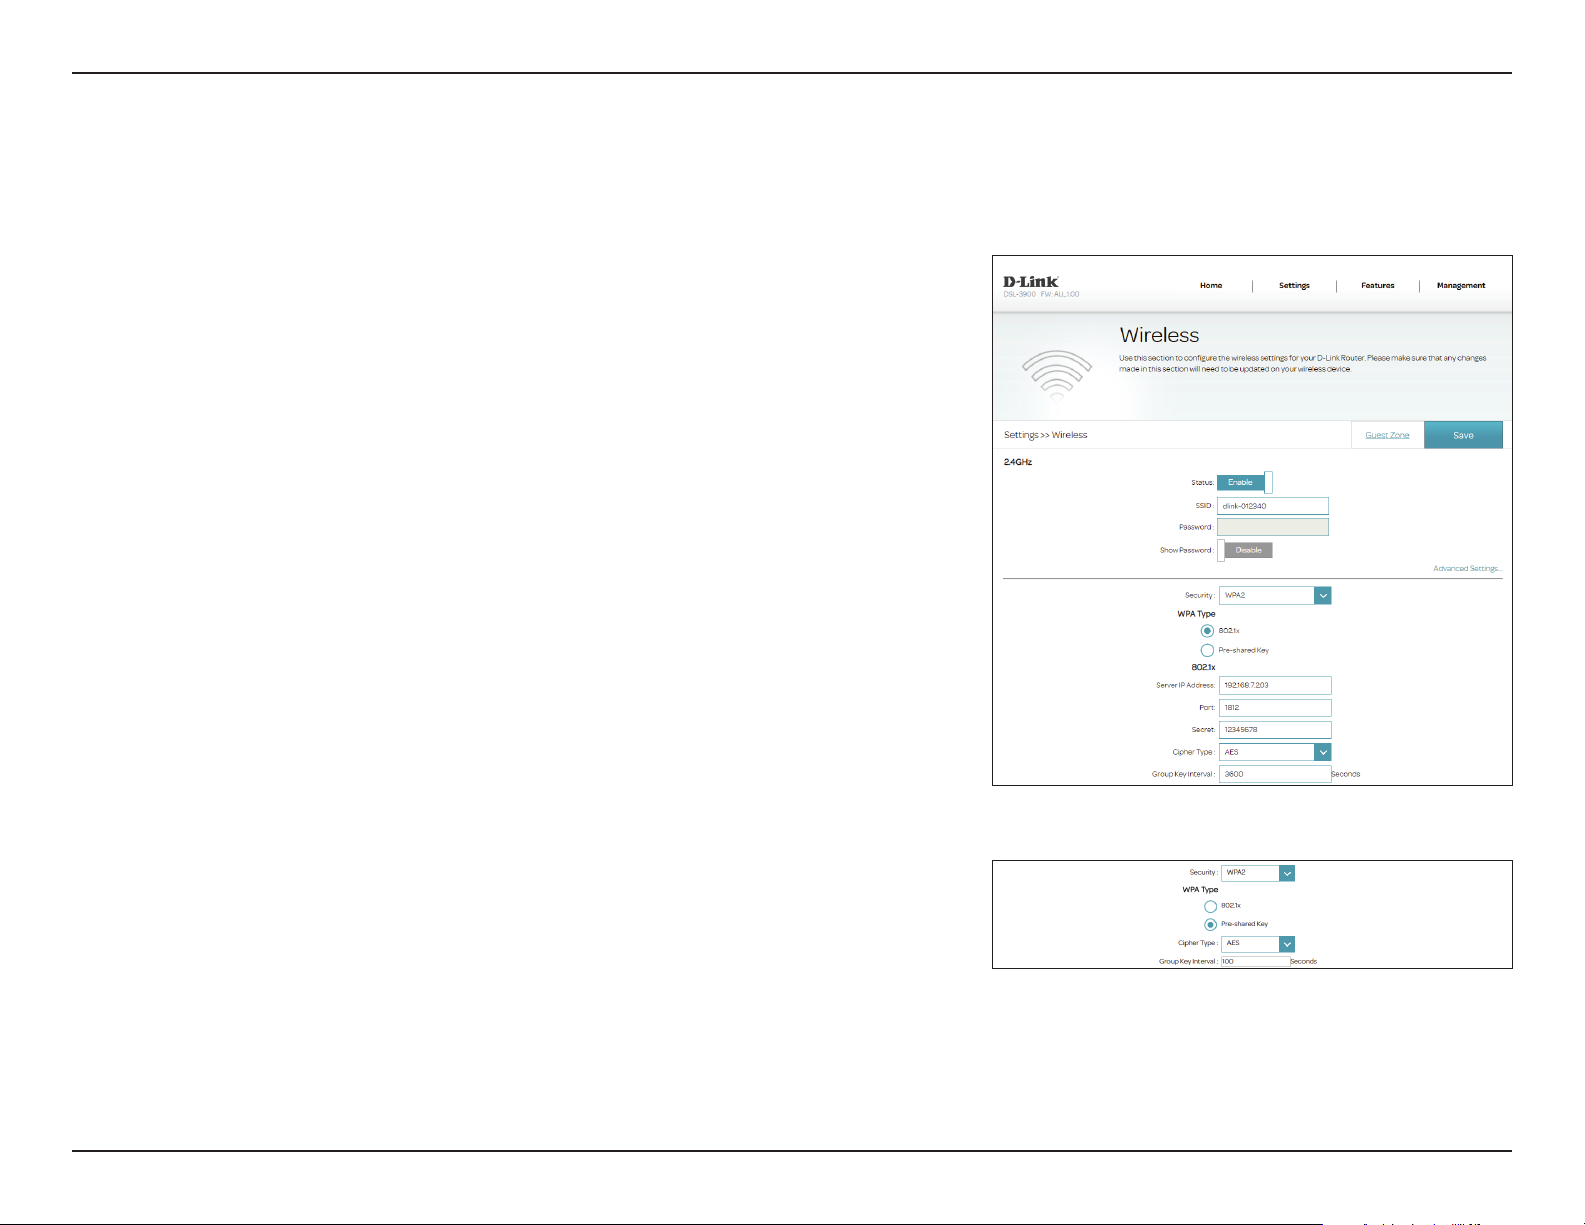
Clicking Advanced Settings allows you to manually congure security,
wireless radio operation, and schedule settings.
Security: Choose None, WEP-64Bit, WEP-128Bit, WPA2, or WPA/WPA2.
WPA2
Using WPA2 with AES encryption is recommended. Using it you can be
reasonably assured that your wireless connection is secure.
Security: WPA2
WPA Type
If you select 802.1x the following options are available:
Server IP Address: Enter the IP address of the RADIUS Server.
Port: Enter the port used by the RADIUS Server.
Secret: Enter the secret used by the RADIUS Server.
Cipher Type: Select either AES or Both (AES/TKIP). AES is recommended.
Group Key
Interval:
If you select Pre-shared key the following options are available:
Cipher Type: Select either AES or Both (AES/TKIP). AES is recommended.
Group Key
Interval:
Enter the Group Key Interval. The default is 100 seconds.
Enter the Group Key Interval. The default is 100 seconds.
40D-Link DSL-3900 User Manual
Page 45
Section 4 - Conguration
Advanced Settings (continued)
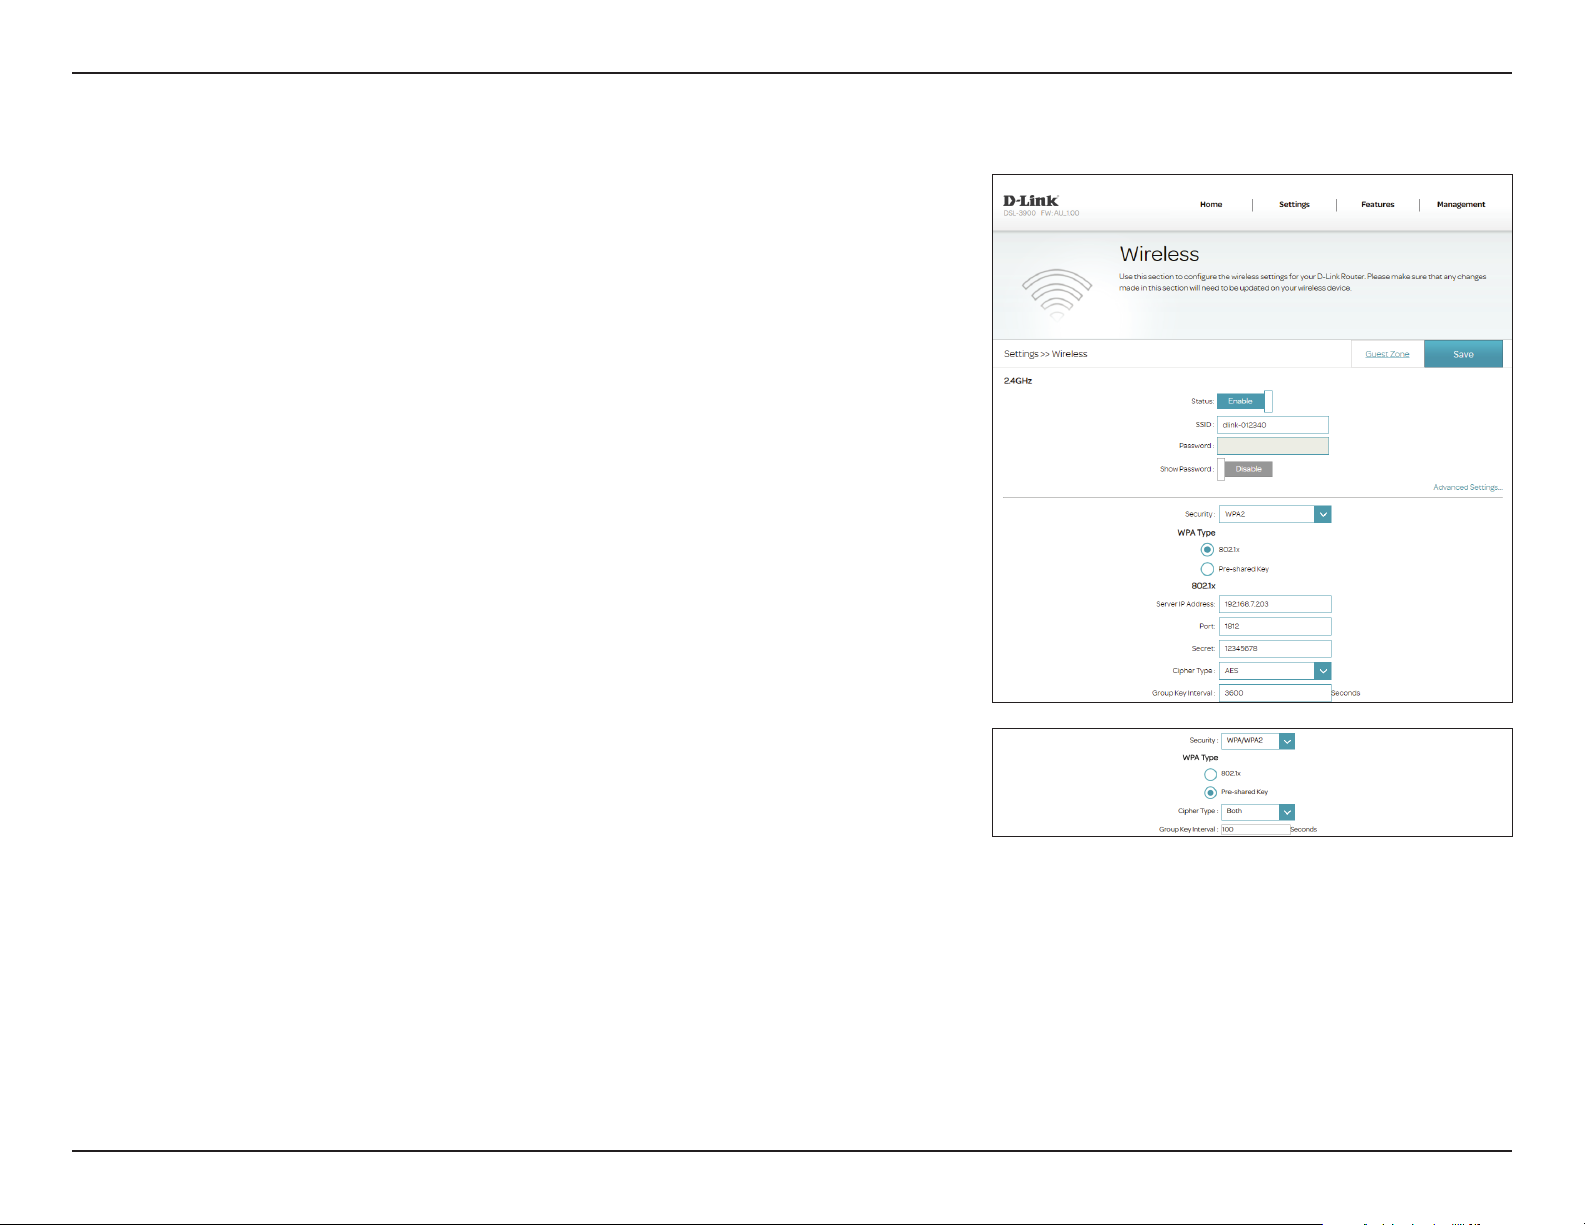
WPA/WPA2
WPA/WPA2 is a reasonably strong wireless security encryption type. Use this
for wireless clients which do not support WPA2 encryption.
Security: WPA/WPA2
WPA Type
If you select 802.1x the following options are available:
Server IP Address: Enter the IP address of the RADIUS Server.
Port: Enter the port used by the RADIUS Server.
Secret: Enter the secret used by the RADIUS Server.
Cipher Type: Select AES, TKIP, or Both. AES is recommended.
Group Key
Interval:
If you select Pre-shared key the following options are available:
Cipher Type: Select AES, TKIP, or Both. AES is recommended.
Group Key
Interval:
Enter the Group Key Interval. The default is 100 seconds.
Enter the Group Key Interval. The default is 100 seconds.
41D-Link DSL-3900 User Manual
Page 46
Section 4 - Conguration
Advanced Settings (continued)
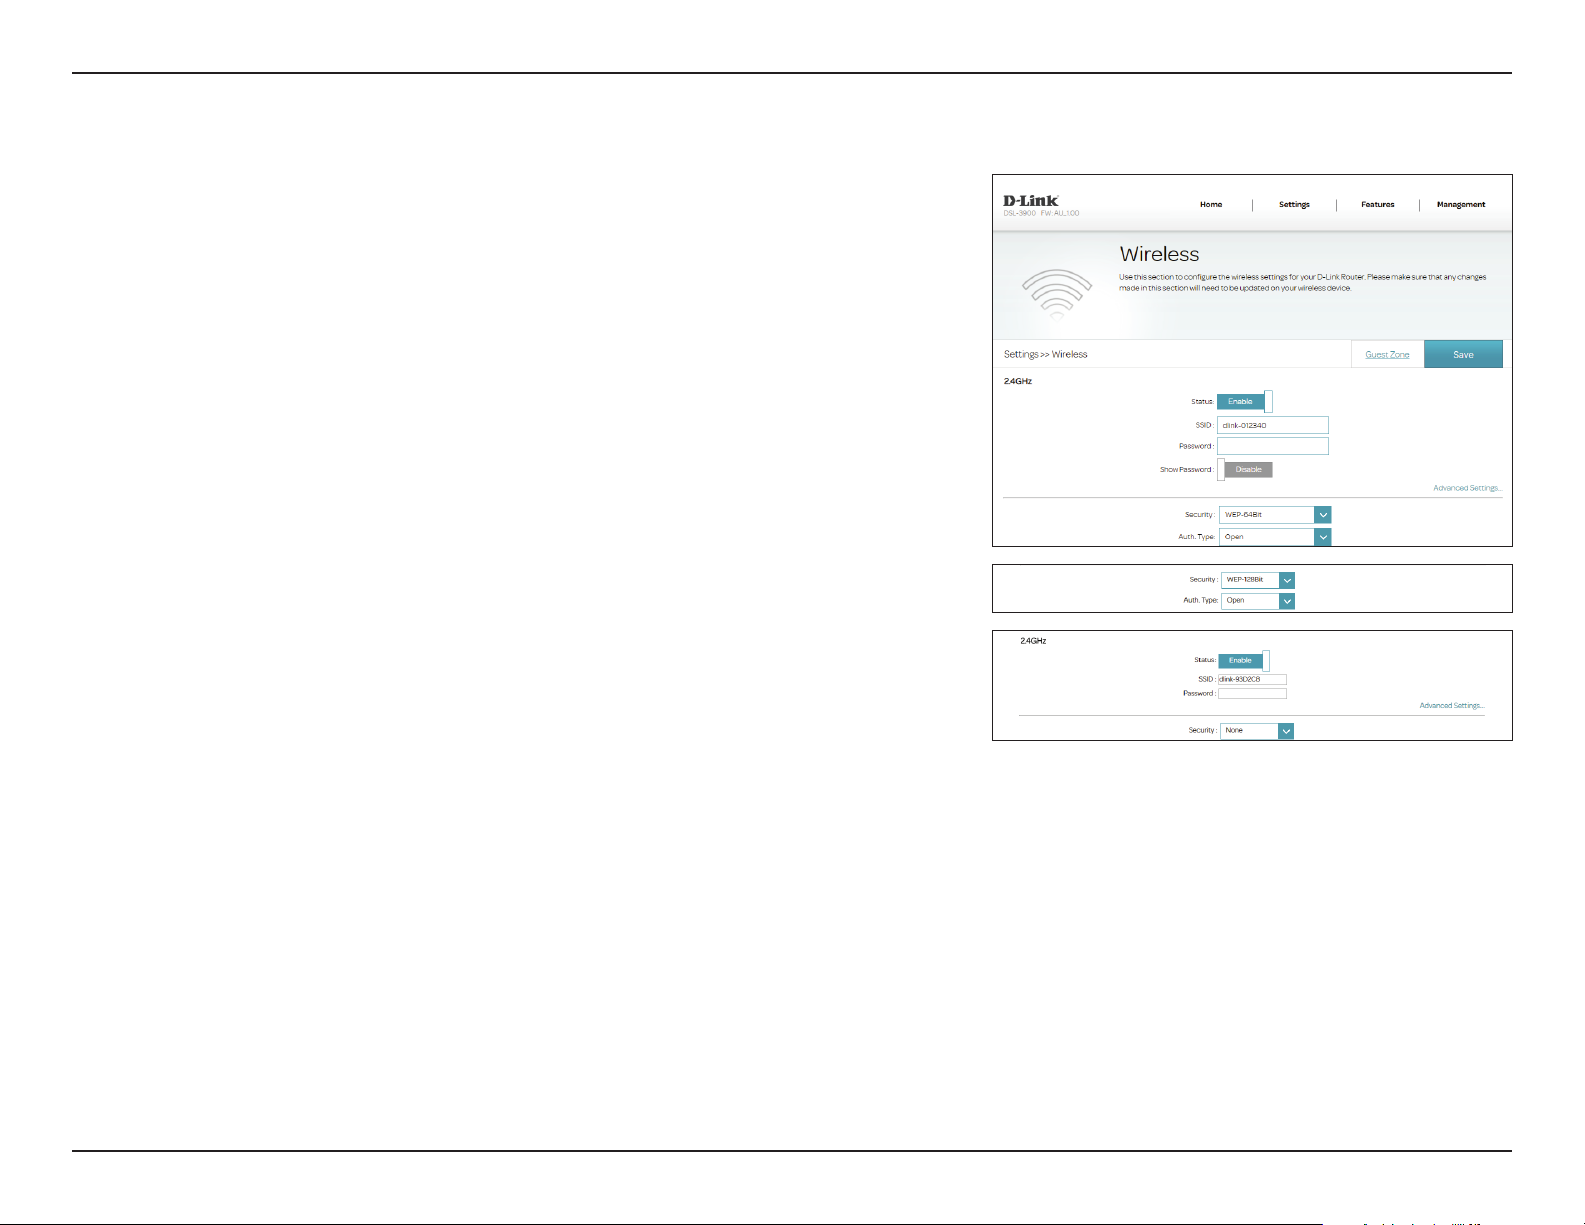
WEP-64Bit or WEP-128Bit
Use of WEP encryption is not recommended. Unless your clients do not
support WPA encryption, it is recommended that you select WPA2 or WPA/
WPA2 Mixed instead of WEP as.
Security: WEP-64Bit or WEP-128Bit.
Auth Type: Select either Open or Shared.
None
Disabling encryption and leaving your wireless network open is not
recommended. Any wireless client will be able to access your network, be able
to use your Internet connection, and leaves you open to security threats.
Security: None. If you select None, no further wireless security conguration
options are available.
42D-Link DSL-3900 User Manual
Page 47
Section 4 - Conguration
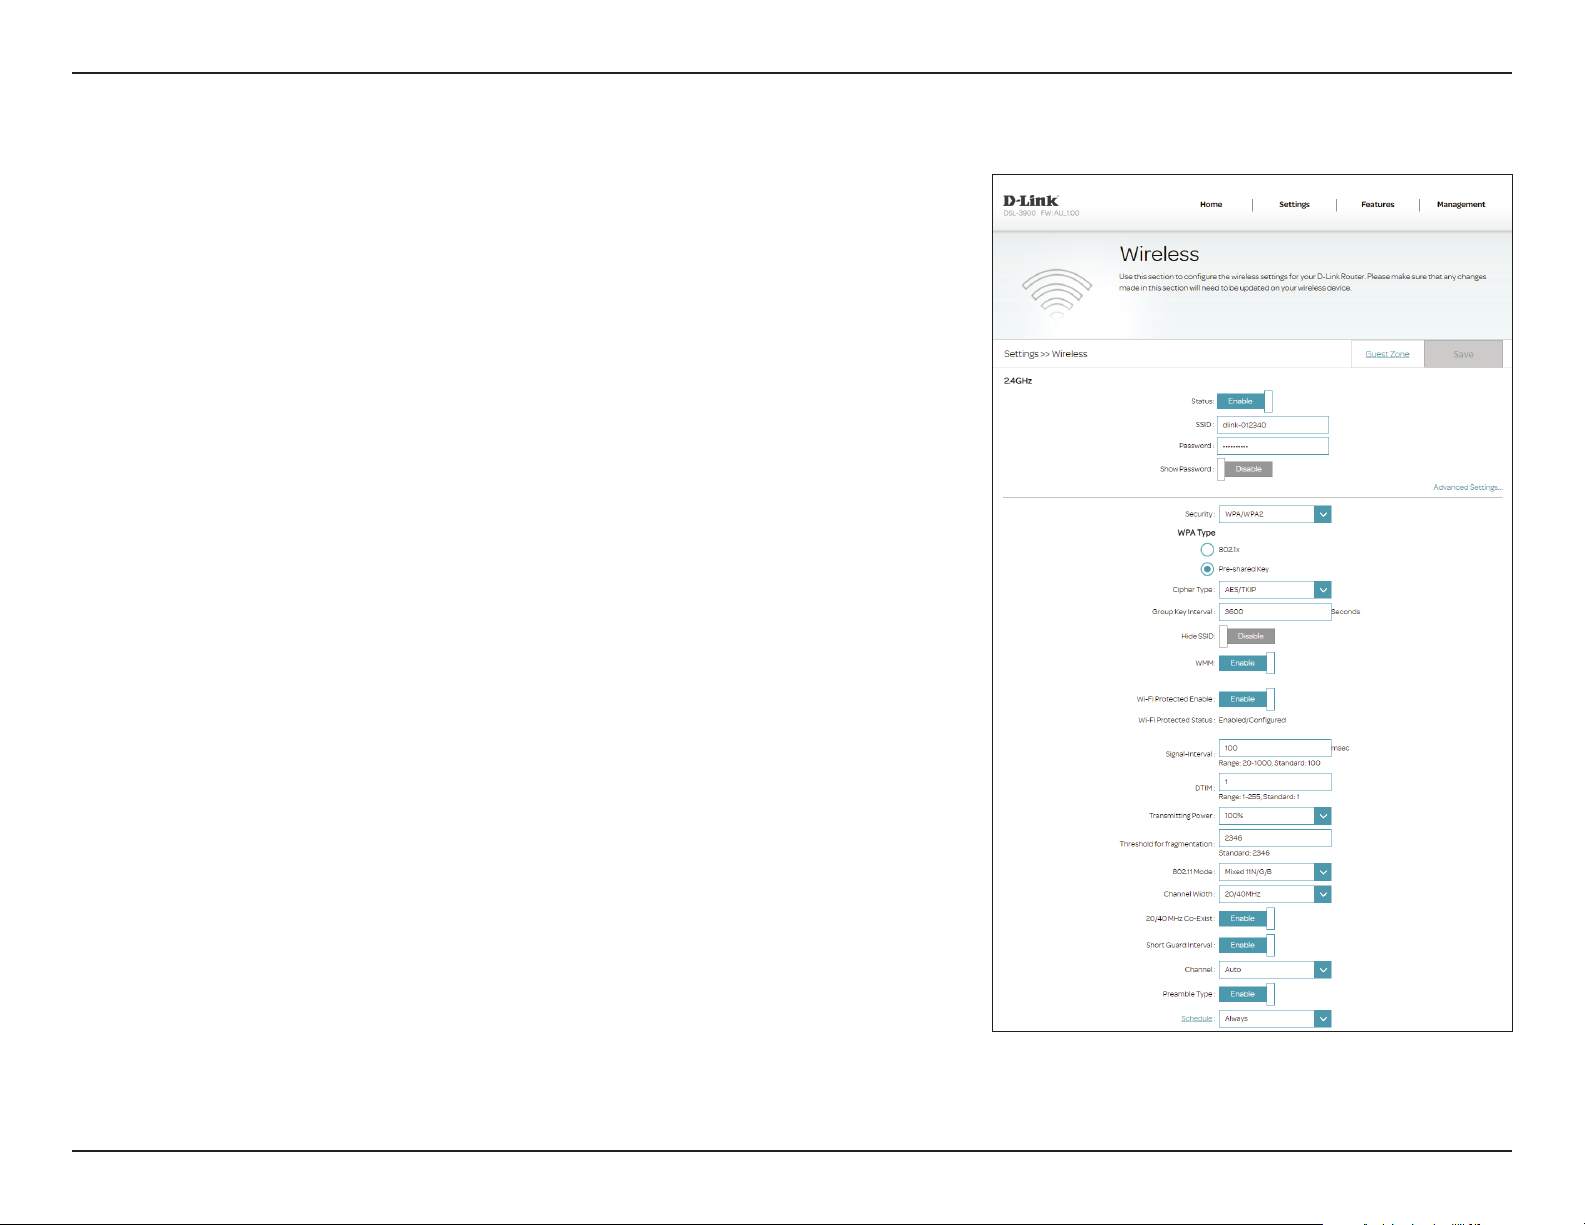
2.4 GHz / 5 GHz Advanced Settings
Hide SSID: The default setting is Disabled. Select Enabled if you do not want
to broadcast the SSID of your wireless network.
Note: Hiding your SSID is not a form of security alone.
WMM: Enable or disable WMM QoS for your wireless network. This can
help to improve the quality of video and voice applications for your
wireless clients.
Advanced Settings (continued)
Wi-Fi Protected
Enable:
Wi-Fi Protected
Status:
Signal-Interval: Set the rate at which your wireless network is advertised. The default
DTIM: Specify the Delivery Trac Information Map (DTIM) message interval.
Transmitting
Power:
Threshold for
fragmentation
(2.4 GHz only):
2.4 GHz 802.11
Mode:
Enabled or disable WPS functionality of this device.
The current WPS functionality status is displayed.
is 100 milliseconds.
Select the desired wireless transmission power. The available options
are 100%, 50%, 25%, or 12.5%. The default is 100%.
The fragmentation threshold, which is specied in bytes, determines
whether packets will be fragmented. Packets exceeding the 2346
byte threshold will be fragmented before transmission. 2346 is the
default setting.
Select the desired wireless networking standard(s) to use. The
available options are 11B Only, 11G Only, Mixed 11G/B, 11N Only,
Mixed 802.11g/n, or Mixed 802.11b/g/n.
43D-Link DSL-3900 User Manual
Page 48
Section 4 - Conguration
Advanced Settings (continued)
2.4 GHz Channel
Width:
5 GHz 802.11
Mode:
5 GHz Channel
Width:
20/40 MHz Co-
Exist:
Short Guard
Interval:
Channel: Select the desired channel for your wireless network to use. Auto is
Channel Width is available if you select Mixed 11N/G/B, 11N/G, or
11N for 802.11 Mode. Select 20/40 if you are using both 802.11n
and non-802.11n devices, or select 20 MHz if you want to disable 40
MHz bandwidth communication. The recommended setting is 20/40.
Select the desired wireless networking standard(s) to use. The
available options are 11A Only, 11A/N Mixed Mode, Mixed 11AC/
N/A, or Mixed 11AC/N.
Select the desired channel width. The available options are 20 MHz,
20/40 MHz, or 20/40/80/160 MHz. Depending upon the selected 5
GHz 802.11 Mode, some options may be unavailable.
Enable or disable 20/40 MHz Co-Exist.
Enable or disable Short Guard Interval.
the default option.
Preamble Type: Enable or disable short preamble type.
Schedule
Select a user-generated schedule. A schedule that that either the
2.4GHz or 5Ghz Wi-Fi modes will be turned on or o according to.
Click Schedule to edit schedules.
Click Save when you are done.
44D-Link DSL-3900 User Manual
Page 49
Section 4 - Conguration
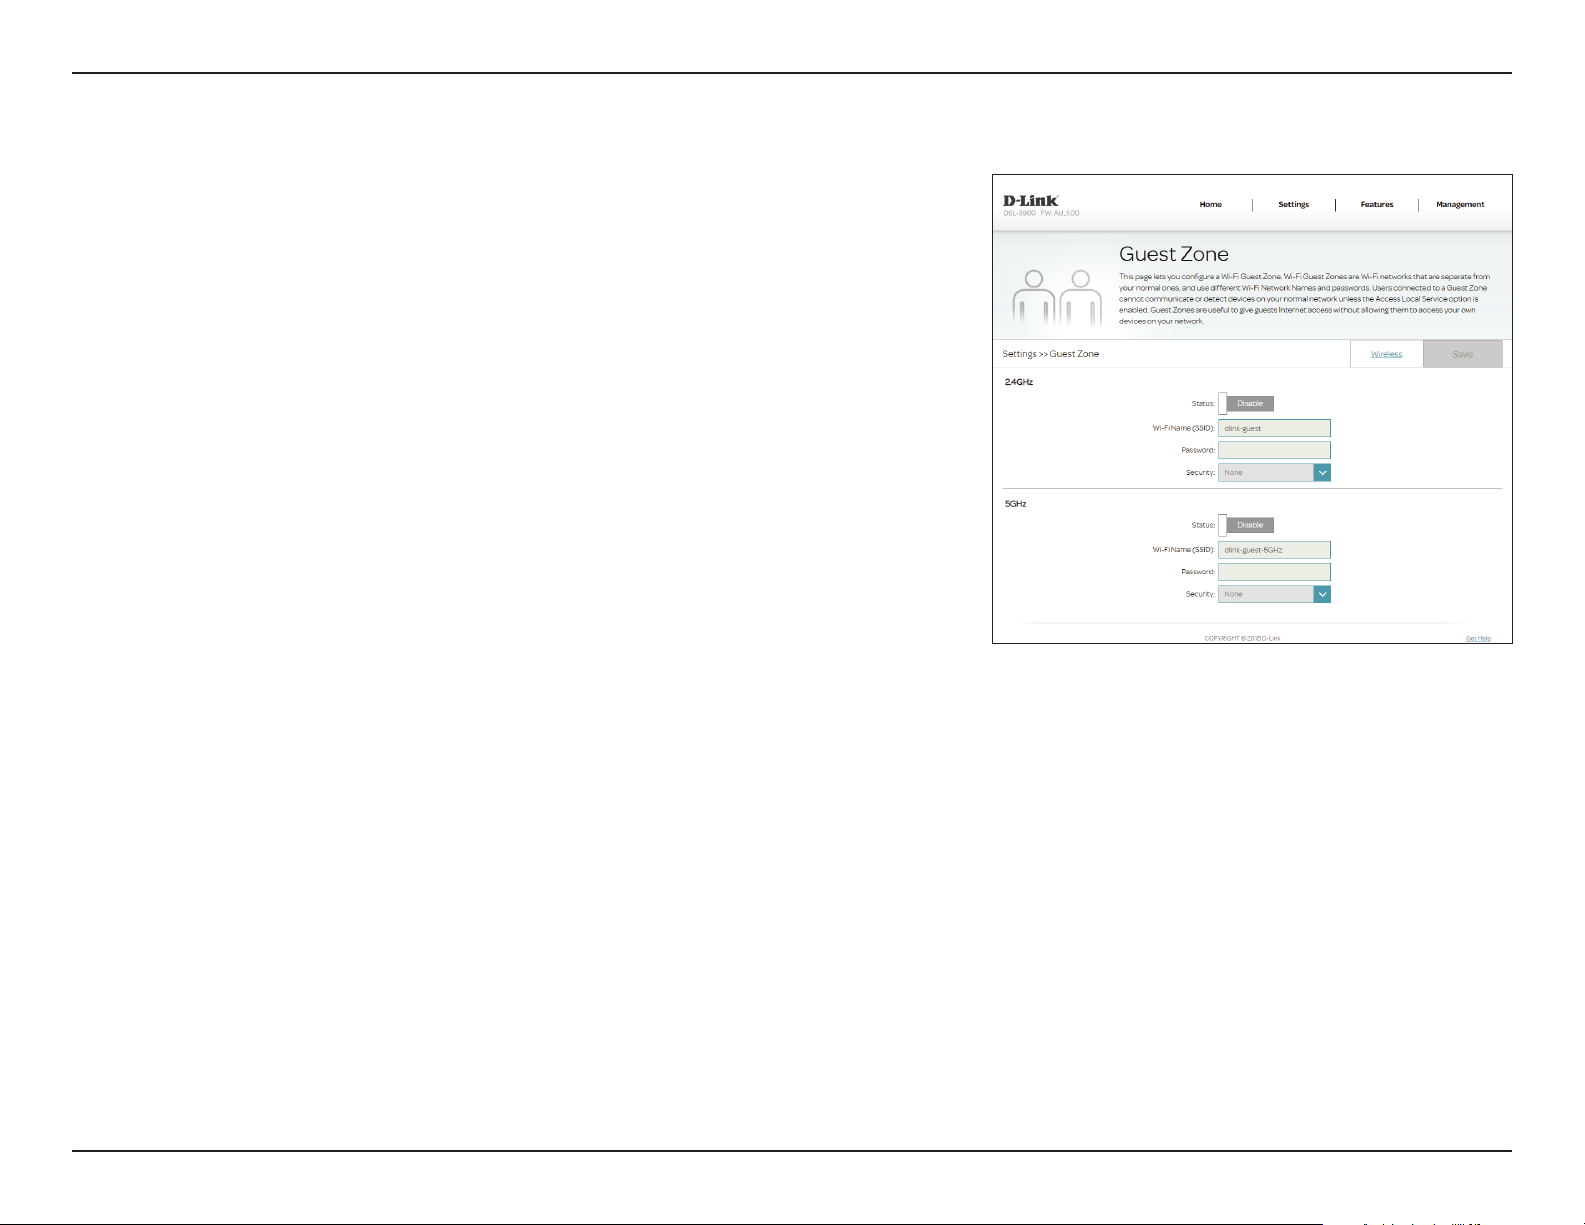
Guest Zone
The Guest Zone feature will allow you to create wireless networks that can be
used by guests to access the Internet. These zones will be separate from your
main wireless network. You may congure dierent zones for the 2.4 GHz and
5 GHz wireless bands. To access this page, click Wireless from the Settings
menu on the bar on the top of the page and click Guest Zone.
2.4 GHz / 5 GHz
Status: Enable or disable the selected SSID.
Wi-Fi Name (SSID): Enter a wireless network name (SSID) that is dierent from your main
wireless network.
Password: Create a password to use for wireless security. Wireless clients will
need to enter this password to successfully connect to the guest zone.
Security: Choose None, WPA2, or WPA/WPA2.
Click Save when you are done.
45D-Link DSL-3900 User Manual
Page 50
Section 4 - Conguration
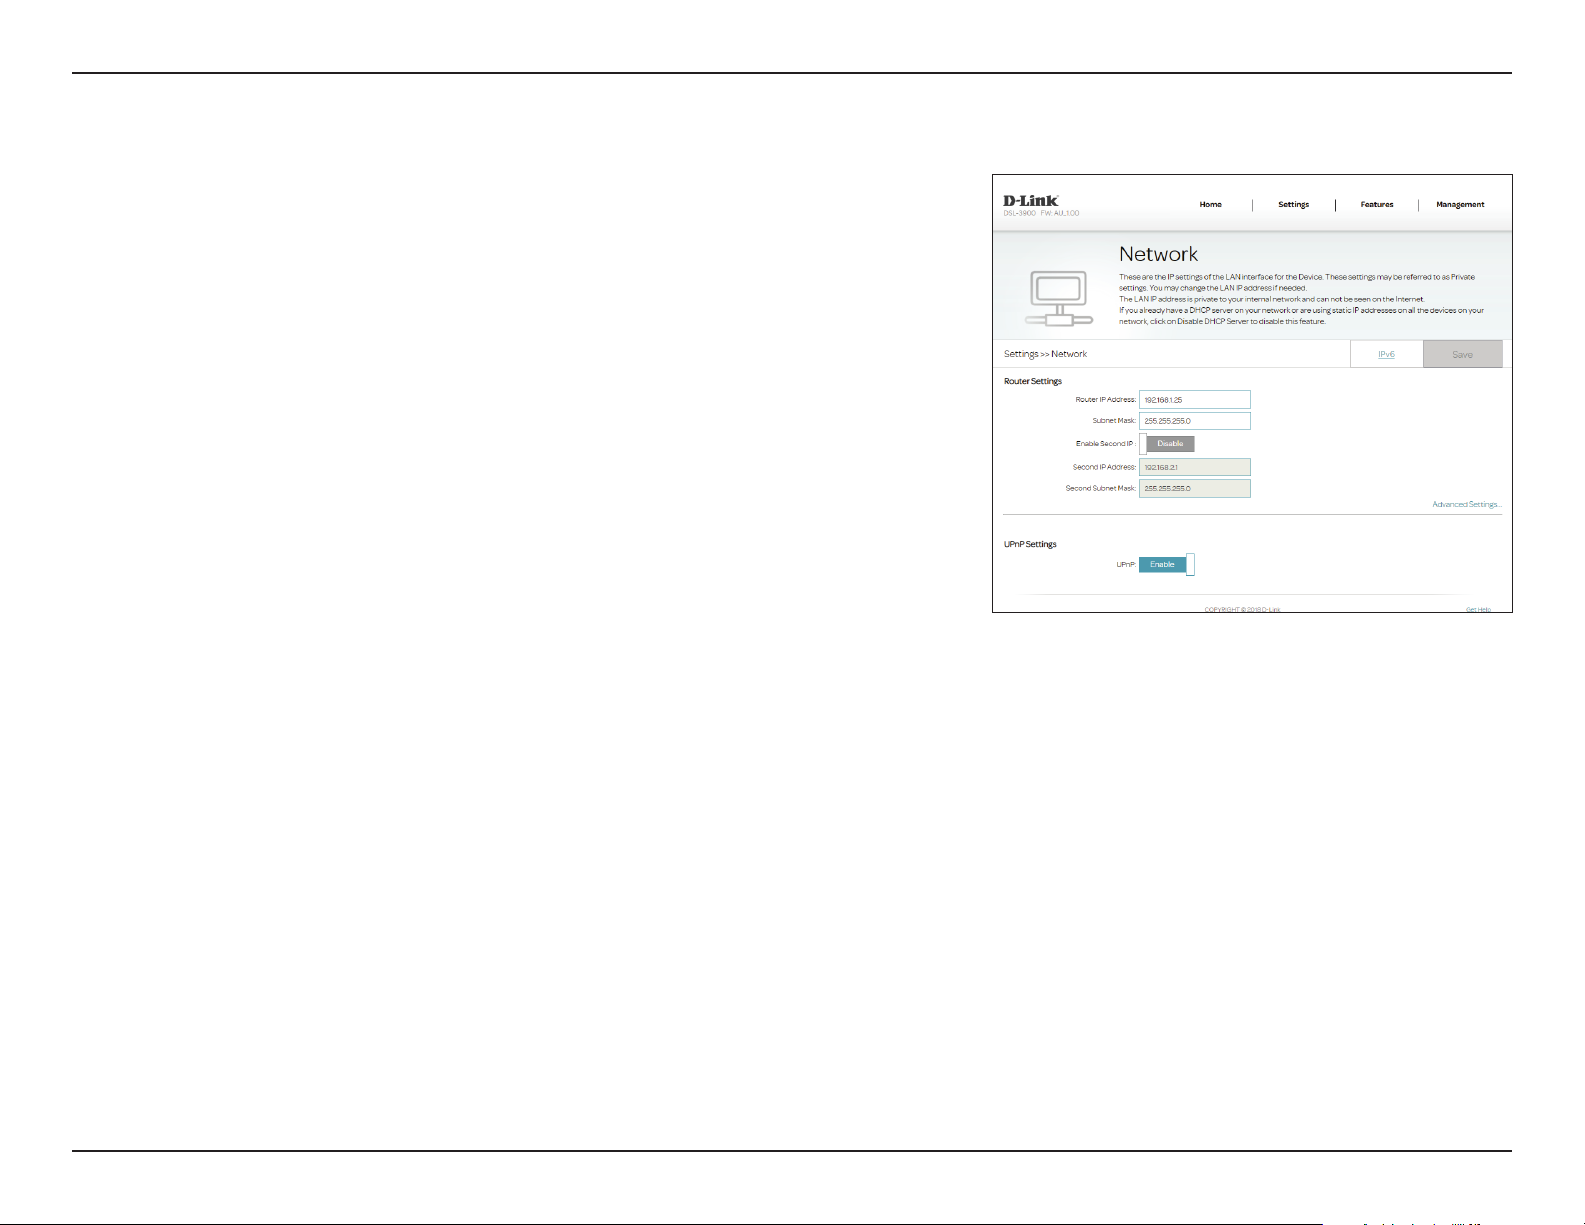
Network
This section will allow you to change the local network settings of the router
and to congure the DHCP settings. To access this page, click Network from
the Settings menu on the bar on the top of the page.
Router Settings
Router IP Address: Enter the IP address of the router for this interface. The default IP
address is 192.168.1.1.
If you change the IP address, once you click Save, you will need
to enter the new IP address in your browser to get back into the
conguration utility.
Subnet Mask: Enter the subnet mask of this interface. The default subnet mask is
255.255.255.0.
Enable Second IP: Enable or disable the dual LAN IP capability of this router. The default
setting is Disabled.
Second IP
Address:
Second Subnet
Mask:
Enter the second IP address of the router for this interface. The default
IP address is 192.168.2.1.
Enter the second subnet mask of this interface. The default subnet
mask is 255.255.255.0.
UPNP Settings
UPNP: Enable or disable UPNP.
Click Save when you are done or click Advanced Settings.
46D-Link DSL-3900 User Manual
Page 51
Section 4 - Conguration
Network - Advanced Settings
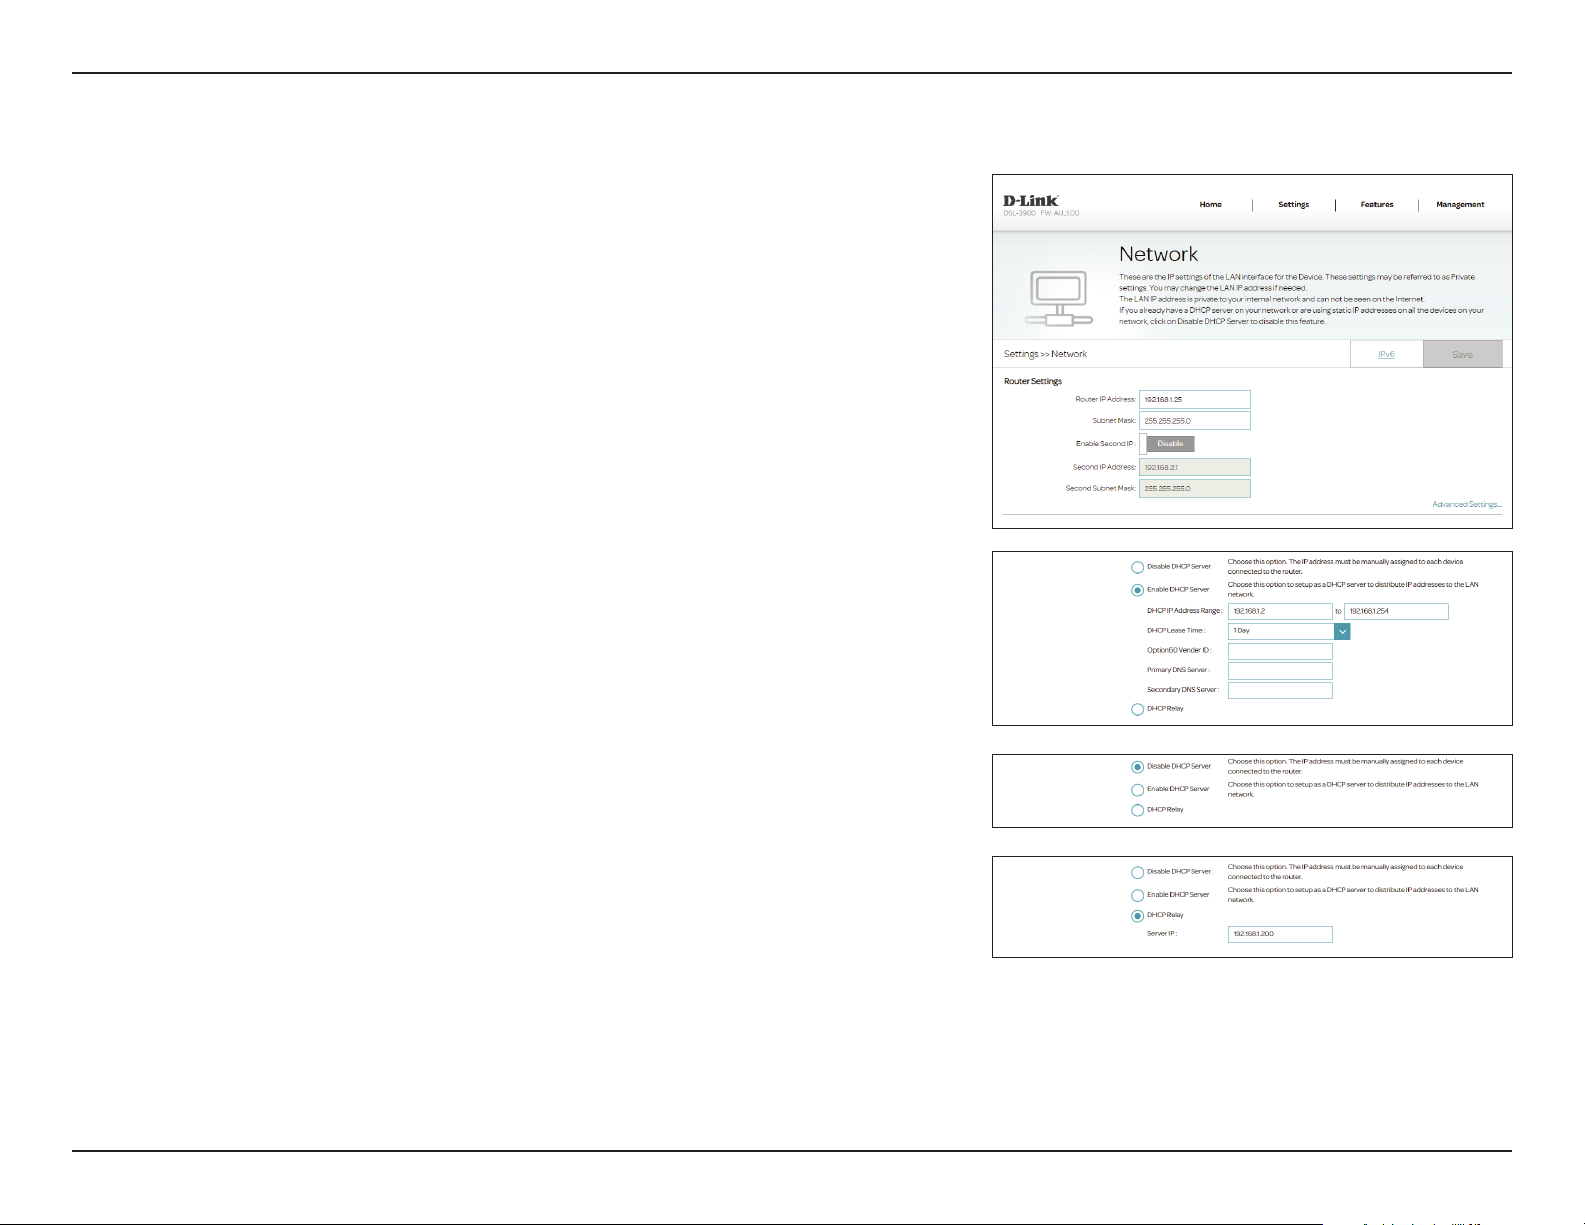
Advanced Settings
You may select one of the following DHCP mode behaviors:
Disable DHCP
Server:
Enable DHCP
Server:
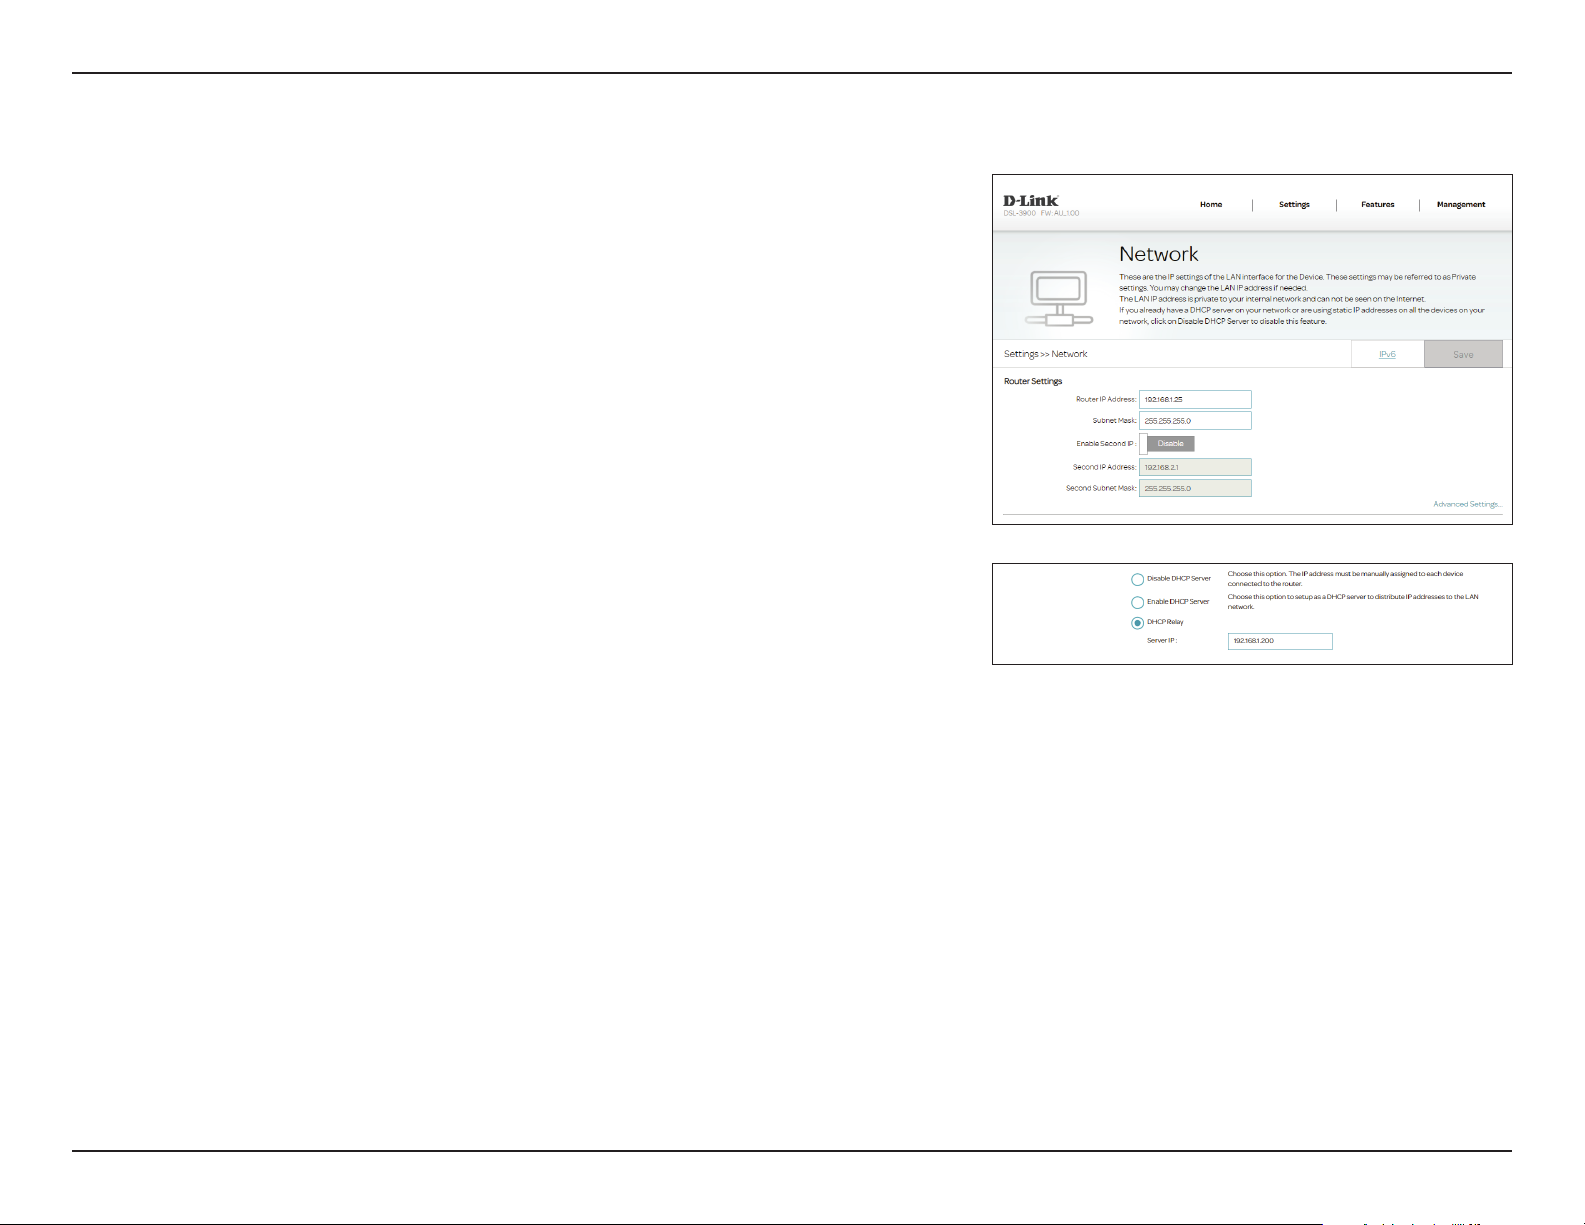
DHCP Relay: Select this option to enable DHCP Relay. Use this if you have a
If you selected Enable DHCP, the following options are available:
DHCP IP Address
Range:
DHCP Lease Time: Select the DHCP lease time from the drop down menu.
Option60 Vendor
Select this option to disable the DHCP server. No further conguration
is available.
Select this option to enable the DHCP server.
dedicated DHCP server on your network.
Enter the starting and ending IP addresses for the DHCP server’s IP
assignment.
Note: If you statically (manually) assign IP addresses to your computers
or devices, make sure the IP addresses are outside of this range or you
may have an IP conict.
Enter Option60 information here. (Optional)
ID:
Primary DNS
Server:
Secondary DNS
Server:
Enter the primary DNS server IP address assigned by your ISP. This
address is usually obtained automatically from your ISP.
Enter the secondary DNS server IP address assigned by your ISP. This
address is usually obtained automatically from your ISP.
47D-Link DSL-3900 User Manual
Page 52
Section 4 - Conguration
Network - Advanced Settings
If you selected DHCP Relay, the following options are available:
Server IP: Enter the DHCP server IP address.
Click Save when you are done.
48D-Link DSL-3900 User Manual
Page 53
Section 4 - Conguration
USB
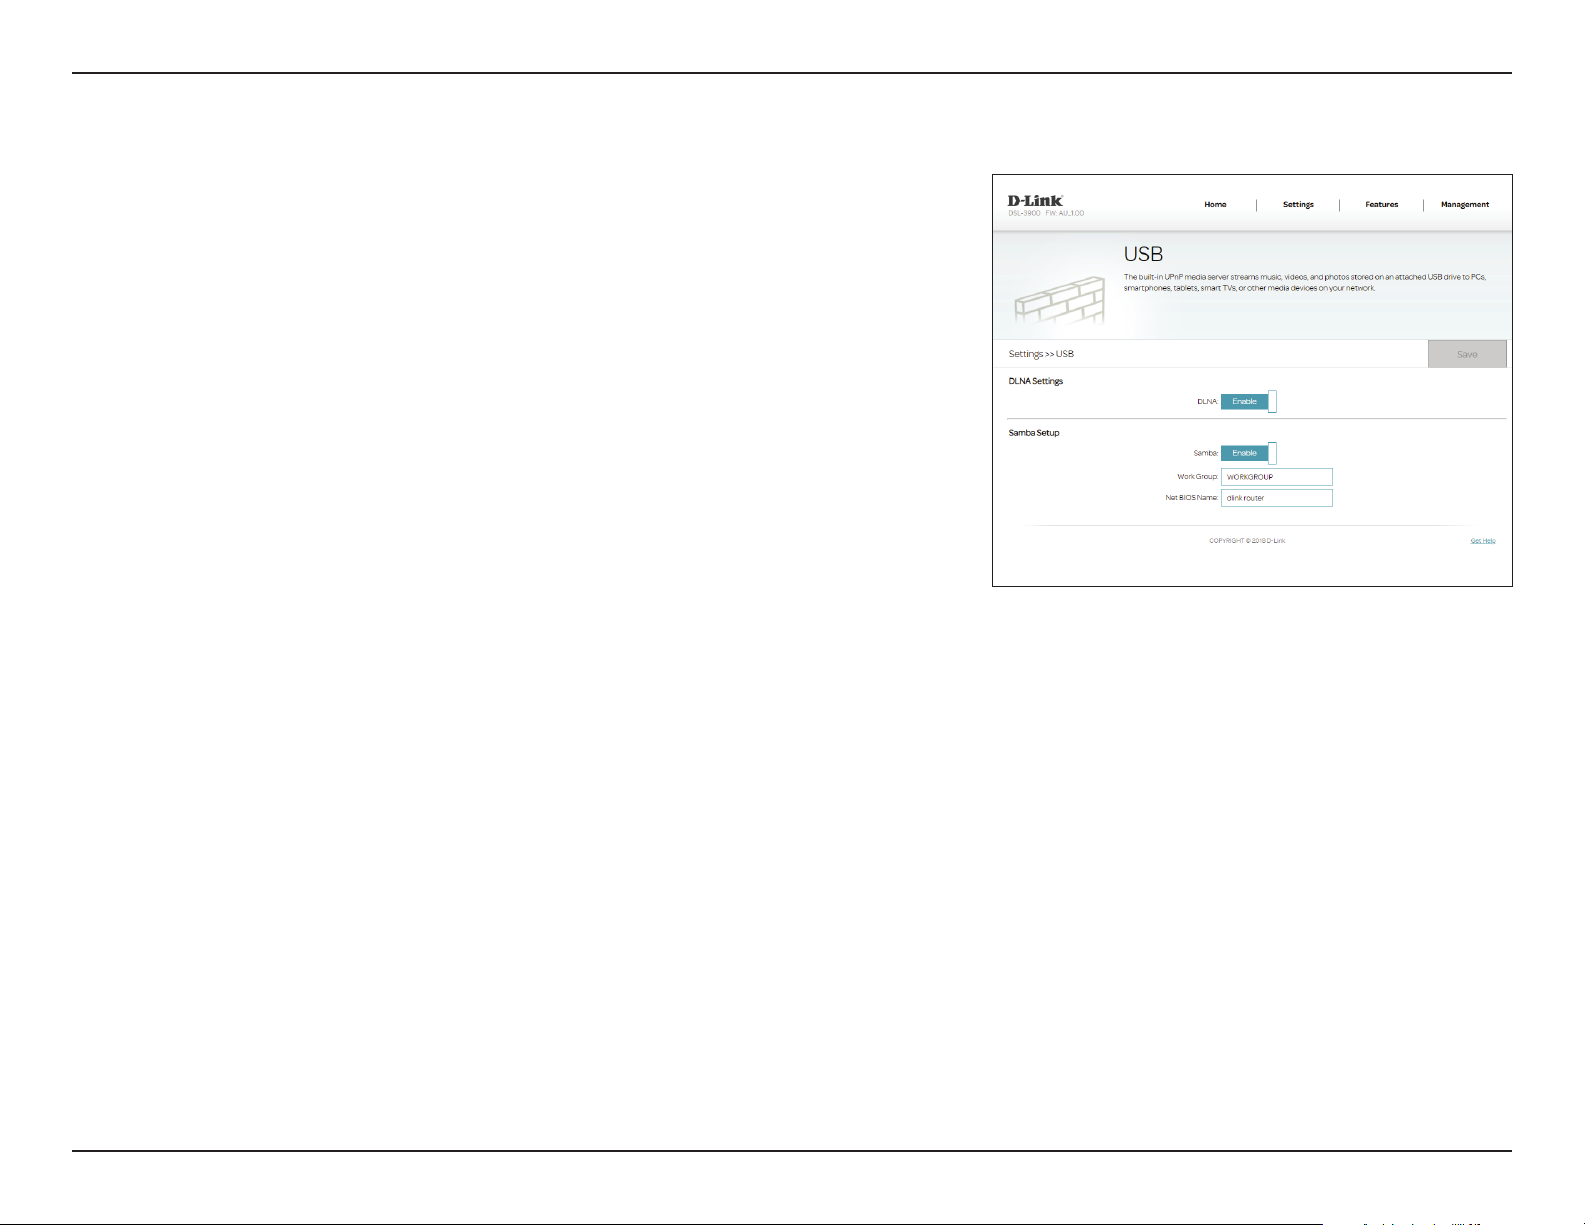
This page will allow you to set up access to les on an external USB device
plugged into the router. You can do this through the local network. To access
this page, click USB from the Settings menu on the bar on the top of the
page.
DLNA Settings
DLNA: Enable or disable the DLNA media server functions, allowing
connected DLNA clients access to media les over the network.
Samba Setup
Samba: Enable or disable Windows File Sharing, or Samba. Computers and
devices which support Samba will be able to access the les on the
USB device connected to this router.
Work Group: Enter the Windows workgroup name.
Net BIOS Name: Enter the name for this device as you wish it to appear on your
network.
Click Save when you are done.
For information on how to access your USB drive from a Windows-based PC
refer to Connect and Share a USB Storage Device on page 73.
49D-Link DSL-3900 User Manual
Page 54
Section 4 - Conguration
Features
Firewall
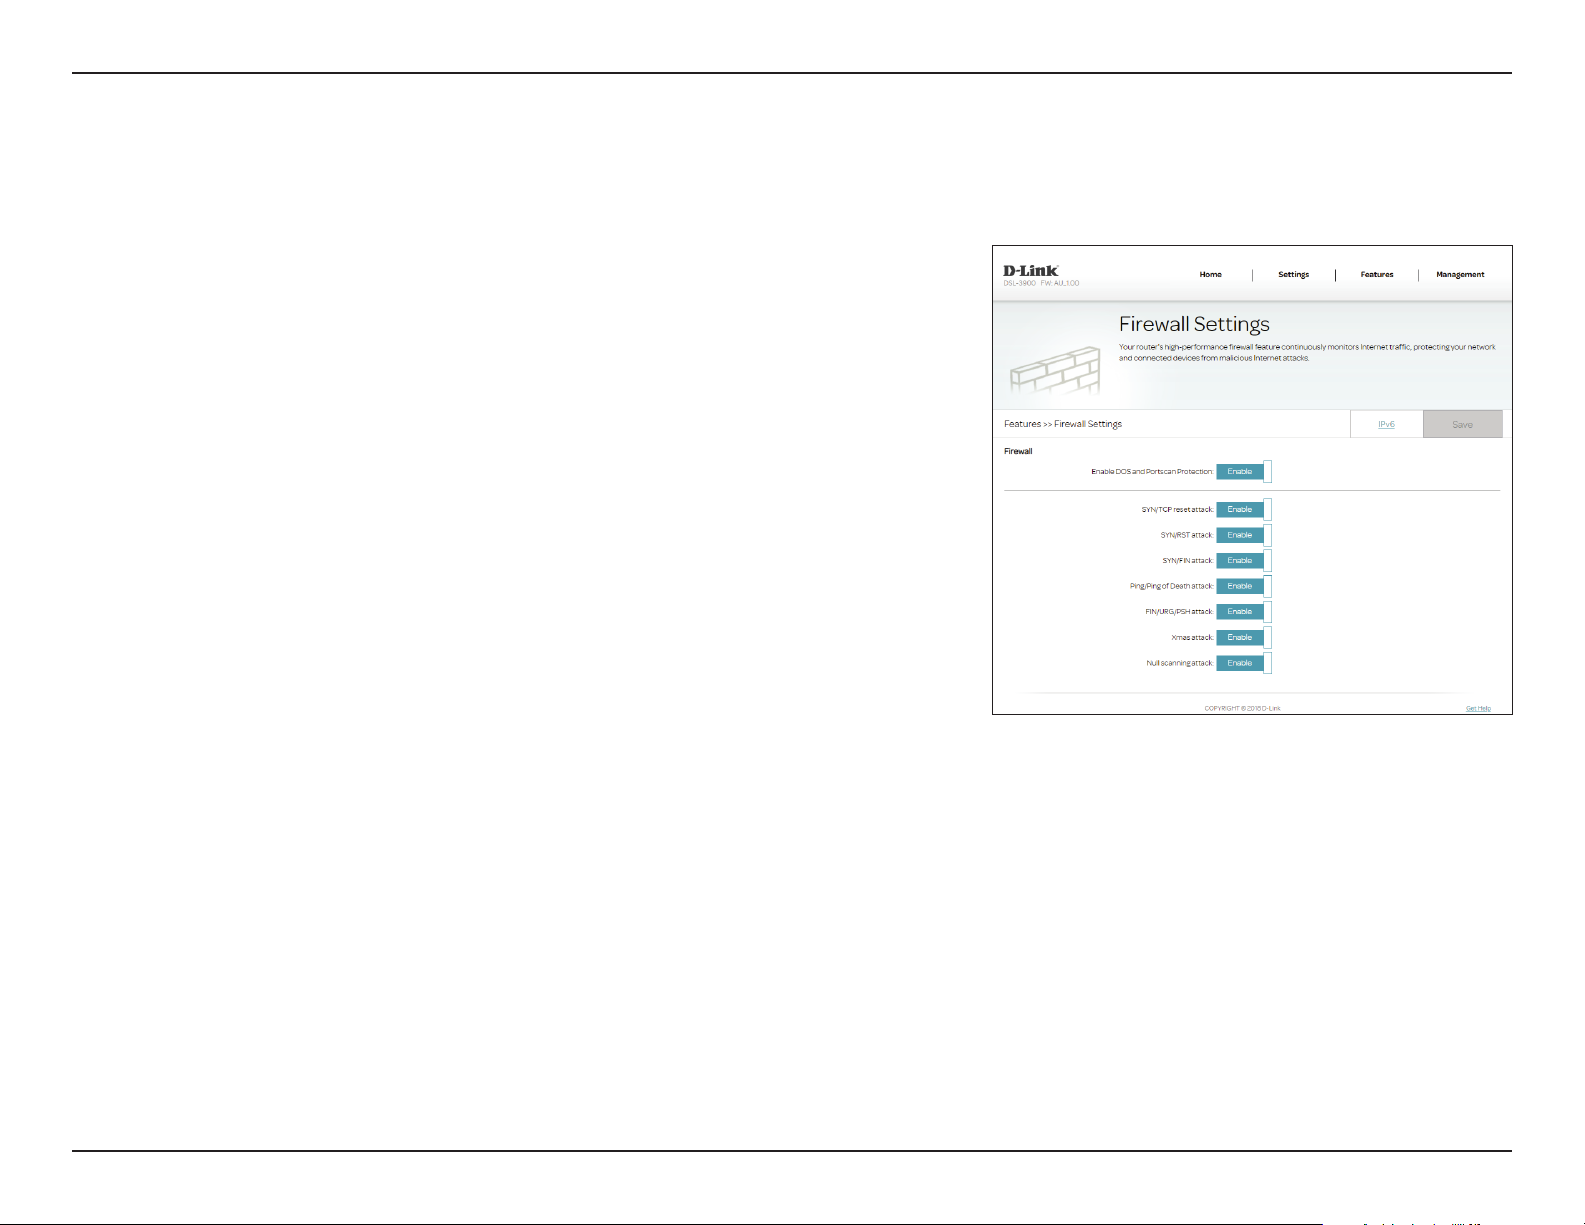
The router’s rewall protects your network from malicious attacks over the
Internet. To access this page, click Firewall from the Features menu on the
bar on the top of the page. It is recommended to leave all values at their
default Enable setting.
50D-Link DSL-3900 User Manual
Page 55
Section 4 - Conguration
Application
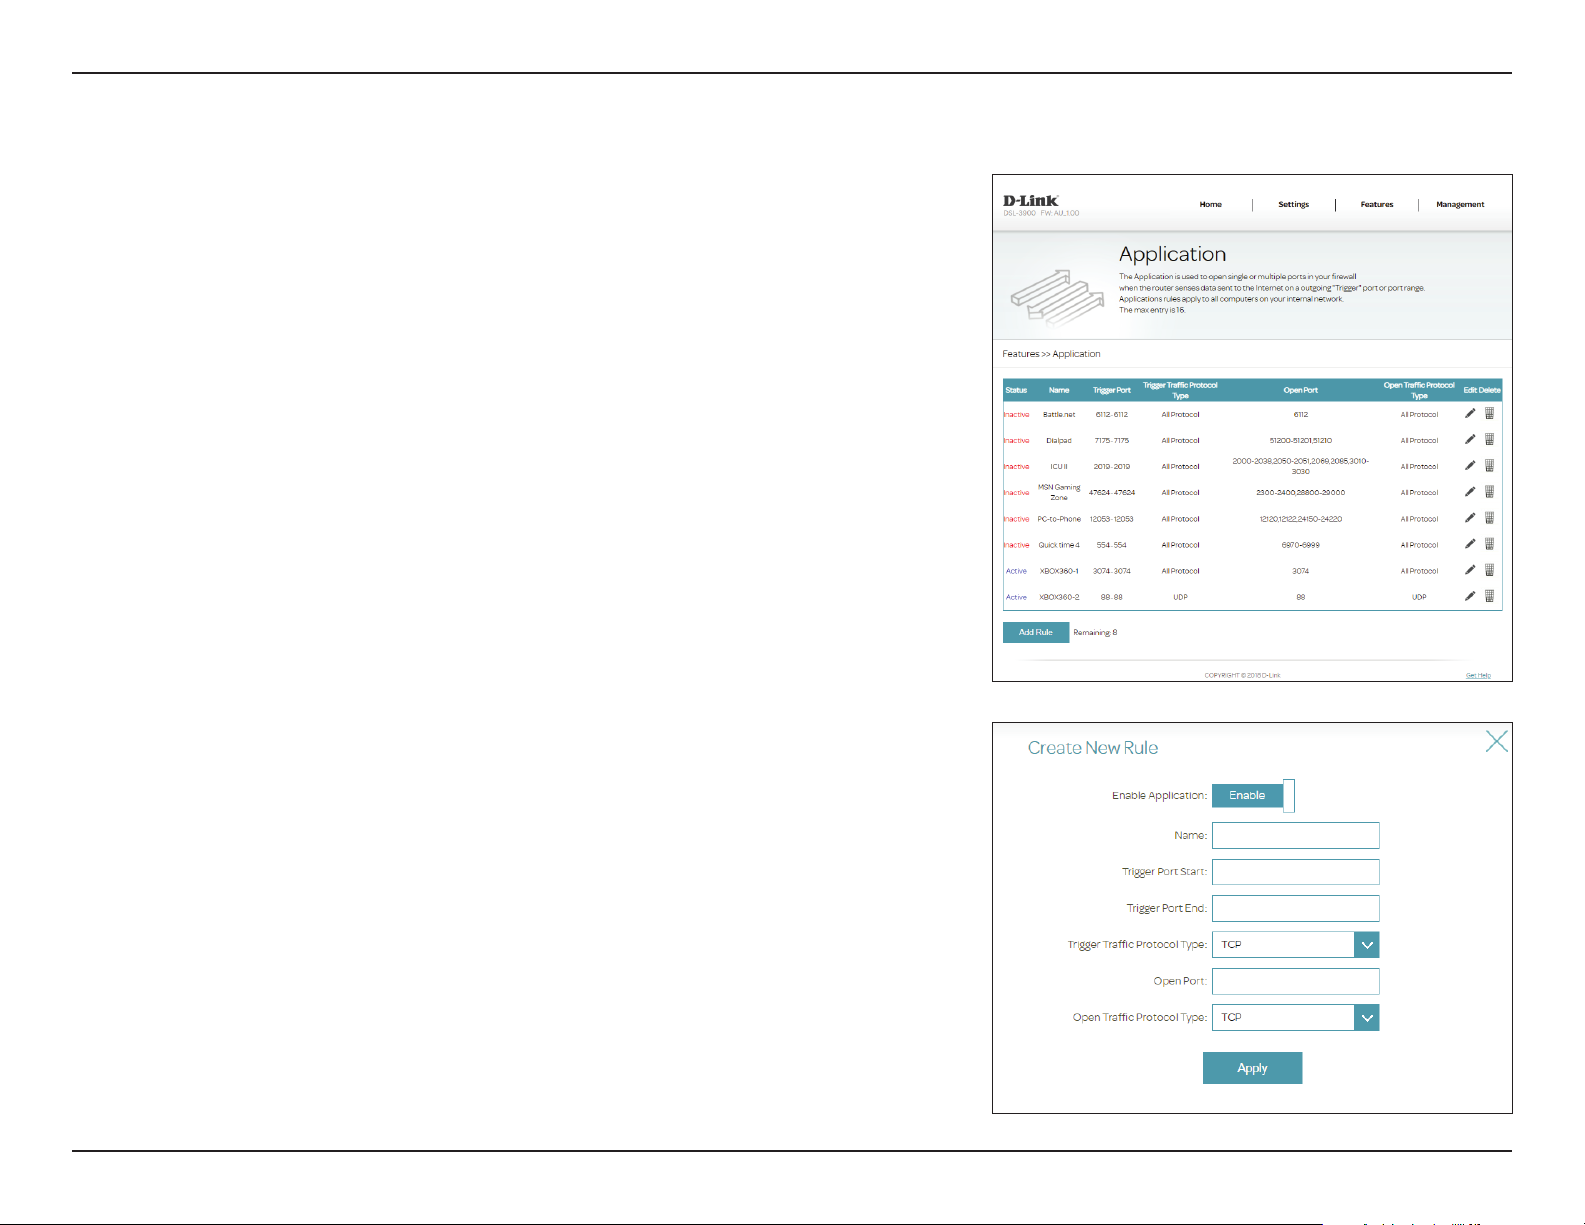
Port triggering allows ports to be opened when trac is detected on specied
ports. This is used for facilitating communication between applications and
servers behind a NAT rewall. To access this page, click Application from the
Features menu on the bar on the top of the page.
The currently dened Application rules are displayed in the table. Some
commonly used Applications are pre-congured by default. You may create
up to eight application rules. If you wish to remove an application rule, click
on its trash can icon in the Delete column. If you wish to edit an application
rule, click on its pencil icon in the Edit column. If you wish to create a new
application rule, click the Add Rule button.
Create New Rule
Enable
Application:
Name: Enter a name for this application.
Trigger Port Start: Enter the starting port range trac will be forwarded from.
Trigger Port End: Enter the ending port range trac will be forwarded from.
Trigger Trac
Protocol Type:
Open Port: Enter the port or port range to open once triggered.
Open Trac
Protocol Type:
Enable or disable the Application rule.
Select the protocol to trigger this rule: TCP, UDP, or All Protocol.
Select the protocol to trigger this rule: TCP, UDP, or All Protocol.
Click Apply when you are done.
51D-Link DSL-3900 User Manual
Page 56
Section 4 - Conguration
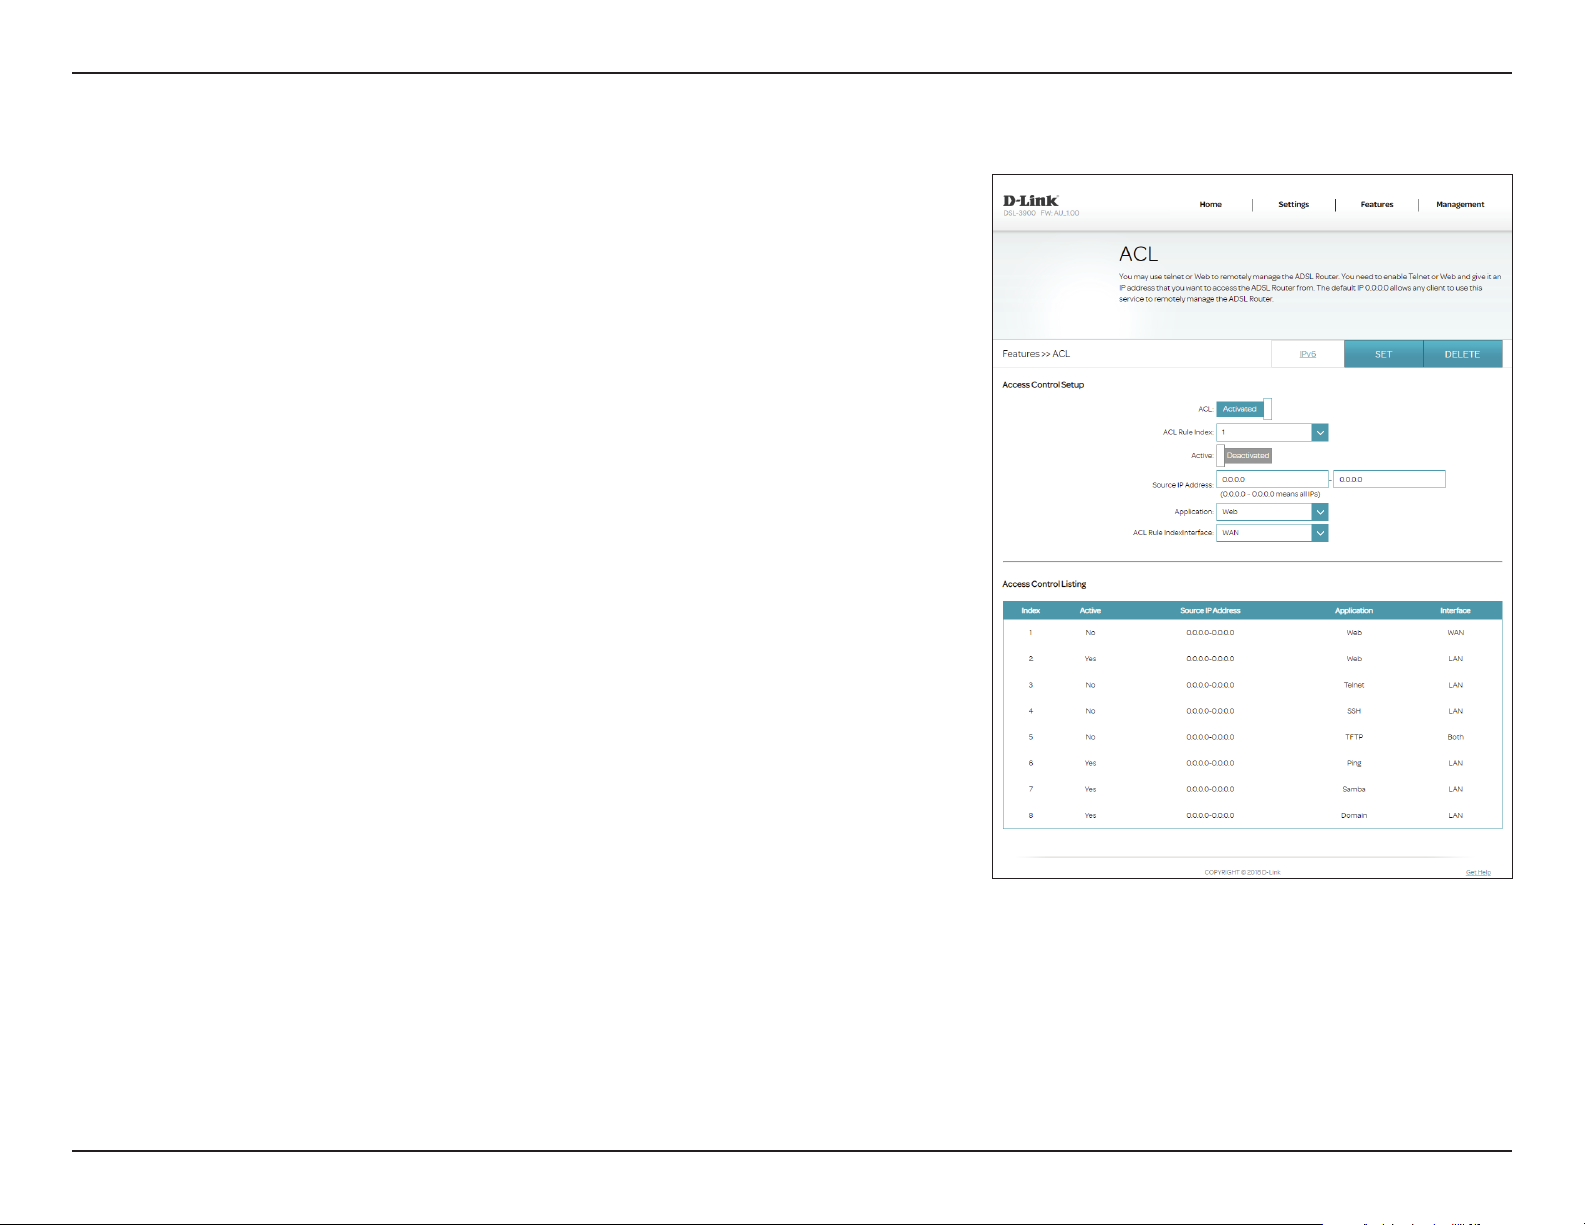
ACL
The Access Control List (ACL) page allows you to enable or disable various
services from being used on the LAN or WAN side. To access this page, click
ACL from the Features menu on the bar on the top of the page.
Access Control Setup
ACL: Activate or deactivate ACL.
ACL Rule Index: The ACL Rule Index number. Chose from 1 to 16.
Active: Activate or deactivate the individual ACL rule.
Service IP address: Enter the IP address range to apply the rule to.
Application: Select a pre-dened service.
ACL Rule
IndexInterface:
Select the interface from the drop down menu to apply this access
control list rule to.
Access Control Listing
A list of the currently dened Access Control List rules is displayed here. Click
the ACL Rule Index number from the drop-down menu above to modify one.
Click SET when you are done. Click DELETE to remove one from the index.
52D-Link DSL-3900 User Manual
Page 57
Section 4 - Conguration
Features
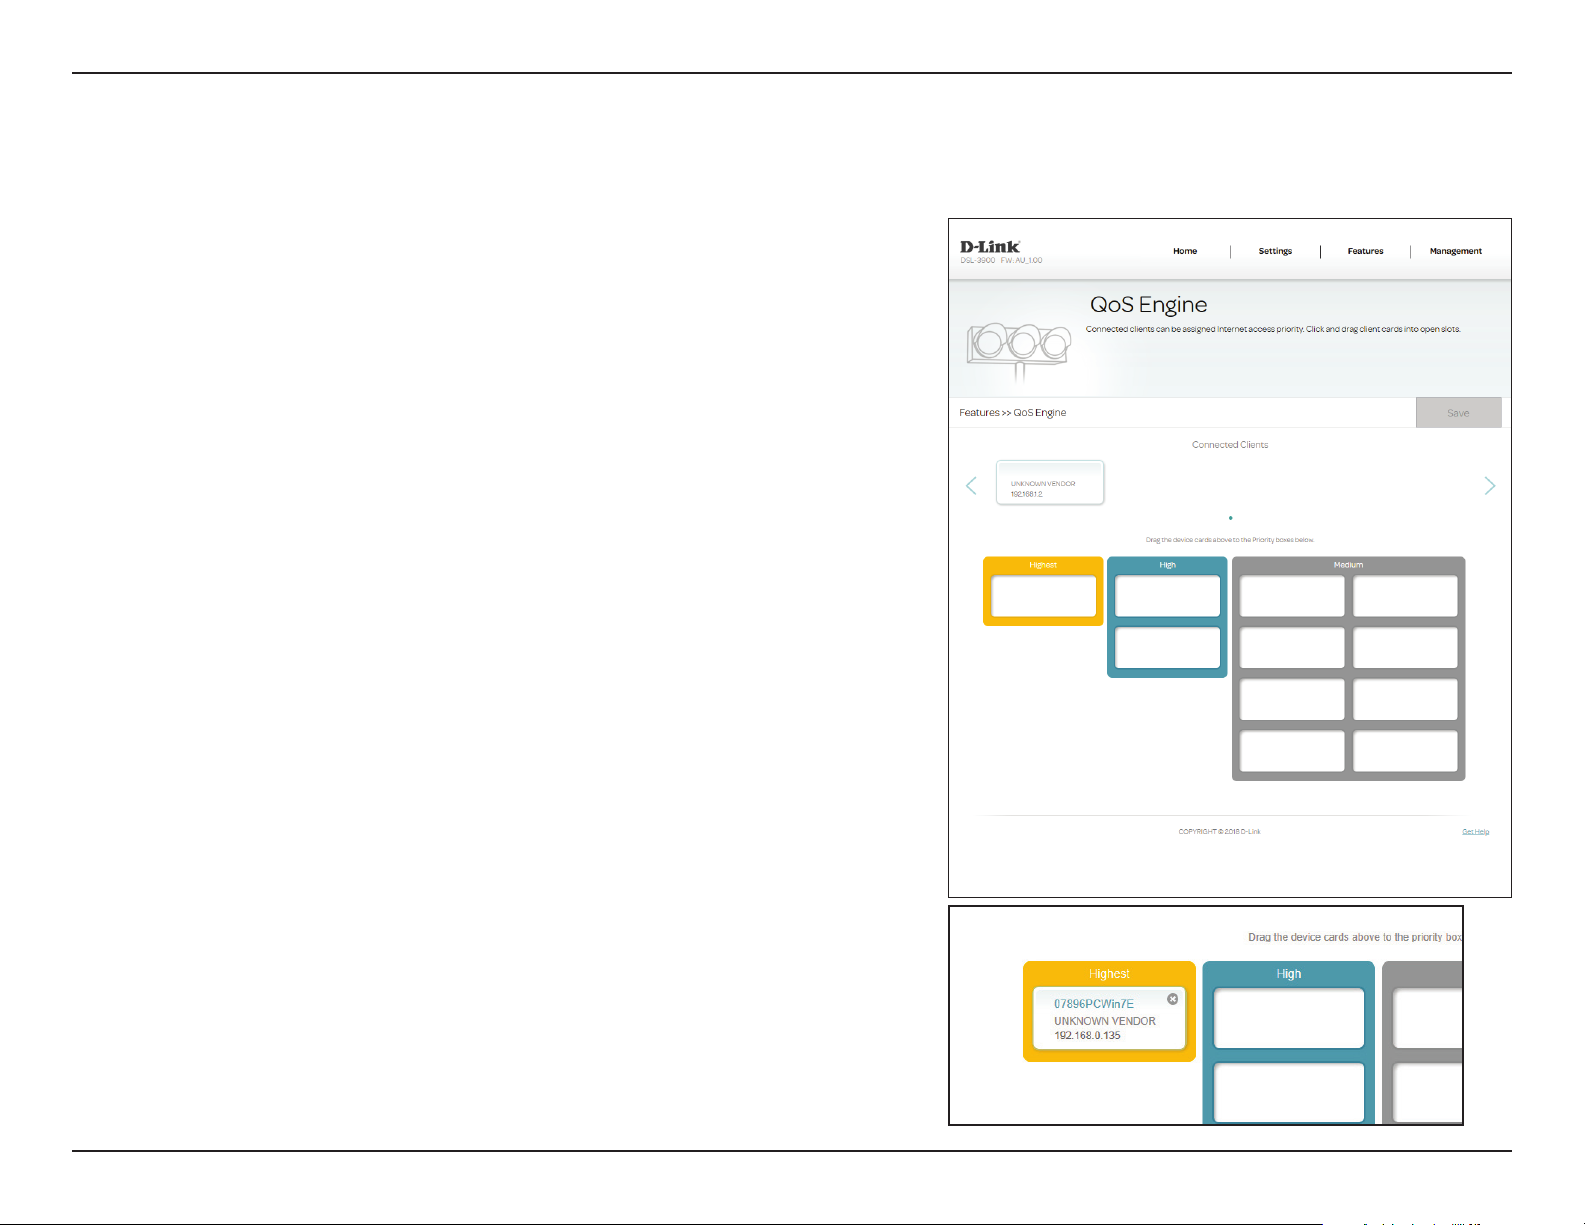
QoS Engine
This section will allow you to prioritize particular clients over others, so that those
clients receive higher bandwidth. For example, if one client is streaming a movie
and another is downloading a non-urgent le, you might wish to assign the former
device a higher priority than the latter so that the movie streaming is not disrupted
by the trac of the other devices on the network.
In the Features menu on the bar on the top of the page, click QoS Engine.
Under All Devices, you will see device cards representing each connected client. If
some are o-screen, you can use the < and > buttons to scroll through the cards.
A maximum of one device can be assigned Highest priority.
A maximum of two devices can be assigned High priority.
A maximum of eight devices can be assigned Medium priority.
If no devices are explicitly assigned a priority, they will all be treated with equal
priority. If some devices are not assigned a priority and others are, the unassigned
devices will be treated with the lowest priority.
To assign a priority level to a device, drag the device card from the All Devices list
over an empty slot and release the mouse button. The card will remain in the slot.
If you want to remove a priority assignment from a device and return it to the All
Devices list, click the cross icon in the top right of the device card.
Click Save when you are done.
53D-Link DSL-3900 User Manual
Page 58
Section 4 - Conguration
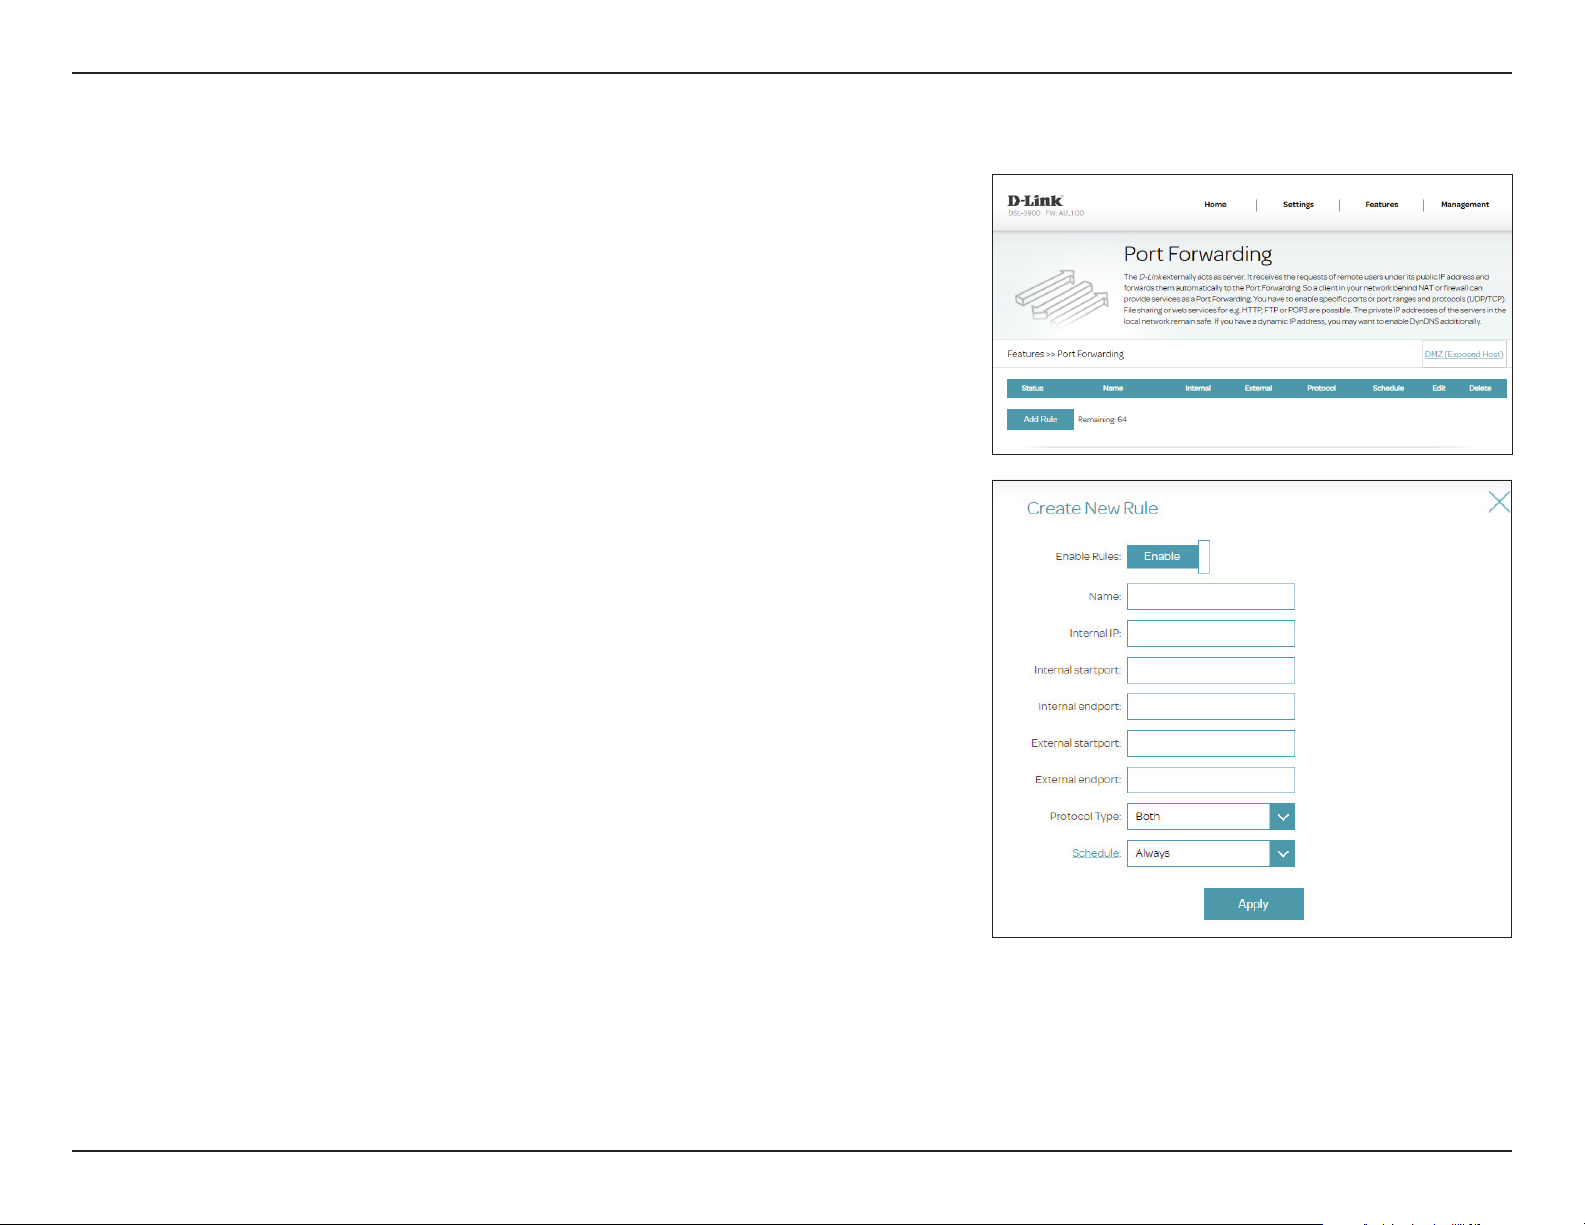
Port Forwarding
Port forwarding allows you to specify a port or range of ports to open
for specic devices on the network. This might be necessary for certain
applications to connect through the router. To access this page, click Port
Forwarding from the Features menu on the bar on the top of the page.
If you wish to remove a rule, click on its trash can icon in the Delete column. If
you wish to edit a rule, click on its pencil icon in the Edit column. If you wish to
create a new rule, click the Add Rule button. Click Save when you are done. If
you edit or create a rule, the following options will appear:
Create New Rule
Enable Rules: Enable or disable the port forwarding rules.
Name: Enter a name for the rule.
Internal IP: Enter the IP address of the computer on your local network that you
want to allow the incoming service to.
Internal startport: Enter the starting internal port that you want to open.
Internal endpoint: Enter the ending internal port that you want to open.
External startport: Enter the starting external port that you want to open.
External endpoint: Enter the ending external port that you want to open.
Protocol Type: Select TCP, UDP, or Both.
54D-Link DSL-3900 User Manual
Page 59
Section 4 - Conguration
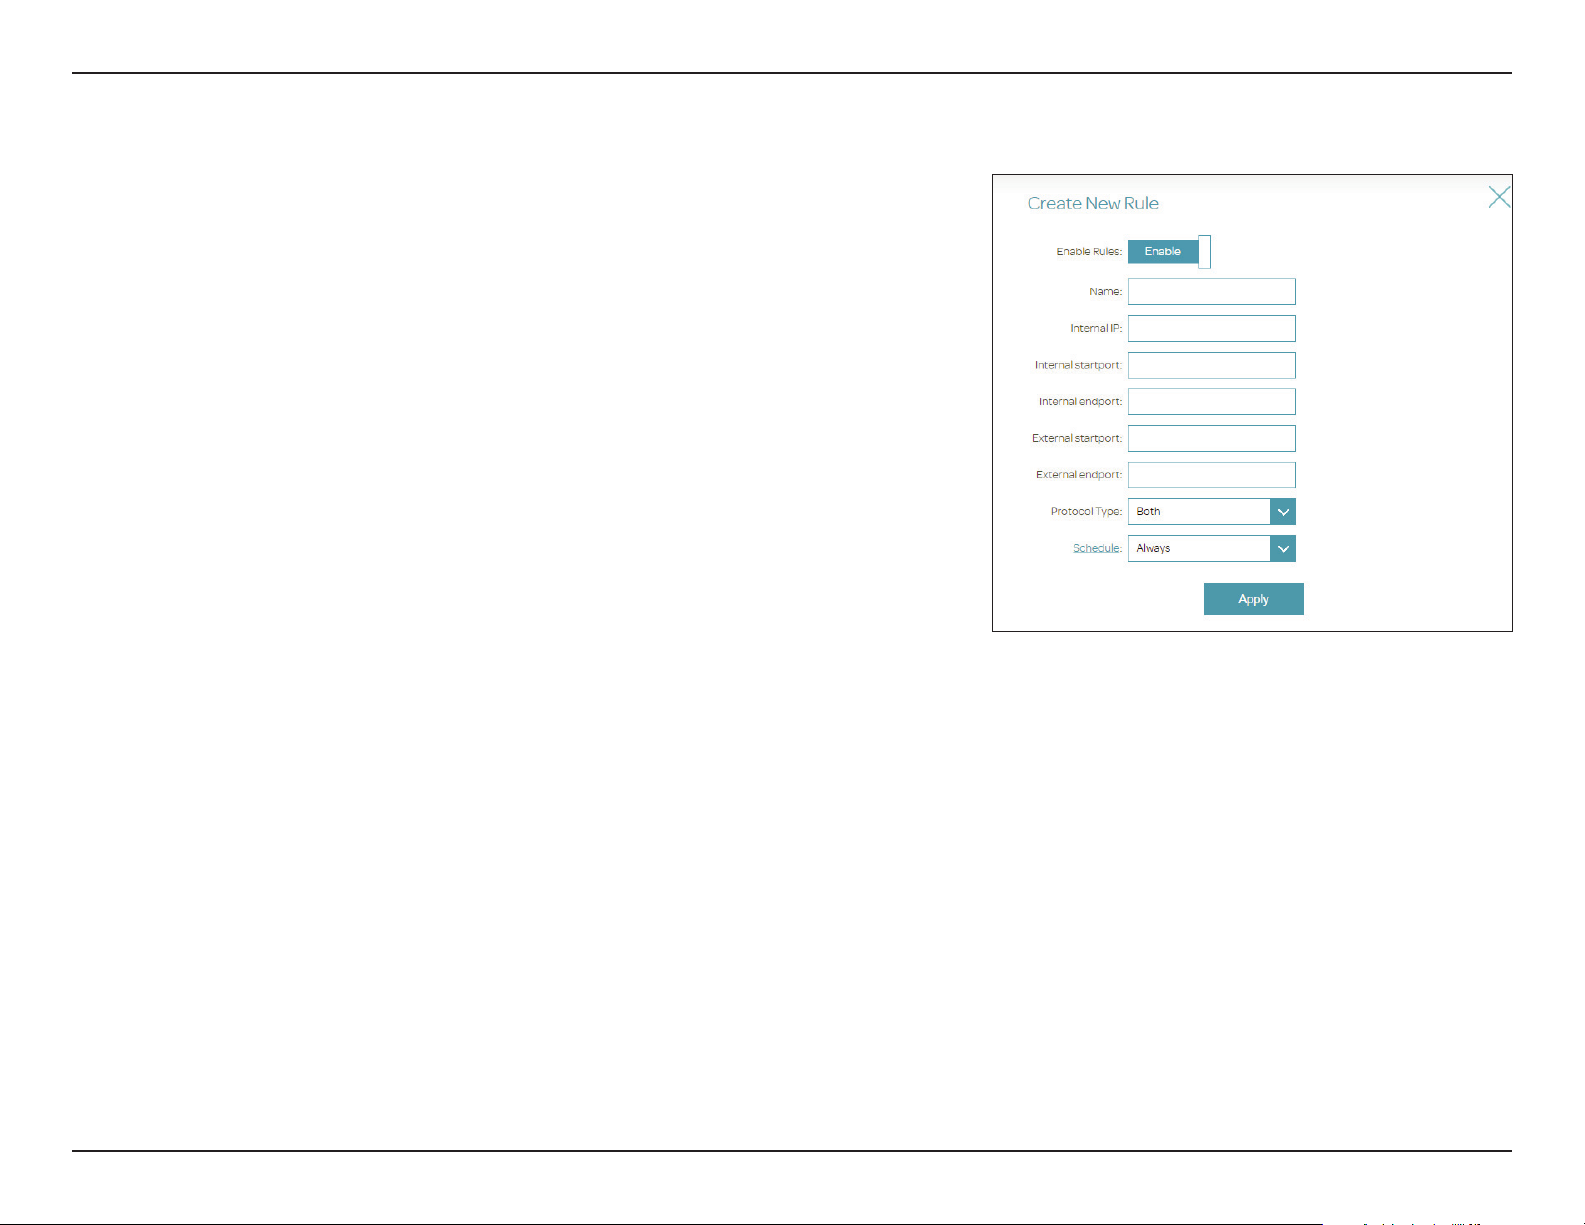
Schedule: Use the drop-down menu to select the time schedule that the rule will
be enabled on. The schedule may be set to Always, or you can create
your own schedules in the Schedules section. Refer to Schedule on
page 65 for more information.
Click Apply when you are done.
Port Forwarding (continued)
55D-Link DSL-3900 User Manual
Page 60
Section 4 - Conguration
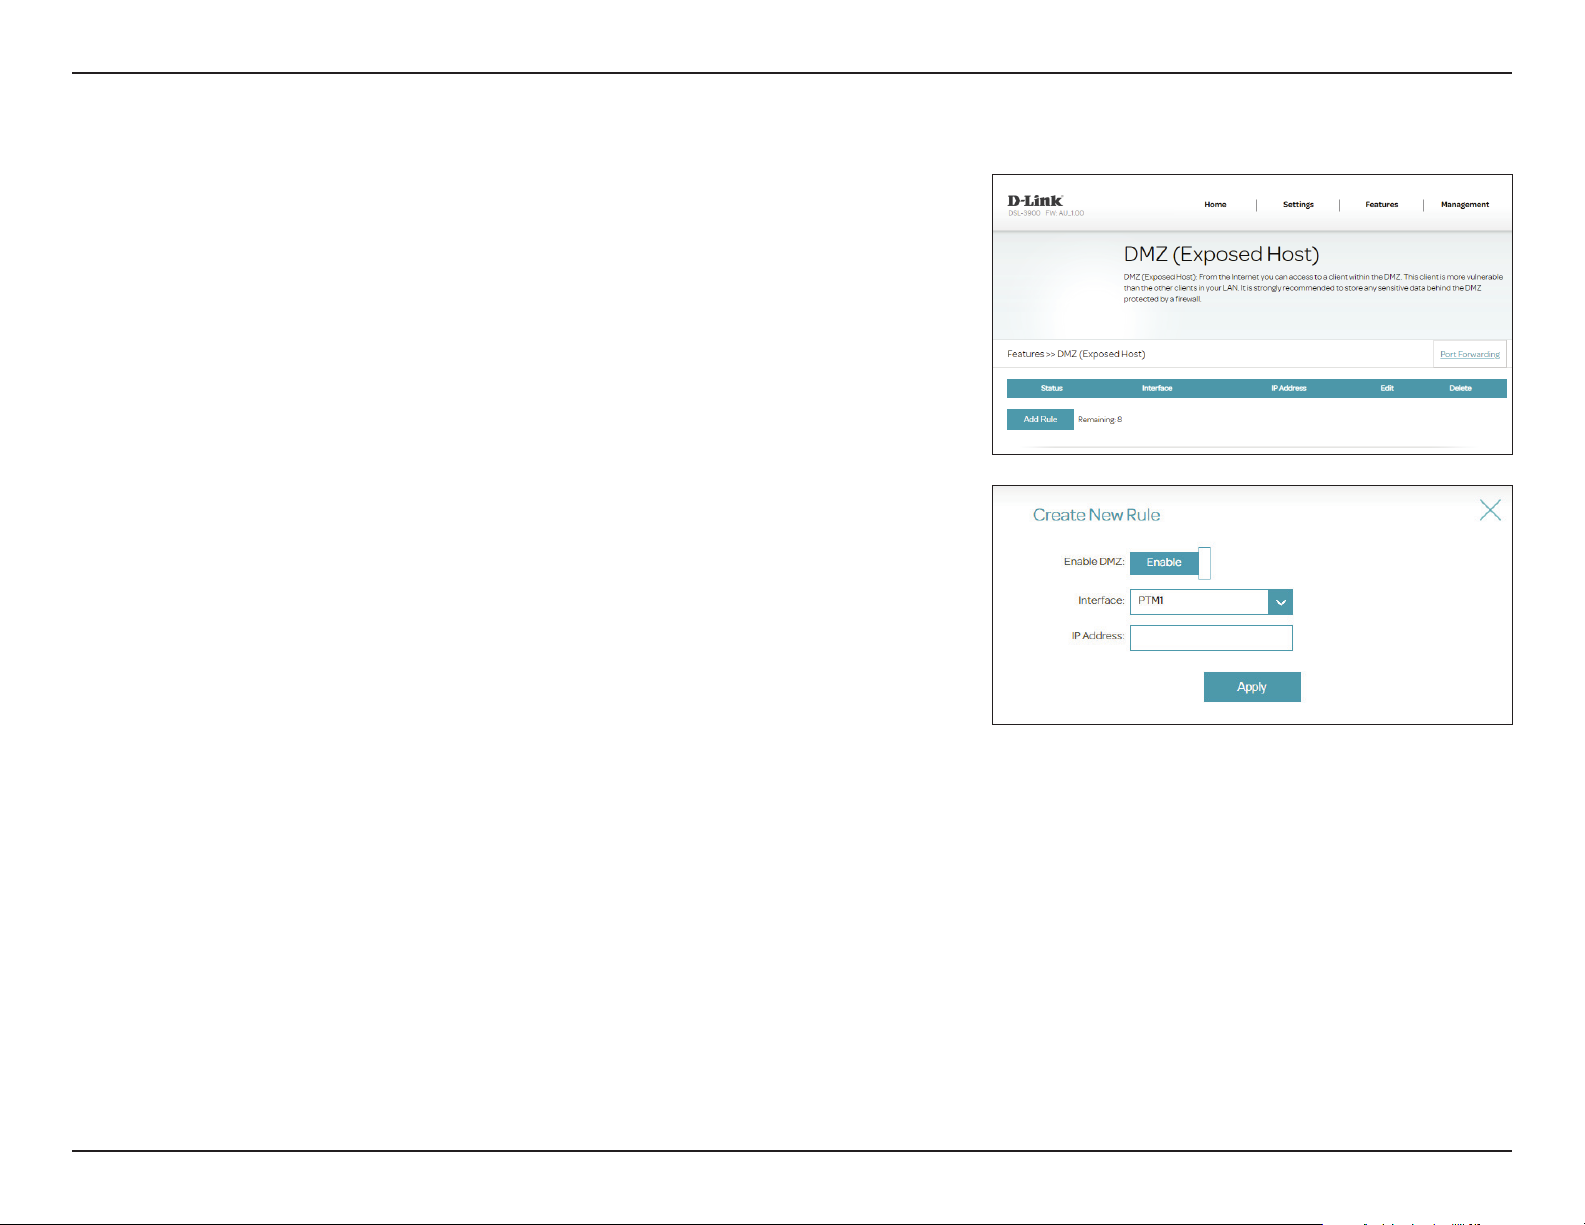
DMZ (Exposed Host)
This page allows you to manually congure the router’s DMZ settings. To
access this page, click Port Forwarding from the Features menu on the
bar on the top of the page and click DMZ (Exposed Host). Since some
applications are not compatible with NAT, the device supports the use of a
DMZ IP address for a single host on the LAN. This IP address is not protected by
NAT and it is visible on the Internet with the correct type of software.
Note: Any client PC in the DMZ is exposed to various types of security risks. If
you use DMZ, take measures (such as client-based virus protection) to protect
the remaining client PCs on your LAN from possible contamination through
DMZ.
The devices currently placed in the DMZ are displayed in the table. You may
place up to 8 devices in the DMZ. If you wish to remove a DMZ rule, click on its
trash can icon in the Delete column. If you wish to edit a DMZ rule, click on its
pencil icon in the Edit column. If you wish to create a new DMZ rule, click the
Add Rule button.
Create New Rule
Enable DMZ: Enable or disable the DMZ rule.
Interface: Select the interface to apply the rule to.
IP Address: Enter the IP address of the computer on your local network that you
want to place in the DMZ.
Click Apply when you are done.
56D-Link DSL-3900 User Manual
Page 61
Section 4 - Conguration
IP/MAC/Web Filtering
IP Filter
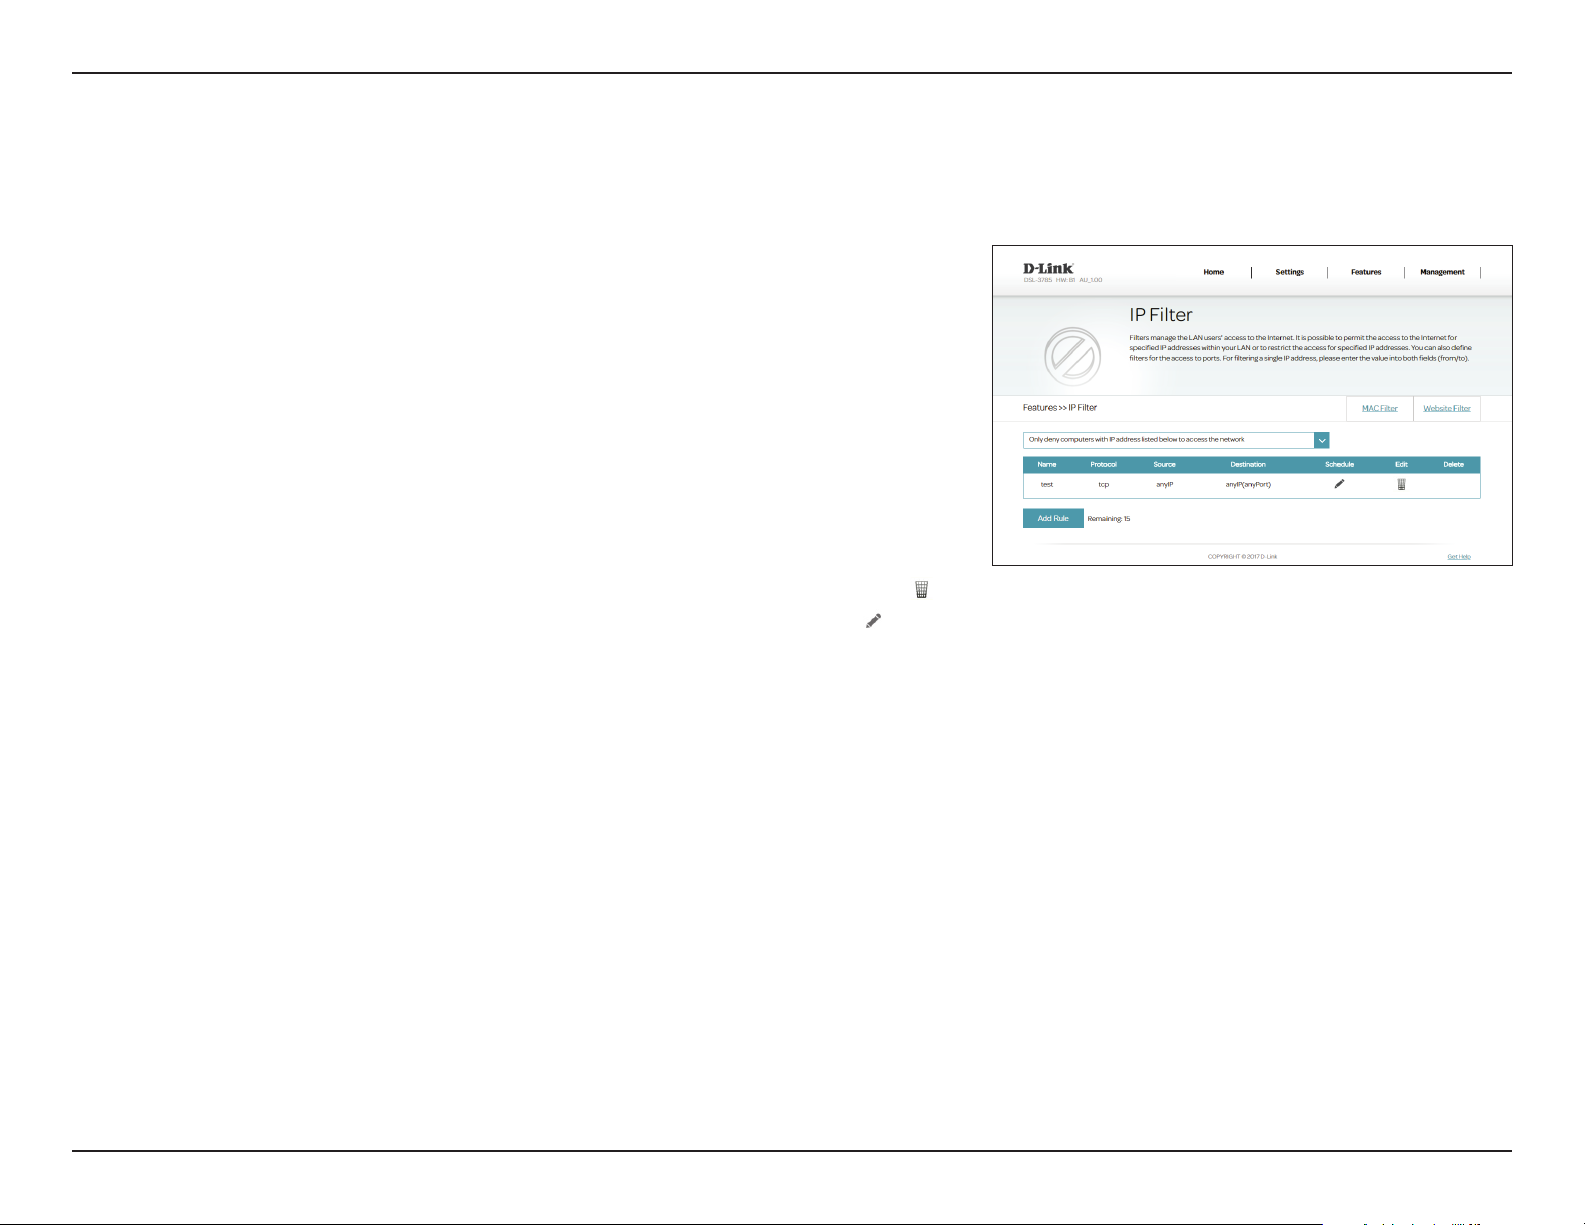
The IP Filters page manages LAN users' access to the Internet. It is possible
to permit access to the Internet for specied IP addresses within your LAN or
to restrict access for specied IP addresses. You can also dene lters for port
access. To access this page, click IP/MAC/Web Filtering from the Features
menu on the bar on the top of the page.
You may choose from the following options: Disable IP Filters, Only allow
computers with IP addresses listed below access to the network, or Only
deny computers with IP addresses listed below access to the network.
The currently dened IP lters are displayed in the table. You may dene up to
16 IP ltering rules. If you wish to remove a rule, click on its trash can icon (
in the Delete column. If you wish to edit a rule, click on its pencil icon (
Edit column. If you wish to create a new rule, click the Add Rule button.
)
) in the
The following page contains a detailed description of rule creation.
57D-Link DSL-3900 User Manual
Page 62
Section 4 - Conguration
IP Filter (continued)
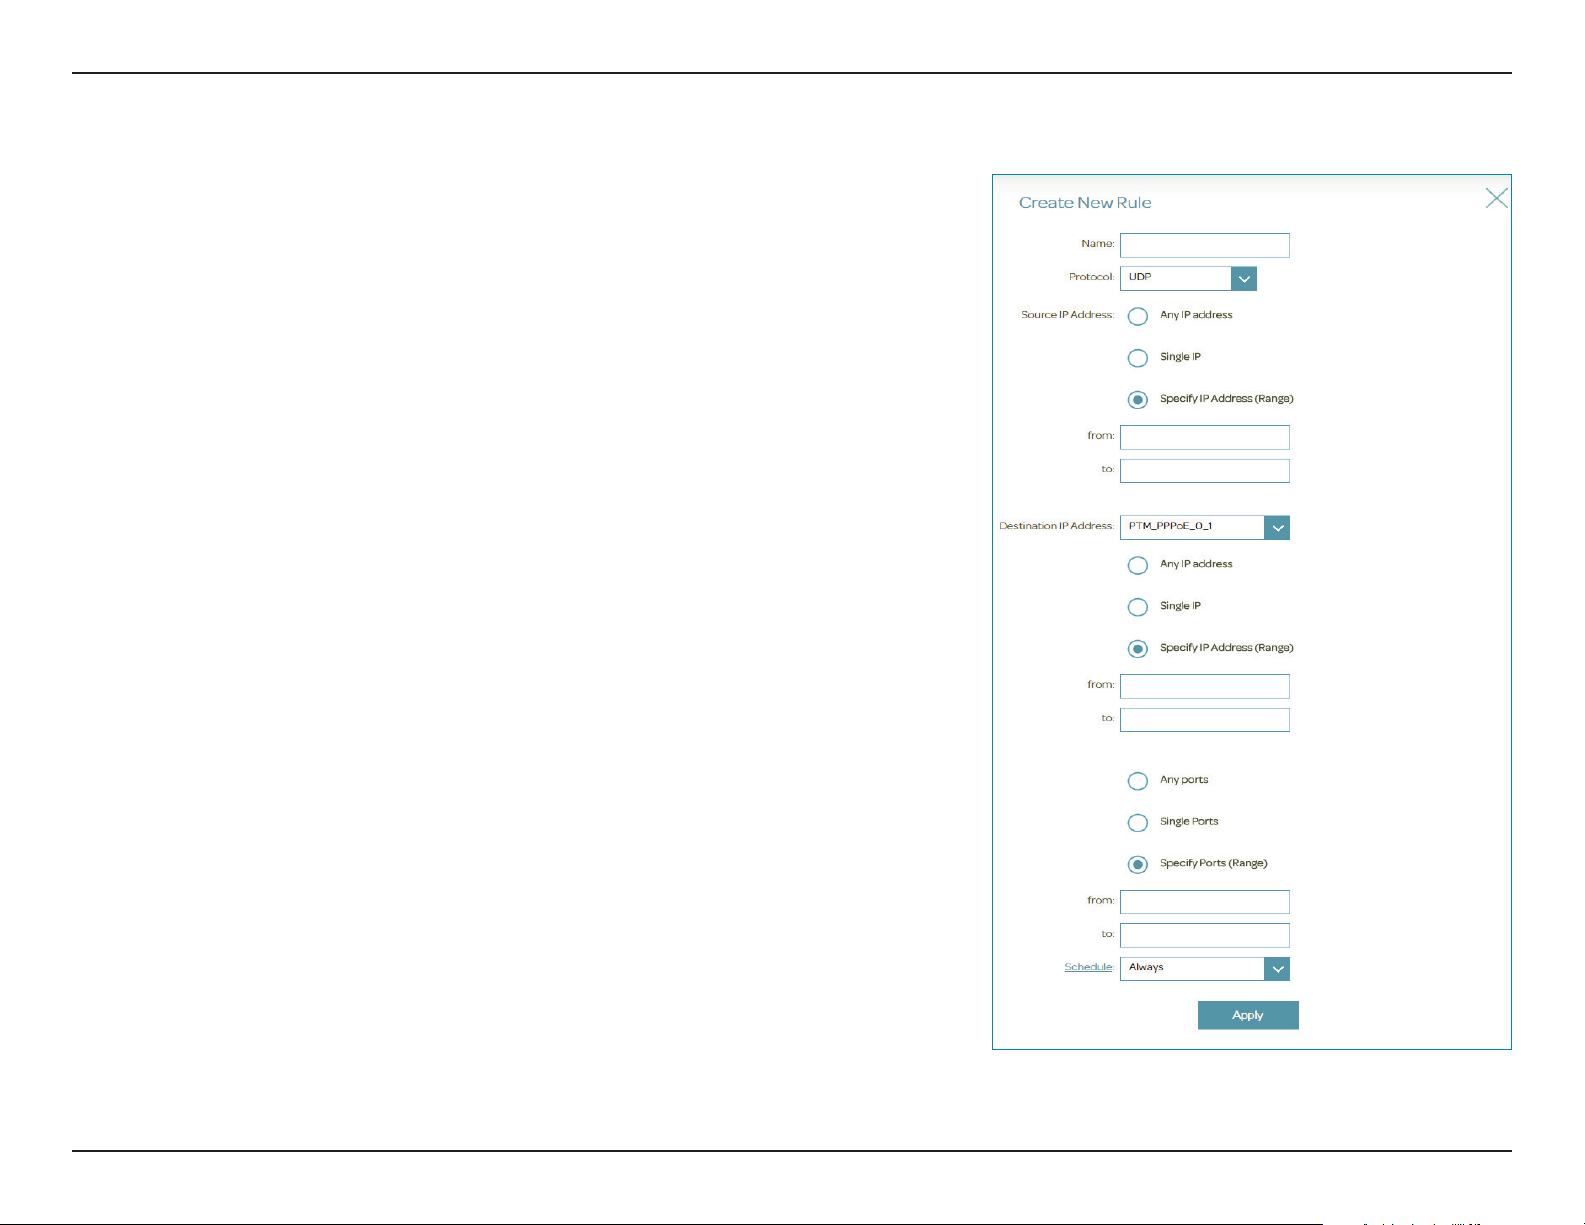
If you enabled IP ltering, click Add Rule to create a new IP ltering rule.
Create New Rule
Name: Create a name for the rule.
Protocol: Select the protocol type: Any, UDP, TCP, or ICMP.
Source IP Address: Select Any IP address, Single IP, or Specify IP Address (Range). If
you selected Single IP or Specify IP Address (Range), enter the IP
address into the From and To elds.
Destination IP
Address:
If you selected UDP or TCP as the Protocol above, you may lter Any Port, a Single Port,
or Specify a Port Range.
Schedule: Use the drop-down menu to select the time schedule that the rule will
Select the destination to apply the rule to: PVC1, PTM, or WAN.
Select Any IP address, Single IP, or Specify IP Address (Range). If
you selected Single IP or Specify IP Address (Range), enter the IP
address into the From and To elds.
be enabled on. The schedule may be set to Always, or you can create
your own schedules in the Schedules section. Refer to Schedule on
page 65 for more information.
Click Apply when you are done.
58D-Link DSL-3900 User Manual
Page 63
Section 4 - Conguration
MAC Filter
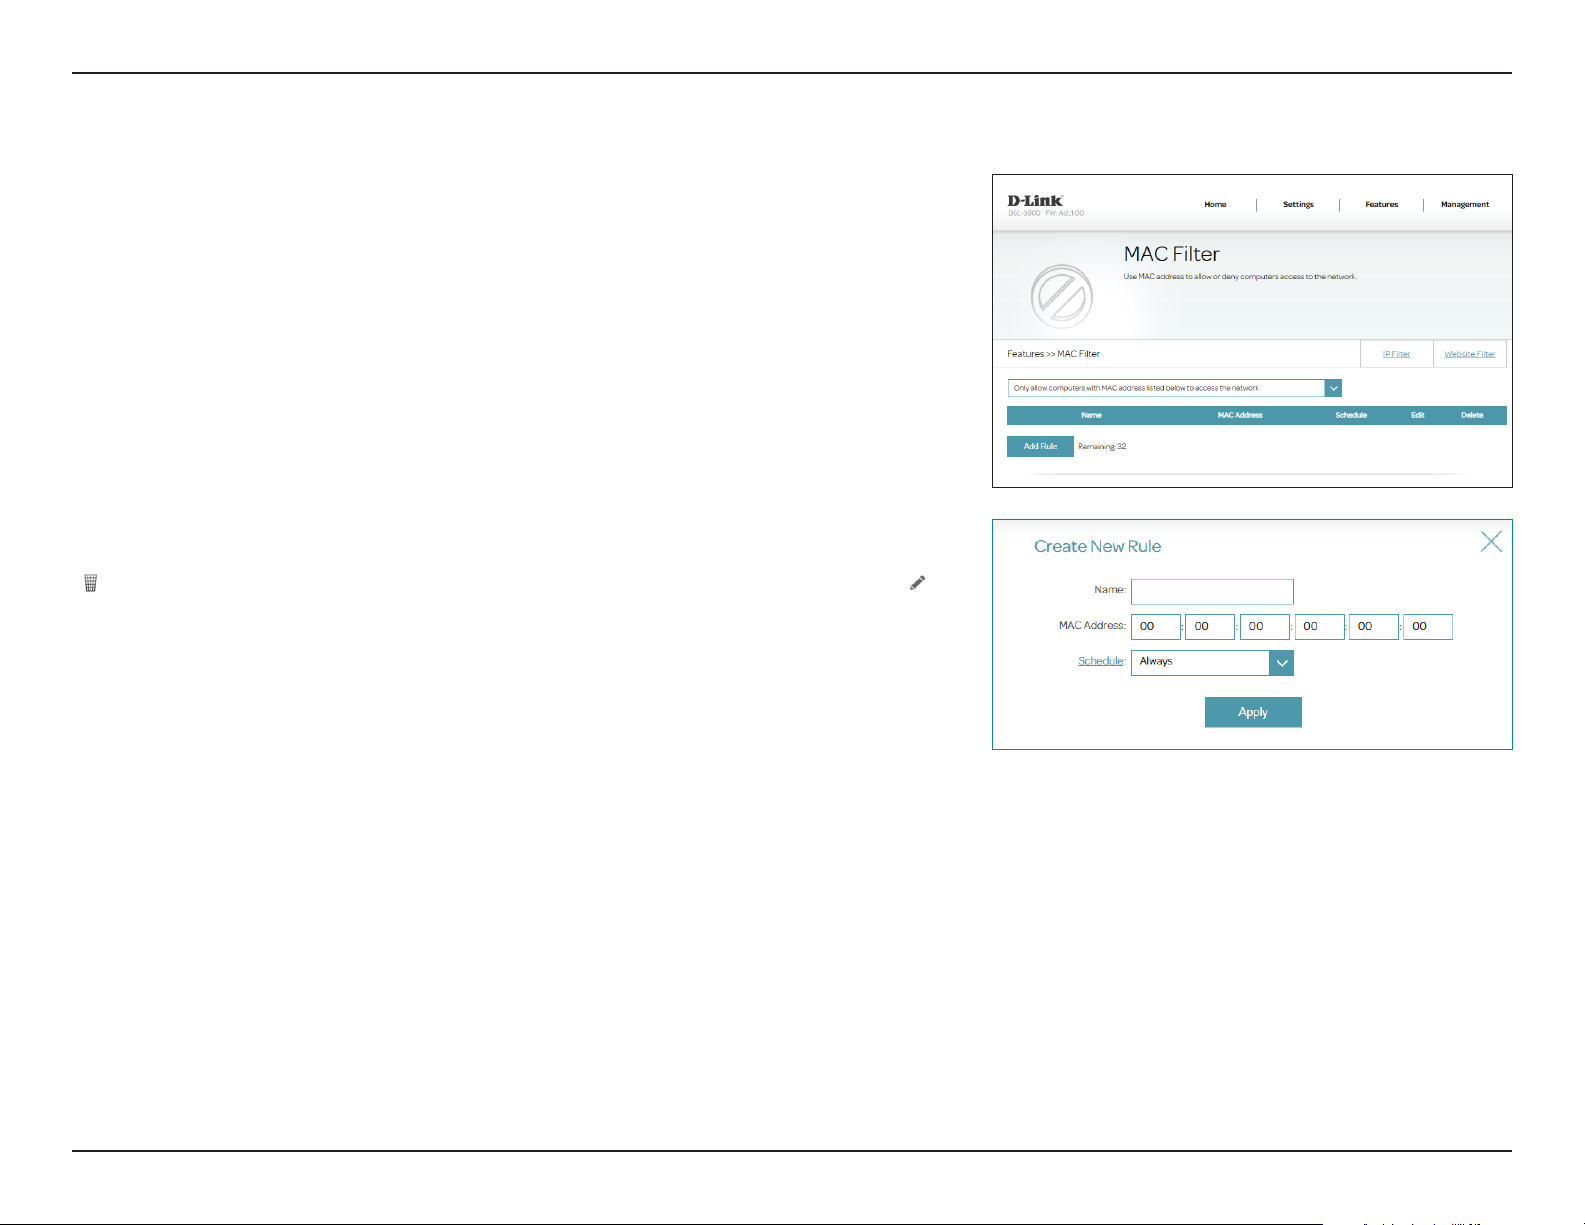
The MAC lter is used to restrict or allow certain types of Ethernet Frames
through the gateway based on their source or destination MAC address. These
lters are helpful in securing or restricting trac on your local network. To
access this page, click IP/MAC Filtering from the Features menu on the bar
on the top of the page and then click the MAC Filter link. To return to the IP
Filter page, click IP Filter.
You may choose from the following options: Disable MAC Filters, Only allow
computers with MAC addresses listed below access to the network, or
Only deny computers with addresses listed below access to the network.
The currently dened MAC lters are displayed in the table. You may dene up
to 32 MAC ltering rules. If you wish to remove a rule, click on its trash can icon
) in the Delete column. If you wish to edit a rule, click on its pencil icon ( ) in
(
the Edit column. If you wish to create a new rule, click the Add Rule button.
If you enable MAC ltering, click Add Rule to create a new MAC ltering rule.
Create New Rule
Name: Create a name for the rule.
MAC Address: Enter the MAC address to apply the rule to.
Schedule: Use the drop-down menu to select the time schedule that the rule will
be enabled on. The schedule may be set to Always, or you can create
your own schedules in the Schedules section. Refer to Schedule on
page 65 for more information.
Click Apply when you are done.
59D-Link DSL-3900 User Manual
Page 64
Section 4 - Conguration
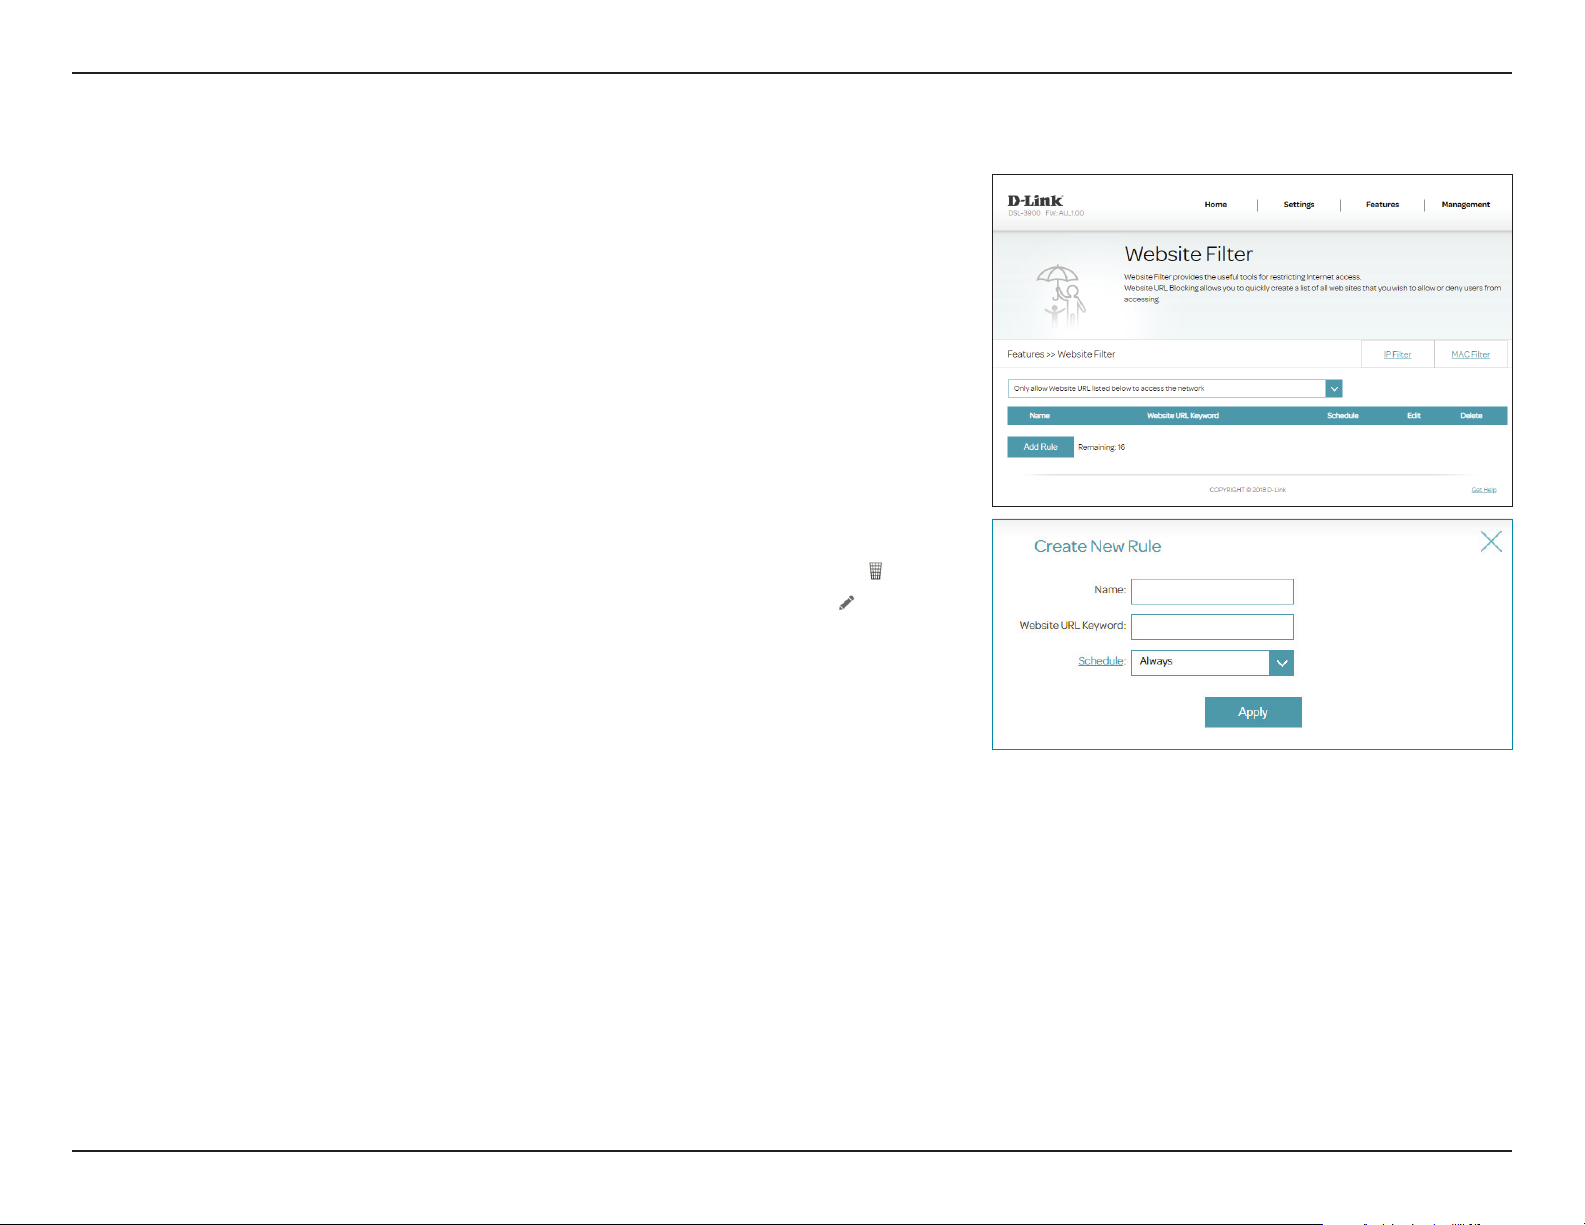
Website Filter
The website lter settings allow you to block access to certain web sites. You
can either create a list of sites to block, or create a list of sites to allow (with all
other sites being blocked). To access this page, click IP/MAC/Web Filtering
from the Features menu on the bar on the top of the page and then click
the Website Filter link. To return to the IP Filter page, click IP Filter.
If you want to create a list of sites to block, select DENY computers access to
ONLY these sites from the drop-down menu. All other sites will be accessible.
If you want to specify a list of sites to allow, select ALLOW computers access
to ONLY these sites from the drop-down menu. All other sites will be blocked.
You may specify a maximum of 16 web sites. To add a new site to the list, click
Add New Rule. If you wish to remove a rule, click on its trashcan icon (
the Delete column. If you wish to edit a rule, click on its pencil icon (
edit column.
) in
) in the
If you enable Web Filtering, click Add Rule to create a new Web Filtering
rule.
Create New Rule
Name: Create a name for the rule.
Website URL
Keyword:
Schedule: Use the drop-down menu to select the time schedule that the rule will
Enter the Website URL Keyword to apply the rule to.
be enabled on. The schedule may be set to Always, or you can create
your own schedules in the Schedules section. Refer to Schedule on
page 65 for more information.
Click Apply when you are done.
60D-Link DSL-3900 User Manual
Page 65
Section 4 - Conguration
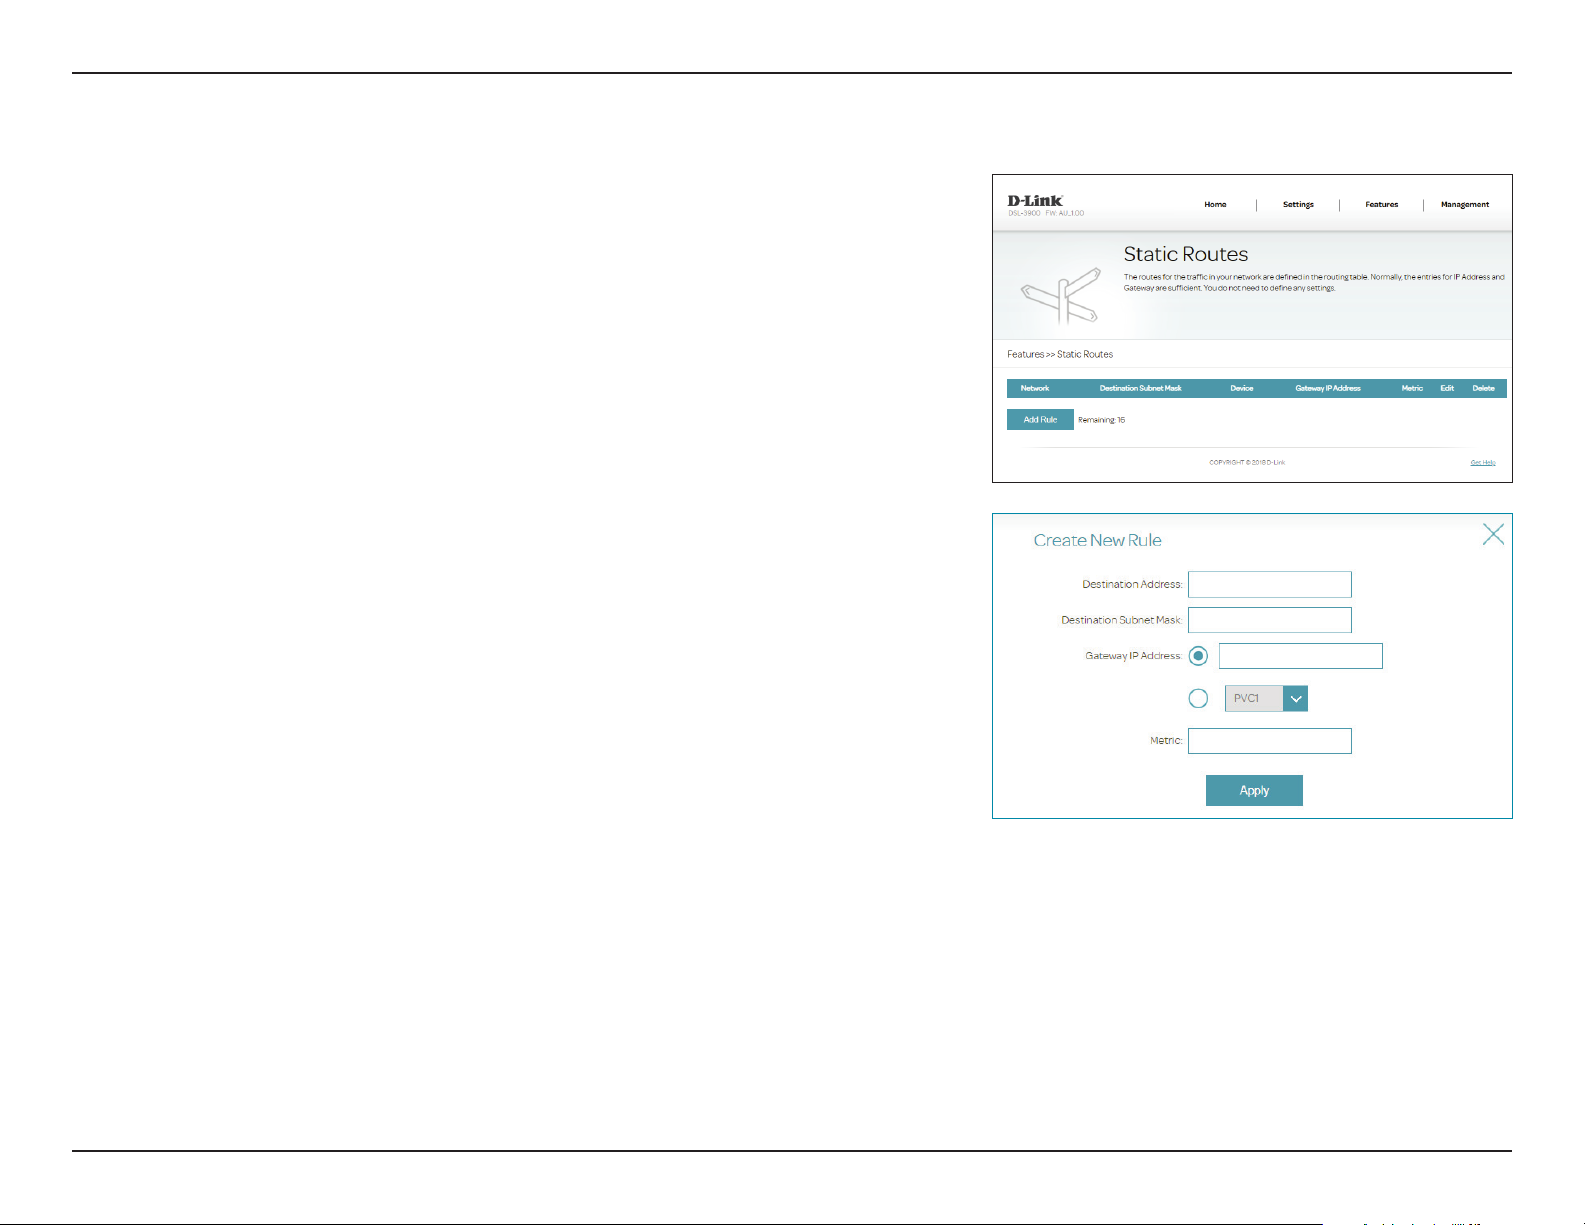
Static Route
The Static Routes section allows you to dene custom routes to control how
data trac is moved around your network. To access this page, click Static
Route from the Features menu on the bar on the top of the page.
If you wish to remove a rule, click on its trash can icon in the Delete column. If
you wish to edit a rule, click on its pencil icon in the Edit column. If you wish to
create a new rule, click the Add Rules button. Click Save when you are done.
If you edit or create a rule, the following options will appear:
Create New Rule
Destination
Address:
Destination
Subnet Mask:
Gateway IP
Address:
Metric: The route metric is a value from 0 to 15 that indicates the cost of
Enter the destination IP address of packets that will take this route.
Enter the destination for this route.
Enter your next hop gateway to be taken if this route is used.
In the drop-down menu, specify the interface the route will transit.
using this route.
Click Apply when you are done.
61D-Link DSL-3900 User Manual
Page 66
Section 4 - Conguration
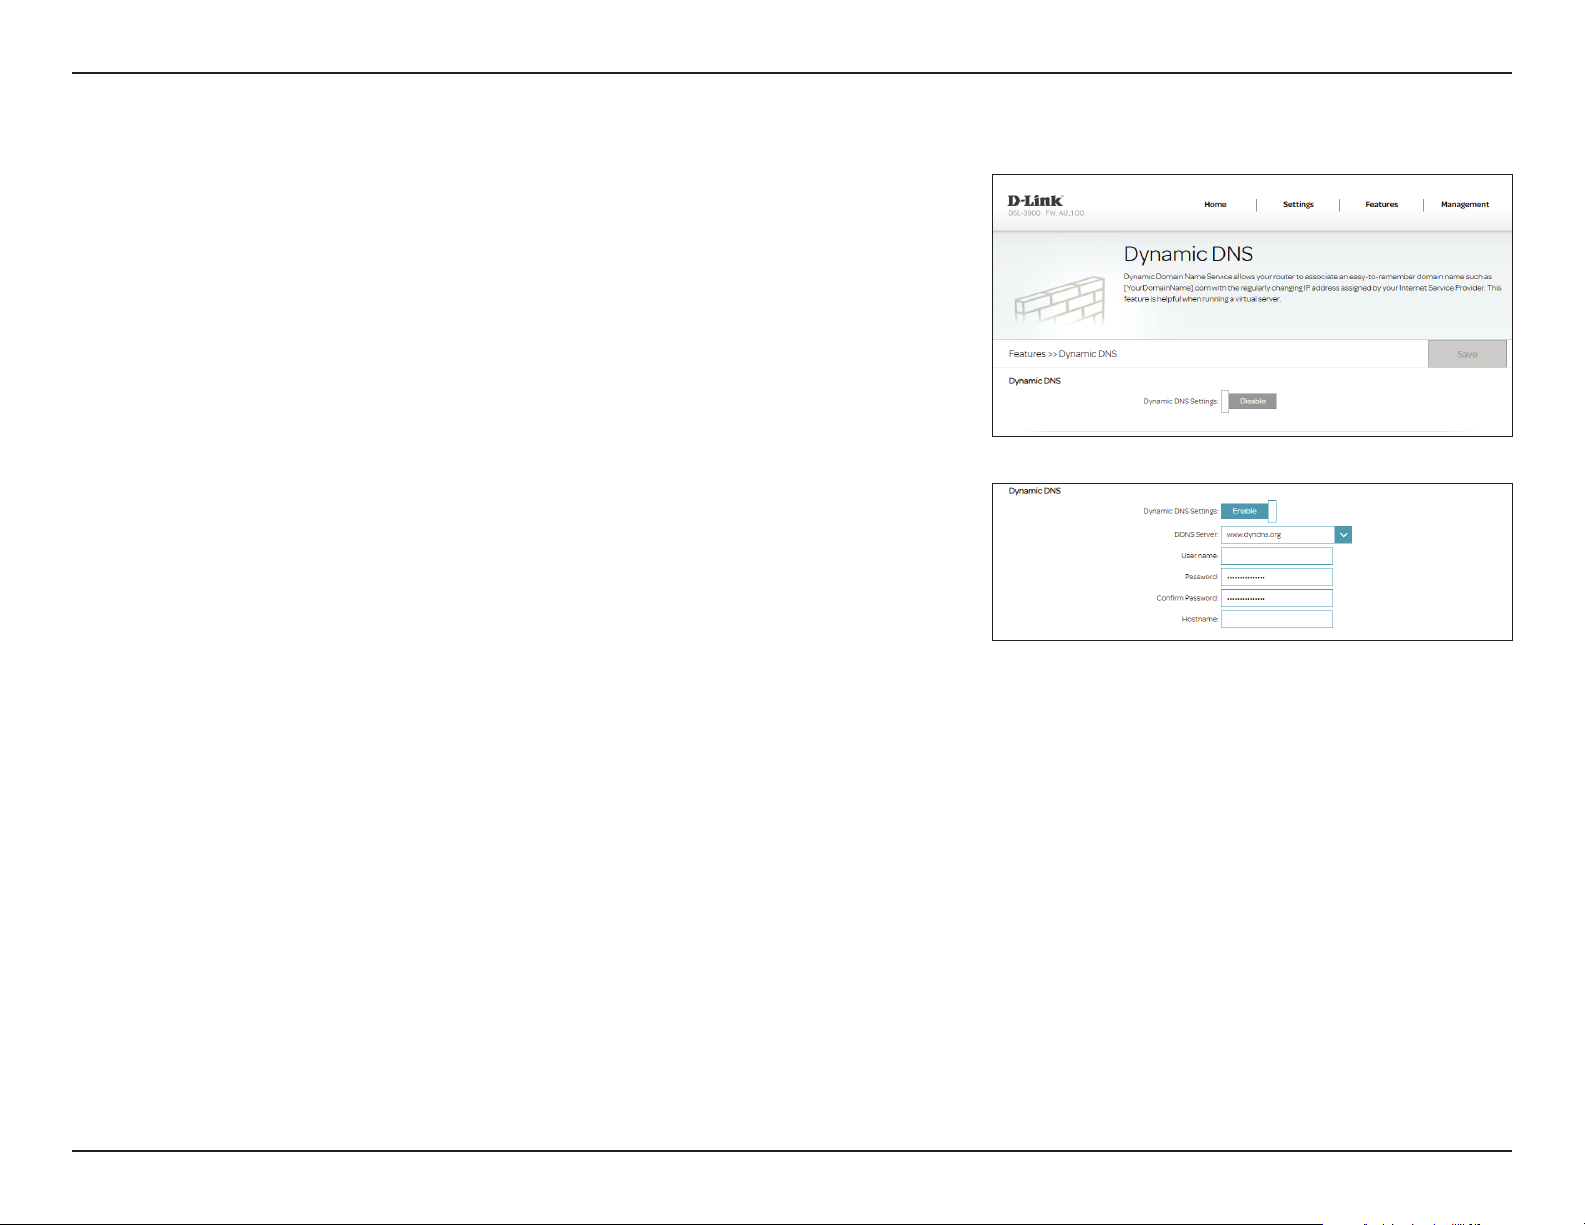
Dynamic DNS
The Dynamic DNS page is used to Most Internet Service Providers (ISPs) assign
dynamic (changing) IP addresses. Using a dynamic DNS service provider,
people can enter your domain name in their web browser to connect to your
server, no matter what your IP address is. To access this page, click Dynamic
DNS from the Features menu on the bar on the top of the page.
Enable Dynamic
DNS:
DDNS Server: Select your DDNS server from the drop-down menu.
Username: Enter your dynamic DNS username.
Password: Enter your dynamic DNS password.
Conrm Password: Enter your dynamic DNS password again.
Host Name: Enter the host name that you registered with your dynamic DNS
Enabling dynamic DNS will reveal further conguration options.
service provider.
Click Save when you are done.
62D-Link DSL-3900 User Manual
Page 67
Section 4 - Conguration
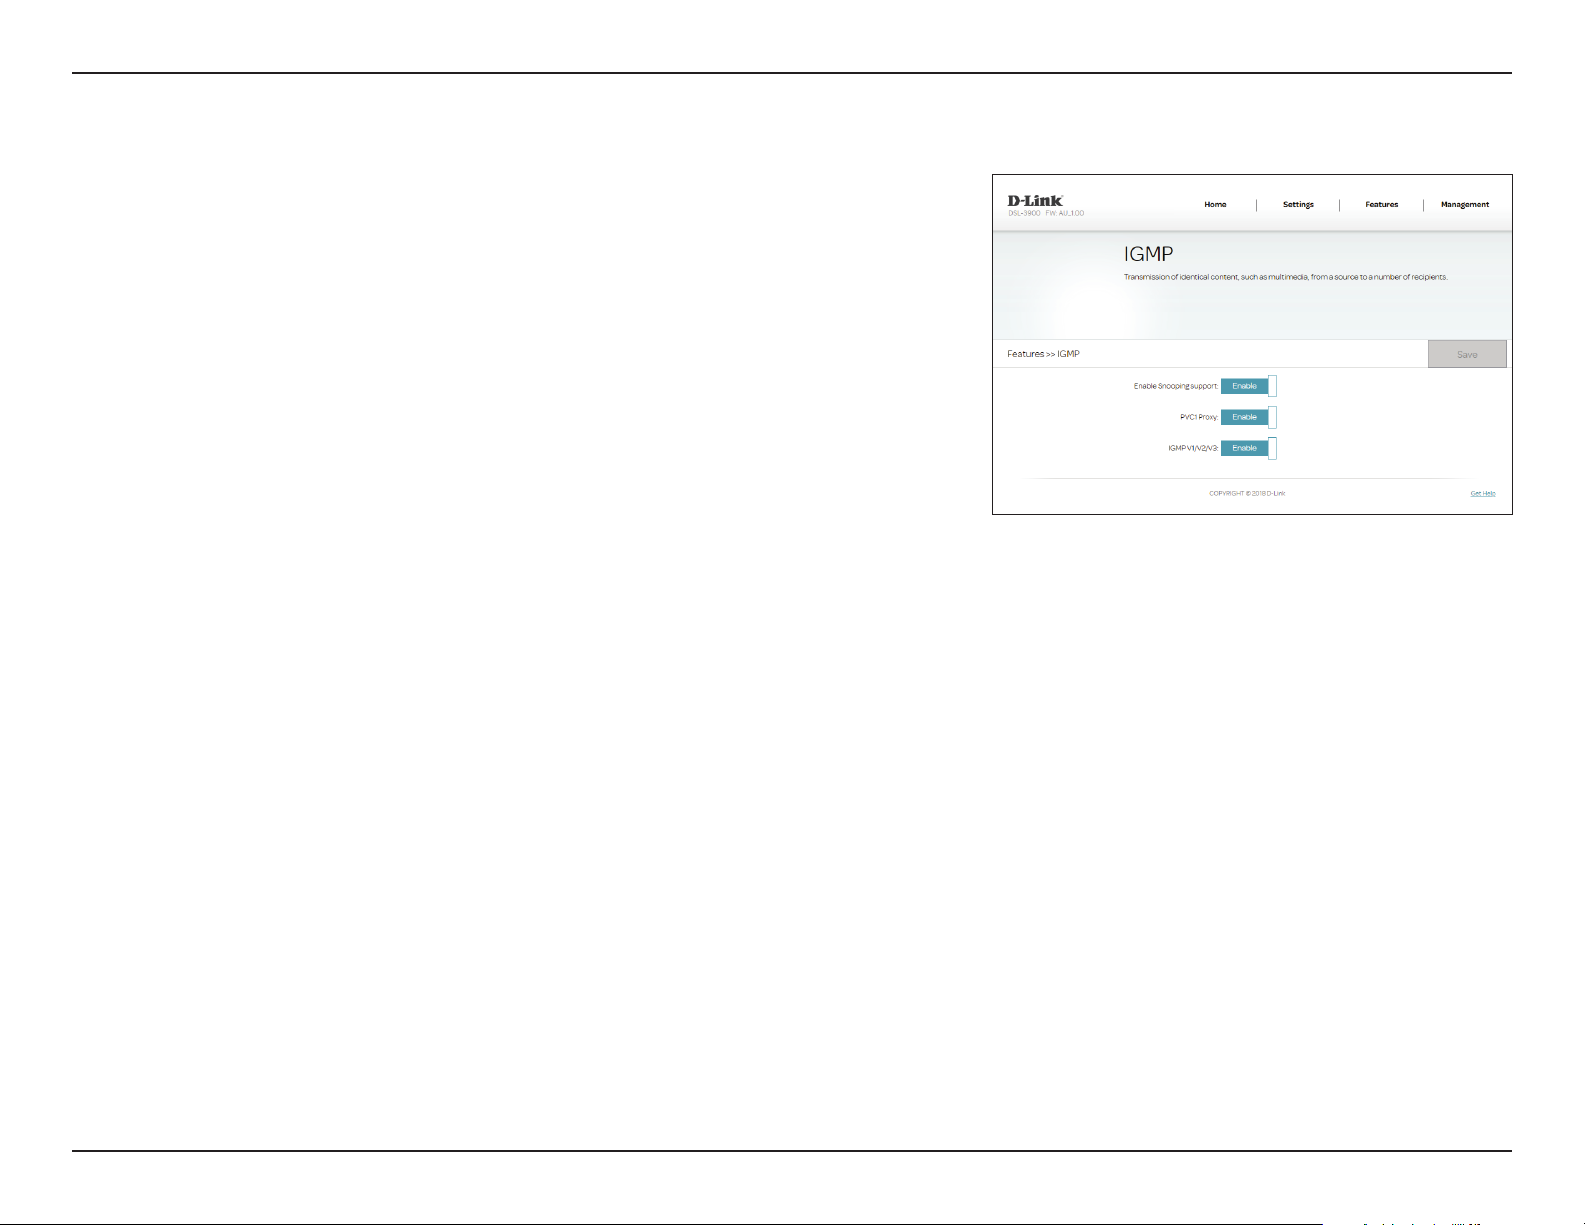
IGMP
The Internet Group Management Protocol (IGMP) Transmission allows for
the transmission of identical content, such as multimedia, from a source to a
number of recipients.
Enable IGMP
Snooping:
PVC1 Proxy: Enable or disable PVC1 Proxy.
IGMP V1/V2/V3: Enable or disable IGMP V1/V2/V3.
Enable or disable Internet Group Management Protocol
(IGMP) snooping to build multicast tables.
Click Save when you are done.
63D-Link DSL-3900 User Manual
Page 68
Section 4 - Conguration
Management
Time & Schedule
Time
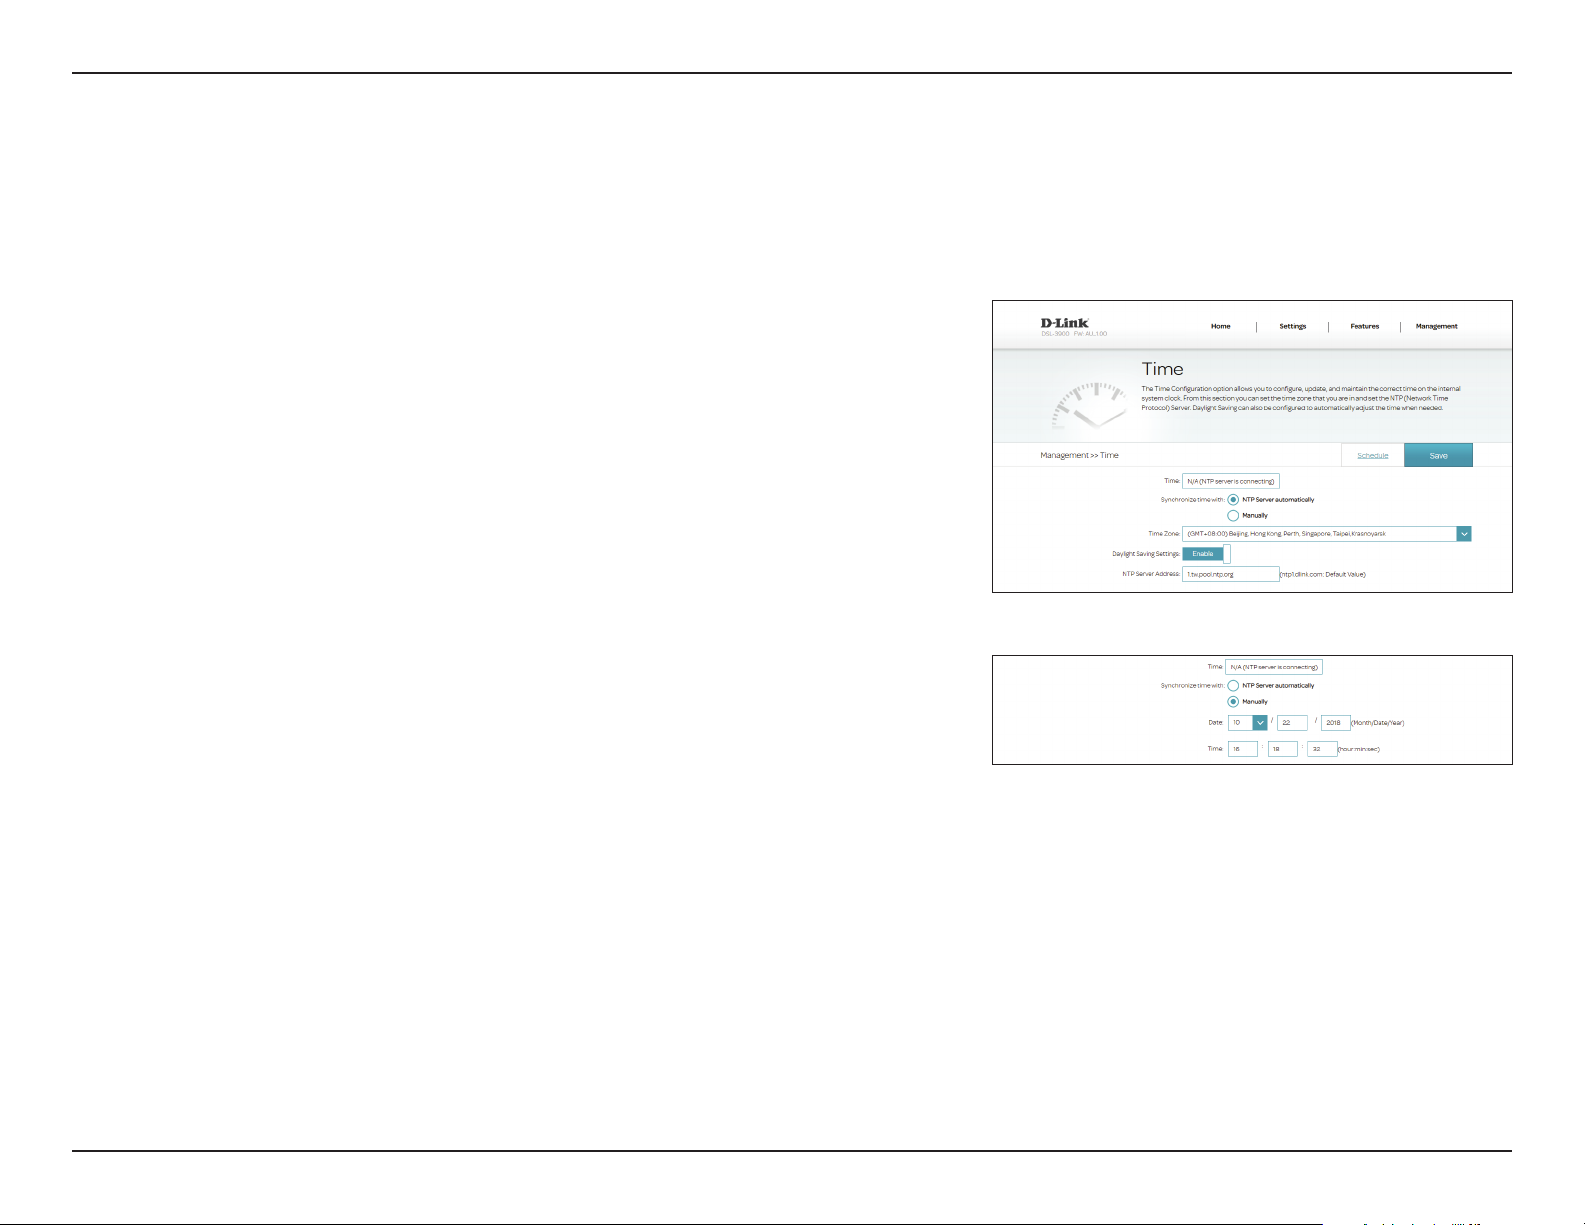
The Time page allows you to congure, update, and maintain the correct
time for the internal system clock. From here you can set the time zone, the
Network Time Protocol (NTP) server, and enable or disable daylight saving
time. To access this page, click Time & Schedule from the Management
menu on the bar on the top of the page.
Time: Displays the current date and time of the router.
Synchronize time
with:
If you selected NTP Server automatically, the following options are available:
Time Zone: Select your time zone from the drop-down menu.
Daylight Saving: Enable or disable daylight saving time.
NTP Server
Address:
If you selected Manually, the following options are available:
Date: Enter the Month, Date, and then year here.
Time: Enter the time (24-hour format) here.
Select either NTP Server automatically or Manually
Enter the NTP server address. The default is ntp1.dlink.com. Adding
a second server is optional.
64D-Link DSL-3900 User Manual
Page 69
Section 4 - Conguration
Schedule
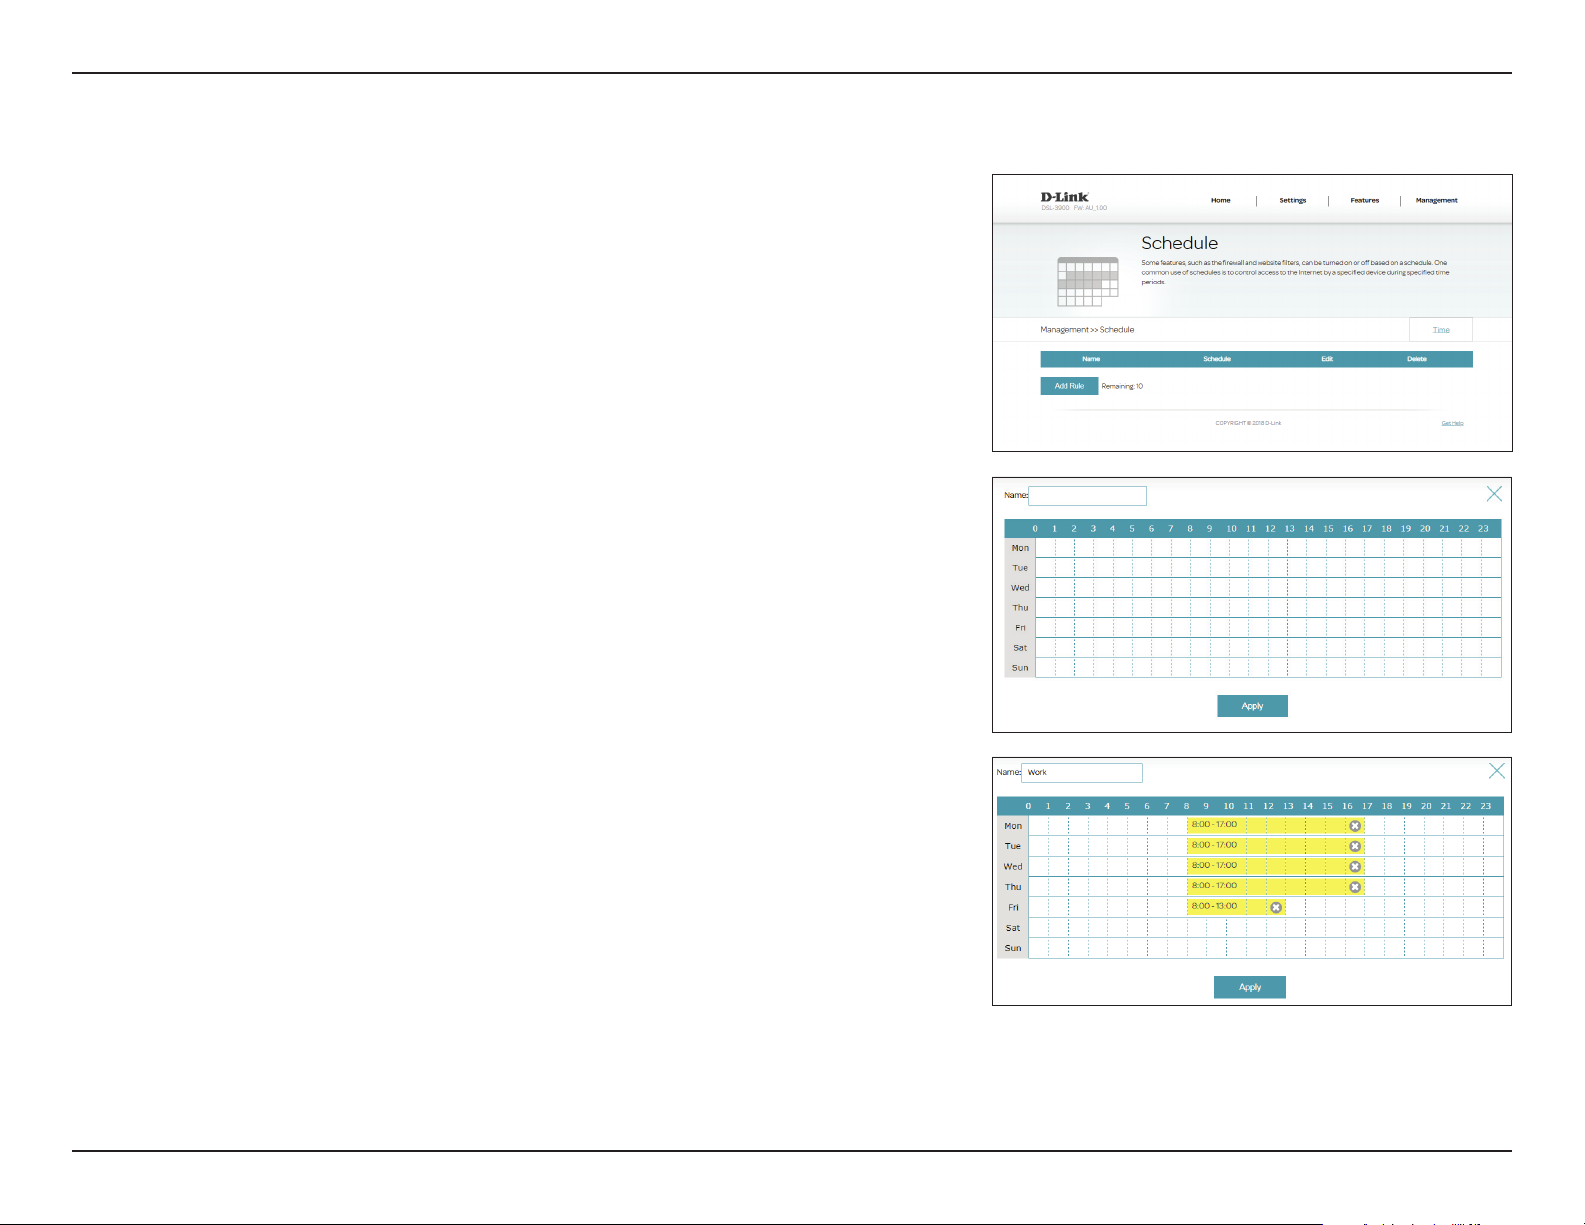
Some conguration rules can be set according to a pre-congured schedule.
To access this page, click Time & Schedule from the Management menu on
the bar on the top of the page and click the Schedule link. To return to the
Time page, click Time.
If you wish to remove a rule, click on its trash can icon in the Delete column. If
you wish to edit a rule, click on its pencil icon in the Edit column. If you wish to
create a new rule, click the Add Rules button. Click Apply when you are done.
If you edit or create a rule, the following options will appear:
First, enter the name of your schedule in the Name eld.
Each box represents one hour, with the time at the top of each column. To add
a time period to the schedule, simply click on the start hour and drag to the
end hour. You can add multiple days to the schedule, but only one period per
day.
To remove a time period from the schedule, click on the cross icon.
Click Apply when you are done.
65D-Link DSL-3900 User Manual
Page 70
Section 4 - Conguration
Log Info
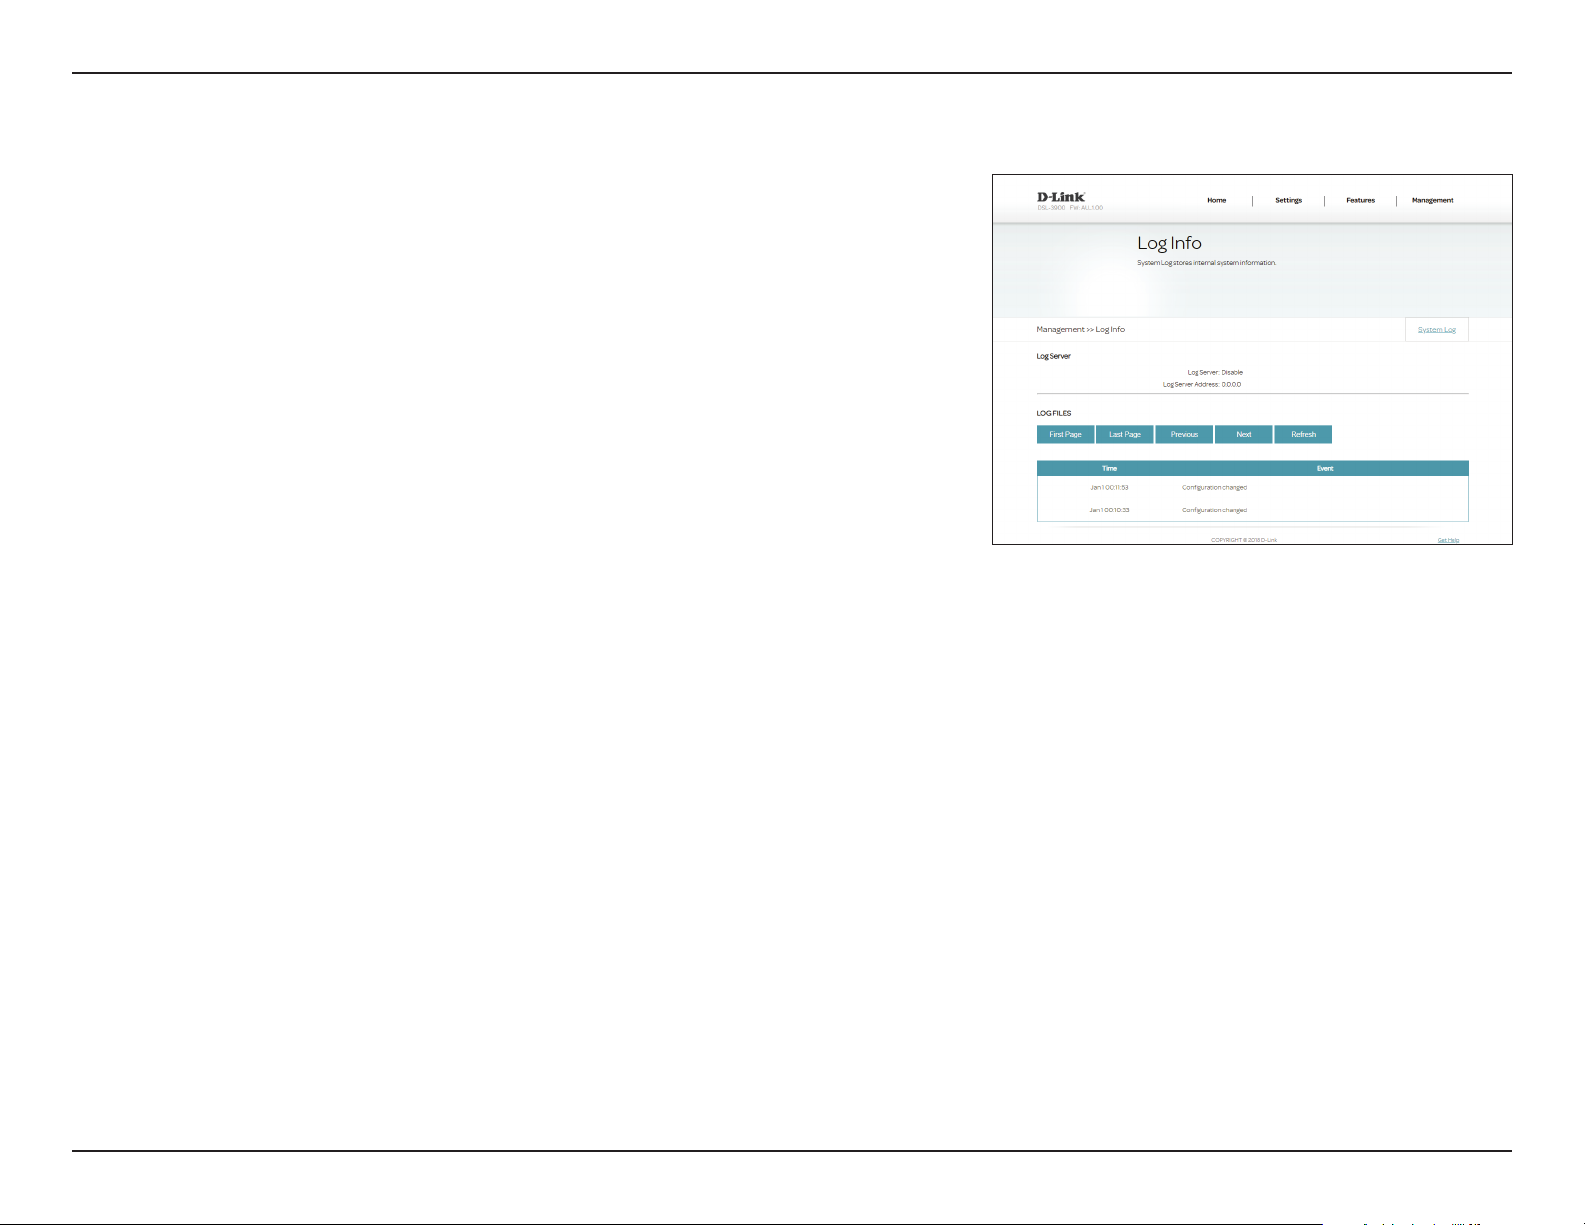
The router keeps a running log of events. To access this page, click Log Info
from the Management menu on the bar on the top of the page. System
logging must be enabled in order for this feature to work.
Refer to System Log on page 67 for information on how to enable the
system log.
66D-Link DSL-3900 User Manual
Page 71
Section 4 - Conguration
System Log
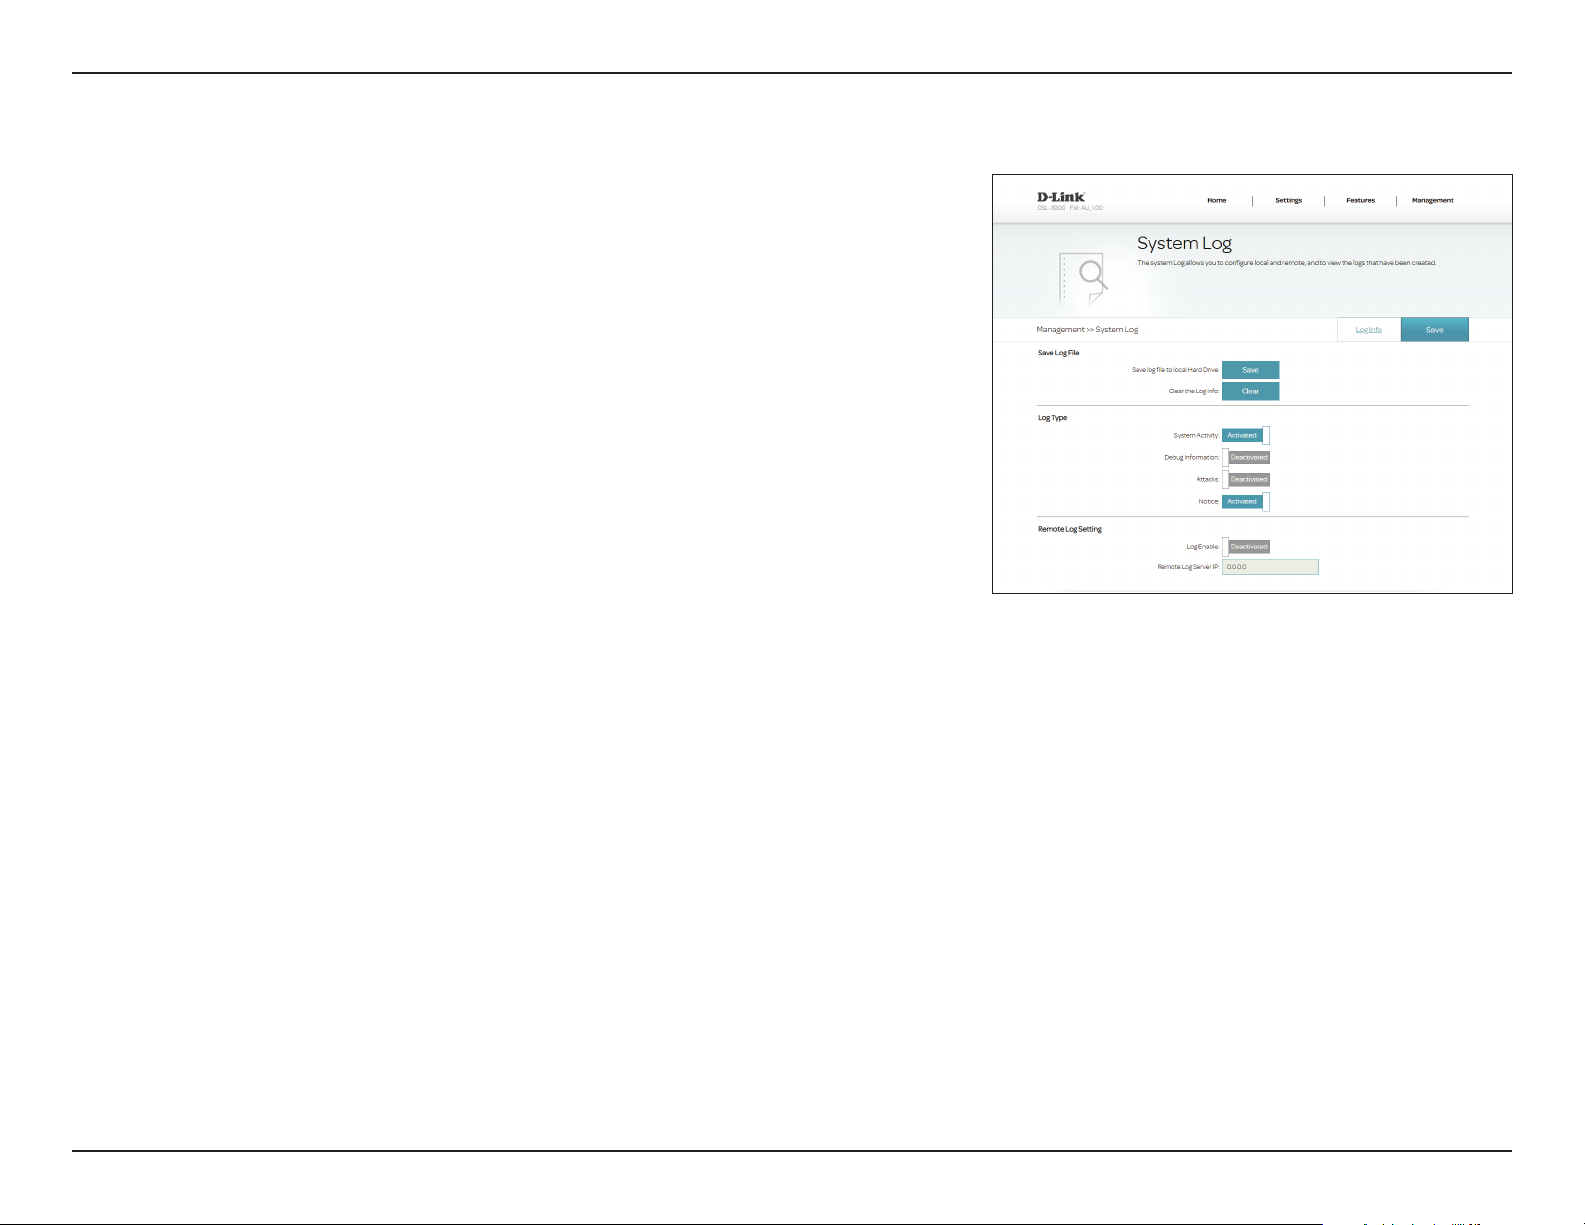
This page controls how the System Log operates. This log can be sent to a
Syslog server or saved to your local hard drive. To access this page, click Log
Info from the Management menu on the bar on the top of the page and
then click System Log. To return to the Log Info page, click Log Info.
Save Log File
Save log le to
local Hard Drive:
Clear the Log info: Click this button to clear the system log.
Click this button to save the log le to your local hard drive.
Log Type
System Activity: Enable or disable logging of System Activity.
Debug
Information:
Attacks: Enable or disable logging of Attacks.
Notice: Enable or disable logging of Notices.
Enable or disable logging of Debug Information.
Remote Log Setting
Log Enable: Activate or deactivate remote logging.
Remote Log
Server IP:
Enter the IP address for the Syslog server.
Click Save when you are done.
67D-Link DSL-3900 User Manual
Page 72
Section 4 - Conguration
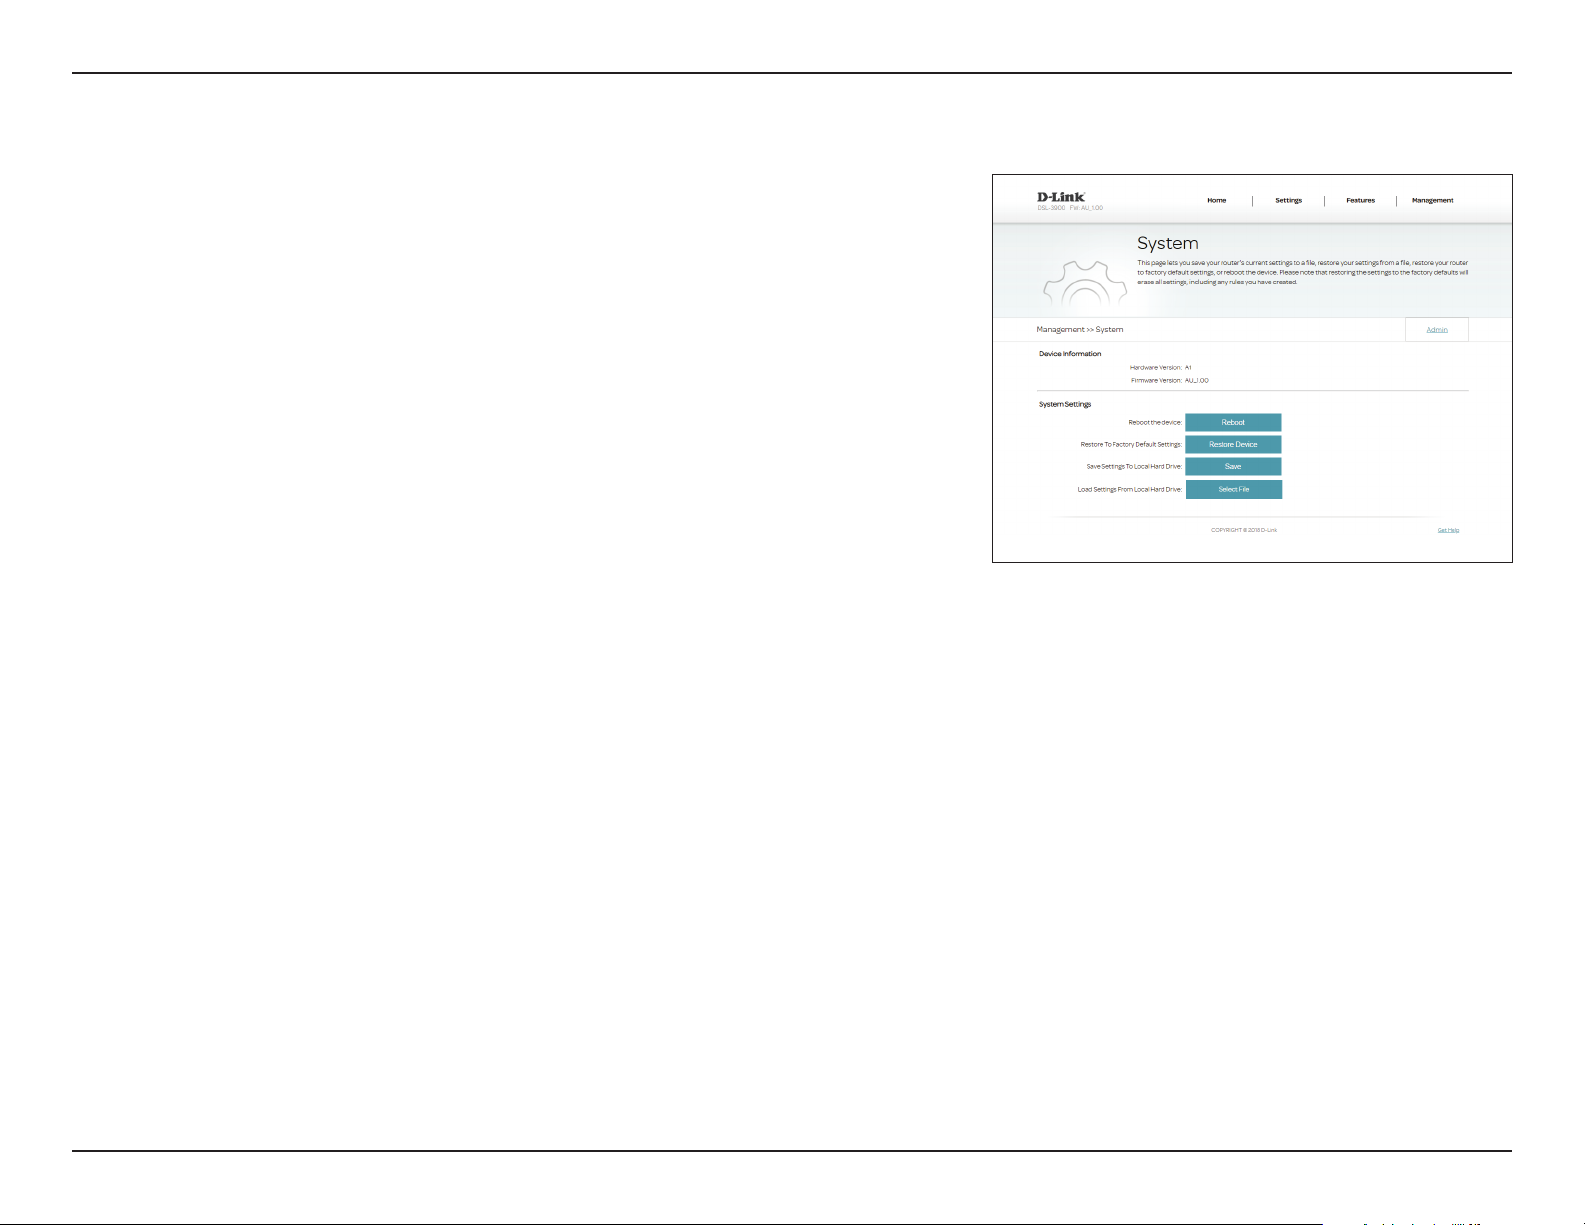
System Settings
This page allows you to save the router’s current conguration, load a
previously saved conguration, reset the router to its factory default settings,
or reboot the router. To access this page, click System Settings from the
Management menu on the bar on the top of the page.
Device Information
Hardware Version: The hardware version of the router is displayed here.
Firmware Version: The current rmware version is displayed here.
System
Save and Reboot
The Device:
Restore To Factory
Default Settings:
Save Settings To
Local Hard Drive:
Load Settings
From Local Hard
Drive:
Click to reboot the router.
This option will restore all conguration settings back to the settings that
were in eect at the time the router was shipped from the factory. Any
settings that have not been saved will be lost, including any rules that
you have created. If you want to save the current router conguration
settings, use the Save Settings To Local Hard Drive button below.
This option will save the current router conguration settings to a le
on your computer.
This option will load a previously saved router conguration le. This will
overwrite the router’s current conguration.
68D-Link DSL-3900 User Manual
Page 73
Section 4 - Conguration
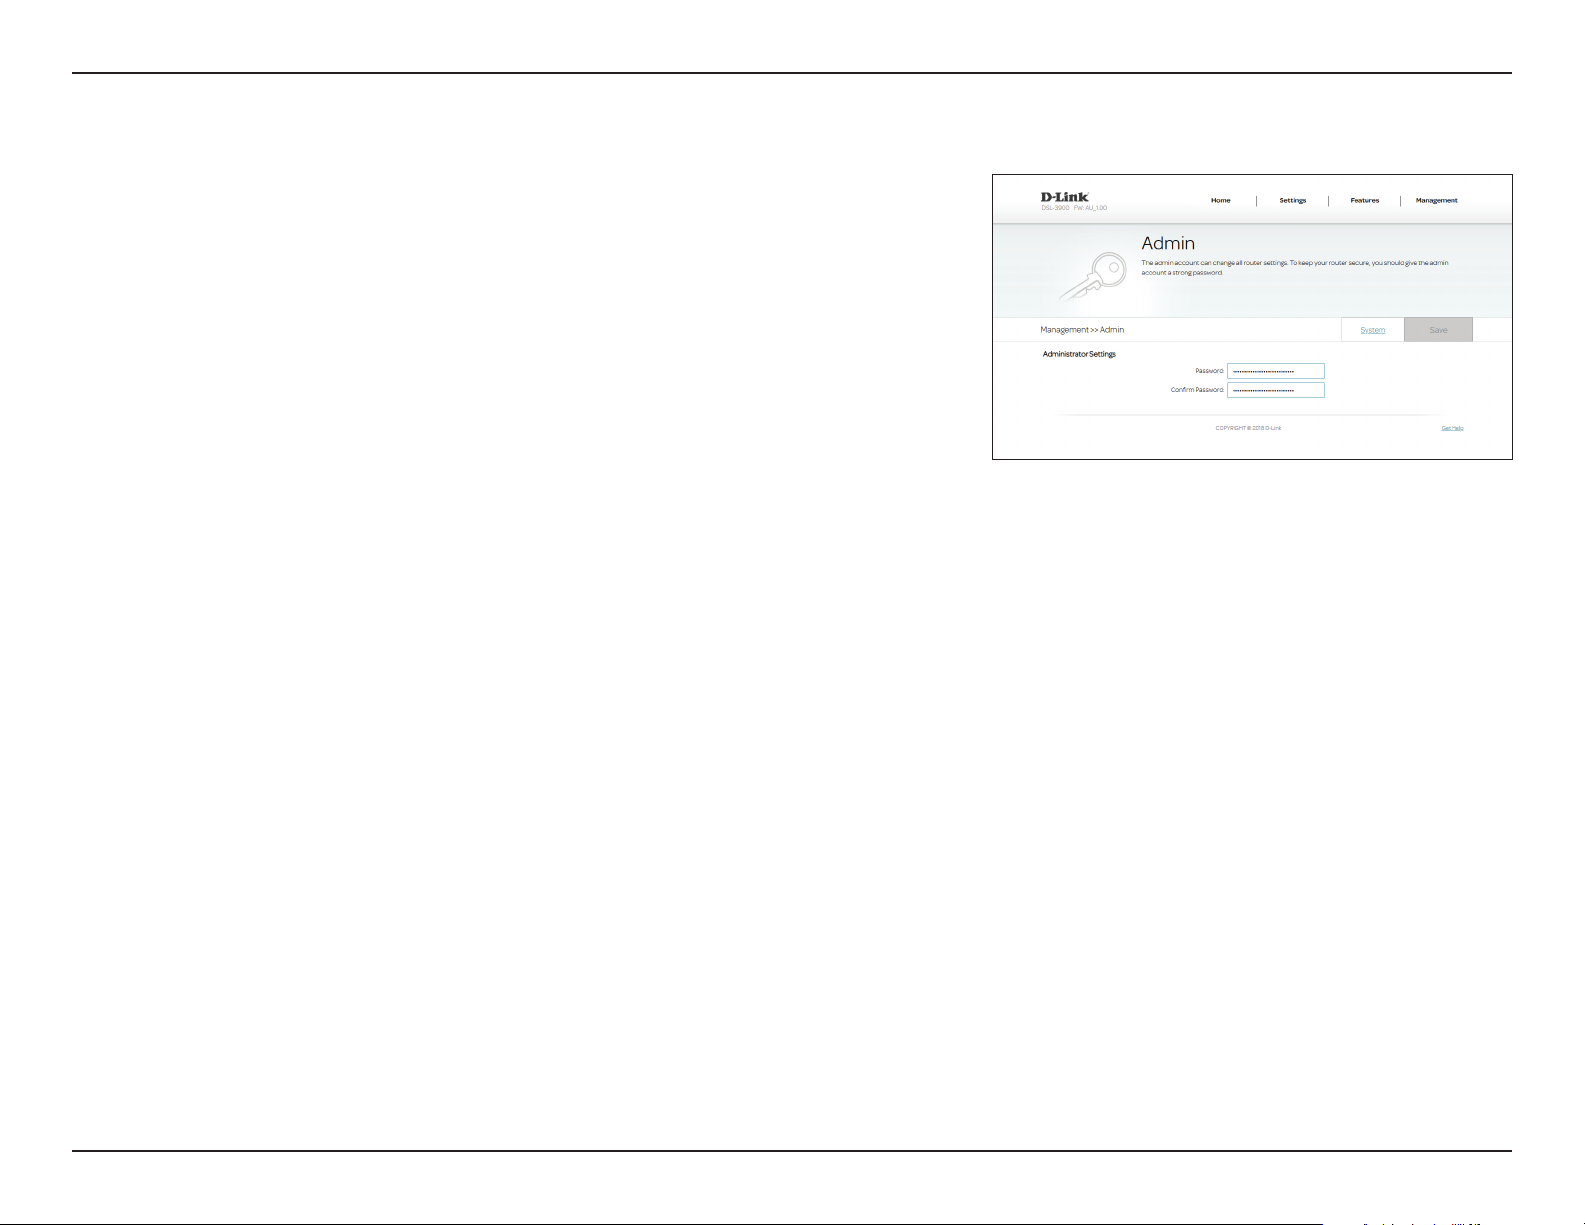
Admin
This page will allow you to change the administrator (admin) password and
enable remote management. To access this page, select System from the
Management menu on the bar on the top of the page, and click Admin. To
return to the System page, click System.
Administrator Settings
Password: Enter a new password for the admin account. You will need to enter this
password whenever you congure the router using a web browser.
Conrm Password: Conrm the administrator account password.
Click Save when you are done.
69D-Link DSL-3900 User Manual
Page 74
Section 4 - Conguration
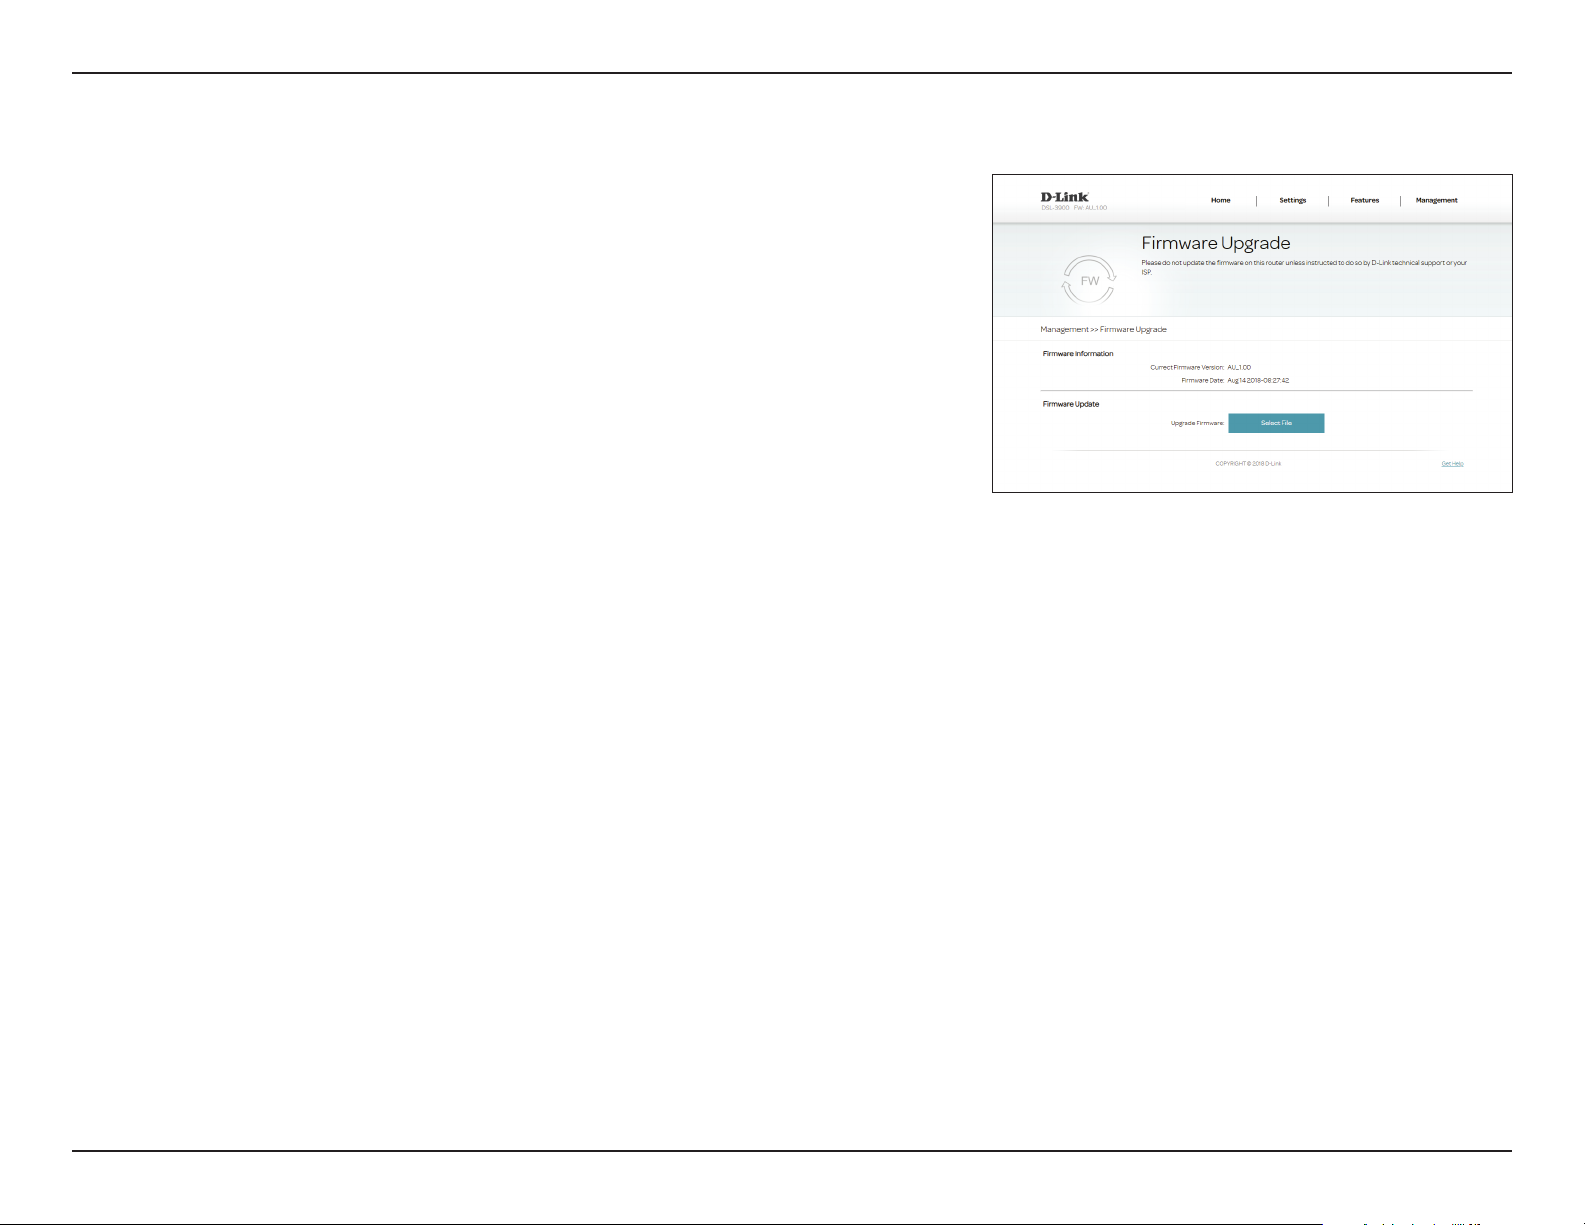
Firmware Upgrade
This page will allow you to upgrade the router’s rmware. To access this page,
click Firmware Upgrade from the Management menu on the bar on the
top of the page.
To upgrade the rmware, you must rst download the relevant le from
http://support.dlink.com.
Firmware Information
Current Firmware
Version:
Firmware Date: The current rmware’s date is displayed.
The current rmware’s version is displayed.
Upgrade Manually
Upgrade
Firmware:
If you wish to upgrade manually, rst download the rmware le you wish
to upgrade to. Next, click the Select File button and browse to the le
to install the new rmware. Then press Upgrade to begin the upgrade
process. Do not power o the router while the rmware is uploading.
70D-Link DSL-3900 User Manual
Page 75
Section 4 - Conguration
Statistics
This page gives you various statistics about data transmitted and received
by your router through the Internet, on your wired network (LAN), and
through your wireless networks. To access this page, click Statistics from the
Management menu on the bar on the top of the page.
You can view the statistics of the Internet, LAN, Wi-Fi 2.4 GHz, or Wi-Fi 5
GHz interfaces by clicking on their respective tabs at the top of the graph.
The graph will update every few seconds. The table at the bottom of the page
displays the total number of packets and data sent and received since the
DSL-3900 was booted.
The current amount of trac being sent and received, measured in KByte/sec
is displayed, along with the current number of sessions.
To clear the information on the graph, click Clear.
Note: The trac counter will reset if the device is rebooted.
71D-Link DSL-3900 User Manual
Page 76
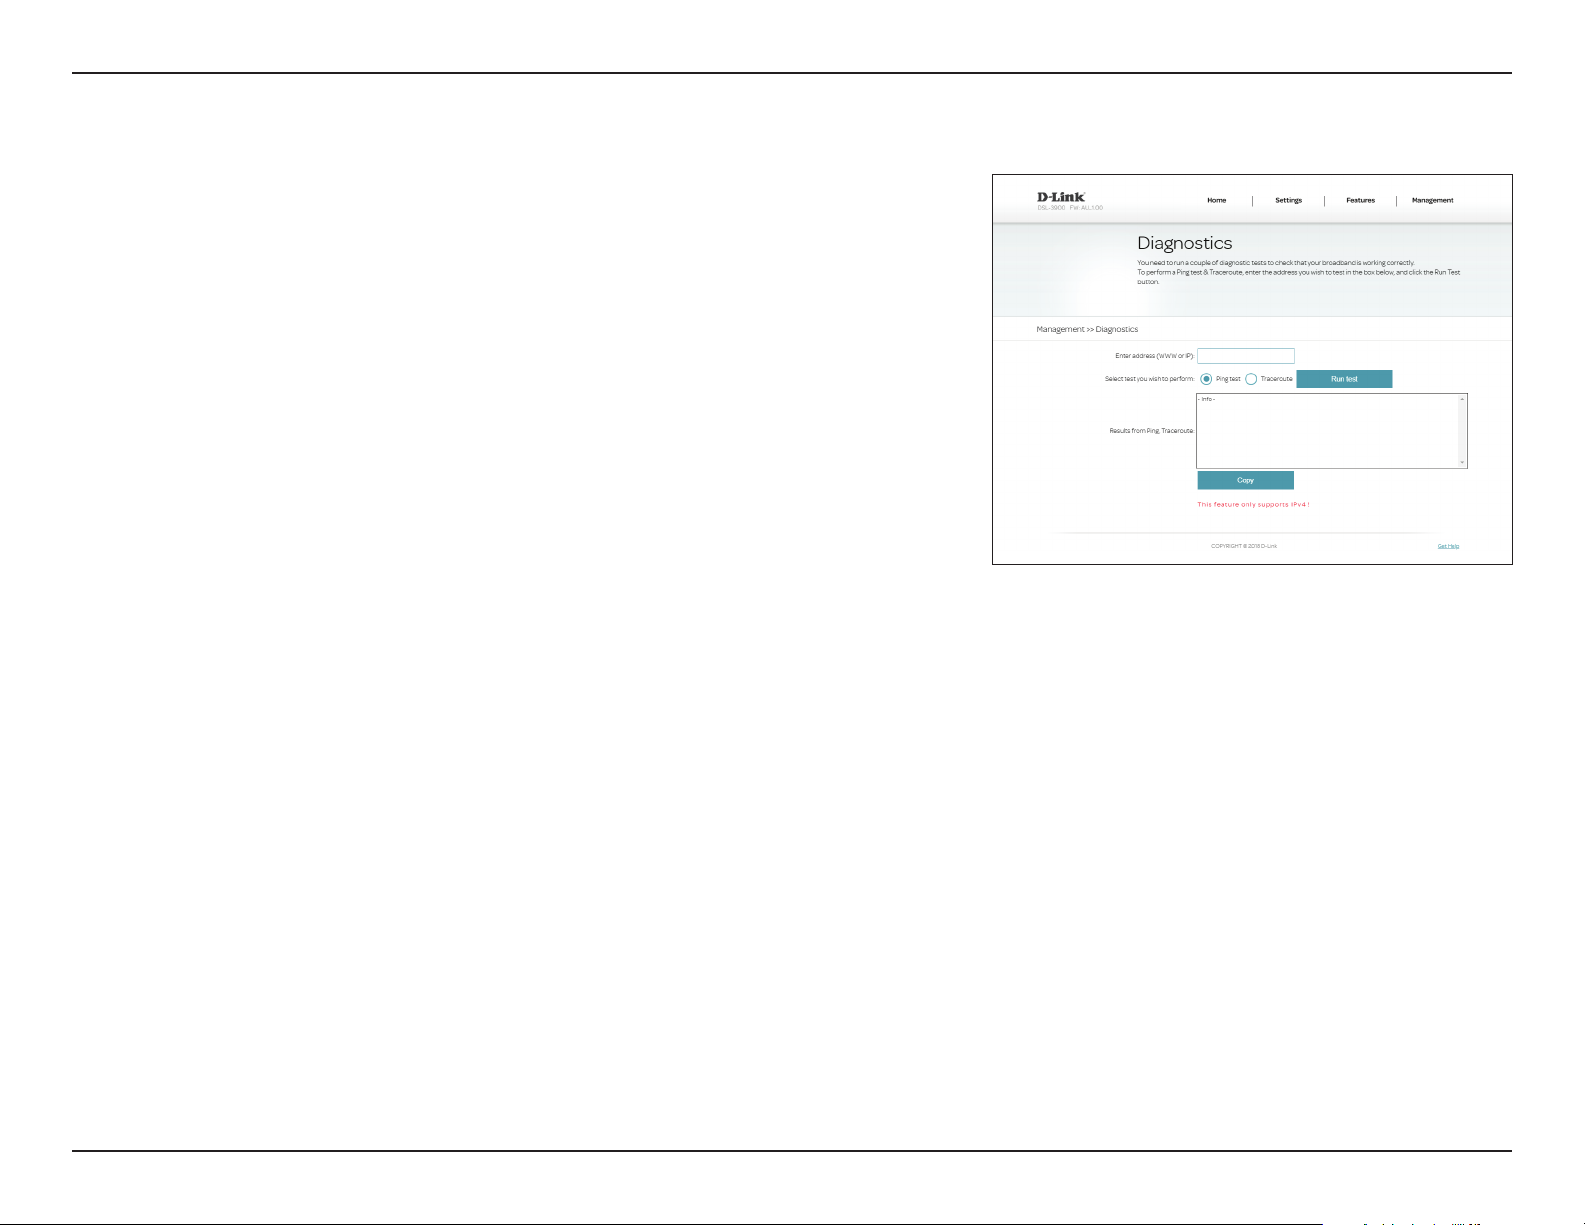
Section 4 - Conguration
Diagnostics
This page is used to test the router's connection to the Internet. To access this
page, click Diagnostics from the Management menu on the bar on the top
of the page.
Enter either an IP address or web address, select either Ping or Tracert test,
and click Run Test.
The results of the test will be displayed in the dialog box. You may copy the
results by pressing the Copy button.
72D-Link DSL-3900 User Manual
Page 77
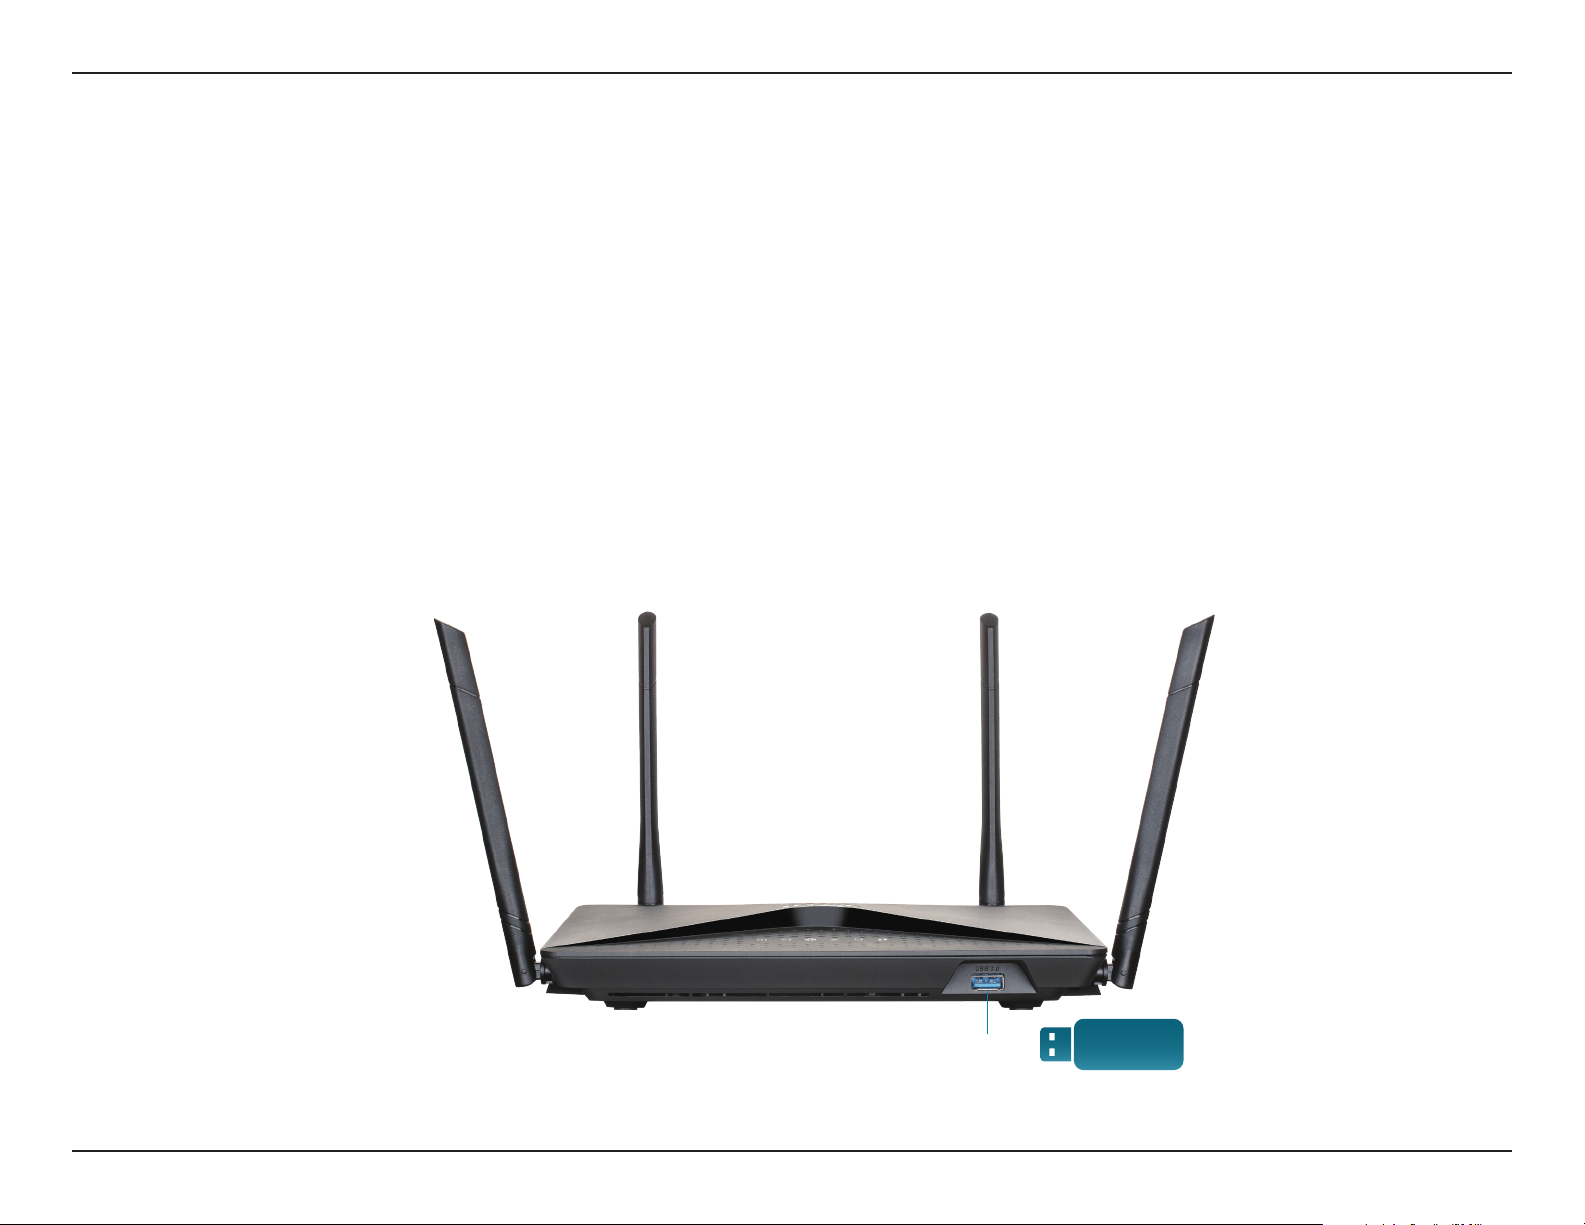
Section 5 - Connect and Share a USB Device
Connect and Share a USB Device
After you have successfully installed and congured your D-Link Modem Router, you are ready to enjoy the benets of D-Link’s
USB sharing technology. This allows you to quickly and easily share a USB storage device with multiple computers on your
network.
Connect and Share a USB Storage Device
The DSL-3900 will share a FAT32 or NTFS-formatted USB storage device using the Samba le sharing protocol. Once connected,
you can copy, move, delete, and edit les over the network like you would with any ordinary drive attached to your computer.
Connect a USB storage device to the USB Port on the front of the DSL-3900.
USB Port
73D-Link DSL-3900 User Manual
Page 78
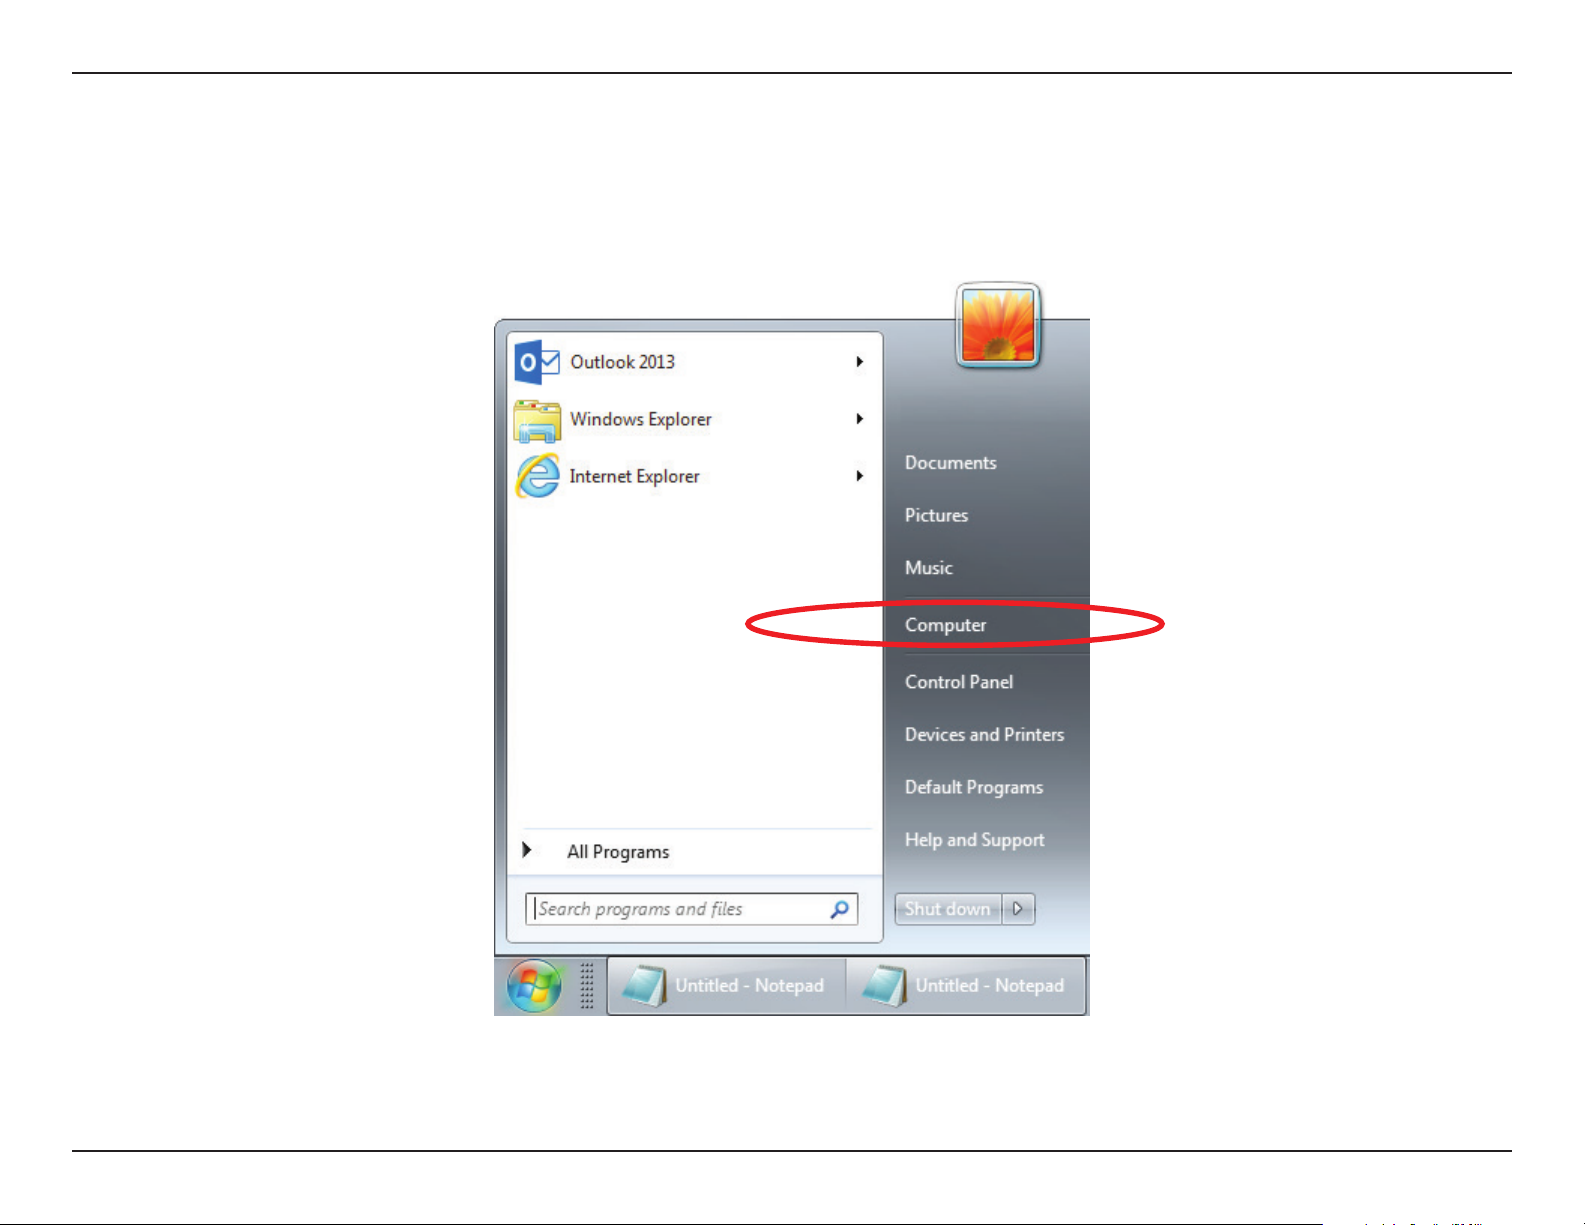
Section 5 - Connect and Share a USB Device
Connecting from a Windows-Based PC
Step 1 - Click the Start menu and select Computer.
74D-Link DSL-3900 User Manual
Page 79
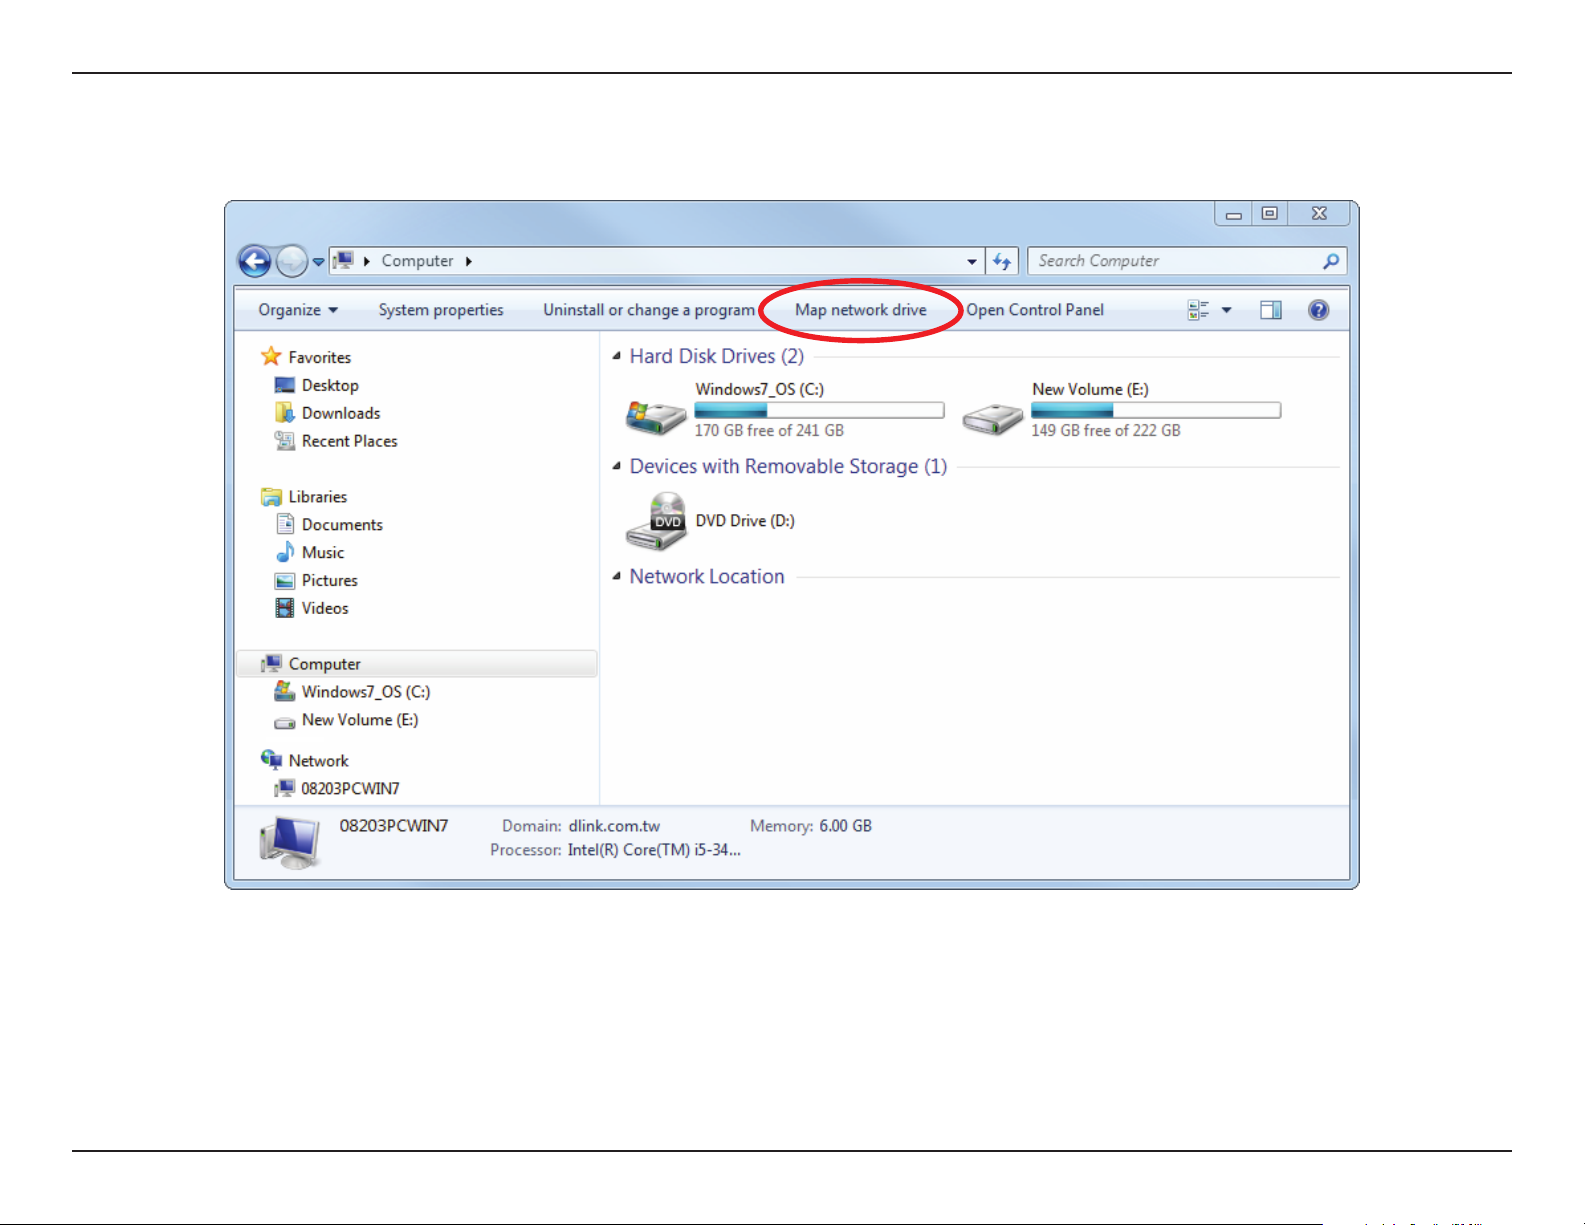
Section 5 - Connect and Share a USB Device
Step 2 - Click Map network drive.
75D-Link DSL-3900 User Manual
Page 80
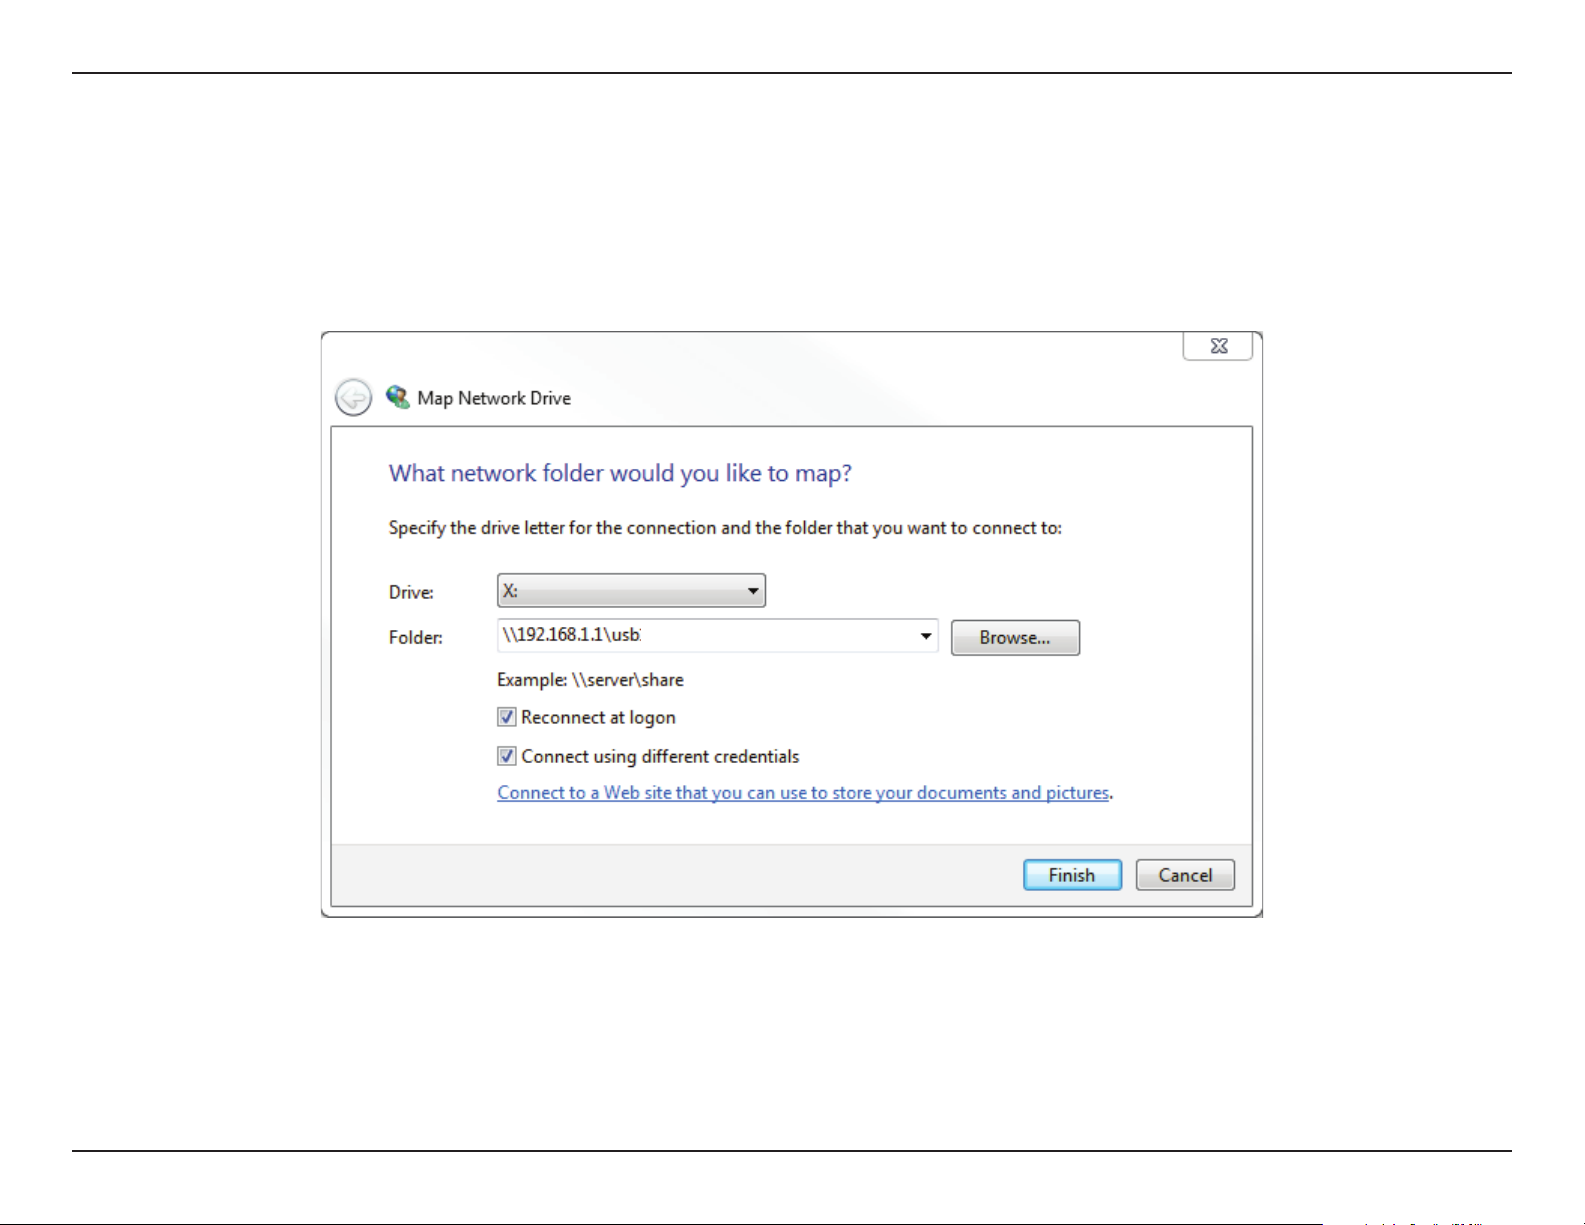
Section 5 - Connect and Share a USB Device
Step 3 - Select the drive letter you wish to map your network drive to. Enter the DSL-3900’s IP address and the name of the
USB volume you wish to share. For example \\192.168.1.1\usb.
Check the boxes Reconnect at logon and Connect using dierent credentials.
Click Finish.
If you have multiple USB storage devices attached via a USB hub, click USB Device from the Home section of the DSL-3900’s
Web Conguration utility for a list of available volume names.
76D-Link DSL-3900 User Manual
Page 81
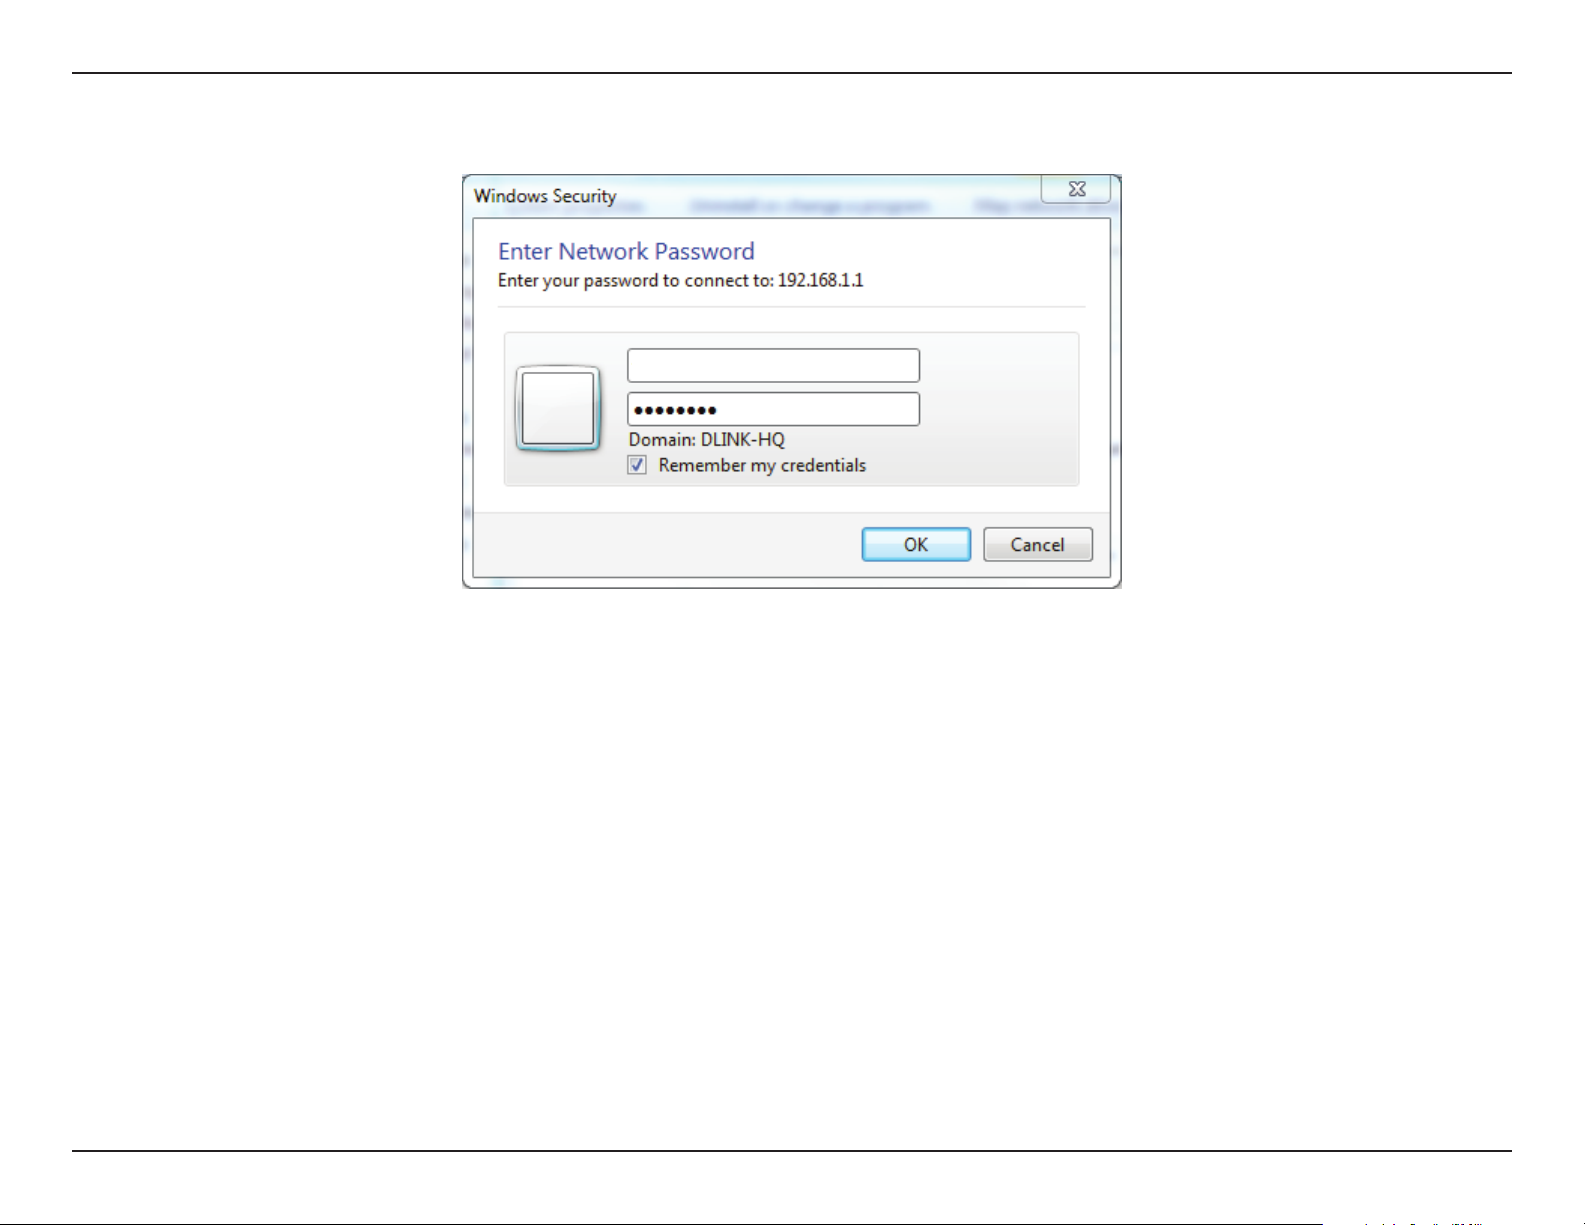
Section 5 - Connect and Share a USB Device
Step 4 - Enter admin and the password to your router and click Ok.
admin
77D-Link DSL-3900 User Manual
Page 82
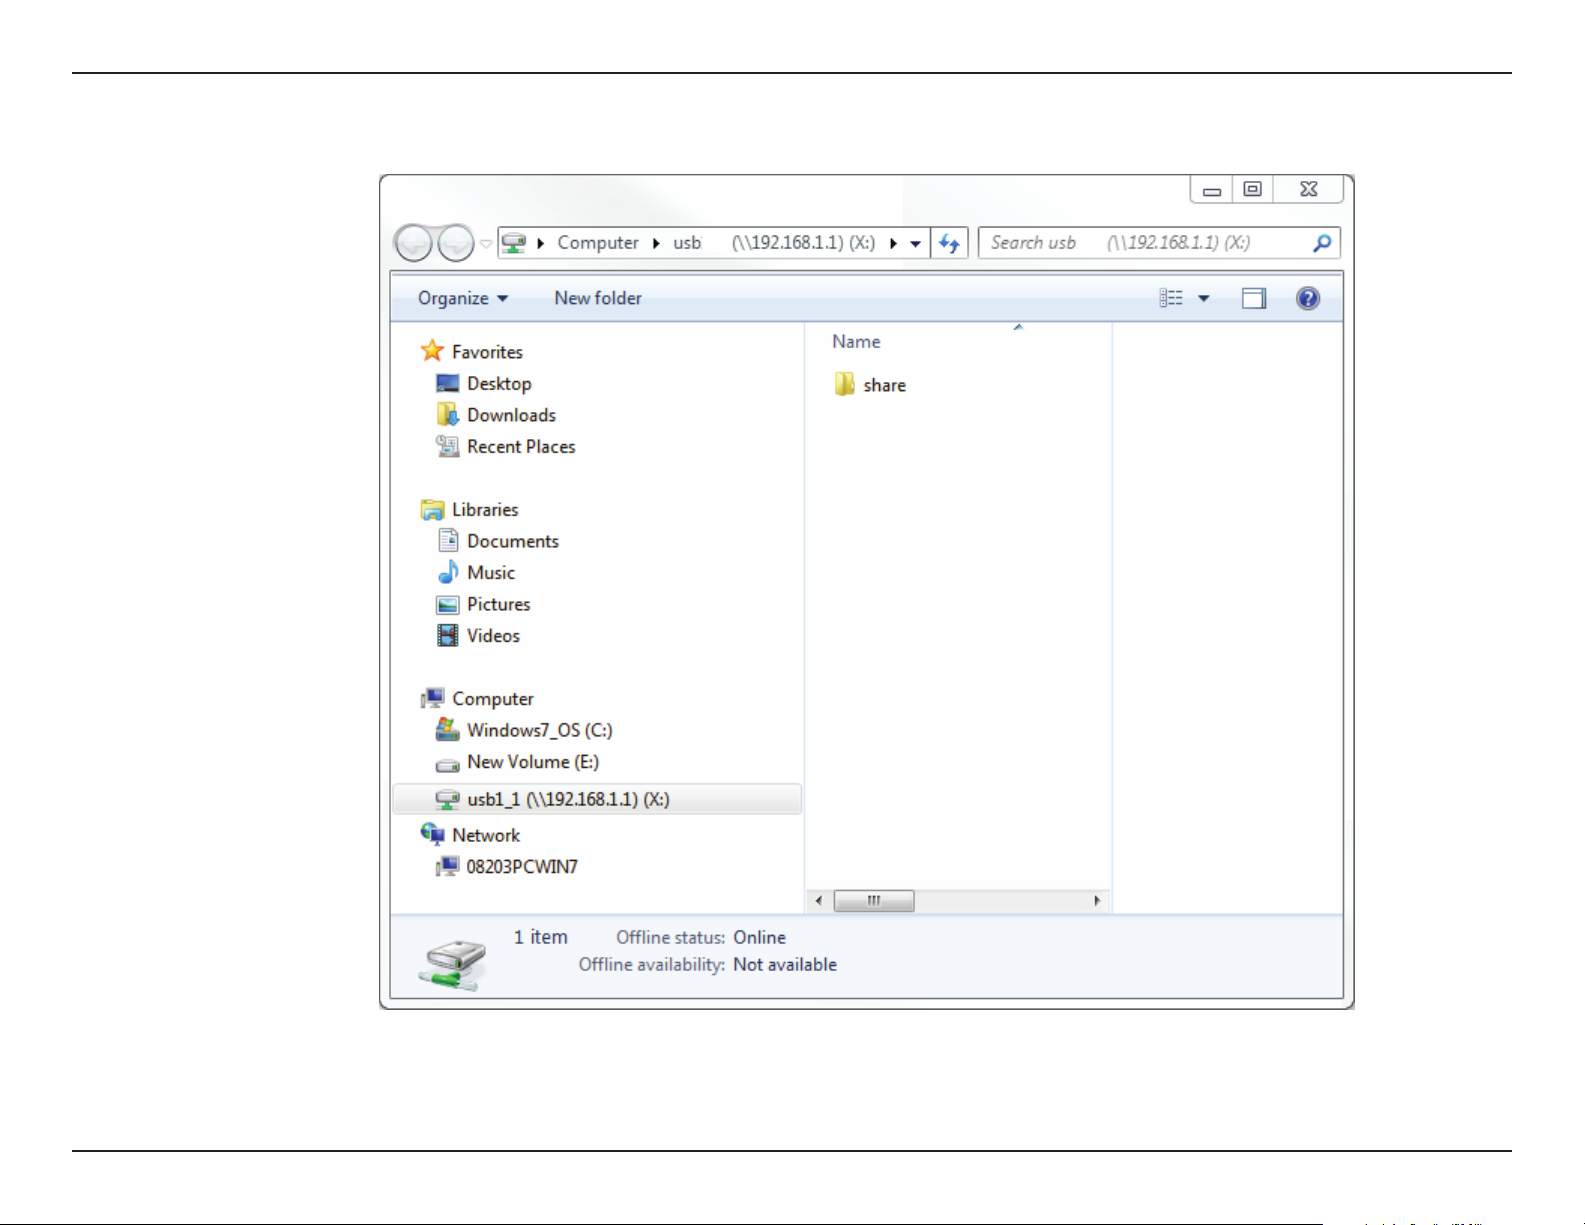
Section 5 - Connect and Share a USB Device
Congratulations! Your les are now shared. Repeat this process from each Windows PC you wish to share your USB drive with.
78D-Link DSL-3900 User Manual
Page 83
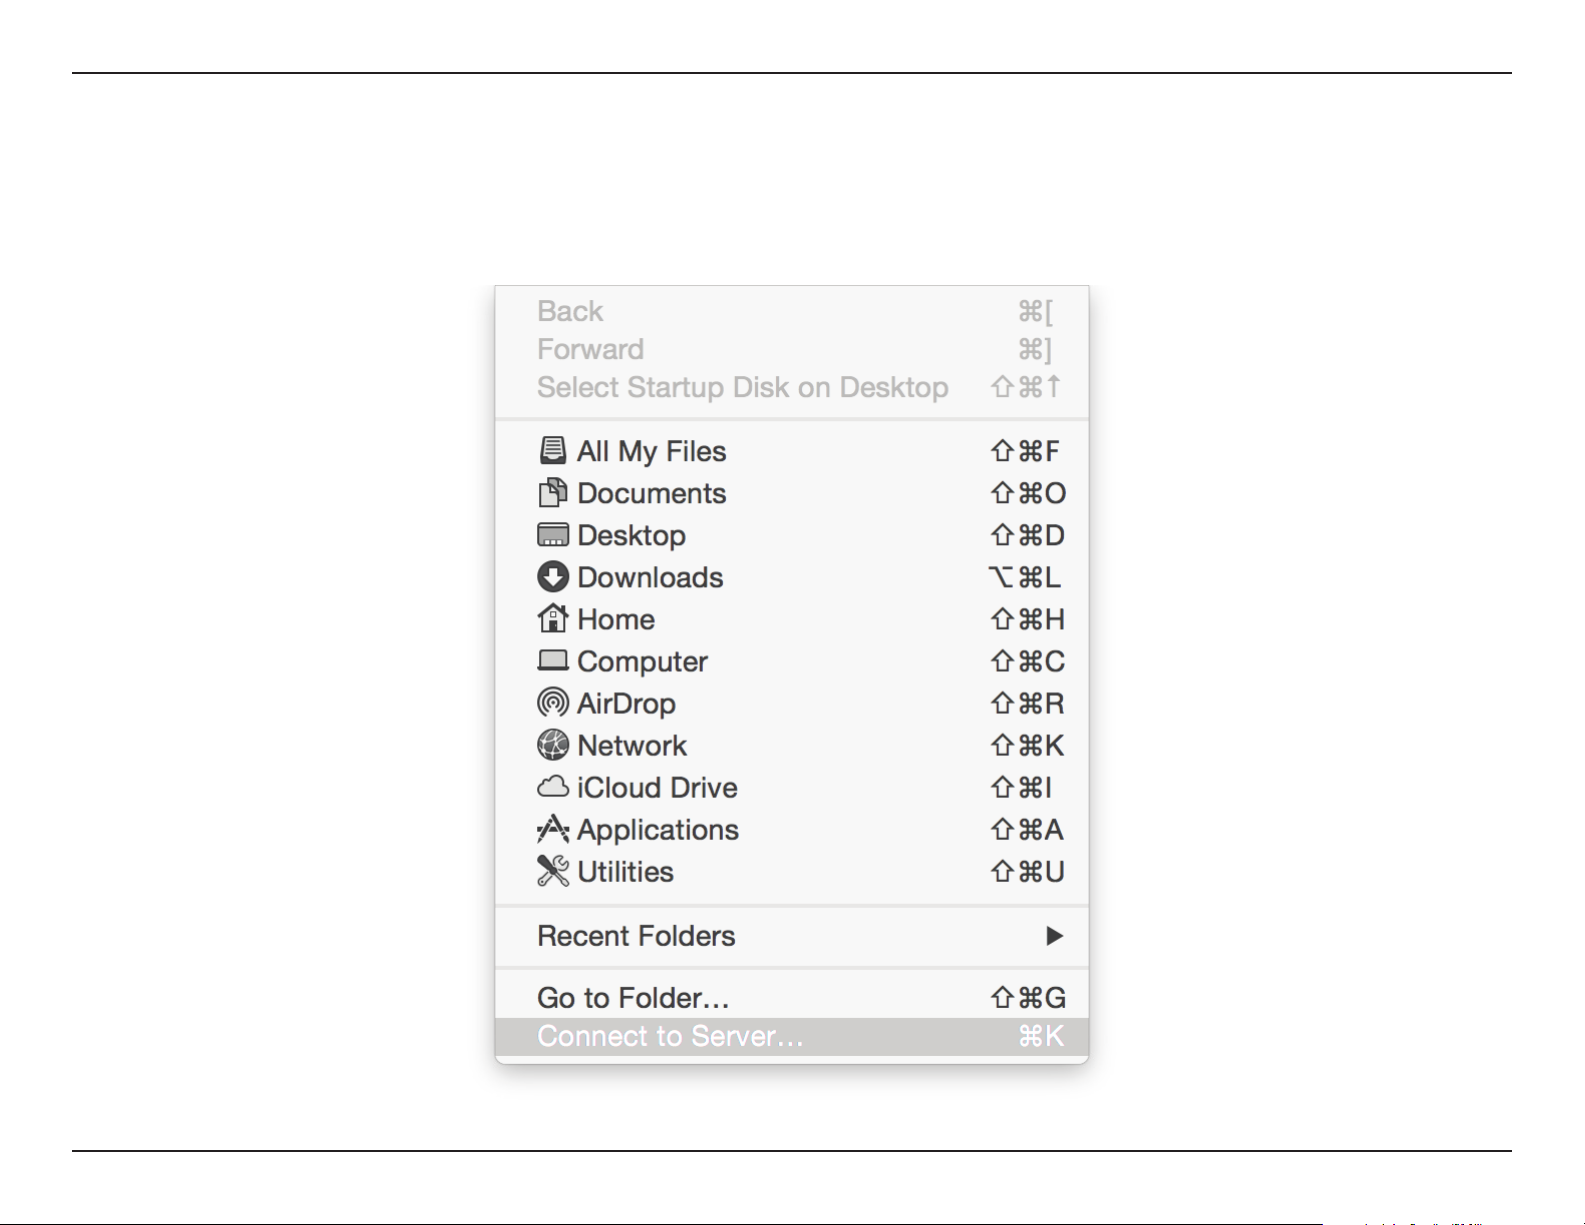
Section 5 - Connect and Share a USB Device
Connecting from a Mac
Step 1 - While in Finder, click Go menu and select Connect to Server...
79D-Link DSL-3900 User Manual
Page 84
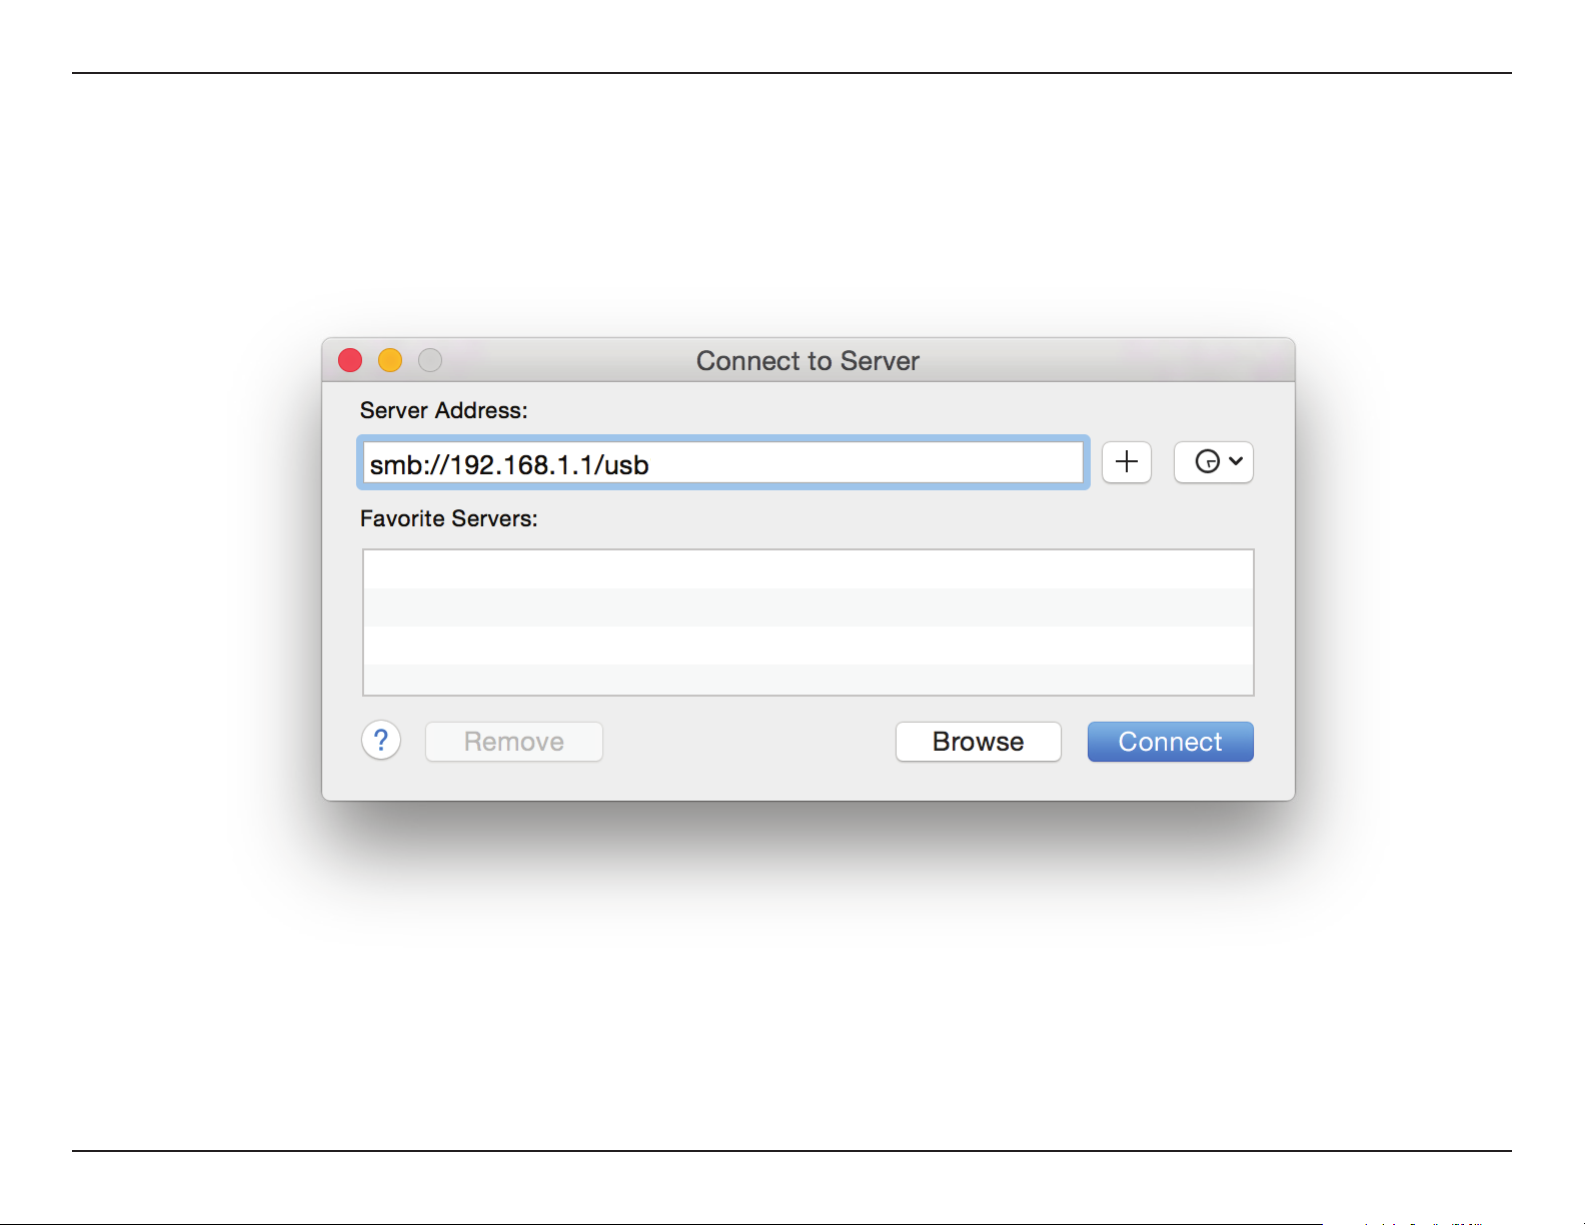
Section 5 - Connect and Share a USB Device
Step 2 - Enter the DSL-3900’s IP address and the name of the USB volume you wish to share.
For example smb//192.168.1.1/usb1_1.
Click Connect.
If you have multiple USB storage devices attached via a USB Hub, consult the HOME>USB sectionof the DSL-3900’s Web
Conguration utility for a list of available volume names.
80D-Link DSL-3900 User Manual
Page 85
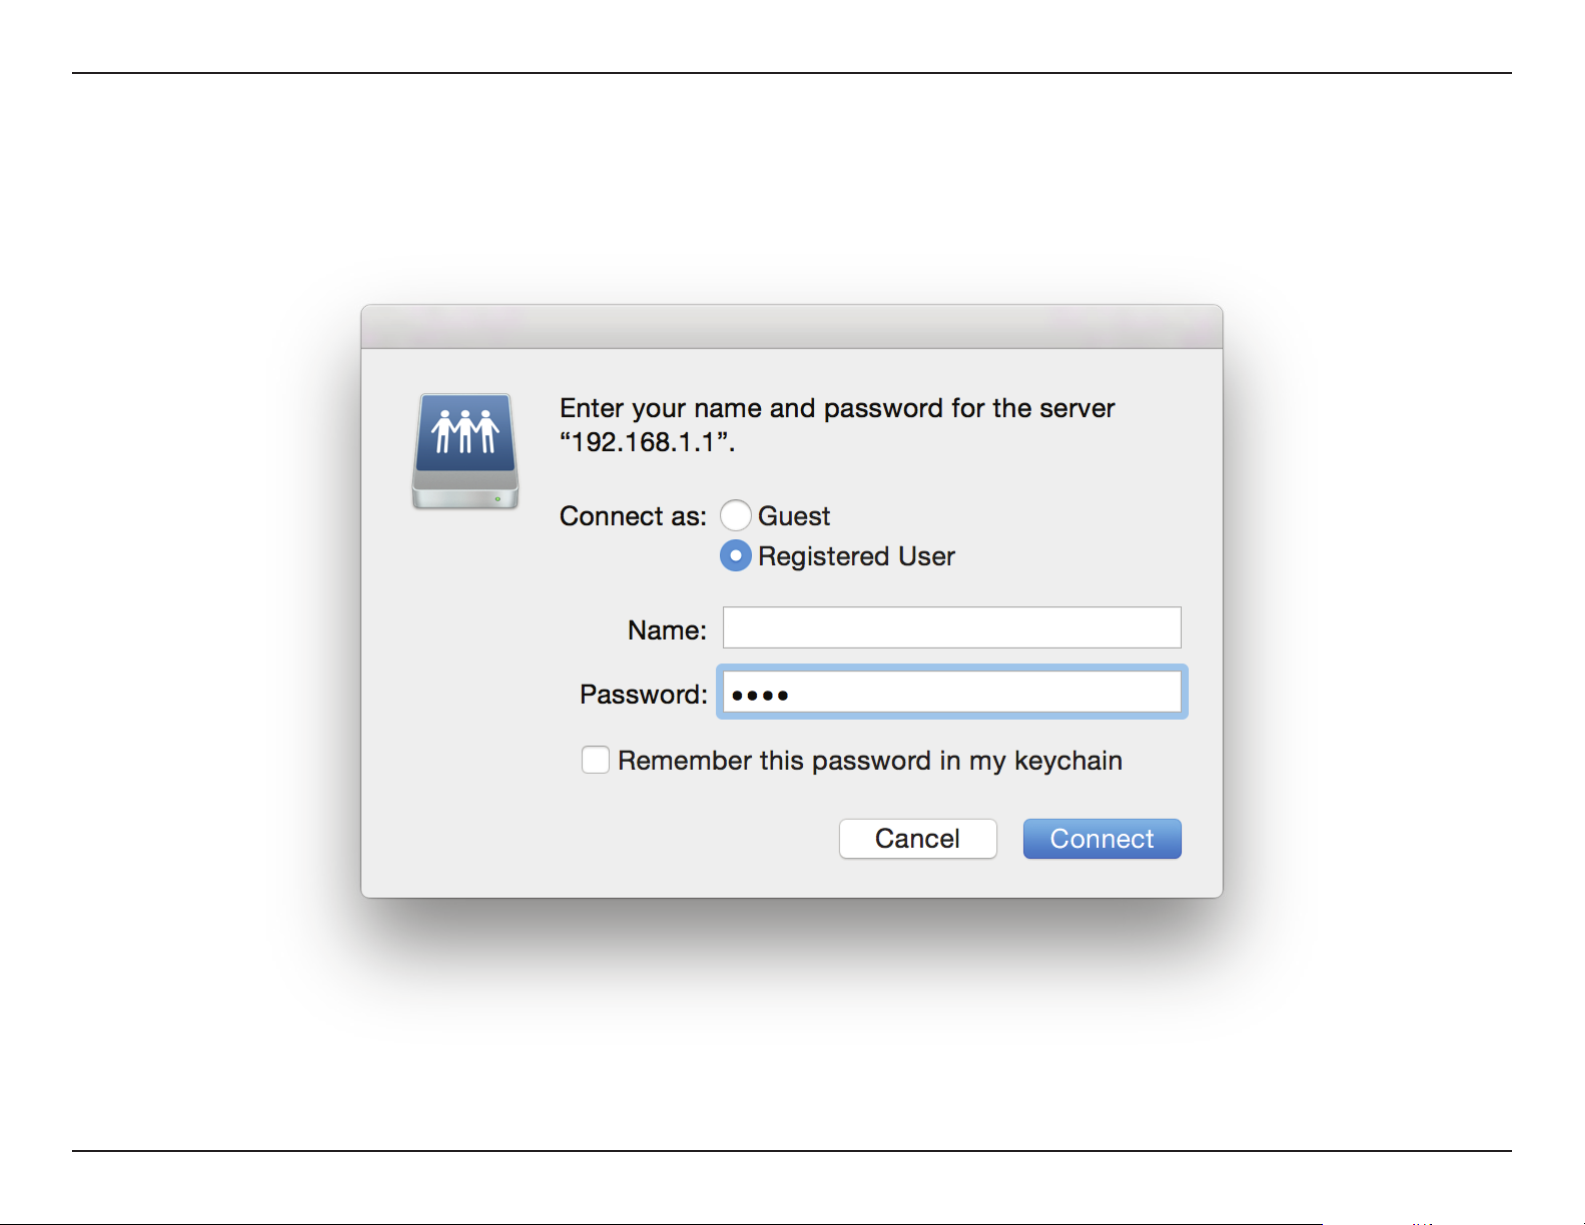
Section 5 - Connect and Share a USB Device
Step 4 - Enter admin and the password to your router and click Connect. If you wish to have your computer remember your
password, check the Remember this password in my keychain box.
admin
81D-Link DSL-3900 User Manual
Page 86
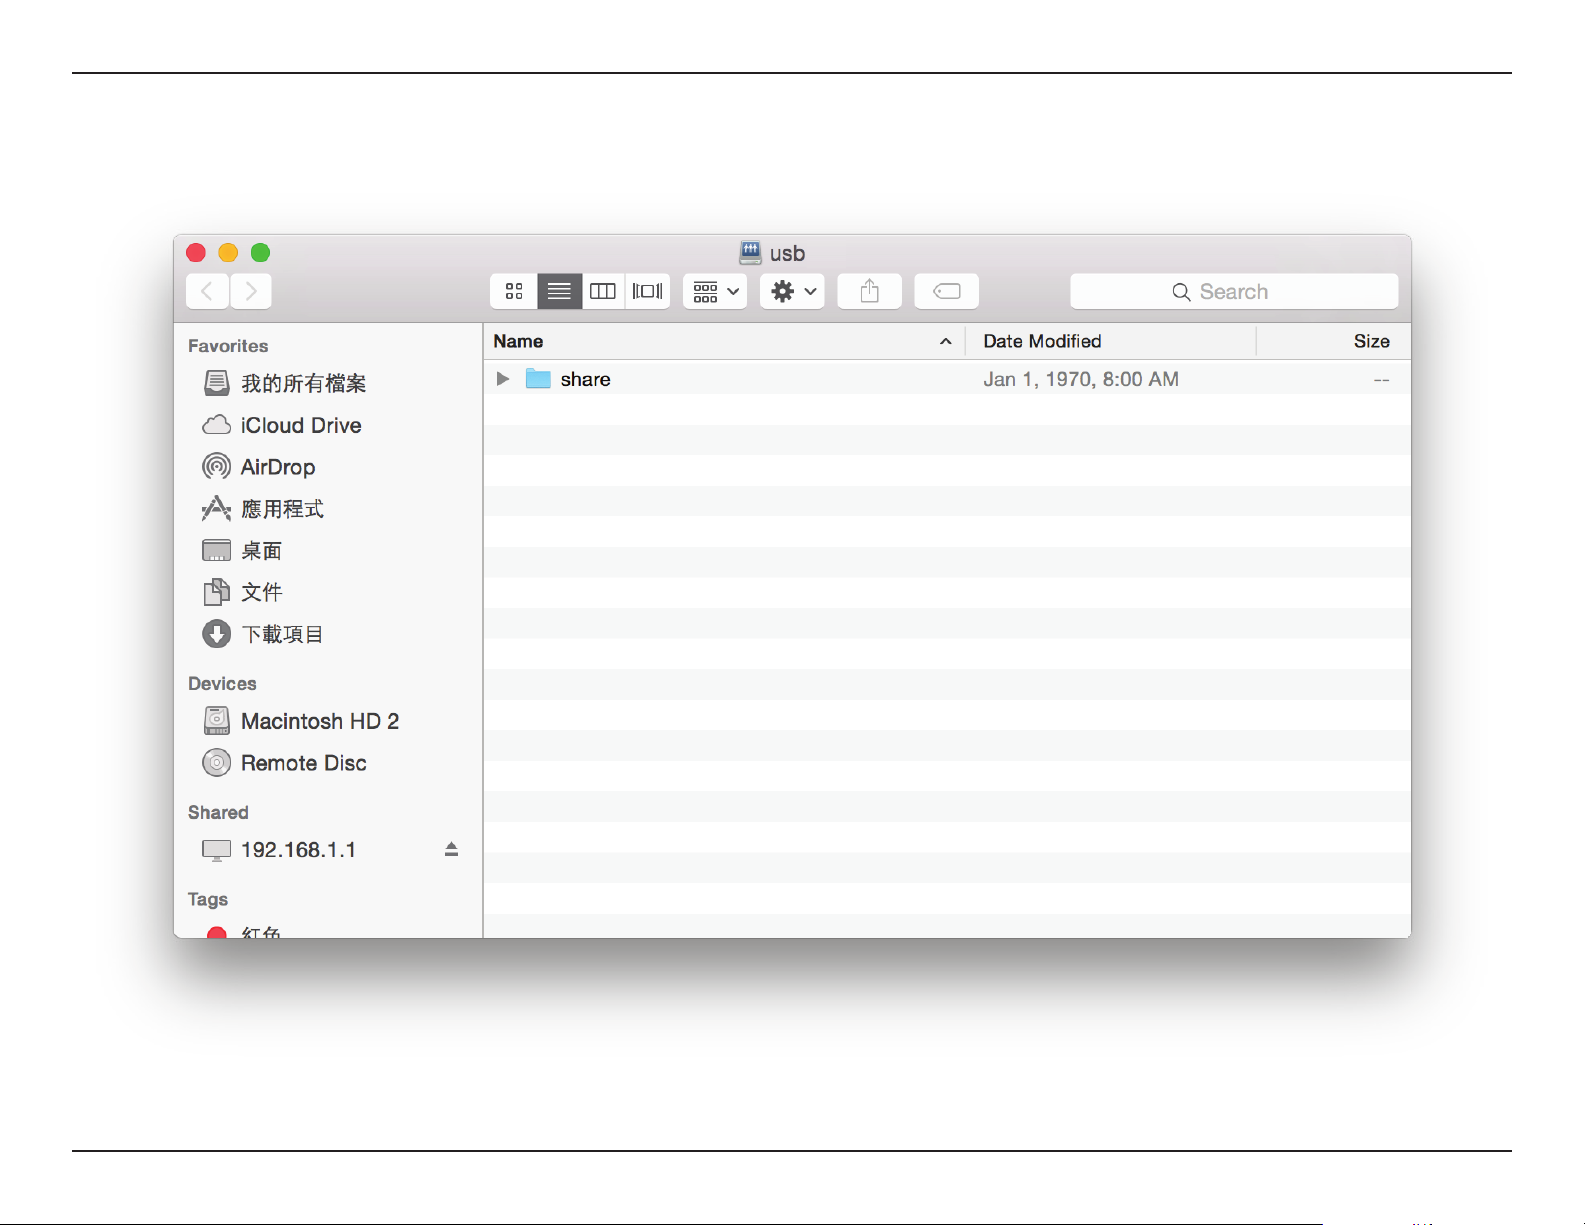
Section 5 - Connect and Share a USB Device
Congratulations
Your les are now shared. Repeat this process from each Mac you wish to share your USB drive with.
82D-Link DSL-3900 User Manual
Page 87
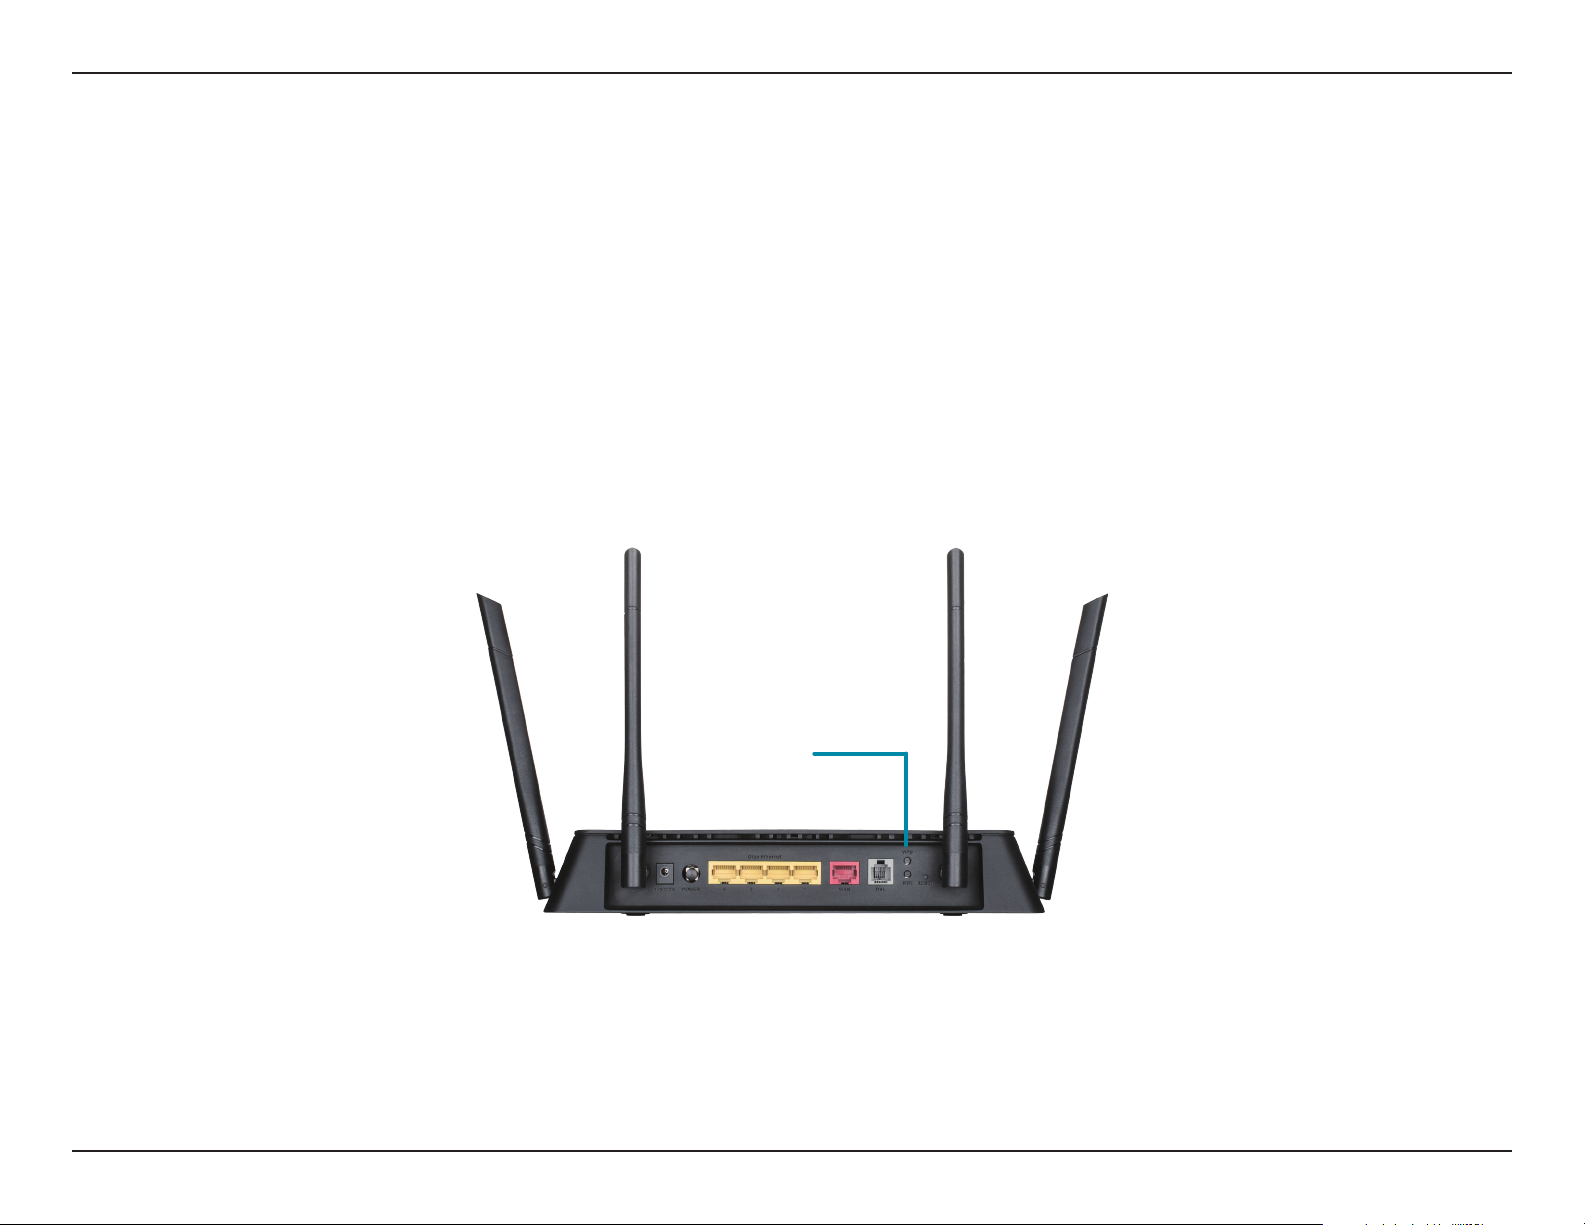
Section 6 - Connecting to a Wireless Network
Connect a Wireless Client to Your Router
WPS Button
The easiest and most secure way to connect your wireless devices to the router is with WPS (Wi-Fi Protected Setup). Most
wireless devices such as wireless adapters, media players, Blu-ray DVD players, wireless printers and cameras will have a WPS
button (or a software utility with WPS) that you can press to connect to the DSL-3900 router. Please refer to your user manual
for the wireless device you want to connect to make sure you understand how to enable WPS. Once you know, follow the steps
below:
Step 1 - Press the WPS button on the DSL-3900 for about 5 seconds. The WPS LED on the front will start to blink.
WPS Button
Step 2 - Within 2 minutes, press the WPS button on your wireless device (or launch the software utility and start the WPS
process).
Step 3 - Allow up to 1 minute for your connection to be congured. Once the WPS LED stops blinking, you will be connected
and your wireless connection will be secure with WPA2.
83D-Link DSL-3900 User Manual
Page 88
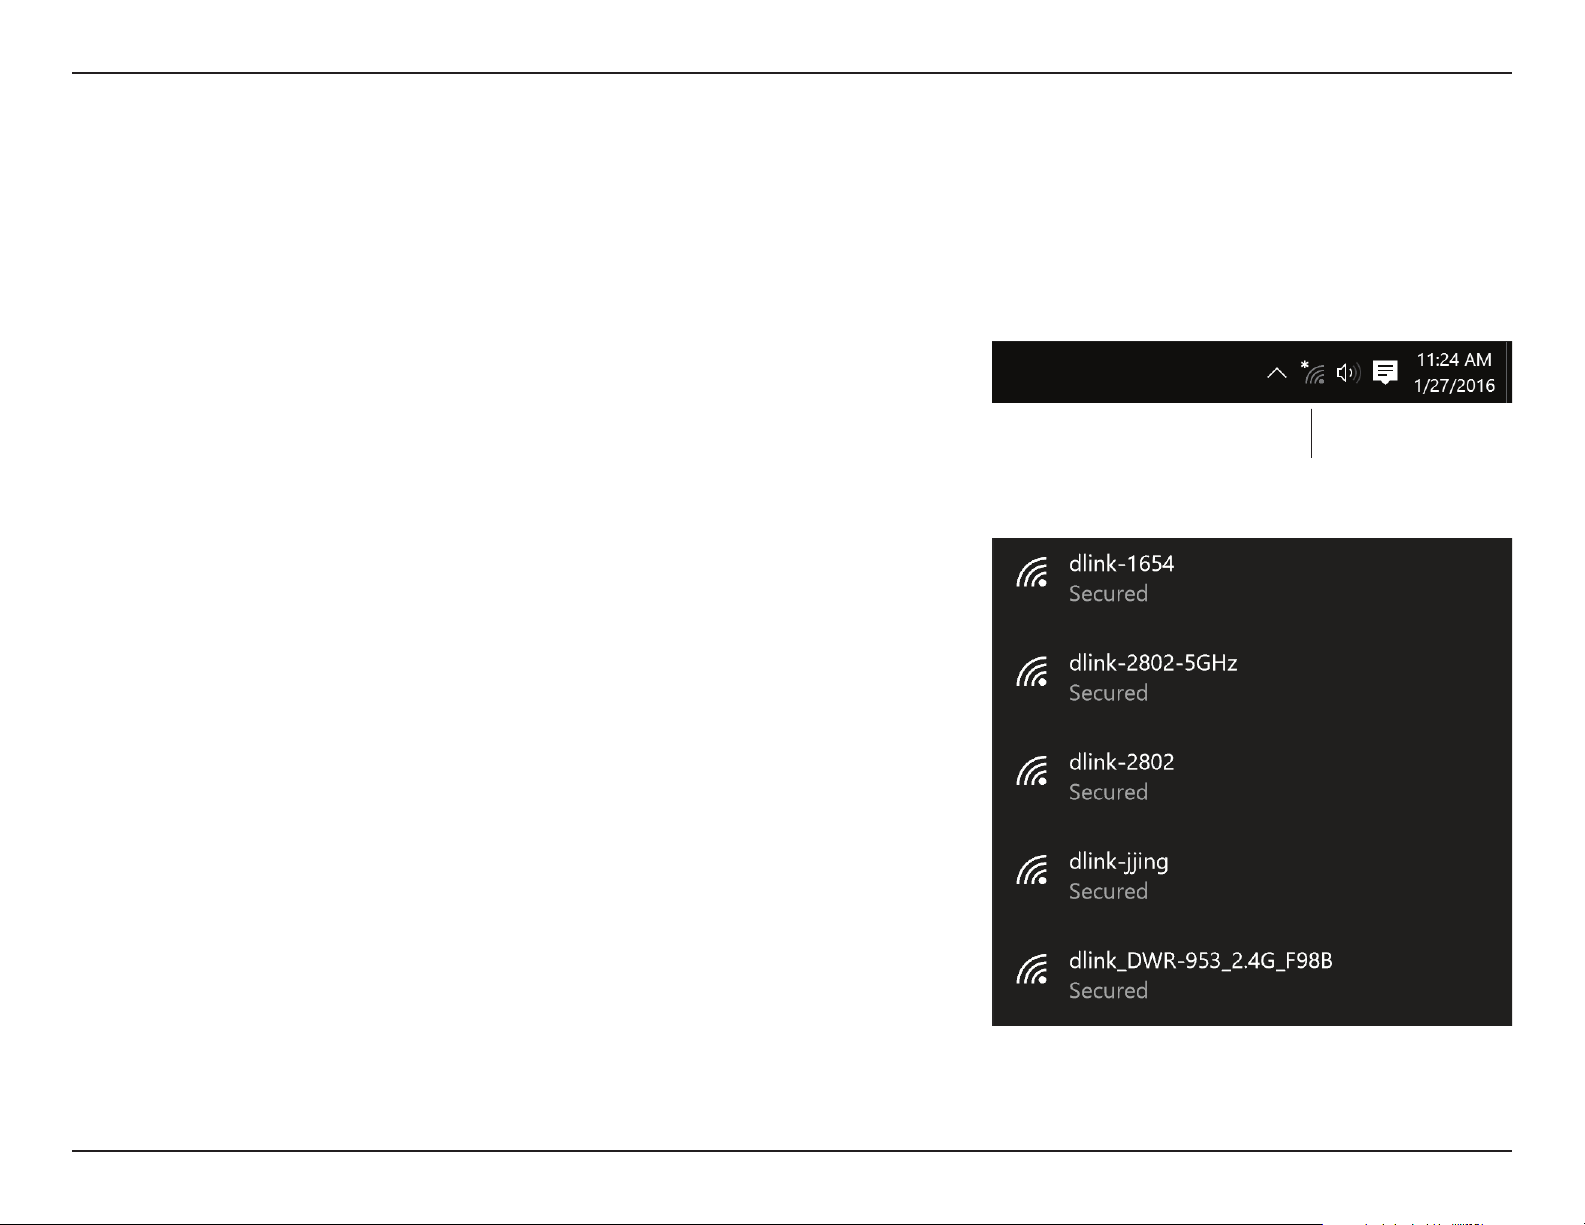
Section 6 - Connecting to a Wireless Network
Windows® 10
When connecting to the DSL-3900 wirelessly for the rst time, you will need to input the wireless network name (SSID) and
Wi-Fi password (security key) of the device you are connecting to. If your product has a Wi-Fi conguration card, you can
nd the default network name and Wi-Fi password here. Otherwise refer to the product label for the default Wi-Fi network
SSID and password, or enter the Wi-Fi credentials set during the product conguration.
To join an existing network, locate the wireless network icon in the taskbar,
next to the time display and click on it.
Wireless Icon
Clicking on this icon will display a list of wireless networks which are within
range of your computer. Select the desired network by clicking on the SSID.
84D-Link DSL-3900 User Manual
Page 89
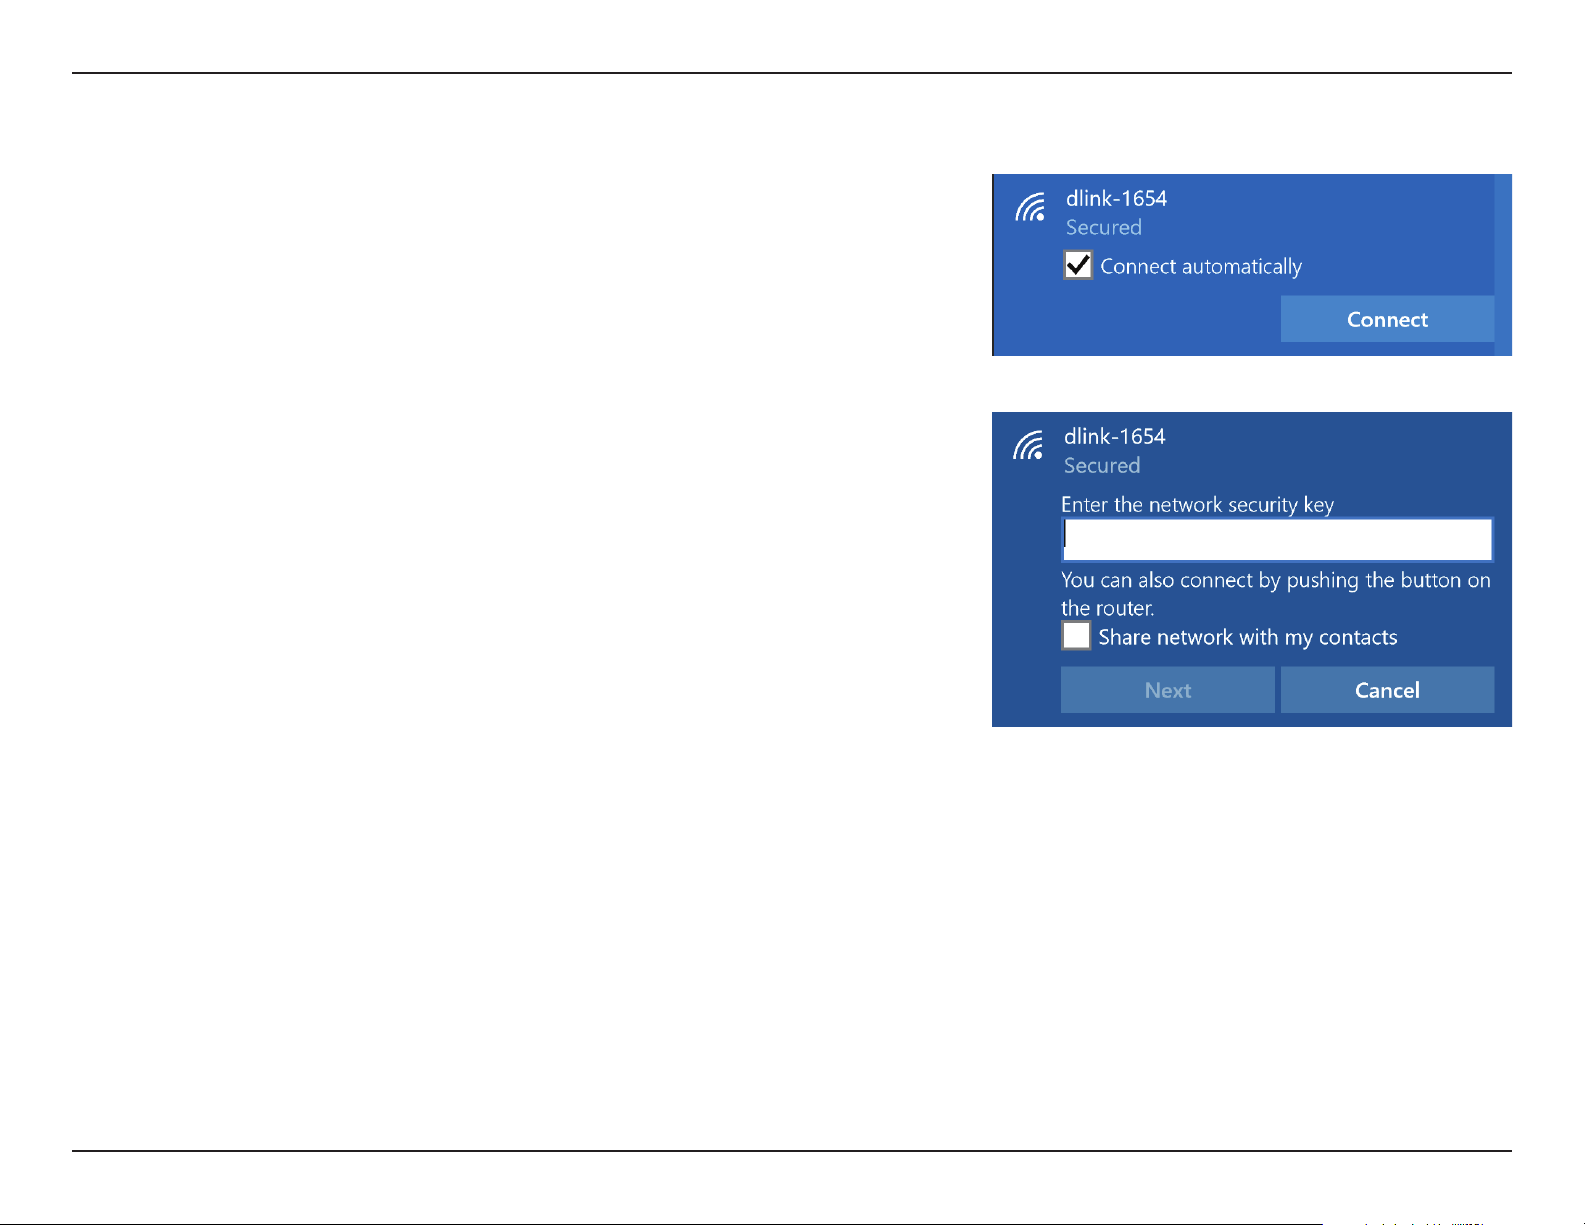
Section 6 - Connecting to a Wireless Network
To connect to the SSID, click Connect.
To automatically connect with the router when your device next detects the
SSID, click the Connect Automatically check box.
You will then be prompted to enter the Wi-Fi password (network security key)
for the wireless network. Enter the password into the box and click Next to
connect to the network. Your computer will now automatically connect to this
wireless network when it is detected.
You can also use Wi-Fi Protected Setup (WPS) to connect to the router.
Press the WPS button on your D-Link device and you will be automatically
connected.
85D-Link DSL-3900 User Manual
Page 90
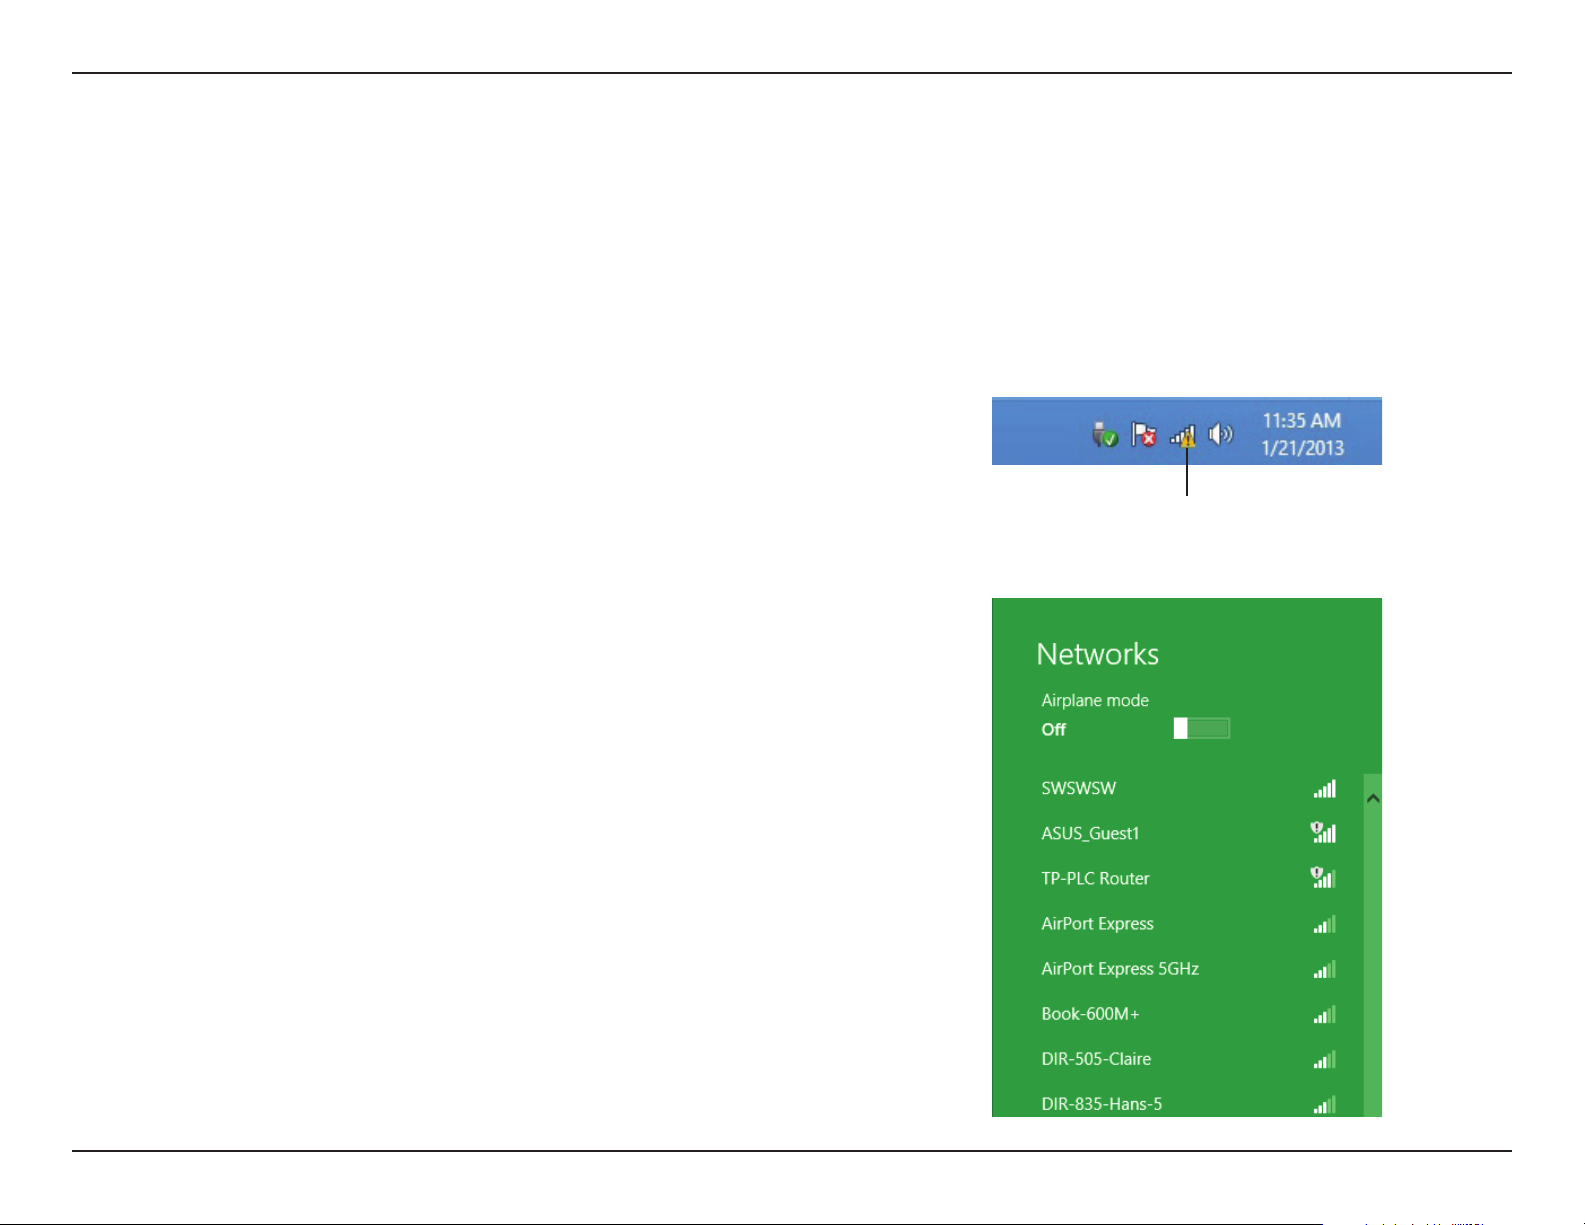
Section 6 - Connecting to a Wireless Network
Windows® 8
WPA/WPA2
It is recommended that you enable wireless security (WPA/WPA2) on your wireless router or access point before conguring
your wireless adapter. If you are joining an existing network, you will need to know the security key (Wi-Fi password) being
used.
To join an existing network, locate the wireless network icon in the taskbar
next to the time display.
Wireless Icon
Clicking on this icon will display a list of wireless networks that are within
connecting proximity of your computer. Select the desired network by clicking
on the network name.
86D-Link DSL-3900 User Manual
Page 91
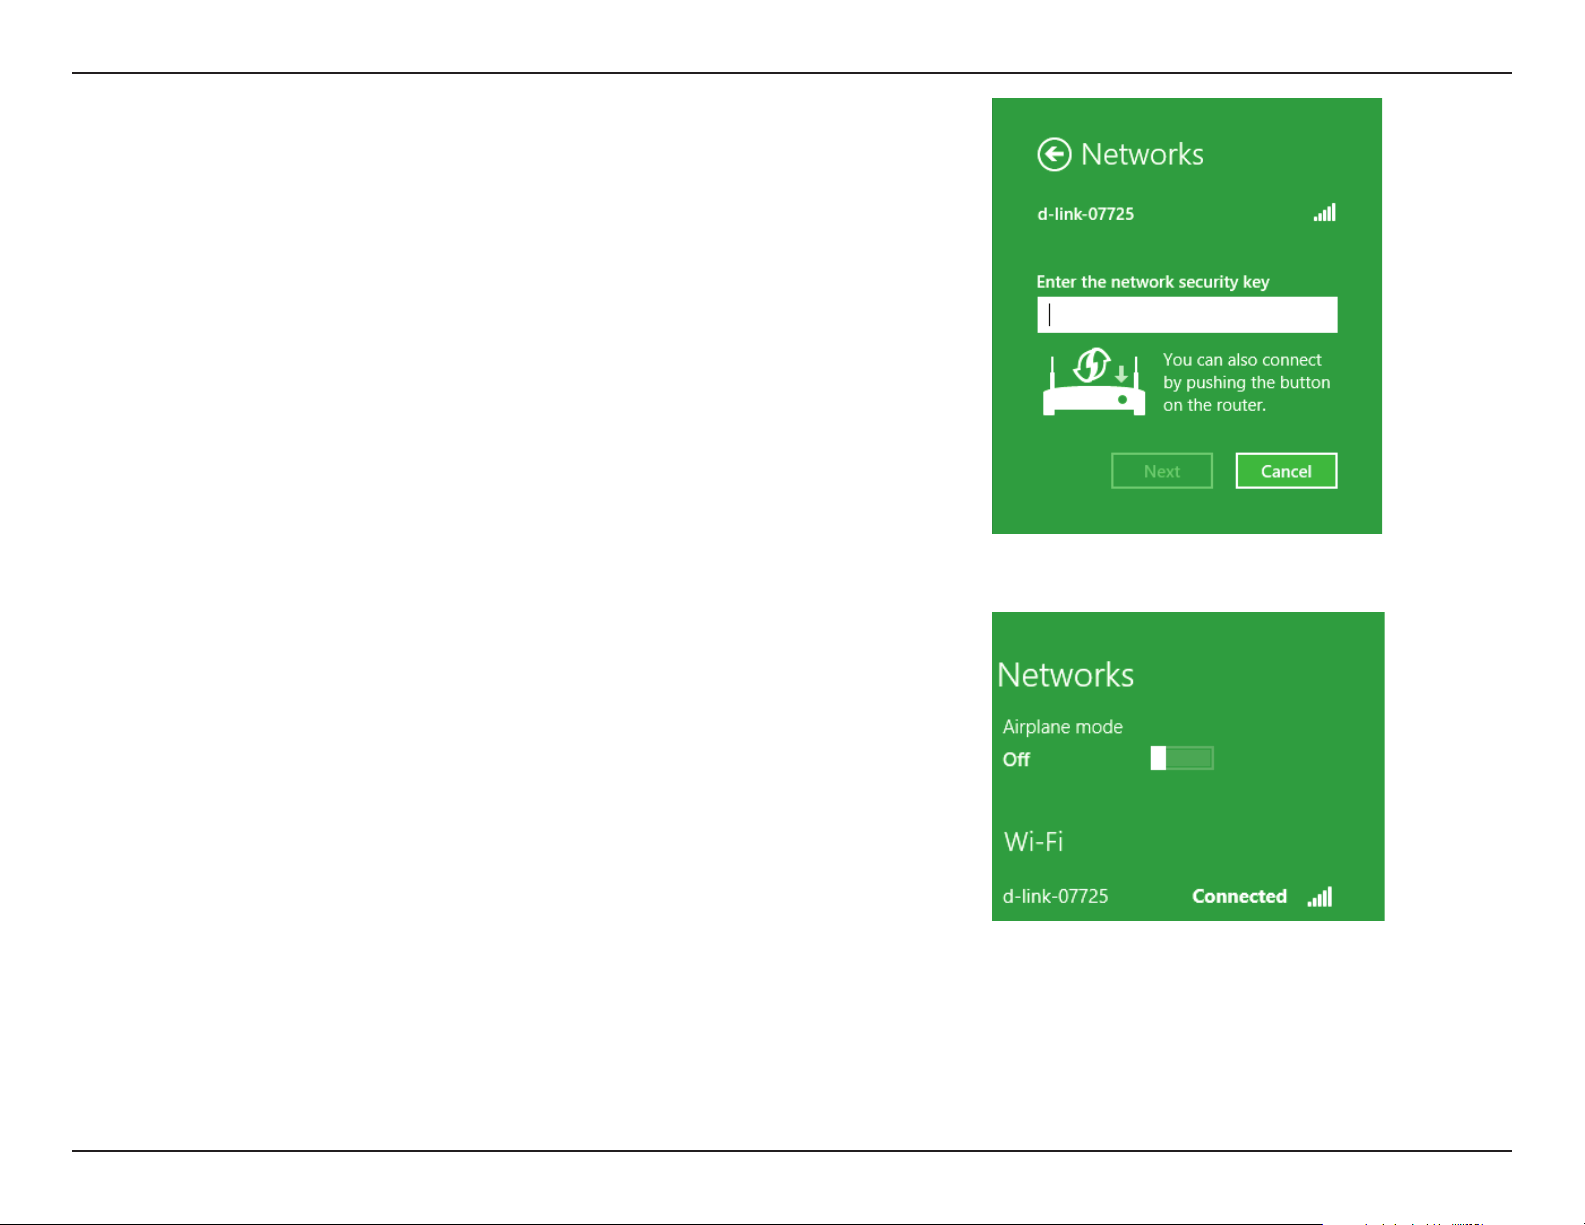
Section 6 - Connecting to a Wireless Network
You will then be prompted to enter the network security key (Wi-Fi password)
for the wireless network. Enter the password into the box and click Next.
If you wish to use Wi-Fi Protected Setup (WPS) to connect to the router, you
can also press the WPS button on your router during this step to enable the
WPS function.
When you have established a successful connection to a wireless network, the
word Connected will appear next to the name of the network to which you
are connected to.
87D-Link DSL-3900 User Manual
Page 92
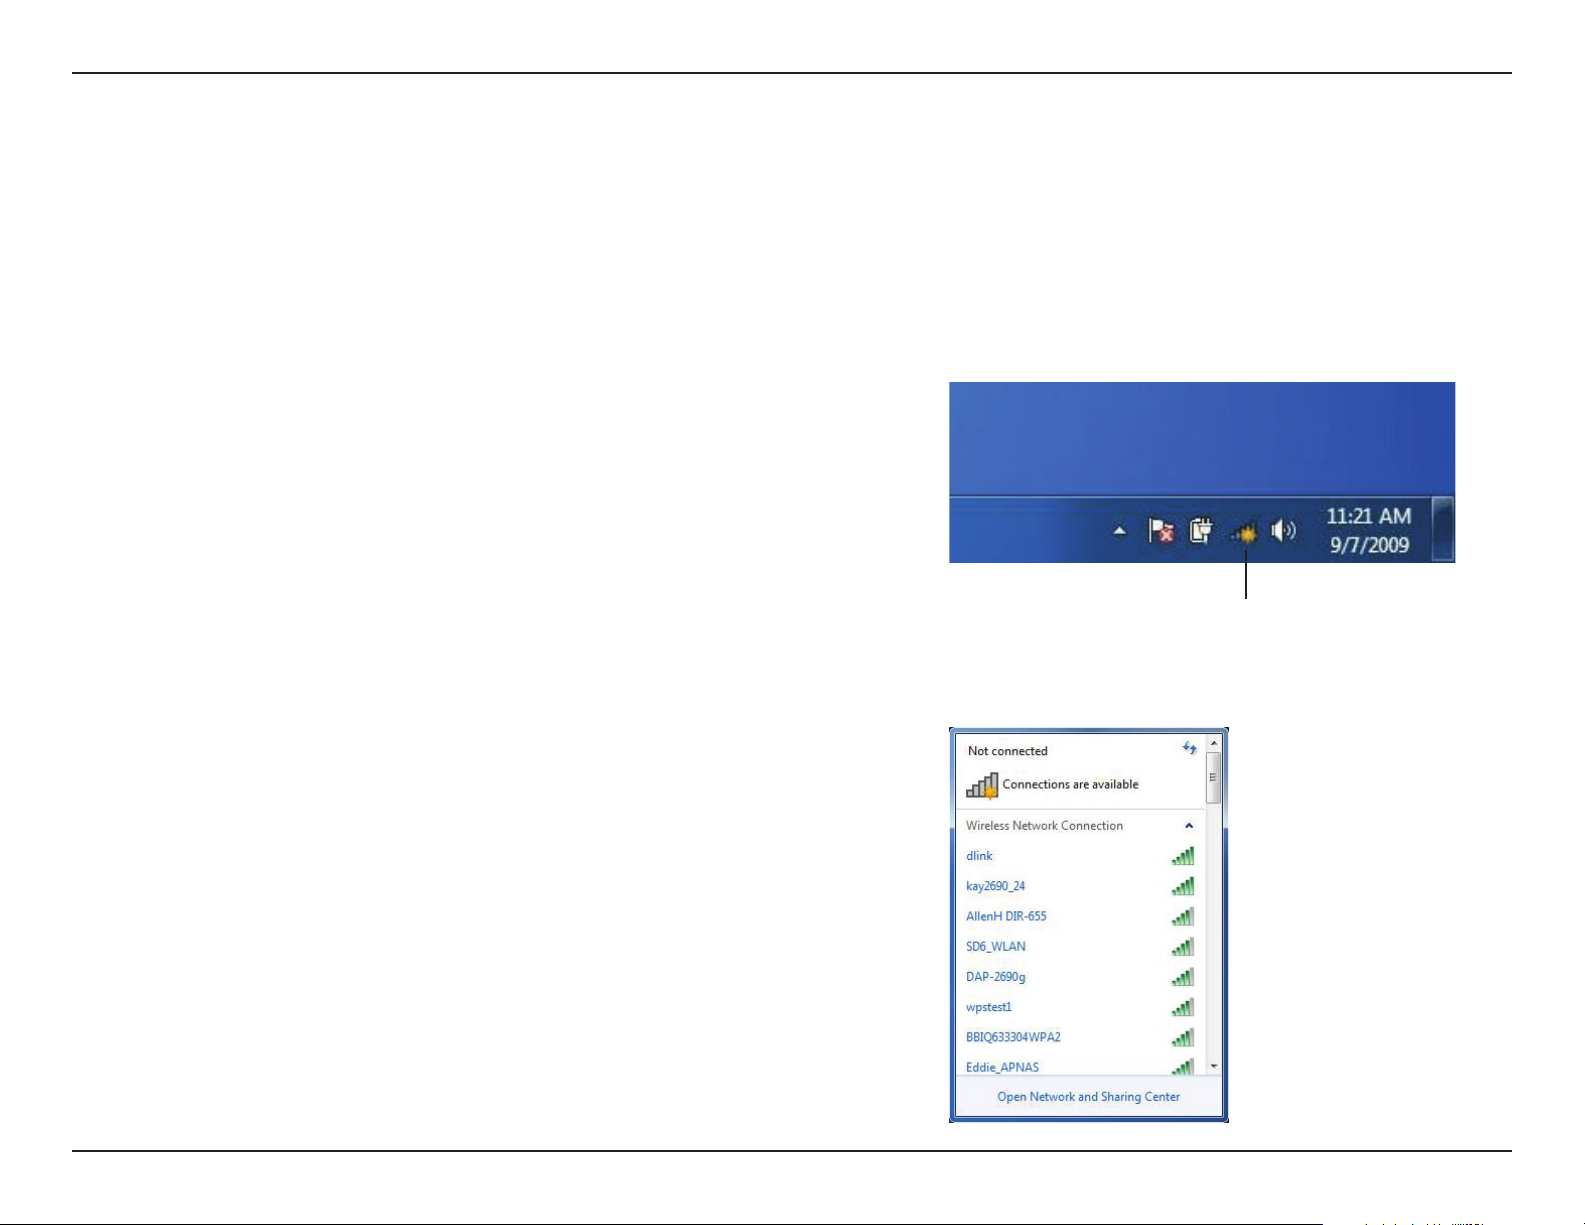
Section 6 - Connecting to a Wireless Network
Windows® 7
WPA/WPA2
It is recommended that you enable wireless security (WPA/WPA2) on your wireless router or access point before conguring
your wireless adapter. If you are joining an existing network, you will need to know the security key or passphrase being used.
1. Click on the wireless icon in your system tray (lower-right corner).
Wireless Icon
2. The utility will display any available wireless networks in your area.
88D-Link DSL-3900 User Manual
Page 93
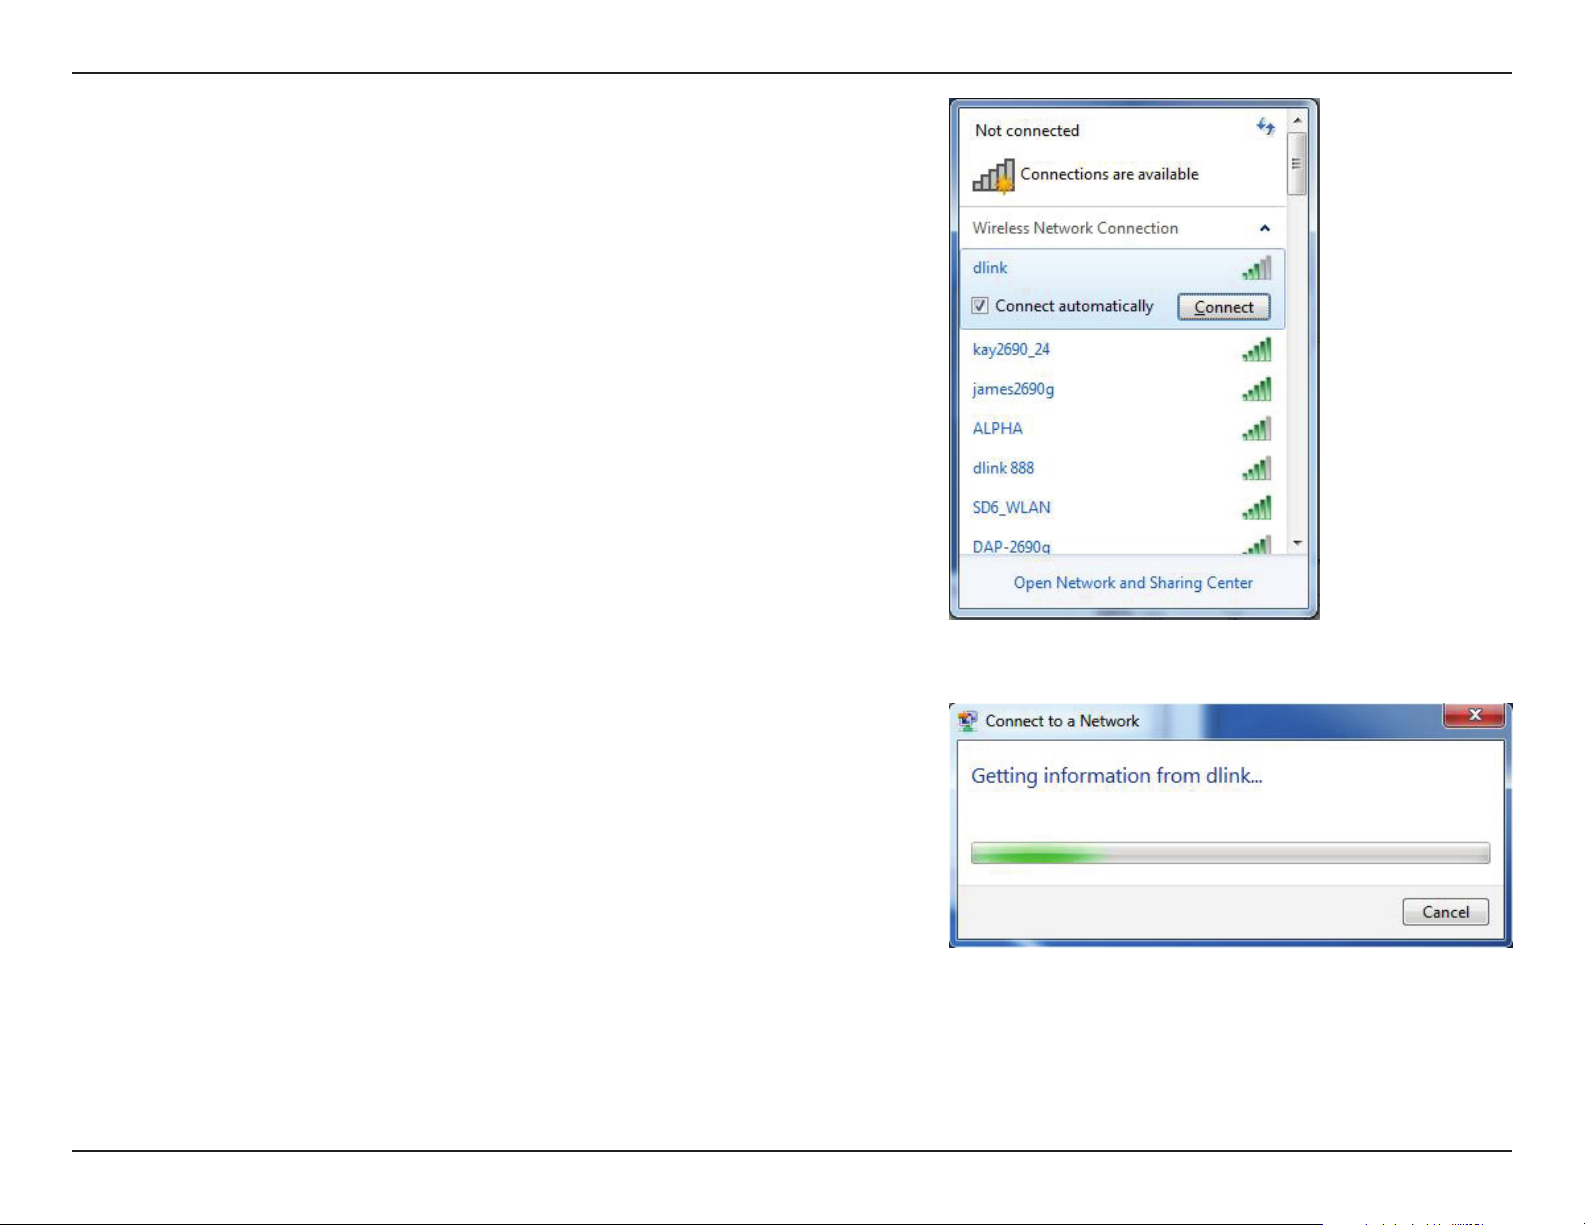
Section 6 - Connecting to a Wireless Network
3. Highlight the wireless connection with Wi-Fi name (SSID) you would
like to connect to and click the Connect button.
If you get a good signal but cannot access the Internet, check your
TCP/IP settings for your wireless adapter. Refer to the Networking
Basics section in this manual for more information.
4. The following window appears while your computer tries to connect
to the router.
89D-Link DSL-3900 User Manual
Page 94
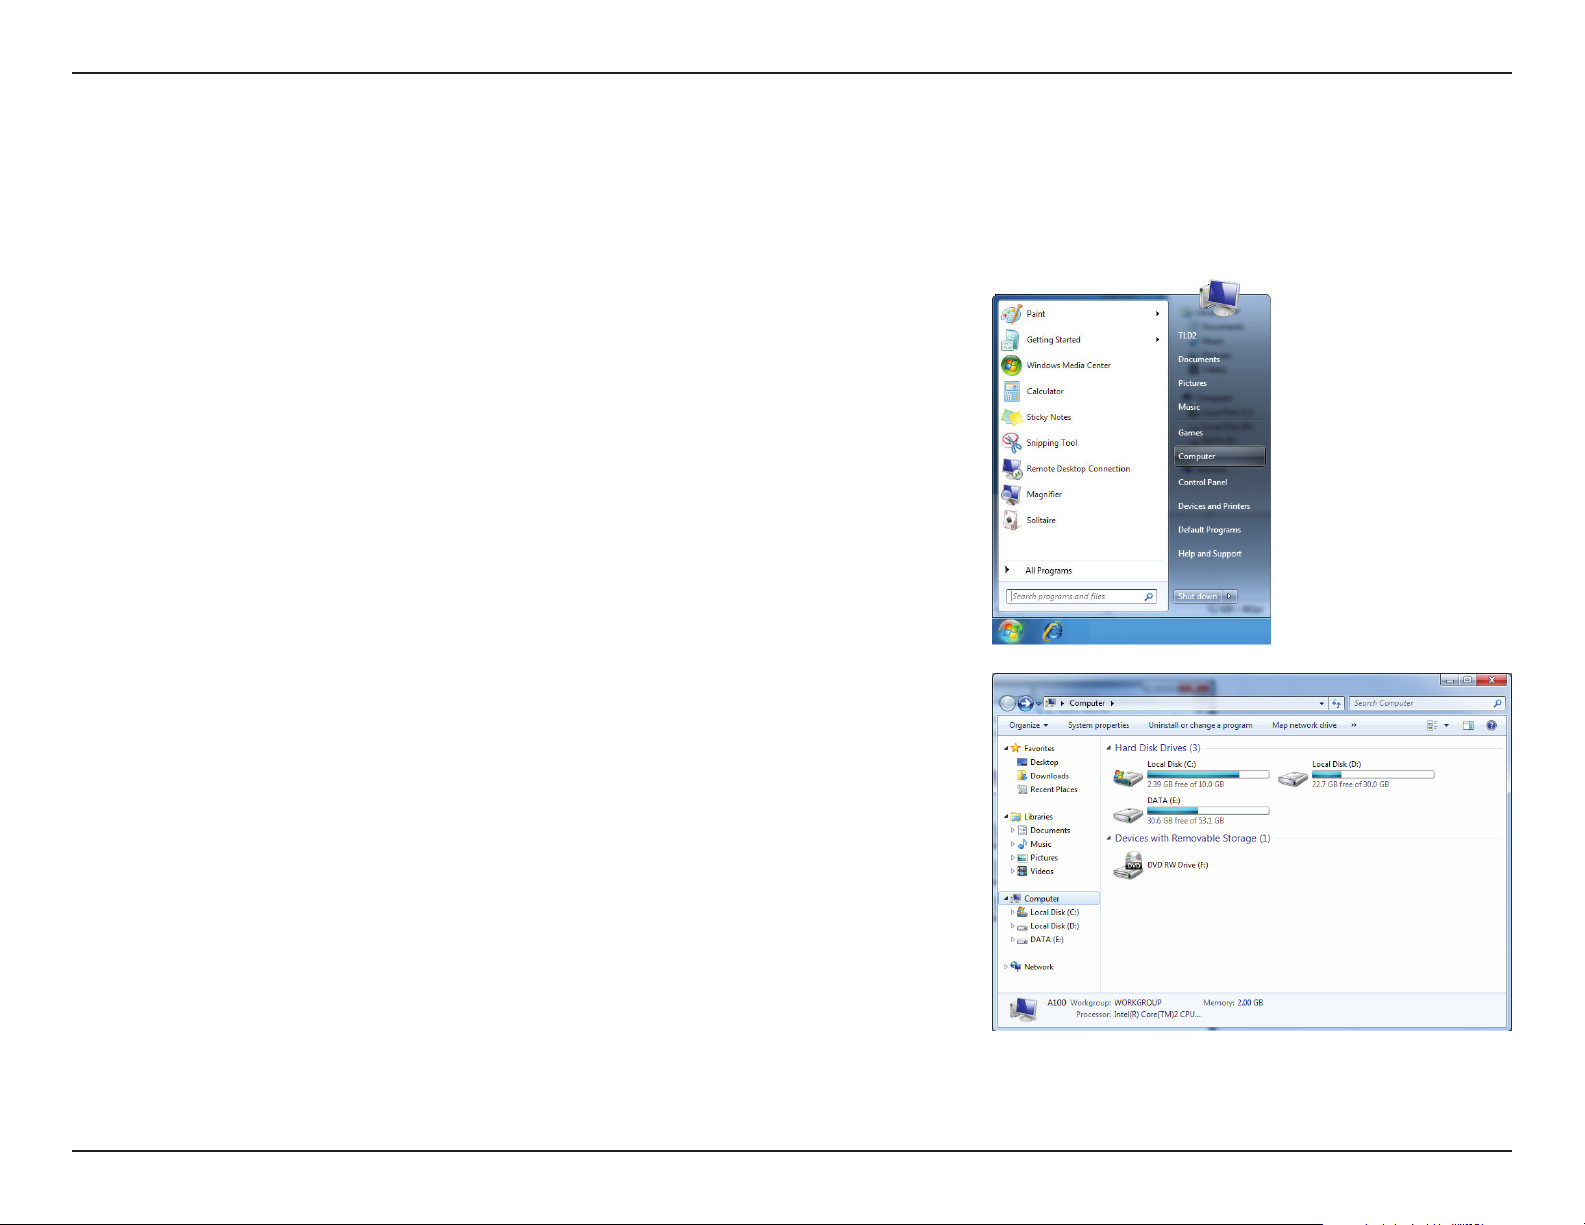
Section 6 - Connecting to a Wireless Network
WPS
The WPS feature of the DSL-3900 can be congured using Windows® 7. Carry out the following steps to use Windows® 7 to
congure the WPS feature:
1. Click the Start button and select Computer from the Start menu.
2. Click Network on the left side.
90D-Link DSL-3900 User Manual
Page 95
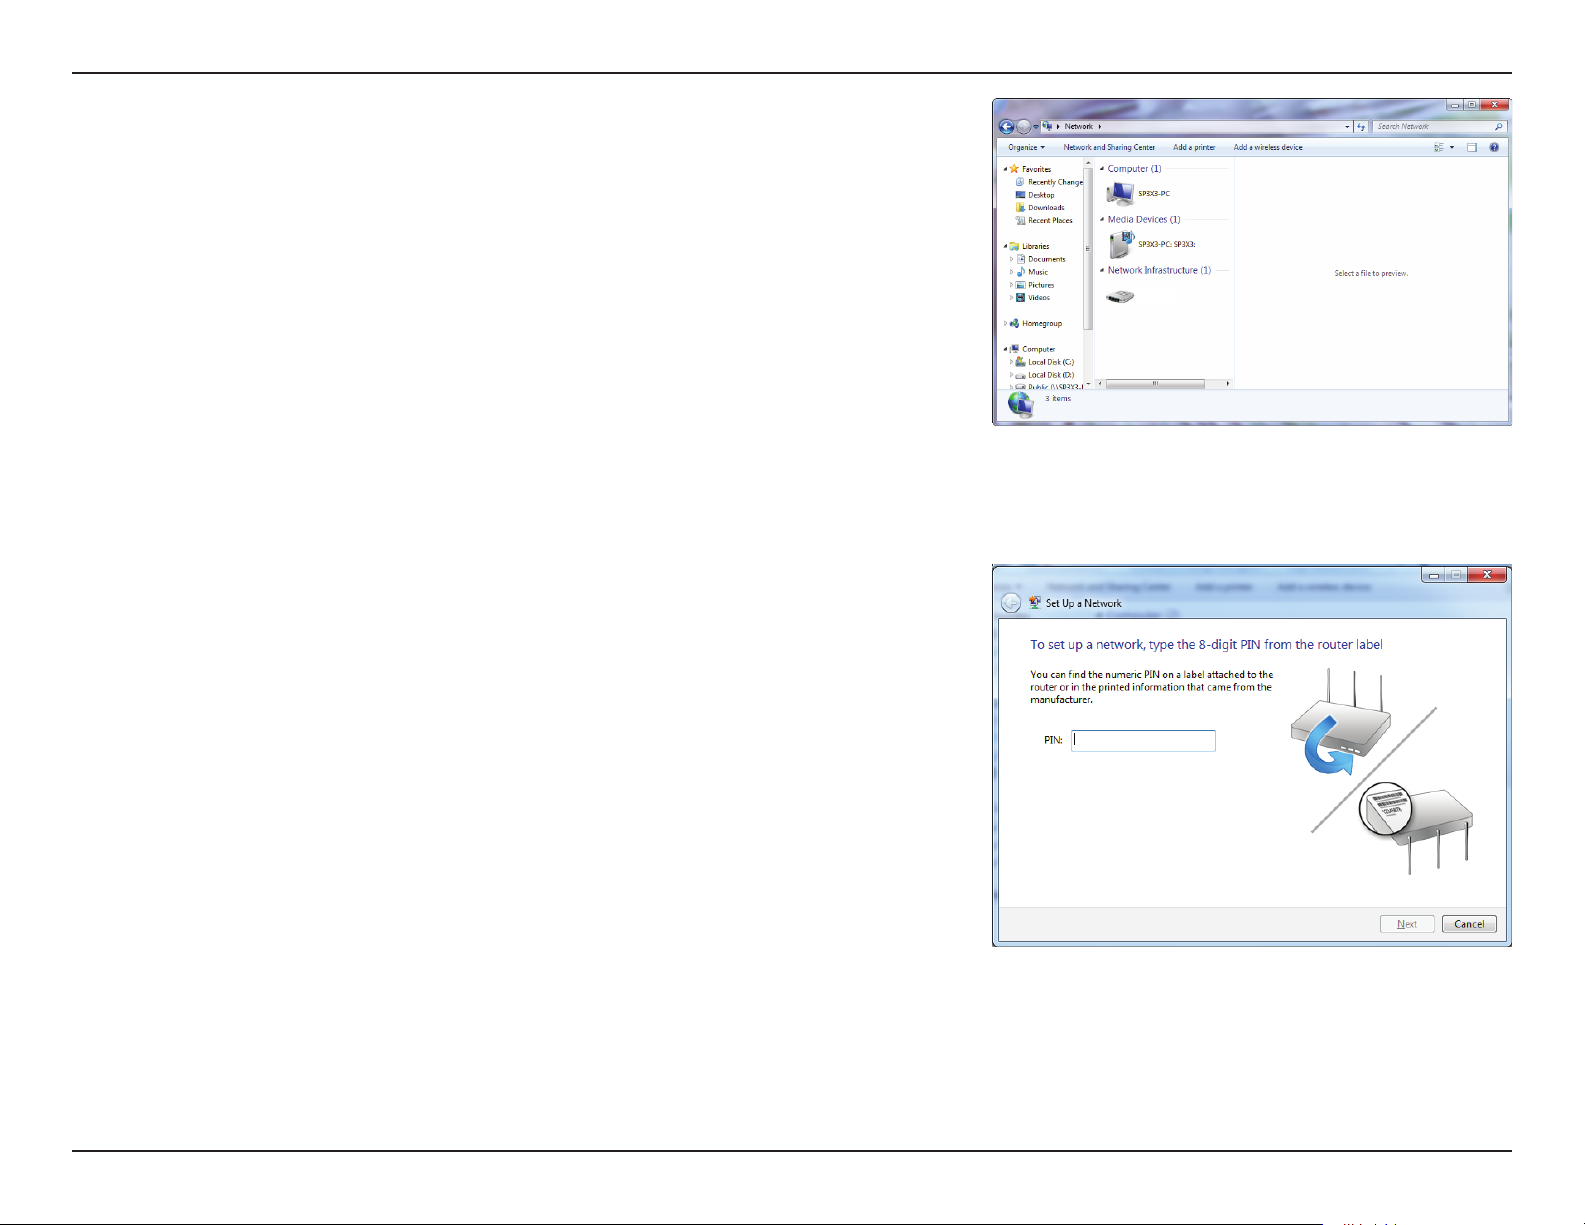
Section 6 - Connecting to a Wireless Network
3. Double-click the DSL-3900.
4. Input the WPS PIN number (on the router label) in the Setup >
Wireless Setup menu in the Router’s Web UI) and click Next.
DSL-3900
91D-Link DSL-3900 User Manual
Page 96
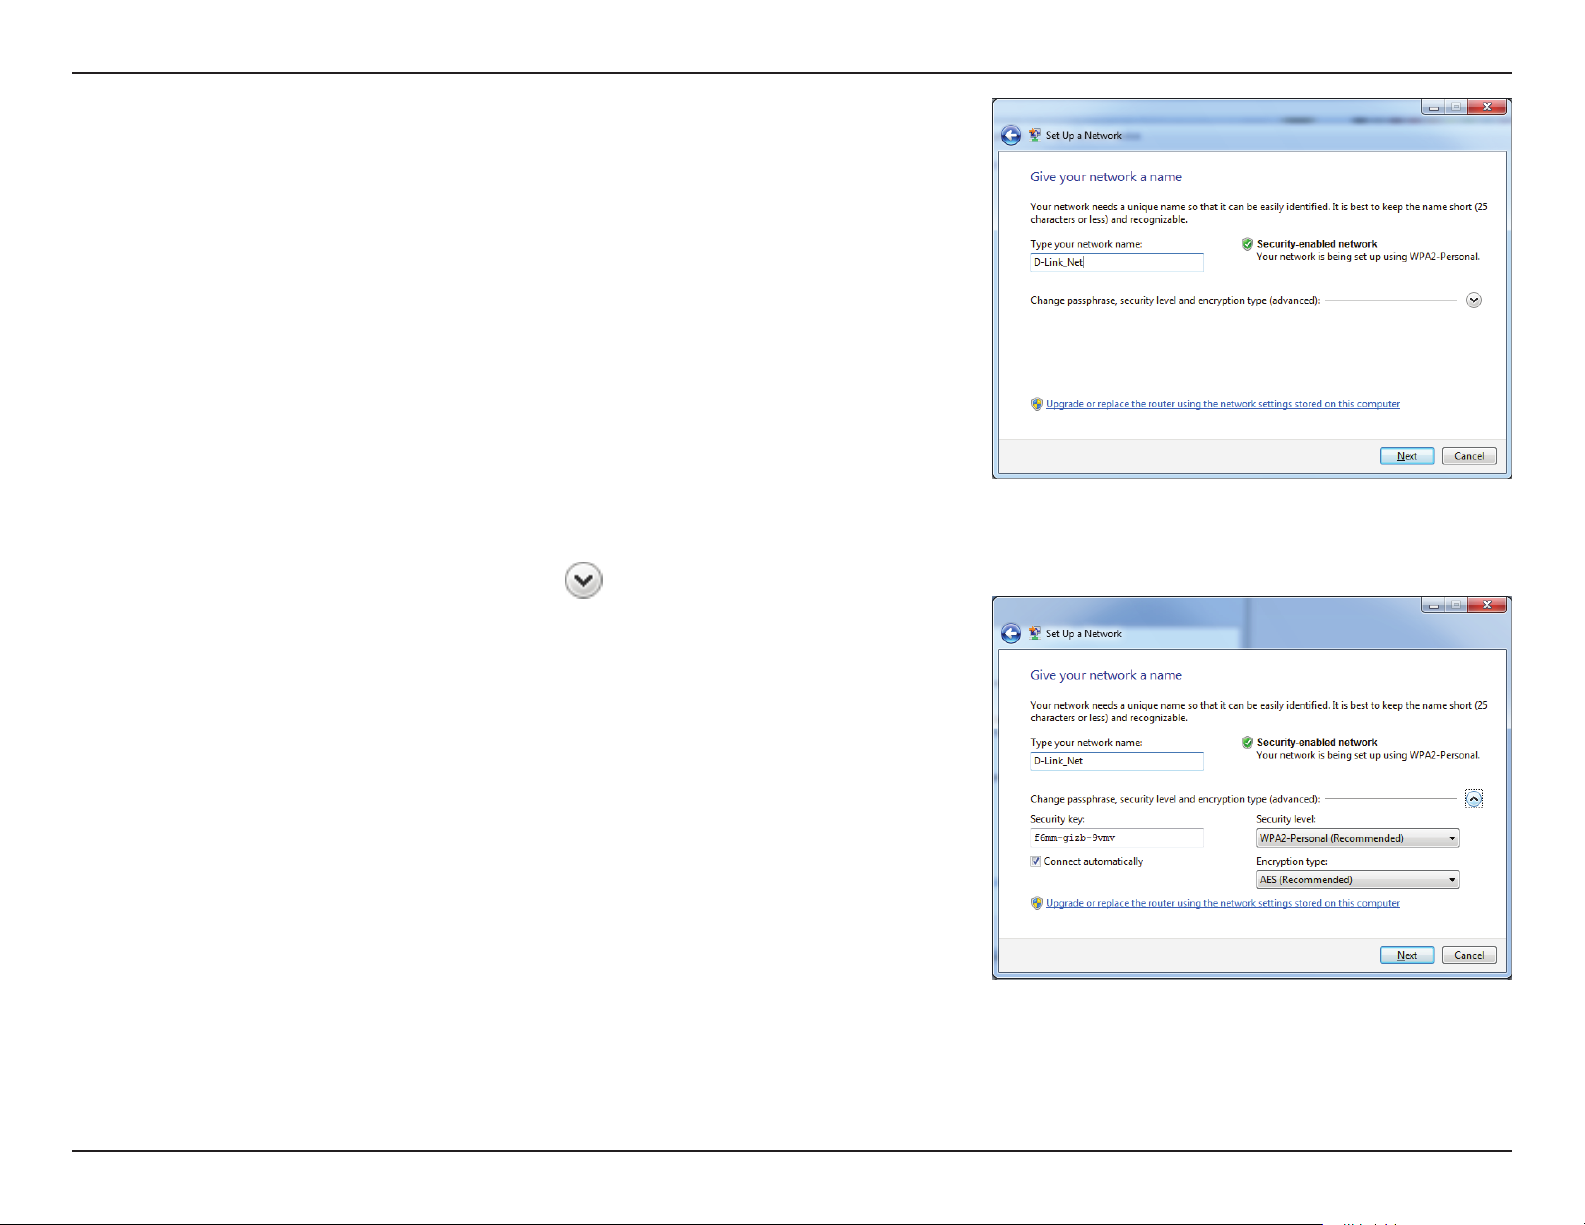
Section 6 - Connecting to a Wireless Network
5. Type a name to identify the network.
6. To congure advanced settings, click the
Click Next to continue.
icon.
92D-Link DSL-3900 User Manual
Page 97
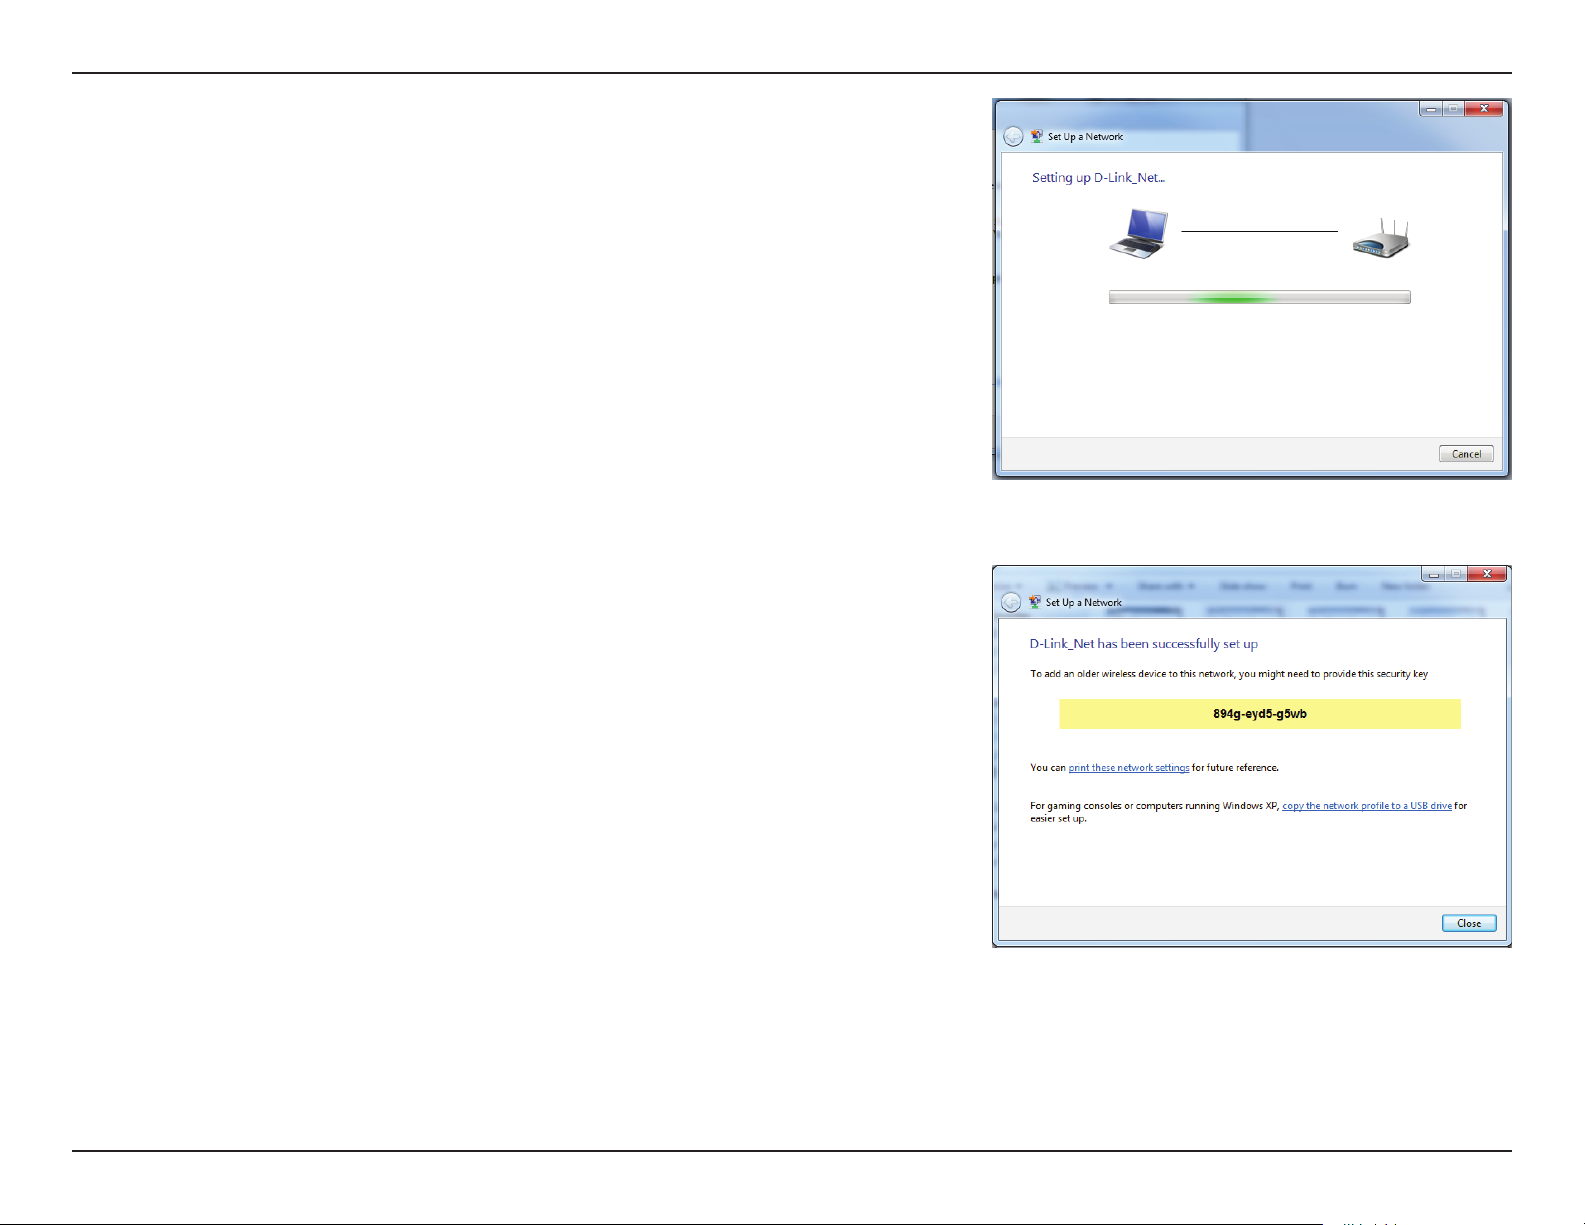
Section 6 - Connecting to a Wireless Network
7. The following window appears while the DSL-3900 is being congured.
Wait for the conguration to complete.
8. The following window informs you that WPS on the DSL-3900 has been set
up successfully.
Make a note of the security key as you may need to provide this security key
if adding an older wireless device to the network in the future.
9. Click Close to complete WPS setup.
93D-Link DSL-3900 User Manual
Page 98
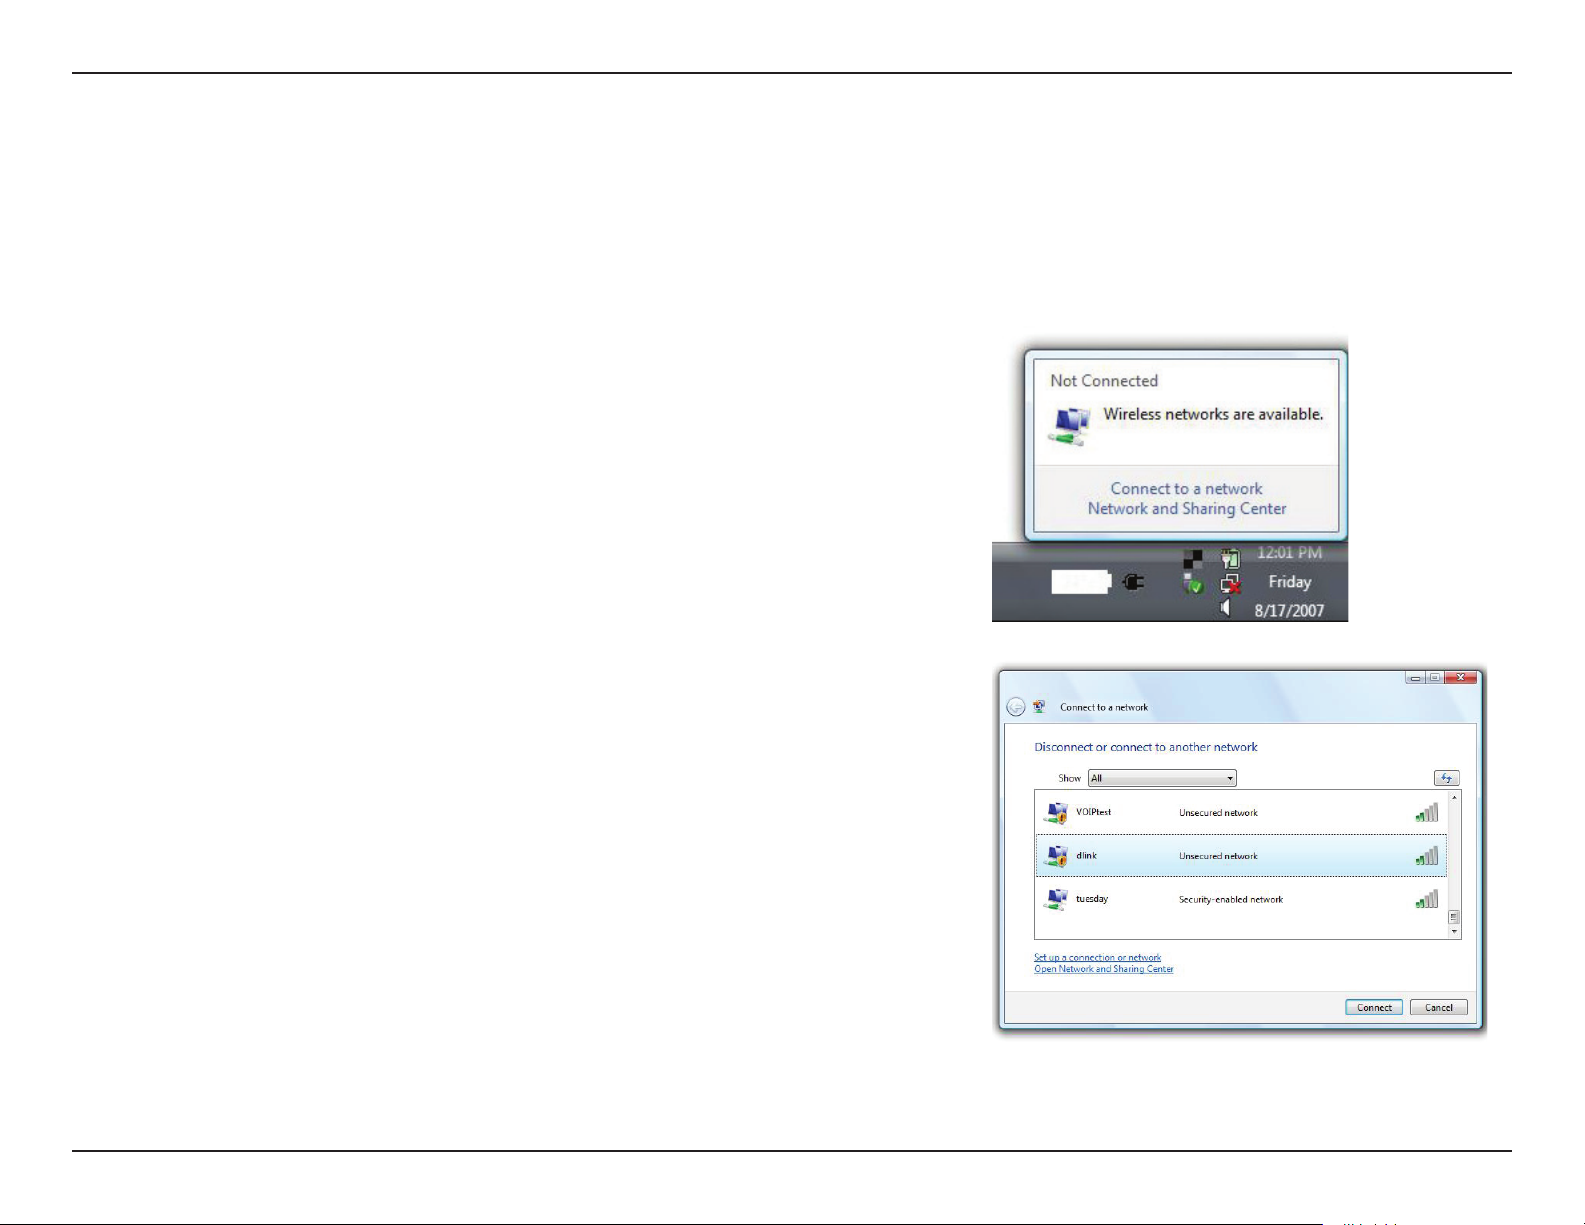
Section 6 - Connecting to a Wireless Network
Windows Vista®
Windows Vista® users may use the built-in wireless utility. If you are using another company’s wireless utility, please refer to the
user manual of your wireless adapter for help connecting to a wireless network. Most wireless utilities will have a “site survey”
option similar to the Windows Vista® utility as seen below.
If you receive the Wireless Networks Detected bubble, click on the center of
the bubble to access the utility.
or
Right-click on the wireless computer icon in your system tray (lower-right
corner next to the time). Select Connect to a network.
The utility will display any available wireless networks in your area. Click on a
network (displayed using the SSID) and click the Connect button.
If you get a good signal but cannot access the Internet, check you TCP/IP
settings for your wireless adapter. Refer to the Networking Basics section in
this manual for more information.
94D-Link DSL-3900 User Manual
Page 99
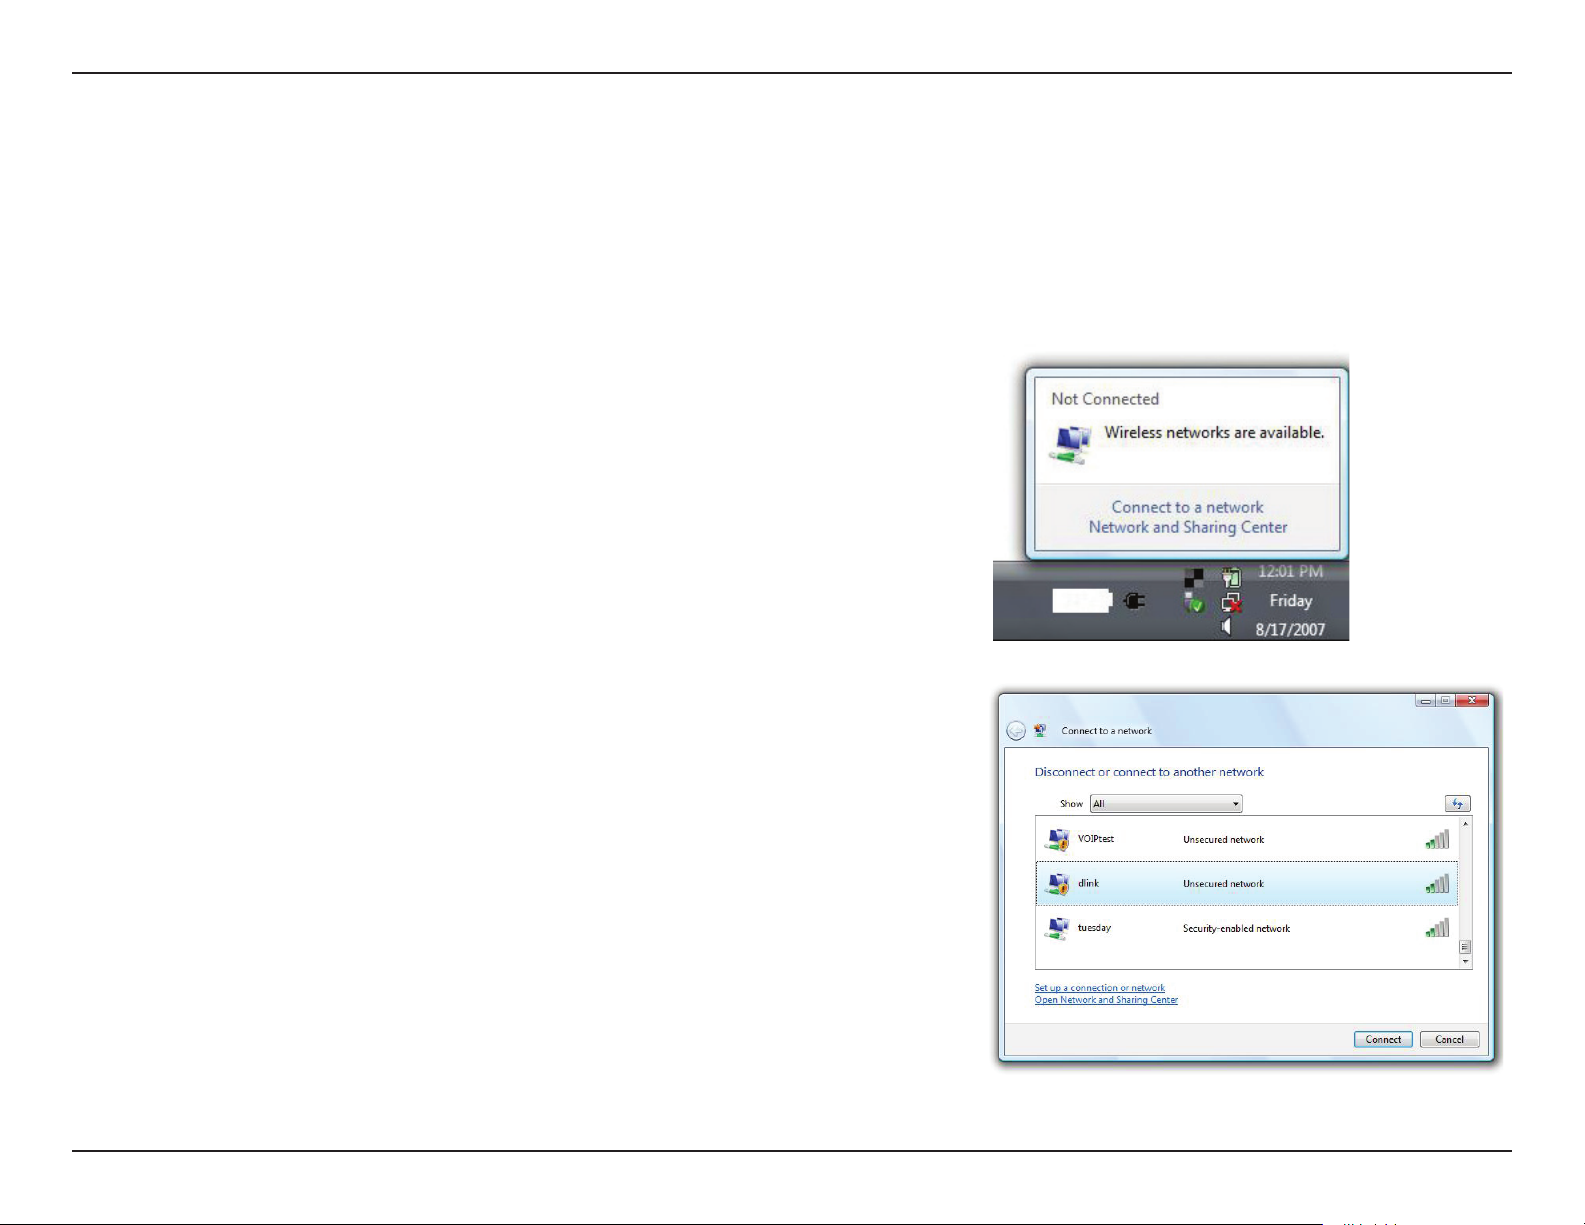
Section 6 - Connecting to a Wireless Network
WPA/WPA2
It is recommended that you enable wireless security (WPA/WPA2) on your wireless router or access point before conguring
your wireless adapter. If you are joining an existing network, you will need to know the security key or passphrase being used.
1. Open the Windows Vista® Wireless Utility by right-clicking on the wireless
computer icon in your system tray (lower right corner of screen). Select
Connect to a network.
2. Highlight the Wi-Fi name (SSID) you would like to connect to and click
Connect.
95D-Link DSL-3900 User Manual
Page 100
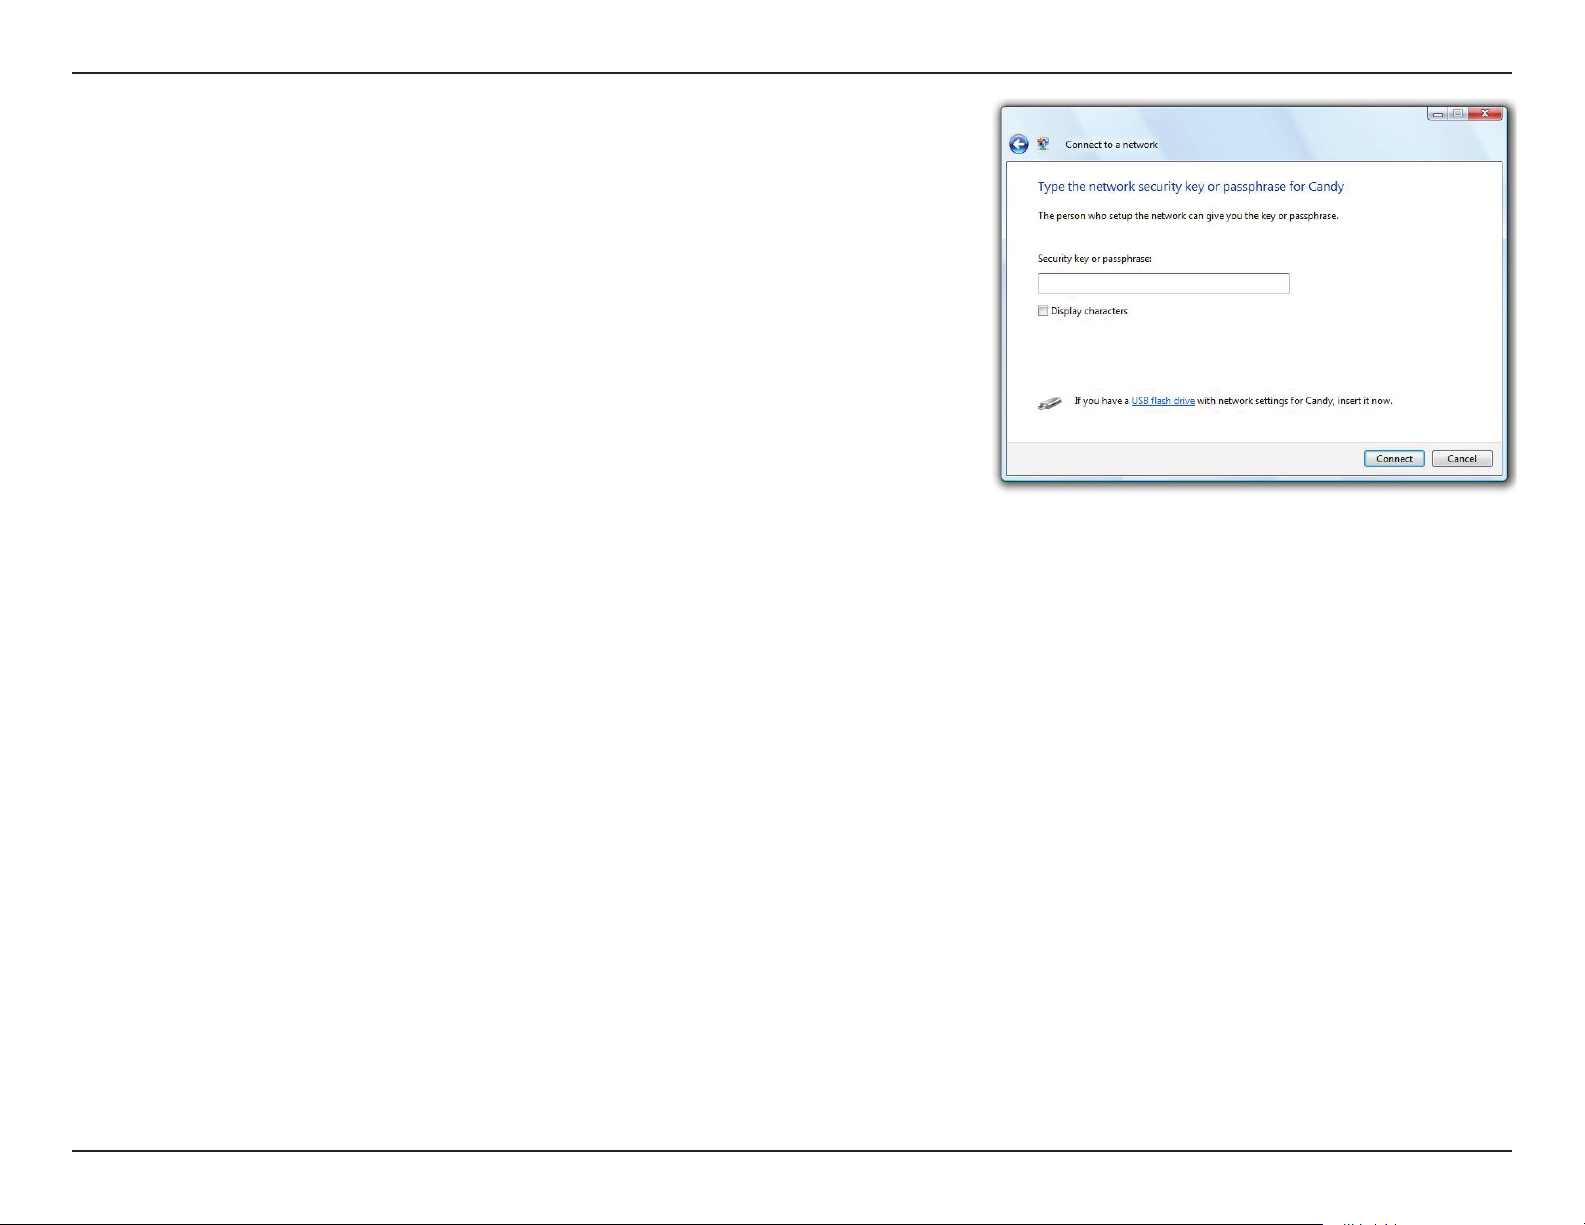
Section 6 - Connecting to a Wireless Network
3. Enter the same security key or passphrase (Wi-Fi password) that is on your
router and click Connect.
It may take 20-30 seconds to connect to the wireless network. If the
connection fails, please verify that the security settings are correct. The key or
passphrase must be exactly the same as the one on the wireless router.
96D-Link DSL-3900 User Manual
 Loading...