

Page 1
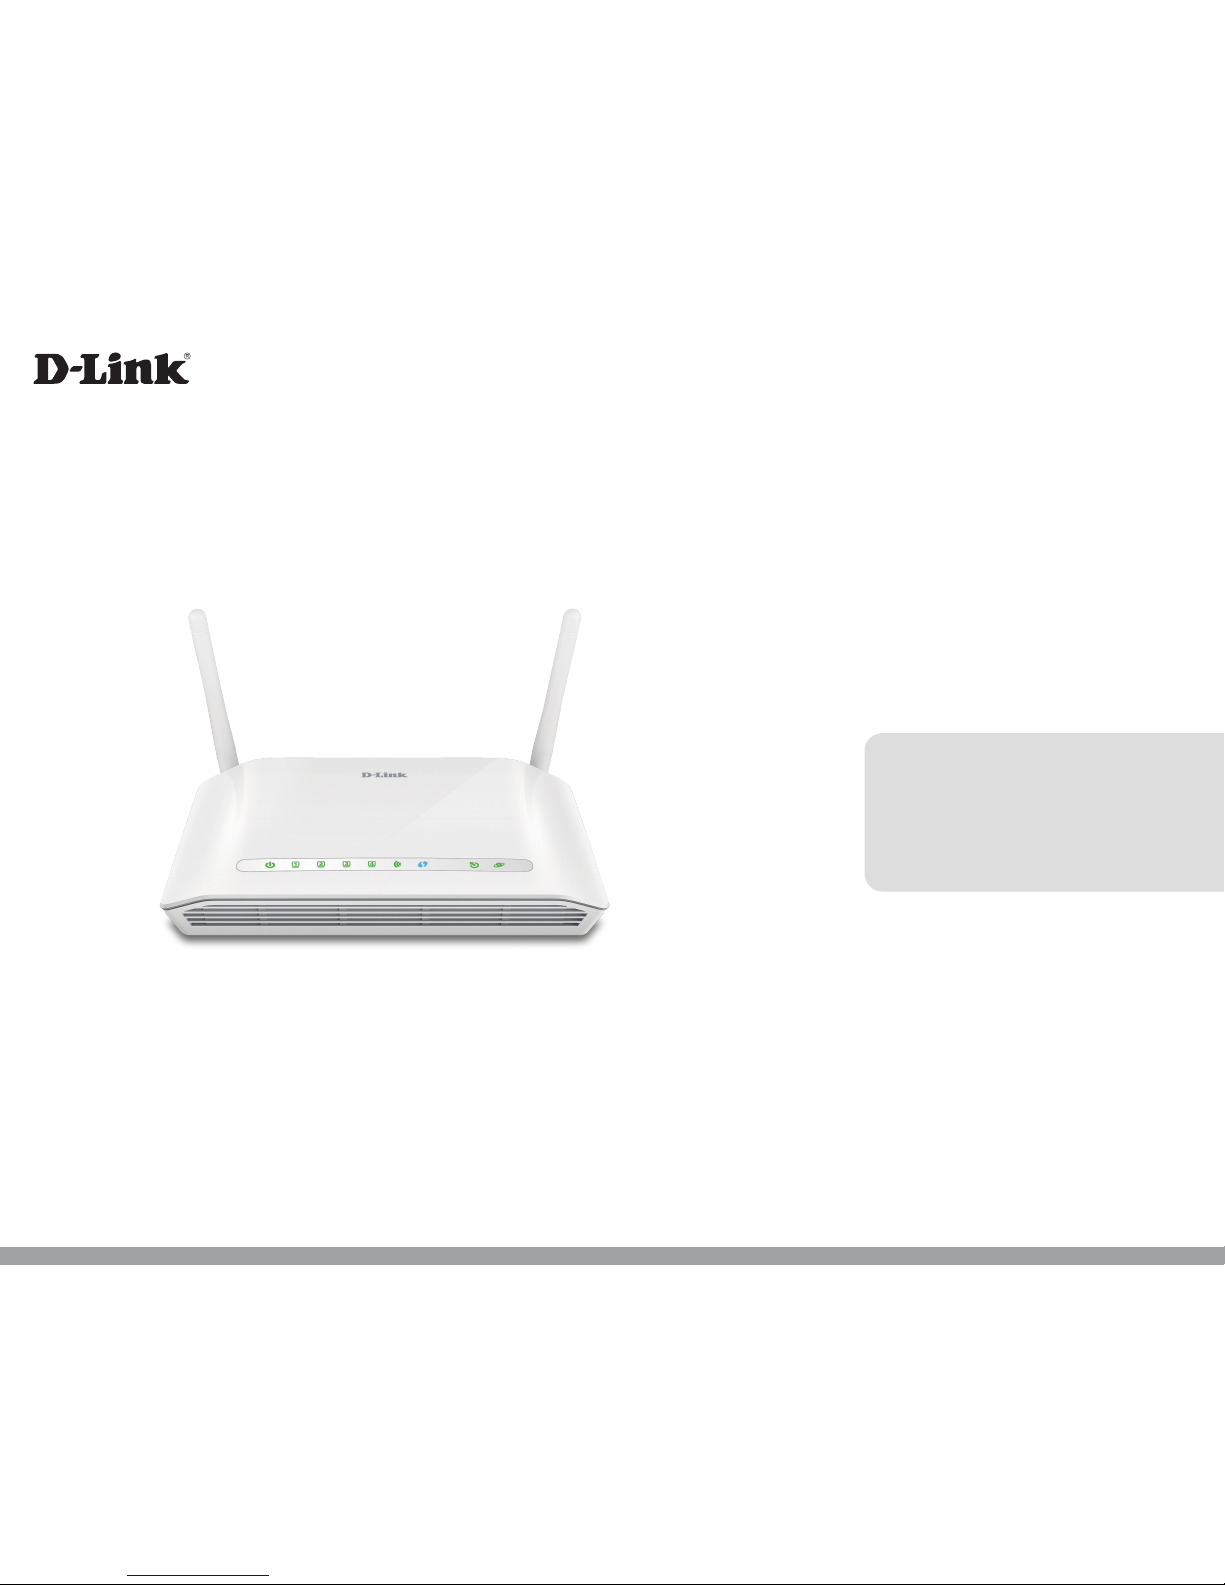
Wireless N300 ADSL2+ Modem Router
User Manual
DSL-2745
Version 1.00 | 04/06/2016
Page 2
iD-Link DSL-2745 Wireless N300 ADSL2+ Modem Router User Manual
D-Link reserves the right to revise this publication and to make changes in the content hereof without obligation to notify any person or organization
of such revisions or changes.
Manual Revisions
Revision Date Description
1.00 April 06, 2016 • Release for revision A1
Trademarks
D-Link and the D-Link logo are trademarks or registered trademarks of D-Link Corporation or its subsidiaries in the United States or other countries.
All other company or product names mentioned herein are trademarks or registered trademarks of their respective companies.
Chrome™ browser, Google Play™ and Android™ are trademarks of Google Inc.
Internet Explorer®, Windows® and the Windows logo are trademarks of the Microsoft group of companies.
Copyright © 2016 by D-Link Corporation, Inc.
All rights reserved. This publication may not be reproduced, in whole or in part, without prior expressed written permission from D-Link Corporation, Inc.
Preface
ErP Power Usage
This device is an Energy Related Product (ErP) that automatically switches to a power-saving Network Standby mode within 1 minute of no
packets being transmitted. It can also be turned o through a power switch to save energy when it is not needed.
Network Standby: 4.165 watts
Switched O: 0.004 watts
Page 3

iiD-Link DSL-2745 Wireless N300 ADSL2+ Modem Router User Manual
Table of Contents
Product Overview ..............................................................1
Package Contents ......................................................................... 1
System Requirements ................................................................. 2
Introduction ................................................................................... 3
Features ............................................................................................ 4
Hardware Overview ..................................................................... 5
Front LED Panel ..................................................................... 5
Back............................................................................................6
Installation ......................................................................... 7
Before you Begin ...........................................................................7
Wireless Installation Considerations ...................................... 8
Manual Setup ................................................................................. 9
Getting Started ................................................................ 12
Web-based Conguration Utility ..........................................13
Wizard .............................................................................................14
Conguration ...................................................................20
Setup ...............................................................................................21
Local Network ......................................................................22
Local Network .................................................................23
IPv6 Local Network ........................................................25
Internet Setup ......................................................................28
Create a New Connection ...........................................29
Modify an Existing Connection .................................40
Wireless Setup ......................................................................47
Wireless Basics .....................................................................48
Wireless Security .................................................................49
Time and Date ......................................................................54
Support ..................................................................................55
Logout ....................................................................................56
Advanced ......................................................................................57
Advanced LAN .....................................................................58
ADSL Settings .......................................................................59
Advanced Wireless .............................................................60
Wireless Advanced ........................................................61
Wireless Access Control ...............................................63
Wi-Fi Protected Setup...................................................64
MBSSID Security Settings ............................................65
Port Triggering .....................................................................70
Port Forwarding ..................................................................72
DMZ .........................................................................................74
Parent Control ......................................................................75
URL Block ..........................................................................76
Online Time Limit ...........................................................77
Schedules .........................................................................78
Filtering Options .................................................................79
IP/Port Filter .....................................................................80
IPv6/Port Filter ................................................................82
MAC Filter .........................................................................84
Anti-Attack Settings ...........................................................85
DNS ..........................................................................................86
DNS .....................................................................................87
IPv6 DNS ............................................................................88
Table of Contents
Page 4

iiiD-Link DSL-2745 Wireless N300 ADSL2+ Modem Router User Manual
Table of Contents
Dynamic DNS .......................................................................89
Network Tools ......................................................................90
Port Mapping ..................................................................91
IGMP Proxy Conguration ..........................................92
IP QoS .................................................................................93
UPnP ...................................................................................94
ARP Binding .....................................................................95
Routing ...................................................................................96
Static Routing ..................................................................97
IPv6 Static Route ............................................................99
RIP ..................................................................................... 100
ALG ........................................................................................ 101
NAT ALG .......................................................................... 102
NAT Exclude IP .............................................................103
NAT Forwarding ...........................................................104
FTP ALG Cong ............................................................ 105
NAT IP Mapping ...........................................................106
Wireless Schedules .......................................................... 107
Management ............................................................................. 108
System ................................................................................. 109
Firmware Update .............................................................110
Access Control List...........................................................111
Access Control List ......................................................112
Access Control List IPv6 ............................................ 113
Password ............................................................................. 115
Diagnostics ........................................................................116
Ping .................................................................................. 117
Ping6................................................................................118
Traceroute......................................................................119
ADSL ................................................................................ 120
Diag Test .........................................................................121
System Log ......................................................................... 122
Status ........................................................................................... 123
Device Info ......................................................................... 124
Wireless Clients .................................................................125
DHCP Clients ..................................................................... 126
ADSL Status ........................................................................127
Statistics .............................................................................. 128
Route Info ........................................................................... 129
Help .............................................................................................. 130
Connect a Wireless Client to your Router ....................131
WPS Button ................................................................................ 131
Windows® 10 ............................................................................ 132
Windows® 8 ................................................................................134
WPA/WPA2 ......................................................................... 134
Windows® 7 ................................................................................136
WPA/WPA2 ......................................................................... 136
WPS ....................................................................................... 139
Troubleshooting ............................................................143
Wireless Basics ...............................................................147
What is Wireless? ...................................................................... 148
Tips ................................................................................................150
Wireless Modes .........................................................................151
Networking Basics .........................................................152
Check your IP address ............................................................ 152
Statically assign an IP address .............................................153
Page 5

ivD-Link DSL-2745 Wireless N300 ADSL2+ Modem Router User Manual
Table of Contents
Technical Specications ................................................154
Regulatory Statements .................................................155
Page 6
1D-Link DSL-2745 Wireless N300 ADSL2+ Modem Router User Manual
Section 1 - Product Overview
Product Overview
Package Contents
Note: Using a power supply with a dierent voltage rating than the one included with the device will cause damage and void the warranty for this product.
If any of the above items are missing, please contact your reseller.
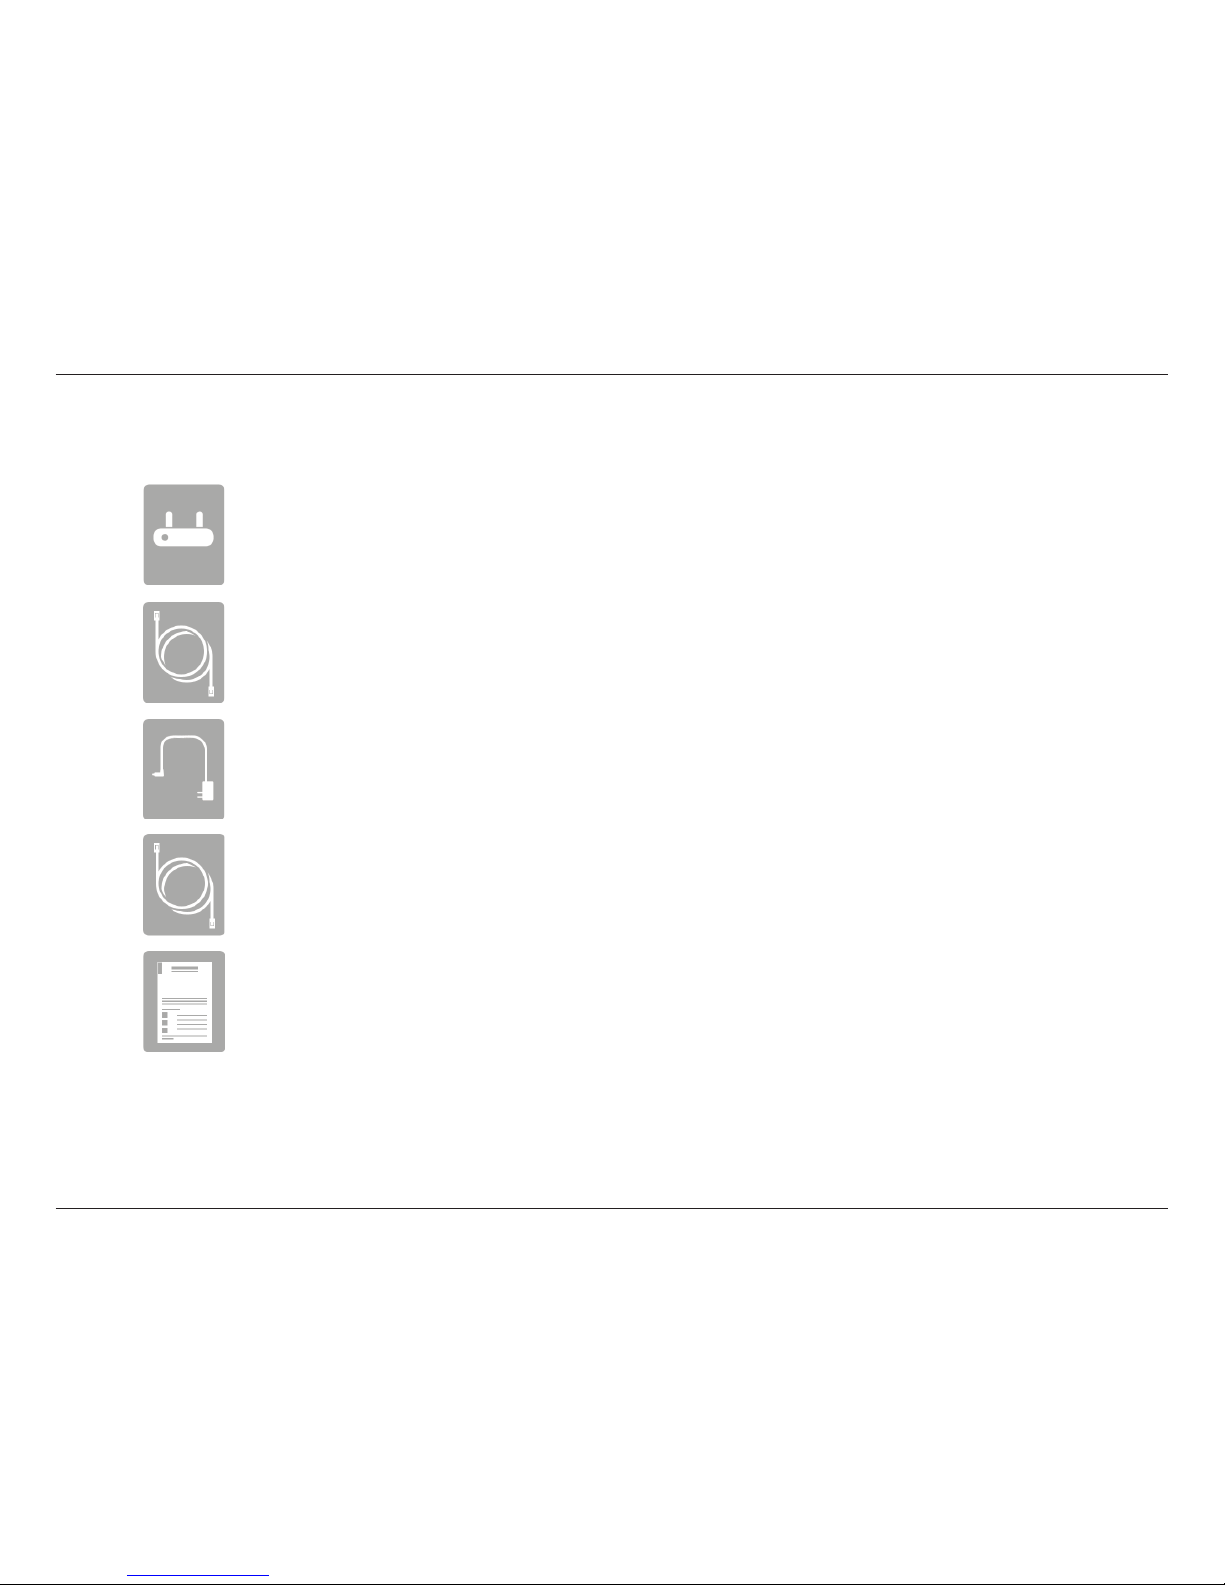
Wireless N300 ADSL2+ Modem Router
Ethernet Cable
Power Adapter
ADSL Telephone Cable
Quick Installation Guide
Page 7
2D-Link DSL-2745 Wireless N300 ADSL2+ Modem Router User Manual
Section 1 - Product Overview
System Requirements
Network Requirements
• Wired 10/100 Ethernet Devices/Computers or Wireless Ethernet
802.11 n/g/b Devices/Computers
• A DSL enabled Internet Connection with a subscription to an
Internet Service Provider
Web-based Conguration
Utility Requirements
Computer with the following:
• Windows®, Macintosh, or Linux-based operating system
• An installed Ethernet adapter
Browser Requirements:
• Internet Explorer 8 or higher
• Firefox 20 or higher
• Safari 4 or higher
• Chrome 25 or higher
Windows
®
Users: Make sure you have the latest version of Java
installed. Visit www.java.com to download the latest version.
Page 8

3D-Link DSL-2745 Wireless N300 ADSL2+ Modem Router User Manual
Section 1 - Product Overview
Introduction
The DSL-2745 Wireless N300 ADSL2+ Modem Router is a versatile, high-performance router for homes and small oces. With
integrated ADSL2/2+ supporting up to 24 Mbps download speeds, rewall protection, Quality of Service (QoS), 802.11n wireless
LAN and 4 Ethernet switch ports, this router provides all the functions that a home or small oce needs to establish a secure
and high-speed link to the outside world.
High-speed ADSL2/2+ Internet Connection - The latest ADSL2/2+ standards provide Internet transmission of up to 24 Mbps
downstream, 1 Mbps upstream.
High-performance Wireless - Embedded 802.11n technology for high-speed wireless connection, complete compatibility
with 802.11b/g wireless devices.
Ultimate Wireless Connection with Maximum Security - This router maximizes wireless performance by connecting to
computer interfaces and staying connected from virtually anywhere at home and in the oce. The router can be used with
802.11b/g/n wireless networks to enable signicantly improved reception. It supports WPA/WPA2 and WEP for exible user
access security and data encryption methods.
Firewall Protection & QoS - Security features prevent unauthorized access to your home and oce network, be it from the
wireless devices or from the Internet. The router provides rewall security using Stateful Packet Inspection (SPI) and hacker
attack logging for Denial of Service (DoS) attack protection. SPI inspects the contents of all incoming packet headers before
deciding what packets are allowed to pass through. Router access control is provided with packet ltering based on port and
source/destination MAC/IP addresses. For Quality of Service (QoS), the router supports multiple priority queues to enable a
group of home or oce users to experience the benet of smooth network connection of inbound and outbound data without
concern for trac congestion. This QoS feature allows users to enjoy high-speed ADSL transmission for applications such as
VoIP and streaming multimedia over the Internet.
* Maximum wireless signal rate derived from IEEE Standard 802.11b, 802.11g, and 802.11n specications. Actual data throughput will vary. Network conditions and environmental
factors, including volume of network trac, building materials and construction, and network overhead, lower actual data throughput rate. Environmental conditions will
adversely aect wireless signal range.
Page 9

4D-Link DSL-2745 Wireless N300 ADSL2+ Modem Router User Manual
Section 1 - Product Overview
• Faster Wireless Networking - The DSL-2745 provides up to 300 Mbps* wireless connection with other 802.11n
wireless clients. This capability allows users to participate in real-time activities online, such as video streaming,
online gaming, and real-time audio.
• Compatible with 802.11b and 802.11g Devices - The DSL-2745 is still fully compatible with the IEEE 802.11b
and g standards, so you can use keep your existing 802.11b and g devices.
• Precise ATM Trac Shaping - Trac shaping is a method of controlling the ow rate of ATM data cells. This
function helps to establish Quality of Service for ATM data transfer.
• High Performance - Very high rates of data transfer are possible with the router-providing up to 24 Mbps
downstream for ADSL2+.
• Full Network Management - The DSL-2745 incorporates SNMP (Simple Network Management Protocol) support
for web-based management and text-based network management via a Telnet connection.
• Easy Installation - The DSL-2745 can be congured and managed easily using a web-based UI. Any common
web browser software can be used to manage the router.
• IPv6 Connection Support - Compatible with IPv6 networks, the DSL-2745 provides several connection types:
Link-local, Static IPv6, DHCPv6, Stateless Autoconguration, PPPoE, IPv6 in IPv4 Tunnel, and 6to4.
* Maximum wireless signal rate derived from IEEE Standard 802.11b, 802.11g, and 802.11n specications. Actual data throughput will vary. Network conditions and environmental
factors, including volume of network trac, building materials and construction, and network overhead, lower actual data throughput rate. Environmental conditions will
adversely aect wireless signal range.
Features
Page 10
5D-Link DSL-2745 Wireless N300 ADSL2+ Modem Router User Manual
Section 1 - Product Overview
Hardware Overview
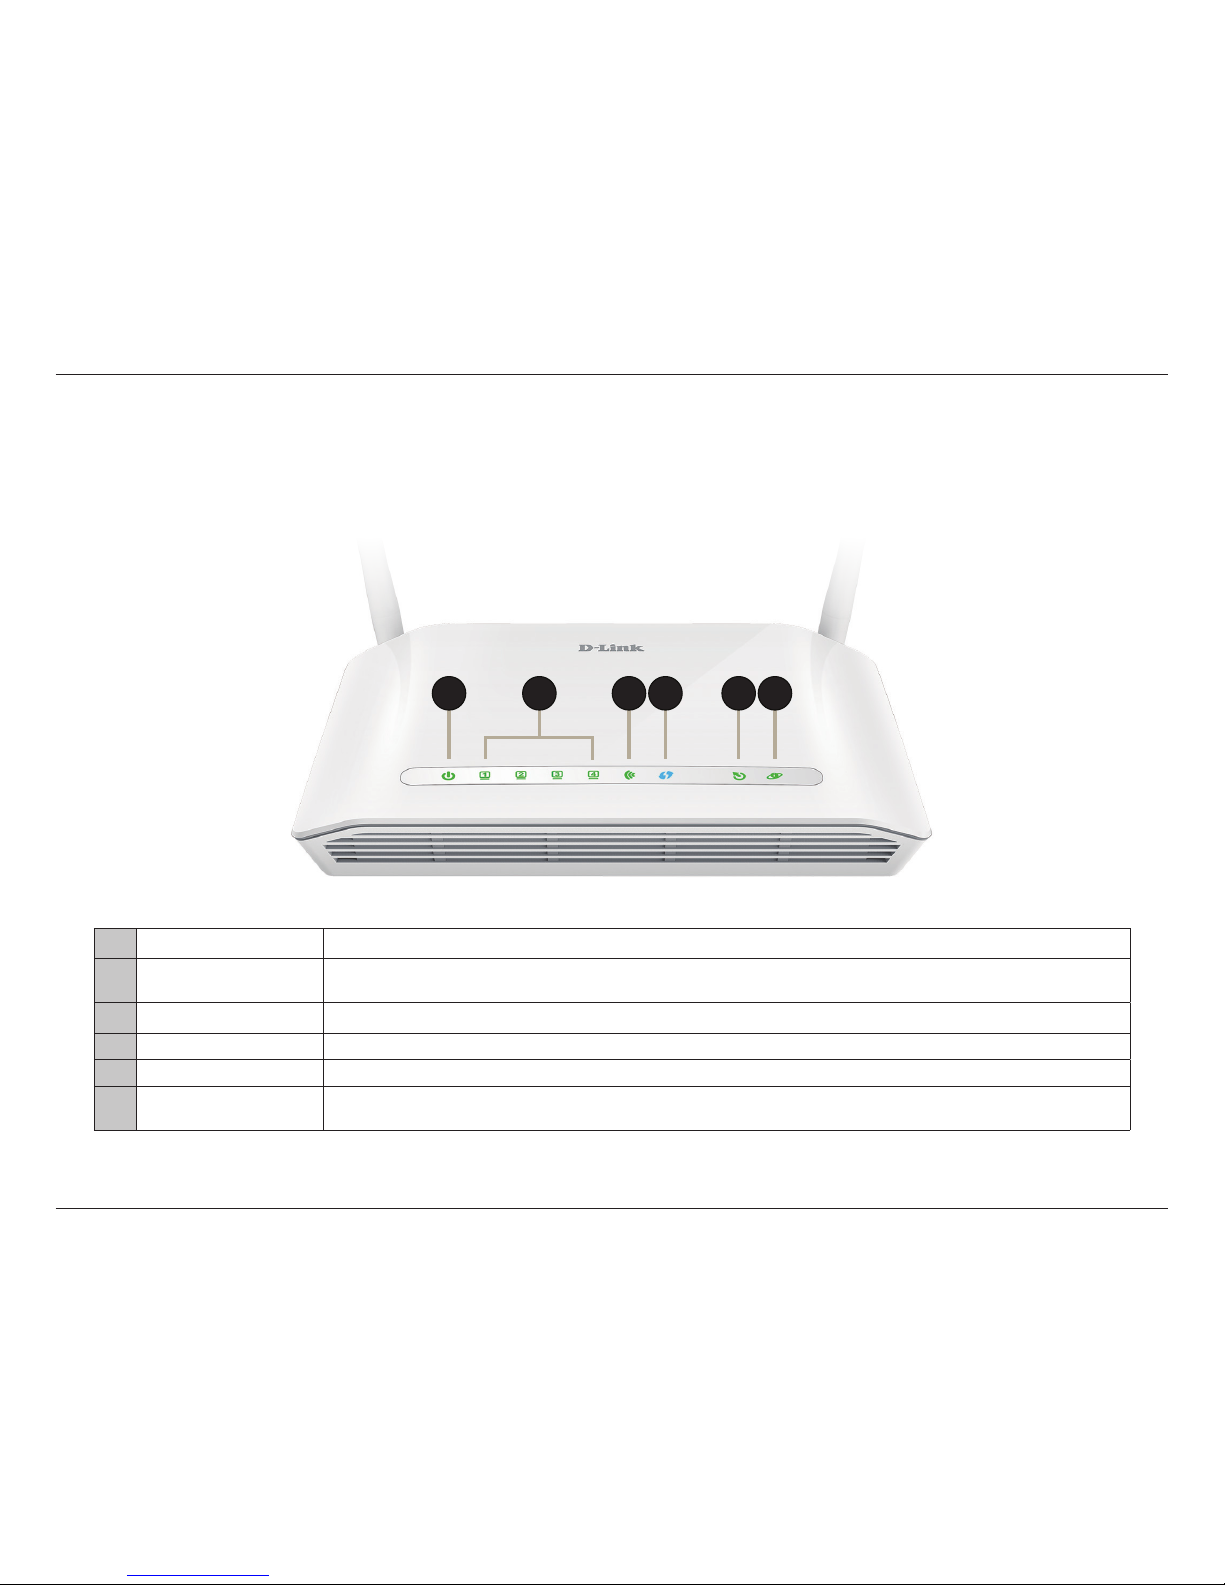
Front LED Panel
1 Power LED A solid green light indicates the unit is powered on. A red light indicates device malfunction.
2 LAN LEDs 1-4 A solid green light indicates a connection to a device. The light will blink during data transmission.
3 WLAN LED A solid green light indicates that the Wi-Fi is ready.
4 WPS LED The light will blink during the WPS process.
5 DSL LED A solid green light indicates a proper connection to the ADSL enabled telephone line.
6 Internet
A solid green light indicates a proper connection to a broadband service. A red light indicates that IP
assignment has failed.
2 41 3
5
5 6
Page 11
6D-Link DSL-2745 Wireless N300 ADSL2+ Modem Router User Manual
Section 1 - Product Overview
Hardware Overview
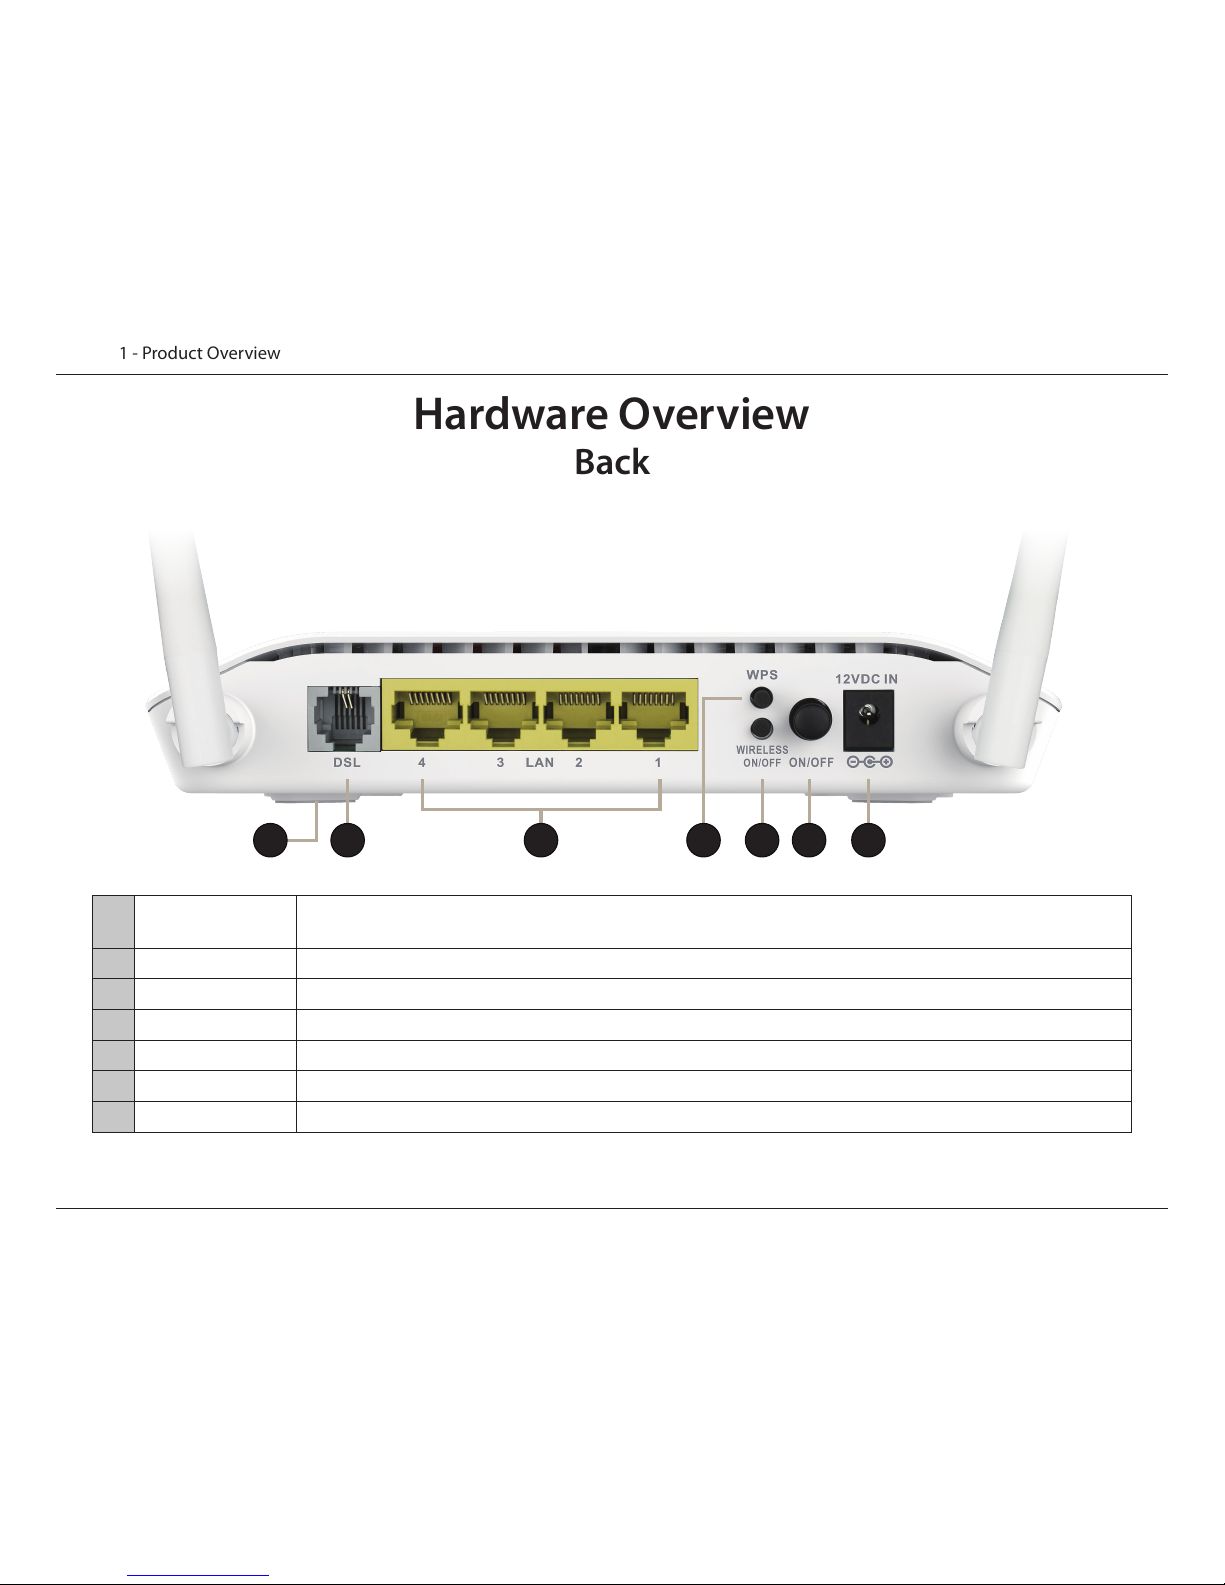
Back
1 Reset Button
To reset the DSL-2745 to the default settings, insert a paperclip into the hole on the bottom of the device
located near the label and wait several seconds.
2 DSL Port Connects to an DSL-enabled telephone line.
3 LAN Ports (1-4) Connects Ethernet devices such as computers, switches, storage (NAS) devices and game consoles.
4 WPS Button Press to start the WPS process and automatically create a secure connection to a WPS client.
5 Wireless On/O Press and hold this button for about 5 seconds to enable or disable the Wi-Fi network.
6 Power Button Press to power the DSL-2745 on or o.
7 Power Connector Connector for the supplied power adapter.
3 6 74 521
Page 12

7D-Link DSL-2745 Wireless N300 ADSL2+ Modem Router User Manual
Section 2 - Installation
Before you Begin
Installation
This section will walk you through the installation process. Placement of the router is very important. Do not place the router
in an enclosed area such as a closet, cabinet, attic, or garage.
Note: This installation section is written for users who are setting up their home Internet service with the DSL-2745
Wireless N300 ADSL2+ Modem Router for the rst time. If you are replacing an existing DSL modem and/or router, you may
need to modify these steps.
• Make sure to have your DSL service information provided by your Internet Service Provider handy. This information
is likely to include your DSL account's Username and Password. Your ISP may also supply you with additional WAN
conguration settings which are necessary to establish a connection. This information may include the connection
type (DHCP IP, Static IP, PPPoE, or PPPoA) and/or ATM PVC details.
• If you are connecting a considerable amount of networking equipment, it may be a good idea to take the time
to label each cable or take a picture of your existing setup before making any changes.
• We suggest setting up your DSL-2745 from a single device and verifying that it is connected to the Internet before
connecting additional devices.
• If you have DSL and are connecting via PPPoE, make sure you disable or uninstall any PPPoE connection software
such as WinPoET, BroadJump, or EnterNet 300 from your computer as the DSL-2745 will be providing this
functionality.
Page 13

8D-Link DSL-2745 Wireless N300 ADSL2+ Modem Router User Manual
Section 2 - Installation
Wireless Installation Considerations
The D-Link wireless router lets you access your network using a wireless connection from virtually anywhere within the
operating range of your wireless network. Keep in mind, however, that the number, thickness and location of walls, ceilings,
or other objects that the wireless signals must pass through, may limit the range. Typical ranges vary depending on the types
of materials and background RF (radio frequency) noise in your home or business. The key to maximizing wireless range is to
follow these basic guidelines:
1. Keep the number of walls and ceilings between the D-Link router and other network devices to a minimum - each wall or
ceiling can reduce your adapter’s range from 3-90 feet (1-30 meters.) Position your devices so that the number of walls or
ceilings is minimized.
2. Be aware of the direct line between network devices. A wall that is 1.5 feet thick (.5 meters), at a 45-degree angle appears
to be almost 3 feet (1 meter) thick. At a 2-degree angle it looks over 42 feet (14 meters) thick! Position devices so that the
signal will travel straight through a wall or ceiling (instead of at an angle) for better reception.
3. Building materials make a dierence. A solid metal door or aluminum studs may have a negative eect on range. Try to
position access points, wireless routers, and computers so that the signal passes through drywall or open doorways. Materials
and objects such as glass, steel, metal, walls with insulation, water (sh tanks), mirrors, le cabinets, brick, and concrete will
degrade your wireless signal.
4. Keep your product away (at least 3-6 feet or 1-2 meters) from electrical devices or appliances that generate RF noise.
5. If you are using 2.4 GHz cordless phones or X-10 (wireless products such as ceiling fans, lights, and home security systems),
your wireless connection may degrade dramatically or drop completely. Make sure your 2.4 GHz phone base is as far away
from your wireless devices as possible. The base transmits a signal even if the phone in not in use.
Page 14
9D-Link DSL-2745 Wireless N300 ADSL2+ Modem Router User Manual
Section 2 - Installation
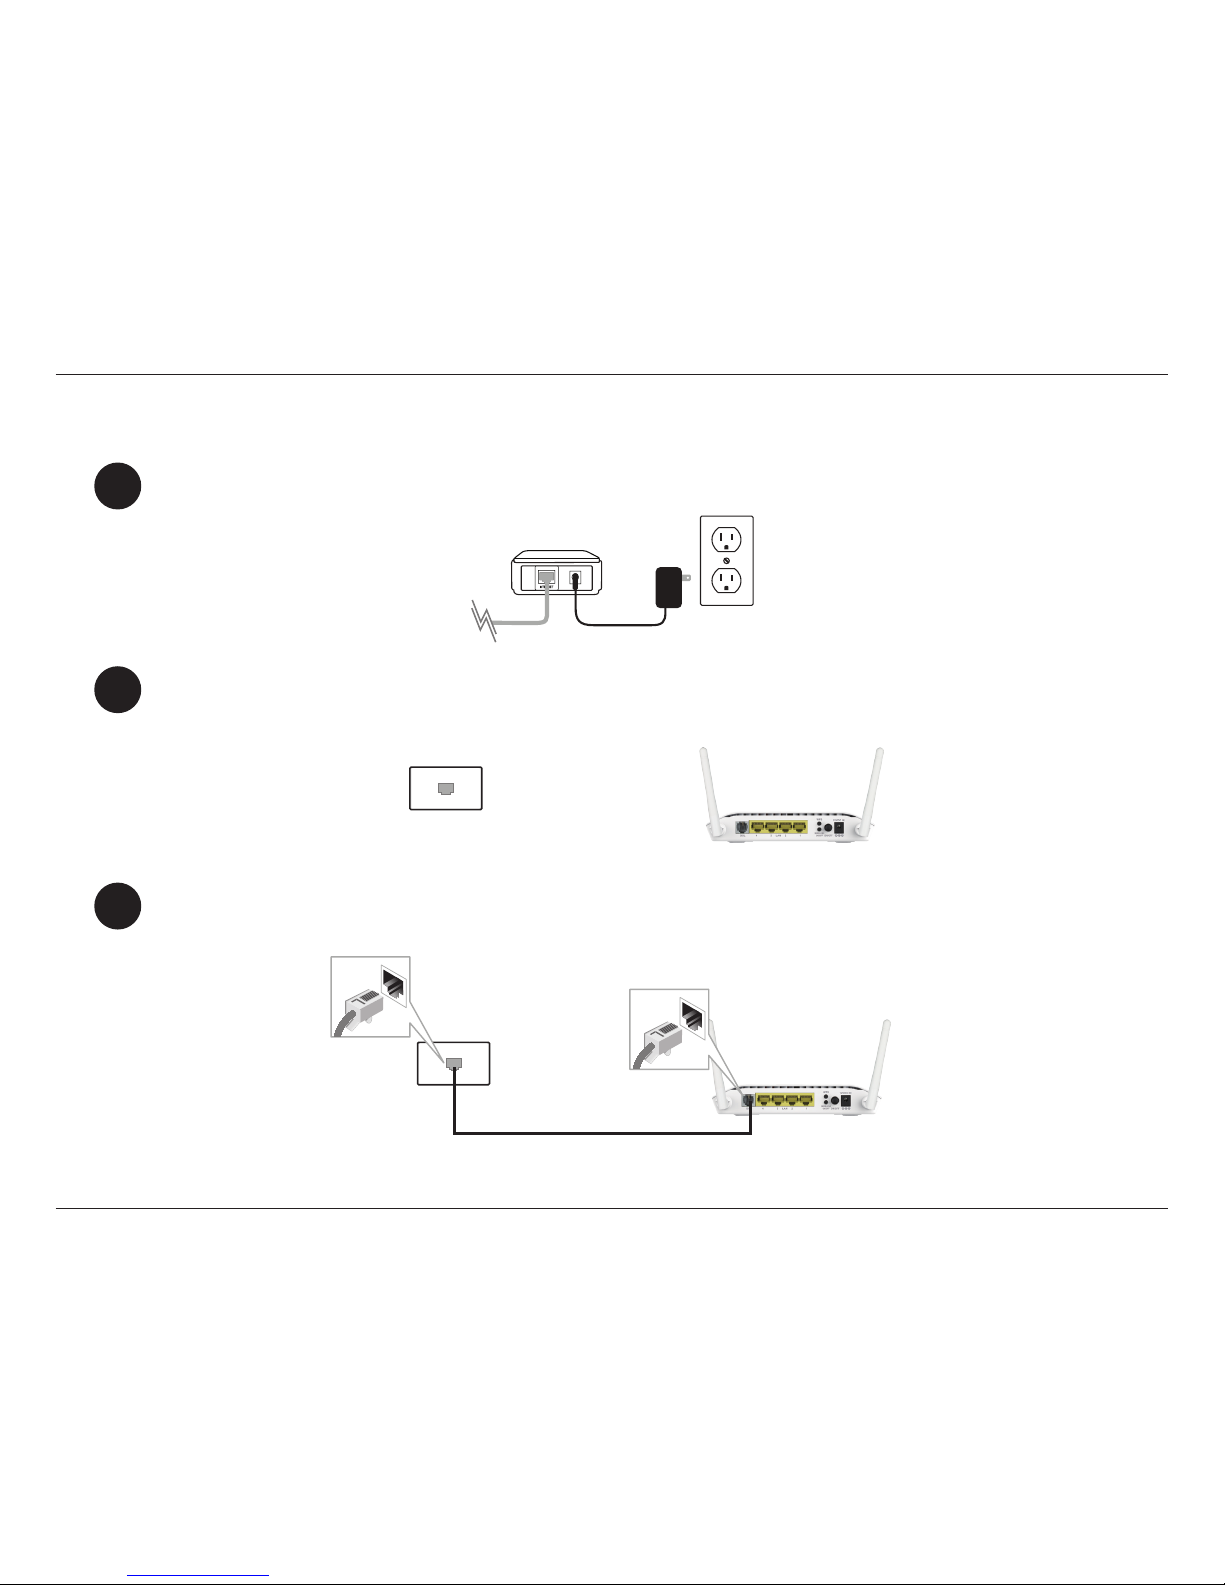
1
Connect the included ADSL Telephone Cable from a telephone outlet to the DSL port on your DSL-2745.
2
3
Position your DSL-2745 close to a telephone outlet which provides DSL service. Place the router in an open
area of your intended work area for better wireless coverage.
Turn o and unplug your existing DSL broadband modem. This is required.
Manual Setup
Telephone Outlet
Existing Modem
DSL-2745
DSL-2745
Page 15
10D-Link DSL-2745 Wireless N300 ADSL2+ Modem Router User Manual
Section 2 - Installation
Ethernet Cable
DSL-2745
DSL-2745
Computer
Power Adapter
Computer
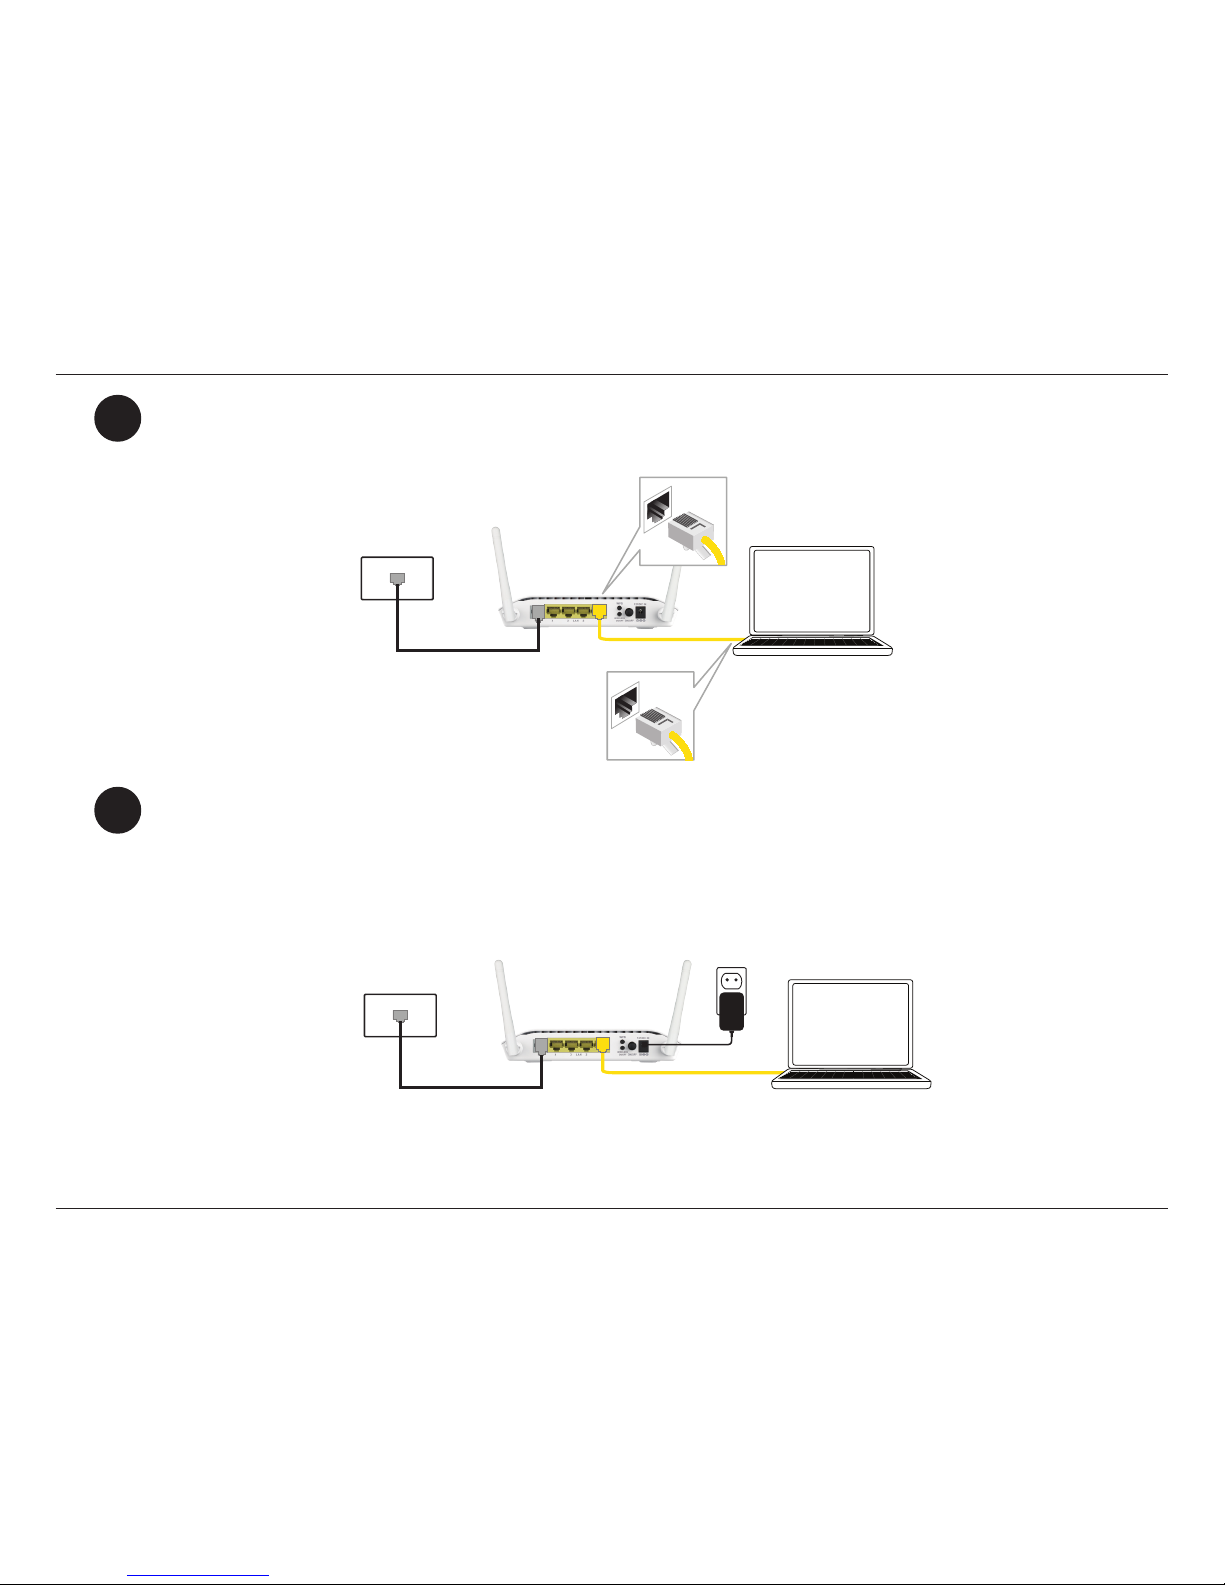
4
5
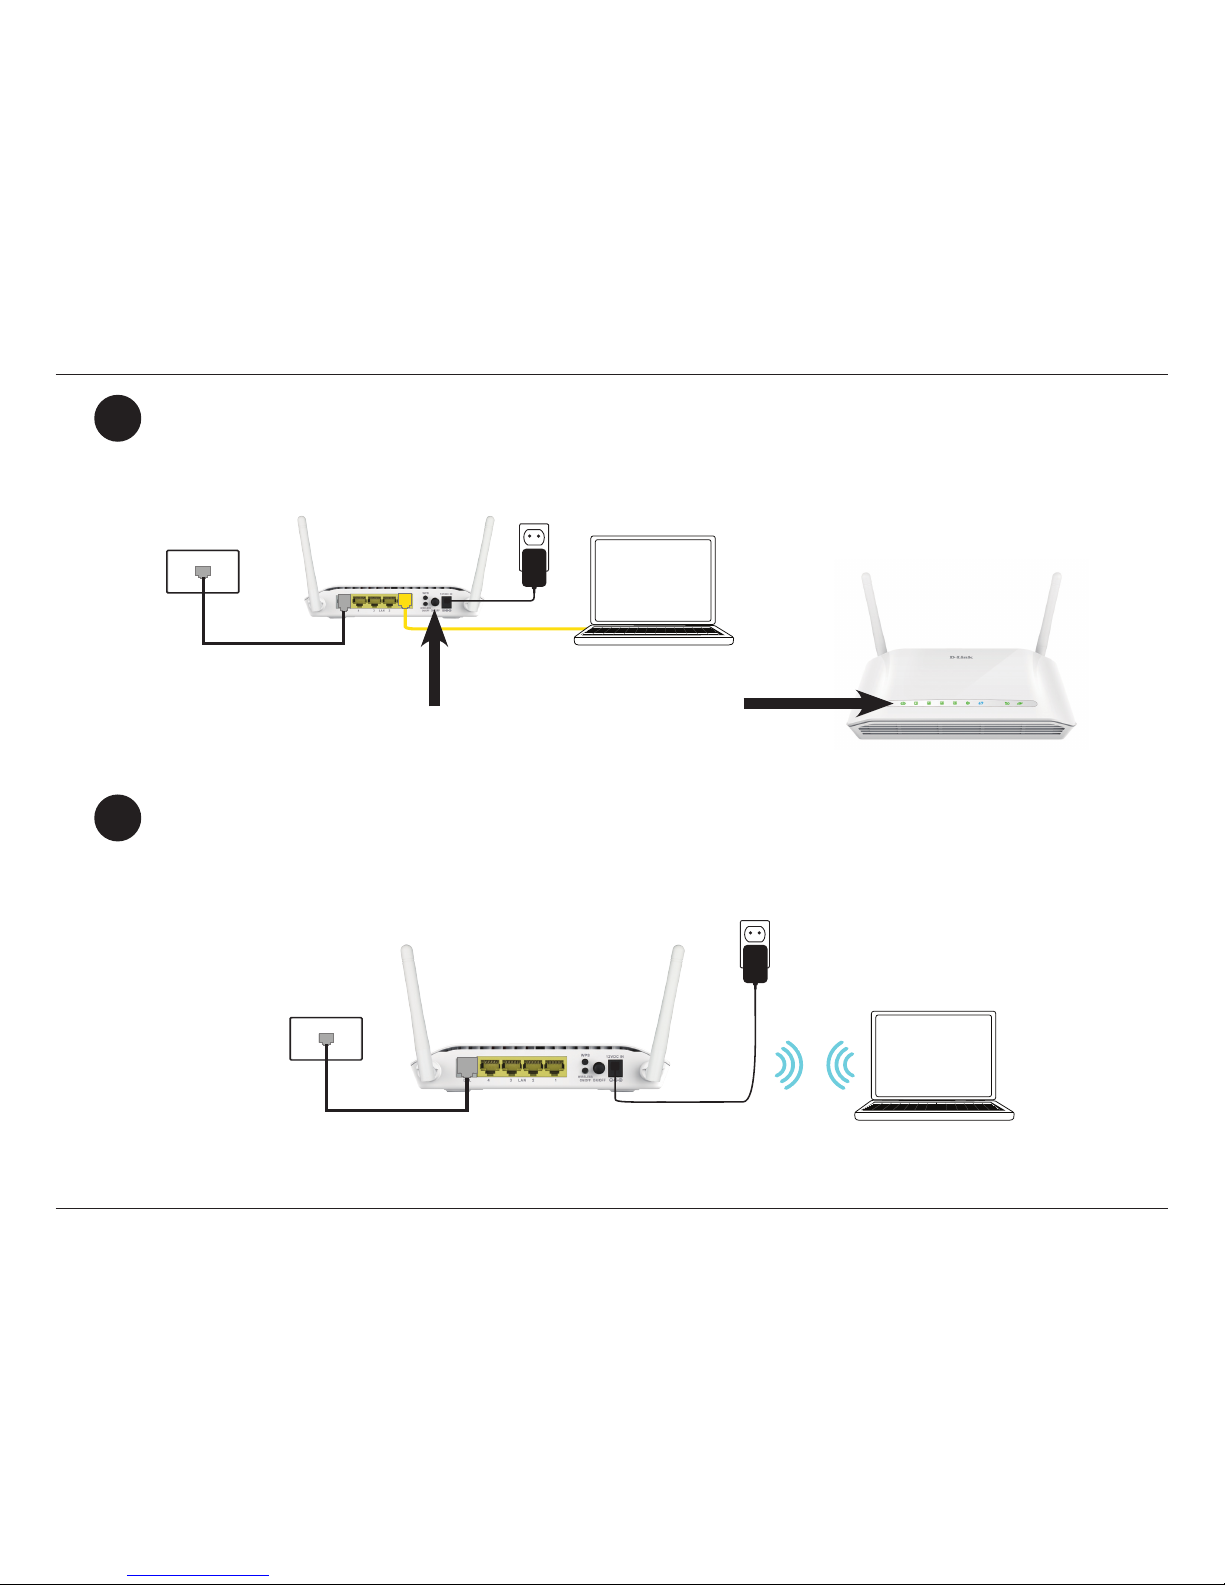
If you wish to use a wired connection, connect the Ethernet cable from a LAN port of the DSL-2745 to the
Ethernet port on your computer.
Plug the power adapter into your DSL-2745 and connect to an available power outlet or
surge protector.
Caution: - Only use the included power adapter with this product.
Page 16
11D-Link DSL-2745 Wireless N300 ADSL2+ Modem Router User Manual
Section 2 - Installation
6
7
If connecting to the DSL-2745 wirelessly, access the wireless utility on your computer or mobile device. Scan
for available Wi-Fi networks (SSID). Select and join the Wi-Fi network printed on the label on the bottom of
your DSL-2745.
Press the power button and verify that the power LED is lit. Allow 1 minute for the router to boot up.
DSL-2745
DSL-2745
DSL-2745
Power Adapter
Power Adapter
Computer
Computer
Page 17

12D-Link DSL-2745 Wireless N300 ADSL2+ Modem Router User Manual
Section 3 - Getting Started
There are two dierent ways you can congure your router to connect to the Internet and connect to your clients:
• Web-based Setup Wizard - This wizard will launch when you log into the DSL-2745 for the rst time.
Refer to Web-based Conguration Utility on page 13.
• Manual Setup - Log into the DSL-2745 and manually congure your it, refer to Manual Setup on page 9.
Getting Started
Page 18
13D-Link DSL-2745 Wireless N300 ADSL2+ Modem Router User Manual
Section 3 - Getting Started
Web-based Conguration Utility
This section will show you how to congure your D-Link DSL-2745 using the web-based conguration utility.
If you wish to change the default settings or adjust the conguration of the
DSL-2745 you may use the web-based conguration utility.
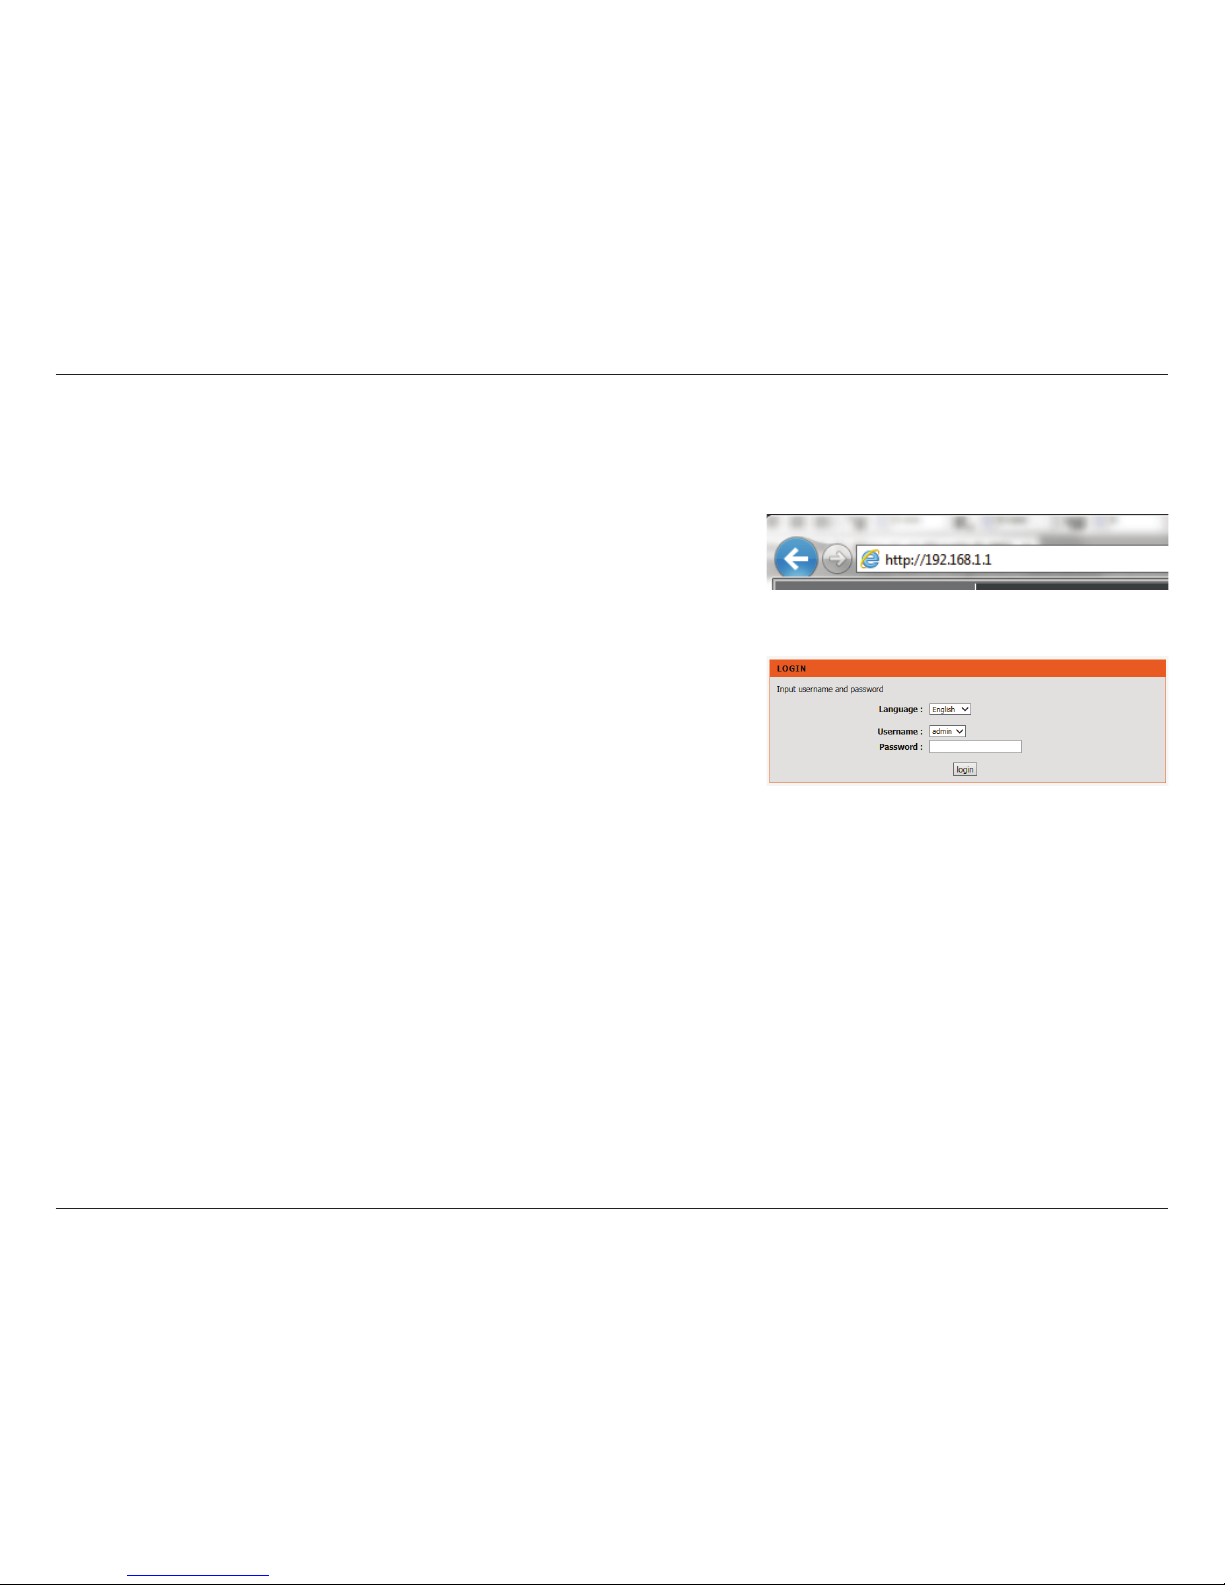
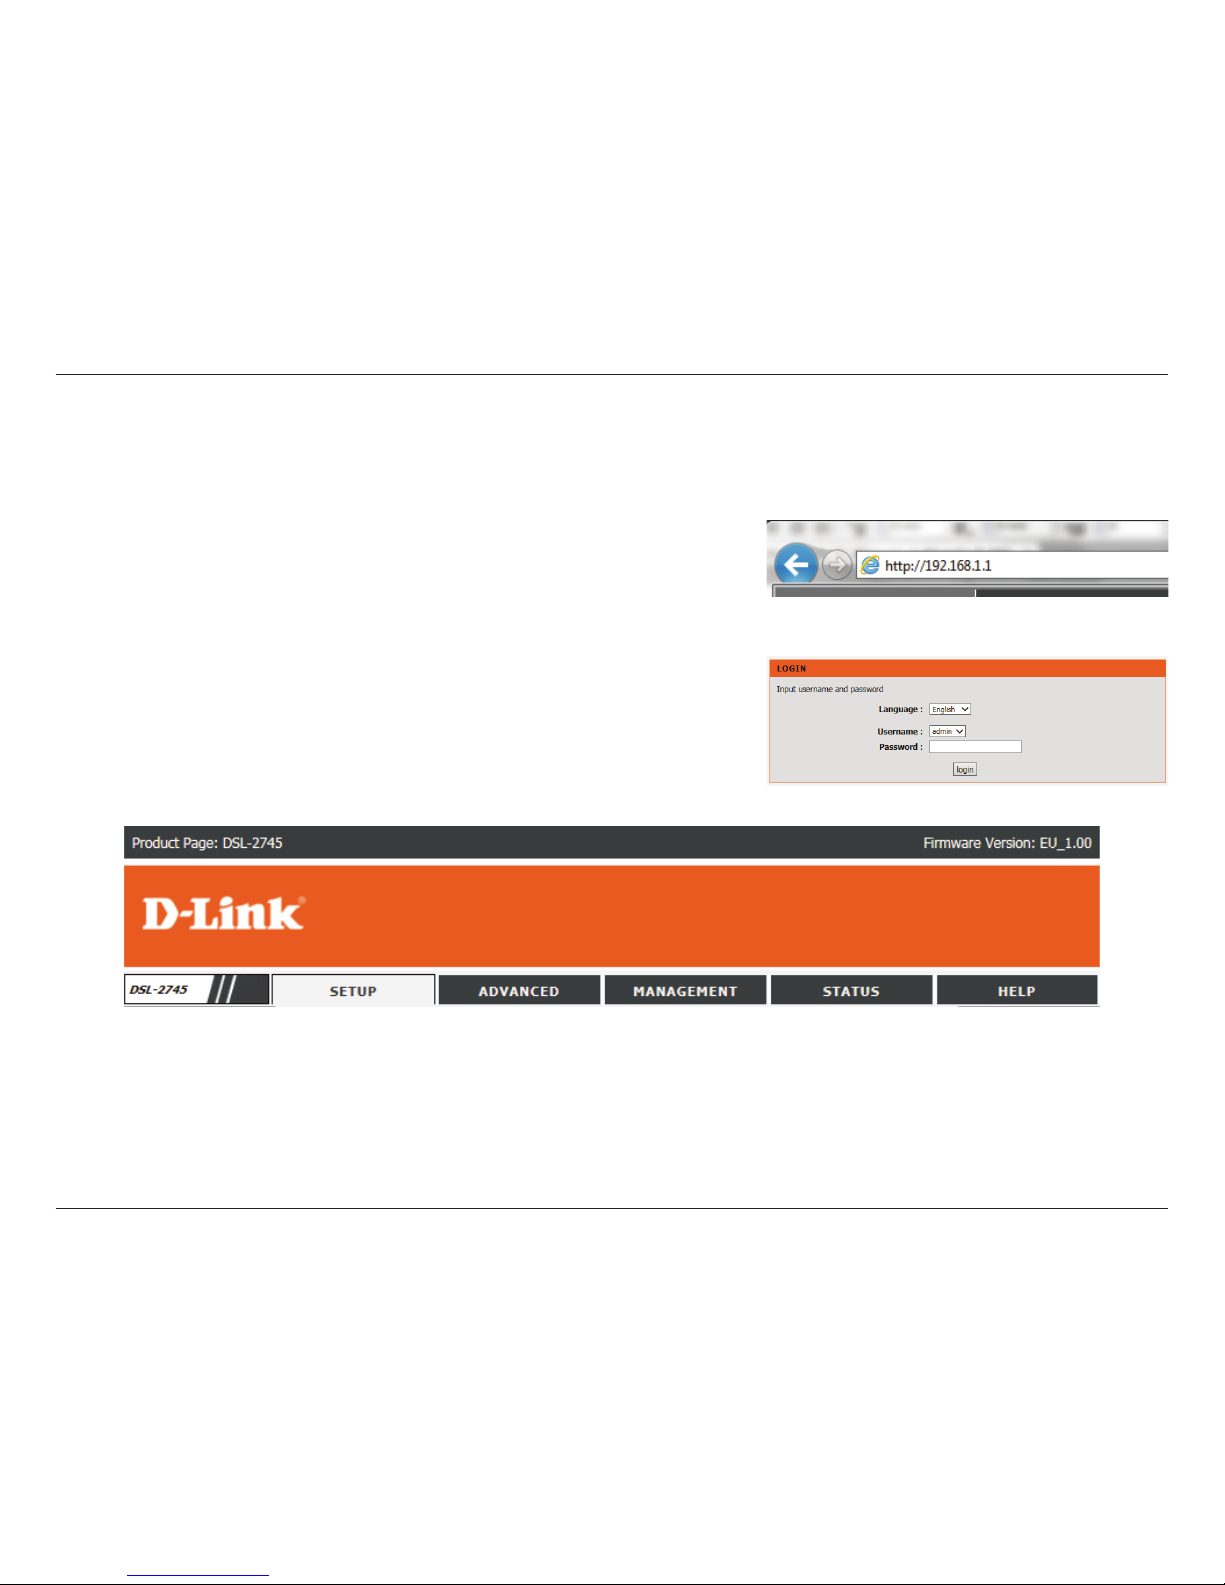
To access the conguration utility, open a web browser such as Internet Explorer
and enter http://192.168.1.1 in the address eld.
Select admin from the drop-down menu and then enter your password. The
default password is admin.
On your rst login, you will be directed to the Setup Wizard page.
If you want to congure the router manually without running the wizard, skip
to Conguration on page 20.
Page 19
14D-Link DSL-2745 Wireless N300 ADSL2+ Modem Router User Manual
Section 3 - Getting Started
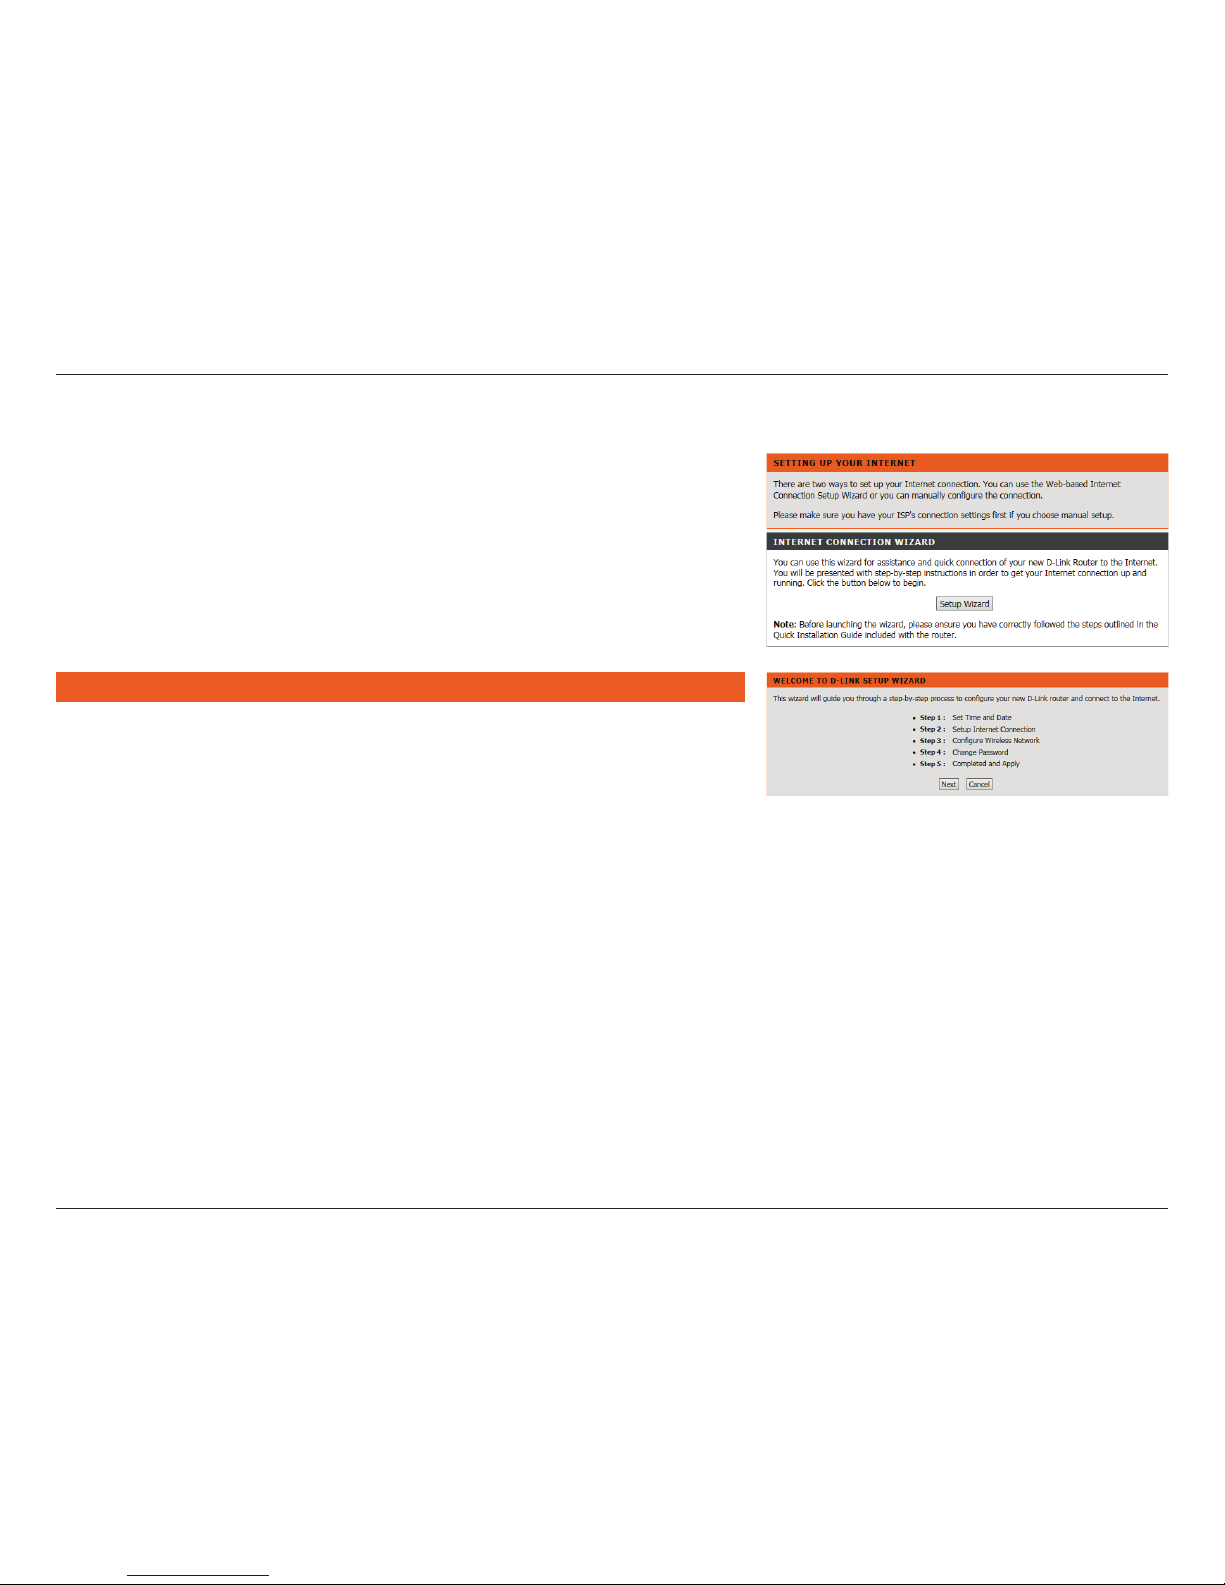
Use the Setup Wizard to quickly and easily congure the DSL-2745. This wizard
is designed to guide you through a step-by-step process to congure your new
D-Link router and connect to the Internet.
Click the Setup Wizard button to continue.
If you want to congure the DSL-2745 manually without running the wizard,
skip to Conguration on page 20.
Wizard
SETUP WIZARD
The Setup Wizard will guide you through the following steps:
Step 1: Set Time and Date
Step 2: Setup Internet Connection
Step 3: Congure Wireless Network
Step 4: Change Password
Step 5: Completed and Apply
Click Next to begin.
Page 20
15D-Link DSL-2745 Wireless N300 ADSL2+ Modem Router User Manual
Section 3 - Getting Started
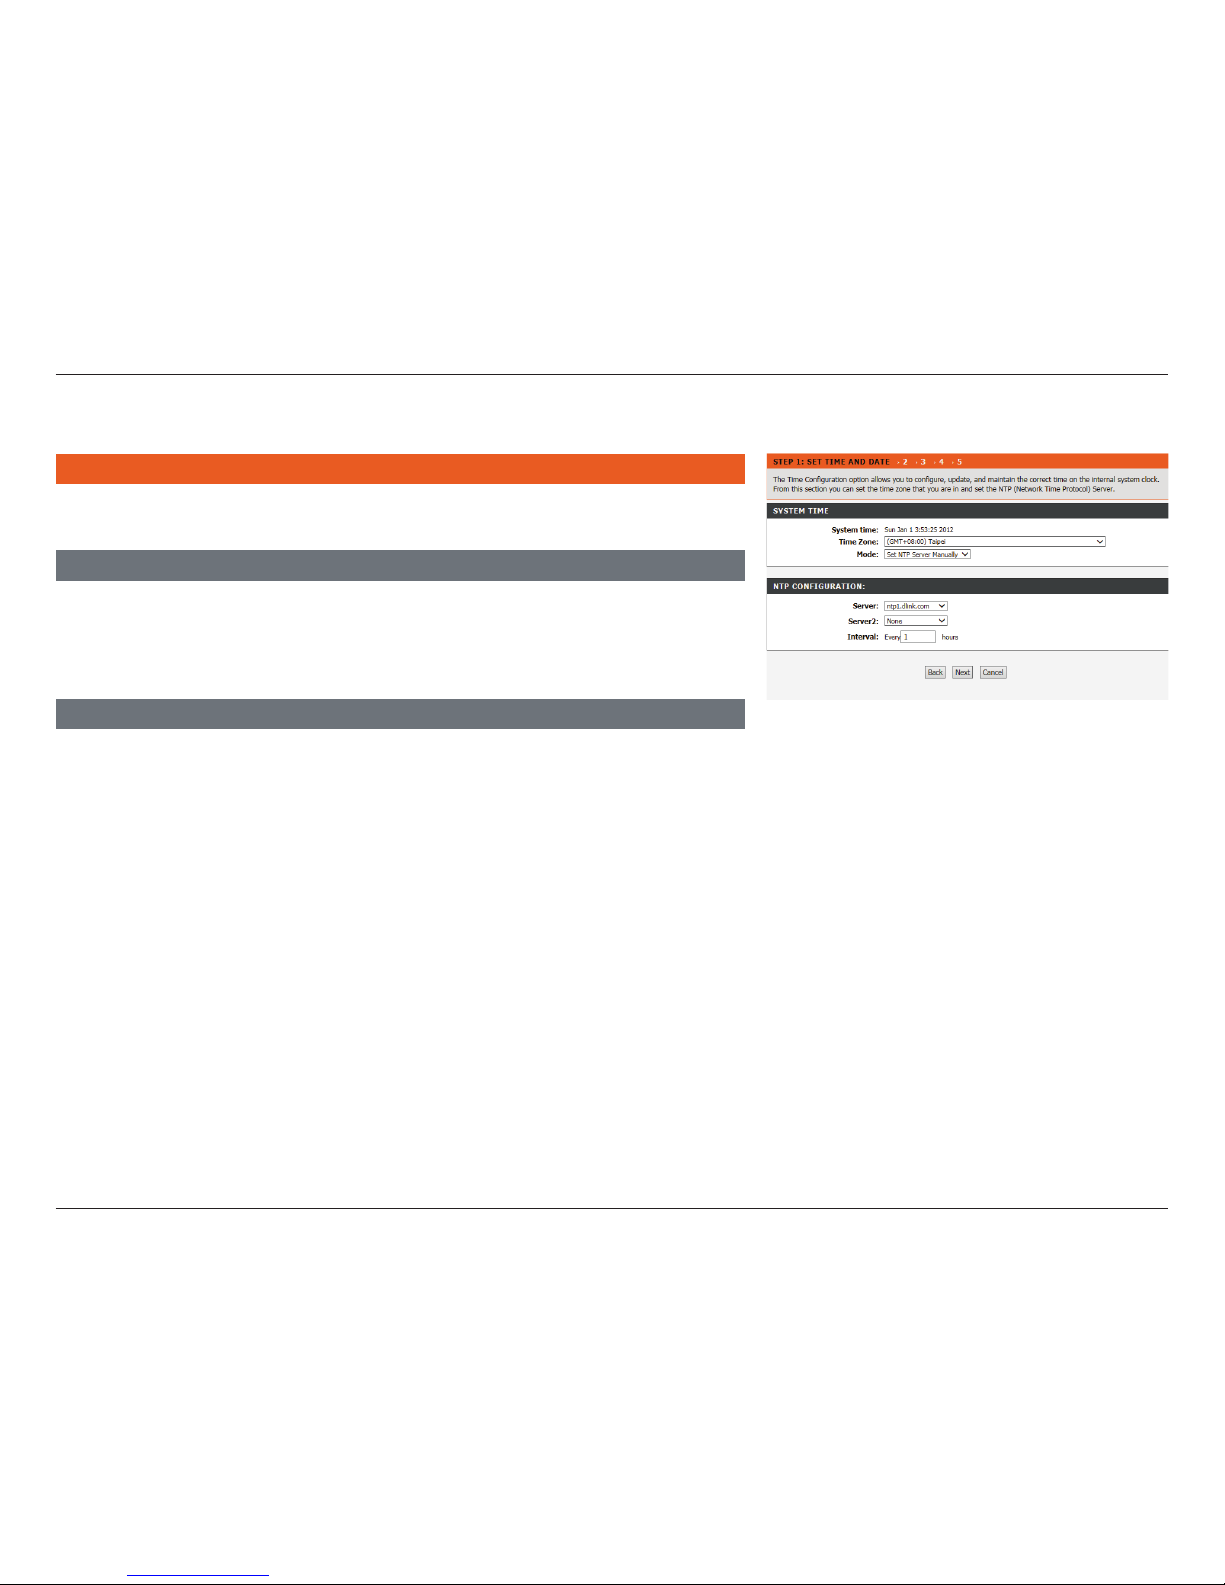
This step of the wizard allows you to congure your Time and Date settings.
Step 1: Set Time and Date
SYSTEM TIME
The current system time is displayed. Select your Time Zone from the drop-
down menu. From the Mode select either Set NTP Server Manually or Copy
Computer time.
NTP CONFIGURATION:
If necessary, change the Network Time Protocol (NTP) servers or interval.
Click Next to continue.
Page 21
16D-Link DSL-2745 Wireless N300 ADSL2+ Modem Router User Manual
Section 3 - Getting Started
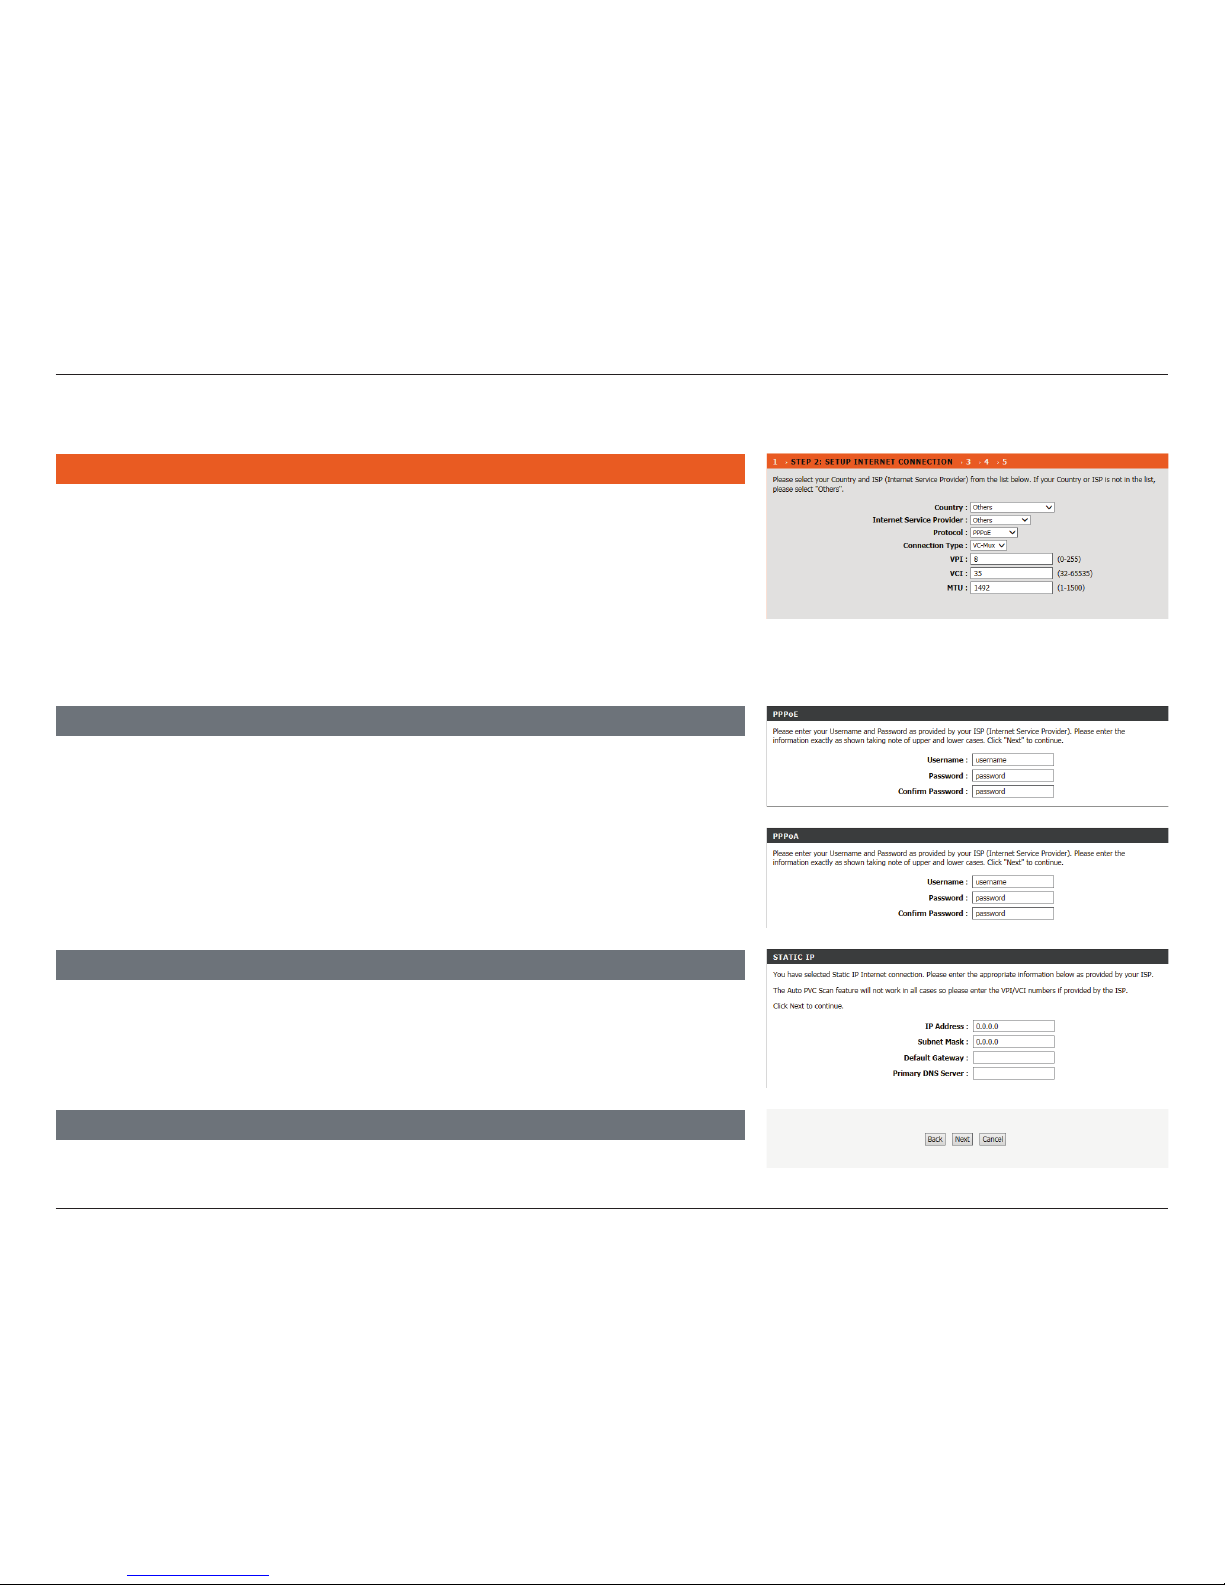
This step of the wizard allows you to congure your Internet connection type.
Choose your Country and Internet Service Provider (ISP) from the drop
down menu. The necessary settings will automatically populate. If you cannot
nd your country or ISP, select Others. You will need to enter the connection
details, provided by your ISP, manually. Select the Protocol used by your ISP:
Dynamic IP, Static IP, PPPoE, PPPoA, or Bridge, along with the Connection
Type: VC-MUX or LLC and input the VPI, VCI, and MTU settings.
Step 2: Setup Internet Connection
PPPOE/ PPPOA
If you selected PPPoE or PPPoA, a box will appear to enter your PPPoE/PPPoA
username and password. Once you have entered your PPPoE/PPPoA credentials,
click Next to continue.
Note: Make sure to remove your PPPoE software from your computer. The software
is no longer needed and will not work through a router.
If you selected Static IP, enter your Static IP information as supplied by your
ISP. Click Next to continue.
STATIC IP
Bridge or Dynamic IP require no additional conguration. Click Next to
continue.
BRIDGE/DYNAMIC
Page 22
17D-Link DSL-2745 Wireless N300 ADSL2+ Modem Router User Manual
Section 3 - Getting Started
Step 3: Congure Wireless Network
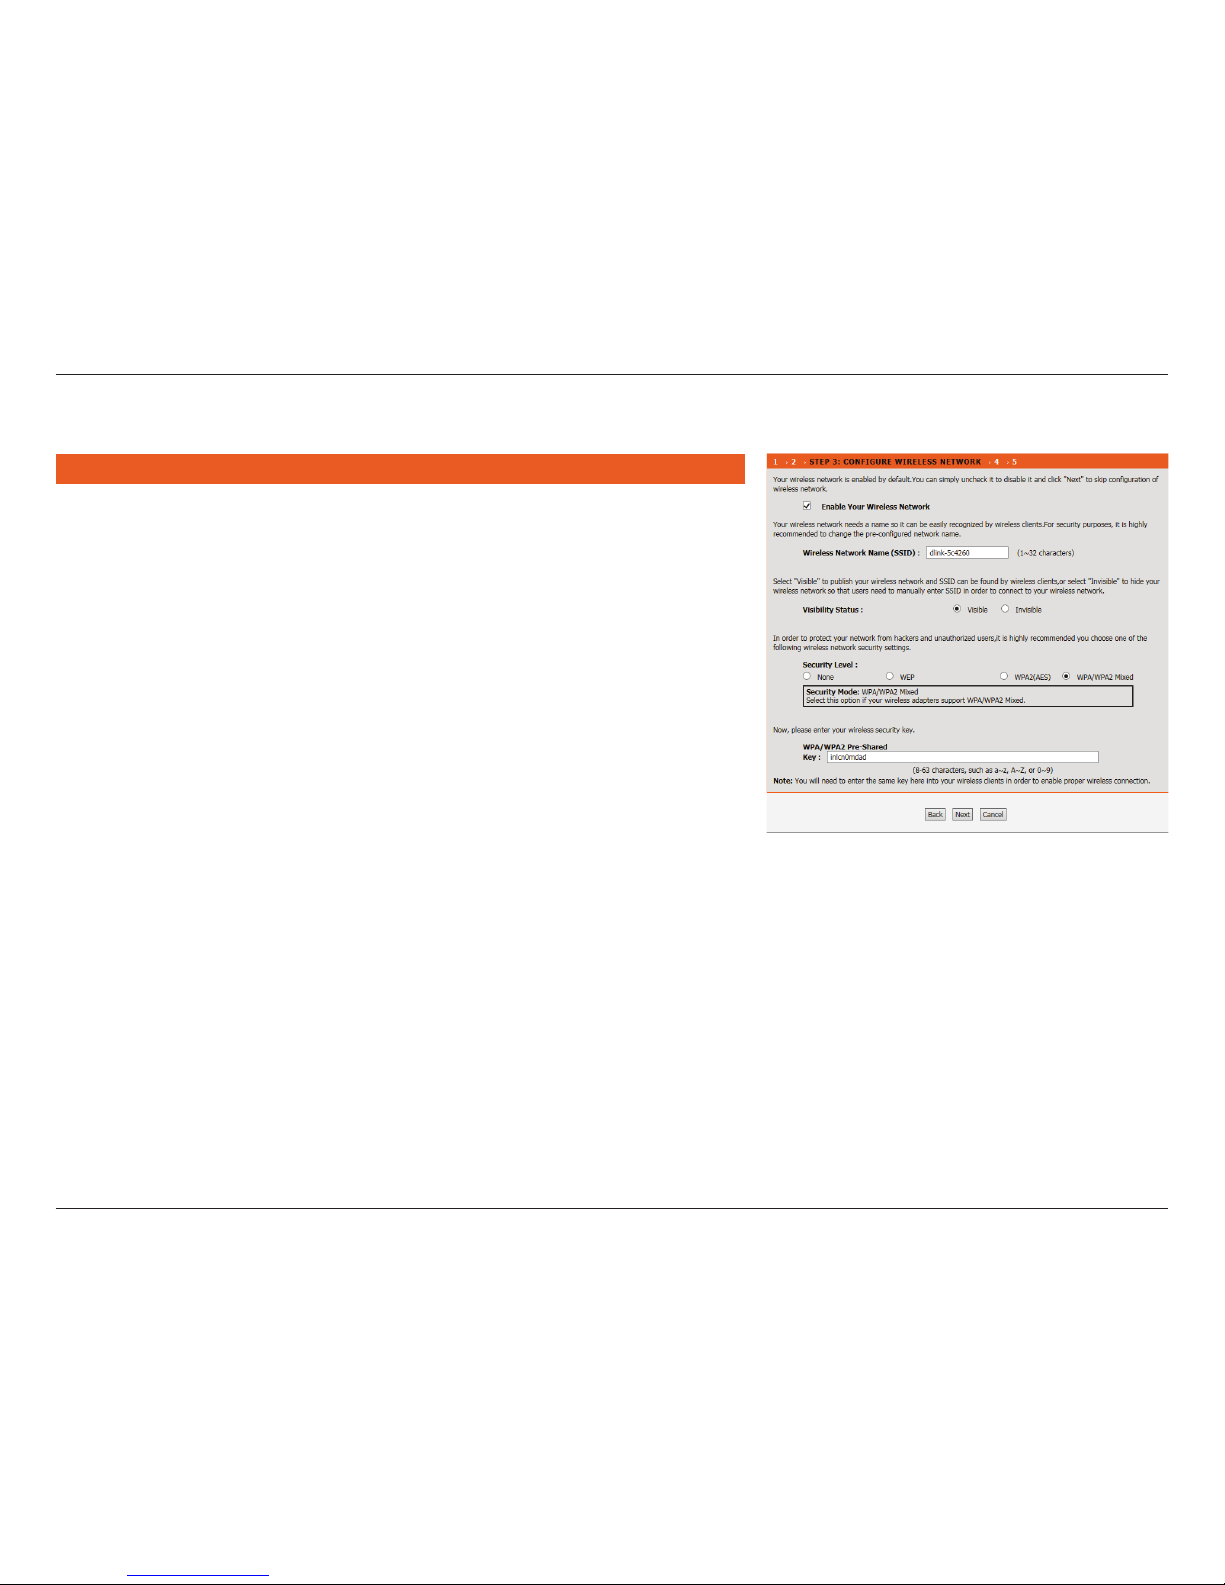
This step of the wizard allows you to congure your Wireless network settings.
By default, wireless is enabled. If you want to disable the DSL-2745’s wireless
capability, uncheck Enable Your Wireless Network.
Under Wireless Network Name (SSID) you can change the SSID of your wireless
network, for easier identication by wireless clients. If Visibility Status is set
to Visible, this name will show up when a client in range scans for wireless
networks. Otherwise, if your network is Invisible, clients will have to enter the
SSID in order to connect.
Choose the best security level that is compatible with your wireless clients.
WPA2-PSK is recommended. Unless you chose None (this is NOT recommended),
you will need to enter a key below.
WPA/WPA2 Pre-Shared Key - Wireless clients requesting a connection with
the network will need to enter this key in order to connect.
Click Next to continue.
Page 23
18D-Link DSL-2745 Wireless N300 ADSL2+ Modem Router User Manual
Section 3 - Getting Started
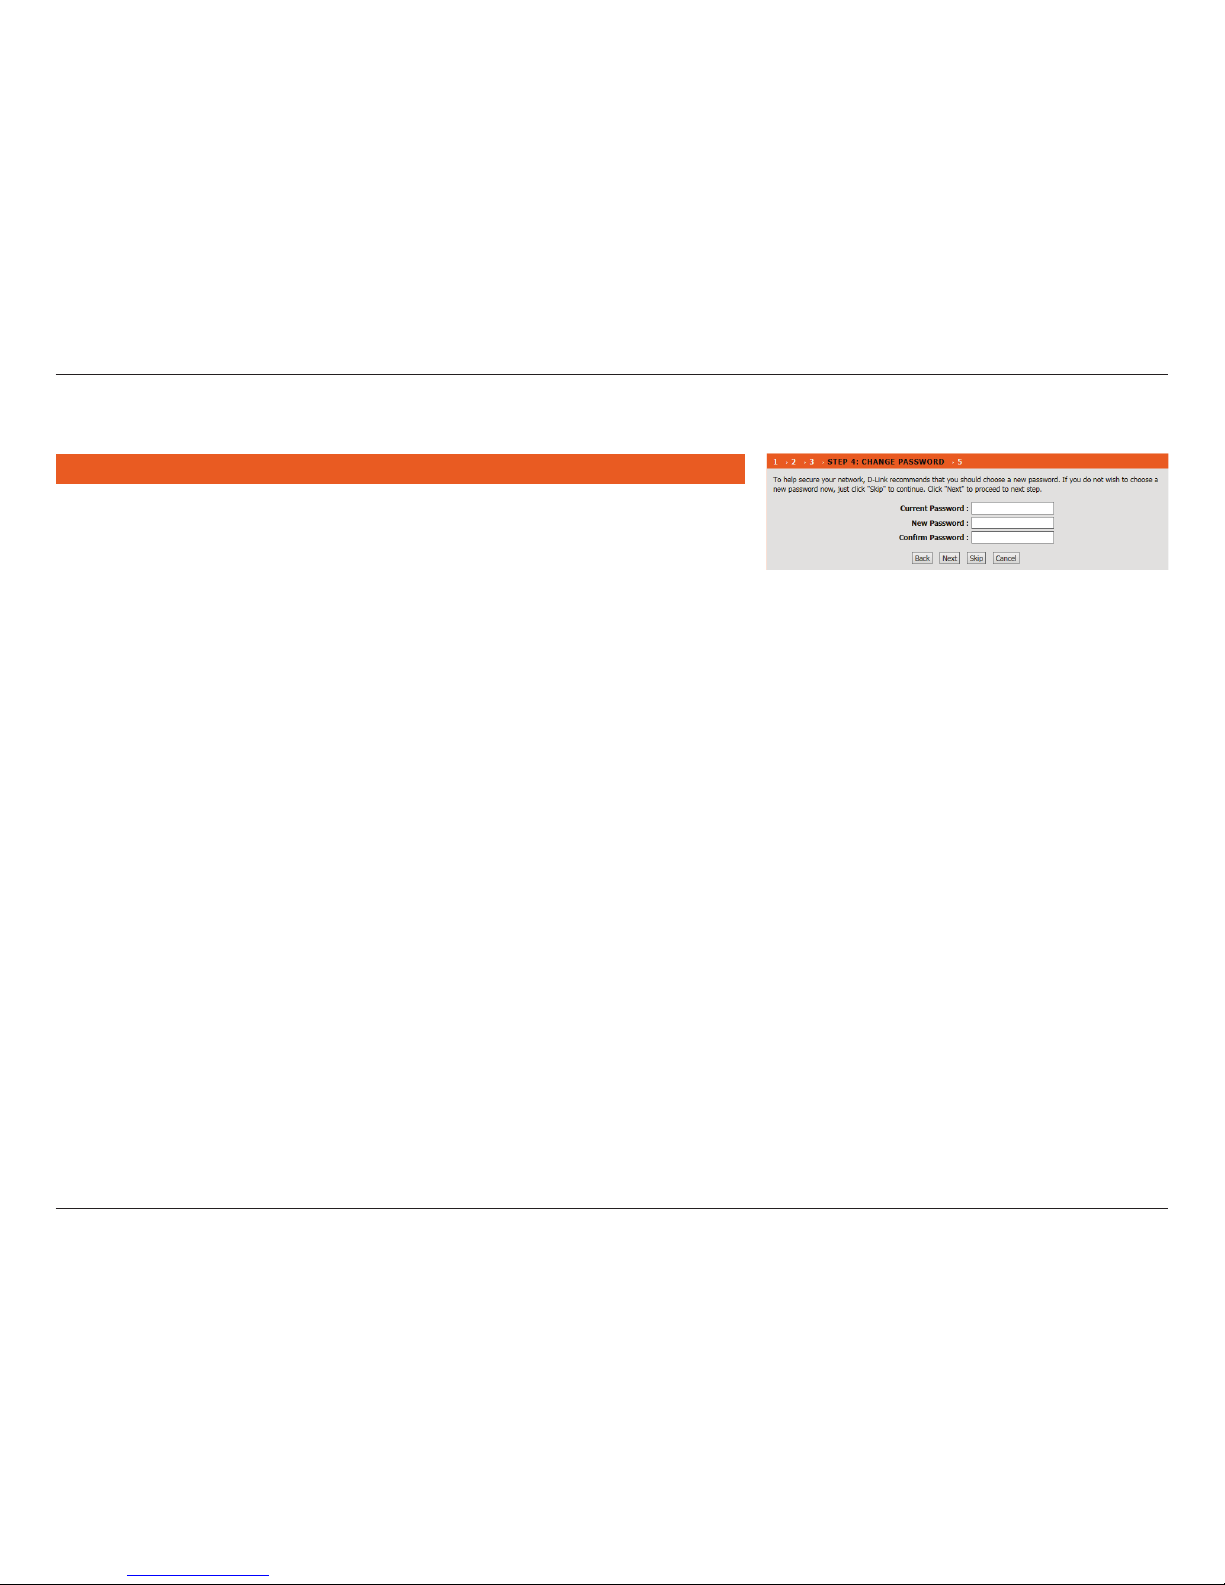
This step of the wizard allows you to congure your password settings.
Enter your Current Password, Enter a new Password, and Conrm Password
to secure your DSL-2745.
Click Next to continue. Otherwise, click Skip to leave the password unchanged.
Step 4: Change Device Login Password
Page 24
19D-Link DSL-2745 Wireless N300 ADSL2+ Modem Router User Manual
Section 3 - Getting Started
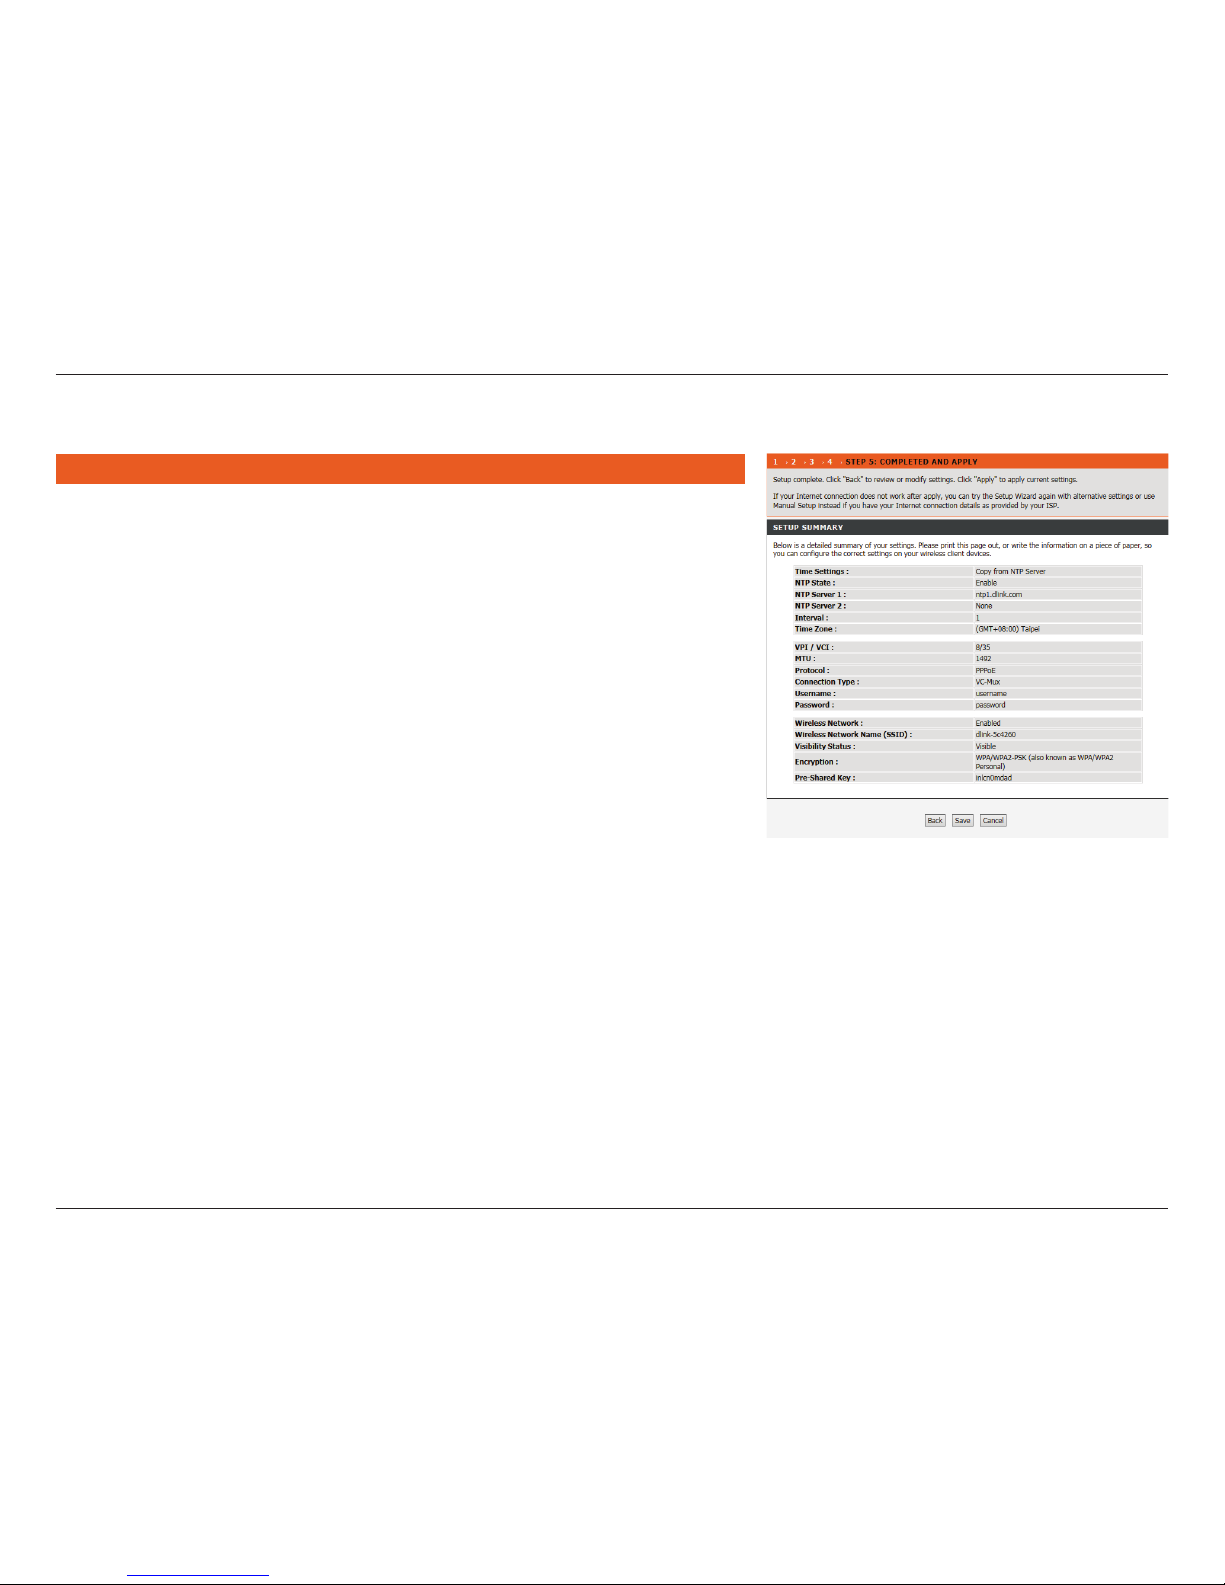
Congratulations! You have completed the setup of your DSL-2745. You will see
a summary of the settings you chose. It is recommended that you make a note
of this information for future reference.
If you are satised with these settings, click Save to complete the setup wizard.
Otherwise, click Back to return to the previous step(s) or Cancel to exit the
wizard without saving your changes.
Step 5: Completed and Apply
Page 25
20D-Link DSL-2745 Wireless N300 ADSL2+ Modem Router User Manual
Section 4 - Conguration
This section will show you how to congure your D-Link wireless router using the web-based conguration utility.
If you wish to change the default settings or adjust the conguration of the
DSL-2745 you may use the web-based conguration utility.
To access the conguration utility, open a web browser such as Internet Explorer
and enter http://192.168.1.1 in the address eld.
Select admin from the drop-down menu and then enter your password. The
default password is admin.
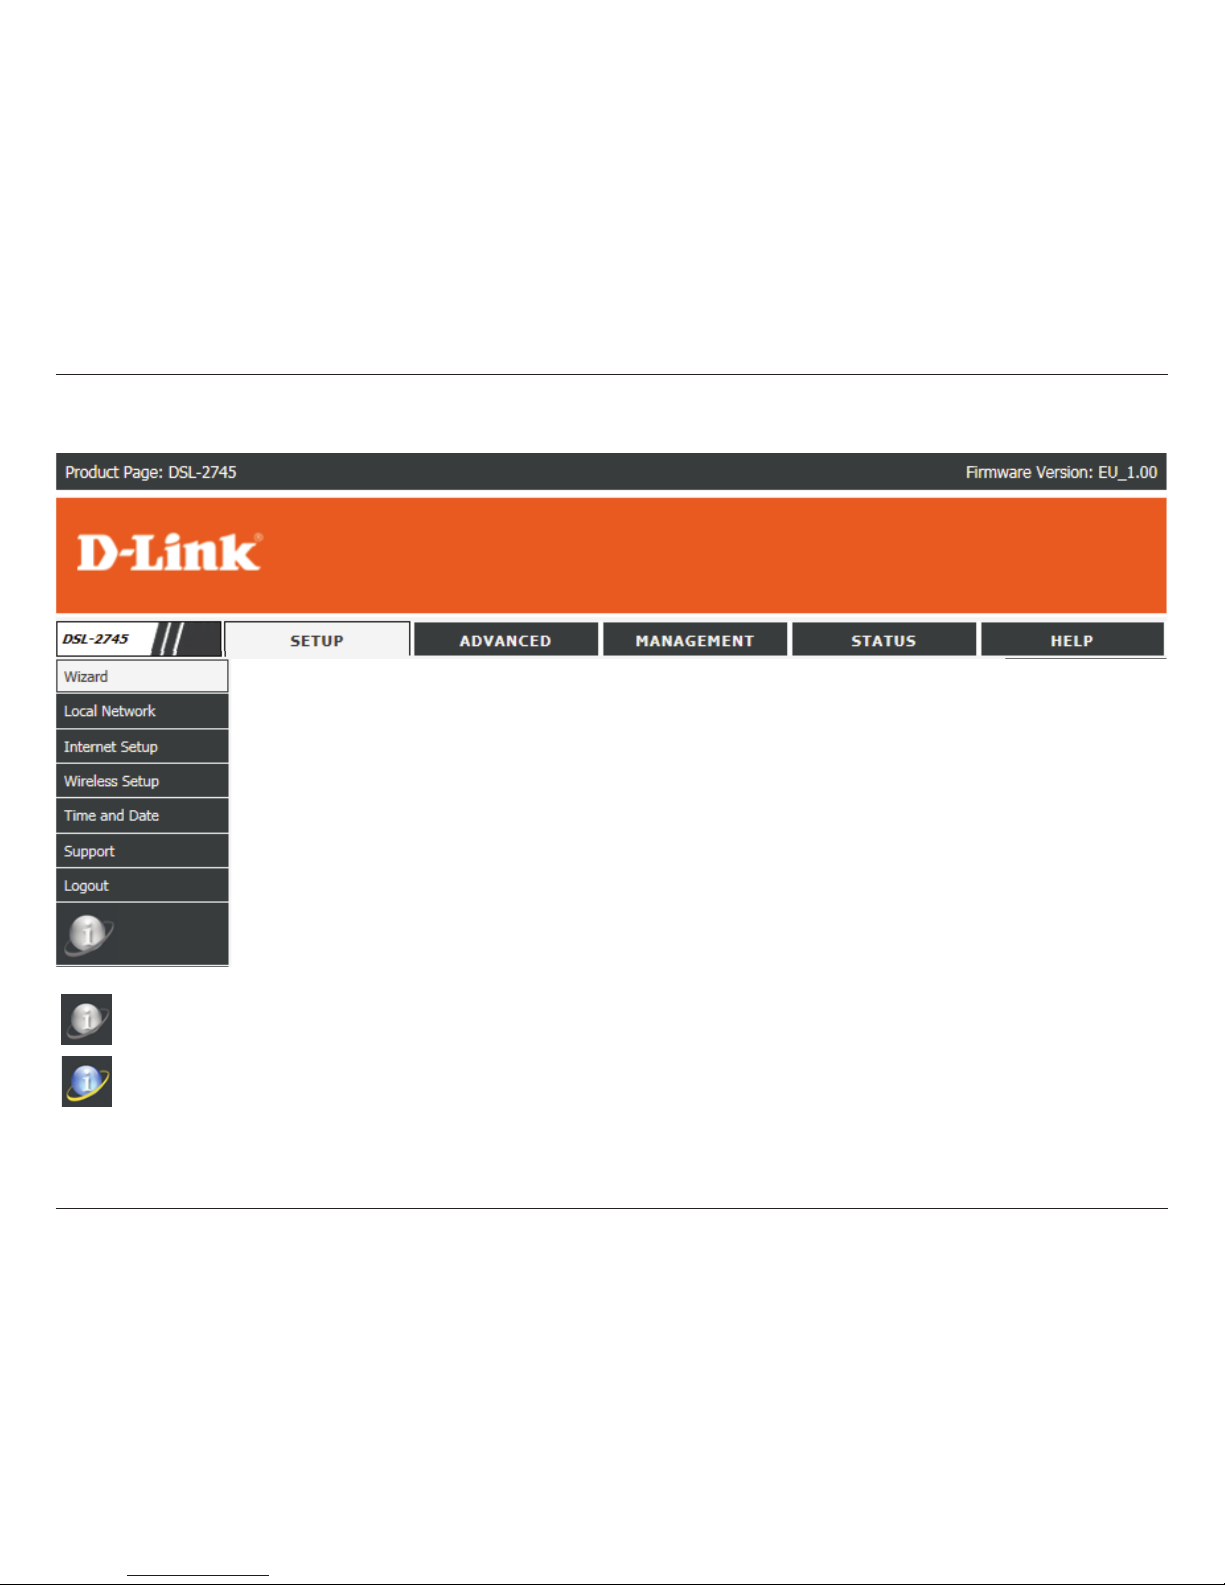
Once logged in you will see the that the user interface is divided into ve
horizontal tabs, each with a vertical menu bar running along the left side.
Conguration
Page 26
21D-Link DSL-2745 Wireless N300 ADSL2+ Modem Router User Manual
Section 4 - Conguration
Setup
Indicates the Internet is disconnected.
Indicates the DSL-2745 is successfully connected to the Internet.
The Setup Tab provides access to congure the most commonly used settings of your DSL-2745.
Page 27

22D-Link DSL-2745 Wireless N300 ADSL2+ Modem Router User Manual
Section 4 - Conguration
Local Network
Hover your mouse over the Local Network option on the vertical menu bar
running along the left side to access:
• LAN Interface
• LAN IPv6 Interface
Page 28
23D-Link DSL-2745 Wireless N300 ADSL2+ Modem Router User Manual
Section 4 - Conguration
Local Network
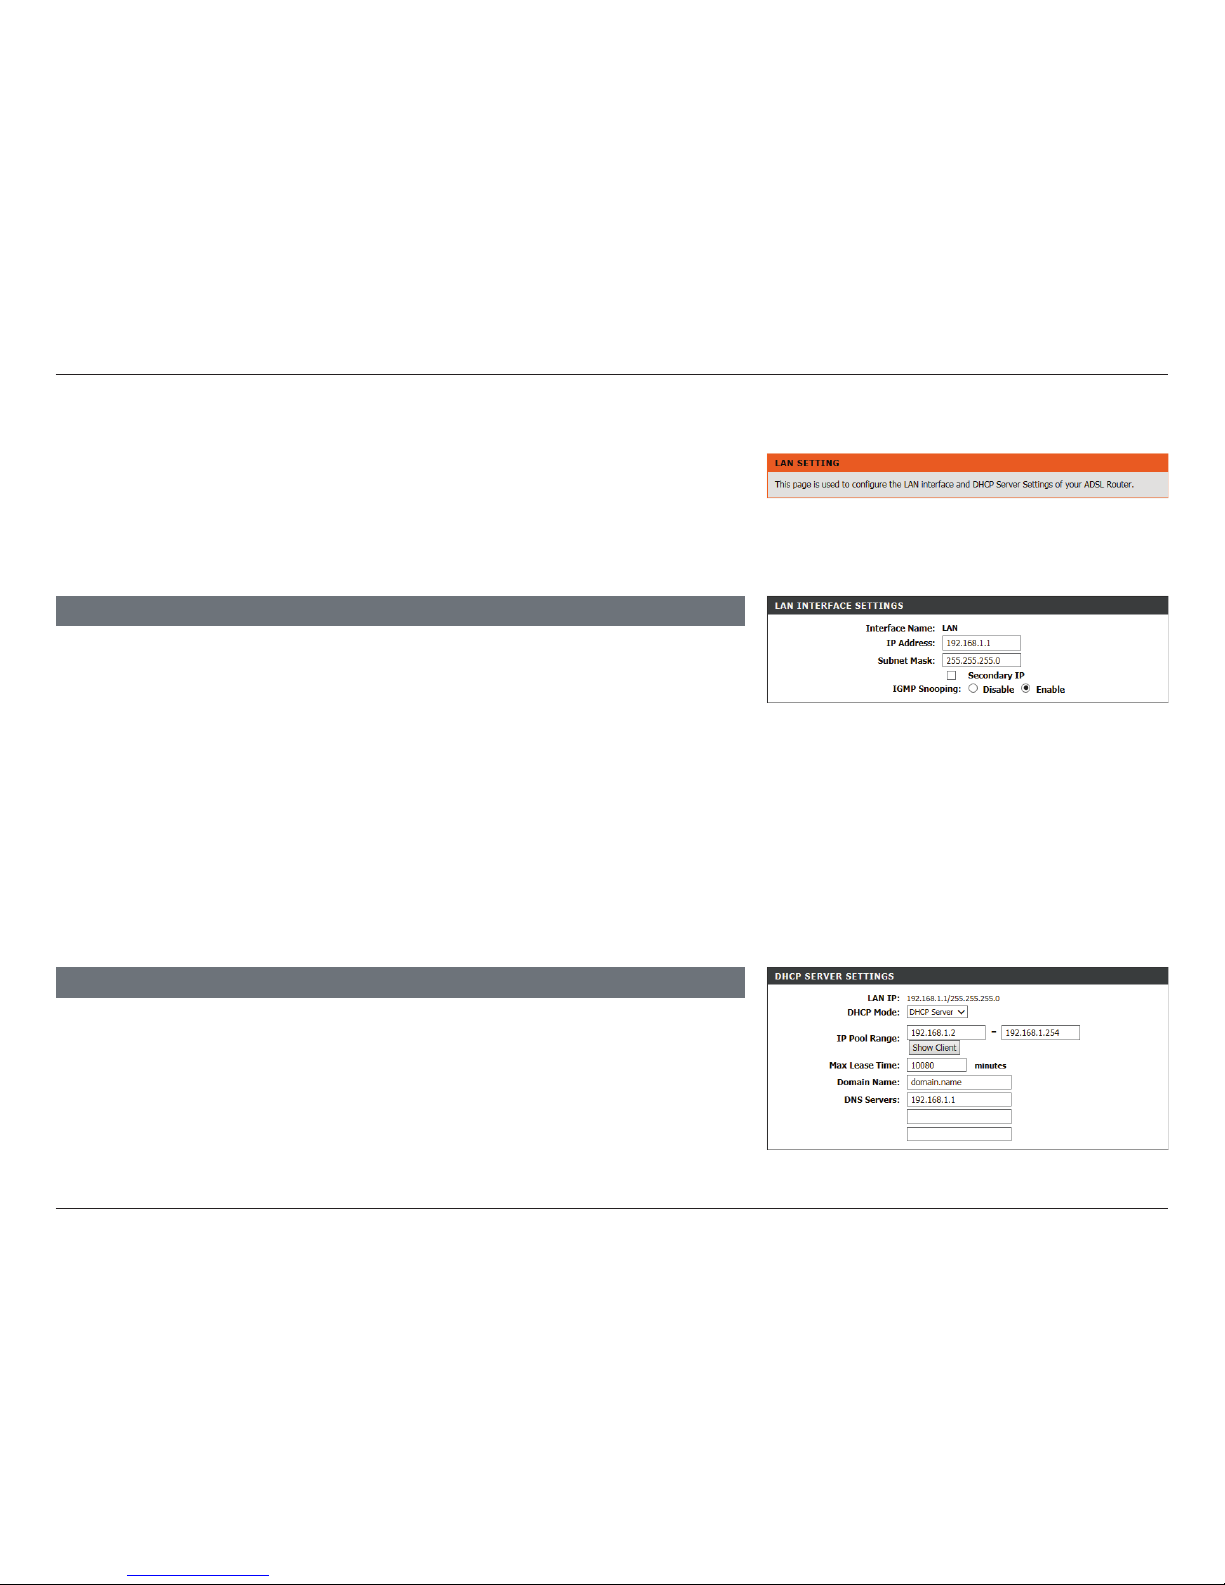
This optional section allows you to congure the local network and DHCP
settings of your device. The DHCP service supplies IP settings to clients
congured to automatically obtain IP settings that are connected to the device
through the Ethernet port. You may also set static DHCP reservations from this
screen. Click Apply when you are done.
Interface Name: LAN indicates you are conguring the LAN address settings.
IP Address: Enter the IP address of the DSL-2745. The default IP address is
192.168.1.1. Note: If you change the IP address, once you click Apply
you will need to enter the new IP address in your browser in order to
access the conguration utility.
Subnet Mask: Enter the subnet mask. The default subnet mask is 255.255.255.0.
Secondary IP: If you wish to add another IP address to use to configure the
DSL-2745, check this box and enter the IP address and subnet
mask.
IGMP Snooping: Check the box to enable Internet Group Management Protocol
(IGMP) snooping for extra network traffic security.
LAN INTERFACE SETTINGS
LAN IP: The current Router LAN IP and Subnet mask are displayed.
DHCP Server: By default, DHCP is enabled. Select None to disable the DHCP
server.
IP Pool Range Enter the starting and ending IP addresses for the DHCP server’s IP
assignment.
DHCP SERVER SETTINGS
Page 29
24D-Link DSL-2745 Wireless N300 ADSL2+ Modem Router User Manual
Section 4 - Conguration
DHCP STATIC IP TABLE
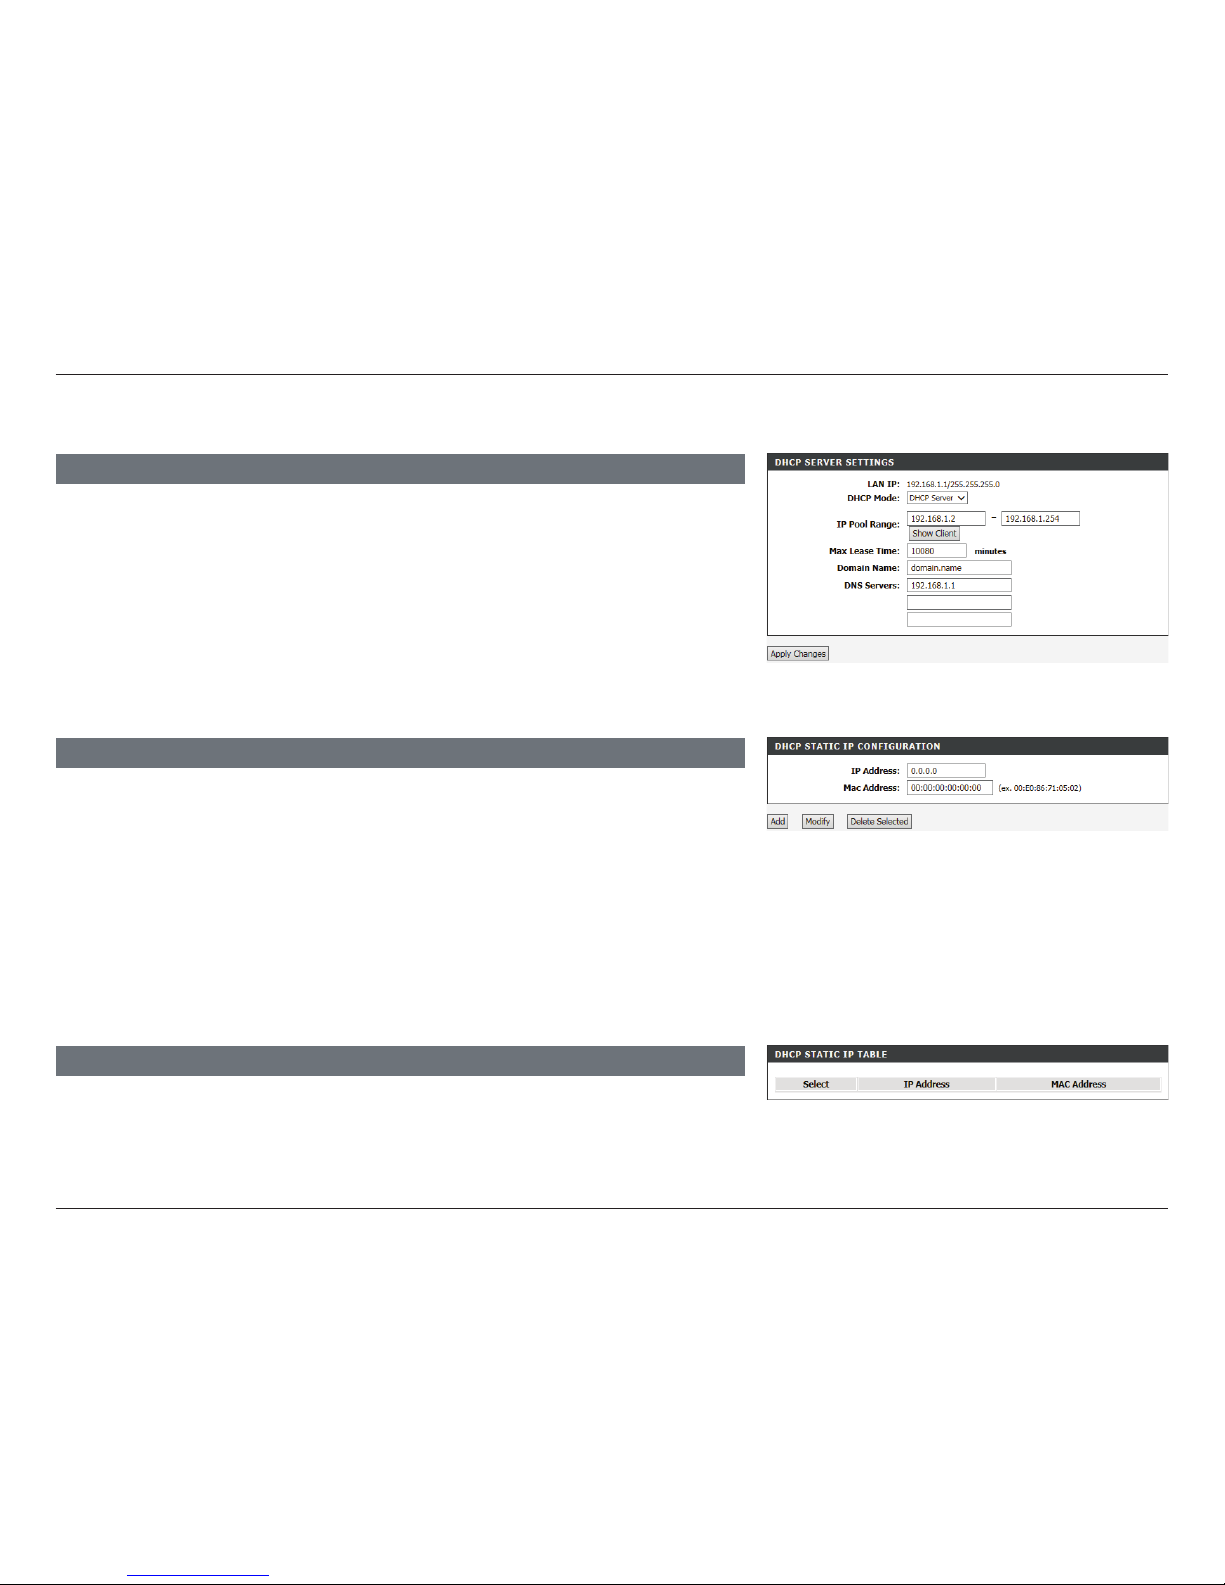
This table lists the current reserved DHCP IP addresses by MAC address and IP address. Press
Select radio button and the Modify or Delete Selected above to make adjustments.
DHCP STATIC IP CONFIGURATION
DHCP Reservation allows you to reserve IP addresses for specic machines based on their
unique hardware MAC addresses. During DHCP IP address assignment, these devices will
receive the same IP address. This is particularly useful if you run servers on your network.
After inputting an IP address and the associated MAC address, click Add.
IP Address: Enter the IP address you want to assign to the computer or device.
This IP address must be within the DHCP IP address range.
MAC Address: Enter the MAC address of the computer or device you wish to
reserve an IP for.
Max Lease Time: Note: If you statically (manually) assign IP addresses to your
computers or devices, make sure the IP addresses are outside of
this range or you may experience an IP address conflict.
Domain Name: Enter a domain name (optional) to provide along with DHCP
assigned addresses.
DNS Servers: Enter a DNS server to distribute to DHCP clients.
DHCP SERVER SETTINGS CONTINUED
Local Network (continued)
Click Apply Changes when you are done.
Page 30
25D-Link DSL-2745 Wireless N300 ADSL2+ Modem Router User Manual
Section 4 - Conguration
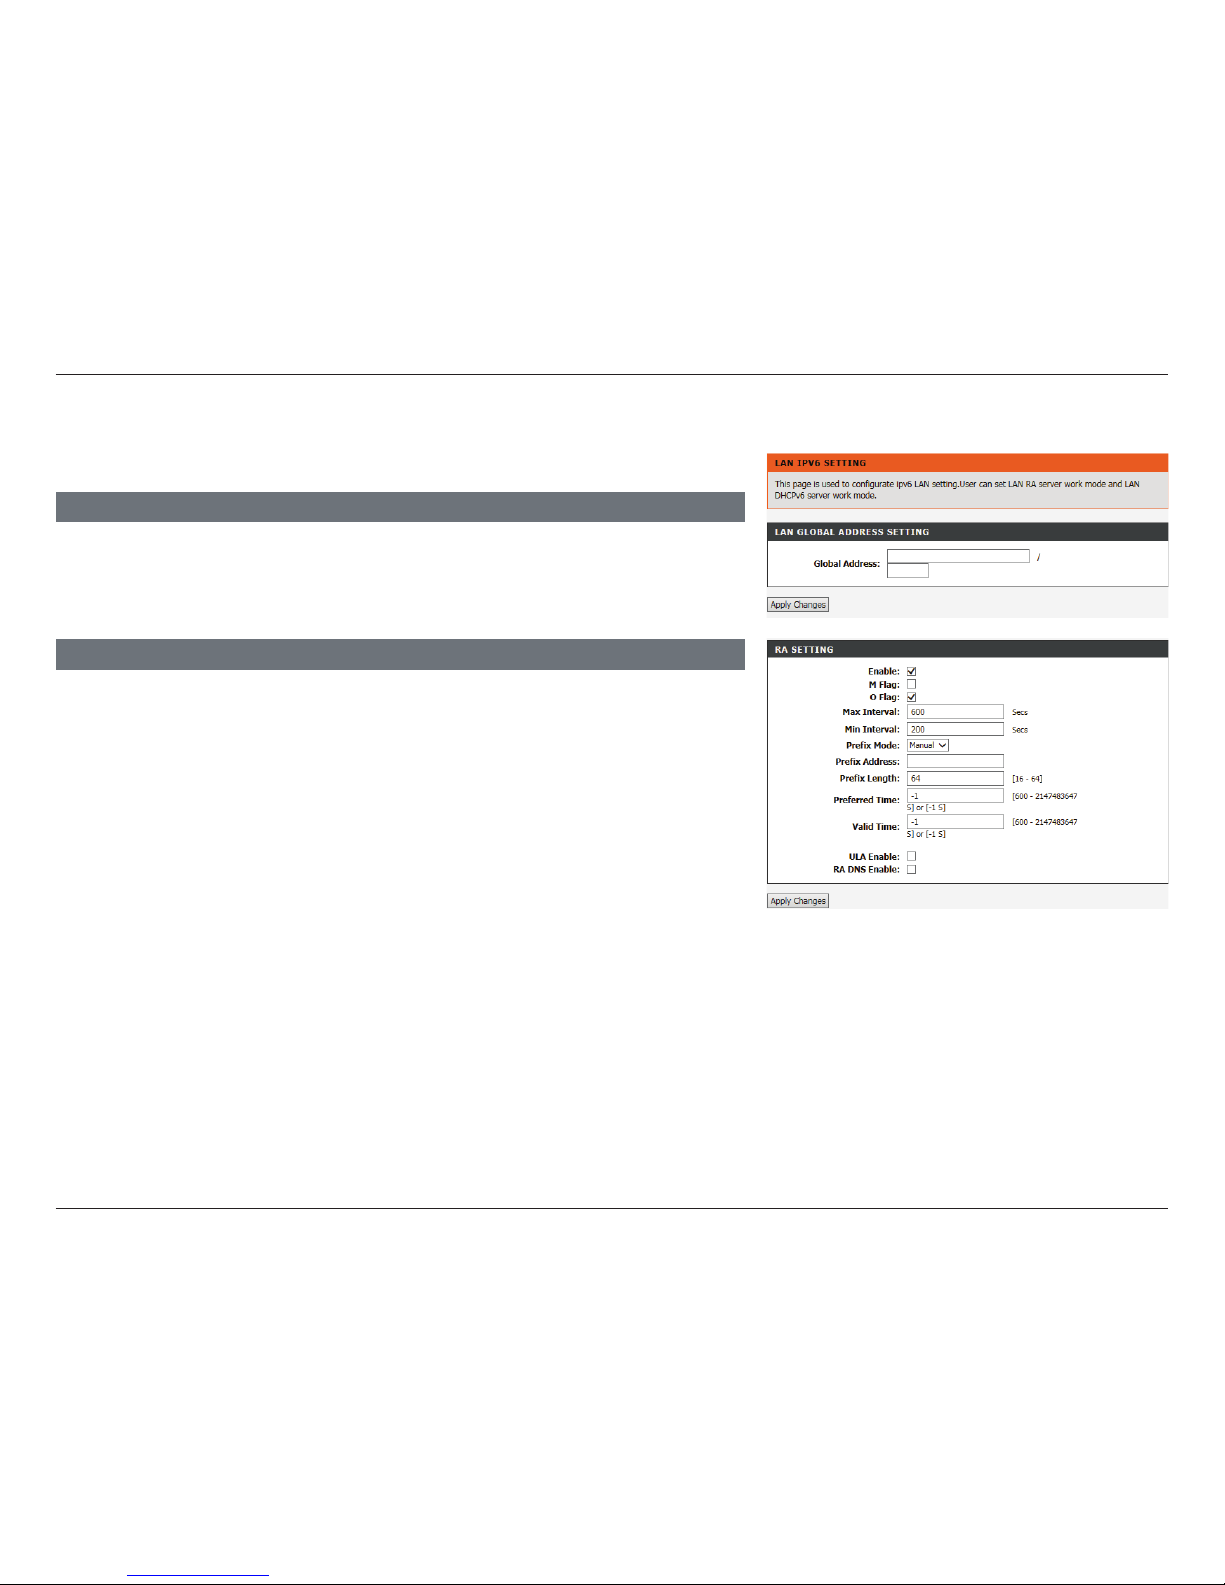
IPv6 Local Network
This section allows you to congure your IPv6 local network settings.
Global Address Enter your IPv6 global address.
LAN GLOBAL ADDRESS SETTING
Enable: Check this box to enable Router Advertisement.
M Flag: Check this box to set the managed address conguration ag to 1.
O Flag: Check this box to set the other ag to 1.
Max Interval: Set the maximum interval between each router advertisement
message.
Min Interval: Set the minimum interval between each router advertisement
message.
Prefix Mode: Select Auto or Manual and enter your prex address and length.
RA SETTING
Click Apply Changes when you are done.
The following settings are available if Prefix Mode is set to Manual:
Prefix Address: Enter the prex address.
Prefix length: Enter the prex length.
Preferred Time: Enter the preferred amount of time the address is used for.
Valid Time: Enter the amount of time the address is valid for.
Page 31
26D-Link DSL-2745 Wireless N300 ADSL2+ Modem Router User Manual
Section 4 - Conguration
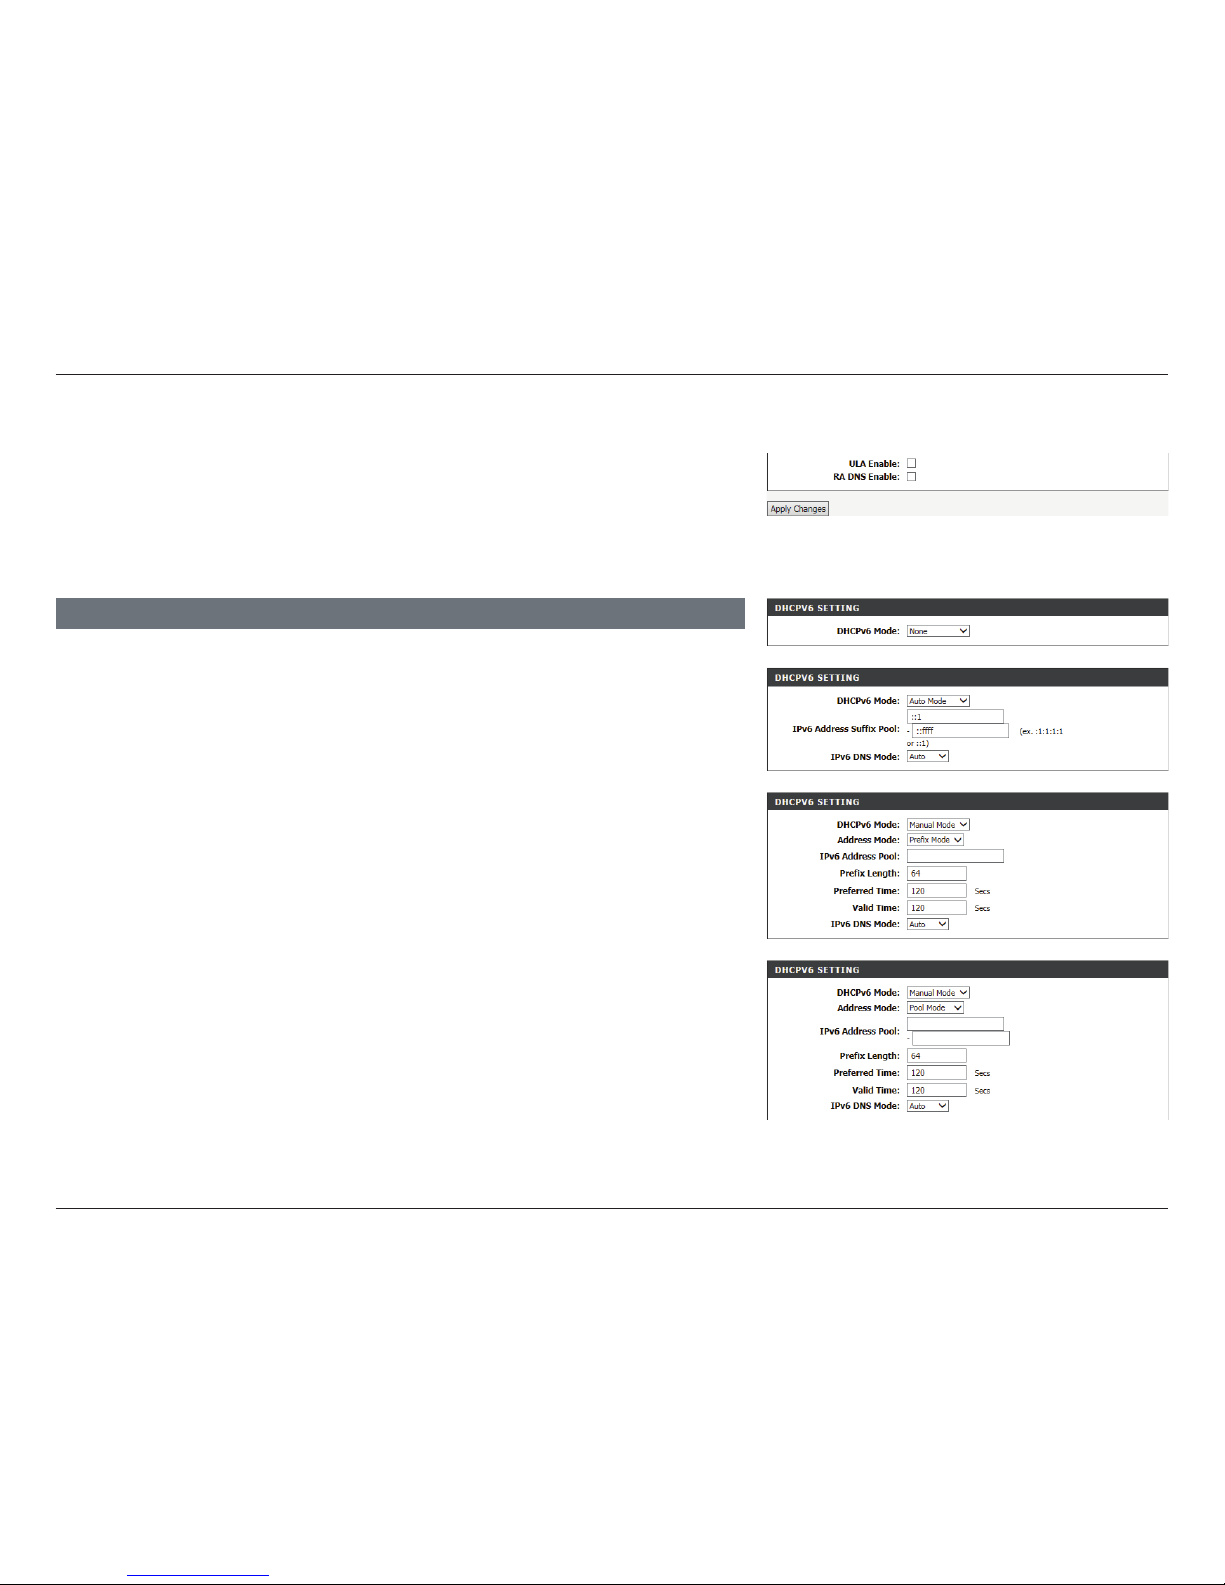
DHCPv6 Mode: Choose the desired DHCPV6 mode None, Auto Mode, or Manual
Mode.
DHCPV6 SETTING
IPv6 Local Network (continued)
Click Apply Changes when you are done.
Address Mode: Select either Prex Mode or Pool Mode.
IPv6 Address
Suffix Pool:
Enter the IPv6 address sux pool range.
IPv6 Address Pool: Enter the IPv6 address prex.
IPv6 Address Pool: Enter the IPv6 address pool range.
ULA Enable: Check this box to enable ULA.
RA DNS Enable: Check this box to enable router advertisement DNS.
The following setting are available if DHCPv6 Mode is set to Auto Mode:
The following settings are available if DHCPv6 Mode is set to Manual Mode:
The following settings are available if Address Mode is set to Prefix Mode:
The following settings are available if Address Mode is set to Pool Mode:
Page 32
27D-Link DSL-2745 Wireless N300 ADSL2+ Modem Router User Manual
Section 4 - Conguration
IPv6 Local Network (continued)
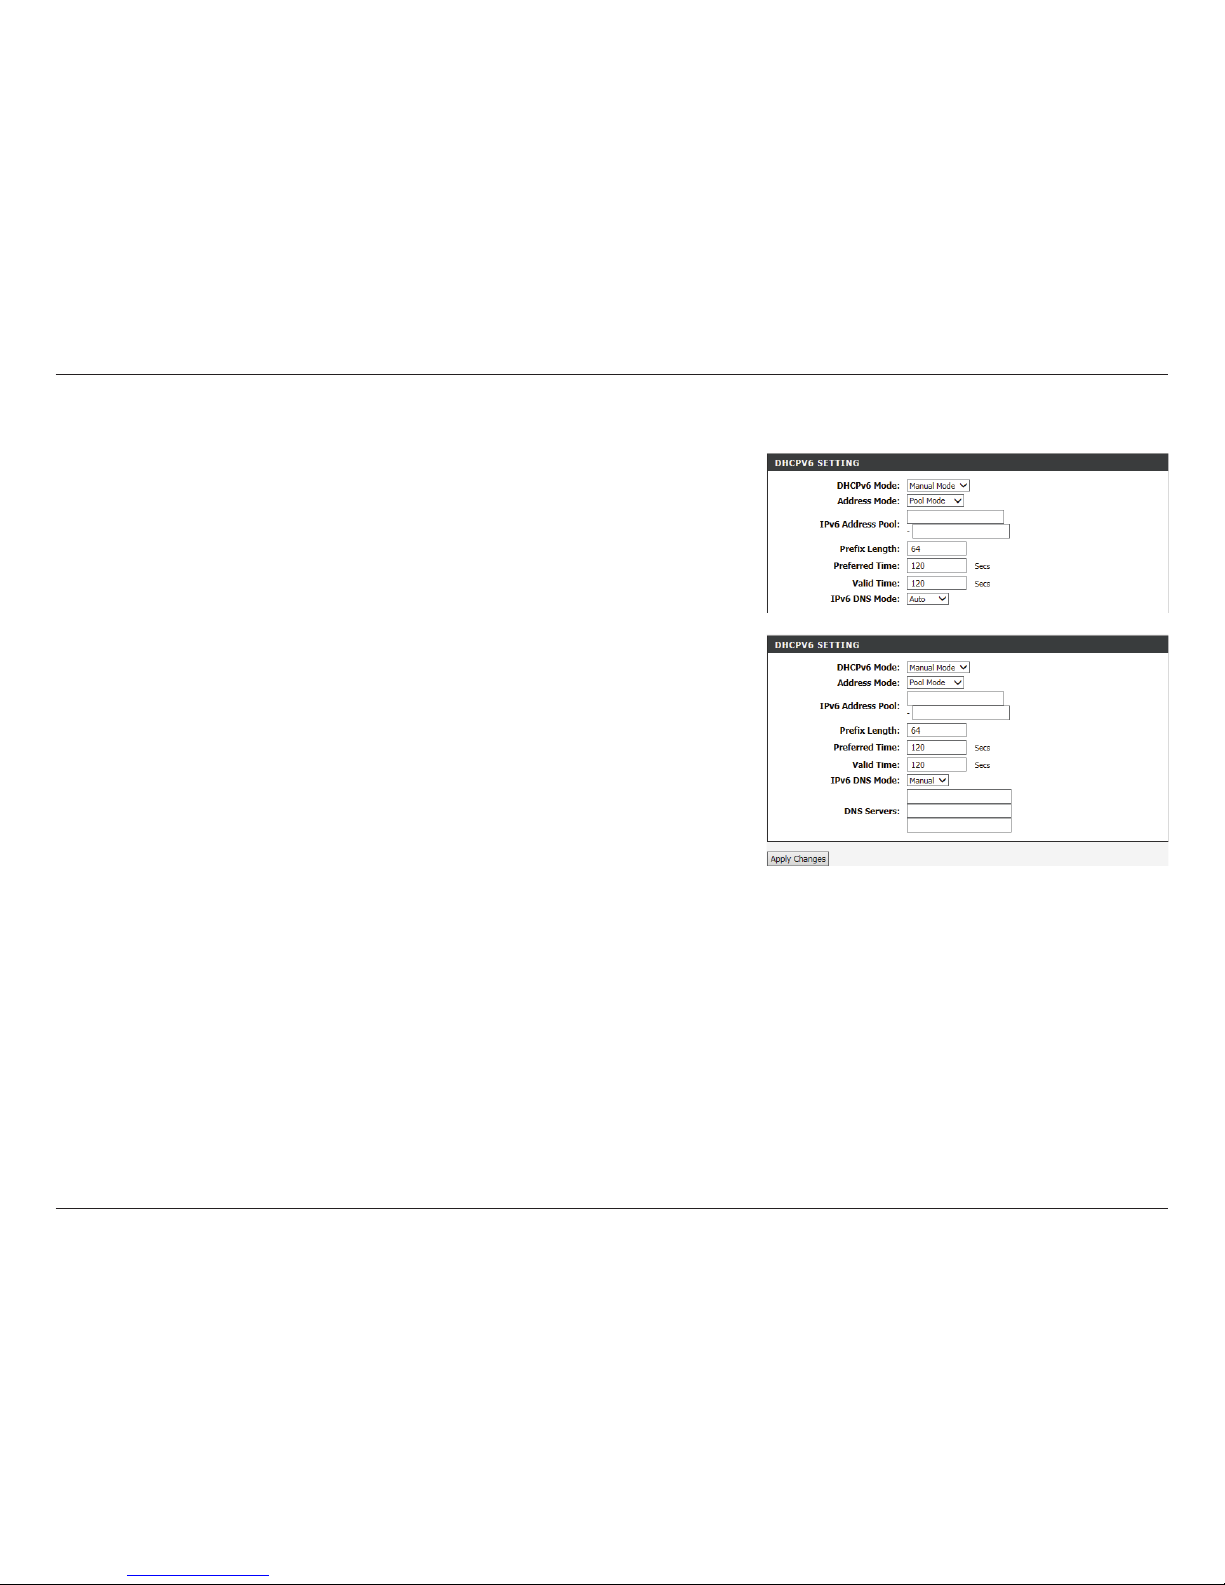
Prefix length: Enter the prex length.
Preferred Time: Enter the preferred amount of time the address is used for.
Valid Time: Enter the amount of time the address is valid for.
IPv6 DNS Mode: Select either Auto or Manual.
The following settings are available if IPv6 DNS Mode is set to Manual:
DNS Servers: Enter up to three IPv6 DNS servers.
Click Apply Changes when you are done.
Page 33
28D-Link DSL-2745 Wireless N300 ADSL2+ Modem Router User Manual
Section 4 - Conguration
Internet Setup
Click Internet Setup on the left menu to congure your connection manually.
This section is only recommended for advanced users. It is recommended to
use the Setup Wizard to set up your Internet connection.
The following sections describe how to Create a New Connection, Modify an
existing connection, or Delete a connection.
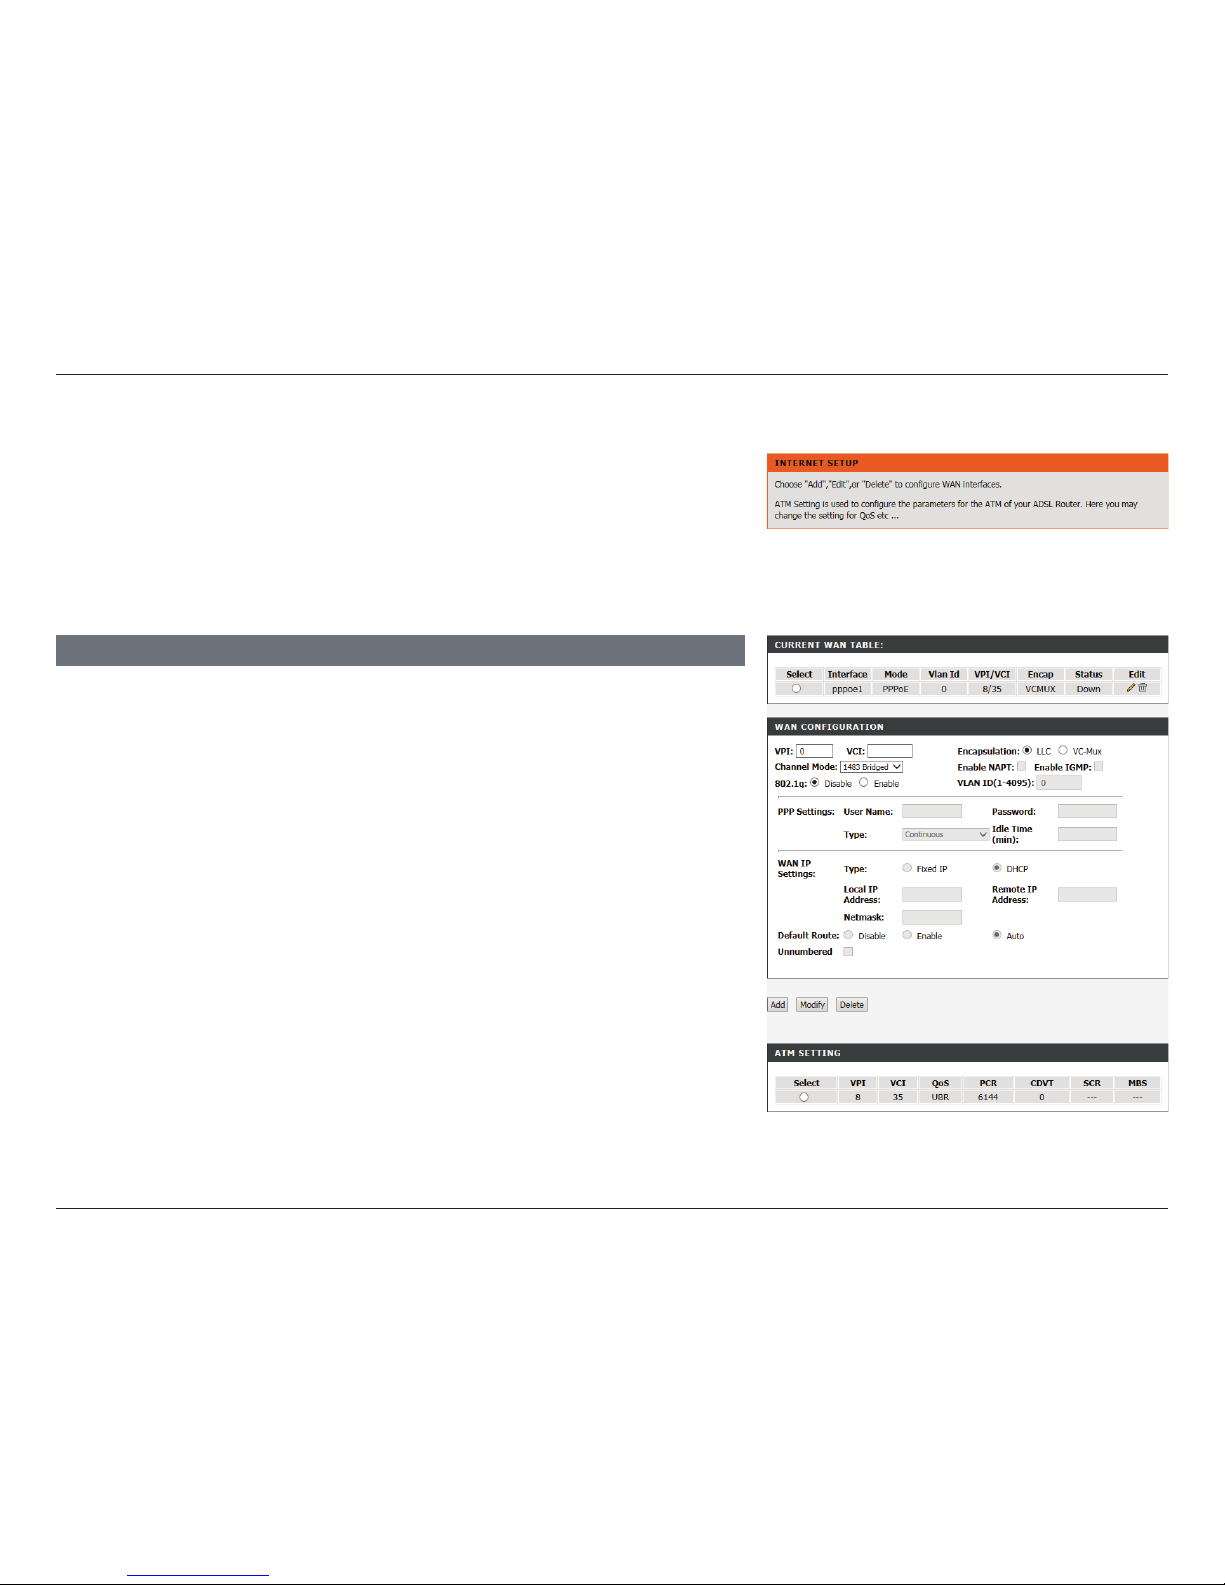
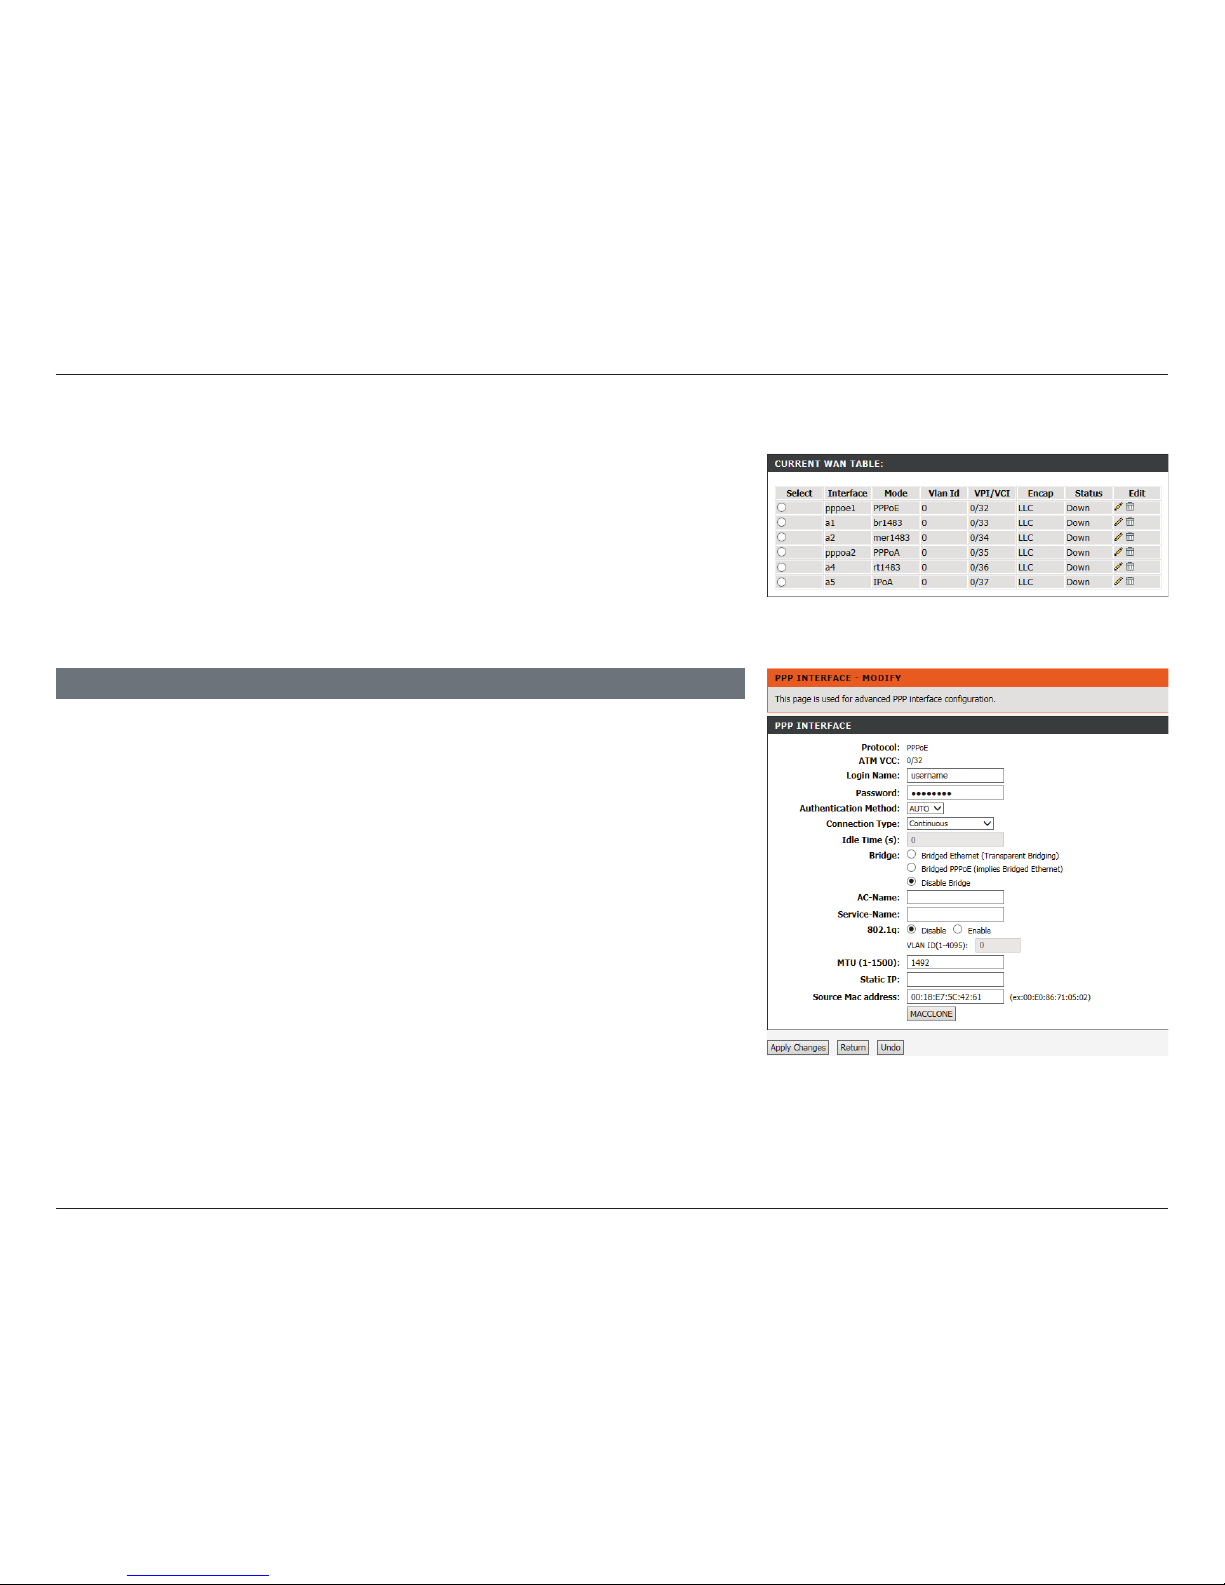
CURRENT WAN TABLE
This table lists the current WAN conguration. It displays the Interface Name,
Mode, Vlan Id, VPI/VCI settings, the Encapsulation method, and Status.
To modify an existing entry, select the radio button of the row you wish to alter
and click on the Modify button below the WAN Conguration box. If you wish
to make more detailed changes, click on the pencil icon in the Edit column.
Refer to Modify an Existing Connection on page 40.
To delete an existing connection, select the radio button of the row you wish
to alter and click on the Delete button below the WAN Conguration box or
click on the trash can icon in the Edit column.
To create a new connection, proceed to the next page.
Page 34
29D-Link DSL-2745 Wireless N300 ADSL2+ Modem Router User Manual
Section 4 - Conguration
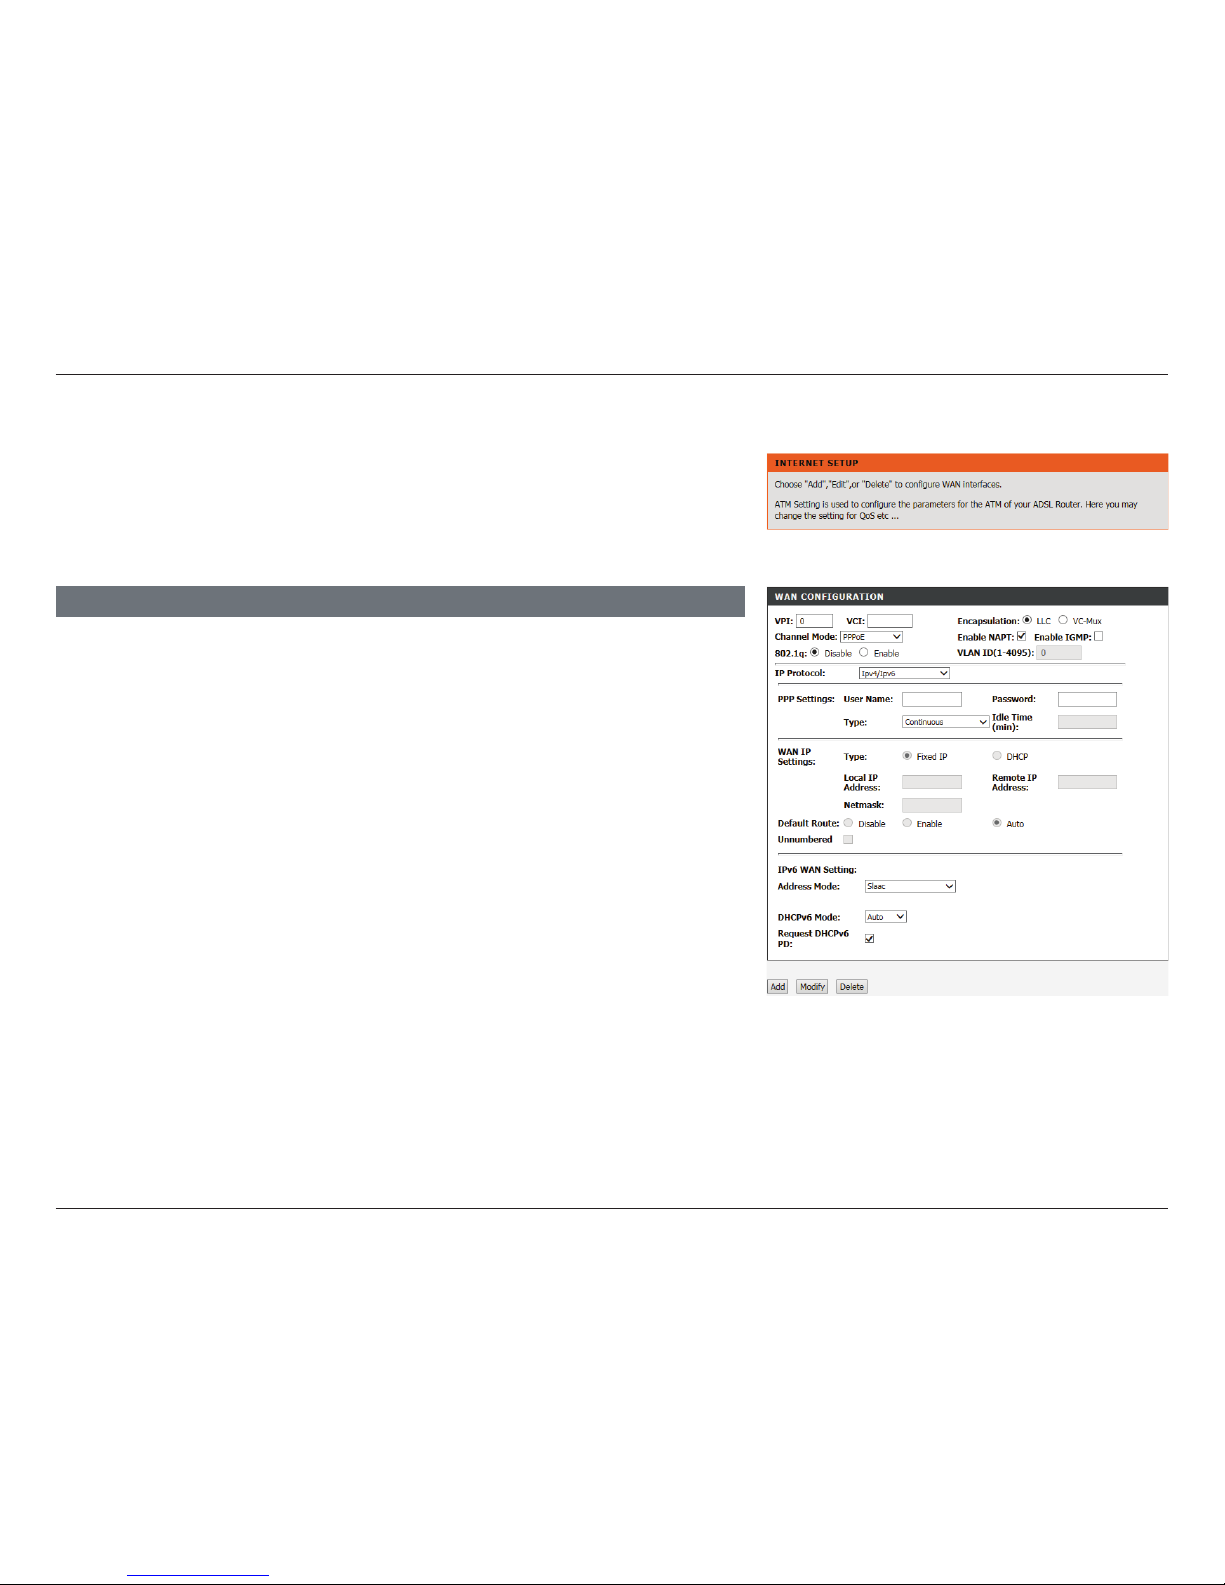
PPPoE
Channel Mode: Select PPPoE.
VPI: Virtual path identifier (VPI) is the virtual path between two points
in an ATM network. Its valid value is between 0 and 255. Enter the
correct VPI provided by your ISP.
VCI: Virtual channel identifier (VCI) is the virtual channel between two
points in an ATM network. Its valid value is between 32 and 65535.
Enter the correct VCI provided by your ISP.
Encapsulation: Select the type of encapsulation your ISP uses, either Logical Link
Control (LLC) or Virtual Circuit Multiplexing (VC-Mux).
Enable NAPT: Check this box to enable NAT, which allows devices on your
network to share one public IP address.
Enable IGMP: Check to enable IGMP Multicast.
802.1q: Choose to either Disable or Enable the use of VLANs.
VLAN ID(1-4095): If you enabled 802.1q, enter the VLAN ID.
IP Protocol: Select the type of IP addressing: IPv4/v6, IPv4, or IPv6.
PPP Settings: Enter your PPP authentication information.
WAN CONFIGURATION
Create a New Connection
To set up your Internet Connection, use the WAN Conguration box. Begin by
selecting the channel mode or network encapsulation protocol your ISP uses,
then proceed to fill in the IP, PPP, and WAN IP parameters.
Page 35
30D-Link DSL-2745 Wireless N300 ADSL2+ Modem Router User Manual
Section 4 - Conguration
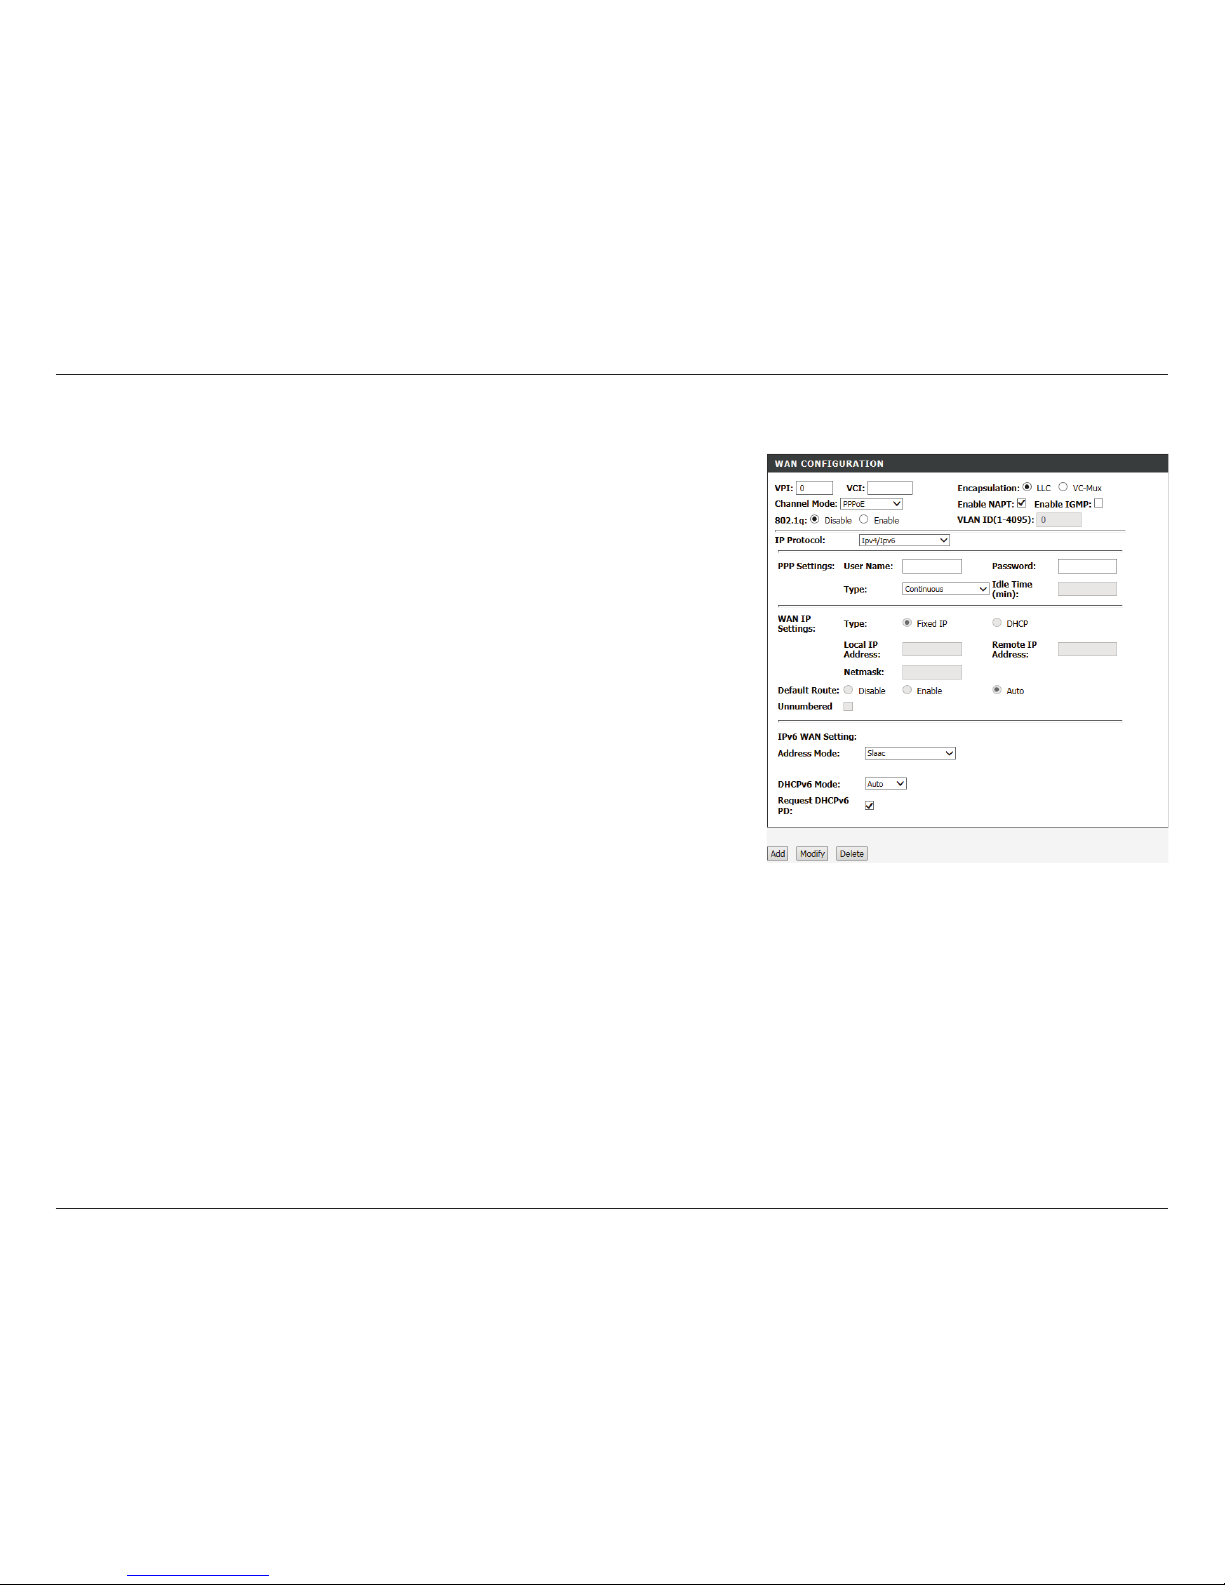
User Name: Enter your DSL account username provided by your ISP.
Password: Enter your DSL account password provided by your ISP.
Type: Select how your DSL-2745 connects to your ISP. Choose either
Continuous, Connect on Demand, and Manual.
Idle Time (min): If you selected Connect on Demand, enter the amount time the
router waits if there is no activity before disconnecting.
WAN IP Settings: If IPv4 or IPv4/IPv6 is selected, these settings are disabled. The
router will use DHCP only, Fixed (Static IP) is unavailable.
IPv6 WAN
Settings:
Configure the IPv6 WAN settings. If the IP Protocol is set to IPv4,
these settings are unavailable.
Address Mode: Select either Slaac or Static.
IPv6 Address: Enter your IPv6 Static Address. Only available in Static mode.
IPv6 Gateway: Enter your IPv6 Gateway. Only available in Static mode.
DHCPv6 Mode: Select either Auto, Enable, or Disable.
Request DHCPv6
Address:
Check this box to enable. Only available if DHCPv6 Mode is set to
Enable or Auto:
Request DHCPv6
PD:
Check this box to enable. Only available if DHCPv6 Mode is set to
Enable.
Click Add to create your connection.
PPPoE Mode (continued)
Page 36
31D-Link DSL-2745 Wireless N300 ADSL2+ Modem Router User Manual
Section 4 - Conguration
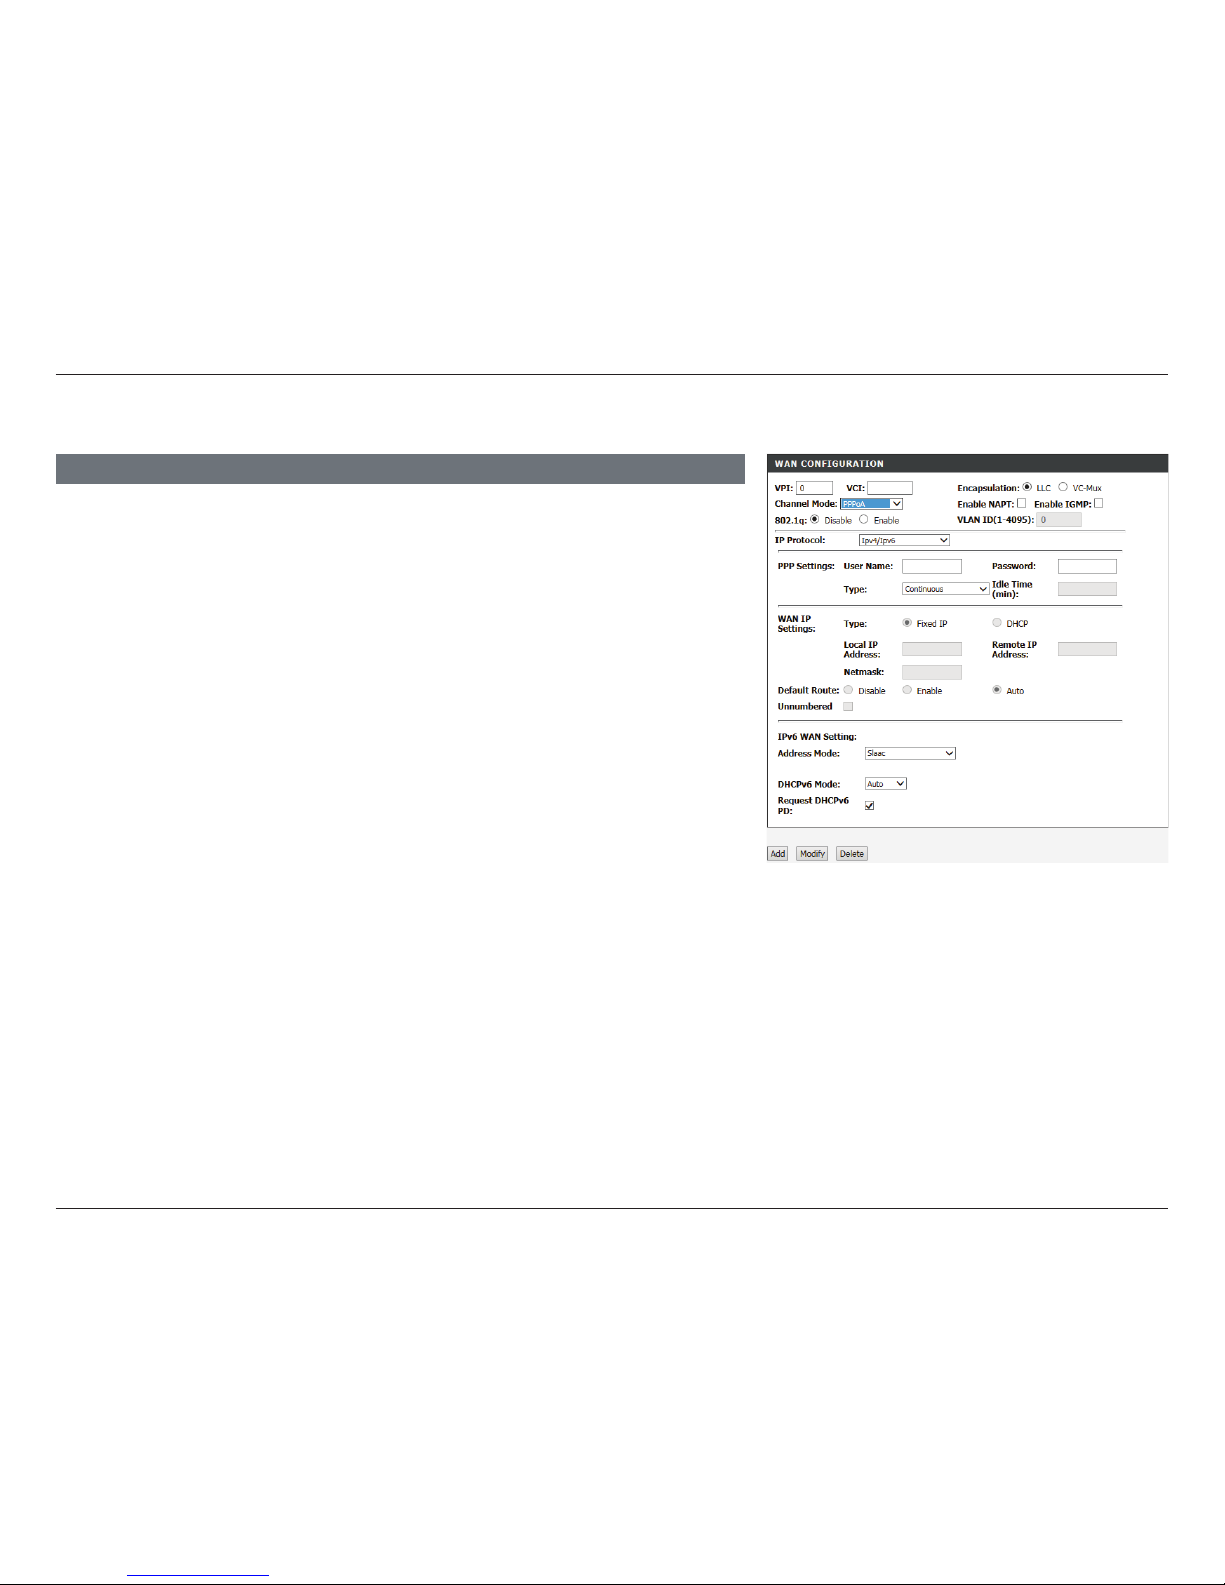
Channel Mode: Select PPPoA.
VPI: Virtual path identifier (VPI) is the virtual path between two points
in an ATM network. Its valid value is between 0 and 255. Enter the
correct VPI provided by your ISP.
VCI: Virtual channel identifier (VCI) is the virtual channel between two
points in an ATM network. Its valid value is between 32 and 65535.
Enter the correct VCI provided by your ISP.
Encapsulation: Select the type of encapsulation your ISP uses, either Logical Link
Control (LLC) or Virtual Circuit Multiplexing (VC-Mux).
Enable NAPT: Check this box to enable NAT, which allows devices on your
network to share one public IP address.
Enable IGMP: Check to enable IGMP Multicast.
802.1q: Choose to either Disable or Enable the use of VLANs.
VLAN ID(1-4095): If you enabled 802.1q, enter the VLAN ID.
IP Protocol: Select the type of IP addressing: IPv4/v6, IPv4, or IPv6. This will
effect the WAN IP Settings and WAN IPv6 Settings.
PPP Settings: Enter your PPP authentication information.
User Name: Enter your DSL account username provided by your ISP.
Password: Enter your DSL account password provided by your ISP.
Type: Select how your DSL-2745 connects to your ISP. Choose either
Continuous, Connect on Demand, and Manual.
WAN CONFIGURATION
PPPoA Mode
Page 37
32D-Link DSL-2745 Wireless N300 ADSL2+ Modem Router User Manual
Section 4 - Conguration
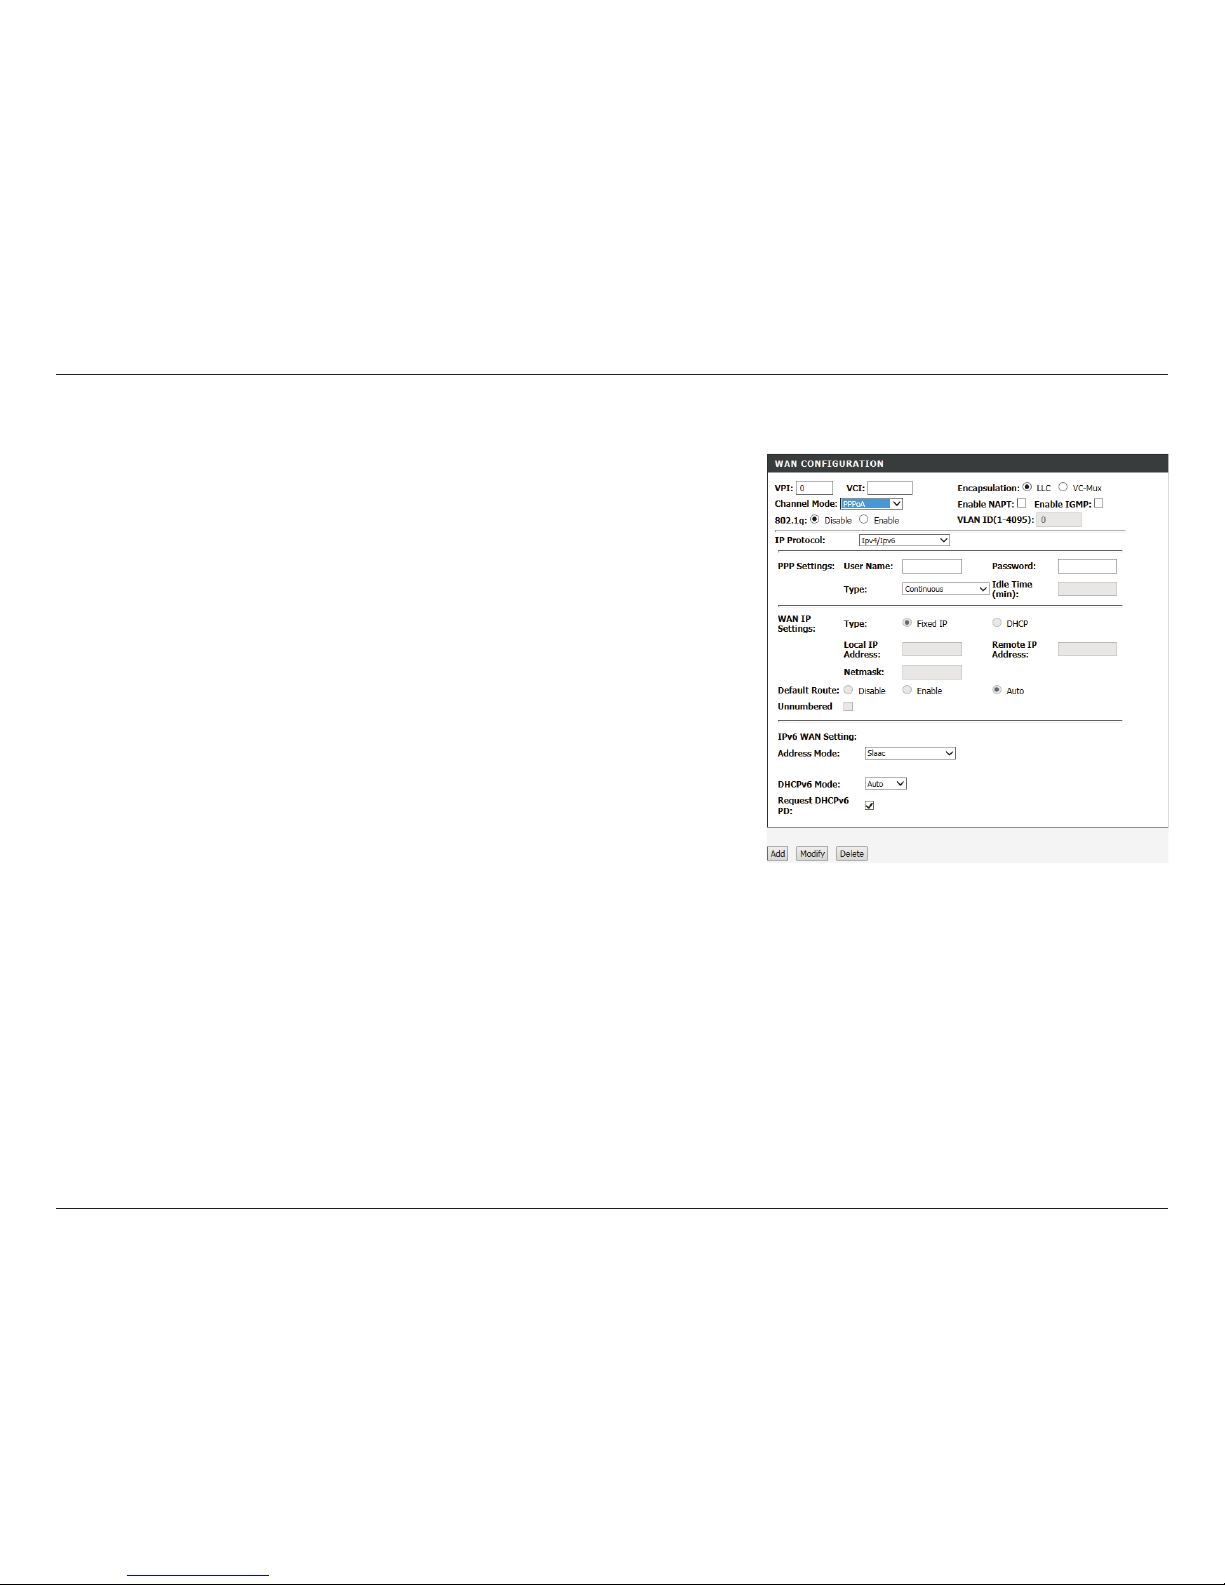
Click Add to create your connection.
Idle Time (min): If you selected Connect on Demand, enter the amount the router
waits if there is no activity before disconnecting from the Internet.
WAN IP Settings: If IPv4 or IPv4/IPv6 is selected, these settings are disabled. The
router will use DHCP only, Fixed (Static IP) is unavailable.
IPv6 WAN
Settings:
Configure the IPv6 WAN settings. If the IP Protocol is set to IPv4,
these settings are unavailable.
Address Mode: Select either Slaac or Static.
IPv6 Address: Enter your IPv6 Static Address. Only available in Static mode.
IPv6 Gateway: Enter your IPv6 Gateway. Only available in Static mode.
DHCPv6 Mode: Select either Auto, Enable, or Disable.
Request DHCPv6
Address:
Check this box to enable. Only available if DHCPv6 Mode is set to
Enable or Auto:
Request DHCPv6
PD:
Check this box to enable. Only available if DHCPv6 Mode is set to
Enable.
PPPoA Mode (continued)
Page 38
33D-Link DSL-2745 Wireless N300 ADSL2+ Modem Router User Manual
Section 4 - Conguration
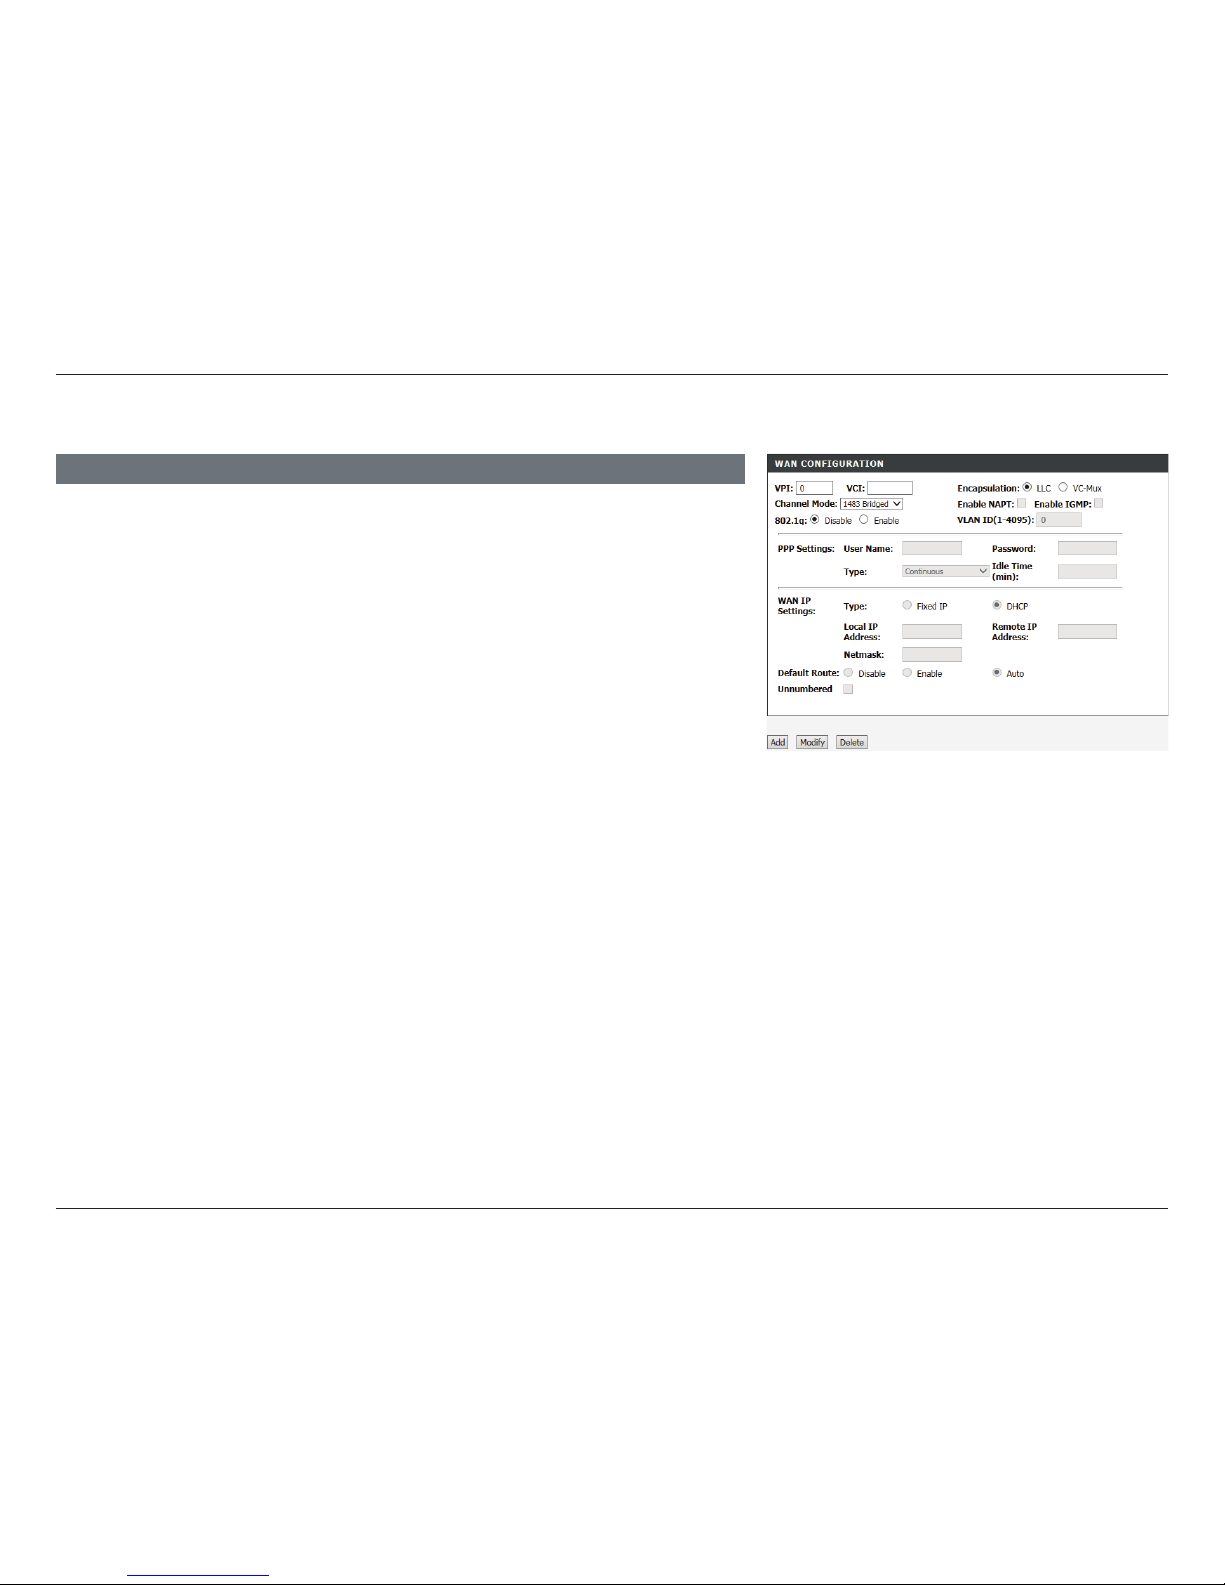
1483 Bridged Mode
Channel Mode: Select 1483 Bridged.
VPI: Virtual path identifier (VPI) is the virtual path between two points
in an ATM network. Its valid value is between 0 and 255. Enter the
correct VPI provided by your ISP.
VCI: Virtual channel identifier (VCI) is the virtual channel between two
points in an ATM network. Its valid value is between 32 and 65535.
Enter the correct VCI provided by your ISP.
Encapsulation: Select the type of encapsulation your ISP uses, either Logical Link
Control (LLC) or Virtual Circuit Multiplexing (VC-Mux).
Enable NAPT: 1483 Bridged mode does not support NAPT.
Enable IGMP: 1483 Bridged mode does not support IGMP.
802.1q: Choose to either Disable or Enable the use of VLANs.
VLAN ID(1-4095): If you enabled 802.1q, enter the VLAN ID.
WAN CONFIGURATION
1483 Bridged does not support PPP or WAN IP settings.
Click Add to create your connection. Further configuration of your other
network equipment may be necessary.
Page 39
34D-Link DSL-2745 Wireless N300 ADSL2+ Modem Router User Manual
Section 4 - Conguration
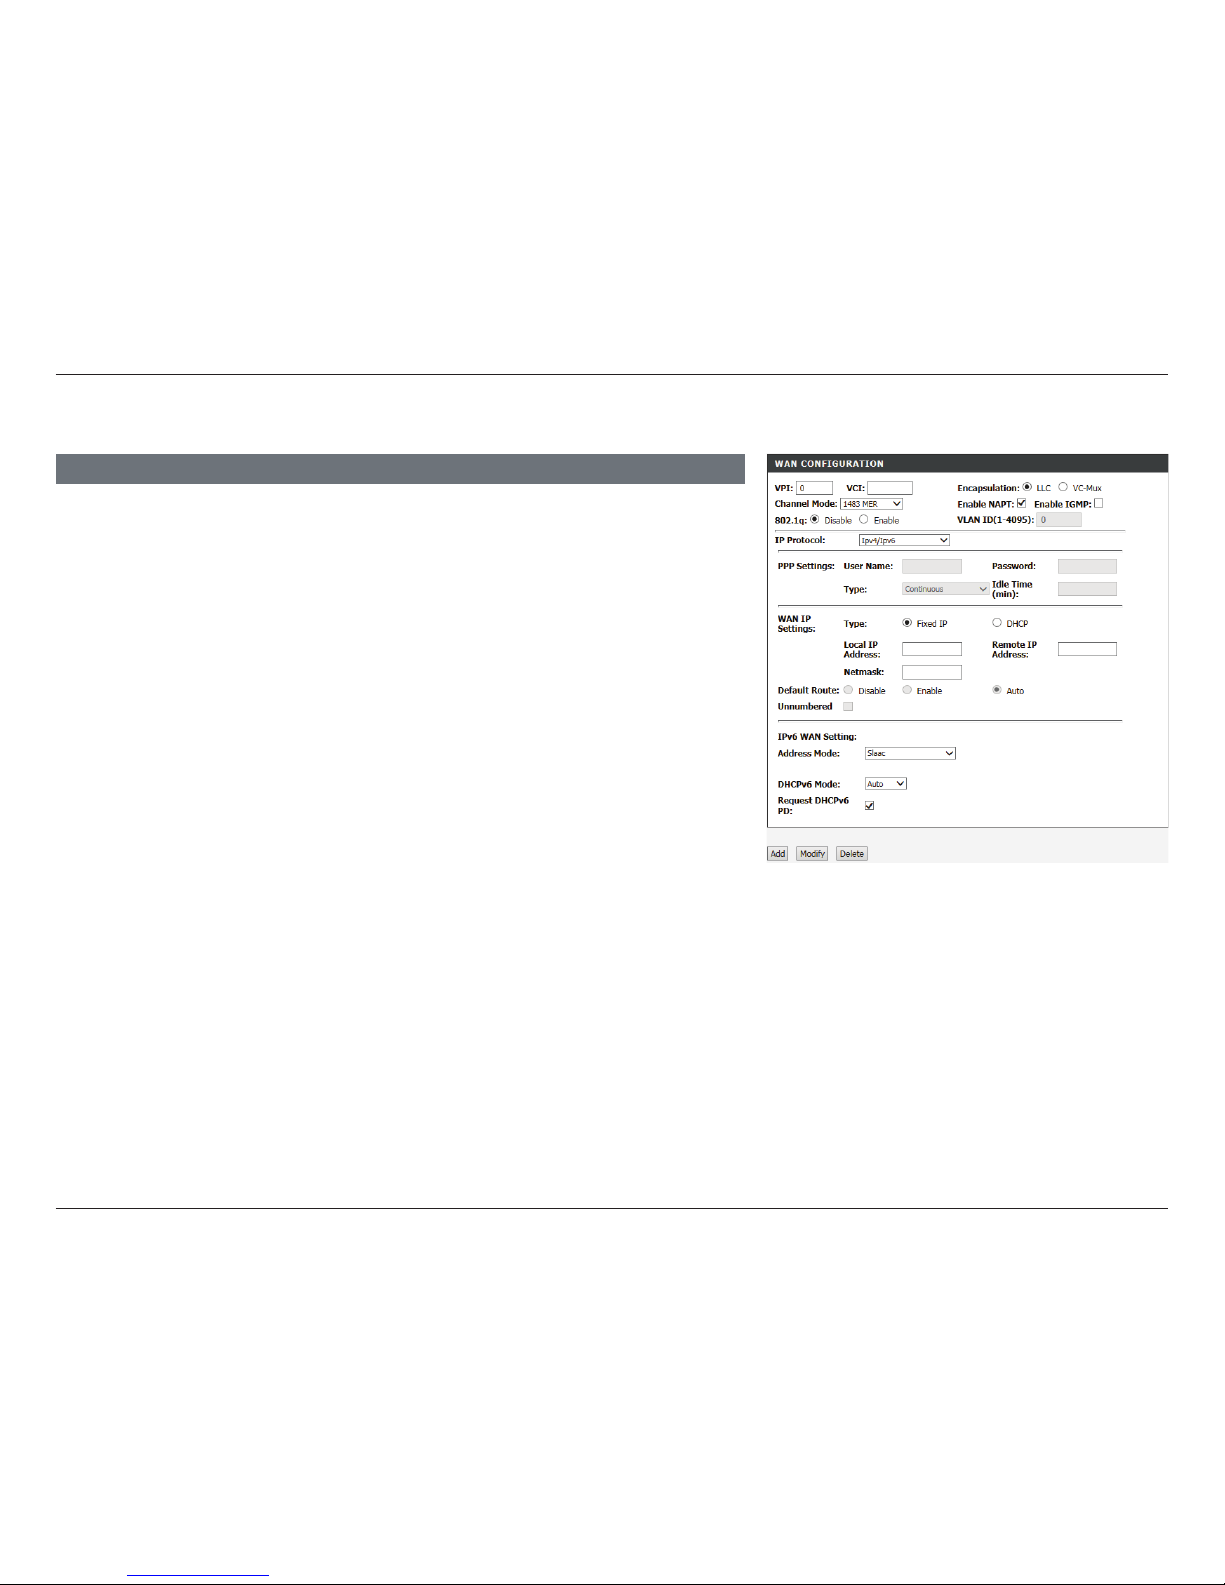
Channel Mode: Select 1483 MER.
VPI: Virtual path identifier (VPI) is the virtual path between two points
in an ATM network. Its valid value is between 0 and 255. Enter the
correct VPI provided by your ISP.
VCI: Virtual channel identifier (VCI) is the virtual channel between two
points in an ATM network. Its valid value is between 32 and 65535.
Enter the correct VCI provided by your ISP.
Encapsulation: Select the type of encapsulation your ISP uses, either Logical Link
Control (LLC) or Virtual Circuit Multiplexing (VC-Mux).
Enable NAPT: Check this box to enable NAT, which allows devices on your
network to share one public IP address.
Enable IGMP: Check to enable IGMP Multicast.
802.1q: Choose to either Disable or Enable the use of VLANs.
VLAN ID(1-4095): If you enabled 802.1q, enter the VLAN ID.
IP Protocol: Select the type of IP addressing: IPv4/v6, IPv4, or IPv6. This will
effect the WAN IP Settings and WAN IPv6 Settings.
PPP Settings: 1483 MER does not support PPP authentication.
WAN IP Settings: Configure the IPv4 WAN settings. If the IP Protocol is set to IPv6,
these settings are unavailable.
Type: Choose either Fixed (Static IP), or Dynamic IP.
WAN CONFIGURATION
1483 MER Mode
Page 40
35D-Link DSL-2745 Wireless N300 ADSL2+ Modem Router User Manual
Section 4 - Conguration
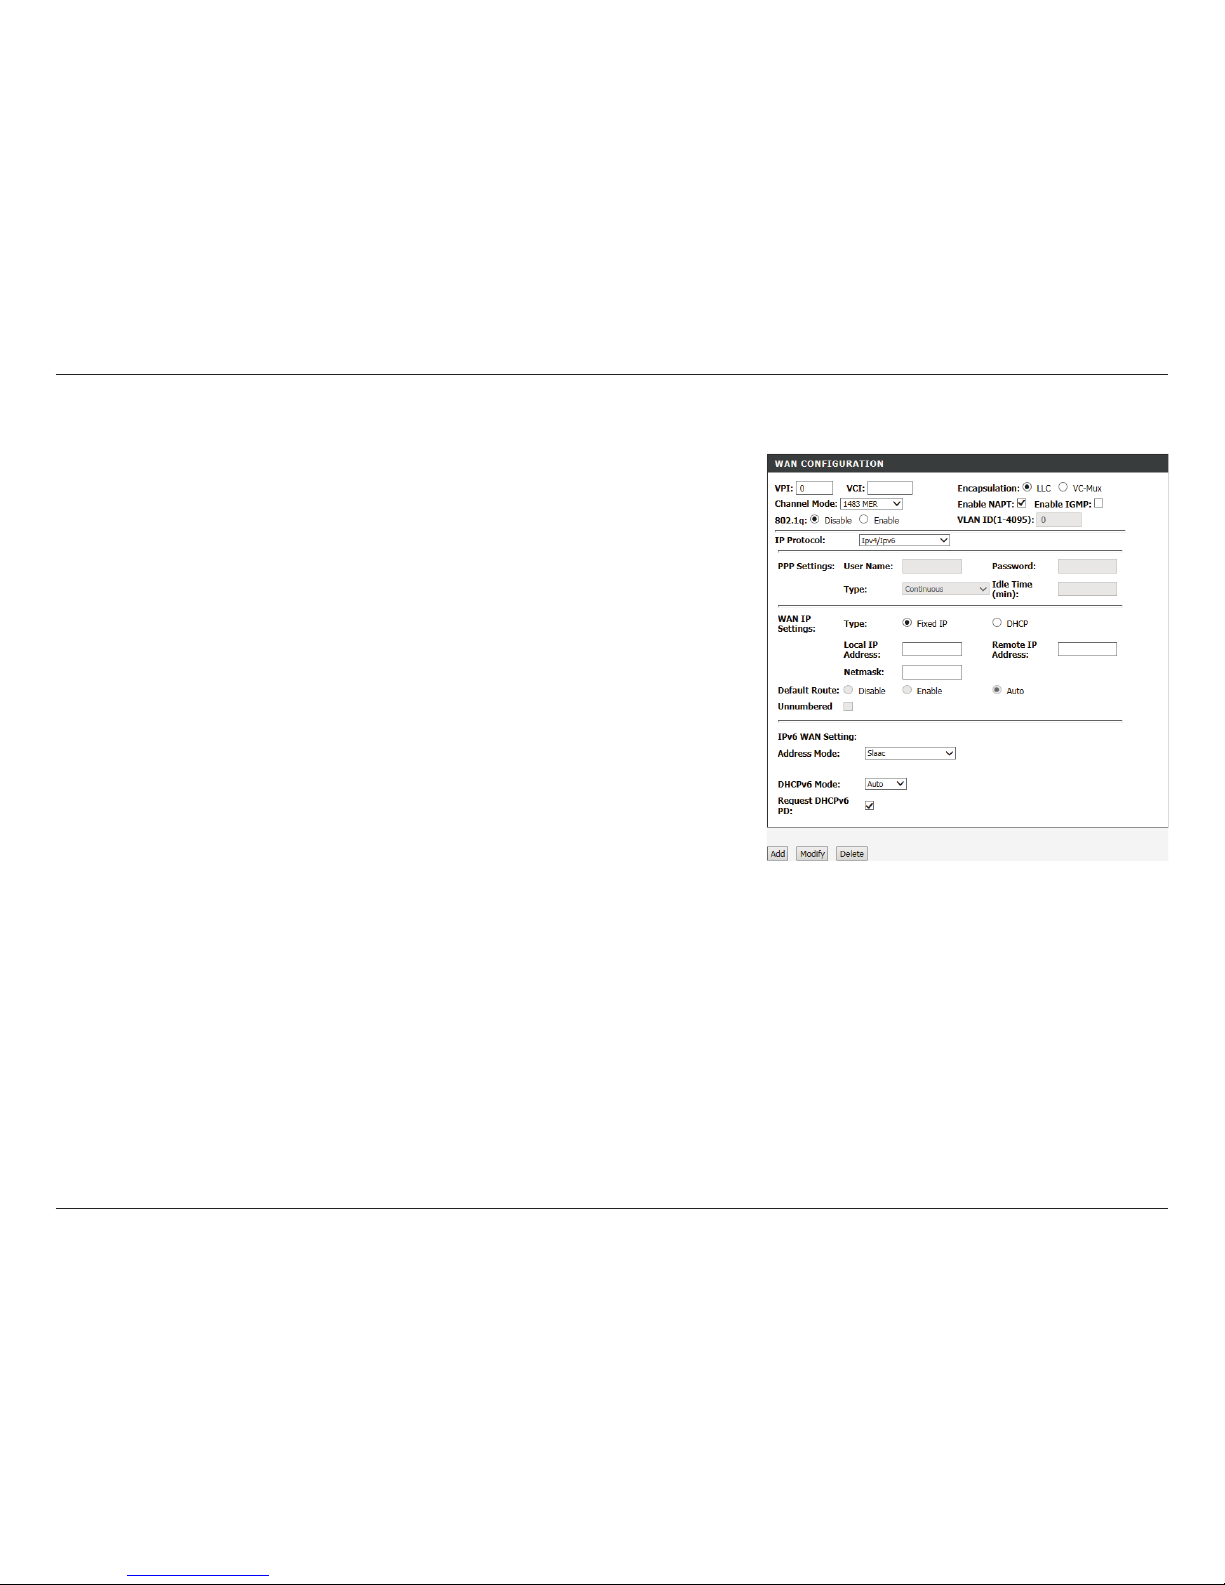
The following settings are available if Type is set to Fixed:
Local IP Address: Enter your local IP address.
Netmask: Enter your subnet mask.
Default Route: This defaults to Auto.
Unnumbered: This option is unavailable.
IPv6 WAN
Settings:
Configure the IPv6 WAN settings. If the IP Protocol is set to IPv4,
these settings are unavailable.
Address Mode: Select either Slaac or Static.
IPv6 Address: Enter your IPv6 Static Address. Only available in Static mode.
IPv6 Gateway: Enter your IPv6 Gateway. Only available in Static mode.
DHCPv6 Mode: Select either Auto, Enable, or Disable.
Request DHCPv6
Address:
Check this box to enable. Only available if DHCPv6 Mode is set to
Enable or Auto:
Request DHCPv6
PD:
Check this box to enable. Only available if DHCPv6 Mode is set to
Enable.
Click Add to create your connection.
1483 MER Mode (continued)
Page 41
36D-Link DSL-2745 Wireless N300 ADSL2+ Modem Router User Manual
Section 4 - Conguration
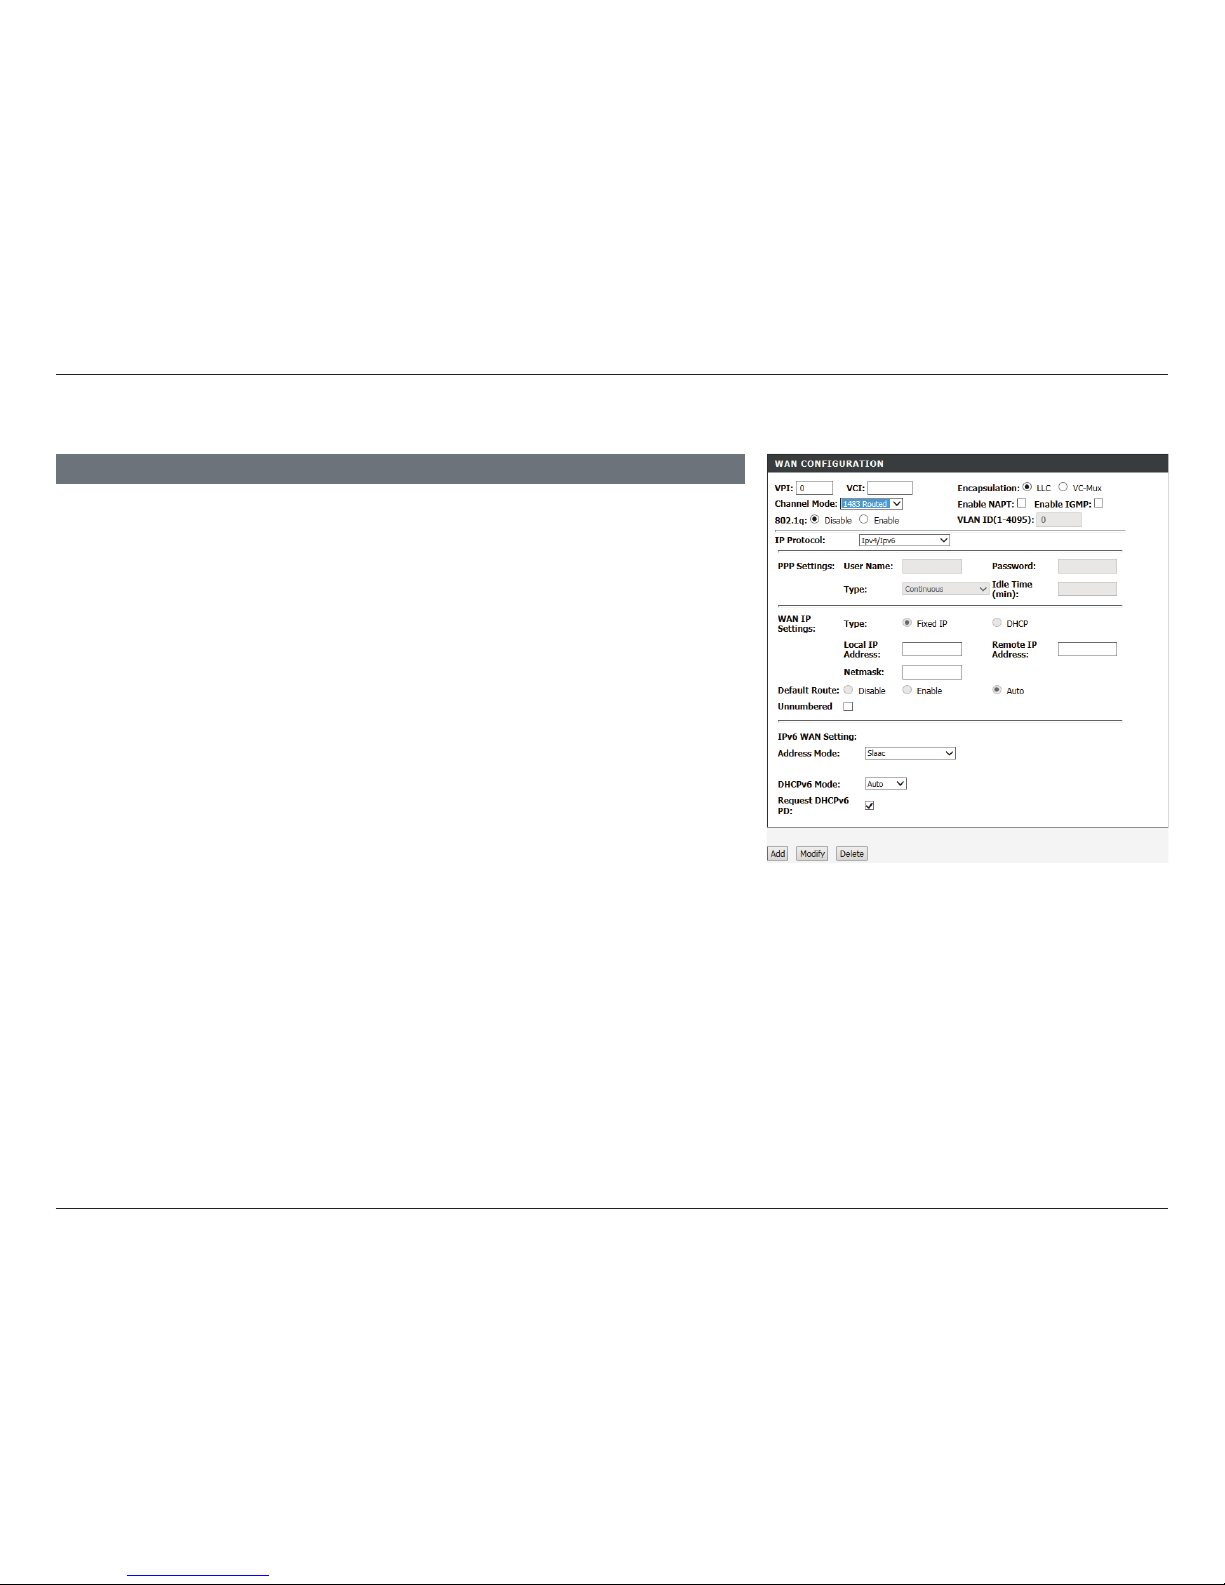
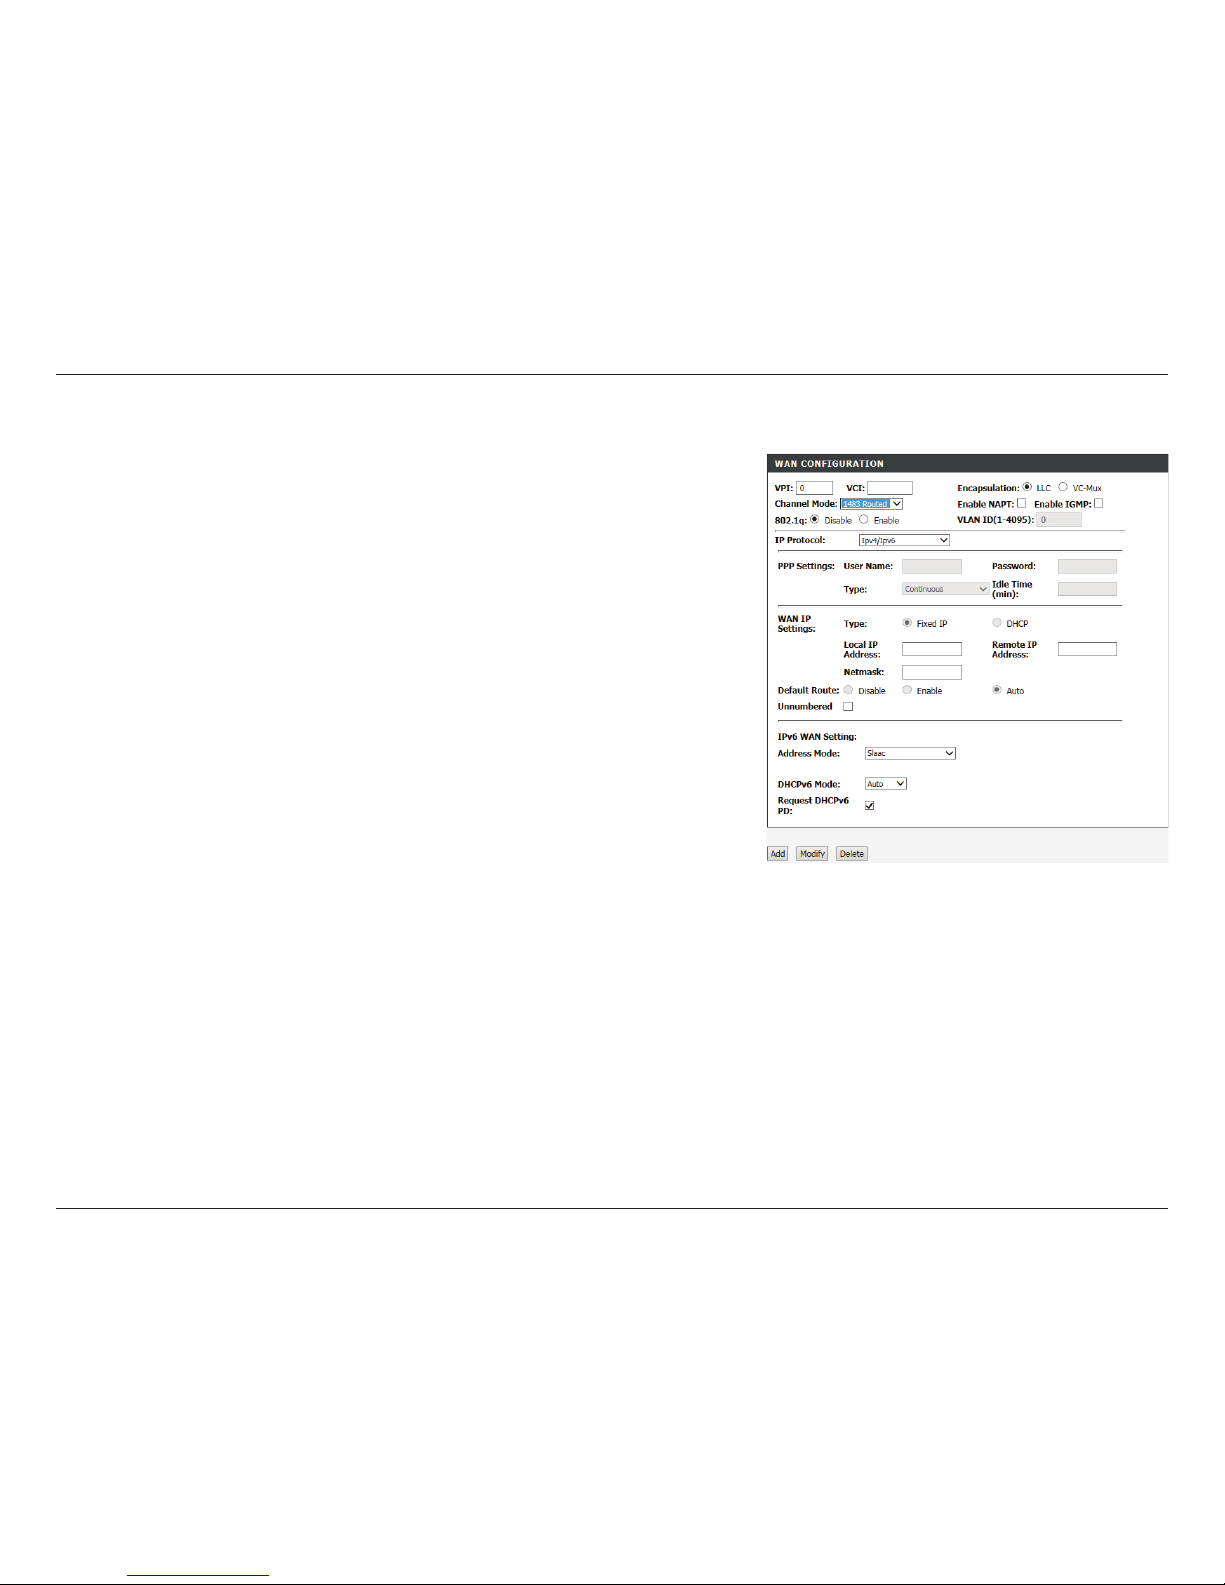
Channel Mode: Select 1483 Routed.
VPI: The virtual path identifier (VPI) is the virtual path between two
points in an ATM network. Its valid value is between 0 and 255.
Enter the correct VPI provided by your ISP.
VCI: The virtual channel identifier (VCI) is the virtual channel between
two points in an ATM network. Its valid value is between 32 and
65535. Enter the correct VCI provided by your ISP.
Encapsulation: Select the type of encapsulation your ISP uses, either Logical Link
Control (LLC) or Virtual Circuit Multiplexing (VC-Mux).
Enable NAPT: Check this box to enable NAT, which allows devices on your
network to share one public IP address.
Enable IGMP: Check to enable IGMP Multicast.
802.1q: Choose to either Disable or Enable the use of VLANs.
VLAN ID(1-4095): If you enabled 802.1q, enter the VLAN ID.
IP Protocol: Select the type of IP addressing: IPv4/v6, IPv4, or IPv6. This will
effect the WAN IP Settings and WAN IPv6 Settings.
PPP Settings: 1483 Routed mode does not support PPP authentication.
WAN IP Settings: Configure the IPv4 WAN settings. If the IP Protocol is set to IPv6,
these settings are unavailable.
Type: Only Fixed (Static IP) is available for 1483 Routed Mode.
WAN CONFIGURATION
1483 Routed Mode
Page 42
37D-Link DSL-2745 Wireless N300 ADSL2+ Modem Router User Manual
Section 4 - Conguration
Click Add to create your connection.
Local IP Address: Enter your local IP address.
Remote IP
Address:
Enter your default gateway.
Netmask: Enter your subnet mask.
Default Route: This defaults to Auto.
Unnumbered: This option is unavailable.
IPv6 WAN
Settings:
Configure the IPv6 WAN settings. If the IP Protocol is set to IPv4,
these settings are unavailable.
Address Mode: Select either Slaac or Static.
IPv6 Address: Enter your IPv6 Static Address. Only available in Static mode.
IPv6 Gateway: Enter your IPv6 Gateway. Only available in Static mode.
DHCPv6 Mode: Select either Auto, Enable, or Disable.
Request DHCPv6
Address:
Check this box to enable. Only available if DHCPv6 Mode is set to
Enable or Auto:
Request DHCPv6
PD:
Check this box to enable. Only available if DHCPv6 Mode is set to
Enable.
1483 Routed Mode Continued
Page 43
38D-Link DSL-2745 Wireless N300 ADSL2+ Modem Router User Manual
Section 4 - Conguration
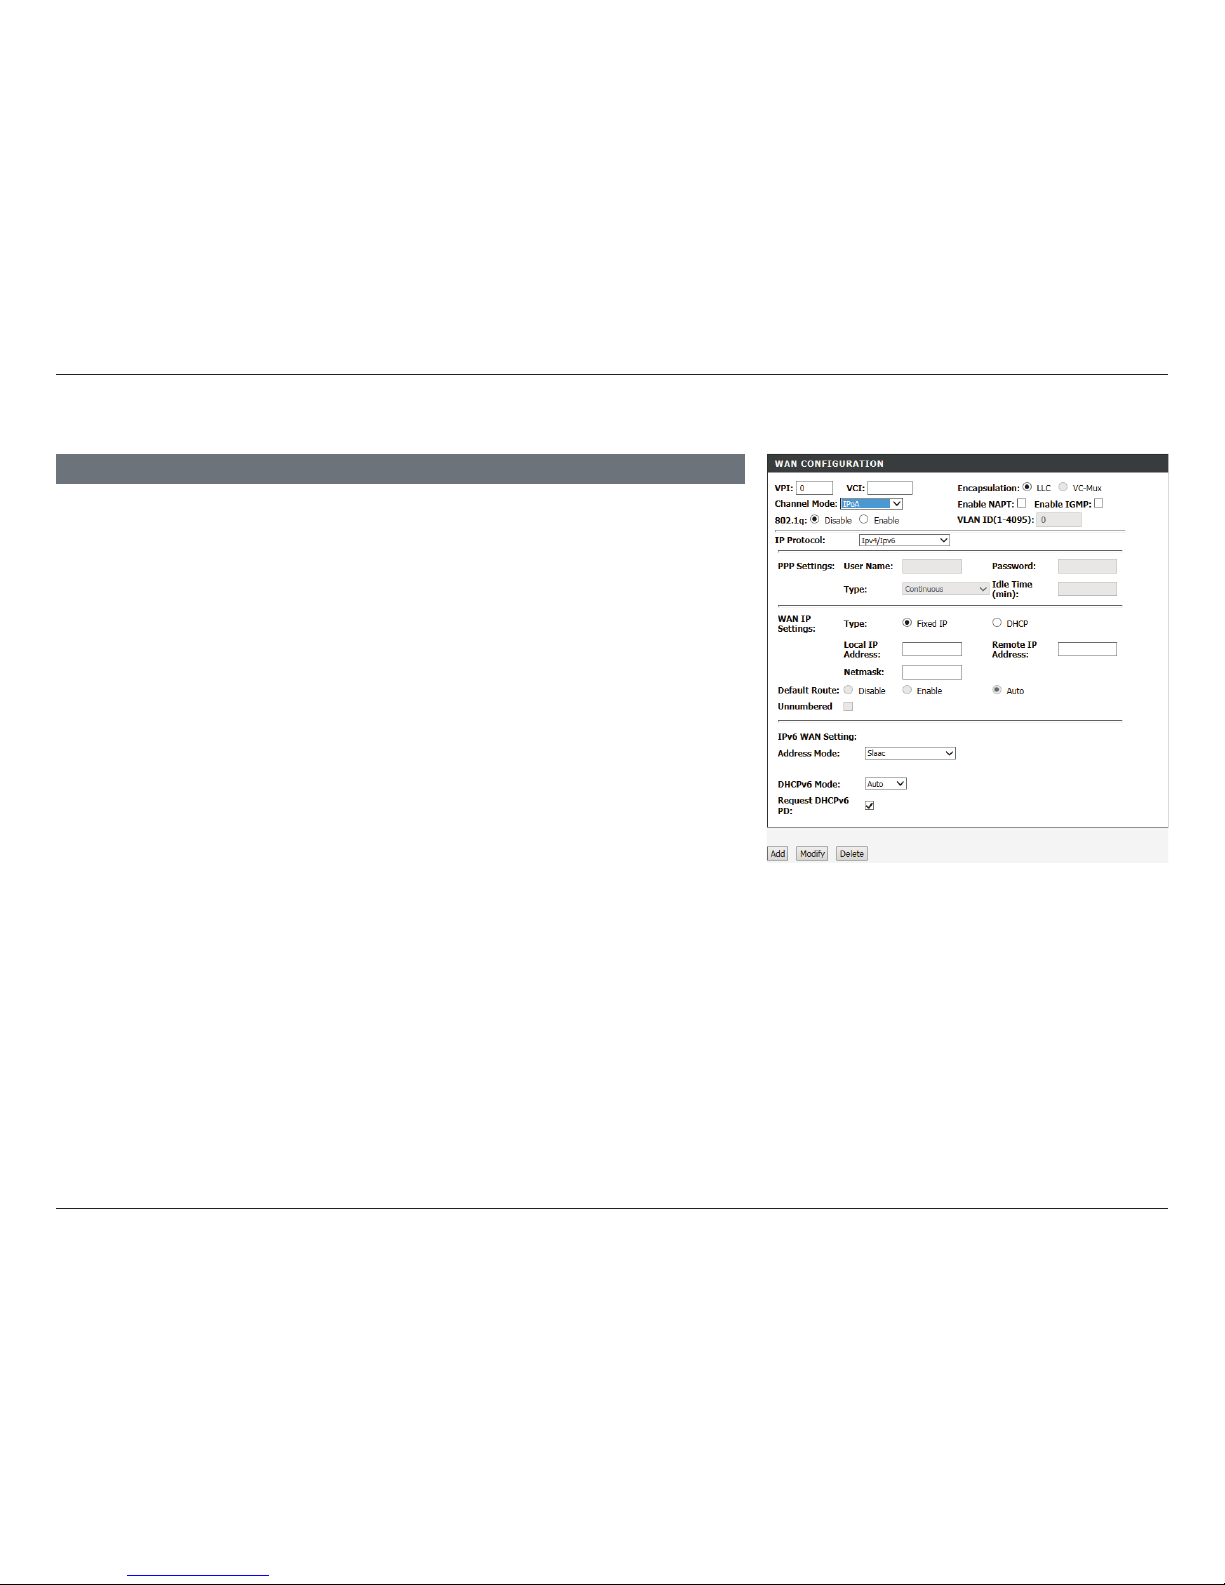
Channel Mode: Select IPoA.
VPI: Virtual path identifier (VPI) is the virtual path between two points
in an ATM network. Its valid value is between 0 and 255. Enter the
correct VPI provided by your ISP.
VCI: Virtual channel identifier (VCI) is the virtual channel between two
points in an ATM network. Its valid value is between 32 and 65535.
Enter the correct VCI provided by your ISP.
Encapsulation: Only Logical Link Control (LLC) encapsulation is supported.
Enable NAPT: Check this box to enable NAT, which allows devices on your
network to share one public IP address.
Enable IGMP: Check to enable IGMP Multicast.
802.1q: Choose to either Disable or Enable the use of VLANs.
VLAN ID(1-4095): If you enabled 802.1q, enter the VLAN ID.
IP Protocol: Select the type of IP addressing: IPv4/v6, IPv4, or IPv6. This will
effect the WAN IP Settings and WAN IPv6 Settings.
PPP Settings: IPoA mode does not support PPP authentication.
WAN IP Settings: Configure the IPv4 WAN settings. If the IP Protocol is set to IPv6,
these settings are unavailable.
Type: Choose either Fixed (Static IP), or Dynamic IP.
WAN CONFIGURATION
IPoA Mode
Page 44
39D-Link DSL-2745 Wireless N300 ADSL2+ Modem Router User Manual
Section 4 - Conguration
The following settings are available if Type is set to Fixed:
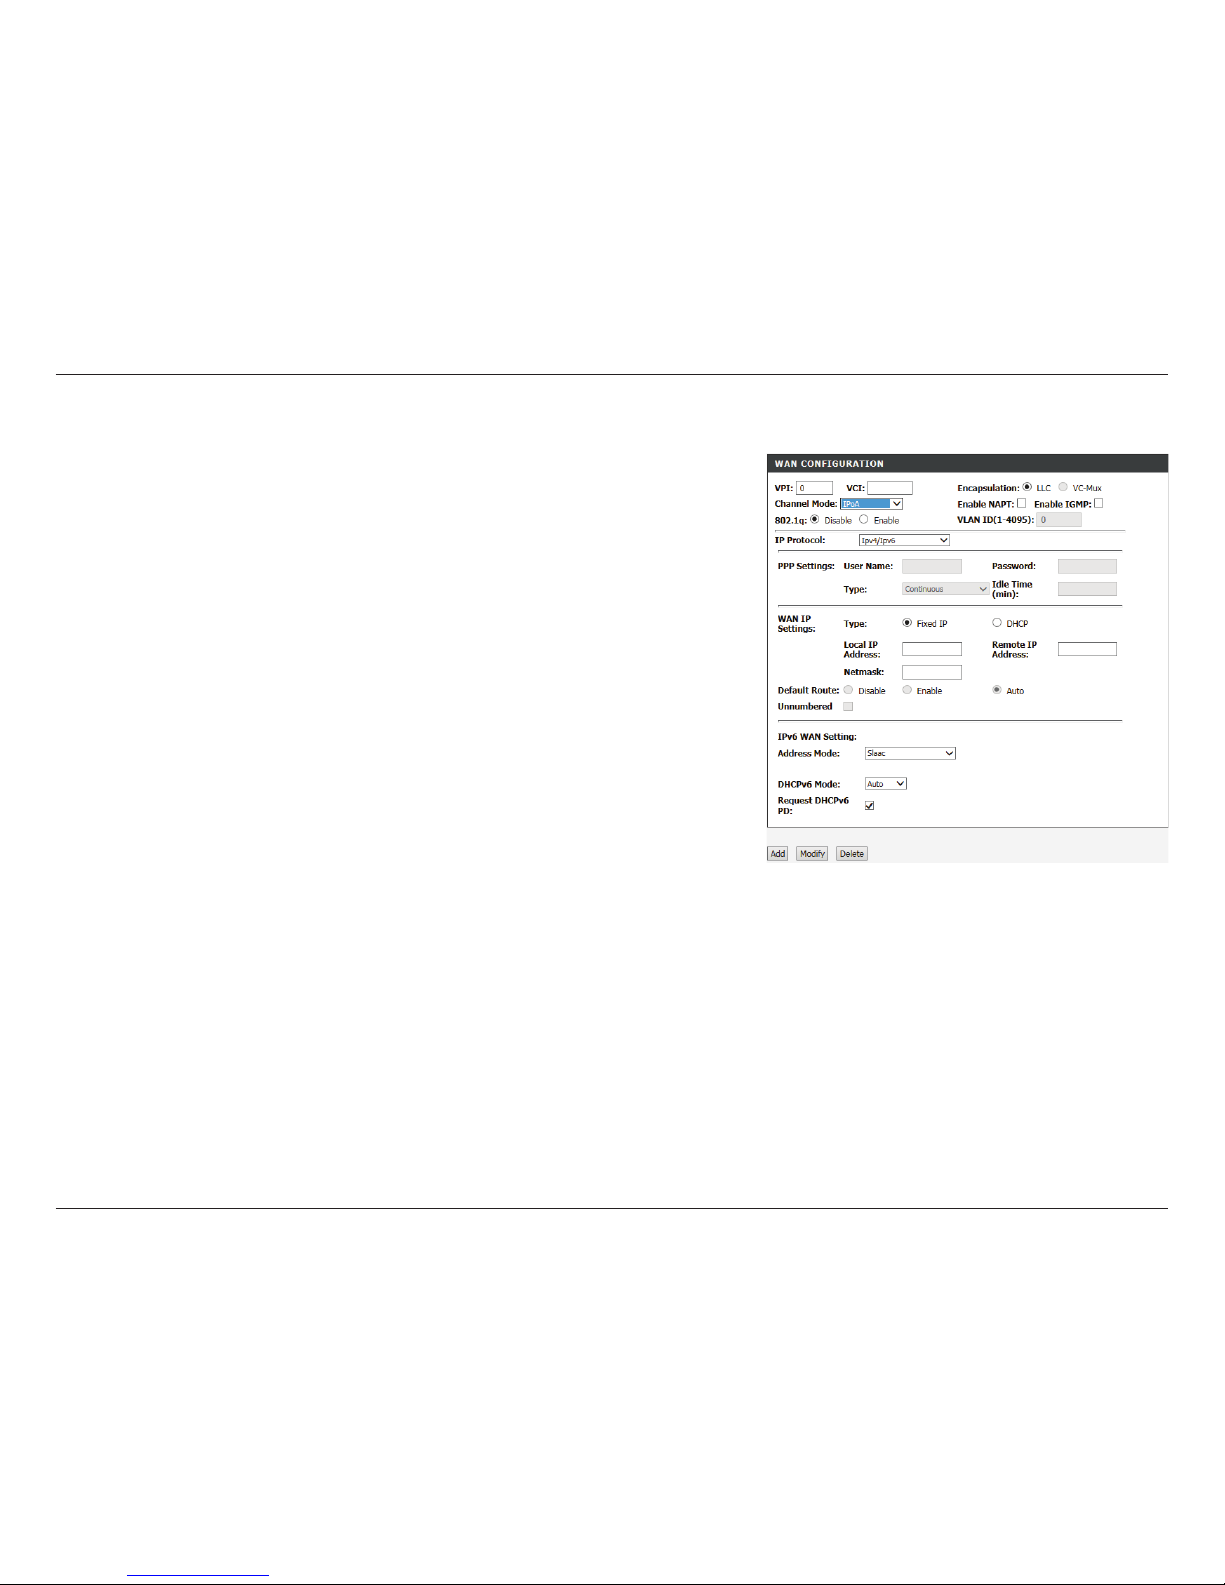
Local IP Address: Enter your local IP address.
Netmask: Enter your subnet mask.
Remote IP
Address:
Enter your default gateway.
Default Route: This defaults to Auto.
Unnumbered: This option is unavailable.
IPv6 WAN
Settings:
Configure the IPv6 WAN settings. If the IP Protocol is set to IPv4,
these settings are unavailable.
Address Mode: Select either Slaac or Static.
IPv6 Address: Enter your IPv6 Static Address. Only available in Static mode.
IPv6 Gateway: Enter your IPv6 Gateway. Only available in Static mode.
DHCPv6 Mode: Select either Auto, Enable, or Disable.
Request DHCPv6
Address:
Check this box to enable. Only available if DHCPv6 Mode is set to
Enable or Auto:
Request DHCPv6
PD:
Check this box to enable. Only available if DHCPv6 Mode is set to
Enable.
IPoA Mode (continued)
Click Add to create your connection.
Page 45
40D-Link DSL-2745 Wireless N300 ADSL2+ Modem Router User Manual
Section 4 - Conguration
Modify an Existing Connection
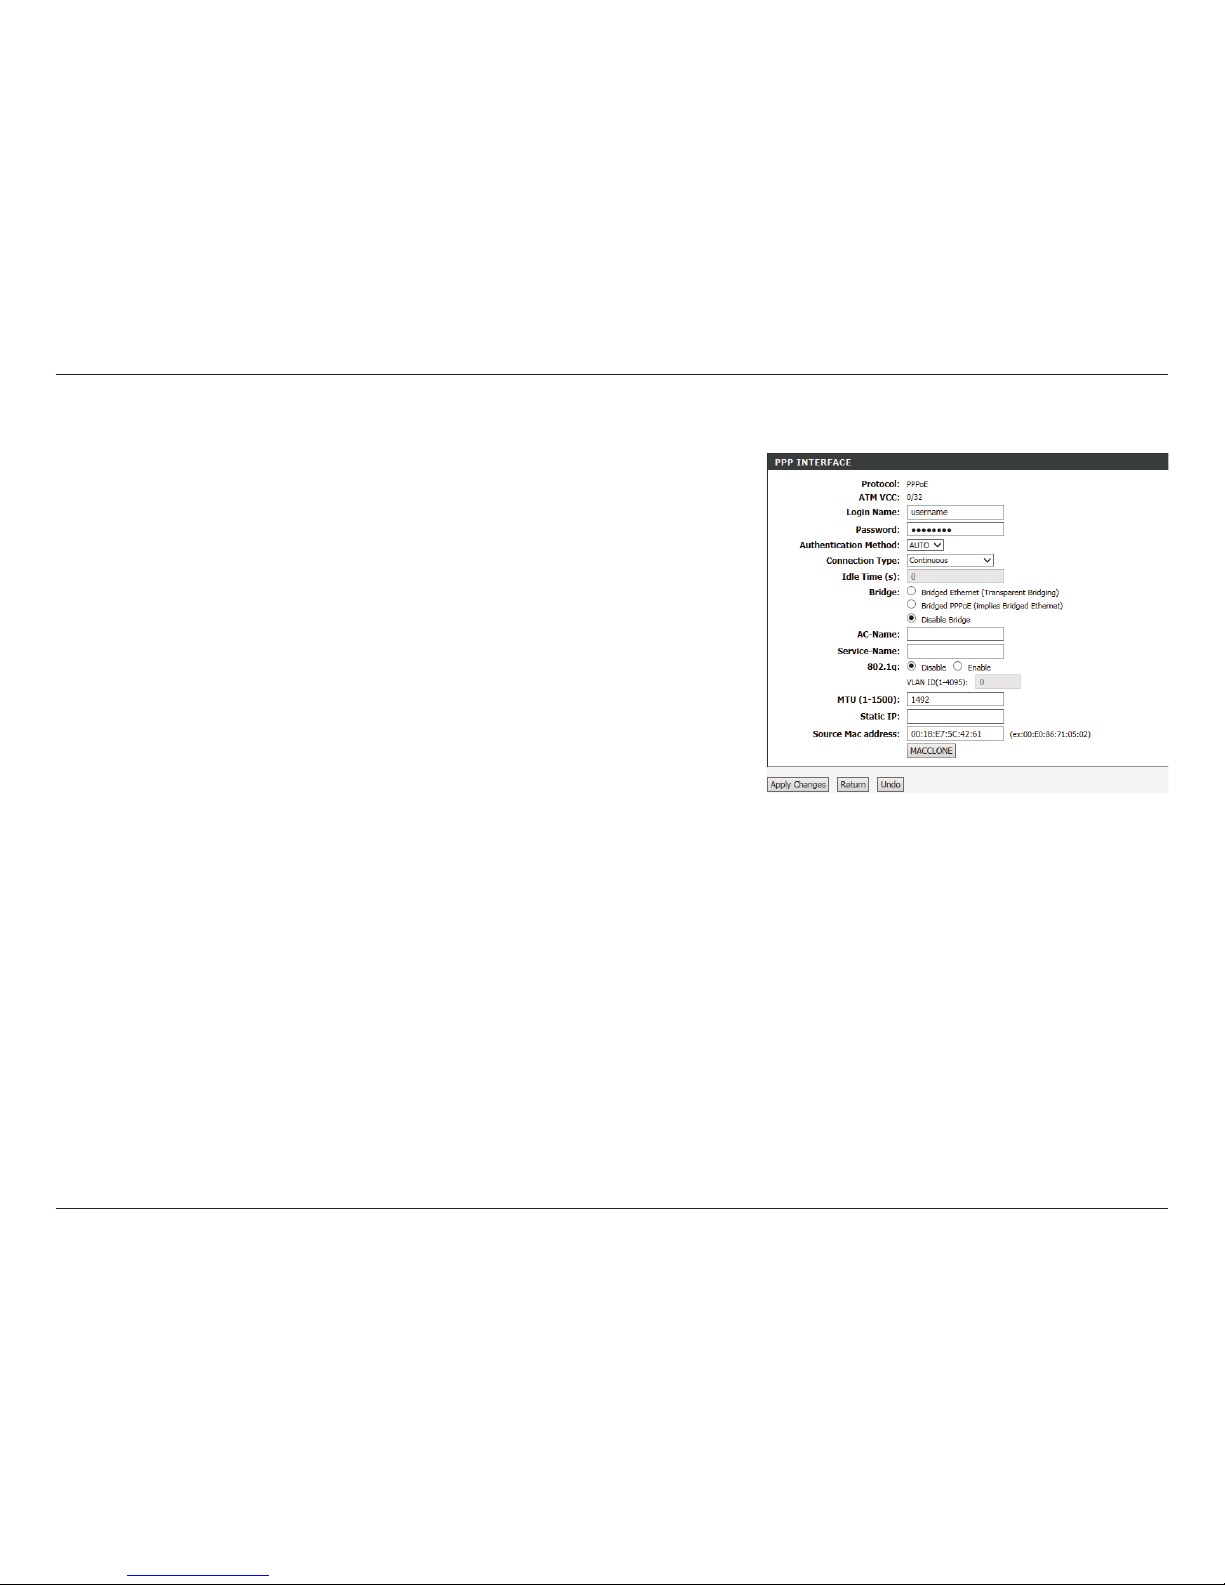
Modify a PPPoE Connection
To modify an existing entry in detail, select the radio button of the row you
wish to alter and click on the pencil icon in the Edit column.
Protocol: This shows the current protocol being modified.
ATM VCC: The shows the current ATM VCC configuration.
Login Name: You can change the currently configured DSL account username
here.
Password: You can change the currently configured DSL account password
here.
Authentication: Select PAP, CHAP, or Auto. The default is Auto.
Connection Type: How your DSL-2745 connects to your ISP. Choose either
Continuous, Connect on Demand, and Manual.
Idle Time(s): If you selected Connect on Demand, enter the amount time the
router waits if there is no activity before disconnecting.
Bridge: Select Bridged Ethernet (Transparent Bridging), Bridged
PPPoE(implies Bridged Ethernet), or Disable Bridge.
AC-Name: Used for PPPoE tagging, normally this should be left blank.
PPP INTERFACE
Page 46
41D-Link DSL-2745 Wireless N300 ADSL2+ Modem Router User Manual
Section 4 - Conguration
Service-Name: Used for PPPoE tagging, normally this should be left blank.
802.1q: Choose to either Disable or Enable the use of VLANs.
VLAN ID(1-4095): If you enabled 802.1q, enter the VLAN ID.
MTU(1-1500): Enter the packet size. The default is 1492.
Static IP: If you have been assigned a static IP by your ISP, enter it here.
Source Mac
address:
By default the DSL-2745’s MAC address is listed. Press MACCLONE
to clone your configuring device’s MAC address.
Click Apply Changes to have your changes take effect. Click Return to discard
your changes and return to the Internet Setup page. Click Undo to revert back
to the existing settings.
Modify a PPPoE Connection (continued)
Page 47
42D-Link DSL-2745 Wireless N300 ADSL2+ Modem Router User Manual
Section 4 - Conguration
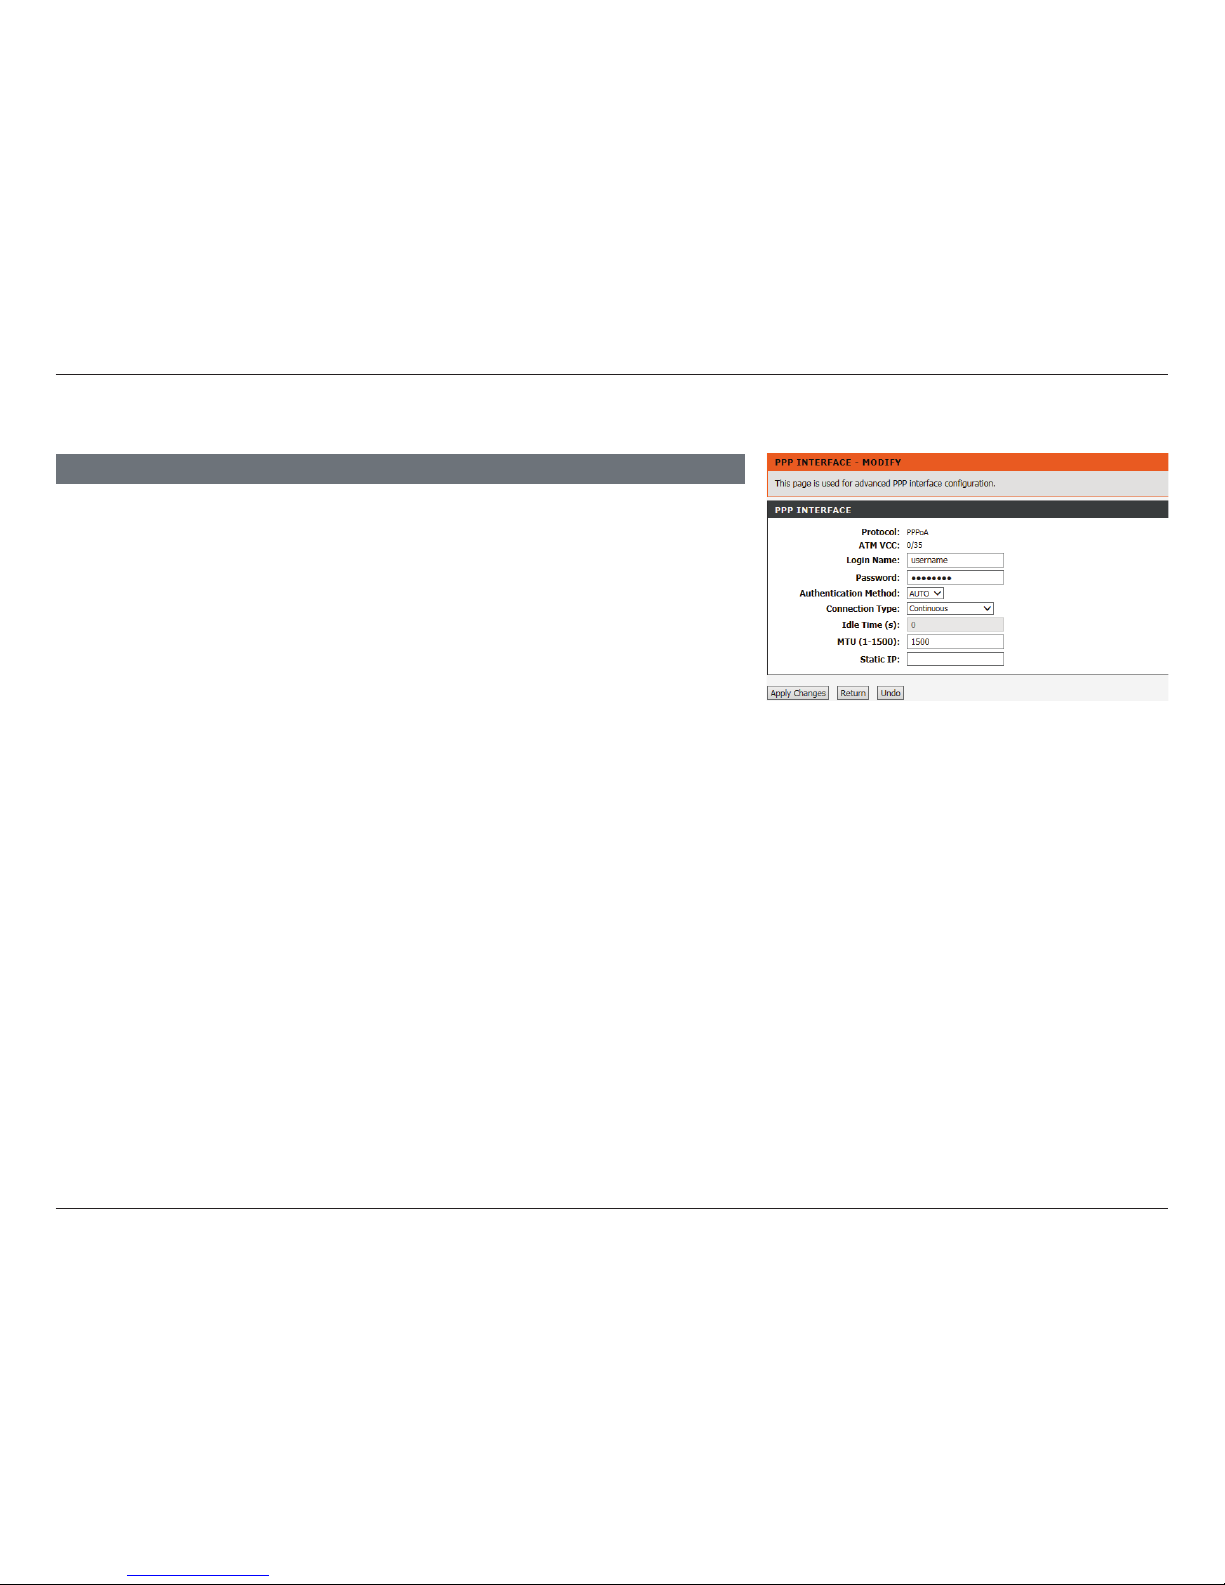
Modify a PPPoA Connection
Protocol: This shows the current protocol being modified.
ATM VCC: The shows the current ATM VCC configuration.
Login Name: You can change the currently configured DSL account username
here.
Password: You can change the currently configured DSL account password
here.
Authentication: Select PAP, CHAP, or Auto. The default is Auto.
Connection Type: How your DSL-2745 connects to your ISP. Choose either
Continuous, Connect on Demand, and Manual.
Idle Time(s): If you selected Connect on Demand, enter the amount time the
router waits if there is no activity before disconnecting.
Static IP: If you have been assigned a static IP by your ISP, enter it here.
Click Apply Changes to have your changes take effect. Click Return to discard
your changes and return to the Internet Setup page. Click Undo to revert back
to the existing settings.
PPP INTERFACE
Page 48
43D-Link DSL-2745 Wireless N300 ADSL2+ Modem Router User Manual
Section 4 - Conguration
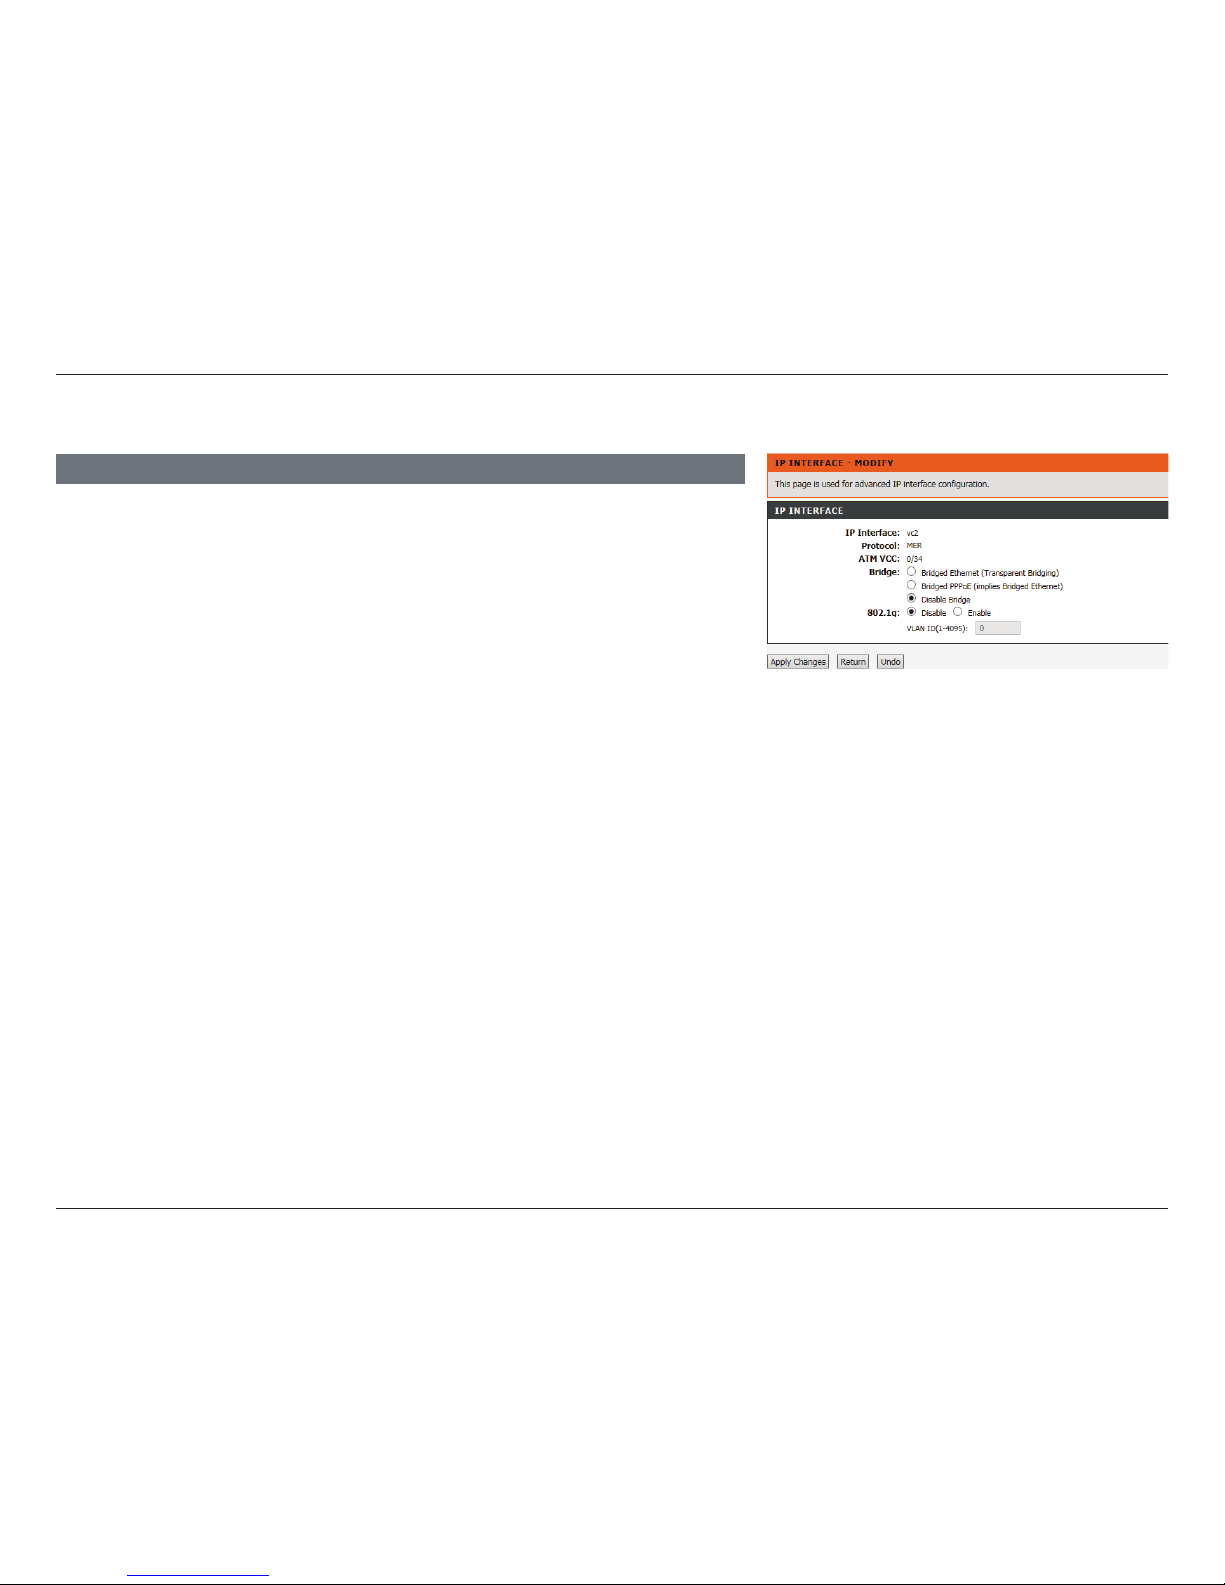
Modify a 1483 MER Connection
Click Apply Changes to have your changes take effect. Click Return to discard
your changes and return to the Internet Setup page. Click Undo to revert back
to the existing settings.
IP Interface: This shows the current interface being modified.
Protocol: This shows the current protocol being modified.
ATM VCC: The shows the current ATM VCC configuration.
Bridge: Select Bridged Ethernet (Transparent Bridging), Bridged
PPPoE(implies Bridged Ethernet), or Disable Bridge.
802.1q: Choose to either Disable or Enable the use of VLANs.
VLAN ID(1-4095): If you enabled 802.1q, enter the VLAN ID.
IP INTERFACE
Page 49
44D-Link DSL-2745 Wireless N300 ADSL2+ Modem Router User Manual
Section 4 - Conguration
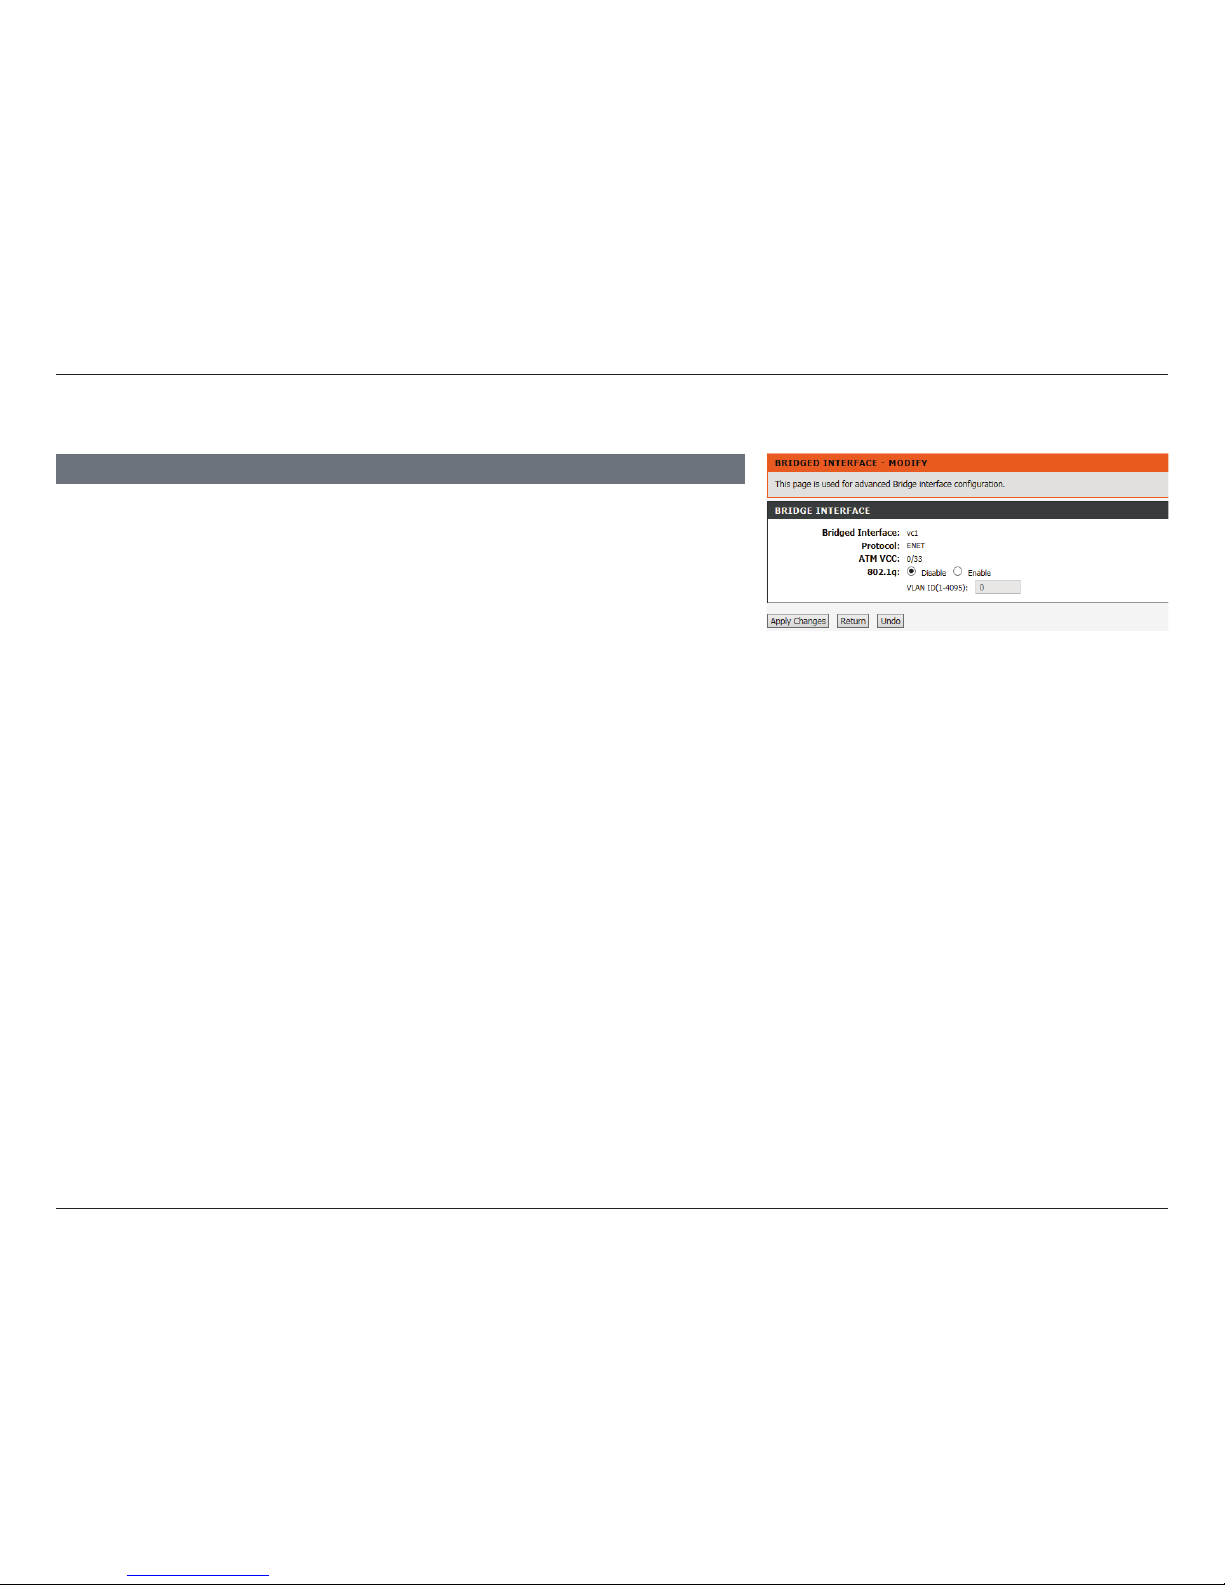
Modify a 1483 Bridged Connection
Click Apply Changes to have your changes take effect. Click Return to discard
your changes and return to the Internet Setup page. Click Undo to revert back
to the existing settings.
IP Interface: This shows the current interface being modified.
Protocol: This shows the current protocol being modified.
ATM VCC: The shows the current ATM VCC configuration.
802.1q: Choose to either Disable or Enable the use of VLANs.
VLAN ID(1-4095): If you enabled 802.1q, enter the VLAN ID.
BRIDGED INTERFACE
Page 50
45D-Link DSL-2745 Wireless N300 ADSL2+ Modem Router User Manual
Section 4 - Conguration
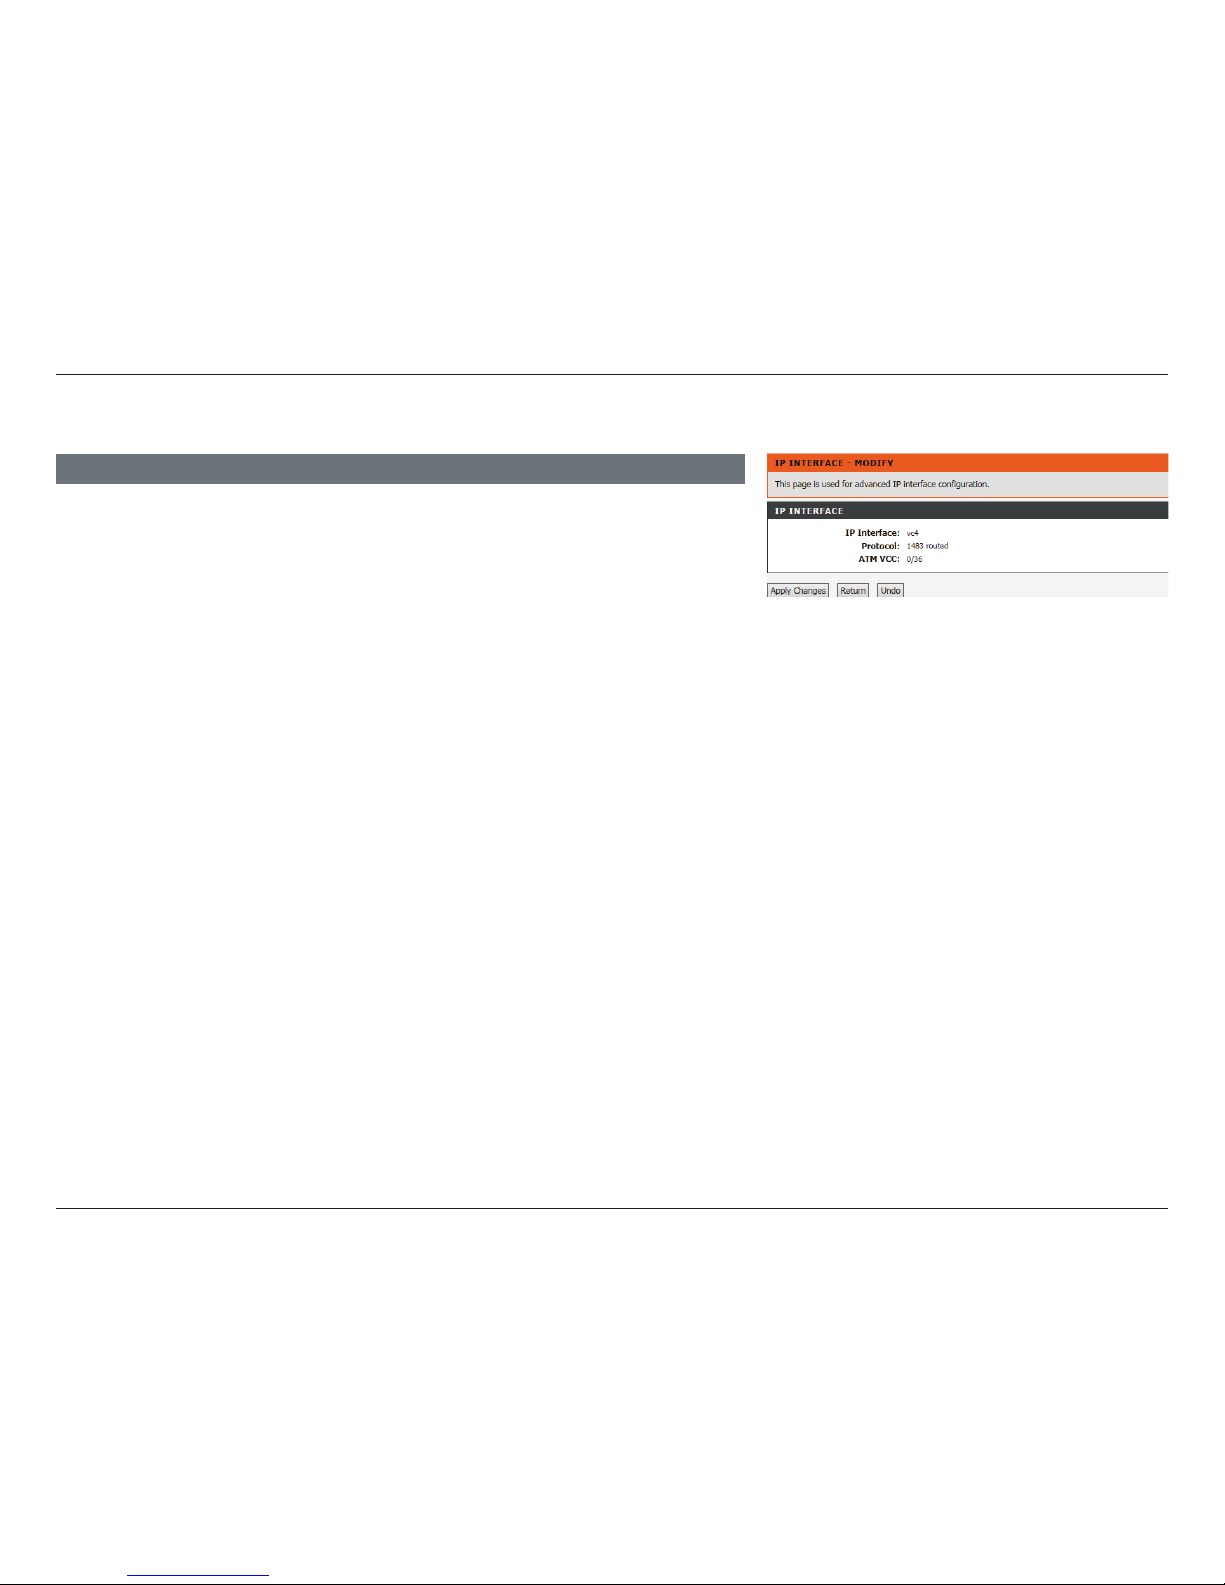
Modify a 1483 Routed Connection
IP Interface: This shows the current interface being modified.
Protocol: This shows the current protocol being modified.
ATM VCC: The shows the current ATM VCC configuration.
BRIDGED INTERFACE
No advanced configuration settings are available.
Page 51
46D-Link DSL-2745 Wireless N300 ADSL2+ Modem Router User Manual
Section 4 - Conguration
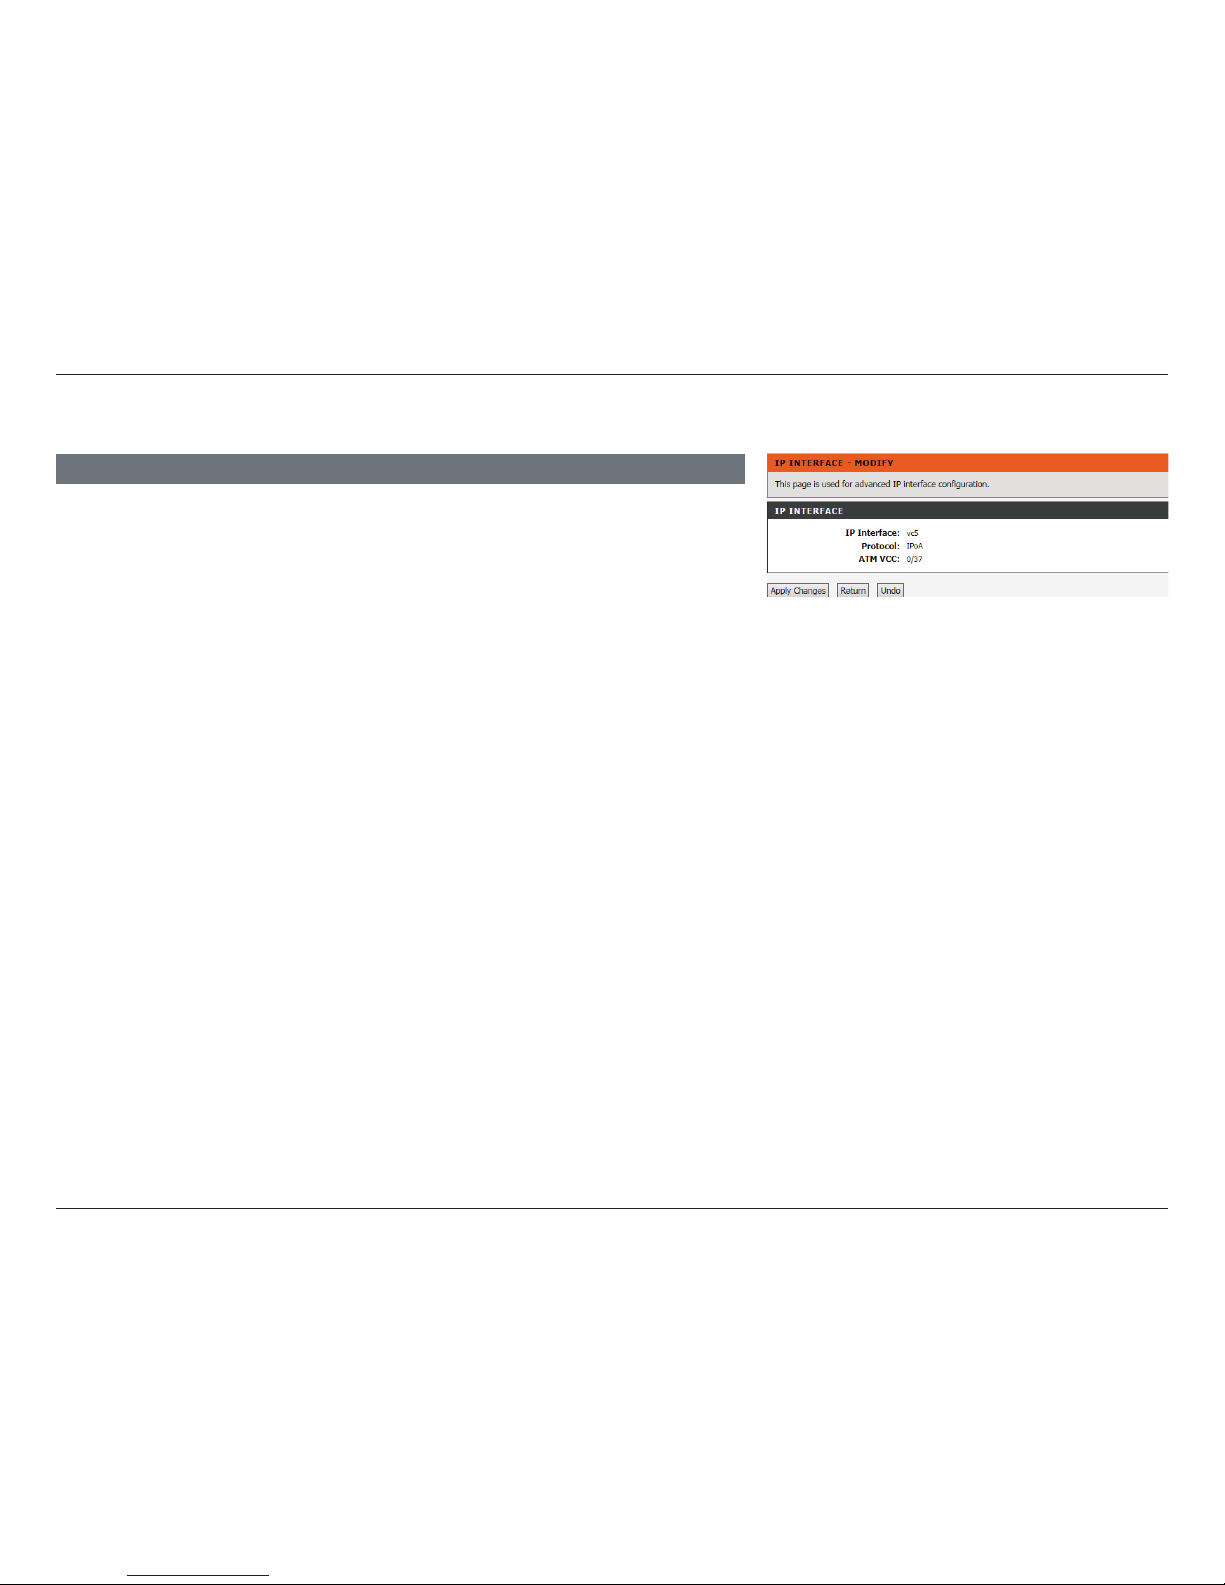
Modify an IPoA Connection
IP Interface: This shows the current interface being modified.
Protocol: This shows the current protocol being modified.
ATM VCC: The shows the current ATM VCC configuration.
IP INTERFACE
No advanced configuration settings are available.
Page 52
47D-Link DSL-2745 Wireless N300 ADSL2+ Modem Router User Manual
Section 4 - Conguration
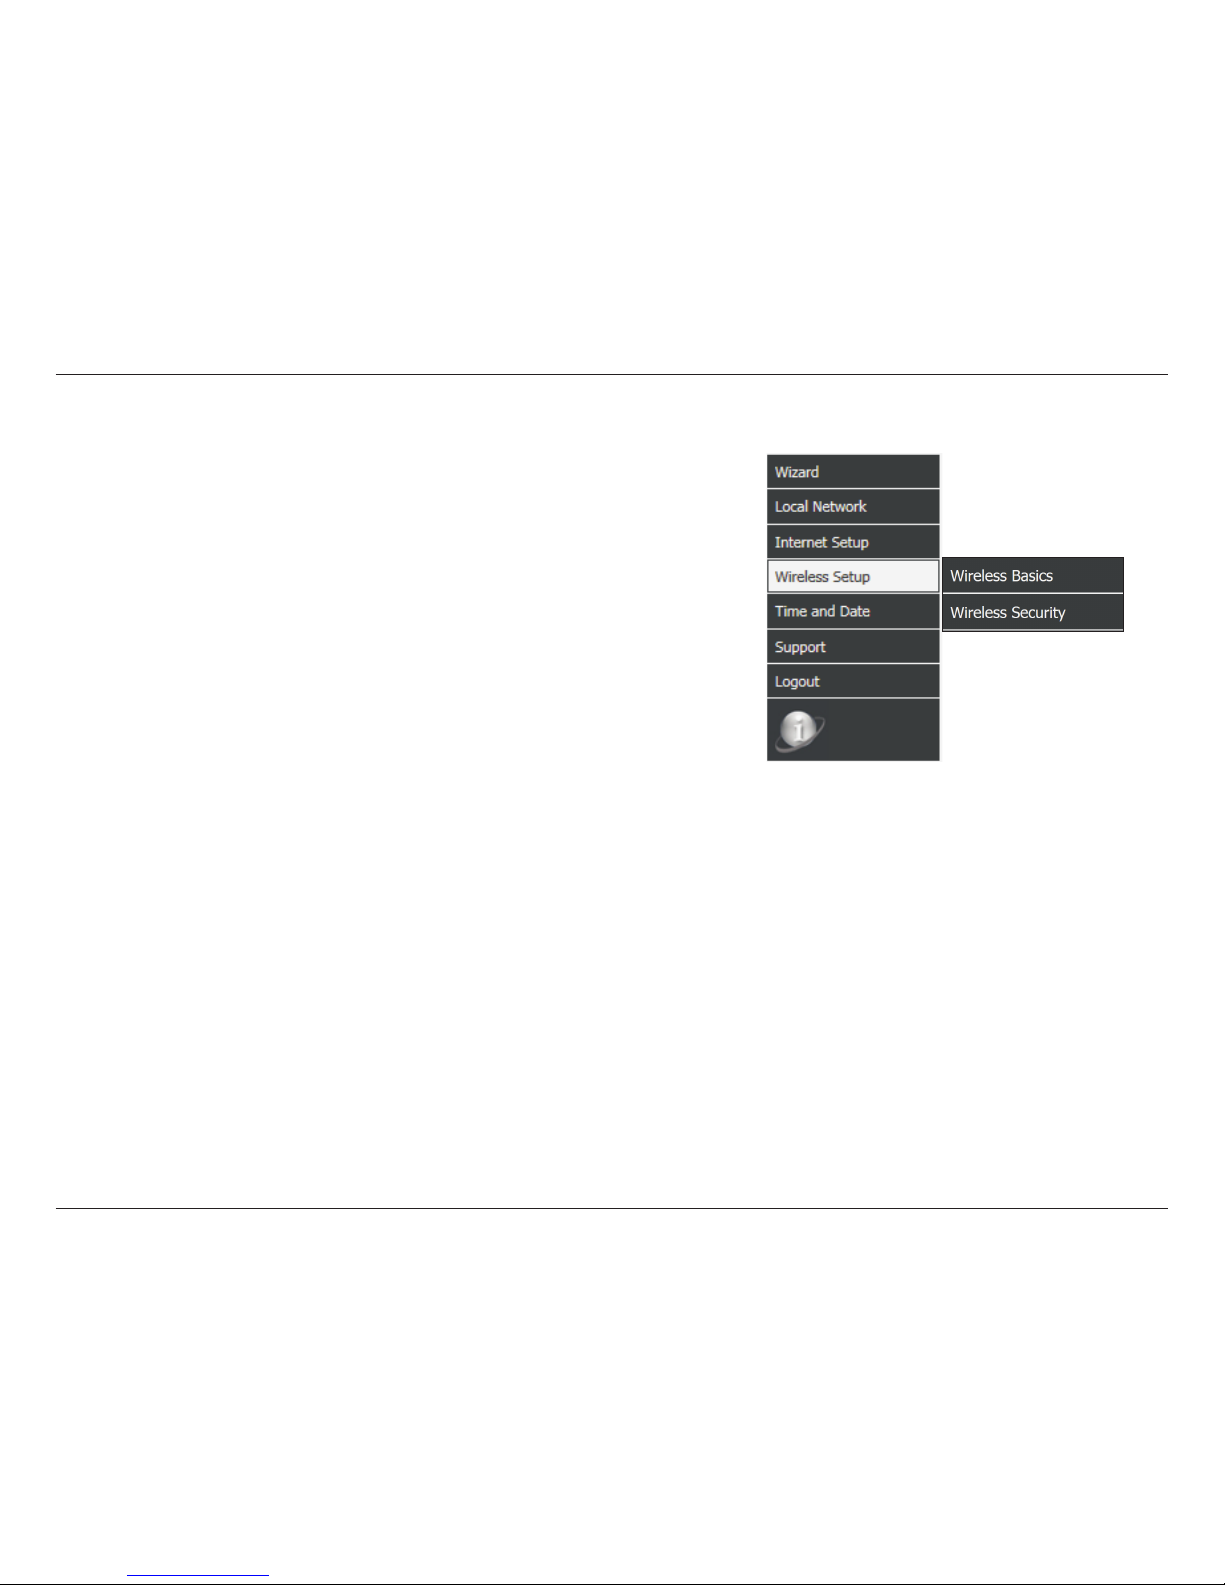
Wireless Setup
Hover your mouse over the Wireless Setup option on the vertical menu bar
running along the left side to access:
• Wireless Basics
• Wireless Security
Page 53
48D-Link DSL-2745 Wireless N300 ADSL2+ Modem Router User Manual
Section 4 - Conguration
Wireless Basics
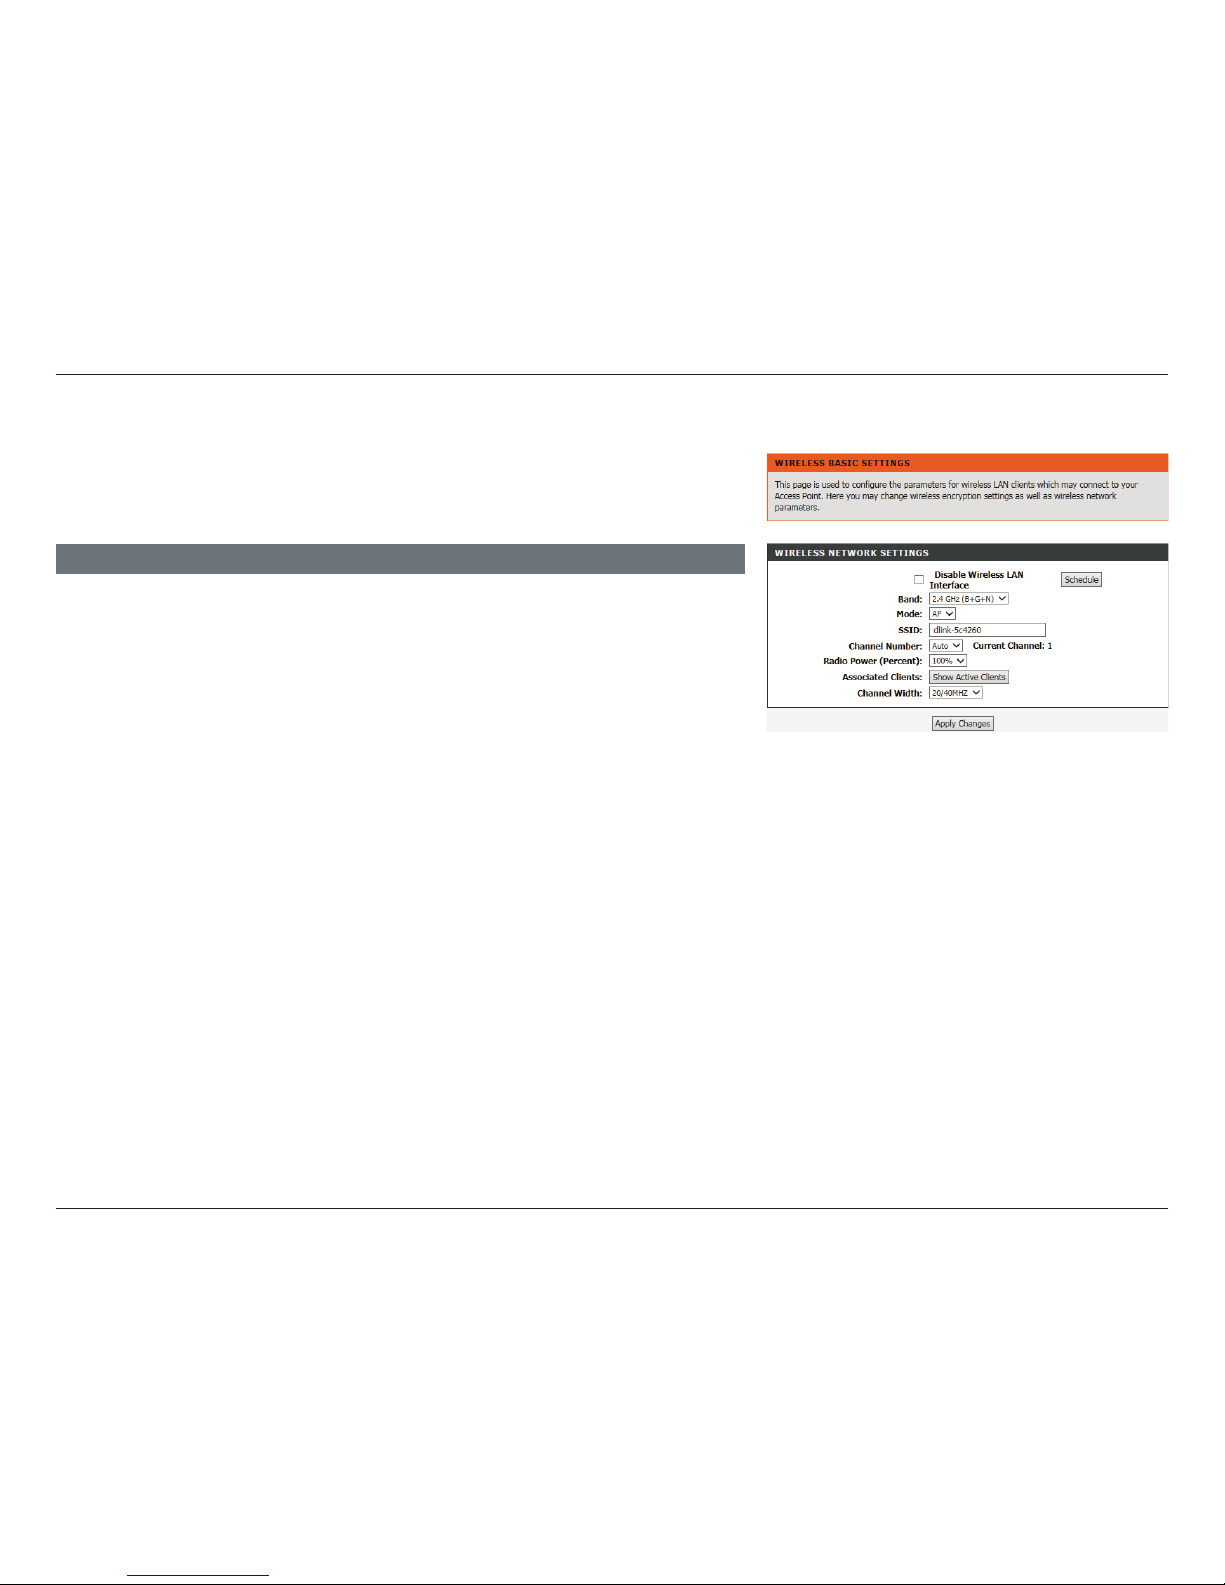
This page allows you to manually congure the router’s wireless connectivity
settings. To change your wireless network security settings refer to Wireless
Security on page 49.
Disable Wireless
LAN Interface:
Check this box to disable the Wireless functionality of this device.
Band: Select the wireless standards to use on your wireless network. The
options are 2.4 GHz (B), 2.4 GHz (G), 2.4 GHz (B+G), 2.4 GHz (N),
2.4 GHz (N+G), or 2.4 GHz (N+G+B).
Mode: The DSL-2745 operates in AP mode by default.
SSID: Enter a unique Network Name (SSID) to identify your network.
Channel Number: Select the channel number for your wireless network to operate
on. Choose 1-13, or Auto. The default is Auto.
Radio Power
(Percent):
Choose the wireless transmission power strength. The options are
100%, 60%, or 20%. The default is 100%.
Associated
Clients:
Click this button to see a list of the currently connected wireless
clients.
Channel Width: Choose the transmission channel bandwidth. The options are 20
MHz or 20/40 MHz.
WIRELESS NETWORK SETTINGS
Click Apply Changes to have your changes take effect.
Page 54
49D-Link DSL-2745 Wireless N300 ADSL2+ Modem Router User Manual
Section 4 - Conguration
Wireless Security
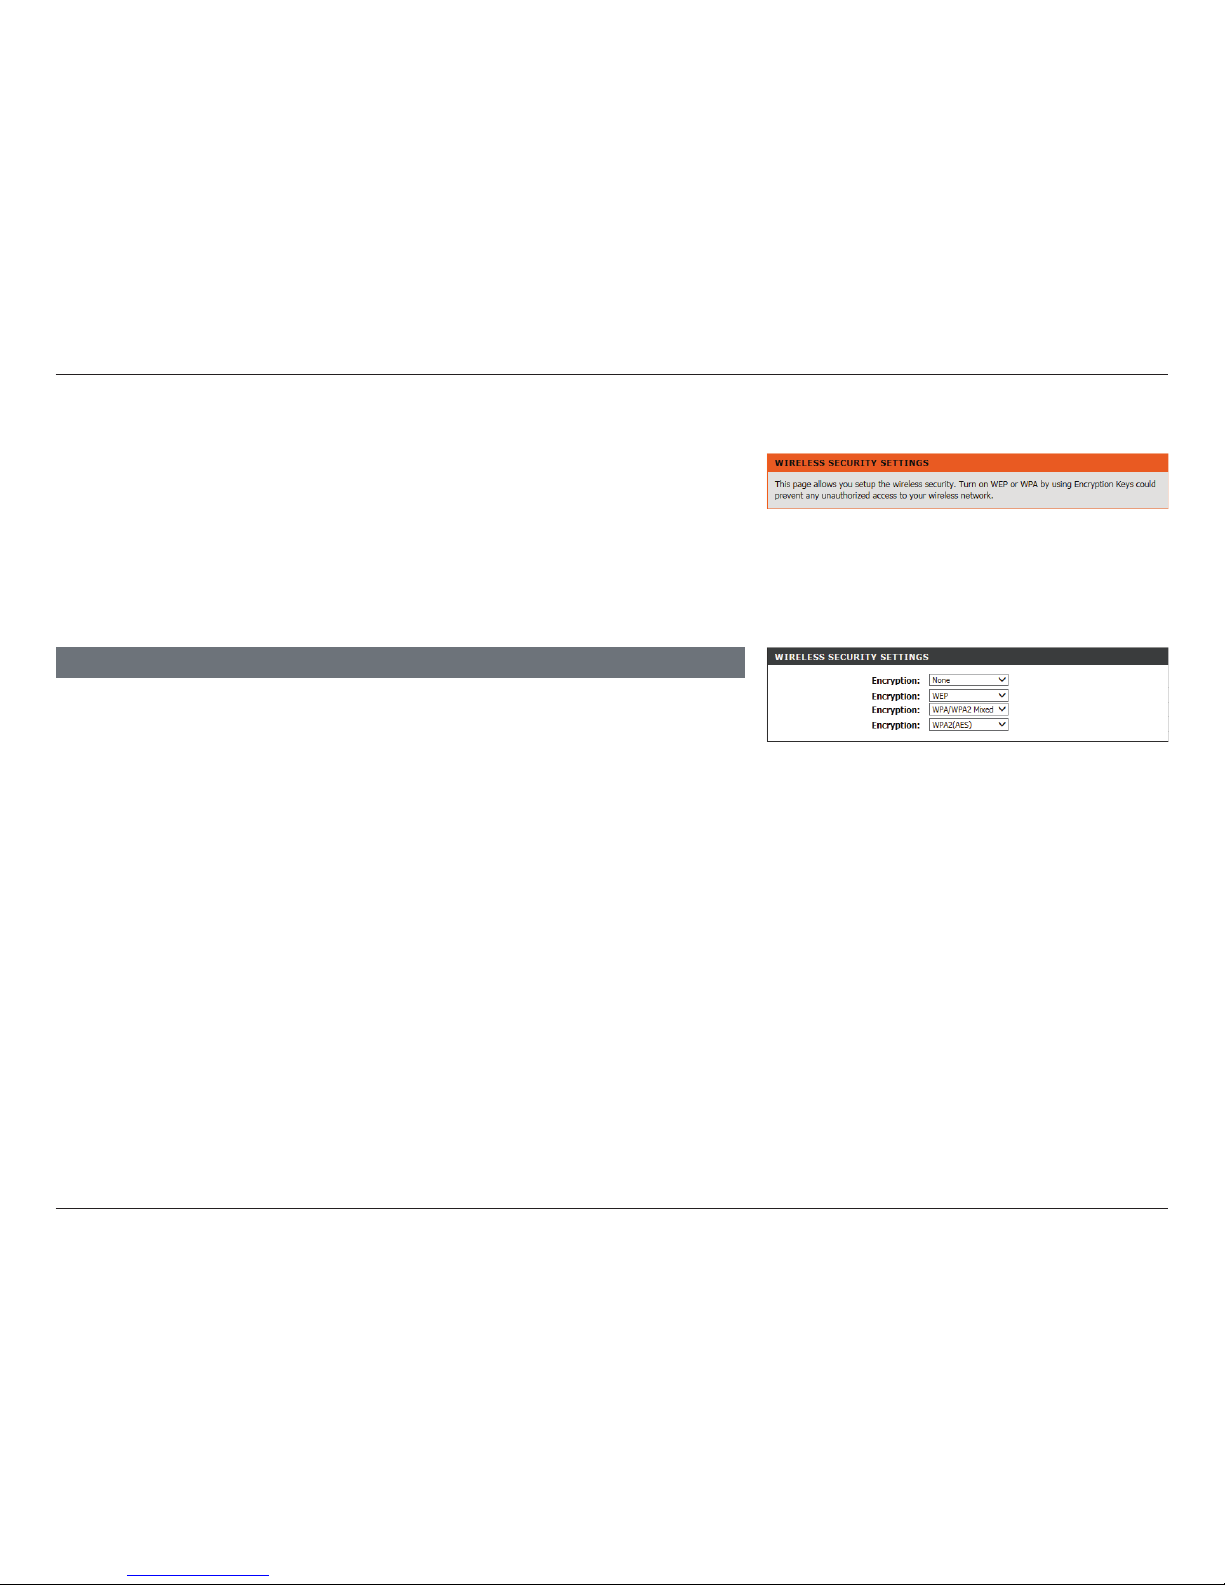
This page allows you to manually congure the router’s wireless security
settings. To change your wireless network settings refer to Wireless Setup on
page 47.
Remember to keep your wireless network passwords safe. Remember that if
you change the wireless password of your DSL-2745, you must re-input this
password on all of your wireless devices.
Encryption: Select the type of Encryption you wish to use. The available options
are None, WEP, WPA/WPA2 Mixed, and WPA2(AES). Using
WPA2(AES) is recommended.
WIRELESS SECURITY SETTINGS
The following pages describe the wireless conguration settings. They are
separated by encryption type.
Page 55
50D-Link DSL-2745 Wireless N300 ADSL2+ Modem Router User Manual
Section 4 - Conguration
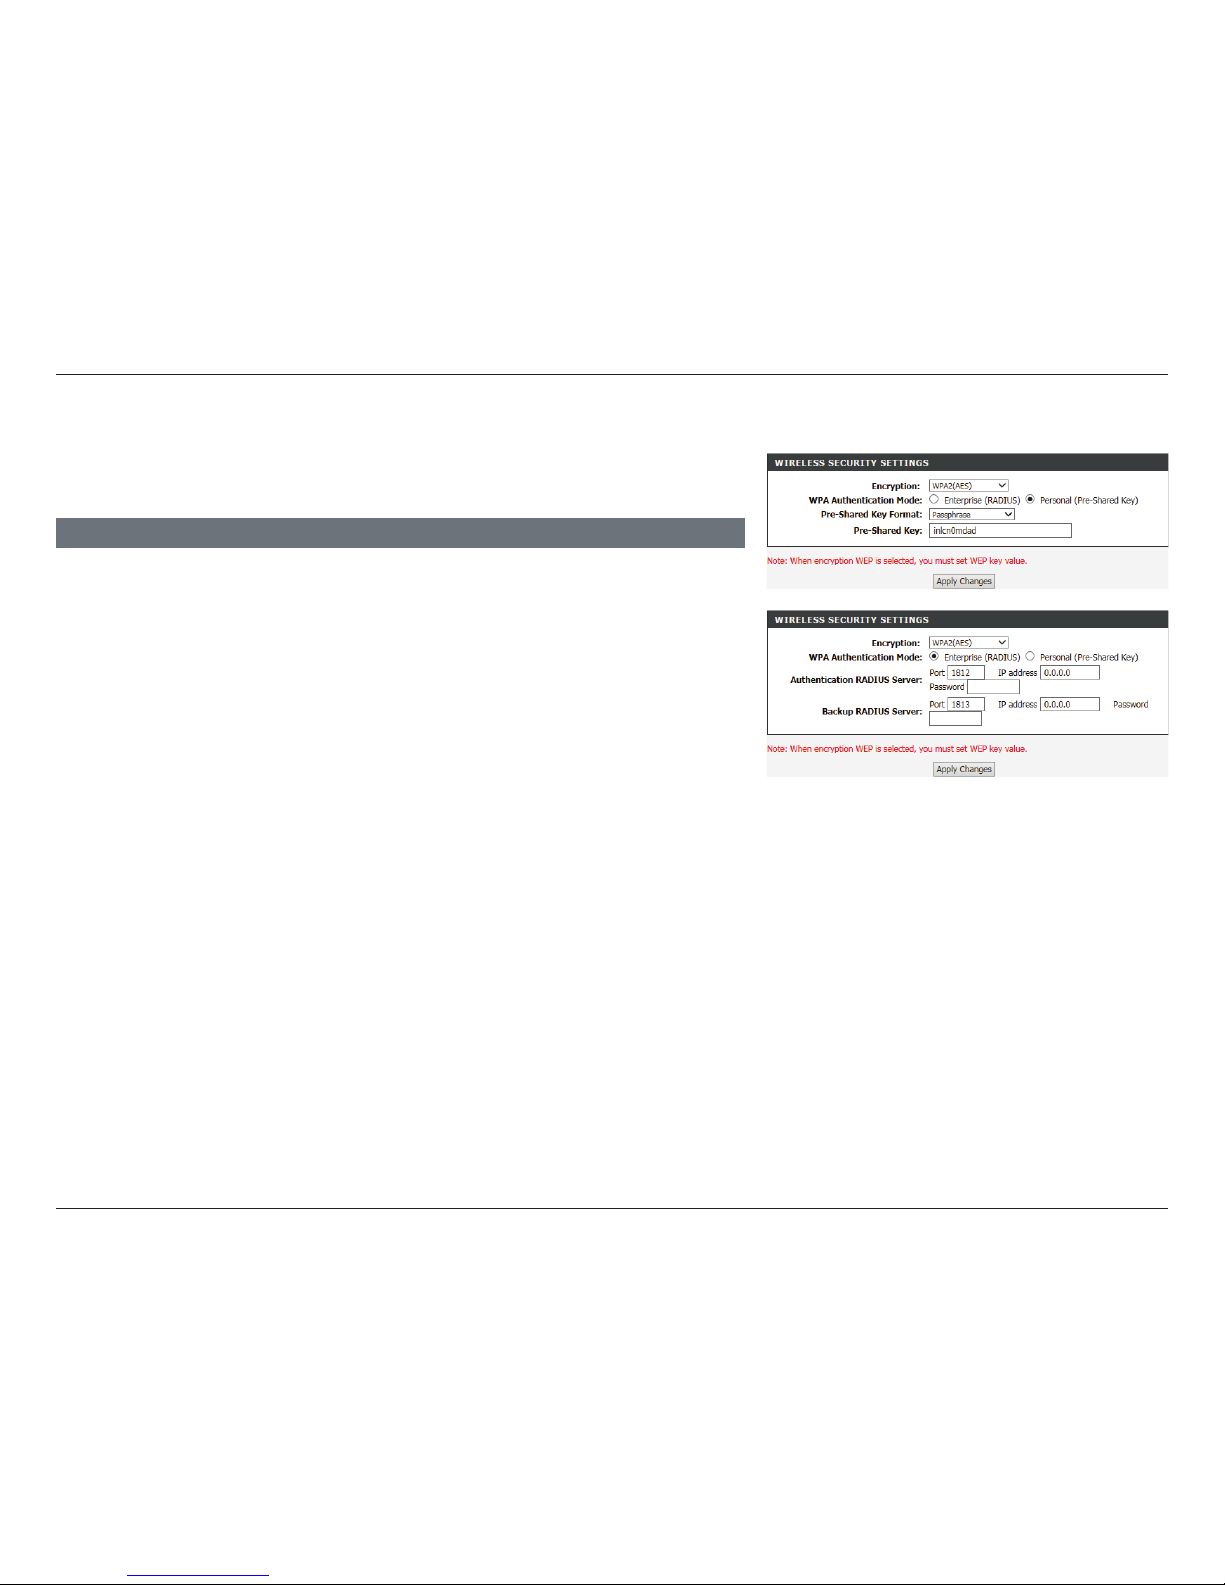
Encryption: WPA2(AES)
Click Apply Changes to have your changes take effect.
Encryption: Choose WPA2(AES) from the drop-down menu.
WPA
Authentication
Mode:
Choose either Enterprise (Radius) or Personal (Pre-shared
Key). Most small home/business networks will want to use
Personal (Pre-shared Key). If you are running a dedicated RADIUS
authentication server, choose Enterprise (RADIUS)
If Personal (Pre-Shared Key) is selected:
Pre-Shared Key
Format:
Select the Encryption key format. Choose either Passphrase or
HEX(26 Characters).
Pre-Shared Key: Enter a wireless key to use on your wireless network.
If Enterprise (Radius) is selected:
Authentication
RADIUS Server:
Enter the Port, IP address, and Password of the RADIUS Server.
Backup RADIUS
Server:
Enter the Port, IP address, and Password of the backup RADIUS
Server.
WIRELESS SECURITY SETTINGS
WP2(AES) is the recommended wireless security encryption type. Using it you
can be reasonably assured that your wireless connection is secure.
Page 56
51D-Link DSL-2745 Wireless N300 ADSL2+ Modem Router User Manual
Section 4 - Conguration
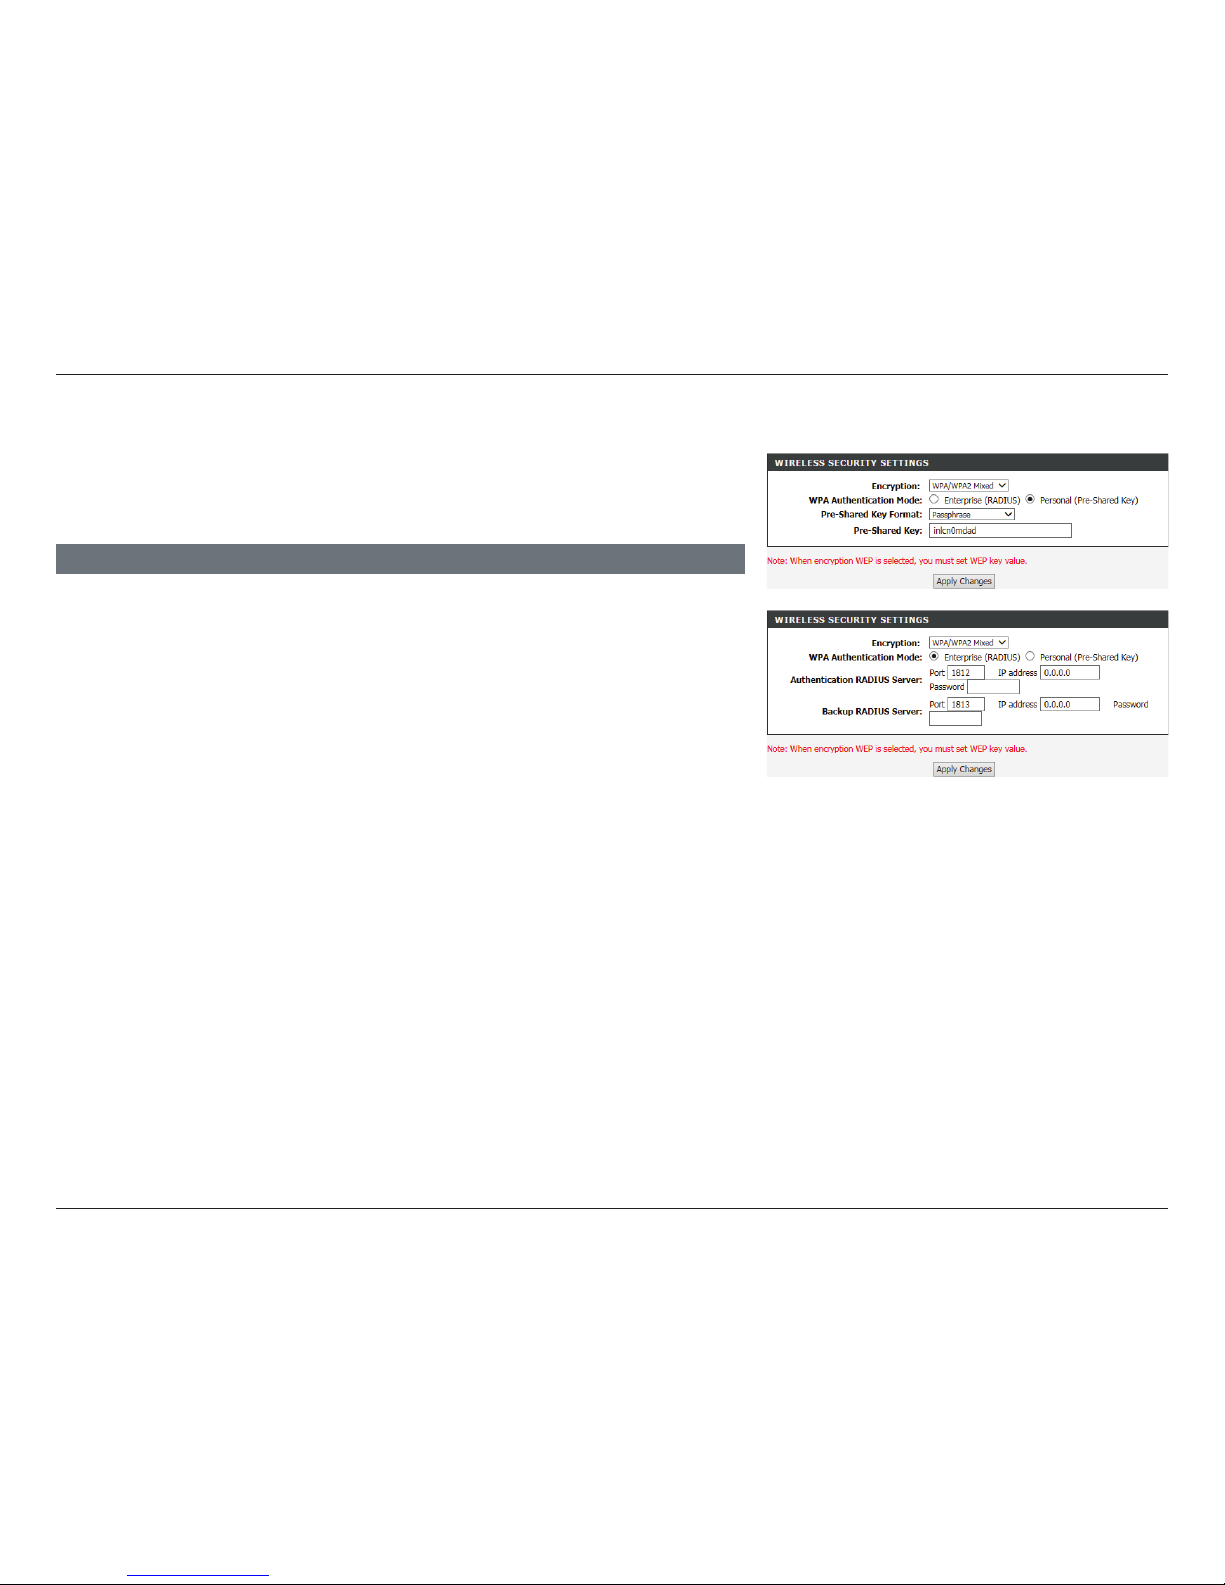
Encryption: WPA/WPA2 Mixed
Click Apply Changes to have your changes take effect.
Encryption: Choose WPA/WPA2 Mixed from the drop-down menu.
WPA
Authentication
Mode:
Choose either Enterprise (Radius) or Personal (Pre-shared
Key). Most small home/business networks will want to use
Personal (Pre-shared Key). If you are running a dedicated RADIUS
authentication server, choose Enterprise (RADIUS)
If Personal (Pre-Shared Key) is selected:
Pre-Shared Key
Format:
Select the Encryption key format. Choose either Passphrase or
HEX(26 Characters).
Pre-Shared Key: Enter a wireless key to use on your wireless network.
If Enterprise (Radius) is selected:
Authentication
RADIUS Server:
Enter the Port, IP address, and Password of the RADIUS Server.
Backup RADIUS
Server:
Enter the Port, IP address, and Password of the backup RADIUS
Server.
WIRELESS SECURITY SETTINGS
WPA/WPA2 Mixed(AES) is a reasonably strong wireless security encryption type.
This is for wireless clients which do not support WPA2 encryption, otherwise
use of WP2(AES) is recommended.
Page 57
52D-Link DSL-2745 Wireless N300 ADSL2+ Modem Router User Manual
Section 4 - Conguration
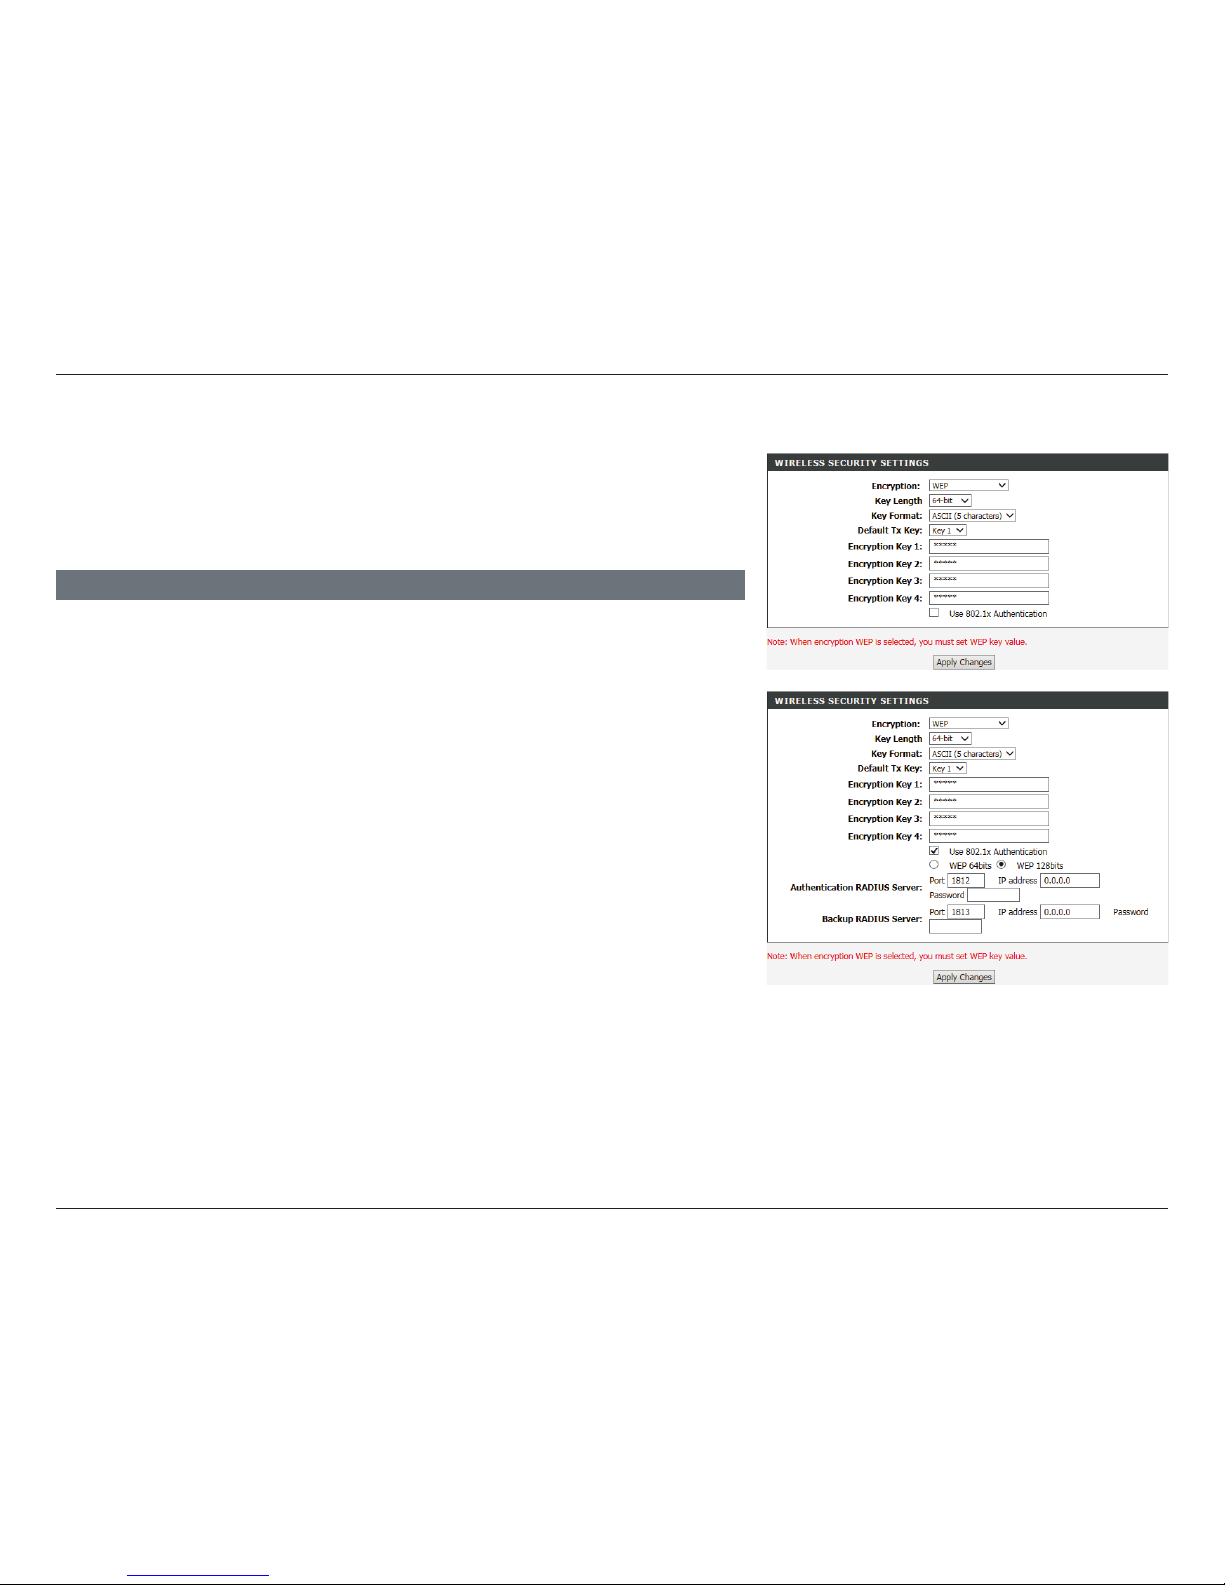
Encryption: WEP
Click Apply Changes to have your changes take effect.
Encryption: Choose WEP from the drop-down menu.
Key Length: Select the Encryption cipher key bit strength. The available options
are 64-bit and 128-bit.
Key Format: Select the Encryption key format. If you selected a 64-bit
key length, you may choose ASCII (5 Characters) or HEX(10
Characters). If you selected a 128-bit key length, you may choose
ASCII (13 Characters) or HEX(26 Characters).
Default Tx Key: Select the default Tx key.
Encryption Key
1-4:
Enter a wireless key to use on your wireless network.
The following settings are available if Use 802.1x Authentication is checked:
Authentication
RADIUS Server:
Enter the Port, IP address, and Password of the RADIUS Server.
Backup RADIUS
Server:
Enter the Port, IP address, and Password of the backup RADIUS
Server.
WIRELESS SECURITY SETTINGS
Use of WEP encryption is not recommended, as it only oers a trivial amount
of protection for your wireless data. Unless your clients do not support WPA
encryption, it is recommended that you select WPA2(AES) or WPA/WPA2
Mixed instead of WEP as they are more secure.
Page 58
53D-Link DSL-2745 Wireless N300 ADSL2+ Modem Router User Manual
Section 4 - Conguration
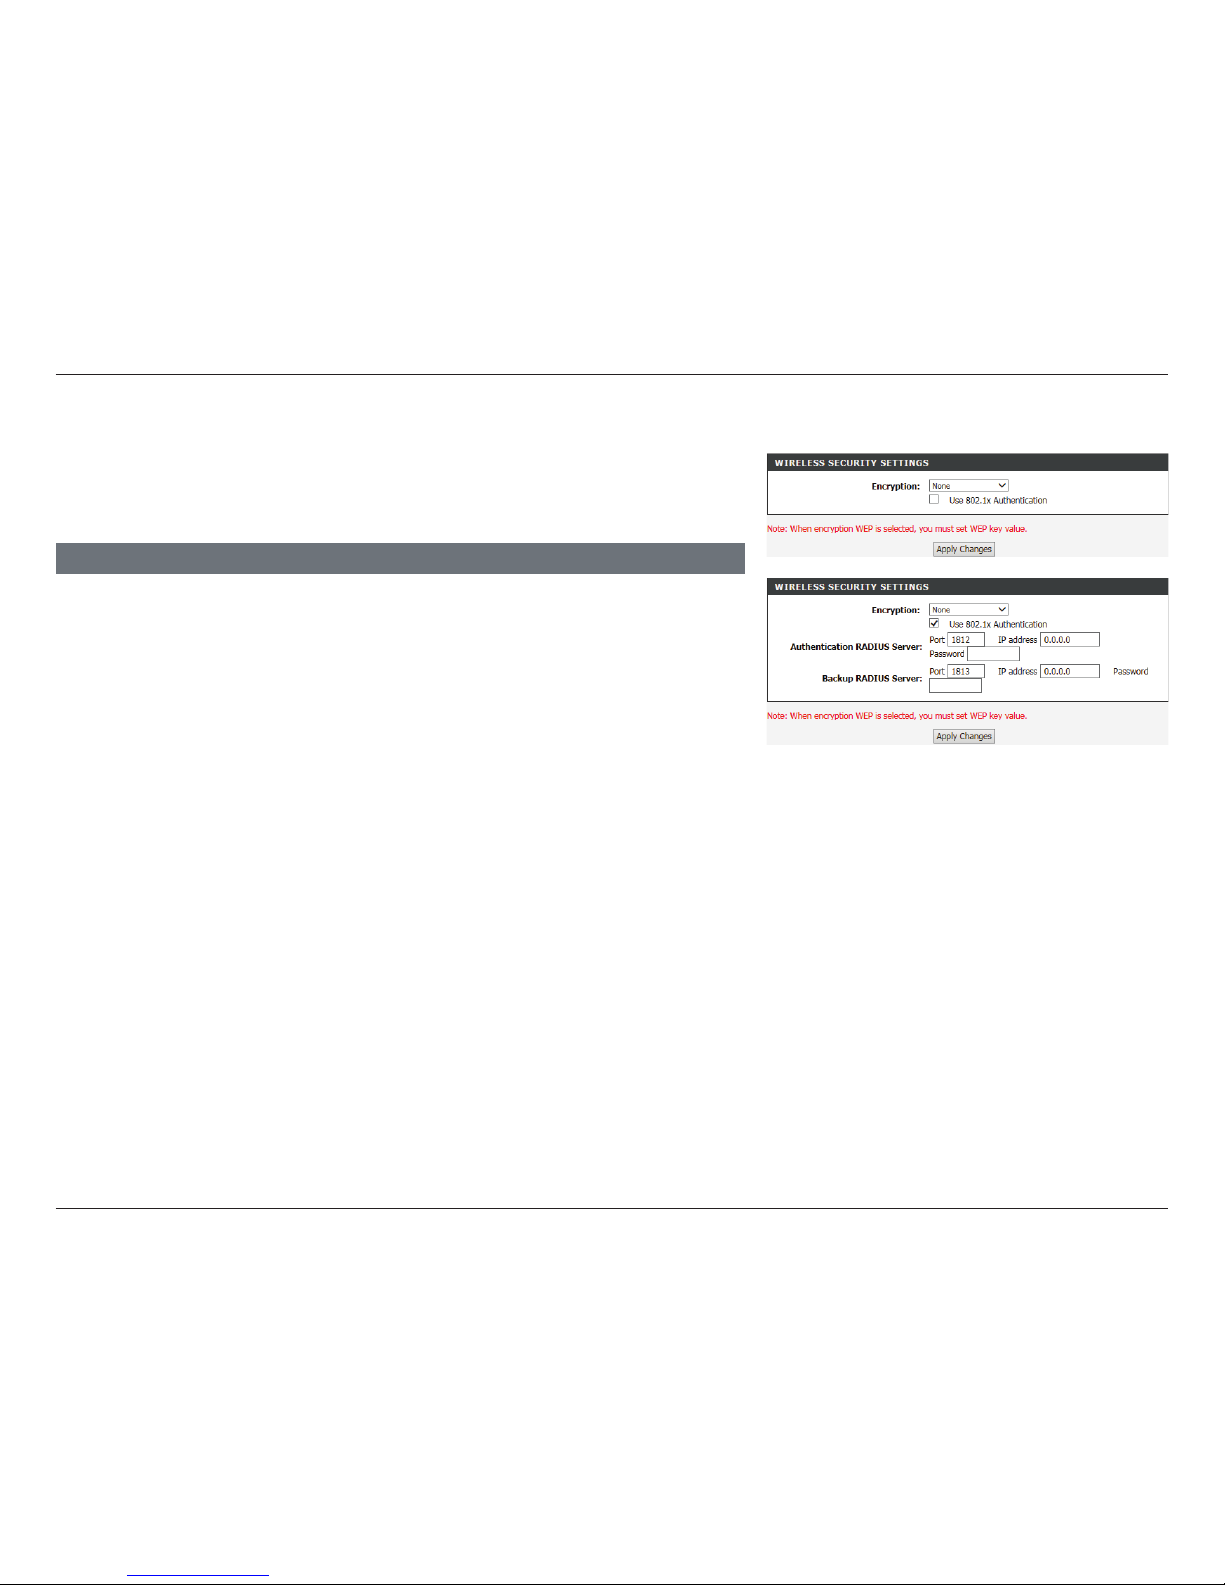
Disabling encryption and leaving your wireless network open is not
recommended. Any wireless client will be able to access your network, be able
to use your Internet connection, and leaves you open to security threats.
Encryption: Choose None from the drop-down menu.
No configuration settings are available if Encryption is set to None.
The following settings are available if Use 802.1x Authentication is checked:
Authentication
RADIUS Server:
Enter the Port, IP address, and Password of the RADIUS Server.
Backup RADIUS
Server:
Enter the Port, IP address, and Password of the backup RADIUS
Server.
WIRELESS SECURITY SETTINGS
Click Apply Changes to have your changes take effect.
Encryption: None
Page 59
54D-Link DSL-2745 Wireless N300 ADSL2+ Modem Router User Manual
Section 4 - Conguration
Time and Date
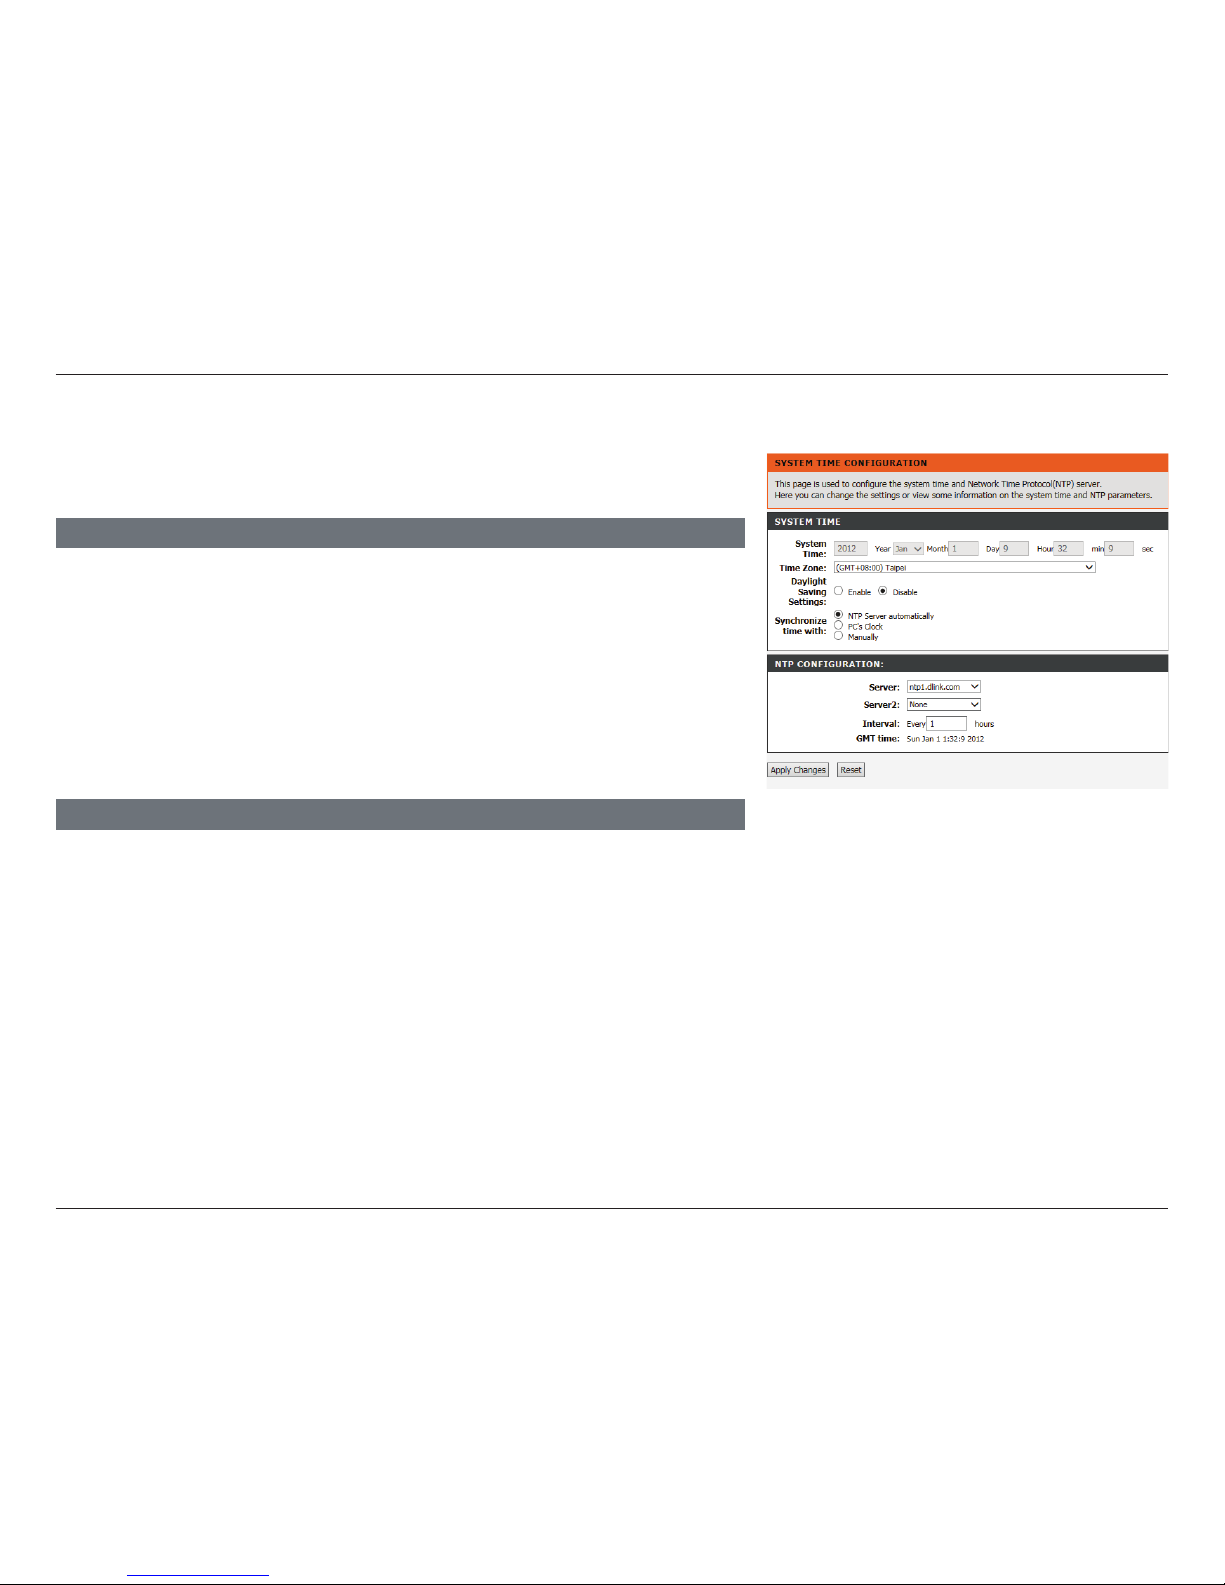
This section enables you to use an international time server to set the internal
time and date for the DSL-2745.
System Time:
Enable or disable automatic synchronisation with an Internet Time
Server.
Time Zone:
Select your time zone from the drop down menu.
Daylight Saving
Settings:
Enable or disable Daylight Savings.
Synchronize time
with:
Select the method of setting the time from NTP Server automatically,
PC’s Clock, or Manually.
SYSTEM TIME
Server:
Select ntp1.dlink.com, ntp.dlink.com, or other. If other is selected,
enter the NTP server address in the box provided.
Server2:
Select ntp1.dlink.com, ntp.dlink.com, or other. If other is selected,
enter the NTP server address in the box provided.
Interval:
Enter the frequency which the time is updated.
GMT time:
The current time is displayed.
NTP CONFIGURATION
Click Apply Changes when you are done or Reset to revert to the previous
settings.
Page 60
55D-Link DSL-2745 Wireless N300 ADSL2+ Modem Router User Manual
Section 4 - Conguration
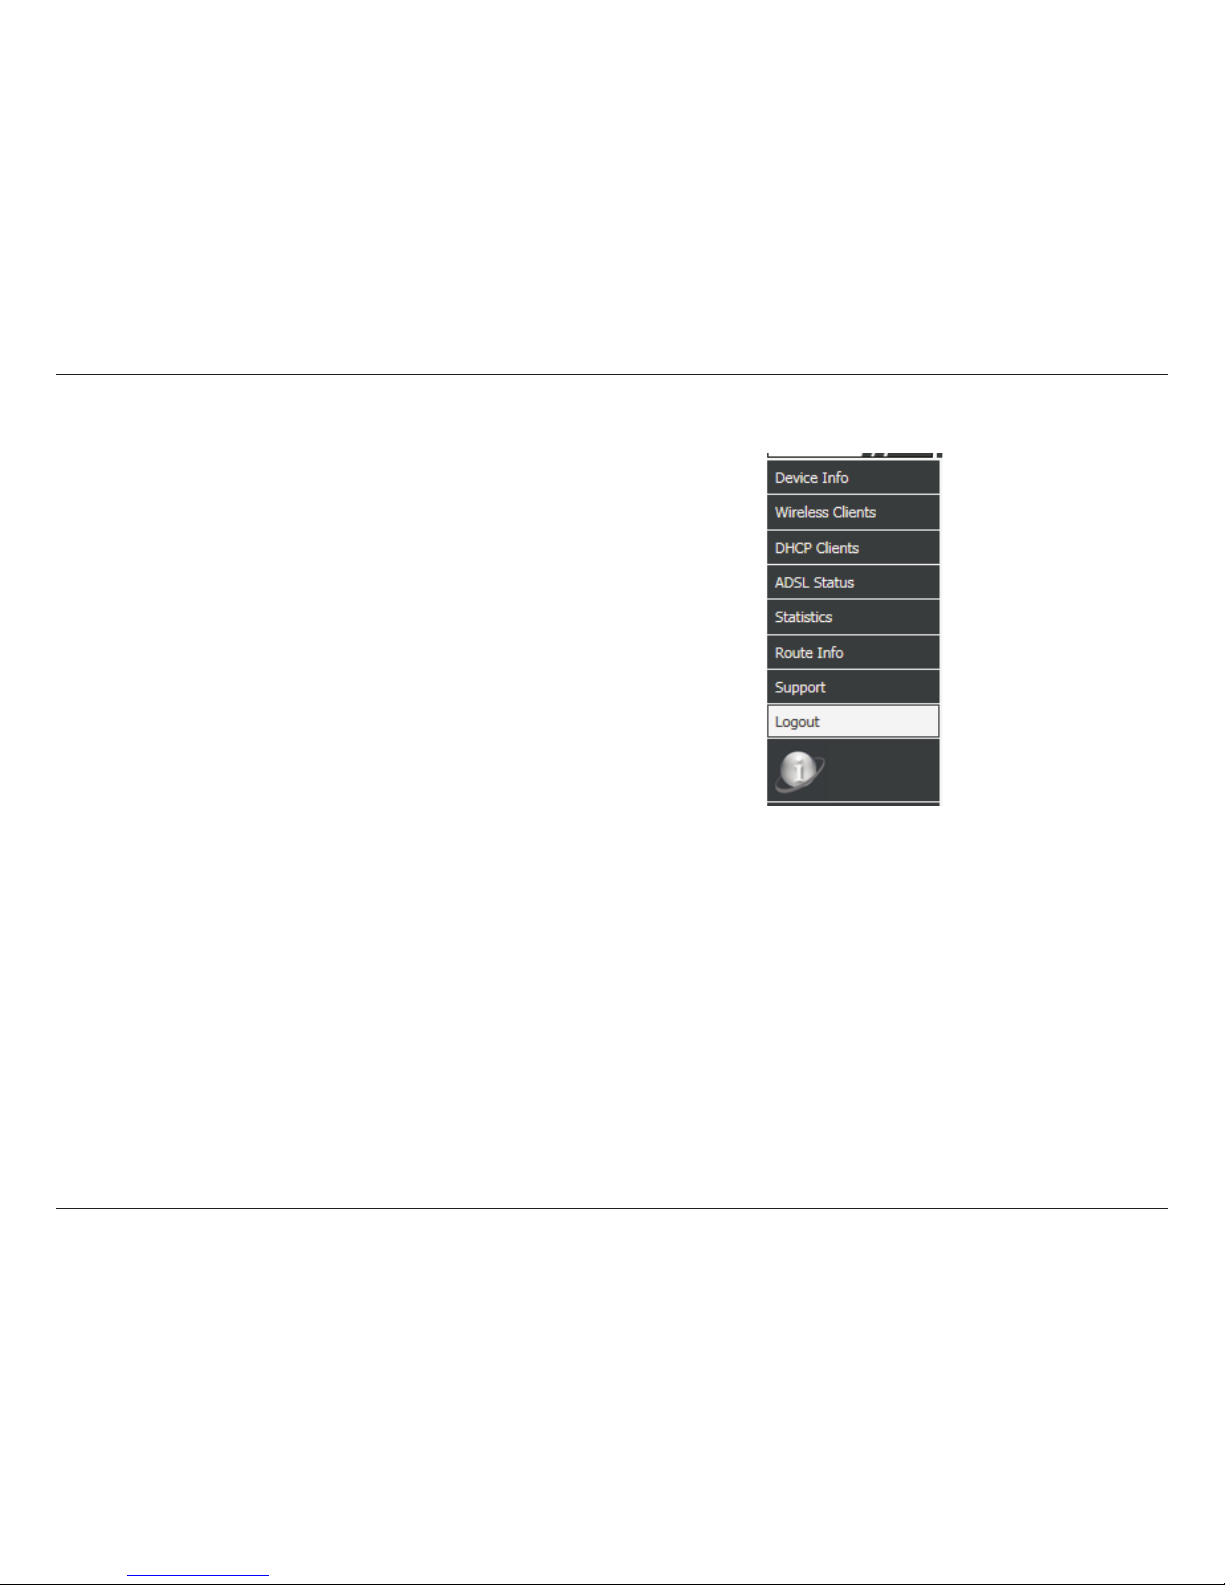
Support
Clicking Support will direct you to http://www.dlink.com/support.
Page 61
56D-Link DSL-2745 Wireless N300 ADSL2+ Modem Router User Manual
Section 4 - Conguration
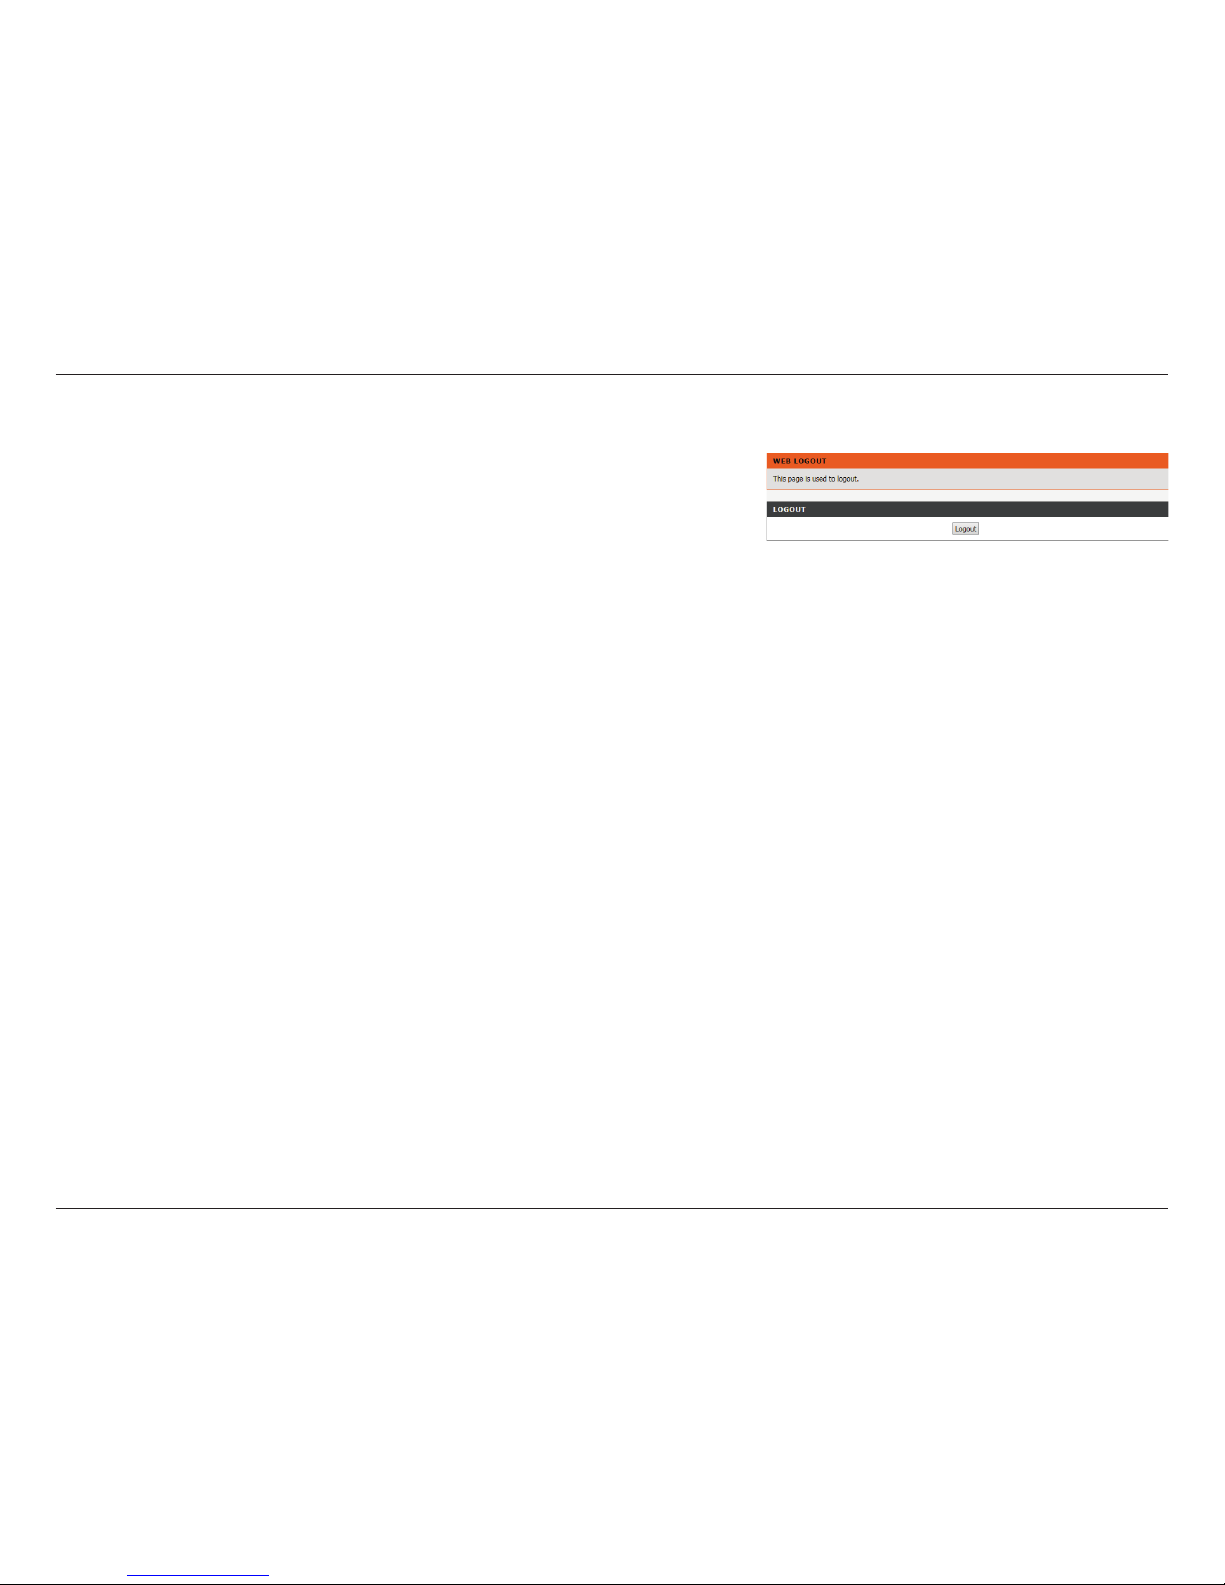
Logout
Click Logout when you are done conguring your DSL-2745.
Page 62
57D-Link DSL-2745 Wireless N300 ADSL2+ Modem Router User Manual
Section 4 - Conguration
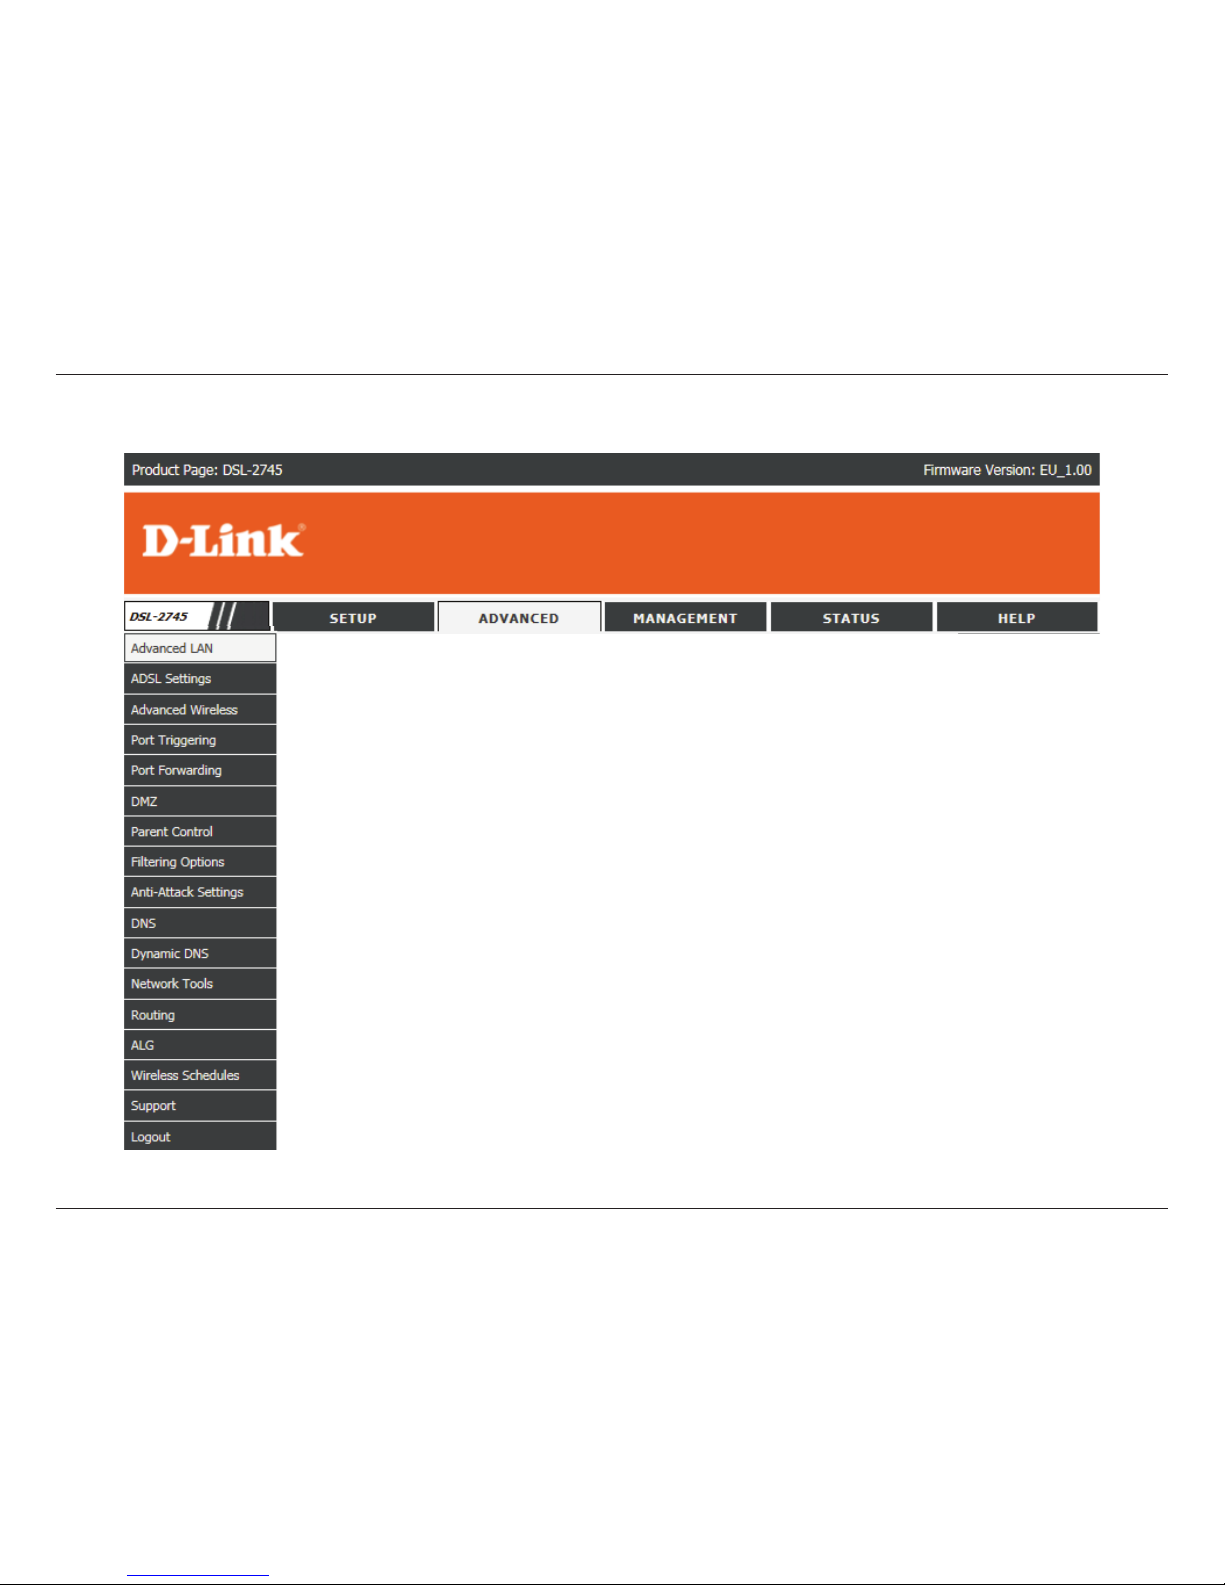
Advanced
The Advanced tab provides access to features used for network management, security,
and administrative tools to manage the device. You can use diagnostic tools to examine
performance and troubleshoot problems your DSL-2745 may have.
Page 63
58D-Link DSL-2745 Wireless N300 ADSL2+ Modem Router User Manual
Section 4 - Conguration
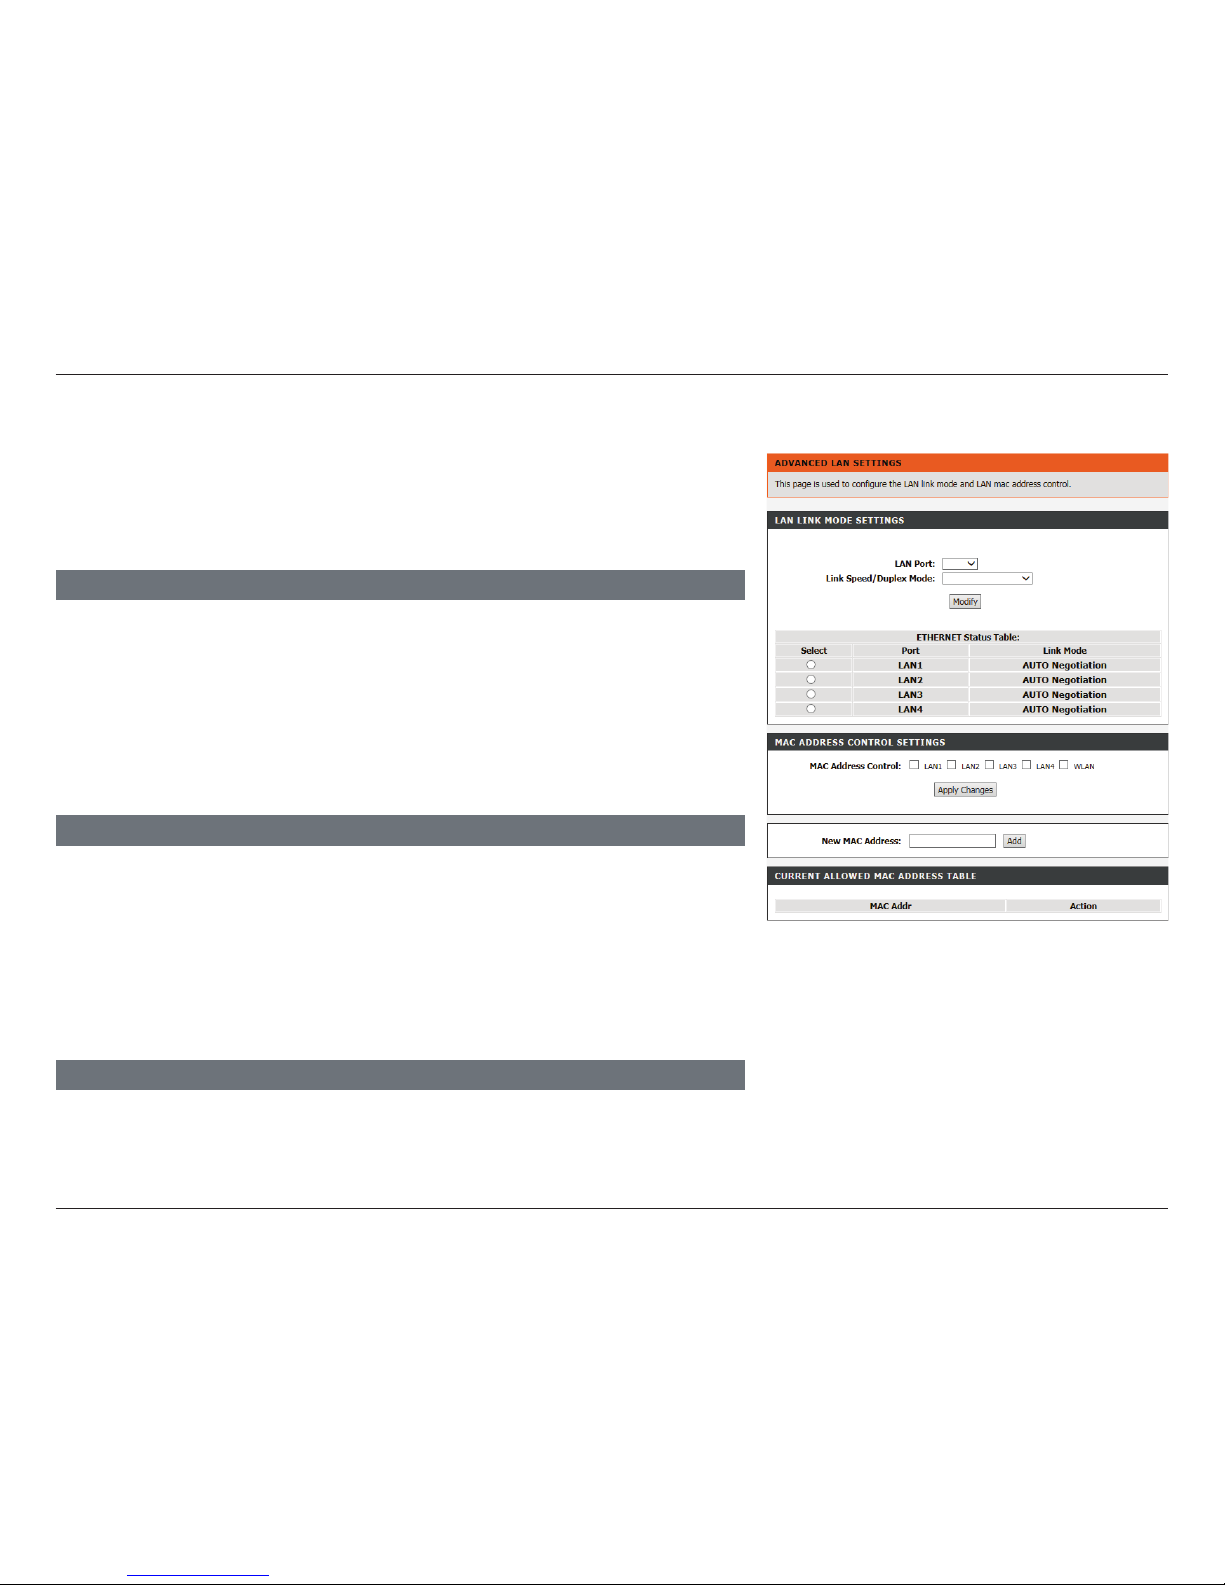
Advanced LAN
The Advanced LAN settings page allows you to congure the LAN ports of your
DSL-2745. This page allows you to manually congure the Speed and Duplex
Mode of your Ethernet connections. You can also limit connections to your LAN
and WLAN based on MAC address.
LAN LINK MODE SETTINGS
LAN Port: Select the LAN port to modify. The options are LAN1, LAN2, LAN3,
and LAN4.
Link Speed/
Duplex Mode:
Select the link speed and duplex mode. The options are 100 Mbps/
Full Duplex, 100 Mbps/Half Duplex, 10 Mbps/Full Duplex, 10
Mbps/Half Duplex, or Auto Negotiation.
The Ethernet Status Table displays the current Ethernet LAN conguration.
MAC ADDRESS CONTROL SETTINGS
MAC Address
Control:
Select the LAN interfaces to apply the MAC address control to. The
options are LAN1, LAN2, LAN3, LAN4, and WLAN.
New MAC
Address:
Enter the MAC address of your client devices and click Add.
Add your client device MAC addresses below, then select the interfaces to apply MAC Address
Control to, and click Apply Changes.
CURRENT ALLOWED MAC ADDRESS TABLE
This list displays the currently allowed devices, listed by their MAC address. If you wish to
remove a device, click the Delete button. Take care when removing devices so you don’t
accidentally block your conguring device.
Page 64
59D-Link DSL-2745 Wireless N300 ADSL2+ Modem Router User Manual
Section 4 - Conguration
ADSL Settings
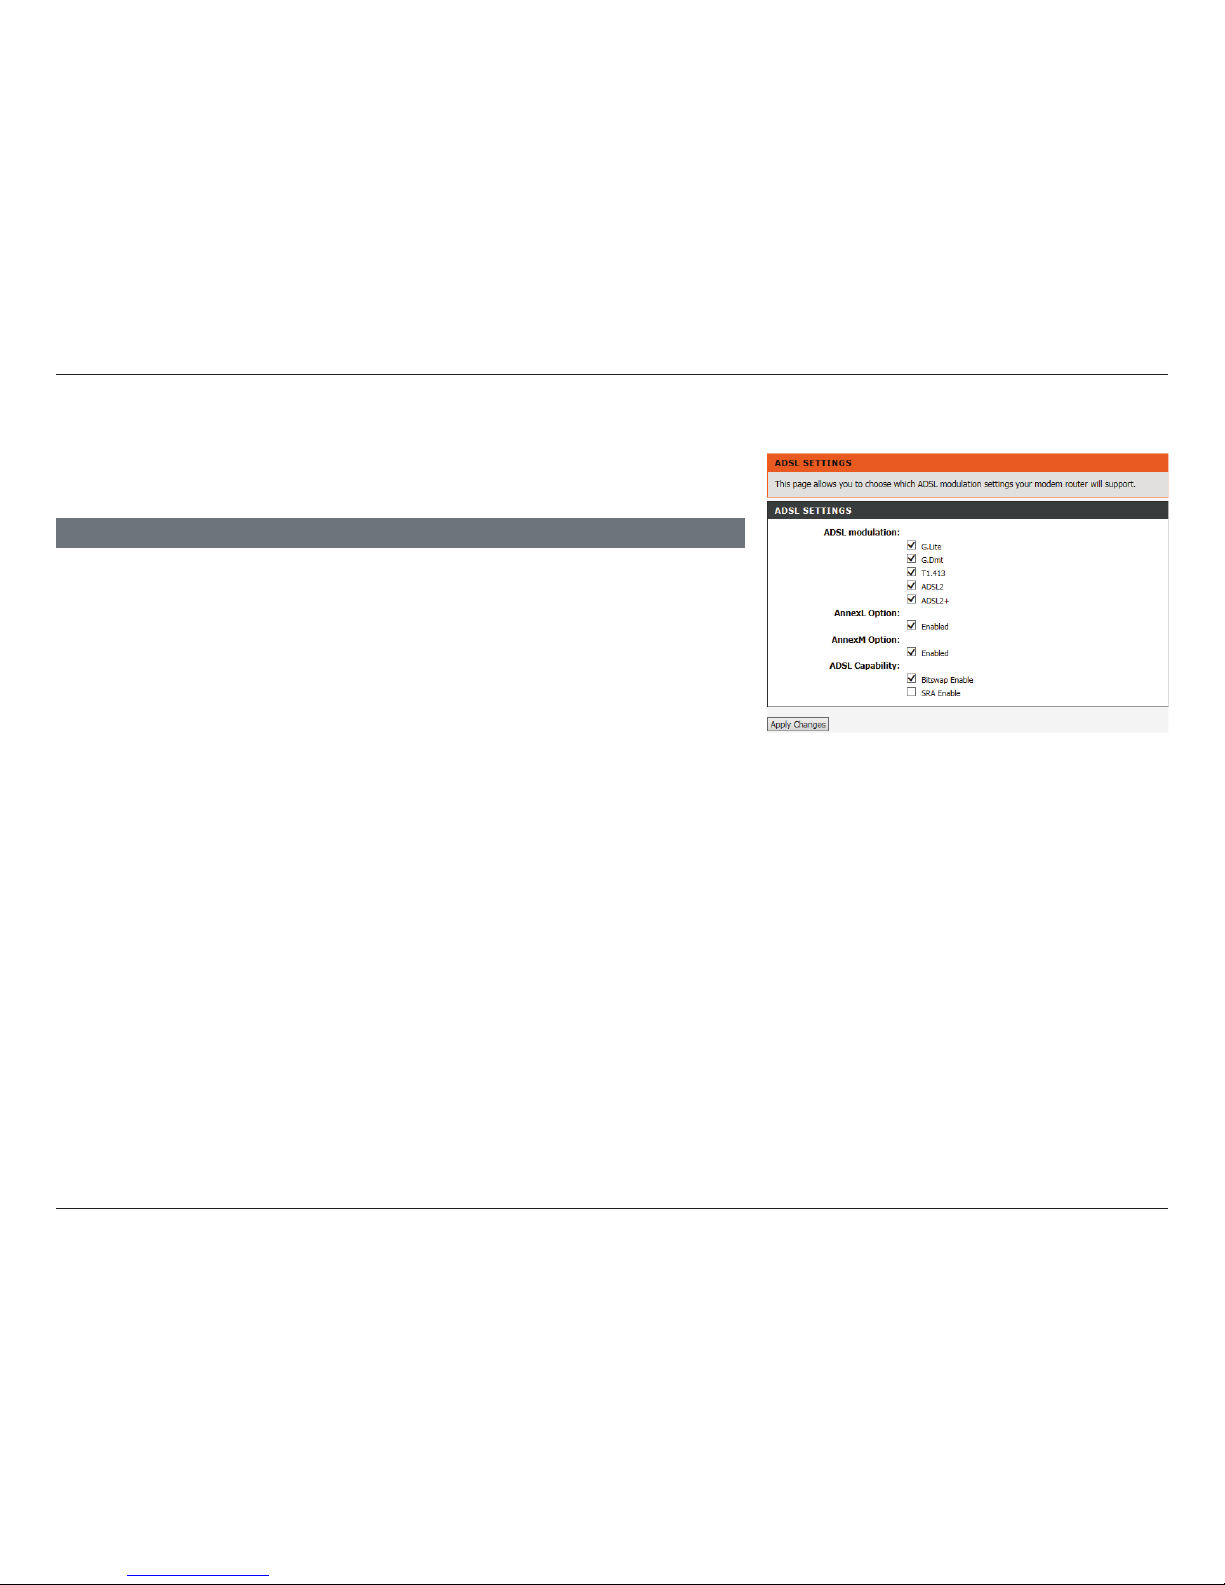
ADSL SETTINGS
To congure the ADSL modulation, click ADSL Settings.
In most cases you can leave the settings at their default values.
Click Apply Changes when you are done.
The ADSL Settings allows you to select the DSL standards your DSL-2745 uses
to connect to your ISP.
Page 65
60D-Link DSL-2745 Wireless N300 ADSL2+ Modem Router User Manual
Section 4 - Conguration
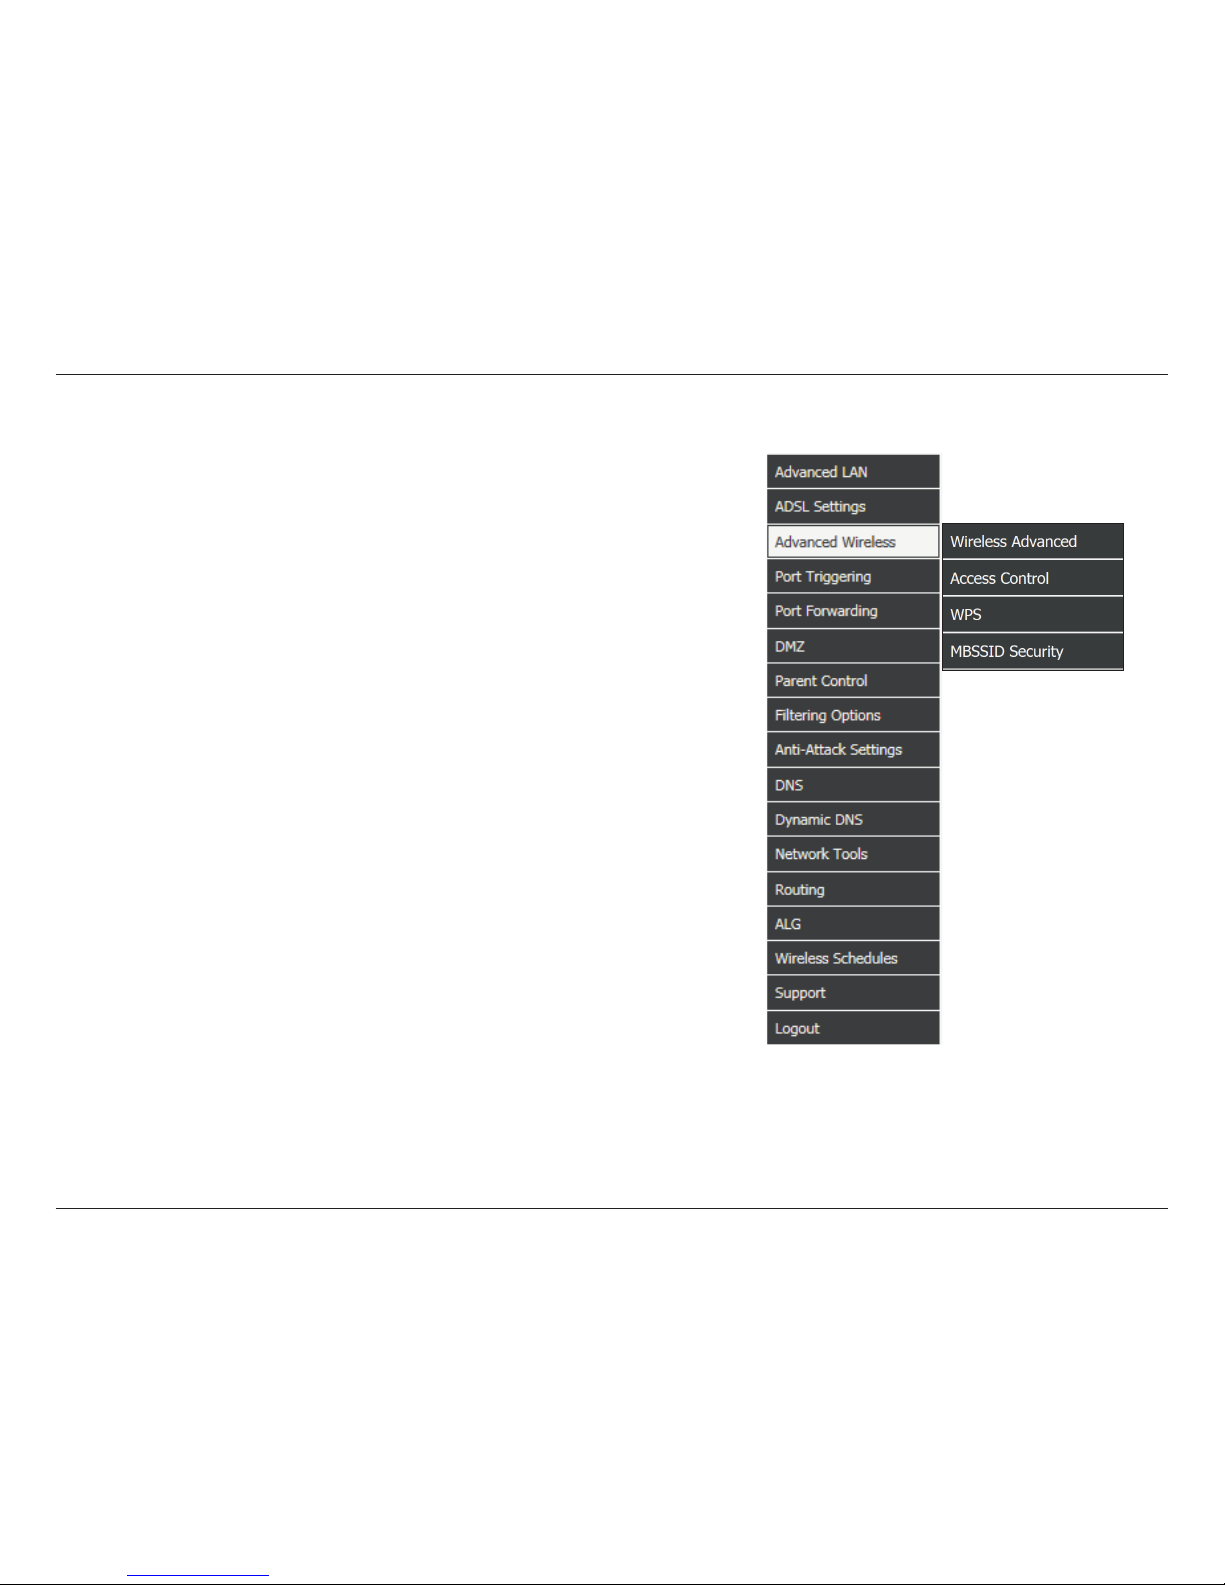
Advanced Wireless
Hover your mouse over the Advanced Wireless option on the vertical menu
bar running along the left side to access:
• Wireless Advanced
• Access Control
• WPS
• MBSSID Security
Page 66
61D-Link DSL-2745 Wireless N300 ADSL2+ Modem Router User Manual
Section 4 - Conguration
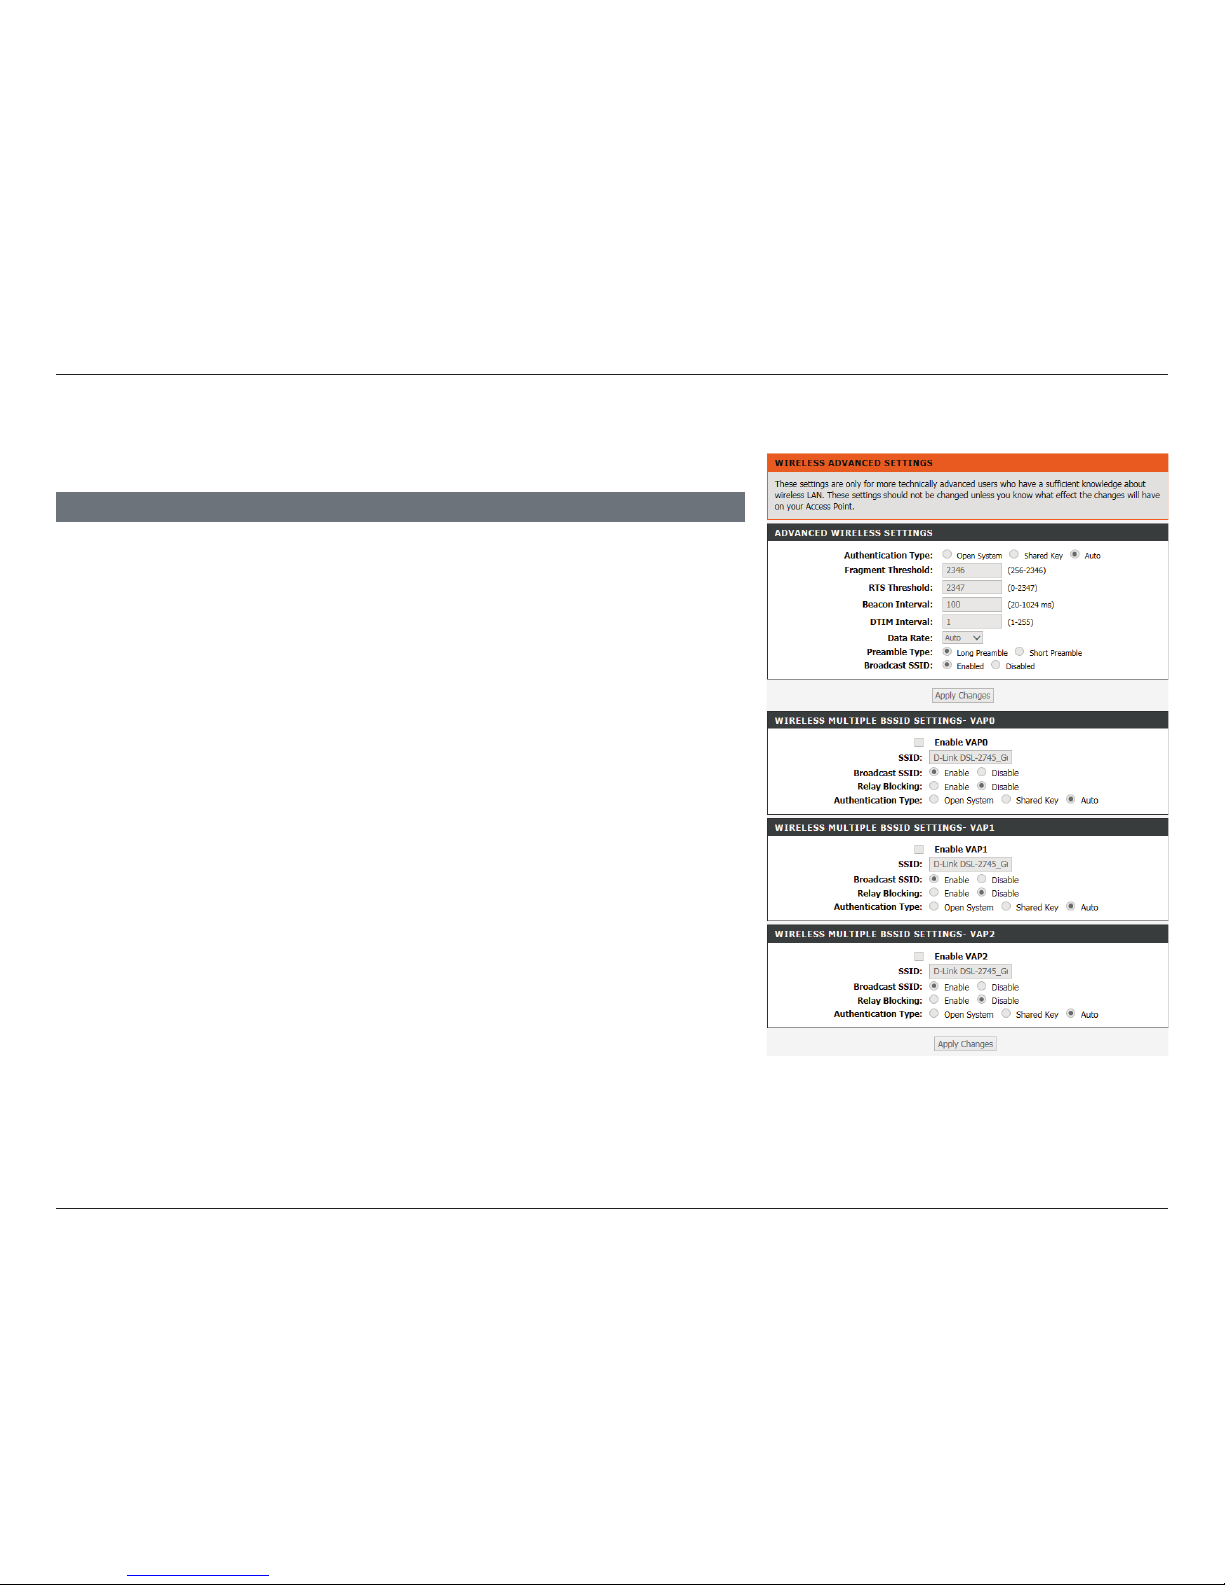
Wireless Advanced
This section allows for advanced conguration of wireless settings.
Authentication
Type:
Select the type of authentication, either Open System, Shared Key,
or Auto. Open System is not recommended.
Fragmentation
Threshold:
2346 is the default and recommended setting. Packets exceeding
this threshold, in bytes, are fragmented before transmission.
Advanced users may wish to adjust this value to improve
performance in the presence of radio frequency (RF) interference.
RTS
Threshold:
2347 is the default and recommended setting. Advanced users
may wish to make minor adjustments if data flow problems exist.
Beacon
Interval:
100 is the default and recommended setting. Specify a value for
the beacon interval. Beacons are packets sent to synchronize a
wireless network.
DTIM
Interval:
1 is the default and recommended setting. Delivery trac indication
messages inform wireless clients of how often to listen for buered
multicast or broadcast data.
Data Rate: Select the data rate from the drop down menu. Be careful when
selecting speeds as your legacy devices may not support higher
speeds or bandwidths. The default and recommended setting is Auto.
Preamble Type: Use the drop-down menu to specify whether the router should use
the Short Preamble or Long Preamble type. The preamble type
denes the length of the CRC (Cyclic Redundancy Check) block for
communication between the router and roaming wireless adapters.
ADVANCED WIRELESS SETTINGS
Page 67
62D-Link DSL-2745 Wireless N300 ADSL2+ Modem Router User Manual
Section 4 - Conguration
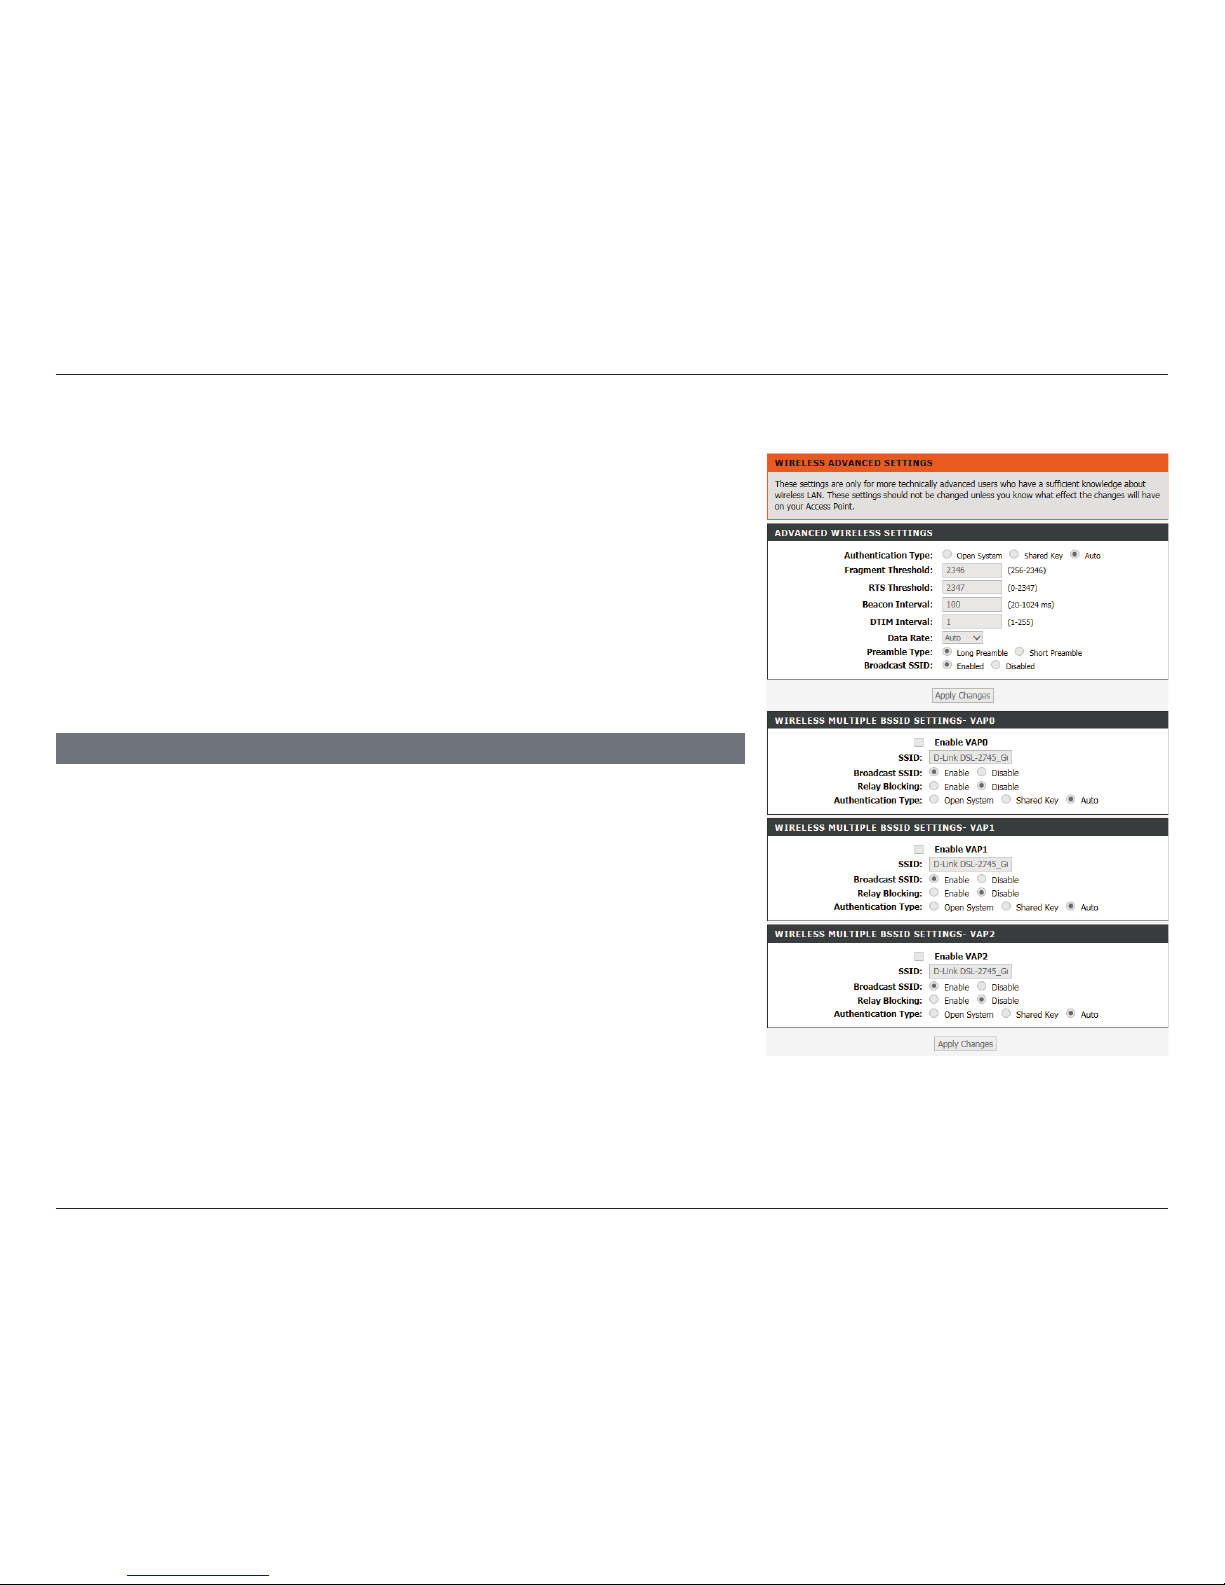
Broadcast SSID: Visible networks conveniently advertise their existence to devices
looking for Wi-Fi networks to join. Invisible, or hidden, networks
do not. To join an invisible network users must manually input its
SSID. Note: Making a network Invisible is not a form of security.
Wireless Advanced (continued)
Click Apply Changes when you are done.
Click Apply Changes when you are done.
Guest Networks
The following sections allow you to create guest wireless networks. These
networks are separate from your main wireless network.
Enable VAP0-VAP2 Check Enable to create a guest wireless network.
SSID: Enter a unique Network Name (SSID) to identify your guest
network.
Broadcast SSID: Visible networks conveniently advertise their existence to devices
looking for Wi-Fi networks to join. Invisible, or hidden, networks
do not. To join an invisible network users must manually input its
SSID. Note: Making a network Invisible is not a form of security
alone.
Relay Blocking: Enable user isolation to prevent wireless clients from
communicating with each other. This may be desired if the
DSL-2745 is used in a public setting.
Authentication
Type:
Select the type of authentication, either Open System, Shared Key,
or Auto. Open System is not recommended.
WIRELESS MULTIPLE BSSID SETTINGS VAP0 VAP2
Page 68
63D-Link DSL-2745 Wireless N300 ADSL2+ Modem Router User Manual
Section 4 - Conguration
Wireless Access Control
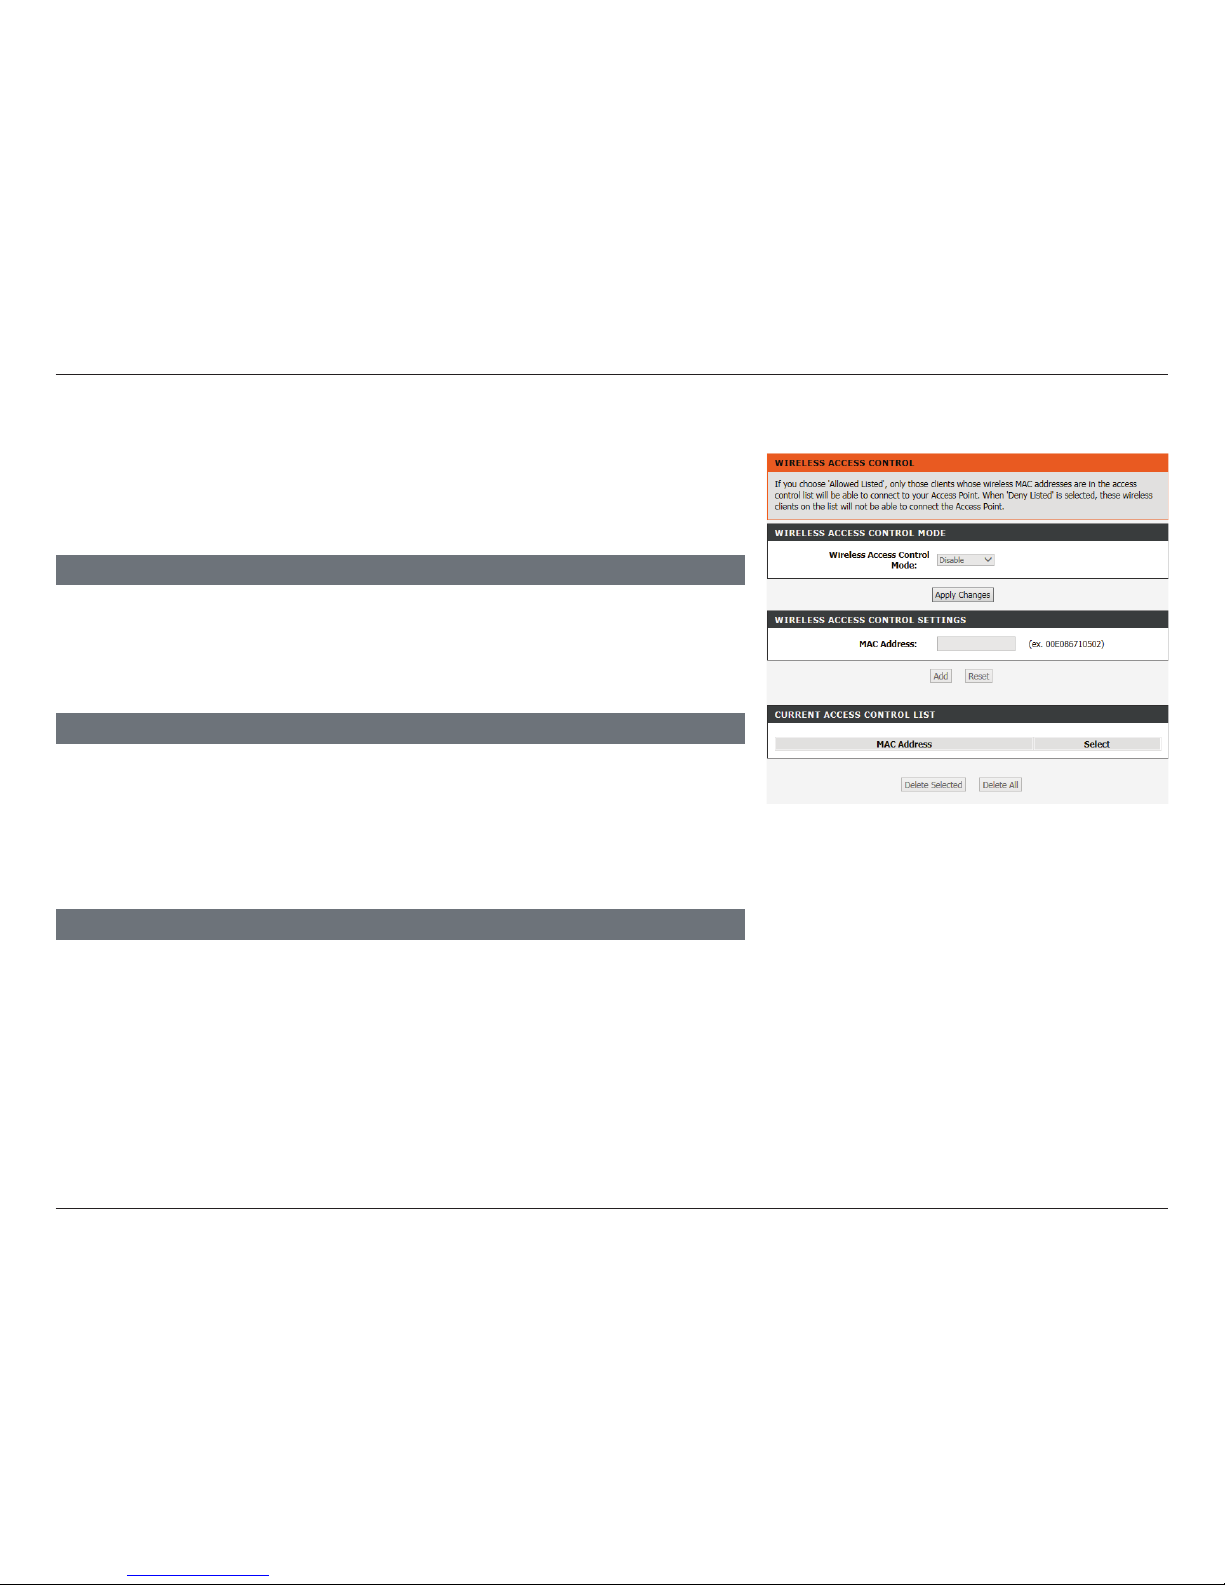
The Wireless Access Control setup section enables you to congure MAC
Address lters to control which wireless clients can or cannot connect to your
network.
Wireless Access
Control Mode:
Select Allow Listed, Deny Listed, or Disable.
WIRELESS ACCESS CONTROL MODE
MAC Address: Enter the MAC address of the device you wish to add to the current
access control list.
WIRELESS ACCESS CONTROL SETTINGS
CURRENT ACCESS CONTROL LIST
This list currently displays the MAC addresses of the devices being ltered. To remove a
device from the list, select the radio button next to the MAC address and click the Delete
Selected button. To remove all the entries from the list, click Delete All.
Click Apply Changes when you are done.
Click Add to add a device to the access control list or click Reset to clear the
MAC address.
Page 69
64D-Link DSL-2745 Wireless N300 ADSL2+ Modem Router User Manual
Section 4 - Conguration
Wi-Fi Protected Setup
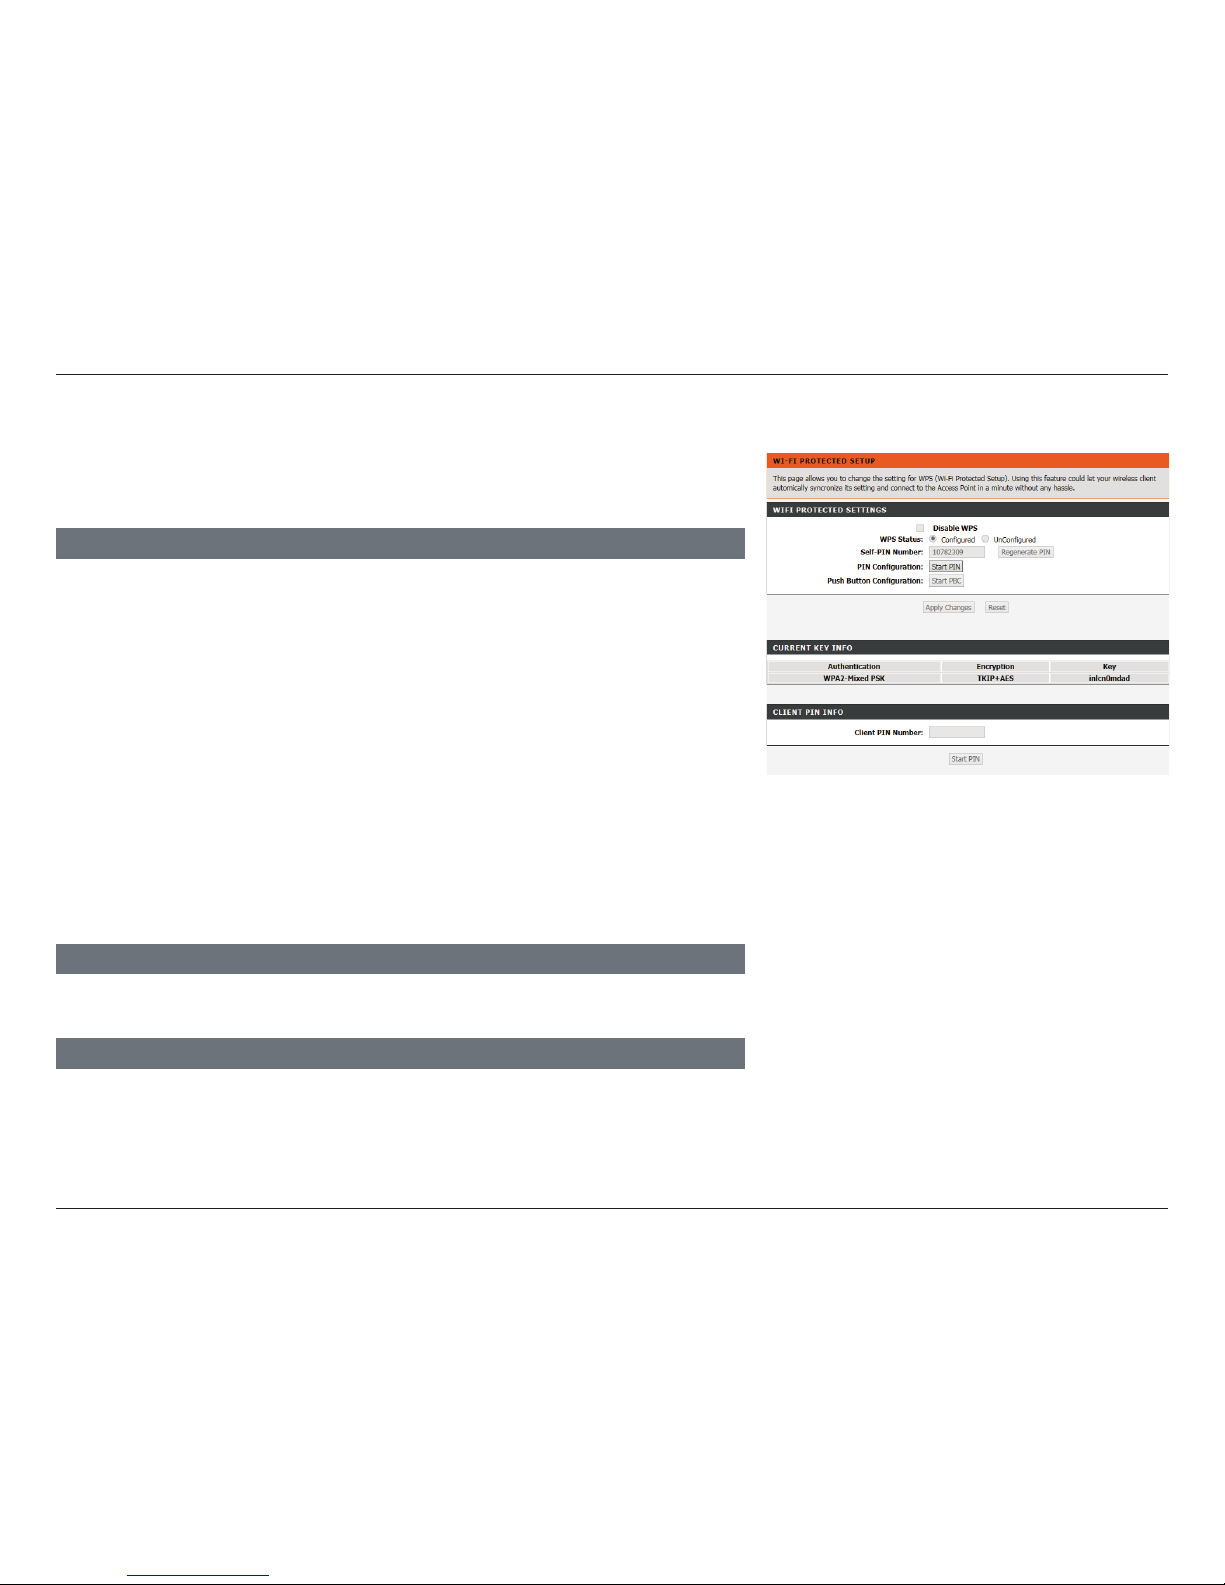
This section allows you to congure how the DSL-2745 uses Wi-Fi Protected
Setup (WPS) to create a secure wireless connection.
WPS Status: WPS is configured by default.
Self-PIN Number: Enter a 4 or 8 digit WPS pin, or click Regenerate PIN to create a
new random WPS PIN.
PIN Configuration: Click Start PIN to activate the WPS-PIN (PIN) method. You will then
have 120 seconds to connect an enter the PIN on your device.
Push Button
Configuration:
Click Start PBC to activate the WPS-PBC (push-button) method. You
will then have 120 seconds to press the WPS button on the new device
that you wish to connect.
WIFI PROTECTED SETTINGS
Check the box to Disable WPS.
CURRENT KEY INFO
This box shows the type of Authentication, Encryption, and wireless key.
CLIENT PIN INFO
Some wireless conguration utilities on client devices allow you to generate a WPS PIN. This
can be useful in various situations, such as to ensure that you are adding the correct wireless
device to your network. To use this feature, create a PIN on your wireless client, enter it into
the Client PIN Number box, and click Start PIN.
Click Apply Changes when you are done or click Reset to undo any changes
you may have made.
Page 70
65D-Link DSL-2745 Wireless N300 ADSL2+ Modem Router User Manual
Section 4 - Conguration
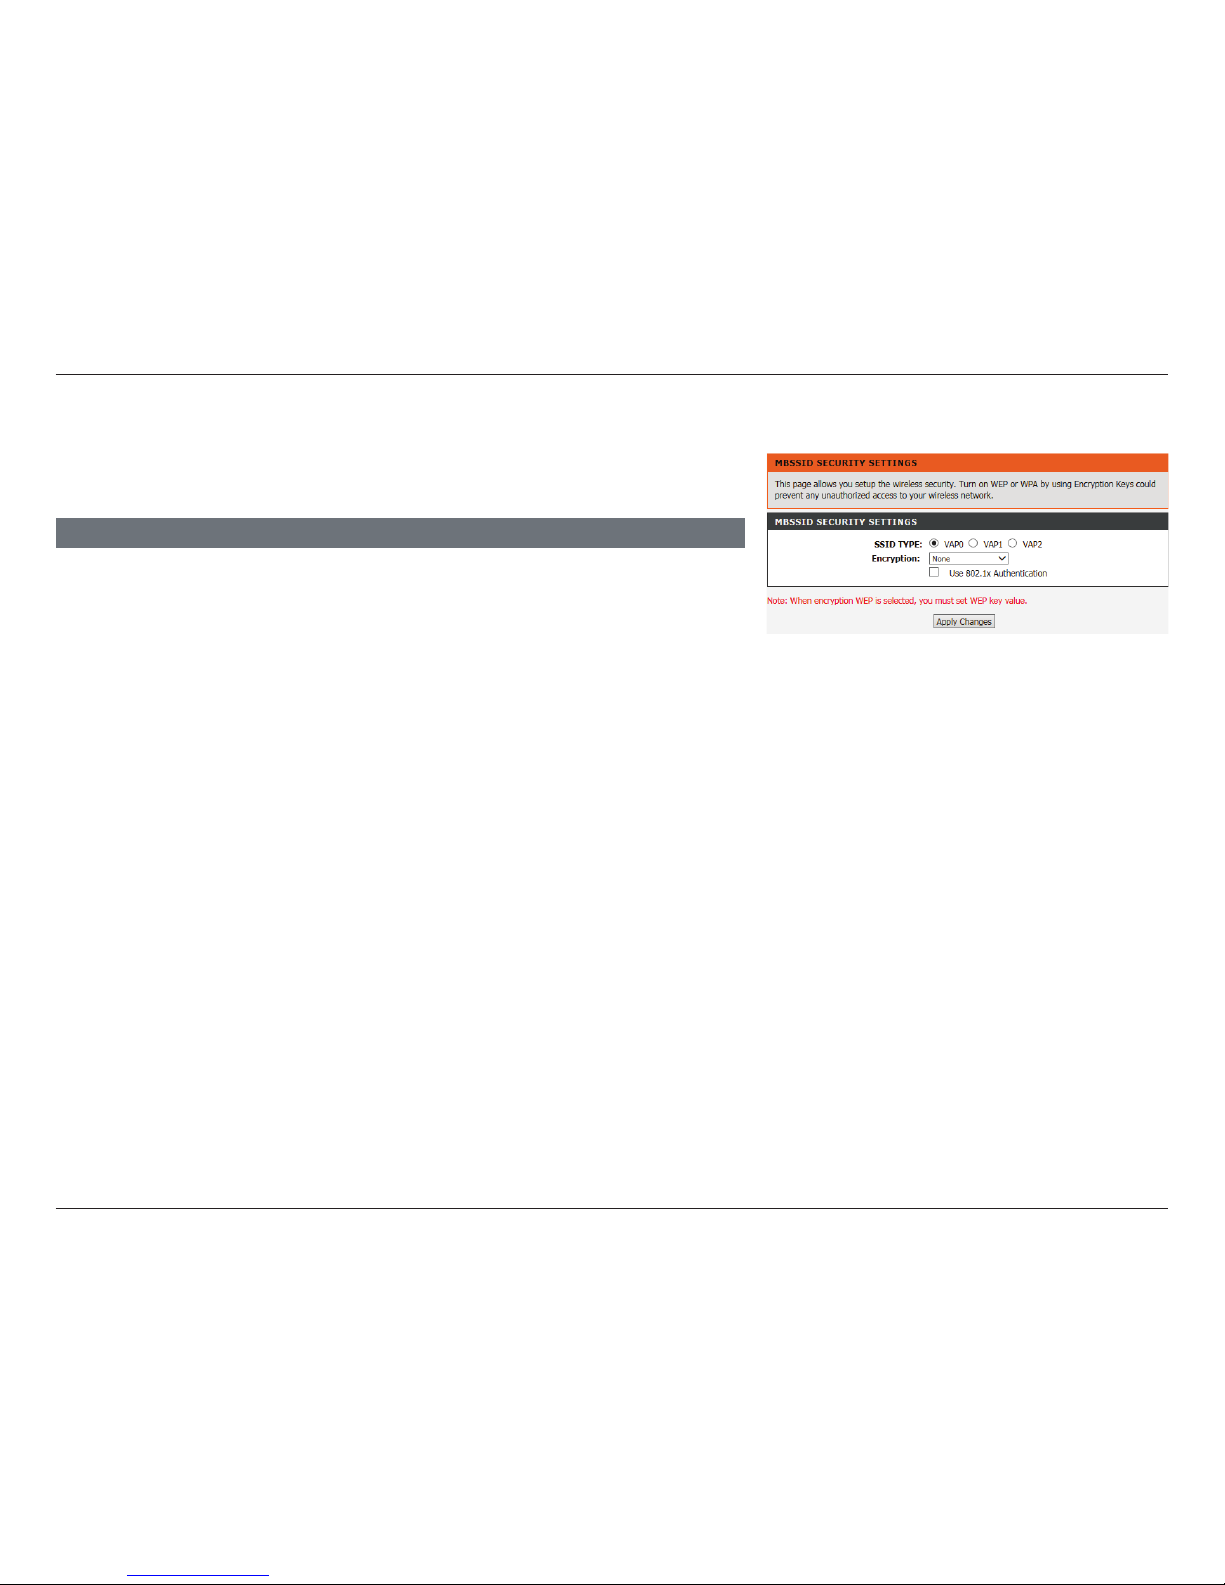
MBSSID Security Settings
The following sections allow you to adjust the security used on guest wireless
networks.
SSID Type: Select either VAP0, VAP1, or VAP2.
Encryption: Select the type of Encryption you wish to use. The available options
are None, WEP, WPA/WPA2 Mixed, and WPA2(AES). Using
WPA2(AES) is recommended.
MBSSID SECURITY SETTINGS
The following pages describe the wireless conguration settings. They are
separated by encryption type.
Page 71
66D-Link DSL-2745 Wireless N300 ADSL2+ Modem Router User Manual
Section 4 - Conguration
Click Apply Changes to have your changes take effect.
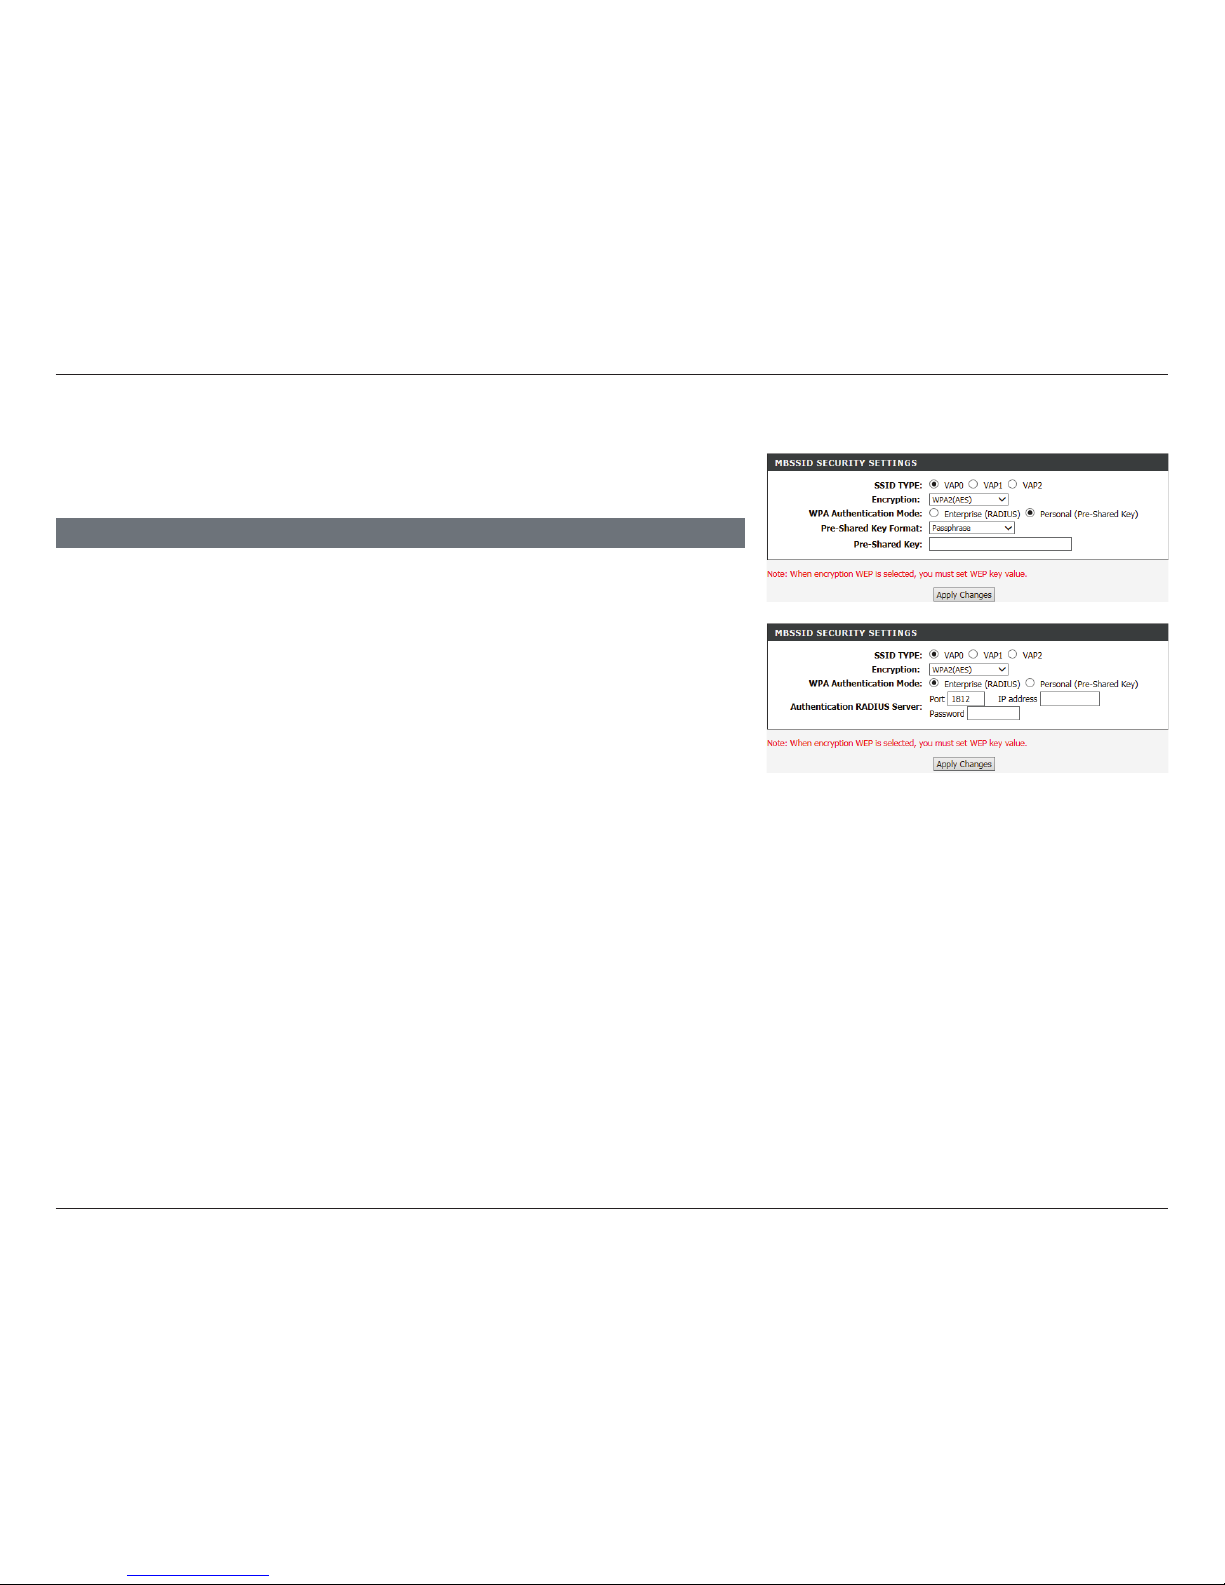
SSID Type: Select either VAP0, VAP1, or VAP2.
Encryption: WPA2(AES)
WPA
Authentication
Mode:
Choose either Enterprise (Radius) or Personal (Pre-shared
Key). Most small home/business networks will want to use
Personal (Pre-shared Key). If you are running a dedicated RADIUS
authentication server, choose Enterprise (RADIUS)
If Personal (Pre-Shared Key) is selected:
Pre-Shared Key
Format:
Select the Encryption key format. Choose either Passphrase or
HEX(26 Characters).
Pre-Shared Key: Enter a wireless key to use on your wireless network.
If Enterprise (Radius) is selected:
Authentication
RADIUS Server:
Enter the Port, IP address, and Password of the RADIUS Server.
Backup RADIUS
Server:
Enter the Port, IP address, and Password of the backup RADIUS
Server.
MBSSID SECURITY SETTINGS
WP2(AES) is the recommended wireless security encryption type. Using it you
can be reasonably assured that your wireless connection is secure.
MBSSID Encryption: WPA2(AES)
Page 72
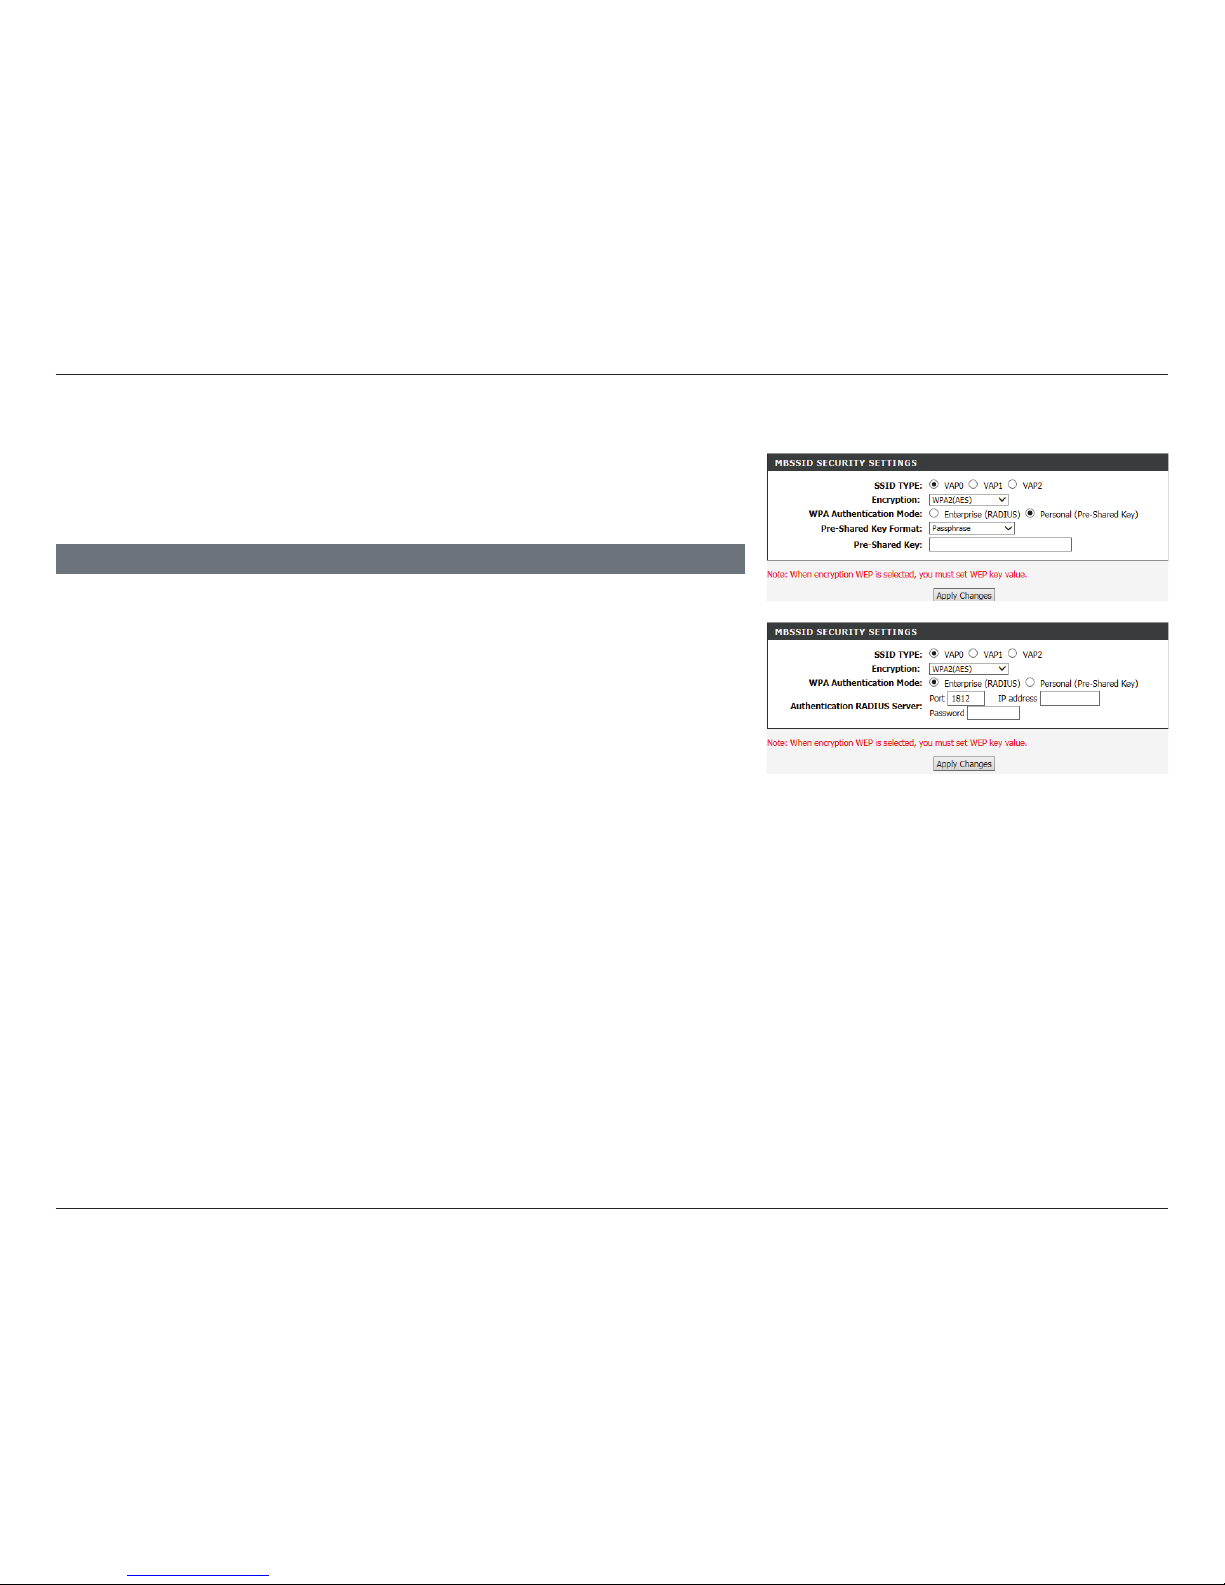
67D-Link DSL-2745 Wireless N300 ADSL2+ Modem Router User Manual
Section 4 - Conguration
MBSSID Encryption: WPA/WPA2 Mixed
Click Apply Changes to have your changes take effect.
SSID Type: Select either VAP0, VAP1, or VAP2.
Encryption: WPA/WPA2 Mixed
WPA
Authentication
Mode:
Choose either Enterprise (Radius) or Personal (Pre-shared
Key). Most small home/business networks will want to use
Personal (Pre-shared Key). If you are running a dedicated RADIUS
authentication server, choose Enterprise (RADIUS)
If Personal (Pre-Shared Key) is selected:
Pre-Shared Key
Format:
Select the Encryption key format. Choose either Passphrase or
HEX(26 Characters).
Pre-Shared Key: Enter a wireless key to use on your wireless network.
If Enterprise (Radius) is selected:
Authentication
RADIUS Server:
Enter the Port, IP address, and Password of the RADIUS Server.
Backup RADIUS
Server:
Enter the Port, IP address, and Password of the backup RADIUS
Server.
MBSSID SECURITY SETTINGS
WPA/WPA2 Mixed(AES) is a reasonably strong wireless security encryption type.
This is for wireless clients which do not support WPA2 encryption, otherwise
use of WP2(AES) is recommended.
Page 73
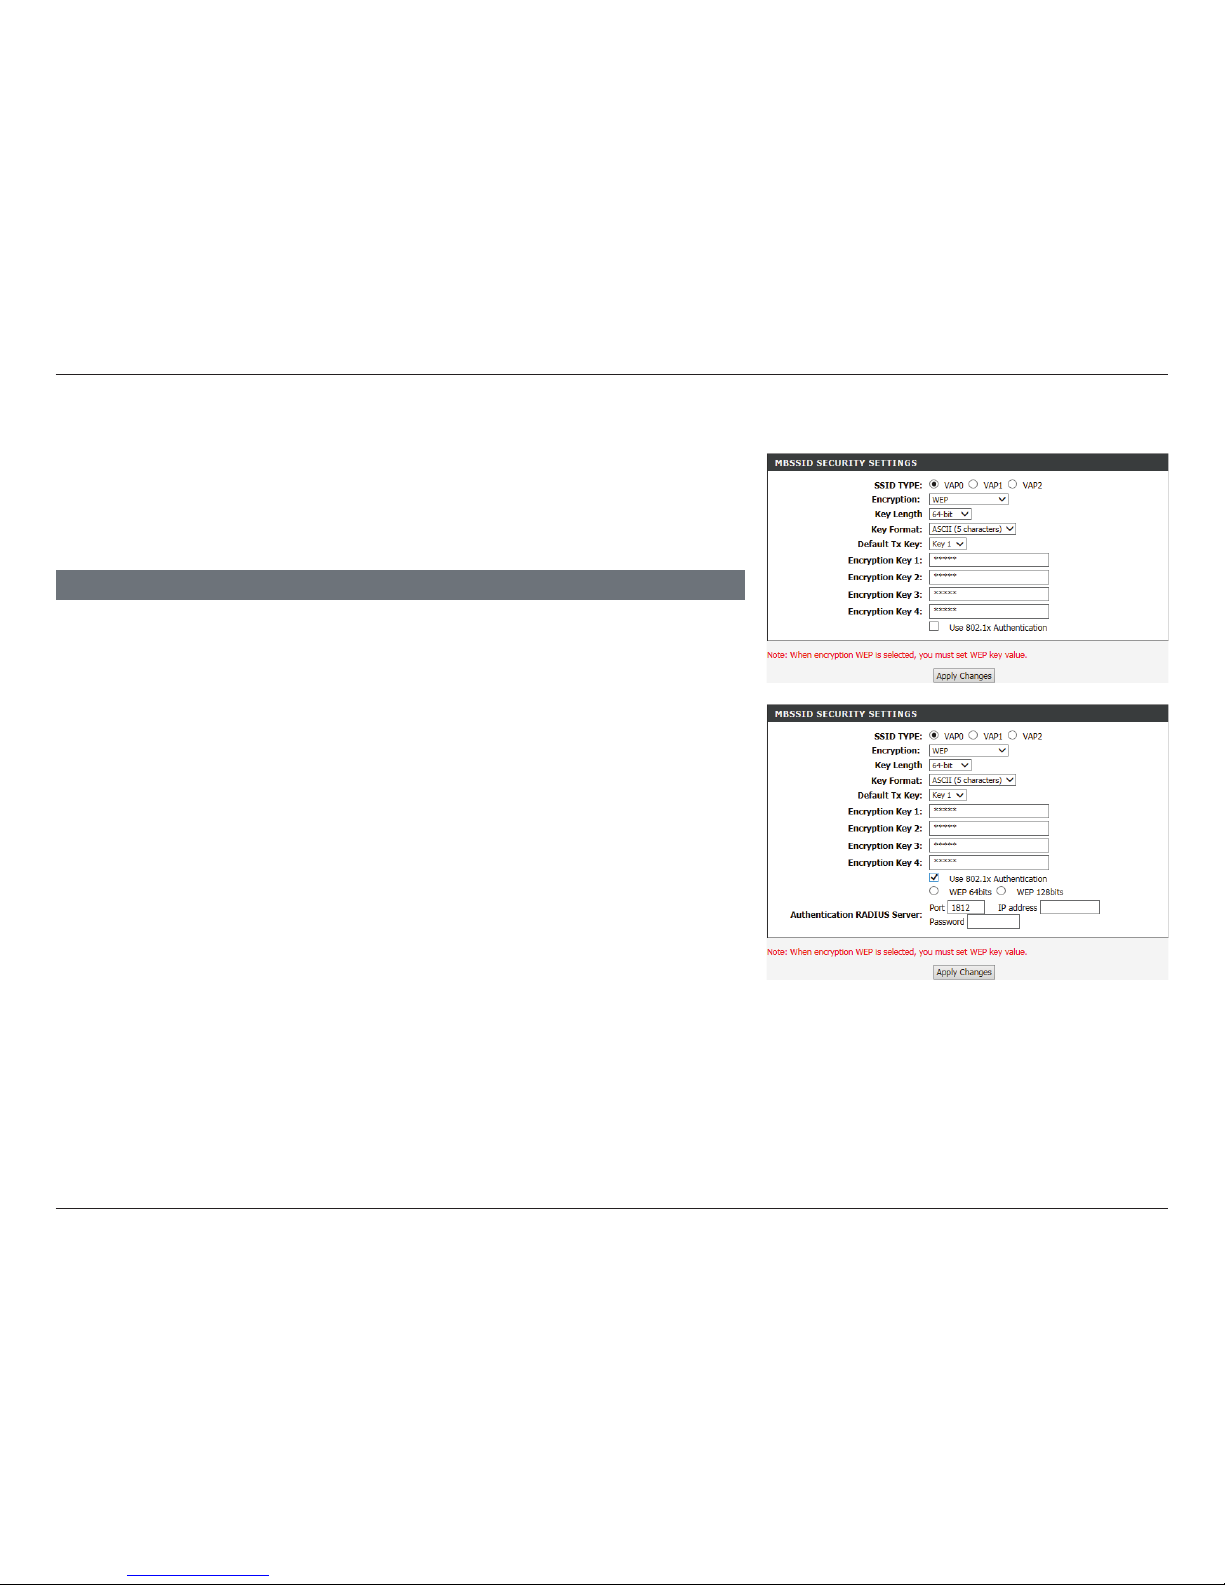
68D-Link DSL-2745 Wireless N300 ADSL2+ Modem Router User Manual
Section 4 - Conguration
MBSSID Encryption: WEP
Click Apply Changes to have your changes take effect.
SSID Type: Select either VAP0, VAP1, or VAP2.
Encryption: WEP
Key Length: Select the Encryption cipher key bit strength. The available options
are 64-bit and 128-bit.
Key Format: Select the Encryption key format. If you selected a 64-bit
key length, you may choose ASCII (5 Characters) or HEX(10
Characters). If you selected a 128-bit key length, you may choose
ASCII (13 Characters) or HEX(26 Characters).
Default Tx Key: Select which Tx key is used as the default.
Encryption Key
1-4:
Enter a wireless key to use on your wireless network.
The following settings are available if Use 802.1x Authentication is checked:
Authentication
RADIUS Server:
Enter the Port, IP address, and Password of the RADIUS Server.
Backup RADIUS
Server:
Enter the Port, IP address, and Password of the backup RADIUS
Server.
WIRELESS SECURITY SETTINGS
Use of WEP encryption is not recommended, as it only oers a trivial amount
of protection for your wireless data. Unless your clients do not support WPA
encryption, it is recommended that you select WPA2(AES) or WPA/WPA2
Mixed instead of WEP as they are more secure.
Page 74
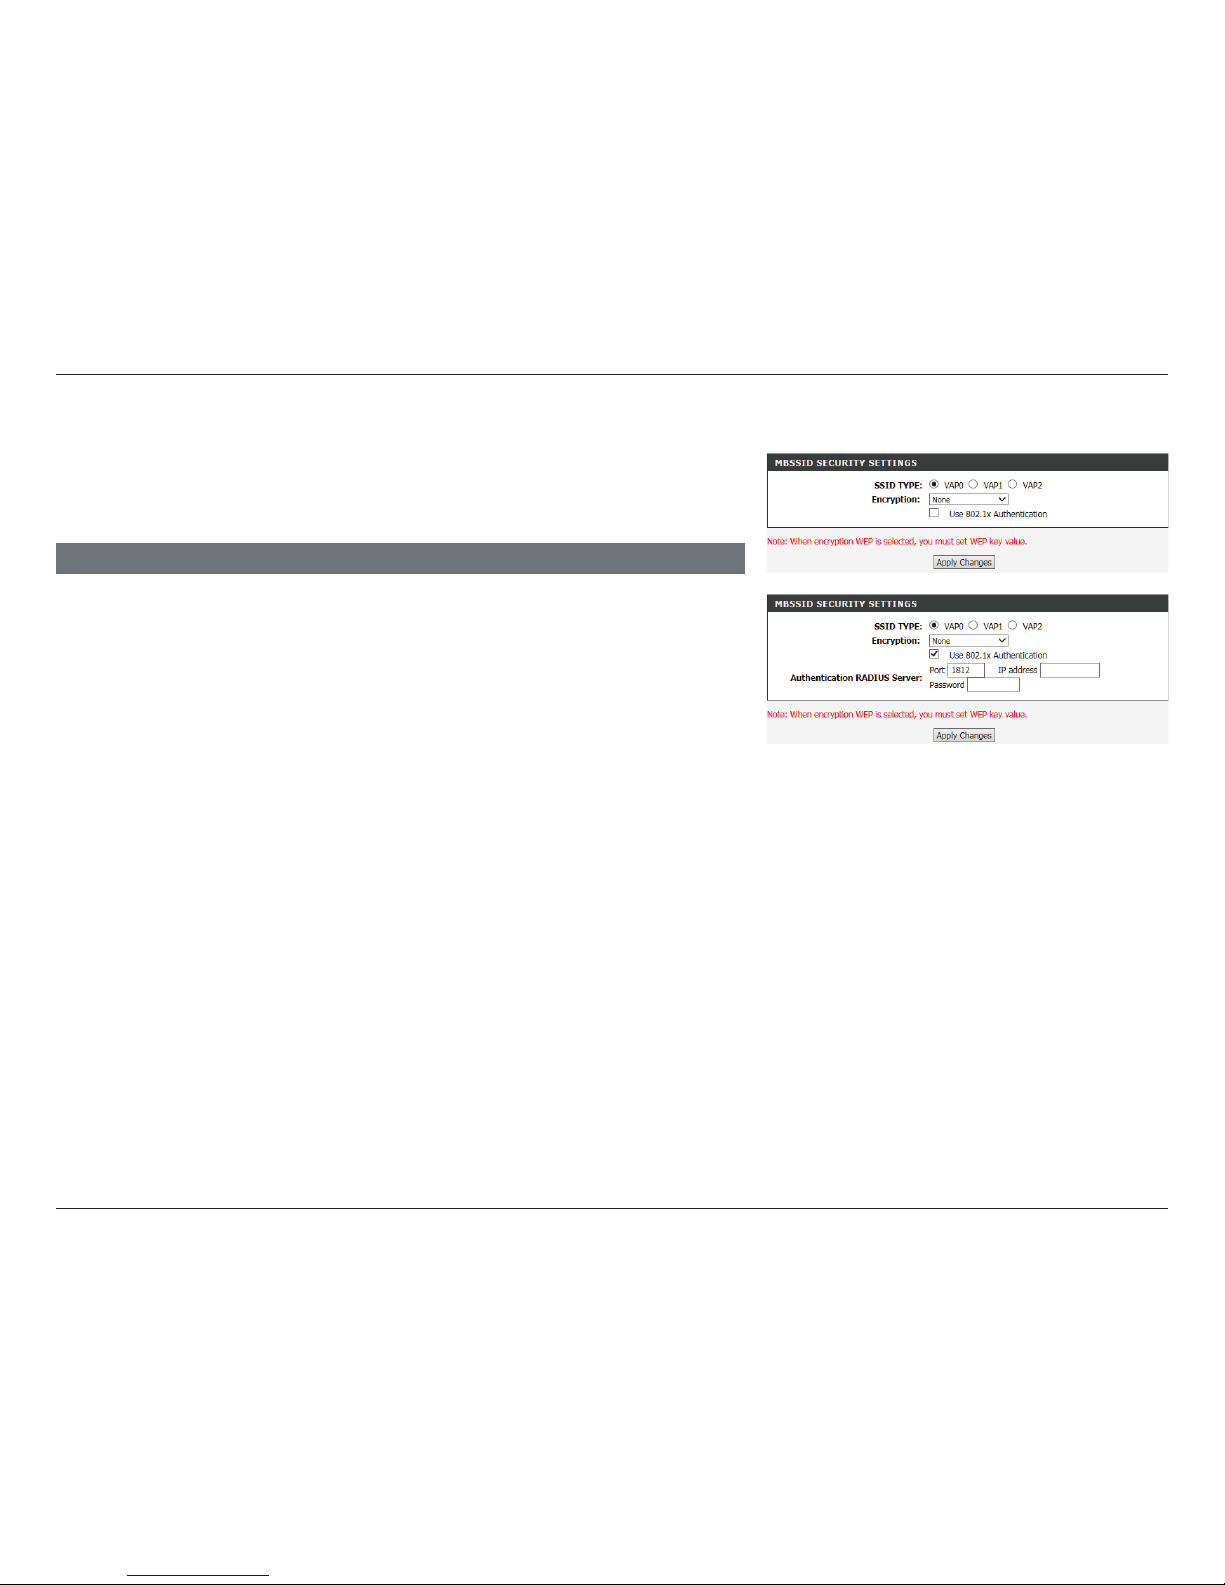
69D-Link DSL-2745 Wireless N300 ADSL2+ Modem Router User Manual
Section 4 - Conguration
Disabling encryption and leaving your wireless network open is not
recommended. Any wireless client will be able to access your network, be able
to use your Internet connection, and leaves you open to security threats.
Encryption: None
No configuration settings are available if Encryption is set to None.
The following settings are available if Use 802.1x Authentication is checked:
Authentication
RADIUS Server:
Enter the Port, IP address, and Password of the RADIUS Server.
Backup RADIUS
Server:
Enter the Port, IP address, and Password of the backup RADIUS
Server.
WIRELESS SECURITY SETTINGS
Click Apply Changes to have your changes take effect.
MBSSID Encryption: None
Page 75
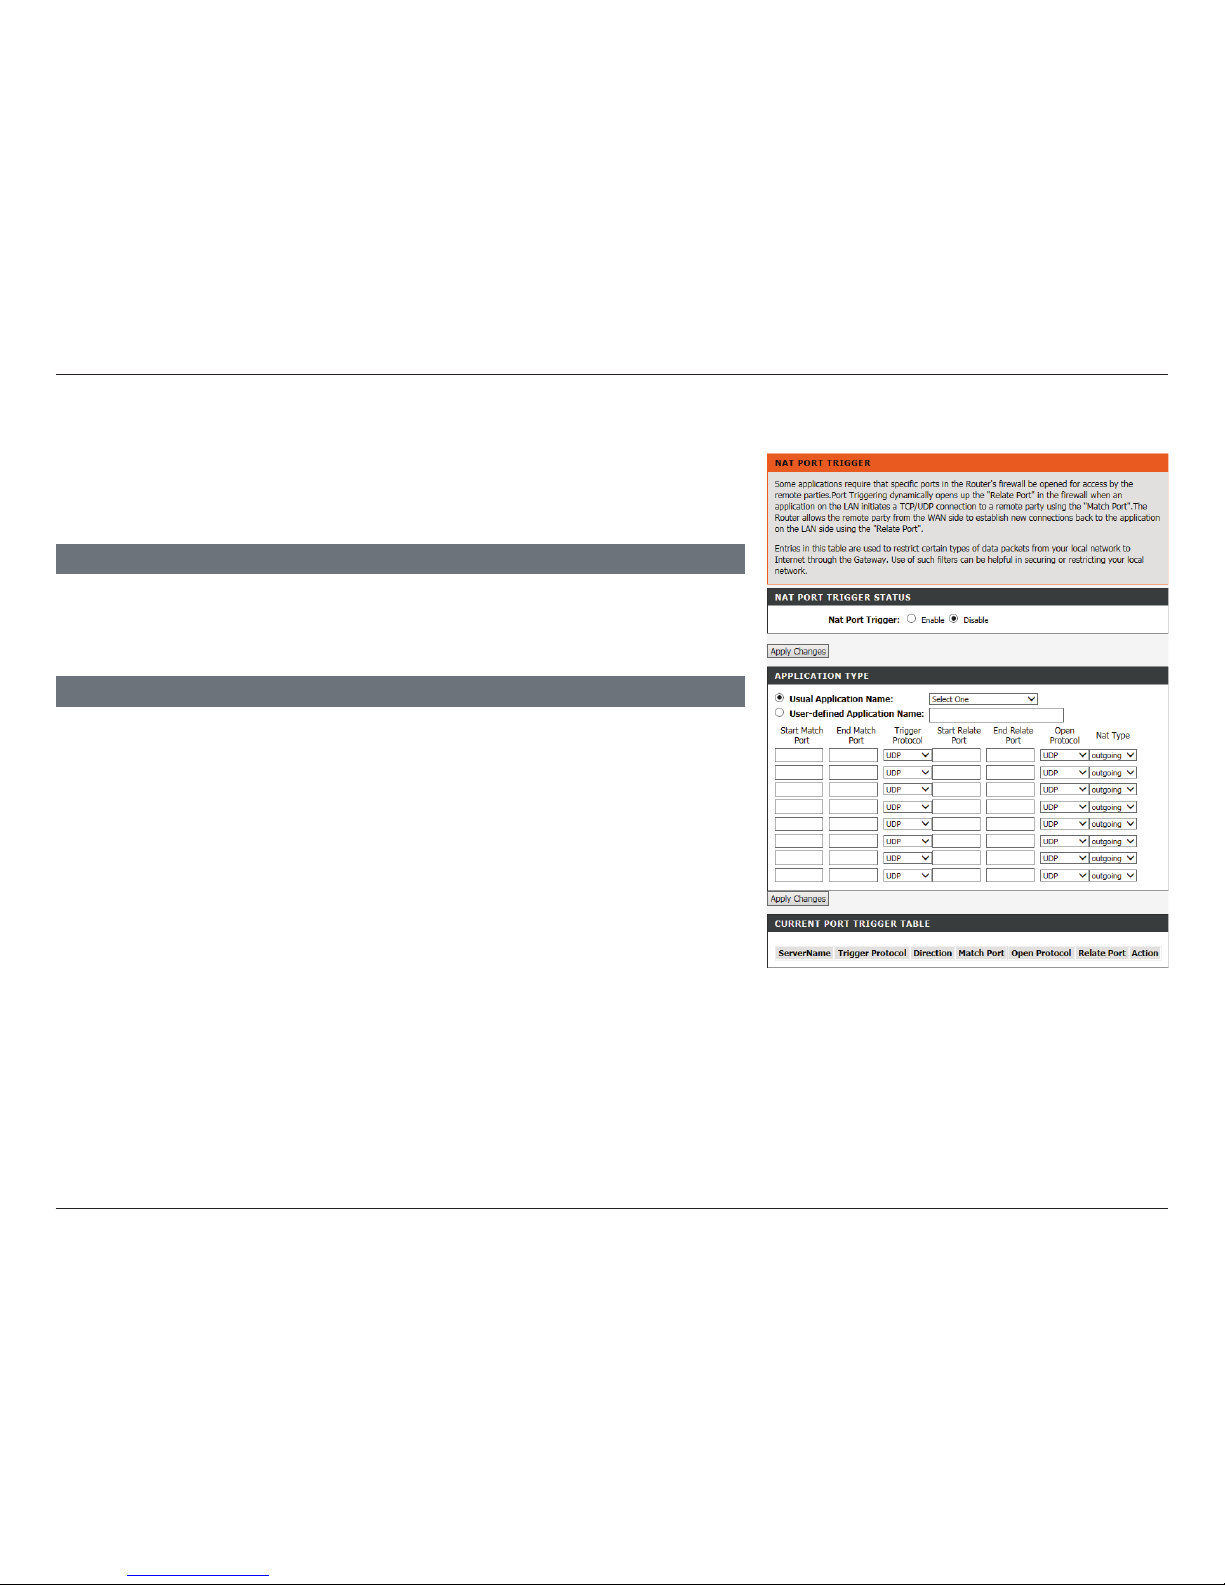
70D-Link DSL-2745 Wireless N300 ADSL2+ Modem Router User Manual
Section 4 - Conguration
Port Triggering
Port triggering allows ports to be opened when trac is detected on specied
ports. This is used for facilitating communication between applications and
servers behind a NAT rewall.
Nat Port Trigger: Select Enable or Disable.
NAT PORT TRIGGER STATUS
Usual Application
Name:
These commonly used applications are provided as an example of
how to input port ranges.
User-defined
Application name:
Name the rule you are about to define for your application. You
may define up to 8 port ranges per application.
Start Match Port: Enter the starting source port range your DSL-2745 will forward
traffic from.
End Match Port: Enter the ending source port range your DSL-2745 will forward
traffic from.
Trigger Protocol: Select the protocol to monitor for to trigger this rule.
Start Relate Port: Enter the starting destination port range your DSL-2745 will
forward traffic to.
End Relate Port: Enter the ending destination port range your DSL-2745 will
forward traffic to.
APPLICATION TYPE
Click Apply Changes to have your changes take effect.
Click Apply Changes to have your changes take effect.
Page 76
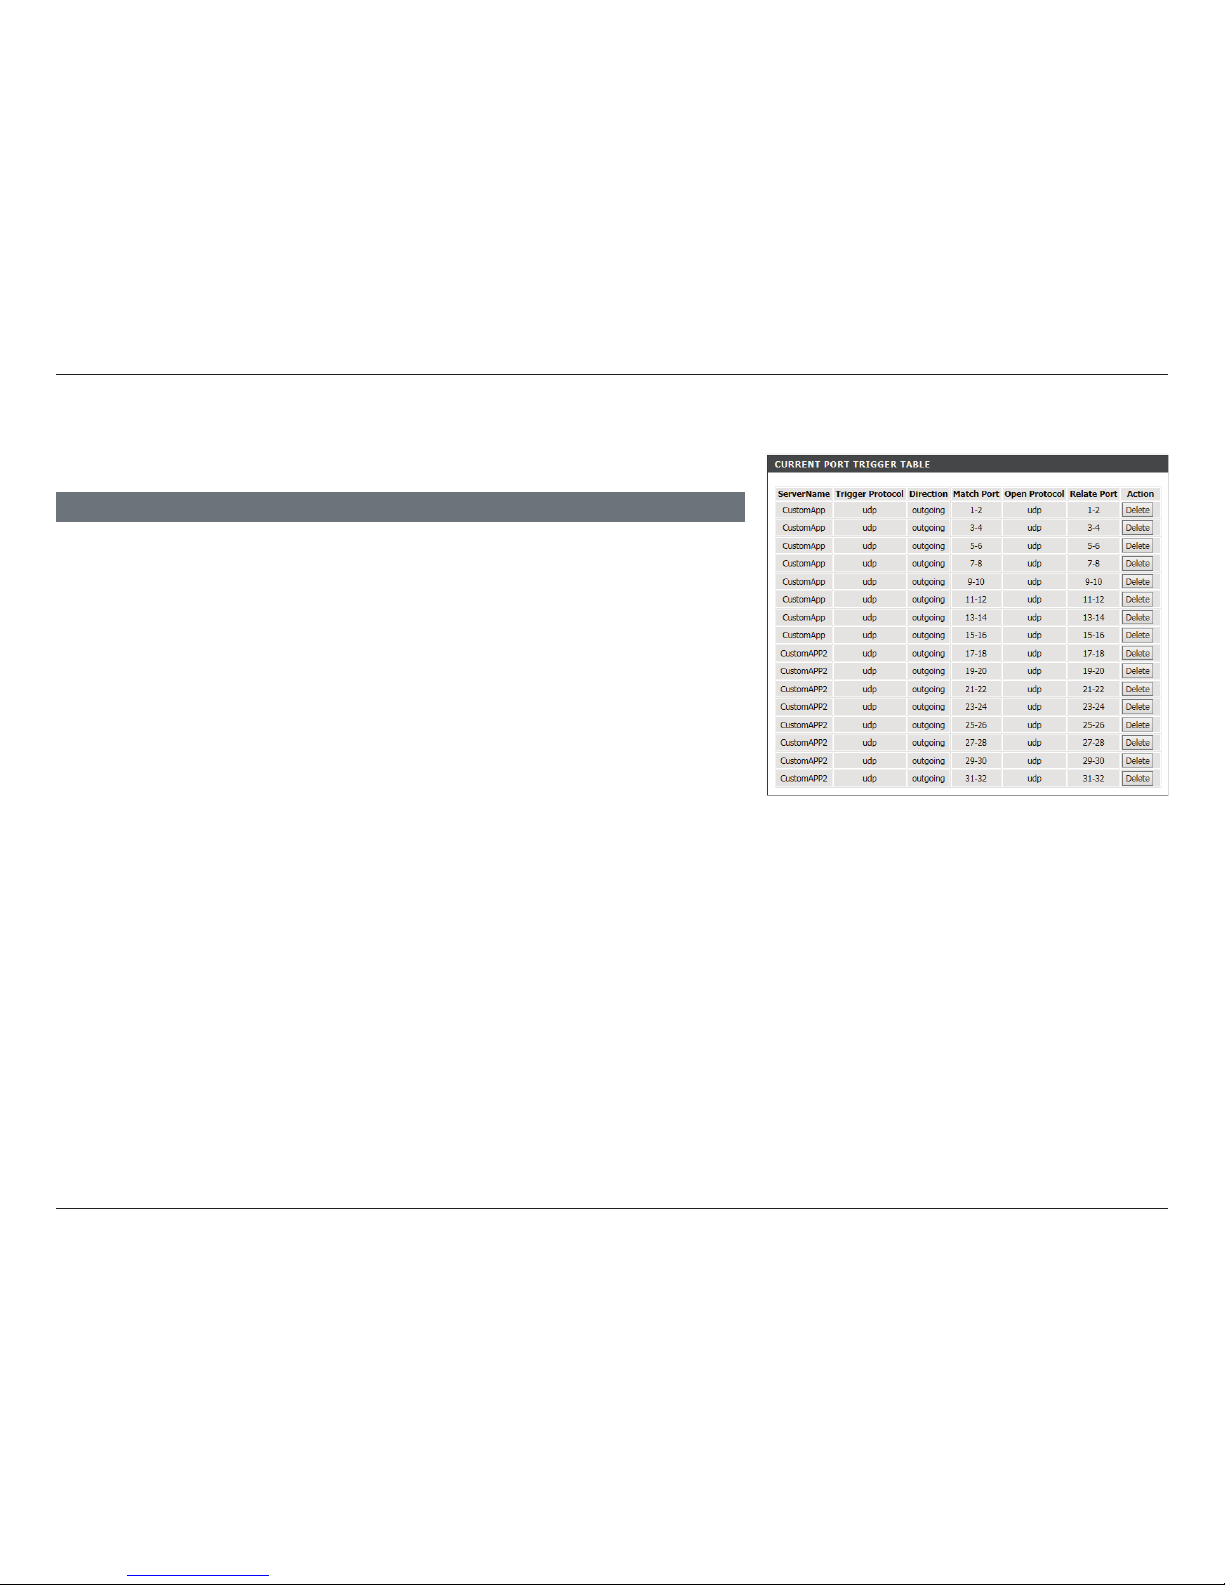
71D-Link DSL-2745 Wireless N300 ADSL2+ Modem Router User Manual
Section 4 - Conguration
Port Triggering (continued)
An example Port Triggering Table is shown to the right.
From the table you can see the current port triggering rules and their details. To delete a
rule, select the Delete button in the last column of the rule.
CURRENT PORT TRIGGER TABLE
Page 77
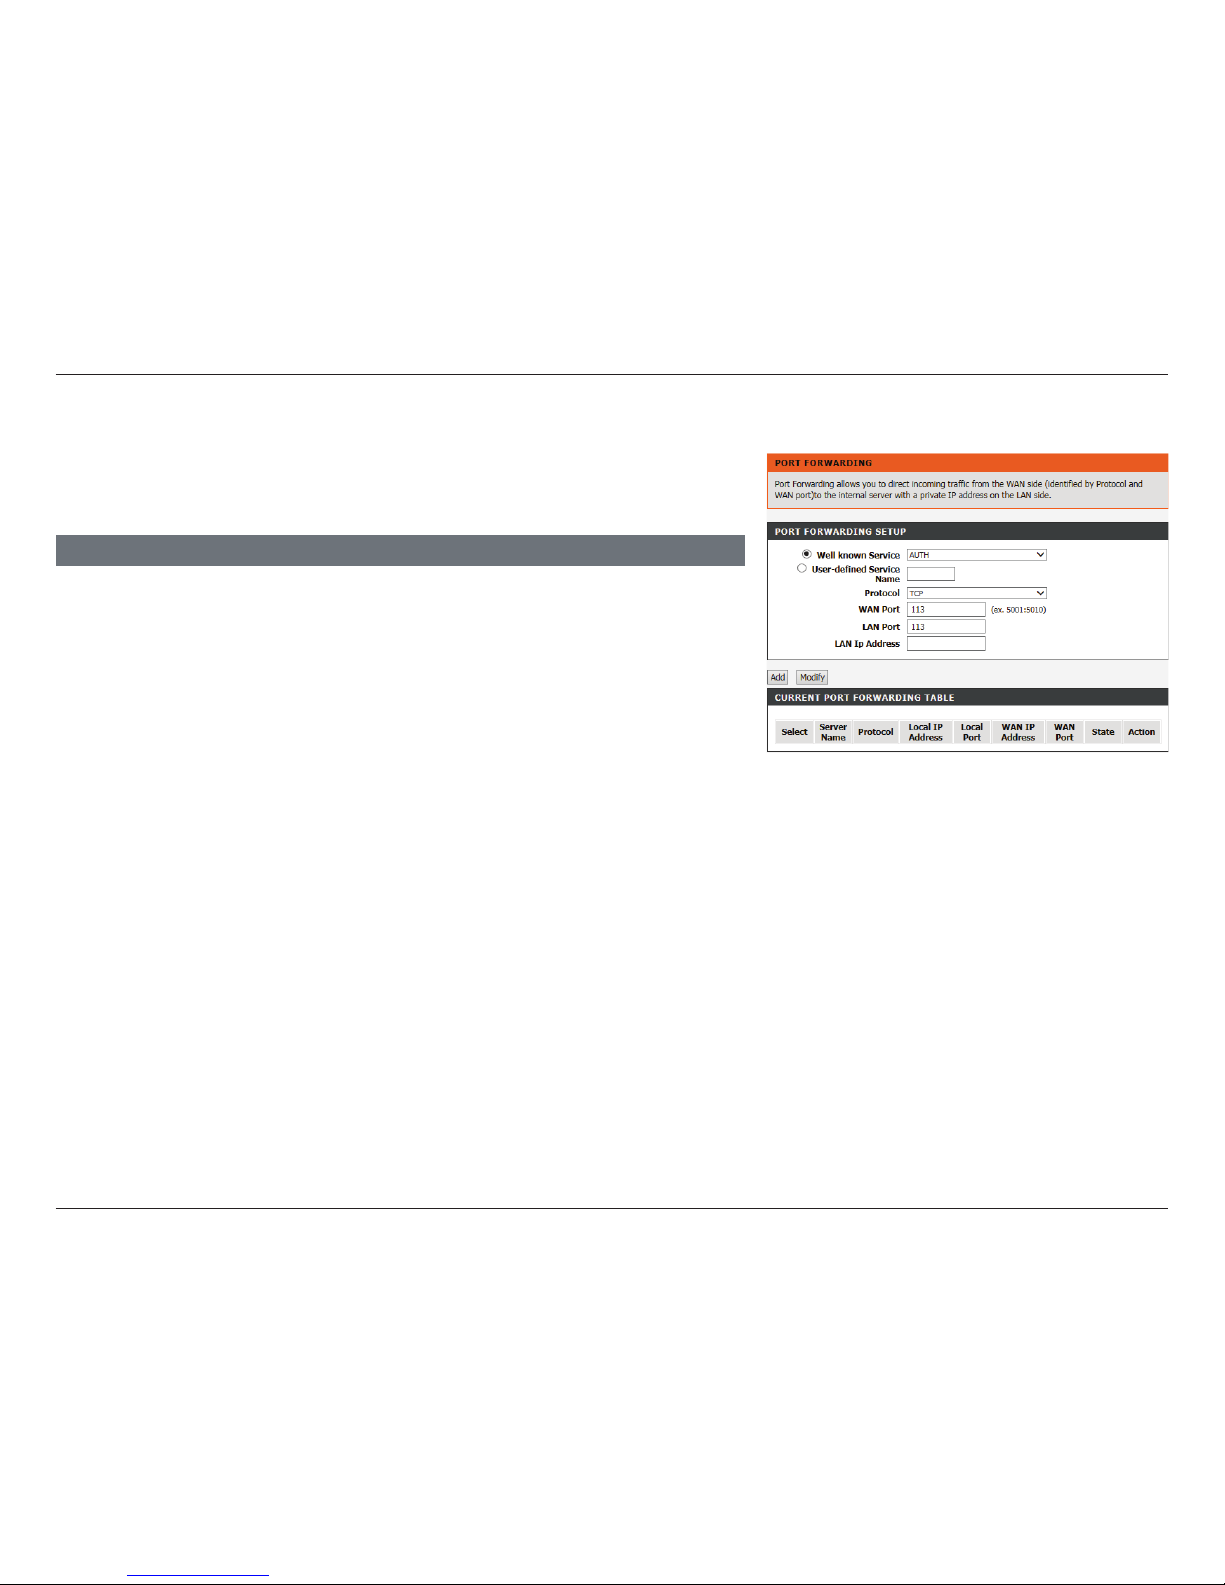
72D-Link DSL-2745 Wireless N300 ADSL2+ Modem Router User Manual
Section 4 - Conguration
Port Forwarding
Port Forwarding allows you to direct incoming trac from the WAN side
(identied by Protocol and WAN port) to an internal server with a private IP
address on the LAN side.
Well known
Service:
Commonly used protocols are pre-defined and can be easily
selected.
User-defined
Service:
Name the rule you are about to define for your server.
Protocol: Select the protocol type to use with this service.
WAN Port: Enter the WAN port number.
LAN Port: Enter the LAN port number.
LAN IP Address: Enter the IP address trac is forwarded to.
PORT FORWARDING SETUP
Click Add to add the new port forwarding rule. To modify an existing rule,
select it using the radio selection button. The boxes of the Port Forwarding
Setup section will populate with the rules parameters. Enter your changes and
click Modify.
Page 78
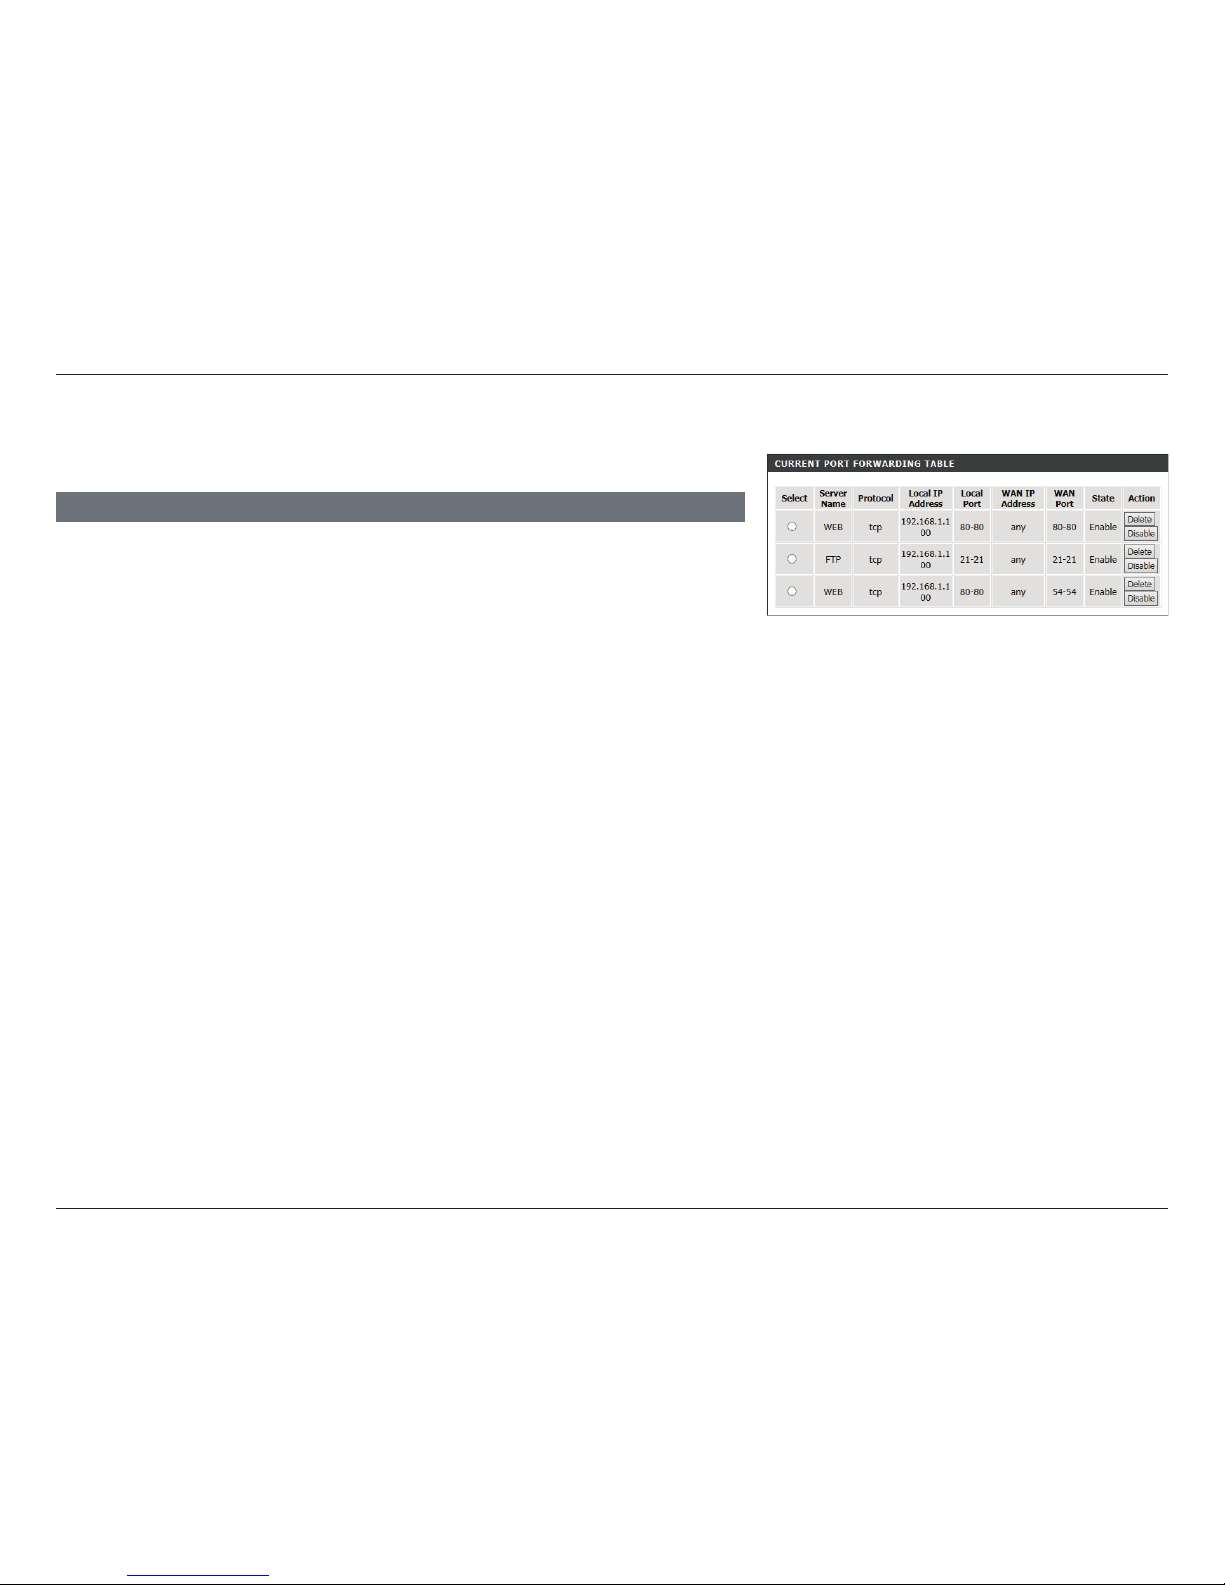
73D-Link DSL-2745 Wireless N300 ADSL2+ Modem Router User Manual
Section 4 - Conguration
Port Forwarding (continued)
An example Port Forwarding Table is shown to the right.
From the table you can see the current port forwarding rules and their details. To disable
a rule select the Disable button in the last column of the rule. To delete a rule, select the
Delete button in the last column of the rule.
CURRENT PORT FORWARDING TABLE
Page 79
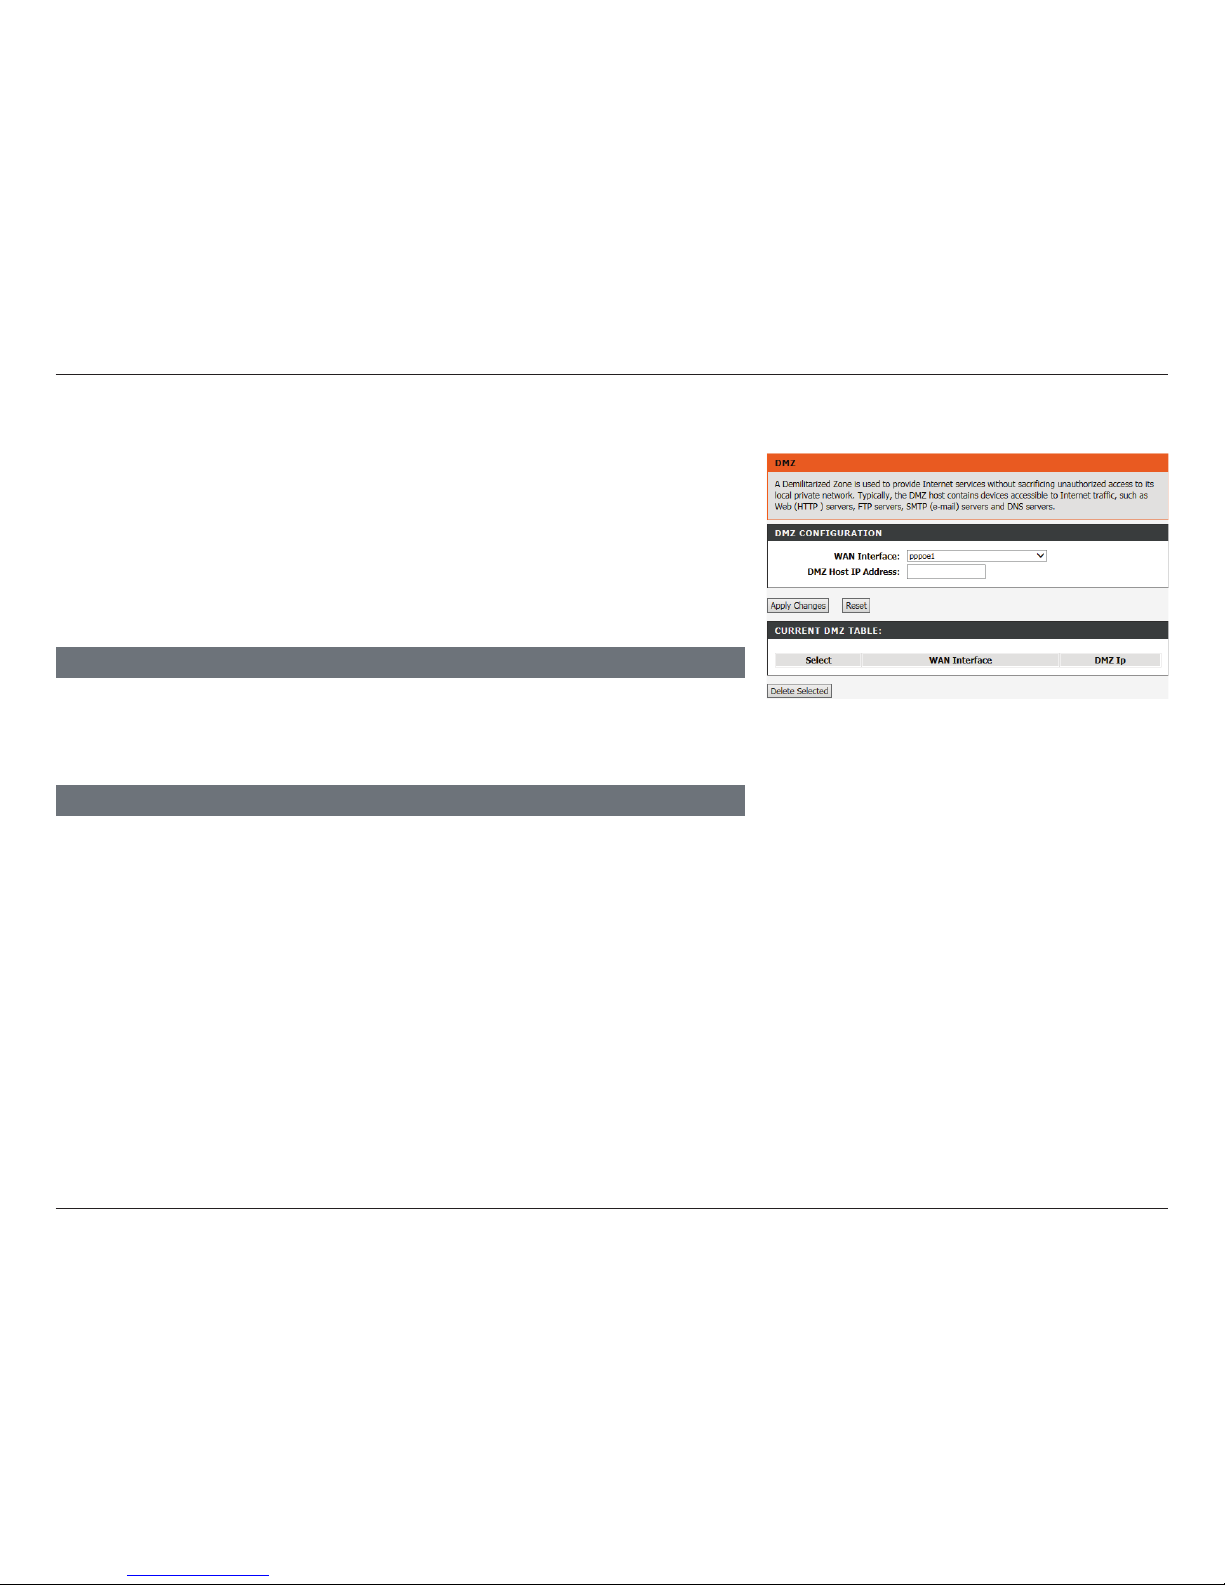
74D-Link DSL-2745 Wireless N300 ADSL2+ Modem Router User Manual
Section 4 - Conguration
DMZ
This page allows you to manually congure the router’s DMZ settings. Since
some applications are not compatible with NAT, the device supports the use of
a DMZ IP address for a single host on the LAN. This IP address is not protected
by NAT and it is visible on the Internet with the correct type of software. Note
that any client PC in the DMZ is exposed to various types of security risks. If you
use DMZ, take measures (such as client-based virus protection) to protect the
remaining client PCs on your LAN from possible contamination through DMZ.
DMZ CONFIGURATION
Select the WAN Interface to associate with a DMZ Host IP address, LAN IP address. Click
Apply Changes when you are done or Reset WAN Interface to revert to the previously
saved settings.
CURRENT DMZ TABLE
The currently assigned DMZ is displayed in this list. To delete the DMZ, select it using the
radio button and press Delete Selected.
Page 80
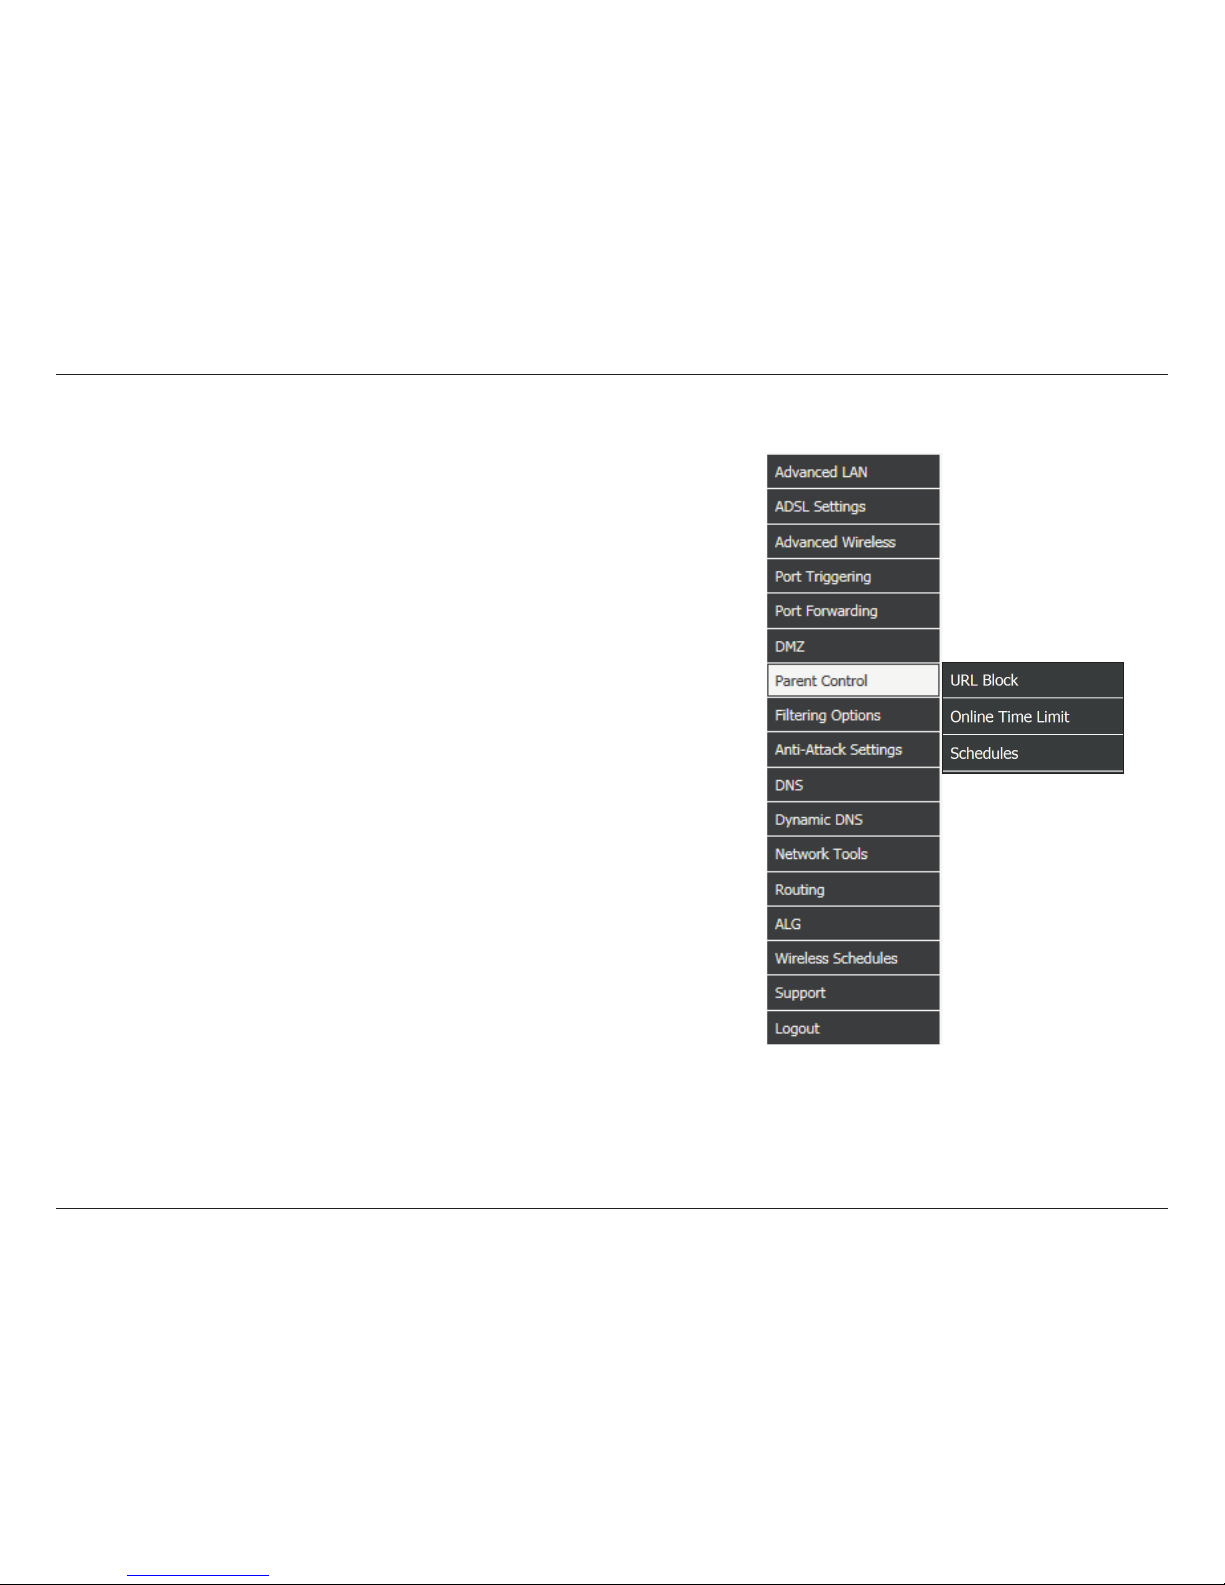
75D-Link DSL-2745 Wireless N300 ADSL2+ Modem Router User Manual
Section 4 - Conguration
Hover your mouse over the Parent Control option on the vertical menu bar
running along the left side to access:
• URL Block
• Online Time Limit
• Schedules
Parent Control
Page 81
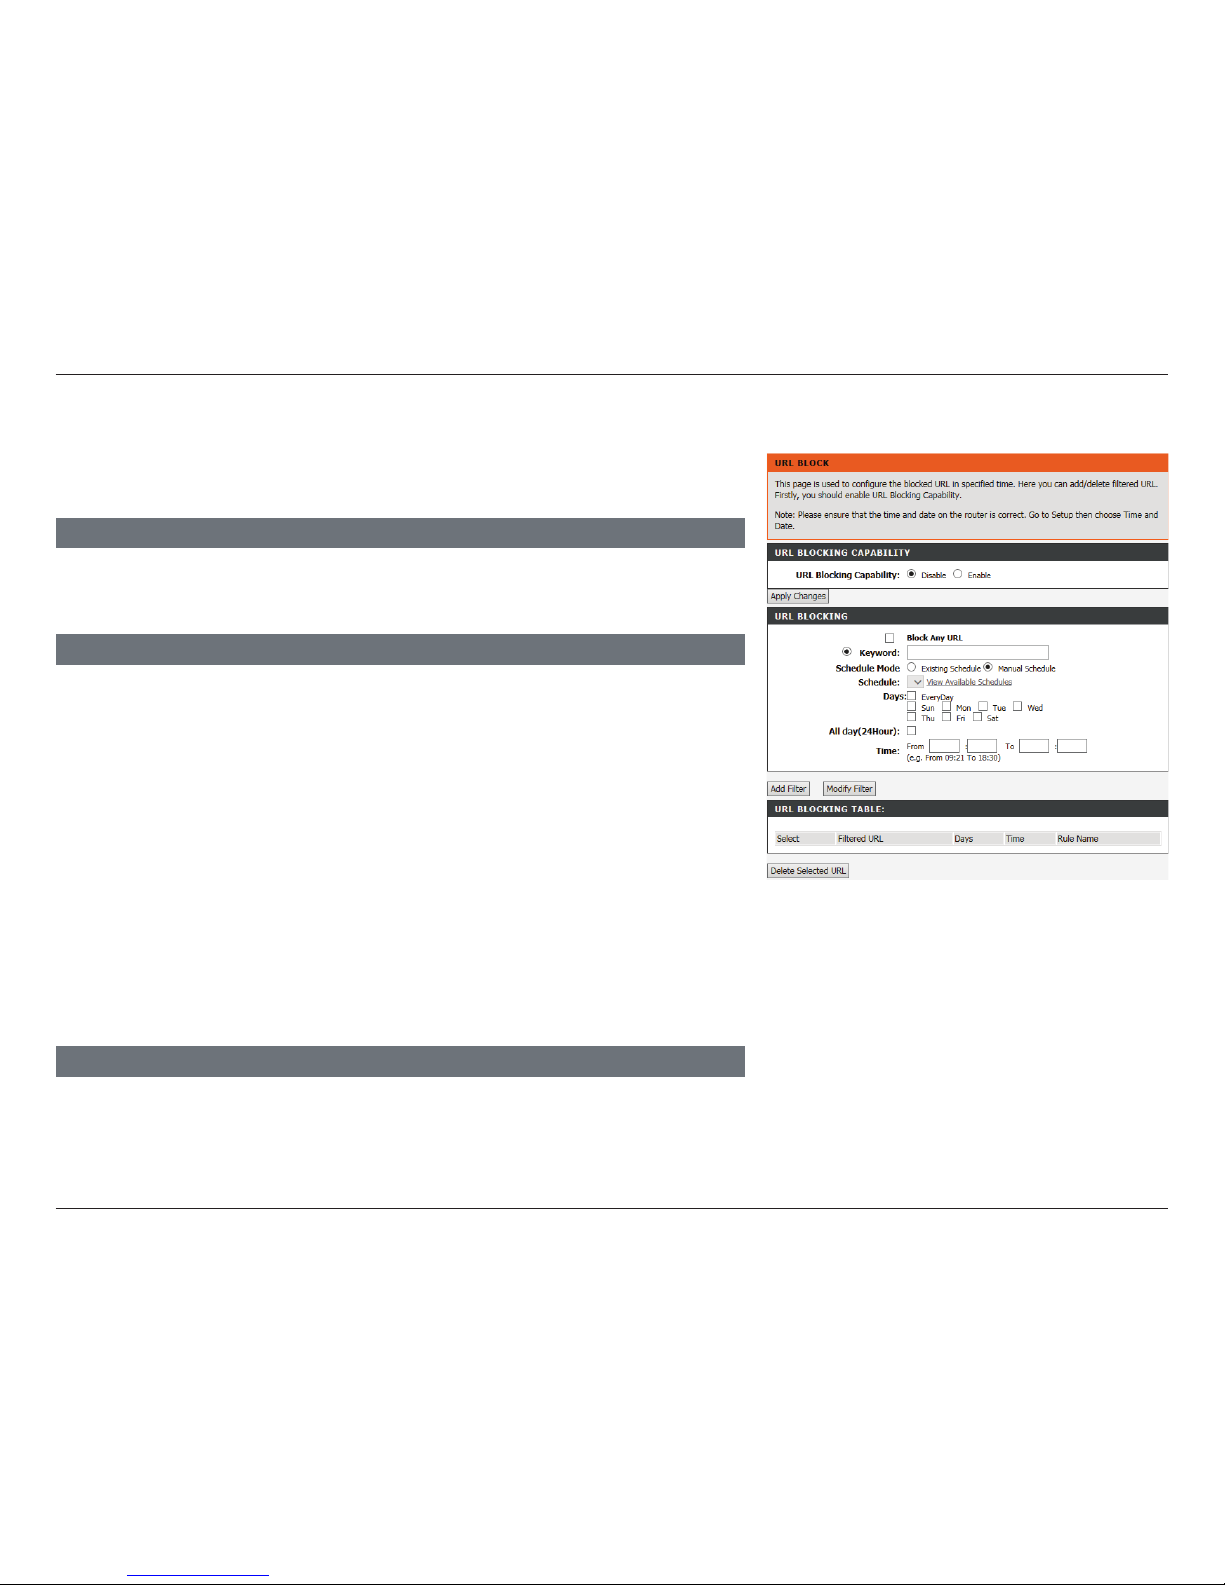
76D-Link DSL-2745 Wireless N300 ADSL2+ Modem Router User Manual
Section 4 - Conguration
URL Block
URL BLOCKING TABLE
This table displays the current URL Blocking rules in eect. To delete an existing rule, select
it from the list and click Delete Selected URL.
URL Blocking
Capability:
Check the radio button to enable URL blocking. Click Apply Changes
to enable the feature and start adding rules.
URL BLOCKING CAPABILITY
When you are satised with your URL blocking rule, click Add Filter. To edit an existing
rule, select if from the URL Blocking Table and click Modify Filter.
Block Any URL: Check the radio button to block all URLs.
Keyword: Enter a URL to be blocked.
Schedule Mode: Select either Existing Schedule or Manual Schedule. Refer to
Schedules on page 78 for more information on creating schedules.
Days: If Manual Schedule is selected, select the days to apply the rule.
All day (24Hour): If Manual Schedule is selected, the rule will run 24 hours a day.
Time: If All Day is not selected, enter start and end time to apply the rule.
Use a 24 hour format.
URL BLOCKING
This page is used to congure URLs to be blocked during specic times. In order
for this function to work as expected, the system time must be set correctly.
Page 82
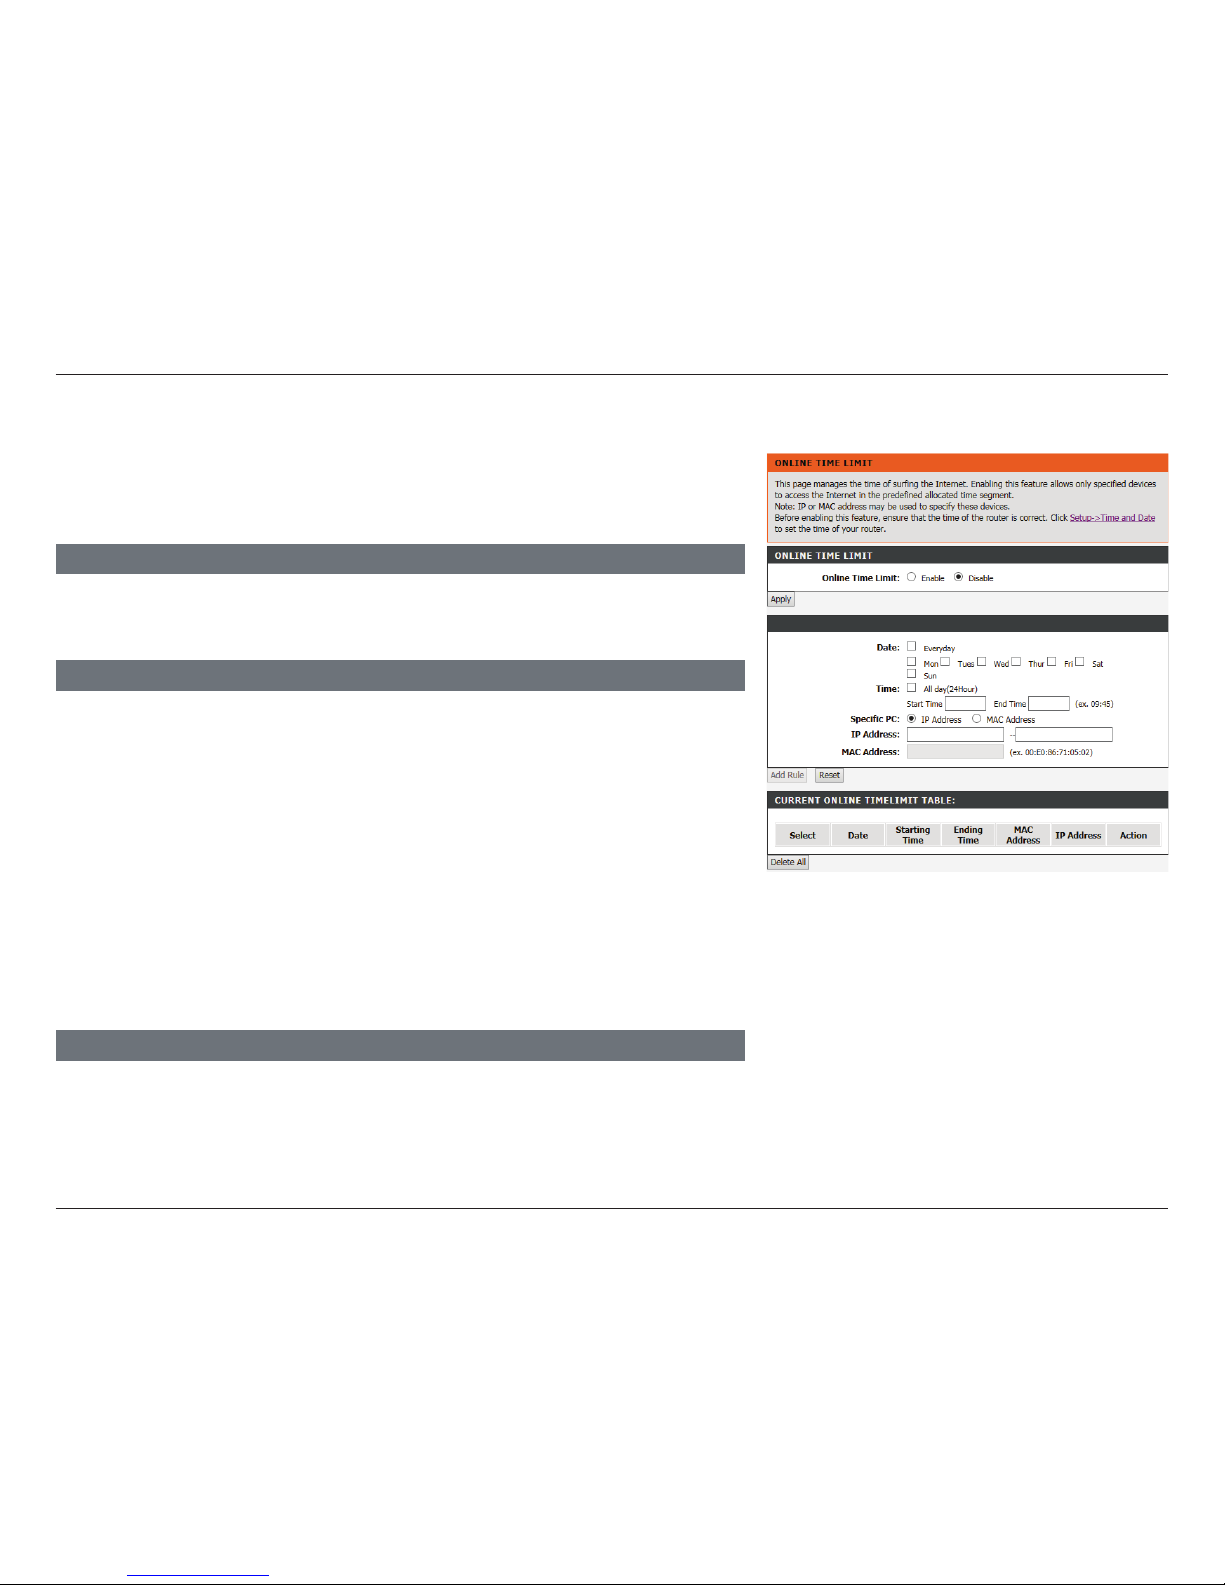
77D-Link DSL-2745 Wireless N300 ADSL2+ Modem Router User Manual
Section 4 - Conguration
Online Time Limit
CURRENT ONLINE TIMELIMIT TABLE:
This table displays the current online time limit rules in eect. To delete all the rules, click
Delete All.
Online Time Limit: Check the radio button to enable the online time limit feature. Click
Apply to enable the feature and start adding rules.
ONLINE TIME LIMIT
When you are satised with your time limit rules, click Add Rules. To clear the elds and
start over, click Reset.
Date: Select the days to apply the time limit.
Time: If All Day is not selected, enter start and end time to apply the rule.
Use a 24 hour format.
Specific PC: Select a PC to apply an online time limit to by either IP Address or
MAC Address.
IP Address: Enter a single IP address or IP address range to apply the rule to.
MAC Address: Enter a MAC Address to apply the rule to.
This page allows Internet browsing time to be set for a group of devices or on
a per device basis. In order for this function to work as expected, the system
time must be set correctly.
Page 83
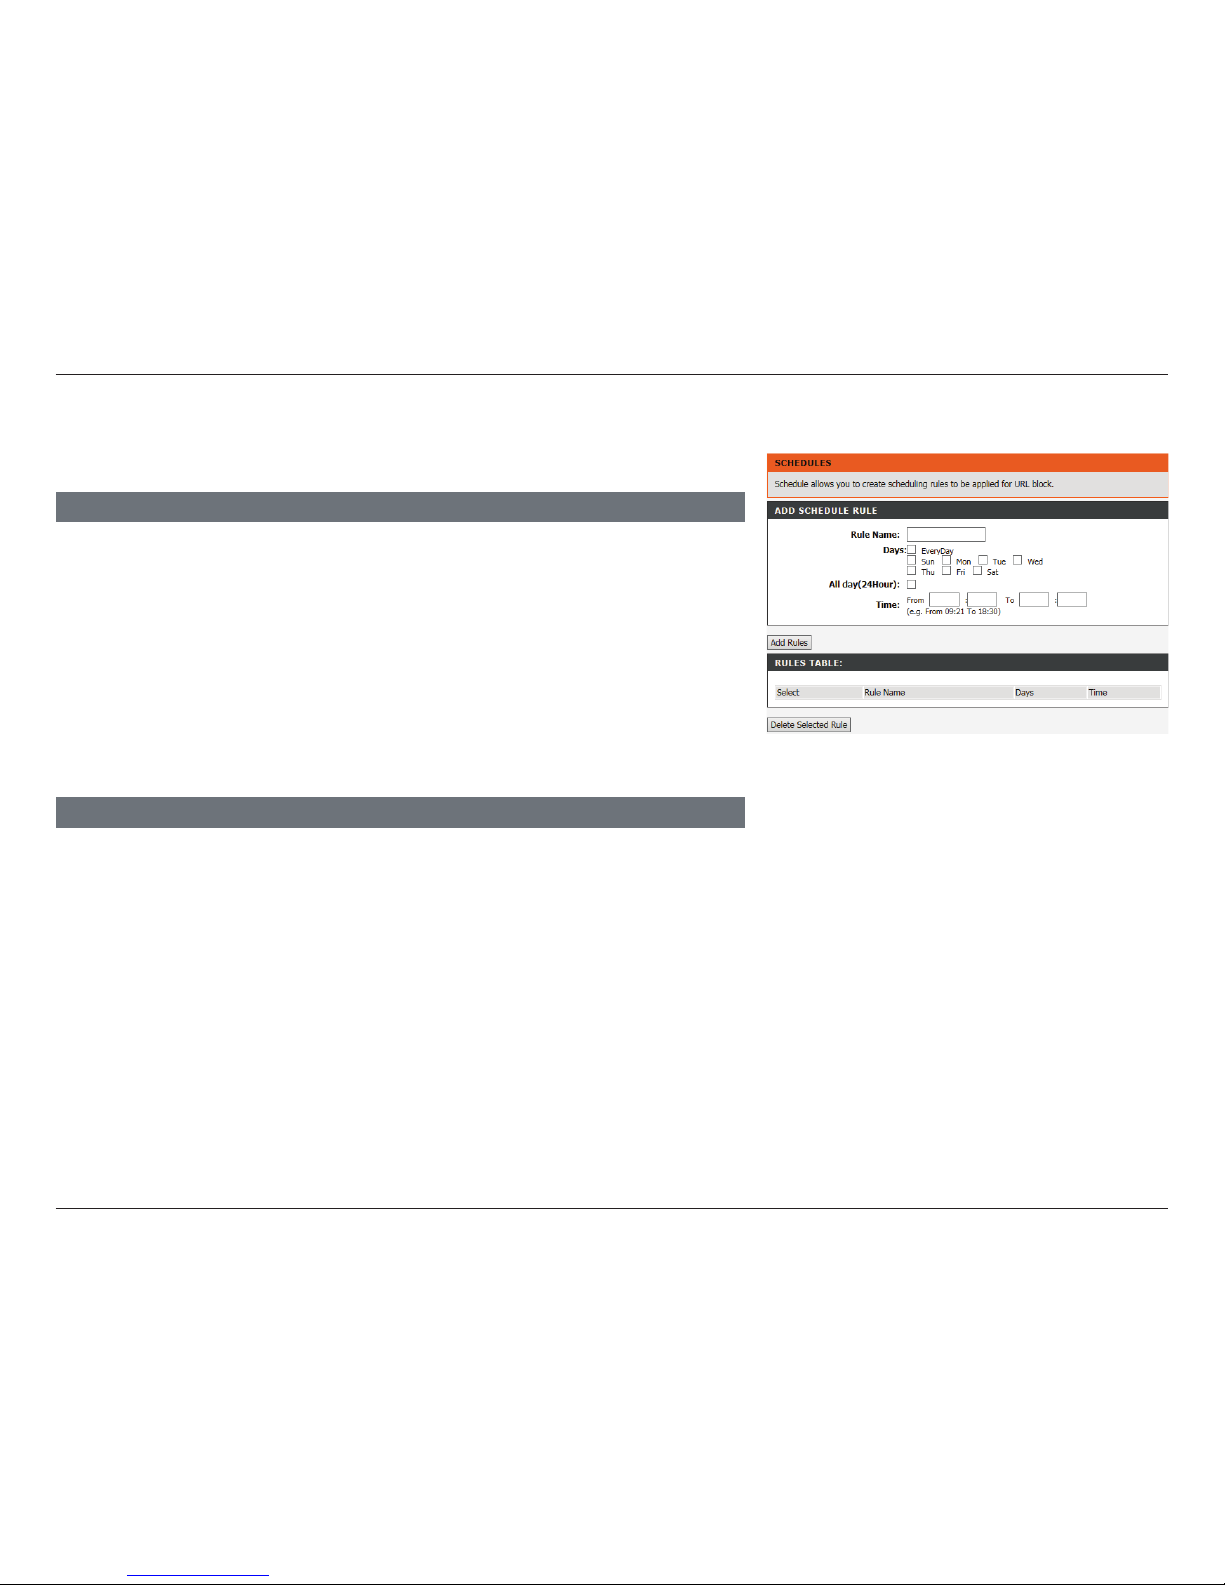
78D-Link DSL-2745 Wireless N300 ADSL2+ Modem Router User Manual
Section 4 - Conguration
Schedules
RULES TABLE:
This table displays the current rules available for selection. To delete a rule, select it and
click Delete Selected Rule.
This page allows you to input schedule rules to be used for the URL block feature.
Rule Name: Enter a name for the rule.
Days: Select the days to apply the rule.
All day (24Hour): Select to have the rule run 24 hours a day.
Time: If All Day is not selected, enter start and end time to apply the rule.
Use a 24 hour format.
ADD SCHEDULE RULE
When you are satised with your time limit rules, click Add Rules. To clear the elds and
start over, click Reset.
Page 84
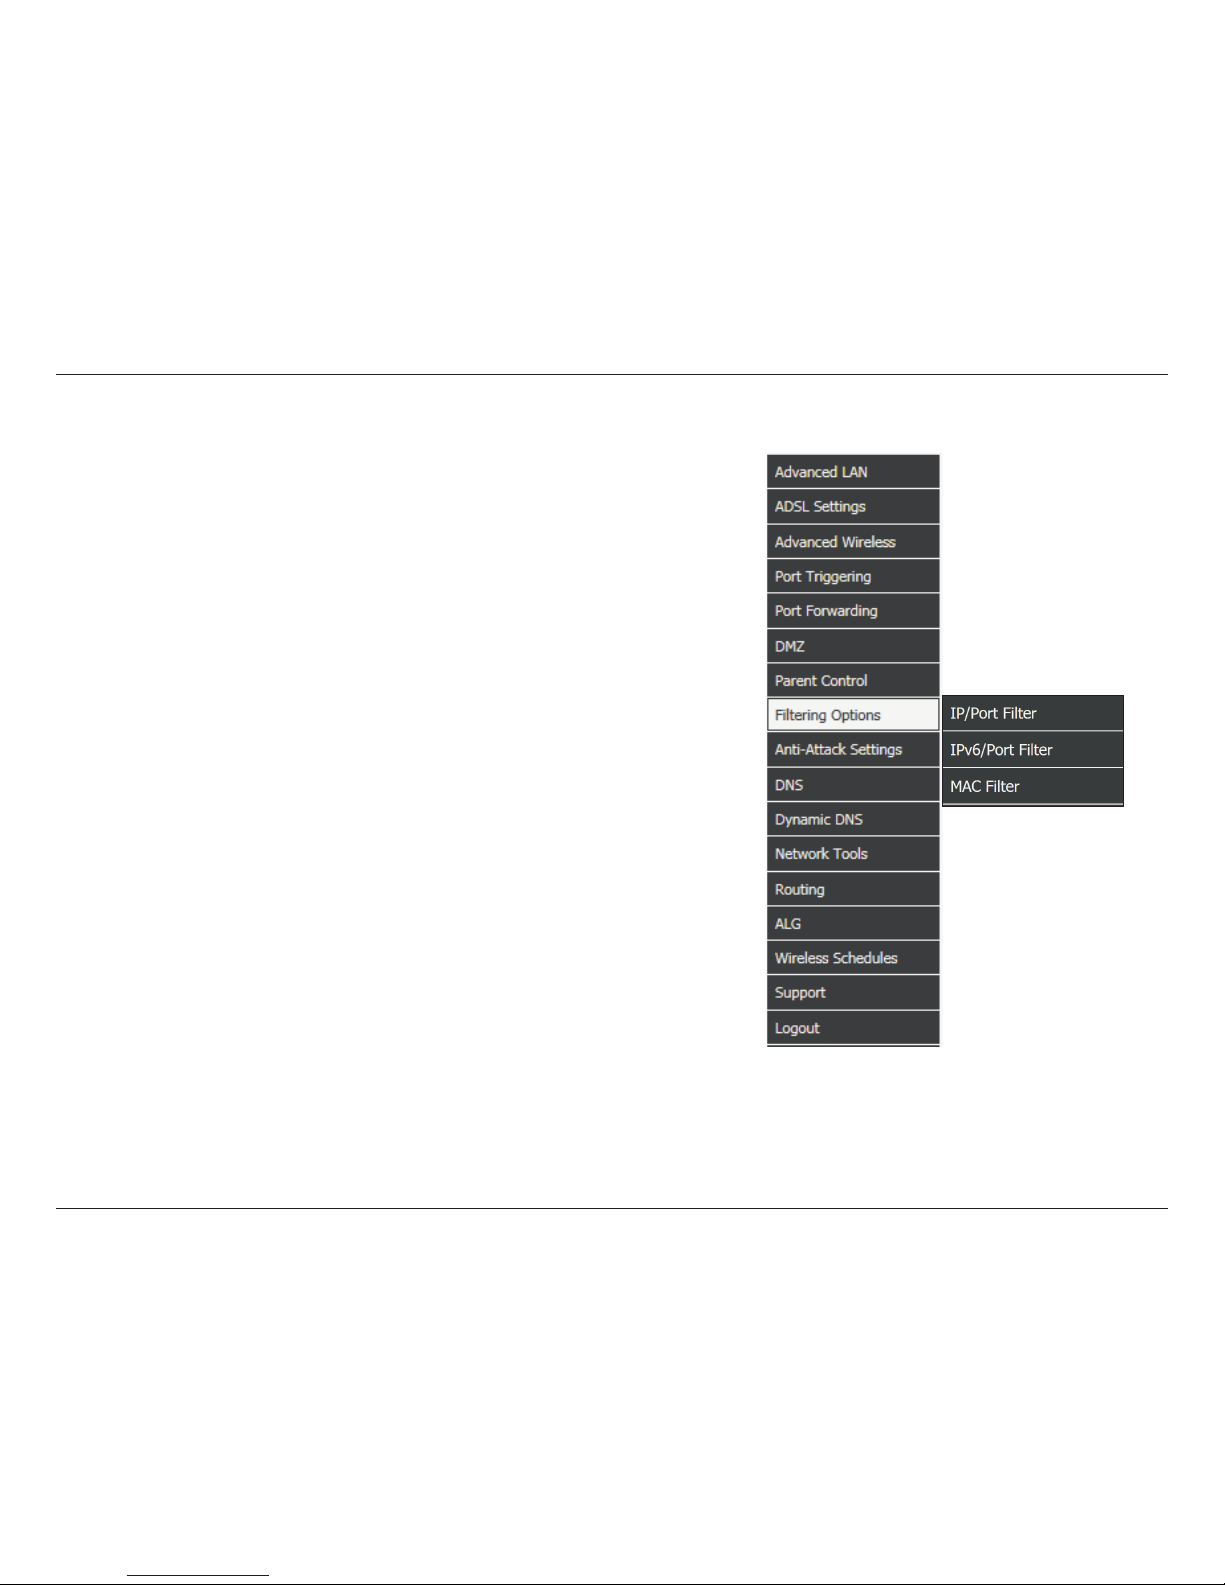
79D-Link DSL-2745 Wireless N300 ADSL2+ Modem Router User Manual
Section 4 - Conguration
Hover your mouse over the Filtering Options option on the vertical menu bar
running along the left side to access:
• IP/Port Filter
• IPv6/Port Filter
• MAC Filter
Filtering Options
Page 85
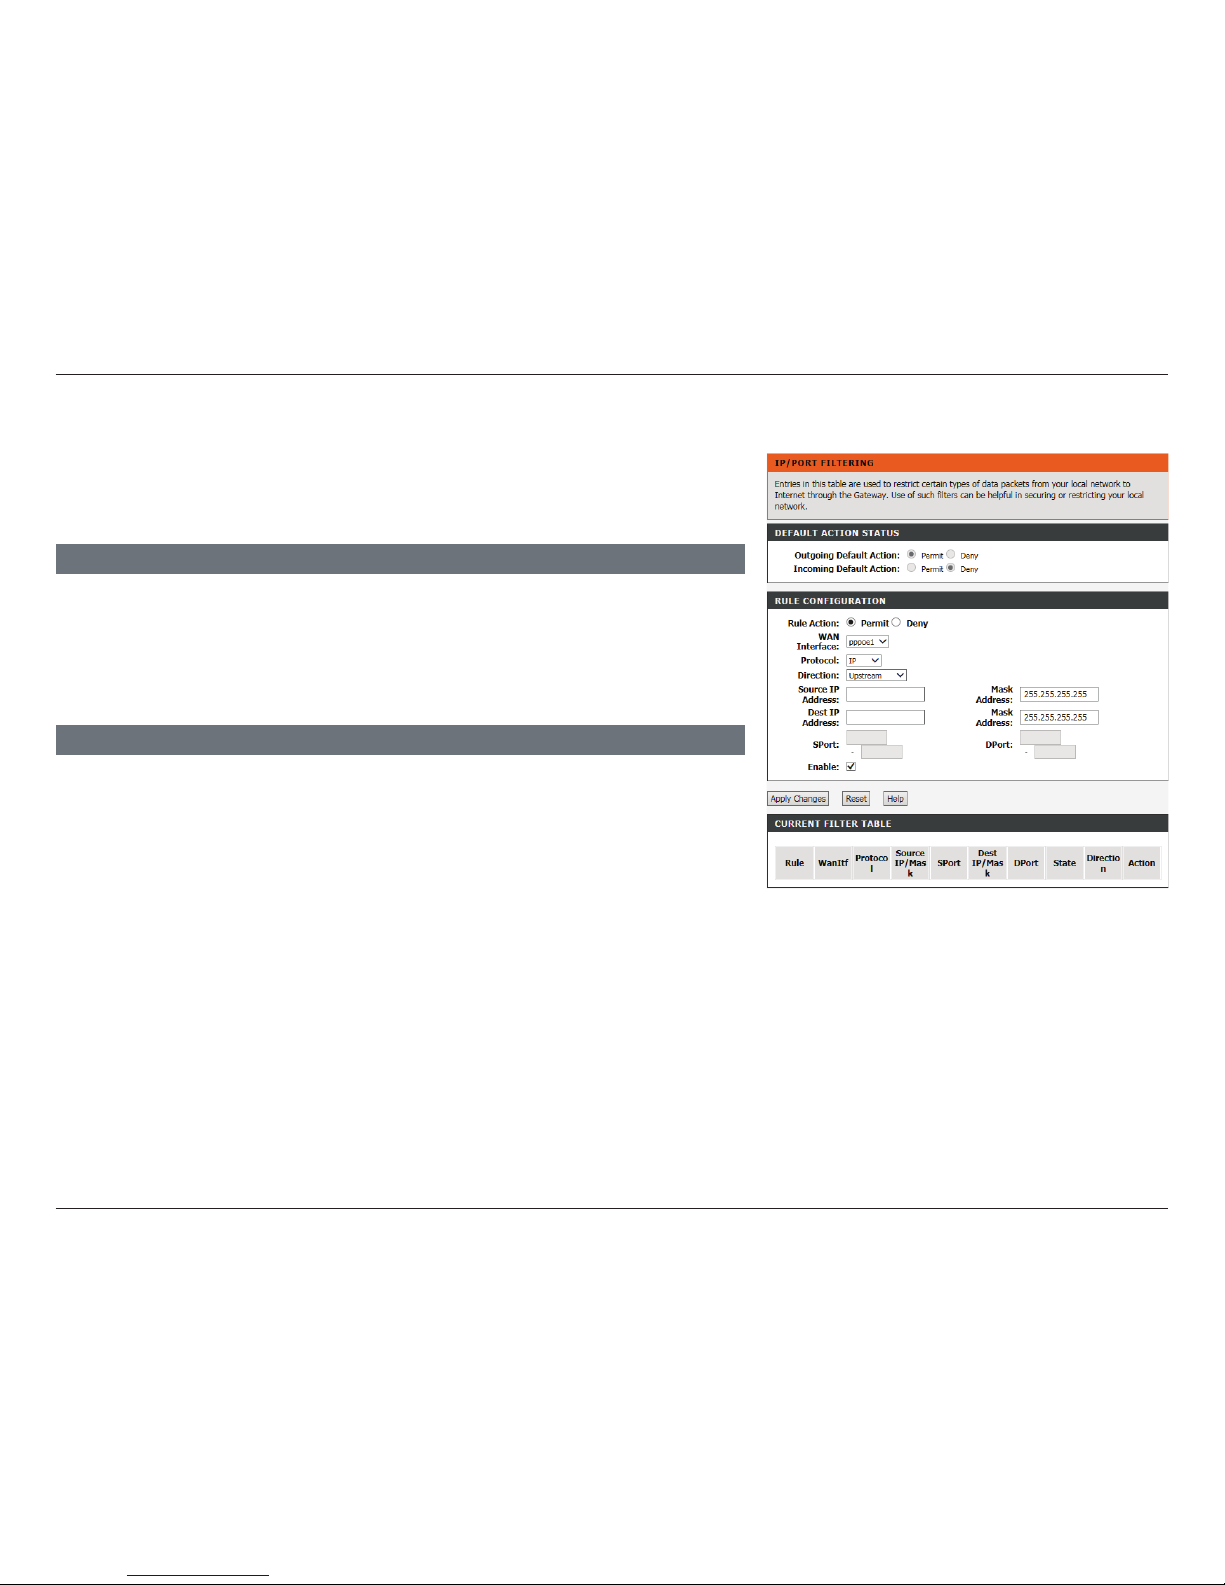
80D-Link DSL-2745 Wireless N300 ADSL2+ Modem Router User Manual
Section 4 - Conguration
IP/Port Filter
The IP/Port lter is used to restrict or allow certain types of data packets through
the gateway. These lters are helpful in securing or restricting trac on your
local network.
Outgoing Default
Action:
Select whether to Permit or Deny data packets to ow out of the
WAN interface. The default setting is Permit.
Incoming Default
Action:
Select whether to Permit or Deny data packets to ow into the WAN
interface. The default setting is Deny.
DEFAULT ACTION STATUS
Rule Action: Select whether this rule will Permit or Deny data packets.
WAN Interface: Select the WAN interface.
Protocol: Select the protocol type: IP, ICMP, TCP, or UDP.
Source IP Address
& Mask Address:
Enter the source IP address and subnet mask for the rule.
Destination IP
Address & Mask
Address:
Enter the destination IP address and subnet mask for the rule.
SPort: Enter the source port number if TCP or UDP is selected.
DPort: Enter the destination port number if TCP or UDP is selected.
RULE CONFIGURATION
To create a rule, ll out the following parameters.
Page 86
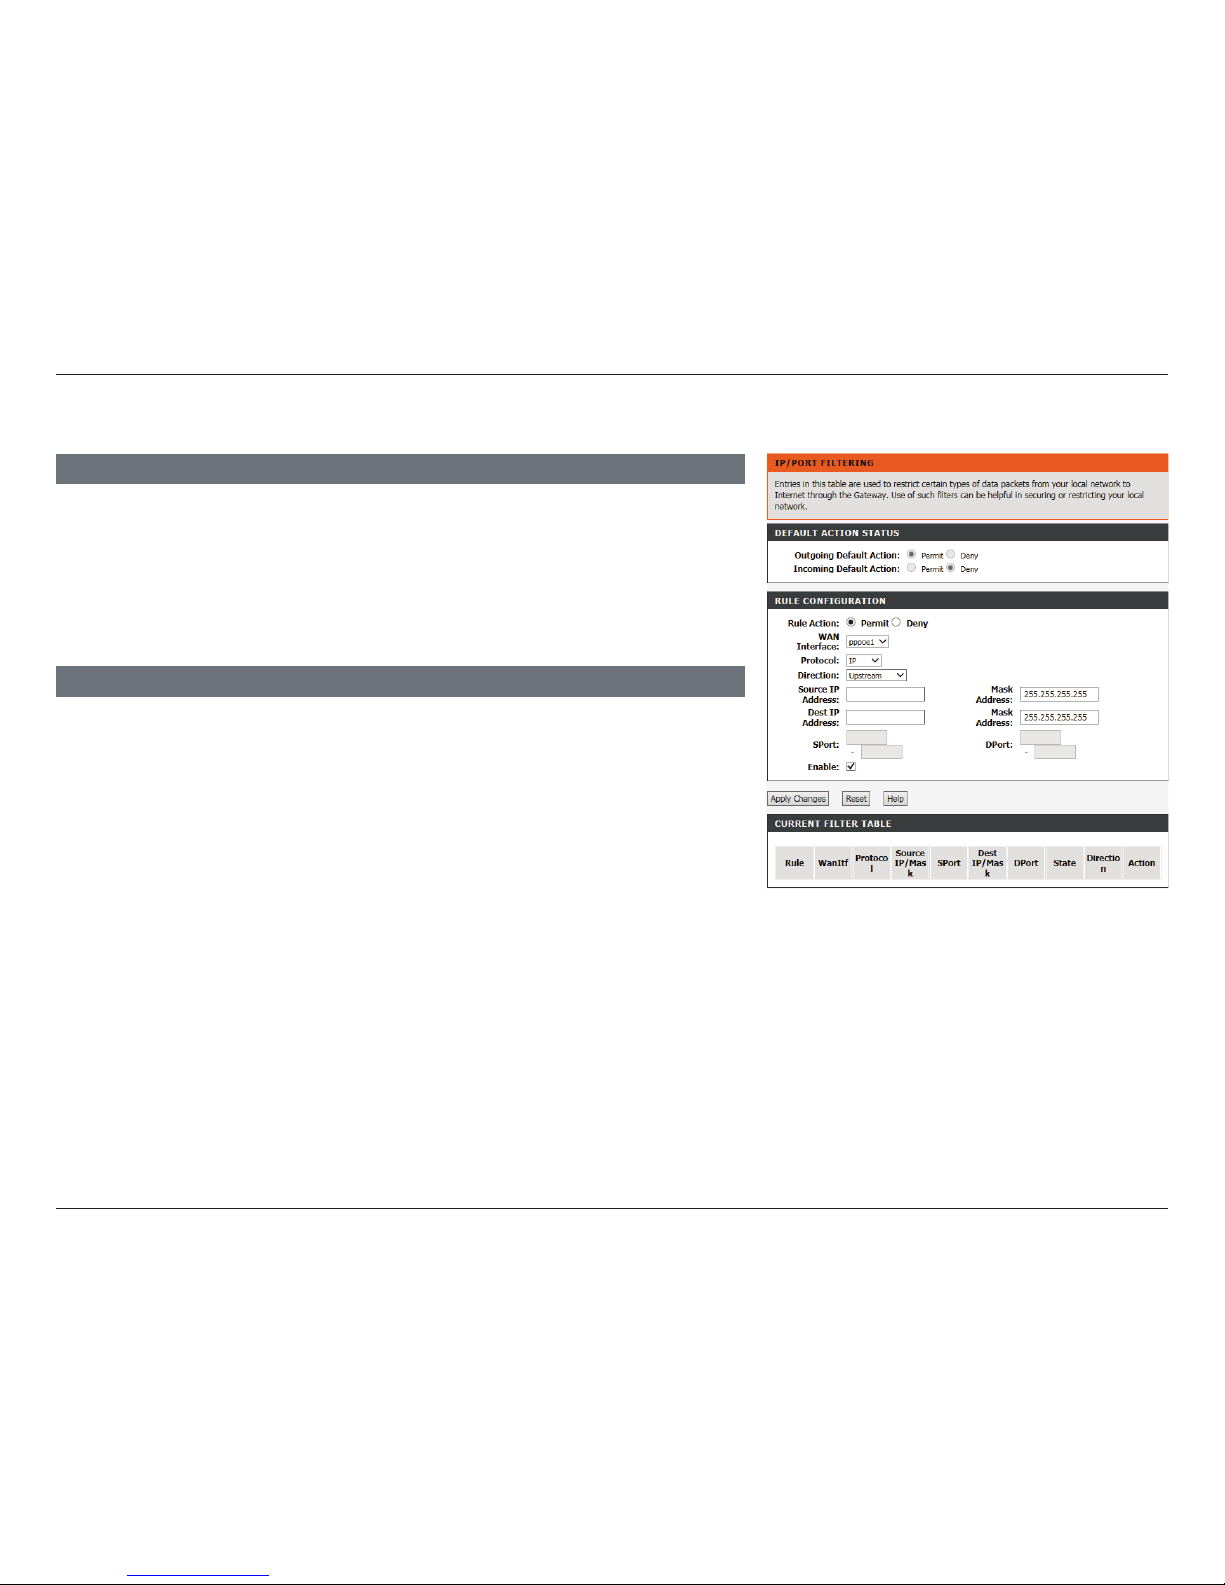
81D-Link DSL-2745 Wireless N300 ADSL2+ Modem Router User Manual
Section 4 - Conguration
When you are satised with your IP/Port Filtering rule, click Apply Changes to
add it to the Current Filter Table. To clear the elds and start over, click Reset.
To see help on creating rules, click Help.
Enable: Check to enable the rule
RULE CONFIGURATION CONTINUED
IP/Port Filter (continued)
CURRENT FILTER TABLE
The current lter rules in eect are listed here. Click Disable/Enable to disable or enable a
rule. Click Delete to delete a rule.
Page 87
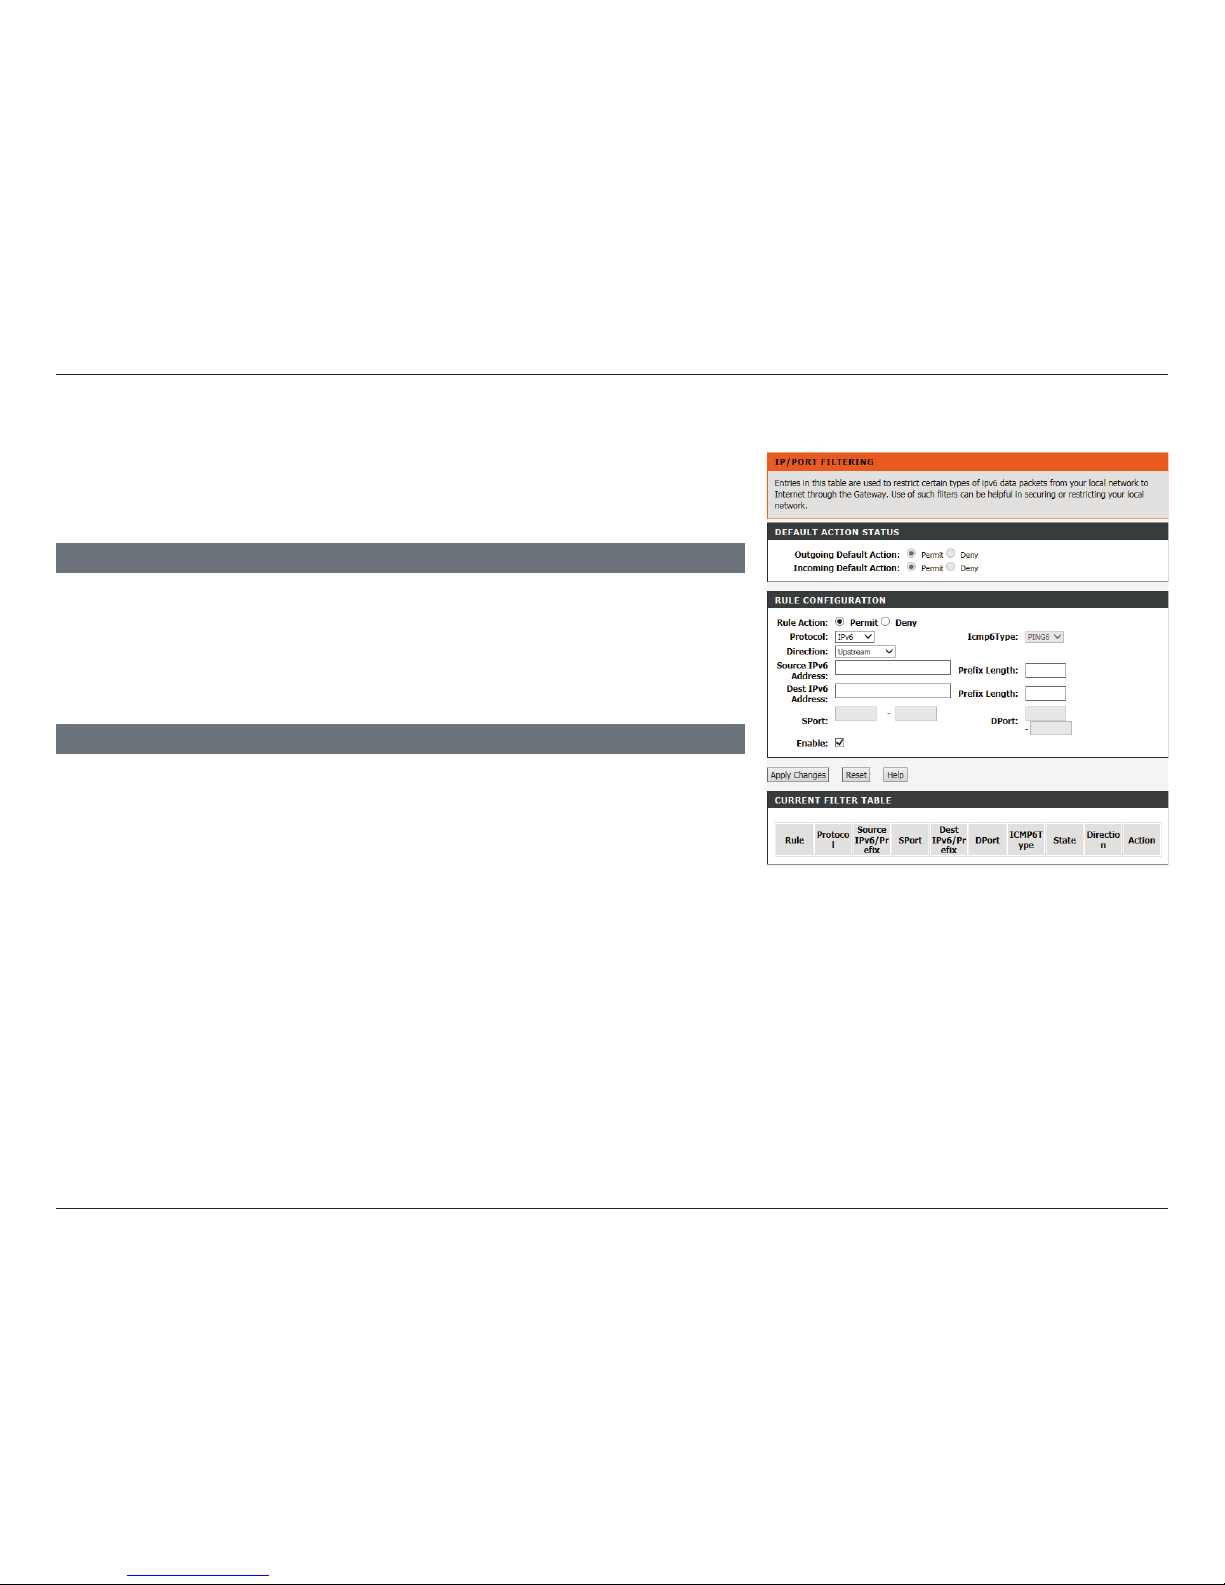
82D-Link DSL-2745 Wireless N300 ADSL2+ Modem Router User Manual
Section 4 - Conguration
IPv6/Port Filter
The IPv6/Port lter is used to restrict or allow certain types of IPv6 data packets
through the gateway. These lters are helpful in securing or restricting trac
on your local network.
Outgoing Default
Action:
Select whether to Permit or Deny data packets to ow out of the
WAN interface. The default setting is Permit.
Incoming Default
Action:
Select whether to Permit or Deny data packets to ow into the WAN
interface. The default setting is Permit.
DEFAULT ACTION STATUS
Rule Action: Select whether this rule will Permit or Deny data packets.
Protocol: Select the protocol type: IPv6, ICMP6, TCP, or UDP.
Icmp6Type: If ICMP6 is selected, select Ping6.
Direction: Select the direction, either Upstream or Downstream.
Source IP Address
& Prefix Length:
Enter the source IPv6 address and prex length for the rule.
Destination IP
Address & Prefix
Length:
Enter the destination IP address and subnet mask for the rule.
SPort: Enter the source port number if TCP or UDP is selected.
DPort: Enter the destination port number if TCP or UDP is selected.
RULE CONFIGURATION
To create a rule, ll out the following parameters.
Page 88
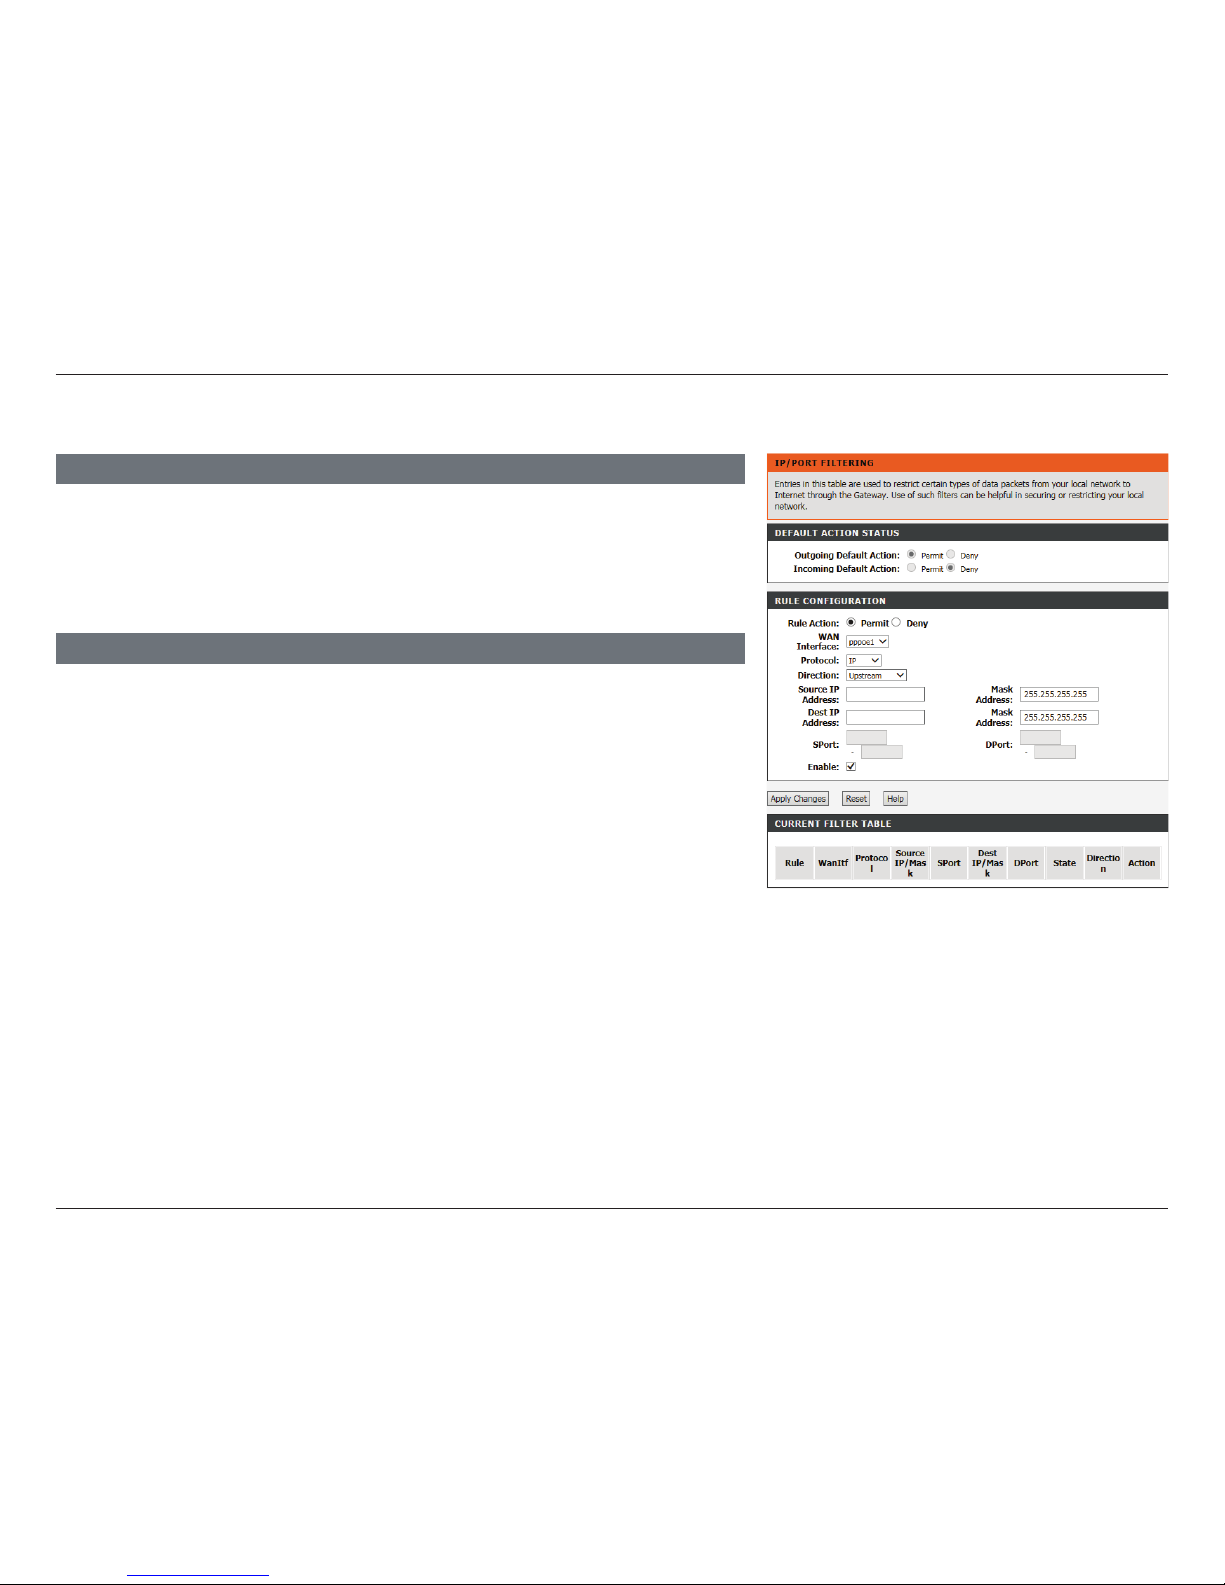
83D-Link DSL-2745 Wireless N300 ADSL2+ Modem Router User Manual
Section 4 - Conguration
Enable: Check to enable the rule
When you are satised with your IP/Port Filtering rule, click Apply Changes to add it to the
Current Filter Table. To clear the elds and start over, click Reset. To see help on creating
rules, click Help.
RULE CONFIGURATION CONTINUED
IPv6/Port Filter (continued)
CURRENT FILTER TABLE
The current lter rules in eect are listed here. Click Disable/Enable to disable or enable a
rule. Click Delete to delete a rule.
Page 89
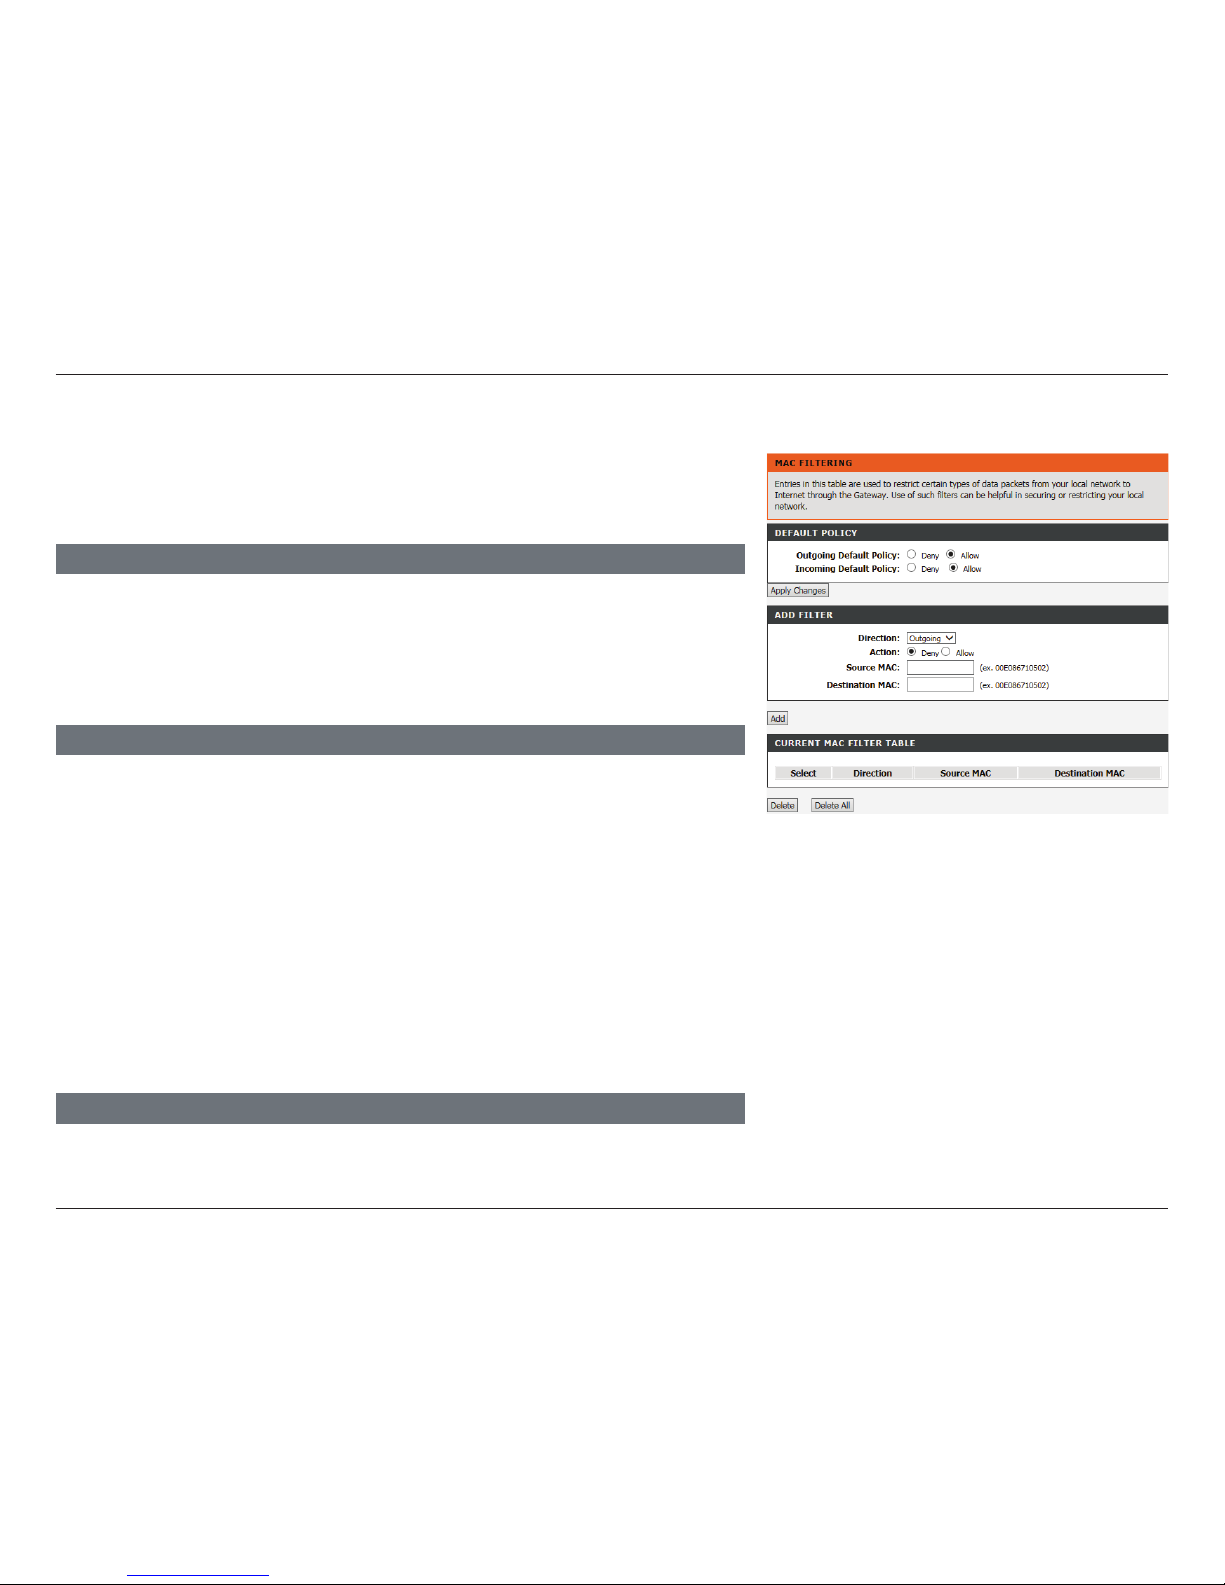
84D-Link DSL-2745 Wireless N300 ADSL2+ Modem Router User Manual
Section 4 - Conguration
MAC Filter
Outgoing Default
Action:
Select whether to Deny or Allow frames to ow out of the WAN
interface. The default setting is Allow.
Incoming Default
Action:
Select whether to Deny or Allow frames to flow into the WAN
interface. The default setting is Allow.
DEFAULT POLICY
CURRENT MAC FILTER TABLE
The current list of MAC lters are displayed here. To delete a lter, select it from the list and
click Delete. To delete all the lters, click Delete All.
Direction: Select whether this rule will apply to Outgoing or Incoming trac.
Action: Select whether to Deny or Allow frames.
ADD FILTER
To create a rule, ll out the following parameters.
Source MAC: Enter the source MAC address to lter.
Destination Mac: Enter the destination MAC address.
You may create a rule to apply to either a Source MAC address, Destination MAC address,
or both. Broadcast MAC addresses may not be ltered.
When you are satised with your MAC Filtering rule, click ADD.
The MAC lter is used to restrict or allow certain types of Ethernet Frames
through the gateway based on their source or destination MAC address. These
lters are helpful in securing or restricting trac on your local network.
Page 90
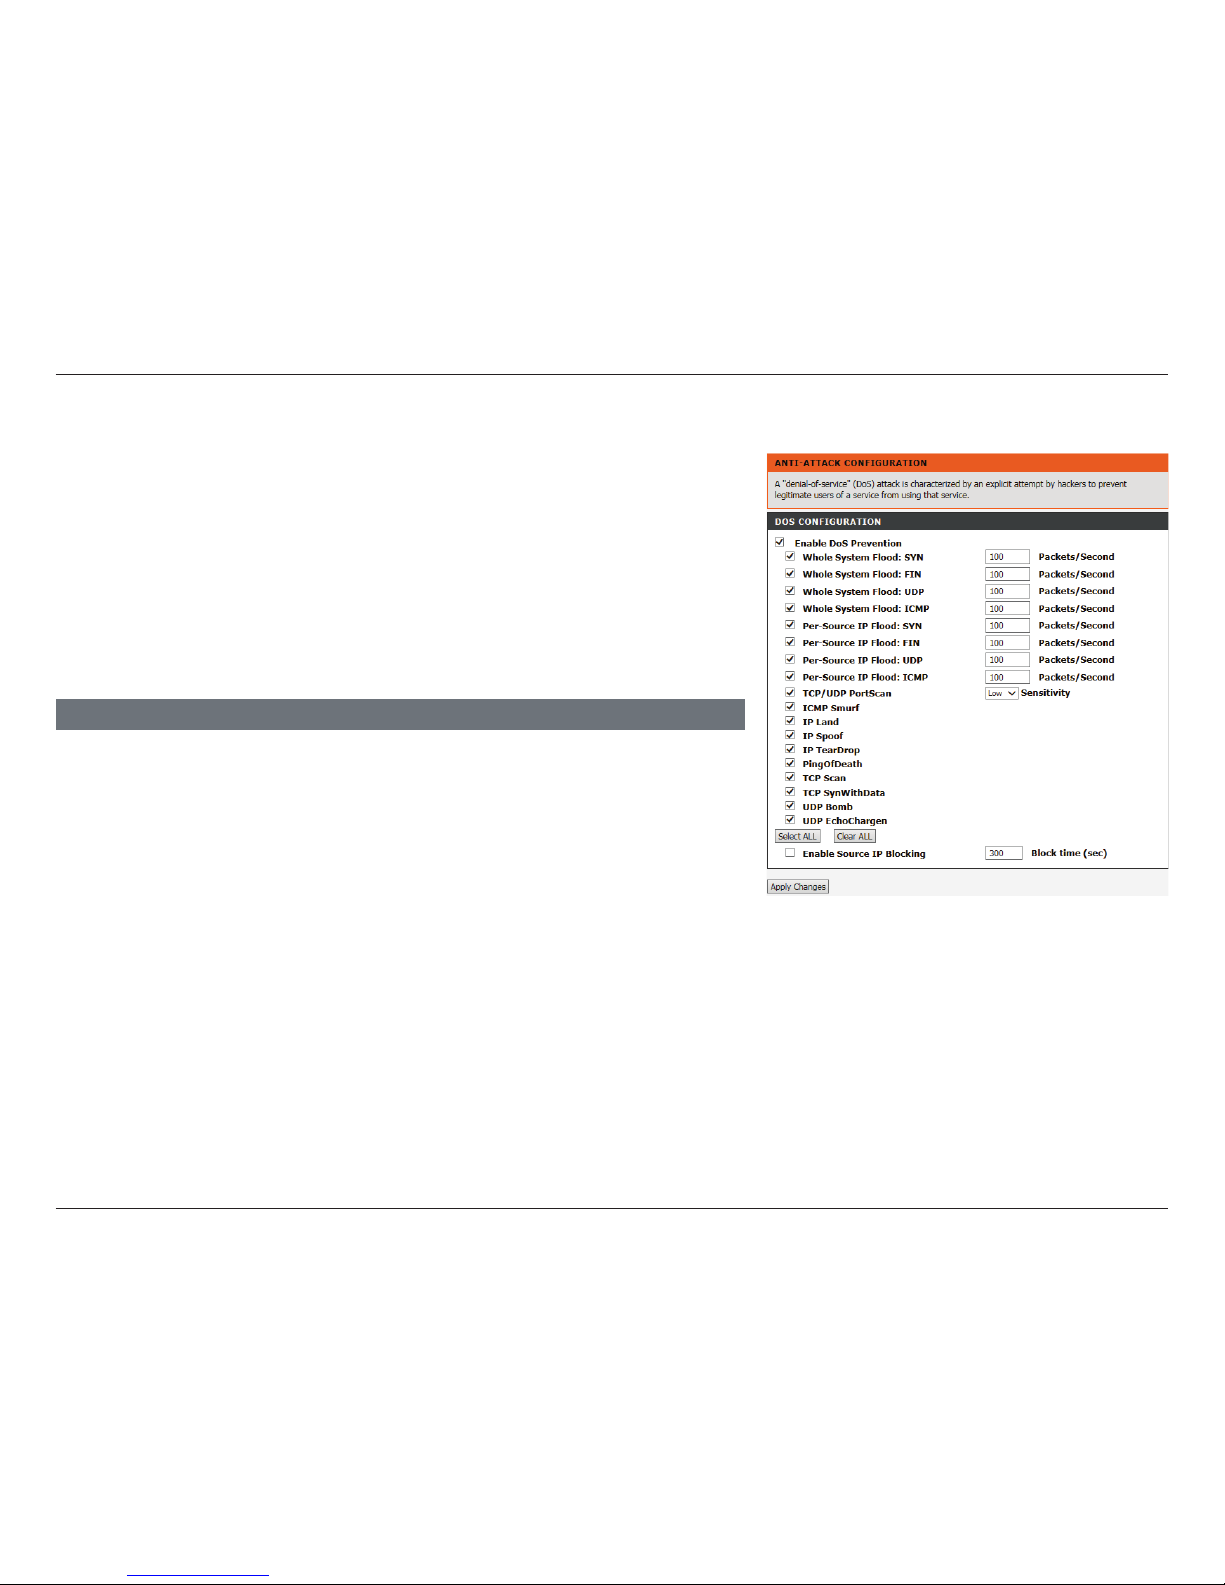
85D-Link DSL-2745 Wireless N300 ADSL2+ Modem Router User Manual
Section 4 - Conguration
Anti-Attack Settings
Enable DoS
Prevention:
Check this box to enable DoS prevention. Types of attacks may be
individually enabled, along with their thresholds. You may enable
or disable all the anti-attack types by clicking Select ALL/Clear All.
Enable Source IP
Blocking:
You may block source IP addresses for a set period of time.
DOS CONFIGURATION
A denial-of-service (DoS) attack is characterized by an explicit attempt by
attackers to prevent legitimate users of a service from using that service. Attacks
can be malicious security breaches or unintentional network issues that render
the router unusable Attack checks allow you to manage WAN security threats
such as continual ping requests and discovery via ARP scans. Certain Denial-ofService (DoS) attacks can be blocked. These attacks, if uninhibited, can use up
processing power and bandwidth and prevent regular network services from
running normally. Thresholds can be congured to temporarily restrict trac
from the oending source.
Click Apply Changes to have your changes take effect.
Page 91
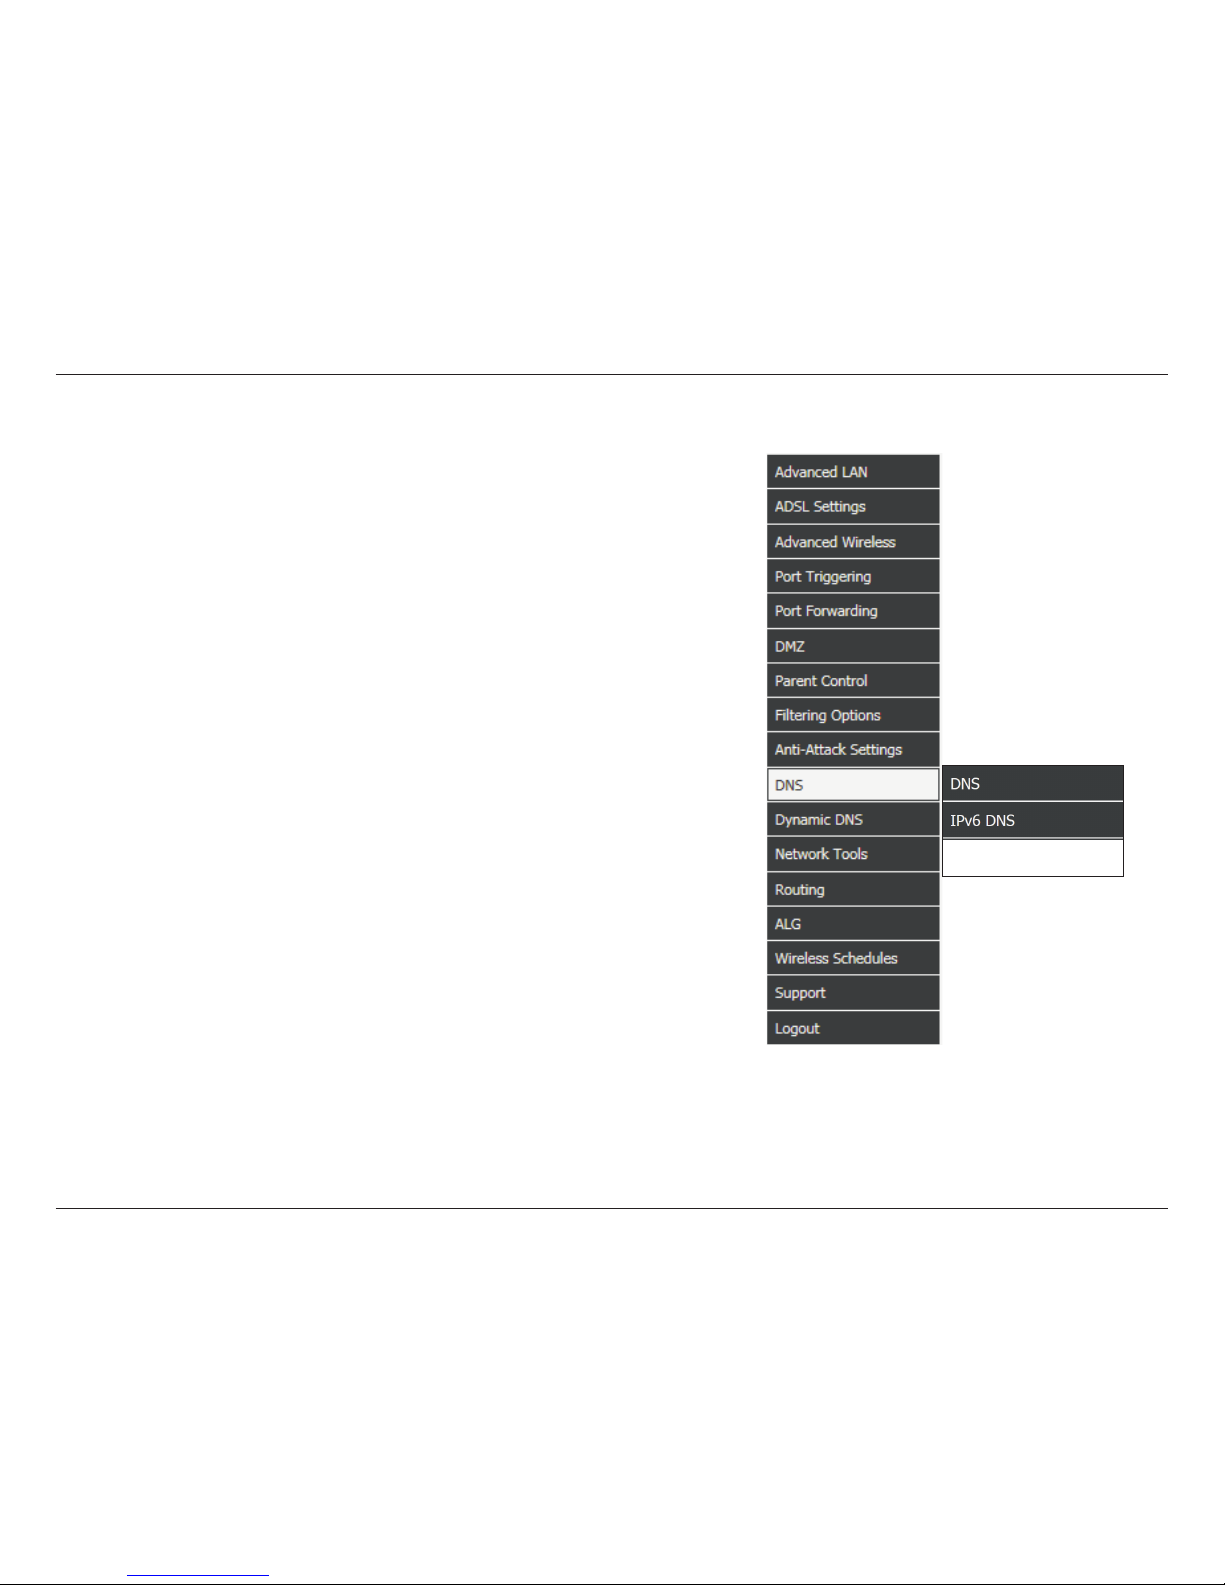
86D-Link DSL-2745 Wireless N300 ADSL2+ Modem Router User Manual
Section 4 - Conguration
Hover your mouse over the DNS option on the vertical menu bar running along
the left side to access:
• DNS
• IPv6 DNS
DNS
Page 92
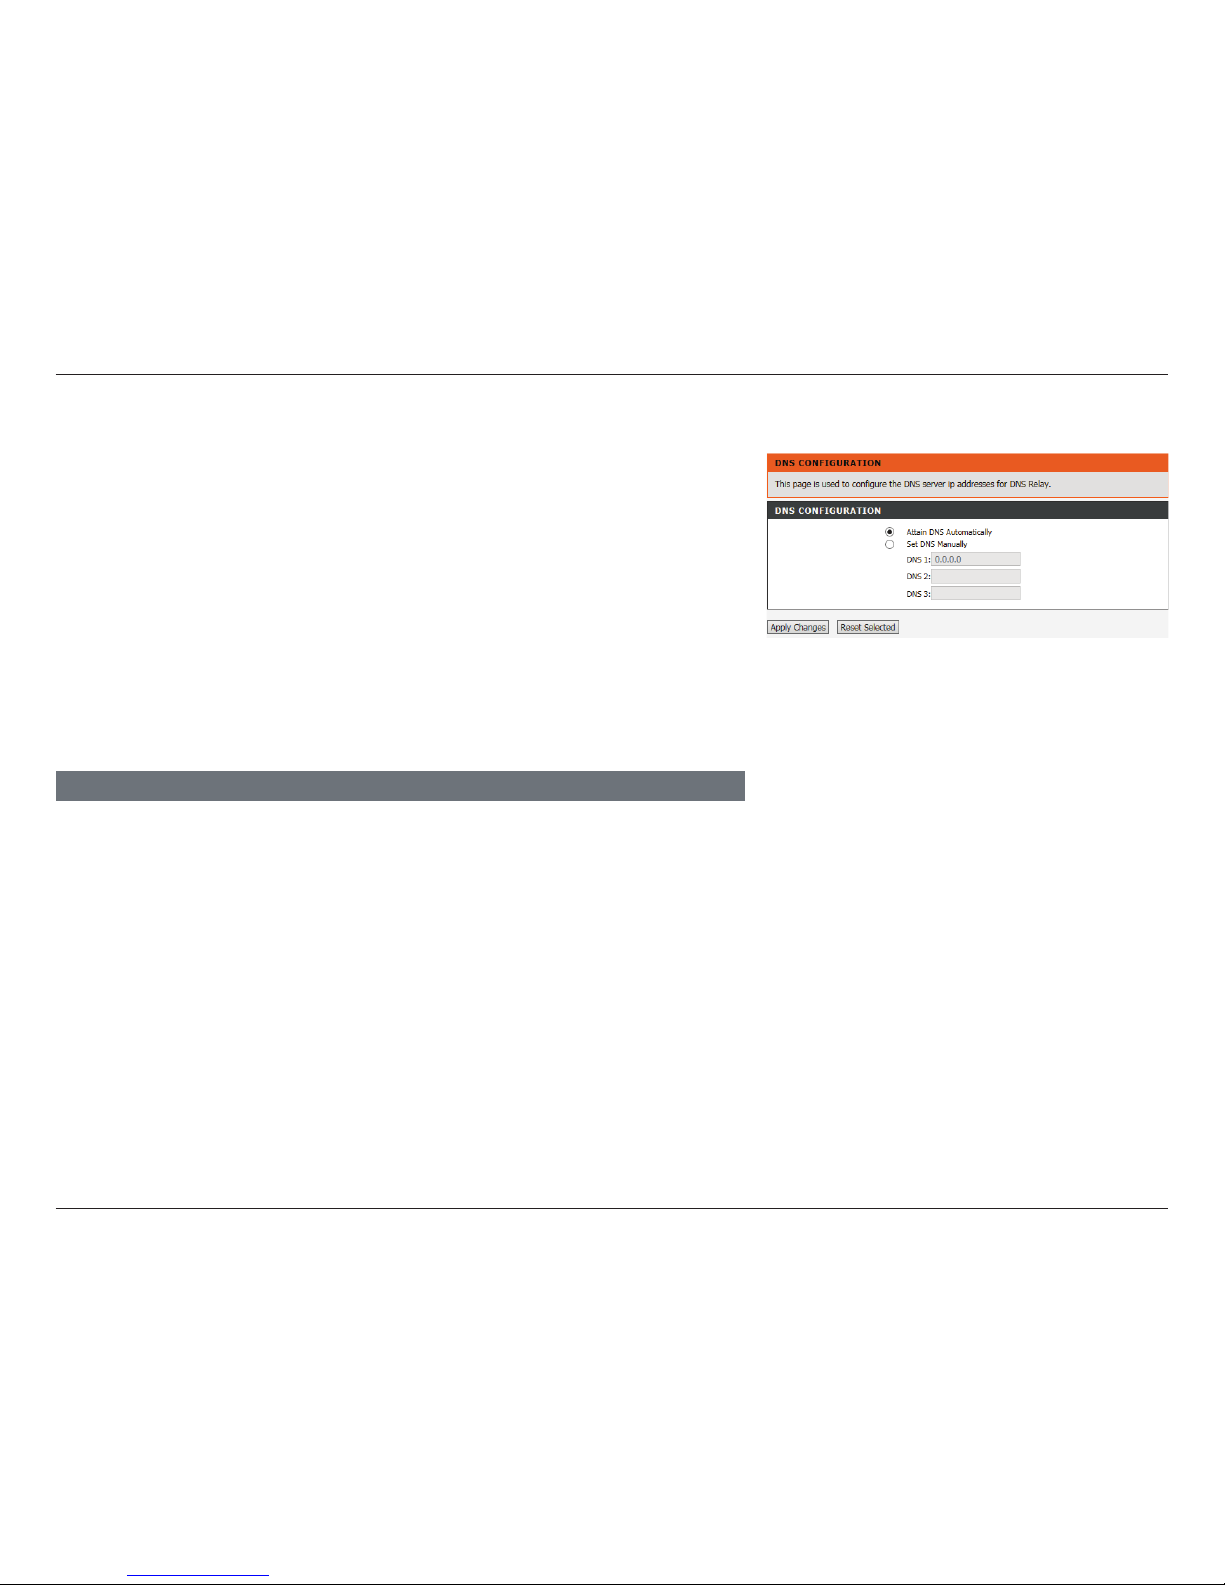
87D-Link DSL-2745 Wireless N300 ADSL2+ Modem Router User Manual
Section 4 - Conguration
DNS
Click Apply Changes when you are done or Reset Selected to revert to your
previously saved settings.
Domain Name System (DNS) is an Internet service that translates domain names
into IP addresses. Because domain names are alphanumeric, they are easier
to remember. The Internet, however, is actually based on IP addresses. Each
time you use a domain name, a DNS service must translate the name into the
corresponding IP address. For example, the domain name www.example.com
might be translated to 198.105.232.4.
The DNS system is, in fact, its own network. If one DNS server does not know
how to translate a particular domain name, it asks another one, and so on, until
the correct IP address is returned.
This page allows you to manually congure the router’s DNS settings.
DNS CONFIGURATION
If you are using the device for DHCP service on the LAN or if you are using DNS servers on
the ISP network, select Attain DNS Automatically.
If you have alternate DNS IP addresses, select Set DNS Manually and enter them into the
DNS 1, DNS 2, and DNS 3 elds.
Page 93
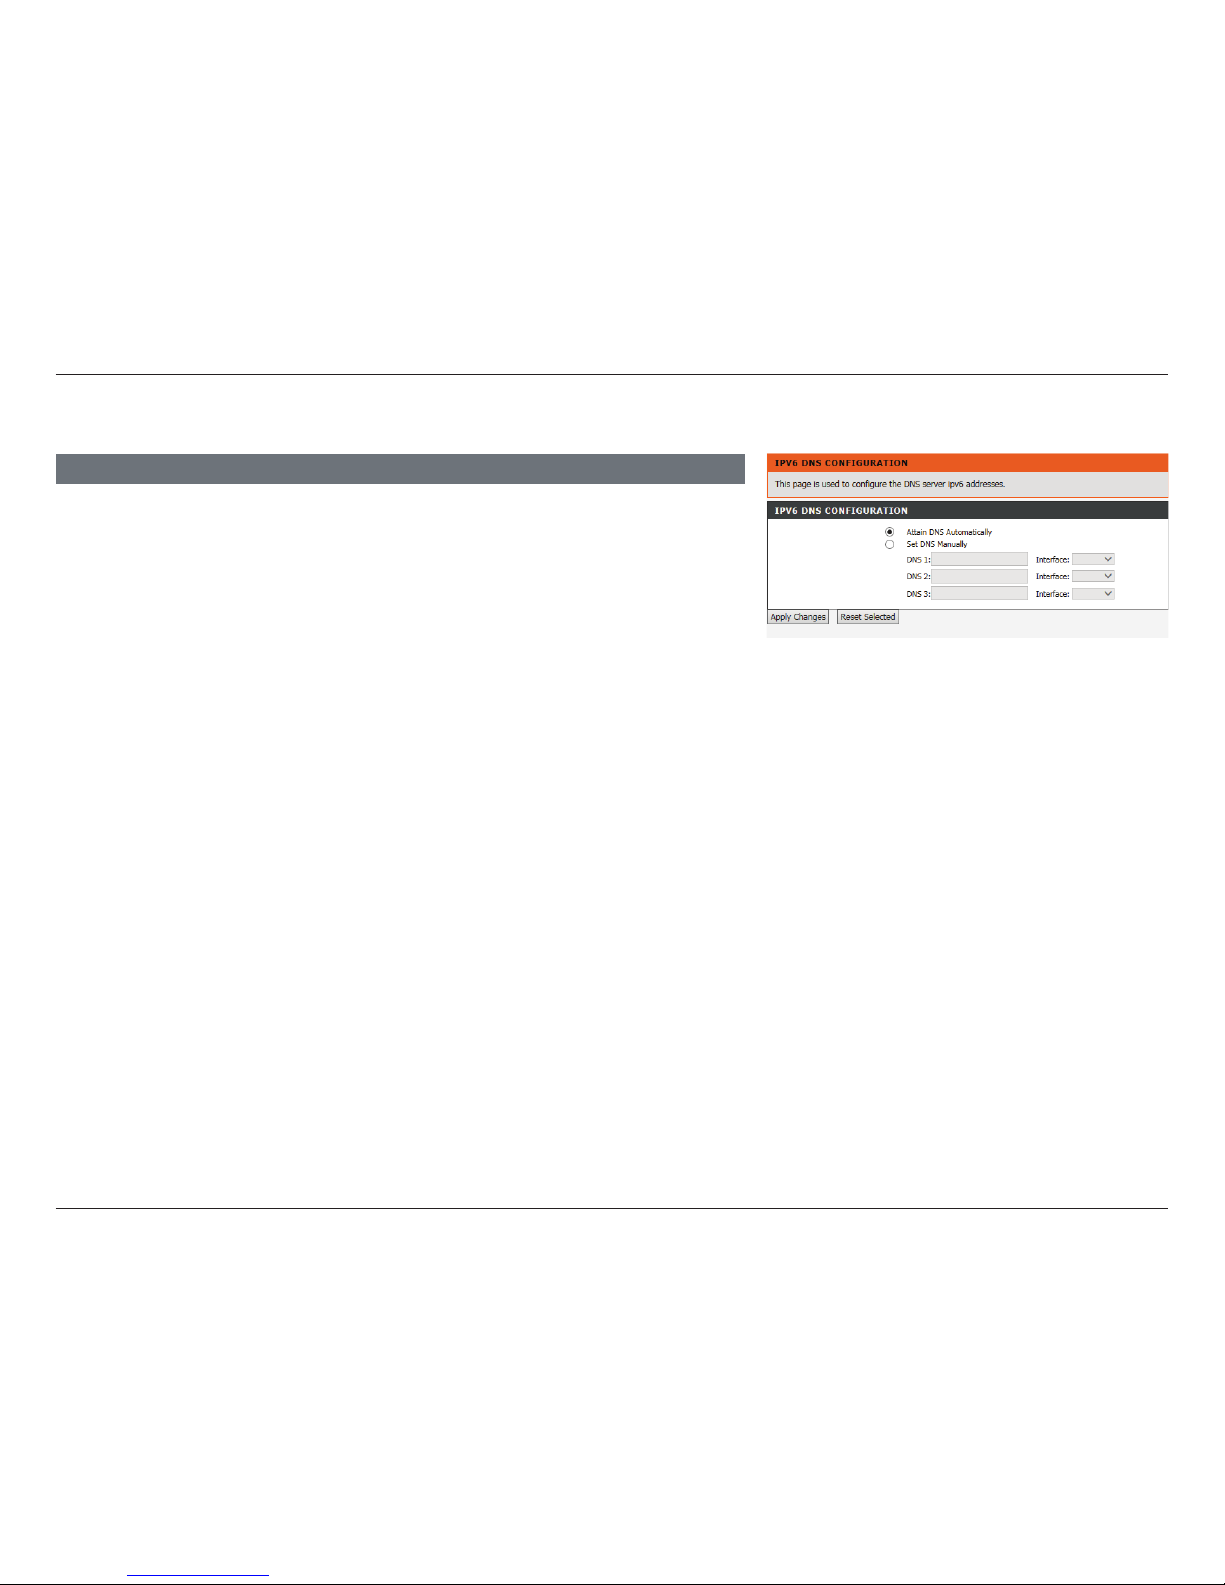
88D-Link DSL-2745 Wireless N300 ADSL2+ Modem Router User Manual
Section 4 - Conguration
IPv6 DNS
Click Apply Changes when you are done or Reset Selected to revert to your
previously saved settings.
IPV6 DNS CONFIGURATION
If you are using the device for DHCP service on the LAN or if you are using DNS servers on
the ISP network, select Attain DNS Automatically.
If you have alternate DNS IP addresses, select Set DNS Manually and enter them into the
DNS 1, DNS 2, and DNS 3 elds.
Page 94
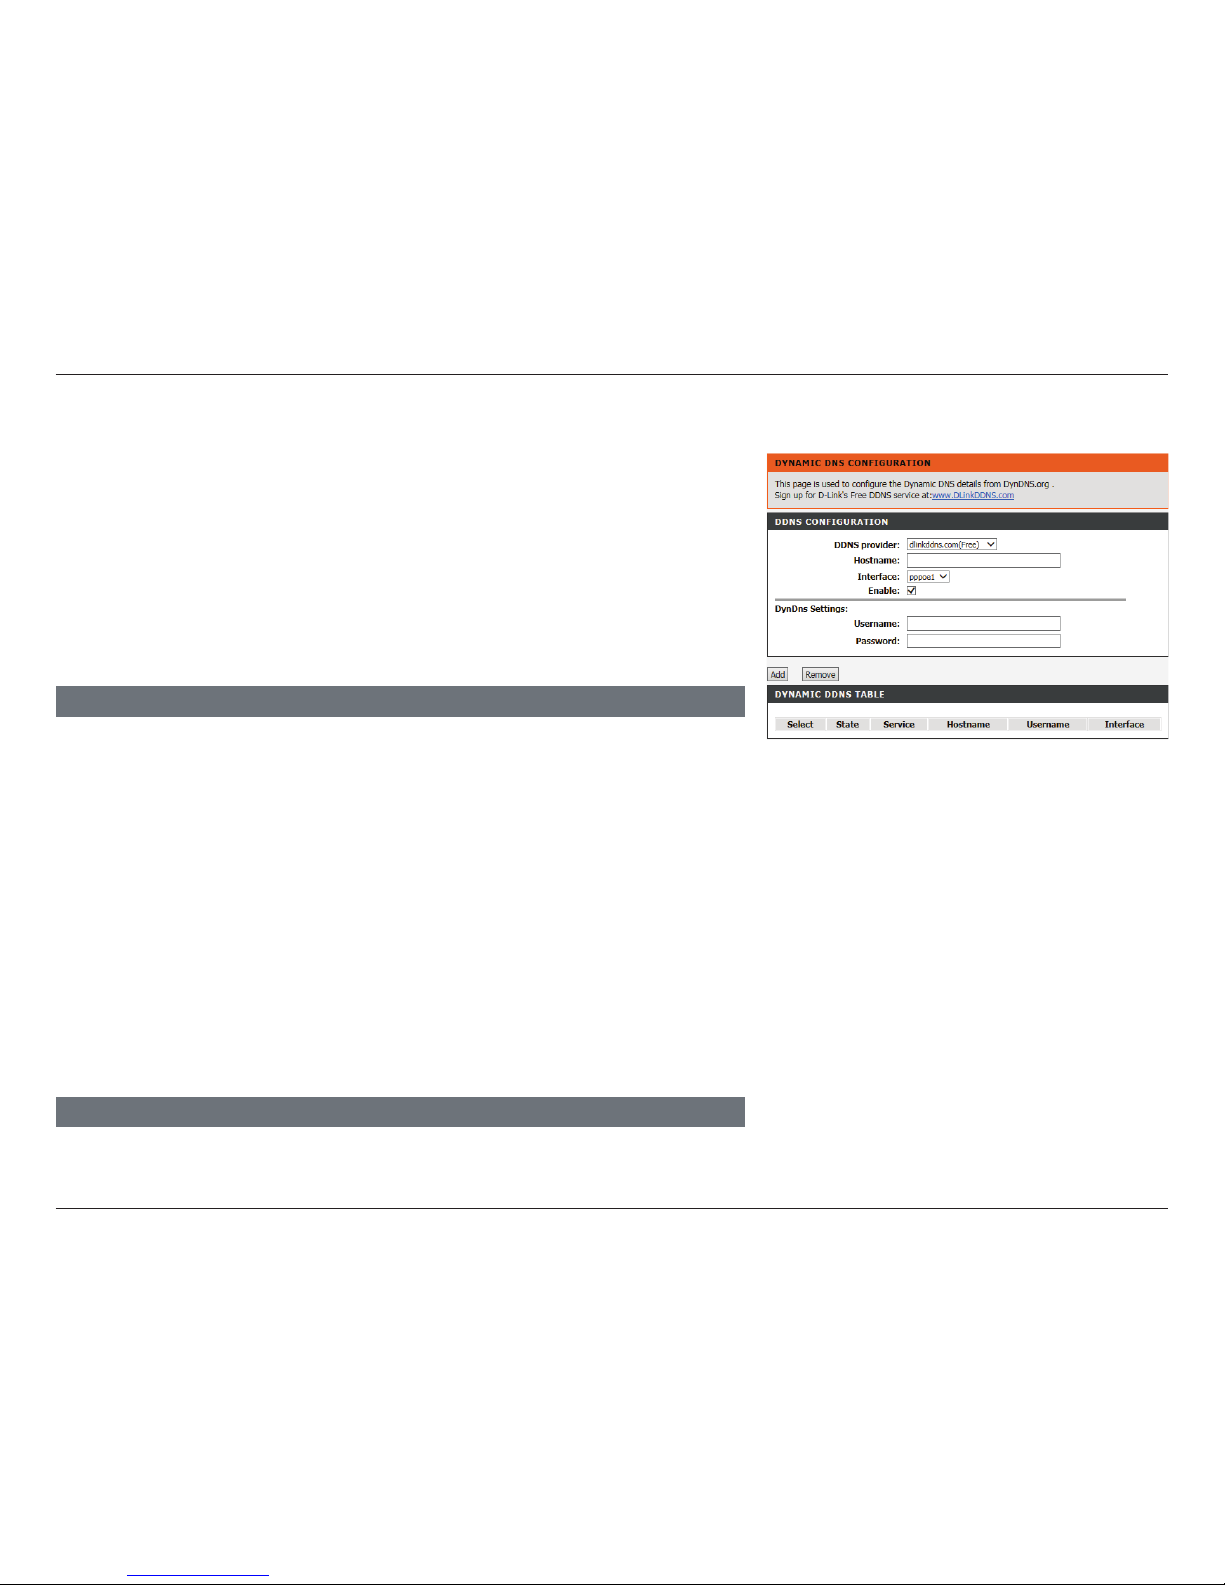
89D-Link DSL-2745 Wireless N300 ADSL2+ Modem Router User Manual
Section 4 - Conguration
Dynamic DNS
DYNAMIC DDNS TABLE
This list displays the current dynamic Dynamic DNS settings.
The DDNS (Dynamic Domain Name System) feature allows you to host a server
(e.g. a Web, FTP, or game server) using a domain name that you have purchased
(www.yourdomain.com) with your dynamically assigned IP address. Most
broadband Internet Service Providers assign dynamic (changing) IP addresses.
Using a DDNS service provider, your friends can enter your domain name to
connect to your server no matter what your IP address is.
DDNS provider: Select one of the Dynamic DNS organizations from the menu.
Hostname: Enter the hostname you registered with the Dynamic DNS provider.
Interface: Select the appropriate interface.
Enable: Check this box to enable DDNS.
DDNS CONFIGURATION
This page allows you to congure the router’s Dynamic DNS settings.
Username: Enter the username for your Dynamic DNS account.
Password: Enter the password for your Dynamic DNS account.
DynDNS Settings
Click Add when you are done. To remove an existing DDNS entry, select it from
the table below and click the Remove button.
Page 95
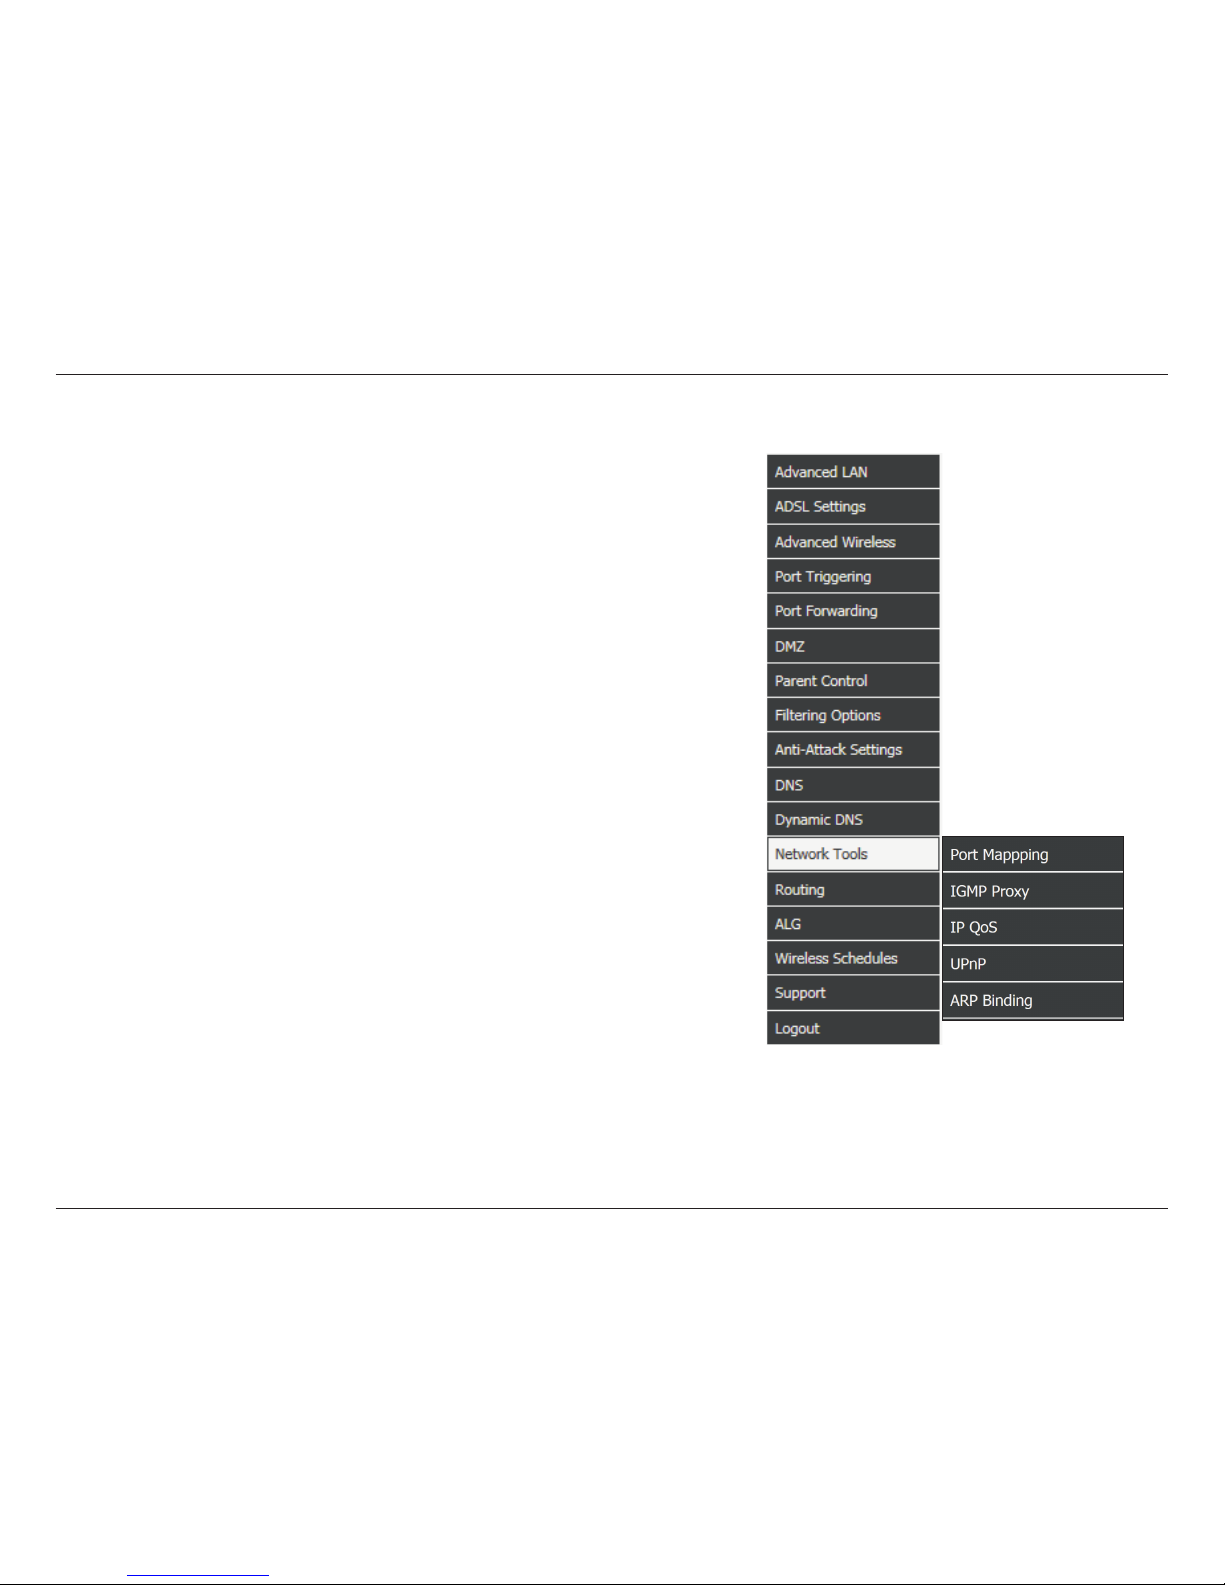
90D-Link DSL-2745 Wireless N300 ADSL2+ Modem Router User Manual
Section 4 - Conguration
Hover your mouse over the Network Tools option on the vertical menu bar
running along the left side to access:
• Port Mapping
• IGMP Proxy
• IP QoS
• ARP Binding
Network Tools
Page 96
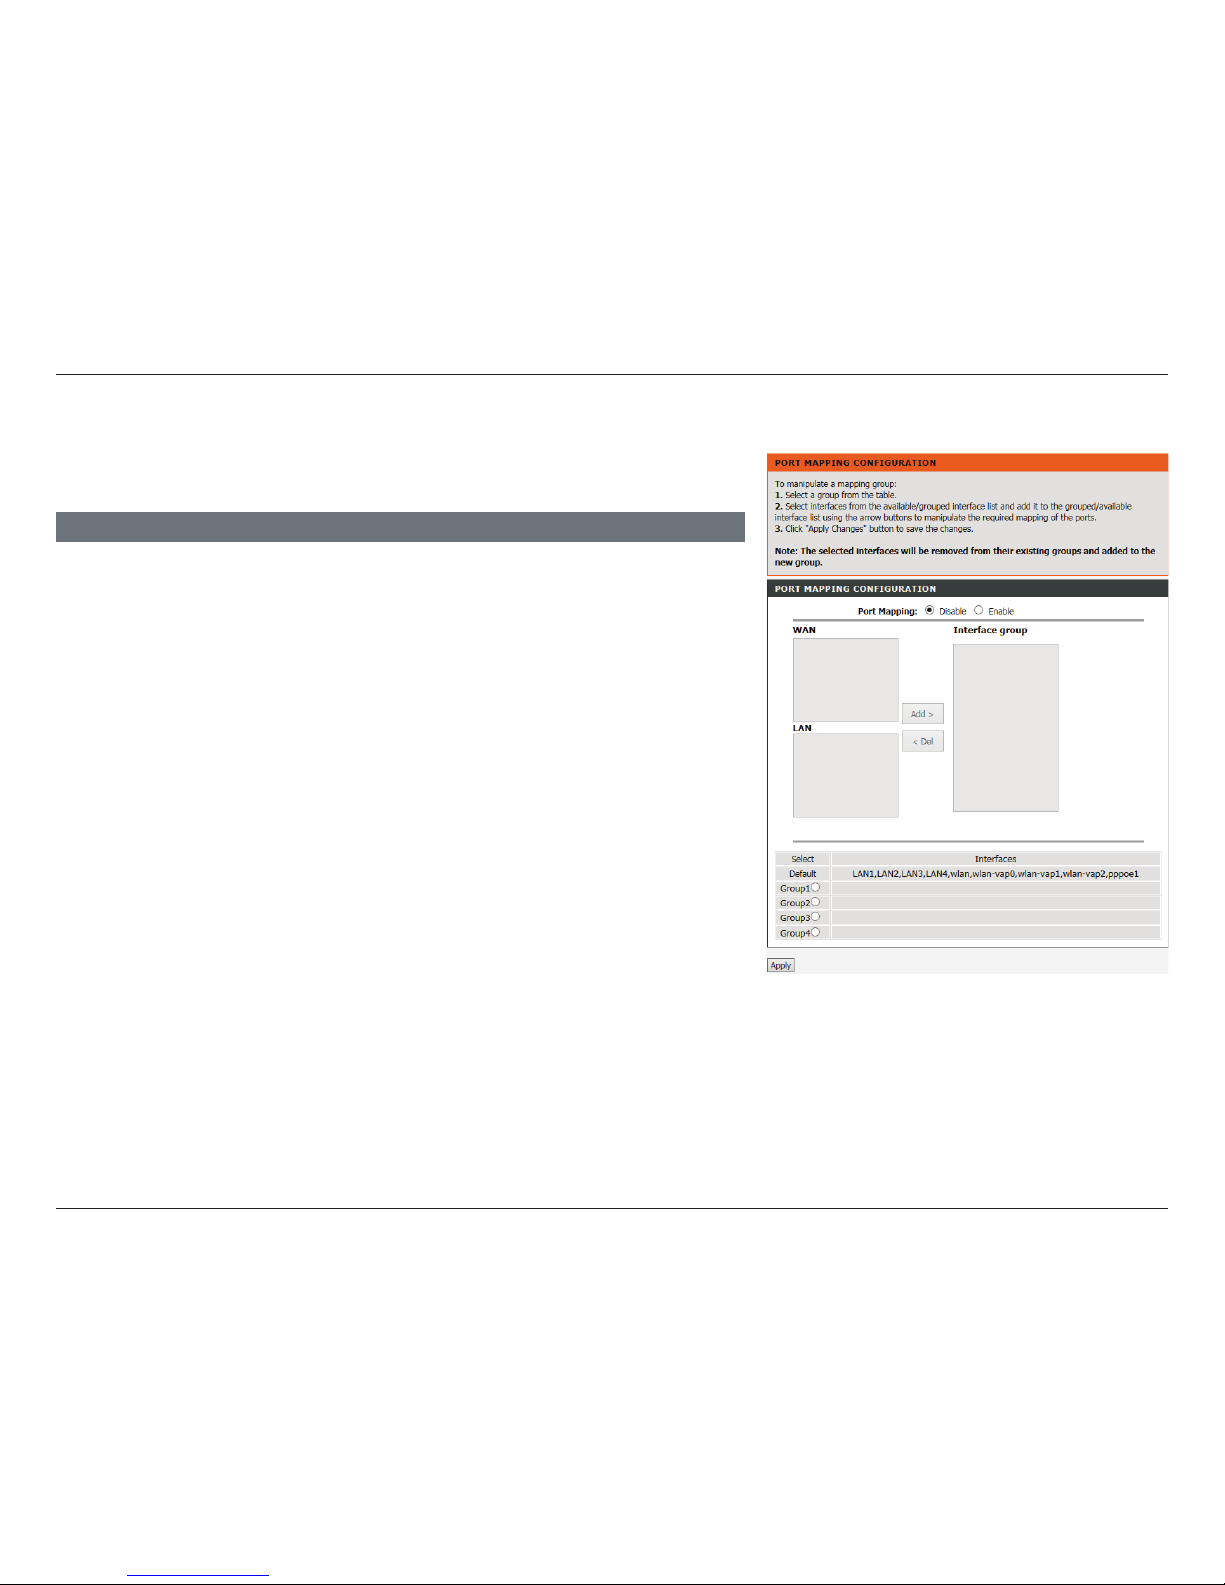
91D-Link DSL-2745 Wireless N300 ADSL2+ Modem Router User Manual
Section 4 - Conguration
Port Mapping
From the Port Mapping page you can bind the WAN interfaces and the LAN interfaces to
the same group.
The procedure for manipulating a mapping group is as follows:
Step 1 Select a group from the table.
Step 2 Select interfaces from the WAN and LAN interface list and add them to
interface group list.
Step 3 Click Apply to save the changes.
Port Mapping: Enable/Disable port mapping.
PORT MAPPING SETUP
Page 97
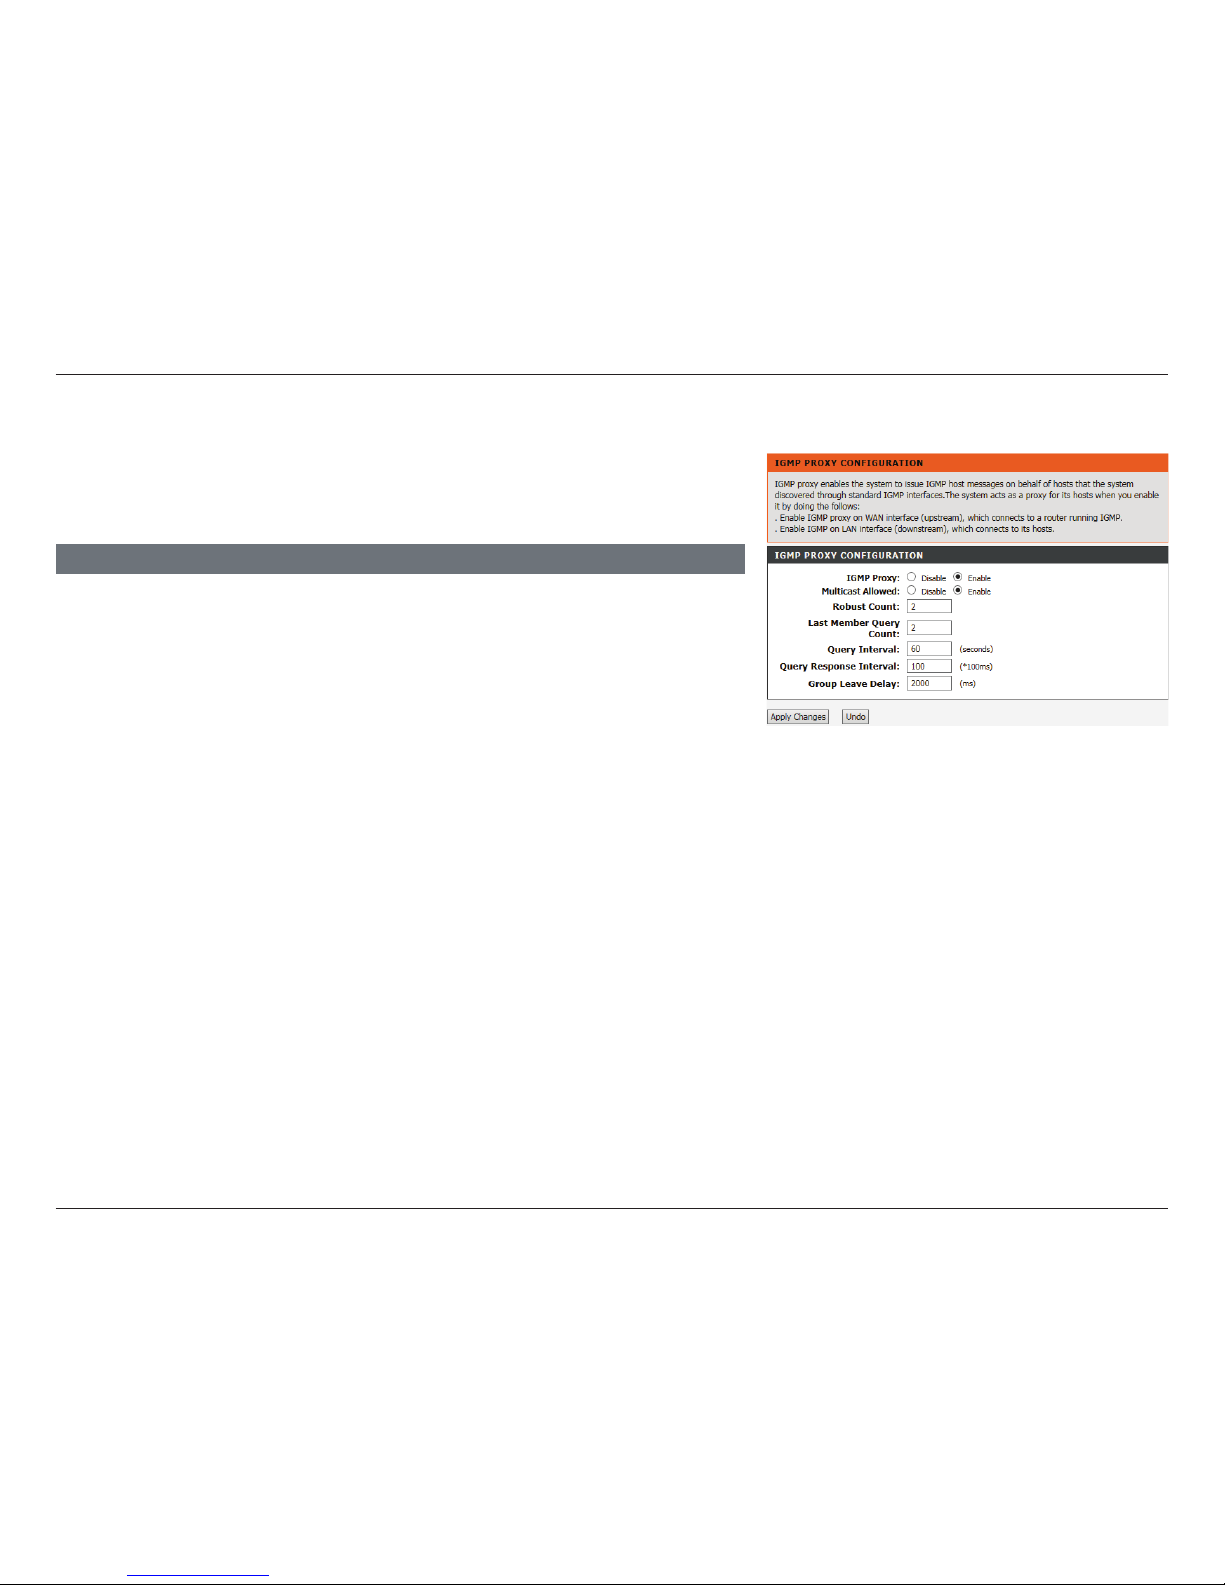
92D-Link DSL-2745 Wireless N300 ADSL2+ Modem Router User Manual
Section 4 - Conguration
IGMP Proxy Conguration
IGMP proxy enables the system to issue IGMP host messages on behalf of hosts
that the system discovered through standard IGMP interfaces. The system acts
as a proxy for its hosts after you enable it.
IGMP Proxy: Select to Enable or Disable the IGMP proxy. Enable is the default.
Multicast Allowed: Select to Enable or Disable Multicast. Enable is the default.
Robust Count: Set robustness value to account for packet loss on congested
networks.
Last Member
Query Count:
Set IGMP query count. 2 is the default.
Query Interval: Set IGMP query interval. 2 is the default.
Query Response
Interval:
Set the IGMP response interval time in seconds. 60 seconds is the
default.
Query Response
Interval:
Set the IGMP query response interval in ms. 100 ms is the default.
Group Leave
Delay:
Set the IGMP group leave delay in ms. 2000 ms is the default.
IGMP PROXY CONFIGURATION
Click Apply Changes when you are done or Undo to revert to your previous
settings.
Page 98
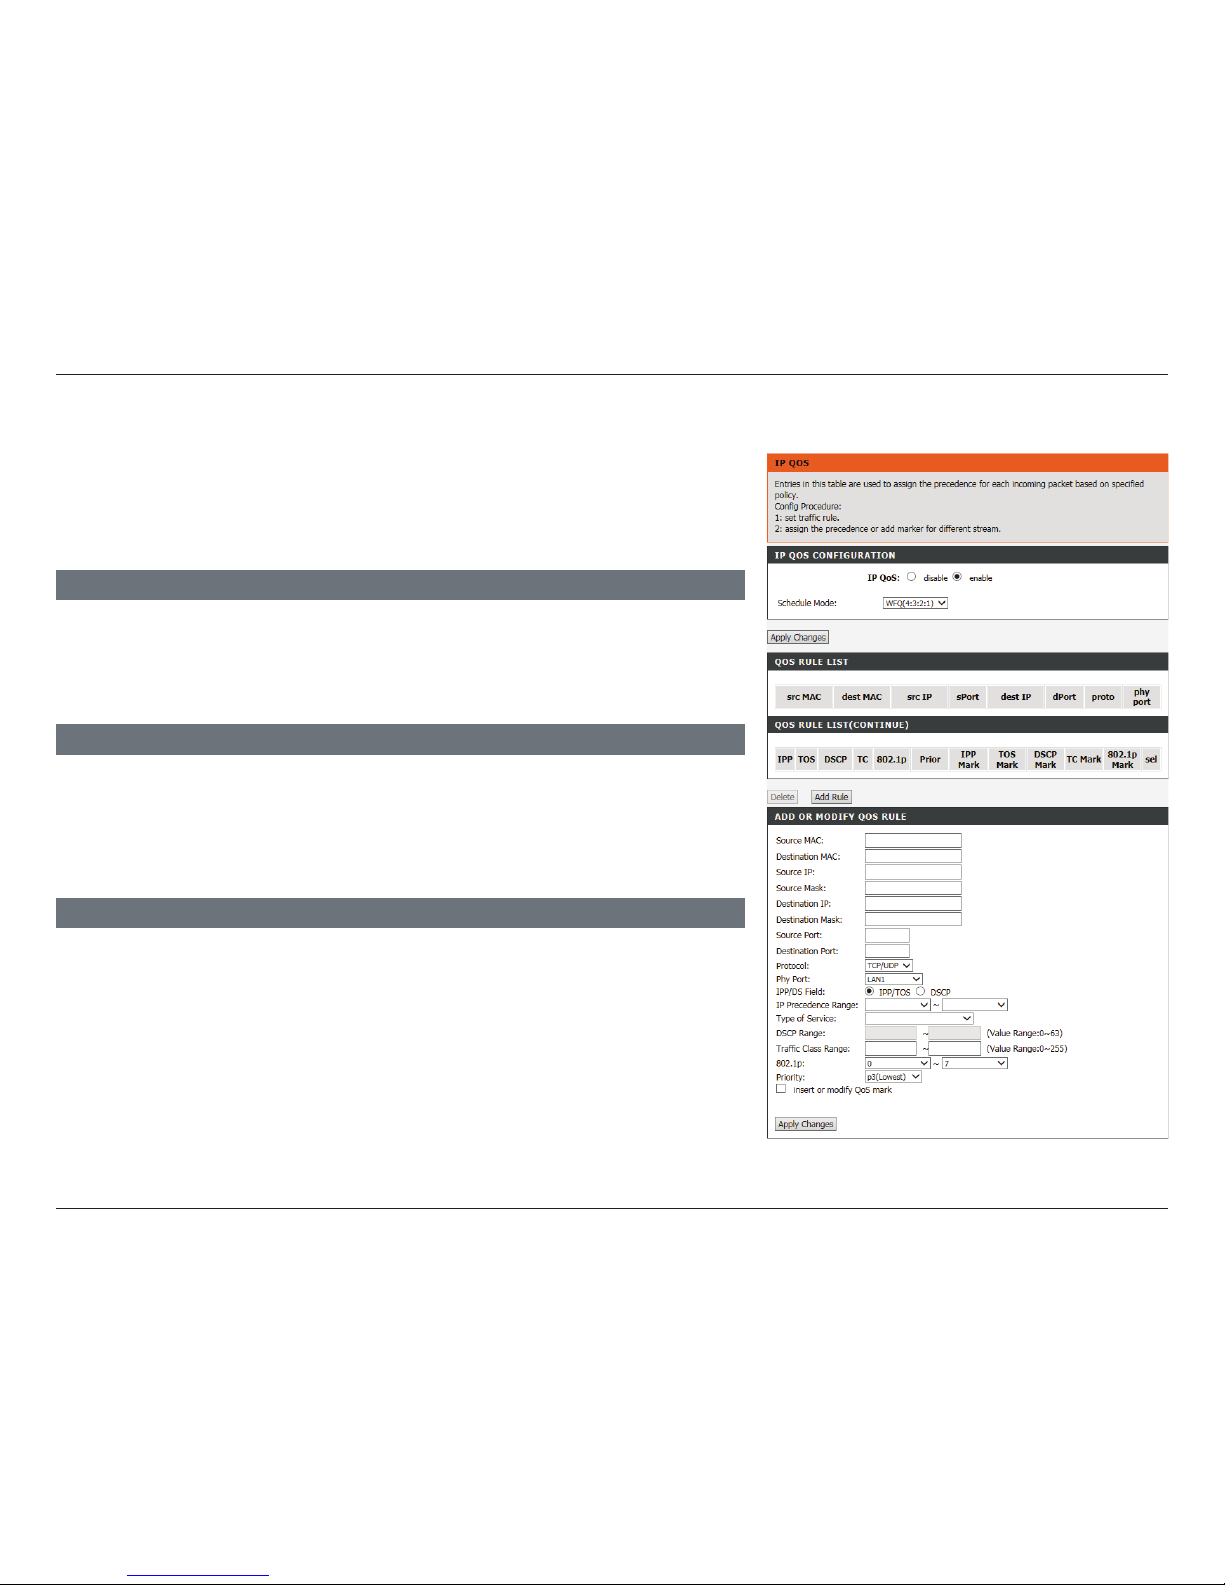
93D-Link DSL-2745 Wireless N300 ADSL2+ Modem Router User Manual
Section 4 - Conguration
IP QoS
IP QOS CONFIGURATION
Click the radio button to enable or disable IP QoS. If enabled, choose whether to use
WFQ(4:3:2:1) or strict prior.
QOS RULE LIST & QOS RULE LISTCONTINUTE
The table shows the current QoS rules currently in eect.
ADD OR MODIFY QOS RULE
Enter the criteria for your QoS rule.
Click Apply Changes to begin using QoS.
Click Apply Changes to add your rule to the QoS rule list.
Click Add Rule to add a rule. To modify a rule, select it from the table. The Add or Modify
QoS Rule box will appear and the fields will populate with the rule credentials. To delete a
rule, select it from the list and click Delete Rule.
From this page you can congure the Quality of Service settings on your
DSL-2745 to help improve your browsing experience. Setting up QoS requires
familiarity with networking technology outside the scope of this document,
as well as an understanding of the trac on your network.
Page 99
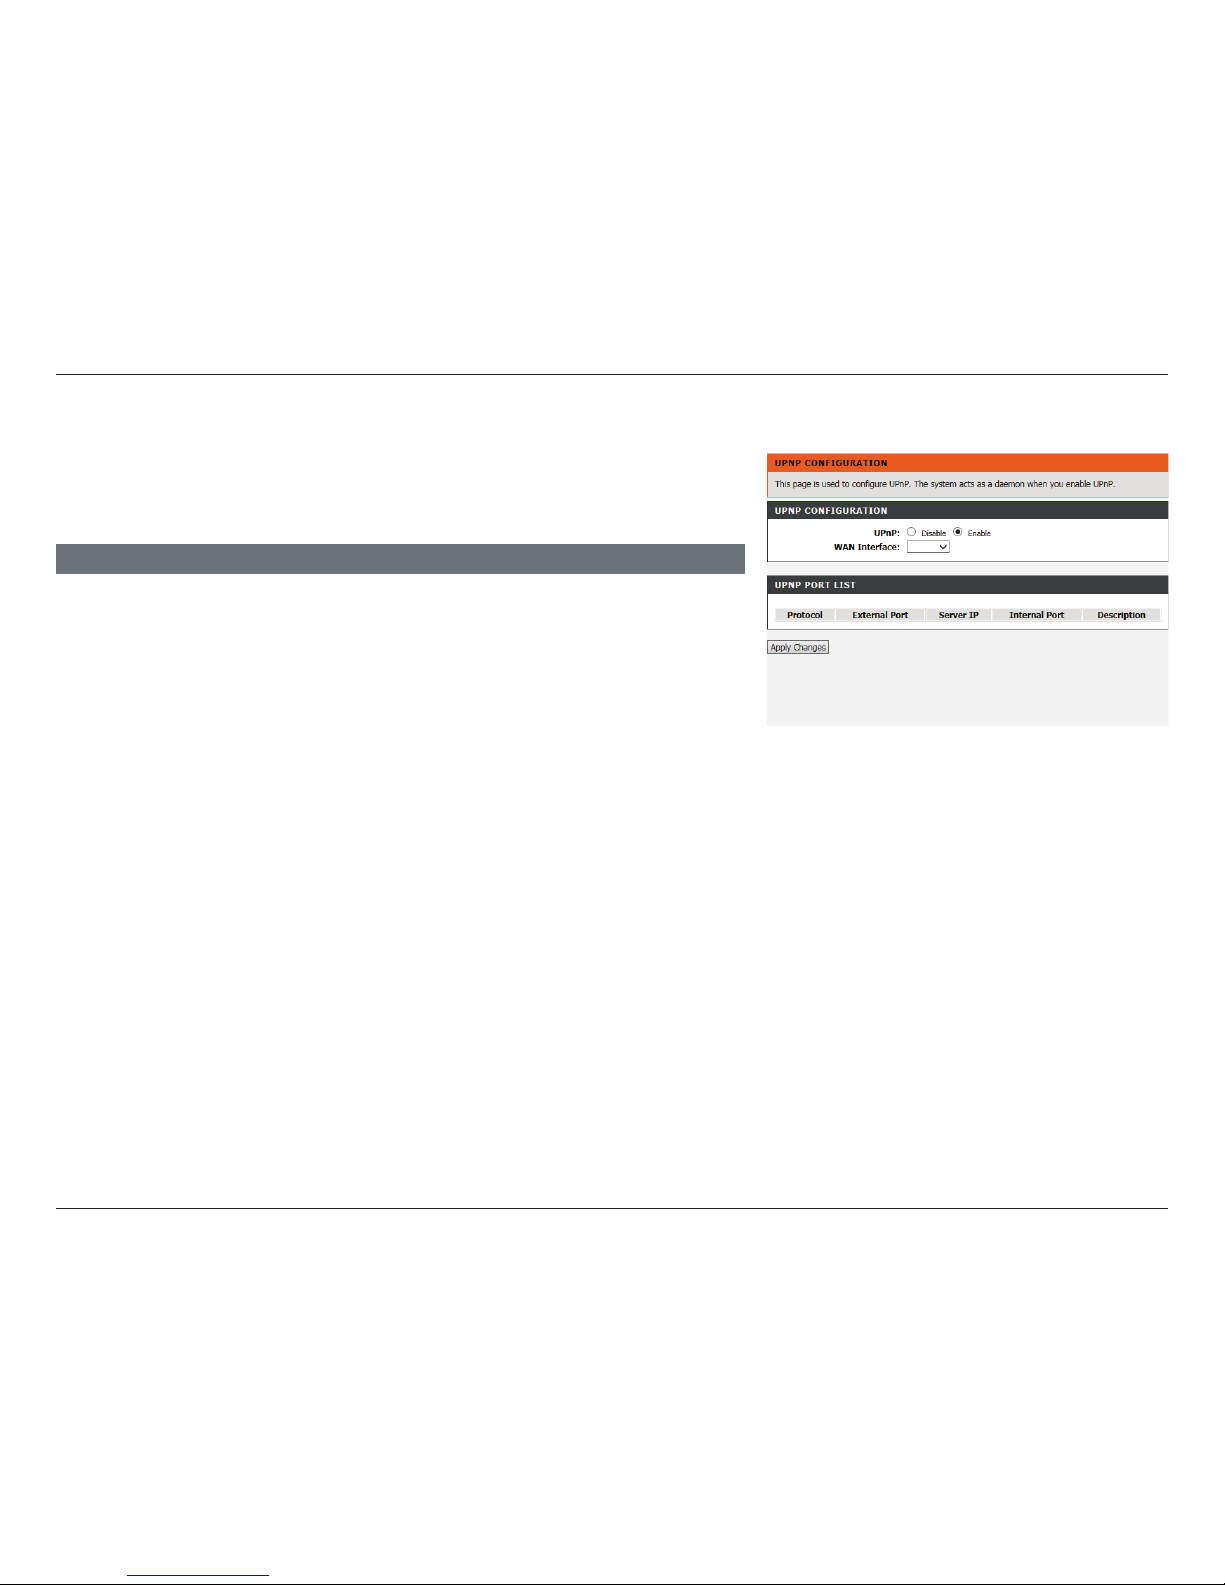
94D-Link DSL-2745 Wireless N300 ADSL2+ Modem Router User Manual
Section 4 - Conguration
UPnP
UPNP SETUP
Click the radio button to enable or disable Universal Plug and Play (UPnP).
Check the box to Enable UPnP.
Click Apply Changes when you are done.
This page is used to congure UPnP. The system acts as a daemon after you
enable it. UPnP helps to automatically congure software and devices on your
network to access the resources they require.
Page 100
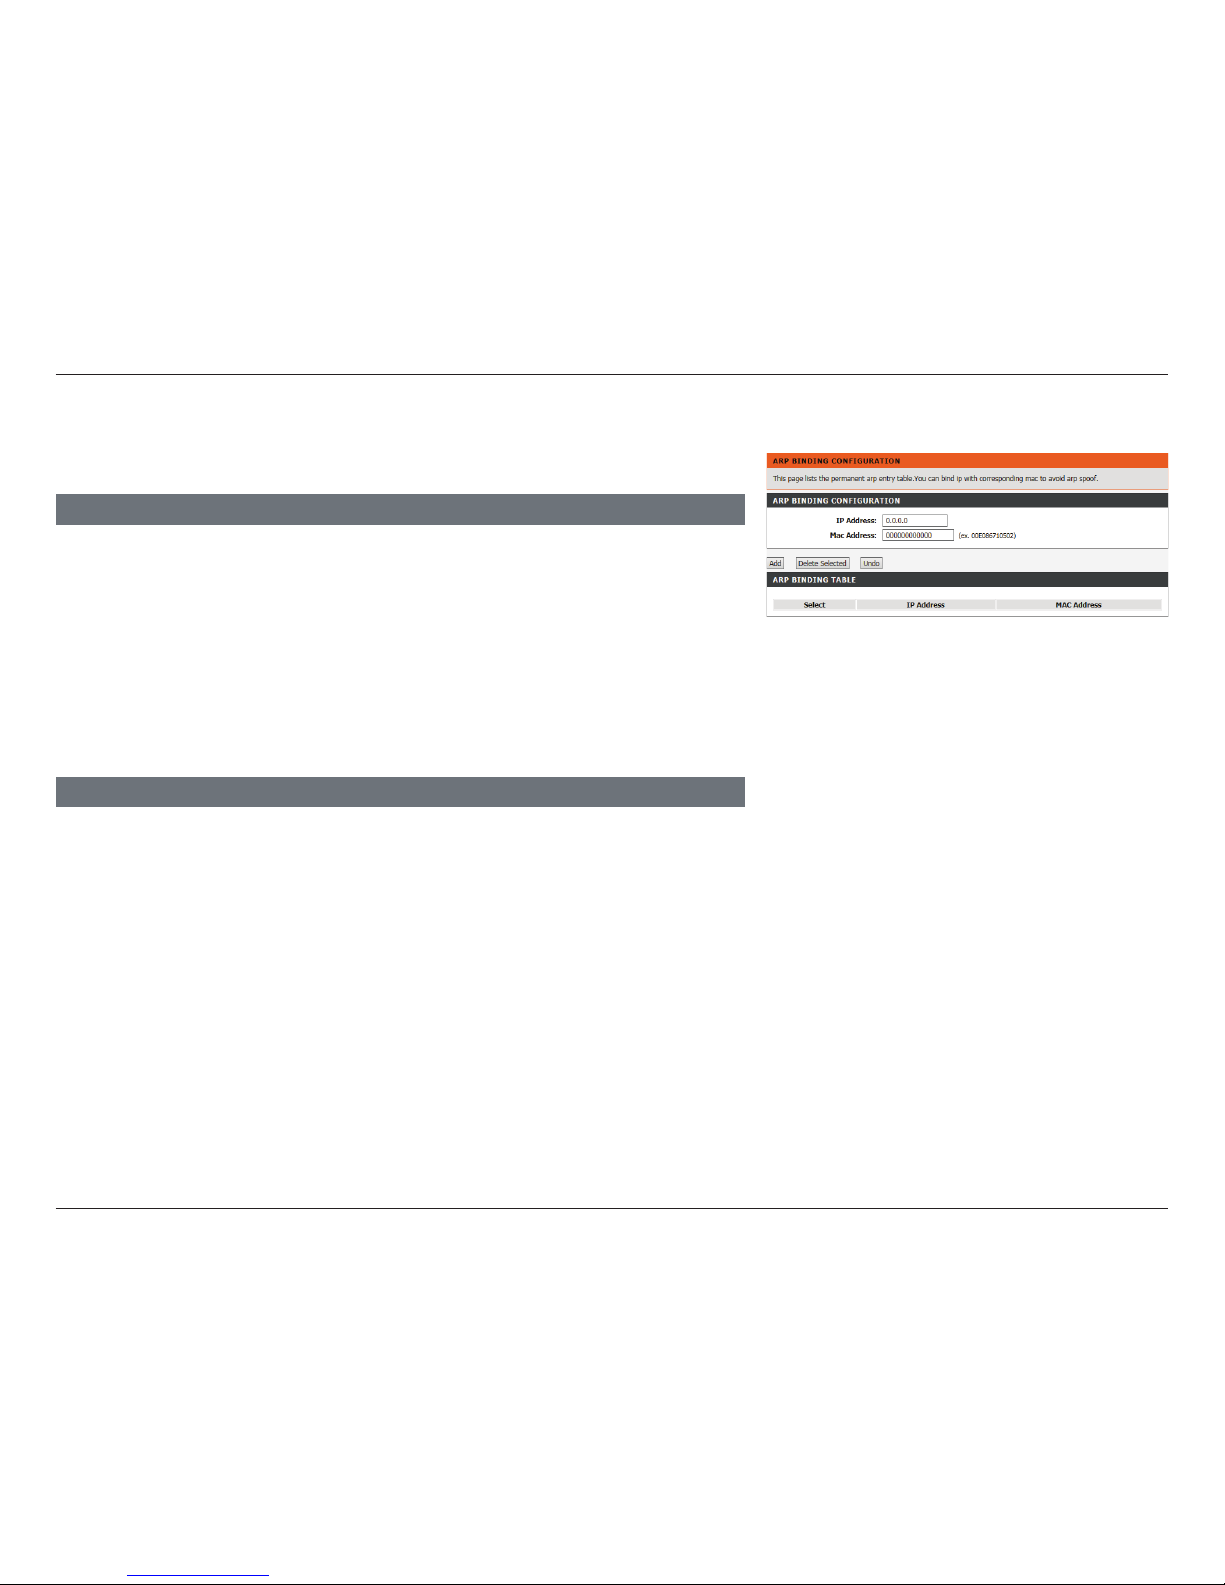
95D-Link DSL-2745 Wireless N300 ADSL2+ Modem Router User Manual
Section 4 - Conguration
ARP Binding
IP Address: Enter the IP address to bind the MAC address to.
MAC Address: Enter the MAC address to have bound with an IP address.
ARP BINDING CONFIGURATION
This page allows you to bind an IP address to a MAC address.
Once you have entered the IP address to bind to a MAC address, click Add.
To delete an ARP binding, select it from the ARP binding table and click Delete
Selected.
To undo your changes, click Undo.
ARP BINDING TABLE
The table shows a list of currently bound ARP addresses.
 Loading...