

Page 1
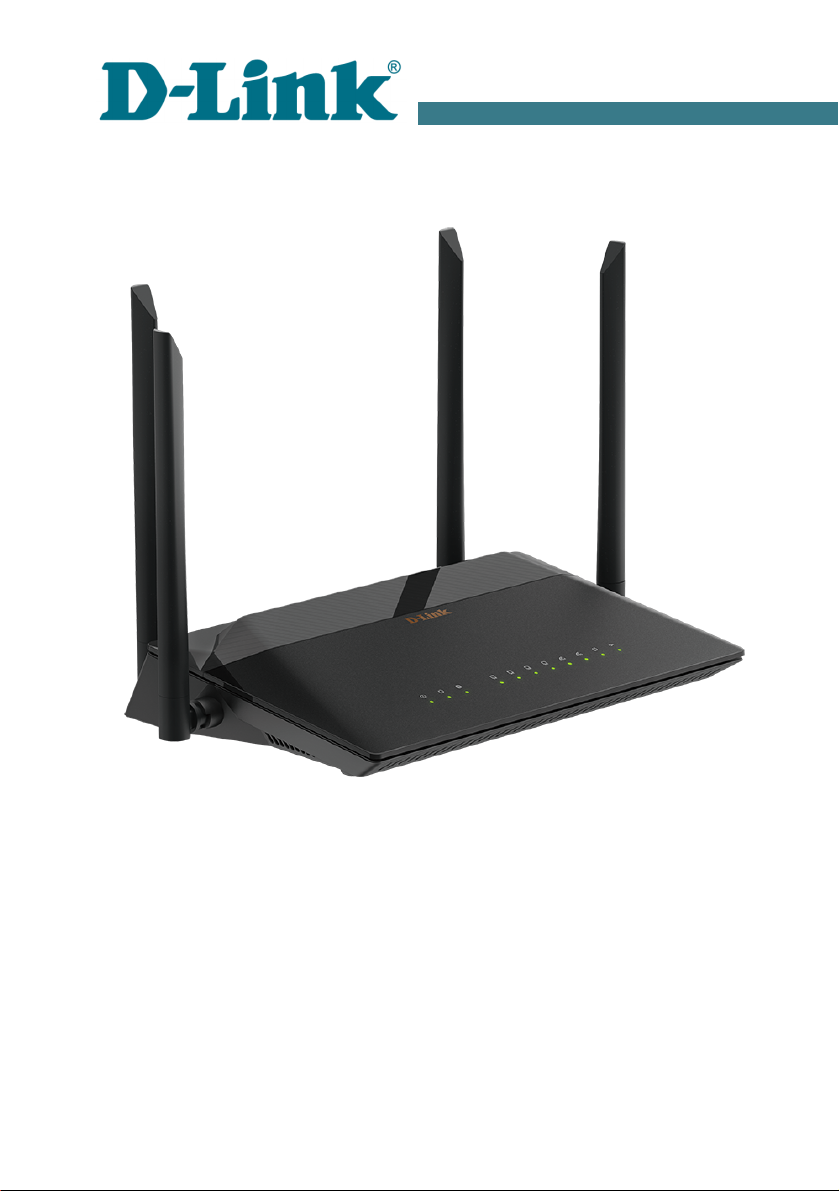
Quick Installation Guide
DSL-245GR
Wireless Dual Band VDSL2 Router with
ASDL2+/3G/LTE Support and USB Port
Page 2

DSL-245GR Quick Installation Guide
BEFORE YOU BEGIN
Delivery Package
• Router DSL-245GR
• Power adapter DC 12V/1.5A
• RJ-11 telephone cable
• Ethernet cable
• Splitter
• “Quick Installation Guide” (brochure).
If any of the items are missing, please contact your reseller.
The “User Manual” and “Quick Installation Guide” documents are available
on D-Link website (see www.dlink.ru).
!
Using a power supply with a different voltage rating than the one
included will cause damage and void the warranty for this product.
2
Page 3

DSL-245GR Quick Installation Guide
Default Settings
Domain name of device
dlinkrouter.local.
IP address of device
192.168.1.1
Username (login)
admin
Password
admin
Name of wireless network
(SSID)
2.4GHz
DSL-245GR
5GHz
DSL-245GR-5G
Network key (PSK password)
see WPS PIN on the
barcode label on the bottom
panel of the device
!
Router DSL-245GR with default settings cannot connect to the Internet.
To get started, please set your own password for access to the webbased interface and change the WLAN name (SSID); then, if needed,
configure other settings recommended by your ISP.
3
Page 4
DSL-245GR Quick Installation Guide
System Requirements and Equipment
• A computer with any operating system that supports a web browser.
• A web browser to access the web-based interface of the router:
◦ Apple Safari 8 and later
◦ Google Chrome 48 and later
◦ Microsoft Internet Explorer 10 and later
◦ Microsoft Edge 20.10240 and later
◦ Mozilla Firefox 44 and later
◦ Opera 35 and later.
• A NIC (Ethernet or Wi-Fi adapter) to connect to the router.
• An 802.11a, b, g, n, or ac Wi-Fi adapter to create a wireless network.
• A USB modem (when it is necessary to connect to the Internet via mobile
operators' networks).
1
!
Your USB modem should be equipped with an active SIM card of your
operator.
Some operators require subscribers to activate their USB modems prior
to using them. Please, refer to connection guidelines provided by your
operator when concluding the agreement or placed on its website.
For some models of USB modems, it is required to disable the PIN
code check on the SIM card prior to connecting the USB modem to the
router.
1 Contact your operator to get information on the service coverage and fees.
4
Page 5

DSL-245GR Quick Installation Guide
CONNECTING TO PC
PC with Ethernet Adapter
1. Connect an Ethernet cable between any of LAN ports located on the back
panel of the router and the Ethernet port of your PC.
2. To connect via USB modem: connect your USB modem to the USB port
2
located on the back panel of the router.
!
In some cases you will need to reboot the router after connection of the
USB modem.
3. To connect the device to a DSL line: connect a phone cable between the
DSL port of the router and the MODEM port of the splitter. Connect your
phone to the PHONE port of the splitter. Then connect another phone
cable between a phone jack and the LINE port of the splitter.
4. To connect the device to an Ethernet line: please connect the router to
the ISP's Ethernet line only after setting the WAN port and creating the
Internet connection (see the Initial Configuration Wizard section, page
16).
5. Connect the power cord to the power connector port on the back panel of
the router, then plug the power adapter into an electrical outlet or power
strip.
6. Turn on the router by pressing the ON/OFF button on its back panel.
Then make sure that your PC is configured to obtain an IP address
automatically (as DHCP client).
2 It is recommended to use a USB extension cable to connect a USB modem to the
router.
5
Page 6
DSL-245GR Quick Installation Guide
Obtaining IP Address Automatically (OS Windows 7)
1. Click the Start button and proceed to the Control Panel window.
2. Select the Network and Sharing Center section. (If the Control Panel
has the category view (the Category value is selected from the View by
drop-down list in the top right corner of the window), choose the View
network status and tasks line under the Network and Internet
section.)
3. In the menu located on the left part of the window, select the Change
adapter settings line.
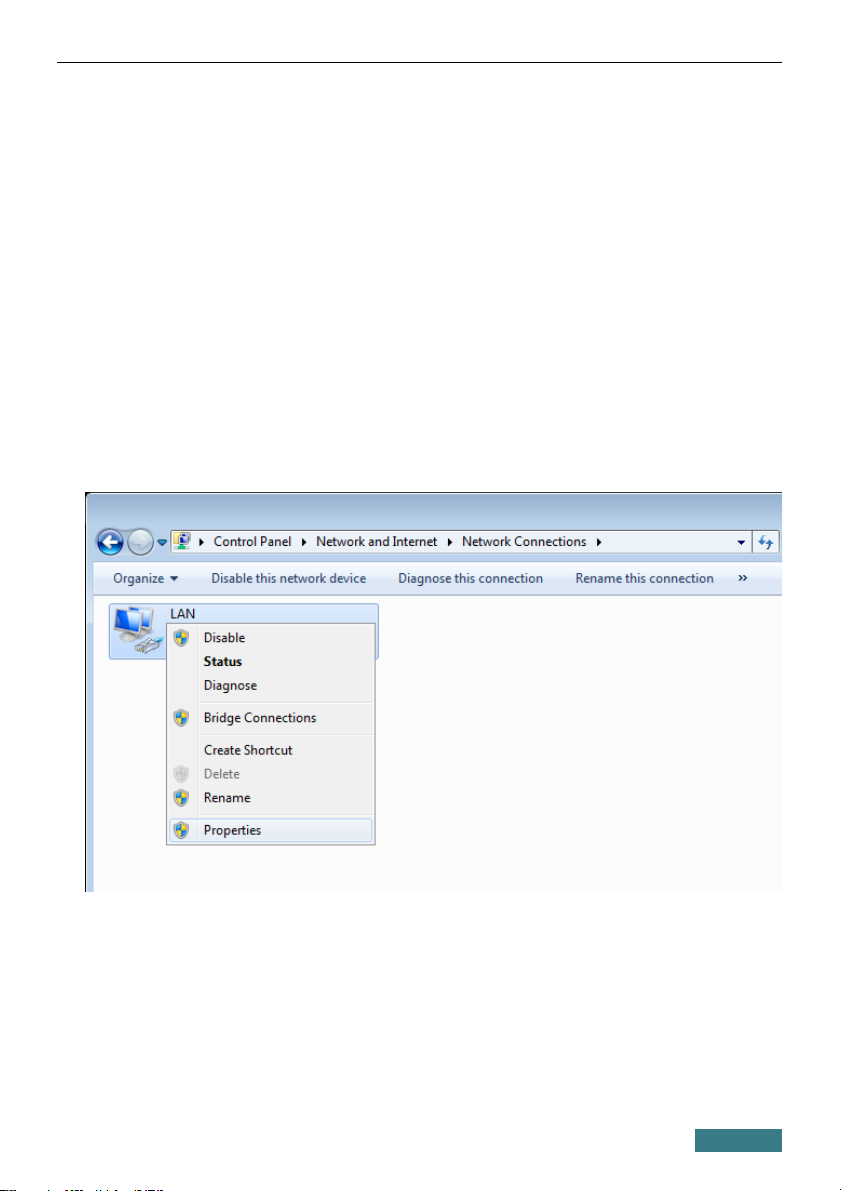
4. In the opened window, right-click the relevant Local Area Connection
icon and select the Properties line in the menu displayed.
5. In the Local Area Connection Properties window, on the
Networking tab, select the Internet Protocol Version 4 (TCP/IPv4)
line. Click the Properties button.
6
Page 7
DSL-245GR Quick Installation Guide
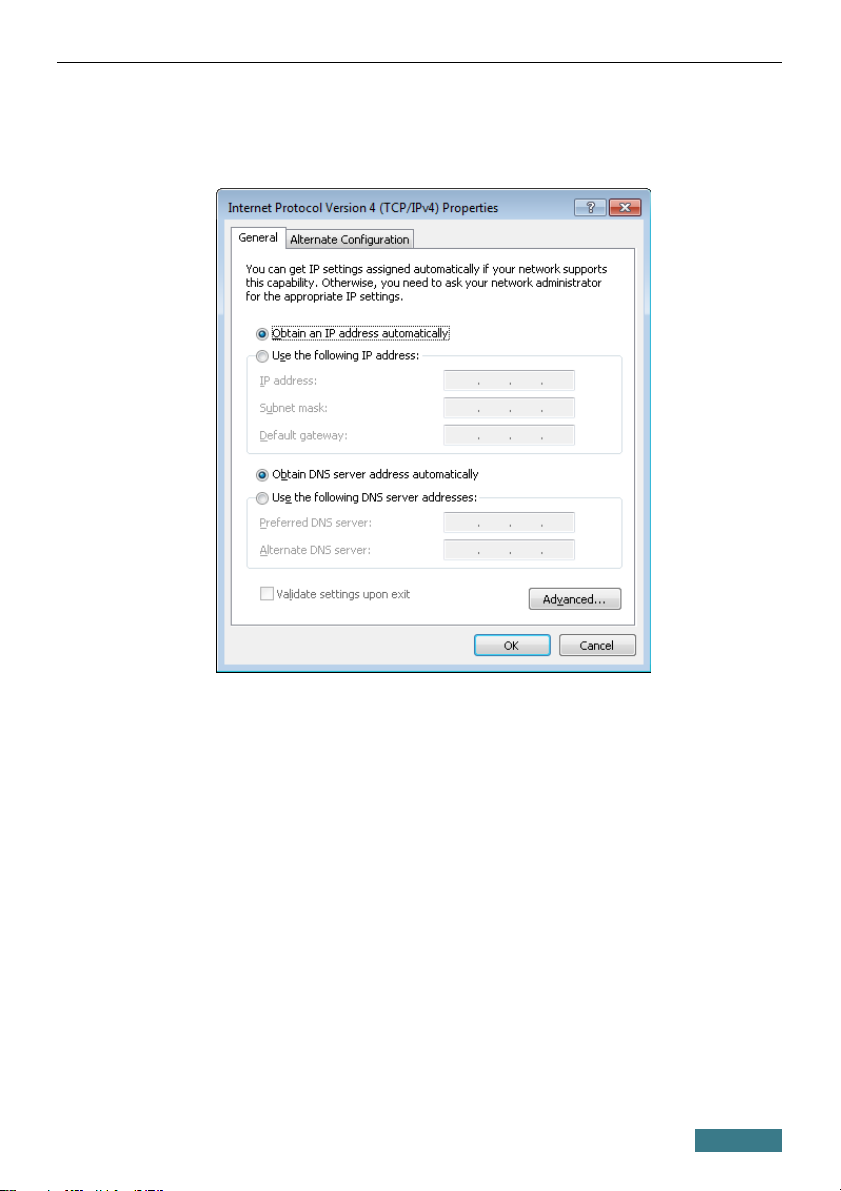
6. Make sure that the Obtain an IP address automatically and Obtain
DNS server address automatically choices of the radio buttons are
selected. Click the OK button.
7. Click the OK button in the connection properties window.
7
Page 8

DSL-245GR Quick Installation Guide
PC with Wi-Fi Adapter
1. To connect via USB modem: connect your USB modem to the USB port
3
located on the back panel of the router.
!
In some cases you will need to reboot the router after connection of the
USB modem.
2. To connect the device to a DSL line: connect a phone cable between the
DSL port of the router and the MODEM port of the splitter. Connect your
phone to the PHONE port of the splitter. Then connect another phone
cable between a phone jack and the LINE port of the splitter.
3. To connect the device to an Ethernet line: please connect the router to
the ISP's Ethernet line only after setting the WAN port and creating the
Internet connection (see the Initial Configuration Wizard section, page
16).
4. Connect the power cord to the power connector port on the back panel of
the router, then plug the power adapter into an electrical outlet or power
strip.
5. Turn on the router by pressing the ON/OFF button on its back panel.
6. Make sure that the Wi-Fi adapter of your PC is on. As a rule, modern
notebooks with built-in wireless NICs are equipped with a button or
switch that turns on/off the wireless adapter (refer to your PC documents).
If your PC is equipped with a pluggable wireless NIC, install the software
provided with your Wi-Fi adapter.
Then make sure that your Wi-Fi adapter is configured to obtain an IP address
automatically (as DHCP client).
3 It is recommended to use a USB extension cable to connect a USB modem to the
router.
8
Page 9

DSL-245GR Quick Installation Guide
Obtaining IP Address Automatically and Connecting to Wireless Network (OS Windows 7)
1. Click the Start button and proceed to the Control Panel window.
2. Select the Network and Sharing Center section. (If the Control Panel
has the category view (the Category value is selected from the View by
drop-down list in the top right corner of the window), choose the View
network status and tasks line under the Network and Internet
section.)
3. In the menu located on the left part of the window, select the Change
adapter settings line.
4. In the opened window, right-click the relevant Wireless Network
Connection icon. Make sure that your Wi-Fi adapter is on, then select
the Properties line in the menu displayed.
5. In the Wireless Network Connection Properties window, on the
Networking tab, select the Internet Protocol Version 4 (TCP/IPv4)
line. Click the Properties button.
9
Page 10
DSL-245GR Quick Installation Guide
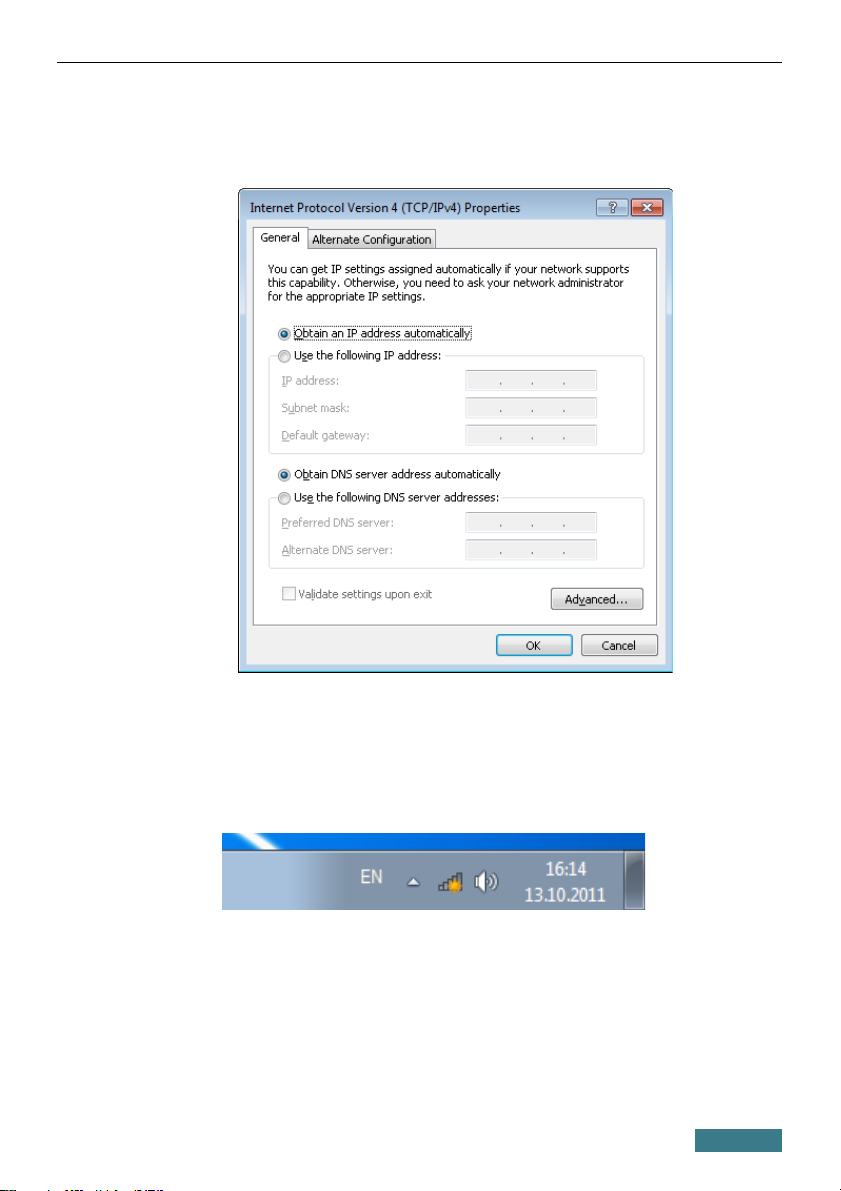
6. Make sure that the Obtain an IP address automatically and Obtain
DNS server address automatically choices of the radio buttons are
selected. Click the OK button.
7. Click the OK button in the connection properties window.
8. To open the list of available wireless networks, select the icon of the
wireless network connection and click the Connect To button or left-
click the network icon in the notification area located on the right side of
the taskbar.
10
Page 11
DSL-245GR Quick Installation Guide
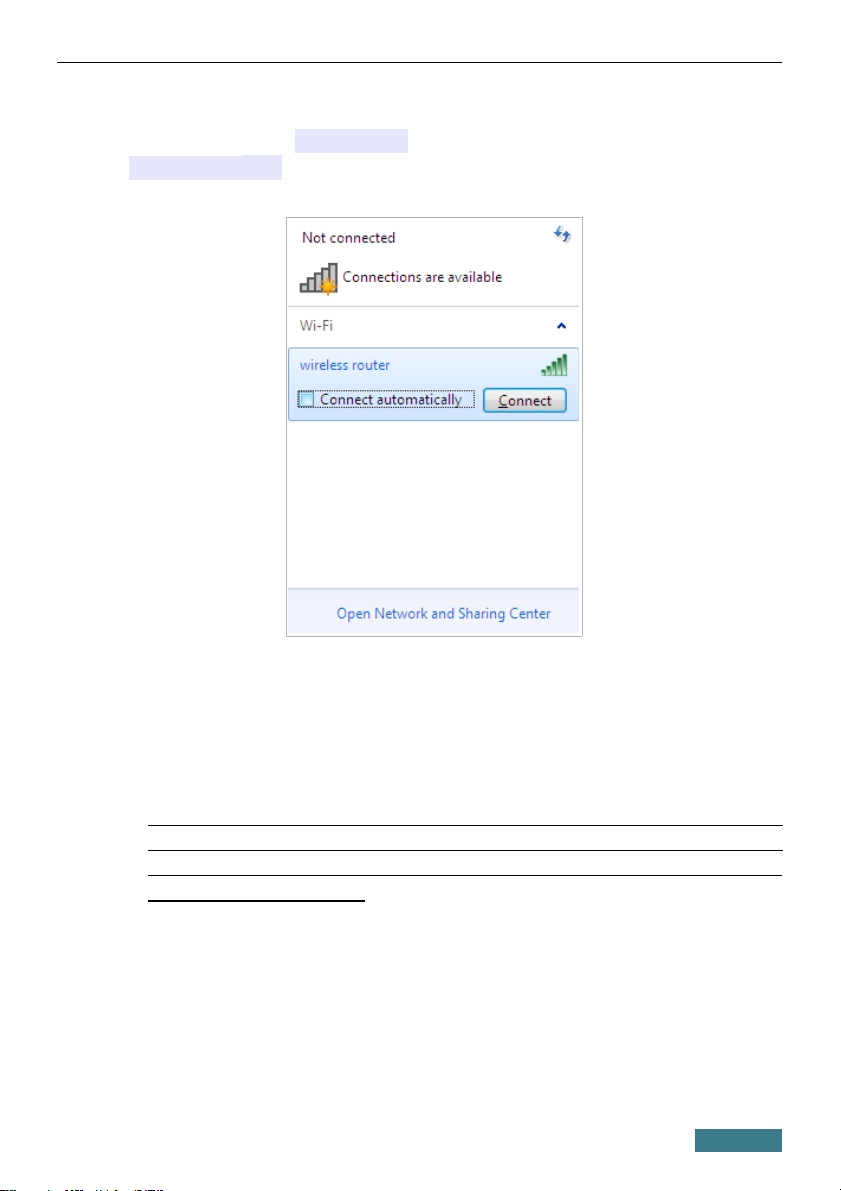
9. In the opened window, in the list of available wireless networks, select the
wireless network DSL-245GR (for operating in the 2.4GHz band) or
DSL-245GR-5G (for operating in the 5GHz band) and click the
Connect button.
10. In the opened window, enter the network key (see WPS PIN on the
barcode label on the bottom panel of the device) in the Security key
field and click the OK button.
11. Wait for about 20-30 seconds. After the connection is established, the
network icon will be displayed as the signal level scale.
!
If you perform initial configuration of the router via Wi-Fi connection,
note that immediately after changing the wireless default settings of the
router you will need to reconfigure the wireless connection using the
newly specified settings.
11
Page 12
DSL-245GR Quick Installation Guide
CONFIGURING ROUTER
Connecting to Web-based Interface
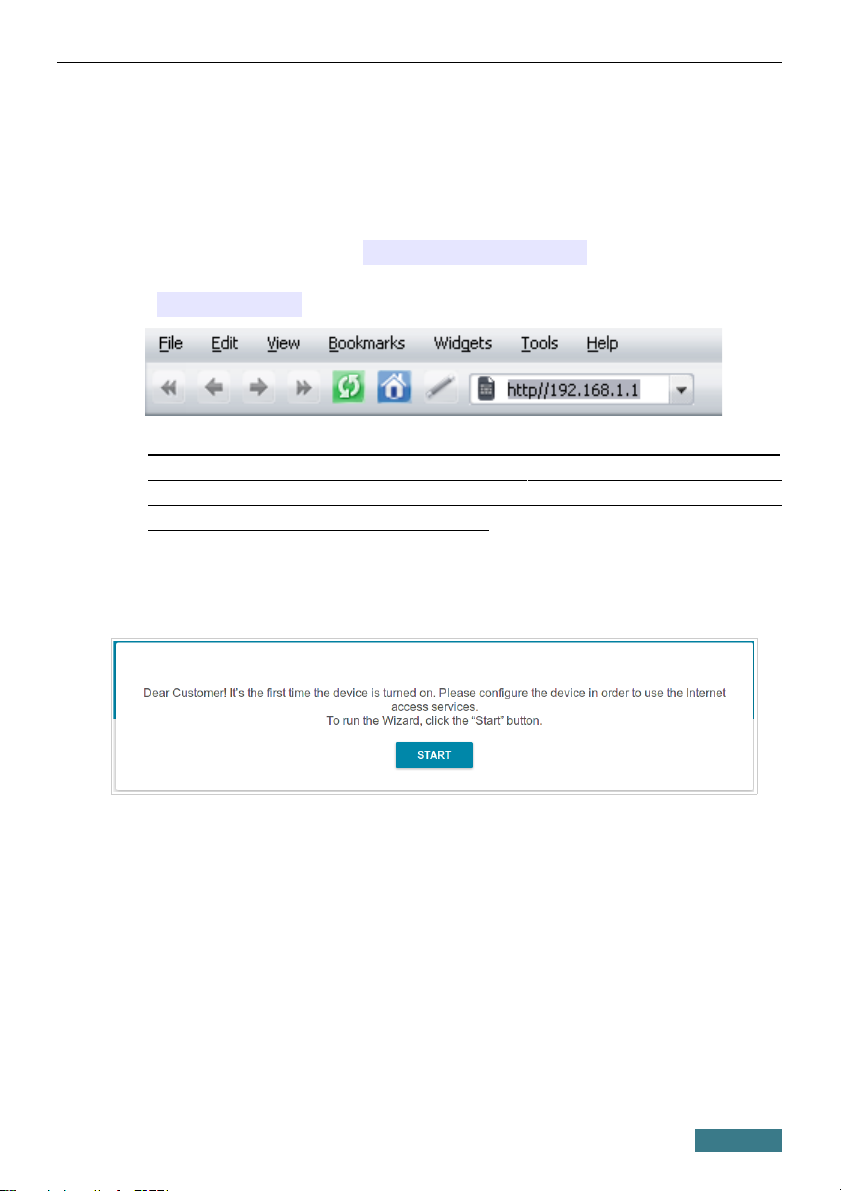
Start a web browser. In the address bar of the web browser, enter the domain
name of the router (by default, dlinkrouter.local) with a dot at the end
and press the Enter key. Also you can enter the IP address of the device (by
default, 192.168.1.1).
!
If the error “ The page cannot be displayed ” (or “ Unable to display the
page ”/“ Could not connect to remote server ”) occurs upon connecting to
the web-based interface of the router, make sure that you have properly
connected the router to your computer.
If the device has not been configured previously or the default settings have
been restored, after access to the web-based interface the Initial Configuration
Wizard opens (see the Initial Configuration Wizard section, page 16).
12
Page 13
DSL-245GR Quick Installation Guide
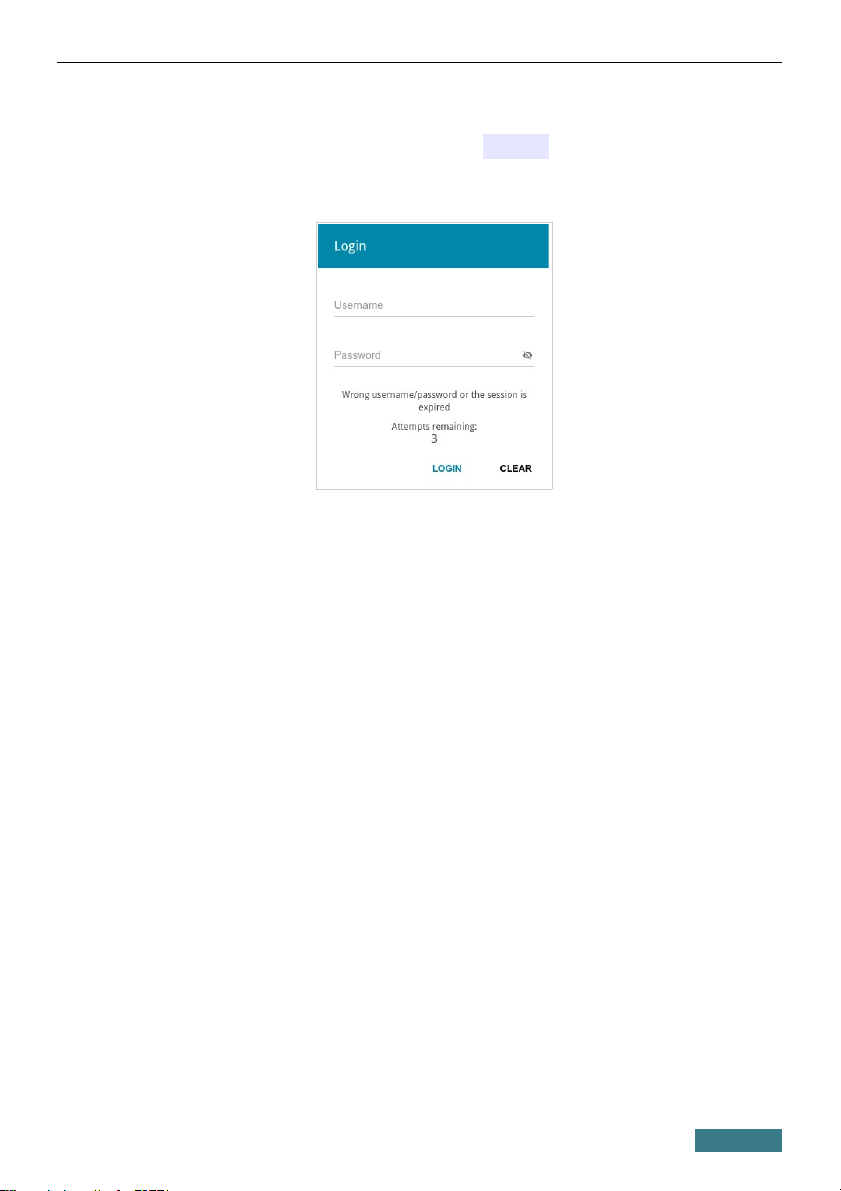
If you configured the device previously, after access to the web-based interface
the login page opens. Enter the username (admin) in the Username field
and the password you specified in the Password field, then click the LOGIN
button.
If you enter a wrong password several times, the web-based interface will be
blocked for a while. Please wait for one minute and reenter the password you
specified.
13
Page 14
DSL-245GR Quick Installation Guide
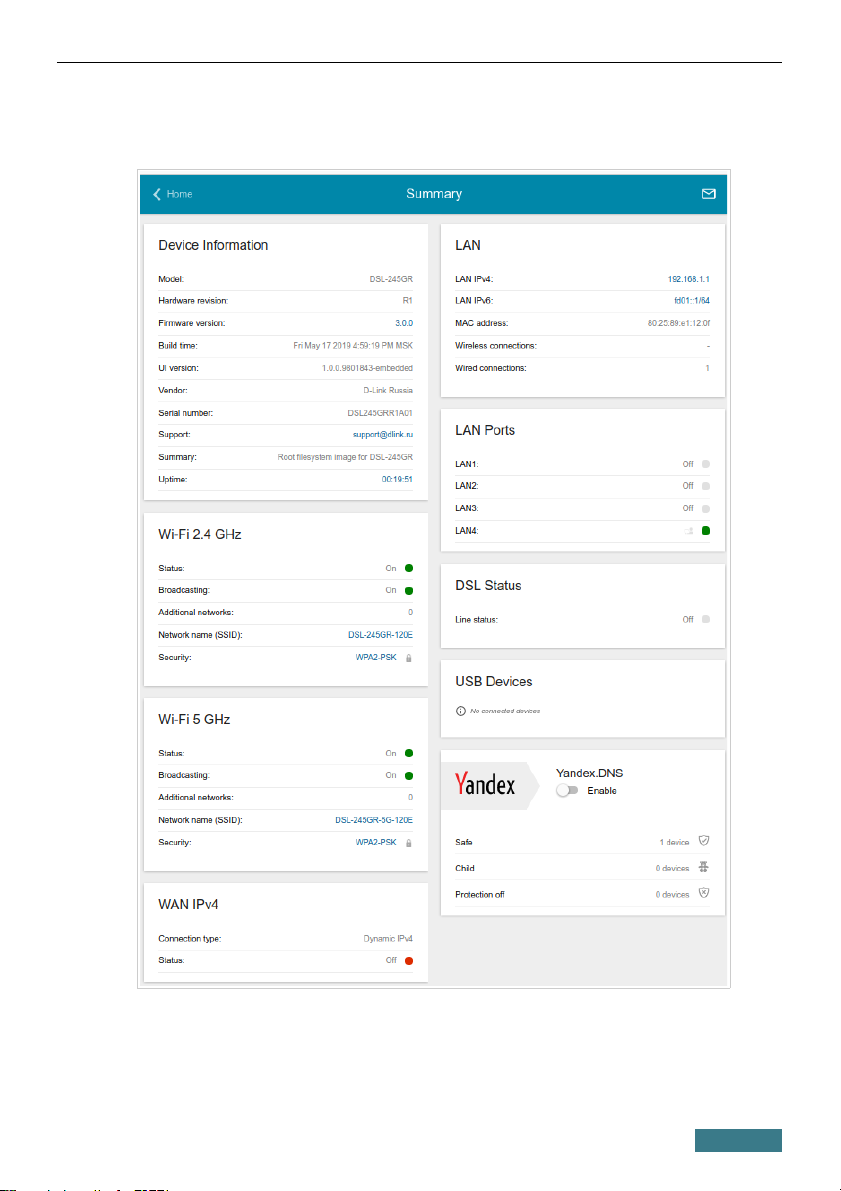
The Summary page displays general information on the router and its
software.
14
Page 15
DSL-245GR Quick Installation Guide
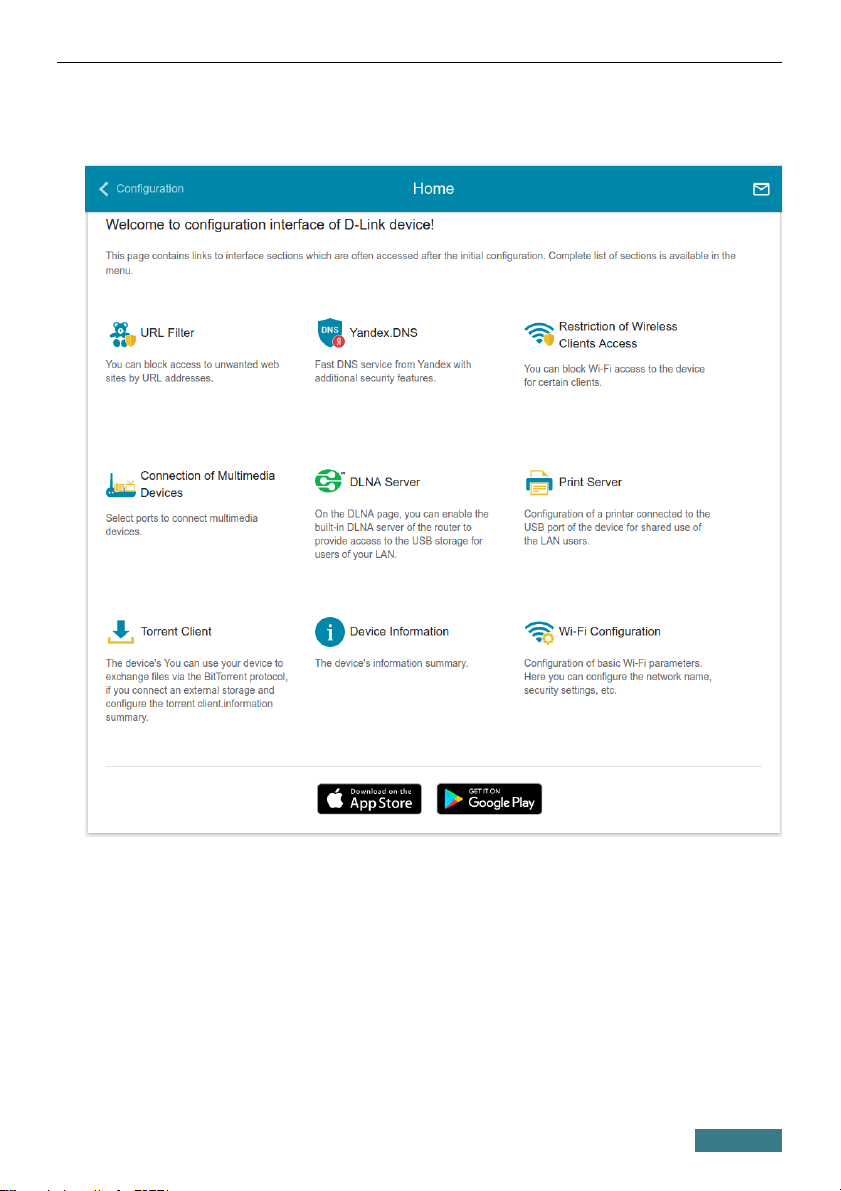
The Home page displays links to the most frequently used pages with device's
settings.
The web-based interface of the router is bilingual (English/Russian). You can
select the needed language upon the initial configuration of the web-based
interface of the router or in the System / Configuration section of the
menu.
Other settings of the router are available in the menu in the left part of the
page. Go to the relevant section and select the needed page or run the wizard
in the Initial Configuration section.
15
Page 16
DSL-245GR Quick Installation Guide
Initial Configuration Wizard
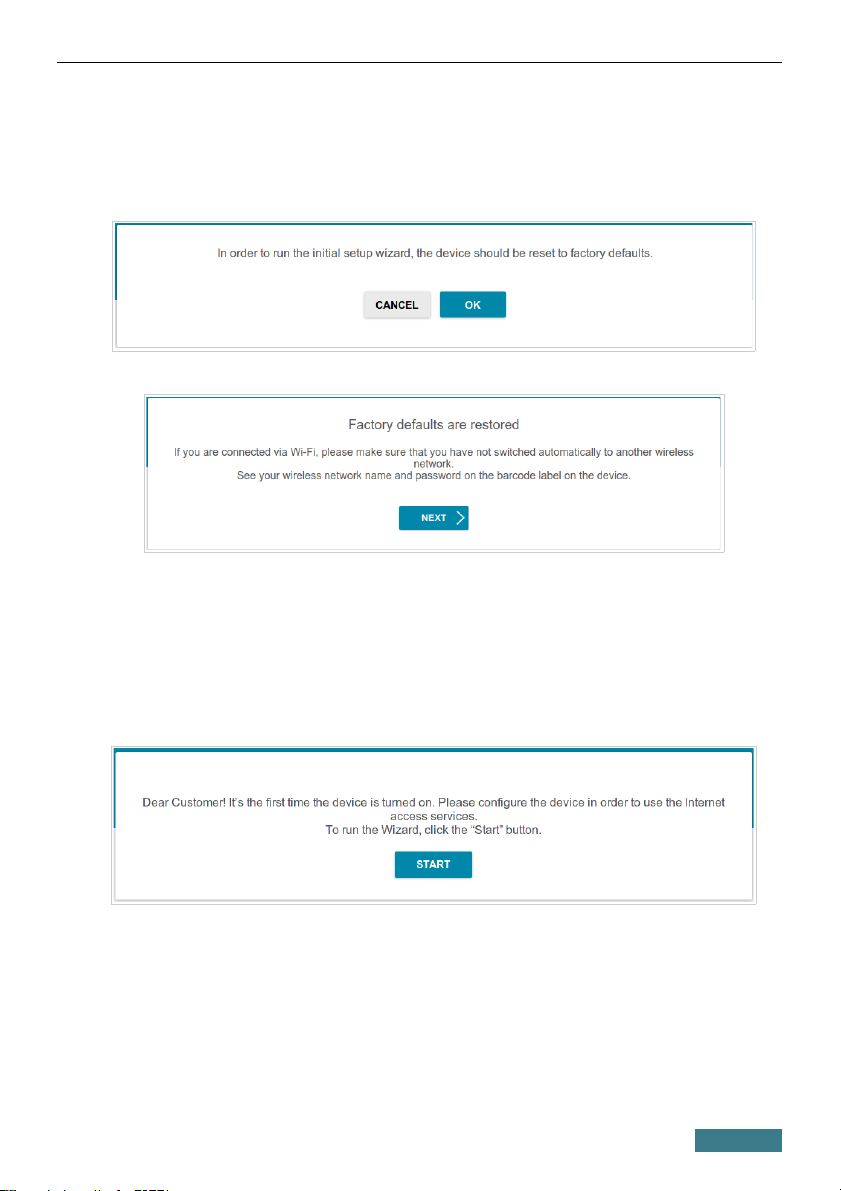
In order to start the Initial Configuration Wizard manually, go to the Initial
Configuration section.
Click the OK button and wait until the factory default settings are restored.
If you perform initial configuration of the router via Wi-Fi connection, please
make sure that you are connected to the wireless network of DSL-245GR and
click the NEXT button. Then click the START button.
If the device has not been configured previously or the default settings have
been restored, the Initial Configuration Wizard starts automatically upon
access to the web-based interface or upon opening a web site on the Internet.
16
Page 17
DSL-245GR Quick Installation Guide
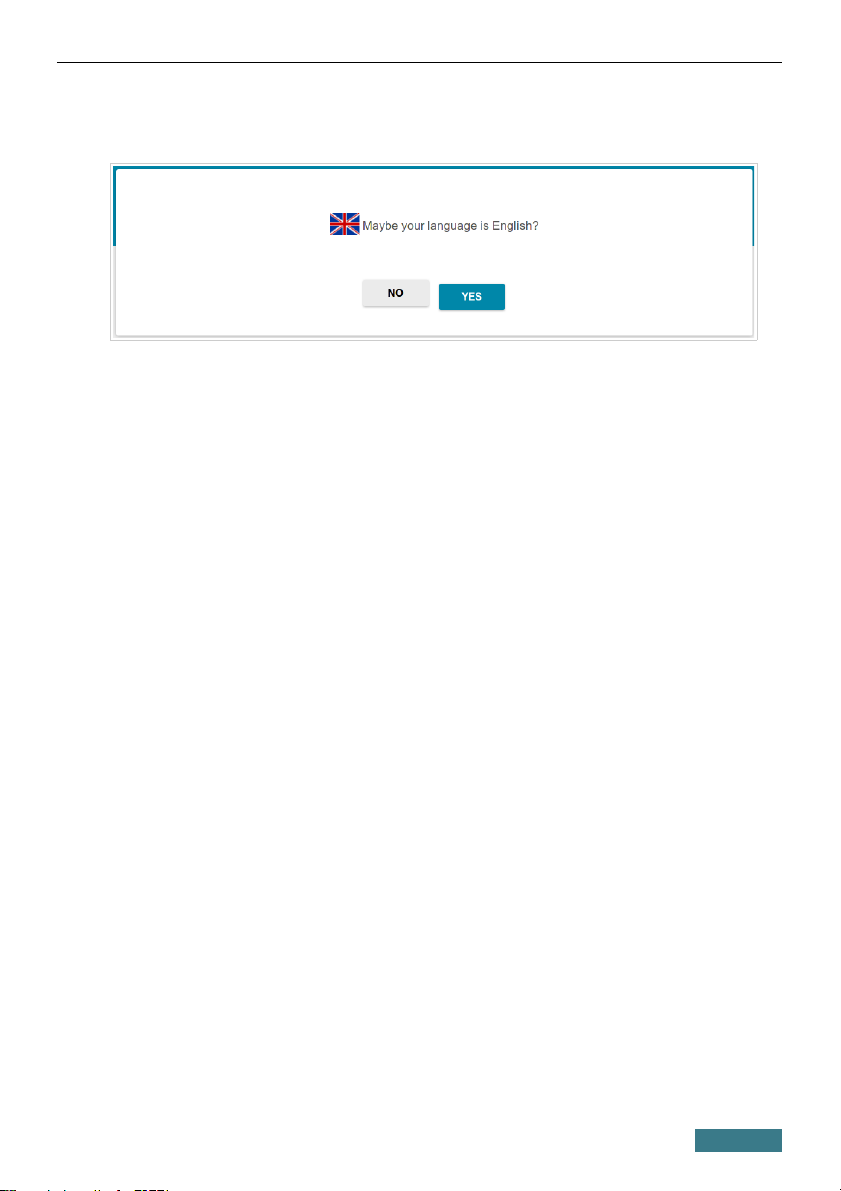
1. Click YES in order to leave the current language of the web-based
interface or click NO to select the other language.
2. On the next page, click the CONTINUE button.
17
Page 18
DSL-245GR Quick Installation Guide
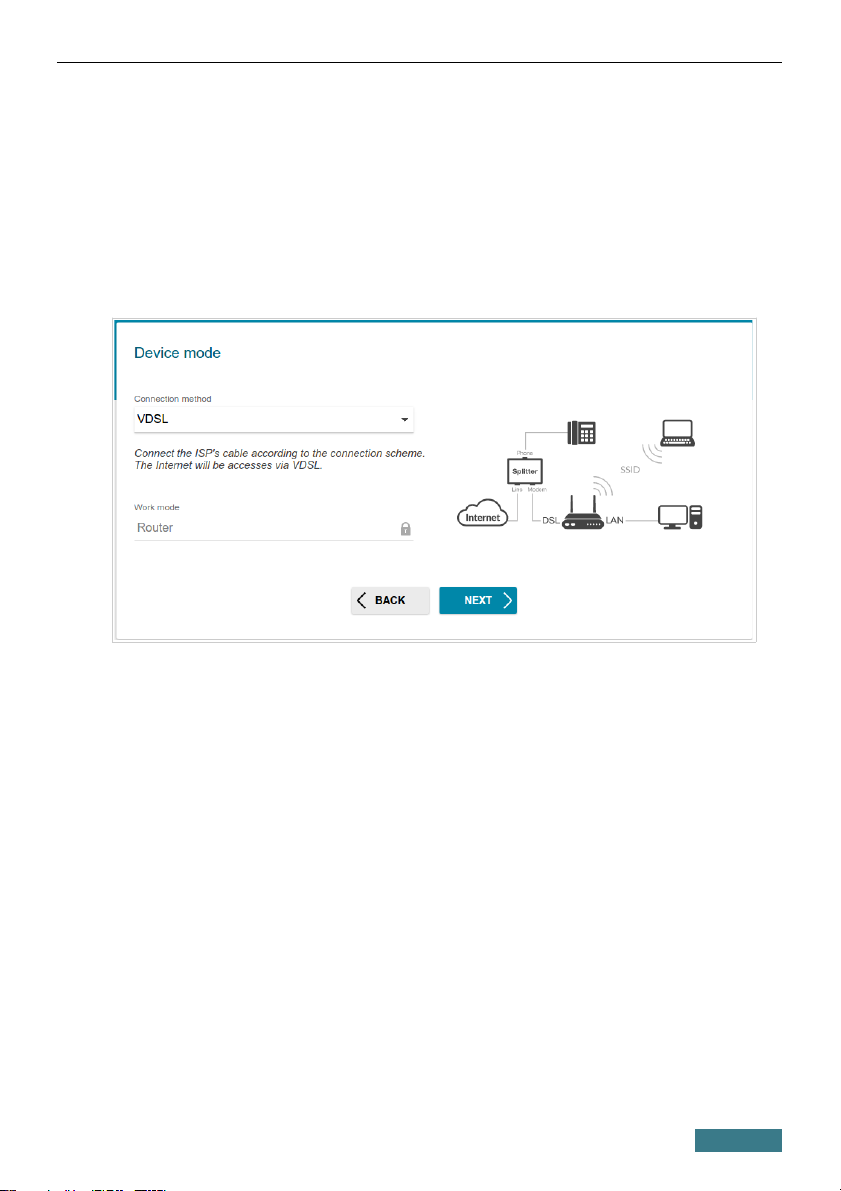
Selecting Operation Mode
In order to connect your device to a VDSL or ADSL line, on the Device
mode page, from the Connection method list, select the VDSL or ADSL
value correspondingly. In this mode you can configure a WAN connection, set
your own settings for the wireless network in the 2.4GHz and 5GHz bands,
configure LAN ports to connect an STB or VoIP phone, and set your own
password for access to the web-based interface of the device.
In order to connect your device to a private Ethernet line, on the Device
mode page, from the Connection method list, select the Ethernet (LAN)
value. In this mode you can configure one of the router's LAN port as the
WAN port, configure a WAN connection, set your own settings for the
wireless network in the 2.4GHz and 5GHz bands, configure LAN ports to
connect an STB or VoIP phone, and set your own password for access to the
web-based interface of the device.
18
Page 19
DSL-245GR Quick Installation Guide
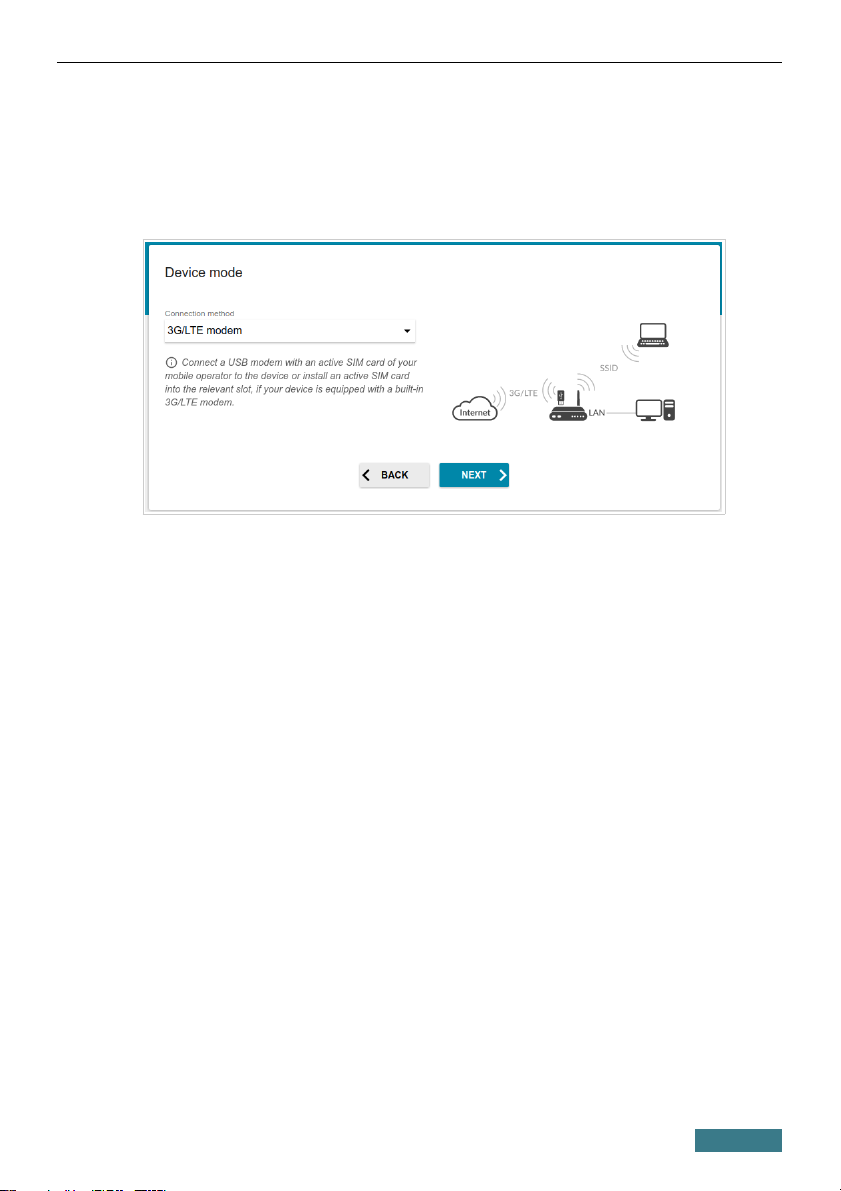
In order to connect your device to the network of a 3G or LTE operator, on the
Device mode page, from the Connection method list, select the 3G/LTE
modem value. In this mode you can configure a 3G/LTE WAN connection,
set your own settings for the wireless network in the 2.4GHz and 5GHz bands,
and set your own password for access to the web-based interface of the device.
In order to connect your device to a wireless ISP (WISP), on the Device
mode page, from the Connection method list, select the Wi-Fi value. In
this mode you can connect your device to another access point, configure a
WAN connection, set your own settings for the wireless network in the
2.4GHz and 5GHz bands, configure LAN ports to connect an STB or VoIP
phone, and set your own password for access to the web-based interface of the
device.
When the operation mode is selected, click the NEXT button.
19
Page 20
DSL-245GR Quick Installation Guide
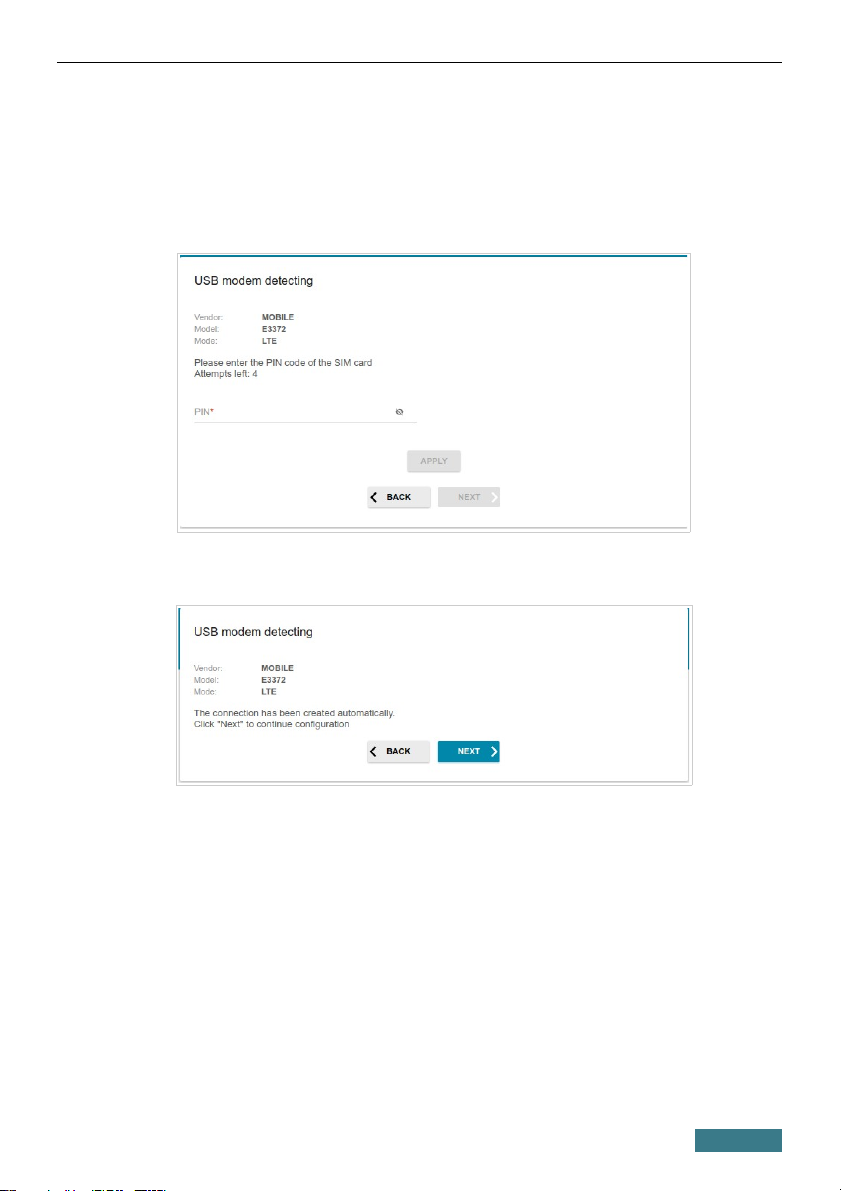
Creating 3G/LTE WAN Connection
This configuration step is available for the 3G/LTE modem mode.
1. If the PIN code check is enabled for the SIM card inserted into your USB
modem, enter the PIN code in the PIN field and click the APPLY button.
2. Please wait while the router automatically creates a WAN connection for
your mobile operator.
3. Click the NEXT button.
If the router failed to create a WAN connection automatically, click the
CONFIGURE MANUALLY button. On the Internet connection type
page, configure all needed settings and click the NEXT button.
20
Page 21
DSL-245GR Quick Installation Guide
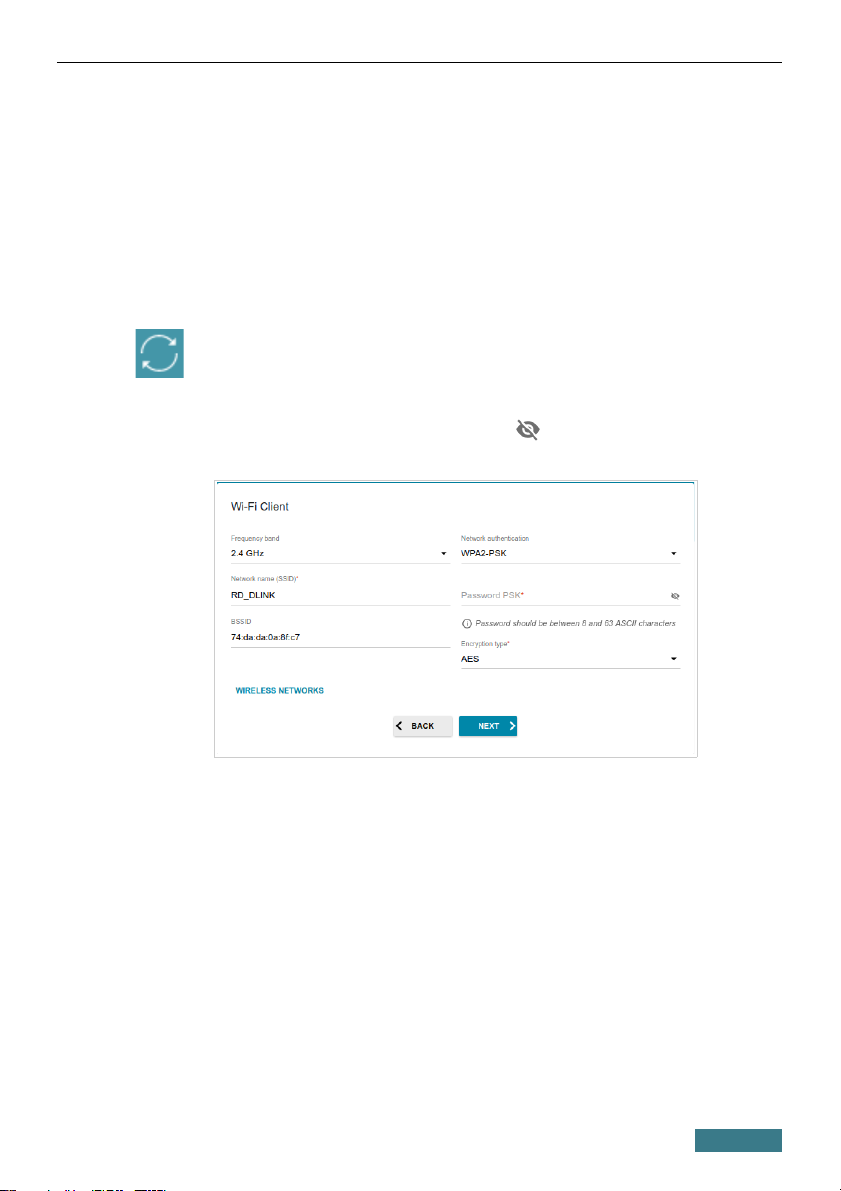
Wi-Fi Client
This configuration step is available for the Wi-Fi mode.
1. On the Wi-Fi Сlient page, click the WIRELESS NETWORKS button
and select the network to which you want to connect in the opened
window. When you select a network, the Network name (SSID) and
BSSID fields are filled in automatically.
If you cannot find the needed network in the list, click the UPDATE LIST
icon ( ).
2. If a password is needed to connect to the selected network, fill in the
relevant field. Click the Show icon ( ) to display the entered
password.
If you connect to a hidden network, select the band where the hidden network
operates from the Frequency band list and enter the network name in the
Network name (SSID) field. Then select a needed value from the Network
authentication list and then, if needed, enter the password in the relevant
field.
3. Click the NEXT button.
21
Page 22
DSL-245GR Quick Installation Guide
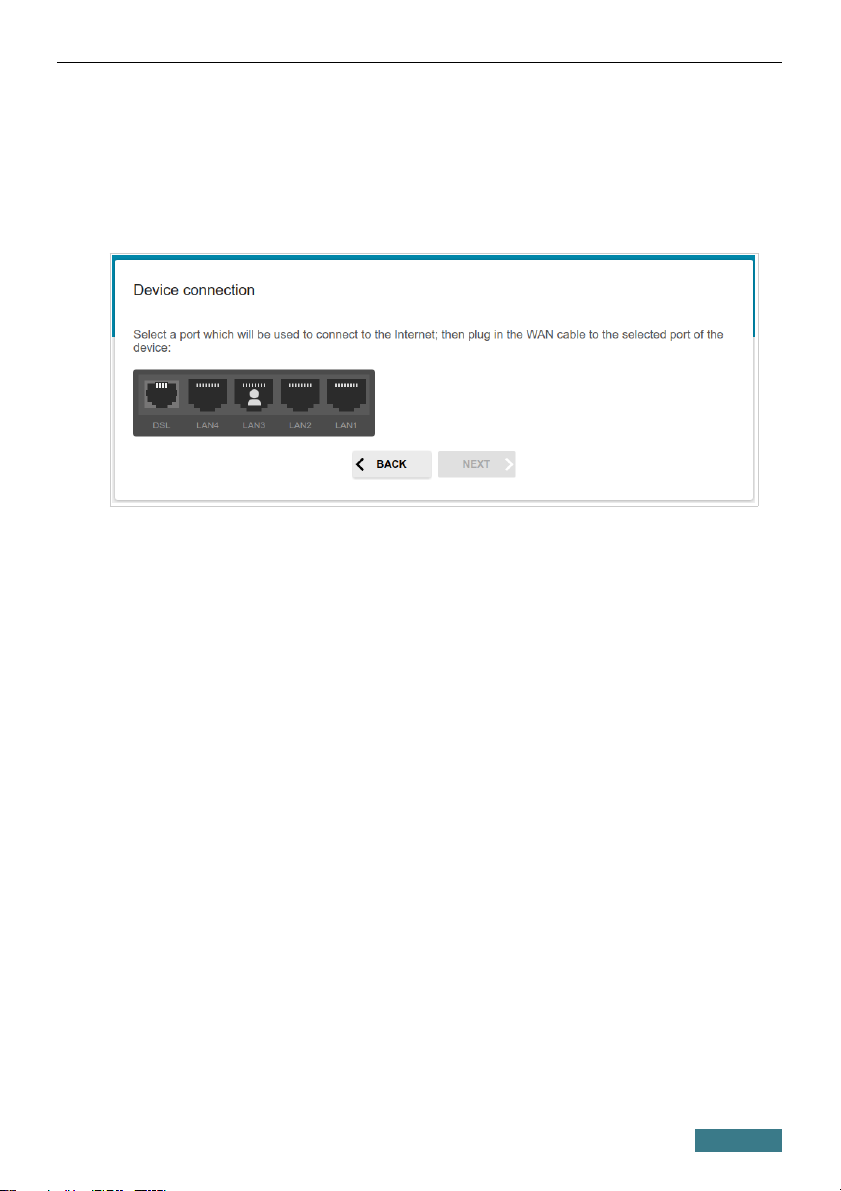
Conguring LAN Port as WAN Port
This configuration step is available for the Ethernet (LAN) mode.
1. On the Device connection page, select a free LAN port which will be
used as the WAN port.
2. Click the NEXT button.
22
Page 23
DSL-245GR Quick Installation Guide
Conguring Ethernet WAN Connection
This configuration step is available for the Ethernet (LAN) mode.
!
You should configure your WAN connection in accordance with data
provided by your Internet service provider (ISP). Make sure that you have
obtained all necessary information prior to configuring your connection.
Otherwise contact your ISP.
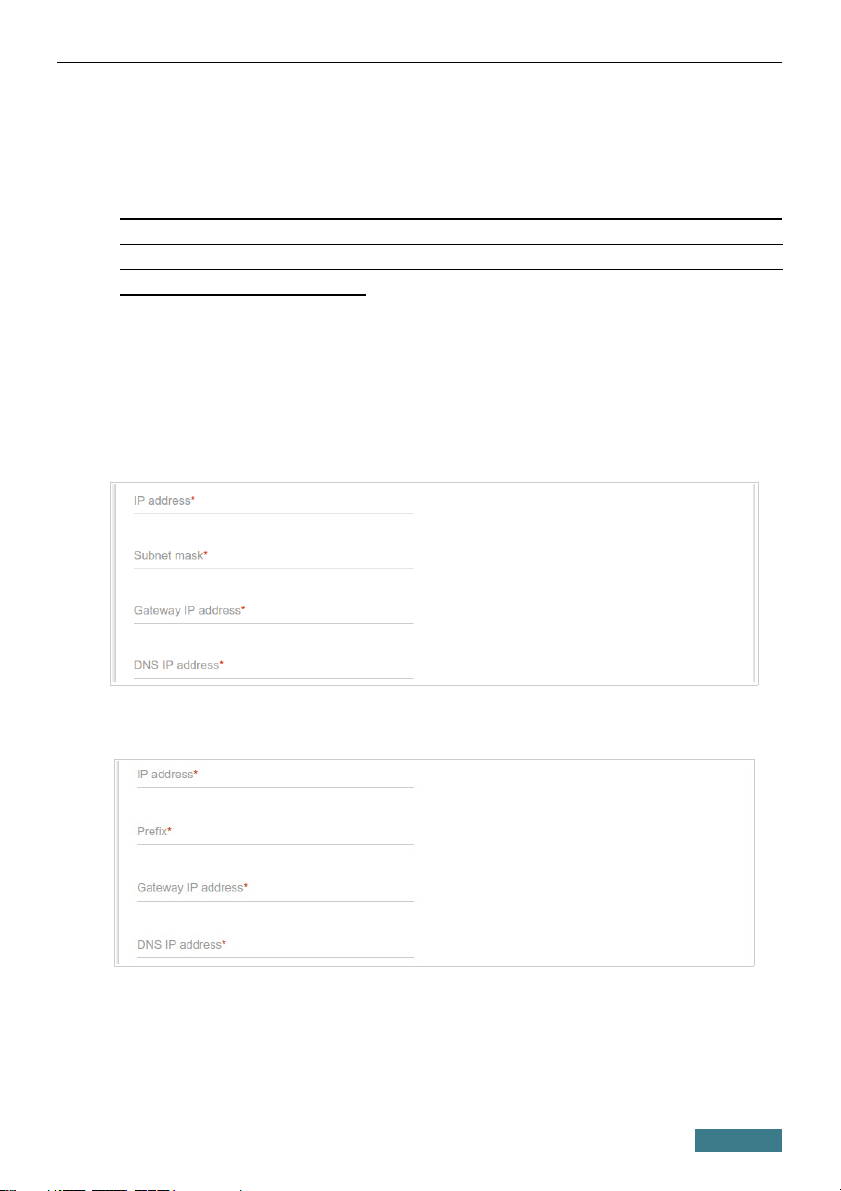
1. On the Internet connection type page, from the Connection type
list, select the connection type used by your ISP and fill in the fields
displayed on the page.
Static IPv4: Fill in the following fields: IP address, Subnet mask,
Gateway IP address, and DNS IP address.
Static IPv6: Fill in the following fields: IP address, Prefix, Gateway IP
address, and DNS IP address.
23
Page 24
DSL-245GR Quick Installation Guide
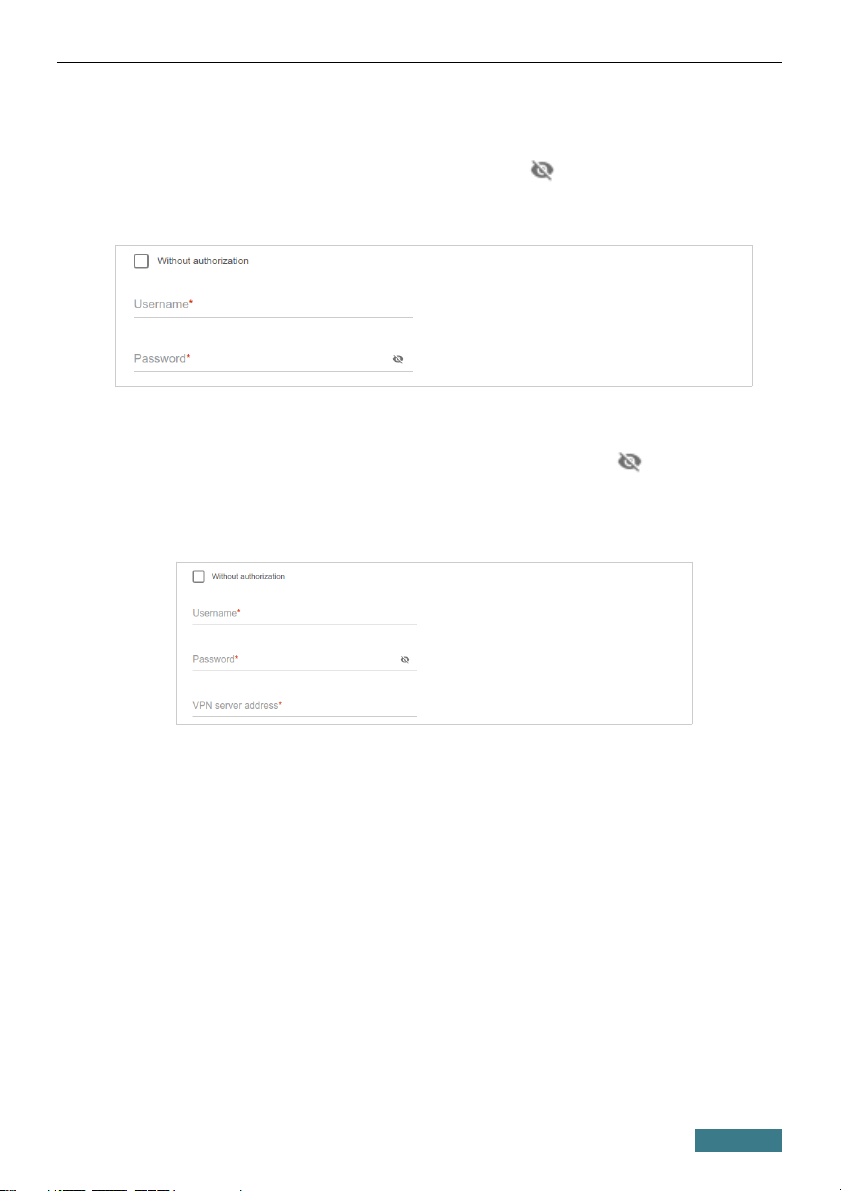
PPPoE, IPv6 PPPoE, PPPoE Dual Stack: Enter authorization data provided
by your ISP (the username (login) in the Username field and the password in
the Password field). Click the Show icon ( ) to display the entered
password. If authorization is not required, select the Without authorization
checkbox.
PPTP + Dynamic IP or L2TP + Dynamic IP: Enter authorization data
provided by your ISP (the username (login) in the Username field and the
password in the Password field). Click the Show icon ( ) to display the
entered password. If authorization is not required, select the Without
authorization checkbox. In the VPN server address field, enter the IP or
URL address of the PPTP or L2TP authentication server.
24
Page 25
DSL-245GR Quick Installation Guide
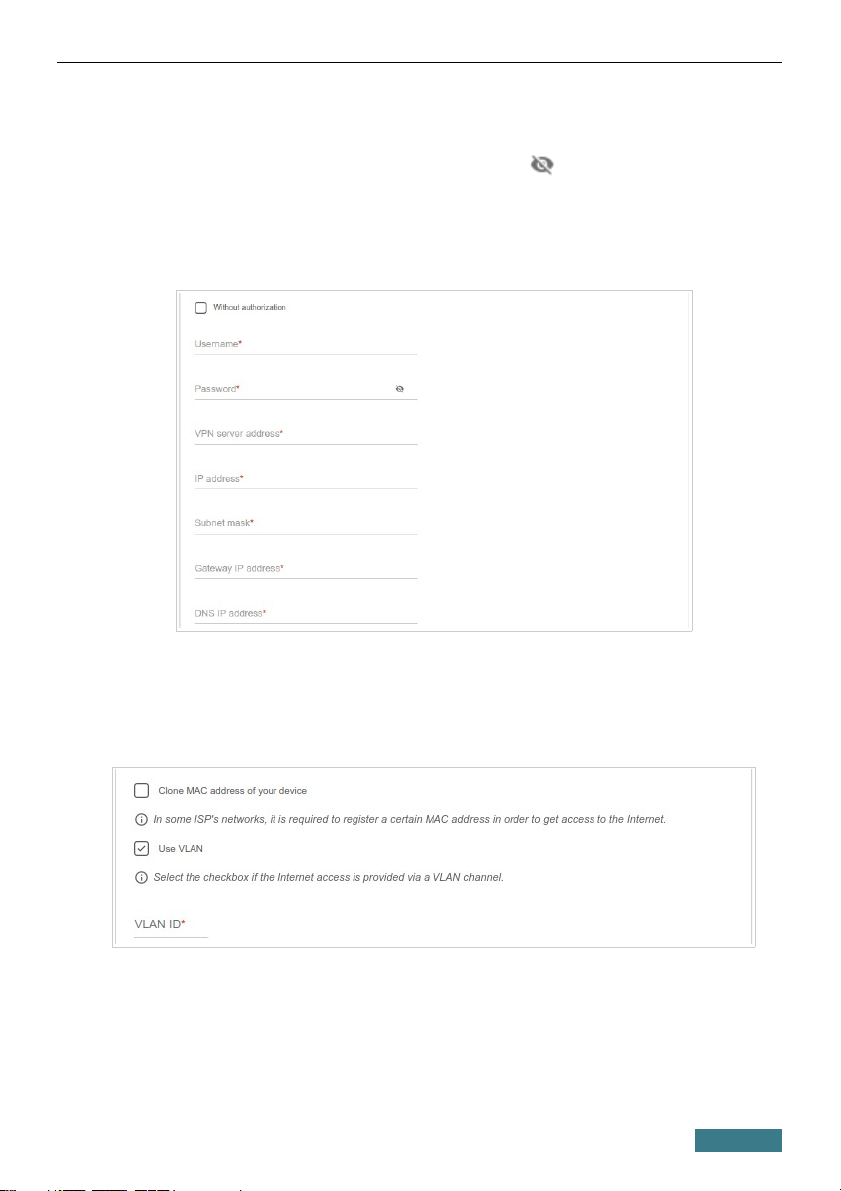
PPTP + Static IP or L2TP + Static IP: Enter authorization data provided by
your ISP (the username (login) in the Username field and the password in
the Password field). Click the Show icon ( ) to display the entered
password. If authorization is not required, select the Without authorization
checkbox. In the VPN server address field, enter the IP or URL address of
the PPTP or L2TP authentication server. Also fill in the following fields: IP
address, Subnet mask, Gateway IP address, and DNS IP address.
2. If your ISP uses MAC address binding, select the Clone MAC address
of your device checkbox.
3. If the Internet access is provided via a VLAN channel, select the Use
VLAN checkbox and fill in the VLAN ID field.
4. Click the NEXT button.
25
Page 26
DSL-245GR Quick Installation Guide
Conguring VDSL WAN Connection
This configuration step is available for the VDSL mode.
!
You should configure your WAN connection in accordance with data
provided by your Internet service provider (ISP). Make sure that you have
obtained all necessary information prior to configuring your connection.
Otherwise contact your ISP.
1. On the Internet connection type page, from the Connection type
list, select the connection type used by your ISP and fill in the fields
displayed on the page.
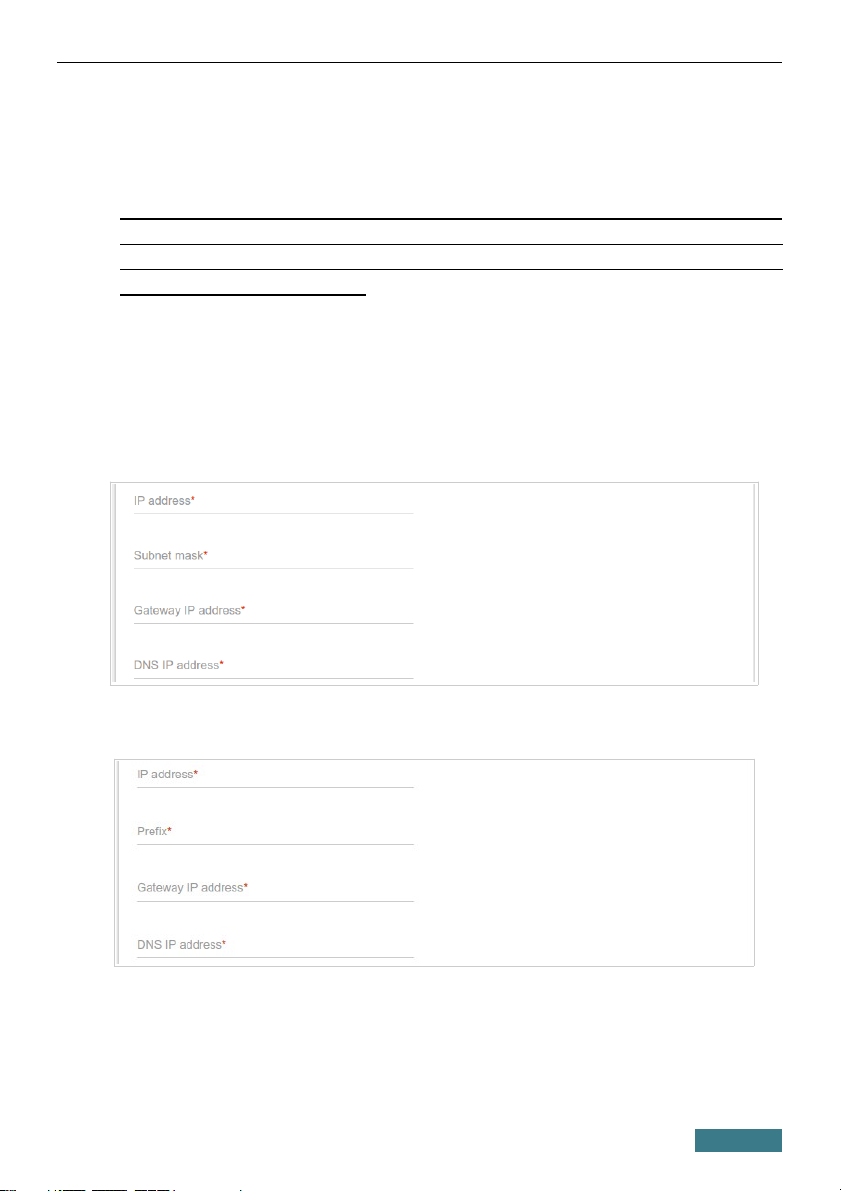
Static IPv4: Fill in the following fields: IP address, Subnet mask,
Gateway IP address, and DNS IP address.
Static IPv6: Fill in the following fields: IP address, Prefix, Gateway IP
address, and DNS IP address.
26
Page 27
DSL-245GR Quick Installation Guide
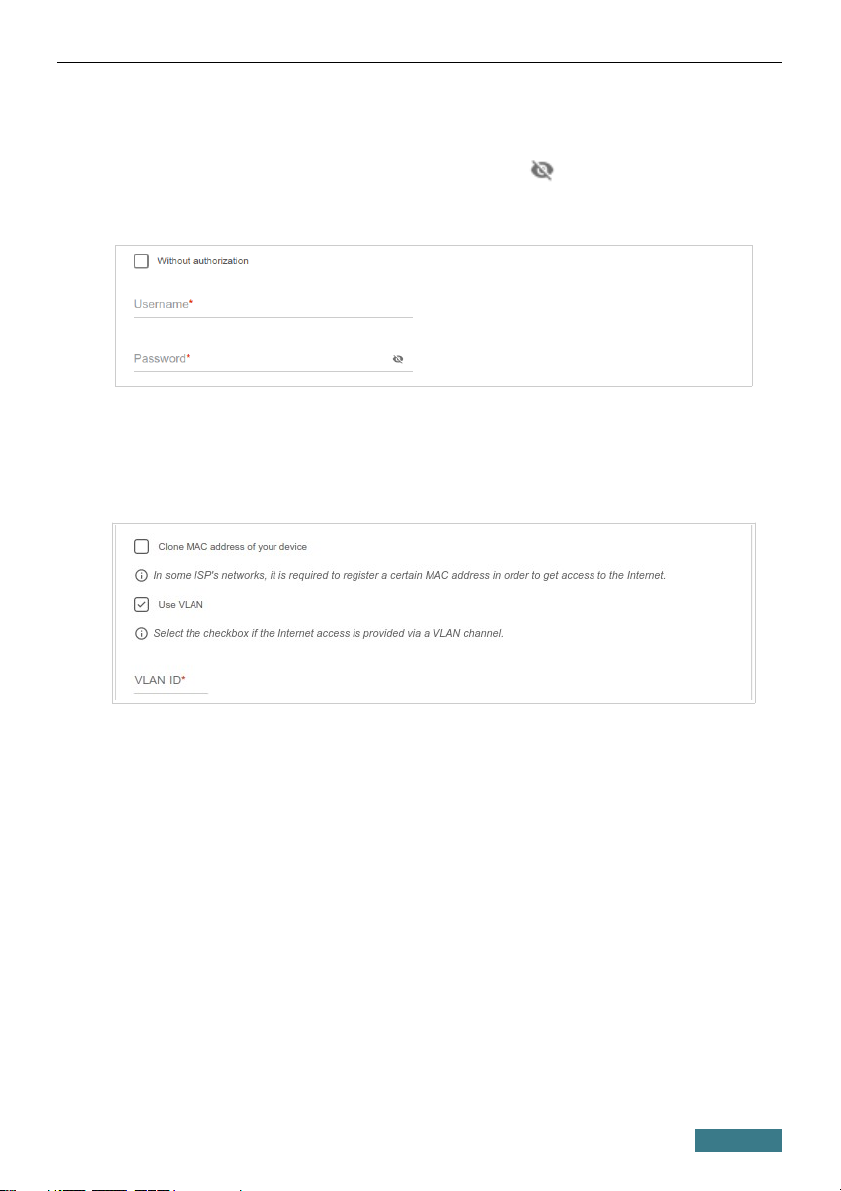
PPPoE, IPv6 PPPoE, PPPoE Dual Stack: Enter authorization data provided
by your ISP (the username (login) in the Username field and the password in
the Password field). Click the Show icon ( ) to display the entered
password. If authorization is not required, select the Without authorization
checkbox.
2. If your ISP uses MAC address binding, select the Clone MAC address
of your device checkbox.
3. If the Internet access is provided via a VLAN channel, select the Use
VLAN checkbox and fill in the VLAN ID field.
4. Click the NEXT button.
27
Page 28
DSL-245GR Quick Installation Guide
Conguring ADSL WAN Connection
This configuration step is available for the ADSL mode.
!
You should configure your WAN connection in accordance with data
provided by your Internet service provider (ISP). Make sure that you have
obtained all necessary information prior to configuring your connection.
Otherwise contact your ISP.
1. On the Internet connection type page, from the Connection type
list, select the connection type used by your ISP and fill in the fields
displayed on the page.
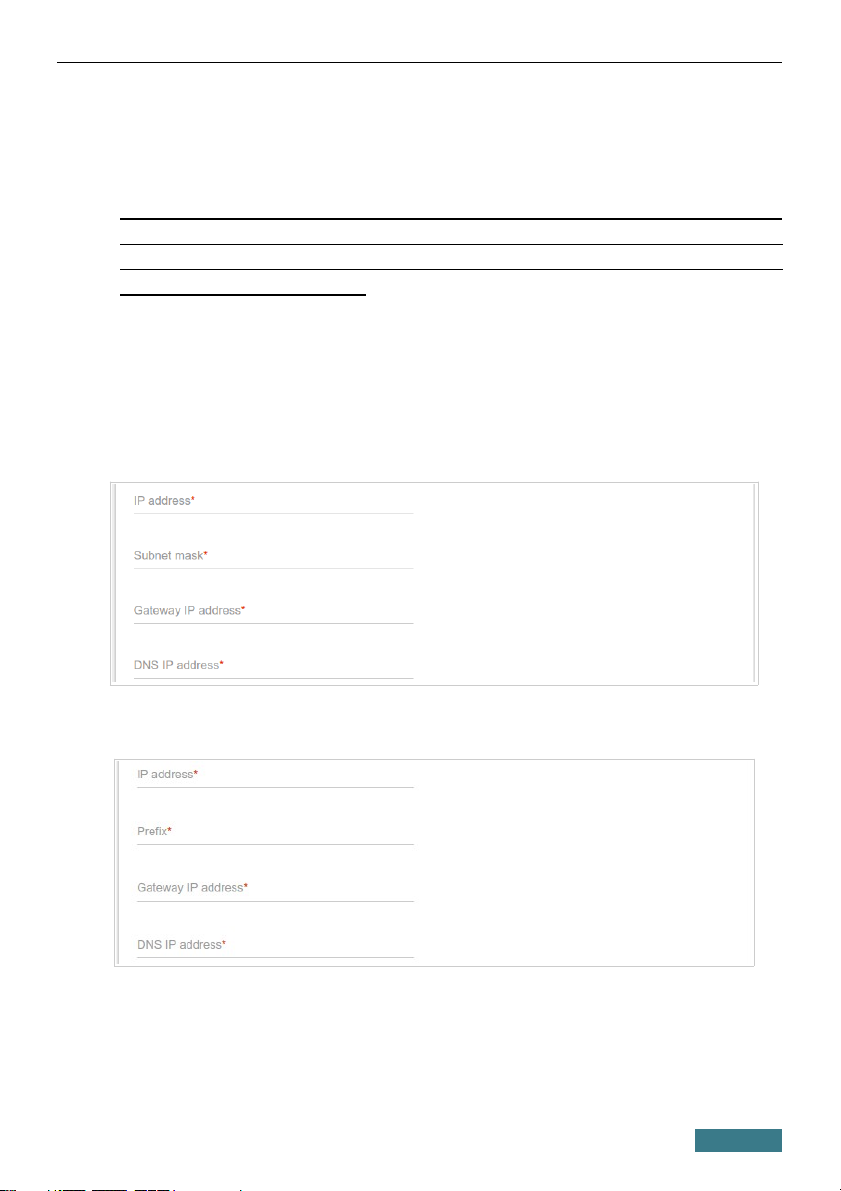
Static IPv4, IPoA: Fill in the following fields: IP address, Subnet mask,
Gateway IP address, and DNS IP address.
Static IPv6: Fill in the following fields: IP address, Prefix, Gateway IP
address, and DNS IP address.
28
Page 29
DSL-245GR Quick Installation Guide
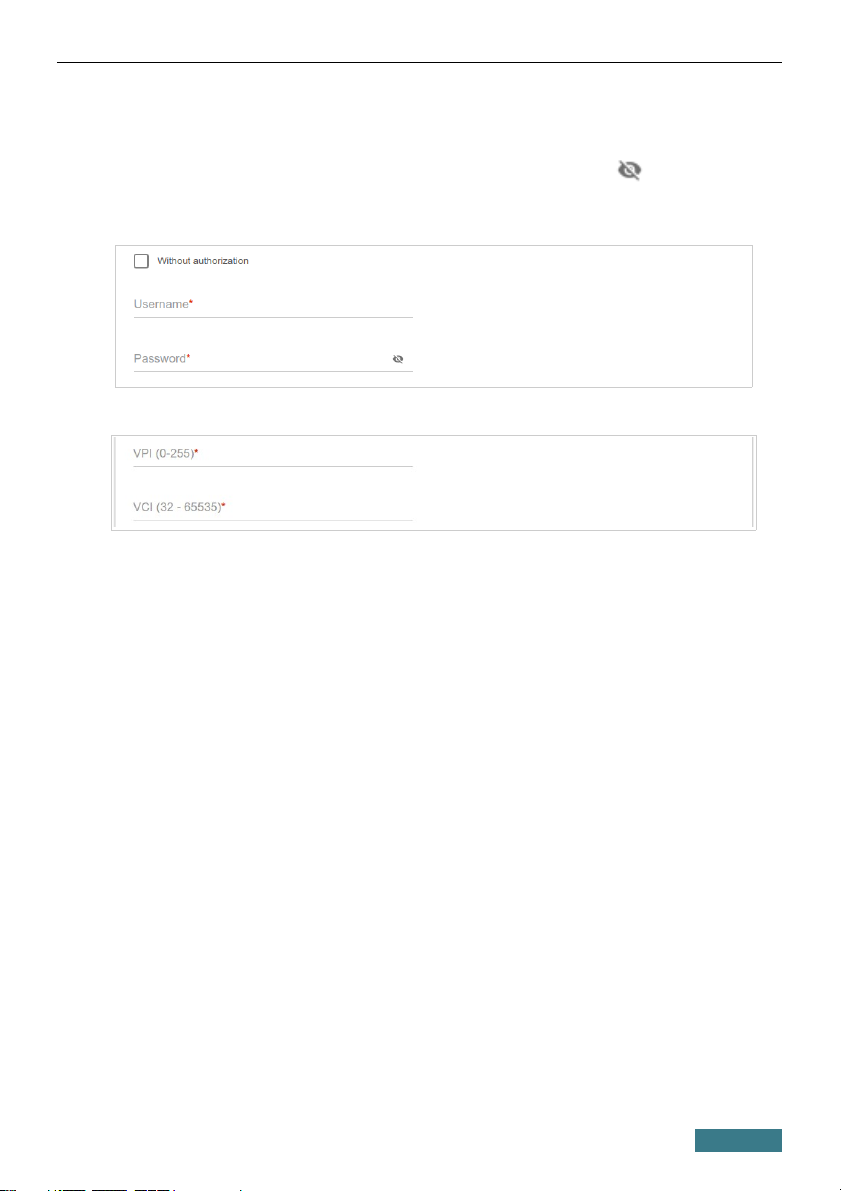
PPPoE, IPv6 PPPoE, PPPoE Dual Stack, PPPoA: Enter authorization data
provided by your ISP (the username (login) in the Username field and the
password in the Password field). Click the Show icon ( ) to display the
entered password. If authorization is not required, select the Without
authorization checkbox.
2. Specify the VPI and VCI values in the relevant fields.
3. Click the NEXT button.
29
Page 30
DSL-245GR Quick Installation Guide
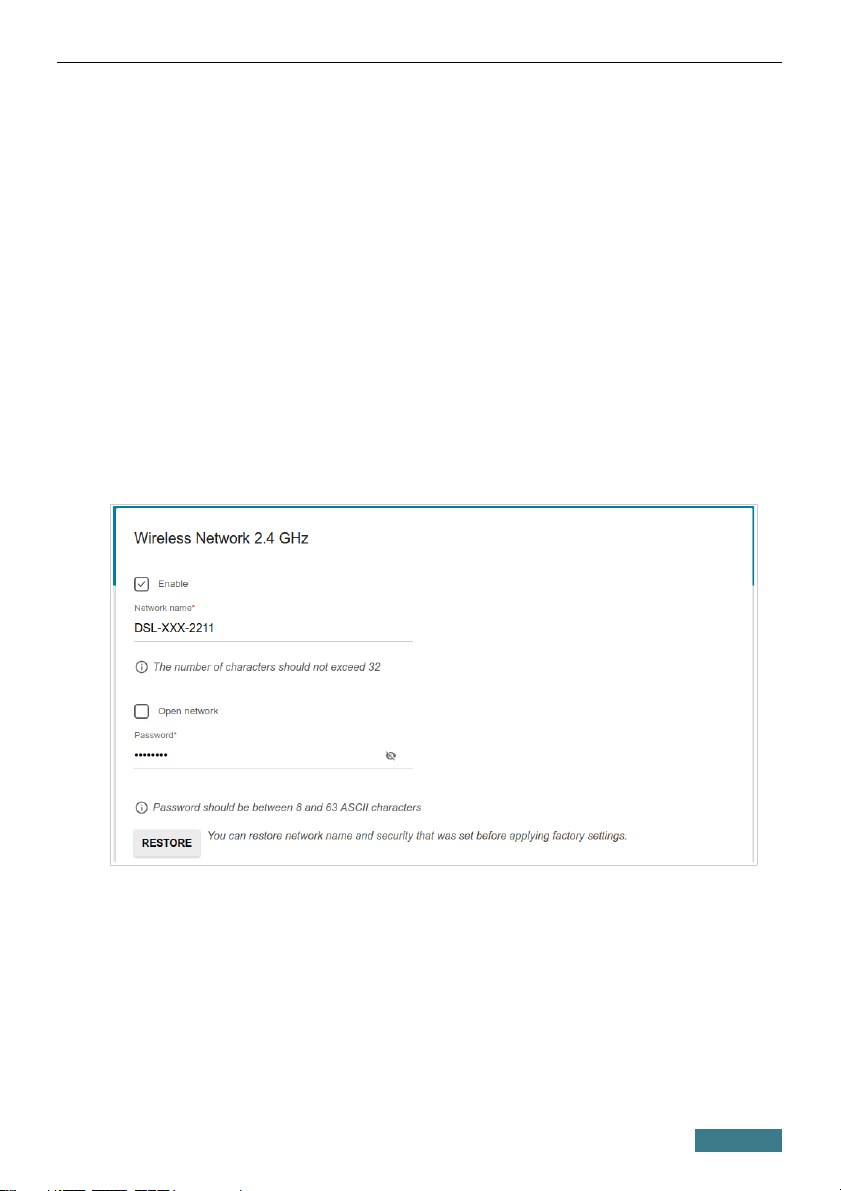
Conguring Wireless Network
1. On the Wireless Network 2.4 GHz page, in the Network name field,
specify your own name for the wireless network or leave the value
suggested by the router.
2. In the Password field, specify your own password for access to the
wireless network or leave the value suggested by the router (WPS PIN of
the device, see the barcode label).
3. If the router is used as a Wi-Fi client, you can specify the same
parameters of the wireless network as specified for the network to which
you are connecting. To do this, click the USE button (available for the
Wi-Fi mode only).
4. You can restore the parameters of the wireless network specified before
resetting to factory defaults. To do this, click the RESTORE button.
30
Page 31
DSL-245GR Quick Installation Guide
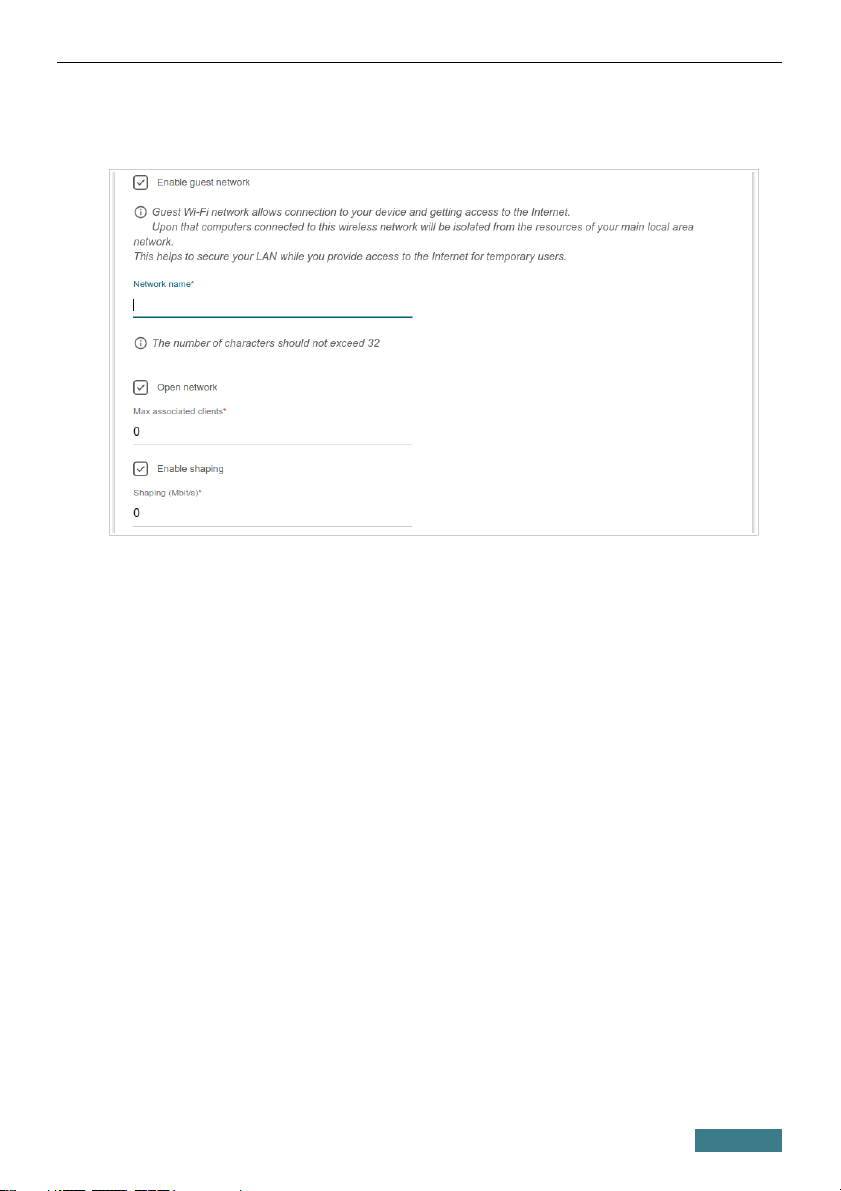
5. If you want to create an additional wireless network isolated from your
LAN, select the Enable guest network checkbox.
6. In the Network name field, specify your own name for the guest
wireless network or leave the value suggested by the router.
7. If you want to create a password for access to the guest wireless network,
deselect the Open network checkbox and fill in the Password field.
8. If you want to limit the bandwidth of the guest wireless network, select
the Enable shaping checkbox and fill in the Shaping field.
9. Click the NEXT button.
10. On the Wireless Network 5 GHz page, specify needed settings for the
wireless network in the 5GHz band and click the NEXT button.
31
Page 32
DSL-245GR Quick Installation Guide
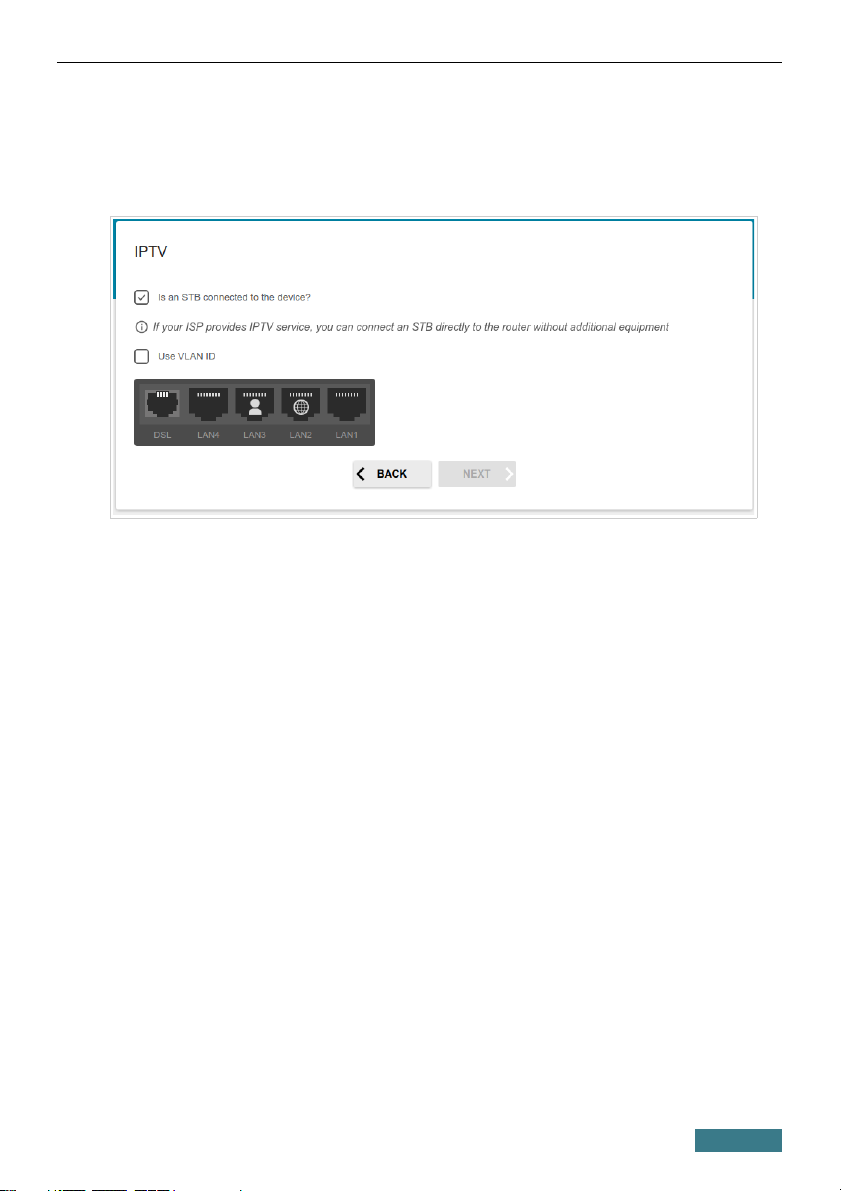
Conguring LAN Ports for IPTV/VoIP
1. On the IPTV page, select the Is an STB connected to the device
checkbox.
2. Select a free LAN port for connecting your set-top box.
3. For the VDSL, Ethernet (LAN), Wi-Fi modes: If the IPTV service is
provided via a VLAN channel, select the Use VLAN ID checkbox and
fill in the VLAN ID field.
4. For the ADSL mode: Specify the VPI and VCI values in the relevant
fields.
5. Click the NEXT button.
32
Page 33
DSL-245GR Quick Installation Guide
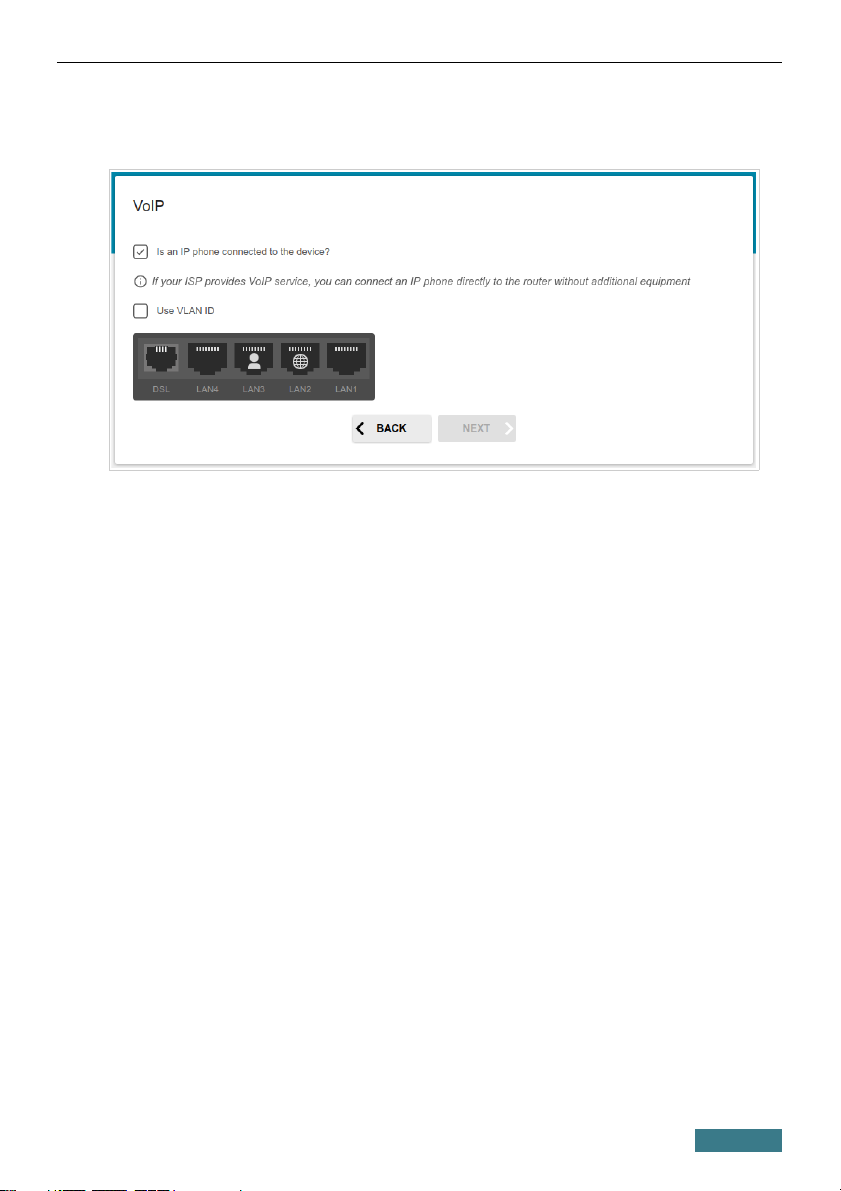
6. On the VoIP page, select the Is an IP phone connected to the
device checkbox.
7. Select a free LAN port for connecting your IP phone.
8. For the VDSL, Ethernet (LAN), Wi-Fi modes: If the VoIP service is
provided via a VLAN channel, select the Use VLAN ID checkbox and
fill in the VLAN ID field.
9. For the ADSL mode: Specify the VPI and VCI values in the relevant
fields.
10. Click the NEXT button.
33
Page 34
DSL-245GR Quick Installation Guide
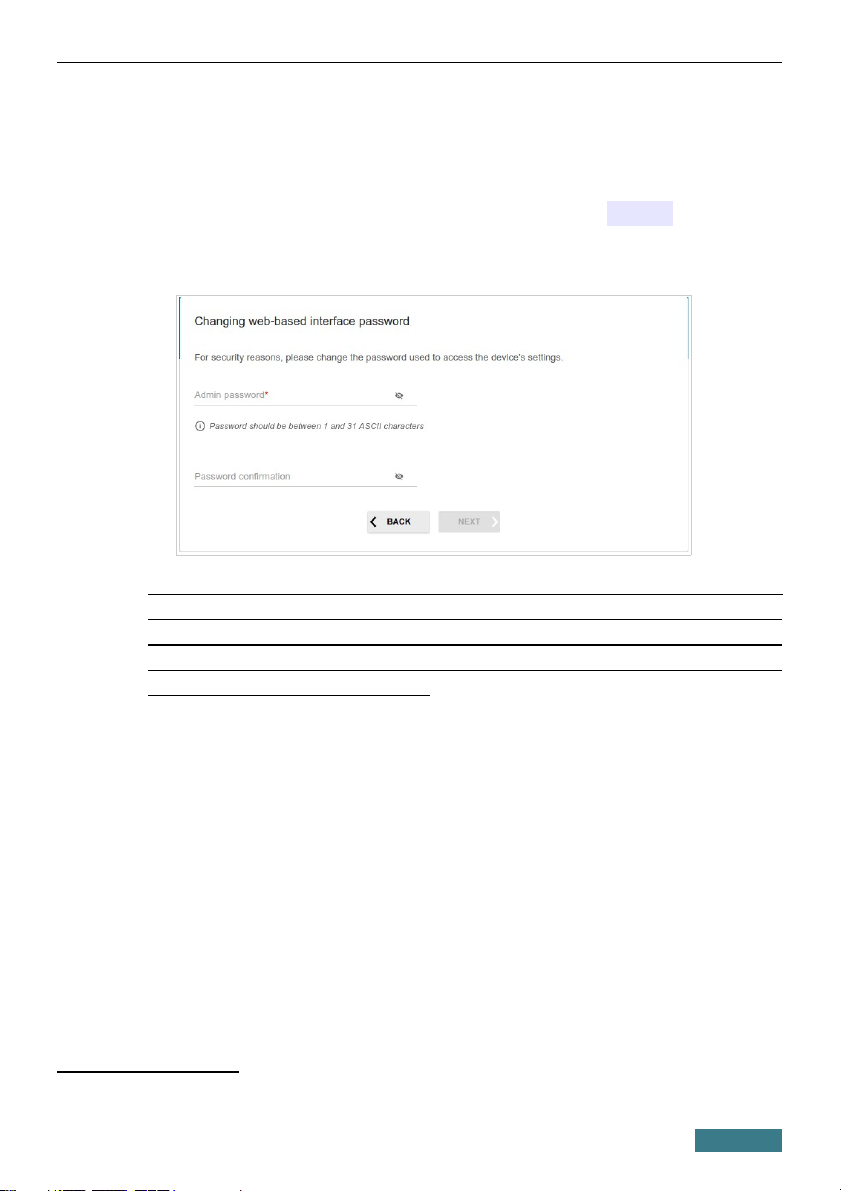
Changing Web-based Interface Password
On this page you should change the default administrator password. To do this,
enter a new password in the Admin password and Password
confirmation fields. You may set any password except admin. Use digits,
Latin letters (uppercase and/or lowercase), and other characters available in the
US keyboard layout.
4
!
Remember or write down the new password for the administrator
account. In case of losing the new password, you can access the settings
of the router only after restoring the factory default settings via the
hardware RESET button. This procedure wipes out all settings that you
have configured for your router.
Click the NEXT button.
On the next page, check all the settings you have just specified.
Also you can save a text file with parameters set by the Wizard to your PC. To
do this, click the SAVE CONFIGURATION FILE button and follow the
dialog box appeared.
To finish the Wizard, click the APPLY button. The router will apply settings,
reboot, if needed, and check the Internet connection if the Wizard has
configured a WAN connection.
4 0-9, A-Z, a-z, space, !"#$%&'()*+,-./:;<=>?@[\]^_`{|}~.
34
Page 35
DSL-245GR Quick Installation Guide
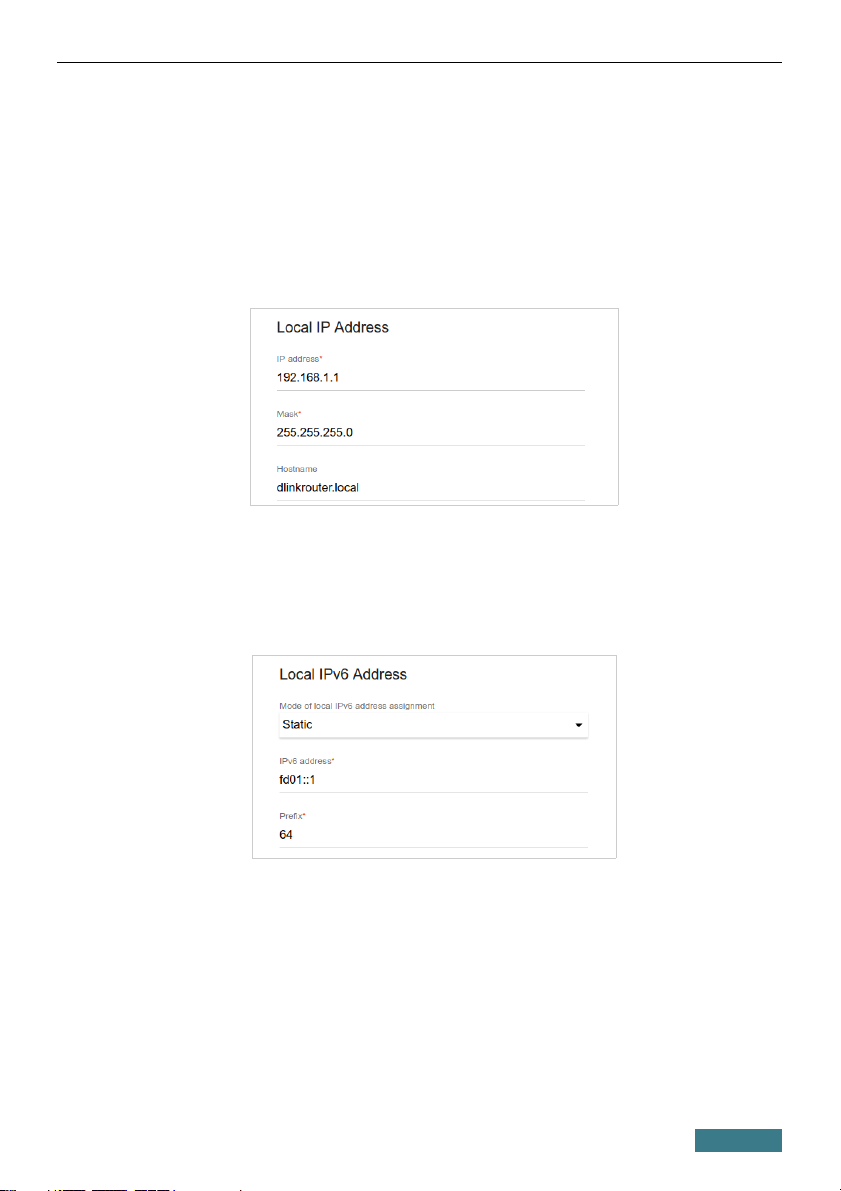
Configuring Local Area Network
1. Go to the Connections Setup / LAN page.
2. If needed, change the IPv4 address of the router's LAN interface and the
mask of the local subnet. To do this, click the IPv4 tab and specify
needed values in the IP address and Mask fields in the Local IP
Address section.
3. If needed, specify your own IPv6 address of the router's LAN interface.
To do this, click the IPv6 tab and select the Static value from the Mode
of local IPv6 address assignment drop-down list in the Local IPv6
Address section. Then specify the needed value in the IPv6 address
field.
35
Page 36
DSL-245GR Quick Installation Guide
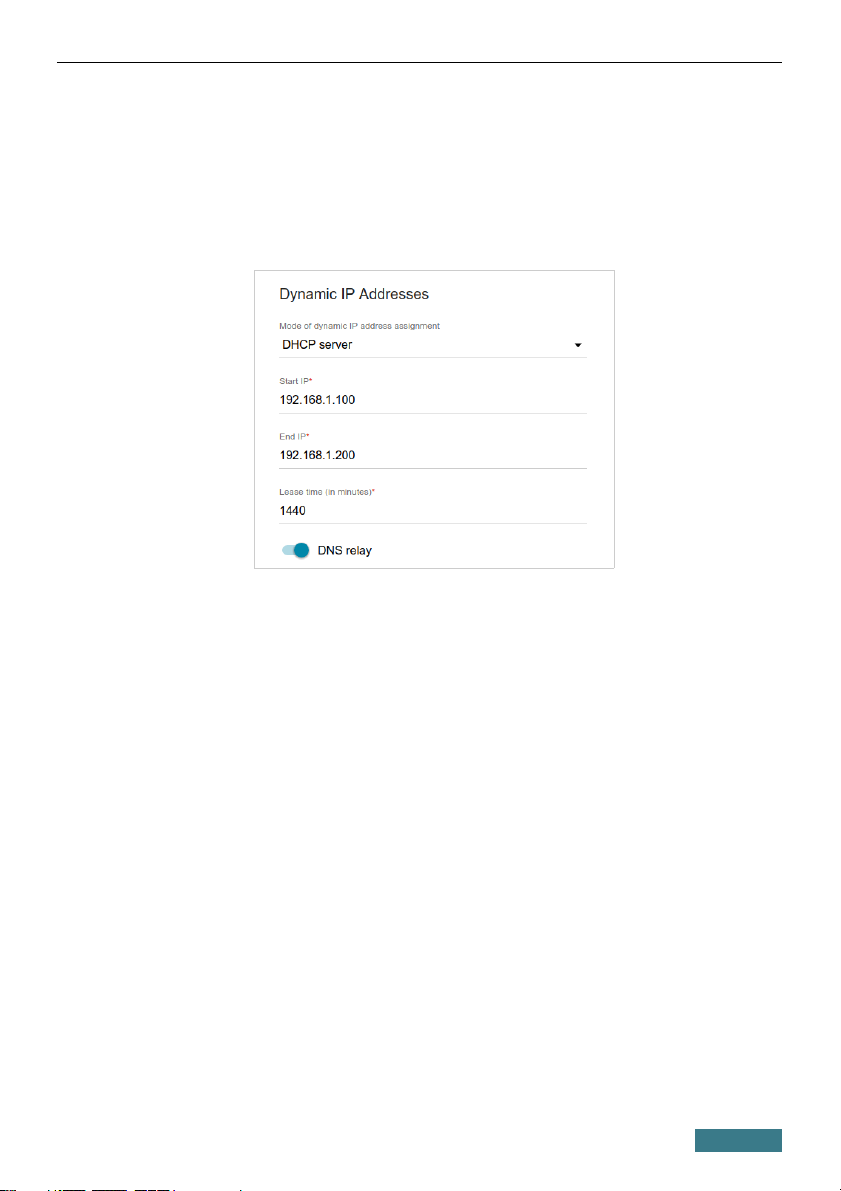
4. IPv4 address assignment. By default, the built-in DHCP server of
the router assigns IPv4 addresses to the devices of the LAN. If you want
to manually assign IPv4 addresses, disable the DHCP server (click the
IPv4 tab and select the Disable value from the Mode of dynamic IP
address assignment drop-down list in the Dynamic IP Addresses
section).
36
Page 37
DSL-245GR Quick Installation Guide
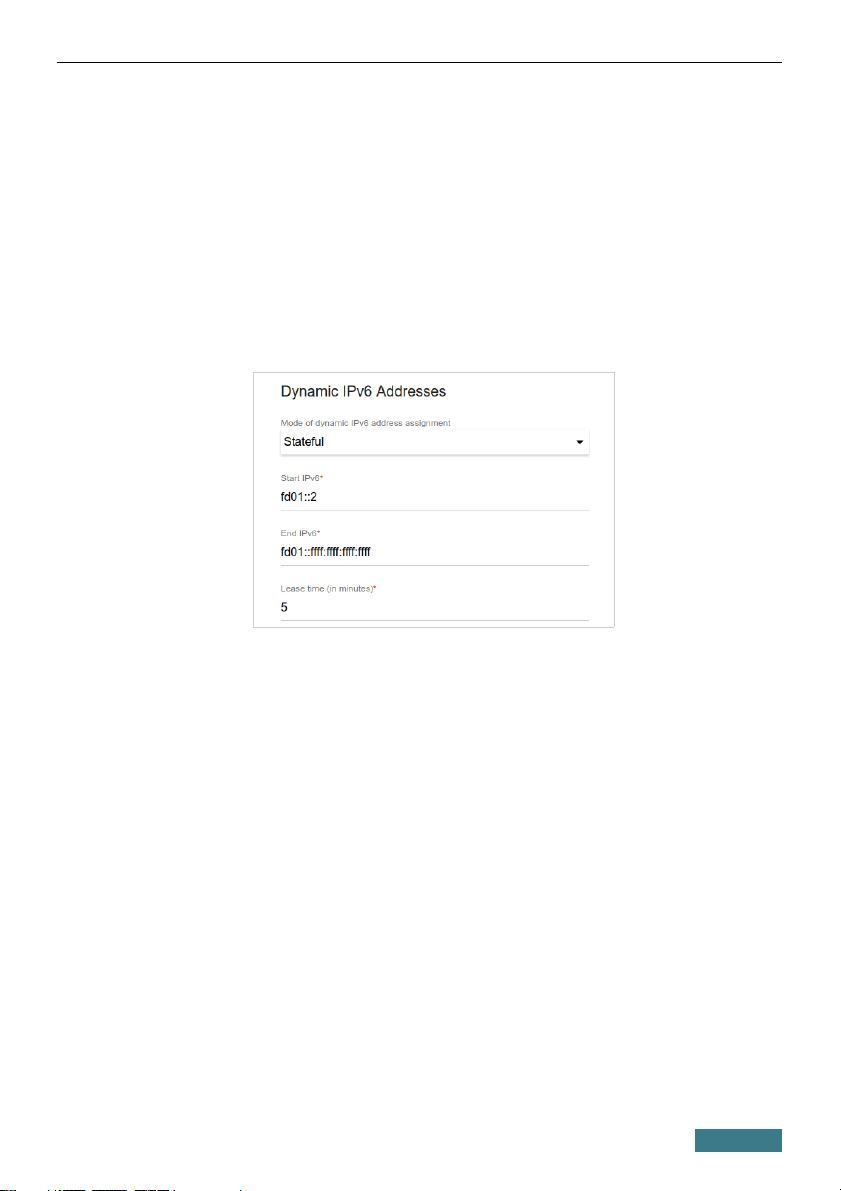
5. IPv6 address assignment. By default, the devices of the LAN
automatically assign IPv6 addresses to themselves (the Stateless value
is selected from the Mode of dynamic IPv6 address assignment
drop-down list in the Dynamic IPv6 Addresses section on the IPv6
tab). If the devices of the LAN do not support IPv6 address
autoconfiguration, use the built-in DHCPv6 server of the router (select
the Stateful value from the Mode of dynamic IPv6 address
assignment drop-down list). If you want to manually assign IPv6
addresses to devices of the LAN, select the Disable value from the
Mode of dynamic IPv6 address assignment drop-down list.
6. After specifying the needed parameters on the Connections Setup /
LAN page, click the APPLY button.
37
Page 38
DSL-245GR Quick Installation Guide
Configuring Network Printer
1. Make sure that a driver for your printer which will be used as a network
printer is installed on your PC.
5
2. To connect the printer to the router, power off both devices. Connect the
printer to the USB port of the router, power on the printer, then power on
the router.
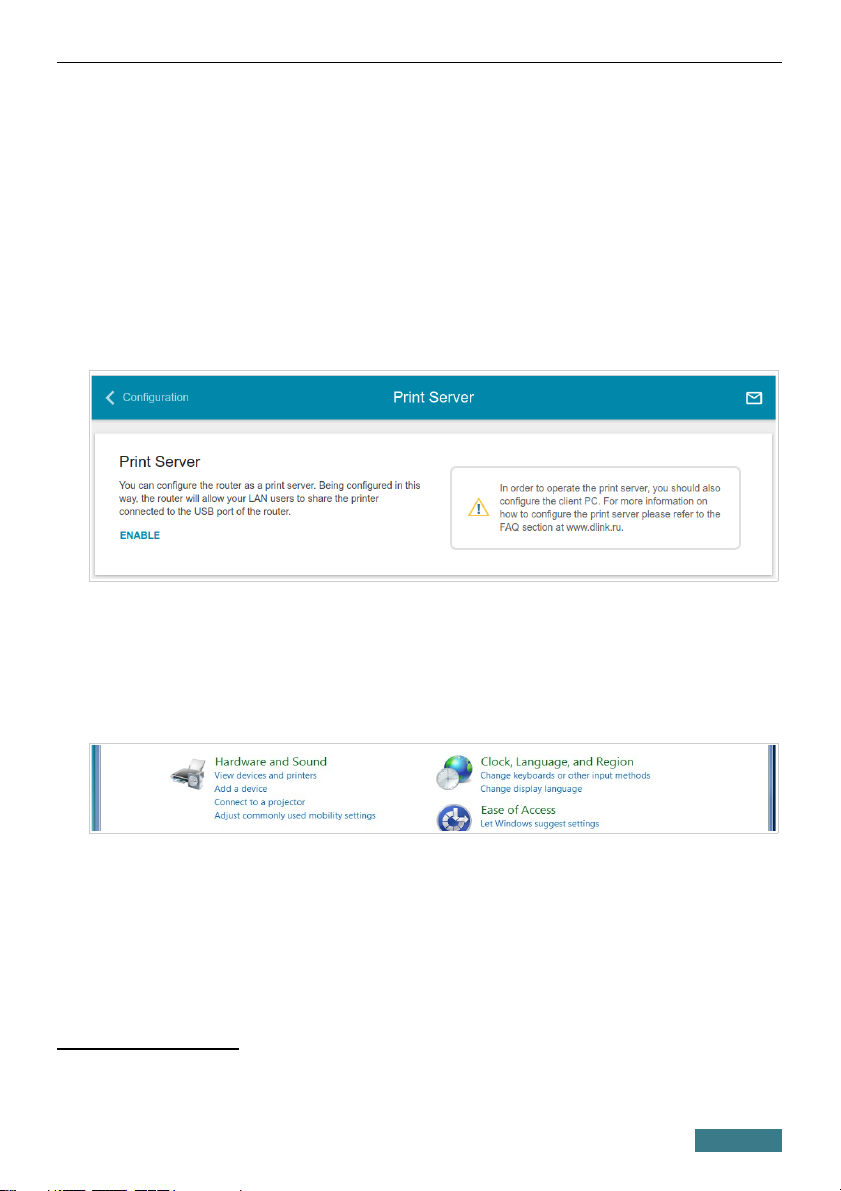
3. Then access the web-based interface, go to the Print Server page and
click the ENABLE button.
4. Click the Start button and go to the Control Panel window.
5. Select the Hardware and Sound section. (If the Control Panel has the
category view (the Category value is selected from the View by dropdown list in the top right corner of the window), choose the View
devices and printers line.)
5 Some home printers can work incorrectly as network printers. Contact the technical
support of your printer’s manufacturer to clarify if your printer supports this function.
38
Page 39
DSL-245GR Quick Installation Guide
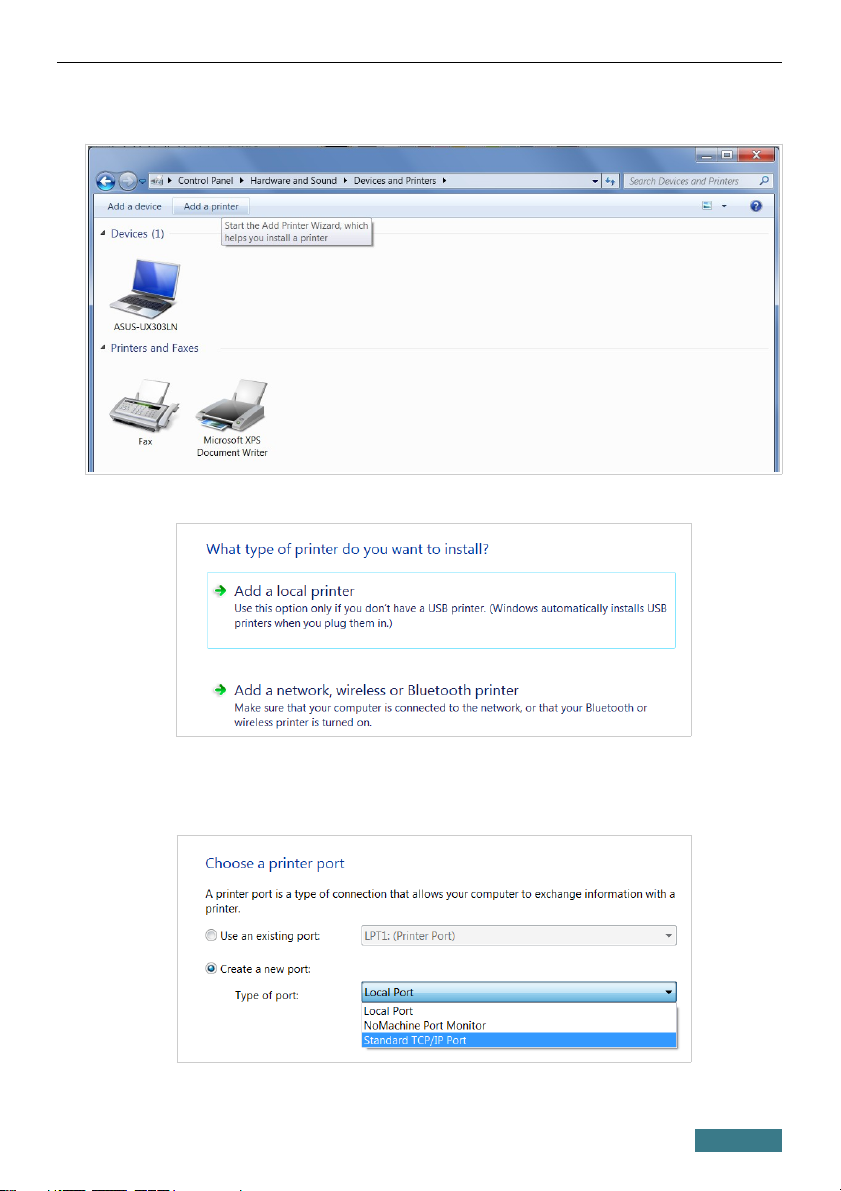
6. In the opened window, click the Add a printer button.
7. Select the Add a local printer value and click the Next button.
8. Select the Create a new port choice of the radio button and then select
the Standard TCP/IP Port value from the Type of port drop-down
list. Click the Next button.
39
Page 40
DSL-245GR Quick Installation Guide
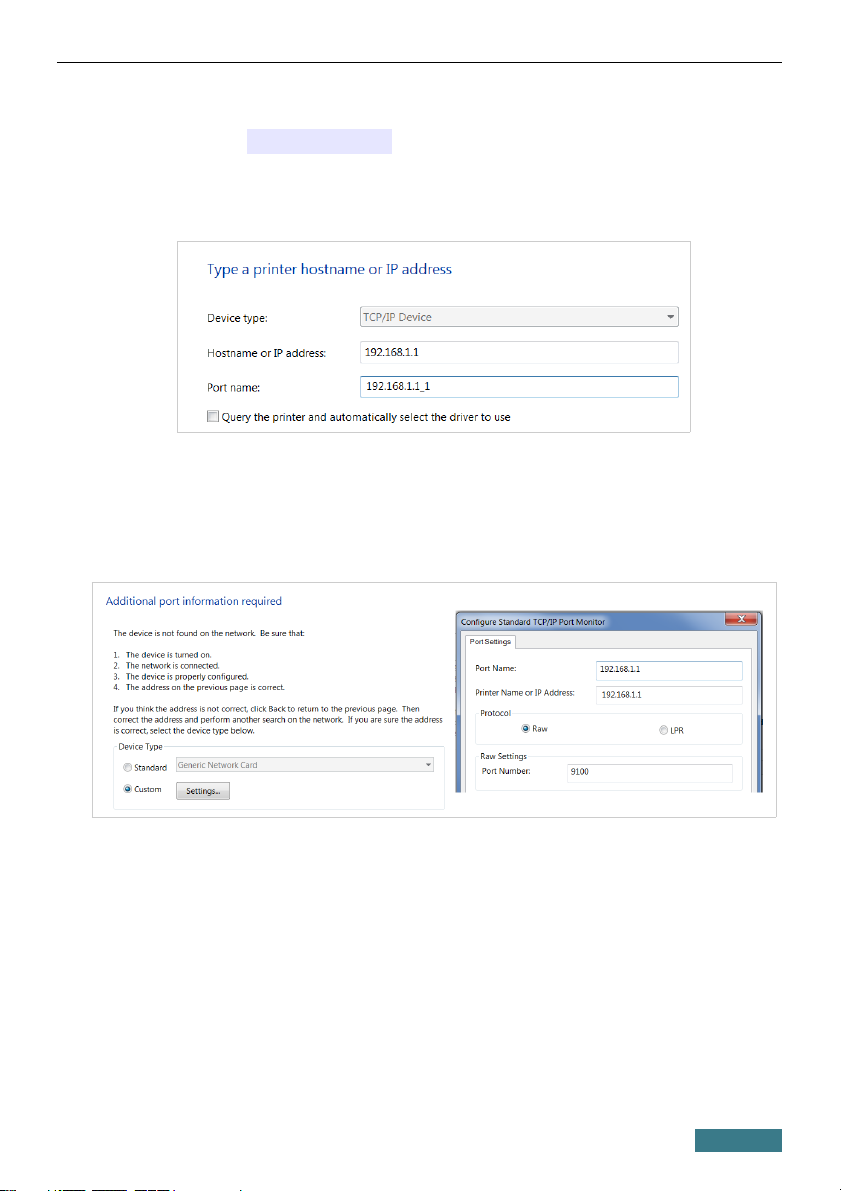
9. Enter the IP address of the router in the Hostname or IP address field
(by default, 192.168.1.1). Deselect the Query the printer and
automatically select the driver to use checkbox and, if needed,
change the name of the port in the Port name field. Click the Next
button.
10. Wait for about 20-30 seconds. In the opened Additional port
information required window, select the Custom choice of the radio
button, click the Settings button, and make sure that the RAW choice of
the radio button is selected in the Protocol section and the 9100 value is
specified in the Raw Settings section. Click the OK button.
11. Then in the Additional port information required window, select the
Standard choice of the radio button and click the Next button.
40
Page 41
DSL-245GR Quick Installation Guide
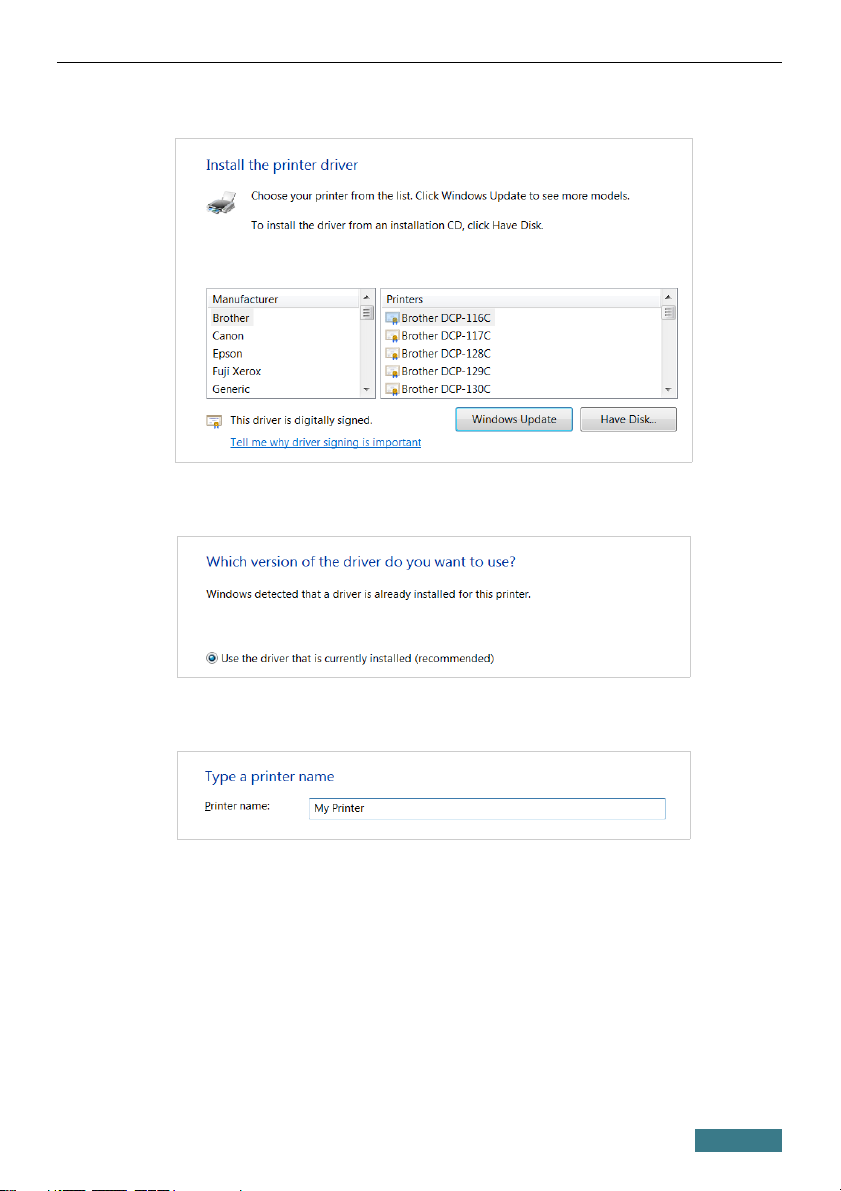
12. Select your printer and click the Next button.
13. Select the Use the driver that is currently installed choice of the
radio button and click the Next button.
14. Enter a name of the printer (you can specify any name) in the Printer
name field and click the Next button.
41
Page 42
DSL-245GR Quick Installation Guide
15. In the Printer Sharing window, select the Do not share this printer
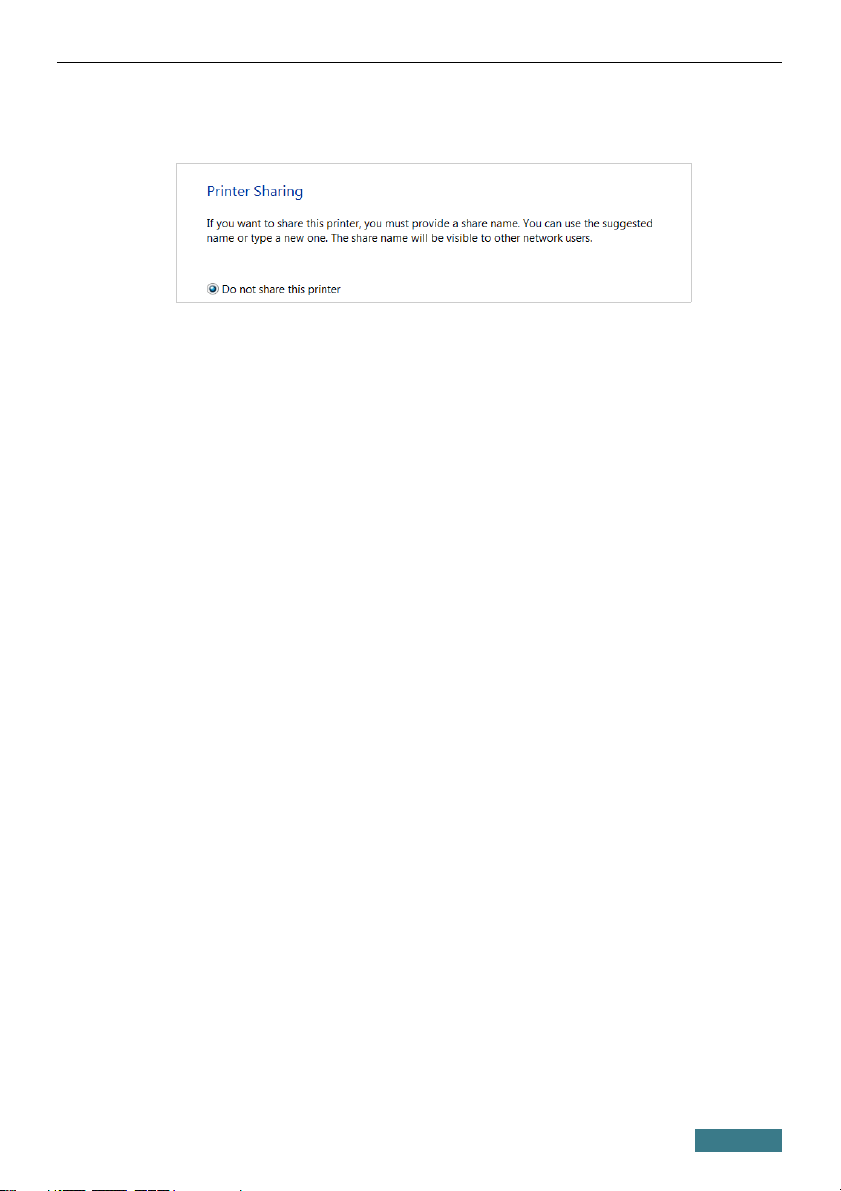
choice of the radio button and click the Next button.
16. If you need to print a test page, click the Print a test page button. To
finish the printer installation, click the Finish button.
42
Page 43
DSL-245GR Quick Installation Guide
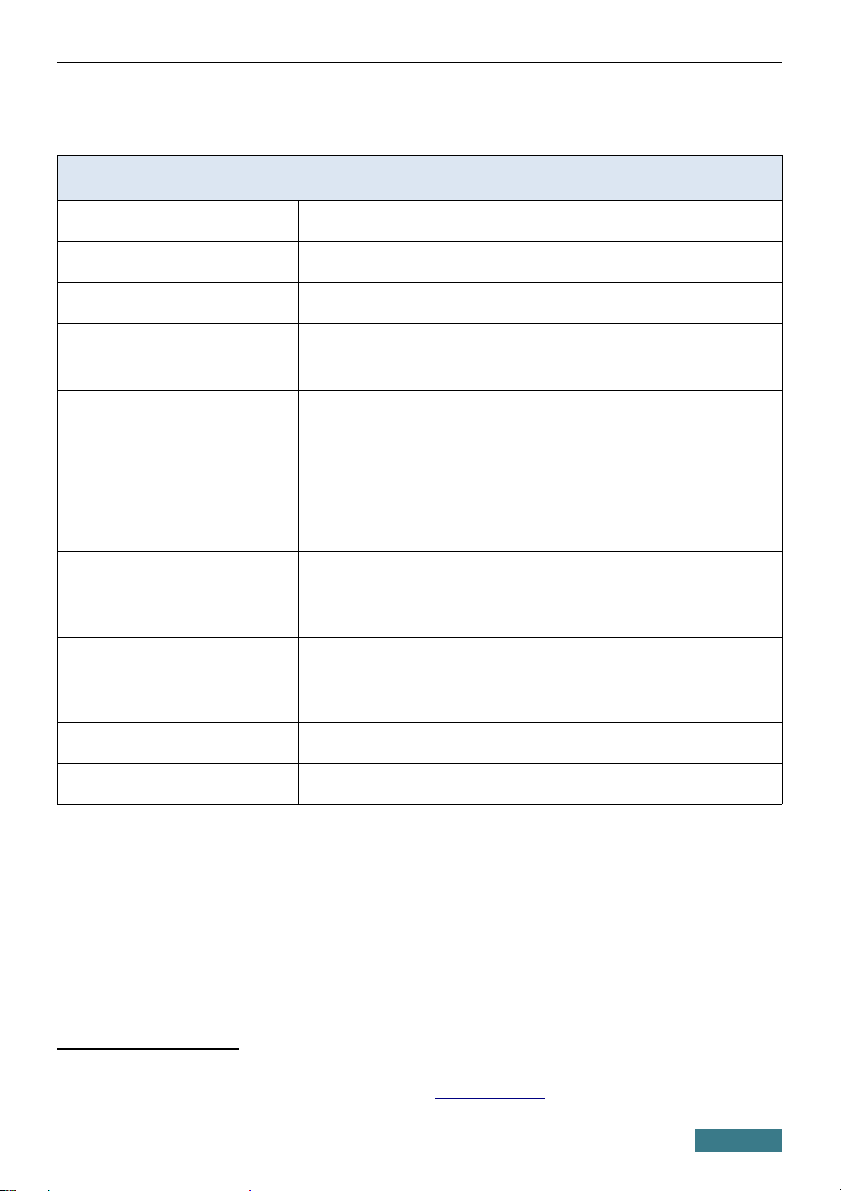
SPECIFICATIONS
*
Hardware
Processor
· RTL8685PB (1GHz)
RAM
· 128MB, DDR2, built in processor
Flash
· 16MB, SPI
Interfaces
· 1 RJ-11 DSL port
· 4 10/100/1000BASE-T LAN ports
· USB 2.0 port
LEDs
· POWER
· DSL
· INTERNET
· 4 LAN LEDs
· 2.4G WLAN
· 5G WLAN
· WPS
· USB
Buttons
· ON/OFF button to power on/power off
· RESET button to restore factory default settings
· WPS button to set up wireless connection
· WIFI button to enable/disable wireless network
Antenna
· Two external non-detachable antennas for 2.4GHz band
(5dBi gain)
· Two external non-detachable antennas for 5GHz band
(5dBi gain)
MIMO
· 2 x 2
Power connector
· Power input connector (DC)
* The device features are subject to change without notice. For the latest versions of the
firmware and relevant documentation, visit www.dlink.ru.
43
Page 44
DSL-245GR Quick Installation Guide
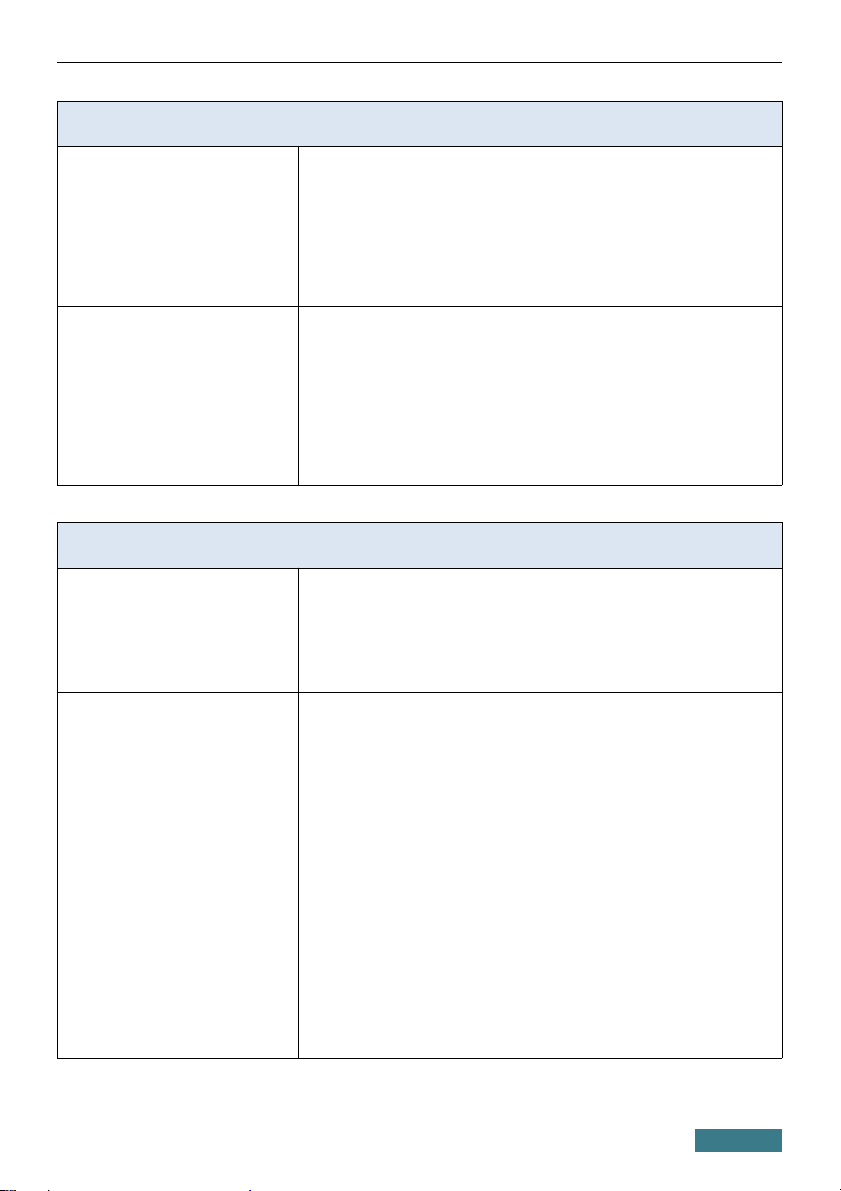
DSL Parameters
VDSL/ADSL Standards
· VDSL2: ITU G.993.2, support of 8a, 8b, 8c, 8d, 12a,
12b, 17a, 30a, 35b profiles
· ADSL: Multi-mode, ANSI T1.413 Issue 2, ITU-T G.992.1
(G.dmt) Annex A, ITU-T G.992.2 (G.lite) Annex A, ITU-T
G.994.1 (G.hs)
· ADSL2: ITU-T G.992.3 (G.dmt.bis) Annex A/L/M, ITU-T
G.992.4 (G.lite.bis) Annex A
· ADSL2+: ITU-T G.992.5 Annex A/L/M
ATM/PPP Protocols
· Bridged and routed Ethernet encapsulation
· VC-based or LLC-based multiplexing
· ATM Forum UNI3.1/4.0 PVC (up to 8 PVCs)
· ATM Adaptation Layer Type 5 (AAL5)
· ITU-T I.610 OAM F4/F5 loopback
· ATM QoS
· PPP over ATM (RFC 2364)
· PPP over Ethernet (PPPoE)
· Keep-alive for PPP connections
Software
WAN connection types
· LTE / 3G
· PPPoE / IPv6 PPPoE / PPPoE Dual Stack / PPPоA
· Static IPv4 / Dynamic IPv4 / IPoA
· Static IPv6 / Dynamic IPv6
· PPTP / L2TP
· Bridge
Network functions
· Support of IEEE 802.1X for Internet connection
· DHCP server/relay
· Advanced configuration of built-in DHCP server
· Stateful/Stateless mode for IPv6 address assignment,
IPv6 prefix delegation
· DNS relay
· Dynamic DNS
· Static IP routing
· Static IPv6 routing
· IGMP Proxy
· IGMP snooping
· RIP
· Support of UPnP IGD
· Support of VLAN
· WAN ping respond
· Support of SIP ALG
· Support of RTSP
· WAN failover
· LAN/WAN conversion
44
Page 45
DSL-245GR Quick Installation Guide
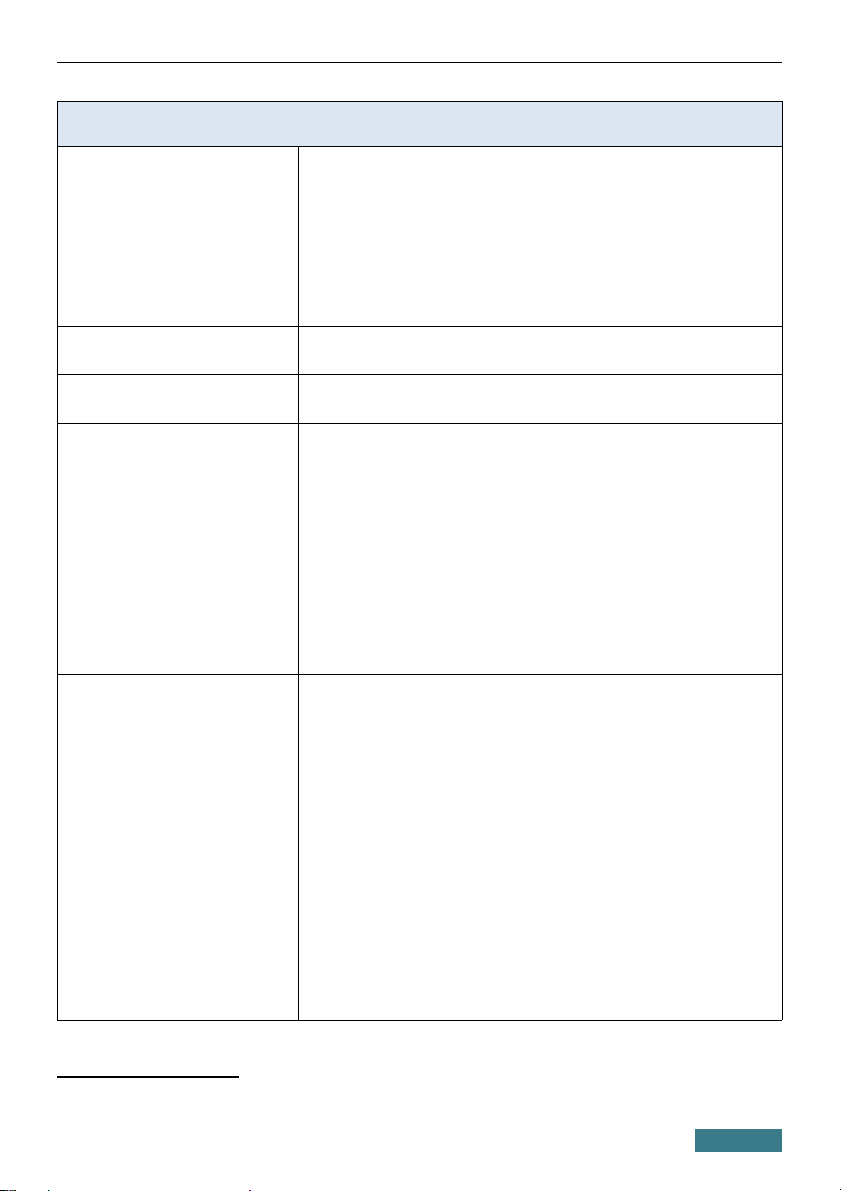
Software
Firewall functions
· Network Address Translation (NAT)
· Stateful Packet Inspection (SPI)
· IPv4/IPv6 filter
· MAC filter
· URL filter
· DMZ
· Prevention of ARP and DDoS attacks
· Virtual servers
· Built-in Yandex.DNS web content filtering service
VPN
· IPsec/PPTP/L2TP/PPPoE pass-through
· IPsec tunnels
QoS
· Interface grouping
· VLAN priority (802.1p)
USB interface functions
· USB modem
Auto connection to available type of supported network
(4G/3G/2G)
Auto configuration of connection upon plugging in USB
modem
Enabling/disabling PIN code check, changing PIN code
6
· USB storage
File browser
Print server
Access to storage via accounts
Built-in Samba/FTP/DLNA server
Built-in Transmission torrent client;
uploading/downloading files from/to USB storage
Management and monitoring
· Local and remote access to settings through
SSH/TELNET/WEB (HTTP/HTTPS)
· Bilingual web-based interface for configuration and
management (Russian/English)
· Support of D-Link Assistant application for Android and
iPhone smartphones
· Notification on connection problems and auto redirect to
settings
· Firmware update via web-based interface
· Automatic notification on new firmware version
· Saving/restoring configuration to/from file
· Support of logging to remote host/connected USB
storage
· Automatic synchronization of system time with NTP
server and manual time/date setup
· Ping utility
· Traceroute utility
· TR-069 client
6 For some models of USB modems.
45
Page 46
DSL-245GR Quick Installation Guide
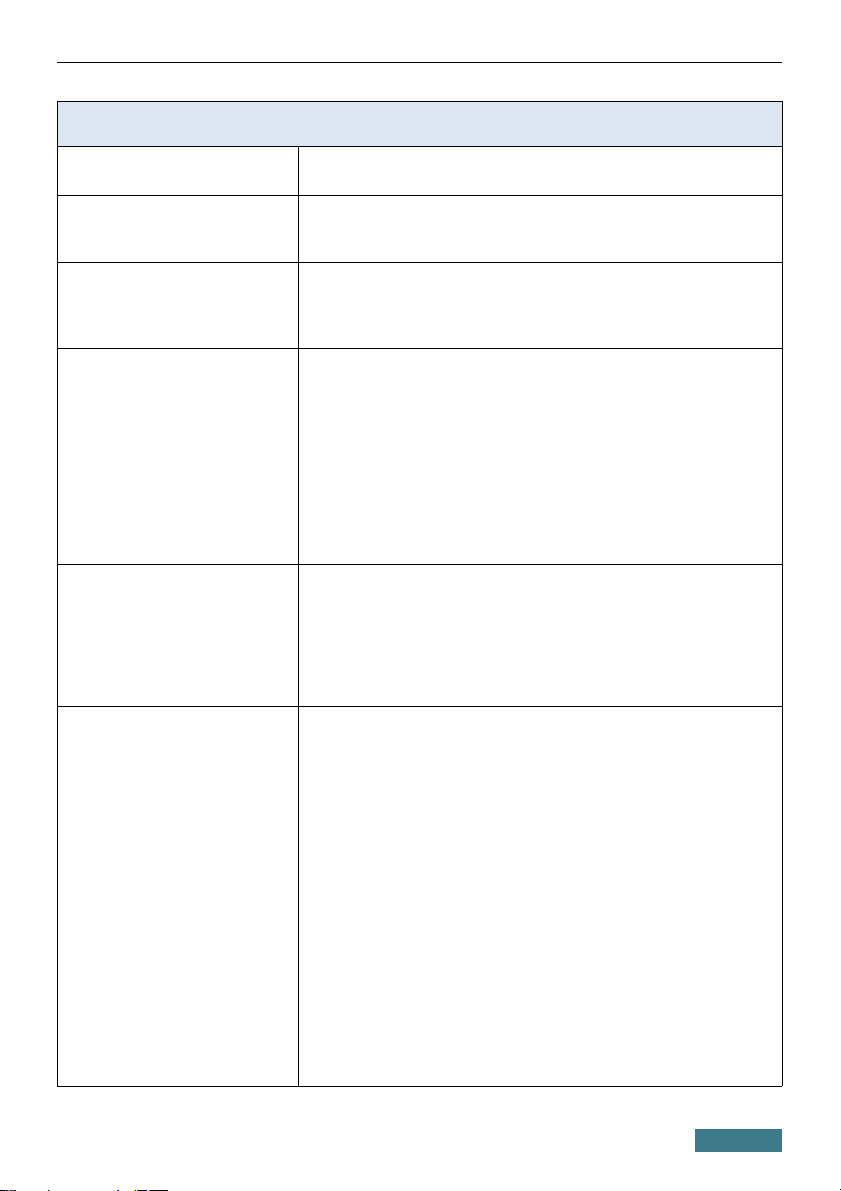
Wireless Module Parameters
Standards
· IEEE 802.11a/n/ac
· IEEE 802.11b/g/n
Frequency range
· 2400 ~ 2483.5MHz
· 5150 ~ 5350MHz
· 5650 ~ 5850MHz
Wireless connection security
· WEP
· WPA/WPA2 (Personal/Enterprise)
· МАС filter
· WPS (PBC/PIN)
Advanced functions
· Support of client mode
· WMM (Wi-Fi QoS)
· Information on connected Wi-Fi clients
· Advanced settings
· Guest Wi-Fi / support of MBSSID
· Limitation of wireless network rate
· Periodic scan of channels, automatic switch to least
loaded channel
· Autonegotiation of channel bandwidth in accordance
with environment conditions (20/40 Coexistence)
· Support of 802.11ac (5GHz) TX Beamforming
Wireless connection rate
· IEEE 802.11a: 6, 9, 12, 18, 24, 36, 48, and 54Mbps
· IEEE 802.11b: 1, 2, 5.5, and 11Mbps
· IEEE 802.11g: 6, 9, 12, 18, 24, 36, 48, and 54Mbps
· IEEE 802.11n (2.4GHz/5GHz): from 6.5 to 300Mbps
(from MCS0 to MCS15)
· IEEE 802.11ac (5GHz): from 6.5 to 867Mbps
(from MCS0 to MSC9)
Transmitter output power
The maximum value of the
transmitter output power
depends upon the radio
frequency regulations applied in
your country
· 802.11a
15dBm at 6, 54Mbps
· 802.11b
15dBm at 1, 11Mbps
· 802.11g
15dBm at 6, 54Mbps
· 802.11n
HT20/HT40
15dBm at MCS0, 7
· 802.11ac
HT20
15dBm at MCS0, 8
HT40
15dBm at MCS0, 9
HT80
15dBm at MCS0, 9
46
Page 47
DSL-245GR Quick Installation Guide
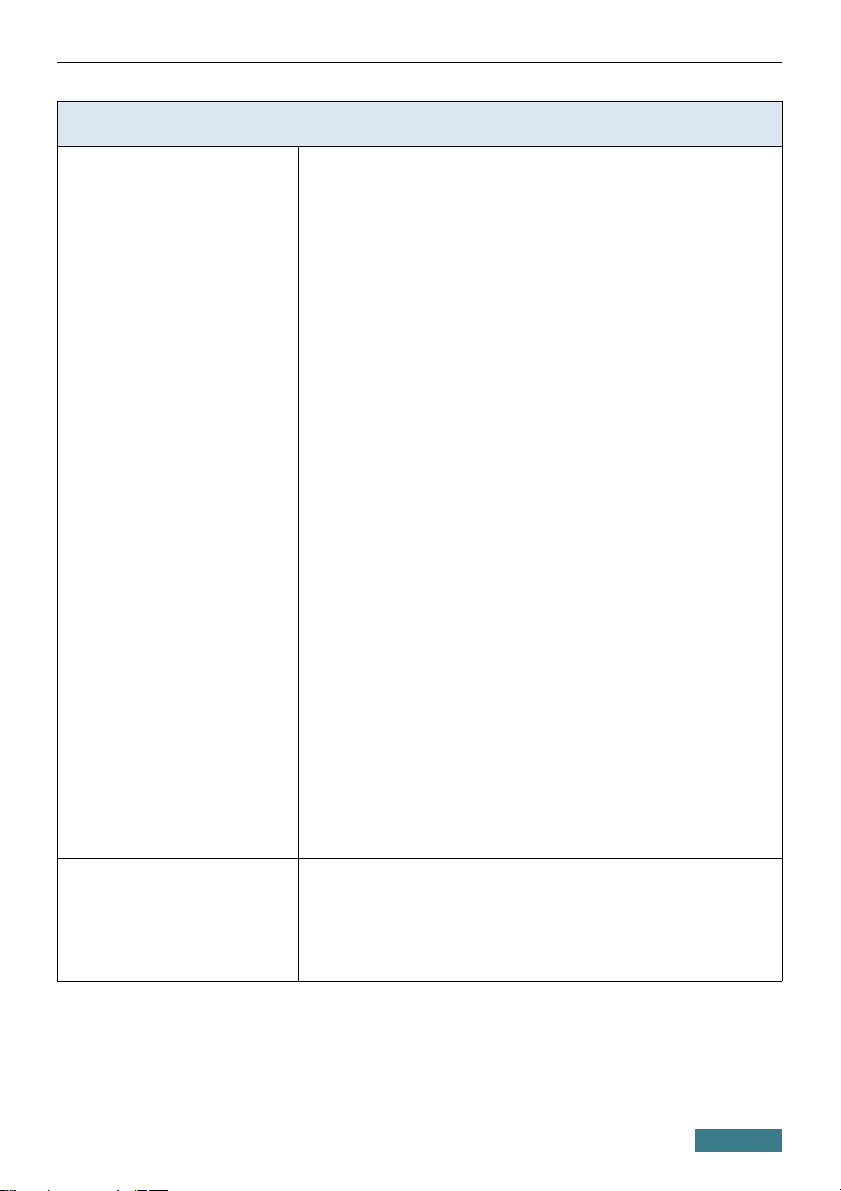
Wireless Module Parameters
Receiver sensitivity · 802.11a
-86dBm at 6Mbps
-65dBm at 54Mbps
· 802.11b
-90dBm at 1Mbps
-76dBm at 11Mbps
· 802.11g
-86dBm at 6Mbps
-68dBm at 54Mbps
· 802.11n
2.4GHz
HT20
-85dBm at MCS0
-67dBm at MCS7
HT40
-82dBm at MCS0
-64dBm at MCS7
5GHz
HT20
-85dBm at MCS0
-65dBm at MCS7
HT40
-82dBm at MCS0
-61dBm at MCS7
· 802.11ac
HT20
-82dBm at MCS0
-59dBm at MCS8
HT40
-79dBm at MCS0
-54dBm at MCS9
HT80
-76dBm at MCS0
-51dBm at MCS9
Modulation schemes · 802.11a: BPSK, QPSK, 16 QAM, 64 QAM with OFDM
· 802.11b: DQPSK, DBPSK, DSSS, and CCK
· 802.11g: BPSK, QPSK, 16 QAM, 64 QAM with OFDM
· 802.11n: BPSK, QPSK, 16 QAM, 64 QAM with OFDM
· 802.11ac: BPSK, QPSK, 16 QAM, 64 QAM, 256 QAM
with OFDM
47
Page 48
DSL-245GR Quick Installation Guide
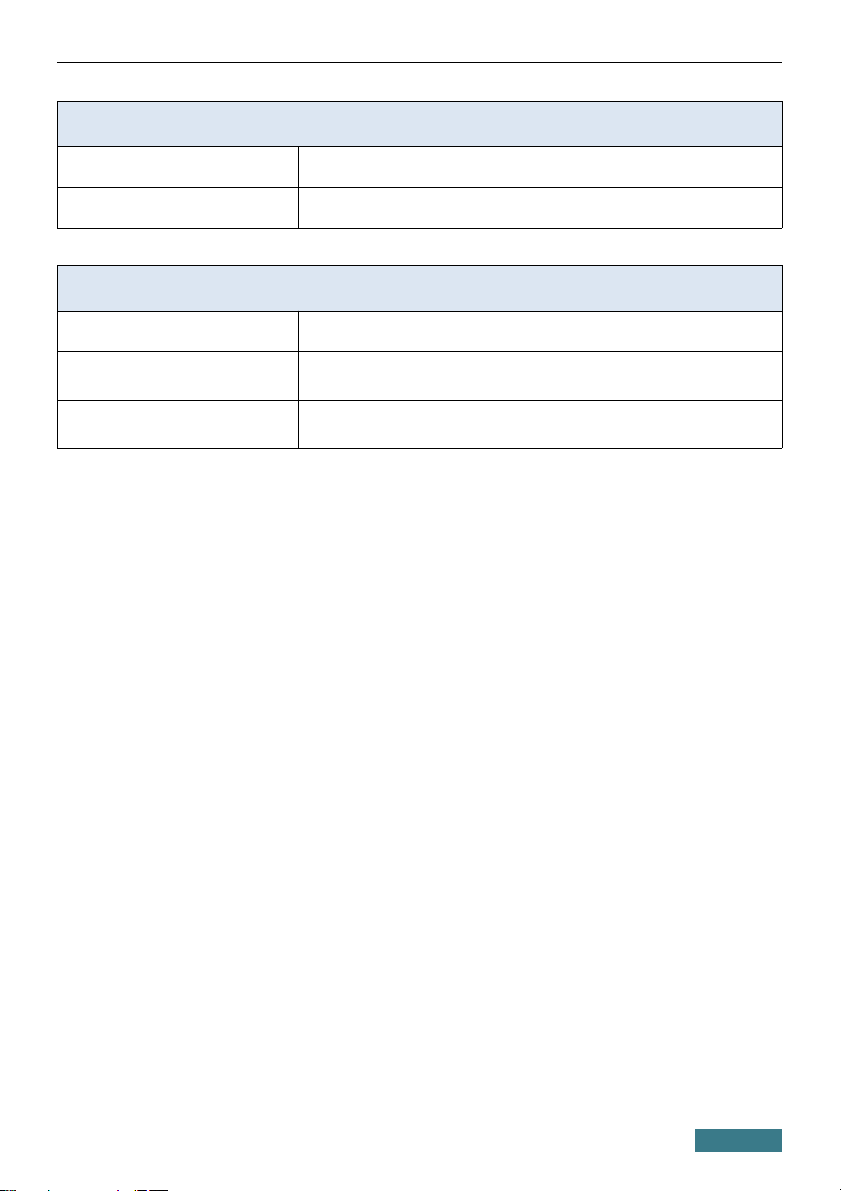
Physical Parameters
Dimensions (L x W x H)
· 217 x 148 x 47 mm (8.5 x 5.8 x 1.9 in)
Weight
· 345 g (0.8 lb)
Operating Environment
Power
· Output: 12V DC, 1.5A
Temperature
· Operating: from 5 to 40 °C
· Storage: from -20 to 70 °C
Humidity
· Operating: from 10% to 90% (non-condensing)
· Storage: from 5% to 95% (non-condensing)
48
Page 49
DSL-245GR Quick Installation Guide
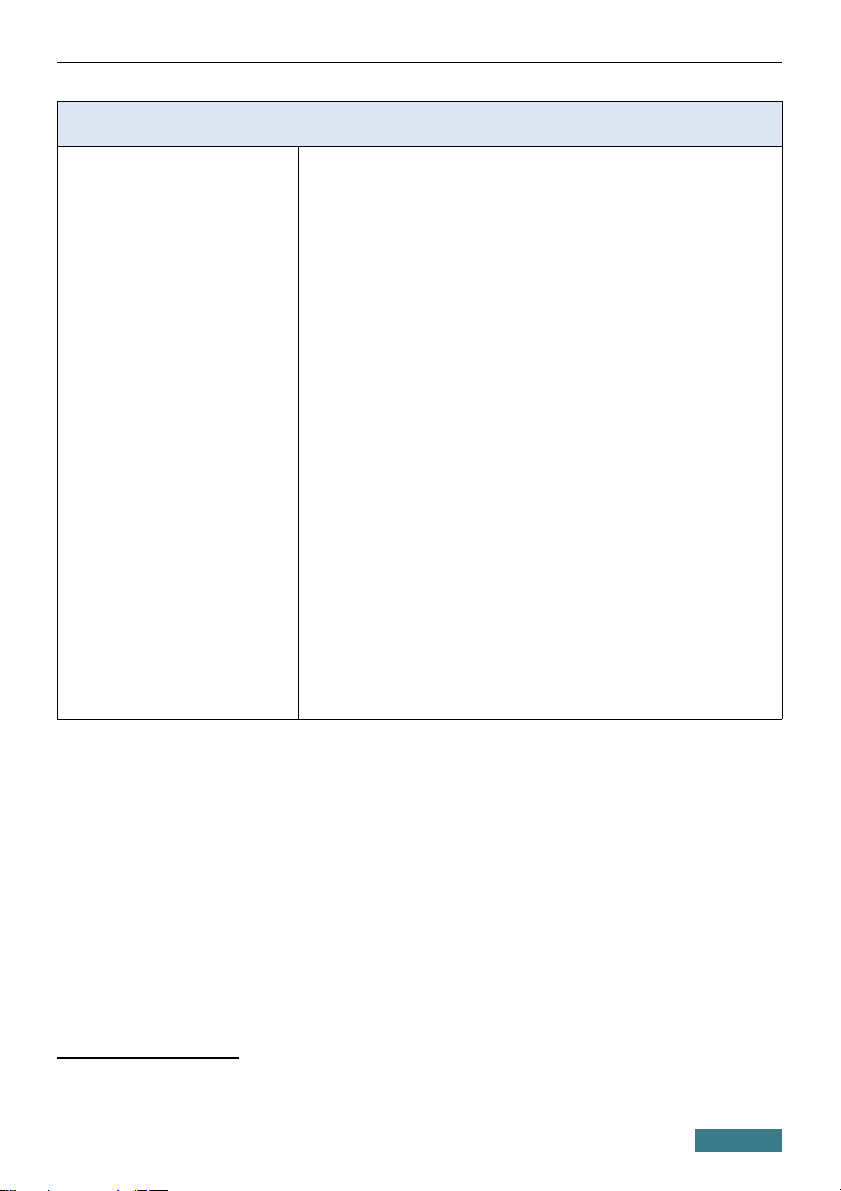
Supported USB modems
7
GSM
· Alcatel X500
· D-Link DWM-152C1
· D-Link DWM-156A6
· D-Link DWM-156A7
· D-Link DWM 156A8
· D-Link DWM-156C1
· D-Link DWM-157B1
· D-Link DWM-157B1 (Velcom)
· D-Link DWM-158D1
· D-Link DWR-710
· Huawei E150
· Huawei E1550
· Huawei E156G
· Huawei E160G
· Huawei E169G
· Huawei E171
· Huawei E173 (Megafon)
· Huawei E220
· Huawei E3131 (MTS 420S)
· Huawei E352 (Megafon)
· Prolink PHS600
· Prolink PHS901
· ZTE MF112
· ZTE MF192
· ZTE MF626
· ZTE MF627
· ZTE MF652
· ZTE MF667
· ZTE MF668
· ZTE MF752
7 The manufacturer does not guarantee proper operation of the router with every modification of the firmware
of USB modems.
49
Page 50
DSL-245GR Quick Installation Guide
Supported USB modems
LTE
· Alcatel IK40V
· D-Link DWM-222
· Huawei E3131
· Huawei E3272
· Huawei E3351
· Huawei E3372
· Huawei E367
· Huawei E392
· Megafon M100-1
· Megafon M100-2
· Megafon M100-3
· Megafon M100-4
· Megafon M150-1
· Megafon M150-2
· Quanta 1K6E (Beeline 1K6E)
· MTS 824F
· MTS 827F
· Yota LU-150
· Yota WLTUBA-107
· ZTE MF823
· ZTE MF827
Smartphones in USB
tethering mode
· Some models of Android smartphones
50
Page 51

DSL-245GR Quick Installation Guide
SAFETY RULES AND CONDITIONS
Please carefully read this section before installation and connection of the
device. Make sure that the power adapter and cables are not damaged. The
device should be used only as intended in accordance with the documents.
The device is intended for use in dry, clean, dust-free, and well ventilated areas
with normal humidity away from strong heat sources. Do not use the device
outdoors or in the areas with high humidity. Do not place foreign objects on
the device. Do not obstruct the ventilation openings of the device. The
environmental temperature near the device and the temperature inside the
device's cover should be within the range from 0 °С to +40 °С.
Only use the power adapter supplied with the device. Do not plug in the
adapter, if its case or cable are damaged. Plug the adapter only into working
electrical outlets with parameters indicated on the adapter.
Do not open the cover of the device! Unplug the device before dusting and
cleaning. Use a damp cloth to clean the device. Do not use liquid/aerosol
cleaners or magnetic/static cleaning devices. Prevent moisture getting into the
device or the power adapter.
The service life of the device is 2 years.
51
Page 52

DSL-245GR Quick Installation Guide
TECHNICAL SUPPORT
You can find software updates and user documentation on our website.
D-Link provides its customers with free support within the product's
warranty period.
Customers can contact the technical support group by phone or by
e-mail/Internet.
FOR TELEPHONE NUMBERS AND ADDRESSES OF D-LINK
OFFICES WORLDWIDE VISIT
http://www.dlink.com/corporate/worldwideoffices/
52
 Loading...