

Page 1
1
DNS-312H
Network Attached Storage
Manual
Building Networks for People
Ver.1.01
2005/08/31
Page 2

2
Contents
Introduction ......................................................................................5
Specifications .....................................................................................6
Package Contents ..............................................................................8
LEDs ……………................................................................................9
Physical Connections .......................................................................10
Getting Started ...............................................................................11
D-Link Storage Utility ........................................................................ 11
Double-click the D-Link Storage Utility icon...................................... 11
Setup Wizard....................................................................................15
Enter the default IP........................................................................... 15
Enter the default user name ............................................................. 16
Start the wizard ................................................................................. 16
Enter system information.................................................................. 17
Enter networking information............................................................ 19
Setup time settings ........................................................................... 20
Setup network file protocol ............................................................... 21
Finish the settings............................................................................. 23
LAN Setup........................................................................................25
Changing server name ..................................................................... 26
Advanced Setup .............................................................................27
User Management............................................................................27
Creating new user ............................................................................ 27
Editing user information.................................................................... 29
Deleting a user ................................................................................. 30
Group Management..........................................................................30
Creating a new group .......................................................................30
Page 3

3
Editing group information.................................................................. 32
Deleting a group ............................................................................... 33
Share Management..........................................................................33
Creating a new share ....................................................................... 34
Editing share information.................................................................. 36
Deleting a share ............................................................................... 37
Hard Drive Hibernation .....................................................................38
USB Disk..........................................................................................39
USB Printer ......................................................................................40
Tools................................................................................................43
Time Setup.......................................................................................43
Set the time manually ....................................................................... 43
Connecting to an NTP server ........................................................... 44
Backup Configurations .....................................................................45
Backup system settings.................................................................... 45
Restore system settings ................................................................... 47
Restore factory default settings ........................................................ 47
Format Hard Drive............................................................................48
Networking and Encoding.................................................................49
Firmware Update..............................................................................52
E-mail Notifications...........................................................................53
Service .............................................................................................55
Device Status..................................................................................57
Device Information............................................................................57
Logs ….............................................................................................58
Clear the log ..................................................................................... 58
Save the log...................................................................................... 60
Refresh the log ................................................................................. 61
Page 4

Table of Content
4
Online Help .....................................................................................62
Individual Help..................................................................................62
Overall Help......................................................................................63
Page 5

5
With the emergence of increasingly large multimedia files, the need for bigger, more
dependable storage for personal computers grows rapidly as well. D-Link
DNS-312H is designed to meet your need for multimedia file storage and immediate
playback.
As it is attached to your home network environment, you don't have to take apart
your computer to expand the storage like was previously the case when adding an
additional hard drive to your PC. All you have to do is plug in the network cable of the
device running D-Link DNS-312H to your computer, or the hub or switch in the same
network environment, and then you are ready to start storing your home
entertainment files in the device.
Configuring the device and getting it running is amazingly simple. A browser-based
wizard only takes a few steps for the initialization settings to take effect.
Introduction
Page 6
6
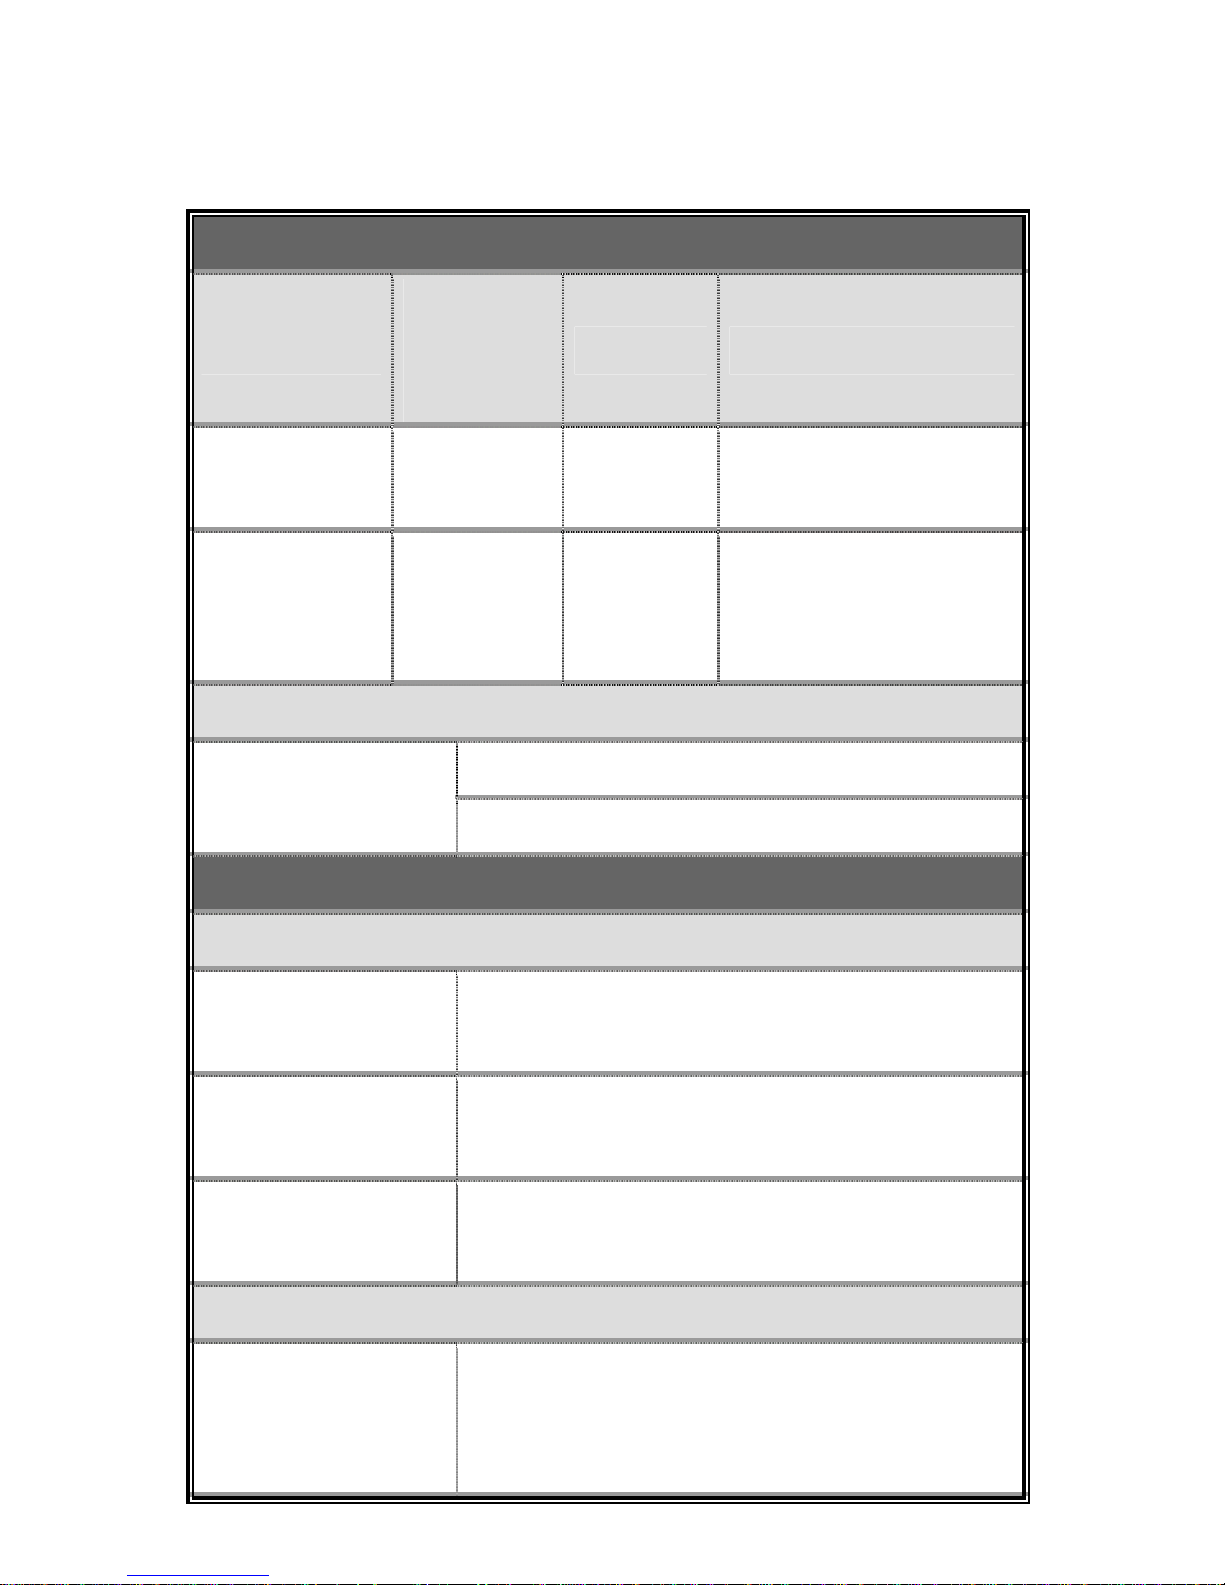
Specifications
Networking
Network
Types
Network
File
Protocols
Protocols Client types
Microsoft
network
CIFS, SMB TCP/IP
Windows 98, ME, NT 4.0,
2000, XP
Apple
Macintosh
network
AFP
AppleTalk,
TCP/IP
Apple Macintosh 7.x, 8.x,
9.x, OS X
LAN port setting
Manual configuration
Type
DHCP
Management
User/ Group/ Share
Maximum user
number
32
Maximum group
number
4
Maximum share
number
16
Logs / Notification
Available log type
System log
Connection log
Current connection
Page 7
7
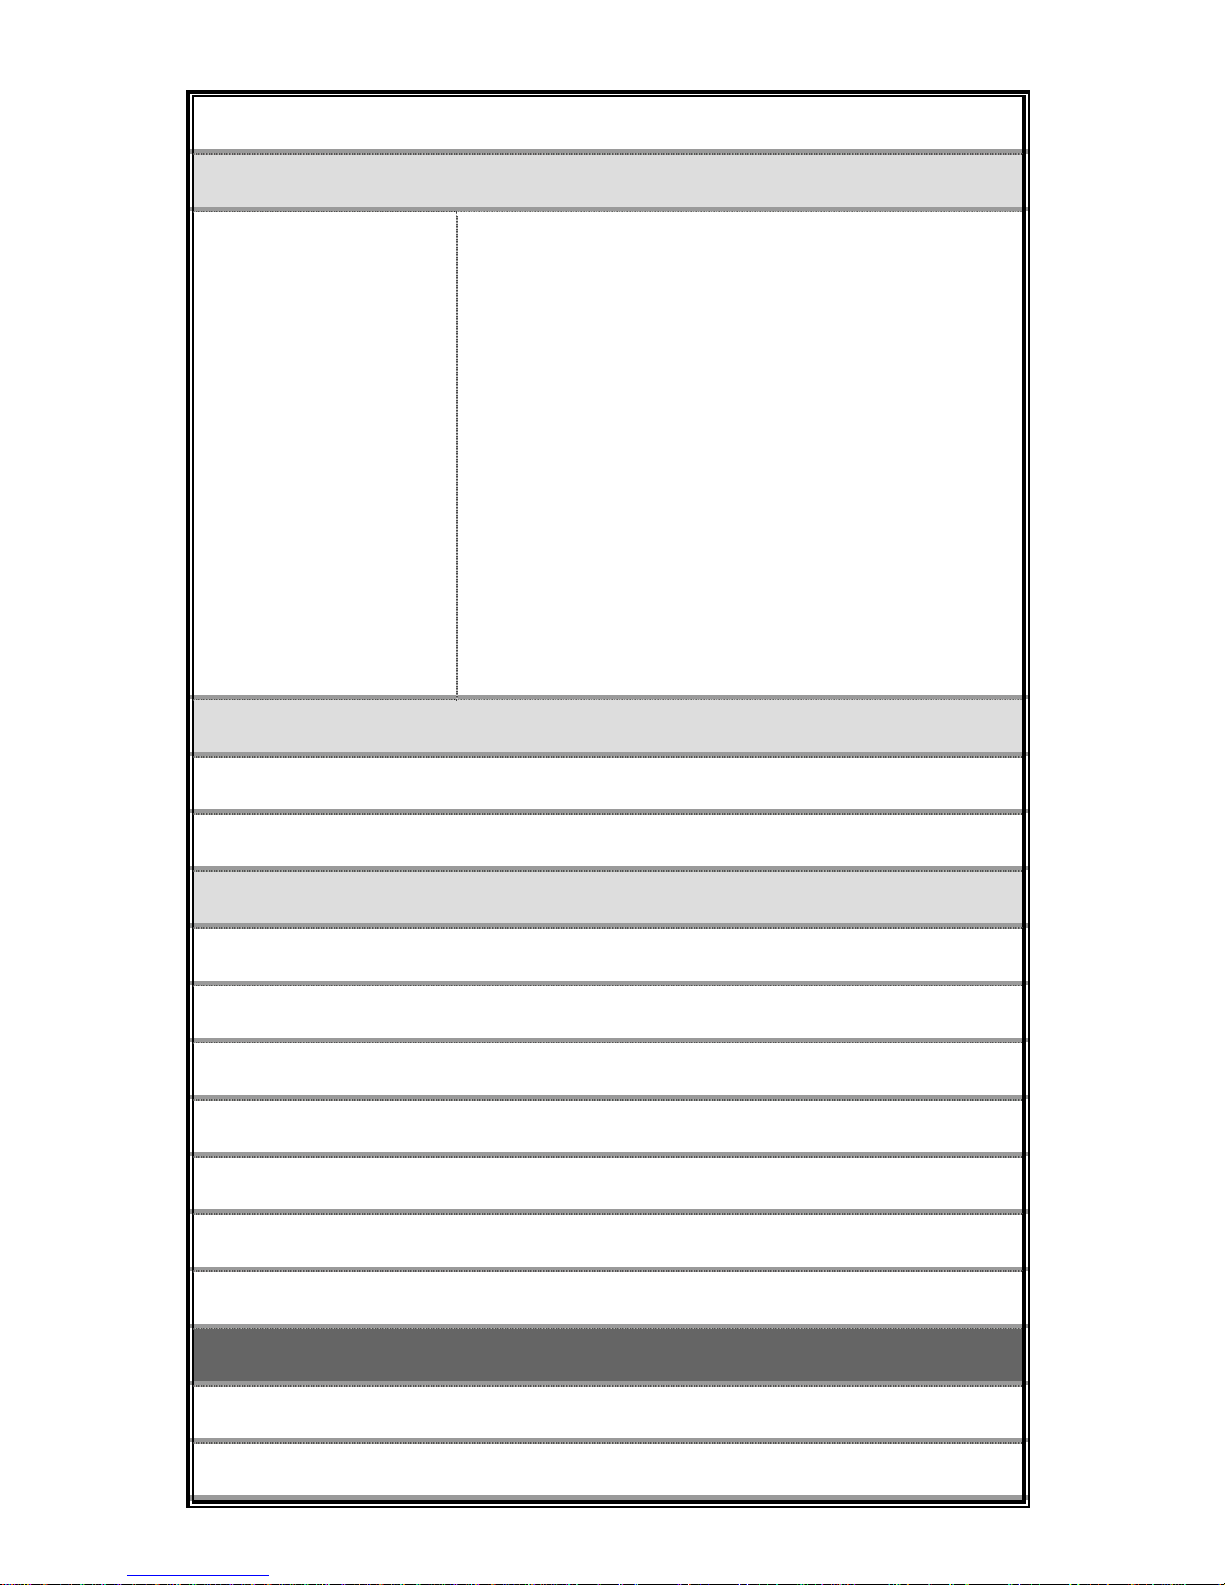
E-mail notification
Encoding
Available codepage
U.S. English (Code Page 437)
Greek (Code Page 737)
Western European (Code Page 850)
MS-DOS Latin 2 (Code Page 852)
Icelandic (Code Page 861)
Cyrillic (Code Page 866)
Japanese SJIS (Code Page 932)
Simplified Chinese (Code Page 936)
Korean Hangul (Code Page 949)
Traditional Chinese (Code Page 950)
USB Support
USB Disk
USB Printer
Miscellaneous
Online help
Hard drive usage overview
Firmware update
HDD format
System configuration backup and restore
Network Time Protocol (NTP) support
HDD Hibernation
Usability
Initialization wizard
Web-based management UI
Page 8
8
Package Contents
Contents of package:
• One D-Link DNS-312H Media Storage Server device
• One Category 5 cable
• One power switch with power cord
• One CD-ROM
• One QIG
If any of the above items are missing, please contact your reseller.
Important Warning:
Tampering with any components inside the product other than those
specifically mentioned in this manual or the accompanying QIG will
automatically invalidate the product warranty.
Page 9
9
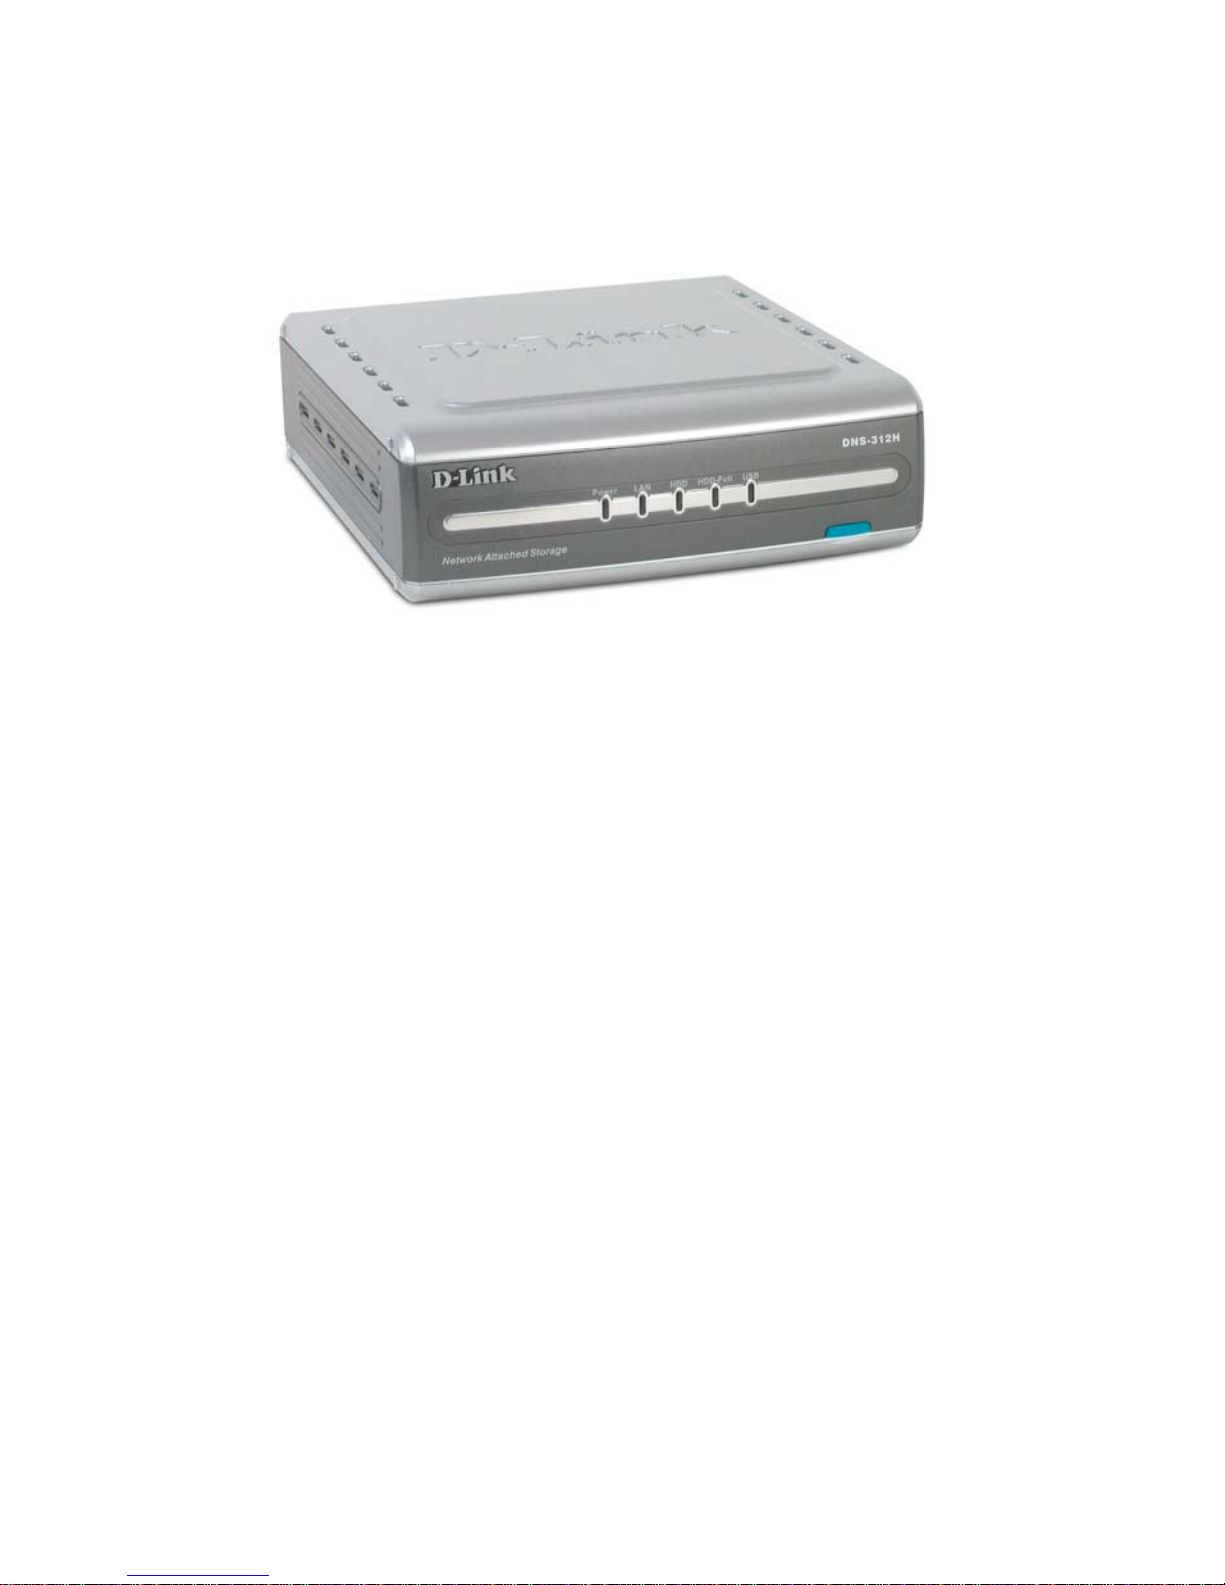
LEDs
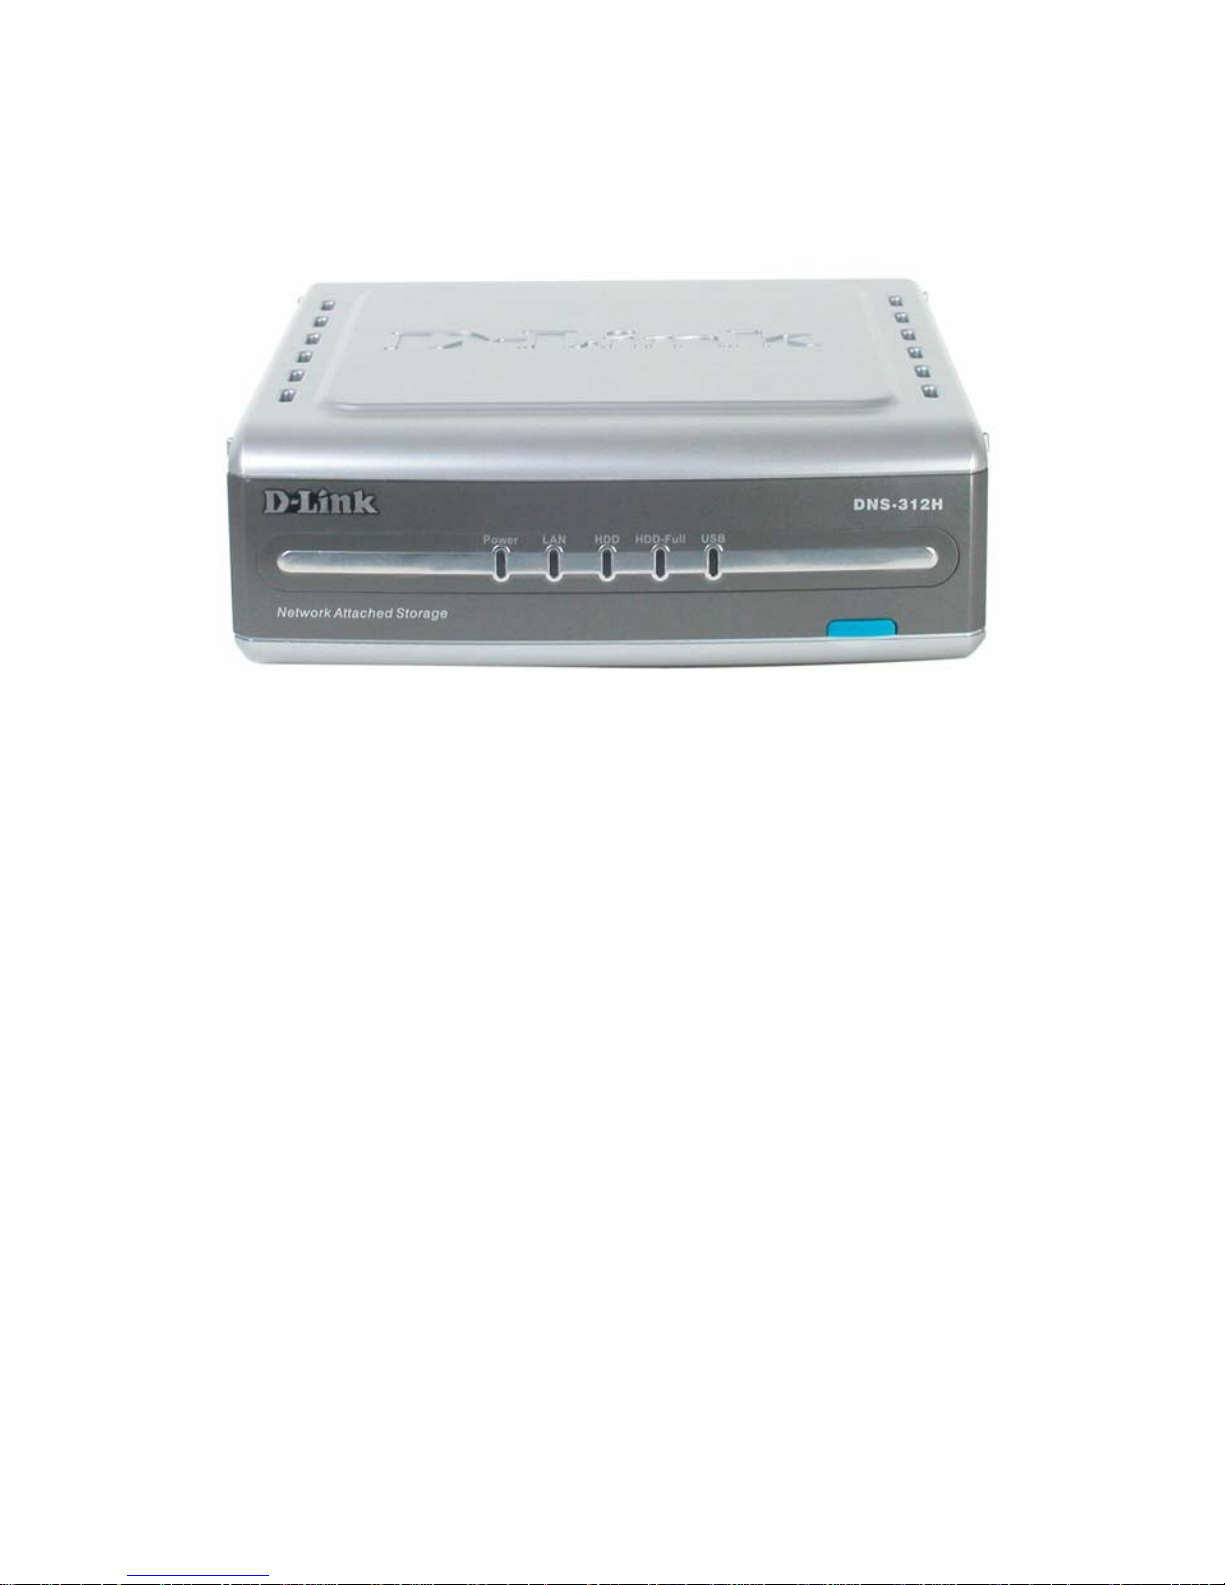
Power: A solid light indicates a proper connection. No light indicates the power is
off.
LAN: A solid light indicates a proper connection to LAN port. A blinking light indicates
that data is being transferred. No light indicates the port is disconnected.
HDD: A blinking light indicates the HD is in read/write mode. No light indicates the
read/write mode is not engaged.
HDD Full: A solid light indicates the HD is completely full (100%). A blinking light
indicates the HD is almost full (95%). No light is the normal condition.
USB: A solid light indicates that the USB flash/HDD is properly connected. A blinking
light indicates that data is being received. No light indicates that there is neither a
USB Flash nor a USB HDD connected.
Page 10
10
Physical Connections
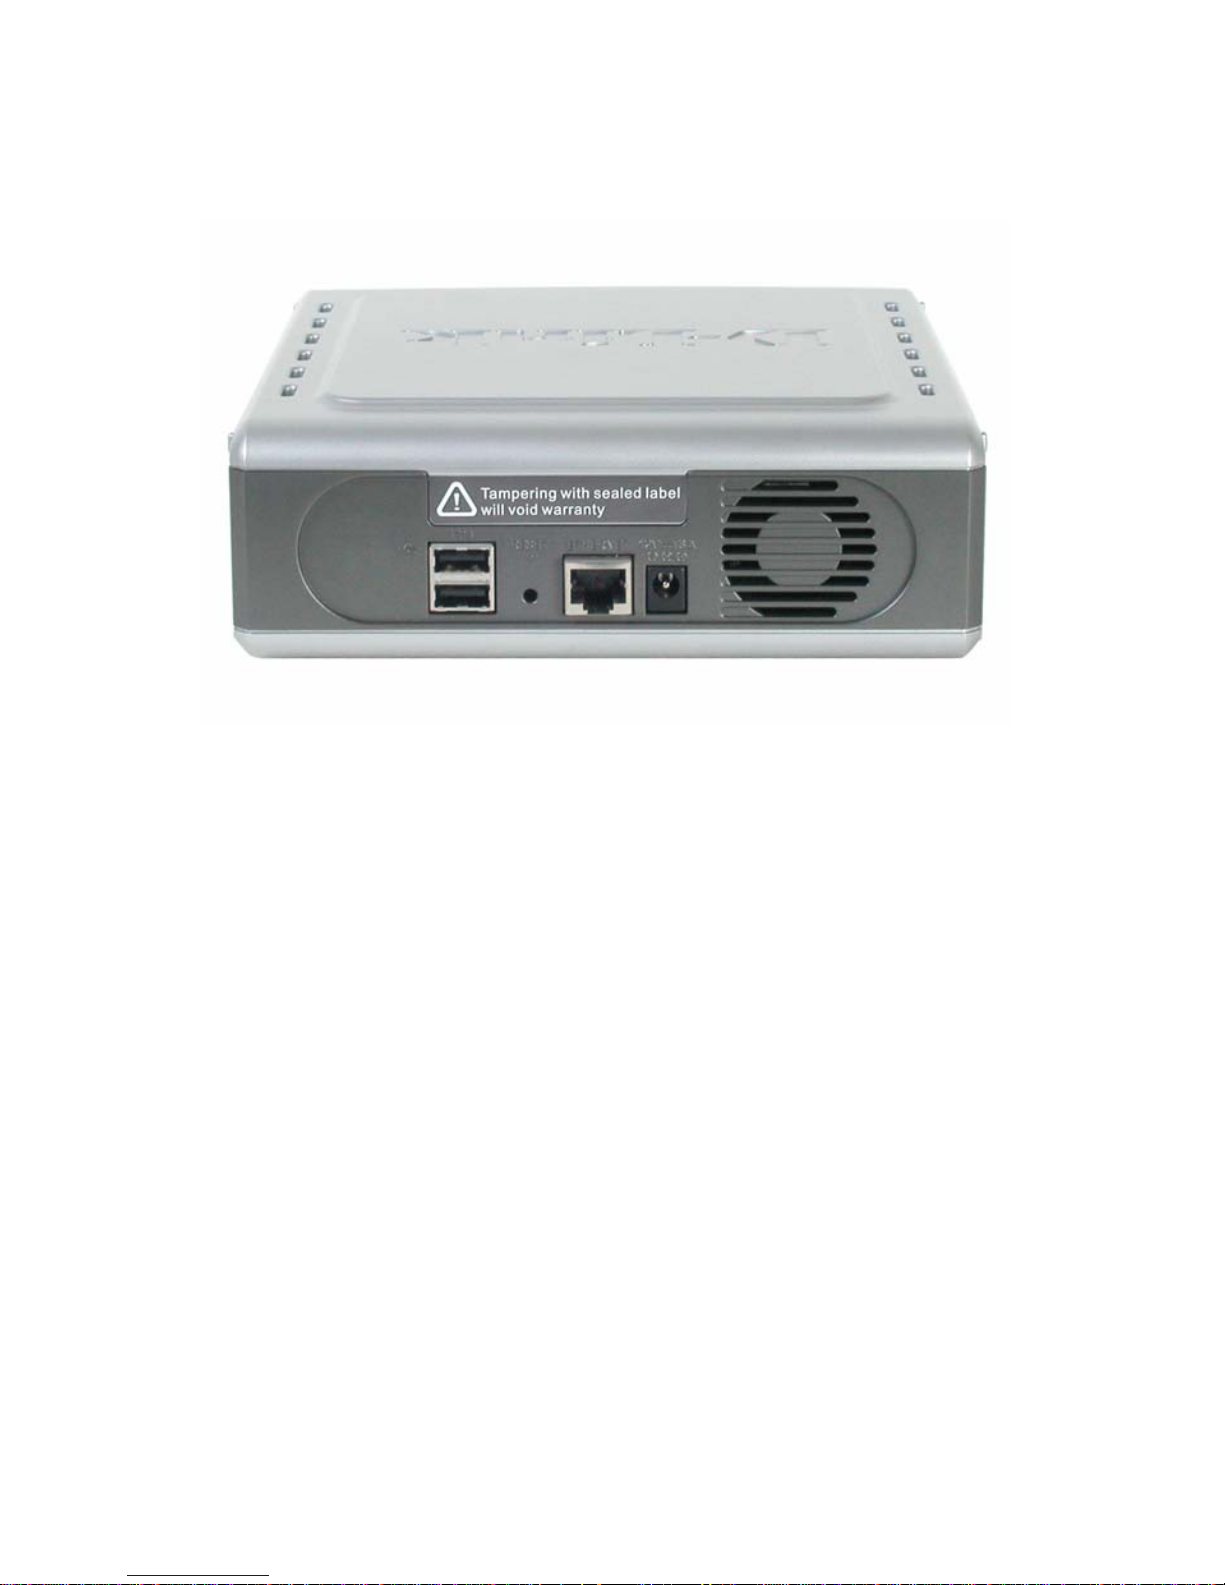
USB Ports for Printer Server/USB HDD: Please use the USB printer cable to
connect the DNS-312H’s USB Port (for printer server) or USB HDD for additional
volume.
Reset: Pressing this button restores the DNS-312H to its original factory default
settings.
LAN Port: Please use the Ethernet cable to connect the DNS-312H and the
router/switch/hub in the network.
Power Adapter: Receptor for power adapter.
Warning:
The two USB ports support:
a. Two USB HDDs or
b. One USB printer and One USB HDD.
Please note that the USB ports do not support a USB Hub. If you have problems in
detecting your USB HDD, try to connect your USB HDD to the upper USB port.
Page 11

11
D-Link Storage Utility
D-Link Storage Utility is a tool to connect and use the DNS-312H Network Attached
Storage device.
Double-click the D-Link Storage Utility icon
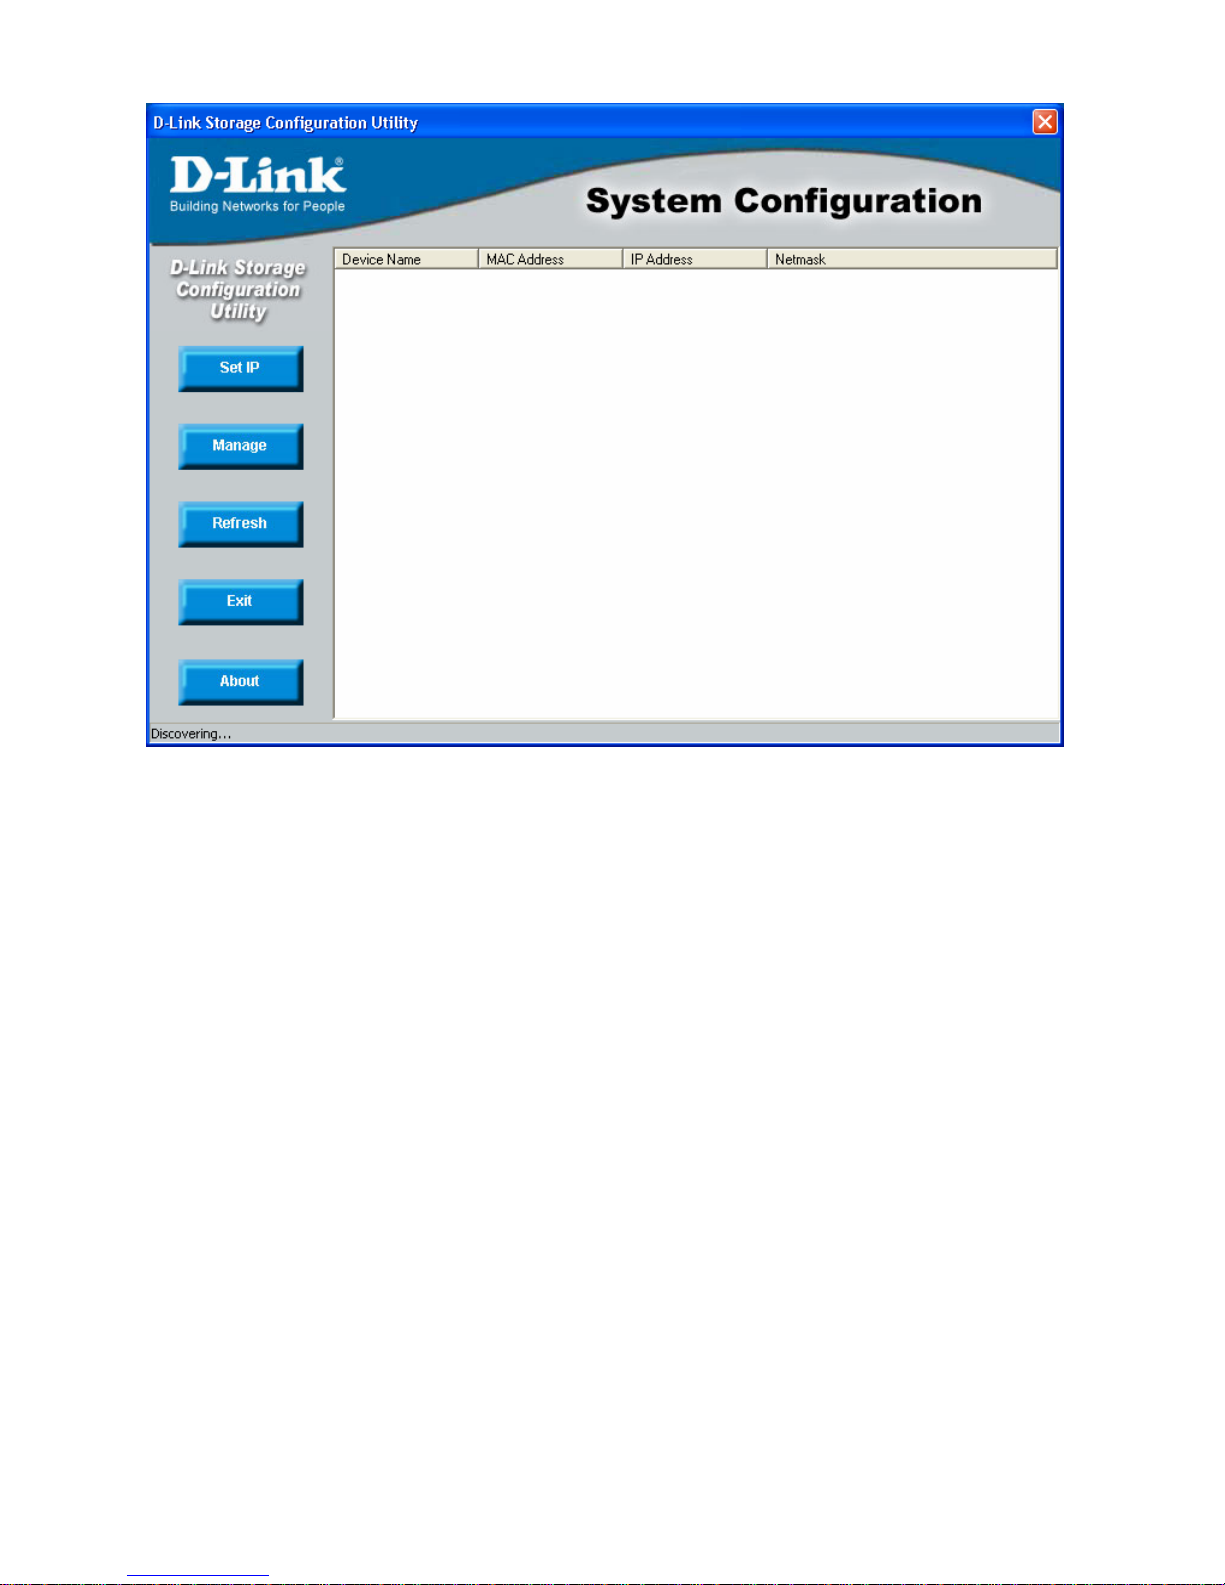
Double-click the D-Link Storage Utility icon.
This will automatically detect all servers on the network at the moment by displaying
the following System Configuration window:
Getting Started
Page 12
12
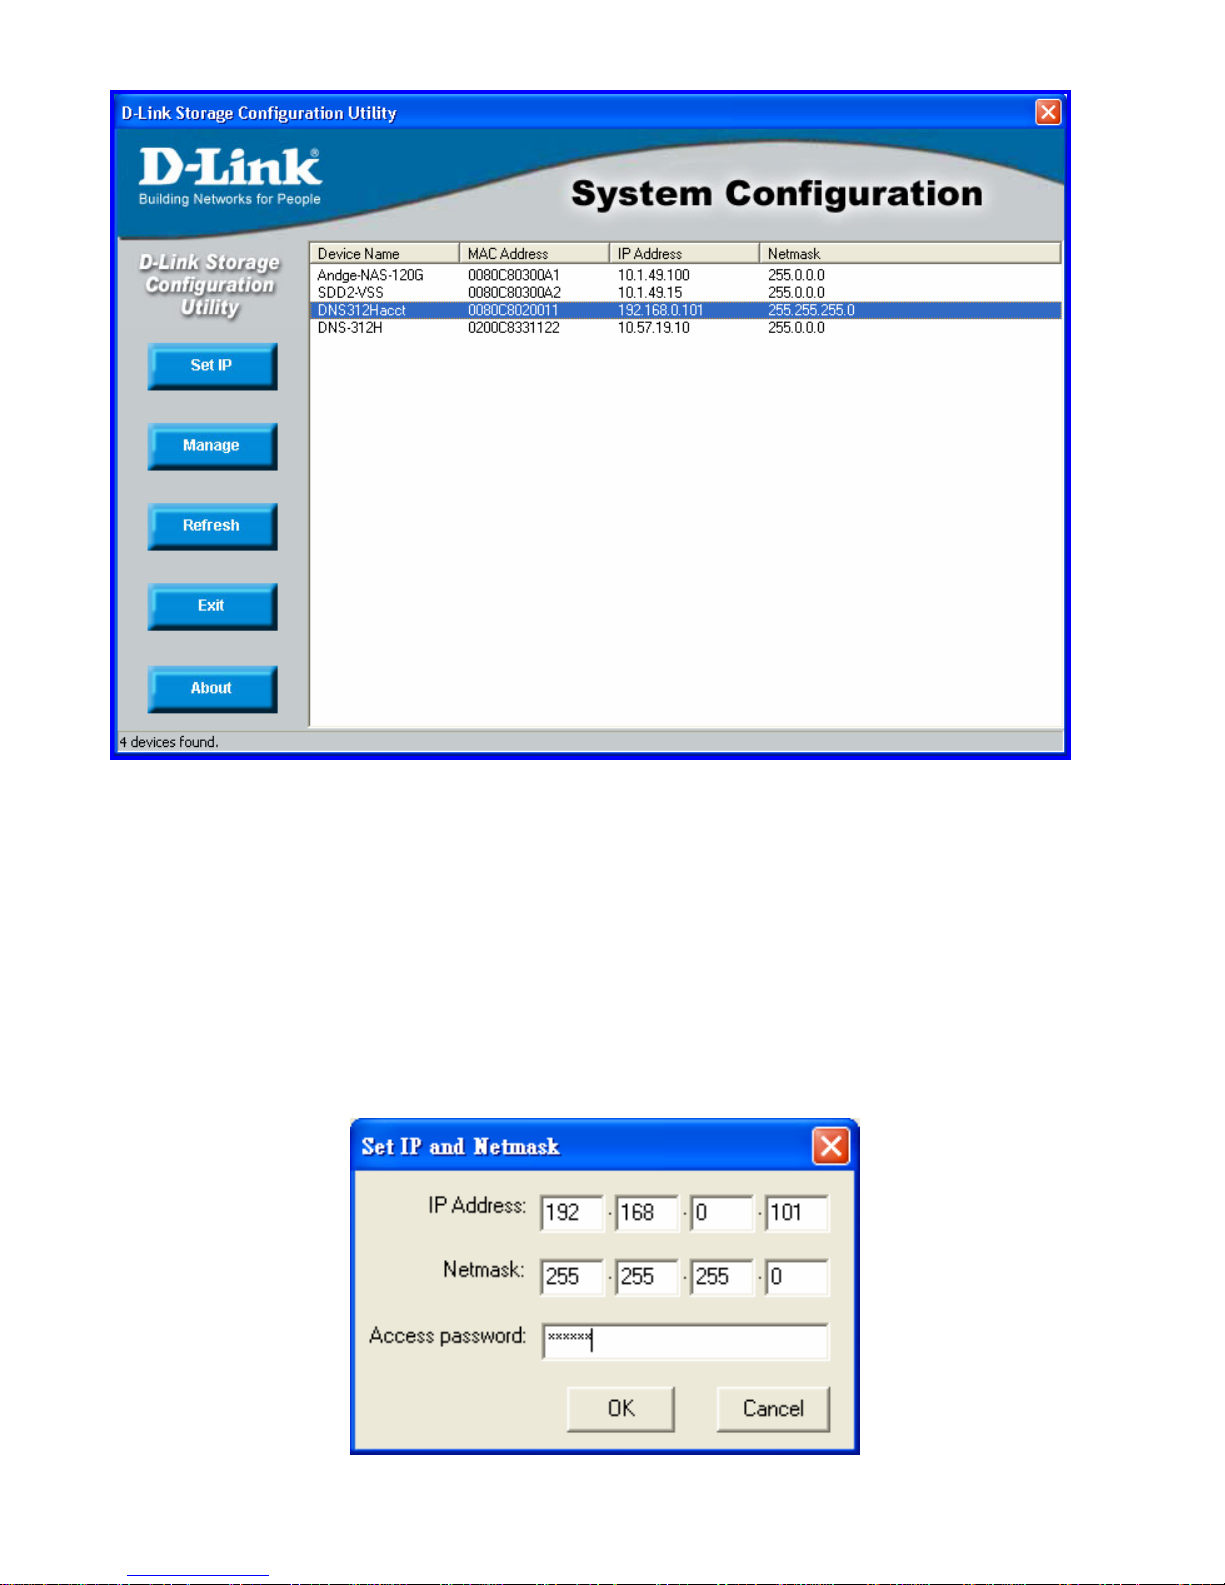
After it is finished searching, a detailed list will be shown, as below. This includes
Device Name, MAC Address, IP Address, and Netmask.
Page 13
13
Note:
The default IP address of the DNS-312H is 192.168.0.101.
You now are able to set the IP address of the DNS-312H by clicking the Set IP button
on the System Configuration window. Enter the appropriate information in the
following pop-up dialogue and input admin password then click OK.
Page 14
14
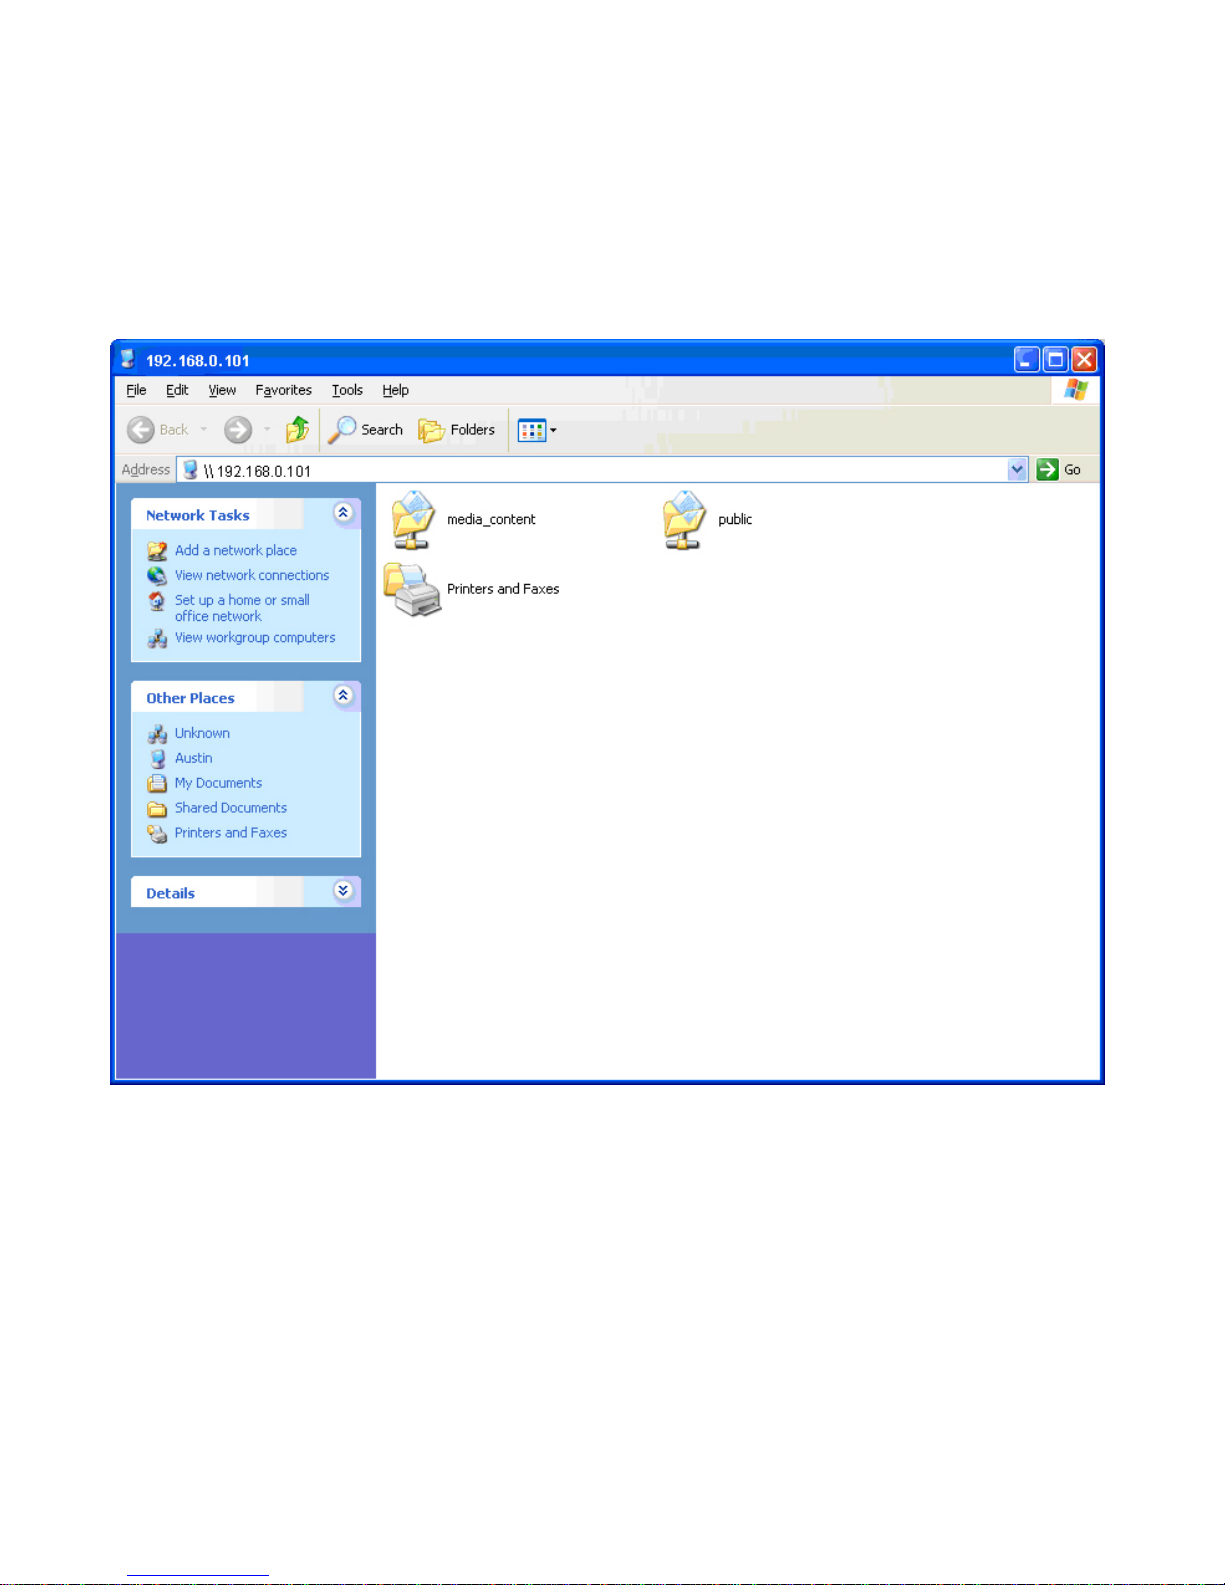
Clicking the correct server name from the list displayed in the System
Configuration window will open the default file folders provided for the user
account.
Please note that in order for media files to be displayed, they must be placed in the
“media_content” folder rather than the “public” folder.
Clicking the Manage button on the System Configuration window will activate your
browser. This is described in more detail later in the manual.
Page 15
15
Setup Wizard
Please follow the steps below to run the initialization wizard:
Enter the default IP
1. Connect the device running D-Link DNS-312H to the network.
2. Power the device on.
3. Open the browser, using Opera, Microsoft IE Browser, (Version
6.0 or above is recommended.), or another suitable Web
browser.
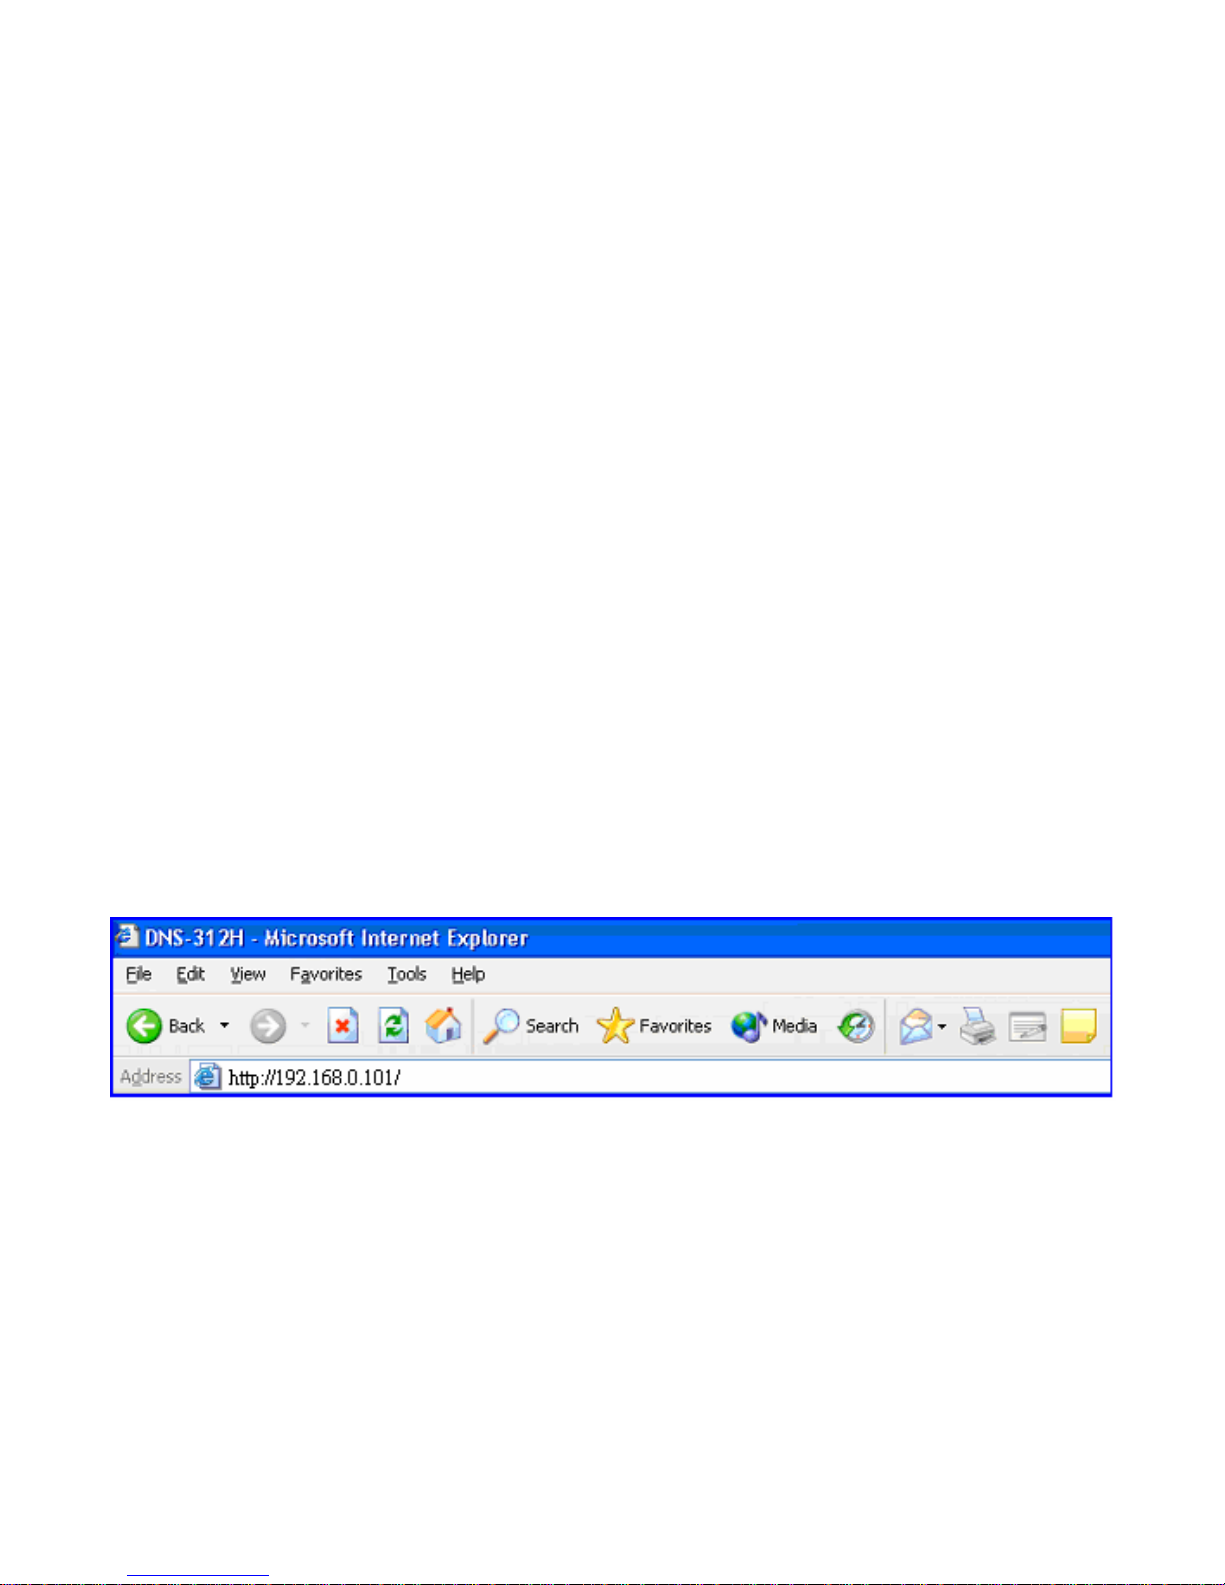
4. Enter the device default IP “192.168.0.101” (or the new address
you set using the D-Link Storage Configuration Utility) the
address bar.
5. Click Go to continue.
Page 16
16
Enter the default user name
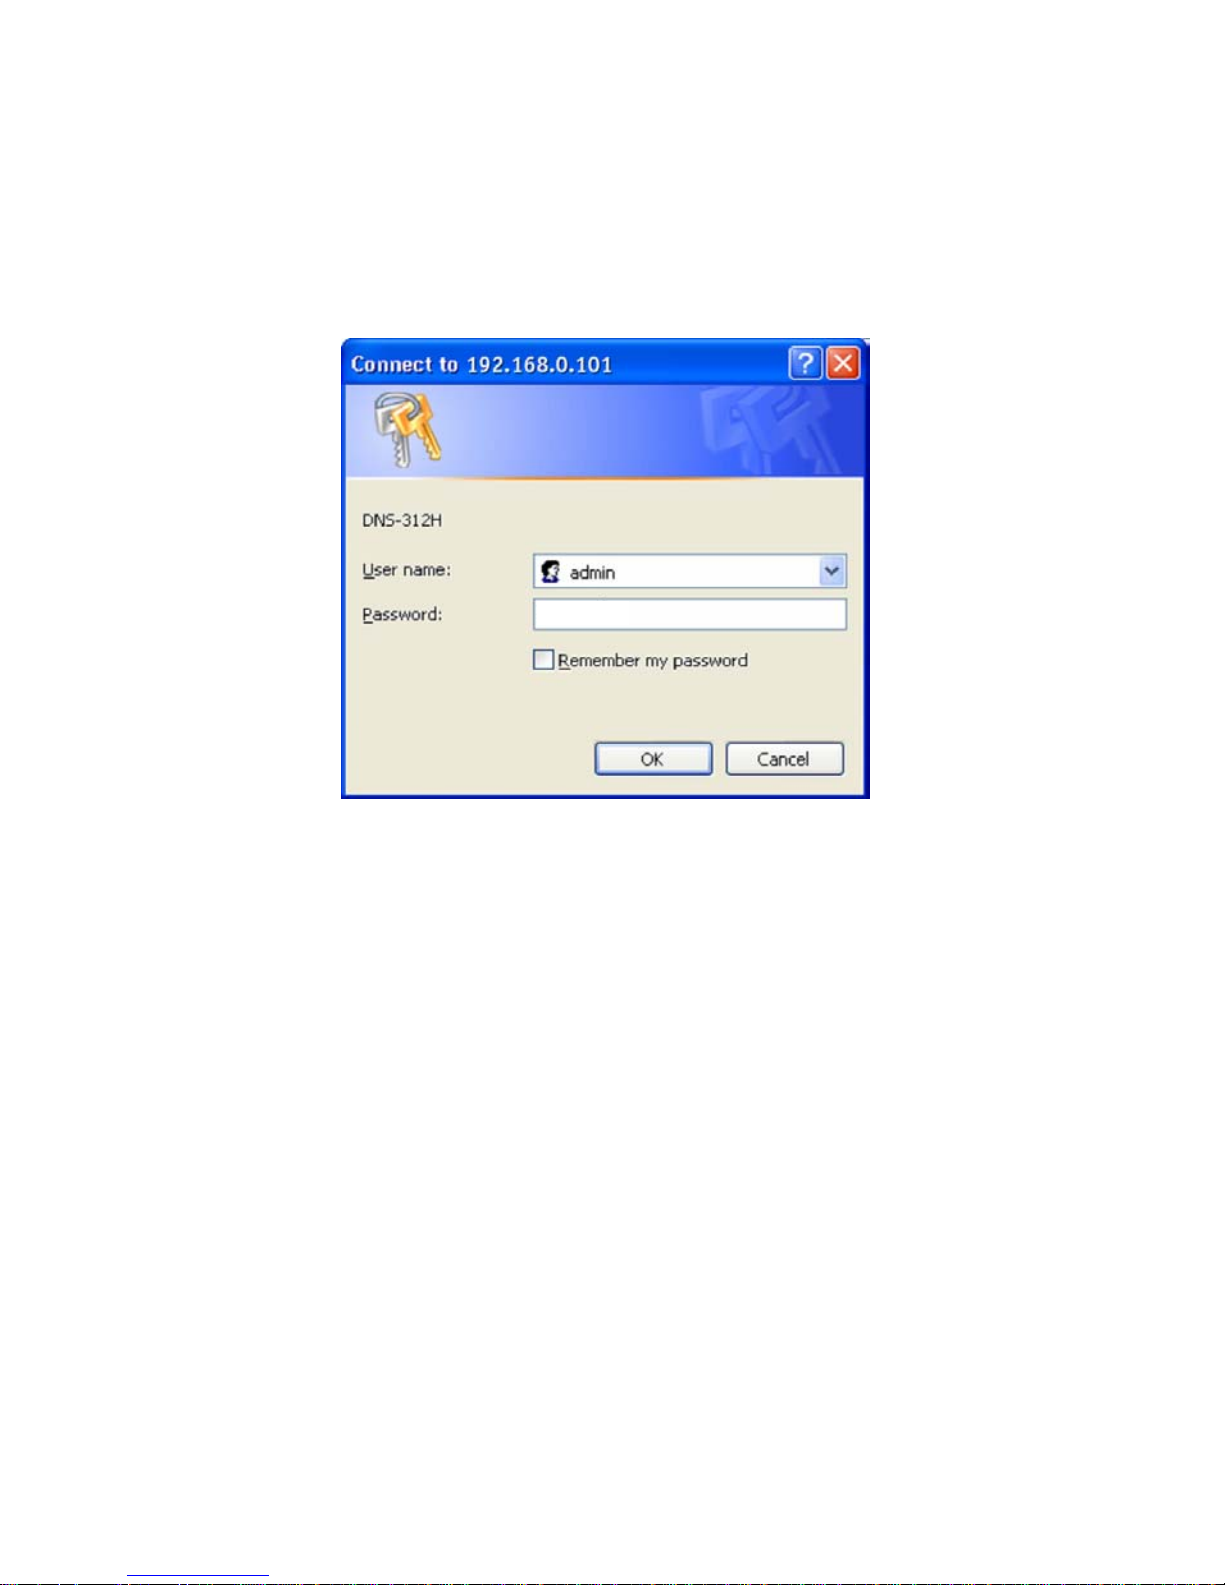
In the authentication dialogue please enter the default user “admin,” leave the
password field blank, and click OK.
Start the wizard
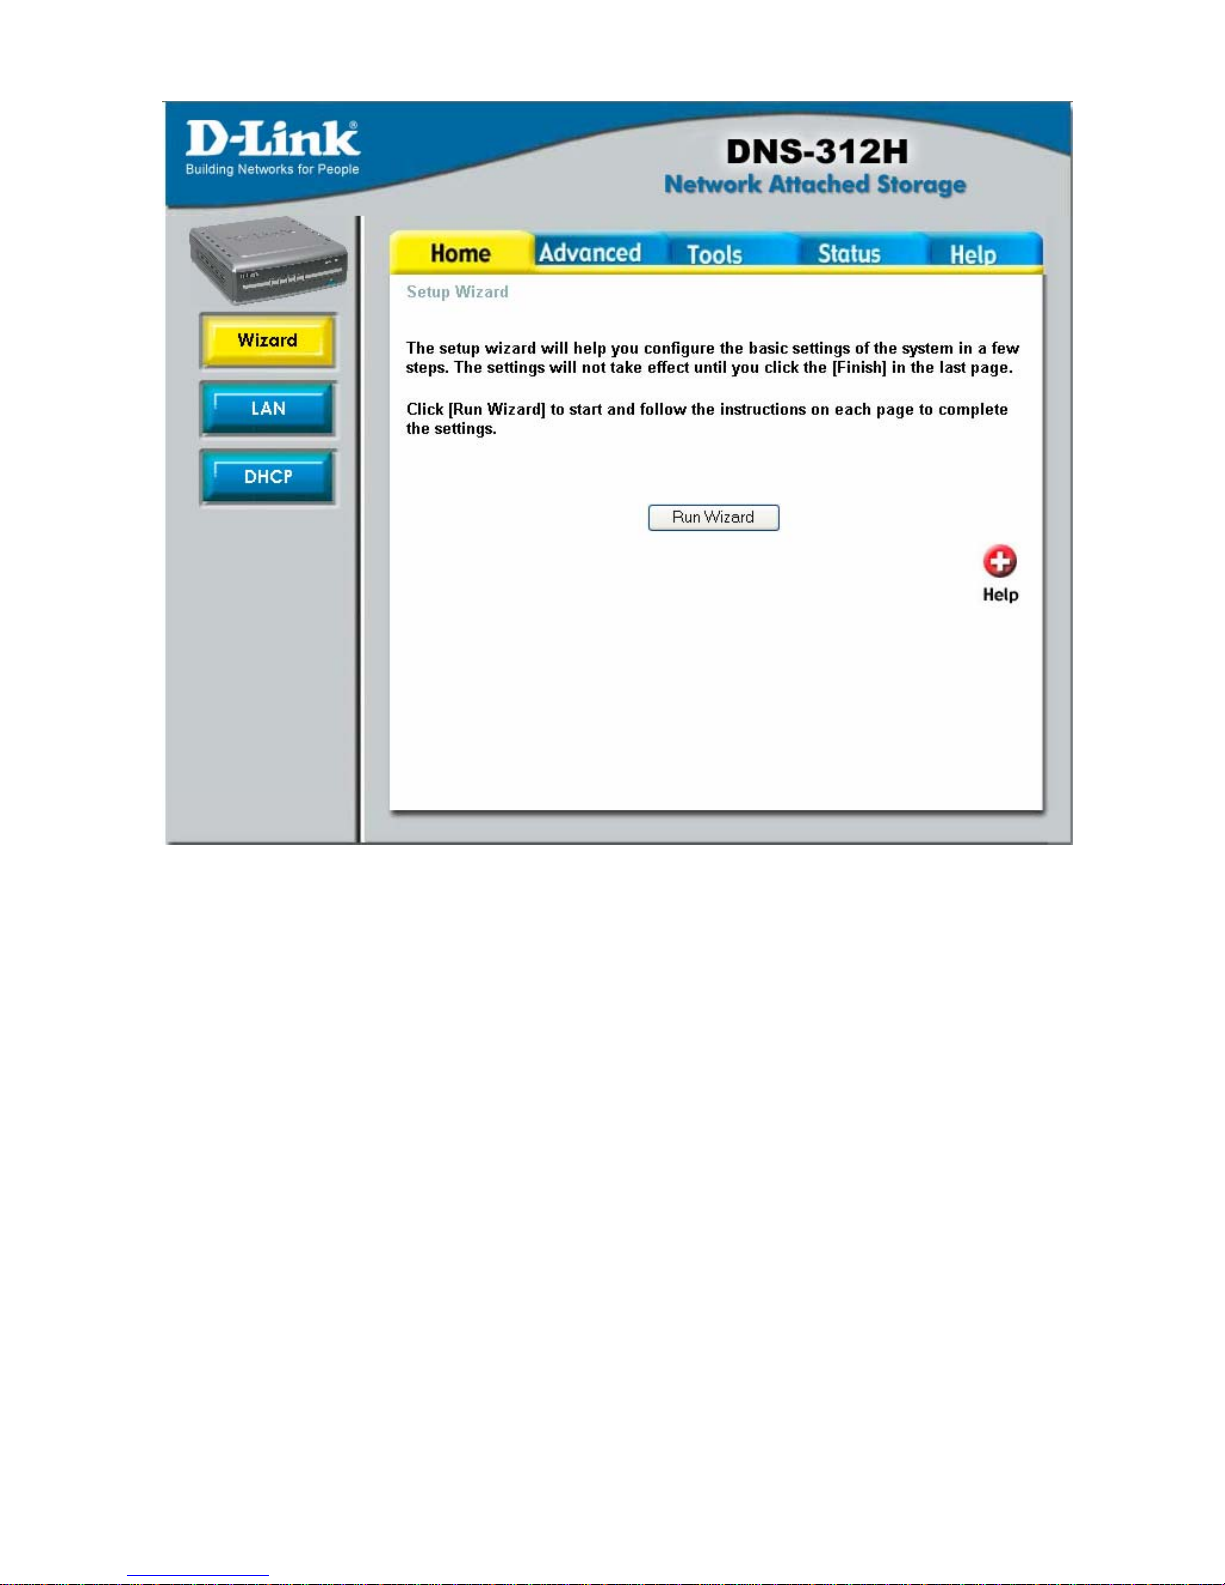
The Setup Wizard will help you configure the basic settings of the device in a few
steps. The settings will not take effect until you click the Finish button in the last
page.
Click the Run Wizard button to start.
Page 17
17
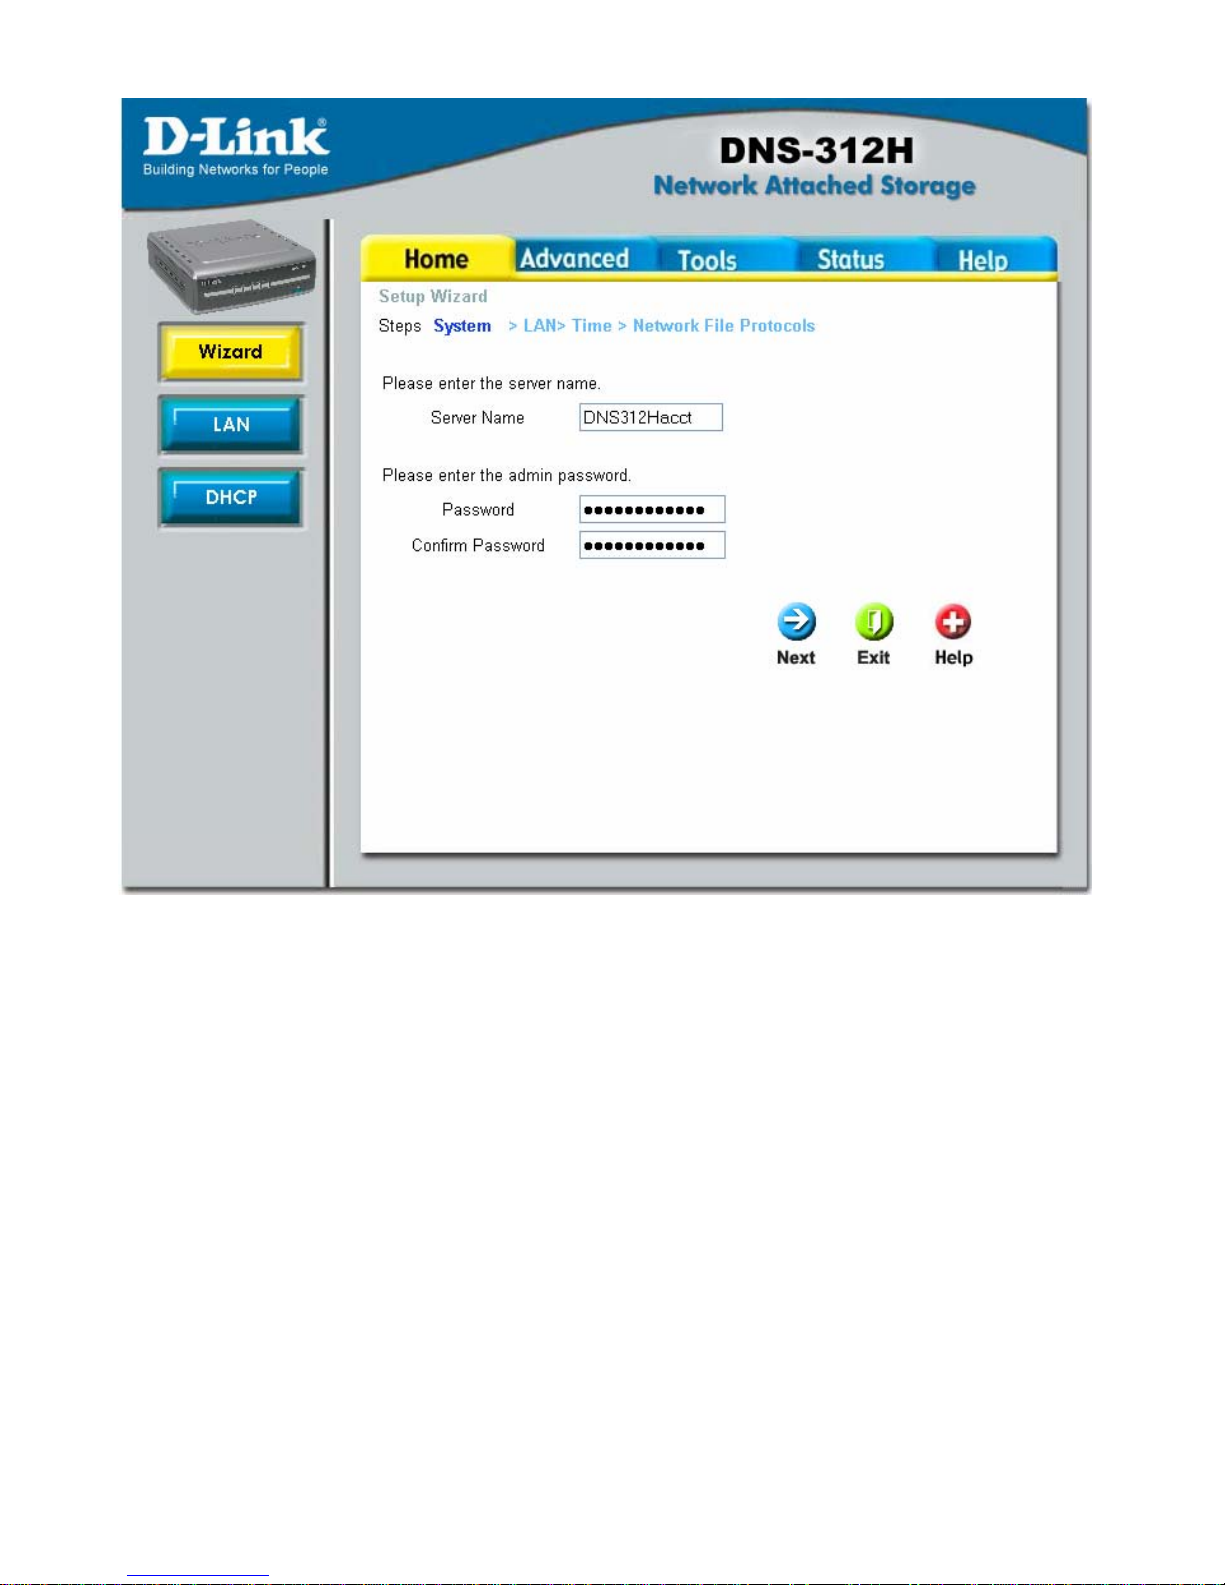
Enter system information
1. Enter the server name in the “Server Name” field so you can
quickly access the storage capabilities of this system either from
a Windows or a Mac OS by searching for the server name.
2. Enter the new password. If you don’t enter a password, it will
remain blank as the default value.
3. Click Next.
Page 18
18
Page 19
19
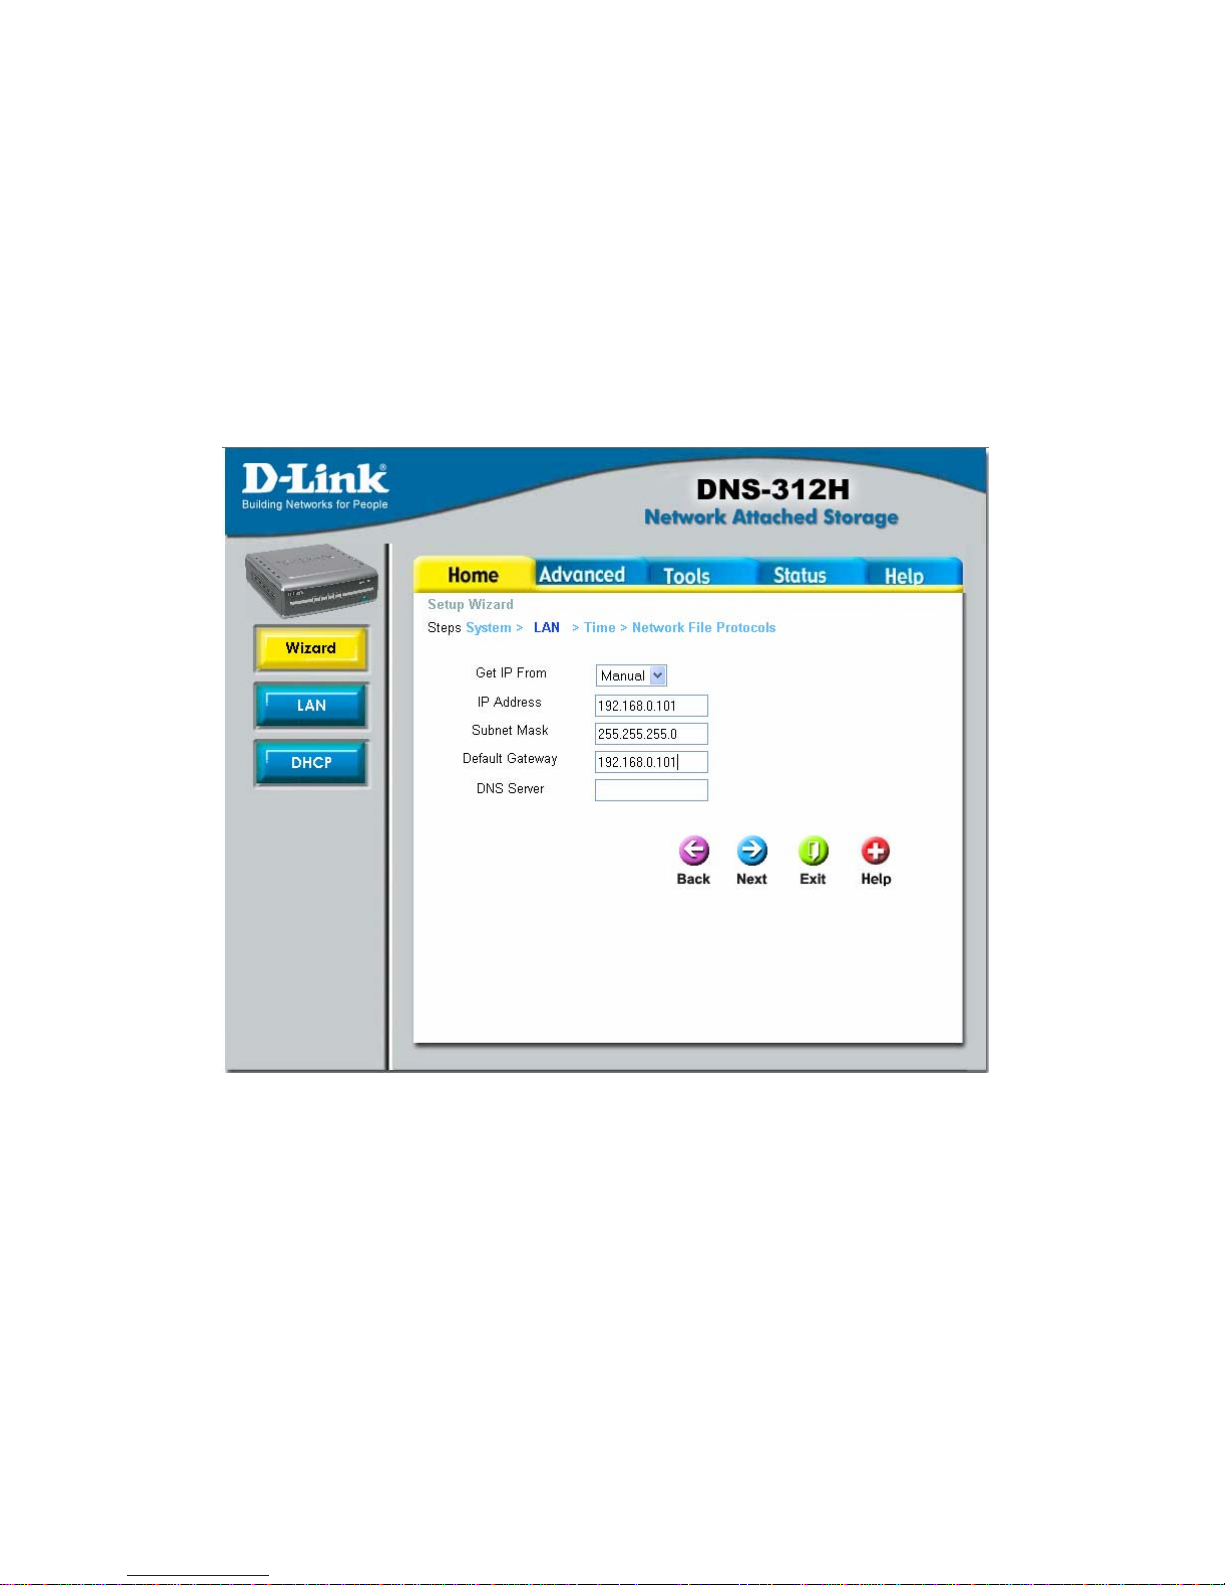
Enter networking information
1. If a DHCP server is available in the same network environment
and you prefer to obtain the networking settings for the system
from the DHCP server, change the “Get IP From” drop-down
menu from Manual to DHCP and then click Next.
2. Since this is the first time you configure the device, the following
networking settings will be adopted by default:
IP: 192.168.0.101
Subnet mask: 255.255.255.0
Default gateway: 192.168.0.101
DNS server: empty
You can modify the settings to fit your need.
Page 20
20
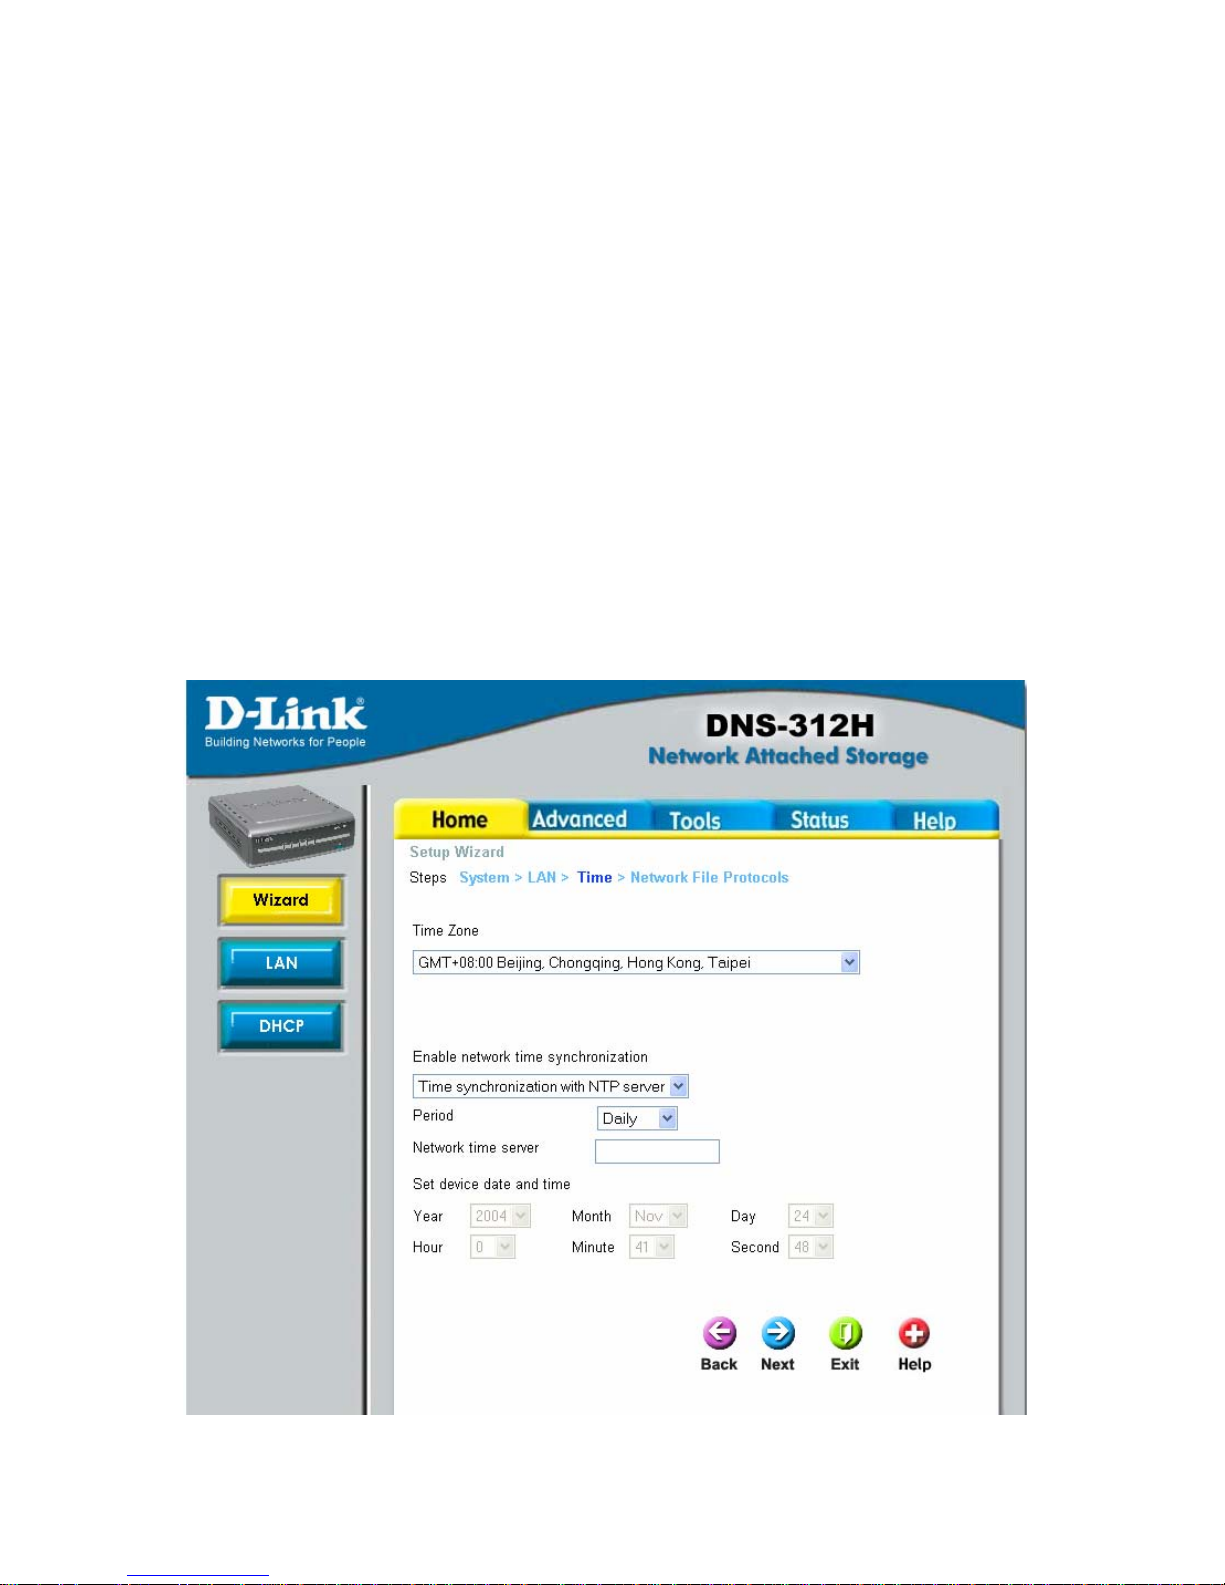
Setup time settings
1. Select your time zone from the Time Zone drop-down menu.
Note:
In the drop-down menu, please select time zone corresponds
to your location
2. Choose to enable network time synchronization protocol (NTP)
or manually set the system time.
3. Click Next.
Page 21
21
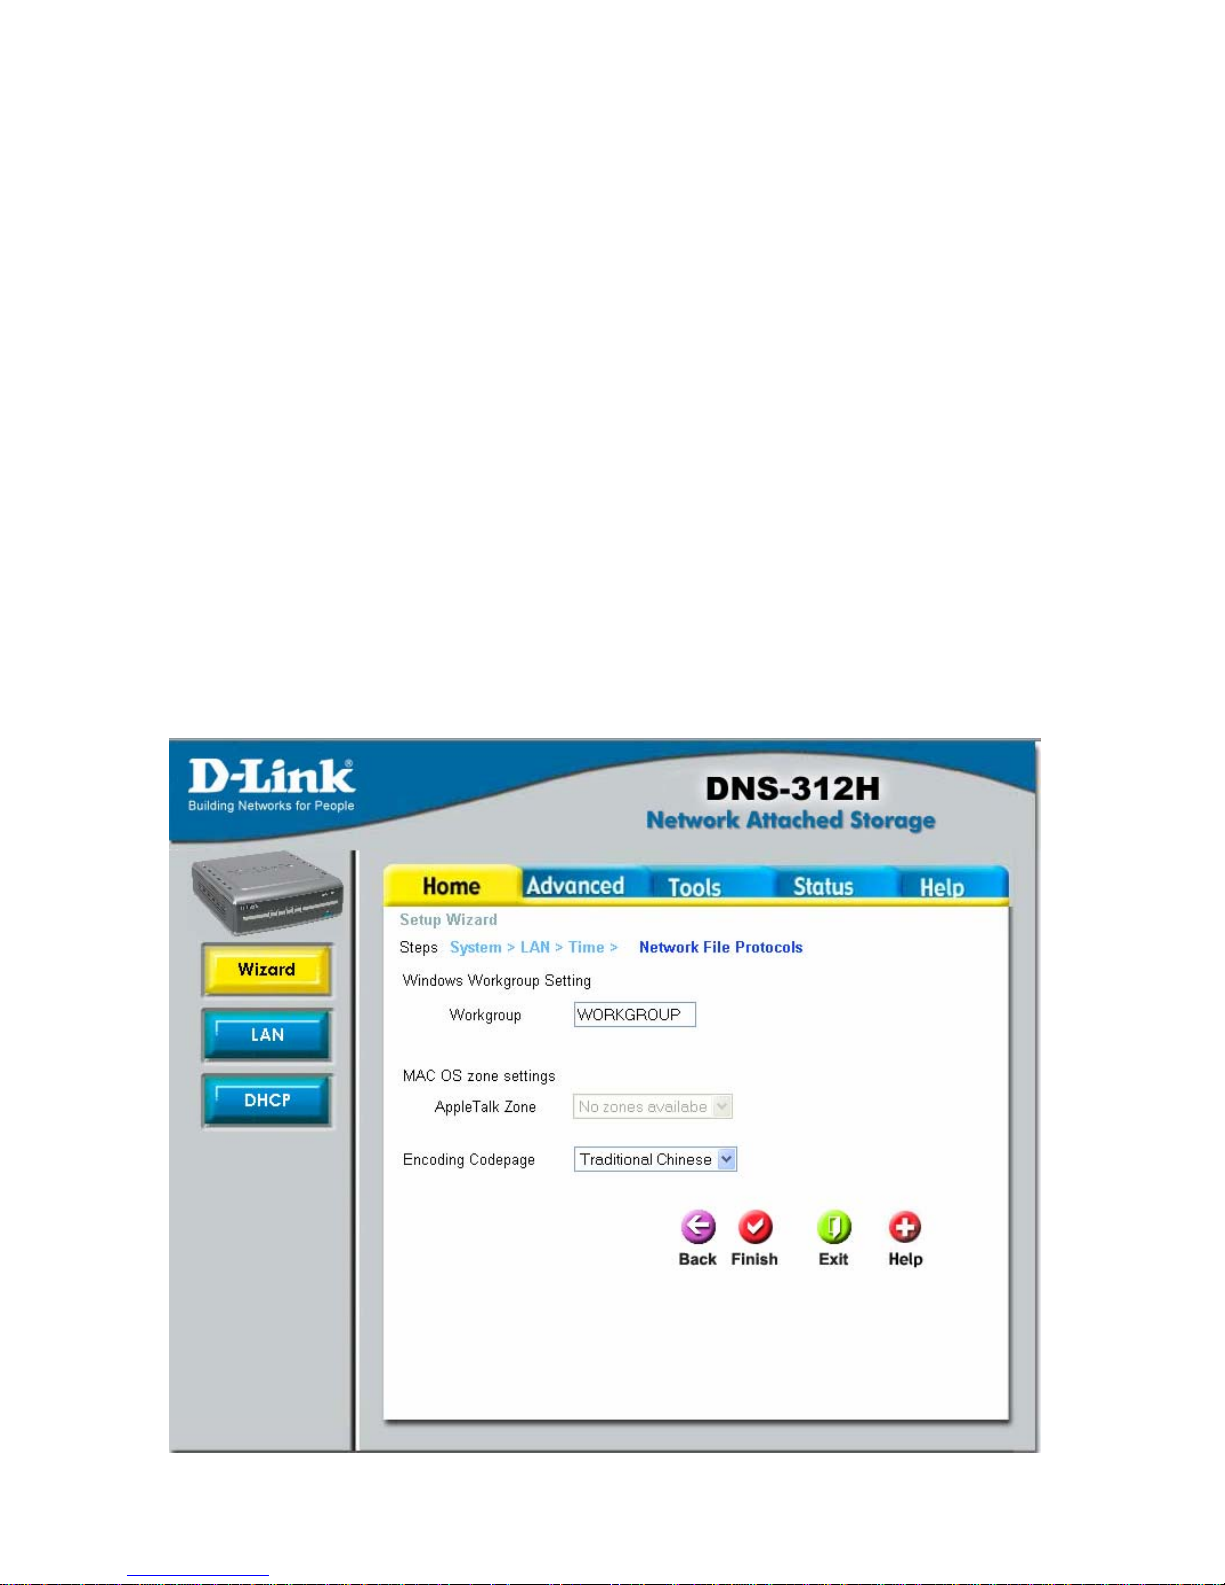
Setup network file protocol
1. Determine the Workgroup here. The Workgroup should be 0 to
14 characters, in English only.
2. Choose the Mac OS zone. A zone is a logical grouping of
devices in an AppleTalk network. Select the zone from the Apple
Talk Zone drop-down menu.
3. Choose the appropriate encoding from the Encoding Codepage
drop-down menu to help clients that don’t have Unicode support
installed correctly to access the system.
4. Click Finish for the settings to take effect.
Page 22

22
Note:
a) If the local language is the only language used in your working
environment, there is no need to change any settings for the encoding code
page and you can just go ahead and load the defaults.
For example: If the local language is English, and all files or folders use
English names, then it is unnecessary to change any settings here, just
follow the defaults.
b) If it is necessary to recognize a second, non-local language, it is
recommended that you select an encoding that recognizes the second
language.
For example: If the local language is English but some files or folders use
Japanese characters, please select “Japanese SJIS (Code Page 932)” in
the Encoding Codepage drop-down menu.
Page 23
23
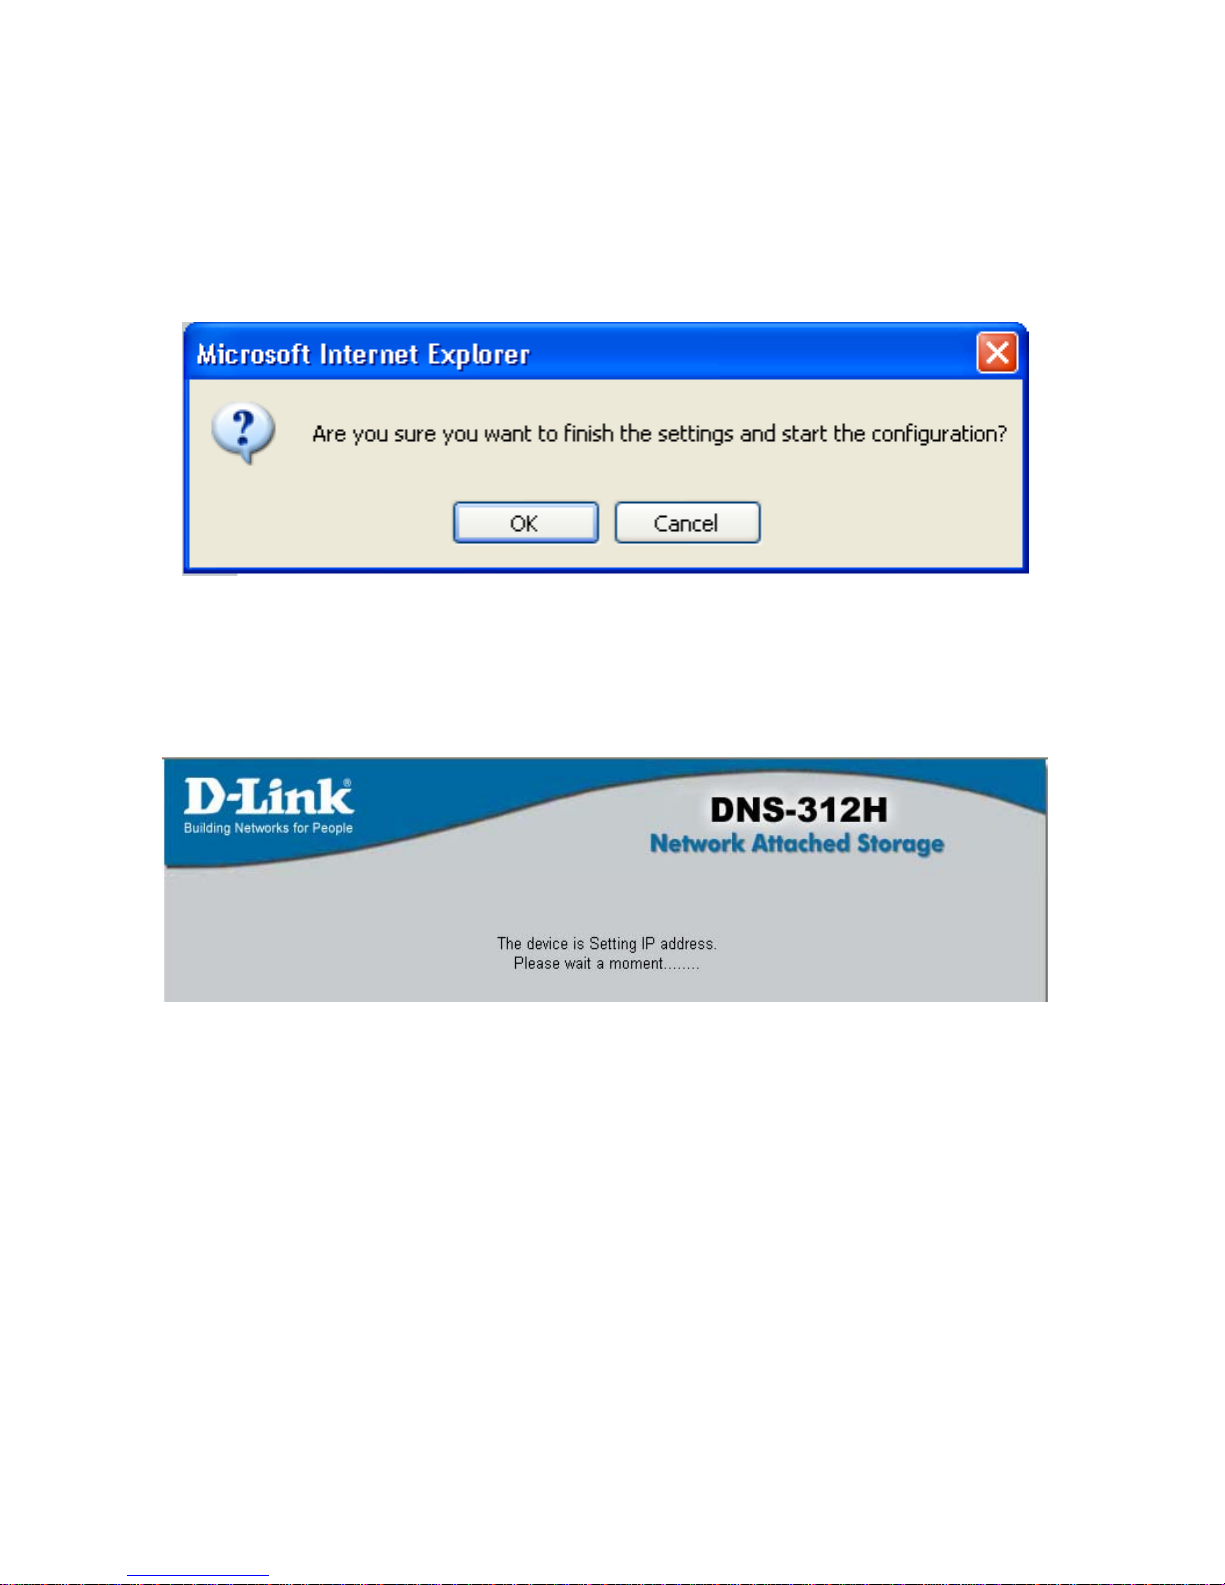
Finish the settings
Click the OK button in the pop-up dialogue.
The following window will be displayed to indicate the DNS-312H is preparing your
new settings:
The page will then be directed to the summary page—which is described later in this
manual—so you can review the settings that have been set.
Page 24
24
Page 25
25
LAN Setup
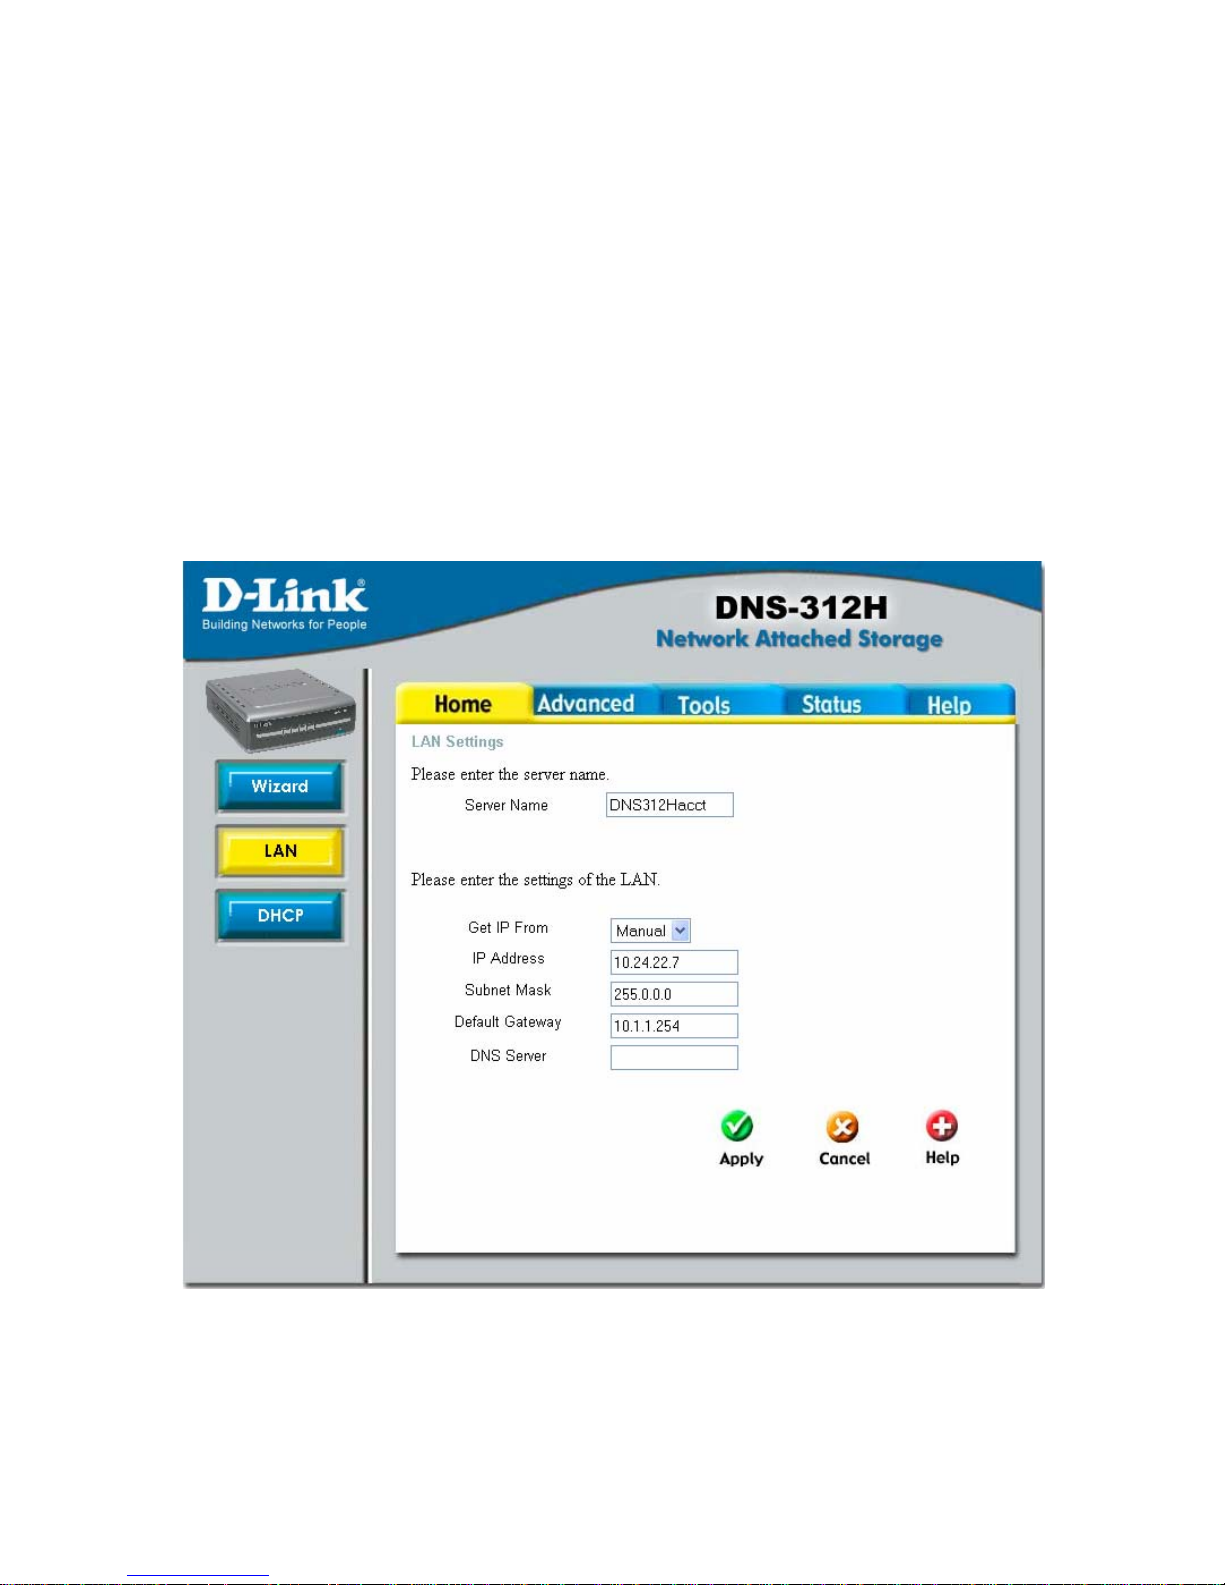
If you need to make any modification of the LAN setting, follow the steps below:
1. Click the Home tab on the top of window.
2. Click the LAN button on the left. A new window will open.
3. Enter the new LAN settings.
4. Click Apply.
Note:
To make sure email notifications are delivered correctly through the SMTP
server, you need to enter the IP of the DNS server.
Page 26

26
Changing server name
1. Click the Home tab on the top.
2. Click the LAN button on the left. A new window will open.
3. Enter the new server name.
4. Click Apply.
Note:
The server name should be 1 to 15 characters in English
(single-byte characters only).
Page 27
27
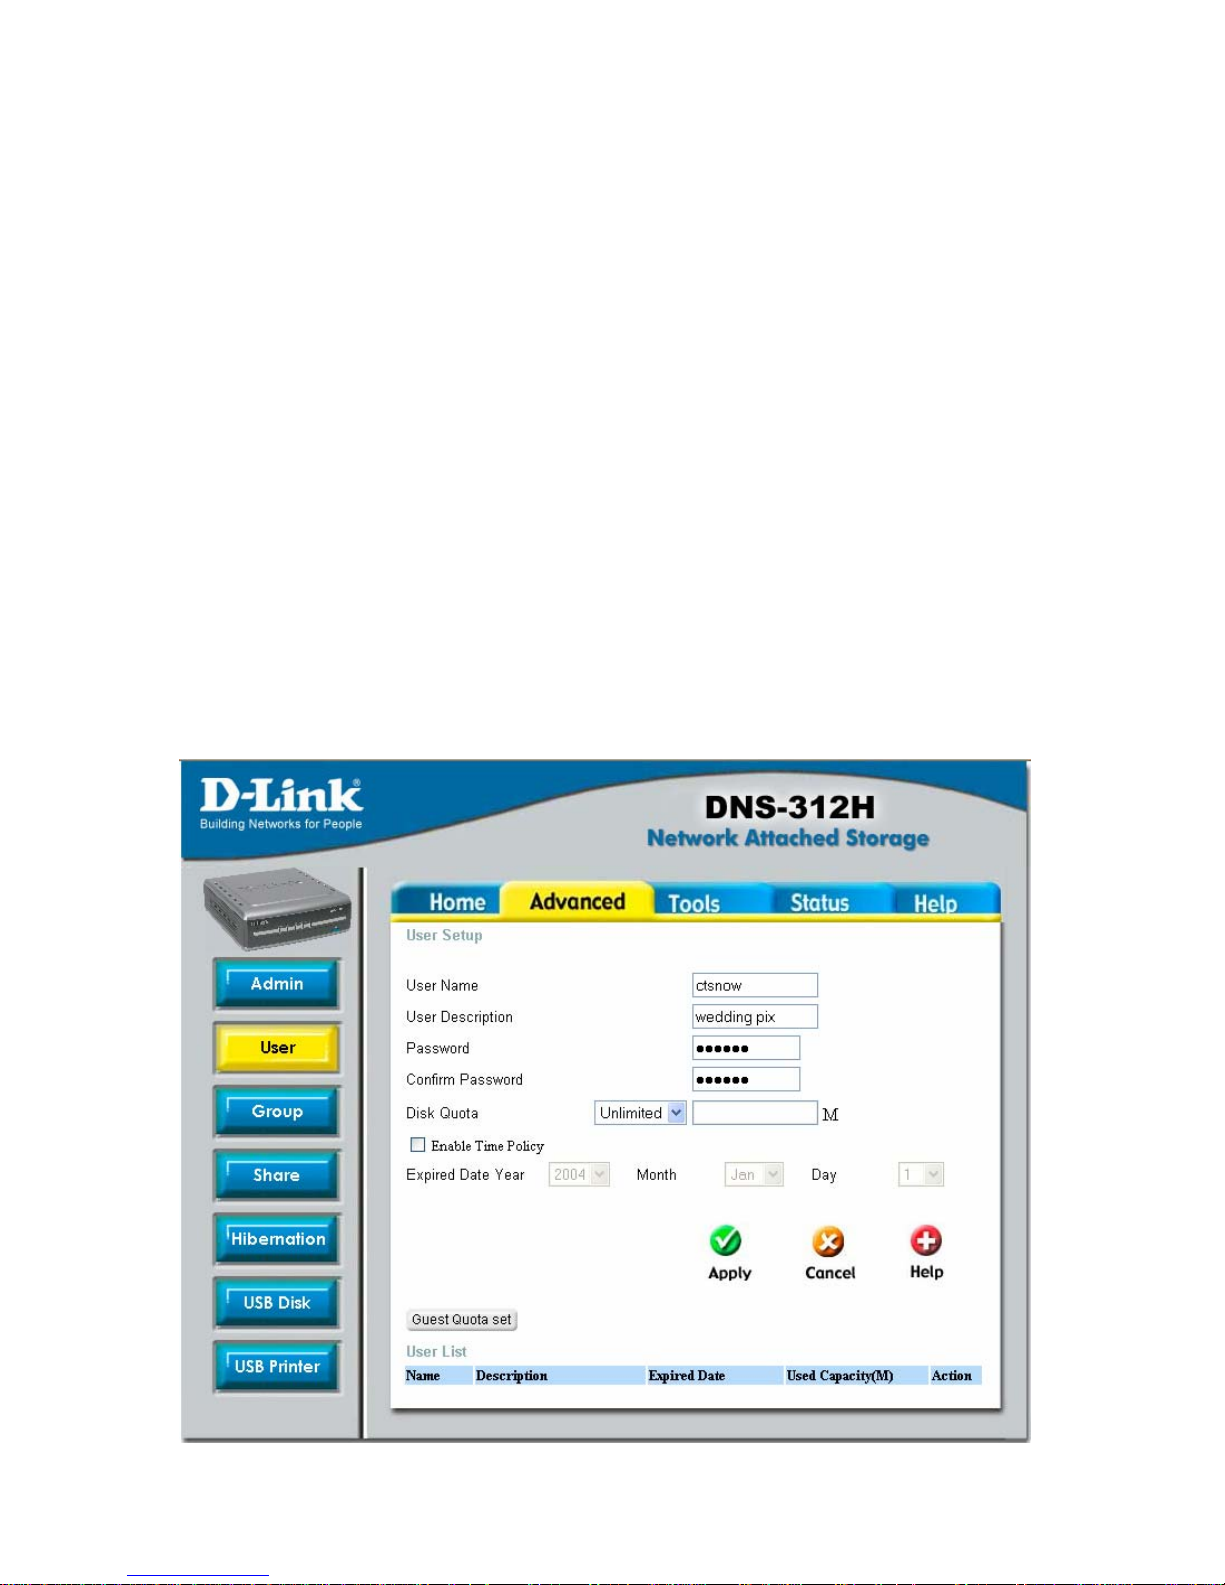
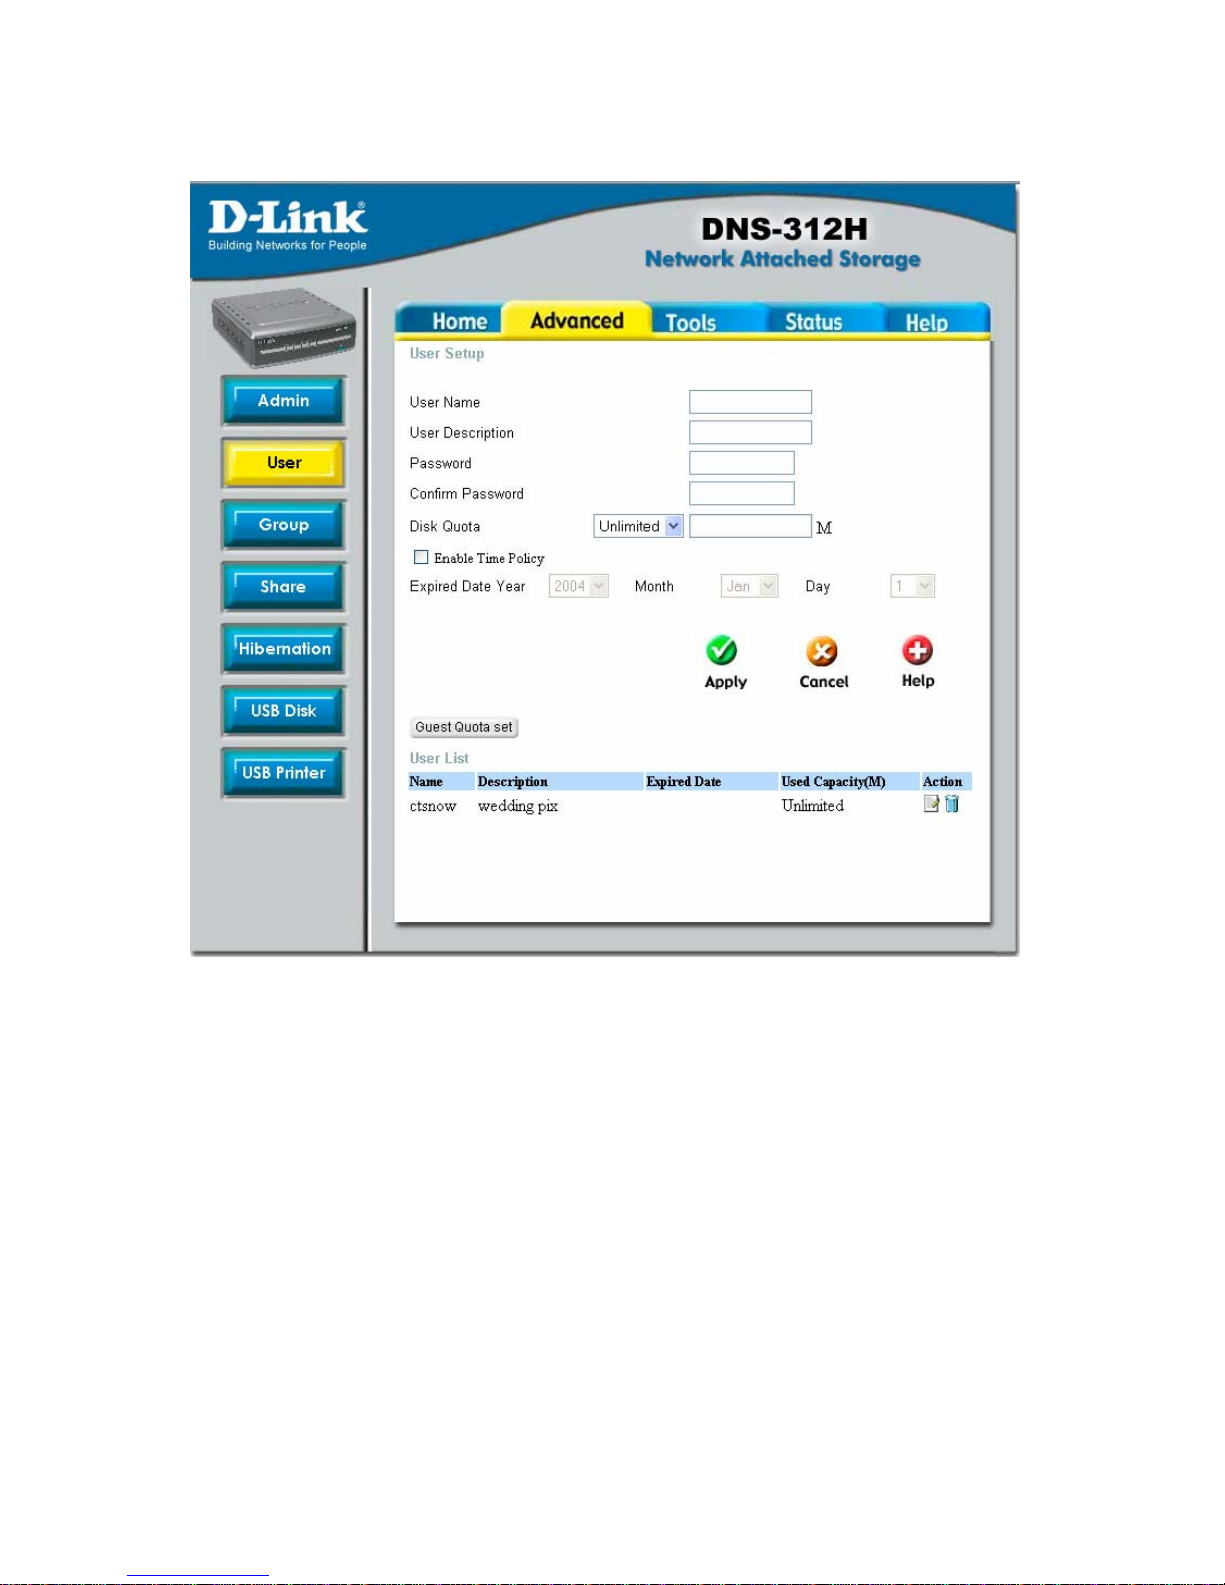
User Management
You can create up to 32 users, excluding the system default account "guest." The
user name is case sensitive and should be 1 to 15 characters; the user description
can be any displayable characters and can be 0 to 128 characters; the password is
case sensitive and should be 0 to 12 displayable bytes, including space.
Creating new user
1. Enter the user name, description, and password.
Advanced Setup
Page 28
28
2. Click Apply.
Note:
If the user details, including "User Name," "User Description," "Password,"
and "Confirm Password," are not empty when you try to create a new user,
click the Cancel button to clear the data before proceeding.
Page 29
29
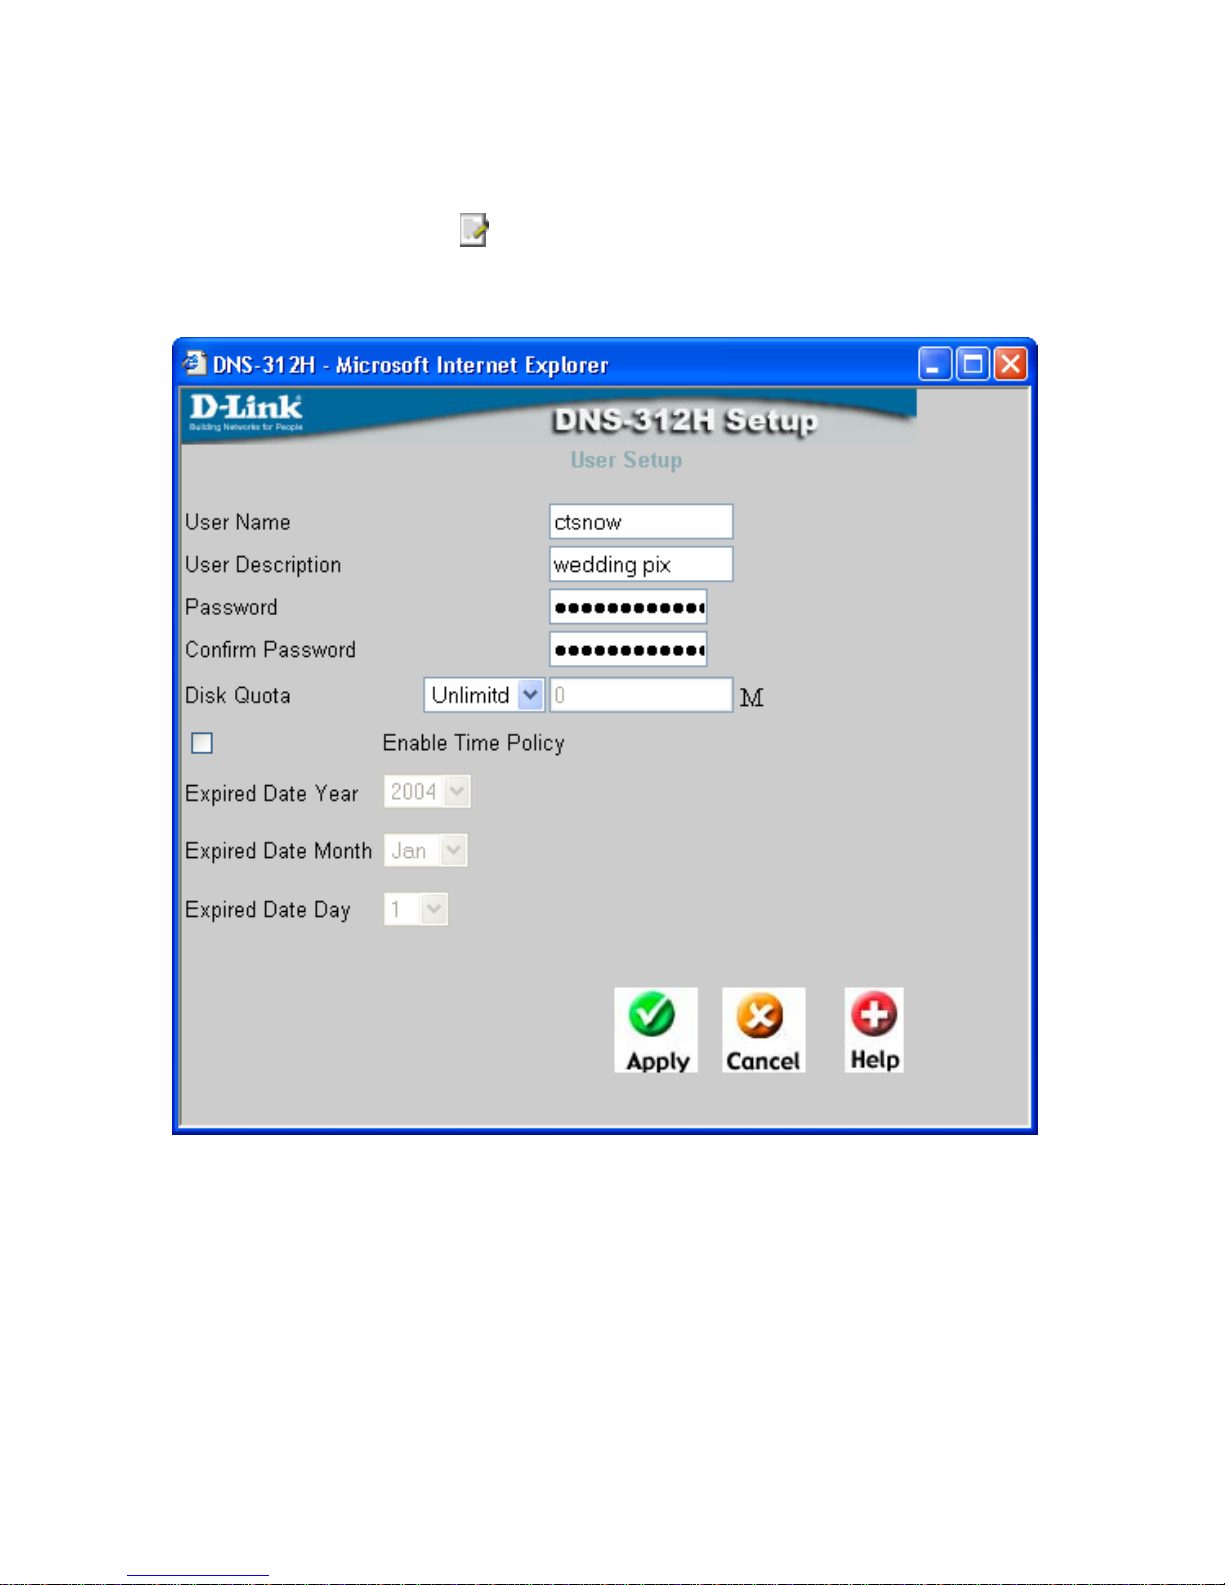
Editing user information
1. Click the graphic after the user you want to edit to load the user
details. The following window will open:
2.
Edit the data.
3.
Click Apply.
Page 30
30
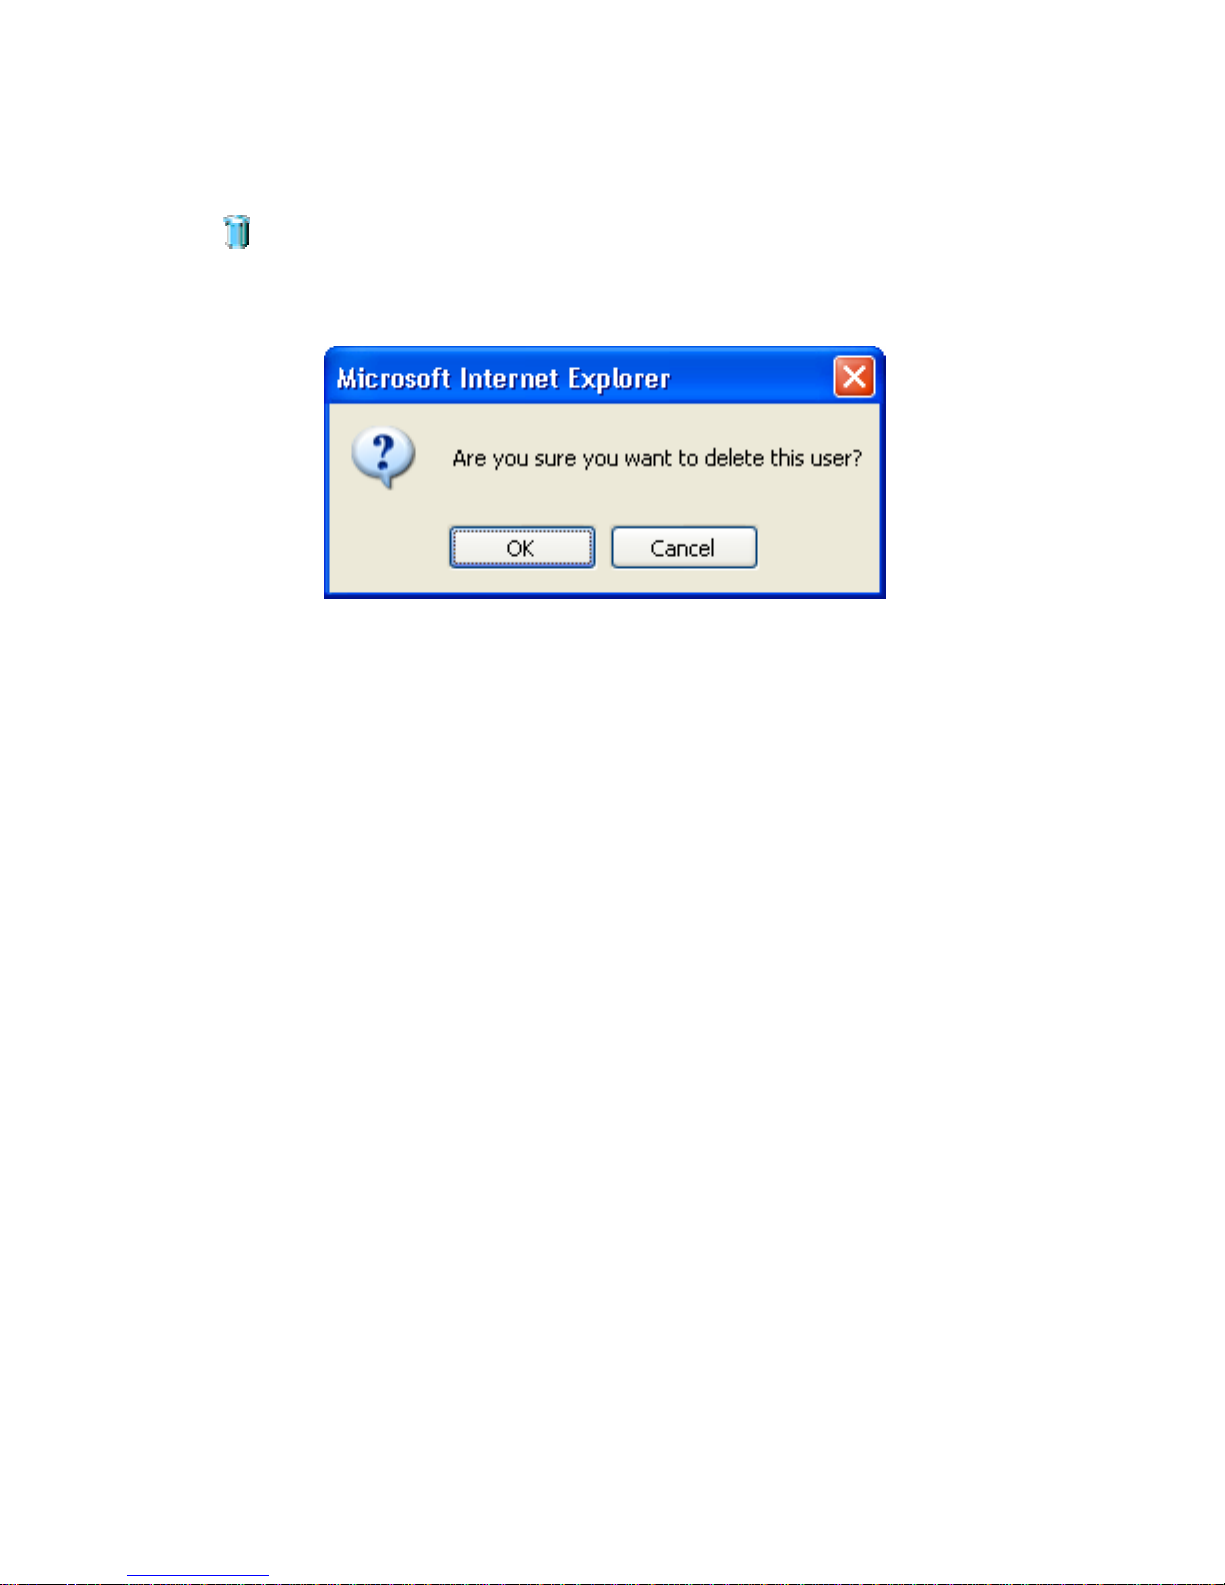
Deleting a user
Click the graphic after the user you want to delete and click OK after the confirm
dialogue pops up.
Group Management
You can create up to four user groups. The group name is case sensitive and should
be 1 to 15 characters. The group description can be any displayable characters (0 to
64 Unicode characters).
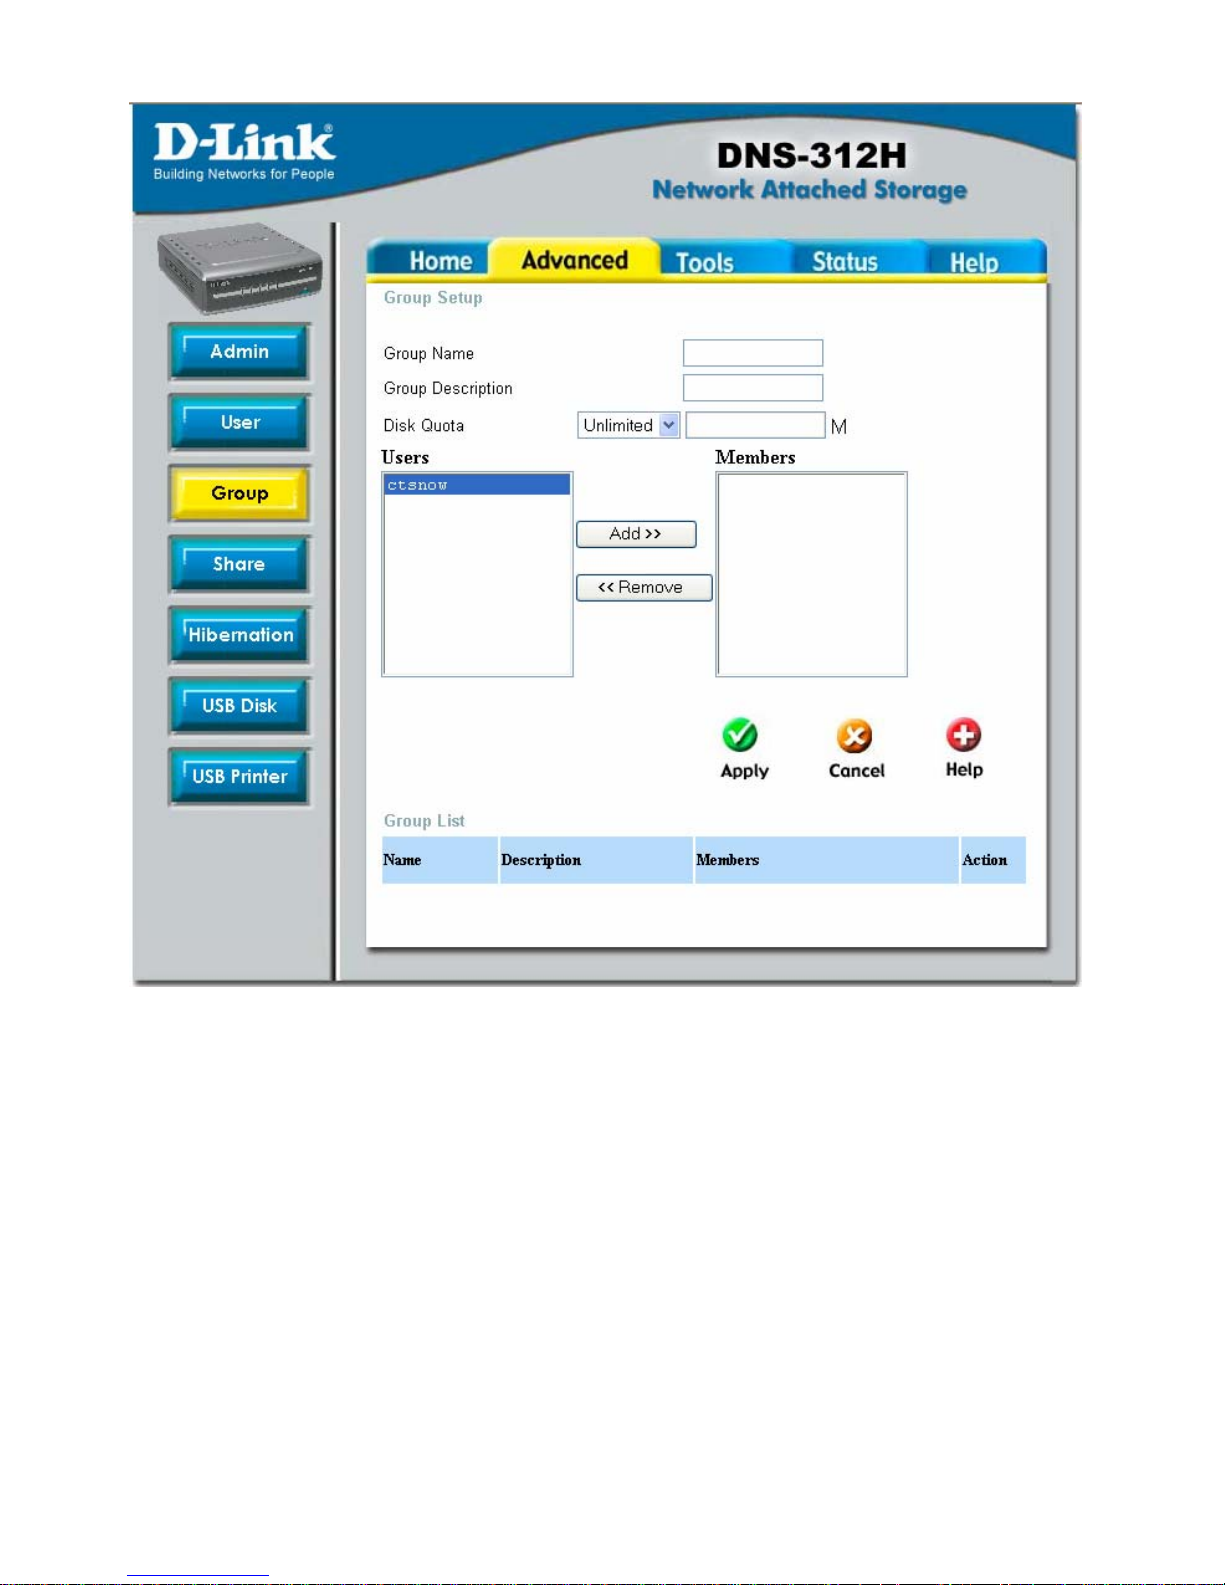
Creating a new group
1. Enter the group name and description.
2. Choose the members that you plan to add to this group from the
Users list on the left side of the window.
3. Click the Add>> button.
4. Click Apply.
Page 31
31
Note:
If the group details are not empty when you try to create a new group, click
the Cancel button to clear the data before proceeding.
Page 32
32
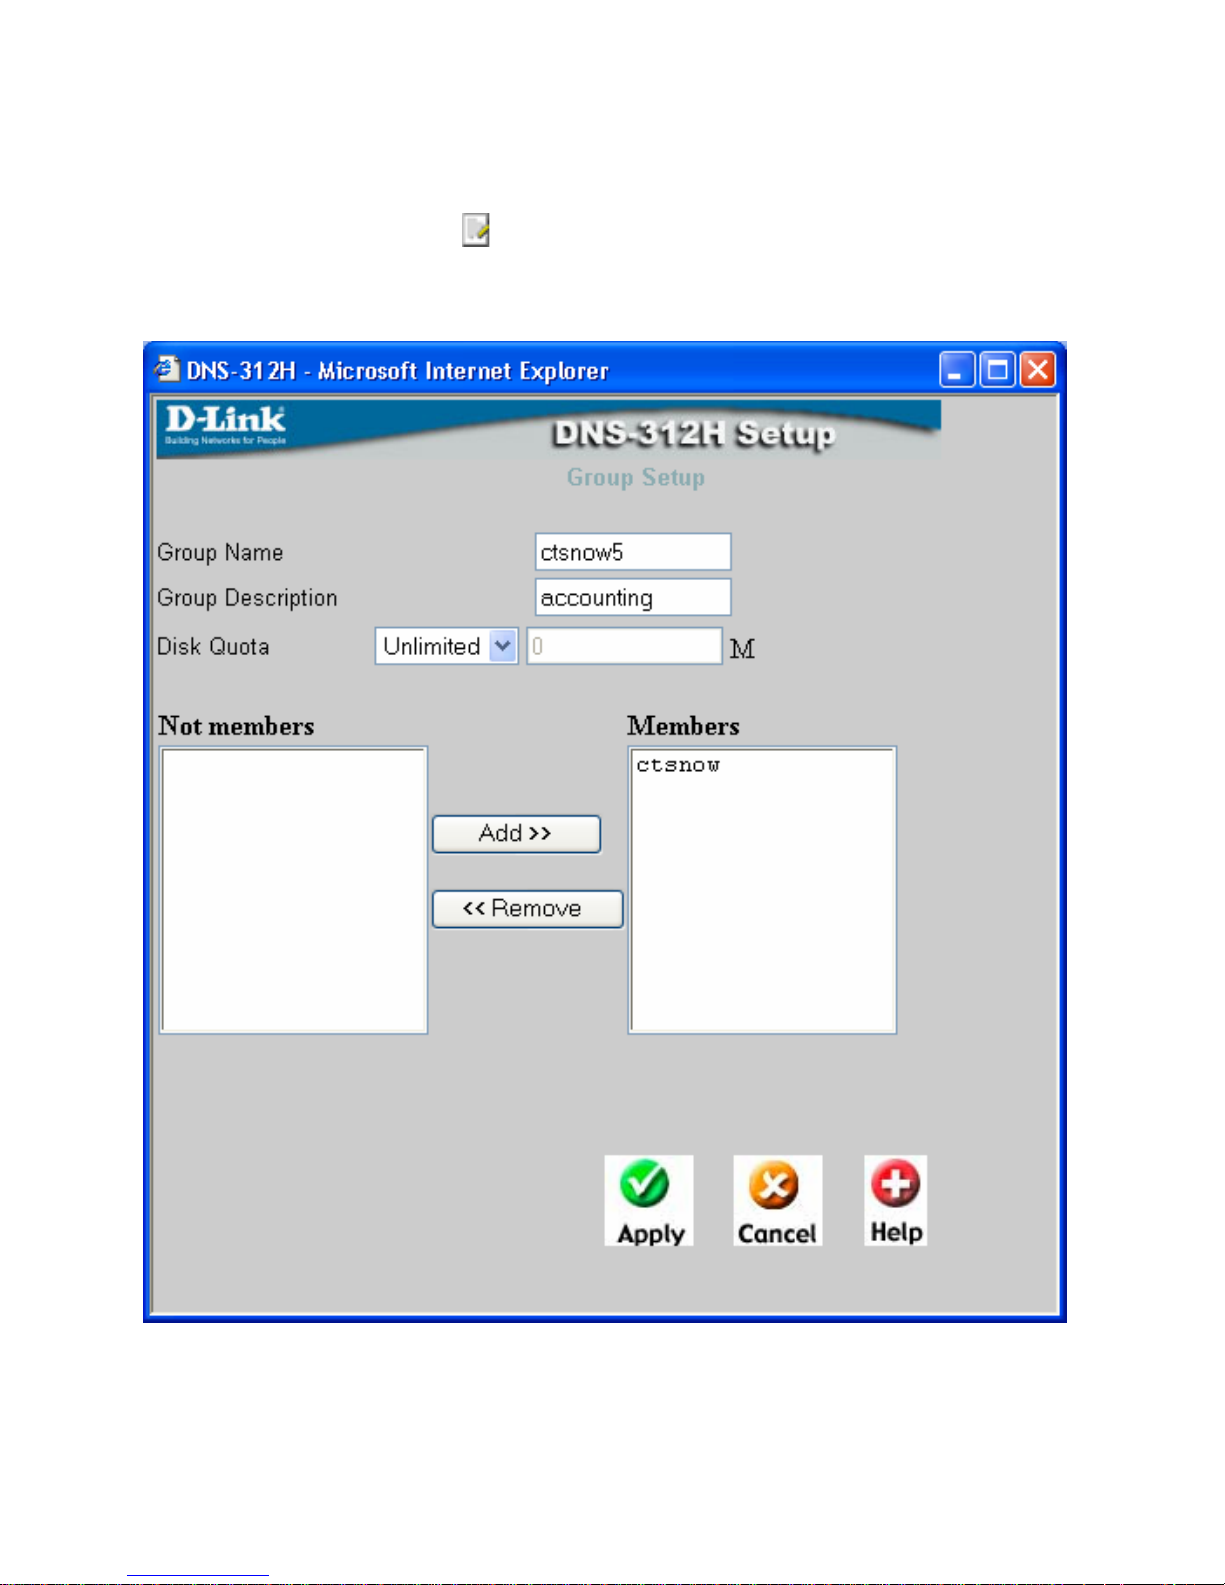
Editing group information
1. Click the graphic after the user you want to edit to load the
group details. The following window will open:
2.
Edit the group details in the Group Setup section.
3.
Click Apply.
Page 33
33
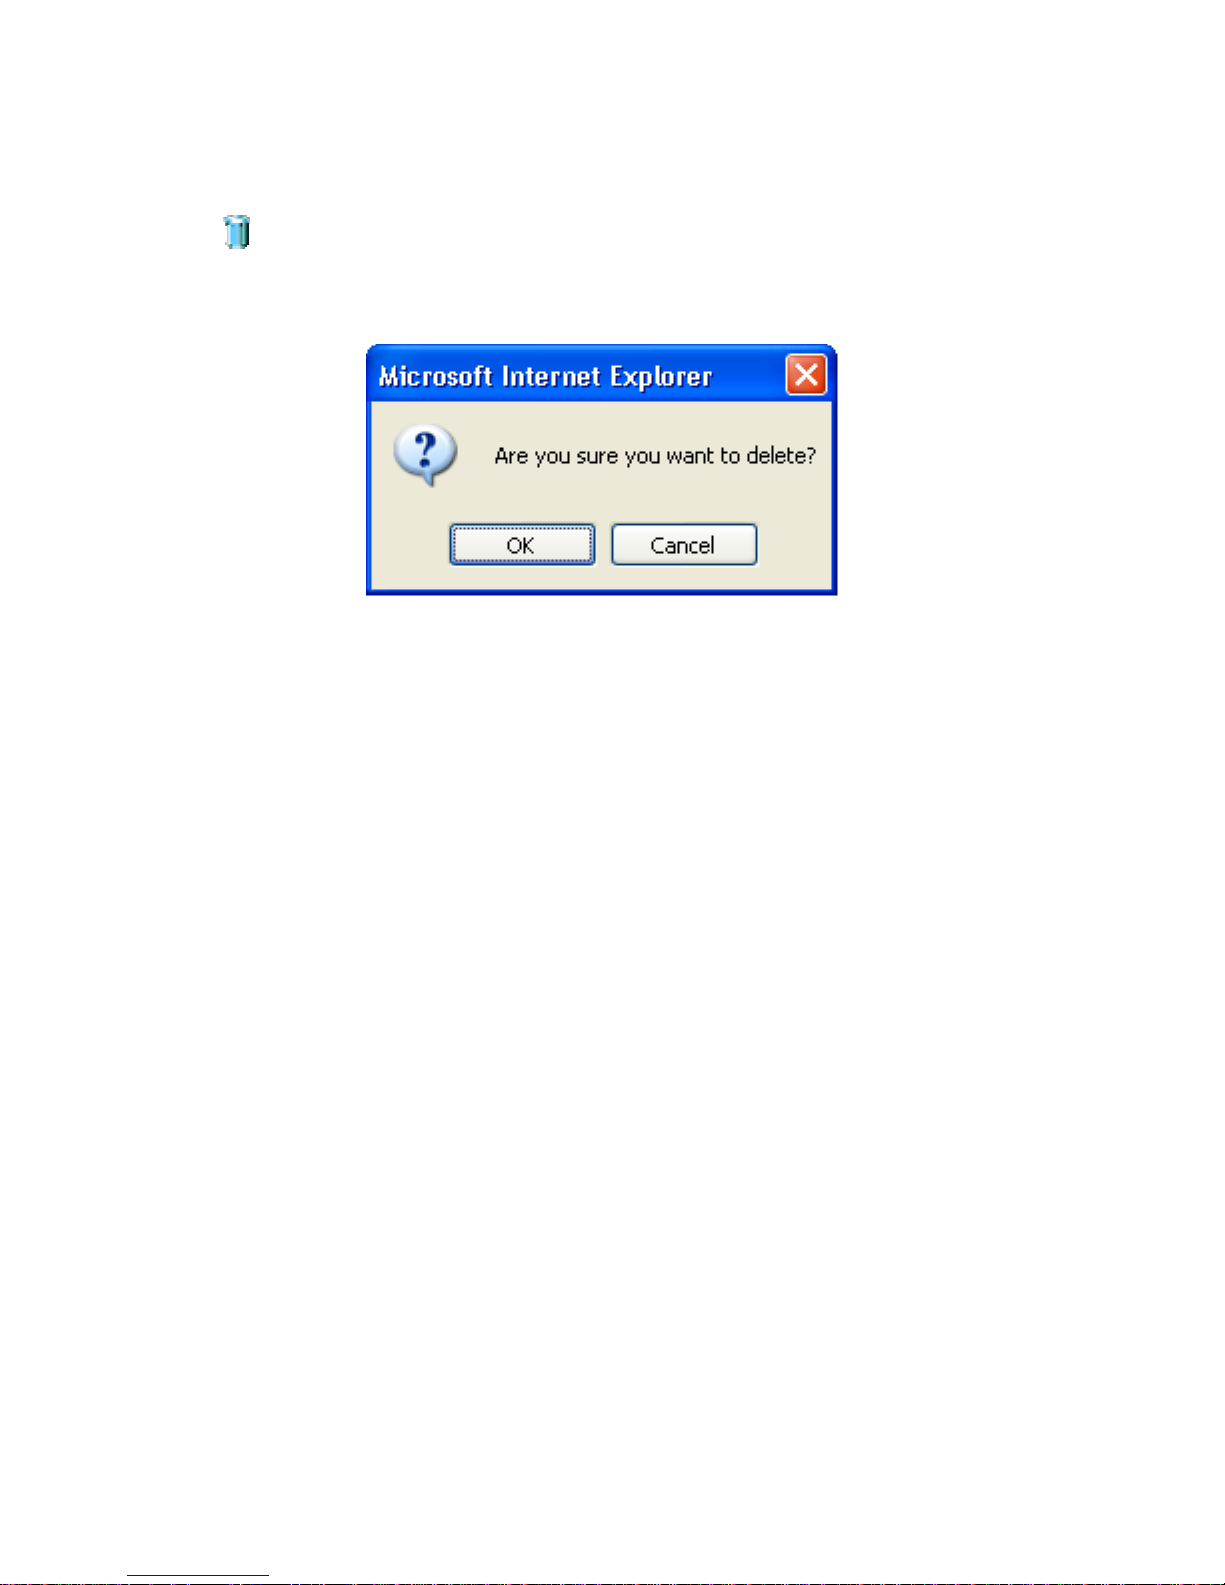
Deleting a group
Click the graphic after the group you want to delete and click OK after the confirm
dialogue pops up.
Share Management
A Share is a logical unit you can open access to the user accounts with appropriate
privileges. You can create up to 16 shares, in addition to the system default share
and the USB disk share. The share name is case sensitive and should be 1 to 31
characters. The share description is case sensitive and should be 0 to 64 characters
Page 34
34
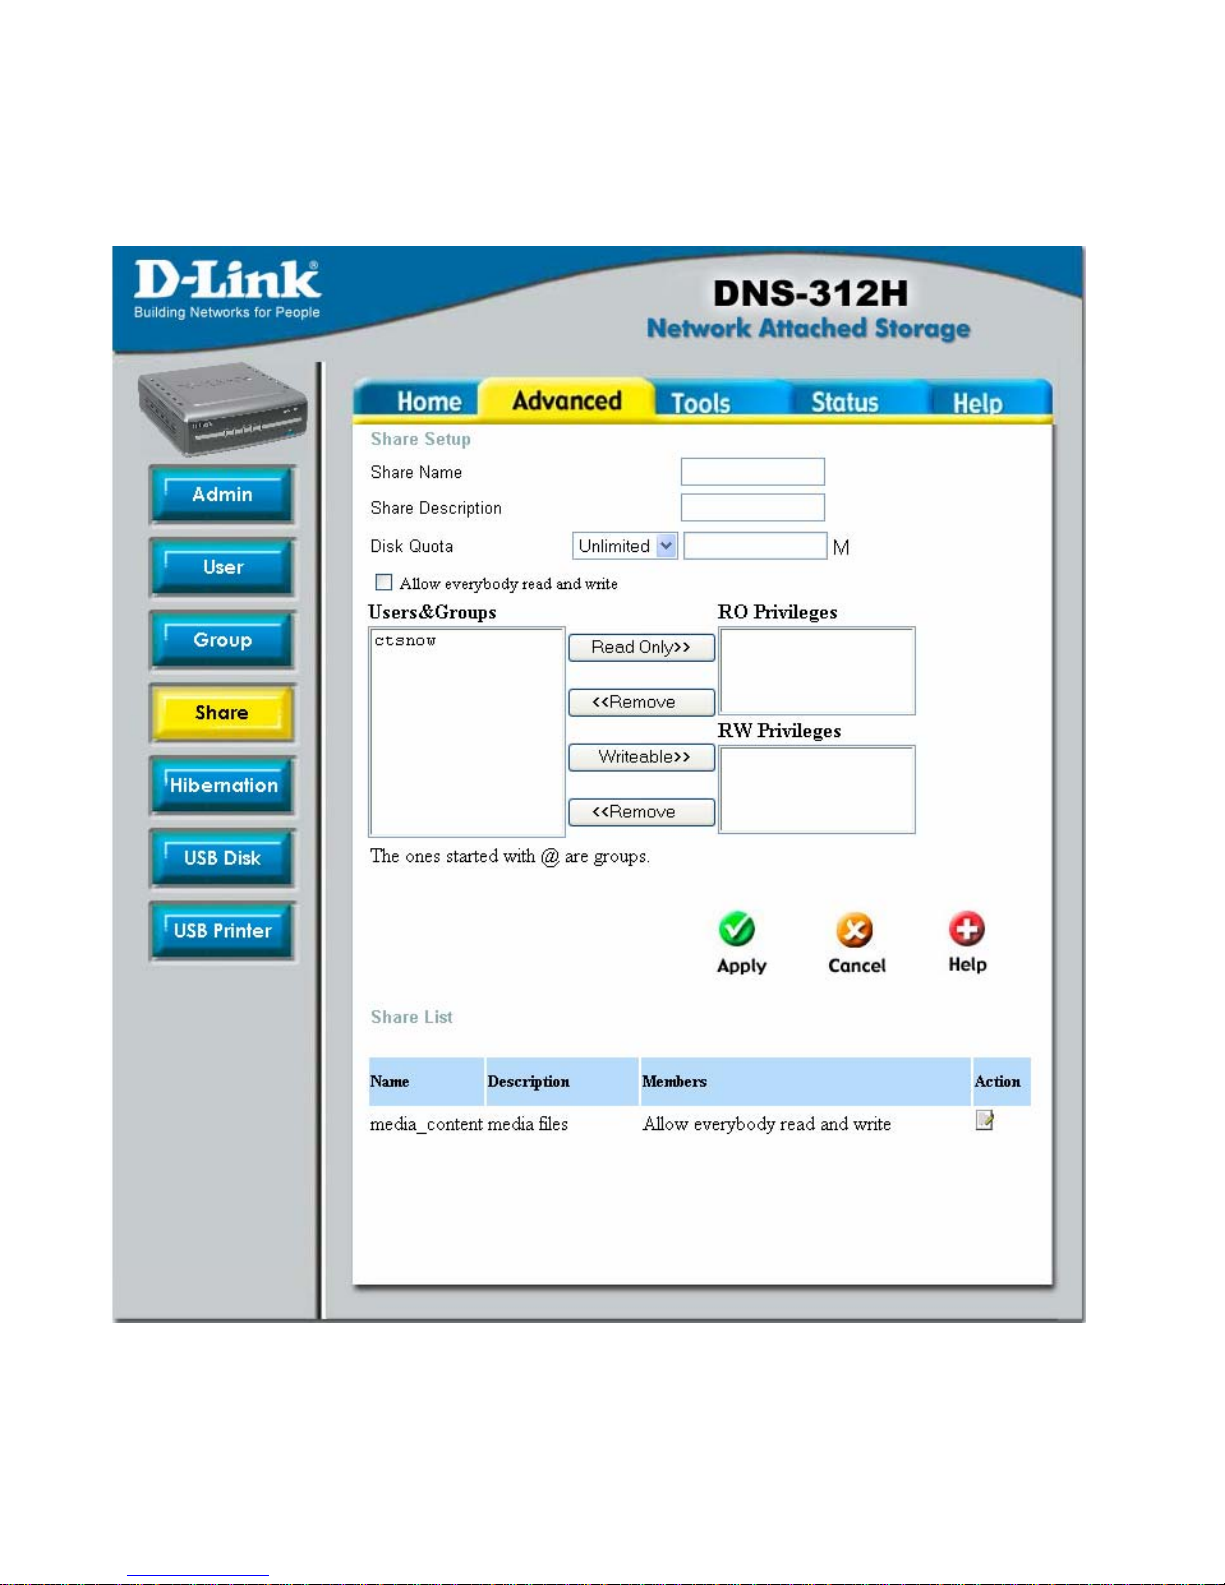
Creating a new share
1. Enter the Share Name and Share Description.
2. Enter the desired Disk Quota.
Page 35

35
3. Choose the user or group from the Users & Groups list.
4. Choose the access privileges you want to apply to the selected
user or group.
5. Click Apply to finish.
Note: Items that start with “@” are groups.
Note:
There are two different types of privileges that can be set:
Read Only (RO) – Except the “Read” privilege, no
other access privilege will be granted for this option.
Writeable (RW) – All access privileges will be granted
for this option.
Page 36
36
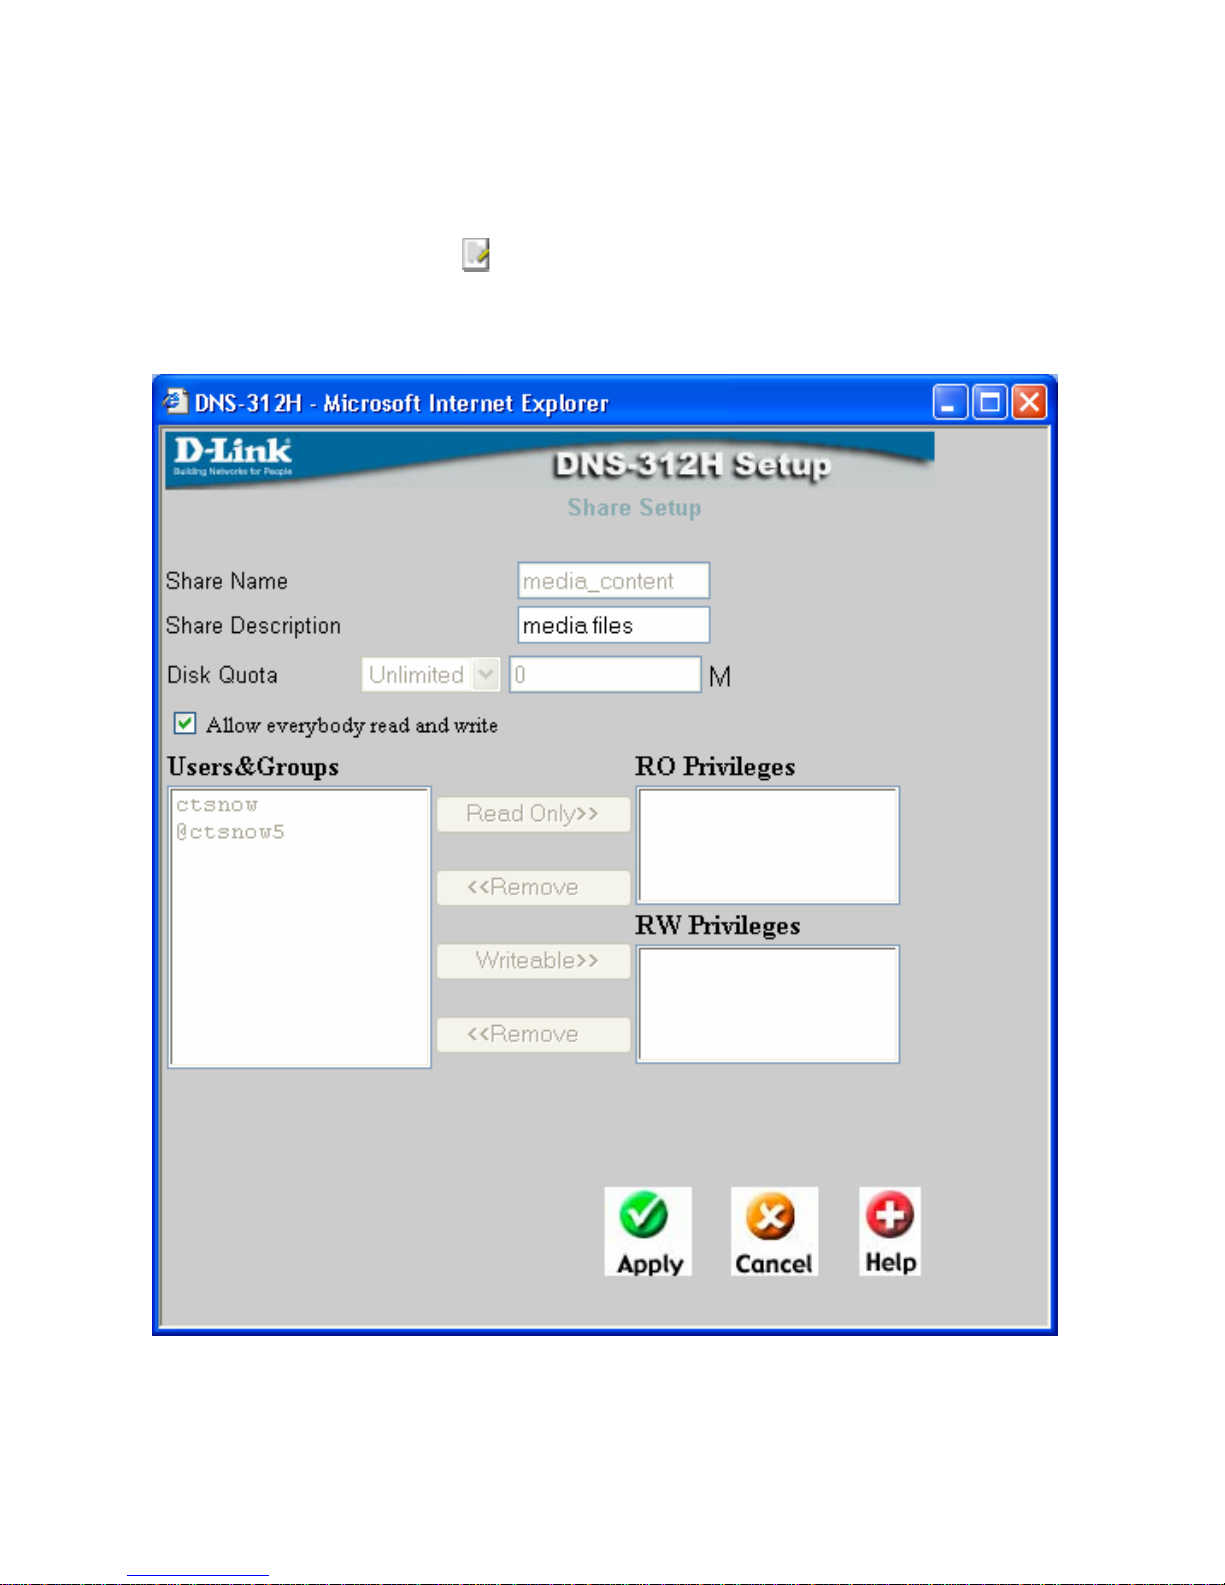
Editing share information
1. Click the graphic after the share you want to edit to load the
share details.
2.
Edit the share details below the Share Setup section.
3.
Click Apply.
Page 37
37
Deleting a share
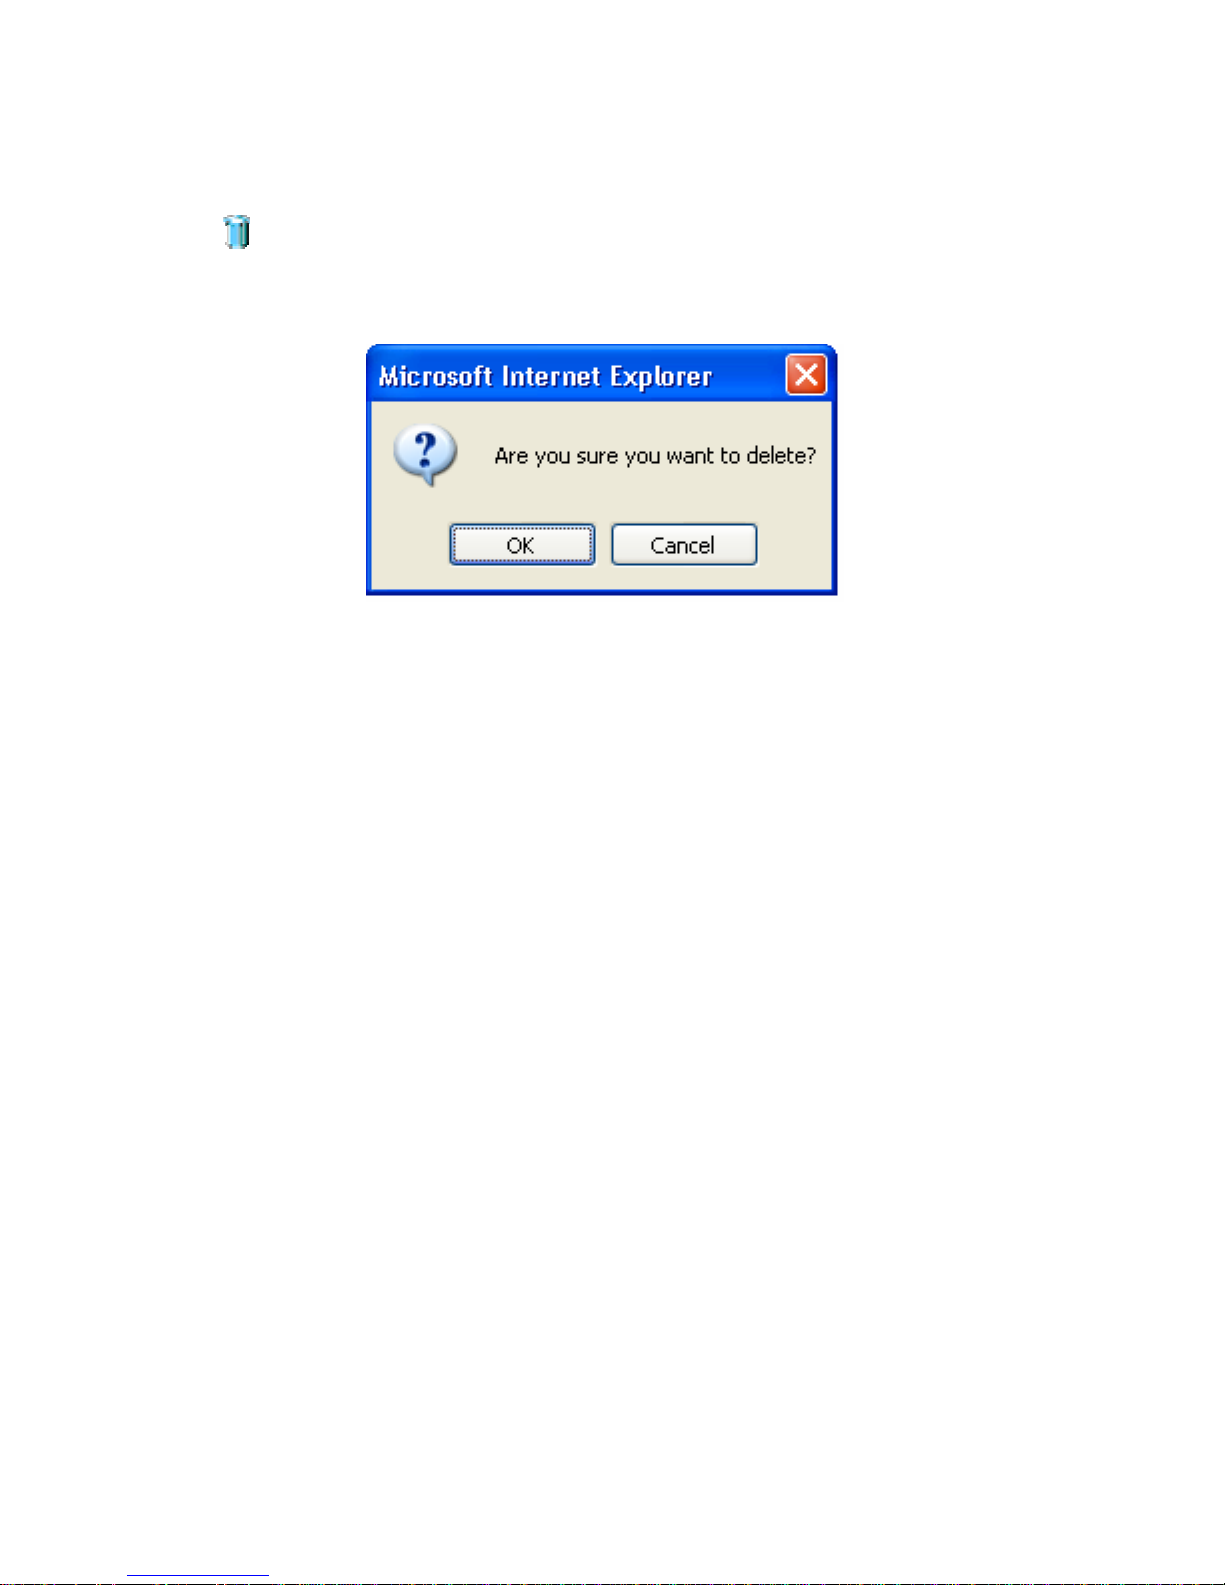
Click the graphic after the share you want to delete and click OK after the confirm
dialogue pops up.
Page 38
38
Hard Drive Hibernation
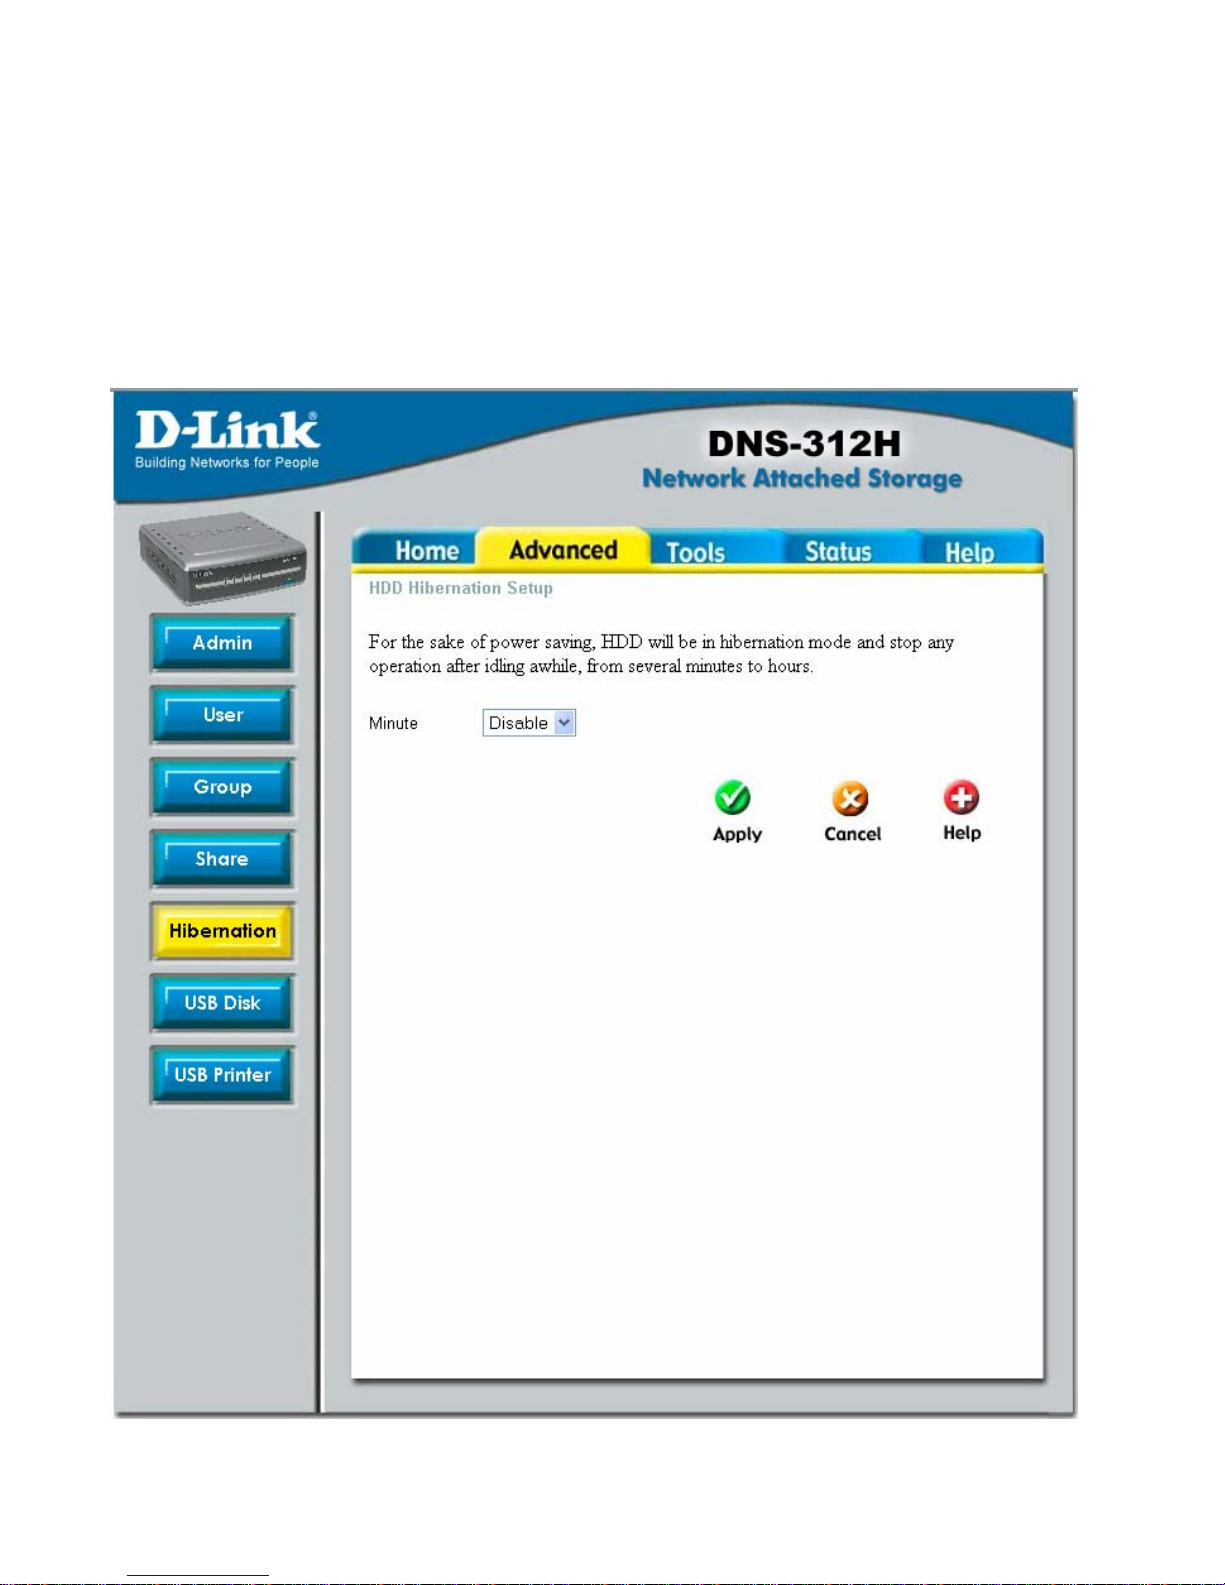
To save power, the HDD will be in hibernation mode and stop any operation after the
specified idle time. To set an idle time, choose the idle time from the drop-down
menu and then click Apply to finish the setting.
Page 39
39
USB Disk
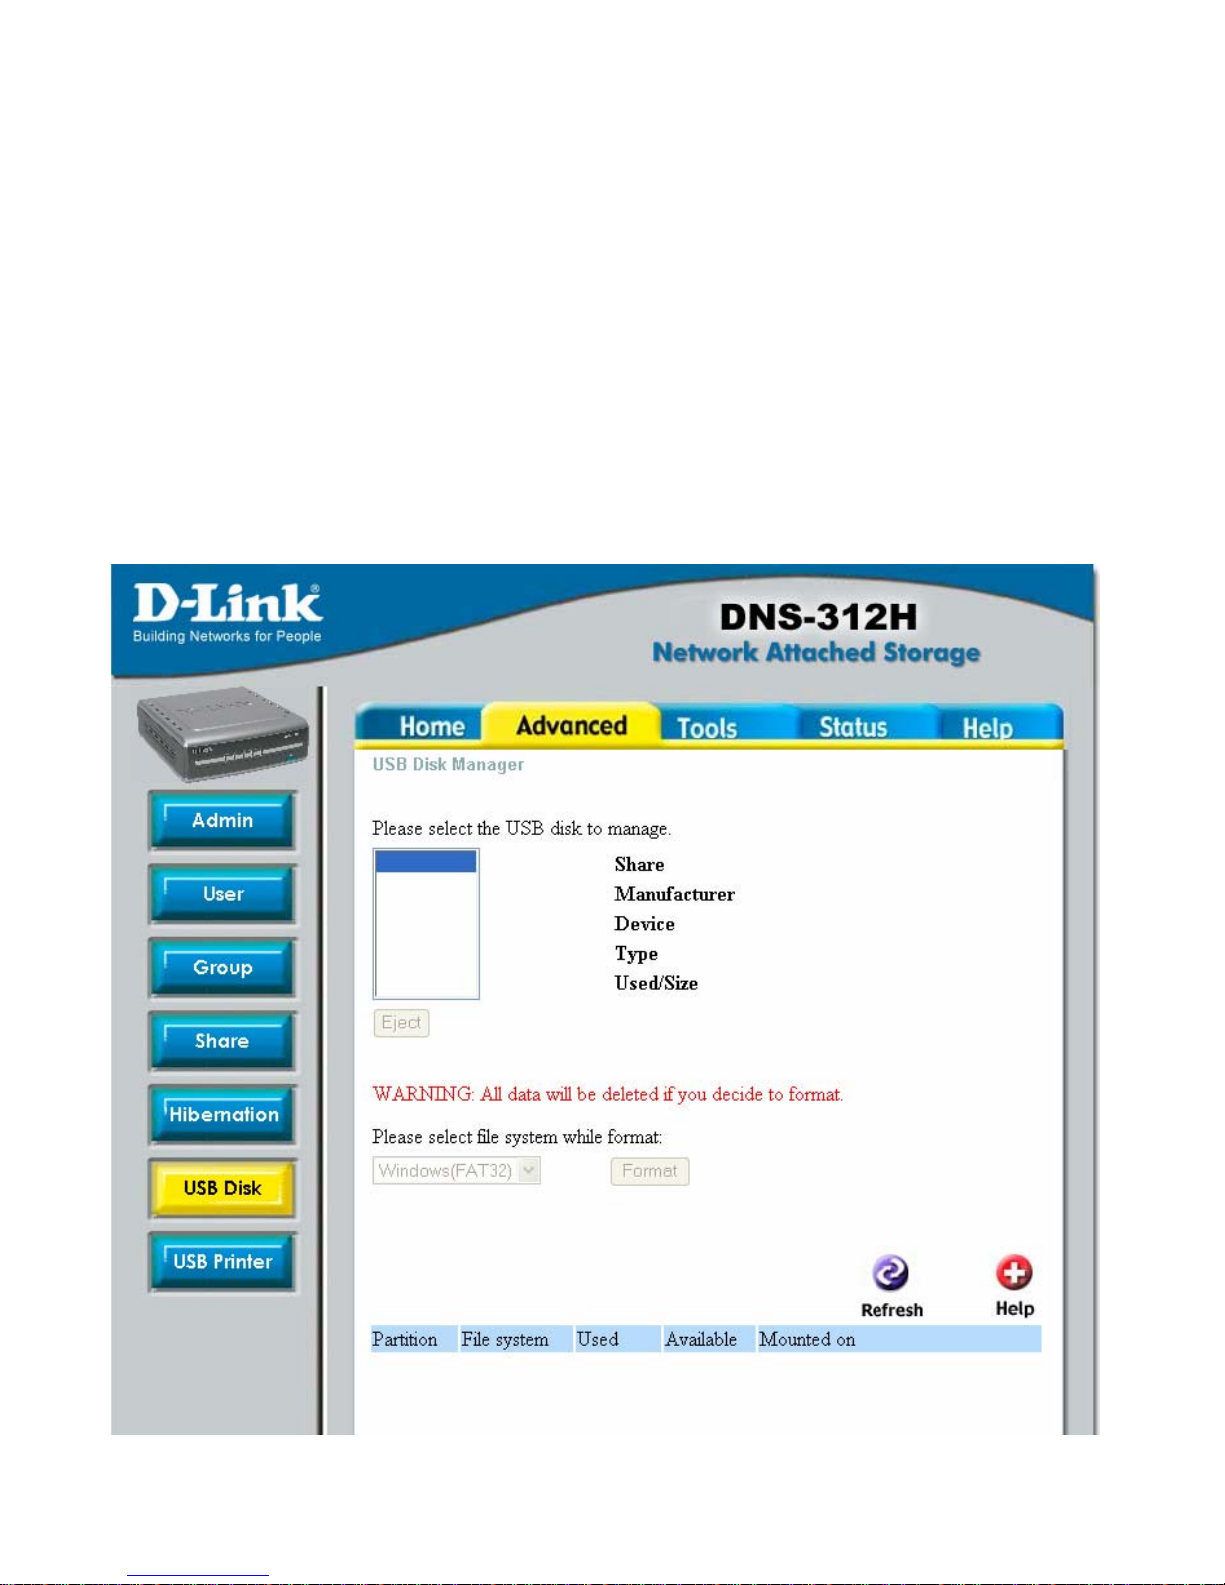
By connecting a USB disk to the system, you will be able to share the USB disk capacity
through a system created share prefixed with "usbshare". The share will be removed
automatically when the USB disk is ejected from the system.
1. The USB Disk will be automatically detected and then its
relevant info (Share name, Manufacturer, Device, Type, and
Used/Size) will be shown.
Page 40

40
2. If the capacity of the USB Disk is less than 1GB, then the
DNS-312H does not provide the function to format this USB
disk.
3. If you want to remove the USB device, please click the Eject
button in the top half of the window before removing the device
from the disk station.
USB Printer
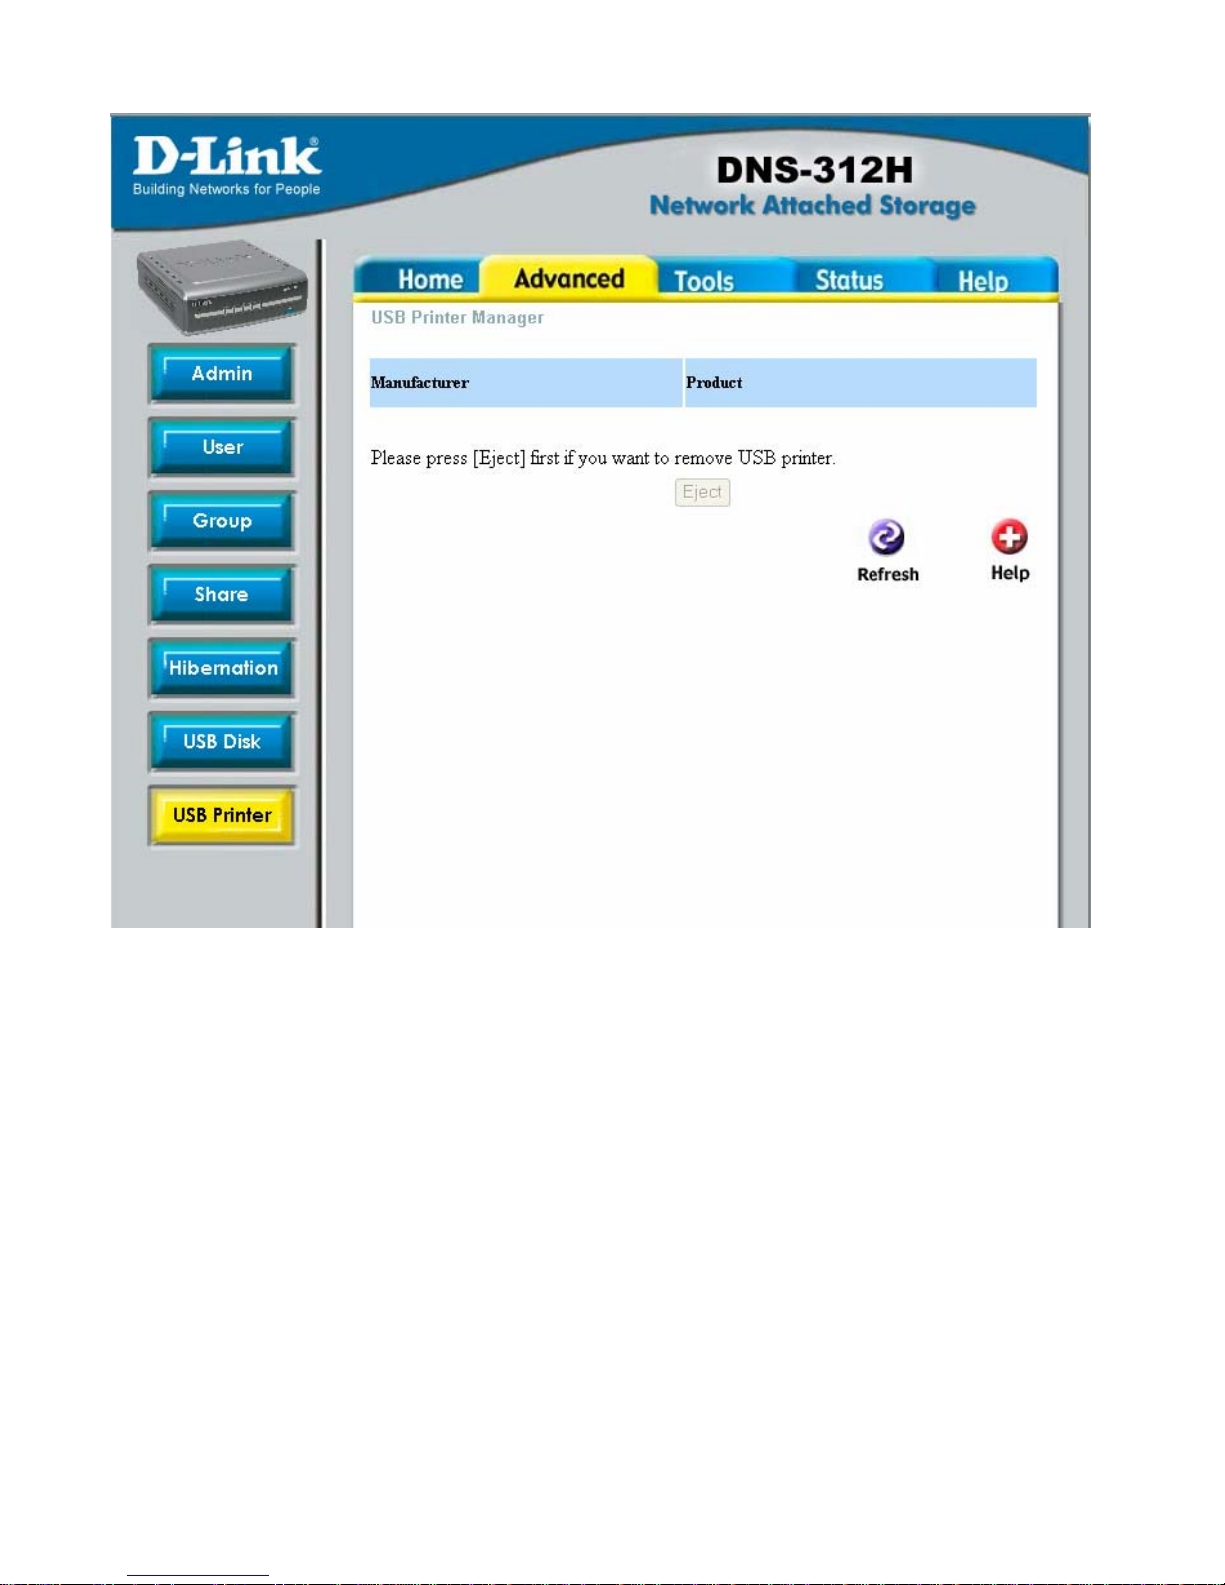
By connecting the USB printer to DNS-312H, you would be able to share the USB printer
through the network and USB printer status will become active in this page.
Refresh the USB printer's status
Click Refresh to update the printer status.
Eject the USB printer
We suggest clicking the Eject button before you remove the printer.
Steps for configuring USB printer in Windows
Warning!!
All data on your disk will be deleted by formatting. It
cannot be restored, so please take care before
formatting.
Page 41

41
1. Open My Network Places and connect to the DNS-312H.
2. Double-click usblp and the system will prompt you to install a correct driver.
3. Click Finish to start using the printer.
Steps for setting up USB printer in Mac OS X running AppleTalk
1. Follow the Go > Applications > Utilities path to find the Printer Setup Utility.
2. Click to open a dialog box.
3. Select Add for setting up a new printer.
4. Select the correct hostname object and choose the type AppleTalk.
5. Select proper printer model or Generic.
6. Click Add to finish.
Steps for setting up USB printer in Mac OS X running TCP/IP
1. Follow the Go >Applications > Utilities path to find the Printer Setup Utility.
2. Click to open a dialog box.
3. Select Add for setting up a new printer.
4. Enter the printer IP Address and Queue Name and choose the type IP printing.
5. Select proper printer model or Generic.
6. Click Add to finish.
Tips for Mac OS 9 setup
1. Click on Chooser.
2. Under LaserWriter8, click the hostname object.
3. Click Setup and choose a proper PostScript Printer Description (PPD) file or
Generic.
4. Finish.
Page 42
42
Page 43
43
Time Setup
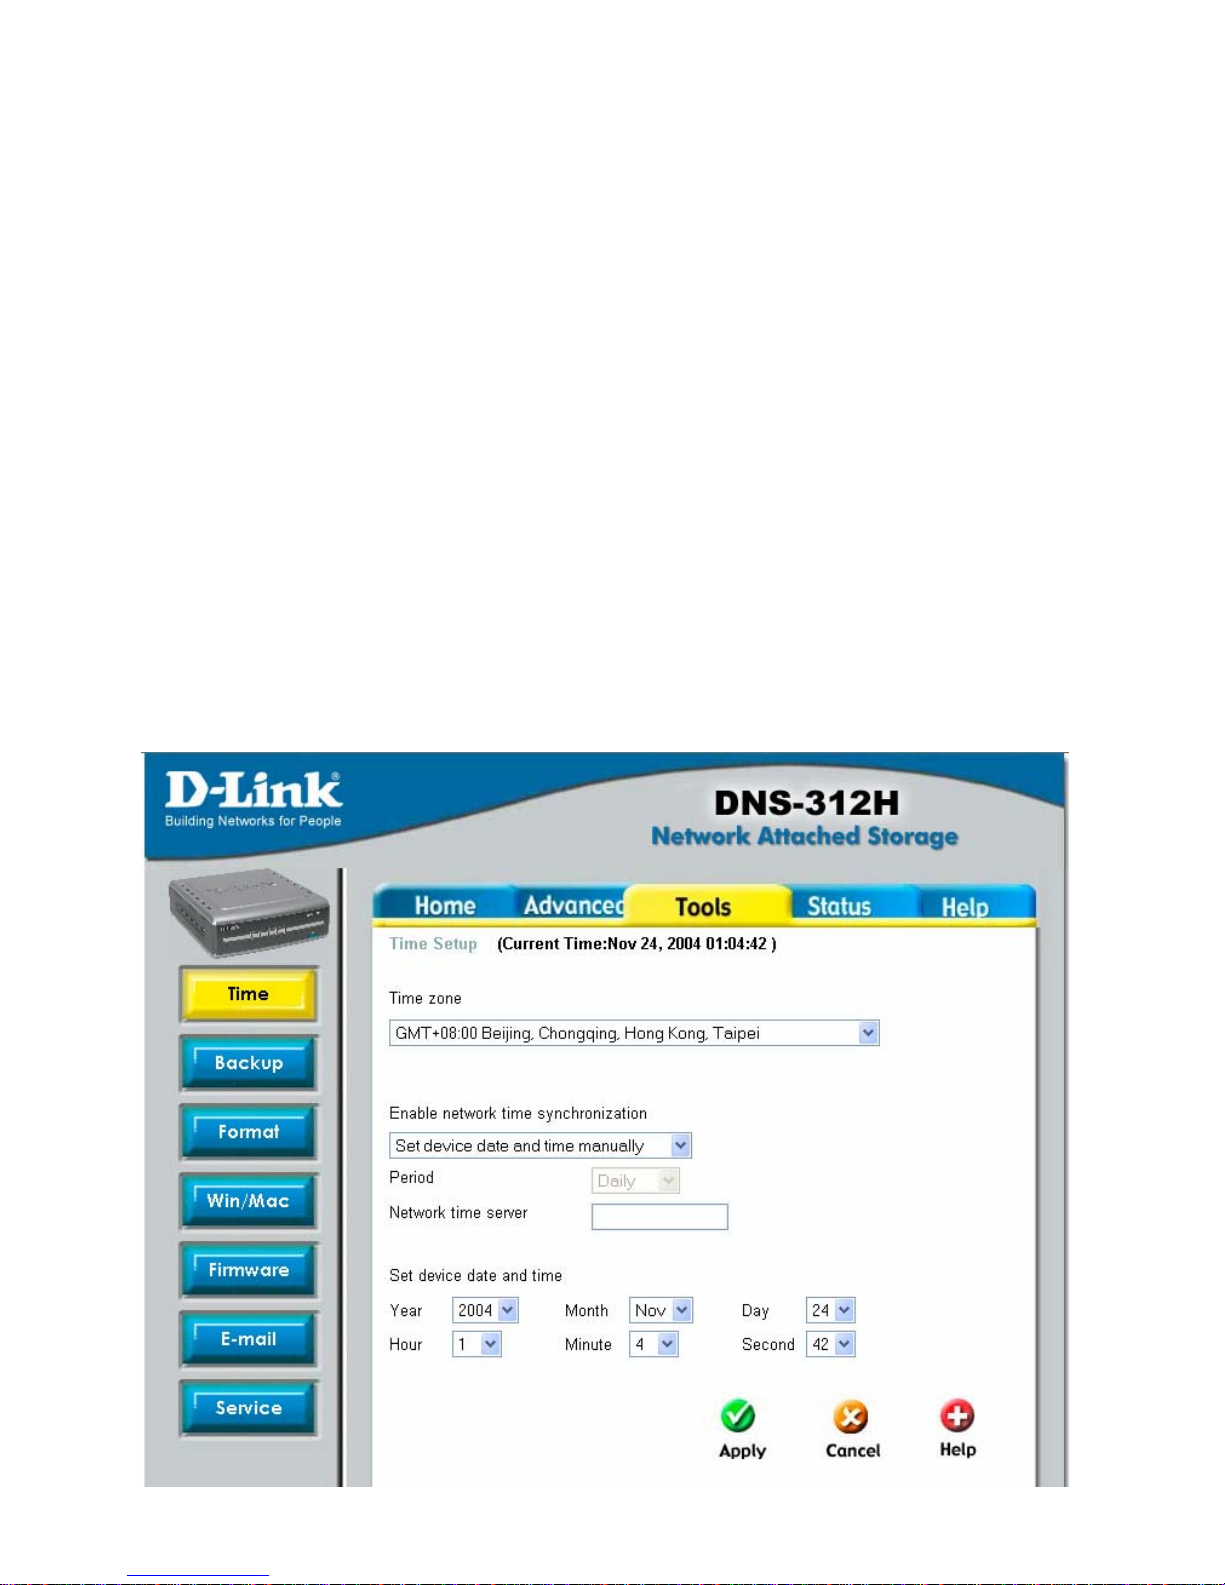
Set the time manually
1. Choose the correct time zone.
2. Choose the “Set device date and time manually” option from the
drop-down menu.
3. Click Apply.
Tools
Page 44
44
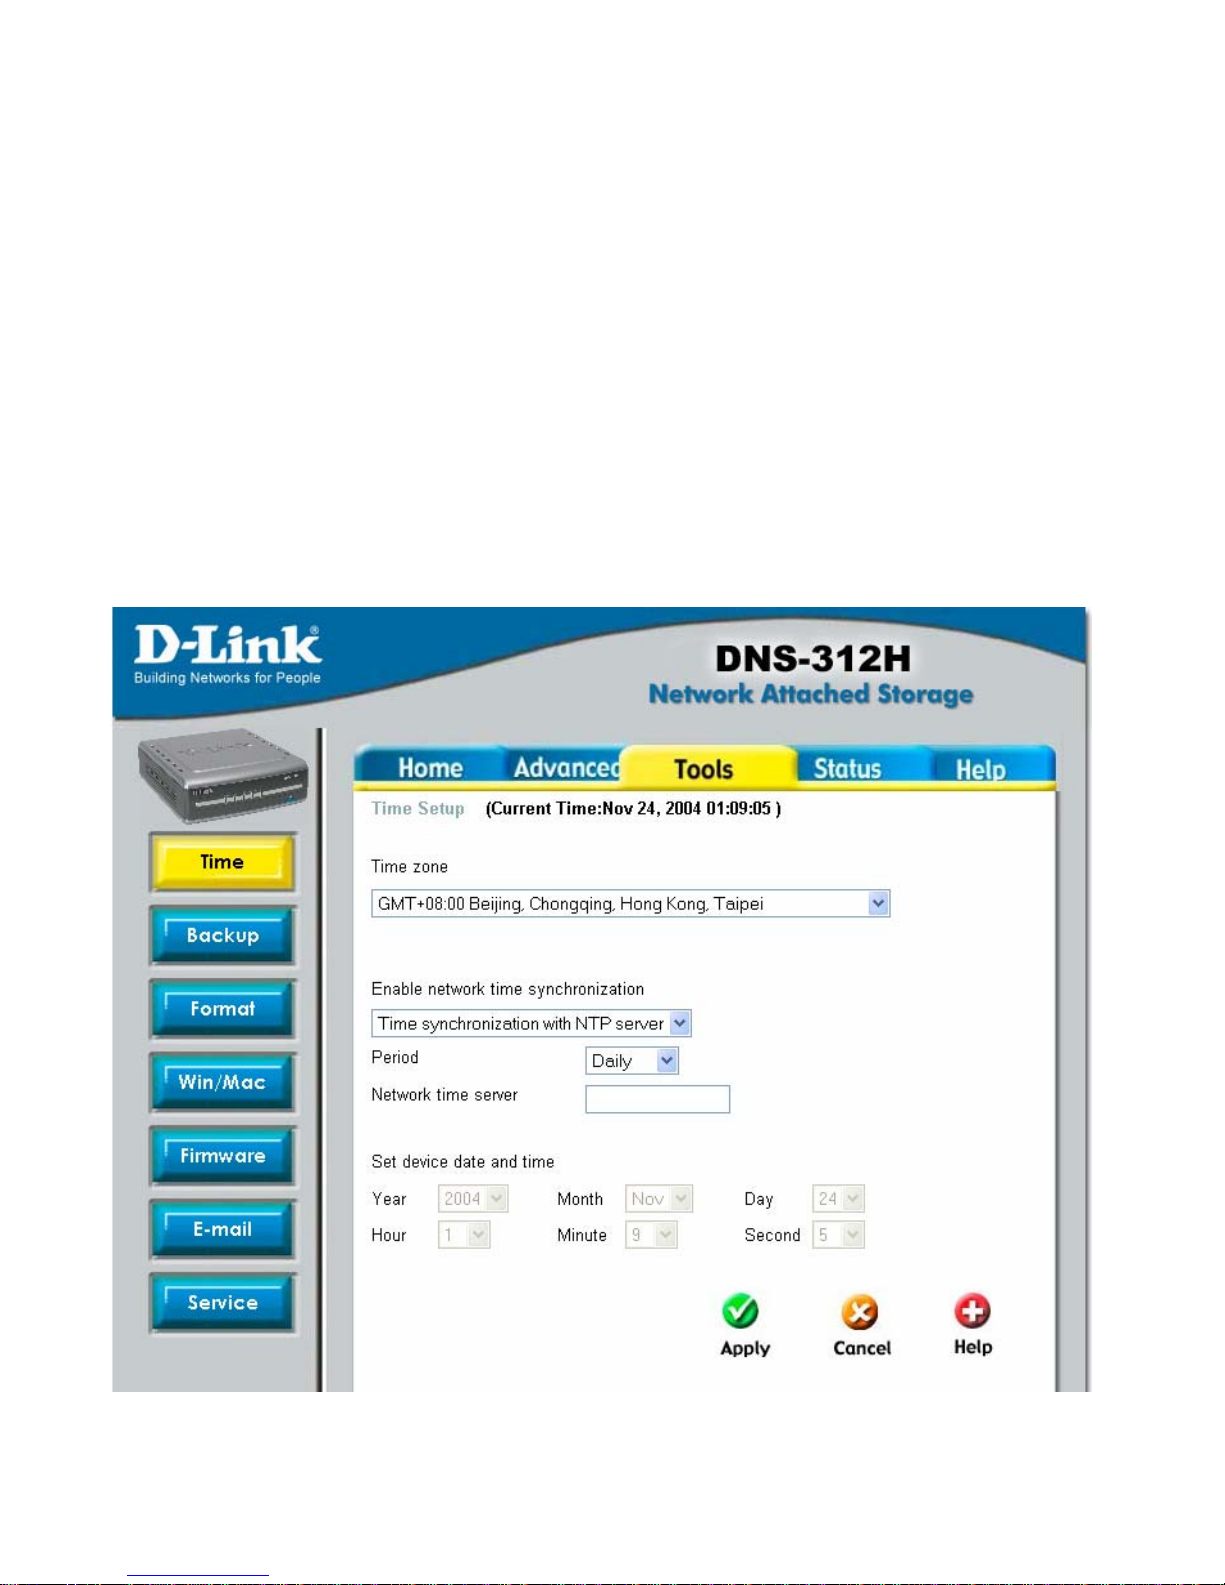
Connecting to an NTP server
1. Choose the correct time zone.
2. Choose the “Time synchronization with NTP server” option from
the drop-down menu.
3. Choose the desired synchronization period and enter the time
server IP address.
4. Click Apply.
Page 45
45
Backup Configurations
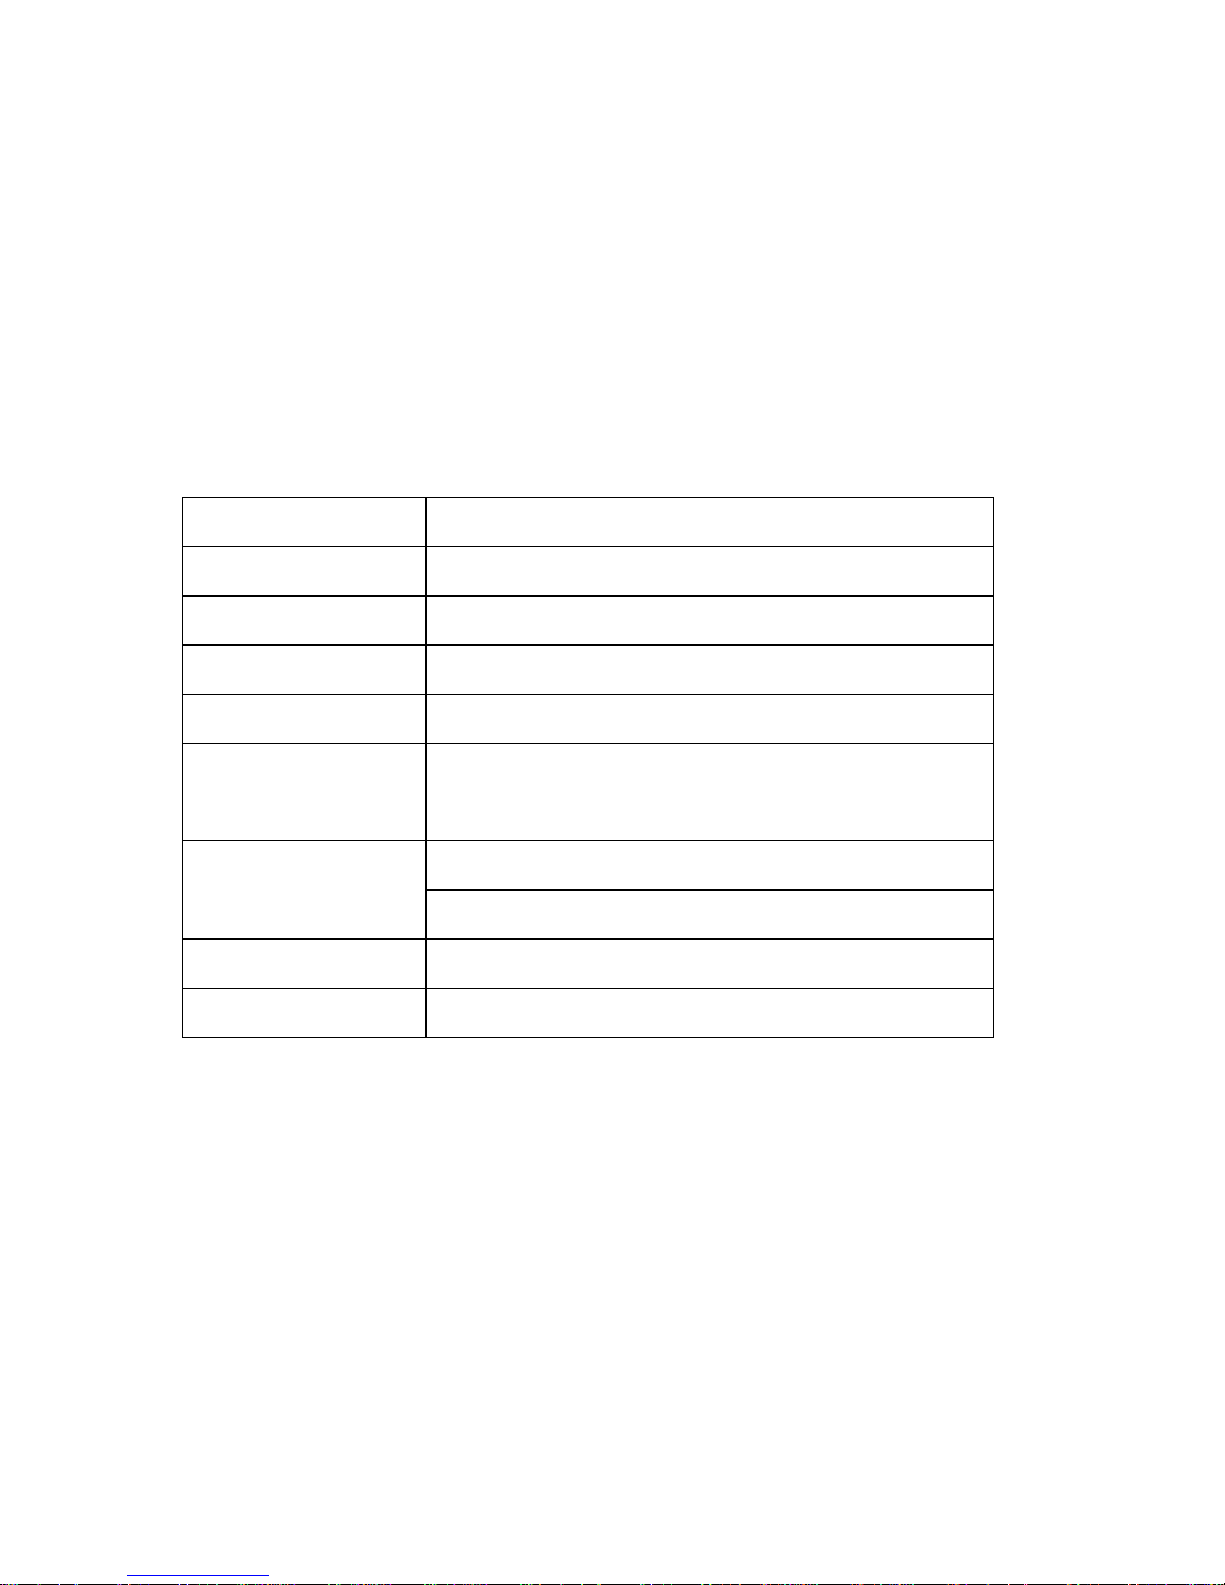
You can backup the device configurations for future restoration.
Items that will be restored are listed below:
Time Time zone; NTP settings
Host name Server name
Language Encoding codepage
Mail SMTP; E-mail settings
Share Each share information except USB share
User Each user’s information except the
password of Admin
Apple: Apple Zone
Group
Windows: Work Group, Windows Server
HD Sleep Idle time
FTP
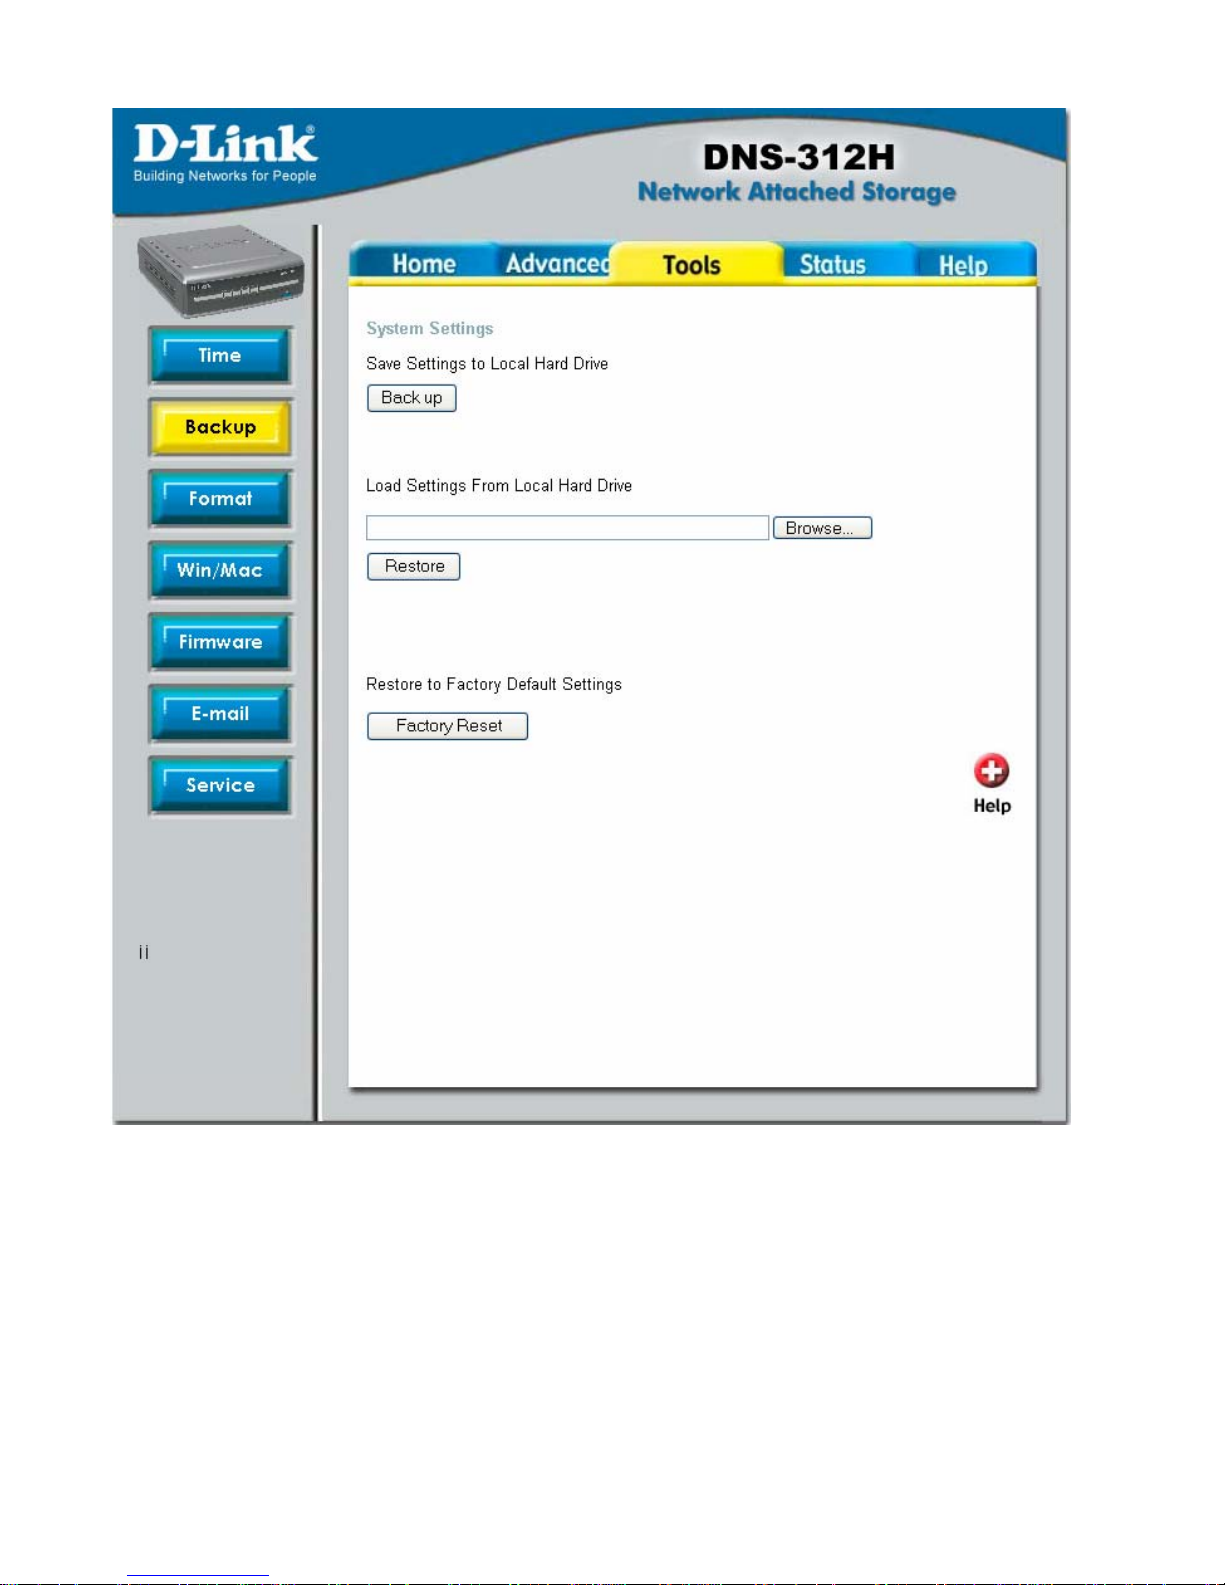
Backup system settings
1. Click Back up under Save Settings to Local Hard Drive.
Page 46
46
2. Click Save on the prompt dialogue.
3. Choose the location to save the backup file and click Save to
finish.
Page 47

47
Restore system settings
1. Enter the location of the system settings to restore under Load
Settings From Local Hard Drive or click Browse and select the
backup file.
2. Click Restore.
3. Follow the on-screen prompts including checking the “Overwrite
on setting conflict” option if you don’t want the conflict setting to
be skipped.
4. Click Apply to finish.
Restore factory default settings
Click Factory Reset under Restore to Factory Default Settings to cause the
DNS-312H to return to its original settings.
Warning!!
When this action is completed, all data on your hard drive will be deleted and
will not be able to be restored.
Page 48
48
Format Hard Drive
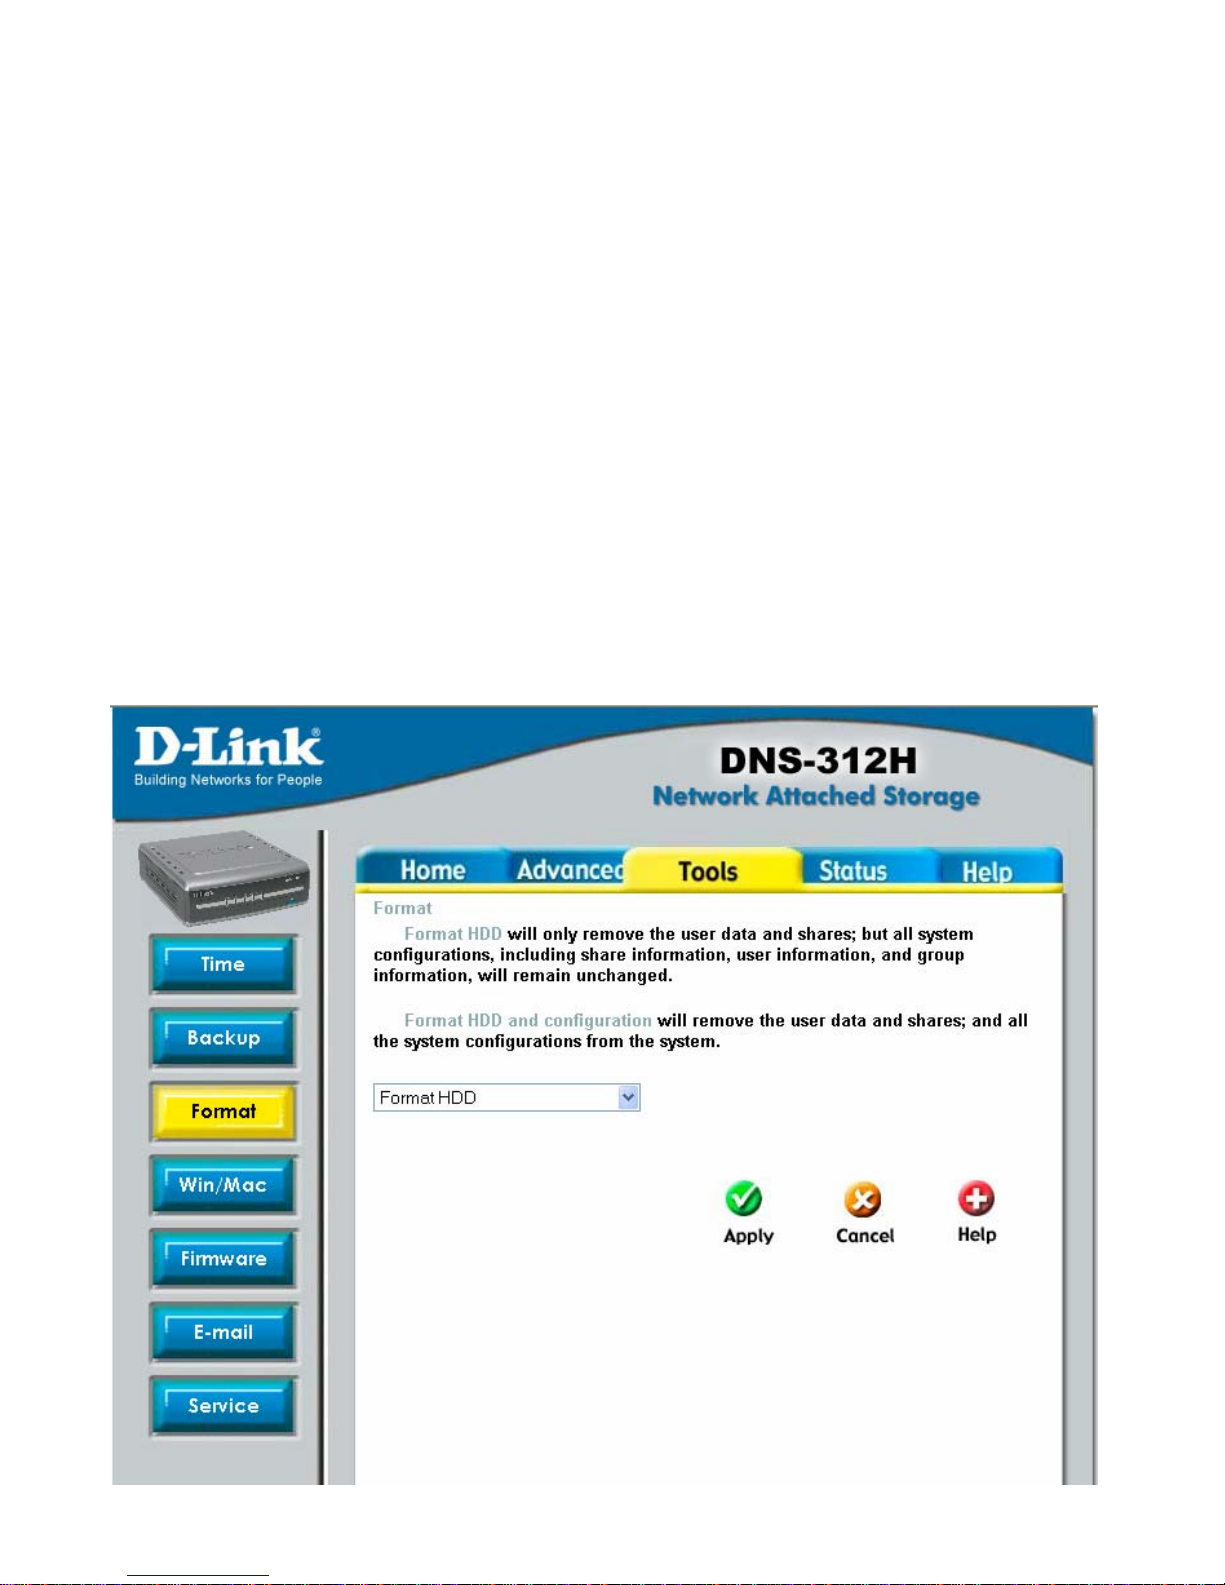
You can remove the data on the system by formatting the hard drive. There are two
options for you to choose from on the drop-down menu:
Format HDD – This option will only remove the user data and shares; but all system
configurations, including share information, user information, and group information,
will remain unchanged.
Format HDD and configuration – This option will remove the user data and all the
system configurations from the system.
Page 49
49
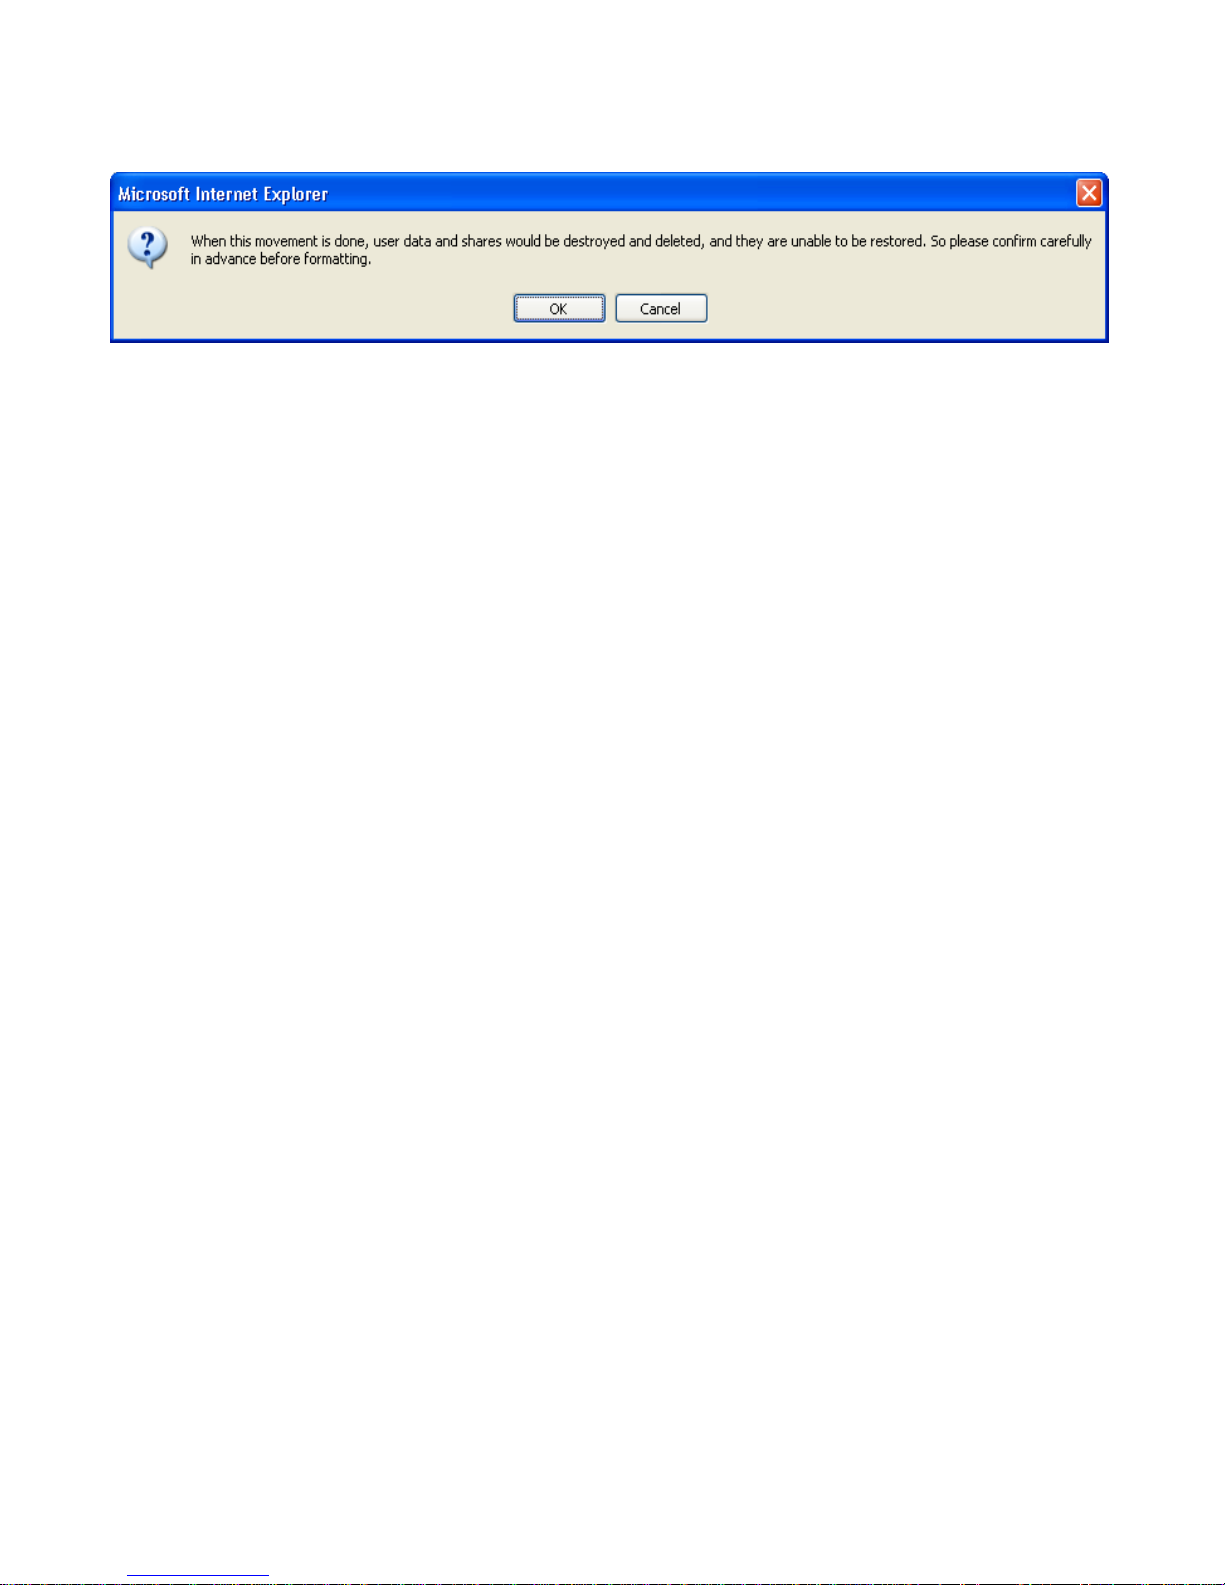
Click Apply to initiate formatting.
Please click OK at the pop-out warning message to continue formatting.
Networking and Encoding
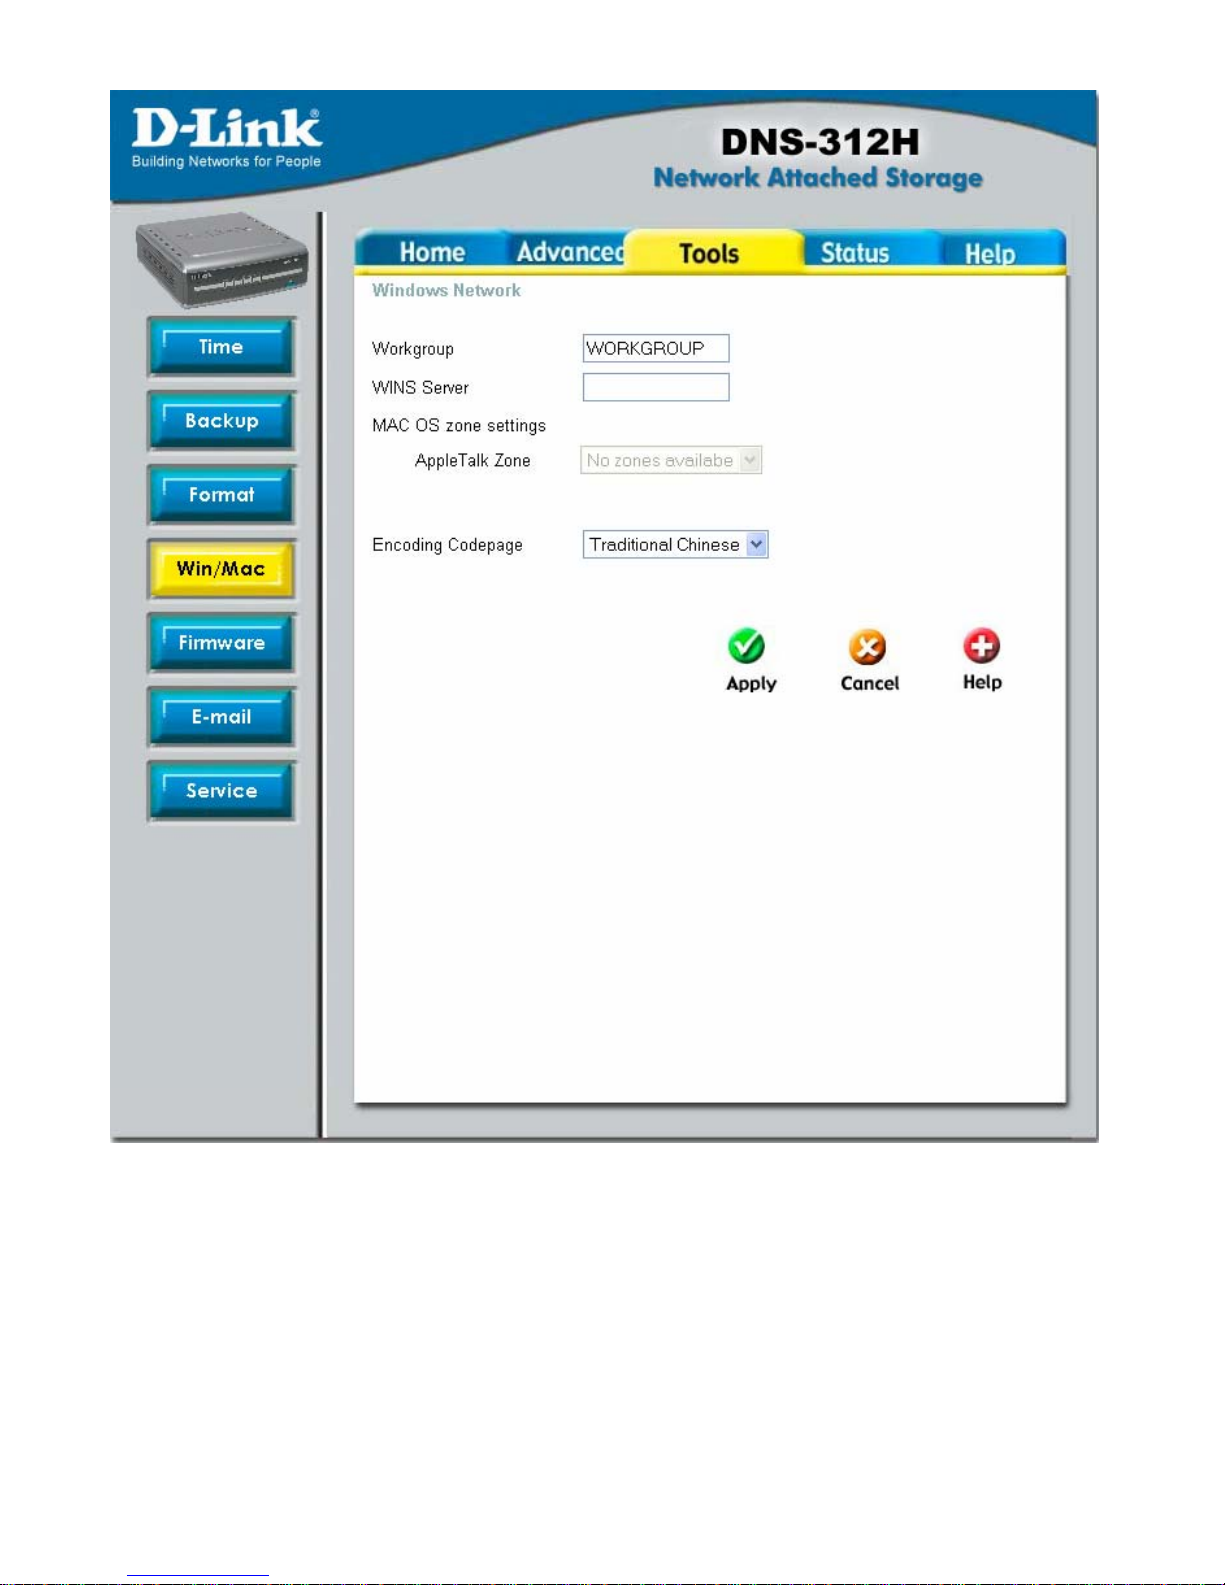
Windows Network
You can determine the Workgroup and WINS server IP here. The Workgroup should
be 1 to 15 characters.
Apple Network
A zone is a logical grouping of devices in an AppleTalk network. Select the zone from
the drop-down menu and click Apply for it to take effect.
Encoding
Choose the appropriate encoding from the Encoding Codepage drop-down menu so
that clients that don’t have Unicode support installed correctly can access the
device.
Page 50

50
Note:
a) If the local language is the only language used in your working
environment, there is no need to change any settings for the encoding code
page and you can just go ahead and load the defaults.
For example: If the local language is English, and all files or folders use
English names, then it is unnecessary to change any settings here, just
follow the defaults.
b) If it is necessary to recognize a second, non-local language, it is
recommended that you select an encoding that recognizes the second
language.
For example: If the local language is English but some files or folders use
Japanese characters, please select “Japanese SJIS (Code Page 932)” in
the Encoding Codepage drop-down menu.
Page 51
51
Page 52
52
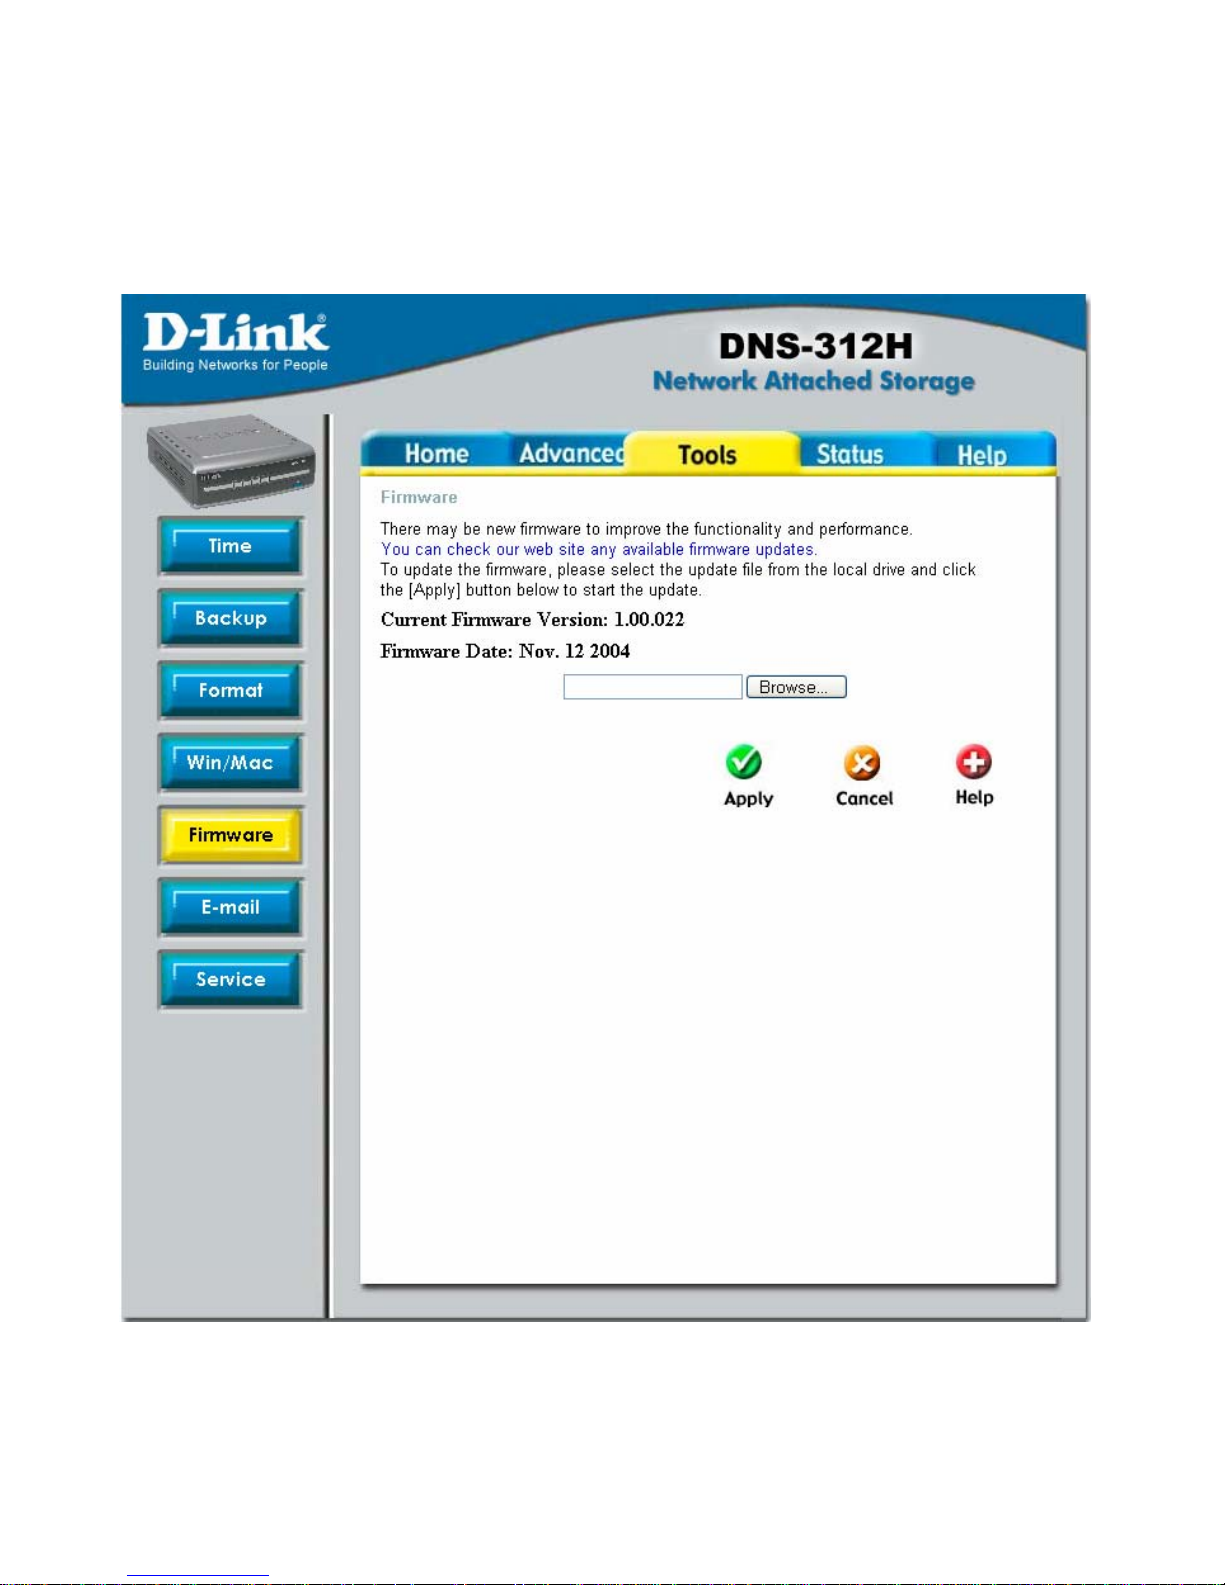
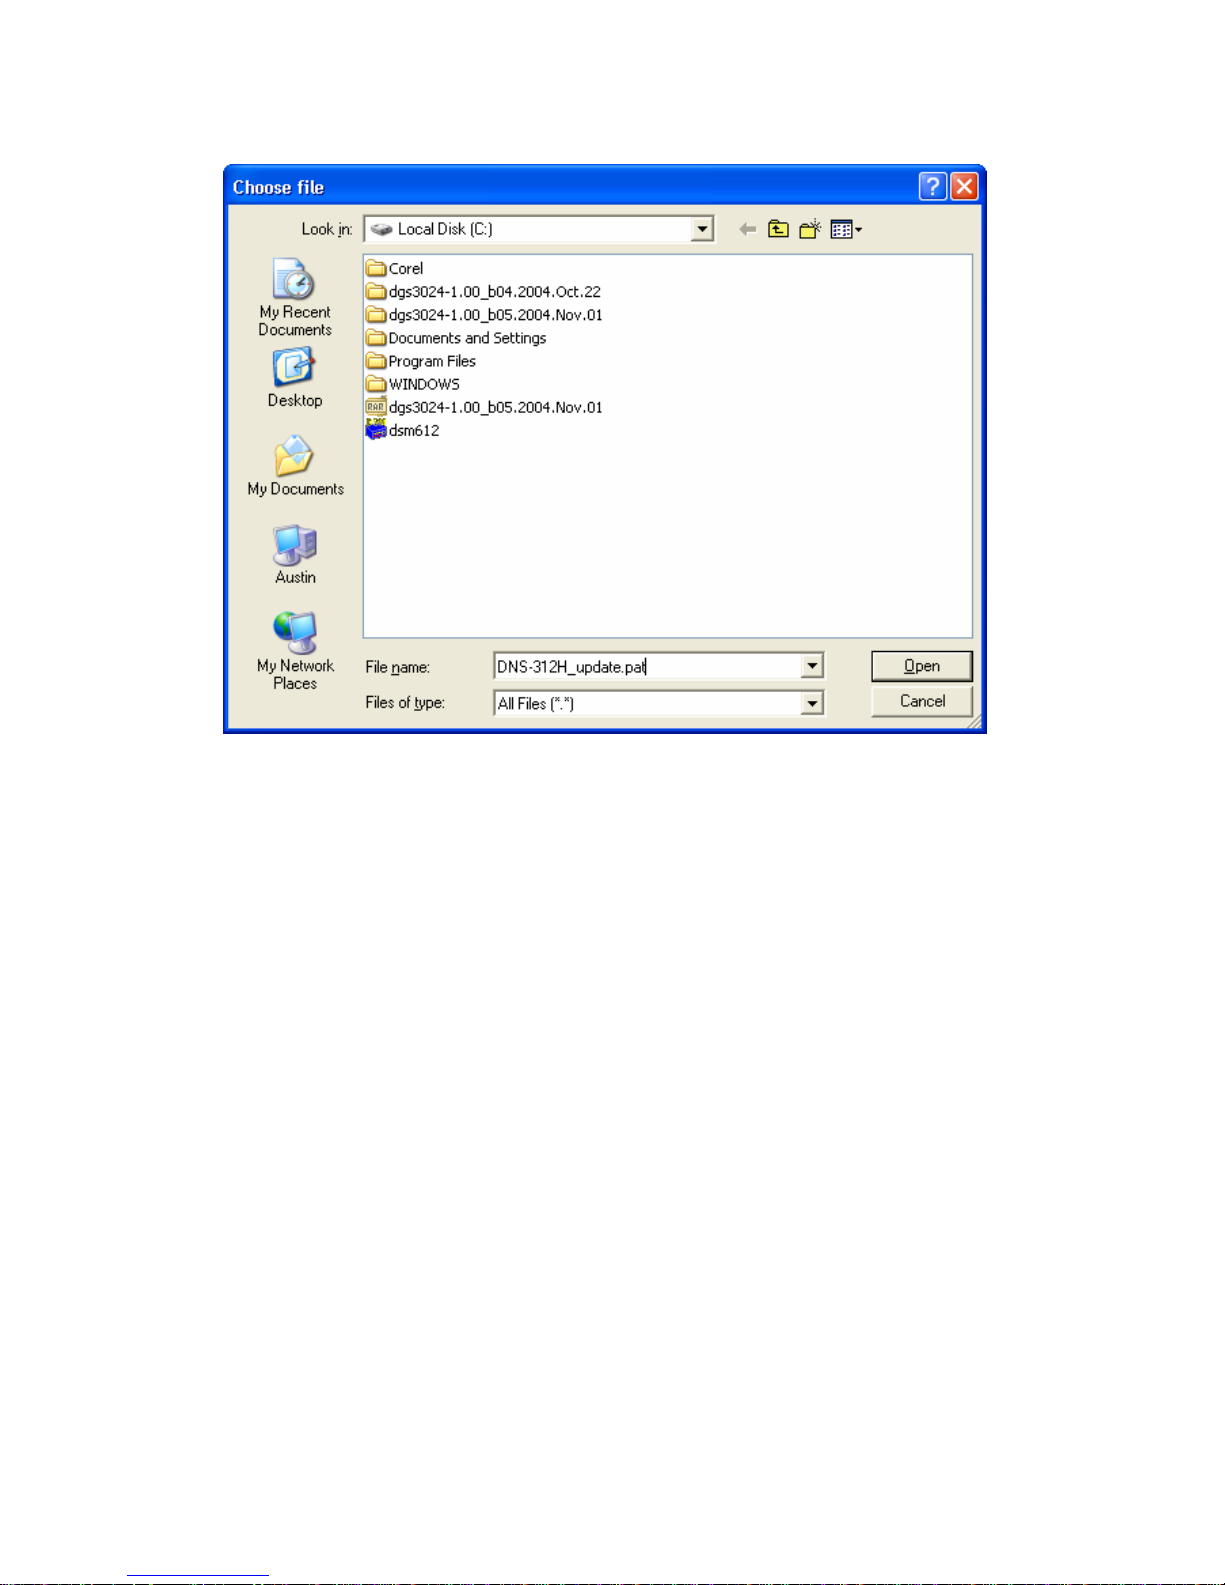
Firmware Update
1. Click the Browse button.
Page 53
53
2. Choose the file from the local hard drive.
3. Click Apply.
Warning!!
Do not power-off or disconnect the device while firmware upgrading is
processing.
Page 54
54
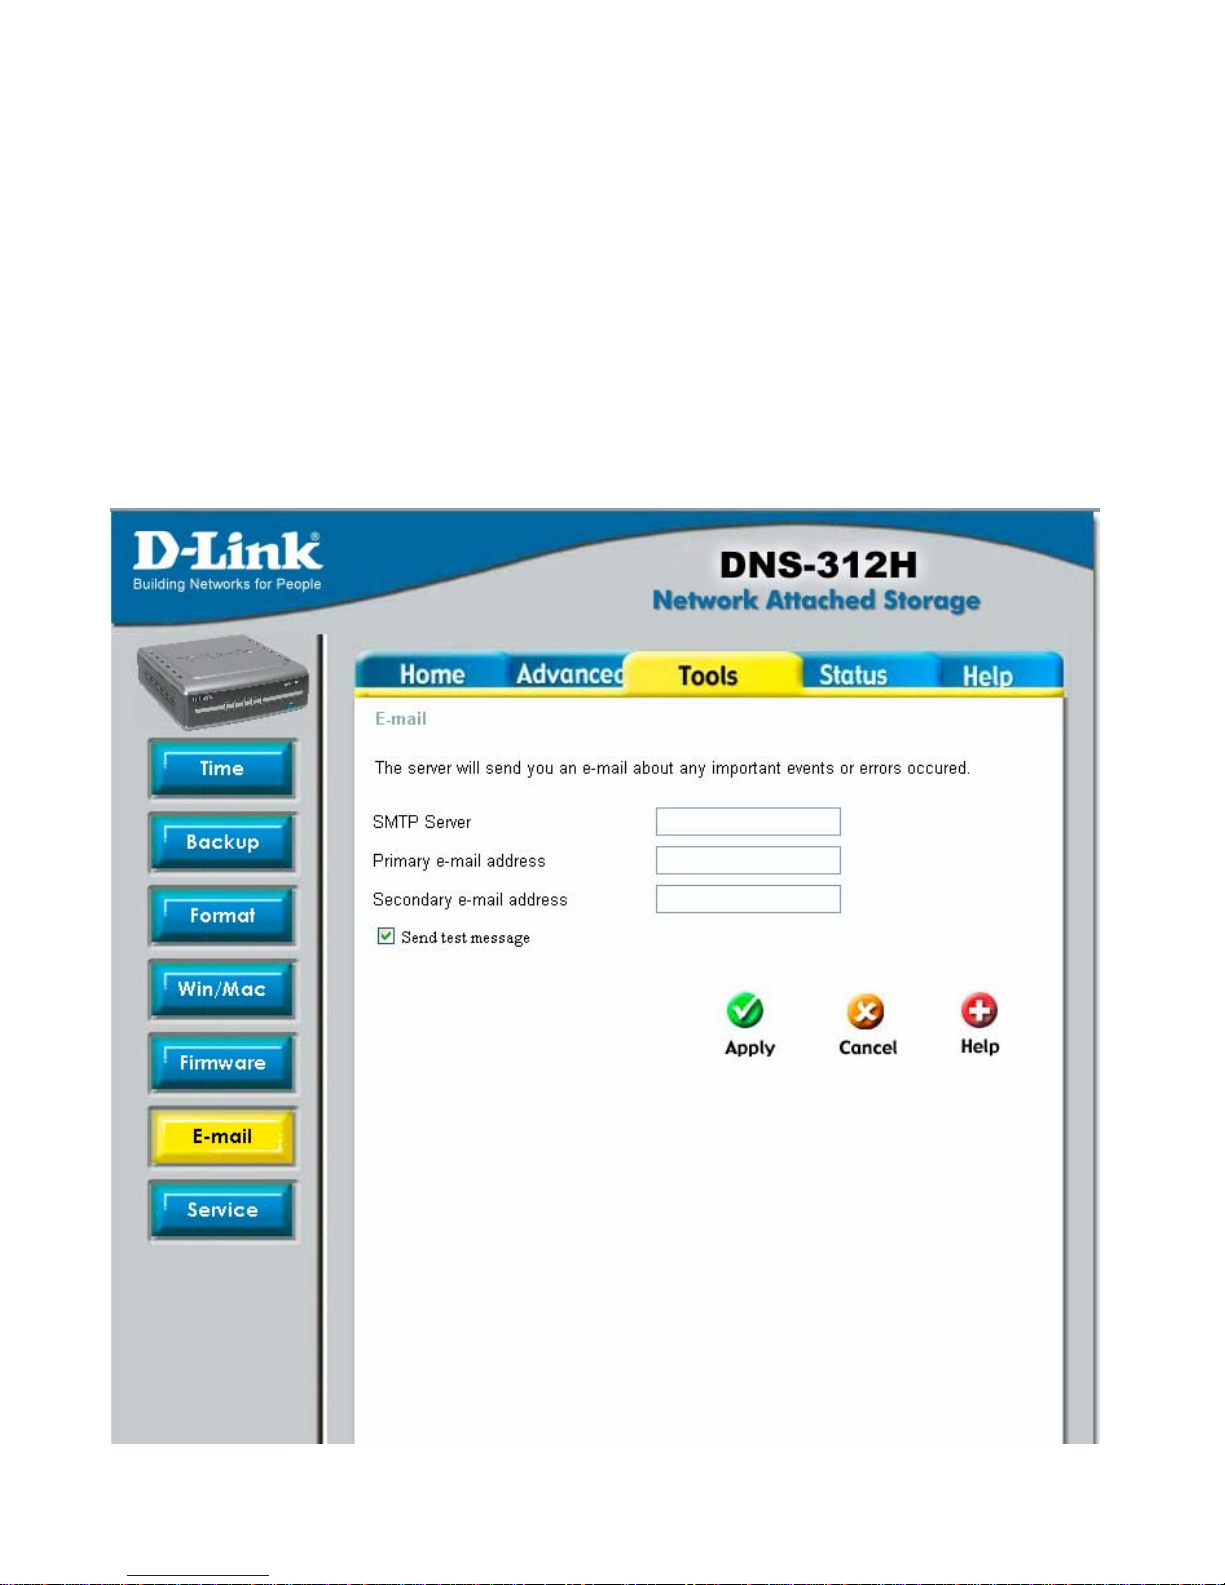
E-mail Notifications
E-mail notifications will be sent to notify you when important and critical events or
errors occur. Please enter the SMTP server and the e-mail address the notifications
should be sent to. You can assign up to two e-mail addresses.
If the SMTP server is assigned by host name rather than IP address, please make
sure a valid DNS server has been assigned on the [Home > LAN] page.
Page 55
55
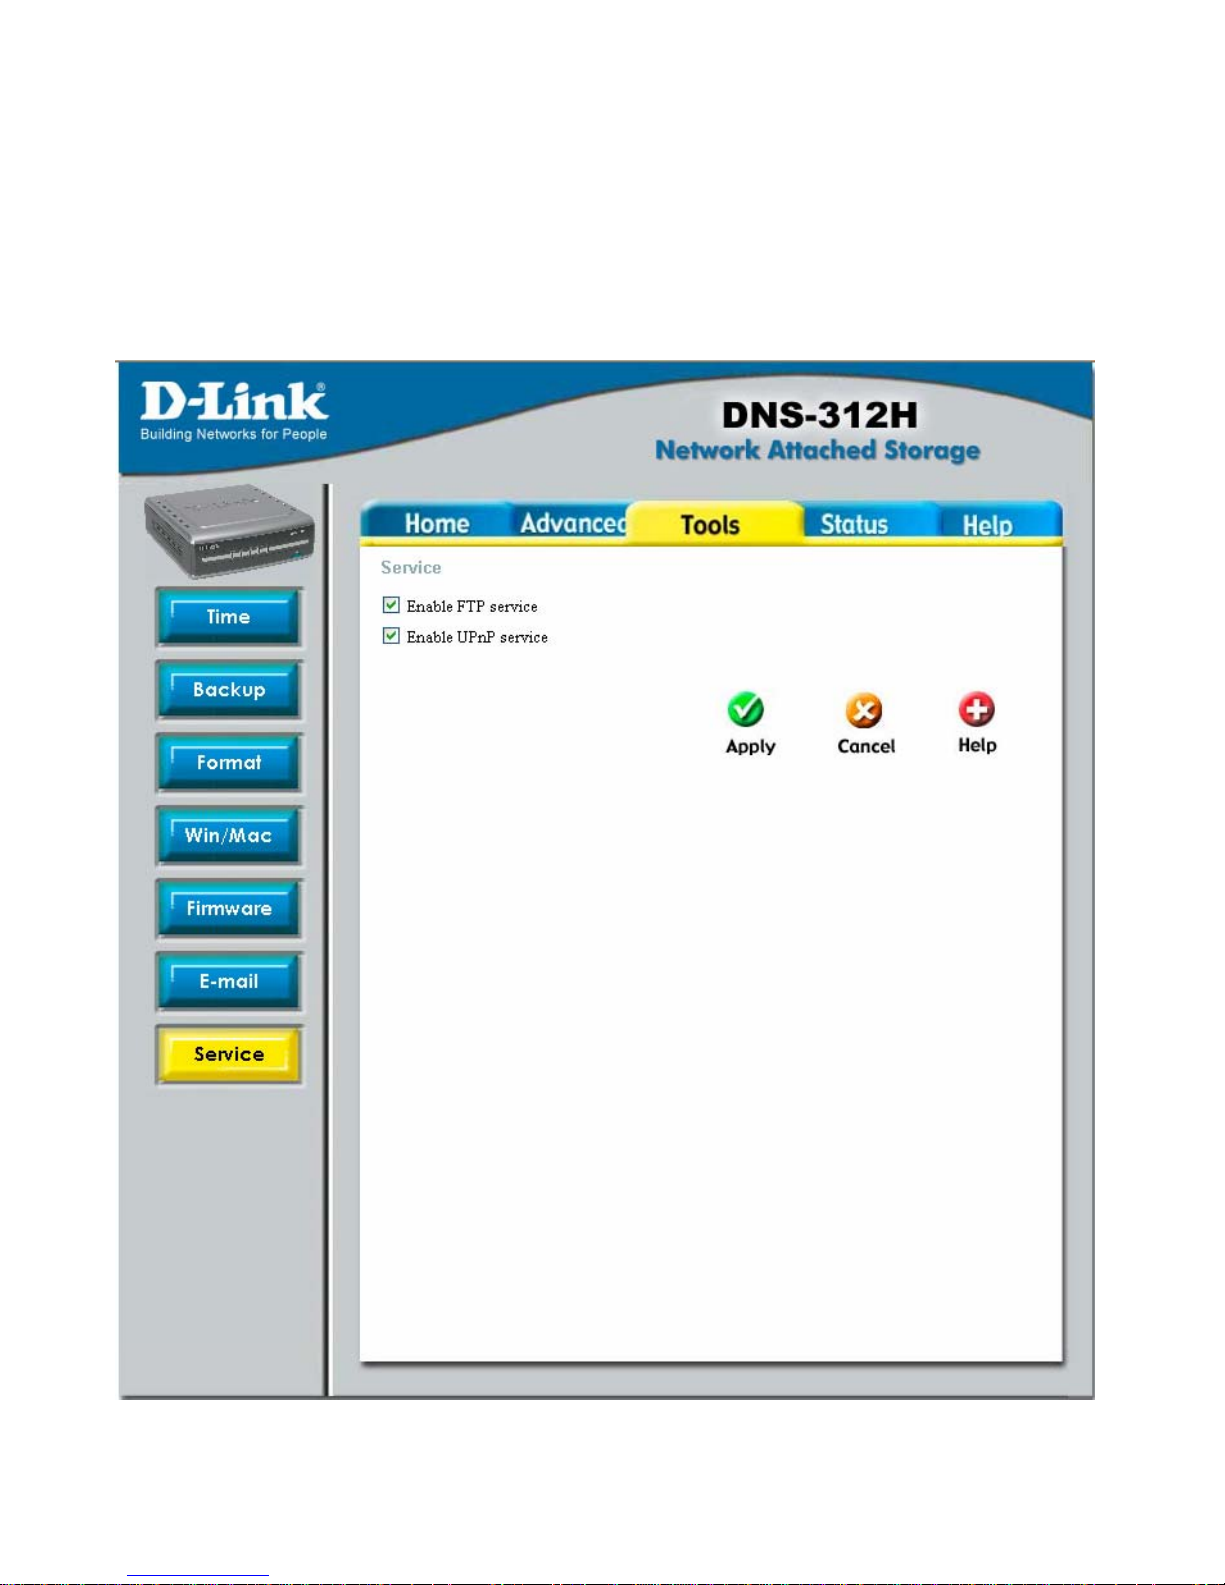
Service
Here is a facility for uploading various kinds of data easily and efficiently.
1. Select “Enable FTP service” or “Enable UPnP service.”
Page 56

56
2. Click Apply to Finish
Note:
File Transfer Protocol (FTP) is a convenient way for users to download,
upload, or transfer files from one computer to another. Also, FTP is a
special way to login to a certain site for the purpose of retrieving and
sending files.
Microsoft IE Version 6.0 or above is recommended.
Page 57
57
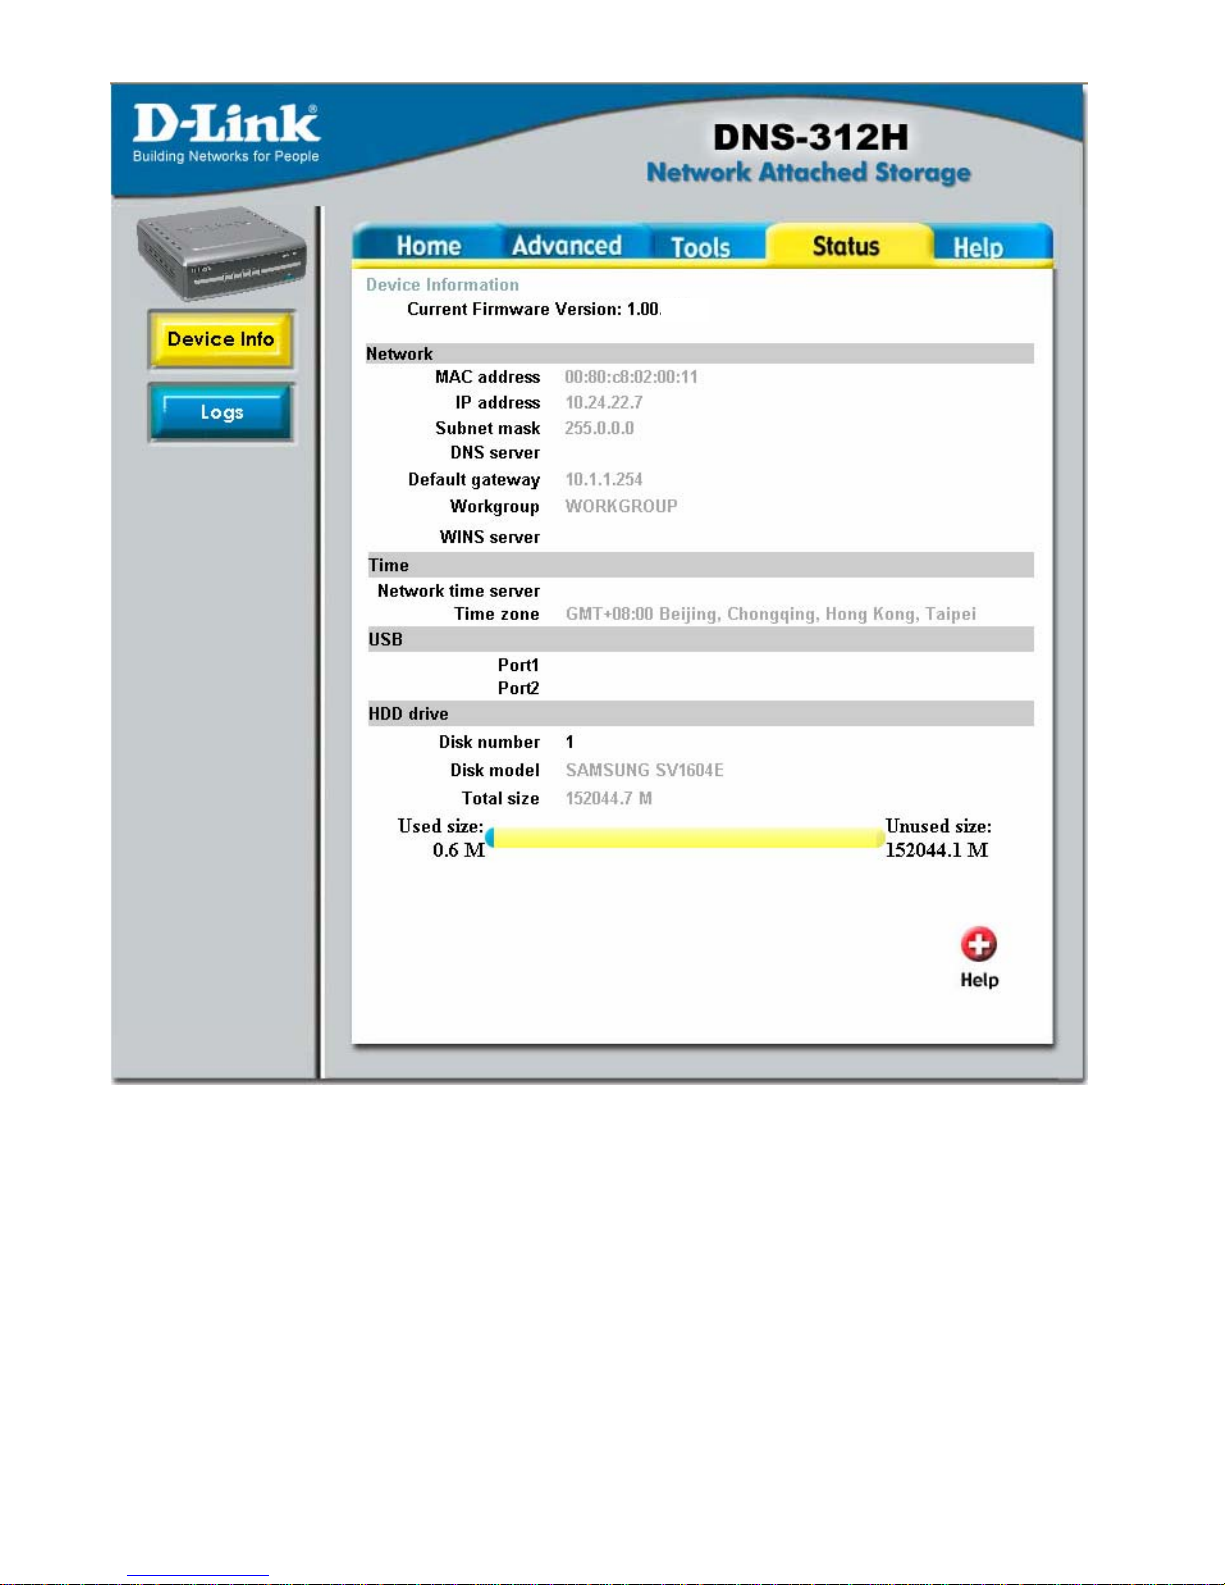
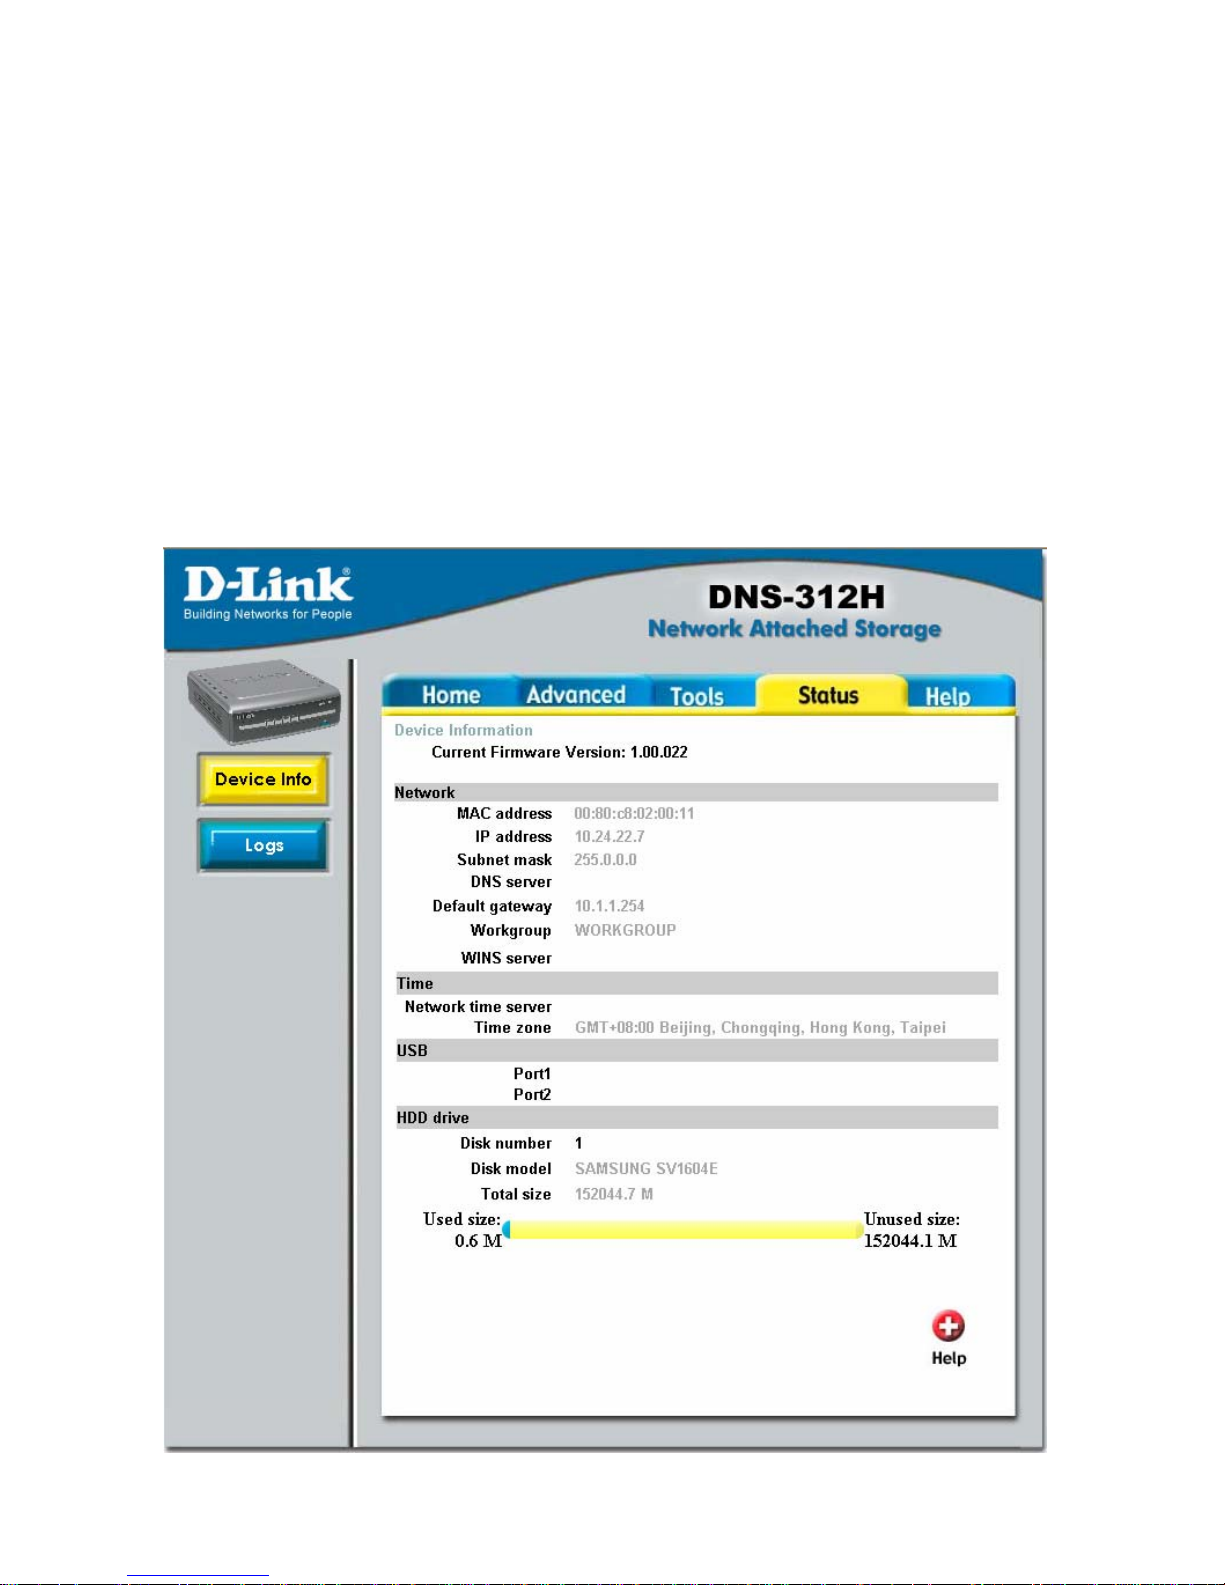
Device Information
On this page you can overview the device information. This is solely for overview
purposes. If you want to change any setting, please go to the page of the setting you
want to change.
Device Status
Page 58
58
Logs
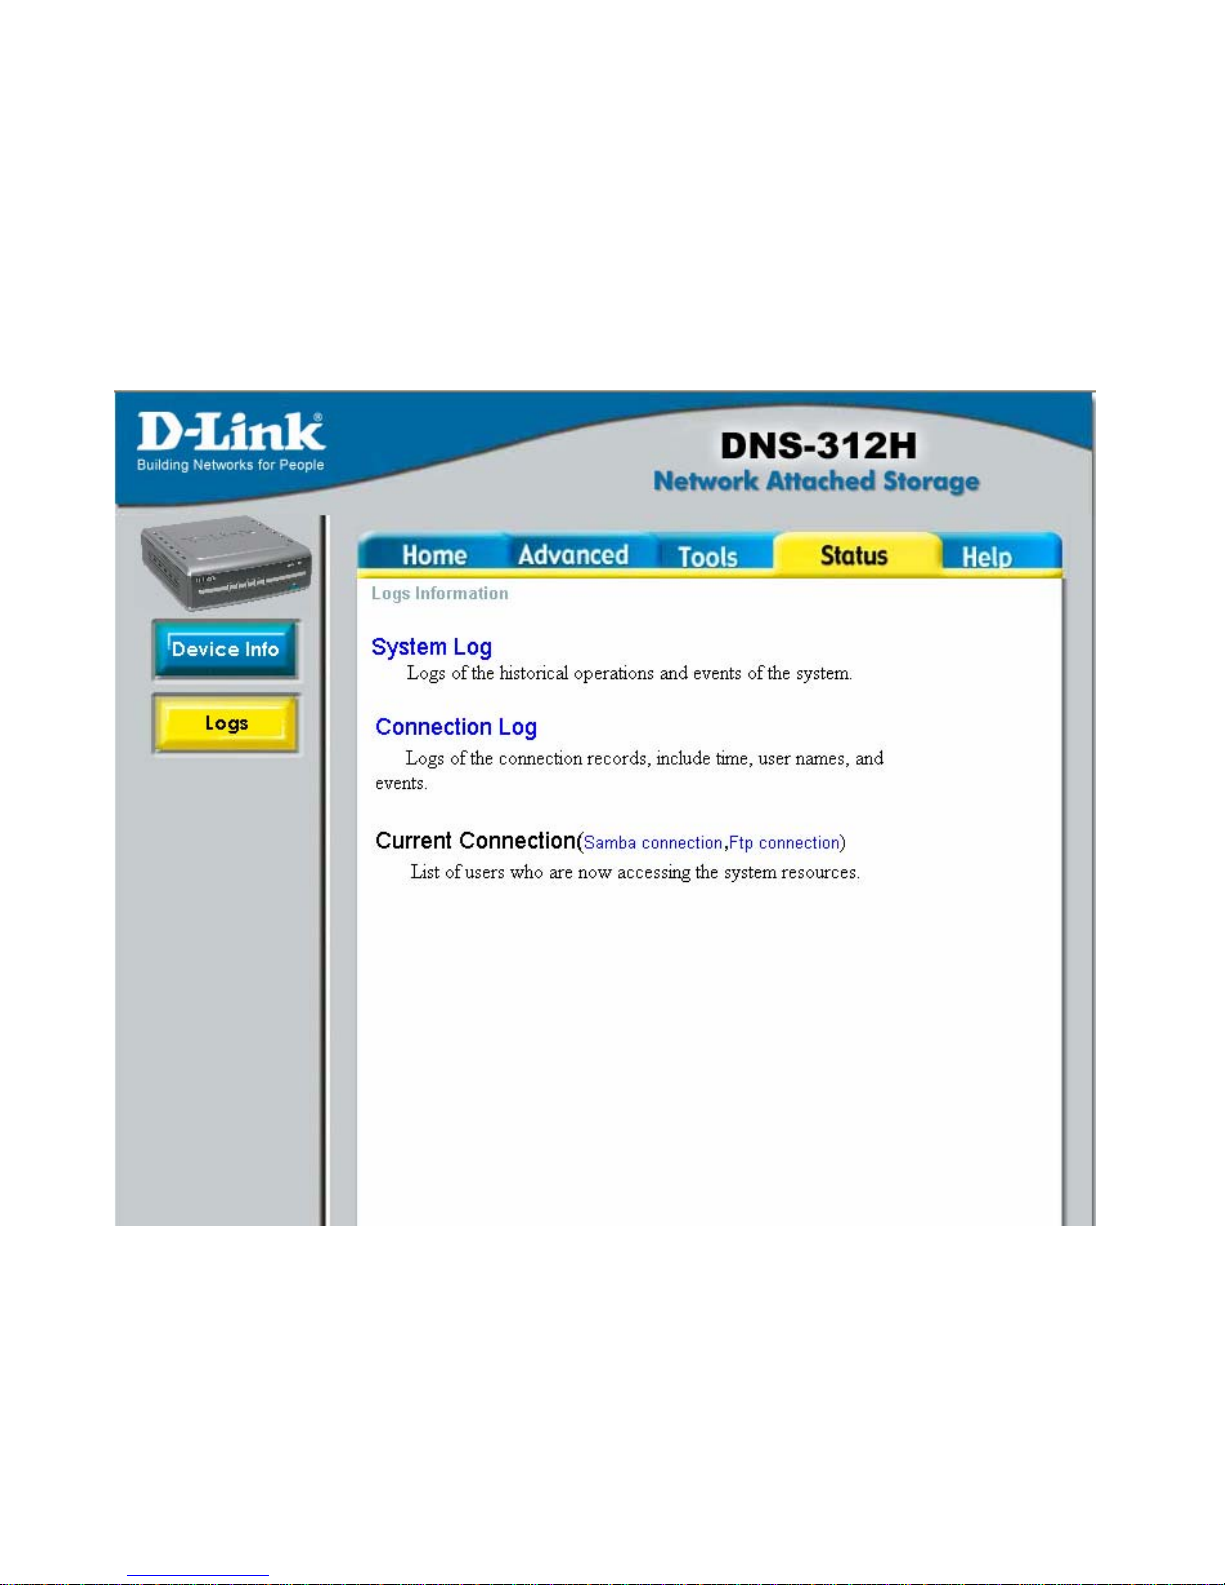
On this page you can view, clear, and save System Log, Connection Log, and
Current Connection. The maximum size or number of each kind of log is 32K bytes
or 320 logs, depending on which criterion is reached first.
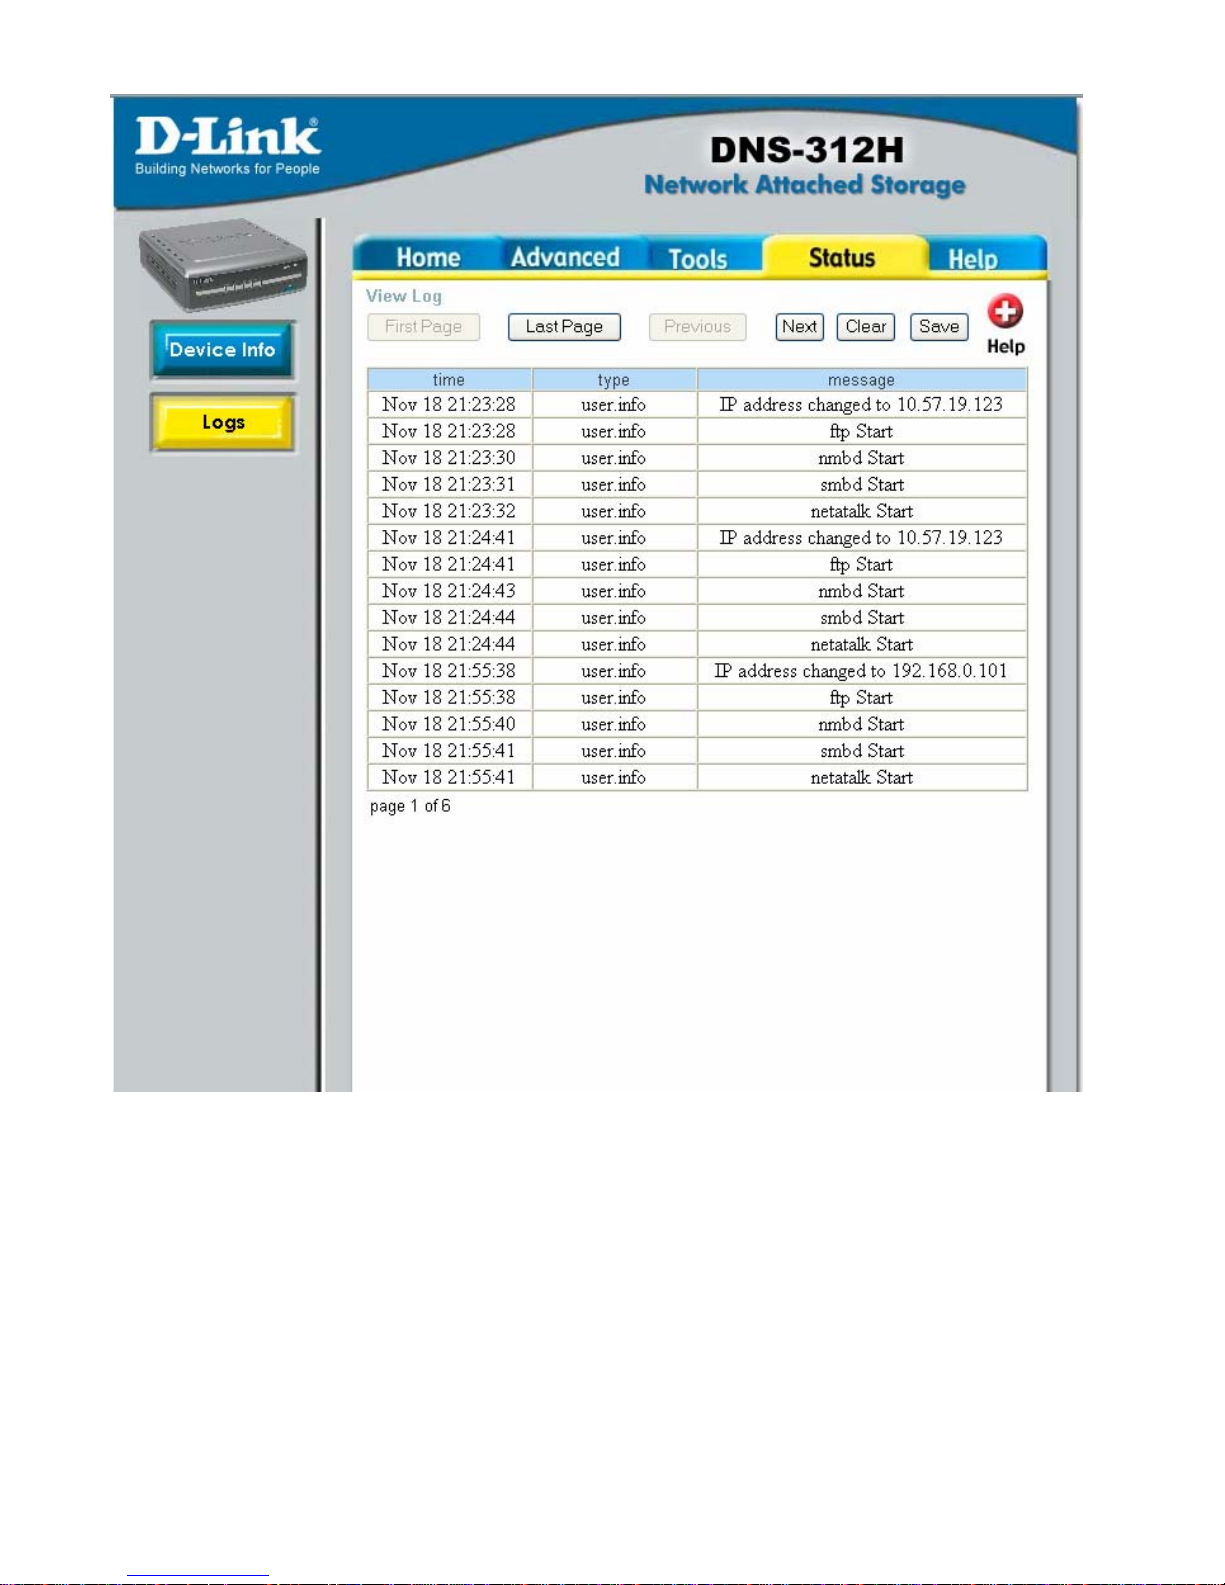
Clear the log
1. Click on the log page that you want to clear the log for.
Page 59
59
2. Click the Clear button.
Warning!!
When this action is completed, all data of logs will be deleted. They will not
be able to be restored.
Page 60
60
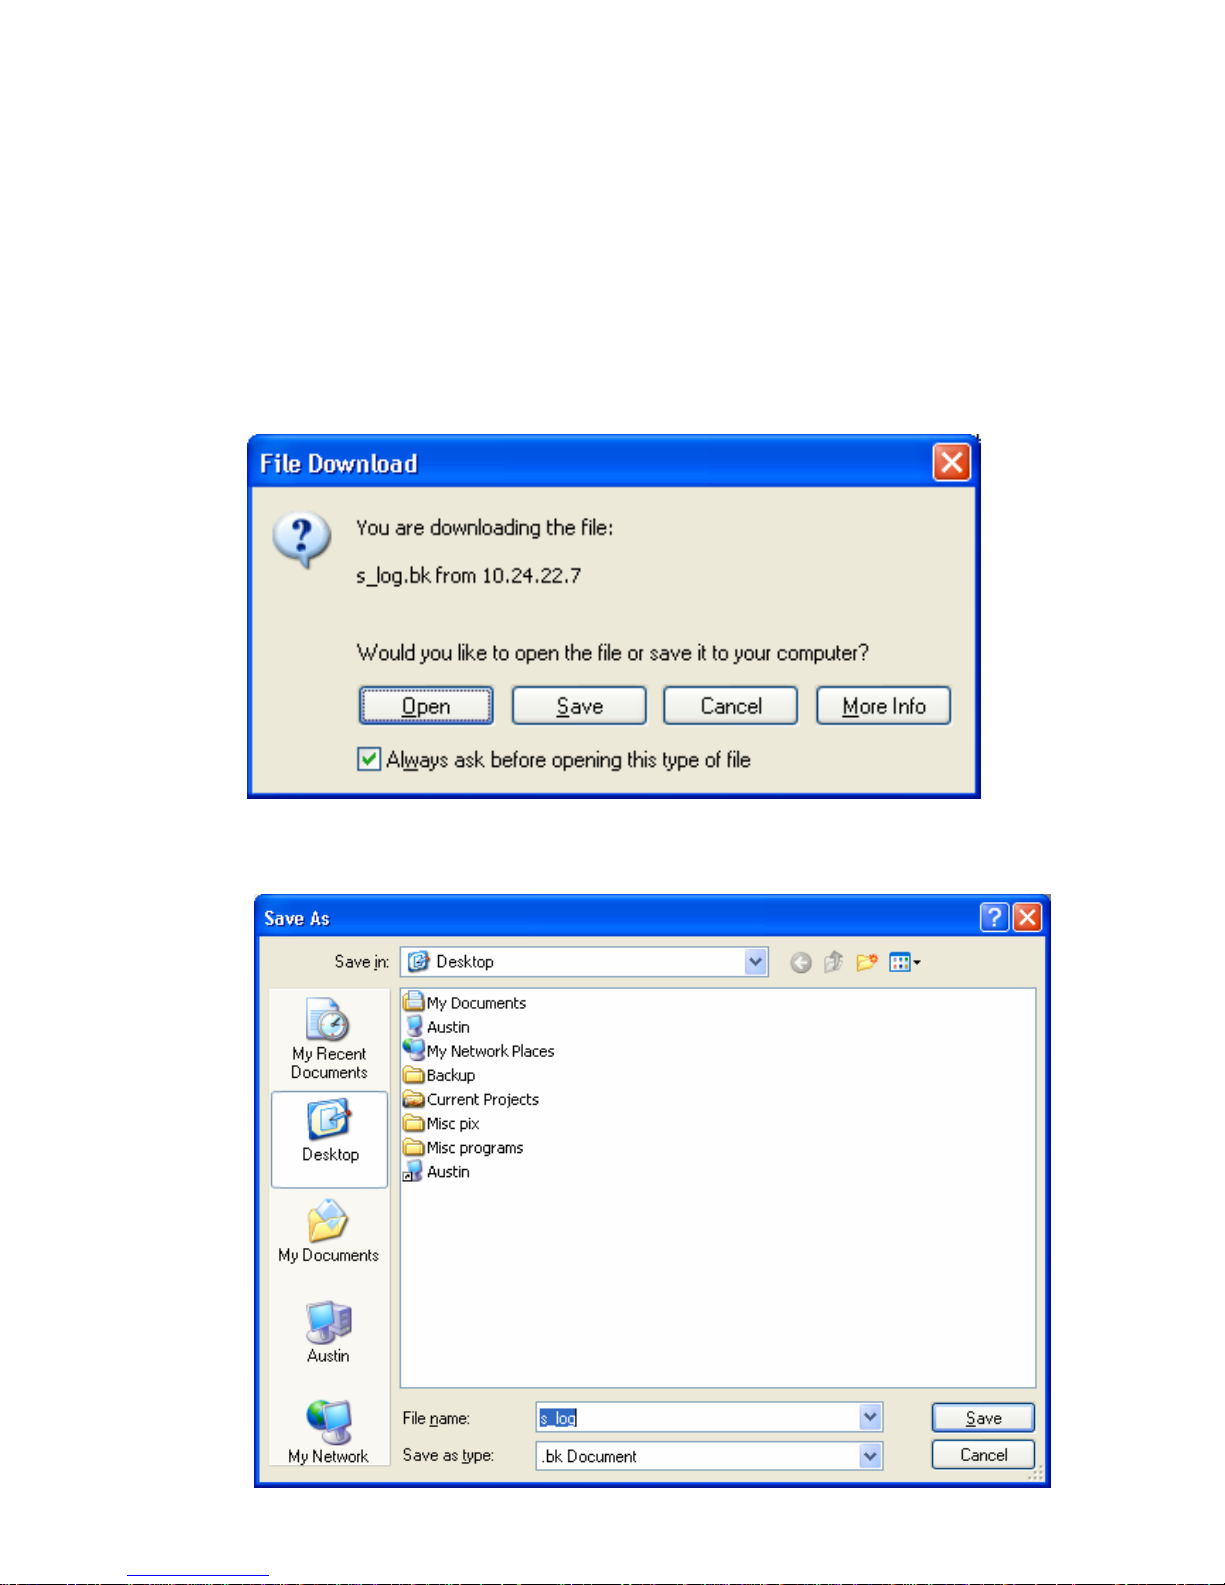
Save the log
1. Go to the log page that you want to save the log for.
2. Click the Save button.
3. Click the Save button again from the File Download prompt.
4. Choose a local location and click Save to finish.
Page 61

61
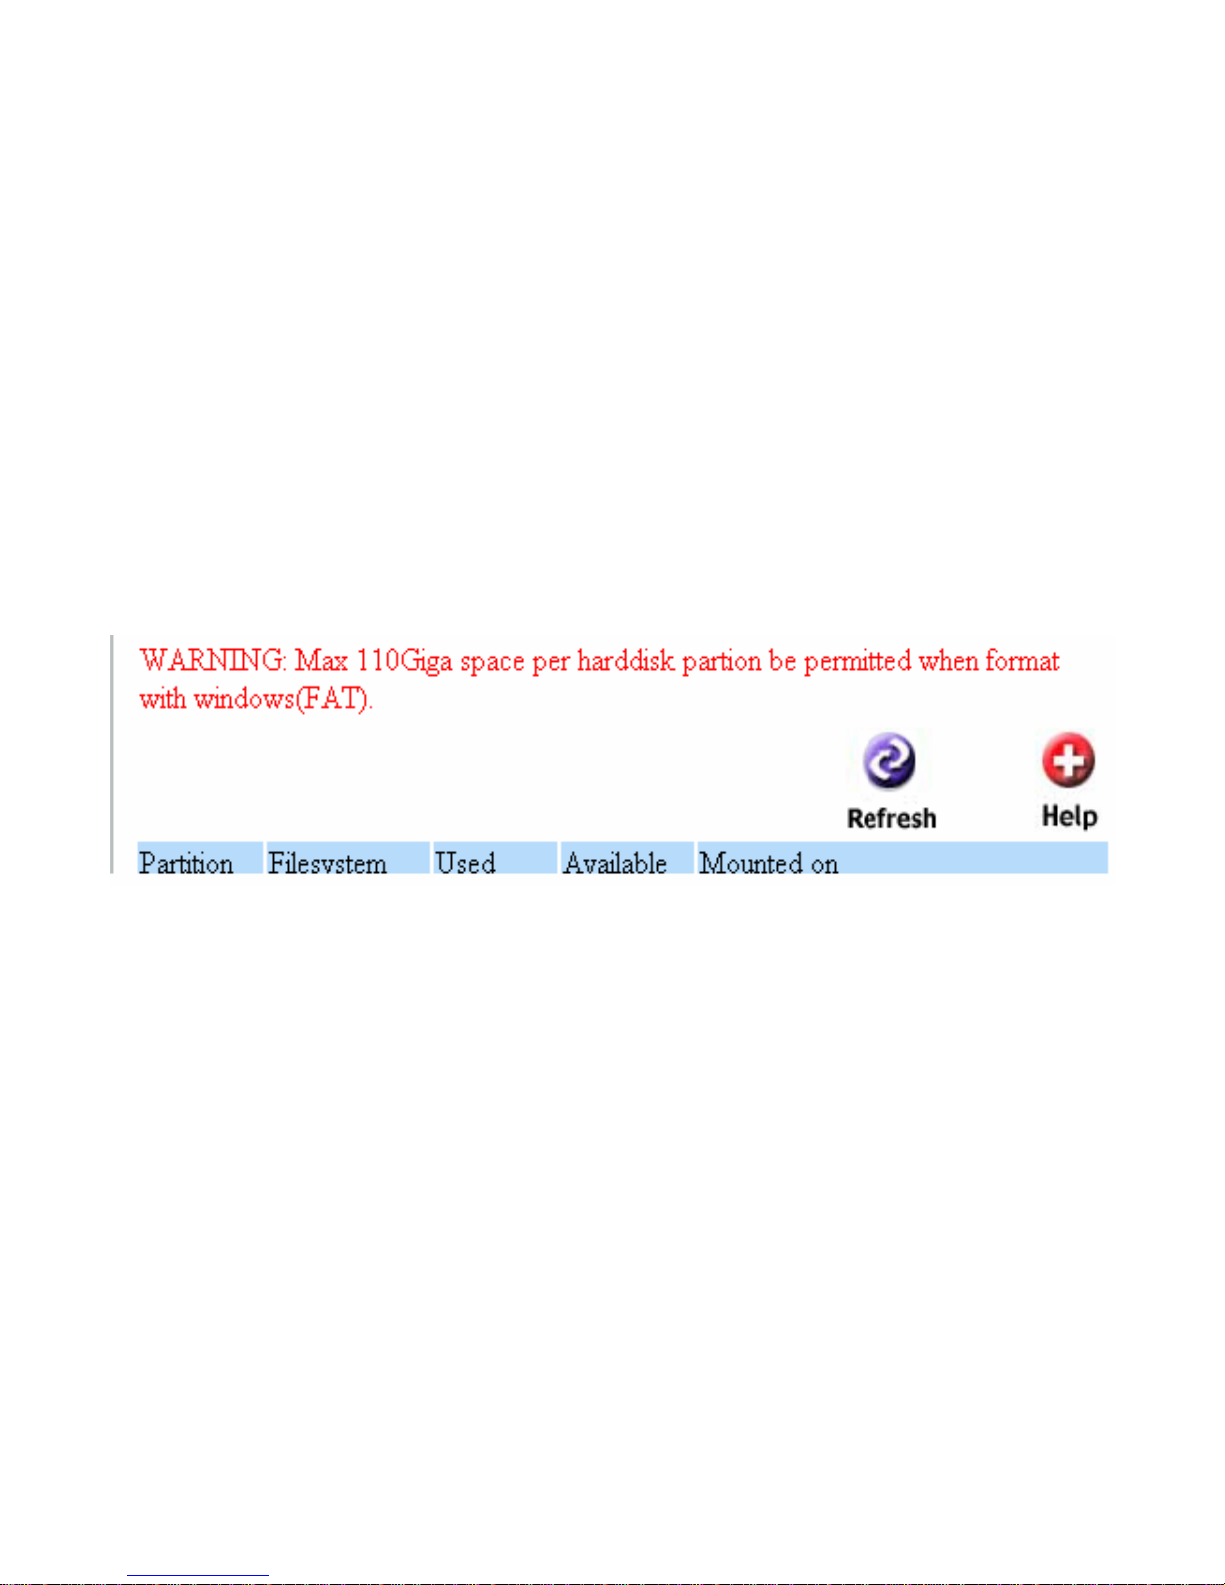
Refresh the log
When you view a log, you can click the Refresh button to refresh the page so the
most updated information will be displayed.
Page 62
62
Individual Help
If there are questions during the set up of the device, please click the Help button
that is found at the bottom of each page. This will provide you with access to a help
topic for each page.
Online Help
Page 63
63
Overall Help
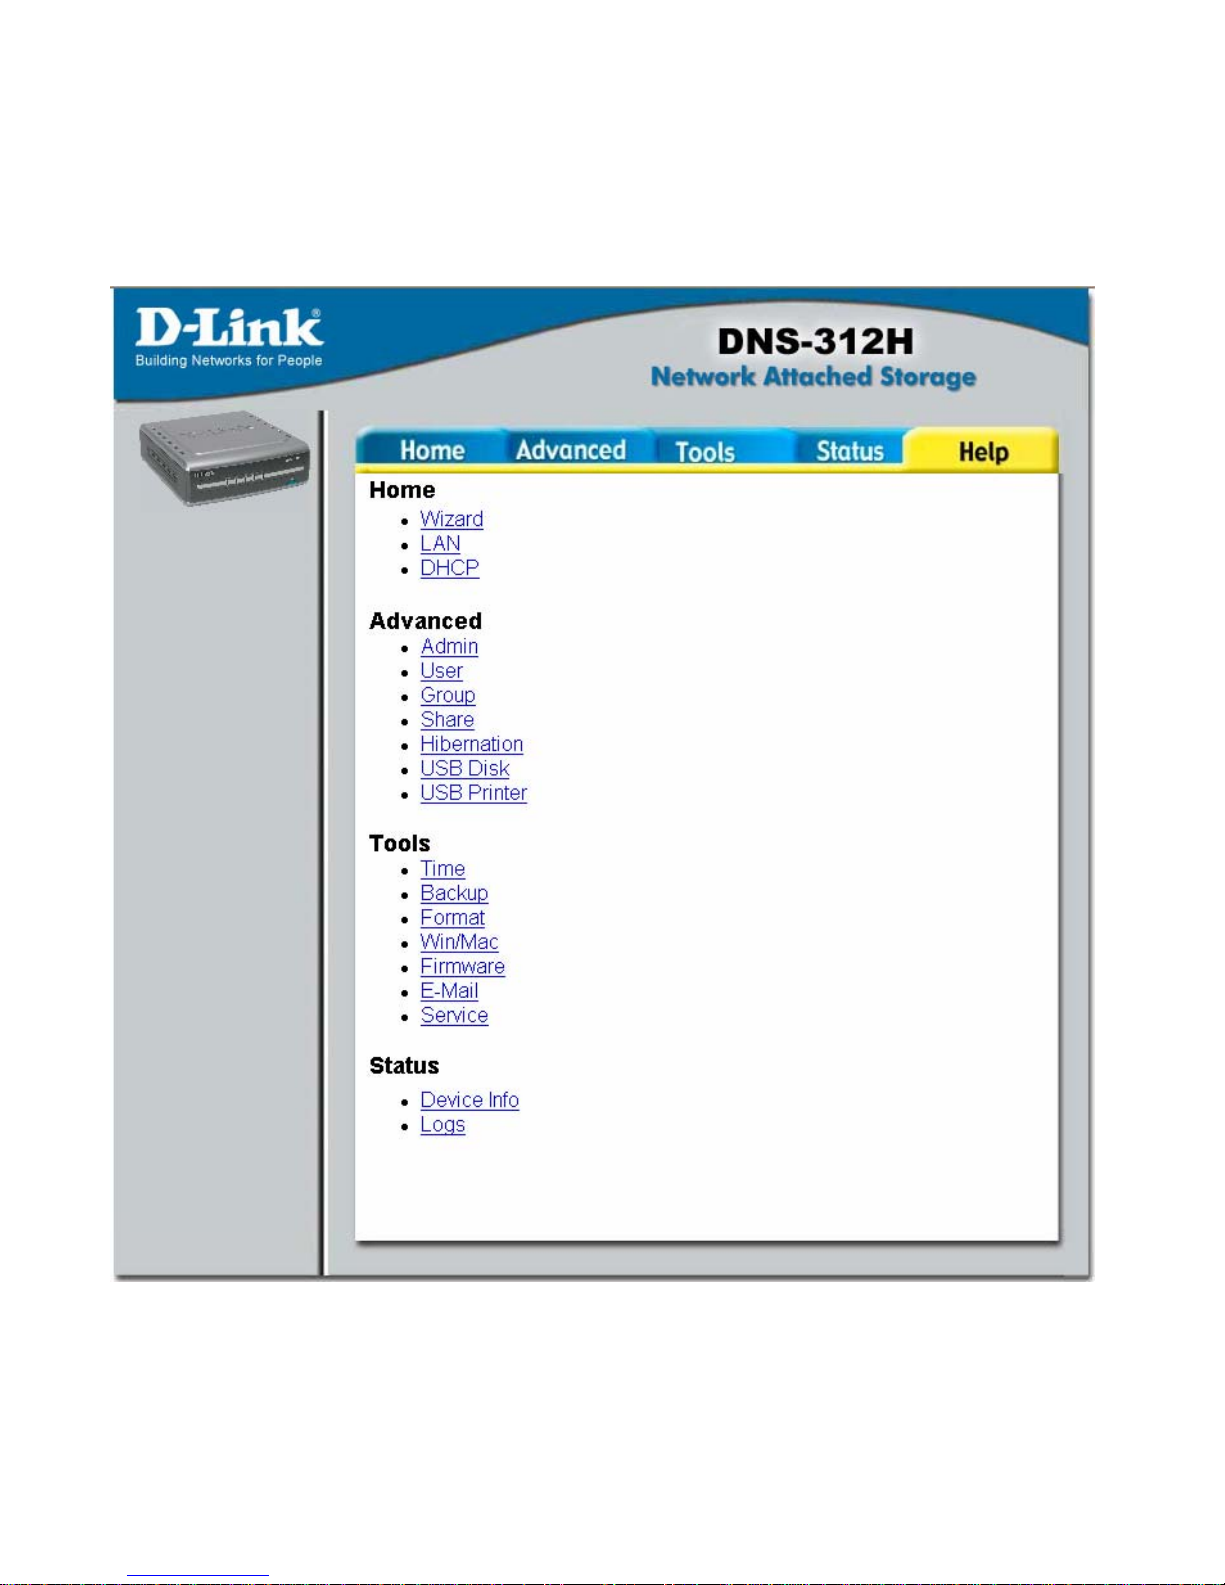
Click the Help tab at the top of every page to view all help topics.
Page 64

64
LIMITED WARRANTY
D-Link provides this limited warranty for its product only to the person or entity who originally purchased the
product from D-Link or its authorized reseller or distributor. D-Link would fulfill the warranty obligation according
to the local warranty policy in which you purchased our products.
Limited Hardware Warranty: D-Link warrants that the hardware portion of
the D-Link products described below (“Hardware”) will be free from
material defects in workmanship and materials from the date of original
retail purchase of the Hardware, for the period set forth below applicable to
the product type (“Warranty Period”) if the Hardware is used and serviced in
accordance with applicable documentation; provided that a completed
Registration Card is returned to an Authorized D-Link Service Office within
ninety (90) days after the date of original retail purchase of the Hardware.
If a completed Registration Card is not received by an authorized D-Link
Service Office within such ninety (90) period, then the Warranty Period shall
be ninety (90) days from the date of purchase.
Product Type Warranty
Period
Product (including Power Supplies and Fans)
One (1) Year
Spare parts and pare kits
Ninety (90)
days
D-Link’s sole obligation shall be to repair or replace the defective Hardware at no charge to the original owner.
Such repair or replacement will be rendered by D-Link at an Authorized D-Link Service Office. The replacement
Hardware need not be new or of an identical make, model or part; D-Link may in its discretion may replace the
defective Hardware (or any part thereof) with any reconditioned product that D-Link reasonably determines is
substantially equivalent (or superior) in all material respects to the defective Hardware. The Warranty Period shall
extend for an additional ninety (90) days after any repaired or replaced Hardware is delivered. If a material defect is
incapable of correction, or if D-Link determines in its sole discretion that it is not practical to repair or replace the
defective Hardware, the price paid by the original purchaser for the defective Hardware will be refunded by D-Link
Page 65

65
upon return to D-Link of the defective Hardware. All Hardware (or part thereof) that is replaced by D-Link, or for
which the purchase price is refunded, shall become the property of D-Link upon replacement or refund.
Limited Software Warranty: D-Link warrants that the software portion of the product (“Software”) will
substantially conform to D-Link’s then current functional specifications for the Software, as set forth in the
applicable documentation, from the date of original delivery of the Software for a period of ninety (90) days
(“Warranty Period”), if the Software is properly installed on approved hardware and operated as contemplated in its
documentation. D-Link further warrants that, during the Warranty Period, the magnetic media on which D-Link
delivers the Software will be free of physical defects. D-Link’s sole obligation shall be to replace the
non-conforming Software (or defective media) with software that substantially conforms to D-Link’s functional
specifications for the Software. Except as otherwise agreed by D-Link in writing, the replacement Software is
provided only to the original licensee, and is subject to the terms and conditions of the license granted by D-Link
for the Software. The Warranty Period shall extend for an additional ninety (90) days after any replacement
Software is delivered. If a material non-conformance is incapable of correction, or if D-Link determines in its sole
discretion that it is not practical to replace the non-conforming Software, the price paid by the original licensee for
the non-conforming Software will be refunded by D-Link; provided that the non-conforming Software (and all
copies thereof) is first returned to D-Link. The license granted respecting any Software for which a refund is
given automatically terminates.
Page 66

66
What You Must Do For Warranty Service:
Registration Card
. The Registration Card provided at the back of this manual must be completed and returned to
an Authorized D-Link Service Office for each D-Link product within ninety (90) days after the product is purchased
and/or licensed. The addresses/telephone/fax list of the nearest Authorized D-Link Service Office is provided in
the back of this manual. FAILURE TO PROPERLY COMPLETE AND TIMELY RETURN THE
REGISTRATION CARD MAY AFFECT THE WARRANTY FOR THIS PRODUCT.
Submitting A Claim
. Any claim under this limited warranty must be submitted in writing before the end of the
Warranty Period to an Authorized D-Link Service Office. The claim must include a written description of the
Hardware defect or Software nonconformance in sufficient detail to allow D-Link to confirm the same. The
original product owner must obtain a Return Material Authorization (RMA) number from the Authorized D-Link
Service Office and, if requested, provide written proof of purchase of the product (such as a copy of the dated
purchase invoice for the product) before the warranty service is provided. After an RMA number is issued, the
defective product must be packaged securely in the original or other suitable shipping package to ensure that it will
not be damaged in transit, and the RMA number must be prominently marked on the outside of the package. The
packaged product shall be insured and shipped to Authorized D-Link Service Office with all shipping costs prepaid.
D-Link may reject or return any product that is not packaged and shipped in strict compliance with the foregoing
requirements, or for which an RMA number is not visible from the outside of the package. The product owner
agrees to pay D-Link’s reasonable handling and return shipping charges for any product that is not packaged and
shipped in accordance with the foregoing requirements, or that is determined by D-Link not to be defective or
non-conforming.
What Is Not Covered:
This limited warranty provided by D-Link does not cover
:
Products that have been subjected to abuse, accident, alteration, modification, tampering, negligence, misuse, faulty
installation, lack of reasonable care, repair or service in any way that is not contemplated in the documentation for
the product, or if the model or serial number has been altered, tampered with, defaced or removed;
Initial installation, installation and removal of the product for repair, and shipping costs;
Page 67

67
Operational adjustments covered in the operating manual for the product, and normal maintenance;
Damage that occurs in shipment, due to act of God, failures due to power surge, and cosmetic damage; and
Any hardware, software, firmware or other products or services provided by anyone other than D-Link.
Disclaimer of Other Warranties: EXCEPT FOR THE LIMITED WARRANTY SPECIFIED HEREIN, THE
PRODUCT IS PROVIDED “AS-IS” WITHOUT ANY WARRANTY OF ANY KIND INCLUDING, WITHOUT
LIMITATION, ANY WARRANTY OF MERCHANTABILITY, FITNESS FOR A PARTICULAR PURPOSE AND
NON-INFRINGEMENT. IF ANY IMPLIED WARRANTY CANNOT BE DISCLAIMED IN ANY TERRITORY
WHERE A PRODUCT IS SOLD, THE DURATION OF SUCH IMPLIED WARRANTY SHALL BE LIMITED
TO NINETY (90) DAYS. EXCEPT AS EXPRESSLY COVERED UNDER THE LIMITED WARRANTY
PROVIDED HEREIN, THE ENTIRE RISK AS TO THE QUALITY, SELECTION AND PERFORMANCE OF
THE PRODUCT IS WITH THE PURCHASER OF THE PRODUCT.
Limitation of Liability: TO THE MAXIMUM EXTENT PERMITTED BY LAW, D-LINK IS NOT LIABLE UNDER
ANY CONTRACT, NEGLIGENCE, STRICT LIABILITY OR OTHER LEGAL OR EQUITABLE THEORY FOR
ANY LOSS OF USE OF THE PRODUCT, INCONVENIENCE OR DAMAGES OF ANY CHARACTER,
WHETHER DIRECT, SPECIAL, INCIDENTAL OR CONSEQUENTIAL (INCLUDING, BUT NOT LIMITED TO,
DAMAGES FOR LOSS OF GOODWILL, WORK STOPPAGE, COMPUTER FAILURE OR MALFUNCTION,
LOSS OF INFORMATION OR DATA CONTAINED IN, STORED ON, OR INTEGRATED WITH ANY
PRODUCT RETURNED TO D-LINK FOR WARRANTY SERVICE) RESULTING FROM THE USE OF THE
PRODUCT, RELATING TO WARRANTY SERVICE, OR ARISING OUT OF ANY BREACH OF THIS
LIMITED WARRANTY, EVEN IF D-LINK HAS BEEN ADVISED OF THE POSSIBILITY OF SUCH
DAMAGES. THE SOLE REMEDY FOR A BREACH OF THE FOREGOING LIMITED WARRANTY IS
REPAIR, REPLACEMENT OR REFUND OF THE DEFECTIVE OR NON-CONFORMING PRODUCT.
GOVERNING LAW: This Limited Warranty shall be governed by the laws of the state of California.
Some states do not allow exclusion or limitation of incidental or consequential damages, or limitations on how long an
implied warranty lasts, so the foregoing limitations and exclusions may not apply. This limited warranty provides
specific legal rights and the product owner may also have other rights which vary from state to state.
Page 68

68
Trademarks
Copyright 2002 D-Link Corporation. Contents subject to change without
prior notice. D-Link is a registered trademark of D-Link Corporation/D-Link
Systems, Inc. All other trademarks belong to their respective proprietors.
Copyright Statement
No part of this publication may be reproduced in any form or by any means or used to make any derivative such as
translation, transformation, or adaptation without permission from D-Link Corporation/D-Link Systems Inc., as
stipulated by the United States Copyright Act of 1976.
Page 69

69
FCC Warning
This equipment has been tested and found to comply with the limits for a Class B digital device, pursuant to part 15
of the FCC Rules. These limits are designed to provide reasonable protection against harmful interference in a
residential installation. This equipment generates, uses and can radiate radio frequency energy and, if not installed
and used in accordance with the instructions, may cause harmful interference to radio communications. However,
there is no guarantee that interference will not occur in a particular installation. If this equipment does cause
harmful interference to radio or television reception, which can be determined by turning the equipment off and on,
the user is encouraged to try to correct the interference by one or more of the following measures:
-Reorient or relocate the receiving antenna.
-Increase the separation between the equipment and receiver.
-Connect the equipment into an outlet on a circuit different from that to which the receiver is connected.
-Consult the dealer or an experienced radio/ TV technician for help.
FCC Radiation Exposure Statement
This equipment complies with FCC radiation exposure limits set forth for an uncontrolled environment. This
equipment should be installed and operated with minimum 20cm between the radiator and your body.
 Loading...