

Page 1
USER MANUAL
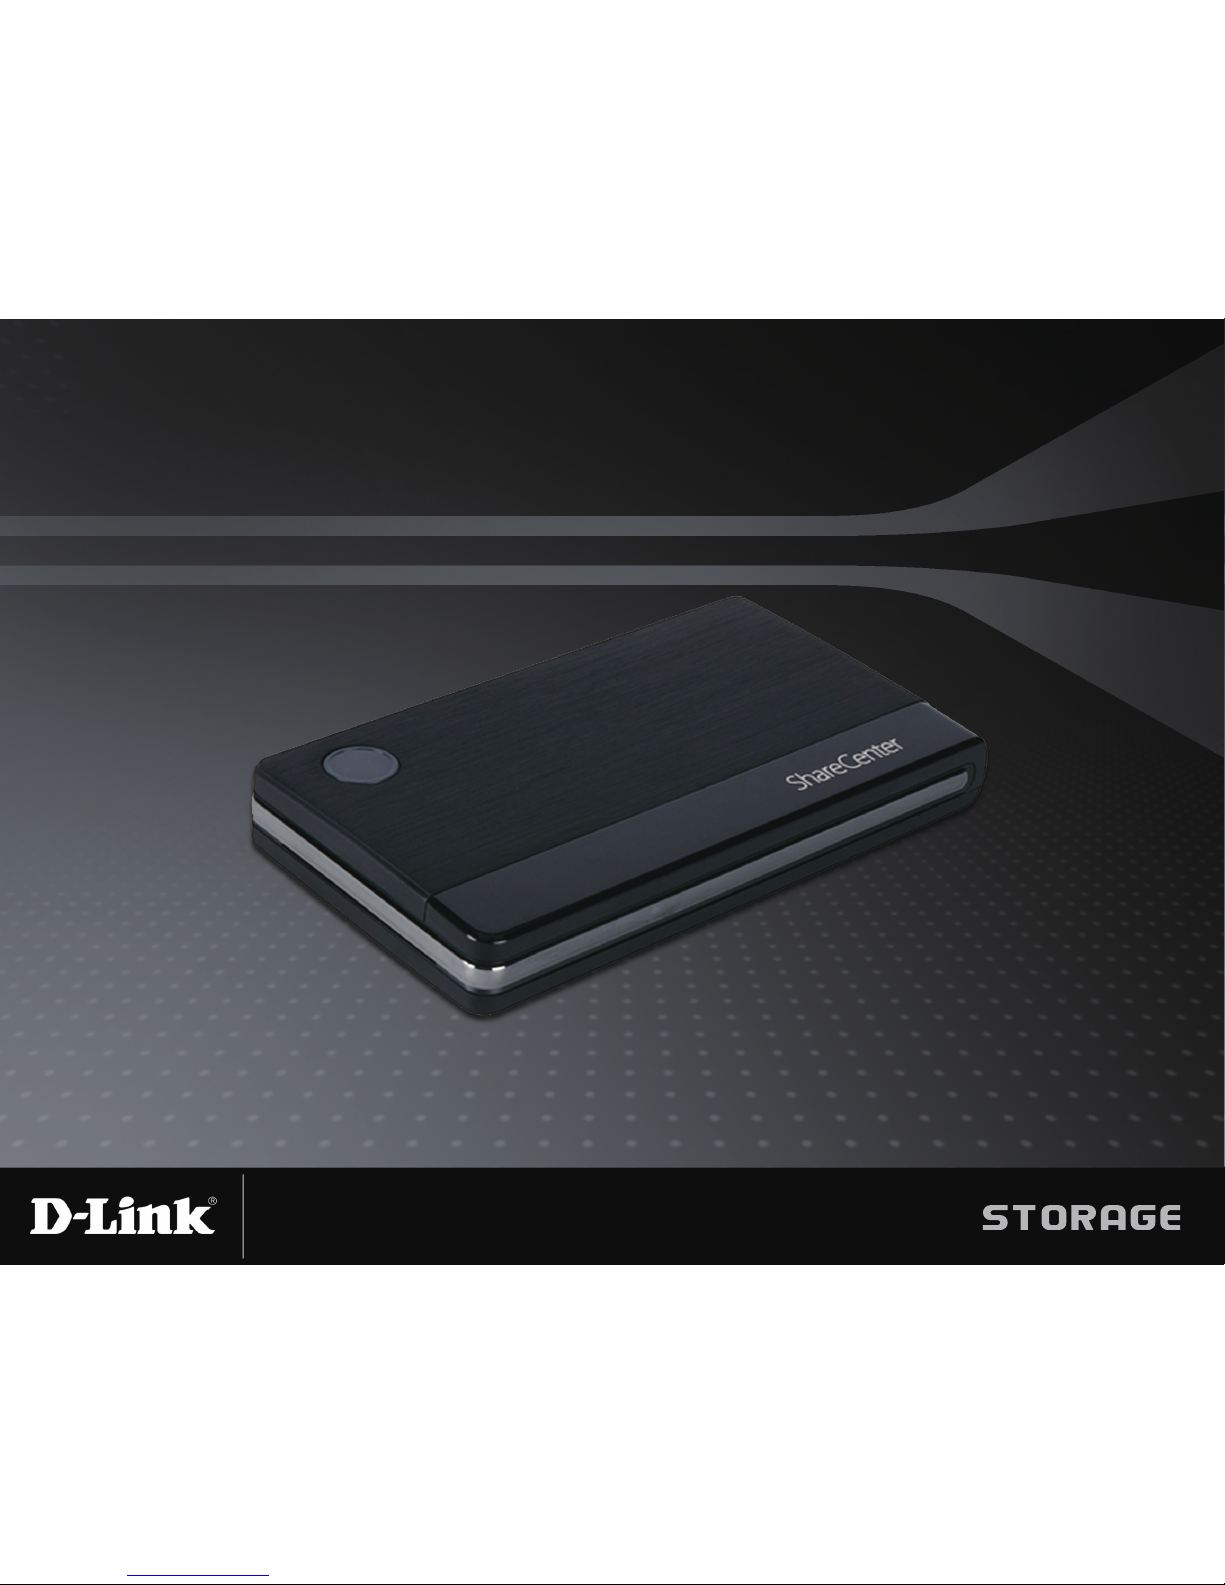
ShareCenter™ 2Go - DNS-213
VERSION 1.0
Page 2
iD-Link ShareCenter™ 2Go User Manual
Table of Contents
Product Overview ........................................................ 1
Package Contents ................................................... 1
System Requirements ............................................. 1
Introduction ..............................................................2
Features ..................................................................3
Hardware Overview ................................................. 4
Top View ............................................................4
Rear and Bottom Panel(Connections) ............... 5
Direct Attached/Network Storage Mode ...... 6
Installation ....................................................................7
Hardware Setup ....................................................... 7
Network Storage Mode ...................................... 7
Direct Attached Storage Function ............................ 8
Easy Search Utility ................................................10
Utility Overview ................................................ 11
Connecting to the ShareCenter™ 2Go ............12
Mapping the Network Drive .............................15
Web UI ................................................................... 20
Conguration ............................................................. 21
Setup ..................................................................... 21
Wizard .............................................................. 21
Setup ..................................................................... 22
Wizard .............................................................. 22
LAN Setup .......................................................26
Time and Date .................................................27
Device ..............................................................28
Language .........................................................29
Advanced ............................................................... 30
Users and Groups ............................................ 30
Add (Create) Users ................................... 31
Add (Create) User ..................................... 32
Add (Create) Group ..................................33
Add (Create) Group ..................................34
Navigation and Search buttons. ................ 35
Network Shares ...............................................36
Add a Network Share ................................ 37
FTP Server ......................................................44
FTP Server Settings .................................. 45
FTP Server Status ....................................46
FTP Server Behind a Router ..................... 47
Secure FTP Connections .......................... 48
UPnP AV Server .............................................. 55
iTunes Server ..................................................56
Maintenance .......................................................... 58
Admin Password ..............................................58
System .............................................................59
Firmware Upgrade ........................................... 60
E-Mail Alerts ....................................................61
E-Mail Alert Settings .................................62
E-Mail Alert Types ..................................... 63
Power Management ......................................... 64
Table of Contents
Page 3
iiD-Link ShareCenter™ 2Go User Manual
Table of Contents
Format Disk .....................................................65
Dynamic DNS ..................................................66
Disk Diagnostic ................................................ 67
S.M.A.R.T Test .........................................68
Status ....................................................................69
System Information ..........................................69
Hard Drive Info ................................................. 70
Logs ................................................................. 71
Support .................................................................. 72
Schedule Downloads .............................................73
Scheduling .............................................................75
Scheduling Settings ......................................... 76
Scheduling Settings - Continued .....................77
Schedule Backups List ....................................78
FTP / HTTP Downloads ...................................79
P2P Downloads ..................................................... 80
Setting .............................................................. 81
Adding Torrents ...............................................82
P2P Tasks list .................................................. 83
Support .................................................................. 84
Page 4
1D-Link ShareCenter™ 2Go User Manual
Section 1 - Product Overview
Product Overview
Package Contents
For best results, the following minimum requirements are recommended:
System Requirements
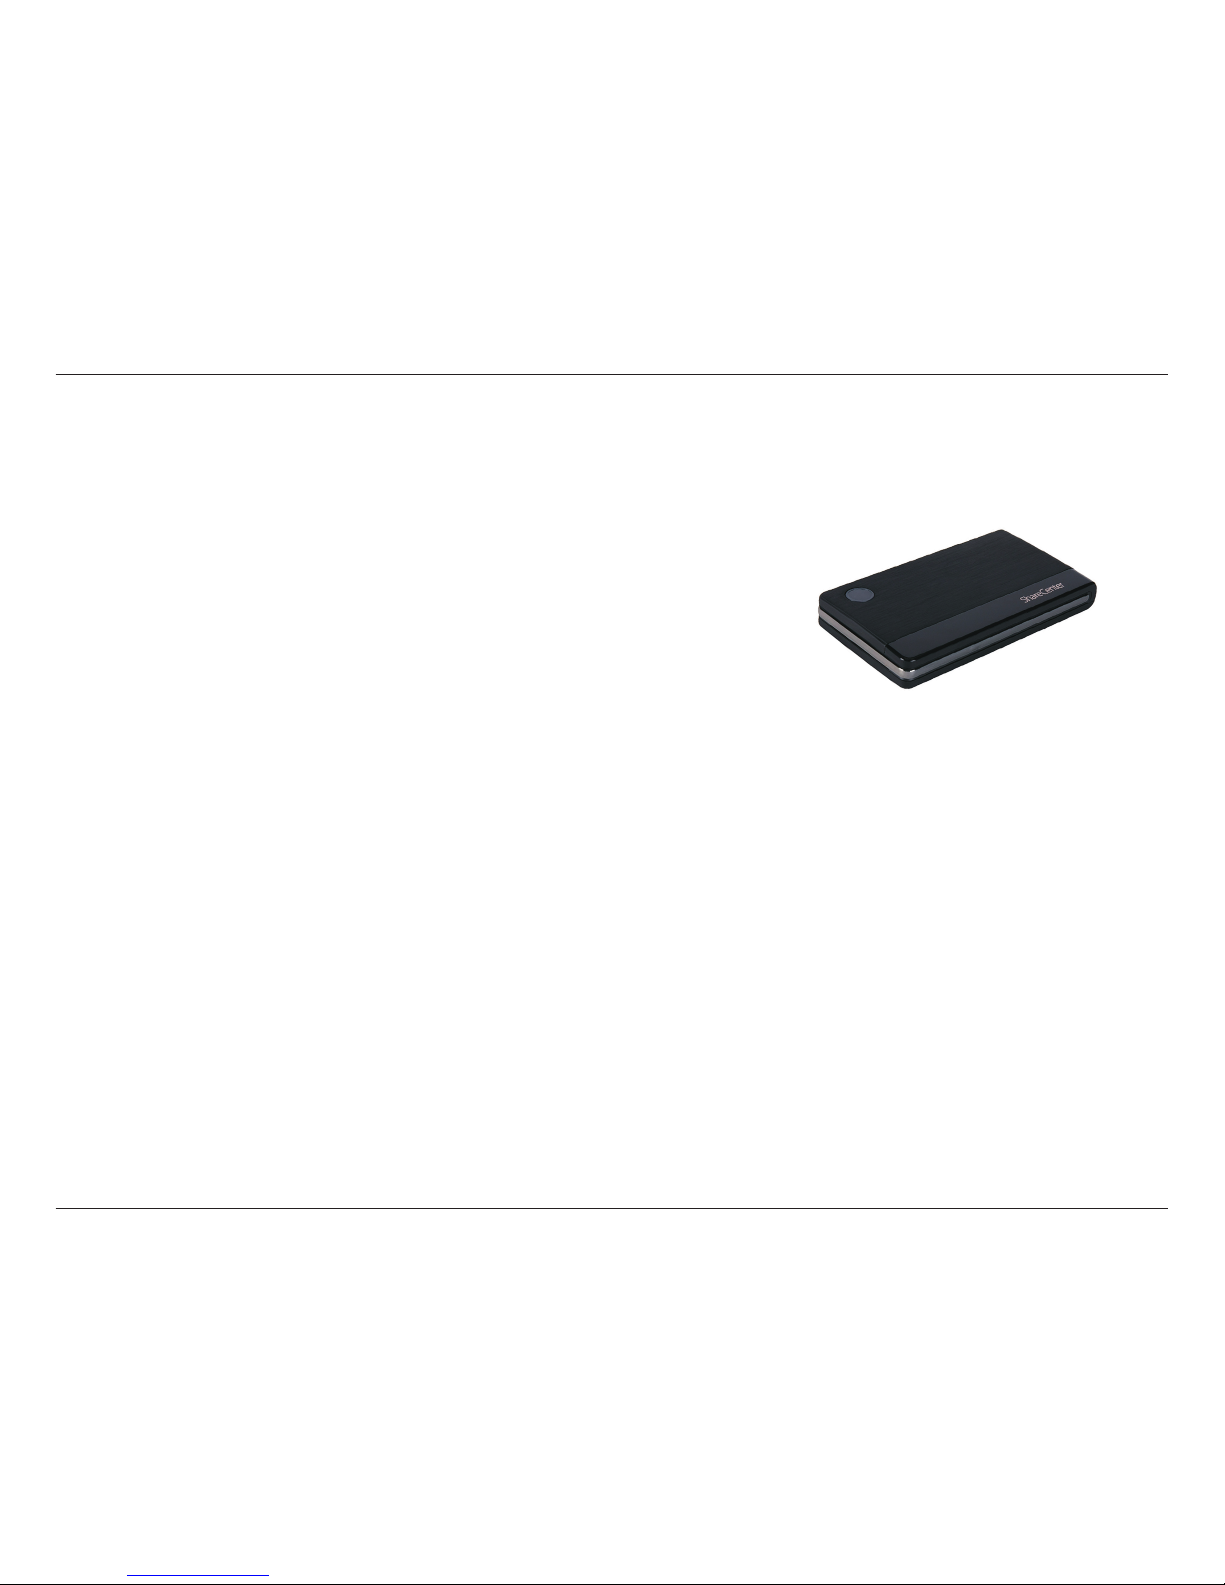
ShareCenter™ 2Go DNS-213 with 2.5 inch
SATA HDD
CD-ROM with Manual and Software
Quick Installation Guide
Power Adapter and cord (12V / 1.25A)
1.5 M Ethernet Cable
1 M Type A to miniB USB cable
Warranty Card
Computer with: 1GHz processor / 512 MB RAM / 200 MB available space / CD-ROM drive
Internet Explorer version 7.0, Mozilla Firefox 3.0, Apple Safari 4.0 and above
Windows
®
XP (with Service Pack 2), Windows Vista® , or Windows® 7
Note: Using a power supply with a different voltage than the one included with the ShareCenter™ 2Go will cause damage and
void the warranty for this product.
If any of the above items are missing, please contact your reseller.
Page 5
2D-Link ShareCenter™ 2Go User Manual
Section 1 - Product Overview
The D-Link ShareCenter™ 2Go DNS-213 1-Bay Portable Network/USB Storage with 2.5” SATA Hard Drive enables
you to share your documents, photos, music and videos across the network and over the Internet (via FTP server) so
that family members, friends or employees can access them at anytime. This device is equipped with a 2.5” SATA
hard drive; it creates a central network point for backing up valuable les. The ShareCenter™ 2Go also supports the
DAS function which can be powered by PC/NB through a USB port allowing the ShareCenter™ 2Go to be used as a
2.5” external USB hard disk.
The ShareCenter™ 2Go shares les over the Internet via the built-in FTP server. Users and groups can be created and
assigned to folders with either read or read/write permissions. This is ideal for an ofce environment with employeespecic sensitive data or for the home where you can ensure your children will only have access to age appropriate
material. The ShareCenter™ 2Go will be available to any computer (PC, or Linux-based) on your network, without the
need to install any software on the computer.
In addition, the ShareCenter™ 2Go can be used to stream photos, music, and videos to UPnP AV compatible network
media players (such as those found in D-Link’s MediaLounge product line). This feature is highly convenient as it allows
you to turn off a computer that would normally be needed for the same function.
The included CD contains D-Link’s Easy Search Utility. This utility allows you to locate the ShareCenter™ 2Go on
the network and map drives to your computer. Backup software is also included on the CD. This software allows you
to backup your les from a computer to the ShareCenter™ 2Go manually, by a schedule, or in real-time. Real-time
backups are a great way to safeguard against unfortunate accidents that may result in the loss of important les.
Combining ease of use with practical, high performance features, the ShareCenter™ 2Go DNS-213 is an organized
solution for any network. Free up disk space on computers and centralize data on your network with the ShareCenter™
2Go.
Note: When rst powered on, during the initial boot sequence, the ShareCenter™ 2Go will wait to be assigned an IP address
via DHCP. If it does not receive a DHCP assigned IP address, by default it will have an Auto IP address of 169.254.xxx.xxx
Introduction
Page 6
3D-Link ShareCenter™ 2Go User Manual
Section 1 - Product Overview
Features
The ShareCenter™ 2Go is an easy to install data storage platform used for remote access through a private network
or from the Internet. The ShareCenter™ 2Go includes the following multiple product features listed here:
One hard drive bay equipped with a pre-
formatted 2.5” SATA hard drive.
High performance gigabit Ethernet connectivity
USB 2.0 mini port included for use as portable
hard disk
2
Built-in FTP server for le access from over
the Internet
Supports secure FTP over SSL and TLS (use
with Mozilla Firefox FireFTP feature and similar
software)
Scheduled downloads from Web or FTP sites
Full or incremental backups
Recover your computer using the bundled
backup software
Supports P2P Download
Supports Power Off Scheduling
Supports S.M.A.R.T test function
Supports System Logging/FTP Logging
Users and groups can be assigned to folders
with read or read/write permissions
Automatic e-mail notications of Device Status
Power management for conserving energy and
extending hard drive life
UPnP AV server for streaming music, photos,
and video to compatible network media
players, Xbox 360, and Playstation
1
iTunes® software will be able to automatically
nd and play music directly from the device
D-Link Easy Search Utility
Web browser conguration
Supports secure login using HTTPS
Yahoo Widget support
1. D-Link cannot guarantee full compatibility or proper playback with all codecs. Playback capability depends on the codec support of the UPnP™ AV media player.
2. When using the ShareCenter™ 2Go as a USB 2.0 portable drive, the Network Storage functionality will be disabled. To re-enable Network Storage functionality, please power
woff the ShareCenter™ 2Go and unplug the USB cable. Then, plug in the Ethernet Cable and power back on the ShareCenter™ 2Go.
Disclaimer: D-Link assumes no responsibility for any lost data. In the event of any warranty return, repair, or drive replacement, all data contained on the hard drive
may be lost during service. D-Link recommends that you regularly back up the contents of your hard drive on a separate storage medium.
Page 7
4D-Link ShareCenter™ 2Go User Manual
Section 1 - Product Overview
Hardware Overview
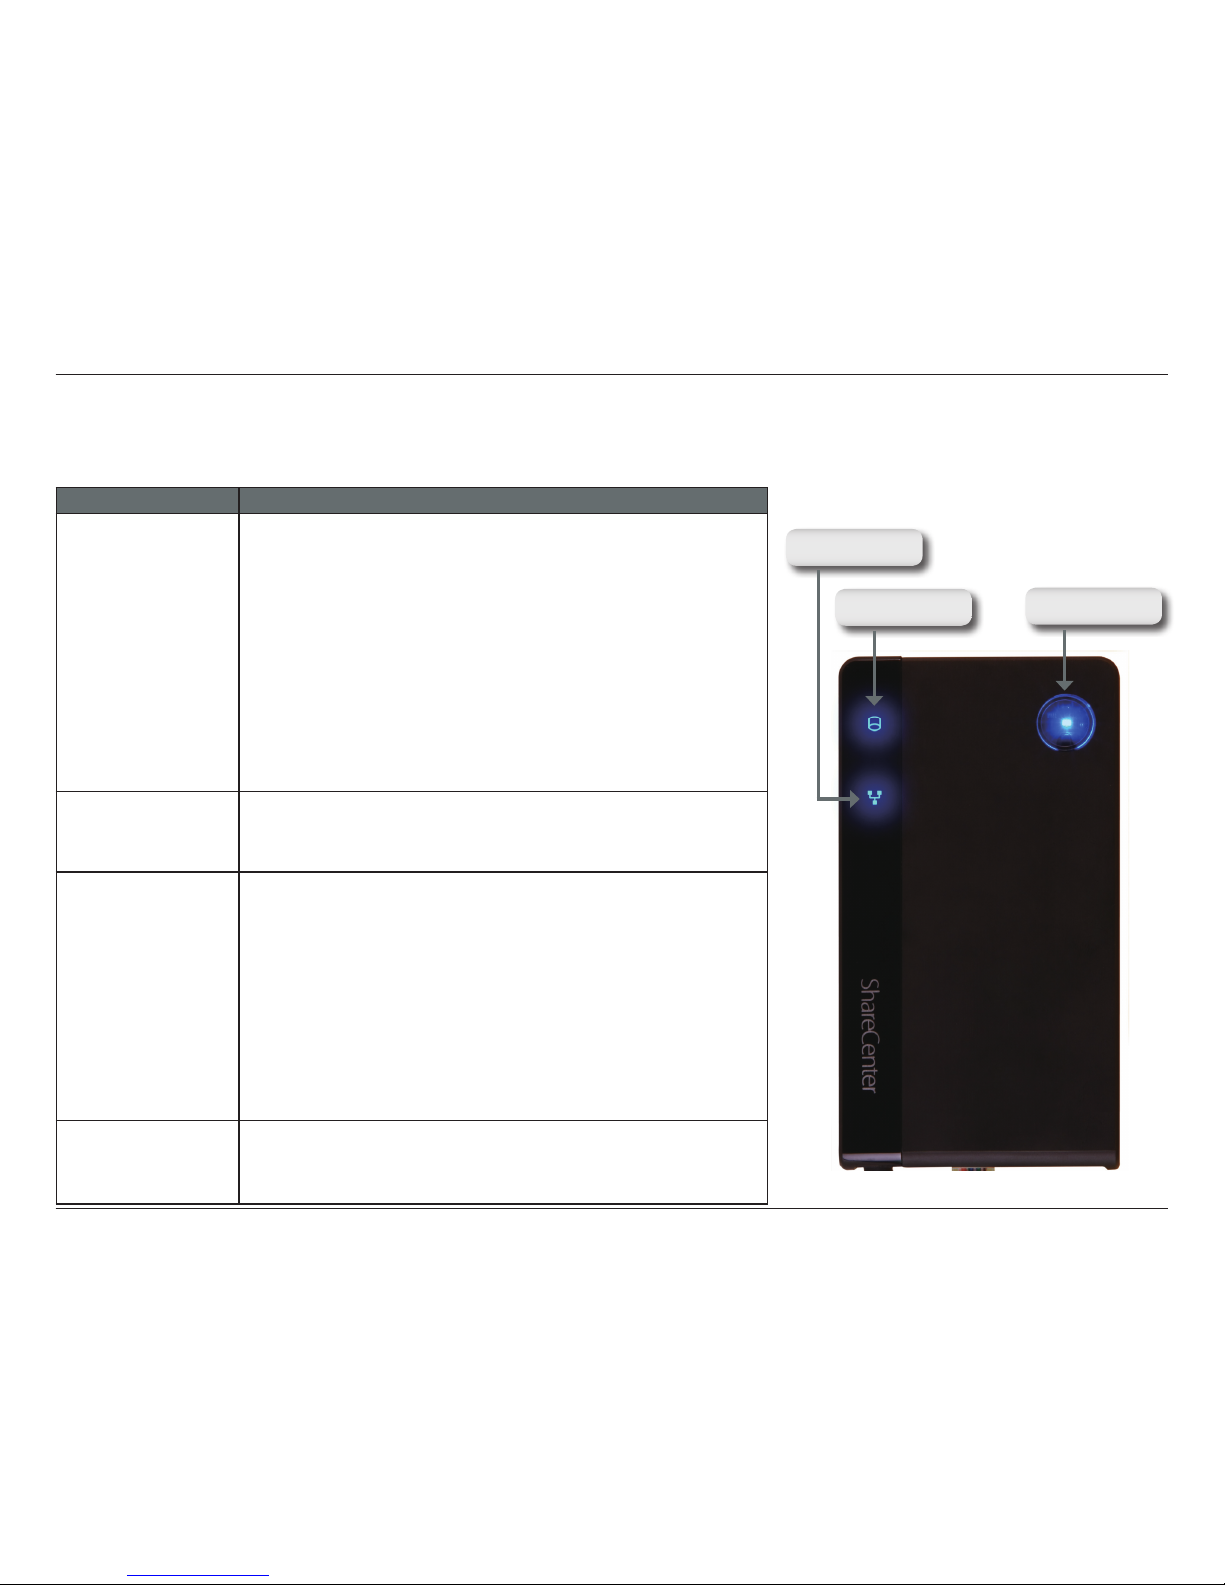
Top View
Power Button
COMPONENT DESCRIPTION
HDD LED
(NAS Mode)
Blue (HDD capacity more than 5%)
Solid HDD is present
Blinking HDD is read/write
Off Power is off or no hard drive inserted
Amber (HDD capacity less than 5%)
Solid HDD is present
Blinking HDD is in read/write mode
Off Power is off or no hard drive inserted
Red Solid HDD out of capacity
Blinking HDD fail
Off Power is off or no hard drive inserted
HDD LED
(DAS Mode)
Solid USB Power is on
Blinking While transferring data
Off USB Power is off
Power Button LED
(NAS mode)
Push this button to power-on the ShareCenter™ 2Go. The center
of the button will illuminate with a blue LED when the device is
powered on. To turn off the NAS, hold the power button down
until the all LEDs on the ShareCenter™ 2Go begin to ash. There
is a 15-20 second delay before the device will power off.
Solid System is under booting (restarting)
Power is on and device is in a ready state
Blinking Blink 3 times after system booting up
(restarting) ready
Off Power is off or device is in power saving mode
LAN LED
(NAS mode)
Solid Connected to LAN
Blinking Transferring data
Off Not connected
HDD LED
LAN LED
Page 8
5D-Link ShareCenter™ 2Go User Manual
Section 1 - Product Overview
COMPONENT DESCRIPTION
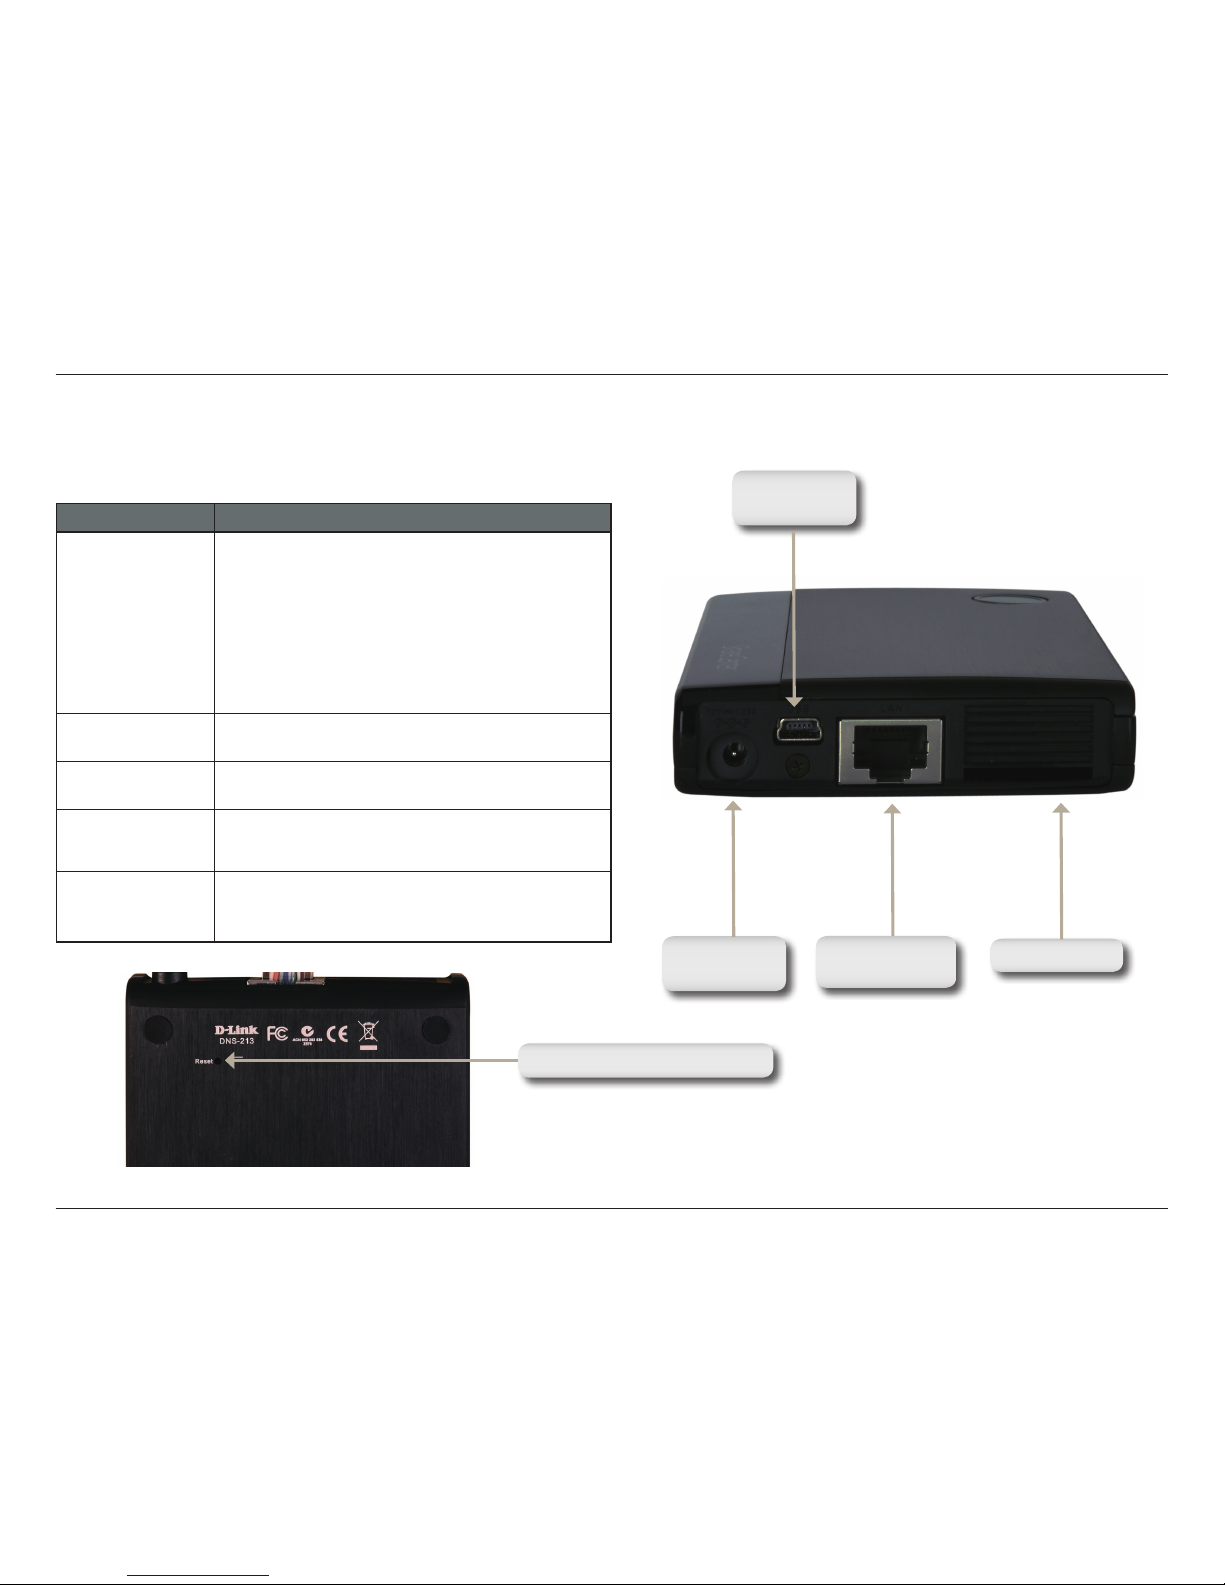
Cooling Fan The cooling fan is used to cool the hard drive.
The cooling fan will run during system bootup
and will turn off after bootup has completed. The
ShareCenter™ 2Go will also turn on the fan if
the system temperature becomes too high and
turn off the fan when the system temperature
lowers down to a reasonable level.
Do not block this opening.
RJ-45 Ethernet
port
Gigabit E th er net port that conn ec ts the
ShareCenter™ 2Go to the local network.
Mini USB Port One mini USB 2.0 connector: USB device port
to connect to PC as an external USB hard disk.
Power
Receptacle
The 12V/1.25A power supply connects here.
Reset Button Reset conguration to default (push over 5 sec
using a long thin paperclip through the hole on
the bottom panel)
Rear and Bottom Panel (Connections)
Reset Pinhole and Button
Mini USB
Port
Power
Receptacle
RJ45 Ethernet
Port
Cooling Fan.
Disclaimer: The factory-installed internal hard drive can only be
replaced or repaired by a D-Link Authorized Service
Center. Any attempt by the consumer to replace or
repair the internal hard drive will void the warranty.
Page 9
6D-Link ShareCenter™ 2Go User Manual
Section 1 - Product Overview
Rear Panel (Connections)
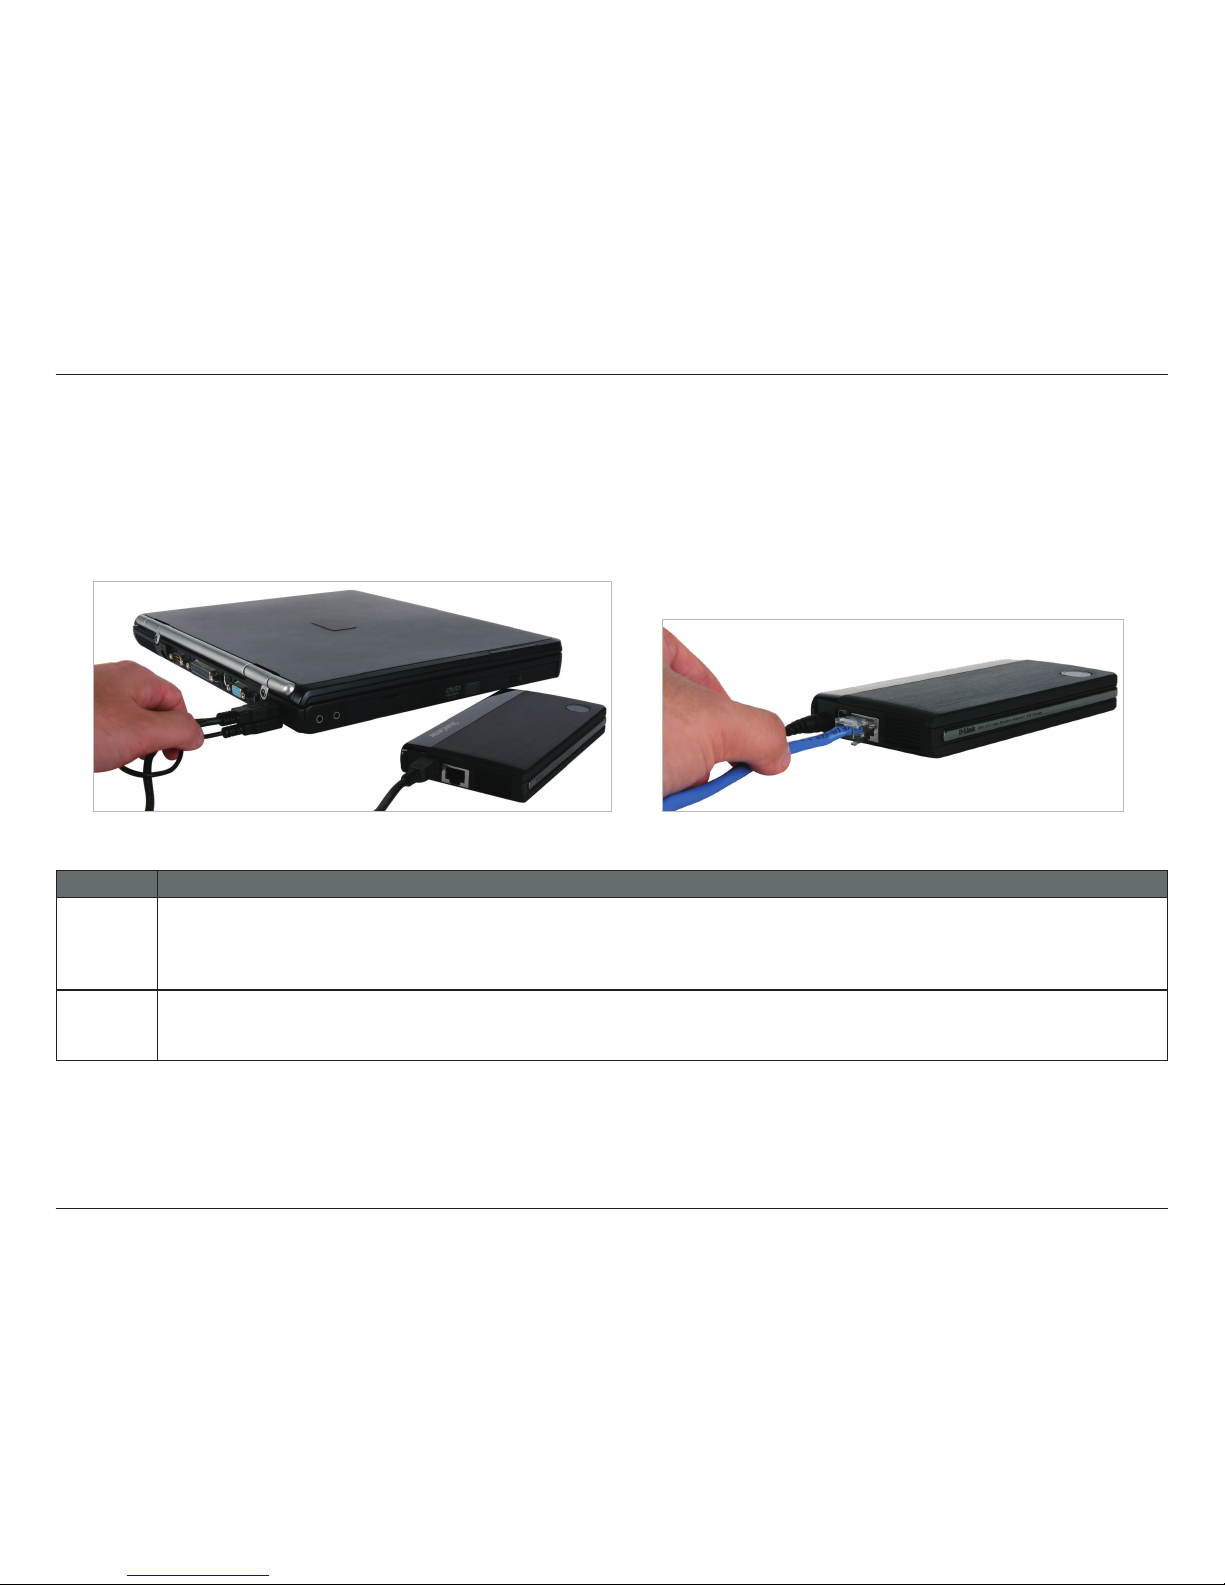
MODE DESCRIPTION
Direct
Attached
This mode allows you to connect the ShareCenter™ 2Go to your computer as a USB 2.0 portable drive. To use this mode
power off the drive and connect a USB cable between the ShareCenter™ 2Go’s USB connection and a USB port on a
desktop or notebook. Wait for the USB drive to be ready on your computer. See the “Direct Attached Storage Function”
section on page 8 for more information.
Network
Storage
This mode allows you to use the ShareCenter™ 2Go as a network storage device. To use this mode power-off the drive
and connect an RJ45 cable between the gigabit Ethernet port and the local network connection. Then power-on the drive
and connect to the drive using the Easy Search D-Link Storage Utility.
Direct Attached/Network Storage Mode
The ShareCenter™ 2Go can operate as either a USB 2.0 portable hard drive (DAS) or as a Network Storage (NAS)
device. To change the operating mode power down the drive and restart it with only one of either the USB or the
Ethernet ports connected.
Direct Attached Storage Mode Network Storage Mode
Note: When using the ShareCenter™ 2Go as a USB 2.0 portable drive, the Network Storage functionality will be disabled. To
re-enable Network Storage functionality, please power off the ShareCenter™ 2Go and unplug USB cable. Plug in the Ethernet
cable and power cable into the ShareCenter™ 2Go.
Page 10
7D-Link ShareCenter™ 2Go User Manual
Section 2 - Installation
Installation
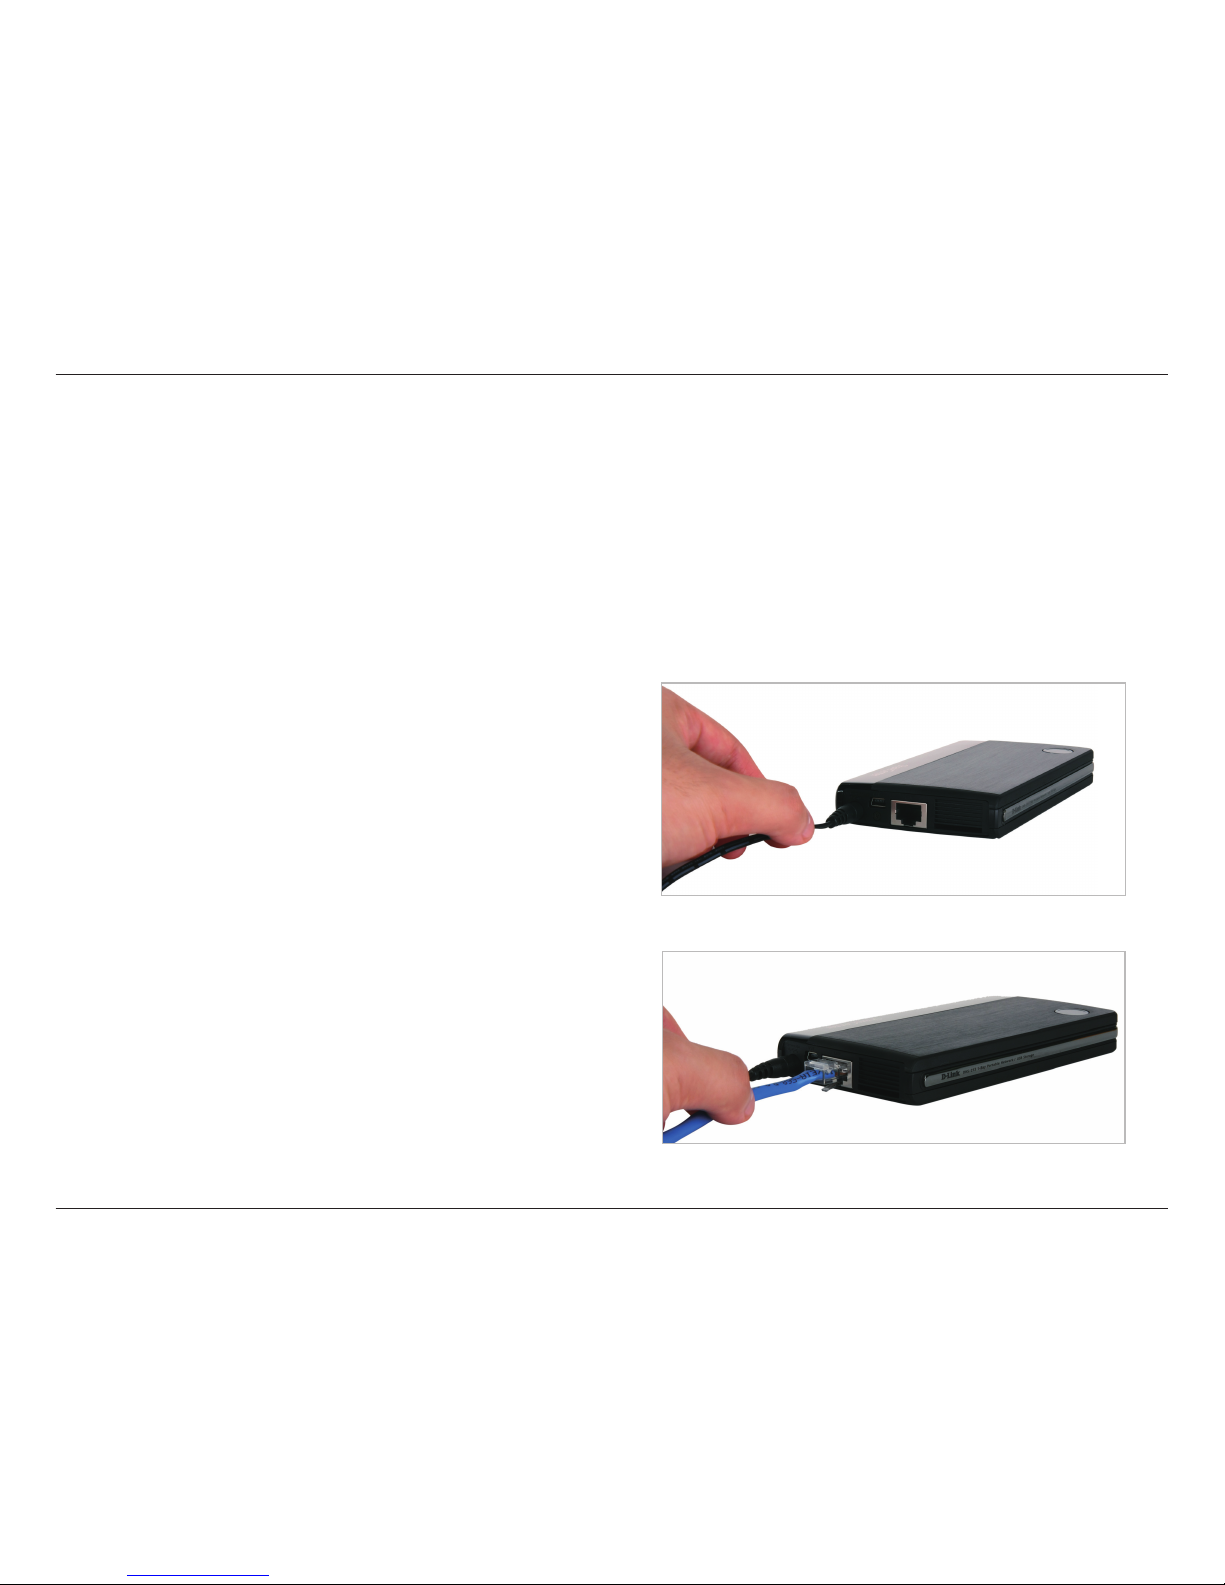
1. Connect the power adapter plug to the ShareCenter™
2Go power receptacle.
3. Plug in the power adapter to a power receptacle.
Follow the instructions below to install a hard drive, connect to the network and power on the ShareCenter™ 2Go.
Open the packaging of the ShareCenter™ 2Go and carefully remove and unwrap its contents. .
To install ShareCenter™ 2Go on your local network, refer to the steps below:
Hardware Setup
Network Storage Mode
2. Connect the ShareCenter™ 2Go using an RJ-45
Connector on an Ethernet Cable to your Local Network.
This cable should connect the ShareCenter™ 2Go to
your local network via a router or switch, or directly
to a computer for conguration.
Page 11
8D-Link ShareCenter™ 2Go User Manual
Section 2 - Installation
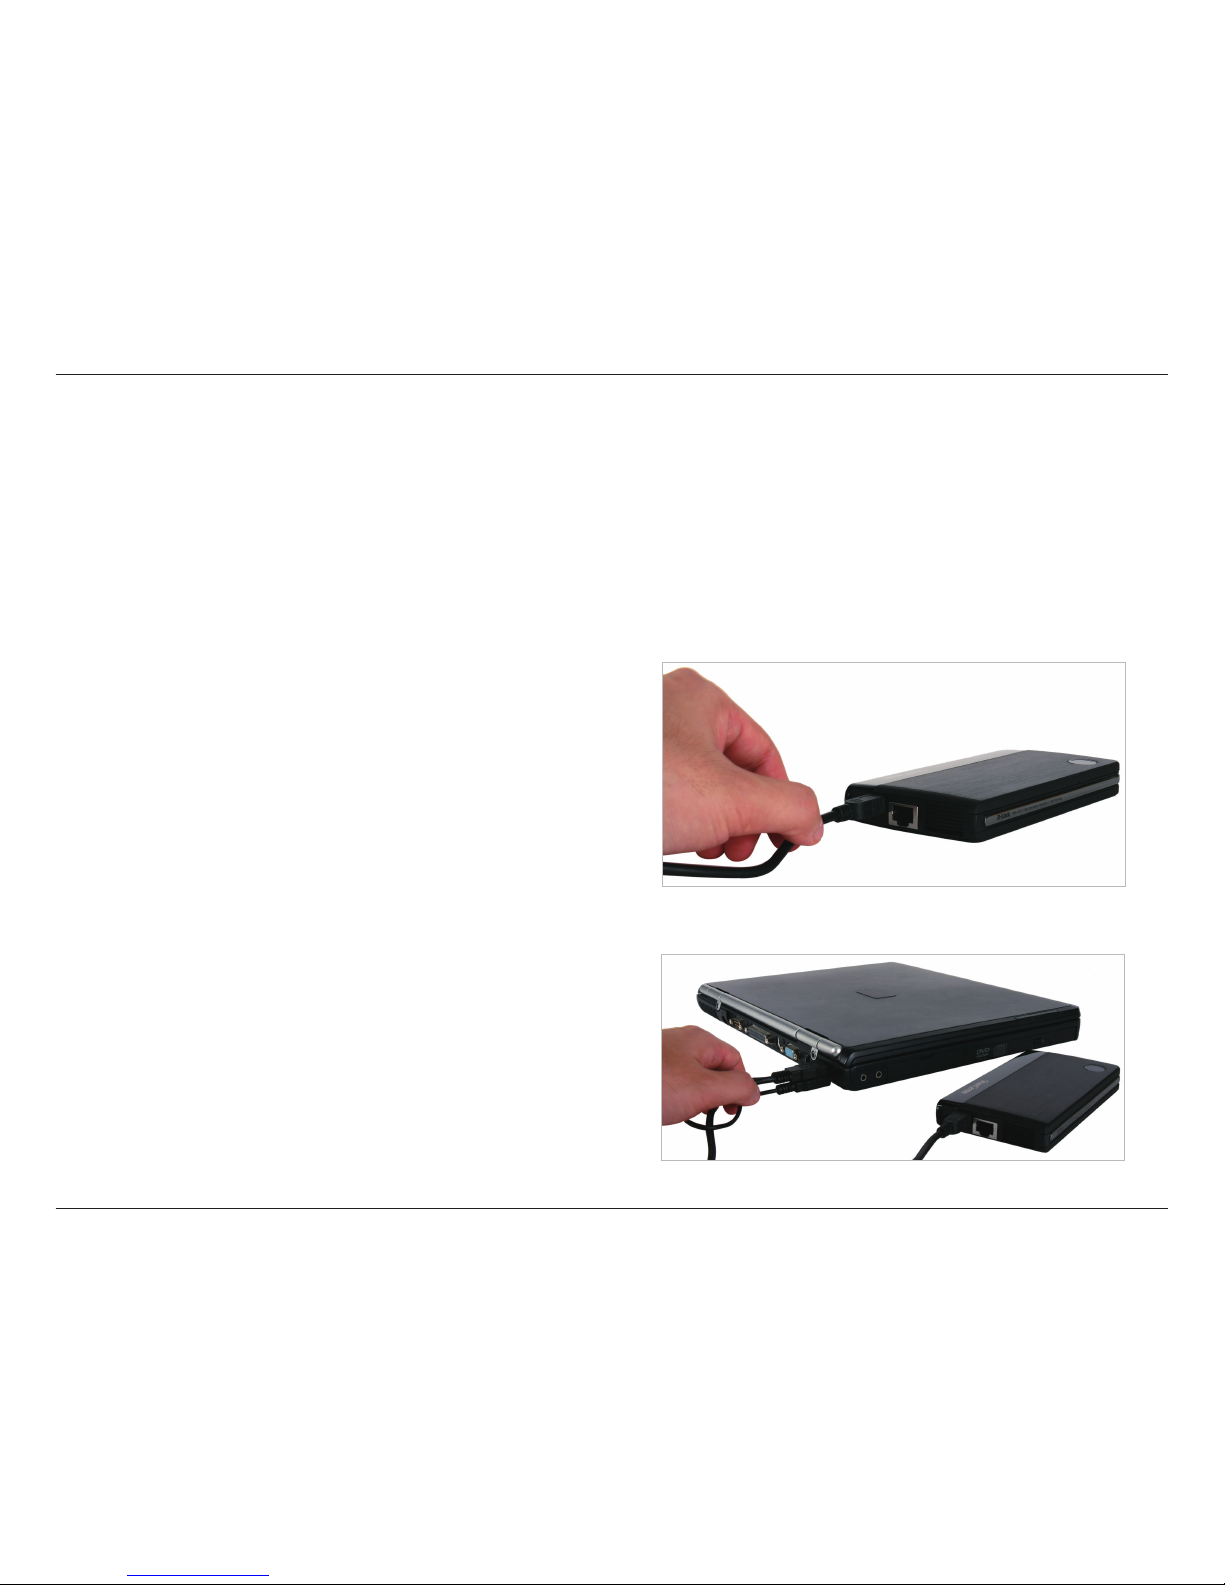
1. C onne ct t he M ini -USB cab le plug int o th e
ShareCenter™ 2Go Mini-USB port.
2. Connect the Type A USB connector(s) to USB port(s)
of the computer that you wish to connect directly with
the ShareCenter™ 2Go.
The ShareCenter™ 2Go features a built in Direct Attached Storage function that allows the ShareCenter™ 2Go to
function as a USB 2.0 Portable Drive. Just plug it into your computer and it installs automatically with Windows XP,
Windows Vista, or Windows 7 computers.
To use the ShareCenter™ 2Go Direct Attached Storage function, refer to the steps below:
Direct Attached Storage Function
Page 12
9D-Link ShareCenter™ 2Go User Manual
Section 2 - Installation
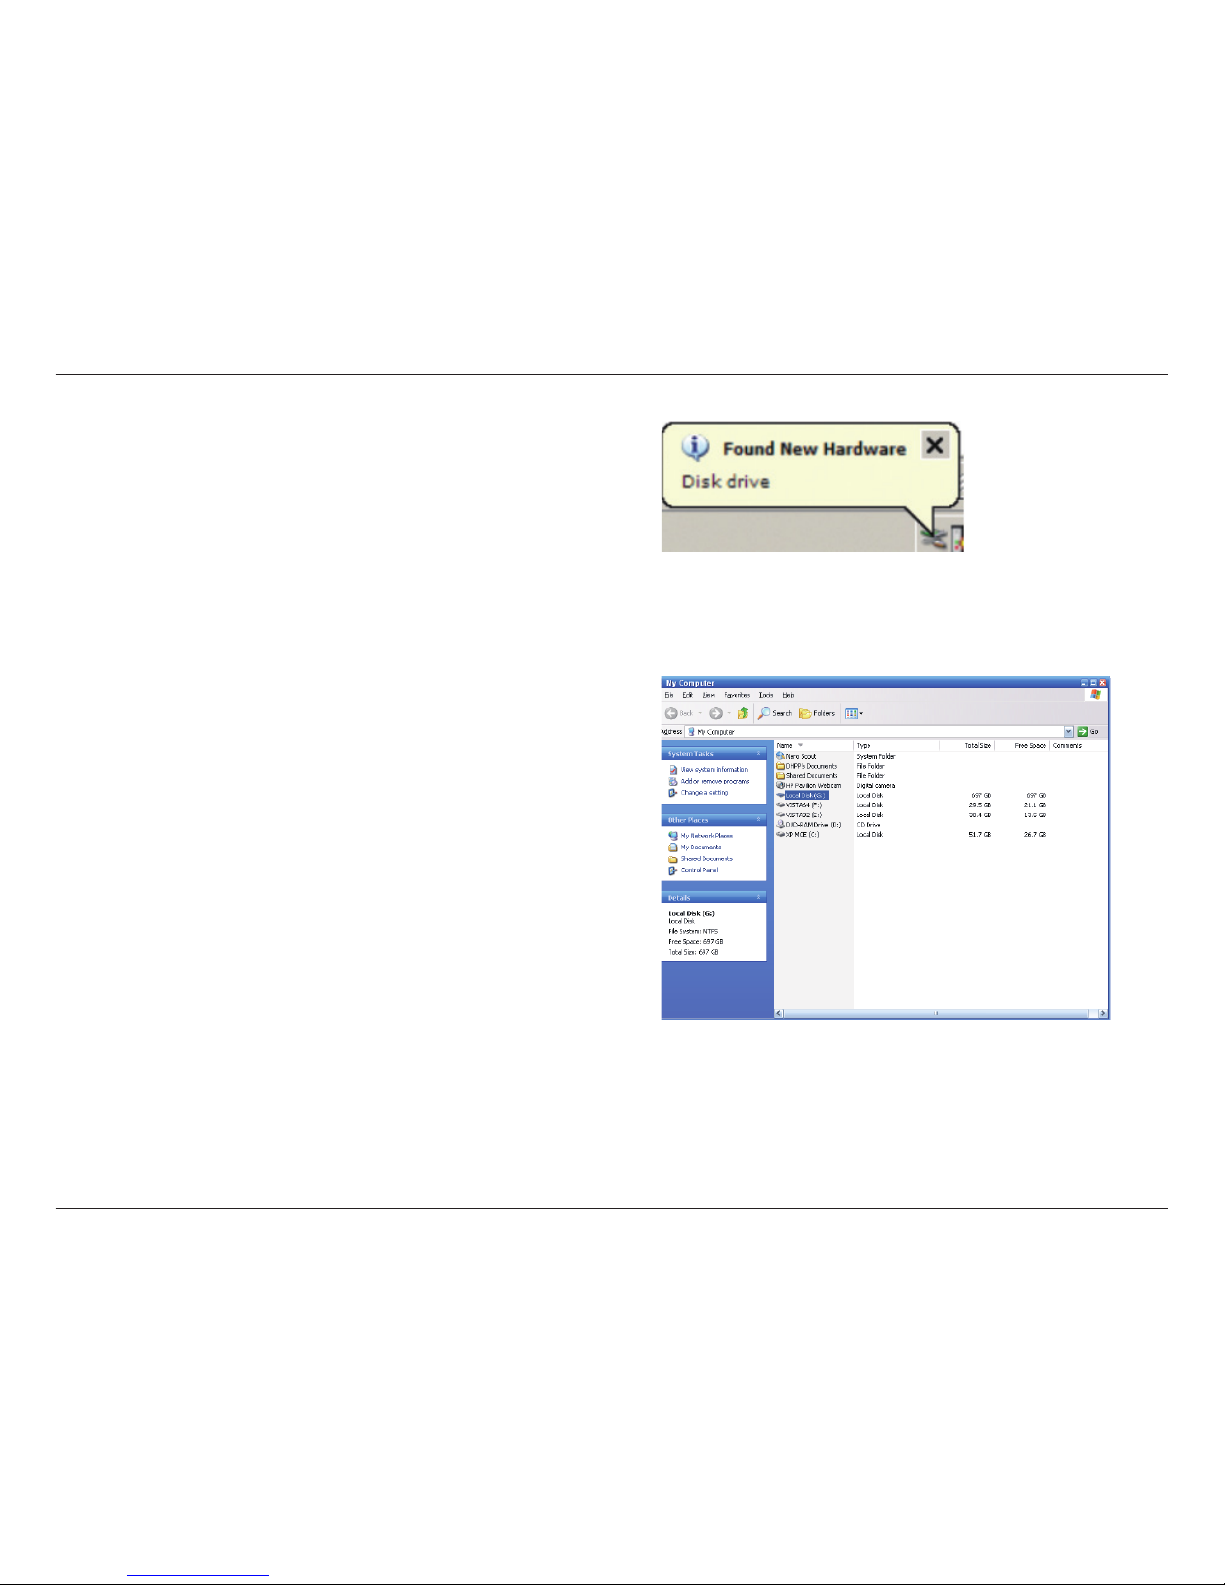
3. Press the Power Button on the ShareCenter™ 2Go,
In XP, Vista, and Windows 7 the ShareCenter™ 2Go
will automatically install once it is powered-on.
4. Open My Computer and the new drive will appear.
By default the ShareCenter™ 2Go will use the rst
available drive letter.
Page 13
10D-Link ShareCenter™ 2Go User Manual
Section 3 - Conguration
Easy Search Utility
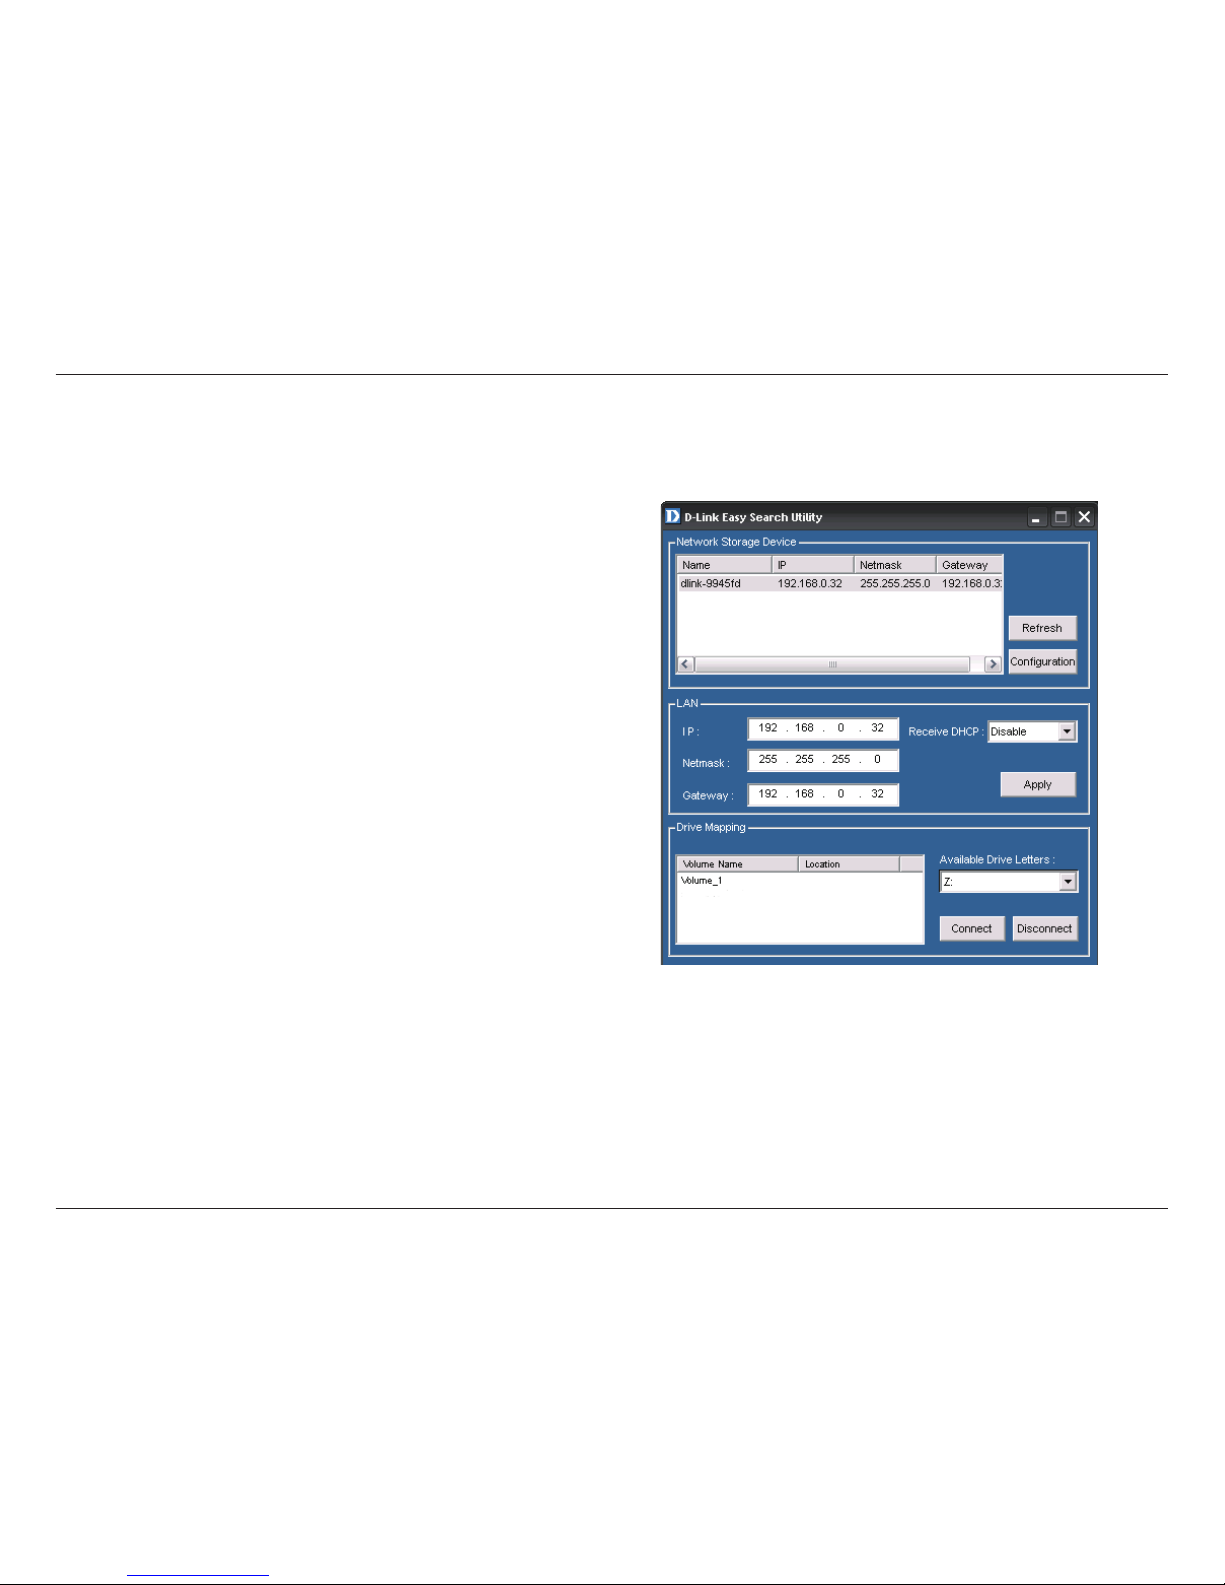
It is recommended to use the included D-Link Easy Search
Utility when accessing and conguring the ShareCenter™
2Go for the first time. If you want to change the IP
address before logging in or are unable to connect to the
ShareCenter™ 2Go IP address, you can use the Easy
Search Utility provided on the product CD to locate the
device on your network and make any required changes.
Once the ShareCenter™ 2Go is connected to the Local
Network, follow the instructions below to change the device
IP settings and use the Easy Search Utility to map the drive
to your Windows computer.
Click the Easy Search Utility link. A new menu appears.
The ShareCenter™ 2Go will appear listed under Network
Storage Devices. If none are listed, click the Refresh
button. If a DHCP server is active on your network, the
ShareCenter™ 2Go will receive an IP address by DHCP. If
there is no DHCP address available, the Auto-IP process
will assign a 169.254.xxx.xxx address to the ShareCenter™
2Go.
See the “Utility Overview” section on page 11 for more
information on how to use Easy Search utility.
Page 14
11D-Link ShareCenter™ 2Go User Manual
Section 3 - Conguration
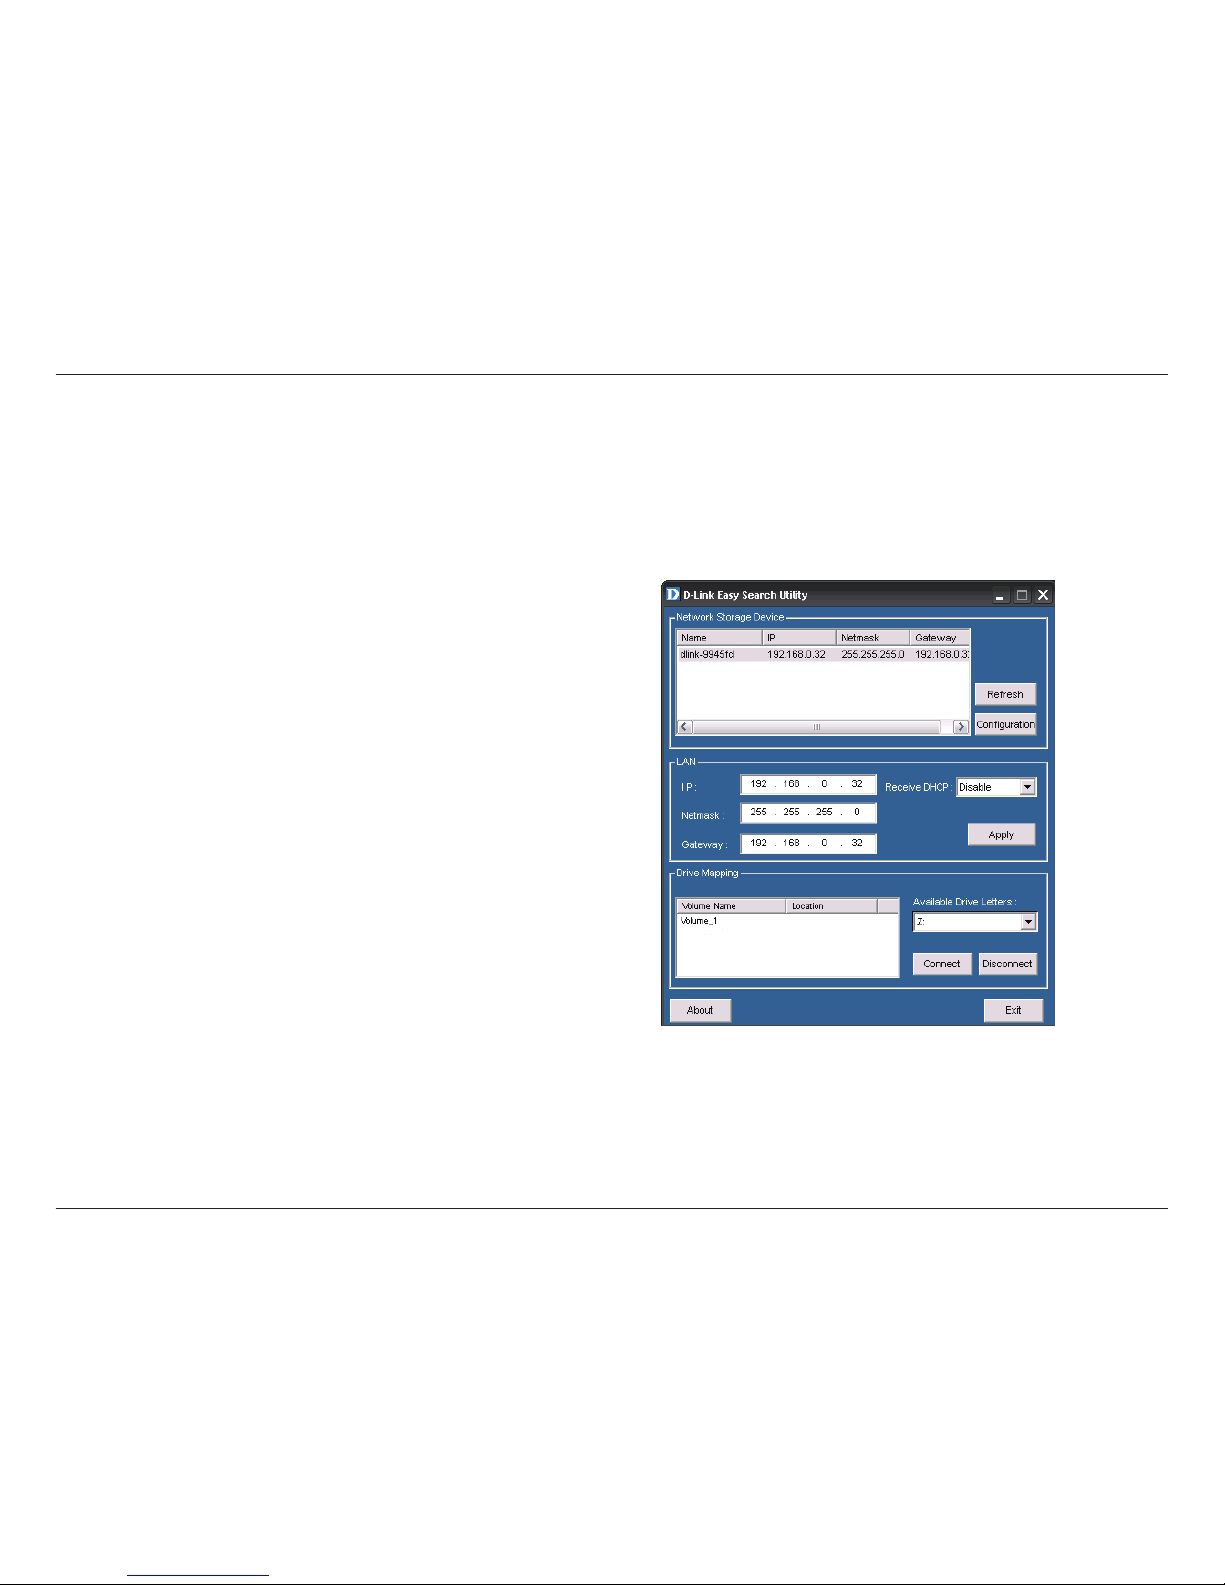
The Easy Search Utility displays all available
ShareCenter™ 2Go devices on the network here.
Refresh the device list.
Click Conguration to access the Web-based utility
of the ShareCenter™ 2Go.
Congure the LAN Settings for the ShareCenter™
2Go here.
Click Apply to save and activate the changes to the
LAN Settings.
Volumes available for mapping are displayed here.
Choose an available drive letter. Click Connect
to map the selected volume. Click Disconnect to
disconnect the selected mapped volume.
Click Exit to close the utility.
Click to see the basic firmware and copyright
information about D-Link Easy Search Utility.
Network Storage
Device
Refresh
Conguration
LAN
Apply
Drive Mapping
Available Drive
Letters
Exit
About
Easy Search Utility
Utility Overview
Page 15
12D-Link ShareCenter™ 2Go User Manual
Section 3 - Conguration
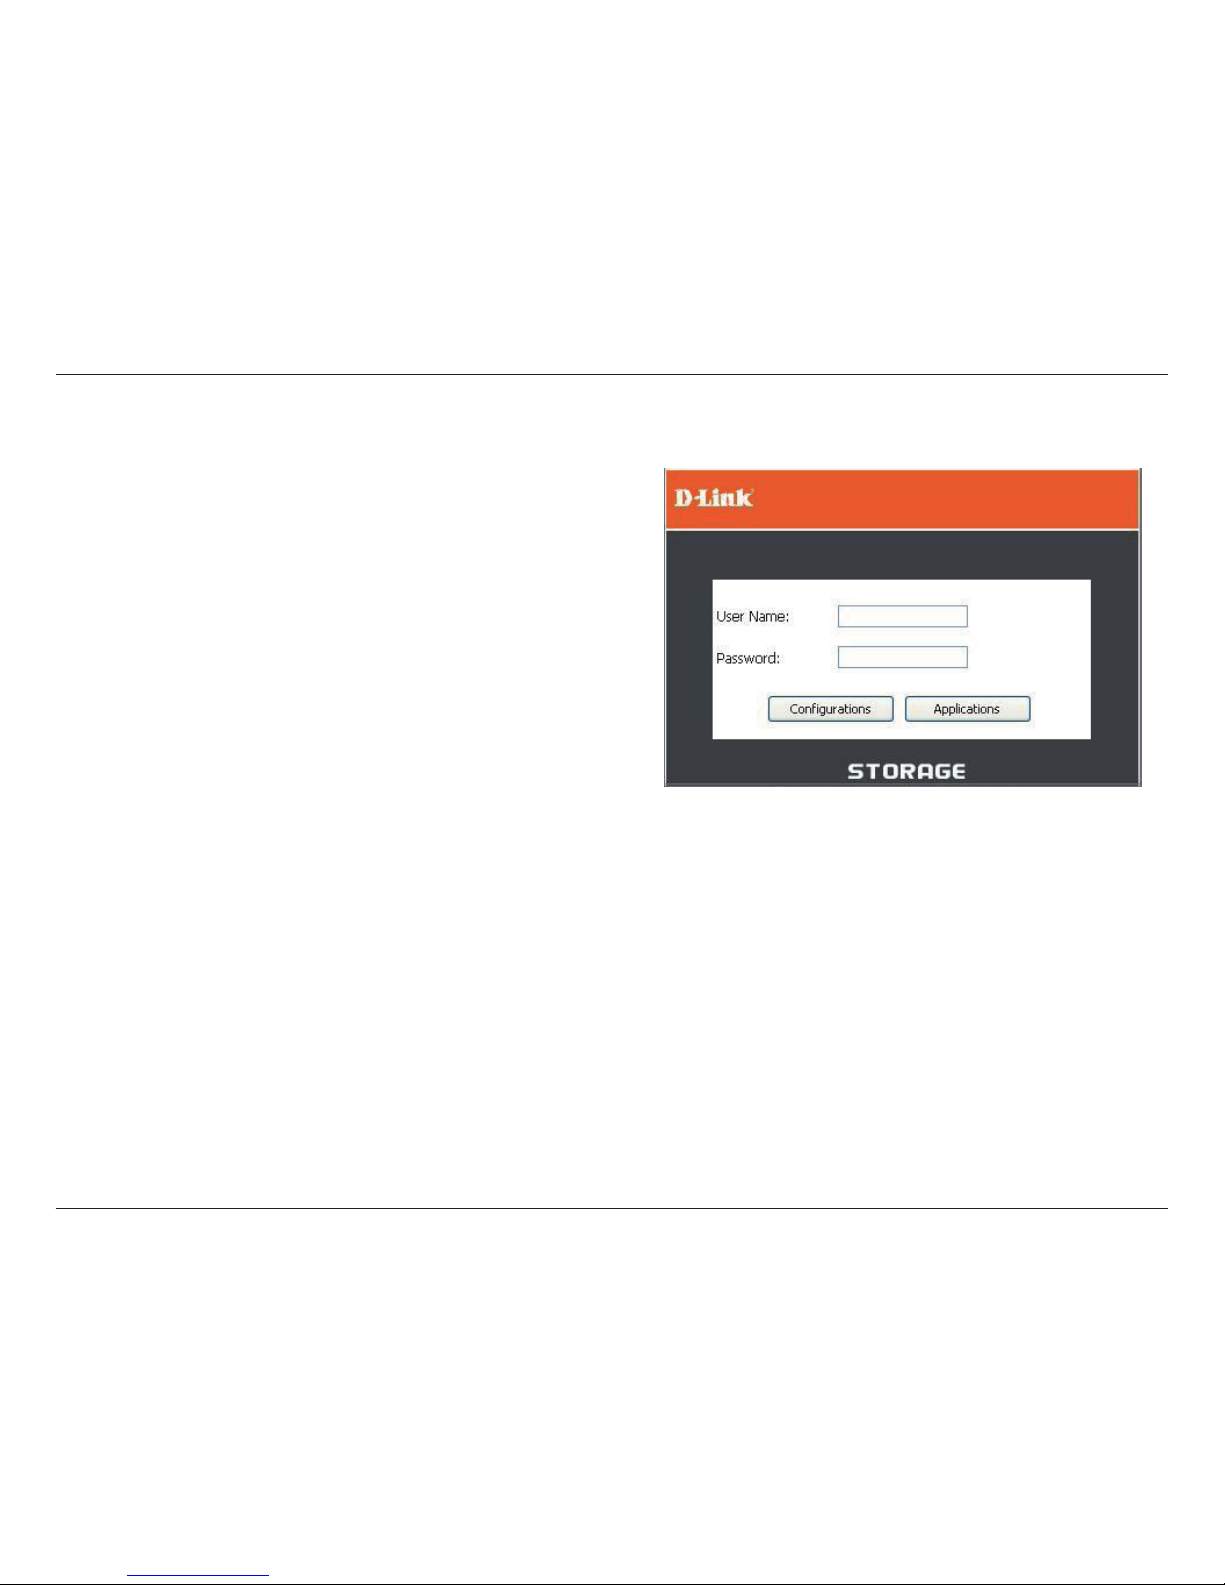
Select the listed ShareCenter™ 2Go and click the
Conguration button. This will launch the computer’s
default web browser and direct it to the IP address listed
for the device. Make sure the browser is not congured to
use a proxy server.
The rst window that appears requires the user to login
for Conguration menus or Applications menus. The
Configuration menus are used for management and
maintenance of the ShareCenter™ 2Go. The Applications
menus include BitTorrent downloading and Scheduled
Downloading.
The Default username to use for the conguration is admin.
Easy Search Utility
Connecting to the ShareCenter™ 2Go
Page 16
13D-Link ShareCenter™ 2Go User Manual
Section 3 - Conguration
The login menu appears in the web page. Type the default
User Name “admin” and click the Congurations button.
Note: The ShareCenter™ 2Go supports secure connection
using HTTPS. To login using HTTPS, simply use HTTPS in
the browser address bar and login with the User Name and
Password for either Congurations or Applications menus.
If the web browser is unable to connect to the web manager
of the ShareCenter™ 2Go, check to make sure your
computer is on the same subnet as the ShareCenter™ 2Go.
ShareCenter™ 2Go uses the Auto-IP (APIPA) process to
obtain the address. If there is no DHCP address available,
the Auto-IP process will assign a 169.254.xxx.xxx address
to the ShareCenter™ 2Go..
Note: The computer used to access the ShareCenter™
2Go web-based conguration manager must be on the
same subnet as the ShareCenter™ 2Go. If your network is
using a DHCP server and the computer receives IP settings
from DHCP, the ShareCenter™ 2Go will automatically be
in the same subnet.
Note: After logging in to the ShareCenter™ 2Go for the rst time it is recommended to add a password to the admin account.
(See the “Admin Password” section on page 58 for more information.)
Page 17
14D-Link ShareCenter™ 2Go User Manual
Section 3 - Conguration
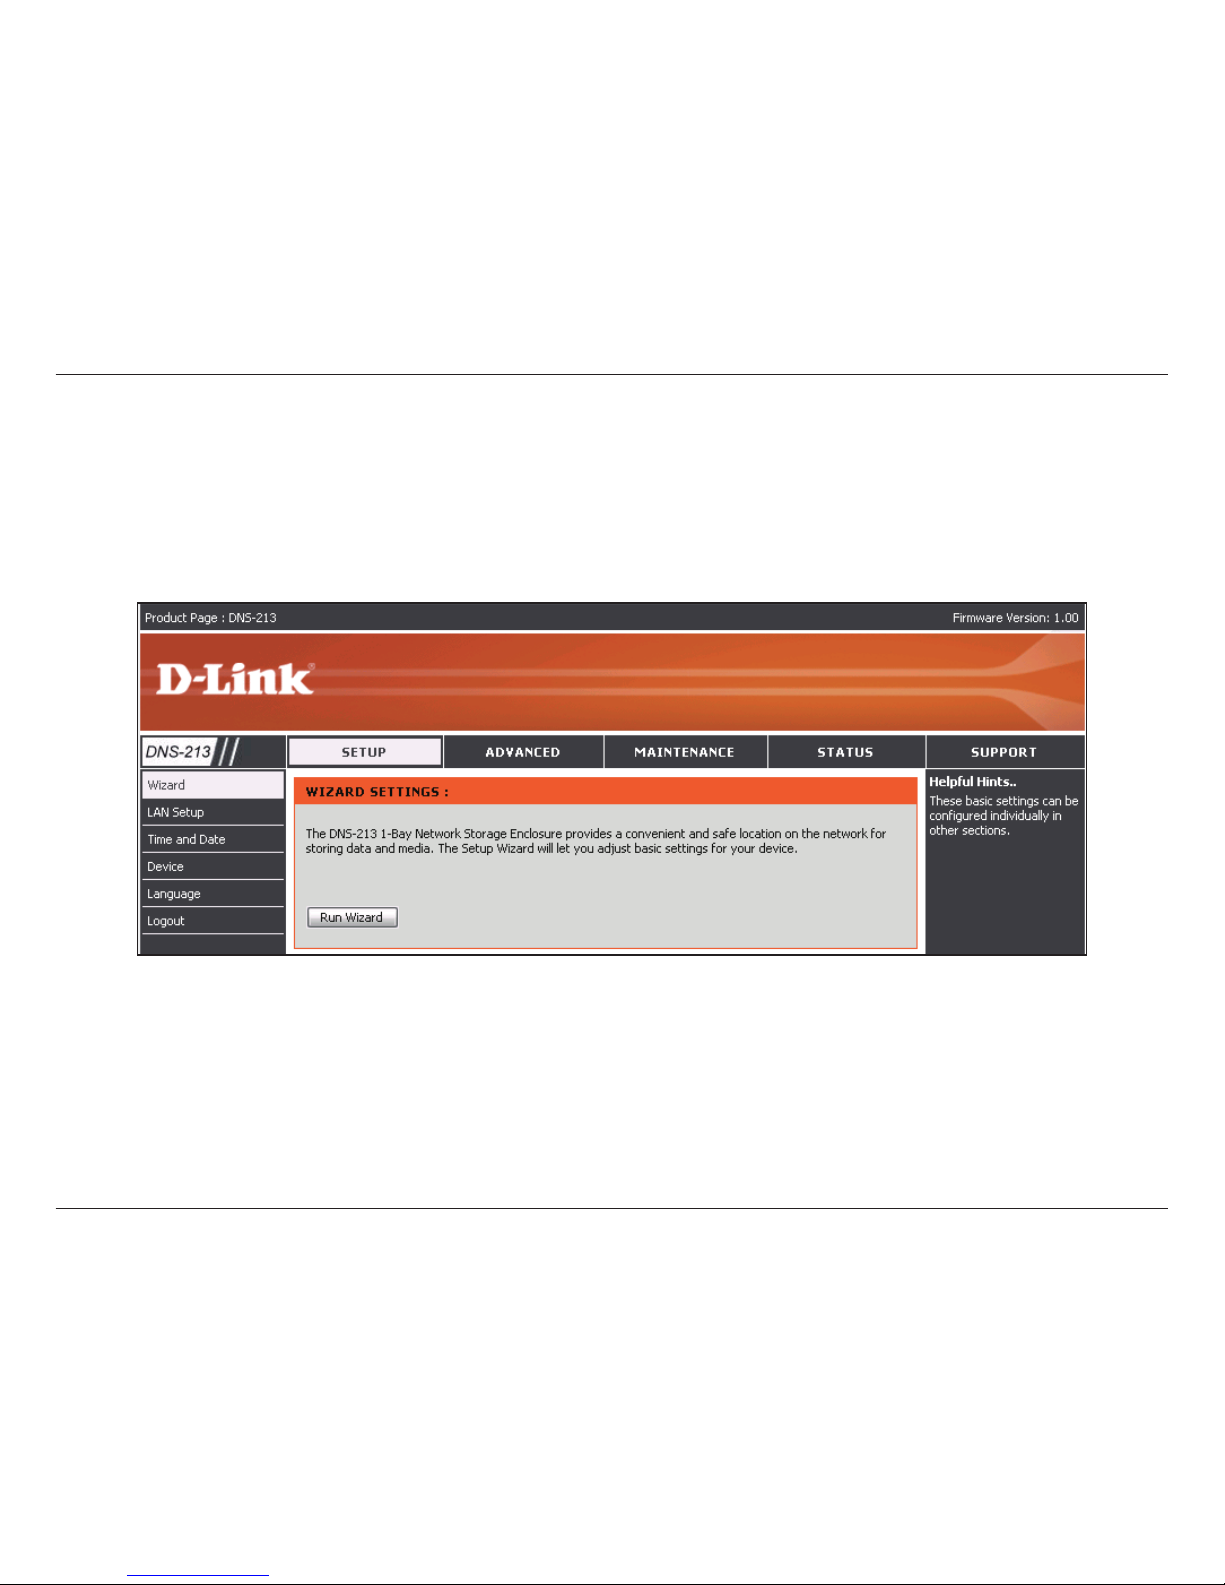
After logging in, you will be redirected to the ShareCenter™
2Go Web UI:
See the “Web UI” section on page 20 for more information
on how to use the Web UI.
Page 18
15D-Link ShareCenter™ 2Go User Manual
Section 3 - Conguration
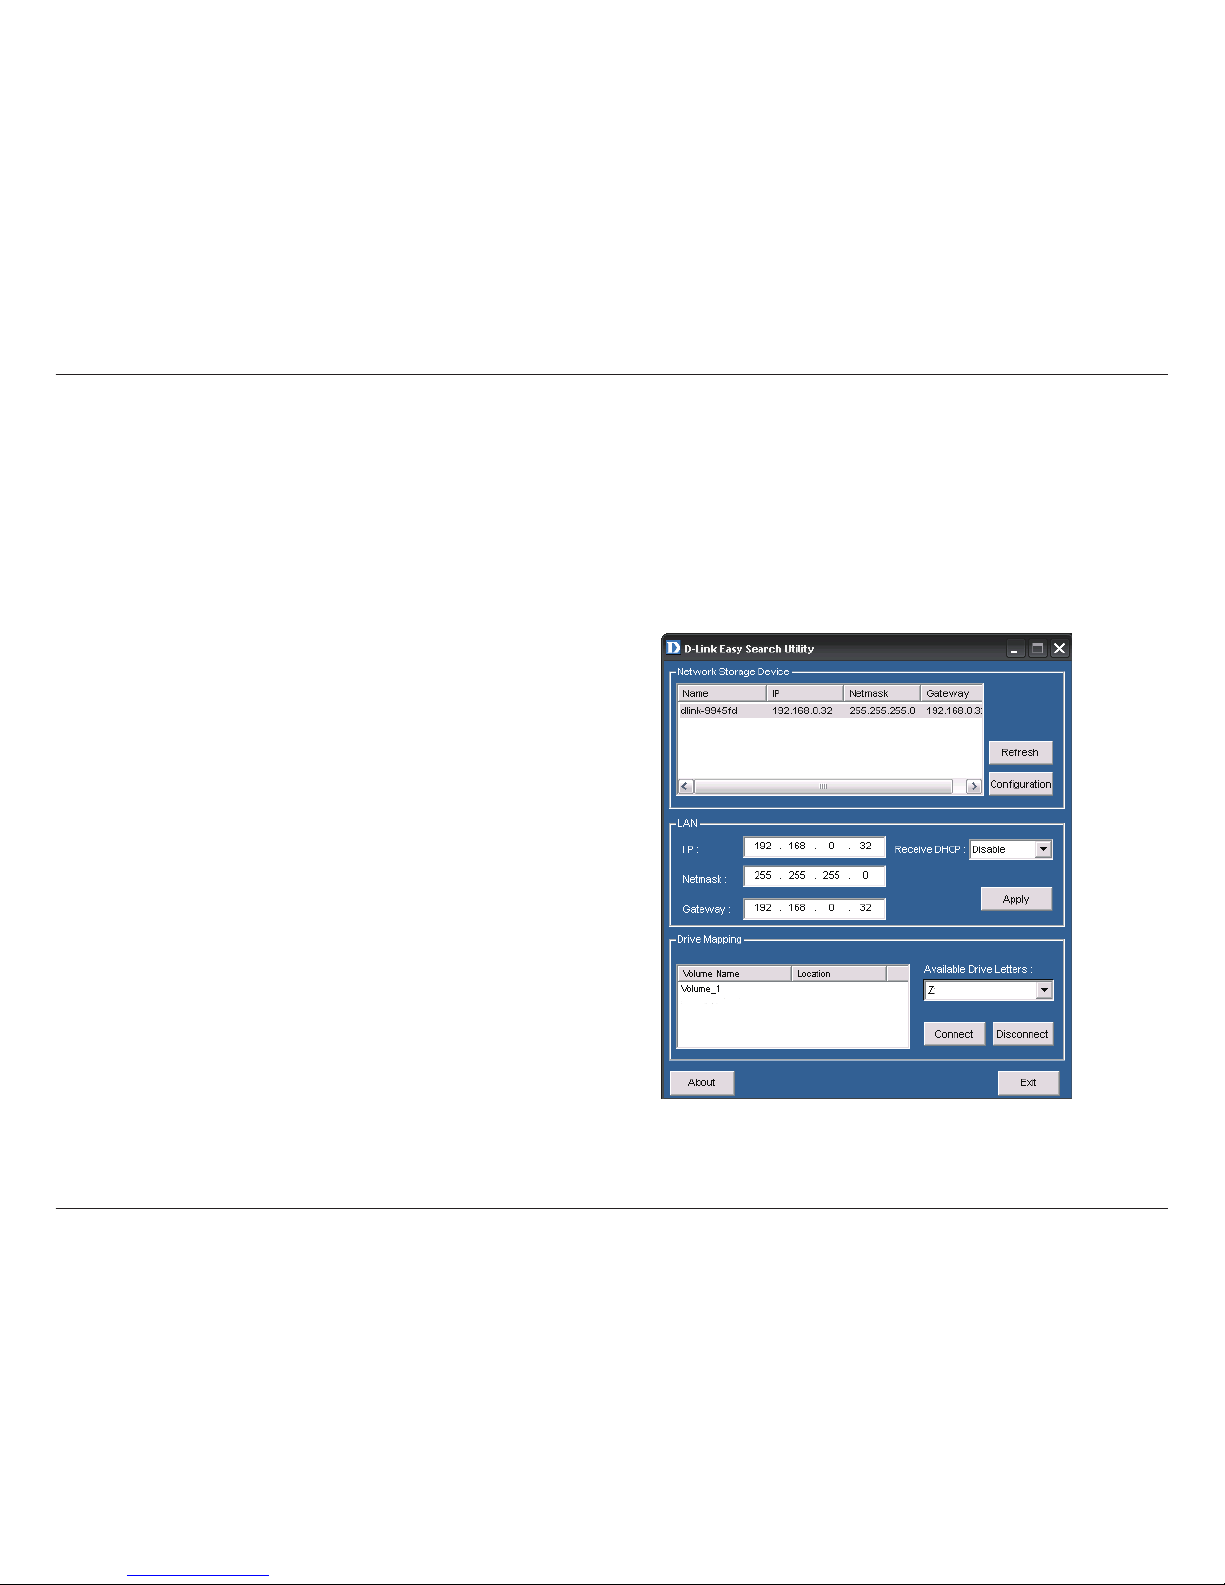
The Easy Search Utility located on the Installation CD is used to map the ShareCenter™ 2Go to your Windows computer
where it appears as a Network Storage Drive. Follow these steps to map the drive to your computer.
Easy Search Utility
Mapping the Network Drive
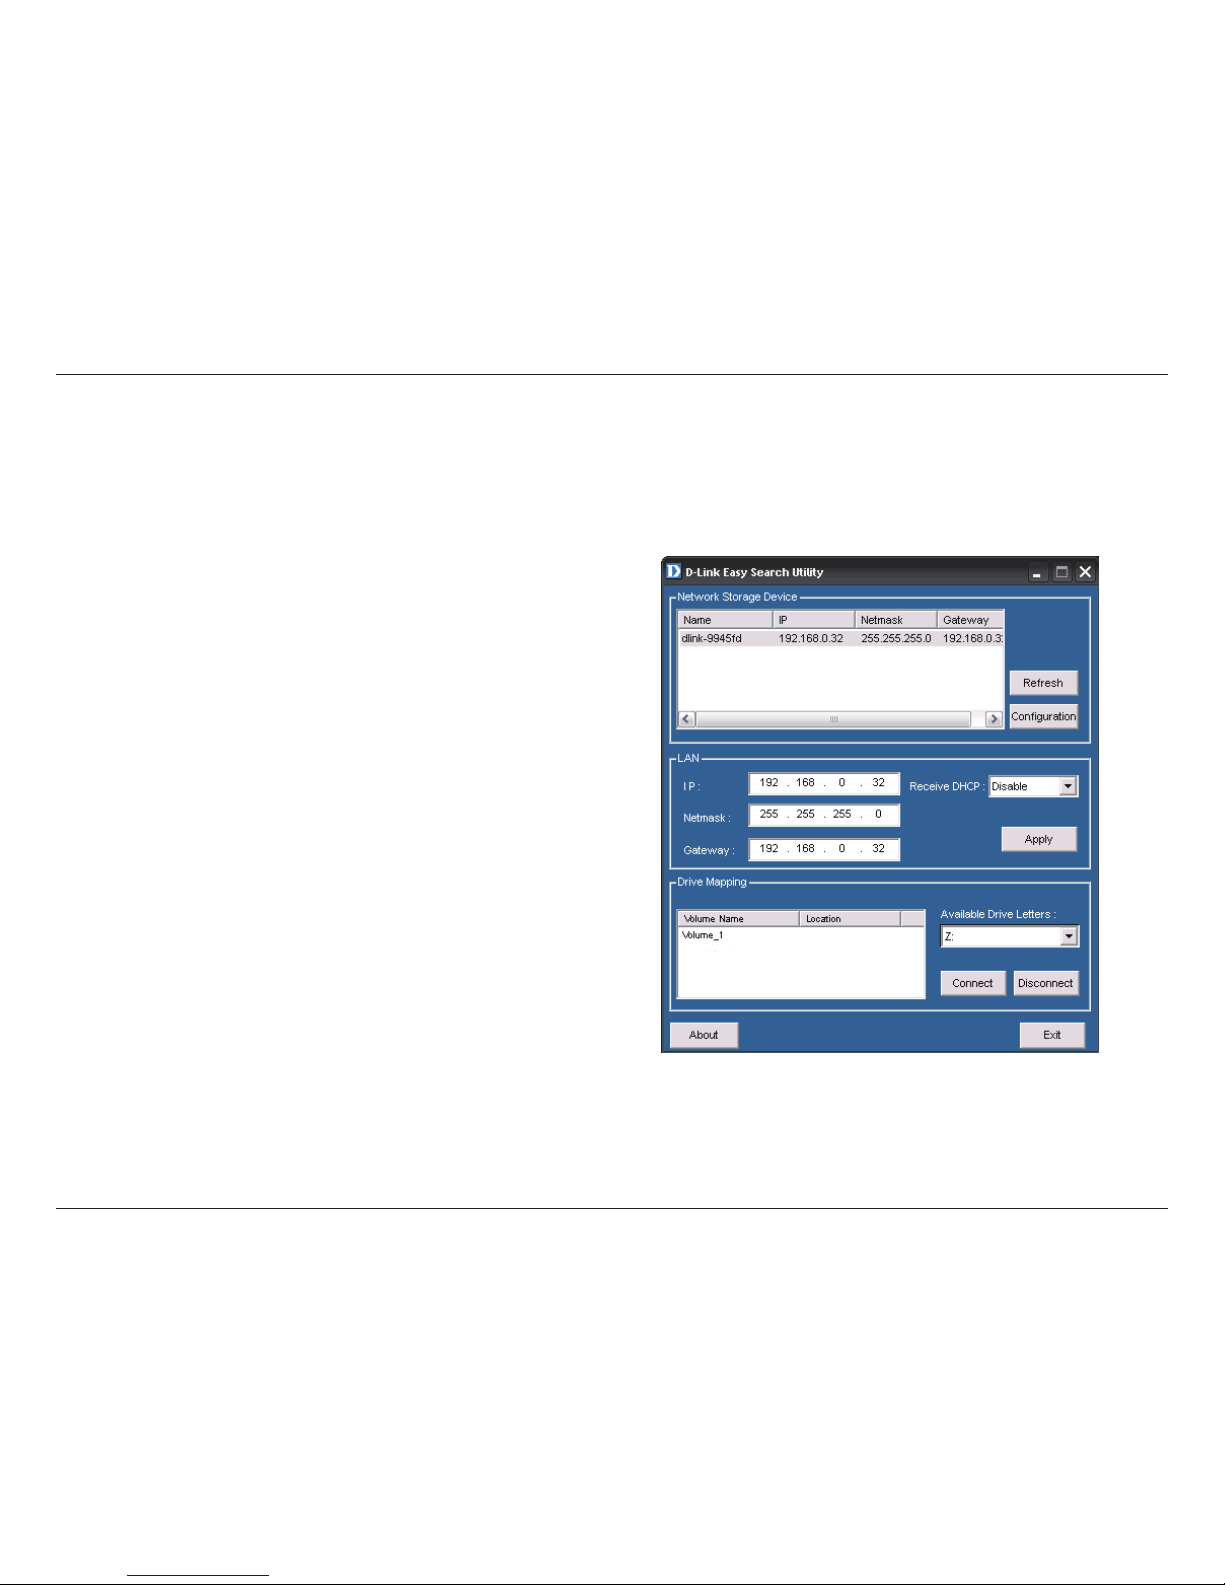
1. Launch the D-Link Easy Search Utility from the
Installation CD. You will see the ShareCenter™ 2Go
in the Network Storage Device list. If there is more
than one D-Link ShareCenter™ 2Go device on your
network, these devices will also appear in the list.
Page 19
16D-Link ShareCenter™ 2Go User Manual
Section 3 - Conguration
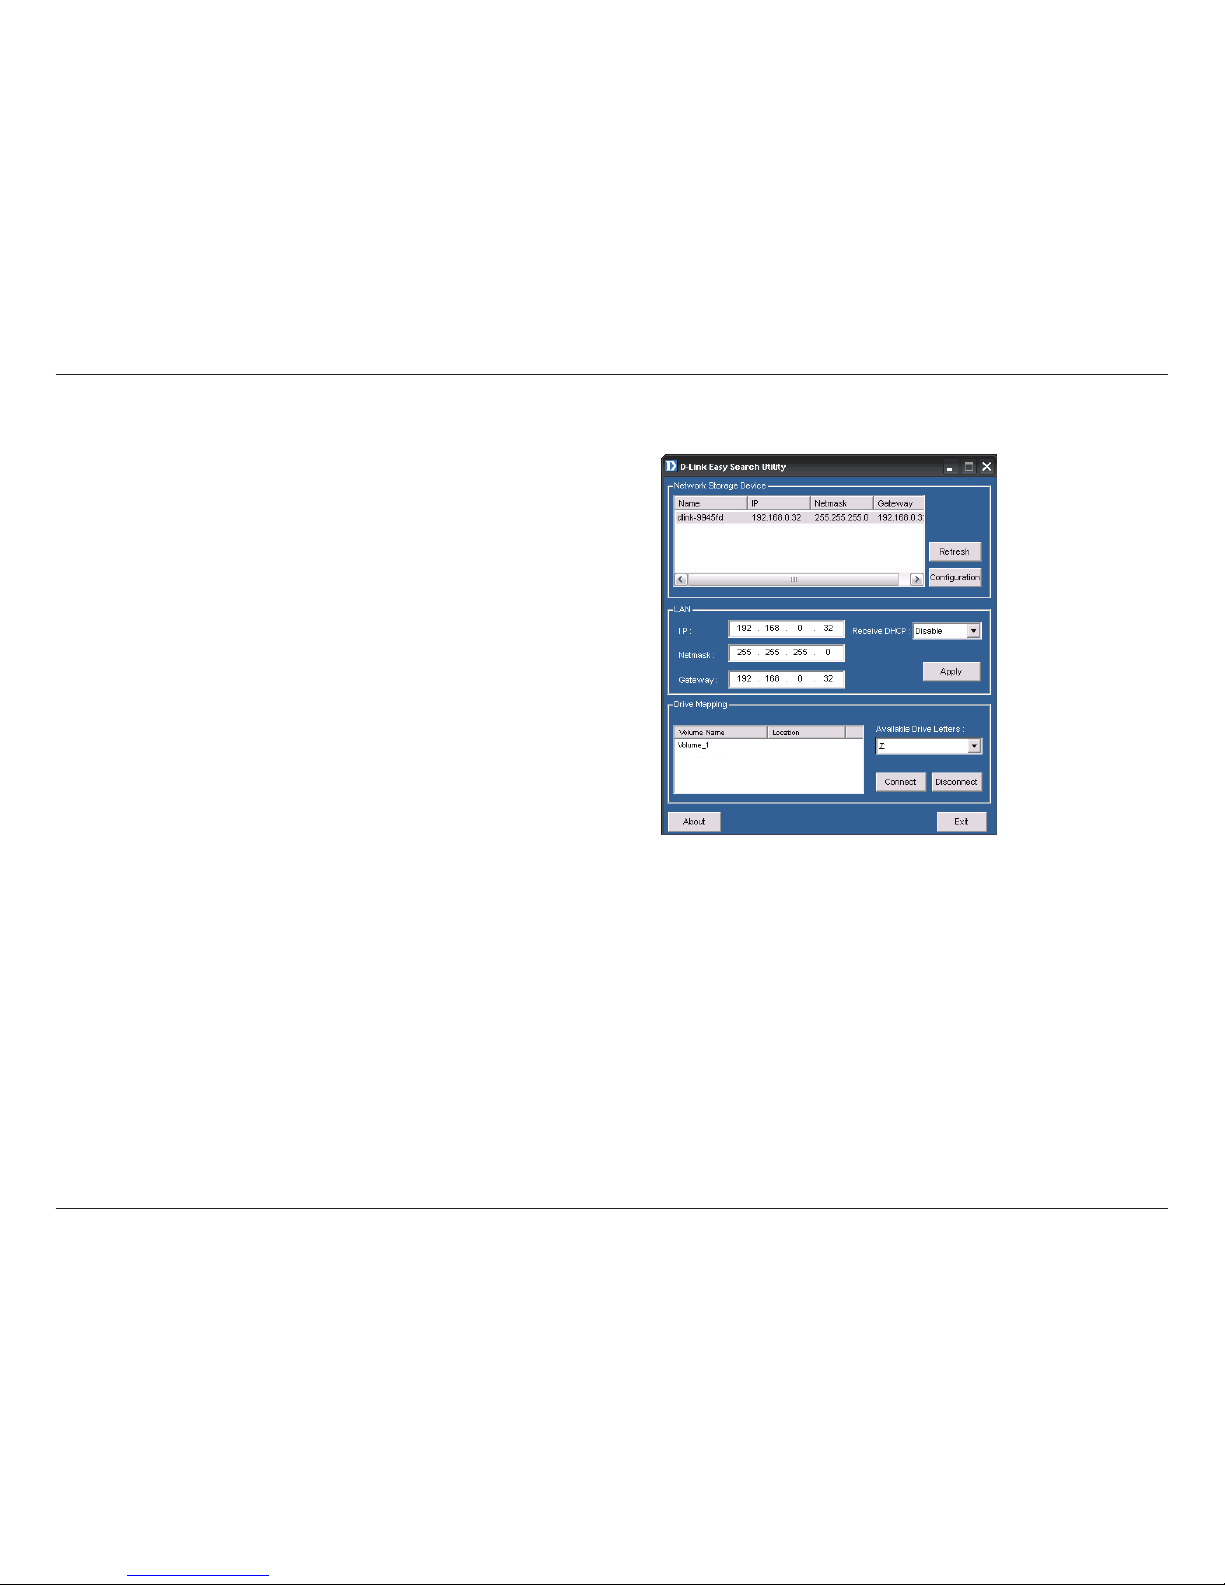
2. Select the ShareCenter™ 2Go you want to map to
your system from the list. Any volumes located on
the drive appear below in the Drive Mapping list. If
this is the rst time you are mapping the drive, the
volume name Volume_1 should appear in the list.
Page 20
17D-Link ShareCenter™ 2Go User Manual
Section 3 - Conguration
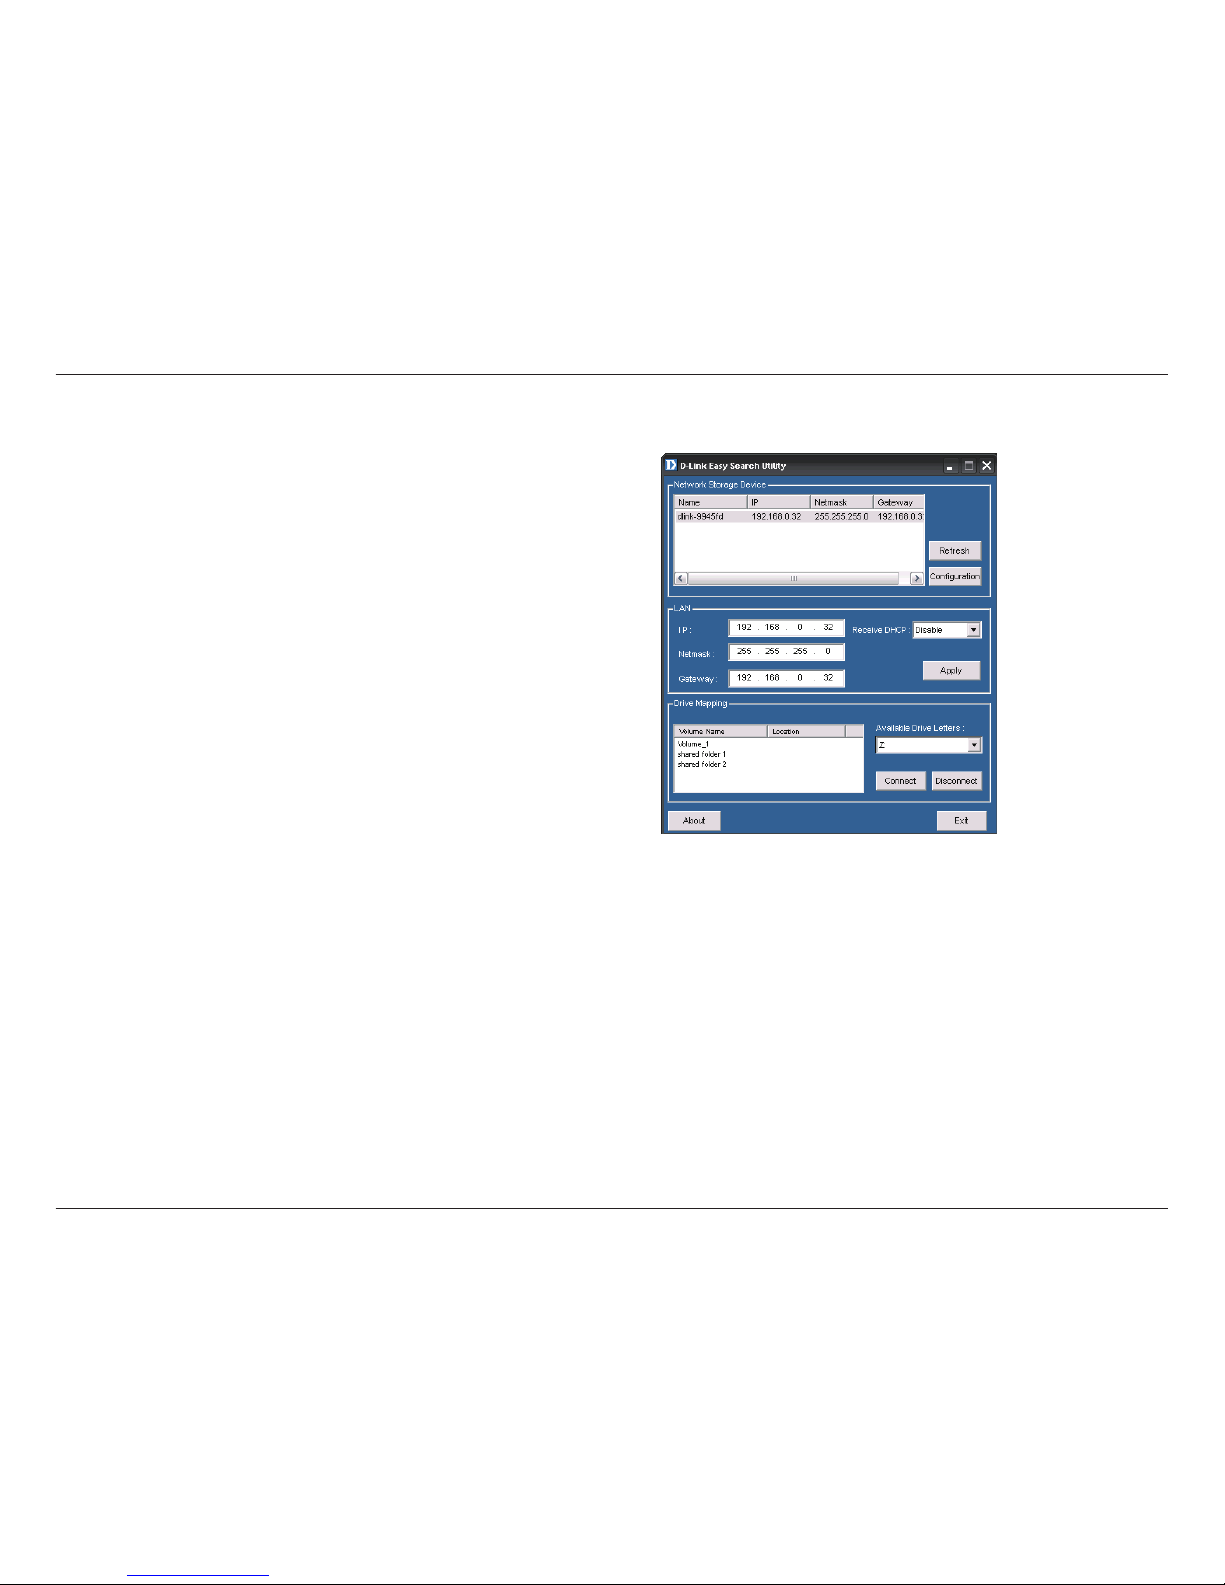
3. Select the Volume that you want to map from the list
and choose a Drive Letter from the Available Drive
Letters pull-down menu. Volumes can be the entire
disk or previously congured shared folders on the
DNS harddrive.
Click the Connect button to map the drive.
Note: To avoid possible conicts with detachable storage
devices (such as USB ash memory sticks or external hard
drives) that may have previously been congured on your
Windows system, the Available Drive Letters pull-down
menu begins with “Z” as the default. The pull-down menu lists
drive letter options in reverse alphabetical order (Z to A). If
you add another ShareCenter™ 2Go, the next default letter
will be “Y” then “X” and so on.
Page 21
18D-Link ShareCenter™ 2Go User Manual
Section 3 - Conguration
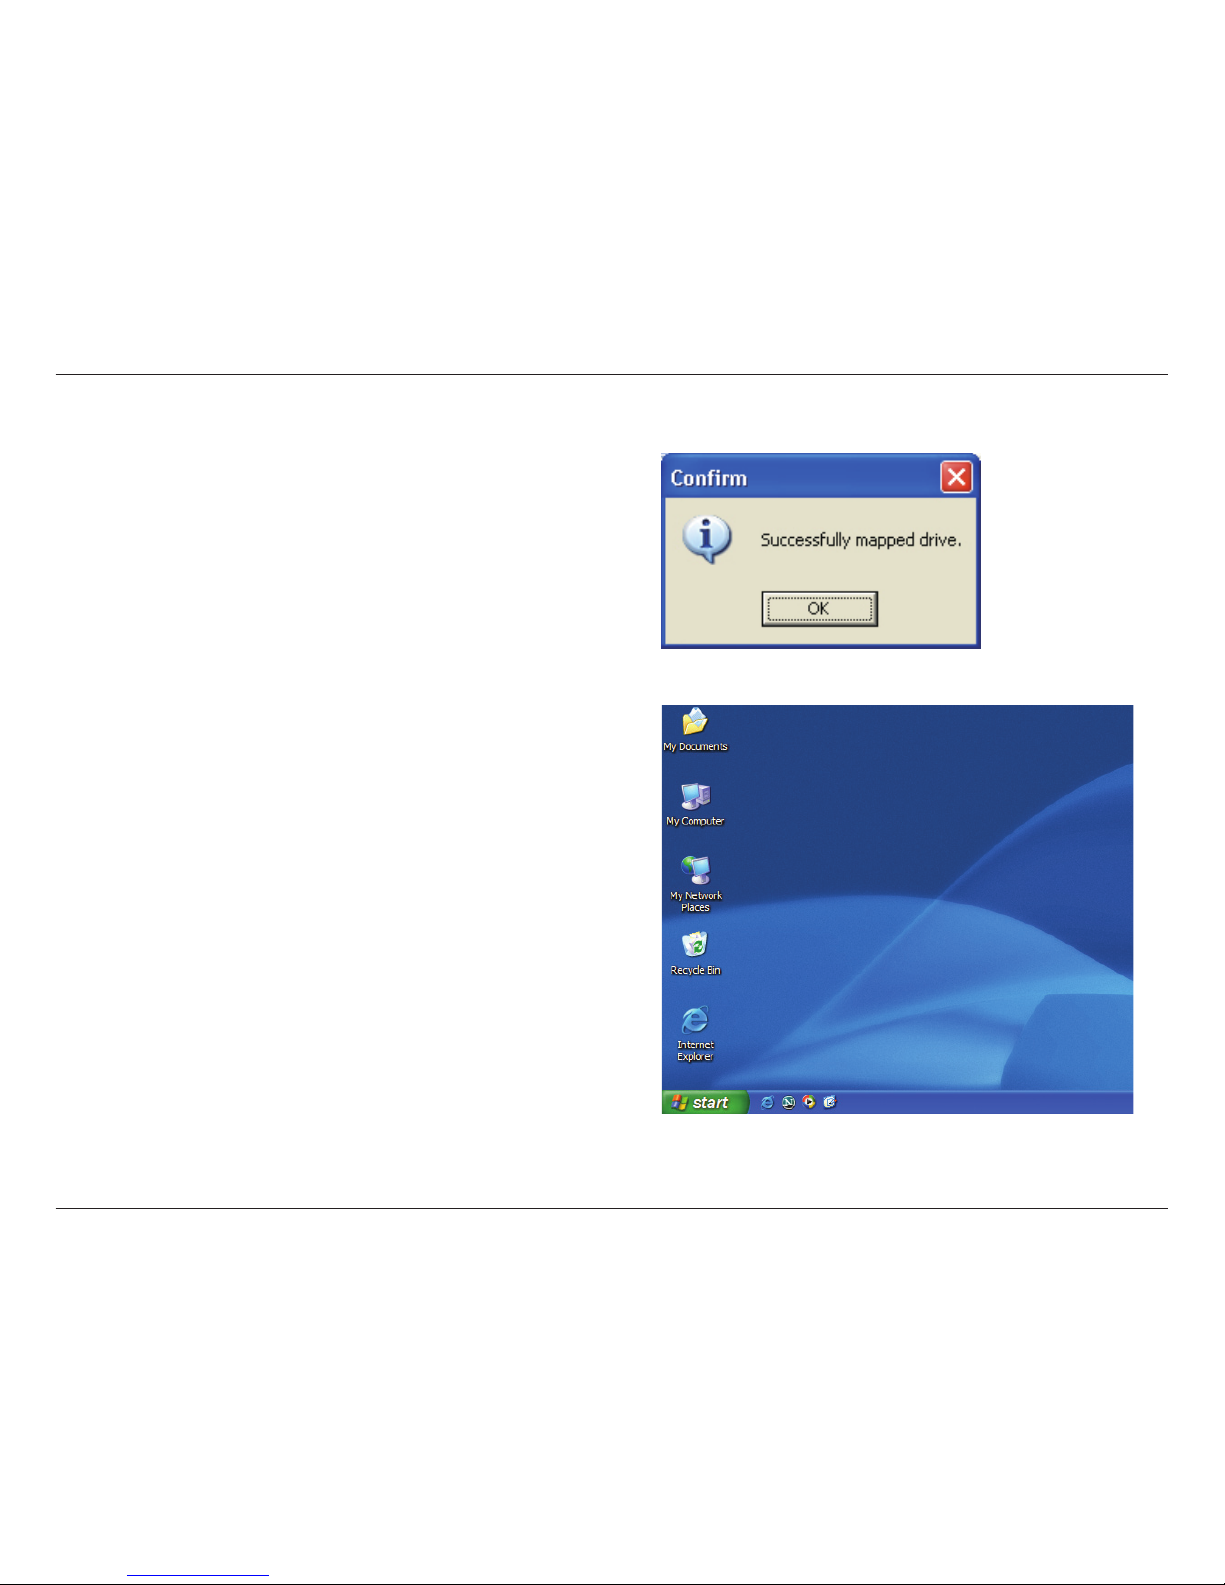
4. A conrmation dialog box will inform you if the drive
has been mapped successfully.
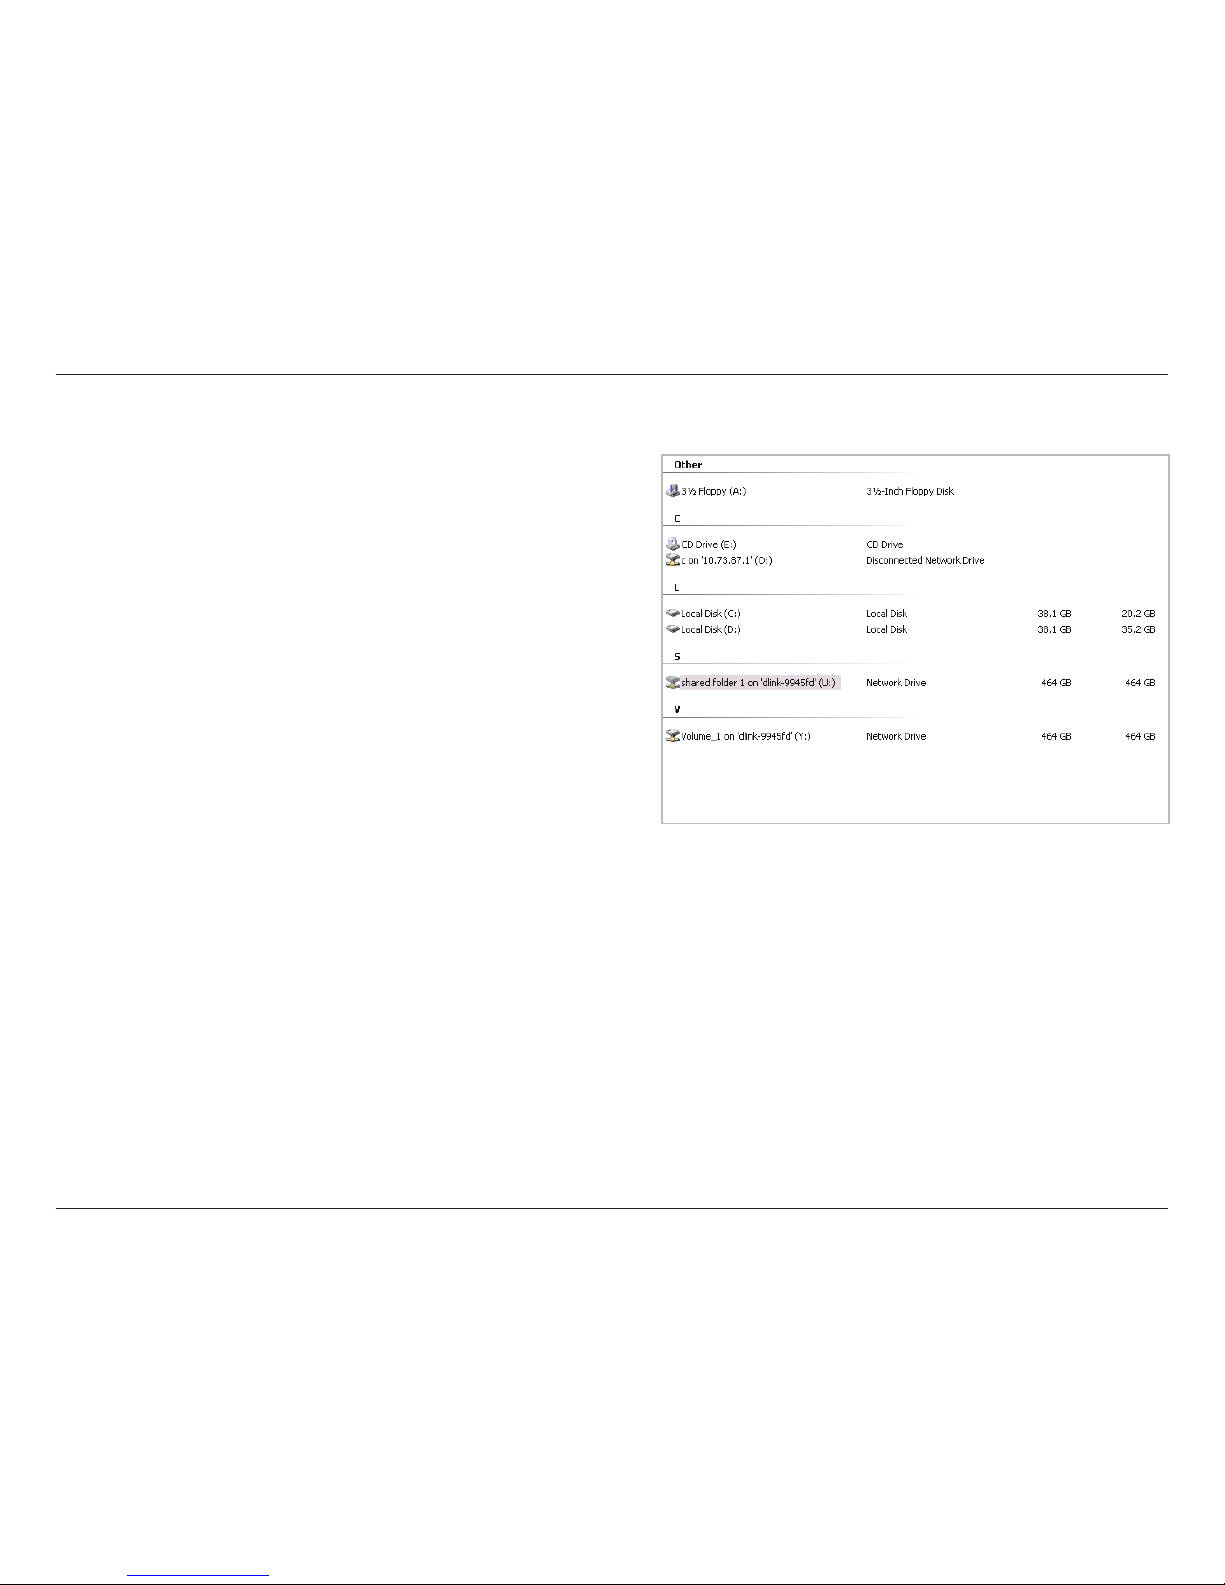
5. You will now be able to view the mapped drive using
Windows Explorer. To view the mapped drive, click
on the My Computer icon on the Windows desktop.
Page 22
19D-Link ShareCenter™ 2Go User Manual
Section 3 - Conguration
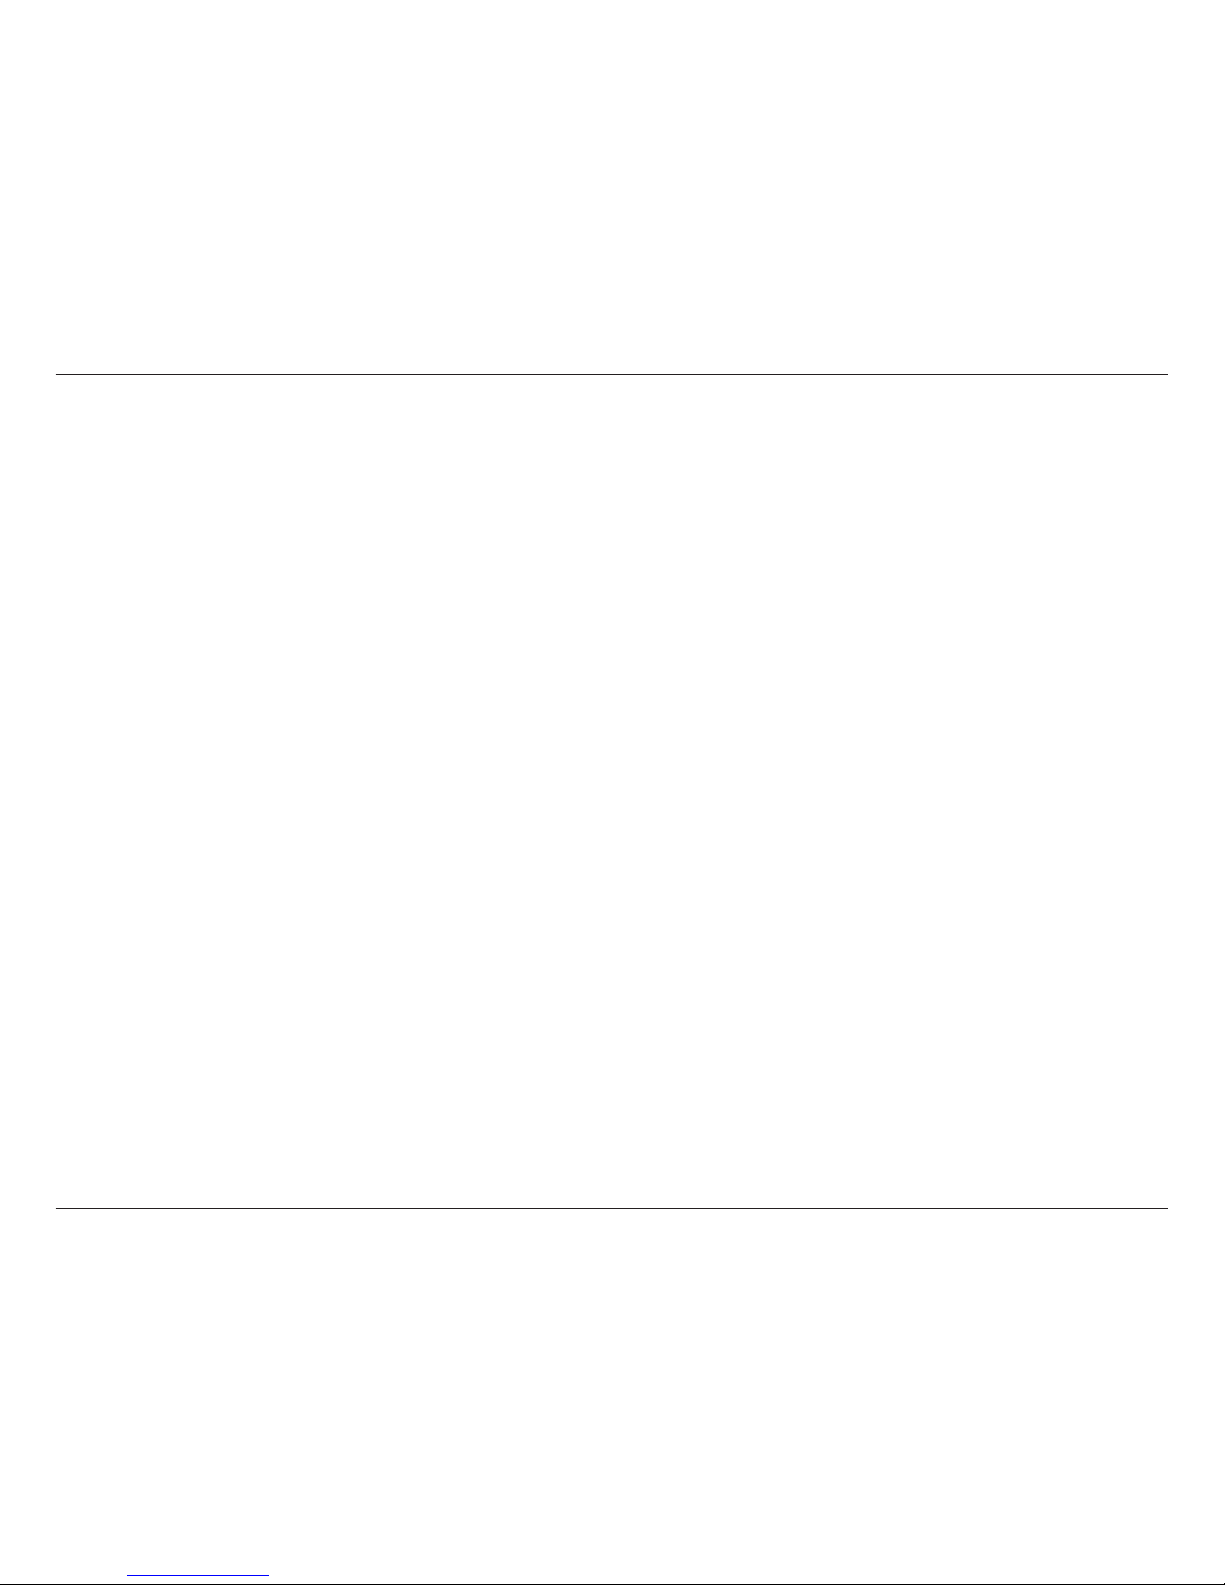
6. The ShareCenter™ 2Go’s drive or shared folder
appears as a mapped drive, using the letter(s) that
you specied.
Page 23
20D-Link ShareCenter™ 2Go User Manual
Section 3 - Conguration
The ShareCenter™ 2Go’s web UI defaults to the Setup page. The main categories for conguration are located in the
menu tabs at the top of the page. These categories include:
Setup - Contains the ShareCenter™ 2Go Setup Wizard, as well as the LAN Conguration Settings,
Device Settings, and Time/Date Settings.
Advanced - Allows the ShareCenter™ 2Go administrator to congure Users and User Groups. The
Network Shares Settings, FTP Server, UPnP AV Server, iTunes Server, and Add-ons Settings are
also found under this category.
Maintenance - Contains conguration options for the Admin Password, System Settings, Firmware
Upgrades, E-mail Alerts, Power Management, Format Disk, Scan Disk, and Dynamic DNS.
Status - Contains a summary of the ShareCenter™ 2Go information and logs.
Support - Contains the ShareCenter™ 2Go help les.
These pages and their conguration options will be discussed in detail in the following pages of this manual.
Web UI
Page 24
21D-Link ShareCenter™ 2Go User Manual
Section 3 - Conguration
Wizard
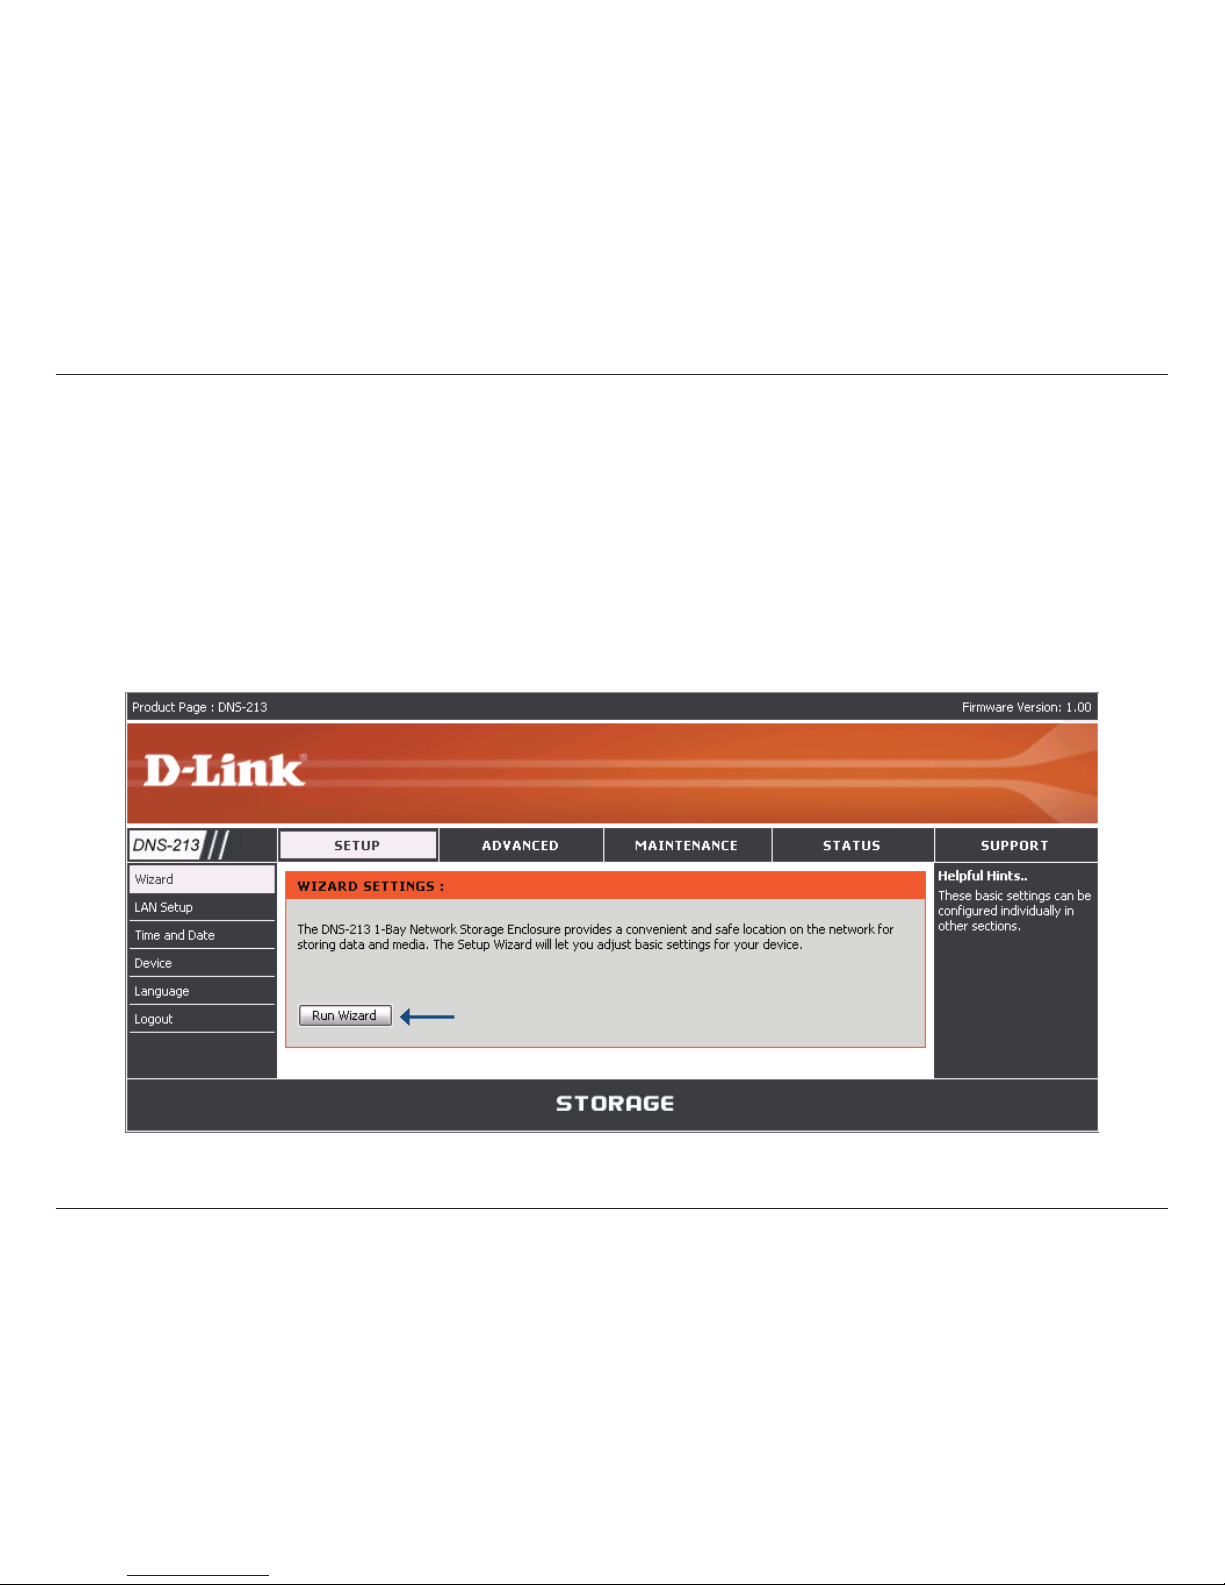
The ShareCenter™ 2Go has a setup Wizard that allows you to quickly congure some of the basic device settings.
Click the Run Wizard button in the Setup>Wizard window to launch the Setup Wizard.
Setup
Click to Start the wizard
Conguration
Page 25
22D-Link ShareCenter™ 2Go User Manual
Section 3 - Conguration
Wizard
The ShareCenter™ 2Go has a setup Wizard that allows you to quickly congure some of the basic device settings.
Click the Run Wizard button in the Setup>Wizard window to launch the Setup Wizard.
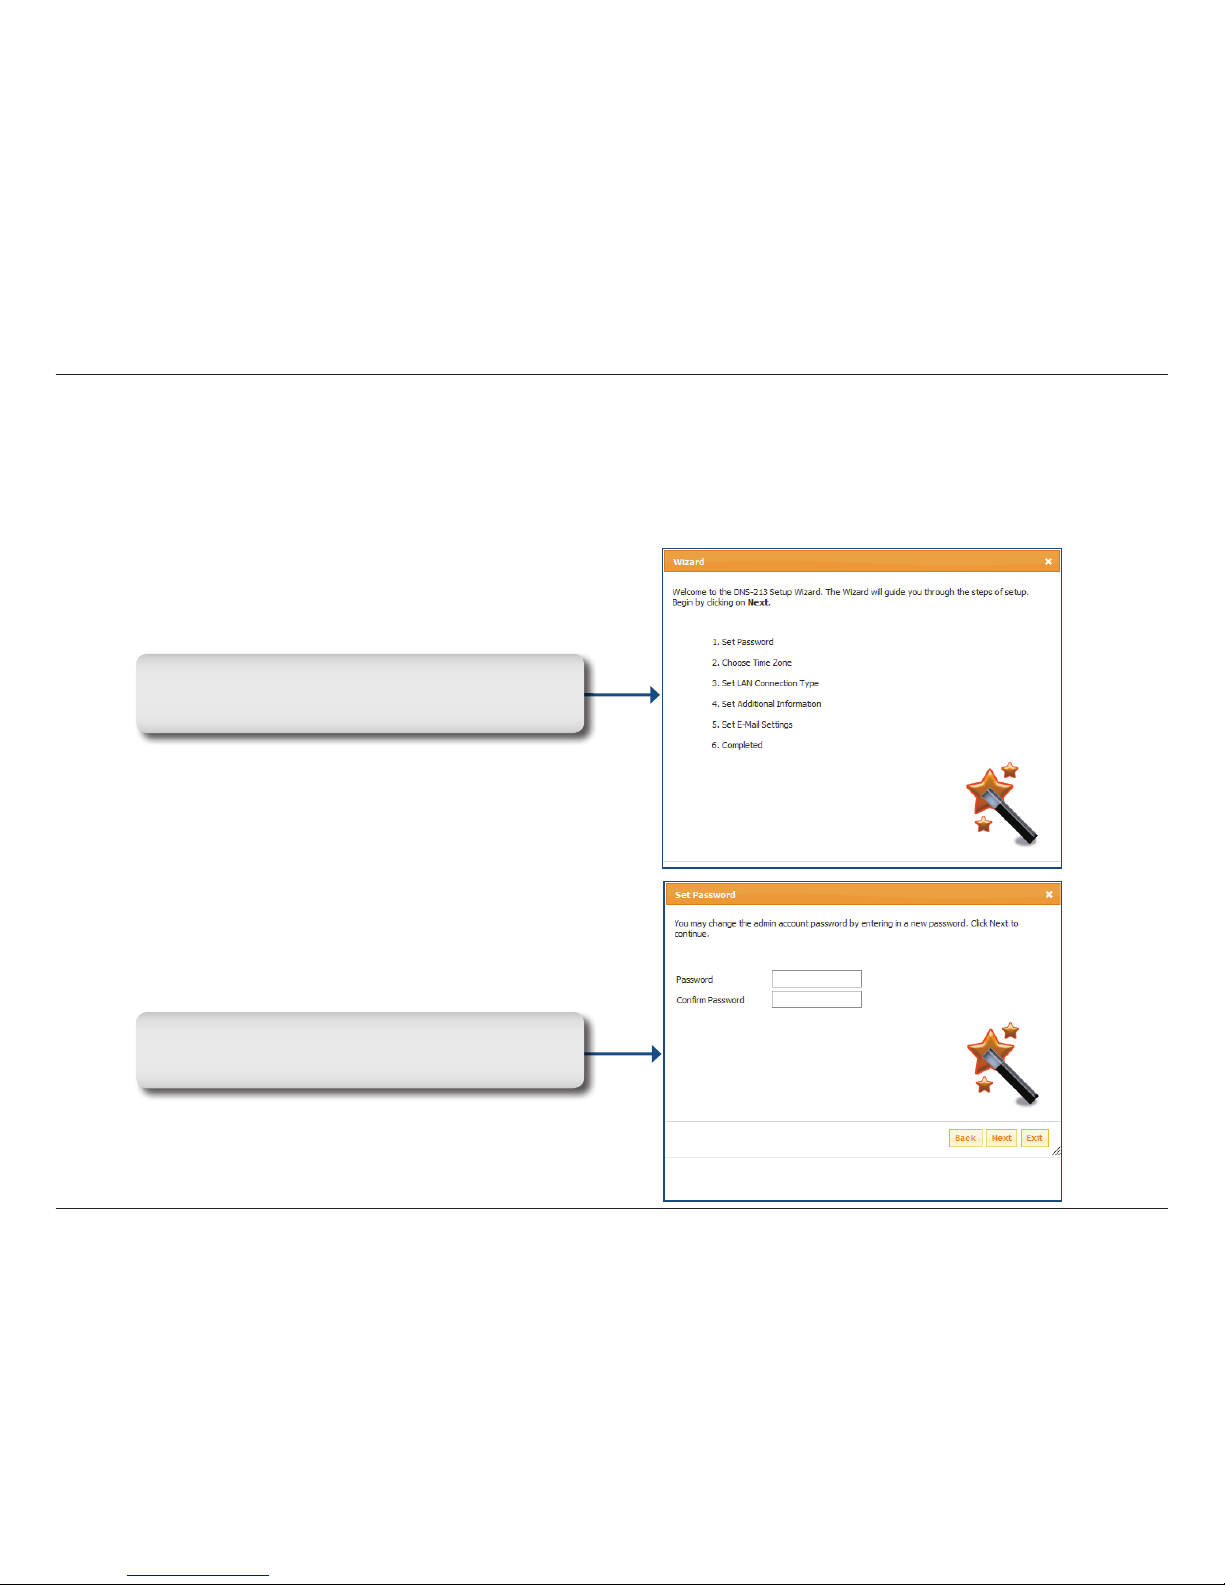
When running the ShareCenter™ 2Go setup wizard,
the welcome screen details the ve steps of the
wizard. Click Next to continue.
It is recommended you set an admin password
here. Enter the new password and re-enter it for
conrmation. Click Next to continue.
Setup
Page 26
23D-Link ShareCenter™ 2Go User Manual
Section 3 - Conguration
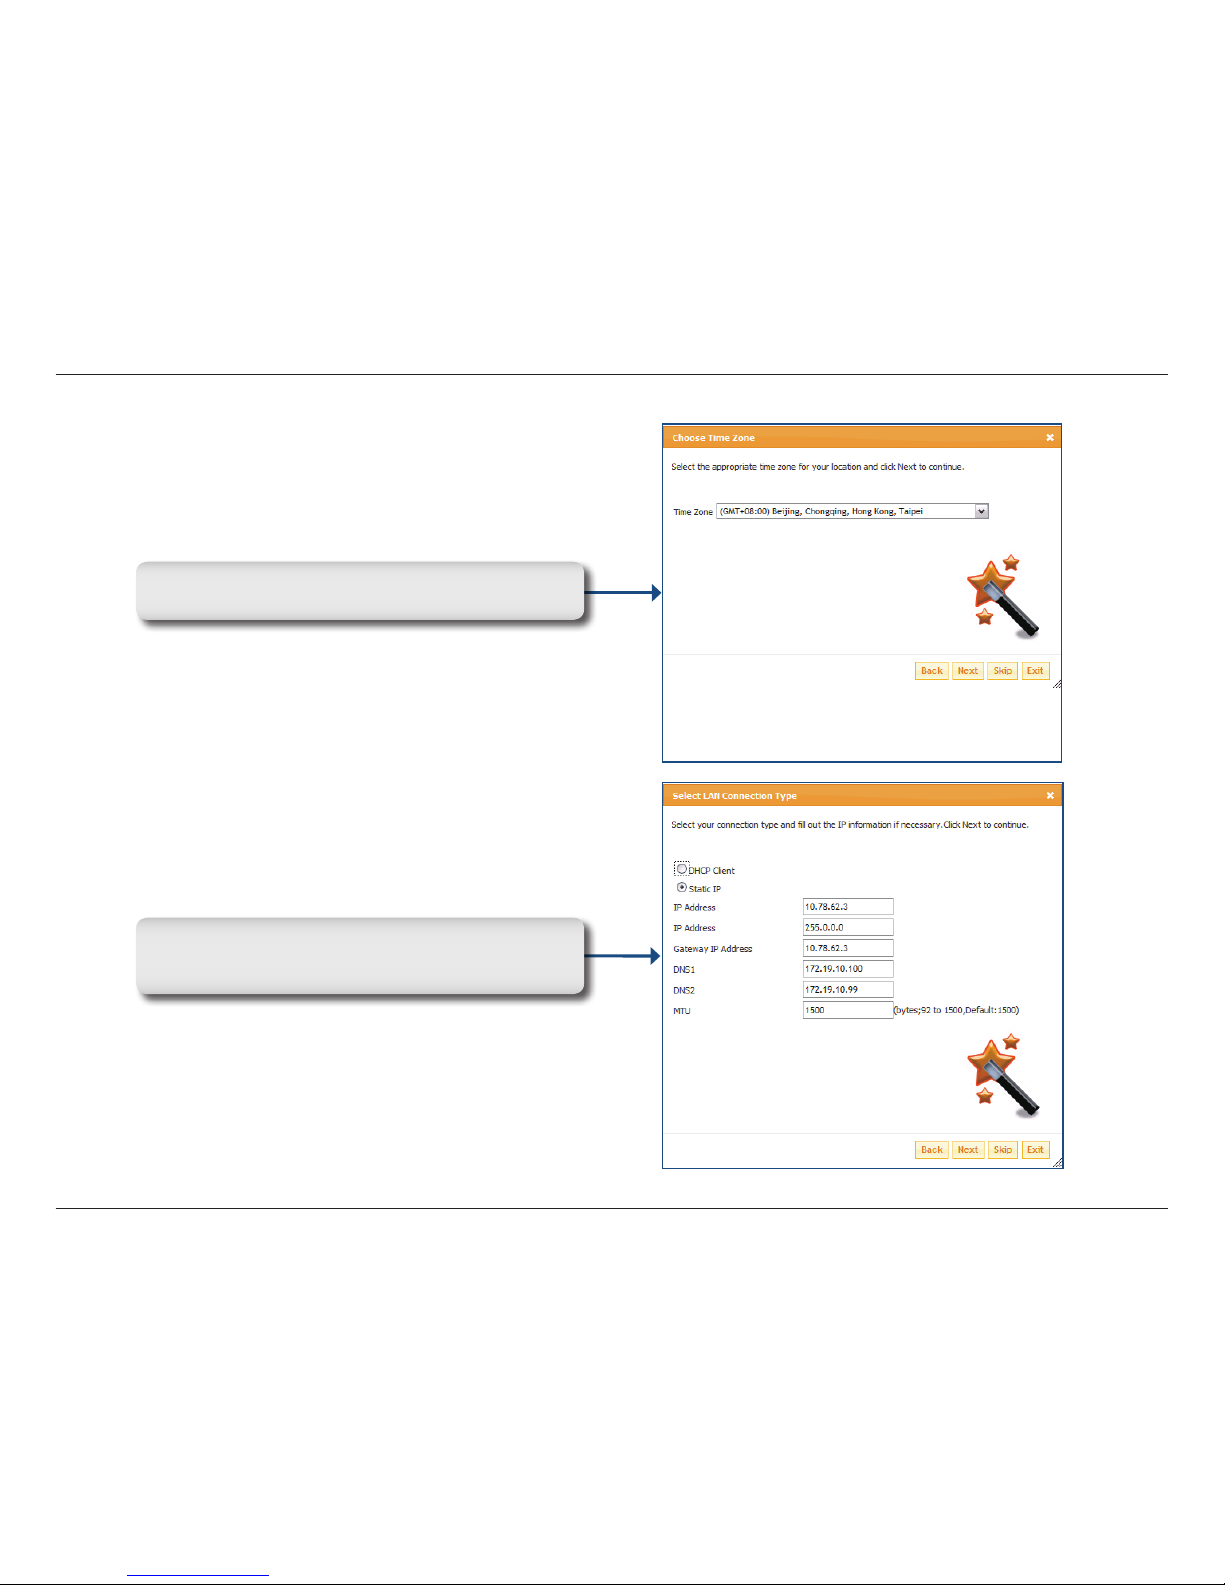
Choose the appropriate Time Zone and Daylight
Savings Time settings and click Next to continue.
Ed it or change the Sh areCenter™ 2Go LA N
information or keep the current settings. Click Next
to continue.
Page 27
24D-Link ShareCenter™ 2Go User Manual
Section 3 - Conguration
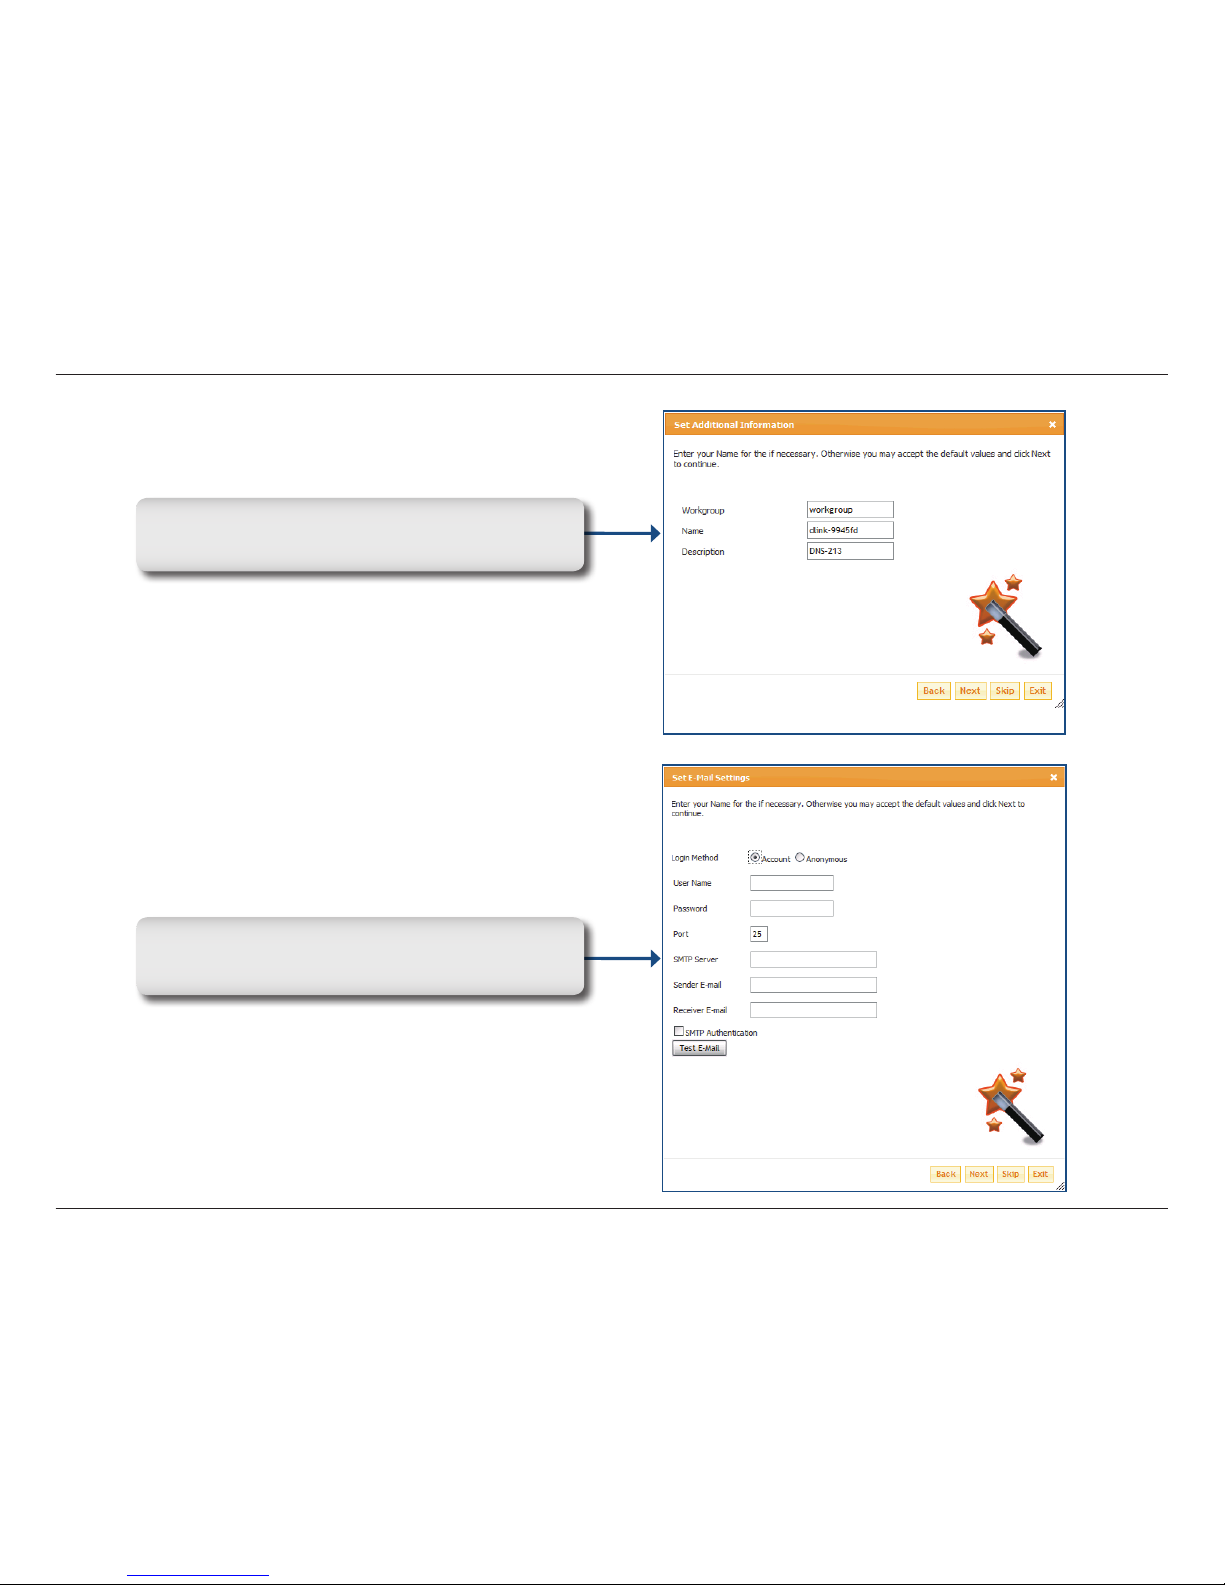
Enter your workgroup, name and description for the
ShareCenter™ 2Go, or leave the default values and
click Next to continue.
Enter in your email information or leave the default
values. The setting will be used to send event
information from the DNS to the address entered.
Page 28
25D-Link ShareCenter™ 2Go User Manual
Section 3 - Conguration
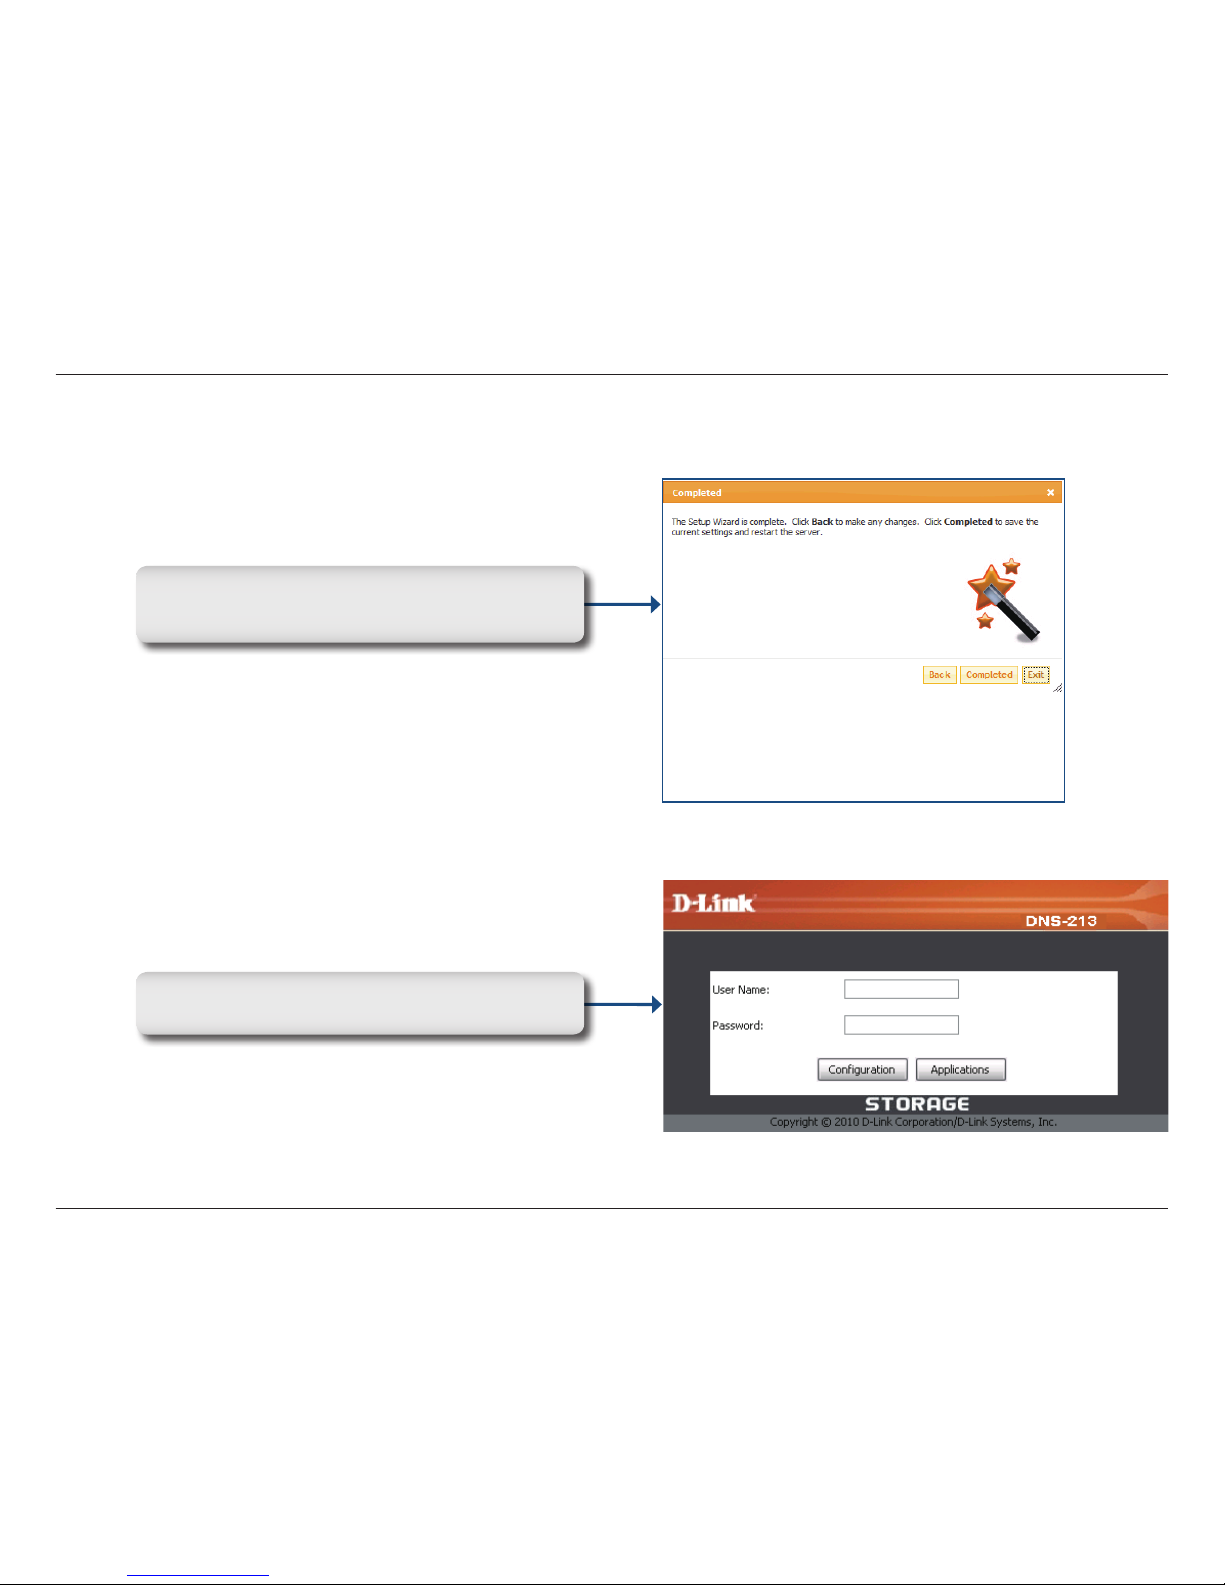
When the wizard completes, click Back to go back
and make changes or click Completed to restart the
ShareCenter™ 2Go and save the conguration.
When the login prompt appears, login using the new
administrator password and click Conguration.
Page 29
26D-Link ShareCenter™ 2Go User Manual
Section 3 - Conguration
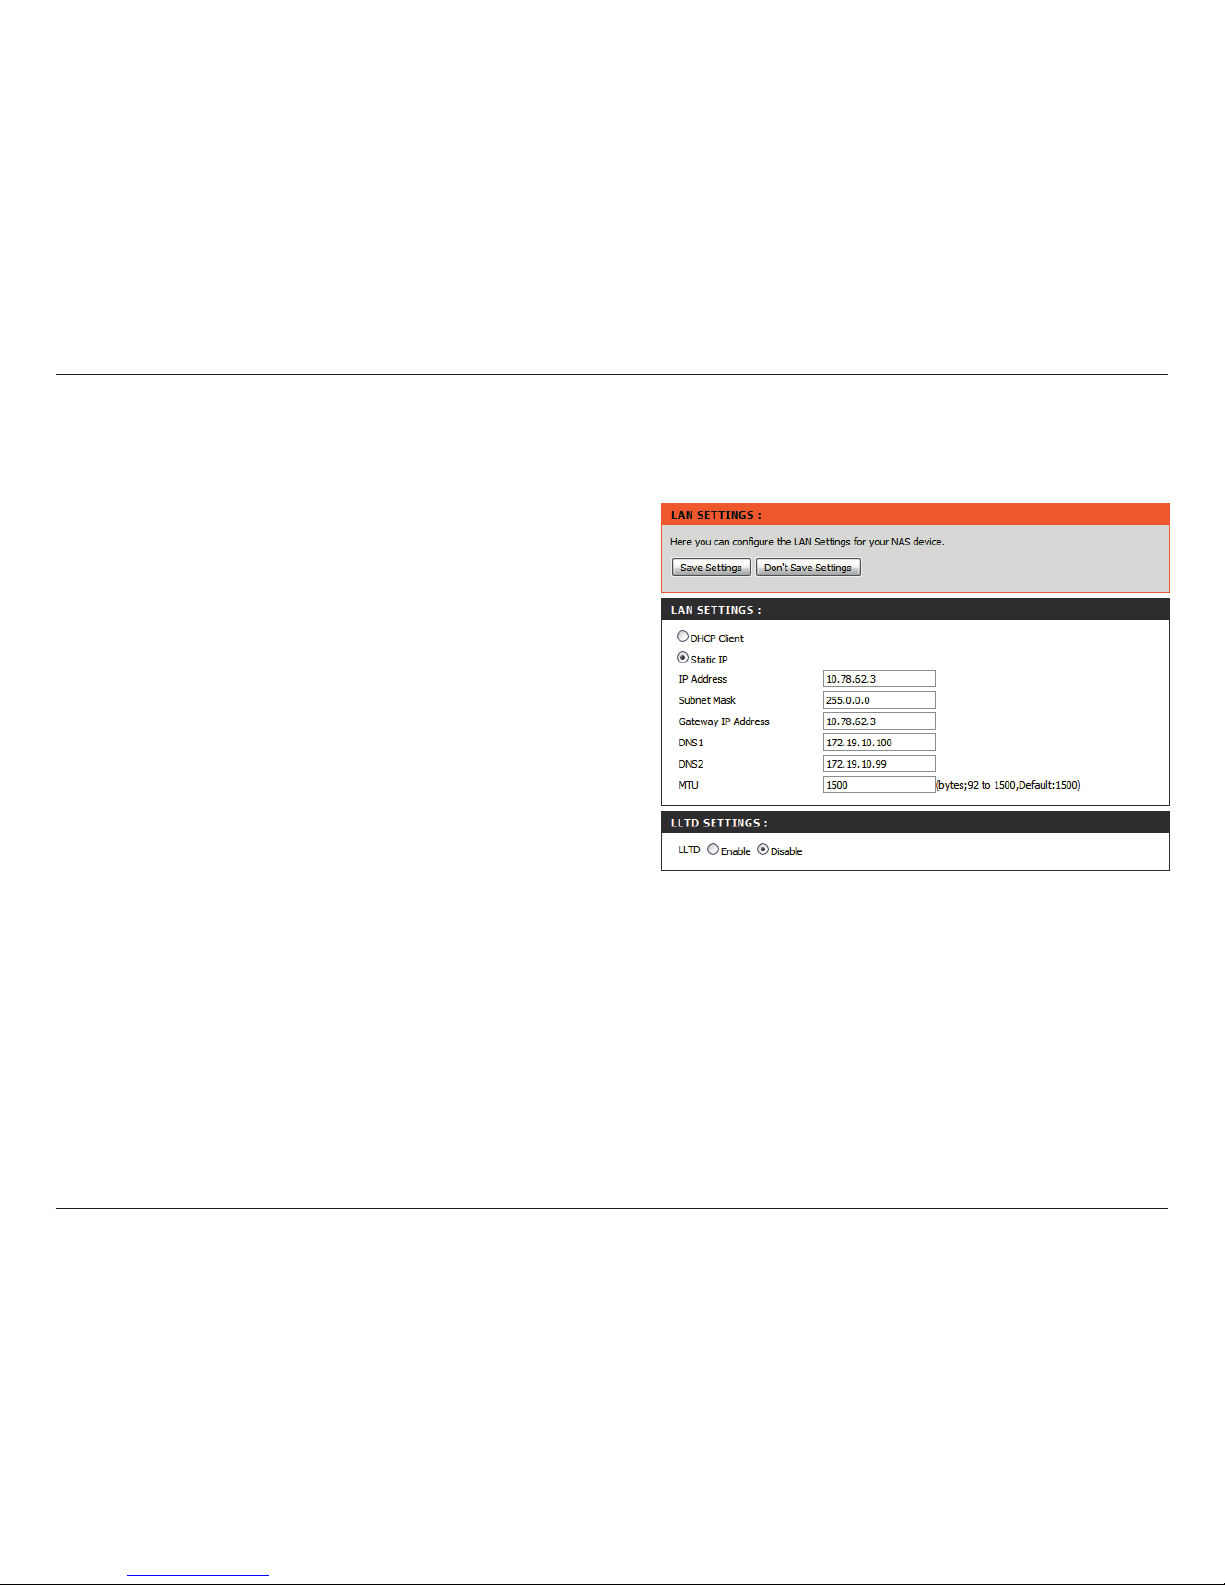
LAN Setup
The Local Area Network settings for the ShareCenter™ 2Go are congured on the LAN Setup page.
DHCP Client
Static IP
MTU
DNS1 / DNS2
Selecting DHCP Client will cause the ShareCenter™
2Go to obtain an IP address from the local DHCP
server. This is the default setting. If no DHCP server
is detected, the device will use the default Auto IP
address of 169.254.xxx.xxx.
Selecting Static IP requires you to assign the IP
information for the ShareCenter™ 2Go manually.
Enter the IP address, subnet mask, and gateway
IP address that you would like to assign to the
ShareCenter™ 2Go in their respective elds.
Maximum Transmission Unit. You may need to
change the MTU for optimal performance on your
LAN connection. 1500 is the default MTU.
Note: The MTU number must be a multiple of 4
between 90 and 1500.
If you would like to use a DNS service, enter the DNS
server IP addresses that you would like to use in the
DNS1 and DNS2 entry elds.
Click on the Save Settings button to apply and save the new settings.
If you are changing the IP address or DHCP client status of the device, it will be necessary to log in again using the
new IP address. If you do not know the new IP address (as would likely be the case when changing from a static IP
address to DHCP client) use the Easy Search Utility on the Installation CD to learn the IP address of the device.
Use the radio buttons to enable or disable
the LLTD (Link Layer Topology Discovery)
responder setting. This is used to provide
information to network topology display monitors,
such as the one included in Windows Vista.
LLTD Settings
Page 30
27D-Link ShareCenter™ 2Go User Manual
Section 3 - Conguration
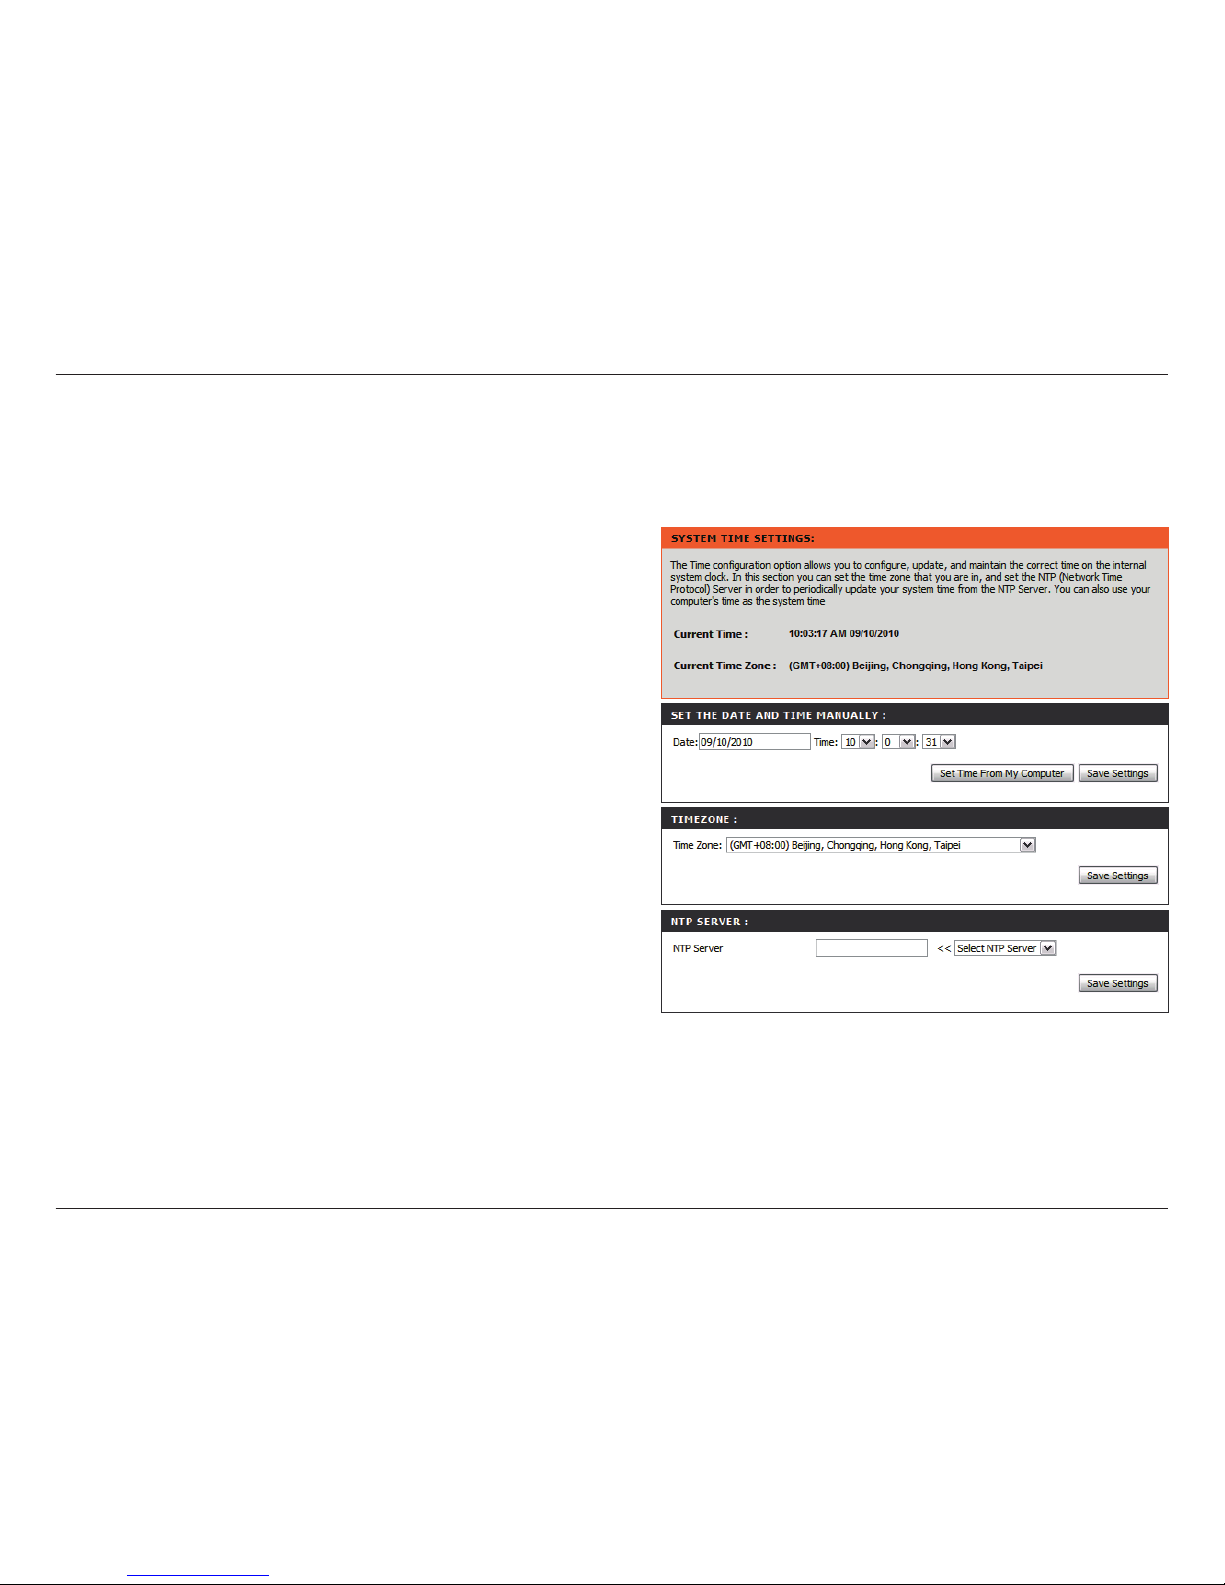
Time and Date
The ShareCenter™ 2Go Time and Date page contains several different options for setting the device’s internal clock.
It is important to set an accurate time so that backups and downloads can be accurately scheduled.
Select your time zone from the pull-down menu and
click the adjacent Set Time button.
Click the Set Time button in this section to congure
the ShareCenter™ 2Go to use the time congured
on your PC.
Network Time Protocol (NTP) synchronizes the
ShareCenter™ 2Go with an Internet time server.
NTP can be congured using a URL or one of the two
D-Link time servers. To use one of the D-Link time
servers for NTP, use the pull-down menu to select
the NTP server that is closest to your location.
To use another NTP server, type the URL of the
NTP server.
When you have nished conguring the NTP settings,
click the adjacent Set Time button.
This option allows you to set the time and date
manually. Use the pull-down menus to select the
appropriate time and date and click the adjacent Set
Time button.
Time Zone
Set Time From
My Computer
NTP Server
Set The Date
Time Manually
Page 31
28D-Link ShareCenter™ 2Go User Manual
Section 3 - Conguration
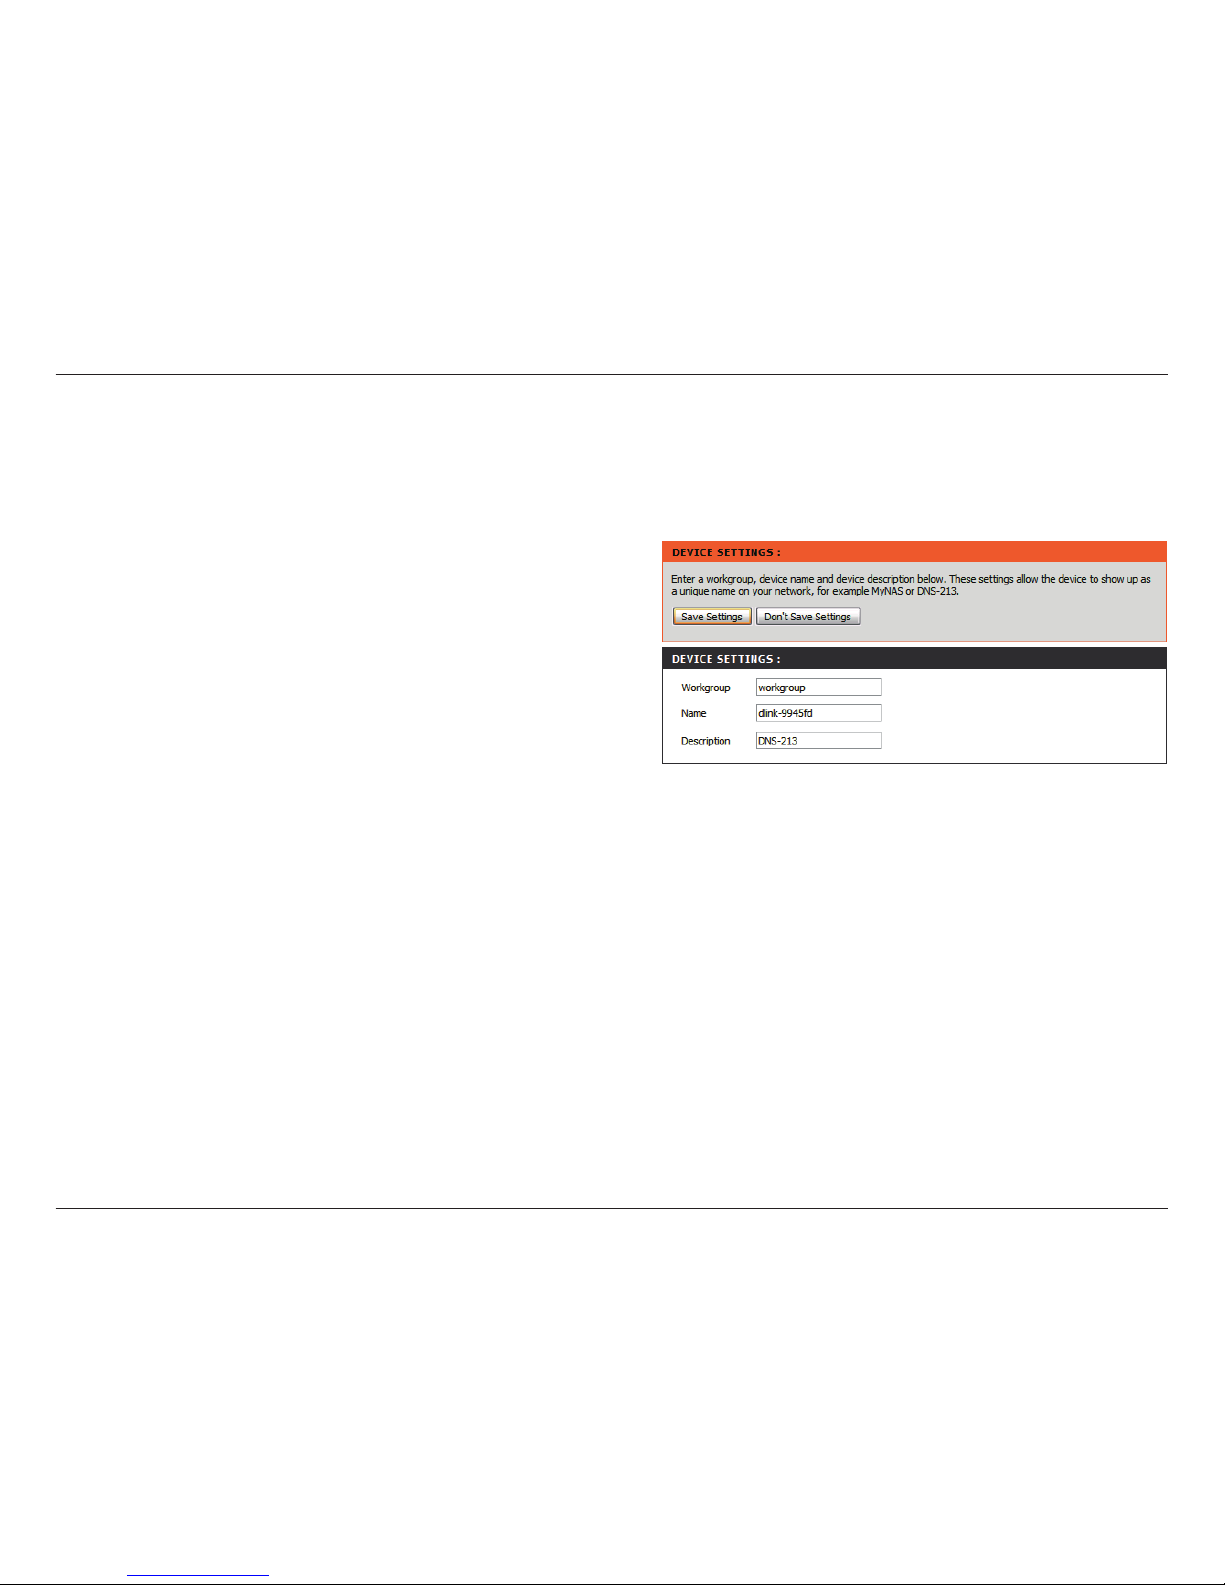
Device
The device settings page allows you to assign a workgroup, name and description to the ShareCenter™ 2Go.
Workgroup
Name
Description
Assigns a workgroup name to the ShareCenter™
2Go. The Workgroup name is used by Microsoft
Windows networking to organize networks into
groups.
Assigns a unique name to the ShareCenter™ 2Go.
The Name assigned here can be used to access the
device from a web browser instead of using the IP
address.
For example: http://dlink-xxxxxx
The Name assigned here is also used by various
network services to identify the device, including
the shared libraries available in iTunes and other
media players.
Assigning a unique name is also useful for identifying
the device if there is more than one ShareCenter™ 2Go
on the network. By default the device name is
dlink-xxxxxx, where xxxxxx is the last six digits of
the MAC address.
Assigns a device description to the ShareCenter™
2Go.
Click on the Save Settings button to apply and save the new settings.
Page 32
29D-Link ShareCenter™ 2Go User Manual
Section 3 - Conguration
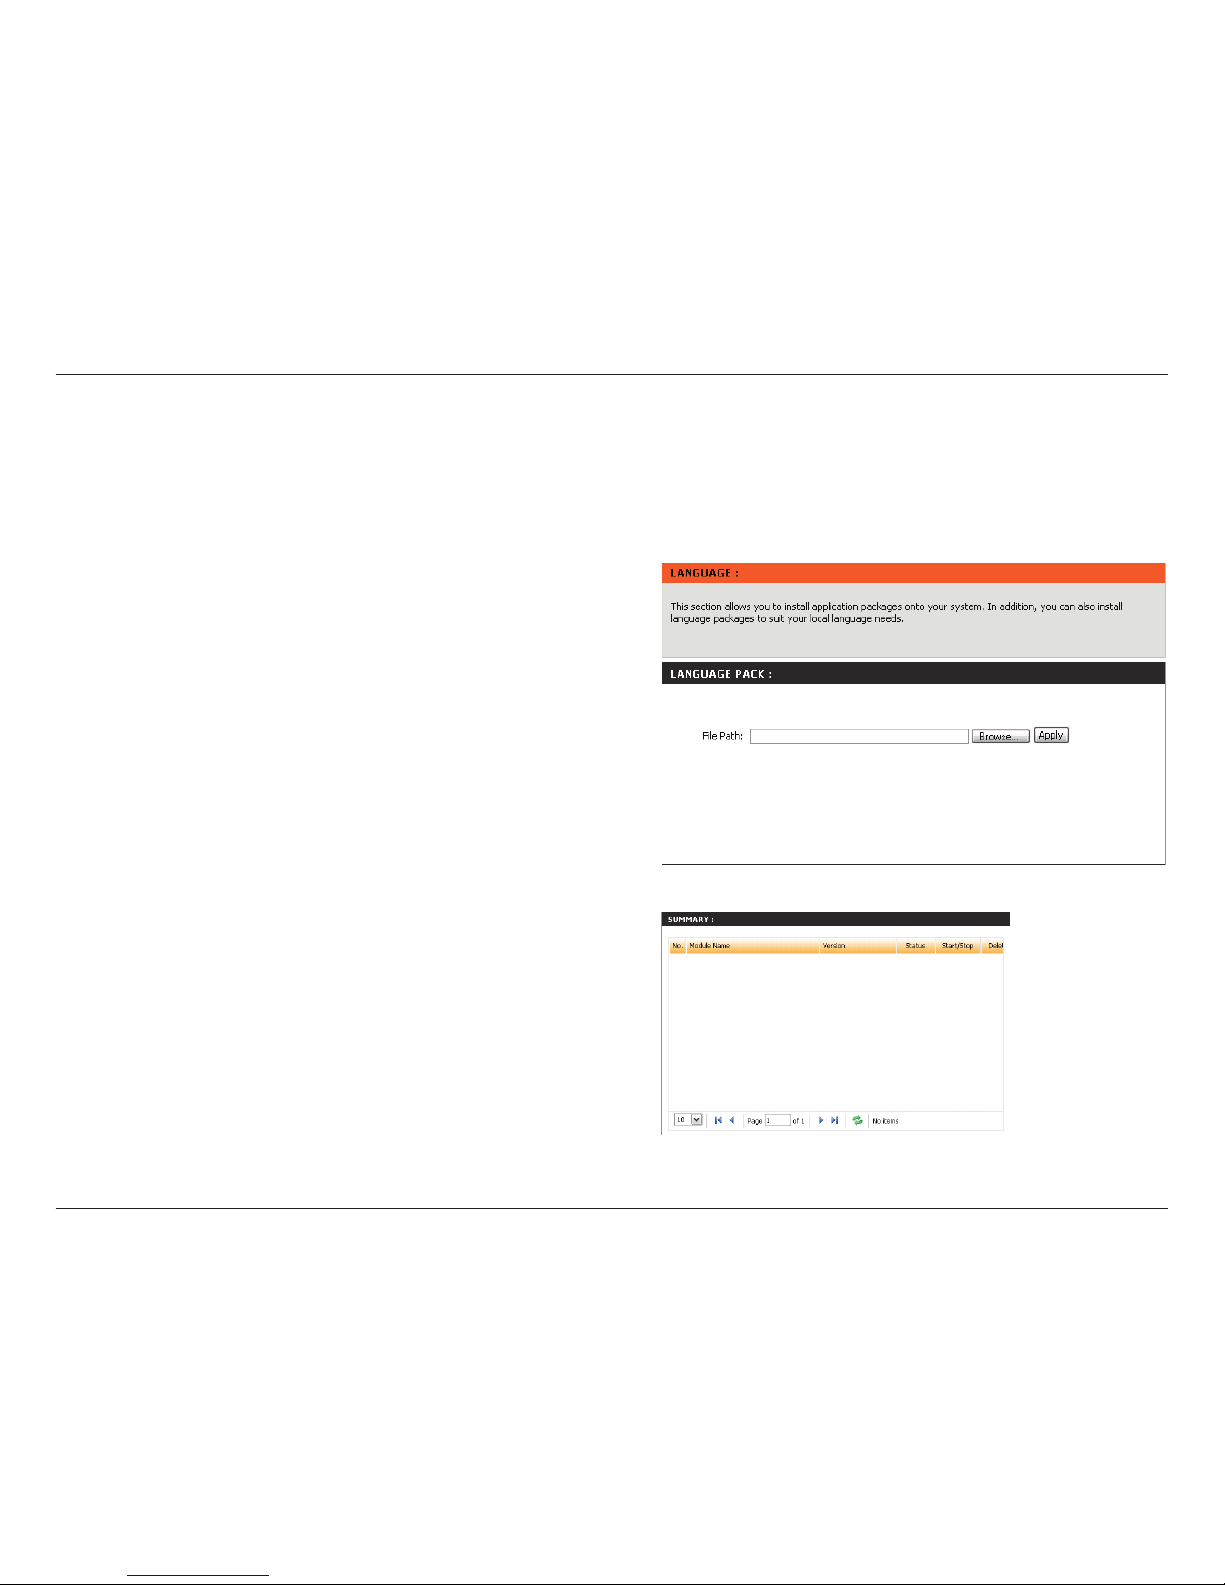
Language
The Language Menu under Settings provides a function to add software application packages to the ShareCenter™
2Go. Use this menu to add optional language packages to match your language needs.
Language
Pack
Summary
Click on browse to select the language pack provided
from the D-Link page.
For example: http://dlink-xxxxxx
The Name assigned here is also used by various
network services to identify the device, including
the shared libraries available in iTunes and other
media players.
Click on the Save Settings button to apply and save the
new settings.
Note: Please check D-Link’s local website for new Language
Packs.
Page 33
30D-Link ShareCenter™ 2Go User Manual
Section 3 - Conguration
Users and Groups
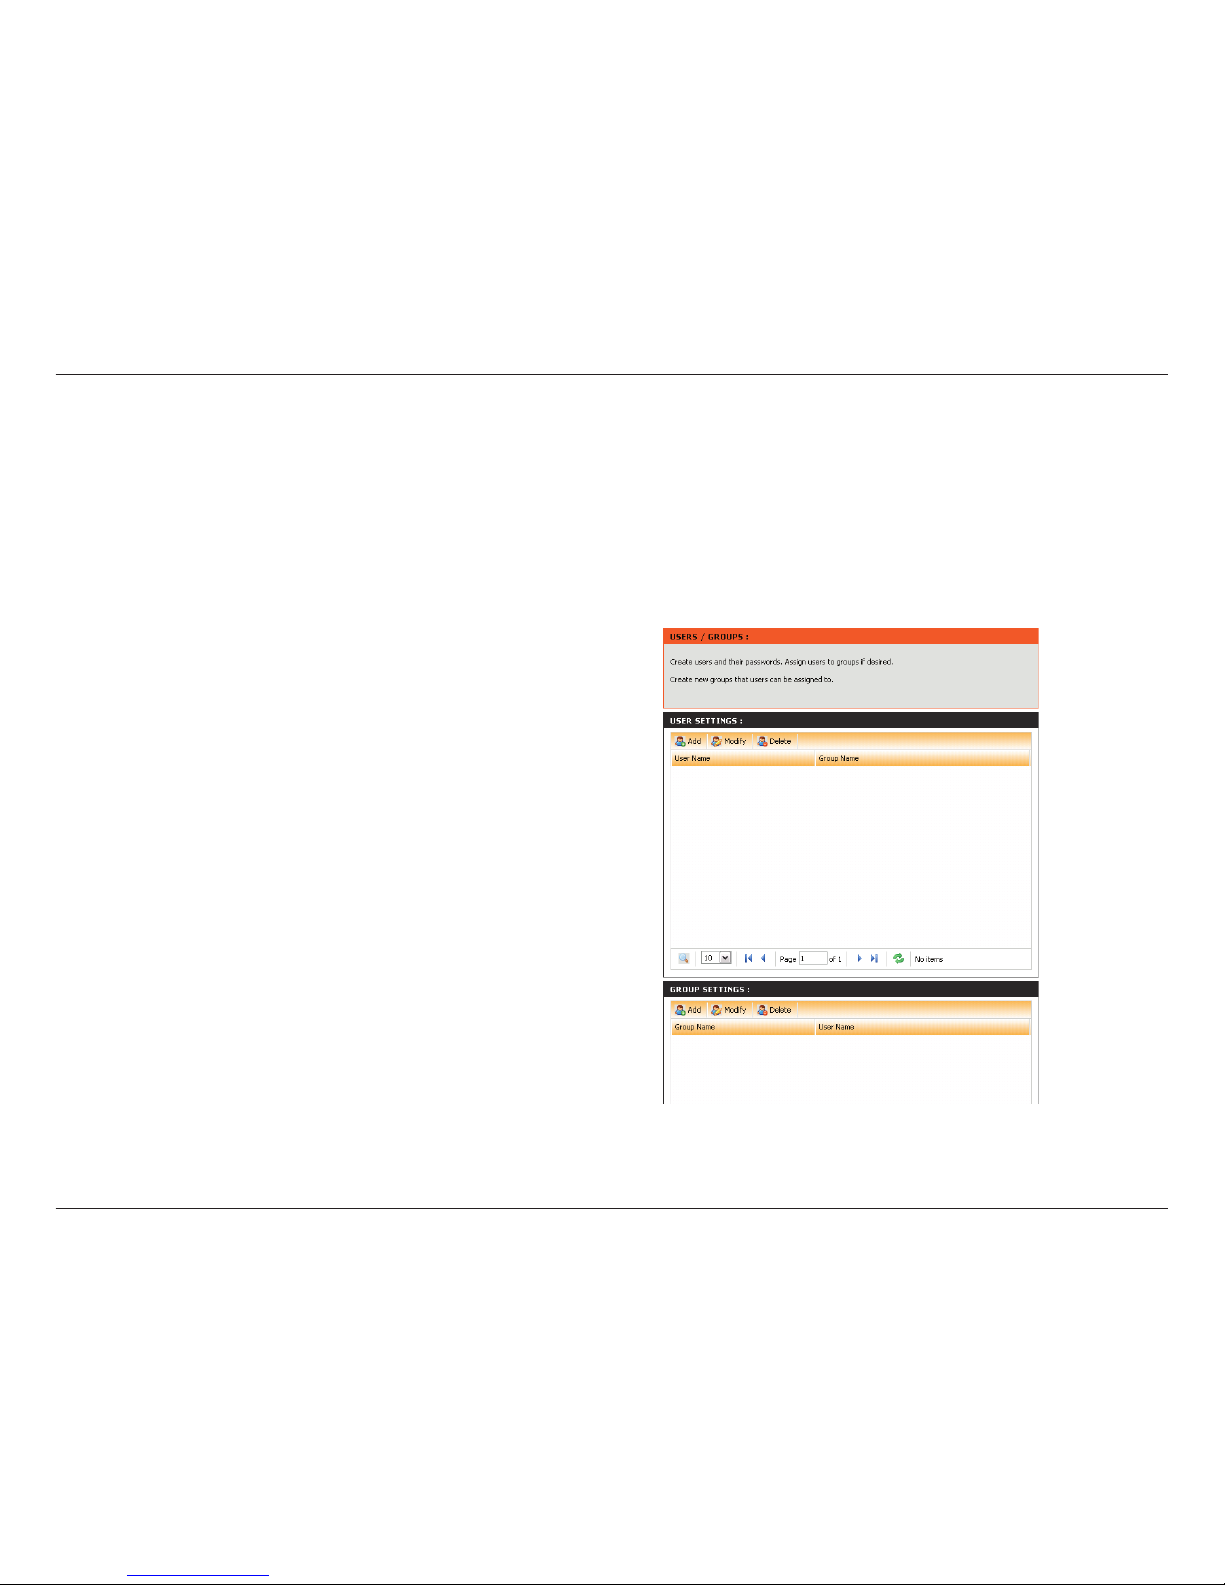
The Users and Groups menu is used to create user accounts and groups. Users and groups can be used for managing
the read/write privileges to access or deny specied folders on the network drive (see the “Network Shares” section
on page 36 for more information) or for setting up FTP access rights. The ShareCenter™ 2Go allows up to 64 unique
users and 10 groups to be created. By default, all users have read and write access to all folders until an access rule
is created in the Network Shares menu.
Advanced
User Setting
Section
Group Settings
Section
Add Buttons
Modify Buttons
Delete Buttons
This section is used to create (add) new users or
modify and delete existing users. Users created
will be either given read, write access privileges or
denied access to specic shared volumes. Once the
users are created the are listed here.
This section is used to create (add) group settings.
See the “Add (Create) Group” section on page 33 for
more information on how to congure group settings.
Group settings allows a user to be a member of a
group with already predened access rights to the
folders on the volume.
Use the Add buttons in the User or Group Settings
to add a new user or group to the conguration. The
refer to the following pages for the add user and
group functions.
Use the Modify buttons in the User or Group Settings
to edit the settings of a user or group. See the Add
(Create) Users for the details.
Use the Delete buttons in the User or Group
Settings to remove a user or group setting from the
conguration. A conrmation box appears to cancel
the deletion if necessary.
Page 34
31D-Link ShareCenter™ 2Go User Manual
Section 3 - Conguration
Adding a New
User
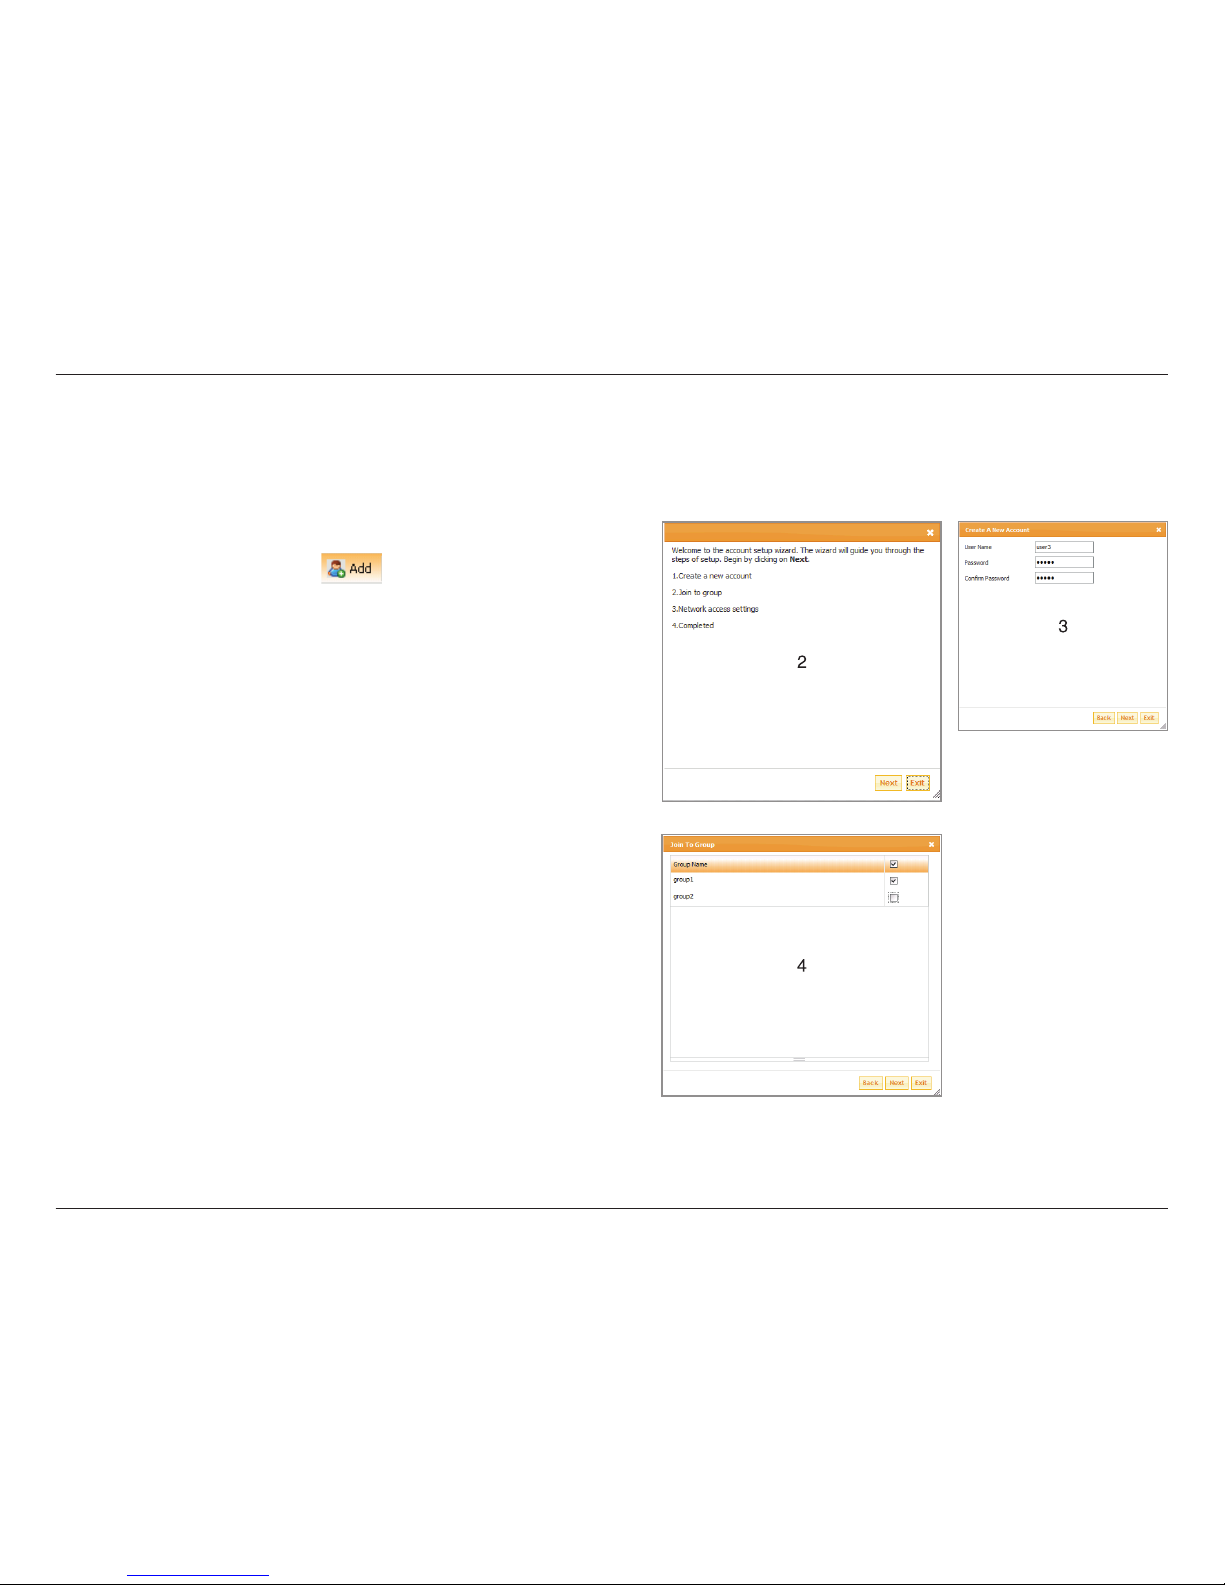
Click the add button:
1. Click the
button at the top of the User
Settings list to launch the Add User Wizard
2. The rst window outlines the 4 steps of the
Add User wizard - click the Next button to
continue.
3. In the Create a New Account window enter
the new Username and Password. Click
Next button to continue.
4. In the Join to Group window click the check
boxes to select the groups the user will be
a member of. Click Next button to continue.
Users and Groups
Add (Create) Users
Page 35
32D-Link ShareCenter™ 2Go User Manual
Section 3 - Conguration
Adding a New
User
- continued
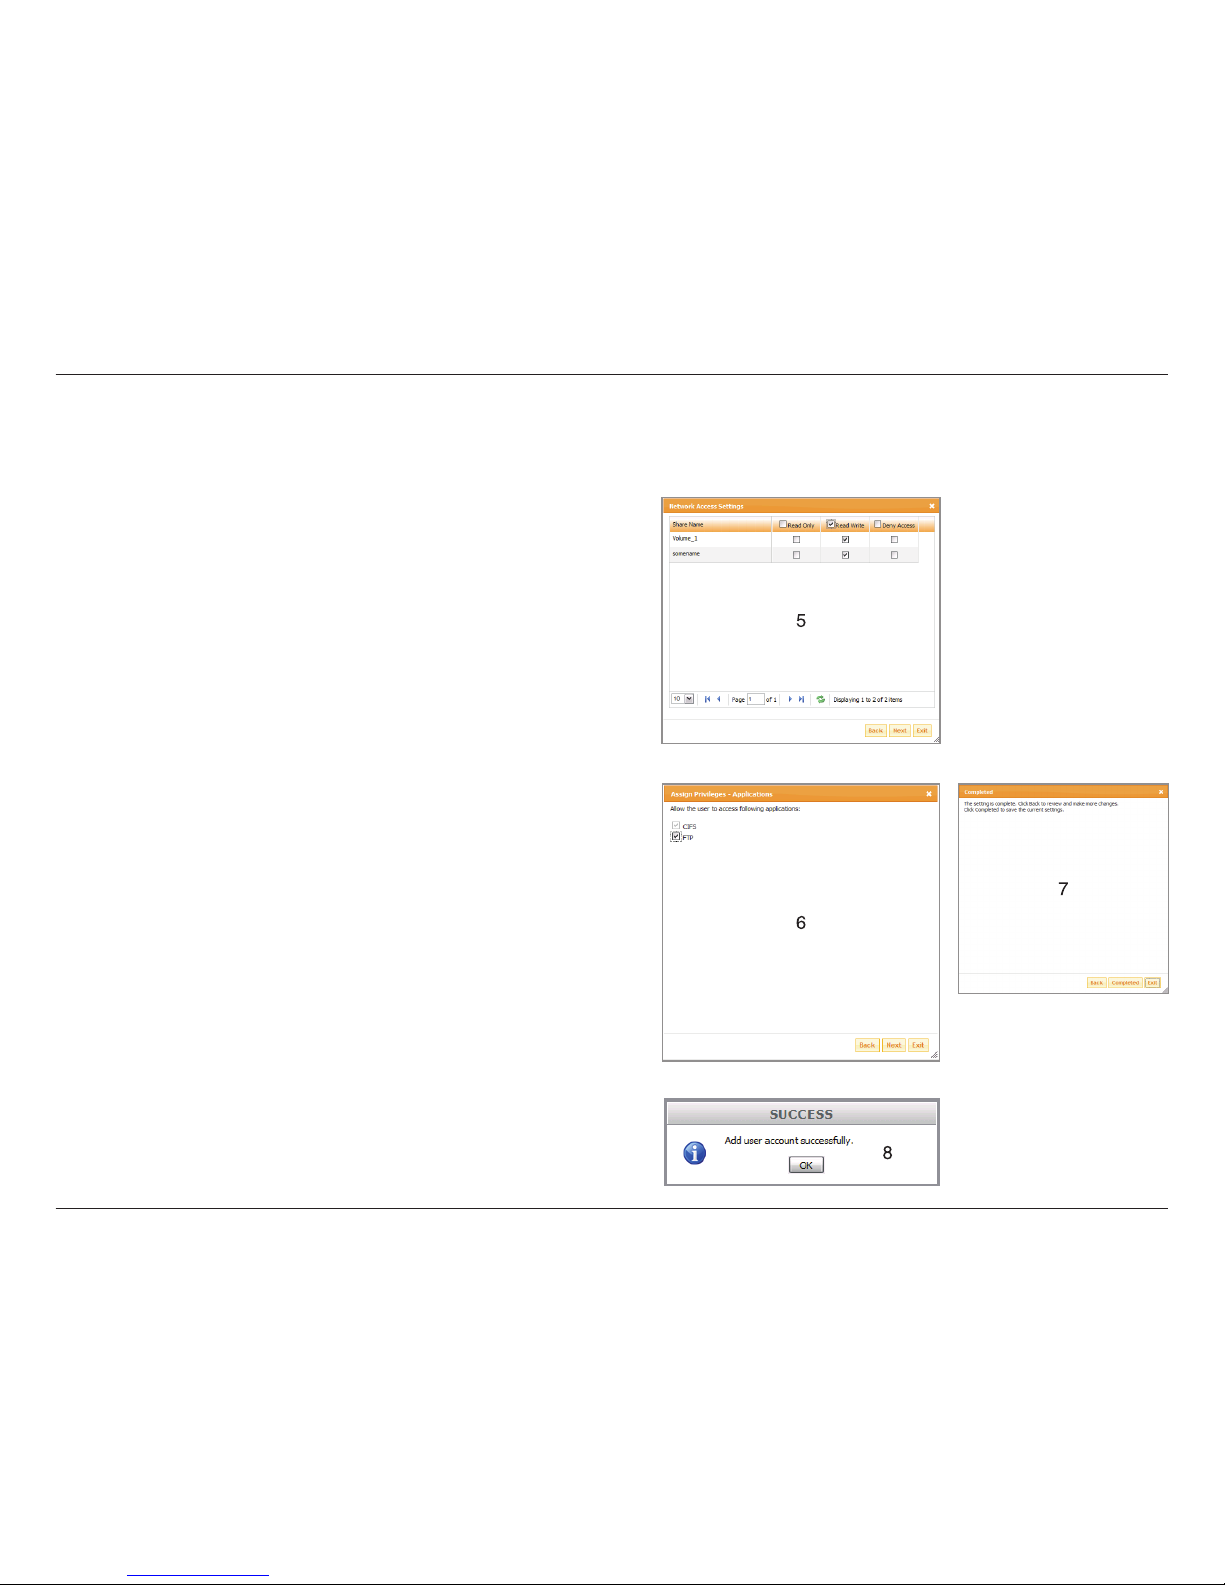
5. In the Network Access Setting window
click the Read Only, Read/Write, and Deny
check boxes th at will define the users
access permissions to the HDD Volume and
its Network Shares. Click Next button to
continue.
6. In the Assign Privileges - Applications check
the FTP box if the user will have access to
the FTP server (CIFS or Common Internet
File System protocol is always available for
the users).
7. In the Completed window use the Back
butto n to revie w you r set tings in the
Completed window. Click the Completed
button to add the new user account or click
Exit to cancel the add operation.
8. The Success window should appear verifying
the addition of the new user.
Users and Groups
Add (Create) User
Page 36
33D-Link ShareCenter™ 2Go User Manual
Section 3 - Conguration
Users and Groups
Add (Create) Group
Adding a New
Group
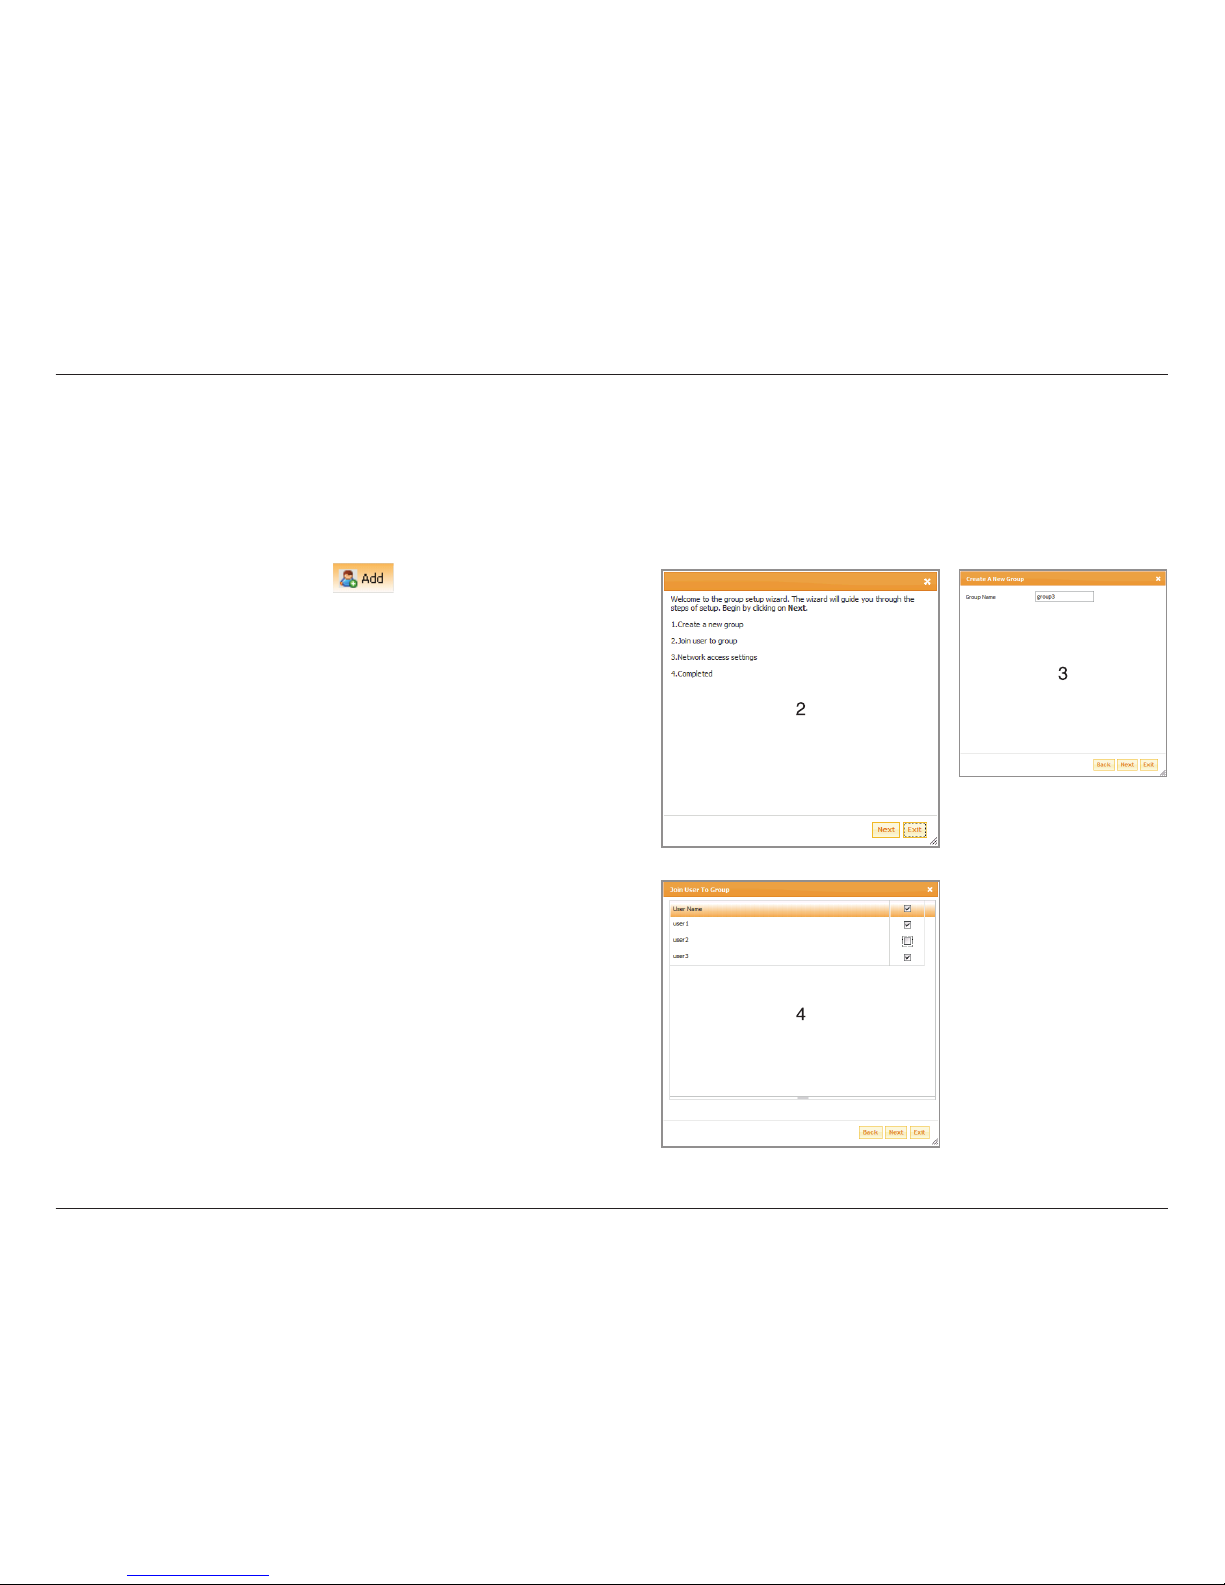
Click the add button:
1. Click the
button at the top of the
Group Settings list to launch the Add User
Wizard.
2. The rst window outlines the 4 steps of the
Add Group wizard - click the Next button to
continue.
3. In the Create a New Group window enter
the new Group Name. Click Next button to
continue.
4. In the Join User To Group window click the
check boxes to select the users that will be
a member of the group being created. Click
Next button to continue.
Page 37
34D-Link ShareCenter™ 2Go User Manual
Section 3 - Conguration
Users and Groups
Add (Create) Group
Adding a New
Group
- continued
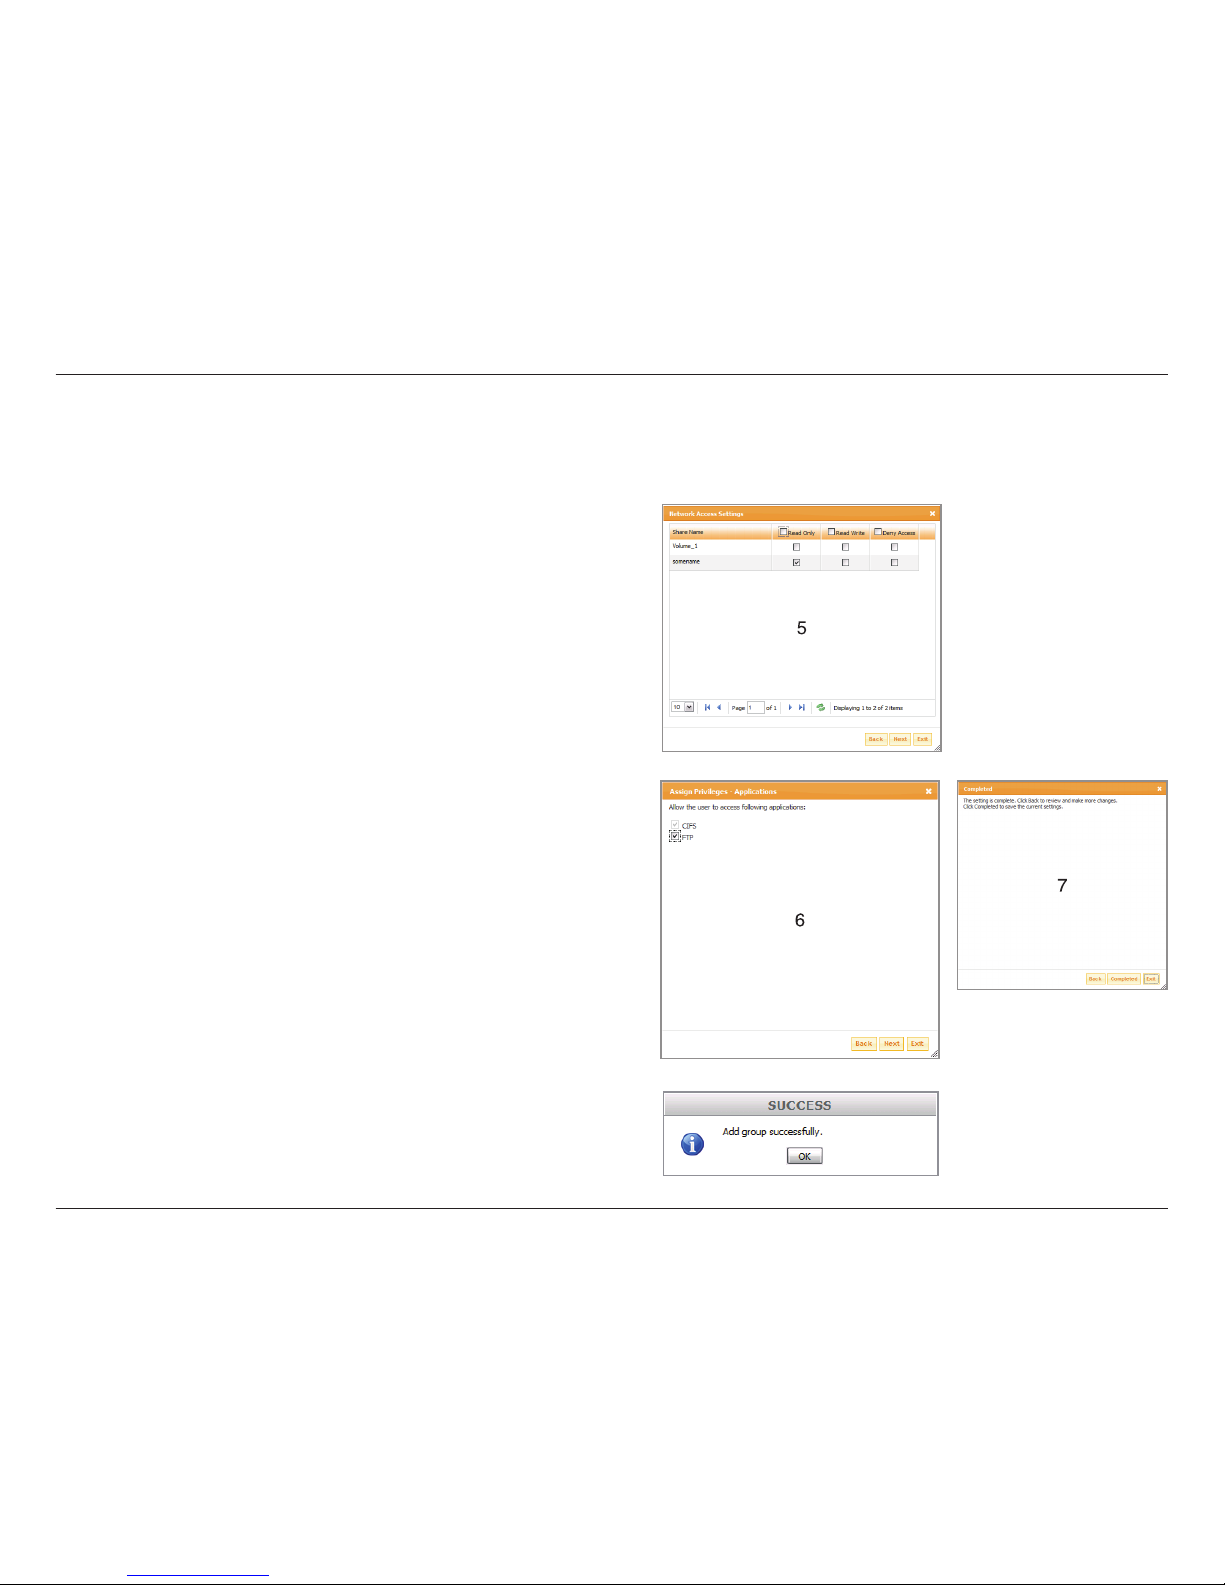
5. In the Network Ac cess Settings click
th e Read On ly, Read/ Write, and Deny
check boxes that will define the groups
access permissions to the HDD Volume and
its Network Shares. Click Next button to
continue.
6. In the Assign Privileges - Applications
check the FTP box if the user will have
access to the FTP server. Click Next button
to continue (CIFS or Common Internet File
System protocol is always available for the
group) .
7. In the Completed window use the Back
butto n to revie w you r set ti ngs in t he
Completed window. Click the Completed
button to add the new group account or click
Exit to cancel the add operation.
8. The Success window should appear verifying
the addition of the new group.
8
Page 38
35D-Link ShareCenter™ 2Go User Manual
Section 3 - Conguration
Users and Groups
Navigation and Search buttons.
Navigation
Navigation
Arrows
Number of Users
/Groups per page
Searching for a
specic User or
Group name
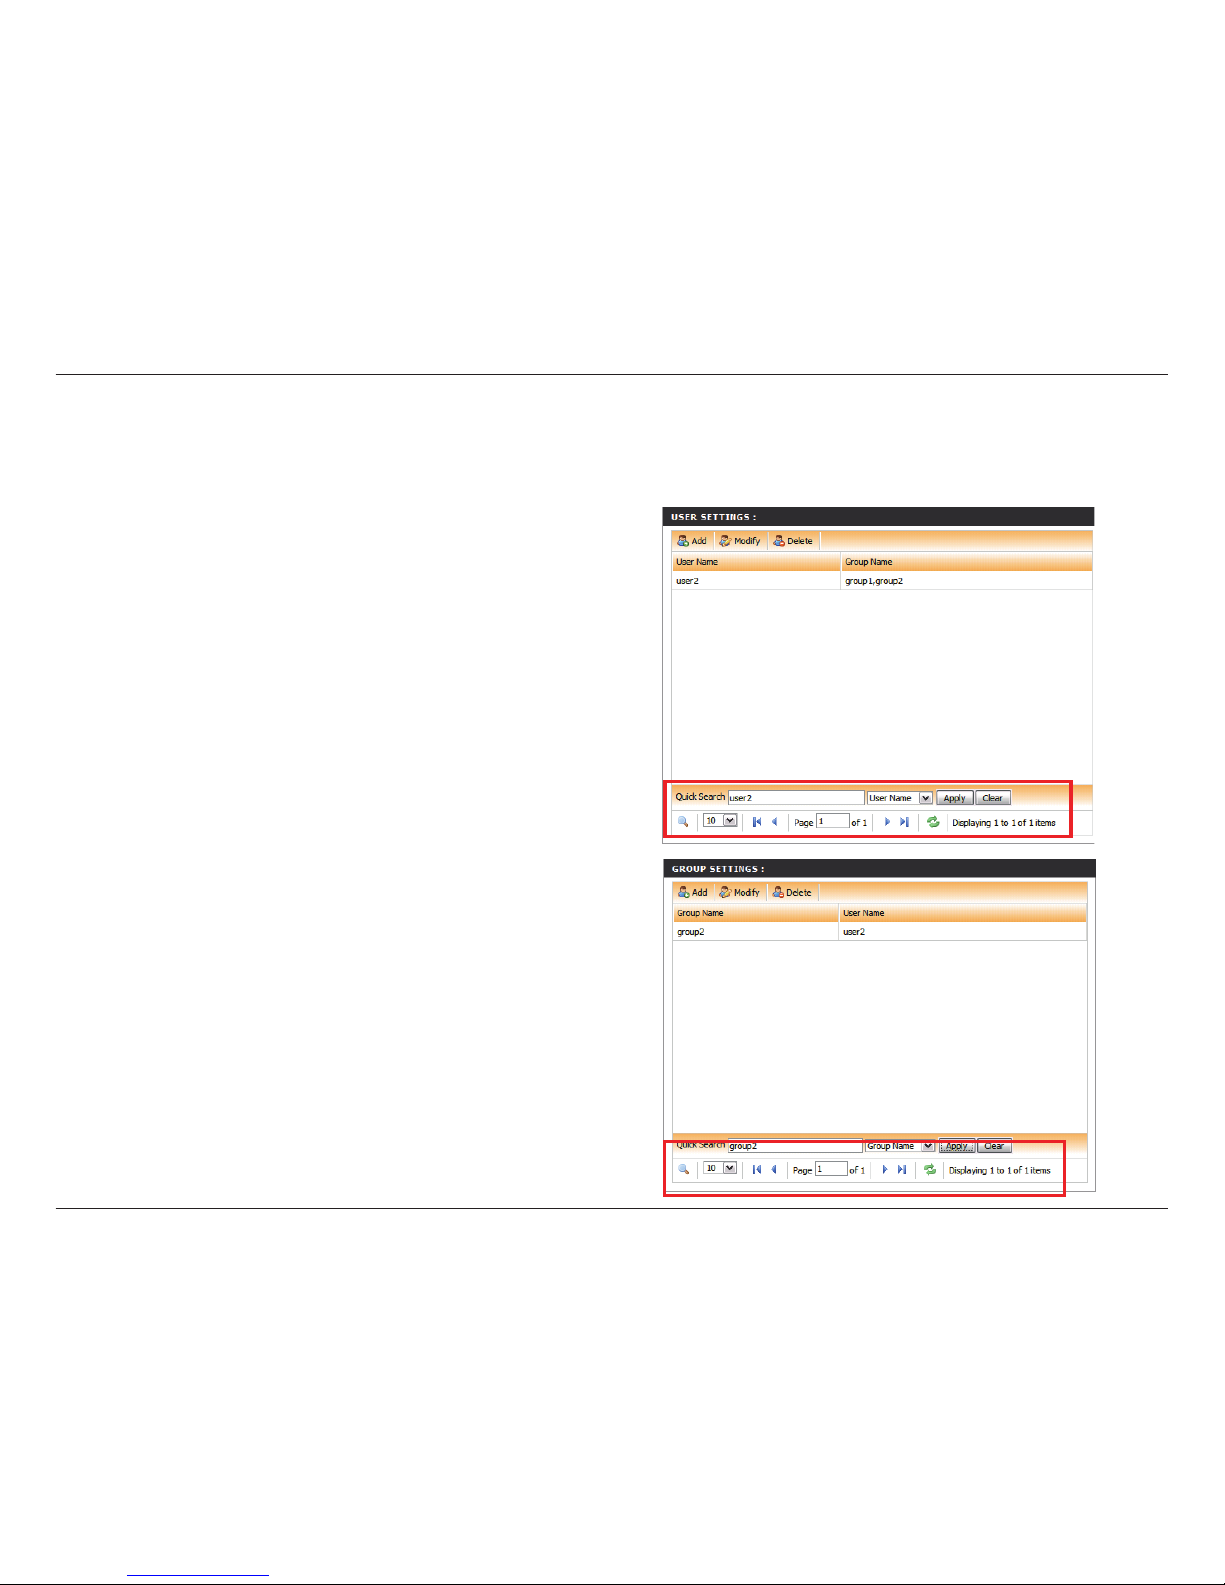
At the bottom of the User Settings List and Group
Settings List are navigation buttons to go forward
and back in each of the respective lists (see the red
rectangle on the screenshots to the right).
Click the inner left and right arrows to go forward and
backwards one page of users or groups in the list.
Click the outer left and right arrows to go to the rst
or last user or group page in the list.
Use the pull down menu to expand or limit the number
of users in the view
Clicking the magnifying glass to the left of the
navigation section brings up a a Quick Search. In the
entry box that appears type the name of the user or
group to search for then click the Apply button. Click
the Clear button to view the entire list again.
Page 39
36D-Link ShareCenter™ 2Go User Manual
Section 3 - Conguration
Network Shares
CIFS
Add
Modify
Delete
Reset Network
Access List
Navigation buttons
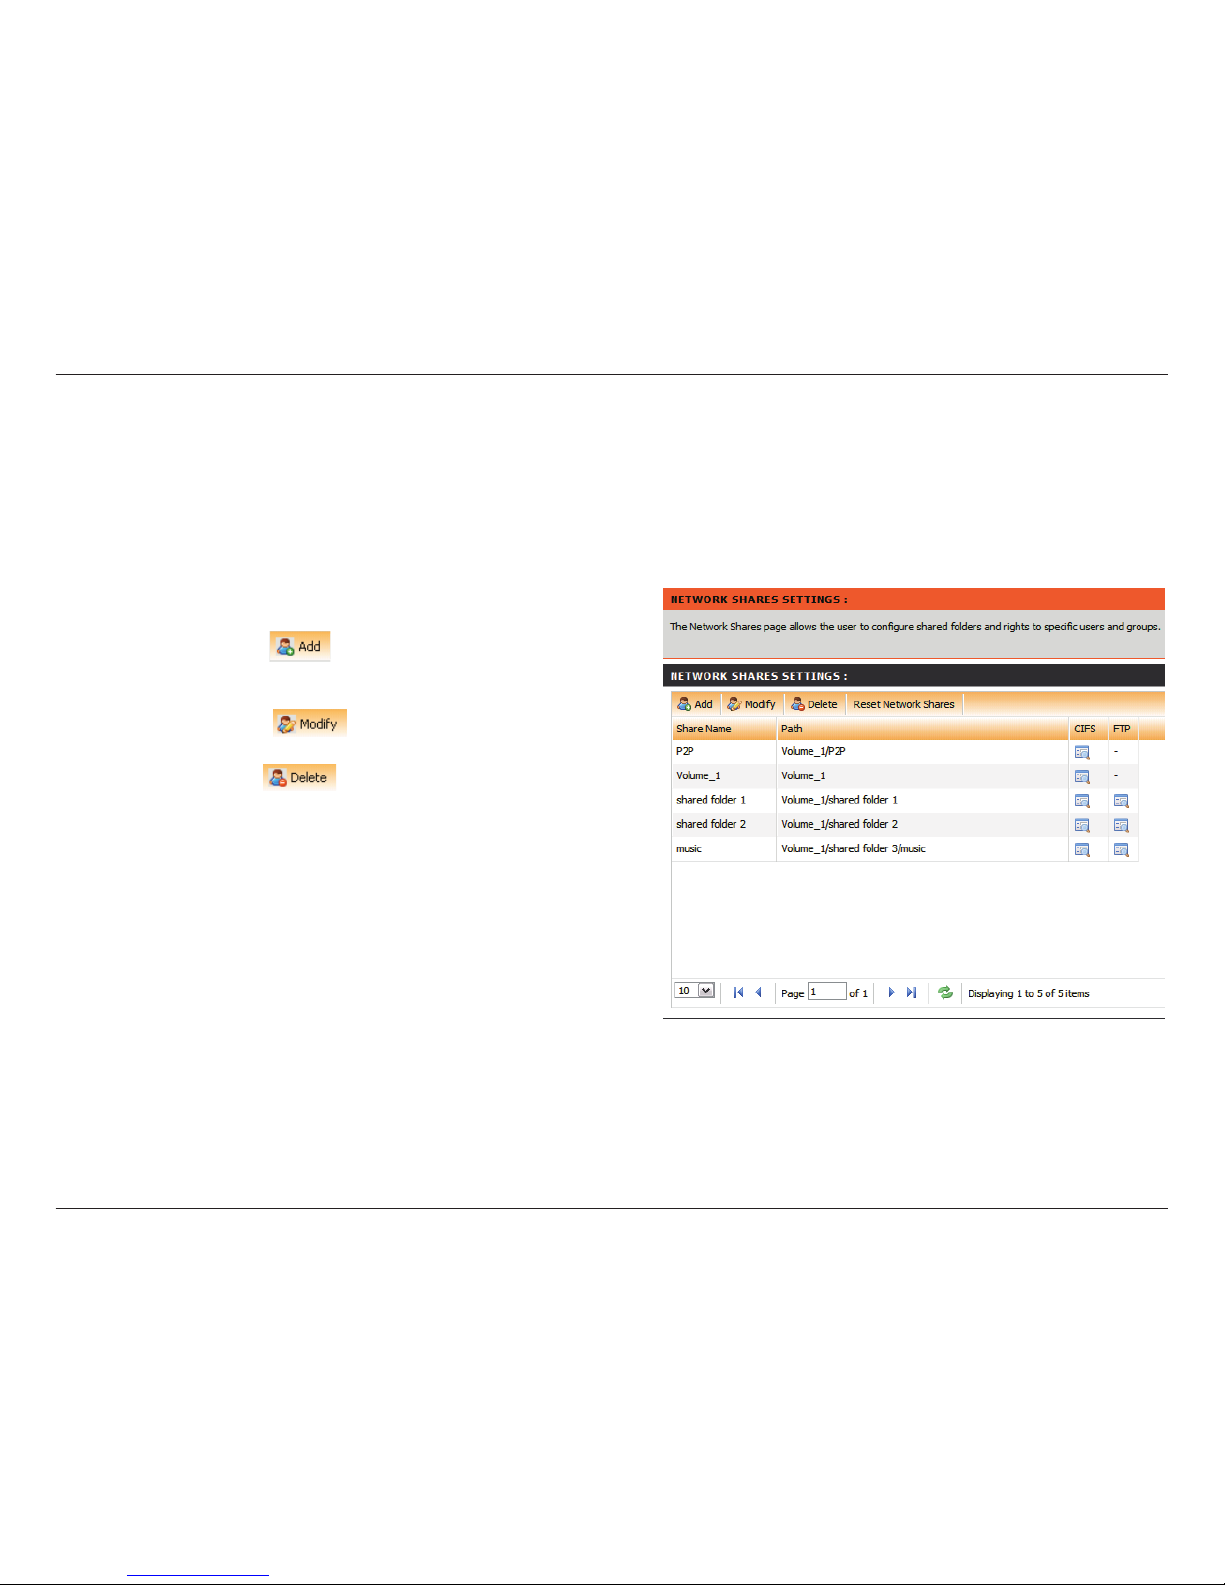
The Network Shares window allows you to congure the access rights to specic folders or volumes for the users or
groups that have been setup on ShareCenter™ 2Go. By default, all volumes are open to anyone on the local network
with read/write access. Once
The table that displays the volume and folders that
have been congured as Network Shares.
.
Click the button to create a Network Share
that all or specic users and groups can access. A
Network Share Wizard will open.
Click the button to edit the settings of a
Network Share.
Click the button to remove a Network Share
from the conguration settings.
Click to reset the Network Access List and remove
all the previously created Network Shares
Use the controls at the bottom of the window to scroll
through the list of Network Shares.
Page 40
37D-Link ShareCenter™ 2Go User Manual
Section 3 - Conguration
Network Shares
Adding a New
Network Share
Click the add button:
1. Click the
button at the top of the
User Settings list to launch the Add Network
Wizard
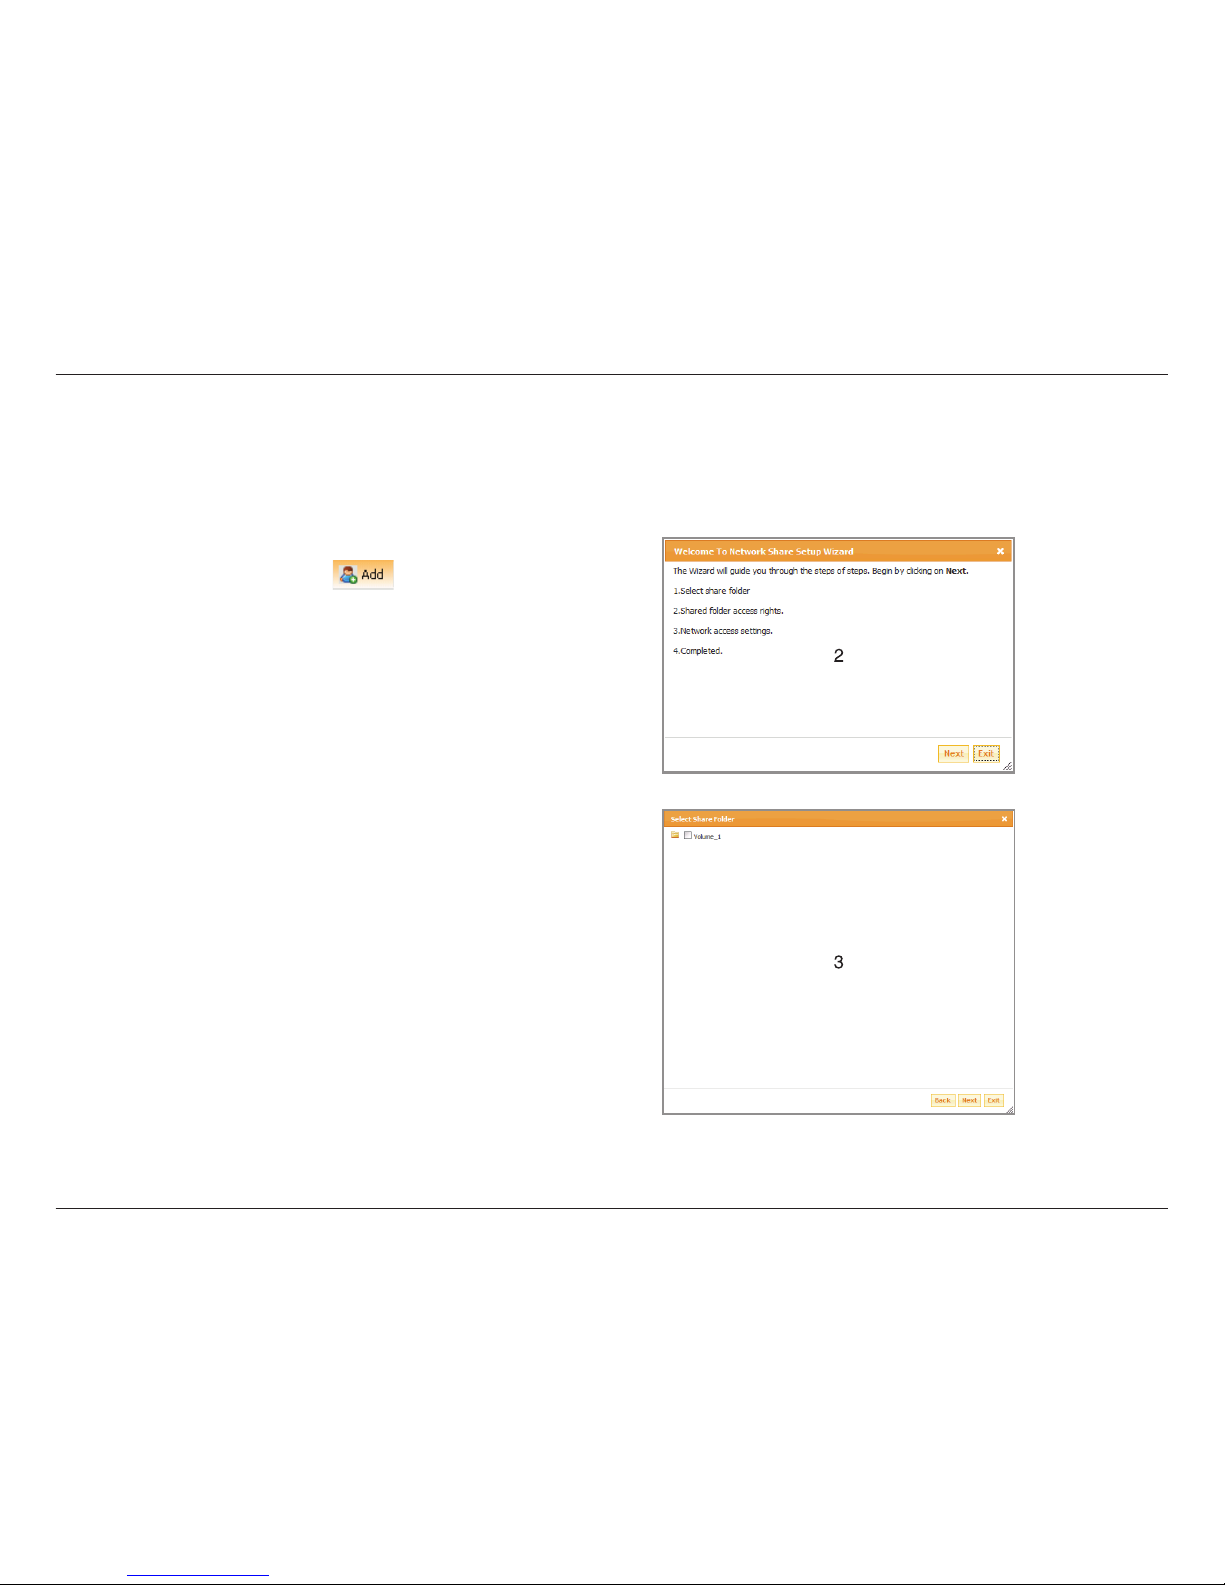
2. The rst window outlines the 4 steps of the
Add Network Share wizard - click the Next
button to continue.
3. In the Select Network Share window click
the word Volume next to the checkbox to
expand volume view.
Add a Network Share
Page 41
38D-Link ShareCenter™ 2Go User Manual
Section 3 - Conguration
Network Shares
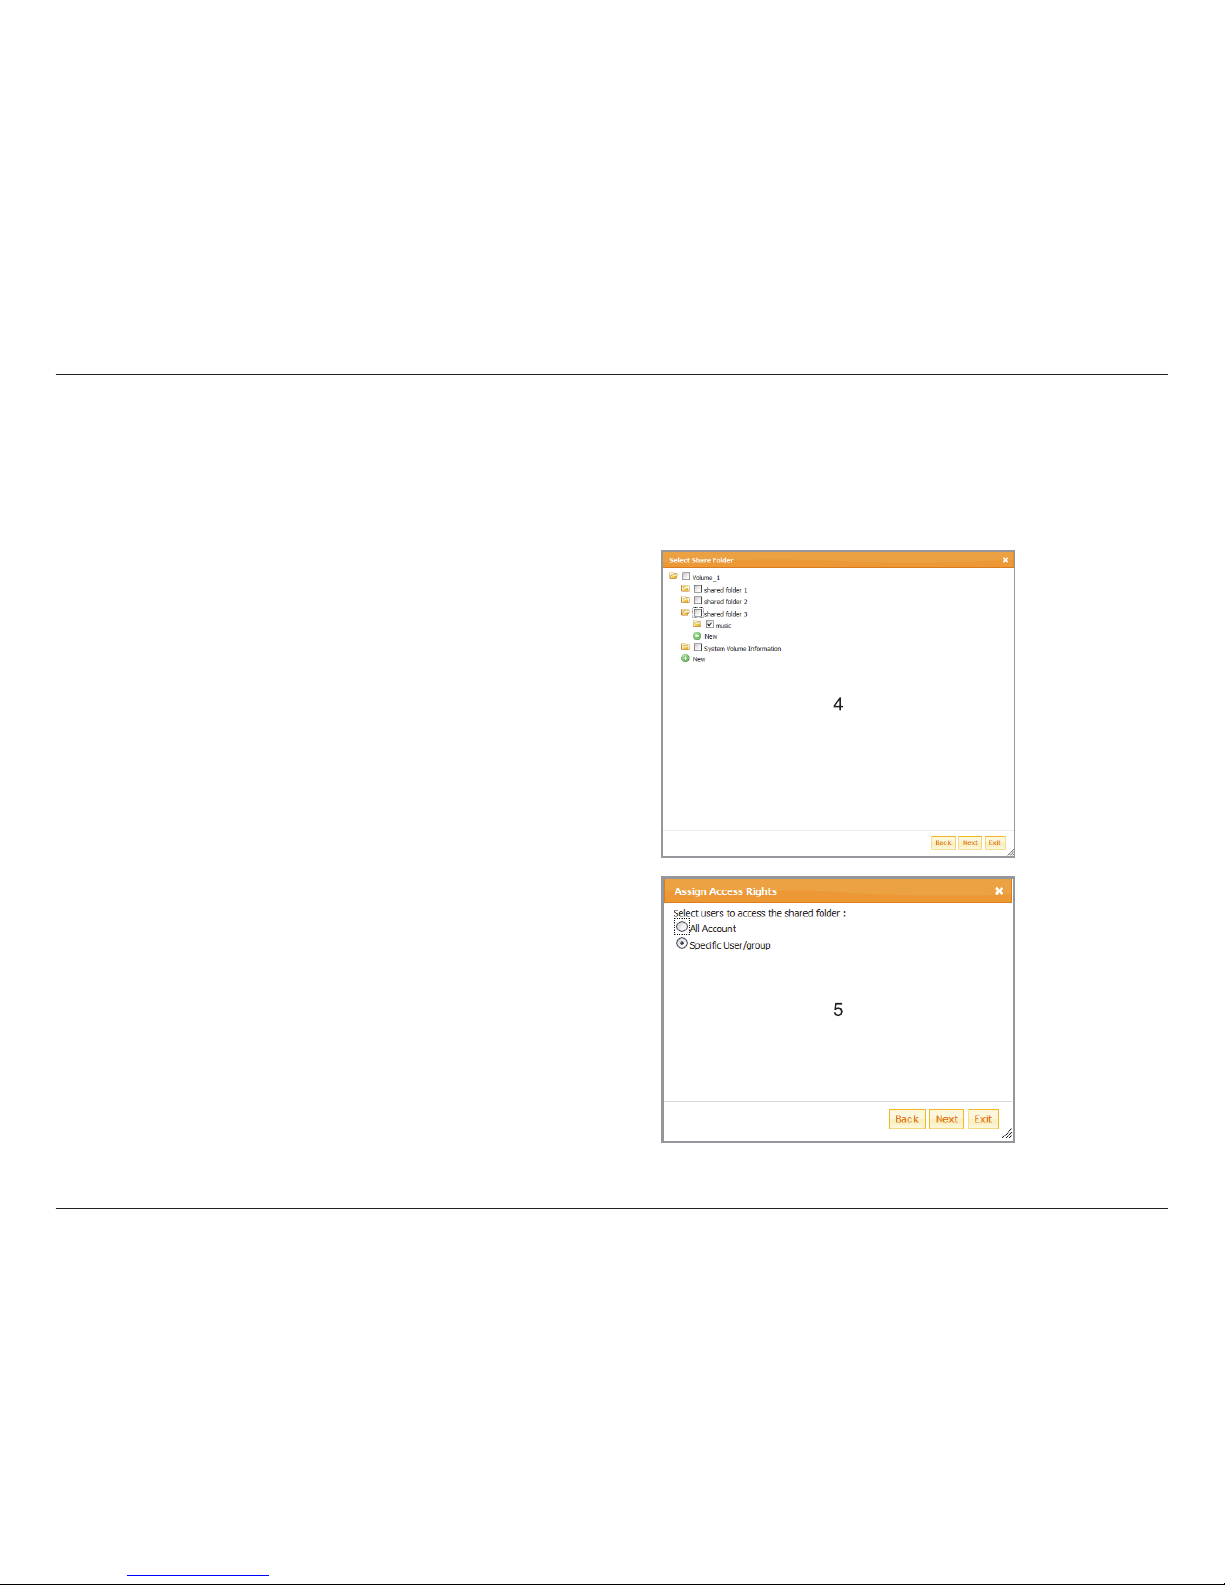
4. In the Select Share Folder window click the
check box for the folder that you wish to use
as a Network Share. In the example the folder
“music” is selected. If you click the New icon
in the expanded volume view you can create
a new folder to be used as a Network Share.
Click the Next button to continue.
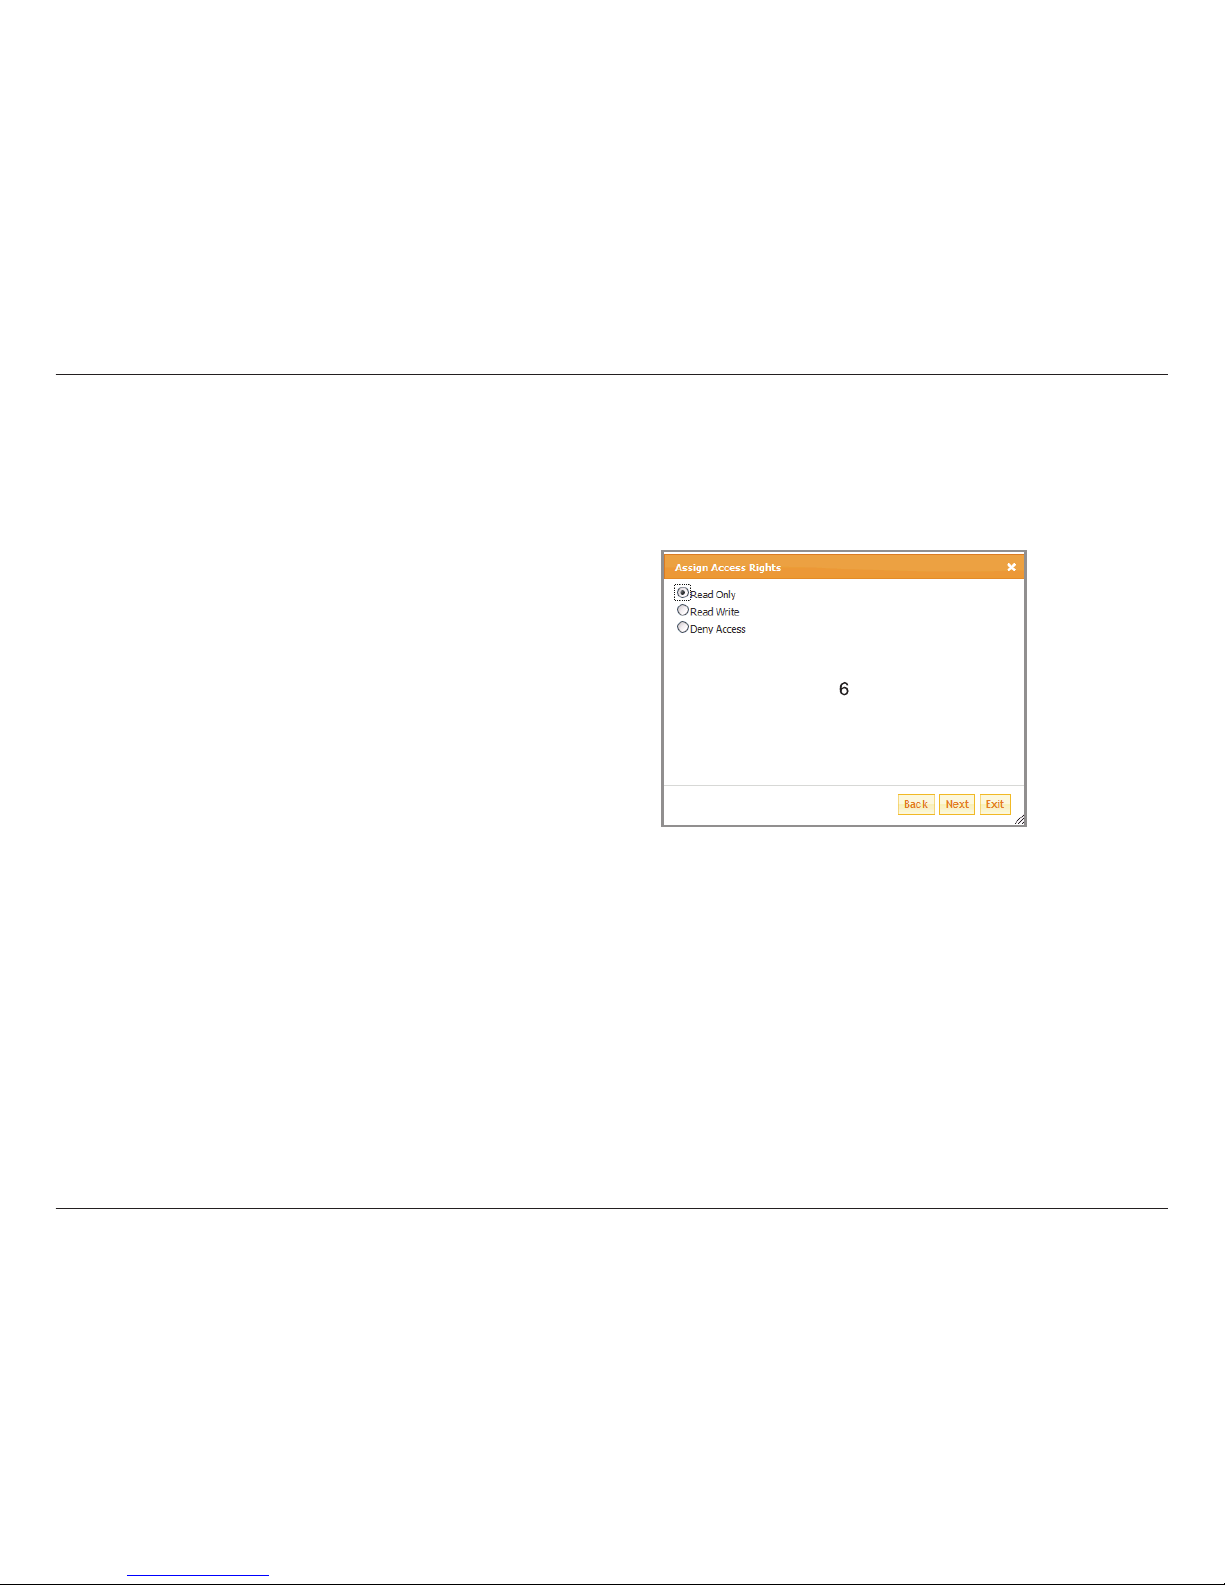
5. In the Assign Access Rights window select
either: All Accounts; to give any congured
user and group access or deny rights to the
Network Share, or select Specific User/
group to individually assign access and deny
rights. Click the Next button to continue.
Add a Network Share
Adding a New
Network Share
- continued
Page 42
39D-Link ShareCenter™ 2Go User Manual
Section 3 - Conguration
Network Shares
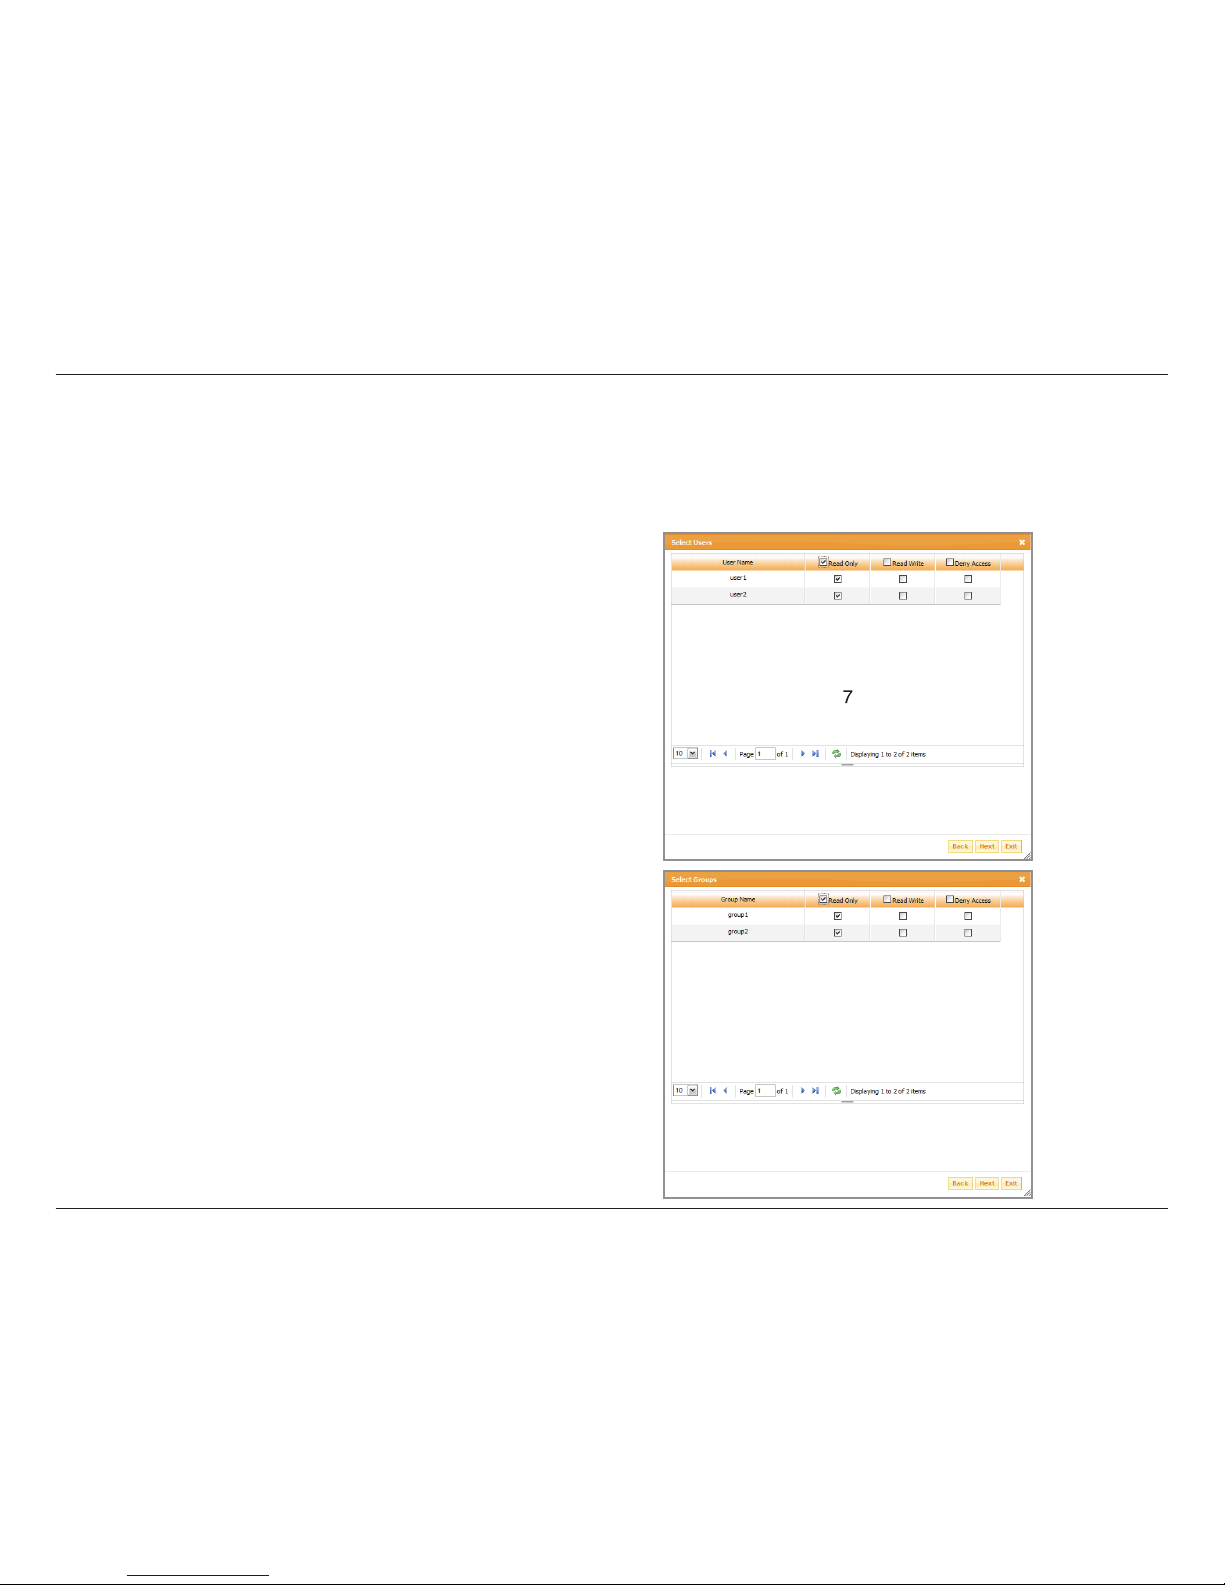
6. If you selected All Accounts in step 5 then
the window on the right of this page appears
to Assign Access Rights. Select Read Only,
Read Write, or Deny Access access rights to
be applied to all users. Go to step 8 since All
Accounts was selected previously.
Add a Network Share
Adding a New
Network Share
- continued
Page 43
40D-Link ShareCenter™ 2Go User Manual
Section 3 - Conguration
Network Shares
Add a Network Share
Adding a New
Network Share
- continued
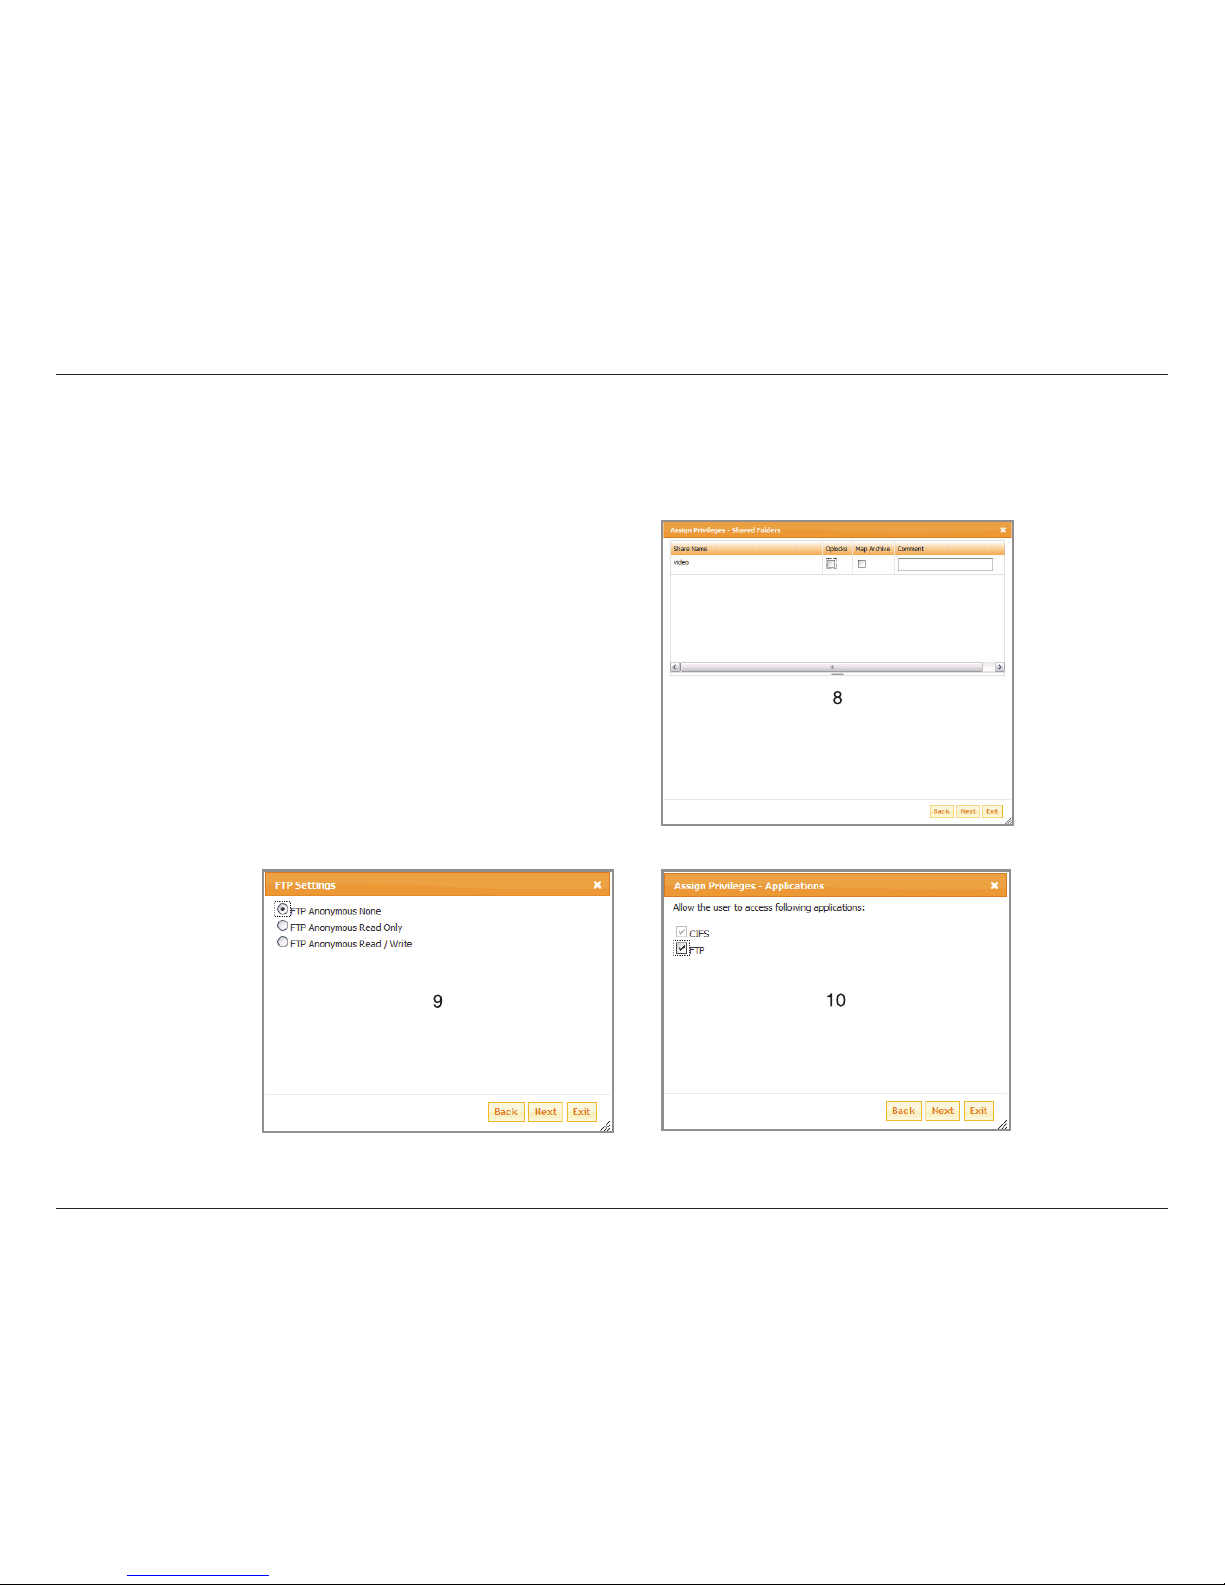
7. If in Step 5 you selected Specific User/
group the two windows on the right of the
page will appear. Use the two windows to
assign read/write/deny rights to both Users
and Groups by checking the checkboxes for
the individual users and groups. Click the
Next button in each window to continue.
Page 44
41D-Link ShareCenter™ 2Go User Manual
Section 3 - Conguration
Network Shares
Add a Network Share
Adding a New
Network Share
- continued
8. In the Assign Privileges - Shared Folders
window check the Oplocks and Map Archive
check boxes if desired. See page 55 for
information about Oplocks and Map Archive
functionality.
9. In the Assign Privileges - Applications
window select the FTP check box if the new
Network Share is to allow FTP access.
10. In the FTP Settings window select the
access rights that Anonymous FTP users will
have when using FTP protocol to access the
Network Share.
Page 45
42D-Link ShareCenter™ 2Go User Manual
Section 3 - Conguration
Network Shares
Add a Network Share
Adding a New
Network Share
- continued
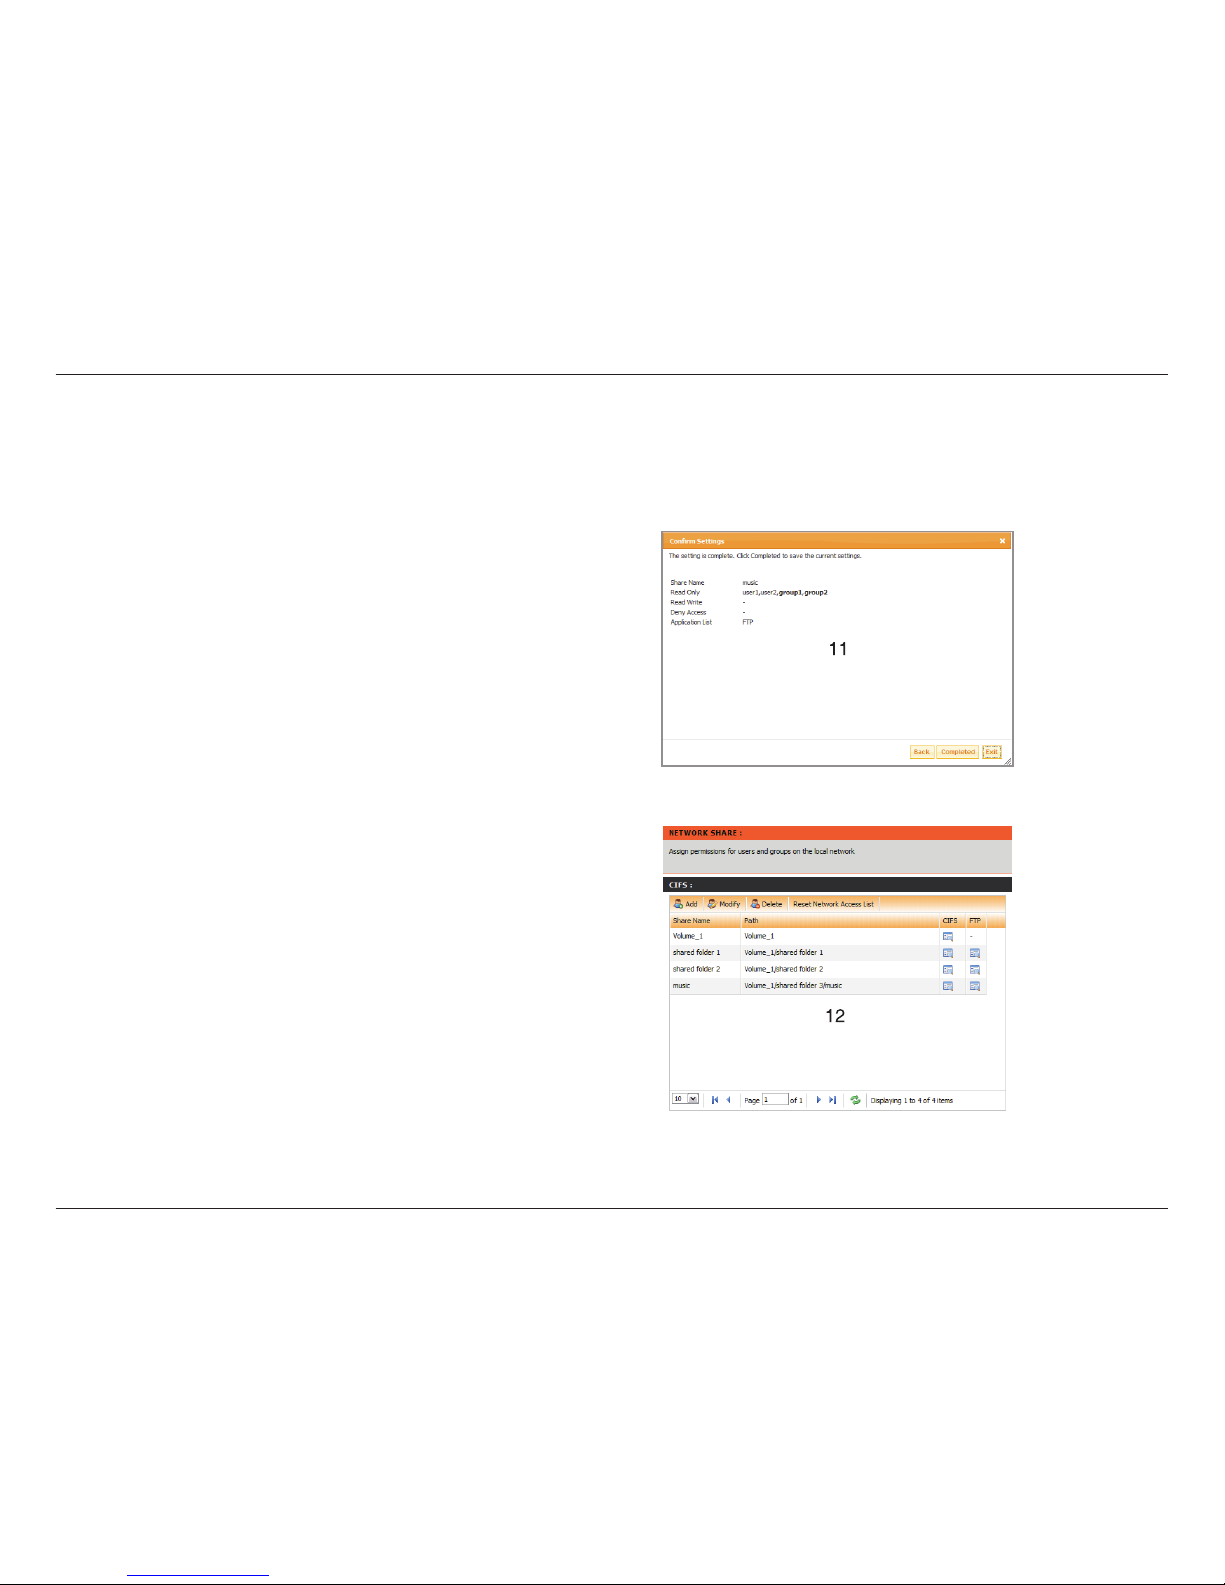
11. Fi nally the Confirm Se ttings wi nd ow
appears. Check the settings and use the
Back button to recongure them if necessary
in the prev ious wi ndows. Se lected th e
Completed button to save the new Network
Share settings. Use the Exit button to cancel
the operation.
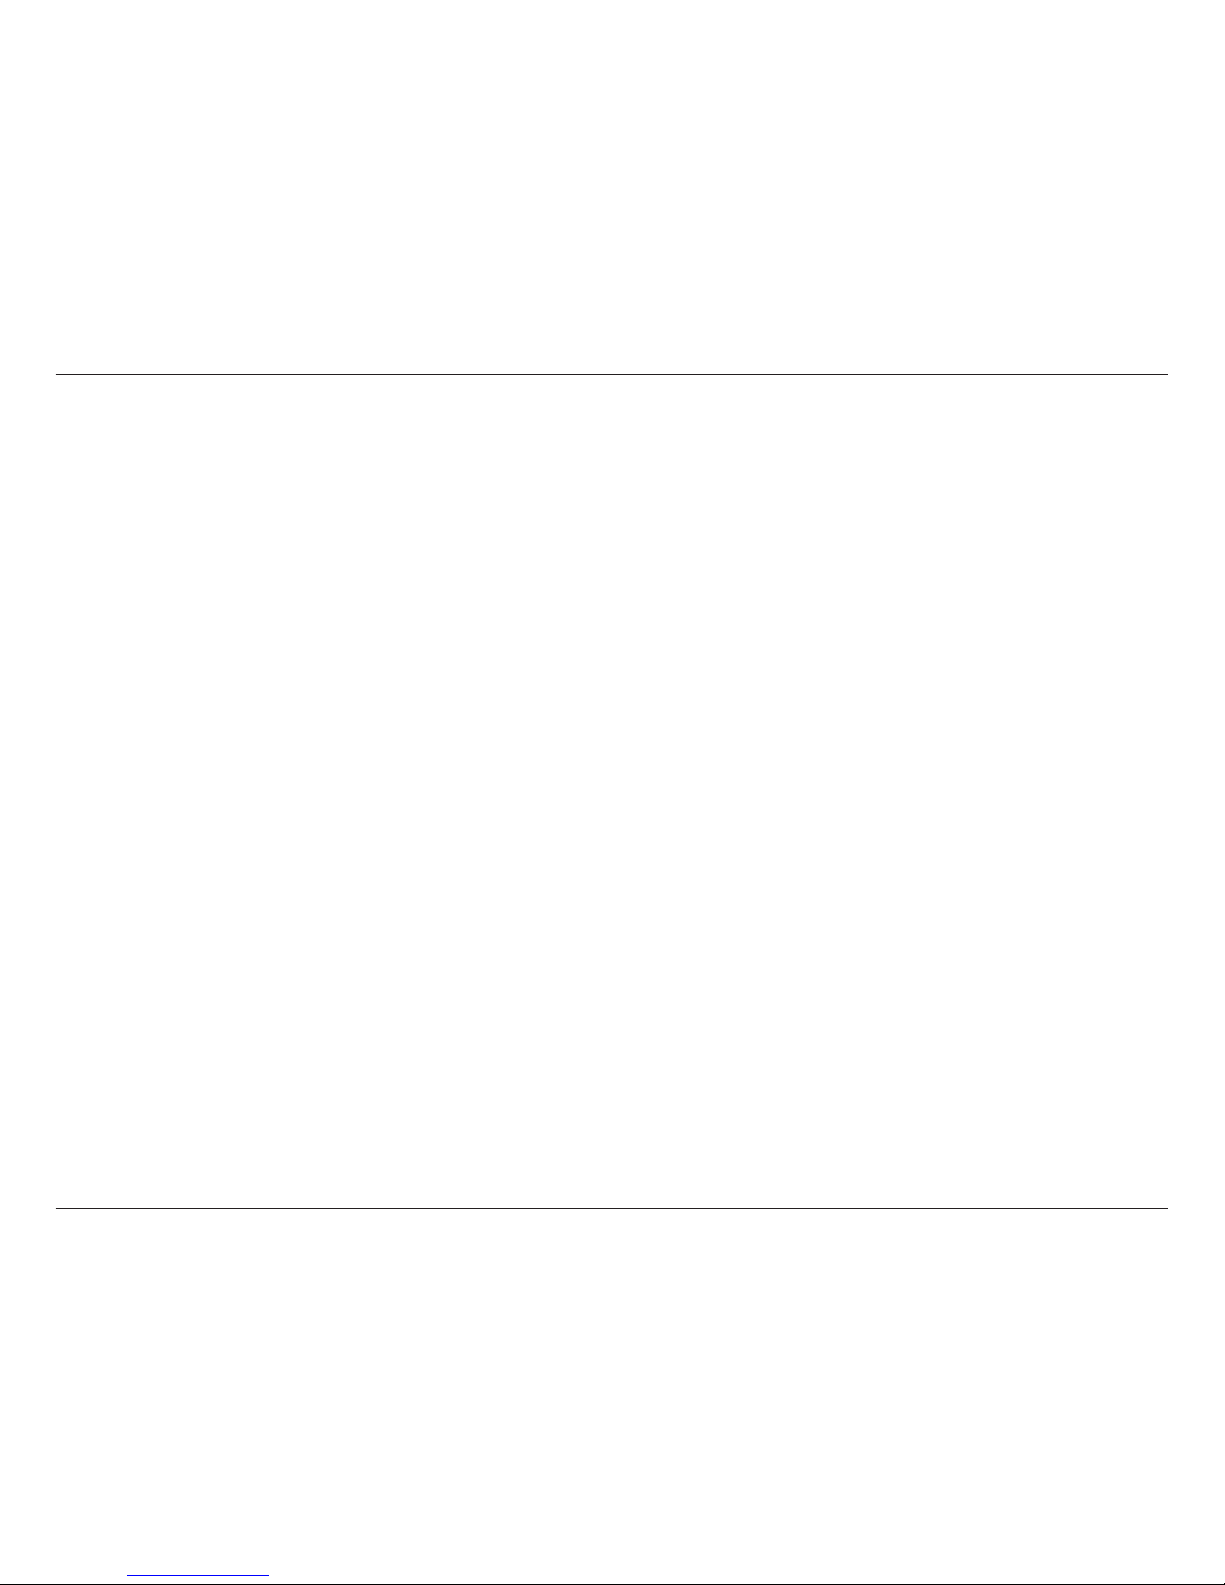
12. In the CIFS list the new network share should
now appear.
Page 46
43D-Link ShareCenter™ 2Go User Manual
Section 3 - Conguration
Oplocks and Net Archives
Add a Network Share
Opportunistic locks (oplocks) are a characteristic of the LAN Manager networking protocol implemented in
the 32-Bit Windows family of operating system environments. Oplocks are guarantees made by a server for a
shared logical volume to its clients. These guarantees inform the Client that a le’s content will not be allowed
to be changed by the server, or if some change is imminent, the client will be notied before the change is
allowed to proceed.
Oplocks are designed to increase network performance when it comes to network le sharing however when
using le-based database applications it is recommended to set the share oplocks to No (off).
By default Vista has Oplocks enabled and can not be disabled. If you are having network performance issues
with applications sharing les from the ShareCenter™ 2Go you may try to improve performance by setting
Oplocks to No (off).
Map archive, When enabled, the le attribute--”Archive” will be copied as the le is being stored on the
ShareCenter™ 2Go. Certain backup software programs attach this attribute to les that are being stored as
backups.
Oplocks
Map Archive
Page 47
44D-Link ShareCenter™ 2Go User Manual
Section 3 - Conguration
FTP Server
FTP Server
Settings
FTP Server
Status
The ShareCenter™ 2Go is equipped with a built-in FTP Server. The server is easy to congure and allows access
to important data, whether you are on a local network or at a remote location. The FTP server can be congured to
allow access to specic directories, and will allow up to 10 users to access the ShareCenter™ 2Go at the same time.
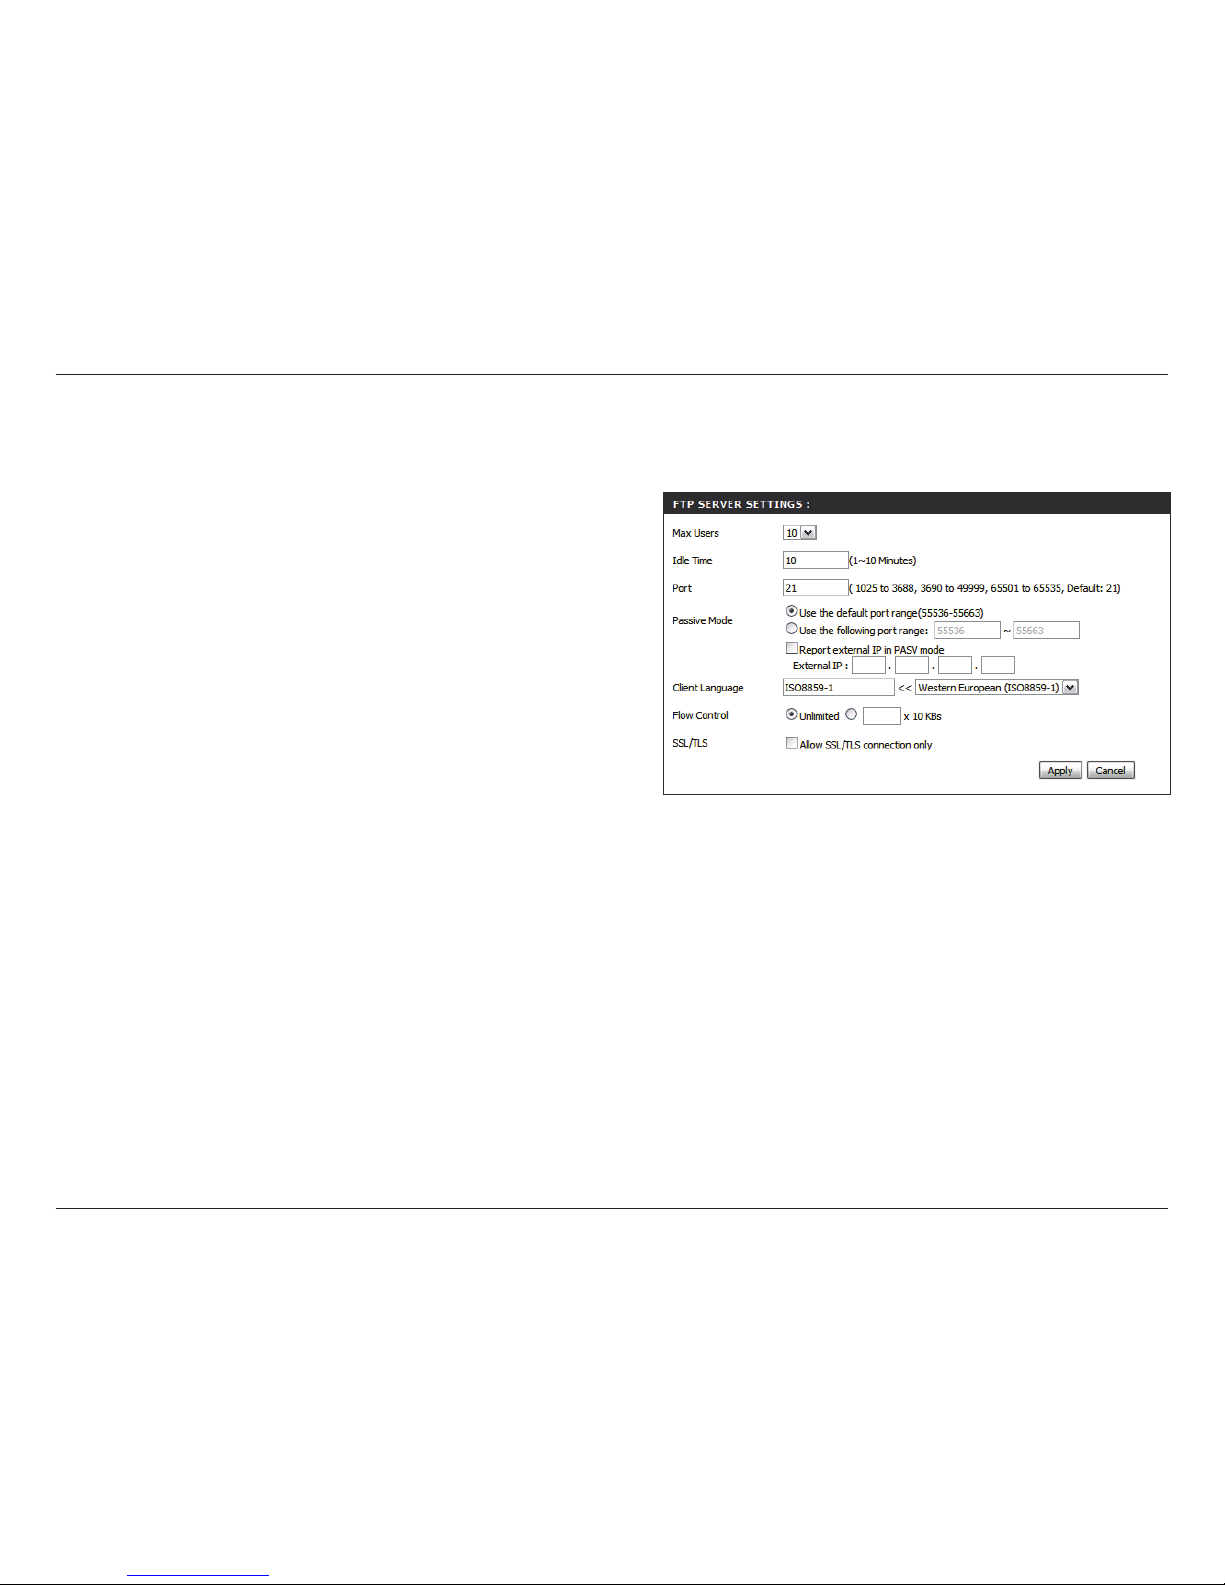
This section contains the conguration settings for
the ShareCenter™ 2Go FTP Server.
Displays the current status of the FTP Server.
The FTP Server window is divided into 3 main sections:
Page 48
45D-Link ShareCenter™ 2Go User Manual
Section 3 - Conguration
FTP Server
FTP Server Settings
Max User
Idle Time
Port
Passisve Mode
Flow Control
Client Language
SSL/TLS
Sets the maximum amount of users that can connect
to the FTP server.
Sets the amount of time a user can remain idle before
being disconnected.
Sets the FTP port. The default FTP port is 21.
Allows the client to initiate both of the FTP connections
to overcome rewall lters. Click the appropriate
port range options and whether or not to report the
external IP when using passive mode.
Allows you to limit the amount of bandwidth available
for each user.
Most standard FTP clients like Windows FTP,
only support Western European codepage when
transferring les. Use the drop-down list to select the
appropriate codepage ID.
Note: If the codepage with the character encoding
required is not listed, select the User-Dened option
in the list (top item in the list) and then enter the code
page ID into the entry box to the left of the drop-down
list.
Click this checkbox to limit FTP connectivity to use
secure FTP over SSL or TLS only.
Click on the Apply button to apply and save the new settings.
Page 49
46D-Link ShareCenter™ 2Go User Manual
Section 3 - Conguration
FTP Server
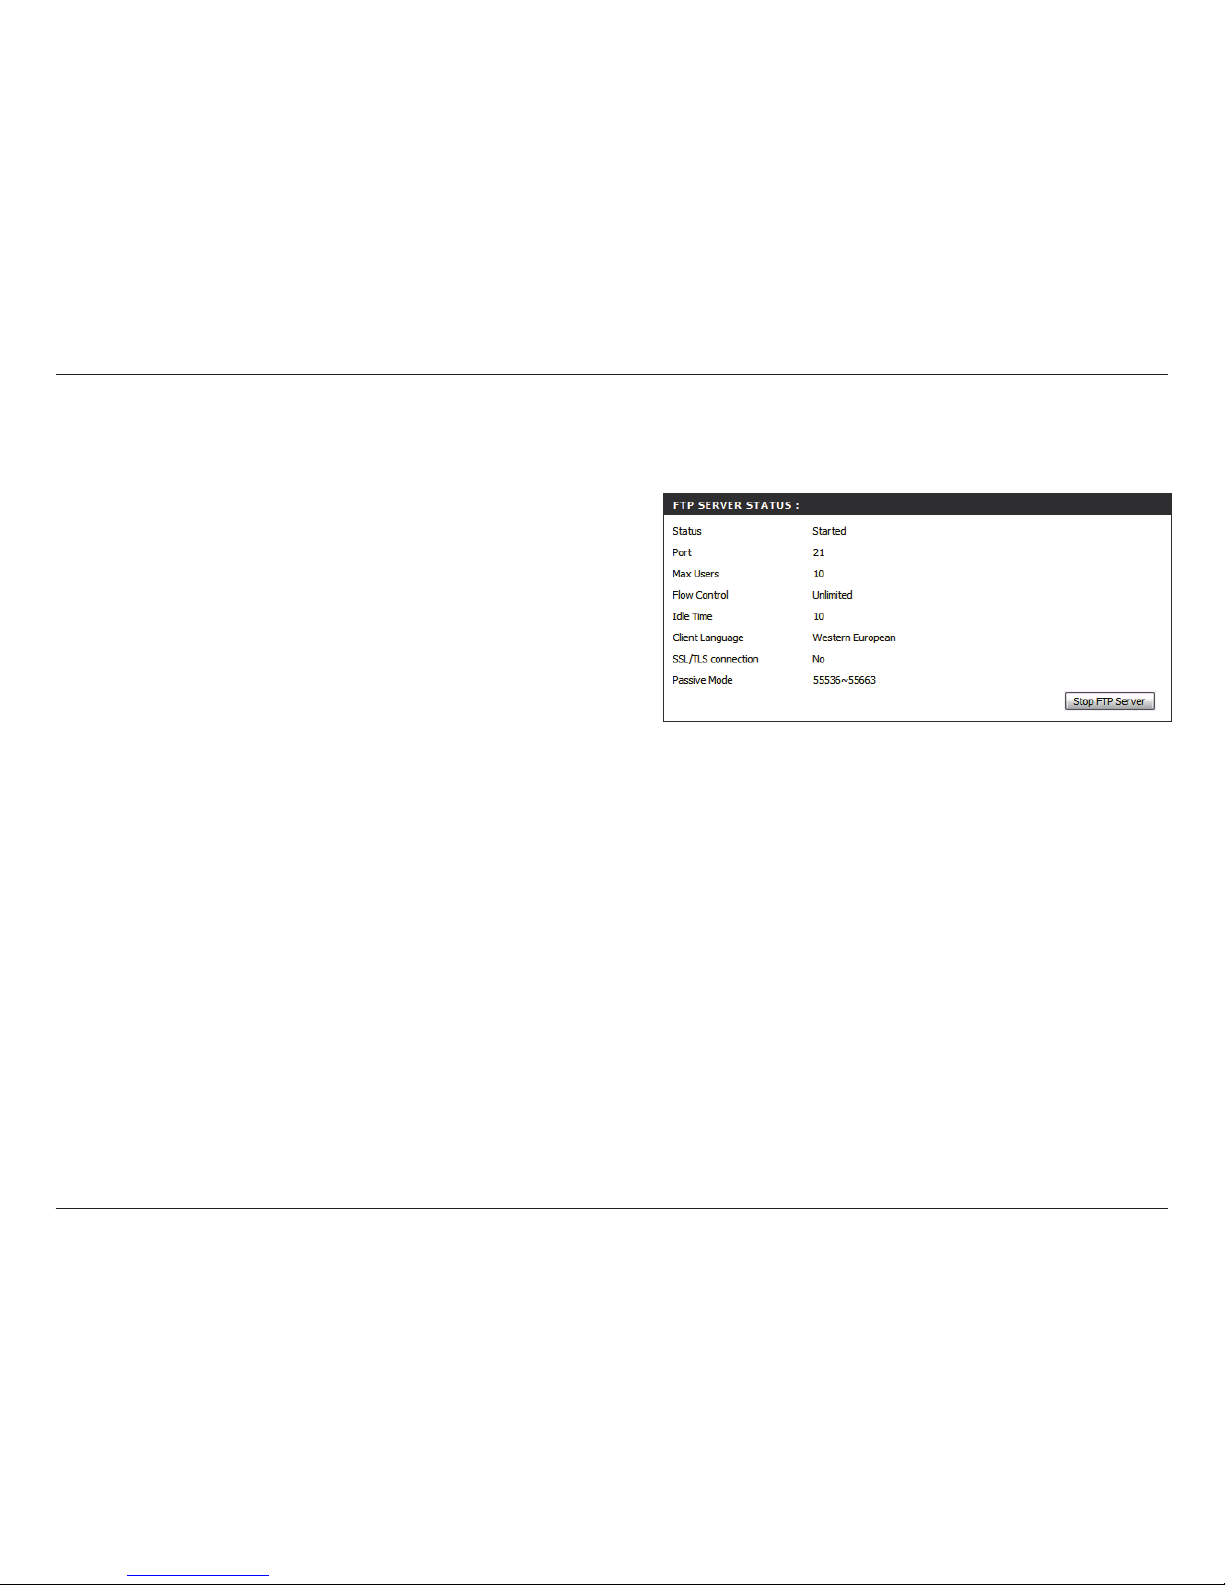
FTP Server Status
Status
Port
Max User
Flow Control
Idle Time
Client Language
SSL/TLS
connection
Passive Mode
Start / Stop FTP
Server
Displays if the FTP server service has started or not.
Displays the FTP port.
Displays the maximum number of FTP users.
Displays the ow control status.
Displays the idle time before disconnecting the user.
Displays the client language that has been set for
the FTP server.
Di sp lays if Secure FT P over SSL or TSL i s
implemented.
The port range available for Passive Mode FTP
connections
Click this button to Start or Stop the FTP server.
Page 50
47D-Link ShareCenter™ 2Go User Manual
Section 3 - Conguration
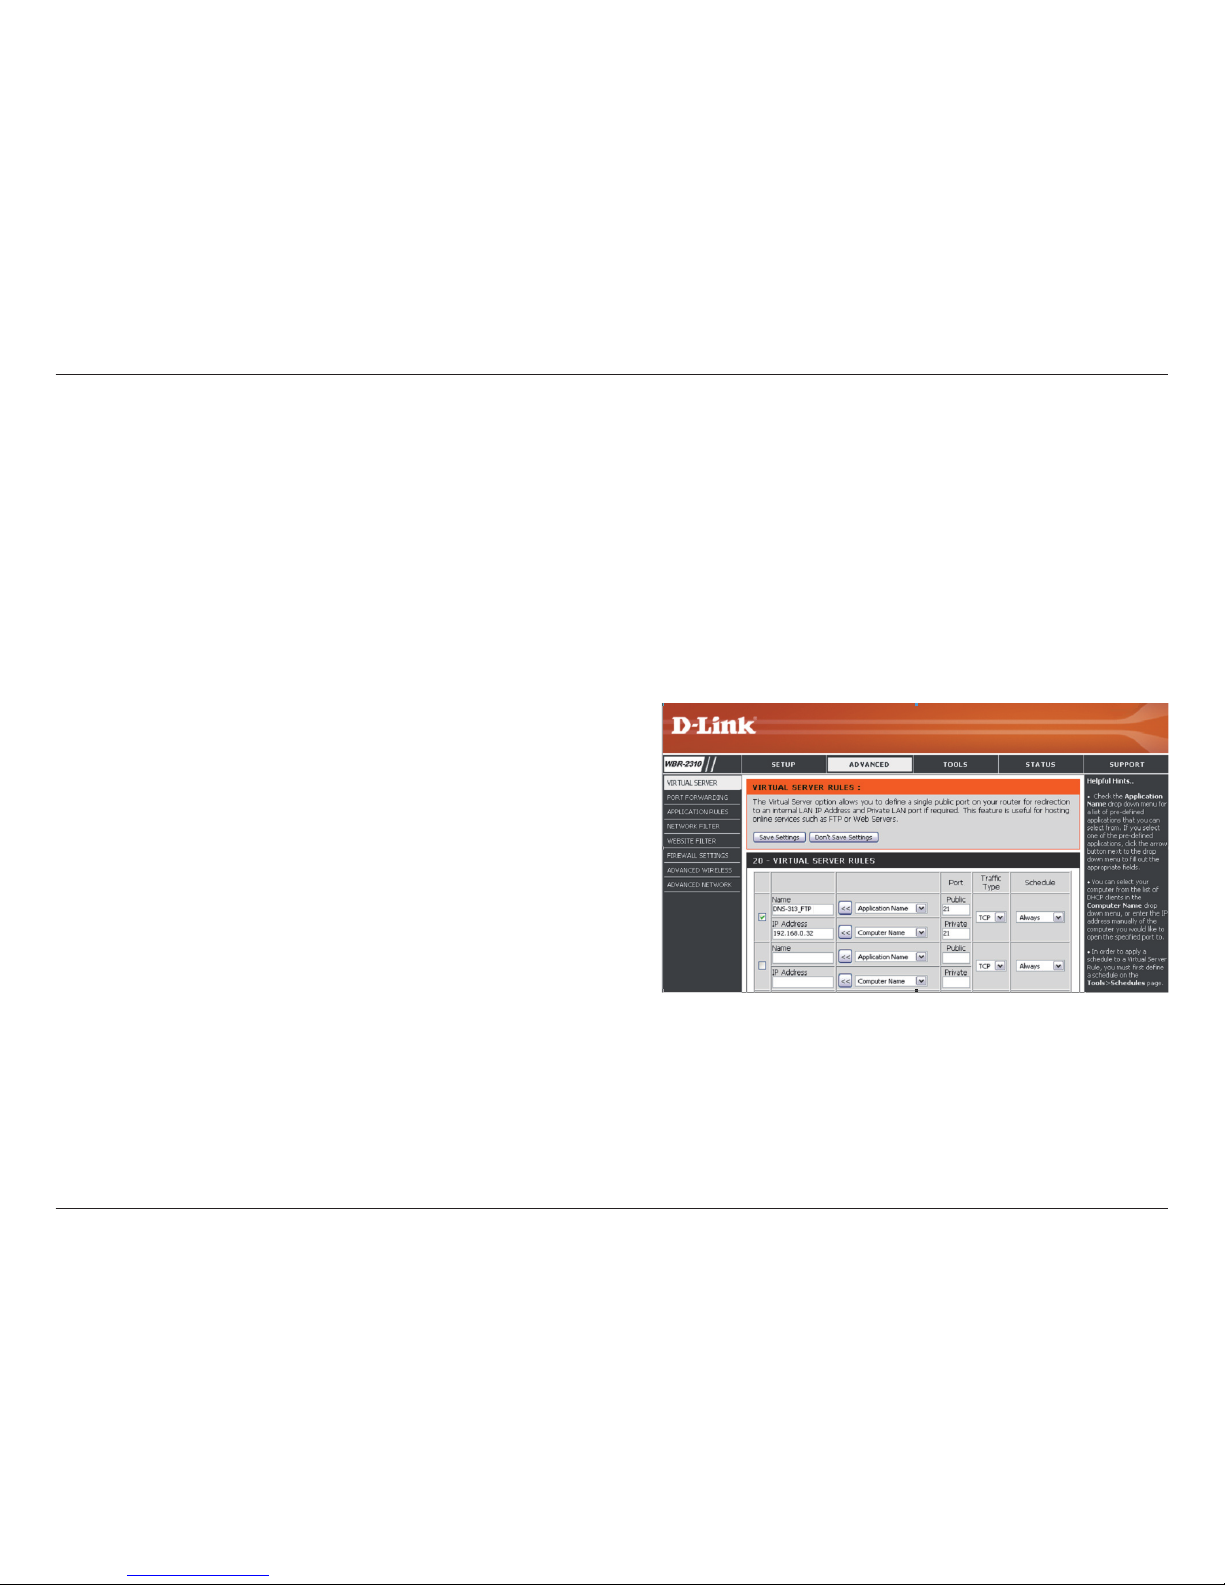
If you are behind a router, you will need to forward the FTP port from the router to the ShareCenter™ 2Go. Additional
ltering and rewall settings may need to be modied on your router to allow FTP Access to the ShareCenter™ 2Go
from the Internet. Once the port has been forwarded on the router, users from the Internet will access the FTP server
through the WAN IP address of the router.
If you are using a D-Link router, such as the WBR-2310 used in the example below, your port forwarding rule should
be similar to the following:
Name
IP Address
Public Port
Private Port
Trafc Type
Type a name for the ShareCenter™ 2Go FTP server
rule.
Enter the IP address of the ShareCenter™ 2Go.
Enter the public FTP port. By default, the port is 21.
Enter the private FTP port. By default, the port is 21.
Set the trafc type to TCP.
If you are using an FTP port other than 21, the users accessing the FTP server using an FTP client will have
to specify the non-standard port, and users who are using a browser will have to specify the port in the URL
(e.g. ftp://ftp.dns213.com:3000, where the FTP port is 3000).
FTP Server
FTP Server Behind a Router
Page 51
48D-Link ShareCenter™ 2Go User Manual
Section 3 - Conguration
FTP Server
Secure FTP Connections
The ShareCenter™ 2Go supports secure FTP connection using SSL or TLS. Follow the instructions here to set up a
secure FTP connection using FireFTP with the Firefox browser. The FireFTP add-on for the Mozilla Firefox browser
supports FTP connections over SSL and TLS.
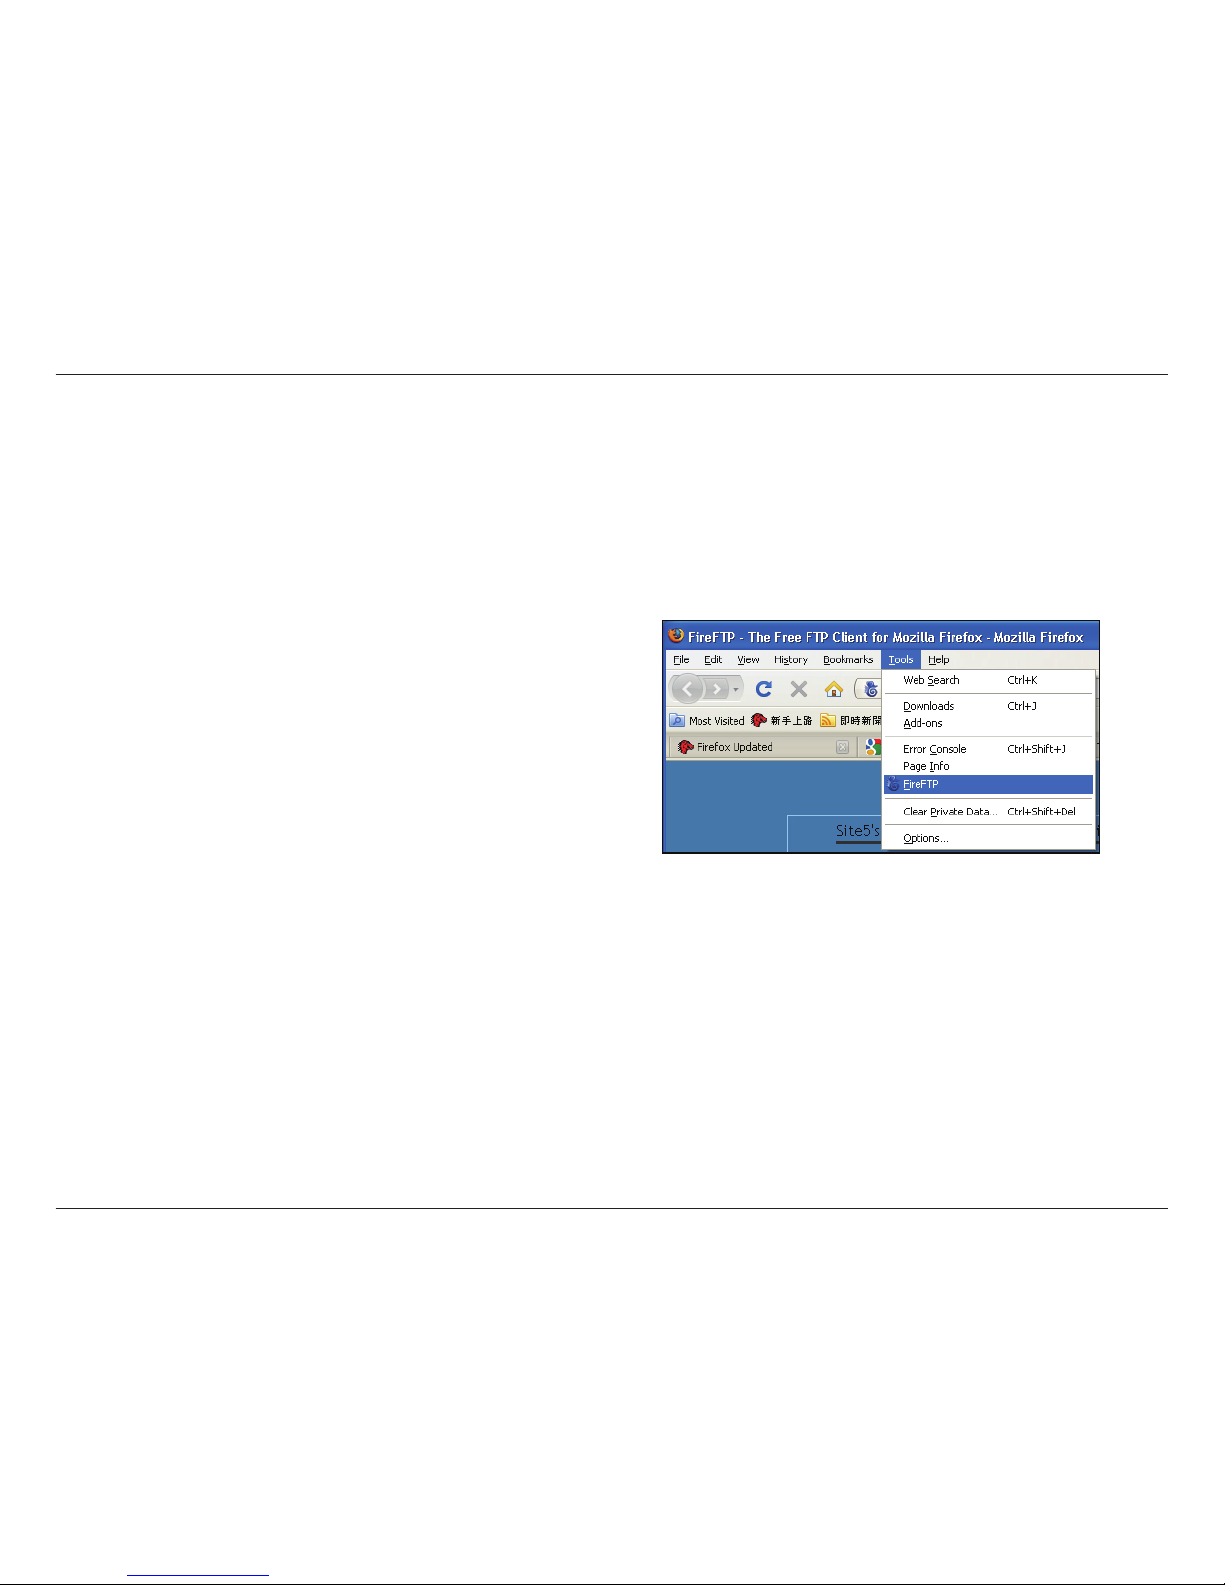
Install the FireFTP add on for Firefox and restart the
application. The FireFTP option appears in the Tools menu.
Select the FireFTP option to launch it in a new window.
Page 52
49D-Link ShareCenter™ 2Go User Manual
Section 3 - Conguration
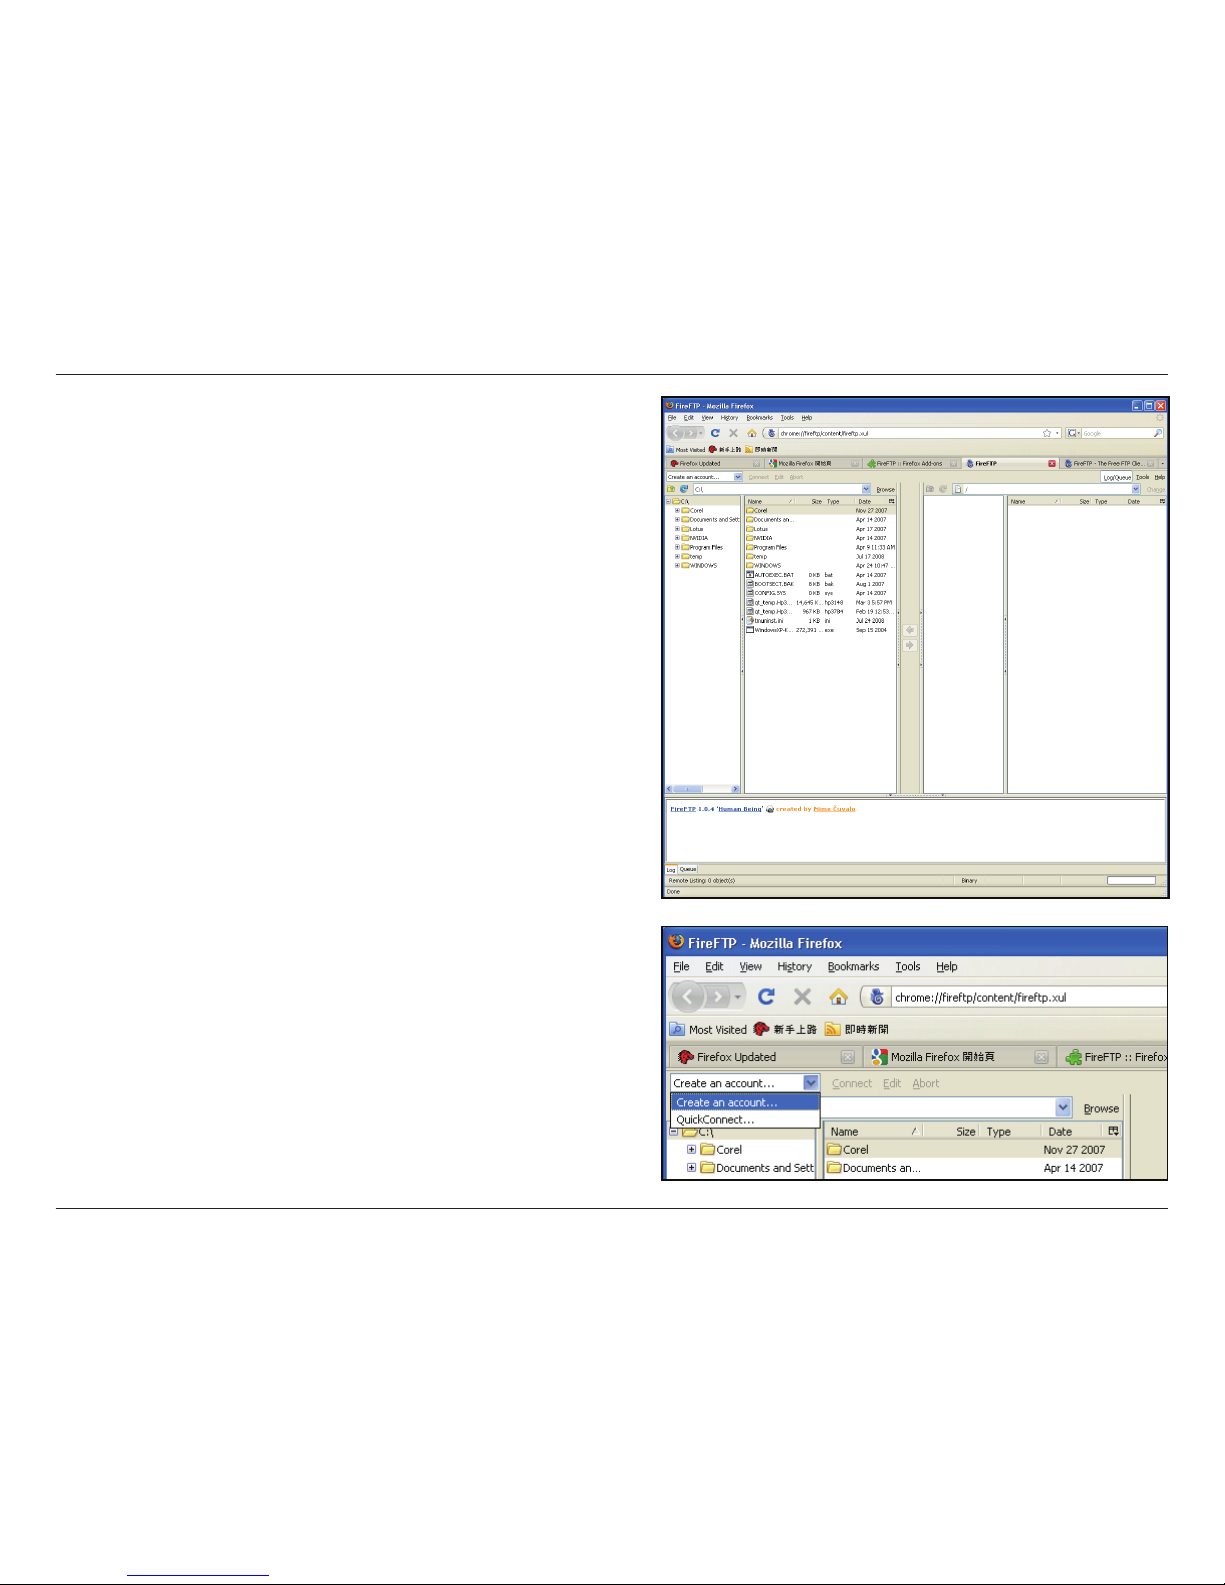
The FireFTP option appears in a new window:
Use the Create an account pull-down menu to create a
new connection to the FTP server.
Note: A user account must also be created on the
ShareCenter™ 2Go and the FTP server started in the FTP
Server menu for the connection to succeed.
Page 53
50D-Link ShareCenter™ 2Go User Manual
Section 3 - Conguration
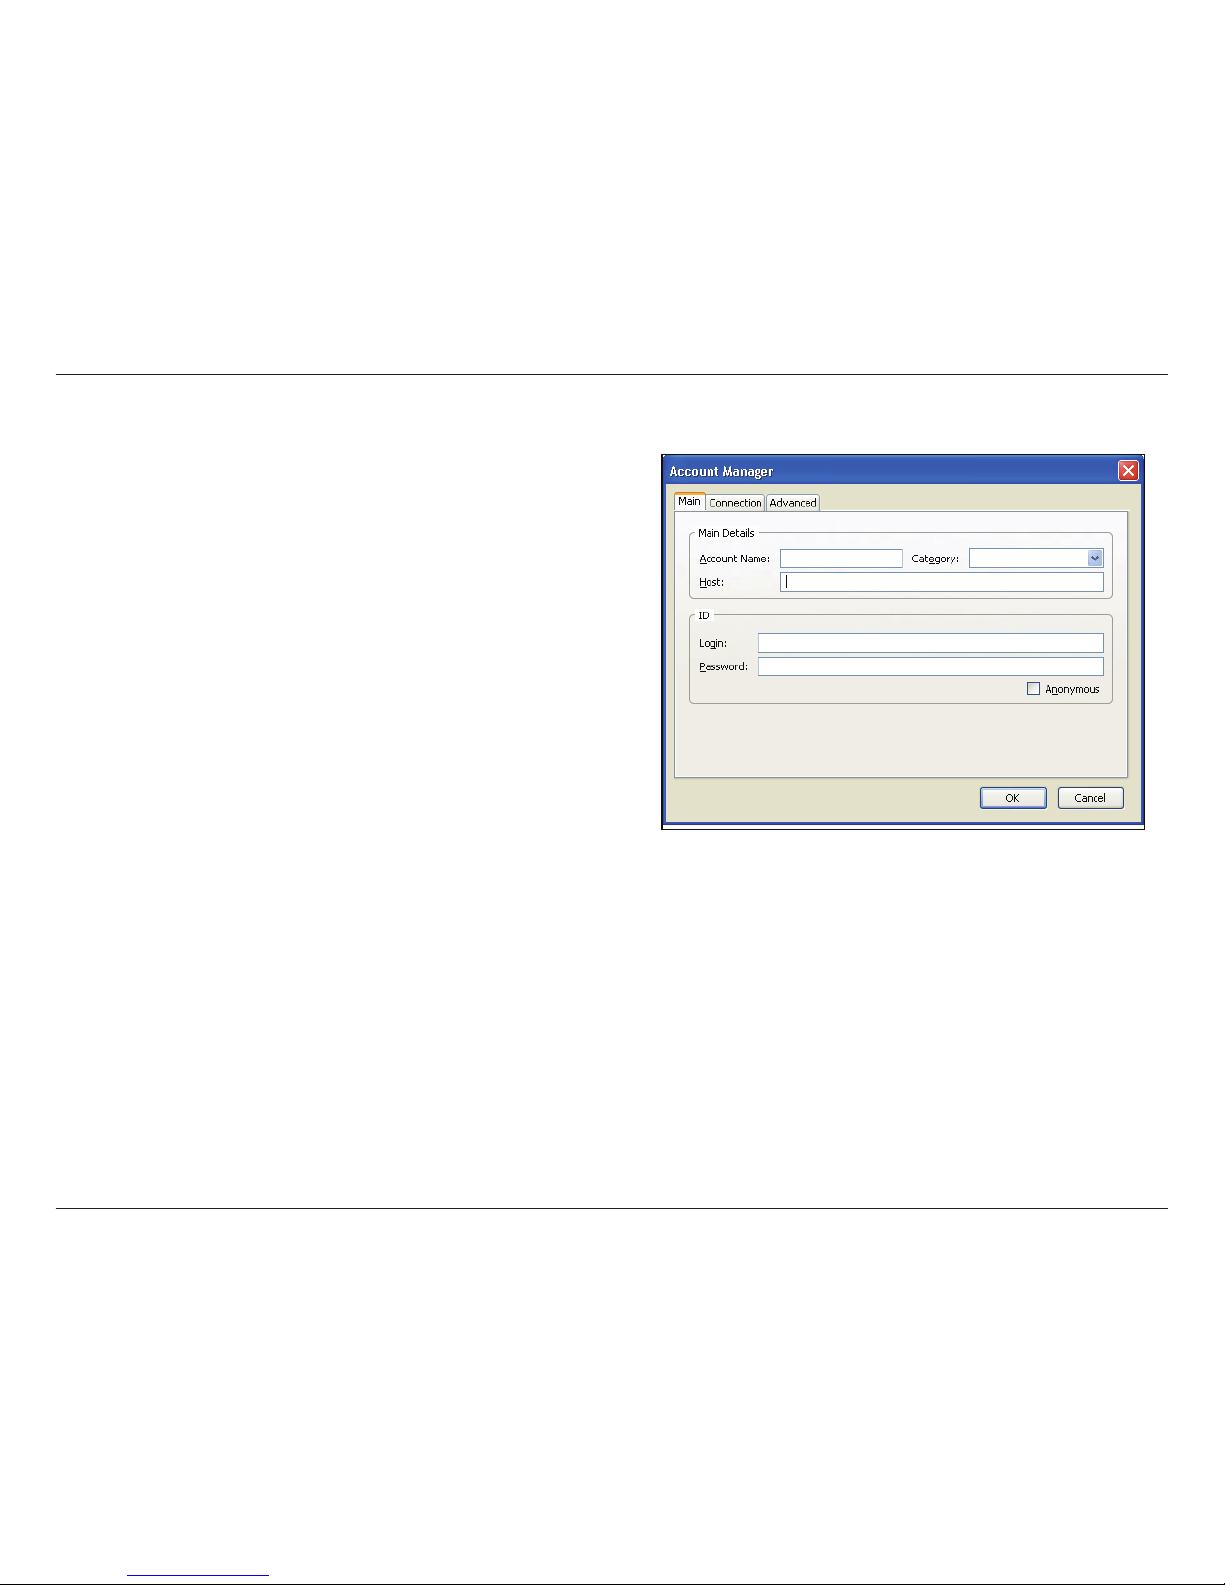
The Account Manager menu appears in a new window:
In the Main tab of the Account Manager menu carry out
the following:
Ent er an Acc ount Nam e for the
connection.
Enter the Category that you want the
new account to be part of in the Category
eld. Alternatively, choose a Category
from the Category drop-down menu.
Enter the IP address of the ShareCenter™
2Go in the Host entry eld.
Enter the user name and password of
an existing FTP user account on the
ShareCenter™ 2Go in the Login and
Password elds.
Click OK to apply the account settings.
The newly created connection setting will
appear as an option in the “Create an
account” pull-down menu.
Page 54
51D-Link ShareCenter™ 2Go User Manual
Section 3 - Conguration
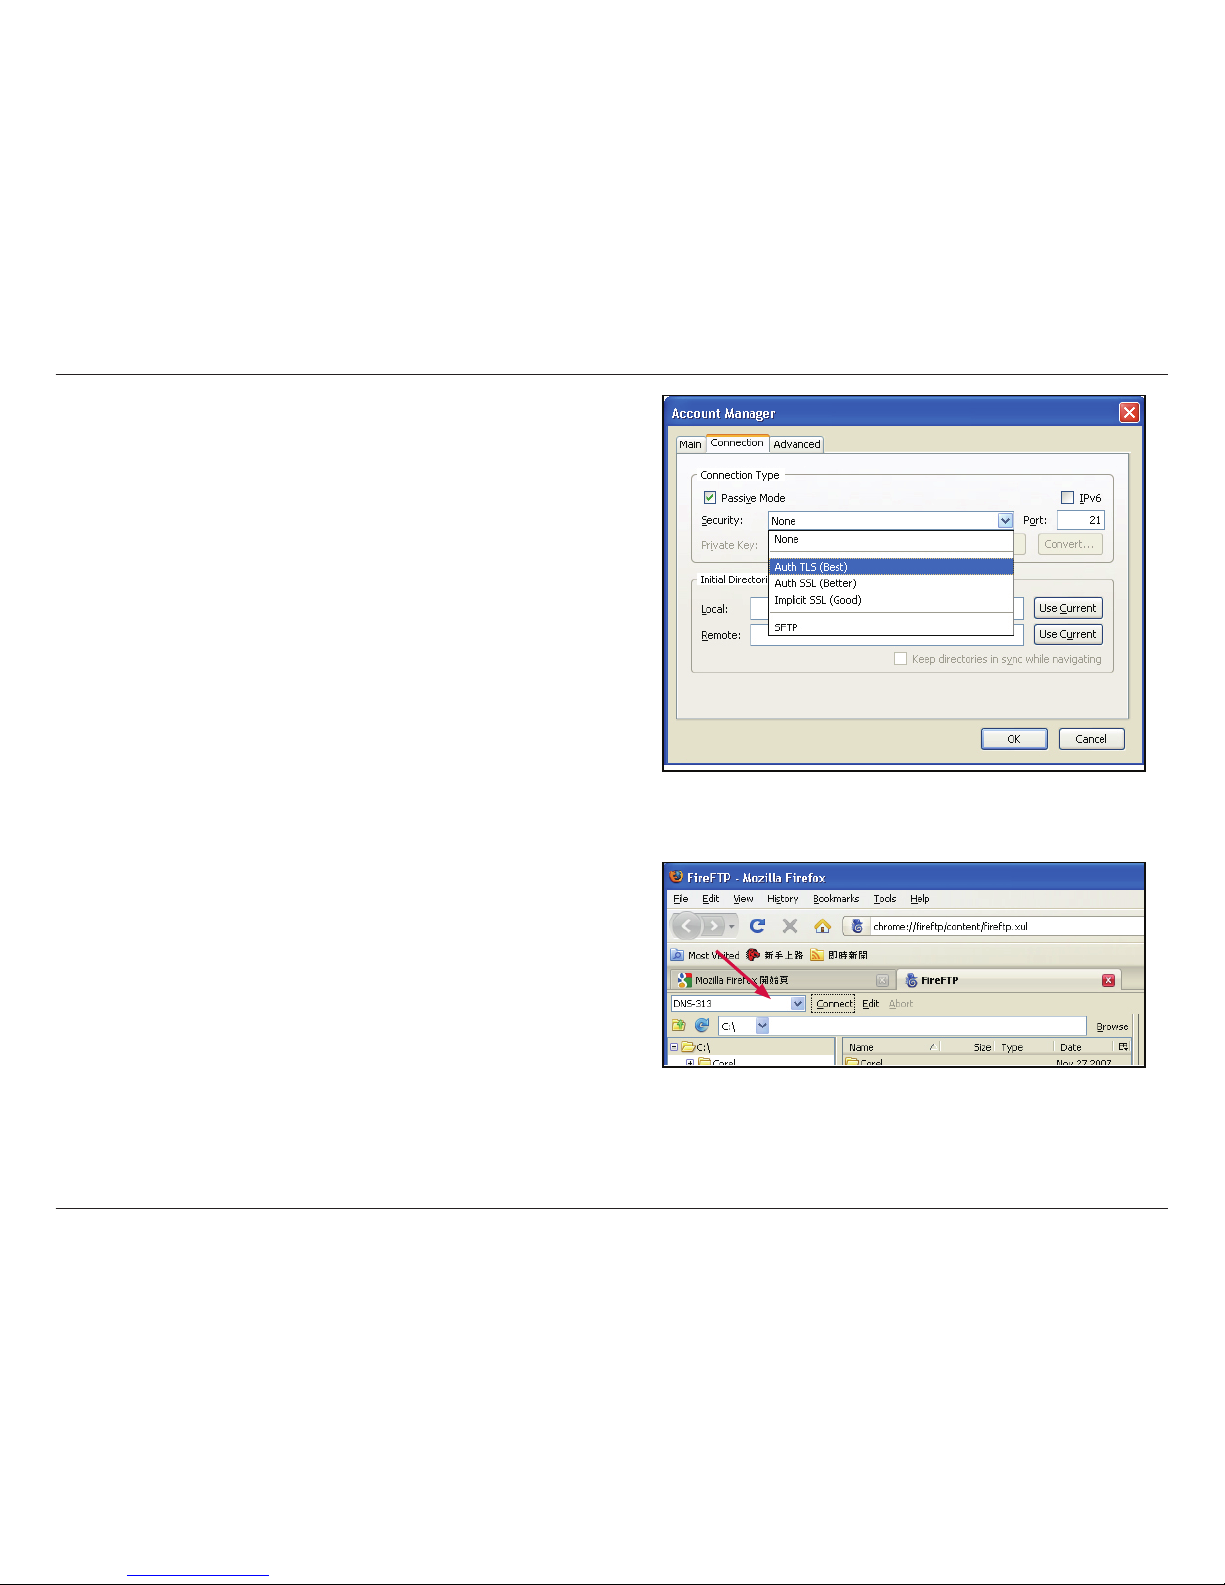
In the Connection tab choose the security protocol to use
and click OK. The FireFTP application is now ready to
connect to the ShareCenter™ 2Go.
Click on Connect next to the connection name in the Firefox
browser window.
Page 55
52D-Link ShareCenter™ 2Go User Manual
Section 3 - Conguration
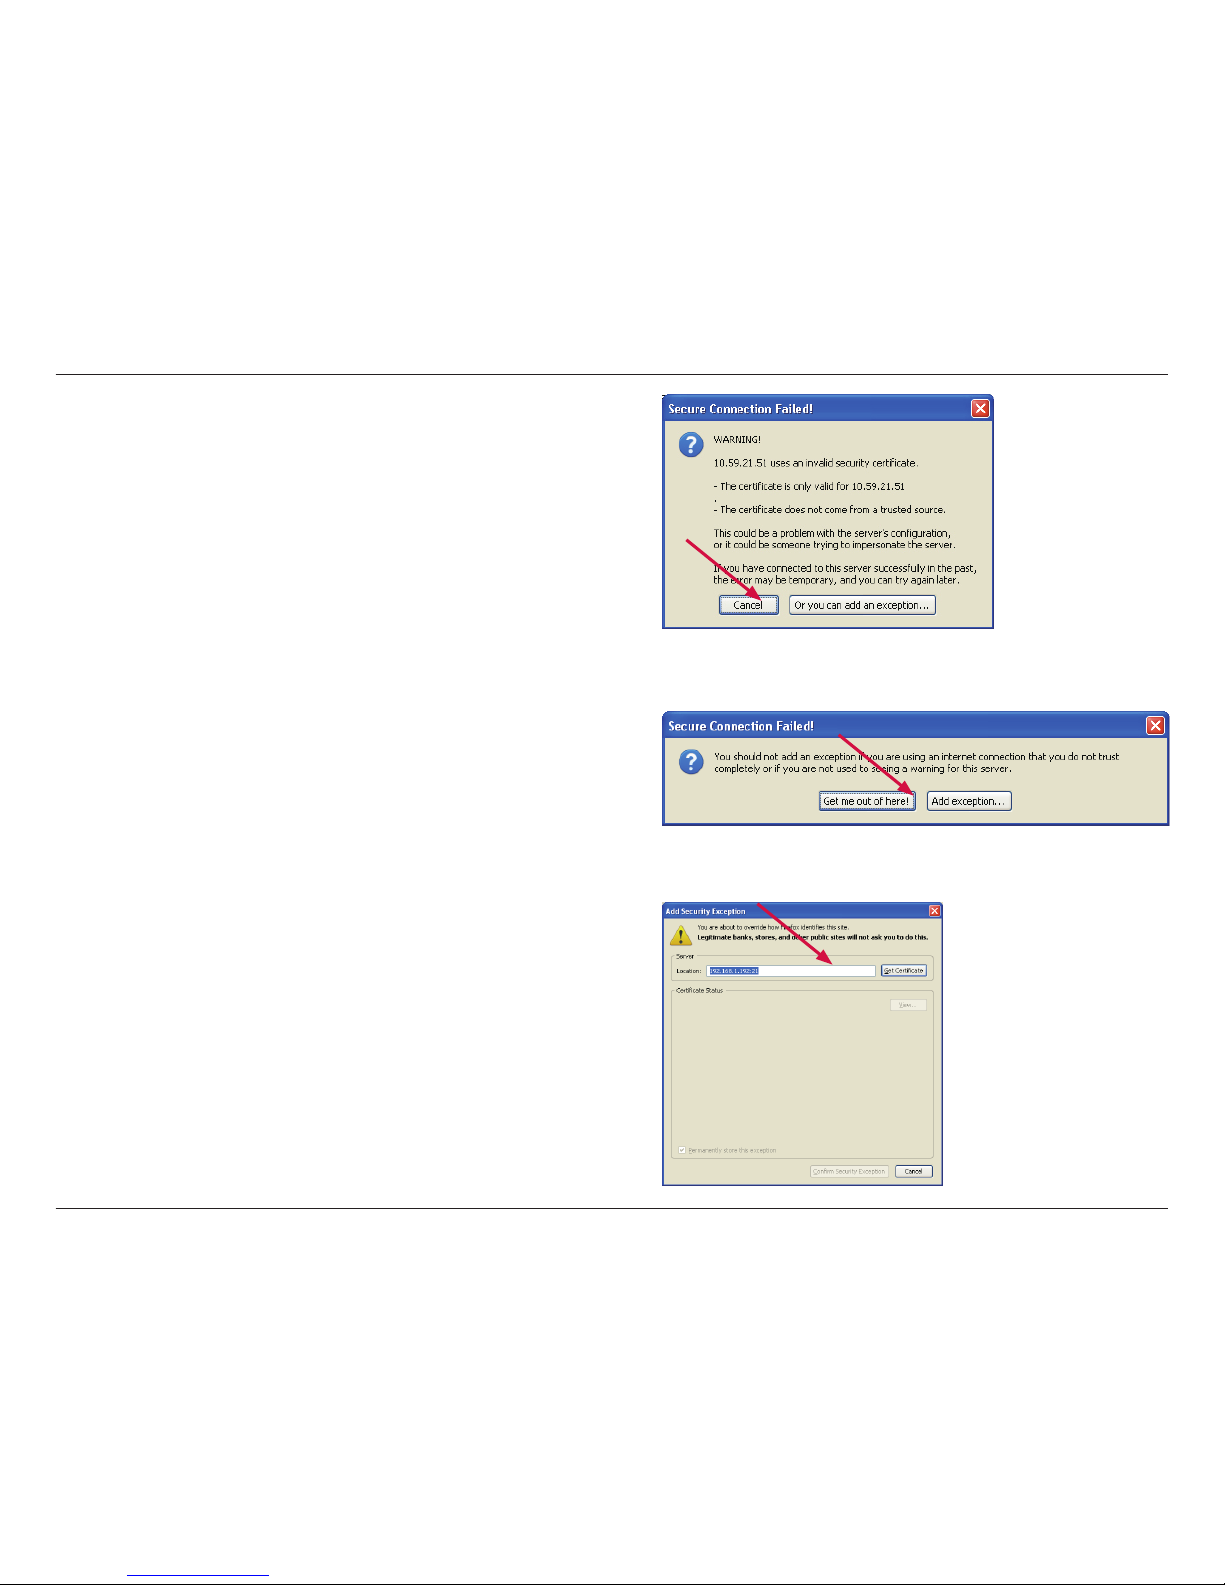
A series of pop-up dialog boxes will warn you that the
secure connection failed. Since this connection is from a
trusted source on the LAN, you can make an exception to
the normal security certication. Click the Or you can add
an exception… button.
Click the Add exception… button.
Click the Get Certicate button.
Page 56
53D-Link ShareCenter™ 2Go User Manual
Section 3 - Conguration
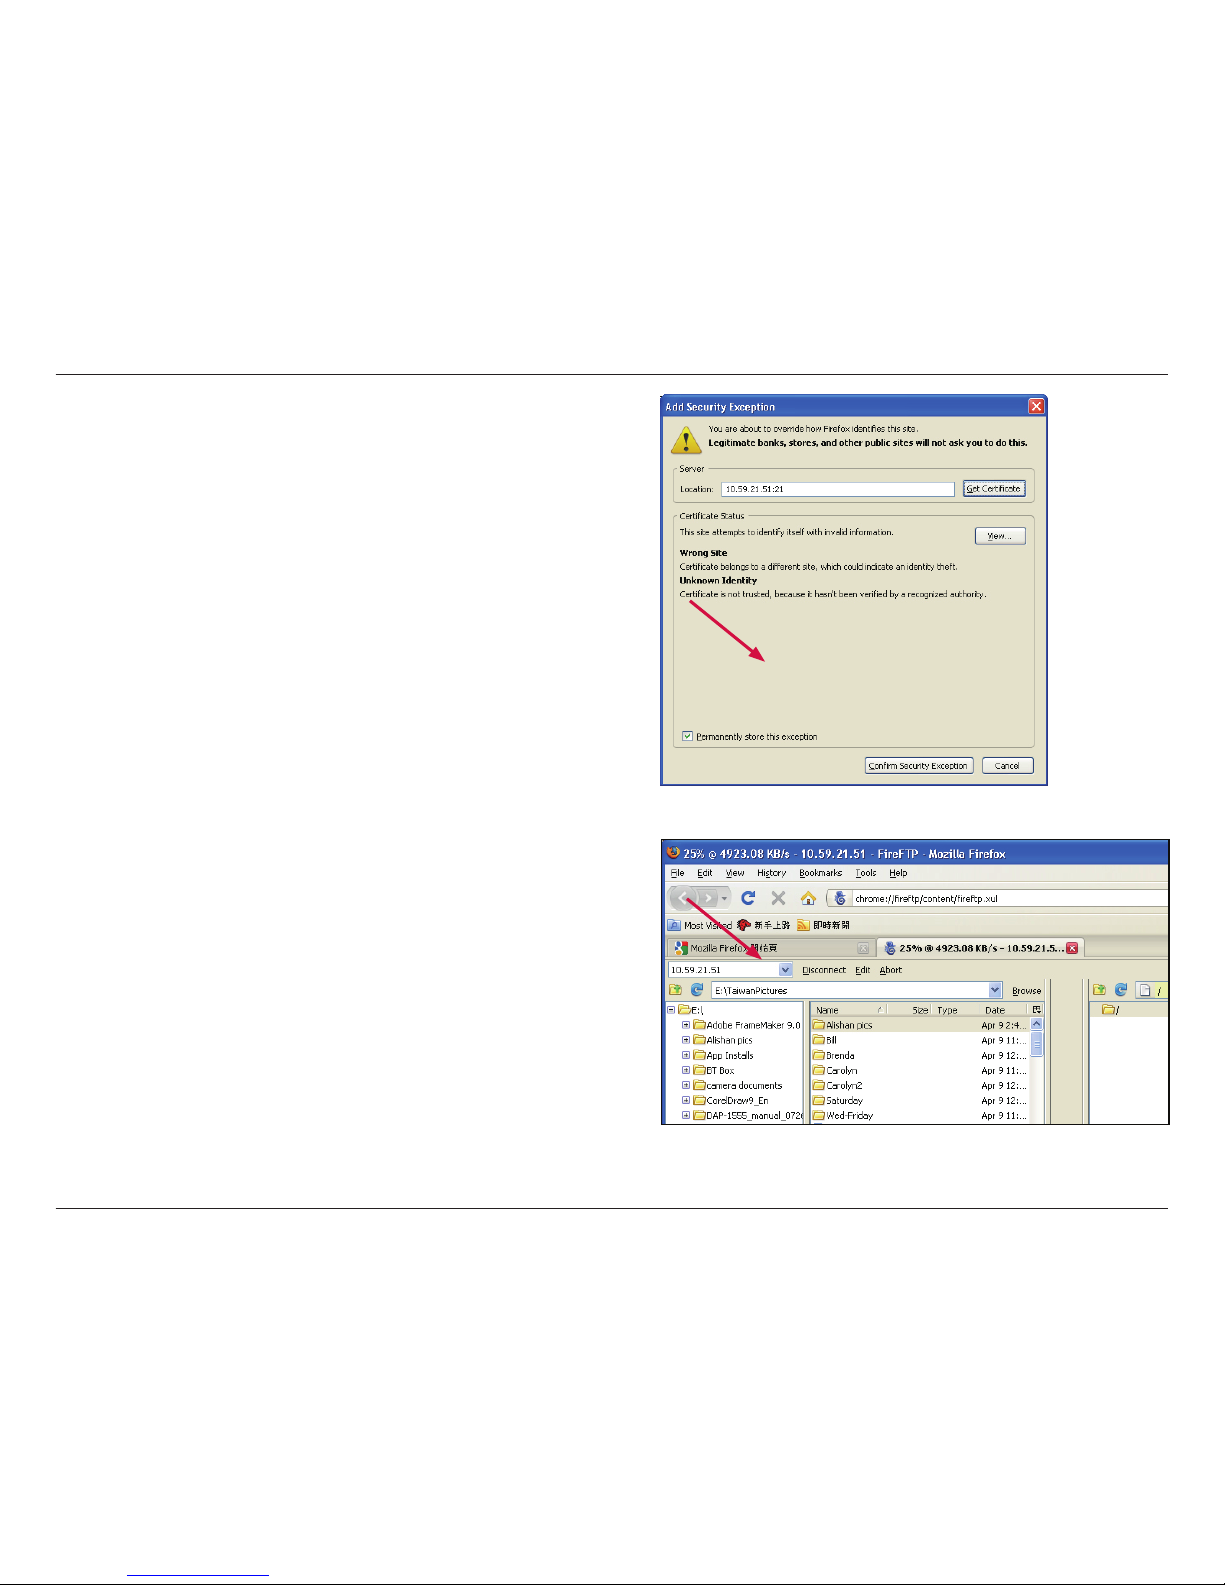
Finally, click the Conrm Security Exception button. The
browser is now ready for a secure FTP connection.
Click on Connect to establish the connection.
Note: An FTP user account must also be created on the
ShareCenter™ 2Go with the FTP server started in the FTP
Server menu for the connection to succeed.
Page 57
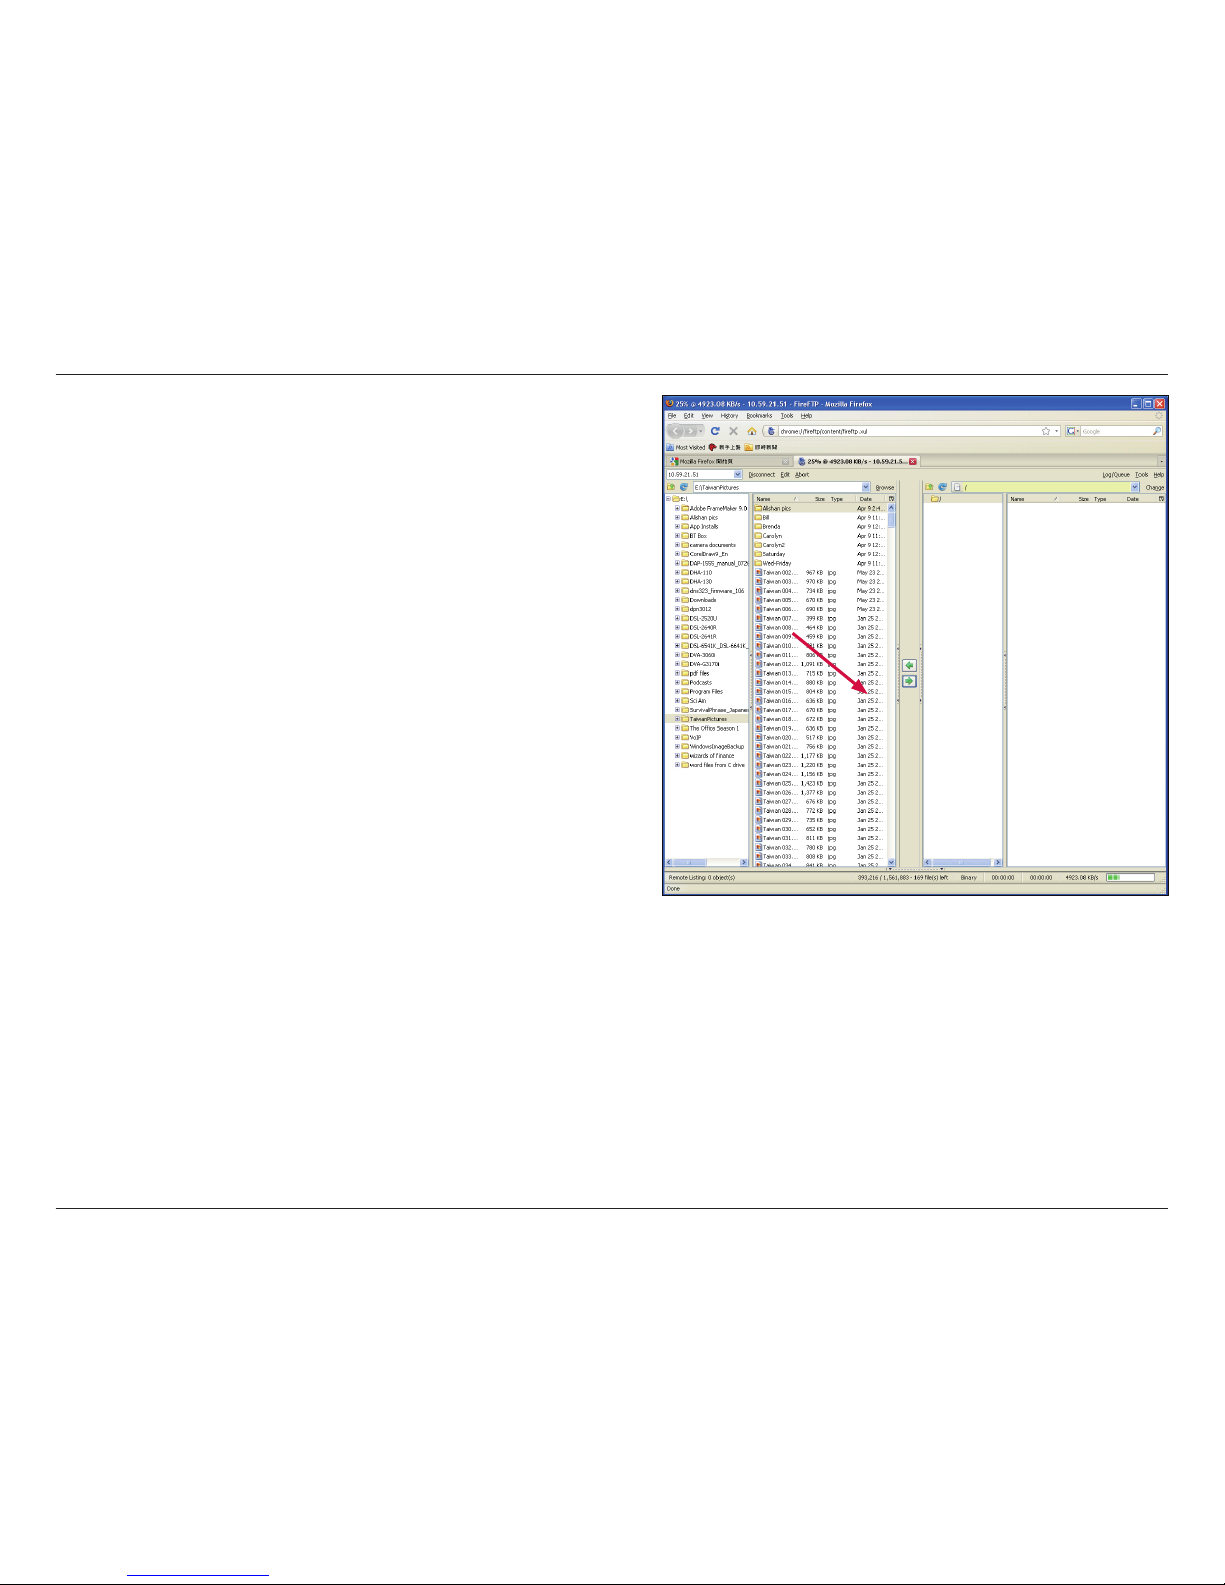
54D-Link ShareCenter™ 2Go User Manual
Section 3 - Conguration
Depending on the Read/Write capabilities congured for the
User associated with the connection, select the les to be
transferred to or from the ShareCenter™ 2Go.
Page 58
55D-Link ShareCenter™ 2Go User Manual
Section 3 - Conguration
UPnP AV Server
UPnP AV
Server
Add
Delete
Refresh
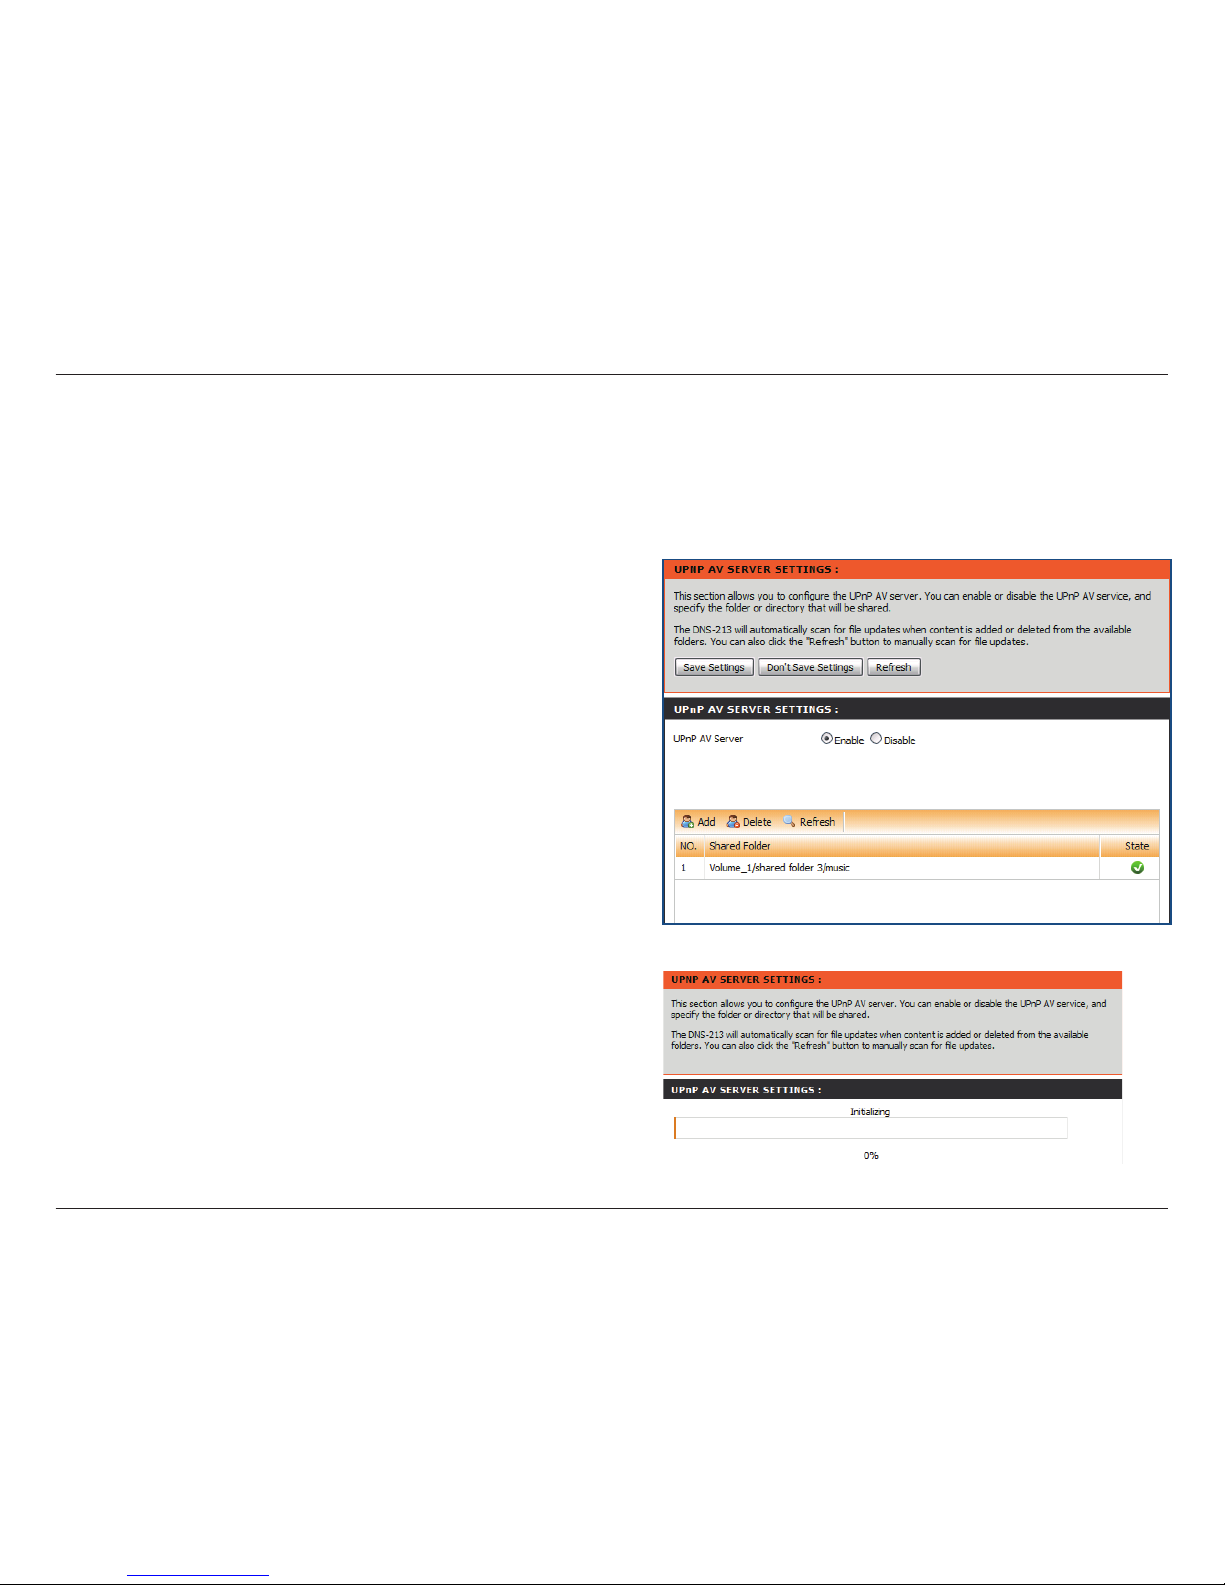
Select Enable or Disable to enable or disable the
ShareCenter™ 2Go UPnP AV server.
Use the add button to select from the popup
conguration window the folder(s) that the UPnP AV
server can stream from. Once the folder is added the
UPnp AV server will re-initialize with the new folder
as shown in the below right screenshot.
Species the folder or directory that will be shared
by the UPnP AV server. Select root to share all les
on all volumes, or click Browse to select a specic
folder.
Click the Refresh button after adding new les to be
used by UPnP AV compatible devices.
The ShareCenter™ 2Go features a UPnP AV Server. This server provides the ability to stream photos, music and videos
to UPnP AV compatible network media players. If the server is enabled, the ShareCenter™ 2Go will be automatically
detected by UPnP AV compatible media players on your local network.
Click on the Save Settings button to apply and save the
new settings.
Page 59
56D-Link ShareCenter™ 2Go User Manual
Section 3 - Conguration
iTunes Server
iTunes Server
Folder
Password
MP3 tag
Codepage
Auto Refresh
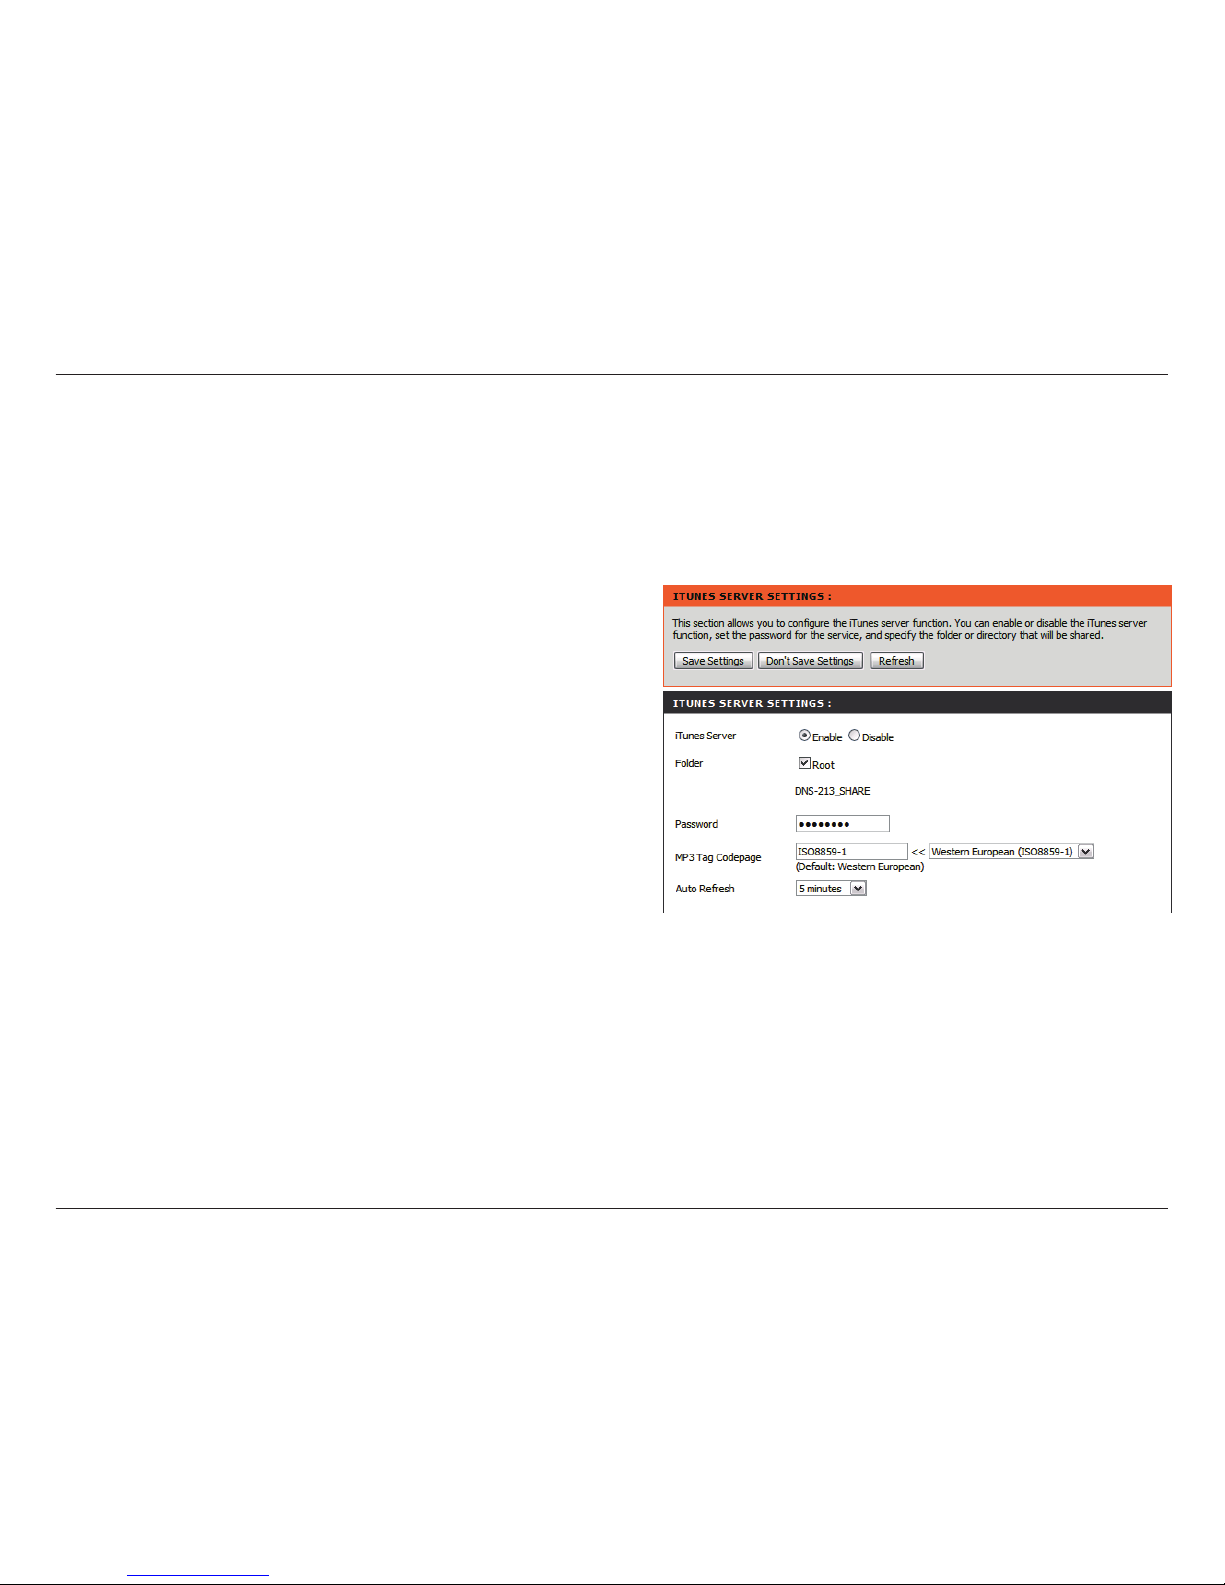
The ShareCenter™ 2Go features an iTunes Server. This server provides the ability to share music and videos to
computers on the local network running iTunes. If the server is enabled, the ShareCenter™ 2Go will be automatically
detected by the iTunes program and the music and videos contained in the specied directory will be available to
stream over the network.
Select Enable or Disable to enable or disable the
ShareCenter™ 2Go iTunes server.
Species the folder or directory that will be shared by
the iTunes server. Select root to share all les on all
volumes, or click Browse to select a specic folder.
Sets the password for the iTunes server. (Optional)
Select the desired MP3 codepage for the character
encoding required from the drop-down list.
Note: If the codepage with the character encoding
required is not listed, select the User-Dened option
in the list (top item in the list) and then enter the code
page ID into the entry box to the left of the drop-down
list.
Click Refresh after adding the new les that will be
used with iTunes.
Click on the Save Settings button to apply and save the new settings.
Page 60
57D-Link ShareCenter™ 2Go User Manual
Section 3 - Conguration
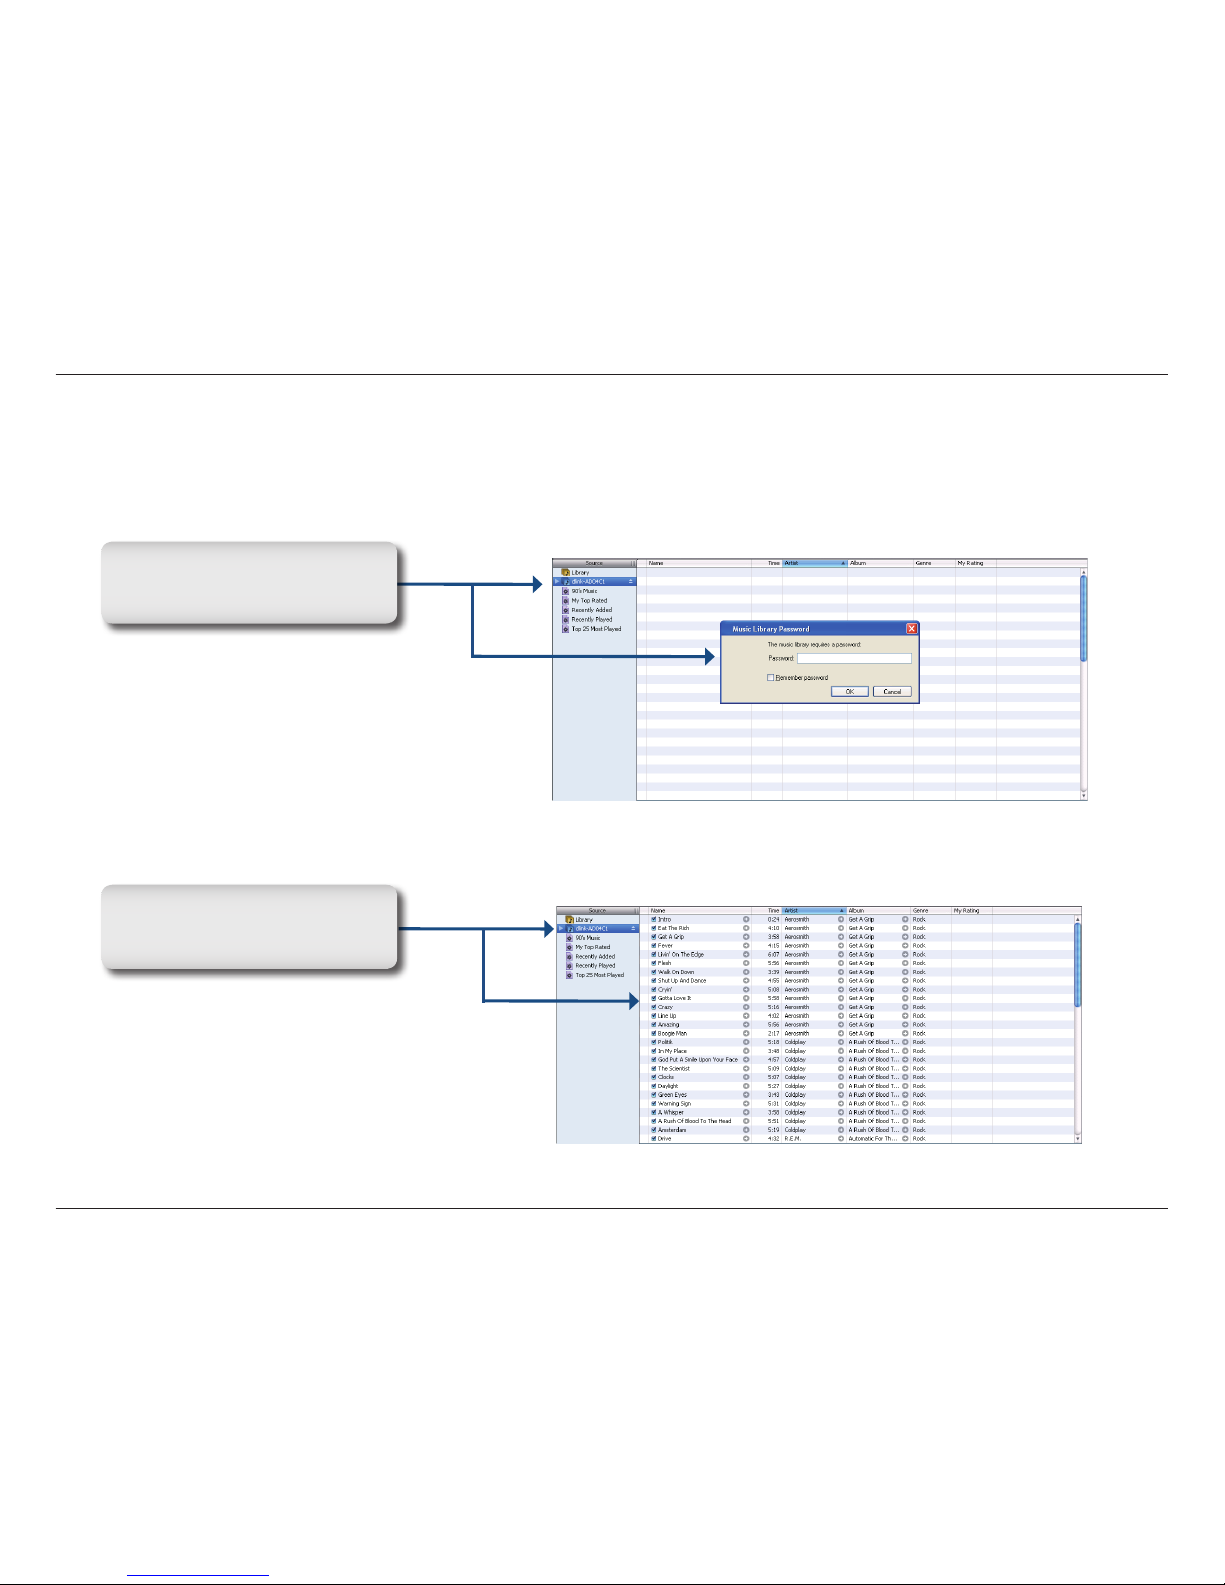
After enabling the iTunes server on the ShareCenter™ 2Go, launch iTunes. When iTunes detects the ShareCenter™
2Go, select it and you will be prompted to enter the iTunes server password if required.
Select the ShareCenter™ 2Go.
When prompted, enter the iTunes
server password. Click OK.
Media stored on the ShareCenter™
2Go will be available for use in
iTunes.
Page 61
58D-Link ShareCenter™ 2Go User Manual
Section 3 - Conguration
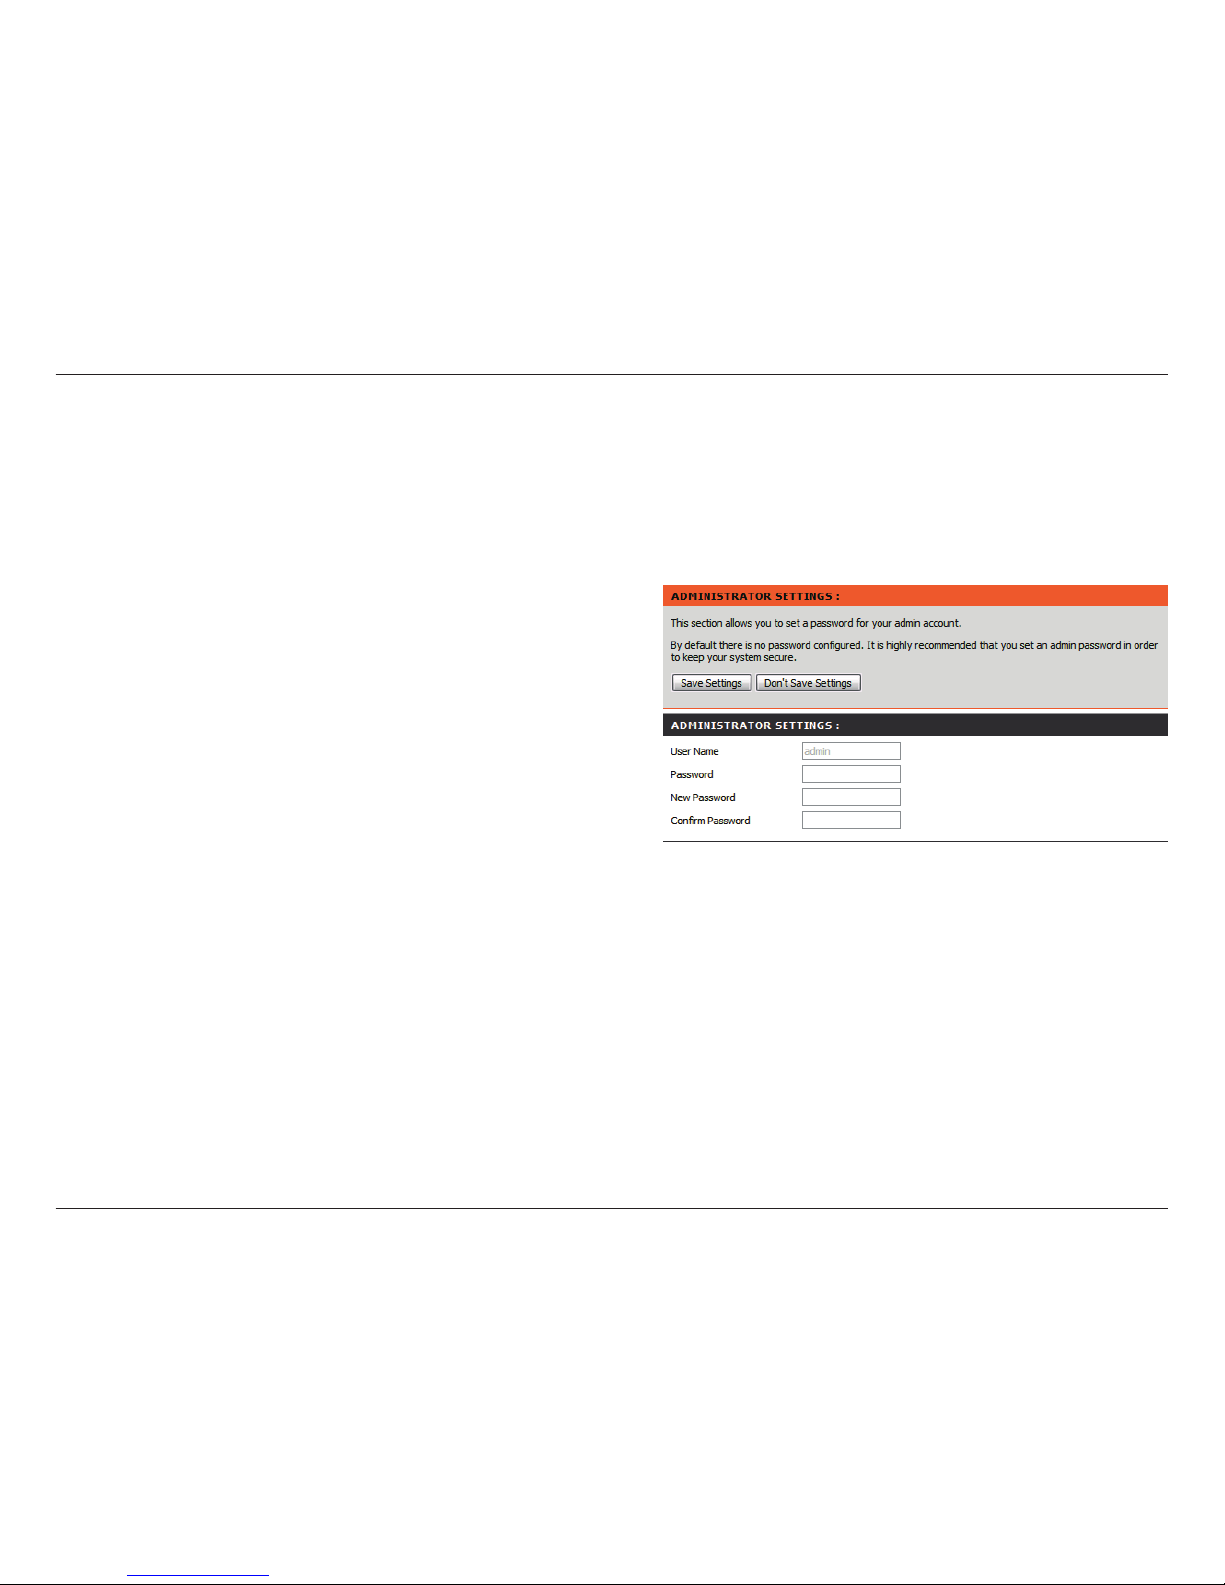
Admin Password
User Name
Password
New Password
Conrm
Password
Maintenance
The Admin menu allows you to set a password for your admin account. It is recommended to set a password when
you rst congure the ShareCenter™ 2Go.
The administrator user name is admin, and this
cannot be changed.
Enter the current password. (Leave this blank if you
have not set a password yet.)
Enter a new password.
Enter the new password again for conrmation.
Click Save Settings to save the new password.
Page 62
59D-Link ShareCenter™ 2Go User Manual
Section 3 - Conguration
System
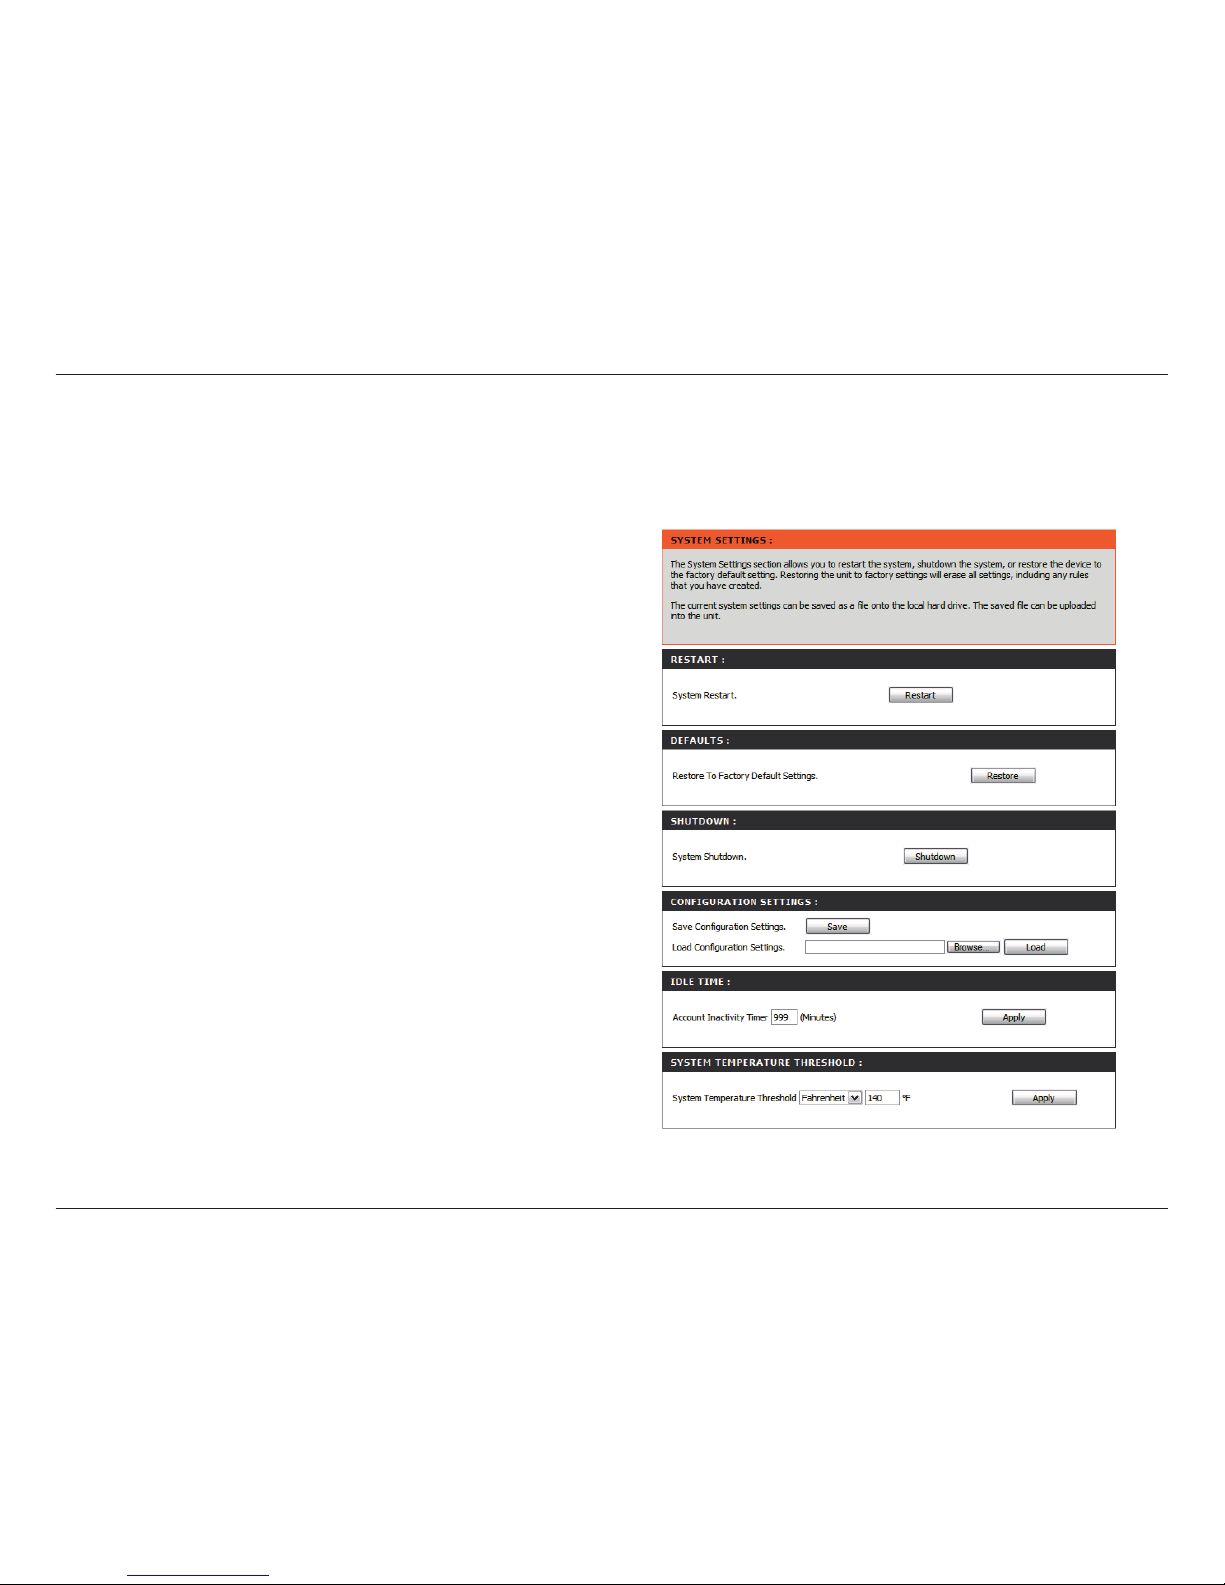
Restart
Defaults
Shutdown
Conguration
Settings
Idle Time
System
Temperature
Threshold
The ShareCenter™ 2Go System menu provides options for system restarts, saving and loading conguration settings,
and setting idle times.
Click Restart to reboot the ShareCenter™ 2Go.
Click Restore to reset the ShareCenter™ 2Go to its
factory default settings. This will erase all previous
conguration changes.
Click Shutdown to turn off the ShareCenter™ 2Go.
Click Save to save the current ShareCenter™ 2Go
conguration settings to a le on the local computer.
If at a later time you need to reload this conguration
after a system reset, browse to the le and click Load.
Account Inactivity Timer: Enter the time (in minutes)
that the administrator will be allowed to remain
inactive while accessing the ShareCenter™ 2Go
conguration settings or that users will be allowed
to remain inactive while accessing the download
schedule settings.
Th e Sh ar eC enter™ 2Go will shutdown if i ts
temperature exceeds the temperature setting input
here. Select either Celsius or Fahrenheit scale and
input the Threshold setting per below:
Default setting: 161 °F or 72 °C
Settings range: 158 to 170 °F or 70 to 77 °C
Click Apply to save the settings.
Page 63
60D-Link ShareCenter™ 2Go User Manual
Section 3 - Conguration
Firmware Upgrade
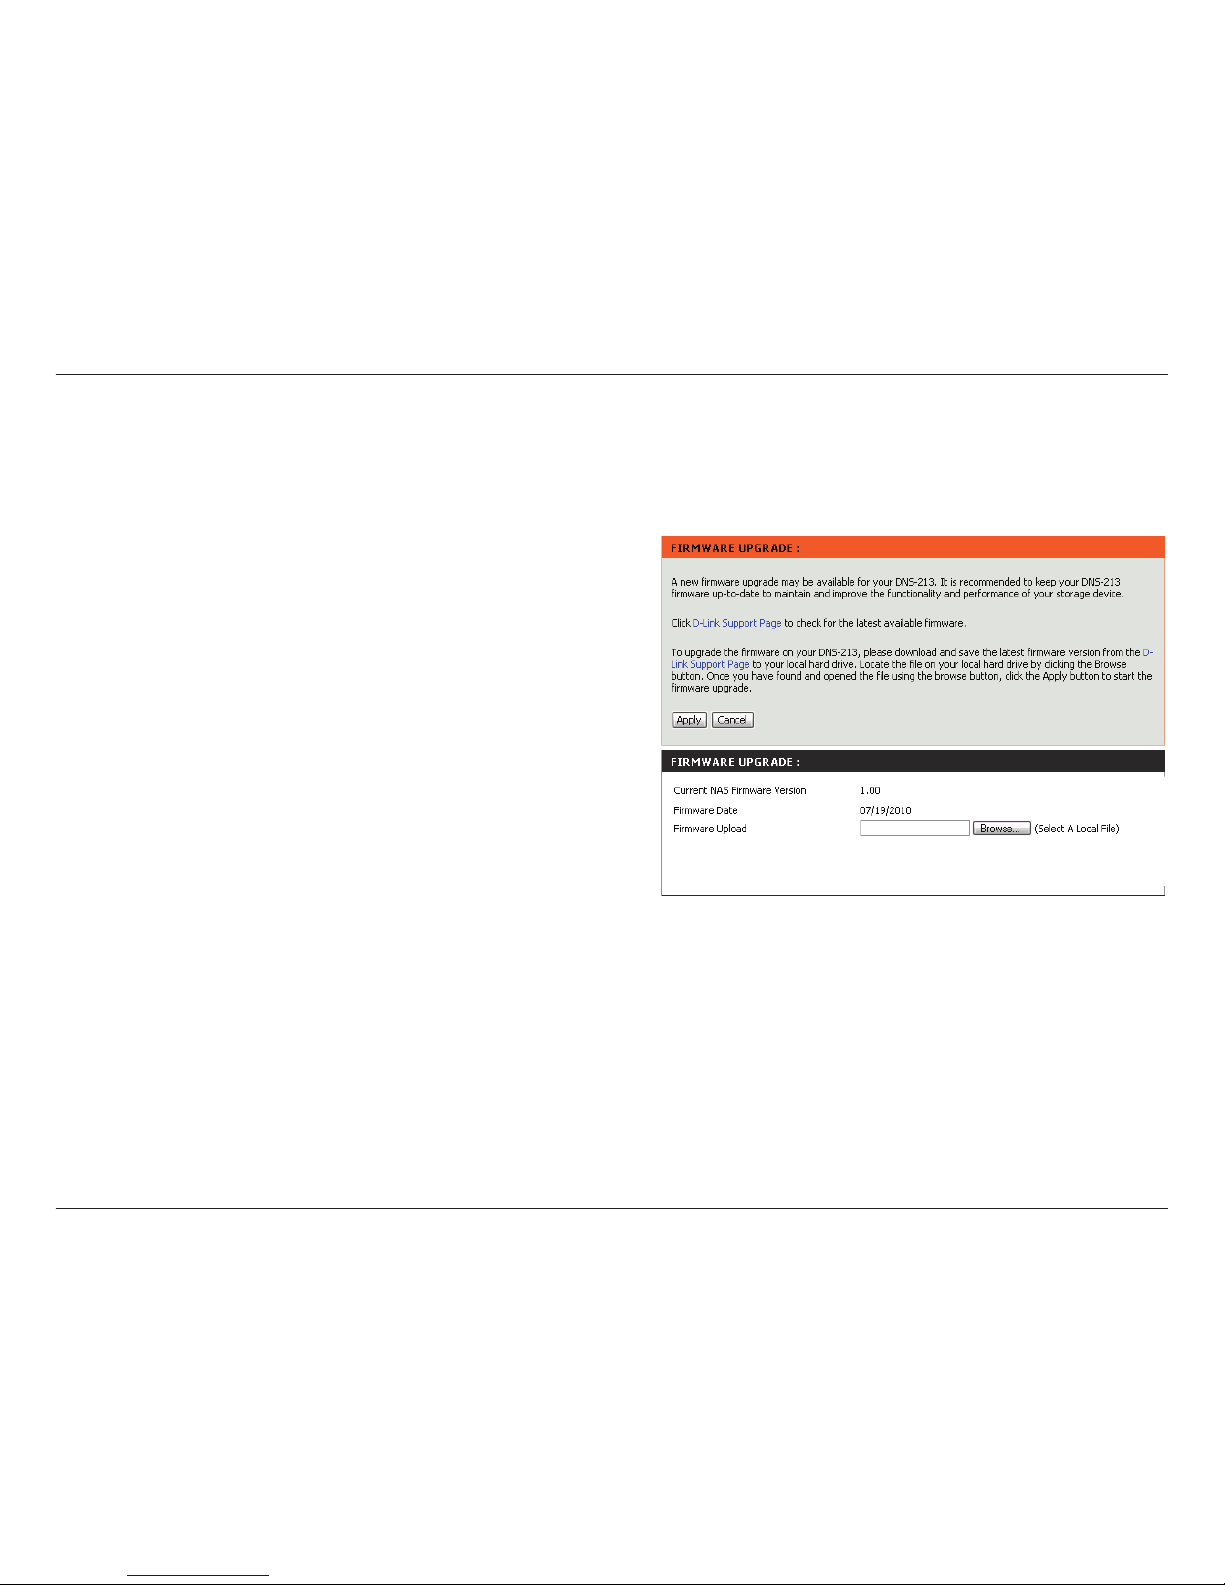
Firmware
Upgrade
Current
Firmware Info
The ShareCenter™ 2Go Firmware menu makes it simple to check for new rmware releases and upload them to the
device.
This section provides a link to check for new rmware
on the D-Link support website.
If a new rmware is available, download the le to
your local computer.
This section provides information about the current
ShareCenter™ 2Go rmware.
When upgrading the rmware, click Browse to select
the new rmware le on your local computer.
Click Apply to begin the rmware upgrade process.
Page 64
61D-Link ShareCenter™ 2Go User Manual
Section 3 - Conguration
E-Mail Alerts
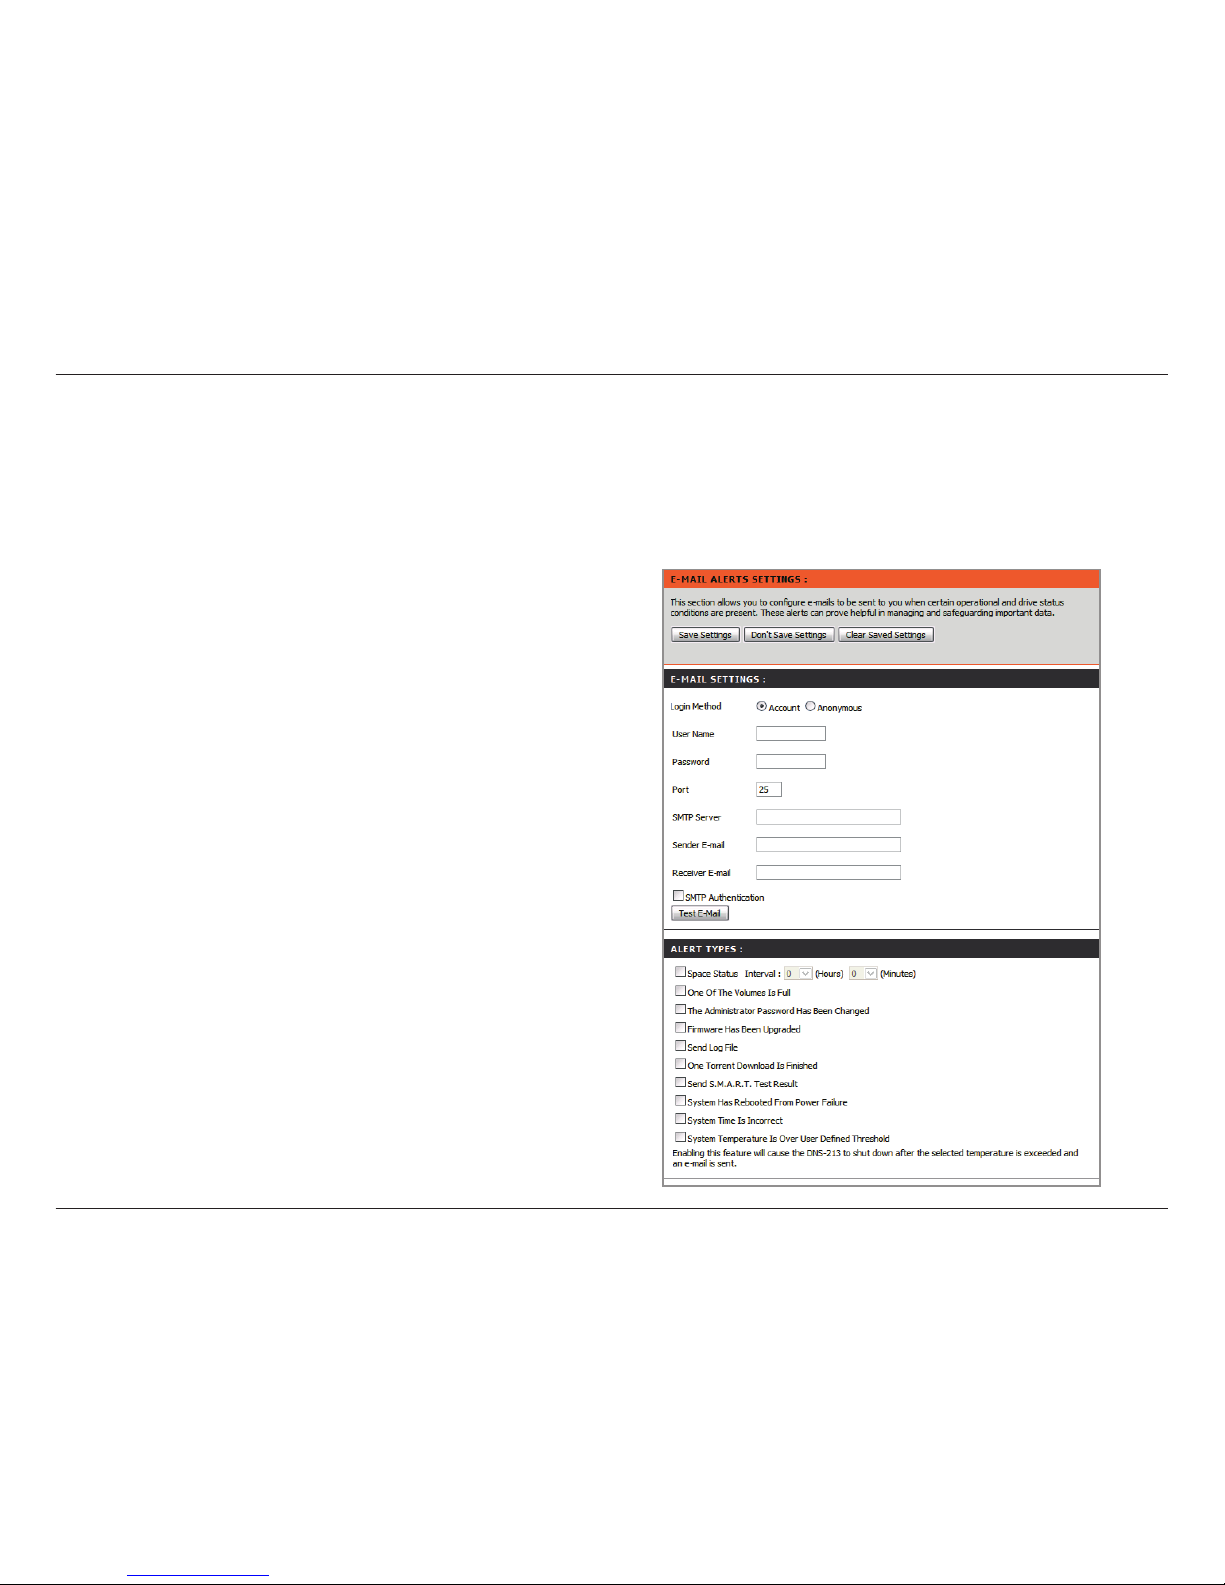
E-mail
Settings
E-Mail Events
With the ShareCenter™ 2Go E-Mail Alerts feature, you can congure e-mails to be sent if the ShareCenter™ 2Go
experiences certain operational conditions and drive status conditions. These alerts can prove helpful with the
management and safeguarding of important data.
This section contains the conguration settings for
the your e-mail account and alert preferences.
Once congured, use the Test E-Mail button to send
a test e-mail and conrm your settings are correct.
This section contains the alert options and their
conguration settings.
Click on the Save Settings button to apply and save any
changes made to the E-mail Alert settings.
Page 65
62D-Link ShareCenter™ 2Go User Manual
Section 3 - Conguration
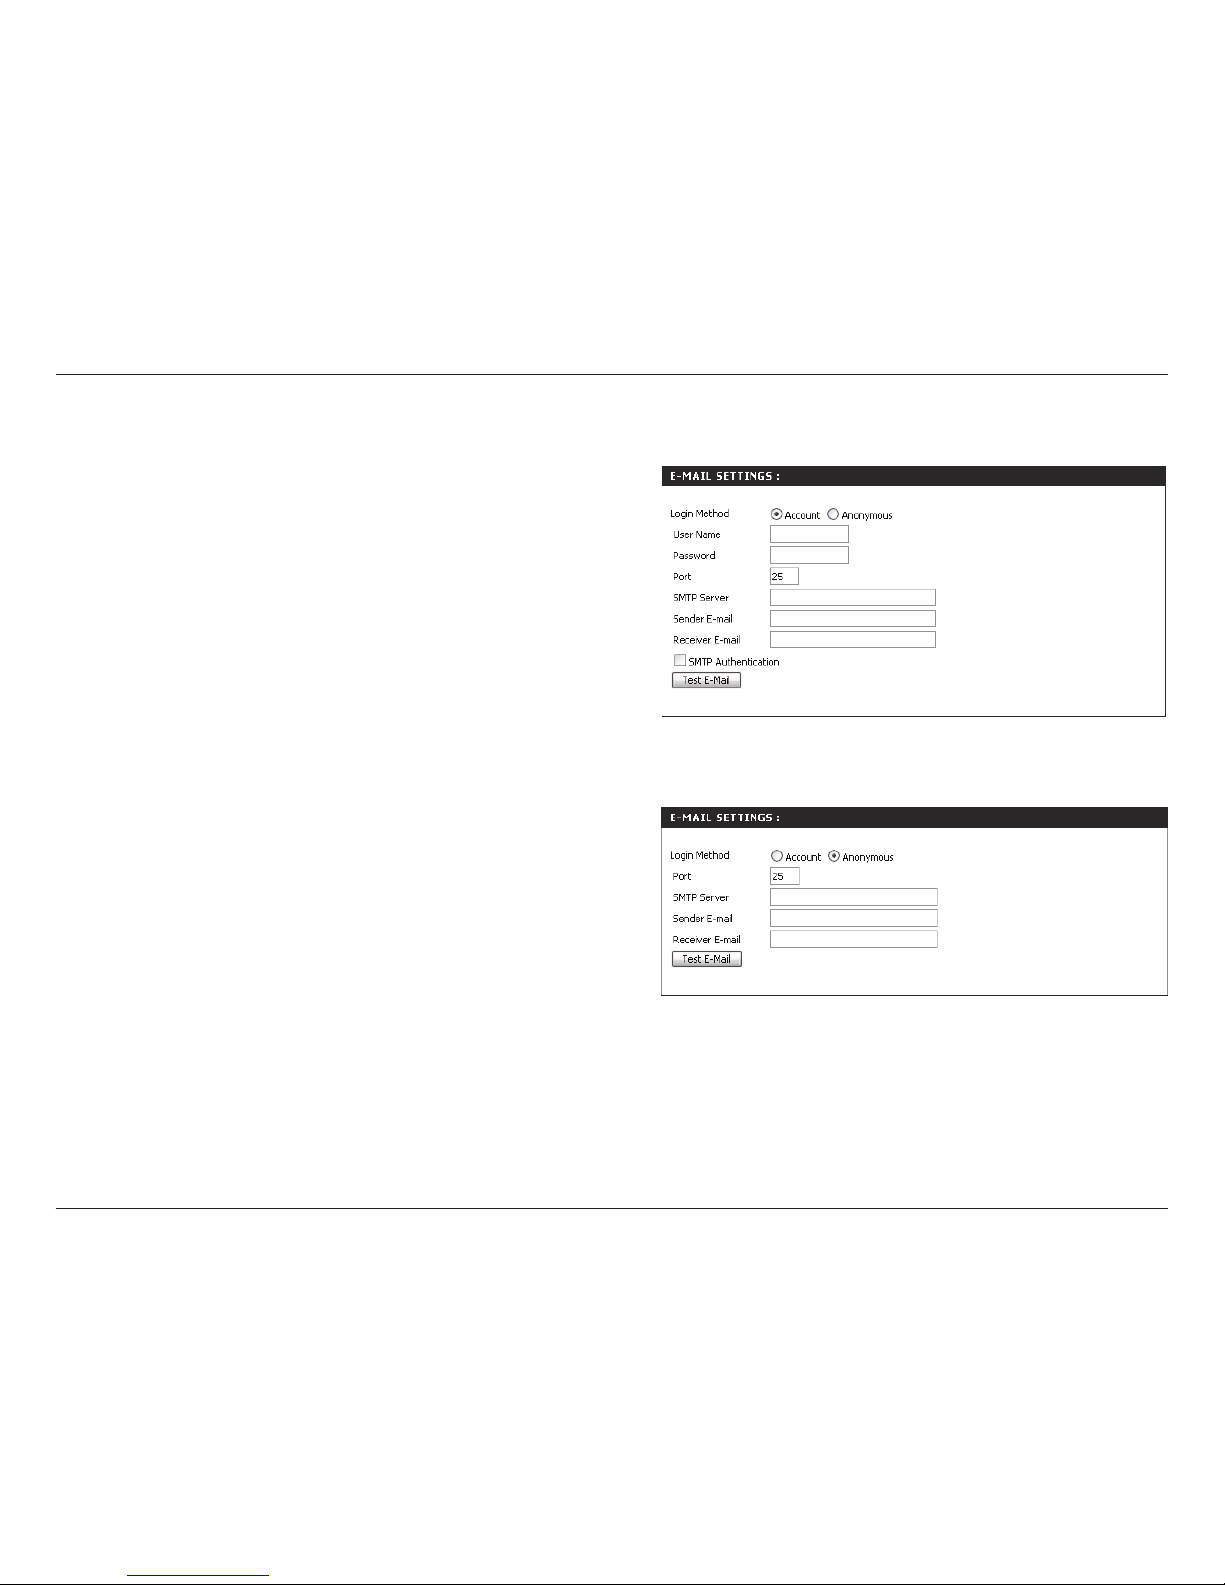
E-Mail Alert Settings
Login Method
User Name
Password
Port
SMTP Server
Sender E-Mail
Receiver
E-Mail
SMTP
Authentication
Test E-Mail
Select either Account or Anonymous. Choosing
Anonymous does not require a User Name or
Password.
If selecting the Account option, enter the appropriate
user name for your e-mail account.
If selecting the Account option, enter the appropriate
password for your e-mail account.
The TCP port for SMTP default should be 25.
Enter the IP address or domain name of your
outgoing mail server. If you are unsure of this value,
contact your e-mail provider.
Enter the “from” e-mail address (e.g. alerts@
dns213.com). This eld does not require a valid
e-mail address. However, if your e-mail client is
ltering spam, make sure you allow this address to
be received.
Enter the e-mail address that will receive the alerts.
This address must correspond with the SMTP server
congured above.
Click to turn on SMTP authentication.
Click the Test E-Mail button to send a test alert and
conrm your settings are correct.
E-Mail Alert Settings- Account Category
E-mail Alert Settings- Anonymous Category
Page 66
63D-Link ShareCenter™ 2Go User Manual
Section 3 - Conguration
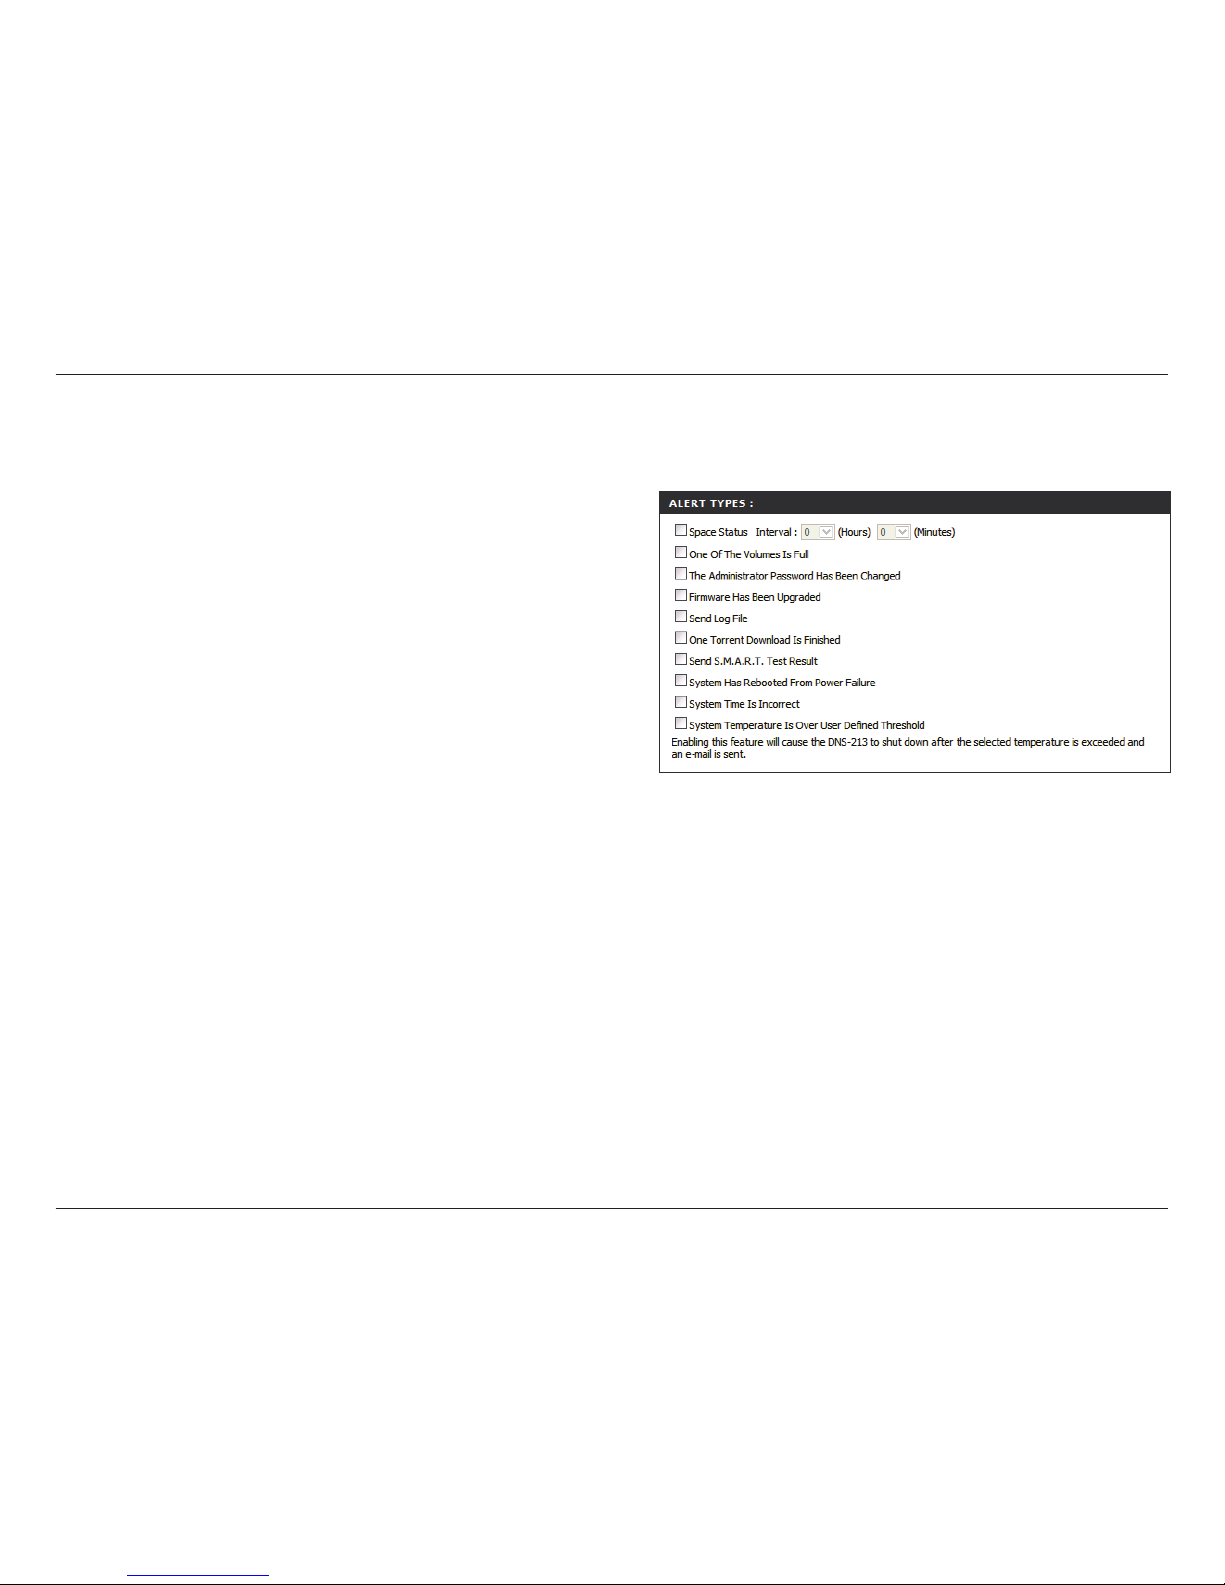
E-Mail Alert Types
Space Status
A Volume Is
Full
The
Administrator’s
Password Has
Been Changed
Firmware
Has Been
Upgraded
Send Log File
One Torrent
Download
Finished
Send
S.M.A.R.T.
Test Result
Select an interval in hours and minutes to have a
status of space remaining on the drives e-mailed.
An alert will be sent when the hard drive is full.
An alert will be sent if the admin password is changed.
An alert will be sent if the rmware is upgraded.
An alert will be sent with log le information when
the number of logs stored reaches a multiple of 800.
The number of logs sent will be rounded-down to the
nearest multiple of 800 and leftover logs will be sent
in the next alert.
An alert will be sent whenever a Torrent is nished
downloading
Check this box to enable the ShareCenter™ 2Go
to send Self-Monitoring, Analysis, and Reporting
Technology (S.M.A.R.T) test results to the user.
S.M.A.R.T tests are used to warn users about any
imminent drive failures. This allows users to take
appropriate action before the drive fails and avoid
data loss.
An alert will be sent if the Power Recovery
function has rebooted the ShareCenter™ 2Go
after a power failure has occurred
When the ShareCenter™ 2Go starts-up and it
fails to sync its Time and Date with an NTP server,
then an alert is sent. The Time and Date will be
reset to default.
An alert will be sent if the ShareCenter™ 2Go
device temperature exceeds the set threshold.
After the alert has been sent, the ShareCenter™
2Go will power off for safety.
System Has
Rebooted
from Power
Failure
System Time
Is Incorrect
System
Temperature
Is Over
User-Dened
Threshold
Fahrenheit
Page 67
64D-Link ShareCenter™ 2Go User Manual
Section 3 - Conguration
Power Management
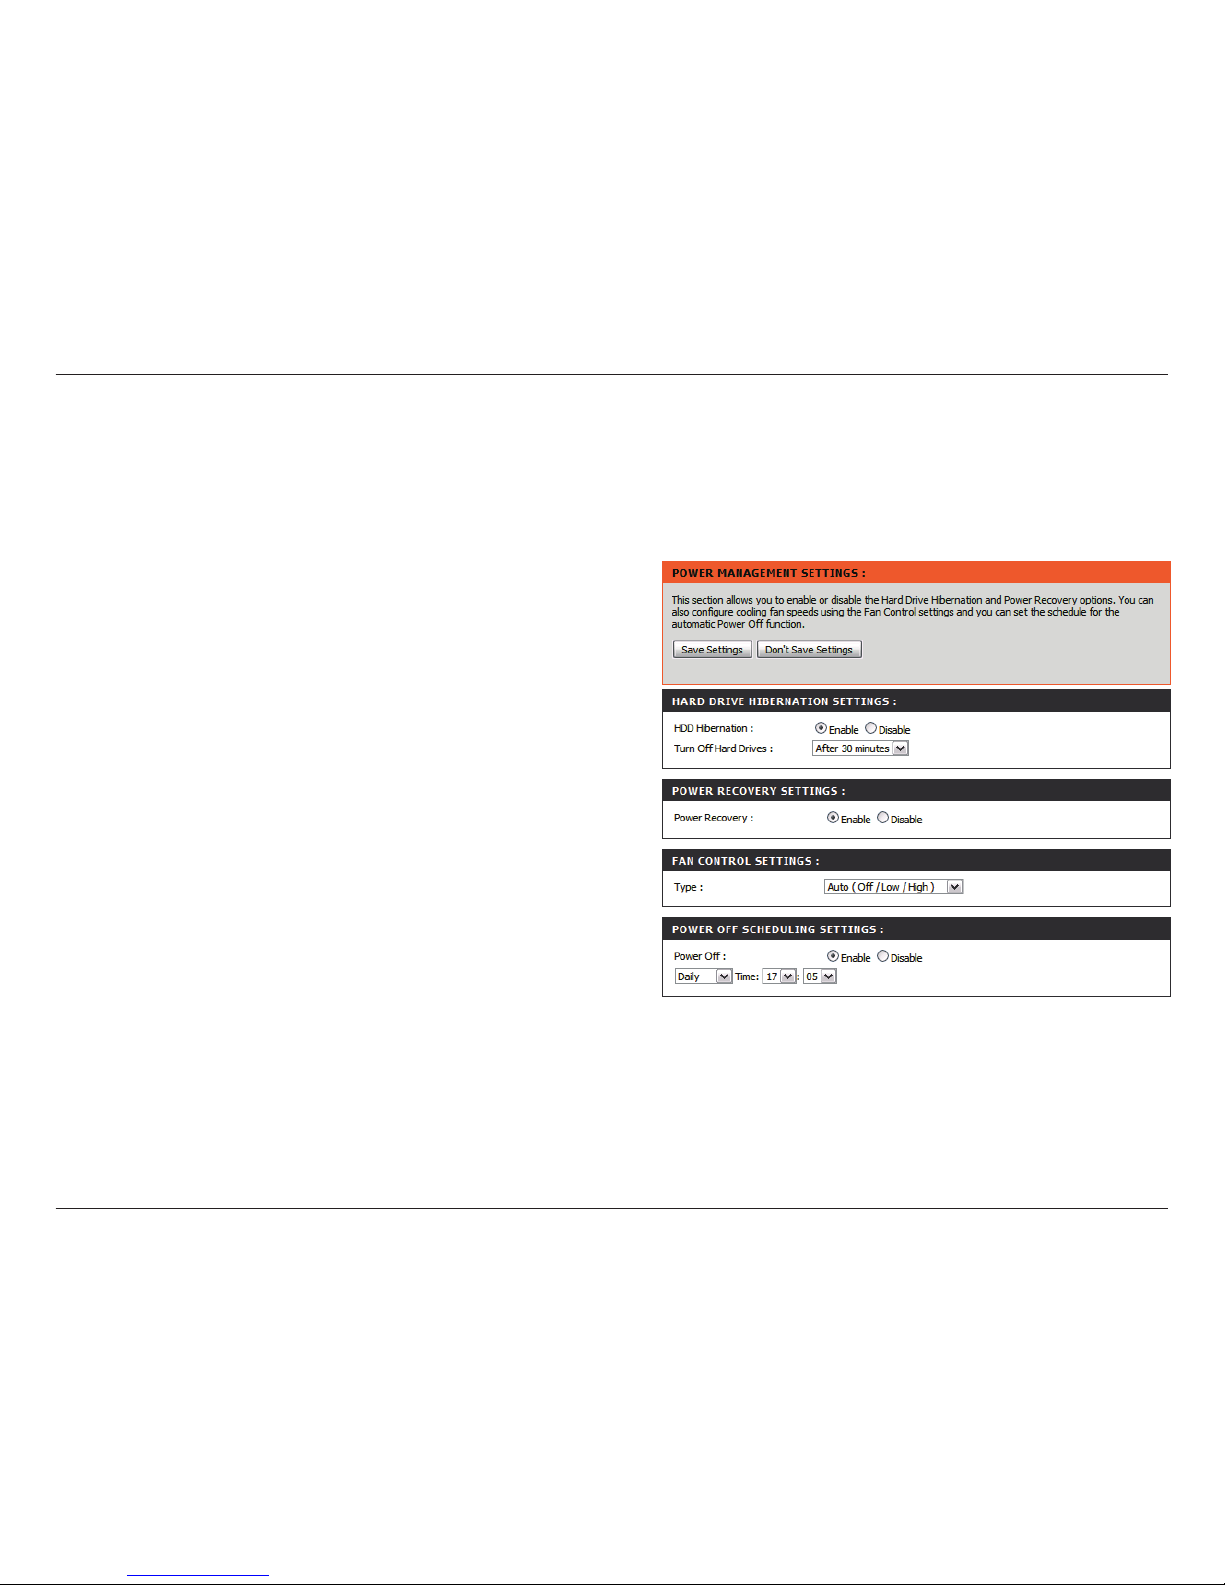
The ShareCenter™ 2Go Power Management feature allows you to congure the drive to shut down while power
remains constant to the device. The drive will power up again when data is accessed. You can also turn on Hard Drive
Hibernation, set Fan Speeds using Fan Control and enable Power Recovery to automatically restart the Share Center
after a power failure.
Hard Drive
Hibernation
Settings
Power
Recovery
Settings
Fan Control
Settings
Power Off
Scheduling
Settings
Click the Enable button at the top of the window and
then use the drop-down menu to set the amount of
time that must pass before the hard drive will go into
hibernation.
Enable or D is ab le Power Re co ve ry on the
ShareCenter™ 2Go by clicking the appropriate radio
button. Power Recovery in the Enabled state will
restart your ShareCenter™ 2Go and recover it to an
operational state after an unexpected power outage
Select the Fan Control states suitable for the
environment your ShareCenter will operate in.
Use the Power Off Scheduling section if you would
like the ShareCenter™ 2Go to automatically power
off on a monthly, weekly or daily time. To use this
feature carry out the following:
1. Click the Enable radio button,
2. Check the boxes next to the days you
wo uld like to enable the P ower Off
Scheduling feature on.
3. Use the Time drop-down menus to specify
the time that you want the ShareCenter™
2Go to power off on.
4. Click the Apply button at the bottom
of the window to save the Power Off
Scheduling settings.
Page 68
65D-Link ShareCenter™ 2Go User Manual
Section 3 - Conguration
Format Disk
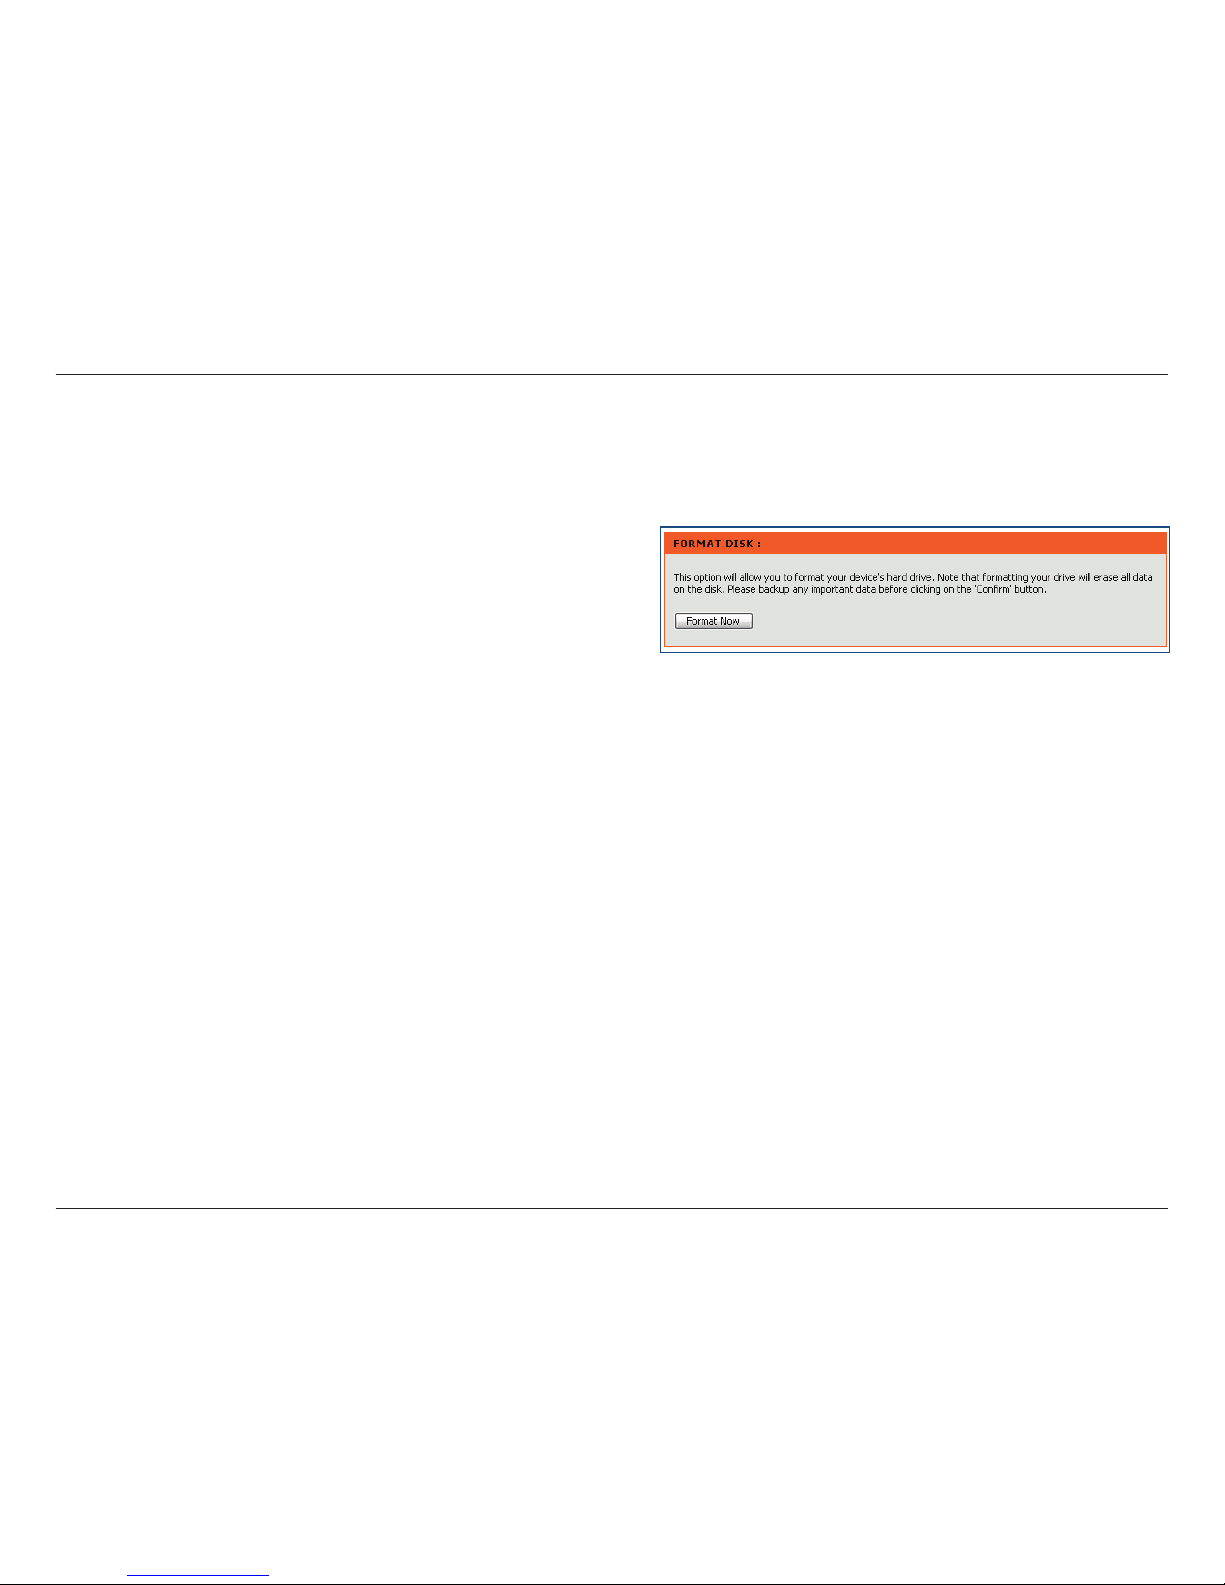
Use the Format Disk menu in the web manager to reformat the installed hard disk.
To format the installed hard disk, click on the Format
Now button. A dialog box will appear, warning that all
data on the disk will be erased. Ensure that you want
to format the disk. To proceed click the OK button, to
cancel the format request click the Cancel button or
close the dialog box. The format might take several
minutes depending on the capacity of the hard disk.
Disks are formatted with the Microsoft disk le format
NTFS.
Format Disk
Page 69
66D-Link ShareCenter™ 2Go User Manual
Section 3 - Conguration
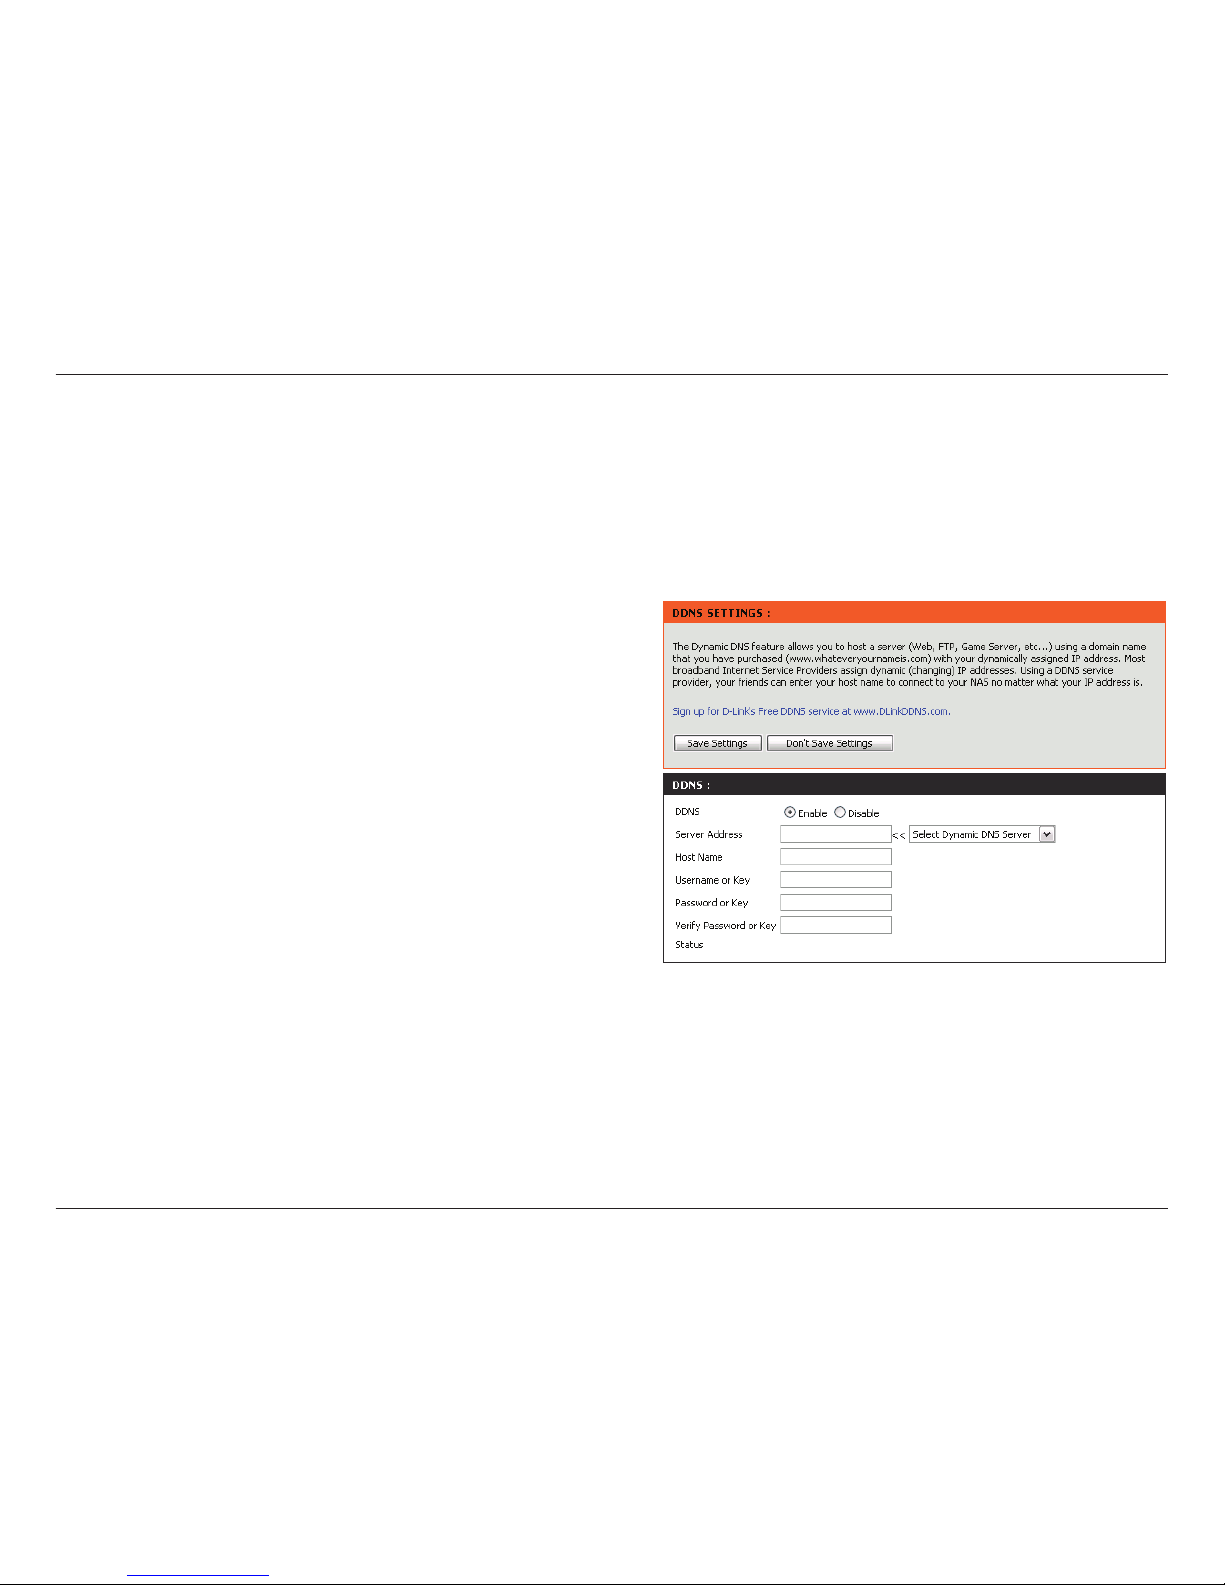
Dynamic DNS
DDNS
Server
Address
Host Name
Username or
Key
Password or
Key
Verify
Password or
Key
Status
The Dynamic DNS feature allows you to host a server (Web, FTP, Game Server, etc…) using a domain name that
you have purchased (www.whateveryournameis.com) with your dynamically assigned IP address. Most broadband
Internet Service Providers assign dynamic (changing) IP addresses. Using a DDNS service provider, your friends can
enter your domain name to connect to your server no matter what your IP address is.
Select Enable or Disable.
Select a DDNS Server from the combo box on the
right hand-side, or alternatively type in the server
address manually.
Enter your fully qualied Host Name in this eld.
Enter the username or key provided by your service
provider. If the Dynamic DNS provider supplies only
a key, enter that key in three elds.
Enter your DDNS password or key.
Re-type the password or key provided by your service
provider. If the Dynamic DNS provider supplies only
a key, enter that key in the three elds.
Displays your DDNS status.
Click on the Save Settings button to apply and save the new settings.
Page 70
67D-Link ShareCenter™ 2Go User Manual
Section 3 - Conguration
Disk Diagnostic
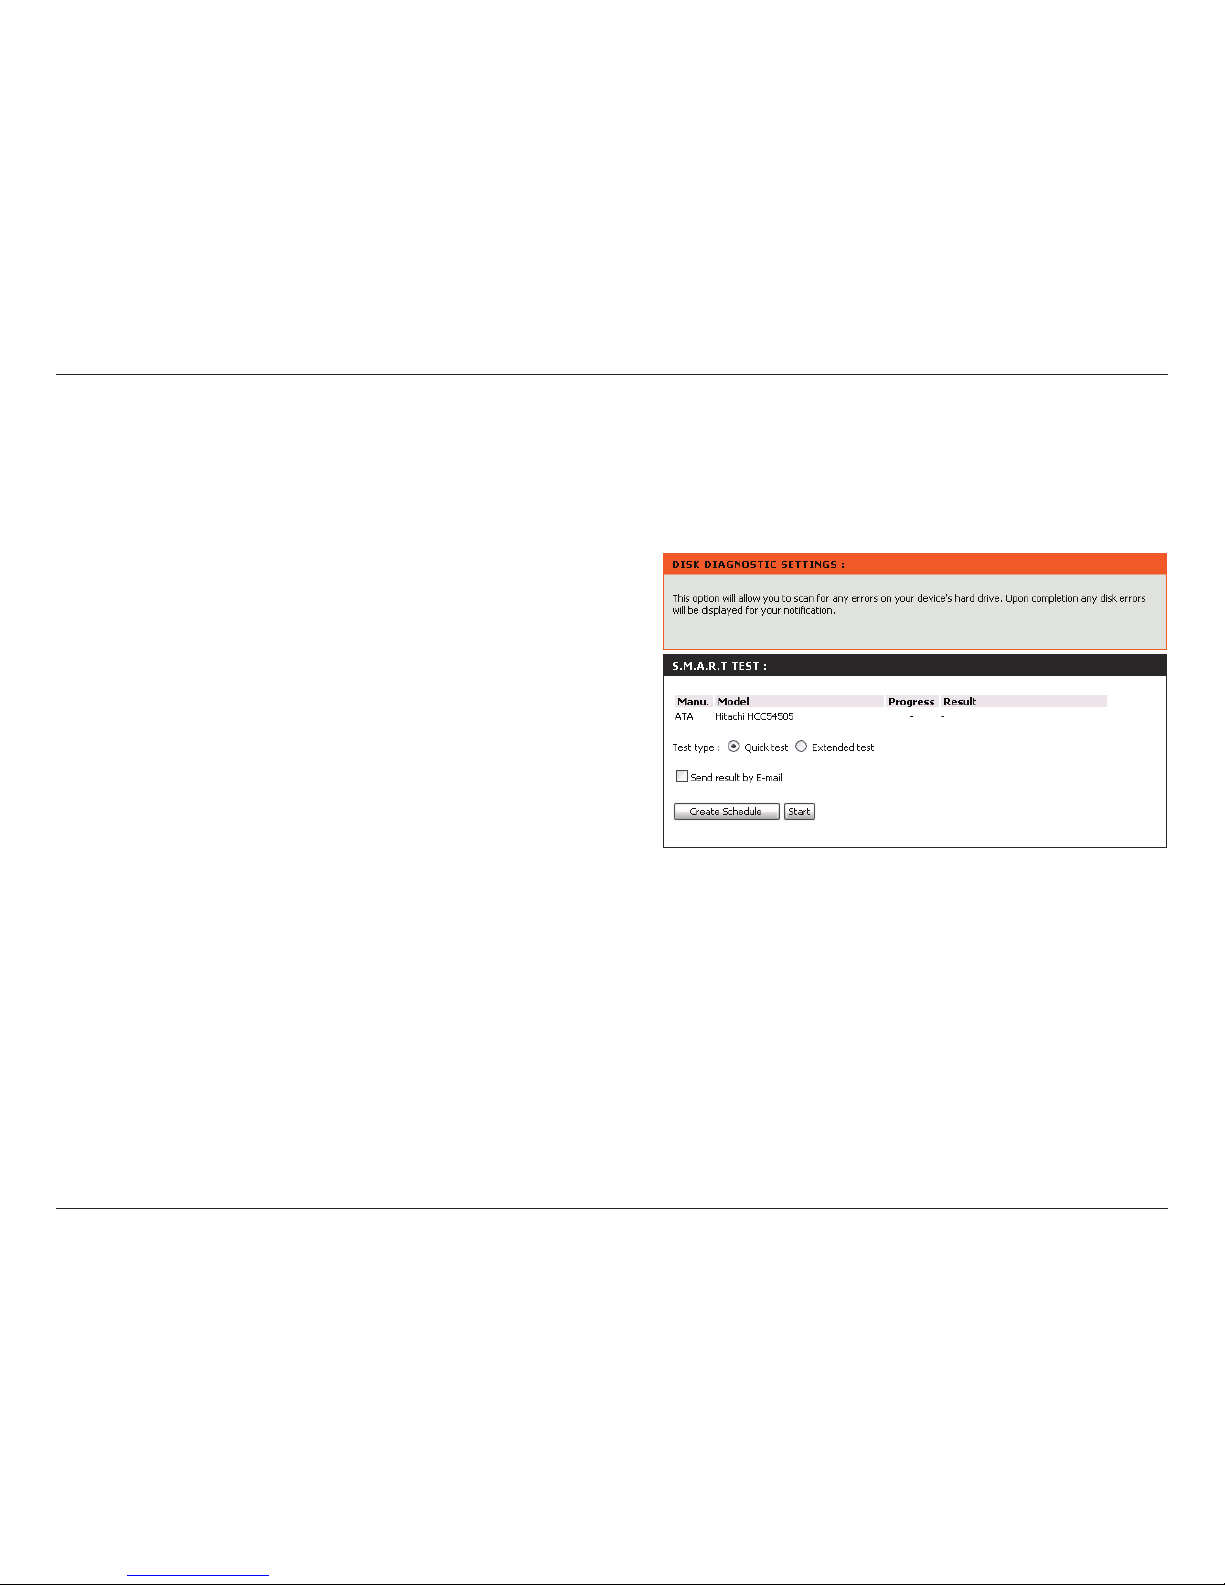
The Disk Diagnostic window features a number of tools to help check the health of the hard drive installed in the
ShareCenter™ 2Go. The tool included in the Disk Diagnostic window is described below:
S.M.A.R.T stands for “Self-Monitoring, Analysis, and
Reporting Technology”. This is a system on a hard
drive that is used to monitor and report on the health
of the drive. If the HD is grayed out, the hard drive
does not support S.M.A.R.T. See the “S.M.A.R.T
Test” section on page 68 for more information.
S.M.A.R.T
Test
Page 71
68D-Link ShareCenter™ 2Go User Manual
Section 3 - Conguration
Disk Diagnostic
S.M.A.R.T Test
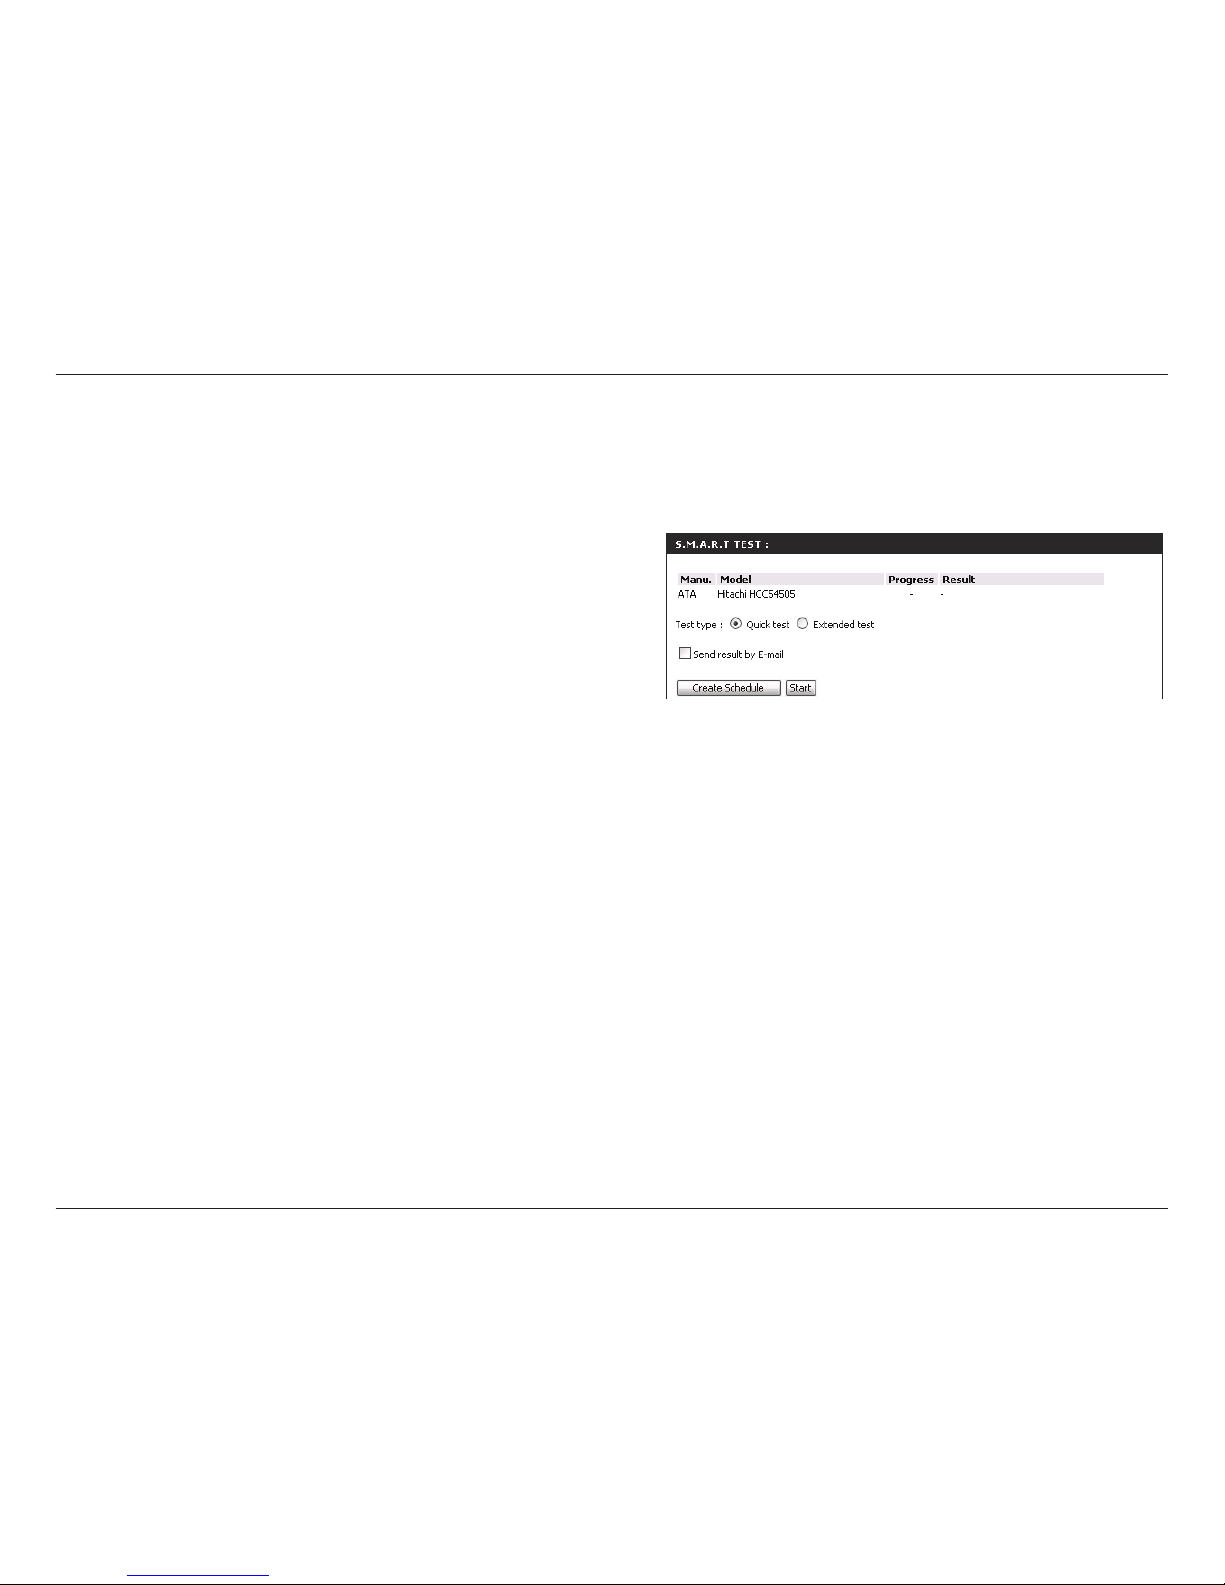
Click this radio button to run a quick S.M.A.R.T test.
This test usually takes less than 10 minutes. This
test will check the electrical, mechanical, and read
performance of the hard drive. The test results will
display in the Result eld on the right. You also have
the option of sending the test result as an e-mail alert.
Click this radio button to run an extended S.M.A.R.T
test. This test takes a lot more time to complete.
However, it is much more thorough and complete
test when compared to the Quick Test.
Check this box to send the results of the S.M.A.R.T
test to an e-mail address.
Click this button to create a scheduled S.M.A.R.T
test. You will be able to schedule a test on a daily,
weekly, and monthly basis.
Select whether you want to run a Quick Test or and
Extended Test by clicking the appropriate radio
button and then click the Start button. When the test
has completed, the result will appear in the Result
column.
Quick Test
Extended Test
Send Result by
Email
Create
Schedule
Start
Page 72
69D-Link ShareCenter™ 2Go User Manual
Section 3 - Conguration
Status
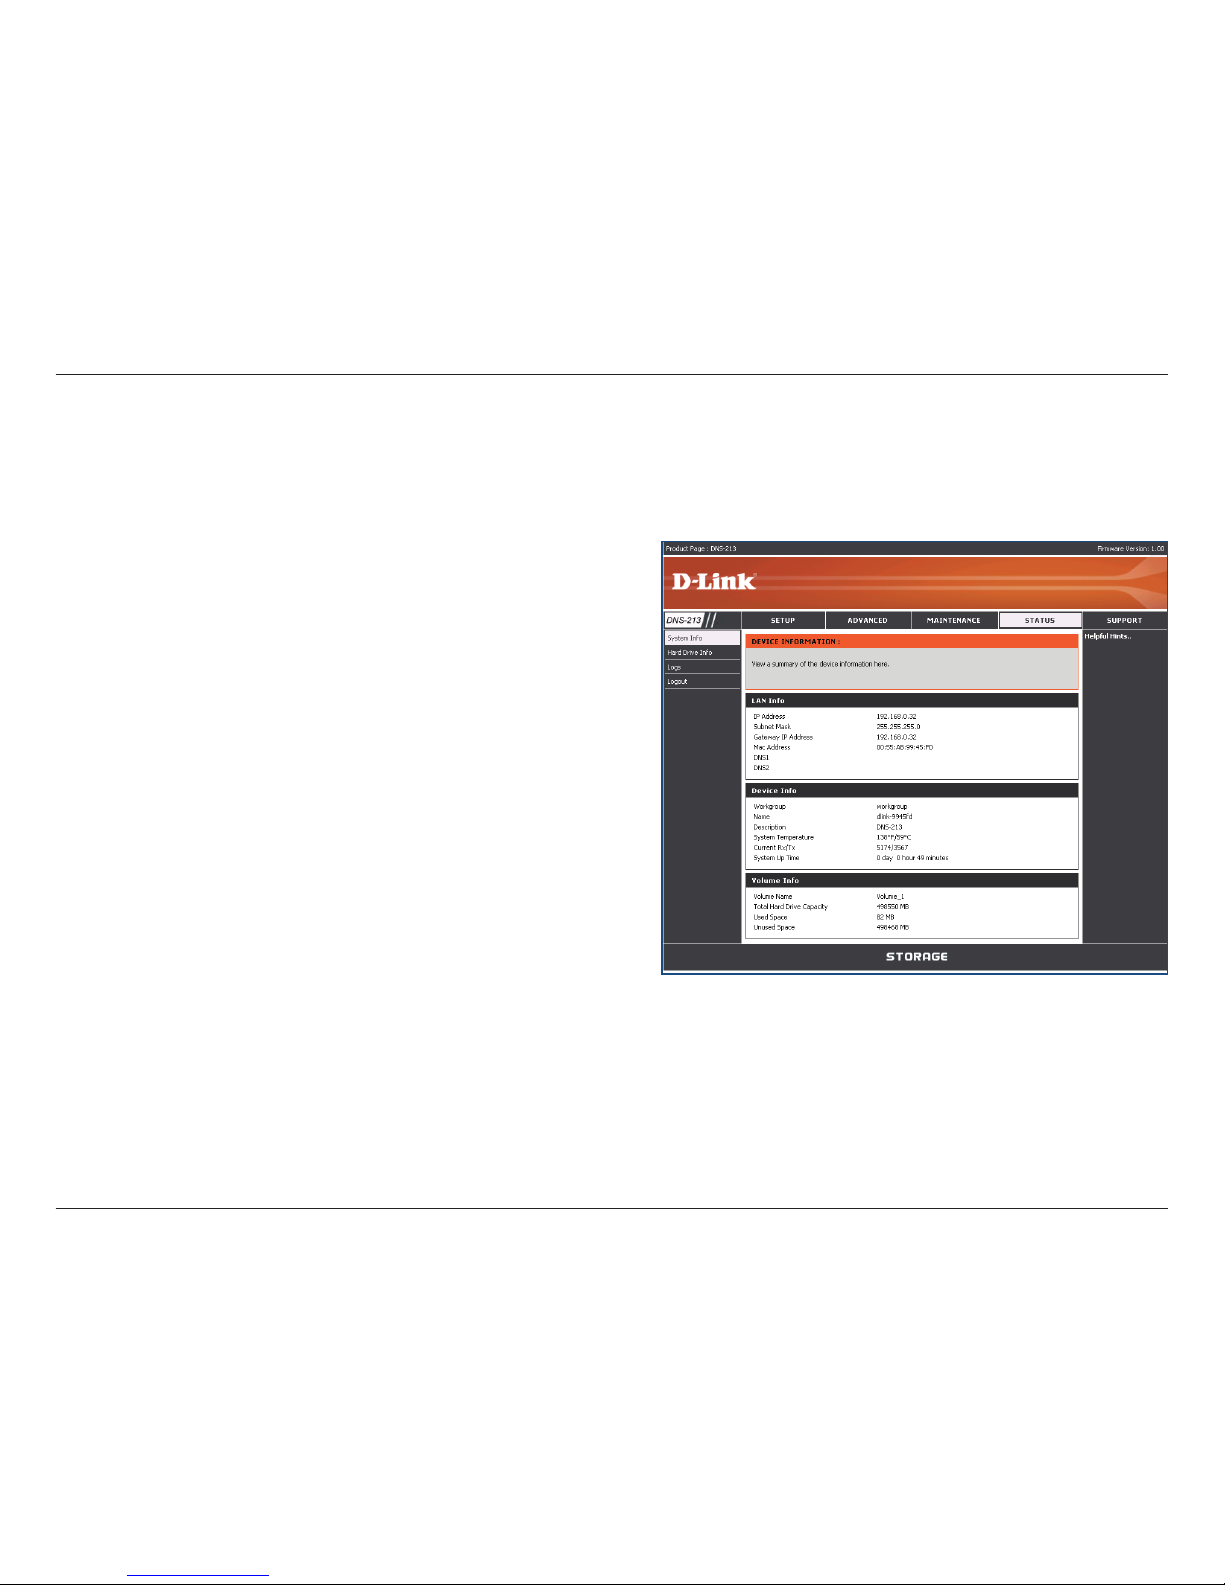
System Information
LAN Info
Device Info
Volume Info
Displ ays th e l oca l n etwor k sett ings o f t he
ShareCenter™ 2Go.
Displays the workgroup, name, description current
ShareCenter™ 2Go temperature, the Rx/Tx statistics,
and the system up time..
Displays the hard drive information, including the
volume name, hard drive capacity, used space, and
remaining drive (unused) space.
Page 73
70D-Link ShareCenter™ 2Go User Manual
Section 3 - Conguration
Hard Drive Info
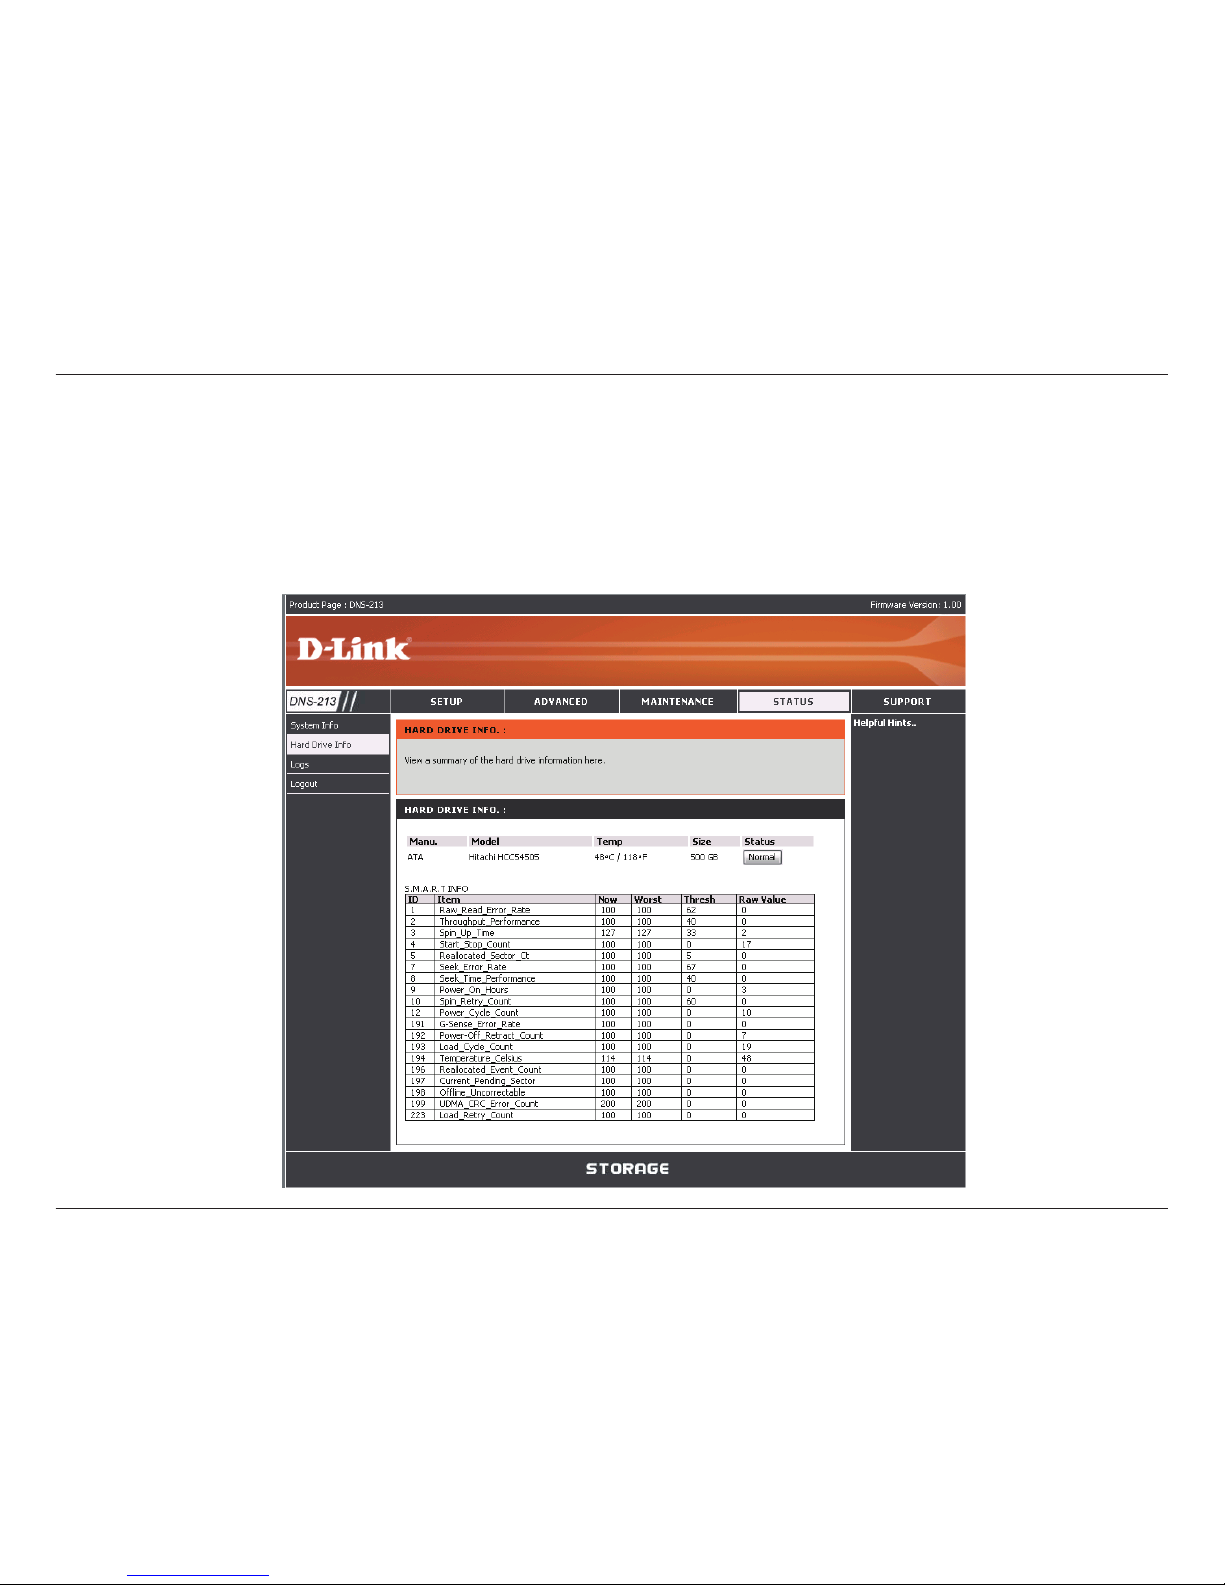
This section will display a summary of the hard drive currently installed in the ShareCenter™ 2Go. The summary will
include information such as the hard drive manufacturer, model, serial number, temperature, total capacity size, and
status. The “Status” of the hard drive will display the health of the hard drive. If your hard drive is healthy, the status
will display “Normal”. If your hard drive is not healthy, the status will display “Abnormal”. At any time, if you wish to view
the S.M.A.R.T table of the hard drive, you can click the Normal/Abnormal button.
Page 74
71D-Link ShareCenter™ 2Go User Manual
Section 3 - Conguration
Logs
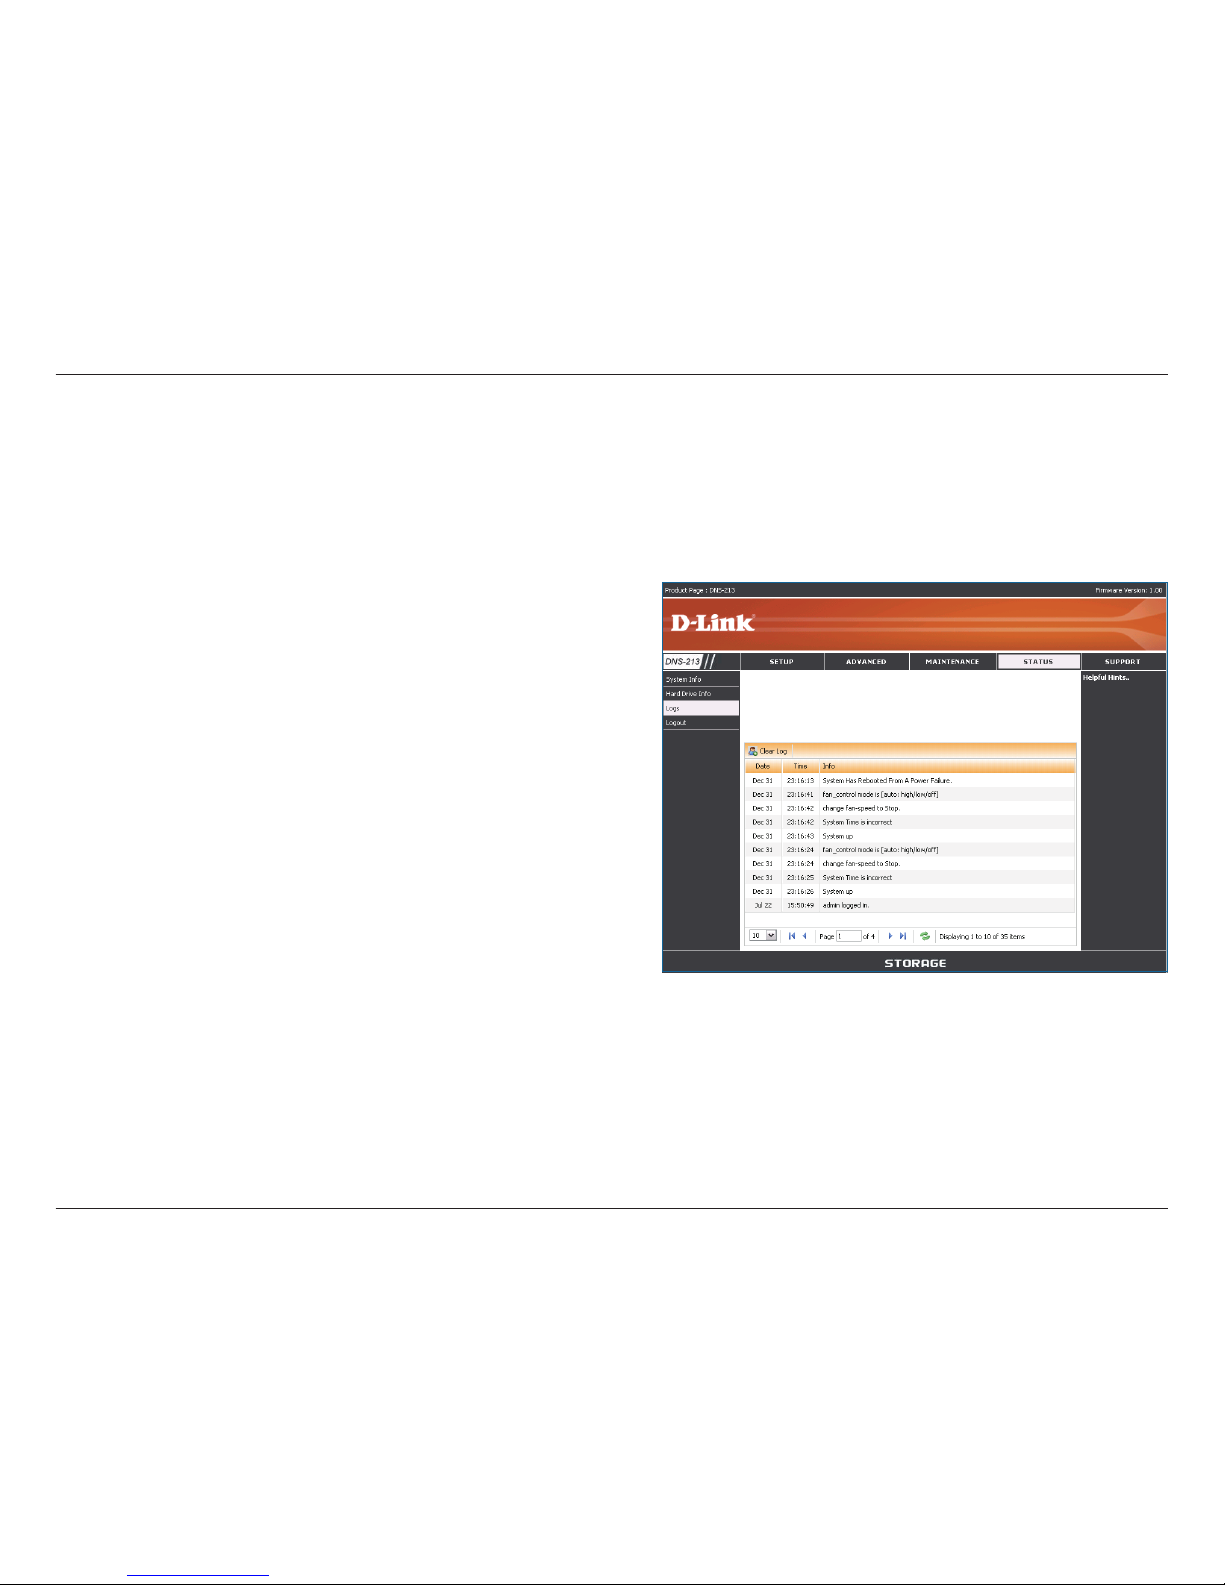
Use the Log window to view a summary of the System and FTP Log Events on the ShareCenter™ 2Go
Logs
Clear Log
Navigation
Buttons
Choose System Log from the pull-down menu to view
the System Log events. Choose FTP Log from the
pull-down menu to view FTP Log events..
Click the Clear System Log button clear all the log
events recorded in the ShareCenter™ 2Go’s log.
Use the navigation buttons at the bottom of the log
event list to scroll through the available log pages.
Page 75
72D-Link ShareCenter™ 2Go User Manual
Section 3 - Conguration
Support
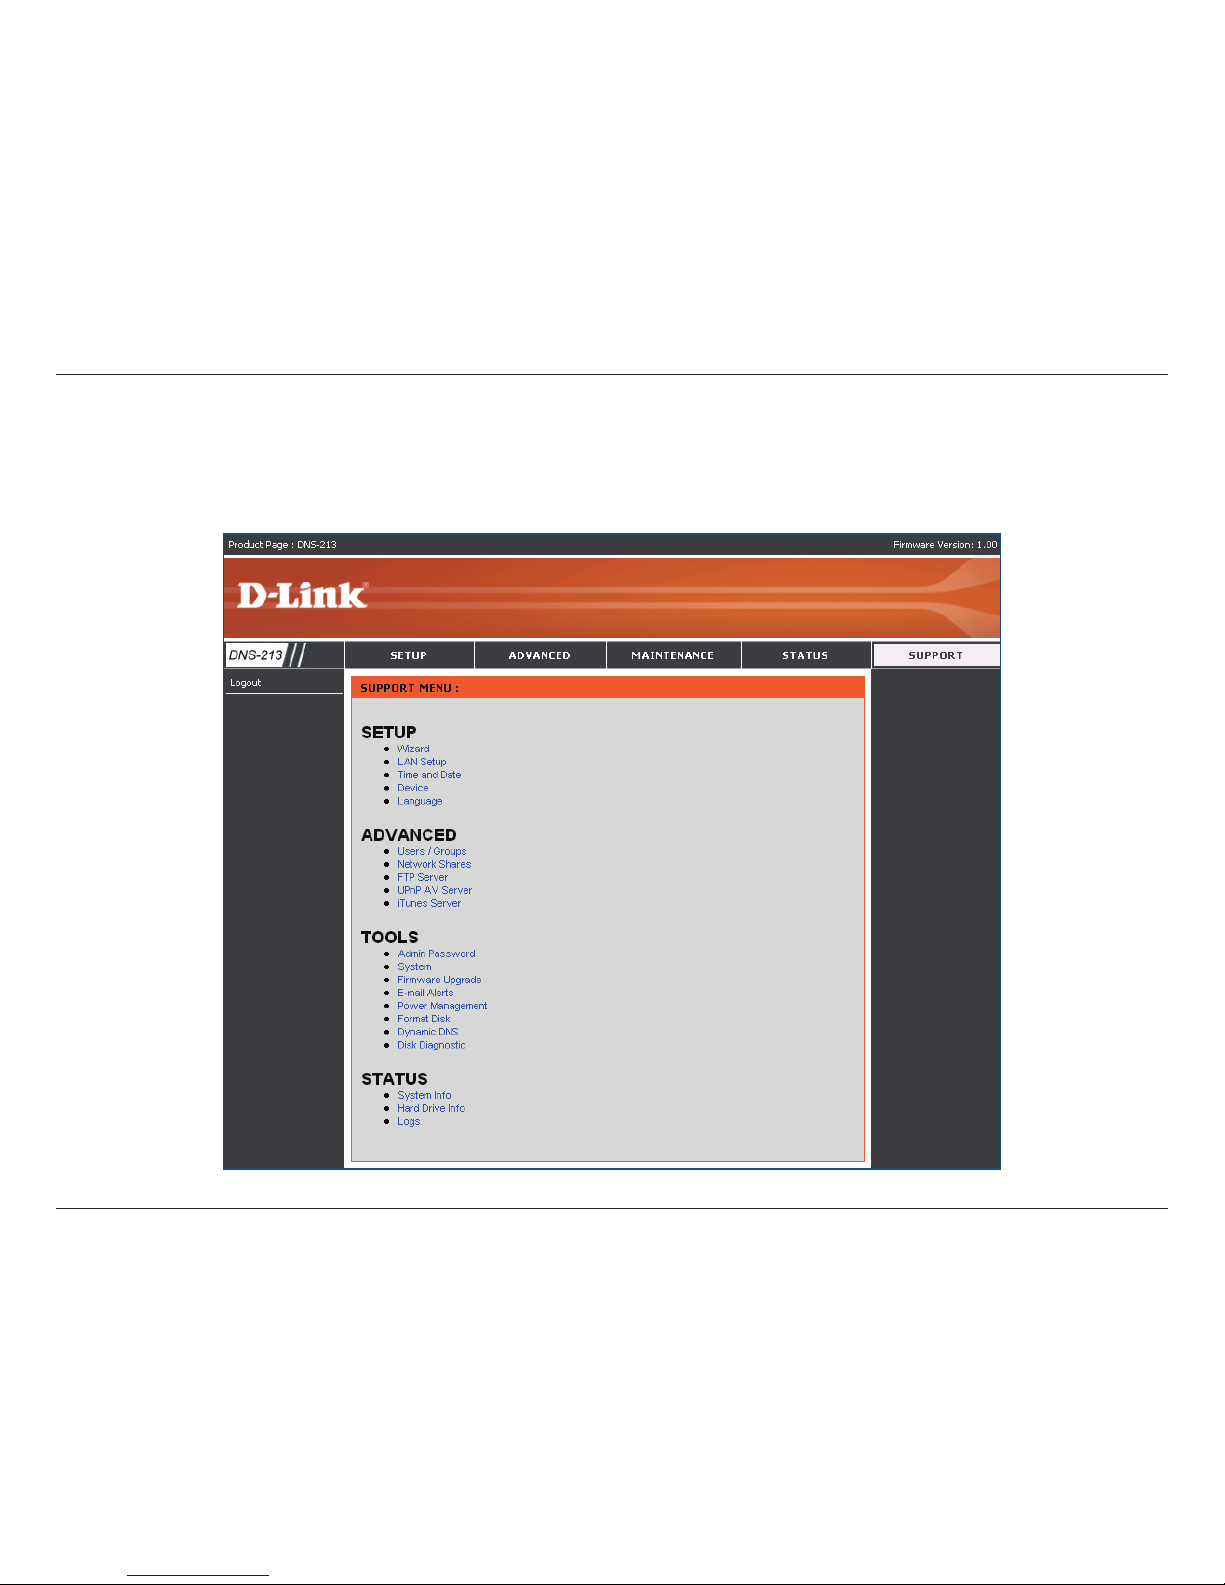
The ShareCenter™ 2Go Support page provides a menu of Support topics explaining the features of the device.
Page 76
73D-Link ShareCenter™ 2Go User Manual
Section 3 - Conguration
Schedule Downloads
To access the Schedule Downloads application menu, you must rst logout of the ShareCenter™ 2Go conguration
menus.
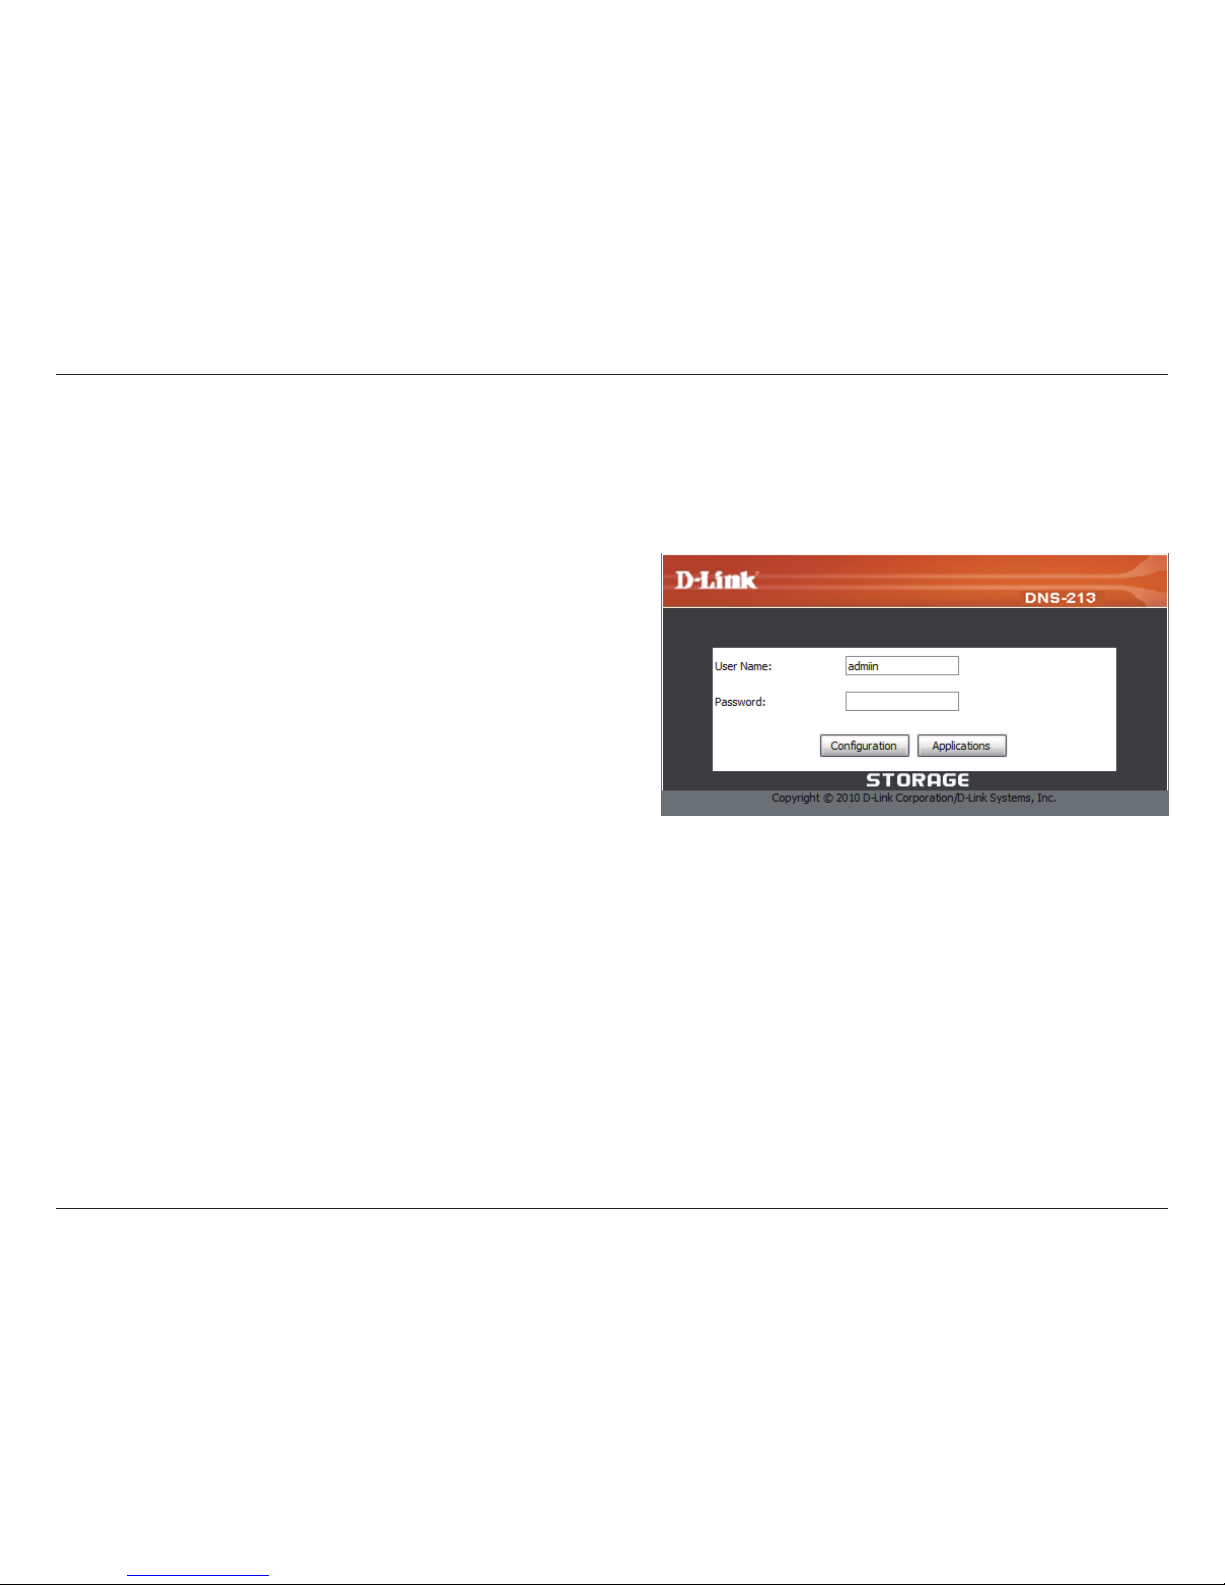
The login menu appears in the web page. Type the default
User Name and Password and click the Applications
button.
Page 77
74D-Link ShareCenter™ 2Go User Manual
Section 3 - Conguration
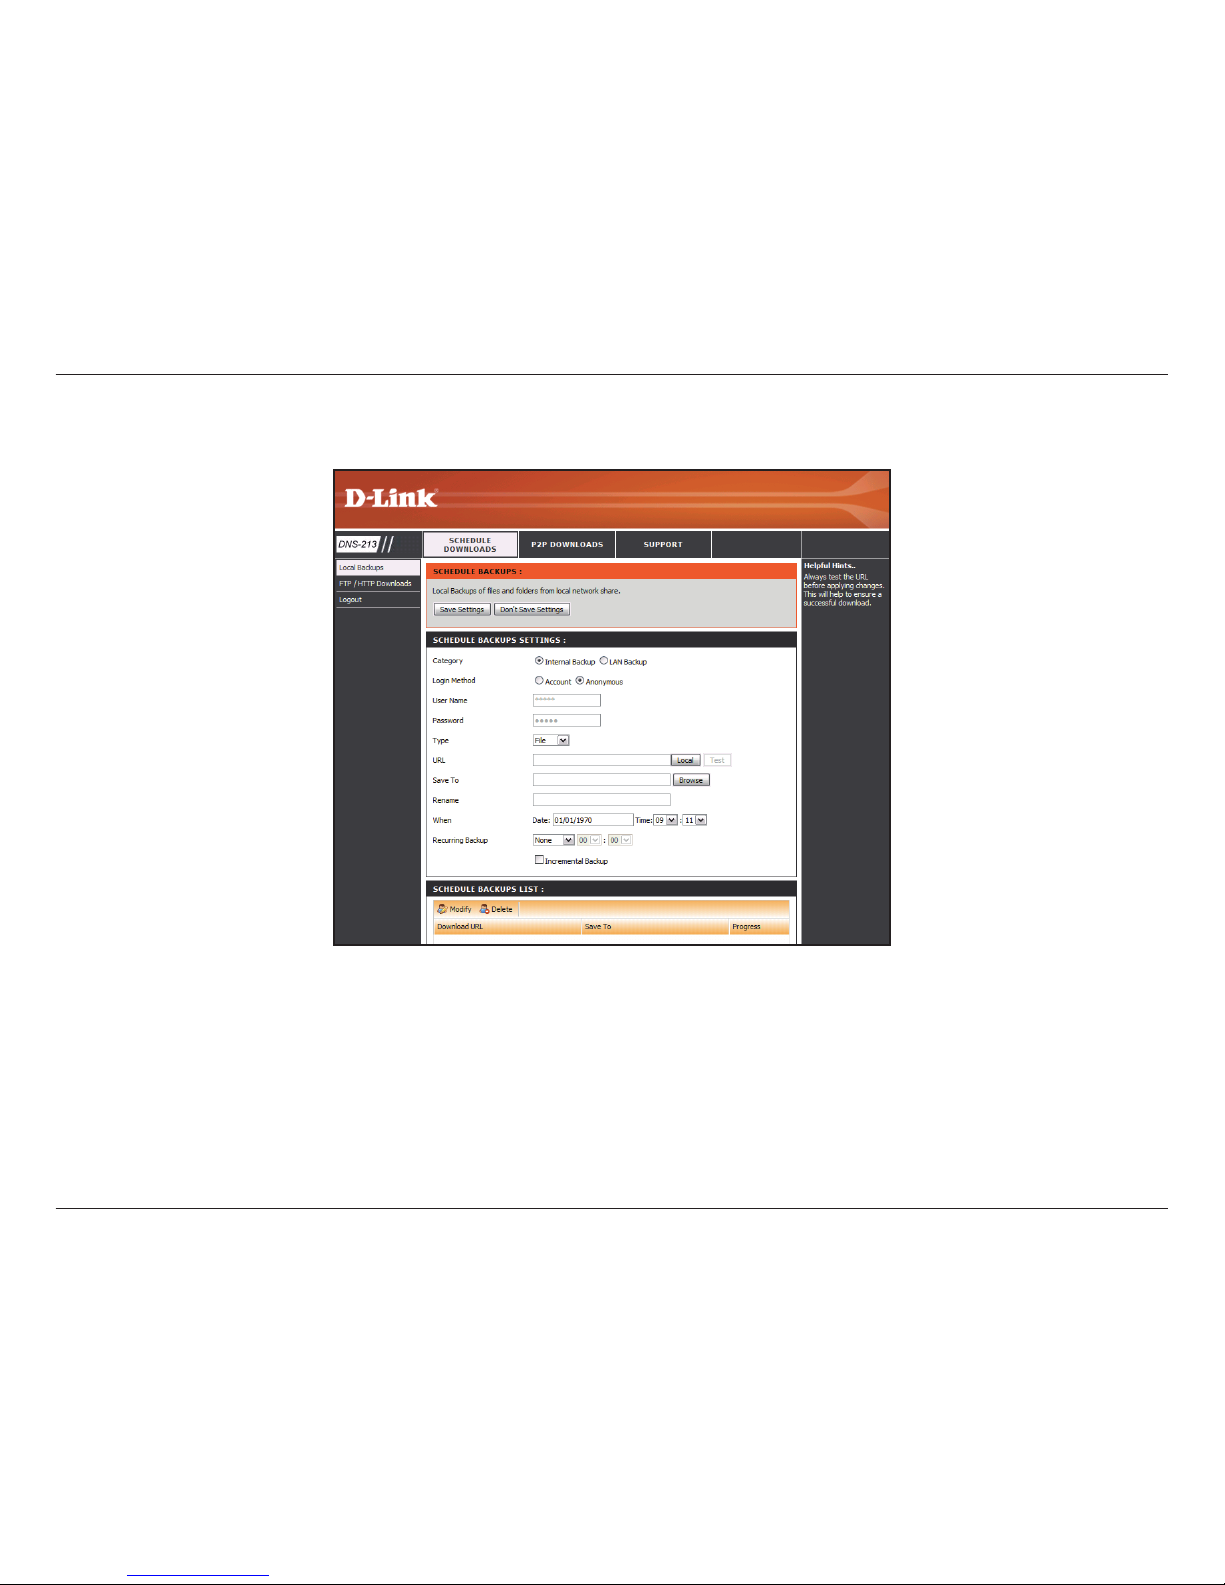
The ShareCenter™ 2Go’s Scheduling conguration page will appear:
Page 78
75D-Link ShareCenter™ 2Go User Manual
Section 3 - Conguration
Scheduling
Settings
Schedule List
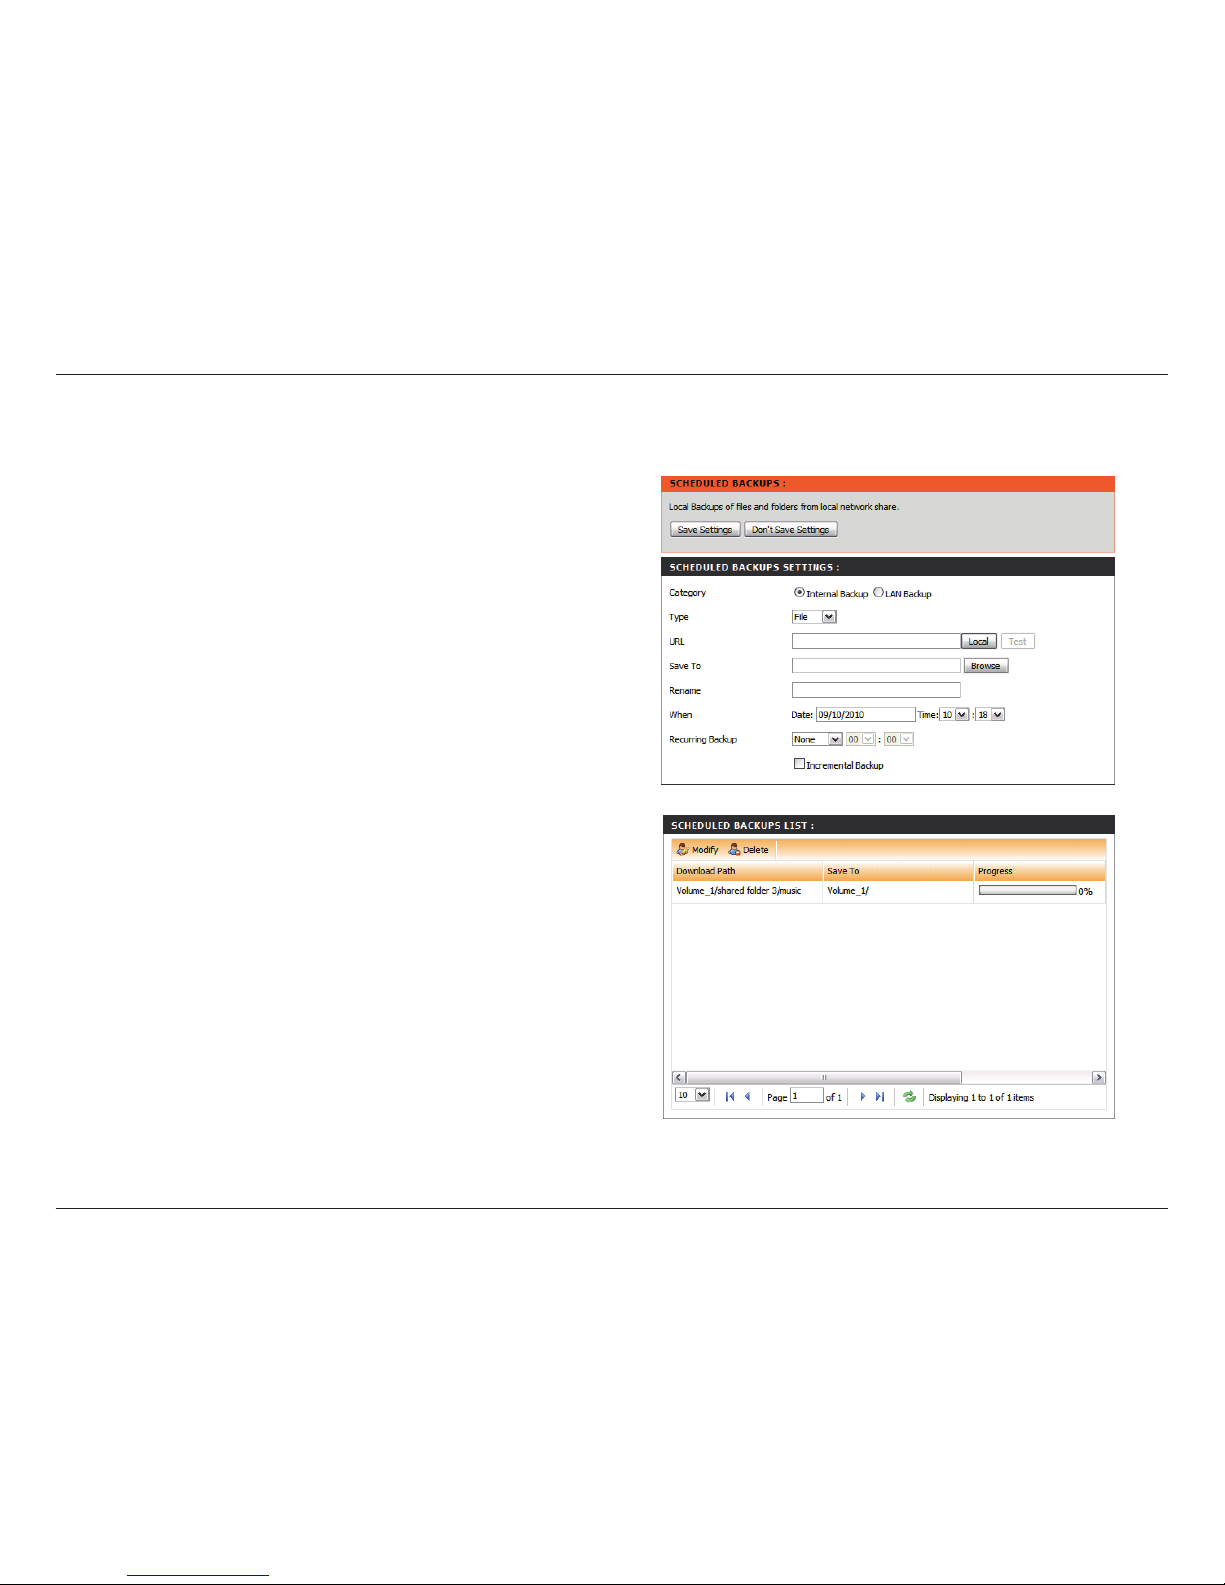
This section is used to configure the schedule
downloads settings.
This section is used to view and manage the les
or folders that are being downloaded from an FTP
server.
Scheduling
Click on the Save Settings button to apply and save the new settings.
Page 79
76D-Link ShareCenter™ 2Go User Manual
Section 3 - Conguration
Category
Login Method
Type
URL
Test
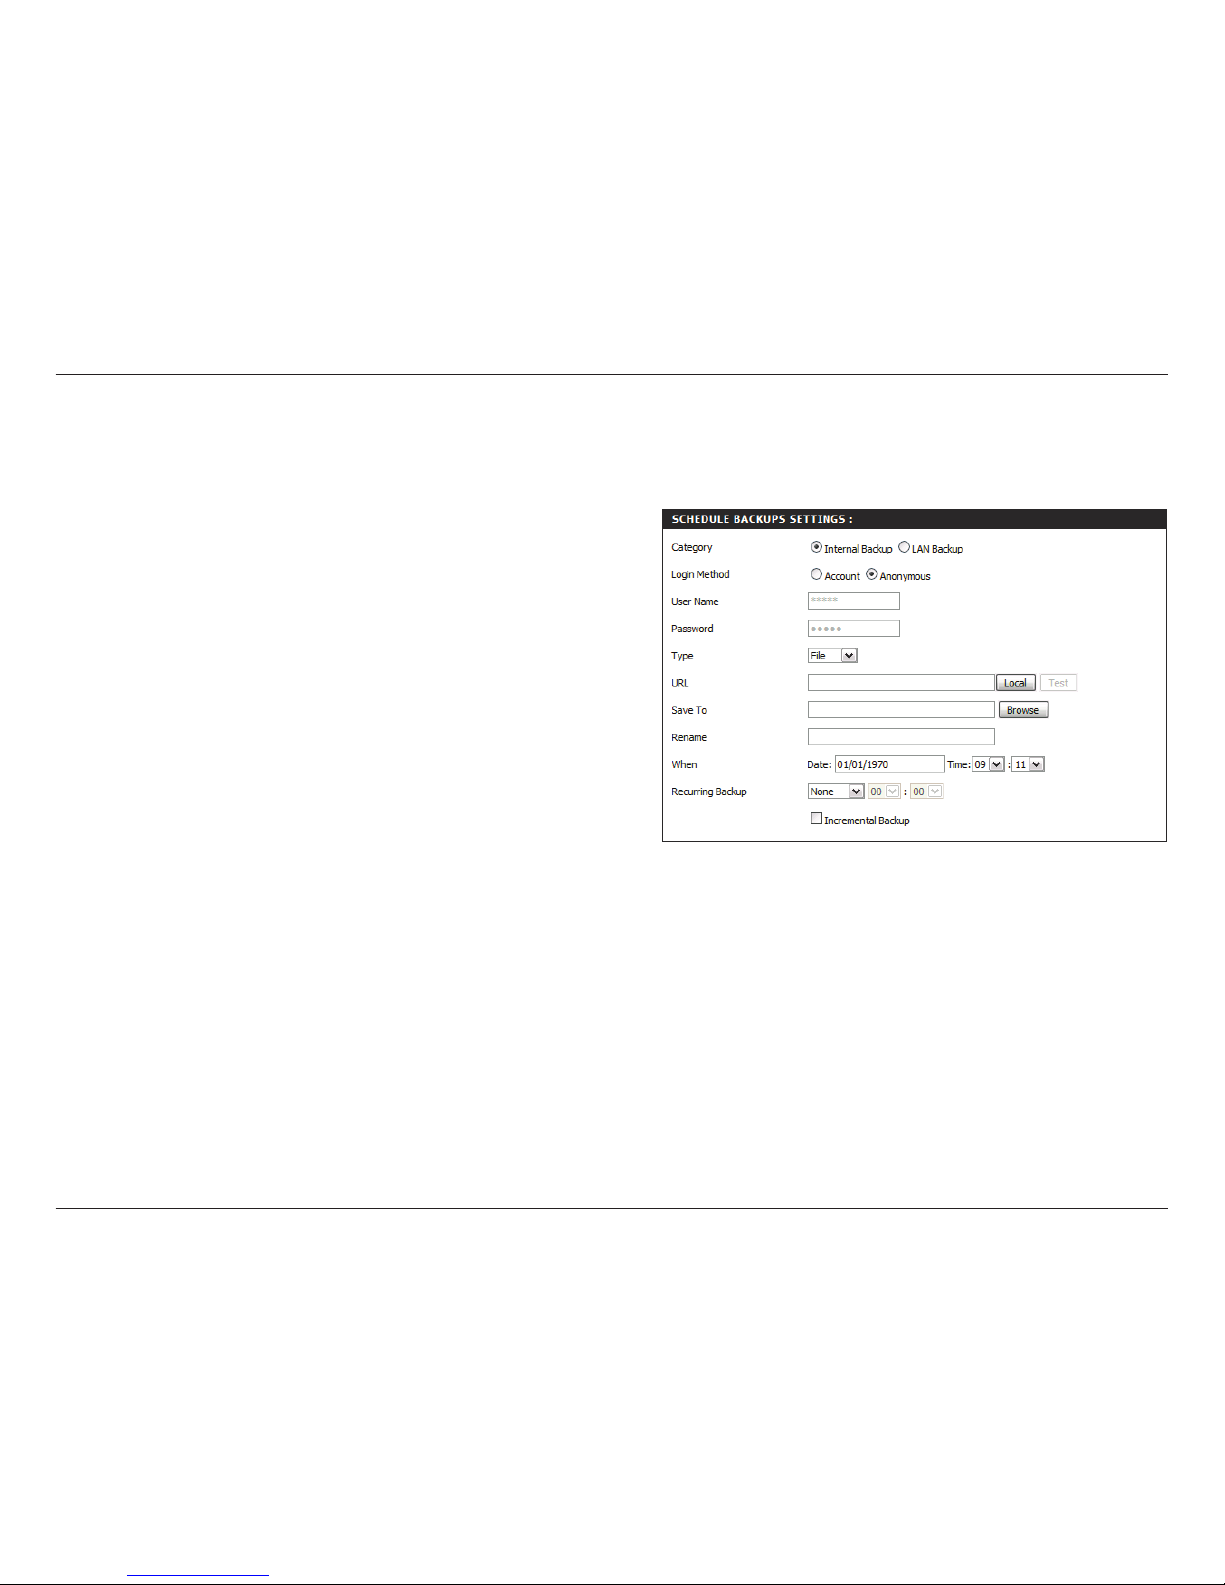
Use the radio buttons to select the backup method.
If your NAS device has two volumes you can click
the Internal Backup radio button to backup the data
from the rst volume to the second volume and vice-
versa. The Internal Backup feature also allows you
to backup an existing folder on a volume to another
folder on the same volume.
Note: Nested folders in the same volume are not
allowed.
To backup the data from your PC or another NAS
device to your NAS device, click the LAN Backup
radio button.
Select the appropriate login method to access the
les that will be downloaded. If the site requires
login credentials, select Account and enter a valid
username and password.
Select File or Folder, depending on what you want
to download or backup.
Enter the URL of the site or server you are initiating
a transfer from.
e.g. ftp://123.456.789/Test
ftp://123.456.789/test.txt
http://www.test.com/test.txt
Click Test to test that the URL is valid and that the
user name and password are correct.
Scheduling
Scheduling Settings
Page 80
77D-Link ShareCenter™ 2Go User Manual
Section 3 - Conguration
Local
Save To
Rename
When
Recurring
Backup
Incremental
Backup
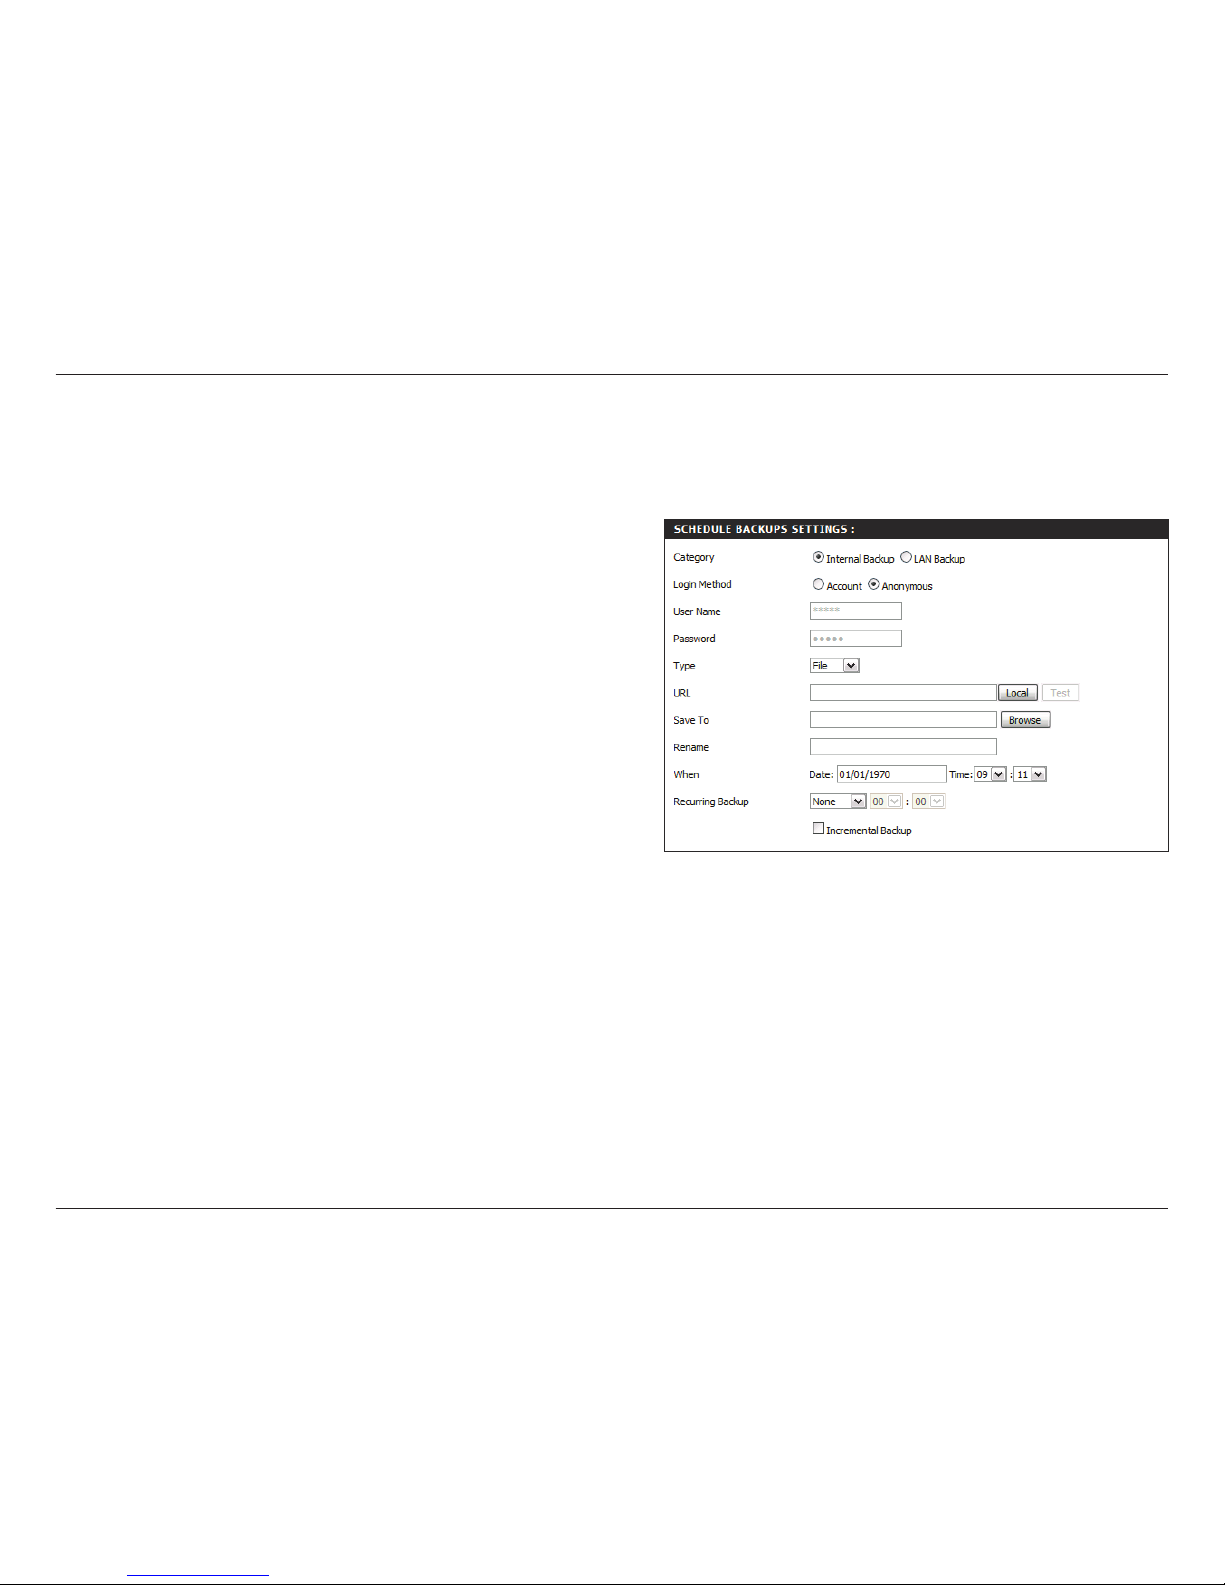
Click Local to download a le located on the
ShareCenter™ 2Go hard drive. A pop-up window
will open, allowing you to browse to the le you
want to download from the ShareCenter™ 2Go.
Browse to the le and click OK. The le path will
appear in the URL eld.
Enter a valid destination drive on the ShareCenter™
2Go, or click Browse to select the destination.
Input a new name for the backup if required.
Enter the date and time you want the scheduled
backup or download to occur.
Designate the interval and time you want the backup
or download to run unattended.
By default all local backups and le/folder downloads
are in Overwrite mode, meaning that identical les
in the destination folder will be overwritten by the
source les.
Checking Increm ental Backup will have the
ShareCenter™ 2Go compare identical le names
at the source and destination. Files will only be
overwritten if the source le has been edited more
recently.
Scheduling
Scheduling Settings - Continued
Page 81
78D-Link ShareCenter™ 2Go User Manual
Section 3 - Conguration
Scheduling
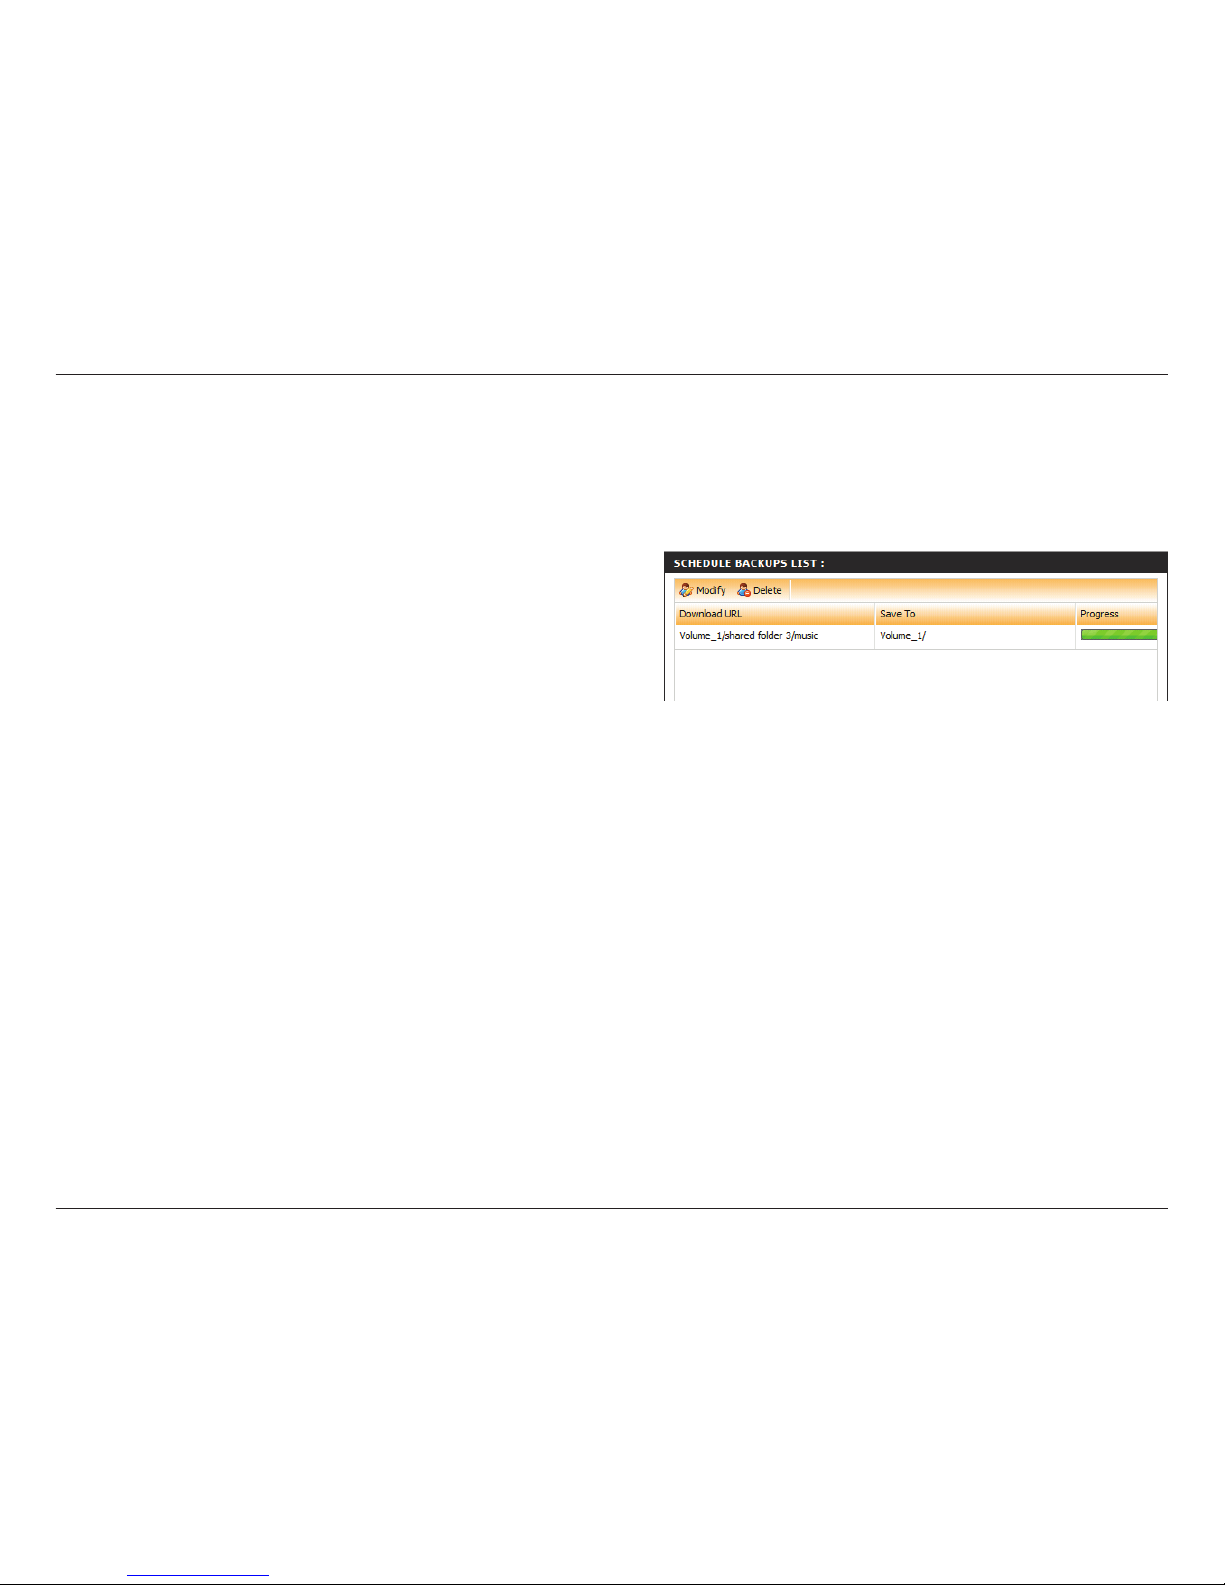
Schedule Backups List
Progress
Download URL
Save To
Modify
Delete
Displays the progress of the le or folder that is being
downloaded. If the download is a le, this eld uses
a bar and percentage value to indicate the download
progress. If the download is a folder, the eld only
indicates when the download has completed and
does not indicate the progress of the folder download.
Indicates the source URL/le path.
If a le is available for download, click the Now
Download button to start downloading the le.
Indicates the location on the ShareCenter™ 2Go that
the download le/folder will be saved to.
Select the Backup and then click Modify to view the
settings in the Schedule Backups Settings. Then edit
them as required.
To remove a download from the Schedule List, click
the backup download to select it and then click the
Delete button.
The Schedule Backup’s List displays the completed, active, and pending scheduled downloads and backups.
Page 82
79D-Link ShareCenter™ 2Go User Manual
Section 3 - Conguration
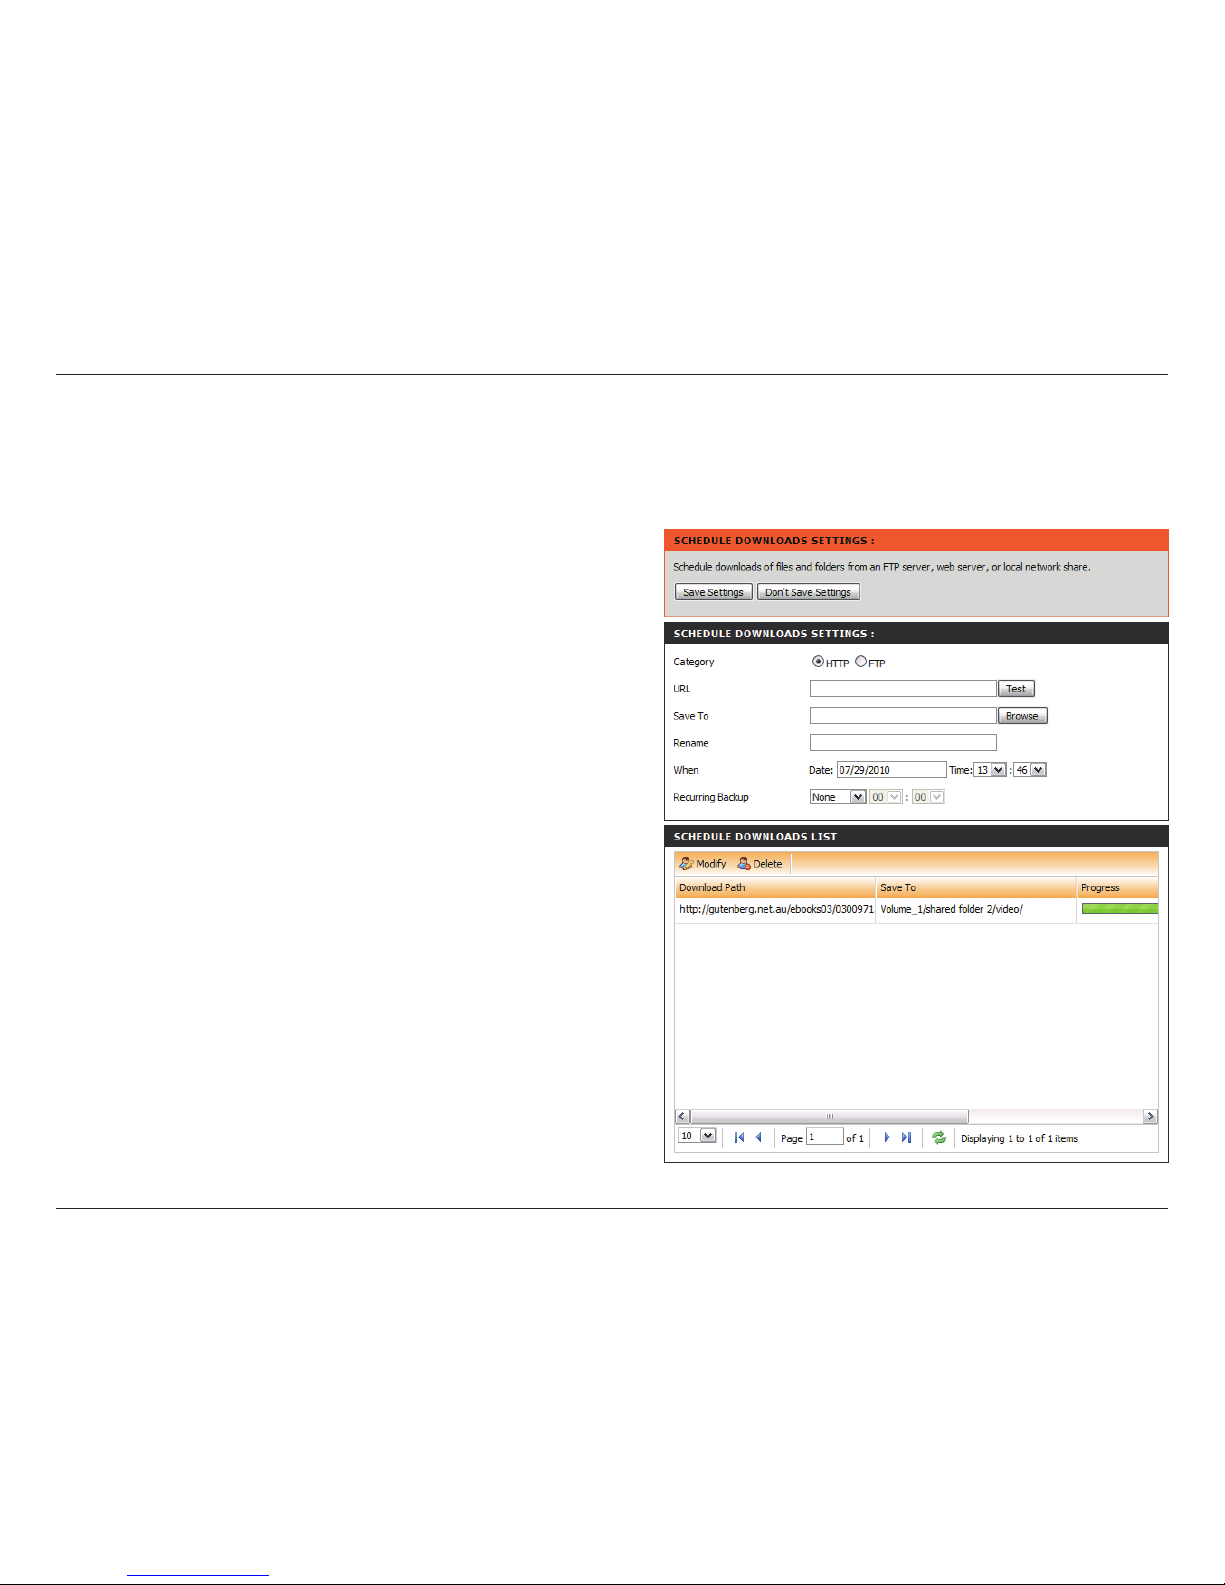
Schedule List
Displays the completed, active, and pen ding
scheduled downloads and backups.
Click the Refresh button to refresh the download list.
Scheduling
FTP / HTTP Downloads
Page 83
80D-Link ShareCenter™ 2Go User Manual
Section 3 - Conguration
P2P Downloads
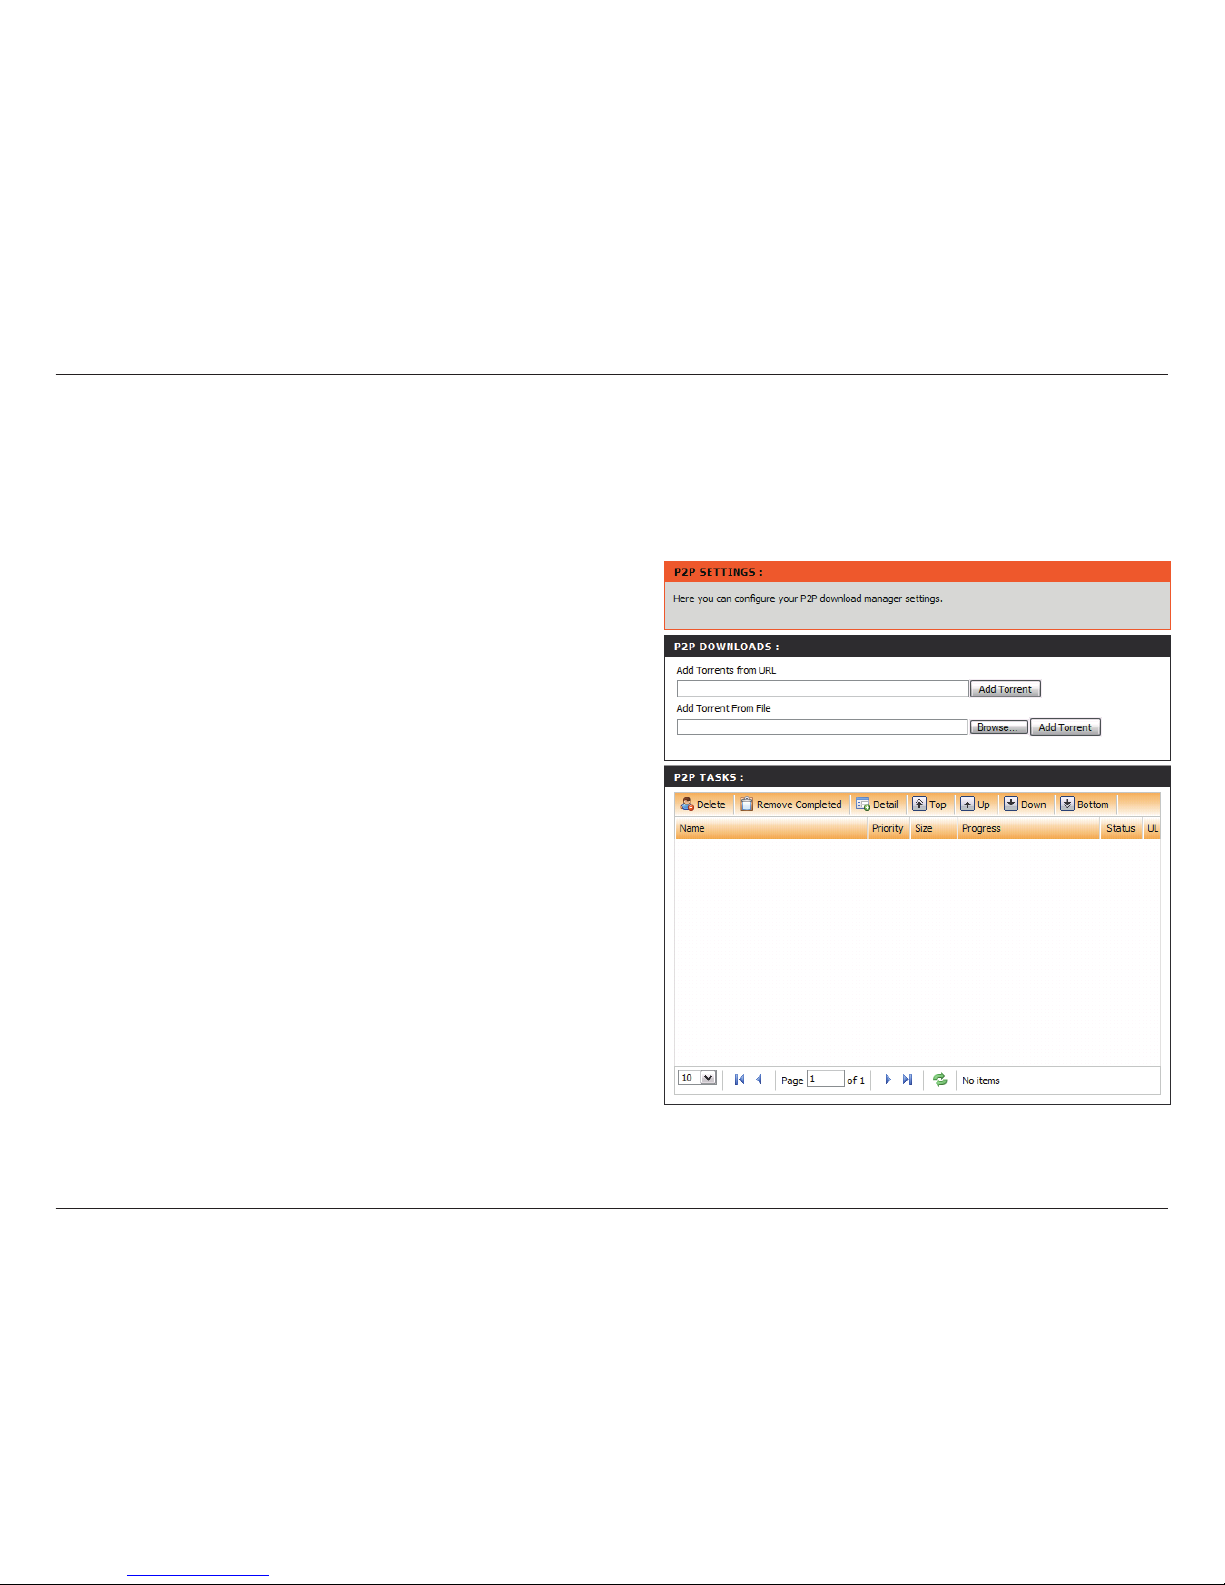
The ShareCenter™ 2Go supports a Peer to Peer download manager, which can be used to download bittorrent les
to the hard drive in the ShareCenter™ 2Go.
To begin downloading a BitTorrent le, check the method
that you would like to use to share and download information.
The available options are:
Add Torrents From URL
Add Torrent From File
See the following pages for more information on how to add
Torrents to the ShareCenter™ 2Go.
Page 84
81D-Link ShareCenter™ 2Go User Manual
Section 3 - Conguration
P2P Downloads
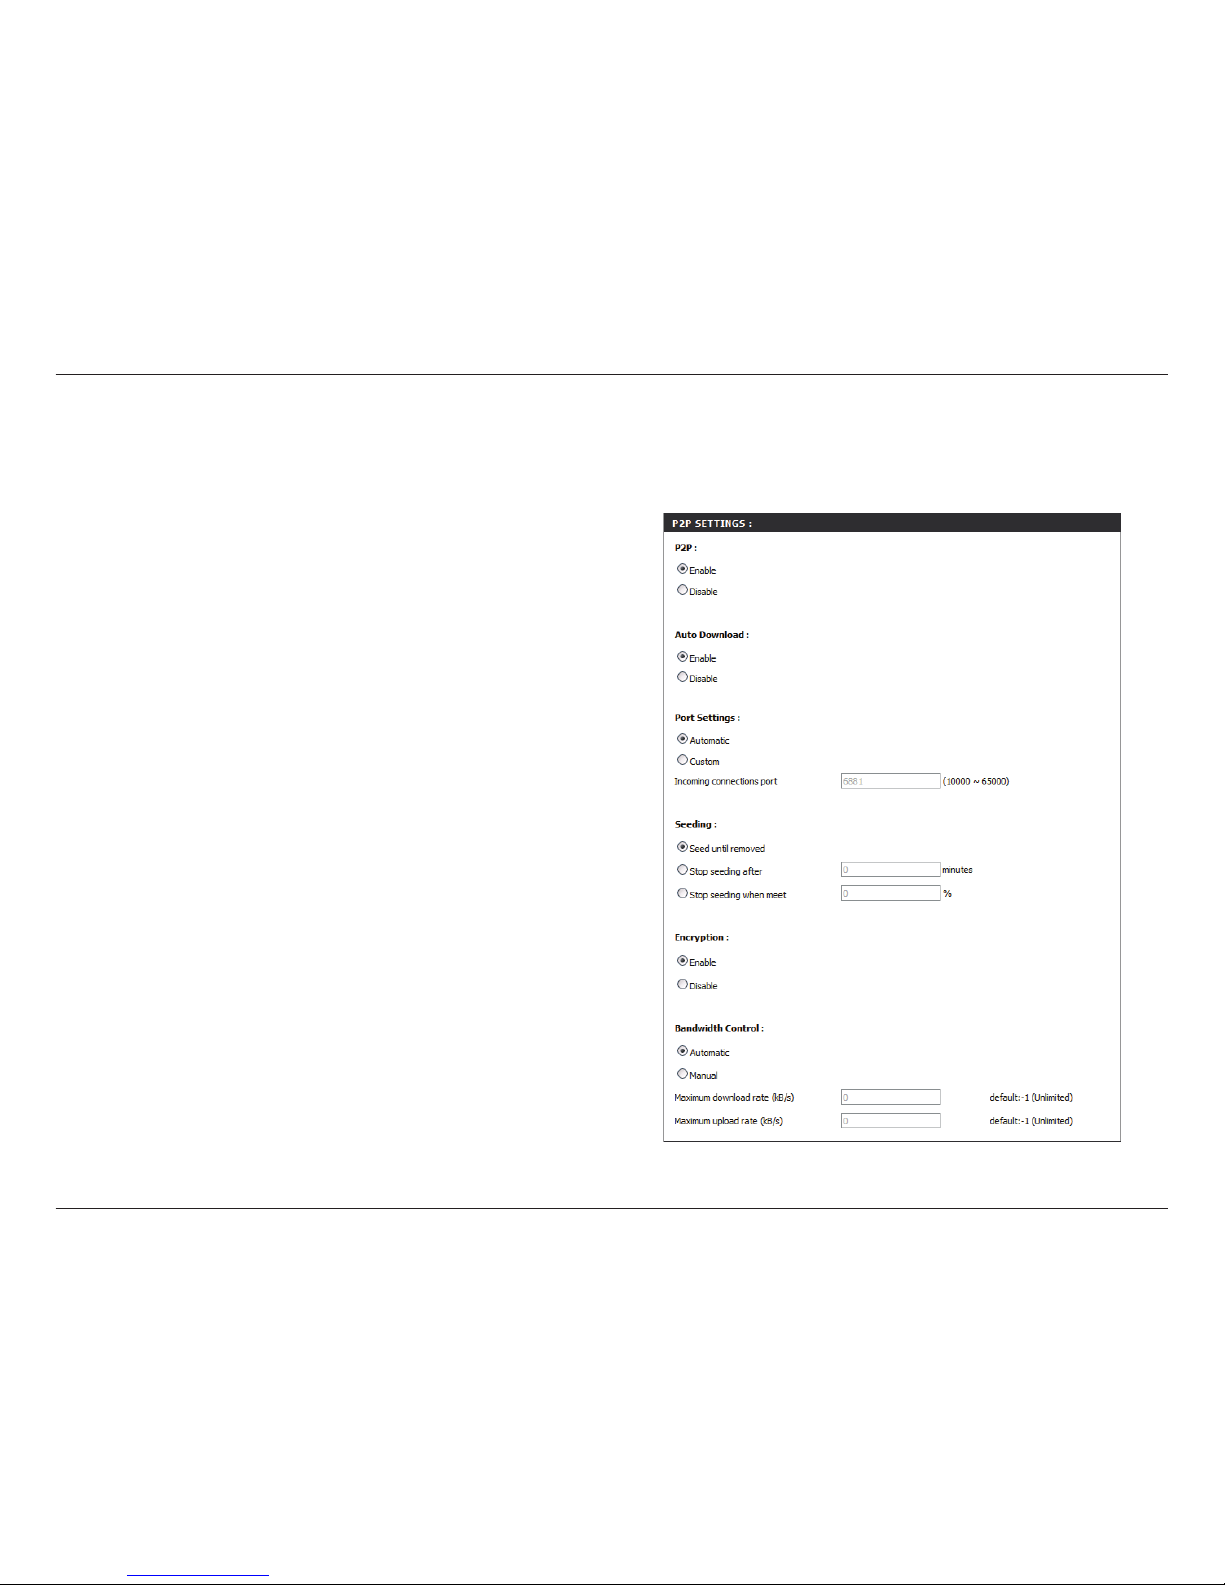
Setting
P2P
Auto Download
Port Settings
Seeding
Encryption
Bandwidth
Control
Click the Enable radio button to turn on Peer to
Peer Downloading function. Check the Disable radio
button to turn it off.
Click the Enable radio button to automatically start
the download of any newly added torrent les.
Click Automatic radio button to allow the DNS to
select the TCP incoming connection port to use for
the le download. Click the Custom radio button to
manual dene a port.
Select the options for Seeding the le to other Peer
to Peer users downloading the same le.
Seed until removed
Stop Seeding after (input the
minutes allowed to seed while
downloading the le)
Stop seeding when meet (input
size in percentage of the le
being downloaded as the point
to stop seeding)
Turn on the Peer to Peer encryption capability.
Click Automatic to allow the DNS to configure
the download and upload rates. Click Manual to
congure the Maximum upload and download rates
in the entry elds below. Conguring 1 in the eld
sets the rate to unlimited.
Page 85
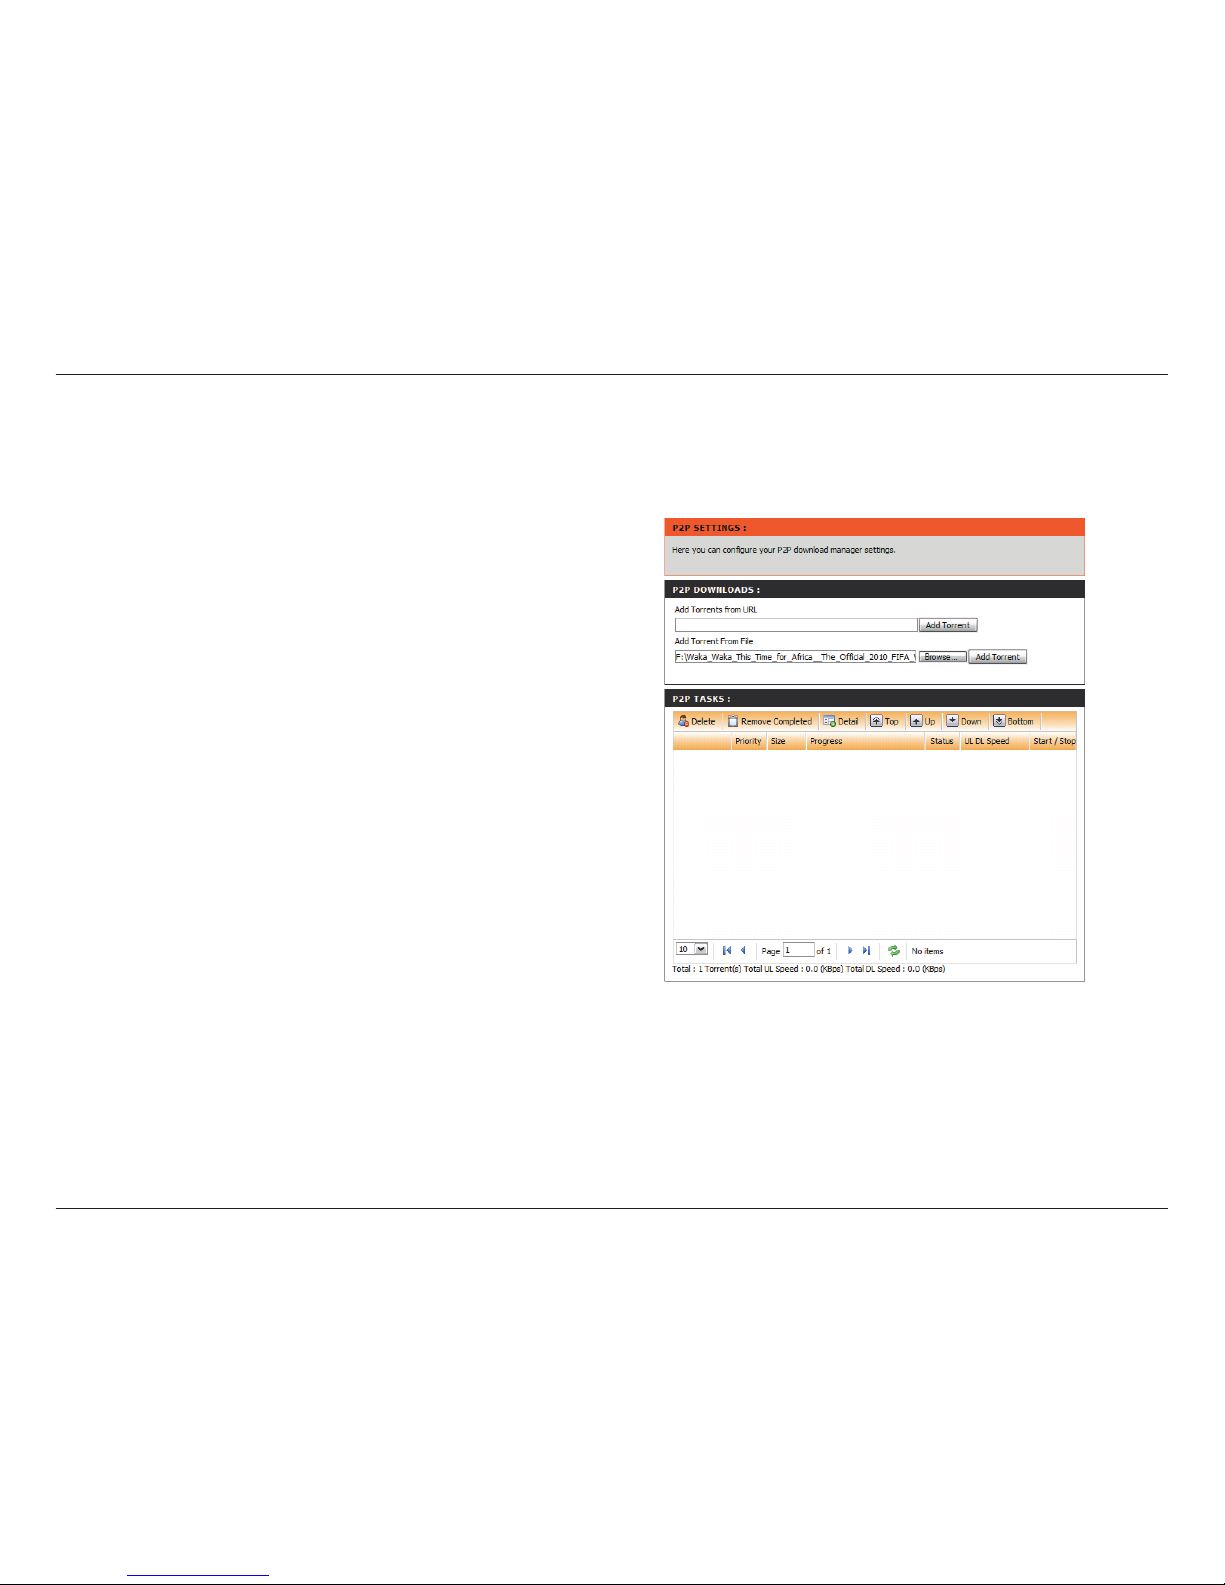
82D-Link ShareCenter™ 2Go User Manual
Section 3 - Conguration
P2P Downloads
If you checked the Add Torrent From URL
box, copy the URL link, paste it into the space
provided, and click the Add button. After a few
seconds the le will be listed below in the P2P
Task List, displaying the download progress.
If you are using the Add Torrent From File
box, use the Browse button to browse to the
location that the torrent le is stored in on your
computer and click the Add button. After a few
seconds the le will be listed below, displaying
the download progress.
Note: The recommended maximum number of concurrent
downloads is 10.
Note: The ShareCenter™ 2Go torrent downloading
application has been tested to function properly with
Windows Internet Explorer and Mozilla Firefox web
browser software. Torrent downloads might not work using
other browser software.
Adding Torrents
Page 86
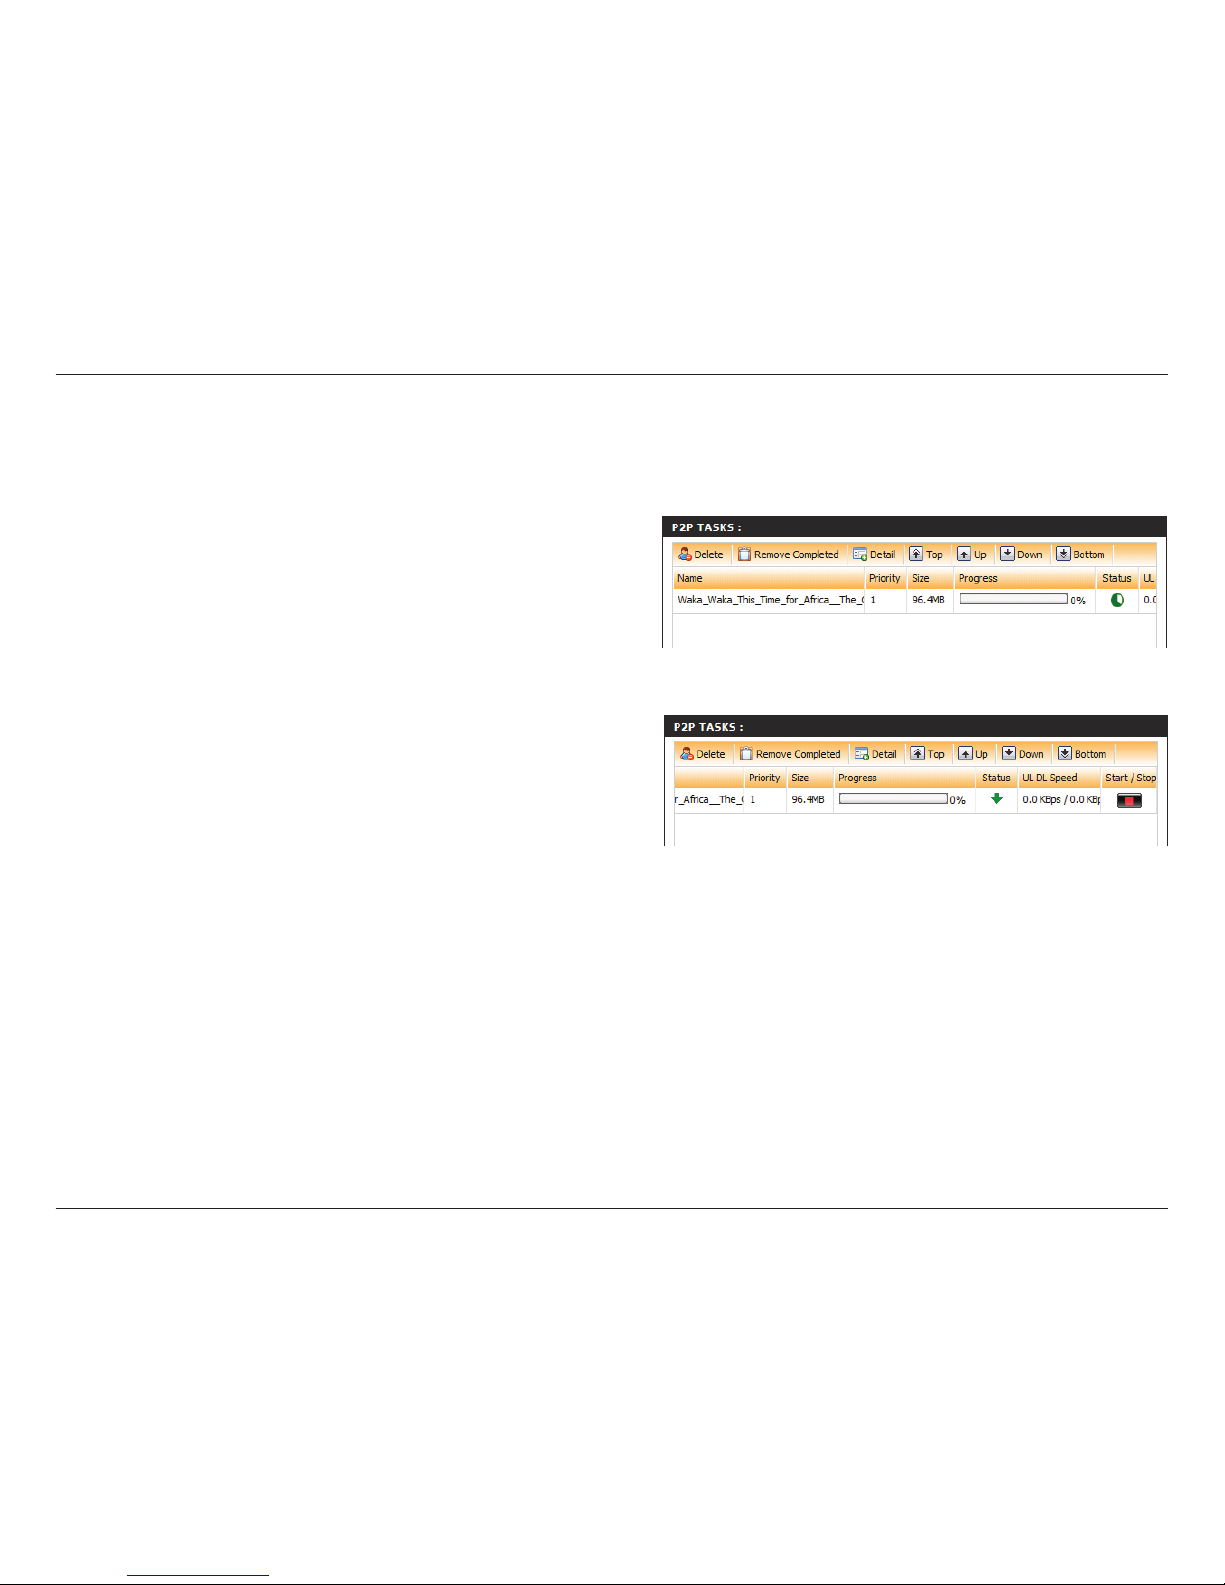
83D-Link ShareCenter™ 2Go User Manual
Section 3 - Conguration
P2P Downloads
In the P2P Tasks list click the Start/Stop
icon next to the torrent to begin or pause the
transferring and sharing of a le in the list.
After selecting a torrent in the list click the
Delete button at the top to remove a partial
or complete le from actively downloading or
sharing.
Click the Remove Completed button to remove
and torrents that have completed downloading
in the list i.e. 100% downloaded.
Use the Detail button to expand the torrent le
information in a separate window.
Use the Top/Up/Down/Bottom buttons to
navigate the list.
P2P Tasks list
Page 87
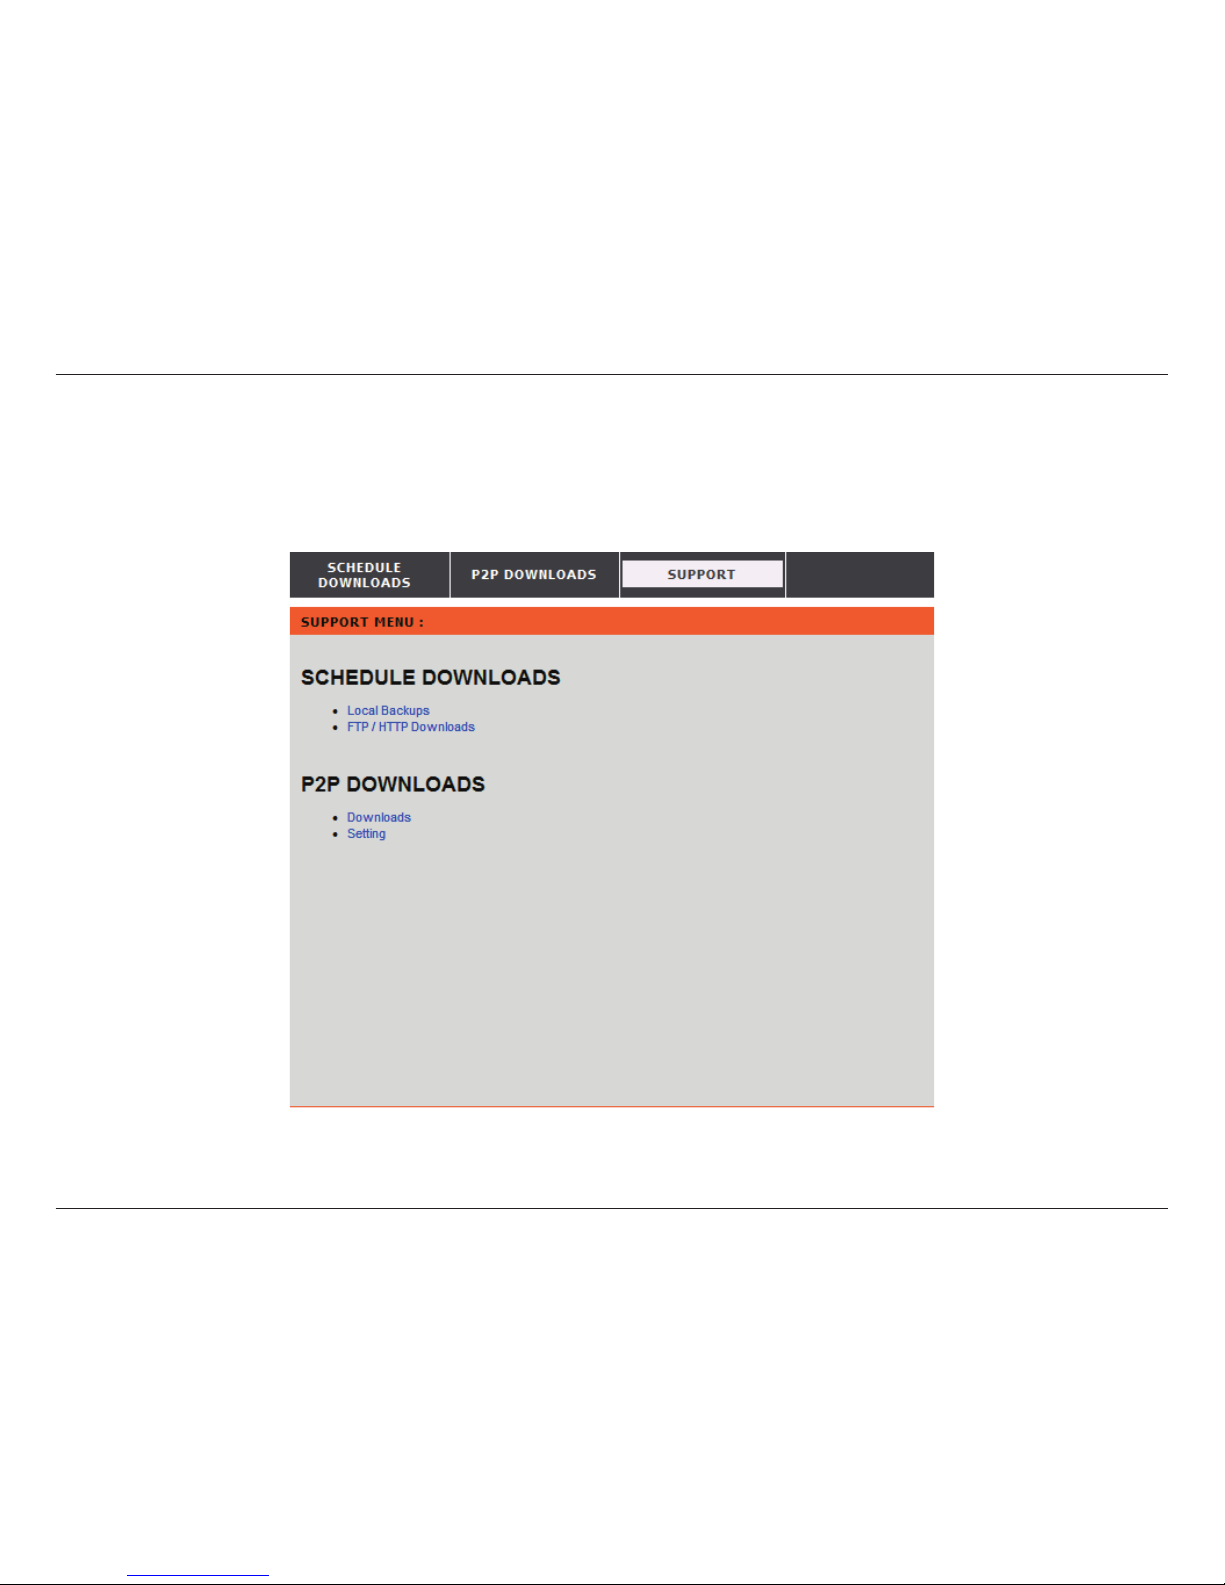
84D-Link ShareCenter™ 2Go User Manual
Section 3 - Conguration
Support
The Schedule Downloads Help page provides a menu of Help topics that explain the Schedule Downloads features.
 Loading...