


AX5400 Mesh Wi-Fi 6 Router
Version 1.00 | 2020/04/30
DIR-X5460
User Manual

Preface
D-Link reserves the right to revise this publication and to make changes in the content hereof without obligation to notify
any person or organization of such revisions or changes.
Manual Revisions
Hardware Revision Date Description
A1 v1.00 2020/04/30 Initial release
Trademarks
D-Link and the D-Link logo are trademarks or registered trademarks of D-Link Corporation or its subsidiaries in the United
States or other countries. All other company or product names mentioned herein are trademarks or registered trademarks
of their respective companies.
Apple®, Apple logo®, Safari®, iPhone®, and Macintosh® are trademarks of Apple Inc., registered in the U.S. and other
countries. App StoreSM is a service mark of Apple Inc.
Chrome™ browser, Google Play™ and Android™ are trademarks of Google Inc.
Internet Explorer®, Windows® and the Windows logo are trademarks of the Microsoft group of companies.
Copyright © 2020 by D-Link Corporation, Inc.
All rights reserved. This publication may not be reproduced, in whole or in part, without prior expressed written permission from
D-Link Corporation, Inc.
iD-Link DIR-X5460 User Manual

ErP Power Usage
This device is an Energy Related Product (ErP) with High Network Availability (HiNA), and automatically switches to a powersaving Network Standby mode within 1 minute of no packets being transmitted. It can also be turned o through a power
switch to save energy when it is not needed.
DIR-X5460 Network Standby: 4.26 watts
Switched O: 0.073 watts
iiD-Link DIR-X5460 User Manual

Table of Contents
Table of Contents
Product Overview ..............................................................1
Package Contents .........................................................................1
System Requirements ................................................................. 2
Features ............................................................................................3
Hardware Overview .....................................................................4
LED Indicators ........................................................................ 4
Back Panel ...............................................................................5
Installation ......................................................................... 6
Before you Begin ...........................................................................6
Wireless Installation Considerations ......................................7
Setup ................................................................................................. 8
D-Link Wi-Fi App Setup .......................................................9
Antenna Setup .....................................................................11
Hardware Setup ..................................................................12
Setup Wizard ........................................................................15
Conguration ................................................................... 22
Home ..............................................................................................23
Internet ...................................................................................24
DIR-X5460 ..............................................................................25
Connected Clients ..............................................................26
USB Device ............................................................................28
Settings ..........................................................................................29
Wizard .....................................................................................29
Internet - IPv4 .......................................................................30
IPv4 - Dynamic IP (DHCP) ............................................31
IPv4 - Static IP ..................................................................32
IPv4 - PPPoE .....................................................................33
IPv4 - PPTP ........................................................................35
IPv4 - L2TP ........................................................................37
IPv4 - DS-Lite ...................................................................39
Internet - IPv6 .......................................................................40
IPv6 - Auto Detection ...................................................41
IPv6 - Static IPv6 .............................................................43
IPv6 - Auto Conguration (SLAAC/DHCPv6) ........45
IPv6 - PPPoE .....................................................................48
IPv6 - 6rd ...........................................................................52
IPv6 - Local Connectivity Only ..................................54
Internet - VLAN ....................................................................55
Wireless ..................................................................................57
Guest Zone .......................................................................63
Network ..................................................................................64
USB Sharing ..........................................................................66
D-Link Cloud .........................................................................67
Features ..........................................................................................68
QoS Engine............................................................................68
Firewall Settings - Advanced ..........................................70
Firewall Settings - IPv4/IPv6 Rules ................................72
Port Forwarding ..................................................................74
Port Forwarding - Virtual Server .................................... 76
Website Filter ........................................................................78
Static Route - IPv4 ...............................................................79
Static Route - IPv6 ...............................................................80
Dynamic DNS .......................................................................81
iiiD-Link DIR-X5460 User Manual

Table of Contents
Quick VPN ..............................................................................83
Management ................................................................................84
Time & Schedule - Time ....................................................84
Time & Schedule - Schedule ...........................................85
System Log ............................................................................86
System Admin - Admin .....................................................88
System Admin - System ....................................................89
User ..........................................................................................90
Upgrade .................................................................................91
Statistics .................................................................................92
Third Party Services .........................................................93
Registering a D-Link Cloud Service Account ....................94
Amazon Alexa Setup .........................................................97
Amazon Alexa Voice Commands ............................... 101
The Google Assistant Setup .........................................102
The Google Assistant Voice Commands .................. 105
VPN Setup Instructions .................................................. 118
Connect or Disconnect .................................................. 123
Windows 10 ............................................................................... 124
VPN Setup Instructions .................................................. 124
Connect or Disconnect .................................................. 126
Android ....................................................................................... 127
VPN Setup Instructions .................................................. 127
Connect or Disconnect .................................................. 129
Connect a Wireless Client to your Router ....................131
WPS Button ................................................................................131
Windows® 10 ............................................................................. 132
Windows® 8 ................................................................................133
Windows® 7 ................................................................................135
Troubleshooting ............................................................137
Wireless Basics ...............................................................139
Quick VPN ....................................................................... 106
Important Information .......................................................... 107
iOS Devices ................................................................................ 108
VPN Setup Instructions .................................................. 108
Connect or Disconnect .................................................. 110
Mac OS X ..................................................................................... 111
VPN Setup Instructions .................................................. 111
Connect or Disconnect .................................................. 113
Windows 7 ..................................................................................114
VPN Setup Instructions .................................................. 114
Connect or Disconnect .................................................. 117
Windows 8.1/8 .......................................................................... 118
Wireless Modes ..............................................................143
Networking Basics .........................................................144
Wireless Security ...........................................................146
Technical Specications ................................................147
Regulatory Statements .................................................148
Wall Mounting ...............................................................168
ivD-Link DIR-X5460 User Manual

Section 1 - Product Overview
Product Overview
Package Contents
DIR-X5460 V
Quick Installation Guide V
Quick Installation Card V
DIR-X5460
Ethernet Cable (RJ45) V
Power Adapter V
If any of the above items are missing or damaged, please contact your local reseller.
Note: Using a power supply with a dierent voltage rating than the one included with the router will cause damage and void the warranty for this product.
1D-Link DIR-X5460 User Manual

Section 1 - Product Overview
Network Requirements
System Requirements
• An Ethernet-based cable, DSL or ber modem
• IEEE 802.11ax/ac/n/g/b/a wireless clients
• 10/100/1000 Ethernet
Computer with the following:
• Windows®, Macintosh, or Linux-based operating system
• An installed Ethernet adapter
Web-based
Conguration Utility
Requirements
D-Link Wi-Fi App
Requirements
Browser Requirements:
• Internet Explorer 10 or higher
• Firefox 28 or higher
• Safari 6 or higher
• Chrome 28 or higher
®
Windows
installed. Visit www.java.com to download the latest version.
• iOS® or Android™ device (Please refer to the app's store page
to check whether your device is compatible.)
Users: Make sure you have the latest version of Java
2D-Link DIR-X5460 User Manual

Section 1 - Product Overview
Features
Need super-fast Wi-Fi for your wire-free, all-streaming house? With a powerful dual-core processor, the AX5400 Mesh Wi-Fi 6 Router packs in
enough processing power to handle every networking task you throw at it. It’s a powerful, intelligent home router with integrated voice assistant
compatibility for Amazon Alexa and Google Assistant so you can control your network with voice commands.
Handle More with a High-Power Processor
With the DIR-X5460, you’re not only enjoying buer-free gaming and lightning fast surng, you’re also enjoying features such as an optimizing
QoS, an automatic rmware update system that ensures the best protection and the latest features, and compatibility with voice assistants. All this
is possible with the router’s 1.5 GHz tri-core high-power processor, 128 MB of ash memory and 512 MB of RAM.
Enhanced Quality of Service Features
The built-in Quality of Service (QoS) engine allows you to prioritize important trac to ensure that your favorite applications are receiving optimal
bandwidth.
Always Up-to-Date with the Latest Features
The DIR-X5460 will automatically check daily for updates to make sure that the device always has the latest features and the most secure rmware,
and will install the update silently in the background. For an extra peace of mind, in the event of failure during the rmware update, the router will
store a backup system image in the memory before proceeding with the update.
Easy to Set Up and Manage
Sharing your Internet connection doesn’t have to be a complicated process; just download the free D-Link Wi-Fi app for your mobile device and
follow the on-screen step-by-step instructions to set up your DIR-X5460. You also have the option to use a web browser to access the setup wizard
and to manage your router. Support for industry-standard Wi-Fi Protected Setup (WPS) lets you create encrypted connections to new devices by
pressing a button.
3D-Link DIR-X5460 User Manual

Section 1 - Product Overview
Hardware Overview
LED Indicators
1 2 3 4
Solid White The device is on and the system is healthy.
1 Power
2 Internet
3 Wireless (2.4 GHz)
4 Wireless (5 GHz)
5 USB 2.0 Solid White USB Device is attached.
6 USB 3.0 Solid White USB Device is attached.
Solid Orange The device is booting up or performing the factory reset process.
Blinking Orange The device is under recovery mode.
Solid White The Internet port connection is established.
Solid Orange The device cannot connect to the Internet.
Blinking Orange The device is undergoing the rmware upgrade process.
Solid White The 2.4 GHz wireless band is enabled.
Blinking White The device is processing WPS.
Solid White The 5 GHz wireless band is enabled.
Blinking White The device is processing WPS.
5 6
4D-Link DIR-X5460 User Manual

Section 1 - Product Overview
Back Panel
5
1 2
1 USB 2.0 Port Connect a USB storage device to share les over the network.
2 USB 3.0 Port Connect a USB storage device to share les over the network.
3
4 Gigabit WAN Port Using an Ethernet cable, connect your broadband modem to this port.
5 WPS Button
6 Reset Button
7 Power Connector Connector for the supplied power adapter.
8 Power Button Press the power button to power the device on or o.
Gigabit LAN Ports
(1- 4)
Connect Ethernet devices such as computers, switches, storage (NAS) devices, and game
consoles.
Press to start the WPS process and automatically create an encrypted connection to a WPS
client.
Insert a paperclip in the hole, wait for 10 seconds, and release to reset the router to default
settings.
3 7 84 6
5D-Link DIR-X5460 User Manual

Section 2 - Installation
Installation
This section will walk you through the installation of your DIR-X5460.
Before you Begin
• Placement of the router is very important. Do not place the router in an enclosed area such as a closet, cabinet, attic, or
garage.
• Congure the router with the computer that was last connected directly to your Internet connection. Verify that it is
connected to the Internet before connecting additional devices.
• You can only use the Ethernet port on your modem. If you were using the USB connection before using the router, then
you must turn o your modem, disconnect the USB cable and connect an Ethernet cable to the Internet port on the
router, and then turn the modem back on. In some cases, you may need to call your Internet Service Provider (ISP) to
change connection types (USB to Ethernet).
• If connecting to a DSL modem, make sure to have your DSL service information provided by your Internet Service
Provider handy. This information is likely to include your DSL account's Username and Password. Your ISP may also supply
you with additional WAN conguration settings which might be necessary to establish a connection.
• If you are connecting a considerable amount of networking equipment, it may be a good idea to take the time to label
each cable or take a picture of your existing setup before making any changes.
• If you have DSL and are connecting via PPPoE, make sure you disable or uninstall any PPPoE software such as WinPoET,
BroadJump, or EnterNet 300 from your computer or you will not be able to connect to the Internet.
6D-Link DIR-X5460 User Manual

Section 2 - Installation
Wireless Installation Considerations
The D-Link wireless router lets you access your network using a wireless connection from virtually anywhere within the
operating range of your wireless network. Keep in mind that the number, thickness and location of walls, ceilings, or other
objects that the wireless signals must pass through may limit the range. Typical ranges vary depending on the types of
materials and background RF (radio frequency) noise in your home or business. The key to maximizing wireless range is to
follow these basic guidelines:
1. Keep the number of walls and ceilings between the D-Link router and other network devices to a minimum - each wall or
ceiling can reduce your adapter’s range from 3-90 feet (1-30 meters.) Position your devices so that the number of walls or
ceilings is minimized.
2. Be aware of the direct line between network devices. A wall that is 1.5 feet thick (0.5 meters), at a 45-degree angle
appears to be almost 3 feet (1 meter) thick. At a 2-degree angle it looks over 42 feet (14 meters) thick. Position devices so
that the signal will travel straight through a wall or ceiling (instead of at an angle) for better reception.
3. Building materials make a dierence. A solid metal door or aluminum studs may have a negative eect on range. Try
to position access points, wireless routers, and computers so that the signal passes through drywall or open doorways.
Materials and objects such as glass, steel, metal, walls with insulation, water (sh tanks), mirrors, le cabinets, brick, and
concrete will degrade your wireless signal.
4. Keep your product away (at least 3-6 feet or 1-2 meters) from electrical devices or appliances that generate RF noise.
5. If you are using 2.4 GHz cordless phones or X-10 (wireless products such as ceiling fans, lights, and home security
systems), your wireless connection may degrade dramatically or drop completely. Make sure your 2.4 GHz phone base is
as far away from your wireless devices as possible. The base transmits a signal even if the phone is not in use.
7D-Link DIR-X5460 User Manual

Section 2 - Installation
Setup
There are several dierent ways you can congure your router to connect to the Internet
• D-Link Wi-Fi App - Use your compatible iOS or Android device to install and congure your router. Refer to D-Link Wi-Fi
App Setup on page 9.
• Hardware Setup - This section explains how to setup your DIR-X5460. Refer to Hardware Setup on page 12.
• D-Link Setup Wizard - This wizard will launch when you log into the router by using your PC for the rst time. Refer to
Setup Wizard on page 15.
• Manual Setup - Log in to the router to manually congure your router. Refer to Conguration on page 22
8D-Link DIR-X5460 User Manual

Section 2 - Installation
D-Link Wi-Fi App Setup
The D-Link Wi-Fi app allows you to install and congure your DIR-X5460 from your compatible Android or iOS device.
Note: The screenshots may be dierent depending on your mobile device’s OS version. The following steps show the iOS interface
of the D-Link Wi-Fi app. If you are using an Android device, the appearance may be dierent from that of the screenshots, but the
process is the same.
Step 1
Search and install the free D-Link Wi-Fi app available on the App Store or on
Google Play. You can also scan the QR code on the right, which will take you
to the respective D-Link Wi-Fi app store page.
Step 2
Launch the D-Link Wi-Fi app from the home screen of your device.
Step 3
Tap on the Install New Device button at the middle of the screen.
D-Link Wi-Fi
9D-Link DIR-X5460 User Manual

Section 2 - Installation
Step 4
Tap Scan the QR code to scan the setup QR code located on the Quick
Installation Card and proceed to step 6. Alternatively, you can tap Continue
without scanning to proceed to step 5.
QUICK INSTALLATION CARD
SETUP QR CODE
Model Name: DEVICE
Wi-Fi Name: dlink-XXXX
Password: XXXXXXXX
S/N: 123456789
www.dlink.com
Step 5
Select Router and select DIR-X5460 from the list of available devices. Tap
Next to continue.
Step 6
You will now be guided through a step-by-step process for setting up your
router. Simply follow the on-screen instructions to continue the installation
and the conguration process.
10D-Link DIR-X5460 User Manual

Section 2 - Installation
Antenna Setup
Attach the antennas to the router by twisting them on in a clockwise direction as demonstrated in the diagram below. Keep
the router in an open area for better wireless coverage.
11D-Link DIR-X5460 User Manual

Section 2 - Installation
Hardware Setup
Step 1
Position your DIR-X5460 near your Internet-connected modem. Place it in an
open area for better wireless coverage.
Step 2
Turn o and unplug the power to your cable or DSL broadband modem. This
is required. In some cases, you may need to turn it o for up to ve minutes.
ModemModem
Step 3
Use the Ethernet cable to connect your modem to the port labelled
INTERNET on the router.
Modem
12D-Link DIR-X5460 User Manual

Section 2 - Installation
Step 4
Plug in and turn your modem back on and wait approximately one minute
before proceeding.
Step 5
Connect the supplied power adapter to the router and a power outlet,
press the power button, and wait approximately one minute until the LED
indicator on the front of the device changes from orange to solid white.
Modem
Modem
Step 6
If you are conguring the router wirelessly from a PC, connect to the Wi-Fi network printed on the label attached to the
bottom of your router or on the Quick Installation Card.
SSID:
Password:
Modem
13D-Link DIR-X5460 User Manual

Section 2 - Installation
If you are conguring the router from a PC with a wired Ethernet connection, plug one end of an Ethernet cable into the
port labeled 1 on the back of the router, and the other end into the Ethernet port on your computer.
Modem
Step 7
If you are connecting to a broadband service that uses a dynamic connection (not PPPoE), you may be online already. Try
opening a web browser and connecting to a website. If the website does not load, proceed to Setup Wizard on page 15.
14D-Link DIR-X5460 User Manual

Section 2 - Installation
Setup Wizard
The setup wizard is designed to guide you through a step-by-step process to congure your new DIR-X5460 and connect to the
Internet via a wireless setup process.
If this is your rst time installing the router, open your web browser and
enter http://dlinkrouter.local./ in the address bar. Alternatively, enter the IP
address of the router (default: http://192.168.0.1).
If this is your rst time logging in to the page and no connection has been
established, then log in with the password shown on the device label or Quick
Install Guide.
Agree to the Terms of Use and Privacy Policy before proceeding.
15D-Link DIR-X5460 User Manual

Section 2 - Installation
Follow the on-screen instructions to congure your new D-Link router and
connect to the Internet.
Click Next to continue.
Please wait while your router detects your Internet connection type.
16D-Link DIR-X5460 User Manual

Section 2 - Installation
If the router does not detect a valid Internet connection, a list of connection
types to choose from will be displayed. Select your Internet connection type
(this information can be obtained from your Internet Service Provider).
Click Next to continue.
If the router detected or you selected PPPoE, enter your PPPoE username and
password. If you do not have this information, please contact your ISP.
Click Next to continue.
Note: Make sure to remove all other existing PPPoE software from your computer.
The software is no longer needed and will not work through a router.
17D-Link DIR-X5460 User Manual

Section 2 - Installation
If the router detected or you selected Static, enter the IP and DNS settings
supplied by your ISP. If you do not have this information, please contact your ISP.
Click Next to continue.
Type in a Wi-Fi Network Name and Wi-Fi Password to setup your Wi-Fi
network. Your wireless clients will need to have this passphrase to be able to
connect to your wireless network.
Click Next to continue.
Note: The router's Smart Connect feature presents a single wireless network. When
connecting clients to an extension network, they will be automatically added to
the best band, either 2.4 GHz or 5 GHz. To disable the Smart Connect feature and
individually congure 2.4 GHz and 5 GHz networks, refer to Wireless on page 57.
18D-Link DIR-X5460 User Manual

Section 2 - Installation
In order to secure the router's conguration access, please enter a password.
You will be prompted for this password every time you want to use the router’s
web conguration utility.
Click Next to continue.
Select your time zone from the drop-down menu.
Click Next to continue.
19D-Link DIR-X5460 User Manual

Section 2 - Installation
Keeping your router's firmware up-to-date provides you with the latest
protection and new features over the air. Choose whether to keep your device
up-to-date automatically or to manage the device updates by yourself.
Click Next to continue.
You will be presented with a summary of your settings.
Click Next to nalize the settings or Back to make changes.
20D-Link DIR-X5460 User Manual

Section 2 - Installation
Please wait while the device settings are saved.
Do not turn o or unplug your router during this time.
Your new settings have been saved and your router is now congured.
Click OK to close the Setup Wizard.
Congratulations, your device has been successfully congured!
You can log in to the conguration utility by inputting the Admin Password.
21D-Link DIR-X5460 User Manual

Section 3 - Conguration
Conguration
To access the conguration utility, open your web-browser and enter http://
dlinkrouter.local./ or you may also connect by typing the IP address of the
router (by default this is http://192.168.0.1) in the address bar.
Enter your password. If you previously followed the setup wizard, please use
the admin password you entered during the wizard. Otherwise, log in with
the password shown on the device label or Quick Install Guide.
Note: If you cannot remember your password and cannot log in, use a paperclip
to press the recessed Reset button on the back of the device for longer than 10
seconds to restore the router to its default settings.
The router’s home page will open displaying its current connection status.
The bar at the top of the page has quick access to Settings, Features and
Management functions. You can quickly jump back Home at any time.
Note: The system will automatically log out after a period of inactivity.
22D-Link DIR-X5460 User Manual

Section 3 - Conguration
Home
The Home page displays the current status of the router in the form of an interactive diagram. You can click each icon to
display information about each part of the network at the bottom of the screen. The menu bar at the top of the page will
allow you to quickly navigate to other pages.
The Home page displays whether or not the router is currently connected to
the Internet.
If it is disconnected, click Click to repair to bring up the setup wizard, refer
to the Setup Wizard on page 15 for more information.
23D-Link DIR-X5460 User Manual

Section 3 - Conguration
Internet
To bring up more details about your Internet connection, click on the Internet icon.
Click IPv4 or IPv6 to see details of the IPv4 connection and IPv6 connection
respectively.
Click Release IP Address to disconnect from the Internet. If you do this and
wish to reconnect, click Renew.
To recongure the Internet settings, refer to Internet - IPv4 on page 30
24D-Link DIR-X5460 User Manual

Section 3 - Conguration
DIR-X5460
Click on the DIR-X5460 icon to view details about the router and its wireless settings.
Here you can see the router’s current Wi-Fi network name and password, as
well as the router's MAC address, IPv4 address, and IPv6 address.
To recongure the network settings, either click Go to settings on the lower
left, or click Settings (at the top of the page) and then Network on the
menu that appears. Refer to Network on page 64 for more information.
To recongure the wireless settings, either click Go to settings, on the lower
right, or click Settings (at the top of the page) and then Wireless on the
menu that appears. Refer to Wireless on page 57 for more information.
25D-Link DIR-X5460 User Manual

Section 3 - Conguration
Connected Clients
Click on the Connected Clients icon to view details about the connected clients to the router and their wireless settings.
On this page you can see all the clients currently connected to the router,
and their IP addresses.
To edit each client’s settings, click the pencil icon on the client you want to
edit.
26D-Link DIR-X5460 User Manual

Section 3 - Conguration
Click Save when you are done.
Edit Rule
Name Enter a custom name for this client.
Vendor Displays the vendor of the client.
MAC Address Displays the MAC address of the client.
IP Address Displays the current IP address of the client.
Reserve IP Enable to reserve an IP address for the client.
IP Address (Reserved) Specify an IP address for the router's DHCP server to assign.
Parental Control Enable Parental Control for the client to specify whether it is
allowed network access.
Schedule Use the drop-down menu to select the time schedule that
the Parental Controls will be enabled for. The schedule may
be set to Always OFF meaning that the client will always
be blocked from accessing the network, or you can create
your own schedules in the Schedules section to specify the
times that the client is allowed to access the network. Refer
to Time & Schedule - Schedule on page 85 for more
information.
27D-Link DIR-X5460 User Manual

Section 3 - Conguration
USB Device
Click on the USB Device icon to view details about the currently connected USB storage device, DLNA media server,
Windows File Sharing, and FTP.
If you have an USB device connected, you can see its name and how much free space it has.
To recongure the USB sharing settings, either click Go to settings on the lower right, or click Settings (at the top of
the page) and then USB Sharing on the drop down menu that appears. Refer to USB Sharing on page 66 for more
information.
28D-Link DIR-X5460 User Manual

Section 3 - Conguration
Settings
Wizard
In the Settings menu on the bar at the top of the page, click Wizard to open the setup wizard. This is the same wizard that
appears when you start the router for the rst time. Refer to Setup Wizard on page 15 for details.
Note: When the Wizard is opened, the router will disconnect from the internet.
29D-Link DIR-X5460 User Manual

Section 3 - Conguration
Internet - IPv4
In the Settings menu on the bar at the top of the page, click Internet to see the Internet conguration options for the IPv4
connection details.
To congure the IPv6 Internet and network connection details, click the IPv6 link. Refer to Internet - IPv6 on page 40
To congure the VLAN connection details, click the VLAN link. Refer to Internet - VLAN on page 55
Click Save at any time to save the changes you have made on this page.
My Internet
Connection is
Choose your Internet connection type from the drop-down menu.
You will be presented with the appropriate options for your
connection type.
For IPv4 - Dynamic IP (DHCP) refer to page 31
For IPv4 - Static IP refer to page 32
For IPv4 - PPPoE refer to page 33
For IPv4 - PPTP refer to page 35
For IPv4 - L2TP refer to page 37
For IPv4 - DS-Lite refer to page 39
30D-Link DIR-X5460 User Manual

Section 3 - Conguration
IPv4 - Dynamic IP (DHCP)
Select Dynamic IP (DHCP) to obtain IP address information automatically from your Internet Service Provider (ISP). Select
this option if your ISP does not specify an IP address to use. Click Save at any time to save the changes you have made on this
page.
Advanced Settings...
Host Name The host name is optional but may be required by some ISPs.
Leave it blank if you are not sure.
Primary DNS Server Enter the primary DNS server IP address assigned by your ISP.
This address is usually obtained automatically from your ISP.
Secondary DNS Server Enter the secondary DNS server IP address assigned by your ISP.
This address is usually obtained automatically from your ISP.
MTU Maximum Transmission Unit - you may need to change the
MTU for optimal performance with your ISP.
MAC Address Clone The default MAC address is set to the Internet port’s physical
interface MAC address on the router. You can use the dropdown menu to replace the Internet port’s MAC address with
the MAC address of a connected client.
31D-Link DIR-X5460 User Manual

Section 3 - Conguration
IPv4 - Static IP
Select Static IP if your IP information is provided by your Internet Service Provider (ISP). Click Save at any time to save the
changes you have made on this page.
IP Address Enter the IP address provided by your ISP.
Subnet Mask Enter the subnet mask provided by your ISP.
Default Gateway Enter the default gateway address provided by your ISP.
Primary DNS Server Enter the primary DNS server IP address assigned by your ISP.
Advanced Settings...
Secondary DNS Server Enter the secondary DNS server IP address assigned by your
ISP.
MTU Maximum Transmission Unit - you may need to change the
MTU for optimal performance with your ISP.
MAC Address Clone The default MAC address is set to the Internet port’s physical
interface MAC address on the router. You can use the dropdown menu to replace the Internet port’s MAC address with
the MAC address of a connected client.
32D-Link DIR-X5460 User Manual

Section 3 - Conguration
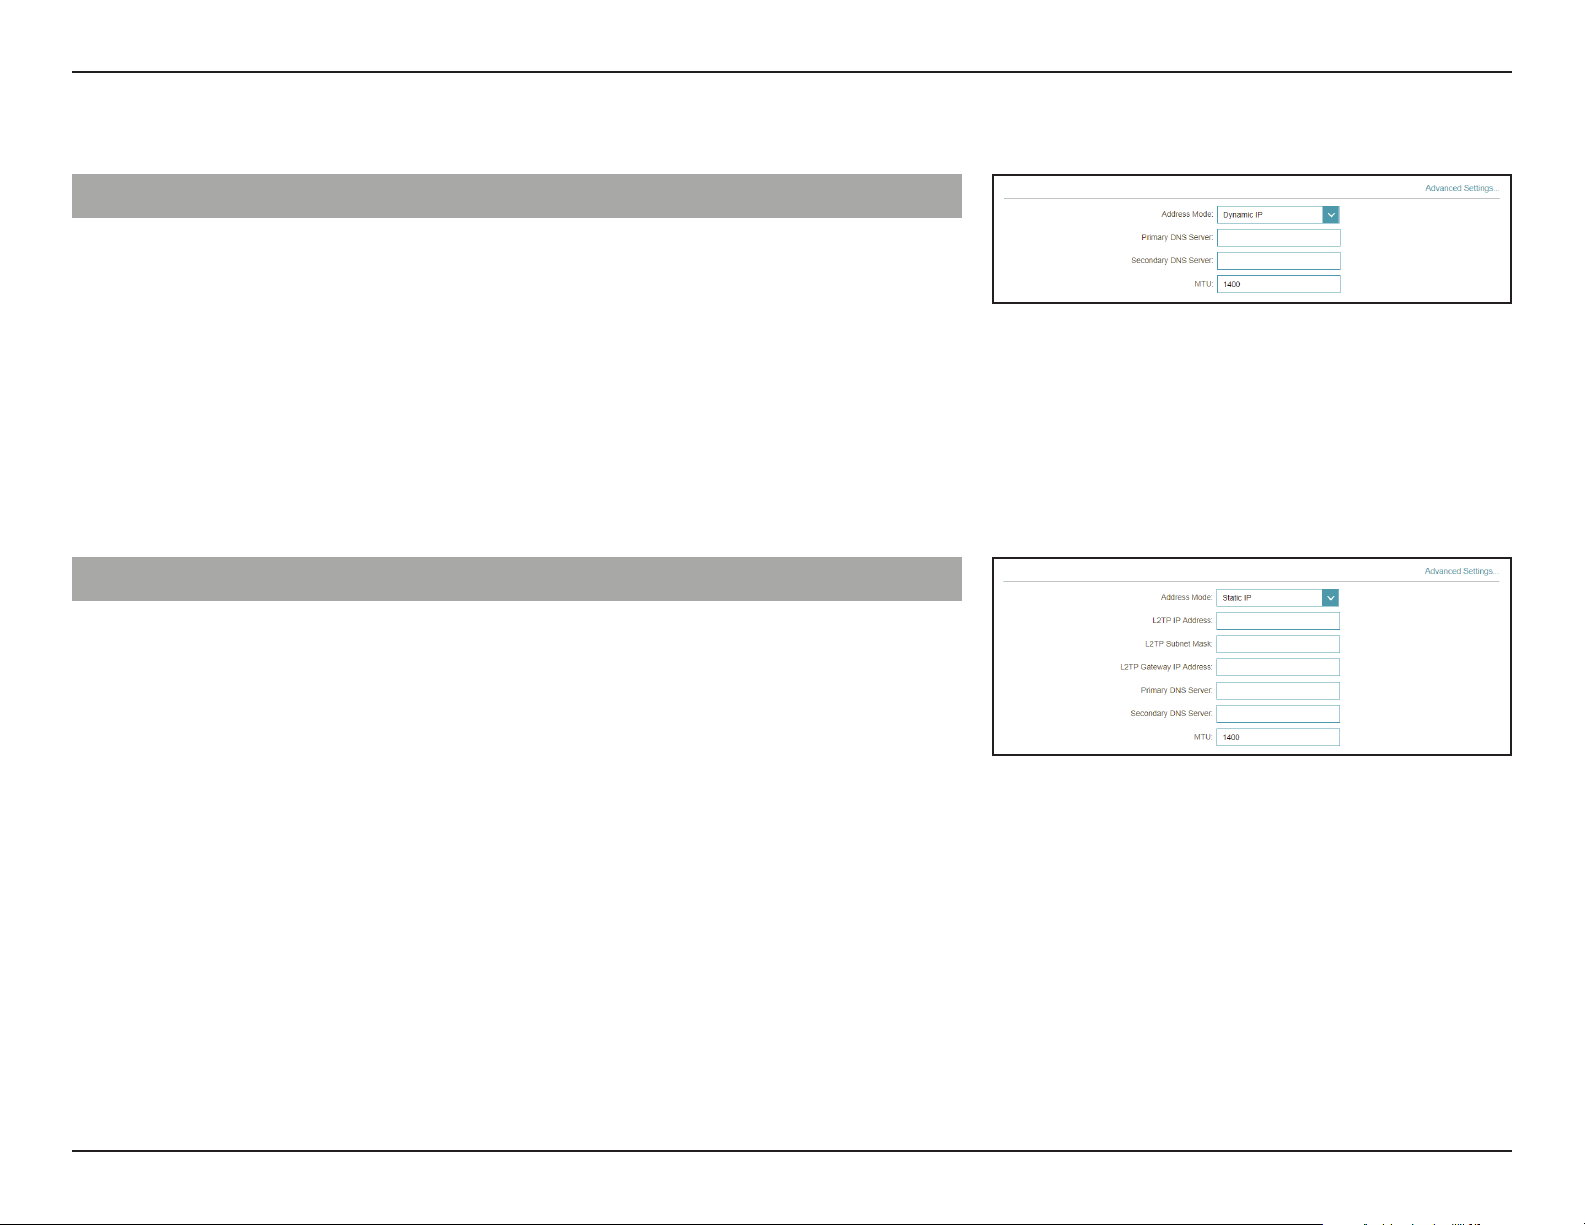
IPv4 - PPPoE
Select PPPoE if your ISP provides and requires you to enter a PPPoE username and password in order to connect to the
Internet. Click Save at any time to save the changes you have made on this page.
Username Enter the username provided by your ISP.
Password Enter the password provided by your ISP.
Reconnect Mode Select either Always on, On Demand, or Manual.
Maximum Idle Time Congurable when On Demand is selected. Enter a maximum
idle time during which the Internet connection is maintained
during inactivity. To disable this feature, select Always on as
the reconnect mode.
Advanced Settings...
Address Mode Select Static IP if your ISP assigned you the IP address, subnet
mask, gateway, and DNS server addresses. In most cases, select
Dynamic IP.
33D-Link DIR-X5460 User Manual

Section 3 - Conguration
Advanced Settings... - Dynamic IP
Address Mode Shows your chosen address mode.
Service Name Enter the ISP service name (optional)
Primary DNS Server Enter the primary DNS server IP address assigned by your ISP.
Secondary DNS Server Enter the secondary DNS server IP address assigned by your
ISP.
MTU Maximum Transmission Unit - you may need to change the
MTU for optimal performance with your ISP.
MAC Address Clone The default MAC address is set to the Internet port’s physical
interface MAC address on the router. You can use the dropdown menu to replace the Internet port’s MAC address with
the MAC address of a connected client.
Advanced Settings... - Static IP
Address Mode Displays your chosen address mode.
IP Address Enter the IP address provided by your ISP.
Service Name Enter the ISP service name (optional)
Primary DNS Server Enter the primary DNS server IP address assigned by your ISP.
Secondary DNS Server Enter the secondary DNS server IP address assigned by your
ISP.
MTU Maximum Transmission Unit - you may need to change the
MTU for optimal performance with your ISP.
MAC Address Clone The default MAC address is set to the Internet port’s physical
interface MAC address on the router. You can use the dropdown menu to replace the Internet port’s MAC address with
the MAC address of a connected client.
34D-Link DIR-X5460 User Manual

Section 3 - Conguration
IPv4 - PPTP
Choose PPTP (Point-to-Point-Tunneling Protocol) if your Internet Service Provider (ISP) uses a PPTP connection. Your ISP will
provide you with a username and password. Click Save at any time to save the changes you have made on this page.
PPTP Server Enter the PPTP server IP address provided by your ISP.
Username Enter the username provided by your ISP.
Password Enter the password provided by your ISP.
Reconnect Mode Select either Always on, On Demand, or Manual.
Maximum Idle Time Congurable when On Demand is selected. Enter a maximum
idle time during which the Internet connection is maintained
during inactivity. To disable this feature, select Always on as
the reconnect mode.
Advanced Settings...
Address Mode Select Static IP if your ISP assigned you the IP address, subnet
mask, gateway, and DNS server addresses. In most cases, select
Dynamic IP.
35D-Link DIR-X5460 User Manual

Section 3 - Conguration
Advanced Settings... - Dynamic IP
Address Mode Shows your chosen address mode.
Primary DNS Server Enter the primary DNS server IP address assigned by your ISP.
Secondary DNS Server Enter the secondary DNS server IP address assigned by your
ISP.
MTU Maximum Transmission Unit - you may need to change the
MTU for optimal performance with your ISP.
Advanced Settings... - Static IP
Address Mode Displays your chosen address mode.
PPTP IP Address Enter the IP address provided by your ISP.
PPTP Subnet Mask Enter the subnet mask provided by your ISP.
PPTP Gateway IP
Address
Primary DNS Server Enter the primary DNS server IP address assigned by your ISP.
Secondary DNS Server Enter the secondary DNS server IP address assigned by your
MTU Maximum Transmission Unit - you may need to change the
Enter the gateway IP address provided by your ISP.
ISP.
MTU for optimal performance with your ISP.
36D-Link DIR-X5460 User Manual

Section 3 - Conguration
IPv4 - L2TP
Choose L2TP (Layer 2 Tunneling Protocol) if your Internet Service Provider (ISP) uses a L2TP connection. Your ISP will provide
you with a username and password. Click Save at any time to save the changes you have made on this page.
L2TP Server Enter the L2TP server IP address provided by your ISP.
Username Enter the username provided by your ISP.
Password Enter the password provided by your ISP.
Reconnect Mode Select either Always on, On Demand, or Manual.
Maximum Idle Time Congurable when On Demand is selected. Enter a maximum
idle time during which the Internet connection is maintained
during inactivity. To disable this feature, select Always on as
the reconnect mode.
Advanced Settings...
Address Mode Select Static IP if your ISP assigned you the IP address, subnet
mask, gateway, and DNS server addresses. In most cases, select
Dynamic IP.
37D-Link DIR-X5460 User Manual
Section 3 - Conguration
Advanced Settings... - Dynamic IP
Address Mode Shows your chosen address mode.
Primary DNS Server Enter the primary DNS server IP address assigned by your ISP.
Secondary DNS Server Enter the secondary DNS server IP address assigned by your
ISP.
MTU Maximum Transmission Unit - you may need to change the
MTU for optimal performance with your ISP.
Advanced Settings... - Static IP
Address Mode Shows your chosen address mode.
L2TP IP Address Enter the IP address provided by your ISP.
L2TP Subnet Mask Enter the subnet mask provided by your ISP.
L2TP Gateway IP
Address
Primary DNS Server Enter the primary DNS server IP address assigned by your ISP.
Secondary DNS Server Enter the secondary DNS server IP address assigned by your
MTU Maximum Transmission Unit - you may need to change the
Enter the gateway IP address provided by your ISP.
ISP.
MTU for optimal performance with your ISP.
38D-Link DIR-X5460 User Manual

Section 3 - Conguration
IPv4 - DS-Lite
DS-Lite is an IPv6 connection type. After selecting DS-Lite, the following parameters will be available for conguration. Click
Save at any time to save the changes you have made on this page.
Advanced Settings...
DS-Lite Select DS-Lite DHCPv6 Option to let the router allocate the
AFTR IPv6 address automatically. Select Manual Conguration
to enter the AFTR IPv6 address manually.
Advanced Settings... - DS-Lite DHCPv6 Option
B4 IPv4 Address Enter the B4 IPv4 address value used here.
WAN IPv6 Address Once connected, the WAN IPv6 address will be displayed here.
IPv6 Default WAN
Gateway
Once connected, the IPv6 WAN default gateway address will
be displayed here.
Advanced Settings... - Manual Conguration Option
AFTR IPv6 Address Enter the AFTR IPv6 address used here.
B4 IPv4 Address Enter the B4 IPv4 address value used here.
WAN IPv6 Address Once connected, the WAN IPv6 address will be displayed here.
IPv6 WAN Default
Gateway
Once connected, the IPv6 WAN default gateway address will
be displayed here.
39D-Link DIR-X5460 User Manual

Section 3 - Conguration
Internet - IPv6
In the Settings menu on the bar at the top of the page, click Internet to see the Internet conguration options for the IPv4
connection details, then click the IPv6 link to access the conguration options for the IPv6 connection details.
To congure the IPv4 Internet and network connection details, click the IPv4 link. Refer to Internet - IPv4 on page 30
To congure the VLAN connection details, click the VLAN link. Refer to Internet - VLAN on page 55
Click Save at any time to save the changes you have made on this page.
My Internet
Connection is
Choose your Internet connection type from the drop-down
menu. You will be presented with the appropriate options for
your connection type.
For IPv6 - Auto Detection refer to page 41
For IPv6 - Static IPv6 refer to page 43
For IPv6 - Auto Conguration (SLAAC/DHCPv6) refer to page 45
For IPv6 - PPPoE refer to page 48
For IPv6 - 6rd refer to page 52
For IPv6 - Local Connectivity Only refer to page 54
40D-Link DIR-X5460 User Manual

Section 3 - Conguration
If
IPv6 - Auto Detection
Select Auto Detection to automatically detect the IPv6 connection method
used by your Internet Service Provider (ISP). If Auto Detection fails, you can
manually select another IPv6 connection type. Click Save at any time to save
the changes you have made on this page.
IPv6 DNS Settings
DNS Type Select either Obtain DNS server address automatically or
Use the following DNS address.
Primary DNS Server If you selected Use the following DNS address, enter the
primary DNS server address.
Secondary DNS Server If you selected Use the following DNS address, enter the
secondary DNS server address.
LAN IPv6 Address Settings
Enable DHCP-PD Enable or disable DHCP Prex Delegation.
LAN IPv6 Link-Local
Address
Enable DHCP-PD is disabled, these additional parameters are available for conguration:
LAN IPv6 Address Enter a valid LAN IPv6 address.
LAN IPv6 Link-Local
Address
Displays the router’s LAN link-local address.
Displays the router’s LAN link-local address.
41D-Link DIR-X5460 User Manual
Section 3 - Conguration
If you selected
If you selected
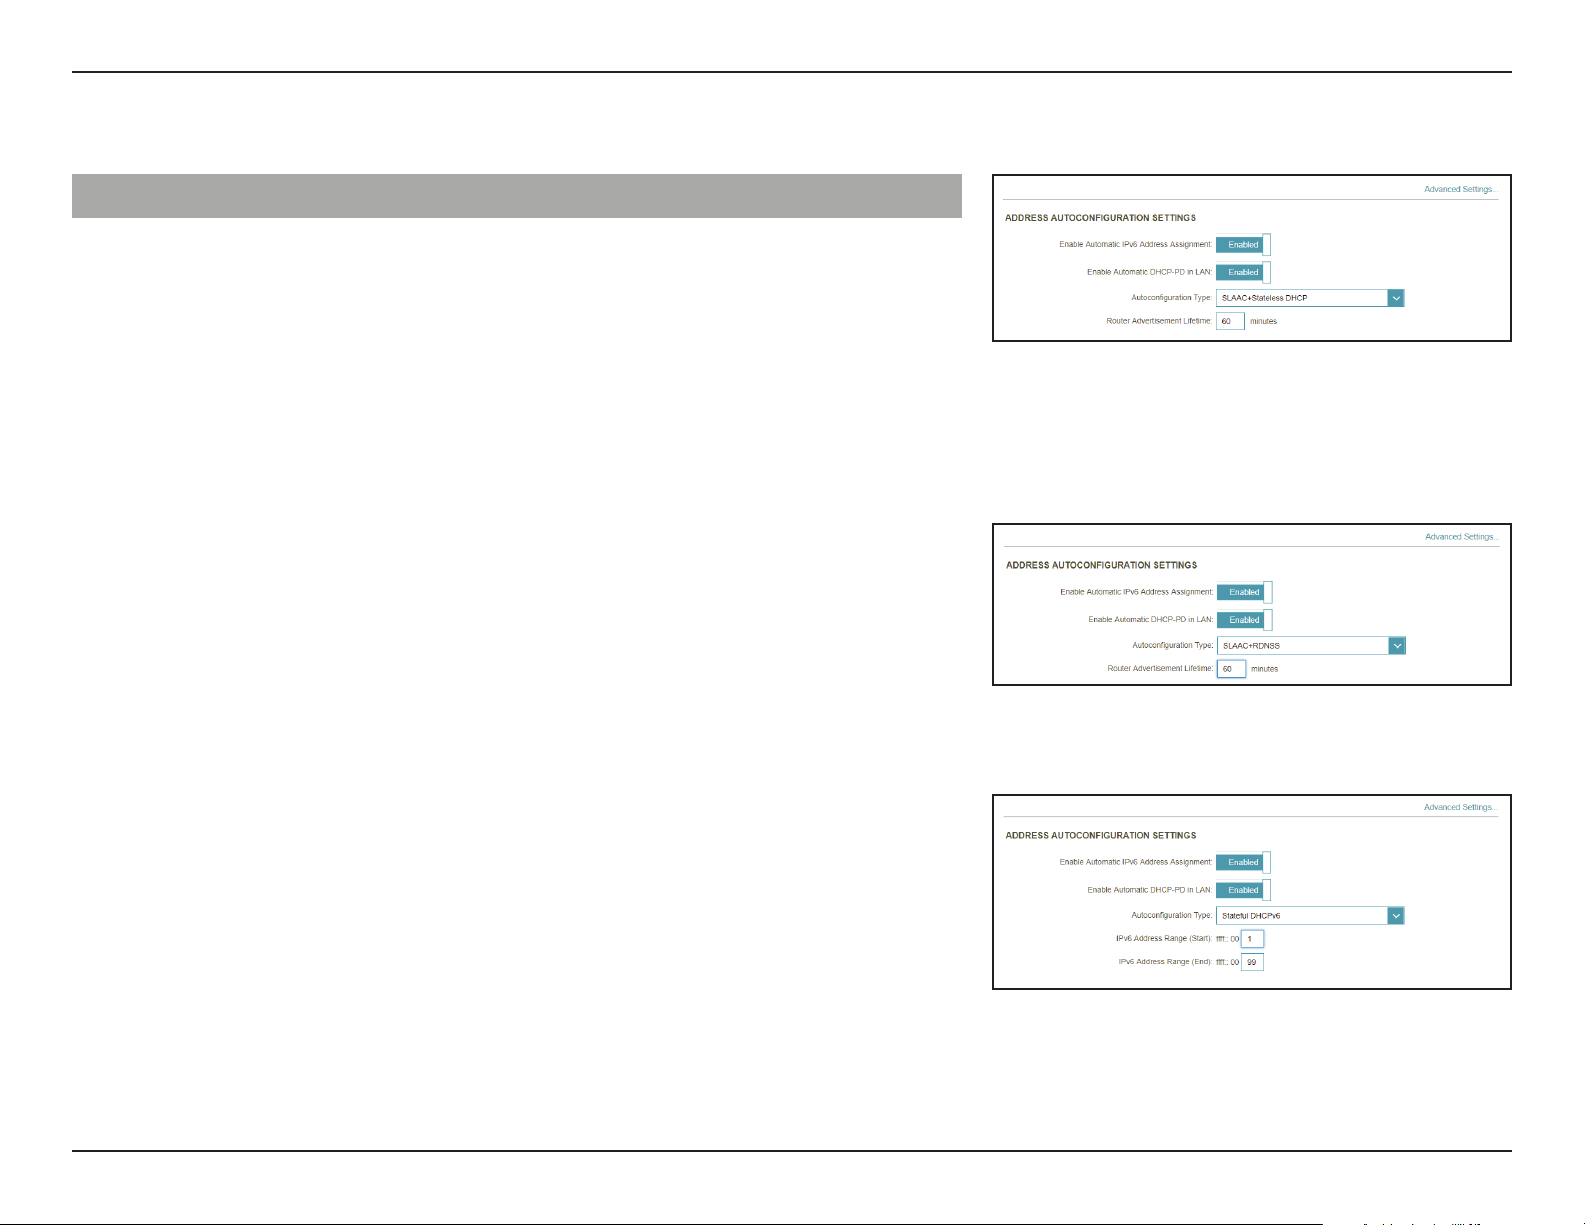
Advanced Settings... - Address Autoconguration Settings
Enable Automatic
IPv6 Address
Assignment
Enable Automatic
DHCP-PD in LAN
Autoconguration
Type
SLAAC+RDNSS or SLAAC+Stateless DHCP as the Autoconguration Type:
Router
Advertisement
Lifetime
Stateful DHCPv6 as the Autoconguration Type:
Enable or disable the Automatic IPv6 Address Assignment
feature.
Enable or disable DHCP-PD for other IPv6 routers connected
to the LAN interface.
Select SLAAC+RDNSS, SLAAC+Stateless DHCP, or Stateful
DHCPv6.
Enter the router advertisement lifetime (in minutes).
IPv6 Address
Range (Start)
IPv6 Address
Range (End)
Enter the starting IPv6 address for the DHCP server’s IPv6
assignment.
Enter the ending IPv6 address for the DHCP server’s IPv6
assignment.
42D-Link DIR-X5460 User Manual

Section 3 - Conguration
Use Link-Local Address
IPv6 - Static IPv6
Select Static IP if your IPv6 information is provided by your Internet Service Provider (ISP). Click Save at any time to save the
changes you have made on this page.
Enable or disable link-local address use.
IPv6 Address Congurable when Use Link-Local Address is disabled. Enter
the address supplied by your ISP.
Subnet Prex Length Congurable when Use Link-Local Address is disabled. Enter
the subnet prex length supplied by your ISP.
Default Gateway Enter the default gateway for your IPv6 connection.
Primary DNS Server Enter the primary DNS server address.
Secondary DNS Server Enter the secondary DNS server address.
LAN IPv6 Address Enter the LAN (local) IPv6 address for the router.
LAN IPv6 Link-Local
LAN IPv6 Address Settings
Displays the router’s LAN link-local address.
Address
43D-Link DIR-X5460 User Manual

Section 3 - Conguration
If you selected
If you selected
Advanced Settings... - Address Autoconguration Settings
Enable Automatic
IPv6 Address
Assignment
Autoconguration
Type
SLAAC+RDNSS or SLAAC+Stateless DHCP as the Autoconguration Type:
Router
Advertisement
Lifetime
Stateful DHCPv6 as the Autoconguration Type:
IPv6 Address
Range (Start)
IPv6 Address
Range (End)
Enable or disable the Automatic IPv6 Address Assignment
feature.
Select SLAAC+RDNSS, SLAAC+Stateless DHCP, or Stateful
DHCPv6.
Enter the router advertisement lifetime (in minutes).
Enter the starting IPv6 address for the DHCP server’s IPv6
assignment.
Enter the ending IPv6 address for the DHCP server’s IPv6
assignment.
IPv6 Address Lifetime Enter the IPv6 address lifetime (in minutes).
44D-Link DIR-X5460 User Manual

Section 3 - Conguration
If
IPv6 - Auto Conguration (SLAAC/DHCPv6)
Select Auto Conguration if your ISP assigns your IPv6 address when your
router requests one from the ISP’s server. Some ISPs require you to adjust
settings on your side before your router can connect to the IPv6 Internet.
Click Save at any time to save the changes you have made on this page.
IPv6 DNS Settings
DNS Type Select either Obtain DNS server address automatically or
Use the following DNS address.
Primary DNS Server If you selected Use the following DNS address, enter the
primary DNS server address.
Secondary DNS Server If you selected Use the following DNS address, enter the
secondary DNS server address.
LAN IPv6 Address Settings
Enable DHCP-PD Enable or disable prex delegation services.
LAN IPv6 Link-Local
Address
Enable DHCP-PD is disabled, these additional parameters are available for conguration:
LAN IPv6 Address Enter a valid LAN IPv6 address.
LAN IPv6 Link-Local
Address
Displays the router’s LAN link-local address.
Displays the router’s LAN link-local address.
45D-Link DIR-X5460 User Manual

Section 3 - Conguration
If
If you selected
If you selected
Advanced Settings... - Address Autoconguration Settings
Enable Automatic
IPv6 Address
Assignment
Enable DHCP-PD is enabled in the previous LAN IPv6 Address Settings:
Enable Automatic
DHCP-PD in LAN
Autoconguration
Type
SLAAC+RDNSS or SLAAC+Stateless DHCP as the Autoconguration Type:
Router
Advertisement
Lifetime
Stateful DHCPv6 as the Autoconguration Type:
Enable or disable the Automatic IPv6 Address Assignment
feature.
Enable or disable DHCP-PD for other IPv6 routers connected
to the LAN interface.
Select SLAAC+RDNSS, SLAAC+Stateless DHCP, or Stateful
DHCPv6.
Enter the router advertisement lifetime (in minutes).
IPv6 Address
Range (Start)
IPv6 Address
Range (End)
Enter the starting IPv6 address for the DHCP server’s IPv6
assignment.
Enter the ending IPv6 address for the DHCP server’s IPv6
assignment.
46D-Link DIR-X5460 User Manual

Section 3 - Conguration
If
If you selected
If you selected
Advanced Settings... - Address Autoconguration Settings
Enable Automatic
IPv6 Address
Assignment
Enable DHCP-PD is disabled in the previous LAN IPv6 Address Settings:
Autoconguration
Type
SLAAC+RDNSS or SLAAC+Stateless DHCP as the Autoconguration Type:
Router
Advertisement
Lifetime
Stateful DHCPv6 as the Autoconguration Type:
IPv6 Address
Range (Start)
Enable or disable the Automatic IPv6 Address Assignment
feature.
Select SLAAC+RDNSS, SLAAC+Stateless DHCP, or Stateful
DHCPv6.
Enter the router advertisement lifetime (in minutes).
Enter the starting IPv6 address for the DHCP server’s IPv6
assignment.
IPv6 Address Lifetime Enter the IPv6 address lifetime (in minutes).
IPv6 Address
Range (End)
Enter the ending IPv6 address for the DHCP server’s IPv6
assignment.
47D-Link DIR-X5460 User Manual

Section 3 - Conguration
IPv6 - PPPoE
Select PPPoE if your ISP provides and requires you to enter a PPPoE username and password in order to connect to the
Internet. Click Save at any time to save the changes you have made on this page.
PPPoE Session Create a new PPPoE session.
Username Enter the username provided by your ISP.
Password Enter the password provided by your ISP.
Address Mode Select either Dynamic IP or Static IP.
IP Address Configurable if Static IP is chosen. Enter the IP address
provided by your ISP.
Service Name Enter the ISP service name (optional).
Reconnect Mode Select either Always On or Manual.
MTU Maximum Transmission Unit - you may need to change the
MTU for optimal performance with your ISP.
48D-Link DIR-X5460 User Manual

Section 3 - Conguration
If
IPv6 DNS Settings
DNS Type Select either Obtain DNS server address automatically or
Use the following DNS address.
Primary DNS Server If you selected Use the following DNS address, enter the
primary DNS server address.
Secondary DNS Server If you selected Use the following DNS address, enter the
secondary DNS server address.
LAN IPv6 Address Settings
Enable DHCP-PD Enable or disable prex delegation services.
LAN IPv6 Link-Local
Address
Enable DHCP-PD is disabled, these additional parameters are available for conguration:
LAN IPv6 Address Enter a valid LAN IPv6 address.
LAN IPv6 Link-Local
Address
Displays the router’s LAN link-local address.
Displays the router’s LAN link-local address.
49D-Link DIR-X5460 User Manual

Section 3 - Conguration
If
If you selected
If you selected
Advanced Settings... - Address Autoconguration Settings
Enable Automatic
IPv6 Address
Assignment
Enable DHCP-PD is enabled in the previous LAN IPv6 Address Settings:
Enable Automatic
DHCP-PD in LAN
Autoconguration
Type
SLAAC+RDNSS or SLAAC+Stateless DHCP as the Autoconguration Type:
Router
Advertisement
Lifetime
Stateful DHCPv6 as the Autoconguration Type:
Enable or disable the Automatic IPv6 Address Assignment
feature.
Enable or disable DHCP-PD for other IPv6 routers connected
to the LAN interface.
Select SLAAC+RDNSS, SLAAC+Stateless DHCP, or Stateful
DHCPv6.
Enter the router advertisement lifetime (in minutes).
IPv6 Address
Range (Start)
IPv6 Address
Range (End)
Enter the starting IPv6 address for the DHCP server’s IPv6
assignment.
Enter the ending IPv6 address for the DHCP server’s IPv6
assignment.
50D-Link DIR-X5460 User Manual

Section 3 - Conguration
If
If you selected
If you selected
Advanced Settings... - Address Autoconguration Settings
Enable Automatic
IPv6 Address
Assignment
Enable DHCP-PD is disabled in the previous LAN IPv6 Address Settings:
Autoconguration
Type
SLAAC+RDNSS or SLAAC+Stateless DHCP as the Autoconguration Type:
Router
Advertisement
Lifetime
Stateful DHCPv6 as the Autoconguration Type:
IPv6 Address
Range (Start)
Enable or disable the Automatic IPv6 Address Assignment
feature.
Select SLAAC+RDNSS, SLAAC+Stateless DHCP, or Stateful
DHCPv6.
Enter the router advertisement lifetime (in minutes).
Enter the starting IPv6 address for the DHCP server’s IPv6
assignment.
IPv6 Address Lifetime Enter the IPv6 address lifetime (in minutes).
IPv6 Address
Range (End)
Enter the ending IPv6 address for the DHCP server’s IPv6
assignment.
51D-Link DIR-X5460 User Manual

Section 3 - Conguration
If you selected
IPv6 - 6rd
In this section the user can congure the IPv6 6rd connection settings. Click Save at any time to save the changes you have
made on this page.
Assign IPv6 Prex Currently unsupported.
Primary DNS Server Enter the primary DNS server address.
Secondary DNS Server Enter the secondary DNS server address.
Enable Hub and Spoke
WAN IPv4 Address Displays the router’s IPv4 address.
6rd Border Relay IPv4
6rd Manual Conguration
Enable this option if you want to minimize the number of
Mode
6rd Conguration Choose the 6rd DHCPv4 Option to automatically discover
Manual Conguration as the 6rd Conguration:
6rd IPv6 Prex Enter the 6rd IPv6 prex and mask length supplied by your ISP.
Address
routes to the destination by using a hub and spoke method
of networking.
and populate the data values, or Manual Conguration to
enter the settings yourself.
Enter the 6rd border relay IPv4 address settings supplied by
your ISP.
52D-Link DIR-X5460 User Manual

Section 3 - Conguration
If you selected
If you selected
LAN IPv6 Address Settings
LAN IPv6 Address Displays the router’s LAN IPv6 Address link-local address.
LAN IPv6 Link-Local
Address
Advanced Settings... - Address Autoconguration Settings
Enable Automatic
IPv6 Address
Assignment
Autoconguration
Type
SLAAC+RDNSS or SLAAC+Stateless DHCP as the Autoconguration Type:
Router
Advertisement
Lifetime
Displays the router’s LAN link-local address.
Enable or disable the Automatic IPv6 Address Assignment
feature.
Select SLAAC+RDNSS, SLAAC+Stateless DHCP, or Stateful
DHCPv6.
Enter the router advertisement lifetime (in minutes).
IPv6 Address Lifetime Enter the IPv6 address lifetime (in minutes).
Stateful DHCPv6 as the Autoconguration Type:
IPv6 Address
Range (Start)
IPv6 Address
Range (End)
Enter the starting IPv6 address for the DHCP server’s IPv6
assignment.
Enter the ending IPv6 address for the DHCP server’s IPv6
assignment.
53D-Link DIR-X5460 User Manual

Section 3 - Conguration
IPv6 - Local Connectivity Only
Local Connectivity Only allows you to set up an IPv6 connection that will
not connect to the Internet. Click Save at any time to save the changes you
have made on this page.
Advanced Settings... - IPv6 ULA Settings
Enable ULA Click here to enable Unique Local IPv6 Unicast Addresses
settings.
Use Default ULA Prex Enable this option to use the default ULA prex.
ULA Prex Congurable if you disable Use Default ULA Prex. Enter your
own ULA prex.
Advanced Settings... - Current IPv6 ULA Settings
Current ULA Prex Displays the current ULA prex.
LAN IPv6 ULA Displays the LAN's IPv6 ULA.
54D-Link DIR-X5460 User Manual

Section 3 - Conguration
Internet - VLAN
In the Settings menu on the bar at the top of the page, click Internet to see the Internet conguration options for the IPv4
connection details, then click the VLAN link to access the conguration options for the VLAN connection details.
VLAN allows for services such as Triple-Play to be used, and divides a network into segments that can only be accessed by
other devices in the same VLAN.
To congure the IPv4 Internet and network connection details, click the IPv4 link. Refer to Internet - IPv4 on page 30
To congure the IPv6 Internet and network connection details, click the IPv6 link. Refer to Internet - IPv6 on page 40
Click Save at any time to save the changes you have made on this page.
Status Click to enable or disable the Triple-Play VLAN feature. More
conguration options will be available if the Status is enabled.
55D-Link DIR-X5460 User Manual

Section 3 - Conguration
If Triple-Play Status is
Enabled:
Priority ID Enable or disable trac priority ID for the Internet, IPTV, and
VLAN TAG Enable VLAN TAG to enter VLAN ID, as provided by your ISP
Internet VLAN ID Enter the VLAN ID for your Internet connection, as provided
IPTV VLAN ID Enter the VLAN ID for your IPTV service, as provided by your ISP.
VOIP VLAN ID Enter the VLAN ID for your VoIP network, as provided by your
VoIP VLANs. If Priority ID is enabled, Priority ID options are
available for conguration. Select a priority ID from the dropdown menus to assign to the corresponding VLAN. Higher
priority ID trac takes precedence over trac with a low
priority ID tag.
by your ISP.
ISP.
LAN Port 1-4 From the drop-down menu, you can select the type of
Interface Trac Type Setting
connection (Internet, IPTV, or Voice over IP) coming from the
WAN connection to each interface on the router.
56D-Link DIR-X5460 User Manual

Section 3 - Conguration
If Smart Connect is Status is
Wireless
In the Settings menu on the bar at the top of the page, click Wireless to see your wireless network settings for your
DIR-X5460.
Click Save at any time to save the changes you have made on this page.
Smart Connect
Status Enable or disable the Smart Connect Feature. When enabled,
only a few conguration options are available to simplify
conguration.
Enabled:
Wireless
Wi-Fi Name (SSID) Create a name for your wireless network using up to 32
characters.
Password Create a password to use for wireless security. Wireless clients
will need to enter this password to successfully connect to
the network.
57D-Link DIR-X5460 User Manual

Section 3 - Conguration
Wireless - Advanced Settings...
Security Mode Choose None or WPA/WPA2-Personal (recommended).
DFS Channel DFS enables you to use more channels to help nd one with
the least interference. However, please note that when using
DFS, the router must scan for radar signals for a minute before
using a channel, and will change channels automatically if
radar signals are detected.
Transmission Power Select the desired wireless transmission power.
Schedule Use the drop-down menu to select the time schedule that the
rule will be enabled for. The schedule may be set to Always
Enable, or you can create your own schedules in the Schedules
section. Refer to Time & Schedule - Schedule on page 85
for more information.
58D-Link DIR-X5460 User Manual

Section 3 - Conguration
If Smart Connect is Status is
Smart Connect
Status Enable or disable the Smart Connect Feature. When disabled,
2.4GHz and 5GHz conguration options become available.
Disabled:
2.4GHz / 5GHz
Status Enable or disable the 2.4GHz / 5GHz wireless network.
Wi-Fi Name (SSID) Create a name for your wireless network using up to 32
characters.
Password Create a password to use for wireless security. Wireless clients
will need to enter this password to successfully connect to
the network.
59D-Link DIR-X5460 User Manual

Section 3 - Conguration
2.4GHz - Advanced Settings...
Security Mode Choose None or WPA/WPA2-Personal (recommended).
802.11 Mode (2.4GHz) Select the desired wireless networking standards to use.
The available options for the 2.4 GHz wireless network are
Mixed 802.11b/g/n, Mixed 802.11g/n, or 802.11n only.
Wi-Fi Channel Select the desired channel. The default is Auto (recommended).
Transmission Power Select the desired wireless transmission power.
Channel Width
(2.4GHz)
HT20/40 Coexistence
(2.4GHz)
Visibility Status The default setting is Visible. Select Invisible if you do not
Schedule Use the drop-down menu to select the time schedule that
Select Auto 20/40 if you are using both 802.11n and non-
802.11n devices, or select 20 MHz if you are not using any
802.11n devices.
Enable or disable HT20/40 Coexistence.
want to broadcast the SSID of your wireless network.
the rule will be enabled for. The schedule may be set to
Always Enable, or you can create your own schedules in the
Schedules section. Refer to Time & Schedule - Schedule on
page 85 for more information.
60D-Link DIR-X5460 User Manual

Section 3 - Conguration
5GHz - Advanced Settings...
Security Mode Choose None or WPA/WPA2-Personal (recommended).
802.11 Mode (5GHz) Select the desired wireless networking standards to use.
The available options for the 5 GHz wireless network are Mixed
802.11a/n/ac/ax, Mixed 802.11a/n/ac, Mixed 802.11n/ac,
Mixed 802.11a/n, 802.11ac only, Mixed 802.11a only, or
802.11n only.
Wi-Fi Channel Select the desired channel. The default is Auto (recommended).
DFS Channel DFS enables you to use more channels to help nd one with
the least interference. However, please note that when using
DFS, the router must scan for radar signals for a minute before
using a channel, and will change channels automatically if
radar signals are detected.
Transmission Power Select the desired wireless transmission power.
Channel Width (5GHz) Select Auto 20/40/80 if you are using 802.11ac, 802.11n, and
802.11a devices, select Auto 20/40 if you are using 802.11n
and 802.11a devices, or select 20 MHz if you are using 802.11a
devices.
Visibility Status The default setting is Visible. Select Invisible if you do not
want to broadcast the SSID of your wireless network.
Schedule Use the drop-down menu to select the time schedule that
the rule will be enabled for. The schedule may be set to
Always Enable, or you can create your own schedules in the
Schedules section. Refer to Time & Schedule - Schedule on
page 85 for more information.
61D-Link DIR-X5460 User Manual

Section 3 - Conguration
The easiest way to connect your wireless devices to the router is with Wi-Fi Protected Setup (WPS).
WPS-PBC Status Enable or disable WPS-PBC (Push Button Configuration)
Wi-Fi Protected Setup
functionality.
62D-Link DIR-X5460 User Manual

Section 3 - Conguration
If Smart Connect is Status is
Guest Zone
In the Settings menu on the bar at the top of the page, click Wireless to see your wireless network settings for your
DIR-X5460. Then click the link to Guest Zone to congure your guest zone settings.
The Guest Zone feature will allow you to create temporary zones that can be used by guests to access the Internet. These
zones will be separate from your main wireless network. You may congure dierent zones for the 2.4 GHz and 5 GHz
wireless bands.
Click Save at any time to save the changes you have made on this page.
Enabled in the previous Wireless settings:
Wireless
Status Enable or disable the Guest Zone feature. The status is disabled
by default.
Wireless Name (SSID) Create a name for your wireless network using up to 32
Password Create a password to use for wireless security.
Schedule Use the drop-down menu to select the time schedule that
Internet Access Only Enabling this option will conne connectivity to the Internet,
characters.
the rule will be enabled for. The schedule may be set to
Always Enable, or you can create your own schedules in the
Schedules section. Refer to Time & Schedule - Schedule on
page 85 for more information.
Home Network Access
preventing guests from accessing other local network devices.
63D-Link DIR-X5460 User Manual

Section 3 - Conguration
Network
In the Settings menu on the bar at the top of the page, click Network to change the local network settings of the router and
to congure the DHCP settings.
Click Save at any time to save the changes you have made on this page.
Network Settings
LAN IP Address Enter the IP address of the router. The default IP address is
192.168.0.1. If you change the IP address, once you click Save,
you will need to enter the new IP address in your browser to
get back into the conguration utility.
Subnet Mask Enter the subnet mask of the router. The default subnet mask
is 255.255.255.0.
Management Link The default address to access the router’s conguration is
http://dlinkrouter.local/. You can replace dlinkrouter with
a name of your choice.
Local Domain Name Enter the domain name (optional).
Enable DNS Relay Disable to transfer the DNS server information from your ISP
to your computers. If enabled, your computers will use the
router for a DNS server.
64D-Link DIR-X5460 User Manual

Section 3 - Conguration
IPv4 Multicast Streams
IPv6 Multicast Streams
Status Enable or disable the DHCP server.
DHCP Server
DHCP IP Address
Range
DHCP Lease Time Enter the length of time for the IP address lease in minutes.
Always Broadcast Enable this feature to broadcast your network's DHCP server
Enter the starting and ending IP addresses for the DHCP
server's IP assignment. Note: If you statically assign IP addresses
to your computers or devices, make sure the IP addresses are
outside of this range or you may have an IP conict.
to LAN/WLAN clients.
Advanced Settings...
WAN Port Speed You may set the port speed of the Internet port to 10 Mbps,
100 Mbps, 1000 Mbps, or Auto (recommended).
UPnP Enable or disable Universal Plug and Play (UPnP). UPnP
provides compatibility with networking equipment, software,
and peripherals.
Enable to allow IPv4 multicast trac to pass through the router
from the Internet. This is enabled by default.
Enable to allow IPv6 multicast trac to pass through the router
from the Internet. This is enabled by default.
65D-Link DIR-X5460 User Manual

Section 3 - Conguration
USB Sharing
In the Settings menu on the bar at the top of the page, click USB Sharing to set up access to les on an external USB drive
plugged into the router. You can access shared les such as photos, music, and movies through the local network or from
the Internet using a web browser or an app on your mobile device. Access your les on your local network using SAMBA or
UPnP media sharing.
Click Save at any time to save the changes you have made on this page.
UPnP Media Server
Status Enable or disable the UPnP media server function, allowing
connected clients access to media les over the network.
UPnP Media Server Choose a name for your DLNA media server so that it can be
found.
Windows File Sharing (SAMBA)
Status Enable or disable the Windows le sharing function, allowing
connected clients access to shared les over the network.
FTP Server
Status Enable or disable the File Transfer Protocol (FTP) server
function, allowing connected clients access to shared les
over the network.
FTP Server Advanced Settings...
Enable Remote
Sharing
FTP Server Port If Enable Remote Sharing is enabled. Enter the port number
Idle Time Enter a maximum idle time during which the client connection
If FTP server is enabled. Enable or disable the remote sharing
function on the File Transfer Protocol (FTP) server.
for FTP clients to communicate with the server.
is maintained during inactivity.
66D-Link DIR-X5460 User Manual

Section 3 - Conguration
D-Link Cloud
In the Settings menu on the bar at the top of the page, click D-Link Cloud to see your D-Link Cloud Service details. This
page lists whether you are registered with D-Link Cloud Service and email address associated with the account. Use the
D-Link Wi-Fi app to nd out more about D-Link Cloud's features.
67D-Link DIR-X5460 User Manual

Section 3 - Conguration
Features
QoS Engine
In the Features menu on the bar at the top of the page, click QoS Engine to congure connected clients Internet access
priority.
Click Save at any time to save the changes you have made on this page.
Management Type Use the drop-down menu to select the Management Type that
the rule will be enabled for. This may be set to O or Manage
By Device.
Download Speed
(Mbps)
Upload Speed (Mbps) Set the upload speed based on your ISP subscription plan in
Set the download speed based on your ISP subscription plan
in order to adjust the QoS engine.
order to adjust the QoS engine.
68D-Link DIR-X5460 User Manual

Section 3 - Conguration
This Quality of Service (QoS) Engine will allow you to prioritize particular
clients over others, so that those clients receive higher bandwidth. For
example, if one client is streaming a movie and another is downloading a
non-urgent le, you might wish to assign the former device a higher priority
than the latter so that the movie streaming is not disrupted by the trac of
the other devices on the network.
Under Connected Clients, you will see device cards representing each
connected client. If some are o-screen, you can use the < and > buttons to
scroll through the cards.
A maximum of one device can be assigned Highest priority.
A maximum of two devices can be assigned High priority.
A maximum of eight devices can be assigned Medium priority.
If no devices are explicitly assigned a priority, they will all be treated with
equal priority. If some devices are not assigned a priority and others are, the
unassigned devices will be treated with the lowest priority.
To assign a priority level to a device, drag the device card from the All
Devices list over an empty slot and release the mouse button. The card will
remain in the slot. If you want to remove a priority assignment from a device
and return it to the All Devices list, click the cross icon in the top right of the
device card.
69D-Link DIR-X5460 User Manual

Section 3 - Conguration
Firewall Settings - Advanced
In the Features menu on the bar at the top of the page, click Firewall to congure the router’s rewall settings. The rewall
feature protects your network from malicious attacks over the Internet.
To congure the IPv4 rewall rules, click the IPv4 Rules link. Refer to Firewall Settings - IPv4/IPv6 Rules on page 72
To congure the IPv6 rewall rules, click the IPv6 Rules link. Refer to Firewall Settings - IPv4/IPv6 Rules on page 72
Click Save at any time to save the changes you have made on this page.
Enable DMZ Enable or disable Demilitarized Zone (DMZ). This completely
exposes the client to threats over the Internet, and is not
recommended in ordinary situations.
DMZ IP Address If you enabled DMZ, enter the IP address of the client you wish
to expose, or use the drop-down menu to quickly select it.
Enable SPI IPv4 Enabling Stateful Packet Inspection (SPI) helps to prevent
cyber attacks by validating that the trac passing through
the session conforms to the protocol.
Enable Anti-spoof
Checking
IPv6 Simple Security Enable or disable IPv6 simple security.
IPv6 Ingress Filtering Enable or disable IPv6 ingress ltering.
Enable this feature to help protect your network from certain
kinds of “spoong” attacks.
70D-Link DIR-X5460 User Manual

Section 3 - Conguration
Advanced Settings... - Application Level Gateway (ALG) Conguration
PPTP Allows multiple machines on the LAN to connect to their
corporate network using the PPTP protocol.
IPSec (VPN) Allows multiple VPN clients to connect to their corporate
network using IPSec. Some VPN clients support traversal of
IPSec through NAT. This Application Level Gateway (ALG)
may interfere with the operation of such VPN clients. If you
are having trouble connecting with your corporate network,
try turning this ALG off. Please check with the system
administrator of your corporate network whether your VPN
client supports NAT traversal.
RTSP Allows applications that uses Real Time Streaming Protocol
(RTSP) to receive streaming media from the Internet.
SIP Allows devices and applications using VoIP (Voice over IP)
to communicate across NAT. Some VoIP applications and
devices have the ability to discover NAT devices and work
around them. This ALG may interfere with the operation of
such devices. If you are having trouble making VoIP calls, try
turning this ALG o.
71D-Link DIR-X5460 User Manual

Section 3 - Conguration
Firewall Settings - IPv4/IPv6 Rules
In the Features menu on the bar at the top of the page, click Firewall to congure the router’s rewall settings, then click
the IPv4 Rules link or the IPv6 Rules link to congure what kind of trac is allowed to pass through the network.
To congure the Firewall Advanced settings, click the Advanced link. Refer to Firewall Settings - Advanced on page 70
Click Save at any time to save the changes you have made on this page.
To begin, use the drop-down menu to select whether you want to ALLOW or DENY the
rules you create. You can also choose to turn ltering OFF.
If you wish to remove a rule, click on the trash can icon in the Delete column. If you wish to
edit a rule, click on the pencil icon in the Edit column. If you wish to create a new rule, click
the Add Rule button.
72D-Link DIR-X5460 User Manual

Section 3 - Conguration
If you clicked on
Edit or Add Rule, the following options will appear:
Name Enter a name for the rule.
Source IP Address
Range
Destination IP Address
Range
Protocol & Port Range Select the protocol of the trac to allow or deny (Any, TCP,
Schedule Use the drop-down menu to select the time schedule that
Enter the source IP address range that the rule will apply to.
Using the drop-down menu, specify whether it is a WAN or
LAN IP address.
Enter the destination IP address range that the rule will apply
to. Using the drop-down menu, specify whether it is a WAN
or LAN IP address.
or UDP) and then enter the range of ports that the rule will
apply to.
the rule will be enabled for. The schedule may be set to
Always Enable, or you can create your own schedules in the
Schedules section. Refer to Time & Schedule - Schedule on
page 85 for more information.
73D-Link DIR-X5460 User Manual

Section 3 - Conguration
Port Forwarding
In the Features menu on the bar at the top of the page, click Port Forwarding to specify a port or range of ports to open for
specic devices on the network. This might be necessary for certain applications to connect through the router.
To congure the Virtual Server settings, click the Virtual Server link. Refer to Port Forwarding - Virtual Server on page
76
Click Save at any time to save the changes you have made on this page.
If you wish to remove a rule, click on the trash can icon in the Delete column. If you wish to
edit a rule, click on the pencil icon in the Edit column. If you wish to create a new rule, click
the Add Rule button.
74D-Link DIR-X5460 User Manual

Section 3 - Conguration
If you clicked on
Edit or Add Rule, the following options will appear:
Name Enter a name for the rule.
Local IP Enter the IP address of the computer on your local network
TCP Port Enter the TCP ports that you want to open. You can enter a
UDP Port Enter the UDP ports that you want to open. You can enter a
Schedule Use the drop-down menu to select the time schedule that
that you want to allow the incoming service to. Alternatively,
select the device from the drop-down menu.
single port or a range of ports. Separate ports with a comma
(for example: 24,1009,3000-4000).
single port or a range of ports. Separate ports with a comma
(for example: 24,1009,3000-4000).
the rule will be enabled for. The schedule may be set to
Always Enable, or you can create your own schedules in the
Schedules section. Refer to Time & Schedule - Schedule on
page 85 for more information.
75D-Link DIR-X5460 User Manual

Section 3 - Conguration
Port Forwarding - Virtual Server
In the Features menu on the bar at the top of the page, click Port Forwarding then click the Virtual Server link to congure
its settings and specify a single public port on your router for redirection to an internal LAN IP address and Private LAN port.
This might be necessary for certain applications to connect through the router.
To congure the Port Forwarding settings, click the Port Forwarding link. Refer to Port Forwarding on page 74
Click Save at any time to save the changes you have made on this page.
If you wish to remove a rule, click on the trash can icon in the Delete column. If you wish to
edit a rule, click on the pencil icon in the Edit column. If you wish to create a new rule, click
the Add Rule button.
76D-Link DIR-X5460 User Manual

Section 3 - Conguration
If you clicked on
Edit or Add Rule, the following options will appear:
Name Enter a name for the rule. Alternatively, select the protocol/
Local IP Enter the IP address of the computer on your local network
Protocol Select the protocol of the trac to allow or deny (TCP, UDP,
Protocol Number If you entered Other above, enter the protocol number.
External Port Enter the public port you want to open.
Internal Port Enter the private port you want to open.
Application Name from the drop-down menu.
that you want to allow the incoming service to. Alternatively,
select the device from the drop-down menu.
Both, or Other).
Schedule Use the drop-down menu to select the time schedule that
the rule will be enabled for. The schedule may be set to
Always Enable, or you can create your own schedules in the
Schedules section. Refer to Time & Schedule - Schedule on
page 85 for more information.
77D-Link DIR-X5460 User Manual

Section 3 - Conguration
Website Filter
In the Features menu on the bar at the top of the page, click Website Filter. The website lters feature allows rules to be set
that restrict access to a specied web address (URL) or blocks specied keywords in the URL. You can use Website Filter to
restrict access to potentially harmful and inappropriate websites.
Click Save at any time to save the changes you have made on this page.
To begin, use the drop-down menu to select whether you want to ALLOW or DENY the
access to the listed sites.
If you wish to remove a Website URL/Domain, click on the trash can icon in the Delete
column. If you wish to list a new site to allow or deny access to, click the Add Rule button.
78D-Link DIR-X5460 User Manual

Section 3 - Conguration
If you clicked on
Static Route - IPv4
In the Features menu on the bar at the top of the page, click Static Route to dene custom routes, controlling how data
trac is moved around your network.
To congure the Static Route IPv6 settings, click the IPv6 link. Refer to Static Route - IPv6 on page 80
Click Save at any time to save the changes you have made on this page.
If you wish to remove a route, click on the trash can icon in the Delete column. If you wish
to edit a route, click on the pencil icon in the Edit column. If you wish to create a new route,
click the Add Route button.
Destination Network Enter the IP address of packets that will take this route.
Edit or Add Rule, the following options will appear:
Name Enter a name for the rule.
Mask Enter the subnet mask of the route.
Gateway Enter your next hop gateway to be taken when this route is
used.
Metric Enter a route metric value ranging from 0 to 15. This value
indicates the cost of using this route.
Interface Select the interface that the IP packet must use to transit out
of the router when this route is used.
79D-Link DIR-X5460 User Manual

Section 3 - Conguration
If you clicked on
Static Route - IPv6
In the Features menu on the bar at the top of the page, click Static Route to access the IPv4 Static Route settings, then click
IPv6 to congure the IPv6 Static Routes.
To congure the Static Route IPv4 settings, click the IPv4 link. Refer to Static Route - IPv4 on page 79
Click Save at any time to save the changes you have made on this page.
If you wish to remove a route, click on the trash can icon in the Delete column. If you wish
to edit a route, click on the pencil icon in the Edit column. If you wish to create a new route,
click the Add Route button.
Edit or Add Rule, the following options will appear:
Name Enter a name for the rule.
DestNetwork This is the IP address of the router used to reach the specied
destination.
PrexLen Enter the IPv6 address prex length of the packets that will
take this route.
Gateway Enter your next hop gateway to be taken when this route is
used.
Metric Enter a route metric value ranging from 0 to 15. This value
indicates the cost of using this route.
Interface Select the interface that the IP packet must use to transit out
of the router when this route is used.
80D-Link DIR-X5460 User Manual

Section 3 - Conguration
Dynamic DNS
In the Features menu on the bar at the top of the page, click Dynamic DNS. This setting allows your router to associate an
easy-to-remember domain name such as [YourDomainName].com with the regularly changing IP address assigned by your
Internet Service provider. This feature is helpful when running a virtual server.
Click Save at any time to save the changes you have made on this page.
Enable Dynamic DNS Enable or disable dynamic DNS. Enabling this feature will
reveal further conguration options.
Status Displays the current dynamic DNS connection status.
Server Address Enter the address of your dynamic DNS server, or select one
from the drop-down menu.
Host Name Enter the host name that you registered with your dynamic
DNS service provider.
User Name Enter your dynamic DNS username.
Password Enter your dynamic DNS password.
Time Out Enter a time out time (in hours).
81D-Link DIR-X5460 User Manual

Section 3 - Conguration
At the bottom of the page are the IPv6 host settings.
If you wish to remove a record, click on the trash can icon in the Delete column. If you wish to
edit a record, click on the pencil icon in the Edit column. If you wish to create a new record,
click the Add Record button.
Host Name Enter the host name that you registered with your dynamic
DNS service provider.
IPv6 Address Enter the IPv6 address of the dynamic DNS server. Alternatively,
select the server device in the drop-down menu.
82D-Link DIR-X5460 User Manual

Section 3 - Conguration
Quick VPN
In the Features menu on the bar at the top of the page, click Quick VPN. This page will help you congure the Quick VPN
feature of your router. For more information, refer to Quick VPN on page 106. Before proceeding, ensure that your Internet
connection is working properly. We recommend conguring Dynamic DNS before proceeding with Quick VPN setup. If your
router is assigned an IP address from your ISP using DHCP, it may frequently change, requiring clients credentials to be set
up again and a simple DDNS address will be easier than an IP address.
To congure the User settings and create, manage, and delete user accounts with user-dened access to certain router
services, click the User link. Refer to User on page 90
Click Save at any time to save the changes you have made on this page.
L2TP over IPSec Enable or disable the Quick VPN server.
Username Enter a username between 1 and 20 characters.
Password Enter a password between 1 and 20 characters.
PSK Enter a passkey between 6 and 64 characters.
VPN Prole for iOS
Device and MAC OS X
Authentication
Protocol
MPPE Select the encryption cipher strength: None, RC4-40, or RC4-
Click export to save the VPN prole settings le for iOS devices
or Mac OS X.
Advanced Settings...
Choose the authentication protocol type: MSCHAPv2, PAP,
or CHAP. MSCHAPv2 is the default.
128.RC4-128 is the default.
83D-Link DIR-X5460 User Manual

Section 3 - Conguration
Management
Time & Schedule - Time
In the Management menu on the bar at the top of the page, click Time & Schedule. The Time page allows you to congure,
update, and maintain the correct time on the internal system clock. From here you can set the time zone and the Network
Time Protocol (NTP) server.
To congure the Schedule settings, click the Schedule link. Refer to Time & Schedule - Schedule on page 85
Click Save at any time to save the changes you have made on this page.
Time Conguration
Time Zone Select your time zone from the drop-down menu.
Time Displays the current date and time of the router.
Automatic Time Conguration
NTP Server Select from the drop-down menu to either use the D-Link
NTP Server to synchronize the time and date for your router,
or choose Manual to set the NTP server's IP address.
84D-Link DIR-X5460 User Manual

Section 3 - Conguration
Time & Schedule - Schedule
In the Management menu on the bar at the top of the page, click Time & Schedule to access the Time page, then click the
Schedule link. The Schedule page allows you to control some of the router functions through a pre-congured schedule.
To congure the Time settings, click the Time link. Refer to Time & Schedule - Time on page 84
Click Save at any time to save the changes you have made on this page.
If you wish to remove a schedule, click on the trash can icon in the Delete column. If you
wish to edit a schedule, click on the pencil icon in the Edit column. If you wish to create a
new schedule, click the Add a Schedule button.
First, enter the name of your schedule in the Name eld.
Each box represents one hour, with the time at the top of each column. To add a time period
to the schedule, simply click on the starting hour and drag to the ending hour. You can add
multiple days to the schedule, but only one period per day.
To remove a time period from the schedule, click on the cross icon.
Click Apply when you are done.
85D-Link DIR-X5460 User Manual

Section 3 - Conguration
System Log
In the Management menu on the bar at the top of the page, click System Log. The router keeps a running log of events. This
log can be sent to a Syslog server, or sent to your email address.
Click Save at any time to save the changes you have made on this page.
Log Settings
System Log Click the Check System Log button to download a text le
containing the system log.
Enable Logging to
Syslog Server
SysLog Server IP
Address
SysLog Settings
Check this box to send the router logs to a SysLog Server.
Congurable if Enable Logging to Syslog Server is enabled.
Enter the IP address for the Syslog server. If the Syslog server
is connected to the router, select it from the drop-down menu
to automatically populate the eld.
86D-Link DIR-X5460 User Manual

Section 3 - Conguration
If you enabled
Email Settings
Enable E-mail
Notication
Enable E-mail Notication, the following options will appear:
From E-mail Address Enter the email address your SysLog messages will be sent
To E-mail Address Enter the email address your SysLog messages will be sent to.
SMTP Server Address Enter your SMTP server address.
SMTP Server Port Enter your SMTP server port.
Enable Authentication Check this box if your SMTP server requires authentication.
Account Name Enter your SMTP account name.
Password Enter your SMTP account's password.
Enable this option if you want the logs to be automatically
sent to an email address.
from.
E-mail Log When Full or On Schedule
Send When Log Full If enabled, this option will set the router to send the log when
it is full.
Send on Schedule If enabled, this option will set the router to send according to
a set schedule.
Schedule If you enable Send On Schedule, use the drop-down menu to
select a schedule to apply. The schedule may be set to Always
Enable, or you can create your own schedules in the Schedules
section. Refer to Time & Schedule - Schedule on page 85
for more information.
87D-Link DIR-X5460 User Manual

Section 3 - Conguration
System Admin - Admin
In the Management menu on the bar at the top of the page, click System Admin to access the Admin page. This page will
allow you to change the administrator (Admin) password.
To congure the System settings, click the System link. Refer to System Admin - System on page 89
Click Save at any time to save the changes you have made on this page.
Admin Password
Password Enter a new password for the administrator account. You will
need to enter this password whenever you congure the
router using a web browser or the D-Link Wi-Fi app.
Advanced Settings... - Administration
Enable Remote
Management
Remote Admin Port Specify the port number for accessing the web conguration
Click the toggle to enable remote management for your router.
settings UI.
LED Control
Status LED Turn the LED status lights on or o.
88D-Link DIR-X5460 User Manual

Section 3 - Conguration
System Admin - System
In the Management menu on the bar at the top of the page, click System Admin to access the Admin page, then click
System. This page allows you to save the router’s current conguration, load a previously saved conguration, reset the
router to its factory default settings, or reboot the router.
To congure the Admin settings, click the Admin link. Refer to System Admin - Admin on page 88
Click Save at any time to save the changes you have made on this page.
System
Save Settings to Local
Hard Drive
Load Settings from
Local Hard Drive
Restore to Factory
Default Settings
This option will save the current router conguration settings
to a le on your computer.
This option will load a previously saved router conguration
le. This will overwrite the router’s current conguration.
This option will restore the router back to the default
congurations stored in the rmware. Any settings that have
not been saved will be lost, including any rules that you have
created. If you want to save the current router conguration
settings, use the Save Settings To Local Hard Drive button
above.
Auto Reboot Conguration
Reboot the Device Click to reboot the router immediately.
Auto Reboot You may set the router to automatically reboot at a set time.
The options are Never, Daily, or Weekly. You may set the
hour, the minute, and the day you wish to have the router
automatically reboot at.
89D-Link DIR-X5460 User Manual

Section 3 - Conguration
User
In the Management menu on the bar at the top of the page, click User. The User section is used to create, manage, and
delete user accounts with user-dened access to certain router services.
Click Save at any time to save the changes you have made on this page.
If you wish to remove a user, click on the trash can icon in the Delete column. If you wish
to edit a user, click on the pencil icon in the Edit column. If you wish to create a new user,
click the Create User button.
User Name Enter a username for the new user account.
Password Enter a password for the new user account.
VPN
Status Enable or disable Virtual Private Network (VPN) functionality
for this user.
90D-Link DIR-X5460 User Manual

Section 3 - Conguration
Upgrade
In the Management menu on the bar at the top of the page, click Upgrade. This page will allow you to upgrade the router’s
rmware, either automatically or manually. To manually upgrade the rmware, you must rst download the relevant le
from http://support.dlink.com.
Click Save at any time to save the changes you have made on this page.
Firmware
Current Firmware
Version
Check for New
Firmware
The current rmware's version will be displayed.
Click this button to prompt the router to automatically check
for a new rmware version. If a newer version is found, it will
prompt you to install it.
Automatic Firmware Upgrade
Automatic Upgrade If enabled, the router will automatically check for and upgrade
to the newest rmware.
Choose Upgrade Time Enable this function to set the router to automatically upgrade
its rmware at a set time.
Upgrade Time Congurable if Choose Upgrade Time is enabled. Set the
hour and minute to automatically upgrade by using the dropdown menus.
Upgrade Firmware
Upgrade Firmware If you wish to upgrade manually, rst download the rmware
le you wish to upgrade to. Next, click the Select File button
and browse to the le to install the new rmware.
91D-Link DIR-X5460 User Manual

Section 3 - Conguration
Statistics
In the Management menu on the bar at the top of the page, click Statistics. On the Statistics page you can view the amount of
packets that pass through the router on the Internet, LAN, Wi-Fi 2.4 GHz and Wi-Fi 5GHz networks.
You can view the Internet, LAN, Wi-Fi 2.4 GHz, or Wi-Fi 5 GHz by clicking on the respective
tabs at the top. The graph will update in real time. To clear the information on the graph,
click Clear near the top of the page.
The trac counter will reset if the device is rebooted.
92D-Link DIR-X5460 User Manual

Section 4 - Third Party Services
Third Party Services
With the DIR-X5460, you can command your router’s functionality with your voice through Amazon Alexa and the Google
Assistant, enabling you to control your network with voice commands. Features include enabling and disabling your Wi-Fi
guest zone without having to go into the UI, rebooting the router and checking your router for rmware upgrades. In order
to use third party services to control and manage your device, please register your device with D-Link Cloud Service.
93D-Link DIR-X5460 User Manual

Section 4 - Third Party Services
Registering a D-Link Cloud Service Account
In order to use third party services to control and manage your device, you will rst need to register your device with D-Link
Cloud Service. Follow the steps below if you do not have a D-Link Cloud Service account.
Step 1
Launch the D-Link Wi-Fi app.
D-Link Wi-Fi
Step 2
Tap the settings gear icon on the top right corner of the screen.
DIR-X5460DIR-X5460
94D-Link DIR-X5460 User Manual

Section 4 - Third Party Services
Step 3
Tap the Cloud Service icon.
Step 4
Tap the Register button.
95D-Link DIR-X5460 User Manual
 Loading...