


Section 3 - Configuration
Add Wireless
Station:
Add Wireless
Device Wizard:
This Wizard helps you add wireless devices to the wireless network.
The wizard will either display the wireless network settings to guide you through manual configuration, prompt you to enter
the PIN for the device, or ask you to press the configuration button on the device. If the device supports Wi-Fi Protected Setup
and has a configuration button, you can add it to the network by pressing the configuration button on the device and then
the on the router within 60 seconds. The status LED on the router will flash three times if the device has been successfully
added to the network.
There are several ways to add a wireless device to your network. A “registrar” controls access to the wireless network. A
registrar only allows devices onto the wireless network if you have entered the PIN, or pressed a special Wi-Fi Protected Setup
button on the device. The router acts as a registrar for the network, although other devices may act as a registrar as well.
Start the wizard.
51D-Link DIR-625 User Manual
Section 3 - Configuration
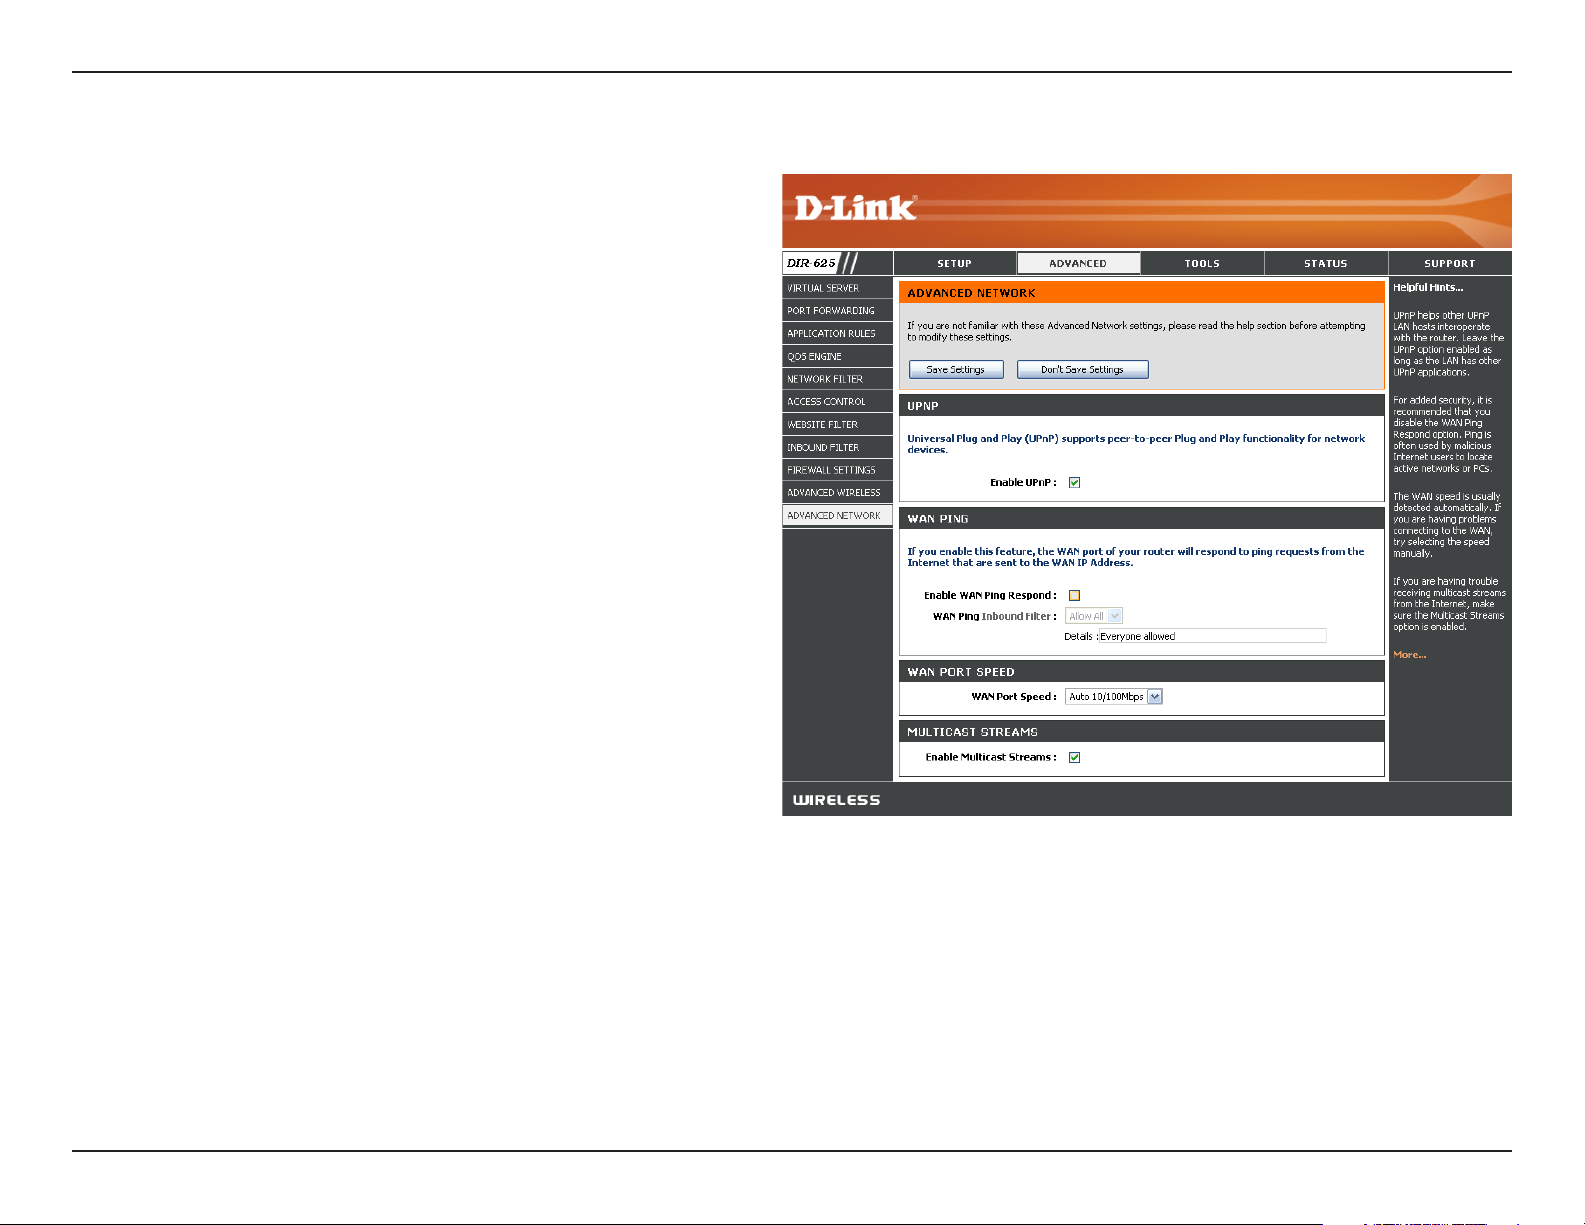
Advanced Network Settings
UPnP Settings:
Internet Ping:
Internet Port
Speed:
Multicast
streams:
To use the Universal Plug and Play (UPnP™)
feature click on Enabled. UPNP provides
compatibility with networking equipment, software
and peripherals.
Unchecking the box will not allow the DIR-625 to
respond to pings. Blocking the Ping may provide
some extra security from hackers. Check the box
to allow the Internet port to be “pinged”.
You may set the port speed of the Internet port
to 10Mbps, 100Mbps, or auto. Some older cable
or DSL modems may require you to set the port
speed to 10Mbps.
Check the box to allow multicast traffic to pass
through the router from the Internet.
UPnP
Internet Ping Block
Internet Port Speed
Multicast Streams
52D-Link DIR-625 User Manual
Section 3 - Configuration
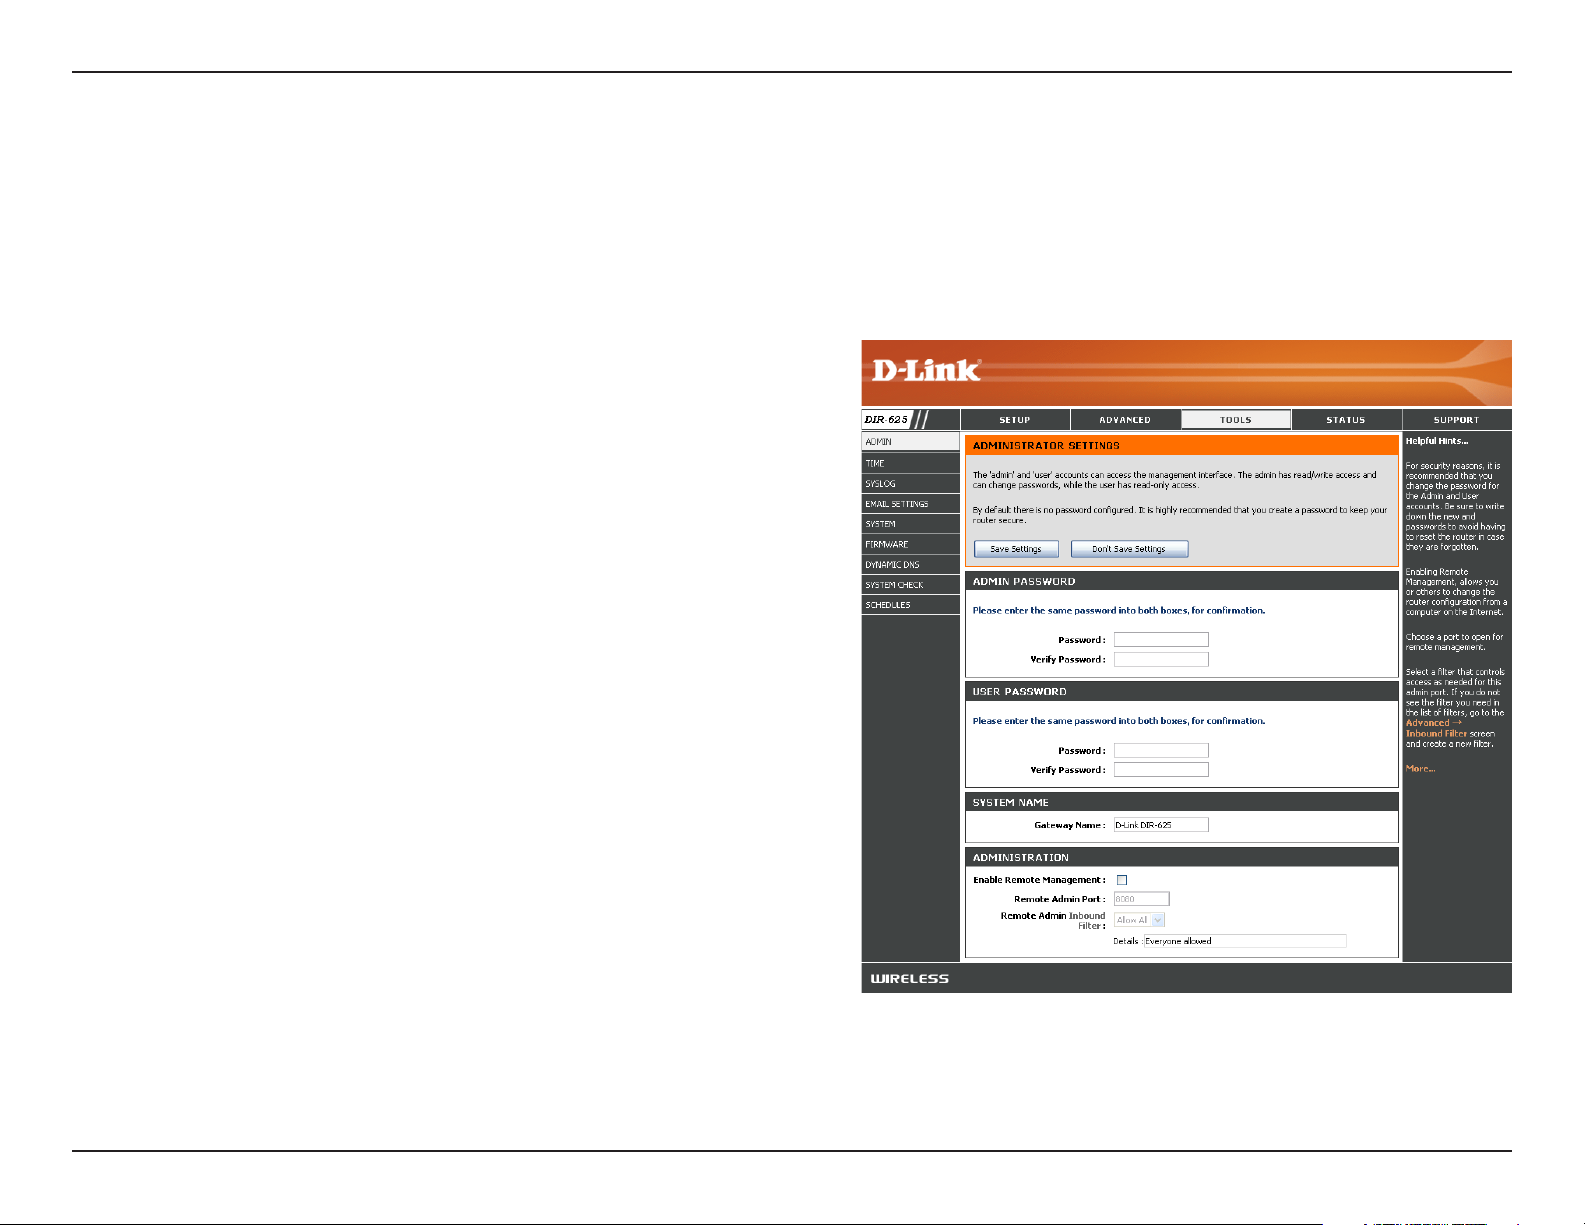
Administrator Settings
This page will allow you to change the Administrator and User passwords. You can also enable Remote Management.
There are two accounts that can access the management interface through the web browser. The accounts are admin
and user. Admin has read/write access while user has read-only access. User can only view the settings but cannot
make any changes. Only the admin account has the ability to change both admin and user account passwords.
Admin Password:
User Password:
Gateway Name:
Remote
Management:
Remote Admin
Port:
Enter a new password for the Administrator Login Name. The
administrator can make changes to the settings.
Enter the new password for the User login. If you login as
the User, you can only see the settings, but cannot change
them.
Enter a name for the DIR-625 router.
Remote management allows the DIR-625 to be configured
from the Internet by a web browser. A username and
password is still required to access the Web-Management
interface. In general, only a member of your network can
browse the built-in web pages to perform Administrator tasks.
This feature enables you to perform Administrator tasks from
the remote (Internet) host.
The port number used to access the DIR-625.
Example: http://x.x.x.x:8080 whereas x.x.x.x is the Internet
IP address of the DIR-625 and 8080 is the port used for the
Web Management interface.
Inbound Filter:
This section will list any rules that are created. You may click
the Edit icon to change the settings or enable/disable the
rule, or click the Delete icon to remove the rule.
Remote Management
Change Password
53D-Link DIR-625 User Manual
Section 3 - Configuration
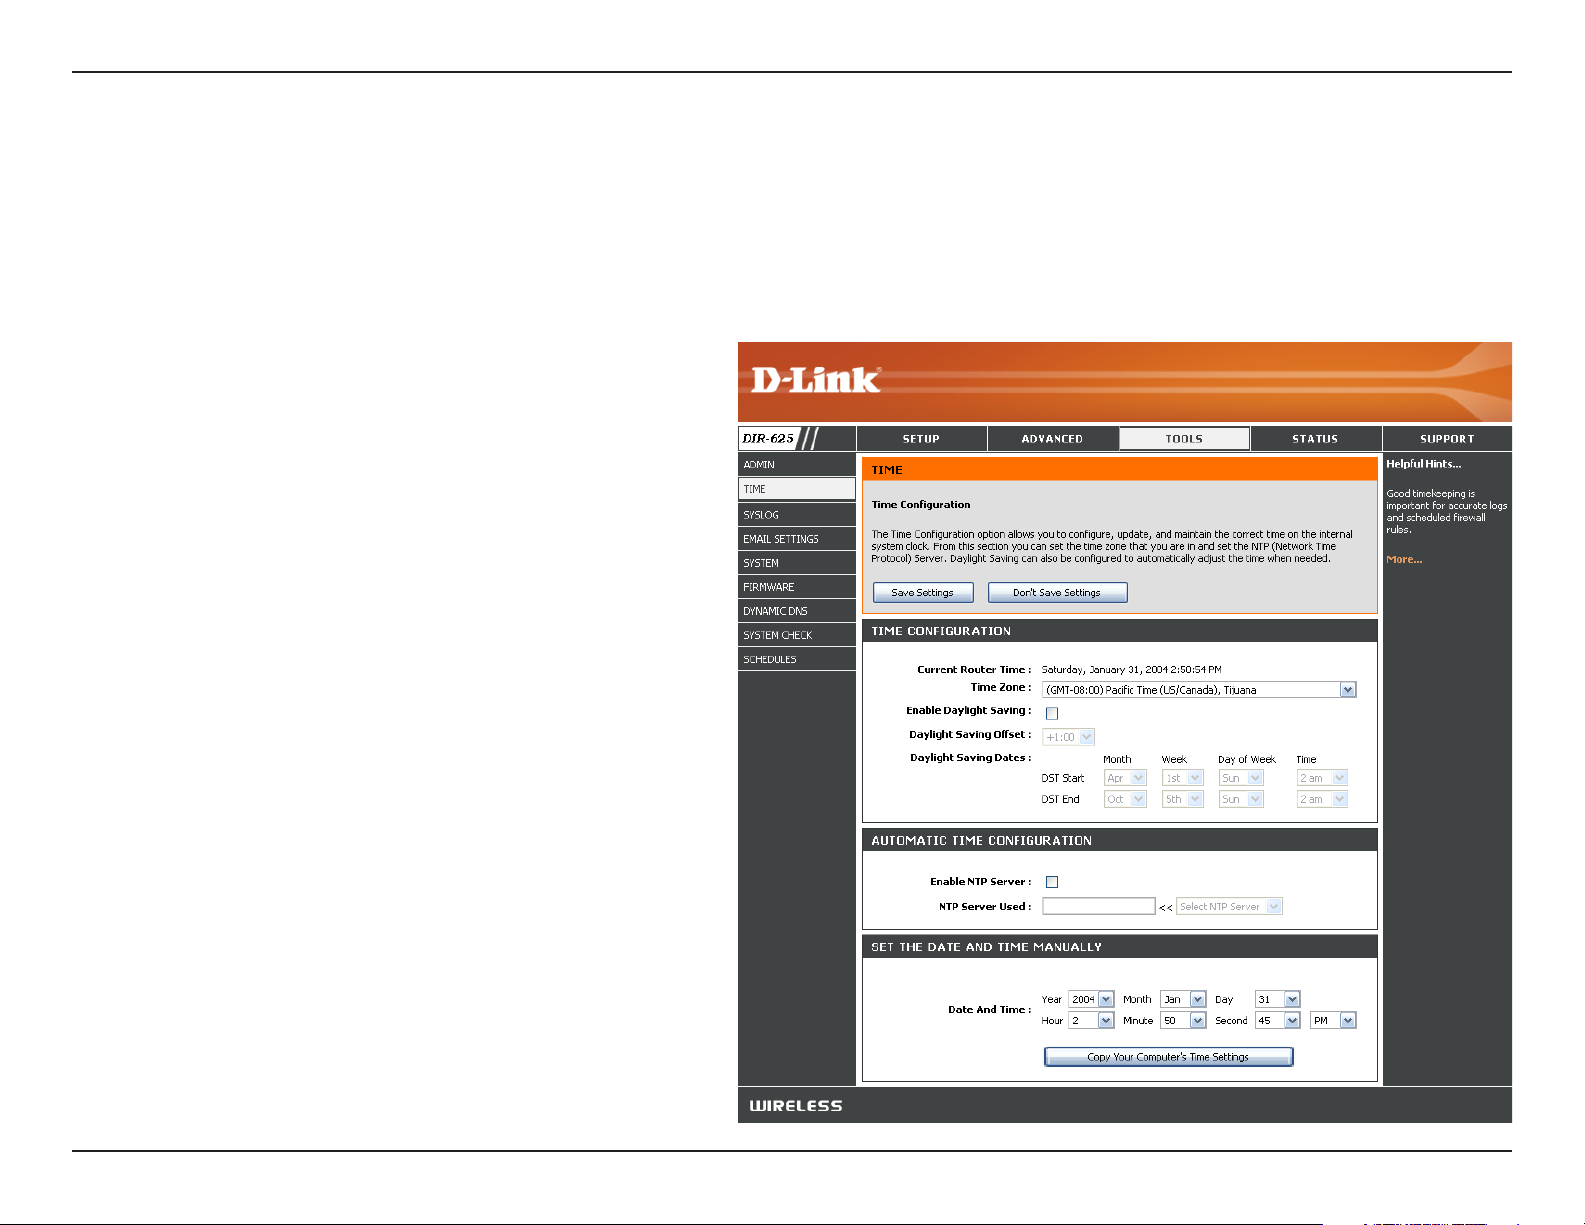
Time Settings
The Time Configuration option allows you to configure, update, and maintain the correct time on the internal system
clock. From this section you can set the time zone that you are in and set the Time Server. Daylight Saving can also
be configured to automatically adjust the time when needed.
Time Zone:
Daylight Saving:
Enable NTP
Server:
NTP Server Used:
Manual:
Select the Time Zone from the drop-down
menu.
To select Daylight Saving time manually, select
enabled or disabled, and enter a start date and
an end date for daylight saving time.
NTP is short for Network Time Protocol. NTP
synchronizes computer clock times in a network
of computers. Check this box to use a NTP
server. This will only connect to a server on the
Internet, not a local server.
Enter the NTP server or select one from the
drop-down menu.
To manually input the time, enter the values
in these fields for the Year, Month, Day, Hour,
Minute, and Second and then click Set Time.
You can also click Copy Your Computer’s Time
Settings.
54D-Link DIR-625 User Manual

Section 3 - Configuration
SysLog
The Broadband Router keeps a running log of events and activities occurring on the Router. You may send these logs
to a SysLog server on your network.
Enable Logging to
SysLog Server:
SysLog Server IP
Address:
Check this box to send the router logs to a
SysLog Server.
The address of the SysLog server that will be
used to send the logs. You may also select
your computer from the drop-down menu (only
if receiving an IP address from the router via
DHCP).
55D-Link DIR-625 User Manual
Section 3 - Configuration
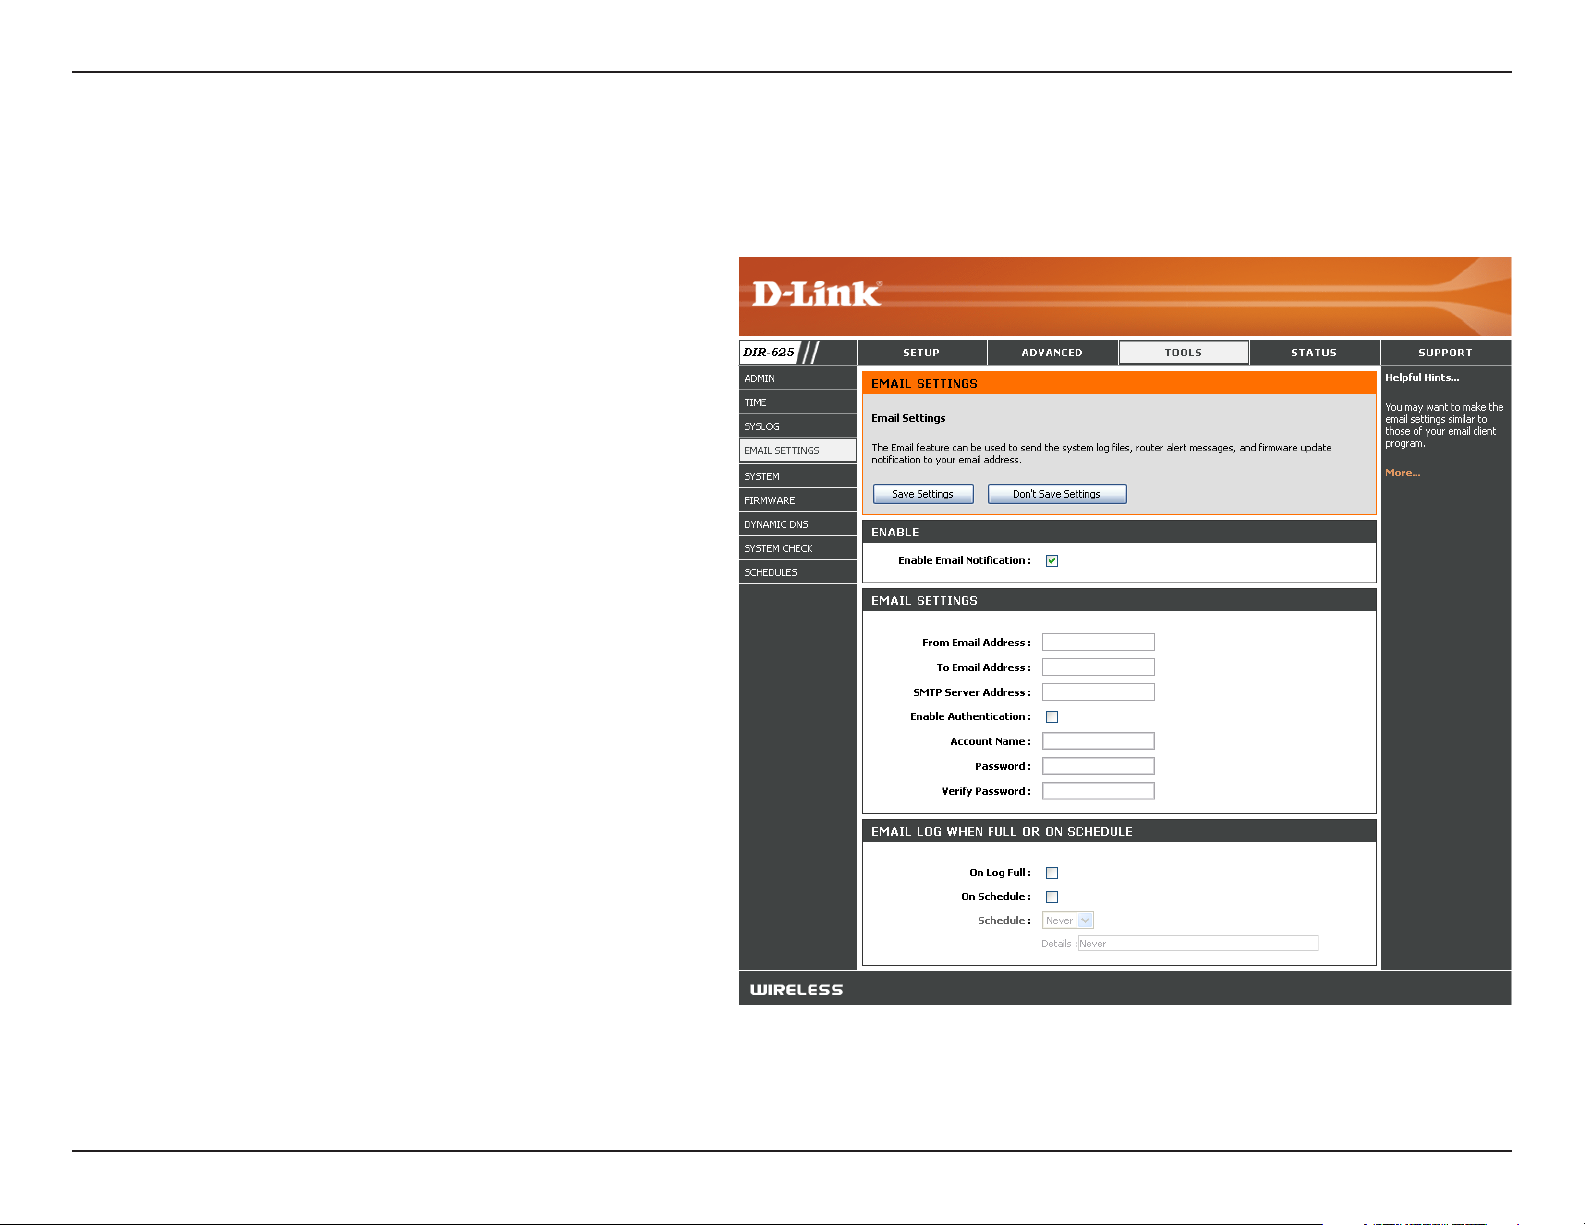
Email Settings
The Email feature can be used to send the system log files, router alert messages, and firmware update notification
to your email address.
Enable Email
Notification:
From Email
Address:
To Email Address:
SMTP Server
Address:
Enable
Authentication:
Account Name:
Password:
When this option is enabled, router activity logs
are e-mailed to a designated email address.
This email address will appear as the sender
when you receive a log file or firmware upgrade
notification via email.
Enter the email address where you want the
email sent.
Enter the SMTP server address for sending email.
If your SMTP server requires authentication,
select this option.
Check this box if your SMTP server requires
authentication.
Enter your account for sending email.
Enter the password associated with the account.
Re-type the password associated with the
account.
On Log Full:
On Schedule:
Schedule:
When this option is selected, logs will be sent
via email when the log is full.
Selecting this option will send the logs via email
according to schedule.
This option is enabled when On Schedule is selected. You can select a schedule from the list of defined schedules. To create
a schedule, go to Tools > Schedules.
56D-Link DIR-625 User Manual
Section 3 - Configuration
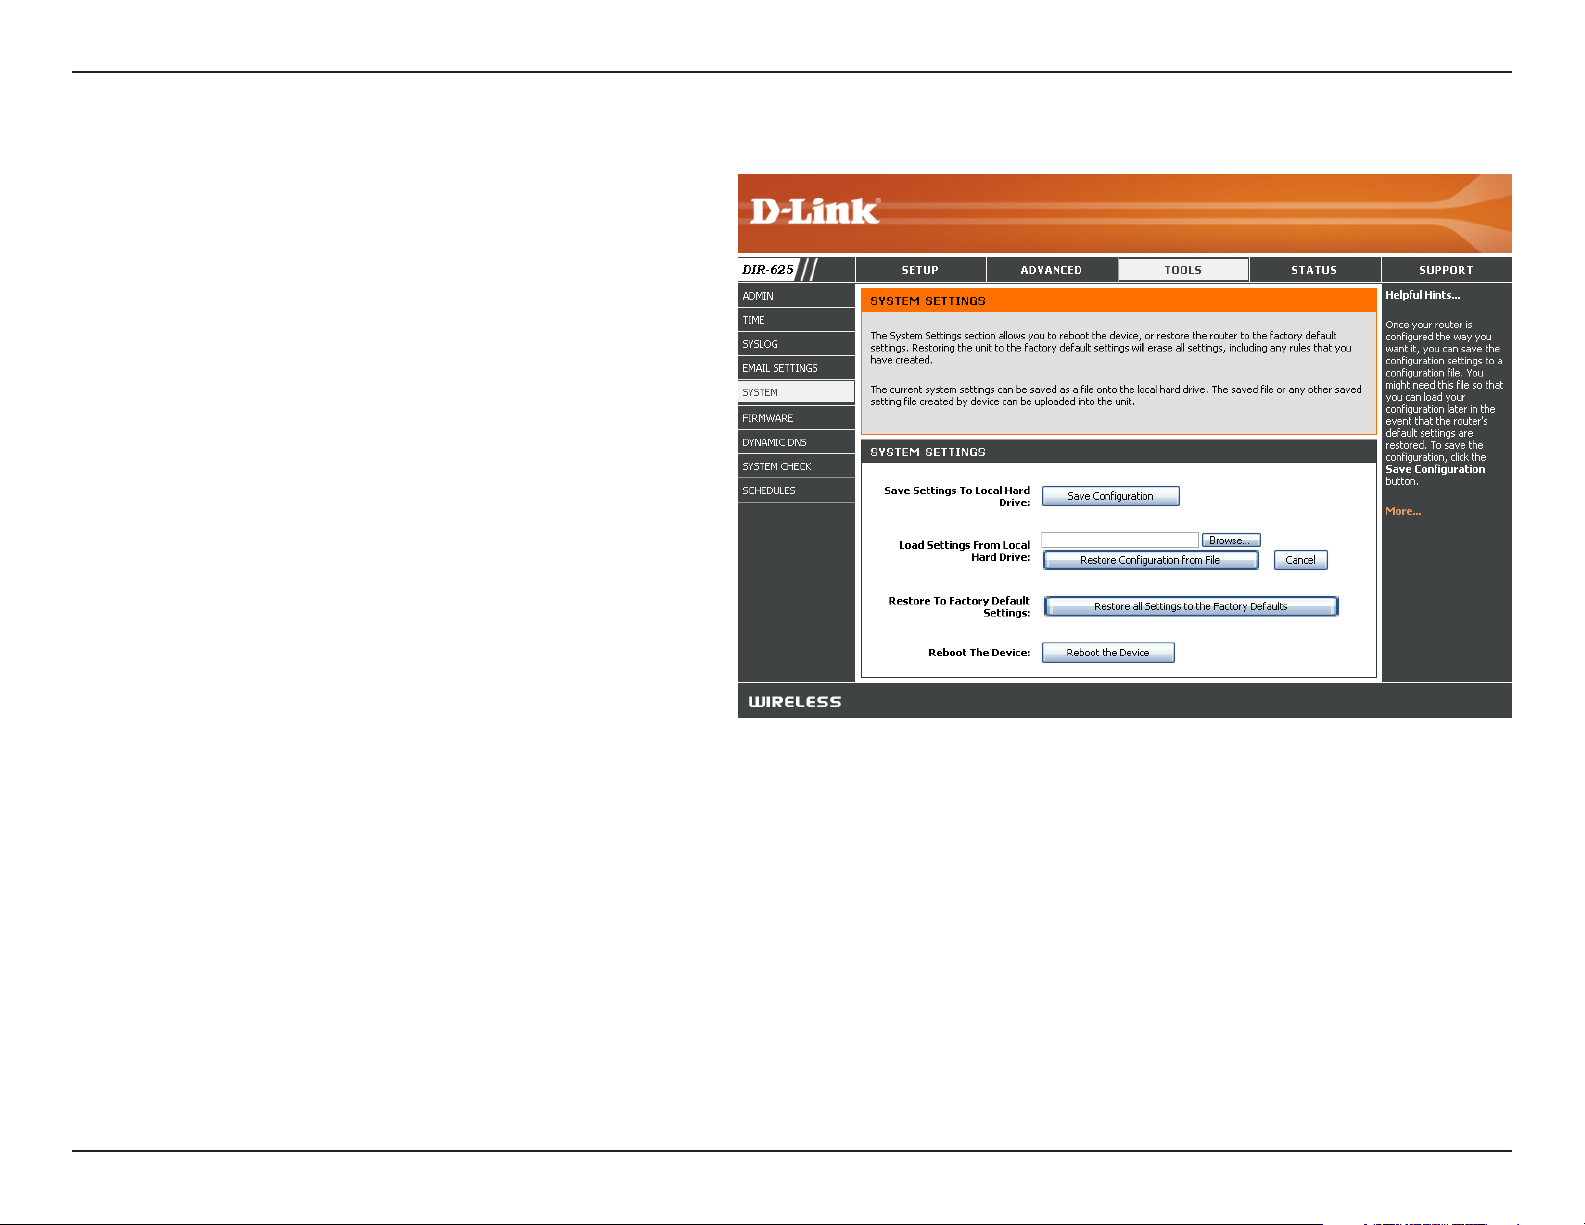
System Settings
Save Settings to
Local Hard Drive:
Load Settings
from Local Hard
Drive:
Restore to Factory
Default Settings:
Use this option to save the current router
configuration settings to a file on the hard disk
of the computer you are using. First, click the
Save button. You will then see a file dialog,
where you can select a location and file name
for the settings.
Use this option to load previously saved
router configuration settings. First, use the
Browse control to find a previously save file
of configuration settings. Then, click the Load
button to transfer those settings to the router.
This option will restore all configuration settings
back to the settings that were in effect at the
time the router was shipped from the factory.
Any settings that have not been saved will be
lost, including any rules that you have created. If
you want to save the current router configuration
settings, use the Save button above.
Reboot Device:
Click to reboot the router.
57D-Link DIR-625 User Manual
Section 3 - Configuration
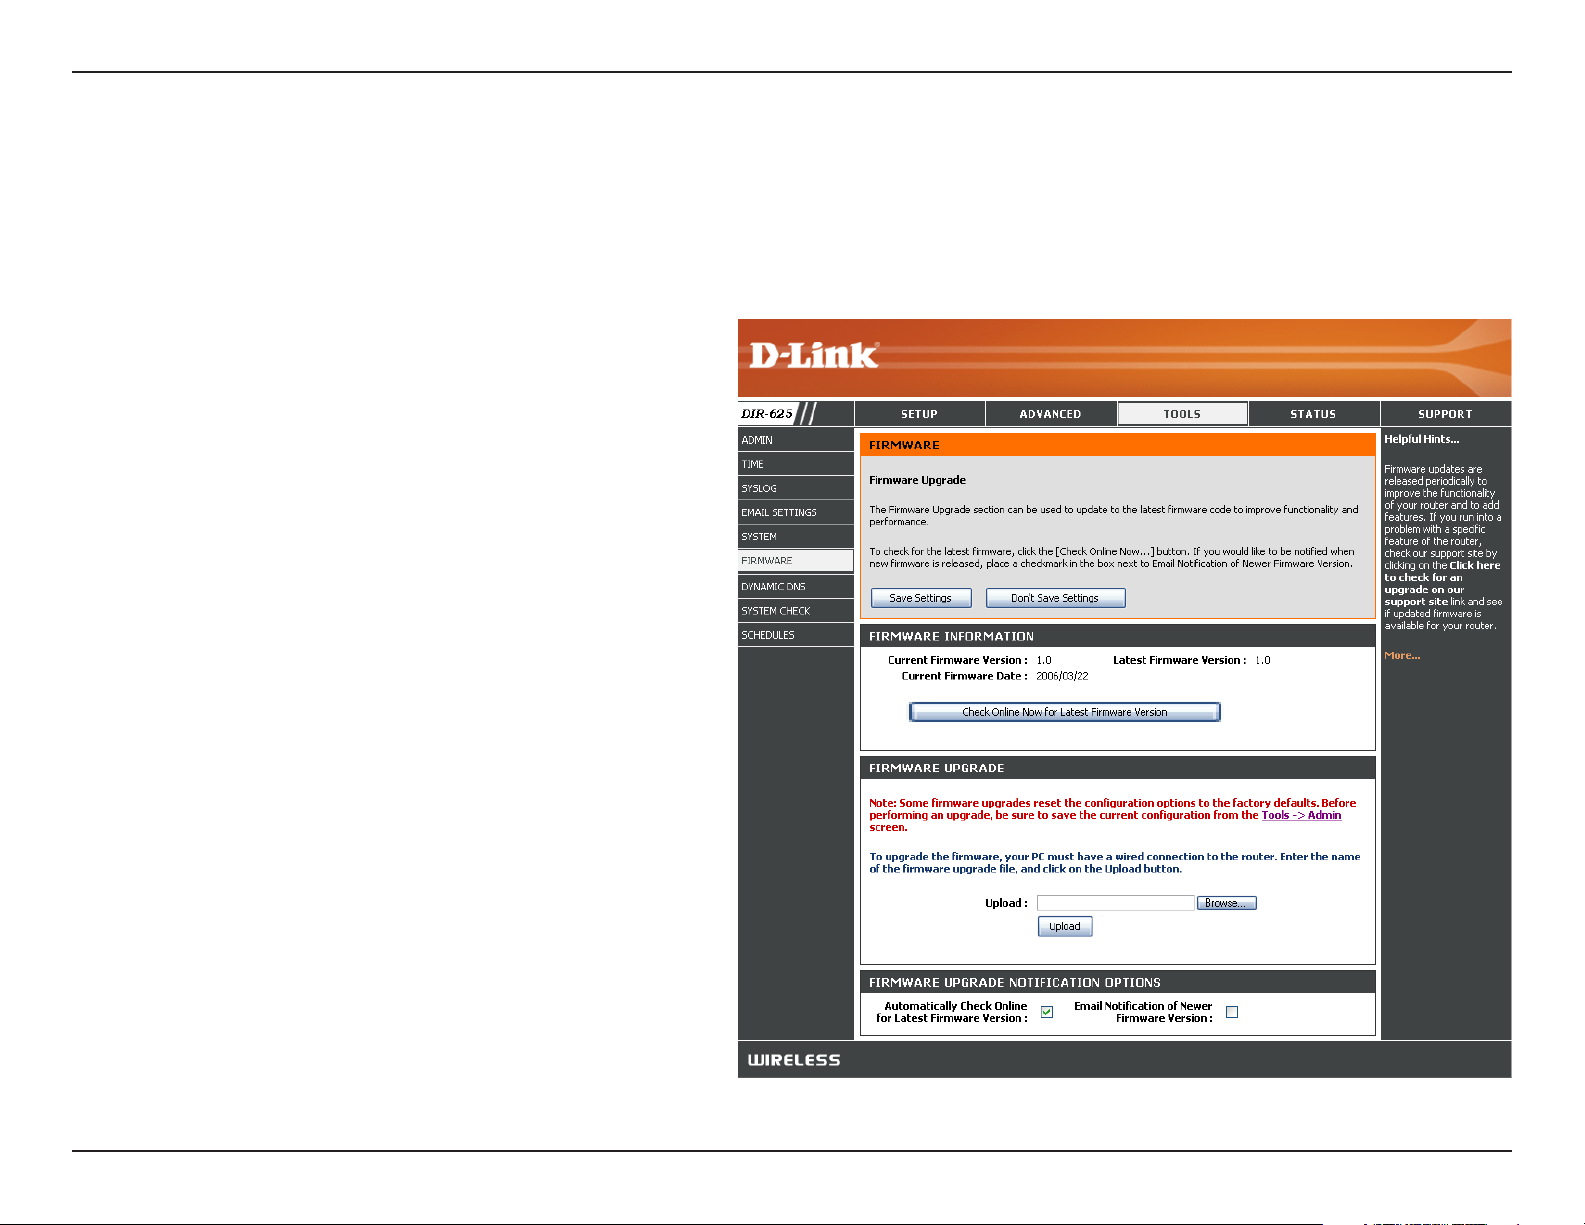
Update Firmware
You can upgrade the firmware of the Router here. Make sure the firmware you want to use is on the local hard drive of
the computer. Click on Browse to locate the firmware file to be used for the update. Please check the D-Link support
site for firmware updates at http://support.dlink.com. You can download firmware upgrades to your hard drive from the
D-Link support site.
Firmware
Upgrade:
Browse:
Notifications
Options:
Click on Check Online Now for Latest Firmware
Version to find out if there is an updated firmware;
if so, download the new firmware to your hard
drive.
After you have downloaded the new firmware,
click Browse to locate the firmware update on
your hard drive. Click Upload to complete the
firmware upgrade.
Check Automatically Check Online for Latest
Firmware Version to have the router check
automatically to see if there is a new firmware
upgrade.
Check Email Notification of Newer Firmware
Version to have the router send an email when
there is a new firmware available.
58D-Link DIR-625 User Manual
Section 3 - Configuration
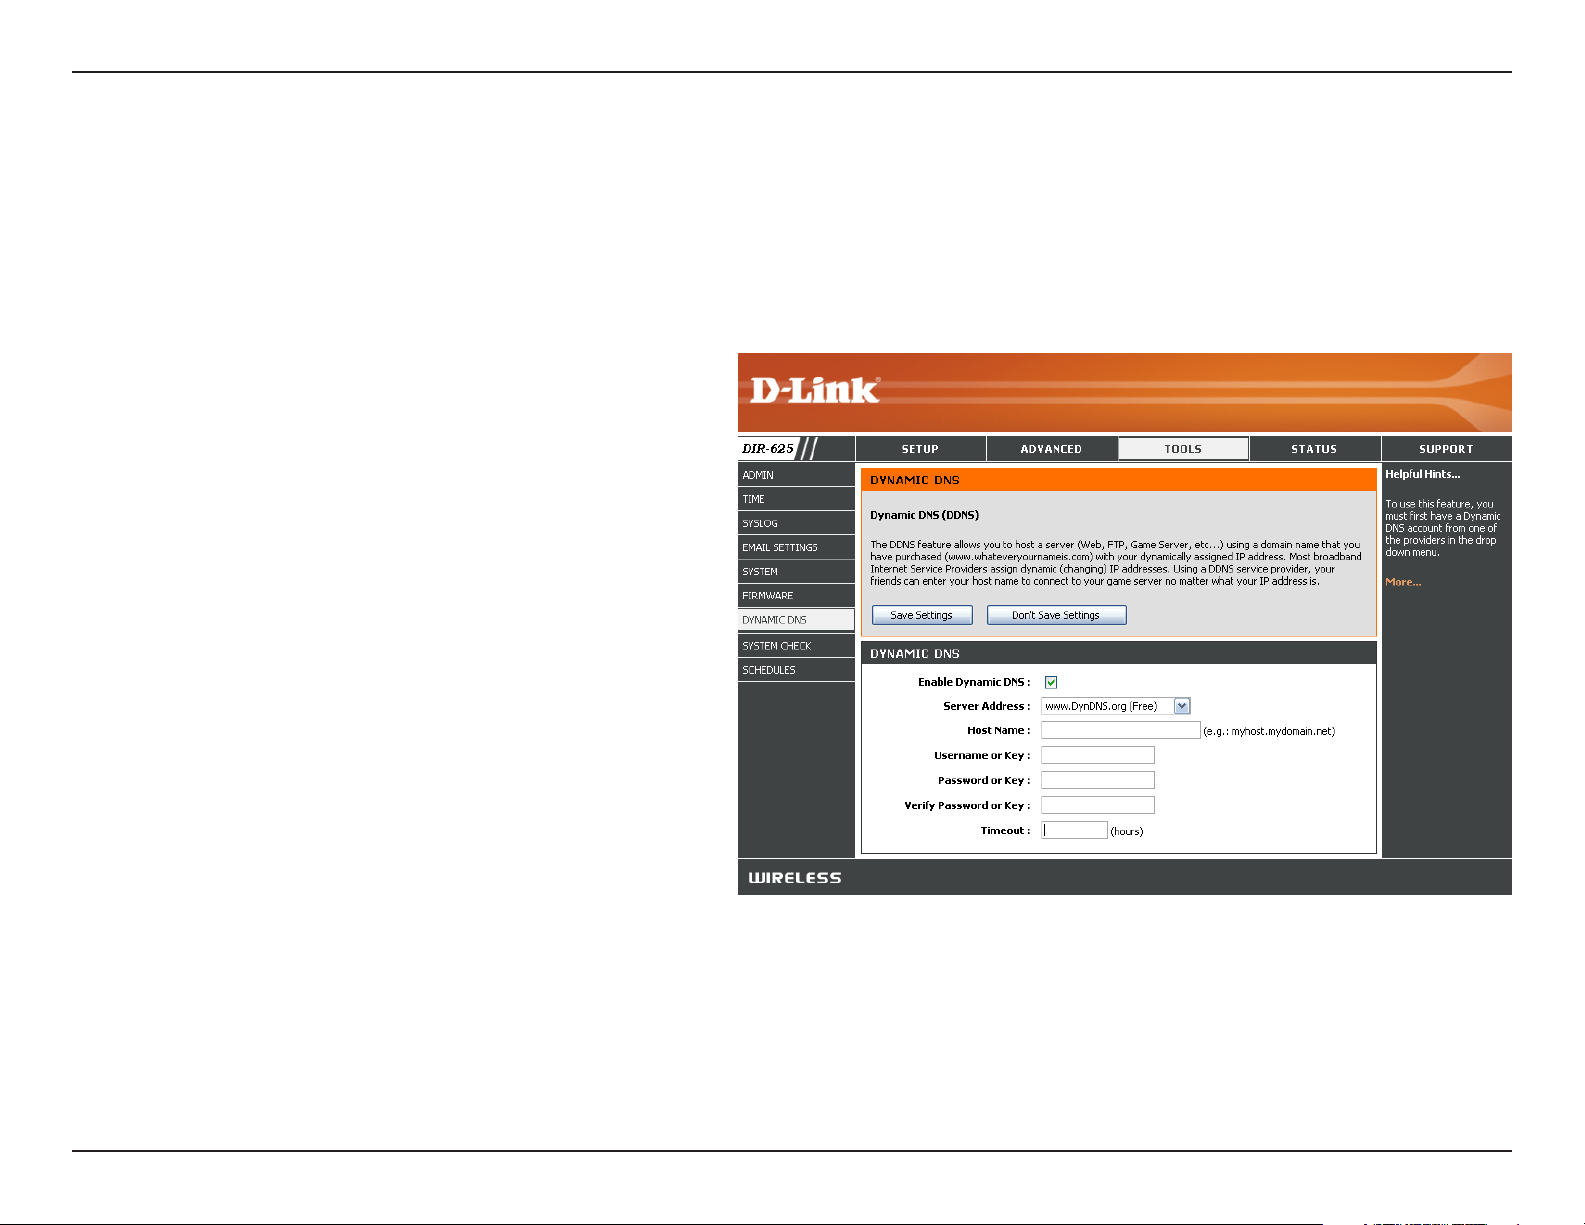
DDNS
The DDNS feature allows you to host a server (Web, FTP, Game Server, etc…) using a domain name that you have
purchased (www.whateveryournameis.com) with your dynamically assigned IP address. Most broadband Internet
Service Providers assign dynamic (changing) IP addresses. Using a DDNS service provider, your friends can enter in
your domain name to connect to your server no matter what your IP address is.
DDNS:
Server Address:
Host Name:
Username or Key:
Password or Key:
Timeout:
Dynamic Domain Name System is a method of
keeping a domain name linked to a changing IP
Address. Check the box to enable DDNS.
Choose your DDNS provider from the drop
down menu.
Enter the Host Name that you registered with
your DDNS service provider.
Enter the Username for your DDNS account.
Enter the Password for your DDNS account.
Enter a time (in hours).
59D-Link DIR-625 User Manual
Section 3 - Configuration
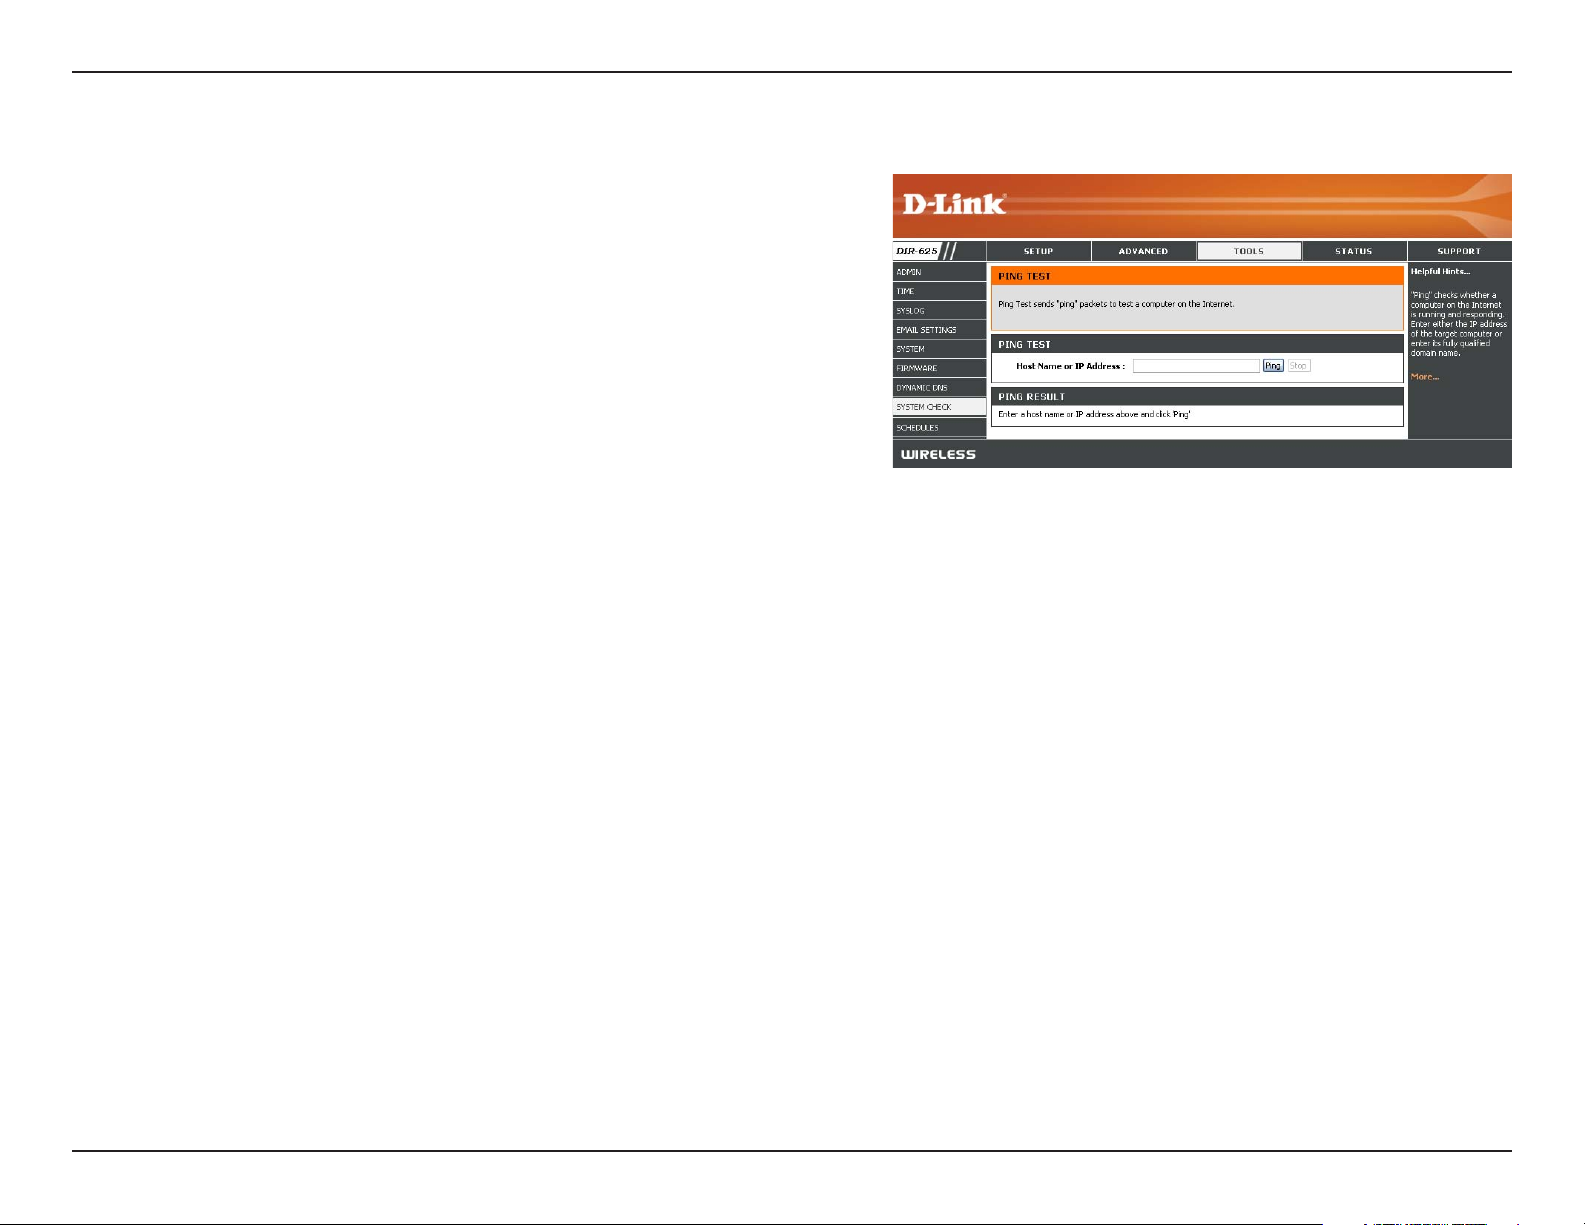
System Check
Ping Test:
Ping Results:
The Ping Test is used to send Ping packets to test if a
computer is on the Internet. Enter the IP Address that you
wish to Ping, and click Ping.
The results of your ping attempts will be displayed here.
60D-Link DIR-625 User Manual
Section 3 - Configuration
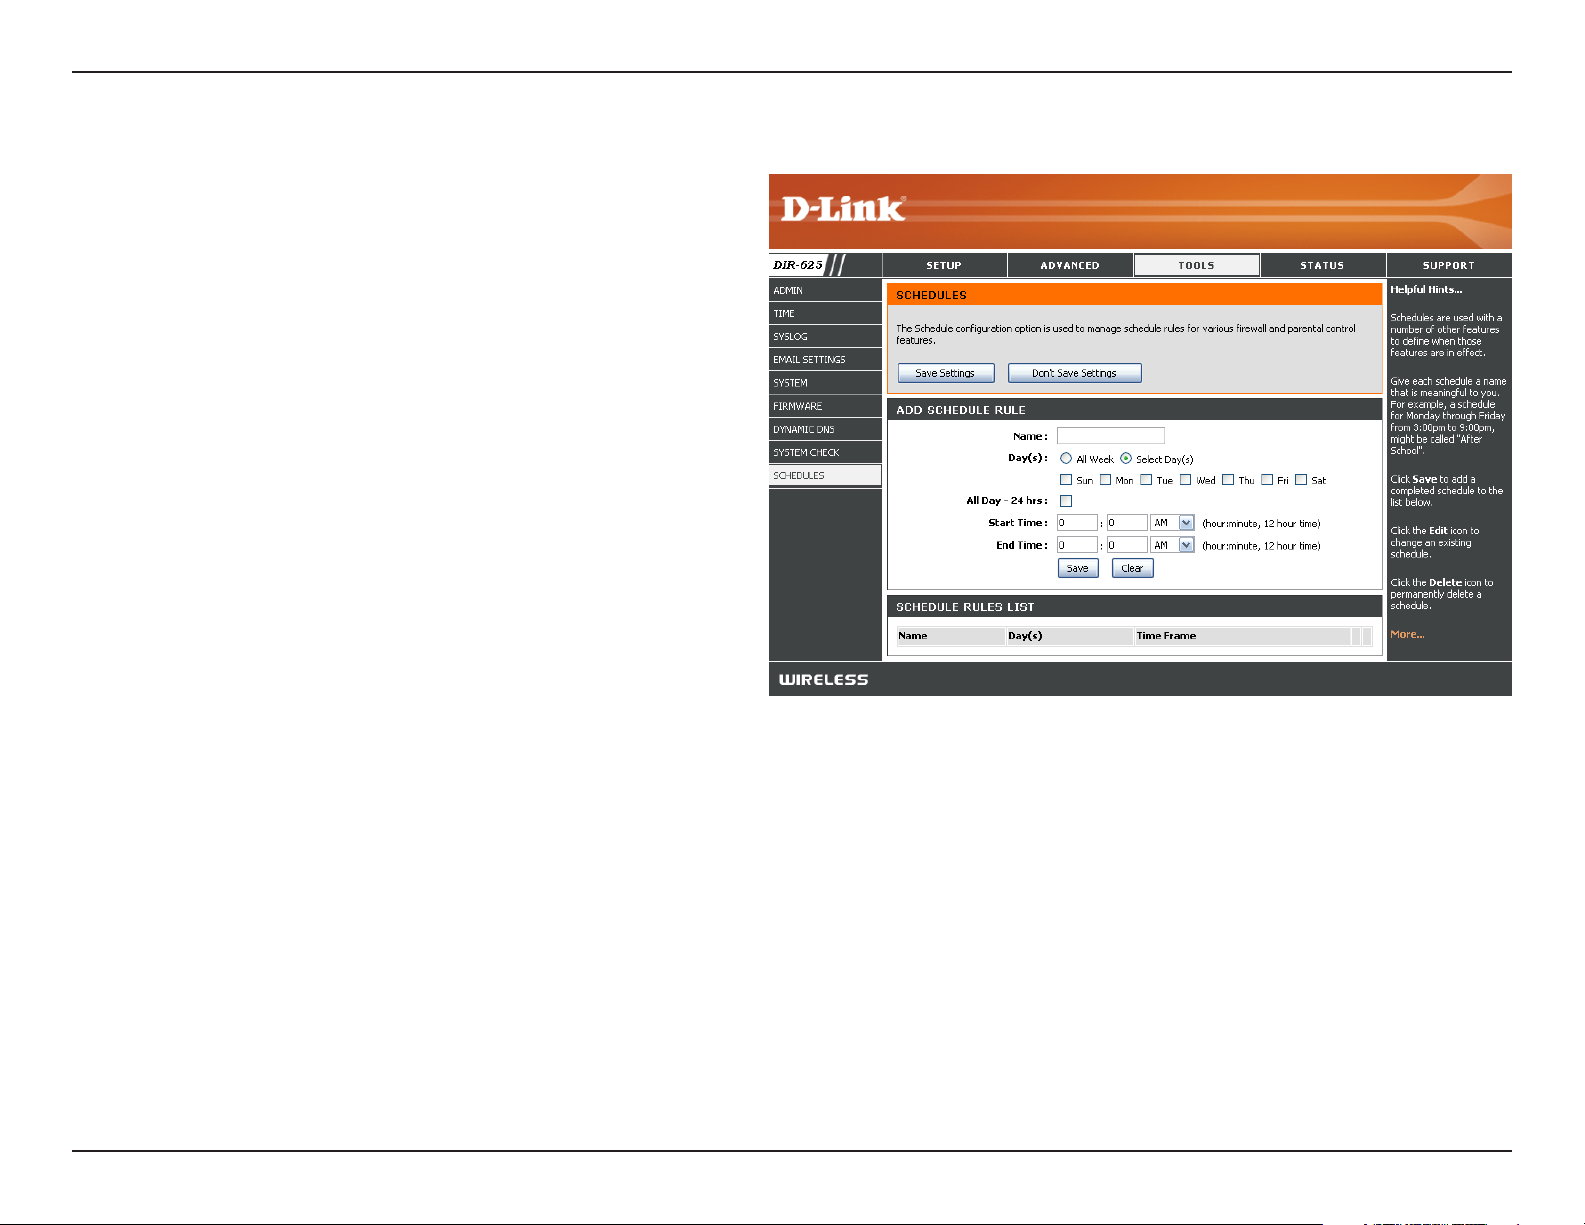
Schedules
Name:
Days:
Time:
Save:
Schedule Rules
List:
Enter a name for your new schedule.
Select a day, a range of days, or All Week to
include every day.
Check All Day - 24hrs or enter a start and end
time for your schedule.
Click Save to save your schedule. You must click
Save Settings at the top for your schedules to go
into effect.
The list of schedules will be listed here. Click the
Edit icon to make changes or click the Delete
icon to remove the schedule.
61D-Link DIR-625 User Manual
Section 3 - Configuration
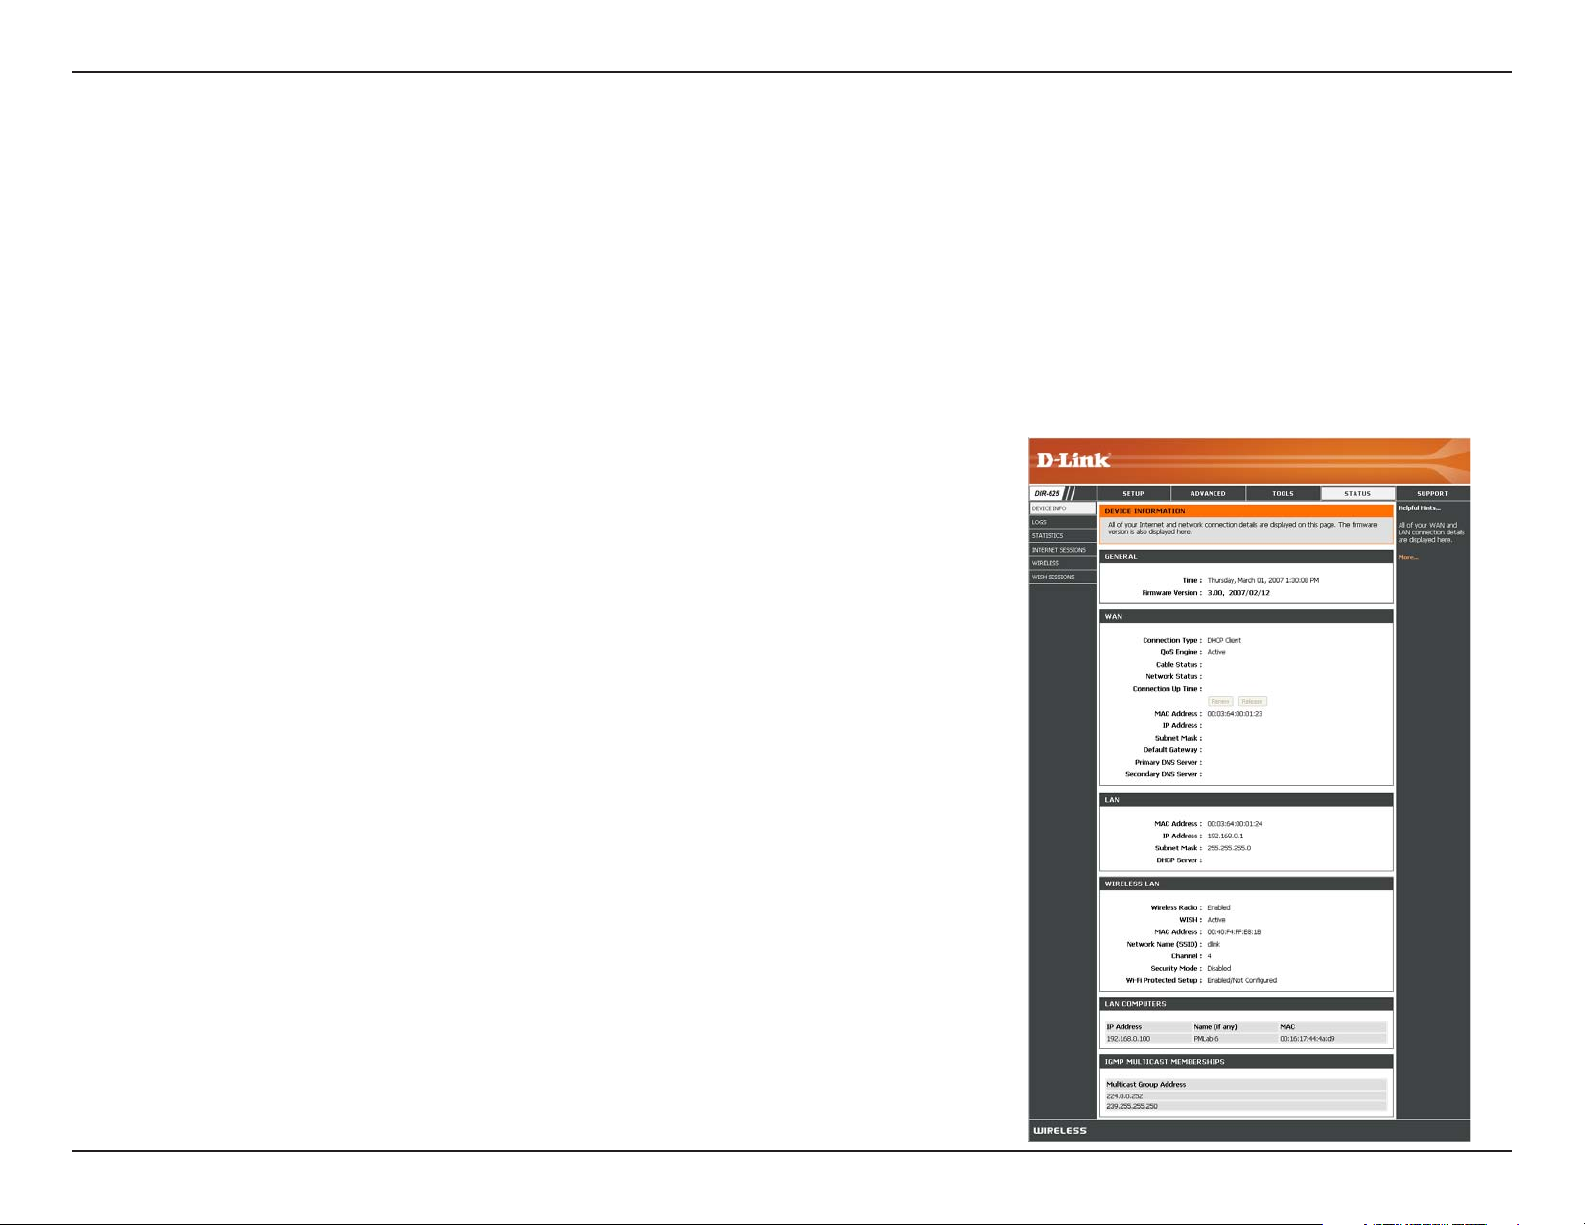
Device Information
This page displays the current information for the DIR-625. It will display the LAN, WAN (Internet), and Wireless
information.
If your Internet connection is set up for a Dynamic IP address then a Release button and a Renew button will be
displayed. Use Release to disconnect from your ISP and use Renew to connect to your ISP.
If your Internet connection is set up for PPPoE, a Connect button and a Disconnect button will be displayed. Use
Disconnect to drop the PPPoE connection and use Connect to establish the PPPoE connection.
General:
WAN:
LAN:
Wireless LAN:
LAN Computers:
IGMP Multicast
Memberships:
Displays the router’s time and firmware version.
Displays the MAC address and the public IP settings for the router.
Displays the MAC address and the private (local) IP settings for the
router.
Displays the wireless MAC address and your wireless settings such as
SSID and Channel.
Displays computers and devices that are connected to the router via
Ethernet and that are receiving an IP address assigned by the router
(DHCP).
Displays the Multicast Group IP Address.
62D-Link DIR-625 User Manual
Section 3 - Configuration
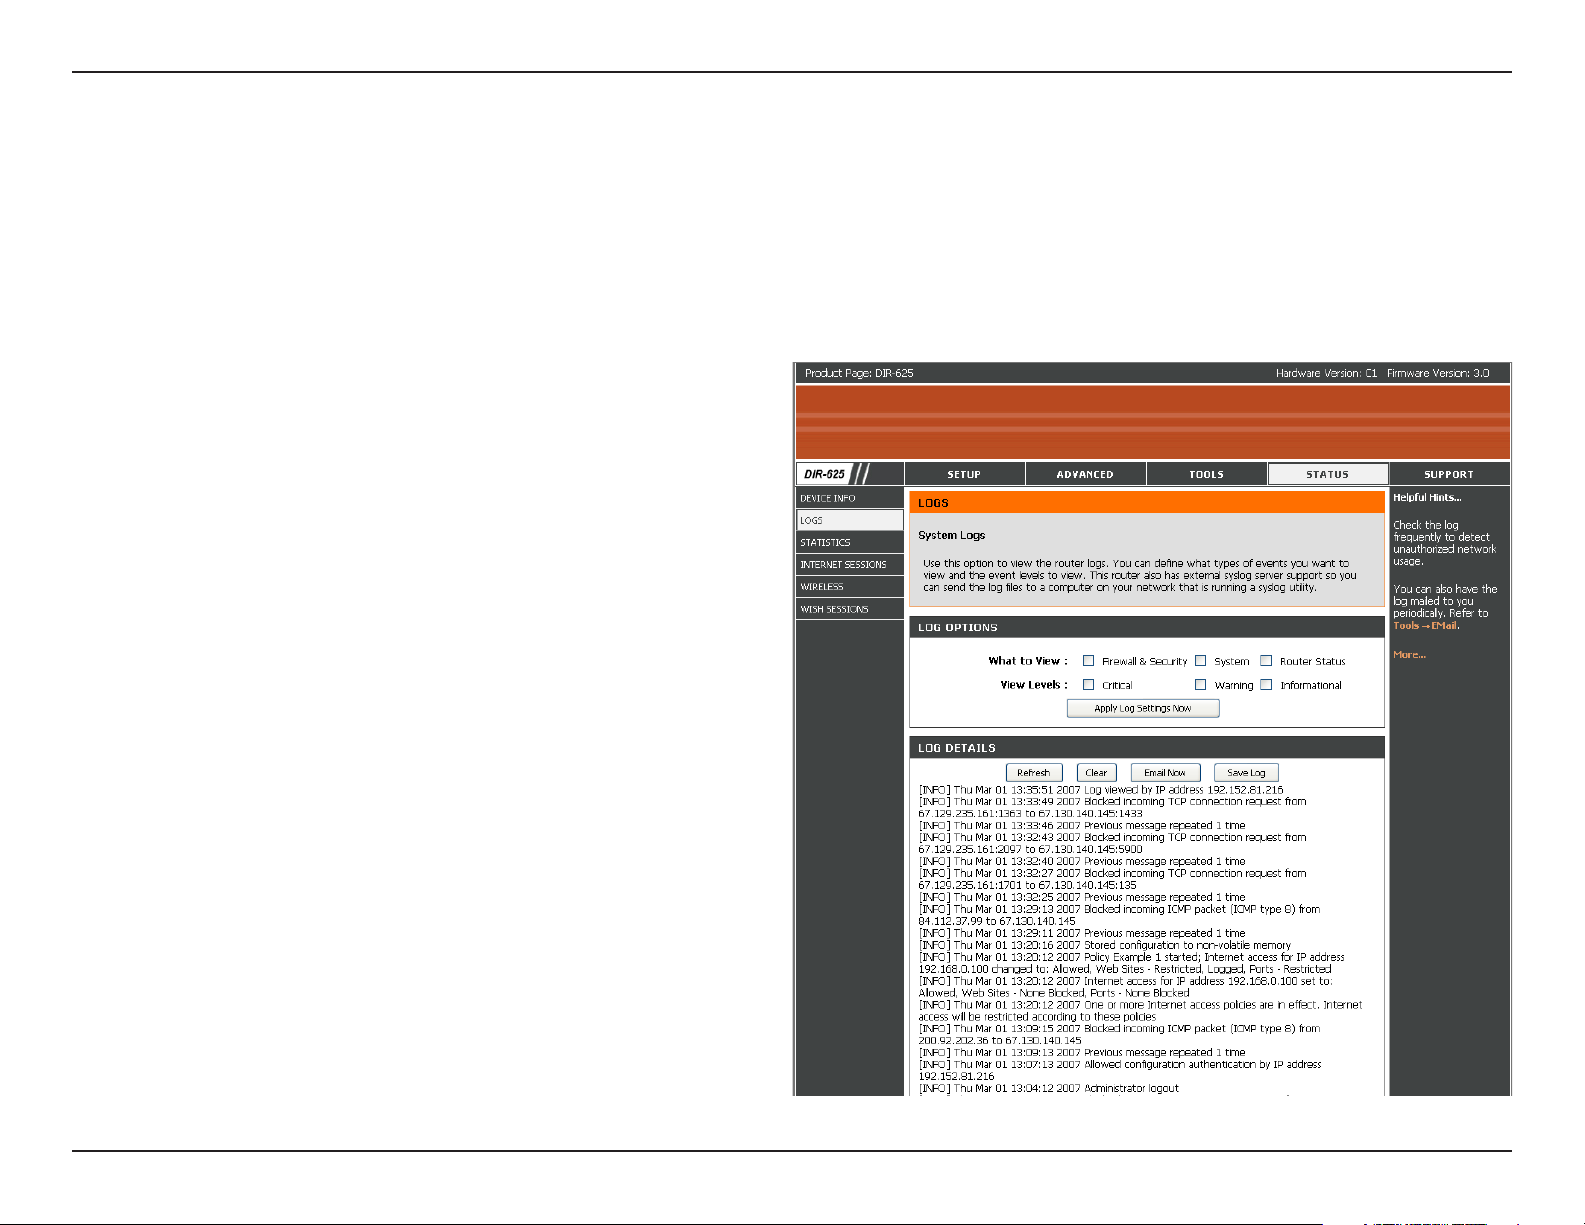
Log
The router automatically logs (records) events of possible interest in it’s internal memory. If there isn’t enough internal
memory for all events, logs of older events are deleted but logs of the latest events are retained. The Logs option allows
you to view the router logs. You can define what types of events you want to view and the level of the events to view.
This router also has external Syslog Server support so you can send the log files to a computer on your network that
is running a Syslog utility.
What to View:
View Levels:
Apply Log
Settings:
Refresh:
Clear:
Email Now:
Save Log:
You can select the types of messages that you want
to display from the log. Firewall & Security, System,
and Router Status messages can be selected.
There are three levels of message importance:
Informational, Warning, and Critical. Select the levels
that you want displayed in the log.
Will filter the log results so that only the selected
options appear.
Updates the log details on the screen so it displays
any recent activity.
Clears all of the log contents.
This option will send a copy of the router log to
the email address configured in the Tools > Email
screen.
This option will save the router to a log file on your
computer.
63D-Link DIR-625 User Manual
Section 3 - Configuration
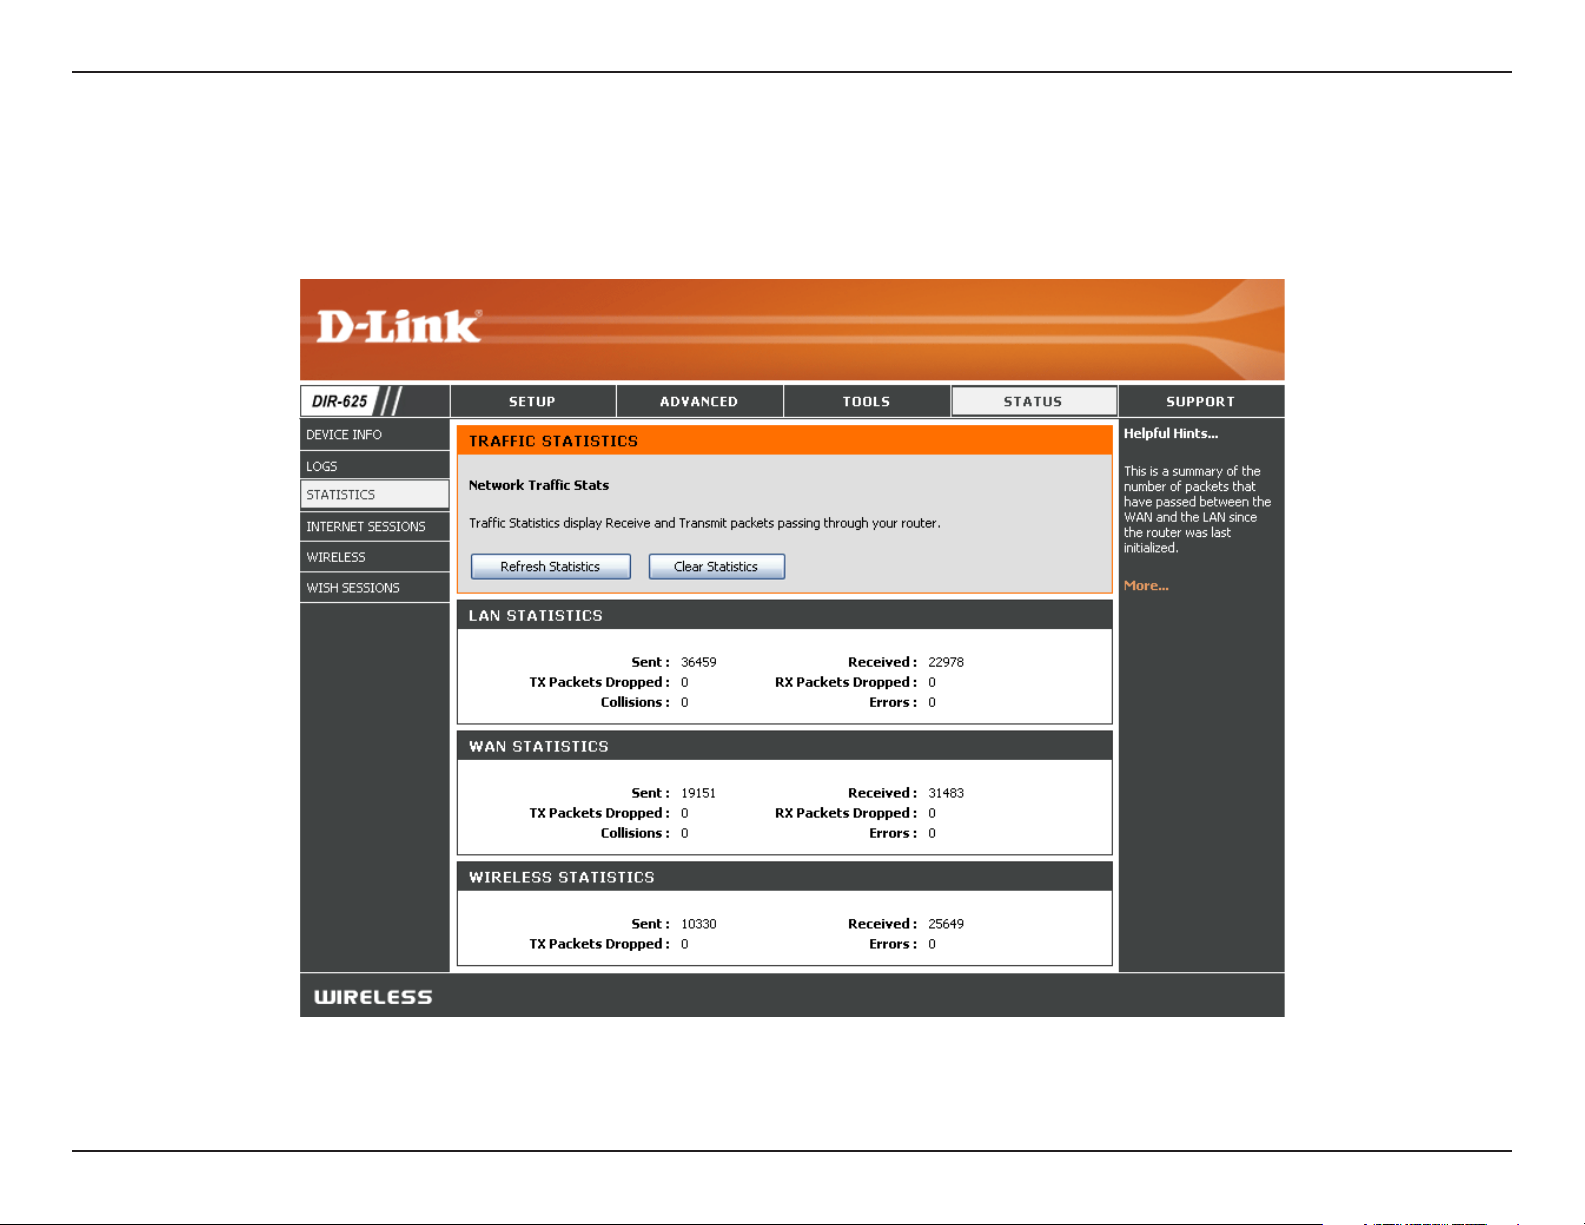
Stats
The screen below displays the Traffic Statistics. Here you can view the amount of packets that pass through the DIR-625 on
both the Internet and the LAN ports. The traffic counter will reset if the device is rebooted.
64D-Link DIR-625 User Manual
Section 3 - Configuration
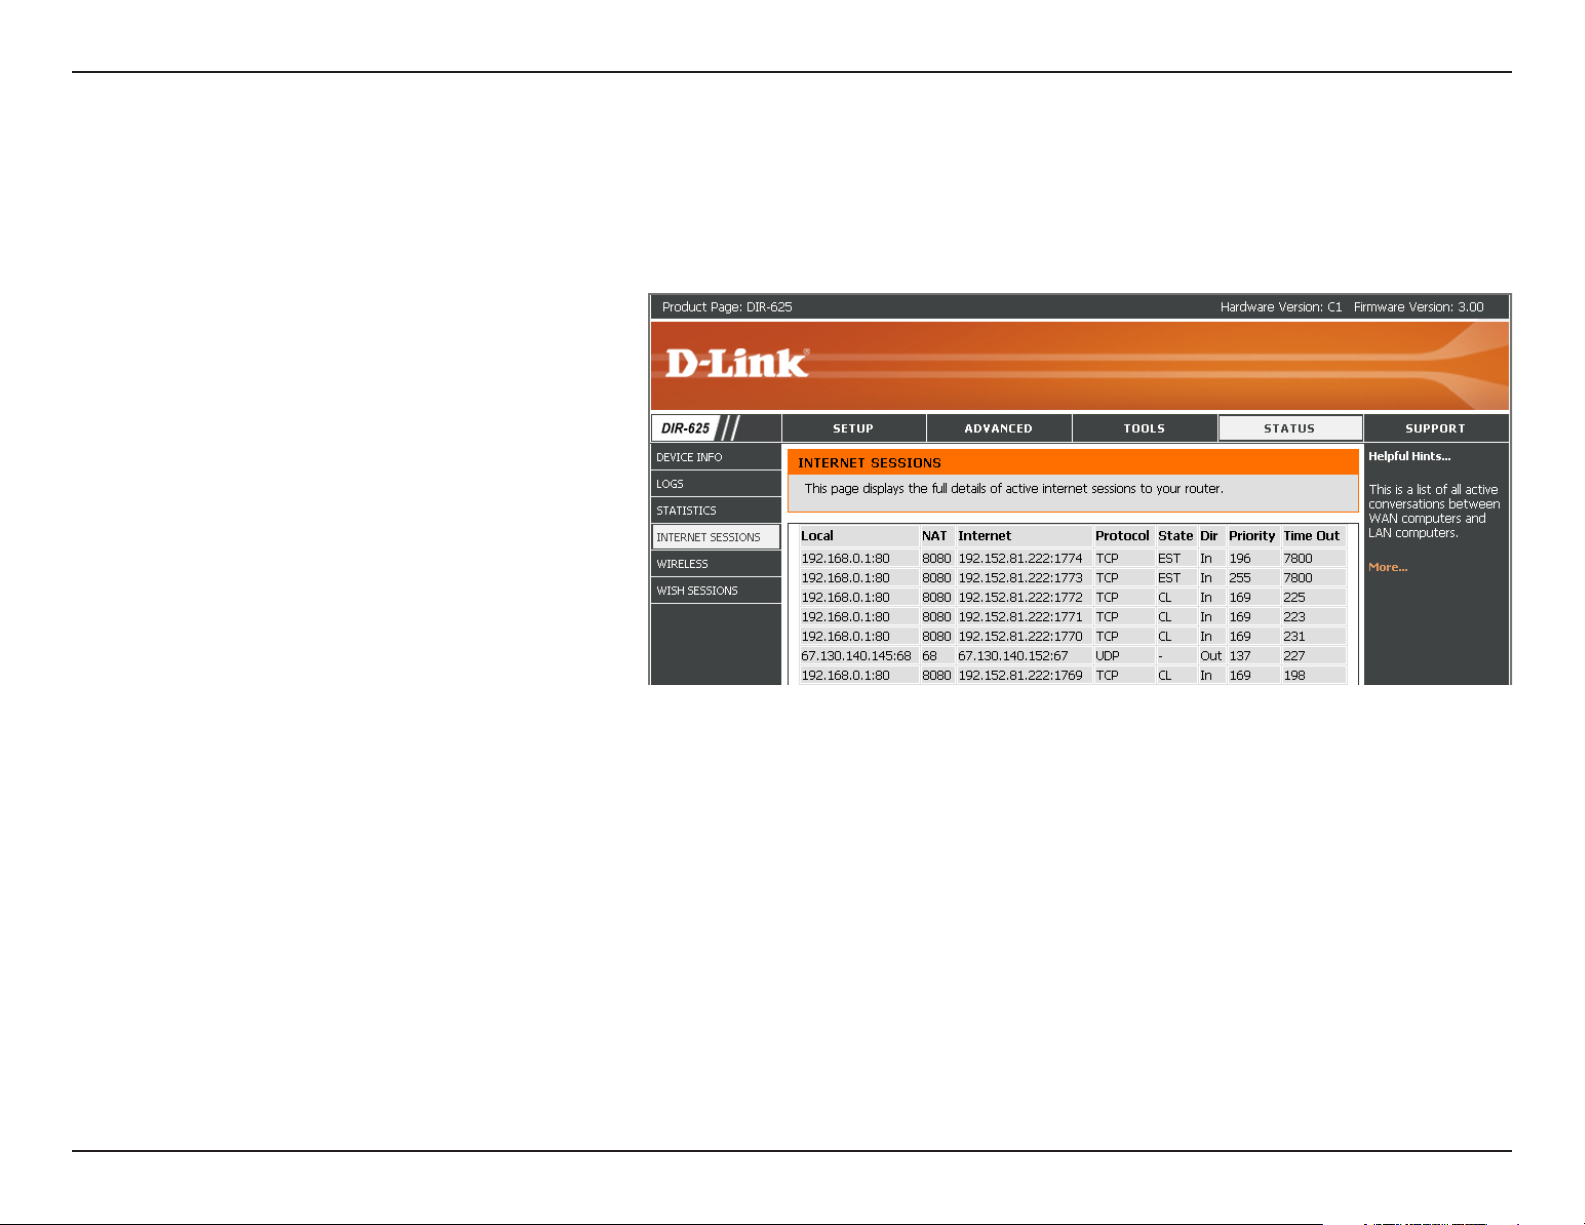
Internet Sessions
The Internet Sessions page displays full details of active Internet sessions through your router. An Internet session is a
conversation between a program or application on a LAN-side computer and a program or application on a WAN-side
computer.
Local:
NAT:
Internet:
Protocol:
State:
The IP address and, where appropriate,
port number of the local application.
The por t number of the LAN-si de
application as viewed by the WAN-side
application.
The IP address and, where appropriate,
port number of the application on the
Internet.
The communications protocol used for
the conversation.
State for sessions that use the TCP protocol:
NO: None -- This entry is used as a placeholder for a future connection that may occur.
SS: SYN Sent -- One of the systems is attempting to start a connection.
EST: Established -- the connection is passing data.
FW: FIN Wait -- The client system has requested that the connection be stopped.
CW: Close Wait -- The server system has requested that the connection be stopped.
TW: Time Wait -- Waiting for a short time while a connection that was in FIN Wait is fully closed.
LA: Last ACK -- Waiting for a short time while a connection that was in Close Wait is fully closed.
CL: Closed -- The connection is no longer active but the session is being tracked in case there are any retransmitted
packets still pending.
65D-Link DIR-625 User Manual

Section 3 - Configuration
The direction of initiation of the conversation:
Dir:
Out - Initiated from LAN to WAN.
In - Initiated from WAN to LAN.
Priority:
Time Out:
The preference given to outbound packets of this conversation by the QoS Engine logic. Smaller numbers represent higher
priority.
The number of seconds of idle time until the router considers the session terminated. The initial value of Time Out depends
on the type and state of the connection.
300 seconds - UDP connections.
240 seconds - Reset or closed TCP connections. The connection does not close instantly so that lingering packets
can pass or the connection can be re-established.
7800 seconds - Established or closing TCP connections.
66D-Link DIR-625 User Manual
 Loading...