

Page 1

This Quick Installation Guide gives step-by-step instructions for setting up the D-Link
DAS-3216/3208 ADSL IP DSLAM. This Quick Installation Guide only introduces you for the
main setup procedure. For more detailed information about complete installation and
configuration, please refer to the User’s Manual on master CD included with your DLSAM.
Check Your Package Contents
If any of the above items are missing, please contact your reseller
©2004 D-Link Corporation, Inc. All rights reserved. Trademarks or registered trademarks are the property of their respective
holders. Software and specifications subject to change without notice. D-Link ADSL IP DSLAM.
• D-Link DAS-3216/3208 ADSL IP DSLAM
• CD-ROM (containing Manual and Warranty)
•Ethernet Cable (CAT5 UTP Straight-Through)
• AC Power Cord (AC power module only)
• RS-232 cable
This product can be set up using
any current web browser, i.e.,
Internet Explorer 6.x, Netscape
Navigator 7. x.
DAS-3216/3208
ADSL IP DSLAM
Before You Begin
Using a power
supply with a
different voltage rating
will damage and void
the warranty for this
product.
Page 2

Setup DAS-3216/3208 ADSL IP
DSLAM
The DAS-3216/3208 can be installed in a standard 19-inch rack, by using
the mounting brackets provided. The only difference between DAS-3216
and DAS-3208 is the port density: DAS-3216 is a 16-port design, while
DAS-3208 is equipped with 8 ports to meet the application of fewer
subscribers. Mount the shelf on the rack using the large screws provided.
The procedure to connect and wire the system is as follows.
Note: this Q.I.G takes DAS-3216 as example.
Rear Panel Connection
The following figure shows the rear panel connection of DAS-3216/3208:
1. Ground DAS-3216/3208 by connecting a grounded wire
2. Connect the ADSL line connector, a 50-pin centronic connector, of
DAS-3216/3208 to CPE by using a telco cable. Each line connector
supports 8 ports of ADSL for Data path from MDF(Main Distribution
Frame).
3. Connect the phone connector, a 50-pin centronic connector, of DAS3216/3208 to Exchange/PBX by using telco cable. Phone connector
is an optional module supporting Voice path to Exchange/PBX; it
must be along with Line Connector.
4. Connect the power adapter and plug it into an outlet.
Page 3

Front Panel Connection
Web Configuration
This section shows how to prepare the system to perform basic
communication functions through Embedded Web Interface (EmWeb).
You can access the EmWeb from any Web Browser. Perform initial
configuration procedures as follows:
1. Before you start to connect to EmWeb, it is necessary that your PC’s
IP and DAS-3216/3208’s IP are in the same group.
2. Establish a connection to the Internet.
3. Open a Web browser.
4. Enter the IP address “10.90.90.90”of the DAS-3216/3208.
5. Log in with the “Admin” for both user name and password.
6. After that, you could enter the main menu of EmWeb for your
configuration.
Uplink
Console
Console Terminal
For Manufacture
Maintenance Only
Page 4
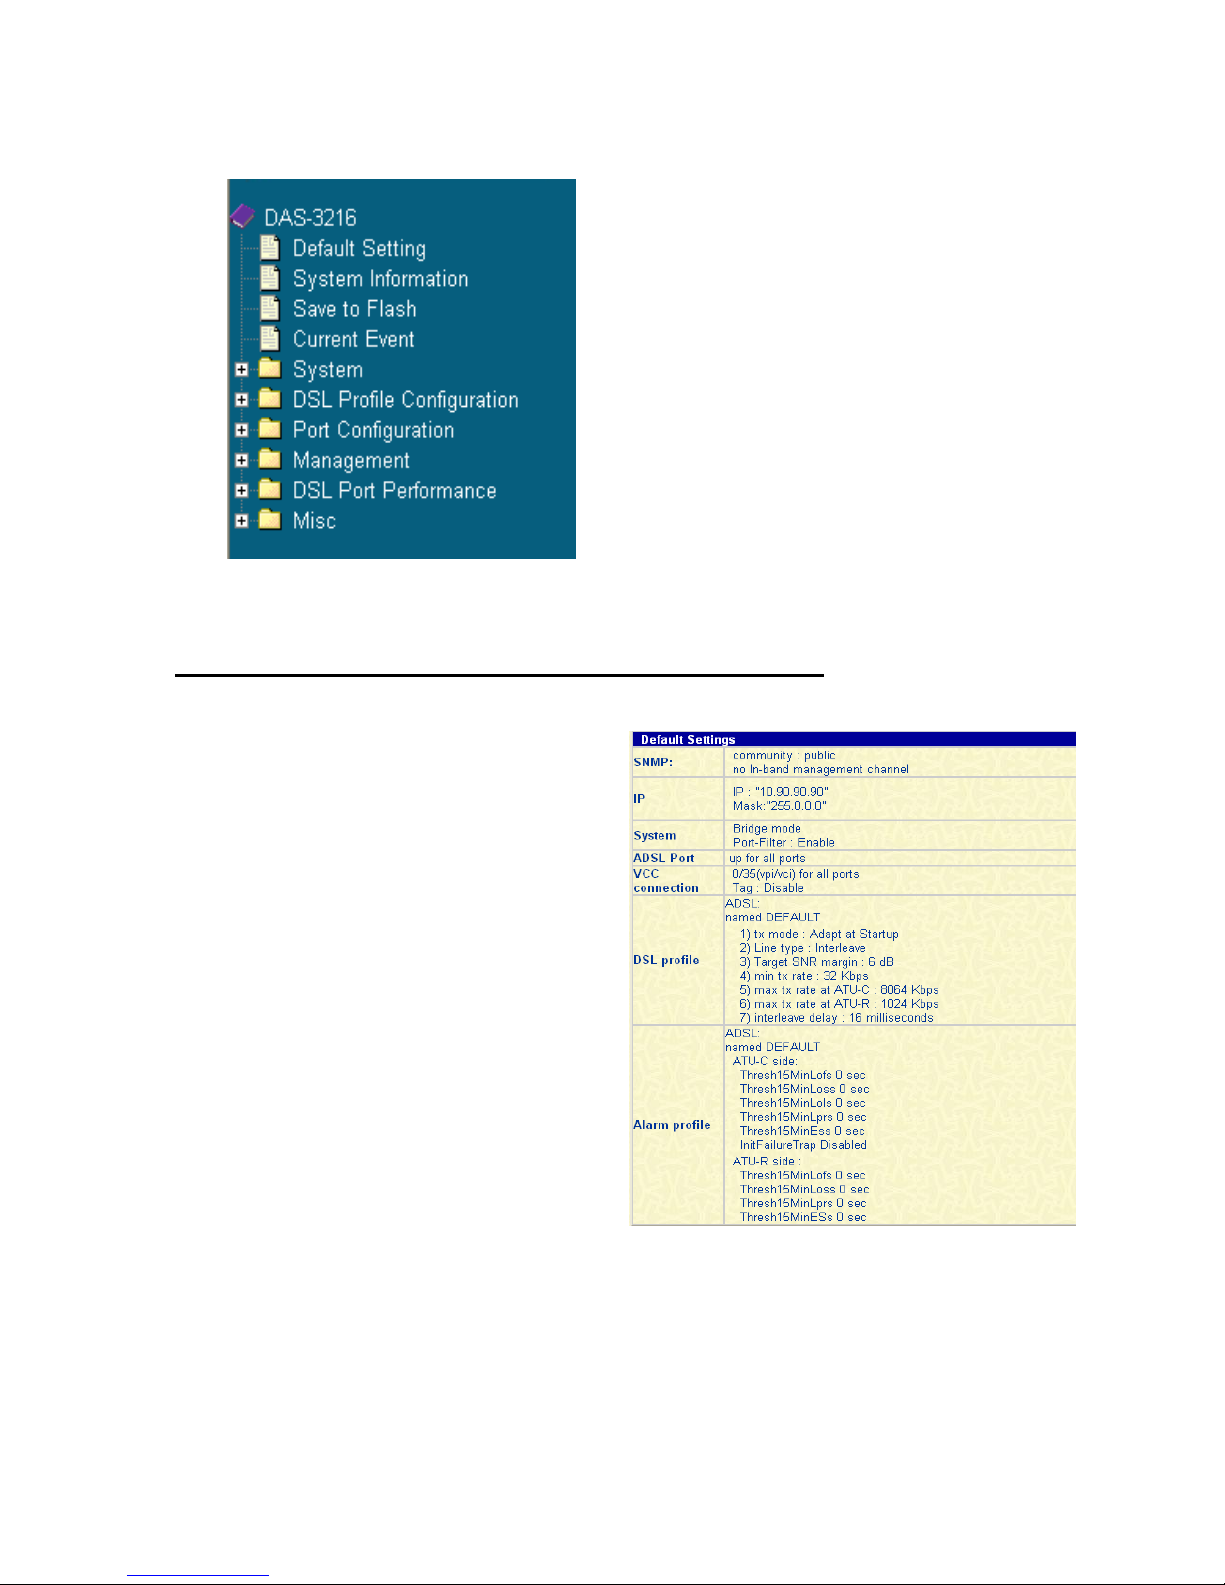
The main menu of EmWeb is as follows:
To access any menu item on EmWeb,
simply click on the item you want. The
corresponding work screen will then
appear on the right side frame. By
pressing the Apply button will allow you
to achieve your configuration, whereas
pressing Cancel button will clear all
your changes without applying them. In
some menus, there will be Modify item
will allow you to modify the existing
configuration.
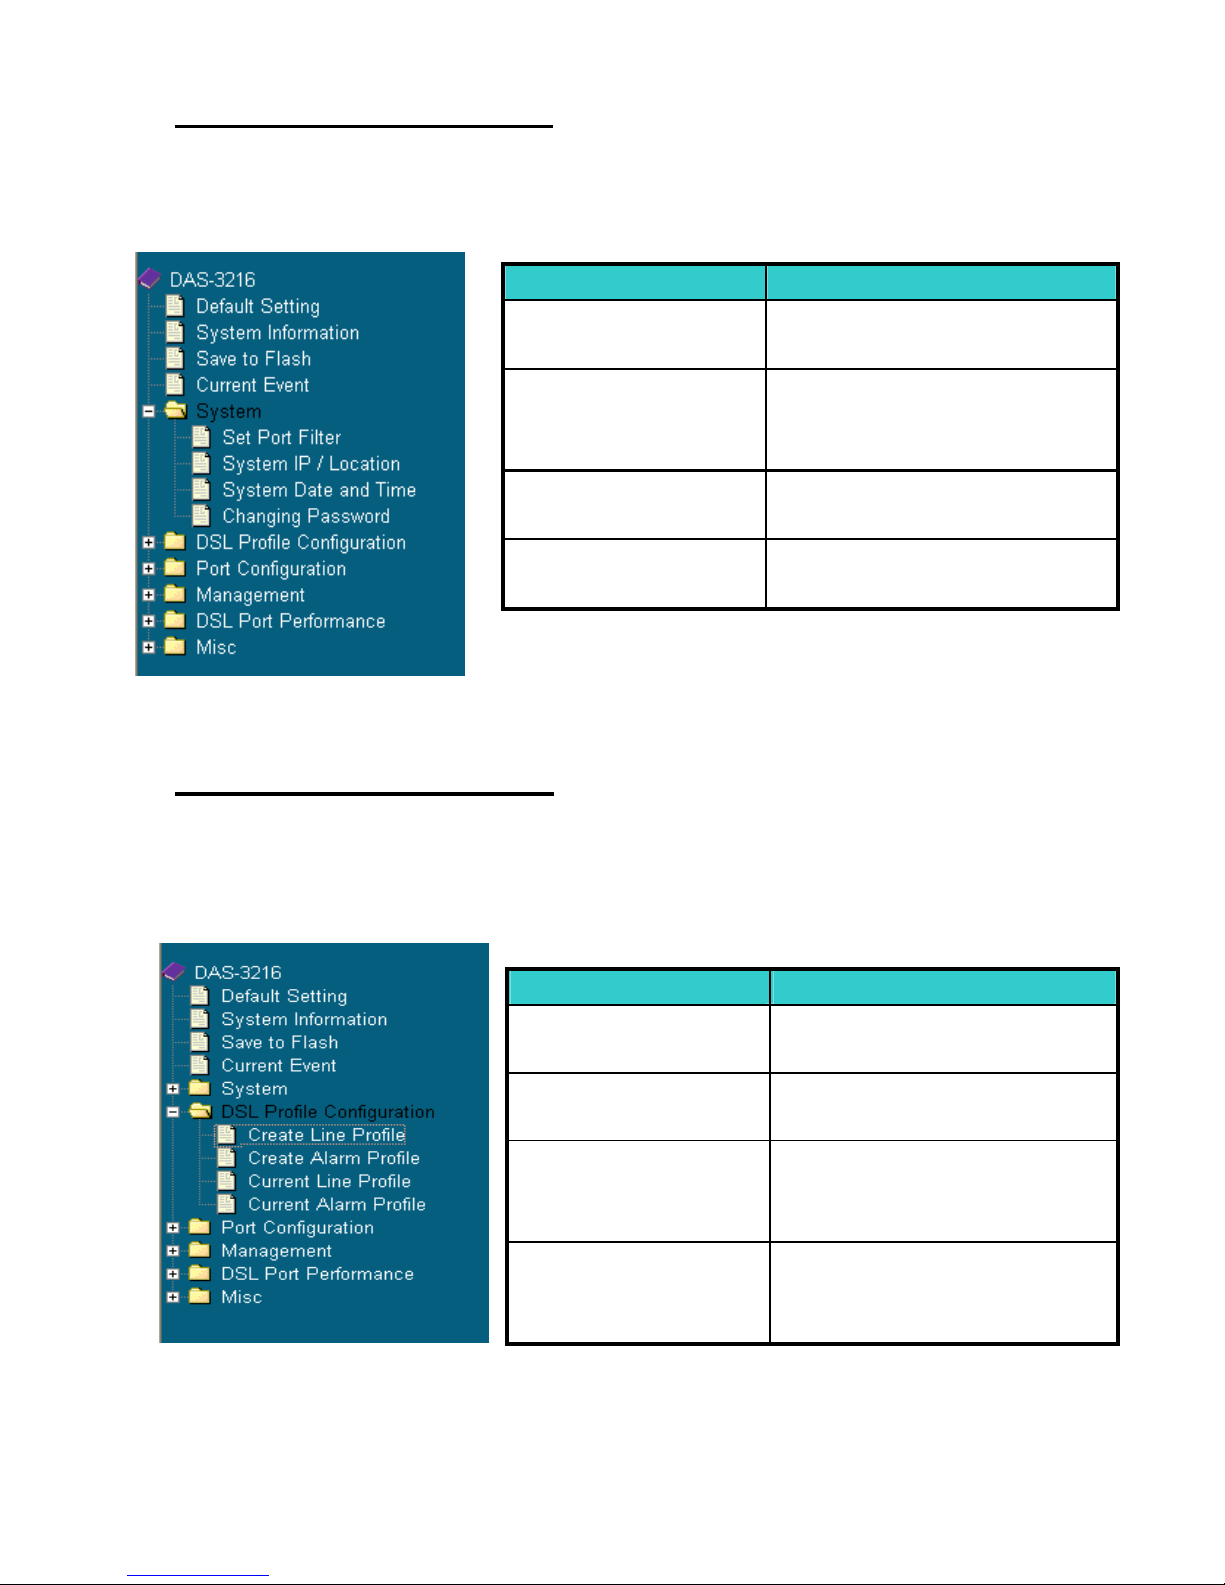
Get the Information of Default Setting
Click on Default Setting from the
DAS-3216 main menu. The
screen will appear as the figure
Page 5
Configure the System
Click on the System from the DAS-3216/3208 main menu. The DAS3216/3208 main menu tree will appear as follows:
Configure DSL Profile
Click on the DSL Profile Configuration from the DAS-3216/3208 main
menu. The DAS-3216/3208 main menu tree will appear as follows:
Item Description
Set Port Filter To configure the port
filtering function.
System IP /
Location
To configure the IP
address and location of
your DAS-3216.
System Date and
Time
To configure the date and
time of your DAS-3216.
Changing
Password
To change your password.
Item Description
Create Line Profile To create ADSL line
profiles.
Create Alarm
Profile
To create ADSL alarm
profiles.
Current Line
Profile
To view, modify, or delete
existing ADSL line
profiles.
Current Alarm
Profile
To view, modify, or delete
existing ADSL alarm
profiles.
Page 6
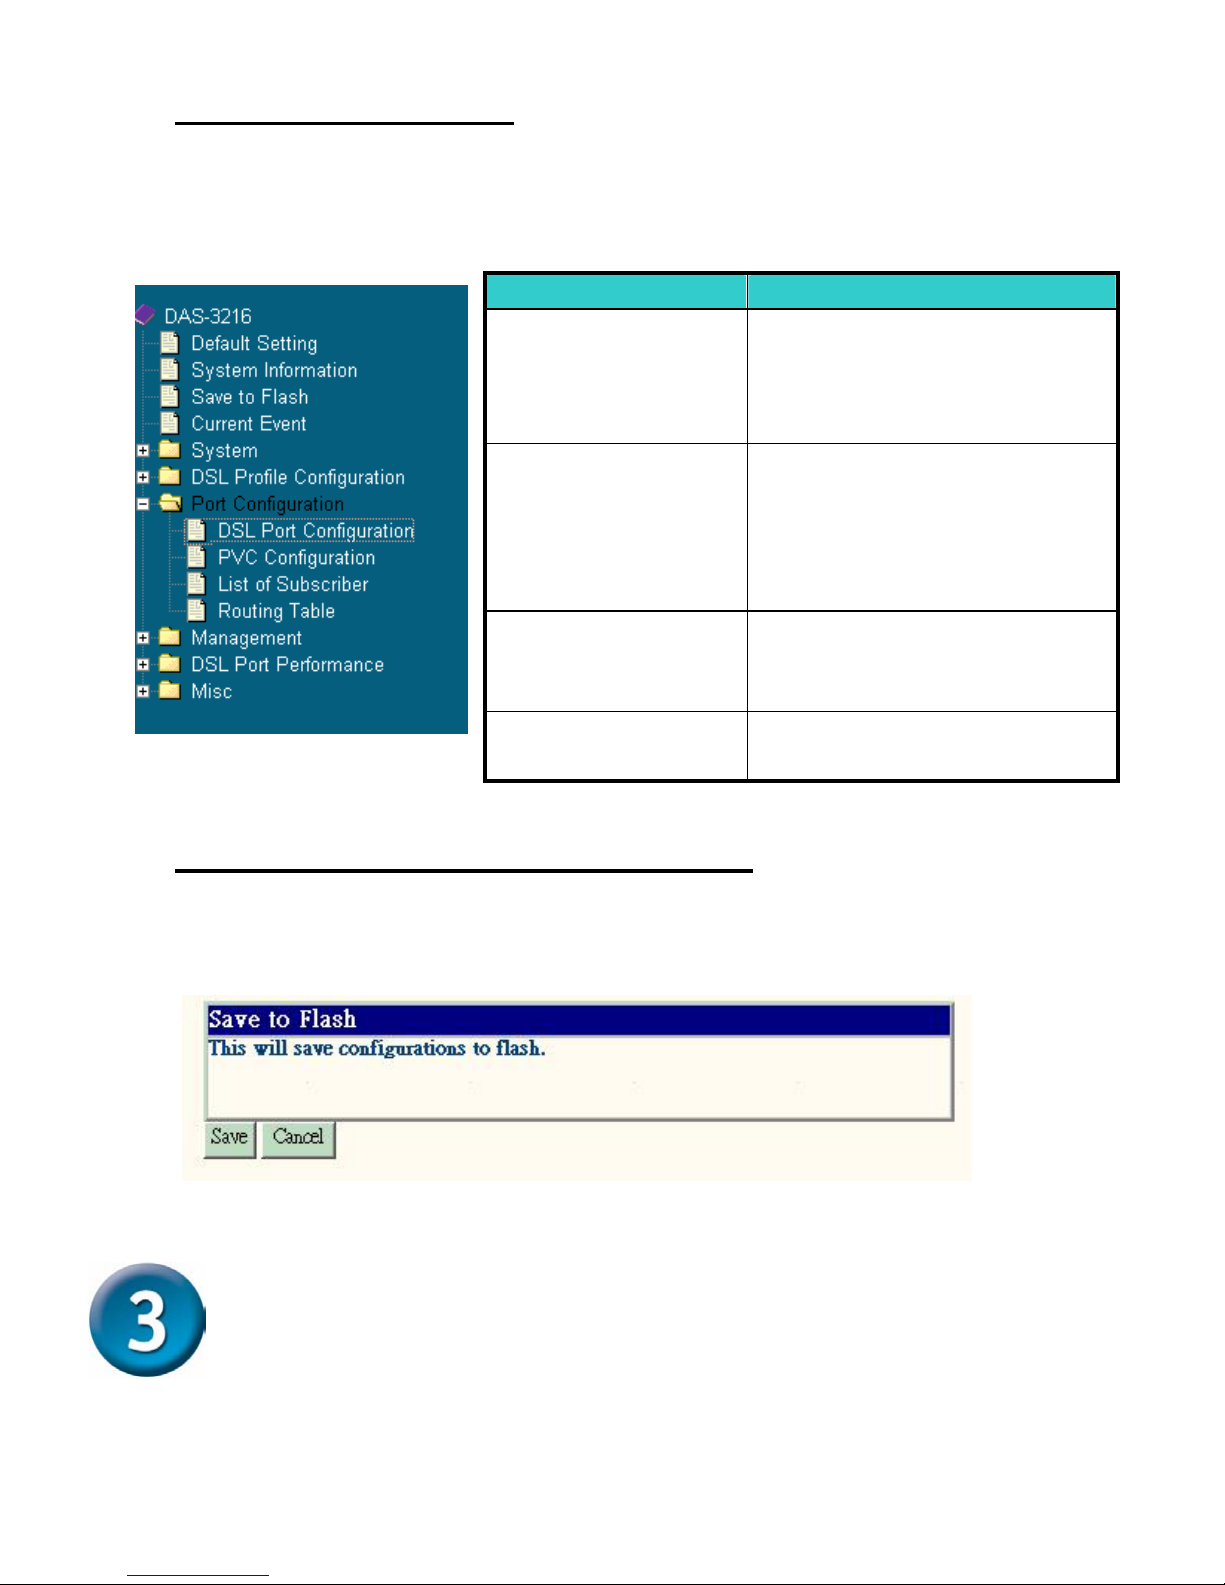
Configure DSL Port
Click on the Port Configuration from the DAS-3216/3208 main menu.
The DAS-3216/3208 main menu tree will appear as follow:
Save Your Configuration to Flash
Click on the Save to Flash from the DAS-3216/3208 main menu. The
screen will appear as follows:
Submit the Save button.
Advanced Setting
For more detailed information about complete configuration, please
refer to the User’s Manual on master CD
Item Description
DSL Port
Configuration
To display, modify or delete
the status of the port. It
provides the configuration of
a port’s status.
PVC Configuration To configure PVC and VID
on a port and setting the
priority. It also provides the
modification and deleting
function.
List of Subscriber To view the existing
information of subscribers
and modify them.
Routing Table To view the existing Routing
Table and modify them.
Page 7
Technical Support
You can find software updates and user documentation on the D-Link website.
D-Link provides free technical support for customers within the United States
and within Canada for the duration of the warranty period on this product.
U.S. and Canadian customers can contact D-Link technical support through our
website, or by phone.
Tech Support for customers within the United States:
D-Link Technical Support over the Telephone:
(877) 453-5465
24 hours a day, seven days a week.
D-Link Technical Support over the Internet:
http://support.dlink.com
email:[email protected]
Tech Support for customers within Canada:
D-Link Technical Support over the Telephone:
(800) 361-5265
Monday to Friday 8:30am to 9:00pm EST
D-Link Technical Support over the Internet:
http://support.dlink.ca
email:[email protected]
Tech Support for customers within
the United Kingdom & Ireland:
D-Link UK & Ireland Technical Support over the Telephone:
+44 (0)20 7365 8440 (United kingdom)
+353 (0)12 421 061 (Ireland)
Monday to Friday 8:00 am to 10:00 pm
D-Link Technical Support over the Internet:
http://www.dlink.co.uk
 Loading...