

Page 1
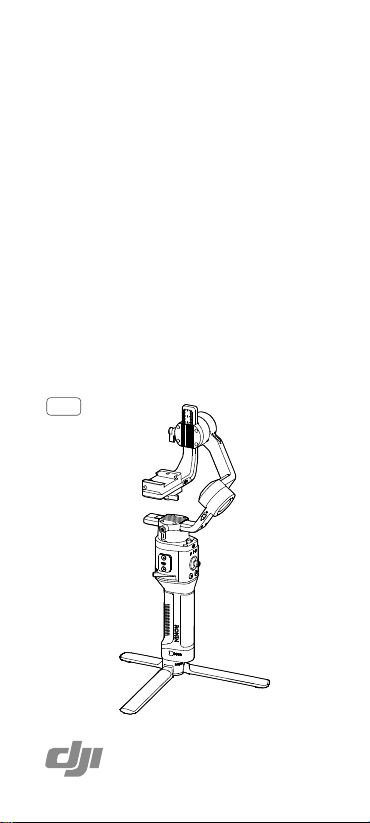
RONIN-SC
Quick Start Guide
快速入门指南
快速入門指南
クイックスタートガイド
퀵 스타트 가이드
Kurzanleitung
Guía de inicio rápido
Guide de démarrage rapide
Guida rapida
Snelstartgids
Guia de início rápido
Guia de Início Rápido
Краткое руководство пользователя
v1.0
Page 2

Contents
Quick Start Guide 2
EN
快速入门指南
CHS
快速入門指南
CHT
JP
クイックスタートガイド
퀵 스타트 가이드
KR
DE
Kurzanleitung 42
ES
Guía de inicio rápido 50
FR
Guide de démarrage rapide 58
IT
Guida di avvio rapido 66
NL
Snelstartgids 74
PT
Guia de início rápido 82
PT-BR
Guia de início rápido 90
RU
Краткое руководство пользователя 98
10
18
26
34
© 2019 DJI OSMO All Rights Reserved.
1
Page 3
EN
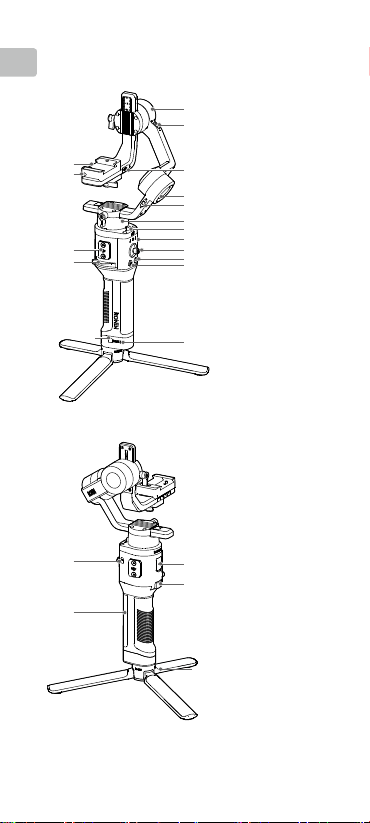
Ronin-SC Overview
17
16
15
14
13
1. Tilt Motor
2. Tilt Lock
1
3. Camera Control/
2
4. Roll Motor
5. Roll Lock
3
6. Pan Motor
4
7. Pan Lock
5
8. Profile LED
6
7
8
9. Joystick
9
10. Camera Control
10
11
11. M Button
12. Battery Level
13. Battery Level
12
14. Lever
15. Ronin Series
16. Safety Lock
17. Camera
Accessories Port
(USB-C)
Indicators
Button
Indicators
Button
Accessories
(RSA) Port
Mounting Plate
22
21
© 2019 DJI OSMO All Rights Reserved.
2
18. Power Port
18
(USB-C)
19
19. Trigger
20. Tripod
21. Grip (Inc. 1/4” and
3/8” Mounting
Holes
22. Power Button
20
)
Page 4

Getting Started
A. Downloading the DJI RONINTM App and
Watching the Tutorials
Search for “Ronin” in the App Store or on
Google Play and follow the instructions to
install the app. Watch the tutorials on the
ocial DJI website. https://www.dji.com/
ronin-sc
B. Attaching the Tripod
1
2
C. Mounting the Grip
1
EN
Ronin App
3
2
© 2019 DJI OSMO All Rights Reserved.
3
Page 5

D. Charging the Battery
EN
Before using for the rst time, charge the grip through the
power port using a power cable (included) and a USB adapter
(not included). It is recommended to use a 5V/2A USB adapter.
Power Outlet
100 - 240 V
Adapter
Power Port USB Power
E. Checking the Battery Level
During charging, the battery level
indicators indicate the battery level.
When not charging, press the battery
level button to check the battery level.
LowHigh
F. Powering On/O and Sleep Mode
Press and hold the power button to turn Ronin-SC on or o
Tap the power button to enter sleep mode. Tap again to exit
sleep mode.
Ronin-SC can be operated during charging.
Activating Ronin-SC
Ronin-SC needs to be activated through the Ronin app before
using for the first time.
1. Press and hold the power button to power on the gimbal.
2. Enable Bluetooth on your mobile device and launch the
Ronin app. Note that a DJI account is required to launch
the Ronin app. Once detected in the list of Bluetooth
devices, select Ronin-SC and input the default Bluetooth
password: 12345678.
3. Make sure you are connected to the internet and follow the
on-screen instructions to activate Ronin-SC.
Ronin-SC
Device Activation
Activation is required prior to using the
device. To do so, information regarding
your device and DJI account will be
uploaded to DJI. Please agree and
proceed to activation.
Agree and activate
User Profile
Status
© 2019 DJI OSMO All Rights Reserved.
4
Create
Page 6
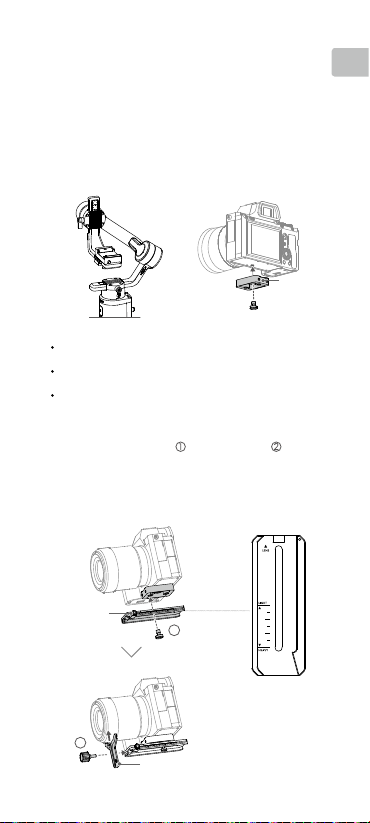
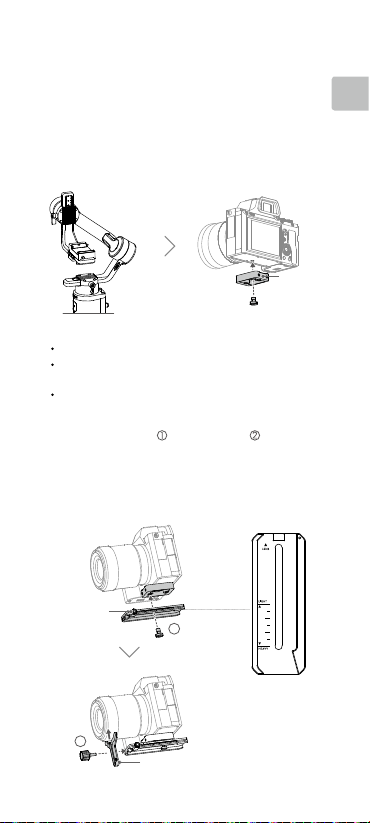
Mounting the Camera
1
2
3
Make sure to prepare the camera before mounting it to RoninSC. Remove the lens cap and make sure the battery and
memory card are inserted in the camera.
1. The three axes of the gimbal are locked by default. Unlock
the three axes, adjust the gimbal to the position as shown,
and lock the three axes again.
2. If required, attach the riser plate* to the bottom of the
camera using a flathead screwdriver.
Riser Plate
* Riser plate is required in the following scenarios:
When using a small and lightweight camera such as a Sony A6300
camera.
When using a lens with a large diameter such as a Sony A7M3 camera
with a 16-35 mm f/2.8 GM lens.
When used with a focus motor.
Refer to the Ronin-SC product page on the official DJI website (http://
www.dji.com/ronin-sc) for the most updated Camera Compatibility List.
3. Attach the dovetail plate and lens support . Move
the slider to the front of the plate. The camera lens and
the arrow on the dovetail plate must face the same
direction. Mount the camera according to the indicators
on the dovetail plate. Use the lens support for optimal
performance.
EN
2
Slider
1
Dovetail Plate
Lens Support
© 2019 DJI OSMO All Rights Reserved.
5
Page 7

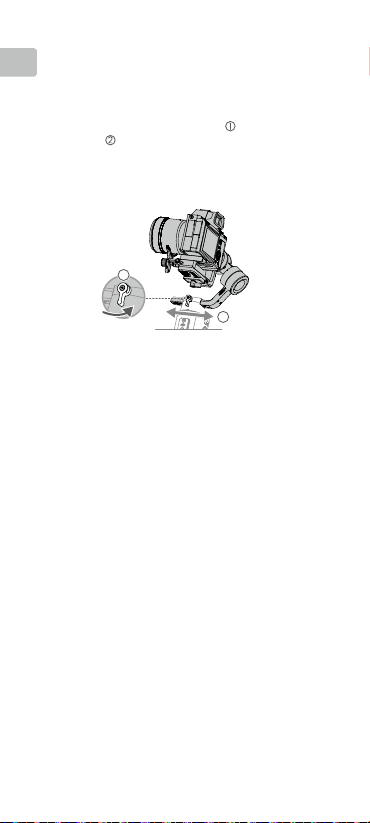
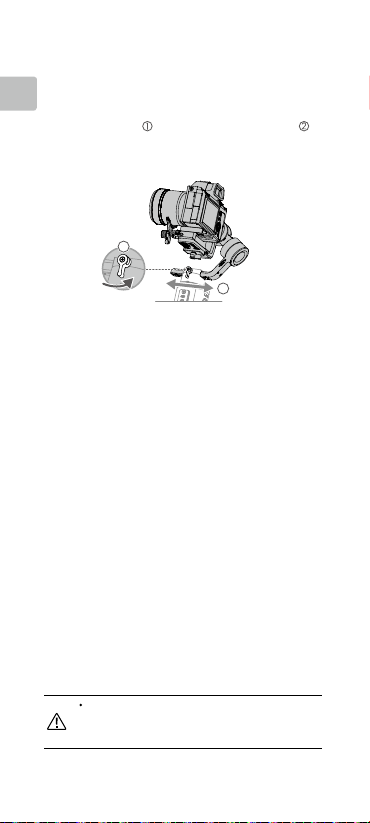
1
2
3
4. Loosen the knob on the bottom of the camera mounting
EN
plate and move it to the side of the axis. Slide the
camera into the plate . Tighten the knob when the
camera is in the middle of the plate.
2
If using accessories such as the phone holder or focus
motor, make sure to mount all accessories before balancing.
Refer to the manual documents of the accessories for more
information.
Make sure to tighten the screw under the dovetail plate.
Balancing
Balancing is required before shooting. Before balancing,
make sure to power on the camera if using a optical zoom
lens and to select the focal length if using a varifocal lens.
There are balancing tutorials in the Ronin app, which can
be viewed after activation. Balancing can also be performed
without connecting to the Ronin app. In that scenario, make
sure Ronin-SC is powered off or in sleep mode before
balancing.
1. Balancing depth for the tilt axis
a. Unlock the tilt axis and lower the camera by loosening the tilt
axis knob .
b. Rotate the tilt axis so that the camera lens is pointing
forward. Check to make sure the camera is not front or
back-heavy. If front-heavy, move the camera backward. If
back-heavy, move the camera forward.
c. Loosen the knob under the camera mounting plate and
adjust the camera balance until the camera is steady.
d. Tighten the knob.
1
1
© 2019 DJI OSMO All Rights Reserved.
6
2
3
Page 8

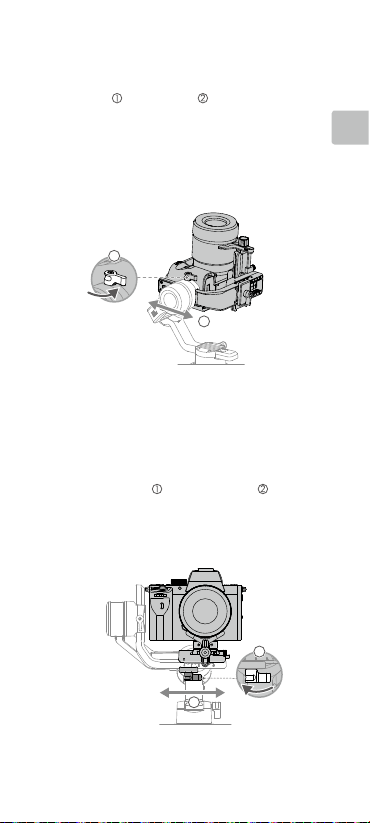
2. Balancing the vertical tilt
a. Rotate the tilt axis so that the camera lens is pointing
upward. Check to make sure the camera is not top or
bottom-heavy. If the camera is tilted to one side, pull the tilt
arm towards the other side.
b. Loosen the knob on the tilt motor and adjust the balance
of the camera until the camera is steady without tilting up
or down.
c. Tighten the knob.
d. Repeat Step 1 to balance the depth of the tilt axis. The
slider on the dovetail plate is used to record the balance
position. Move the slider next to the mounting plate and
tighten the slider.
1
2
3. Balancing the roll axis
a. Lock the tilt axis and unlock the roll axis. Check the direction
in which the roll motor swings. If the camera rotates to the
left, move the camera to the right. If the camera rotates to
the right, move the camera to the left.
b. Loosen the knob on the camera mounting plate , and
adjust position of the plate until the camera is steady.
c. Tighten the knob. If the camera moves forward, move the
camera back until the slider is next to the mounting plate.
EN
1
2
© 2019 DJI OSMO All Rights Reserved.
7
Page 9
4. Balancing the pan axis
EN
a. Unlock the pan axis. Hold the grip, tilt Ronin-SC sideward,
and check the movement of the pan axis. If the camera
lens rotates downward, push the pan axis backward. If the
camera lens rotates upward, push the pan axis forward.
b. Loosen the knob on the pan motor . Adjust the camera
balance until the camera is steady when rotating the pan
while lifting the grip.
c. Tighten the knob.
1
2
Operation
Auto Tune
After installation, activation, and balancing, Ronin-SC must be
auto-tuned before it can be used. Make sure to place Ronin-SC
on a flat surface before conducting an auto tune. There are
two ways to auto-tune Ronin-SC.
A. Press and hold the M button and trigger on Ronin-SC
simultaneously for four seconds to start Auto Tune.
B. Launch the Ronin app, go to the Motor Parameters page,
and select Auto Tune.
Button Features
Power Button: press and hold the power button to turn the
Ronin-SC on or o. Tap the power button to enter or exit sleep
mode.
M Button: tap to select a user prole. Press and hold to enter
Sport mode.
Joystick: push the joystick up or down to control the movement of
the tilt axis, and push it left or right to control the movement of the
pan axis. Go to the Joystick page of the Ronin app to adjust the
parameters for the pan, tilt, and roll axes.
Camera Control Button: after connecting the camera control
port and camera, press halfway for autofocus, as you would the
shutter button on a camera. Press to start or stop recording.
Press and hold to take a photo. For the most updated Camera
Compatibility List, refer to the Ronin-SC product page on the
© 2019 DJI OSMO All Rights Reserved.
8
Page 10

ocial DJI website (http://www.dji.com/ronin-sc).
Trigger: press and hold the trigger to enter Lock mode. Press
twice to recenter the gimbal. Press three times to turn the gimbal
180° so that the camera faces you.
When the camera and Ronin-SC are connected using the
camera control cable (USB-C), playback cannot be used. In
that scenario, press the power button to enter sleep mode
and then use playback.
Specications
Weight Gimbal: Approx. 830 g
Dimensions Gimbal (folded): 220×200×75 mm
Input Power Model: RB2-2450 mAh-7.2 V
Operating Current Static Current: 0.2 A
Bluetooth Operating
Frequency
Bluetooth Transmitter
Power
Operating Temperature -20° to 45° C (-4° to 113° F)
Max. Standby Time 11 hours
Grip: Approx. 258 g
Tripod: Approx. 160 g
Gimbal (unfolded): 370×165×150 mm
Type: 18650 Lithium
Capacity: 2450 mAh
Energy: 17.64 Wh
2.40 GHz -2.4835 GHz
8 dBm
<
EN
For more information, read the User Manual:
http://www.dji.com/ronin-sc
※This content is subject to change without prior notice.
© 2019 DJI OSMO All Rights Reserved.
9
Page 11

认识 Ronin-SC
CHS
17
16
15
14
13
1. 俯仰轴电机
1
2. 俯仰轴锁
2
3. 相机控制 / 配件接口
(USB-C)
4. 横滚轴电机
3
5. 横滚轴锁
6. 平移轴电机
4
5
7. 平移轴锁
6
8. 配置指示灯
7
8
9. 摇杆
9
10. 相机控制按键
10
11
11. 配置切换按键
(M 按键)
12. 电量指示灯
13. 电量查看按键
14. 手柄锁定拨杆
12
15. RSA 配件扩展接口
16. 安全锁
17. 相机安装底座
22
21
2019 大疆灵眸 版权所有
©
10
18. 充电接口(USB-C)
18
19. 模式切换按键
19
20. 三脚架
21. 手柄(底部含 1/4"、
3/8" 安装孔)
22. 电源按键
20
Page 12

准备
A. 下载 RONINTM App 和观看教学视频
请在软件商店或使用移动设备扫描二维
码下载。请在 DJI 官网观看 Ronin-SC
教学视频。
https://www.dji.com/ronin-sc
B. 安装三脚架
1
2
C. 安装手柄
1
CHS
Ronin App
3
2
2019 大疆灵眸 版权所有
©
11
Page 13

D. 充电
首次使用时需要通过充电以激活电池。使用 USB-C 线和通
CHS
用 USB 充电器(用户自备,推荐使用规格为 5V/2A 的 USB
充电器)给云台充电。
100~240 V
充电接口USB 充电器交流电源
E. 查看电量
充电过程中电量指示灯指示电量。
不充电时,短按电量查看按键,电
量指示灯指示当前电量。
低高
F. 开机 / 关机 / 休眠
长按电源按键 开启/ 关闭云台。单击电源按键可使云台休眠,
再次单击唤醒。
Ronin-SC 充电过程中可以使用。
激活
首次使用 Ronin-SC 需连接 Ronin App 激活。激活步骤如下:
1. 长按电源按键开启云台。
2. 开启移动设备蓝牙功能。
3. 运行 Ronin App,注册或登录 DJI 帐号。在点击连接后选择
Ronin-SC,输入默认密码 12345678,按提示激活。激活过
程中需连接网络。
Ronin-SC
设备激活
请激活之后开始使用设备,完成激活操作
需要您向DJI 提供您的 DJI设备信息、DJI
账号信息,请确认同意后开始激活。
同意,开始激活
用户参数
系统状态
智能拍摄
2019 大疆灵眸 版权所有
©
12
Page 14
安装相机
1
2
3
安装相机之前,确保已完成“准备”章节的安装步骤。确保相
机已做好拍摄准备,镜头盖已移除,电池(确保电量充足)及
内存卡已安装。
1. 安装相机前请将云台三轴解锁, 并调整至图示状态后重新锁
定,尽量使俯仰轴重心偏低,方便下一步操作。
2. 根据相机大小,视情况安装垫高模块 *(使用一字螺丝刀或
硬币等工具)。
垫高模块
*
需要使用垫高模块的情况:
使用尺寸小、体重轻的相机时(如 Sony A6300);
使用直径较大的镜头时(如 Sony A7M3 搭载 16-35 mm f/2.8 GM
镜头);
使用跟焦电机时。
请访问 www.dji.com/ronin-sc 了解相机兼容列表以及支持功能。
3. 安装相机底部安装板 和镜头固定支架 。注意先将安
装板侧边记忆滑块移至最前端。底部安装板箭头所指方向
应与镜头方向一致,并根据安装板指示确定相机螺丝的安
装位置:较重相机靠近HEAVY 端安装,较轻小相机靠近
LIGHT 端安装。镜头固定支架可帮助获得更好的拍摄增稳
效果,尤其当使用较长、较重的镜头拍摄时。
CHS
记忆滑块
2
镜头支架
1
2019 大疆灵眸 版权所有
©
相机底部安装板
13
Page 15

1
2
3
4. 拧松相机安装底座底部旋钮并将底座移至最侧边 ,然后
将相机嵌入相机安装底座 ,到达中间位置时拧紧旋钮。
CHS
2
如需安装 DJI 手机夹搭配手机使用,或安装跟焦电机
等配件使用,请参考相应配件说明书,在完成所有配
件安装后再开始平衡调节。
确保螺丝拧紧。
平衡调节
拍摄前需要对云台相机进行平衡调节。若相机搭配电动伸缩镜
头,请将相机开启后调平。若使用变焦段镜头,请先选定焦段
后再开始调平。Ronin App 内置调平教学,可连接 Ronin-SC 后
按步骤调平。调平步骤也可独立进行,不连接 Ronin App 调平
时请单击电源按键使电机休眠,或者关机。
1. 俯仰轴的前后平衡调节
a. 解锁俯仰轴 ,并尽量将俯仰轴往下调。
b. 使相机镜头水平朝前,判断相机重心偏向。当相机镜头往
前倾,说明重心在俯仰轴前方,需将相机往后移动;当相
机镜头往后倾,则将相机往前移动。
c. 拧松安装底座底部旋钮 ,前后调节相机位置 。
d. 锁紧旋钮。若相机能稳定停留,表示已调节平衡。
1
2
1
3
2019 大疆灵眸 版权所有
©
14
Page 16

2. 俯仰轴的垂直平衡调节
a. 翻转相机使镜头垂直朝上,判断相机重心偏向。当相机镜
头往一侧倾斜,需将力臂往反向移动。
b. 拧松旋钮 后调节相机位置 。
c. 拧紧旋钮,相机镜头垂直朝上时能稳定停留代表已调节平
衡。
d. 重复步骤 1,再次精调俯仰轴前后平衡,以达到最佳效果。
俯仰轴平衡调节完成后使记忆滑块紧贴安装底座后拧紧,
以记录相机俯仰轴平衡位置。
1
2
3. 横滚轴的平衡调节
a. 锁定俯仰轴,解锁横滚轴,然后判断相机重心偏向。若相
机向左侧倾斜,说明相机重心在横滚轴左侧,需将安装底
座连同相机往右移动;若相机向右侧倾斜,则将安装底座
连同相机往左移动。
b. 拧松安装底座旋钮 ,左右调节相机位置 。
c. 拧紧旋钮。若相机能稳定停留,表示已调节平衡。若调节
横滚轴过程中相机前后位置改变,可通过记忆滑块找回俯
仰轴平衡位置。
CHS
1
2
2019 大疆灵眸 版权所有
©
15
Page 17
4. 平移轴的平衡调节
a. 锁定横滚轴,解锁平移轴。握住云台向侧边倾斜,观察相
CHS
机在平移轴旋转方向。若相机镜头往下方旋转,需将平移
轴力臂往后推;若相机镜头往上方旋转,则将平移轴力臂
往前拉。
b. 拧松平移轴旋钮 ,推拉平移轴力臂调整相机位置 。
c. 拧紧旋钮,若云台平移轴在任意角度都能保持静止不动,
表示已调节平衡。
1
2
使用
自动校准
经过安装、激活以及调平后,Ronin-SC 经过自动校准即可使用。
务必将云台放置平稳平面上进行自动校准。自动校准有两种方
式:
1. 同时按住云台 M 按键与模式切换按键 4s。配置指示灯绿灯闪
烁表示开始校准。
2. 运行 Ronin App 进入电机设置页面,选择自动校准。
按键功能
电源按键:长按可开 / 关机。单击使云台电机休眠 / 唤醒。
M 按键:短按切换配置参数;长按 M 按键不放进入运动模式。
摇杆:上下推动摇杆控制俯仰轴运动,左右推动摇杆控制平移
轴运动(默认设置)。进入 Ronin App 摇杆设置界面,可设置
摇杆参数与配置通道。
相机控制按键:使用相机控制线连接云台相机控制接口与相机
后,半按控制相机自动对焦;短按控制相机开始或停止录像;
长按控制相机拍照。请访问 http://www.dji.com/ronin-sc 了解相
机兼容列表以及支持功能。
模式切换按键:长按不放进入锁定模式;双击云台回中;三击
云台进入自拍模式。
使用相机控制线(USB-C)连接相机和云台时,相机
无法使用回放,此时可使云台电机休眠,以使用回放
功能。
2019 大疆灵眸 版权所有
©
16
Page 18

规格参数
重量 云台:约 830 g
尺寸 云台折叠:220×200×75 mm
手柄内置电池 型号:RB2-2450 mAh-7.2 V
工作电流 静态电流:0.2 A
工作频率 2.40 GHz -2.4835 GHz
发射功率
工作环境温度 -20℃至 45℃
最长待机时间 11 小时
手柄:约 258 g
三脚架:约 160 g
工作状态:370×165×150 mm
类型:18650 锂离子电池
容量:2450 mAh
能量:17.64 Wh
8 dBm
<
CHS
了解产品详细信息,请访问以下网址下载 《用户手册》
http://www.dji.com/ronin-sc
※ 内容如有更新,恕不另行通知。
2019 大疆灵眸 版权所有
©
17
Page 19

認識 Ronin-SC
CHT
17
16
15
14
13
1
2
3
4
5
6
7
8
9
10
11
12
1.
俯仰軸馬達
2.
俯仰軸鎖
3.
相機控制/配件
連接埠(
4.
橫滾軸馬達
5.
橫滾軸鎖
6.
平移軸馬達
7.
平移軸鎖
8.
設定指示燈
9.
搖桿
10.
相機控制按鍵
11.
設定切換按鍵
(M
按鍵)
12.
電量指示燈
13.
電量查看按鍵
14.
把手鎖定撥桿
15. RSA
配件擴充接頭
16.
安全鎖
17.
相機安裝底座
USB-C
)
22
21
2019 大疆灵眸 版权所有
©
18
18.
18
19.
19
20.
21.
22.
充電連接埠(
模式切換按鍵
三腳架
把手(底部含
3/8"
安裝孔)
電源按鈕
USB-C
1/4"
)
、
20
Page 20

準備
A. 下載 RONINTM App 並觀看教學影片
請在軟體商店或使用行動裝置掃描
碼下載。請在
教學影片。
https://www.dji.com/ronin-sc
B. 安裝三腳架
C. 安裝把手
DJI
官網觀看
Ronin-SC
1
2
1
QR
CHT
Ronin App
3
2
2019 大疆灵眸 版权所有
©
19
Page 21

D. 充電
首次使用時需要透過充電以啟動電池。使用
USB
用
充電器(使用者自備,推薦使用規格為
USB
CHT
充電器)給雲台充電。
USB-C
線和通
5V/2A 的
100~240 V
USB
充電連接埠
充電器交流電源
E. 查看電量
充電過程中,電量指示燈將顯示
電量。
不充電時,短按電量查看按鍵,
電量指示燈將指示當前電量。
F. 開機 / 關機 / 休眠
長按電源按鍵 開啓 / 關閉雲台。按一下電源按鍵可使雲台休
眠,再按一下則可喚醒。
Ronin-SC
充電過程中可以使用。
啟動
Ronin-SC
首次使用
1.
長按電源按鍵開啓雲台。
2.
開啓行動裝置藍芽功能。
3. 執行 Ronin App
Ronin-SC
,輸入預設密碼
程需連線網路。
Ronin App
需連接
、註冊或登錄
請啟動之後開始使用設備,完成啟動操作
需要您向 DJI 提供您的 DJI 設備資料、
DJI 帳號資料,請確認同意後開始啟動。
用户参数
啟動。啟動步驟如下:
DJI
帳號。在點擊連接後選擇
12345678
,按提示啟動。啟動過
Ronin-SC
設備啟動
同意,開始啟動
系统状态
智能拍摄
低高
2019 大疆灵眸 版权所有
©
20
Page 22

安裝相機
1
2
3
安裝相機之前,確保已完成「準備」章節的安裝步驟。確保相
機已做好拍攝準備、鏡頭蓋已移除、電池(確保電量充足)及
記憶卡已安裝。
1.
安裝相機前請將雲台三軸解鎖,並調整至圖示狀態後重新鎖
定,盡量使俯仰軸重心偏低,方便下一步操作。
2.
根據相機大小,視情況安裝墊高模組*(使用一字螺絲起子
或硬幣等工具)。
墊高模組
*
需要使用墊高模組的情況:
使用尺寸小、體重輕的相機時(如
使用直徑較大的鏡頭時(如
鏡頭);
使用對焦馬達時。
www.dji.com/ronin-sc
請前往
3.
安裝相機基座 和鏡頭固定架 。注意先將基座側邊記憶
滑塊移至最前端。基座箭頭所指方向應與鏡頭方向一致,
並根據基座指示確定相機螺絲的安裝位置:較重相機靠近
HEAVY
端安裝,較輕小相機靠近
支架可幫助獲得更好的拍攝增穩效果,尤其當使用較長、較
重的鏡頭拍攝時。
Sony A6300
LIGHT
端安裝。鏡頭固定
);
Sony A7M3 搭載 16-35 mm f/2.8 GM
瞭解相機兼容列表以及支援功能。
CHT
記憶滑塊
2
鏡頭支架
1
2019 大疆灵眸 版权所有
©
相機基座安裝板
21
Page 23

1
2
3
4.
轉鬆相機安裝底部旋鈕並將底座移至最側邊
機嵌入相機安裝底座 ,到達中間位置時轉緊旋鈕。
CHT
2
DJI
如需安裝
等配件使用,請參考相應配件說明書,在完成所有配
件安裝後再開始平衡調節。
確保螺絲轉緊。
手機夾搭配手機使用,或安裝對焦馬達
平衡調節
拍攝前需要對雲台相機進行平衡調節。若相機搭配電動伸縮鏡
頭,請將相機開啓後調節平衡。若使用變焦段鏡頭,請先選定
焦段後再開始調節平衡。
Ronin-SC
接
Ronin App
接
關機。
1.
俯仰軸的前後平衡調節
a.
解鎖俯仰軸 ,並盡量將俯仰軸往下調。
b.
使相機鏡頭水平朝前,判斷相機重心偏向。當相機鏡頭往
前傾,說明重心在俯仰軸前方,需將相機往後移動;當相
機鏡頭往後傾,則將相機往前移動。
c.
轉鬆安裝底座底部旋鈕 ,前後調節相機位置 。
d.
鎖緊旋鈕。若相機能穩定停留,表示已調節平衡。
1
Ronin App
後按步驟調節。調節平衡步驟也可獨立進行,不連
調節平衡時請按一下電源按鍵使電機休眠,或者
內建調節平衡教學,可連
2
,然後將相
1
3
2019 大疆灵眸 版权所有
©
22
Page 24
2.
俯仰軸的垂直平衡調節
a.
翻轉相機使鏡頭垂直朝上,判斷相機重心偏向。當相機鏡
頭往一側傾斜,需將力臂往反向移動。
b.
轉鬆旋鈕
c.
d.
後調節相機位置 。
轉緊旋鈕,相機鏡頭垂直朝上時能保持穩定代表已調節
平衡。
重複步驟 1,再次精調俯仰軸前後平衡,以達到最佳效果。
俯仰軸平衡調節完成後使記憶滑塊緊貼安裝底座後轉緊,
以記錄相機俯仰軸平衡位置。
1
2
3.
橫滾軸的平衡調節
a.
鎖定俯仰軸,解鎖橫滾軸,然後判斷相機重心偏嚮。若相
機嚮左側傾斜,說明相機重心在橫滾軸左側,需將安裝底
座連同相機往右移動;若相機嚮右側傾斜,則將安裝底座
連同相機往左移動。
b.
轉鬆安裝底座旋鈕
c.
鎖緊旋鈕。若相機能穩定停留,表示已調節平衡。若調節
橫滾軸過程中相機前後位置改變,可透過記憶滑塊找回俯
仰軸平衡位置。
,前後調節相機位置 。
CHT
1
2
2019 大疆灵眸 版权所有
©
23
Page 25

4.
平移軸的平衡調節
a.
鎖定橫滾軸,解鎖平移軸。握住雲台向側邊傾斜,觀察相
機在平移軸的旋轉方向。若相機鏡頭往下方旋轉,需將平
移軸力臂往後推;若相機鏡頭往上方旋轉,則將平移軸力
臂往前拉。
CHT
b.
轉鬆平移軸旋鈕
c.
轉緊旋鈕,若雲台平移軸在任意角度都能保持穩定,表示
已調節平衡。
,推拉平移軸力臂調整相機位置 。
1
2
使用說明
自動校準
經過安裝、啟動以及調節平衡後,
使用。務必將雲台放置平穩平面上進行自動校準。自動校準有
兩種方式:
1.
2. 執行 Ronin App
按鍵功能
電源按鍵:長按可開/關機。按一下使雲台電機休眠/喚醒。
M
搖桿:上下推動搖桿可控制俯仰軸,而左右推動搖桿可控制平
移軸移動(預設設定)。進入
定搖桿參數與配置通道。
相機控制按鍵:使用相機控制線連接雲台相機控制連接埠與相
機後,半按控制相機自動對焦;短按控制相機開始或停止錄影;
長按控制相機拍照。請前往
機兼容列表以及支援功能。
模式切換按鍵:長按不放進入鎖定模式;按兩下雲台回到中位;
按三下雲台進入自拍模式。
M
同時按住雲台
燈表示開始校準。
按鍵:短按切換設定參數;長按
按鍵與模式切換按鍵
進入馬達設定頁面,選擇自動校準。
使用相機控制線(
無法使用播放,此時可使雲台馬達休眠,以使用播放
功能。
Ronin-SC
經過自動校準即可
4s
。設定指示燈閃爍綠
M
按鍵不放進入運動模式。
Ronin App
搖桿設定介面,可設
http://www.dji.com/ronin-sc
USB-C
)連接相機和雲台時,相機
瞭解相
2019 大疆灵眸 版权所有
©
24
Page 26

規格參數
重量 雲台:約
尺寸 雲台摺疊:
把手內建電池 型號:
運轉電流 靜態電流:
運轉頻率
發射功率
操作溫度
最長待機時間
把手:約
三腳架:約
工作狀態:
RB2-2450 mAh-7.2 V
18650
類型:
2450 mAh
容量:
17.64 Wh
能量:
2.40 GHz -2.4835 GHz
8 dBm
<
-20℃ 至 45℃
11
小時
830 g
258 g
160 g
220×200×75 mm
370×165×150 mm
鋰離子電池
0.2 A
CHT
要瞭解產品詳細資訊,請前往以下網址下載《使用者手冊》
http://www.dji.com/ronin-sc
※ 內容如有更新,恕不另行通知。
2019 大疆灵眸 版权所有
©
25
Page 27

Ronin-SC
JP
の概要
1.
チルト軸モーター
2.
チルト軸ロック
1
3.
カメラ制御/アクセサ
2
リーポート(
4.
ロール軸モーター
5.
17
16
15
14
13
3
4
5
6
7
8
9
10
11
12
ロール軸ロック
6.
パン軸モーター
7.
パン軸ロック
8.
プロファイル
インジケーター
9.
ジョイスティック
10.
11. M
12.
13.
14.
15. RSA
16.
17.
USB-C
LED
カメラ制御ボタン
ボタン
バッテリー残量
インジケーター
バッテリー残量
ボタン
レバー
アクセサリ
ーポート
安全ロック
カメラマウント
プレート
)
22
21
© 2019 DJI OSMO All Rights Reserved.
26
18
19
20
18.
電源ポート(
19.
トリガー
20.
三脚
21.
グリップ(
チおよび
の取り付け穴含む)
22.
電源ボタン
USB-C
)
1/4
イン
3/8
インチ
Page 28

準備
A. DJI RONIN
B.
TM
チュートリアルの視聴
App Store
を検索し、アプリインストールの指示
に従います。
でチュートリアルをご覧ください。
https://www.dji.com/ronin-sc
三脚の取り付け
アプリのダウンロードと
Google Playで「Ronin
または
DJI
の公式ウェブサイト
1
2
C.
グリップの取り付け
1
」
3
Ronin アプリ
2
JP
© 2019 DJI OSMO All Rights Reserved.
27
Page 29

D.
バッテリーの充電
初めて使用する前に、電源ケーブル(付属)と
プター(別売)を使用して、電源ポートからグリップを
充電してください。
ます。
5V/2A USB
アダプターの使用を推奨し
USB
アダ
JP
電源コンセント
100 - 240 V
E.
バッテリー残量の確認
充電中は、バッテリー残量インジケー
ターがバッテリー残量を示します。充
電していない時にバッテリー残量を確
認するには、バッテリー残量ボタンを
押します。
F.
電源オン/オフとスリープモード
電源ボタンを長押しして
にします。電源ボタンをタップするとスリープモードに入
ります。もう一度タップすると、スリープモードを終了し
ます。
Ronin-SC
Ronin-SC
Ronin-SC
は初めて使用する前に、
ベーションする必要があります。
1.
電源ボタンを長押ししてジンバルの電源を入れます。
2.
モバイル端末で
Ronin
します。
要ですのでご注意ください。
検出されたら、
パスワード「
3.
インターネットに接続されていることを確認し、画面の指
示に従って
ダプター
は充電中でも操作することができます。
のアクティベーション
Bluetooth
アプリを起動するには、
Ronin-SC
12345678
」を入力します。
Ronin-SC
のアクティベーションを行います。
デバイス アクティベーション
デバイスを使用する前にアクティベーシ
ョンが必要です。そのために、デバイ
DJI
スと
アカウントに関する情報が
にアップロードされます。同意して、ア
クティベーションへと進んでください。
同意してアクティベーションする
User Profile
電源ポート
電源ア
Ronin-SC
の電源をオン/オフ
Ronin
アプリからアクティ
Bluetooth
DJI
Status
Ronin
デバイスのリストで
を有効にし、
を選択してデフォルトの
Ronin-SC
USB
アプリを起動
DJI
アカウントが必
Bluetooth
低高
© 2019 DJI OSMO All Rights Reserved.
28
Create
Page 30

カメラの取り付け
1
2
3
Ronin-SC
に取り付ける前に、必ずカメラの準備を先に行って
ください。レンズキャップを取り外し、カメラのバッテリーと
メモリーカードが挿入されていることを確認してください。
1.
ジンバルの3つの軸は初期状態ではロックされています。
軸をロック解除して、ジンバルを図のとおりの位置に調整
して、3軸を再度ロックします。
2.
必要に応じてマイナスドライバーを使用し、ライザープ
レート*をカメラの底部に取り付けます。
ライザープレート
*
以下の使用シーンでは、ライザープレートが必要です。
Sony A6300
カメラなどの小型軽量カメラを使用する場合。
16-35 mm f/2.8 GM
口径レンズを使用する場合。
Focus
最新のカメラ互換性リストについては、
SC
製品ページをご参照ください(
3.
ダブテールプレート とレンズサポート を取り付けま
す。スライダーをプレートの前面に動かします。カメラレ
ンズとダブテールプレート上の矢印は同じ方向を向いてい
る必要があります。ダブテールプレート上のインジケー
ターに従ってカメラを取り付けます。最適な性能を実現す
るには、レンズサポートを使用してください。
レンズを搭載した
モーターと使用した場合。
Sony A7M3
カメラなどの大
DJI
Web
の公式
http://www.dji.com/ronin-sc
サイトの
)。
Ronin-
3
JP
スライダー
2
1
ダブテールプレート
レンズサポート
© 2019 DJI OSMO All Rights Reserved.
29
Page 31

1
2
3
4.
カメラマウントプレートの底部にあるノブを緩め、 それを
軸の横に動かします。カメラをプレート にスライドさせま
す。カメラがプレートの中央に来たら、ノブを締めます。
JP
2
スマートフォンホルダーや
サリーを使用している場合は、バランス調整する前に必ず
すべてのアクセサリーを取り付けてください。詳細につ
いては、アクセサリーのマニュアルを参照してください。
ダブテールプレートの下にあるネジを必ず締めてください。
Focus
モーターなどのアクセ
バランス調整
撮影前にバランス調整が必要です。バランス調整前に、光学
ズームレンズを使用している場合は必ずカメラの電源を入
れ、可変焦点レンズを使用している場合は焦点距離を選択し
てください。
アルが入っているので、アクティベーション後に確認してく
ださい。
も可能です。そのような場合は、バランス調整をする前に、
Ronin-SC
なっていることを確認してください。
1.
Ronin
アプリには、バランス調整のチュートリ
Ronin
アプリに接続せずに、バランス調整をすること
の電源がオフになっているか、スリープモードに
チルト軸の奥行きのバランス調整
a.
チルト軸をロック解除して、チルト軸ノブ を緩めてカ
メラを下げます。
b.
チルト軸を回し、カメラレンズを前に向けます。カメラ
の前面または背面に重さが偏っていないかどうかを確
認します。前面が重い場合は、カメラを後方に動かしま
す。背面が重い場合は、カメラを前方に動かします。
c.
カメラマウントプレート の下にあるノブを緩め、カメ
ラのバランスを カメラが安定するまで調節します。
d.
ノブを締めます。
1
2
1
3
© 2019 DJI OSMO All Rights Reserved.
30
Page 32

2.
垂直チルトのバランス調整
a.
チルト軸を回し、カメラレンズを上に向けます。カメラ
の上下に重さが偏っていないかどうかを確認します。カ
メラが片側に傾いている場合は、チルトアームを反対側
に引きます。
b.
チルト軸モーター のノブを緩め、カメラ が上下にチ
ルトせずに静止状態を保つまでカメラのバランスを調整
します。
c.
ノブを締めます。
d. 手順1
を繰り返し、チルト軸の奥行きのバランスを取り
ます。ダブテールプレートのスライダーを使って、バラ
ンス位置を記録します。取り付けプレートの横にあるス
ライダーを動かし、スライダーを締めます。
1
2
3.
ロール軸のバランス調整
a.
チルト軸をロックし、ロール軸をロック解除します。
ロールモーターが揺れる方向を確認します。カメラが左
に回転する場合は、カメラを右に移動します。カメラが
右に回転する場合は、カメラを左に移動します。
b.
カメラマウントプレート のノブを緩め、プレート の
位置をカメラが安定するまで調節します。
c.
ノブを締めます。カメラが前方に動く場合は、スライ
ダーが取り付けプレートの隣に来るまでカメラを後方に
動かします。
JP
1
2
© 2019 DJI OSMO All Rights Reserved.
31
Page 33

4.
パン軸のバランス調整
a.
パン軸のロックを解除します。グリップを握り、
SC
を斜めに傾け、パン軸の動きを確認します。カメラレ
ンズが下向きに回転する場合は、パン軸を後方に押しま
す。カメラレンズが上向きに回転する場合は、パン軸を
前方に押します。
b.
パン軸モーター のノブを緩めます。グリップを持ち上
JP
げてパン軸を回してもカメラが安定するまで、カメラの
バランス を調整します。
c.
ノブを締めます。
1
2
操作
オートチューン
インストール、アクティベーション、およびバランス調整を
Ronin-SC
した後、
る必要があります。オートチューンを実行する前に、必ず
Ronin-SC
チューンする方法は2つあります。
A. Ronin-SCのM
ートチューン]を開始します。
B. Ronin
に移動し、[オートチューン]を選択します。
ボタン機能
電源ボタン:電源ボタンを長押しすると
ン/オフします。電源ボタンをタップすると、スリープモー
ドが開始/終了されます。
M
ボタン:タップしてユーザープロファイルを選択します。
長押しすると、スポーツモードになります。
ジョイスティック:ジョイスティックを上下に動かすことで
チルト軸の動きを制御し、左右に動かすことでパン軸の動き
を制御します。パン、チルト、ロール軸のパラメーターを調
整するには、
動します。
カメラ制御ボタン:カメラ制御ポートとカメラを接続後、カ
© 2019 DJI OSMO All Rights Reserved.
32
を使用する前にオートチューンを実行す
を平らな面に置いてください。
ボタンとトリガーを同時に4秒間押すと、[オ
アプリを起動し、[モーターパラメーター]ページ
Ronin
アプリの[ジョイスティック]ページに移
Ronin-SC
Ronin-SC
Ronin-
をオート
の電源をオ
Page 34

メラのシャッターボタンを押す時と同じように、半押しする
と、オートフォーカスします。押すと録画が開始/停止され
ます。長押しすると写真を撮影します。最新のカメラ互換性
リストについては、
ージをご参照ください(
トリガー:長押しするとロックモードに入ります。2回押すと、
ジンバルを再センタリングします。3回押すと、ジンバルが
180°
回転し、カメラがユーザーの方を向きます。
DJI
Web
の公式
http://www.dji.com/ronin-sc)
カメラ制御ケーブル(
SC
を接続しているときは、再生は使用できません。この
場合、電源ボタンを押してスリープモードに入ってから
再生を使用してください。
USB-C
Ronin-SC
サイトの
)を使ってカメラと
製品ペ
。
Ronin-
JP
仕様
160 g
RB2-2450 mAh-7.2 V
18650
2450 mAh
17.64 Wh
8 dBm
0.2 A
830 g
258 g
リチウム
重量 ジンバル:約
サイズ ジンバル(折りたたんだ状態 ):
入力電力 モデル:
動作電流 静的電流:
Bluetooth
動作周波数
Bluetooth
送信出力 <
動作環境温度
最大 スタンバイ時間11時間
詳細については、ユーザーマニュアルをご覧ください。
http://www.dji.com/ronin-sc
グリップ:約
三脚:約
220×200×75 mm
ジンバル(開いた状態 ):
370×165×150 mm
タイプ:
容量:
電力量:
2.40 GHz~2.4835 GHz
-20℃~45℃
※ 本内容は予告なく変更される場合があります。
© 2019 DJI OSMO All Rights Reserved.
33
Page 35

Ronin-SC 개요
17
16
KR
15
14
1. 틸트 모터
2. 틸트 잠금장치
1
3. 카메라 제어/
2
액세서리 포트
(USB-C)
4. 롤 모터
5. 롤 잠금장치
3
6. 팬 모터
4
7. 팬 잠금장치
5
8. 프로필 LED 표시기
6
9. 조이스틱
7
8
10. 카메라 제어 버튼
9
11. M 버튼
10
11
12. 배터리 잔량 표시기
13. 배터리 잔량 버튼
14. 레버
15. Ronin 시리즈
13
12
16. 안전 잠금장치
17. 카메라 마운팅 플레이트
액세서리(RSA)
포트
22
21
© 2019 DJI OSMO All Rights Reserved.
34
18. 전원 포트(USB-C)
18
19. 트리거
19
20. 삼각대
21. 그립(1/4" 및 3/8"
장착 구멍 포함)
22. 전원 버튼
20
Page 36

시작
A. DJI RONINTM 앱 다운로드 및 튜토리얼
영상 시청
App Store나 Google Play에서 "Ronin"을
검색하고 지침에 따라 앱을 설치합니다.
DJI 공식 웹사이트(https://www.dji.com/
ronin-sc)에서 튜토리얼 영상을 시청합니다.
B. 삼각대 장착
1
2
C. 그립 장착
1
앱
Ronin
KR
3
2
© 2019 DJI OSMO All Rights Reserved.
35
Page 37

D. 배터리 충전
처음으로 사용할 때는 먼저 전원 케이블(포함)과 USB 어댑터
(미포함)를 사용하여 전원 포트를 통해 그립을 충전합니다.
5V/2A USB 어댑터 사용을 권장합니다.
전원 콘센트
KR
100~240 V
E. 배터리 잔량 확인
충전하는 동안 배터리 잔량이 배터리 잔량 표시기에
나타납니다. 충전하지 않을 때는 배터리 잔량 버튼을 눌러
배터리 잔량을 확인합니다.
USB 전원 어댑터
전원 포트
F. 전원 켜기/끄기 및 휴면 모드
전원 버튼 을 길게 누르면 Ronin-SC 전원이 켜지거나 꺼지고 전원
버튼을 살짝 누르면 휴면 모드로 전환됩니다. 다시 살짝 누르면 휴면
모드에서 나옵니다.
Ronin-SC는 충전
Ronin-SC 활성화
Ronin-SC를 처음으로 사용할 때는 먼저 Ronin 앱을 통해 활성화해야 합니다.
중에도 작동할 수 있습니다
.
1. 전원 버튼을 길게 눌러 짐벌의 전원을 켭니다.
2. 모바일 기기에서 블루투스를 활성화하고 Ronin 앱을 실행합니다. Ronin 앱을
실행하려면 DJI 계정이 필요합니다. 블루투스 장치 목록에서 감지된 Ronin-SC를
선택하고 기본 블루투스 비밀번호 (12345678)를 입력합니다.
3. 인터넷 연결을 확인한 다음 화면의 지시에 따라 Ronin-SC를 활성화합니다.
Ronin-SC
기기 활성화
기기를 사용하려면 먼저 활성화가
필요합니다. 기기를 활성화하려면
기기와
계정에 대한 정보가
DJI
업로드됩니다. 동의 후
DJI에
활성화를 진행하십시오
.
동의 및 활성화
User Profile
Status
Create
낮음높음
© 2019 DJI OSMO All Rights Reserved.
36
Page 38

카메라 장착
1
2
3
카메라를 Ronin-SC에 장착하기 전에 카메라를 준비하십시오. 렌즈
캡을 분리하고 카메라에 배터리와 메모리 카드가 삽입되어 있는지
확인합니다.
1. 짐벌의 축 3개는 기본적으로 잠겨 있습니다. 축 3개의 잠금을
해제하고, 그림과 같이 짐벌의 위치를 조정한 후 3개의 축을 다시
잠급니다.
2. 필요한 경우, 일자 드라이버를 사용해 라이저 플레이트*를 카메라의
하단에 장착합니다.
라이저 플레이트
* 라이저 플레이트는 다음과 같은 상황에서 필요합니다.
Sony A6300 카메라와 같이 작고 가벼운 카메라를 사용할 때
Sony A7M3 카메라와 같이 직경이 큰 렌즈(16-35 mm f/2.8 GM 렌즈)를
사용할 때
포커스 모터와 함께 사용할 때
카메라 호환성 목록의 최신 업데이트 정보는 DJI 공식 웹사이트의 Ronin-SC
제품 페이지(http://www.dji.com/ronin-sc)에서 확인하십시오.
3. 카메라 도브테일 플레이트 와 렌즈 서포트 를 장착합니다.
슬라이더를 플레이트 앞쪽으로 이동합니다. 카메라 렌즈와 도브테일
플레이트의 화살표가 같은 방향을 향해야 합니다. 도브테일
플레이트의 표시기에 따라 카메라를 장착합니다. 최적의 성능을 위해
렌즈 서포트를 사용합니다.
KR
슬라이더
2
1
도브테일 플레이트
렌즈 서포트
© 2019 DJI OSMO All Rights Reserved.
37
Page 39

1
2
3
4. 카메라 마운팅 플레이트 하단의 노브를 풀고 축 측면으로
이동시킵니다. 카메라를 플레이트 에 밀어 넣습니다. 카메라가
플레이트 중앙에 위치하면 노브를 조입니다.
KR
2
휴대폰 홀더 또는 포커스 모터와 같은 액세서리를 사용할 때는
모든 액세서리를 장착한 후에 균형을 잡아야 합니다. 자세한
내용은 해당 액세서리의 사용 설명서를 참조하십시오.
도브테일 플레이트 아래에 있는 나사를 조입니다.
균형 조정
촬영 전에 먼저 균형을 잡아야 합니다. 균형을 잡기 전에 광학 줌
렌즈를 사용하는 경우에는 카메라가 켜져 있는지 그리고 다초점 렌즈를
사용하는 경우에는 초점 거리를 선택했는지 확인합니다. Ronin 앱에는
균형 조정에 관한 튜토리얼이 있으며, 활성화 후 볼 수 있습니다. 균형
조정은 Ronin 앱에 연결하지 않고도 수행할 수 있습니다. 이 경우,
균형을 잡기 전에 Ronin-SC의 전원이 꺼져 있거나 휴면 모드에 있는지
확인합니다.
1. 틸트 축에 대한 깊이 균형 조정
a. 틸트 축 노브 를 풀어서 틸트 축의 잠금을 해제하고
카메라를 낮춥니다.
b. 카메라 렌즈가 전방을 향하도록 틸트 축을 돌립니다. 카메라의
무게 중심이 앞쪽이나 뒤쪽에 있지 않은지 확인합니다. 무게
중심이 앞쪽에 있으면, 카메라를 뒤로 이동합니다. 무게
중심이 뒤쪽에 있으면 , 카메라를 앞으로 이동합니다.
c. 카메라 마운팅 플레이트 아래에 있는 노브를 풀고 카메라가
안정될 때까지 카메라의 균형을 조정 합니다.
d. 노브를 조입니다.
1
2
1
3
© 2019 DJI OSMO All Rights Reserved.
38
Page 40

2. 수직 틸트 균형 조정
a. 카메라 렌즈가 위를 향하도록 틸트 축을 돌립니다. 카메라의 무게
중심이 위쪽 또는 아래쪽에 있지 않은지 확인합니다. 카메라가 한
쪽으로 기울어지면, 틸트 암을 다른 쪽으로 당깁니다.
b. 틸트 모터의 노브 를 풀고 카메라가 위아래로 기울어지지 않고
안정될 때까지 카메라의 균형을 조정 합니다.
c. 노브를 조입니다.
d. 1단계를 반복하여 틸트 축 깊이의 균형을 조정합니다. 도브테일
플레이트의 슬라이더는 균형 위치를 기록하는 데 사용됩니다.
슬라이더를 마운팅 플레이트 옆으로 이동하고 슬라이더를
조입니다.
1
2
3. 롤 축 균형 조정
a. 틸트 축을 잠그고 롤 축의 잠금을 해제합니다. 롤 모터가
회전하는 방향을 확인합니다. 카메라가 왼쪽으로 회전하면,
카메라를 오른쪽으로 이동합니다. 카메라가 오른쪽으로
회전하면, 카메라를 왼쪽으로 이동합니다.
b. 카메라 마운팅 플레이트 의 노브를 풀고 카메라가 안정될
때까지 플레이트 의 위치를 조정합니다.
c. 노브를 조입니다. 카메라가 앞으로 움직이면, 슬라이더가 마운팅
플레이트 옆으로 올 때 때까지 카메라를 뒤로 이동합니다.
1
KR
2
© 2019 DJI OSMO All Rights Reserved.
39
Page 41

4. 팬 축 균형 조정
a. 팬 축의 잠금을 해제합니다. 그립을 잡고 Ronin-SC 옆으로
기울인 다음 팬 축의 움직임을 확인합니다. 카메라 렌즈가 아래로
회전하면, 팬 축을 뒤로 밉니다. 카메라 렌즈가 위로 회전하면, 팬
축을 앞으로 밉니다.
b. 팬 모터 의 노브를 풉니다. 그립을 올린 상태에서 팬을 회전할 때
카메라가 안정될 때까지 카메라의 균형을 조정 합니다.
c. 노브를 조입니다.
KR
1
2
조작
오토 튠
설치, 활성화 및 균형 조정이 끝나면 Ronin-SC를 사용하기 전에 먼저
오토 튠 작업을 해야 합니다. 오토 튠 작업을 수행할 때는 우선 RoninSC를 평평한 표면에 놓아야 합니다. Ronin-SC의 오토 튠 수행 방법은
두 가지가 있습니다.
A. Ronin-SC의 M 버튼과 트리거를 4초 동안 동시에 눌러 오토 튠을 시작합니다.
B. Ronin 앱을 실행하고 모터 매개변수 페이지로 이동하여 오토 튠을 선택합니다.
버튼 기능
전원 버튼: 전원 버튼을 길게 누르면 Ronin-SC가 켜지거나 꺼집니다.
전원 버튼을 살짝 누르면 휴면 모드로 들어가거나 휴면 모드에서
나옵니다.
M 버튼: 살짝 눌러 사용자 프로필을 선택합니다. 길게 누르면 스포츠
모드로 들어갑니다.
조이스틱: 조이스틱을 위 또는 아래로 밀어서 틸트 축의 움직임을
제어하고, 왼쪽 또는 오른쪽으로 밀어서 팬 축의 움직임을 제어합니다.
팬, 틸트 및 롤 축에 대한 매개변수를 조정하려면 Ronin 앱의 조이스틱
페이지로 이동하십시오.
카메라 제어 버튼: 카메라 제어 포트 및 카메라를 연결한 후 일반
카메라의 셔터 버튼과 마찬가지로 반쯤 누르면 포커스가 자동으로
맞춰집니다. 버튼을 누르면 녹화가 시작되거나 중단됩니다. 길게
누르면 사진이 촬영됩니다. 카메라 호환성 목록의 최신 업데이트
정보는 DJI 공식 웹사이트의 Ronin-SC 제품 페이지(http://www.dji.
com/ronin-sc)에서 확인하십시오.
트리거: 트리거를 길게 누르면 잠금 모드로 들어갑니다. 두 번 누르면
짐벌이 중앙으로 복귀합니다. 세 번 누르면 카메라가 사용자를
향하도록 짐벌이 180° 회전합니다.
© 2019 DJI OSMO All Rights Reserved.
40
Page 42

카메라 제어 케이블(USB-C)을 사용하여 카메라와 Ronin-SC를
연결하면 재생 기능을 사용할 수 없습니다. 이 경우, 전원 버튼을
눌러 휴면 모드로 들어가야 재생 기능을 사용할 수 있습니다.
사양
무게
크기
입력 전원 모델: RB2-2450 mAh-7.2V
작동 전류 정적 전류: 0.2 A
블루투스 작동 주파수 2.40 GHz ~ 2.4835 GHz
블루투스 송신기 출력
작동 온도
최대 대기 시간 11시간
짐벌: 약 830 g
그립: 약 258 g
삼각대: 약 160 g
짐벌(접은 상태): 220×200×75 mm
짐벌(펼친 상태): 370×165×150 mm
유형: 18650 리튬
용량: 2450 mAh
에너지: 17.64 Wh
<8 dBm
-20~45 °C
KR
자세한 내용은 사용자 매뉴얼을 참조하십시오.
http://www.dji.com/ronin-sc
※ 본 내용은 사전 고지 없이 변경될 수 있습니다.
© 2019 DJI OSMO All Rights Reserved.
41
Page 43

Übersicht über den Ronin-SC
1
2
17
16
DE
15
14
13
3
4
5
6
7
8
9
10
11
12
1. Neigemotor
2. Neigungssperre
3. Kamerasteuerung /
Zubehöranschluss
(USB-C)
4. Rollmotor
5. Rollsperre
6. Schwenkmotor
7. Schwenksperre
8. Profil-LED-Anzeigen
9. Joystick
10. Kamerasteuerungstaste
11. M-Taste
12. Akkuladestandsanzeigen
13. Akkuladestandstaste
14. Hebel
15. RSA-Zubehöranschluss
16. Sicherheitssperre
17. Kamerabefestigungs-
platte
22
21
18
19
20
© 2019 DJI OSMO Alle Rechte vorbehalten.
42
18. Ladeanschluss (USB-C)
19. Auslöser
20. Stativ
21. Griff (inkl. 1/4und 3/8-Zoll-
Befestigungslöcher)
22. Netztaste
Page 44

Erste Schritte
A. Herunterladen der DJI RONINTM App
und Anschauen des Tutorials
Suchen Sie im App-Store oder im
Google Play Store nach „Ronin“, und
folgen Sie den Installationsanweisungen
für die App. Schauen Sie sich die
Tutorials auf der oziellen DJI-Website
an. https://www.dji.com/ronin-sc
B. Anbringen des Stativs
1
2
C. Montieren des Gris
1
Ronin-App
DE
3
2
© 2019 DJI OSMO Alle Rechte vorbehalten.
43
Page 45

D. Laden des Akkus
Laden Sie den Gri vor dem ersten Gebrauch mit einem
Ladekabel (im Lieferumfang enthalten) und einem USBLadegerät (nicht im Lieferumfang enthalten) über den
Netzanschluss auf. Es wird empfohlen, ein USB-Ladegerät
mit 5 V / 2 A zu verwenden.
Steckdose
100 - 240 V
E. Akkuladestand prüfen
Beim Auaden zeigen die Akku-LEDs
DE
den Ladestand an. Wenn das Gerät
nicht geladen wird, drücken Sie
die Akkuladestandstaste, um den
Akkuladestand zu prüfen.
F. Ein- und Ausschalten und Ruhemodus
Halten Sie die Netztaste gedrückt, um den Ronin-SC
ein- oder auszuschalten. Tippen Sie auf die Netztaste,
um in den Ruhemodus zu wechseln. Tippen Sie erneut,
um den Ruhemodus zu beenden.
Ronin-SC kann während des Ladevorgangs betrieben
werden.
Netzanschluss USB-Ladegerät
Den Ronin-SC aktivieren
Der Ronin-SC muss vor der ersten Verwendung über die
Ronin-App aktiviert werden.
1. Halten Sie die Netztaste gedrückt, um den Gimbal
einzuschalten.
2. Schalten Sie Bluetooth auf Ihrem Mobilgerät ein und starten
Sie die Ronin-App. Beachten Sie, dass zur Verwendung
der Ronin-App ein DJI-Benutzerkonto erforderlich ist.
Sobald es in der Liste der Bluetooth-Geräte erscheint,
wählen Sie den Ronin-SC und geben Sie das StandardBluetooth-Passwort ein: 12345678.
3. Achten Sie darauf, dass Sie mit dem Internet verbunden
sind, und folgen Sie den Anweisungen auf dem Bildschirm,
um den Ronin-SC zu aktivieren.
Ronin-SC
Geräteaktivierung
Die Aktivierung ist vor der Verwendung
des Geräts erforderlich. Zu diesem
Zweck werden Informationen zu Ihrem
Gerät und Ihrem DJI-Benutzerkonto
auf DJI-Server hochgeladen. Bitte
stimmen Sie zu und fahren Sie
mit der Aktivierung fort.
Zustimmen und aktivieren
User Profile
Status
NiedrigHoch
Create
© 2019 DJI OSMO Alle Rechte vorbehalten.
44
Page 46

Die Kamera befestigen
1
2
3
Achten Sie darauf, die Kamera vorzubereiten, bevor Sie
sie diese an dem Ronin-SC befestigen. Entfernen Sie die
Objektivkappe und achten Sie darauf, dass der Akku und die
Speicherkarte der Kamera bereits eingesetzt sind.
1. Die drei Achsen des Gimbals sind standardmäßig gesperrt.
Entriegeln Sie die drei Achsen, stellen Sie den Gimbal wie
gezeigt ein und sperren Sie die drei Achsen wieder.
2. Befestigen Sie ggf. die Erhöhungsplatte* an der Unterseite
der Kamera mit einem Flachschraubendreher.
Erhöhungsplatte
* In den folgenden Szenarien ist eine Erhöhungsplatte erforderlich:
Bei Verwendung einer kleinen und leichten Kamera wie einer Sony
A6300.
Bei Verwendung eines Objektivs mit großem Durchmesser, z. B.
einer Sony A7M3-Kamera mit einem 16-35 mm f/2.8 GM-Objektiv.
Bei Verwendung mit einem Fokusmotor.
Die aktuellste Kamera-Kompatibilitätsliste finden Sie auf der RoninSC-Produktseite auf der offiziellen DJI-Website (http://www.dji.com/
ronin-sc).
3. Befestigen Sie die Schwalbenschwanzplatte und die
Objektivhalterung . Bewegen Sie den Schieber an die
Vorderseite der Platte. Das Kameraobjektiv und der Pfeil
auf der Schwalbenschwanzplatte müssen in dieselbe
Richtung zeigen. Befestigen Sie die Kamera entsprechend
den Markierungen auf der Schwalbenschwanzplatte.
Verwenden Sie die Objektivhalterung für eine optimale
Leistung.
DE
Schieberegler
2
1
Schwalbenschwanzplatte
Objektivhalterung
© 2019 DJI OSMO Alle Rechte vorbehalten.
45
Page 47

1
2
3
4. Lösen Sie den Knopf an der Unterseite der
Kamerabefestigungsplatte und verschieben Sie ihn an
die Seite der Achse. Schieben Sie die Kamera in die Platte
ein . Ziehen Sie den Knauf fest, wenn sich die Kamera
in der Mitte der Platte befindet.
1
DE
Ausbalancieren
Die Ausbalancierung ist erforderlich, bevor Sie Aufnahmen
machen können. Achten Sie vor dem Abgleich darauf, die
Kamera einzuschalten, falls Sie ein optisches Zoomobjektiv
verwenden, und die Brennweite auszuwählen, falls Sie ein
Varioobjektiv verwenden. In der Ronin-App gibt es Tutorials für
die Balancierung, die nach der Aktivierung angezeigt werden
können. Die Ausbalancierung kann auch ohne Bajonett zur
Ronin-App durchgeführt werden. Achten Sie in diesem Szenario
darauf, Ronin-SC auszuschalten oder in den Ruhemodus zu
gehen, bevor Sie die Balancierung durchführen.
1. Tiefe der Neigungsachse ausbalancieren
a. Entriegeln Sie die Neigungsachse und senken Sie die
Kamera ab, indem Sie den Neigungsachsenknauf lösen .
b. Drehen Sie die Neigungsachse so, dass das Kameraobjektiv
nach vorne zeigt. Vergewissern Sie sich, dass die Kamera
nicht vorderlastig oder hinterlastig ist. Falls die Kamera
vorderlastig ist, bewegen Sie sie nach hinten. Falls die
Kamera hinterlastig ist, bewegen Sie sie nach vorne.
c. Lösen Sie den Knauf unter der Kamerabefestigungsplatte
und stellen Sie die Kamera-Balance ein bis die Kamera
ruhig ist.
d. Ziehen Sie den Knauf fest.
2
Falls Sie Zubehör wie die Telefonhalterung oder den
Fokusmotor verwenden, achten Sie darauf, das gesamte
Zubehör vor dem Auswuchten zu befestigen. Weitere
Informationen nden Sie in den Handbüchern des Zubehörs.
Achten Sie darauf, dass die Schraube unter der
Schwalbenschwanzplatte festgezogen ist.
1
2
© 2019 DJI OSMO Alle Rechte vorbehalten.
46
3
Page 48

2. Neigung ausbalancieren
a. Drehen Sie die Neigungsachse so, dass das
Kameraobjektiv nach oben zeigt. Achten Sie darauf, dass
die Kamera nicht kopf- oder fußlastig ist. Falls die Kamera
zu einer Seite geneigt ist, ziehen Sie den Neigungsarm zur
anderen Seite.
b. Lösen Sie den Knauf am Neigungsmotor und passen
Sie das Kamera-Balance so an, dass die Kamera sich
nicht bewegt und sich nicht nach oben oder unten neigt.
c. Ziehen Sie den Knauf fest.
d. Wiederholen Sie Schritt 1, um die Tiefe der
Neigungsachse auszugleichen. Der Schieber auf der
Schwalbenschwanzplatte dient zur Aufzeichnung der
ausbalancierten Position. Bewegen Sie den Schieber
neben die Montageplatte und ziehen Sie den Schieber fest.
1
2
3. Rollachse ausbalancieren
a. Sperren Sie die Neigungsachse und entriegeln Sie
die Rollachse. Überprüfen Sie die Richtung, in die der
Rollmotor schwingt. Falls sich die Kamera nach links dreht,
bewegen Sie sie nach rechts. Falls sich die Kamera nach
rechts dreht, bewegen Sie sie nach links.
b. Lösen Sie den Knopf an der Kamerabefestigungsplatte
und stellen Sie die Position der Platte ein, bis die
Kamera ruhig ist.
c. Ziehen Sie den Knauf fest. Falls sich die Kamera vorwärts
bewegt, bewegen Sie die Kamera zurück, bis sich der
Schieber neben der Montageplatte bendet.
DE
1
2
© 2019 DJI OSMO Alle Rechte vorbehalten.
47
Page 49

4. Ausbalancieren der Schwenkachse
a. Entriegeln Sie die Schwenkachse. Halten Sie den Griff
fest, neigen Sie den Ronin-SC zur Seite und überprüfen
Sie die Bewegung der Schwenkachse. Falls sich das
Kameraobjektiv nach unten dreht, schieben Sie die
Schwenkachse nach hinten. Falls sich das Kameraobjektiv
nach oben dreht, schieben Sie die Schwenkachse nach
vorne.
b. Lösen Sie den Knauf am Schwenkmotor . Stellen Sie
das Kamera-Balance solange ein , bis sich die Kamera
beim Drehen der Schwenkachse nicht bewegt, während
Sie den Gri anheben.
c. Ziehen Sie den Knauf fest.
DE
1
2
Betrieb
Auto Tune
Nach der Installation, Aktivierung und der Ausbalancierung
muss der Ronin-SC automatisch abgestimmt werden, bevor es
verwendet werden kann. Stellen Sie sicher, dass Ronin-SC auf
einer ebenen Fläche steht, bevor Sie „Auto Tune“ durchführen.
Es gibt zwei Möglichkeiten, Ronin-SC automatisch abzustimmen.
A. Drücken Sie die M-Taste des Ronin-SC und gleichzeitig
den Auslöser vier Sekunden lang, um die automatische
Anpassung „Auto Tune“ zu starten.
B. Starten Sie die Ronin-App, gehen Sie auf die Seite
Motorparameter und wählen Sie „Auto Tune“ aus.
Tastenfunktionen
Netztaste: Halten Sie die Netztaste gedrückt, um den Ronin-SC
ein- oder auszuschalten. Tippen Sie auf die Netztaste, um den
Ruhemodus zu aktivieren oder zu beenden.
M-Taste: Tippen Sie auf diese Taste, um ein Benutzerprofil
auszuwählen. Gedrückt halten, um in den Sportmodus zu
wechseln.
Joystick: Drücken Sie den Joystick nach oben oder unten, um
die Bewegung der Neigungsachse zu steuern, und schieben Sie
ihn nach links oder rechts, um die Bewegung der Schwenkachse
zu steuern. Gehen Sie zur Joystick-Seite der Ronin-App, um
die Parameter für die Schwenk-, Neigungs- und Rollachsen
anzupassen.
Kamerasteuertaste: Drücken Sie nach dem Anschließen des
Kamerasteuerungsanschlusses und der Kamera die Taste
zur Hälfte, um den Autofokus zu aktivieren, wie Sie es mit der
Fototaste einer Kamera tun würden. Zum Starten und Beenden
© 2019 DJI OSMO Alle Rechte vorbehalten.
48
Page 50

der Videoaufnahme drücken. Zum Fotografieren drücken und
halten. Die neueste Kompatibilitätsliste für Kameras nden Sie
auf der Ronin-SC-Produktseite auf der offiziellen DJI-Website
(http://www.dji.com/ronin-sc).
Auslöser: Halten Sie den Auslöser gedrückt, um den
Sperrmodus aufzurufen. Drücken Sie die Taste zweimal, um
den Gimbal wieder zu zentrieren. Drücken Sie dreimal, um den
Gimbal um 180° zu drehen, so dass die Kamera zu Ihnen zeigt.
Wenn die Kamera und der Ronin-SC über das Kamera-
Steuerkabel (USB-C) verbunden sind, kann die Wiedergabe
nicht verwendet werden. Drücken Sie in diesem Szenario
die Netztaste, um in den Ruhemodus zu wechseln, und
verwenden Sie dann die Wiedergabe.
Technische Daten
Gewicht Gimbal: ca. 830 g
Abmessungen Gimbal (gefaltet): 220 × 200 × 75 mm
Leistungsaufnahme Modell: RB2-2450 mAh-7,2 V
Betriebsstromstärke Statischer Strombedarf: 0,2 A
Bluetooth-
Betriebsfrequenz
BluetoothSendeleistung
Betriebstemperatur -20° bis 45° C (-4° bis 113° F)
Max. Standby-Zeit 11 Stunden
Gri: ca. 258 g
Stativ: ca. 160 g
Gimbal (entfaltet): 370 × 165 × 150 mm
Typ: 18650 Lithium
Kapazität: 2450 mAh
Energie: 17,64 Wh
2,40 GHz - 2,4835 GHz
8 dBm
<
DE
Eine ausführliche Beschreibung finden Sie in der
Bedienungsanleitung unter:
http://www.dji.com/ronin-sc
※Dieser Inhalt kann ohne vorherige Ankündigung geändert
werden.
© 2019 DJI OSMO Alle Rechte vorbehalten.
49
Page 51

Descripción general del Ronin-SC
1. Motor de inclinación
2. Bloqueo de inclinación
1
3. Control de cámara /
2
Puerto de accesorios
(USB-C)
17
16
ES
15
14
13
4. Motor de rotación
5. Bloqueo de rotación
3
6. Motor de giro
4
7. Bloqueo de giro
5
8. Indicadores led de perfil
6
9. Joystick
7
8
10. Botón de control de
9
10
11
11. Botón M
12. Indicadores del nivel
13. Botón del nivel
14. Palanca
12
15. Puerto de accesorios
16. Seguro
17. Placa de montaje
la cámara
de batería
de batería
RSA
de la cámara
22
21
© 2019 DJI OSMO Todos los derechos reservados.
50
18. Puerto de alimentación
18
(USB-C)
19
19. Disparador
20. Trípode
21. Empuñadura (Inc.
orificios de montaje
de 1/4" y 3/8"
22. Botón de encendido
20
)
Page 52

Para empezar
A. Descarga de la aplicación DJI RONINTM
y visualización de los tutoriales.
Busque "Ronin" en la App Store o en
Google Play y siga las instrucciones
para instalar la aplicación. Mire los
tutoriales en el sitio web ocial de DJI.
https://www.dji.com/ronin-sc
B. Colocación del trípode
1
2
C. Montaje de la empuñadura
1
3
Aplicación
Ronin
2
ES
© 2019 DJI OSMO Todos los derechos reservados.
51
Page 53

D. Carga de la batería
Antes de usarlo por primera vez, cargue la empuñadura
a través del puerto de alimentación con un cable de
alimentación (incluido) y un adaptador USB (no incluido).
Se recomienda utilizar un adaptador USB de 5 V/2 A.
Adaptador de
Toma de
alimentación
100 - 240 V
E. Comprobación de nivel de carga
de la batería
Durante la carga, los indicadores de
nivel de batería indican el nivel de la
ES
batería. Cuando no se esté cargando,
pulse el botón de nivel de batería para
comprobar el nivel de la batería.
F. Encendido / apagado y modo suspendido
Mantenga pulsado el botón de encendido para encender
o apagar el Ronin-SC Toque el botón de encendido para
entrar al modo suspendido. Toque de nuevo para salir del
modo suspendido.
Es posible utilizar el Ronin-SC mientras se carga.
alimentación
USB
Puerto de
alimentación
Activación del Ronin-SC
El Ronin-SC debe activarse a través de la aplicación Ronin
antes de usarlo por primera vez.
1. Mantenga presionado el botón de encendido para
encender el estabilizador.
2. Active la función Bluetooth en su dispositivo móvil e inicie
la aplicación Ronin. Tenga en cuenta que se requiere
una cuenta DJI para iniciar la aplicación Ronin. Una vez
detectado en la lista de dispositivos Bluetooth, seleccione
el Ronin-SC e introduzca la contraseña predeterminada de
Bluetooth: 12345678.
3. Asegúrese de que tiene conexión a Internet y siga las
instrucciones que aparecen en pantalla para activar el
Ronin-SC.
Ronin-SC
Activación del dispositivo
Se requiere activación antes de
usar el dispositivo. Para hacerlo,
la información sobre su dispositivo
y cuenta de DJI será transmitida
a DJI. Por favor acepte y
proceda a la activación.
Aceptar y activar
User Profile
Status
BajaAlta
Create
© 2019 DJI OSMO Todos los derechos reservados.
52
Page 54

Montaje de la cámara
1
2
3
Asegúrese de preparar la cámara antes de montarla en el
Ronin-SC. Retire la tapa del objetivo y asegúrese de que la
batería y la tarjeta de memoria están insertadas en la cámara.
1. Los tres ejes del estabilizador están bloqueados por
defecto. Desbloquee los tres ejes, coloque el estabilizador
en la posición que se muestra y vuelva a bloquear los tres
ejes.
2. Si es necesario, fije la placa elevadora* a la parte inferior
de la cámara mediante un destornillador de cabeza plana.
Placa elevadora
* Se requiere la placa elevadora en los siguientes escenarios:
Cuando utilice una cámara pequeña y ligera, como una cámara
Sony A6300.
Cuando utilice un objetivo con un diámetro grande, como una
cámara Sony A7M3 con un objetivo de 16-35 mm f/2.8 GM.
Cuando utilice un motor de enfoque.
Consulte la página del producto Ronin-SC en el sitio web oficial
de DJI (http://www.dji.com/ronin-sc) para ver la lista de cámaras
compatibles más actualizada.
3. Fije la placa de cola de milano y el soporte del
objetivo . Mueva el deslizador hacia el frente de la
placa. El objetivo de la cámara y la flecha en la placa
de cola de milano deben estar orientados en la misma
dirección. Monte la cámara de acuerdo con los indicadores
en la placa de cola de milano. Utilice el soporte de objetivo
para un rendimiento óptimo.
ES
Deslizador
1
Placa de cola de milano
2
Soporte de objetivo
© 2019 DJI OSMO Todos los derechos reservados.
53
Page 55

1
2
3
4. Afloje la rueda de ajuste en la parte inferior de la placa de
montaje de la cámara y muévala hacia el lado del eje.
Deslice la cámara hacia la placa . Apriete la rueda de
ajuste cuando la cámara esté en el centro de la placa.
2
ES
Si usa accesorios como el soporte para el teléfono o
el motor de enfoque, asegúrese de montar todos los
accesorios antes de realizar el equilibrado. Consulte los
documentos del manual de los accesorios para obtener
más información.
Asegúrese de apretar el tornillo de debajo de la placa
de cola de milano.
Equilibrado
Es necesario equilibrar antes de grabar. Antes de equilibrar,
asegúrese de encender la cámara si usa un objetivo con
zoom óptico y de seleccionar la distancia focal si usa
un objetivo varifocal. Hay tutoriales para equilibrar en
la aplicación Ronin, que se pueden ver después de la
activación. También se puede equilibrar sin conectarse a la
aplicación Ronin. En ese caso, asegúrese de que el Ronin-SC
esté apagado o en modo suspendido antes de equilibrarlo.
1. Equilibrado de la profundidad del eje de inclinación
a. Desbloquee el eje de inclinación y baje la cámara aojando
la rueda de ajuste del eje de inclinación .
b. Ajuste el eje de inclinación, de forma que el objetivo de la
cámara apunte hacia delante. Asegúrese de que el peso
de la cámara no esté descompensado hacia delante o
hacia atrás. Si está descompensada hacia delante, mueva
la cámara hacia atrás. Si está descompensada hacia atrás,
mueva la cámara hacia delante.
c. Aoje la rueda debajo de la placa de montaje de la cámara
y equilibre la cámara hasta que esta quede estable.
d. Apriete la rueda.
1
1
2
© 2019 DJI OSMO Todos los derechos reservados.
54
3
Page 56

2. Equilibrado de la inclinación vertical
a. Ajuste la inclinación para que el objetivo de la cámara
apunte hacia arriba. Asegúrese de que el peso de la cámara
no esté descompensado hacia arriba o abajo. Si la cámara
está inclinada hacia un lado, tire del brazo de inclinación
hacia el otro lado.
b. Aoje la rueda del motor de inclinación y ajuste el
equilibrio de la cámara hasta que quede estable sin
inclinarse hacia arriba ni hacia abajo.
c. Apriete la rueda.
d. Repita el paso 1 para equilibrar la profundidad del eje de
inclinación. El deslizador de la placa de cola de milano
se utiliza para registrar la posición de equilibrio. Mueva el
deslizador junto a la placa de montaje y apriételo.
1
2
3. Equilibrado del eje de rotación
a. Bloquee el eje de inclinación y desbloquee el eje de
rotación. Compruebe la dirección en la que gira el motor
de rotación. Si la cámara rota hacia la izquierda, mueva
la cámara hacia la derecha. Si la cámara rota hacia la
derecha, mueva la cámara hacia la izquierda.
b. Aoje la rueda de ajuste en la placa de montaje de la
cámara , y ajuste la posición de la placa hasta que la
cámara quede estable.
c. Apriete la rueda. Si la cámara se mueve hacia adelante,
muévala hacia atrás hasta que el deslizador esté junto a la
placa de montaje.
ES
1
2
© 2019 DJI OSMO Todos los derechos reservados.
55
Page 57

4. Equilibrado del eje de giro
a. Desbloquee el eje de giro. Sostenga la empuñadura, incline
el Ronin-SC hacia un lado y compruebe el movimiento
del eje de giro. Si el objetivo de la cámara gira hacia
abajo, empuje el eje de giro hacia atrás. Si el objetivo de
la cámara gira hacia arriba, empuje el eje de giro hacia
adelante.
b. Aoje la rueda del motor de giro . Ajuste el equilibrio de
la cámara hasta que permanezca estable al mover el eje
de giro a la vez que se levanta la empuñadura.
c. Apriete la rueda.
ES
1
2
Funcionamiento
Auto Tune
Después de la instalación, activación y equilibrado, el
Ronin-SC debe ajustarse automáticamente antes de poder
usarse. Asegúrese de colocar el Ronin-SC en una superficie
plana antes de realizar un ajuste automático. Hay dos formas
de ajustar automáticamente el Ronin-SC.
A. Mantenga pulsado el botón M y el disparador simultáneamente
en el Ronin-SC durante cuatro segundos para iniciar Auto
Tune.
B. Inicie la aplicación Ronin, vaya a la página Parámetros del
motor (Motor Parameters) y seleccione Auto Tune.
Funciones de botón
Botón de encendido: mantenga pulsado el botón de encendido
para encender o apagar el Ronin-SC. Toque el botón de
encendido para entrar o salir del modo suspendido.
Botón M: toque para seleccionar un perl de usuario. Pulse y
mantenga pulsado para entrar al modo Sport.
Joystick: empuje el joystick hacia arriba o hacia abajo para
controlar el movimiento del eje de inclinación, y empújelo hacia
la izquierda o la derecha para controlar el movimiento del eje
de giro. Vaya a la página Joystick de la aplicación Ronin para
ajustar los parámetros de los ejes de giro, inclinación y rotación.
Botón de control de la cámara: después de conectar la cámara
al puerto de control de la cámara, presione hasta la mitad
para enfocar automáticamente, como lo haría con el botón del
obturador en una cámara. Pulse para iniciar o parar la grabación.
Mantenga pulsado para hacer una foto. Consulte la página del
© 2019 DJI OSMO Todos los derechos reservados.
56
Page 58

producto Ronin-SC en el sitio web ocial de DJI (http://www.dji.
com/ronin-sc) para ver la lista de compatibilidad con cámaras
más actualizada.
Disparador: mantenga pulsado el disparador para entrar en
el modo Bloqueo. Pulse dos veces para volver a centrar el
estabilizador. Pulse tres veces para girar el estabilizador 180
grados de modo que la cámara mire hacia usted.
Cuando la cámara y el Ronin-SC se conectan mediante el
cable de control de la cámara (USB-C), no se puede utilizar
la función de reproducción. En ese caso, presione el botón
de encendido para entrar al modo suspendido y después
use la función de reproducción.
Especicaciones
Peso Estabilizador: Aprox. 830 g
Dimensiones Estabilizador (plegado): 220 × 200 × 75 mm
Potencia de entrada Modelo: RB2-2450 mAh-7.2 V
Corriente de
funcionamiento
Frecuencia de
funcionamiento de
Bluetooth
Potencia del
transmisor Bluetooth
Temperatura de
funcionamiento
Velocidad Tiempo
de espera
Para obtener más información, lea el manual del
usuario:
http://www.dji.com/ronin-sc
※Este contenido puede modificarse sin notificación previa.
© 2019 DJI OSMO Todos los derechos reservados.
Empuñadura: Aprox. 258 g
Trípode: Aprox. 160 g
Estabilizador (desplegado): 370 × 165 ×
150 mm
Tipo: 18650 Litio
Capacidad: 2450 mAh
Energía 17.64 Wh
Corriente estática: 0.2 A
2.40 GHz -2.4835 GHz
8 dBm
<
De -20 °C a 45 °C (-4 °F a 113 °F)
11 horas
ES
57
Page 59

Présentation du Ronin-SC
17
16
15
FR
14
13
1. Moteur d’inclinaison
2. Verrou d’inclinaison
1
3. Port de contrôle
2
de la caméra/des
accessoires (USB-C)
4. Moteur de roulis
5. Verrou de roulis
3
6. Moteur panoramique
4
7. Verrou panoramique
5
8. Voyants LED de profil
6
9. Joystick
7
8
10. Bouton de commande
9
de la caméra
10
11
11. Bouton M
12. Indicateurs du
niveau de batterie
13. Bouton de niveau
de batterie
14. Levier
12
15. Port d’accessoires
de la gamme Ronin
16. Verrou de sécurité
17. Plateau d’installation
de caméra
22
21
© 2019 DJI OSMO All Rights Reserved.
58
18. Port d’alimentation
18
(USB-C)
19
19. Gâchette
20. Trépied
21. Poignée (avec
orifices de fixation
1/4” et 3/8”)
22. Bouton d’alimentation
20
Page 60

Mise en route
A. Téléchargement de l’application DJI
RONINTM et visionnage des didacticiels
Recherchez « Ronin » dans l’App
Store ou Google Play, puis suivez les
instructions d’installation. Regardez les
didacticiels sur le site ociel de DJI.
https://www.dji.com/ronin-sc
B. Fixation du trépied
1
2
C. Montage de la poignée
1
3
Application
Ronin
2
FR
© 2019 DJI OSMO All Rights Reserved.
59
Page 61

D. Recharge de la batterie
Avant la première utilisation, chargez la poignée via le port
d’alimentation à l’aide d’un câble d’alimentation (fourni)
et d’un adaptateur USB (non fourni). Il est recommandé
d’utiliser un adaptateur USB de 5 V/2 A.
Prise courant
100 - 240 V
E. Vérication du niveau de batterie
Pendant la charge, les indicateurs de
niveau de batterie indiquent le niveau
de la batterie. Hors charge, appuyez
sur le bouton de niveau de batterie
pour vérier le niveau de la batterie.
FR
F. Mise sous/hors tension et mode veille
Appuyez et maintenez le bouton d’alimentation enfoncé
pour allumer ou éteindre le Ronin-SC. Appuyez sur le bouton
d’alimentation pour passer en mode veille. Appuyez à
nouveau pour quitter le mode veille.
Le Ronin-SC peut être utilisé pendant la charge.
secteur USB
Port d’alimentation Adaptateur
Activation du Ronin-SC
Le Ronin-SC doit être activé via l’application Ronin avant la
première utilisation.
1. Appuyez et maintenez enfoncé le bouton d’alimentation pour
mettre la nacelle sous tension.
2. Activez le Bluetooth sur votre appareil mobile et lancez
l’application Ronin. Notez qu’un compte DJI est requis pour
lancer l’application Ronin. Une fois détecté dans la liste des
périphériques Bluetooth, sélectionnez le Ronin-SC et entrez le
mot de passe Bluetooth par défaut : 12345678.
3. Assurez-vous d’être connecté à Inter net et suivez les
instructions à l’écran pour activer le Ronin-SC.
Ronin-SC
Activation de l’appareil
L'activation est nécessaire avant toute
utilisation de l'appareil. Pour ce faire,
les informations concernant votre
appareil et votre compte DJI seront
transmises à DJI. Veuillez accepter
et procéder à l'activation.
Accepter et activer
User Profile
Status
Create
FaibleÉlevé
© 2019 DJI OSMO All Rights Reserved.
60
Page 62

Montage de la caméra
1
2
3
Assurez-vous de préparer la caméra avant de la monter sur le
Ronin-SC. Retirez le cache de l’objectif et assurez-vous que la
batterie et la carte mémoire sont insérées dans la caméra.
1. Les trois axes de la nacelle sont verrouillés par défaut.
Déverrouillez les trois axes, réglez la nacelle sur la position
indiquée et verrouillez à nouveau les trois axes.
2. Si nécessaire, xez la plaque de xation* au bas de la caméra
à l’aide d’un tournevis plat.
Plaque de
fixation
* Une plaque de xation est requise dans les scénarios suivants :
Lorsque vous utilisez un appareil photo petit et léger tel qu’un
appareil photo Sony A6300.
Lorsque vous utilisez un objectif de grand diamètre tel qu’un appareil
photo Sony A7M3 avec un objectif 16-35 mm f/2.8 GM mm.
Lorsque vous utilisez un moteur de mise au point.
Reportez-vous à la page du produit Ronin-SC sur le site Web ociel
de DJI (http://www.dji.com/ronin-sc) pour la liste la plus récente des
caméras compatibles.
3. Fixez le plateau glissière et le support de l’objectif .
Déplacez le curseur vers l’avant du plateau. L’objectif de
caméra et la èche sur le plateau glissière doivent être
orientés dans la même direction. Montez la caméra en
fonction des indicateurs du plateau glissière. Utilisez le
support de l’objectif pour des performances optimales.
FR
Curseur
2
1
Plateau glissière
Support de l’objectif
© 2019 DJI OSMO All Rights Reserved.
61
Page 63

1
2
3
4. Desserrez la molette au bas du plateau d’installation de la
caméra et déplacez-la sur le côté de l’axe. Faites glisser
l’appareil photo sur le plateau . Serrez la molette lorsque
la caméra est au milieu du plateau.
2
Si vous utilisez des accessoires tels que le support pour
FR
téléphone ou le moteur de mise au point, veillez à installer
tous les accessoires avant l’équilibrage. Reportez-vous
aux manuels des accessoires pour plus d’informations.
Assurez-vous de serrer la vis sous le plateau glissière.
Équilibrage
L’équilibrage est nécessaire avant la prise de vue. Avant
l’équilibrage, assurez-vous de mettre sous tension l’appareil
photo si vous utilisez un objectif à zoom optique et de
sélectionner la distance focale si vous utilisez un objectif à focale
variable. Il existe des didacticiels d’équilibrage dans l’application
Ronin, qui peuvent être visualisés après l’activation. L’équilibrage
peut également être eectué sans connexion à l’application
Ronin. Dans ce scénario, assurez-vous que le Ronin-SC est hors
tension ou en mode veille avant l’équilibrage.
1. Équilibrage de la profondeur de l’axe d’inclinaison
a. Déverrouillez l’axe d’inclinaison et abaissez la caméra en
desserrant la molette de l’axe d’inclinaison .
b. Tournez l’axe d’inclinaison de manière à ce que l’objectif
de caméra soit orienté vers l’avant. Assurez-vous que la
caméra ne pèse pas trop sur l’avant ou l’arrière. Si elle pèse
trop à l’avant, déplacez la caméra vers l’arrière. Si elle pèse
trop à l’arrière, déplacez la caméra vers l’avant.
c. Desserrez la molette sous le plateau d’installation de la
caméra et ajuster l’équilibre de la caméra jusqu’à ce
qu’elle soit stable.
d. Serrez la molette.
1
1
© 2019 DJI OSMO All Rights Reserved.
62
2
3
Page 64

2. Équilibrage de l’inclinaison verticale
a. Tournez l’axe d’inclinaison de manière à ce que l’objectif de
caméra soit dirigé vers le haut. Assurez-vous que la caméra
ne pèse pas trop sur l’inclinaison haut ou bas. Si la caméra
est inclinée d’un côté, tirez le bras d’inclinaison de l’autre
côté.
b. Desserrez la molette du moteur d’inclinaison et réglez
l’équilibre de la caméra jusqu'à ce qu’elle reste immobile
et ne s’incline ni vers le haut, ni vers le bas.
c. Serrez la molette.
d. Répétez l’étape 1 pour équilibrer la profondeur de l’axe
d’inclinaison. Le curseur du plateau glissière sert à enregistrer
la position d’équilibre. Déplacez le curseur à côté de la
plaque de xation et serrez le curseur.
1
2
3. Équilibrage de l’axe de roulis
a. Verrouillez l’axe d’inclinaison et déverrouillez l’axe de roulis.
Vériez la direction vers laquelle le moteur de roulis bascule.
Si la caméra pivote vers la gauche, déplacez-la vers la
droite. Si la caméra pivote vers la droite, déplacez-la vers la
gauche.
b. Desserrez la molette sur le plateau d’installation de la
caméra , et ajustez la position du plateau jusqu’à ce
que la caméra soit stable.
c. Serrez la molette. Si la caméra va vers l’avant, reculez-la
jusqu’à ce que le curseur se trouve à côté de la plaque de
xation.
FR
1
2
© 2019 DJI OSMO All Rights Reserved.
63
Page 65

4. Équilibrage de l’axe panoramique
a. Déverrouillez l’axe panoramique. Tenez la poignée, inclinez
le Ronin-SC latéralement et vériez le mouvement de l’axe
panoramique. Si l’objectif de caméra pivote vers le bas,
poussez l’axe panoramique vers l’arrière. Si l’objectif de
caméra pivote vers le haut, poussez l’axe panoramique vers
l’avant.
b. Desserrez la molette du moteur panoramique . Réglez
l’équilibre de la caméra jusqu'à ce qu’elle reste
immobile
lorsque vous faites tourner l’axe panoramique tout en soulevant
la poignée.
c. Serrez la molette.
FR
1
2
Fonctionnement
Réglage automatique
Après l’installation, l’activation et l’équilibrage, le Ronin-SC doit
être réglé automatiquement pour pouvoir être utilisé. Assurez-
vous de placer le Ronin-SC sur une surface plane avant de
procéder au réglage automatique. Il y a deux façons de régler
automatiquement le Ronin-SC.
A. Appuyez sur le bouton M du Ronin-SC et maintenez-le
enfoncé pendant quatre secondes pour démarrer Auto Tune.
B. Lancez l’application Ronin, allez à la page des paramètres du
moteur et sélectionnez Auto Tune.
Fonctions des boutons
Bouton d’alimentation : appuyez et maintenez le bouton d’alimentation
enfoncé pour allumer ou éteindre le Ronin-SC. Touchez le bouton
d’alimentation pour entrer ou quitter le mode veille.
Bouton M : touchez pour sélectionner un prol d’utilisateur.
Maintenez la touche enfoncée pour accéder au mode Sport.
Joystick : poussez le joystick vers le haut ou vers le bas pour
contrôler le mouvement de l’axe d’inclinaison, et poussez-le
vers la gauche ou la droite pour contrôler le mouvement de l’axe
panoramique. Accédez à la page Joystick de l’application Ronin
pour régler les paramètres des axes panoramiques, d’inclinaison
et de roulis.
Bouton de commande de la caméra : après avoir connecté le
port de contrôle de la caméra, appuyez à mi-course pour la
mise au point automatique, comme vous le feriez avec le bouton
d’obturateur d’un appareil photo. Appuyez pour démarrer ou
arrêter l’enregistrement. Maintenez la touche enfoncée pour
prendre une photo. Pour la liste la plus récente des caméras
© 2019 DJI OSMO All Rights Reserved.
64
Page 66

compatibles, reportez-vous à la page du produit Ronin-SC sur le
site Web ociel de DJI (http://www.dji.com/ronin-sc).
Gâchette : maintenez la gâchette enfoncée pour passer en
mode Verrouillage. Appuyez deux fois pour recentrer la nacelle.
Appuyez trois fois sur cette touche pour faire pivoter la nacelle de
180° an que la caméra soit face à vous.
Lorsque la caméra et le Ronin-SC sont connectés à l’aide
du câble de commande de la caméra (USB-C), la lecture
ne peut pas être utilisée. Dans ce scénario, appuyez sur
le bouton d’alimentation pour passer en mode veille, puis
utilisez la lecture.
Caractéristiques techniques
Poids Nacelle : env. 830 g
Dimensions Nacelle (pliée) : 220 x 200 x 75 mm
Puissance d’entrée Modèle : RB2-2450 mAh-7,2 V
Courant de
fonctionnement
Fréquence de
fonctionnement
Bluetooth
Puissance de
l’émetteur Bluetooth
Température de
fonctionnement
Temps de veille max.
Poignée : env. 258 g
Trépied : env. 160 g
Nacelle (dépliée) : 370 x 165 x 150 mm
Type : 18650 Lithium
Capacité : 2 450 mAh
Énergie : 17,64 Wh
Courant statique : 0,2 A
2,4 GHz à 2,4835 GHz
8 dBm
<
de -20 à 45 °C (de -4 à 113 °F)
11 heures
FR
Pour en savoir plus, consultez le Guide de l’utilisateur :
http://www.dji.com/ronin-sc
※Ce contenu peut être modié sans préavis.
© 2019 DJI OSMO All Rights Reserved.
65
Page 67

Panoramica di Ronin-SC
17
16
15
14
IT
13
1. Motore di inclinazione
2. Blocco inclinazione
1
3. Porta comandi/accessori
2
fotocamera (USB-C)
4. Motore di rollio
5. Blocco rollio
3
6. Motore di rotazione
orizzontale (panorama)
4
7. Blocco panorama
5
8. Indicatori LED
6
9. Joystick
7
8
10. Pulsante di controllo
9
della fotocamera
10
11
11. Pulsante M
12. Indicatori del livello
di carica della batteria
13. Pulsante del livello di
carica della batteria
14. Leva di blocco
12
15. Porta accessori RSA
16. Blocco di sicurezza
17. Piastra di montaggio
della fotocamera
22
21
© 2019 DJI OSMO All Rights Reserved.
66
18. Porta di alimentazione
18
(USB-C)
19
19. Tasto di attivazione
20. Treppiede
21. Impugnatura (compresi
i fori di montaggio da
1/4” e 3/8”
22. Pulsante di accensione
20
)
Page 68

Come iniziare
A. Scaricare l’app DJI RONINTM e guardare
i tutorial.
Cercare “Ronin” nell’App Store o su
Google Play e seguire le istruzioni per
l’installazione dell’app. Guardare i
tutorial sul sito web uciale di DJI.
https://www.dji.com/ronin-sc
B. Installazione del treppiede
App Ronin
1
2
C. Montaggio dell’impugnatura
1
© 2019 DJI OSMO All Rights Reserved.
IT
3
2
67
Page 69

D. Ricarica della batteria
Prima dell’uso, ricaricare l’impugnatura mediante la porta
di alimentazione utilizzando un cavo di alimentazione (incluso
nella confezione) e un adattatore USB (non in dotazione).
Si consiglia di usare un adattatore USB 5V/2A.
Status
Porta di
alimentazione
Presa di
alimentazione
100 - 240 V
E. Controllo del livello di carica della
batteria
Durante la ricarica, le spie di livello
della batteria indicano il livello della
batteria. Quando non in carica,
premere il pulsante sul livello della batteria
per controllare il livello.
F. Accensione/Spegnimento e modalità standby
IT
Premere e tenere premuto il pulsante di accensione
per accendere o spegnere Ronin-SC. Premere il pulsante
di accensione per attivare la modalità di riposo. Premere
nuovamente per uscire dalla modalità di riposo.
È possibile usare Ronin-SC durante la ricarica.
Attivazione di Ronin-SC
Al primo utilizzo, attivare Ronin-SC tramite l’app Ronin.
1. Tenere premuto il tasto di accensione per attivare lo
stabilizzatore.
2. Sul proprio dispositivo mobile, attivare il Bluetooth e avviare
l’app Ronin. È necessario disporre di un account DJI per
avviare l’applicazione Ronin. Una volta visualizzato nell’elenco
dei dispositivi Bluetooth, selezionare Ronin-SC e inserire la
password Bluetooth predenita: 12345678.
3. Assicurarsi di essere collegati a Internet e seguire le istruzioni
visualizzate sullo schermo per attivare Ronin-SC per la prima
volta.
Adattatore di
alimentazione
USB
Ronin-SC
Device Activation
Activation is required prior to using
the device. To do so, information
regarding your device and DJI account
will be uploaded to DJI. Please agree
and proceed to activation.
Agree and activate
User Profile
BassoAlto
© 2019 DJI OSMO All Rights Reserved.
68
Create
Page 70

Montaggio della fotocamera
1
2
3
Preparare la fotocamera prima di procedere con l’installazione
su Ronin-SC. Rimuovere il copri-obiettivo e verificare che la
batteria e la scheda di memoria siano state già inserite.
1. I tre assi dello stabilizzatore sono bloccati per impostazione
predefinita. Sbloccare i tre assi, regolare lo stabilizzatore
nella posizione indicata e bloccare nuovamente gli assi.
2. Se necessario, fissare la parte inferiore della fotocamera
sulla piastra di rialzo* usando un cacciavite piatto.
Piastra di rialzo
*Utilizzare la piastra di rialzo nelle seguenti situazioni:
Si utilizza una fotocamera compatta e leggera, come una Sony A6300.
Si utilizza un obiettivo con un diametro simile a quello di una
fotocamera Sony A7M3 (16-35 mm f/2.8 GM).
Si utilizza un motore esterno di messa a fuoco.
Consultare la pagina del prodotto Ronin-SC, sul sito web uciale DJI
(http://www.dji.com/ronin-sc), per prendere visione dell’elenco delle
fotocamere compatibili più aggiornato.
3. Fissare il supporto dell’obiettivo alla piastra a coda di
rondine . Spostare il cursore verso la parte anteriore del
supporto. L’obiettivo della fotocamera e la freccia sulla piastra
a coda di rondine devono essere rivolti nella stessa direzione.
Installare la fotocamera sulla piastra di supporto seguendo
gli indicatori sulla piastra a coda di rondine. Usare il supporto
dell’obiettivo per prestazioni ottimali.
IT
Cursore
2
1
Supporto a coda di rondine
Supporto per obiettivo
© 2019 DJI OSMO All Rights Reserved.
69
Page 71

1
2
3
4. Allentare la levetta sul fondo della piastra di montaggio
e spostarla verso l’estremità dell’asse. Far scorrere la
fotocamera sulla piastra . Serrare la levetta quando
la fotocamera raggiunge la parte centrale della piastra.
2
Se si utilizzano accessori come il supporto per smartphone
o un motore esterno di messa a fuoco, assicurarsi di aver
montato tutti gli accessori prima di eseguire il bilanciamento.
Per ulteriori informazioni, consultare la documentazione
relativa agli accessori.
Assicurarsi di aver serrato la vite sotto il supporto a coda
IT
di rondine.
Bilanciamento
Prima di iniziare a operare, eseguire il bilanciamento. Prima
di bilanciare, assicurarsi di aver acceso la fotocamera se si
utilizza un obiettivo con zoom ottico, e di aver selezionato la
lunghezza focale se si utilizza un obiettivo varifocale. L’app
Ronin include alcuni tutorial sul bilanciamento, visualizzabili non
appena il dispositivo è stato attivato. È anche possibile eseguire
il bilanciamento senza collegarsi all’app Ronin. In tal caso,
assicurarsi che Ronin-SC sia spento o in modalità standby prima
di eseguire il bilanciamento.
1. Bilanciamento della profondità per l’asse di inclinazione
a. Sbloccare l’asse di inclinazione e abbassare la posizione della
fotocamera allentando la levetta dell’asse di inclinazione .
b. Ruotare l’asse di inclinazione in modo tale che l’obiettivo
della fotocamera sia rivolto in avanti. Assicurarsi che il peso
non sbilanci la fotocamera verso avanti o all’indietro. Se
sbilanciata in avanti, arretrare la posizione della fotocamera.
Se sbilanciata all’indietro, spostare la posizione della
fotocamera in avanti.
c. Allentare la levetta sotto la piastra di montaggio e regolare
la posizione della fotocamera nché non risulta stabile.
d. Serrare la levetta.
1
1
© 2019 DJI OSMO All Rights Reserved.
70
2
3
Page 72

2. Bilanciamento dell’inclinazione verticale
a. Ruotare l’asse di inclinazione in modo tale che l’obiettivo
della fotocamera sia rivolto verso l’alto. Verificare che la
fotocamera non sia sbilanciata verso l’alto o verso il basso.
Se la fotocamera risulta inclinata su un lato, spingere il
braccio di inclinazione verso l’altro lato.
b. Allentare la levetta del motore di inclinazione e bilanciare
la fotocamera finché non si trova in posizione stabile
senza sbilanciarsi verso l’alto o verso il basso.
c. Serrare la levetta.
d. Ripetere il passo 1 per bilanciare la profondità dell’asse
di inclinazione. Il cursore sul supporto a coda di rondine
serve a indicare la posizione in cui la fotocamera si trova
in equilibrio. Spostare il cursore sul lato della piastra di
montaggio e serrarlo.
1
2
3. Bilanciamento dell’asse di rollio
a. Bloccare l’asse di inclinazione e sbloccare l’asse di rollio.
Controllare la direzione di oscillazione del motore di rollio.
Se la fotocamera ruota verso sinistra, spostarla verso
destra. Se la fotocamera ruota verso destra, spostarla
verso sinistra.
b. Allentare la levetta sulla piastra di montaggio e regolare
la posizione del supporto nché la fotocamera non è
stabile.
c. Serrare la levetta. Se la fotocamera si sbilancia in avanti,
spostarla all’indietro fino a quando il cursore si trova
allineato alla piastra di montaggio.
1
2
© 2019 DJI OSMO All Rights Reserved.
IT
71
Page 73

4. Bilanciamento dell’asse di rotazione orizzontale
a. Sbloccare l’asse di rotazione orizzontale. Afferrare
l’impugnatura, inclinare Ronin-SC lateralmente e controllare
il movimento dell’asse di rotazione orizzontale. Se
l’obiettivo della fotocamera ruota verso il basso, spingere
l’asse di rotazione orizzontale indietro. Se l’obiettivo della
fotocamera ruota verso l’alto, spingere l’asse di rotazione
orizzontale in avanti.
b. Allentare la levetta sul motore di rotazione orizzontale
. Regolare il bilanciamento della fotocamera nché non
risulterà in posizione stabile durante la rotazione sull’asse
di rotazione orizzontale e sollevando l’impugnatura.
c. Serrare la levetta.
IT
1
2
Funzionamento
Sintonizzazione automatica
Dopo l’installazione, l’attivazione e il bilanciamento, occorre
eseguire la sintonizzazione automatica di Ronin-SC prima di
poterlo utilizzare. Assicurarsi di posizionare Ronin-SC su una
supercie piana prima di eseguirne la sintonizzazione automatica.
Ci sono due modi per sintonizzare automaticamente Ronin-SC.
A. Premere e tenere premuti contemporaneamente il pulsante M
e il tasto di attivazione di Ronin-SC per quattro secondi, per
avviare la sintonizzazione automatica con Auto Tune.
B. Avviare l’app Ronin, andare alla pagina “Motor Parameters”
(Parametri del motore) e selezionare Auto Tune.
Funzioni dei pulsanti
Premere e tenere premuto il pulsante di accensione per
accendere o spegnere Ronin-SC. Premere il pulsante di
accensione per entrare o uscire dalla modalità standby.
Pulsante M: premere per selezionare un prolo utente. Tenere
premuto per accedere alla modalità Sport.
Joystick: spingere il joystick verso l’alto o verso il basso per
controllare il movimento dell’asse di inclinazione; spingerlo
verso sinistra o destra per controllare il movimento dell’asse
di rotazione orizzontale. Accedere alla schermata “Joystick”
dell’app Ronin per regolare i parametri relativi agli assi di
rotazione orizzontale, inclinazione e rollio.
Pulsante di controllo della fotocamera: dopo aver collegato la
porta di controllo della fotocamera e la fotocamera, premere
il pulsante fino a metà corsa per eseguire la messa a fuoco
automatica, come si farebbe con il pulsante di scatto di una
fotocamera. Premere questo pulsante per avviare o interrompere
la registrazione. Premere e tenere premuto per scattare una foto.
Fare riferimento alla pagina del prodotto Ronin-SC sul sito web
uciale DJI (http://www.dji.com/ronin-sc) per prendere visione
dell’elenco delle fotocamere compatibili più aggiornato.
Tasto di attivazione: premere e tenere premuto questo tasto
© 2019 DJI OSMO All Rights Reserved.
72
Page 74

per accedere alla modalità Lock (Blocco). Premere due volte
per centrare nuovamente lo stabilizzatore. Premere tre volte per
ruotare lo stabilizzatore di 180° in modo tale che la fotocamera
sia rivolta verso di sé.
Quando la fotocamera e Ronin-SC sono collegati mediante
il cavo di controllo (USB-C), non è possibile riprodurre
le immagini filmate. In tal caso, premere il pulsante di
accensione per attivare la modalità standby, quindi avviare
la riproduzione delle immagini.
Caratteristiche tecniche
Peso Sospensione cardanica: Circa 830 g
Dimensioni dello
stabilizzatore
Potenza in ingresso Modello: RB2-2450 mAh-7,2 V
Corrente operativa Corrente statica: 0,2 A
Frequenza di
funzionamento
Bluetooth
Potenza del
trasmettitore Bluetooth
Temperatura operativa tra -20 °C e 45 °C
Autonomia in standby 11 ore
Impugnatura: Circa 258 g
Treppiede: Circa 160 g
Richiuso: 220 × 200 × 75 mm
Aperto: 370 × 165 × 150 mm
Tipo: 18650 litio
Capacità: 2450 mAh
Energia: 17,64 Wh
2.40 GHz-2.4835 GHz
8 dBm
<
IT
Per ulteriori informazioni, consultare il manuale d’uso:
http://www.dji.com/ronin-sc
I presenti contenuti sono soggetti a modifiche senza
※
preavviso.
© 2019 DJI OSMO All Rights Reserved.
73
Page 75

Overzicht Ronin-SC
17
16
15
14
NL
13
1. Kantelmotor
2. Kantelsluiting
1
3. Camerabediening/
2
accessoirepoort
(USB-C)
4. Rolmotor
5. Rolsluiting
3
6. Draaimotor
4
7. Draaisluiting
5
8. Profiel LED-indicatoren
6
9. Joystick
7
8
10. Camerabedieningsknop
9
11. M-knop
10
11
12. Indicatoren accuniveau
13. Knop accuniveau
14. Hefboom
15. RSA-accessoirespoort
16. Veiligheidssluiting
12
17. Camerabevestiging-
splaatje
22
21
© 2019 DJI OSMO All Rights Reserved.
74
18. Voedingspoort (USB-C)
18
19. Trigger
19
20. Driepoot
21. Grip (Incl. montagegaten
1/4" en 3/8"
22. Aan-/uitknop
20
)
Page 76

Aan de slag
A. Download de mobiele DJI RONINTM-app
en bekijk de instructievideo's
Zoek ‘Ronin’ in de App Store of Google
Play en volg vervolgens de instructies voor
installatie. Bekijk de tutorials op de ociële
DJI-website. https://www.dji.com/ronin-sc
B. De tripod bevestigen
1
2
C. De greep monteren
1
Ronin-app
NL
3
2
© 2019 DJI OSMO All Rights Reserved.
75
Page 77

D. De batterij opladen
Laad de handgreep vóór het eerste gebruik op via de
stroompoort met behulp van een voedingskabel (meegeleverd)
en een USB-adapter (niet meegeleverd). Het wordt
aanbevolen om een USB-oplader van 5 V/2 A te gebruiken.
Stopcontact
100 - 240 V
voedingsadapter
E. Het accuniveau controleren
Tijdens het opladen geven de
indicatorlampjes het accuniveau aan.
Druk één keer op de knop van het
batterijniveau om het batterijniveau te
controleren als deze niet geladen wordt.
F. In-/uitschakelen en slaapmodus inschakelen
Houd de aan-/uitknop ingedrukt om de Ronin-SC in of uit
te schakelen. Tik op de aan-/uitknop om de slaapmodus te
activeren. Tik opnieuw om de slaapmodus te verlaten.
NL
De Ronin-SC kan tijdens het opladen worden gebruikt.
Voedingspoort USB-
De Ronin-S activeren
De Ronin-SC moet voor het eerste gebruik via de Ronin-app
worden geactiveerd.
1. Houd de aan-/uitknop ingedrukt om de gimbal aan te
zetten.
2. Schakel op uw mobiele apparaat Bluetooth in en open de
Ronin-app. U hebt een DJI-account nodig om de Roninapp te starten. Eenmaal gedetecteerd in de lijst met
Bluetooth-apparaten, selecteert u Ronin-SC en voert u het
standaard Bluetooth-wachtwoord in: 12345678.
3. Zorg dat u een internetverbinding heeft en volg de
instructies op het scherm om de Ronin-S te activeren.
Ronin-SC
Activering van het apparaat
Activering is vereist voordat u het
apparaat gebruikt. Hiertoe wordt
informatie over uw apparaat en uw
DJI-account naar DJI geüpload. Ga
akkoord en ga verder met activering.
Akkoord en activeer
User Profile
Status
Create
LaagHoog
© 2019 DJI OSMO All Rights Reserved.
76
Page 78

De camera monteren
1
2
3
Zorg ervoor dat u de camera voorbereidt voordat u hem op de
Ronin-SC monteert. Verwijder de lensdop en zorg dat de accu
van de camera en de geheugenkaart al zijn aangebracht.
1. De drie assen van de cardanische ophanging zijn
standaard vergrendeld. Ontgrendel de drie assen, stel de
cardanische ophanging in op de aangegeven positie en
vergrendel de drie assen opnieuw.
2. Bevestig het afstandsplaatje* op de onderkant van de
camera met een platte schroevendraaier of een munt.
Adapterplaat
* Er is een adapterplaat nodig in de volgende scenario's:
Bij gebruik van een kleine en lichtgewicht camera zoals een Sony
A6300-camera.
Bij gebruik van een lens met een grote diameter, zoals een Sony
A7M3-camera met een 16-35 mm f/2.8 GM-lens.
Bij gebruik met een focusmotor.
Raadpleeg de Ronin-SC productpagina op de officiële DJI-website
(http://www.dji.com/ronin-sc) voor de meest recente lijst met
compatibele camera's.
3. Bevestig de zwaluwstaartplaat en de lenssteun .
Verplaats de schuifregelaar naar de voorkant van de plaat.
De cameralens en de pijl op de zwaluwstaartplaat moeten
in dezelfde richting wijzen. Monteer de camera volgens de
indicatoren op de zwaluwstaartplaat. Gebruik de lenssteun
voor optimale prestaties.
Schuif
1
Zwaluwstaartplaat
2
Lenssteun
© 2019 DJI OSMO All Rights Reserved.
NL
77
Page 79

1
2
3
4. Maak de knop aan de onderkant van de montageplaat
van de camera los en verplaats deze naar de zijkant
van de as. Schuif de camera in de plaat . Draai de
knop vast wanneer de camera zich in het midden van
de plaat bevindt.
2
Als u accessoires zoals de telefoonhouder of focusmotor
gebruikt, moet u ervoor zorgen dat alle accessoires zijn
bevestigd voordat u gaat uitbalanceren. Raadpleeg de
handleidingen van de accessoires voor meer informatie.
Zorg ervoor dat de schroef onder de zwaluwstaartplaat
vast zit.
NL
Uitbalanceren
Evenwicht is nodig voor het fotograferen. Zorg dat u voor
het uitbalanceren de camera inschakelt als u een optische
zoomlens gebruikt en om de brandpuntsafstand te selecteren
bij gebruik van een varifocuslens. Er zijn tutorials voor het
uitbalanceren in de Ronin-app handleidingen die na activering
kunnen worden bekeken. Het balanceren kan ook worden
uitgevoerd zonder verbinding te maken met de Ronin-app.
Zorg er in dat geval voor dat Ronin-SC is uitgeschakeld of in
de slaapstand staat voordat u het apparaat uitbalanceert.
1. Diepte voor de kantelas uitbalanceren
a. Ontgrendel de kantelas en laat de camera zakken door de
knop van de kantelas los te draaien .
b. Draai de kantelas tot de cameralens vooruit is gericht.
Controleer of de camera niet zwaarder is aan de voor- of
achterkant. Als de voorzijde zwaarder is, beweegt u de
camera naar achteren. Als de achterzijde zwaarder is,
beweegt u de camera naar voren.
c. Maak de knop onder de montageplaat van de camera
los en pas de camerabalans aan totdat de camera
stabiel staat.
d. Draai de knop vast.
1
1
© 2019 DJI OSMO All Rights Reserved.
78
2
3
Page 80

2. De verticale kanteling uitbalanceren
a. Draai de kantelas tot de cameralens omhoog is gericht.
Controleer of de camera niet zwaarder is aan de boven- of
onderkant. Als de camera naar een kant is gekanteld, trekt
u de kantelarm naar de andere kant.
b. Draai de knop op de kantelmotor los en corrigeer de
camerabalans totdat de camera blijft stilstaan zonder
dat hij omhoog of omlaag kantelt.
c. Draai de knop vast.
d. Herhaal stap 1 om de diepte van de kantelas uit te
balanceren. De schuif op de zwaluwstaartplaat wordt
gebruikt om de balanspositie vast te leggen. Verplaats
de schuifregelaar naast de montageplaat en draai de
schuifregelaar vast.
1
2
3. De rolas uitbalanceren
a. Vergrendel de kantelas en ontgrendel de rolas. Controleer
de richting waarin de rolmotor zwaait. Als de camera
naar links draait, beweegt u de camera naar rechts. Als
de camera naar rechts draait, beweegt u de camera naar
links.
b. Maak de knop op de montageplaat van de camera los
en pas de positie van de plaat aan totdat de camera
stabiel staat.
c. Draai de knop vast. Als de camera vooruit beweegt,
beweegt u de camera terug totdat de schuif naast de
montageplaat staat.
NL
1
2
© 2019 DJI OSMO All Rights Reserved.
79
Page 81

4. De as voor horizontale richting uitbalanceren
a. Ontgrendel de richtingas. Houd de greep vast, kantel de
Ronin-SC zijwaarts en controleer de beweging van de
richtingas. Als de cameralens naar beneden draait, duwt
u de richtingas naar achteren. Als de lens van de camera
naar boven draait, duwt u de richtingas naar voren.
b. Draai de knop op de richtingmotor los . Stel de
camerabalans in totdat de camera blijft stilstaan
wanneer de richtingas wordt gedraaid en de greep omhoog
wordt getild.
c. Draai de knop vast.
1
NL
2
Bediening
Auto Tune
Na installatie, activering en uitbalancering, moet de RoninSC automatisch worden afgestemd voordat hij kan worden
gebruikt. Plaats de Ronin-SC op een vlak oppervlak voordat u
een automatische afstemming uitvoert. Er zijn twee manieren
om Ronin-SC automatisch aan te passen.
A. Houd de M-knop ingedrukt en activeer de Ronin-S
tegelijkertijd vier seconden lang om Auto Tune te starten.
B. Open de Ronin-app, ga naar de motorparameterpagina en
selecteer Auto Tune.
Knopfuncties
Aan-/uitknop: houd de aan-/uitknop ingedrukt om de Ronin-SC
aan of uit te zetten. Tik op de aan-/uitknop om de slaapmodus
te openen of te verlaten.
M-knop: tik erop om een gebruikersproel te selecteren. Houd
deze ingedrukt om naar de sportmodus te gaan.
Joystick: duw de joystick naar boven of beneden om de kantelas
te bedienen en duw hem naar links of rechts om de richtingas te
bedienen. Ga naar de pagina Control om de parameters voor de
richting-, kantel-, en rolas aan te passen.
Camerabedieningstoets: nadat de camerabedieningspoort en
camera zijn aangesloten, drukt u deze half in voor autofocus,
net als de ontspanknop op een camera. Druk om de videoopname te starten/stoppen. Houd de knop ingedrukt om een
foto te nemen. Raadpleeg de Ronin-SC-productpagina op de
ociële DJI-website voor de meest actuele compatibiliteitslijst
van camera's (http://www.dji.com/ronin-sc).
© 2019 DJI OSMO All Rights Reserved.
80
Page 82

Trigger: houd deze ingedrukt om de vergrendelmodus in
te schakelen. Druk tweemaal op de knop om de gimbal te
centreren. Druk driemaal om de gimbal 180° te draaien, zodat
de camera naar uzelf gericht is.
Wanneer de camera en de Ronin-SC zijn verbonden met
behulp van de camerabesturingskabel (USB-C), kan het
afspelen niet worden gebruikt. In die situatie drukt u op de
aan-/uitknop om naar de slaapstand te gaan en vervolgens
het afspelen te gebruiken.
Technische gegevens
Gewicht Gimbal: circa 830 g
Afmetingen Gimbal (opgevouwen): 220 × 200 × 75 mm
Ingangsvermogen Model: RB2-2450 mAh-7.2 V
Bedrijfsstroom Ruststroom: 0,2 A
Bedrijfsfrequentie
Bluetooth
Bluetooth Transmitter
Power
Bedrijfstemperatuur
Max. Standby-tijd
Handgreep: circa 258 g
Tripod: circa 160 g
Gimbal (uitgevouwen): 370 × 165 × 150 mm
Type: 18650 Lithium
Capaciteit: 2450 mAh
Vermogen: 17,64 Wh
2,40 GHz -2,4835 GHz
8 dBm
<
-20 tot 45 °C (-4 tot 113 °F)
11 uur
NL
Lees de gebruikershandleiding voor meer informatie:
http://www.dji.com/ronin-sc
※Deze inhoud kan zonder voorafgaande kennisgeving
worden gewijzigd.
© 2019 DJI OSMO All Rights Reserved.
81
Page 83

Visão geral do Ronin-SC
17
16
15
14
PT
13
1. Motor de inclinação
2. Bloqueio de inclinação
1
3. Controlo da câmara/
2
Porta para acessórios
(USB-C)
4. Motor de rotação
5. Bloqueio do rolo
3
6. Motor de oscilação
4
7. Bloqueio de panorâmica
5
8. Indicadores LED
6
de perfil
7
8
9. Joystick
9
10. Botão de controlo
10
da câmara
11
11. Botão M
12. Indicadores do
nível da bateria
13. Botão do nível
da bateria
12
14. Alavanca
15. Porta de acessórios
RSA
16. Bloqueio de segurança
17. Placa de montagem
da câmara
22
21
© 2019 DJI OSMO Todos os direitos reservados.
82
18. Porta de alimentação
18
19
19. Acionador
20. Tripé
21. Anel de bloqueio
22. Botão de alimentação
20
(USB-C)
(incl. orifícios de
montagem de
1/4” e 3/8”
)
Page 84

Como começar
A. Transferir a aplicação DJI RONINTM
e veja os tutoriais
Procure por "Ronin" na App
Store ou no Google Play e siga as
instruções para instalar a aplicação.
Veja os tutoriais no website ocial DJI.
https://www.dji.com/ronin-sc
B. Fixação do tripé
1
Aplicação
Ronin
2
C. Montar o anel de bloqueio
1
© 2019 DJI OSMO Todos os direitos reservados.
PT
3
2
83
Page 85

D. Carregamento da bateria
Antes de utilizar pela primeira vez, carregue a pega pela porta
de alimentação utilizando um cabo de alimentação (incluído)
e um adaptador USB (não incluído). Recomenda-se usar
um adaptador USB de 5V/2A.
Tomada elétrica
100 - 240 V
E. Vericar o nível da bateria
Durante o carregamento, os
indicadores de nível de bateria indicam
o nível da bateria. Quando não estiver
a carregar, prima o botão de nível da
bateria para vericar o nível da bateria.
F. Ligar/Desligar o modo de ligar/desligar
Prima e mantenha premido o botão de alimentação para
ligar ou desligar o Ronin-SC, toque no botão de alimentação
para entrar no modo de suspensão. Toque novamente para
sair do modo de suspensão.
PT
Transformador
USB
O Ronin-SC pode ser operado durante o carregamento.
Porta de
alimentação
Ativar o Ronin-SC
O Ronin-SC tem de ser ativado através da aplicação Ronin
antes de utilizar pela primeira vez.
1. Prima e mantenha premido o botão de alimentação para
poder ligar a suspensão cardã.
2. No dispositivo móvel, ative o Bluetooth e inicie a aplicação
Ronin. Note que é necessária uma conta DJI para lançar a
aplicação Ronin. Uma vez detetado na lista de dispositivos
Bluetooth, selecione Ronin-SC e introduza a palavra-passe
Bluetooth predefinida: 12345678.
3. Certifique-se de que está ligado à internet e siga as
instruções no ecrã para ativar o Ronin-SC.
Ronin-SC
Ativação do dispositivo
É necessária uma ativação antes de utilizar
o dispositivo. Para tal, as informações
relativas ao seu dispositivo
e à conta DJI serão carregadas para DJI.
Aceite e prossiga para a ativação.
Concordar e ativar
User Profile
Status
BaixoAlto
Create
© 2019 DJI OSMO Todos os direitos reservados.
84
Page 86

Montar a câmara
1
2
3
Certifique-se de que prepara a câmara antes de a montar ao
Ronin-SC. Remova a tampa da lente e certifique-se de que a
bateria e o cartão de memória estão inseridos na câmara.
1. Os três eixos da suspensão cardã estão bloqueados
por predefinição. Desbloqueie os três eixos, ajuste a
suspensão cardã para a posição como mostrado e
bloqueie novamente os três eixos.
2. Se necessário, fixe a placa de elevação* à parte inferior da
câmara utilizando uma chave de fendas.
Placa de elevação
* A placa de elevação é necessária nos seguintes cenários:
Quando utilizar uma câmara pequena e leve, como uma câmara
Sony A6300.
Quando utilizar uma lente com um diâmetro grande, como uma
câmara Sony A7M3 com uma lente de 16-35 mm f/2.8 GM.
Quando utilizado com um motor de foco.
Consulte a página de produtos Ronin-SC no website oficial da DJI
(http://www.dji.com/ronin-sc) para a Lista de compatibilidade da
câmara mais actualizada.
3. Fixe a placa saliente e o suporte para a lente .
Desloque o seletor para a frente da placa. A lente da
câmara e a seta na placa saliente têm de ficar viradas
na mesma direção. Monte a câmara de acordo com os
indicadores da placa saliente. Utilize o suporte da lente
para um desempenho ideal.
PT
Seletor
1
Placa saliente
2
Suporte para a lente
© 2019 DJI OSMO Todos os direitos reservados.
85
Page 87

1
2
3
4. Desaperte o botão na parte inferior da placa de montagem
da câmara e movê-lo para o lado do eixo. Deslize a
câmara para a placa . Aperte o botão quando a câmara
estiver no meio da placa.
2
Se utilizar acessórios como o suporte do telefone ou
o motor de foco, certique-se de que instala todos os
acessórios antes de o equilibrar. Consulte os documentos
manuais dos acessórios para obter mais informações.
Certique-se de que aperta o parafuso sob a placa saliente.
Equilibrar
O equilíbrio é necessário antes de gravar. Antes de equilibrar,
PT
certifique-se de que liga a câmara se estiver a utilizar uma
lente de zoom óptica e para selecionar o comprimento focal
se utilizar uma lente varifocal. Existem tutoriais equilibrantes
na aplicação Ronin, que podem ser visualizados após a
ativação. O equilíbrio também pode ser efetuado sem ligar
à aplicação Ronin. Nesse cenário, certifique-se de que o
Ronin-SC está desligado ou em modo de suspensão antes de
equilibrar.
1. Equilibrar a profundidade do eixo de inclinação
a. Desbloqueie o eixo de inclinação e baixe a câmara
desapertando o botão do eixo de inclinação .
b. Rode o eixo de inclinação de forma a virar a lente da
câmara para a frente. Certique-se de que a câmara não
está na dianteira ou nas costas. Se for frontal, desloque a
câmara para trás. Se for pesado, desloque a câmara para
a frente.
c. Desaperte o botão por baixo da placa de montagem da
câmara e ajuste o equilíbrio da câmara até a câmara
estar estável.
d. Aperte o manípulo.
1
1
2
© 2019 DJI OSMO Todos os direitos reservados.
86
3
Page 88

2. Equilibrar a inclinação vertical
a. Rode o eixo de inclinação de forma a virar a lente da
câmara para cima. Certique-se de que a câmara não está
muito pesada. Se a câmara estiver inclinada para um lado,
puxe o braço de inclinação para o outro lado.
b. Solte o manípulo do motor de inclinação e ajuste o
equilíbrio da câmara até a câmara permaneça xa sem
inclinar para cima ou para baixo.
c. Aperte o manípulo.
d. Repita o passo 1 para equilibrar a profundidade do eixo
de inclinação. O seletor na placa saliente é utilizado para
registar a posição do equilíbrio. Mova o seletor junto à
placa de montagem e aperte o seletor.
1
2
3. Equilibrar o eixo de rotação
a. Bloqueie o eixo de inclinação e desbloqueie o eixo do
rolo. Verique a direção na qual o motor do rolo oscila. Se
a câmara rodar para a esquerda, mova a câmara para a
direita. Se a câmara rodar para a direita, mova a câmara
para a esquerda.
b. Desaperte o botão na placa de montagem da câmara e
ajuste a posição da placa até a câmara estar estável.
c. Aperte o manípulo. Se a câmara se mover para a frente,
desloque a câmara para trás até o seletor estar próximo
da placa de montagem.
1
2
© 2019 DJI OSMO Todos os direitos reservados.
PT
87
Page 89

4. Equilibrar o eixo de varrimento horizontal
a. Desbloqueie o eixo de oscilação. Segure o anel de
bloqueio, incline o Ronin-SC para a frente e verifique o
movimento do eixo da forma. Se a lente da câmara rodar
para baixo, empurre o eixo da forma para trás. Se a lente
da câmara rodar para cima, empurre o eixo da forma para
a frente.
b. Solte o manípulo do motor de oscilação . Ajuste o
equilíbrio da câmara até que a câmara permaneça xa
ao rodar a oscilação ao elevar o anel de bloqueio.
c. Aperte o manípulo.
1
2
PT
Funcionamento
Sintonização automática
Após a instalação, ativação e equilíbrio, o Ronin-SC tem de
ser ajustado automaticamente antes de poder ser utilizado.
Certifique-se de que coloca o Ronin-SC numa superfície
plana antes de realizar uma afinação automática. Existem
duas formas de auto-sintonizar o Ronin-SC.
A. Pode premir continuamente o botão M e o acionador do
Ronin-SC em simultâneo durante quatro segundos para
iniciar a Auto Tune.
B. Inicie a aplicação Ronin, aceda à página Parâmetros do
Motor e selecione Auto Tune.
Características do botão
Botão de alimentação: prima e mantenha premido o botão de
alimentação para ligar ou desligar o Ronin-SC. Toque no botão
de ligar/desligar para entrar ou sair do modo de suspensão.
Botão M: toque para selecionar um perl de utilizador. Prima e
mantenha premido para entrar no modo Sport.
Joystick: desloque o joystick para cima ou para baixo para
controlar o movimento do eixo de inclinação, e desloque-o para
a esquerda ou para a direita para controlar o movimento do
eixo de oscilação. Aceda à página Joystick da aplicação Ronin
para ajustar os parâmetros dos eixos de oscilação, inclinação e
rotação.
Botão de controlo da câmara: depois de ligar a porta de
controlo da câmara e a câmara, prima meio para focagem
automática, como faria com o botão obturador numa câmara.
Prima para iniciar ou parar a gravação. Mantenha premido para
tirar uma fotograa. Para a Lista de compatibilidade da câmara
© 2019 DJI OSMO Todos os direitos reservados.
88
Page 90

mais atualizada, consulte a página de produtos Ronin-SC no
website ocial DJI (http://www.dji.com/ronin-sc).
Acionador: prima continuamente o acionador para entrar
em modo de bloqueio. Prima duas vezes para recentrar a
suspensão cardã. Prima três vezes para rodar a suspensão
cardã 180 graus para que que virada para si.
Quando a câmara e o Ronin-SC estiverem ligados utilizando
o cabo de controlo da câmara (USB-C), não é possível
utilizar a reprodução. Nesse cenário, prima o botão de
alimentação para entrar no modo de suspensão e, em
seguida, utilize a reprodução.
Especicações
Peso Suspensão cardã: Aprox. 830 g
Dimensões Suspensão cardã (dobrada):
Potência de entrada Modelo: RB2-2450 mAh-7.2 V
Corrente de
funcionamento
Frequência de
Funcionamento
do Bluetooth
Potência do
Transmissor Bluetooth
Temperatura de
funcionamento
Distância máxima
Tempo de espera
Anel de bloqueio: Aprox. 258 g
Tripé: Aprox. 160 g
220×200×75 mm
Suspensão cardã (não dobrada):
370×165×150 mm
Tipo: 18650 Lítio
Capacidade: 2450 mAh
Energia: 17,64 Wh
Corrente estática: 0,2 A
2,40 Ghz -2,4835 Ghz
8 dBm
<
-20° a 45° C (-4° a 113° F)
11 horas
PT
Para mais informações, consulte o manual do
utilizador:
http://www.dji.com/ronin-sc
※Este conteúdo está sujeito a alterações sem aviso prévio.
© 2019 DJI OSMO Todos os direitos reservados.
89
Page 91

Visão geral do Ronin-SC
17
16
15
14
13
PT-BR
1. Motor de inclinação
2. Trava de inclinação
1
3. Controle da câmera/
2
entrada de acessórios
(USB-C)
4. Motor de rotação
5. Trava de rotação
3
6. Motor de varrimento
horizontal
4
5
7. Trava de varrimento
6
horizontal
7
8. Indicadores de LED
8
do perfil
9
10
9. Botão de controle
11
10. Botão de controle
da câmera
11. Botão M
12. Indicadores de
nível da bateria
12
13. Botão de nível
da bateria
14. Alavanca
15. Entrada de
acessórios RSA
16. Trava de segurança
17. Placa de montagem
da câmera
22
21
© 2019 DJI OSMO Todos os direitos reservados.
90
18. Entrada de
18
19
19. Acionador
20. Tripé
21. Cabo (inc. orifícios
22. Botão liga/desliga
20
carregamento
(USB-C)
de montagem de
1/4” e 3/8”
)
Page 92

Primeiros passos
A. Baixe o aplicativo DJI RONINTM
e assista aos tutoriais
Pesquise “Ronin” na App Store
ou Google Play e siga as instruções
de instalação do aplicativo. Assista
aos tutoriais no site ocial da DJI.
https://www.dji.com/ronin-sc
B. Conectando o tripé
1
2
Aplicativo
Ronin
C. Montando o cabo
1
© 2019 DJI OSMO Todos os direitos reservados.
3
PT-BR
2
91
Page 93

D. Carregando a bateria
Antes de usar pela primeira vez, carregue o cabo através da
entrada de carregamento usando um cabo de alimentação
(incluso) e um adaptador USB (não incluso). Recomenda-se
usar um adaptador USB de 5V/2A.
Tomada elétrica
100 - 240 V
E. Vericando o nível da bateria
Durante o carregamento, os
indicadores de nível da bateria
exibem o nível da bateria. Quando
não estiver carregando, pressione
o botão de nível da bateria para
vericar o nível da bateria.
F. Ligando/Desligando e modo de repouso
Pressione e segure o botão liga/desliga para ligar ou
desligar o Ronin-SC. Toque no botão liga/desliga para entrar
no modo de repouso. Toque novamente para sair do modo
de repouso.
Adaptador de
energia USB
O Ronin-SC pode ser operado durante o carregamento.
Entrada de
carregamento
PT-BR
Ativando o Ronin-SC
O Ronin-SC precisa ser ativado por meio do aplicativo Ronin
antes de ser utilizado pela primeira vez.
1. Pressione e segure o botão liga/desliga para ligar o
estabilizador.
2. Em seu dispositivo móvel, habilite o Bluetooth e inicie o
aplicativo Ronin. Observe que é preciso ter uma conta DJI
para iniciar o aplicativo Ronin. Uma vez detectado na lista
de dispositivos Bluetooth, selecione Ronin-SC e digite a
senha padrão do Bluetooth: 12345678.
3. Certifique-se de que está conectado à internet e siga as
instruções na tela para ativar o Ronin-SC.
Ronin-SC
Device Activation
Activation is required prior to using
the device. To do so, information
regarding your device and DJI account
will be uploaded to DJI. Please agree
and proceed to activation.
Agree and activate
User Profile
Status
BaixoAlto
Create
© 2019 DJI OSMO Todos os direitos reservados.
92
Page 94

Montagem da câmera
1
2
3
Prepare a câmera antes de montá-la no Ronin-SC. Remova a
tampa da lente e certifique-se de que a bateria e o cartão de
memória já estejam inseridos na câmera.
1. Os três eixos do estabilizador são travados por padrão.
Destrave os três eixos, ajuste o estabilizador até a posição
mostrada e trave os três eixos novamente.
2. Se necessário, acople a placa riser* na parte inferior da
câmera usando uma chave de fenda com ponta chata.
Placa riser
* A placa riser é necessária nos seguintes casos:
Ao usar uma câmera pequena e leve, como a câmera Sony A6300.
Ao usar uma lente de grande diâmetro, como a câmera Sony A7M3
com uma lente 16-35 mm f/2.8 GM.
Ao usar um Focus Motor.
Consulte a página do produto Ronin-SC no site oficial da DJI (http://
www.dji.com/ronin-sc) para ter acesso à lista de compatibilidade de
câmeras mais recente.
3. Acople a placa de encaixe e o suporte da lente .
Mova o controle deslizante para a frente da placa. A lente
da câmera e a seta na placa de encaixe devem apontar
para a mesma direção. Monte a câmera de acordo com
os indicadores na placa de encaixe. Use o suporte da
lente para obter um desempenho ideal.
PT-BR
Controle deslizante
1
2
Suporte da lente
© 2019 DJI OSMO Todos os direitos reservados.
Placa de encaixe
93
Page 95

1
2
3
4. Solte o botão na parte inferior da placa de montagem da
câmera e mova-o para o lado do eixo. Deslize a câmera
na placa . Aperte o botão quando a câmera estiver no
meio da placa.
2
Se estiver usando acessórios como o suporte para
celular ou o Focus Motor, certique-se de acoplar todos
os acessórios antes de fazer o balanceamento. Consulte
os documentos e manual dos acessórios para obter
mais informações.
Certique-se de apertar o parafuso sob a placa de encaixe.
Balanceamento
O balanceamento precisa ser realizado antes de filmar.
Antes de balancear, certifique-se de ligar a câmera se
estiver usando uma lente com zoom óptico e de selecionar
PT-BR
a distância focal se estiver usando uma lente varifocal. O
aplicativo Ronin contém tutoriais de balanceamento que
podem ser visualizados após a ativação. O balanceamento
também pode ser realizado sem conectar-se ao aplicativo
Ronin. Neste caso, certifique-se de que o Ronin-SC está
desligado ou no modo de repouso antes de equilibrar.
1. Profundidade de balanceamento do eixo de inclinação
a. Desbloqueie o eixo de inclinação e abaixe a câmera ao
soltar o botão do eixo de inclinação .
b. Gire o eixo de inclinação de modo que a lente da câmera
aponte para frente. Verifique se a câmera não está
pendendo para a frente ou para trás. Se estiver pendendo
para a frente, mova a câmera para trás. Se estiver
pendendo para trás, mova a câmera para frente.
c. Solte o botão sob a placa de montagem da câmera e
ajuste o equilíbrio da câmera até que ela esteja rme.
d. Aperte o botão.
1
1
2
© 2019 DJI OSMO Todos os direitos reservados.
94
3
Page 96

2. Balanceamento da inclinação vertical
a. Gire o eixo de inclinação de modo que a lente da câmera
aponte para cima. Verique se a câmera não está mais
pesada no topo ou na base. Se a câmera estiver inclinada
para um lado, puxe o braço de inclinação para o outro lado.
b. Solte o botão do motor de inclinação e ajuste o equilíbrio
da câmera até que a câmera permaneça imóvel, sem
inclinar para cima ou para baixo.
c. Aperte o botão.
d. Repita o passo 1 para equilibrar a profundidade do eixo
de inclinação. O controle deslizante na placa de encaixe
é usado para registrar a posição de equilíbrio. Mova o
controle deslizante ao lado da placa de montagem e aperte
o controle deslizante.
1
2
3. Balanceamento do eixo de rotação
a. Trave o eixo de inclinação e destrave o eixo de rotação.
Verique a direção de oscilação do motor de rotação. Se a
câmera girar para a esquerda, mova-a para a direita. Se a
câmera girar para a direita, mova-a para a esquerda.
b. Solte o botão na placa de montagem da câmera , e
ajuste a posição da placa até que a câmera esteja
estável.
c. Aperte o botão. Se a câmera se mover para frente, mova-a
de volta até que o controle deslizante esteja ao lado da
placa de montagem.
PT-BR
1
2
© 2019 DJI OSMO Todos os direitos reservados.
95
Page 97

4. Balanceamento do eixo de giro
a. Destrave o eixo de giro. Segure o cabo, incline o Ronin-SC
para o lado e verique o movimento do eixo de giro. Se a
lente da câmera girar para baixo, empurre o eixo de giro
para trás. Se a lente da câmera girar para cima, empurre o
eixo de giro para frente.
b. Solte o botão no motor de varrimento horizontal . Ajuste
o equilíbrio da câmera até que ela permaneça imóvel
durante a rotação do varrimento horizontal, enquanto
levanta o cabo.
c. Aperte o botão.
1
2
Operação
PT-BR
Auto Tune
Após a instalação, ativação e balanceamento, o Ronin-SC
precisa ser sintonizado automaticamente antes de ser usado.
Coloque o Ronin-SC em uma superfície plana antes de
realizar uma sintonização automática. Existem duas maneiras
de sintonizar automaticamente o Ronin-SC.
A. Pressione e segure o botão M e o acionador do Ronin-
SC simultaneamente por quatro segundos para iniciar a
sintonização automática.
B. Inicie o aplicativo Ronin, acesse a aba Motor Parameters
(Parâmetros do motor) e selecione Auto Tune (sintonização
automática).
Recursos do botão
Botão liga/desliga: pressione e segure o botão liga/desliga para
ligar ou desligar o Ronin-SC. Toque no botão liga/desliga para
entrar ou sair do modo de repouso.
Botão M: toque para selecionar um perl de usuário. Pressione
e segure para entrar no modo Esportivo (S).
Botão de controle: mova o botão de controle para cima ou para
baixo para controlar o movimento do eixo de inclinação; mova-o
para a esquerda ou direita para controlar o movimento do eixo
de giro. Acesse a aba Joystick (botão de controle) no aplicativo
Ronin e ajuste os parâmetros dos eixos de giro, inclinação e de
rotação.
Botão de controle da câmera: depois de conectar a entrada de
controle da câmera e a câmera, pressione até a metade para o
foco automático, como faria com o botão do obturador em uma
câmera. Pressione para iniciar ou parar de gravar. Pressione e
© 2019 DJI OSMO Todos os direitos reservados.
96
Page 98

segure para tirar uma foto. Para obter a lista de compatibilidade
de câmeras mais recente, consulte a página do produto Ronin-
SC no site ocial da DJI (http://www.dji.com/ronin-sc).
Acionador: pressione e mantenha pressionado o acionador para
habilitar o modo de bloqueio. Pressione o botão duas vezes
para recentralizar o estabilizador. Pressione três vezes para
girar o estabilizador em 180°, para que a câmera que voltada
para você.
Quando a câmera e o Ronin-SC estiverem conectados
por meio do cabo de controle da câmera (USB-C), não
é possível usar a função de reprodução. Neste caso,
pressione o botão liga/desliga para habilitar o modo de
repouso e então usar a função de reprodução.
Especicações
Peso Estabilizador: Aprox. 830 g
Dimensões Estabilizador (dobrado): 220×200×75 mm
Potência de
entrada
Corrente de
funcionamento
Frequência de
funcionamento
do Bluetooth
Potência do
transmissor
de Bluetooth
Temperatura de
funcionamento
Tempo máx.
de espera
Cabo: Aprox. 258 g
Tripé: Aprox. 160 g
Estabilizador (desdobrado): 370×165×150 mm
Modelo: RB2-2450 mAh-7.2 V
Tipo: Lítio 18650
Capacidade: 2450 mAh
Energia: 17.64 Wh
Corrente estática: 0,2 A
2,40 GHz - 2,4835 GHz
8 dBm
<
-20° a 45 °C
11 horas
PT-BR
Para obter mais informações, consulte o Manual do
Usuário:
http://www.dji.com/ronin-sc
※ Este conteúdo está sujeito a alterações sem aviso prévio.
© 2019 DJI OSMO Todos os direitos reservados.
97
Page 99

Обзор Ronin-SC
17
16
15
14
13
RU
1. Электродвигатель
оси наклона
1
2. Фиксатор оси
наклона
2
3. Порт управления
камерой/для
аксессуаров
(USB-C)
3
4. Электродвигатель
оси крена
4
5
5. Фиксатор оси крена
6. Электродвигатель
6
7
оси поворота
8
7. Фиксатор оси поворота
9
10
8. Передние светодиодные
11
индикаторы
9. Джойстик
10. Кнопка управления
камерой
11. Кнопка M
12. Индикаторы уровня
12
заряда аккумулятора
13. Кнопка уровня заряда
аккумулятора
14. Рычаг
15. Порт для аксессуаров
серии Ronin
16. Предохранительный
стопор
17. Монтажная пластина
камеры
22
21
© 2019 DJI OSMO Все права защищены.
98
18
19
18. Порт питания (USB-C)
19. Кнопка блокировки
20. Штатив
21. Рукоятка (вкл.
крепежные отверстия
1/4 и 3/8 дюйма
22. Кнопка питания
20
)
Page 100

Начало работы
A. Загрузка приложения DJI RONINTM и
просмотр обучающих видеороликов
Введите «Ronin» в поиске App Store или
Google Play и следуйте инструкциям
по установке приложения. Посмотрите
видеоуроки на официальном сайте DJI.
https://www.dji.com/ronin-sc
Б. Установка штатива
1
2
3
Приложение
Ronin
В. Установка рукоятки
1
© 2019 DJI OSMO Все права защищены.
RU
2
99
 Loading...