

Page 1

RONIN 2
V1.2
2017.12
User Manual
Page 2

Searching for Keywords
Search for keywords such as “battery” and “install” to find a topic. If you are
using Adobe Acrobat Reader to read this document, press Ctrl+F on Windows or
Command+F on Mac to begin a search.
Navigating to a Topic
View a complete list of topics in the table of contents. Click on a topic to navigate to
that section.
Printing this Document
This document supports high resolution printing.
Page 3

Using this Manual
Legend
Warning Important Hints and Tips Reference
Before You Begin
The following documents have been produced to help you safely operate and make full
use of your RONIN
Ronin 2 in the Box
Ronin 2 Quick Start Guide
Ronin 2 User Manual
Ronin 2 Intelligent Battery Safety Guidelines
Ronin 2 Disclaimer and Safety Guidelines
Check all of the included parts listed in the In the Box manual. Read this entire User
Manual and watch the informational and tutorial videos on the product page of DJI’s
ofcial website (http://www.dji.com/ronin-2). Read the Disclaimers and Safety Guidelines
to understand your legal rights and responsibilities. If you have any questions or problems
during the installation, maintenance or use of this product, please contact DJI or a DJI
authorized dealer.
Download the Ronin 2 App
Download and install the Ronin 2 App.
Search “Ronin 2” in the App Store or Google Play and then follow instructions for
installation.
TM
2:
iOS 9.0 or above
* Ronin 2 app supports iOS 9.0 (or later) or Android 4.4 (or later).
Android 4.4 or above
Ronin 2 App
Download DJI Assistant 2
Download DJI Assistant 2 at http://www.dji.com/ronin-2/info#downloads
2017 DJI OSMO All Rights Reserved.
©
1
Page 4

Contents
Using this Manual 1
Legend 1
Before You Begin 1
Download the Ronin 2 App 1
Download DJI Assistant 2 1
Introduction 3
Ronin 2 Diagram 4
Getting Started 5
Assembling the Grip 5
Installing the Grip onto the Gimbal 6
Mounting the Camera 7
Extending the Roll Axis Arm 10
Cable and Accessory Guides 10
Balancing 12
Before Balancing 12
Step 1: Balancing the Vertical Tilt 12
Step 2: Balancing Depth for the Tilt Axis 13
Step 3: Balancing the Roll Axis 13
Step 4: Balancing the Pan Axis 14
Intelligent Battery 15
Charging the Intelligent Battery 16
Mounting the Intelligent Battery 19
Using the Intelligent Battery 20
Gimbal Settings 21
Built-in Touch Panel Settings 21
Ronin 2 App 29
Remote Controller 33
Remote Controller Diagram 33
Binding the Remote Controller 34
Charging 35
Calibrating the Control Joystick and Roll Knob 35
Operation Modes 36
3-Axis Mode 36
Pan Lock Mode 36
Usage with a DJI A3 Flight Controller and Lightbridge 36
Maintenance 36
Specications 37
2017 DJI OSMO All Rights Reserved.
2
©
Page 5

Introduction
DJI Ronin 2 is a professional 3-axis handheld gimbal that is highly compatible with cable
cams, drones, cranes, Steadicams, and more. Its customizable mounting modes such
as Handheld, Car Mount, Aerial, and Tripod mode help the Ronin 2 work accurately in
different shooting scenarios. Also, its new Pan Lock mode has been specially designed
for work with Steadicams.
Features Highlights
• Its carbon fiber structure makes the Ronin 2 lightweight, strong, and functional.
Upgraded high-torque motors support payloads of 30 lbs.
• A new mechanical design makes camera mounting and balancing easier while
optimizing accuracy. New axis locks improve usability, and its extendable roll axis
allows the Ronin 2 to support more cameras.
• Angular vibration is within ±0.02°, and the built-in GPS module improves the gimbal
accuracy, making it extremely stabile even while shooting at high speeds.
• Adjusting settings is easier with the built-in touch panel, and it also displays the Ronin 2’s
working status.
• A dual battery system and support for hot swapping allows for continuous operation
when replacing batteries. With fully charged TB50 Intelligent Batteries, the Ronin 2 can
power a camera and the whole system for 2.5 hours.
• Power and video signal are transmitted through the built-in slip ring. The Ronin 2 comes
with several accessory ports and supports the DJI Focus system, lens hoods, wireless
video downlinks, and monitors.
• Transmits signal at 2.4 GHz and 5.8 GHz to improve transmission stability.
• The brand new Ronin 2 app can adjust settings and also activate multiple intelligent
features such as Track and CamAnchor.
2017 DJI OSMO All Rights Reserved.
©
3
Page 6

Ronin 2 Diagram
1
2
3
4
5
6
7
8
9
10
11
1. Gimbal Dovetail Mount
2. Ronin 2 Grip
3. SDI-Out Port
17
16
4. Power Button
5. 14.4 V Accessory Power Port
6. Pan Motor
7. Camera Top Cross Bar
15
8. Built-in GPS
9. SDI-in Port
10. 15 mm Rod and Focus Rod
Mount
14
13
12
11. Camera Base Plate
12. Power Hub
13. Tilt Motor
14. Roll Motor
15. USB Type-C Port
16. Safety Hole
17. Battery Mount/Intelligent
Batteries
18. Battery Mount Release Button
19. Secondary Power Button
20. Battery Eject Buttons
21. 14.4 V P-Tap Port
22. 22.8 V DC-out Port
23. Built-in Touch Panel
24. Built-in Antennas
25. D-Bus Port
26. 14.4 V Accessory Power Port
27. DC-in Port
28. 14.4 V Accessory Power Port
2017 DJI OSMO All Rights Reserved.
4
©
18
19
20
21
22
23
24
25
28
27
26
Page 7

Getting Started
Assembling the Grip
Use the Grip to hold the Ronin 2 during setup or operation. Follow the steps below to
assemble the Ronin 2 Grip.
1. Press the button
2. Attach the upper and lower parts of the Grip
3. The hand stops on both sides are used to help users hold the Grip rmly. Adjust their
positions according to your needs.
on the Grip Feet and extend them outwards.
and then tighten them .
1
2
3
When setting on a table, make sure the table is at and level.
2017 DJI OSMO All Rights Reserved.
©
5
Page 8

Ronin 2 User Manual
Installing the Grip onto the Gimbal
1. The pan, tilt and roll axes are locked by default. Unlock the tilt and roll axes to adjust
their positions as shown, then lock the tilt and roll axes again.
2. Toggle the lever
the safety lock engages. Then lock the lever.
To remove the gimbal, toggle the lever to the unlocked position and press down
the safety lock. Then slide the gimbal off the dovetail mount.
2017 DJI OSMO All Rights Reserved.
6
©
to the unlocked position. Next, attach the gimbal to the Grip until
2
1
1
Page 9

Ronin 2 User Manual
Mounting the Camera
Supported Cameras
ARRI ALEXA Mini Canon C300 MKII RED Raven
ARRI ALEXA XT Canon C500 RED Dragon
Black Magic Ursa Mini Panasonic Varicam LT Sony FS5
Black Magic Ursa Mini Pro RED Epic Sony FS7
Canon C100 RED Epic-W Sony F55
Canon C100 MKII RED Scarlet Sony F5
Canon C300 RED Weapon
Supported Lens
Canon Fujinon Cooke Zeiss
CN-E Primes ZK2.5x 14 T2.9 Mini S4/i Primes Ultra Primes
CN-E 18-80 ZK4.7x 19 T2.9 S4/i Primes up to
CN7x17 KAS ZK3.5x 85
T2.9 -4.0
CN-E 15.5-47 XK6x 20 T3.5 S7/i Primes up to
CN-E 30-105 T2.8 Anamorphic/i lenses
135 mm
5/i Primes up to
100 mm
100 mm
up to 135 mm (65 mm
Macro excluded)
Master Primes
Master Anamorphic
Lightweight Zoom 21100mm T2.9-3.9
Cinema Zoom up to
70-200 T2.9
Compact Primes
Angenieux Leica Sony Schneider
Optimo Style Spherical
16-40, 30-76, 48-130
Optimo Spherical 15-40,
28-76, 45-120
Optimo Anamorphic
30-72 A2S, 56-152 A2S
Optimo DP 16-42, 30-80
Type EZ Series
Please note that not all camera and lens combinations will t on the Ronin 2. For
example, the ARRI ALEXA XT and XK6x 20 T3.5 is too long as a combination, so
they cannot be used on Ronin 2 simultaneously.
Summilux-C
Primes
Summicron-C
Primes
CineAlta Primes Xenon FF-Primes
2017 DJI OSMO All Rights Reserved.
©
7
Page 10

Ronin 2 User Manual
Camera Size Requirements
The maximum depth from the center of gravity on the camera base plate is 250 mm.
The maximum height, measured from the top of the camera base plate, is 170 mm. The
maximum width is 190 mm.
250mm
170mm
Make sure the camera is powered off during installation.
It is recommended to use soft connection cables to avoid obstructing camera
movement.
190mm
Mounting a Camera
1. Unlock the levers and remove the upper crossbar .
1
2
2017 DJI OSMO All Rights Reserved.
8
©
Page 11

Ronin 2 User Manual
2. Attach the Camera Top Cross Bar to the camera. Refer to the locations below to mount
the Top Cross Bar to the ARRI ALEXA MINI (using M4-10 screws), RED EPIC (using
1/4" screws) and RED WEAPON 8K (using M4-10 screws) cameras.
ARRI ALEXA MINI
RED EPIC,
RED WEAPON 8K
The Top Cross Bar can be installed in two directions. If the camera lens’ center of
gravity is forward, then mount the Top Cross Bar with the long part forward as shown.
3. Attach the 15 mm Rod and the Focus Rod Mount to the camera.
4. Choose the proper camera screws (type 3/8"-16 or 1/4"-20) and attach the Camera
Base Plate to the camera.
5. Slide the camera into the mounting plate
.
lever
6. Attach the upper crossbar and tighten the securing knob
the levers
.
until the safety lock engages, then lock the
to the camera, then lock
3
4
2
1
It is recommended to adjust the camera’s center of gravity further back and down.
2017 DJI OSMO All Rights Reserved.
©
9
Page 12

Ronin 2 User Manual
Extending the Roll Axis Arm
The roll axis arm can be extended up to 5.5 cm if there isn’t sufcient mounting space for a
long camera.
Loosen the screws on both sides of the roll axis, and toggle the levers to their unlocked
position. Next, pull out the arms on both sides simultaneously as needed. Make sure the
measurement marks match up on both of the arms. Tighten the screws and toggle the levers.
The balance and performance of the gimbal may be reduced when the roll axis arms
are extended. Make sure to push back the arms to their default position after use.
Cable and Accessory Guides
Cables Connector to Ronin 2 Connector to Device
ARRI Alexa Mini Power Cable
ARRI Alexa Mini Start/Stop Cable
RED Power Cable
RED RCP Control Cable*
Ronin 2 Power Cable
2-pin Power Cable
DC Power Cable
Triple P-TAP Breakout Box
SDI IN Cable BNC Male BNC Male
SDI OUT Cable BNC Male BNC Male
USB Type-C Cable USB Type-C USB Type-A
UART to D-BUS Cable DJI 4pin 3pin Servo Cable
2017 DJI OSMO All Rights Reserved.
10
©
Push-Pull Connector
1B 4+2pin Male
Push-Pull Connector
1B 14pin Male
Push-Pull Connector
1B 4+2pin Male
Push-Pull Connector
1B 14pin Male
Push-Pull Connector
2B 10pin Single Slot Male
Push-Pull Connector
1B 4+2pin Male
Push-Pull Connector
1B 4+2pin Male
Push-Pull Connector
1B 4+2pin Male
Push-Pull Connector
2B 8pin Male
Push-Pull Connector
1B 7pin Male
Push-Pull Connector
1B 4+2pin Female
Push-Pull Connector
00B 4pin Male
Push-Pull Connector
2B 10pin Dual Slot Male
Push-Pull Connector
0B 2pin Male
DC 5.5x2.1 Male
P-TAPx3
Page 13

Ronin 2 User Manual
The Top Mounting Block replaces the center handle on the Ronin 2 Grip. It has 1/4"-20 holes
allowing third party handles and accessories to be attached.
The Universal Mount offers an attachment point for the gimbal allowing it to be mounted to
various platforms such as a jib, vehicle mount, or cable cam.
Do not use unauthorized accessories/cables as they may harm your Ronin 2 and
void your warranty.
* To control the RED camera, connect the RCP Control Cable to the CTRL Port of the
camera. Go to Menu > Settings > Setup > Communication. Select the Serial tab and
then choose REDLINK Command Protocol from the Serial Protocol drop-down menu.
RED camera rmware V5.3.49 or above is required.
2017 DJI OSMO All Rights Reserved.
©
11
Page 14

Balancing
To obtain the best performance from the Ronin 2, proper balancing is essential. Accurate
balance is critical for shots where the Ronin 2 will be subjected to fast motion or
acceleration (running, biking, moving in cars, attached to aircraft, etc.). Proper balance
will also offer longer battery runtimes. There are three axes that need to be accurately
balanced prior to turning on the Ronin 2 and setting up the software.
Before Balancing
1. Before balancing the camera, connect the SDI cable and the camera’s power cable
and install a Focus system.
2. The camera needs to be fully congured, with all accessories and cables connected,
prior to installing and balancing the camera on the gimbal. If the camera has a lens
cap, be sure to remove it prior to balancing.
3. Be sure that the Ronin 2’s power and camera are turned off while balancing the
camera.
Step 1: Balancing the Vertical Tilt
1. Unlock the tilt axis. Rotate the tilt axis so that the camera lens is pointing up.
2. Push up on the side levers
balance by turning the adjustment knob
appears balanced without tilting up or down.
3. Tighten the levers
.
to their unlocked position. Then adjust the camera's
. Make adjustments until the camera
1
Ensure that the measurement marks match up on both of the vertical bars. If
they do not match up, the assembly could possibly be skewed higher or lower
on one side, which would cause the tilt motor to bind.
2017 DJI OSMO All Rights Reserved.
12
©
2
3
Page 15

Step 2: Balancing Depth for the Tilt Axis
1. Rotate the tilt axis so that the camera lens is pointing forward.
2. Toggle the lever
Adjust the camera's balance by turning the adjustment knob
still when rotating the tilt axis 45 degrees upwards or downwards.
3. Tighten the securing knob
4. Lock the tilt axis.
to the unlocked position and then loosen the top securing knob .
and toggle the lever to the locked position.
Ronin 2 User Manual
until the camera remains
2
3
1
Step 3: Balancing the Roll Axis
1. Unlock the roll axis.
2. Toggle the lever
Adjust the camera's position by turning the adjustment knob
still when rotating the tilt axis 45 degrees to the left or right.
3. Tighten the securing knob
4. Lock the roll axis.
2
1
to the unlocked position, then loosen the top securing knob .
and toggle the lever to the locked position.
3
4
5
until the camera remains
4
5
Recheck the tilt axis balance. Loosen the securing knob and adjust the camera's
position if the tilt axis is not balanced.
2017 DJI OSMO All Rights Reserved.
©
13
Page 16

Ronin 2 User Manual
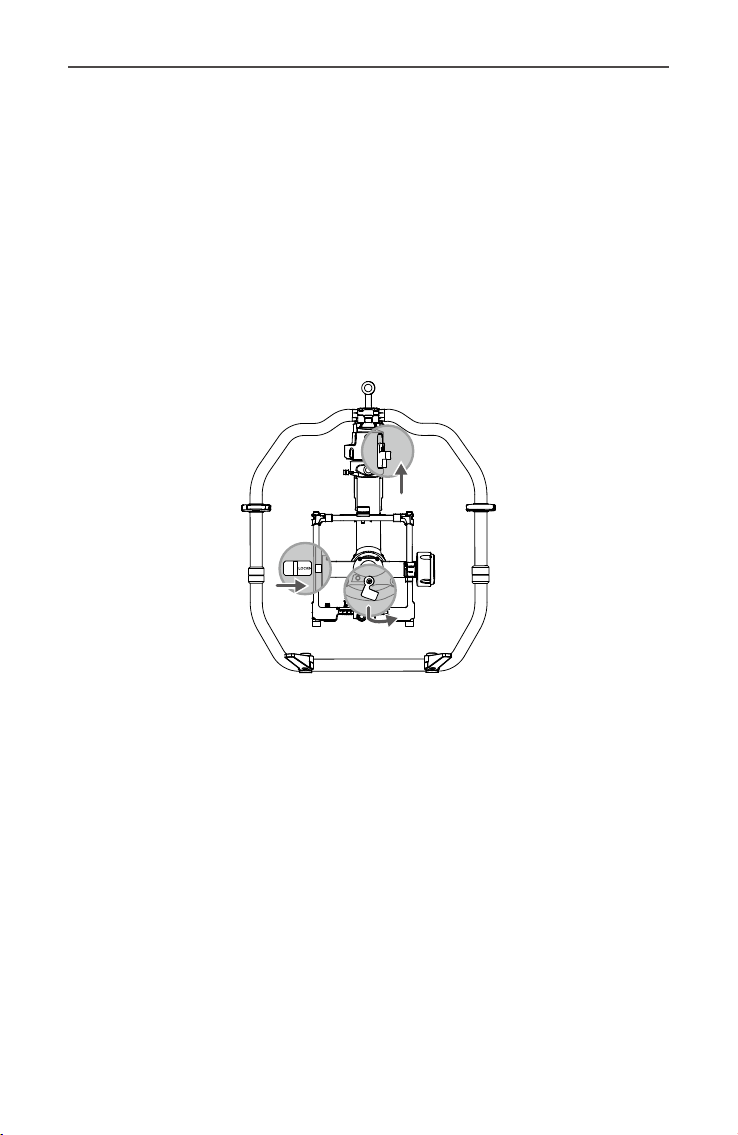
Step 4: Balancing the Pan Axis
Please note: It is recommended to mount the provided MotionBlock before balancing
the pan axis when shooting in a high-speed situation for improved gimbal performance.
Attach the MotionBlock to the pan axis and tighten the screws as shown.
It is necessary to use the optional Counterweights if mounting a longer camera
system and the MotionBlock cannot be mounted due to the pan axis balancing
position. Visit the ofcial DJI Online Store to learn more.
1. Unlock the pan axis. Lift up one side of the Grip.
2. Toggle the lever
turning the adjustment knob
axis 45 degrees while lifting up one side of the Grip.
3. Tighten the lever
to the unlocked position, then adjust the camera's position by
until the camera remains still when rotating the pan
.
1
1
2
It is necessary to use the optional Counterweights if mounting a camera and the
camera system cannot be moved back far enough for balancing.
2017 DJI OSMO All Rights Reserved.
14
©
3
Page 17

Intelligent Battery
The Ronin 2 comes with a hot-swappable dual battery system, allowing the gimbal work
continuously without suspending shooting. The TB50 Intelligent Battery has a capacity of
4280 mAh, a voltage of 22.8 V, and a variety of power management functions. When the
Intelligent Battery is fully charged, it can power the whole system, including the gimbal,
camera, Focus system, and monitor for approximately 2.5 hours. When only powering the
gimbal, the TB50 has a max runtime of eight hours.
Battery Mount Release Button
Secondary Power Button
Battery Eject Buttons
14.4 V P-Tap Port
22.8 V DC-out Port
14.4 V P-Tap Port
Dual TB50 Battery Mount
Battery Level Button
LED4
LED3
LED2
LED1
TB50 Intelligent Battery
Intelligent Battery Functions
1. Battery Level Display: LEDs display the current battery level.
2. Auto-Discharging Function: The battery automatically discharges to below 70% of
total power when it is idle for more than 10 days to prevent swelling. To exit idle state,
press the Power Level button to check the battery level. It takes approximately three
days to discharge the battery to 65%. It is normal to feel moderate heat emitting from
the battery during the discharge process. Discharge thresholds can be set in the DJI
2017 DJI OSMO All Rights Reserved.
©
15
Page 18

Ronin 2 User Manual
Assistant 2 app.
3. Balancing Function: Automatically balances the voltage of each battery cell when
charging.
4. Overcharge Protection: Charging stops automatically when the battery is fully
charged.
5. Temperature Protection: The battery will only charge when the temperature is between
5-45° C (41-113° F).
6. Overcurrent Protection: Battery stops charging when high amperage (> 10 A) is
detected.
7. Over-Discharge Protection: To prevent serious damage to the battery, current output
will be cut off when the battery cell is discharged to 2.8 V and not in use. To extend
operating times, overcharging protection is disabled as batteries discharge during
usage. In this instance, a battery voltage below 2 V may cause a safety hazard such
as a re when charged. To prevent this, the battery will not be able to charge if the
voltage of a single battery cell is below 2 V. Avoid using any batteries matching this
description. Always be alert to avoid over-discharging to prevent permanent battery
damage.
8. Short Circuit Protection: Automatically cuts the power supply when a short circuit is
detected.
9. Battery Cell Damage Protection: DJI Assistant 2 displays a warning message when
detecting a damaged battery cell.
10. Sleep Mode: Sleep mode is entered to save power when the battery is not in use.
11. Communication: Battery voltage, capacity, current, and other relevant information is
provided to the gimbal.
12. Pairing Batteries: Powered by two batteries (with battery cells connected in parallel),
the Ronin 2 requires the two batteries to have similar properties, e.g., internal
resistance. Pairing batteries in the beginning is recommended. Pairing can be done
using DJI Assistant 2, which will also prompt when batteries that are not paired are in
use. The Intelligent Battery Charging Hub will charge paired batteries simultaneously.
13. Heating: Batteries can work even in cold weather. Refer to "Using the Battery" section
for details.
Read the user manual, disclaimer, and battery safety guidelines before use. Users
take full responsibility for all operations and usage.
Charging the Intelligent Battery
The Ronin 2 Quad Charging Hub is designed for use with the Ronin 2 Battery Charger. It
charges up to four Intelligent Batteries simultaneously. The battery pair with more stored
power will be charged rst. If batteries are not paired, the Charging Hub will intelligently
charge batteries in sequence according to battery power levels from high to low. Pairing
can be carried out using DJI Assistant 2.
2017 DJI OSMO All Rights Reserved.
16
©
Page 19

Ronin 2 User Manual
1
2
3
1. Power Port
2. Charging Port
3. Charging Port Cover
4. Battery Charging Level Indicators
6
5
4
7
8
5. Cover/Battery Release Button
6. Status LEDs
7. Firmware Update Port (Micro USB)
8. Speaker Switch
1. Connect the Battery Charger to a power outlet (100-240 V, 50/60 Hz), then uncover the
rubber cover on the power port to connect the Charging Hub to the Battery Charger.
Power OutletCharging Hub Charger
2. Press the Release button and open the corresponding charging port cover. Insert the
Intelligent Battery into the charging port to begin charging.
Refer to the "Status LED Descriptions” section for more information about Status LED
blinking patterns. The Speaker will begin beeping when charging is complete. Refer to the
“Speaker Beeping Descriptions” for more information about Speaker beeping patterns.
Press the Release button to detach batteries after charging is complete.
DO NOT leave metal terminals exposed to open air when not in use.
2017 DJI OSMO All Rights Reserved.
©
17
Page 20

Ronin 2 User Manual
Status LED Descriptions
Status LED (Charging Hub) Description
Blinking Green Charging
— Solid Green Fully charged
Blinking Red
— Solid Red Intelligent Battery error
Blinking Yellow Battery temperature too high/low.
—
Solid Yellow Ready to charge
Alternating Green Blinks Intelligent Battery not detected
Battery Level Indicators while Charging (Battery)
LED1 LED2 LED3 LED4 Battery Level
0%~50%
50%~75%
Fully Charged
Battery Charger Error. Retry with an official
battery charger.
75%~100%
Charging Protection LED Display
The table below shows battery protection mechanisms and corresponding Status LED
patterns.
Battery Level Indicators for Battery Protection
LED1 LED2 LED3 LED4 Blinking Pattern Battery Protection Item
LED2 blinks twice
per second
LED2 blinks three
times per second
LED3 blinks twice
per second
LED3 blinks three
times per second
LED4 blinks twice
per second
LED4 blinks three
times per second
Over current detected
Short circuit detected
Over charge detected
Over-voltage charger
detected
Charging temperature is too
low (<0° C)
Charging temperature is too
high (>40° C)
2017 DJI OSMO All Rights Reserved.
18
©
Page 21

Ronin 2 User Manual
After any of the above-mentioned protection issues are resolved, press the Battery Level
button to turn off the Battery Level Indicator. Unplug the Intelligent Battery from the
charger and plug it back in to resume charging. Note that you do not need to unplug
and plug the charger in the event of a room temperature error. The charger will resume
charging when the temperature falls within the normal range.
DJI is not responsible for damage caused by third-party chargers.
Speaker Beeping Descriptions
Toggle the Speaker switch to turn the warning sound on or off.
Descriptions Beeping Pattern
Toggle the buzzer switch to turn it on Quick beeping
Connect to the Battery Charger Quick beeping
A battery pair is fully charged Quick beeping
Four Intelligent Batteries are fully charged
Alternating two short and one long
beeps, last for about 1 hour
Mounting the Intelligent Battery
1. Insert the Intelligent Batteries into the Battery Mount until the battery's Eject buttons are
engaged.
2. Attach the Battery Mount to the gimbal until the Release button is engaged.
3. The Battery Mount can also be separated from the Ronin 2 during usage. Power the
Ronin 2 by connecting the 22.8 V DC-Out Port on the Battery Mount to the Power Port
of the gimbal using the provided Ronin 2 Power Cable.
An incorrectly installed battery may lead to (1) dropping during usage, (2) poor
battery connection, or (3) unavailable battery information.
Be sure to press the Release button on top of the Charging Hub when removing
the battery.
2017 DJI OSMO All Rights Reserved.
©
19
Page 22

Ronin 2 User Manual
Using the Intelligent Battery
Check the Battery Level
Press the Battery Level button once to check the battery level.
Powering ON/OFF
Press and hold the Power button on the gimbal or Battery Mount to turn on the Ronin 2.
Make sure you unlock the pan, tilt, and roll axes before powering on the Ronin 2.
Heating the Battery
Manual Heating: When the battery is powered off, press and hold the Power button for 3
seconds to initiate battery warm-up manually.
The battery will warm up if the temperature is below 15° C (59° F). As it warms, Status
LED 1 & 2 and LED 3 & 4 will blink alternately. The battery will stop warming when it
reaches 20° C (68° F). The temperature of the battery will remain between 15-20° C (5968° F). When Status LED 1 and LED 4 blink alternately indicates a temperature above
15° C (59° F). This will last for approximately 30 minutes, then the Ronin 2 will power off
automatically.
Auto Heating: Insert the batteries into the battery mount and power on. When the
temperature of the battery is below 15° C (59° F), it will warm up automatically. Check the
Status LEDs for the current power level.
Low-Temperature Notice
1. The performance of the Intelligent Battery is signicantly reduced at low temperatures
(air temperatures below 5° C/41° F). Ensure that the battery is fully charged and the
cell voltage is at 4.35 V before use.
2. In extremely cold weather, the battery temperature may not be high enough even after
warming up. In these cases, insulate the battery as required.
3. To ensure optimum performance, keep the Intelligent Battery’s core temperature
above 20° C (68° F) when in use.
2017 DJI OSMO All Rights Reserved.
20
©
Page 23

Gimbal Settings
Built-in Touch Panel Settings
After balancing and powering on the Ronin 2, you can adjust gimbal settings directly on
the Built-in Touch Panel.
Buttons Description
Follow Mode ButtonMounting Mode Button
Back Button
USB Type-C Port
Jog Wheel
Lock Button
Toggle Button
D-Bus Port
OK Button
Motor Pause Button
1. Mounting Mode Button
Press the Mounting Mode button to select a mounting mode.
Handheld: Select Handheld mode when using the Ronin 2 handheld.
Car Mount: Select Car Mount mode when mounting the Ronin 2 on vehicle-mounted
camera jibs. The Ronin 2 can remain stable for high-speed situations using the built-in
GPS and offer increased holding strength.
Aerial: Select Aerial mode when mounting the Ronin 2 onto an aircraft and connected
to a DJI A3 Flight Controller.
Tripod Mode: Select Tripod mode with static shots or when using a cable cam. Even
for long periods of lming, the gimbal will not drift.
If the Ronin 2 needs to be mounted on different mounting plates and switched
between them, it is recommended to select the mounting modes listed below:
Aerial, Car Mount and Handheld: select Aerial mode.
Aerial and Handheld: select Aerial mode.
Car Mount and Handheld: select Car Mount mode.
2. Follow Mode Button
Press the Follow Mode button to select a Follow mode.
Free Mode: The Ronin 2 will stay in its current position, regardless of Grip movement.
Follow Mode: When Follow mode is enabled, the camera operator can “steer” the
Ronin 2 on a selected axis. When the Grip is rotated left or right, the camera will
smoothly follow the user’s input and stop at the appropriate angle. The SmoothTrack
settings are applied in this mode, and the settings for the pan, roll, and tilt axes can
be independently adjusted. SmoothTrack settings are affected when Follow mode is
2017 DJI OSMO All Rights Reserved.
©
21
Page 24

Ronin 2 User Manual
enabled. It is not related to Free, Recenter, or FPV mode.
FPV Mode
to provide a rst-person perspective experience.
Recenter Mode: The gimbal will reorient and reset the pan angle to the forward-facing
direction.
:The gimbal will synchronize with the movement of the Grip including roll
3. Back Button
Press once to go back to the previous menu.
4. Toggle Button
Press once to toggle between the submenus.
5. Jog Wheel
Rotate to select options.
6. OK Button
Press once to conrm an option.
7. Lock Button
Toggle to lock the Touch Panel during usage to avoid unexpected operation.
8. Motor Pause Button
Press once to power off the motor without powering on the gimbal.
9. D-Bus Port
For connecting with Futaba and other third-party Futaba protocol remote controllers.
10. USB Type-C Port
Used to update the rmware via a USB connection.
Top Bar Icon Description
1 2 3 4 5 6 7 8 9
1. Bluetooth Connection Status
: Indicates the Ronin 2 App is connected.
2. Remote Controller Signal Strength
: Displays the remote controller signal strength.
3. GPS Signal Strength
: Shows the current GPS signal strength.
4. Mounting Mode
: Handheld Mode.
: Car Mount Mode.
: Aerial Mode.
: Tripod Mode.
2017 DJI OSMO All Rights Reserved.
22
©
212
60%
Page 25

Ronin 2 User Manual
0
Power-6-2
1.9
Atti Err
0.6
0.1
0.02
Atti
-0.66
-0.15
Stiffness
Tilt6Roll10Pan
212
More
10
212
70
80
90
100
+
50
20
40
_
30
5. Motor Pause
: Indicates the motor is powered off.
6. Pan Lock Mode
: Indicates the gimbal is in Pan Lock Mode, and the pan motor is powered off.
7. Follow Mode
: Free mode.
: Follow mode.
: FPV mode.
: Recenter mode.
8. Working Battery number
: Shows the number of batteries currently working. The Ronin 2 can operate with
one or two batteries.
9. Battery Level
:Displays the current battery level.
Basic Settings
Motor Settings
Basic
Motor
0º
60%
0º
60%
Tuning Level
60
Auto tune
Cancel
1. Basic Motor Settings
It is recommended to select Auto Tune to obtain automatic adjustment of each motor’s
settings.
Auto Tune: To begin the Auto Tune process, you need to select a Stiffness Grade. Stiffness
value is determined by the gimbal system according to the payloads of the gimbal. 100% is
the maximum stiffness value. For example, when the payload is 8 kg, 100% of the Stiffness
value provided by Auto Tune is 50, so selecting the 60% means the Stiffness value is 30. It
is recommended to select 60% for Handheld mode and 80% for Car Mount or Aerial mode.
Manual adjustment is required if gimbal performance is not ideal after auto tuning, or if anything
causes Auto Tune to fail (if the payload includes too many accessories or the rotational inertia is
too large). Reset the gimbal to default settings before trying to manually adjust settings.
2017 DJI OSMO All Rights Reserved.
©
23
Page 26

Ronin 2 User Manual
Stiffness: Select the mounting mode prior to adjusting the Stiffness value. The motor
stiffness adjustment allows you to ne-tune the amount of power that is applied by the
motors as they react and balance the weight on each axis. Please make sure you leave
an extra margin for this setting to ensure stability at all times. For example, if the Pan axis
starts to shake at a stiffness of 40, then lower the value to 32. When shooting in Handheld
mode, if the stiffness value set for the roll axis is 20, but the roll axis shaking affects
the footage, that means the stiffness value is too low to provide optimal stability. Try
increasing the stiffness value to 30.
Strength: It is recommended to leave this setting as default. The motor strength
adjustment allows you to minimize Ronin 2’s attitude error. This parameter affects how
quickly the Ronin 2 will react to changes in orientation. If you see any unusual attitude
errors (more than 1 in the readings), you may minimize it by increasing the corresponding
motor’s strength. However, increasing strength too much may also cause the Ronin 2 to
over adjust its orientation and induce shakiness. When the Strength value is set to 10, and
the pan axis cannot stop immediately after a fast rotation, try to decrease the value to 6.
Filter: This setting can ease high-frequency vibrations of the Ronin 2. When the Ronin 2 is
vibrating at a high frequency, you may experience numbness while touching the gimbal
motors of each axis. In such instances, it is recommended to lower the Filter settings.
Control: It is recommended to leave this setting as default. Control can guide the Ronin 2
to better handle low-frequency vibrations. If your Ronin 2 vibrates at a visible range, you
can suppress it by increasing Control. When the vibration persists at low frequency, then
decrease Control. Adjusting Control to optimal settings may take readjustment.
Payloads (kg)
0 10 6 10 10 10 10 30 45 45 26 28 28
0-2 kg 25 20 20 10 10 10 30 45 45 26 28 28
2-4 kg 35 30 30 10 10 10 30 45 45 26 28 28
4-6 kg 40 40 35 10 10 10 30 40 40 26 28 28
6-8 kg 45 45 40 10 10 10 25 35 35 26 28 28
8-10 kg 50 50 40 10 10 10 25 35 35 26 28 28
10-12 kg 55 55 45 10 10 10 20 30 30 26 28 28
12-13.6 kg 60 55 45 10 10 10 20 25 25 26 28 28
Remarks
Stiffness Strength Filter Control
Pan Tilt Roll Pan Tilt Roll Pan Tilt Roll Pan Tilt Roll
The values above
are for reference.
You can adjust
the value within
a value of 10 as
needed.
It is recommended
to use default
settings.
The values above
are for reference.
You can adjust
the value within
a value of 10 as
needed.
It is recommended
to use default
settings.
It is recommended to use the remote controller to test the pan and tilt axis. Control
the pan and tilt axis to all angles to see if shaking occurs. It is normal if the pan or
tilt axis shakes one time and doesn’t shake after that.
2017 DJI OSMO All Rights Reserved.
24
©
Page 27

2. More Settings
Tilt
Pan
Gimbal Trim
Set power-on position
Basic
212
Tilt
Roll
Push Pan
SmoothTrack
Speed5Deadband
Accel
0º
Motor
More
+0.0+0
Balance test
SmoothTrack Settings
0º
SmoothTrack
Pan
ON
20
OFF
20
Set the Power-on Position: It is not necessary to set the
60%
power-on position if there is no special requirement. To set
the power-on position, adjust the pan position as needed,
and then press the OK button to conrm. The Ronin 2 will
record this new position and the pan axis will stay at the
recorded position when restarted.
Gimbal Trim: To ne-tune the pan or tilt axis. The default
value is 0, which means the motor is at the center position
and it is not necessary to change.
Balance Test: The pan, tilt, and roll axes will rotate automatically
to check the balance status after selecting Balance Test.
Ensure there is no obstruction of the gimbal before balance
testing. Do not perform a Balance Test if the gimbal is set to
Recenter mode.
212
60%
The settings for the pan, roll, and the tilt axes can be
independently adjusted.
Push Pan (Push Tilt): Enable Push Pan or Push Tilt to allow
the pan and tilt axes to be adjusted by hand when the
Ronin 2 is turned on.
Speed: The speed will determine how fast the camera will
travel while translating a pan, roll, or tilt movement.
Deadband will determine how much movement the gimbal
will tolerate prior to translating the camera’s pan, roll, and
tilt.
Acceleration determines how closely the camera will follow
the translated pan, tilt, and roll movement.
Ronin 2 User Manual
2017 DJI OSMO All Rights Reserved.
©
25
Page 28

Ronin 2 User Manual
Device
Log
212
Channel
0
0
Left
Right
212
Deadband
Max Speed
Smoothing
212
Motion
Speed
CH 1
CH 2
CH 3
Rev
CH 4
Rev
CH 5
CH 6
Monitor
60%
Monitor
Motor
Angle
Pan Tilt Roll
1.4º
1.4º
4.5º
Remote Control Settings
1. Motor
Displays the power, angle, and temperature of motors. If
a particular motor axis indicates a power reading greater
than 10, this often means the mechanical balance of
the camera hasn’t been properly adjusted. A properly
balanced camera rig will display readings close to 0
power on each axis, but these values may vary.
2. Device
Displays the connection status with other devices, such
as the remote controller, GPS, Flight Controller, DJI
Focus, etc.
3. Log
Displays any abnormal status information of the gimbal.
0º
60%
Remote
Motion
Pan
10
50
15
Test Endpoint
1. Motion
The remote controller can have independently adjusted pan, tilt, and roll deadband
Remote
0º
Channel
Nor
Nor
Rev
Rev
60%
Roll
Tilt
Pan
N/A
N/A
N/A
settings.
Deadband: When this value increases, more stick movement will be required to
translate into actual movement of the gimbal.
Max Speed: Allows you to adjust the remote-controlled rotational speed.
Smoothing: When this value increases, and when control stick input is released it
will be translated into smoother and slower movement. If smoothing is set to 0, the
slowdown will be translated as an abrupt stop.
2017 DJI OSMO All Rights Reserved.
26
©
Page 29

Ronin 2 User Manual
Profile
More
Remote Freq.
Bind Remote
ON
Axis Mode
3-axis
Calibrate System
212
Speaker
Endpoint: Limits the gimbal’s rotation range by setting the endpoint during controller
input.
Test Endpoint: Allows testing of the pan and tilt endpoints. Ensure the camera is
unobstructed before tapping the test buttons.
The default endpoint settings for pan axis are set to 180°, which means there
is no endpoint for the pan axis, allowing it to rotate 360° continuously.
2. Channel
The channel indicator provides feedback during remote operator conguration. Pan,
tilt, and roll can have channels reassigned. Each axis can also be reversed.
System Settings
0º
60%
Settings
General
2.4HzStart
1. General
2. Prole
Calibrate System: Use only if you notice drift on any of the axes. To calibrate the
system, place the Ronin 2 on the Grip and make sure it is completely steady. Be
sure the camera can rotate 90° with the lens pointing straight down, without any
interference from any wires. Select Calibrate System and let the process nish before
picking up the Ronin 2.
Bind Remote: Select to bind with a remote controller.
Remote Freq.: The remote controller can work on both 2.4 GHz and 5.8 GHz Wi-Fi
frequencies. Switch the operating frequency if serious interference is detected.
Speaker: A built-in speaker comes with the Ronin 2, and there will be sound alerts
when powering the gimbal on or off or when an abnormal system status is detected.
The speaker can be switched off via the built-in screen for quieter shooting scenarios.
Axis Mode: Choose between 3-Axis and Pan Lock mode.
The user can save the custom motor congurations or reset to default settings.
2017 DJI OSMO All Rights Reserved.
©
27
Page 30
Ronin 2 User Manual
3. More
Access Log File: Internal storage is built into the Ronin 2 for recording data. If the
gimbal is acting abnormally, contact DJI Support. If the provided solutions are not
successful, DJI Support will request log les for further analysis. Access log les only
when instructed by a DJI Support specialist.
Password: Displays the default Bluetooth password of your Ronin 2. The password
can be changed.
Joint Angle Calibration: Joint Angle Calibration is needed if the gimbal cannot maintain
its altitude, cannot recenter in Recenter mode, or the pan axis drifts in Tripod mode.
To begin calibration, pause the motors, and then lock the pan, tilt, and roll axis. Then,
select Joint Angle Calibration.
Language: Languages can be switched between English or Chinese.
About: Displays the SN number and the rmware version of your Ronin 2.
Camera Page
Enter the Camera page to control camera recording and various other supported settings
when a camera control cable is attached.
2017 DJI OSMO All Rights Reserved.
28
©
Page 31

Ronin 2 User Manual
Ronin 2 App
The Ronin 2 app allows you to adjust gimbal settings remotely. Also, new intelligent
features have been added to the Create menu such as Track, CamAnchor, and more.
Use the Ronin 2 app to activate the Ronin 2 for the very rst time. An internet connection
is required for product activation.
Conguration
You can use the Default Settings or setup and save several custom settings proles.
The options for Motor Settings, SmoothTrack, Remote Control, and General are the same
as the Built-in Touch Panel. Refer to the section above to learn more, or tap the question
mark icon to read basic guidelines.
2017 DJI OSMO All Rights Reserved.
©
29
Page 32

Ronin 2 User Manual
Create
The Create menu includes the Video, Track, and CamAnchor features.
Ensure the Ronin 2 is in Follow or Free mode when using Create features.
It is recommended to mount the Ronin 2 onto a tripod when using Create
features.
Video
You can use the mobile device to control the camera for recording video.
10
平
Speed Control Knobs: Turn the Speed Control Knobs to adjust the max speed
轴10俯仰轴10横
轴
of each axis.
Roll Slider: Slide to control roll axis movement.
Control Joystick: Slide the Joystick left or right to control pan axis movement, and slide
the Joystick up or down to control tilt axis movement.
Record Button: Tap to start/stop recording.
2017 DJI OSMO All Rights Reserved.
30
©
Page 33

Ronin 2 User Manual
Track
Tap the screen to select several positions, and the camera will use the selected positions
as a track to record video.
2
1
Position Settings: Up to 10 individual positions can be selected. Tap to add
position and tap
Stay Time
Duration
Time Settings: Duration is how long the camera will take to move between two
1.0s 0.0s
to delete.
positions, and Stay Time is how long it will stay at the current position.
Preview Button: Tap Preview button to see if the position is proper.
Record Button: Tap to start/stop recording.
CamAnchor
In CamAnchor, you can control the camera move and record video between different
target positions.
Target Position: Tap to select different target positions.
Speed
Speed: Determines the speed at which the camera will move between target positions.
1deg/s
Preview Button: Tap to see if the positions set are suitable.
Record Button: Tap to start recording. Switch to the other target position, and the
camera will move to that position at the set speed.
Monitor
Displays the real-time status of the motors, IMU, attitude, GPS, connected devices, and
batteries.
2017 DJI OSMO All Rights Reserved.
©
31
Page 34

Ronin 2 User Manual
About
Displays your account information, rmware version, and more.
2017 DJI OSMO All Rights Reserved.
32
©
Page 35

Remote Controller
Remote Controller Diagram
1
2
3
4
5
6
7
8
9
16
15
14
13
12
11
17
10
18
19
1. Built-in Antenna
Do not obstruct the antenna.
2. Pan Axis Speed Control Knob
Turn this Speed Control Knob to adjust the maximum speed of the pan axis.
3. Tilt Axis Speed Control Knob
Turn this Speed Control Knob to adjust the maximum speed of the tilt axis.
4. Roll Axis Speed Control Knob
Turn this Speed Control Knob to adjust the maximum speed of the roll axis.
5. Power Button
Press and hold the power button to turn on/off the remote controller.
6. Status LED
If the Status LED glows solid green, it is connected to the gimbal. If the status LED
glows solid red, the remote controller is disconnected from the gimbal. Blinking red
means the remote controller and gimbal are binding.
7. Mode Switch
Switches between the different follow modes: Free, Follow, and Recenter.
8. Roll Knob
Turn the knob to control roll axis movements (default settings can be changed).
9. Control Joystick
Push the Control Joystick up or down to control tilt axis movement. Push the Control
Joystick left or right to control pan axis movement (default settings can also be
changed).
2017 DJI OSMO All Rights Reserved.
©
33
Page 36

Ronin 2 User Manual
Profile
More
Remote Freq.
Bind Remote
ON
Axis Mode
3-axis
Calibrate System
212
Speaker
10. Neck Strap Bracket
11. Prole Switch
Switch between various proles.
12. C2 Button
13. Record Button
Press once to start/stop recording.
14. USB Type-C Port
For charging and updating rmware.
15. Battery Level Indicators
Displays the current battery level.
16. Handle
17. Accessory Mounting Hole
1/4”-20 thread.
18. CAN Port
19. C1 Button
Binding the Remote Controller
The remote controller is bound to the gimbal by default. If using a new remote controller,
follow the steps below to begin binding.
1. Power on the gimbal and remote controller.
2. Enter the Settings page via the built-in touch panel and select “Bind Remote” Within 30
seconds, press C1, C2, and the Record Button simultaneously on the remote controller
until you hear a continuous beep.
3. The status LED will glow solid green once a successful connection is established.
34
0º
60%
Settings
General
C1 Button C2 Button
2.4HzStart
PAN
-
MODE
Free
Follow
Recenter
TILT
ROLL
+
RONIN
+
-
REC
+-
ROLL
PROFILE
Default
User 1
User 2
POWERED BY
Record Button
When using the remote controller, ensure that the antenna is at least 20 cm away
from any person or object to provide the best wireless connection.
2017 DJI OSMO All Rights Reserved.
©
Page 37

Ronin 2 User Manual
Charging
Charge the Remote Controller using a USB charger via the USB Type-C port. The remote
controller has a maximum run time of 6 hours when fully charged.
Low High
Charging Time: 2 hours (when charging at 2 A)
Battery Level Indicators
The battery level indicators display the current battery level. The following is a description
of the indicators.
The LED is solidly lit : The LED is blinking : The LED is off
:
LED1 LED2 LED3 LED4 Current Battery Level
75% to 100%
50% to 75%
25% to 50%
12.5% to 25%
0% to 12.5%
<0%
Calibrating the Control Joystick and Roll Knob
Only calibrate the Control Joystick and Roll knob if you notice control is not accurate
(like if the pan axis is rotating without any input). Ensure the gimbal is powered off during
calibration.
1. Press once on the C1+C2 buttons, and then press the C1 and C2 buttons
simultaneously and hold them until the long beeping changes to a continuously short
beeping, which indicates calibration has begun. Do not touch the Control Stick until
calibration starts. Repeat step 1 if calibration fails to initiate.
2. Pull and push the control joystick and rotate the roll knob several times to the endpoints.
3. Press and hold the C1+C2 buttons again to exit calibration. The controller will beep
if calibration is successful. If calibration fails and there is no beep emitted, repeat the
steps above.
2017 DJI OSMO All Rights Reserved.
©
35
Page 38

Operation Modes
There are two operation modes for the Ronin 2: 3-Axis mode and Pan Lock mode.
3-Axis Mode
3-Axis mode is the standard, default mode. The Ronin 2 can be used in this mode without
any adjustments.
Pan Lock Mode
Pan Lock mode is specially designed for using the Ronin 2 with Steadicams. To use Pan
Lock mode:
1. Select the Handheld Mounting mode.
2. Enter the Settings page via the built-in touch panel and select “Pan Lock,” and then
the pan motor will shut off.
3. Lock the pan axis. The Ronin 2 will now work in Pan Lock mode.
4. The pan axis cannot stabilize itself in Pan Lock mode, use a Steadicam stabilizer if
needed.
5. The roll axis can rotate 360° in Pan Lock mode.
6. To properly use Pan Lock mode, the pan axis locking accessory should be installed.
Please visit the ofcial DJI Online Store for more details.
Usage with a DJI A3 Flight Controller and Lightbridge
The Ronin 2 can be mounted to an aircraft with a DJI A3 Flight Controller and Lightbridge.
Connect the Ronin 2’s 14.4 V power/accessory port to the A3 Flight Controller, and
connect the Ronin 2’s CAN port to Lightbridge.
Maintenance
The Ronin 2 is a precise machine, and its power/data ports are not waterproof. Be sure
to protect them from dust and water during use. After use, it is recommended to wipe the
Ronin 2 down with a soft dry cloth. Never spray any cleaning liquids onto the Ronin 2.
2017 DJI OSMO All Rights Reserved.
36
©
Page 39

Specications
General
Built-In Functions
Ingress Protection Rating IP52*
Peripheral
Camera Tray
Dimensions
Accessory Power
Connections
Input Power Intelligent Battery: 4280 mAh-22.8 V
Connections 2.4 GHz/5.8 GHz Remote Control; Bluetooth 4.0; USB
DJI Assistant 2
Requirements
Ronin 2 App
Requirements
Operation Modes
Underslung Mode
Upright Mode
Briefcase Mode
Handheld, Car Mount, Aerial, Tripod, & Steadicam Mode
Built-in, independent IMU modules
DJI Advanced 32-Bit ARM Processor
DJI Specialized Gimbal Drive Motors with Encoders
Dual Battery System
Bluetooth Module
D-Bus Receiver Supported
2.4 GHz/5.8 GHz Receiver
Temperature Sensors
Built-in Touch Panel
Built-in GPS/GLONASS
USB Type-C Connection
Power and Video Signal through Slip Ring
Maximum depth from the center of gravity on camera
base plate: 250 mm
Maximum height measured from top of the camera base plate:
190 mm
Maximum width: 170 mm
14.4 V x 4 Camera Cage (Combined 8 A), 14.4V x 2 Pan
Motor (Combined 4 A), 14.4 V x1 P-Tap (8 A)
Type-C
Windows 7 or above; Mac OS X 10.11 or above
iOS 9 or above; Android 4.4 or above
2017 DJI OSMO All Rights Reserved.
©
37
Page 40

Ronin 2 User Manual
Mechanical & Electrical Characteristics
Working Current
Operating Temperature -4° F ~ 122° F (-20° C ~ 50° C)
Operating Frequency 2.4-2.4835 GHz; 5.725-5.850 GHz
Transmitter Power
(EIRP)
Weight Including handle bar: 14 lb (6.3 kg)
Dimensions Excluding handle bar : 350 mm (W) x 416 mm (D) x 530 mm (H)
Working Performance
Load Weight
(Reference Value)
Angular Vibration Range ± 0.02 °
Maximum Controlled
Rotation Speed
Mechanical Endpoint
Range
Controlled Rotation
Range
Static current: ≈300 mA (@22.8 V)
Dynamic current: ≈500 mA (@22.8 V)
Locked motor current: Max 15 A (@22.8 V)
2.4 GHz
FCC: ≤25 dBm; CE: ≤20 dBm; SRRC: ≤20 dBm
5.8 GHz
FCC: ≤25 dBm; CE: ≤14 dBm; SRRC: ≤14 dBm
Excluding handle bar: 11 lb (4.9 kg)
Including handle bar : 630 mm (W) x 416 mm (D) x 720 mm (H)
30 lbs (13.6 kg)
Pan axis: 400 °/s
Tilt axis: 360 °/s
Roll axis: 360 °/s
Pan axis control: 360 ° continuous rotation
Tilt axis control: ±135 °
Roll axis control: ± 220 °
Pan axis control: 360 ° continuous rotation
Tilt axis control: ±135 °
Roll axis control: ± 30 °
* The Ronin 2's power/data ports are not waterproof. Be sure to protect them from
harmful dust and water during use, otherwise damage may occur.
2017 DJI OSMO All Rights Reserved.
38
©
Page 41

Contents are subject to change.
Download the latest version from
http://www.dji.com/product/ronin-2
If you have any questions about this document, please contact DJI
by sending a message to DocSupport@dji.com.
RONIN is a trademark of DJI OSMO. Copyright
2017 DJI OSMO All Rights Reserved.
©
 Loading...