

Page 1

Scratch 3.0 Tello
Extension
v1.1 20211013
Overview
Safety Features
Reset the Wi-Fi
Architecture
Quick Start
Tello Extension allows users to use Scratch 3.0 to control Tello with visual programming.
After Tello executes the current command, if there is no additional command input after 15
seconds, the drone will automatically land.
The extension only supports Direct Wi-Fi (AP mode). If Tello enters STA mode, you can press and
hold the power button for 5s when the drone is on. The status indicator will turn off and the
drone will restart. When the status indicator blinks yellow, the Wi-Fi SSID will restore to factory
settings, with no set password by default.
Build Wi-Fi communication between Tello and computer.
Tello IP: 192.168.10.1 UDP PORT: 8889 << - - >> computer
The extension will automatically create two UDP clients that bind to ‘0.0.0.0:45689’ and
‘0.0.0.0:8890’ respectively. Port ‘45678’ is responsible for sending and receiving commands to
Tello. Port ‘8890’ is responsible for receiving Tello status information. Before using the extension,
make sure both ports are available.
1. Power on Tello, connect computer to Tello’s Wi-Fi, and launch Scratch 3.0 for Tello
Extension;
Page 2

2. Click the Add Extension button on the bottom left corner to open the extension selection
interface;
3. Click the extension Tello Talent;
4. Read the command block instructions, and drag the blocks to use them. You can see one
example bellow. A connect block is always required at the beginning of the program. A wait
execute all cmds block is required at the end of any non-blocking command (blocking and
non-blocking commands will be explained later);
Page 3

5. Click the code block to initiate the program. A Connecting window will pop up to connect with
Tello. Once the drone is connected, the Connecting window will close automatically and the
programs will run successively. The connect block will execute the connection command
before running every code to make sure Tello is stably connected to the computer;
6. As a state display block is used, the Tello status window will appear and can be closed at any
time;
7. While a program is running, the entire code module will be highlighted in yellow. You can
stop the program mid-execution by clicking the Stop button.
Page 4

Blocking and Non-blocking
Non-blocking Blocks
Besides blocking modes in plain-text , all
other blocks are non-blocking.
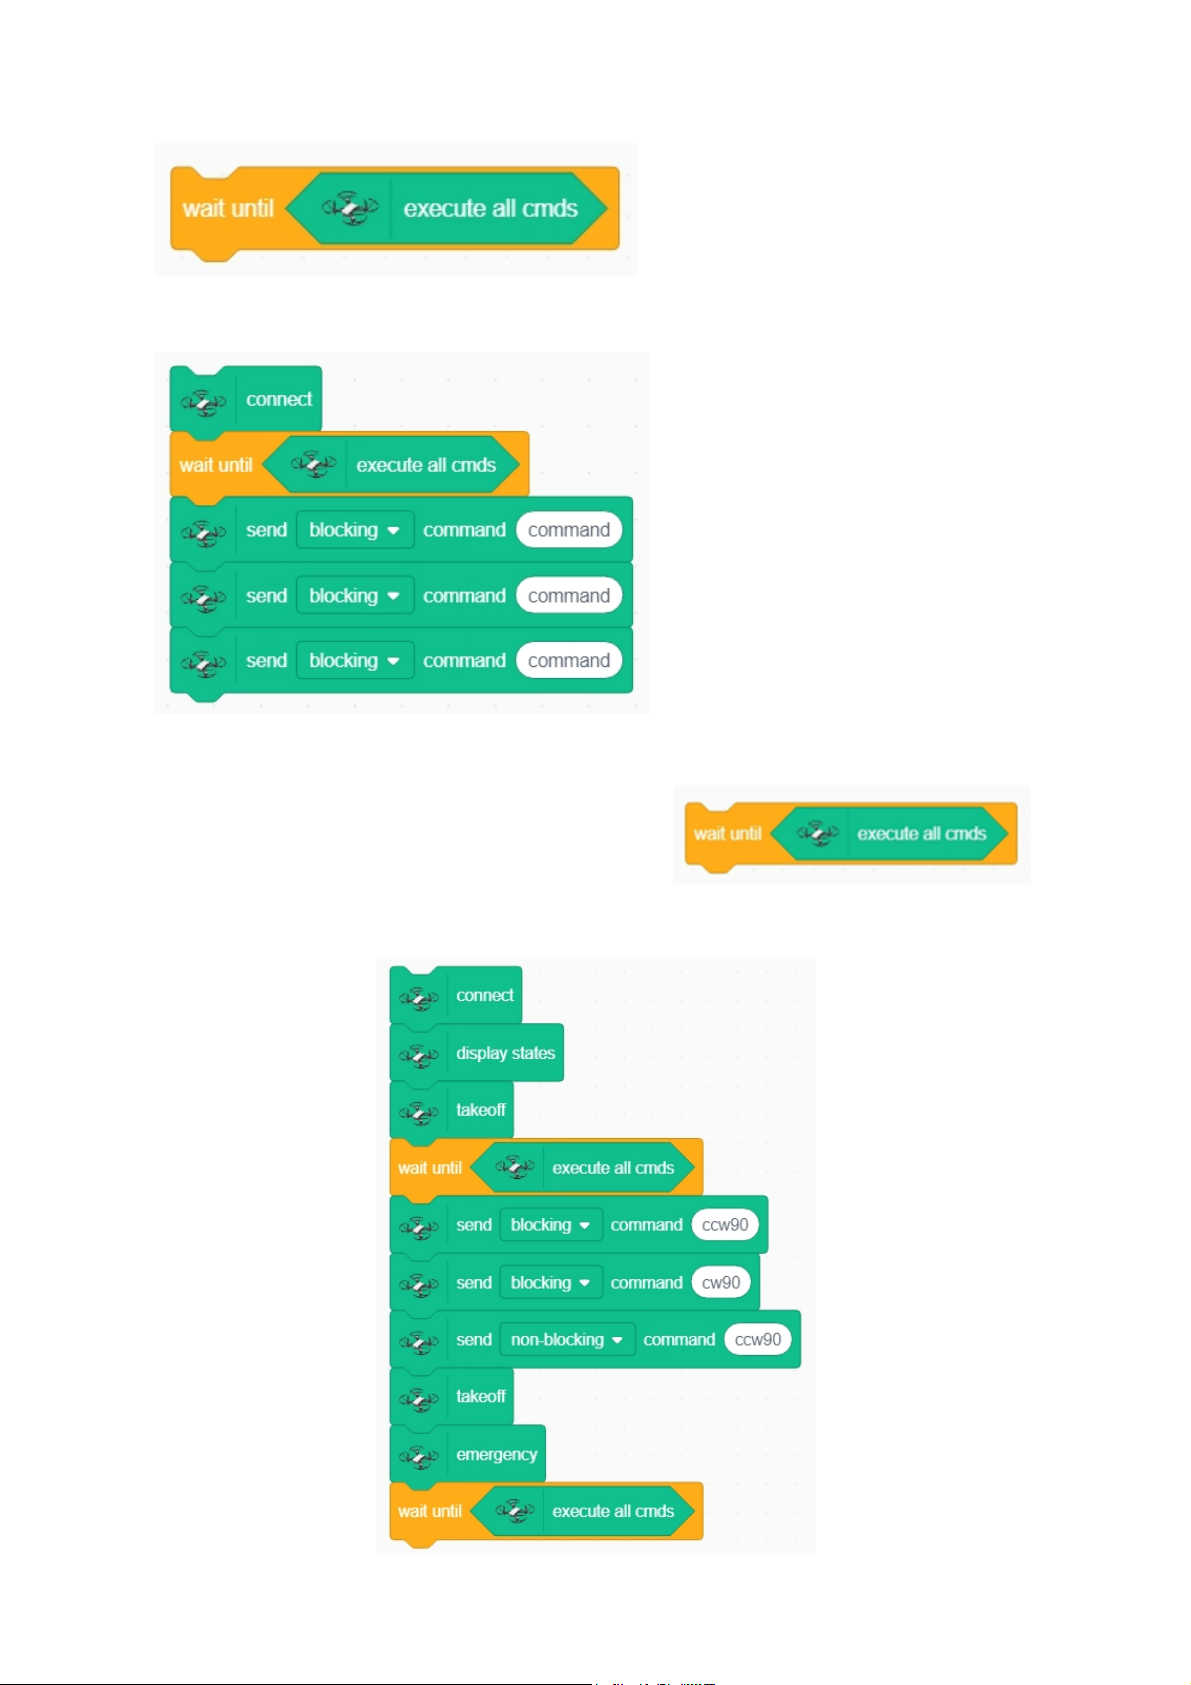
When using non-blocking blocks, all command blocks will automatically be set to completed and
then send a land command to end the program. After that, the entire code module will no longer
be highlighted in yellow and the Stop button will not be functional.
As shown in the illustration, the program will directly complete and exit.
To turn an unblocking block into a blocking state, put wait execute all cmds
at the end of the non-blocking block.
As shown below, the program can now run normally.
Page 5
Blocking Blocks
Combination of Blocking and Non-blocking Blocks
Blocking blocks can be used independently without the wait executive all cmds block
. All blocking blocks will executive
successively, which means a command will only execute when the previous one is completed.
As shown below, blocking blocks can enter a blocking state.
As shown below, all non-blocking blocks should end with ,
and then be followed by blocking blocks. There are no limits for connections between blocking
blocks. A blocking block can be followed directly by a non-blocking one.
Page 6

Command Blocks
: To connect with Tello, check the connection between a single block and
Tello before adding more blocks
Note: This block must be put at the beginning of the Tello program.
: To open the Tello status window
: To return to a Boolean value based on mission status. If
the mission is completed, return to true; if not, return to false
Attention: This block should be used with ,that comes with scratch 3.0 and
must be put at the end of the Tello code.
: To set speed
: To set timeout. If there is no response after timeout, the
program will send a land command and then stop
: To take off
: To land
: To turn off Tello during an emergency
: To move Tello up by [X]cm; X: 20-500
: To move Tello down by [X]cm; X: 20-500
Page 7

: To move Tello left by [X]cm; X: 20-500
: To move Tello right by [X]cm; X: 20-500
: To move Tello forward by [X]cm; X: 20-500
: To move Tello back by [X]cm; X: 20-500
: To right rotate Tello by [X] degrees; X: 1 - 360
: To left rotate Tello by [X] degrees; X: 1 - 360
: To flip Tello [forward, back, left, right]
:
To set the speed at (cm/s) and fly to (x,y,z) ;
x: -500 - 500 y: -500 - 500 z: -500 - 500
speed: 10-100 (cm/s);
x, y and z should not be in the -20 to 20 range all at the same time.
:
To set the speed at (cm/s) and fly through (x1,y1,z1) in a curve to (x2,y2,z2). If the curve radius is
not in the 0.5-10 meters range, return relevant notifications;
x1, x2: -500 - 500 y1, y2: -500 - 500
z1, z2: -500 - 500 speed: 10-60 (cm/s)
x, y and z should not be in the -20 to 20 range all at the same time.
:
Page 8

Status Information
FAQs
Plain-text command: To send plain-text commands in non-blocking or blocking mode.
To learn more about plain-text command, please refer to Tello_SDK_3.0_User_Guide.
CMD: Command number: current command
RES: Command number: return information of the command
time: flight time after Tello takes off
battery: remaining power of Tello
pitch: pitch angle
roll: roll angle
yaw: yaw angle
vgx/vgy/vgz: speed on x,y,z
agx/agy/agz: acceleration on x,y,z
tof: height from the ground
height: height from the takeoff point
baro: height of the barometer
1. Command Block Compatibility with Tello and Tello Talent.
Page 9

Only established blocks in the extension supports Tello. Other plain-text commands in SDK
3.0 do not support Tello. Using unsupported commands will lead to an Unknown Command
notification in the RES status window.
2. If the following error occurs when launching Scratch, it means another software is occupying
Port 8890. To fix, close the software and restart Scratch.
Detailed steps:
(1) Press win+R to launch Command Input and enter powershell to open up the Windows
Terminal;
(2) Enter netstat -aon|findstr "8890" in the Terminal to get the program pid;
(3) Enter taskkill /T /F /PID 16908 in the Terminal (16908 is the pid value returned in the last
step), close the program and restart Scratch.
 Loading...