

Page 1
ROBOMASTER TT
TELLO TALENT
Quick Start Guide
快速入门指南
快速入門指南
Краткое руководство пользователя
v1.0
Page 2
Contents
Quick Start Guide
EN
CHS
快速入门指南
CHT
快速入門指南
Краткое руководство пользователя 39
RU
2
16
28
Page 3

Disclaimer
It is not recommended for children under the age
of 14 to use this product without adult supervision.
Please note that in Japan the recommended age
EN
is 15 years. Adults should keep the aircraft out of
the reach of children and exercise caution when
operating this aircraft in the presence of children.
This product incorporates various advanced control
technologies. However, inappropriate use of the
product could result in personal injury or property
damage. Please read the materials associated with
the product before your first use of the product.
These documents are included in the product
package and/or are available online on the SZ RYZE
TECHNOLOGY CO., LTD ("Ryze Tech") website
(http://www.ryzerobotics.com).
This product is a ying camera that oers easy ight
when in good working order as set forth below.
Visit http://www.ryzerobotics.com for the most
current instructions and warnings. Users operating
their aircraft in the United States should visit http://
knowbeforeyoufly.org for more information about
ight safety and compliance.
The information in this document aects your safety
and your legal rights and responsibilities. Read
this entire document carefully to ensure proper
conguration before use. Failure to read and follow
the instructions and warnings in this document may
result in serious injury to yourself or others, damage
to or loss of your Ryze Tech product, or damage to
other objects in the vicinity.
By using this product, you hereby signify that
you have read this disclaimer carefully and that
you understand and agree to abide by the terms
and conditions herein. EXCEPT AS EXPRESSLY
PROVIDED IN RYZE TECH AFTER-SALES
SERVICE POLICIES AVAILABLE AT HTTP://
RYZEROBOTICS.COM/SERVICE, THE PRODUCT
AND ALL MATERIALS, AND CONTENT AVAILABLE
THROUGH THE PRODUCT ARE PROVIDED “AS
IS” AND ON AN “AS AVAILABLE” BASIS, WITHOUT
WARRANTY OR CONDITION OF ANY KIND, EITHER
EXPRESS OR IMPLIED. RYZE TECH DISCLAIMS
ALL WARRANTIES OF ANY KIND, EXCEPT AS
EXPRESSLY PROVIDED IN RYZE TECH AFTER-
SALES SERVICE POLICIES, WHETHER EXPRESS
OR IMPLIED, RELATING TO THE PRODUCT,
PRODUCT ACCESSORIES, AND ALL MATERIALS,
2
Page 4

INCLUDING: (A) ANY IMPLIED WARRANTY OF
MERCHANTABILITY, FITNESS FOR A PARTICULAR
PURPOSE, TITLE, QUIET ENJOYMENT, OR NONINFRINGEMENT; AND (B) ANY WARRANTY
ARISING OUT OF COURSE OF DEALING, USAGE,
OR TRADE. RYZE TECH DOES NOT WARRANT,
EXCEPT AS EXPRESSLY PROVIDED IN RYZE
TECH LIMITED WARRANTY, THAT THE PRODUCT,
PRODUCT ACCESSORIES, OR ANY PORTION
OF THE PRODUCT, OR ANY MATERIALS, WILL
BE UNINTERRUPTED, SECURE, OR FREE OF
ERRORS, VIRUSES, OR OTHER HARMFUL
COMPONENTS, AND DOES NOT WARRANT THAT
ANY OF THOSE ISSUES WILL BE CORRECTED.
NO ADVICE OR INFORMATION, WHETHER ORAL
OR WRITTEN, OBTAINED BY YOU FROM THE
PRODUCT, PRODUCT ACCESSORIES, OR ANY
MATERIALS WILL CREATE ANY WARRANTY
REGARDING RYZE TECH OR THE PRODUCT THAT
IS NOT EXPRESSLY STATED IN THESE TERMS.
YOU ASSUME ALL RISKS FOR ANY DAMAGE THAT
MAY RESULT FROM YOUR USE OF OR ACCESS
TO THE PRODUCT, PRODUCT ACCESSORIES,
AND ANY MATERIALS. YOU UNDERSTAND AND
AGREE THAT YOU USE THE PRODUCT AT YOUR
OWN DISCRETION AND RISK, AND THAT YOU
ARE SOLELY RESPONSIBLE FOR ANY PERSONAL
INJURY, DEATH, DAMAGE TO YOUR PROPERTY
(INCLUDING YOUR COMPUTER SYSTEM OR
MOBILE DEVICE OR RYZE TECH HARDWARE
USED IN CONNECTION WITH THE PRODUCT)
OR THIRD PARTY PROPERTY, OR THE LOSS OF
DATA THAT RESULTS FROM YOUR USE OF OR
INABILITY TO USE THE PRODUCT.
SOME JURISDICTIONS MAY PROHIBIT A
DISCLAIMER OF WARRANTIES AND YOU
MAY HAVE OTHER RIGHTS THAT VARY FROM
JURISDICTION TO JURISDICTION.
Ryze Tech accepts no liability for damage, injury or
any legal responsibility incurred directly or indirectly
from the use of this product. The user shall observe
safe and lawful practices including, but not limited to,
those set forth in these Safety Guidelines. You shall
be solely responsible for all your behaviors when
ying Tello.
Warnings
1. Stay away from rotating propellers and motors.
EN
3
Page 5

2. DO NOT touch the underside of the aircraft as it
may be hot.
3. Never use non-Ryze Tech batteries and DO NOT
short-circuit the Flight Battery.
4. Important information is included on the product
EN
package and in the documentation included in
the product package. Read all of this information
carefully and retain the product package and
documentation for future reference.
5. Always use an FCC/CE (depending on
location) certified USB adapter that is rated
at 5 V and 1.5 A or above.
6. Ensure the aircraft is powered o before charging.
It cannot be charged when it is powered on.
7. DO NOT charge a Flight Battery immediately after
ight, because its temperature may be too high.
DO NOT charge a Flight Battery until it cools
down to near room temperature.
8. Charge the Flight Battery in the temperature range
41° to 113° F (5° to 45° C). The ideal charging
temperature range is 72° to 82° F (22° to 28° C).
9. If a low battery warning appears, charge the
Flight Battery until the Flight Battery level reaches
between 30 and 60 % for long-time storage.
10. Discharge Flight Batteries to the range 40 to
65% if they will NOT be used for 10 days or
more. This can greatly extend battery life.
Regulations
To avoid serious injury and property damage,
observe the following rules:
1. DO NOT operate in the vicinity of manned aircraft,
regardless of altitude. (Land immediately if
necessary.)
2. DO NOT y the aircraft in or at densely populated
areas including cities, sporting events, exhibitions,
and performances.
3. DO NOT fly the aircraft above the relevant
maximum altitude set forth in your local laws and
regulations.
4. Remain well clear of and DO NOT interfere with
manned aircraft operations. Be aware of and
avoid other aircraft and obstacles at all times.
5. DO NOT y the aircraft near or inside no y zones
specified by local laws and regulations. The no
y zone list includes: airports, borders between
two sovereign countries or regions, and major
cities/regions, and is continuously updated. DO
NOT y around sensitive infrastructure or property
such as power stations, water treatment facilities,
4
Page 6

correctional facilities, heavily traveled roadways,
government facilities, or military zones.
6. Maintain visual line of sight with your aircraft at all
times and use an observer to assist if needed.
7. NEVER use the aircraft to carry illegal or
dangerous goods/payloads.
8. Make sure you understand the nature/type of your
ight operation (such as for recreation, for public
use, or for commercial use) and have obtained
corresponding approval and clearance from the
related government agencies before ight. Consult
with your local regulators for comprehensive
definitions and specific requirements. Users
operating their aircraft in the United States
should first visit http://www.knowbeforeyoufly.
org and take the most appropriate action for their
circumstances.
9. Please note that remote-controlled aircraft may
be banned from conducting commercial activities
in certain territories and regions. Check and follow
all local laws and regulations before flying as
those rules may dier from those stated here.
10. Respect the privacy of others when using the
camera. Make sure you comply with local
privacy laws, regulations, and moral standards.
DO NOT conduct surveillance operations such
as image capture or video recording on any
person, entity, event, performance, exhibition, or
property without authorization or where there is
an expectation of privacy, even if the image or
video is captured for personal use.
11. Please be advised that in certain areas, the
recording of images and videos from events,
performances, exhibitions, or commercial
properties by means of a camera may
contravene copyright or other legal rights, even
if the image or video is shot for personal use.
Flight Limit
1. Fly NO higher than 33 ft (10 m) above ground level
and stay away from any surrounding obstacles.
2. The Vision Positioning System is only effective
when the aircraft is at altitudes of 1.0 to 98.4 ft
(0.3 to 30 m) and works best at altitudes of 1.0 to
19.7 ft (0.3 to 6 m).
3. The performance of the Vision Positioning System
is aected by the surface being own over. The
aircraft automatically changes to Attitude mode
when the Vision Positioning System is unavailable.
In Attitude mode the aircraft is not able to position
EN
5
Page 7
itself. Operate the aircraft with great caution in the
following situations, which may cause the aircraft
to enter Attitude mode:
a. Flying at high speed below 2 ft (0.5 m).
b. Flying over monochrome surfaces (e.g. pure
EN
black, pure white, pure red, pure green).
c. Flying over highly reective surfaces.
d. Flying over water or transparent surfaces.
e. Flying over moving surfaces or objects.
f. Flying in an area where the lighting changes
frequently or drastically.
g. Flying over extremely dark (< 10 lux) or bright
(> 100,000 lux) surfaces or towards bright
sources of light (e.g. towards sunlight).
h. Flying over surfaces without clear patterns or
texture.
i. Flying over surfaces with identical repeating
patterns or textures (e.g. tiling).
j. Flying over small and fine objects (e.g. tree
branches or power lines).
k. Flying at speeds of over 11 mph (18 kph)
at 3.5 ft (1 m) or lower.
4. If the aircraft's Vision Positioning system fails for
3 seconds when its ying altitude is above 20 ft
(6 m), Failsafe Protection will automatically initiate
landing. If the Vision Positioning system recovers
during landing, Failsafe Protection will shut o and
the aircraft will hover.
5. The Vision Positioning System may not be able
to recognize patterns on the ground in very
dark (< 100 lux) environments. DO NOT take o
if there is a warning prompt in the Tello app telling
you that the environment is too dark.
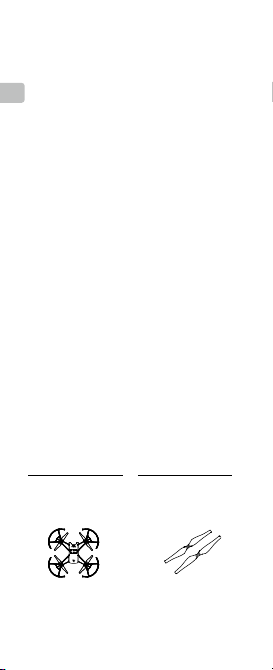
In the Box
Aircraft ×1
(Propellers and Propeller
Guards included*)
6
Spare Propeller ×2 (pair)
Page 8
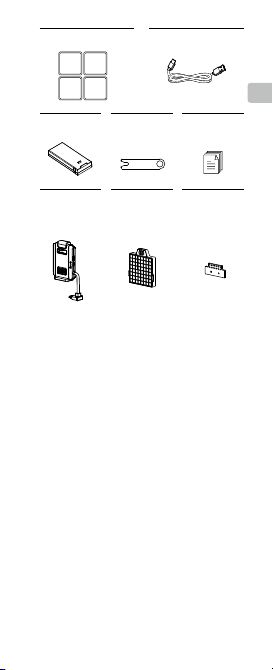
Mission Pad ×4 Micro USB Cable ×1
EN
Flight Battery ×1 Propeller Removal
Open-Source
Controller ×1
* The diagrams in this document are for reference only and
may dier from the actual product.
Tool ×1
Dot-Matrix
Display &
Distance Sensing
Module ×1
Quick Start
Guide × 1
Extension Board
×1
7
Page 9
1. Introduction
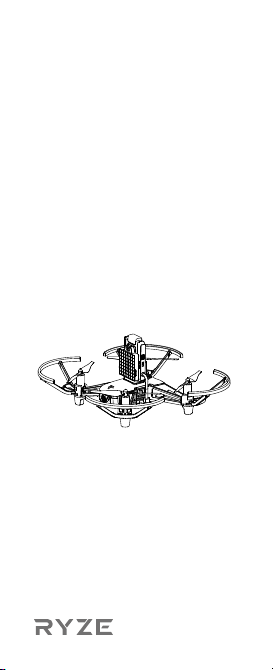
ROBOMASTERTM TT TELLOTM Talent includes
the aircraft and the Expansion Kit. Tello is a small
quadcopter that features a Vision Positioning System
EN
and an onboard camera. Using its Vision Positioning
System and advanced ight controller, it can hover
in place and is suitable for ying indoors. Advanced
features like Bounce mode, 8D Flips, and EZ Shots
make using Tello fun. Tello captures 5 megapixel
photos and streams 720p live video to the Tello
app on a mobile device. Its maximum ight time is
approximately 13 minutes*.
Experience DIY flight with an Expansion Kit that
includes an open-source controller, dot-matrix
display & distance-sensing module, and extension
board, which support programming with Arduino,
Scratch, MicroPython, and more.
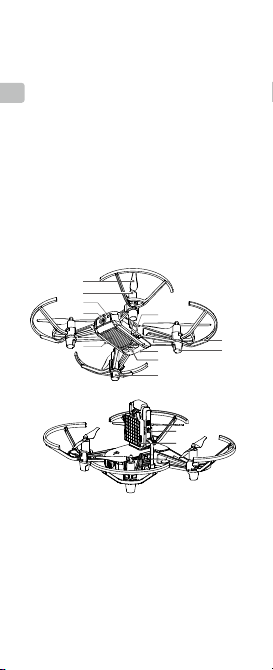
1
2
3
4
5
9
8
7
6
11
12
10
6
1. Propellers
2. Motors
3. Aircraft Status Indicator
4. Camera
5. Power Button
6. Antennas
7. Vision Positioning System
* The maximum ight time was tested in windless
conditions ying at a consistent 9 mph (15 kph) and
without the expansion kit mounted. This value should be
taken for reference only.
8
8. Flight Battery
9. Micro USB Port
10. Propeller Guards
11. Open-Source Controller
12. Dot-Matrix Display
& Distance Sensing
Module
Page 10
2. Downloading the Tello App and
Watching Tutorial Videos
Search for “Tello” on the App Store or Google Play
or scan the QR code to download the app on your
mobile device. To ensure flight safety, watch the
tutorial videos on the official Ryze Tech website
(http://www.ryzerobotics.com) before your rst ight.
Operating system compatibility: iOS v9.0 or later;
Android v4.4 or later.
Only use the Tello app for activation.
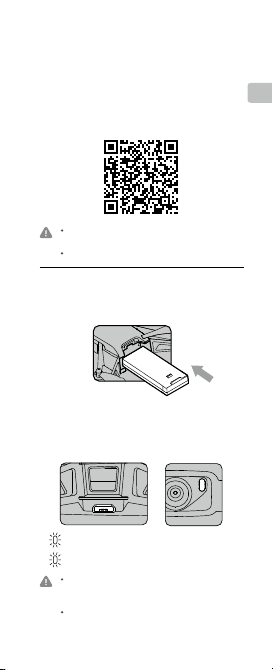
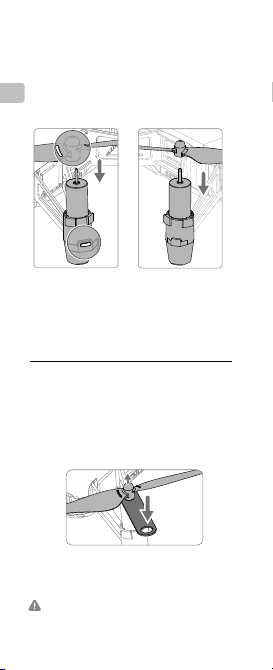
3. Charging the Battery
Insert the Flight Battery into the aircraft as shown.
To charge the Flight Battery connect the Micro USB
port on the aircraft to a USB adapter (not provided)
using a standard Micro USB cable.
Charging time: Approx. 1 hour and 30 minutes.
...
Blinking blue slowly: charging.
-
Solid blue: fully charged.
Always use an FCC/CE (depending on location)
certied USB adapter that is rated at 5 V and 1.5 A
or above.
Ensure the aircraft is powered o before charging.
It cannot be charged when it is turned on.
EN
9
Page 11
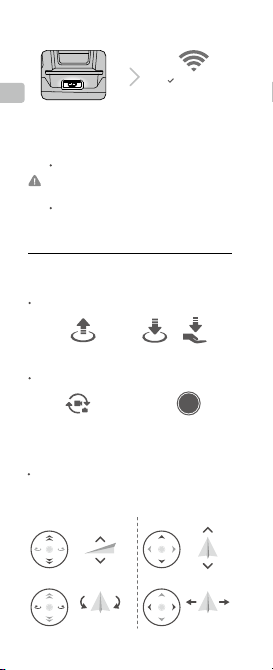
4.PreparingforTakeo
EN
Press the power button
once to turn the aircraft on.
(Press again to turn o)
With the open-source controller connected, the
Wi-Fi network is RMTT-XXXXXX. The Wi-Fi network
is Tello-XXXXXX without the open-source controller
connected.
Launch the Tello app. Connection has been
established when the Aircraft Status Indicator
blinks yellow slowly and the live camera view is
shown on your mobile device.
Tello-XXXXXX
RMTT-XXXXXX
Enable Wi-Fi on your
mobile device and
connect to the network.
5. Flight
In the Tello app:
Auto Takeo and Auto Landing
Auto Takeo Auto Landing
Taking Photos and Recording Videos
Tap to switch between
Photo mode and Video
mode.
Use the Virtual Joysticks in the app to control the
aircraft (the default control stick mode is known as
Mode 2)
Left Stick
Turn Left
10
Up
Down
Turn Right
Tap to take a photo or
record video.
Right Stick
Left
OR
Forward
Backward
Right
Page 12
6. Programming with Tello
The RoboMaster TT Tello Talent can be programmed
in several ways. Use the Tello EDU app for
programming when using a mobile device. Scan the
QR code to download the app on your mobile device
or search for “Tello EDU” on the App Store or Google
Play. Visit https://www.dji.com/robomaster-tt for more
information about using computer program software
to program the RoboMaster TT.
The Tello Edu app is compatible with iOS 10.0 (or
later) or Android 4.4 (or later).
Users should be condent ying a Tello before they
use the Tello Edu app to learn about programming.
Please note that the Tello app and Tello Edu app
cannot connect to the Tello simultaneously. Exit
one app before using the other.
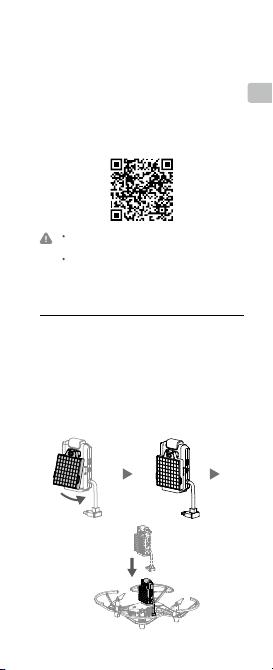
7. Using the Open-Source
Controller and Dot-Matrix Display
& Distance-Sensing Module
Attach the dot-matrix display & distance-sensing module
to the open-source controller and attach the open-
source controller to the aircraft. Program via the Tello
EDU app or computer program software for DIY ight.
EN
11
Page 13
Installation Notes
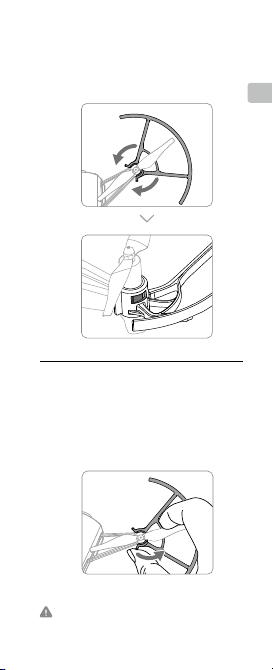
1. Installing the Propellers
When mounting, ensure that the gap between the
EN
bottom of the propeller cap and the motor is no
bigger than needed to insert the propeller removal
tool.
Mount marked
propellers on the
motors with marked
landing gear.
Mount unmarked
propellers on the
motors with unmarked
landing gear.
2. Detaching the Propellers
Insert the propeller removal tool between the
propeller cap and the motor. Be sure to hold the
motor while detaching the propeller.
Always detach the propellers using the propeller
removal tool. DO NOT remove the propellers by
hand, or you may be seriously hurt, and may
damage the motors.
12
Page 14
3. Installing the Propeller Guards
Push each propeller guard inwards to wrap it around
the landing gear. Make sure it clicks into position and
that the protruding parts of the landing gear securely
t into the notches on the propeller guards.
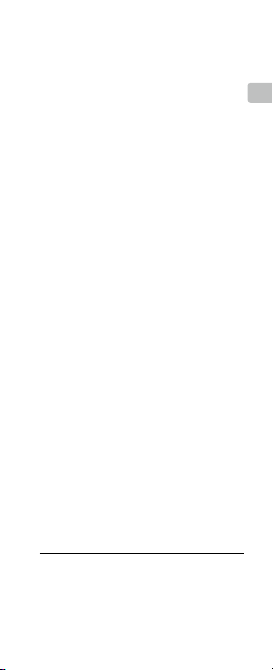
4. Detaching the Propeller Guards
To remove a propeller guard place your nger and
thumb as shown in the figure below. With your
thumb, gently apply a twisting force to the lip that
protrudes from the propeller guard where it wraps
around the landing gear.
DO NOT use excessive force when removing
propeller guards as doing so may damage the
aircraft’s arms and you may get hurt.
EN
13
Page 15

Specications
Aircraft
● Tello (Model: TLW004)
Weight (Propeller
EN
Guards Included)
Max Speed
Max Flight Time
Operating
Temperature
Operating Frequency 2.4 to 2.4835 GHz
Transmitter (EIRP)
Camera
●
Max Image Size 2592×1936
Video Recording
Modes
Video Format MP4
Flight Battery
●
Capacity 1100 mAh
Voltage 3.8 V
Battery Type
Energy 4.18 Wh
Net Weight 25±2 g
Charging
Temperature Range
Max Charging Power
Expansion Kit
Open-Source Controller
●
Model RMTTOC
Operating Mode
Wi-Fi
Bluetooth
MCU
Open-Source
Expansion
LED
14
87 g
17.8 mph (28.8 kph)
13 minutes (0 wind at a
consistent 9 mph
(15 kph))
32° to 104° F (0° to 40° C)
20 dBm (FCC)
<
19 dBm (CE)
<
19 dBm (SRRC)
<
HD: 1280×720 30p
LiPo
41° to 113° F
(5° to 45° C)
10 W
Direct Connection Mode,
Router Mode
2.4 GHz , 5.8 GHz
2.4 GHz
ESP32-D2WD, Dual-Core
Main Frequency:
160 MHz, Calculation
ability: 400 MIPS
Supports SDK, Arduino,
Scratch and MicroPython
14-pin expansion port
(I2C, UART, SPI, GPIO,
PWM, power source)
Full Color LED
Page 16
Dot-Matrix Display & Distance Sensing Module
●
Dot-Matrix LED
Dot-Matrix Driver
function
Distance Sensing
Module
Maximum Sensing
Distance of TOF
Extension Board
●
DIY Connection 14-pin extension port to
For more information, read the User Manual:
https://www.dji.com/robomaster-tt
This content is subject to change without prior notice.
TELLO is a trademark of Ryze Tech.
ROBOMASTER is a trademark of DJI.
Copyright © 2020 Ryze Tech. All Rights Reserved.
Red and blue LED 8×8
IIC data port, auto dot-
matrix scan, adjustable
256 global brightness,
adjustable single-pixel
red and blue LED 256
brightness
TOF
1.2 m (indoors with white
wall)
2×7 pin, 2.54mm dual
in-line package, two
reserved positions for
5V/3.3V power indicators,
two reserved positions for
test indicators
EN
15
Page 17

免责声明
本产品不适合未满14岁的人士单独使用。未满14岁
的人士需在成人陪同下使用本产品。
触本产品,在有儿童出现的场景操作时请务必特别
小心注意。
CHS
本产品是一款多旋翼飞行器,在电源正常工作及各
部件未损坏的情况下将提供轻松自如的飞行体验。
访问获取完整的《用户手册》和最新说明和警告。
深圳市睿炽科技有限公司(以下简称“睿炽科
技”)保留更新所有文档的权利。
请务必在使用产品之前仔细阅读本文档和《用户手
册》,了解您的合法权益、责任和安全说明;否
则,可能带来财产损失、安全事故和人身安全隐
患。一旦使用本产品,即视为您已理解、认可和接
受本文档全部条款和内容。使用者承诺对自己的行
为及因此而产生的所有后果负责。使用者承诺仅出
于正当目的使用本产品,并且同意本文档全部条款
和内容及睿炽科技可能制定的任何相关政策或者准
则。您了解并同意,在无 App 飞行记录的情况下,
睿炽科技可能无法分析您的产品损坏或事故原因,
并无法向您提供睿炽科技售后服务。
睿炽科技不承担因用户未按本文档、《用户手册》
使用产品所引发的一切损失。 在遵从法律法规的情
况下,睿炽科技享有对本文档的最终解释权。睿炽
科技有权在不事先通知的情况下,对本条款进行更
新,改版或终止。
警告
1. 请勿贴近高速旋转的螺旋桨,以免割伤。
2. 飞行器机身底部为发热部件,请勿触摸,以免
烫伤。
3. 为保证航空无线电台(站)电磁环境的要求,
禁止在以机场跑道中心点为圆心、半径5000 m
的区域内使用各类模型遥控器。在国家有关部
门发布无线电管制命令的期间、区域区,应按
要求停止使用模型遥控器。
4. 请仅使用标配电池。请勿使电池正负极短路。
5. 包装或说明书中含有重要信息,应保留。
6. 请使用符合FCC/CE合规的USB充电器,充电器
规格应为输出DC 5 V /1.5 A及以上。
7. 请在关机状态下连接USB充电器充电,开机状
态下无法充电。
8. 飞行结束后飞行电池温度较高,建议等待飞行
16
请勿让儿童接
Page 18

电池降至室温再进行充电。
9. 飞行电池可充电温度范围为5 ℃至40 ℃,理想
的充电环境温度(22 ℃至28 ℃)可大幅度延长
电池的使用寿命。
10. 如果飞行结束后电池严重低电量,需充电到
30%-60%存放。否则长时间存放可能导致电池
损坏。
11. 若超过10天不使用电池,请将电池放电至40%65%电量存放,以延长电池寿命。
法律规范
请遵守当地法律法规使用飞行器,避免可能的伤害
和损失。请务必遵守以下各项:
1. 切勿在载人飞行器附近飞行。必要时立即降
落。
2. 禁止在人口或建筑物密集地区使用飞行器。这
些地区包括但不限于:城市、体育比赛场馆、
展会、演唱会。
3. 确保飞行器飞行时不会对航线上的载人飞行器
造成影响。时刻保持警惕并躲避其他飞行器。
4. 禁止操控飞行器使之进入法律规定的禁飞区。
禁飞区包括:机场、边境线、发电站、水电
站、监狱、交通要道、政府大楼、军事设施以
及主要城市。
5. 禁止在超过限定高度的空域飞行。
6. 确保飞行器在您的视距范围内飞行,若有必要
可安排观察员帮助您监控飞行器位置。
7. 禁止使用飞行器搭载任何违法危险物品。
8. 确保您已清楚了解飞行活动的类别(例如娱
乐、公务或商务)。在飞行前务必获取相关部
门颁发的许可证。如有必要,可向当地法务工
作者咨询飞行活动类别的详细定义说明。请注
意,在某些地区与国家禁止使用飞行器进行任
何形式的商业行为。
9. 使用飞行器进行拍摄时务必尊重他人隐私权。
禁止使用本产品进行任何未经授权的监视活
动,这些活动包括但不仅限于对他人、团体、
活动、表演、展会或楼宇进行监视。
10. 请注意,在某些地区与国家,尽管不是出于商
业目的,但是使用相机对他人、团体、活动、
表演、展会等进行录像或者拍照也将侵犯版
权、隐私权或者他人的其他合法权益。在某些
地区与国家,小型航拍模型亦被禁止参与任何
CHS
17
Page 19

商业行为。因此,使用之前请仔细了解并遵循
当地法律法规。
飞行限制
用户知悉并同意其应对使用飞行器产生的一切后果
CHS
负责。
1. 保持飞行高度在 10 m以下,飞行时飞行器应远
离任何高大建筑物。
2.视觉定位系统适用高度为0.3-30 m,适合在室内
以及在室外无风环境飞行。
3. 视觉定位系统容易受光照强度、物体表面纹理情
况所影响,在视觉定位系统失效时飞行器会自动
切换到姿态模式。所以以下场景,需谨慎使用:
a. 低空(0.5 m以下)快速飞行时,视觉定位系
统可能会无法定位。
b. 纯色表面(例如纯黑、纯白、纯红、纯绿)。
c. 有强烈反光或者倒影的表面。
d. 水面或者透明物体表面。
e. 运动物体表面(例如人流上方、大风吹动的灌
木或者草丛上方)。
f. 光照剧烈快速变化的场景。
g. 特别暗(光照小于300 lux)或者特别亮(光照
大于10,000 lux)的物体表面。
h. 纹理特别稀疏的表面。
i. 纹理重复度很高的物体表面(例如颜色相同的
小格子砖)。
j. 细小的障碍物。
k. 飞行器速度不宜过快,如离地1 m处时飞行速
度不可超过5 m/ s。
4. 当飞行器飞行高度大于6 m时,若视觉定位系统
失效超过3秒,飞行器会触发失控保护并开始降
落。降落过程中若视觉定位系统恢复则飞行器会
在当前位置保持悬停。
5. 如果Tello App提示视觉定位系统在当前环境无法
正常工作(如光线太暗),请勿起飞。
18
Page 20

物品清单
飞行器 ×1
(含桨、桨叶保护罩*)
挑战卡 ×4 Micro USB 线 ×1
备用螺旋桨(对)×2
CHS
电池 ×1
开源控制器×1
*桨叶保护罩结构请以实物为准。
拆桨工具 ×1
测距点阵屏拓展
模块 ×1
文档 ×1
转接拓展板 ×1
19
Page 21

1. 简 介
ROBOMASTER
展配件两部分组成。飞行器配备视觉定位系统,并
集成飞控系统,能稳定悬停、飞行。通过Tello App
在移动设备上可显示高清画面,并可实现拍照、录
CHS
影、弹跳、全向翻滚以及一键飞行等功能。Tello相
机可拍摄500万像素照片与720p高清视频。最长飞
行时间约为13分钟*。
拓展配件包含开源控制器、测距点阵屏拓展模块
和转接拓展板,支持通过Arduino、Scratch和
MicroPython等编程语言进行编程,实现DIY创意
智能飞行。
1. 螺旋桨
2. 电机
3. 状态指示灯
4. 相机
5. 电源按键
6. 天线
7. 视觉定位系统
8. 飞行电池
9. Micro USB 接口
10. 桨叶保护罩
11. 开源控制器
12. 测距点阵屏拓展模块
* 最长飞行时间为无风环境时以15 km/h匀速飞行时,并且
20
TM
TT TELLOTM Talent由飞行器和拓
1
2
3
4
5
未安装拓展配件时测得。
9
8
7
6
11
12
10
6
Page 22

2. 下载 Tello App 和观看教学视频
请使用移动设备在软件商店下载 Tello App。请在官
方网站观看教学视频。
Tello App 要求使用 iOS 9.0 及以上系统或 Android
4.4 及以上系统。
仅Tello App可以用于产品激活。
3. 充电
按图示方向,安装飞行电池
使用标准 Micro USB 线,连接 Micro USB 接口与自
备 USB 充电器给 Tello 充电。
充电时间约为1.5小时。
飞行器状态指示灯
...
蓝灯慢闪,正在充电
-
蓝灯常亮,电已充满
请使用符合 FCC/CE 合规的 USB 充电器,充电器
规格应为输出DC 5V /1.5A 及以上。
请在关机状态下连接充电器充电,开机状态下无法
充电。
21
CHS
Page 23

4. 准备飞行
CHS
按一下电源按键,
开启/关闭飞行器
未连接开源控制器时,Wi-Fi 为Tello-XXXXXX,连接
开源控制器时,Wi-Fi 为 RMTT-XXXXXX。
运行 Tello App,当飞行器状态指示灯显示黄灯慢
闪、App 出现预览画面表示连接成功。
Tello-XXXXXX
或
RMTT-XXXXXX
移动设备连接 Wi-Fi
5. 飞行
Tello App 界面:
起飞/降落
自动起飞 自动降落
拍照/录影
切换拍照或录影模式
使用虚拟摇杆控制飞行(默认操控方式为美国手)
左摇杆 右摇杆
上升
下降
22
拍照或录影
右转左转
前
后
右左
Page 24

6. 编程
RoboMaster TT可以支持多种编程方式。移动端可以
使用Tello Edu App进行编程,请扫描二维码下载。
PC端编程工具或平台请参见官网信息。
Tello Edu App 要求使用 iOS 10.0 及以上系统或
Android 4.4 及以上系统。
建议使用 Tello App 熟悉飞行器操作后再使用 Tello
Edu App 进行学习。Tello App与Tello Edu App 不
可同时连接至Tello,例如使用 Tello Edu App,请
先退出 Tello App。
7. 使用开源控制器和测距点阵屏拓展
模块
安装开源控制器和测距点阵屏拓展模块至飞行器,
通过Tello Edu App或PC端编程环境编程,实现DIY
创意飞行。
CHS
23
Page 25

安装注意事项
1. 安装螺旋桨
安装时请用力向下压,确保桨帽底部与电机之间的
缝隙仅够插入拆桨工具。
CHS
带凸起标记
装于脚架
电机上
的螺旋桨安
带凸起标记
不带标记
的螺旋桨安
装于脚架
的电机上
无凸起标记
的
2. 拆卸螺旋桨
将拆桨工具插入桨帽底部与电机之间的缝隙,按住
电机往上撬起螺旋桨并取下。
务必使用拆桨工具拆卸螺旋桨。请勿用手直接
拆下,否则将损坏电机或割伤手指。
24
Page 26

3. 安装桨叶保护罩
将桨叶保护罩安装位置两侧向内按压,安装过程中
会听到“咔”的一声。确保桨叶保护罩的凹槽将电
机下方的脚架凸起处牢牢卡住。
4. 拆卸桨叶保护罩
请用手固定桨叶保护罩的同时将桨叶保护罩安装位
置向外掰开,然后移除桨叶保护罩。
拆卸桨叶保护罩时请格外小心,请勿使用暴力。
否则可能损坏机臂或割伤手指。
CHS
25
Page 27

技术规格
飞行器模块
●
Tello
遥控无人机 (型号TLW004)
起飞重量 (含桨保护罩) 87 g
最大水平飞行速度 28.8 km/h
最长飞行时间 13分钟 (无风环境,以 15
CHS
工作环境温度 0 ℃ 至 40 ℃
工作频率 2.4-2.4835 GHz
等效全向辐射功率 (EIRP) <20 dBm (FCC)
●
相 机
照片最大分辨率 2592×1936
录像分辨率 HD:1280×720 30p
视频格式 MP4
●
飞行电池
容 量 1100 mAh
电 压 3.8 V
电池类型 LiPo
能 量 4.18 Wh
电池整体重量 25±2 g
充电环境温度 5 ℃ 至 45 ℃
最大充电功率 10 W
拓展配件
●
开源控制器
型号 RMTTOC
工作模式 直连模式,路由器模式
Wi-Fi频段 2.4 GHz,5.8 GHz
蓝牙 2.4 GHz
MCU ESP32-D2WD ,双核主
开源性 支持SDK开发,支持
扩展性
LED灯 全彩LED
●
测距点阵屏拓展模块
点阵LED 红蓝双色 8×8
点阵驱动功能 IIC数据接口、自动矩阵扫
测距模块 红外深度传感器(TOF)
TOF最大测量距离 1.2 m(室内白墙)
26
km/h匀速飞行时测得)
<19 dBm (CE)
<19 dBm (SRRC)
频 160 MHZ,运算能力
400 MIPS
Arduino,Scratch,
MicroPython编程控制
14 pin 扩展口(I2C,
UART,SPI,GPIO,
PWM,电源)
描、全局亮度256级可
调、单像素红蓝LED亮度
256级独立可调、自动呼
吸灯功能
Page 28

●
转接拓展板
DIY转接 14 pin扩展口转2×7 pin
了解产品详细信息,请访问以下网址下载《用户手册》
https://www.dji.com/cn/robomaster-tt
※
内容如有更新,恕不另行通知。
TELLO 是睿炽科技的商标。
ROBOMASTER是大疆创新的商标
Copyright © 2020 睿炽科技 版权所有
2.54 mm间距直插封装、
5 V/3.3 V电源指示灯预留
位置×2、调试用指示灯
预留位置×2
。
CHS
27
Page 29

免責聲明
本産品不適合未滿 14 歲的人士單獨使用。未滿 14
歲的人士需在成人陪同下使用本産品。
碰觸本產品;有兒童在場時,請務必特別小心注
意。
本產品是一款多旋翼航拍機,在電源正常運作且各
零組件未損壞的情況下,可提供安全可靠的飛行體
CHT
驗。前往取得完整的《使用者手冊》及最新說明和
警告。深圳市睿熾科技有限公司 (以下簡稱「睿熾科
技」) 保留更新所有文件的權利。
使用產品之前,請務必仔細閱讀本文件和《使用者
手冊》,了解您的法律權益、責任和安全說明;否
則,可能導致財產損失、安全事故和人身安全隱
憂。一旦使用本產品,即視為您已理解、認可並接
受本文件全部條款和內容。使用者承諾對自己的行
為及因此而產生的所有後果負責。使用者承諾僅基
於正當目的使用本產品,並且同意本文件全部條款
和內容及睿熾科技可能制定的任何相關政策或準
則。您了解並同意,在無應用程式飛行記錄的情況
下,睿熾科技可能無法分析您的產品損壞或事故原
因,並無法向您提供睿熾科技售後服務。
睿熾科技不承擔因使用者未按本文件、《使用者手
冊》使用產品所引發的一切損失。在遵循法律法規
的情況下,睿熾科技擁有對本文件的最終解釋權。
睿熾科技有權在不事先通知的情況下,對本條款進
行更新、改版或終止。
警告
1. 請勿靠近高速旋轉的螺旋槳,以免割傷。
2. 航拍機機身底部為發熱零組件,請勿觸摸,以免
燙傷。
3. 為保證航空無線電台( 站) 電磁環境的要求,禁止
在以機場跑道中心點為圓心、半徑 5000 m 的區
域內使用各類模型遙控器。在國家相關部門發佈
無線電管制命令的期間、區域區,應按要求停止
使用模型遙控器。
4. 請僅使用標準配置電池。請勿使電池正負極短
路。
5. 包裝或說明書中含有重要資訊,應予以保留。
6.請使用符合FCC/CE法規的USB充電器,充電
器規格應為輸出DC5V/1.5A以上。
7.請在關機狀態下連接 USB充電器充電,開機狀
態下無法充電。
8.飛行結束後飛行電池溫度較高,建議等飛行電池
降至室溫後再進行充電。
28
請勿讓兒童
Page 30

9.飛行電池可充電溫度範圍為5℃ 至40℃,在理
想的充電環境溫度(22℃ -28℃)下充電,可大
幅延長電池的使用壽命。
10.如果飛行結束後,電池提示嚴重低電量,需充
電到30% -60% 存放。否則長時間存放可能
導致電池損壞。
11.若超過 10天不使用電池,請將電池放電至
40%- 65%電量再存放,這樣可延長電池使
用壽命。
法律規範
請遵守當地法律規定使用航拍機,避免可能的傷害
和損失。請務必遵守以下各項規定:
1. 請勿在飛機附近操作航拍機。必要時立即降落。
2. 禁止在人口或建築物密集地區使用航拍機。這
些地區包括但不限於:市區、運動賽事、展
覽、演唱會。
3. 確定航拍機在飛行時,不會對航線上的飛機造
成影響。隨時保持警覺並避開其他航拍機。
4. 禁止讓航拍機飛入法律規定的禁航區。禁航區
包括:機場、邊境線、發電站、水電站、監
獄、交通要道、政府大樓、軍事設施以及主要
城市。
5. 對於設有高度限制的空域,飛行禁止超過高度
限制。
6. 確保航拍機在您的視線範圍內飛行,如有必
要,可安排觀察員幫助您監控航拍機位置。
7. 禁止使用航拍機搭載任何違法危險物品。
8. 確定您已清楚了解飛行活動的類別 (例如娛樂、
公務或商業用途)。在飛行前務必取得主管機關
頒發的許可證。如有必要,可向當地主管機關
諮詢飛行活動類別的詳細定義說明。請注意,
在某些地區與國家禁止使用航拍機進行任何形
式的商業行為。
9. 使用航拍機進行拍攝時,務必尊重他人隱私
權。禁止使用本產品進行任何未經授權的監視
活動,這些活動包括但不僅限於對他人、團
體、活動、表演、展覽與不動產進行監視。
10. 請注意,在某些地區與國家,儘管不是出於商
業目的,但是使用相機對他人、團體、活動、
表演、展覽等進行錄影或拍照,也會侵犯版
權、隱私權或他人的其他合法權益。在某些國
家/地區,亦禁止小型航拍模型參與任何商業行
為。因此,使用之前請仔細了解並遵循當地法
律規定。
CHT
29
Page 31

飛行限制
使用者知悉並同意其應對使用航拍機產生的一切後
果負責。
1. 將飛行高度控制在 10 公尺以下,飛行時航拍機
應遠離任何高大建築物。
2.視覺定位系統適用高度為 0.3-30公尺,適合在
室內以及在室外無風環境飛行。
CHT
3.視覺定位系統容易受光照強度、物體表面紋理情
況所影響,在視覺定位系統失效時,航拍機會自
動切換到姿態模式。因此在以下場景時,需謹慎
使用:
a.低空(0.5公尺以下)快速飛行時,視覺定位系
統可能會無法定位。
b.純色表面(例如純黑、純白、純紅、純綠)。
c.有強烈反光或倒影的表面。
d.水面或者透明物體表面。
e.運動物體表面( 例如人流上方、大風吹動的灌
木或者草叢上方)。
f. 光照劇烈快速變化的情況。
g.特別暗( 光照小於300 lux) 或特別亮( 光照
大於10,000lux)的物體表面。
h.紋理特別稀疏的表面。
i. 紋理重複度很高的物體表面(例如顏色相同的
小格子磚)。
j. 細小的障礙物。
k.航拍機速度不宜過快,如離地1公尺時飛行速
度不可超過5m/s。
4.當航拍機飛行高度大於6 m時,若視覺定位系統
失效超過3秒,航拍機會觸發失控保護並開始降
落。降落過程中若視覺定位系統恢復則航拍機會
在當前位置保持懸停。
5.如果 Tello應用程式提示視覺定位系統在目前環
境無法正常運作(如光線太暗),請勿起飛。
物品清單
航拍機 × 1
(含槳、槳葉保護罩*)
備用螺旋槳 (對) × 2
30
Page 32

挑戰卡 ×4 Micro USB 傳輸線×1
開源控制器 ×1測距點陣螢幕拓
*槳葉保護罩結構請以實物為準。
展模組
×1
文件 × 1電池 × 1 拆槳工具 × 1
轉接拓展板
CHT
×1
31
Page 33

1. 簡 介
ROBOMASTER
展配件兩部分組成。航拍機配備視覺定位系統,並
結合飛行控制系統,能穩定懸停、飛行。透過 Tello
應用程式可在行動裝置上顯示高畫質畫面,並可進
行拍照、錄影、彈跳、全向翻滾以及一鍵飛行。
Tello 相機可拍攝 500 萬像素照片與 720p 高畫質影
CHT
片。最長飛行時間約為 13 分鐘*。
拓展配件包含開源控制器、測距點陣螢幕拓展模組
和轉接拓展板,支援透過Arduino、Scratch和
Micro Python等編程語言進行編程,實現DIY創意
智能飛行。
1. 螺旋槳
2. 馬達
3. 狀態指示燈
4. 相機
5. 電源按鈕
6. 天線
7. 視覺定位系統
8. 飛行電池
9. Micro USB 連接埠
10. 槳葉保護罩
11. 開源控制器
12. 測距點陣螢幕拓展模組
* 最長飛行時間為無風環境時以 15 km/h 均速飛行時,並
32
TM
TT TELLOTM Talent由航拍機和拓
1
2
3
4
5
且未拓展配件時測得。
9
8
7
6
11
12
10
6
Page 34

2. 下載 Tello 應用程式並觀看教學影片
請使用行動裝置在軟體商店下載 Tello 應用程式。請
在官方網站觀看教學影片。
Tello 應用程式要求使用 iOS 9.0 及以上系統或
Android 4.4 及以上系統。
僅 Tello 應用程式可以用於產品啟動。
3. 充電
按圖示方向,安裝飛行電池
使用標準 Micro USB 傳輸線,連接 Micro USB 連接
埠與自備 USB 充電器為 Tello 充電。
充電時間約為 1.5 小時。
航拍機狀態指示燈
...
藍燈緩慢閃爍,正在充電
-
藍燈恆亮,已充飽電
請使用符合 FCC/CE 法規的 USB 充電器,充電器
規格應為輸出 DC 5V /1.5A 及以上。
請在關機狀態下連接充電器充電,開機狀態下無法
充電。
CHT
33
Page 35

4. 準備飛行
CHT
按住電源按鈕,
開啟/關閉航拍機
未連接開源控制器時,Wi-Fi 為 Tello-XXXXXX,連
接開源控制器時,Wi-Fi 為 RMTT-XXXXXX。
執行 Tello 應用程式,當航拍機狀態指示燈顯示黃
燈緩慢閃爍,且應用程式出現預覽畫面,則表示連
接成功。
5. 飛行
Tello 應用程式介面:
起飛/降落
自動起飛 自動降落
拍照/錄影
Tello-XXXXXX
或
RMTT-XXXXXX
行動裝置連接 Wi-Fi
切換拍照或錄影模式
使用虛擬搖桿控制飛行(預設操控方式為美國手)
左搖桿 右搖桿
上升
下降
34
拍照或錄影
前
後
右轉左轉
右左
Page 36

6. 編程學習
RoboMaster TT 可以支援多種編程方式。移動端可
以使用 Tello Edu 應用程式進行編程,請掃描 QR 碼
下載。PC 端編程工具或平台請參見官網資訊。
Tello Edu 應用程式要求使用 iOS 10.0 及以上系統
或 Android 4.4 及以上系統。
建議先使用 Tello 應用程式熟悉航拍機操作,然後
再使用 Tello Edu 應用程式進行學習。Tello 應用程
式與 Tello Edu 應用程式不可同時連接至 Tello,例
如在使用 Tello Edu 應用程式時,請先退出 Tello 應
用程式。
7. 使用開源控制器和測距點陣螢幕拓
展模組
安裝開源控制器和測距點陣螢幕拓展模組至航拍
機,透過 Tello Edu 應用程式或 PC 端編程環境編
程,實現 DIY 創意飛行。
CHT
35
Page 37

安裝注意事項
1. 安裝螺旋槳
安裝時請用力向下壓,確保槳帽底部與馬達之間的
縫隙僅夠插入拆槳工具。
CHT
帶凸起標記
裝於腳架
馬達上
的螺旋槳安
帶凸起標記
不帶標記
的螺旋槳安
裝於腳架
的馬達上
無凸起標記
的
2. 拆卸螺旋槳
將拆槳工具插入槳帽底部與馬達之間的縫隙,按住
馬達往上撬起螺旋槳並取下。
務必使用拆槳工具拆卸螺旋槳。請勿用手直接
拆下,否則將損壞馬達或割傷手指。
36
Page 38

3. 安裝槳葉保護罩
將槳葉保護罩安裝位置兩側向內按壓,安裝過程中
會聽到「卡」一聲。確保槳葉保護罩的凹槽將馬達
下方的腳架凸起處牢牢卡住。
4. 拆卸槳葉保護罩
請用手固定槳葉保護罩,並同時將槳葉保護罩安裝
位置向外掰開,然後移除槳葉保護罩。
拆卸槳葉保護罩時請格外小心,請勿使用暴力。
否則可能損壞機臂或割傷手指。
技術規格
航拍機
●
Tello
遙控無人機 (型號
起飛重量 (含槳保護罩) 87 g
TLW004
)
CHT
37
Page 39

最大水平飛行速度 28.8 km/h
最長飛行時間 13 分鐘 (無風環境下,以 15 km/h
操作環境溫度 0 ℃ 至 40 ℃
操作頻率 2.4-2.4835 GHz
等效全向輻射功率
(EIRP)
●
相 機
照片最大解像度 2592×1936
CHT
錄影解像度 HD:1280×720 30p
影片格式 MP4
●
飛行電池
容 量 1100 mAh
電 壓 3.8 V
電池類型 LiPo
能 量 4.18 Wh
電池整體重量 25±2 g
充電環境溫度 5 ℃ 至 45 ℃
最大充電功率 10 W
拓展配件
●
開源控制器
型號 RMTTOC
運作模式 直連模式,路由器模式
Wi-Fi 頻段 2.4 GHz,5.8 GHz
藍牙 2.4 GHz
MCU ESP32-D2WD ,雙核心主頻
開源性 支援 SDK 開發,支援 Arduino,
擴展性 14 pin 擴展口(I2C,UART,
LED 燈 全彩 LED
●
測距點陣螢幕拓展模組
點陣 LED 紅藍雙色 8×8
點陣驅動功能 IIC 資料連接埠、自動矩陣掃描、
測距模組 紅外線深度感應器(TOF)
TOF 最大測量距離 1.2 m(室内白牆)
●
轉接拓展板
DIY 轉接 14 pin 拓展口轉 2×7 pin 2.54
若要了解產品詳細資訊,請造訪以下網址下載《使用者手冊》
https://www.dji.com/robomaster-tt
※
內容如有更新,恕不另行通知。
TELLO是睿熾科技的商標。
ROBOMASTER是大疆創新的商標。
Copyright©2020睿熾科技版權所有
38
等速飛行時測得)
<20 dBm (FCC),<19 dBm (CE)
<19 dBm (SRRC)
160 MHZ,運算能力 400 MIPS
Scratch,MicroPython 編程控制
SPI,GPIO,PWM,電源)
全局亮度 256 級可調整、單像素
紅藍 LED 亮度 256 級獨立可調、
自動呼吸燈功能
mm 間距直插封裝、5 V/3.3 V 電
源指示燈預留位置×2、調試用指
示燈預留位置×2
Page 40

Отказотответственности
Не рекомендуется использование данного
продукта детьми младше 14 лет без присмотра
взрослых. Обратите внимание, что рекомендуемый
возраст в Японии — 15 лет. Дрон должен храниться
в местах, недоступных для детей. В присутствии детей
полеты следует выполнять с особой осторожностью.
Данный продукт использует различные передовые
технологии управления. Однако ненадлежащее
использование продукта может привести к травмам
или повреждению имущества. Перед использованием
ознакомьтесь с материалами, относящимися к работе
продукта. Эти документы содержатся в комплекте
поставки продукта, а также доступны на официальном
сайте Ryze Tech (http://www.ryzerobotics.com).
Данный продукт представляет собой летающую
камеру. Аппарат легко использовать, если он
находится в хорошем рабочем состоянии (описано
ниже). Посетите сайт http://www.ryzerobotics.com для
ознакомления с самыми свежими инструкциями и
предупреждениями. Пользователи в США должны
посетить сайт http://knowbeforeyouy.org для получения
дополнительной информации о безопасности полетов
и соответствии требованиям.
Информация, содержащаяся в этом документе,
затрагивает вашу безопасность, законные права и
обязанности. Внимательно ознакомьтесь с данным
документом перед использованием продукта.
Пренебрежение содержимым данного документа и
несоблюдение мер безопасности может привести к
серьезным травмам, утере или повреждению продукта
Ryze Tech и другого имущества.
Используя данный продукт, вы подтверждаете, что
внимательно ознакомились с заявлением об отказе от
ответственности и соглашаетесь выполнять правила
и условия настоящего документа. КРОМЕ ЯВНЫМ
ОБРАЗОМ ПРЕДУСМОТРЕННОГО В ПРАВИЛАХ
ПОСЛЕПРОДАЖНОГО ОБСЛУЖИВАНИЯ RYZE TECH
(HTTP://RYZEROBOTICS.COM/SERVICE), ПРОДУКТ И
ВСЕ ДОСТУПНЫЕ МАТЕРИАЛЫ ПРЕДОСТАВЛЕНЫ
«КАК ЕСТЬ» И «В СУЩЕСТВУЮЩЕМ СОСТОЯНИИ»
БЕЗ КАКИХ-ЛИБО ГАРАНТИЙ ИЛИ УСЛОВИЙ,
ЯВНО ВЫРАЖЕННЫХ ИЛИ ПОДРАЗУМЕВАЕМЫХ.
ЗА ИСКЛЮЧЕНИЕМ ГАРАНТИЙ, ЯВНЫМ
ОБРАЗОМ ПРЕДУСМОТРЕННЫХ В ПРАВИЛАХ
ПОСЛЕПРОДАЖНОГО ОБСЛУЖИВАНИЯ RYZE
TECH, КОМПАНИЯ RYZE TECH НЕ ПРЕДОСТАВЛЯЕТ
НИКАКИХ ДРУГИХ ГАРАНТИЙ, ЯВНО ВЫРАЖЕННЫХ
ИЛИ ПОДРАЗУМЕВАЕМЫХ, ОТНОСЯЩИХСЯ К
ПРОДУКТУ, АКСЕССУАРАМ ПРОДУКТА И ВСЕМ
МАТЕРИАЛАМ, ВКЛЮЧАЯ СЛЕДУЮЩЕЕ: (A) ЛЮБАЯ
ПОДРАЗУМЕВАЕМАЯ ГАРАНТИЯ ОТНОСИТЕЛЬНО
КОММЕРЧЕСКОЙ ПРИГОДНОСТИ, СООТВЕТСТВИЯ
НАЗНАЧЕНИЮ, НАЗВАНИЯ, БЕСПРЕПЯТСТВЕННОГО
ПОЛЬЗОВАНИЯ, ОТСУТСТВИЯ НАРУШЕНИЙ
ПРАВ ИНТЕЛЛЕКТУАЛЬНОЙ СОБСТВЕННОСТИ;
И (Б) ЛЮБАЯ ГАРАНТИЯ, ВОЗНИКАЮЩАЯ В
RU
39
Page 41

РЕЗУЛЬТАТЕ ЭКСПЛУАТАЦИИ, ДЕЛОВЫХ ОПЕРАЦИЙ
ИЛИ КОММЕРЧЕСКОГО ИСПОЛЬЗОВАНИЯ. ЗА
ИСКЛЮЧЕНИЕМ ГАРАНТИЙ, ЯВНЫМ ОБРАЗОМ
ПРЕДУСМОТРЕННЫХ В ОГРАНИЧЕННОЙ
ГАРАНТИИ RYZE TECH, КОМПАНИЯ RYZE TECH НЕ
ПРЕДОСТАВЛЯЕТ НИКАКИХ ДРУГИХ ГАРАНТИЙ,
ЧТО ПРОДУКТ, АКСЕССУАРЫ ПРОДУКТА, ЛЮБАЯ
ЧАСТЬ ПРОДУКТА ИЛИ ЛЮБЫЕ МАТЕРИАЛЫ БУДУТ
ПОСТОЯННО И БЕЗОПАСНО РАБОТАТЬ, НЕ БУДУТ
СОДЕРЖАТЬ НЕИСПРАВНОСТЕЙ, ВИРУСОВ ИЛИ
ДРУГИХ ВРЕДНЫХ КОМПОНЕНТОВ, А ТАКЖЕ НЕ
ПРЕДОСТАВЛЯЕТ ГАРАНТИЙ ТОГО, ЧТО ЛЮБАЯ ИЗ
RU
ЭТИХ ПРОБЛЕМ БУДЕТ ИСПРАВЛЕНА.
НИКАКИЕ РЕКОМЕНДАЦИИ И ИНФОРМАЦИЯ,
В УСТНОЙ ИЛИ ПИСЬМЕННОЙ ФОРМЕ,
ПОЛУЧЕННЫЕ ВАМИ ПРИ ИСПОЛЬЗОВАНИИ
ПРОДУКТА, АКСЕССУАРОВ ПРОДУКТА ИЛИ ЛЮБЫХ
МАТЕРИАЛОВ, НЕ ЯВЛЯЮТСЯ ОСНОВАНИЕМ
ПРЕДОСТАВЛЕНИЯ ГАРАНТИИ, ОТНОСЯЩЕЙСЯ К
RYZE TECH ИЛИ ПРОДУКТУ, ЗА ИСКЛЮЧЕНИЕМ
ГАРАНТИЙ, ЯВНЫМ ОБРАЗОМ ПРЕДУСМОТРЕННЫХ
В ЭТИХ УСЛОВИЯХ. ВЫ ПРИНИМАЕТЕ НА СЕБЯ ВСЮ
ОТВЕТСТВЕННОСТЬ ЗА ЛЮБЫЕ ПОВРЕЖДЕНИЯ,
КОТОРЫЕ МОГУТ ВОЗНИКНУТЬ В РЕЗУЛЬТАТЕ
ИСПОЛЬЗОВАНИЯ ПРОДУКТА, АКСЕССУАРОВ
ПРОДУКТА ИЛИ ЛЮБЫХ МАТЕРИАЛОВ ИЛИ
ВАШЕГО ДОСТУПА К НИМ. ВЫ ПОНИМАЕТЕ И
СОГЛАШАЕТЕСЬ, ЧТО ИСПОЛЬЗУЕТЕ ПРОДУКТ
ПО ВАШЕМУ СОБСТВЕННОМУ УСМОТРЕНИЮ
И НА ВАШ РИСК И ЧТО ВЫ САМОСТОЯТЕЛЬНО
НЕСЕТЕ ОТВЕТСТВЕННОСТЬ ЗА ЛЮБЫЕ ТРАВМЫ,
СМЕРТЬ, УЩЕРБ ВАШЕМУ ИМУЩЕСТВУ (ВКЛЮЧАЯ
КОМПЬЮТЕРНУЮ СИСТЕМУ, МОБИЛЬНОЕ
УСТРОЙСТВО ИЛИ АППАРАТНОЕ ОБЕСПЕЧЕНИЕ
RYZE TECH, ПОДКЛЮЧАЕМЫЕ К ПРОДУКТУ) ИЛИ
ИМУЩЕСТВУ ТРЕТЬИХ ЛИЦ, И ЗА ПОТЕРЮ ДАННЫХ,
ПРОИЗОШЕДШИЕ В РЕЗУЛЬТАТЕ ИСПОЛЬЗОВАНИЯ
ВАМИ ИЛИ НЕВОЗМОЖНОСТИ ИСПОЛЬЗОВАНИЯ
ВАМИ ПРОДУКТА.
НЕКОТОРЫЕ ЮРИСДИКЦИИ МОГУТ ИСКЛЮЧАТЬ
ОТКАЗ ОТ ОТВЕТСТВЕННОСТИ, И ВЫ МОЖЕТЕ
ИМЕТЬ ДРУГИЕ ПРАВА, В ЗАВИСИМОСТИ ОТ
КОНКРЕТНОЙ ЮРИСДИКЦИИ.
Ryze Tech не несет ответственность за повреждения,
травмы или любую юридическую ответственность,
прямо или косвенно вызванную использованием
данного продукта. На пользователя возлагается
обязанность соблюдать правила техники безопасности
и законодательство, включая, но не ограничиваясь
изложенными в настоящем руководстве по технике
безопасности. Вы несете единоличную ответственность
за все действия при управлении полетом дрона Tello.
Предупреждения
1. Не приближайтесь к вращающимся пропеллерам и
электродвигателям.
2. НЕ прикасайтесь к нижней стороне дрона, она
40
Page 42

может быть горячей.
3. Запрещается использовать аккумуляторы других
компаний (не Ryze Tech). Также ЗАПРЕЩАЕТСЯ
замыкать аккумулятор Flight Battery накоротко.
4. Важная информация включена в комплект поставки
продукта и в соответствующую документацию.
Прочтите внимательно эту информацию и
сохраните упаковку продукта и документацию для
использования в будущем.
5. Обязательно используйте USB-адаптер,
сертифицированный FCC/CE (в зависимости от
местонахождения), с номинальными параметрами
5 В и 1,5 A или выше.
6. Перед зарядкой убедитесь, что дрон выключен.
Если дрон включен, зарядка не будет выполняться.
7. НЕ заряжайте аккумулятор непосредственно после
полета, поскольку он может быть очень горячим.
ЗАПРЕЩАЕТСЯ производить зарядку аккумулятора
Flight Battery до тех пор, пока он не остынет до
комнатной температуры.
8. Заряжайте аккумулятор в температурном диапазоне
5–45 °C (41–113 °F). Оптимальный температурный
диапазон зарядки аккумулятора 22–28 °C (72–82 °F).
9. Если появляется предупреждение о низком уровне
заряда аккумулятора Flight Battery, зарядите его
до уровня 30–60% для длительного хранения.
10. Если аккумуляторы НЕ будут использоваться
в течение 10 или более дней, их необходимо
разрядить до уровня 40–65%. Это позволит
значительно увеличить срок службы.
Нормативно-правовыеакты
Соблюдение следующих правил поможет вам избежать
серьезных травм и причинения ущерба имуществу:
1. НЕ выполняйте полеты в непосредственной
близости от других летательных аппаратов
независимо от высоты. (При необходимости
произведите посадку немедленно.)
2. НЕ выполняйте полеты над густонаселенными
районами, городами, спортивными мероприятиями,
выставками, концертами и т. д.
3. НЕ поднимайте дрон выше максимальной
разрешенной высоты, определенной местным
законодательством и нормативно-правовыми
актами.
4. Держитесь на расстоянии и НЕ мешайте пилотируемым
летательным аппаратам. Всегда держите другие
летательные аппараты и препятствия в зоне
видимости и облетайте их.
5. НЕ выполняйте полеты в непосредственной
близости и внутри зон, запрещенных для полета,
определенных местным законодательством и
нормативно-правовыми актами. Список зон,
запрещенных для полетов, включает в себя
аэропорты, границы между двумя суверенными
государствами или регионами, крупные города/
регионы и т. д. Этот список постоянно обновляется.
НЕ выполняйте полеты вблизи стратегически
важных объектов инфраструктуры или зон, таких
RU
41
Page 43

как электростанции, водоочистные сооружения,
исправительные учреждения, оживленные шоссе,
правительственные учреждения, военные зоны и т. д.
6. Постоянно держите дрон в пределах видимости,
прибегая к помощи напарника, если это
необходимо.
7. НИКОГДА не используйте дрон для перевозки
незаконных или опасных товаров/грузов.
8. Вы должны понимать цель вашего полета
(для развлечения, для общественного или
коммерческого использования) и получить
соответствующее разрешение органов власти
RU
перед полетом. Проконсультируйтесь с
местными регулирующими органами по всем
соответствующим вопросам. Пользователям в США
рекомендуется сначала посетить сайт
http://www.knowbeforeyouy.org/ и далее действовать
сообразно обстоятельствам.
9. Помните, что в некоторых областях и регионах может
быть запрещено коммерческое использование
дистанционно управляемых летательных аппаратов.
Перед полетом ознакомьтесь с местными законами
и правилами и соблюдайте их, так как они могут
отличаться от указанных в этом документе.
10. При использовании камеры уважайте
конфиденциальность других людей. Ваши действия
должны соответствовать местным законам о
конфиденциальности и нормам и стандартам
морали. НЕ производите видеонаблюдение за
людьми, объектами, событиями, выступлениями,
выставками и собственностью без разрешения или
там, где возможно нарушение конфиденциальности,
даже если снятые кадры или видео предназначены
для личного пользования.
11. Помните, что в определенных местах
фотографирование и видеозапись событий,
выступлений, выставок или коммерческой
собственности с помощью камеры может
нарушать авторское право или другие законные
права, даже если снятые кадры или видео
предназначены для личного пользования.
Ограничениевысоты
1. Выполняйте полет на высоте НЕ более 10 м (33 фута)
и не приближайтесь к препятствиям.
2. Система визуального поз ициони рован ия
эффективна только при условии, что дрон
находится на высоте от 0,3 до 10 м (1,0–32,8
фута ) и л учше всего работает на высоте от 0,3 до
6 м (1,0–19,7 фута).
3. Работа системы визуального позиционирования
зависит от поверхности, над которой пролетает
дрон. Дрон автоматически переходит в режим
пространственного положения, если система
визуального позиционирования недоступна. В
режиме пространственного положения дрон не
может себя позиционировать. Управляйте дроном
с большой осторожностью в следующих ситуациях,
42
Page 44

из-за которых он может перейти в режим
пространственного положения:
a. При полете на высокой скорости ниже 0,5 м (2
футов).
б. При полете над одноцветной поверхностью
(например, над поверхностью чисто черного,
чисто белого, чисто красного, чисто зеленого
цвета).
в. При полете над поверхностями с высокими
отражающими свойствами.
г. При полете над водой или прозрачными
поверхностями.
д. При полете над движущимися поверхностями
или объектами.
е. При полете в местах с частым или резким
изменением освещения.
ж. При полете над крайне темными (менее 10 люкс)
или крайне яркими (более 10 000 люкс)
поверхностями или по направлению к ярким
источникам света (например, к солнцу).
з. При полете над поверхностями, не имеющими
четких контуров или текстуры.
и. При полете над поверхностями с
повторяющимися одинаковыми контурами или
текстурами (например, плиточное покрытие).
к. При полете над мелкими и тонкими объектами
(например, ветвями деревьев или линиями
электропередач).
л. При полете на скорости более 18 км/ч (11 миль/ч)
на высоте 1 м (3,5 фута) или ниже.
4. Система визуального позиционирования может не
различить предметы на земле при очень слабой
освещенности (менее 100 люкс). НЕ запускайте
дрон, если в приложении Tello появилось
предупреждение о недостаточном освещении.
Комплектпоставки
Дрон ×1
(включая пропеллеры и
защиту пропеллеров*)
Запасной пропеллер ×2
(пара)
RU
Планшет с траекторией
полета ×4
Кабель Micro USB ×1
43
Page 45

Flight Battery ×1
Приспособление
для снятия
пропеллеров ×1
Руководство ×1Аккумулятор
Контроллер
с открытым
RU
кодом ×1
* Схемы, указанные в данном документе, даны только
для справки и могут отличаться от фактического
продукта.
Матричный
индикатор
с модулем
датчика
расстояния ×1
Расширенная
панель ×1
1.Введение
ROBOMASTERTM TT TELLO™ Talent включает в себя
дрон Tello и расширенный набор.Tello представляет
собой маленький квадрокоптер, оснащенный системой
визуального позиционирования и бортовой камерой.
Благодаря системе визуального позиционирования
и усовершенствованному полетному контроллеру
он может зависать на месте и подходит для полета
в помещениях. Дополнительные функции, такие как
режим автоматического взлета/посадки на руку
(Bounce Mode), запись коротких видеороликов с
помощью технологии EZ Shots и 8D Flips, позволяющая
делать трюки в воздухе, превращают управление
Tello в сплошное удовольствие. Tello позволяет
снимать фотографии с разрешением 5 Мп и видео
720p с передачей в режиме реального времени
через приложение Tello на мобильном устройстве.
Максимальное полетное время составляет
приблизительно 13 минут*.
Создайте собственный полет, используя расширенный
набор, в который входит контроллер с открытым
кодом, матричный индикатор с модулем датчика
расстояния и расширенная панель. Устройство
поддерживает программирование на языках Arduino,
Scratch, MicroPython и др.
44
Page 46

1
2
3
4
5
1. Пропеллеры
2. Электродвигатели
3. Индикатор состояния дрона
4. Камера
5. Кнопка питания
6. Антенны
7. Система визуального позиционирования
8. Аккумулятор Flight Battery
9. Порт Micro-USB
10. Защита пропеллеров
11. Контроллер с открытым кодом
12. Матричный индикатор с модулем датчика
расстояния
* Максимальное время полета было получено в
безветренных условиях при скорости 15 км/ч без
использования набора. Значение приведено только
для справки.
9
8
7
6
11
12
10
6
RU
45
Page 47

2.ЗагрузкаприложенияTello
ипросмотробучающих
видеороликов
Найдите «Tello» в App Store или Google Play или
отсканируйте QR-код, чтобы загрузить приложение
на свое мобильное устройство. Для обеспечения
безопасности полета посмотрите обучающие
видеоролики на официальном веб-сайте Ryze Tech
(http://www.ryzerobotics.com) перед первым полетом.
RU
Приложение Tello поддерживает iOS 9.0 (или
более позднюю версию) и Android 4.4 (или
более позднюю версию).
Для активации используйте только приложение
Tello.
3.Зарядкааккумулятора
Установите аккумулятор Flight Battery на дрон, как
показано на рисунке.
Для зарядки аккумулятора Flight Battery подключите
порт Micro USB на дроне к USB-адаптеру (не входит в
комплект), используя стандартный кабель Micro USB.
Время зарядки: прибл. 1 час 30 минут.
...
Медленно мигает синим: заряжается.
-
Горит синим: заряжен полностью.
Обязательно используйте USB-адаптер,
сертифицированный FCC/CE (в зависимости
от местонахождения), с номинальными
параметрами 5 В и 1,5 A или выше.
Перед зарядкой убедитесь, что дрон выключен.
Если дрон включен, зарядка не будет
выполняться.
46
Page 48

4.Подготовкаквзлету
Левый
налево
направо
Правый
Tello-XXXXXX
ИЛИ
Нажмите кнопку
питания один раз,
чтобы включить дрон.
(Нажмите еще раз для
выключения)
Wi-Fi для подключения с использованием
контроллера с открытым кодом: RMTT-XXXXXX.
Wi-Fi для подключения без использования
контроллера с открытым кодом: Tello-XXXXXX.
Запустите приложение Tello. Об установлении
соединения свидетельствует медленное
мигание индикатора состояния дрона желтым
и видеоизображение с камеры в режиме
реального времени на мобильном устройстве.
RMTT-XXXXXX
Включите Wi-Fi на
мобильном устройстве
и подключитесь к сети.
5.Полет
В приложении Tello:
Автоматический взлет и автоматическая посадка
Автоматический взлет Автоматическая посадка
Съемка фотографий и запись видео
RU
Нажмите для переключения
между режимами съемки
фото и записи видео.
Используйте виртуальные джойстики в приложении
для управления дроном (режим джойстиков по
умолчанию называется «Режим 2»)
джойстик
Поворот
Вверх
Вниз
Поворот
Нажмите для съемки
фото или записи видео.
джойстик
Влево Вправо
Вперед
Назад
47
Page 49

6.Программированиес
помощьюTello
Программировать с помощью RoboMaster TT Tello
можно несколькими способами. Используйте
приложение Tello EDU для программирования при
помощи мобильного устройства. Отсканируйте QRкод, чтобы загрузить приложение на мобильное
устройство, или наберите «Tello EDU» в строке
поиска App Store или Google Play. Для получения
более подробной информации об использовании
компьютерного программного обеспечения (ПО)
RU
для программирования RoboMaster TT перейдите по
ссылке: https://www.dji.com/robomaster-tt.
Приложение Tello Edu поддерживает iOS 10.0
(или более позднюю версию) и Android 4.4 (или
более позднюю версию).
Пользователи должны уверенно управлять
Tello, прежде чем использовать приложение
Tello Edu для изучения программирования.
Обратите внимание, что приложение Tello и
приложение Tello Edu невозможно подключить
к Tello одновременно. Выйдите из одного
приложения перед использованием другого.
7.Использованиеконтроллерас
открытымкодомиматричного
индикаторасмодулем
датчикарасстояния
Установите матричный индикатор с модулем датчика
расстояния на контроллере с открытым кодом, затем
присоедините контроллер к дрону. Используйте
приложение Tello EDU или ПО для программирования
собственного полета.
48
Page 50

Замечанияпоустановке
1. Установка пропеллеров
При установке следите за тем, чтобы зазор между
нижней частью колпачка пропеллера и двигателем
позволял вставить съемник для пропеллера, но не был
чрезмерно большим.
RU
Установите пропеллеры
с маркировкой
на двигатели с
промаркированными
посадочными шасси.
Установите пропеллеры
без маркировки
на двигатели с
непромаркированными
посадочными шасси.
2. Снятие пропеллеров
Вставьте приспособление для снятия пропеллеров
между крышкой пропеллера и двигателем. Обязательно
удерживайте двигатель при снятии пропеллера.
Снимайте пропеллеры только с помощью
специального съемника. ЗАПРЕЩАЕТСЯ снимать
пропеллеры вручную, т. к. это может привести к
тяжелым травмам и повреждению двигателей.
49
Page 51

3. Установка защиты пропеллеров
Нажмите на защиту пропеллера, чтобы она обхватила
посадочное шасси. Убедитесь, что защита встала на
место со щелчком, а выступающие части посадочного
шасси надежно вошли в пазы на защите пропеллера.
RU
4. Снятие защиты пропеллеров
Чтобы снять защиту пропеллера, расположите
пальцы, как показано на рисунке ниже. Большим
пальцем осторожно подтолкните край зажима защиты
пропеллера, выступающий в том месте, где он
обхватывает посадочное шасси.
НЕ ПРИЛАГАЙТЕ чрезмерных усилий при снятии
защиты пропеллера, так как это может привести
к повреждению дрона и травмам.
50
Page 52

Техническиехарактеристики
Летательный аппарат
● Tello (Модель: TLW004)
Масса (включая защиту
пропеллеров)
Максимальная скорость 28,8 км/ч (17,8 мили/ч)
Максимальное время
полета
Диапазон рабочих
температур
Рабочая частота От 2,4 до 2,4835 ГГц
Передатчик (ЭИИМ)
●
Камера
Максимальный размер
изображения
Разрешение видео HD: 1280:720 30p
Формат видео MP4
●
Аккумулятор Flight Battery
Емкость 1100 мАч
Напряжение 3,8 В
Тип аккумулятора
Емкость 4,18 Вт·ч
Масса 25±2 г
Диапазон температуры
зарядки
Максимальная
мощность зарядки
Расширенный набор
●
Контроллер с открытым
Модель RMTTOC
Режим работы
Wi-Fi
Bluetooth
Микроконтроллер
Открытый код
Расширение
87 г
13 минут (отсутствие ветра
при постоянной скорости
15 км/ч (9 миль/ч))
от 0 до 40 °C
(от 32 до 104 °F)
20 дБм (FCC)
<
19 дБм (CE)
<
19 дБм (SRRC)
<
2592×1936
Литий-полимерный
от 5 до 45 °C
(от 41 до 113 °F).
10 Вт
кодом
Режим подключения
напрямую, режим роутера
2,4 ГГц
2,4 ГГц
ESP32-D2WD,
двухъядерный,
рабочая частота: 160
МГц, вычислительная
способность: 400 MIPS
Поддержка SDK, Arduino,
Scratch и MicroPython
14-контактный порт
расширения (I2C, UART,
SPI, GPIO, PWM, источник
питания)
RU
51
Page 53

Светодиодные
индикаторы
●
Матричный индикатор с модулем датчика
расстояния
Матричный светодиод
Функция матричного
драйвера
RU
Модуль датчика
расстояния
Максимальное
расстояние,
измеряемое датчиком
ToF
●
Расширенная панель
Самостоятельное
подключение
Дополнительную информацию можно найти в
руководстве пользователя:
https://www.dji.com/robomaster-tt
※
Эта отметка означает, что содержание может быть
изменено без предварительного уведомления.
TELLO является товарным знаком Ryze Tech.
ROBOMASTER является товарным знаком DJI.
© 2020 Ryze Tech. Все права защищены.
52
Полноцветные светодиоды
Красные и синие
светодиоды 8×8
Порт передачи
данных IIC, матричное
автосканирование,
настройка общей яркости
(256 градаций), настройка
яркости единичного
пикселя красного и синего
светодиода (256 градаций)
Датчик ToF
1.2 м (в помещении на
фоне белой стены)
14-контактного порта
расширения к разъему
2×7, DIP с шагом выводом
2,54 мм, два свободных
места для индикаторов
питания 5 В / 3,3 В, два
свободных места для
контрольных индикаторов
Page 54

Compliance Information
取得審驗證明之低功率射頻器材,非經核准,公司、商號
或使用者均不得擅自變更頻率、加大功率或變更原設計之
特性及功能。低功率射頻器材之使用不得影響飛航安全及
干擾合法通信;經發現有干擾現象時,應立即停用,並改
善至無干擾時方得繼續使用。前述合法通信,指依電信管
理法規定作業之無線電通信。低功率射頻器材須忍受合法
通信或工業、科學及醫療用電波輻射性電機設備之干擾。
應避免影響附近雷達系統之操作。
高增益指向性天線只得應用於固定式點對點系統。
限用物質及其化學符號
六價鉻
多溴聯苯
單元
鉛
汞
鎘
nit
U
Lead
(Pb)
線路板 - ○ ○ ○ ○ ○
外殼 ○ ○ ○ ○ ○ ○
AC 輸入
○ ○ ○ ○ ○ ○
插座
排針 ○ ○ ○ ○ ○ ○
備考 1.〝超出 0.1 wt %〞及〝超出 0.01 wt %〞係指限用物質之百分比含量超出
百分比含量基準值。
備考 2.〝○〞係指該項限用物質之百分比含量未超出百分比含量基準值。
備考 3.〝-〞係指該項限用物質為排除項目。
部件名称
线路板 × ○ ○ ○ ○ ○
外壳 × ○ ○ ○ ○ ○
金属部件
(铜合金)
内部线材 × ○ ○ ○ ○ ○
其他配件 × ○ ○ ○ ○ ○
本表格依据 SJ/T 11364 的规定编制。
○:表示该有害物质在该部件所有均质材料中的含量均在
GB/T 26572 规定的限量要求以下。
×:表示该有害物质至少在该部件的某一均质材料中的含量
超出 GB/T 26572 规定的限量要求。
(产品符合欧盟 ROHS 指令环保要求)
Hexavalent
Mercury
Cadmium
chromium
(Hg)
(Cd)
(Cr+6)
六价铬
(Cr+6)
有害物质
铅
(Pb)汞(Hg)镉(Cd)
× ○ ○ ○ ○ ○
Polybrominated
biphenyls
(PBB)
多溴联苯
(PBB)
多溴二苯醚
Polybrominated
diphenyl ethers
(PBDE)
多溴二苯醚
(PBDE)
Page 55

ROBOMASTER TT
TELLO TALENT
YCBZSS00139102
 Loading...