

Page 1
Multilink
User Guide
使用说明
使用說明
Bedienungsanleitung
Guía de usuario
Guide de l'utilisateur
Guida dell'utente
Gebruiksaanwijzing
Manual do utilizador
2018.08V1.0
Page 2
Contents
User Guide
EN
使用说明
CHS
使用說明
CHT
DE
Bedienungsanleitung
ES
Guía de usuario
FR
Guide de l'utilisateur
IT
Guida dell'utente
NL
Gebruiksaanwijzing
PT-PT
Manual do utilizador
Compliance Information
2
6
10
14
18
22
26
30
34
38
1
Page 3

Disclaimer and Warning
Congratulations on purchasing your new DJITM product. The information in this
document affects your safety and your legal rights and responsibilities. Read this
entire document carefully to ensure proper conguration before use. Failure to
read and follow instructions and warnings in this document may result in serious
injury to yourself or others, damage to your DJI product, or damage to other
EN
objects in the vicinity. This document and all other collateral documents are
subject to change at the sole discretion of DJI.
By using this product, you hereby signify that you have read this disclaimer
and warning carefully and that you understand and agree to abide by the terms
and conditions herein. You agree that you are solely responsible for your own
conduct while using this product, and for any consequences thereof.
You agree to use this product only for purposes that are proper and in accordance
with all applicable laws, rules, and regulations, and all terms, precautions,
practices, policies and guidelines DJI has made and may make available.
DJI accepts no liability for damage, injury or any legal responsibility incurred
directly or indirectly from the use of this product. The user shall observe safe and
lawful practices including, but not limited to, those set forth in this document.
Notwithstanding above, your statutory rights under applicable national legislation
are not affected by this disclaimer.
DJI is a trademark of SZ DJI TECHNOLOGY CO., LTD. (abbreviated as “DJI”)
and its afliated companies. Names of products, brands, etc., appearing in this
document are trademarks or registered trademarks of their respective owner
companies. This product and document are copyrighted by DJI with all rights
reserved. No part of this product or document shall be reproduced in any form
without prior written consent of or authorization from DJI
.
Product Prole
Introduction
Multilink is designed specically for use with the INSPIRETM 2 remote controller
and CENDENCETM remote controller. It can create a master-slave controller
network with up to three slave remote controllers. The multiple slave controllers
form a star network with the master controller as the hub, sending commands
to the aircraft via the slave controllers.Slave controllers receive the image and
video signal from the aircraft directly.
Features
• Master-slave network
Can create a master-slave network with up to three slave remote controllers.
2
Page 4
Each controller is responsible for the following:
Master–Pilot, Slave 1–Gimbal Operator, Slave 2–Assistant A, Slave 3– Assistant B
• Gimbal control
The Master remote controller and Slave controller 1 can both control the
gimbal, but not simultaneously. Slave 2 and Slave 3 cannot control the
gimbal.
• Camera control
Camera control is shared between all of the remote controllers.
• Support for Inspire 2 and Cendence remote controllers
Both the Inspire 2 and Cendence remote controllers can be used as a master
or slave.
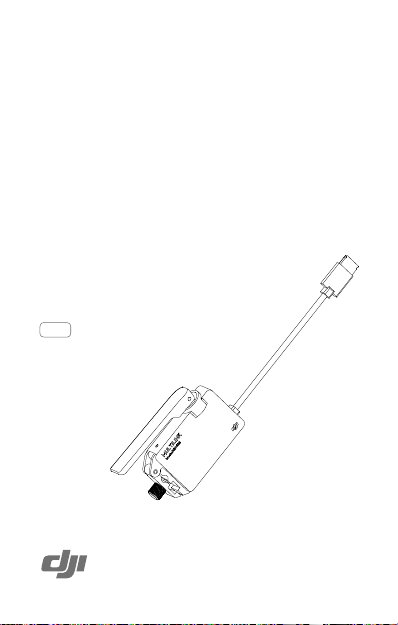
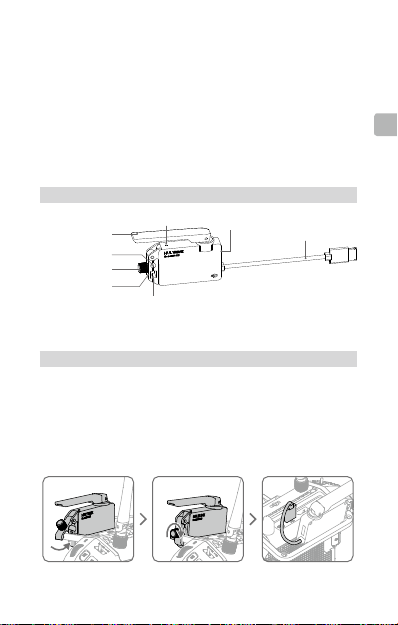
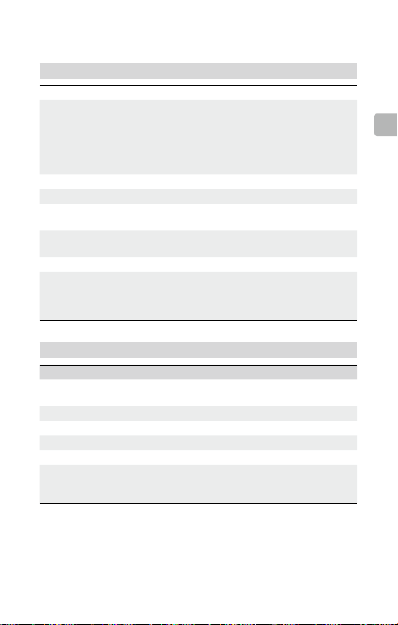
Overview
Antenna
Inspire 2 Remote
Controller Mount
Locking Knob
Mounting Arm
Status Indicator
Cendence Remote Controller Mount
CAN Port
CAN Cable
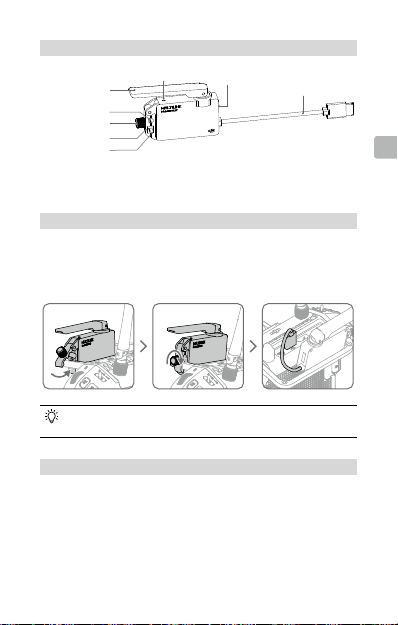
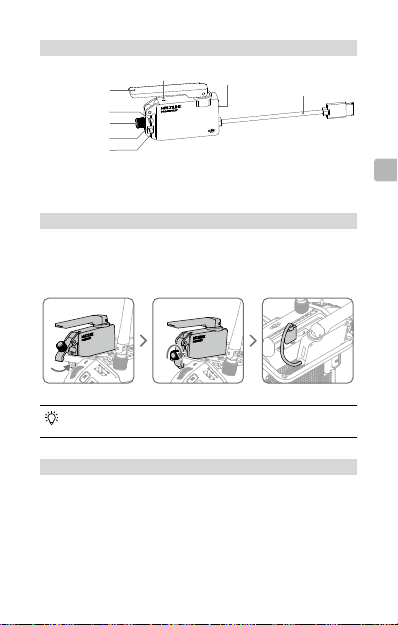
Usage
Installation and Connection
Multilink can be installed onto both the Inspire 2 Remote Controller and
Cendence Remote Controller using different holes on the mounting arm. Their
installation steps are otherwise similar. The steps provided below use the
Cendence as an example.
1. Mount the Multilink module onto the back of the remote controller and
tighten the locking knob to secure it.
2. Connect the CAN cable to the remote controller’s CAN port.
EN
3
Page 5
The CAN cable can be also be connected to the Patch Antenna module
if a Patch Antenna is used. Make sure the Patch Antenna is connected
correctly.
Assigning Roles
EN
The following steps explain how to set the Multilink as master or slave remote
controller. There are three roles that you can assign for the slave remote
controller: Gimbal Operator, Assistant A, and Assistant B.
Master remote controller
1. Turn on the remote controller. Make sure the Multilink is connected correctly.
2. Set the Multilink as master remote controller using the Remote Controller
Setting page in DJI GOTM 4 app.
3. Set an access password.
Slave remote controller
1. Turn on the remote controller. Make sure the Multilink is connected correctly.
2. Set the Multilink as slave remote controller using the Remote Controller Setting
page in DJI GO 4 app. Determine which role you would like to assign to the
slave, and then select the desired role in DJI GO 4 app. At this time, the
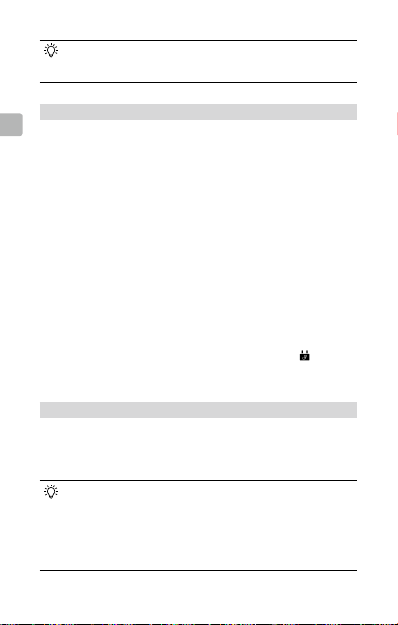
Status Indicator of the Multilink will light up steady purple.
3. Enter the access password.
4. The Status Indicator will turn steady green after the role is successfully
assigned. The remote controller icon shown in app will turn to .
5. If you’d like to switch a slave to a different role, go to the Remote Controller
Setting page in DJI GO 4 app to do so.
Usage Details
1. The Master can control the aircraft, gimbal, camera and vision systems.
2. Slave 1 can control the gimbal and camera.
3. Slave 2 and 3 can only control the camera (can be disabled in Remote
Controller Setting page).
• Firmware upgrades can be handled in DJI GO 4 app by connecting
the Multilink to the remote controller.
• The CAN port on the Multilink can be connected to other DJI devices
with a CAN port.
• For best results, use the Multilink together with a Patch Antenna.
• The Multilink will make a beeping sound every time it is connected or
disconnected.
4
Page 6
Appendix
Specication
Operating Frequency 2400-2483.5 MHz, 5725-5850 MHz
EIRP
Maximum Communication Distance 150 m (2.4 GHz), 100 m (5.8 GHz)
Input 4.2-5.5 V, 1 A Max
Maximum Delay
(From Master to Slave 3)
Minimum Delay
(From Master to Slave 1)
Operation Environment Temperature -22° to 104° F (-30° to 40° C)
Compatible DJI Devices
Status Indicator
Indicator Description
Steady Red
Steady Purple Disconnected; assigned as a slave remote controller.
Steady Green Connected.
Steady White Firmware updating.
Blinking Blue Communication status error.
Off
Disconnected; assigned as the master remote
controller.
Current remote controller rmware version not
matched / remote controller not initialized / hardware
failure.
2.4 GHz: FCC< 25 dBm,
CE< 20 dBm,
SRRC< 20 dBm
5.8 GHz: FCC<29 dBm,
CE< 14 dBm,
SRRC< 19 dBm
7.5 ms (5.8 GHz) / 11.1 ms (2.4 GHz)
2.5 ms (5.8 GHz) / 3.7 ms (2.4 GHz)
DJI Focus
Inspire 2 GPS module for the
remote controller
Patch Antenna
EN
5
Page 7

免责声明
感谢您购买 DJITM产品。本文所提及的内容关系到您的安全以及合法权益与责任。
使用本产品之前,请仔细阅读本文以确保已对产品进行正确的设置。不遵循和不
按照本文的说明与警告来操作可能会给您和周围的人带来伤害,损坏本产品或其
它周围的物品。本文档及本产品所有相关的文档最终解释权归大疆TM创新(DJI)
所有。如有更新,恕不另行通知。请访问 www.dji.com 官方网站以获取最新的产
品信息。
CHS
一旦使用本产品,即视为您已经仔细阅读免责声明与警告,理解、认可和接受本
声明全部条款和内容。您承诺对使用本产品以及可能带来的后果负全部责任。您
承诺仅出于正当目的使用本产品,并且同意本条款以及大疆创新(DJI)制定的
任何相关条例、政策和指引。
大疆创新(DJI)对于直接或间接使用本产品而造成的损坏、伤害以及任何法律
责任不予负责。用户应遵循包括但不限于本文提及的所有安全指引。
即使存在上述规定,消费者权益依然受当地法律法规所保障,并不受本免责声明
影响。
DJI 是深圳市大疆创新科技有限公司及其关联公司的商标。本文出现的产品名称、
品牌等,均为其所属公司的商标或注册商标。本产品及手册为大疆创新版权所有。
未经许可,不得以任何形式复制翻印。
产品说明
简 介
Multilink 可配合 INSPIRETM 2 普通遥控器与专业遥控器CENDENCETM使用,组
成一主三从的多从机网络。多从机采用星形网络形式,使用主机做传输中枢,将
各从机的指令再发到飞行器,各从机的图像信号直接从飞行器天空端获取。
特 性
•
一主三从:主机- 飞控手(Pilot),从机三个机位分别为从机1- 云台手(Gimbal
Operator)、从机 2- 助理 A(Assistant A)和从机 3- 助理 B(Assistant B)。
•
云台控制权:主机与从机 1通过抢夺控制权共享,从机 2和 3 没有云台控制权。
•
相机控制权:一主三从共享(不需要抢夺控制权)。
•
普通 / 专业遥控器通用:普通遥控器和专业遥控器(Cendence)都可以使用
该模块,并且两者都可以设为主机或从机。
6
Page 8
部件说明
天线
普通遥控器安装孔
旋紧旋钮
锁紧扣
专业遥控器安装孔
状态指示灯
CAN 口
CAN 线
使 用
安装连线
Multilink 可安装到 Inspire 2 普通遥控器与专业遥控器Cendence,需要通过不同
的安装孔来固定,安装步骤相似,下面以 Cendence 为例进行示意。
1. 安装 Multilink 锁紧扣到遥控器提手上,拧紧旋紧旋钮固定。
2. 连接 CAN 线到遥控器 CAN 口。
如果使用平板天线,则可以连到平板天线的 CAN 口,并确保平板天线已
正确连接专业遥控器。
设 置
请根据以下步骤分别设置各个 Multilink 模块为主机或者从机,从机分为云台手 /
助理 A/ 助理 B 三个机位。
设置主机
1. 开启遥控器并确保 Multilink 与遥控器连接正常。
2. 运行 DJI GOTM 4 App,进入遥控器设置界面,将该模块设置为主机。
3. 设置准入密码。
CHS
7
Page 9
设置从机
1. 开启遥控器并确保 Multilink 与遥控器连接正常。
2. 运行 DJI GO 4 App,进入遥控器设置界面,将该模块设置为从机,同时可以
查看到目前组网内三个从机位置被占用情况,选择所需要的机位再进行连接配
对,此时指示灯为紫灯常亮。
3. 输入所选主机的准入密码。
4. 等待配对,成功之后指示灯变为绿灯常亮。此时遥控器信号图标会变为 。
CHS
5. 若已连接的某个从机位置想要切换到另一个位置,可以进入遥控器主从机设置
中点击切换。
使用说明
1. 主机拥有云台控制权,相机控制,飞行和视觉等功能的控制权。
2. 云台手拥有云台控制权和相机控制权。
3. 助理 A 和助理 B 只有相机控制权(可以通过遥控器设置禁用相机控制权)。
•
升级只需要将 Multilink 连接上遥控器及 DJI GO 4 App,根据 DJI GO 4
App 的提示进行升级即可。
•
Multilink 上的 CAN 口可以用于连接其它 DJI CAN 口的设备。
•
配合平板天线使用可发挥最大工作效益。
•
插拔 Multilink 都会伴随“嘀嘀”的提示音。
附 录
规格参数
指标 参考值
工作频率 2400-2483.5MHz,5725-5850MHz
发射功率(EIRP)
无遮挡通信距离 150m(2.4GHz),100m(5.8GHz)
输入 4.2-5.5V,1A Max
最大延时(主机到从机 3) 7.5ms(5.8GHz)/11.1ms(2.4GHz)
最小延时(主机到从机 1) 2.5ms(5.8GHz)/3.7ms(2.4GHz)
工作环境温度 -30°至 40℃
CAN 口扩展 DJI 设备
8
2.4GHz:FCC<25dBm,CE<20dBm,
SRRC<20dBm
5.8GHz:FCC<29dBm,CE<14dBm,
SRRC<19dBm
跟焦器,Inspire 遥控器外接 GPS 模块,
平板天线
Page 10

状态指示灯
指示灯 描述
红灯常亮 主机状态下,未连接
紫灯常亮 从机状态下,未连接
绿灯常亮 已连接
白灯常亮 进入升级状态
蓝灯闪烁 通信状态错误
灯灭 当前遥控器版本不匹配 / 遥控器未初始化 / 硬件故障
CHS
9
Page 11

免責聲明
感謝您購買 DJITM 產品。本文所提及的內容關係到您的安全及合法權益與責任。
使用本產品之前,請仔細閱讀本文以確保已對產品進行正確的設定。若未遵循及
未按照本文的說明與警告來操作,可能會對您和周圍的人造成傷害,損壞本產品
或其它鄰近的物品。本文件及本產品所有相關文件的最終解釋權歸大疆TM創新
(DJI) 所有。如有更新,恕不另行通知。請前往 www.dji.com 官方網站以獲取最
新的產品資訊。
一旦使用本產品,即視為您已經仔細閱讀免責聲明與警告,理解、認可和接受本
CHT
聲明全部條款和內容。您承諾對使用本產品及可能帶來的後果負全部責任。您承
諾僅出於正當目的使用本產品,並且同意本條款以及大疆創新 (DJI) 制定的任何
相關條例、政策和指南。
大疆創新 (DJI) 對於直接或間接使用本產品而造成的損壞、傷害及任何法律責任
概不負責。使用者應遵循包括但不限於本文提及的所有安全指南。
即使存在上述規定,消費者權益依然受當地法律法規所保障,並不受本免責聲明
影響。
DJI 是深圳市大疆創新科技有限公司及其附屬公司的商標。本文出現的產品名稱、
品牌等,均為其所屬公司的商標或註冊商標。本產品及手冊之版權為大疆創新所
有。未經許可,不得以任何形式複製翻印。
産品說明
簡介
Multilink 可配合 INSPIRETM 2 普通遙控器與專業遙控器 CENDENCETM 使用,組
成一主三從的多從機網路。多從機採用星形網路形式,以主機做為傳輸中樞,將
各從機的指令再發到航拍機,各從機的影像訊號直接從航拍機天空端獲取。
特性
•
一主三從:主機 - 飛行控制者 (Pilot),從機三個機位分別為從機 1 - 雲台手
(Gimbal Operator)、從 機 2 - 助理 A (Assistant A) 和從機 3 - 助理 B (Assistant B)。
•
雲台控制權:主機與從機 1 可共享控制權,但必須進行搶奪,從機 2 和 3 沒
有雲台控制權。
•
相機控制權:一主三從共享 ( 不需要搶奪控制權 )。
•
普通 / 專業遙控器通用:普通遙控器和專業遙控器 (Cendence) 都可以使用該
模組,且兩者都可以設為主機或從機。
10
Page 12
零組件說明
天線
普通遙控器安裝孔
旋緊旋鈕
鎖緊扣
專業遙控器安裝孔
狀態指示燈
CAN 連接埠
CAN 纜線
使用
安裝連線
Multilink 可安裝到 Inspire 2 普通遙控器與專業遙控器 Cendence,需要透過不同
的安裝孔來進行固定,安裝步驟相似,下面以 Cendence 為例進行示範。
1. 安裝 Multilink,將其鎖緊扣到遙控器把手上,擰緊旋緊旋鈕加以固定。
2. 連接 CAN 纜線到遙控器 CAN 連接埠。
如果使用平板天線,則可以連到平板天線的 CAN 連接埠,並確保平板天
線已正確連接至專業遙控器。
設定
請根據以下步驟分別設定各個 Multilink 模組為主機或從機,從機分為雲台手 / 助
理 A/ 助理 B 三個機位。
設定主機
1. 開啓遙控器並確保 Multilink 與遙控器正常連接。
2. 執行 DJI GOTM 4 App,進入遙控器設定介面,將該模組設定為主機。
3. 設定存取密碼。
CHT
11
Page 13
設定從機
1. 開啓遙控器並確保 Multilink 與遙控器正常連接。
2. 執行 DJI GO 4 App,進入遙控器設定介面,將該模組設定為從機,同時可以
查看目前組網內三個從機位置分配情况,選擇所需要的機位再進行連接配對,
此時指示燈為恆亮紫燈。
3. 輸入所選主機的存取密碼。
4. 等待配對,成功之後指示燈變為恆亮綠燈。此時遙控器訊號圖示會變為 。
5. 若已連接的某個從機位置想要切換為另一個位置,可以進入遙控器主從機設定
中點選切換。
CHT
使用說明
1. 主機擁有雲台控制權、相機控制、飛行和視覺等功能的控制權。
2. 雲台手擁有雲台控制權和相機控制權。
3. 助理 A 和助理 B 只有相機控制權 ( 可以通過遙控器設定禁用相機控制權 )。
•
若要升級,只需將 Multilink 連接上遙控器及 DJI GO 4 App,根據 DJI
GO 4 App 的提示即可進行升級。
•
Multilink 上的 CAN 連接埠可以用於連接其它 DJI CAN 連接埠的裝置。
•
配合平板天線使用可發揮最大工作效益。
•
插拔 Multilink 都會伴隨「嗶嗶」的提示音。
附錄
規格
指標 參考值
運作頻率 2400-2483.5MHz,5725-5850MHz
發射功率(EIRP)
無遮擋通訊距離 150m (2.4GHz),100m (5.8GHz)
輸入 4.2-5.5V,1A Max
最大縮時 ( 主機到從機 3) 7.5ms (5.8GHz)/11.1ms (2.4GHz)
最小縮時 ( 主機到從機 1) 2.5ms (5.8GHz)/3.7ms (2.4GHz)
操作溫度 -30° 至 40℃
CAN 連接埠擴充 DJI 裝置
12
2.4 GHz:FCC< 25dBm,CE<20dBm,
SRRC<20dBm
5.8 GHz:FCC<29dBm,CE<14dBm,
SRRC<19dBm
跟焦器,Inspire 遙控器外接 GPS 模組,平
板天線
Page 14

狀態指示燈
指示燈 說明
恆亮紅燈 處於主機狀態,未連接
恆亮紫燈 處於從機狀態,未連接
恆亮綠燈 已連接
恆亮白燈 進入升級狀態
閃爍藍燈 通訊狀態錯誤
燈號熄滅 目前的遙控器版本不相符 / 遙控器未初始化 / 硬體故障
CHT
13
Page 15

Haftungsausschluss und Warnhinweis
Vielen Dank, dass Sie sich für ein Produkt von DJITM entschieden haben. Die hier
enthaltenen Informationen betreffen Ihre persönliche Sicherheit sowie Ihre gesetzlichen
Rechte und Verpichtungen. Bitte lesen Sie das gesamte Dokument aufmerksam durch,
um das Produkt für den Betrieb ordnungsgemäß einrichten zu können. Die Nichtbeachtung
der in diesem Dokument enthaltenen Anweisungen und Warnungen kann zu schweren
Verletzungen der eigenen Person oder anderer oder zu Schäden an Ihrem DJI-Produkt
oder anderen Objekten in der näheren Umgebung führen. Dieses Dokument und alle
zugehörigen Dokumente können nach eigenem Ermessen von DJI jederzeit geändert
werden.
Mit dem Gebrauch des Produkts bestätigen Sie, dass Sie diesen Haftungsausschluss
inkl. Warnungen aufmerksam gelesen und den Inhalt verstanden haben, und erklären
DE
Ihr Einverständnis mit den Bedingungen. Sie stimmen zu, dass Sie beim Gebrauch des
Produkts die alleinige Verantwortung für Ihre Handlungen und alle daraus entstehenden
Folgen tragen.
Sie erklären sich damit einverstanden, dass Sie das Produkt ausschließlich für
sachgerechte Zwecke nutzen, die allen geltenden Gesetzen, Regelungen und Vorschriften
sowie allen aktuellen wie künftigen Bedingungen, Schutzmaßnahmen, Praktiken, Richtlinien
und Empfehlungen von DJI entsprechen.
DJI übernimmt keine Haftung für Sachschäden oder Personenschäden sowie keine
juristische Verantwortung für Schäden, die direkt oder indirekt mit dem Gebrauch des
Produkts in Zusammenhang stehen. Der Anwender richtet sich nach der sicheren,
rechtskonformen Praxis, die zum Teil in dem vorliegenden Dokument festgelegt ist.
Unbeschadet des weiter oben gesagten werden ihre gesetzlichen Rechte unter der
anwendbaren nationalen Gesetzgebung nicht durch diesen Haftungsausschluss berührt.
DJI ist eine Marke der SZ DJI TECHNOLOGY CO., LTD. (kurz DJI) und seiner verbundenen
Unternehmen. Namen von Produkten, Marken, usw., die in diesem Dokument enthalten
sind, sind Warenzeichen oder eingetragene Warenzeichen der jeweiligen Besitzer. Dieses
Produkt und dieses Dokument sind urheberrechtlich geschütztes Eigentum von DJI und
alle Rechte sind vorbehalten. Kein Teil dieses Produkts oder dieses Dokuments darf in
irgendeiner Form ohne vorherige schriftliche Zustimmung oder Genehmigung von DJI
reproduziert werden
.
Produktbeschreibung
Einleitung
Multilink ist speziell für den Einsatz mit der Fernsteuerung der Serien INSPIRETM 2 und
CENDENCETM konzipiert. Es kann ein Master-Slave-Fernsteuerungsnetzwerk mit bis zu drei
Slave-Fernsteuerungen erstellen. Mehrere Slave-Fernsteuerungen bilden ein sternförmiges
Netzwerk mit der Master-Fernsteuerung als Hub, die über die Slave-Fernsteuerungen
Befehle an das Fluggerät sendet. Die Slave-Fernsteuerungen empfangen das Bild- und
Videosignal direkt vom Fluggerät.
14
Page 16

Eigenschaften
• Master-Slave-Netzwerk
Kann ein Master-Slave-Netzwerk mit bis zu drei Slave-Fernsteuerungen erstellen. Jede
Fernsteuerung ist für Folgendes verantwortlich:
Master–Pilot, Slave 1–Bediener des Gimbals, Slave 2–Assistant A, Slave 3– Assistant B
• Gimbal-Steuerung
Die Master-Fernsteuerung und die Slave-Fernsteuerung 1 können beide den Gimbal
steuern, jedoch nicht gleichzeitig. Slave 2 und Slave 3 können den Gimbal nicht steuern.
• Kamerasteuerung
Die Kamera kann mit allen Fernsteuerungen gesteuert werden.
• Unterstützt die Fernsteuerungen der Serien Inspire 2 und Cendence
Die Fernsteuerungen der Serie Inspire 2 und Cendence können als Master oder Slave
verwendet werden.
Übersicht
Antenne
Inspire 2 – Halterung
für Fernsteuerung
Fixierknopf
Befestigungsarm
Statusleuchte
Cendence – Halterung für Fernsteuerung
CAN-Anschluss
CAN-Kabel
Verwendung
Montage und Anschluss
Multilink kann auf Fernsteuerungen der Serien Inspire 2 und Cendence montiert werden,
da am Befestigungsarm verschiedene Bohrungen vorhanden sind. Die Installationsschritte
sind ansonsten ähnlich. Die nachstehend aufgeführten Schritte gelten für die Cendence.
1. Montieren Sie das Multilink-Modul auf der Rückseite der Fernsteuerung und ziehen
Sie den Fixierknopf an, um es zu sichern.
2. Schließen Sie das CAN-Kabel am CAN-Anschluss der Fernsteuerung an.
DE
15
Page 17

Das CAN-Kabel kann auch mit dem Modul der Zusatzantenne verbunden
werden, wenn eine solche verwendet wird. Stellen Sie sicher, dass die
Zusatzantenne richtig angeschlossen ist.
Zuweisen von Rollen
Im Folgenden wird erläutert, wie Sie Multilink als Master- oder Slave-Fernsteuerung
festlegen. Es gibt drei Rollen, die Sie der Slave-Fernsteuerung zuweisen können: Bediener
des Gimbals, Assistant A und Assistant B.
Master-Fernsteuerung
1. Schalten Sie die Fernsteuerung ein. Stellen Sie sicher, dass Multilink richtig
DE
angeschlossen ist.
2. Legen Sie über die Einstellungsseite für die Fernsteuerung in der „DJI GOTM 4“-App
Multilink als Master-Fernsteuerung fest.
3. Legen Sie ein Zugriffskennwort fest.
Slave-Fernsteuerung
1. Schalten Sie die Fernsteuerung ein. Stellen Sie sicher, dass Multilink richtig
angeschlossen ist.
2. Legen Sie über die Einstellungsseite für die Fernsteuerung in der „DJI GO 4“-App
Multilink als Slave-Fernsteuerung fest. Bestimmen Sie, welche Rolle Sie der Slave
zuweisen möchten, und wählen Sie dann die gewünschte Rolle in der „DJI GO 4“-
App. Zu diesem Zeitpunkt leuchtet die Multilink-Statusanzeige dauerhaft violett.
3. Geben Sie das Zugriffskennwort ein.
4. Die Statusanzeige leuchtet dauerhaft grün, nachdem die Rolle erfolgreich zugewiesen
wurde. Das in der App angezeigte Symbol für die Fernsteuerung ändert sich zu .
5. Wenn Sie einer Slave eine andere Rolle zuweisen möchten, gehen Sie zur
Einstellungsseite für die Fernsteuerung in der „DJI GO 4“-App.
Verwendungsinformationen
1. Die Master kann das Fluggerät, den Gimbal, die Kamera und die Sichtsysteme
steuern.
2. Slave 1 kann den Gimbal und die Kamera steuern.
3. Slave 2 und 3 können nur die Kamera steuern (dies kann auf der Einstellungsseite für
die Fernsteuerung deaktiviert werden).
• Firmware-Upgrades können in der „DJI GO 4“-App durchgeführt werden,
indem Multilink mit der Fernsteuerungverbunden wird.
• Der CAN-Anschluss von Multilink kann mit einem CAN-Anschluss an anderen
DJI-Geräten verbunden werden.
• Für beste Ergebnisse sollte Multilink zusammen mit einer Zusatzantenne
verwendet werden.
• Multilink gibt jedes Mal, wenn es angeschlossen oder getrennt wird, ein
akustisches Signal aus.
16
Page 18

Anhang
Technische Daten
Betriebsfrequenz 2400 bis 2483,5 MHz; 5725 bis 5850 MHz
EIRP
Maximale Kommunikationsentfernung 150 m (2,4 GHz), 100 m (5,8 GHz)
Eingang Max. 4,2–5,5 V, 1 A
Maximale Verzögerung
(von Master zu Slave 3)
Minimale Verzögerung
(von Master zu Slave 1)
Umgebungstemperatur im Betrieb -30 ° bis 40 °C
Kompatible DJI-Geräte
Statusleuchte
Anzeige Beschreibung
Dauerhaft rot Getrennt; als Master-Fernsteuerung zugewiesen.
Dauerhafte violett Getrennt; als Slave-Fernsteuerung zugewiesen.
Dauerhaft grün Verbunden.
Dauerhaft weiß Aktualisierung der Firmware.
Blinkt blau Kommunikationsstatusfehler.
Aus
2,4 GHz: FCC< 25 dBm; CE< 20 dBm;
SRRC< 20 dBm
5,8 GHz: FCC< 29 dBm; CE< 14 dBm;
SRRC< 19 dBm
7,5 ms (5,8 GHz)/11,1 ms (2,4 GHz)
2,5 ms (5,8 GHz)/3,7 ms (2,4 GHz)
DJI Focus
Inspire 2-GPS-Modul für die
Fernsteuerung
Zusatzantenne
Aktuelle Firmware-Version der Fernsteuerung stimmt nicht
überein/Fernsteuerung nicht initialisiert/Hardware-Fehler.
DE
17
Page 19

Renuncia de responsabilidad y advertencia
Enhorabuena por la compra de su nuevo producto DJITM. La información incluida en este
documento afecta a su seguridad y sus derechos y responsabilidades legales. Lea este
documento en su totalidad para garantizar una conguración adecuada antes de su uso.
Si no lee ni sigue correctamente las instrucciones y advertencias de este documento,
podría sufrir lesiones importantes o provocarlas en otras personas; igualmente, podría
causar daños en su producto DJI u otros objetos en las proximidades. Este documento y
el resto de documentos colaterales están sujetos a cambios a entera discreción de DJI.
Al usar este producto, por la presente manifiesta que ha leído detenidamente esta
renuncia de responsabilidad y advertencia, y que entiende y acepta cumplir con los
términos y condiciones establecidos en este documento. Acepta que usted es el único
responsable de su propia conducta durante el uso de este producto, así como de
cualquier consecuencia derivada del mismo.
Acepta usar este producto sólo con nes apropiados y de acuerdo con todas las leyes,
reglas y normativas aplicables, así como todos los términos, precauciones, prácticas,
ES
políticas y directrices que haya facilitado y pueda facilitar DJI.
DJI no acepta responsabilidad alguna por daños o lesiones, ni ningún tipo de
responsabilidad legal derivada directa o indirectamente del uso de este producto.
El usuario deberá respetar las prácticas seguras y legales incluidas, entre otras, las
establecidas en este documento.
Sin perjuicio de lo anterior, esta renuncia de responsabilidad no afecta a sus derechos de
conformidad con la legislación nacional vigente.
DJI es una marca comercial de SZ DJI TECHNOLOGY CO., LTD. (abreviado como “DJI”)
y sus empresas liales. Los nombres de productos, marcas, etc., que aparecen en este
documento son marcas comerciales o marcas comerciales registradas de sus respectivas
empresas propietarias. Este producto y el documento están protegidos por los derechos
de autor de DJI con todos los derechos reservados. No se permite la reproducción total
ni parcial de este documento o producto en forma alguna sin el consentimiento previo por
escrito o la autorización de DJI
.
Perl del producto
Introducción
El dispositivo Multilink se ha diseñado especícamente para su uso con el control remoto
del INSPIRETM 2 y el modelo CENDENCETM. Puede crear una red de controles remotos
maestro-esclavo con hasta tres controles remotos esclavos. Los distintos controles
remotos esclavos forman una red en estrella con el control maestro en el centro, enviando
órdenes a la aeronave a través de los controles esclavos. Los controles esclavos reciben
la señal de imagen y vídeo directamente de la aeronave.
Características
• Red maestro-esclavo
Es posible crear una red maestro-esclavo con un máximo de tres controles remotos
esclavos. Cada control remoto tiene el siguiente perl:
Maestro-piloto, esclavo 1-operador del estabilizador, esclavo 2-asistente A,
esclavo 3- asistente B
• Control del estabilizador
18
Page 20

El control remoto maestro y el control remoto esclavo 1 pueden controlar el estabilizador,
pero no de forma simultánea. Los controles esclavos 2 y 3 no pueden controlar el
estabilizador.
• Control de la cámara
El control de la cámara se comparte entre todos los controles remotos.
• Compatibilidad con el control remoto del Inspire 2 y el modelo Cendence
El control remoto del Inspire 2 y el modelo Cendence se pueden utilizar como maestro
o esclavo.
Descripción general
Antena
Puerto para el control
remoto del Inspire 2
Rueda de bloqueo
Brazo de montaje
Indicador de estado
Puerto para el control remoto Cendence
Puerto CAN
Cable CAN
Uso
Instalación y conexión
El dispositivo Multilink se puede instalar en el control remoto del Inspire 2 y en el modelo
Cendence mediante los distintos puertos del brazo de montaje. Los pasos de instalación
son similares. En los pasos que se indican a continuación se usa el control remoto
Cendence como ejemplo.
1. Monte el módulo Multilink en la parte posterior del control remoto y apriete la rueda
de bloqueo para jarlo.
2. Conecte el cable CAN al puerto CAN del control remoto.
El cable CAN también se puede conectar al módulo de la antena auxiliar si se
utiliza una. Asegúrese de que la antena auxiliar está conectada correctamente.
ES
19
Page 21

Asignación de funciones
En los siguientes pasos se explica cómo configurar el Multilink como control remoto
maestro o esclavo. Puede asignar tres funciones al control remoto esclavo: operador del
estabilizador, asistente A y asistente B.
Control remoto maestro
1. Encienda el control remoto. Asegúrese de que el dispositivo Multilink se ha
conectado correctamente.
2. Establezca el dispositivo Multilink como control remoto maestro mediante las
instrucciones de la página de conguración del control remoto de la aplicación
DJI GOTM 4.
3. Establezca una contraseña de acceso.
Control remoto esclavo
1. Encienda el control remoto. Asegúrese de que el dispositivo Multilink se ha conectado
ES
correctamente.
2. Establezca el dispositivo Multilink como control remoto esclavo mediante las
instrucciones de la página de configuración del control remoto de la aplicación
DJI GO 4. Determine qué perl desea asignar al control esclavo y, a continuación,
seleccione el perl deseado en la aplicación DJI GO 4. Al hacerlo, el indicador de
estado del dispositivo Multilink se iluminará en morado.
3. Introduzca la contraseña de acceso.
4. El indicador de estado se iluminará en verde cuando la función se haya asignado
correctamente. El icono del control remoto que se muestra en la aplicación cambiará
a .
5. Si desea cambiar el perl del control esclavo, vaya a la página de conguración del
control remoto de la aplicación DJI GO 4.
Detalles de uso
1. El maestro puede controlar la aeronave, el estabilizador, la cámara y el sistema de
visión.
2. El esclavo 1 puede controlar el estabilizador y la cámara.
3. Los esclavos 2 y 3 sólo pueden controlar la cámara (esta función se puede
desactivar en la página de conguración del control remoto).
• Para gestionar las actualizaciones del rmware en la aplicación DJI GO 4,
conecte el dispositivo Multilink al control remoto.
• Puede conectar otros dispositivos DJI con conexión CAN al puerto CAN del
dispositivo Multilink.
• Para obtener mejores resultados, utilice el dispositivo Multilink con una antena
auxiliar.
• El dispositivo Multilink emitirá un pitido cada vez que se conecte o se
desconecte.
20
Page 22

Apéndice
Especicaciones
Frecuencia operativa 2400-2483,5 MHz; 5725-5850 MHz
EIRP
Alcance de transmisión 150 m (2,4 GHz), 100 m (5,8 GHz)
Entrada 4,2-5,5 V, 1 A máx.
Retardo máximo
(de maestro a esclavo 3)
Retardo mínimo
(de maestro a esclavo 1)
Temperatura de funcionamiento De -30 °C a 40 °C (de -22 °F a 104 °F)
Dispositivos DJI compatibles
Indicador de estado
Indicador Descripción
Rojo Desconectado; asignado como control remoto maestro.
Morado Desconectado; asignado como control remoto esclavo.
Verde Conectado.
Blanco Se está actualizando el rmware.
Parpadeo azul Error de estado de la comunicación.
Apagado
La versión de rmware actual del control remoto no coincide/
control remoto no inicializado/fallo de hardware.
2,4 GHz: FCC< 25 dBm; CE< 20 dBm;
SRRC< 20 dBm
5,8 GHz: FCC< 29 dBm; CE< 14 dBm;
SRRC< 19 dBm
7,5 ms (5,8 GHz) / 11,1 ms (2,4 GHz)
2,5 ms (5,8 GHz) / 3,7 ms (2,4 GHz)
Módulo GPS DJI Focus
para el control remoto del Inspire 2
Antena auxiliar
ES
21
Page 23

Clause d'exclusion de responsabilité et mise en
garde
Vous venez d'acquérir un nouveau produit DJITM. Félicitations ! Les informations contenues
dans ce document concernent votre sécurité, vos droits et vos obligations. Lisez-le
attentivement pour bien congurer votre appareil avant de l'utiliser. Si vous ne lisez pas les
instructions et les avertissements ci-après, vous exposez les autres et vous-même à des
blessures graves et risquez d'endommager votre produit DJI ou d'autres objets placés à
proximité. DJI est susceptible de modier à tout moment le présent document et les autres
documents connexes.
En utilisant ce produit, vous conrmez que vous avez lu attentivement la présente clause
d’exclusion de responsabilité et que vous comprenez et acceptez de respecter les termes
et conditions qui y sont énoncés. Vous déclarez assumer l'entière responsabilité de votre
utilisation du produit ainsi que toutes les conséquences qui en découlent.
Vous vous engagez à utiliser le produit dans un cadre légal et adapté, conformément aux
lois et réglementations en vigueur, dans le respect des conditions, précautions, pratiques,
politiques et consignes publiées par DJI, aujourd'hui et à l'avenir.
FR
DJI décline toute responsabilité quant aux dégâts, aux blessures ou aux problèmes
découlant directement ou indirectement de l'utilisation de ce produit. L'utilisateur s'engage
à respecter la réglementation et les pratiques décrites dans le présent document (sans s'y
limiter).
Nonobstant ce qui précède, vos droits statutaires en vertu de la législation nationale
applicable ne sont pas affectés par cette clause d'exclusion de responsabilité.
DJI est une marque commerciale de SZ DJI TECHNOLOGY CO., LTD. (abrégée en
« DJI ») et de ses sociétés afliées. Les noms de produits, de marques, etc., apparaissant
dans le présent document sont des marques commerciales ou des marques déposées
de leurs détenteurs respectifs. Ce produit et le présent document sont la propriété de DJI,
tous droits réservés. Aucune partie de ce produit ou du présent document ne peut être
reproduite sous quelque forme que ce soit sans l'autorisation ou le consentement écrit
préalable de DJI
.
Présentation du produit
Introduction
Le dispositif Multilink est spécialement conçu pour une utilisation avec les
radiocommandes INSPIRETM 2 et CENDENCETM. Il peut créer un réseau de contrôleurs
principal/secondaire avec trois radiocommandes secondaires maximum. Les contrôleurs
secondaires forment un réseau en forme d'étoile avec le contrôleur principal comme
concentrateur. Ce dernier envoie des commandes jusqu'à l'appareil via les contrôleurs
secondaires, lesquels reçoivent le signal d'image et de vidéo directement de l'appareil.
Fonctionnalités
• Réseau principal/secondaire
Capable de créer un réseau principal/secondaire avec trois radiocommandes
secondaires maximum. Chaque contrôleur est responsable des rôles suivants :
Principal : pilote, Secondaire 1 : opérateur de la nacelle, Secondaire 2 : assistant A,
Secondaire 3 : assistant B
22
Page 24

• Contrôle de la nacelle
La radiocommande principale et le contrôleur secondaire 1 peuvent contrôler
la nacelle. Toutefois, ils ne peuvent pas le faire simultanément. Les contrôleurs
secondaires 2 et 3 ne peuvent pas contrôler la nacelle.
• Contrôle de la caméra
Les radiocommandes se partagent le contrôle de la caméra.
• Prise en charge des radiocommandes Inspire 2 et Cendence
Les radiocommandes Inspire 2 et Cendence peuvent être utilisées comme contrôleur
principal ou secondaire.
Vue d'ensemble
Antenne
Point de xation de
la radiocommande
Inspire 2
Bouton de verrouillage
Bras de xation
Voyant d'état
Point de xation de la radiocommande Cendence
Port CAN
Câble CAN
Utilisation
Installation et connexion
Le dispositif Multilink peut être installé sur les radiocommandes Inspire 2 et Cendence
grâce aux points de xation situés sur le bras de xation. Les étapes d'installation sont
similaires. Les étapes indiquées ci-dessous prennent la radiocommande Cendence
comme exemple.
1. Fixez le module Multilink sur l'arrière de la radiocommande et serrez le bouton de
verrouillage pour le xer.
2. Connectez le câble CAN au port CAN de la radiocommande.
Le câble CAN peut être également connecté au module d'antenne patch, à
condition qu'une antenne patch soit utilisée. Assurez-vous que l'antenne patch
est bien connectée.
FR
23
Page 25

Attribution des rôles
Les étapes suivantes expliquent comment configurer le dispositif Multilink comme
radiocommande principale ou secondaire. Vous pouvez attribuer trois rôles différents à la
radiocommande secondaire : Opérateur de la nacelle, Assistant A et Assistant B.
Radiocommande principale
1. Mettez la radiocommande sous tension. Assurez-vous que le dispositif Multilink est
bien connecté.
2. Congurez le dispositif Multilink comme radiocommande principale à l'aide de la
page Réglages de la radiocommande de l'application DJI GOTM 4.
3. Dénissez un mot de passe d'accès.
Radiocommande secondaire
1. Mettez la radiocommande sous tension. Assurez-vous que le dispositif Multilink est
bien connecté.
2. Dénissez le dispositif Multilink comme radiocommande secondaire à l'aide de la
page Réglages de la radiocommande de l'application DJI GO 4. Déterminez le rôle
FR
que vous souhaitez attribuer au contrôleur secondaire, puis sélectionnez le rôle
souhaité dans l'application DJI GO 4. À ce moment-là, l'indicateur d'état du dispositif
Multilink reste allumé en violet.
3. Saisissez le mot de passe d'accès.
4. L'indicateur d'état devient vert fixe après l'attribution du rôle. L'icône de la
radiocommande apparaît dans l'application.
5. Si vous souhaitez modier le rôle d'un contrôleur secondaire, accédez à la page
Réglages de la radiocommande de l'application DJI GO 4.
Informations relatives à l'utilisation
1. Le contrôleur principal peut contrôler les appareils, les nacelles, les caméras et les
systèmes optiques.
2. Le contrôleur secondaire 1 peut contrôler la nacelle et la caméra.
3. Les contrôleurs secondaires 2 et 3 ne peuvent contrôler que la caméra (peut être
désactivée dans la page Réglages de la radiocommande).
• Les mises à niveau du firmware peuvent être gérées dans l'application
DJI GO 4 en connectant le dispositif Multilink à la radiocommande.
• Le port CAN du dispositif Multilink peut être connecté à d'autres dispositifs
DJI intégrant un port CAN.
• Pour de meilleurs résultats, utilisez le dispositif Multilink avec une antenne
patch.
• Le dispositif Multilink émet un bip sonore à chaque fois qu'il est connecté ou
déconnecté.
24
Page 26

Annexe
Caractéristiques techniques
Fréquence de fonctionnement 2400 à 2483,5 MHz; 5725 à 5850 MHz
EIRP
Distance de communication maximale 150 m (2,4 GHz), 100 m (5,8 GHz)
Entrée 4,2 à 5,5 V, 1 A max.
Délai maximum
(du contrôleur principal au contrôleur
secondaire 3)
Délai minimum
(du contrôleur principal au contrôleur
secondaire 1)
Température de l'environnement de
fonctionnement
Produits DJI compatibles
2,4 GHz: FCC< 25dBm; CE< 20 dBm;
SRRC< 20 dBm
5,8 GHz: FCC< 29 dBm; CE< 14 dBm;
SRRC< 19 dBm
7,5 ms (5,8 GHz) / 11,1 ms (2,4 GHz)
2,5 ms (5,8 GHz) / 3,7 ms (2,4 GHz)
-30 à 40 °C (-22 à 104 °F)
DJI Focus
Module GPS Inspire 2 pour la
radiocommande
Antenne patch
Voyant d'état
Indicateur Description
Rouge xe Déconnecté. Associé comme la radiocommande principale.
Violet xe Déconnecté. Associé comme la radiocommande secondaire.
Vert xe Connecté.
Blanc xe Mise à jour du rmware.
Bleu clignotant Erreur du statut de la communication.
Éteint
La version actuelle du rmware de la radiocommande ne
correspond pas. La radiocommande n'est pas initialisée.
Défaillance matérielle.
FR
25
Page 27

Limitazioni di responsabilità e avvertenze
Congratulazioni per aver acquistato il nuovo prodotto DJITM. Le informazioni contenute
nel presente documento riguardano la sicurezza, i diritti e le responsabilità legali degli
utenti. Leggere attentamente l'intero documento per garantire la corretta congurazione
dell'apparecchio prima dell'uso. La mancata lettura del presente documento e
l'inosservanza delle istruzioni e delle avvertenze in esso contenute possono causare
lesioni gravi a se stessi o ad altri, danneggiare il prodotto DJI o causare danni a oggetti
che si trovano in prossimità. Il presente documento e tutti i documenti complementari sono
soggetti a modiche a esclusiva discrezione di DJI.
Utilizzando il prodotto, l'utente dichiara di aver letto e compreso le limitazioni di
responsabilità e le avvertenze e di accettare i termini e le condizioni ivi specicati. L'utente
riconosce di essere l'unico responsabile della propria condotta durante l'utilizzo del
prodotto e delle relative conseguenze.
L'utente accetta di utilizzare il presente prodotto esclusivamente per scopi leciti e conformi
a tutte le leggi, le normative e i regolamenti applicabili e nel rispetto di tutti i termini, le
precauzioni, le pratiche, le politiche e le direttive che DJI ha reso o renderà disponibili.
DJI declina ogni responsabilità per danni, lesioni o altre responsabilità legali direttamente
o indirettamente imputabili all'utilizzo del presente prodotto. L'utente è tenuto a osservare
IT
pratiche di condotta sicure e legittime, ivi comprese, ma non limitatamente a, quelle
esposte nel presente documento.
Nonostante quanto indicato, i diritti giuridici dell'utente previsti dalle leggi nazionali
applicabili non sono inuenzati dalla presente limitazione di responsabilità.
DJI è un marchio di SZ DJI TECHNOLOGY CO., LTD. (abbreviato come "DJI") e sue
società afliate. I nomi di prodotti, marchi, ecc. che compaiono nel presente documento
sono marchi o marchi registrati delle rispettive società proprietarie. Il presente prodotto
e il relativo documento sono protetti da copyright di proprietà di DJI. Tutti i diritti riservati.
Nessuna parte di questo prodotto o del relativo documento potrà essere riprodotta in
qualsiasi forma senza previa autorizzazione o consenso scritto da parte di DJI
Prolo del prodotto
Introduzione
Multilink è progettato specificamente per l'uso con i dispositivi di controllo remoto
INSPIRETM 2 e CENDENCETM. Esso può creare una rete di controllo master-slave con un
massimo di tre dispositivi di controllo remoto slave. I diversi dispositivi di controllo slave
formano una rete a stella con il dispositivo di controllo principale come hub centrale per
inviare comandi al velivolo tramite i dispositivi di controllo slave. Questi ultimi ricevono il
segnale immagine e video direttamente dal velivolo.
Caratteristiche
• Rete master-slave
Possibilità di creare una rete master-slave con un massimo di tre dispositivi di
controllo remoto Slave. Ogni dispositivo di controllo è responsabile di quanto segue:
Master-Pilota, Slave 1-Operatore gimbal, Slave 2-Assistente A, Slave 3- Assistente B
26
.
Page 28

• Controllo gimbal
Il dispositivo di controllo remoto Master e il dispositivo di controllo Slave 1 possono
entrambi controllare il gimbal, ma non contemporaneamente. Slave 2 e Slave 3 non
possono controllare il gimbal.
• Controllo della fotocamera
Il controllo della fotocamera è condiviso tra tutti i dispositivi di controllo remoti.
• Supporto per i dispositivi di controllo remoto INSPIRE 2 e Cendence
I dispositivi di controllo remoto Inspire 2 e Cendence possono entrambi essere
utilizzati come master o slave.
Panoramica
Antenna
Supporto per
dispositivo di controllo
remoto Inspire 2
Manopola di bloccaggio
Braccio di montaggio
Indicatore di stato
Supporto per dispositivo di controllo remoto Cendence
Porta CAN
Cavo CAN
Uso
Installazione e collegamento
Il collegamento multiplo Multilink può essere installato sia sul dispositivo di controllo
remoto Inspire 2, sia sul Cendence, utilizzando i diversi fori sul braccio di montaggio. Per il
resto, le fasi di installazione sono simili. Le fasi riportate di seguito utilizzare come esempio
il dispositivo di controllo Cendence.
1. Montare il modulo Multilink sul retro del dispositivo di controllo remoto e serrare la
manopola di bloccaggio per ssarlo.
2. Collegare il cavo CAN alla porta CAN del dispositivo di controllo remoto.
Il cavo CAN può anche essere collegato al modulo dell'antenna a microstriscia
nel caso venga utilizzata un'antenna di questo tipo. Vericare che l'antenna a
microstriscia sia collegata correttamente.
IT
27
Page 29

Assegnazione dei ruoli
Le fasi descritte di seguito illustrano come impostare il Multilink come dispositivo di
controllo remoto master o slave. Ci sono tre ruoli che è possibile assegnare per il
dispositivo di controllo remoto slave: Operatore gimbal, Assistente A e Assistente B.
Dispositivo di controllo remoto master
1. Accendere il dispositivo di controllo remoto. Assicurarsi che il Multilink sia collegato
correttamente.
2. Impostare il Multilink come dispositivo di controllo remoto master consultando la
pagina delle impostazioni del dispositivo di controllo remoto nell'app DJI GOTM 4.
3. Impostare una password di accesso.
Dispositivo di controllo remoto slave
1. Accendere il dispositivo di controllo remoto. Assicurarsi che il Multilink sia collegato
correttamente.
2. Impostare il Multilink come dispositivo di controllo remoto slave consultando la pagina
delle impostazioni del dispositivo di controllo remoto nell'app DJI GO4. Determinare
il ruolo che si desidera assegnare allo Slave, quindi scegliere il ruolo desiderato
IT
nell'app DJI GO4. A questo punto, la spia di stato del Multilink si accenderà di colore
viola sso.
3. Immettere la password di accesso.
4. La spia di stato diventerà verde sso se il ruolo è stato assegnato correttamente.
L'icona del dispositivo di controllo remoto mostrata nell'app diventerà .
5. Se si desidera commutare uno Slave a un ruolo diverso, consultare la pagina delle
impostazioni del dispositivo di controllo remoto nell'app DJI GO4.
Dettagli per l'uso
1. Il master può controllare il velivolo, il gimbal, la fotocamera e i sistemi di visione.
2. Slave 1 può controllare il gimbal e la fotocamera.
3. Slave 2 e 3 possono controllare solo la fotocamera (può essere disabilitato nella
pagina delle impostazioni del dispositivo di controllo remoto).
• Gli aggiornamenti del rmware possono essere gestiti nell'app DJI GO 4
collegando il Multilink al dispositivo di controllo remoto.
• La porta CAN sul Multilink può essere collegato ad altri dispositivi DJI tramite
una porta CAN.
• Per ottenere risultati ottimali, utilizzare Multilink con un'antenna a microstriscia.
• Il Multilink emetterà un segnale acustico ogni volta che viene collegato o
scollegato.
28
Page 30

Appendice
Caratteristiche tecniche
Frequenza di funzionamento 2400-2483,5 MHz; 5725-5850 MHz
EIRP
Massima distanza di comunicazione 150 m (2,4 GHz), 100 m (5,8 GHz)
Ingresso 4,2-5,5 V, 1 A max
Ritardo massimo
(Da Master a Slave 3)
Ritardo minimo
(Da Master a Slave 1)
Temperatura ambiente di funzionamento Da -30 °C a 40 °C (da -22 °F a 104 °F)
Dispositivi DJI compatibili
Indicatore di stato
Indicatore Descrizione
Rosso sso
Viola sso
Verde sso Collegato.
Bianco sso Aggiornamento del rmware.
Blu lampeggiante Errore di stato della comunicazione.
Off
Scollegato; assegnato come dispositivo di controllo remoto
master.
Scollegato; assegnato come dispositivo di controllo remoto
slave.
La versione corrente del dispositivo di controllo remoto non
corrisponde / dispositivo di controllo remoto non inizializzato
/ guasto dell'hardware.
2,4 GHz: FCC< 25 dBm; CE< 20 dBm;
SRRC< 20 dBm
5,8 GHz: FCC< 29 dBm; CE< 14 dBm;
SRRC< 19 dBm
7,5 ms (5,8 GHz) / 11,1 ms (2,4 GHz)
2,5 ms (5,8 GHz) / 3,7 ms (2,4 GHz)
DJI Focus
Modulo GPS Inspire 2 per il
dispositivo di controllo remoto
Antenna a microstriscia
IT
29
Page 31

Disclaimer en waarschuwing
Gefeliciteerd met de aankoop van je nieuwe DJITM-product. De informatie in dit document
betreft je veiligheid en je wettelijke rechten en plichten. Lees dit hele document zorgvuldig
door om ervoor te zorgen dat je de juiste conguratie toepast vóór het gebruik. Het niet
lezen en opvolgen van de instructies en waarschuwingen in dit document kan leiden tot
ernstig letsel bij jezelf of anderen, tot schade aan je DJI-product of schade aan andere
objecten in de omgeving. Dit document en alle overige documentatie zijn onderhevig aan
veranderingen naar goeddunken van DJI.
Door dit product te gebruiken geef je aan dat je deze disclaimer en waarschuwing
zorgvuldig hebt gelezen en dat je begrijpt en ermee akkoord gaat dat je je moet houden
aan de hierin gestelde voorwaarden en bepalingen. Je gaat ermee akkoord dat je
verantwoordelijk bent voor je eigen gedrag tijdens het gebruik van dit product, en voor de
mogelijke gevolgen daarvan.
Je gaat ermee akkoord om dit product uitsluitend voor gepaste doeleinden te gebruiken
en in overeenstemming met alle toepasselijke wetten, regels en voorschriften, en alle
voorwaarden, voorzorgsmaatregelen, gewoonten, beleidsregels en richtlijnen die DJI heeft
opgesteld en beschikbaar heeft gesteld.
DJI aanvaardt geen aansprakelijkheid voor schade, letsel of enige wettelijke
verantwoordelijkheid die direct of indirect voortkomt uit het gebruik van dit product. De
NL
gebruiker neemt veilig en legaal gebruik in acht, inclusief, maar niet beperkt tot wat in dit
document uiteen is gezet.
Desalniettemin worden je wettelijke rechten conform de toepasselijke nationale wetgeving
niet door deze disclaimer beperkt.
DJI is een handelsmerk van SZ DJI TECHNOLOGY CO., LTD. (Afgekort als “DJI”) en
haar dochterondernemingen. Namen van producten, merken, enz. in dit document zijn
handelsmerken of gedeponeerde handelsmerken van hun respectieve eigenaren. Het
copyright voor dit product en dit document rust bij DJI met alle rechten voorbehouden.
Geen enkel onderdeel van dit product of document mag worden gereproduceerd in welke
vorm dan ook zonder voorafgaande schriftelijke toestemming van DJI
.
Productproel
Inleiding
Multilink is speciaal ontwikkeld voor gebruik met de INSPIRETM 2- en CENDENCETM-
afstandsbediening. Je kunt hiermee een master-slave-controllernetwerk met maximaal
drie slave-afstandsbedieningen creëren. De diverse slave-controllers vormen samen met
de mastercontroller als hub een sternetwerk, om signalen via de slave-controllers naar de
drone te versturen. Slave-controllers ontvangen het beeld- en videosignaal direct van de
drone.
30
Page 32

Eigenschappen
• Master-slave-netwerk
Kan een master-slave-controllernetwerk met maximaal drie slave-afstandsbedieningen
creëren. Elke controller is verantwoordelijk voor het volgende:
Master–Piloot, Slave 1–Bediener van gimbal, Slave 2–Assistent A, Slave 3– Assistent B
• Bediening van de gimbal
De gimbal kan met zowel de master-afstandsbediening als slave-controller 1 worden
bediend, maar niet tegelijkertijd. De gimbal kan niet worden bediend met slave 2 en slave 3.
• Bediening van de camera
De bediening van de camera wordt gedeeld door alle afstandsbedieningen.
• Ondersteuning voor Inspire 2- en Cendence-afstandsbediening
Zowel de Inspire 2- als Cendence-afstandsbediening kunnen als master of slave
worden gebruikt.
Overzicht
Antenne
Bevestiging Inspire
2-afstandsbediening
Vergrendelknop
Montagearm
Statusindicator
Bevestiging Cendence-afstandsbediening
CAN-poort
CAN-kabel
Gebruik
Installatie en verbinding
Multilink kan op zowel de Inspire 2- als de Cendence-afstandsbediening worden
gemonteerd met de gaten op de montagearm. De montage-instructies zijn voor beide
gelijk. In de onderstaande stappen wordt de Cendence als voorbeeld gebruikt.
1. Bevestig de Multilink-module op de achterkant van de afstandsbediening en draai de
vergrendelknop vast.
2. Sluit de CAN-kabel aan op de CAN-poort van de afstandsbediening.
NL
31
Page 33

De CAN-kabel kan ook worden aangesloten op de patch-antennemodule indien
een patch-antenne wordt gebruikt. Controleer of de patch-antenne juist is
aangesloten.
Rollen toewijzen
Hieronder wordt uitgelegd hoe je de Multilink als master- of slave-afstandsbediening kunt
instellen. Je kunt drie rollen toewijzen aan de slave-afstandsbediening: Bediener van
gimbal, Assistent A en Assistent B.
Master-afstandsbediening
1. Schakel de afstandsbediening in. Controleer of de Multilink is verbonden.
2. Stel de Multilink in als master-afstandsbediening met behulp van de instellingenpagina
Remote (afstandsbediening) in de DJI GOTM 4-app.
3. Stel een wachtwoord in.
Slave-afstandsbediening
1. Schakel de afstandsbediening in. Controleer of de Multilink is verbonden.
2. Stel de Multilink in als slave-afstandsbediening met behulp van de instellingenpagina
NL
Remote (afstandsbediening) in de DJI GO 4-app. Bepaal welke rol je aan de slave
wilt toewijzen en selecteer vervolgens de gewenste rol in de DJI GO 4-app. De
statusindicator van de Multilink blijft nu paars branden.
3. Voer het wachtwoord in.
4. De statusindicator blijft groen branden wanneer de rol is toegewezen. Het
afstandsbedieningspictogram in de app wordt gewijzigd in .
5. Als je een andere rol wilt toewijzen aan een slave, dan kun je dit doen via de
instellingenpagina Remote (afstandsbediening) in de DJI GO 4-app.
Gebruik
1. Met de master kun je de drone, gimbal en camera- en videosystemen bedienen.
2. Met slave 1 kun je de gimbal en camera bedienen.
3. Met slave 2 en 3 kun je alleen de camera bedienen (kan worden uitgeschakeld op de
instellingenpagina Remote (afstandsbediening).
• Firmware kan worden bijgewerkt met de DJI GO 4-app door de Multilink aan
te sluiten op de afstandsbediening.
• De CAN-poort op de Multilink kan op de CAN-poort van andere DJIapparaten worden aangesloten.
• Gebruik de Multilink in combinatie met een patch-antenne voor optimale
resultaten.
• Telkens wanneer de Multilink wordt aangesloten of losgekoppeld, klinkt een
pieptoon.
32
Page 34

Bijlage
Specicatie
Bedrijfsfrequentie 2400-2483,5 MHz; 5725-5850 MHz
EIRP
Maximale communicatieafstand 150 m (2,4 GHz), 100 m (5,8 GHz)
Invoer 4,2-5,5 V, 1 A max
Maximale vertraging
(Van master naar slave 3)
Minimale vertraging
(Van master naar slave 1)
Omgevingstemperatuur bij bedrijf -30° tot 40°C (-22° tot 104°F)
Compatibele DJI-apparaten
Statusindicator
Indicator Beschrijving
Continu rood Losgekoppeld; toegewezen als de master-afstandsbediening.
Continu paars Losgekoppeld; toegewezen als slave-afstandsbediening.
Continu groen Verbonden.
Continu wit Bijwerken van rmware.
Knipperend blauw Fout communicatiestatus.
Uit
Huidige rmwareversie van de afstandsbediening komt niet
overeen / afstandsbediening niet geïnitialiseerd / hardwarefout.
2,4 GHz: FCC< 25 dBm; CE< 20 dBm;
SRRC< 20 dBm
5,8 GHz: FCC< 29 dBm; CE< 14 dBm;
SRRC< 19 dBm
7,5 ms (5,8 GHz) / 11,1 ms (2,4 GHz)
2,5 ms (5,8 GHz) / 3,7 ms (2,4 GHz)
DJI Focus
Inspire 2 GPS-module voor de
afstandsbediening
Patch-antenne
NL
33
Page 35

Declaração de exoneração de responsabilidade
e aviso
Parabéns por ter adquirido o seu novo produto da DJITM. As informações contidas neste
documento afetam a sua segurança e os seus direitos legais e responsabilidades.
Leia este documento cuidadosamente para assegurar uma conguração correta antes
da utilização. A não leitura e o incumprimento das instruções e avisos contidos neste
documento podem resultar em lesões graves para si ou terceiros, em danos no produto
da DJI ou em danos noutros objetos que se encontrem nas proximidades. Este e todos
os outros documentos de garantia estão sujeitos a alteração ao critério exclusivo da DJI
TECHNOLOGY CO., LTD.
A utilização deste produto significa que leu cuidadosamente esta declaração de
exoneração de responsabilidade e aviso, e que compreende e aceita cumprir os termos e
condições aqui expostos. Concorda que é o único responsável pela sua própria conduta
durante a utilização deste produto e pelas possíveis consequências daí resultantes.
O utilizador compromete-se a utilizar este produto apenas para ns que sejam aceitáveis
e estejam em conformidade com todas as leis, regras e regulamentações aplicáveis e
ainda todos os termos, precauções, práticas, políticas e diretrizes que a DJI disponibilize
e possa vir a disponibilizar.
A DJI não assume qualquer responsabilidade pelos danos, ferimentos ou quaisquer
responsabilidades legais decorrentes direta ou indiretamente da utilização deste produto.
Deve adotar práticas seguras e legais, incluindo, entre outras, as apresentadas no
PT-PT
presente documento.
Não obstante o disposto acima, os seus direitos legais ao abrigo da legislação nacional
aplicável não são afetados por esta isenção de responsabilidade.
DJI é uma marca comercial da SZ DJI TECHNOLOGY CO., LTD. (abreviada como
"DJI") e suas empresas aliadas. Todos os nomes de produtos, marcas, etc., incluídos
no presente documento são marcas comerciais ou marcas comerciais registadas das
respetivas empresas detentoras. Este produto e este documento estão protegidos por
direitos de autor pela DJI, com todos os direitos reservados. Nenhuma parte deste produto
ou documento deverá ser reproduzida, seja de que forma for, sem o consentimento ou
autorização prévios, por escrito, da DJI
.
Perl do produto
Introdução
O Multilink foi concebido especificamente para utilização com os telecomandos
INSPIRETM 2 e CENDENCETM. Pode criar uma rede de telecomandos com um principal e
até três secundários. Os vários telecomandos secundários formam uma rede em estrela
com o telecomando principal como a base central que envia comandos para a aeronave
através dos telecomandos secundários. Os telecomandos secundários recebem sinais
de imagem e de vídeo diretamente da aeronave.
34
Page 36

Características
• Rede de telecomandos com um principal e vários secundários
Pode criar uma rede de telecomandos com um principal e até três secundários. Cada
telecomando tem as seguintes funções:
principal: piloto; secundário 1: controlador da suspensão cardã; secundário 2:
assistente A; secundário 3: assistente B.
• Controlo da suspensão cardã
O telecomando principal e o telecomando secundário 1 podem controlar a suspensão
cardã desde que não o façam simultaneamente. O telecomandos secundários 2 e 3
não podem controlar a suspensão cardã.
• Controlo da câmara
O controlo da câmara é partilhado entre todos telecomandos.
• Compatibilidade com os telecomandos Inspire 2 e Cendence
Os telecomandos Inspire 2 e Cendence podem ser utilizados como telecomando
principal ou secundário.
Visão geral
Antena
Suporte para o
telecomando Inspire 2
Manípulo de bloqueio
Braço de montagem
Indicador de estado
Suporte para o telecomando Cendence
Porta CAN
Cabo CAN
Utilização
Instalação e ligação
O Multilink pode ser instalado nos telecomandos Inspire 2 e Cendence através dos
diferentes orifícios no braço de montagem. Os passos de instalação são semelhantes. Os
passos apresentados abaixo utilizam o telecomando Cendence como exemplo.
1. Monte o módulo Multilink na parte traseira do telecomando e aperte o manípulo de
bloqueio para xá-lo.
2. Ligue o cabo CAN à porta CAN do telecomando.
PT-PT
35
Page 37

O cabo CAN também pode ser ligado ao módulo da antena de correção
(caso seja utilizada). Certique-se de que a antena de correção está ligada
corretamente.
Atribuição de funções
Os seguintes passos explicam como configurar o Multilink como um telecomando
principal ou secundário. Existem três funções que pode atribuir ao telecomando principal:
controlador da suspensão cardã, assistente A e assistente B.
Telecomando principal
1. Ligue o telecomando. Certique-se de que o Multilink está ligado corretamente.
2. Dena o Multilink como telecomando principal utilizando a página de conguração
do telecomando na aplicação DJI GOTM 4.
3. Dena uma palavra-passe.
Telecomando secundário
1. Ligue o telecomando. Certique-se de que o Multilink está ligado corretamente.
2. Dena o Multilink como telecomando secundário utilizando a página de conguração
do telecomando na aplicação DJI GO 4. Determine a função que pretende atribuir
ao telecomando secundário e selecione-a na aplicação DJI GO 4. O indicador de
PT-PT
estado do Multilink deverá car roxo xo.
3. Introduza a palavra-passe.
4. O indicador de estado ficará verde fixo depois de a função ser atribuída com
sucesso. O ícone do telecomando apresentado na aplicação muda para .
5. Se pretender alterar a função de um telecomando secundário, aceda à página de
conguração do telecomando na aplicação DJI GO 4.
Detalhes de utilização
1. O telecomando principal pode controlar a aeronave, a suspensão cardã, a câmara e
os sistemas de visão.
2. O telecomando secundário 1 pode controlar a suspensão cardã e a câmara.
3. Os telecomandos 2 e 3 só podem controlar a câmara (podem ser desativados na
página de conguração dos telecomandos).
• As atualizações de rmware podem ser geridas na aplicação DJI GO 4 ao ligar
o Multilink ao telecomando.
• A porta CAN do Multilink pode ser ligada a outros dispositivos DJI com uma
porta CAN.
• Para obter os melhores resultados, utilize o Multilink juntamente com uma
antena de correção.
• O Multilink emite um sinal sonoro sempre que é ligado ou desligado.
36
Page 38

Apêndice
Especicações
Frequência de funcionamento 2400-2483,5 MHz; 5725-5850 MHz
EIRP
Distância de comunicação máxima 150 m (2,4 GHz), 100 m (5,8 GHz)
Entrada 4,2 a 5,5 V, 1 A máx.
Atraso máximo
(do telecomando principal ao telecomando
secundário 3)
Atraso mínimo
(do telecomando principal ao telecomando
secundário 1)
Temperatura ambiente de funcionamento -30° a 40 °C (-22° a 104 °F)
Dispositivos DJI compatíveis
Indicador de estado
Indicador Descrição
Vermelho xo Desligado; atribuído como telecomando principal.
Roxo xo Desligado; atribuído como telecomando secundário.
Verde xo Ligado.
Branco xo Atualização de rmware.
Azul intermitente Erro do estado de comunicação.
Desligado
A versão atual de rmware do telecomando não é
compatível/o telecomando não foi ativado/falha de hardware.
2,4 GHz: FCC< 25 dBm; CE< 20 dBm;
SRRC< 20 dBm
5,8 GHz: FCC< 29 dBm; CE< 14 dBm;
SRRC< 19 dBm
7,5 ms (5,8 GHz) / 11,1 ms (2,4 GHz)
2,5 ms (5,8 GHz) / 3,7 ms (2,4 GHz)
DJI Focus
Módulo GPS Inspire 2 para o
telecomando
Antena de correção
PT-PT
37
Page 39

Compliance Information
FCC Compliance Notice
Changes or modifications not expressly approved by the party responsible for
compliance could void the user’s authority to operate the equipment.
This device complies with Part 15 of the FCC Rules. Operation is subject to the following
two conditions: (1) this device may not cause harmful interference, and (2) this device
must accept any interference received, including interference that may cause undesired
operation.
This equipment has been tested and found to comply with the limits for a Class B digital
device, pursuant to Part 15 of the FCC Rules. These limits are designed to provide
reasonable protection against harmful interference in a residential installation. This
equipment generates, uses and can radiate radio frequency energy and, if not installed
and used in accordance with the instructions, may cause harmful interference to radio
communications. However, there is no guarantee that interference will not occur in a
particular installation.
If this equipment does cause harmful interference to radio or television reception, which
can be determined by turning the equipment off and on, the user is encouraged to try to
correct the interference by one or more of the following measures:
-- Reorient or relocate the receiving antenna.
-- Increase the separation between the equipment and receiver.
-- Connect the equipment into an outlet on a circuit different from that to which the
receiver is connected.
-- Consult the dealer or an experienced radio/TV technician for help.
This equipment complies with FCC radiation exposure limits set forth for an uncontrolled
environment. End user must follow the specic operating instructions for satisfying RF
exposure compliance. This transmitter must not be co-located or operating in conjunction
with any other antenna or transmitter except the transmitter listed in user manual.
The portable device is designed to meet the requirements for exposure to radio waves
established by the Federal Communications Commission (USA). These requirements
set a SAR limit of 1.6 W/kg averaged over one gram of tissue. The highest SAR value
reported under this standard during product certication for use when properly worn on
the body
Canada ISED Compliance notice
This device contains licence-exempt transmitter(s)/receiver(s) that comply with
Innovation, Science and Economic Development Canada’s licence-exempt RSS(s).
Operation is subject to the following two conditions: (1)This device may not cause
interference.(2)This device must accept any interference, including interference that may
cause undesired operation of the device.
L’émetteur/récepteur exempt de licence contenu dans le présent appareil est conforme
aux CNR d’Innovation, Sciences et Développement économique Canada applicables
aux appareils radio exempts de licence. L’exploitation est autorisée aux deux conditions
suivantes :(1)L’appareil ne doit pas produire de brouillage; (2)L’appareil doit accepter
tout brouillage radioélectrique subi, même si le brouillage est susceptible d’en
compromettre le fonctionnement.
This equipment complies with ISED radiation exposure limits set forth for an uncontrolled
environment. End user must follow the specic operating instructions for satisfying RF
38
Page 40

exposure compliance. This transmitter must not be co-located or operating in conjunction
with any other antenna or transmitter.The portable device is designed to meet the
requirements for exposure to radio waves established by the ISED. These requirements
set a SAR limit of 1.6 W/kg averaged over one gram of tissue. The highest SAR value
reported under this standard during product certication for use when properly worn on
the body.
Cet équipement est conforme aux limites d’exposition aux rayonnements ISED établies
pour un environnement non contrôlé. L’utilisateur final doit suivre les instructions
spéciques pour satisfaire les normes. Cet émetteur ne doit pas être co-implanté ou
fonctionner en conjonction avec toute autre antenne ou transmetteur. Le dispositif
portatif est conçu pour répondre aux exigences d’exposition aux ondes radio établie par
le développement énergétique DURABLE. Ces exigences un SAR limite de 1,6 W/kg en
moyenne pour un gramme de tissu. La valeur SAR la plus élevée signalée en vertu de
cette norme lors de la certication de produit à utiliser lorsqu’il est correctement porté
sur le corps.
KCC Warning Message
“해당무선설비는 운용 중 전파혼신 가능성이 있으므로 인명안전과 관련된 서비스는 할 수 없습니다 .”
“해당 무선설비는 운용 중 전파혼신 가능성이 있음”
NCC Warning Message
低功率電波輻射性電機管理辦法
第十二條 經型式認證合格之低功率射頻電機,非經許可,公司、商號或使用者均不得擅自
變更頻率、加大功率或變更原設計之特性及功能。
第十四條 低功率射頻電機之使用不得影響飛航安全及干擾合法通信;經發現有干擾現象時,
應改善至無干擾時方得繼續使用。前項合法通信,指依電信法規定作業之無線電通信。低
功率射頻電機須忍受合法通信或工業、科學及醫療用電波輻射性電機設備之干擾。
EU Compliance Statement:
device is in compliance with the essential requirements and other relevant provisions of
the Directive 2014/53/EU.
A copy of the EU Declaration of Conformity is available online at www.dji.com/euro-
compliance
EU contact address: DJI GmbH, Industriestrasse 12, 97618, Niederlauer, Germany
Declaración de cumplimiento UE:
declara que este dispositivo cumple los requisitos básicos y el resto de provisiones
relevantes de la Directiva 2014/53/EU.
Hay disponible online una copia de la Declaración de conformidad UE en www.dji.com/
euro-compliance
Dirección de contacto de la UE: DJI GmbH, Industriestrasse 12, 97618, Niederlauer,
Germany
EU-verklaring van overeenstemming:
dat dit apparaat voldoet aan de essentiële vereisten en andere relevante bepalingen van
Richtlijn 2014/53/EU.
De EU-verklaring van overeenstemming is online beschikbaar op www.dji.com/euro-
compliance
Contactadres EU: DJI GmbH, Industriestrasse 12, 97618, Niederlauer, Germany
SZ DJI TECHNOLOGY CO., LTD. hereby declares that this
SZ DJI TECHNOLOGY CO., LTD. por la presente
SZ DJI TECHNOLOGY CO., LTD. verklaart hierbij
39
Page 41

Declaração de conformidade da UE:
através deste documento, que este dispositivo está em conformidade com os requisitos
essenciais e outras disposições relevantes da Diretiva 2014/53/EU.
Existe uma cópia da Declaração de conformidade da UE disponível online em www.dji.
com/euro-complianc
Endereço de contacto na UE: DJI GmbH, Industriestrasse 12, 97618, Niederlauer,
Germany
Dichiarazione di conformità UE:
presente dispositivo è conforme ai requisiti essenziali e alle altre disposizioni rilevanti
della direttiva 2014/53/EU.
Una copia della dichiarazione di conformità UE è disponibile online all'indirizzo Web
www.dji.com/euro-compliance
Indirizzo di contatto UE: DJI GmbH, Industriestrasse 12, 97618, Niederlauer, Germany
Déclaration de conformité UE:
que cet appareil est conforme aux principales exigences et autres clauses pertinentes
de la directive européenne 2014/53/EU.
Une copie de la déclaration de conformité UE est disponible sur le site www.dji.com/
euro-compliance
Adresse de contact pour l'UE : DJI GmbH, Industriestrasse. 12, 97618, Niederlauer,
Germany
EU-Compliance:
den wesentlichen Anforderungen und anderen einschlägigen Bestimmungen der EURichtlinie 2014/53/EU entspricht.
Eine Kopie der EU-Konformitätserklärung finden Sie online auf www.dji.com/euro-
compliance.
Kontaktadresse innerhalb der EU: DJI GmbH, Industriestrasse. 12, 97618, Niederlauer,
Germany
CAUTION: RISK OF EXPLOSION IF BATTERY IS REPLACED BY AN INCORRECT TYPE.
DISPOSE OF USED BATTERIES ACCORDING TO THE INSTRUCTIONS
Environmentally friendly disposal
valuable raw materials and the treatment of toxic substances.
Thailand Warning Message
เครื่องโทรคมนาคมและอุปกรณ์นี้ มีความสอดคล้องตามข้อกำาหนดของ กทช.
40
Hiermit erklärt SZ DJI TECHNOLOGY CO., LTD., dass dieses Gerät
Old electrical appliances must not be disposed of together with the residual
waste, but have to be disposed of separately. The disposal at the communal
collecting point via private persons is for free. The owner of old appliances
is responsible to bring the appliances to these collecting points or to similar
collection points. With this little personal effort, you contribute to recycle
A SZ DJI TECHNOLOGY CO., LTD. declara,
SZ DJI TECHNOLOGY CO., LTD. dichiara che il
Par la présente, SZ DJI TECHNOLOGY CO., LTD déclare
Page 42

Mexico Warning message
“La operación de este equipo está sujeta a las siguientes dos condiciones: (1) es
posible que este equipo o dispositivo no cause interferencia perjudicial y (2) este equipo
o dispositivo debe aceptar cualquier interferencia, incluyendo la que pueda causar su
operación no deseada.”
Brazil Warning message
Este equipamento opera em caráter secundário, isto é, não tem direito a proteção
contra interferência prejudicial, mesmo de estações do mesmo tipo, e não pode causar
interferência a sistemas operando em caráter primário.
41
Page 43

DJI Support
DJI
技术支持
DJI
技術支援
DJI Support
Servicio de asistencia de DJI
Service client DJI
Assistenza DJI
DJI-ondersteuning
Assistência da DJI
http://www.dji.com/support
If you have any questions about this document, please
contact DJI by sending a message to
如果您对说明书有任何疑问或建议,请通过以下电子邮箱联系
DocSupport@dji.com
我们:
Designed by DJI. Printed in China.
YC.BZ.SS000387.02
DocSupport@dji.com
。
.
 Loading...