

Page 1
Droplet Analyzer
User Guide
使用说明
ユーザーガイド
사용자 가이드
2017.05V1.0
Page 2
Contents
EN
User Guide
CH
使用说明
JP
ユーザーガイド
KR
사용자 가이드
2
8
14
20
1
Page 3

Disclaimer
EN
Thank you for purchasing Droplet Analyzer (hereinafter referred to as the
“Product”). Read this disclaimer carefully before using this Product. By using
this Product, you hereby agree to this disclaimer and signify that you have
read it fully. Please use this Product in strict accordance with the manual
and be sure to pay attention to the Warnings. SZ DJI TECHNOLOGY CO.,
LTD., and its afliated companies assume no liability for damage(s) or injuries
incurred directly or indirectly from using, installing or refitting this product
improperly, including but not limited to using non-designated accessories
such as a battery, test paper or app.
TM
is a trademark of SZ DJI TECHNOLOGY CO., LTD. (abbreviated as “DJI”)
DJI
and its afliated companies. Names of products, brands, etc., appearing in
this manual are trademarks or registered trademarks of their respective owner
companies. This Product and manual are copyrighted by DJI with all rights
reserved. No part of this Product or manual shall be reproduced in any form
without the prior written consent or authorization of DJI.
This disclaimer is produced in various languages. In the event of divergence
among different versions, the Chinese version shall prevail when the Product
in question is purchased in China, and English version shall prevail when the
Product in question is purchased in any other region.
Warnings
1. The Droplet Analyzer does not come with a battery. Please purchase an
approved 9 V battery. DO NOT use leaking or damaged batteries.
2. The Droplet Analyzer analyzes droplet information after obtaining a sample
on the test paper. Analysis results may vary according to different types of
test paper. Use water-sensitive paper from an established manufacturer to
reduce research bias.
3. Be sure to keep the lens clean. If dirty, wipe it with the lens cleaning cloth
included.
4. Remove the battery from the analyzer and put it into the toolbox if unused
for extended periods.
2
Page 4
Introduction
The Droplet Analyzer comes equipped with a high-precision lens module
designed for agricultural applications, with the ability to take photos with a
smart mobile device. Droplet information is easily obtained and analyzed with
the DJI Droplet Analyzer app, providing reliable data support for precision
agriculture. Its compact structure and easy-to-use features make it ideal for
single-person droplet analysis.
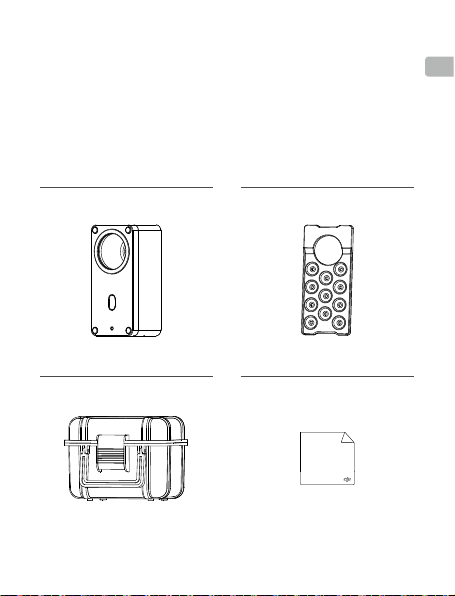
In the Box
Droplet Analyzer × 1
Suction Cup Set × 1
EN
Toolbox × 1
Lens Cleaning Cloth × 1
3
Page 5
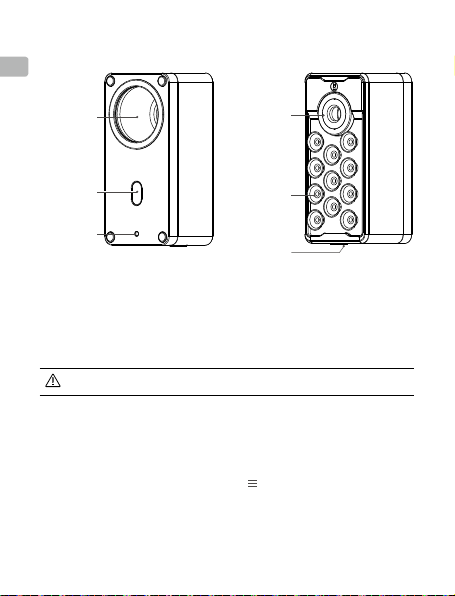
Overview
EN
Lighting
System
Power Button
Power
Indicator
Lens
Suction
Cups
Battery
Compartment
Cover
Usage
Download the DJI Droplet Analyzer
Search “Droplet Analyzer” in Google Play, and download the app to your
mobile device.
The app supports Android 5.0 or later.
Binding Device
The app can only be used by binding it to the analyzer via the Internet.
1. Scan the QR code on the body of the analyzer or type in the serial number.
Each QR code or serial number will bind the app to up to ve mobile devices.
2. To unbind the Droplet Analyzer, tap the
the app then, Bound Device > Unbind.
Installing the Battery
A 9 V battery is required.
4
icon in the upper right corner of
Page 6
1. Push the battery compartment cover out.
2. Insert the 9 V battery into the compartment. Check that the positive and
negative terminals are correctly aligned. Push again to ensure secure
installation.
3. Remount the cover.
Turning the Analyzer On/Off
Turning On: Press and hold the power button for two seconds to turn it on.
The lighting system will switch on, and the power indicator will show a solid
green light, indicating a normal start. A solid red light indicates low battery
level. Replace the battery as soon as possible.
Turning Off: Press and hold the power button for two seconds to turn it off.
The power indicator and the lighting system will turn off. The analyzer will turn
off automatically if idle for more than eight minutes after being switched on.
Fixing the Analyzer
1. Align the lens of the analyzer to the camera of your mobile device with the
suction cups facing the device. Press the analyzer to x it on the mobile
device via the suction cups.
2. Adjust the position of the analyzer so that all the suction cups are attached
to the mobile device sticking to the analyzer.
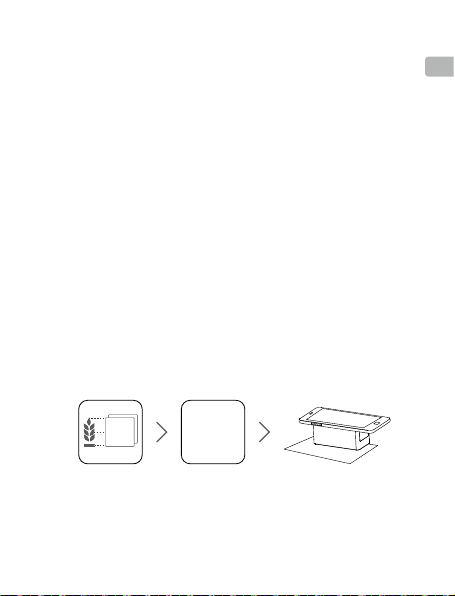
Droplet Analysis
Droplet
Analyzer
App
Place the test paper where you want to do droplet analysis on the plants. Spray
the liquid, then run the app and follow the instructions below for droplet analysis.
Data Collection
1. Tap “New Task”.
EN
5
Page 7

2. Type “Task Name”, “Operator”, “Time”.
EN
3. Select “Area of Test Paper”.
4. Type “Ground Length” and “Sample Space”. The app will display the value
of “Estimated Sample Number”.
5. Tap “+” under “Import Photo” to enter Shooting View.
a. Place the test paper onto a at surface. Align the lens of the analyzer to
the desired shooting area and stick the analyzer to the paper.
b. Roll the menu in the lower right corner of the screen to change the
sample location.
c. Tap the screen to select an area for focusing, then tap the shutter
.
button
d. The area selecting tool will appear on the screen. Drag the box in the
middle to select the desired area. Drag the dots around it to change the
size of the area.
e. After selecting the area, tap “Complete” to end shooting or tap “Take
next photo”.
f. After importing your photos, tap a photo to see its corresponding
information. Tap the photo under “Photo Info” to show detected
droplets. If the information is inaccurate, tap the delete icon
“Replace Photo” to import the photo again.
Always use the lens of the analyzer when taking photos. Make
sure that there is no space between the analyzer and test paper
to avoid extra sources of light, which may compromise droplet
information accuracy.
Use the Gradienter in the upper right corner of Shooting View
to check whether the mobile device is horizontal when taking
photos. The mobile device is adjusted to level when the dot of the
Gradienter is coincident with the central cross, turning green.
6. Tap “More Info” to congure Spray Info, Environment Info, Flight Info, and
Crop Info, then tap “Save”.
7. After conguring all the settings, tap “Save”.
6
or
Page 8
Data Analysis
In the task list in Data Collection View, swipe one task to the left to edit or
delete the task. Tap the desired task and the app will show you the results of
the analysis.
1. Coefficient of Variation: Indicates the distribution of the droplets. The
smaller the value, the more uniform the distribution.
2. Coverage Rate and Drop: Select/clear to show/hide the corresponding item.
3. Display Value: Select/clear to show/hide the value of each sample location.
4. Landscape: Select/clear to show the results in landscape/portrait.
Photo Info: Tap to view the results of the analysis for each photo at its
5.
corresponding sample location, such as drop number, diameter, coverage,
and distribution. You can enter Photo Info by tapping the sampling point
on the polyline. Tap the photo under Photo Info to show the detected
droplets. Tap “<”/“>” to show the previous or next photo.
6. Swipe to the left to view task information. Tap “<”/“>” to show the previous
or next task. Tap “Edit” for conguration.
More
icon on the upper right corner of Data Collection View for more
Tap the
functions i.e. Bound Device, Feedback, APP Version, and Clear all tasks.
Specications
Model DA4231
Dimensions 96 mm × 46 mm × 45 mm
Weight (Battery Excluded) 134 g
Power 1.5 W
Battery 9 V alkaline or 9 V NiMH rechargeable
This content is subject to change.
Download the latest version from
http://www.dji.com/mg-1s
batteries recommended.
Copyright © 2017 DJI All Rights Reserved.
DJI is a trademark of DJI.
EN
Page 9

免责声明
感谢您购买雾滴分析仪。在使用之前,请仔细阅读本声明,一旦使用,
CH
即被视为对本声明全部内容的认可和接受。请严格遵守本文安装和使用
该产品,并务必重视注意事项。因用户不当使用、安装、改装(包含但
不限于使用非 DJITM指定的零配件,如:电池、试纸、App 等)造成的
任何损失,深圳市大疆TM创新科技有限公司及其关联公司将不承担任
何责任。
DJI 是深圳市大疆创新科技有限公司及其关联公司的商标。本文出现的
产品名称、品牌等,均为其所属公司的商标或注册商标。本产品及文
档为深圳市大疆创新科技有限公司版权所有。未经许可,不得以任何
形式复制翻印。
关于不同语言版本的免责声明可能存在的语义差异,中国以中文版为准,
其他地区以英文版为准。
注意事项
1. 雾滴分析仪不包含电池,用户需自行购买 9V 电池。切勿使用存在破
损、漏液等情况的电池。
2. 雾滴分析仪通过获取试纸上的雾滴样本进行雾滴分析,使用不同试
纸所得的分析结果会有所不同。请选用正规厂商的水敏纸,否则可
能导致分析结果与实际情况偏差较大。
3. 务必保持镜头清洁,若有异物请使用包装内的镜头清洁布擦拭。
4. 若长期不使用分析仪,需取出电池并将分析仪放置在工具箱中。
8
Page 10

简介
雾滴分析仪专为农业领域设计,配备高精度镜头模组,在可拍照的智能
移动设备上配合定制的 DJI 雾滴分析仪 App 使用,能够准确地获取并
分析试纸上的雾滴信息,为精准农业提供可靠的数据支持。分析仪体积
小巧,简单易用,单人即可实现田间雾滴分析工作。
物品清单
CH
雾滴分析仪 ×1
工具箱 ×1
吸盘 ×1 组
镜头清洁布 ×1
9
Page 11

部件名称
CH
照明系统
电源开关
电源指示灯
镜头
吸盘
电池仓盖
使用
下载 DJI 雾滴分析仪 App
在软件商店搜索“雾滴分析仪”,下载并安装至移动设备。
目前仅可于 Google Play、华为应用市场及腾讯应用宝平台进
行下载,可下载平台将持续更新,请访问 DJI MG-1S 产品页
面查看详细列表。
App 要求使用 Android 5.0 及以上系统。
绑定设备
App 需要绑定分析仪方可使用。绑定时确保移动设备已接入互联网。
1. 使用 App 扫描分析仪上的二维码,或在 App 中输入序列号即可。每
个二维码(序列号)最多可与 5 部移动设备上的 App 绑定。
2. 如需解除绑定,点击 App 右上角的 图标 > 设备绑定 > 解除绑定。
10
Page 12

安装电池
请自备 9V 电池。
1. 推开电池仓盖。
2. 将 9V 电池装入电池仓,注意正负极对应。稍加用力确保电池安装
稳固。
3. 装回电池仓盖。
开启 / 关闭分析仪
开启:长按分析仪的电源开关 2 秒以开启分析仪。照明系统点亮且电源
指示灯显示绿灯常亮表示正常启动;电源指示灯显示红灯常亮表示电池
电量低,请尽快更换电池,以免影响正常使用。
关闭:在分析仪开启的状态下,长按电源开关 2 秒以关闭分析仪,电源
指示灯和照明系统将熄灭。分析仪开启后闲置超过 8 分钟也会自动关闭。
固定分析仪
1. 将分析仪带吸盘的一面贴近移动设备,使分析仪的镜头对准移动设
备的摄像头。按压分析仪,通过吸盘将其固定至移动设备。
2. 适当调整分析仪角度,使尽可能多的吸盘吸附至移动设备,以确保
稳固。
雾滴分析
雾滴分析仪
APP
将试纸放置于需要分析雾滴的位置(植物的顶部、中部或根部),并进
行喷洒。运行 App,然后按照以下方法进行雾滴分析。
11
CH
Page 13

数据采集
1. 点击“新建任务”。
CH
2. 输入“任务名称”、“作业者”、“时间”。
3. 选择“试纸放置区域”。
4. 输入“场地长度”和“采样间距”,App 将显示“预计需要采样张数”。
5. 点击“导入照片”下方的“+”,进入拍照界面。
a. 将试纸放置于平整的平面上,使分析仪镜头对准需要拍照的位置,
并贴紧试纸。
b. 滑动右下角菜单可更改采样位置。
c. 点击屏幕选择对焦点,然后点击拍照按钮
。
d. 屏幕显示照片区域选择工具。拖动中间的方框选择所需区域,拖
动四周的圆点改变区域大小。
e. 区域选择完成后,可选择“完成”结束拍照,或选择“继续拍下
一张”。
f. 导入照片后,可点击照片查看照片信息。点击照片信息中的照片,
可显示检测到的雾滴。若照片信息不准确,可选择删除
照片以重新导入。
务必配合分析仪镜头拍摄照片,并确保分析仪贴紧试纸以避
免外界光线进入镜头,否则将无法获取准确的雾滴信息。
拍照时,如有需要,可使用拍照界面右上方的水平仪观察移
动设备是否水平。水平仪的圆点与中心十字重合且变为绿色
时表示移动设备已调至水平。
6. 点击“更多信息”,设置喷洒信息、环境信息、飞行信息和作业信
息并保存。
7. 所有设置完成后,点击“保存”。
12
或替换
Page 14

数据分析
在数据采集界面的任务列表中,向左滑动任务可编辑或删除相应任务;
点击需要查看的任务,App 将显示分析结果。
1. 变异系数:表示雾滴的分布情况,变异系数越小分布越均匀。
2. 覆盖率、雾滴:勾选 / 取消将显示 / 隐藏此项分析结果。
3. 显示值:勾选 / 取消将显示 / 隐藏各个采样位置对应的数值。
4. 横屏:勾选 / 取消将横屏 / 竖屏显示分析结果。
5.
照片信息:点击可查看每个采样位置对应照片的雾滴个数、直径、
覆盖率、分布情况等分析结果。点击折线上的采样点
亦可进入照
片信息。点击照片可显示检测到的雾滴,点击“<”/“>”切换至上
一张 / 下一张照片。
6. 向左滑动可查看任务信息,点击右上角的“<”/“>”切换至上一
个 / 下一个任务,点击“编辑”可修改信息。
更多
点击数据采集界面右上角的 图标,可进行以下操作:设备绑定、用
户反馈、查看 App 版本、清空所有任务。
规格参数
型号 DA4231
尺寸 96 mm×46 mm×45 mm
重量(不含电池) 134 g
功率 1.5 W
电池 推荐使用 9V 碱性电池或 9V 镍氢充电电池
内容如有更新,恕不另行通知。
您可以在 DJI 官方网站查询最新版本
http://www.dji.com/mg-1s
DJI 是大疆创新的商标。
Copyright © 2017 大疆创新 版权所有
CH
Page 15

免責事項
散布分析計(以下[本製品]と記載します)をご購入いただきありがとうございます。
本製品の使用前に、この免責事項をよくお読みください。本製品を使用すると、この
免責事項をすべて読み、これに同意したとみなされます。本製品をご使用の際は、
JP
マニュアルの記載事項を厳守し、警告に注意してください。SZ DJI TECHNOLOGY
CO., LTD. とその関連会社は、本製品が不適切な使用、取り付けまたは改変(指定
外のバッテリー、試験紙、アプリなどアクセサリーの使用などが含まれます)により、
直接または間接的な原因で生じた物的損害または人的被害についていかなる責
任も負いません。
TM
DJI
は SZ DJI TECHNOLOGY CO., LTD.( 略 し て[ DJI])およびその関連会社の
商標です。本書に記載されている製品、ブランドなどの名称は、その所有者である
各社の商標または登録商標です。本製品および本マニュアルは、不許複製・禁無断
転載 を原 則とする DJI の著作物のため、DJI から書面による事前承認または許諾
を得ることなく何らかの形で本製品またはマニュアルのいかなる部分も複製するこ
とは固く禁じられています。
この免責事項は複数の言語で提供されています。各言語版の内容に相違がある場
合、中国で購入された製品については中国語版の内容が優先され、他の地域で購
入された製品については英語版の内容が優先されるものとします。
警告
1. 散布分析計にバッテリーは付属していません。指定の 9V バッテリー をお 買 い
求めください。液漏れや損傷のあるバッテリーは使用しないてください。
2. 試験紙上ににサンプルを滴下し、散布分析計で液滴情報分析を行います。分析
結果は試験紙のタイプによって変化することがあります。測定バイアスを低減す
るため、実績のあるメーカーの感水試験紙を使用してください。
3. レンズをきれいな状態に保ってください。汚れている場合は、同梱しているレン
ズクリーニングクロスでレンズを 拭いてください。
4. 長時間使用しない場合は、分析計からバッテリーを取り外し、ツールボックスに
入れてください。
14
Page 16

はじめ に
散布分析計には、農業用途に設計された高性能レンズモジュールが搭載されており、
スマートフォンと連携させて写真を撮ることができます。液滴の分布情報を取得し、
DJI Droplet Analyzer アプリで容易に分析できます。このため信頼性の高いデータ
を得ることができ、精密農業をサポートします。本装置のコンパクトな構造と使いや
すい機能は、一人で散布分析を行うのに理想的です。
同梱物
JP
散布分析計× 1
ツ ー ル ボックス× 1
吸 盤 セット× 1
レンズクリーニ ングクロス× 1
15
Page 17

概観
JP
照明 システム
電源ボタン
電源 インジケ
ータ
レンズ
吸盤
バッテリー 部
カバー
使用方法
DJI Droplet Analyzer のダウンロード
Google Play で Droplet Analyzer を検索して、お使いのモバイルデバイスにアプリ
をダウンロードします。
このアプリは Android 5.0 以降に対 応しています。
モバイルデバイスとの紐づけ
このアプリを使 用 するには 、インター ネット経由でアプリを 分析 計に 紐づ けする 必
要 が あります 。
1. 分析計本体の QR コードをスキャンするか、シリアル番号を入 力します。QR
コードまたはシリアル番号によって最大 5 つのモバイルデバイスにアプリを
紐づけできます。
2. バインドを解除するには、アプリの右上の
紐づけする]>[解除する]を選択します。
16
アイコンをタップして、[デバイスを
Page 18

バッテリー の 取り付 け
9V バッテリー が必 要 です。
1. バッテリー 部カ バー を押 して、取り外し ます。
2. 9V バ ッテリーを バッテリー部 に 挿入しま す。正 負端 子 が合って いることを確 認し
ます。再 度押して、バ ッテリーをしっかり取り付 けま す。
3. カバ ーを 取り付 けます。
散布分析計の電源オン/オフ
電源をオンにする:電源ボタンを 2 秒間長押しして分析計をオンにします。照明シ
ステムがオンになり、電源インジケータが緑色点灯している場合は、正常に起動し
ています。赤色点灯している場合は、バッテリー残量が残り少ない状態です。速やか
にバ ッテリーを 交 換してください 。
電 源 を オ フ に す る: 電源ボタンを 2 秒間長押しして分析計をオフにします。電源イ
ンジケータおよび照明システムがオフになります。電源オンになってから分析計が
8 分間使用されないと、自動的に電源オフになります。
分析計の固定
1. 吸盤をモバイルデバイスの方に向け、分析計のレンズをお手持ちのモバイルデ
バイスのカメラに合わせます。分析計をモバイルデバイスに押し当てて吸盤で
固定し ます。
2. 分析計に取り付けたモバイルデバイスにすべての吸盤が吸着するように、分析
計の位置を調整します。
散布分析
Droplet
Analyzer
アプリ
分析を行いたい植物の上に試験紙を置きます。液体を散布して、アプリを実行します。
以下の手順に従って、散布分析を行ってください。
17
JP
Page 19

データ収集
1. [ 新規 タスク]をタップします。
2. [タスク名]、[オペレーター]、[時間]を入力します。
3. [ 試 験 紙 位 置 ]を 選 択 し ま す 。
JP
4.
[土地の全長]と[サンプルスペース]を入力します。アプリに[推定サンプル数]
の値が表示されます。
5. [写真をインポートする]の下の[+]をタップして、撮影 ビュー にします。
a. 試験紙を平らな面上に置きます。分析計のレンズを撮影領域に合わせ、分析
計を試験紙に密着させます。
b. 画面右下のメニューをスクロールしてサンプルの位置を変えます。
c. 画面 をタップして、フォーカスする 領域 を選 択しま す。次 にシャッターボ タン
をタップし ます 。
d. 領域選択ツールが画面に表示されます。中央のボックスをドラッグして、目的
の領域を選択します。ボックス周囲のドットをドラッグして、領域のサイズを
変更し ます。
e. 領域を選択したら、[完了]をタップして撮影を終了するか、[次の写真を撮
影 ]を タ ッ プ し ま す 。
f.
写真をインポートした後、画像をタップして、対応する情報を確認します。[画
像情報]の下の画像をタップして、検出された液滴を表示します。情報が正確
でない場合は、削除アイコン
をインポートします。
写真を撮るときは必ず分析計のレンズを使用してください。余分な光
が入るのを防ぐため、分析計と試験紙との間にすき間がないことを確
認してください。すき間によって液滴の情報の精度が損なわれることが
ありま す。
写真撮影時は、撮影ビューの右上にある測斜計で、モバイルデバイス
が水平であることを確認してください。測斜計のドットが中央の十字と
一致して緑色になっていれば、モバイルデバイスは水平になっています。
[詳細情報]をタップして散布情報、環境情報、飛行情報および作物情報の設定を行い、
6.
[保存]をタップします。
7. すべての設定が完了したら、[保存]をタップします。
18
または[写真を交換]をタップして、再度画像
Page 20

データ分析
データ 収集 ビューのタスク一 覧で 、タスクを左 側に スワイプすると、タスクを 編集 ま
たは削除できます。目的のタスクをタップすると、分析結果が表示されます。
1. 変動係数:液滴の分布を表します。値が小さいほど、分布が均一であることを示
します。
2. 被覆率および滴下:選択/消去で、対応する項目を表示/非表示にします。
3. 表示値:選択/消去で、各サンプル位置の値を表示/非表示にします。
4. ランドスケープ:選択/消去で、結果を横/縦で表示します。
5.
画像情報:タップすると、対応するサンプル位置における各画像の滴下数、直
径、被覆率、分布などの分析結果を表示します。多角形のサンプリングポイント
をタップすると、[画像情報]に入ることができます。[画像情報]で画像をタップ
すると、検出された液滴が表示されます。[<”/“>]をタップすると、前の画像また
は次の画像が表示されます。
6. 左側 にスワイプしてタスク情報 を表 示します。[<”/“>]をタップすると、前のタス
クまたは次のタスクが表示されます。設定を行うには、[編集]をタップします。
追加機能
データ収集ビューの右上にある アイコンをタップすると、デバイスの紐づけ、フィ
ードバック、アプリのバージョン、すべてのタスクの消去などの追加機能にアクセス
できま す。
仕様
型式 DA4231
寸法 96mm × 46mm × 45mm
重量( バッテリー を除 く) 134g
電源 1.5W
バッテリー 9V アルカリま た は 9V NiMH 充電式バッテリー推奨
本内容は変更されることがあります。
最新版は下記よりダウンロードしてください。
http://www.dji.com/mg-1s
Copyright © 2017 DJI All Rights Reserved.
DJI は DJI の商標です。
JP
Page 21

고지 사항
스프레이 분석기를 구매해 주셔서 감사합니다. (본 장치는 이후 "제품"으로 언급됩니
다.) 본 제품을 사용하기 전에 본 문서의 고지 사항을 주의 깊게 읽어 주십시오. 본 제
품을 사용하는 것은 이 고지 사항에 동의하고 모든 내용을 읽은 것으로 간주됩니다. 반
드시 매뉴얼을 숙지한 후 제품을 사용하고 경고 사항에 주의를 기울이십시오. SZ DJI
KR
TECHNOLOGY CO., LTD.와 해당 자회사는 배터리, 테스트 용지 또는 앱 등 지정되지 않
은 액세서리의 사용을 포함(단, 이에 국한되지 않음)하여 제품의 부적절한 사용, 설치 또
는 수리로 인해 직접 또는 간접적으로 발생하는 손해 및 부상에 대해 어떠한 책임도 지지
않습니다.
TM
는 SZ DJI TECHNOLOGY CO., LTD. (약어로 “DJI”)와 해당 자회사의 상표입니
DJI
다. 이 매뉴얼에 표시된 제품 이름, 브랜드 이름 등은 해당 소유자의 상표 또는 등록 상
표입니다. DJI는 본 제품과 매뉴얼의 소유권과 함께 모든 권한을 보유합니다. 본 제품
또는 매뉴얼의 어떤 부분도 DJI의 서면 허가 또는 동의 없이 어떤 형식으로도 재생산할
수 없습니다.
이 고지 사항은 다양한 언어로 제공됩니다. 서로 다른 버전 간에 차이점이 있을 경우, 중
국에서 제품 구매 시 중국어 버전이 우선적으로 적용되며 기타 지역에서 제품 구매 시 영
어 버전이 우선적으로 적용됩니다.
경고
1. 스프레이 분석기에는 배터리가 제공되지 않습니다. 공인 9V 배터리를 구매하십시오.
누출되거나 손상된 배터리는 사용하지 마십시오.
2. 스프레이 분석기는 테스트 용지에서 샘플을 확보한 후 분사 정보를 분석합니다. 분석
결과는 테스트 용지의 유형에 따라 다를 수 있습니다. 연구 결과에 편차가 없도록 하
려면 인정받는 제조업체에서 공급하는 감수지를 사용하십시오.
3. 렌즈가 깨끗한지 확인합니다. 렌즈가 지저분한 경우 동봉된 렌즈 청소용 천을 사용하
여 닦습니다.
4. 장시간 사용하지 않는 배터리는 분석기에서 분리하여 툴박스에 보관합니다.
20
Page 22

소개
스프레이 분석기는 스마트 모바일 기기로 사진을 촬영할 수 있는 기능과 함께 농업용으
로 사용하도록 설계된 고정밀 렌즈 모듈이 장착된 상태로 제공됩니다. 분사 정보는 DJI
Droplet Analyzer 앱을 사용해 쉽게 확보되어 분석되므로 정밀 농업을 위한 신뢰할 수 있
는 데이터가 지원됩니다. 컴팩트한 구조와 사용하기 쉬운 기능으로 한 명의 사람으로도
분사를 분석할 수 있습니다.
구성품 설명서
KR
스프레이 분석기 × 1
툴박스 × 1
흡입 컵 세트 × 1
렌즈 청소용 천 × 1
21
Page 23

개요
KR
조명 시스템
전원 버튼
전원 표시등
렌즈
흡입 컵
배터리 함 덮개
사용
DJI Droplet Analyzer 다운로드
Google Play에서 "Droplet Analyzer"를 검색하여 앱을 모바일 기기에 다운로드합니다.
이 앱은 Android 5.0 이상을 지원합니다.
기기 바인딩
앱은 인터넷을 통해 분석기에 바인딩하는 경우에만 사용할 수 있습니다.
1. 분석기 본체의 QR 코드를 스캔하거나 일련 번호를 입력합니다. 각 QR 코드 또는 일련
번호로 앱을 최대 5개의 모바일 기기에 바인딩할 수 있습니다.
2. 스프레이 분석기의 바인딩을 해제하려면 앱의 오른쪽 상단 모서리에 있는
을 탭한 다음 바인딩된 기기 > 바인딩 해제를 탭합니다.
22
아이콘
Page 24

배터리 설치
9V 배터리 1개가 필요합니다.
1. 배터리 함 덮개를 밀어 빼냅니다.
2. 9V 배터리를 배터리 함에 넣습니다. 음극 및 양극 단자가 제대로 맞춰져 있는지 확인
합니다. 다시 한 번 밀어 단단히 장착되도록 합니다.
3. 덮개를 다시 닫습니다.
분석기 켜기/끄기
전원을 켜려면 전원 버튼을 2초간 길게 누릅니다. 조명 시스템이 켜지고 전원 표시
켜기:
등이 녹색으로 일정하게 유지되면서 정상적인 시작을 나타냅니다. 빨간색으로 유지되는
경우 배터리 부족을 나타냅니다. 가능한 빨리 배터리를 교체하십시오.
전원을 끄려면 전원 버튼을 2초간 길게 누릅니다. 전원 표시등 및 조명 시스템이
끄기:
꺼집니다. 분석기는 전원을 켠 후 8분 이상 대기 상태를 유지하면 자동으로 꺼집니다.
분석기 고정
1. 흡입 컵을 기기 방향으로 하여 분석기 렌즈를 모바일 기기의 카메라에 맞춥니다. 분석
기를 눌러 흡입 컵을 통해 모바일 기기에 고정시킵니다.
2. 모든 흡입 컵이 모바일 기기에 부착되어 분석기에 고정되도록 분석기 위치를 조정합
니다.
분사 분석
Droplet
Analyzer
앱
식물에서 분사 분석을 수행하려는 위치에 테스트 용지를 놓습니다. 액체를 분사하고 앱을
실행한 후 분사 분석을 위한 아래 지침을 따릅니다.
KR
23
Page 25

데이터 모음
1. "새로운 작업"을 탭합니다.
2. "작업명", "조종자", "시간"에 정보를 입력합니다.
3. "시험용지 (배치) 위치"를 선택합니다.
4. "토지 길이" 및 "샘플 공간"에 정보를 입력합니다. 앱에 "예상 샘플 수" 값이 표시됩
KR
니다.
5. "사진 불러오기" 아래의 "+"를 탭하여 촬영 보기로 전환합니다.
a. 테스트 용지를 평평한 바닥에 놓습니다. 분석기 렌즈를 원하는 촬영 영역에 맞추고
분석기를 용지에 고정시킵니다.
b. 화면의 오른쪽 하단 모서리에 있는 메뉴를 회전하면서 샘플 위치를 변경합니다.
c. 화면을 탭하여 초점을 지정할 영역을 선택한 다음 셔터 버튼
d. 영역 선택 도구가 화면에 나타납니다. 가운데의 상자를 끌면서 원하는 영역을 선택
합니다. 주위의 점을 끌면서 영역의 크기를 변경합니다.
e. 영역을 선택한 후에 "완료"를 탭하여 촬영을 종료하거나 "다음 사진 촬영하기"를
탭합니다.
f. 사진을 가져온 후에 사진을 탭하여 해당 정보를 확인합니다. "사진 정보" 아래의 사
진을 탭하여 감지된 분사를 표시합니다. 정보가 정확하지 않을 경우 삭제 아이콘
또는 "사진 교체"를 탭하여 사진을 다시 가져옵니다.
사진을 촬영할 때는 항상 분석기 렌즈를 사용하십시오. 추가 광원이 유입되지
않도록 분석기와 테스트 용지 사이에는 공간이 없어야 합니다. 이 경우 분사
정보의 정확도가 떨어질 수 있습니다.
촬영 보기의 오른쪽 상단 모서리에 있는 수평기를 사용하여 사진을 촬영할
때 모바일 기기가 수평인지 확인합니다. 수평기의 점이 중심의 십자가와 일치
하여 녹색으로 바뀌면 모바일 기기가 수평으로 조정된 것입니다.
6. "더 알아보기"를 탭하여 분사 정보, 환경 정보, 비행 정보 및 작물 정보를 구성한 후 "저
장"을 탭합니다.
7. 모든 설정을 구성한 후 "저장"을 탭합니다.
데이터 분석
데이터 모음 보기의 작업 목록에서 한 작업을 왼쪽으로 밀어 작업을 편집하거나 삭제합
니다. 원하는 작업을 탭하면 앱에 분석 결과가 표시됩니다.
24
을 탭합니다.
Page 26

1. 변동계수: 분사의 분포를 나타냅니다. 값이 작을수록 균일한 분포를 나타냅니다.
2. 면적률 및 분사: 선택하거나 선택을 취소하여 해당 항목을 표시하거나 숨깁니다.
3. 디스플레이 값: 선택하거나 선택을 취소하여 각 샘플 위치의 값을 표시하거나 숨깁
니다.
4. 가로 화면: 선택하거나 선택을 취소하여 세로/가로 모드로 결과를 표시합니다.
사진 정보: 탭하여 해당하는 샘플 위치에 있는 각 사진에 대한 분석 결과(예: 분
5.
사 수, 직경, 범위, 분포)를 봅니다. 폴리라인에서 샘플링 지점
를 확인할 수 있습니다. 사진 정보 아래의 사진을 탭하여 감지된 분사를 표시합니다.
"<"/">"를 탭하여 이전 또는 다음 사진을 표시합니다.
6. 왼쪽으로 밀어 작업 정보를 확인합니다. "<"/">"를 탭하여 이전 또는 다음 작업을 표시
합니다. 구성하려면 "편집"을 탭합니다.
기타
바인딩된 기기, 사용자 피드백, 앱 버전, 모든 작업 지우기 등의 추가 기능을 사용하려면
데이터 모음 보기의 오른쪽 상단 모서리에 있는
아이콘을 탭합니다.
을 탭하여 사진 정보
사양
모델 DA4231
크기 96mm × 46mm × 45mm
무게(배터리 제외) 134g
전력 1.5W
배터리 9V 알카라인 또는 9V NiMH 충전식 배터리가 권장됩니다.
이 문서의 내용은 언제든지 변경될 수 있습니다.
최신 버전은 다음 웹사이트에서
다운로드하십시오.
http://www.dji.com/mg-1s
DJI 는 DJI 의 상표입니다 .
Copyright © 2017 DJI All Rights Reserved.
KR
Page 27

DJI Support
DJI
技术支持
DJI
サポート
고객지원
DJI
http://www.dji.com/support
If you have any questions about this document, please
contact DJI by sending an email to
如果您对说明书有任何疑问或建议,请通过以下电子
邮箱联系我们:
YC.BZ.S01574.03
DocSupport@dji.com
DocSupport@dji.com
。
。
Printed in China.
中国印制
 Loading...