

Page 1
©2013 DJI Innovations. All Rights Reserved.
- 1 -
DT7&DR16 2.4G RC System User Manual V1.00
Congratulations on purchasing your new DJI product. Please read this manual carefully to ensure you can get the
most out of it.
*:8KSUZK)UTZXURRKX
*88KIKO\KX
I
n the box
DT7 Remote Controller, DR16 Receiver, 3-Pin cable.
Required Items
4 AA batteries, Micro-USB cable, flight control system, multi-rotor etc.
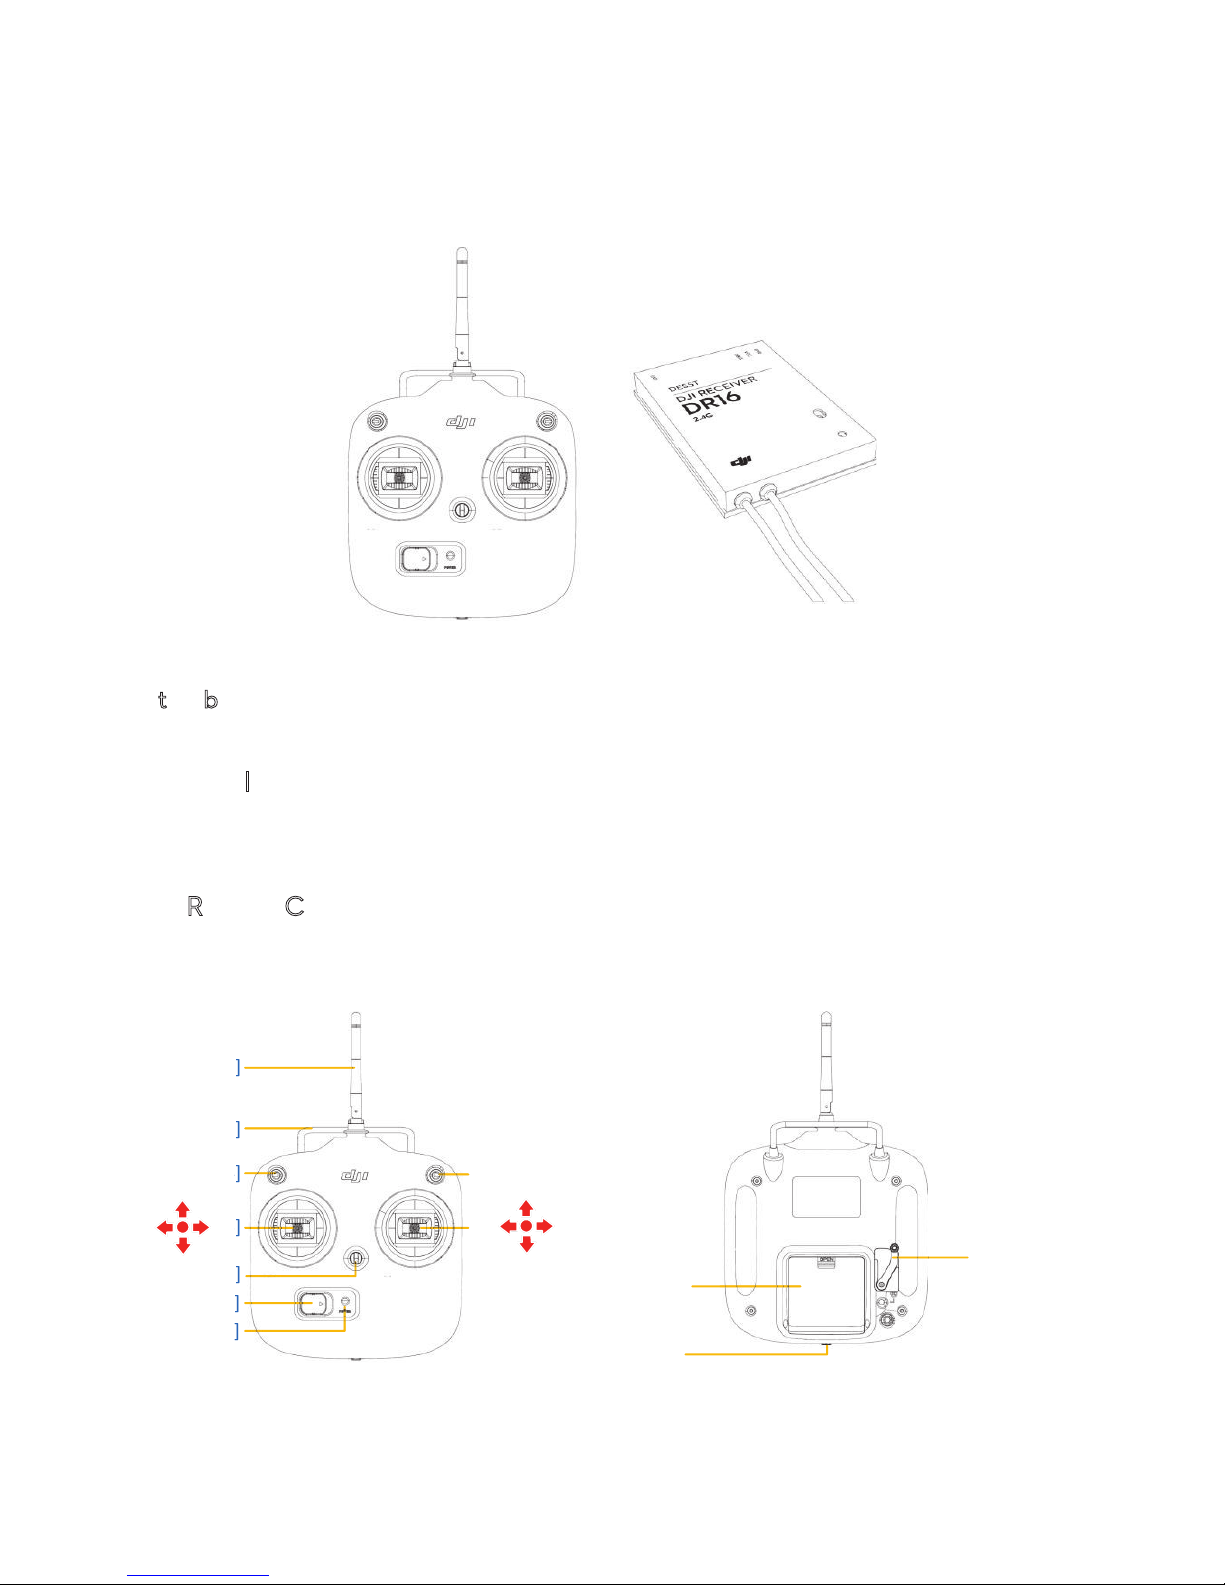
D
T7 Remote Controller
The DT7 remote controller is a wireless communication device using the 2.4GHz frequency band. It is only
compatible with the DR16 receiver.
[1]
[2]
[4]
[3]
[8]
[9]
J2
J1
J3
J4
[6]
[7]
[5]
]
]
]]]
]
]
[10]
[12]
[11]
[1] Antenna [2] Carrying Handle [3] 3-Position Switch S1 [4] 3-Position Switch S2 [5] Stick1 J1;J2
[6] Stick2J3;J4 [7] Neck Strap Attachment [8] Power Switch [9] Power LED Indicator
[10] Slide Lever [11] Micro-USB Port [12] Battery Compartment
Page 2

©2013 DJI Innovations. All Rights Reserved.
- 2 -
DR16 Receiver
The DR16 is a 16 channel receiver working at the 2.4GHz frequency band. It is compatible with the DT7 remote
controller.
[1]
[2]
[3]
[7]
[6]
[5]
[4]
[1] Antenna
[2] LED Indicator
[3] Link Button
[4] GND
[5] VCC
[6] DBUS
[7] EXP.
Default Channel Mappings of DT7&DR16
MODE 1
A
J1
MODE 2
A
J1
E
J3 E J2
T
J2 T J3
R
J4 R J4
U
S1 U S1
X1
Slider Lever
X1
Slider Lever
X2
S2
X2
S2
U
sages of the DT7 Remote Controller
Turn on the remote controller
1. Open the battery compartment on the back of the remote controller.
2. Install 4 AA batteries into the compartment according to the signs of negative and positive poles.
3. Push the power switch to the right to power on the remote controller. If the power LED indicator is solid red, the
remote controller is functioning normally.
4. The remote controller’s antenna should point skywards without obstructions for maximum communication range
during flight.
Turn off the Remote Controller
Push the power switch to the left to power off, the power LED indicator will be out and the remote controller will be
turned off.
Important Notes
l Turn on the remote controller before powering on the aircraft. Power off the aircraft before turning off the
remote controller.
l Avoid interferences between the remote controller and other wireless equipment.
l Remove batteries from the remote controller before long term storage.
l Ensure batteries in the remote controller have enough capacity before every flight.
l Dispose of batteries according to their instructions.
Page 3
©2013 DJI Innovations. All Rights Reserved.
- 3 -
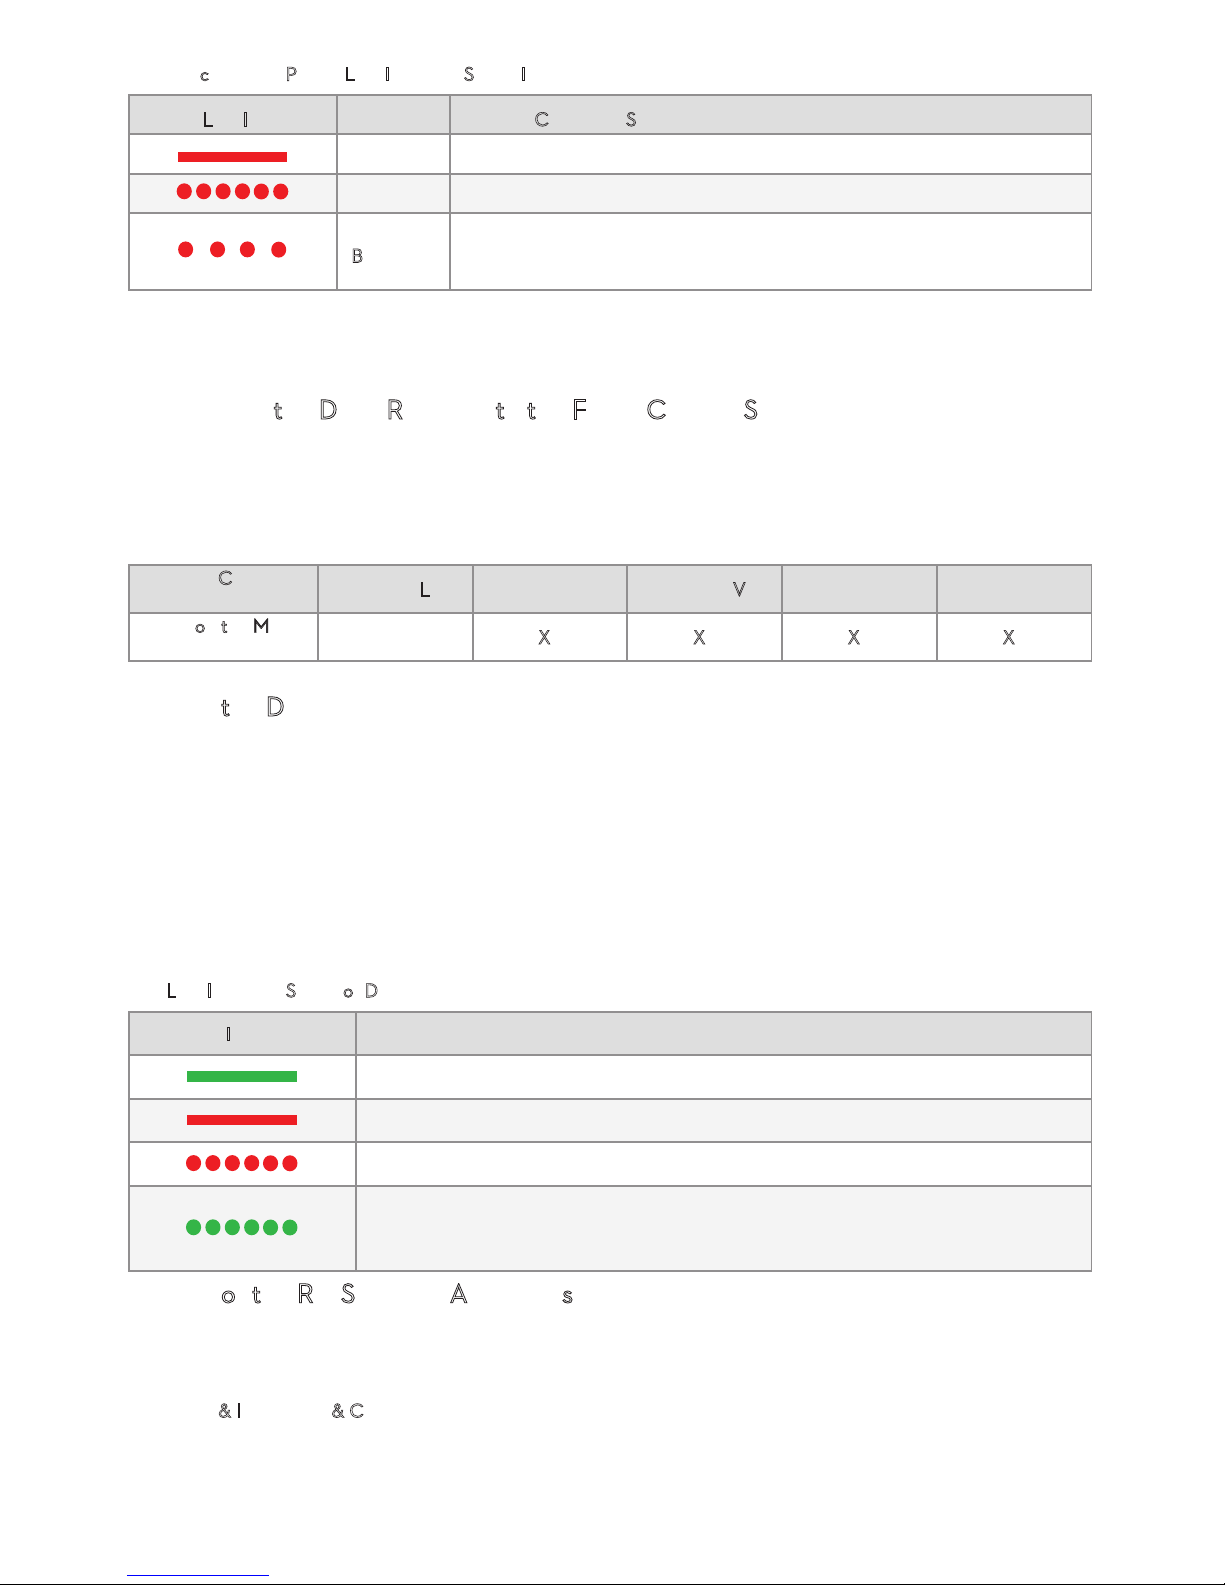
Remote controller Power LED Indicator Status Information
Power LED Indicator
Sound
Remote Controller Status
None
Normal
B-B-B……
Low voltage (at 4V-4.3V). Replace the batteries immediately
B--B--B……
Alarm will sound after 15 minutes without activity. It will stop once you
start using the remote controller.
Important: The remote controller will power off automatically when battery voltage drops below 4V. Land and
change batteries as soon as possible when the low voltage alert occurs to avoid loss of control during flight.
Connecting the DR16 Receiver to the Flight Control System
The DR16 Receiver is designed to be used with the below flight control system. Connect the DR16 receiver to the
correct port on the main controller in the flight control system using a 3-Pin cable, then select the
D-BUS receiver
type in the Assistant software.
Flight Control
System
NAZA-M Lite
NAZA-M NAZA-M V2
WooKong-M
A2
Port on the Main
Controller
X2 X2 X2 X2 X2
L
inking the DT7&DR16
1. Power on the main controller and the DR16 receiver.
2. Turn on the remote controller and place the remote controller 0.5m~1m from the receiver.
3. Poke the link button with a thin object and hold it until the LED indicator on the receiver blinks red, then release
it.
4. When the LED indicator becomes solid green, the link between the DT7 remote controller and the DR16 receiver
has been successfully established.
The LED Indicator Status of DR16
LED Indicator
Status
The remote controller is linked with the receiver successfully
The remote controller is turned off and there is no 2.4GHz signal around
The receiver is ready for linking
There is 2.4GHz signal around but the remote controller is not linked with the
receiver
Usages of the RC SYSTEM Assistant software
The RC SYSTEM assistant software is used to configure the DT7 remote controller, upgrade its firmware, select the
sticks mode and calibrate the sticks.
D
ownload & Installation & Connection
1. Download the driver and RC SYSTEM Assistant software, then install the diver and software on your PC.
2. Turn on the remote controller and connect it to the PC by Micro-USB cable.
Page 4

©2013 DJI Innovations. All Rights Reserved.
- 4 -
3. Run the RC SYSTEM Assistant software. Wait for the remote controller to connect to the Assistant software.
When the connection indicator is solid green
and the communication indicator blinks blue , it has connected.
DT7ઁԿѝ
F
irmware Upgrade
1. On the [Info] page, click
Latest version to download and install the upgrade following prompts.
2. Power cycle the remote controller after finishing the upgrade. Check the firmware version on the [Info] page, if
Assistant software shows the latest version, upgrade was successful.
S
tick Mode Configuration
1. Select your custom control mode in the Stick Mode bar on the [Main] page.
2. Power cycle the remote controller, push both sticks and observe whether the cursors in the respective channels
are moving. This will confirm stick mode configuration.
Sticks Calibration
1. On the [Main] page, click the “Calibration” button to calibrate the sticks following prompts.
2. Calibrate the remote controller after every firmware upgrade or configuration, and calibrate on a regular basis.
D
T7&DR16 Specifications
DJI DESSET 2.4G SYSTEM
Operating Frequency
2.4GHz ISM
Communication Distanceopen area
1000m
Remote Controller
General
2-stick, 7-channel
Working Current
100mA@6V
Battery Required
4 AA Batteries
DJI Receiver 16
General
2.4GHz D-BUS System
Receiving Sensitivity1%PER
-97dBm
Working Current
145mA@5V
Power Supply
4~8.4V
Size
41mmX29mmX5mm
Weight
10g
Page 5

Rechtliche Hinweise
Konformitätserklärung
Hiermit erklärt die Globe Flight GmbH, dass dieses Gerät den produktspezifisch geltenden EURichtlinien entspricht. Durch die Kennzeichnung dieses Gerätes mit dem CE-Symbol wird die
Konformität mit diesen Richtlinien zum Ausdruck gebracht.
Diese RC Funkfernsteuerung verwendet das 2,4GHz ISM-Frequenzband im Bereich
von 2400MHz bis 2483,5MHz (anmelde- und gebührenfrei). Die Einhaltung der
R&TTE-Richtlinien (Radio and Telecommunications Terminal Equipment Directive) ist
mit den entsprechenden Zertifikaten dokumentiert, diese finden Sie entweder an dieses Dokument
angehängt oder zum Download auf unserer Homepage bei der jeweiligen Produktbeschreibung. Das
Gerät ist mit dem CE-Symbol gekennzeichnet, welches auf die Konformität mit den Richtlinien
verweist. Somit darf das Gerät in den Mitgliedsstaaten der Europäischen Union verkauft und
verwendet werden.
Das CE-Symbol beinhaltet weiterhin die Richtlinie 2002/95/EG des Europäischen Parlaments und des
Rates über die Beschränkung der Verwendung bestimmter gefährlicher Stoffe in Elektro- und Elektround Elektronikgeräten (sog. RoHS).
WEEE-Registrierungsnummer: DE 52086694
Hierbei handelt es sich um die Einhaltung der Richtlinie 2002/96/EG des Europäischen Parlaments
und des Rates über Elektro- und Elektronik-Altgeräte (sog. WEEE) zur Reduktion der zunehmenden
Menge an Elektroschrott.
Entsorgung elektrischer und elektronischer Geräte
Dieses Gerät darf nicht über den Hausmüll entsorgt werden! Bitte suchen Sie hierfür eine
kommunale Sammelstelle oder einen Recyclinghof auf.
Page 6

Entsorgung von Batterien
Dieses Gerät enthält einen Lithium-Polymer-Akku. Dieser darf keinesfalls über den
Hausmüll entsorgt werden! Bitte suchen Sie hierfür eine kommunale Sammelstelle oder
einen Recyclinghof auf. Gemäß Batterieverordnung sind auch Fachhändler und Hersteller
zur Rücknahme und Entsorgung verpflichtet.
Ansprechpartner / Importeur
Globe Flight GmbH
- vertreten durch Geschäftsführer Sebastian Seidel Borsigstrasse 9
93092 Barbing
Deutschland
Tel: +49 9401 949 88-88
www.globe-flight.de
Die in dieser Anleitung enthaltenen Informationen wurden sorgfältig überprüft. Dennoch kann für
inhaltliche Fehler, Druckfehler und Unvollständigkeiten keinerlei Haftung übernommen werden.
Technische Änderungen vorbehalten.
Page 7

 Loading...