


Dock Bundle
User Manual
2024.02v1.8

This document is copyrighted by DJI with all rights reserved. Unless otherwise authorized
by DJI, you are not eligible to use or allow others to use the document or any part of
the document by reproducing, transferring or selling the document. Users should only
refer to this document and the content thereof as instructions to operate DJI UAV. The
document should not be used for other purposes.
Searching for Keywords
Search for keywords such as FOV and Mount to find a topic. If you are using Adobe
Acrobat Reader to read this document, press Ctrl+F on Windows or Command+F on
Mac to begin a search.
Navigating to a Topic
View a complete list of topics in the table of contents. Click on a topic to navigate to
that section.
Printing this Document
This document supports high resolution printing.
Revision Log
Version Date Revisions
v1.2 2023.03 Updated with the dock firmware v01.02.0500. Added backup battery
maintenance interval and optimized the descriptions of remote
controller B and the RTH process. It is recommended to update the
firmware to the latest version to ensure optimal device performance.
v1.4 2023.04 Updated with the dock firmware v01.03.0902. Optimized the
battery maintenance strategy. DJI FlightHub 2 added support for
live flight controls, resuming task from breakpoint, and email and
message notifications.
v1.6 2023.09 Updated with the dock firmware v01.05.0902. Updated RTH to
Advanced RTH, added support for DJI AirSense, and optimized the
battery safety strategy. DJI FlightHub 2 added support for task area
management, safe RTH, and camera and PSDK payload settings.
v1.8 2024.02 Updated with the dock firmware v01.06.1704. Added support for
Trial Flight, Silent Mode, Obstacle Data settings, and managing
Unlocking Licenses in DJI FlightHub 2. Optimized the Live Flight
Control functions.
2024 DJI All Rights Reserved.
©
2

Using this Manual
Legend
Important Hints and Tips
Read Before Use
TM
DJI
provides users with tutorial videos and the following documents.
1. Safety Guidelines
2. Quick Installation Guide
3. Installation and Setup Manual
4. User Manual
It is recommended to watch all tutorial videos and read the Safety Guidelines before
using for the first time. Prepare for dock installation and first flight by reviewing the Quick
Installation Guide. Refer to the Installation and Setup Manual and this user manual for
more information.
• DJI Dock must be installed and set up by an authorized service provider.
Unauthorized installation and set up may lead to safety risks. Contact DJI
Support for more information on authorized service providers.
Download DJI Assistant 2
Download and install DJI ASSISTANTTM 2 (Enterprise Series) using the link below:
https://www.dji.com/dock/downloads
Video Tutorials
Go to the address below or scan the QR code to watch the tutorial videos, which
demonstrate how to use the product safely.
https://www.dji.com/dock/video
• The operating temperature of DJI Dock is -35° to 50° C (-31° to 122° F)*, while that
of the aircraft is -20° to 50° C (-4° to 122° F). Both products DO NOT meet the
standard operating temperature for military grade application of -55° to 125° C
(-67° to 257° F), which is required to endure greater environmental variability.
Operate the products appropriately and only for applications that meet the
operating temperature range requirements of that grade.
* When the temperature is below -20° C (-4° F), the aircraft cannot perform flight tasks and
the dock cover and the driving rods cannot be controlled automatically.
2024 DJI All Rights Reserved.
©
3

Contents
Using this Manual 3
Legend 3
Read Before Use 3
Download DJI Assistant 2 3
Video Tutorials 3
Product Profile 7
Introduction 7
Feature Highlights 8
Overview 9
Flight Procedure 12
Flight Safety 14
Compliance with Regulations 14
Environment and Wireless Communications Requirements 15
Flight Restrictions and Unlocking 16
DJI AirSense 20
Remote Controller B 21
Flight Test Checklist 23
Dock 27
Electrical Cabinet 27
Dock Cover 30
Emergency Stop Button 33
Environment Sensors 34
Landing Pad 36
Dock RTK Module 37
Air Conditioning System 37
Backup Battery 37
Dock Network Connection 39
IP Rating of the Dock 39
Aircraft 41
Flight Modes 41
Vision System and Infrared Sensing System 41
Return to Home 45
Aircraft Indicators 53
2024 DJI All Rights Reserved.
©
4

Beacons and Auxiliary Light 54
Propellers 55
FPV Camera 57
Cameras 57
Gimbal 59
Aircraft RTK 60
IP Rating of the Aircraft 60
Intelligent Flight Battery 61
DJI FlightHub 2 66
Cloud Management 66
Real-time Device Information 68
Dock Management 71
Appendix 76
Aircraft Settings Using the Remote Controller 76
Firmware Update 76
Access to a Third-Party Cloud Platform 77
Specifications 78
Using Third-Party Payloads 84
Troubleshooting List 86
FAR Remote ID Compliance Information 87
2024 DJI All Rights Reserved.
©
5

Product Profile
This chapter introduces the Dock
Bundle and lists the components of
the dock and the aircraft.

Product Profile
Introduction
DJITM Dock is an automatic unattended operation platform with highly integrated design,
including an ultra wide-angle camera, wind speed gauge, rainfall gauge, communication
antennas, RTK module, and UPS power supply. DJI Dock has strong environmental
adaptability. With built-in lightning protection and a protection level of IP55 (refer to IEC
60529 standard), DJI Dock can operate even in harsh climates. The longest maintenance
interval is six months
conditioner, allowing it to cool down the battery in a short time. It takes approximately 25
minutes
[2]
to charge the battery from 10% to 90%. And the operating radius is up to 7 km.
One DJI Dock weighs less than 105 kg and has a dimension smaller than 1 square-meter
footprint, and supports quick installation and configuration.
DJI MATRICE
TM
30 Series (M30/M30T) Dock Version is equipped with a multi-redundancy
flight controller system, six-directional sensing and positioning system
performance multi-camera load, and a new FPV camera with night vision, providing Return
to Home and obstacle sensing. The aircraft has a maximum flight time of approximately
40 minutes.
[5]
DJI FlightHub 2 is a cloud-based aircraft task management platform, allowing users to
plan flight routes, set flight task plans, view livestreams, upload and download media
files, and conduct remote debugging. It can also work with DJI Dock and Matrice 30 Series
Dock Version aircraft to perform unattended operations, achieving efficient flight task and
device management.
[1] Depending on environmental conditions and the frequency of DJI Dock operations, it is
recommended that maintenance be conducted every six months or less.
[2] Measured at a temperature of 25° C (77° F). As the temperature increases, the battery
cooling time will increase and lengthen downtime.
[3] Measured in environments without transmission or signal interference, and wind speeds
<4 m/s, where the aircraft has a flight speed of 15 m/s and reserves 20% battery as a safety
buffer for landing.
[4] The vision system and infrared sensing systems are affected by surrounding conditions.
Refer to the Vision System and Infrared Sensing System section for more information.
[5] Measured in windless environment with a constant flight speed of 10 m/s, and should be
used for reference only. The actual use time may vary depending on the environment, flight
mode, and the use of accessories.
[1]
. DJI Dock comes with a quick-charging module and TEC air
[4]
, high-
[3]
2024 DJI All Rights Reserved.
©
7

Matrice 30 Series Dock Bundle User Manual
Feature Highlights
Automated Operation: The powerful adaptability allows DJI Dock to operate in harsh
environments. DJI Dock can work with the Matrice 30 Series Dock Version aircraft to
perform automatic flight tasks, battery charging and management, temperature and
humidity control, achieving unattended operations.
Precise Positioning and Flight: The internal RTK module of DJI Dock can receive a
dual-band multi-mode GNSS signal, providing high-precision data for centimeter-level
positioning. Precise flight and landing can be achieved when used with the Matrice 30
Series Dock Version aircraft.
Video Transmission: Matrice 30 Series Dock Version aircraft features long-range
transmission O3 Enterprise (OCUSYNCTM 3.0 Enterprise) technology, providing users with
improved transmission quality and ensure safer flight in complex environments.
Cloud Management: DJI FlightHub 2 supports flight task planning and device
management of the dock. Users can set flight task plans based on actual needs. The
aircraft will automatically takeoff according to the preset task plans, and the media files
will be automatically uploaded to DJI FlightHub 2. During the operation, livestreams
and real-time device information can be viewed remotely to monitor the operation site.
Users can also view the operation status of the dock and aircraft and conduct remote
debugging, making device management more convenient.
[1] The dock coordinates need to be calibrated to obtain accurate absolute position when
configuring the dock.
[2] For more information, refer to the DJI FlightHub 2 User Guide, which is available to
download from the official DJI website https://www.dji.com/flighthub-2/downloads.
[1]
[2]
2024 DJI All Rights Reserved.
©
8

Overview
DJI Dock
Matrice 30 Series Dock Bundle User Manual
1. Status Indicators
2. Internal Video
Transmission Antennas
3. Dock Cover Arms
4. Matrice 30 Series Dock
Version
5. Landing Pad Bolts
6. Wind Speed Gauge
7. Integrated Security
Camera
8. Camera Auxiliary Light
9. Rainfall Gauge
10. Dock Cover Propeller
Bumpers
11. Emergency Stop
Button
12. Electrical Cabinet
Triangular Lock
13. Mounting Base
Brackets
2024 DJI All Rights Reserved.
©
9

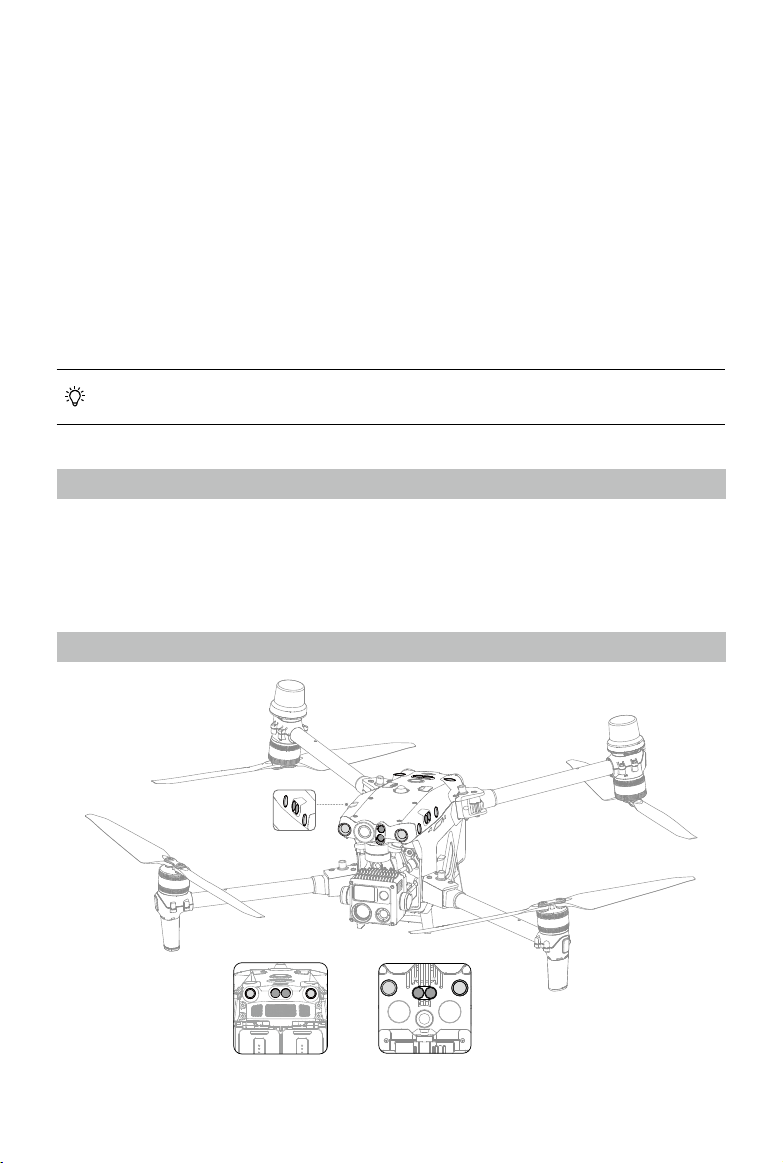
Matrice 30 Series Dock Bundle User Manual
21
Matrice 30 Series Dock Version
18
17
15
16
14
4
5
4
3
8
7
7
10
9
13
12
11
5
3
1
2
4
6
4
2
0
19
1. FPV Camera
2. Forward Infrared Sensing
System
3. Forward Vision System
4. Left and Right Vision Systems
5. Left and Right Infrared Sensing
Systems
6. microSD Card Slot
7. Upward Vision System
8. Upward Infrared Sensing
System
9. Power Button/Indicator
10. PSDK Port
M30T
M30
21
22
11. Upward Beacon
12. Assistant Port
13. Frame Arm Folding Buttons
14. Frame Arms
15. Motors
16. Propellers
17. Aircraft Rear Indicators
18. GNSS Antennas
19. Video Transmission
Antennas
20. Front LEDs
21. Gimbal and Camera
22. Charging Ports
[1]
2024 DJI All Rights Reserved.
©
10
[1] The M30 and M30T are equipped with different
cameras. Refer to the actual product purchased.

Matrice 30 Series Dock Bundle User Manual
23 23
25
26
27
2
8
29
24
30 30
31
32
32
33
23. Backward Vision System
24. Backward Infrared Sensing System
25. Air Vent
26. TB30 Intelligent Flight Battery
27. Battery Level LEDs
Rear View
28. Battery Level Button
29. Battery Release Toggle
30. Downward Vision System
31. Downward Infrared Sensing System
32 Bottom Auxiliary Light
33. Downward Beacon
Bottom View
• DO NOT disassemble the product without the assistance of a DJI authorized
dealer (except for components allowed to be disassembled by users in this
guide), otherwise it will not be covered under warranty.
DJI RC Plus Remote Controller
DJI RC Plus remote controller can be used for dock configuration and debugging. The
remote controller can also link to the aircraft as controller B for manual flight control.
Refer to the Remote Controller B section for more information.
2024 DJI All Rights Reserved.
©
11

Matrice 30 Series Dock Bundle User Manual
Bind Dock to Project
(Device Management)
Edit Flight Route
(Flight Route Library)
Plan Flight Task
(Task Plan Library)
Real-Time Project Details
(
View Media Files
(Media Files)
Power on aircraft
Open dock cover
Release driving rods
Aircraft take off
Close dock cover
Aircraft return to dock
Open dock cover
Aircraft landing
Live Flight Control
Pull back driving rods
Aircraft return to center
Close dock cover
Rotate and fold propellers
Upload media files to
DJI FlightHub 2
Power off aircraft
Charge batteries
Wait for next flight
Flight Altitude
Flight Speed
Gimbal Pan/Tilt
Camera Action
… …
Flight Trajectory
Device Statuses
Warning Messages
Livestreams
Plan Timer
RTH Altitude
Signal Lost Action
Device Maintenance
Device Details
Remote Debugging
Issue Report
Photos
Livestream Records
DJI FlightHub 2
The Dock and the Aircraft
Flight Procedure
The operating procedure in FlightHub 2 and the automated flight procedure of the dock
and the aircraft is shown in the figure:
Resume Flight Route
Gain Control
Automatic flight
RTH
• For more information, refer to the DJI FlightHub 2 User Guide which is available
to download from the official DJI website https://www.dji.com/flighthub-2/
downloads.
2024 DJI All Rights Reserved.
©
12

Flight Safety
This chapter provides information
about compliance with regulations,
flight environment and wireless
communication requirements, and
introduces the control of remote
controller B and flight test checklist.

Flight Safety
Compliance with Regulations
1. DO NOT operate in the vicinity of manned aircraft. DO NOT interfere with the
operations of manned aircraft. Be alert and make sure there is no other aircraft in the
operation area.
2. DO NOT fly the aircraft in venues of major events, including but not limited to sporting
events and concerts.
3. DO NOT fly the aircraft without authorization in areas prohibited by local laws.
Prohibited areas include airports, national borders, major cities and densely
populated areas, venues of major events, areas where emergencies have occurred
(such as forest fires), and locations with sensitive structures (such as nuclear power
plants, power stations, hydropower plants, correctional facilities, heavily traveled
roads, government facilities, and military zones).
4. DO NOT fly the aircraft above the authorized altitude. DO NOT use the aircraft to carry
illegal or dangerous goods or payloads.
5. Make sure you understand the nature of your flight operation (such as for recreation,
for public use, or for commercial use) and have obtained corresponding approval
and clearance from the related government agencies before flight. Consult with your
local regulators for comprehensive definitions and specific requirements. Note that
remote-controlled aircraft may be banned from conducting commercial activities in
certain countries and regions. Check and follow all local laws and ordinances before
flying, as those rules may differ from those stated here.
6. Respect the privacy of others when using the camera. DO NOT conduct surveillance
operations, such as image capture or video recording on any person, entity, event,
performance, exhibition, or property without authorization or where there is an
expectation of privacy, even if the image or video is captured for personal use.
7. Be advised that in certain areas, the recording of images and videos from events,
performances, exhibitions, or commercial properties by means of a camera may
contravene copyright or other legal rights, even if the image or video was shot for
personal use.
8. DO NOT use this product for any illegal or inappropriate purpose, such as spying,
military operations, or unauthorized investigations. DO NOT trespass onto the private
property of others. DO NOT use this product to defame, abuse, harass, stalk, threaten,
or otherwise violate the legal rights of others, such as privacy and publicity rights.
2024 DJI All Rights Reserved.
©
14

Matrice 30 Series Dock Bundle User Manual
Environment and Wireless Communications Requirements
1. DO NOT fly the aircraft in severe weather conditions, including strong winds (speeds
exceeding 12 m/s), sandstorms, snow, rain heavier than 100 mm (3.9 in) in 24 hours,
smog, hail, lightning, tornadoes, or hurricanes.
2. Avoid obstacles, crowds, trees, and bodies of water (recommended height is at least 3 m
above water).
3. Be extremely alert when flying near areas with magnetic or radio interference. It is
recommended to set the remote controller as controller B during flight tests. Pay close
attention to the video transmission quality and signal strength on DJI Pilot 2. Sources
of electromagnetic interference include but are not limited to: high voltage lines,
large-scale power transmission stations or mobile base stations, and broadcasting
towers. The aircraft may behave abnormally or lose control when flying in areas with
too much interference. Return to the dock and land the aircraft, and make future task
plans until the flight test is stable.
4. Fly in wide open areas. Tall buildings, steel structures, mountains, rocks, or tall trees
may affect the accuracy of the GNSS and block the video transmission signal.
5. Avoid interference between the dock and other wireless equipment. It is
recommended to power off nearby Wi-Fi and Bluetooth devices.
6. The performance of the aircraft and its batteries are limited when flying at high
altitudes. Fly with caution.
7. DO NOT use the aircraft or the dock in an environment at risk of a fire or explosion.
8. Only operate the dock and the aircraft only for applications in the operating
temperature range. The operating temperature of DJI Dock is -35° to 50° C (-31° to
*
122° F)
, and the operating temperature of the aircraft is -20° to 50° C (-4° to 122° F).
In low-temperature environments, it is necessary to check whether the dock cover
and the aircraft is covered with snow and ice, and whether the propellers are frozen
using the dock camera livestreams.
9. Make sure to set an alternate landing site before flight. The aircraft will fly to the
alternate landing site when the dock's conditions are not suitable for landing. Follow
the instructions in DJI Pilot 2 to set an alternate landing site when configuring the
dock. An obvious sign should be set up near the alternate landing site. Make sure that
the area within the five-meter radius of the alternate landing site is clear of obstacles.
* When the temperature is below -20° C (-4° F), the aircraft cannot perform flight tasks and
the dock cover and the driving rods cannot be controlled automatically.
2024 DJI All Rights Reserved.
©
15

Matrice 30 Series Dock Bundle User Manual
Flight Restrictions and Unlocking
GEO (Geospatial Environment Online) System
The DJI Geospatial Environment Online (GEO) system is a global information system that
provides real-time information on flight safety and restriction updates and prevents
UAVs from flying in restricted airspace. Under exceptional circumstances, restricted areas
can be unlocked to allow flight. Prior to that, the user must submit an unlocking request
based on the current restriction level in the intended flight area. The GEO system may not
fully comply with local laws and regulations. Users shall be responsible for their own flight
safety and must consult with the local authorities on the relevant legal and regulatory
requirements before requesting to unlock a flight in a restricted area.
GEO Zones
DJI’s GEO system designates safe flight locations, provides risk levels and safety notices
for individual flights and offers information on restricted airspace. All restricted flight
areas are referred to as GEO Zones, which are further divided into Restricted Zones,
Authorization Zones, Warning Zones, Enhanced Warning Zones, and Altitude Zones.
GEO Zones include but are not limited to airports, venues of major events, areas where
emergencies have occurred (such as forest fires), nuclear power plants, correctional
facilities, government facilities, and military zones. Users can view real-time GEO
information in DJI FlightHub 2.
By default, the GEO system limits takeoffs and flights in zones that may cause safety or
security concerns. A GEO Zone map that contains comprehensive information on GEO
Zones around the globe is available on the official DJI website:
https://fly-safe.dji.com/nfz/nfz-query.
The settings and alerts provided by DJI on operations within GEO Zones are only to assist
the user in ensuring flight safety and DO NOT guarantee full compliance with all local laws
and regulations. Before each flight task, the user is responsible for seeking advice on the
relevant local laws, regulations, and requirements for the safety of their own aircraft.
Flight Restrictions in GEO Zones
The following section describes in detail the flight restrictions for the above mentioned
GEO Zones.
GEO Zone Flight Restriction Scenario
UAVs are prohibited from flying
Restricted
Zones (Red)
2024 DJI All Rights Reserved.
©
16
in Restricted Zones. If you have
obtained permission to fly in
a Restricted Zone, please visit
https://fly-safe.dji.com/unlock
or contact flysafe@dji.com to
unlock the zone.
The aircraft cannot take off, and a
prompt will appear in DJI FlightHub 2
when the flight route passes through
the Restricted Zones.

Matrice 30 Series Dock Bundle User Manual
The aircraft cannot take off, and a
prompt will appear in DJI FlightHub 2
The aircraft will not be able to
Authorization
Zones (Blue)
Warning Zones
(Yellow)
Enhanced
Warning Zones
(Orange)
Altitude Zones
(Gray)
When creating a flight task in Task Plan Library, make sure that the selected flight
route does not pass through any GEO zones, and that the RTH altitude and flight
route altitude is at least 5 m below the altitude limit. It is recommended that the
flight route keeps a horizontal distance of at least 20 m from the GEO zone.
take off in an Authorization Zone
unless it obtains a permission to
fly in the area.
The aircraft can fly in the zone.
The aircraft’s altitude is limited
when flying inside an Altitude
Zone.
when the flight route passes through
the Authorization Zones. To fly in
an Authorization Zone, the user is
required to submit an unlocking
license request and synchronize the
license to the dock in DJI Pilot 2 app.
The aircraft can fly in the zone. Please
view GEO information in DJI FlightHub 2
and stay alert.
The aircraft cannot take off, and a
prompt will appear in DJI FlightHub 2
when the planned flight altitude exceeds
the maximum altitude of the aircraft.
Buffer Zone
Buffer Zones for Restricted Zones/Authorization Zones: to prevent the aircraft from
accidentally flying into a Restricted or Authorization Zone, the GEO system creates a
buffer zone of about 20 meters wide outside each Restricted and Authorization Zone.
As shown in the illustration below, the aircraft can only take off and land away from
the Restricted or Authorization Zone when inside the buffer zone. The aircraft cannot
fly toward the Restricted or Authorization Zone unless an unlocking request has been
approved. The aircraft cannot fly back into the buffer zone after leaving the buffer zone.
Buffer Zones for Altitude Zones: a buffer zone of about 20 meters wide is established
outside each Altitude Zone. As shown in the illustration below, when approaching the
buffer zone of an Altitude Zone in a horizontal direction, the aircraft will gradually reduce
its flight speed and hover outside the buffer zone. When approaching the buffer zone
from underneath in a vertical direction, the aircraft can ascend and descend in altitude
or fly away from the Altitude Zone. The aircraft cannot fly toward the Altitude Zone. The
aircraft cannot fly back into the buffer zone in a horizontal direction after leaving the
buffer zone.
2024 DJI All Rights Reserved.
©
17

Matrice 30 Series Dock Bundle User Manual
20 m
Restricted Zone/
Authorized Zone
20 m
Altitude Zone
Altitude Limit
20 m
20 m
5m
Flight Altitude
Buffer Zone
Ground
Ground
Unlocking GEO Zones
To satisfy the needs of different users, DJI provides two unlocking modes: self-Unlocking
and Custom Unlocking. Users may request on the DJI Fly Safe website.
Self-Unlocking is intended for unlocking Authorization Zones. To complete SelfUnlocking, the user is required to submit an unlocking request via the DJI Fly Safe website
at https://fly-safe.dji.com/unlock Once the unlocking request is approved, the user may
synchronize the unlocking license to the dock using the DJI Pilot 2 app to unlock the zone.
The user can designate an unlocked period during which multiple flights can be operated.
Custom Unlocking is tailored for users with special requirements. It designates userdefined custom flight areas and provides flight permission documents specific to the
needs of different users. This unlocking option is available in all countries and regions and
can be requested via the DJI Fly Safe website at https://fly-safe.dji.com/unlock.
For more information about unlocking, please visit https://fly-safe.dji.com or contact
flysafe@dji.com.
2024 DJI All Rights Reserved.
©
18

Matrice 30 Series Dock Bundle User Manual
Maximum Altitude & Distance Restrictions
Maximum flight altitude restricts the aircraft flight altitude, while maximum flight distance
restricts the aircraft flight radius around the dock. These limits can be set using the DJI
FlightHub 2 for improved flight safety. The maximum flight altitude is 120 m (393.7 ft) by
default. Fly at altitudes lower than the maximum altitude in accordance with all local laws
and regulations.
* Flight altitude restrictions vary in different regions. DO NOT fly above the maximum altitude
set forth in your local laws and regulations.
Max Altitude Altitude of the aircraft cannot
Max Distance The straight-line distance from
*
Max Altitude
Home Point
Max Radius
Altitude of aircraft when
powered on
Home Point not manually updated during flight
Flight Restrictions DJI FlightHub 2 Prompt
Flight route altitude exceeds
exceed the value set in DJI
FlightHub 2.
maximum altitude, the dock is
unable to perform flight task.
Flight route distance exceeds
the aircraft to the Home Point
cannot exceed the max flight
maximum distance, the dock is
unable to perform flight task.
distance set in DJI FlightHub 2.
• The aircraft cannot take off when the GNSS signal is weak.
• DO NOT fly the aircraft close to airports, highways, railway stations, railway
lines, city centers, or other sensitive areas.
• Open DJI FlightHub 2 Project page, click > , to manage the custom task
areas (user defined operation zones) and custom GEO Zones (user defined nofly zones), or import obstacle data. The aircraft can bypass custom GEO Zones
and the imported obstacles during RTH or when performing FlyTo tasks.
2024 DJI All Rights Reserved.
©
19

Matrice 30 Series Dock Bundle User Manual
DJI AirSense
Manned airplanes or helicopters with Automatic Dependent Surveillance–Broadcast
(ADS-B) transmitters can broadcast flight information. The DJI aircraft equipped with
DJI AirSense can receive the flight information broadcast from ADS-B transmitters that
comply with the 1090ES (RTCA DO-260) or UAT (RTCA DO-282) standard and within
a radius range of 10 km. DJI AirSense only issues warning messages under certain
circumstances when specific manned airplanes or helicopters are approaching and is not
able to actively control or take over the DJI aircraft to avoid collisions. Users should always
fly the aircraft within the visual line of sight and be cautious at all times to ensure flight
safety. DJI AirSense has the following limitations:
1. DJI AirSense can only receive messages broadcast by manned airplanes or helicopters
installed with an ADS-B Out device that is in compliance with the 1090ES or UAT
standard. DJI AirSense cannot receive messages from manned airplanes or helicopters
that are not equipped with ADS-B Out devices or equipped with devices that are not
functioning properly.
2. DJI AirSense uses satellite and radio signals to receive ADS-B messages. If there is an
obstacle between a manned airplane or helicopter and a DJI aircraft, DJI AirSense may
not be able to receive broadcast and issue warning messages.
3. Warning messages may be sent with delays if DJI AirSense experiences any interference
from the surrounding environment. Users need to observe the surrounding
environment and fly with caution.
4. Warning messages may not be accurate when the DJI aircraft is unable to obtain its
location information.
5. DJI AirSense cannot receive broadcast from manned airplanes or helicopters, nor send
warning messages to FlightHub 2 users when DJI AirSense is disabled or not properly
functioning.
DJI FlightHub 2 collects all the DJI AirSense data reported by the dock aircraft in the
project and displays the location of an approaching manned airplane or helicopter, as
well as a warning message on the web page when there is a potential risk of collision.
DJI AirSense can obtain and analyze the location, altitude, orientation, and velocity of the
manned airplane or helicopter and compare the information with the current location,
altitude, orientation, and velocity of the dock aircraft to evaluate the collision risk in real
time. Users can click
the low and medium collision risk warnings on the map.
2024 DJI All Rights Reserved.
©
20
in the lower right corner of the map to decide whether to display

Matrice 30 Series Dock Bundle User Manual
Warning (high collision risk): A red airplane icon will appear on the map, and the web
page will display the message stating, "Manned aircraft nearby. Take over aircraft
promptly to avoid". FlightHub 2 users can click the dock name to open the device
status window and obtain the aircraft control to avoid collisions.
Caution (medium collision risk): A yellow airplane icon will appear on the map when a
manned airplane or helicopter is relatively near the dock aircraft.
Normal (low collision risk): A blue airplane icon will appear on the map when the
manned airplane or helicopter is relatively far away from the dock aircraft.
Remote Controller B
DJI RC Plus remote controller can be linked to the aircraft as controller B. During onsite flight tests, the remote controller can take over control and manually control flight.
After the remote controller gains control, press and hold the RTH button on the remote
controller, and the aircraft will return to the dock.
Linking Remote Controller B
The dock is already linked to the aircraft when it is purchased together in the Dock Bundle.
Link the remote controller to the aircraft as controller B following the steps below:
1. Power on the remote controller and the aircraft.
2. Run DJI Pilot 2, tap Controller A > Switch to Controller B.
3. Press and hold the power button on the aircraft for at least five seconds.
4. When linking is successful, the remote controller will beep twice.
Gaining Control Using Remote Controller B
1. To gain control of the aircraft, press the aircraft control button on the upper-left of
the remote controller; and then press the orange Pause button on the upper-right to
control flight manually.
2. To gain control of the gimbal camera, tap
camera view in DJI Pilot 2.
• Make sure to link the dock to the aircraft first, and then link remote controller B.
• The remote controller is not included in the Matrice 30 Series Dock Bundle. Pay
attention to flight safety when manually controlling with the remote controller.
Visit https://www.dji.com/cn/matrice-30/downloads, carefully read, understand,
and follow the instructions in the disclaimer and safety guidelines and the user
manual.
• DO NOT update the Home Point after gaining control. Otherwise the aircraft
cannot return to the dock.
on the upper right corner of the gimbal
2024 DJI All Rights Reserved.
©
21

Matrice 30 Series Dock Bundle User Manual
Control of the Dock and the Remote Controller
1. Control over the aircraft is independent of control over the gimbal camera. The control
sticks are used for operating the gimbal if the remote controller only has control over
the gimbal camera. When the remote controller has full control, the control sticks are
used for controlling the aircraft and the dials for adjusting gimbal movement.
2. By default, the dock connected to the aircraft is granted control of both the aircraft
and the gimbal camera, while the remote controller is not given any control.
3. Only the remote controller with aircraft control can be used to start or cancel RTH. Only
the remote controller with control of the gimbal camera can be used to adjust relevant
settings for the gimbal and camera and to download or replay media files.
4. The dock will automatically take control of the aircraft before each flight task.
A control transfer mechanism will be triggered if either the dock or the remote
controller is disconnected from the aircraft. When this happens, control will shift to
the one that still connected with the aircraft. If the dock disconnects from the aircraft,
the remote controller will receive a notification that the user may manually take over
aircraft control. If the pilot of the remote controller chooses not to take over aircraft
control, the aircraft will automatically perform the signal lost action. If the pilot of the
connected remote controller does not choose either option within a specified time
period, the aircraft will also activate the signal lost action.
5. If the disconnected remote controller reconnects with the aircraft during the flight, it
will not resume its previous control and will by default have no control of any device.
6. RTH cannot be triggered in DJI FlightHub 2 after remote controller B gains control.
The dock will automatically gain control over the aircraft if remote controller B is
disconnected from the aircraft (such as when the remote controller is powered off
or the video transmission signal is lost). The aircraft can continue the flight task in
progress.
7. During a flight task, if the remote controller gains control under N mode, the aircraft
will continue the flight task. If the flight mode is switched to another mode, the flight
task will be interrupted and RTH will be triggered. If the remote controller gains
control in another flight mode, the flight task will be interrupted and RTH will be
triggered.
8. The remote controller can be used to modify the flight control system, the sensing
system and other aircraft settings. Refer to the Aircraft Settings Using the Remote
Controller section for more information.
9. Both the firmware of the dock and the aircraft can be updated in DJI FlightHub 2,
but the remote controller can only be used to update the firmware of the remote
controller.
2024 DJI All Rights Reserved.
©
22

Matrice 30 Series Dock Bundle User Manual
10. Users can upload the logs of both the dock and the aircraft in DJI FlightHub 2, and can
upload the logs of remote controller using the remote controller.
11. Remote controller B cannot be used to update the Fly Safe database.
Flight Test Checklist
After adding new flight route or changing flight route settings, it is recommended to
perform on-site flight test to ensure normal dock operation.
On-site Checklist
Make sure there is no foreign object in the battery ports of the aircraft.
Make sure the TB30 batteries are installed firmly, and the battery release toggles are
locked.
Make sure the propellers are firmly mounted and not damaged or deformed, that
there are no foreign objects in or on the motors or propellers, that the propeller blades
and arms are unfolded, and that the frame arm folding buttons are popped out in the
locked position.
Make sure the lenses of the vision systems, FPV, gimbal cameras, the glass of the
infrared sensors, and the auxiliary lights are clean and not blocked in any way.
Make sure the gimbal is unlocked and the camera is facing the front of the aircraft.
Make sure the covers of the microSD card slot, the assistant and the PSDK port have
been closed properly.
Make sure that the wind speed gauge rotates properly and that the rainfall gauge
surface is clear of dirt or foreign objects.
Make sure the landing pad surface is clean and clear of obstacles.
Make sure the Emergency Stop Buttons are released.
Modify the aircraft settings using the remote controller (excluded) based on actual needs.
Check the settings of the obstacle braking distance, warning distance, gimbal camera
settings, and aircraft RTK Maintain Positioning Accuracy mode in the DJI Pilot 2 App.
Refer to the Aircraft Settings Using Remote Controller section for more information.
DJI FlightHub 2 Checklist
Open the DJI FlightHub 2 Project page, click > and check the following:
a. Make sure the dock status is Idle, and the aircraft status is Standby or Powering Off.
b. Make sure the wind speed, ambient temperature, and rainfall are within the
reasonable range, and that the dock network connection is stable.
c. Click Live to open dock livestream. Make sure the dock cover surface is clear of
obstacles and snow or ice.
2024 DJI All Rights Reserved.
©
23

Matrice 30 Series Dock Bundle User Manual
d. Click Action to check device status. Make sure the dock RTK is calibrated and the
RTK data is converged, the satellite signal is good, and that the device storage has
enough free space.
e. Make sure to enable the obstacle sensing of the aircraft. Make sure to turn on the
beacons of the aircraft at night. Make sure to set a maximum altitude, maximum
distance, and alternate route altitude based on actual flight conditions.
Make sure the dock and aircraft firmware have been updated to the latest version in
the Devices page.
Make sure that an alternate landing site is set.
Check the following flight route settings:
a. Make sure that the flight route does not pass through any GEO zones, and that the
flight route keep a horizontal distance of at least 20 m from the GEO zone.
b. Check the takeoff point, altitude mode, and flight altitude. When flying near a GEO
zone, it is recommended to set the flight altitude at least 5 m lower than the altitude
limit of the GEO zone.
When creating a task plan, make sure to set an RTH altitude at least 5 m lower than the
altitude limit of the GEO zone.
Pay attention to the flight altitude, flight speed, battery level and other flight
parameters during the flight test.
Divide the airspace for flight when multiple aircraft are operating simultaneously in
order to avoid collision mid-air.
• It is recommended to link the remote controller as controller B before flight tests
for safety reasons.
• To ensure flight precision, when importing flight routes to DJI FlightHub 2, make
sure the RTK signal source of the flight route is the same as the signal source
used to calibrate the dock RTK. Otherwise, the actual flight trajectory of the
aircraft differs from the preset flight route, and may even cause the aircraft to
crash.
• After a task plan is launched, the dock will automatically check whether the
environment (such as wind speed, rainfall and ambient temperature) is suitable
for flight tasks. To ensure flight safety, the aircraft cannot take off in the following
conditions:
a. Wind speed is above 12 m/s.
b. In heavy rainfall.
c. Environment temperature is below -20° C (-4° F).
d. One of the Emergency Stop Buttons is pressed.
e. The dock power supply is powered off.
f. The Intelligent Flight Battery level is below 30%.
2024 DJI All Rights Reserved.
©
24

Matrice 30 Series Dock Bundle User Manual
g. The aircraft RTK is disabled.
h. The aircraft satellite signal is weak (the aircraft satellite icon in DJI FlightHub 2
is red).
i. The dock cannot perform Continuous or Timed tasks if the battery cycle count
exceeds 500 cycles.
• If a warning message appears in DJI FlightHub 2, click the message to view
warning details, and follow the instructions to conduct remote debugging.
• If the wind speed is close to 12 m/s, try lowering the flight altitude and the RTH
altitude to reduce the effect of the strong wind. Meanwhile, check the flight
altitude and the RTH altitude to ensure the flight path and the RTH path is free of
any obstacles.
2024 DJI All Rights Reserved.
©
25

Dock
This chapter introduces the major
features of the dock.

Dock
DJI Dock mainly consists of the electrical cabinet, dock cover, environment sensors,
landing pad, RTK module, communication system, air conditioning system, and UPS
module. A detailed introduction to the dock components and functions will be provided in
this chapter.
Electrical Cabinet
The Electrical Cabinet has an AC Power Switch, Backup Battery Switch, Grounding
Terminals, Surge Protective Devices (SPD), and operation ports.
The Electrical Cabinet can be connected to external cables for dock grounding, power
supply, and wired network connection. The dock can be connected to the remote
controller via the USB-C port on the electrical cabinet or to a computer via the USB-A port
for on-site operations.
Opening the Electrical Cabinet
1. Insert the triangular key and rotate counterclockwise to open the electrical cabinet
door.
2. Use a hex key to loosen the screws and remove the metal plate.
• The electrical cabinet should be operated by a qualified professional. Make sure
to power off the dock before operating the terminals. Pay attention to safety
during operation in order to avoid an electric shock.
• DO NOT press the cabinet door or place any heavy objects on it.
2024 DJI All Rights Reserved.
©
27

Matrice 30 Series Dock Bundle User Manual
Panel Description
NPE
L
• The red color indicates the area above safety voltage while the blue color
indicates the area under safety voltage. Pay attention when operating in the
area above safety voltage in order to avoid electric shocks.
NPE
L
14
15
Overview Description
1. Grounding Terminals Connect the dock to earth electrodes.
Connect to external AC Power (100-240 V). The three
terminals are PE (protective earth), N (neutral), and L (live),
2. AC Power Input
respectively.
DO NOT touch the Terminals in order to avoid an
electric shock.
3. SPD for AC Power
4. Surge Protector Circuit
Breaker (SCB)
Protect electrical devices of the dock from lightning,
overvoltage, and surge damage.
Protect the SPD for AC Power and conduct leakage
protection to avoid risk of fire.
5. AC Power Switch Power on/off the dock.
6. AC Power Output
Connect to user equipment for power supply (Max. power
should be less than 240 W).
7. Backup Battery Switch Turn on/off the backup battery of the dock.
8. Electrical Cabinet
Indicators
2024 DJI All Rights Reserved.
©
28
Indicate the working status of the power supply, the backup
battery, the wired network and the wireless network.

Matrice 30 Series Dock Bundle User Manual
9. USB-A Port
10. Dock Cover Manual
Release Button
11. USB-C Port Connect to a computer to access DJI Assistant 2.
12. Ethernet Port Connect to ethernet for wired network access.
13. SPD for Ethernet Device
14. Magnetic Door Sensor Detect whether the electrical cabinet door is closed.
15. Power Port for
Emergency Unlocking
* It is recommended to use the standard chargers of Matrice 200 Series, Inspire 2, or
Phantom 4 Series.
Connect the remote controller to the dock for dock
configuration and set up.
Press to unlock the dock cover for manual control.
Protect the dock ethernet devices from damage by
lightning overvoltage.
Connect to external power supply* to unlock the dock
cover when the dock is powered off or failure occurs.
Electrical cabinet Status Indicators
Power Indicator
Backup Battery Indicator
Wired Network Indicator
4G Network Indicator
Status Indicator
Power Indicator
Backup Battery
Indicator
Wired Network
Indicator
4G Network
Indicator
Status
——
——
Solid Red AC power supply is normal.
Off No AC power supply.
Solid blue
Blinks blue
slowly
Blinks blue
quickly
Off
Blinks green
quickly
Off Ethernet is disconnected.
Blinks green
quickly
Off 4G network is disconnected .
Description
Backup battery is fully charged or is
supplying power to the dock.
Backup battery is charging.
Backup battery level is low.
Backup battery is not installed or the
backup battery switch is off.
Ethernet is connected and has data
transmission with the dock.
4G network is connected and has
data transmission.
2024 DJI All Rights Reserved.
©
29

Matrice 30 Series Dock Bundle User Manual
Dock Cover
The internal video transmission antennas and status indicators are located on the dock
cover. The dock cover propeller bumpers on the side edges of the dock cover are used for
folding the aircraft propellers when closing the dock cover.
The heating strips at the dock cover seam can automatically heat the dock cover to
prevent the seam from freezing.
• Make sure the internal video transmission antennas are not blocked by snow,
ice, or any foreign objects.
• The dock cover heating strips can only prevent the dock cover seam from
freezing. Make sure to clean the snow or ice covered on the surface.
• The Dock Cover Propeller Bumpers are easily-worn parts, replace them if
necessary.
Opening and Closing the Dock Cover
When conducting remote debugging, the dock cover can be opened or closed using
DJI FlightHub 2 or the DJI Pilot 2 app to check the aircraft status and the component
status inside the dock. The dock cover can also be controlled manually. Make sure the
emergency stop buttons are released before opening the dock cover. If not, pull out or
rotate clockwise to release the emergency stop buttons.
• Keep a safe distance from the dock cover to avoid injury when opening or
closing the dock cover. Press the emergency stop button if necessary.
• DO NOT press or place heavy objects on the dock cover after it is opened.
Using DJI FlightHub 2
Open DJI FlightHub 2 Project page, click > > Action, and enable Remote Debugging;
or open Devices page, click Dock >
Debugging to open or close the dock cover.
If the dock cannot detect the aircraft, check whether the aircraft is on the landing pad
using the dock livestream, and follow the instructions prompted in DJI FlightHub 2. Click
Force Close Dock Cover if the aircraft is not on the landing pad. Click Close Dock Cover if
the aircraft is on the landing pad.
• DO NOT click Force Close Dock Cover if the aircraft is on the landing pad.
Otherwise, the propellers and the dock cover may be damaged.
• When closing the dock cover, the aircraft will automatically power on, and the
propellers will slowly rotate to avoid damage to the propellers.
2024 DJI All Rights Reserved.
©
30
> Device Maintenance, and enable Remote

Matrice 30 Series Dock Bundle User Manual
开
ON
蓄电池
UPS
关
OFF
Using DJI Pilot 2
Connect the remote controller to the dock. Run DJI Pilot 2 and tap Open Dock Cover.
USB-C
Pilot 2 App
Manual Control
1. Make sure the dock is powered on, and the dock cover status indicators are blinking.
2. Open the electrical cabinet door using the triangular key.
3. Press and hold the manual release button, then lift and rotate the connection
between the cover arm and the cover to open the dock covers. Make sure to control
the descent speed to prevent the cover from falling.
4. Before closing the dock cover manually, to avoid breaking the propellers, rotate the
propellers to the landing pad and make them as 90°.
开
ON
关
OFF
交流电源
蓄电池
后备保护器
电源防雷器
AC POWER
UPS
SCB
SPD
Connection between the Cover Arm and the Cover
2024 DJI All Rights Reserved.
©
31

Matrice 30 Series Dock Bundle User Manual
• When opening/closing the dock cover, DO NOT lift the dock cover edge or other
parts of the dock cover directly to avoid damage.
Dock Cover Status Indicators and Buzzer Alerts
Normal States
Blinks white
Blinks green
—— Solid blue
Warning States
—— Solid Red The dock is malfunctioning.
Blinks blue
Short beeps
Blinks red
Long beeps
Blinks red and
yellow alternately
The dock is working normally and the aircraft is ready
to take off.
The dock and the aircraft are linking.
The aircraft has taken off from the dock and is
performing a flight task.
The dock is updating or debugging (including remote
debugging and on-site debugging).
The dock covers are moving or the aircraft is taking off
or landing.
Keep a safe distance from the dock to avoid injury.
Any of the emergency stop buttons on the dock is pressed.
2024 DJI All Rights Reserved.
©
32

Matrice 30 Series Dock Bundle User Manual
Emergency Stop Button
There are two Emergency Stop Buttons on the dock. In an emergency situation, press
the Emergency Stop Button to stop all dock movements when operating or maintaining
the dock. The Status Indicators blink red and yellow alternatively after pressing the
Emergency Stop Button.
If the aircraft is powered on but the motors are not running, the aircraft cannot take off
after pressing the Emergency Stop Button. If the Emergency Stop Button is pressed when
the aircraft is performing a flight task, the aircraft will fly to the alternate landing site after
completing the flight task.
• Pull out or rotate the button clockwise to release the Emergency Stop Button
before conducting other operations (e.g. dock cover control).
2024 DJI All Rights Reserved.
©
33

Matrice 30 Series Dock Bundle User Manual
Environment Sensors
DJI Dock integrates multiple environment sensors to provide information on wind
speed, rainfall scale, temperature, and humidity, allowing users to monitor real-time
environment condition and ensure flight safety.
Wind Speed Gauge Module
The wind speed gauge module is located on the top of the dock cover and consists of a
wind speed gauge, an integrated security camera, and a camera auxiliary light.
1. Wind Speed Gauge: the wind speed gauge is used to
measure wind speed near the dock. The wind speed
gauge features self-heating and is able to work in lowtemperature environments. Users can view real-time
wind speed in DJI FlightHub 2. To ensure flight safety,
the aircraft cannot take off or land when the wind
speed is above 12 m/s.
2. Integrated Security Camera: the integrated security
camera is used to monitor the real-time dock
environment. Users can monitor the dock environment
from dock livestreams in DJI FlightHub 2, and can check
the aircraft status on the landing pad after opening the
dock cover.
3. Camera Auxiliary Light: the camera auxiliary light can
be enabled at night to assist the integrated security
camera monitoring.
• The wind speed gauge can only measure the wind speed near the dock, which is
different from the wind speed provided by local meteorological department. If
the aircraft ascends to high altitude, the wind speed and direction may change
significantly. Operate the dock and the aircraft with caution when the measured
wind speed is close to 12 m/s.
2024 DJI All Rights Reserved.
©
34

Matrice 30 Series Dock Bundle User Manual
Rainfall Gauge
The rainfall gauge is located near the wind speed gauge
module, and is used to measure rainfall information near
the dock. The rainfall gauge features self-heating and is
able to work in low-temperature environments. Users can
view the rainfall information in DJI FlightHub 2. To ensure
flight safety, the aircraft cannot take off in heavy rain.
• There is a pressure sensing module in the rainfall gauge. DO NOT press hard on
the surface of the rainfall gauge. Otherwise, the pressure sensing module may
be damaged.
• Clean the rainfall gauge surface on a regular basis. Replace the rainfall gauge
immediately if it is dented, deformed, or damaged.
Temperature and Humidity Sensor
DJI Dock features temperature and humidity sensors, which are used to measure ambient
temperature and the temperature and humidity inside the dock. Users can open Project
Page in DJI FlightHub 2 and click
information.
To ensure flight safety, the aircraft cannot take off when the ambient temperature is
below -20° C (-4° F). Flight tasks will be resumed after the ambient temperate is higher
than -20° C (-4° F).
> > Action, to view the temperature and humidity
Water Immersion Sensor
The water immersion sensors are located in the lower compartment under the landing
pad, and are used to detect whether the dock is immersed in water. If DJI FlightHub 2
prompts dock flooding, remove the water immediately and check whether the dock works
properly. If the dock fails to work properly, make sure to turn off the AC power switch and
backup battery switch, and contact DJI Support.
2024 DJI All Rights Reserved.
©
35

Matrice 30 Series Dock Bundle User Manual
Landing Pad
Overview Description
1. Return Vent
2. Supply Vent
3. Positioning Marks
4. Driving Rods
5. Charging
Connectors
6. Landing Pad Bolts
7. Aircraft Orientation
Mark
8. Internal RTK
Antennas
The air from the air conditioning system flows through the
return vent and supply vent, and forms an airflow, adjusting the
temperature and humidity inside the dock.
There are four positioning marks on the landing pad for the
aircraft to identify dock position.
There are a pair of front and rear driving rods and a pair of left
and right driving rods on the landing pad. The driving rods push
the aircraft to the center of the landing pad after landing, and
detect the aircraft position before taking off.
The charging connectors are located in the driving rods. After
the aircraft is pushed to the center, the charging connectors will
connect to the aircraft and charge the batteries automatically.
Insert the triangular key and rotate counter-clockwise to loosen
the landing pad bolts. Grab the edge of the landing pad to open
the lower compartment of the dock.
When placing the aircraft on the landing pad, make sure to align
the aircraft heading with the aircraft orientation mark. Otherwise,
the aircraft and the driving rods may be damaged.
Make sure the landing pad is clear of obstacles and the internal
RTK antennas are not covered. Otherwise, the signals will be
obstructed and the positioning performance will be affected.
2024 DJI All Rights Reserved.
©
36

Matrice 30 Series Dock Bundle User Manual
Dock RTK Module
The dock internal RTK module of the dock supports receiving dual-band multi-mode GNSS
signals, providing high-precision data for centimeter-level positioning when used with the
Matrice 30 Series Dock Version aircraft.
Make sure the dock RTK is calibrated before a flight task to ensure accurate flight along
the flight route. The dock RTK values are already calibrated using the remote controller
during dock configuration, and are not required to be recalibrated if the dock position
remains the same. If the dock is moved, the position needs to be recalibrated in DJI Pilot 2
using the remote controller. Refer to the Installation and Setup Manual for details.
• Users can open DJI FlightHub 2 Project page, click > > Action to view the
dock RTK status.
Air Conditioning System
The air conditioning system facilitates temperature and humidity control of the dock.
When the dock is in Idle state, the air conditioning system will automatically adjust the
temperature and humidity inside the dock, providing a suitable environment for the
aircraft and the Intelligent Flight Battery.
If the Intelligent Flight Battery temperature is above 35° C (95° F), the air conditioning
system will start cooling to cool down the batteries. When the ambient temperature is
below 0° C (32° F), the air conditioning system will start heating to prevent the propellers
from freezing.
When opening the dock cover, the air conditioning system will lower the speed of the
inner circulating fan to prevent dust or catkins from entering the return vent.
• Users can open the DJI FlightHub 2 Devices page, click Dock > , and enable
Remote Debugging to start heating or cooling. To ensure the service life of the
TEC air conditioning system, a five-minute interval is required when switching
between cooling and heating operations, and a countdown will appear in DJI
FlightHub 2. Wait for the countdown to end before switching operations.
Backup Battery
DJI Dock features a backup battery with a capacity of 12 Ah and maximum runtime of
approximately 5 hours. If the dock is powered off due to an emergency power outage, the
backup battery can provide power to the dock* so that the aircraft can safely return and
land.
* In this case, the dock cannot charge the aircraft battery, the air conditioning system cannot
work properly, and the self-heating of the wind speed gauge, the rainfall gauge, and the
dock cover will be unavailable.
2024 DJI All Rights Reserved.
©
37

Matrice 30 Series Dock Bundle User Manual
PE
N
L
• Check and fix the issue as soon as possible to restore power to the dock.
Make sure to turn off the backup battery switch if the power supply cannot
be restored and the dock is not used for an extended period. Otherwise, the
backup battery will overdischarge when powered on for more than 20 days.
Replace the backup battery if overdischarged.
Charging the Backup Battery
If the dock is stored for an extended period, make sure to charge the backup battery
before use:
1. Open the electrical cabinet door.
2. Remove the electrical cabinet plate.
3. Connect a three-core cable to the PE, N, and L terminals of the AC Power Input in the
electrical cabinet.
4. Turn on the AC power switch to power on the dock. Turn on the backup battery switch
to charge the backup battery.
1
3
2
4
When the dock is not in use for an extended period, make sure to maintain the backup
battery by charging it for at least six hours. Refer to the following table for the backup
battery maintenance intervals under different storage environment temperatures.
2024 DJI All Rights Reserved.
©
38

Matrice 30 Series Dock Bundle User Manual
Storage Environment Temperature Backup Battery Maintenance Interval
Below 20° C (68° F) Every nine months
20° to 30° C (68° to 86° F) Every six months
30° to 40° C (86° to 104° F) Every three months
40° to 60° C (104° to 113° F) Every month
• The charging operation should be operated by a qualified professional. DO NOT
touch the metal terminals in order to avoid an electrical shock. Make sure the
cable is correctly connected to the PE, N, and L terminals.
• The backup battery cannot be charged when the battery temperature is above
40° C (104° F) or below -20° C (-4° F).
Dock Network Connection
The dock can be connected to a wired network or 4G network* for internet access. Users
can choose different internet access based on actual needs. When the dock is connected
to both a wired network and a 4G network, the 4G network works as a backup to the
wired network. The dock will automatically switch to the 4G network if the wired network
fails.
* 4G network service is not available in some countries or regions. Please consult your local
DJI authorized dealer or DJI Support for more information.
IP Rating of the Dock
1. Under stable laboratory conditions, DJI Dock achieves an IP55 protection rating by
IEC 60529 standards when used with Matrice 30 Series Dock Version aircraft. The
protection rating is not permanent, and may lower over an extended period. Maintain
the device on a regular basis.
2. The dock does not achieve IP55 protection rating in the following circumstances:
a. The electrical cabinet door is not firmly closed.
b. The wind speed gauge module is not firmly installed.
c. The dock cover is not firmly closed.
d. When the waterproof rubber strip cannot be firmly attached to the dock cover. For
example, when manually closing the dock cover.
e. The dock shell is cracked or the waterproof adhesive is aged or damaged.
3. The body surface may become discolored after long-term use. However, such color
change does not affect the performance and IP rating of the dock.
2024 DJI All Rights Reserved.
©
39

Aircraft
This chapter introduces the major
features of the aircraft.
Aircraft
The Matrice 30 Series Dock Version aircraft mainly consists of the flight control system,
communication system, vision system, image processing system, propulsion system, and
power and battery system. This chapter describes the functions of these components.
The aircraft is already linked to the dock when purchased in the Matrice 30 Series Dock
Bundle. Otherwise, follow the instructions to link the aircraft to the dock (the firmware of
both the dock and the aircraft should be updated to the latest firmware version):
1. Open the electrical cabinet door using the triangular key.
2. Press the dock cover manual release button five times, and then press and hold the
power button on the aircraft for five seconds or more. During the linking process, the
dock cover status indicators will blink blue, and short beeps will sound from the dock.
3. When the linking process is successful, the dock status indicators will blink white.
• The dock can also be linked to the aircraft using the remote controller, refer to
the Installation and Setup Manual for more information.
Flight Modes
Matrice 30 Series Dock Version aircraft flies in N mode (Normal) by default. In N mode, the
aircraft utilizes the GNSS and the vision system that allows obstacle sensing in six directions
to stabilize itself automatically. When obstacle sensing is enabled and the lighting and other
environment conditions are sufficient, the maximum tilt angle of the aircraft will be 25°.
Vision System and Infrared Sensing System
Rear View Bottom View
2024 DJI All Rights Reserved.
©
41

Matrice 30 Series Dock Bundle User Manual
0.6-38 m
The main components of the vision system (cameras with vision sensors) are located on
the front, rear, left, right, top, and bottom of the aircraft. The infrared sensing system has
two infrared sensors on each side of the aircraft (front, rear, left, right, top, and bottom).
The vision system constantly scans for obstacles and uses image data to calculate
the aircraft position, and the infrared sensing system uses infrared sensors to detect
obstacles and determine the flight altitude. Both systems work together to position the
aircraft and sense obstacles during flight.
• To ensure a safe and steady flight, DO NOT block the vision system and the
infrared sensing system.
Detection Range
Detection Range of the Vision System
0.5-33 m
0.5-33 m
65°65°
50°
50°
0.5-33 m
50°50°
0.5-33 m
0.5-33 m
0.5-33 m
50°
50°
65°
0.5-33 m
50°
0.5-33 m
0.6-38 m
65°
65°
65°
0.5-33 m
Detection Range of the Infrared Sensing System
0.1-10 m
30°
0.1-10 m
30°
0.1-10 m
30°
0.1-10 m
30°
30°
30°
0.1-10 m
30°
30°
30°
0.1-10 m
0.1-10 m
30°
30°
0.1-10 m
30°
30°
0.1-10 m
30°
0.1-10 m
30°
• Be aware of the blind spots (marked gray) of the vision system and the
infrared sensing system. The aircraft cannot sense obstacles that are out of the
detection range.
• The aircraft cannot sense moving obstacles such as people, animals, or vehicles.
65°
65°65°
0.1-10 m
30°
65°
0.5-33 m
65°
30°
0.1-10 m
30°
2024 DJI All Rights Reserved.
©
42

Matrice 30 Series Dock Bundle User Manual
Using the Vision System
Obstacle sensing works best when the lighting is adequate and the obstacle is clearly
textured. It does not work well with obstacles that are less dense such as twigs on trees.
The infrared sensing system can only be used for large or diffuse reflective objects and
rough surfaces.
• Pay attention to the flight environment. The vision system and infrared sensing
system only work in certain scenarios.
• When the ambient light is insufficient, the vision positioning performance will be
negatively affected. The auxiliary bottom light will be automatically enabled to
assist the vision system.
• The vision system cannot function properly in dark environments and over
surfaces without clear patterns or texture such as water and ice.
• Obstacle avoidance cannot detect certain obstacles such as iron wiring, cables,
tree branches, blind spots, and mirrored surfaces.
• The measurement accuracy of the vision system is easily affected by the light
intensity and the surface texture of the object. The vision system cannot work
properly in the following situations:
a. Flying near monochrome surfaces (e.g., pure black, white, red, or green) or
those without clear texture.
b. Flying near surfaces with strong reflected light or images.
c. Flying near water, ice, or transparent surfaces.
d. Flying near moving surfaces or objects (e.g., crowds of people or swaying
reeds, shrubs, or grass).
e. Flying in an area where lighting changes frequently or drastically or with direct
exposure to strong light.
f. Flying near extremely dark (< 15 lux) or extremely bright (> 10,000 lux)
surfaces.
g. The aircraft speed is too fast when flying below 2 m above the ground (e.g.,
faster than 14 m/s at a 2m height or 5 m/s at a 1m height).
h. Tiny obstacles (e.g., iron wires, cables, tree branches, or leaves).
i. The lens is dirty (e.g., from raindrops or fingerprints).
j. In low-visibility environments (e.g., heavy fog or snow).
• The infrared sensing system may NOT detect the distance accurately in the
following situations:
a. Flying near surfaces that can absorb sound waves (e.g., asphalt road surfaces).
b. A large area of strong reflectors situated at a distance of more than 15 m (e.g.,
multiple traffic signs placed side by side).
c. Tiny obstacles (e.g., iron wires, cables, tree branches, or leaves).
d. Mirrors or transparent objects (e.g., water or glass).
e. In low-visibility environments (e.g., heavy fog or snow).
• DO NOT obstruct the infrared sensing system. DO NOT hang or place anything
in an area that will block the vision system, infrared sensing system, and their
observation range.
2024 DJI All Rights Reserved.
©
43

Matrice 30 Series Dock Bundle User Manual
• Make sure that the sensor lens is clear and free of stains. DO NOT interfere
with the vision system and infrared sensing system in any way such as using a
strong light source to illuminate the vision system or aiming specular reflectors
towards the infrared sensor.
• Make sure that the sensor lens is clear and free of stains. Check the following
before placing the aircraft on the dock:
a. Make sure there are no stickers or any other obstructions over the glass of
the infrared sensing systems and vision systems.
b. Use soft cloth if there is any dirt, dust, or water on the glass of the vision
systems and infrared sensing systems. DO NOT use any cleaning product that
contains alcohol.
c. Contact DJI Support if there is any damage to the lenses of the infrared
sensing and vision systems.
Vision System Calibration
The vision system installed on the aircraft is factory calibrated. If the aircraft experiences
a collision or a significant change in the operating temperature, calibration may be
required. DJI FlightHub 2 will display a prompt when calibration is required. Follow the
instructions to calibrate the vision system when prompted:
1. Power on the aircraft.
2. Connect the aircraft to a computer.
3. Launch DJI Assistant 2 and log in using a DJI account.
4. Select the M30 Series, then click the calibration button.
5. Position the aircraft with the vision system facing the dotted pattern displayed on the
computer screen, and follow the on-screen instructions to calibrate the vision sensors
on each side.
• DO NOT power off the aircraft or unplug the USB-C cable after calibration. Wait
for the data calculation to complete.
2024 DJI All Rights Reserved.
©
44

Matrice 30 Series Dock Bundle User Manual
Return to Home
The Return to Home (RTH) function returns the aircraft back to the dock or the alternate
landing site when the GNSS signal is strong. RTH can be triggered in three ways: userinitiated triggers, the aircraft has low battery, or the control signal between the dock
and the aircraft is lost. Alternate Landing will be triggered if the dock is not suitable for
landing. In this case, the aircraft will fly to and land on the alternate landing site.
Flight route task will be interrupted and RTH will be triggered if any of these situation
occurs:
The aircraft approaches the GEO zones, or the flight distance approaches the
maximum distance.
The GNSS signal is poor during flight task.
RTH is triggered in DJI FlightHub 2.
If the Intelligent Flight Battery level is low, low Battery RTH will be triggered.
If the aircraft disconnects from the dock, Signal Lost Action (Return to Home or
Continue Task) will be triggered.
• Make sure to set an appropriate RTH Altitude when creating flight task plans.
The RTH altitude should also be at least 5 m lower than the altitude limit of the
GEO zone.
• The RTH feature will be disabled when the GNSS signal icon is red, or the GNSS
is unavailable.
• GEO zones may affect the RTH. Avoid flying near GEO zones.
• The aircraft will exit RTH if the lighting and environment conditions are too
complex to complete RTH, even if the vision systems are working properly.
Advanced RTH
When Advanced RTH is triggered, the aircraft will automatically plan the best RTH path,
which will be displayed in DJI FlightHub 2 and will adjust according to the environment.
The user can cancel RTH after gaining aircraft control in DJI FlightHub 2. RTH can also be
cancelled by pressing the Flight Pause button or the RTH button on the remote controller
B after gaining aircraft control.
During RTH, the aircraft will automatically adjust the tilt and pan angles of the gimbal so
that the gimbal camera points towards the RTH path.
2024 DJI All Rights Reserved.
©
45

Matrice 30 Series Dock Bundle User Manual
• When manually adjusting the gimbal pan angle in DJI FlightHub 2, the aircraft
orientation will change accordingly. Since the aircraft has visual blind spots, the
aircraft's flight speed will be affected after the orientation has changed. DO NOT
manually adjust the gimbal pan angle during RTH.
• When the lighting and environment conditions are unsuitable for vision systems,
the aircraft will rely on the laser rangefinder on the gimbal camera to assist in
distance measurement. Once the user adjusts the gimbal pan angle from the
RTH path, obstacles on the RTH path will not be recognized, and flight safety
risks will increase. DO NOT manually adjust the gimbal pan angle during RTH.
Trigger Method
•
The user actively triggers RTH
Advanced RTH can be initiated by clicking Return to Home in the device status window
in DJI FlightHub 2.
•
Aircraft low battery
When the Intelligent Flight Battery level is too low and there is not enough power to
return home, land the aircraft as soon as possible.
To avoid unnecessary danger caused by insufficient power, the aircraft automatically
calculates if the battery power is sufficient to return to the Home Point according to
the current position, environment, and flight speed. The flight task will be interrupted
and Low Battery RTH will be triggered when the Intelligent Flight Battery is depleted to
the point that the safe return of the aircraft may be affected.
The user can cancel RTH by pressing the RTH button on the remote controller. If RTH
is canceled following the warning, the Intelligent Flight Battery may not have enough
power for the aircraft to land safely, which may lead to the aircraft crashing or being
lost.
The aircraft will land automatically if the current battery level can only support the
aircraft long enough to descend from its current altitude. Auto landing cannot be
cancelled, but users can gain aircraft control using remote controller B, and control the
horizontal movement and the descent speed of the aircraft during landing. If there is
sufficient power, the throttle stick can be used to make the aircraft ascend at a speed
of 1 m/s.
During auto landing, gain control using remote controller B and move the aircraft
horizontally to find an appropriate place to land as soon as possible. The aircraft will fall
if the user keeps pushing the throttle stick upward until the power is depleted.
2024 DJI All Rights Reserved.
©
46
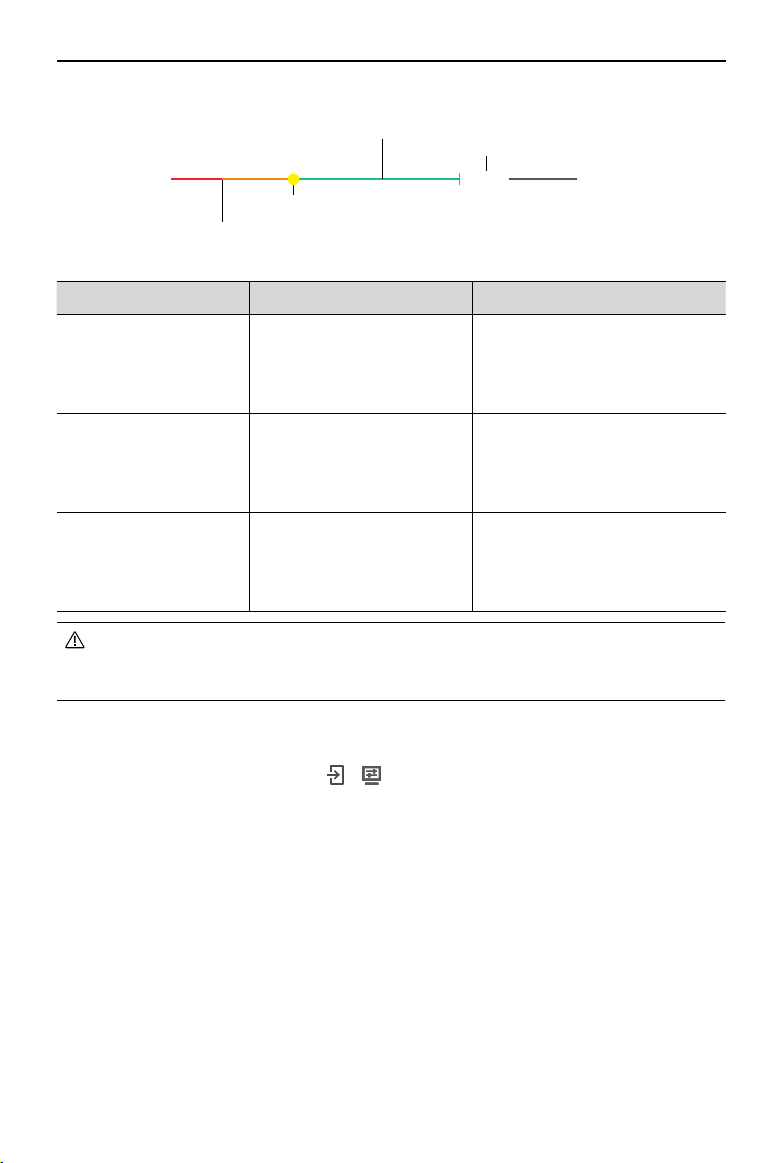
Matrice 30 Series Dock Bundle User Manual
The battery level indicator is displayed in the device status window:
Sufficient battery level (Green)
H
Power required to return home (Yellow)
Auto landing (Red)
Estimated remaining flight time
30:17
Battery Level Warning Implication Flight
Low Battery RTH
Auto Landing
The remaining battery
level is only enough for the
aircraft to fly to the Home
Point safely.
The remaining battery
level is only enough for the
aircraft to descend from its
current altitude.
Flight task will be interrupted
and the aircraft will enter RTH.
Dock landing detection will be
triggered before landing.
The aircraft will land
automatically and dock landing
detection will be triggered.
The estimated remaining
Estimated Remaining
Flight Time
flight time of the aircraft is
based on its current battery
/
level.
• The colored zones and the estimated remaining flight time on the battery level
indicator are automatically adjusted according to the current location and status
of the aircraft.
•
Loss of signal
The signal lost action can be set to Return to Home, Hover, or Continue. Go to Project
Page in DJI FlightHub 2, and click
> > Aircraft Control > Flight Settings > On Signal
Lost to set the signal lost action. The signal lost action during a flight route task can be
set to Return to Home or Continue Task in DJI FlightHub 2. If the action is set to RTH,
the Home Point was successfully recorded and the compass is functioning normally,
Failsafe RTH automatically activates after the signal between the dock and the aircraft
is lost for more than six seconds.
When the lighting is sufficient and the vision systems are working normally, DJI
FlightHub 2 will display the RTH path that was generated by the aircraft before the
signal was lost. The aircraft will start RTH using Advanced RTH according to the RTH
settings. The aircraft will remain in RTH even if the signal is restored. DJI FlightHub 2
will update the RTH path accordingly.
When the lighting is not sufficient and the vision systems are not available, the aircraft
2024 DJI All Rights Reserved.
©
47

Matrice 30 Series Dock Bundle User Manual
will enter Original Route RTH. The aircraft enters Preset RTH if the remote controller
signal is restored during Original Route RTH. The Original Route RTH procedure is as
follows:
1. The aircraft brakes and hovers in place.
2. When RTH begins:
If the RTH distance (the horizontal distance between the aircraft and the Home
•
Point) is farther than 50 m, the aircraft adjusts its orientation and flies backward
for 50 m on its original flight route before entering Preset RTH.
If the RTH distance is farther than 5 m but less than 50 m, it adjusts its
•
orientation and flies to the Home Point in a straight line at the current altitude.
The aircraft lands immediately if the RTH distance is less than 5 m.
•
3. The aircraft begins to land when it reaches above the Home Point.
• The aircraft may not be able to return to the Home Point if the positioning
performance is poor. In case of loss of remote controller signal, the aircraft may
enter ATTI mode and will automatically land.
• It is important to set a suitable RTH altitude before each flight. Set the RTH
altitude in the device status window or in Plan Library in DJI FlightHub 2.
• The aircraft cannot bypass obstacles during RTH if the lighting and environment
conditions are unsuitable for the vision systems.
• The aircraft may not be able to return to a Home Point when the wind speed is
too high. Fly with caution.
• Pay extra attention to small or fine objects (such as tree branches or power lines)
or transparent objects (such as water or glass) during RTH. In an emergency, exit
RTH and control the aircraft manually using DJI FlightHub 2.
RTH Procedure
1. The Home Point is recorded.
2. Advanced RTH is triggered.
3. The aircraft brakes and hovers in place. When RTH begins:
The aircraft lands immediately if the RTH distance is less than 5 m.
•
If the RTH distance is farther than 5 m, the aircraft will plan the best path according
•
to the RTH settings, lighting, and environmental conditions.
4. The aircraft will fly automatically according to the RTH settings, environment, and
transmission signal during RTH.
5. The aircraft lands and the motors stop after reaching the Home Point.
2024 DJI All Rights Reserved.
©
48

Matrice 30 Series Dock Bundle User Manual
RTH Settings
Advanced RTH will plan the RTH path using Preset RTH.
Preset:
Lighting and Environment
Conditions
Current altitude <
RTH distance
> 50 m
RTH distance is within 5-50 m
The RTH plans for different environments, RTH trigger methods, and RTH settings are as
follows:
Lighting and Environment
Conditions
The user actively triggers RTH
Aircraft low battery
Loss of remote controller signal
RTH altitude
Current altitude ≥
RTH altitude The aircraft will return to
Suitable for Vision Systems
The aircraft will plan the
RTH path, fly to an open
area while bypassing
obstacles, ascend to the
RTH altitude, and return to
home using the best path.
home using the best path
at the current altitude.
Suitable for Vision
Systems
The aircraft can bypass
obstacles and GEO zones
Preset
Unsuitable for Vision
Systems
The aircraft will ascend
to the RTH altitude,
adjust its orientation
and fly to the Home
Point in a straight line at
the RTH altitude.
The aircraft will adjust
its orientation and fly
to the Home Point in
a straight line at the
current altitude.
Unsuitable for Vision
Systems
The aircraft cannot
bypass obstacles but can
bypass GEO zones
Preset
Original route RTH,
Preset RTH will be
executed when the
signal is restored
2024 DJI All Rights Reserved.
©
49

Matrice 30 Series Dock Bundle User Manual
• During Advanced RTH, the aircraft will adjust the flight speed automatically to suit
environmental factors such as wind speed and obstacles.
• The aircraft cannot avoid small or fine objects such as tree branches or power
lines. Fly the aircraft to an open area using Live Flight Controls in DJI FlightHub 2
before initiating RTH.
• Set Advanced RTH as Preset if there are power lines or towers that the aircraft
cannot bypass on the RTH path and make sure the RTH Altitude is set higher than
all obstacles.
• The aircraft will brake and return to home according to the latest settings if the
RTH settings are changed during RTH.
• If the max altitude is adjusted below the current altitude during RTH, the aircraft
will descend to the max altitude first and then continue returning to home.
• The RTH Altitude cannot be changed during RTH.
• If there is a large difference between the current altitude and the RTH altitude,
the amount of battery power used cannot be calculated accurately due to wind
speed difference at different altitudes. Pay extra attention to the battery power
prompts and warning prompts in DJI FlightHub 2.
• During Advanced RTH, if the lighting condition and environment becomes
unsuitable for the vision systems, the aircraft cannot bypass the obstacles on
the RTH path. In this case, the aircraft will use the infrared sensor and the laser
rangefinder on the gimbal camera to assist in distance measurement. Fly with
caution. Make sure to set an appropriate RTH altitude before entering RTH.
• When the remote controller signal is normal during Advanced RTH, the pitch stick
can be used to control the flight speed, but the orientation and altitude cannot
be controlled and the aircraft cannot be controlled to fly to the left or right.
Constantly pushing the pitch stick to accelerate will increase the battery power
consumption speed. The aircraft cannot bypass obstacles if the flight speed
exceeds the effective sensing speed. The aircraft will brake and hover in place
and exit RTH if the pitch stick is pushed all the way down. The aircraft can be
controlled after the pitch stick is released.
• If the aircraft reaches the altitude limit of the aircraft current location or of the
Home Point while it is ascending during Preset RTH, the aircraft stops ascending
and returns to the Home Point at the current altitude. Pay attention to flight
safety during RTH.
• If the Home Point is within the Altitude Zone but the aircraft is not, when the
aircraft reaches the Altitude Zone it will descend below the altitude limit, which
may be lower than the set RTH altitude. Fly with caution.
• The aircraft will bypass any GEO zones encountered when it is flying forward
during Advanced RTH. Fly with caution.
Straight Line RTH
The aircraft will enter Straight Line RTH when the lighting is not sufficient and the
environment is not suitable for the Advanced RTH.
2024 DJI All Rights Reserved.
©
50

Matrice 30 Series Dock Bundle User Manual
During the Advanced RTH process, once there are dense obstacles (such as dense woods)
on the RTH path or obstacles are encountered on the RTH path at night, the aircraft will
hover for 30 seconds and then start a straight line RTH.
Straight Line RTH Procedure
1. The Home Point is recorded.
2. Straight Line RTH is triggered.
3. The aircraft brakes and hovers in place.
a. If the aircraft is farther than 50 m from the Home Point when RTH begins, the
aircraft first ascends to a height of 20 m (this step will be skipped if the current
height is higher than 20 m), then the aircraft adjusts its orientation and ascends to
the preset RTH altitude and flies to the Home Point. If the current altitude is higher
than the RTH altitude, the aircraft will fly to the Home Point at the current altitude.
b. If the aircraft is at a distance of 5 to 50 m from the Home Point when RTH begins,
the aircraft adjusts its orientation and flies to the Home Point at the current
altitude. If the current altitude is lower than 2 m when RTH begins, the aircraft will
ascend to 2 m and flies back to the Home Point.
c. The aircraft lands immediately if it is less than 5 m from the Home Point when RTH
begins.
4. The aircraft lands and the motors stop after reaching the Home Point.
• The user can also gain control using remote controller B and exit RTH by
pushing the control stick in the opposite direction of flight (e.g., pushing the
throttle stick down when the aircraft is ascending).
Obstacle Sensing During RTH
The aircraft can sense and avoid obstacles during RTH if the lighting is sufficient for
obstacle sensing. The obstacle sensing procedure is as follows:
1. The aircraft decelerates when an obstacle is sensed from a distance of approximately
20 m (65.62 ft). If the distance from the obstacle is less than 20 m, the aircraft will fly
backward (or forward) to keep a distance of more than 20 m.
2. The aircraft stops and hovers, then ascends to avoid the obstacle. Eventually, the
aircraft stops ascending when it is at least 5 m (16.4 ft) above the detected obstacle.
3. The aircraft continues flying to the Home Point at its current altitude.
If the aircraft cannot ascend to avoid the obstacle, it will hover. A prompt will appear in
DJI FlightHub 2, reminding users to check actual flight environment using the aircraft
livestream.
• To ensure the aircraft flies forward to the Home Point, the user is unable to rotate
the aircraft during RTH.
• During RTH, obstacles on either side of the aircraft cannot be detected or avoided.
2024 DJI All Rights Reserved.
©
51

Matrice 30 Series Dock Bundle User Manual
Dock Landing Detection
Dock landing detection is activated during auto landing and is executed as follows:
1. If dock landing detection determines the dock is suitable for landing, the aircraft will
land on the dock directly.
2. If the dock is not suitable for landing (such as the dock cover fails to open, emergency
stop button is pressed), the aircraft will fly to the alternate landing site. If an alternate
landing site is not set, the aircraft will hover above the dock, and will start descending
only when the battery level drops to 10%.
3. If the aircraft cannot detect the landing status of the dock (such as the dock and the
aircraft are disconnected), or the aircraft fails to land on the dock due to bad weather,
the aircraft will descend below 3 m (9.8 ft) above the ground and hover. The aircraft
will fly to the alternate landing site when the battery level is less than 20%. If an
alternate landing site is not set, the aircraft will hover above the dock, and will start
descending only when the battery level drops to 10%.
• Make sure to set an alternate landing site during dock configuration. Otherwise,
the aircraft may crash land if the dock is not suitable for landing, damaging the
aircraft and the dock.
Alternate Landing
Dock Landing Detection will be triggered after the aircraft flies back to the dock during
RTH. If the dock is determined unsuitable for landing, alternate landing will be triggered.
The aircraft will ascend to the alternate route altitude, then fly to the alternate landing
site for landing. Open DJI FlightHub 2, Click Devices > Dock > Device Maintenance to view
Alternate Route Altitude.
RTH Altitude
• To ensure flight safety, make sure to set an alternate landing site and an
alternate route altitude during dock configuration.
2024 DJI All Rights Reserved.
©
52
Alternate Route Altitude

Matrice 30 Series Dock Bundle User Manual
Aircraft Indicators
The aircraft has front and rear indicators.
1. Front indicators: blinks green and red alternately to indicate the nose of the aircraft.
2. Rear indicators: blinks green to indicate the rear of the aircraft when flying. When
the aircraft is powered on but not in flight, the rear indicators will show the aircraft
statuses.
Refer to the table below for the different aircraft statuses.
Normal States
Blinks green once
Blinks red, yellow, and green
alternately
*
×2 Blinks green twice repeatedly *Vision systems enabled
Blinks green quickly RTK enabled and RTK data is being used
Blinks yellow slowly Attitude mode (GNSS is not available)
Warning States
Blinks yellow quickly Remote controller signal lost
Blinks red slowly Low battery level, takeoff is disabled
Blinks red quickly Critically low battery
Blinks red for five seconds
—— Solid Red Critical error
Powering on and performing selfdiagnostic tests
Only GPS is used for positioning
(RTK is not used)
***
IMU error
**
2024 DJI All Rights Reserved.
©
53

Matrice 30 Series Dock Bundle User Manual
* Blinks green slowly in N mode, and blinks green quickly in S mode.
** If the aircraft cannot takeoff while the rear indicator is blinking red slowly, open DJI
FlightHub 2 Project Page and check the device status.
*** When performing combination stick command (CSC) after remote controller B gains
control.
Blinks red and yellow
alternately
Blinks red and green
alternately
Compass calibration required
RTK enabled but RTK data unavailable
Beacons and Auxiliary Light
Beacons
The upward and downward beacons on the aircraft allow users to find the aircraft when
flying at night. The beacons can be enabled/disabled in DJI FlightHub 2 > Devices > Dock >
Device Maintenance.
• DO NOT look directly at the beacon when it is in use to avoid eye damage.
Auxiliary Light
The auxiliary light is located at the bottom of the aircraft and will automatically turn on in
low-light environments to assist the downward vision system.
2024 DJI All Rights Reserved.
©
54

Matrice 30 Series Dock Bundle User Manual
• The auxiliary light will automatically turn on in low-light environments when the
flight altitude is under 5 m. Note that the positioning performance of the vision
systems may be affected. Pay attention to the dock and the aircraft livestream.
Fly with caution.
Propellers
Using the Propellers
The Matrice 30 Series Dock Version aircraft supports both the 1671 Propeller and
the 1676 High Altitude Propeller (excluded). Refer to the diagram below to choose
the appropriate propellers according to the aircraft takeoff weight and the expected
maximum flight altitude. The service ceiling is the theoretical maximum altitude that the
aircraft can fly at normally, on the condition that the wind speed does not exceed 12 m/
s. The aircraft braking and acceleration capabilities will be reduced when flying near the
service ceiling. Use the 1676 High Altitude Propeller when flying at altitudes higher than
3000 m (9842.5 ft) above sea level.
1676 High Altitude Propeller Service Ceiling
1671 Propeller Service Ceiling
Matrice 30 Series Dock Version Service Ceiling
Flight Altitude (m)
8000
7000
6000
5000
4000
3000
2000
1000
Takeoff weight Max. Takeoff Weight
3.85 3.9 3.95 4 4.05 4.1 4.15 4.2
3.8
Maximum Weight (kg)
2024 DJI All Rights Reserved.
©
55
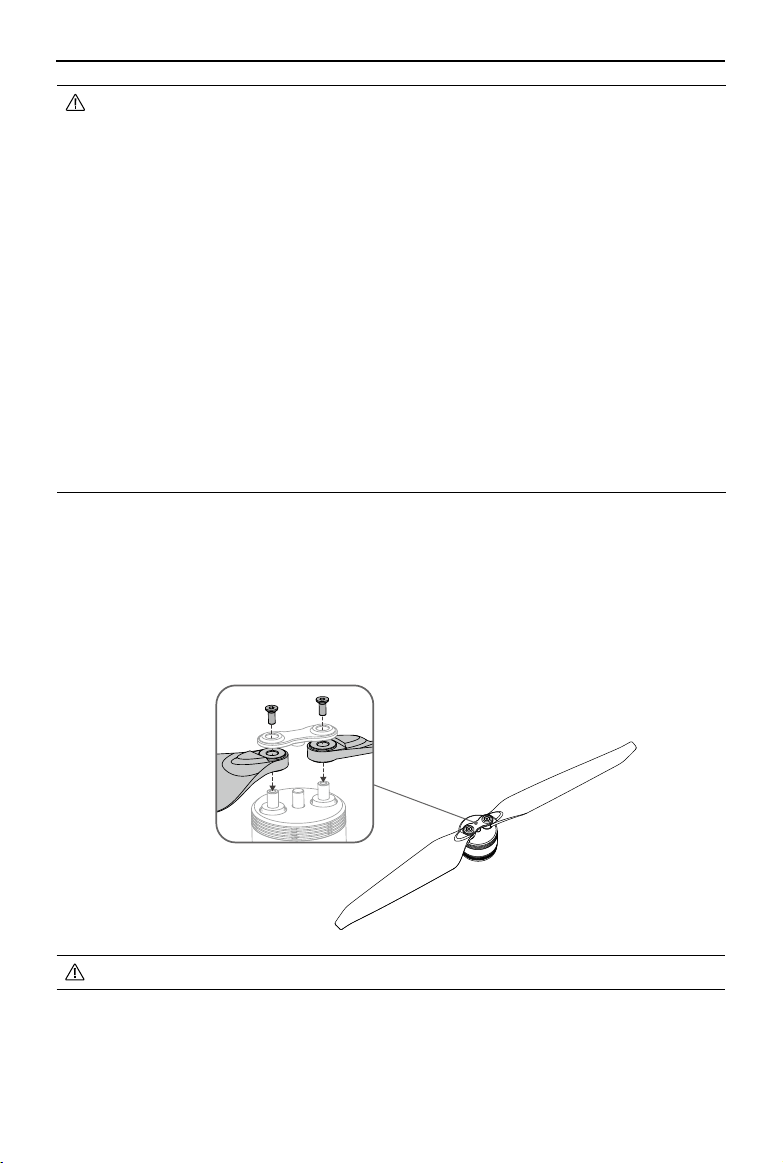
Matrice 30 Series Dock Bundle User Manual
• Using high altitude propellers for extended periods may reduce motor life.
Compared with the ordinary propellers, if high altitude propellers are used
to fly at altitudes lower than 3000 m (9842.5 ft) above sea level, the motor
temperature rises higher, which may reduce motor life or even damage it.
Therefore, only use the high altitude propellers at the recommended altitude or
under suitable working conditions.
• Only use official DJI propellers. DO NOT mix propeller types.
• Purchase additional propellers if necessary.
• Make sure that propellers are unfolded and firmly tightened before placing the
aircraft on the dock.
• Make sure that all propellers are in good condition when placing the aircraft on
the dock. DO NOT use aged, chipped, or broken propellers.
• Power off the aircraft before examining or replacing any propellers.
• To avoid injury, stay away from rotating propellers or motors.
• The dock air conditioning system will start heating before each flight task when
the ambient temperature is approximately 0° C (32° F) or below to prevent the
propellers from freezing. Return to the dock and land the aircraft as soon as
possible if a motor overload warning prompt appears in DJI FlightHub 2.
Replacing the Propeller Blades
Use the H2.0 hex key to replace the propellers.
It is recommended to only replace the propellers in the case of an emergency during
outdoor operations. After the emergency flight is over, please contact DJI Support or an
authorized dealer as soon as possible.
• The propeller blades are sharp. Handle with care.
2024 DJI All Rights Reserved.
©
56

Matrice 30 Series Dock Bundle User Manual
FPV Camera
The Matrice 30 Series Dock Version aircraft is equipped with a night vision FPV camera,
which can optimize images in poor lighting conditions at night. Users can view real-time
flight information in DJI FlightHub 2 via the FPV camera.
Cameras
Both Matrice 30 and Matrice 30T Dock Version feature a laser rangefinder, a zoom
camera, and a wide-angle camera. The laser range finder can provide the location and
distance information of a target during inspections or search-and-rescue operations.
The zoom camera and the wide-angle camera enable users to quickly switch to a highly
magnified zoom view for detailed observation after recognizing a target in the wideangle camera view. Matrice 30T Dock Version is also equipped with a long-wave infrared
thermal imaging camera, which can shoot thermal images.
The zoom camera features lens defogging. After powering on, the zoom camera will
automatically heat the zoom lens for five seconds to dissipate the moisture on the lens.
The thermal camera features sunburn protection. When the camera detects direct
sunlight, the infrared shutter will turn off automatically to protect the infrared sensors.
1. Laser Rangefinder
2. Zoom Camera
3. Thermal Camera
(Matrice 30T Dock Version only)
4. Wide-Angle Camera
• Due to the characteristics of the infrared sensor, the infrared sensor may
become burnt before sunburn protection is triggered. DO NOT expose the
infrared camera lenses to strong sources of energy such as the sun, lava, or
a laser beam. Otherwise, the camera sensor may become burnt leading to
permanent damage.
2024 DJI All Rights Reserved.
©
57

Matrice 30 Series Dock Bundle User Manual
Camera Operation
Users can designate waypoint actions when planning flight routes in DJI FlightHub 2. The
aircraft will automatically hover, adjust the gimbal tilt mode, photo-shooting, and videorecording according to the waypoint action during flight. Waypoints and waypoint actions
can be edited in the Flight Route Library to achieve more accurate flight route planning.
Go to the DJI FlightHub 2 User Guide and then refer to the Flight Route Library section for
more information.
Aircraft Livestream
Aircraft livestreams can be activated in DJI FlightHub 2 to view real-time flight information.
Users can switch to different camera views or start recording in the aircraft livestream
view. The recorded video will automatically be stored to Media Files in DJI FlightHub 2.
Go to the DJI FlightHub 2 User Guide and then refer to the Real-Time Device Information
section for more information.
Storing Media Files
A 32 GB microSD card is in the microSD card slot when shipped. The aircraft supports
microSD cards with a maximum capacity of up to 128 GB. To ensure that the camera can
quickly read and write data for HD video recording, use a microSD card with UHS Speed
Class 3 or above and a write speed greater than 30 MB/s.
• The following microSD cards are recommended:
Lexar 667x U3 A2 Class10 32GB/64GB/128GB
Lexar 1066x U3 A2 V30 32GB/64GB/128GB
SanDisk Extreme PRO U3 A2 V30 32GB/64GB/128GB
SanDisk Extreme U3 A2 V30 32GB/64GB/128GB
• The photos and videos will be automatically uploaded to DJI FlightHub 2 after
each flight task. Open the DJI FlightHub 2 Project page and click
to view the uploaded files.
• To ensure the stability of the camera system, single video recordings are limited
to 30 minutes. If the recording time exceeds 30 minutes, the video recording will
stop.
2024 DJI All Rights Reserved.
©
58
> Media Files

Matrice 30 Series Dock Bundle User Manual
Gimbal
The 3-axis gimbal stabilizes the camera, allowing the user to capture clear and steady
photos and videos during flight. Refer to the figure below for the tilt, pan, and roll range
of the gimbal.
Controllable Rotation Range
+45°
0°
-120°
Horizon
Tilt Pan Roll
• Precision elements in the gimbal may be damaged by a collision or impact,
which may cause the gimbal to function abnormally. Make sure to protect the
gimbal from damage.
• DO NOT add any extra payload to the gimbal as this may cause the gimbal to
function abnormally or even lead to permanent motor damage.
-90°
+90°
+35°-35°
Gimbal Lock
Rotate the gimbal tilt down to 0° to unlock the gimbal before use.
It is recommended to rotate the gimbal tilt up to +90° to lock the gimbal before
transporting the aircraft.
2024 DJI All Rights Reserved.
©
59

Matrice 30 Series Dock Bundle User Manual
Setting Gimbal Actions
The gimbal pitch and yaw angles at each waypoint can be set in DJI FlightHub 2 when
editing a flight route. Go to the DJI FlightHub 2 User Guide and then refer to the Edit
Waypoint Routes section for more information.
Aircraft RTK
Matrice 30 Series Dock Version aircraft features an internal RTK module. Together with
the dual-antenna technology, the aircraft can withstand strong magnetic interference
from metal structures and high-voltage lines, ensuring a safe and stable flight. Accurate
positioning data can be obtained when the aircraft is used with the dock internal RTK
module, allowing for a precise flight route and precision landing.
• The number of searched satellites should be greater than 20 for the aircraft
RTK data to converge. If there is strong signal interference or ionospheric
scintillation, the aircraft RTK data may not converge.
IP Rating of the Aircraft
1. Under stable laboratory conditions, the Matrice 30/30T Dock Version aircraft achieves
an IP55 protection rating by IEC 60529 standards when equipped with TB30 Intelligent
Flight Batteries. The protection rating is not permanent, and may lower over an
extended period.
a. DO NOT fly when the amount of rainfall exceeds 100 mm in 24 hours.
b. DO NOT fold the frame arms in the rain. If the aircraft needs to be moved away
from the dock, move the aircraft indoors, and make sure it is dry before folding
frame arms.
c. Make sure the battery ports, battery compartment ports, battery surfaces, and
battery compartment surfaces are dry before inserting the batteries.
d. The product warranty does not cover water damage.
2. The aircraft does not achieve an IP55 protection rating in the following circumstances:
a. Frame arms are folded.
b. Batteries other than the TB30 Intelligent Flight Batteries are used.
c. The cover for the ports are not attached correctly.
d. The waterproofing top shell plug is not firmly attached to the top shell.
e. The aircraft shell is cracked or the waterproof adhesive is aged or damaged.
3. The aircraft body is made of flame retardant materials to improve safety. As such,
the body surface may become discolored after long-term use. However, such color
change does not affect the performance and IP rating of the aircraft.
2024 DJI All Rights Reserved.
©
60

Matrice 30 Series Dock Bundle User Manual
Intelligent Flight Battery
The TB30 Intelligent Flight Battery is equipped with high-energy battery cells and uses
an advanced battery management system to power the aircraft. The firmware for the
Intelligent Flight Battery is included in the aircraft firmware. Make sure the firmware of all
Intelligent Flight Batteries is updated to the latest firmware version.
Battery Features
The TB30 battery has the following features:
1. Battery Level Display: the battery level LEDs display the current battery level.
2. Battery self-discharge will be triggered if the battery level is higher than 50%.
Discharging the battery level to 50% can extend battery life.
3. Balanced Charging: during charging, the voltages of the battery cells are automatically
balanced.
4. Overcharge Protection: the battery stops charging automatically once fully charged.
5. Temperature Detection: to prevent damage, the battery only charges when the
temperature is between 10° and 44° C (50° and 111° F).
6. Overcurrent Protection: the battery stops charging if an excess current is detected.
7. Over-Discharge Protection: to ensure flight safety and allow users to have as much
time as possible to deal with emergencies during flight, over-discharge protection is
disabled to allow continuous output. The aircraft will intelligently determine whether
to perform RTH or to land based on the current flight battery level. Charging an overdischarged battery may be a fire hazard. To prevent this, the battery will be locked
and can no longer be charged or used.
8. Short Circuit Protection: the power supply is automatically cut if a short circuit is
detected.
9. Battery Cell Damage Protection: DJI FlightHub 2 will display a warning prompt when a
damaged battery cell is detected.
10. Hibernation Mode: the battery will be in Hibernation mode when not inserted to the
aircraft to save power.
11. Communication: information about the voltage, capacity, and temperature of the
battery is transmitted to the aircraft.
12. Warming up: the feature ensures the battery operates normally at a low temperature.
Refer to the Warming the Battery section for more information.
13. Waterproofing and Dustproofing: after being installed in the aircraft, the battery
meets the IP55 rating standards.
2024 DJI All Rights Reserved.
©
61

Matrice 30 Series Dock Bundle User Manual
• Refer to the user manual, safety guidelines, and battery labels before use. Users
shall take full responsibility for all operations and usage.
• If only one battery is usable after takeoff, land the aircraft promptly and replace
the battery.
• Use batteries provided by DJI. DO NOT use other batteries.
• DO NOT drop or damage the battery. DO NOT place heavy objects on the
battery. Avoid dropping batteries.
• Always use a clean, dry cloth when cleaning the battery terminals. Otherwise,
this may cause poor contact, resulting in energy loss or failure to charge.
Using the Battery
Using Paired Batteries
Charge and discharge the two batteries together to optimize flight performance and
maximize battery life.
After the batteries are inserted and the aircraft is powered on, if there is a huge difference
between their battery life, DJI FlightHub 2 will display a prompt alerting the user to such
condition of the batteries. It is recommended to replace them with batteries with similar
performance before use.
Checking the Battery Information
There are two ways to view the battery information in DJI FlightHub 2.
1. Open the Project page, click
2. Open the Devices page, click Dock >
temperature, battery cycles and other information.
> to view the battery level and battery status.
to view the battery level and battery
Warming the Battery
The battery has a built-in self-heating feature for when operating in low-temperature
conditions:
1. When the battery temperature is lower than 18° C (64.4° F), self-heating starts once
the battery is inserted into the aircraft and powered on. Self-heating will turn off
automatically after takeoff. The aircraft cannot takeoff when the battery temperature
is lower than 10° C (50° F). Flight tasks will start after the battery is warmed up.
2. If the battery is not inserted into the aircraft, press and hold the battery level button
for five seconds to initiate self-heating. The battery will continue to keep warm with a
temperature between 15° to 20° C (59° to 68° F) for approximately 30 minutes. Press
and hold the battery level button for five seconds to stop self-heating.
3. When the battery is warming up and keeping warm the battery level LEDs will blink as
follows.
2024 DJI All Rights Reserved.
©
62

Matrice 30 Series Dock Bundle User Manual
Keeping WarmWarming Up
Dock Warming
If the aircraft is powered off in low-temperature environments, the dock will constantly
provide a power supply for the battery to keep warm, so that the aircraft can take off at
any time in cold conditions. After the battery charging is completed, if the aircraft is in the
idle status, the battery will keep warm at a temperature between 10° to 20° C (50° to 68° F).
The battery will stop keeping warm if the user launches an Immediate flight task, powers
on the aircraft, or starts battery charging.
Charging Mode
DJI FlightHub 2 provides two charging modes (Schedule Mode and Standy Mode). When
the dock is in idle status, the battery level and the temperature inside the dock can be
automatically modified to meet different scenarios. Two hours before a Timed flight task,
the dock will automatically charge the batteries and wait for the flight task to be executed
after the charging is completed.
Schedule mode is suitable for performing regular tasks. The battery will be charged
between 55% and 60% when no task is assigned.
Standby mode is suitable for performing urgent tasks. The battery will be charged
between 90% and 95% when no task is assigned.
Switching Charging Mode: open the DJI FlightHub 2 Project page, click
switch to different charging modes.
> > Action to
• Battery level may be low under Schedule Mode. If the Plan Timer is selected as
Immediate, Low Battery RTH may be triggered during the flight task.
• Maintaining a high power level in Standby Mode will affect battery life. It is
recommended to select Schedule Mode if there is no need to take off at any
time.
2024 DJI All Rights Reserved.
©
63

Matrice 30 Series Dock Bundle User Manual
Charging the Battery
If the aircraft charging ports are properly connected after landing, the dock will
automatically charge the Intelligent Flight Battery based on the flight task plans. The
charging temperature range of the TB30 battery is 10° to 44° C (50° to 111.2° F). Charging
will begin after the battery temperature reaches the charging temperature range. In this
case, the charging time will be extended.
To charge the Intelligent Flight Battery, open the DJI FlightHub 2 Project page, click
> Action, enable Remote Debugging, and then click Charging.
• Users can also charge the battery in the Device Maintenance page: open Devices
page, click Dock > Device Maintenance, enable Remote Debugging, and then
click Charging.
>
Battery Maintenance
The Intelligent Flight Battery will conduct an intelligent self-evaluation. A prompt will
appear in DJI FlightHub 2 when battery capacity calibration or battery maintenance
is required. Open DJI FlightHub 2 Devices page, click Dock >
Debugging to start battery maintenance, and the dock will perform battery maintenance
automatically. During battery maintenance, the battery will first discharge to below 20%,
and the maintenance process will last three to eight hours based on different battery
levels. Battery maintenance will be interrupted if the dock receives a flight task during this
process.
to enable Remote
• To save discharge time and shorten maintenance time, it is recommended to
start battery maintenance when the battery level is low (e.g. after completing a
flight task).
• Battery performance will be affected if the battery is not maintained for an
extended period.
• The battery contains hazardous chemicals, DO NOT dispose of the battery in a
regular waste disposal container. Strictly follow your local regulations regarding
the disposal and recycling of batteries.
• Batteries that are over-discharged, swollen, involved in a crash, come into
contact with liquid, damaged, or leaky must be disposed. DO NOT use any
battery in such a condition to avoid damage or injury. Contact a professional
battery disposal or recycling agent for further assistance.
2024 DJI All Rights Reserved.
©
64

DJI FlightHub 2
This chapter introduces the main
interface and functions in
DJI FlightHub 2, including realtime device information and device
management.

DJI FlightHub 2
DJI FlightHub 2 is a cloud-based aircraft task management platform. When used with DJI
Dock and Matrice 30 Series Dock Version aircraft, DJI FlightHub 2 can perform flight task
planning and management, monitor real-time flight information, and conduct integrated
dock management to achieve unattended operations.
Cloud Management
Organization and Project Management
Users can visit https://fh.dji.com to enter the DJI FlightHub 2 Organization page after
logging in with a DJI account. DJI FlightHub 2 supports centralized management for
Projects, Members, and Devices.
Before first use, refer to DJI FlightHub 2 User Guide, and follow the instructions to create
an organization and a project, bind the dock and add members to a project, and assign
permissions to members.
• Users can click the user account in the upper right corner, select User Center to
view the account and organization information, and add a mobile number or email
address for a service subscription. After the service is subscribed, the system will
automatically send a message or email to notify users of an emergency or failed task.
2024 DJI All Rights Reserved.
©
66

Matrice 30 Series Dock Bundle User Manual
Project 0
1
DockMy Call Sig
n
Admin
Dock 01
Task in Progr…N/A
N/ATask in Progr…
New Pla
n
执⾏中
Time remaining 12mi
n
In progress
Online Device
s
Online Member
s
Admin
Dock0
1
ASL: 115.3
m
M3D
RTH
PauseDock 0
1
Task in Progres
s
18.8°
C
Norma
l
Dock 201.5MB/
s
Task in Progres
s
M3D
New Pla
n
Quiet
Normal status
Normal status
Aircraft...Shar
e
M3D Ca...
Liv
e
Actions
Time remaining 12mi
n
In progress
CWZICW11:00:1
1
22:22
Payload Comtrol
ALT
72.3
m
100ms
1.3 m/s
H.S
171.3 m
2
0
RTK
88%
5m/
s
24:12
Project Details
In the Project page, select a project and click to enter the project. Users can plan flight
routes, create task plans, manage models and media files, as well as monitor real-time
flight task information.
Team: displays team, device, and flight task
information of the project.
Map Annotations: users can create and manage
annotations (e.g. cell sites and other buildings) on
the map.
Map Photos: users can manage all the photos that
are overlaid on the map.
Map Models: users can view and manage the
imported 2D and 3D models.
Map Task Area: users can manage custom flight
areas (user defined operation zones) and custom
GEO Zones (user defined no-fly zones). Users can
also enable obstacle data, and DJI FlightHub 2 will
distribute the data to the dock aircraft. The aircraft
will plan the best path according to the task area data to perform FlyTo tasks and RTH,
while bypassing obstacles and GEO zones. When the flight areas are updated, the data
will be automatically synchronized to the idle dock and aircraft.
Flight Route Library: users can import or create flight routes, as well as edit flight route
settings and waypoint actions in Flight Route Library. Users can also enter the FPV view to
edit waypoints to achieve more accurate flight route planning.
Task Plan Library: users can designate flight route and dock, and create task plans in
Task Plan Library based on their actual needs. The aircraft will take off automatically
according to the preset Plan Timer. Resume Flight from Breakpoint can be enabled when
creating a task plan or can be triggered in the task plan library. In case of low environment
temperatures, strong winds, or long flight routes, the flight task cannot be completed in
a single flight. In this case, if Resume Task from Breakpoint is enabled (or triggered), a
new task will be automatically generated, and the aircraft will resume the flight from the
breakpoint and complete the task after the battery charging is completed.
Media Files: users can view and manage the uploaded media files. The media files (images
and videos) can be automatically uploaded to the dock after each flight task. And the
aircraft will automatically delete the file after it is uploaded to the dock. The dock will
upload the received media files to DJI FlightHub 2. And the dock will automatically delete
the file after it is uploaded to DJI FlightHub 2.
Model Library: users can import and view 2D and 3D models. Model Library supports
displaying the model on the Map, which can be further used to create flight routes.
2024 DJI All Rights Reserved.
©
67

Matrice 30 Series Dock Bundle User Manual
• For more details, refer to the DJI FlightHub 2 User Guide which is available to
download from the official DJI website at https://www.dji.com/flighthub-2/
downloads.
Real-time Device Information
When the dock is performing a flight task, DJI FlightHub 2 will display real-time device
information, including the task status, flight route (green), aircraft trajectory (blue), and
livestreams.
Device Status Window
Select a device and click to open the device status window. Users can view the flight
task status, device operation status, and device information in the device status window.
1
2
3
5
6
7
8
4
1. Flight Task Status: indicates the flight task status of the selected dock. Flight task status
includes task plan status and live flight controls status. Click to view all flight tasks of the
dock on that day.
2. Dock Information: users can view dock flight task status, the dock status, wind speed,
ambient temperature, rainfall, internet speed, and media file upload status.
If a warning message appears during flight, it will be displayed in the system status
bar. Tap to view the message. Warnings that are not reported in real-time will not be
displayed.
3. Aircraft Control: project administrators can remotely operate the aircraft after clicking
Aircraft Control. Refer to the Live Flight Controls section for more information.
4. Aircraft Information: users can view the aircraft flight task status, device warnings,
transmission signal strength, satellite connection status, battery status, and aircraft
altitude. When the aircraft is disconnected from the dock, the last recorded time and
2024 DJI All Rights Reserved.
©
68

Matrice 30 Series Dock Bundle User Manual
coordinates of the aircraft will be displayed. Users can click the information to center
the aircraft location at the middle of the map and then right-click to create a PinPoint
to help locate the aircraft during a search. The information will not be displayed after
the aircraft re-connects to the dock.
5. Live: click to view the dock livestream.
6. Actions: click to view more information about the dock and the aircraft, change
aircraft settings and conduct remote debugging.
• The dock and aircraft can only be remotely operated by one user at a time.
• After Remote Debugging is enabled, yellow and black strips will appear around
the dock and aircraft in the device status window. Users can hover the mouse
over the dock image to view the operator account.
2024 DJI All Rights Reserved.
©
69
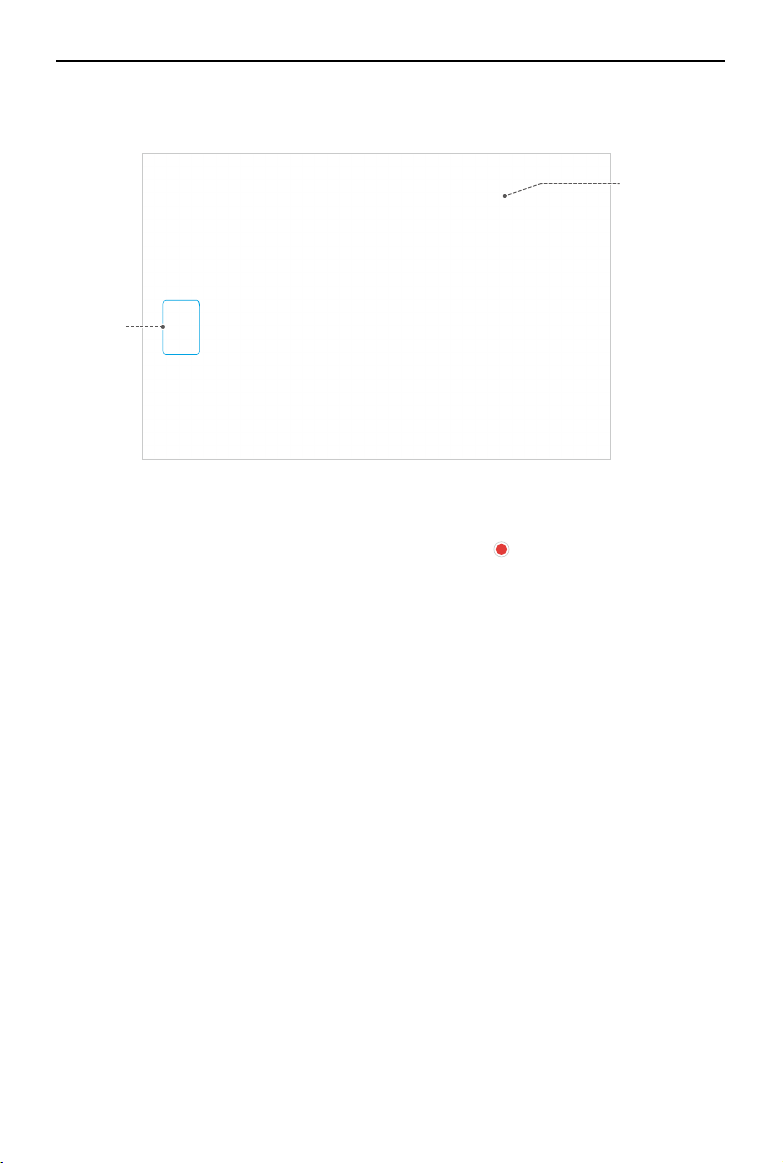
Matrice 30 Series Dock Bundle User Manual
7. Aircraft Livestream: click FPV Camera or M30/M30T Camera to view the aircraft
livestream.
b
a
a. Switching Camera Views: click the camera type to switch between different camera
views.
b. Recording Livestreams: during a livestream, click
to start recording, and the
recorded video will be stored to Media Files automatically. Different camera views
are recorded separately and cannot be recorded at the same time. Switching
camera views during livestream does not affect recording.
8. Share: Click to share the livestream view to other users and customize the sharing
settings.
2024 DJI All Rights Reserved.
©
70
Matrice 30 Series Dock Bundle User Manual
Dock Management
In the Devices page, click Dock to switch to Dock Management. Administrators can view
the device warning messages and conduct remote debugging.
: click to view warning details of the dock and aircraft. The warning messages include
the start and end time, warning level, device type, error code, content, and
recommended solutions.
: click to open Device Maintenance page, users can view device details and conduct
remote debugging.
: click and select Edit to bind the dock to a specific project. Select Delete to remove the
device from this organization.
• If the dock is deleted, connect the remote controller to set up the dock and
rebind the dock to an organization. Exercise Delete with caution.
• Users can update the device firmware and the flight safety database in the
Devices page.
Device Maintenance
Device Information
Users can view device information and modify aircraft settings in the Device Maintenance
page.
1
2024 DJI All Rights Reserved.
©
2
71

Matrice 30 Series Dock Bundle User Manual
1. Dock Information: users can view the dock status, total operation and flight time,
network connection, dock satellite connection, supply voltage, remaining maintenance
days, dock position, and alternate landing site.
2. Dock Environment Information: users can view the dock internal temperature
and humidity, external temperature, rainfall, real-time wind speed, and other
environmental information.
1
2
3
1. Aircraft Information: users can view the total flight time and flight total, video
transmission signal strength, and other aircraft information.
2. Battery Information: users can view the battery cycles, battery voltage, battery
temperature, and battery level.
3. Aircraft Settings: users can enable/disable the beacons, modify maximum altitude
and maximum flight distance, view alternate route altitude, enable/disable obstacle
sensing, and switch charging modes. Click
to view the detailed descriptions for the
parameters.
• After disabling obstacle sensing, the aircraft cannot detect or bypass obstacles
and may cause the aircraft to crash.
2024 DJI All Rights Reserved.
©
72

Matrice 30 Series Dock Bundle User Manual
Remote Debugging
2
1
4
5
1. Remote Debugging: users can enable Remote Debugging to control the dock and the
aircraft if any device issue occurs.
2. Trial Flight: Users can quickly test the task performance and the media file transfer
performance for the dock. Click Trial Flight and confirm the settings of the created
task plan. During the trial flight, the aircraft will ascend 60 m vertically, the gimbal will
tilt down to 90° to take a photo, and the aircraft will then return home.
3. Device Issue Report: users can submit an issue report to report issues that occurred
to the dock or aircraft. Make sure to upload device logs in time and provide the QR
code and the tracking number to DJI Support. Refer to the Device Issue Report section
for more information.
4. Dock Control
a. Users can restart the dock system and control the dock cover, driving rods, and air
conditioning system. Users can also enable the sound-light alarm and silent mode,
format the dock storage, customize the enhanced transmission settings, and set the
unlocking license details.
b. Click Live to view the dock livestream.
5. Aircraft Control:
a. Users can power on/off the aircraft, charge and maintain the Intelligent Flight
Battery, and format aircraft storage.
b. Battery Management: click Charging to charge the Intelligent Flight Battery. Click
Maintain to start automatic battery maintenance or capacity calibration for the
Intelligent Flight Battery.
c. Click FPV Camera or M30/M30T Camera to view the aircraft livestream.
3
• Remote Debugging cannot be enabled if the dock is connected to the remote
controller for on-site operations.
• The aircraft cannot take off after enabling remote debugging.
2024 DJI All Rights Reserved.
©
73

Matrice 30 Series Dock Bundle User Manual
• When silent mode is enabled, the operating noise of the dock will be reduced.
Note the following will occur:
a. The fan noise will be reduced and the cooling performance of the air
conditioning system will be affected. The task interval may be longer in high
temperatures.
b. The buzzer sound of the dock will be disabled. Stay away from dock when
opening or closing the dock cover.
c. The white lights indicating the idle status of dock will be turned off. Other
status indicators are not affected.
Device Issue Report
If the device issue cannot be addressed via Remote Debugging, users can create device
issue reports in the Device Maintenance page and provide the report information to DJI
Support.
1. In the Device Maintenance page, click Device Issue Reports > Create Report.
2. Fill in Report Details: such as issue description, issue occurrence time, and contact
information, and uploading screenshots or video recording of the issue.
3. Upload device logs using one of the following methods:
a. Click the checkbox to select designated device logs.
b. Enable Synchronize Selection. DJI FlightHub 2 automatically associates device logs
that coincide within the issue occurrence time range.
4. Click Submit to finish the issue report.
5. Click Devices > Dock > Device Issue Reports >
the tracking number to DJI Support.
• Select and upload the device logs within the issue occurrence time range to reduce
the log upload time. If the aircraft is powered off, make sure the aircraft is inside the
dock, wait for the aircraft to automatically power on, and click the refresh button to
reload the aircraft logs.
• Click Devices > Dock > Device Issue Reports to check all issue reports under the
current organization.
• Make sure to power on the aircraft before uploading the aircraft logs.
• Users can also connect a computer to the dock and export device logs via DJI Assistant
2 (Enterprise Series), and then upload the device logs in Device Issue Report.
2024 DJI All Rights Reserved.
©
74
, and then provide the QR code and

Appendix

Matrice 30 Series Dock Bundle User Manual
Appendix
Aircraft Settings Using the Remote Controller
It is recommended to link the remote controller to the aircraft as controller B during onsite flight tests. Users can modify aircraft settings using the remote controller based on
actual needs.
1. Run DJI Pilot 2, tap Enter Camera View on the homepage. Users will be directed to FPV
Camera view by default after finishing the preflight check.
Tap
2. After the remote controller gain control over the gimbal camera, tap CAM on the
Palette displays the highest and lowest temperature measurement values of the
Firmware Update
on the upper-right to modify aircraft settings of each module:
a.
Sensing System Settings: set the horizontal and vertical obstacle braking distance
and the warning distance. Default values are recommended.
b.
RTK Module: enable Maintain Positioning Accuracy mode.
bottom-right corner, and then tap Infrared on the bottom-left corner to switch to the
Thermal Camera view.
current view. Tap to choose between different infrared temperature measurement
palettes.
Using DJI FlightHub 2
1. Power on the aircraft and the dock. Ensure the aircraft is linked to the dock, and the
battery level of the aircraft is higher than 20%.
2. Open DJI FlightHub 2, and click Devices > Dock.
3. Click Update, and a prompt will appear in the window indicating the firmware version
and updates.
4. Select the multiple boxes on the left to upgrade device firmware in batches.
5. Click Update, the firmware will be downloaded automatically.
6. The firmware of both the dock and the aircraft will be updated simultaneously. If the
aircraft is not inside the dock, only the dock firmware will be updated.
7. The aircraft and the dock will restart automatically after the firmware update is done.
• Make sure DJI FlightHub 2 is connected to the internet during the whole update
process.
• The Intelligent Flight Battery installed on the aircraft will be updated to the latest
firmware version.
• Users cannot operate the aircraft or the dock during firmware update. The
aircraft and the dock will be available after the update is completed or cancelled.
2024 DJI All Rights Reserved.
©
76

Matrice 30 Series Dock Bundle User Manual
Using DJI Assistant 2 (Enterprise Series)
Make sure that the computer is connected to the internet and that the device has
sufficient power before updating the firmware. The aircraft firmware update follows the
same steps as those of the dock firmware update. Take the dock firmware update as an
example:
1. Open the electrical cabinet and power on the dock. Connect the computer to the
USB-C port of the dock.
2. Launch DJI Assistant 2
3. Select DJI Dock, and tap the firmware update button on the left side.
4. Select the firmware version and click to update. The firmware will be downloaded and
updated automatically.
5. When the Update successful prompt appears, the update is completed, and the DJI
device will restart automatically.
and log in with a DJI account.
• Connect the remote controller or aircraft to a computer separately, as the
assistant software does not support updating multiple DJI devices at the same
time.
• DO NOT disconnect the dock and the computer during firmware update.
Access to a Third-Party Cloud Platform
Based on Cloud API, DJI Dock can connect to third-party platforms for private configuration,
allowing users to build a customized management system. Visit https://developer.dji.com/
cn/cloud-api/ for more information.
Users can bind the dock to a third-party cloud platform using the DJI Pilot 2 when
configuring the dock. Refer to Installation and Setup Manual for more information.
2024 DJI All Rights Reserved.
©
77

Matrice 30 Series Dock Bundle User Manual
Specifications
Dock
General
Product Name DJI Dock
Total weight 105 kg (excl. aircraft)
Dimensions
Input Current Max. 15 A
Input Voltage 100-240 VAC, 50-60 Hz
Input Power Max. 1500 W
AC Power Output
Operating Temperature
Ingress Protection Rating
[1]
[2]
Number of Aircrafts
Accommodated
Max. Allowable Landing Wind
Speed
Max. Operating Altitude 4000 m
Max. Operating Radius 7000 m
Receiving Frequency of RTK Base
Station Satellite
RTK Positioning Accuracy
(fixed RTK enabled)
Charging Performance
Output Voltage 18-26.1 VDC
Output Current Max. 24 A
Output Power Max. 626 W
Charging Time
[3]
Transmission
Video Transmission System O3 Enterprise Transmission System
Operating Frequency 2.4000-2.4835 GHz, 5.725-5.850 GHz
Max. Transmission Distance
(Unobstructed, free of interference)
Dock cover opened : 1675×885×735 mm (L×W×H)
Dock cover closed : 800×885×1065 mm (L×W×H)
100-240 VAC, 50/60 Hz, Max. 1 A, Max. 240 W
(provide power supply for user devices)
-35° to 50° C (-31° to 122° F)
IP55
1
12 m/s
Simultaneously receive:
GPS: L1 C/A, L2
BeiDou2: B1l, B2l, B3l
BeiDou3: B1l, B3l
GLONASS: L1, L2
Galileo: E1, E5B
1 cm+1 ppm (horizontal)
2 cm+1 ppm (vertical)
Approx. 25 min
15 km (FCC); 8 km (CE/SRRC/MIC)
2024 DJI All Rights Reserved.
©
78

Matrice 30 Series Dock Bundle User Manual
Data Security AES-256
Antennas 4 antennas, 2T4R
2.4 GHz: <33 dBm (FCC)
<20 dBm (CE/SRRC/MIC)
Transmitter Power (EIRP)
5.8 GHz: <33 dBm (FCC)
<23 dBm (SRRC)
<14 dBm (CE)
Air Conditioning System
Operating Voltage 48 VDC
Air Conditioning Type TEC Air Conditioning
Backup Battery
Battery Capacity 12 Ah
Output Voltage 24 V
Battery Type Lead-acid battery
Backup Battery Life >5 hours
Network Access
Ethernet Access 10/100/1000Mbps Adaptive Ethernet port
Integrated Security Camera
Resolution 1920×1080
Field of View (FOV) 180°
Auxiliary Light Auxiliary White Light
Lightning Protection
AC Power Port 40 KA Protection
Ethernet Port 1.5 KA Protection
Supported Software
Applications
Cloud Platform
DJI Pilot 2 (connects to the dock via DJI RC Plus for
configuration and set up)
DJI FlightHub 2
3rd Party Platforms through DJI Cloud API
Expansion Capability
Open Protocol DJI Cloud API
Edge computing
[1] When the temperature is below -20° C (-4° F), the aircraft cannot perform flight tasks, the
dock cover and the driving rods cannot be controlled automatically.
[2] This protection rating is not permanent and may reduce over time after long-term use due
to aging and wear.
[3] The ambient temperature is 25°C (77° F), and the aircraft is charged from 10% to 90%.
DJI Dock provides internal power supply, data
interface, and space for equipment installation.
2024 DJI All Rights Reserved.
©
79

Matrice 30 Series Dock Bundle User Manual
Matrice 30 Series Dock Version
General
Dimensions (unfolded, excl.
propellers)
Dimensions (folded) 365×215×226 mm (L×W×H)
Diagonal Wheelbase 668 mm
Weight (incl. two batteries) 3870 ± 10 g
Max Takeoff Weight 3998 g
Operating Frequency
[1]
Transmitter Power (EIRP)
Hovering Accuracy
(windless or breezy)
RTK Positioning Accuracy
(fixed RTK enabled)
Max Angular Velocity Pitch: 150°/s; Yaw: 100°/s
Max Tilt Angle 35° (N-mode and forward vision system enabled: 25°)
Max Ascent/Descent Speed 6 m/s; 5 m/s
Max Tilt Descent Speed 7 m/s
Max Horizontal Speed 23 m/s
Max service ceiling above sea
level
(without other payloads)
Max Wind Resistance 12 m/s
Max Hover Time
Max Flight Time
[2]
[2]
Motor Model Number 3511
Propeller Model Number 1671; 1676 High Altitude (not included)
Ingress Protection Rating
[3]
GNSS
Operating Temperature -20° to 50° C (-4° to 122° F)
470×585×246 mm (L×W×H)
2.4000-2.4835 GHz, 5.725-5.850 GHz
2.4 GHz: <33 dBm (FCC); <20 dBm (CE/SRRC/MIC)
5.8 GHz: <33 dBm (FCC/SRRC); <14 dBm(CE)
Vertical:
±0.1 m (with Vision Positioning)
±0.5 m (with GPS Positioning)
±0.1 m (with RTK positioning)
Horizontal:
±0.3 m (with Vision Positioning)
±1.5 m (with GPS Positioning)
±0.1 m (with RTK positioning)
1 cm +1 ppm (horizontal)
1.5 cm + 1 ppm (vertical)
5000 m (with 1671 propellers)
7000 m (with 1676 propellers)
35 min
40 min
IP55
GPS+Galileo+BeiDou+GLONASS (GLONASS is
supported only when RTK module is enabled)
2024 DJI All Rights Reserved.
©
80

Matrice 30 Series Dock Bundle User Manual
Gimbal
Angular Vibration Range ±0.01°
Controllable Rotation Range Pan: ±90° , Tilt: -120° to +45°
Mechanical Range Pan: ±105°, Tilt: -135° to +60°, Roll: ±45°
Zoom Camera
Sensor 1/2" CMOS; Effective Pixels: 48M
Focal Length: 21-75 mm (equivalent focal length: 113-
Lens
405 mm
Aperture: f/2.8 - f/4.2
Focus: 5 m to ∞
Exposure Compensation ±3 ev (using 1/3 ev as step length)
Auto mode:
Capture mode: 1/8000 - 1/2 s
Electronic Shutter Speed
Photo: 1/8000 - 1/30 s
M mode:
Capture mode: 1/8000 - 8 s
Photo: 1/8000 - 1/30 s
ISO Range 100-25600
Max. Video Resolution 3840×2160
Max. Photo Size 8000×6000
Wide Camera
Sensor 1/2" CMOS; Effective Pixels: 12M
DFOV: 84°
Lens
Focal Length: 4.5 mm (equivalent focal length: 40 mm)
Aperture: f/2.8
Focus: 1 m to ∞
Exposure Compensation ±3 ev (using 1/3 ev as step length)
Auto mode:
Capture mode: 1/8000 - 1/2 s
Electronic Shutter Speed
Photo: 1/8000 - 1/30 s
M mode:
Capture mode: 1/8000 - 8 s
Photo: 1/8000 - 1/30 s
ISO Range 100-25600
Max. Video Resolution 3840×2160
Photo Size 4000×3000
Thermal Camera
Thermal Imager Uncooled VOx Microbolometer
2024 DJI All Rights Reserved.
©
81

Matrice 30 Series Dock Bundle User Manual
DFOV: 61°
Lens
Focal Length: 9.1 mm (equivalent focal length: 40 mm)
Aperture: f/1.0
Focus: 5 m to ∞
Infrared Temperature
Measurement Accuracy
Video Resolution
Photo Size
[4]
±2° C or ±2% (using the larger value)
Infrared Image Super-resolution Mode: 1280×1024
Basic Mode: 640×512
Infrared Image Super-resolution Mode: 1280×1024
Basic Mode: 640×512
Pixel Pitch 12 µm
Temperature Measurement
Method
Scene Range
Spot Meter, Area Measurement
High Gain mode: -20° to 150° C (-4° to 302° F)
Low Gain mode: 0° to 500° C (32° to 932° F)
Temperature Alert Supported
Palette
White Hot/Fulgurite/Iron Red/Hot Iron/Medical/Arctic/
Rainbow 1/Rainbow 2/Tint/Black Hot
FPV Camera
Resolution 1920×1080
DFOV 161°
Frame Rate 30 fps
Laser Module
Wavelength 905 nm
Max Laser Power 3.5 mW
Single Pulse Width 6 ns
Measurement Accuracy
Measuring Range
± (0.2 m + D×0.15%)
D is the distance to a vertical surface
3-1200 m (0.5×12 m vertical surface with 20%
reflectivity)
Vision System
Obstacle Sensing Range
Forward: 0.6-38 m
Upward/Downward/Backward/Sideward: 0.5-30 m
FOV 67° (H), 53° (V)
Operating Environment
Surfaces with clear patterns and adequate lighting
(> 15 lux)
Infrared Sensing System
Obstacle Sensing Range 0.1-10 m
FOV 30°
2024 DJI All Rights Reserved.
©
82

Matrice 30 Series Dock Bundle User Manual
Operating Environment
Large, diffuse, and reflective obstacles (reflectivity
>10%)
TB30 Intelligent Flight Battery
Capacity 5880 mAh
Voltage 26.1 V
Battery Type Li-ion 6S
Energy 131.6 Wh
Net Weight Approx. 685 g
Operating Temperature -20° to 50° C (-4° to 122° F)
Ideal Storage Temperature 20° to 30° C (68° to 86° F)
-20° to 50° C (-4° to 122° F)
(The battery will initiate self-heating in low-
Charging Temperature
temperature environments, and the air conditioning
system will start cooling in high-temperature
environments.)
Chemical System LiNiMnCoO2
Auxiliary Lights
Effective Illumination Distance 5 m
Illumination Type 60 Hz, solid glow
[1] 5.8 and 5.1GHz frequencies are prohibited in some countries. In some countries, the 5.1GHz
frequency is only allowed for use indoors.
[2] The maximum flight time was tested in a lab environment and is for reference only.
[3] This protection rating is not permanent and may reduce over time after long-term use due
to aging and wear.
[4] The infrared temperature measurement accuracy was tested in a lab environment and is
for reference only.
2024 DJI All Rights Reserved.
©
83

Matrice 30 Series Dock Bundle User Manual
Using Third-Party Payloads
The aircraft provides a PSDK port for connecting a third-party payload and the dock
reserves a space inside the cover for storing the third-party payload, which facilitates the
expansion of the aircraft operating capabilities.
Third-Party Payload Requirements
• Installing a third-party payload will shorten the flight time and reduce the aircraft wind
resistance. Make sure to install the payload as needed.
• The third-party payload should have a protection rating of IP43 or above not to reduce
the working stability or the service life of the aircraft.
• The cable connector of the third-party payload connecting to the aircraft should have a
waterproof rubber ring.
• Visit https://developer.dji.com/payload-sdk/ for more information about SDK
development.
Installation Requirements
• To ensure the stability of the aircraft, use the DJI official original PSDK Mounting
Bracket, and install the third-party payload properly according to the user guide. Visit
https://www.dji.com/matrice-30/downloads to learn more about the PSDK Mounting
Bracket.
• The size of the reserved storage space inside the dock cover is 150 mm × 150 mm
× 100 mm (length × width × height). The height of the third-party payload must not
exceed 80 mm if the height of the PSDK Mounting Bracket is taken into consideration.
• After installing the payload, make sure that the third-party payload does not block the
aircraft vision system to avoid affecting the obstacle-sensing performance.
2024 DJI All Rights Reserved.
©
84

Matrice 30 Series Dock Bundle User Manual
Connection Requirements
The third-party payload is connected to the aircraft PSDK port by inserting the connector
with a waterproof rubber ring. If necessary, seal the PSDK port of the aircraft. As shown
below.
• Make sure to seal the port properly. If the seal fails and water leaks into the
aircraft, it will seriously affect flight safety.
2024 DJI All Rights Reserved.
©
85

Troubleshooting List
Description Possible Cause Troubleshooting
• Wind speed is above 12 m/s.
• In heavy rainfall.
The aircraft does not
take off after the flight
task is launched.
The aircraft does not
charge after landing in
the dock.
The Live button on DJI
FlightHub 2 is gray and
cannot be clicked.
The device shows offline
on DJI FlightHub 2.
• Environment temperature is below -20° C (-4° F).
• One of the Emergency Stop Buttons is pressed.
• The dock power supply is disabled.
• The Intelligent Flight Battery level is below 30%.
• The aircraft RTK is not enabled.
• The aircraft satellite signal is weak (the aircraft
satellite icon in DJI FlightHub 2 is red).
• The battery is cooling down or warming up.
• The charging ports of the aircraft have poor contact
with the dock.
• Dock failure or aircraft failure.
• The dock cover is opened.
• There is still a task in progress.
• The wind speed gauge is not connected. • Make sure the wind speed gauge is firmly installed.
• Dock network connection failure.
• The dock power supply is abnormal and the backup
battery level is zero.
• The dock is switched to a third-party cloud platform.
• Dock failure.
• View the warning message on the device status window in DJI
FlightHub 2, click the message to view warning details, and
follow the instructions to conduct device debugging.
• The charging temperate range of the battery is 10° to 44° C (50°
to 111.2° F). Charging will begin after the battery temperature
reaches the charging temperature range.
• Enable remote debugging and try to push or pull the driving
rods. Contact DJI authorized service provider if the issue
persists.
• Enable remote debugging and restart the dock.
• Close the dock cover and try charging again.
• Wait for execution timeout until no task is in progress, and try
charging again.
• Make sure the dock is connected to the internet.
• Make sure the power supply is normal.
• Make sure the cloud platform of the dock remains the same.
• Contact a DJI authorized service provider for device
maintenance.

Matrice 30 Series Dock Bundle User Manual
FAR Remote ID Compliance Information
The aircraft complies with the requirements of 14 CFR Part 89:
• The aircraft automatically initiates a pre-flight self-test (PFST) of the Remote ID system
before takeoff and cannot take off if it does not pass the PFST
of the Remote ID system can be viewed in a DJI flight control app such as DJI Pilot 2 or in
a DJI cloud platform such as DJI FlightHub 2.
• The aircraft monitors the Remote ID system functionality from pre-flight to shut down.
If the Remote ID system malfunctions or has a failure, an alarm will be displayed in a
DJI flight control app such as DJI Pilot 2 or in a DJI cloud platform such as DJI FlightHub 2.
• The user shall keep the DJI flight control app running in the foreground and always
allow it to obtain the location information of the remote controller when using the DJI
flight control app to fly the aircraft.
• Developers who develop third-party applications based on the DJI Mobile SDK shall
obtain and display the PFST results and the failure status of the Remote ID system
during operation by calling specific APIs
[2]
.
• Developers who develop third-party platforms based on the DJI Cloud API shall obtain
and display the PFST results and the failure status of the Remote ID system during
operation by calling specific APIs
[1] The pass criterion for PFST is that the hardware and software of the Remote ID required-data
source and transmitter radio in the Remote ID system are functioning properly.
[2] For detailed APIs information, please visit https://developer.dji.com/mobile-sdk/
[3] For detailed APIs information, please visit https://developer.dji.com/cloud-api/
[3]
.
[1]
. The results of the PFST
2024 DJI All Rights Reserved.
©
87

WE ARE HERE FOR YOU
Contact
DJI SUPPORT
The content is subject to change without prior notice.
※
Download the latest version from
https://www.dji.com/dock/downloads
If you have any questions about this document, contact DJI by
sending a message to DocSupport@dji.com.
DJI and MATRICE are trademarks of DJI.
Copyright © 2024 DJI All Rights Reserved.
 Loading...