

Page 1

WHOLE-HOME DVR
USER GUIDE
Page 2

913.book Page 1 Tuesday, January 15, 2013 4:57 PM
Warning and Attention Symbols
You must be aware of safety when you install and use this system. This User Guide provides various procedures. If you do
some of these procedures carelessly, you could injure or kill yourself or damage equipment or property. Some other
procedures require special attention.
The lightning flash with arrowhead symbol, within an equilateral triangle, is intended to alert the user to
the presence of uninsulated “dangerous voltage” within the product’s enclosure that may be of sufficient
magnitude to constitute a risk of electric shock to persons.
The exclamation point within an equilateral triangle is intended to alert the user to the presence of
important operating and maintenance (servicing) instructions in the literature accompanying the
appliance.
For Your Safety
Do not try to open the case of the receiver. There is risk of electrical shock, which may cause damage to
the receiver and/or personal injury or death to you. There are no user-serviceable parts inside the
receiver. Opening the receiver case or making unauthorized changes will void the warranty.
Warning: To reduce the risk of fire or electric shock, do not expose this appliance to rain or moisture.
Important Software Notice
As with all software controlled products, unexpected behavior could arise if the user tries to perform operations in a nonroutine manner. This product, like almost any other high tech product, is subject to bugs and hence EchoStar CANNOT
AND DOES NOT GUARANTEE OR WARRANT THAT ALL FEATURES, SUCH AS PARENTAL CONTROLS, WILL WORK
AS INTENDED UNDER ALL CIRCUMSTANCES. EchoStar endeavors to improve such conditions and will periodically
download improvements.
In compliance with the terms of the GNU Public License (GPL), EchoStar is making some source code available to the
public to download from www.echostar.com.
Equipment and Software Covered by this User’s Guide
This User Guide covers the Hopper with Sling HD DVR receiver, and software model Hopper with Sling. This Guide may
cover other devices, not listed here.
Copyright Notice
Copyright © 2013 EchoStar Technologies L.L.C., Englewood, Colorado 80112. All rights reserved.
The information in this User Guide may change without notice. We may issue revisions to tell you about such changes.
Please send comments or questions about this User Guide to: Technical Publications, EchoStar Corporation, 100 Inverness Terrace East,
Englewood, Colorado 80112.
Part Number: 198699
DISH and DISH Network are registered trademarks of DISH Network L.L.C. For information about DISH Network, please visit our website
at www.dish.com.
We acknowledge all product names, trade names, or corporate names we mention in this User Guide to be the proprietary property of the
registered owners.
Bluetooth and the Bluetooth logo are registered trademarks of the Bluetooth SIG.
Manufactured under license from Dolby Laboratories. Dolby and the double-D symbol are trademarks of Dolby Laboratories.
HDMI, the HDMI logo and High-Definition Multimedia Interface
are trademarks or registered trademarks of HDMI Licensing LLC.
This equipment may incorporate copyright protection technology that is protected by U.S. patents, patent applications, and/or other
intellectual property rights. Use of such copyright protection technology is intended for home and other limited pay-per-view uses only
unless otherwise authorized. Reverse engineering or disassembly is prohibited.
®
Page 3

913.book Page i Tuesday, January 15, 2013 4:57 PM
Important Safety Instructions .........................vii
Introduction ........................................................1
WELCOME ...................................................................2
OW TO USE THIS USER GUIDE ...................................2
H
BOUT YOUR DISH ACCOUNT .....................................4
A
ATCHING TV NOW ....................................................5
W
DDITIONAL SERVICES ................................................7
A
BOUT SATELLITE TV RECEPTION ...............................7
A
HY CONNECT TO A PHONE LINE OR BROADBAND INTERNET? 8
W
OVING ON-SCREEN LOGO .........................................8
M
Receiver & Remote Control .............................11
HOPPER WITH SLING HD DVR OVERVIEW .................12
EMOTE CONTROL(S) ................................................ 12
R
HE LOCATE REMOTE FEATURE .................................15
T
AIRING YOUR REMOTE CONTROL .............................16
P
ONTROLLING OTHER COMPONENTS .........................17
C
OPPER WITH SLING FRONT PANEL ...........................25
H
OPPER WITH SLING BACK PANEL ............................25
H
i
Page 4

913.book Page ii Tuesday, January 15, 2013 4:57 PM
Table of Contents
TV Basics ..........................................................29
USING THE ON-SCREEN MENUS .................................26
SING TEXT FIELDS ..................................................27
U
IPS ..........................................................................28
T
UESTIONS ...............................................................28
Q
CHANGING CHANNELS ...............................................30
SING THE PROGRAM GUIDE .....................................30
U
SING THE BROWSE BANNER ....................................32
U
SING THEMES AND PREDICTIVE SEARCH ..................32
U
SING PICTURE-IN-PICTURE (HOPPER WITH SLING ONLY) 34
U
TARTING IN ONE ROOM AND FINISHING IN ANOTHER 34
S
OMES WITH A SECOND HOPPER WITH SLING INSTALLED 35
H
IPS ..........................................................................36
T
UESTIONS ...............................................................36
Q
On Demand .......................................................37
PAY-PER-VIEW ..........................................................38
DISH O
LOCKBUSTER @HOME™ ......................................... 39
B
ISHONLINE.COM ......................................................39
D
RDERING CONSIDERATIONS .....................................40
O
IPS ..........................................................................40
T
UESTIONS ...............................................................41
Q
N DEMAND ....................................................38
ii
OTES ......................................................................42
N
Favorites Lists ..................................................43
WHAT ARE FAVORITES LISTS? ..................................44
REATING OR CHANGING FAVORITES LISTS ...............44
C
DITING FAVORITES LISTS .........................................45
E
SING FAVORITES LISTS ...........................................46
U
IPS ..........................................................................46
T
UESTIONS ...............................................................46
Q
Page 5

913.book Page iii Tuesday, January 15, 2013 4:57 PM
Parental Controls .............................................47
Table of Contents
WHAT ARE LOCKS AND RESTRICTIONS? ....................48
REATING OR CHANGING A PASSWORD .....................49
C
OPYING LOCKS FROM YOUR HOPPER TO A JOEY .....49
C
REATING OR CHANGING RATINGS RESTRICTIONS .....50
C
REATING OR CHANGING CHANNEL LOCKS ...............53
C
IDING ADULT CONTENT OR LOCKED CHANNELS .......53
H
IPS ..........................................................................54
T
UESTIONS ...............................................................54
Q
Apps ..................................................................55
USING THE HOME MEDIA FEATURE ............................56
SING APPS ON YOUR HOPPER WITH SLING ..............57
U
Y ACCOUNT/CUSTOMER SUPPORT ..........................57
M
IPS ..........................................................................57
T
Digital Video Recordings .................................59
WHAT IS A DVR? ...................................................... 60
AUSING A PROGRAM ...............................................60
P
EVERSE, FAST FORWARD, AND SKIP .......................61
R
LOW MOTION AND FRAME-BY-FRAME ......................61
S
ECORDING A LIVE PROGRAM ...................................62
R
LAYING A RECORDED PROGRAM ..............................62
P
ECORDING WHILE WATCHING DIFFERENT PROGRAMS 63
R
THER RECORDING OPTIONS ....................................63
O
ROUPING AND SORTING RECORDINGS .....................64
G
Recording Future Programs ...........................65
USING PRIMETIME ANYTIME™ AND AUTOHOP™ ........66
IMERS AND RECORDINGS .........................................68
T
SING THE TIMERS LIST ............................................71
U
SING THE DAILY SCHEDULE .....................................71
U
ETTING UP AN EVENT TIMER ...................................72
S
iii
Page 6

913.book Page iv Tuesday, January 15, 2013 4:57 PM
Table of Contents
Hopper Extras ...................................................75
SETTING UP A SEEK & RECORD™ TIMER ..................72
HANGING OR DELETING A TIMER ..............................73
C
IPS ..........................................................................73
T
UESTIONS ...............................................................74
Q
WHAT’S HOT .............................................................76
IRIUSXM® SATELLITE RADIO ..................................76
S
SRS® T
SING MULTI-CHANNEL RECALL ................................77
U
LUETOOTH® AUDIO STREAMING ..............................78
B
USB D
RUVOLUME FEATURE ...................................76
IGITAL OVER-THE-AIR TUNER .........................79
User Preferences ..............................................81
USING MULTIMEDIA ...................................................82
SING CALLER ID ..................................................... 83
U
USTOMIZING THE GUIDE AND CHANNEL LISTS ..........85
C
HANGING LANGUAGES .............................................86
C
SING CLOSED CAPTIONING ......................................86
U
SING AUDIO OUTPUT ...............................................87
U
ESETTING TO FACTORY DEFAULTS ..........................89
R
ECEIVER UPDATES ..................................................89
R
IPS ..........................................................................90
T
UESTIONS ...............................................................90
Q
iv
Connectivity ......................................................91
CONNECTING THE HOPPER WITH SLING HD DVR .......90
ONNECTING THE JOEY RECEIVER(S) ........................93
C
ONNECTING THE PHONE LINE ..................................95
C
ONNECTING TO BROADBAND INTERNET ....................97
C
SING DISH ANYWHERE ............................................99
U
SING TROUBLESHOOTING TOOLS ...........................100
U
Page 7

913.book Page v Tuesday, January 15, 2013 4:57 PM
Reference ........................................................ 103
Appendix ......................................................... 117
Table of Contents
TROUBLESHOOTING TABLES ....................................104
EMOTE CONTROL DEVICE CODES ..........................115
R
LIMITED WARRANTY ................................................118
ESIDENTIAL CUSTOMER AGREEMENT .....................120
R
FCC C
OMPLIANCE ..................................................128
Index ................................................................ 129
Inside Back Cover to Record Codes & Settings
v
Page 8

913.book Page vi Tuesday, January 15, 2013 4:57 PM
Table of Contents
vi
Page 9
913.book Page vii Tuesday, January 15, 2013 4:57 PM
Important Safety Instructions
1 Read these instructions. 2 Keep these instructions. 3 Heed all warnings. 4 Follow all instructions. 5 Do not use this apparatus near water. 6 Clean only with a dry cloth. 7 Do not block any ventilation openings. Install in accordance with the manufacturer’s instructions. 8 Do not install near any heat sources such as radiators, heat registers, stoves, or other apparatus
(including amplifiers) that produce heat.
9 Do not defeat the safety purpose of the polarized or grounding-type plug. A polarized plug has
two blades with one wider than the other. A grounding-type plug has two blades and a third
grounding prong. The wide blade or the third prong are provided for your safety. If the provided
plug does not fit into your outlet, consult an electrician for replacement of the obsolete outlet.
10 Protect the power cord from being walked on or pinched, particularly at plugs, convenience
receptacles, and the point where they exit from the apparatus.
11 Use only attachments/accessories specified by the manufacturer. 12 Unplug this apparatus during lightning storms or when unused for long periods of time. 13 Refer all servicing to qualified service personnel. Servicing is required when the apparatus has
been damaged in any way, such as the power supply cord or plug is damaged, liquid has been
spilled or objects have fallen into the apparatus, the apparatus has been exposed to rain or
moisture, does not operate normally, or has been dropped.
14 The power plug must be readily accessible so that the apparatus can be easily disconnected from
the AC power.
15 Tighten all of the coaxial cable connections only by hand. If you use a wrench, you may
overtighten the connections and damage your equipment.
16 The receiver is still connected to the AC power whenever it is plugged into a live power outlet,
even if it is “turned off” (in standby mode) using a remote-control or front-panel POWER button.
vii
Page 10
913.book Page viii Tuesday, January 15, 2013 4:57 PM
Safety
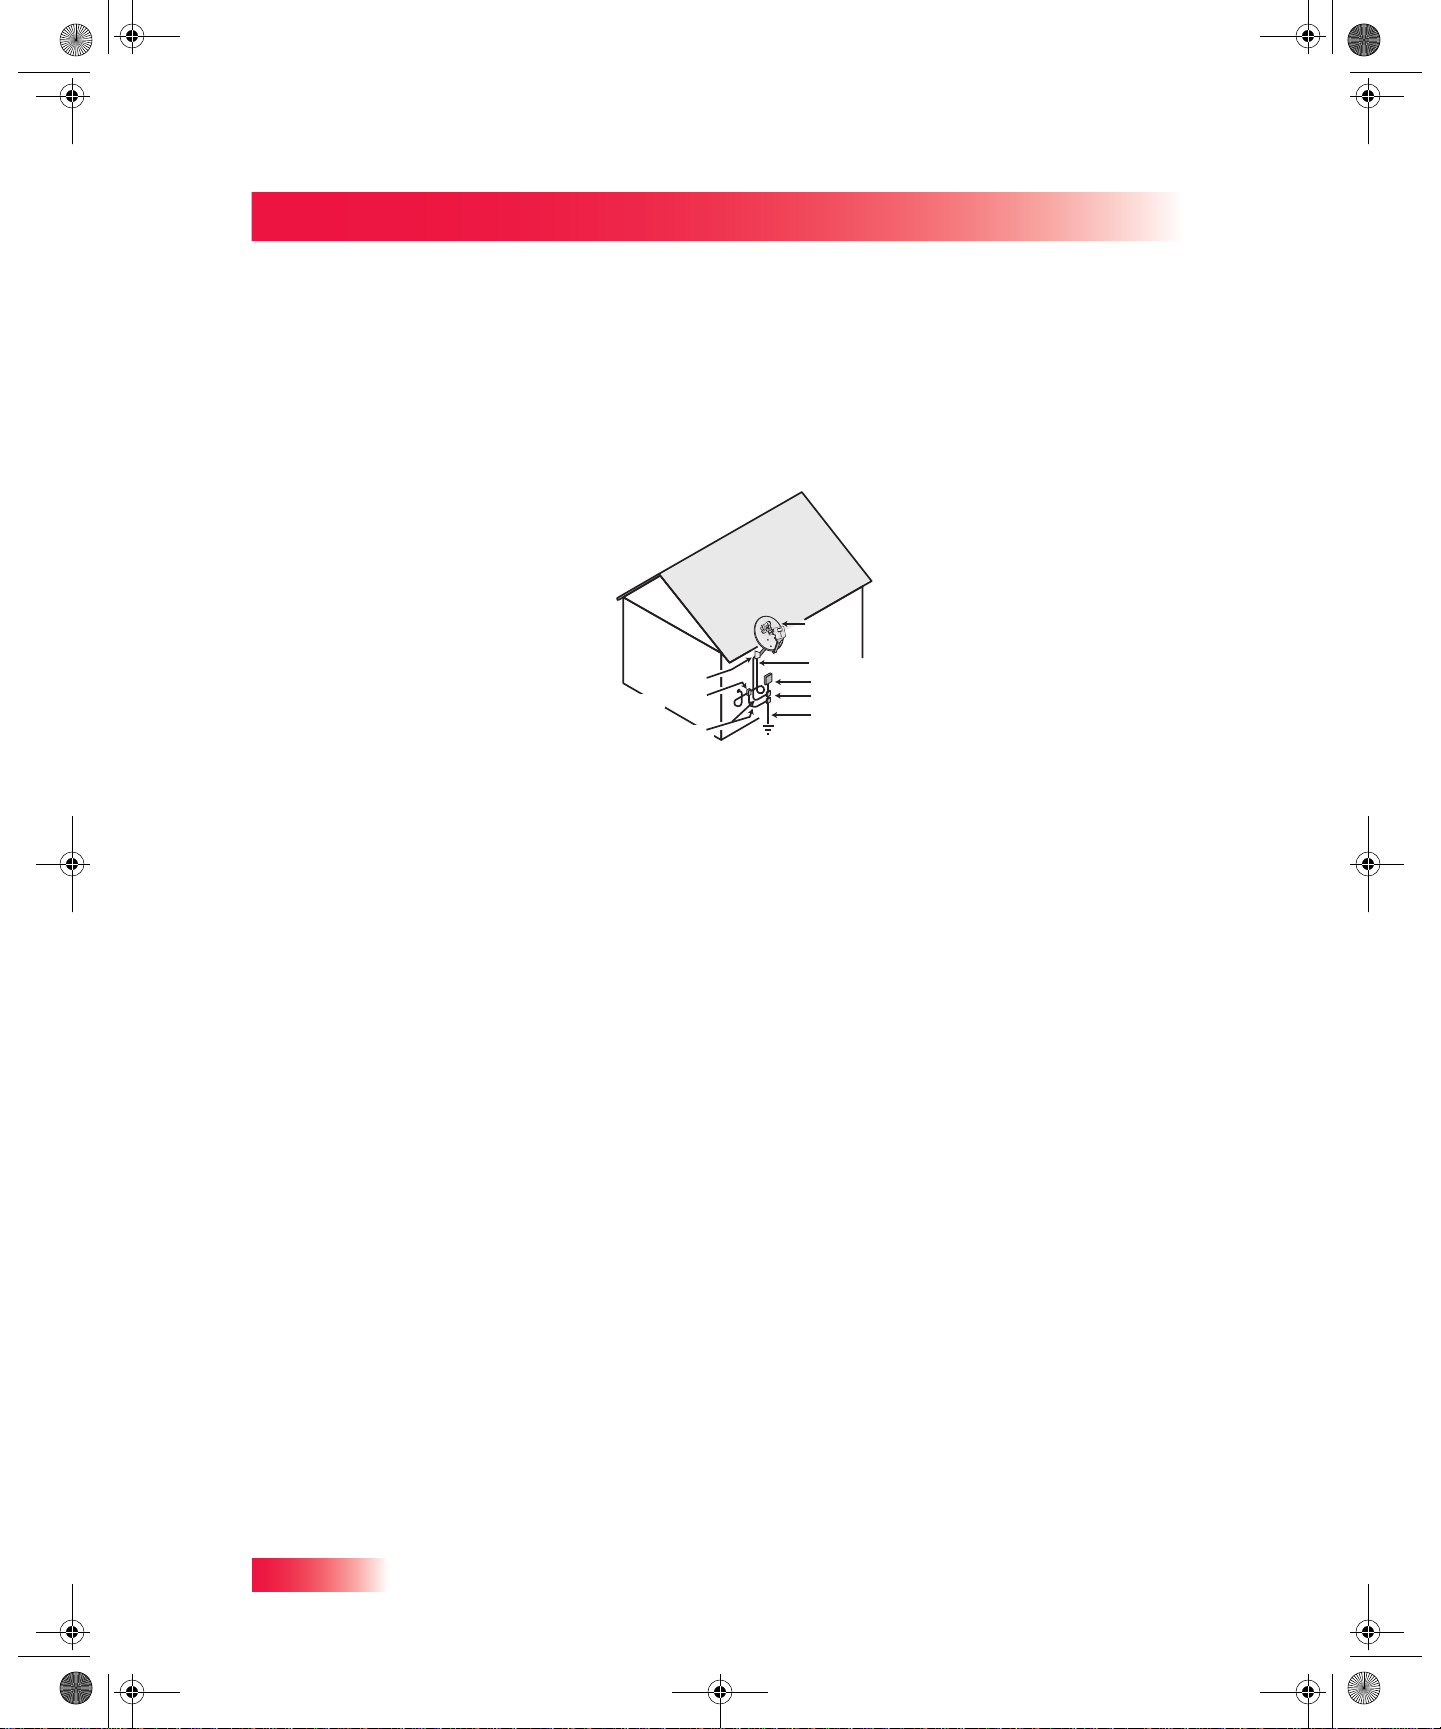
Note to Satellite TV System Installer: This reminder is provided to call the satellite TV system installer’s
attention to Article 820-40 of the National Electrical Code (NEC) that provides guidelines for proper grounding
and, in particular, specifies that the cable ground shall be connected to the grounding system of the building as
close to the point of cable entry as practical.
Apparatus shall not be exposed to dripping or splashing and no objects filled with liquids, such
as vases, shall be placed on the apparatus. Also, no sources of flame, such as lit candles, shall
be placed on the apparatus.
Satellite Dish
Coaxial Cable
Ground Clamp
Antenna Discharge
Unit
Grounding Conductors
(NEC Section 810-21)
from Satellite Dish
Electric Service Equipment
Ground Clamps
Power Service Grounding
Electrode System
(NEC Art. 250, Part H)
• Operate the receiver using only the type of power source indicated on the marking label. Unplug the
receiver power cord by gripping the power plug, not the cord.
• Do not overload wall outlets or extension cords; this can result in a risk of fire or electrical shock.
• Never insert objects of any kind into the receiver through openings, as the objects may touch dangerous
voltage points or short out parts. This could cause fire or electrical shock.
• Do not locate the antenna near overhead light or power circuits, or where it can fall into such power lines or
circuits. When installing the antenna, take extreme care to avoid touching such power lines or circuits, as
contact with them can be fatal.
• Do not attempt to service the receiver yourself, as opening or removing covers may expose you to
dangerous voltage, and will void the Limited Warranty. Refer all servicing to authorized service personnel.
Proper Care of Your Equipment
• Always handle the satellite receiver carefully. Excessive shock and vibration can damage the hard drive.
• Unplug the receiver from the AC power outlet before cleaning.
• Always turn the receiver off, unplug it and let it sit for at least 30 seconds before moving it.
• The use of accessories or attachments not recommended by the receiver manufacturer will void the Limited
Warranty.
• Do not place the receiver in an enclosure (such as a cabinet) without proper ventilation.
• Do not stack the receiver on top of or below other electronic devices as this can cause heat build-up and
vibration.
• Do not install the receiver in any area where the temperature can be less than 40°F or more than 113°F. If
the receiver is cold to the touch, do not plug it in immediately. Let it sit unplugged at room temperature for at
least 45 minutes before plugging it in.
• Use an outlet that contains surge suppression or ground fault protection. During an electrical storm or when
the receiver is left unattended and unused for long periods of time, unplug the power cord from the wall
outlet, disconnect the lines between the receiver and the antenna, and disconnect the telephone line. This
will provide additional protection against damage caused by lightning or power line surges.
viii
On some TVs, the presence of fixed images for extended periods of time may cause them to be
permanently imprinted on the screen. Consult your TV user guide for information on whether this is
a problem for your TV, what operating/viewing restrictions apply to avoid this problem, and
associated TV warranty coverage.
Page 11
913.book Page 1 Tuesday, January 15, 2013 4:57 PM
Introduction
Introduction and Welcome to DISH!
What you’ll find in this chapter:
• WELCOME
• HOW TO USE THIS USER GUIDE
• ABOUT YOUR DISH ACCOUNT
• WATCHING TV NOW
• ADDITIONAL SERVICES
• ABOUT SATELLITE TV RECEPTION
• WHY CONNECT TO A PHONE LINE OR
BROADBAND INTERNET? INTERNET
• MOVING ON-SCREEN LOGO
1
Page 12

913.book Page 2 Tuesday, January 15, 2013 4:57 PM
Chapter 1
Welcome
WELCOME
Thanks for choosing DISH®. You are about to experience the excitement and
convenience of our Direct Broadcast Satellite (DBS) service, which delivers the very best
picture and sound quality. DISH consistently provides the latest products and satellite
services—with high performance, ease of operation, and a wide variety of entertainment
options.
Your new Hopper™ with Sling® is a Whole-Home HD DVR that offers full digital video
recording functionality, including pausing live TV, to every TV in your house that is a part of
your Whole-Home DVR system. The Hopper with Sling HD DVR is the hub for all things
entertainment. It's a three-tuner HD DVR that lets you record up to three HD channels at
once at any time and play them back in any room in your home. Plus, using the PrimeTime
Anytime™ feature, you can record up to six HD channels at once (with your local ABC,
CBS, FOX AND NBC channels provided in HD, which may not be available in all markets).
It is one HD DVR that works independently on as many as four different TVs at the same
time, so everyone can be in different rooms watching their favorite TV programming.
Joey™ Receivers connect to other TVs in your home and link to the Hopper with Sling
system, creating a Whole-Home DVR network. It offers all of the features of the Hopper
with Sling HD DVR (with the exception of Picture-In-Picture) and offers an identical user
interface and remote control as the Hopper with Sling. You can connect a Joey Receiver to
a high-definition or standard-definition TV.
HOW TO USE THIS USER GUIDE
This section explains how the user guide is divided and the conventions used throughout.
Guide Overview
The information in this guide is separated into several chapters to make it easy for you to
find exactly what you’re looking for:
• Chapter 1: Introduction gives you a brief overview of DISH and your new Hopper with
Sling HD DVR.
• Chapter 2: Receiver & Remote Control explains the basic features of your system and
how to use the remote controls, front panel buttons, and back panel connections.
• Chapter 3: TV Basics describes how to change channels and look for programs.
• Chapter 4: On Demand shows you how to order and watch Pay-Per-View events and
On Demand programming offered by DISH.
• Chapter 5: Favorites Lists explains how to create, name, and use favorites lists.
• Chapter 6: Parental Controls explains how to set locks and passwords for parental
controls.
• Chapter 7: Apps describes how to use the home media and interactive features of
your satellite TV system.
• Chapter 8: Digital Video Recordings explains how to use the integrated recording
features of your Hopper with Sling HD DVR to maximize your viewing pleasure.
• Chapter 9: Recording Future Programs shows you how you can set your DVR to
record and then play back your favorite programs when you want to watch them.
2
Page 13

913.book Page 3 Tuesday, January 15, 2013 4:57 PM
• Chapter 10: Hopper Extras contains instructions for programming your remote to
control your Hopper with Sling HD DVR and equipment like a TV or DVD player.
• Chapter 11: User Preferences shows you how to customize your TV system.
• Chapter 12: Connectivity explains how to connect your Hopper with Sling HD DVR to
your TV, as well as to other equipment you may have, such as a VCR.
Guide Conventions
• The labels of the remote-control buttons are all in capital letters.
Example: Press SAT to control your Hopper or Joey.
• Select means to move the highlight to an on-screen option or choice in a menu list and
then press the SELECT button on the remote control.
Example: Select the Locks option.
• This user guide uses HD to refer to high definition and SD for standard definition.
• In a Whole-Home HD DVR system, the TV nearest the Hopper with Sling receives
menus and programming directly from its outputs and is connected using audio/video
cables, for example an HDMI cable connected to an HDTV.
• In a Whole-Home HD DVR system, one or more TV(s) located in other rooms are
connected to Joey Receivers using audio/video cables. Each Joey Receiver is linked
to a Hopper with Sling HD DVR, which provides audio/video signals via the Home
Video Network connections.
• The instructions in this guide are shown in two ways:
Introduction
How to Use this User Guide
– Instructions in the form of pictures are handy if you’d like to learn something
quickly. These instructions are numbered left to right as shown in the sample
below.
– Instructions that are written out are helpful if you’d like to learn more details.
3
Page 14
913.book Page 4 Tuesday, January 15, 2013 4:57 PM
Chapter 1
About Your DISH Account
ABOUT YOUR DISH ACCOUNT
This section describes how to order your packages and provides information on how to
find information about your DISH account.
Ordering Your Programming Packages
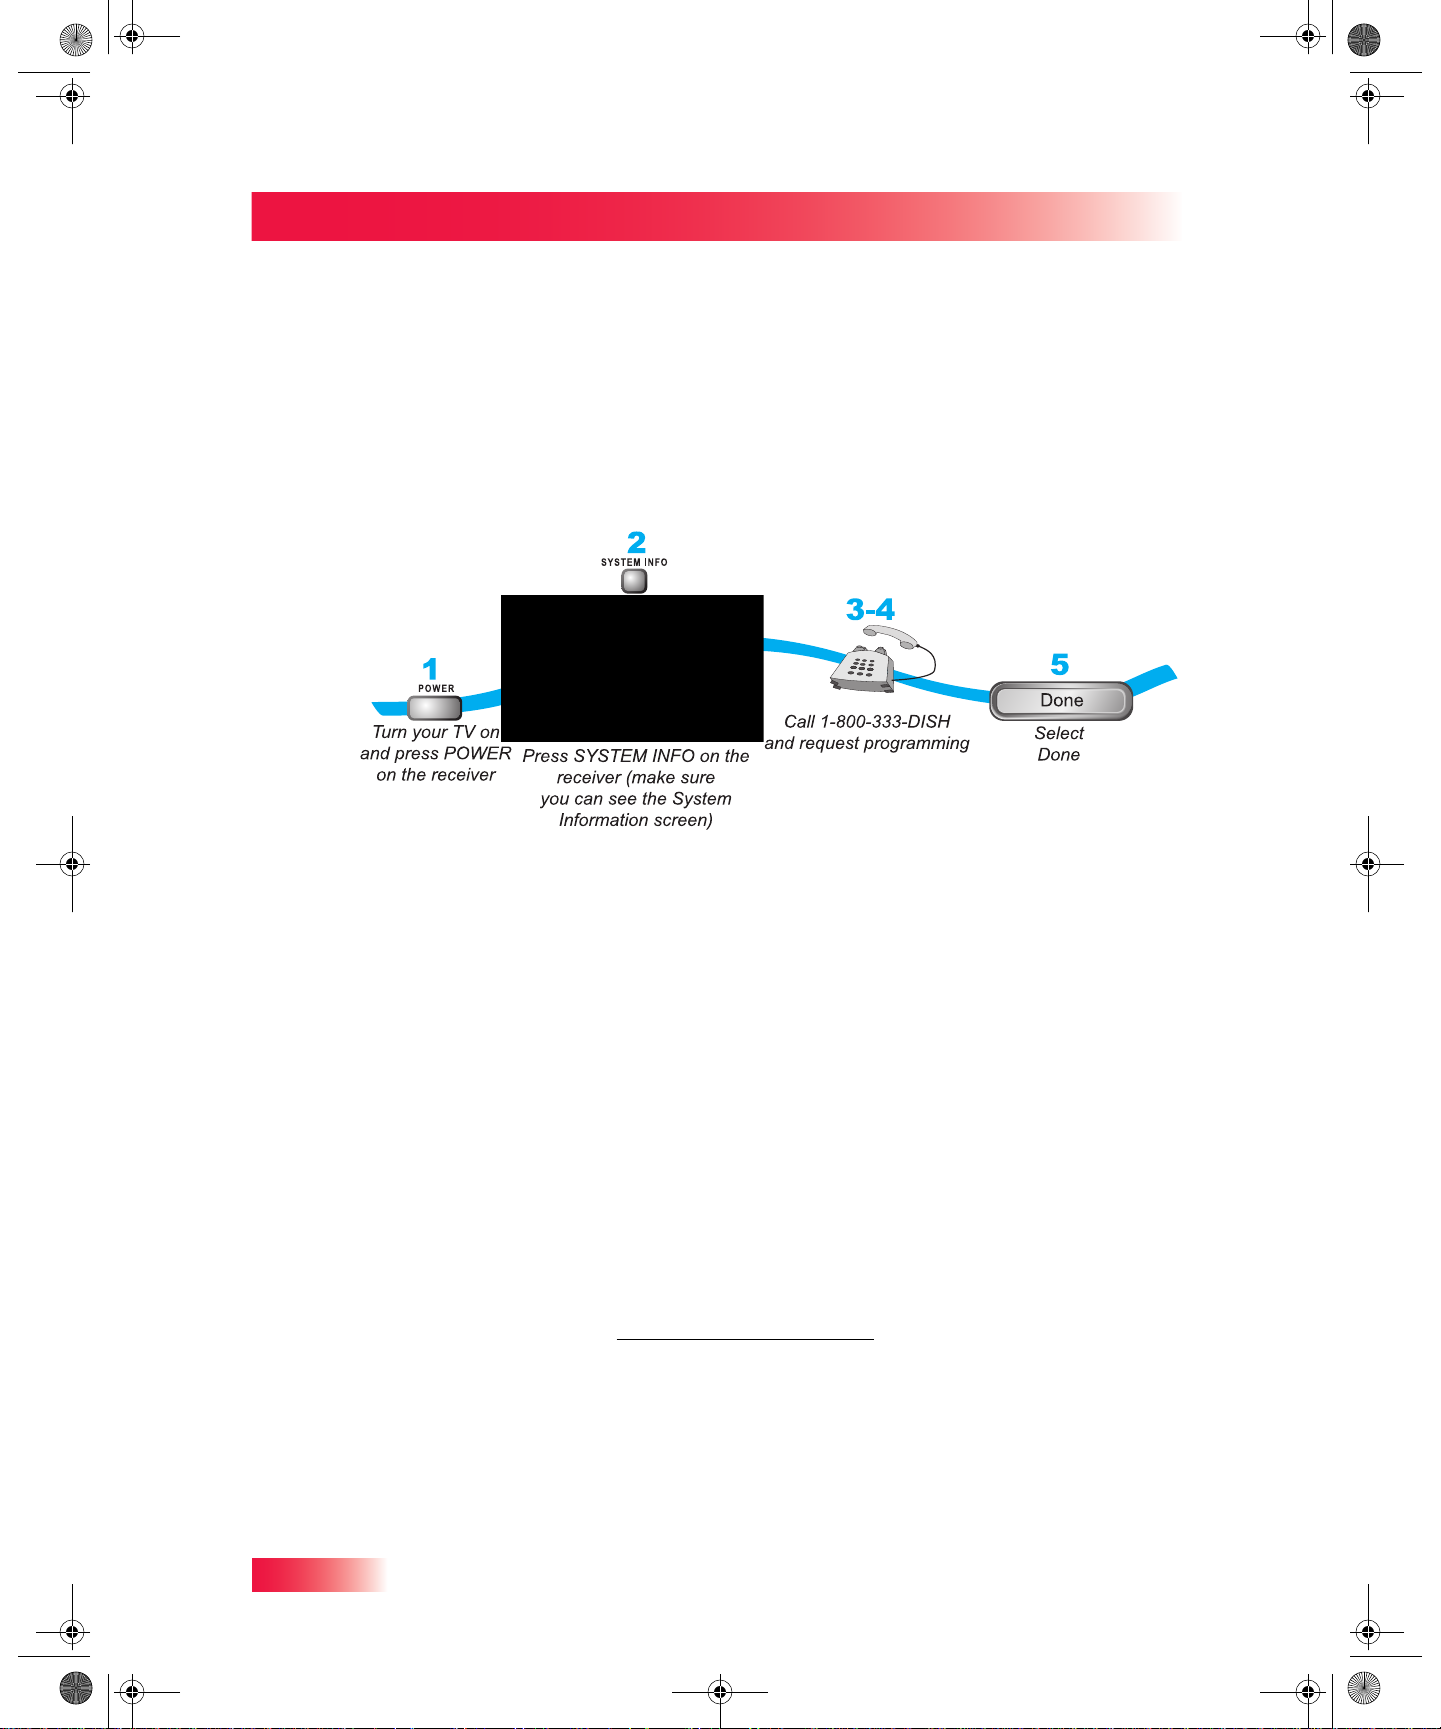
Before you can enjoy your new Hopper HD DVR, order your programming packages.
1 Press POWER on the front panel to turn on the Hopper. 2 Press SYSTEM INFO on the front panel to display the System Information screen on the
TV where your Hopper with Sling is located.
3 Call 1-800-333-DISH (3474) and tell the Customer Service Center representative that the
system has been installed and you would like to begin receiving services. A representative
will explain the available DISH packages. Give the representative information from the
System Information screen displayed on the TV where your Hopper with Sling is located.
4 The representative will send a signal via the satellite to activate your DISH services. This
process usually takes just a few minutes.
5 If the System Information menu screen is still displayed on your TV screen, select Done.
Where to Find Information on Your Account
If you want to know about charges to your DISH account or if you would like to make
changes to your programming packages, be sure to have your account information handy
and choose one of the following:
• Go to our website at www.mydish.com/myaccount
• Press MENU on your remote control and then select Customer Support.
• Call the DISH Customer Service Center at 1-800-333-DISH (3474).
Note: Additional authorization may be required before certain types of programs and/or
optional over-the-air broadcasts can be viewed; certain additional fees may apply.
4
Page 15
913.book Page 5 Tuesday, January 15, 2013 4:57 PM
WATCHING TV NOW
After you have ordered your programming package, you can begin enjoying the features
of your new Hopper with Sling HD DVR. When you complete these simple tours, you’ll be
familiar with the remote control and be able to find a program to watch, pause live TV, and
record your favorite shows.
Finding a Program to Watch
If you want to know more about watching TV, see Chapter 3: TV Basics starting on
page 29.
Introduction
Watching TV Now
Highlight a current
program by pressing the
UP or DOWN ARROW
and then SELECT
Highlight a current
program by pressing the
UP or DOWN ARROW
and then SELECT
5
Page 16

913.book Page 6 Tuesday, January 15, 2013 4:57 PM
Chapter 1
Watching TV Now
Pausing Live TV
Here’s something you can’t do with regular old TV: pause live TV because someone’s at
the door or calling you on the phone, or there’s something else you have to do right now.
For more about the pause feature, see Pausing a Program on page 60.
5
Banner displays to indicate
how long you paused
Recording and Playing Back a Program
Take this tour to learn how to make basic recordings of your favorite shows. For more
about the DVR features of your Hopper with Sling system, see Chapter 8: Digital Video
Recording starting on page 59.
2
1
While watching
a program,
press RECORD
7-8
STOP
Press STOP to stop
playback of the
recorded program
For more recording
options, press
RECORD again
6
Select Start Over
or Resume
(the recorded
program will
begin playback)
SELECT
3
press STOP and select
STOP
4
5
Select the
program you
recorded
After a few minutes,
Yes to stop recording
To begin watching
DVR
your recorded
program, press DVR
6
Page 17

913.book Page 7 Tuesday, January 15, 2013 4:57 PM
ADDITIONAL SERVICES
Pay-Per-View
Catch all the action on Pay-Per-View. Take a break from regular TV and order the latest
movies, sports, and special events. For details on ordering Pay-Per-View events, see
page 38. Be sure to connect your Hopper with Sling to an active telephone line or
broadband Internet service before you order a Pay-Per-View event (see the instructions
on page 96 and page 97). For more information, visit the mydish.com/ppv website.
On Demand
Press the ON DEMAND button on your remote control and enjoy movies and other
programming any time without perusing schedules or waiting around for programs to get
started, and without leaving your own home. For more information, visit the mydish.com/
vod website.
Introduction
Additional Services
DISH Online
DISH Online lets you schedule your DVR recordings on the Hopper with Sling if it is
connected to broadband Internet service. For options and steps to connect your Hopper
with Sling to the Internet, refer to Connecting to Broadband Internet on page 97. For steps
to order DISH Online programs, refer to DishOnline.com on page 39. For more
information, visit the mydish.com/dishonline website.
ABOUT SATELLITE TV RECEPTION
Satellite television service uses satellites in a stationary orbit over the Earth to deliver TV
and audio programming. This type of orbit enables the satellites to stay aligned over one
place on the surface of the Earth. Once the satellite dish has been aimed at the satellite,
the dish does not have to move to follow it.
Rain and Snow Fade
Heavy rain, snow, or dense cloud cover can
reduce the satellite signal, which may interrupt
your programming service. Your service will
return after the weather condition has passed.
Aiming the satellite dish to get the strongest
signal during installation, will help prevent rain
and snow from interrupting the signal.
7
Page 18

913.book Page 8 Tuesday, January 15, 2013 4:57 PM
Chapter 1
Why Connect to a Phone Line or Broadband Internet?
Solar Interference
Twice a year, the sun moves to a position behind
the DISH satellites as they orbit the Earth. This
event occurs during a few days at the beginning
of spring and the beginning of autumn, and lasts
only a few minutes.
During these brief periods, you will not be able to
see programs on DISH. When the sun moves
from behind the satellites, the programs will
reappear. This is an unavoidable natural event
and has an adverse effect on many providers of
satellite services.
WHY CONNECT TO A PHONE LINE OR BROADBAND
INTERNET?
Your Hopper with Sling HD DVR is equipped with one standard telephone jack and two
Ethernet ports that you can use to connect to an active telephone line and to broadband
Internet service, respectively. Keep the Hopper with Sling HD DVR connected so that you
will be able to order pay-per-view programs using your remote control, use all of the
interactive TV features and Hopper with Sling apps, and access other services from DISH
(see the instructions on page 97). A connected telephone line also supports the Caller ID
feature of your Hopper with Sling HD DVR system (see the instructions on page 96).
Your Hopper with Sling can be connected to your broadband home network. Currently this
connection allows you to order additional content not usually available through your
satellite TV subscription, and you can order video on demand and pay-per-view events
using your remote control (just as you do if connected to a phone line). See the connection
instructions on page 97, and more information about DISH Online on page 39.
MOVING ON-SCREEN LOGO
Whenever the Hopper with Sling system is turned off using the remote control or front
panel POWER button, you will see the DISH logo and helpful tips still displayed on your
TV screen. This feature is included on your Hopper with Sling to assure you that the
connections between your Hopper with Sling and TV(s) are OK, and also provides useful
information about your whole-home HD DVR system and its features. Press the POWER
or SELECT button on the front panel or your remote control to resume watching satellite
8
Page 19

913.book Page 9 Tuesday, January 15, 2013 4:57 PM
TV programming. Make sure you are using the correct remote control for your TV-viewing
location (see page 12 for details).
Introduction
Tips
TIPS
• Always have the latest software—Press POWER to turn off the the Hopper with
Sling when you’re not using it. This way, the satellite can send updated software and
guide data to your system.
• Order Pay-Per-View programs and events with your remote control—Keep an
active telephone line or broadband Internet service connected to the Hopper with
Sling system so that you can always have Pay-Per-View ordering at your fingertips,
and also avoid any unnecessary additional charges.
QUESTIONS
• How do I find something to watch? Refer to page 5. For more information on finding
something to watch, see Chapter 3: TV Basics.
• Why are some of the channels red in the Program Guide? The channels that are
red in the Program Guide are those which are not currently included with your DISH
package. If you’d like to watch those channels, call 1-800-333-DISH (3474) or visit the
www.mydish.com website.
• I’m looking at program information in a guide I bought at the grocery store, but
nothing matches what’s on my Hopper with Sling; is something wrong? No,
nothing’s wrong. DISH programming data may vary from what you’ll find in a local TV
publication. For best results, you should use the Electronic Program Guide (EPG) on
your system, or you can order DISH Entertainment Magazine.
9
Page 20

913.book Page 10 Tuesday, January 15, 2013 4:57 PM
Chapter 1
Notes
Notes
10
Page 21
913.book Page 11 Tuesday, January 15, 2013 4:57 PM
Receiver & Remote Control
About the Hopper with Sling HD DVR
What you’ll find in this chapter:
• HOPPER WITH SLING HD DVR OVERVIEW
• REMOTE CONTROL(S)
HE LOCATE REMOTE FEATURE
• T
• PAIRING YOUR REMOTE CONTROL
• CONTROLLING OTHER COMPONENTS
• HOPPER WITH SLING FRONT PANEL
• HOPPER WITH SLING BACK PANEL
• USING THE ON-SCREEN MENUS
• USING TEXT FIELDS
11
Page 22

913.book Page 12 Tuesday, January 15, 2013 4:57 PM
Chapter 2
Hopper with Sling HD DVR Overview
HOPPER WITH SLING HD DVR OVERVIEW
This section gives you an overview of your DISH satellite TV system with integrated DVR.
Satellite Receiver
This three-tuner satellite receiver with integrated digital video recorder can view/record
high-definition (HD) and standard-definition (SD) DISH programming on multiple TVs.
• Connect the Hopper with Sling to an HDTV to access, view and record HD and SD
programming. The programming from the receiver is delivered to the TV where your
Hopper with Sling is located using one or more audio/video interconnect cables.
• The Hopper with Sling HD DVR is also the host for Whole-Home DVR services,
delivered to other TV(s) using existing in-home coaxial cable connections to Joey
Receiver(s). Each Joey Receiver links to a Hopper with Sling HD DVR and then
connects to an HDTV to view HD and SD programming or an SDTV to view SD and
down-converted HD programming.
Remote Controls
A remote control comes with each Hopper with Sling HD DVR or Joey Receiver. These
remotes use Ultra-High Frequency Second Generation (UHF-2G) radio frequencies to
control satellite TV programming. Be sure to set up each remote control to pair to and
operate the correct receiver in your home (see page 16).
REMOTE CONTROL(S)
The included remote control(s) give you access to all the features of your satellite TV
system, including whole-home DVR services available in a Hopper with Sling HD DVR.
You can set up each remote to control a DISH HD DVR satellite TV receiver, via radio
frequency (RF) signals, and as many as three other devices in the same room, via infrared
(IR) signals (see page 17). These devices can be a TV, a DVD or Blu-ray Disc™ player (or
VCR), and a third “auxiliary” device (such as an audio-system component or even a
second satellite TV receiver via line-of-sight infrared signals).
The following sections describe how to use the various features on the remote control(s)
included with your Hopper with Sling Whole-Home HD DVR system.
Remote Locator
12
Your Hopper with Sling HD DVR and Joey Receiver(s) have a feature to help you find a
lost remote control. On the left side of the front panel of the Hopper with Sling HD DVR
where the word Pull appears, lower the hinged panel door to reveal the control buttons,
including one labeled LOCATE REMOTE. Press this button, and in a few seconds the
remote will begin to beep to help you locate it. See “The Locate Remote feature” on
page 15.
Page 23
913.book Page 13 Tuesday, January 15, 2013 4:57 PM
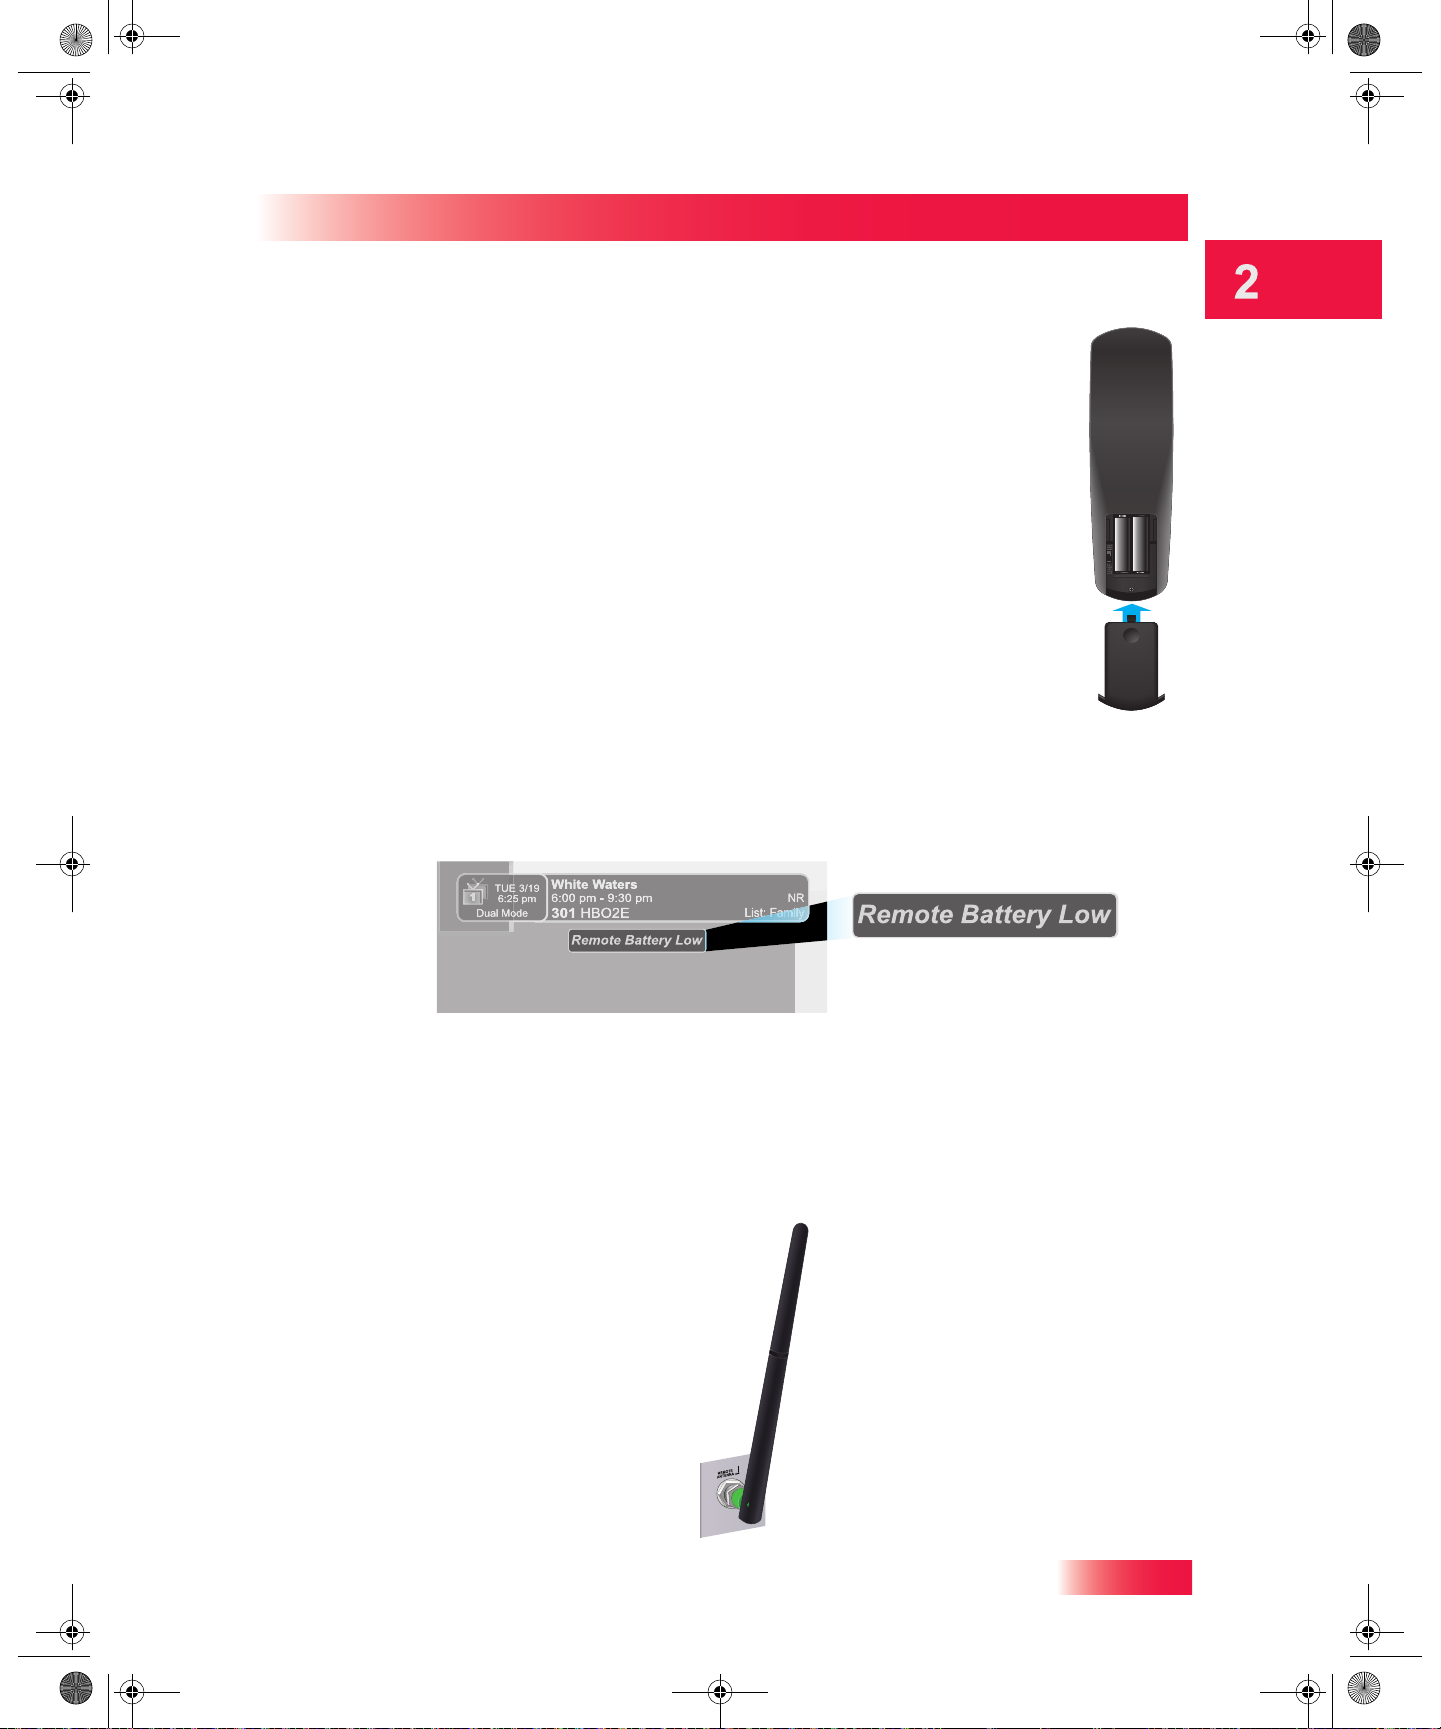
Remote Control Batteries
Each remote control comes with four AAA batteries. When you replace old
batteries, you should replace all of the batteries. Use batteries of the same
type together, for example, all alkaline. Don’t mix batteries of different
types/chemistries. Alkaline batteries will last longer than carbon zinc.
1 Press down on the dimple at the top of the battery cover on the back of the
remote control and slide off the cover.
2 Take out all four of the old batteries. 3 Put in new batteries. Make sure you match the plus (“+”) ends with the plus
markings on the battery case.
Satellite Receiver
Remote Control(s)
4 Slide the battery cover back into place on the back of the remote control.
Low Battery Warning
When you see a low-battery warning message below the Program Banner on your TV
screen, the batteries in your remote control are weak and need to be replaced.
Attach the Remote-Control Antenna
Attach the remote-control antenna to the REMOTE ANTENNA connection on the Hopper with
Sling back panel to use your UHF-2G remote. (The Joey Receiver’s remote antenna is
internal.) Without a remote-control antenna attached, you cannot use this remote to
control a Hopper. See Adjusting the Remote-Control Antenna on page 14 for information
about improving the performance of your UHF-2G remote control. (Image may vary.)
13
Page 24
913.book Page 14 Tuesday, January 15, 2013 4:57 PM
Chapter 2
Remote Control(s)
Adjusting the Remote-Control Antenna
Be sure to point the remote-control antenna (back of the receiver) straight up so you can
use the remote control from as far away as possible. Don't let the antenna touch anything.
If your remote control isn't working well from far away or another room, you
may be experiencing interference from objects near your receiver. To
improve your remote control's range, try the following:
– Place the receiver higher than all of the other equipment in your cabinet
or entertainment center.
– Provide space above the receiver so that the remote-control antenna can
be installed pointing straight up. If you cannot install the antenna straight
up, then tilt the antenna at no more than a 30° angle from vertical.
– Place the remote-control antenna outside the entertainment center by
using an optional coaxial cable to connect the antenna to the receiver.
– Try moving the receiver itself to other suitable locations.
– Move any nearby over-the-air antennas away from the remote-control
antenna. Do not sit an over-the-air antenna on top of your receiver.
– Install a UHF attenuator. See Installing a UHF Attenuator on page 14 for
more details.
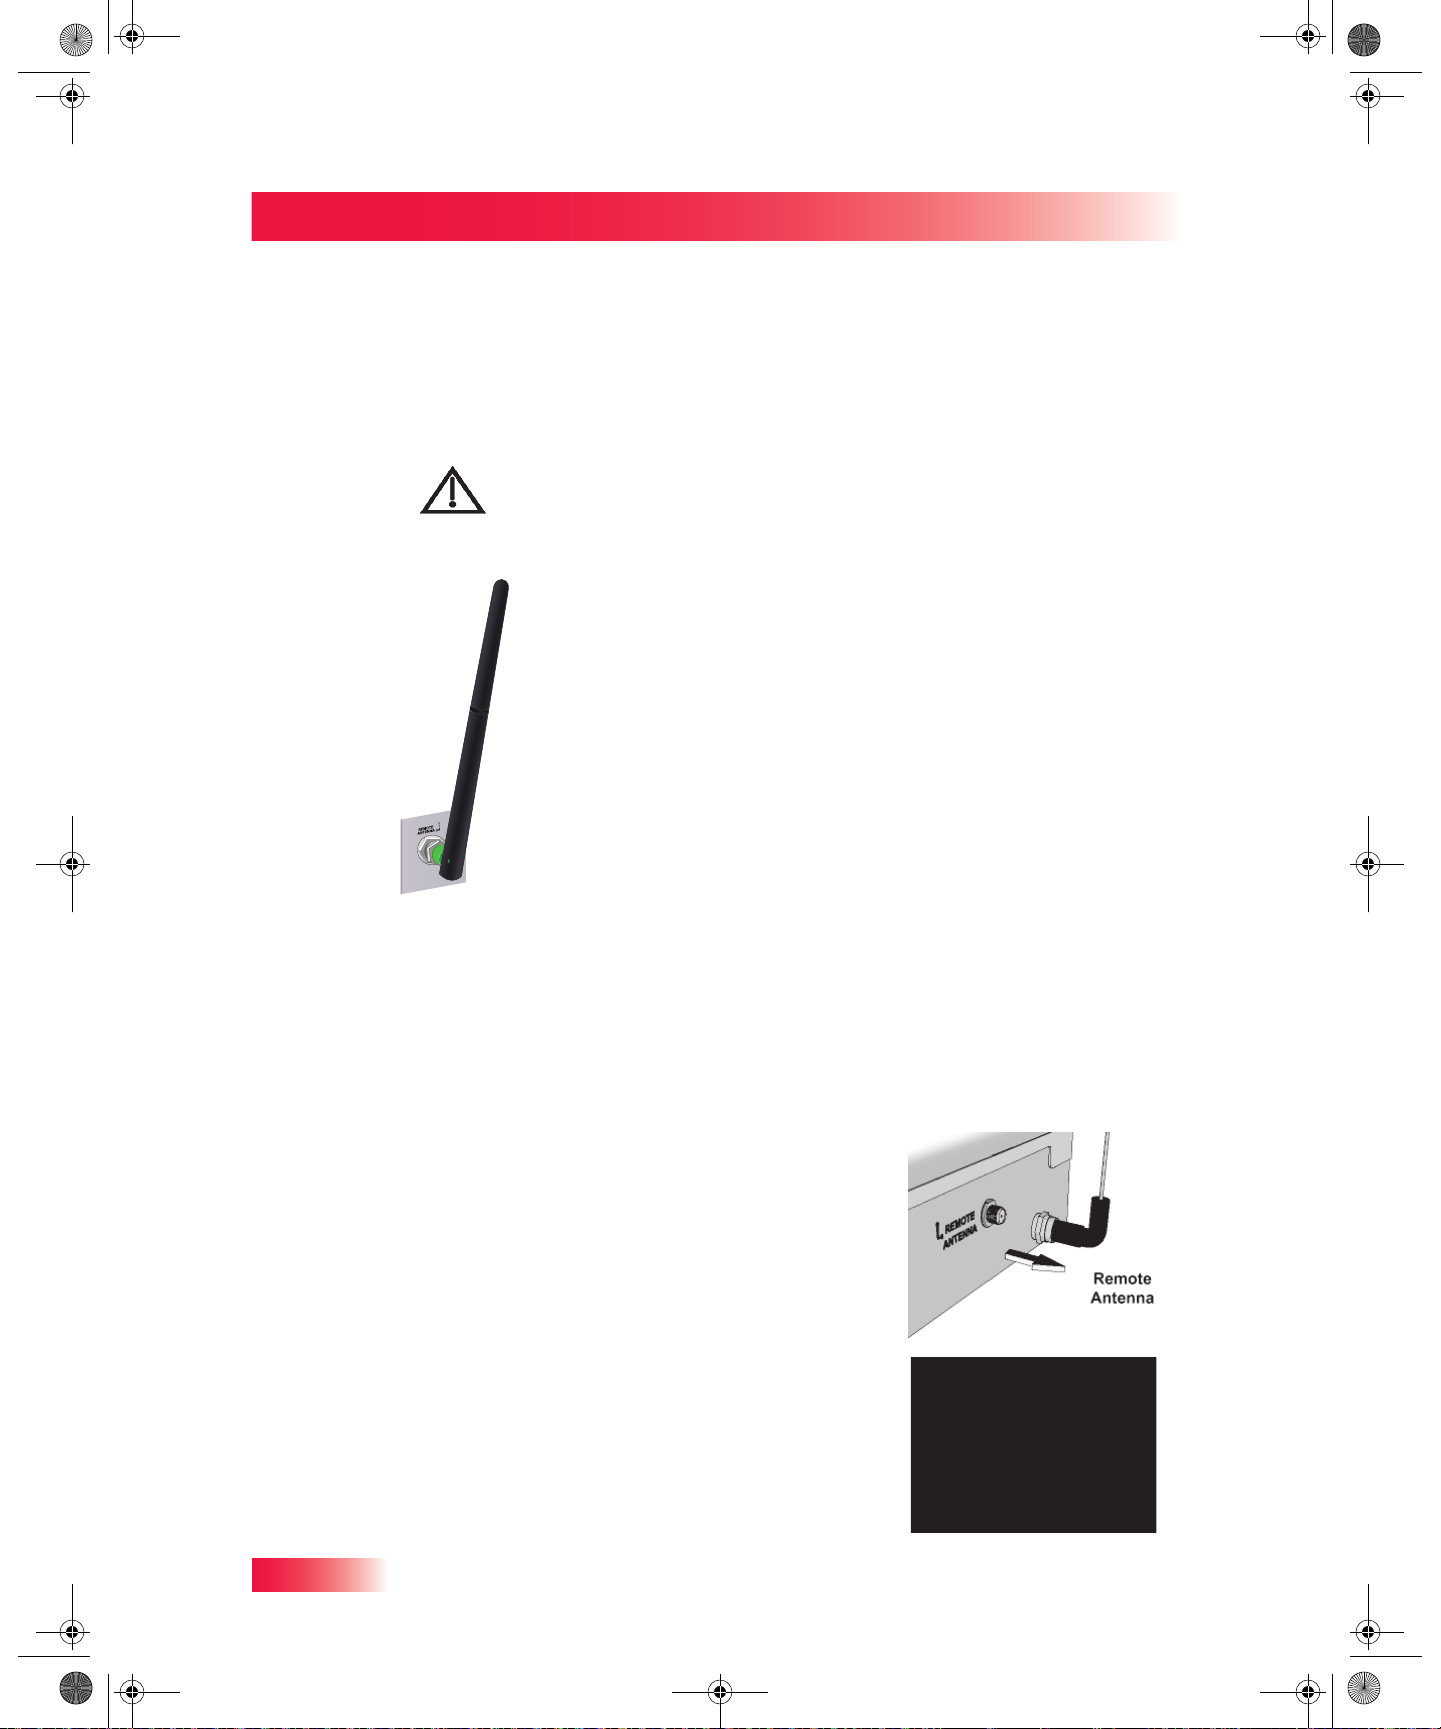
Installing a UHF Attenuator
Unwanted UHF signals may interfere with signals from the remote control to the receiver.
To prevent such interference, you can install a 10 dB attenuator (available from many
electronics parts stores). Adding this attenuator will help keep out stray UHF signals, but it
will also cut down how far away your remote control can operate the receiver.
1 Remove the remote-control antenna from the
REMOTE ANTENNA input on the receiver’s back
panel.
14
2 Attach a 10 dB attenuator directly to the REMOTE
ANTENNA input.
Page 25
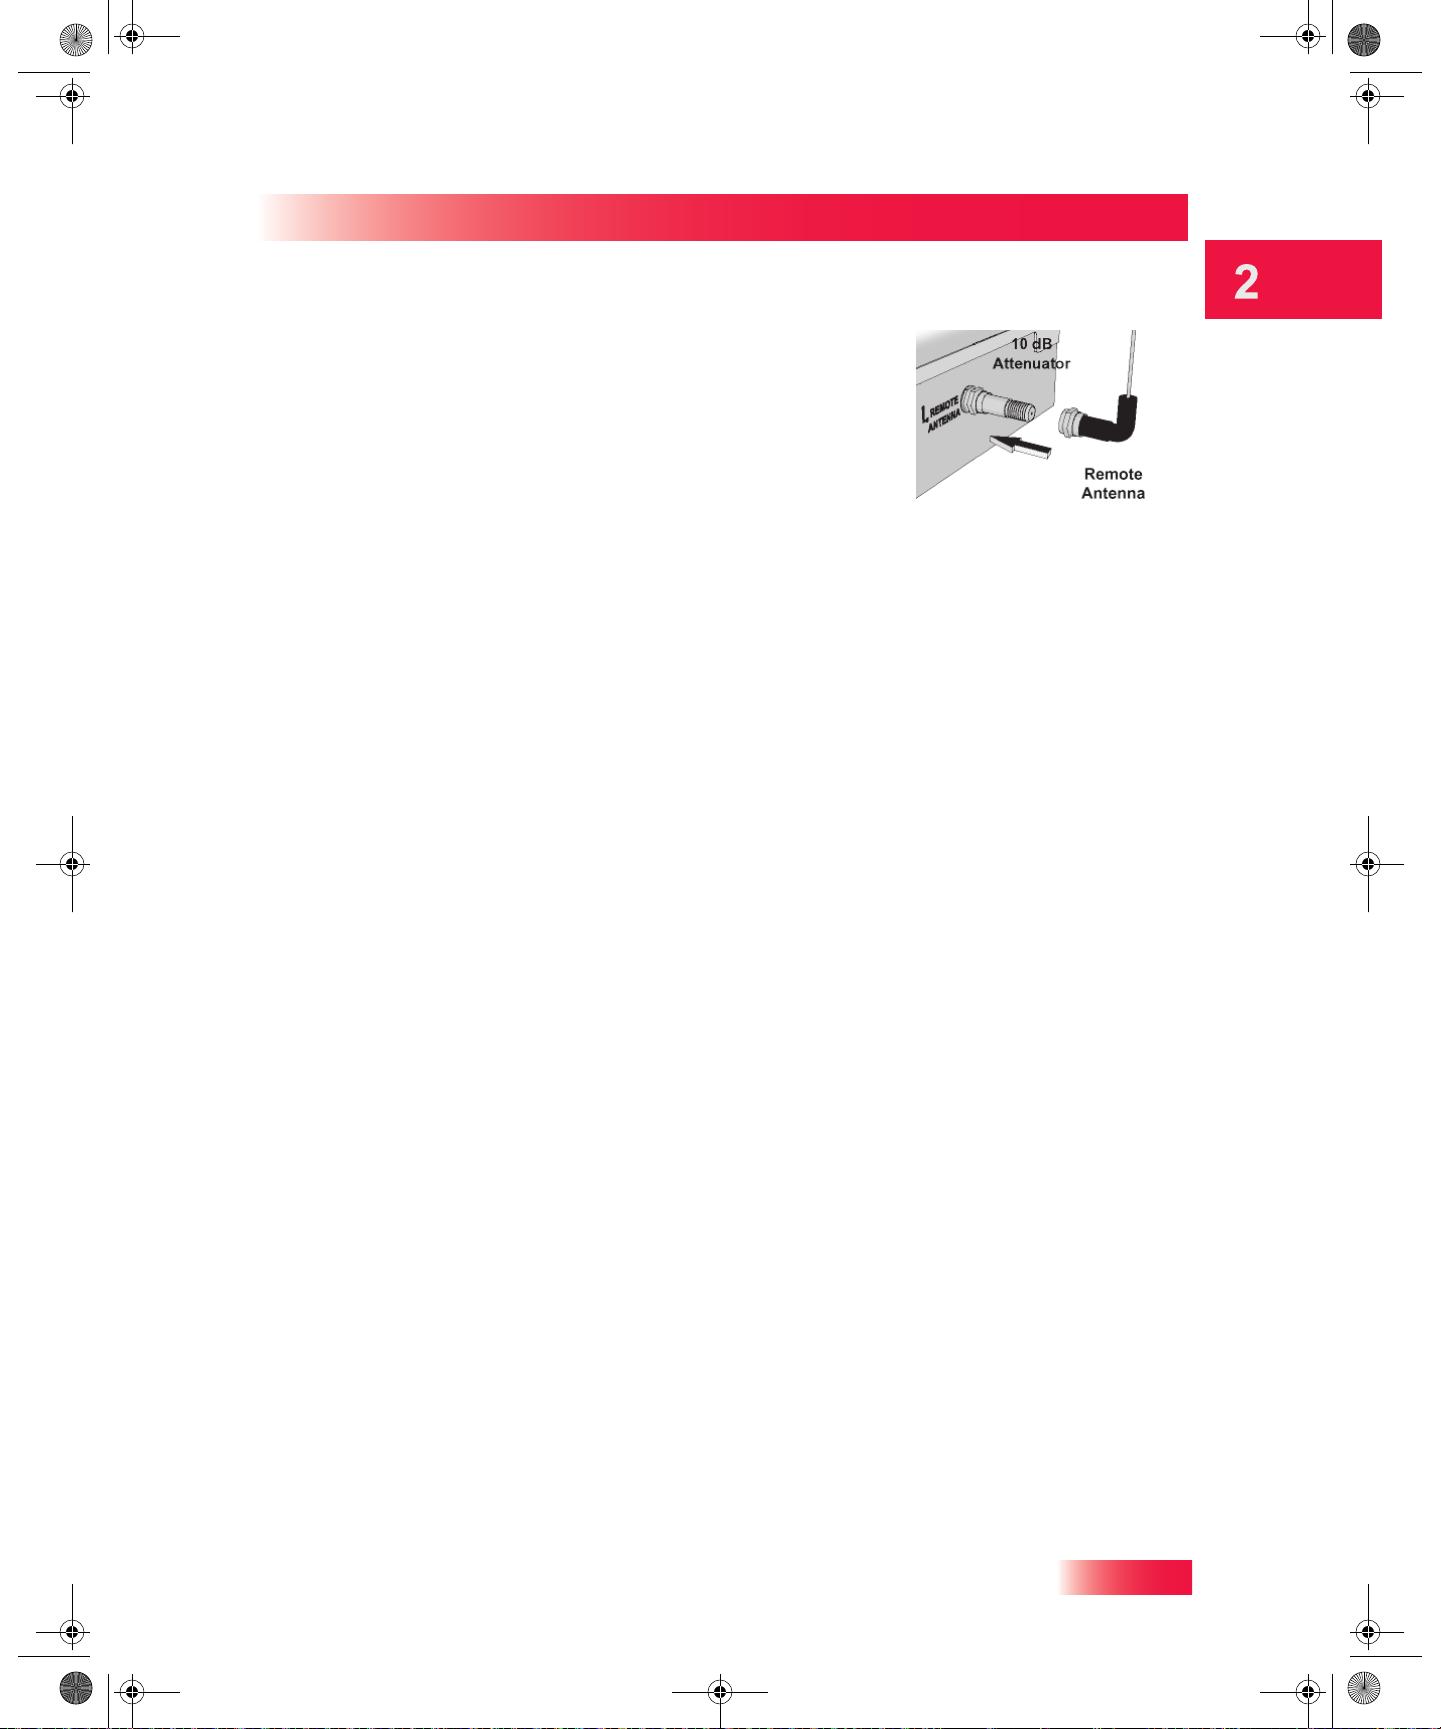
913.book Page 15 Tuesday, January 15, 2013 4:57 PM
3 Attach the remote-control antenna to the newly
installed attenuator.
THE LOCATE REMOTE FEATURE
Satellite Receiver
The Locate Remote feature
Ever misplace your remote control somewhere in your home and wonder where it is?
Press the LOCATE REMOTE button on the front panel of your Hopper with Sling HD DVR
(behind the left-side panel door) or Joey Receiver if you cannot find your DISH remote.
Within a few seconds you should hear your remote control emitting a series of beep tones
to help you locate it. (If the remote control is out of range of the DISH receiver or remote’s
batteries are dead, you will not hear these tones.)
When you find your DISH remote control, press and hold the SELECT button on it and the
beeping will stop. Then you can use the remote control normally.
15
Page 26
913.book Page 16 Tuesday, January 15, 2013 4:57 PM
Chapter 2
Pairing Your Remote Control
PAIRING YOUR REMOTE CONTROL
These instructions help you pair your remote control to your Hopper with Sling HD DVR or
Joey Receiver. Your DISH receiver comes with a universal UHF/IR remote control that
uses proprietary ZigBee® RF4CE technology. It includes two-way learning functionality
and the ability to control up to three additional devices, such as TVs and DVD/Blu-ray
Disc™ players, via line-of-sight IR commands.
You will not be able to pair a remote that is already paired to a Hopper with Sling HD DVR
or Joey Receiver in your home. To identify which DISH receiver a remote is paired to, you
can use the Locate Remote feature (just press the LOCATE REMOTE button on your
receiver’s front panel) to have the remote paired to that receiver emit a series of beep
tones to identify it.
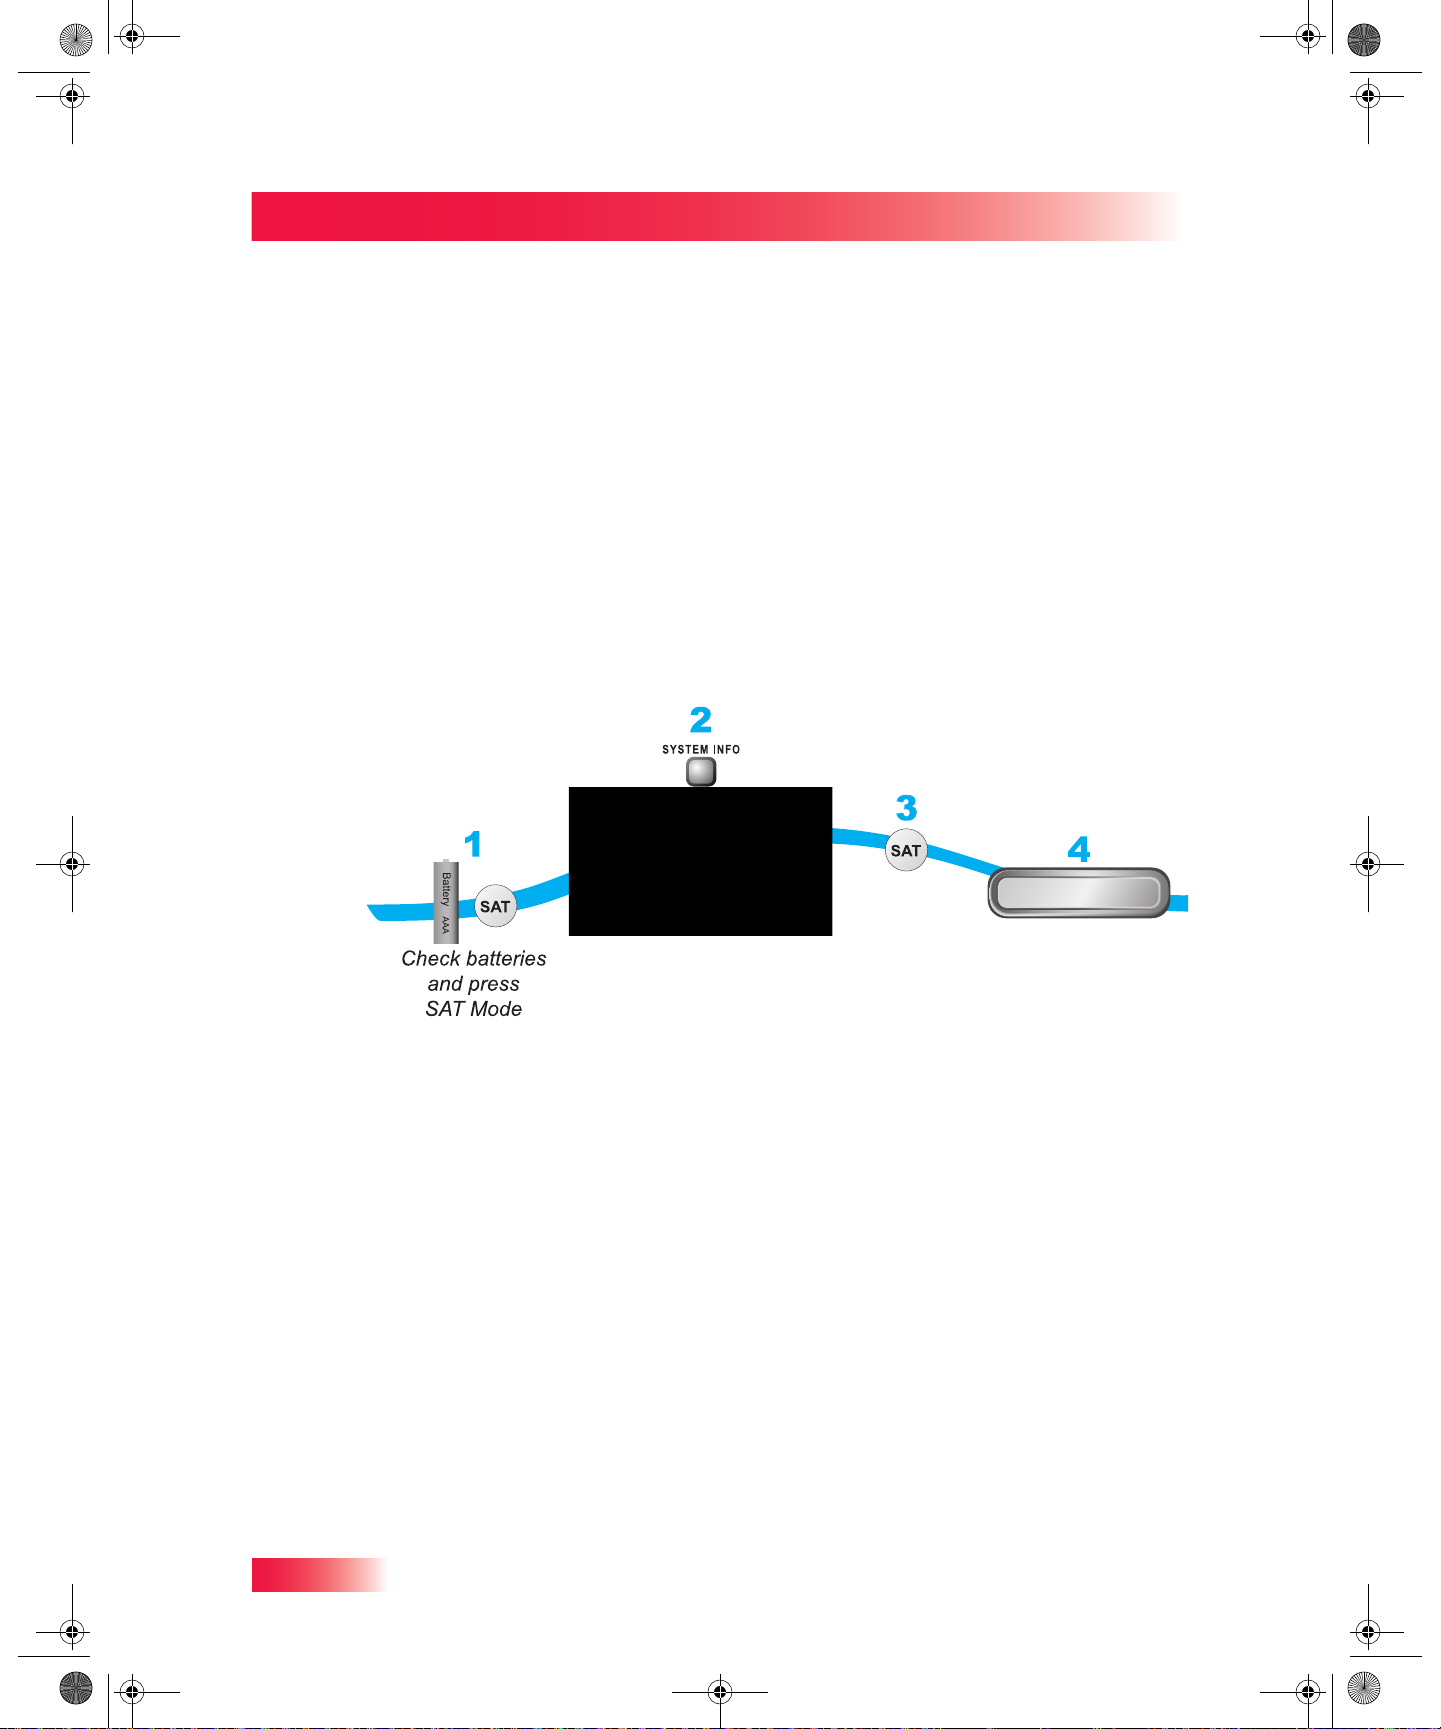
To pair your remote control
Press SAT
If no operation,
press SYSTEM INFO
on the receiver
(image may vary)
1 Make sure the remote control has fresh batteries installed and is in SAT mode. 2 Press the SYSTEM INFO button on the receiver front panel to display the System
Information screen on the TV.
3 Press and release the SAT button on the remote control:
• Remote 1—Press SYS INFO on the receiver’s front panel. The System Information
screen lists your remote control. Typically, the remote control for your Hopper with
Sling is shown on the TV connected to your Hopper with Sling HD DVR and the
remote for the Joey Receiver on the TV connected to the Joey Receiver.
• Remote 2, 3, ..., 8—As many as eight remote controls can be paired to a receiver and
listed in its System Information screen. If you have more than two DISH remote
controls, then consult the SYSTEM INFO screen on each of your receivers to ensure
that all your DISH remote controls are paired with the correct receivers.
Close
Press Close
16
4 Select Close to close the System Information screen.
Page 27

913.book Page 17 Tuesday, January 15, 2013 4:57 PM
CONTROLLING OTHER COMPONENTS
To use the remote to control other devices (such as a TV, DVD or Blu-ray Disc™ player or
VCR, an audio tuner/preamp or amplifier, or another compatible DISH receiver via IR
only), you must first program the remote to control each of these devices. You can do this
using the following procedures:
• Setting Up Using the Remote Manager on page 17
• Limited Mode on page 18
• Setting Up by Learning from Another Remote on page 19
• Switching Between TV and Tuner/Amplifier Volume Adjustment on page 21.
Satellite Receiver
Controlling Other Components
Remote Control Modes
Use the remote’s mode buttons, SAT (Hopper with Sling HD DVR or Joey Receiver), TV
(for a TV), DVD (for a a disc player or VCR), and AUX (“auxiliary,” for a second TV, DVD/
BD player or VCR, tuner/preamp or audio amplifier) to set the remote control to the right
mode for each device. To change the mode, firmly press the button for the device you
want the remote to control. The mode button lights for about two seconds to show you
have set the remote to that mode.
Setting Up Using the Remote Manager
To set up your remote to control your devices, use the Remote Manager, as follows:
1 Press MENU, highlight and select the Settings tile, and then Remote Manager.
2 Highlight and select the option for the device mode you want to program:
• Select TV Code and follow the on-screen instructions to program the remote in TV
Mode to control your TV. After programming is complete, the TV Power button will also
turn your TV on and off in any device mode. When Limited Mode is enabled, only the
POWER, MUTE and VOLUME buttons will operate your TV.
• Select DVD Code and follow the on-screen instructions to program the remote in DVD
Mode to control your DVD or Blu-ray Disc™ player or VCR. When Limited Mode is
17
Page 28

913.book Page 18 Tuesday, January 15, 2013 4:57 PM
Chapter 2
Controlling Other Components
enabled, only the POWER and VCR-function buttons (like PLAY, PAUSE, etc.) will
operate your device.
• Select AUX Code and follow the on-screen instructions to program the remote in AUX
Mode to control your auxiliary device, like an audio component or amplifier. You can
also program AUX mode to control a second TV or disc player, or even certain other
DISH receivers (via IR commands only).
3 Highlight and select Save when you are finished.
Limited Mode
Your remote control is programmed automatically in Limited Mode to prevent inadvertent
commands from being sent to your TV, such as an accidental channel or input change.
When you use the remote to control your TV in Limited Mode, you will only be able to use
the POWER, MUTE, and VOLUME buttons. Also, when you use the remote to control your
VCR (using the mode button for a DVD or AUX device) in Limited Mode, you will only be
able to use the POWER and VCR-function buttons (like PLAY, PAUSE, etc.).
Turning Limited Mode On and Off
To turn off Limited Mode so that you can use all of the buttons on your DISH remote to
control your TV or disc player, do the following:
1 Press MENU, highlight and select the Settings tile, and then Remote Manager. 2 Highlight and select the option for Limited Mode:
• Select Enabled to turn Limited Mode on. This is the default setting.
• Select Disabled to turn Limited Mode off. Now more of the remote-control buttons
function in TV and DVD modes.
3 Highlight and select Save when you are finished.
Note: Limited Mode is not used if an audio amplifier is programmed in AUX mode.
18
Page 29

913.book Page 19 Tuesday, January 15, 2013 4:57 PM
Setting Up by Learning from Another Remote
After you have programmed your DISH remote to control your devices (in TV, DVD, and/or
AUX modes), you may find not all of the commands used by the devices’ original remote
controls function as you expect. The learning function of your new DISH remote control
can support these commands.
Satellite Receiver
Controlling Other Components
The remote control can learn commands in two ways:
1 You can use the Remote Manager to program a specific mode, and then learn commands
that add new functions or overwrite existing functions of the remote control’s buttons in
this mode. For this type of learning, any remote-control button without a learned command
keeps the pre-existing command (if any) for that programmed device code.
2 Each button on this remote control can learn a command from the equipment’s original
remote control. For this type of learning, any remote-control button without a learned
command will have no function for that programmed device mode.
To “teach” your DISH remote-control buttons specific commands for your devices,
complete the following:
Instructions Additional Information
1 Press the MENU button, select the
Settings tile, then Remote Manager.
2 Select the the option for which device
mode you want to learn commands: TV
Code, DVD Code, or AUX Code.
3 On the next screen, select the Learn option
for this device.
After you select AUX Code, you will need to
select the type of auxiliary device you want to
control in that mode from the on-screen list.
Follow the on-screen instructions.
19
Page 30

913.book Page 20 Tuesday, January 15, 2013 4:57 PM
Chapter 2
Controlling Other Components
4 Place both your DISH remote control and
the original equipment’s remote control on
a table or other flat, stable surface.
5 To start learning device commands:
• If you've found a code for a device,
then under Learning Style select
“Add learned commands to
existing code”.
• If you have not found a code for a
device, then under Learning Style
select “Blank Slate-This will erase
all previous commands”.
6 Point the front of the original device remote
to face the small square (IR window) on the
front, left-hand side of the DISH remote
control, as shown on page 19.
7 Select the Start Learning option. 8 After a button has learned a command suc-
cessfully, repeat step 6 and step 7 until all
commands you want have been learned.
Holding either remote control in your hand may
cause learning to fail.
To find and program the device code, use the
instructions, “Setting Up Using the Remote
Manager” on page 17
The device mode button that you selected
remains lit while learning.
Follow the on-screen learning instructions.
9 To end the learning sequence:
• Press one of the mode buttons on
the DISH remote. This saves all
the commands for that mode, and
exits learning to return to normal
remote-control operation.
• To cancel learning, do not press
any buttons on either remote
control for at least 30 seconds. The
DISH remote control times out of
learning and returns to its normal
operation.
Note that no learned commands
are saved if the DISH remote
control times out before completion
of learning.
The learning sequence also ends if the remote:
• Runs out of memory for learned
commands, whereupon it saves
the commands you have learned
for equipment in this mode, exits
learning and returns to normal
remote-control operation. Then the
DISH remote cannot learn any
additional commands.
• Batteries are too low for learning,
when all the mode buttons blink
quickly eight times. Learning ends
with no learned commands
saved, and the DISH remote
control returns to its normal
operation.
Change the remote’s batteries.
20
Page 31

V
913.book Page 21 Tuesday, January 15, 2013 4:57 PM
Controlling a Tuner or Amplifier
Use the following remote-control buttons to control a tuner or amplifier. When the remote
control is set up as described on pages 17 and 21, press the AUX device mode button to
set the remote to AUX mode. The AUX mode button will stay lit for two seconds to show
you’ve set the remote to AUX mode. Make sure to keep the remote in AUX mode to use
the following buttons.
Satellite Receiver
Controlling Other Components
AUX Mode
To use the features described in this section, make sure
you are in AUX mode by pressing the AUX Mode button.
Power
Turns the
tuner/amplifier
on and off
olume & Mute Buttons
Control tuner/amplifier
volume
Press this
button for
AUX Mode
Select/Arrows
Button
Channel up/down
with the Arrow buttons.
Change tuner/amplifier
inputs with the Select
button
AUX
Switching Between TV and Tuner/Amplifier Volume Adjustment
When the remote control is set up to operate your TV, the VOLUME and MUTE buttons
will adjust your TV’s volume by default. If you prefer the volume and mute functions of the
remote control to adjust the volume of a remote-controllable audio tuner/preamp, other
component or amplifier device instead of the TV, this capability can be set up using AUX
mode of the remote control.
1 Press the MENU button, highlight and select the Settings tile, then Remote Manager. 2 Select the Volume option. 3 Select the device for your remote VOLUME and MUTE buttons to control while in SAT
mode. By default, these buttons control the TV you have programmed in TV mode. You
can choose to use an AUX device, such as an audio component or amplifier, instead. Note
that you must program the audio device in AUX mode for this function to operate correctly.
4 Select the Save option when finished.
21
Page 32

m
s
o
o
e
y
g
913.book Page 22 Tuesday, January 15, 2013 4:57 PM
Chapter 2
Controlling Other Components
Remote Control Button Map
SAT Mode
Pair/Input
Access receiver
features and settings
Menu
Access receiver
features and settings
Volume and
Mute Buttons
Control TV volume
Programming required
Themes
Search for programs
using Themes
Recall
Return to previously
viewed TV channel(s)
Info
Retrieve info on
programs or set a timer
Search
Search for a program
Colored Buttons
Provides shortcuts to
frequently used menus
Press this
button for
SAT Mode
Power & TV Power
Top Button turns the receiver on/off
Bottom button turns the TV on/off
Page Buttons
Page up/down in the
Program Guide and
event content
Guide
Display current and
future satellite progra
listings
Browse
See what is on other
channels while
watching TV
Arrow/Select Button
Channel up/down,
navigate through
menus, and select a
desired option
Cancel
Return to previous
menu or to watch a
program
View Satellite
Programming
Exit out of any menu
the guide and return t
viewing live TV
Digital Video Record
(DVR) Buttons
Pause live TV and pla
or record programmin
22
Format the picture to
Format
the desired width to
match the program
you are viewing
PIP (Picture-In-
Picture) Buttons
Watch two separate
programs at the
same time (Hopper
only)
Number Buttons
Enter a channel
number or navigate
through menus and
the program guide
System Wizard
Press and hold to go
to the backup and
restore screen
Page 33

913.book Page 23 Tuesday, January 15, 2013 4:57 PM
Satellite Receiver
Controlling Other Components
TV Mode
Switch between TV
Pair/Input
inputs
(available only for certain
makes and models of TVs)
TV Menu
Access menu features
available on some TVs
Mute
Turn TV volume
on or off
Select Button
Select a program or
menu
Recall
Return to the last
channel viewed
Press this
button for
TV Mode
Power & TV Power
Top Button turns the TV on/off
Bottom button turns the TV on/off
Volume
Control TV volume
Up/Down Arrow
Buttons
Channel up/down on
the TV
PIP (Picture-In-
Picture) Buttons
Watch two separate
programs at the
same time
(Note: May not be
available)
Number Buttons
Enter a channel
number
23
Page 34

913.book Page 24 Tuesday, January 15, 2013 4:57 PM
Chapter 2
Controlling Other Components
DVD Mode
op Button turns the DVD/BR/VCR on/off
Power & TV Power
Bottom button turns the TV on/off
Press this
button for
DVD Mode
Pause
Pause a DVD, Blu-ray
disc, or videotape
Rewind a DVD, Blu-ray
Back
disc, or videotape
Stop
Stop playing or
recording a videotape,
or stop playing a DVD
or Blu-ray disc
Record
Record on a videotape
FWD (Forward)
Forward a DVD, Blu-ray
disc, or videotape
Play
Play a DVD, Blu-ray
disc, or videotape
Number Buttons
Use to get to specific
chapters on the DVD;
the function of the
remote number
buttons depends on
the device
24
Page 35

POWER
MENU
INFO
S
C
ARD
SYS
O
JUMP
LOCATE
REMOTE
RES
EC
RE
913.book Page 25 Tuesday, January 15, 2013 4:57 PM
HOPPER WITH SLING FRONT PANEL
Power
Turns
receiver
power
on/off
Select
Chooses
an item
or channel
Sys Info
Displays
information
on system
Reset
Press to
reset the
receiver
Satellite Receiver
Hopper with Sling Front Panel
Smart
Card
Slot for
smart card
SMARTCARD
MART
Info
Displays
program
information
POWER
MENU
INFO
Menu
Displays
the Main
Menu
screen
SELECT
Arrows
Navigates
through
menus or
channels
SYS INFO
INF
JUMP
LOCATE
REMOTE
Jump
Moves to
another
selection
RESET
ET
PWR
REC
Locate
Remote
Locates
the remote
control
HOPPER WITH SLING BACK PANEL
Digital Audio
Audio/Video Output
High-quality
standard-definition
connection to the TV
audio and video input
Output
Optical
connection to a
high-quality
sound- decoding
system
Ethernet
Connects to a
broadband
home network
Remote Antenna
Connects to a
UHF-2G remote
control antenna
See applicable patents at
www.echostar.com/ip
FCC ID: DKNX34
Manufactured under license
from Dolby Laboratories.
Dolby and the double-D symbol
are trademarks of Dolby Laboratories.
US: 5G6MM00BID050
®
Satellite In
Connects to
the satellite
dish
YPbPr/Component
Output
Video connection
to a high-definition
TV video input
HDMI
Output
Provides
digital audio
and video
to an HDTV
USB Ports
Connects to
multimedia
devices,
such as an
external
hard drive
eSATA
Connects to
an external
hard drive
(feature
coming soon)
Phone Jack
Connects to a
telephone line
Note: Your receiver may look slightly different than the unit shown above.
25
Page 36

913.book Page 26 Tuesday, January 15, 2013 4:57 PM
Chapter 2
Using the On-screen Menus
USING THE ON-SCREEN MENUS
The menus make using the receiver and selecting programs quick and easy. Use the
menus to control the receiver and to use its features, such as setting parental controls and
locks, choosing a program you want to watch, or creating lists of your favorite channels.
Open and Close Menus
You can open the menus in either of two ways:
• Press the MENU button on the receiver front panel or remote control to open the Main
Menu, then access any of the other menus from the Main Menu.
• Use the following buttons on the remote control:
– Press GUIDE to open the Program Guide.
– Press THEMES (LEFT ARROW) when watching a program to open the Themes
and Search menu.
– Press BROWSE (RIGHT ARROW) to display the Browse Banner.
To close a menu screen and return to watching a program, press VIEW LIVE TV.
Highlighting Menu Options
Use the remote-control ARROWS to move the on-screen highlight to the menu option.
When you move the on-screen highlight to an option, the name changes color.
Selecting Menu Options
You can select an option on a menu in either of two ways:
• Move the highlight to the menu
option using the remote-control
ARROWS. Then press SELECT.
In the example, the option for the
Program Guide is highlighted.
• If an option has a color next to it,
press the matching color button
(red, green, yellow or blue) on the
remote control. When you use the
color button, your choice both
highlights and selects the option.
26
List of Choices in the Menus
When you make a choice in a list, the receiver does not apply the change until you select
Save or Done on the right of the screen. If you do not want to save any changes, select
Cancel to discard all changes you made in the current menu. There are two types of lists:
Page 37

913.book Page 27 Tuesday, January 15, 2013 4:57 PM
• A single choice list allows you to select only one choice at a time. If you select another
choice, your previous choice is deselected.
• A multiple choice list allows you to select more than one choice at one time. If you
select another choice, your previous choice(s) also stays selected, as indicated by a
check mark.
Canceling a Procedure
You can cancel a procedure in any of three ways:
• If you want to return to watching a program, then press the VIEW LIVE TV button.
• If you want to return to the previous menu or screen, then press the CANCEL button.
• If you do nothing in the current menu for a few moments, then the menu will close
automatically, and any changes you have made in that menu will be discarded.
Satellite Receiver
Using Text Fields
USING TEXT FIELDS
When you use some of the features on your receiver, you might be required to enter
information, such as the name of a movie when using the Search feature, into areas on
the screen called text fields. There are two basic ways for you to enter this information:
• Using the alphanumeric characters on the screen
• Pressing the remote-control NUMBER PAD buttons
Using the On-screen Keyboard
Use the keyboard letters and numbers to type in the information. Use the LEFT, RIGHT,
UP, and DOWN ARROWS to navigate around the keyboard on the screen. Press
SELECT to choose each character, one at a time.
Using the Number Pad
Use the letters printed with the NUMBER PAD digits on the
remote control—just like on phones—while the highlight is in
the field. For example, when looking for the channel and times
to watch Rudy Friml Presents, you press the 7 button three
times for an R, the 8 button two times for a U, the 3 one time
for a D, and 9 three times for a Y, to type in the word “Rudy.”
While in the Text Field
Use the on-screen keyboard and the SELECT button on your remote control to edit the
characters in a text field. In addition, using your remote when the cursor is in the text field:
• Press the LEFT ARROW to move back without deleting characters.
27
Page 38

913.book Page 28 Tuesday, January 15, 2013 4:57 PM
Chapter 2
Tips
• Press FORMAT/* to backspace without deleting characters.
• Press 0 to enter a blank space character, such as between words.
• Use the RIGHT ARROW to move forward without deleting characters.
TIPS
• You can put a DISH receiver in a remote location (such as inside a closet or cabinet),
but be sure to use the remote control you have paired to that receiver.
• To use the UHF-2G remote, be sure to attach the remote-control antenna to the jack
on the back panel of your Hopper with Sling HD DVR. See page 13 for more details.
• Press the FORMAT(*) button on the remote to change the aspect ratio (image shape
displayed) for any HD programming being shown. Press the button again to view a
different display format, and keep pressing the button until the display is acceptable.
• If you don’t want to accidentally change channels on your TV (or VCR, if applicable),
then you may place the remote control in Limited Mode, as described on page 18.
QUESTIONS
• When can I use the Picture-In-Picture (PIP) feature on the Hopper with Sling?
When any two of the three tuners on your Hopper with Sling are available, you can
use the PIP functions on the TV that is connected to your Hopper with Sling HD DVR.
The TV(s) connected to your linked Joey Receiver(s) do not support the PIP feature.
• Can I watch and use the DVR functions on the same program on all of the TVs in
my house? Put down the remote control for the Hopper with Sling HD DVR, go to
another room with a linked Joey Receiver connected to a TV, and the remote control
for that Joey Receiver will operate the same DVR features and functions.
• Why does my receiver change channels or display menus at random? A close
neighbor may have a DISH remote control set on the same address. If there is
significant radio-frequency interference with remote-control signals, then you may
have to install a UHF attenuator as described on page 14.
• My remote doesn’t control my receiver or other components. What should I do?
– Make sure the remote control is in the correct device mode (page 17).
– Check that the batteries are working and installed correctly (page 13).
• Verify (page 13) or adjust (page 14) the remote-control antenna connection.
28
Page 39

913.book Page 29 Tuesday, January 15, 2013 4:57 PM
TV Basics
Let’s Watch TV
What you’ll find in this chapter:
• CHANGING CHANNELS
• USING THE PROGRAM GUIDE
• USING THE BROWSE BANNER
• USING THEMES AND PREDICTIVE SEARCH
• USING PICTURE-IN-PICTURE (HOPPER WITH
SLING ONLY)
TARTING IN ONE ROOM AND FINISHING IN
• S
ANOTHER
• HOMES WITH A SECOND HOPPER WITH
SLING INSTALLED
29
Page 40

913.book Page 30 Tuesday, January 15, 2013 4:57 PM
Chapter 3
Changing Channels
CHANGING CHANNELS
There are two basic ways to change the channel on your satellite TV receiver:
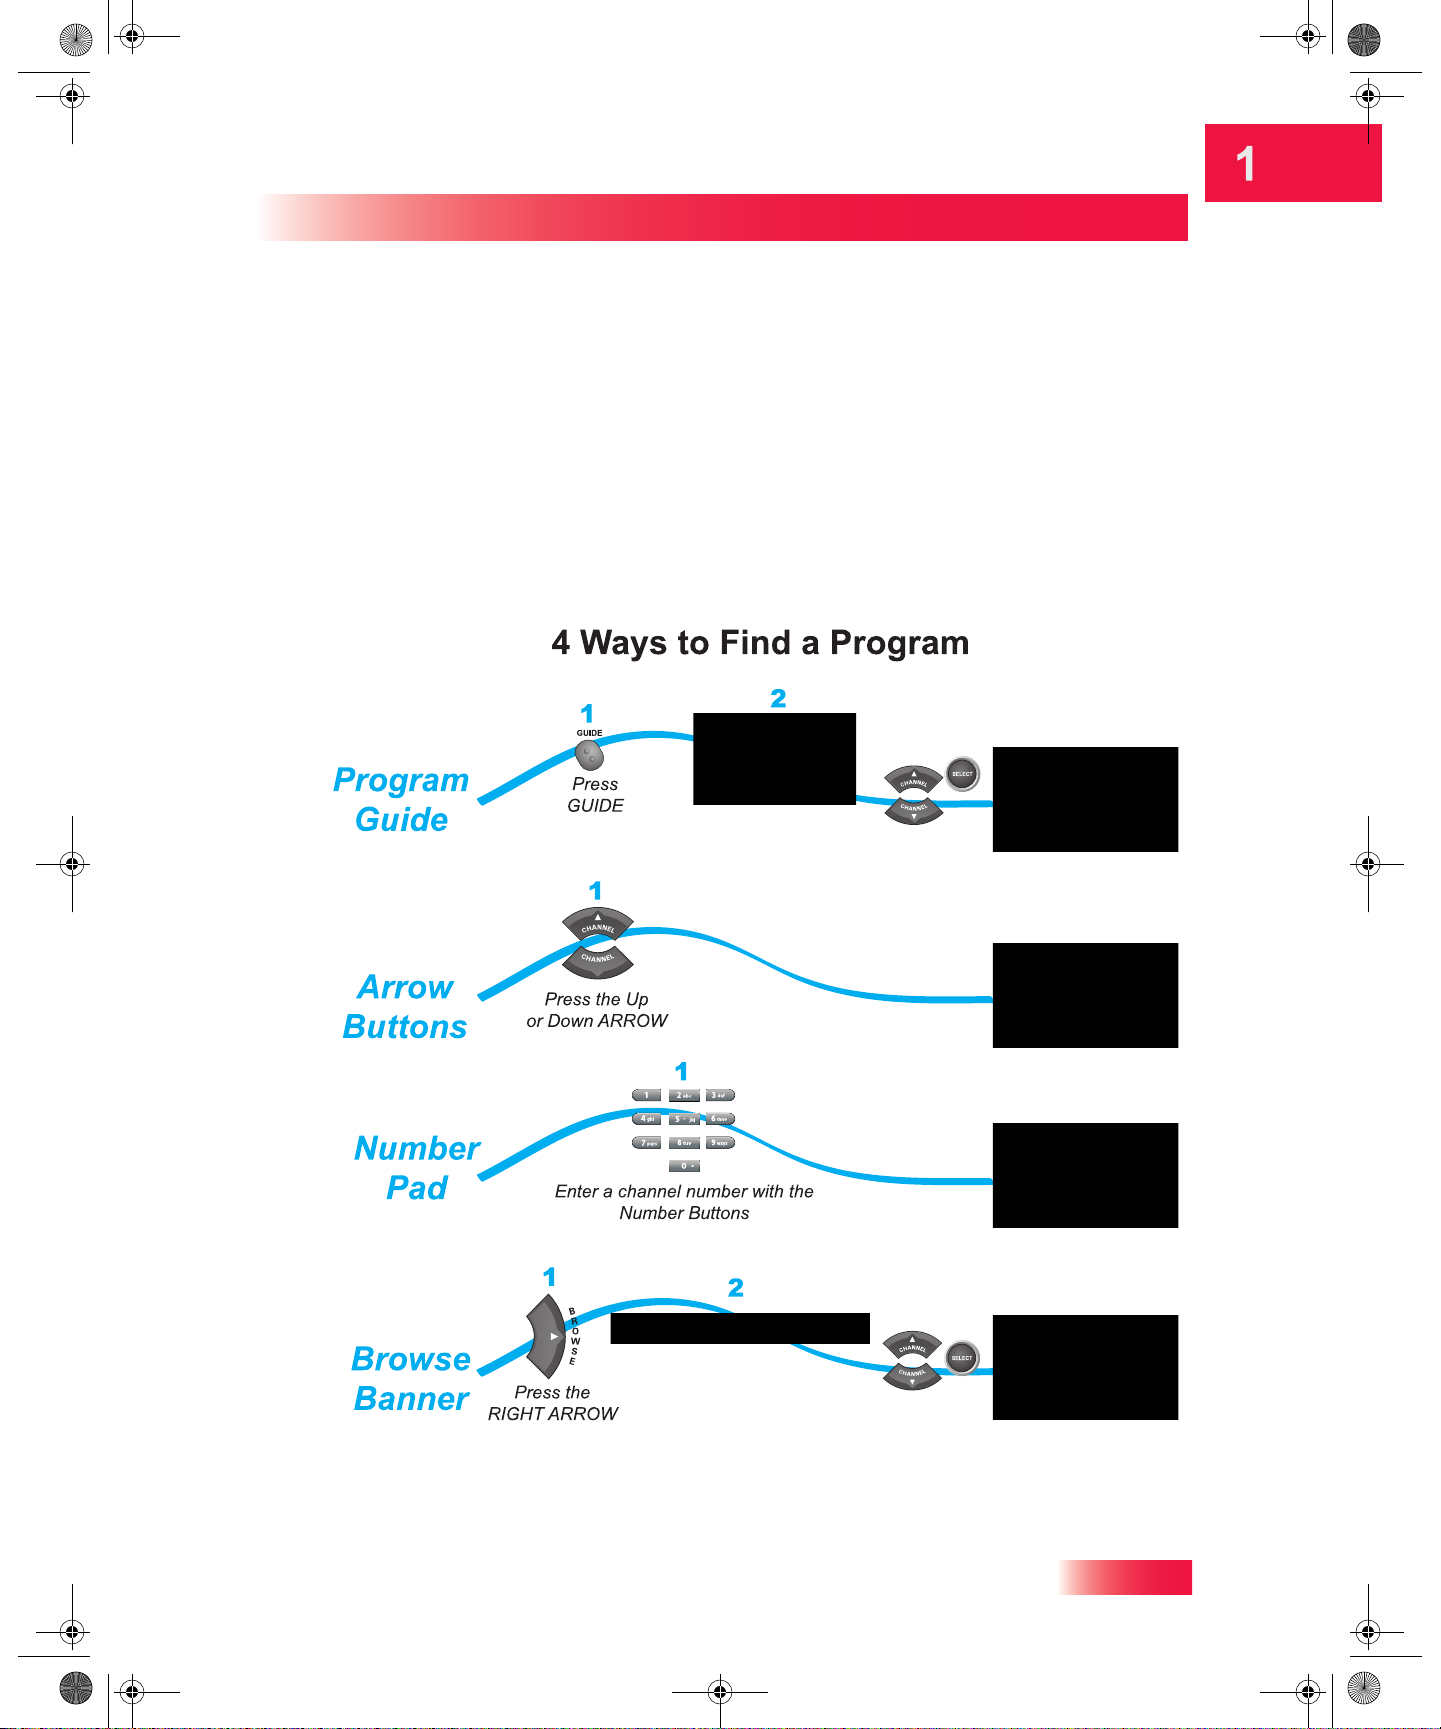
• Use the UP and DOWN ARROWS on your remote control
• Enter a channel number using the remote’s NUMBER PAD buttons
Using the Up and Down Arrows
While watching live TV, if you want to change the channels one at a time
to see what’s on, press the UP and DOWN ARROWS on your remote
control. You can also change the channels the same way using the UP
and DOWN ARROWS on the receiver front panel.
Entering a Channel Number
While watching live TV, if you know the specific channel you
want to watch, enter the digits of the channel number using
the NUMBER PAD buttons on the remote control.
USING THE PROGRAM GUIDE
You can use the Electronic Program Guide (EPG) to see what programs are on, to change
channels, and to set up timed recordings. To access the program guide, press GUIDE.
30
• When a channel name and number are both in red, this means the channel is not in
your DISH package. After you add a channel to your package, you can watch it. To
add a channel, visit the website at www.mydish.com or call 1-800-333-DISH (3474).
• The Program Guide shows which Favorites List is active. If All Channels is the active
list, the Program Guide displays all the channels. The My Channels Favorites List
displays only the channels included in your current DISH package. And the My HD
Channels Favorites List displays only the high-definition channels in your package.
Page 41

913.book Page 31 Tuesday, January 15, 2013 4:57 PM
If you set up another list, then the Program Guide displays only the channels that you
included on that list. See page 44 for more information on using Favorites Lists.
• The Program Guide displays information for programs on now and those coming on
within the next nine days. The guide does not include programs that have ended.
Finding Programs to Watch
Using the Program Guide
Use the UP and DOWN
ARROWs to highlight
a program currently broadcasting
While accessing the on-screen Program Banner (top) and Browse Banner, you can:
• Press PAGE UP/PAGE DOWN to move a page of program data at a time, allowing
you to view guide information about programs on other channels.
• Enter the number of hours you want to skip, and then press the RIGHT/LEFT ARROW
to move forward/back in the schedule. You cannot move back to programs that ended.
• Press FWD/BACK to move forward or back a day at a time, allowing you to view guide
information about future programs on the current channel.
• Press SKIP FWD/SKIP BACK to move forward or back three hours at a time, allowing
you to view guide information about future programs on the current channel.
While browsing Program Guide information, you can move the highlight to a program and:
• Press the INFO button to see a pop-up screen of more detailed program information.
• Press the RECORD button to set an event timer for a program in the future.
Note: You must be able to receive satellite programming from either the 119°W or 72.7°
orbital location for the Program Guide to display up to nine days of program information. If
your satellite TV system cannot access either of these two orbital locations, then the
Program Guide displays up to two days of program information.
Expanding and Collapsing Channel Ranges
Certain types of programming are available on a range of channels in the Program Guide.
And sometimes the range of channels is collapsed into one row of the guide to make it
easier to scroll through programming. For example, the range of SiriusXM® Satellite
Radio music channels are accessed from DISH channel 99, as indicated by the + sign on
that row in the Progam Guide. Highlight and select the row for channel 99 and the display
of dozens of specific channels within this range will expand upwards (if your Channel
Order in Format Guide under Guide Settings is set to Descending) or downwards (if
your Channel Order setting is Ascending) on your TV screen. Scroll to and select a
specific music channel. Or if you know the number of your favorite music channel, you can
type 99 followed by the number on the remote-control NUMBER PAD to directly access it.
31
Page 42

913.book Page 32 Tuesday, January 15, 2013 4:57 PM
Chapter 3
Using the Browse Banner
USING THE BROWSE BANNER
Use the Browse Banner to see what other programs are on now or coming on soon, while
not missing any of the program that you are watching.
When the Browse Banner is open, you will see the Program Banner information about the
current program displayed at the top of the screen, and on the left-hand side of the Browse
Banner at the bottom of the screen. At the bottom right of the screen is guide information
about the program or event that is coming on next on the same channel.
USING THEMES AND PREDICTIVE SEARCH
32
Use the Themes and Search Feature to find exactly what you want to watch. This section
shows you how to use these features to find your favorite programs by type (for example,
movies, sports, news), or by keyword (if you’re looking for a particular title or name).
Page 43

913.book Page 33 Tuesday, January 15, 2013 4:57 PM
Using Themes
You can list programs by the theme of their contents, (for example, just movies or just
sports). Use Themes and Search to quickly find programs based on:
• Theme. You can look for something to watch by the program’s category or theme
(Movies, Sports, News/Business, etc.), which makes your search easier and your
television viewing time more enjoyable.
• Sub-theme. You can use this selection to help you narrow the type of program or
event even further. The Sub-Theme feature is different for each Theme category. For
example, you can search Movies for Comedy or Sports for Football.
• Media Source. Use this selection if you want your search results to be limited to a
particular source, such as the Program Guide listings, or just the My Recordings list.
By default, results are returned for all available source listings.
• Scheduled. Use this selection if you want your search results to be limited to a
particular time (for example, to programs that are On Now or coming On Next). You
can even find Sports events that are being broadcast live right now! By default, results
are returned for programs and events at any scheduled time.
Finding Programs to Watch
Using Themes and Predictive Search
Using Predictive Search
Predictive Search makes it easier than ever to locate programs saved on your Hopper
with Sling HD DVR or find what you are looking for on live TV. To search for programming:
1 Press the SEARCH button on your remote control, or press the MENU button and select
the Search tile from the Main Menu screen.
2 Using the on-screen keyboard, start to type a title, actor’s name or keyword. 3 Results of your search will start to be displayed as soon as you start typing. Typing more
characters narrows the results.
Using Search History
After you have searched for programs or keywords, your receiver keeps a history. You can
access separate Search History information for each TV in your Whole-Home HD DVR
33
Page 44

913.book Page 34 Tuesday, January 15, 2013 4:57 PM
Chapter 3
Using Picture-In-Picture (Hopper with Sling only)
system. Each TV’s Search History is available using that receiver’s remote. You can use
Search History to re-search for programming instead of typing the information again.
Press the Search button, access the drop-down list on the menu bar and select the History
item to see a list of your recent searches. Highlight one of the listed searches and press
the Select button to repeat it. Searches done on different days will often yield new results.
USING PICTURE-IN-PICTURE (HOPPER WITH SLING ONLY)
The Picture-In-Picture (PIP) feature of your Hopper with Sling lets you watch two
programs at once on the TV connected to your Hooper with Sling. The following
instructions describe how to use the PIP feature.
1 Press the PIP button on the remote control for your Hopper with Sling to access the fea-
ture. By default, a small window showing the programming from a second available tuner
will be displayed. PIP Controls also will be displayed across the bottom of the screen on
the TV connected to your Hopper with Sling HD DVR.
2 You can use the on-screen controls to reposition or resize the PIP window, Swap the
images in the main and PIP windows, or display them side by side on your TV screen. You
can also choose to Close the PIP window (freeing the second tuner), or select X to cancel
out of the on-screen PIP Controls. If you have closed/canceled, you can display the onscreen controls again at any time by pressing the PIP button on your Hopper remote.
Note that the POSITION and SWAP buttons on your Hopper remote perform the same
functions as the on-screen PIP Controls for these two functions.
STARTING IN ONE ROOM AND FINISHING IN ANOTHER
To start watching a program in one room and resume it in another, do the following:
1 Press the pause button on your current receiver’s remote control and leave it behind. 2 Go to another room in your home with a connected Hopper with Sling HD DVR or linked
Joey Receiver and pick up the DISH remote control for this location. (Each remote control
shoud be paired to one and only one DISH receiver in your whole-home DVR system.)
34
Page 45

913.book Page 35 Tuesday, January 15, 2013 4:57 PM
3 Press the red button on this remote control to display the TV Viewing Status screen.
Finding Programs to Watch
Homes With a Second Hopper with Sling Installed
4 From the TV Viewing Status screen, select the program you want to resume and continue
watching from where you paused it.
HOMES WITH A SECOND HOPPER WITH SLING INSTALLED
Users with two Hoppers with Sling now can experience true Whole-Home HD DVR
functionality. You can toggle between the two DVR libraries and access any of their
contents from any room with a linked Joey Receiver in the house.
Accessing the DVR Library on a Second Hopper
To access the DVR library on a second Hopper with Sling from any TV in your system, do
the following:
1 Press the DVR button on your remote control, or press the MENU button and highlight and
select the DVR tile from the Main Menu screen.
2 Select the second Hopper with Sling HD DVR from the yellow Hopper drop-down menu. 3 View the DVR library available on the second Hopper with Sling in your system. You can
switch back to the original Hopper’s DVR at any time using the Hopper drop-down menu.
Linking a Joey Receiver to a Different Hopper
You can link any Joey Receiver to the Hopper with Sling HD DVR of your choice in your
whole-home system. If the tuners of the currently linked Hopper with Sling are busy, for
example, you can link a Joey Receiver to the second Hopper and use its available tuners
to view live or recorded content on the TV connected to that Joey Receiver.
1 Press the MENU button and select the Settings tile on the Main Menu screen. 2 Select Network Setup, and then Whole-Home.
35
Page 46

913.book Page 36 Tuesday, January 15, 2013 4:57 PM
Chapter 3
Tips
3 Using the ARROW buttons, highlight and select the other Hopper with Sling in your home
to link to it.
4 Highlight and select the Save option when you have finished on this screen.
Now you will see the DVR library on your newly linked Hopper with Sling when you press
the DVR button. Repeat these steps to re-link to your original Hopper with Sling.
TIPS
• Press INFO to view more information about a program or event you have highlighted.
• Press VIEW LIVE TV to cancel almost any menu screen and return to watching TV.
• On the remote control for your Hopper with Sling HD DVR, press SWAP, without
pressing the PIP button first, to switch among your available satellite TV tuners.
QUESTIONS
• How can I customize the Program Guide? You can set up a Favorites List (
page 44). Also, you can change how the Program Guide is displayed (page 86).
• Why does my Program Guide show only two days of programming? Your
receiver may not be obtaining a signal from the 119°W or 72.7° orbital locations. Refer
to Point Dish and Check Switch on page 101 to see if you’re receiving the signal(s).
• Why are some of my channels missing?
– Parental controls may be set to lock or hide the channels. See Chapter 6: Parental
Controls on page 48 for detailed information on locking or hiding channels.
– Your Program Guide may be displaying the wrong list of channels. Press the
GUIDE button to access the Program Guide and display the default Favorites List.
Press GUIDE again to highlight the next available list. Press GUIDE repeatedly to
scan through all the available lists. You can also choose to edit your own Favorites List. See Chapter 5: Favorites Lists on page 43 for more information.
36
• Why isn’t PIP working? If the PIP feature is not working on your Hopper with Sling
HD DVR, at least two of the three TV tuners are probably in use. Check with other
users in your home to see which locations are in use.
Page 47

913.book Page 37 Tuesday, January 15, 2013 4:57 PM
On Demand
Video On Demand and Pay-Per-View
What you’ll find in this chapter:
• PAY-PER-VIEW
• DISH ON DEMAND
• BLOCKBUSTER @HOME™
• D
ISHONLINE.COM
• ORDERING CONSIDERATIONS
• TIPS
• QUESTIONS
37
Page 48

913.book Page 38 Tuesday, January 15, 2013 4:57 PM
Chapter 4
Pay-Per-View
PAY-PER-VIEW
To order Pay-Per-View programming using your remote control, you must connect the
receiver to an active telephone line or broadband Internet service. After you order a PayPer-View program, you can watch it on all of the receivers on one DISH account. Using
the remote control, you can order the exact same program for each receiver but pay for
the program only once. However, replays of most programs are separate events. Visit
www.mydish.com/ppv for a detailed description of the types of Pay-Per-View events.
Ordering a Pay-Per-View Program
1
6:30 pm 7:00 pm 7:30 pm
Fri 1/14
GUIDE
508
Shrek 2 (All
PPV
507
Shrek 2 (All
PPV
506
Shrek 2 (All Day, DD)
PPV
NHL
505
Day After...
PPV
Hockey
504
Day After...
PPV
Press GUIDE and
Shrek 2 (All Day, DD)
Shrek 2 (All Day, DD)
Day After Tomorrow (All Day, DD)
Day After Tomorrow (All Day, DD)
Shrek 2 (All
select a Pay-Per-View
program from the
Program Guide
Note: Once you confirm an order for a Pay-Per-View program, you cannot cancel the
order and you will be billed for it.
If your receiver is not connected to a phone line or broadband Internet service, and you
wish to order a Pay-Per-View program or event, you may do so online at the mydish.com
website by logging in to your account and then selecting “Order Pay-Per-View.”
DISH ON DEMAND
DISH On Demand is the DISH Video On Demand service. Enjoy movies, TV shows, and
other exciting On Demand events. Through DISH Cinema, for example, you have
immediate access to the latest movies on DISH. You can even use your remote’s DVR
buttons (such as PAUSE, PLAY, FWD, and BACK) to control your viewing experience. For
more information, visit the www.mydish.com/vod website.
2
Dish-On-Demand
Do you wish to purchase this program?
Event:
Shrek 2 (All Day, DD)
Date/Time:
Friday 1/14/05 10:00 pm
Channel:
503-PPV
Cost:
$3.99
Order Cancel No
Select Order to
buy the program
3
Confirmation
You have indicated that you wish to purchase a
DISH-On-Demand event
Is this correct?
Yes Cancel No
Select Yes or OK
to confirm you want to
buy the program
38
To Order a Movie or Program
1 Press the DISH On Demand button to access the On Demand menu screen. 2 Select the option for the type of on-demand programming you wish to order. Select DISH
Cinema, for example, to Explore or Search movies, see a list of New Releases, or view
movies that you have rented. Select TV Shows to Explore or Search TV entertainment,
see a list of Most Popular shows, or view the programs that you have rented. If applicable,
you can select Midnight Lounge to view and choose adult-only programming.
Page 49

913.book Page 39 Tuesday, January 15, 2013 4:57 PM
3 Use the UP and DOWN ARROW buttons to scroll through the available choices. 4 Highlight and select the movie, TV program, or on-demand event that you want to watch.
Some titles offer additional information, such as critics’ rankings from Rotten Tomatoes™.
5 Select Rent.
Rental Considerations
• You can repeatedly watch a rented program for the listed period of time, for example
24 or 48 hours. Rented programs cannot be saved to your DVR’s My Recordings list.
Pay Per Programs
Blockbuster @Home™
• The My Rentals option shows you information about On Demand programs or events
that you have rented, including how much time you have remaining to watch them.
• Be sure to keep Updates and Inactivity Standby enabled so that your receiver always
has the latest On Demand programs. See Receiver Updates on page 89.
BLOCKBUSTER @HOME™
Now you can bring the big screen to your home screen. DISH has joined with Blockbuster
to offer customers the most extensive collection of movies, games, family programs and
TV shows available. With Blockbuster @Home™, you get access to:
• Movies, TV shows and games—unlimited access to over 100,000 titles delivered to
your door. Plus, in-store exchanges.
• Thousands of movies to stream on your TV, computer and iPad® (Streaming to TV
requires HD programming and a broadband Internet connection to Hopper HD DVR.)
• More than 20 additional entertainment channels, including STARZ® Cinema, EPIX 1,
Sony Movie Channel, Palladia and many more!
Visit the mydish.com/blockbuster website to learn more or subscribe.
In order to enjoy full access to Blockbuster @Home™, your Hopper with Sling HD DVR
must be connected to high-speed Internet. For steps to connect your Hopper with Sling
HD DVR to broadband Internet service, refer to Connecting to Broadband Internet on
page 97. For step-by-step instructions, also visit the mydish.com/getconnected website.
DISHONLINE.COM
DISH Online.com lets you set DVR recordings and view authorized programming over the
Internet, as long as you’re connected to a broadband (high-speed) Internet service. For
steps to connect your Hopper with Sling HD DVR to the Internet, refer to Connecting to
Broadband Internet on page 97. For more information, visit the dishonline.com website.
39
Page 50

913.book Page 40 Tuesday, January 15, 2013 4:57 PM
Chapter 4
Ordering Considerations
Use Considerations
• Your receiver must be connected to a network with broadband Internet access to view
the DISH Online content. Contact your Internet service provider to verify download
speeds and any terms or conditions affecting your broadband Internet connection.
• Most Internet service providers have a “Fair Access Policy” which sets usage limits on
the amount that can be downloaded in a given time interval or billing period. Contact
your own Internet service provider to find out about their Fair Access Policy.
• Download-speed of programs or events varies depending on the speed of your
Internet connection, the program being downloaded, and shared usage of the Internet
connection by other devices in your home, such as computers and smartphones.
• You have a limited time frame to watch rented content before it is automatically
deleted from your receiver. You will typically have 7 days to begin watching a program,
and then you will typically have 24 hours to finish watching it. Review the list on the
My Rentals screen on your Hopper with Sling for the time remaining to watch rentals.
• You are billed for a rental or on-demand program or event when you begin watching it
(which may be while the rest of the program continues downloading) or when
downloading of the program or event is completed, whichever occurs first.
ORDERING CONSIDERATIONS
Keep in mind these important considerations about pay-per-view types of programs.
• When you confirm an order for a rental program or event, you cannot cancel the order
and you will be billed for it.
• You can use the Parental Controls feature and receiver locks to control the programs
or events that your family views. See What are Locks and Restrictions? on page 48.
• You can review what you have rented during the last 30-60 days by looking in your
Purchase History. Press the MENU button on your remote control, scroll down the
Main Menu, then highlight and select the Purchase History tile.
40
• The rental program titles that you order will appear on your next DISH account bill.
TIPS
• You can set up the Hopper with Sling HD DVR to record most Pay-Per-View programs
(for example, movies and events on channels 502-568). See page 72 for more details.
You cannot record or re-record On Demand programs or events (channel 501).
Page 51

913.book Page 41 Tuesday, January 15, 2013 4:57 PM
• You can prevent others from purchasing Pay-Per-View programs by setting parental
controls for your receiver (see page 48).
• Keep an active phone line or broadband Internet connection attached to your receiver
at all times so you can order Pay-Per-View programming with your remote control.
QUESTIONS
Pay Per Programs
Questions
• How can I order an event for all receivers in my whole-home DVR system?
– Order the event with the remote control whileyour Hopper with Sling HD DVR is
attached to an active phone line or broadband Internet connection. For each Joey
Receiver you want to play the event, ensure that it is linked to the correct Hopper.
– Order the event over the phone at 1-877-DISH-PPV (347-4778). Fees may apply.
– Order the event online at the www.mydish.com/ppv website.
• I ordered a Pay-Per-View program but can only see it on one receiver. Some Pay-
Per-View programs or events are restricted to watching on one receiver per account.
• Will I be charged more than once for viewing the same Pay-Per-View program
using two or more receivers? If you are using the remote control to order and view
the content, then you won’t be charged more than once as long as it is the exact same
program or event (for example, a movie starting at the same time, or the same All Day
event) and the rental content has not expired.
• Why doesn’t my Program Guide show any Pay-Per-View channels? The currently
active Favorites List may not display Pay-Per-View channels. Press the GUIDE button
repeatedly on your remote control to open the Program Guide and cycle through your
Favorites List options until you see All Channels highlighted in the drop-down list.
Then press the SELECT button. See Chapter 5: Favorites Lists on page 43 for more
information on using Favorites Lists. Also, parental controls may be set to lock and
hide Pay-Per-View channels. See Chapter 6: Parental Controls on page 47.
• Why are some Pay-Per-View programs blacked out? Sporting events and other
programs are sometimes blacked out because of local broadcast restrictions. Note
that the provider of such programming determines these restrictions, not DISH.
• Why did my All-Day Pay-Per-View program shut off while I was watching it? The
all-day events run from 3 AM to 3 AM (Mountain Time). You should ensure that you
can finish watching an event that you have ordered by this time.
41
Page 52

913.book Page 42 Tuesday, January 15, 2013 4:57 PM
Chapter 4
Notes
Notes
42
Page 53

913.book Page 43 Tuesday, January 15, 2013 4:57 PM
Favorites Lists
Setting Up Your Favorite Channels
What you’ll find in this chapter:
• WHAT ARE FAVORITES LISTS?
• C
REATING OR CHANGING FAVORITES LISTS
• EDITING FAVORITES LISTS
• USING FAVORITES LISTS
43
Page 54

913.book Page 44 Tuesday, January 15, 2013 4:57 PM
Chapter 5
What are Favorites Lists?
WHAT ARE FAVORITES LISTS?
Favorites Lists are custom lists of your favorite channels. You can create and change the
lists yourself, adding and removing channels as you wish. Your favorite channels can be
grouped in as many as four lists (for each whole-home HD receiver).
• When using a Favorites List, the Program Guide and Browse Banner display only the
channels in that Favorites List. Also, when you use the UP or DOWN ARROW to
change channels, the receiver skips channels that are not on the list. Unlisted
channels (included in your current DISH programming package) are still accessible by
entering the channel number directly using the remote control NUMBER PAD.
• The All Channels list contains all the channels, including channels not in your current
DISH package. You cannot edit or change the system’s default All Channels list.
• The My Channels list contains all current channels in your DISH package. You cannot
edit or change the My Channels list, except by modifying your DISH package.
• The My HD Channels list contains all the high-definition channels in your package.
• You can give each of your custom Favorites Lists a unique name. When you first
install your DISH receiver, by default the four lists are named List 1, List 2, List 3, and
List 4. These lists are empty until you edit them in order to add channels.
• From your Hopper with Sling and its remote, only the Favorites Lists for the TV
connected to that Hopper are available. If you go to a different room and acess a Joey
Receiver and remote there, only the Favorites Lists for that Joey’s TV are available.
• If you choose a program using the Themes feature, or directly enter a channel number
using the NUMBER PAD on the remote control, then the receiver tunes to the channel
for that program whether or not that channel is included on the active Favorites List.
Parental controls can be used to lock certain channels from being accessed this way.
44
CREATING OR CHANGING FAVORITES LISTS
You can edit any channels on the four Favorites Lists. When you use your Favorites List,
only those channels in the list are shown in the Program Guide and Browse Banner.
Page 55

913.book Page 45 Tuesday, January 15, 2013 4:57 PM
EDITING FAVORITES LISTS
You can rename your Favorites Lists whatever you want, up to eight characters long.
1 Press the GUIDE button repeatedly until the Edit Lists option is highlighted in the drop-
down menu of Favorites Lists on the Program Guide screen. (You can also press MENU,
highlight and select the Settings tile, then Guide Settings and then Favorite Channels.)
2 Press SELECT to display the Edit Favorites screen. Lists that can be edited are displayed. 3 Highlight and select the list you want to edit. As many as four custom lists of channels can
be created for each receiver, which by default are named List 1, List 2, List 3 and List 4.
4 Select from the pop-up menu either to Edit Channels on the list, or to rename the list.
Favorites Lists
Editing Favorites Lists
5 If you are editing the channels comprising a list, navigate the grid of available channels
and choose ones to include using the SELECT button. Select the Save option when done.
If you are editing the the name of the list, use the on-screen keyboard to select characters
to enter in the text field. When you are finished entering the new list name, select Done.
6 When you are finished editing your lists, select Close on the Edit Favorites screen. Any
lists you have created will be available in the gudie’s drop-down menu of Favorites Lists.
45
Page 56

913.book Page 46 Tuesday, January 15, 2013 4:57 PM
Chapter 5
Using Favorites Lists
USING FAVORITES LISTS
Press the GUIDE button to open the Program Guide. Press the GUIDE button
again to highlight the next Favorites List; press GUIDE repeatedly to scan
through all the available lists.Then press the SELECT button to choose a list.
TIPS
• Two lists on the same TV cannot have the same name. For example, the TV where
the Hopper with Sling HD DVR is located cannot have two lists named “Dad’s List.”
When a receiver is connected to a Whole-Home DVR system, users of different
receivers (such as a second Hopper with Sling HD DVR or a Joey Receiver in a
different room) can have lists with the same names.
• While in the program guide, press the GUIDE button to switch Favorites List functions
only if you have added channels to a Favorites List. If you have not edited a Favorites
List by adding channels to it, then pressing GUIDE one or more times scans only the
default My Channels, My HD Channels, and All Channels lists.
• Channels locked and hidden by parental controls do not display in Favorites Lists. See
Hiding Adult Content or Locked Channels on page 53 for more information.
QUESTIONS
• Why are channels missing from the Program Guide?
– You might have a Favorites List that does not contain those channels. Press the
GUIDE button until the All Channels, My Channels, or My HD Channels list displays.
46
– You might have channels locked and hidden by parental controls. For more infor-
mation about locks, see Parental Controls starting on page 47.
• Why are my Favorites Lists missing? When a receiver is in a Whole-Home DVR
system, the Favorites Lists created by users of a different receiver in the home are not
available on your TV.
Page 57

913.book Page 47 Tuesday, January 15, 2013 4:57 PM
Parental Controls
Setting Receiver’s Parental Controls
What you’ll find in this chapter:
• WHAT ARE LOCKS AND RESTRICTIONS?
• C
OPYING LOCKS FROM YOUR HOPPER TO A
JOEY
• CREATING OR CHANGING A PASSWORD
• CREATING OR CHANGING RATINGS
RESTRICTIONS
• CREATING OR CHANGING CHANNEL LOCKS
• HIDING ADULT CONTENT OR LOCKED
CHANNELS
47
Page 58

913.book Page 48 Tuesday, January 15, 2013 4:57 PM
Chapter 6
What are Locks and Restrictions?
WHAT ARE LOCKS AND RESTRICTIONS?
Locks and restrictions are powerful parental controls that allow you to password-protect
programming based on ratings, or on a channel-by-channel basis. When you set locks:
• If you try to access a locked channel or restricted program, or you open the Parental
Controls menu, the receiver displays a message asking you to enter the password.
• The receiver permits three attempts to enter the correct password. If you fail to enter
the correct password, the receiver does not allow you to try again for several minutes.
• If you enter the correct password, then you can access the locked or restricted item or
access the Parental Controls screen to make changes to any locks and restrictions.
• If you exit a locked or restricted item or close the Parental Controls screen, then you
must enter the password again in order to access the item or screen.
• When a receiver is in a Whole-Home DVR system, the parental-control locks and
restrictions for other TVs in the system are not available. Go to the other locations.
Locks for programming on the TV where your Hopper with Sling is located are set using
the on-screen menus of the Hopper. Locks for programming on the TV(s) connected to the
Joey Receiver(s) in other locations are set using the on-screen menus for those TVs.
Programming locks set for the TV where the Hopper with Sling is located are separate
from programming locks set for the TVs connected to any Joey Receivers. The
information in this chapter applies to locks set using either set of parental-control menus.
When you unlock programming delivered through the HOME VIDEO NETWORK
output to your in-home coaxial cabling system, you are allowing all the TVs
connected to your in-home system to have access to this programming. In this
case, you must rely on the V-Chip technology and control settings in the
individual TVs to prevent viewing of inappropriate programming on each TV.
Consult your TVs’ user guides for instructions to set up the V-Chip protection.
Locking your receiver is a two-step process:
1 Create the parental-control locks that you want. Available types of locks are:
• Ratings Restrictions—to lock programs based on their ratings.
48
• Channel Locks—to lock channels, regardless of content.
• Hide Adult Channels or Hide Locked Channels—to hide adult channels or locked
channels from being displayed in the Program Guide, Browse Banner, and Themes
list screens.
2 Set a password. When you have set locks and restrictions, the receiver is locked, and any-
one who wants to access locked items must enter that password each time they do so.
Page 59

913.book Page 49 Tuesday, January 15, 2013 4:57 PM
CREATING OR CHANGING A PASSWORD
You should set up your password before using a receiver’s parental-control locks.
Parental Controls
Creating or Changing a Password
1 Press the MENU button, select the Settings tile, and then select Parental Controls. 2 If the receiver is locked, enter the password using the remote control’s NUMBER PAD.
The receiver displays stars (*) as you enter the digits of your password. Then select OK.
3 If you are changing an existing password, select Edit Password. If you are creating a new
password for the first time, you will be prompted for the password after setting controls. If
you want to erase the current password, you will need to enter it to access the Parental
Controls screen, set all restrictions to None/No, and ensure no channel locks are set.
4 Enter the current password using the remote control’s NUMBER PAD. 5 Enter the new password using the remote control’s NUMBER PAD. 6 Enter the new password again for confirmation, also using the NUMBER PAD. The
receiver displays stars (*) as you enter the digits of the password.
7 Memorize your new password. From now on, enter this password to lock or unlock the
receiver. If you ever forget the password, you will need to call DISH Customer Service.
COPYING LOCKS FROM YOUR HOPPER TO A JOEY
Once you set Parental Controls on a Hopper with Sling HD DVR, you can copy the same
settings to one or more Joey Receiver(s) in your whole-home DVR system, as follows:
1 Press the MENU button on your remote and select the Settings tile on the Main Menu. 2 Select Parental Controls, and then highlight and select the option to Copy Settings. 3 In the pop-up Location List, select each location to which you want to copy the Hopper
with Sling parental-control locks. A check mark appears next to each selected location.
4 You can select a location again to uncheck it, highlight and select the Cancel option to
ignore and start over, or when finished selecting locations, select OK to initiate copying.
49
Page 60

913.book Page 50 Tuesday, January 15, 2013 4:57 PM
Chapter 6
Creating or Changing Ratings Restrictions
CREATING OR CHANGING RATINGS RESTRICTIONS
You can lock programs based on Motion Picture Association of America (MPAA) ratings
(PG, PG-13, etc.) and expanded ratings (violence, language, etc.).
1 Press the MENU button, select the Settings tile, and then select Parental Controls. 2 If the receiver is locked, enter the password using the remote control’s NUMBER PAD.
The receiver displays stars (*) as you enter the digits of the password.
3 To create or change parental controls based on program ratings, select Edit Ratings. 4 Highlight the least restrictive rating that you want to block. Press SELECT to lock the
highlighted rating and all ratings that are more restrictive than it (for example, locking the
PG-13 rating automatically locks R, NC-17 and NR/AO ratings).
MPAA Ratings
G—General Audiences. A G-rated motion picture contains nothing in theme, language,
nudity, sex, violence or other matters that, in the view of the Rating Board, would offend
parents whose younger children view the motion picture. The G rating is not a “certificate
of approval,” nor does it signify a “children’s” motion picture. Some snippets of language
may go beyond polite conversation but they are common everyday expressions. No
stronger words are present in G-rated motion pictures. Depictions of violence are minimal.
No nudity, sex scenes, or drug use are present in the motion picture.
PG—Parental Guidance Suggested. Some Material May Not Be Suitable For
Children. A PG-rated motion picture should be investigated by parents before they let
their younger children attend. The PG rating indicates, in the view of the Rating Board,
that parents may consider some material unsuitable for their children, and parents should
make that decision. The more mature themes in some PG-rated motion pictures may call
for parental guidance. There may be some profanity and some depictions of violence or
brief nudity. But these elements are not deemed so intense as to require that parents be
strongly cautioned beyond the suggestion of parental guidance. There is no drug use
content in a PG-rated motion picture.
50
Page 61

913.book Page 51 Tuesday, January 15, 2013 4:57 PM
PG-13—Parents Strongly Cautioned. Some Material May Be Inappropriate For
Children Under 13. A PG-13 rating is a sterner warning by the Rating Board to parents to
determine whether their children under age 13 should view the motion picture, as some
material might not be suited for them. A PG-13 motion picture may go beyond the PG
rating in theme, violence, nudity, sensuality, language, adult activities or other elements,
but does not reach the restricted R category. The theme of the motion picture by itself will
not result in a rating greater than PG-13, although depictions of activities related to a
mature theme may result in a restricted rating for the motion picture. Any drug use will
initially require at least a PG-13 rating. More than brief nudity will require at least a PG-13
rating, but such nudity in a PG-13 rated motion picture generally will not be sexually
oriented. There may be depictions of violence in a PG-13 movie, but of the harsher
sexually-derived words, though only as an expletive, initally requires at least a PG-13
rating. More than one such expletive requires an R rating, as must even one of those
words used in a sexual context. The Rating Board nevertheless may rate such a motion
picture PG-13 if, based on a special vote by a two-thirds majority, the Raters feel that most
American parents would believe that a PG-13 rating is appropriate because of the context
or manner in which the words are used or because the use of those words in the motion
picture is inconspicuous.
Parental Controls
Creating or Changing Ratings Restrictions
R—Restricted. Children Under 17 Require Accompanying Parent or Adult Guardian. An
R-rated motion picture, in the view of the Rating Board, contains some adult material. An
R-rated motion picture may include adult themes, adult activity, hard language, intense or
persistent violence, sexually-oriented nudity, drug abuse or other elements, so that
parents are counseled to take this rating very seriously. Children under 17 are not allowed
to attend R-rated motion pictures unaccompanied by a parent or adult guardian. Parents
are strongly urged to find out more about R-rated motion pictures in determining their
suitability for their children. Generally, it is not appropriate for parents to bring their young
children with them to R-rated motion pictures.
NC-17—No One 17 and Under Admitted. An NC-17 rated motion picture is one that, in
the view of the Rating Board, most parents would consider patently too adult for their
children 17 and under. No children will be admitted. NC-17 does not mean “obscene” or
“pornographic” in the common or legal meaning of those words, and should not be
construed as a negative judgment in any sense. The rating simply signals that the content
is appropriate only for an adult audience. An NC-17 rating can be based on violence, sex,
aberrational behavior, drug abuse or any other element that most parents would consider
too strong and therefore off-limits for viewing by their children.
NR/AO—Not Rated. Programs created before MPAA rating system have an NR/AO
rating. Also, if connection to the satellite is lost, the NR/AO rating appears.
TV Ratings
TV Ratings contain information about the audience and a content label.
Audience Ratings of TV Ratings
TV-Y—All Children. This program is designed to be appropriate for all children. Whether
animated or live-action, the themes and elements in this program are specifically designed
for a very young audience, including children from ages 2-6. This program is not expected
to frighten younger children.
51
Page 62

913.book Page 52 Tuesday, January 15, 2013 4:57 PM
Chapter 6
Creating or Changing Ratings Restrictions
TV-Y7—Directed to Older Children. This program is designed for children age 7 and
above. It may be more appropriate for children who have acquired the developmental
skills needed to distinguish between make-believe and reality. Themes and elements in
this program may include mild fantasy violence or comedic violence, or may frighten
children under the age of 7. Therefore, parents may wish to consider the suitability of this
program for their very young children.
TV-Y7FV—Directed to Older Children (Fantasy Violence). For those programs where
fantasy violence may be more intense or more combative than other programs in this
category, such programs will be designated TV-Y7 FV.
TV-G—General Audience. Most parents would find this program suitable for all ages.
Although this rating does not signify a program designed specifically for children, most
parents may let younger children watch this program unattended. It contains little or no
violence, no strong language and little or no sexual dialogue or situations.
TV-PG—Parental Guidance Suggested. This program contains material that parents
may find unsuitable for younger children. Many parents may want to watch it with their
younger children. The theme itself may call for parental guidance and/or the program may
contain one or more of the following: some suggestive dialogue (D), infrequent coarse
language (L), some sexual situations (S), or moderate violence (V).
TV-14—Parents Strongly Cautioned. This program contains some material that many
parents would find unsuitable for children under 14 years of age. Parents are strongly
urged to exercise greater care in monitoring this program and are cautioned against letting
children under the age of 14 watch unattended. This program may contain one or more of
the following: intensely suggestive dialogue (D), strong coarse language (L), intense
sexual situations (S), or intense violence (V).
TV-MA—Mature Audience Only. This program is specifically designed to be viewed by
adults and therefore may be unsuitable for children under 17. This program may contain
one or more of the following: crude indecent language (L), explicit sexual activity (S), or
graphic violence (V).
Content Labels of TV Ratings
TV Parental Guidelines may have one or more letters added to the basic rating to let
parents know when a show may contain violence, sex, adult language, nudity, or
suggestive dialogue.
52
V—violence
L—coarse or crude language
N—nudity
SC—sexual content or situations
D—suggestive dialogue (usually means talks about sex)
5 Select the expanded rating code(s), if you want to also lock these program ratings. 6 To unlock a rating code, select the code again.
Page 63

913.book Page 53 Tuesday, January 15, 2013 4:57 PM
7 Select Save. To ensure new parental controls take effect, you will need to set a password
if you have not already. See the instructions for creating a new password on page 49.
CREATING OR CHANGING CHANNEL LOCKS
You can lock any channel, including Pay-Per-View channels. Locked channels can be
accessed or recorded only after you enter the password created for your receiver.
1 Press the MENU button, select the Settings tile, and then Parental Controls.
Parental Controls
Creating or Changing Channel Locks
2 If the receiver is locked, enter the password using the remote control NUMBER PAD. The
receiver displays stars (*) as you enter the digits of the password.
3 To create or change parental controls for specific channels, select Lock Channels. 4 Highlight and select each channel that you want to lock or unlock. Press the ARROW but-
tons to navigate to each channel, and then SELECT it. You can also move the list of channels by entering a number using the remote control NUMBER PAD. If the checkbox next to
the channel has a checkmark, the channel is selected. Select it again to unlock it.
5 You can choose to view only the channels you have selected to be locked, and you can
choose to hide the locked channels so they are not displayed in the Program Guide. (You
can still enter the number of a locked channel directly using the remote NUMBER PAD.)
6 Select Save.
HIDING ADULT CONTENT OR LOCKED CHANNELS
When you hide adult channels or other channels you have locked, then you prevent the
Program Guide, Themes lists, and the Browse Banner from displaying these channels.
When you Hide Adult Channels, you also prevent anyone from choosing these channels
by using the UP or DOWN ARROWS or by directly entering the digits of the channel
number using the NUMBER PAD on their remote control.
53
Page 64

913.book Page 54 Tuesday, January 15, 2013 4:57 PM
Chapter 6
Tips
1 Press the MENU button, select the Settings tile, and then Parental Controls. 2 If the receiver is locked, enter the password using the remote control NUMBER PAD. The
receiver displays stars (*) as you enter the digits of the password.
3 Select the option to Lock Channels. 4 Select Yes under Hide Adult Channels. 5 Select Save.
TIPS
• If the receiver displays a message prompting you to enter a password, then this
confirms that there are parental controls set for this receiver.
• If you want to unlock the receiver or unlock any specific parental control, then use the
password for the TV you are watching. For example, use the Hopper with Sling DVR
password to unlock the controls set for the TV connected to the Hopper and use the
Joey password to unlock the controls set for the TV connected to the Joey Receiver.
• When you restrict by rating, you also lock all other more restrictive ratings. For
example using the MPAA ratings, if you restrict PG-13 rated movies, then all other
programming with the R, NC-17, and NR/AO ratings are also restricted.
QUESTIONS
• Why don’t the locks I set for a remote TV work? If the receiver is in a Whole-Home
DVR system, then any locks you have set on other TVs are not available. Locks and
restrictions are specific to each Hopper with Sling HD DVR and Joey Receiver in your
system. However, you can copy all the same parental-control settings you have made
on your Hopper with Sling HD DVR to one or more linked Joey Receivers in your
whole-home DVR system. See Copying Locks from Your Hopper to a Joey on
page 49. Note that you cannot copy settings made on a Joey Receiver to any other
Joey Receivers (or back to a Hopper with Sling HD DVR) in your whole-home system.
• What do I do if I forget my password? If you ever forget your password, then you
will need to contact a DISH Customer Service Representative.
54
Page 65

913.book Page 55 Tuesday, January 15, 2013 4:57 PM
Apps
Home Media and Apps on Your TV!
What you’ll find in this chapter:
• USING THE HOME MEDIA FEATURE
• USING APPS ON YOUR HOPPER WITH SLING
• MY ACCOUNT/CUSTOMER SUPPORT
55
Page 66

913.book Page 56 Tuesday, January 15, 2013 4:57 PM
Chapter 7
Using the Home Media Feature
USING THE HOME MEDIA FEATURE
To use the Home Media feature on your Hopper with Sling HD DVR, press the MENU
button and select the Home Media tile from the MAIN MENU. A list of compatible devices
should be displayed.
The Home Media application connects your compatible digital-media devices together.
These devices are designed to work together even though they come from different
manufacturers, and may include audio/video systems, Blu–ray Disc™ players, digital
cameras, game consoles, network-attached storage (NAS) devices, personal computers
and mobile devices running compatible software.
To be able to listen to audio, view pictures and/or watch videos, you should:
1 Ensure your Hopper with Sling HD DVR is connected to your local area network (LAN)
and has been assigned a valid IP address.
2 Have compatible media-server software running on a device that is connected to the same
LAN as your Hopper with Sling HD DVR.
3 Confirm access to the media server is not blocked by a firewall or security software. 4 Select the Device List item from the drop–down menu on the Home Media screen and
refresh the list to see all your available compatible devices.
5 Optionally, you can select the Settings item from the drop–down menu to change the
defaults for playing slideshows and/or audio.
Make sure your Hopper with Sling HD DVR remains connected to broadband Internet to
access all features of the Home Media app. You can enjoy the feature on one TV at a time.
56
Page 67

913.book Page 57 Tuesday, January 15, 2013 4:57 PM
USING APPS ON YOUR HOPPER WITH SLING
To use apps on your TV, press the MENU button and select the Apps tile from the MAIN
MENU screen. You can order additional channels, check the news and weather, and even
play games. Make sure you connect your Hopper with Sling to broadband Internet service
to access all the features of your apps. You can enjoy this feature on one TV at a time.
Apps are software applications bringing the best of the web to your TV that you can run
right on your broadband Internet–connected Hopper with Sling HD DVR. These include
news, sports, music, weather and game apps. And you can even follow and share with
friends using social networking apps for Facebook and Twitter®.
Interactive TV
Using Apps on Your Hopper with Sling
Note also that you can use The Weather Channel app by selecting its tile directly on the
MAIN MENU screen.
MY ACCOUNT/CUSTOMER SUPPORT
An important feature of your Hopper with Sling is the My Account tile. It provides
convenient access to your DISH account to add programming, review your statement, pay
your bill, and more. Attach an active telephone line or broadband Internet connection to
your DISH receiver to ensure access to this feature.
Press the MENU button on your remote control and then select My Account.
TIPS
• Whenever you want to exit an app and return to watching DISH programming, press
the VIEW LIVE TV button and you’ll return to the last channel you were watching.
• In addition to the on-screen app, you can also access Customer Support online at the
DISH website. Visit the mydish.com website and log in for more information.
57
Page 68

913.book Page 58 Tuesday, January 15, 2013 4:57 PM
Chapter 7
Tips
Notes
58
Page 69

913.book Page 59 Tuesday, January 15, 2013 4:57 PM
Digital Video Recordings
Recording & Pausing Live Programs
What you’ll find in this chapter:
• WHAT IS A DVR?
• P
AUSING A PROGRAM
• REVERSE, FAST FORWARD, AND SKIP
• SLOW MOTION AND FRAME-BY-FRAME
• RECORDING A LIVE PROGRAM
• PLAYING A RECORDED PROGRAM
• RECORDING WHILE WATCHING DIFFERENT
PROGRAMS
• OTHER RECORDING OPTIONS
• GROUPING AND SORTING RECORDINGS
59
Page 70

913.book Page 60 Tuesday, January 15, 2013 4:57 PM
Chapter 8
What is a DVR?
WHAT IS A DVR?
The Hopper with Sling is a Whole-Home HD Digital Video Recorder (DVR) that lets you
watch TV the way that you want. You can pause, reverse, or skip back through a program.
Then you can resume watching live TV. Also, you can record and play back programs with
full digital audio and video quality, without using a VCR.
For example, if you get a phone call while you are watching a live or recorded program,
you can pause the program, talk on the phone for an hour, resume the program from
where you left off (or restart the program), and not miss any of the action.
You can move through a program forward and backward in slow motion or frame-by-frame
using your DVR auto-recording features while watching live or recorded programs.
PAUSING A PROGRAM
On some TVs, the presence of fixed images for extended periods of time
may cause them to be permanently imprinted on the screen. Consult your
TV user’s guide for information on whether this is a problem for your TV,
what operating/viewing restrictions apply to avoid this problem, and any
associated TV warranty coverage.
For a live TV program, the on-screen pause timer shows how long you have paused the
program. The pause timer shows how far you are behind the live program. You can pause
a live program for as long as an hour. (Each receiver in your whole-home DVR system can
do this.) If you think you might be away from the TV for more than an hour, but don’t want
to miss any of the program, consider recording the program (see page 62).
60
Page 71

913.book Page 61 Tuesday, January 15, 2013 4:57 PM
REVERSE, FAST FORWARD, AND SKIP
This section describes how to use the DVR buttons on your remote control to move
forward and back quickly while you watch TV.
Press BACK once to reverse the program 4 times as fast as normal play. Press
BACK twice to reverse at 15 times normal speed, three times to reverse at 60
times normal speed, and four times to reverse at 300 times normal speed. The
on-screen bar shows how far you’ve gone. For a live program, you can only
reverse back to the last channel change or back one hour, whichever occurs first.
Press FWD (forward) once to fast forward through the program at 4 times normal
speed. Press FWD twice to forward at 15 times normal speed, three times to
forward at 60 times normal speed, and four times to forward at 300 times normal
speed. The on-screen bar shows how far you’ve gone. Of course, you can’t go
forward into the part of a live program that hasn’t been broadcast yet.
Digital Video Recording
Reverse, Fast Forward, and Skip
Press SKIP BACK to skip back about 10 seconds in a program. Press this button
repeatedly to skip back another 10 seconds at a time.
Press SKIP FWD to skip ahead about 30 seconds in the program. Press this
button repeatedly to skip ahead another 30 seconds at a time.
SLOW MOTION AND FRAME-BY-FRAME
Your satellite receiver has features that allow you to slow down live TV. This section
describes how to use the DVR buttons to use slow motion and frame-by-frame advance or
reverse while you watch TV. Press PLAY to exit any of the features described below.
Press PAUSE and then press BACK to reverse the program in slow motion.
Press BACK once to reverse the program 1/4 the speed of normal play. Press
BACK twice to reverse at normal speed.
Press PAUSE and then press FWD to forward the program in slow motion.
When you press FWD once the program advances at 1/15 the speed of normal
play. Press FWD twice to forward at 1/4 as fast as normal play. Press FWD
three times to play the program at normal speed. Of course, you can’t go
forward into the part of a live program that hasn’t been broadcast yet.
Press PAUSE and then press SKIP BACK repeatedly to reverse the recording
frame-by-frame.
Press PAUSE and then press SKIP FWD repeatedly to advance the recording
frame-by-frame.
61
Page 72

913.book Page 62 Tuesday, January 15, 2013 4:57 PM
Chapter 8
Recording a Live Program
RECORDING A LIVE PROGRAM
To record the rest of the program you are watching, PRESS the record button on your
remote control. You can press the RECORD button again at any time during the current
recording and follow the on-screen instructions if you want to extend the end of the
recording past the scheduled end time listed on your Program Guide.
To stop a recording you are watching, press the STOP button on your remote control. A
pop-up screen will ask you to confirm you want to stop recording the current program.
Select Yes to stop the recording now, or No to continue recording.
If all system tuners are in use when you request a new recording, you will see the TV
Viewing Status screen (as shown on page 35). From this screen you can decide to watch
the same content as one of the other tuners, order a DISH On Demand program or event,
or play back a previously recorded program from your Hopper with Sling HD DVR’s My
Recordings list, including (if you enabled the feature) any PrimeTime Anytime™ shows
you have recorded.
Note: Programs or events recorded in high definition, such as those recorded with the
PrimeTime Anytime feature, require as much as six times more storage space than
programs recorded in standard definition.
PLAYING A RECORDED PROGRAM
To play a program or event recorded on your Hopper with Sling HD DVR, do the following:
1 Press the DVR button on your remote control to display the My Recordings screen. 2 Highlight a tile for a program (or a folder of programs, if applicable). If you want to watch
the program (or the latest recording in a folder of programs), then press the PLAY button.
If you want to see more options, press the SELECT button to display a pop-up menu.
3 For a single program or event, choose from the following options:
• Start Over. Watch this recording from the beginning. If you have previously played a
part of the show, you can also select Resume to watch the rest of the program.
• Edit. You can move the recording to a folder or protect it from automatic erasure.
• Delete. Delete this recording from the DVR. This does not delete the associated timer.
• More Info. Display the full Information screen about this program or event.
62
For a program folder, choose from the following options:
• Start Over. Watch the latest recording from the beginning. If you have previously
played a part of it, you can also select Resume to watch the rest of the program.
• Edit. You can move the recording to a folder or protect it from automatic erasure.
• Delete. Delete this recording from the DVR. This does not delete the associated timer.
• More Info. Display the full Information screen about this program or event.
Page 73

913.book Page 63 Tuesday, January 15, 2013 4:57 PM
RECORDING WHILE WATCHING DIFFERENT PROGRAMS
This section describes the basic ways to record a program while watching a different
program at the same time.
Recording a Different Program
You can set up your Hopper with Sling HD DVR to record one or two programs or events
while you are watching another program live or playing back an existing recording.
1 Make sure your Hopper with Sling HD DVR is powered, as indicated by the light on the
front panel.
Digital Video Recording
Recording While Watching Different Programs
2 Press GUIDE to access the Program Guide. Find a program on now you want to record. 3 Highlight the program and press the SELECT button to tune the receiver to that program. 4 Press the RECORD button on your remote control. 5 Your DVR begins recording now with your default DVR recording settings, or you can
press the RECORD button again for more Options to customize your recording settings.
6 If you selected Options, see Other Recording Options on page 63 for more on your
choices.
7 Choose another program to record, as described in Step 2. 8 Press the RECORD button on your remote control and your DVR begins recording with
your default settings. You are now recording two programs at the same time.
9 Press DVR twice on the remote control to access the My Recordings screen. You should
see the two programs that are recording indicated by the red dots for the listings.
10 Select another program to watch now, if applicable, or a program or event that you
recorded earlier and start the playback.
11 You should now be watching one program or event while your DVR receiver is also record-
ing the other two programs or events.
OTHER RECORDING OPTIONS
When you set up a new DVR timer for a future program or event, you can choose from the
following options:
• Type—You can change the type of timer from DVR to Auto Tune. An Auto Tune timer
changes the channel to the program or event, but does not record it.
• Episodes—You can choose to record all New and Reruns, Only New episodes, only
Once, once Weekly or Daily at the same time, or only on weekdays (Mon-Fri).
• Folders—The DVR feature can save new event recordings inside an existing folder.
• Protect—You can choose to protect this timer’s recordings from accidental erasure.
63
Page 74

913.book Page 64 Tuesday, January 15, 2013 4:57 PM
Chapter 8
Grouping and Sorting Recordings
• Keep—By default, an event timer keeps the 20 newest recordings it has made before
it replaces older recordings with newer ones. You can change this number here.
• Start Early—You can extend the start time for the recording. This option is useful for
programs that might start a minute or two early, like some major network shows.
• End Late—You can extend the stop time for the recording. This option is useful for
programs that might run overtime, like sporting events or annual awards shows.
• Priority—By default, new timers have a higher priority assigned to them than existing
timers, for purposes of resolving conflicts when multiple recordings overlap.
Note: If you tune to a program after it has begun, then you can record only the part of the
program after you tuned to it. To do this, reverse as far as you can in the auto-recording.
GROUPING AND SORTING RECORDINGS
1 Press the DVR button (or press MENU, and then select DVR from the MAIN MENU). 2 Choose a group or sort option to help you quickly find the program you want to watch:
• To group programs into folders, select Folders by Title, or you may select another
option from the drop-down menu, like Folders by Genre, My Folders or No Folders.
• By default, recordings are sorted by date. To sort them alphabetically by name (A-Z)
or into rating categories, select the DVR Date drop-down mnu, and choose an option.
The My Recordings list re-arranges itself to match your sorting or grouping selection(s).
TIPS
• If you have a program paused, press PLAY to watch the program. Also, press PLAY to
switch from forward or reverse (at any speed) back to normal playback.
• Press VIEW LIVE TV to catch up with the program as it’s showing now, if applicable.
• As you fill your internal DVR, you may want more space to store additional programs.
You can connect your own compatible, external USB 2.0 hard-disk drive (HDD) and
use the optional Archiving feature. See External Hard-Disk Drive on page 82 for more
information.
64
QUESTIONS
• How can I fast-forward through commercials? If you are watching a pre-recorded
program, or have delayed a live program, press the SKIP FWD or FWD button on your
remote control. However, you cannot skip/forward while watching live TV.
Page 75

913.book Page 65 Tuesday, January 15, 2013 4:57 PM
Recording Future Programs
Setting Up and Using Event Timers
What you’ll find in this chapter:
• USING PRIMETIME ANYTIME™ AND
AUTOHOP™
IMERS AND RECORDINGS
• T
• USING THE TIMERS LIST
• USING THE DAILY SCHEDULE
• SETTING UP AN EVENT TIMER
• SETTING UP A SEEK & RECORD™ TIMER
• CHANGING OR DELETING A TIMER
65
Page 76

913.book Page 66 Tuesday, January 15, 2013 4:57 PM
Chapter 9
Using PrimeTime Anytime™ and AutoHop™
USING PRIMETIME ANYTIME™ AND AUTOHOP™
The PrimeTime Anytime™ feature of your Hopper with Sling HD DVR, once you enable it,
will begin to provide instant access to your favorite shows on ABC, CBS, FOX and NBC in
high definition. (Note if any of your local HD channels are not available in your market,
these shows cannot be recorded automatically.) Programs airing during prime-time hours,
8-11 p.m. ET/PT Monday through Saturday, and 7-11 p.m. ET/PT Sunday, will be recorded
and accessible for eight days from their initial air dates, by default. And you can always
save these recordings to your DVR library to be able to watch them at any time.
Enabling the PrimeTime Anytime™ feature
To enable the PrimeTime Anytime™ feature on your Hopper HD DVR, do the following:
1 Press the MENU button on your DISH remote control or front panel, highlight the Prime-
Time Anytime tile and press SELECT.
2 Select the Enable option to turn on the feature. On the Setup screen for the feature, you
can change which channels are recorded and on which nights of the week. You can also
change the default of eight days before older recordings are replaced with newer ones.
66
3 Highlight and select Done. Then on the PrimeTime Anytime™ screen, select Save. 4 If you Enabled the feature, it will begin recording HD prime-time shows each night. Note
that Enabling the feature does not instantly populate the folder with any saved content;
Page 77

913.book Page 67 Tuesday, January 15, 2013 4:57 PM
recordings will begin during the next applicable nightly interval and gradually populate the
folder, day-by-day. Enable the feature at least 20 minutes in advance of prime time hours.
Disabling the PrimeTime Anytime™ feature
To disable the PrimeTime Anytime™ feature after it has been enabled, do the following:
1 Press the MENU button on your DISH remote control, highlight the Settings tile on the
Main Menu screen and press SELECT.
2 Highlight and select DVR Defaults and then select PrimeTime Anytime. 3 Select the Do Not Enable option to turn off the feature, then highlight and select Save.
Record Future Programs
Using PrimeTime Anytime™ and AutoHop™
If you disable the feature, PrimeTime Anytime will stop recording shows automatically.
(You can still set up event timers to record any individual shows you want, of course.) In
order to stop tonight’s recordings, you must disable the feature at least 20 minutes before
the nightly prime-time interval begins (8 p.m. ET/PT, 7 p.m. CT/MT Monday through
Saturday; and 7 p.m. ET/PT, 6 p.m. CT/MT Sunday).
Note that disabling the PrimeTime Anytime™ feature will not alter or instantly delete any
contents currently in the PrimeTime Anytime™ folder.
Accessing PrimeTime Anytime™ content
To view your PrimeTime Anytime™ shows, do any of the following:
• Press the DVR button twice on your DISH remote control.
• Press the DVR button, highlight the PrimeTime Anytime™ folder on the My
Recordings screen, and then press the SELECT button.
• Highlight and select the PrimeTime Anytime™ tile on the Main Menu screen and then
select the PrimeTime Folder option.
Saving your PrimeTime Anytime™ content
The shows recorded in the PrimeTime Anytime™ folder expire in eight days, by default.
The oldest recording for each program is then deleted automatically, unless you highlight
and select the item in your folder and use the Save option for that individual recording.
AutoHop™ for PrimeTime Anytime™ content
DISH has created commercial-free TV so you can save an hour each night. You can
automatically skip commercials in primetime TV—on ABC, CBS, FOX, and NBC in HD. In
order to take advantage of the AutoHop feature, first you must enable the PrimeTime
Anytime™ feature on the Hopper with Sling HD DVR, and then do the following:
1 The day after PrimeTime Anytime™ recordings occur, access the content in the Prime-
Time Anytime™ folder on your Hopper with Sling HD DVR.
2 Find content with the red “roo” logo in the upper-right corner of the recorded item’s tile.
Each time you begin to watch applicable content, a pop-up screen will be displayed asking
if you want to enable the AutoHop™ feature. Highlight and select the option that you want.
67
Page 78

913.book Page 68 Tuesday, January 15, 2013 4:57 PM
Chapter 9
Timers and Recordings
TIMERS AND RECORDINGS
A timer is your instruction telling the satellite TV system the programs you want to watch in
the future. For most Digital Video Recorder (DVR) timers, you select a specific program on
a specific channel, and tell the system how often you want to record that program.
DVR recordings are listed in the My Recordings screen, which you can find quickly by
pressing the DVR button on your DISH remote control.
Timer Types
There are two types of event timers:
• DVR—to record an event onto your system’s hard-disk drive for later viewing.
• Auto Tune—to automatically change the channel for live viewing of the event.
Timer Frequency
Deciding how often you want to watch a program will help you make the best choice:
• New and Reruns—to record every time that program is shown on that channel.
• Only New—to record the current season’s programs each time they occur on that
channel. This is the initial default for recurring DVR timers, unless you change it.
• Once—to record a program or event once (good for movies, sporting events, etc.).
• Weekly—to record a program once a week, at the same time, on the same channel
(good for episodic programs shown on the same night each week).
• Daily—to record a program once a day, at the same time, on the same channel (good
for daily news programs).
• Mon-Fri—to record a program once a day, Monday through Friday, at the selected
time, on the same channel (good for weekday-only talk shows).
Seek & Record™—to record programs on all channels (by default) or a specific channel,
based on your own specified criteria. See page 72 for more details.
Timer Priorities
Priorities are used by the receiver to know which program you would prefer to record, if
multiple timers are scheduled to start at the same time. For example, having seven
programs scheduled to record at the same time cannot be done on a triple-tuner receiver;
therefore, the receiver will record only the three programs with the highest priority timers.
68
• All timers have an associated numerical priority that you can change at any time.
• The larger the number, the lower the priority (for example, priority 1 is higher than
priorities 2, 3, and 4).
• You can override a specific timer's priority with a one-time skip or by restoring it. Press
the remote control DVR button three times and select a timer in the Daily Schedule.
Then you'll have an option to Skip or Restore (if it’s skipped) that timer. See page 71.
Page 79

913.book Page 69 Tuesday, January 15, 2013 4:57 PM
Timer Options
The Timer Options screen lets you set the following (not used on all options screens):
• Protect Event—to prevent your programs from being erased when the DVR fills up.
• Set Frequency—to record only new episodes of a program. By default, all episodes
of a Seek & Record™ event will be recorded.
• Set Channel—to select a specific channel. When setting manual timers, you select a
channel from a scrolling list of all channels in your guide.
• Start Early—to begin a timed recording a few minutes earlier than its scheduled start.
• End Late—to continue recording a while after the program’s scheduled ending time.
• Save as Defaults—to use the Start Early, End Late, Maximum Events to Keep, and
Priority (highest/lowest) settings for this event as the new defaults for future timers.
• Maximum Events to Keep—to automatically delete the oldest unprotected event
recordings after a specified number of them are accumulated for this particular timer.
Note: This option is especially valuable for certain Seek & Record™ timers, which
might otherwise fill your DVR storage with too many episodes of a single program.
Record Future Programs
Timers and Recordings
Note: When setting Seek & Record™ timers for programs available in both HD and SD, by
default, the DVR system will automatically select the HD program for recording.
Daily Schedule
The Daily Schedule lists the timers that are planned for today, for the future (up to nine
days, if applicable to your satellite system), and have occurred in the recent past. Press
the DVR button three times and use the Daily Schedule, as shown on page 71, to:
• Review today's timers. You can choose to skip a scheduled timer, or restore a timer
that was not planned to occur, perhaps because of a conflict with another program.
See Timer Priorities on page 68.
• Review future timers, up to nine days in advance, and make changes as necessary.
• Review past timers to see which occurred, and the reason why one or more did not, if
applicable. See Reasons Why Timers are Skipped on page 70.
Timers List
Press the DVR button four times and use the Timers List, as shown on page 71, to:
• View the general list of all event timers.
• Select a timer from this list to see a detailed listing with specific dates and times of
upcoming timers for that program/event or Seek & Record™ search term(s).
• Set user-selected priorities for each event timer. See Timer Priorities on page 68.
• Select Edit Event to edit an individual occurrence of a recurring event timer or Edit
Timer to change all occurrences or delete the entire event timer. Deleting an event
timer does not delete any existing recordings or stop any recordings already begun.
69
Page 80

913.book Page 70 Tuesday, January 15, 2013 4:57 PM
Chapter 9
Timers and Recordings
Reasons Why Timers are Skipped
If a timer is skipped, the reason is stated on the Timers List.
• Priority—This timer had a lower priority than other events being recorded at the time.
• User—A user chose to skip that timer.
• Duplicate event—There is already another timer which is set to record that program.
• Event exists in DVR—The program was already recorded and can be found now in
the My Recordings list.
• Not a new episode—Used for New Episode timers. A New Episode is one that has
the word New or the current year listed in the associated Program Guide information.
• Incorrect event—For Weekly, Daily, and Monday-Friday timers. If the program guide
has a different event listed, then the timer will be skipped. For example, the event
timer was set up as a Daily timer on a Saturday, but the specified program is
broadcast only weekdays, so instances of the timer will be skipped on the weekends.
When a Timer Needs Your Tuner to Record
If the three satellite TV tuners of the Hopper with Sling are needed for scheduled event
recordings while you are watching live TV, then you will see a pop-up message on screen.
Choose Allow and the timer will change the channel and record the program. Choose
Stop and the timer will skip recording the scheduled event. Note that stopping one event
recording does not delete a series timer, so future episodes will continue to be recorded.
When the Receiver is Off
70
If the receiver is off when a scheduled type of event timer occurs, the receiver will:
• DVR—Remain powered off (in standby mode), but will record the scheduled event.
• Auto Tune—Turn on at the scheduled time and for the event duration. After a period
of time, if you do nothing, your DISH receiver will turn off (enter standby mode) again.
Page 81

913.book Page 71 Tuesday, January 15, 2013 4:57 PM
Special Considerations When Using Timers
• For Locked or Restricted Programs—You must enter the receiver password before
you can create an automatic event timer for a program restricted by rating or on a
locked or hidden channel. If you do this, and the restrictions or locks are subsequently
changed, then when the timer starts, note that the receiver may display only an error
or password-entry menu screen.
• For Pay-Per-View Programs—You must order a Pay-Per-View program or event at
the time that you create an event timer for it.
• For Blacked Out Programs—If you set a timer for a program or event that is blacked
out in your area, then when the timer occurs, the receiver may only display an error.
Note that the original provider of a program or event decides the black-out restrictions,
not DISH.
Record Future Programs
Using the Timers List
USING THE TIMERS LIST
To use the Timers screen to help manage your event timers, do the following:
1 Press the DVR button on your remote control four times to display the Timers List. 2 Scroll the list of timers. As you do so, detailed information about the highlighted timer
appears on the right. From the drop-down menu bar, you choose to sort the list by Priority
or select multiple Timers to edit at once (for example, to change Priority or Delete them).
Highlight and select one listed Timer if you want to see its Daily Schedule or to Delete it.
USING THE DAILY SCHEDULE
To use the Daily Schedule screen to help manage your event timers, do the following:
1 Press the DVR button on your remote control three times to display the Daily Schedule. 2 Scroll the list of timers for today and the next few days. As you do so, detailed information
about the highlighted timer appears on the right. You Show or Hide events to be skipped.
Highlight and select a future program if you want to Skip or Restore an event. You can
also choose to Protect the recording, or edit the Start Early or End Late timer settings.
• To edit the Start Early/End Late settings for an individual occurrence, select its event
timer and then select Edit Event. To edit an event’s associated timer, select it and
then select Edit Timer. This will access the Timers List with the Timer highlighted.
• If the program is included in a Seek & Record™ timer, you cannot change the Start
Early or End Late times for an individual occurrence; it must be changed within the
Seek & Record™ timer, selected from the full Timers List. Refer to page 72.
• If the PrimeTime Anytime™ feature is enabled, you will see it on the Daily Schedule.
You cannot edit an individual event or settings from this screen. Refer to page 66.
71
Page 82

913.book Page 72 Tuesday, January 15, 2013 4:57 PM
Chapter 9
Setting Up an Event Timer
• Press PAGE UP to see the previous days' timers. Review these timers if you want to
see the result of these timers (for example, if a timer recorded successfully or why it
might have been skipped).
SETTING UP AN EVENT TIMER
1 Find a program or event to record that starts in the future using the Program Guide or
Browse Banner.
2 Highlight and select the future program or event. The Create Timer screen displays. 3 Select one of the Timer Types (see page 68 for more details). 4 Select the Timer Frequency (see page 68 for more details). 5 Select any other recording Options (see page 69 for more details), as applicable. 6 Select Priority if you would like to change the current priority of the event timer (see
page 68 for more details).
7 Select Create to save your new event timer.
SETTING UP A SEEK & RECORD™ TIMER
The Seek & Record™ feature lets you create timers to record programs or events
automatically based on results of your search criteria. When the DVR finds programs
listed that meet your search criteria, it will automatically set a timer to record that program.
As the Program Guide is updated, the Seek & Recordq™ feature will continue to find and
record newly listed programs or events based upon your search criteria.
An example of how to use the Seek & Record™ feature might be that you saw a movie in
a theater and you want to watch it again as soon as it is available on a movie channel. Use
the Exact Match and Title options, and then type the exact title of the movie. If the movie
is made available on a movie channel included in your DISH package, the receiver will
automatically set a one-time DVR timer to record that movie for you!
72
1 Press your remote’s SEARCH button. If you need to, clear or delete the text in the box. 2 Select Seek & Record. 3 Select your preferred Search Method:
• Titles—Search for programs or events by one or more words in their titles.
• Descriptions—Search for programs whose descriptions contain specified terms.
• Actors—Search for programs by the actors’ names listed with their information.
• History—Search for programs by repeating a recent search you have performed.
Page 83

913.book Page 73 Tuesday, January 15, 2013 4:57 PM
4 Enter your search criteria. You can use the virtual on-screen keyboard below the text box,
or you can use the letters on the NUMBER PAD buttons on the remote control (similar to
texting on many mobile phones) while the on-screen cursor is in the text box. See Using
Text Fields on page 27 for instructions.
5 Select any Options for the Seek & Record timers, as described on page 69, if applicable. 6 Select Create. When the system has completed your search, the Timers list and Daily
Schedule screens will display the results.
Note: After entering your search words and selecting Create, be sure to review the timers
the Seek & Record feature created—some may not be what you are expecting. You can:
Record Future Programs
Changing or Deleting a Timer
• Choose any selected events you want to Skip. Review timers for future events often
by pressing the DVR button three times to access the Daily Schedule screen.
• Adjust your search terms and/or method. Select Priority to change the priority of your
Seek & Record timers. To adjust your search further, delete any unwanted Seek &
Record timer(s) and try the following:
— Change your Seek & Record search term(s) to be more specific.
— If you press the SEARCH button when you have highlighted a future program
within the Program Guide, Browse Banner, Themes list or Search results, then the
program's exact title will be entered in the text box for you.
CHANGING OR DELETING A TIMER
1 Press the DVR button three times for the Daily Schedule or four times for the Timers list. 2 Highlight a program or event in the list and press the SELECT button. 3 Select Skip Event if you wish to skip the selected occurrence of the event timer; Edit
Event. if you wish to change recording options for this occurrence only; or Edit Timer if
you wish to change or delete all occurrences of this event timer from the list.
4 Select Delete. A pop-up window displays, asking you to confirm your choice(s). 5 Select Yes on the pop-up screen. The event timer(s) you selected are now deleted.
TIPS
• Make sure the Updates feature is enabled, as described on page 89. By enabling this
feature, the Electronic Program Guide (EPG) always will have the most up-to-date
information, and your DVR can automatically adjust or create timers accordingly.
• Weekly, Daily, and Monday-Friday timers move only if the program is within one hour
earlier or four hours later than the original time for which the timer was set. These
timer frequencies will adjust their length if their event’s time block is extended.
73
Page 84

913.book Page 74 Tuesday, January 15, 2013 4:57 PM
Chapter 9
Questions
• Seek & Record™ event recordings may fill your DVR storage space quickly. If you
have other timers that you know you don't want to be recorded over, choose Protect
on those important programs.
• DVR Timers set for sporting events automatically end late by 60 minutes to allow for
overtime. If you want to change this setting, use Options when you set up the timer.
QUESTIONS
• Why is my receiver recording programs I didn’t schedule? Seek & Record™
timers may include more programs than you initally planned. If you’d like to refine your
search, delete the Seek & Record™ timer and start again as described on page 72.
• Why did the receiver delete a program that I recorded? If your recording was
unprotected and the receiver’s hard-disk drive fills up, your DVR deletes the oldest
unprotected recording. You can protect your recordings as described on page 69.
• Where can I go to find out why the receiver didn’t record something that I had
scheduled? Look at your Daily Schedule screen and refer to Reasons Why Timers
are Skipped on page 70.
74
Page 85

913.book Page 75 Tuesday, January 15, 2013 4:57 PM
Hopper Extras
Exclusive Features of the DVR System
What you’ll find in this chapter:
• WHAT’S HOT
• SIRIUSXM® SATELLITE RADIO
• BLUETOOTH® AUDIO STREAMING
• USING MULTI-CHANNEL RECALL
• BLUETOOTH® AUDIO STREAMING
• USB DIGITAL OVER-THE-AIR TUNER
• TIPS
• QUESTIONS
75
Page 86

913.book Page 76 Tuesday, January 15, 2013 4:57 PM
Chapter 10
What’s Hot
WHAT’S HOT
Never miss the hottest TV shows and sports events. The What’s Hot feature of your
Hopper with Sling HD DVR system displays the top programs, available locally or
nationally in your geographic area, based on what other viewers are currently watching.
You can also choose to set a DVR timer to record these programs or events.
1 Press the MENU button on the remote control or front panel for your Hopper with Sling HD
DVR and select the What’s Hot tile from the Main Menu.
2 Select one or more options from the menu bar to filter the results by programming theme,
region (Local or National), and show time/type (On Now, On Next, Today, On Demand, or
Blockbuster @Home).
SIRIUSXM® SATELLITE RADIO
Your Hopper with Sling HD DVR system delivers the same lineup of music channels from
SiriusXM Satellite Radio that you enjoy in your car to your whole home. Press the GUIDE
button on your remote control and go to and select channel 99 to see the range of music
channels available on your DISH system (or type 99 on your remote’s NUMBER PAD,
followed by the number of your favorite SiriusXM Satellite Radio channel).
SiriusXM Satellite Radio channels are available with select DISH programming packages.
SRS® TRUVOLUME FEATURE
The SRS® TruVolume feature of your Hopper with Sling HD DVR system eliminates
volume fluctuations during commercials or when changing channels, so you can enjoy a
more natural listening experience. This feature is available on the Audio Output settings
screen, as follows:
1 Press the MENU button and select the Settings tile from the Main Menu screen.
76
2 Highlight and select the Audio tile, and then select Audio Output.
From this screen, you can enable (if it is disabled in RF Mode) or disable (if it is enabled)
the Volume Leveling feature in RF Mode. In Line Mode, this feature is always Disabled.
Page 87

913.book Page 77 Tuesday, January 15, 2013 4:57 PM
USING MULTI-CHANNEL RECALL
Another helpful feature to find the program you want to watch is channel RECALL. You
can quickly go back to a channel you were previously watching on your TV. Both your
Hopper with Sling HD DVR and Joey Receiver(s) support the multi-channel recall feature,
allowing easy access to the four most recent satellite channels you viewed on your TV.
To enable, change, or disable the multi-channel recall feature, do the following:
1 Press the MENU button on your remote control and select the Settings tile. 2 Select Guide Settings, and then Format Guide.
Remote Controls
Using Multi-channel Recall
3 Under Multi-Channel Recall, select one of the following options:
• On. This is the default setting. Pressing the RECALL button on your remote allows
you to select any one of the four most recent channels you viewed on this receiver.
• On, immediate. Choose this setting if you want the RECALL button to change
immediately to the previous channel you viewed, but also display all four most recent
channels for you to choose from, as it does when the On option is set.
• Off. If you turn off the receiver’s multi-channel recall feature, the RECALL button
goes immediately to the previous channel you viewed. Older channels are not shown.
4 When you are finished changing these settings, highlight and select the Save option. If
you have made changes you do not want saved, press the remote’s CANCEL button.
77
Page 88

913.book Page 78 Tuesday, January 15, 2013 4:57 PM
Chapter 10
Bluetooth® Audio Streaming
BLUETOOTH® AUDIO STREAMING
The Hopper is the first set-top box to offer Bluetooth Audio Streaming, the feature that lets
you listen to the audio of your program using your Bluetooth wireless headset or speakers.
(Note: Bluetooth audio devices, such as wireless headphones or speakers, are sold
separately.) Now you can listen to sound without disturbing anyone or walk around the
house and never miss a play during a game. You can even listen to all the music from
SiriusXM® Satellite Radio stations.
To use the Bluetooth Audio Streaming feature
In order to use this feature, have your audio device ready and follow these instructions:
1 Press the MENU button on the remote or front panel of the Hopper with Sling HD DVR. 2 Highlight and select the Settings tile. Then highlight and select Bluetooth.
Once Bluetooth is selected, it automatically starts to scan for available Bluetooth wireless
devices. Be sure your device is powered on (and made discoverable, if necessary) and is
within range of the Hopper with Sling HD DVR, so that the scan can find your device. The
range for Bluetooth communications typically is about 30 feet, although it can vary considerably for some devices. Consult the user materials provided for your device for details.
3 Once the scan is complete, a list of devices that were found will appear. A device can be:
Paired – Connected: The Hopper with Sling is currently playing audio to this Bluetooth
device. Select this device in the list to see options to disconnect from it and/or unpair it
from the Hopper with Sling, if desired.
Paired – Not Connected: currently paired and enabled, this Bluetooth device is able to
stream audio when it is on. Turn on the device to use it for streaming audio, or select the
device to unpair it from the Hopper with Sling, if desired.
Unpaired: Bluetooth device has been detected, but is not paired to your Hopper with
Sling. Selecting this device initiates pairing (you must enter the device’s four-digit
Bluetooth passcode, if or when prompted). When device pairing is complete, the device
status then will be Paired – Not Connected (see above).
78
To turn off the Bluetooth feature
To completely turn off the Bluetooth Audio Streaming feature of your Hopper with Sling HD
DVR, do the following:
1 Press the MENU button on your remote control or the Hopper with Sling front panel. 2 Highlight and select the Settings tile on the MAIN MENU, and then Bluetooth. 3 On the screen under the Bluetooth area, highlight and select the "off" option.
Page 89

913.book Page 79 Tuesday, January 15, 2013 4:57 PM
USB DIGITAL OVER-THE-AIR TUNER
Visit the mydish.com website and log in to your DISH account to purchase the optional
USB Digital OTA (Over-The-Air) Tuner. After connecting the tuner to one of the USB 2.0
ports on your Hopper with Sling HD DVR, you can watch and record free local channels.
Do the following:
1 Connect the USB plug of your Digital OTA Tuner into one of the USB 2.0 ports on your
Hopper with Sling HD DVR. Note that the Hopper with Sling HD DVR currently supports
one external USB-connected device at a time. (The OTA tuner does not work connected to
the USB port on a Joey Receiver.)
Remote Controls
USB Digital Over-The-Air Tuner
2 Connect the coaxial port connection of your Digital OTA Tuner to your optional over-the-air
antenna, purchased separately from a consumer electronics retailer.
3 Press the MENU button on the remote control or front panel of the Hopper with Sling HD
DVR, highlight and select the Settings tile on the MAIN MENU, then Diagnostics, and
then Over the Air Locals.
4 Select Scan to begin searching for channels your OTA antenna picks up in your area.
These channels will be added automatically to the Program Guide of your DISH system,
and will be available for live TV viewing as well as DVR recording of over-the-air content.
TIPS
QUESTIONS
•
79
Page 90

913.book Page 80 Tuesday, January 15, 2013 4:57 PM
Chapter 10
Questions
80
Page 91

913.book Page 81 Tuesday, January 15, 2013 4:57 PM
User Preferences
Personalizing Your Hopper HD DVR
What you’ll find in this chapter:
• USING MULTIMEDIA
• USING CALLER ID
• C
USTOMIZING THE GUIDE AND CHANNEL
LISTS
• CHANGING LANGUAGES
• USING CLOSED CAPTIONING
• USING AUDIO OUTPUT
• RESETTING TO FACTORY DEFAULTS
• RECEIVER UPDATES
• TIPS
81
Page 92

913.book Page 82 Tuesday, January 15, 2013 4:57 PM
Chapter 11
Using Multimedia
USING MULTIMEDIA
Photos
You can view photos on the TV connected to your Hopper with Sling HD DVR using the
Home Media feature. Now you don’t have to pass photos around or have a crowd of
people hover around your digital camera. See “Using the Home Media Feature” on
page 56.
External Hard-Disk Drive
The Hopper wityh Sling HD DVR has generous internal storage space for hundreds of
hours of recorded programming. But if you start to notice the hard drive of your integrated
DVR getting full, you can expand the storage capacity by connecting a compatible,
external USB 2.0 hard-disk drive (HDD) between 50 GB and 2 TB in size. You can transfer
any recordings from the integrated DVR to your external storage device (by using
Recordings Transfer on the Main Menu screen) to archive them, and play back any
programs directly from the connected external drive. This feature is free and automatically
enabled on your Hopper with Sling HD DVR.
82
To choose a compatible external hard-disk drive, consider the following:
• The hard-disk drive must have a USB 2.0 data connection.
• The capacity of the hard drive should be a minimum of 50 GB up to a maximum of
2 TB.
• Using a hard-disk drive with an external power supply is recommended. Portable or
pocket hard drives powered only by a single USB cable may not function properly with
your Hopper with Sling HD DVR.
• Do-it-yourself expansion kits and expandable storage racks may not be compatible.
• Dedicate the hard-disk drive for use only with your DVR system; do not use the drive
for any other purposes, such as the backup and storage of computer files.
Page 93

913.book Page 83 Tuesday, January 15, 2013 4:57 PM
To use the external hard-disk drive feature:
1 Purchase a USB 2.0 hard-disk drive from a consumer electronics retailer. 2 Connect the drive to one of the receiver’s three USB ports, making sure to follow any
connection instructions that came with the hard-disk drive.
Note: Currently, the receiver supports having one USB device connected at a time. If you
have a second USB device such as a flash drive or other portable device connected to the
receiver, you should disconnect it before connecting the external hard-disk drive.
3 If the hard-disk drive is compatible, you’ll see a pop-up message screen confirming the
device’s connection and asking if you want to manage its contents. Select Yes.
Receiver Customization
Using Caller ID
4 Follow the on-screen prompts. 5 Once the external device is recognized, you’ll see a pop-up message asking if you want to
format the drive—formatting is necessary to store your recorded programs on the external
hard-disk drive. Note that selecting Yes will cause everything stored on the external hard-
disk drive to be erased, the drive to be formatted for use with your receiver, and then the
receiver to reboot. You can use the Manage Device option to view and manage programs
stored on the external hard drive. Use the Send to Device option to transfer programs
from your receiver to the external hard-disk drive. Copy protection for certain content may
apply. Visit the mydish.com/copyprotection website for more information.
6 Press the MENU button and then highlight and select the Recordings Transfer tile to
transfer DVR content from your integrated DVR to your external hard-disk drive.
Note: Once it has been formatted for use with your DISH equipment, an external hard-
disk drive may not be connected to or used by any non-DISH equipment.
USING CALLER ID
Caller ID displays on your TV if you subscribe to Caller ID from your local phone company.
To use this feature, make sure you have a phone line connected to the receiver, Caller ID
is enabled on your phone line, and that the Caller ID option is selected on your receiver.
Setting Up Caller ID Display
Use these instructions to enable or disable the Caller ID feature on your receiver:
1 Press the MENU button, highlight and select the Settings tile from the Main Menu screen. 2 Highlight and select Network Setup, and then Caller ID.
83
Page 94

913.book Page 84 Tuesday, January 15, 2013 4:57 PM
Chapter 11
Using Caller ID
3 Select Enable or Disable for this feature, then select the option to Save..
Caller ID Screens
When you receive a call, you will see a Caller ID pop-up screen.
You can select OK to eliminate the message. If you do nothing, then the message will
disappear after about 20 seconds.
If you are using a menu screen when a call comes in, then you will see a different Caller ID
pop-up screen. You can select OK to eliminate the message.
84
Page 95

913.book Page 85 Tuesday, January 15, 2013 4:57 PM
Using Caller ID History
Use the following instructions to view and delete numbers from your Caller ID History.
Receiver Customization
Customizing the Guide and Channel Lists
1 Press the MENU button on your remote control or receiver front panel. 2 Scroll down to highlight the Caller ID History tile and then press the SELECT button. 3 From the Caller ID History screen, you can view Call History entries, highlight and delete a
row for an entry, or clear the entire list of entries.
4 Press Save when you are finished.
CUSTOMIZING THE GUIDE AND CHANNEL LISTS
You can set up the on-screen Program Guide to list channels in Descending order, with
the highest channel number displayed at the bottom of the TV screen, or in Ascending
order, with the highest channel number displayed at the top of the screen. The default for
this setting is to list channels in descending order.
To modify your Guide display settings, do the following:
1 Press the MENU button, highlight and select the Settings tile on the Main Menu screen. 2 Highlight and select Guide Settings, and then Format Guide. 3 Change the Channel Order and Preference, as needed, and then select the Save option.
You can also set the Multi-Channel Recall and EPG Banner features on this screen.
85
Page 96

913.book Page 86 Tuesday, January 15, 2013 4:57 PM
Chapter 11
Changing Languages
Changing the Guide Display
The receiver comes ready to display the Program Guide. However, you can change the
way the Electronic Program Guide and EPG Banner display on your TV screen.
CHANGING LANGUAGES
You may be able to change the language of some programs. Some programs, such as
movies, indicate at the beginning whether an alternate language or descriptive video is
available.
An alternate language applies only to the audio portion of specific programs or events and
does not change the language used in the menus displayed by your receiver.
Descriptive video—not included on all channels or programs—is a feature for the visually
impaired that describes what is happening on the screen during a program or event.
To adjust alternate audio settings, do the following:
1 Press MENU and highlight and select the Settings tile on the Main Menu screen. 2 Highlight and select Audio, then Alternate Audio. 3 Select the audio language you want from the list, and then select the option to Save.
USING CLOSED CAPTIONING
86
Your DISH receiver has many options for Closed Captioning (CC), which allows you to
change the feature to suit your needs. Also, you can display captions when you play back
programs recorded on the integrated Hopper with Sling HD DVR, even if you didn't have
them turned on at the time the program or event was recorded.
Page 97

913.book Page 87 Tuesday, January 15, 2013 4:57 PM
Note: Not all programming contains any CC information.
Press MENU, select the Settings tile, and then highlight and select Closed Captioning.
Receiver Customization
Using Audio Output
Choose from the lists the display options matching your preferences, then select Save.
• Closed Captioning: Turn the Closed Captioning (CC) service On or Off. The other
options on this screen are enabled when On is selected.
• Text Size: Select a comfortable type size for the caption letters, or use the CC
Provider’s default choice.
• Text Color: Set the color of the caption letters from the list of eight color options, or
use the CC Provider’s default choice. Choose the color combinations that make the
captioning easy for you to see.
• Background Color: Set the color of the caption background from the list of eight color
options, or use the CC Provider’s default choice. Choose the color combinations that
make the captioning easy for you to see.
• Background Opacity: Choose from the default of the CC Provider, Transparent
(see-through), Translucent (semi-see-through), and Solid.
• Reset Defaults: Select this option to reset all the closed-captioning options on your
DISH receiver to their original default settings.
USING AUDIO OUTPUT
To access the Audio Output settings screen for your receiver, do the following:
1 Press the MENU button and select the Settings tile from the Main Menu screen. 2 Highlight and select the Audio tile, and then select Audio Output. 3 From this screen, you can select your external digital-audio signal decoder’s capabilities
(for example, if your audio equipment supports decoding Dolby® Digital soundtracks), as
well as whether to enable the volume-leveling feature provided by SRS® TruVolume. TruVolume leveling helps prevent annoying volume fluctuations, such as loud commercials.
87
Page 98

913.book Page 88 Tuesday, January 15, 2013 4:57 PM
Chapter 11
Using Audio Output
Dolby Digital gives you the capability to enjoy a program’s audio in surround sound. An
external decoder is required to enjoy this feature. Refer to your decoder’s user’s guide.
Note: Not all programs or events contain a Dolby Digital sound track.
Your new receiver uses an optical port for outputting digital audio. The optical output can
provide two audio data types: Dolby Digital and Linear PCM (only Dolby Digital can
provide full 5.1-channel sound).
• Dolby/PCM: Select this option only if the stereo system or audio component can both
decode Dolby Digital and also support Linear PCM digital audio signals.
• PCM Only: Select this option only if the stereo system or audio component cannot
decode Dolby Digital audio signals.
The audio output is also dependent on what is present in the program you are watching.
The table below shows what type of output you will hear:
Signal Present in Program
Optical Output Setting Dolby Digital PCM Both
Dolby Digital Only Dolby Digital PCM Dolby Digital
PCM Only PCM (downmix) PCM PCM
Dolby Digital/PCM Dolby Digital PCM Dolby Digital
Note: When both audio signals are present for a program or event, the receiver defaults to
Dolby Digital output unless you have selected PCM Only.
Note: If you have selected Dolby Digital Only but there is only PCM audio in the program,
you will hear nothing. This also applies to the analog-only left/right stereo audio outputs.
• Line Mode: When you use this setting, in comparison to RF Mode, the dynamic range
is wider, which makes the music and loud noises louder, but voices quieter.
• RF Mode: When you use this setting, in comparison with Line Mode, the dynamic
range is narrower, which makes music and loud noises quieter, but voices louder.
Volume leveling using SRS® TruVolume can be enabled in this mode, and helps
eliminate fluctuations in volume during commercials or across different channels.
88
Page 99

913.book Page 89 Tuesday, January 15, 2013 4:57 PM
RESETTING TO FACTORY DEFAULTS
You can reset the receiver to discard any changes you have made to receiver settings,
except for remote-control addresses and locks. Resetting the receiver to factory default
settings also discards all Favorite Lists except for the All Chan, All Sub, and All HD lists.
You cannot reset the receiver to default settings to discard or reset a password you have
forgotten. No one but a DISH Customer Service Representative can reset the receiver to
bypass a password-protected parental control setting or lock restriction.
1 Press the MENU button, select System Setup, and then Factory Defaults. The receiver
displays a Warning message to confirm that you want to reset the receiver’s preferences.
Receiver Customization
Resetting to Factory Defaults
2 Select Yes.
RECEIVER UPDATES
Your receiver will turn itself off (that is, enter standby automatically) after a set period of
inactivity. To change the length of or disable this period, do the following:
1 Press MENU, highlight and select the Settings tile, and then Diagnostics. 2 Select Updates, choose an inactivity period from the list, and then select Save.
Your receiver also comes scheduled to update its Electronic Program Guide (EPG)
information at 1:00 a.m. every day. This feature is enabled so that your DVR event data
and Seek & Record™ timers remain current as programming schedules change.
Note: This feature does not interfere with any scheduled event timers.
TIPS
• To take full advantage of Dolby Digital 5.1 surround sound, you need a digital optical
audio cable and audio equipment that supports this feature.
• To use the Caller ID feature on your Hopper with Sling HD DVR, be sure to have it
connected to an active telephone line and have Caller ID service provided from your
phone company.
89
Page 100

913.book Page 90 Tuesday, January 15, 2013 4:57 PM
Chapter 11
Questions
QUESTIONS
• How can I see who has called me in the past? Open your Caller ID History by
pressing the MENU button, selecting System Setup, and then Caller ID History.
• Why is my audio in another language? An alternate language may have been
selected. See the instructions on page 86 to change your preferred language.
• How can I change the channel order in the Program Guide? You can switch from
ascending order (lowest numbered to highest) to descending order (highest numbered
to lowest) or back again, by following the instructions on page 85.
90
 Loading...