

Page 1

Basic Remote
Page 2
Safety Instructions
You must keep safety in mind while using this device. Keep
these and any other instructions for future reference.
Observe Warnings: Carefully follow all warnings on the device
and in the operating instructions.
Heat: Do NOT place the device near heat sources such as
radiators, stoves, heat registers, or other appliances that
produce heat.
Care and Use
Cleaning: Do NOT use liquid, abrasive, solvent, or aerosol
cleaners. Use a damp cloth for cleaning.
When Not in Use: Remove the batteries if this device is to be
left unattended or unused for a long period of time.
Refer servicing to qualied personnel when a
solid object or liquid has fallen onto or into the
device.
Do NOT attempt to service this device. Refer all
servicing to qualied personnel. Opening covers
other than the battery cover will void the warranty.
Publishing Information
Copyright © 2012. EchoStar Technologies L.L.C., Englewood,
Colorado 80112. All rights reserved.
The information in this User Guide may change without notice.
Revisions may be issued to tell you about such changes.
Address comments or questions about this User Guide to
techpubs@echostar.com or
Technical Publications, EchoStar Technologies L.L.C.
90 Inverness Drive Circle East
Englewood, Colorado 80112
Document Number: 196107
Printed in
DISH is a trademark and service mark of DISH Network L.L.C.
All product names, trade names, or corporate names
mentioned in this User Guide are acknowledged to be the
proprietary property of the registered owners.
Page 3
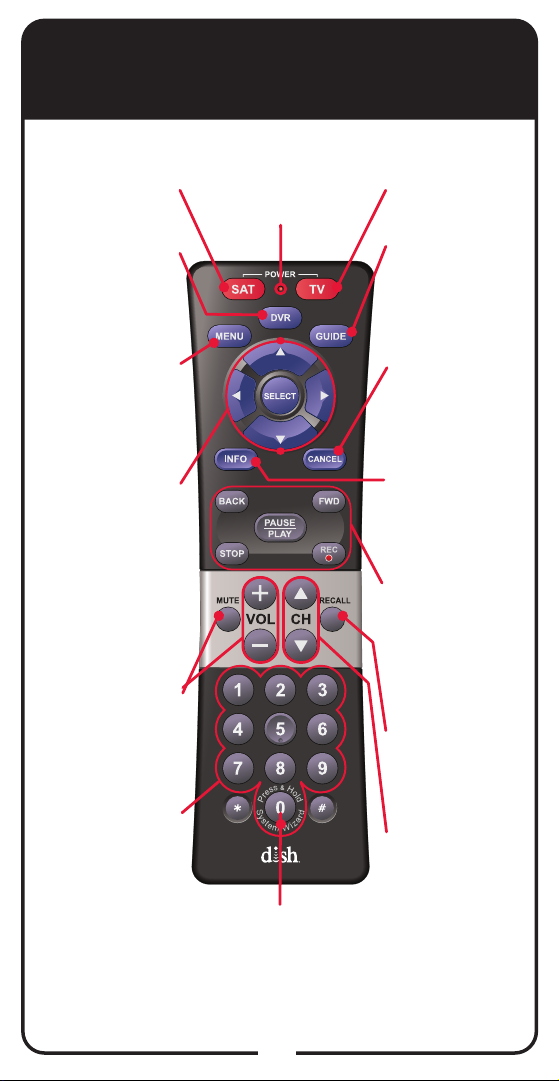
SAT Mode
SAT Power
Controls satellite
receiver
DVR
Goes to list
of recorded
programs
Red Light
Assists in
programming
mode
TV Power
Controls TV
GUIDE
Displays
current and
future satellite
program listings
MENU
Accesses
features and
settings
Arrows and
SELECT
Buttons
Navigates
through menus
and program
guide; selects a
desired option
VOLUME and
MUTE Buttons
Controls TV
volume
Number
Buttons
Enters a
channel number,
or navigates
through menus
SYSTEM WIZARD
Stores/restores
remote settings
(Note: Feature not
available on all receivers)
CANCEL
Returns to
previous menu
or to watching
a program
INFO
Retrieves
information
on programs
DVR Function
Buttons
Pauses live TV
and plays
or records
programming
RECALL
Returns to the
last channel
viewed
CHANNEL
UP/DOWN
Navigates
through
channels
1
Page 4
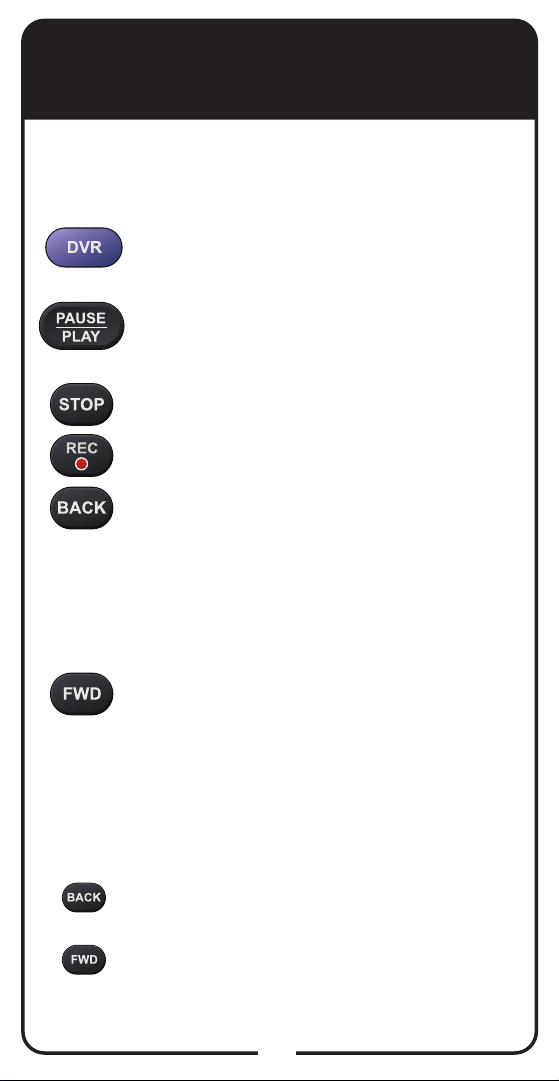
DVR Functions
Note: DVR Functions only work with DISH receivers
that support DVR.
Press twice to go to list of recorded
programs.
Pauses or plays a live or recorded
program.
Stops recording a program.
Records a program.
Press and release to skip backward
through recorded programs. Press
and hold before releasing to rewind
quickly (4x). If pressed and released
once in rewind mode, rewinding video
increases to second speed (60x).
or
Press and release to skip forward
through recorded programs. Press
and hold before releasing to fastforward quickly (4x). If pressed and
released once in fast forward mode,
forwarding video increases to second
speed (60x).
Note: If video is rewinding or forwarding at 4x
speed and the opposite button is pressed, the
video switches to other direction.
If video is rewinding or forwarding at 60x
speed and the opposite button is pressed, the
video decreases to 4x.
2
Page 5
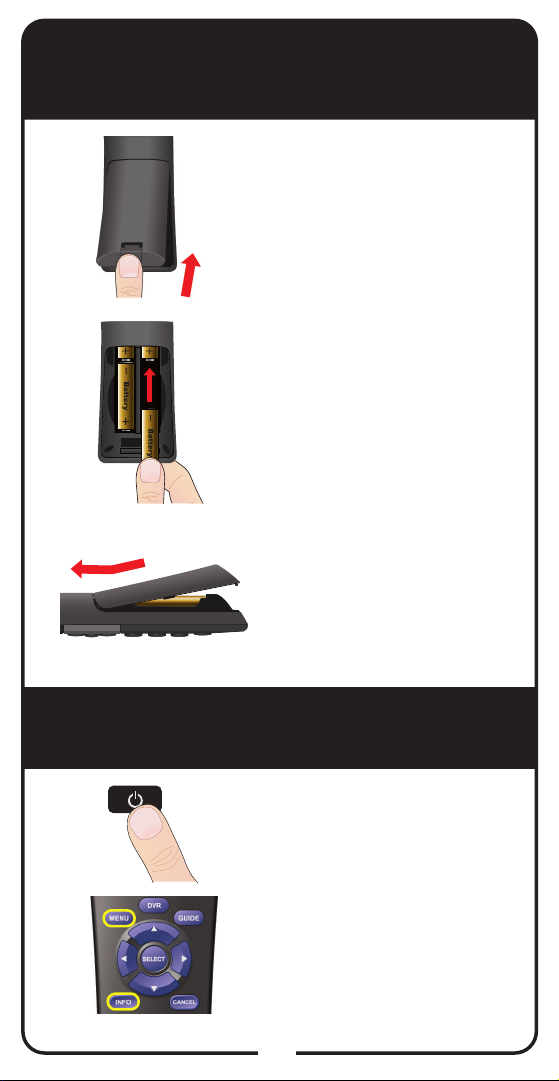
Insert the Batteries
Remove the remote
1
2
3
battery cover.
Insert 4 AA batteries,
making sure to match the
plus (+) ends with the plus
markings on the battery
case.
Replace the remote
battery cover. With the
cover at a slight angle,
line up the tabs and push
down on the cover until it
is in place.
Making the Remote Work
with the Receiver
Press the POWER button
1
2
on the receiver’s front
panel.
Conrm remote operates
the receiver by pressing
other remote buttons.
3
Page 6
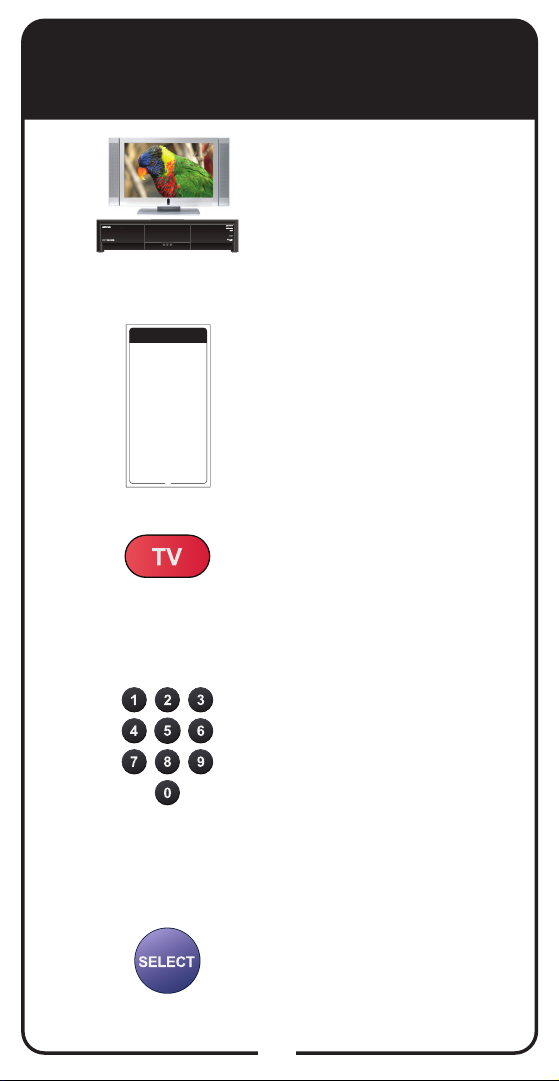
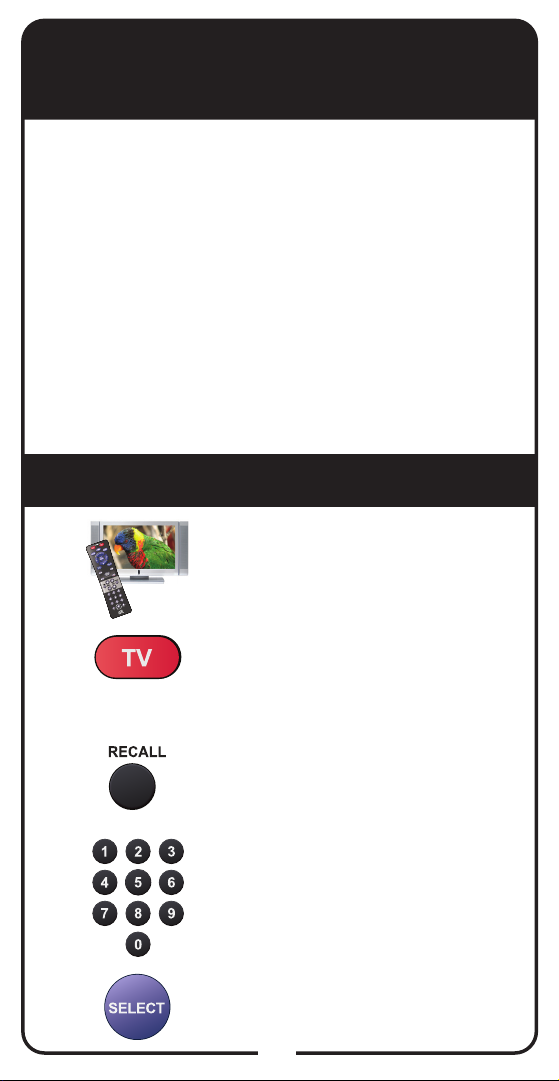
Programming Remote to Control TV
(Entering a TV Code)
Turn TV and receiver on.
1
2
3
4
TV Codes
These tables contain manufacturer codes for programming
the remote control to operate your TV. Every attempt has
been made to include all codes. If your equipment brand is
not listed or if the codes do not work, the remote may not
control your equipment. In some cases, codes may operate
some but not all buttons shown in this guide.
Anam National
3M 026 160
Abex 658 926
963
ABS 721
Anthem 164
Accurian 623
AOC 075 131 157 235 271
Acer 511
505 506 519 520 582 620
Action 061
627 653 654 914 932 952
Admiral 521 532 533 572
975
675 726 739 740 834 835
Apex 542 552 574 595
Advent 032 035 044 053
743 744 745 757 759 771
220 502 653 842 912
815
Adventura 929
Apex Digital 065 086
Aftron 069
231
Aiko 524 727 778
Archer 804 914
Aiwa 018 667
Astar 186 594
Akai 016 175 178 179 180
Audiovox 020 040 099
506 592 601 612 622 627
222 223 224 280 524 528
652 680 684 738 750 754
531 541 565 623 624 657
794 795 807 808 858 865
678 682 697 719 727 778
866 906 907 908 946
810 816 832 914
Alaron 532 974 977
Aurora Systems 039
Albatron 692 804
Aventura 527 569 694
Alienware 721
733 841 846
A-Mark 804 914
Axion 222 636
Ambassador 971
Bang & Olufsen 161
America Action
514 665
541 657
Barco 770 824 825 826
682
828
Ampro 691
Baycraft 536
Amtron 657
Baysonic 682
Anam 657 682 915 916
936
Table continued on next page
11
Find the brand name of the
541 657
TV listed in the TV Code
table that starts on
page 11.
Press and hold TV
POWER until red light
comes on. Release TV
POWER. Red light blinks.
Enter a three-digit TV
code (see page 11) that
corresponds to your TV
brand, using the number
buttons on the remote’s
number pad. Red light
remains on after entering
the code.
5
Press and release
SELECT. Red light blinks
three times.
Steps continued on next page
4
Page 7
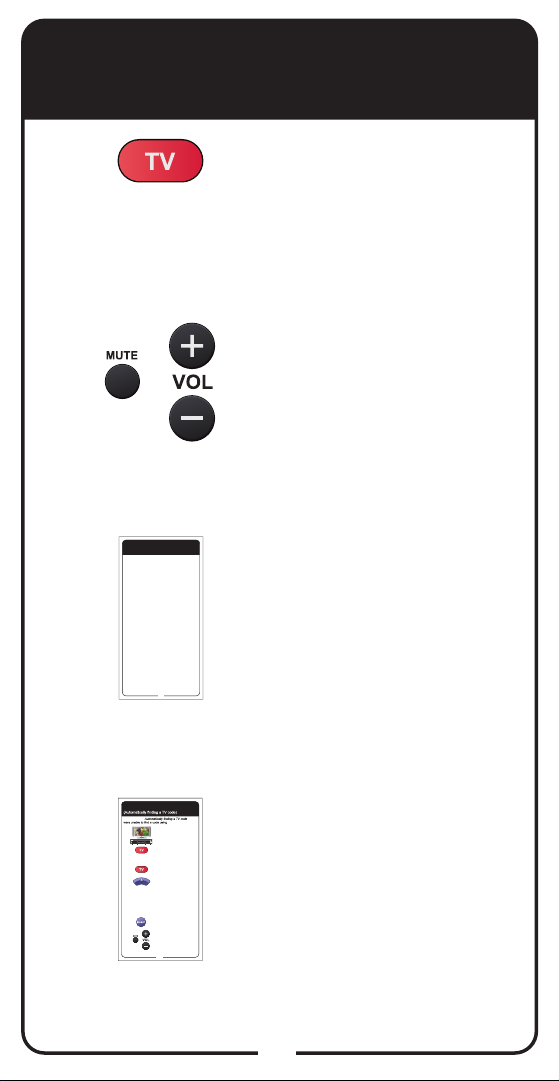
Programming Remote to Control TV
(Entering a TV Code continued)
Press and release TV
6
7
POWER to turn off TV. If
TV turns off, continue to
step 7. If TV does not turn
off, go to Step 8.
Turn TV on and try other
buttons to make sure they
work. If the other buttons
work, stop here. If they do
not work, continue to
Step 8.
8
9
TV Codes
These tables contain manufacturer codes for programming
the remote control to operate your TV. Every attempt has
been made to include all codes. If your equipment brand is
not listed or if the codes do not work, the remote may not
control your equipment. In some cases, codes may operate
some but not all buttons shown in this guide.
Anam National
3M 026 160
Abex 658 926
963
ABS 721
Anthem 164
Accurian 623
AOC 075 131 157 235 271
Acer 511
505 506 519 520 582 620
Action 061
627 653 654 914 932 952
Admiral 521 532 533 572
975
675 726 739 740 834 835
Apex 542 552 574 595
Advent 032 035 044 053
743 744 745 757 759 771
220 502 653 842 912
815
Adventura 929
Apex Digital 065 086
Aftron 069
231
Aiko 524 727 778
Archer 804 914
Aiwa 018 667
Astar 186 594
Akai 016 175 178 179 180
Audiovox 020 040 099
506 592 601 612 622 627
222 223 224 280 524 528
652 680 684 738 750 754
531 541 565 623 624 657
794 795 807 808 858 865
678 682 697 719 727 778
866 906 907 908 946
810 816 832 914
Alaron 532 974 977
Aurora Systems 039
Albatron 692 804
Aventura 527 569 694
Alienware 721
733 841 846
A-Mark 804 914
Axion 222 636
Ambassador 971
Bang & Olufsen 161
America Action
514 665
541 657
Barco 770 824 825 826
682
828
Ampro 691
Baycraft 536
Amtron 657
Baysonic 682
Anam 657 682 915 916
936
Table continued on next page
11
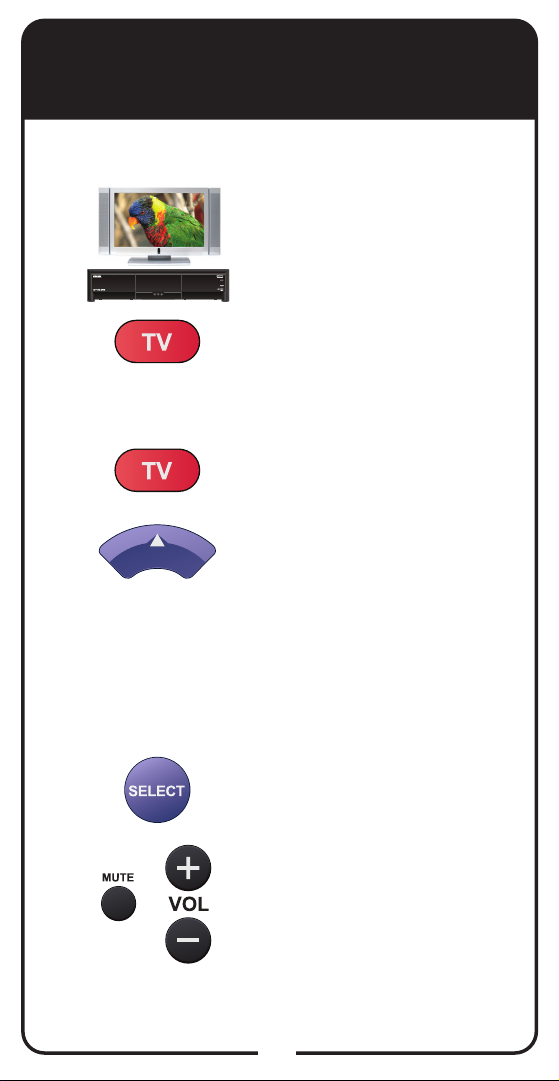
Programming Remote to Control TV
Note: Only use if you
Entering a TV code.
Turn TV and receiver on.
1
Press and hold TV POWER
2
until red light comes on.
Release TV POWER. Red
light blinks.
Press and release TV
3
POWER. Red light stays on.
Pointing the remote at the
TV the entire time, press
4
and release UP ARROW
slowly. Red light goes out
and comes back on. If the
TV turns off, continue to
Step 5. If the TV remains on,
repeat this step until the TV
turns off.
Press and release SELECT.
5
Red light blinks three times.
Press TV POWER to
turn TV on and try other
6
buttons to make sure the
TV responds the way you
expect. If not, try another
code by returning to Step 1.
6
If the code does not work,
541 657
repeat Steps 3 through 7
with another TV code for
your brand of TV listed in
the table starting on
page 11.
If you are unable to
nd a code that works,
try the instructions for
Automatically Finding a TV
Code on page 6.
5
Page 8
Programming Remote to Control TV
(Automatically Finding a TV Code)
Note: Only use Automatically Finding a TV Code if you
were unable to nd a code using Entering a TV Code.
Turn TV and receiver on.
1
Press and hold TV POWER
2
3
4
until red light comes on.
Release TV POWER. Red
light blinks.
Press and release TV
POWER. Red light stays on.
Pointing the remote at the
TV the entire time, press
and release UP ARROW
slowly. Red light goes out
and comes back on. If TV
turns off, continue to Step 5.
If TV remains on, repeat this
step until TV turns off.
5
6
Press and release SELECT.
Red light blinks three times.
Press TV POWER to
turn TV on and try other
buttons to make sure the
TV responds the way you
expect. If not, try another
code by returning to Step 1.
6
Page 9
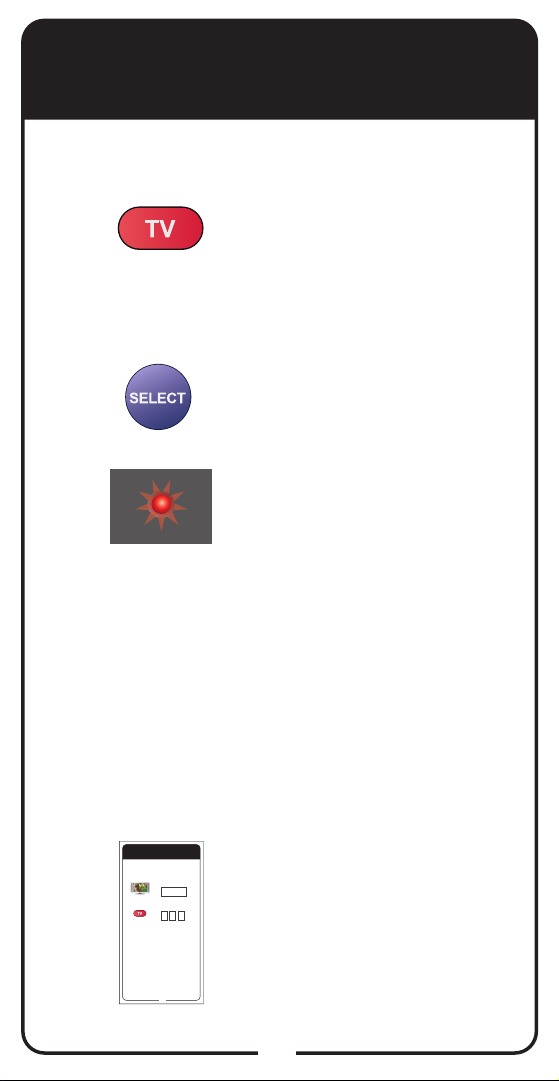
Displaying TV Code
To identify the TV code that your Basic Remote is
using, complete the following steps:
Press and hold TV
1
2
3
POWER until red light
comes on. Release TV
POWER. Red light blinks.
Press and release
SELECT twice.
The red light blinks
a number of times
corresponding to the value
of the stored TV code. For
example, if the stored TV
code is 593, the red light
blinks ve times, pauses,
blinks nine times, pauses,
and blinks three times. For
a zero value, the red light
blinks quickly (different
blink from a value of 1).
4
Reference Table
Write down your channel numbers/inputs and TV
codes as you program them for future reference.
Channel or Input for
Satellite Programming
TV Code
29
Record the stored TV code
in the Reference Table on
the inside back cover.
7
Page 10
SAT Auto-Tune
SAT Auto-Tune programs into the remote control the
correct TV channel used for viewing your satellite
programming. If you are experiencing fuzzy, blue,
or black screens, it might be due to the TV being
set to the wrong channel. Using the SAT Auto-Tune
feature helps prevent fuzzy, blue, or black screens
from occurring. When TV POWER is pressed and
released, the remote sends that channel to the TV,
ensuring that the TV is on the correct channel for
viewing your satellite programming.
To use this feature, you must program the channel
by following the steps under Setting SAT Auto-Tune
Channel.
Setting SAT Auto-Tune Channel
Make sure the remote control
1
2
operates your TV.
Press and hold TV POWER until
red light comes on. Release TV
POWER. Red light blinks.
3
4
5
Press and release RECALL.
Enter the channel used for
viewing (three digits in range
of 002 to 125), for example
channel “003.”
Press and release SELECT.
8
Page 11

Disabling SAT Auto-Tune
Channel
If you decide that you do not want the TV
programmed to the TV channel used for viewing
your satellite programming, follow the steps below to
disable SAT Auto-Tune. This only needs to be done
if you followed the steps for Setting SAT Auto-Tune
Channel on page 8.
Press and hold TV POWER until
1
red light comes on. Release TV
POWER.
Press and release RECALL.
2
Enter 000.
3
4
Press and release SELECT.
9
Page 12

Using System Wizard
Note: System Wizard only works with some
receivers.
Use System Wizard to store and/or restore your
remote settings. If your batteries are low, replace
them before beginning.
Press and hold 0
1
2
until System Wizard
message appears.
Release 0. Make sure
remote and receiver
are in line of sight.
Select Continue to
return to Live TV.
10
Page 13

TV Codes
These tables contain manufacturer codes for programming
the remote control to operate your TV. Every attempt has
been made to include all codes. If your equipment brand is
not listed or if the codes do not work, the remote may not
control your equipment. In some cases, codes may operate
some but not all buttons shown in this guide.
3M 026 160
Abex 658 926
ABS 721
Accurian 623
Acer 511
Action 061
Admiral 521 532 533 572
675 726 739 740 834 835
Advent 032 035 044 053
220502 653 842 912
Adventura 929
Aftron 069
Aiko 524 727 778
Aiwa 018 667
Akai 016 175 178 179 180
506 592 601 612 622 627
652 680 684 738 750 754
794 795 807 808 858 865
866 906 907 908
Alaron 532 974 977
Albatron 692 804
Alienware 721
A-Mark 804 914
Ambassador 971
America Action 541 657
682
Ampro 691
Anam 657 682 915 916
936
Anam National
541 657
963
Anthem 164
AOC 075 131 157 235 271
505 506 519 520 582 620
627 653 654 914 932 952
975
Aomni 162
Apex 542 552 574 595
743 744 745 757 759 771
815
Apex Digital 065 086
231
Archer 804 914
Astar 186 594
Audiovox 020 040 099
222 223 224 280 524 528
531 541 565 623 624 657
678 682 697 719 727 778
810 832 914
Aurora Systems 039
Aventura 527 569 694
733 841 846
Axion 222 636
Bang & Olufsen 161
514 665
Barco 770 824 825 826
828
Baycraft 536
Table continued on next page
11
Page 14

TV Codes continued
Baysonic 682
Belcor 505 627 773
Bell & Howell 590 611
675
Benq 073 112 511 535
Bradford 541 657 682
Brillian 091 092 093 558
Brockwood 505 627
Broksonic 213 533 622
648 682 726 748 750 752
754 834 865 866 899 908
914 980
ByD:sign 109 792
Cadia 098
Candle 506 523 536 627
654 929 933
Canon 036 135 282
Capehart 627
Carnivale 506 627
Carver 621 656 674 761
792 818 897 968
Casio 083
CCE 528 816 978 990
Celebrity 500 640 652
677 758 781 783 795 797
798 837 844
Celera 743 744 745 815
Champion 130
Changhong 743
815
Cinego 230
Cineral 697
Circuit City 627
744 745
Citizen 170 172 173 506
516 523 524 536 590 622
627 654 655 657 658 664
680 702 727 750 754 778
865 866 908 929 933 985
Clairtone 975
Clarion 541 657 682
Classic 229
Coby 165 256 257 258
260 261 262 263 264 265
266 267 268 281 607 626
633
Colortyme 627 654
Colt 660
Commercial Solutions
503 522 645 650 749 776
779 805 830 831 859 863
864
Compaq 029 030
Computime 071
Concerto 523 627 654
933
Contec 541 657 682 960
961 975
Contec/Cony 541 655
657 658
Craig 536 541 657 682
694 963
Crosley 500 621 640 656
674 677 758 761 781 783
792 795 797 798 818 837
844 897
Crown 536 541 655 656
657 658 682 702 761
CTX 804
Table continued on next page
12
Page 15

TV Codes continued
Curtis 573 683
Curtis Mathes
215 503 506 516 521 528 530
531 572 590 611 621 627 641
645 650 654 655 656 658 674
675 680 697 702 719 738 739
740 749 755 761 776 792 794
818 830 832 863 864 897 933
953 966
CXC 541 657 682
CyberHome 037
CyberPower 721
Cytron 537 539 550 903
904
Daewoo 015 016 505 524
528 530 531 590 611 627
630 653 654 655 658 664
684 697 702 719 727 778
816 832 853 935 942
Daytron 505 627 654 658
Dell 080 137 518 676 772
773 774
Delta 070 909
Denon 007 786 953
Denstar 011
DiamondVision
659
Digistar 153
Digital Lifestyles 194
Digital Projection Inc.
143 185 191
Dimensia 503 645 830
DISH Network 742
Disney 247
Dixi 761 897
003 028
546 643
Dumont 501 505 627 711
775 813
Durabrand 527 533 541
564 569 587 627 632 657
682 694 718 726 733 834
841 843 846 914
Dwin 022 034 572 739
Dynatech 930
Dynex 200 538 585 698
701 706
EchoStar 742 763
Eiki 025
Electroband 500 640
652 677 758 781 783 795
797 798 837 844 975
Electrograph 162 507
581 609 710 746 753 763
801
Electrohome 171 173
533 627 652 654 726 795
834 994 997
Element 250 567 568 591
669 723 724
Emerson 213 505 527
528 529 530 531 532 533
536 541 559 564 569 587
590 611 618 627 632 643
646 654 655 657 658 664
668 672 679 682 694 697
702 718 719 726 733 748
752 756 764 767 777 816
829 832 834 838 839 841
846 899 927 961 971 972
973 974 975 980 982 985
987
Table continued on next page
13
Page 16

TV Codes continued
Emprex 152 194 597
Encross 062 142
Envision 042 131 235
506 519 620 627 654
Epson 102 708
Erae 089
ESA 527 569 587 601 618
632 646 679 694 733 767
777 829 838 839 841 846
Fisher 590 595 611
FlexVision 020
Fujitsu 041 532 536 602
603 694
Funai 095 212 228 500
527 532 541 569 587 618
640 657 677 679 682 694
733 756 758 777 781 783
795 797 798 829 837 838
839 841 844 846
Futuretech 541 657 682
694
Gateway 070 071 072
507 511 535 581 609 710
721 746 753 763 801
GE 028 214 215 216 270
920 922 924 950 984 987
General Electric 503
508 522 528 531 544 564
627 645 650 654 661 697
718 719 742 749 776 779
805 830 831 832 859 863
864
GFM 249 527 529 559 569
618 679 694 733 777 829
838 839 841 846
Gibralter 501 505 506
627 711 775 813
Go Video 204 696
Goldstar 219 505 506
523 564 627 653 654 655
658 702 718 720 761 897
913 926 997
Goodmans 993
GPX 532
Gradiente 540 996
Granada 627
Grand 627
Grundig 603
Grunpy 532 541 657 682
H&B 132
Haier 190 276 515 571
693 843
Hallmark 564 627 654
718
Hanns.G 199
Hannspree 124 125 126
188 199
Harley Davidson 212
532 756 928
Harman/Kardon 621
627 656 674 761 792 818
897 938
Harsper 084
Harvard 541 657 682 936
Havermy 521 572 739
740
Helios 901 905
Hello Kitty 528 531 697
719 832
Hewlett Packard 074
075 076 146 712 721 911
Table continued on next page
14
Page 17

TV Codes continued
Hisense 111 169 241 269
759
Hitachi 123 212 517 523
547 549 554 555 606 627
637 638 654 655 658 675
688 709 756 786 788 789
790 791 926 927 933 943
945 953 957 970 984 997
998
Howard Computers
721
HP 074 075 076 146 599
712 721 911
Hush 721
Hyundai 087 103 695
I-Inc 189
iBUYPOWER 721
Ilo 177 529 559 588 596
625 668 764
IMA 657
Innity 621 656 674 761
792 818 897
InFocus 031 148 252 616
Initial 596 625
Insignia 082 149 167 169
181 211 240 272 273 527
533 537 538 539 543 550
553 569 585 618 679 694
698 701 726 728 733 751
766 773 777 809 829 834
838 839 841 846 857 903
Inteq 501 711 775 813
iRIS 251
IX 063
Janeil 929
JBL 621 656 674 761 792
818 897
JC Penney 503 505 506
508 516 595 627 631 645
653 654 658 680 830
JCB 500 640 652 677 758
781 783 795 797 798 837
844
Jensen 032 044 106 220
502 537 627 653 654 842
912 931
JVC 023 164 197 217 508
517 533 557 570 642 649
655 658 688 713 714 715
726 735 736 737 812 817
834 937 962 967 973
Kamp 977
Kawasho 627 652 654
795 961 977 988
Kaypani 932
KDS 591 669
KEC 541 657 682
Kenwood 505 506 627
654 716
KLH 227 595 743 744 745
815
Kloss 627 921 929 938
Kloss Novabeam 657
KMDS 094 255
Konka 011 012 013 019
510
Kost 094 144
Kreisen 062 142
KTV 506 541 627 655 657
658 682 702 974 975 978
985
Table continued on next page
15
Page 18

TV Codes continued
LG 002 047 056 080 115
196 221 501 503 522 545
553 564 615 627 650 653
654 693 711 718 720 730
766 773 775 779 804 805
809 813 830 831 859
Linksys 721
LiteOn 074
Lloyd’s 212 627 756
Lloytron 658
Loewe 656 761 897 951
Logik 675
Luce 052 699
Luxman 523 627 654 933
LXI 028 503 526 564 590
595 611 621 627 631 635
645 650 654 656 674 718
744 749 761 768 771 776
785 792 818 830 863 864
897 955
M. Wards 500 505 506
795
MAG 591 669
Magnasonic 664 756
Magnavox
131 151 208 212 506 507 508
517 527 532 536 550 560 563
569 581 609 618 621 625 627
646 654 656 674 679 688 694
710 733 746 747 753 756 761
762 763 767 777 782 792 801
818 827 828 829 838 839 841
846 887 888 891 892 893 894
897 919 921 923 944 976 995
Magnin 661
Majestic 675
040 081 090
Marantz 078 506 560 563
604 608 621 627 654 656
674 747 761 792 818 836
897
Matsushita 014 512 577
619 634 685 689 700 729
734 765 780 784 819 820
821 822 823
Maxent 033 085 184 193
507 581 609 710 746 753
763 801
MB Quart 210
Media Center 721
Media Center PC 721
Megapower 804
Megatron 564 627 654
718 914 953
MEI 975
Memorex 063 171 211
218 219 504 529 532 533
564 590 611 613 627 648
653 654 675 680 684 718
725 726 752 787 799 834
869 876 899
MGA 504 505 506 564
613 627 653 654 661 718
725 787 799 959
Micro 140
Microsoft 721
Midland 028 501 508 645
650 655 658 702 711 730
749 775 776 813 863 864
926 950
Mind 721
Mintek 596 625
Table continued on next page
16
Page 19

TV Codes continued
Minutz 920
Mitsubishi 051 058 134
150 214 504 505 517 521
564 572 613 614 627 653
654 688 718 725 739 740
787 799 918 946 959 991
992
Mitsui 769
Monivision 692 804
Montgomery Ward 675
Motorola 050 521 572
739 740 835
Moxell 050
MTC 505 506 516 523 627
653 654 680 930 933 942
975 977
Multitech 541 657 682
930 978
Multivision 810
NAD 057 079 526 564 595
627 631 635 637 654 718
744 768 771 785 933
Nakamichi 145
Naxa 233
NEC 006 066 505 506 517
523 604 608 610 627 653
654 687 688 731 732 904
933 968
Net-TV 033 507 581 586
609 710 746 753 763 801
Nexus Electronics 250
Nikkai 613
Nikko 506 524 564 627
654 718 727 778
Niko 156
Niveus Media 721
Noblex 001
Norcent 075 131 157 158
243 519 579 759
Northgate 721
Norwood Micro 104 588
Noshi 681
Novabeam 627
NTC 524 727 778
NuVision 168 248
Nyon 627
Olevia 077 523 564 566
578 580 654 910
Olympus 121
Onwa 541 657 682
Optimus 014 218 512
577 590 611 619 634 637
685 689 700 729 734 756
765 780 784 819 820 821
822 823 869 876 966
Optoma 067 174
Optonica 521 572 739
740 835 965
Orion 213 532 533 538
694 726 748 752 834 899
980
Ovation 024
Table continued on next page
17
Page 20

TV Codes continued
Panasonic 014 110 215
218 508 509 512 576 577
619 634 644 647 656 685
689 700 729 734 761 765
780 784 811 819 820 821
822 823 860 861 862 867
868 869 870 871 872 873
874 875 876 877 878 879
880 881 882 883 884 885
886 889 890 895 896 897
900 964 979
Panavision 734 811
PARK 242
PDI 142
Penney 028 215 219 526
564 595 627 631 635 645
650 655 658 661 681 702
718 720 744 749 768 771
776 785 863 864 913 914
920 922 926 949 950 956
Petters 534
Philco 505 506 527 529
532 536 559 569 618 621
627 653 654 655 656 658
668 674 679 694 733 761
764 777 792 818 829 838
839 841 846 897 919 923
944
Philips 017 078 144 209
226 525 527 548 550 560
563 621 625 627 655 656
658 674 747 761 770 782
792 818 824 825 826 827
828 839 887 888 891 892
893 894 897
Philips Magnavox 527
550 761 826 827 828
Pilot 505 506 627 655 658
702
Pioneer 057 164 547 561
576 604 608 627 637 654
927 966 969
Planar 147
Plasmsync 610
Polaroid 094 096 111
113 116 117 120 153 195
227 231 232 236 244 245
534 537 539 550 588 591
627 669 670 671 678 743
744 745 751 766 773 814
815 901 903 905
Portland 505 524 528
530 531 627 653 654 655
658 697 702 719 727 778
832
Price Club 680
Prima 032 035 044 200
220 502 653 673 674 842
912
Princeton 021 562 804
Prism 508
Projectiondesign 191
192
Proscan 028 216 254 503
506 522 645 650 705 742
749 776 779 805 830 831
859 863 864
Proton 003 536 564 627
654 655 658 718 914 925
932
Protron 114 589
Table continued on next page
18
Page 21

TV Codes continued
Proview 050 591 669 902
Proxima 024 025 026 027
Pulsar 501 505 627 711
775 813
Puneet 152
Pvision 089
Quanta 072
Quasar 014 215 218 508
512 577 619 634 685 689
700 729 734 765 780 784
819 820 821 822 823 860
861 862 867 868 869 870
871 872 873 874 875 876
877 878 879 880 881 882
883 884 885 886 889 890
895 896 965
Radio Shack 028 212
503 505 506 541 564 590
611 627 645 650 682 702
718 749 756 776 830 863
864 926 933 965 997
Radio Shack/Realistic
503 590 627 645 654 655
657 658 830
RCA 028 198 214 215 216
225 503 505 508 521 522
530 544 547 627 630 636
637 639 641 645 650 651
653 654 661 681 686 690
740 742 749 751 776 779
805 830 831 859 863 864
902 924 927 941 950 983
Realistic 503 505 506
541 564 590 611 627 645
682 702 718 830 926 933
965
RevolutionHD 162
Rhapsody 974 975 977
Ricavision 721
Runco 006 163 176 501
506 604 608 627 711 775
813
Sampo 033 506 507 581
609 627 654 655 658 702
710 746 753 763 801 926
932 947 949
Samsung 043 154 505
506 516 523 564 601 627
653 654 655 658 680 684
702 707 717 718 738 755
761 794 833 858 897 926
933 990 999
Samsux 655 658 702
Sansei 697
Sansui 138 171 211 212
527 533 569 622 694 726
733 748 750 752 754 756
834 841 846 865 866 899
908
Sanyo 004 038 274 275
517 590 611 621 627 656
661 674 688 761 792 818
840 897 940 948 954
SBR 761 897
Sceptre 064 086 128 159
279 677
Schneider 761 897
Scimitsu 505 773
Scotch 564 627 654 718
Table continued on next page
19
Page 22

TV Codes continued
Scott 182 505 532 541
564 627 654 655 657 658
682 718 980
Sears 028 212 219 503
523 526 527 532 558 564
569 590 595 611 621 627
631 635 645 650 654 656
658 674 694 718 733 744
749 756 761 768 771 776
785 792 818 830 841 846
863 864 897 933 954 955
956 986
Seimitsu 627
Semivox 682
Semp 595 771
Sharp 005 214 277 521
546 556 572 605 627 628
629 654 655 658 663 702
739 740 803 835 836 898
958 960 965 986 995
Sharper Image 703
Sheng Chia
740
Sherwood 136
Shogun 505 627
Signature 621 656 674
675 761 792 818 897
Signet 094
SIM2 Multimedia 105
Simpson 536 976
Skyworth 202
Solavox 613
Solarism 088
Sole 132 144 162 238 239
699
521 572 739
Sony 049 201 212 500
513 640 652 677 721 756
758 781 783 795 796 797
798 806 837 844 845 917
939
Soundesign 532 536 541
564 627 654 657 682 718
Sova 114 224
Soyo 152 189 205 206
Spectricon 627 914 952
Spectroniq 591 669
Squareview 527 569 694
733 841 846
SSS 505 541 627 657 682
Stack 9 721
Starlite 541 657 682
Studio Experience 692
SunBrite 139 259
Superscan 521 572 583
646 739 740 741 767 777
Supra 523 627
Supre-Macy 929
Supreme 500 640 652
677 758 781 783 795 797
798 807 837 844
SVA 008 059 060 515 618
679 759 777 829 838 839
901 905
Sylvania 095 111 506
527 529 536 559 567 568
569 618 621 627 646 654
656 668 672 674 679 694
723 724 733 756 761 764
767 777 792 818 829 838
839 841 846 888 897 919
923 934 944
Table continued on next page
20
Page 23

TV Codes continued
Symphonic
569 587 632 646 657 679 682
694 733 756 767 841 846
Syntax 077 523 564 566
578 580 654 910
Syntax-Brillian 558 564
Systemax 721
Tagar Systems 721
Tandy 521 572 739 740
835
Tashiko 009
Tatung 076 100 101 129
511 535 588 914 930
Teac 586
Technics 508 512 577
619 634 685 689 700 729
734 765 780 784 819 820
821 822 823
Technol ACE 532
Techview 055 234 590
Techwood 508 523 627
654 914 933
Teco 704
Teknika 504 505 512 516
523 524 532 536 541 613
621 627 644 653 654 655
656 657 658 674 675 680
682 685 702 725 727 761
778 787 792 799 818 897
933 989
Telecaption 688
Telefunken 738 794 933
Telemagic 025
Tera 925
Thomas 212 627 756
Thomson 010
212 527 541
TMK 523 564 627 654 718
933 971
TNCi 501 711 775 813
Toshiba 014 045 048 054
079 108 115 122 127 166
516 517 526 590 595 610
611 615 617 622 631 635
644 666 680 688 721 744
750 754 755 768 771 785
793 800 802 847 848 849
850 851 852 854 855 865
866 908 909 956
Tosonic 975
Totevision 655 658 702
Touch 721
Toyomenko 627
Trical 960
Trutech 237 584
TVS 533 726 834
Ultra 589
Universal 922
US Logic 588
UTI Technology 253
V Inc. 562 575
Vector Research 506
627
Venturer 207
VEOS 558
Victor 557 735 736 737
Video Concepts 946
Vidikron 163 164 604 608
621 656 674 761 792 818
897 981
Vidtech 505 517 564 627
653 654 688 718
Table continued on next page
21
Page 24

TV Codes continued
Viewsonic 118 121 155
187 235 507 551 562 575
579 581 582 583 600 606
609 620 710 721 741 746
753 760 763 789 796 801
Viking 929 989
Viore 177 203 242 683
907
Visart 119
Vistron 246
Vizio 511 535 551 562
575 583 593 598 741 773
Voodoo 721
Wards 057 079 501 503
508 516 526 532 536 541
564 590 595 611 621 627
631 635 640 641 645 653
654 656 657 674 675 677
681 682 711 718 749 758
761 768 775 776 781 783
785 792 797 798 813 818
830 837 844 863 864 897
919 920 921 922 923 924
933 939 944 965 976
Waycon 526 595 631 635
768 785
Westinghouse 068 097
107 183 278 528 531 551
562 574 575 652 697 719
795 797 798 809 832 856
White Westinghouse
528 530 533 726 816 832
834
WinBook 133
Wyse 131
Xoceco 141
Yamaha 505 506 606 627
653 654 789
York 627
Zenith 212 500 501 506
524 530 533 553 555 564
615 627 638 640 645 675
677 711 718 720 726 727
748 749 752 756 758 766
773 775 776 778 781 783
795 797 798 809 813 834
837 844 853 863 864 899
Zonda 804 914
ZT Group 721
22
Page 25

Troubleshooting
Use this information if you have a problem using
the remote. To solve a particular problem, do the
following:
• Find the information that relates to the problem
you are experiencing. Try the suggested solution
for that problem.
• Make sure your remote control has fresh
batteries. If you see the Remote Battery Low
warning on your TV screen, it is time to change
the batteries. Follow the instructions on page 3.
• Make sure you have a direct line of sight between
the remote and the receiver.
• Visit mydish.com.
While performing a remote control procedure, the
remote control stops working.
What to do: Start over again. If you don’t press a
button for 20-30 seconds in a programming sequence,
the remote shuts off its programming function.
When you press a button on the remote control,
the equipment doesn’t do what you expect.
What to do: Point the remote control directly at the
TV, with no objects blocking the signal path. The
remote control uses IR (infrared) signals to control the
receiver. IR signals travel less than 40 feet and cannot
go through walls or other solid objects.
If the batteries are missing or dead, replace them with
fresh AA-size batteries (see page 3). If the remote
has fresh batteries, check whether you put them in
correctly. If you didn’t, take them out and put them in
the right way.
23
Page 26

Troubleshooting, continued
When you try to enter TV programming mode, the
red light comes on and blinks eight times when TV
POWER is released.
What to do: Replace the batteries (see page 3).
Your remote control does not work well.
What to do: Move your receiver to different
locations. For best results, place the receiver as
high as possible, above all other equipment in your
entertainment center. There may be IR interference
from objects near the receiver.
Your picture is fuzzy (or black or blue).
What to do: Make sure your TV is tuned to the correct
channel. You may have accidentally changed the
channel on your TV. Check the Reference Table on
the inside back cover to see what channel your TV is
tuned to.
Your remote control isn’t working.
What to do: Make sure you are using the correct
remote control.
Change the batteries as described on page 3. Your
batteries may be worn out.
When you press the remote control MUTE or
VOLUME button, nothing happens.
What to do: Program the remote to control your TV.
See Programming Remote to Control TV on pages 4
and 5.
24
Page 27

Limited Warranty
This Limited Warranty is a legal document. Keep it in a
safe place. Remember to keep your Sales Receipt for
warranty service. We will consider any items you return
without a copy of the Proof of Purchase to be out of
warranty.
This warranty extends only to the original user (“you,” “your”) of the DISH
Network remote control and is limited to the purchase price of the remote
control. EchoStar Technologies L.L.C., formerly known as EchoStar
Technologies Corporation, and its afliated companies (“we,” “our,” “us”)
warrant this remote control against defects in materials or workmanship as
follows.
For one year from the original date of purchase, if we nd the remote control
is defective subject to the limits of this warranty, we will replace the remote at
no charge for parts or labor. We warrant any such work done against defects
in materials or workmanship for the remaining part of the original warranty
period.
This warranty does not cover installation of the DISH Network System;
consumer instruction; physical set up or adjustment of any consumer
electronic equipment; remote control batteries; signal reception problems;
loss of use of the equipment; unused programming charges due to equipment
malfunction; cosmetic damage; damage due to lightning, electrical or
telephone line surges, re, ood, or other acts of Nature; accident; misuse;
abuse; repair or alteration by other than our factory service; negligence;
commercial or institutional use; improper or neglected maintenance;
equipment sold AS IS or WITH ALL FAULTS; equipment removal or
reinstallation; shipping damage if the equipment was not packed and shipped
in the manner we prescribe; nor equipment purchased, serviced, or operated
outside the contiguous United States of America.
REPLACEMENT AS PROVIDED UNDER THIS WARRANTY IS YOUR
EXCLUSIVE REMEDY. WE SHALL NOT BE HELD LIABLE FOR ANY
INCIDENTAL OR CONSEQUENTIAL DAMAGES FOR BREACH OF ANY
EXPRESSED OR IMPLIED WARRANTY ON THIS DEVICE, NOR FOR ANY
INCIDENTAL OR CONSEQUENTIAL DAMAGE RESULTING FROM THE USE
OF, OR INABILITY TO USE, THIS DEVICE. UNDER NO CIRCUMSTANCES
SHALL OUR LIABILITY, IF ANY, EXCEED THE PURCHASE PRICE
PAID FOR THIS DEVICE. EXCEPT TO THE EXTENT PROHIBITED BY
APPLICABLE LAW, ANY IMPLIED WARRANTY OF MERCHANTABILITY OR
FITNESS FOR A PARTICULAR PURPOSE ON THIS DEVICE IS LIMITED IN
DURATION TO THE DURATION OF THIS WARRANTY. WE RESERVE THE
RIGHT TO REFUSE TO HONOR THIS WARRANTY IF WE DETERMINE
ANY OF THE ABOVE EXCEPTIONS TO HAVE CAUSED THIS DEVICE NOT
TO HAVE PERFORMED PROPERLY. THIS WARRANTY SHALL BE VOID IF
ANY FACTORY-APPLIED IDENTIFICATION MARK, INCLUDING BUT NOT
LIMITED TO SERIAL OR CONDITIONAL ACCESS NUMBERS, HAS BEEN
ALTERED OR REMOVED. THIS WARRANTY SHALL ALSO BE VOID IF THE
DEVICE HAS BEEN OPENED BY AN UNAUTHORIZED PERSON (with the
exception of opening the battery cover).
This warranty gives you specic legal rights which may vary from state to
state. Some states do not allow the exclusion or limitations of incidental or
consequential damages, or allow limitations on the duration of an implied
warranty, so those limitations may not apply to you.
25
Page 28

DISH Network’s Exchange
Programs
DISH Network offers two options if you need to replace
your remote control: the Advanced Exchange Program and
the Post Receipt Exchange Program.
Advance Exchange Program
The Advanced Exchange Program allows you to have
a replacement remote shipped immediately to you.
Depending upon where you live, the remote should arrive
within 3 to 5 business days. You will not have to return your
defective remote to DISH Network using this program.
A shipping charge will be applied for shipping the
replacement remote. This is a one-time fee based on
DISH Network’s competitive bulk shipping rates (additional
charges may apply outside the continental U.S.). This fee
will be charged to your billing account or valid credit card.
Post Receipt Exchange Program
The Post Receipt Exchange Program does require that
you send DISH Network the defective remote control at
your cost to determine if the equipment is covered under
warranty. To provide faster service, upon receipt of your
equipment you will be shipped a replacement. Your original
equipment will not be available for return.
If your equipment is not covered under warranty and can be
repaired, your billing account or credit card will be charged
the standard repair fee for the replacement. If damage to
the defective equipment is found, which DISH Network in
its sole discretion determines has voided the warranty, or
makes the equipment unrepairable, your billing account
or credit card will be charged the market price of the
replacement.
Accessory Warranty
An accessory is any DISH branded equipment,
displaying the DISH logo, excluding the receiver,
Smart Card, cables and hookups, and non-mechanical
components. A one-year warranty becomes effective
upon the activation of the DISH system or date of
purchase, if bought separately. If an accessory has an
expired warranty, you may purchase a replacement from
DISH or your local retailer.
26
Page 29

If You Need Help
1. Review this User Guide.
2. See Troubleshooting on page 23.
3. Visit mydish.com/chat for 24/7 support.
4. Call the Customer Service Center at
1-800-333-DISH (3474). Have the date of purchase
and your customer account number ready.
a. If the representative nds you should return the
remote control, you’ll get a telephone number
to call for a Return Authorization (RA) number.
Before shipping any equipment to us, you must
get a Return Authorization Number.
b. You must package returned equipment the
correct way. Follow the instructions the
representative gives you.
c. Write the RA number in large, clearly visible
characters on the outside of the shipping box
used to return the equipment.
To avoid confusion and misunderstandings, we
will return shipments without an RA number
clearly visible on the outside of the box to you
at your cost.
d. We will:
• Check the remote control, including whether
it is covered under the warranty.
• Replace any remote we nd is defective
with a new or refurbished remote, if the
defective remote is covered under the
warranty. We will ship the replacement
remote at our expense.
• If a defective remote is not covered under
the warranty, we will tell you. We may
assess you a at rate charge for a
replacement remote, including shipping
and insurance.
27
Page 30

Regulatory Factors
This device complies with Part 15 of FCC Rules.
Operation is subject to the following two conditions:
1. This device may not cause harmful
interference,
and
2. This device must accept any interference
received, including interference that may
cause undesired operation.
Changes or modications to this device may void
your authority to operate this equipment.
This equipment has been tested and found to
comply with the limits for a Class B digital device,
pursuant to Part 15 of the FCC Rules. These limits
are designed to provide protection against harmful
interference in a residential installation. This
equipment generates, uses, and can radiate radio
frequency energy and, if not installed and used in
accordance with the instructions, may cause harmful
interference to radio communications. However,
there is no guarantee that interference will not occur
in a particular installation. If this equipment does
cause harmful interference to radio or television
reception, which can be determined by turning the
equipment off and on, the user is encouraged to try
to correct the interference by following one or more
of the following measures:
• Reorient or relocate the receiving antenna.
• Increase the separation between the equipment
and receiver.
• Connect the equipment into an outlet on a
circuit different from that to which the receiver is
connected.
• Consult the dealer or an experienced radio/TV
technician for help.
28
Page 31

Reference Table
Write down your channel numbers/inputs and TV
code as you program them for future reference.
Channel or Input for
Satellite Programming
TV Code
29
Page 32

For all your customer needs,
go to mydish.com/chat or call the
Customer Service center at
1-800-333-DISH (3474)
196107
 Loading...