

Page 1
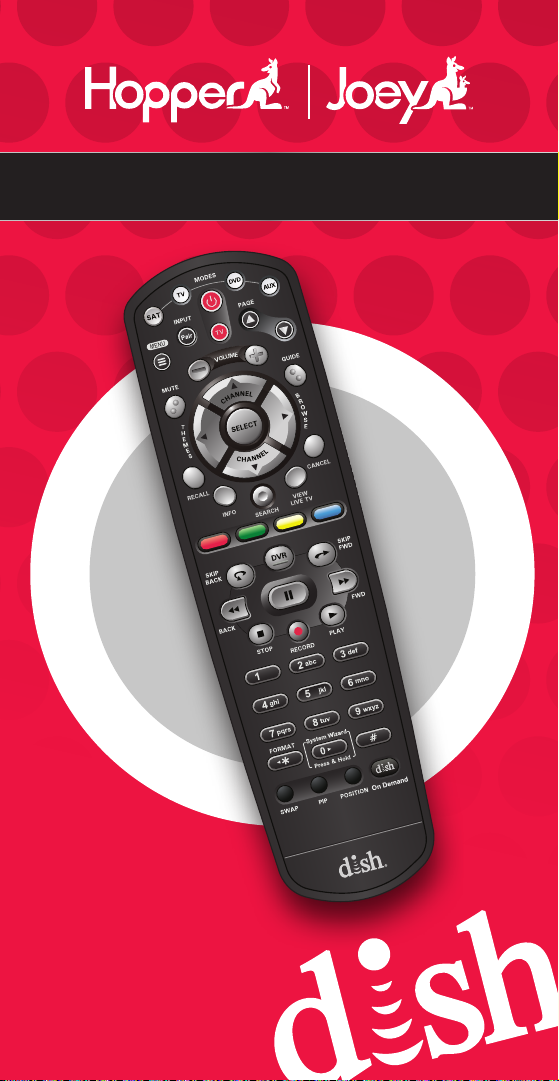
REMOTE USER GUIDE
Page 2
Safety Instructions
You must keep safety in mind while using this device. Keep
these and any other instructions for future reference.
Observe Warnings: Carefully follow all warnings on the device
and in the operating instructions.
Heat: Do NOT place the device near heat sources such as
radiators, stoves, heat registers, or other appliances that
produce heat.
Care and Use
Cleaning: Do NOT use liquid, abrasive, solvent, or aerosol
cleaners. Use a damp cloth for cleaning.
When Not in Use: Remove the batteries if this device is to be
left unattended or unused for a long period of time.
Refer servicing to qualied personnel when a
solid object or liquid has fallen onto or into the
device.
Do NOT attempt to service this device. Refer all
servicing to qualied personnel. Opening covers
other than the battery cover will void the warranty.
Publishing Information
Copyright © 2012. EchoStar Technologies L.L.C., Englewood,
Colorado 80112. All rights reserved.
The information in this User Guide may change without notice.
Revisions may be issued to tell you about such changes.
Send comments or questions about this User Guide to
techpubs@echostar.com or
Technical Publications, EchoStar Technologies L.L.C,
90 Inverness Drive Circle East, Englewood, Colorado 80112.
Document Number: 188891
Printed in
DISH Network is a registered trademark of
DISH Network L.L.C.
All product names, trade names, or corporate names
mentioned in this User Guide are acknowledged to be the
proprietary property of the registered owners.
Page 3

Insert the Batteries
Pull the remote battery cover
1
off.
2
3
Insert 4 AAA batteries,
making sure to match the
plus (+) ends with the plus
markings on the battery case.
Replace the remote battery
cover.
1
Page 4
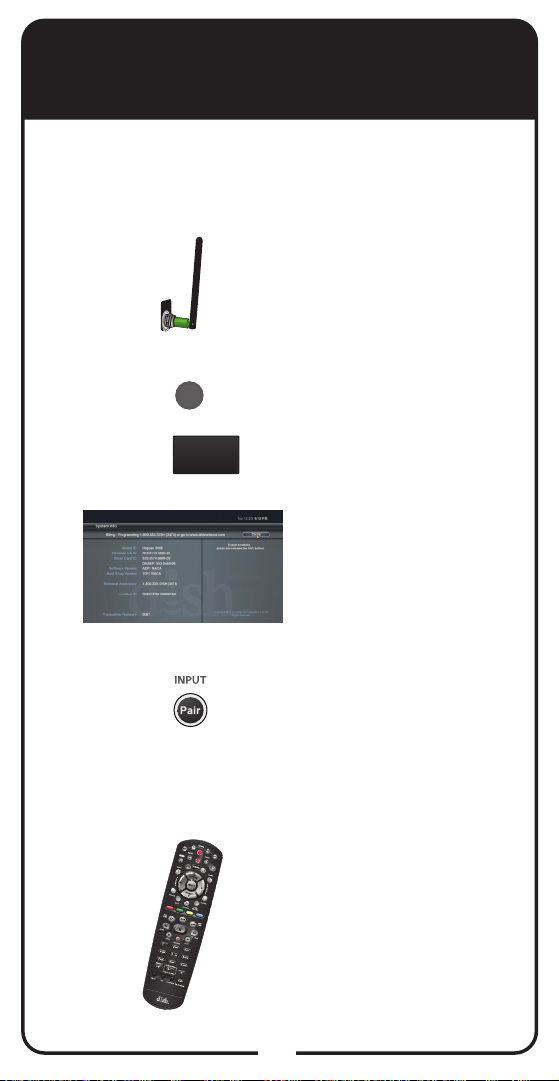
Pairing Remote to Hopper or
Joey
For the remote to work with either Hopper or Joey, it
must be paired. Use the following procedure to pair
the remote.
Verify the antenna
1
E
OT
M
E
R
NA
N
E
T
N
A
is installed on the back
of your Hopper. Joeys
have an internal antenna.
2
3
4
5
Hopper:
OR
Joey:
SYSTEM
INFO
SYS INFO
Turn your Hopper or Joey
and TV on, and press
SYSTEM INFO on the
front panel.
Conrm that you
see the System
Info screen.
Press and release PAIR
on your remote. Wait until
you hear a tone and see
the remote listed on the
screen. After pairing, you
should hear a series of
ascending tones.
Conrm that your remote
operates your Hopper or
Joey by pressing remote
buttons. If this is not
working, go back to
step 4.
2
Page 5
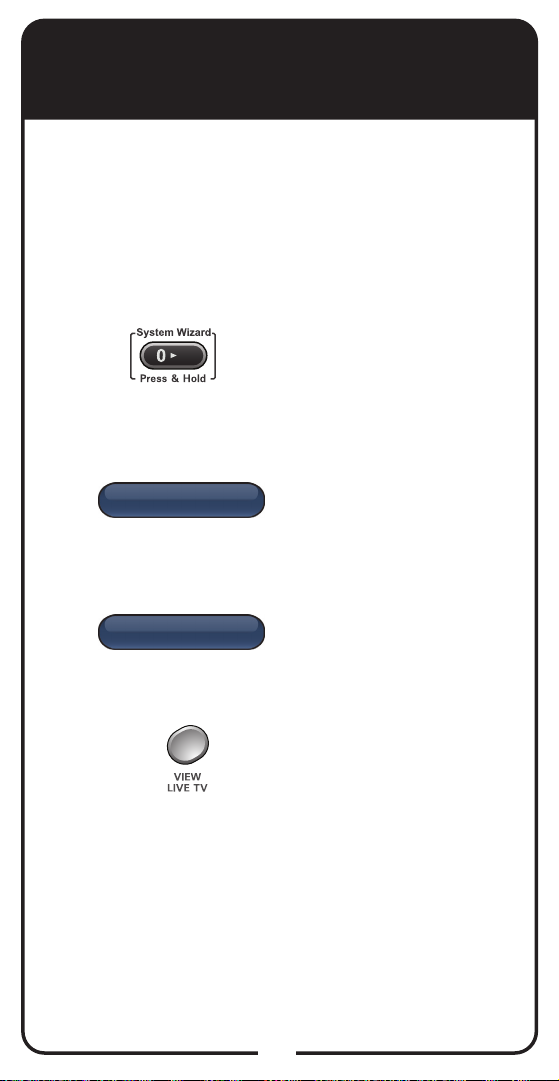
Backing up Remote or
Receiver Settings
After setting up the remote and the receiver, you can
back up your settings. If you back up your settings, you
can restore them if the settings are ever lost or if you
replace your remote or receiver.
Note: If your batteries are low, replace them before
beginning the following steps.
Press and hold SYSTEM
1
WIZARD until the
System Wizard screen
appears.
2
3
4
Backup
Back
If you have nished
setting up a new remote,
click on Backup. Backup
saves your receiver and
remote settings.
When Backup is
complete, click on Back
to return to System
Wizard.
Select VIEW LIVE TV
to return to your paid
programming.
3
Page 6

Restoring Remote or
Receiver Settings
If you should lose settings that have been backed
up (see Backing Up Remote or Receiver Settings
on page 3) or if you replace your remote or receiver,
you can restore the remote and receiver settings.
Press and hold SYSTEM
1
WIZARD until the System
Wizard screen appears.
2
3
4
5
Restore
Device
Remote
Receiver
Back
Close
If you are setting up a
new remote or receiver
and used Backup with
the previous remote or
receiver, click on Restore
to restore the settings.
Select either Remote
or Receiver settings to
restore from the Device
List.
When Restore is nished,
select Back to return to
System Wizard.
Select Close to return
to the Settings menu.
4
Page 7
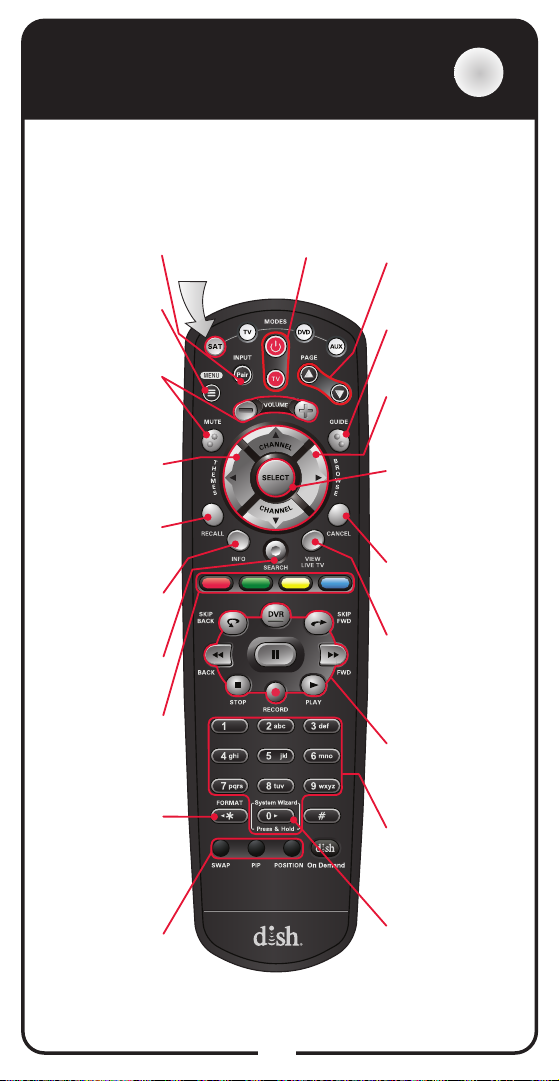
SAT Mode
SAT
To use the features described in this section, make sure
you are in SAT mode by pressing the SAT Mode button.
Note: Some features may not be available depending on
your receiver model.
Pair/Input
Pairs remote to
Hopper or Joey
Access receiver
features and
settings
Volume and
Mute Buttons
Control TV
volume
Programming
required
Themes
Search for
programs using
Themes
Recall
Return to
previously viewed
TV channel(s)
Retrieve info
on programs or
set a timer
Search
Search for a
program
Colored
Buttons
Provides
shortcuts to
frequently
used menus
(see page 10)
Format
Format the
picture to the
desired width
to match the
program you are
Picture) Buttons
(Note: Hopper only
viewing
PIP (Picture-In-
Watch two
separate
programs at
the same time
feature)
Press this
button for
SAT Mode
Menu
Info
Power & TV Power
Top button turns the receiver on/off
Bottom button turns the TV on/off
Page Buttons
Page up/down in
Program Guide
and event content
Program Guide
Display current
and future satellite
program listings
Browse
See what is on
other channels
while watching TV
Arrow/Select
Buttons
Channel up/down,
navigate through
menus, and select
a desired option
Cancel
Return to previous
menu or to watch
a program
View Satellite
Programming
Exit out of any
menu or the guide
and return to
viewing live TV
Digital Video
Recorder (DVR)
Buttons
Pause live TV and
play or record
programming
Number Buttons
Enter a channel
number or navigate
through menus
and program
guide
System Wizard
Press and hold to
go to the backup
and restore screen
5
Page 8
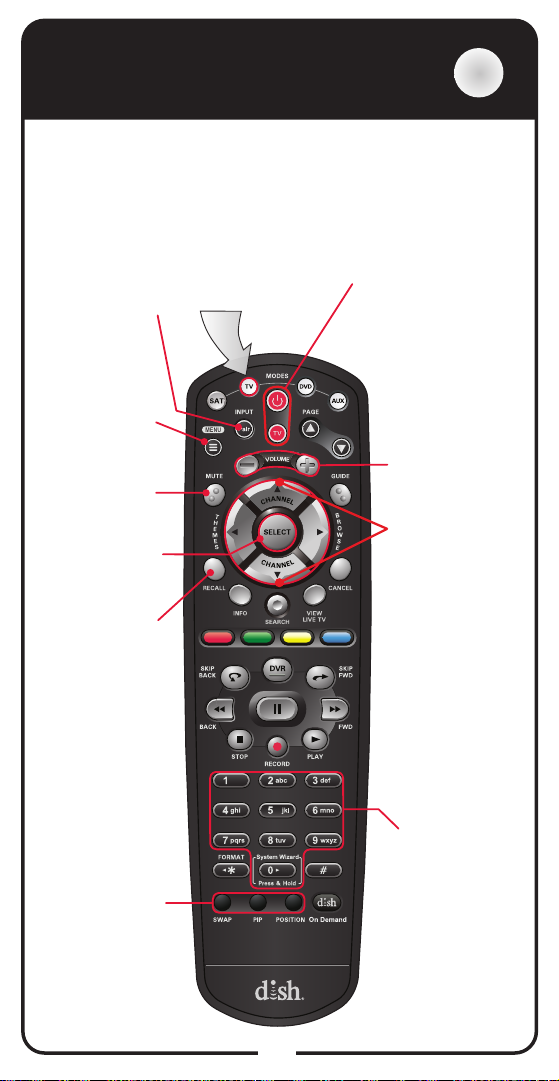
TV Mode
TV
To use the features described in this section, make sure you
are in TV mode by pressing the TV Mode button. Remote
programming is required. Note: The remote has Limited
Mode enabled, which means only the Volume, Mute, and TV
Power buttons work in TV Mode (see Enabling or Disabling
Limited Mode on page 21). Note: Some features may not be
available depending on your TV model.
Power & TV Power
Top button turns
the TV on/off
Bottom button
turns the TV on/off
Volume
Control TV
volume
Up/Down
Arrow Button
Channel up/
down on the TV
Pair/Input
Switch between
TV inputs
(available only for
certain makes and
models of TVs)
TV Menu
Access menu
features available
on some TVs
Turn TV volume
Select Button
Select a program
Return to last TV
channel viewed
Mute
on or off
or menu
Recall
Press this button
for TV Mode
PIP (Picture-In-
Picture) Buttons
Watch two
separate
programs at
the same
time (Note: May
not be available)
Number
Buttons
Enter a
channel
number
6
Page 9

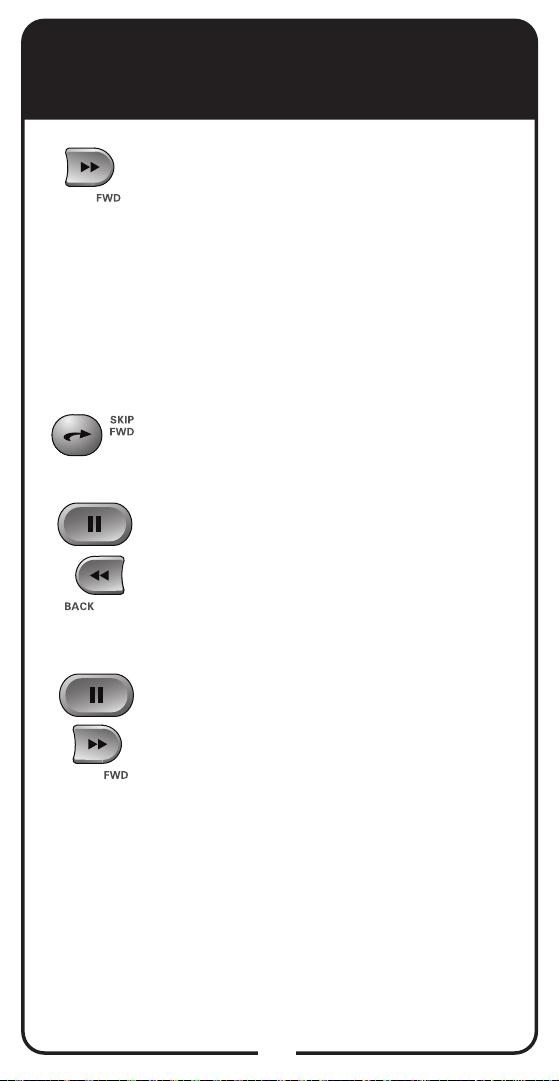
DVD Mode
DVD
To use the features described in this section, make sure you
are in DVD mode by pressing the DVD Mode button. You
can use this mode to operate a DVD player, a Blu-ray
Disc (BD) player, or a VCR. Remote programming is
required. Note: Some features may not be available
depending on your device’s model.
Power & TV Power
Top button turns the
DVD/BD/VCR on/off
Bottom button
turns the TV on/off
Back
Rewind a
videotape
or reverse a
DVD
Stop
Stop playing
or recording a
videotape, or
stop playing a
DVD
Record
Record on a
videotape
Press this button
for DVD Mode
Pause
Pause a
videotape or
DVD
FWD
Forward a
videotape or
DVD
Play
Play a videotape
or DVD
Number Buttons
Use to get to
specic chapters
on the DVD; the
function of remote
number buttons
depends on the
device
7
Page 10

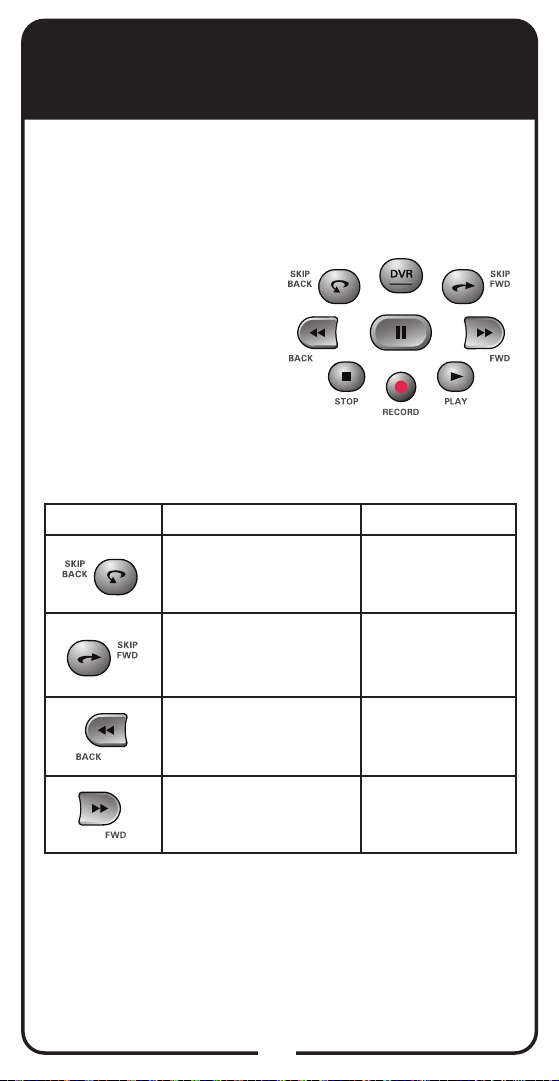
DVR Functions
• Displays a list of recorded programs.
• Plays a live or recorded program.
• Pauses a live or recorded program.
• Stops recording a program or playing a
recorded program.
• Records a program.
• Press BACK once to reverse the program
four times as fast as normal play. Press
BACK twice to reverse at 15 times normal
speed, three times to reverse at 60 times
normal speed, and four times to reverse
at 300 times normal speed. The on-
screen bar shows how far you’ve gone.
For a live program, you can only reverse
back to the last channel change or back
one hour, whichever occurs rst.
• Press SKIP BACK to skip back about 10
seconds in a program.
8
Page 11
DVR Functions, continued
• Press FWD (Forward) once to fast-
forward through the program four times
normal speed. Press FWD twice to
forward at 15 times normal speed, three
times to forward at 60 times normal
speed, and four times to forward at 300
times normal speed. The on-screen bar
shows how far you’ve gone. Of course,
you cannot forward a live program that
has not been broadcast yet.
• Press SKIP FWD to skip ahead about
30 seconds in the program.
• Press PAUSE and then press BACK
to reverse the program in slow motion
at 1/4 the speed of normal play. Press
BACK again to reverse at normal
speed.
• Press PAUSE and then press FWD to
forward the program in slow motion at
1/15 the speed of normal play. Press
FWD twice to forward at 1/4 as fast as
normal play. Press FWD three times
to play the program. Of course, you
cannot forward a live program that has
not been broadcast yet.
9
Page 12
Using Remote Button
Shortcuts
In addition to their normal functions, some buttons
on your remote control have special shortcut
functions. These shortcuts are enabled while
navigating the on-screen Electronic Program Guide
(EPG) or viewing the scrollable list of events.
DVR Buttons
The following table lists
some of these shortcuts
for the gray set of buttons
that normally control your
DVR functions.
Note: Scheduled updates to your receiver software
may add to or modify these shortcuts.
Buttons In Guide Display Scroll in Lists
Move 3 hours back
Move 3 hours ahead
24 hours back To beginning of list
24 hours ahead To end of list
10
By 1 screen
upward
By 1 screen
downward
Page 13

Using Remote Button
Shortcuts, continued
Colored Buttons
The following table lists some of the shortcuts for
the colored set of buttons on your remote control.
Note: Scheduled updates to your receiver software
may add to or modify these shortcuts.
Buttons From Live TV Elsewhere
Jumps to menu bar
Access TV Viewing Status
Access Quick Clicks list
Access Setting screen
Access Network Settings
and displays the red
button menu
option
Jumps to menu bar
and displays the
green button menu
option
Jumps to menu bar
and displays the
yellow button menu
option
Jumps to menu bar
and displays the
blue button menu
option
11
Page 14

Programming Remote to
Control Another Device
There are three ways that you can program your
DISH Network remote to control another device,
such as a TV, DVD, BD, VCR, audio receiver, or
amplier:
• Scanning the Remote Database
• Entering a Code
• Learning Codes
Use Scanning the Remote Database if you don’t
know the device code. The receiver scans the
database of codes for the particular device and
tries each code. When you nd one that works, you
save that code.
Use Entering a Code when you know the device
code.
Use Learning Codes when either your device isn’t
listed under Lookup or when you have scanned the
database and none of the codes worked.
Typically, the TV mode button is programmed to a
TV; the DVD mode button is programmed to a DVD,
BD, or VCR; and the AUX button to a DVD, BD,
VCR, audio receiver, or ampliier. However, each
of the Mode buttons are programmable to whatever
device you select.
Each of these procedures is discussed in the
following pages.
12
Page 15

Programming Remote to Control
Another Device, continued
Scanning the Remote Database
Scan the remote database to nd codes for another
device, such as a TV, DVD, BD, or VCR.
Turn the device and
1
2
3
receiver on.
Press MENU and select
the Settings tile. From the
Settings screen, select
Remote Manager.
Select the TV Code, DVD
Code, or AUX Code
option on the Remote
Manager settings screen.
If programming in TV or
DVD Code, continue to
step 4. If programming in
AUX Mode, continue with
this step.
4
Lookup Code
For programming in
AUX Mode only:
Scroll the Aux Device:
list to select and highlight
your device type. Select
Next.
Select the Lookup Code
option.
continued on next page
13
Page 16

Programming Remote to Control
Another Device, continued
Scanning the Remote Database,
continued
5
6
7
8
Sort by
I-J
K-L
M-N
O-Q
R-S
Brand
RadioShack
RCS
Realistic
Reoc
RevolutionHD
Yes
Scroll the Sort By: (or
Aux Device:) list to
position the selected
option within the blue
highlight bar.
Highlight device’s name
in the Brand: list and
select Next.
Note: If the brand is not
listed, see Entering a
Code on page 16. The
available device codes
and the code ready to be
tested displays for the
selected brand.
Select Yes to test the
remote with the device.
Press the Mode button
for the device you are
setting up. Release.
Press POWER to turn
off your device. If device
turns off, continue with
step 10.
9
No
If it does not turn off,
press and release SAT
to switch modes. Select
No on screen and repeat
steps 6 through 9 for the
next code.
14
Page 17

Programming Remote to Control
Another Device, continued
Scanning the Remote Database,
continued
Using the remote, turn
10
the device on and try
some other remote
buttons to make sure
they work. When
nished, press and
release SAT to switch
modes.
11
Yes
OR
No
Save
If the code worked for
other buttons, select Yes
and continue to step 11.
If the code did not work,
select No and repeat
steps 6 through 10 for
the next code for the
brand of your device.
On the Remote Manager
screen, conrm that the
device’s brand name is in
parentheses after a fourdigit code. Select Save.
15
Page 18

Programming Remote to Control
Another Device, continued
Entering a Code
If you know a device’s code, you can enter the code
directly.
Turn the device and
1
2
3
receiver on.
Press MENU and select
the Settings tile. From the
Settings screen, select
Remote Manager.
Select the TV Code, DVD
Code, or AUX Code
option on the Remote
Manager settings screen.
If programming in TV
Code or DVD Code,
continue to step 4. If
programming in AUX
Code, continue with
this step.
4
Enter Code
For programming in
AUX Mode only:
Scroll the Aux Device:
list to select and highlight
your device type. Select
Next.
Select Enter Code.
16
Page 19

Programming Remote to Control
Another Device, continued
Entering a Code, continued
Using the on-screen keypad,
enter the four-digit code for
your device. Select Next.
Note: The three-digit device
9
codes used by other DISH
Network remote controls
cannot be used.
5
XXXX
1 2 3
4 5 6
7 8
* 0 #
CLEAR
Next
6
7
8
9
10
Yes
Select Yes to save the code.
Conrm that the code
you entered appears for
the programmed device
(TV, DVD, or AUX) on the
Remote Manager settings
screen.
Press the Mode button
for the device you are
programming (TV, DVD, or
AUX). Release.
Press POWER. If device
does not turn off, press
SAT to switch modes and
release. Try entering the
code again. If device turns
off, continue to step 10.
Using remote, turn the
device back on and try some
other remote buttons to see
if they work.
Repeat steps 1 through 10
until you have the best code
for controlling your device.
17
Page 20

Programming Remote to Control
Another Device, continued
Learning Codes
Another way to program codes from one remote to
another is the Learning Codes procedure.
Turn the device and
1
2
3
receiver on.
Press MENU and select
the Settings tile. From the
Settings screen, select
Remote Manager.
Select the TV Code, DVD
Code, or AUX Code option
on the Remote Manager
settings screen, depending
on the device that you want
the remote to learn from.
4
5
Add learned commands to existing code
Blank Slate-This will erase all prvious commands
Start Learning
6
Learn
Learning Style
Select Learn.
Select Learning Style.
Select Add learned
commands to existing
code if you want to program
specic buttons. Select
Blank Slate-This will erase
all previous commands if
you want to program most of
the remote codes into your
40.0 remote.
Select Start Learning.
18
Page 21

Programming Remote to Control
Another Device, continued
Learning Codes, continued
Follow the instructions given
7
8
on the screen.
When nished, press
any Mode button to save
commands and exit this
screen. To cancel without
saving, do not press any
button on either remote for
at least 20 seconds.
19
Page 22

Displaying Device Code
To identify the device code that your remote control
is using, complete the following steps:
Press MENU, select Settings
1
2
3
tile, and then select Remote
Manager. The Home screen
for your current remote
control displays.
If you used the Look Up
option, the brand name
of the device is listed in
parentheses after the code.
If you entered the device
code, the code displays with
Unknown in parentheses
after it.
Remember that the type of
device controlled in DVD
mode may be either a DVD/
BD player or a VCR, and
AUX also may be an audio
receiver, accessory, amplier,
or a second TV. If you
entered the device code, the
code displays with Unknown
in parentheses after it.
4
Record the stored device
code in the Reference Table
on the inside back cover of
this Guide (see page 37).
20
Page 23

Enabling or Disabling
Limited Mode
Limited Mode locks out all the device mode
operations except for the device’s Power, Mute, and
Volume. This prevents you from accidentally tuning
away from satellite programming. The following steps
describe how to enable Limited Mode on the remote
and how to disable Limited Mode.
Note: Limited Mode is only used with TV mode.
Press MENU, select
1
2
Limited Mode
Settings tile, and then
select Remote Manager.
Select the Limited Mode
option.
3
4
Limited Mode
Enabled
Disabled
Limited Mode
Enabled
Disabled
Save
Use the arrow button to
highlight Enabled and
then select it. Highlight and
select Save.
To take the remote out of
Limited Mode, highlight
Disabled instead of
Enabled in step 3.
Select Save.
21
Page 24

Locating a Lost Remote
If you are unable to nd the remote, try this feature
for locating it.
1
2
Hopper:
OR
Joey:
LOCATE
REMOTE
LOCATE
REMOTE
Activate your receiver’s front
panel controls and touch
LOCATE REMOTE.
If the missing remote control
is paired to this receiver and
within range, there should
be a series of tones you
can hear to help you nd
the location of the remote. It
can take up to 30 seconds
for the tones to begin. Press
any button to turn off the
LOCATE REMOTE tones
after nding the remote.
If you do not hear any tones
after pressing LOCATE
REMOTE, press the
SYSTEM INFO button on
the front panel. The System
Info screen lists the paired
remote(s). If the remote
control you want to nd is
not listed, it is not paired to
the receiver and LOCATE
REMOTE is not an option.
If the remote control you
want to nd is out of RF
range, LOCATE REMOTE
is not an option.
22
Page 25

Avoiding RF Interference
Because your remote control uses UHF 2G (2.4
GHz ISM band) radio frequencies (RF), you
might experience interference from other devices
transmitting nearby. The instructions in this section
describe how to avoid such conicts.
Adjusting the Antenna
The Hopper communicates with its remote control(s)
through an UHF 2G antenna connected to the
Remote Antenna input on it’s back panel.
Note: This remote antenna can only be used with
UHF 2G capable receivers.
Ensure the UHF 2G remote
1
2
3
E
OT
M
E
R
NA
N
E
T
N
A
E
OT
M
E
R
NA
N
E
T
N
A
antenna is connected to the correct
input on the Hopper’s back panel
and is not touching anything.
Tighten only by hand.
Vary the tilt angle of the Hopper’s
remote antenna, locating the
antenna’s tip away from any other
electronic equipment or metal
surfaces, even if separated by
wooden shelving.
Move the Hopper and/or Joey to
a different location. Place them
on as high a surface as possible,
above all other equipment in your
entertainment center.
4
5
Use the optionally available special
cable to connect the remote
antenna to the Hopper and place it
away from other equipment.
Move any nearby antenna or radio
equipment away from the Hopper
and/or the Joey. Do not place
an over-the-air antenna, WiFi,
Bluetooth, or Zigbee devices on or
near either the Hopper or the Joey.
23
Page 26

Control Amplier Volume
When the remote is set up to operate your TV, the
MUTE and VOLUME buttons adjust your TV volume
when in SAT mode. When the remote is also set up
to operate a remote-controllable audio receiver or
amplier (usually in AUX Mode), use these steps to
program the remote to control the amplier’s volume.
Press MENU, select
1
Settings tile, and then
select Remote Manager.
2
3
4
Makesuretheremotecontrolstheamplier’s
volume in other modes:
Volume
Control Volume for
TV
AUX
Save
Select Volume.
Under Control Volume for
highlight the AUX option.
Select Save.
Press SAT.
5
Press the plus (+) and minus
6
7
(-) sides of the VOLUME
button.
Your tuner/amplier’s volume
changes, and the AUX mode
button lights.
24
Page 27

Control TV Volume
Use this procedure to change from having the remote
adjust the volume of an audio receiver or amplier to
having the remote adjust the TV’s volume. When the
remote control is set up to operate your TV, the MUTE
and VOLUME buttons adjust your TV volume when in
SAT mode.
Press MENU, select Settings
1
tile, and then select Remote
Manager.
2
3
4
MakesuretheremotecontrolstheTV’s
volume in other modes:
Volume
Control Volume for
TV
AUX
Save
Select Volume.
Under Control Volume for
highlight the TV option.
Select Save.
Press SAT.
5
Press the plus (+) and minus
6
7
(-) sides of the VOLUME
button.
Your TV’s volume changes,
and the TV mode button lights.
25
Page 28

Troubleshooting
Use this information if you have a problem using
the remote. To solve a particular problem, do the
following:
• Find the information that relates to the problem
you are experiencing. Try the suggested solution
for that problem.
• Make sure your remote control has fresh
batteries. If you see the Remote Battery Low
warning on your TV screen, it is time to change
the batteries. Follow the instructions on page 1.
• Make sure you have a direct line of sight between
the remote and the receiver.
• Visit www.dish.com/support.
When you press a button on the remote control,
the equipment doesn’t do what you expect.
What to do: Press the correct mode button to set the
remote to the mode for the device you want to control:
SAT for your receiver, TV for your TV, DVD for your
DVD/BD/VCR, or AUX for your auxiliary equipment.
Point the remote control directly at the TV, with no
objects blocking the signal path. The remote control
uses IR signals to control the devices. IR signals
travel less than 40 feet, and cannot go through walls
or other solid objects.
If the batteries are missing or dead, replace them
with new AAA-size batteries. If the remote has new
batteries, check whether you put them in correctly.
If you didn’t, take them out and put them in the right
way.
Set up the remote to control all the devices you want
to use with the remote. See Programming Remote to
Control Another Device on page 12.
26
Page 29

Troubleshooting, continued
Your remote control does not work well when
controlling the Hopper or the Joey.
What to do: Move your receiver to different
locations. For best results, place the receiver as
high as possible, above all other equipment in your
entertainment center.
Your remote control does not work well when
controlling a TV, DVD, or AUX device.
What to do: There may be IR interference from
objects near the receiver. Make sure there is a direct
line of sight between the remote and the device.
Your remote control seems to have stopped
working.
What to do: Press one or more buttons on the
remote to wake the remote control. The remote
control may have gone to sleep to reduce battery
drain. If your remote is still unresponsive, take out
the batteries and press any button for three seconds,
then reinsert the batteries.
Your picture is snowy (or black or blue).
What to do: Make sure your TV is tuned to the
correct channel. You may have accidentally changed
the channel on your TV. Check the Reference Table
on page 37 to see what channel your TV is tuned to.
When you press the remote control MUTE or
VOLUME button, nothing happens.
What to do: Program the remote to control your TV.
See Programming Remote to Control Another Device
on page 12. If you are trying to control TV volume, but
the remote is set up to control a tuner or amplier in
AUX mode, then see Control TV Volume on page 25.
The receiver does things even though you haven’t
pressed any remote control buttons.
What to do: Check the System Info screen to
view a list of remotes paired to your receiver. Unpair the unwanted remote controls from this screen.
See Avoiding RF Interference on page 23 for more
information.
27
Page 30

Troubleshooting, continued
Your remote control isn’t working.
What to do: Make sure the remote control is in the
correct mode (SAT, TV, DVD, or AUX).
Change the batteries as described on page 1.
Your UHF 2G remote control does not work well
from far away.
What to do: Make sure the UHF antenna is
connected to the receiver and not touching anything
else.
Vary the angle of the receiver’s UHF antenna.
Locate the UHF antenna tip away from other
electronics equipment or metal surfaces, even if
separated by wooden shelving.
Move the receiver to different locations. For best
results, place the receiver as high as possible,
above all other equipment in your entertainment
center.
Move any nearby off-air antenna away from the UHF
remote antenna. Do not place an off-air antenna on
your receiver.
Your PIP (Picture-In-Picture) button isn’t
working.
What to do: The PIP feature works only when
viewing with the Hopper.
28
Page 31

Limited Warranty
This Limited Warranty is a legal document. Keep it in a
safe place. Remember to keep your Sales Receipt for
warranty service. We will consider any items you return
without a copy of the Proof of Purchase to be out of
warranty.
This warranty extends only to the original user (“you,” “your”) of the DISH
Network remote control and is limited to the purchase price of the remote
control. EchoStar Technologies L.L.C., formerly known as EchoStar
Technologies Corporation, and its afliated companies (“we,” “our,” “us”)
warrant this remote control against defects in materials or workmanship as
follows.
For one year from the original date of purchase, if we nd the remote control
is defective subject to the limits of this warranty, we will replace the remote at
no charge for parts or labor. We warrant any such work done against defects
in materials or workmanship for the remaining part of the original warranty
period.
This warranty does not cover installation of the DISH Network System;
consumer instruction; physical set up or adjustment of any consumer
electronic equipment; remote control batteries; signal reception problems;
loss of use of the equipment; unused programming charges due to equipment
malfunction; cosmetic damage; damage due to lightning, electrical or
telephone line surges, re, ood, or other acts of Nature; accident; misuse;
abuse; repair or alteration by other than our factory service; negligence;
commercial or institutional use; improper or neglected maintenance;
equipment sold AS IS or WITH ALL FAULTS; equipment removal or
reinstallation; shipping damage if the equipment was not packed and shipped
in the manner we prescribe; nor equipment purchased, serviced, or operated
outside the contiguous United States of America.
REPLACEMENT AS PROVIDED UNDER THIS WARRANTY IS YOUR
EXCLUSIVE REMEDY. WE SHALL NOT BE HELD LIABLE FOR ANY
INCIDENTAL OR CONSEQUENTIAL DAMAGES FOR BREACH OF ANY
EXPRESSED OR IMPLIED WARRANTY ON THIS DEVICE, NOR FOR ANY
INCIDENTAL OR CONSEQUENTIAL DAMAGE RESULTING FROM THE USE
OF, OR INABILITY TO USE, THIS DEVICE. UNDER NO CIRCUMSTANCES
SHALL OUR LIABILITY, IF ANY, EXCEED THE PURCHASE PRICE
PAID FOR THIS DEVICE. EXCEPT TO THE EXTENT PROHIBITED BY
APPLICABLE LAW, ANY IMPLIED WARRANTY OF MERCHANTABILITY OR
FITNESS FOR A PARTICULAR PURPOSE ON THIS DEVICE IS LIMITED IN
DURATION TO THE DURATION OF THIS WARRANTY. WE RESERVE THE
RIGHT TO REFUSE TO HONOR THIS WARRANTY IF WE DETERMINE
ANY OF THE ABOVE EXCEPTIONS TO HAVE CAUSED THIS DEVICE NOT
TO HAVE PERFORMED PROPERLY. THIS WARRANTY SHALL BE VOID IF
ANY FACTORY-APPLIED IDENTIFICATION MARK, INCLUDING BUT NOT
LIMITED TO SERIAL OR CONDITIONAL ACCESS NUMBERS, HAS BEEN
ALTERED OR REMOVED. THIS WARRANTY SHALL ALSO BE VOID IF THE
DEVICE HAS BEEN OPENED BY AN UNAUTHORIZED PERSON (with the
exception of opening the battery cover).
This warranty gives you specic legal rights which may vary from state to
state. Some states do not allow the exclusion or limitations of incidental or
consequential damages, or allow limitations on the duration of an implied
warranty, so those limitations may not apply to you.
29
Page 32

Accessory Warranty
An accessory is any DISH Network branded
equipment, displaying the DISH Network logo,
excluding the receiver, Smart Card, cables and
hookups, and non-mechanical components. A oneyear warranty becomes effective upon the activation
of the DISH system or date of purchase, if bought
separately. A proof of purchase is required to verify
the purchase date. If an accessory has an expired
warranty, no exchange will be issued. You may
purchase replacement accessories from DISH
Network or your local retailer.
If You Need Help
1. Review this User Guide.
2. See Troubleshooting on page 26.
3. Visit www.dish.com/chat for 24/7 support.
4. Call the Customer Service Center at
1-800-333-DISH (3474).
30
Page 33

Regulatory Factors
This device complies with Part 15 of FCC Rules.
Operation is subject to the following two conditions:
1. This device may not cause harmful
interference,
and
2. This device must accept any interference
received, including interference that may
cause undesired operation.
Changes or modications to this device may void
your authority to operate this equipment.
This equipment has been tested and found to
comply with the limits for a Class B digital device,
pursuant to Part 15 of the FCC Rules. These limits
are designed to provide protection against harmful
interference in a residential installation. This
equipment generates, uses, and can radiate radio
frequency energy and, if not installed and used in
accordance with the instructions, may cause harmful
interference to radio communications. However,
there is no guarantee that interference will not occur
in a particular installation. If this equipment does
cause harmful interference to radio or television
reception, which can be determined by turning the
equipment off and on, the user is encouraged to try
to correct the interference by following one or more
of the following measures:
• Reorient or relocate the receiving antenna.
• Increase the separation between the
equipment and receiver.
• Connect the equipment into an outlet on a
circuit different from that to which the receiver
is connected.
• Consult the dealer or an experienced radio/TV
technician for help.
31
Page 34

DISH Network’s Exchange
Programs
DISH Network offers two options if you need to replace
your remote control--the Advanced Exchange Program
and the Post Receipt Exchange Program.
Advanced Exchange Program
The Advanced Exchange Program allows you to have
a replacement remote shipped immediately to you.
Depending upon where you live, the remote should
arrive within three to ve business days. You will not
have to return your defective remote to DISH Network
using this program.
A shipping charge will be applied for shipping the
replacement remote. This is a one-time fee based
on DISH Network’s competitive bulk shipping rates
(additional charges may apply outside the continental
U.S.). This fee will be charged to your billing account or
valid credit card.
Post Receipt Exchange Program
The Post Receipt Exchange Program does require that
you send the defective remote control at your cost to
DISH Network to determine if the equipment is covered
under warranty. To provide faster service, upon receipt
of your equipment, you will be shipped a replacement.
Your original equipment will not be available for return.
If your equipment is not covered under warranty and
can be repaired, your billing account or credit card will
be charged the standard repair fee for the replacement.
If damage to the defective equipment is found, which
DISH Network in its sole discretion determines
has voided the warranty or makes the equipment
unrepairable, your billing account or credit card will be
charged the market price of the replacement.
32
Page 35

Notes
33
Page 36

Notes
34
Page 37

Notes
35
Page 38

Notes
36
Page 39

Reference Table
Write down the inputs, TV, VCR, DVD player, BD
player, and stereo equipment codes as you program
them for future reference.
Input for
Programming
TV Code
DVD/VCR/BD Player Code
Auxiliary Equipment Code
Auxiliary Device Type
To display your remote codes, see page 20 for instructions.
37
Page 40

For all your customer needs,
go to www.dish.com/chat or call
the Customer Service Center
at 1-800-333-DISH (3474)
188891
 Loading...