

Page 1
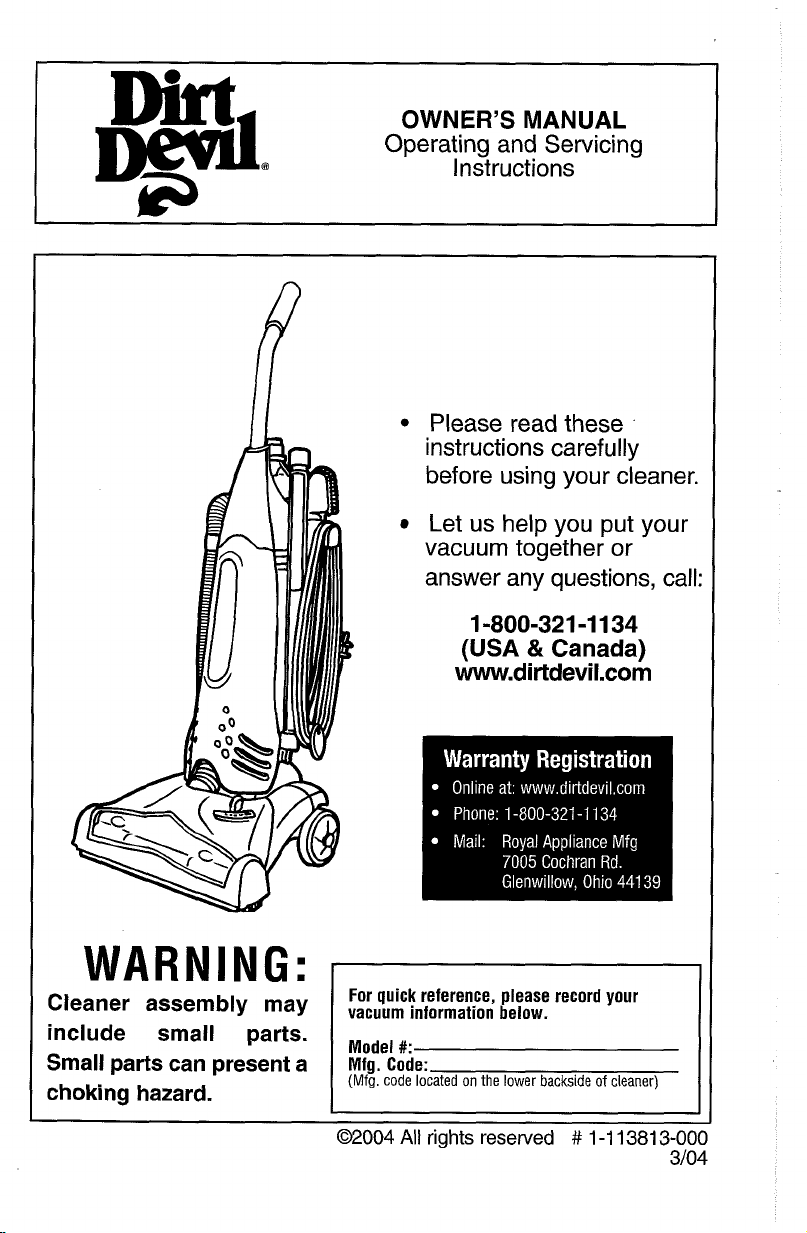
OWNER'S MANUAL
Operating and Servicing
Instructions
Please read these
instructions carefully
before using your cleaner.
Let us help you put your
vacuum together or
answer any questions, call:
1-800-321 -1 134
(USA
&
Canada)
www.dirtdevil.com
WARNING:
Cleaner assembly may
include small parts.
Small parts can present a
choking hazard.
For quick reference, please record your
vacuum information below.
Model
#:
Mfg. Code:
(Mfg.
code located on the lower backside of cleaner)
02004
All
rights reserved # 1-1 1381 3-000
I
3/04
Page 2
THlS CLEANER IS INTENDED FOR HOUSEHOLD USE ONLY.
IMPORTANT SAFETY INSTRUCTIONS
When you use an appliance, basic precautions should be followed,
including the following:
READ ALL INSTRUCTIONS BEFORE USING THE APPLIANCE.
ALWAYS FOLLOW THESE SAFETY INSTRUCTIONS.
BRING CLEANER TO UPRIGHT POSITION WHEN USING THE HOSE AND
ATTACHMENTS.
DO NOT LEAVE CLEANER UNATTENDED WHEN PLUGGED IN.
REGULARLY CHECK THE FILTERS TO CLEAN OR REPLACE.
WARNING: DO NOT USE SHARP OBJECTS TO CLEAN OUT THE HOSE SINCE
THEY COULD CAUSE DAMAGE.
OCCASIONALLY REMOVE BRUSH AND CLEAN DEBRIS FROM END CAPS TO
KEEP BRUSH ROTATING SMOOTHLY.
WARNING: THE CORDS, WIRES, AND/OR CABLES SUPPLIED WITH THlS
PRODUCT CONTAINS CHEMICALS, INCLUDING LEAD OR LEAD COMPOUNDS,
KNOWN TO THE STATE OF CALIFORNIA TO CAUSE CANCER AND BIRTH
DEFECTS OR OTHER REPRODUCTIVE HARM. WASH HANDS AFTER USING.
READ ALL INSTRUCTIONS BEFORE USING THE APPLIANCE.
WARNING: TO REDUCE THE RISK OF FIRE,
ELECTRIC SHOCK OR INJURY:
Do not leave appliance when plugged in. Unplug from outlet when not in use
and before servicing.
Do not use outdoors or on wet surfaces. Electrical shock could occur.
Do not allow to be used as a toy. Close attention is necessary when used by
or near children.
Use only as described in this manual. Use only manufacturer's recom-
mended attachments.
Do not use with damaged cord or plug. If appliance is not working as it should,
has been dropped, damaged, left outdoors, or dropped into water, return
service center for inspection. Call 1-800-321 -1
Do not pull or carry by cord, use cord as handle, close a door on cord, or
pull cord around sharp edges or corners. Do not run appliance over cord.
Keep cord away from heated surfaces.
Do not unplug by pulling on cord. To unplug, grasp the plug, not the cord.
Do not handle plug or appliance with wet hands.
Do not put any objects into openings. Do not use with any opening blocked;
keep free of dust, lint, hair, and anything that may reduce air flow.
Keep hair, loose clothing, fingers, and all parts of body away from openings
and moving parts.
134
for the nearest service center.
it
to a
Page 3
Do not pick up anything that is burning or smoking, such as cigarettes,
matches, or hot ashes.
Do not use without dirt container and filters in place. If appliance is not
working as
www.dirtdevil.com to locate a dealer nearest you.
Turn off all controls before unplugging.
Use extra care when cleaning on stairs.
Do not use to pick up flammable or combustible liquids, such as gasoline,
or use in areas where they may be present.
Keep the vacuum cleaner on the floor. Only the hand-held vacuum cleaners
may be set on furniture.
Cleaner must be in the upright position to
pet when doing above floor cleaning.
Do not use an extension cord with this vacuum cleaner.
Store the vacuum cleaner indoors. Put the vacuum cleaner away after use to
prevent tripping accidents.
Using improper voltage may result in damage to the motor and possible
injury to the user. Proper voltage is listed on the cleaner plate.
Unplug before connecting Turbo ToolB.
it
should, please call 1-800-321-1 134 or visit our website at
lift
the rotating brush off the car-
SAVE THESE INSTRUCTIONS
WARNING:
To reduce the risk of electric shock, this appliance has a polarized plug (one blade
wider than the other). This plug will fit in a polarized outlet only one way. If the plug
does not fit fully in the outlet, reverse the plug. If it still does not fit, contact a qualified electrician to install the proper outlet. Do not change the plug in any way.
Page 4
CONGRATULATIONS
You are now the proud owner of a Dirt DevilB. We trust your new purchase will bring you many years of satisfaction.
Thank you for your support of Dirt Devil" products.
Visit our website at www.dirtdevil.com
TABLE OF CONTENTS
Page
Safety Instructions
Feature Descriptions
How to Assemble
How To Operate
FloorICarpet Cleaning
Above Floor Cleaning
...................................................
................................................
.....................................................
.......................................................
.........................................
.........................................
Dirt Container & Filtration: Removal
and Replacement
Belt or Brush: Removal & Replacement
Lightbulb: Removal & Replacement
General Maintenance
Troubleshooting Guide
.................................................
.....
.........................
...............................................
.............................................
:
.............
2,3
Page
5
Page 6
Page 6,7
7
Page
Page 7
8
Page
Page
9
Page
10
Page
10,ll
Page
12
LIMITED
To the consumer, Royal Appliance Mfg. Co. warrants this vacuum cleaner to be free of defects in material or workmanship commencing upon the date of the original purchase. Refer to your vacuum cleaner
carton for the length of warranty and save your original sales receipt to validate start of warranty period.
If the vacuum cleaner should become defective within the warranty period, we will repair or replace any
defective parts free of charge. The complete machine must be delivered
Authorized Sales
of purchase, copy of original sales receipt and your name, address and telephone number. If you are
not near a Warranty Station, call the factory for assistance at USA
genuine Royal" replacement parts.
The warranty does not include unusual wear, damage resulting from accident or unreasonable use of
the vacuum cleaner. This warranty does not cover brushes, flat belts, filters and bulbs. This warranty
does not cover unauthorized repairs. This warranty gives you specific legal rights and you may also
have other rights (Other rights may vary from state to state in the USA).
&
Warranty Service Station. Please include complete description of the problem, day
WARRANTY
&
Canada: 1-800-321-1 134. Use only
.m.p,&l
to any ROYALm
Page 5
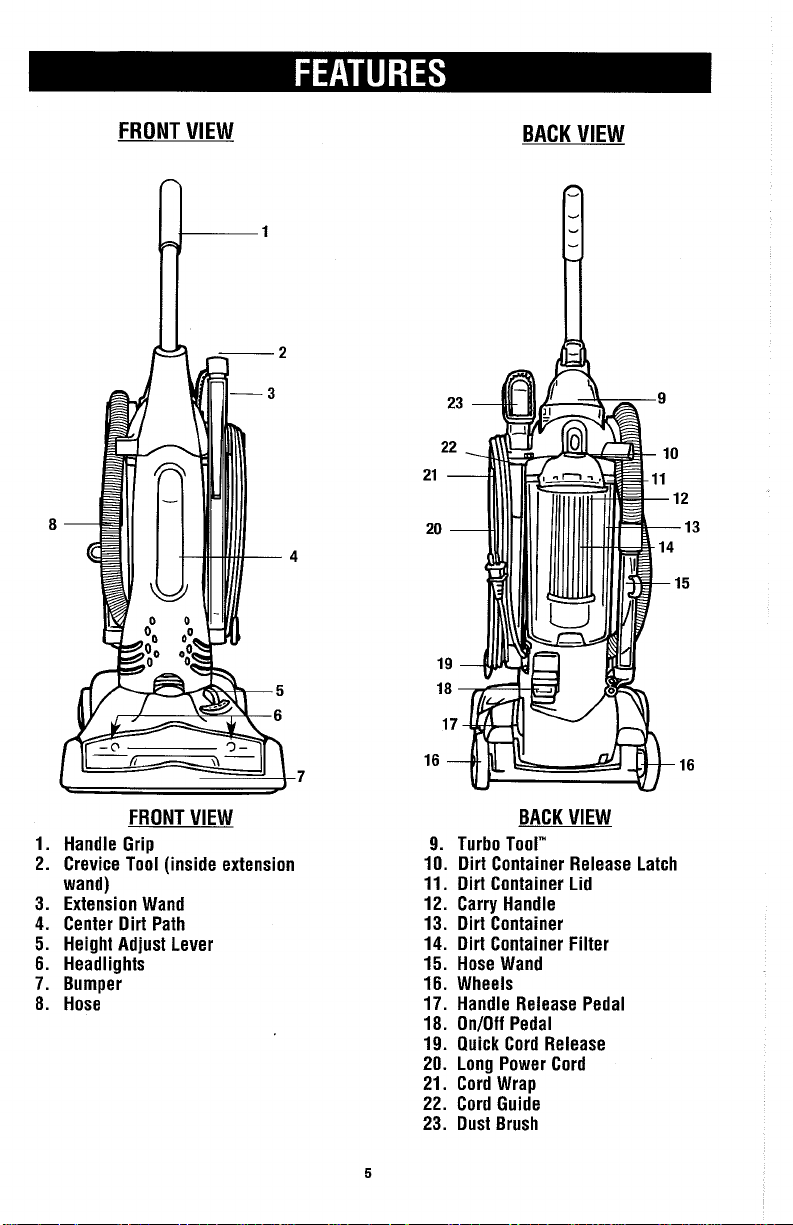
FRONT
VlEW
BACK
VlEW
FRONT
1.
Handle Grip
2.
Crevice Tool (inside extension
wand)
3. Extension Wand
4.
Center Dirt Path
5. Height Adjust Lever
6.
Headlights
7.
Bumper
8.
Hose
VlEW
BACK
VlEW
9.
Turbo Tool"
10. Dirt Container Release Latch
11.
Dirt Container Lid
12.
Carry Handle
13.
Dirt Container
14.
Dirt Container Filter
15. Hose Wand
16. Wheels
17. Handle Release Pedal
18. OnIOff Pedal
19.
Quick Cord Release
20.
Long Power Cord
21.
Cord Wrap
22. Cord Guide
23. Dust Brush
Page 6
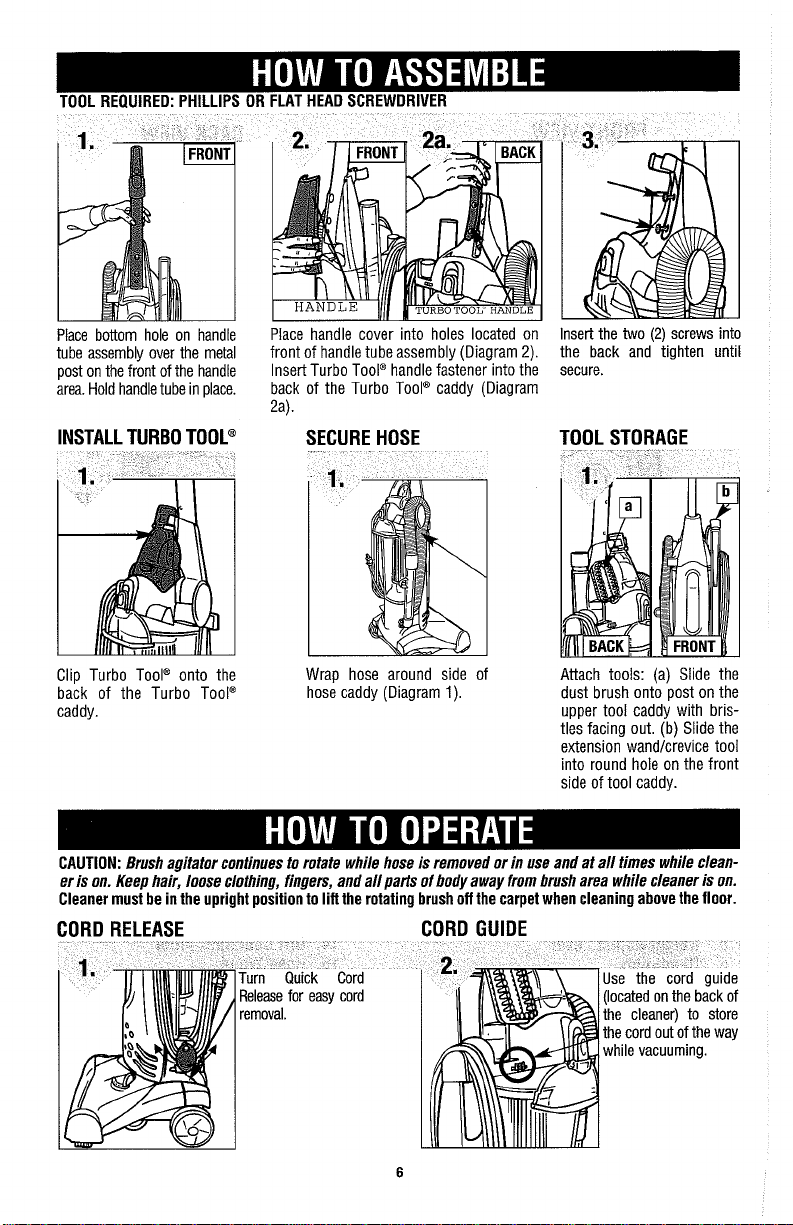
Place bottom hole on handle
tube assembly over the metal
post on the front of the handle
area. Hold handle tube in place.
INSTALL TURBO TOOL@
Place handle cover into holes located on
front of handle tube assembly (Diagram 2).
Insert Turbo Tool" handle fastener into the
back of the Turbo Tool" caddy (Diagram
2a).
SECURE HOSE
Insert the two
the back and tighten until
secure.
(2)
screws into
TOOL STORAGE
Clip Turbo Tool" onto the
back of the Turbo Tool"
caddy.
CAUTION:
Brush agitator continues to rotate while hose is removed or in use and at all times while clean-
Wrap hose around side of
hose caddy (Diagram
1).
Attach tools: (a) Slide the
dust brush onto post on the
upper tool caddy with bristles facing out.
extension wandlcrevice tool
into round hole on the front
side of tool caddy.
(b)
Slide the
er is on. Keep hair, loose clothing, fingers, and all parts of body away from brush area while cleaner is on.
Cleaner must be in the upright position to lift the rotating brush off the carpet when cleaning above the floor.
CORD RELEASE CORD GUIDE
Page 7
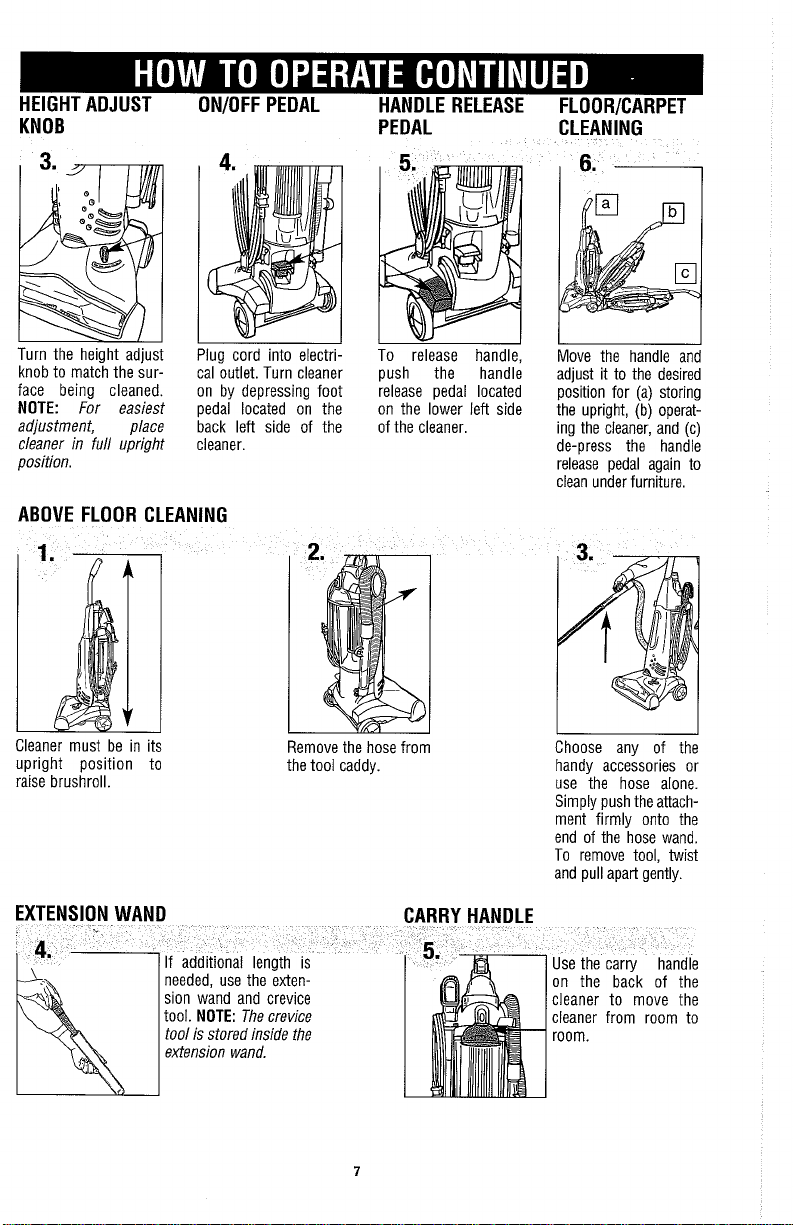
KNOB
PEDAL
CLEANING
6.
---1
Turn the heiaht adius
knob to mat& the sur-
face being cleaned.
NOTE:
adjustment, place
position.
For easiest
cleaner in full upright
Plug cord into electrical outlet. Turn cleaner
on by depressing foot
pedal located on the
back left side of the
cleaner.
To release handle,
push the handle
release pedal located
on the lower left side
of the cleaner.
ABOVE FLOOR CLEANING
Cleaner must be in its
upright position to the tool caddy.
raise brushroll.
I
Remove the hose from
CARRY HANDLE
L
Move the handle and
adjust it to the desired
position for (a) storing
the upright, (b) operating the cleaner, and (c)
de-press the handle
release pedal again to
clean under furniture.
I
Choose any of the
handy accessories or
use the hose alone.
Simply push the attachment firmly onto the
end of the hose wand.
To remove tool, twist
and pull apart gently.
I
on the back of the
cleaner to move the
cleaner from room to
room.
Page 8
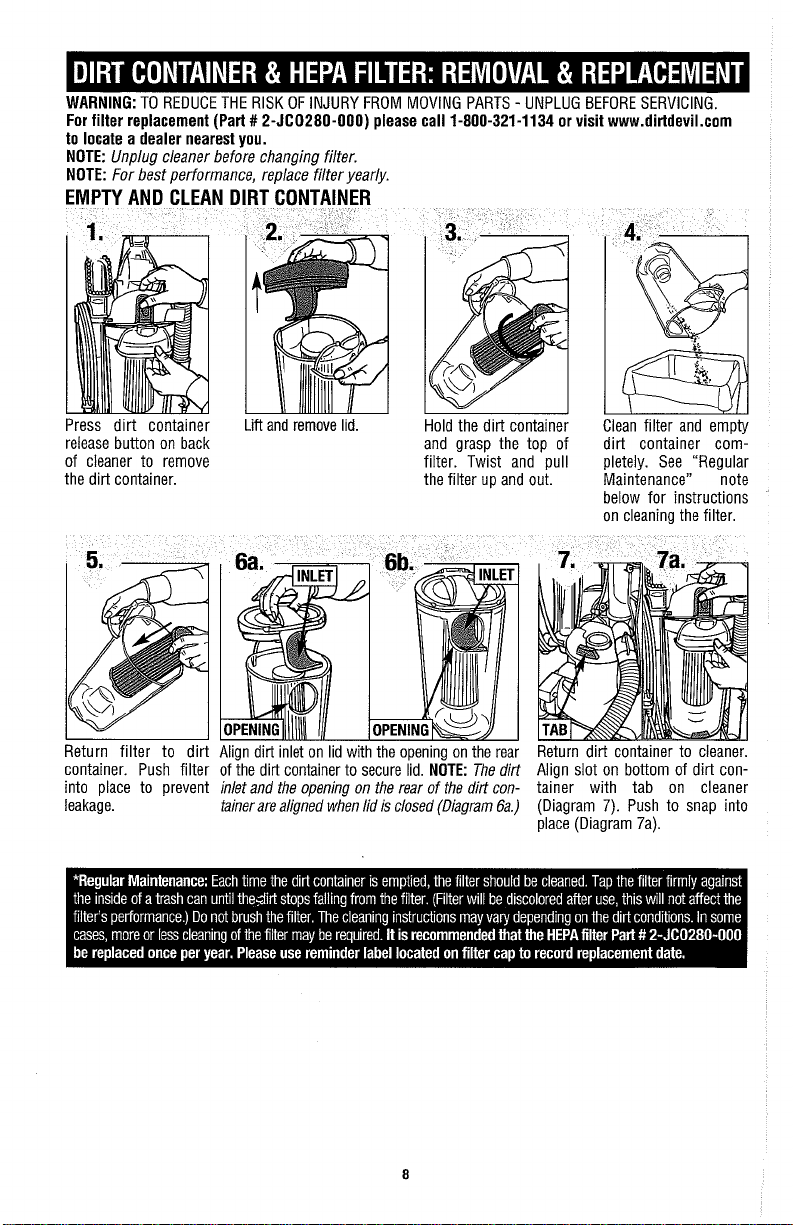
For filter replacement (Part
to locate a dealer nearest you.
NOTE:
Unplug cleaner before changing filter.
NOTE:
For best performance, replace filter yearly.
EMPTY AND CLEAN
# 2-JC0280-000)
LI
please call
1-800-321-1134
or visit www.dirtdevil.com
Press dirt container
release button on back
of cleaner to remove
the dirt container.
Return filter to dirt Align dirt inlet on lid with the opening on the rear Return dirt container to cleaner.
container. Push filter of the dirt container to secure lid.
into place to prevent
leakage.
ift
and remove lid.
inlet and the opening on the rear of the dirt containerare aligned when lid is closed (Diagram 6a.)
Hold the dirt container Clean filter and empty
and grasp the top of dirt container comfilter. Twist and pull pletely. See "Regular
the filter up and out. Maintenance" note
NOTE:
The dirt
below for instructions
on cleaning the filter.
Align slot on bottom of dirt container with tab on cleaner
(Diagram
place (Diagram 7a).
7).
Push to snap into
Page 9
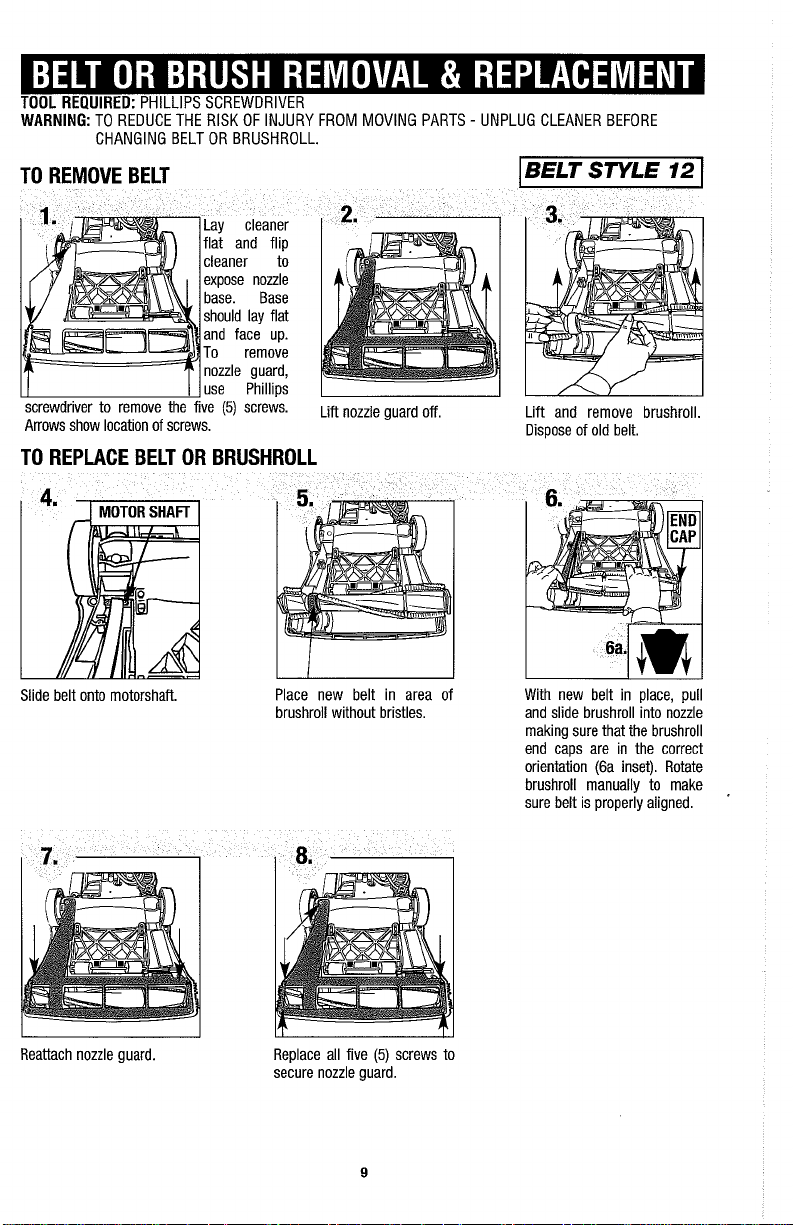
TOOL
REQUIRED:
WARNING:
TO REDUCE THE RISK OF INJURY FROM MOVING PARTS - UNPLUG CLEANER BEFORE
CHANGING BELT OR BRUSHROLL.
PHILLIPS SCREWDRIVER
screwdriver to remove the five
Arrows show location of screws.
(5)
screws.
~ift
nozzle
guard
TOREPLACEBELTORBRUSHROLL
Slide belt onto motorshaft.
Place new belt in area of With new belt in place, pull
brushroll without bristles. and slide brushroll into nozzle
Lift and remove brushroll.
Dispose of old belt.
making sure that the brushroll
end caps are in the correct
orientation (6a inset). Rotate
brushroll manually to make
sure belt is properly aligned.
I
I I
I
Reattach nozzle guard. Replace all five
secure nozzle guard.
(5)
screws to
I
I
Page 10
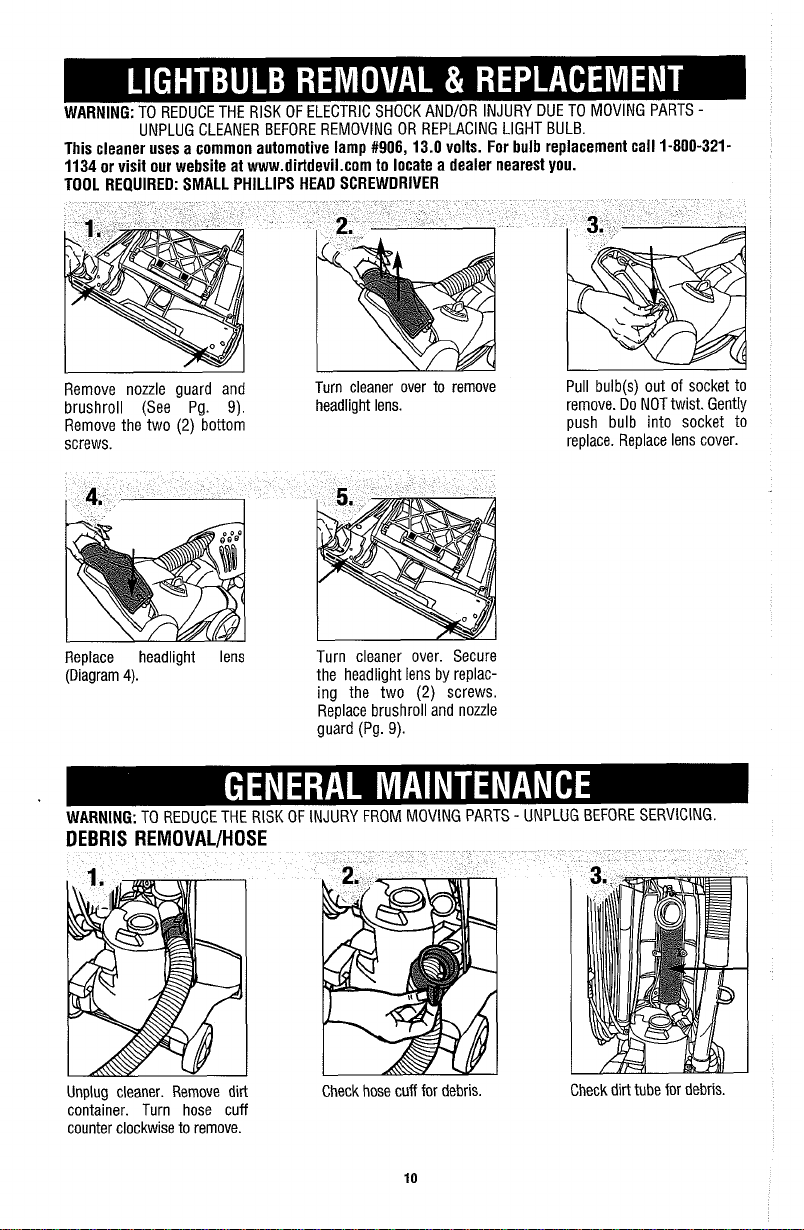
This cleaner uses a common automotive lamp #906, 13.0 volts. For bulb replacement call 1-800-321-
UNPLUG CLEANER BEFORE REMOVING OR REPLACING LIGHT BULB.
1134 or visit our website at www.dirtdevil.com to locate a dealer nearest you.
TOOL
REQUIRED: SMALL PHILLIPS HEAD SCREWDRIVER
Remove nozzle guard and
brushroll (See Pg.
Remove the two
screws.
Replace headlight lens Turn cleaner over. Secure
(Diagram
4).
(2)
9).
bottom
Turn cleaner over to remove
headlight lens. remove. Do NOT twist. Gently
the headlight lens by replac-
ing the two
Replace brushroll and nozzle
guard (Pg.
9).
(2)
screws.
DEBRIS REMOVALIHOSE
Pull bulb@) out of socket to
push bulb into socket to
replace. Replace lens cover.
Unplug cleaner. Remove dirt
container. Turn hose cuff
counter clockwise to remove.
Check hose cuff for debris.
Check dirt tube for debris.
Page 11
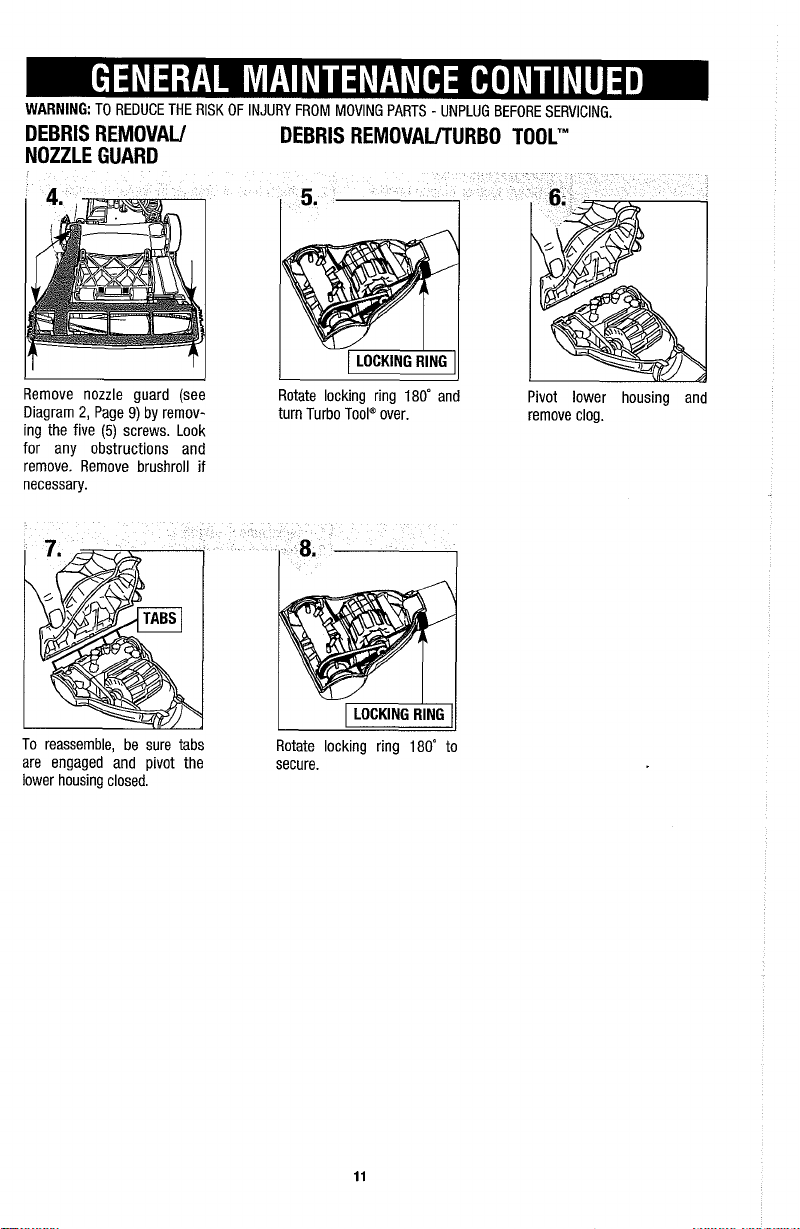
DEBRIS REMOVAU
NOZZLE GUARD
DEBRIS
REMOVAUTURBO TOOL'"
Remove nozzle guard (see
Diagram
2,
Page
9)
ing the five
for any obstructions and
remove. Remove brushroll
necessary.
To reassemble, be sure tabs
are engaged and pivot the
lower housing closed.
by rernov-
(5)
screws. Look
if
I
Rotate locking ring 180" and
turn Turbo Toolm over.
Rotate locking ring 180" to
secure.
Pivot lower housing and
remove clog.
Page 12

Cleaner won't run
Cleaner won't
pick-up or low
suction
1. Power cord not firmly
plugged into outlet.
2. Blown fuse or tripped breaker.
3. Needs service.
I
4.
Thermal Protector activated.
I
Dirt container not installed
correctly.
Dirt container full.
Brushroll worn.
Broken or worn belt.
Clogged filter.
Nozzleldirt passage hose
clogged.
Carpet height sewng is incorrect.
1. Plug unit in firmly.
2. Check fuse or breaker in home. Replace
fuselreset breaker.
3.
Take to service center or call
1-800-321 -1 134.
4.
Allow cleaner to cool - Pg. 3.
1. Review dirt container removal and
-
replacement
2.
Empty dirt container - Pg.
Pg. 8.
8.
3. Replace brushroll - Pg. 9 & 10.
4.
Replace belt - Pg. 9 & 10.
5.
Remove filter and clean - Pg. 8.
6.
Remove lower hose; remove obstru-
-
Pg. 11.
ction
7.
Set carpet height adjust lever to appropriate
setting for carpet being cleaned
-
Pg.
7.
from cleaner
Cleaner tools
won't pick-up
working
2. Dirt container not installed
correctly.
3. Hose not installed correctly.
4. Filter not installed
completely.
1. Hose clogged.
2.
Dirt container full.
3. Filter clogged.
--
2. Loose electrical wires.
2.
Review dirt container removal and
replacement
3. Review hose installation
4.
Review filter Removal and
Replacement
-
Pg. 8.
-
Pg. 8.
-
PQ.
6.
1. Remove hose and tools; remove
-
Pg.
6
&
Pg. 8.
-
Pg. 10.
Pg. 10.
-
Pg. 8.
obstruction
2. Empty dirt container
3. Clean filter
-
1. Replace bulb
2. Call 1-800-321 -1 134 for nearest authorized
RoyaP Dealer.
1. Empty dirt container - Pg. 8.
Cleaner is difficult
1. Carpet height setting is incorrect.
to push or won't
move forward
Dirt container
won't lock into
place
MY
OTHER SERVICING SHOULD BE DONE BY
In the event that further assistance is required, see your Yellow Pages for an 'authorized Royal" Dealer. &&of any transportation to and
from any place of repair are to be paid by the owner. The service parts used in this unit are easily replaced and readily available from an
authorized Royalm Dealer or retailer. Always identify your cleaner by the model number and manufacturing code when requesting infor-
mation or ordering replacement parts. (The model number appears on the bottom of the cleaner.)
1. Dirt container lid not aligned
properly.
2. Alignment tab not aligned.
CUSTOMER SERVICE
---
~
-
1. Set carpet height adjust lever to appropriate
-
setting for carpet being cleaned
-
--
Pg.
1. Remove and realign lid - Pg. 8.
-
2. Realign tab
AN
AUTHORIZED SERVICE REPRESENTATIVE
(1
-800-321
-
- - - -
Pg. 8.
-1
- -
1341
7.
Page 13

MANUAL DEL PROPlETARlO
lnstrucciones de
Funcionamiento y Servicio
Por favor lea estas
instrucciones con cuidad
antes de usar su
aspiradora.
Permitanos ayudarle a
ensamblar su aspiradora
o a contestar
tas, llame al:
1 -800-321 -1 134
(EE.UU. y Canada)
www.dirtdevil.com
sus
pregun
-
0
I-
ADVERTENCIA:
El ensamble de la aspiradora
puede incluir partes pequeiias.
Las partes pequeiias pueden presentar riesgo de ahogamiento.
02004
L
Todos 10s derechos reservados
Para tener una referencia rapida, anote por
favor la informacion de su aspiradora aqui.
No. de Modelo:
Codigo de Fabricante:
(El c15digo del fabricante aparece en la parte posterior e
inferior
de
la aspiradora)
I
#
1-1
131
69-000
3/04
Page 14

ESTA ASPIRADORA ESTA DISENADA PARA US0
DOMESTICO
SOLAMENTE.
INSTRUCCIONES DE SEGURIDAD IMPORTANTES
Cuando use un electrodomestico se deben seguir precauciones basicas, incluyendo las siguientes:
LEA TODAS LAS
SIEMPRE SlGA ESTAS INSTRUCCIONES DE SEGURIDAD.
PONGA LA ASPIRADORA EN
MANGUERA Y LOS ACCESORIOS.
NO DEJE LA ASPIRADORA SIN VIGILANCIA CUANDO
REVISE CON FRECUENCIA LOS FILTROS PARA LlMPlARLOS
ADVERTENCIA: NO UTlLlCE OBJETOS FILOSOS PARA LlMPlAR LA
MANGUERA, DEBIDO A QUE PUEDEN CAUSAR
DE VEZ EN CUANDO RETIRE EL CEPILLO Y LlMPlE LOS RESIDUOS DE LAS
TAPAS FINALES PARA PERMlTlR LA
ADVERTENCIA: LOS CORDONES, ALAMBRES Y/O CABLES SUMINISTRADOS CON
ESTE PRODUCT0 CONTIENEN PRODUCTOS
COMPUESTOS DE PLOMO ACERCA DE LOS CUALES SE HA SABIDO EN EL ESTADO DE
CALIFORNIA, PRODUCEN
REPRODUCTIVOS.
LEA TODAS LAS INSTRUCCIONES ANTES DE USAR EL APARATO
ADVERTENCIA:
INSTRUCCIONES
CANCER,
UVESE
LAS MANOS
PARA
ANTES
POSICION
ROTACION
DEFECTOS DE NAClMlENTO U OTROS
DESPUES
REDUCIR
DE USAR EL
VERTICAL CUANDO USE LA
DANO.
QU~MICOS
DE USAR LA ASPIRADORA.
APARATO.
ESTE
CONECTADA.
0
REEMPLAZARLOS.
UNIFORME DEL CEPILLO.
QUE INCLUYEN PLOMO
EL
RIESGO
0
DANOS
DE
INCENDIO, CHOQUE
No deje solo el-aparato cuando este conectado. Desconectelo de la toma de
corriente cuando no lo use
No lo utilice en exteriores o en superficies mojadas. Puede ocurrir un
choque electrico.
No permita que se use como juguete. Ponga mucha atencion cuando la use
un niiio o cerca de niiios.
Usela solamente como se indica en este manual. Use solamente 10s accesorios recomendados por el fabricante.
No la utilice con el cordon electrico o la clavija
baja como debiera, se ha caido, daiiado, dejado en exteriores o caido en
agua,
regreselo a un centro de servicio para su inspeccion. Llame al 1-800-
321-1 134 para encontrar el centro de servicio mas cercano a su domicilio.
No tire ni lo transporte tomandole del cordon electrico, no utilice el cordon
electrico como asa, no cierre la puerta sobre el cordon electrico, ni tire del
mismo alrededor de esquinas o rebordes agudos. No pase el aparato sobre el
cordon electrico. Mantenga el cordon electrico lejos de superficies calientes.
No la desconecte
clavija, no el cordon electrico.
No tome la clavija o el aparato con las manos mojadas.
No coloque objetos en las aberturas. No lo use con una abertura bloqueada;
mantengalo libre de polvo, pelusa, pelo
el flujo de aire.
tirando del cordon electrico. Para desconectarla, tome la
ELECTRICO
y
antes de darle servicio.
daiiados. Si el aparato no tra-
y
cualquier cosa que pueda reducir
0
LESIONES:
Page 15

Mantenga lejos de las aberturas y partes moviles, el pelo, ropa suelta, dedos
y
todas las partes del cuerpo.
No aspire objetos que esten quemandose o emitiendo humo, tales como cig-
arrillos, cerillos o cenizas calientes.
y
No lo use sin tener en su sitio el recipiente de polvo
no trabaja como debiera, por favor llame al 1-800-321-1 134 o visite nuestro
sitio web www.dirtdevil.com para localizar al distribuidor mas cercano a usted.
Apague todos 10s controles antes de desconectar.
Tenga mas cuidado cuando aspire escaleras.
No lo use para aspirar
gasolina, ni lo use en areas donde estos pudieran estar presentes.
Mantenga la aspiradora en el suelo. Solamente las aspiradoras de mano
pueden ser colocadas sobre 10s muebles.
La aspiradora debe estar en posicion vertical para levantar de la alfombra al
cepillo giratorio cuando haga limpieza por encima del nivel del piso.
No use una extension electrica al usar esta aspiradora.
Guarde la aspiradora en interiores. Guardela despues de su uso para evitar
accidentes de tropiezos.
Usar el voltaje inapropiado puede resultar en daFio al motor
al usuario.
Desconecte la aspiradora antes de conectar el Turbo Toola.
EI
voltaje apropiado esta listado en la placa de la-aspiradora.
liquidos inflamables o combustibles, tales como
10s filtros. Si el aparato
y
posibles lesiones
GUARDE ESTAS INSTRUCCIONES
ADVERTENCIA:
Para reducir el riesgo de choque electrico, este aparato tiene una clavija polarizada (una
hoja mas ancha que la otra.) Esta clavija encajara en una toma de corriente polarizada
de una
manera solamente. Si la clavija no encaja totalmente en la toma de corriente,
invierta la clavija. Si atln no encaja, pongase en contact0 con un electricista calificado
para instalar la toma de corriente apropiada. No modifique la clavija de ninguna manera.
Page 16

FELICITACIONES
Usted es ahora el orgulloso propietario de una Dirt DevilB. Confiamos
en que su nueva adquisici6n le ofrecerh muchos aiios de satisfaccibn.
Gracias por su apoyo a 10s productos Dirt DevilB.
Visite nuestro sitio Web en www.dirtdevil.com
lnstrucciones de Seguridad
Descripciones de las Caracteristicas
Como Ensamblar
Como Funciona
...........................................................
...............................................................
Limpieza de Pisos 1 Alfombras
Limpieza por Encima del Nivel del Piso
Recipiente de Polvo
y
Banda o Cepillo: Retiro y Reemplazo
Foco: Retiro y Reemplazo
Mantenimiento General
Guia de Solucion de Problemas
Al consumidor, Royal Appliance Mfg. Co. le garantiza que esta aspiradora no tiene defectos ni de mate-
rial ni de mano de obra, la garantia cornienza en la fecha de compra original. Vea la caja para informaci6n de la duracion de la garantia y guarde el recibo de cornpra original para hacer valido el inicio
del periodo de garantia.
En caso que la aspiradora muestre algun defect0 dentro del periodo de garantia, repararemos o reemplazaremos de manera gratuita cualquier parte defectuosa. La maquina cornpleta debe ser enviada con
porte pagado a cualquier Estacion Autorizada ROYAL" de
incluya una
y su nornbre, dornicilio y nfimero de telefono. Si no se encuentra cerca de una Estacion de Garantia,
llarne a la fabrica para pedir asistencia en 10s EE.UU.
de repuesto genuinas Royal".
La garantia no incluye el desgaste anorrnal,
cuado de la aspiradora. Esta garantia no cubre 10s cepillos, bandas planas, filtros ni focos. Esta garantia no cubre reparaciones no autorizadas. Esta garantia le confiere derechos legales especificos y
podria tener tambien otros derechos, 10s que varian de estado a estado en 10s EE.UU.
descripcion completa del problerna, fecha de compra, copia del recibo de compra original
.............................................
...............................
..................................
.....................
Filtro: Retiro Reemplazo
...............
..............................
...............................................
...................................................
......................................
Ventas y Servicio de Garantia. Por favor
y
Canada: 1-800-321-1 134. Use solamente partes
daiio como resultado de un accidente o del uso no ade-
Pain E2, E3
Pagina E5
Pagina E6
Pagina E6, E7
Pagina E7
Pagina E7
Pagina E8
Pagina E9
Pagina El
Pagina El
0
0,
El 1
Pagina El 2
Page 17

VISTA DE LA PARTE
FRONTAL
VISTA DE LA PARTE
POSTERIOR
VISTA DE LA PARTE FRONTAL
1.
Empuiiadura del Asa
2. Accesorio para Hendiduras (en la
lanza de extension)
3. Lanza de Extension
Paso del Polvo Central
4.
5.
Palanca de Ajuste de Altura
6.
Luces Frontales
7. Tope
8. Manguera
E5
VlSTA DE
9.
10. Seguro de Liberacion del
11.
12. Asa de Transporte
13. Recipiente de Polvo
14. Filtro del Recipiente de Polvo
15. Lanza de la Manguera
16. Ruedas
17. Pedal de Liberacion del Asa
18. Pedal de Encendido
19. Liberacion Rapida del Cordon
20. Cordon Electrico Largo
21. Enrollamiento del Cordon
22. Guia del Cordon Electrico
23. Cepillo para Polvo
LA
PARTE POSTERIOR
Turbo Toolm
Recipiente de Polvo
Tapa del Recipiente de Polvo
/
Apagad0
Electrico
Page 18

Coloque el orificio inferior del
conjunto de tubo del asa en
de metal que esta en
el poste
el frente del asa. Sostenga el
del asa en su sitio.
tubo
TURBO TOOL@
Coloque la cubierta del asa en 10s orificios
ubicados en el frente del conjunto de tubo
del asa (Diagrarna 2). lnserte el sujetador del
asa de la Turbo Tool" en la parte posterior
del contenedor de la rnisrna (Diagrarna 2a).
FIJACION
DE LA
ALMACENAMIENTO DE
MANGUERA
lnserte dos (2) tornillos en la
parte posterior
hasta asegurarlos.
y
aprietelos
Sujete la Turbo Tool" en
la parte posterior de su
contenedor.
PRECAUCION: El aoitador del ceoillo continua airando cuando usted usa o retira la manauera v si la asoiradora esta funcionando. ~anten~a lejos del area del cepillo el pelo, la ropa suelta,?os debos
partes del cuerpo cuando la aspiradora este funcionando.
La aspiradora debe estar en posiciin vertical para levantar de la alfombra el cepillo giratorio cuando limpie
por encima
LlBERAClON DEL
$4
nivel del piso.
CORDON ELECTRICO
Enrolle la rnanguera alrededor del lado de su contenedor (Diagrarna
1).
GU~A
Parafijar 10s accesorios:
lo para polvo en el contenedor de accesorios superior con las cerdas hacia afuera.
(b) Deslice el accesorio para hendidurasl la
lanza de extension en el orificio redondo del
lado frontal del contenedor de accesorios.
DEL
CORDON
(a)
Deslice el cepil-
y
ELECTRICO
otias
Page 19

MANUEL
DU
PROPRIETAIRE
Notice d'utilisation et d'entretien
Veuillez lire attentivement
ces instructions avant d'utiliser votre aspirateur.
Nous pouvons vous aider
a
assembler votre aspira-
teur et repondre
a
vos
questions. Pour cela
appelez
(E.-U.
le
:
1
-800-321 -1 1 34
et
Canada)
www.dirtdevil.com
AVERTISSEMENT
L'ensemble de cet aspira-
teur comprend de petites
pieces qui presentent un
danger d'etouffement.
:
--
Notez les renseignemenk sur votre aspirateur cidessous afin de pouvoir les consulter rapidement.
No
de modele
Code de fabrication
(Le code de fabrication se trouve sur la partie infkrieure
arriere de I'aspirateur.)
:
:
Page 20

CET ASPIRATEUR A
ETE
CONCU EXCLUSIVEMENT POUR UN USAGE DOMESTIQUE.
CONSIGNES DE
Lorsque vous utilisez un appareil menager, vous devez prendre ces
precautions de securite
LlSEZ TOUTES LES INSTRUCTIONS AVANT D'UTILISER L'APPAREIL.
RESPECTEZ TOUJOURS A LA LETTRE CES CONSIGNES DE
METTEZ L'ASPIRATEUR EN POSITION VERTICALE QUAND VOUS UTlLlSEZ LE
TUYAU ET LES ACCESSOIRES.
NE LAISSEZ PAS L'ASPIRATEUR SANS SURVEILLANCE QUAND IL EST BRANCHE.
VERIFIEZ
AVERTISSEMENT
ER LE TUYAU CAR ILS POURRAIENT L'ENDOMMAGER.
ENLEVEZ LA BROSSE DE TEMPS EN TEMPS ET NETTOYEZ LES SALETES QUI
ENCOMBRENT SES
SANS
AVERTISSEMENT
NIS AVEC CE PRODUIT CONTIENNENT DES PRODUITS CHIMIQUES, Y COMPRlS DU PLOMB OU DES
CALlFORNlE POUR LEUR EFFET
MALFORMATIONS
REPRODUCTION. LAVEZ-VOUS LES MAINS APRES CHAQUE UTILISATION.
Llsn
REGULIEREMENT
:
N'UTILISEZ PAS D'OBJETS TRANCHANTS POUR NETTOY-
EXTREMITES
PROBLEME.
:
LES CORDONS, FILS
CONGENITALES
oms
LES
INSTRUCTIONS
AVERTISSEMENT
SECURITE
:
LES FILTRES A NETTOYER OU A REMPLACER.
AFlN QU'ELLE CONTINUE A TOURNER
ELECTRIQUES
COMPOSES
DU PLOMB, CONNUS PAR
CANCERIGENE,
ET ENDOMMAGER LES ORGANES DE
AVANT
:
POUR REDUIRE LES
IMPORTANTES
SECURITE.
ETIOU
CABLES
CETAT
POUVANT
DI~ILISER
ENTRAINER
LIAPPAREIL.
FOUR-
RISQUES D'INCENDIE, DE DECHARGE
DE
DES
ELECTRIQUE
Ne vous eloignez pas de I'appareil quand il est branche. Debranchez-le
quand il n'est pas en usage et avant de proceder
N'utilisez pas I'appareil a I'exterieur ou sur des surfaces mouillees. Vous
pourriez vous electrocuter.
Ne laissez pas les enfants jouer avec I'appareil. Exercez une surveillance
etroite quand I'appareil est utilise par des enfants ou
Utilisez I'appareil en respectant a la lettre les consignes de ce manuel.
Employez seulement les accessoires recommandes par le fabricant.
N'utilisez pas I'appareil si sa fiche ou son cordon sont endommages. Si
I'aspirateur ne fonctionne pas comme prevu, s'il est tombe, s'il a ete endommage, laisse
tre de service apres-vente pour qu'il soit verifie. Appelez le 1-800-321 -1 134
pour connaitre le centre de service apres-vente le plus proche.
Ne tirez pas I'appareil par son cordon, ne vous servez pas du cordon comme
poignee, ne fermez pas de portes suy le cordon et ne tirez pas le cordon sur
des coins ou des bords tranchants. Evitez de passer I'appareil sur le cordon
d'alimentation. Tenez le cordon
a
I'exterieur ou s'il est tombe dans I'eau, expediez-le a un cen-
ET DE BLESSURE
a
son entretien.
a
proximite de ceux-ci.
a
I'ecart des surfaces chauffees.
:
Page 21

Ne debranchez pas I'appareil en tirant sur le cordon. Pour le debrancher,
tirez sur la fiche, et non sur le cordon.
Ne
manipulez pas la fiche ou I'appareil avec des mains mouillees.
N'inserez pas d'objets dans les ouvertures.
N'utilisez pas I'appareil si ses orifices sont obstrues; enlevez des ouvertures la
poussiere,
Gardez les cheveux,
corps
~vitez d'aspirer tout objet qui brOle ou fume, comme des cigarettes, des
allumettes ou des braises.
N'utilisez pas I'aspirateur sans
ne fonctionne pas normalement, veuillez appeler le 1-800-321 -1 134 ou consulter
notre site Web
~teignez toutes les commandes avant de debrancher I'appareil.
Faites bien attention quand vous nettoyez les marches d'escalier.
N'aspirez aucun liquide inflammable ou combustible, tel que de I'essence,
et n'utilisez pas I'appareil en presence de ce type de produit.
Gardez I'aspirateur au sol. Seuls les aspirateurs
sur les meubles.
L'aspirateur doit &re
tapis lors de nettoyage au-dessus du sol.
N'utilisez jamais de rallonge electrique avec cet appareil.
Rangez I'aspirateur
pour ne pas trebucher dessus.
Cutilisation d'une tension inadequate peut endommager le moteur et blesser I'utilisateur. La tension correcte est indiquee sur la plaque de I'aspirateur.
Debranchez avant de connecter le Turbo Tool".
les peluches, les cheveux et tout ce qui pourrait reduire le debit d'air.
les vetements amples, les doigts et toute partie du
a
I'ecart des ouvertures et des pieces en mouvement.
le collecteur de poussiere ni les filtres. Si I'appareil
:
www.dirtdevil.com pour connaitre le distributeur le plus proche.
a
main peuvent &re poses
a
la verticale pour pouvoir lever la brosse rotative des
a
I'interieur. Rangez I'aspirateur apres son utilisation
VEUILLEZ CONSERVER CES INSTRUCTIONS
AVERTISSEMENT
Afin de reduire les risques de decharge electrique, cet appareil est muni d'une fiche
polarisee (une tige est plus large que I'autre). Cette fiche ne peut &re inseree dans une
prise de courant polarisee que dans un sens. Si la fiche ne s'insere pas completement
dans la prise, inversez-la. Si
qualifie d'installer la prise appropriee. Ne modifiez jamais la fiche.
elle ne s'insere toujours pas, demandez
:
a
un electricien
Page 22

Vous Ctes dksormais l'heureux propriktaire d'un Dirt Devil@. Nous
sommes persuadks que cet appareil vous satisfera pendant
plusieurs annkes.
Merci d'utiliser les produits Dirt Devil@.
Visitez
notre site Web
:
www.dirtdevil.com
TABLE DES
Instructions de securite
Description des caracteristiques
Assemblage de I'appareil
Utilisation de I'appareil
Nettoyage du solltapis
Nettoyage au-dessus du sol
Collecteur de poussiere et filtre : depose
,
.
et remstallation
Courroie et brosse : depose et remplacement
Ampoule : depose et remplacement
Entretien general
Guide de depannage
Royal Appliance Mfg. Co. garantit au consommateur cet aspirateur contre tous vices de rnateriau ou de
fabrication
determiner la duree de la garantie et conservez votre rey d'achat d'origine pour justifier la date d'entree
en vigueur de la
Si I'aspirateur
placerons gratuiternent toute piece defectueuse. L'appareil entier doit ltre renvoye port paye
quel point de vente ou de reparation sous garantie de ROYAL@. Veuillez inclure une description detaillee du problime, la date d'achat, une copie de la preuve d'achat d'origine ainsi que vos nom, adresse
et numero de telephone. Si vous habitez loin d'un centre de garantie, contactez notre usine aux EtatsUnis et au Canada
Cette garantie ne couvre pas I'usure inhabituelle, les dornrnages causes par les accidents ou un usage
abusif de I'appareil. Elle ne couvre pas non plus les brosses, les courroies plates, les filtres et les
ampoules. Cette garantie ne couvre pas les reparations non autorisees. Elle vous offre des droits sp6cifiques auxquels peuvent venir s'en ajouter d'autres (selon votre Etat de residence aux Etats-Unis).
a
cornpter de sa date d'achat d'origine. Consultez le carton d'emballage de I'aspirateur pour
periode de garantie.
tombe en panne pendant la periode couverte par la garantie, nous reparerons ou rem-
:
1-800-321-1134. N'utilisez que les pieces de rechange Royal".
...................................................
...............................................
...................................................
...............................................
.........................................................
............................................................
...................................................
MATIERES
....................................
......................................
................
...............................
Page 2,
Page
5
Page 6
age 6,
Page
7
Page
7
Page
8
Page
9
Page
10
Page
10,
Page 12
a
n'importe
3
7
11
Page 23

VUE AVANT
VUE AVANT
1.
Manche de la poignee
2. Suceur plat (dans la rallonge)
RaIl0nge
3.
4.
Passage central de la poussiere
5. Manette de reglage de la hauteur
6. Phares
7. Pare-choc
8. Tuyau
VUE
ARRIERE
9. Turbo Tool"
10. Loquet du collecteur de poussiere
11.
Couvercle du collecteur de
poussiere
12. Poignee de transport
13. Collecteur de poussiere
14. Filtre du collecteur de poussiere
15. Tube de rallonge
16. Roues
17. Pedale de degagement de la poignee
18. Pedale de marchelarret
19. Declencheur instantane du cordon
20. Cordon d'alimentation long
21. Dispositif d'enroulement du cordon
22. Guide
23. Brosse
du cordon
a
epousseter
Page 24

Placez I'ouverture inferieure
du tube de la poignee sur la
tige en metallique
de la poignee. Maintenez le
tube de la poignee en place.
a
I'avant
Placez le couvercle de poignee dans les
trous situes
(Schema 2). lnserez
Turbo
a
I'avant du tube de la poignee
I'attache de la poignee
a
I'arriere du support Turbo
Tool"
(2)
lnserez les deux
I'arriere et serrez-les.
vis dans
INSTALLATION DU
FlXEZ LE TUYAU
RANGEMENT DES ACCESSOIRES
TURBO TOOL@
li
:omment fixer les accessoires : (a) Glissez la
C
riere de son support. du suppoi de tuyau
AllENTION : L'auitateur de la brosse continue a aivoter lorsuue le tuvau est enleve ou en marche tout le
temps lorsque ~'&~irateur fonctionne. Gardez les'cheveux,
a
I'ecatl de la zone de la brosse lorsque I'aspirateur est en marche. L'aspirateur doit gtre en position ver-
ticale pour pouvoir lever la brosse rotative et nettoyer au-dessus du sol.
(Schema
1).
RDON
Tournez le declencheur
instantane du cordon
pour faciliter I'enlevernent du cordon.
brosse a epousseter dans le taquetsitue sur le
support d'accessoires superieurs avec les
poils de la brosse tournes vers I'exterieur. (b)
Glissez la rallonge
rond de I'avant du support d'accessoires.
I&
vi?tements amples, et toute partie du corps
1
le suceur plat dans le trou
UDE DE CORDON
Page 25

REGLAGE
DE HAUTEUR
/
ARRET
DEGAGEMENT
LA
POIGNEE
DE
SOL
MOQUETTE
/TAPIS
I
Tournez le bouton de
reglage de la hauteur une prise de courant. poignee, poussezsur la reglez-la sur la position
de rnaniere
a
la surface a nettoyer. marche en appuyant situee sur la partie (a) rangez I'aspirateur,
REMARQUE : Pour
faciliter le reglage,
placez I'aspirateur a la
verticale.
Mettez I'aspirateur en Retirez le tuyau du
position verticale pour support
soulever le rouleaubrosse.
a
s'adapter Mettez I'aspirateur en pedale de degagernent souhaitee lorsque vous
ranchez le cordon sur Pour degauer la Deplacez la poignee et
sur la pedale de inferieure gauche de (b) le faites fonctionner,
rnarche situee a I'ar- I'aspirateur. et (6) appuyez sur la
riere gauche. pedale de degagernent
I
a
accessoires.
de la poignee pour net-
toyer sous les rneubles.
I
avec precaution.
Page 26

Pour obtenir un filtre de rechange (no de piece
site www.dirtdevil.com pour connailre le distributeur le plus proche.
REMARQUE : Debranchez I'aspirateur avant de changer le filtre.
REMARQUE : Pour garantir on meilleur fonctionnement, remplacez le filtre chaque annb.
2-JC0280-OOO),
veuillez appeler le
1-800-321-1134
ou consulter le
Pour retirer le collecteur
de poussiere, appuyez
oulevez et enlevez le Tenez le collecteur de
couvercle. poussiere et saisissez le
sur son bouton de
B
degagement situe
I'ar-
riere de I'aspirateur.
Rernettez le filtre dans le
collecteur de poussiere. ture situee
Enfoncez le filtre pour le couvercle.
prevenir toute fuite.
Alignez I'entree de la poussiere du couvercle sur I'ouver- Rernettez le collecteur de poussiere
a
I'ouverture situee
sont alignees lorsque le couvercle est ferme (Schema 6b). enclencher en place (Schema 7a).
L
Nettoyez le filtre et videz completement le collecteur de pous-
a
filtre par le haut.
Tournez le filtre vers le
haut et retirez-le.
I'arriere du collecteur de poussiere pour fixer dans I'aspirateur. Alignez la fente du
REMAROUE
:
L'entree de la poussiere et bas du collecteur sur la languette de
a
I'arriere du collecteur de poussiere I'aspirateur (Schema
siere. Reportez-vous
I'(( Entretien regulier
en ce qui concerne les instructions sur le nettoyage du filtre.
la note sur
*
ci-dessous
7).
Poussez pour
J
Page 27

OUTlL NECESSAIRE
AVERTISSEMENT
:
TOURNEVIS CRUCIFORME
:
POUR
DEBRANCHEZ
REDUIRE
LE RISQUE DE BLESSURE
L'ASPIRATEUR AVANT DE PROGEDER A SON ENTRETIEN.
CAUSEE
PAR DES
PIECES
MOBILES,
POUR ENLEVER
enlever le dispositif de protection du suceur, Soulevez le dispositif de pro- Soulevez et enlevez le
utilisez un tournevis cruciforme afin de
devisser les cinq (5) vis. Les fleches indiquent
I'emplacement des vis.
Faites glisser la courroie sur
I'arbre de moteur.
LA
COURROiE
base doit etre
a
plat et
tournee vers le
haut. Pour
Placez la nouvelle courroie Une fois la nouvelle courroie installee, tirez et
dans la partie du rouleau- glissez le rouleau-brosse dans le suceur en
brosse sans poils. veillant
tection
du
suceur,
rouleau-brosse. Jetez la courroie usagke.
a
ce que les bouchons d'extremites du
rouleau-brosse soient orientes correctement
(Schema 6a). Faites pivoter le rouleau-brosse
a
la main pour vous assurer que la courroie est
alignee correctement.
Remettez en place le dispositif Remettez les cinq (5) vis pour
de protection du suceur.
le dispositif de protection
fixer
du suceur.
Page 28

-
.-
PROVOQUEES
AVANT D'ENLEVER ET DE REMPLACER L'AMPOULE.
PAR DES
PIECES
EN MOUVEMENT,
DEBRANCHEZ
L'ASPIRATEUR
--
Cet aspirateur utilise une ampoule automobile courante, no 906, de 13 volts. Pour obtenir un ampoule
:
de rechange, veuillez appeler le 1-800-321-1134 ou consulter notre site Web
www.dirtdevil.com pour
connaitre le distributeur le plus proche de chez vous.
:
OUTlL NECESSAIRE
PETIT TOURNEVIS CRUCIFORME
Enlevez le dispositif de protection du suceur et le rouleau
brosse (voir page
les deux
(2)
RETRAIT DES
9).
vis du bas.
SALETES
Retirez lampe. les tournez pas. lnserez
Retournez I'aspirateur pour
retirer la protection de la pour les sortir des douilles. Ne
tion de la
(Schema
4).
/
DU TUYAU
Tirez sur la ou
doucement I'arnpoule dans sa
douille. Replacez la protection.
les ampoules
Debranchez I'aspirateur. Retirez le col-
lecteur de poussiere. Tournez I'ern- au niveau de I'ernbouchure du
bouchure du tuyau dans le sens inverse
des aiguilles d'une rnontre pour le retirer.
Verifiez I'absence de saletes
tuyau.
Verifiez I'absence de saletes
au niveau du tuyau.
Page 29

AVERTISSEMENT
:
POUR
NE
DEBRANCHEZ
PAS
RISQUER
L'APPAREIL AVANT DE
DE
vous
BLESSER
PROCEDER
RETRAIT DES SAL- RETRAIT DES
EES
I
DU
DISPOSITIF
DE PROTECTION DU
SUCEUR
AVEC
LES
A
SON ENTRETIEN.
SALETES
I
PIECES
--
MOBILES,
DU TURBO TOOL'"
I
Pour enlever le dispositif de Faites pivoter I'anneau de verprotection du suceur (Schema rouillage de
2,
Page
9),
retirez les cinq
a
vis. Veillez
obstruction. Le cas echeant,
enlevez le rouleau brosse.
Pour assembler de nouveau,
veillez
et faites pivoter le boaier
inferieur pour le fermer.
degager toute
a
engager les ianguettes
(5)
I
I
le Turbo Tool'".
Faites tourner I'anneau de verrouillage de
I
180"
180'
et retournez
pour le fixer.
I
pivoter le boftier inferieur
Faites
et degagez I'obstruction.
Page 30

I
PROBLEME
L'aspirateur ne
fonctionne pas
-
-. . -. . . . .- .
.
I
CAUSE POSSIBLE
1. Le cordon d'alimentation n'est pas
bien branche sur la prise de courant.
2.
Un fusible est grille ou le disjoncteur
est declenche.
3. L'appareil doit 6tre repare.
14.
Protecteur thermique active.
I
r
SOLUTION POSSIBLE
1.
Branchez fermement le cordon d'alimentation
2.
Verifiez le fusible ou le disjoncteur de la maison
Remplacez le fusible ou vknclenchez le disjoncteur
3.
Apportez I'appareil au centre de service apres.
vente ou telephonez au 1-800-321 -1 134.
4.
Laissez I'aspirateur refroidir - Pg.
3.
L'aspirateur aspire
peu ou pas du tout
De la poussiere
s'echappe de
I'aspirateur
Les accessoires de
I'aspirateur
n'aspirent pas
Le phare ne
fonctionne pas
L'aspirateur est
difficile
a
ou refuse d'avancer
pousser
1. Le collecteur de poussiere n'est
pas installe correctement.
2.
Le collecteur de poussiere est plein.
3. Le rouleau-brosse est use.
4.
La courroie est cassee ou usee.
5.
Le filtre est obstrue.
6.
Le suceur ou le tuyau d'aspiration
est obstrue.
7.
Reglage incorrect de hauteur pour
tapislmoquette.
1. Le collecteur de poussiere est plein.
2.
Le collecteur de poussiere n'est
pas installe correctement.
3. Le tuyau n'est pas installe
correctement.
4.
Le filtre n'est pas installe
completement.
1.
Le tuyau est obstrue.
2.
Le collecteur de poussiere est plein.
3. Filtre obstrue.
1. L'ampoule est grillee.
2.
Les fils electriques sont desserres.
1.
Mauvais reglage de hauteur
tapislmoquette.
1.
Consultez la section sur la depose et la
reinstallation du collecteur de poussiere
2.
Videz le collecteur de poussiere - Pg. 8.
3.
Changez le rouleau-brosse - Pg. 9 et 10.
4.
Changez la courroie - Pg. 9 et 10.
5.
Retirez le filtre et nettoyez-le - Pg. 8.
5.
Enlevez le tuyau inferieur, degagez
I'obstruction
7.
Reglez la manette de hauteur en fonction de
I'epaisseur du tapislde la moquette
-
Pg.
1.
Videz le collecteur de poussiere - Pg. 8.
2.
Consultez la section sur la depose et la
reinstallation du collecteur de poussiere
3.
Consultez la section sur I'installation du tuyau
-
Pg.
4.
Consultez la section sur la depose et le
remplacement du filtre
1.
Enlevez le tuyau et les accessoires, degagez
I'obstruction
2.
Videz le collecteur de poussiere - Pg. 8.
3.
Nettoyez le filtre - Pg. 8.
1.
Changez I'ampoule - Pg. 10.
2.
Appelez le 1-800-321 -1 134 pour connaitre le
distributeur agree Royalm le plus proche de
chez vous.
1.
Reglez la rnanette de hauteur en fonction de I'ep-
aisseur du tapidde la moquette
7.
6.
-
Pg. 11.
-
Pg. 6 et 10.
-
Pg. 8.
a
nettoyer
a
nettoyer - Pg.
-
Pg. 8
-
Pg.
8
7.
Impossible de
bloquer le col-
lecteur de pous-
siere en position
TOUTE AUTRE INTERVENTION DOlT
Pour obtenir de I'aide supplementaire, consultez les Pages jaunes afin de connaitre les distributeurs agrees Royal? Les coOts
de transport aller-retour lies aux reparations sont
cet appareil peuvent facilement 6tre remplacees et sont disponibles aupres des distributeurs ou revendeurs Royalm agrees.
ldentifiez toujours I'aspirateur par son numero de modele et son code de fabrication lorsque vous demandez des informa-
tions ou que vous commandez des pieces de rechange. (Le numero de modele figure au bas de I'aspirateur).
1. Couvercle du collecteur de
poussiere pas en face.
2.
Languette d'alignement decalee.
@RE
EFFECTUB
SERVICE
A
LA
CLIENTELE : (1
a
la charge du proprietaire de I'appareil. Les pieces reparables utilisees dans
PAP UN
1.
Retirez le couvercle et replacez-le
dans I'alignement
2.
Remettez la languette dans
I'alignement
REPRESENTANT
-800-321
-
Pg. 8.
-
Pg. 8.
DE SERVICE
-1
134)
APRES-VENTE
AGREE
J
Page 31

ADVERTENCIA:
1
PROBLEMA
iunciona
La aspiradora no
aspira o la
es muy debil
succion
--
PARA
REDUCIR
EL
RIESGO
DELESIONES
I
POSIBLES CAUSAS
conectado en la toma de corriente
2. Fusible quemado o interruptor
desconectado.
3. Necesita servicio.
4. Protector termico activado.
I
1. El recipiente de polvo no esta
instalado correctamente.
2. El recipiente de polvo esta
3. Cepillo giratorio desgastado.
4. Banda rota o desgastada.
5.
Filtro tapado.
6. Esta tapada la boquilla /el paso
de polvo de la manguera.
7. Ajuste incorrecto de la
alfombra.
Ileno.
altura de
DNALES, DESCONECTE ANTES DE DAR SERVICIO.
PER~
SOLUC~~N
1. Conecte la unidad con firmeza.
2. Revise el fusible o el interruptor en casa.
3. Llevela al centro de servicio o Name al
4. Deje que la aspiradora se enfrie
1. Revise la forma de retiro y reemplazo del
2. Vacie el recipiente de polvo
3. Reemplace el cepillo giratorio
4. Reemplace la banda
5.
6. Retire la manguera inferior; retire la
7. Mueva la palanca de ajuste de altura de
POSIBLE
I
Reemplace el fusible
1-800-321 -1 134.
recipiente de polvo
Retire y limpie el filtro - Pag. E8.
obstruccion
alfombra a un nivel apropiado para la
alfombra aue se este limpiando
-
reactive el interruptor.
-
Pag. E8.
-
Pag. E9 & E10.
Pag. El 1.
-
Pag. E8.
-
Pag. E9 & El 0
-
Pag. E3.
-
Pag. E7.
El polvo sale
aspiradora
la
aspiradora no
iuncionan
La luz frontal no
iunciona
Es dificil empujar
la aspiradora
se mueve hacia
delante
El recipiente de
polvo no queda
asegurado en su
sitio
CUALQUIER OTRO SERVlClO
En caso de necesitar mas avuda, vea en las Paginas Amarillas 'para encontrar a un ~istribuidk Autorizado Royal?
Los costos de transporte hacia desde el sitio d&eparacion swan pagados por el propietario. Las partes de repuesto
utilizadas en esta unidad son de reemplazo facil y estan disponibles a traves de un Distribuidor Autorizado Royal" o
en otras tiendas. Siempre identifique su aspiradora por medio del numero de modelo y el codigo de fabricacion cuan-
do pida
o
information
El recipiente de polvo esta Ileno.
I::
El recipiente de polvo no esta
instalado correctamente.
3. La manguera no esta instalada
correctamente.
4. El filtro no esta instalado
completamente.
2. El recipiente de polvo esta Ileno.
1. Foco fundido.
2. Cables electricos sueltos.
1. Ajuste incorrecto de la altura de
no
alfombra.
1. La tapa del recipiente de polvo nc
esta alineada apropiadamente
2. La lengiieta de alineacion no
esta alineada.
DEBE~
SER EFECTUADO POR UN REPRESENTANTE DE SERVICIO AUTORIZAD(
SERVlClOS
u ordene partes de repuesto. (El nhero de modelo aparece en el fondo de la aspiradora.)
AL
CLIENTE
1. Vacie el recipiente de polvo
2. Revise la forma de retiro y reemplazo del
recipiente de polvo
3.
Revise la instalacion de la manguera - Pag. E6.
4. Revise la forma de retiro y reemplazo del filtro
-
Pag. E8.
1. Retire la manguera y 10s accesorios; retire la
obstruccion
2. Vacie el recipiente de polvo
3. Limpie el filtro
1. Reemplace el foco
2.
Llame al 1-800-321 -1 134 para encontrar al
Distribuidor Royalm mas cercano a su
domicilio.
1. Mueva la palanca de ajuste de altura de alfombra
a un nivel apropiado para la alfombra que se
este limpiando
--
1.
Retire y realinee la tapa - Pag. E8.
2. Realinee la lengiieta
-
Pag. E6 & El 0.
-
Pag. E8.
-
Pag. E7.
(1 -800-321 -1 134)
-
Pag. E8.
-
Pag. E10.
-
Pag. E8
-
Pag. E8.
-
Pag. E8.
Page 32

DESCONECTE ANTES DE DAR SERVICIO.
RETIRO DE LOS
RESIDUOS
TECCION
I
DE
PRO-
LA
RETIRO DE LOS RESIDUOS
I
TURBO TOOL'"
Retire la proteccion de la
boquilla (vea el Diagrama
al quitar 10s cinco
Busque las obstrucciones
retirelas. Retire el cepillo
giratorio de ser necesario.
Para reensamblar, asegurese
que las lenguetas esten para asegurarlo.
enganchadas
el alojamiento inferior.
y
gire para cerrar
(5)
tornillos.
1)
y
Gire el anillo del seguro
dele vuelta a la turboboquilla.
anillo del seguro
Gire el
180"
180"
y
Gire el alojamiento inferior
retire el atasco.
y
Page 33

PARTES MOVILES, DESCONECTE
LA
ASPIRADORA ANTES DE RETIRAR 0 REEMPLAZAR EL FOCO.
Esta aspiradora utiliza un foco automotor comin No.906,13.0 voltios. Para el reemplazo del foco pot favor llame
all-800-321-1134 o visite nuestro sitio web www.dirtdevil.com para localizar
al
distribuidor mas cercano a usted.
HERRAMIENTA NECESARIA: DESTORNILLADDR PHILLIPS PEQUENO
Retire la proteccion de la
y
boquilla
(Vea la Pag. E9). Retire 10s
dos
el cepillo giratorio
(2)
tornillos inferiores.
DESCONECTE ANTES DE DAR SERVICIO.
De
vuelta la aspiradora para
retirar la lente de la luzfrontal.
Para retirar el (10s) foco(s),
saquelo(s) del receptaculo.
NO
lo gire. Para reernplazarlo, ernpujelo suavernente en
el receptaculo. Reponga la
tapa de la lente.
tornillos. Reponga la
proteccion de la
boquilla
y
el cepillo
Desconecte la aspiradora. Retire
el recipiente de polvo. Gire el
yugo de la rnanguera en sentido
antihorario para retirarlo.
Revise que no haya residuos Revise que no haya residuos
en el yugo de la manguera.
en el
tubo del polvo.
Page 34

GRRAMIENTA
ADVERTENCIA:
NECESARIA:
PARA REDUCIR EL RIESGO DE LESIONES CAUSADAS POR
LA
ASPIRADORA ANTES DE CAMBIAR
DESTORNILLADOR PHILLIPS
PARA RETIRAR LA BANDA
LAS
LA
BANDA 0 EL CEPILLO GIRATORIO.
PARTES
~ESTILO DE BANDA
MOVILES,
DESCONECTE
121
Acueste la aspiradora y volteela para ver la
base de la boauilla. La base debe auedar olana
y
mirando haia arriba. Utilice un destomiilador
Phillips para retirar 10s cinco
quitar la proteccion'de la boquilla. Las flechas
indican la posici6n de 10s tomillos.
(5)
tomillos y asi
I
Levante la proteccion de la Levante y retire el cepillo giraboquilla. torio. Deseche la banda vieja.
I
REEMPLAZO DE LA BANDA 0 DEL CEPILLO GIRATORIO
Deslice la banda en el eje
del motor.
Coloque la banda nueva en el
area sin cerdas del cepillo
giratorio.
Una vez que la banda nueva esta puesta en su
lugar, tire del cepillo giratorio
de la boquilla asegurandose que las tapas finales
del cepillo giratorio esten en la
recta (insercion 6a). Gire el cepillo giratorio de
forma manual para asegurarse que la banda este
alineada apropiadamente.
I
/"
y
deslicelo dentro
orientacion cor-
I
Page 35

Para el filtro de reemolazo (No. de Park 2-JC0280-000) rror favor llame al 1-800-321-1134 o visite
ANTES DE DAR SERVICIO.
www.dirIdevil.com para lotilizar al distribuidor mas cercano a usted.
Desconecte la aspiradora antes de cambiar el filtro.
NOTA:
NOTA:
Para on mejor desemoeiio, reemolace el filtro cada ah.
y
retire la tapa
Oprirna el boton de liberacion del recipiente
de polvo en la parte
posterior de la
radora para retirar el
recipiente de polvo.
aspi-
evante
Sostenga el recipiente Lirnpie el filtro y el recipiente de
de polvo y sujete el polvo cornpletamente. Vea la
tope del filtro. Gire y nota a continuaci6n
tire del filtro hacia arri- "Mantenirniento Regular" para
bay afuera. las instrucciones de lirnpieza
del filtro.
Coloque de nuevo el
filtro en el recipiente tura de la parte posterior del recipiente de polvo polvo en la aspiradora. Alinee la
de polvo. Ernpuje el
filtro en su sitio para
evitar fugas.
Alinee la entrada de polvo de la tapa con la aber- Coloque de nuevo el recipiente de
para asegurar la tapa (Diagrarna
entrada de polvo y la abertura de la parte posterior del recipiente de polvo estan alineadas
cuando se cierra la tapa (Diagrama
6).
NOTA:
La
ranura de la parte inferior del recipiente de polvo con la lengiieta de la
6a.) para que entre en su sitio
aspiradora (Diag rarna
(Diaararna 7a).
7).
Ernp~j jelo
Page 36

AJUSTE DE ENCENDIDO
/
ACION
DEL ASA
Gire la perilla de ajuste Conecte el cordon elecde altura para que corresponda con la super- riente. Encienda la del asa localizado en la
ficie que se va a aspiradora pisando el parte inferior izquierda
NOTA:
limpiar.
Para on
ajuste mb facil,
coloque la aspiradora
trico en la torna de cor-
pedal localizado en la
parte posterior izquierda de la aspiradora.
Para liberar el asa, pise
el pedal de
de la aspiradora.
liberation
en posicion completamente vertical.
LlMPlEZA POR ENCIMA DEL NlVEL DEL PIS0
La aspiradora debe Retire la rnanguera
estar en su posicion del contenedor de
vertical para levantar el accesorios.
cepillo giratorio.
I
Mueva el asa y ajhtela
en la posicion deseada
para (a) guardar la
aspiradora, (b) operar
la aspiradora
pisar el pedal de lib-
eracion del asa nueva-
rnente para lirnpiar
debajo de 10s rnuebles.
Presione firrnernente el
accesorio hacia abajo en
el
extrerno de la lanza de
la rnanguera. Para
quitar el accesorio, gire
I
y
(c)
gitud, use la lanza de
extension
para hendiduras.
y
el accesorio
NOTA:
El accesorio para hendiduras se guarda dentro
de la lanza de extensidn.
ra de una habitaci6n a
otra, use el asa de
transporte ubicada en
la parte posterior
de la
 Loading...