

Dimplex BFL50-EU Owner's Manual
7212350100R00
IMPORTANT SAFETY INFORMATION: !"#$%&'()$*'+,-&'.$/0$"'1(&+'
2)34()'$++).5+-/6'+4'-/&+$""'4('0&)'+,-&'1()5"$7)8'94('%40('&$3)+%:'$"#$%&'
74.5"%'#-+,'$""'#$(/-/6&'$/*'&$3)+%'-/&+(07+-4/&'74/+$-/)*'-/'+,-&'.$/0$"'+4'5();)/+'5)(&4/$"'-/<0(%'4('5(45)(+%'*$.$6)8
Owner’s Manual
Mode
=>9?@ABC
IT DEFREN
2 www.dimplex.com
Table of Contents
Always use a qualified technician
or service agency to repair
this fireplace.
!
NOTE: Procedures and
techniques that are considered
important enough to
emphasize.
CAUTION: Procedures
and techniques which, if not
carefully followed, will result in
damage to the equipment.
WARNING: Procedures
and techniques which, if not
carefully followed, will expose
the user to the risk of fire,
serious injury, or death.
Welcome & Congratulations . . . . . . . . . . . . . . . . . . . . .3
IMPORTANT INSTRUCTIONS . . . . . . . . . . . . . . . . . . . 4
Quick Reference Guide . . . . . . . . . . . . . . . . . . . . . . . .6
Fireplace Installation . . . . . . . . . . . . . . . . . . . . . . . . . . 7
Site Selection . . . . . . . . . . . . . . . . . . . . . . . . . . . . . . .7
Surface Installation . . . . . . . . . . . . . . . . . . . . . . . . . . .8
In-wall Recessed Installation - 100mm Deep . . . . . .10
Flush Mounted Installation - 200mm Deep . . . . . . . . 11
Front Glass Installation . . . . . . . . . . . . . . . . . . . . . . .12
Operation . . . . . . . . . . . . . . . . . . . . . . . . . . . . . . . . . .14
Maintenance . . . . . . . . . . . . . . . . . . . . . . . . . . . . . . .16
Warranty . . . . . . . . . . . . . . . . . . . . . . . . . . . . . . . . . .17
3
Welcome & Congratulations
Thank you and congratulations for choosing to purchase an electric
fireplace from Dimplex, the world leader in electric fireplaces.
Please carefully read and save these instructions.
CAUTION: Read all instructions and warnings carefully before
starting installation. Failure to follow these instructions may result in
a possible electric shock, fire hazard and will void the warranty.
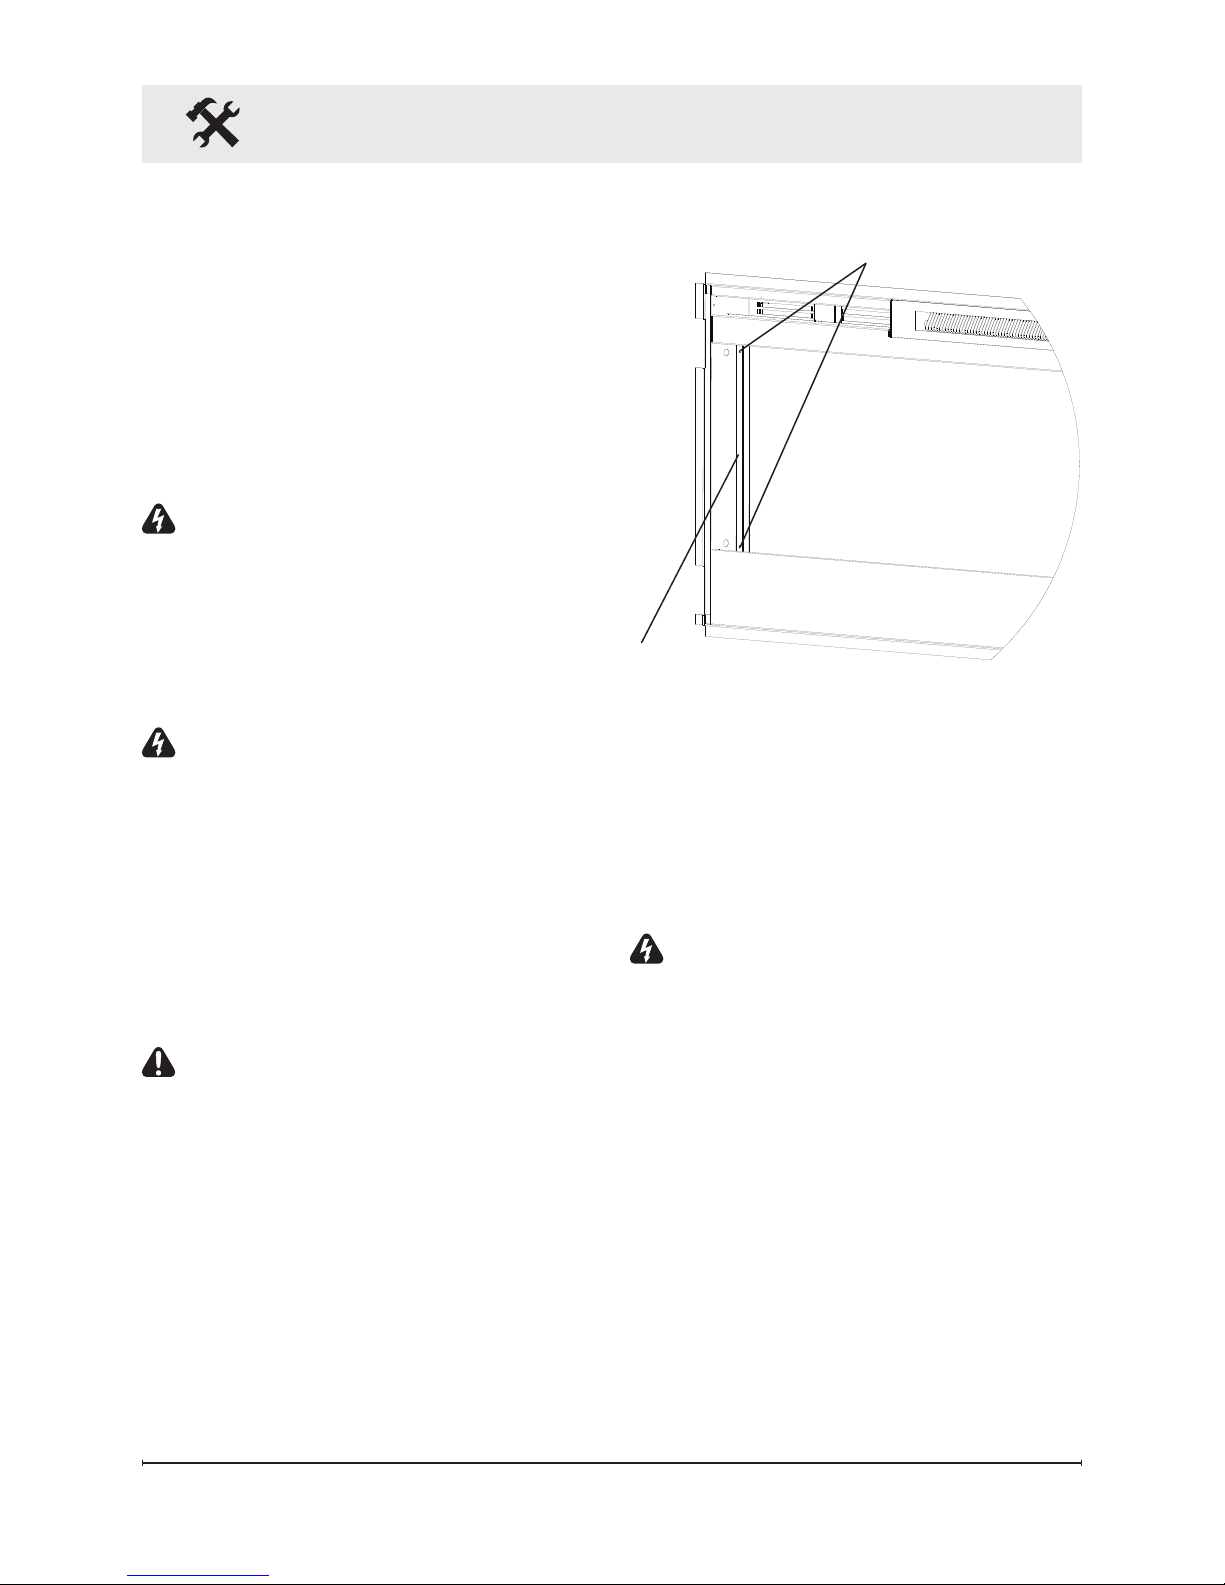
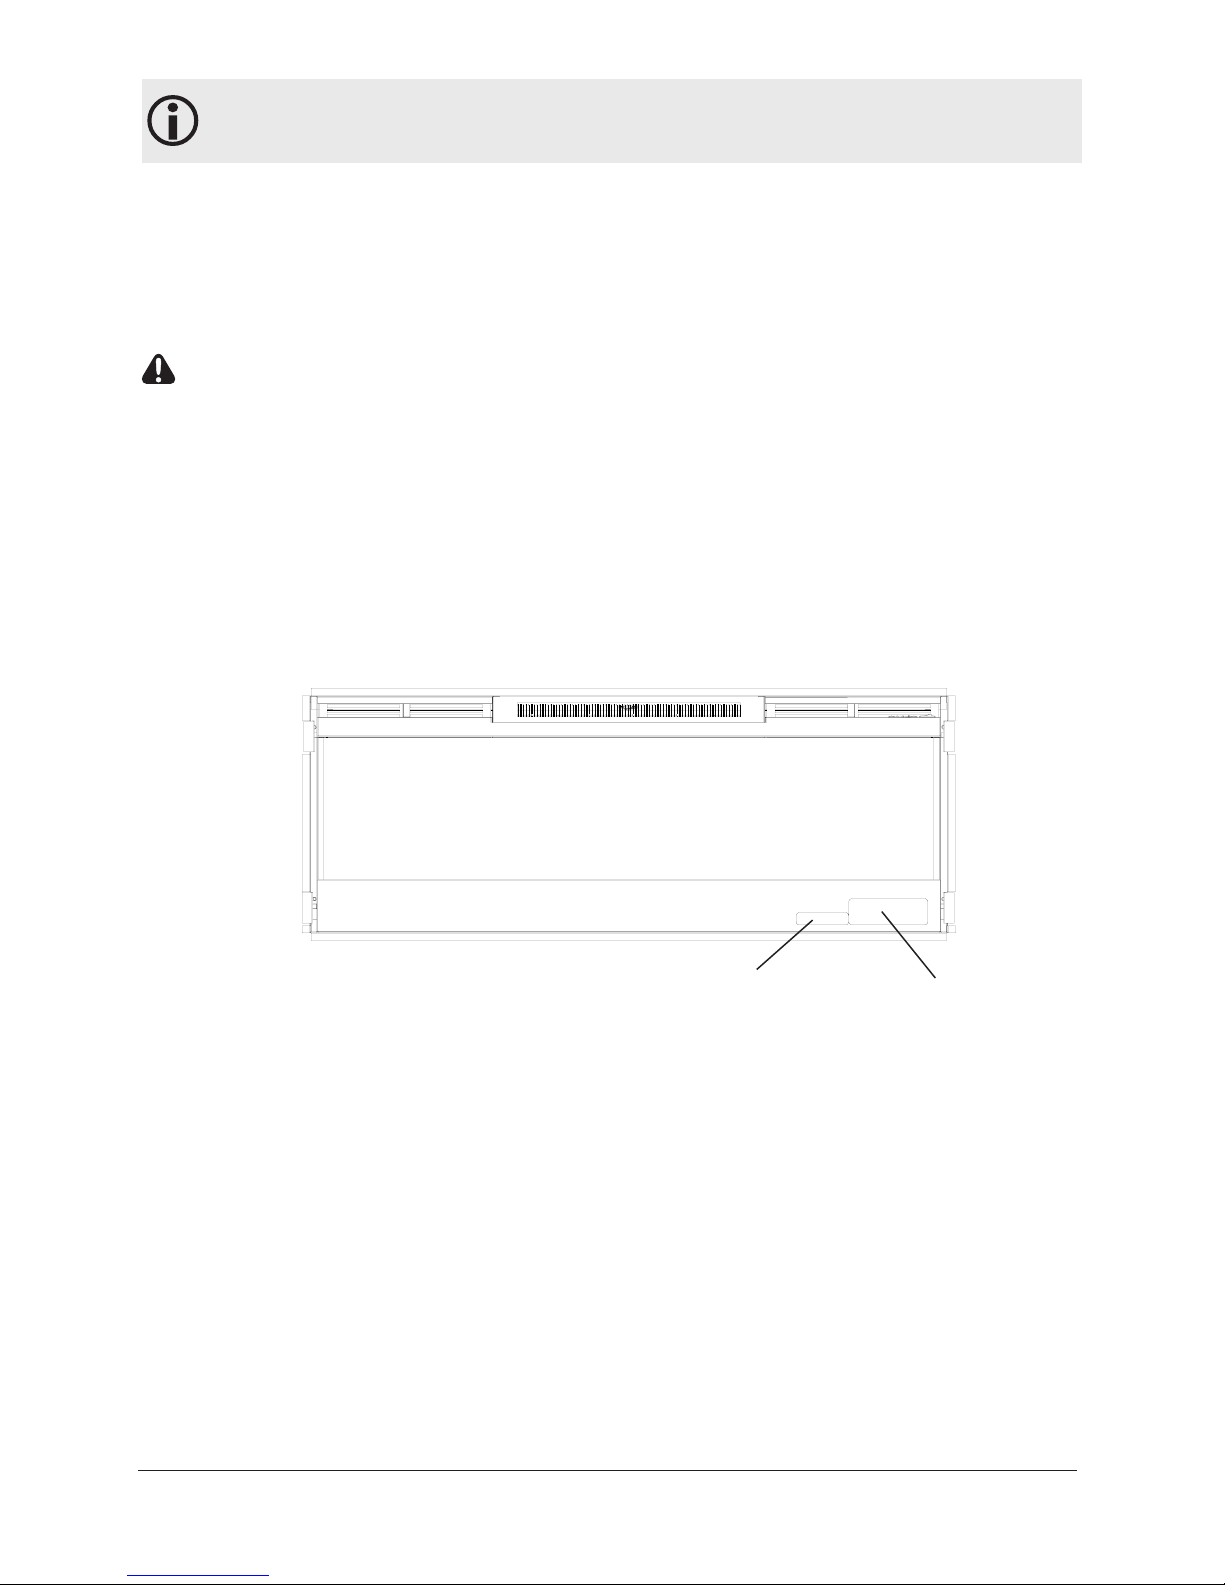
Please record your model and serial numbers below for future
reference: model and serial numbers can be found on the Model and
Serial Number Label of your fireplace.
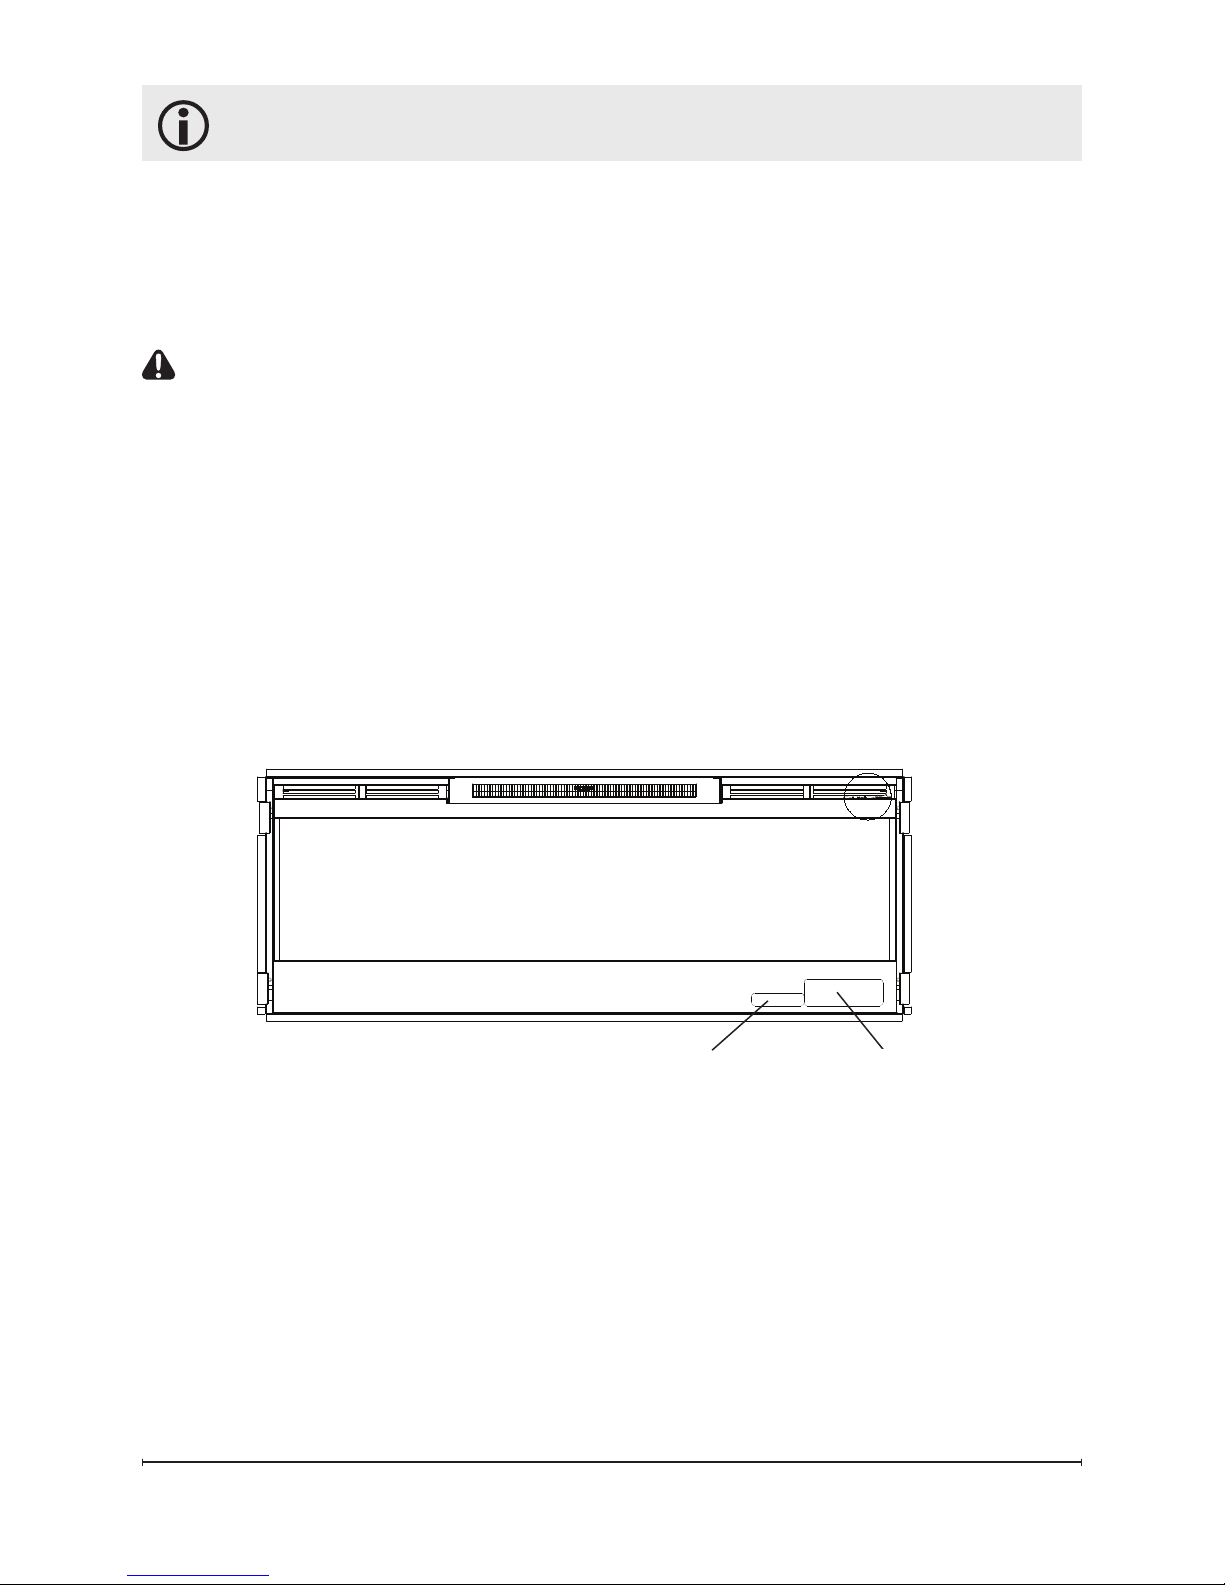
Serial Number
Label
Rating Label

4 www.dimplex.com
When using electrical appliances,
basic precautions should always be
followed to reduce the risk of fire,
electric shock, and injury to persons,
including the following:
① Read all instructions before using
the electric fireplace.
②
This fireplace is hot when in use.
To avoid burns, do not let bare skin
touch hot surfaces. The trim around
the heater outlet becomes hot during
heater operation. Keep combustible
materials, such as furniture, pillows,
bedding, papers, clothes, and
curtains at least 0.9 m (3 feet) from
the front of the unit.
③ Extreme caution is necessary
when any heater is used by or near
children or invalids and whenever the
unit is left operating and unattended
.
④This appliance is not intended for
use by persons (including children)
with reduced physical, sensory or
mental capabilities, or lack of experience and knowledge, unless they
have been given supervision or in-
struction concerning use of the appliance by a person responsible for their
safety. Children should be supervised
to ensure that they do not play with
the appliance.
⑤
Warning this heater is not
equipped with a device to control the
room temperature. Do not use this
heater in small rooms when they are
occupied by persons not capable of
leaving the room on their own, unless
constant supervision is provided.
⑥Children of less than 3 years
IMPORTANT INSTRUCTIONS
should be kept away unless
continuously supervised.
⑦Children aged from 3 years and
less than 8 years shall only switch
on/off the appliance provided that it
has been placed or installed in its
intended normal operating position
and they have been given supervision
or instruction concerning use of
the appliance in a safe way and
understand the hazards involved.
Children aged from 3 years and
less than 8 years shall not plug in,
regulate and clean the appliance or
perform user maintenance.
CAUTION: Some parts of this
product can become very hot and
cause burns. Particular attention
has to be given where children and
vulnerable people are present.
⑧The appliance must be positioned
so that the plug is accessible.
⑨If the supply cord is damaged,
it must be replaced by the
manufacturer, or its service agent, or
a qualified person in order to avoid a
hazard.
⑩Do not operate any unit with
a damaged cord or plug, or if the
heater has malfunctioned, or if the
electric fireplace has been dropped or
damaged in any manner, contact your
local dealer.
⑪Do not use outdoors.
⑫
Never locate fireplace where it
may fall into a bathtub or other water
container.
⑬Do not run the cord under

5
SAVE THESE INSTRUCTIONS
carpeting. Do not cover cord with
throw rugs, runners, or the like.
Arrange cord away from traffic area
and where it will not be tripped over.
⑭Do not locate the heater
immediately below a fixed socketoutlet.
⑮To disconnect the fireplace, turn
the controls off, then remove the plug
from the outlet.
⑯
Means for disconnection must be
incorporated in the fixed wiring in
accordance with the wiring rules.
⑰Do not insert or allow foreign
objects to enter any ventilation or
exhaust opening as this may cause
an electric shock or fire, or damage to
the heater.
⑱Do not block air intake or exhaust
in any manner. Do not use on soft
surfaces, like a bed, where openings
may become blocked.
⑲All electrical heaters have hot and
arcing or sparking parts inside. Do not
use in areas where gasoline, paint, or
flammable liquids are used or stored
or where the unit will be exposed to
flammable vapors.
⑳Do not modify the electric
fireplace. Use it only as described
in this manual. Any other use not
recommended by the manufacturer
may cause fire, electric shock or
injury to persons.
㉑Avoid the use of an extension
cord. Extension cords may overheat
and cause a risk of fire. If you must
use an extension cord, the cord must
be 3-core type and have a rating no
less than 13 Amps.
㉒Do not burn wood or other
materials in the electric fireplace.
㉓Do not strike the fireplace glass.
㉔Always use a certified electrician
should new circuits or outlets be
required.
㉕Always use properly grounded and
fused.
㉖Disconnect all power supply
before performing any cleaning,
maintenance or relocation of the unit.
㉗When transporting or storing the
unit and cord, keep in a dry place,
free from excessive vibration and
store so as to avoid damage.
CAUTION: In order to avoid a
hazard due to inadvertent resetting
of the thermal cut-out, this appliance
must not be supplied through an
external switching device, such as a
timer, or connected to a circuit that is
regularly switched on and off by the
utility.
IMPORTANT INSTRUCTIONS
The heater carries the Warning Symbol
indicating that it must not be covered.
6 www.dimplex.com
Quick Reference Guide
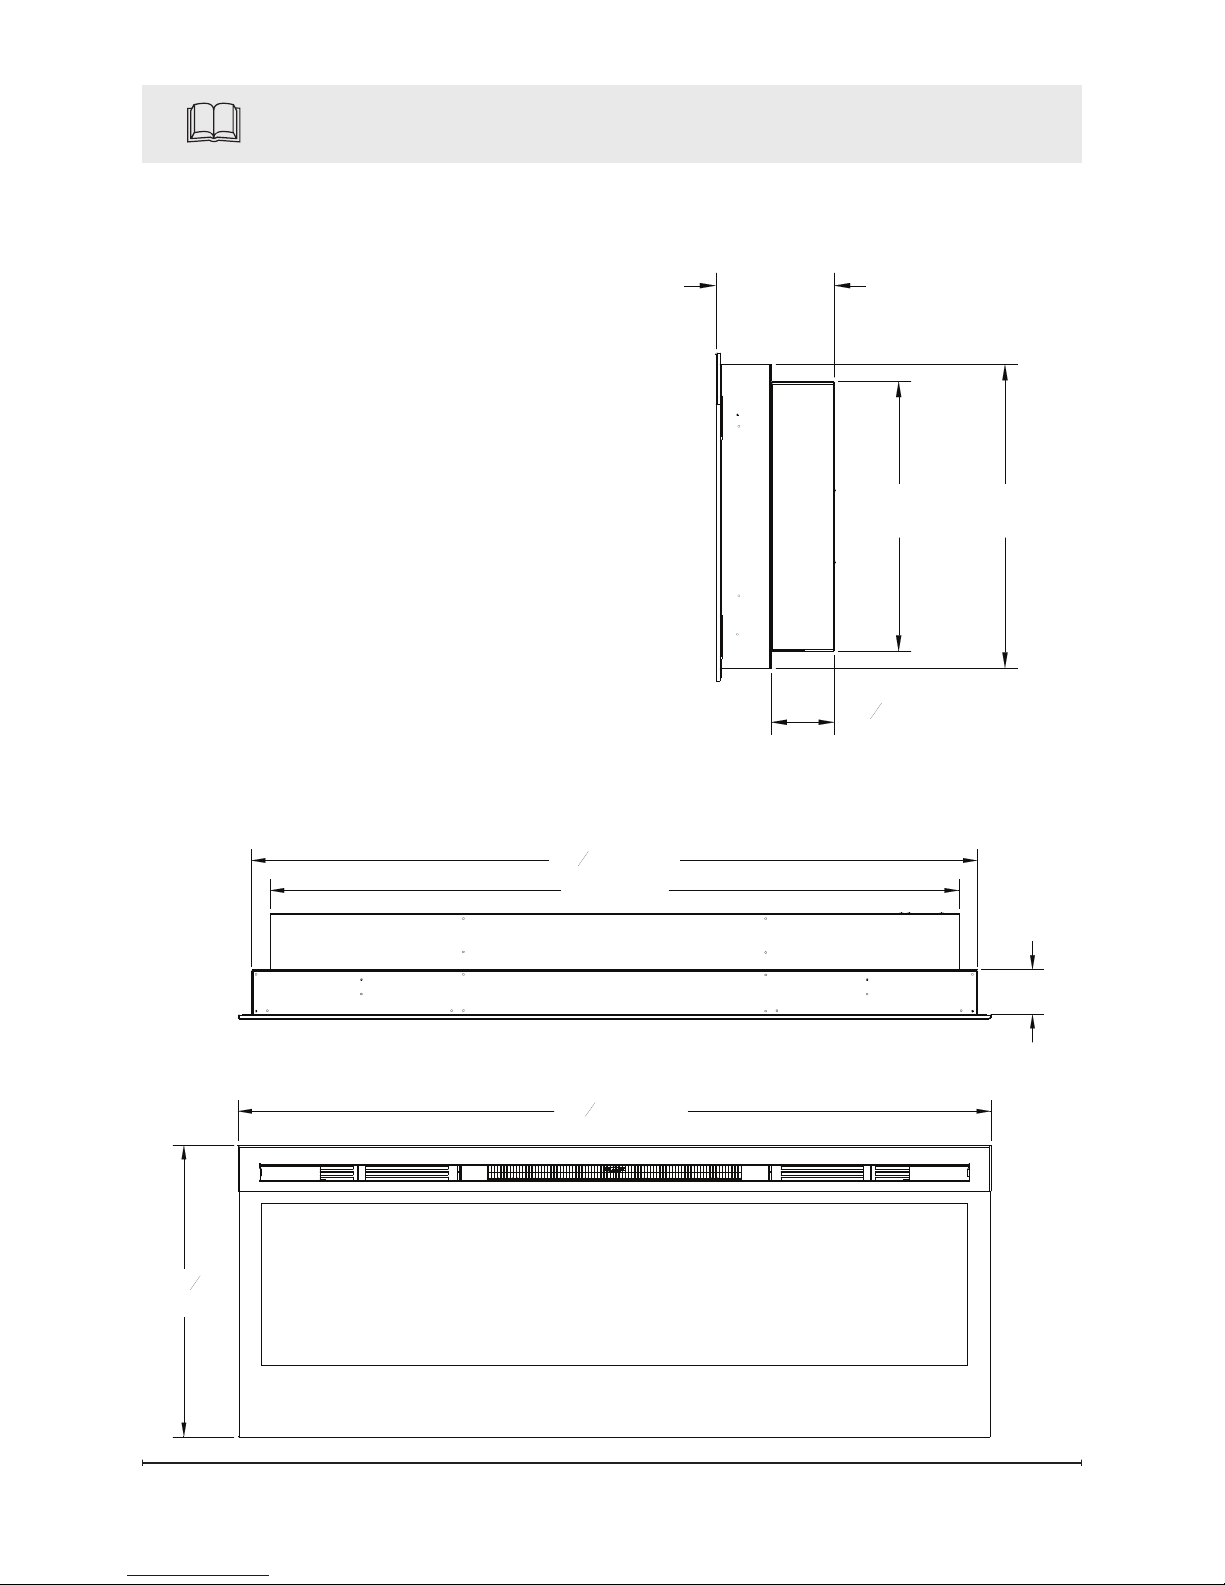
Figure 1
① The electrical information
regarding your electric fireplace can
be found on the rating label located
on the front of the unit, behind the
glass.
Before installation, please record your
fireplace's serial number below for
future reference.
② If you have any technical
questions or concerns regarding the
operation of your electric fireplace,
or require service contact customer
service.
③ For dimensions of your fireplace,
refer to Figure 1.
3" (7.6 cm)
50
5
16
" (128 cm)
19
1
2
(49.5 cm)
46" (116 cm)
48
1
2
" (123 cm)
7"
(17.8 cm)
3
13
16
"
(9.7 cm)
18"
(45.7 cm)
16"
(40.6 cm)

7
Site Selection
Review and consider all of the
following conditions for installation:
Dimensions of the unit: 128cm •
x 49.5cm
Unit requires a minimum of two •
(2) wall studs in order to ensure
a secure installation
Three possible installation
methods:
Installation method: Surface •
mount; In-wall Recessed; or
Flush mount
Hardwired or plug-in method•
WARNING: Ensure the power
cord is not installed so that it
is pinched or against a sharp
edge and ensure that the
power cord is stored or secured
to avoid tripping or snagging to
reduce the risk of fire, electric
shock or injury to persons.
Construction and electrical
outlet wiring must comply
with local building codes and
other applicable regulations to
reduce the risk of fire, electric
shock and injury to persons.
Select a location that is not 1.
susceptible to moisture and
is away from drapes, furniture
and high traffic.
Fireplace Installation
For ease of electrical 2.
hook up you may wish to
locate the fireplace near an
existing outlet (for plug-in
convenience).
!
NOTE 1: A 13 Amp, 230 Volt
circuit is required. A dedicated
circuit is preferred but not
essential in all cases. A
dedicated circuit will be
required if, after installation,
the circuit breaker trips or
fuse blows on a regular basis
when the heater is operating.
Additional appliances on the
same circuit may exceed the
current rating of the circuit
breaker.
Remove fireplace, front 3.
glass and hardware from box
and remove all packaging
materials before installation.
Store the fireplace in a safe, 4.
dry and dust free location until
you are ready to install the
fireplace.
8 www.dimplex.com
Fireplace Installation
The fireplace is packaged with
a three prong plug installed for
plug-in convenience. Hard wiring
the fireplace is also an option
by removing the plug from the
factory fitted cord and completing
the wiring according to National
and Local Elecrical Codes.
WARNING: Do not attempt to
wire your own new outlets or
circuits. To reduce the risk of
fire, electric shock or injury to
persons, always use a licensed
electrician.
WARNING: Ensure that the
3-Position Switch is set to the
Off position ("O") and that the
circuit on which the fireplace is
to be installed has the power
cut off at the service panel until
installation is complete.
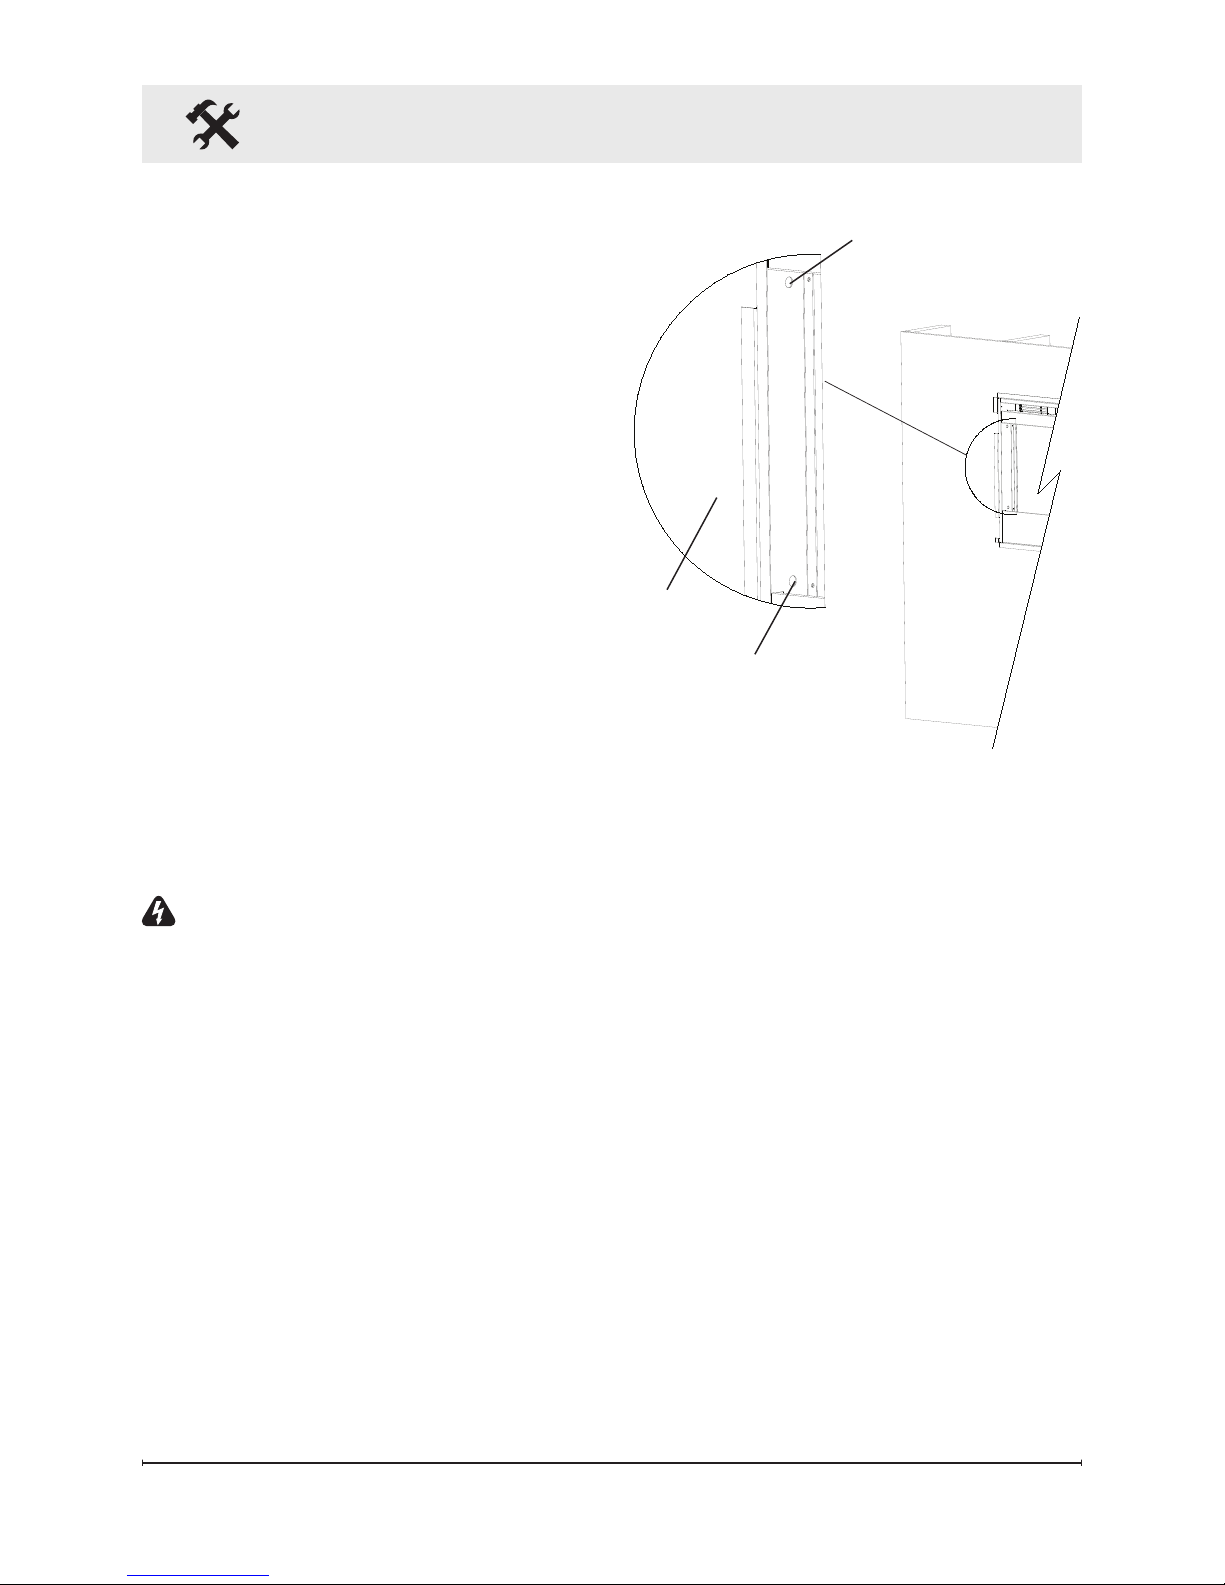
Surface Installation
CAUTION: Two people may
be required for various steps
of this procedure.
Choose a location for 1.
mounting the unit.
Choose your method of 2.
supplying power to the unit:
Plug in to an existing outlet •
or install an outlet nearby.
Hard wire the fireplace. •
Figure 2
Partially
Reflective Glass
Glass Bracket
Bracket Screws
!
NOTE: Hard wiring can
be done by removing the plug
from the factory fitted cord and
completing the wiring according
to National and Local Elecrical
Codes.
WARNING: Do not attempt
to wire your own new outlets or
circuits. To reduce the risk of fire,
electric shock or injury to persons,
always use a licensed electrician.
Ensure that the 3-Position Switch is
set to the Off position ("O") and that
the circuit on which the fireplace is
to be installed has the power cut off
at the service panel until installation
is complete.
Remove the partially 3.
reflective glass from the
fireplace:
9
Mark the location of four (4) 5.
screw locations on the wall
(through key-holes).
CAUTION: If installing unit on
a wall that is constructed of
drywall ensure that appropriate
wall anchors are used and at
least one is located into a stud.
Remove fireplace from wall 6.
and store in a safe place
away from traffic.
Screw all four (4) supplied #8, 7.
3.8 cm square head mounting
screws and washers into
the wall and/or wall anchors
leaving 6.5 mm of thread.
Align chosen key-holes with 8.
screws and hang fireplace
on the wall. Screw heads
and washers will fit through
key-holes and fireplace will
slide down into place (screws
will slide into narrow part of
key-holes).
Tighten all four (4) mounting 9.
screws down on fireplace
chassis.
Screw the two (2) supplied 10.
#8 square head screws
through two of the permanent
mounting holes which align
with a wall stud.
Carefully replace and install 11.
Lay fireplace on its back.•
Remove two (2) Phillips •
screws from each of the two
(2) glass brackets (Figure 2).
Remove glass brackets.•
With one hand keeping •
pressure on the partially
reflective glass, tilt the
fireplace upright and slightly
forward to allow the partially
reflective glass to fall out of
the inside framing.
Remove partially reflective •
glass from fireplace.
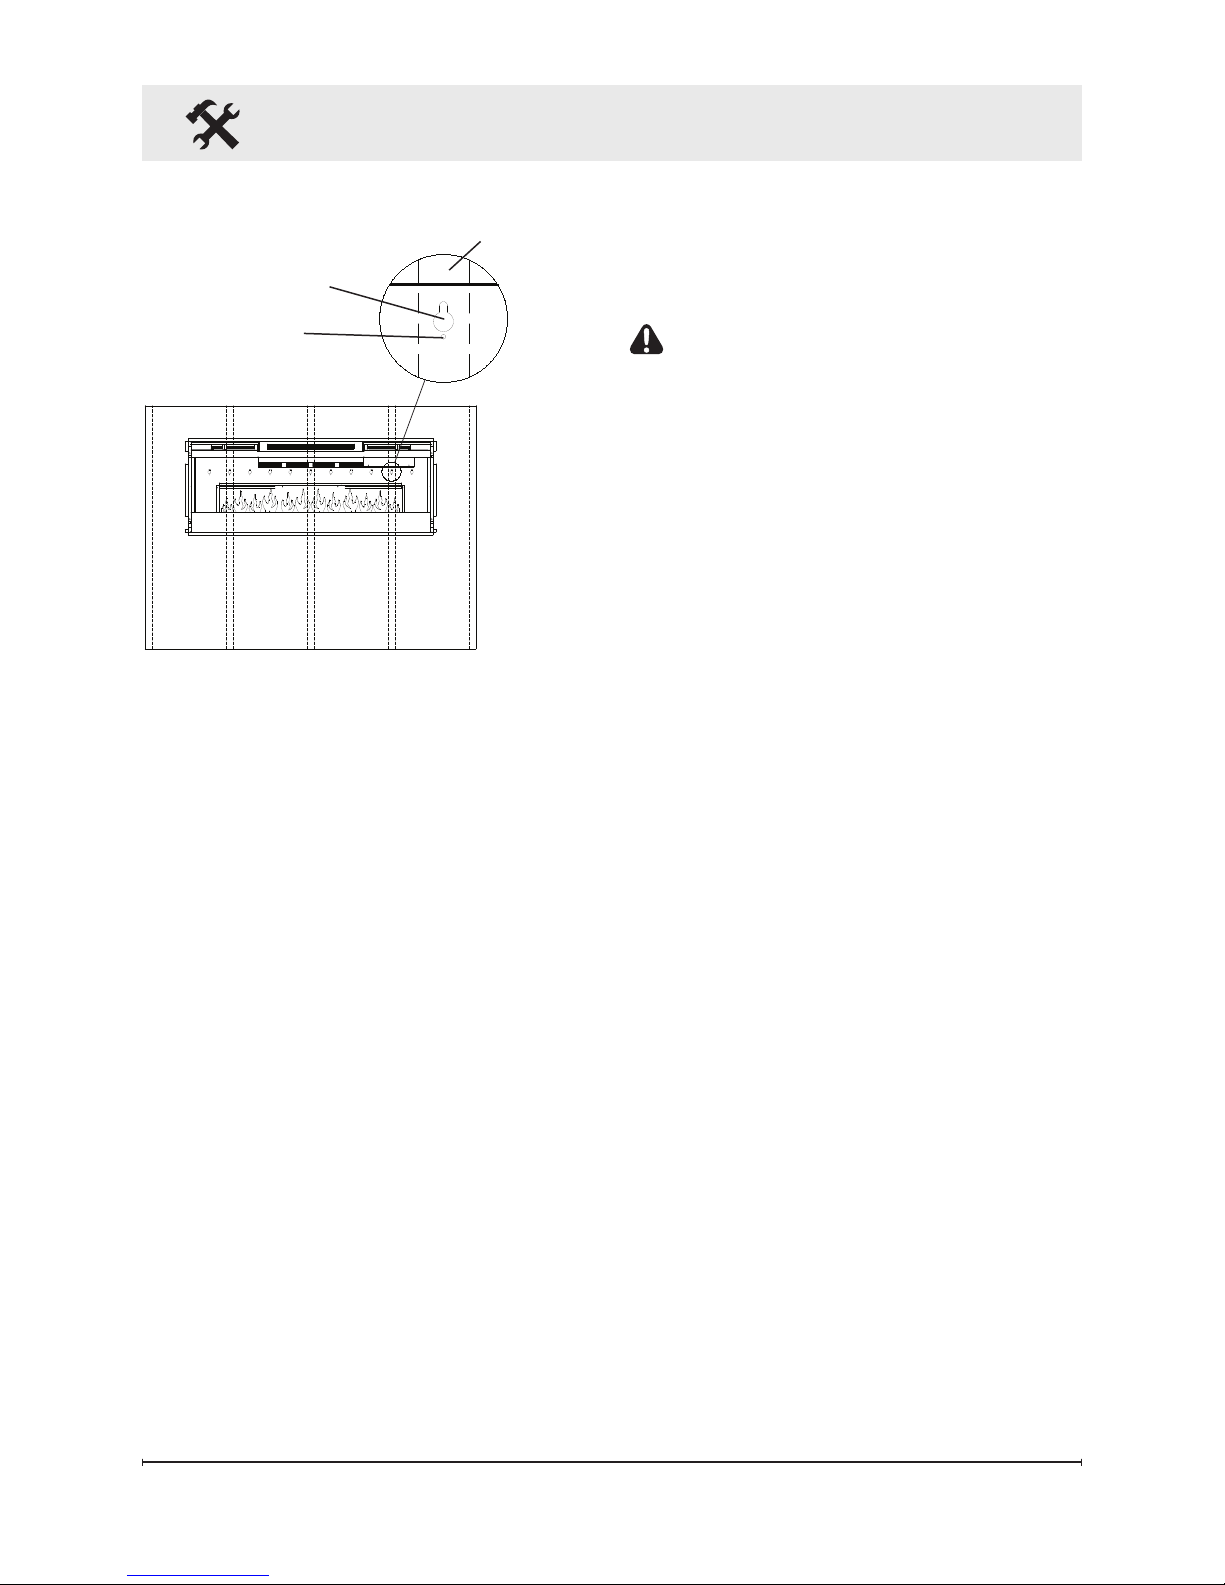
Position the fireplace on a wall 4.
at the position where it will be
mounted (Figure 3). Use a
bubble level (one is supplied)
to ensure that fireplace is level
on the wall.
Fireplace Installation
Figure 3
Key-hole
Wall stud
Permanent
mounting hole
10 www.dimplex.com
Fireplace Installation
partially reflective glass and
glass brackets using screws
from step 1.
Refer to Front Glass 12.
Installation section, for final
installation procedures.
In-wall Recessed
Installation - 100mm Deep
CAUTION: Two people may
be required for various steps
of this procedure.
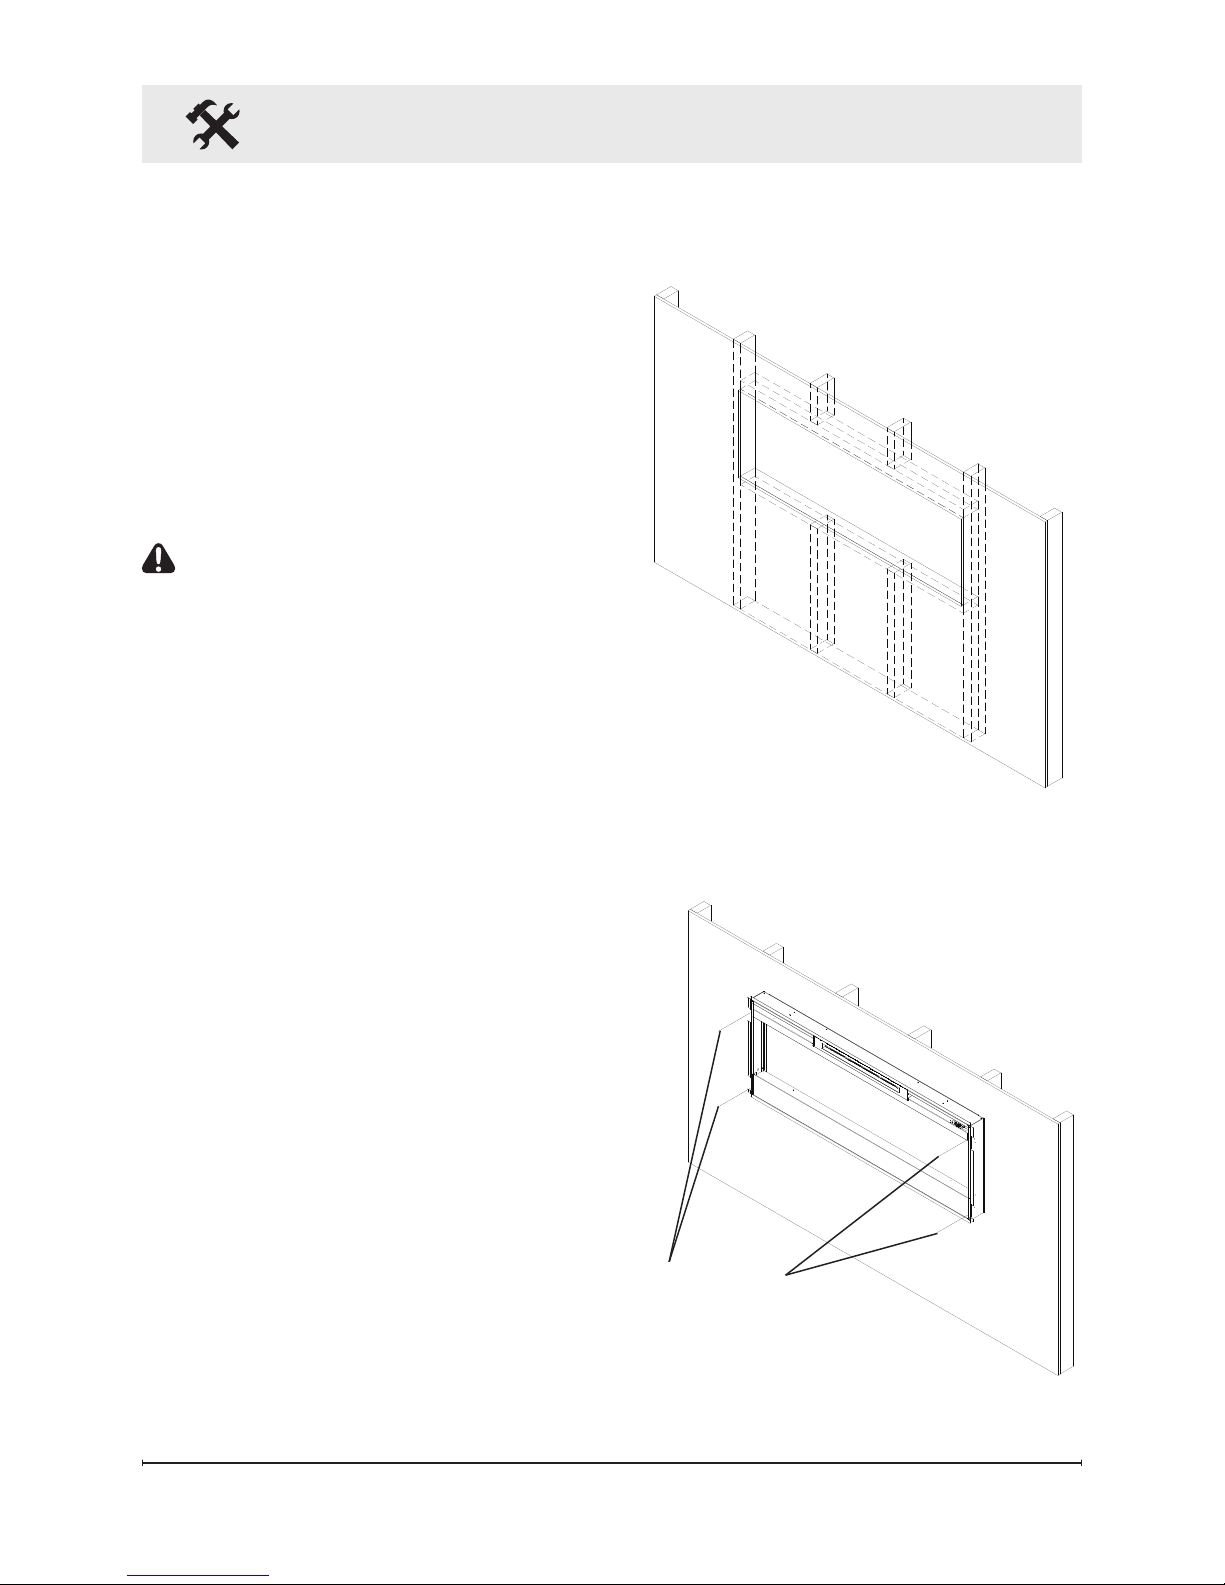
Prepare a wall with a framed 1.
opening of 118.1 cm wide x
42 cm high (Figure 4).
!
NOTE: The sizing has allowed
for 6.4mm around the fireplace
insert for ease of installation. This
fireplace does not require any
additional venting.
Choose your method of 2.
supplying power to the unit:
Plug in (you may run the •
power cord out of the framed
wall opening to an existing
outlet or install an outlet on
a nearby wall stud within the
wall).
Hard wire the fireplace. •
!
NOTE: Hard wiring can
be done by removing the plug
from the factory fitted cord and
Figure 5
Mounting
holes
Figure 4
11
Fireplace Installation
completing the wiring according
to National and Local Elecrical
Codes.
WARNING: Do not attempt
to wire your own new outlets or
circuits. To reduce the risk of fire,
electric shock or injury to persons,
always use a licensed electrician.
Ensure that the 3-Position Switch is
set to the Off position ("O") and that
the circuit on which the fireplace is
to be installed has the power cut off
at the service panel until installation
is complete.
Lift fireplace and insert into 3.
opening (Figure 5).
Use bubble level (supplied) to 4.
level the fireplace within the
framing. Adjust as required.
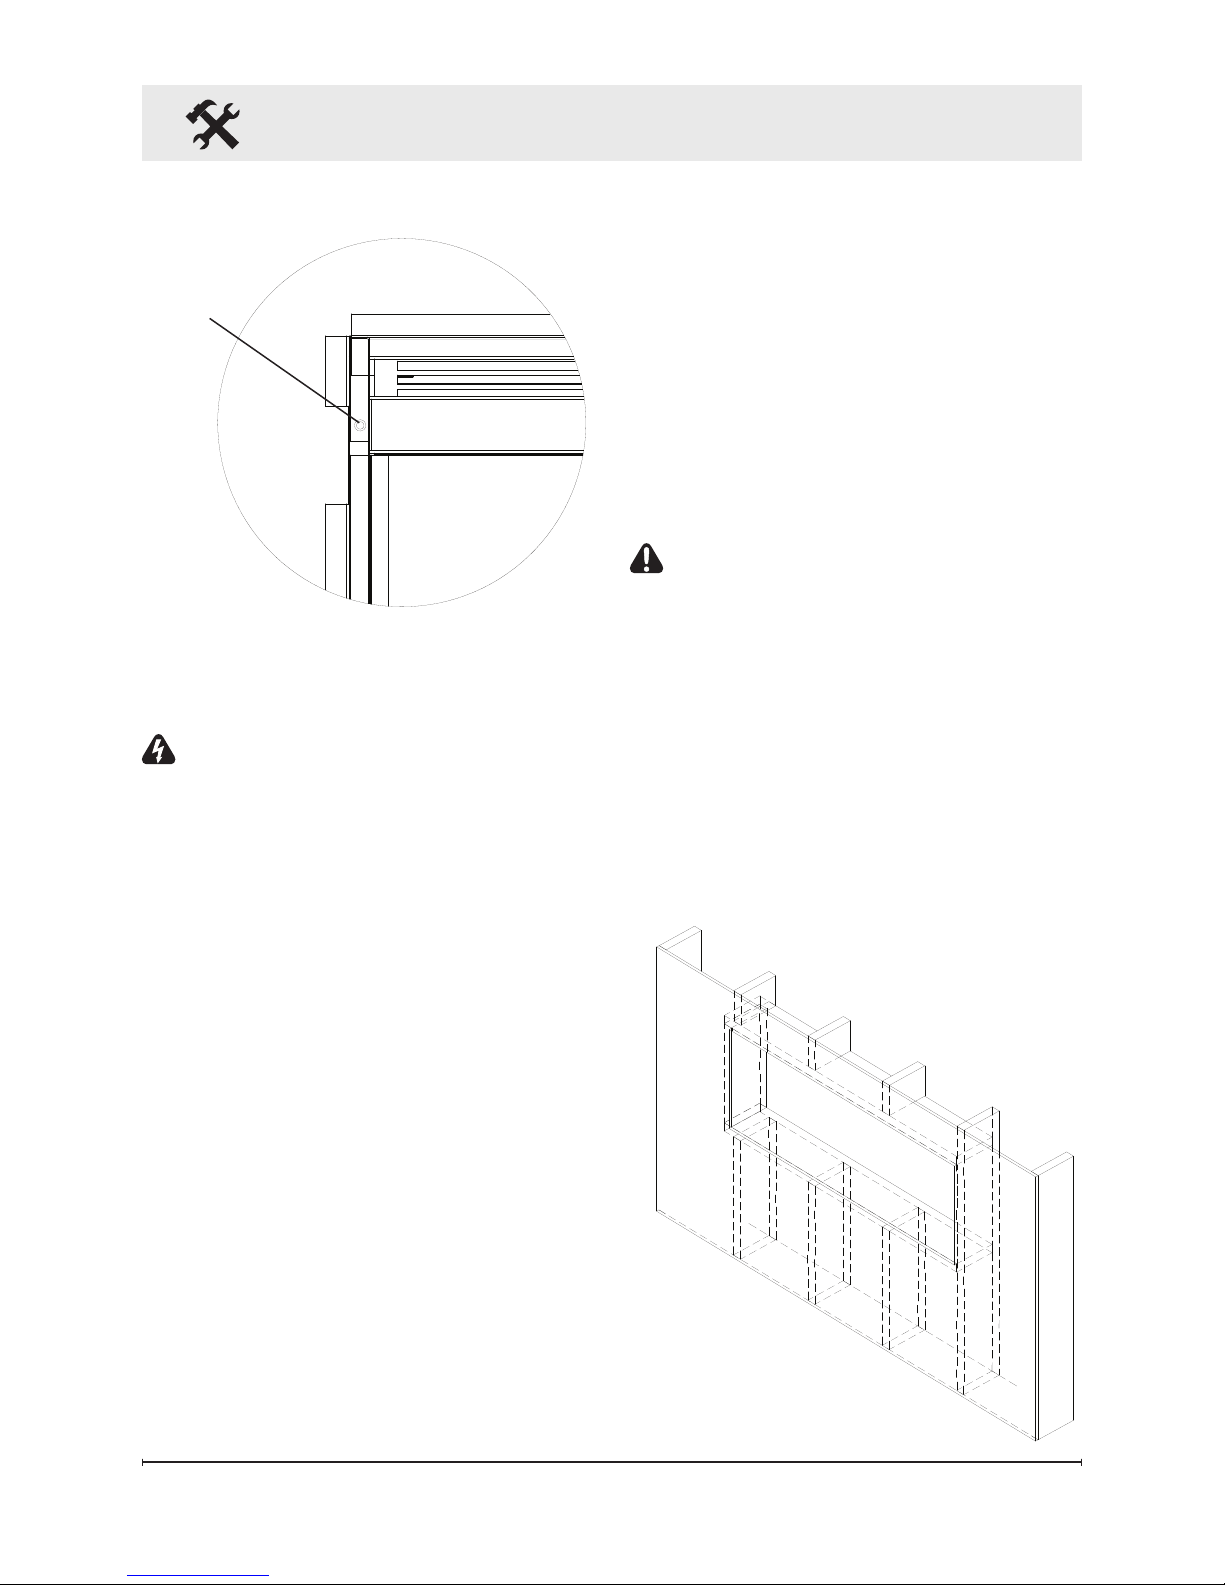
Drive four (4) supplied 5.
mounting screws through
the four (4) mounting holes
located in each corner of the
fireplace chassis, into wall
studs (Figure 6).
Refer to Front Glass 6.
Installation section, for final
installation procedures.
Flush Mounted
Installation - 200mm Deep
CAUTION: Two people may
be required for various steps
of this procedure.
Prepare a wall with a framed 1.
opening of 124.5 cm wide x
47 cm high (Figure 7).
!
NOTE: The sizing has allowed
for 6.4mm around the fireplace
Figure 6
Mounting
hole
Figure 7
12 www.dimplex.com
insert for ease of installation. This
fireplace does not require any
additional venting.
Choose your method of 2.
supplying power to the unit:
Plug in (you may run the •
power cord out of the framed
wall opening to an existing
outlet or install an outlet on
a nearby wall stud within the
wall).
Hard wire the fireplace. •
!
NOTE: Hard wiring can
be done by removing the plug
from the factory fitted cord and
completing the wiring according
to National and Local Elecrical
Codes.
WARNING: Do not attempt
to wire your own new outlets or
circuits. To reduce the risk of fire,
electric shock or injury to persons,
always use a licensed electrician.
Ensure that the 3-Position Switch is
set to the Off position ("O") and that
the circuit on which the fireplace is
to be installed has the power cut off
at the service panel until installation
is complete.
Lift fireplace and insert into 3.
opening. The fireplace's
mounting trim should be flush
against the wall (Figure 8).
Fireplace Installation
Use bubble level (supplied) to 4.
level the fireplace within the
framing. Adjust as required.
Drive four (4) supplied 5.
mounting screws through the
four (4) mounting holes located
on the inside surface of the
fireplace chassis, into wall
studs (Figure 8).
Refer to Front Glass 6.
Installation section, for final
installation procedures.
Front Glass Installation
Evenly distribute supplied 1.
glass rock on the front tray of
the fireplace (Figure 9).
Carefully mount front glass 2.
assembly so that the front
Figure 8
Mounting hole
Mounting hole
Wall
surface
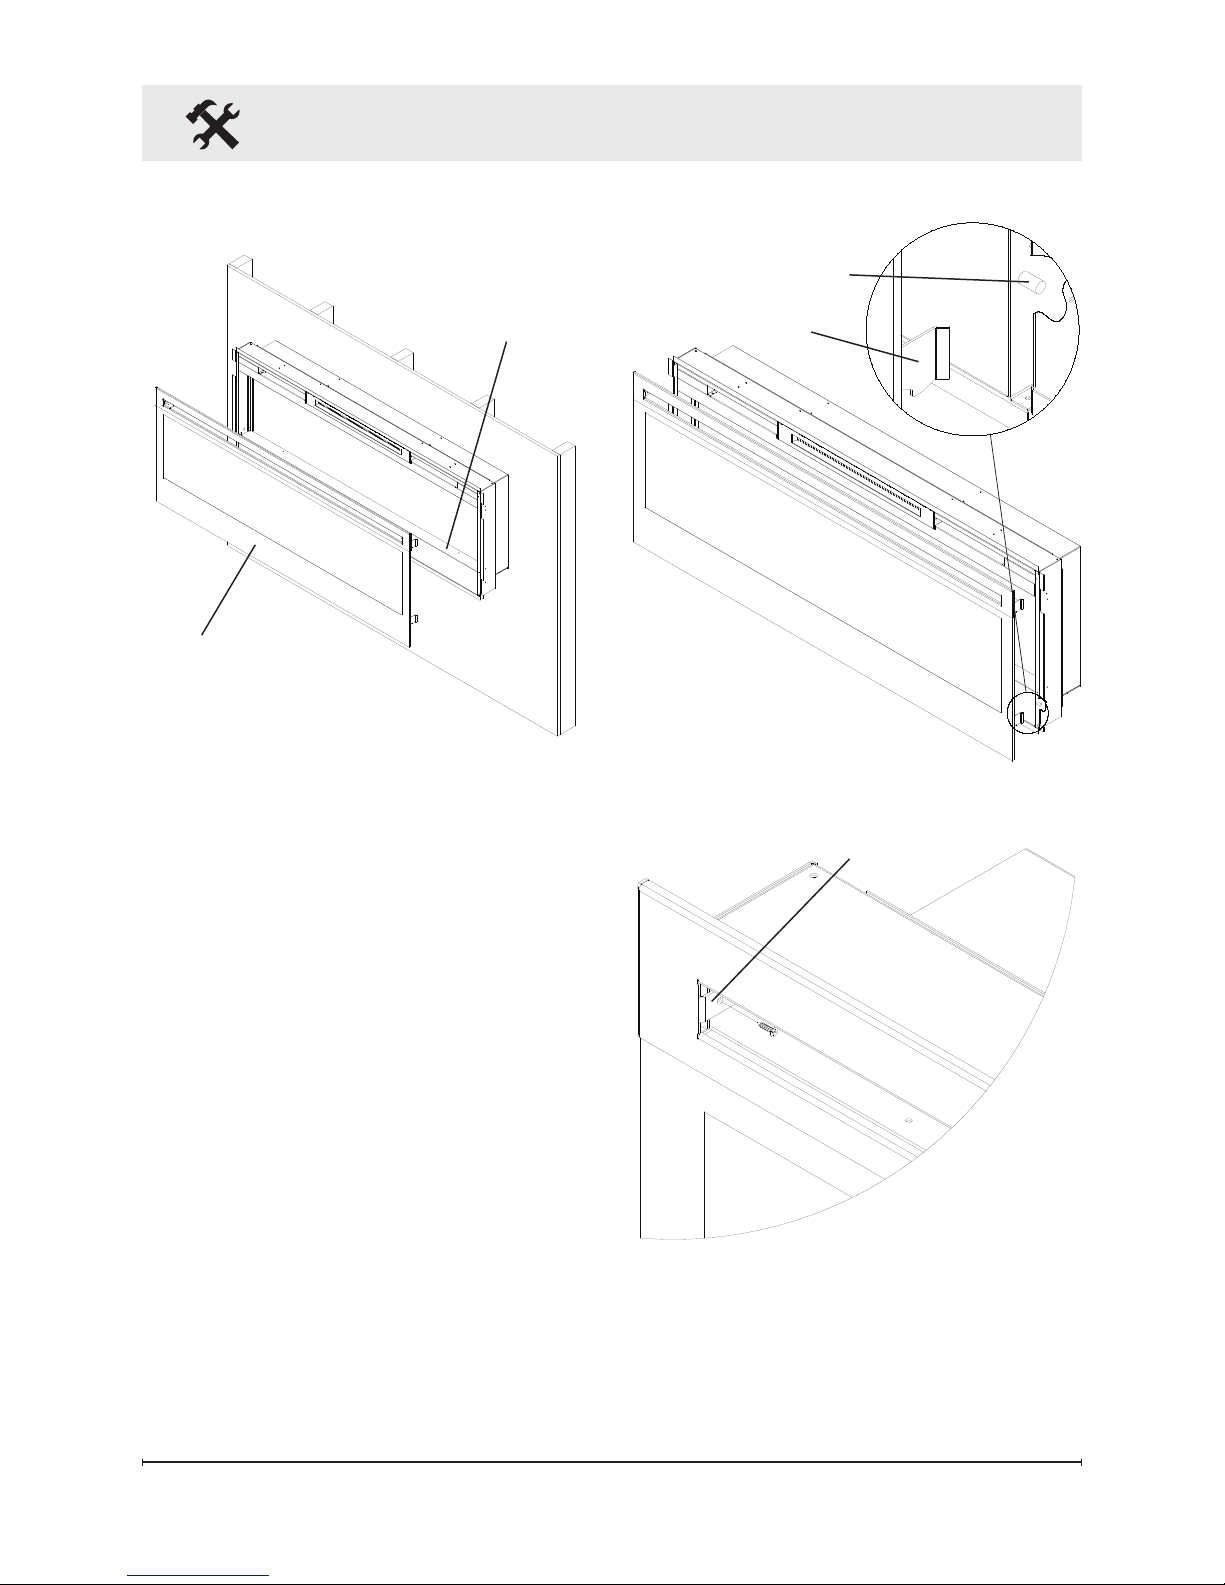
13
Fireplace Installation
glass hooks (4) hang on the
front glass mounts on the
fireplace (4) (Figure 10).
Use the supplied two (2) 3.
Phillips sheet metal screws
to fasten the glass assembly
tabs to the fireplace (Figure
11).
Ensure the fireplace's 4.
3-Position Switch is switched
to the Off position ("O").
If unit is not hard-wired, plug 5.
fireplace into a 13 Amp, 230
Volt outlet (refer to NOTE 1).
Figure 9
Front tray
Front glass
assembly
Figure 10
Hooks (4)
Mounts (4)
Figure 11
Tab

14 www.dimplex.com
Operation
The manual controls for the
electric fireplace are located on
the right side of the unit and inside
the air intake slot (Figure 12).
A. 3-Position Switch
The switch has two (2) On
positions marked with “I” and
“II”. The “I” position is for manual
operation. In this position
the built-in remote control is
bypassed.
The “II” position is for operating
the unit with the provided remote
control. When in “II” position
the unit is operated with the ON
and OFF buttons of the remote
control.
When the switch is in the center
(“O”) position the unit is off.
Figure 12
B
A
B. Heat On/Off Switch
The Heat On/Off Switch supplies
power to the heater fan and the
heater element.
Resetting the Temperature
Cutoff Switch
Should the heater overheat, an
automatic cut out will turn the
fireplace off and it will not come
back on without being reset. It
can be reset by switching the
3-Position Switch to Off and
waiting five (5) minutes before
switching the unit back on.
CAUTION: If you need to
continuously reset the heater,
disconnect power and contact
your local dealer.
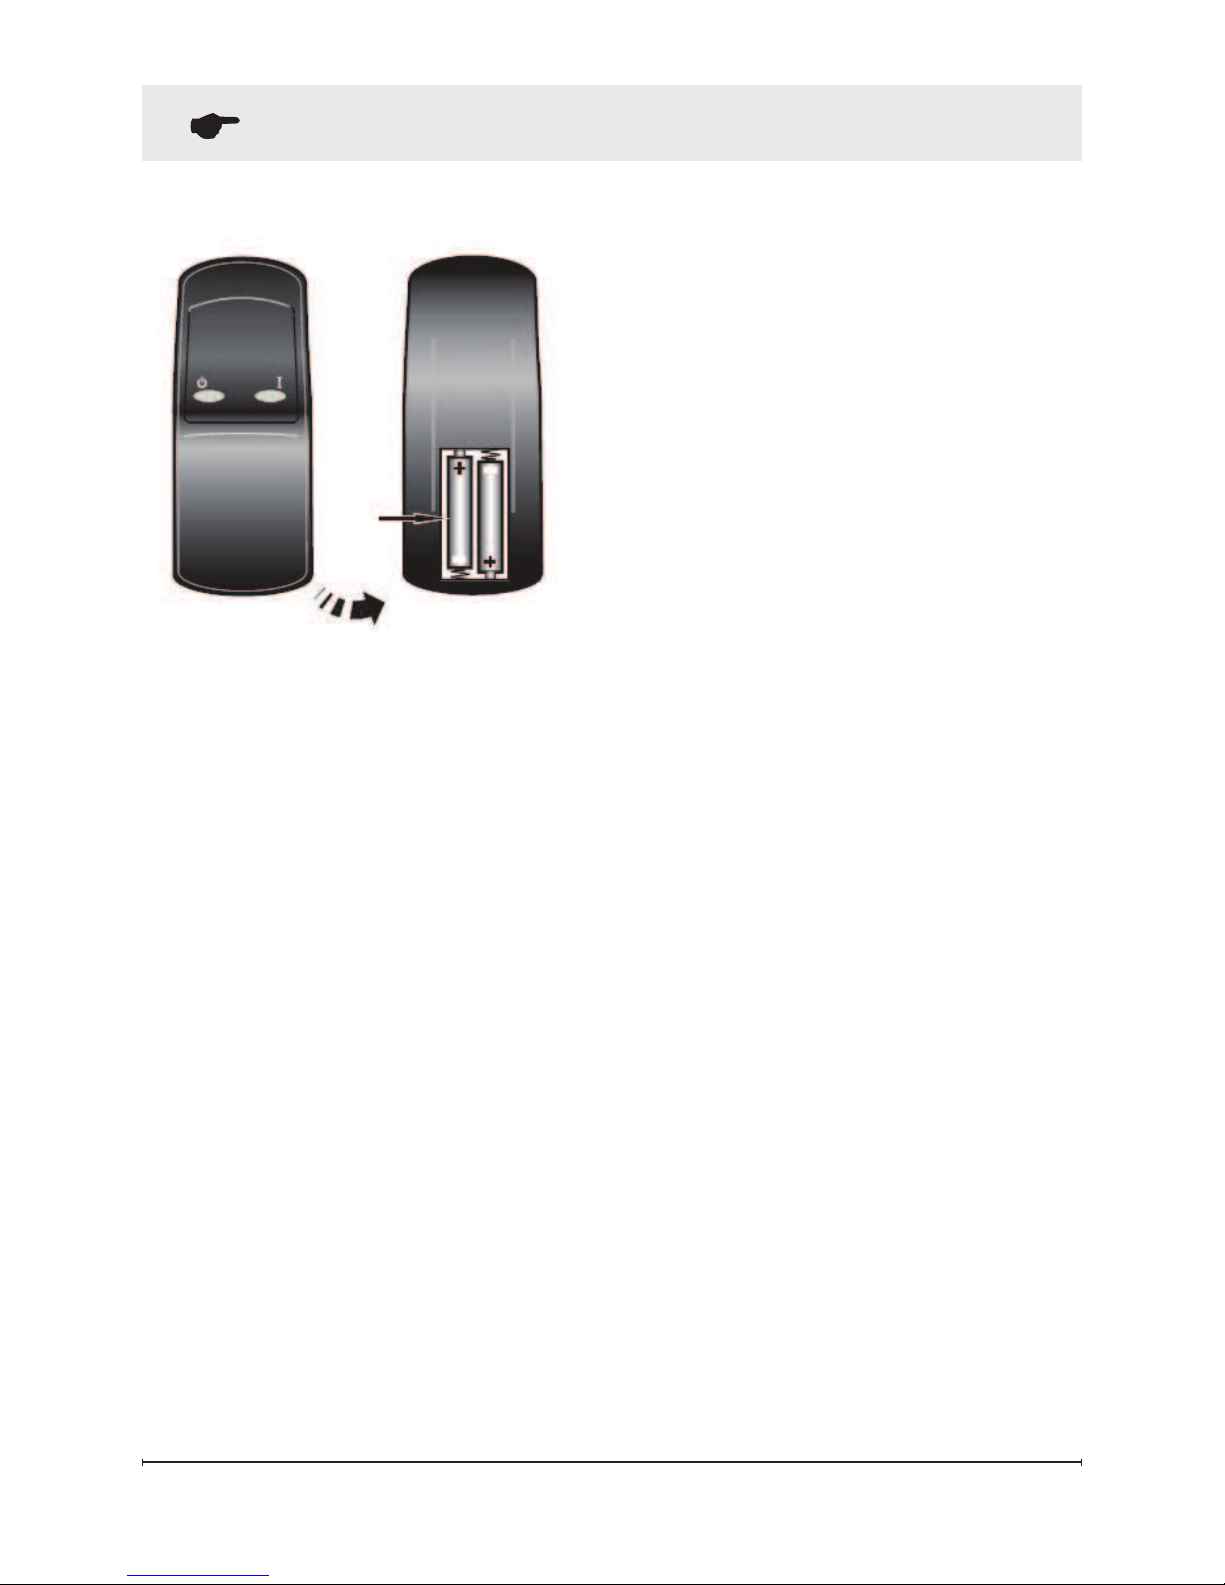
Remote Control (Figure 13)
The fireplace is supplied with an
integrated on/off remote control.
Where the maximum rage of use
is ~15m.
WARNING: It takes time for
the receiver to respond to the
remote control. Do not press the
buttons more than once within
two seconds for correct operation.
!
NOTE: Ensure that the
fireplace 3-Position Switch
is set to the remote control
setting ("II").
15
Operation
Figure 13
To operate, push the ON button
to turn fireplace on, push the OFF
button to turn the fireplace off
.
Battery Replacement
To replace the battery:
Slide battery cover open 1.
on the back of the remote
control.
Install AAA batteries into the 2.
remote control.
Replace the battery cover.3.
Discard leaky batteries. Dispose
of batteries in the proper manner
according to provincial and local
regulations. Any battery may leak
electrolyte if mixed with a different
battery type, if inserted incorrectly,
if all the batteries are not replaced
at the same time, if disposed of in
a fire, or if an attempt is make to
charge a battery not intended to
be recharged.

16 www.dimplex.com
Maintenance
WARNING: Disconnect
power before attempting any
maintenance or cleaning to
reduce the risk of fire, electric
shock or damage to persons.
Partially Reflective Glass
Cleaning
The partially reflective glass is
cleaned in the factory during
the assembly operation. During
shipment, installation, handling,
etc., the partially reflective glass
may collect dust particles; these
can be removed by dusting lightly
with a clean dry cloth.
To remove fingerprints or other
marks, the partially reflective
glass can be cleaned with a damp
cloth. The partially reflective glass
should be completely dried with
a lint free cloth to prevent water
spots. To prevent scratching, do
not use abrasive cleaners.
Fireplace Surface
Cleaning
Use only a damp cloth to clean
painted surfaces of the fireplace.
Do not use abrasive cleaners.
Servicing
Except for installation and
cleaning described in this
manual, an authorized service
representative should perform
any other servicing.
17
Warranty
Dimplex Electric Fireplaces are tested
and inspected prior to shipment and
are guaranteed from defect to the
purchaser of each new product. Any
part which proves to be defective
in material or workmanship under
normal use within one year will
be repaired or replaced without
charge.* The Company will not be
responsible for any expense incurred
for installation, removal for service, or
transportation costs. Any such defect
should be brought to the attention of
the Dealer where the product was
purchased and is authorized to repair
or replace within the terms of this
warranty.
The Company’s only obligation
under this warranty will be at its
sole option to repair or replace any
part proving defective or to refund
the purchase price thereof.
The owner/user assumes all other
risks, if any, including the risk of any
direct, indirect or consequential loss
or damage arising out of the use of or
inability to use the product.
The warranty will not apply if, in
the sole judgment of the Company,
damage or failure has resulted from
accident, alteration, misuse, abuse,
incorrect installation, or operation on
an incorrect power source.
The foregoing is in lieu of all other
warranties expressed, implied, or
statutory, and the Company neither
assumes, nor authorizes any
person to assume for it any other
obligation, or liability in connection
with said product.
*Light bulbs are not covered in the
warranty.
Service
Contact your local dealer for
service or warranty information.
Recycling
For electrical products sold
in the European Community.
At the end of the electrical
product’s useful life it should
not be disposed of with
household waste. Please
recycle where facilities exist.
Check with your Local Authority
or retailer for recycling advice
in your country.
The product complies
with the European Safety
Standard EN60335-2-30
and the European Standard for
Electromagnetic Compatibility
(EMC) EN55014, EN61000 and
EN50366 which cover the essential
requirements of EEC Directives
2006/95 and 2004/108.
7212350100R00
INFORMATIONS DE SÉCURITÉ IMPORTANTES : Lisez attentivement ce manuel avant d’installer ou d’utiliser cette cheminée. Pour
votre sécurité, respectez toujours tous les AVERTISSEMENTS et inst-
!"#$%&'()*+)(,#"!%$,)*&'',()*-'()#+).-'"+/)-0')*1,2%$+!)*+()3/+(("!+()
#&!4&!+//+()&")*+()*&..-5+()6)2&()3%+'(7
Manuel de
l’utilisateur
Modèle
BLF50-EU
EN IT DEFR
www.dimplex.com
! NOTE : Procédures et techniques considérées assez importantes pour être
soulignées.
PRUDENCE : Procédures et techniques qui, en cas de non respect,
risqueront d’endommager votre équipement.
AVERTISSEMENT : Procédures et techniques qui, en cas de non
respect, pourraient exposer l’utilisateur à un danger d’incendie, à de graves
3/+(("!+()&")6)"')!%(8"+).&!$+/7
Pour vos réparations, faites toujours appel à un technicien ou à une entreprise
*+)(+!2%#+()8"-/%0,()
2
Table des matières
Bienvenue et félicitations .......................................................3
INSTRUCTIONS IMPORTANTES .........................................4
Guide de référence rapide .....................................................6
Installation de votre cheminée ...............................................7
Choix de l’emplacement ........................................................7
Installation en surface ............................................................8
Montage mural encastré – profondeur 100 mm ..................10
9&'$-5+)+')-:;+"!+.+'$)<)4!&:&'*+"!)=>>)..) ................. 11
Installation de la vitre frontale ..............................................12
Fonctionnement ...................................................................14
Entretien ..............................................................................16
Garantie ...............................................................................17
Bienvenue et félicitations
3
Merci et félicitations d’avoir choisi une cheminée Dimplex, le leader mondial
des cheminées électriques.
Veuillez lire et conserver soigneusement ces instructions.
PRUDENCE : Veuillez lire attentivement toutes ces instructions et aver-
tissements avant de commencer l’installation. En cas de non respect de ces
%'($!"#$%&'(?)2&"()4&"!!%+@)("3%!)"')#A&#),/+#$!%8"+)&")"')!%(8"+)*1%'#+'*%+)+$)
annulerez la garantie.
Veuillez noter le numéro de modèle et le numéro de série de votre appareil
pour future référence : vous les trouverez sur l’étiquette collée sur votre cheminée.
Numéro
de série
B:0#-#%$,)
énergétique

www.dimplex.com
Instructions Importantes
1
2
Lors de l’utilisation d’appareils élec-
$!%8"+(?)*+()4!,#-"$%&'()*+)3-(+)*&%2+'$)
toujours être respectées pour réduire
les risques d’incendie, de chocs élec-
$!%8"+()+$)*+)3/+(("!+()-"C)4+!(&''+(?)
notamment les suivantes :
Lisez toutes les instructions avant
d’utiliser votre cheminée électrique.
Cette cheminée est très chaude lors
de son utilisation. Pour éviter de vous
3!D/+!?)'+)/-)$&"#A+@)4-()-2+#)/-)4+-")
6)'"7)E+)3&!*)*+)/-)(&!$%+)*1-%!)#A-"*)
*+2%+'$)3!D/-'$)*"!-'$)/+):&'#$%&''+.+'$)
de l’appareil. Maintenez à une distance
d’au moins 90 cm de la partie avant de
/1-44-!+%/)$&"()/+().-$,!%-"C)#&.3"($%3/+()F).+"3/+(?)#&"((%'(?)&!+%//+!(?)/%$+!%+?)
papier, tissus et vêtements, rideaux, etc.
3
L’on doit faire preuve de la plus
grande prudence lorsqu’un appareil de
chauffage est utilisé à côté ou près
d’enfants ou de personnes invalides et
lorsqu’il fonctionne sans surveillance.
4
Cet appareil n’a pas été conçu pour
être utilisé par des personnes (enfants y
compris) dont les capacités physiques,
sensorielles ou mentales sont réduites,
ou qui ne disposent pas des connaissances ou de l’expérience nécessaires,
6).&%'()8"1+//+()-%+'$)3,',0#%,)*1"'+)
supervision ou d’instructions concernant
l’utilisation de cet appareil de la part
*1"'+)4+!(&''+)!+(4&'(-3/+)*+)/+"!)
sécurité. Les enfants doivent être
("!2+%//,()-0')*+)(1-(("!+!)8"1%/()'+)
jouent pas avec cet appareil.
5
Avertissement : Cet appareil de
chauffage n’est pas équipé d’un
dispositif de contrôle de la température
de la pièce. Ne l’utilisez pas dans des
pièces de petites dimensions
lorsqu’elles sont occupées par des
4+!(&''+()%'#-4-3/+()*1+')(&!$%!)(+"/+(?)
à moins d’assurer leur surveillance
permanente.
6
Les enfants de moins de 3 ans
doivent être tenus éloignés, sauf en cas
de surveillance permanente.
7
Les enfants de plus de 3 ans et de
moins de 8 ans seront uniquement
autorisés à allumer/éteindre l’appareil,
dans la mesure où il a été placé ou
installé dans sa position de fonctionnement normale prévue et qu’ils ont
3,',0#%,)*1"'+)("4+!2%(%&')&")
d’instructions concernant son utilisation
en toute sécurité et qu’ils comprennent
3%+')/+()!%(8"+()%.4/%8",(7)E+()+':-'$()
de plus de 3 ans et de moins de 8 ans ne
*&%2+'$)4-()3!-'#A+!?)!,5/+!)+$)'+$$&G+!)
l’appareil ni effectuer son entretien.
PRUDENCE : Certaines parties de
#+)4!&*"%$)4+"2+'$)*+2+'%!)3!D/-'$+()+$)
&##-(%&''+!)*+()3!D/"!+(7)H'+)-$$+'$%&')
spéciale doit être accordée lorsque des
+':-'$()&")*+()4+!(&''+()2"/',!-3/+()
sont présentes.
8
Cet appareil doit être positionné de
:-I&')6)#+)8"+)(-)0#A+)(&%$)-##+((%3/+7
9
Si le cordon d’alimentation électrique
est endommagé, il doit être remplacé par
/+):-3!%#-'$?)(&')-5+'$)*+)(+!2%#+)&")"'+)
4+!(&''+)8"-/%0,+)-0')*1,2%$+!)$&"$)
danger.
10
Ne faites pas fonctionner un appareil
*&'$)/+)#&!*&')&")/-)0#A+)(&'$)+'*&.magés, si la cheminée électrique n’a pas
fonctionné correctement ou si elle a fait
une chute ou a été endommagée de
toute autre façon; dans ce cas, contactez
votre vendeur local.
11
Ne pas utiliser à l’extérieur.
12
Ne placez jamais cette cheminée où
+//+)4&"!!-%$)$&.3+!)*-'()"'+)3-%5'&%!+)
ou tout autre containeur à eau.
13
Ne faites pas courir le cordon sous un
tapis ou une moquette. Ne pas couvrir le
cordon avec une carpette, une glissière,
4
 Loading...