

Page 1
Dillon’s New Dynamic Pistol Dies
& Three-Die Rifle Die Sets
Instruction Manual, May 2007
illon
recision
Products, Inc.
8009 E. Dillon’s Way
Scottsdale, AZ 85260
Technical Support • (800) 223-4570
(480) 948-8009 • FAX (480) 998-2786
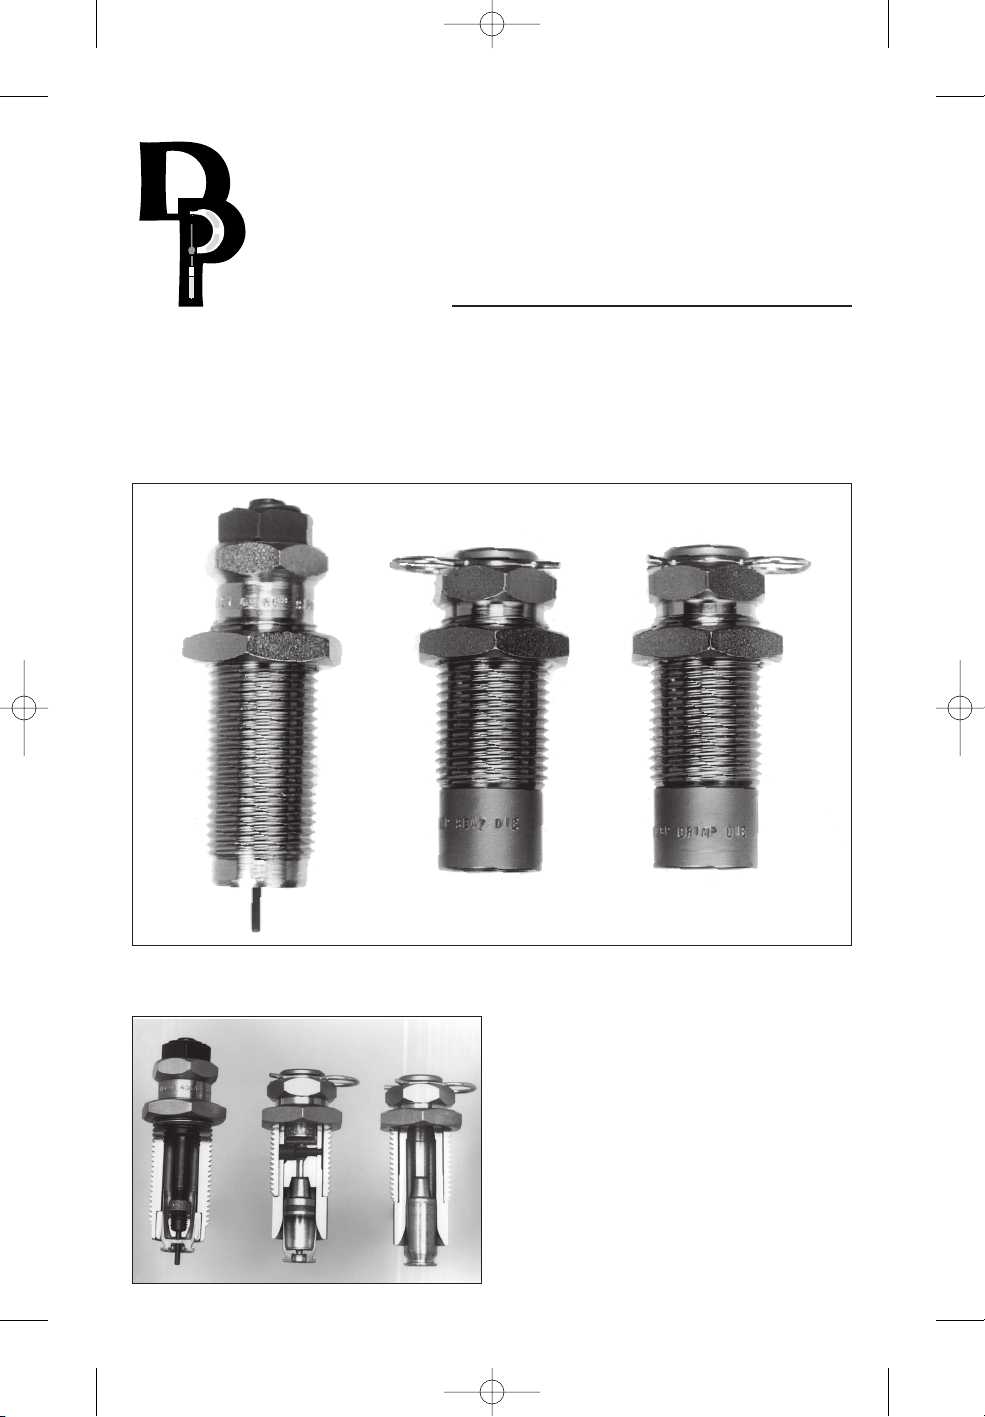
Fig 1. Dillon’s New Dynamic Die Set, cut
a
w
a
y so that y
ou can see how they look and
how they operate. From left to right they
are: Full length sizing and decapping die,
seating die (with the double ended seating
stem) and the crimp die. Note that the seat
die and the crimp die have clips on the top
to allo
w the insert to be remo
ved without
affecting the critical die adjustments.
Adjust the sizing die by screwing the die
bod
y do
wn until it contacts the shellplate and
snug the loc
k ring.
T
he decap assembly should
be screwed fully into the die at all times.
Dillon’s “New Dynamic” Pistol Die Sets
Fig 1
Dillon Die Instructions, May 2007 5/22/07 1:47 PM Page 1
Page 2
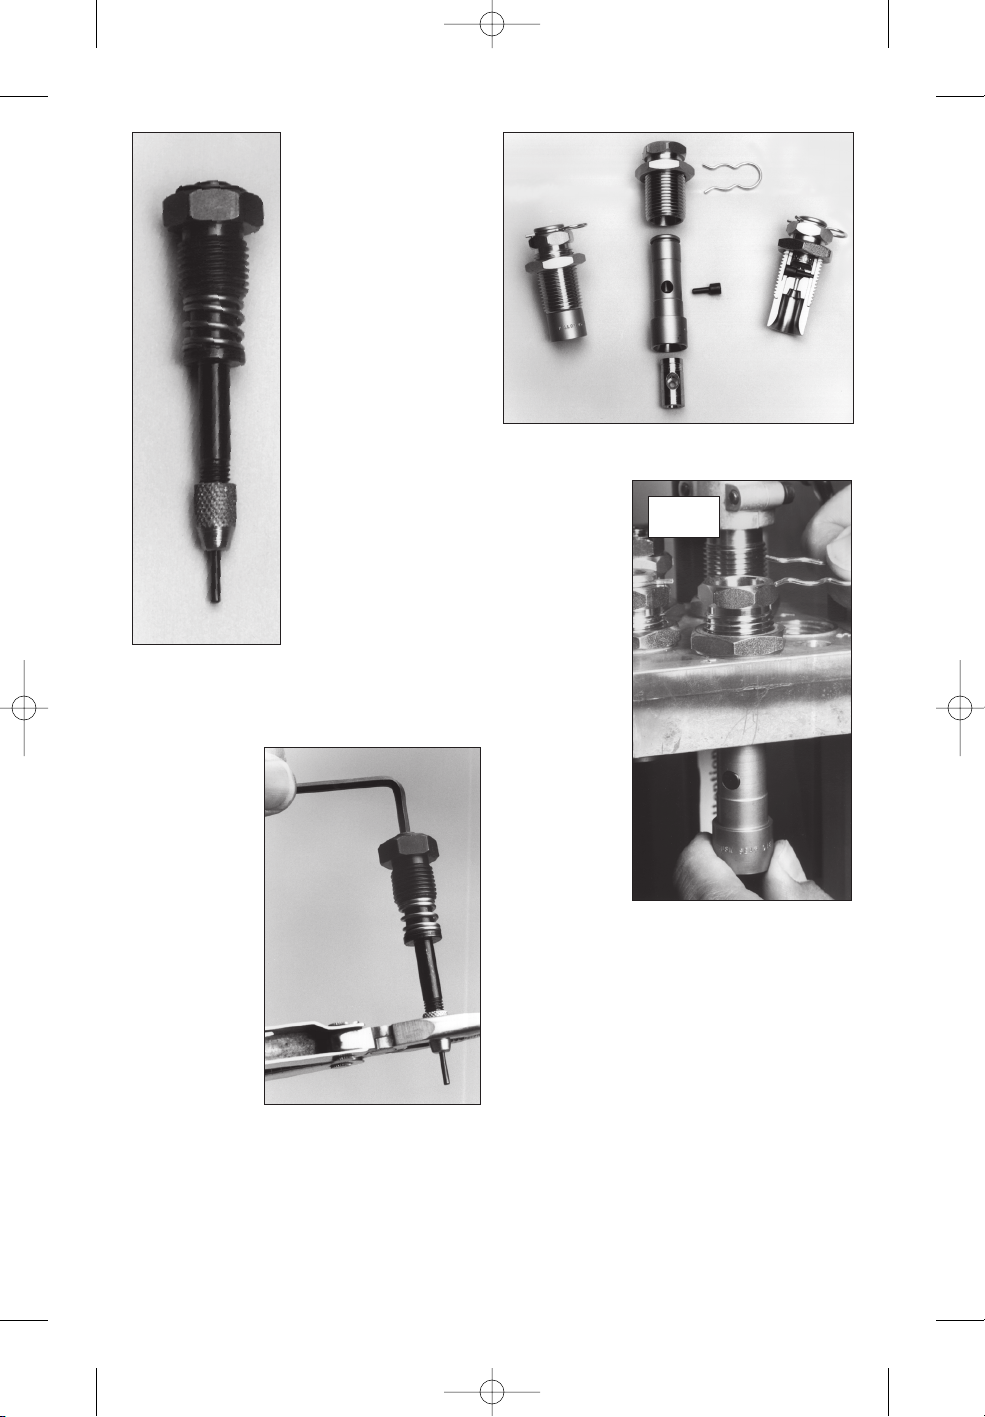
Fig 2. Your New
Dynamic Dies are
equipped with Dillon’s
unique “snap spring”
decap assembly. The
s
pring on this unit
compresses as the
decap pin pushes
against the spent
primer. As the spent
primer clears the
primer pocket, the
spring snaps the pin
downward, throwing
the spent primer off the
pin. This prevents the
spent primer from
being drawn back into
the primer pocket and
jamming the machine.
The problem of primer
“draw back” often
occurs when decapping military brass. This
exclusive feature is
unique to Dillon dies
and at no extra charge. Fig 2 also shows the
three main pieces of the decapping stem:
A. Decapping shaft. B. Retaining cap. C.
Decapping pin.
Fig 3. To
remove the
decap pin, use
a 1/8” Allen
wrench to
hold the decap
stem while
loosening the
retaining cap
with a pair of
pliers. Use a
small amount
of 242 (blue)
Loctite and
tighten securely on reassem
-
bly.
Fig 4. Your Dillon Dynamic seating die is
a snap-together assembly.
Fig 5. The
seating die
can be disassembled by
simply removing the snap
ring at the top
and pulling
the seat die
insert out of
the bottom of
the seat die
body. This
allows you to
take the die
apart for
cleaning without tools and
without disturbing your
seating adjustment.
Fig 5
Fig 4
Fig 2
A
C
B
Fig 3
Dillon Die Instructions, May 2007 5/22/07 1:47 PM Page 2
Page 3

Fig 6. The
double-ended
seating stem
can then be
removed for
cleaning or
changing by
pushing out
the black cross
pin. Note that
the seat stem
is doubled
ended and can
be reversed to
match the
shape of your
bullet.
Figs 7 & 8.
Choose the
seating stem
which best fits
your bullet.
Fig 7 is the round
nose seating stem
and Fig 8 is the
semi-wadcutter
seating stem.
When the
desired configuration is found
push the stem
back into the
insert and
replace the cross
pin. Reinsert the
seating insert
into the die
body. Replace
the clip and proceed.
Adjustment.
Place a sized
and belled case
into the seating
station of the
shellplate.
Next place a bullet on the mouth of the
case and cycle the handle do
wn. Screw the
die do
wn until it makes contact with the
bullet. Raise the handle a small amount and
screw the die down 1/2 turn. Cycle the handle down and raise it to the top. Remove the
case with the partially seated bullet and
measure the overall length with dial
calipers.
Compare the length to that suggested in
y
our loading manual. If the OAL is too long
turn the seating die down in 1/8 turn increments and cycle the handle again.
Repeat the above process until the proper
seating depth is achieved.
Note: One full turn of the die is approximately 0.070 of an inch. As you get closer
to your desired length do not turn the die
down in more than 1/8 turn increments.
When the desired OAL has been achieved
snug the lock ring while the cartridge is in
the die.
Crimp adjustment. Place a belled case
with a seated bullet into the crimping station
of the shellplate and, with the die out of the
toolhead, cycle the handle down. Leave the
handle down and start the die into the toolhead. Screw the die down until it contacts
the case.
Now, raise the handle (to pull the cartridge part way out of the die), screw the die
down 1/8 of a turn and then lower the handle again. Remove the case from the die and
check for the proper crimp. (Note: refer to a
loading manual for proper crimp dimension.)
If your case is not crimped enough,
place the cartridge back into the shellplate
and repeat your adjustments in 1/8 turn
increments until you achieve the proper
crimp.
F
ig 9. Crimp die assembly
. On the left the
completed assembly is sho
wn before screw-
ing it into the toolhead.
IMPORTANT Now is the time to try this
round to see that it fits the barrel or cylinder
of your gun. Also, if you’re loading for a
semi-auto, it’s a good idea to load 10-20
rounds and fire them. It’s depressing to load
a thousand rounds and then find out they
w
on’t function the action of your gun.
Fig 6
Fig 7
Fig 8
Fig 9
Dillon Die Instructions, May 2007 5/22/07 1:47 PM Page 3
Page 4

Dillon Three-Die Rifle Die Sets Include:
1- Full-Length Size die, nut, priming assem-
bly with carbide expander
1- Seat die, nut, seat stem with nut
1- Crimp die, nut and 1- Spare decap pin
Sizing/Depriming Die
The sizing/depriming die is a full-length
sizing die, manufactured to minimum tolerances. We
strongly suggest that a headspace case gage be used to correctly adjust
the size die. Always clean and lube your
rifle cases before attempting to process the
cases (thru the size die).
1. Move the handle down to raise the plat-
form.
2. Screw the sizing/depriming die into sta-
tion one of your reloader.
3. When the die contacts the shellplate,
back the die off 1/2 turn.
4. Use one lubed rifle case to test your siz-
ing and headspace. Readjust the die as
needed to achieve proper headspace.
5.
W
ith a case in the die, snug the loc
k ring.
The depriming assembly includes a car-
bide expander ball for “squeak free,” effort
less neck expansion. In the event of a stuck
case, the design of the depriming assembly
allows it to function as a stuck-case
remover. Simply remove the silver clip,
loosen the stem lock nut and then spin it up
to the top of the stem.
W
ith a wrench, turn
the depriming assembly into the die.
“Clockwise” turns will loosen the stuck
case. Use pliers to remo
v
e the case from the
depriming assembly.
Bullet Seating Die
Our bullet seating die is
internally designed to keep the
b
ullet straight throughout the
seating process.
1. Move the handle down, to
raise the platform.
2. Screw the bullet seating die
into the bullet seating station
on your reloader.
3. Put a sized, empty case into
the shellplate under the seating
die. Pull the handle down.
Screw the seat die body down
until it stops, then back it up
1/8 of a turn.
4. Refer to your rifle loading
manual for proper overall
length (O.A.L.) information.
5. Use only resized, deprimed cases when
setting this die. Move the case to the bullet seating station on your reloader
6. Place a bullet on the case and make one
complete stroke of the handle.
7. Check the overall length (O.A.L) of the
test case and bullet using a quality dial
caliper. Adjust the die up or down as
needed.
8. With the case and bullet in the die, snug
the lock ring.
Taper Crimp Die
The taper crimp die is configured to cen-
ter both the case neck and case body, thereby aligning the entire cartridge for a more
uniform crimp.
1. Place the test case/bullet you have into
the crimp station on your reloader.
2. Move the handle down to raise the platform.
3. Screw the taper crimp die into the crimp
station on your reloader.
4. When the die contacts the test case/bullet
move the handle up to lower the platform
5. Turn the die 1/4 to a 1/2 turn “clockwise”
and try crimping your test case/bullet
6. Use a quality dial caliper to measure the
case mouth diameter. Usually, a .002
change is noticed between the neck
diameter and the case mouth diameter.
Adjust as needed.
7. With the test case/bullet in the die, snug
the lock ring.
Refer to the machine operating manual
for any further instructions.
Hex adjustments
for wrench
Stuck Case
Remover
Solid,
1-Piece
Decapping
Pin
Radiused
Mouth
Precise,
Uniform
Taper Crimp
Size Die
Polished
to a High
Micro-Finish
Standard
7/8 x 14
Threads
Carbide
Expander
Ball
Dillon Three-Die Rifle Die Sets
Dillon Die Instructions, May 2007 5/22/07 1:47 PM Page 4
 Loading...