


Digiview
Travel Alarm Clock
with Atomic Time
and Temperature
(RC61ELW)
USER'S MANUAL
DIGIVIEW RC61ELW MANUAL (English)
SIZE: W65 X H105 (mm)
BY EMILY TSOI 16/03/05
FILM 04/04/05
TABLE OF CONTENTS |
|
INTRODUCTION |
|
|
|
Thank you for selecting the Digiview Atomic Alarm |
|
INTRODUCTION |
3 |
Clock. |
|
ABOUT HIDEKI ELECTRONICS |
3 |
This device includes precise time keeping, moon phase |
|
and temperature monitoring features that you can use |
|||
PRODUCT OVERVIEW |
3 |
||
from the comfort of your home. |
|||
WWVB RADIO CONTROLLED TIME |
6 |
In this package you will find: |
|
GETTING STARTED |
7 |
• One Travel Alarm Clock |
|
BATTERY INSTALLATION |
7 |
• One User Manual |
|
Please keep this manual handy as you use your new |
|||
ATOMIC CLOCK |
7 |
||
item. It contains practical step-by-step instructions, |
|||
CALENDAR AND CLOCK |
7 |
as well as technical specifications and precautions |
|
DISPLAY MODES |
|
you should know. |
|
MANUAL SETTINGS |
8 |
ABOUT HIDEKI ELECTRONICS |
|
LIGHT/SNOOZE |
10 |
Visit our website (www.digiviewtime.com) to learn |
|
DISABLING ALARM |
10 |
more about a wide range of Hideki Electronics |
|
PROGRAMMING THE |
11 |
products such as precise projection time pieces, |
|
environmental products and weather monitoring |
|||
SNOOZE INTERVAL |
|
||
11 |
devices. The website also includes important information |
||
INDOOR TEMPERATURE |
about an extended warranty program and other useful |
||
PRECAUTIONS |
11 |
facts. |
|
SPECIFICATIONS |
12 |
PRODUCT OVERVIEW |
|
STANDARD WARRANTY |
13 |
FEATURES |
|
INFORMATION |
|
* Precise time and date set via RF signals from the |
|
|
|
US Atomic Clock |
|
|
|
* Calendar displaying date with month and day of |
|
|
|
the week in English, Spanish or French |
|
|
|
* Indoor Temperature display in Celsius or Fahrenheit |
|
|
|
* User-selectable 12 or 24 hour time format |
|
|
|
* Dual crescendo alarm with snooze |
|
|
|
* Programmable snooze interval (one to 59 minutes) |
|
|
|
* Bulb Backlight |
|
|
|
* Folded travel size or opened for desktop view |
|
2 |
|
3 |
|
|
|
|
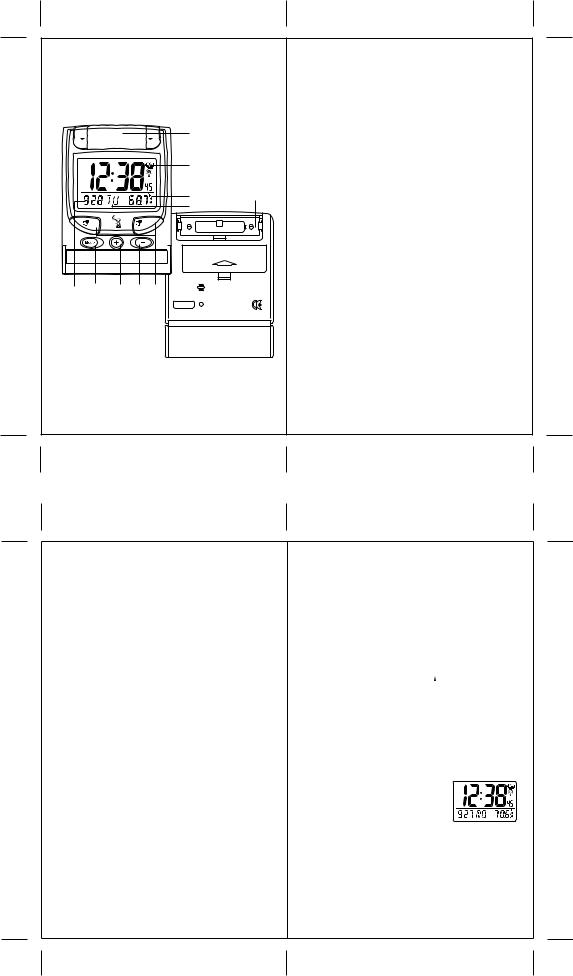
FRONT VIEW
A. ATOMIC CLOCK WITH INDOOR TEMPERATURE IN A TWO - LINE LCD DISPLAY
|
|
LIGHT/SNOOZE |
|
F |
|
|
AM |
|
|
|
|
Time of Day with |
|
|
|
|
|
Seconds, US Time |
|
|
PM |
|
|
|
|
|
|
|
|
|
|
|
Zone Map |
|
|
|
ZZ |
|
|
Indoor Temperature |
G |
MONTH |
DATE |
YEAR |
AM |
1 |
||
PM |
|
|||||
ALARM1 ALARM2 |
Day of the week |
|
||||
|
|
|
|
2 |
|
|
2 SET |
|
|
1 SET |
SIZE AAA/UM4 |
|
|
|
|
|
|
|
|
|
Calendar |
C |
|
D |
E |
B |
|
4
B. SET1 & SET2 BUTTONS
*Select and set Alarm One and Alarm Two
*Recall current alarms status
C. MODE BUTTON
*Allows toggle between display modes (Alarm1, Alarm2 and Temperature)
*Activates manual programming mode
*Activates or deactivates the atomic time receiver
D. UP ( + ) BUTTON
*Increases all function parameters
*Selects 12 or 24 hour time display format
*Activates US Time Zone selection mode
E. DOWN ( – ) BUTTON
*Decreases all function parameters
*Sets the language for the day of the week
F. SNOOZE/LIGHT BUTTON
* Activates snooze function and LCD backlight
REAR VIEW
G. BATTERY COMPARTMENT
*Accommodates one (1) UM-4 or AAA 1.5V alkaline batteries.
5
WWVB RADIO CONTROLLED TIME
The NIST (National Institute of Standards and Technology) radio station (WWVB) is located in Ft. Collins, Colorado. It transmits an exact time signal continuously throughout the most of the continental United States at 60 KHz frequency. The Travel Alarm Clock can receive this WWVB signal through the internal antenna from up to 2,000 miles away. Due to the nature of the Earth’s ionosphere, reception can be limited during the daylight hours. The radio controlled clock will search for an alternate station that receives the atomic time signal from the NIST Atomic clock in Boulder, Colorado.
The WWVB tower icon on the unit’s display will flash indicating a radio signal reception from the WWVB station. If the tower icon is not fully lit, or if the time and date are not set automatically, please consider the following:
*During night-time hours, atmospheric disturbances are typically less severe and radio signal reception may improve. A single daily reception is sufficient enough to keep the clock accuracy within 1 second.
*Make sure the unit is positioned at 8 feet (2 meters) distance from any interference source such as a TV, computer monitor, microwave, etc.
*Within concrete wall rooms such as basements or office buildings, the received signal may be weakened. Always place the Travel Alarm Clock near the window for better reception.
6
GETTING STARTED
BATTERY INSTALLATION
*Open the battery compartment door.
*Install one (1) batteries AAA (UM-4) size 1.5V matching the polarity as shown in the battery compartment.
*Replace the battery compartment door.
ATOMIC CLOCK
Immediately after batteries are installed, the atomic time signal receiver will start to search for the time signal. It usually takes between 5-8 minutes.
Once the atomic time signal is received, the date and time will be set automatically, and the [ ] icon will appear. If the time signal has not been received in 8 minutes, press MODE button to set the time and date manually.
After the clock is set manually, place it by the window for the better reception. The atomic clock receiver is programmed that it will continue to search for the atomic time signal daily for every hour between 1:00 am and 4:30 am. Once the time signal has been successfully received, the time and date will be updated automatically.
CALENDAR AND CLOCK DISPLAY MODES
Precise time is displayed in hour-
minutes-seconds format on the top |
AM |
|
PM |
|
|
ine of the Atomic Alarm Clock. |
|
|
The date is displayed in month-date |
ZZ |
|
MONTH DATE YEAR |
ALARM1 ALARM2 |
|
AM |
1 |
|
PM |
||
format on the bottom line next to the |
|
2 |
|
|
day of the week.
Both Alarms share the space with Indoor Temperature and can be viewed by pressing of the MODE button.
7

MANUAL SETTINGS
TIME ZONE
*Select the Time Zone by pressing and holding the UP (+) button for 3 seconds.
*Keep holding UP (+) button until the desired time zone (Pacific, Mountain, Central or Eastern) is highlighted on the clock’s display map.
CLOCK
* Press and hold MODE button for 3 seconds: the year digit will flash.
* Press UP (+) or DOWN (-) to change flashing digits.
* After the first value is set, press MODE button again to confirm and move to the next parameter.
* Continue setting month, date, hour and minutes and the temperature display in Celsius or Fahrenheit.
* Press MODE button for the last time to confirm the settings after the last parameter is set.
8
AM
PM
ZZ
MONTH |
DATE |
YEAR |
ALARM1 ALARM2 |
|
|
AM |
1 |
|
|
PM |
|
|
|
|
2 |
AM
PM
ZZ
MONTH |
DATE |
YEAR |
ALARM1 ALARM2 |
|
|
AM |
1 |
|
|
PM |
|
|
|
|
2 |
AM
PM
|
|
ZZ |
|
MONTH |
DATE |
YEAR |
ALARM1 ALARM2 |
|
|
AM |
1 |
|
|
PM |
|
|
|
|
2 |
AM
PM
|
|
ZZ |
|
MONTH |
DATE |
YEAR |
ALARM1 ALARM2 |
|
|
AM |
1 |
|
|
PM |
|
|
|
|
2 |
AM
PM
|
|
ZZ |
|
MONTH |
DATE |
YEAR |
ALARM1 ALARM2 |
|
|
AM |
1 |
|
|
PM |
|
|
|
|
2 |
AM
PM
|
|
ZZ |
|
MONTH |
DATE |
YEAR |
ALARM1 ALARM2 |
|
|
AM |
1 |
|
|
PM |
|
|
|
|
2 |
AM
PM
|
|
ZZ |
|
MONTH |
DATE |
YEAR |
ALARM1 ALARM2 |
|
|
AM |
1 |
|
|
PM |
|
|
|
|
2 |
AM
PM
 ZZ
ZZ


MONTH DATE YEAR ALARM1 ALARM2
AM
PM 1
2
TIME FORMAT |
PM |
|
* Press UP(+) button to toggle |
|
|
|
AM |
|
between 12 and 24 hour time format |
ZZ |
|
|
MONTH DATE YEAR |
ALARM1 ALARM2 |
|
AM |
1 |
|
PM |
|
|
|
2 |
AM
PM
ZZ
MONTH |
DATE |
YEAR |
ALARM1 ALARM2 |
|
|
AM |
1 |
|
|
PM |
|
|
|
|
2 |
DAY OF THE WEEK LANGUAGE
* Press and hold DOWN (-) button for 3 seconds: the default language abbreviation will flash ( example – EN)
* Continue holding DOWN (-) button until the desired day of the week language abbreviation is selected.
* Release the DOWN (-) button to confirm the setting.
AM
PM
ZZ
MONTH DATE YEAR ALARM1 ALARM2
AM
PM 1
2
AM
PM
ZZ
MONTH DATE YEAR ALARM1 ALARM2
AM
PM 1
2
AM
PM
ZZ
MONTH DATE YEAR ALARM1 ALARM2
AM
PM 1
2
ALARMS
There are two available alarms –Alarm 1 and Alarm 2. If any of alarms is activated, it will sound at the set time and the alarm icon will flash Mondays through Fridays.
9
SETTING THE ALARM
To set the Alarm1,
*Press MODE button once to display ALARM TIME 1. If the alarm is off, the default time “6:00” will be displayed.
*Press and hold 1SET button for two seconds. The hour digit will flash.
*Enter the hour using DOWN (-) or
UP (+).
*Press 1SET button again. The minute digits will flash.
*Enter the minutes using DOWN (-) or UP (+).
*Press 1SET button again to confirm: an icon [ 1 ] will appear on the display next to the alarm time.
*Repeat the same procedure to set an Alarm2, using 2SET button.
AM
PM
ZZ
MONTH |
DATE |
YEAR |
ALARM1 ALARM2 |
|
|
AM |
1 |
|
|
PM |
|
|
|
|
2 |
AM
PM
|
|
ZZ |
|
MONTH |
DATE |
YEAR |
ALARM1 ALARM2 |
|
|
AM |
1 |
|
|
PM |
|
|
|
|
2 |
AM
PM
|
|
ZZ |
|
MONTH |
DATE |
YEAR |
ALARM1 ALARM2 |
|
|
AM |
1 |
|
|
PM |
|
|
|
|
2 |
AM
PM
 ZZ
ZZ


MONTH DATE YEAR ALARM1 ALARM2
AM
PM 1
2
LIGHT/SNOOZE
When the alarm sounds, press the LIGHT/SNOOZE button to temporarily stop the alarm. After the LIGHT/SNOOZE is depressed, the alarm sound will resume in five minutes. If the alarm is not disabled after that, it will sound for four more minutes and then will stop by itself.
DISABLING ALARM
Press 1SET or 2SET buttons on the unit to disable any of the alarms.
When Al1 and Al2 are disabled, an applicable icon [ 1 ] or [ 2 ] disappears from the unit’s display.
PROGRAMMING THE SNOOZE INTERVAL
*Press and hold 1SET button for two seconds to activate an Alarm1 programming mode. Alarm1 hour digit will flash.
*Adjust the desired hour using UP (+) or DOWN (-) buttons.
*Press 1SET button: the minute digits will flash.
*Adjust the desired minutes using UP (+) or DOWN (-) buttons.
*Press 1SET button again: the snooze interval minutes will flash.
* Adjust the desired interval time using UP (+) or DOWN (-) buttons.
|
|
ZZ |
|
MONTH |
DATE |
YEAR |
ALARM1 ALARM2 |
|
|
AM |
1 |
|
|
PM |
|
|
|
|
2 |
* Press 1SET button to confirm set snooze interval.
Use the same procedure to program the snooze interval for Alarm2.
INDOOR TEMPERATURE
The indoor temperature shares the same display’s line with the calendar and the day of the week.
NOTE: If the indoor temperature goes above or below operating range stated in specifications, the display will show dashes [

 ]
]
PRECAUTIONS
This product is engineered to give you years of satisfactory service if handled carefully. Here are a few precautions:
*Do not immerse the unit in water.
*Do not clean the unit with abrasive or corrosive materials. They may scratch the plastic parts and corrode the electronic circuits.
*Do not subject the product to excessive force, shock, dust, temperature, or humidity, which may result in malfunctions, shorter lifespan, damaged batteries, and damaged parts.
10 |
11 |
 Loading...