

Page 1
Digiview
Multi-Band Atomic
Travel Clock with
Temperature
USER MANUAL
( RC304EL )
1 2
DIGIVIEW RC304EL MANUAL (ENG)
SIZE: W75 X H80 (mm)
BY SHAN WONG 08/04/05
FILM: 08/04/05
Introduction
Thank you for selecting the Digiview Multi-Band Travel Atomic Clock.
This device includes precise time keeping, temperature monitoring and
other neat features that you can use from the comfort of your home or
on the road while traveling.
The travel clock is capable of setting its time and date to the precise
atomic time in any of the three world regions – North America, Europe
and Japan.
In this package you will find:
• One Mult-Band Atomic Travel Clock
• One User Manual
Please keep this manual handy as you use your new item. It contains
practical step - by - step instructions, as well as technical specifications
and precautions you should know.
About Hideki Electronics
Visit our website (www.digiviewtime.com) to learn more about wide
range of Hideki Electronics products suck as precise projection time
pieces, environmental products and weather monitoring devices. The
website also includes important information about an extended
warranty program and other useful facts.
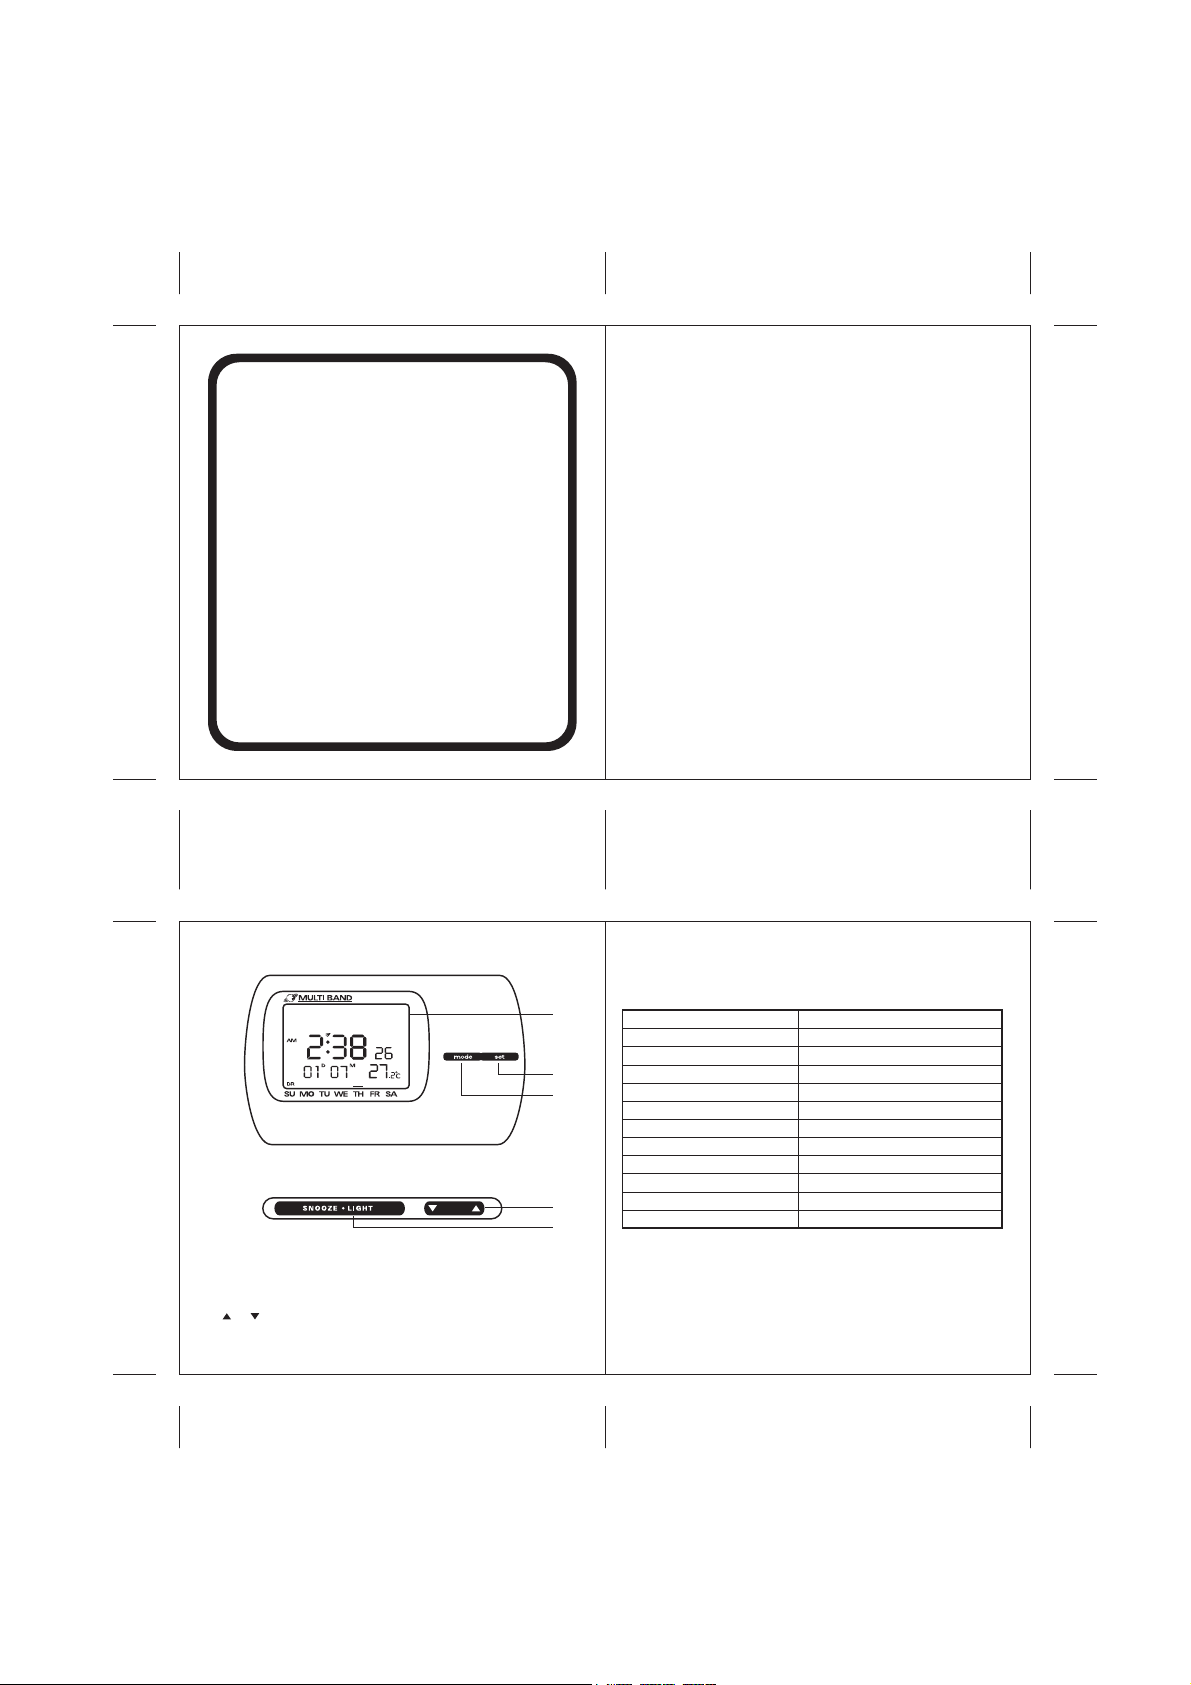
Front View
Front View
A. Digital display
B. MODE button
C. SET button
D. SNOOZE / LIGHT button
E. or button
Initial Setup
When powered on, the clock will sound a beep as acknowledgement and
show full house display, you can press any button to stop the beep.
A
C
B
E
D
3 4
The default settings of the clock are as follows:
Feature/parameter
Time display
Date display
Reception mode
Reception status
DST
Alarm 1
Alarm 2
Date reminder
Zone
Stopwatch
Temperature display
Default setting
local time (24 hours format)
local date (dd/mm)
DCF (Germany)
automatic synchronisation
Auto (off)
7:00 am Off
8:00 am Off
3 August
01h (GMT)
00:00:00:00
ºC
Page 2
Display Setting
• Date format: in the main display, press to choose between
dd/mm or mm/dd format
• GMT (Greenwich Mean Time) time zone:
* Please refer to the world time zone map to find out your time zone.
* Set your time zone as detailed in the section “Time Zone <ZO>”.
* In the main display, press SET button to turn the setting on.
* “UT” will appear on the screen.
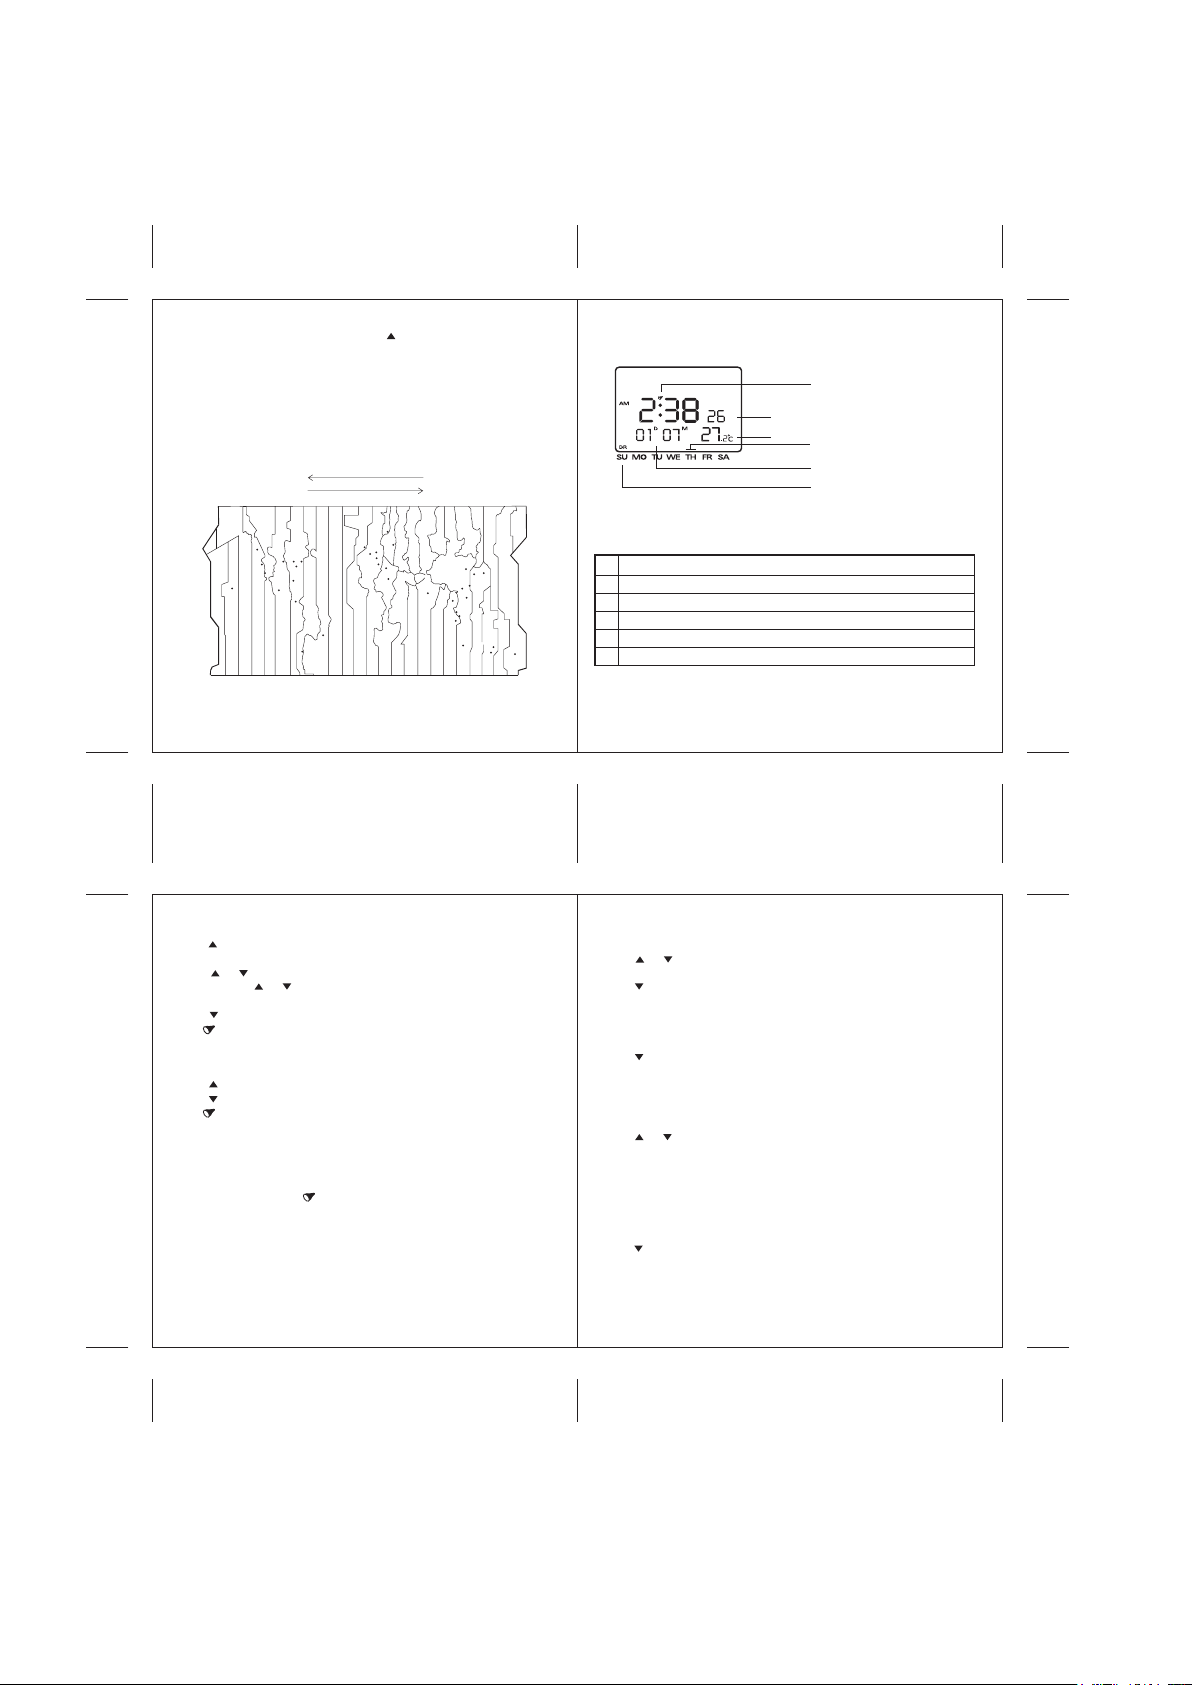
World Time Zone Map
Alarm <AL>
To set alarm time:
• Press to select ALARM 1 or ALARM 2.
• Press SET button and hold until the display flashes.
• Press or to change setting.
• Keep holding or for fast adjustment.
• Confirm your setting by pressing SET button.
• Press to turn the alarm “ON”.
• The icon will appear on the main display.
• The alarm will go off at the set time.
To deactivate the alarm:
• Press to select ALARM 1 or ALARM 2.
• Press to turn the alarm “OFF”.
• The icon will disappear from the main display.
When the ALARM is beeping:
• Press SNOOZE/LIGHT button. The alarm tone will stop and then start
again after 4 minutes. This can repeat up to eleven times.
• To cancel snooze, press any button other than SNOOZE/LIGHT button.
• When snooze is on, the icon will blink.
• Press any button other than SNOOZE/LIGHT button to stop the
alarm tone.
• If you do not stop the alarm tone, it will stop automatically after
3 minutes.
Unless deactivated, the alarm will remain active and go off again
at the set time.
Date reminder <DR>
To set reminder date:
• Press SET button and hold until the display flashes.
• Press or to change setting.
• Confirm your setting by pressing SET button.
• Press to turn the reminder “ON”.
• The “DR” sign will appear on the main display.
• The “DR” sign will blink for a whole day on the set date.
To deactivate the reminder:
• Press to turn the reminder “OFF”.
• The “DR” sign will disappear from the main display.
Time zone <ZO>
• Press SET button and hold until the display flashes.
• Press or to change setting
(range: +/- 12 hours, deviation in hours only).
If radio controlled time received from JJY60 is 3:00 pm (Japan time),
and the time zone set is +8 hours (Hong Kong time zone), then the local
time display will be 2:00 pm.
• Set Daylight Saving Time (DST):
Press MODE button once.
“DS” will appear on the display.
Press to turn the function “ON”, “OFF” or “Auto”.
If DST is on or auto, the clock will automatically tune to the
Daylight Saving Time in spring and fall. In case DST does not apply
in your locality, please turn it off.
• Press SET button to confirm setting.
Main Display
a. Time
b. Date
c. Indoor temperature
d. Weekday indicator
e. Date reminder icon
f. Alarm icon
1 Alarm mode (AL) -- dual alarms with snooze feature
2 Date reminder mode (DR) -- gives alert on the set date
3 Time zone mode (ZO) -- time zone and daylight saving time
4 Stopwatch mode (SP) -- lap mode and split mode
5 Reception mode (RX)
6 Reception information (RI)
In the main display, press MODE button to access the six different
function modes:
Notes : In case no adjustment is made in 10 seconds, clock will return to
the main display time mode. You have to confirm the desired setting in
20 seconds. Otherwise, your desired setting will be ignored and fail to
replace the previous setting.
Vancouver
-3:30
+3:30
+4:30
+5:30
+9:30
Toronto
Chicago
Boston
Helsinki
London
Moscow
Frankfurt
Paris
Rome
Zurich
Athens
Beijing
Tokyo
Seoul
Taipei
Hong Kong
Bombay
Manila
Bangkok
Sydney
Perth
Melbourne
Auckland
Kuala Lumpur
Singapore
Jakarta
Cairo
New York
Miami
Mexico City
Panama
Rio de Janeiro
Santiago
San Francisco
Los Angeles
Honolulu
( - )
( + )
-9 -8 -7 -6 -5 -4 -3 -2 -1 0 +1 +2+3 +4 +5 +6 +7 +8 +9 +10 +11 +12 -11
-10
-9-10-11 -8 -7 -6 -5 -4 -3 -2 -1 0 +1 +2 +3 +4 +5 +6 +7 +8 +9 +10 +11 +12 -11
International Date Line
International Date Line
c
a
d
e
b
f
5 6
7 8
Page 3
Stopwatch <SP>
Press to select Lap (LA) or Split (SP) mode.
Under LA mode:
• Press to start counting.
• Press to display the first read-out.
• The stopwatch resets to zero and restarts counting internally.
• Press to display the counting.
• Press again to display the second read-out.
• The stopwatch resets to zero and restarts counting internally.
• Repeat the above steps as desired.
• Press to stop counting.
• Press to reset the stopwatch to zero.
Under SP mode:
• Press to start counting.
• Press to display the first read-out.
• As the stopwatch continues counting internally:
• Press to mark time.
• Press to pause and display the marked read-out.
• Repeat the above steps as desired.
alternatively:
• Press to continue counting.
• Press to pause and display the read-out.
• Repeat the above steps as desired.
• Press to stop counting.
• Press to reset the stopwatch to zero.
9 10
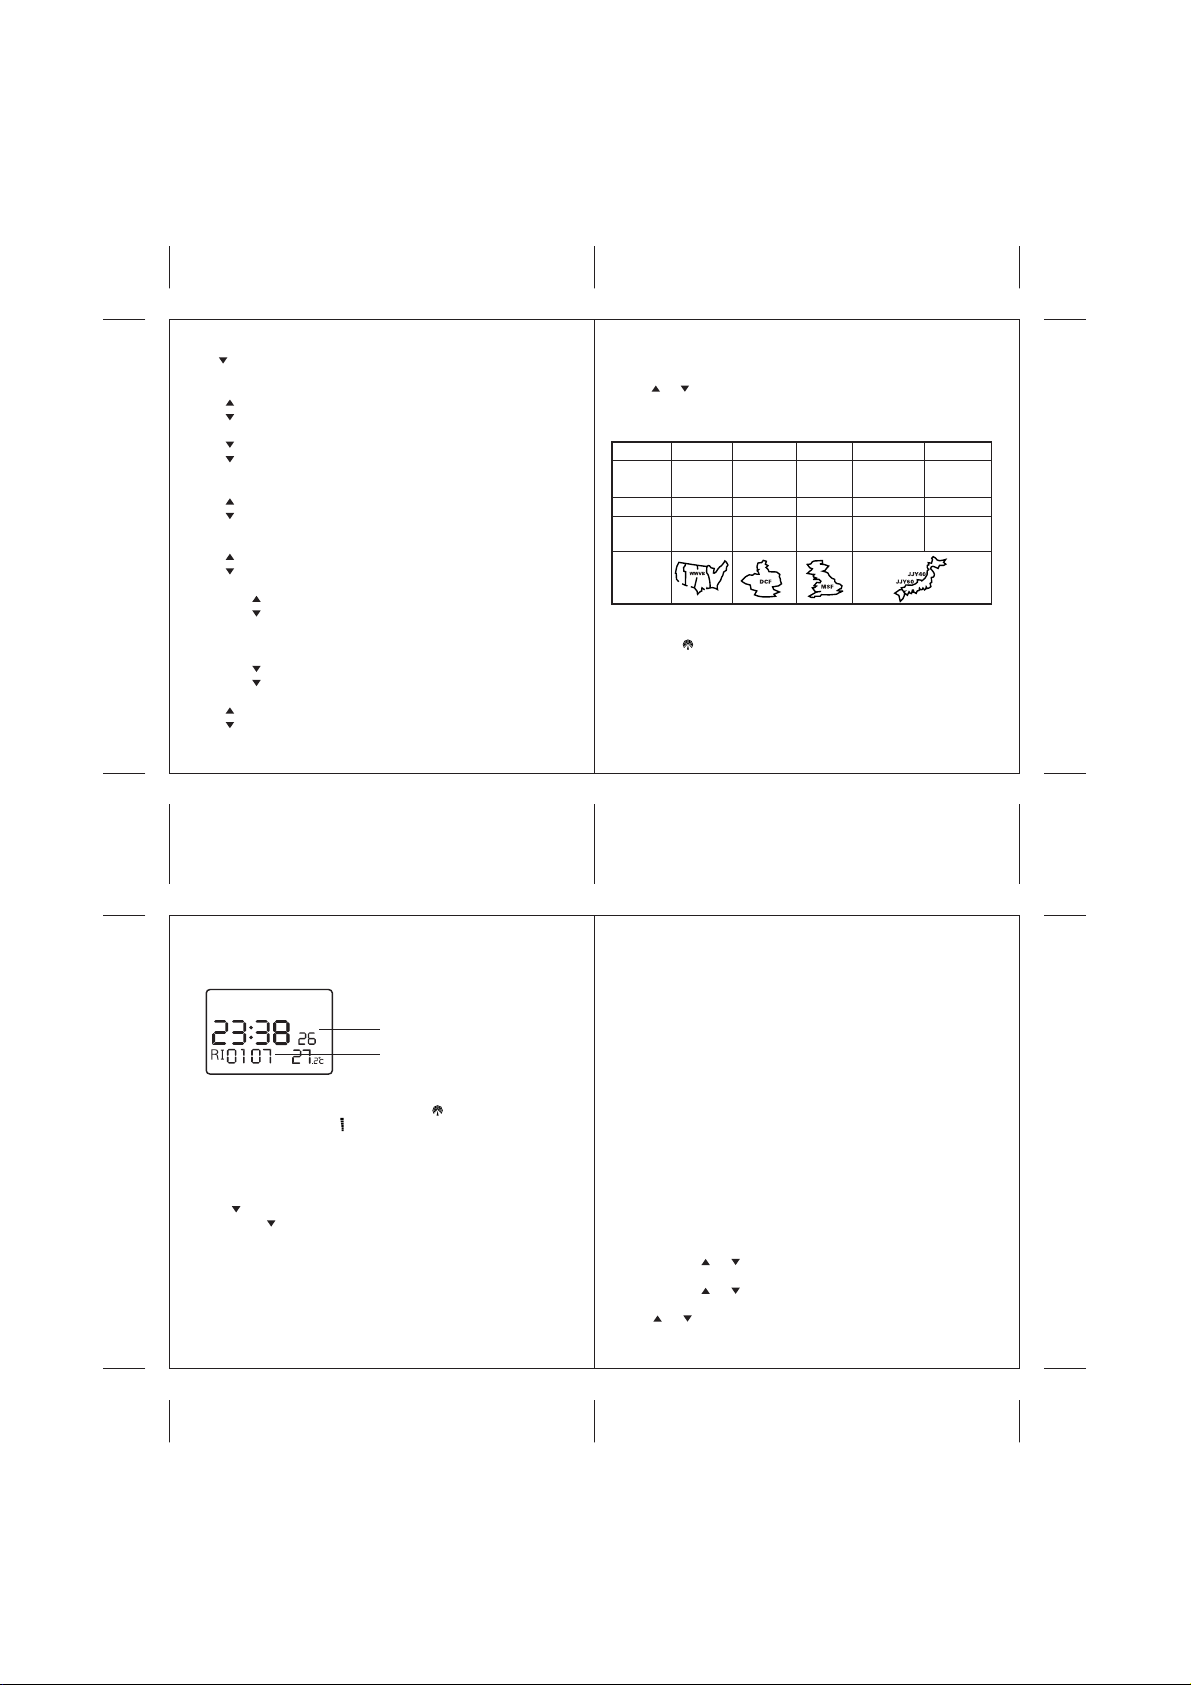
Radio-controlled time reception <RX>
To activate the reception:
• Press SET button.
• Press or to choose among different reception modes:
SEL -- selected single band (WWVB, DCF, MSF, JJY40 or JJY60)
DUAL -- Japan dual band scanning (JJY40 and JJY60)
SCAN -- Multi-country scanning (all available bands).
Radio
source
Frequency
Reception
WWVB
Colorado,
USA
60kHz
1,500km
DCF
Frankfurt,
Germany
77.5kHz
1,500km
MSF
Rugby,
England
60kHz
1,500km
JJY40
Fukushima-
East, Japan
40kHz
1,500km
JJY60
Kyushu-
West, Japan
60kHz
1,500km
radius
Symbol
• Press SET button to confirm setting.
• The relevant map will stop flashing and stay on display. The radio
tower icon will keep flashing until the synchronisation is completed.
• If synchronisation is successful, it will override any manually set time.
• If auto synchronisation is not successful, you may set the time manually.
To disable the reception:
• Press SET button to disable the reception.
• The radio tower icon will disappear from the display.
Radio-controlled time reception information <RI>
Shows information relevant to the last successful reception. This includes
the local time at which the last successful synchronisation takes place.
Last reception time
Length of last reception
Radio Signal Reception
When in reception mode, the radio tower icon will appear on the main
display. The wave indicator shows the strength of reception.
The range is from 0 - 6 bars. 0 is the weakest and 6 is the strongest.
Both auto and manual reception is possible. Each reception session lasts
15 minutes at maximum. Auto reception takes place twice daily at
1:05 am and 3:05 am. Manual reception is activated by pressing and
holding until the radio tower icon is shown. To cancel reception,
press and hold until the icon disappears.
11 12
Interference
Reception can be affected by a number of factors. For optimal reception,
please note that:
•A minimum distance of 8 feet should be kept from any interference
source, such as TV sets, computer monitors, microwave ovens and etc.
•Reception might be weak within concrete rooms (e.g. basements,
superstructures, office buildings). In extreme cases, place the clock
close to a window.
•Some localities may be subject to severe atmospheric disturbances.
However, such interference usually weakens during the night.
A single daily reception is sufficient to keep the accuracy reading.
•If the alarm goes off during radio reception, the session will be
interrupted and restart after the alarm has stopped.
In the event that radio-controlled time reception is not possible,
you may set the time manually.
Manual Time Setting
If you choose to disable the reception for a certain period, or auto
synchronisation is not successful or there is faulty reception, then follow
the steps below to set the clock manually:
In the main display mode:
• Press SET button until the display flashes.
• Press and hold or to set the minute and hour.
• Press MODE button once.
• Press and hold or to set the date, month and year.
• Press MODE button once.
• Press or to set the 12H/24H time display mode.
• Press SET button to confirm setting.
Page 4

Back View
A
A. Battery slide door
B. Key lock slide switch
C. ºC/ºF button
D. Stand (it will be easily broke with rough pulling,
you have to pull it in and out gently)
13 14
Important notes on the Battery
• Battery: the clock is powered only by the specified type of battery
(lithium cell CR 2032 type 3V).
• Observe the correct polarity (as indicated in the battery compartment).
• Low battery indication: When battery is low (below 2.7V), a flashing
B
C
D
battery icon will appear on the main display.
• Regularly check the battery for leakage. You should replace the battery
in the clock at least once a year.
• Dispose of flat batteries in an environmentally friendly manner.
Take them to suitable waste collection point for special waste landfill.
Key lock
• If you slide the switch to , all buttons will be locked and any
unintended change in settings can be avoided.
• If you slide the switch to , changes in settings are allowed.
Indoor temperature display
• Press and hold the ºC/ºF button until the desired display is shown.
• Reading is updated every minute.
• Measurement range is between OºC and 50ºC (32ºF - 122ºF).
• Any temperature below OºC is read as “LL”, while any temperature
above 50ºC is read as “HH”.
• Extreme and sudden changes in temperature will decrease the accuracy
of the readings. For accurate readings, avoid direct sunlight.
• Changes in elevation will also result in inaccurate readings for the next
12 to 24 hours. It may take another 12 to 24 hours before the reliable
data can be obtained.
• When radio-controlled time reception is under way, temperature data
refresh will be suspended until the reception has finished.
EL Backlight
• Press SNOOZE/LIGHT button to activate the backlight.
• The backlight will last for 2-3 seconds. If battery is low, backlight
cannot be activated.
Care Instructions
• Do not immerse the clock in water.
• Protect the clock from moisture, dust, extreme temperatures,
excessive force and shock, which may result in malfunction, shorter
electronic life span, damaged batteries and distorted parts.
• Only use a dry cloth to clean the clock.
• Do not use any aggressive solvents. They may damage the plastic parts
and corrode the electronic circuit.
• Do not tamper with the internal components, which may cause
unnecessary damage.
• Only use fresh batteries of the model as specified. When not in use,
take out the battery from the battery bay and store it properly.
• Read this manual carefully before operating the clock.
15 16
Standard Warranty Information
This product is warranted from manufacturing defects for one year
from the date of retail purchase. It does not cover damages or wear
resulting from accident, misuse, abuse, commercial use, or
unauthorized adjustment and repair.
Note that online product registration is required to ensure valid
warranty protection. To register your product, go to our Company
website at: www.digiviewtime.com. Click Online Product
Registration under the Customer Service menu.
Should you require assistance with this product and its operation,
please contact our Customer Service Hotline 1(866) 443 3543.
Please direct all returns to the place of the original purchase.
Should this not be possible, contact Hideki Customer Service
Hotline for assistance and to obtain a Return Merchandise
Authorization(RMA). Returns without a return authorization will
be refused. Please retain your original receipt as you may be asked
to provide a copy for proof of purchase.
Hideki Electronics, Inc. reserves the right to repair or replace the
product at our option.
Page 5

Digiview
Reloj Radio Controlado
Multibanda Con Termómetro
Manual de Instrucciones
( RC304EL )
17 18
DIGIVIEW RC304EL MANUAL (SPA)
SIZE: W75 X H80 (mm)
BY SHAN WONG 08/04/05
FILM: 08/04/05
Introducción
Esté reloj radio controlado multibanda y termómetro puede operar en
3 regiones: América del Norte, Europa y Japón. Puede recibir señales de
hora por señales de radio WWVB, DCF, MSF, JJY40 y JJY60.
Aparte de ser uno mostrador de hora de alta precisión, el reloj tiene
también un doble alarma, pantalla de temperatura interior, calendario,
zona horaria y función de cronómetro. Es un aparato multifuncional y
es muy fácil de operar.
El reloj tiene también un conveniente y simples trazado. Simplemente
extraiga el soporte y lo coloque en su mesa, empújelo de nuevo hacia
adentro del compartimiento para llevarlo en su maleta cuando salga
de viajar.
Poderoso, pero todavía simples. Con este reloj despertador tentamos
poner un poco de belleza en su vida diaria.
Acerca de Hideki Electronic
Visite nuestro sitio Web (www.digiviewtime.com) para conocer más
detalles acerca de otros productos de Hideki Electronics, como relojes
con proyección de la hora exacta, productos relacionados con el ambiente
y dispositivos de monitorización del tiempo atmosférico. Ese sitio Web
también contiene información importante acerca de un programa de
extensión de garantÌa y otros datos útiles.
Panel frontal
Panel frontal
A. Pantalla digital
B. Botón de Modo (MODE)
C. Botón de Ajuste (SET)
D. Parada momentánea de alarma (SNOOZE) • Luz (LIGHT) botón
E. o botón
19 20
Ajuste Inicial
Cuando prendido, el reloj hará un sonido como reconocimiento y
mostrará una pantalla completa. Usted puede apretar cualquier botón
para parar el sonido.
A
C
B
E
D
Ajustes de fábrica:
Característica / parámetro
Formato de Hora
Formato da Fecha
Modo de recepción
Estado de recepción
DST (Hora de verano)
Alarma 1
Alarma 2
Formato del Calendario
Zona
Cronometro
Formato de Temperatura
Ajuste de fábrica
Hora local (24 horas)
Fecha local (dd/mm)
DCF (Alemania)
Sincronización automática
Auto (apagado)
7:00 am Apagado
8:00 am Apagado
3 Agosto
01h (GMT)
00:00:00:00
ºC
Page 6

Ajuste de Formato
•Formato de fecha: en la pantalla principal, pulse para elegir entre los
formatos dd/mm o mm/dd
•GMT (Tiempo medio de Greenwich):
* Sírvase observar el mapa de husos horarios para usar el reloj en una
zona horaria diferente.
* Entre con su huso horario como detallado en la sección
“ Zona del Tiempo <ZO>”
* Pulse el SET botón en la pantalla principal para ajustar.
* “UT” aparecerá sobre la pantalla.
Mapa de Husos Horarios
-9 -8 -7 -6 -5 -4 -3 -2 -1 0 +1 +2+3 +4 +5 +6 +7 +8 +9 +10 +11 +12 -11
-10
San Francisco
International Date Line
( + )
Vancouver
Toronto
Chicago
New York
Los Angeles
Honolulu
Mexico City
Panama
-9-10-11 -8 -7 -6 -5 -4 -3 -2 -1 0 +1 +2 +3 +4 +5 +6 +7 +8 +9 +10 +11 +12 -11
London
Paris
-3:30
Boston
Miami
Rome
Rio de Janeiro
Santiago
( - )
Helsinki
Moscow
Frankfurt
Zurich
Athens
Cairo
Beijing
Seoul
+4:30
+3:30
+5:30
Hong Kong
Bombay
Bangkok
Kuala Lumpur
Singapore
Jakarta
Perth
International Date Line
Tokyo
Taipei
Manila
Sydney
+9:30
Melbourne
Auckland
21 22
Pantalla Principal
a. Hora
f
b. Fecha
a
c
c. Temperatura interior
d. Indicador del día de
la semana
d
e. Icono del calendario
f. Icono del Alarma
b
e
Pulse el MODO botón en la pantalla principal para tener acceso a las
seis diferentes funciones:
1 Modo de Alarma (AL) – doble alarmas con parada momentánea
2 Modo de Calendario (DR) – sonará en el día seleccionado
3 Modo de Zona del Tiempo (ZO) –
zona del tiempo y hora de verano
4 Modo Cronometro (SP) – modo vuelta o modo intervalo
5 Modo de Recepción (RX)
6 Modo de Información de recepción (RI)
Notas : Si ningún ajuste se ha hecho en 10 segundos, el reloj volverá al
modo de tiempo de demostración principal. Usted tiene que confirmar el
ajuste deseado en 20 segundos o entonces su ajuste deseado será ignorado
y dejará de sustituir el ajuste anterior.
Alarma <AL>
Para ajustar la Alarma:
•Pulse para seleccionar ALARM 1 o ALARM 2.
•Pulse el botón SET y sostenga hasta que la pantalla parpadee.
•Pulse o para cambiar los ajustes
•Pulse y sostenga o para ajuste rápido.
•Pulse el botón SET para confirmar o ajuste.
•Pulse para activar la alarma “ON”.
•El icono aparecerá en la pantalla principal
•La alarma se apagará en la hora deseada.
Para desactivar la alarma:
•Pulse para seleccionar ALARM 1 o ALARM 2.
•Pulse para desactivar la alarma “OFF”.
•El icono desaparecerá de la pantalla principal
Cuando la ALARMA este sonando:
•Pulse el botón SNOOZE • LIGHT (Parada momentánea de alarma • Luz)
La alarma se parará y luego comenzará otra vez después de 4 minutos.
Esto se puede se repetir hasta once veces.
•Para cancelar el botón SNOOZE • LIGHT, pulse cualquier botón otro que
botón SNOOZE • LIGHT
•Cuando el botón SNOOZE • LIGHT está activado, el icono parpadeará.
•Pulse cualquier botón otro que SNOOZE • LIGHT para parar el tono.
•Si usted no para el tono despertador, esto se parará automáticamente
después de 3 minutos.
A menos que desactivado, la alarma permanecerá activa y se apagará otra
vez en la hora ajustada.
23 24
Calendario <DR>
Para ajustar la alarma de fecha:
•Pulse el botón SET y sostenga hasta que la pantalla principal parpadee.
•Pulse o para cambiar los ajustes.
•Pulse el botón SET para confirmar el ajuste.
•Pulse para activar la alarma “ON”.
•El símbolo “DR” aparecerá en la pantalla principal
•El símbolo “DR” parpadeará durante todo el día deseado.
Para desactivar la alarma de fecha:
•Pulse para desactivar la alarma “OFF”.
• El símbolo “DR” desaparecerá de la pantalla principal.
Huso horario <ZO>
•Pulse el botón SET y sostenga hasta que la pantalla parpadee.
•Pulse o para cambiar los ajustes (amplitud de +/-12 horas, apenas
en horas)
Si la hora recibida de JJY60 por el radio controlado es 15h00 (hora de
Japón), y el ajuste del huso horario es +8 horas (huso horario de Hong
Kong), entonces la hora local en la pantalla será 14h00.
•Ajuste da Hora de Verano (DST):
Pulse el botón MODO una vez.
“DS” aparecerá en la pantalla.
Pulse para seleccionar “ON”, “OFF” o “Auto”.
Si la función DST está activada o en automático, el reloj se ajustará
automáticamente al horario de verano en la primavera y otoño.
Desactive”Off” la función DST caso no se aplique en su localidad.
•Pulse el botón SET para confirmar el ajuste.
Page 7

Cronometro <SP>
Pulse para seleccionar el modo de Vuelta (LA) o Intervalo (SP)
Bajo modo LA:
•Pulse para continuar contando.
•Pulse para mostrar a primera lectura.
•El cronometro reinicializa al cero y reanuda contar internamente.
•Pulse para mostrar contar.
•Pulse otra vez para mostrar la segunda lectura..
•El cronómetro reinicializa al cero y reanuda contar internamente.
•Repita los susodichos pasos como deseado.
•Pulse para parar de contar.
•Pulse reinicializar el cronómetro a cero.
Bajo modo SP:
•Pulse para continuar contando.
•Pulse para mostrar a primera lectura.
•Mientras el cronómetro sigue contando internamente:
• Pulse para marcar el tempo.
• Pulse hacer una pausa y mostrar la lectura marcada.
• Repita los susodichos pasos como deseado
Alternativamente:
• Pulse para seguir contando.
• Pulse para hacer una pause y mostrar la lectura.
• Repita los susodichos pasos como deseado.
•Pulse para dejar de contar.
•Pulse para reinicializar el cronómetro al cero.
25 26
Recepción de hora radio controlada <RX>
Para Activar la recepción:
•Pulse el botón SET.
•Pulse o para elegir entre modos de recepción diferentes:
SEL --
opciones seleccionadas de banda
DUAL -- escaneo de doble banda en Japón (JJY40 y JJY60)
SCAN -- Multi-país escaneo (todas las bandas disponibles)
Fuente de
Radio
Frecuencia
Radio de
WWVB
Colorado,
USA
60kHz
1,500km
DCF
Frankfurt,
Germania
77.5kHz
1,500km
(WWVB, DCF, MSF, JJY40 o JJY60)
MSF
Rugby,
Inglaterra
60kHz
1,500km
JJY40
Fukushima-
East, Japón
40kHz
1,500km
JJY60
Kyushu-
West, Japón
60kHz
1,500km
Recepción
Símbolo
•Pulse el botón SET para confirmar el ajuste.
•El mapa relevante dejará de parpadear y se quedará en la pantalla. El
icono de torre de radio seguirá parpadeando hasta que la
sincronización sea completada.
•Si la sincronización es acertada, esto anulará alguno ajuste manual de hora.
•Si
la sincronización no es acertada, usted puede hacer el ajuste manual da hora.
Para Desactivar la recepción:
•Pulse el botón SET para desactivar la recepción.
•El icono de torre de radio desaparecerá de la pantalla.
Información de recepción de hora radiocontrolada <RI>
Muestra la información relevante a la última recepción acertada. Este
incluye la hora local en el cual la última sincronización acertada ocurre.
Hora da última recepción
Duración de la última recepción
Señal de Recepción del Radio
Cuando en modo de recepción el icono de torre de radio aparecerá en
la apantalla. El indicador de señal muestra la fuerza da recepción. El
ancho es de 0 - 6 barras. 0 siendo el más débil y 6 el mas fuerte.
Tanto la recepción automática como la manual son posibles. Cada sesión
de recepción dura 15 minutos en el máximo. La recepción automática
ocurre dos veces al día a la 1h05 y a las 3h05. La recepción manual es
activada apretando y sosteniendo hasta que el icono de torre de radio
sea mostrado. Para anular la recepción, pulse y sostenga hasta que el
icono desaparezca.
27 28
Interferencia
La recepción puede ver afectada por varios factores. Para obtener la
mejor recepción, por favor note esto:
•Una
distancia mínima de 8 pies debería ser guardada de cualquier fuente
de interferencia, como televisores, monitores de computadora, microondas
y etc.
•La recepción puede ser débil en ambientes con pared de concreto
(p.ej sótanos, superestructuras, edificios de oficina) En casos extremos,
coloque el reloj cerca de una ventana.
•Algunas localidades pueden estar sujetas a perturbaciones atmosféricas
severas. Sin embargo, tal interferencia por lo general se debilita durante
la noche.
Una recepción sola diaria es suficiente para guardar la lectura de
exactitud.
•Si la alarma se activa durante la recepción de radio, la sesión será
interrumpida y reactivarse después de que la alarma se ha parado.
En caso de que la recepción dé hora radio controlada no sea posible,
usted puede hacer el ajuste manual da hora.
Ajuste Manual del Reloj
Si usted decide desactivar la recepción durante un cierto periodo, o la
sincronización no es acertada o hay recepción defectuosa, siga los pasos
abajo para ajustar el reloj manualmente:
En la pantalla principal:
•Pulse el botón SET y sostenga hasta que la pantalla parpadee.
•Pulse y sostenga o para ajuste de minutos y hora.
•Pulse una vez el botón MODO
•Pulse y sostenga o para ajustar el día, mes y ano.
•Pulse una vez el botón MODO.
•Pulse o para ajuste del formato de hora en 12 / 24 horas
•Pulse el botón SET para confirmar el ajuste.
Page 8

Vista Posterior
A
A. Tapa del compartimiento de pilas
B. Botón de Cerradura de Protección
C. Botón de formato de temperatura ºC/ºF
D. Soporte (se romperá el soporte caso se aplique mucha fuerza al
sacarlo, usted tiene que tirarlo en y hacia fuera suavemente)
29 30
Notas Importantes sobre la Batería
•Pilas: el reloj es impulsado sólo por el tipo especificado de pilas
(célula de litio CR 2032 tipo 3V)
•Observe la polaridad correcta (como indicado en el compartimiento de
las pilas)
B
C
D
• Indicación de pila baja: El icono parpadeará en la pantalla cuando la
pila esté baja (abajo de 2,7V),
•Verifique las pilas para fuga con regularidad. Usted debería sustituir la
batería al menos una vez al año
•Elimine baterías llanas en una manera ambientalmente amistosa.
Tórnelos al punto de colección conveniente de desecho para el
vertedero de basura especial.
Cerradura de Protección
Si usted desliza el interruptor a, permiten a cambios de ajustes.
•Si usted desliza el interruptor para , todos los botones serán cerrados
evitándose alguna mudanza no planeada.
•Si usted desliza el interruptor para , mudanzas son permitidas.
Pantalla de Temperatura Interior
•Pulse y sostenga el º C / º F botón hasta que la opción deseada.
•La lectura es actualizada cada minuto.
•La variedad de medida está entre O º C y 50 º C (32 º F - 122 º F)
•Cualquier temperatura debajo de O º C es leída como “LL”, mientras
cualquier temperatura encima de 50 º C es leída como “HH”.
•Los cambios extremos y repentinos de la temperatura disminuirán la
exactitud de las lecturas. Para lecturas exactas, evite la luz del sol directa.
•Los cambios de la elevación causarán también lecturas inexactas durante
las 12 a 24 horas siguientes. Esto puede tomar el otro 12 a 24 horas antes
de que los datos confiables puedan ser obtenidos.
La Retroiluminación
•Pulse el botón SNOOZE • LIGHT para encender la retroiluminación.
•La retroiluminación durará durante 2-3 segundos. Si la batería está
baja, la retroiluminación no puede ser activada.
Precauciones
•No sumerjas el reloj en el agua
•Proteja el reloj de humedad, polvo, temperaturas extremas, fuerza
excesiva y choque, que puede causar un mal funcionamiento, acortar la
duración electrónica, dañar las pilas y distorsionar algunas partes.
•Sólo use una tela seca para limpiar el reloj.
•No use ningún solvente agresivo. Ellos pueden dañar las partes plásticas
y corroer el circuito eléctrico.
•No toque los componentes internos de la unidad, que pueden causar el
daño innecesario.
•Sólo use pilas nuevas como se especifica en el manual. Cuando no en el
uso, saque la batería de la bahía de pilas y almacene correctamente.
•Leas el manual del usuario por completo antes de usar la unidad.
31 32
Información De Garantóa Estándar
Este producto tiene garantía frente a defectos de fabricación durante
un año a partir de la fecha de compra. No cubre daños o desperfectos
resultantes de accidente, mal uso, abuso, uso comercial o ajuste y/o
reparaciones no autorizadas.
Tenga en cuenta que es preciso registrar en línea este producto para
asegurar una garantía de protección vúlida.
Para registrar su producto, vaya a la página Web de nuestra compañía
en: at: www.digiviewtime.com. Haga clic en “Online Product
Registration” del menú “Customer Service”.
Si necesita cualquier tipo de ayuda relativa a este producto, contacte
con nuestra Línea de atención al cliente, 1(866) 443 3543.
Por favor, dirija todas las devoluciones al sitio de compra original.
Si esto no fuera posible, contacte con la Línea de atención al cliente
para obtener ayuda o una Autorización de Devolución de la
Mercancía (RMA). Las devoluciones sin una autorización de
devolución ser·n rechazadas. Por favor guarde su recibo original
porque le ser· solicitado proveer una copia como prueba de compra.
Hideki Electronics, Inc. se reserva el derecho de reparar o reemplazar
el producto a nuestra elecciÛn.
 Loading...