


USER MANUAL
INSTALLATION AND QUICK-START GUIDE
CONNECTION GUIDE
OPERATING GUIDE
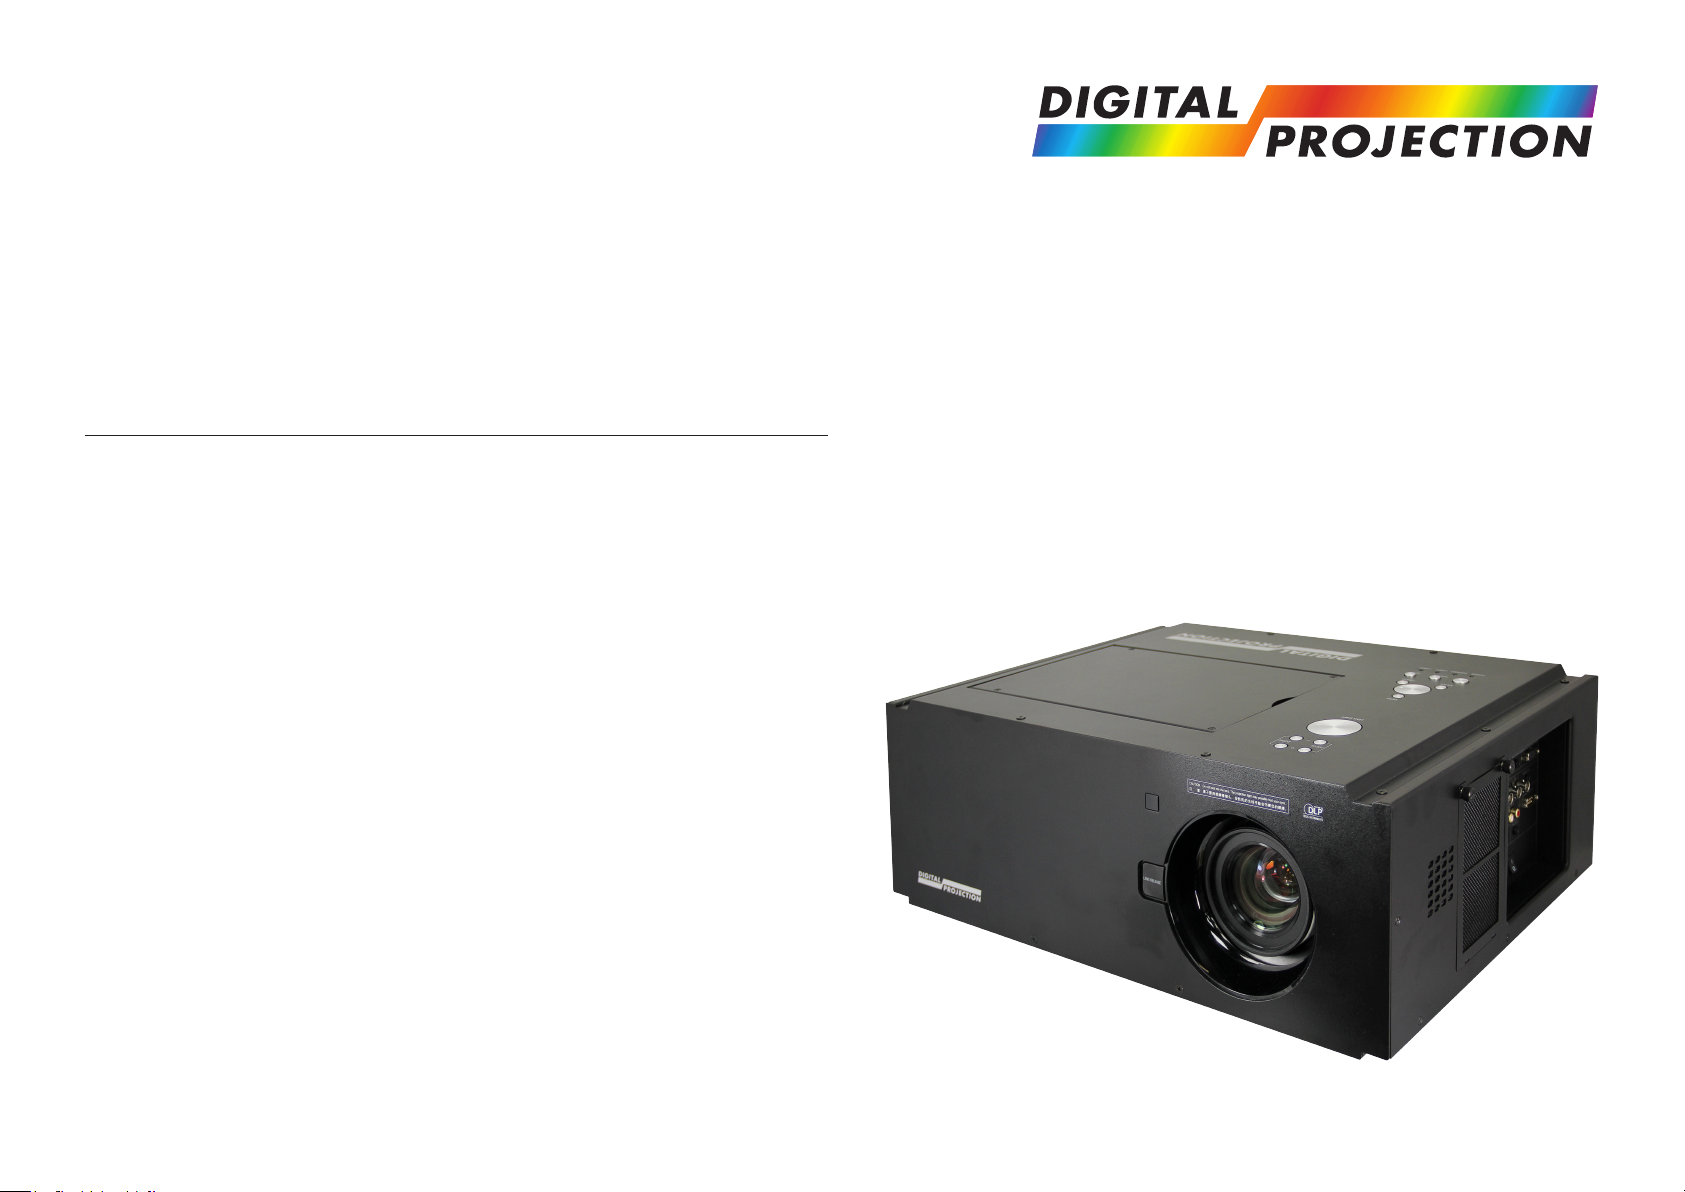
E-Vision 7000 Series
High Brightness Digital Video Projector
REMOTE COMMUNICATIONS GUIDE
Rev C July 2014
112-457C

Digital Projection E-Vision 7000 Series
About This Document
Please follow the instructions in this manual carefully to ensure safe and long-lasting use of the projector.
Keep this manual handy for future reference.
Symbols used in this manual
Many pages in this document have a dedicated area for notes. The information in that area is accompanied by the following symbols:
ELECTRICAL WARNING: this symbol indicates that there is a danger of electrical shock unless the instructions are closely
followed.
WARNING: this symbol indicates that there is a danger of physical injury to yourself and/or damage to the equipment unless
the instructions are closely followed.
NOTE: this symbol indicates that there is some important information that you should read.
Product revision
Because we at Digital Projection continually strive to improve our products, we may change specications and designs, and add new features
without prior notice.
Notes
Legal notice
Trademarks and trade names mentioned in this document remain the property of their respective owners.
Digital Projection disclaims any proprietary interest in trademarks and trade names other than its own.
Copyright © 2014 Digital Projection Ltd. All rights reserved.
iRev C July 2014 i

Digital Projection E-Vision 7000 Series
Introduction
Congratulations on your purchase of this Digital Projection product.
Your projector has the following key features:
• Swappable color wheels for high brightness and color critical applications.
• BrilliantColor™ for increased system brightness.
• DynamicBlack™ for improved black levels in dark scenes.
• Frame sequential 3D support at up to 120Hz with support for DLP® Link™ glasses synchronisation only.
• Independent control of hue, saturation and gain for primary and secondary colors.
• Vertical keystone correction.
• Control via LAN and RS232.
• Motorized lens mount.
A serial number is located on the back of the projector. Please record it here:
Notes
iiRev C July 2014 ii

Digital Projection E-Vision 7000 Series
CONTENTS
INSTALLATION AND QUICK-START GUIDE ..............................1
WHAT’S IN THE BOX? ................................................................... 3
GETTING TO KNOW THE PROJECTOR .......................................... 4
Front and rear views ............................................................................. 4
Remote control ...................................................................................... 4
Control panel and indicators ................................................................. 5
CHANGING THE LENS, LAMPS AND COLOR WHEEL .................... 6
Removing the lens ................................................................................ 6
Fitting the lens ....................................................................................... 6
Changing the lamp ................................................................................ 7
Changing the color wheel...................................................................... 7
POSITIONING THE SCREEN AND PROJECTOR ............................. 8
OPERATING THE PROJECTOR ...................................................... 9
Switching the projector on ..................................................................... 9
Selecting an input signal or test pattern ................................................ 9
Input signal .......................................................................................... 9
Test pattern .......................................................................................... 9
Adjusting the lens ................................................................................ 10
Zoom ................................................................................................ 10
Focus ............................................................................................... 10
Shift ................................................................................................. 10
Adjusting the image............................................................................. 10
Orientation ......................................................................................... 10
Aspect ratio ........................................................................................ 10
Picture .............................................................................................. 10
Switching the projector off ................................................................... 11
CONNECTION GUIDE ............................................................................13
SIGNAL INPUTS AND OUTPUTS .................................................. 15
Computer 1 ......................................................................................... 15
Computer 2 ......................................................................................... 15
Computer 3 ......................................................................................... 15
Component.......................................................................................... 15
Video or S-Video ................................................................................. 15
Monitor Out ......................................................................................... 15
SUPPORTED SIGNAL INPUT MODES .......................................... 16
CONTROL CONNECTIONS ........................................................... 18
Screen Trigger..................................................................................... 18
USB Service Port ................................................................................ 18
RS232 ................................................................................................. 18
LAN ..................................................................................................... 18
WIRING DETAILS ......................................................................... 19
Signal inputs and outputs .................................................................... 19
Monitor video output (VGA) .................................................................... 19
Computer 1 video input: analog computer (VGA) ......................................... 19
Computer 2 video input: RGBHV, RGsB or YCbCr ........................................ 19
Computer 3 video input: DVI-D ................................................................ 20
Monitor audio output ............................................................................. 21
Computer 1, 2, 3 audio inputs ................................................................. 21
Component video and audio input ............................................................ 21
Video input ......................................................................................... 22
Composite and S-Video audio input .......................................................... 22
S-Video input ...................................................................................... 22
iiiRev C July 2014 iii

Digital Projection E-Vision 7000 Series
Control connections ............................................................................ 23
Screen Trigger output ...........................................................................23
RS232 Serial control input ...................................................................... 23
LAN connection ................................................................................... 24
OPERATING GUIDE ................................................................................25
USING THE REMOTE CONTROL .................................................. 27
USING THE MENUS ..................................................................... 28
Navigating the menus ......................................................................... 28
Submenus ........................................................................................... 29
Sliders ................................................................................................. 29
Selecting parameters .......................................................................... 30
Commands .......................................................................................... 31
Editing elds ........................................................................................ 31
A TOUR OF THE MENUS .............................................................. 32
Picture menu ....................................................................................... 32
Picture Mode ...................................................................................... 32
Brilliant Color ...................................................................................... 32
Brightness, Contrast, Color, Tint, Sharpness ............................................... 32
Reset................................................................................................ 32
Advance Setting submenu ..................................................................... 33
Signal menu ........................................................................................ 35
Horizontal and Vertical Position, Phase, Clock ............................................. 35
Reset................................................................................................ 35
Resolution ......................................................................................... 35
Auto Sync .......................................................................................... 35
Video menu ......................................................................................... 36
Overscan ........................................................................................... 36
Video System ..................................................................................... 36
Video Setup ....................................................................................... 36
Closed Caption ................................................................................... 36
Setup menu ......................................................................................... 37
Auto Search ....................................................................................... 37
Auto Power Off.................................................................................... 37
Auto Power On.................................................................................... 37
Standby Mode .................................................................................... 37
Background ........................................................................................ 38
Audio ................................................................................................ 38
3D Mode ........................................................................................... 38
Aspect Ratio ....................................................................................... 38
Advance Setting submenu ..................................................................... 39
Security Lock ...................................................................................... 39
Keypad Lock ...................................................................................... 39
Image Capture .................................................................................... 39
Wall Color .......................................................................................... 39
Messaging ......................................................................................... 40
ivRev C July 2014 iv

Digital Projection E-Vision 7000 Series
Installation menu ................................................................................. 41
Language .......................................................................................... 41
Lamp Control ...................................................................................... 41
Lamp Mode ........................................................................................ 41
Projection Mode .................................................................................. 41
Fan Mode .......................................................................................... 41
Test Pattern ........................................................................................ 41
Advance Setting .................................................................................. 42
Communication Speed .......................................................................... 42
Network ............................................................................................ 43
Reset................................................................................................ 44
Information ......................................................................................... 44
MENU MAP .................................................................................. 45
REMOTE COMMUNICATIONS GUIDE ..........................................49
INTRODUCTION ........................................................................... 51
RS232 CONTROL COMMANDS .................................................... 52
Header code........................................................................................ 52
Examples .......................................................................................... 52
The commands ................................................................................... 53
Command Group 00 ............................................................................. 53
Command Group 01 ............................................................................. 53
Command Group 02 ............................................................................. 54
Command Group 03 ............................................................................. 54
Command Group 04 (Remote Control buttons) ............................................ 55
PJLINK ........................................................................................ 57
Settings ............................................................................................... 57
Host Name ......................................................................................... 57
Domain Name ..................................................................................... 57
Mail .................................................................................................. 57
PJLink .............................................................................................. 57
LAN CONTROL UTILITY............................................................... 58
Power ON/STANDBY .......................................................................... 58
Picture and Volume controls ...............................................................58
Input Select ......................................................................................... 58
AV Mute ............................................................................................... 58
Status .................................................................................................. 58
vRev C July 2014 v
INSTALLATION AND QUICK-START GUIDE
E-Vision 7000 Series
High Brightness Digital Video Projector
Rev C July 2014
112-458C

Digital Projection E-Vision 7000 Series IN THIS GUIDE Installation and Quick-Start Guide
IN THIS GUIDE
What’s In The Box? ............................................................................................. 3
Getting To Know The Projector...................................................................... 4
Front and rear views ...................................................................................................4
Remote control ............................................................................................................4
Control panel and indicators .....................................................................................5
Changing The Lens, Lamps And Color Wheel ............................................ 6
Removing the lens ......................................................................................................6
Fitting the lens .............................................................................................................6
Changing the lamp ......................................................................................................7
Changing the color wheel ..........................................................................................7
Positioning The Screen And Projector ......................................................... 8
Operating The Projector ................................................................................... 9
Switching the projector on .........................................................................................9
Selecting an input signal or test pattern ...................................................................9
Input signal ........................................................................................................................ 9
Test pattern ....................................................................................................................... 9
Adjusting the lens .....................................................................................................10
Zoom ...............................................................................................................................10
Focus ..............................................................................................................................10
Shift .................................................................................................................................10
Adjusting the image ..................................................................................................10
Orientation ......................................................................................................................10
Aspect ratio .....................................................................................................................10
Picture .............................................................................................................................10
Switching the projector off .......................................................................................11
Rev C July 2014
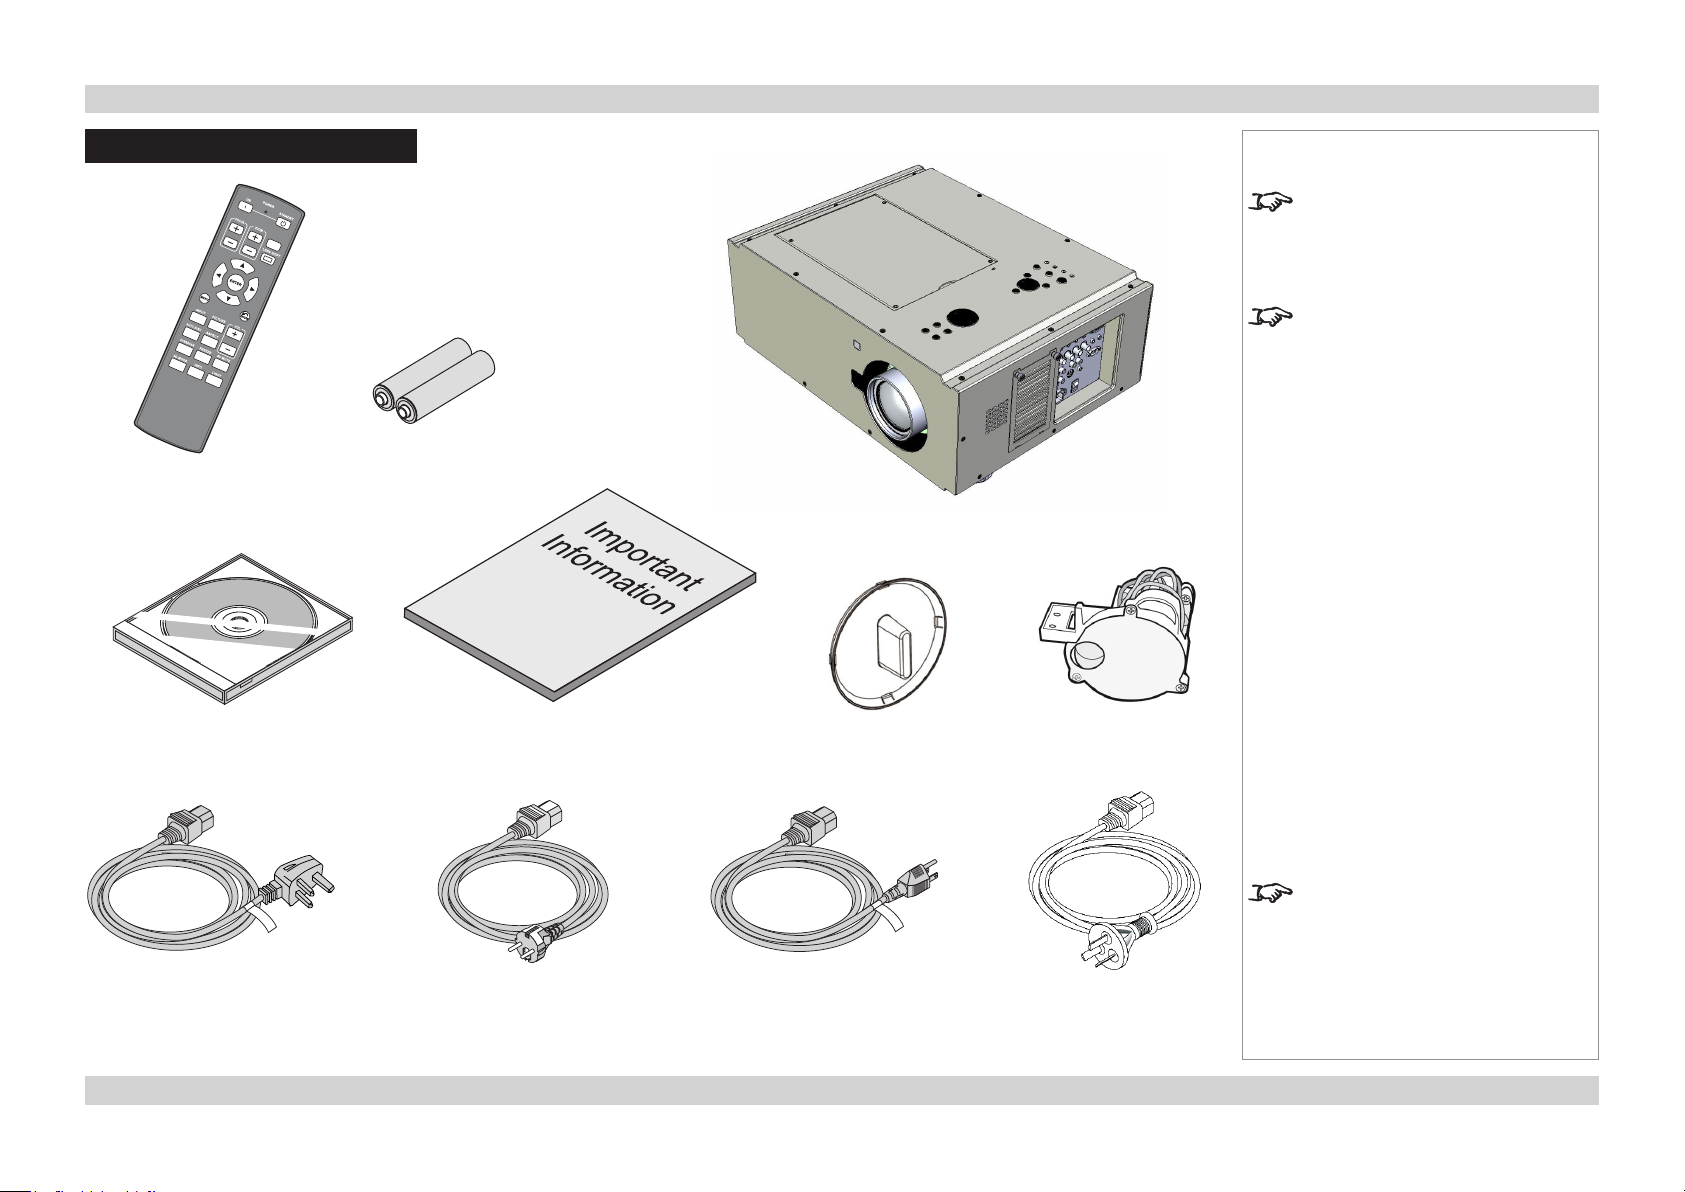
Digital Projection E-Vision 7000 Series What’s In The Box? Installation and Quick-Start Guide
What’s In The Box?
2x AAA batteries
Remote control
(112-377)
Notes
Make sure your box contains
everything listed. If any pieces are
missing, contact your dealer.
You should save the original box
and packing materials, in case you
ever need to ship your Projector.
Projector
User Manual on disc
(115-759)
Power cable 10A, United
Kingdom (102-180)
Important Information
(112-462)
Power cable 10A,
Europe (102-163)
Lens cap
Power cable 13A, North
America (102-165)
Color wheel
Only one power cable - dependent
on the destination territory - will be
supplied with the projector.
Power cable,
China (112-472)
3Rev C July 2014
Digital Projection E-Vision 7000 Series Getting To Know The Projector Installation and Quick-Start Guide
Getting To Know The Projector
Front and rear views
Lamp and color
wheel cover
Front
infra-red
window
Lens
Loudspeaker
Rear
infra-red
window
inlet
Air lter
cover
Air
Control
panel
Connection
panel
Mains
input
Remote control
40°
40°
Infra-red
reception
Notes
The projector uses an infra-red
remote control.
Some of the controls are duplicated
on the projector control panel, as
shown on the next page.
For full details of how to use the
controls and the menu system, see
the Operating Guide.
Theairltersshouldbecleanedor
changed regularly, depending on the
installation environment.
Theltersshouldbechangedatthe
same time as the lamp is changed.
The projector lens is shipped
separately.
Air
inlet
Air lter
cover
Air
outlet
Loudspeaker
Adjustable
feet
4Rev C July 2014
Digital Projection E-Vision 7000 Series Getting To Know The Projector Installation and Quick-Start Guide
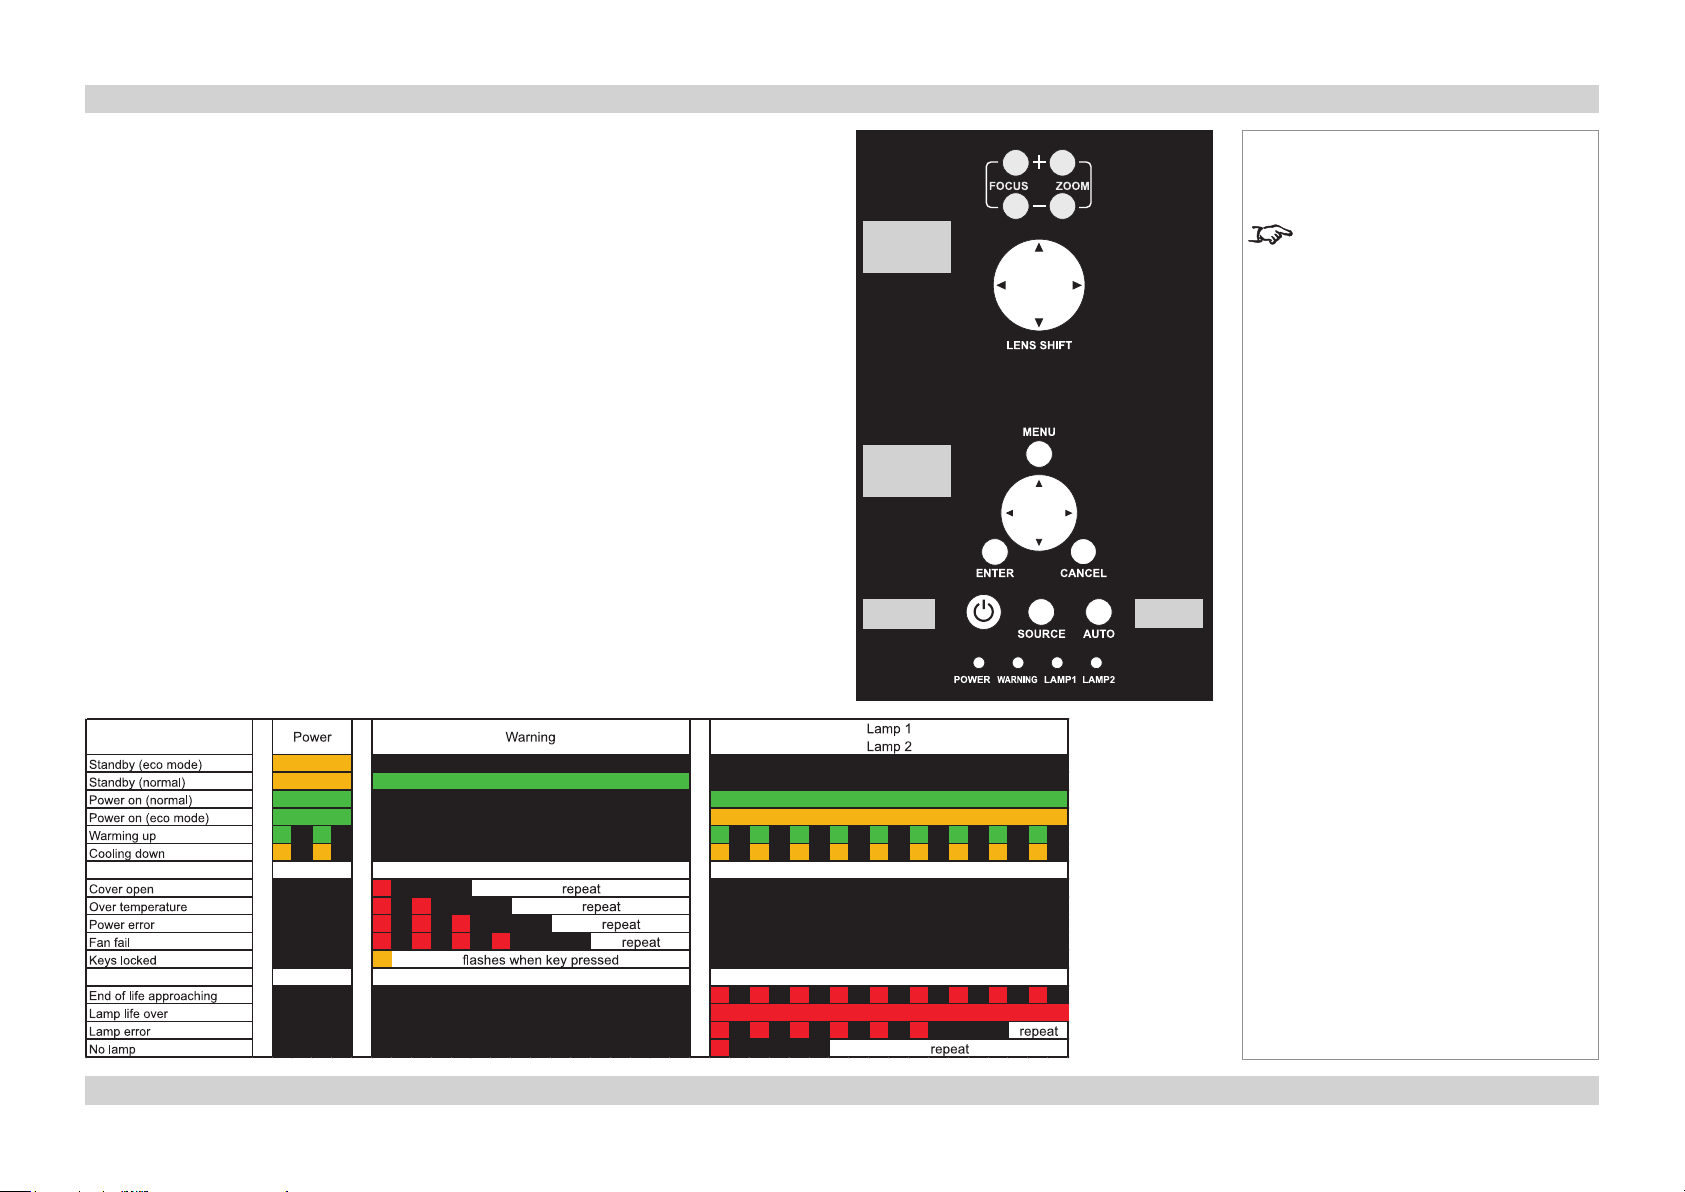
Control panel and indicators
Some of the controls from the remote control are duplicated on the projector control panel, as
shown on the right.
The CANCEL button has the same function as the RETURN button on the remote control.
The SOURCE and AUTO buttons have the same function as the INPUT and AUTO SYNC
buttons on the remote control.
The Power indicator will show amber when in standby and green when the projector is on,
and will ash when the projector is warming up or cooling down.
The Warning indicator will ash to show any error situations.
The Lamp indicators will show which lamp is in use, and whether the projector is in Normal
or Eco mode, and will ash to show lamp status.
The chart below shows all possible combinations of indicator lamp color.
Lens
controls
Menu
controls
Power
Notes
For full details of how to use the
controls and the menu system, see
the Operating Guide.
Input
5Rev C July 2014
Digital Projection E-Vision 7000 Series Changing The Lens, Lamps And Color Wheel Installation and Quick-Start Guide
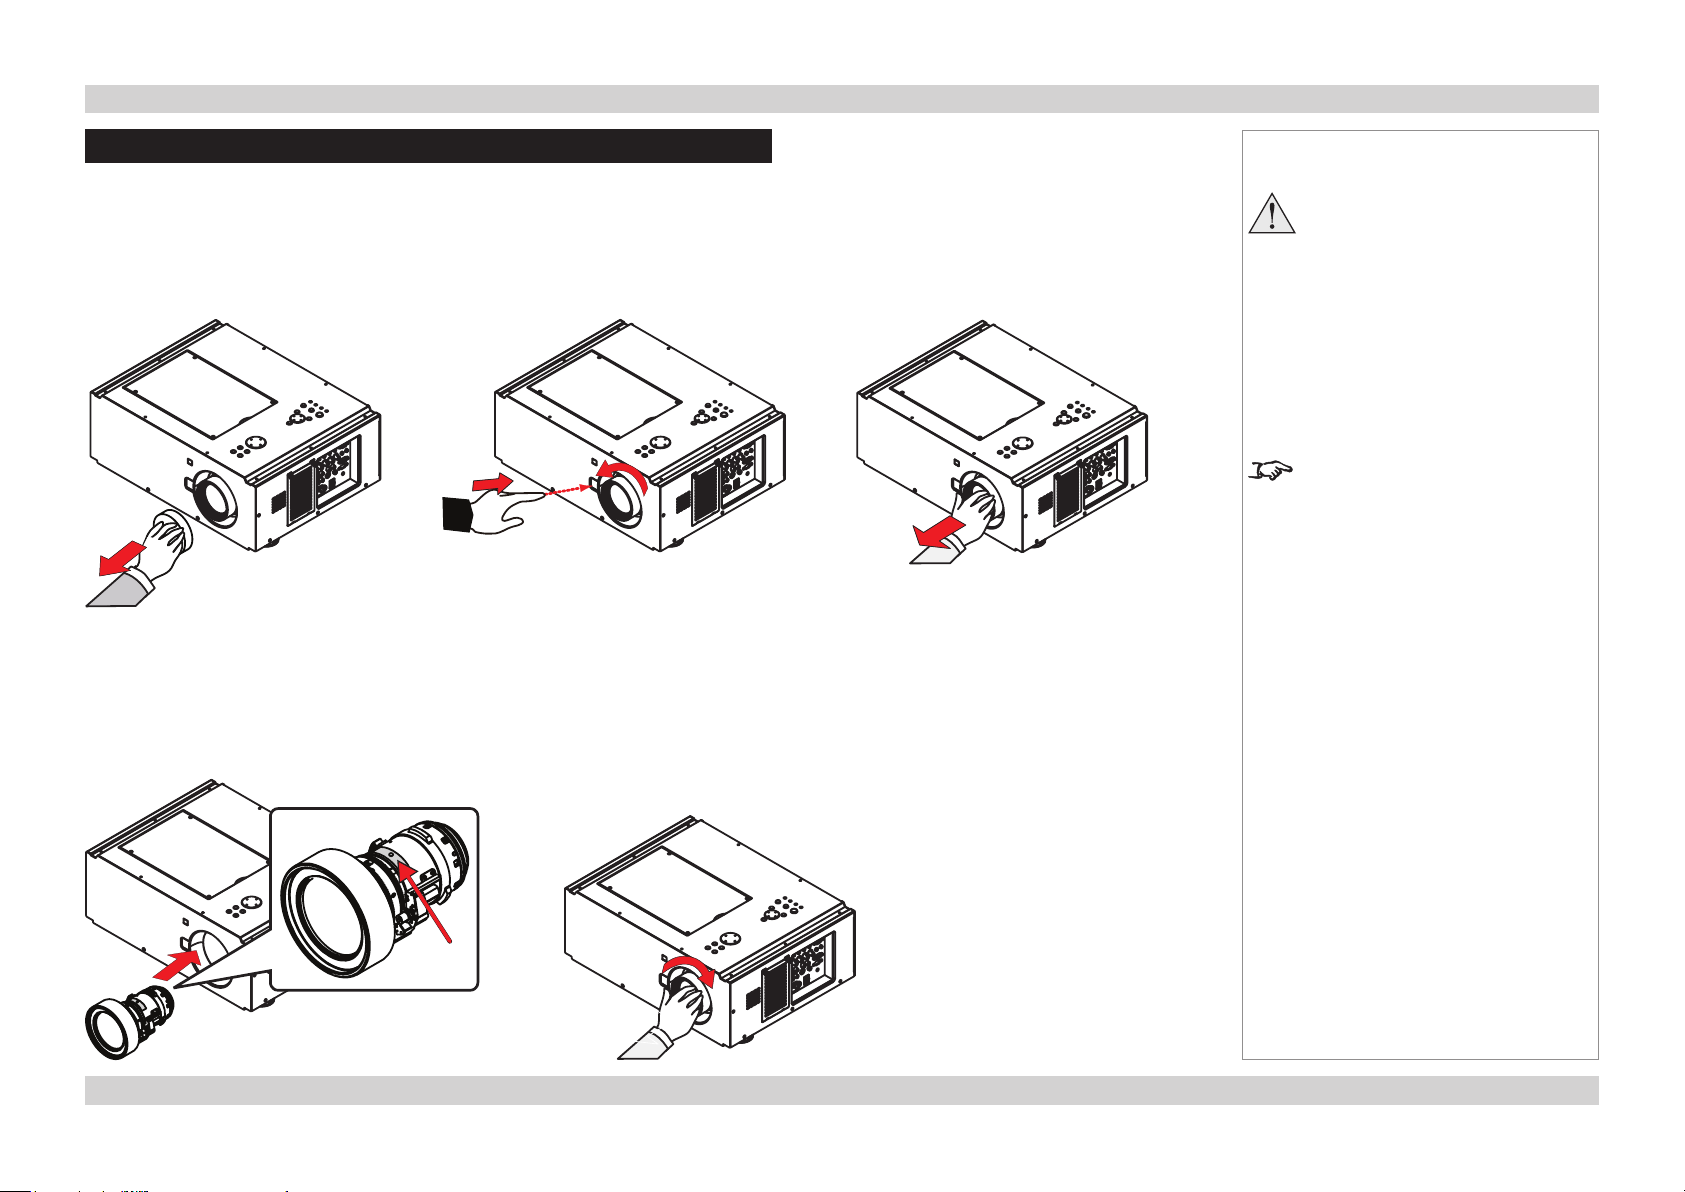
Changing The Lens, Lamps And Color Wheel
Removing the lens
• Remove the lens cap.
• Push in the lens release lever, and turn the lens anti-clockwise.
• Remove the lens.
Fitting the lens
• Position the lens so that the label marked ‘O’ is at the top, and gently insert it all the way
into the lens mount.
• Turn the lens clockwise until it clicks into place.
Notes
Always allow the lamp to cool for
5 minutes before:
- disconnecting the power
- moving the projector
The projector lens is shipped
separately.
‘O’
6Rev C July 2014
Digital Projection E-Vision 7000 Series Changing The Lens, Lamps And Color Wheel Installation and Quick-Start Guide
Changing the lamp
• Remove the four screws securing the lamp compartment cover.
• Open the lamp compartment.
Cover
screws
• Unscrew the two captive screws securing the lamp module.
• Pull rmly upwards on the handle to remove the lamp module.
• Insert a new lamp module, fasten the screws, and replace the lamp compartment cover.
Handle
Lamp
compartment
Color wheel
screws
Lamp module
screws
Color
wheel
Notes
Always allow the lamp to cool for
5 minutes before:
- disconnecting the power
- moving the projector
The lamp and color wheel must
be changed only by suitably
qualied personnel.
The projector will shut down if the
cover is opened whilst in operation.
Theltersshouldbechangedatthe
same time as the lamp is changed.
Changing the color wheel
• Remove the four screws securing the lamp compartment cover.
• Open the lamp compartment.
• Unscrew the four captive screws securing the color wheel.
• Remove the color wheel.
• Insert a new color wheel, fasten the screws, and replace the lamp compartment cover.
7Rev C July 2014
Digital Projection E-Vision 7000 Series Positioning The Screen And Projector Installation and Quick-Start Guide
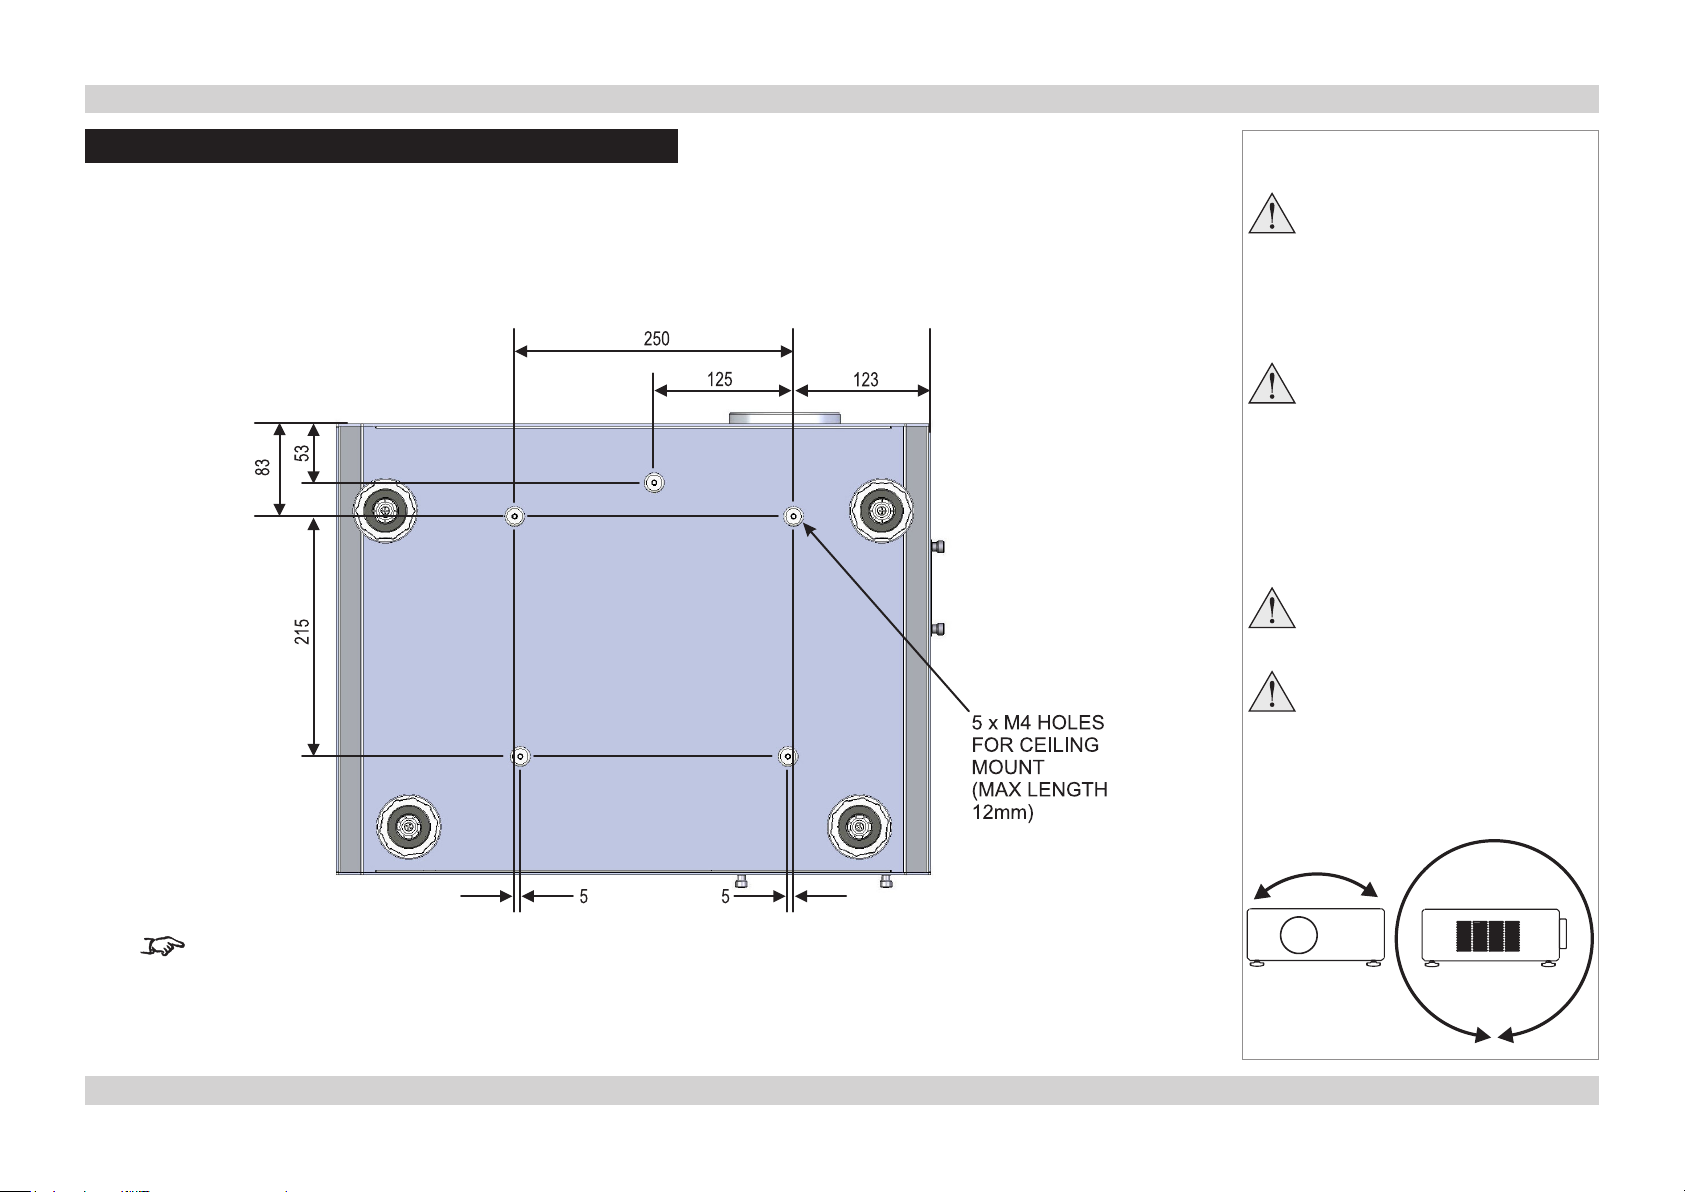
Positioning The Screen And Projector
• Install the screen, ensuring that it is in the best position for viewing by your audience.
• Mount the projector, ensuring that it is at a suitable distance from the screen for the image to ll the screen. Set the adjustable feet so that
the projector is level, and perpendicular to the screen.
• The dimension drawing below shows the positions of the feet for table mounting, and the xing holes for ceiling mounting.
Notes
Always allow the lamp to cool for
5 minutes before:
- disconnecting the power
- moving the projector
Ensure that there is at least
50cm (20in) of space between the
ventilation outlets and any wall,
and 10cm (4in) on all other sides.
If ceiling mounting, ensure there
is 30cm (12in) of space between
the projector and ceiling.
Do not stack the projectors.
Do not tilt the projector more than
±10° from side to side when in
use, as this may cause serious
lamp failure, damage the lamp
module and cause extra cost on
replacement.
All dimensions are in mm.
±10°
±360°
8Rev C July 2014

Digital Projection E-Vision 7000 Series Operating The Projector Installation and Quick-Start Guide
Operating The Projector
Switching the projector on
• Connect the power cable between the mains supply and the projector. Switch on at the switch next to the power connector.
• Wait until the self-test has completed and the Power indicator on the projector control panel shows amber. The lamp will be off and the
projector will be in STANDBY mode.
• Press on the control panel or POWER ON on the remote control.
The Power indicator on the control panel will ash green for a few seconds whilst the lamp comes up to full brightness. When the
projector is ready for use, the Power indicator will show steady green.
Selecting an input signal or test pattern
Input signal
• Connect an image source to the projector. The signal should be automatically detected by the projector, and should be displayed within a
two or three seconds.
• If more than one signal is connected, then select the image you want to display:
Press SOURCE on the control panel to cycle through the inputs,
or press INPUT on the remote control, then or to cycle through the inputs.
Notes
Always allow the lamp to cool for
5 minutes before:
- disconnecting the power
- moving the projector
For full details of how to connect an
image source to the projector, see
the Connection Guide.
For full details of how to use the
controls and the menu system, see
the Operating Guide.
Test patter n
If you have no image source connected to the projector, then you can display a test pattern instead:
Press TEST PATTERN on the remote control, then or to cycle through the patterns,
or select a Test Patter n from the Installation menu.
9Rev C July 2014

Digital Projection E-Vision 7000 Series Operating The Projector Installation and Quick-Start Guide
Adjusting the lens
Zoom
• Use the ZOOM +/− buttons on the control panel or on the remote control to adjust the
lens so that the image lls the screen.
Focus
• Use the FOCUS +/− buttons on the control panel or on the remote control to adjust the
lens until the image is sharp.
Shift
• Use the LENS SHIFT buttons , , and on the control panel to adjust the
position of the image,
or press the LENS SHIFT button on the remote control then use , , and
to adjust the position of the image.
Adjusting the image
Orientation
• Use the Projection Mode settings, in the Installation Menu.
Aspect ratio
• Press the ASPECT button on the remote control to cycle through all the available
settings.
or use the Aspect Ratio setting in the Setup Menu.
Notes
For full details of how to use the
controls and the menu system, see
the Operating Guide.
Picture
• Press PICTURE on the remote control or use the menu controls, to open the Picture
Menu.
Use the sliders in the Picture menu to adjust the brightness, contract etc.
10Rev C July 2014
Digital Projection E-Vision 7000 Series Operating The Projector Installation and Quick-Start Guide
Switching the projector off
• Press on the control panel or STANDBY on the remote control, then press the button a second time within 5 seconds to conrm your
intention to switch off.
The lamp will go off, and the Power indicator on the control panel will ash amber for a few seconds whilst the lamp cools. The Power
indicator on the control panel will then show amber and the projector will be in Standby mode.
• Switch off at the switch next to the power connector. Disconnect the power cable from the projector.
Notes
Always allow the lamp to cool for
5 minutes before:
- disconnecting the power
- moving the projector
11Rev C July 2014

Digital Projection E-Vision 7000 Series INSTALLATION AND QUICK-START GUIDE
This page is intentionally left blank.

E-Vision 7000 Series
High Brightness Digital Video Projector
CONNECTION GUIDE
Rev C July 2014
112-459C

Digital Projection E-Vision 7000 Series IN THIS GUIDE Connection Guide
IN THIS GUIDE
Signal Inputs And Outputs ............................................................................. 15
Computer 1 ................................................................................................................15
Computer 2 ................................................................................................................15
Computer 3 ................................................................................................................15
Component ................................................................................................................15
Video or S-Video........................................................................................................15
Monitor Out ................................................................................................................15
Supported Signal Input Modes ..................................................................... 16
Control Connections ........................................................................................ 18
Screen Trigger ...........................................................................................................18
USB Service Port .......................................................................................................18
RS232 .........................................................................................................................18
LAN .............................................................................................................................18
Wiring Details ..................................................................................................... 19
Signal inputs and outputs ........................................................................................19
Monitor video output (VGA) ............................................................................................19
Computer 1 video input: analog computer (VGA) ...........................................................19
Computer 2 video input: RGBHV, RGsB or YCbCr .........................................................19
Computer 3 video input: DVI-D .......................................................................................20
Monitor audio output .......................................................................................................21
Computer 1, 2, 3 audio inputs .........................................................................................21
Component video and audio input ..................................................................................21
Video input ......................................................................................................................22
Composite and S-Video audio input ...............................................................................22
S-Video input ..................................................................................................................22
Control connections .................................................................................................23
Screen Trigger output .....................................................................................................23
RS232 Serial control input ..............................................................................................23
LAN connection ...............................................................................................................24
Rev C July 2014

Digital Projection E-Vision 7000 Series Signal Inputs And Outputs Connection Guide
Signal Inputs And Outputs
Computer 1
• Connect an analog computer (VGA) cable to the 15-pin D-type.
• Connect a stereo audio cable to the 3.5mm jack.
Computer 2
• Connect a set of RGsB, RGBHV or YCbCr cables to the BNC connectors.
• Connect a stereo audio cable to the 3.5mm jack.
Computer 3
• Connect a DVI-I cable to the DVI connector.
• Connect a stereo audio cable to the 3.5mm jack below the DVI connector.
Component
• Connect a set of YPbPr or YCbCr cables to the RCA phono connectors.
• Connect a pair of audio cables to the L and R audio connectors or a single audio cable
to the L connector.
COMPUTER 1
COMPUTER 2
Notes
For a complete listing of pin
congurationsforallsignaland
control connectors, see Wiring
Details later in this Guide.
When Standby Mode is set to Eco:
the Monitor Out connection is
disabled.
COMPUTER 3
MONITOR
OUT
Video or S-Video
• Connect a composite video cable to the single RCA phono connector, or an S-Video
cable to the 4-pin mini-DIN.
• Connect a pair of audio cables to the L and R audio connectors or a single audio cable
to the L connector.
Monitor Out
• Connect an analog monitor (VGA) cable to the 15-pin D-type.
• Connect a stereo audio cable to the 3.5mm jack.
COMPONENT
VIDEO &
S-VIDEO
15Rev C July 2014

Digital Projection E-Vision 7000 Series Supported Signal Input Modes Connection Guide
Supported Signal Input Modes
Signal Resolution Refresh
Rate
( Hz )
SDTV 480i 720 x 480 59.94 525 15.73
576i 720 x 576 50 625 15.63
HDTV 480p 720 x 480 59.94 525 31.47
576p 720 x 576 50 625 31.25
720p50 1280 x 720 50 750 37.50
720p60 1280 x 720 60 750 45.00
1080i50 1920 x 1080 50 1125 28.13
1080i60 1920 x 1080 60 1125 33.75
1080p50 1920 x 1080 50 1125 56.25
1080p60 1920 x 1080 60 1125 67.5
COMPUTER 480p 640 x 480 59.9 526 31.5
VGA72 640 x 480 72.8 521 37.9
VGA75 640 x 480 75 500 37.5
VGA85 640 x 480 85 509 43.3
SVGA56 800 x 600 56.3 625 35.2
SVGA60 800 x 600 60.3 629 37.9
SVGA72 800 x 600 72.2 666 48.1
SVGA75 800 x 600 75 625 46.9
SVGA85 800 x 600 85.1 631 53.7
SVGA120 800 x 600 120.6 663 80.0
SVGA120 800 x 600_RB 120 611 73.3
SVGA120 800 x 600 119.9 700 83.9
XGA60 1024 x 768 60 807 48.4
XGA70 1024 x 768 70.1 806 56.5
XGA75 1024 x 768 75 800 60
XGA120 1024 x 768 120 806 96.7
XGA120 1024 x 768_RB 120 813 97.6
XGA120 1024 x 768 119.8 823 98.6
continued on next page...
Total
number
of lines
Horizontal
Frequency
(kHz)
3D
VIDEO /
S-VIDEO
COMPONENT
(VGA)
COMPUTER 1
COMPUTER 2
(RGB/YCbCr)
COMPUTER 3
ü ü ü
ü ü ü
ü ü ü
ü ü ü
ü ü ü
ü ü ü
ü ü ü
ü ü ü
ü ü ü
ü ü ü
ü ü ü
ü ü ü
ü ü ü
ü ü ü
ü ü ü
ü ü ü ü
ü ü ü
ü ü ü
ü ü ü
ü ü
ü ü
ü ü
ü ü ü ü
ü ü ü
ü ü ü
ü ü
ü ü
ü ü
(DVI-I)
16Rev C July 2014

Digital Projection E-Vision 7000 Series Supported Signal Input Modes Connection Guide
...continued from previous page
Signal Resolution Refresh
Rate
( Hz )
COMPUTER WXGA60 1280 x 720 59.9 746 44.7
continued WXGA60 1280 x 720 60 750 45
WXGA120 1280 x 720 120 750 90
WXGA120 1280 x 720 120.1 772 92.7
WXGA60 1280 x 768 59.9 798 47.8
WXGA60 1280 x 800 59.8 831 49.7
WXGA75 1280 x 800 74.9 838 62.8
WXGA120 1280 x 800_RB 119.9 847 101.6
WXGA60 1360 x 768 60 795 47.7
WXGA60 1366 x 768 59.8 799 47.8
WXGA+60 1440 x 900 59.9 933 55.9
SXGA75 1152 x 864 75 900 67.5
SXGA60 1280 x 960 60 1000 60
SXGA60 1280 x 1024 60 1067 64
SXGA75 1280 x 1024 75 1067 80
SXGA+60 1400 x 1050 60 1088 65.3
WSXGA+ 1680 x 1050_60 60 1088 65.3
UXGA60 1600 x 1200 60 1250 75.00
MAC MAC13 640 x 480 66.6 526 35.0
MAC16 832 x 624 74.5 667 49.7
MAC19 1024 x 768 74.9 804 60.2
MAC21 1152 x 870 75.1 915 68.7
Total
number
of lines
Horizontal
Frequency
(kHz)
3D
VIDEO /
S-VIDEO
COMPONENT
(VGA)
COMPUTER 1
COMPUTER 2
(RGB/YCbCr)
COMPUTER 3
ü ü ü ü
ü ü ü
ü
ü ü
ü ü ü
ü ü ü ü
ü ü ü
ü ü
ü ü ü
ü ü ü
ü ü ü
ü ü ü
ü ü ü
ü ü ü
ü ü ü
ü ü ü
ü ü ü
ü ü ü
ü ü ü
ü ü ü
ü ü ü
ü ü ü
(DVI-I)
17Rev C July 2014

Digital Projection E-Vision 7000 Series Control Connections Connection Guide
Control Connections
Screen Trigger
• The Trigger output can be connected to an electrically operated screen, automatically
deploying the screen when the projector is switched on, and retracting the screen when
the projector is switched to standby.
USB Service Port
• The USB Service Port is used to download rmware updates, issued from time to time by
Digital Projection.
RS232
• All of the projector’s features can be controlled via a serial connection, using the control
strings described in the Remote Communications Guide.
LAN
• All of the projector’s features can be controlled via a LAN connection, using the industry
standard PJLInk commands. The PJLink specication can be downloaded from
http://pjlink.jbmia.or.jp/english - click on the Specications link.
• The LAN IP Address of the projector can be set by using the Network submenu, which
can be found in the Advanced Setting submenu in the Installation menu.
• Once the LAN IP Address has been set, it is possible to assign a Host Name and
Domain Name to the projector, and to set up an Alert Mail address and PJLink
password.
Notes
For a complete listing of pin
congurationsforallsignaland
control connectors, see Wiring
Details later in this Guide.
Only one remote connection can
be used at any one time. For more
information, see the Installation
menu in the Operating Guide.
For full details of how to use the
menu system, see the Operating
Guide.
When Standby Mode is set to Eco:
the RS232 connection is disabled.
USB
LAN
RS232
For more information about these settings, see PJLink in the Remote
Communications Guide.
• A number of basic picture and input settings can be controlled directly using the
embedded LAN Control utility.
For full details of how to use this feature, see LAN Control Utility in the Remote
Communications Guide.
SCREEN
TRIGGER
MAINS
18Rev C July 2014

Digital Projection E-Vision 7000 Series Wiring Details Connection Guide
Wiring Details
Signal inputs and outputs
Monitor video output (VGA)
Computer 1 video input: analog computer (VGA)
15 way D-type connector
1 R
2 G
3 B
4 unused
5 Digital Ground (H Sync)
6 R Ground
7 B Ground
8 G Ground
9 +5v
10 Digital Ground (V Sync/DDC)
11 unused
12 SDA
13 H Sync
14 V Sync
15 SCL
pin view of female connector
Notes
For full details of all input settings,
see the Advanced menu in the
Operating Guide.
For details of the audio connections
associated with these video
connections, see later in this
section.
Computer 2 video input: RGBHV, RGsB or YCbCr
5 x 75 ohm BNC
RGBHV RGsB YCbCr
Green Green + Sync Y
Blue Blue Cb
Red Red Cr
Hsync
Vsync
R/Cr G/Y B/Cb H V
19Rev C July 2014

Digital Projection E-Vision 7000 Series Wiring Details Connection Guide
Computer 3 video input: DVI-D
24 way D-type connector
1 TMDS Data 2-
2 TMDS Data 2+
3 TMDS Data 2 Shield
4 unused
5 unused
6 DDC Clock
7 DDC Data
8 unused
9 TMDS Data 1-
10 TMDS Data 1+
11 TMDS Data 1 Shield
12 unused
13 unused
14 +5 V Power
15 Ground
16 Hot Plug Detect*
17 TMDS Data 0-
18 TMDS Data 0+
19 TMDS Data 0 Shield
20 unused
21 unused
22 TMDS Clock Shield
23 TMDS Clock+
24 TMDS Clock-
pin view of female connector
Notes
For full details of all input settings,
see the Advanced menu in the
Operating Guide.
* Hot plug detect (HPD) is fully DVI compliant. DVI sources detect the presence of a display
device by providing +5V on pin 14 and looking for +5V on pin 16. Whenever the projector is
operational, and 5V is present on pin 14, pin 16 will be held at +5V.
EDID is available even when the projector is switched off.
Operational means that the projector is powered up. Non operational states are powered
down and some self test and reprogramming modes.
High Denition Content Protection (HDCP) is supported on this input.
20Rev C July 2014
Digital Projection E-Vision 7000 Series Wiring Details Connection Guide
Notes
Tip
Monitor audio output
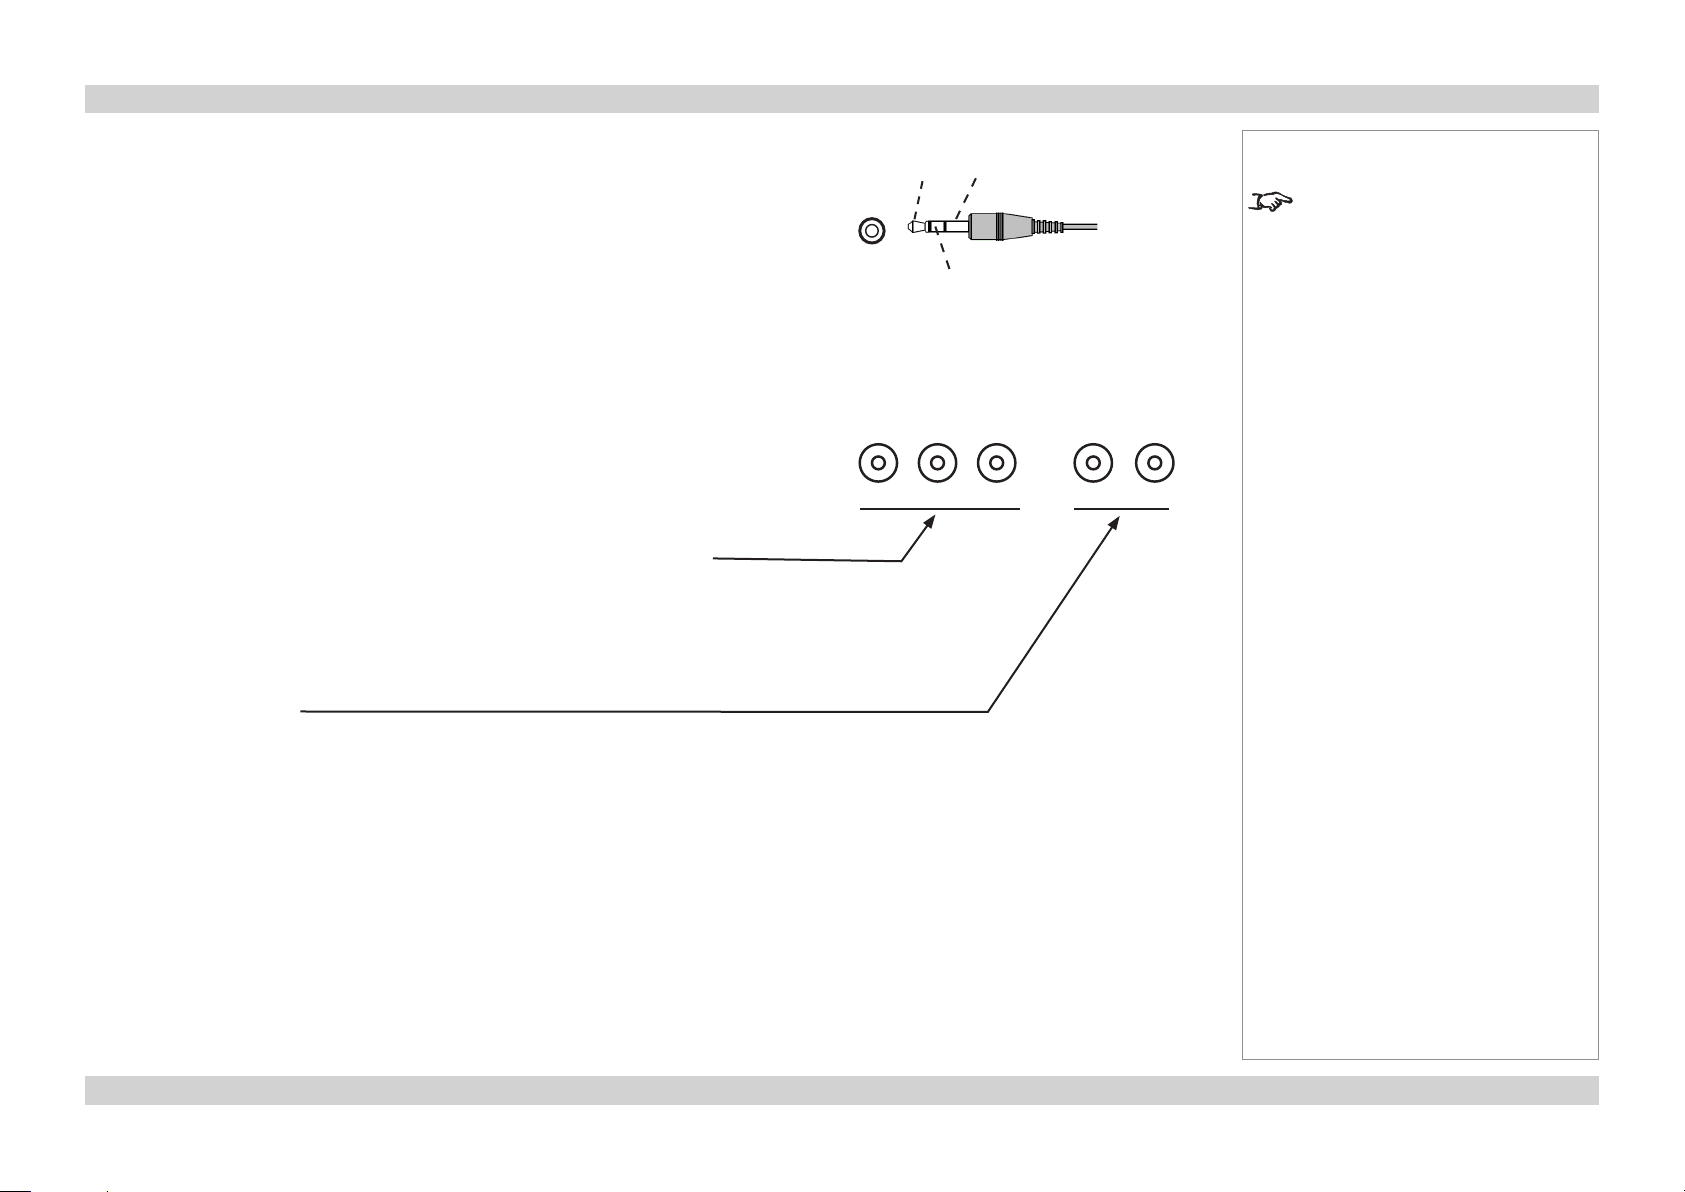
Computer 1, 2, 3 audio inputs
3.5mm mini jack
Tip Left
Ring Right
Sleeve Ground
Component video and audio input
3 x RCA Phono
YCbCr YPbPr
Cr Pr
Y Y
Cb Pb
Sleeve
For full details of all input settings,
see the Advanced menu in the
Operating Guide.
Ring
L R Y Pb/Cb Pr/Cr
2 x RCA Phono
Left or Mono audio
Right audio
21Rev C July 2014

Digital Projection E-Vision 7000 Series Wiring Details Connection Guide
Video input
1 x RCA Phono
Composite Video
Composite and S-Video audio input
2 x RCA Phono
Left or Mono audio
Right audio
S-Video input
4 pin mini-DIN
1 Y Ground
2 C Ground
3 Luminance (Y)
4 Chrominance (C)
L R
pin view of female connector
Notes
For full details of all input settings,
see the Advanced menu in the
Operating Guide.
22Rev C July 2014

Digital Projection E-Vision 7000 Series Wiring Details Connection Guide
Control connections
Screen Trigger output
3.5mm mini jack
Tip Signal
Sleeve Ground
RS232 Serial control input
1 unused
2 Received Data (RX)
3 Transmitted Data (TX)
4 unused
5 Signal Ground
6 unused
7 unused
8 unused
9 unused
Null-modem cable
(used to connect the projector to a computer)
RX 2 --- 3 TX
TX 3 --- 2 RX
GND 5 --- 5 GND
Tip
Sleeve
pin view of female connector
Notes
Only one remote connection can
be used at any one time. For more
information, see the Installation
menu in the Operating Guide.
The projector is a DTE, so use:
a straight cable to connect to a
modem, or
a null-modem cable as shown here
to connect to another DTE such as a
computer.
23Rev C July 2014

Digital Projection E-Vision 7000 Series Wiring Details Connection Guide
LAN connection
10BaseT Unshielded Twisted Pair cable
The standard wire colors are as follows:
1 White / Orange stripe
2 Orange
3 White / Green stripe
4 Blue
5 White / Blue stripe
6 Green
7 White / Brown stripe
8 Brown
Crossed cable
(used to connect directly to a computer with no hub or network.)
(Note that only the green and orange pairs are crossed)
1 White / Orange stripe White / Green stripe 1
2 Orange Green 2
3 White / Green stripe White / Orange stripe 3
4 Blue Blue 4
5 White / Blue stripe White / Blue stripe 5
6 Green Orange 6
7 White / Brown stripe White / Brown stripe 7
8 Brown Brown 8
top view of cable
connector
(clip is underneath)
Notes
Only one remote connection can
be used at any one time. For more
information, see the Installation
menu in the Operating Guide.
For information about how to set the
LANIPconguration,seethenext
page.
Use:
a straight cable to connect to a hub
or network, or
a crossed cable as shown here
to connect ONLY to a computer
directly.
24Rev C July 2014

E-Vision 7000 Series
High Brightness Digital Video Projector
OPERATING GUIDE
Rev C July 2014
112-460C

Digital Projection E-Vision 7000 Series IN THIS GUIDE Operating Guide
IN THIS GUIDE
Using The Remote Control ............................................................................. 27
Using The Menus ............................................................................................... 28
Navigating the menus ...............................................................................................28
Submenus ..................................................................................................................29
Sliders ........................................................................................................................29
Selecting parameters ................................................................................................30
Commands .................................................................................................................31
Editing elds ..............................................................................................................31
A Tour Of The Menus ....................................................................................... 32
Picture menu .............................................................................................................32
Picture Mode ...................................................................................................................32
Brilliant Color ...................................................................................................................32
Brightness, Contrast, Color, Tint, Sharpness ..................................................................32
Reset ...............................................................................................................................32
Advance Setting submenu ..............................................................................................33
Signal menu ...............................................................................................................35
Horizontal and Vertical Position, Phase, Clock ...............................................................35
Reset ...............................................................................................................................35
Resolution .......................................................................................................................35
Auto Sync ........................................................................................................................35
Video menu ................................................................................................................36
Overscan .........................................................................................................................36
Video System ..................................................................................................................36
Video Setup ....................................................................................................................36
Closed Caption ...............................................................................................................36
Setup menu ................................................................................................................37
Auto Search ....................................................................................................................37
Auto Power Off ................................................................................................................37
Auto Power On ................................................................................................................37
Standby Mode .................................................................................................................37
Background .....................................................................................................................38
Audio ...............................................................................................................................38
3D Mode .........................................................................................................................38
Aspect Ratio ....................................................................................................................38
Advance Setting submenu ..............................................................................................39
Security Lock ..................................................................................................................39
Keypad Lock ...................................................................................................................39
Image Capture ................................................................................................................39
Wall Color ........................................................................................................................39
Messaging .......................................................................................................................40
Installation menu .......................................................................................................41
Language ........................................................................................................................41
Lamp Control ..................................................................................................................41
Lamp Mode .....................................................................................................................41
Projection Mode ..............................................................................................................41
Fan Mode ........................................................................................................................41
Test Pattern .....................................................................................................................41
Advance Setting ..............................................................................................................42
Communication Speed ....................................................................................................42
Network ...........................................................................................................................43
Reset ...............................................................................................................................44
Information ......................................................................................................................44
Rev C July 2014
Menu Map............................................................................................................. 45

Digital Projection E-Vision 7000 Series Using The Remote Control Operating Guide
Using The Remote Control
LENS controls
INPUT:
select from the
available video
input signals
AUTO SYNC:
Projector will
re-synchronise
with the current
input signal
OVERSCAN:
select from On
or Off
3D MODE:
opens the 3D
Mode menu
PICTURE:
opens the
Picture menu
ASPECT:
select from a
list of available
aspect ratios
FREEZE:
freeze the
current image
frame
INFO:
opens the
Information
menu
POWER controls
TEST PATTERN:
select from a list
of available test
patterns
MENU controls
AUDIO VOLUME
controls
AV MUTE:
switches both
the video and
sound On or Off
LIGHT:
illuminates the
buttons on the
remote control
for 10 seconds
Notes
Some options and controls may not
be available due to settings in the
menus.
For full details of how to use the
menu system, see later in this guide.
Page 27Rev C July 2014

Digital Projection E-Vision 7000 Series Using The Menus Operating Guide
Using The Menus
Use the buttons on the projector control
panel or on the remote control, to access the
menu system.
• To open or close the on-screen display
(OSD), press MENU.
Navigating the menus
• Select a menu using
and ,
• then open the menu by pressing .
The rst item in the menu is highlighted.
Projector control panel
Notes
Some menu options and controls
may not be available due to settings
in other menus. These will be
shaded grey on the actual menu.
Remote control
• Select an item in the menu using
and .
• To open another menu, rst close the
current menu by pressing CANCEL/
RETURN.
Page 28Rev C July 2014

Digital Projection E-Vision 7000 Series Using The Menus Operating Guide
Submenus
• Select a submenu using
and .
• then open the submenu by pressing
ENTER.
The name of the submenu is shown at
the top of the menu.
• To close the submenu, press CANCEL/
RETURN.
Sliders
• Use or to adjust the value.
Notes
Some menu options and controls
may not be available due to settings
in other menus. These will be
shaded grey on the actual menu.
Page 29Rev C July 2014

Digital Projection E-Vision 7000 Series Using The Menus Operating Guide
Selecting parameters
Most parameters are changed by selecting
from a list:
• Select from the list using
and .
• The change will be made immediately.
Some parameters are changed by selecting
from a pop-up menu.
• Press ENTER to open the pop-up menu.
• The item that is currently selected is
highlighted.
• Select from the list using
Notes
Some menu options and controls
may not be available due to settings
in other menus. These will be
shaded grey on the actual menu.
and .
• The change will be made when you
press ENTER to conrm the selection.
Page 30Rev C July 2014

Digital Projection E-Vision 7000 Series Using The Menus Operating Guide
Commands
• To use a command, press ENTER.
In this example,
• use or to move the green
highlight to No or Yes,
• then press ENTER to conrm your
selection.
Notes
Some menu options and controls
may not be available due to settings
in other menus. These will be
shaded grey on the actual menu.
Editing elds
Some features require a text or numeric eld
to be edited.
• To edit a eld, rst use or to
select the eld to be changed,
• then use and to adjust it the
value.
• then select the next digit or character.
• Press ENTER to accept the new value
or CANCEL/RETURN to exit without
changing.
Editing
this eld
Page 31Rev C July 2014

Digital Projection E-Vision 7000 Series A Tour Of The Menus Operating Guide
A Tour Of The Menus
Picture menu
Picture Mode
• Select a picture mode as required.
Brilliant Color
• Select 0, 1 or 2, as required.
Notes
See also Using the Menus, earlier
in this guide and Menu Map, later in
this guide.
Brilliant Color® allows for
increased projector brightness
and improved color saturation by
enabling the yellow segments on the
color wheel.
Brightness, Contrast, Color, Tint, Sharpness
• Adjust the sliders for these settings, as required.
Reset
• Press ENTER to restore all settings in the Picture Menu (except Picture Mode and Signal
Type) to their factory defaults.
• When the warning message appears, use or to move the green highlight to
YES or NO, then press ENTER to conrm your selection.
Do NOT do this unless you are
sure that you want to restore
ALL the picture settings to their
factory defaults.
Page 32Rev C July 2014

Digital Projection E-Vision 7000 Series A Tour Of The Menus Operating Guide
Picture menu continued
Advance Setting submenu
Signal Type
• Set this to Auto, except when the projector has problems selecting between RGB,
YCrCb and YPrPb.
Color Temperature
• Set this to suit the specication of the input source, or to improve the appearance of the
projected image.
Red, Blue
• Set these to improve the appearance of the projected image.
Notes
See also Using the Menus, earlier
in this guide and Menu Map, later in
this guide.
Picture Menu
Advance Setting Submenu
Increasing the Red content will
make the image feel ‘warmer’, Blue
will make it feel ‘colder’.
Color Manager
• Press ENTER to open the Color Manager sub-menu.
• Select from Red, Green, Blue, Cyan, Magenta or Yellow and press ENTER.
• Use the sliders to adjust the Hue, Saturation and Value of each color as required.
Page 33Rev C July 2014

Digital Projection E-Vision 7000 Series A Tour Of The Menus Operating Guide
Picture menu, Advance Setting submenu continued
Film Mode
• Set this to Auto, and the projector will automatically detect:
3:2 pulldown for 60Hz signals
2:2 pulldown for 50Hz signals
• Set this to Off, to disable automatic pulldown detection.
Noise Reduction
• Select a Noise Reduction level as required.
Dynamic Black
• Set this to On or Off as required.
Notes
The Film Mode setting is available
only for interlaced signals on the
Video or S-Video inputs.
Dynamic Black reduces the overall
light output for images that contain
a lot of black. This improves the
perceived contrast ratio.
See also Using the Menus, earlier
in this guide and Menu Map, later in
this guide.
Page 34Rev C July 2014

Digital Projection E-Vision 7000 Series A Tour Of The Menus Operating Guide
Signal menu
Horizontal and Vertical Position, Phase, Clock
• Adjust the sliders for these settings, as required.
Reset
• Press ENTER to restore the four settings above their factory defaults.
• When the warning message appears, use or to move the green highlight to
YES or NO, then press ENTER to conrm your selection.
Notes
See also Using the Menus, earlier
in this guide and Menu Map, later in
this guide.
These settings are used for VGA
signals only.
Do NOT do this unless you are
sure that you want to restore the
settings to their factory defaults.
Resolution
• Set this to Auto, unless the projector has problems selecting between Wide and 4:3 with
some signals on the Computer 1, Computer 2 and Component inputs.
Auto Sync
• Set this to On if you want the projector to automatically synchronise with the input signal.
• Set this to Off if the settings are to be made manually, using the sliders above only.
The Resolution setting is needed
only for VESA 1024x768_ 60,
VESA 1280x768_60,
VESA 1400x1050_60 and
VESA 1680x1050_60 signals on
the Computer 1, Computer 2 and
Component inputs.
The Auto Sync setting is used for
VGA signals only.
Page 35Rev C July 2014

Digital Projection E-Vision 7000 Series A Tour Of The Menus Operating Guide
Video menu
Overscan
• Set this to On or Off as required.
Video System
• Set this to Auto, unless the projector has problems selecting between PAL , SECAM,
NTSC4.43, NTSC3.58, PAL-M, PAL-N and PAL-60.
Notes
See also Using the Menus, earlier
in this guide and Menu Map, later in
this guide.
Overscan is used to compensate for
noisyorbadlydenedimageedges,
by increasing the size of the image,
to force the edges off-screen.
It is always On for the Video and
S-Video inputs, and for 480i and
576i signals.
The Video System setting is
available only for signals on the
Video and S-Video inputs.
Video Setup
• Set this to 0IRE or 7.5IRE as required.
Closed Caption
• Set this to Off or CC1 as required.
The Video Setup setting is
available only for 480i signals on
the Computer 1, Computer 2 and
Component inputs, and NTSC3.58
signals on the Video and S-Video
inputs.
Closed Captions are recognised
only with NTSC3.58 signals on the
Video and S-Video inputs.
Page 36Rev C July 2014

Digital Projection E-Vision 7000 Series A Tour Of The Menus Operating Guide
Setup menu
Auto Search
• When this is set to On, the projector will search for an alternative input source when the
current input source is disconnected
• When this is set to Off, the projector will show the ‘background’ screen when the current
input source is disconnected.
Notes
See also Using the Menus, earlier
in this guide and Menu Map, later in
this guide.
To set the background screen, see
the next page.
Auto Power Off
• Set this to On, if you want the projector to go into Standby mode when no input source
is detected for 20 minutes.
Auto Power On
• Set this to On, if you want the projector to start up immediately when the mains is
connected.
• Set this to Off, if you want the projector to go into Standby mode when the mains is
connected. In this case, the projector will not start up until the POWER button is pressed
on the control panel or the remote control.
Standby Mode
• Set this to Standard or Eco as required.
When Standby Mode is set to Eco:
the Monitor Out signal is disabled,
and the RS232 connection is
disabled, so it will not be possible
to turn the projector On remotely,
except via the LAN connection.
Page 37Rev C July 2014

Digital Projection E-Vision 7000 Series A Tour Of The Menus Operating Guide
Setup menu continued
Background
• Set this to determine what appears on screen when the projector is searching for a valid
input source.
Audio
• Use the Audio Submenu to turn the speakers On and Off, and set the Volume.
3D Mode
• Use the 3D Mode Submenu to turn the DLPLink synchronisation signal On and Off, and
to invert the signal if necessary.
Aspect Ratio
• Select from Normal, Full, 4:3, 16:9, and Native, as follows:
• Normal: the image will be displayed at its intended aspect ratio, lling either the full
height or width of the screen as appropriate.
• Full: the image will ll the height and width of the screen, depending on the
resolution of the projector.
• 4:3: the image will be displayed with a 4:3 aspect ratio, tting the full height and/or
width of the screen, depending on the resolution of the projector.
• 16:9: the image will be displayed with a 16:9 aspect ratio, tting the full height and/or
width of the screen, depending on the resolution of the projector.
• Native: the image will be displayed pixel for pixel with no scaling. This could be
smaller than full screen or cropped to full screen, depending on the resolutions of the
image and projector.
Notes
To set a background image to
be displayed when Custom is
chosen, see the Advanced Setting
Submenu on the next page.
The full height and width of the
screen will depend on the projector
model. For more information, see
the Specication leaet, or the
Important Information.
See also Using the Menus, earlier
in this guide and Menu Map, later in
this guide.
Page 38Rev C July 2014

Digital Projection E-Vision 7000 Series A Tour Of The Menus Operating Guide
Setup menu continued
Advance Setting submenu
SignalPicture
Advance Setting
Security Lock
Keypad Lock
Image Capture
Wall Color
Messaging
MENU = END | SEL/ADJ. | SEL.
SetupVideo
Installation
Disable
Off
On
Security Lock
• When the Security Lock is enabled, a security Password will need to entered before the
projector can be used, or before the lock can be Disabled.
• When setting the lock for the rst time, the Password will need to be entered twice, to
ensure that it has been entered correctly.
Keypad Lock
• To lock the control panel keys, use or to move the green highlight to YES or
NO, then press ENTER to conrm your selection.
• To unlock the keys, press and hold for 5 seconds.
Image Capture
• To capture the current screen image for use as the Custom background, use Save Image. This will take approximately 2 minutes.
• To delete the currently saved image, use Delete.
Wall Color
• Set this to suit the projection screen.
Notes
See also Using the Menus, earlier
in this guide and Menu Map, later in
this guide.
Setup Menu
Advance Setting Submenu
The Password is made of a
combinationofvepressesonthe
, , and keys.
Image Capture is available only:
- for Component, Computer 1,
Computer 2 and Computer 3 inputs;
- when Aspect Ratio is set to
- for native resolution images:
(1280x800 for E-Vision WXGA,
1024x768 for E-Vision XGA)
There are two storage locations: one
for the 4 segment color wheel and
one for 6 segment color wheel.
If you change wheels you will need
to recapture the image. If you
changeback,theimagefortherst
wheel will still be in memory.
Normal;
Page 39Rev C July 2014

Digital Projection E-Vision 7000 Series A Tour Of The Menus Operating Guide
Setup menu Advance Setting submenu continued
Messaging
SignalPicture
Advance Setting
Security Lock
Keypad Lock
Image Capture
Wall Color
Messaging
MENU = END | SEL/ADJ. | SEL.
SetupVideo
Installation
Disable
Off
On
• Set Messaging to Off is you do not want projector status messages to be displayed.
Notes
See also Using the Menus, earlier
in this guide and Menu Map, later in
this guide.
Setup Menu
Advance Setting Submenu
Page 40Rev C July 2014

Digital Projection E-Vision 7000 Series A Tour Of The Menus Operating Guide
Installation menu
Language
• Select a language as required.
Lamp Control
• Set this to Both, Lamp1, Lamp 2 or Auto 1 as required.
Notes
See also Using the Menus, earlier
in this guide and Menu Map, later in
this guide.
When Lamp Control is set to
Auto 1, the projector will turn on
using the lamp with the least hours
of use.
Lamp Mode
• Set this to Normal or Eco as required.
Projection Mode
• Set this to Front, Rear, Ceiling+Front or Ceiling+Rear as required.
Fan Mode
• Set this to Normal or High speed as required.
Test Pattern
• Select a Test Pattern from the list.
Page 41Rev C July 2014

Digital Projection E-Vision 7000 Series A Tour Of The Menus Operating Guide
MENU = END
|
SEL/ADJ.
|
SEL.
SetupVideo
Installation
SignalPicture
Keystone
Image Resizing
Filter Message
LAN/RS232C
Network
Advance Setting
LAN
0
0
10000H
Communication Speed
9,600
Installation menu continued
Advance Setting
Keystone
• Set the slider to correct for any vertical keystone distortion.
Image Resizing
• Set this to correct for any image distortion when keystone correction is being used.
Notes
See also Using the Menus, earlier
in this guide and Menu Map, later in
this guide.
Installation Menu
Advance Setting submenu
Filter Message
• Select a Filter Message time interval from the list, or select Off.
LAN/RS232C
• Select from LAN or RS232C as the remote connection used for external control of the projector.
Communication Speed
• Sets the Serial Port (RS232) baud rate. Longer cable connections may require lower speeds.
Only one remote connection can be
used at any one time.
Page 42Rev C July 2014

Digital Projection E-Vision 7000 Series A Tour Of The Menus Operating Guide
Installation menu, Advance Setting submenu continued
Network
Link
See also Using the Menus, earlier
in this guide and Menu Map, later in
this guide.
Installation Menu
Advance Setting \ Network submenu
Notes
• For information only: reports whether the projector detects a physical LAN connection.
The LAN settings below should be made manually.
DHCP Client
• Set DHCP Client to On if the IP Address is to be assigned by a DHCP server, or Off if it
is to be set here.
IP Address, Subnet Mask, Gateway and DNS
• If DHCP is set to Off:
• Edit the settings as required.
Apply
• Press ENTER to apply the address settings.
• When the warning message appears, use or to move the green highlight to
YES or NO, then press ENTER to conrm your selection.
If DHCP is set to On, it will not be
possible to edit the address settings.
Page 43Rev C July 2014

Digital Projection E-Vision 7000 Series A Tour Of The Menus Operating Guide
Installation menu continued
Reset
All Reset
• Projector will ask for conrmation before restoring all settings to factory defaults.
• When the warning message appears, use or to select YES or NO, then press
ENTER/SELECT to conrm your selection.
Filter Timer Reset
• Projector will ask for conrmation before resetting the timer to zero.
• When the warning message appears, use or to select YES or NO, then press
ENTER/SELECT to conrm your selection.
Information
• The nal submenu gives information about the projector, eg:
Notes
Do NOT do this unless you are
sure that you want to restore ALL
settings to their factory defaults.
Do NOT do this unless you are
sure that you want to reset the
Filter Timer to zero.
Installation Menu
Information submenu
Page 44Rev C July 2014

Digital Projection E-Vision 7000 Series Menu Map Operating Guide
Menu Map
Menu Submenus and controls
PICTURE
Picture Mode Standard, Game, Movie, Presentation
BrilliantColor 0, 1, 2
Brightness
Contrast
Color
Tint
Sharpness
Advanced Setting
Signal Type Auto, RGB, YCrCb, YPrPb
Color Temperature Standard, Cold, Warm
Red
Blue
Color Manager Hue, Saturation and Value settings for: Red, Green, Blue, Cyan, Magenta and Yellow
Film Mode
Noise Reduction Off, Level 1, Level 2, Level 3
Dynamic Black On, Off
Reset Projectorwillaskforconrmationbeforerestoringallsettingsinthismenu(exceptPictureModeandSignal
Type) to factory defaults.
Notes
Some of the information in this menu
map is summarised. See the actual
menu on the projector for full detail.
Some menu options and controls
may not be available due to settings
in other menus. These will be
shaded grey on the actual menu.
Where it would be helpful, some
menu options are described in more
detail earlier in this operating guide.
SIGNAL
Horizontal Position
Vertical Position
Phase
Clock
Reset Projectorwillaskforconrmationbeforerestoringthefoursettingsabovetofactorydefaults.
Resolution Auto, Wide, 4:3
Auto Sync On, Off
Page 45Rev C July 2014

Digital Projection E-Vision 7000 Series Menu Map Operating Guide
Menu Submenus and controls
VIDEO
Overscan On, Off
Video System Auto, PAL, SECAM, NTSC4.43, NTSC3.58, PAL-M, PAL-N, PAL-60
Video Setup 0IRE, 7.5IRE
Closed Caption Off, CC1
SETUP
Auto Search On, Off
Auto Power Off On, Off
Auto Power On On, Off
Standby Mode Standard, Eco
Background Logo, Custom, Blue, None
Audio Volume, On, Off
3D Mode
DLP®Link™ On, Off
DLP®Link™ Invert
Aspect Ratio Normal, Full, 4:3, 16:9, Native
Advance Setting
Security Lock Disable, Password
Keypad Lock Yes, No
Image Capture Save image, Delete image
Wall Color Off, Whiteboard, Blackboard
Messaging On, Off
Notes
Some of the information in this menu
map is summarised. See the actual
menu on the projector for full detail.
Some menu options and controls
may not be available due to settings
in other menus. These will be
shaded grey on the actual menu.
Where it would be helpful, some
menu options are described in more
detail earlier in this operating guide.
Page 46Rev C July 2014

Digital Projection E-Vision 7000 Series Menu Map Operating Guide
Menu Submenus and controls
INSTALLATION
Language Select from list
Lamp Control Both, Lamp 1, Lamp 2, Auto 1
Lamp Mode Normal, Eco
Projection Mode Front, Rear, Ceiling and Rear, Front and Rear
Fan Mode Normal, High
Test Pattern None, RGB Ramps, Color Bars, Step Bars, Checkboard, Grid, Horizontal Lines, Vertical Lines,
Diagonal lines, Horizontal Ramp, Vertical Ramp, White
Advance Setting
Keystone
Image Resizing
Filter Message 100H, 200H, 500H, Off
LAN/RS232C LAN, RS232C
Network Link, DHP Client On/Off, IP Address, Subnet Mask, Gateway, DNS
Communication Speed 38,400, 19,200, 9,600
Apply Projectorwillaskforconrmationbeforeapplyingtheabovechanges
Reset
All Reset Projectorwillaskforconrmationbeforerestoringallsettingstofactorydefaults
Filter Timer Reset Projectorwillaskforconrmationbeforeresettingthetimertozero
Information Input, Signal Info, Lamp 1 Timer, Lamp 2 Timer, Filter Timer, Model Name, Software Version
Notes
Some of the information in this menu
map is summarised. See the actual
menu on the projector for full detail.
Some menu options and controls
may not be available due to settings
in other menus. These will be
shaded grey on the actual menu.
Where it would be helpful, some
menu options are described in more
detail earlier in this operating guide.
Page 47Rev C July 2014

Digital Projection E-Vision 7000 Series OPERATING GUIDE
This page is intentionally left blank.

REMOTE COMMUNICATIONS GUIDE
E-Vision 7000 Series
High Brightness Digital Video Projector
Rev C July 2014
112-461C

Digital Projection E-Vision 7000 Series IN THIS GUIDE Remote Communications Guide
IN THIS GUIDE
Introduction ........................................................................................................ 51
RS232 Control Commands ............................................................................. 52
Header code ...............................................................................................................52
Examples ........................................................................................................................52
The commands ..........................................................................................................53
Command Group 00 .......................................................................................................53
Command Group 01 .......................................................................................................53
Command Group 02 .......................................................................................................54
Command Group 03 .......................................................................................................54
Command Group 04 (Remote Control buttons) ..............................................................55
PJLink ................................................................................................................... 57
Settings ......................................................................................................................57
Host Name ......................................................................................................................57
Domain Name .................................................................................................................57
Mail .................................................................................................................................57
PJLink .............................................................................................................................57
LAN Control Utility ........................................................................................... 58
Power ON/STANDBY .................................................................................................58
Picture and Volume controls ....................................................................................58
Input Select ................................................................................................................58
AV Mute ......................................................................................................................58
Status .........................................................................................................................58
Rev C July 2014

Digital Projection E-Vision 7000 Series Introduction Remote Communications Guide
Introduction
The projector can be controlled by using an external control system in three different ways:
• All of the projector’s features can be controlled via a serial connection, using the control strings described in this guide.
• All of the projector’s features can be controlled via a LAN connection, using the industry standard PJLInk commands.
For more information about this, see PJLink later in this guide.
• A number of basic picture and input settings can be controlled directly using the embedded LAN Control utility.
For more information about this, see LAN Control Utility later in this guide.
Notes
Details of how to connect to
the projector using the LAN or
RS232 input, can be found in the
Connections Guide.
51Rev C July 2014

Digital Projection E-Vision 7000 Series RS232 Control Commands Remote Communications Guide
RS232 Control Commands
There are 2 types of command, Get commands and Set commands. The individual commands are described later in this guide. All
commands consist of ascii text strings ending wit an ascii carriage return character.
• Set commands: <header code> S <command> [CR]
• Set commands wit data <header code> S <command> <data> [CR]
• Get commands: <header code> G <command> [CR]
The projector sends a reply string to each command.
Header code
The header code, comprises the following three ascii characters:
ascii: V99
hex: 56 39 39
Examples
Set Power On:
ascii: V99 S 0001 [CR] projector return result in ascii: P
hex: 56 39 39 53 30 30 30 31 0D projector return result in hex: 50
Notes
Serial port settings:
Baud rate 9,600 bps
Data length 8 bits
Stop bits one
Parity none
Flow control none
The Communication speed (baud
rate) can be adjusted. For details,
see the Operating Guide.
Spaces are shown in the examples
for clarity, but are NOT used in the
actual commands or replies.
Set brightness to 25:
ascii: V99 S 0101 25 [CR] projector return result in ascii: P
hex: 56 39 39 53 30 31 30 31 32 35 0D projector return result in hex: 50
Get brightness (brightness is 18 in this example):
ascii: V99 G 0101 [CR] projector return result in ascii: P 18
hex: 56 39 39 47 30 31 30 31 0D projector return result in hex: 50 31 38
In the Return Result Strings:
‘P’ is returned for a successful Set
command;
‘Pn’ is returned for a successful Get
command;
‘F’ is returned for a failed command.
52Rev C July 2014

Digital Projection E-Vision 7000 Series RS232 Control Commands Remote Communications Guide
The commands
The commands are divided into ve groups, the group number forming the rst two characters of the command.
Command Group 00
Ascii Hex Function Description Return String
V99S0001 56 39 39 53 30 30 30 31 0D Power On P/F
V99S0002 56 39 39 53 30 30 30 32 0D Power Off P/F
V99S0003 56 39 39 53 30 30 30 33 0D Resync P/F
V99G0004 56 39 39 47 30 30 30 34 0D Get Lamp1 Hours Pn/F
V99G0005 56 39 39 47 30 30 30 35 0D Get Air lter timer n=0~999999 Pn/F
V99S0006 56 39 39 53 30 30 30 36 0D System Reset P/F
V99G0007 56 39 39 47 30 30 30 37 0D Get System
Status
V99G0008 56 39 39 47 30 30 30 38 0D Get F/W Version Pn/F
V99G0010 56 39 39 47 30 30 31 30 0D Get Lamp2 Hours Pn/F
Command Group 01
Ascii Hex Function Description Return String
V99G0101 56 39 39 47 30 31 30 31 0D Get Brightness n= -30~30 Pn/F
V99S0101n 56 39 39 53 30 31 30 31 n 0D Set Brightness n= -30~30 P/F
V99G0102 56 39 39 47 30 31 30 32 0D Get Contrast n= -30~30 Pn/F
V99S0102n 56 39 39 53 30 31 30 32 n 0D Set Contrast n= -30~30 P/F
V99G0103 56 39 39 47 30 31 30 33 0D Get Color n= -30~30 Pn/F
V99S0103n 56 39 39 53 30 31 30 33 n 0D Set Color n= -30~30 P/F
V99G0104 56 39 39 47 30 31 30 34 0D Get Tint n= -30~30 Pn/F
V99S0104n 56 39 39 53 30 31 30 34 n 0D Set Tint n= -30~30 P/F
V99G0105 56 39 39 47 30 31 30 35 0D Get Sharpness n= -30~30 Pn/F
V99S0105n 56 39 39 53 30 31 30 35 n 0D Set Sharpness n= -30~30 P/F
0: Reset
1: Standby
2: Operation
3: Cooling
Pn/F
Continued
Notes
Note: spaces are shown in the
examples for clarity, but are NOT
used in the actual commands or
replies.
IntheAsciicolumn,thenal[CR]
has been omitted for clarity.
In the Command Strings and the
Return Results, ‘n’ represents a
data string.
In the Return Result Strings:
‘P’ is returned for a successful Set
command;
‘Pn’ is returned for a successful Get
command;
‘F’ is returned for a failed command.
53Rev C July 2014

Digital Projection E-Vision 7000 Series IN THIS GUIDE Remote Communications Guide
ASCII HEX Function Description Return String
V99G0106 56 39 39 47 30 31 30 36 0D Get Color
Temperature
V99S0106n 56 39 39 53 30 31 30 36 n 0D Set Color
Temperature
Command Group 02
ASCII HEX Function Description Return String
V99S0201 56 39 39 53 30 32 30 31 0D Select RGB P/F
V99S0202 56 39 39 53 30 32 30 32 0D Select BNC P/F
V99S0203 56 39 39 53 30 32 30 33 0D Select Component P/F
V99S0204 56 39 39 53 30 32 30 34 0D Select Video P/F
V99S0205 56 39 39 53 30 32 30 35 0D Select S-Video P/F
V99S0206 56 39 39 53 30 32 30 36 0D Select DVI P/F
V99G0220 56 39 39 47 30 32 32 30 0D Get Current
Source
Command Group 03
ASCII HEX Function Description Return String
V99G0301 56 39 39 47 30 33 30 31 0D Get Scaling 0: Normal
V99S0301n 56 39 39 53 30 33 30 31 n 0D Set Scaling 0: Normal
0: Warm
1: Standard
2: Cold
0: Warm
1: Standard
2: Cold
0: RGB
1: BNC
2: Component
3: Video
4: S-Video
5: DVI
1: Full
2: 4: 3
3: 16: 9
4: Native
1: Full
2: 4: 3
3 : 16:9
4 : Native
Pn/F
P/F
Pn/F
Pn/F
P/F
Continued
Notes
Note: spaces are shown in the
examples for clarity, but are NOT
used in the actual commands or
replies.
IntheAsciicolumn,thenal[CR]
has been omitted for clarity.
In the Command Strings and the
Return Results, ‘n’ represents a
data string.
In the Return Result Strings:
‘P’ is returned for a successful Set
command;
‘Pn’ is returned for a successful Get
command;
‘F’ is returned for a failed command.
54Rev C July 2014

Digital Projection E-Vision 7000 Series IN THIS GUIDE Remote Communications Guide
ASCII HEX Function Description Return String
V99G0302 56 39 39 47 30 33 30 32 0D Get AV Mute Pn/F
V99S0302n 56 39 39 53 30 33 30 32 n 0D Set AV Mute P/F
V99G0304 56 39 39 47 30 33 30 34 0D Get Image Freeze Pn/F
V99S0304n 56 39 39 53 30 33 30 34 n 0D Set Image Freeze P/F
V99G0305 56 39 39 47 30 33 30 35 0D Get Volume n= 0~60 Pn/F
V99S0305n 56 39 39 53 30 33 30 35 n 0D Set Volume n= 0~60 P/F
V99G0308 56 39 39 47 30 33 30 38 0D Get Projection
Mode
V99S0308n 56 39 39 53 30 33 30 38 n 0D Set Projection
Mode
V99G0309 56 39 39 47 30 33 30 39 0D Get Vertical
Keystone
V99S0309n 56 39 39 53 30 33 30 39 n 0D Set Vertical
Keystone
Command Group 04 (Remote Control buttons)
ASCII HEX Function Description Return String
V99S0401 56 39 39 53 30 34 30 31 0D ON P/F
V99S0402 56 39 39 53 30 34 30 32 0D OFF P/F
V99S0403 56 39 39 53 30 34 30 33 0D Focus+ P/F
V99S0404 56 39 39 53 30 34 30 34 0D Focus- P/F
V99S0405 56 39 39 53 30 34 30 35 0D Zoom + P/F
V99S0406 56 39 39 53 30 34 30 36 0D Zoom - P/F
V99S0407 56 39 39 53 30 34 30 37 0D TEST Pattern P/F
V99S0408 56 39 39 53 30 34 30 38 0D LENS SHIFT P/F
V99S0409 56 39 39 53 30 34 30 39 0D UP P/F
V99S0410 56 39 39 53 30 34 31 30 0D DOWN P/F
0: Front
1: Rear
2: Ceiling + Front
3: Ceiling + Rear
0: Front
1: Rear
2: Ceiling + Front
3: Ceiling + Rear
n= -80~80 Pn/F
n= -80~80 P/F
Pn/F
P/F
Continued
Notes
Note: spaces are shown in the
examples for clarity, but are NOT
used in the actual commands or
replies.
IntheAsciicolumn,thenal[CR]
has been omitted for clarity.
In the Command Strings and the
Return Results, ‘n’ represents a
data string.
In the Return Result Strings:
‘P’ is returned for a successful Set
command;
‘Pn’ is returned for a successful Get
command;
‘F’ is returned for a failed command.
When Standby Mode is set to Eco:
the RS232 connection is disabled,
so it will not be possible to turn the
projector On remotely, except via the
LAN connection.
55Rev C July 2014

Digital Projection E-Vision 7000 Series IN THIS GUIDE Remote Communications Guide
ASCII HEX Function Description Return String
V99S0411 56 39 39 53 30 34 31 31 0D LEFT P/F
V99S0412 56 39 39 53 30 34 31 32 0D RIGHT P/F
V99S0413 56 39 39 53 30 34 31 33 0D ENTER P/F
V99S0414 56 39 39 53 30 34 31 34 0D MENU P/F
V99S0415 56 39 39 53 30 34 31 35 0D RETURN P/F
V99S0416 56 39 39 53 30 34 31 36 0D INPUT P/F
V99S0417 56 39 39 53 30 34 31 37 0D PICTURE P/F
V99S0418 56 39 39 53 30 34 31 38 0D AVMUTE P/F
V99S0419 56 39 39 53 30 34 31 39 0D AUTO SYNC P/F
V99S0420 56 39 39 53 30 34 32 30 0D ASPECT P/F
V99S0421 56 39 39 53 30 34 32 31 0D VOL+ P/F
V99S0422 56 39 39 53 30 34 32 32 0D VOL- P/F
V99S0423 56 39 39 53 30 34 32 33 0D OVERSCAN P/F
V99S0424 56 39 39 53 30 34 32 34 0D FREEZE P/F
V99S0425 56 39 39 53 30 34 32 35 0D 3D MODE P/F
V99S0426 56 39 39 53 30 34 32 36 0D INFO. P/F
Notes
Note: spaces are shown in the
examples for clarity, but are NOT
used in the actual commands or
replies.
IntheAsciicolumn,thenal[CR]
has been omitted for clarity.
In the Command Strings and the
Return Results, ‘n’ represents a
data string.
In the Return Result Strings:
‘P’ is returned for a successful Set
command;
‘Pn’ is returned for a successful Get
command;
‘F’ is returned for a failed command.
56Rev C July 2014

Digital Projection E-Vision 7000 Series PJLink Remote Communications Guide
PJLink
The LAN IP Address of the projector can be set by using the Network submenu, which can
be found in the Advanced Setting submenu in the Installation menu.
Once the LAN IP Address has been set, it is possible to assign a Host Name and Domain
Name to the projector, and to set up an Alert Mail address and PJLink password:
• Point your browser at the projector by typing the url
http://<LAN IP Address>/lanconf.html into the address bar,
then press the Enter key.
• The embedded webpage shown here should appear.
Settings
Host Name
Up to 60 alpha-numeric characters can be entered. Press the Apply
button to conrm the new name.
Domain Name
Up to 60 alpha-numeric characters. Press the Apply button to conrm
the new name.
When enabled, an email will be sent to up to three specied
addresses, when the lamp reaches the end of its useable life, or if an
error occurs on the projector. Press the Apply button to conrm the
new settings.
A test mail can be sent to check that the settings have been made
correctly. Press the Execute button to send the test message.
Notes
The TCP Port number is 5450.
ThePJLinkspecicationcanbe
downloaded from
http://pjlink.jbmia.or.jp/english click on the Specications link.
PJLink
When enabled, a password can be set. Press the Apply button to
conrm the new password.
The projector supports all the commands of PJLink Class 1.
57Rev C July 2014

Digital Projection E-Vision 7000 Series LAN Control Utility Remote Communications Guide
LAN Control Utility
The LAN IP Address of the projector can be set by using the Network submenu, which can
be found in the Advanced Setting submenu in the Installation menu.
Once the LAN IP Address has been set, it is possible to control some basic functions by
using the emedding LAN Control Utility:
• Point your browser at the projector by typing the url
http://<LAN IP Address>/index.html into the address bar, then press the Enter key.
• The embedded webpage shown here should appear.
Power ON/STANDBY
Click on the buttons to turn the projector On or into Standby mode.
Picture and Volume controls
Click on the and controls to adjust the settings as required.
Input Select
Click on the Input buttons to switch to the required input.
Notes
For full details of how to use the
menu system, see the Operating
Guide.
AV Mute
Click to switch both video and sound On or Off.
Status
The panel shows the status of the lamps and lters. Click on the
Refresh button to update the readings.
The lamp life percentage shown
here is based on expected lamp life
in controlled laboratory conditions.
Actual life may vary depending on
installation environment, orientation
and lamp mode (Normal or Eco).”
58Rev C July 2014
 Loading...