

Page 1
E-Vision 6800 3D Series
LENS SHIFT
ZOOM
–
FOCUS
+
MENU
ENTER
RETURN
SOURCE
POWER
WARNING
LAMP1
LAMP2
AU
TO
High Brightness Digital Video Projector
4INSTALLATION AND QUICK-START GUIDE
4CONNECTION GUIDE
4OPERATING GUIDE
4REMOTE COMMUNICATIONS GUIDE
Rev A January 2015
116-281A
Page 2

Digital Projection E-Vision 6800 3D Series
About This Document
Please follow the instructions in this manual carefully to ensure safe and long-lasting use of the projector.
Keep this manual handy for future reference.
Symbols used in this manual
Many pages in this document have a dedicated area for notes. The information in that area is accompanied by the following symbols:
ELECTRICAL WARNING: this symbol indicates that there is a danger of electrical shock unless the instructions are closely
followed.
WARNING: this symbol indicates that there is a danger of physical injury to yourself and/or damage to the equipment unless
the instructions are closely followed.
NOTE: this symbol indicates that there is some important information that you should read.
Product revision
Because we at Digital Projection continually strive to improve our products, we may change specications and designs, and add new features
without prior notice.
Notes
Legal notice
Trademarks and trade names mentioned in this document remain the property of their respective owners.
Digital Projection disclaims any proprietary interest in trademarks and trade names other than its own.
Copyright © 2015 Digital Projection Ltd. All rights reserved.
Rev A January 2015
page i
Page 3
Digital Projection E-Vision 6800 3D Series
Introduction
Congratulations on your purchase of this Digital Projection product.
Your projector has the following key features:
• Support for most 3D formats.
• HDBaseT® for transmission of uncompressed High Denition Video up to 100 m from the source.
• Swappable color wheels for high brightness and color critical applications.
• BrilliantColor™ for increased system brightness.
• DynamicBlack™ for improved black levels in dark scenes.
• Independent control of hue, saturation and gain for primary and secondary colors.
• Vertical and horizontal keystone correction.
• Control via LAN and RS232.
• Motorized lens mount.
A serial number is located on the product label. Please record it here:
Notes
Rev A January 2015
page ii
Page 4

Digital Projection E-Vision 6800 3D Series
CONTENTS
INSTALLATION AND QUICK-START GUIDE ..............................1
GETTING TO KNOW THE PROJECTOR .......................................... 3
Front and rear views ............................................................................. 3
Remote control ...................................................................................... 3
Control panel and indicators ................................................................. 4
CHANGING THE LENS, LAMPS AND COLOR WHEEL .................... 5
Removing the lens ................................................................................ 5
Fitting the lens ....................................................................................... 5
Changing the lamp ................................................................................ 6
Changing the color wheel...................................................................... 7
POSITIONING THE SCREEN AND PROJECTOR ............................. 8
OPERATING THE PROJECTOR ...................................................... 9
Switching the projector on ..................................................................... 9
Selecting an input signal or test pattern ................................................ 9
Input signal .......................................................................................... 9
Test pattern .......................................................................................... 9
Adjusting the lens ................................................................................ 10
Zoom ................................................................................................ 10
Focus ............................................................................................... 10
Shift ................................................................................................. 10
Adjusting the image............................................................................. 10
Orientation ......................................................................................... 10
Aspect ratio ........................................................................................ 10
Picture .............................................................................................. 10
Switching the projector off ................................................................... 11
CONNECTION GUIDE ............................................................................13
SIGNAL INPUTS AND OUTPUTS .................................................. 15
SUPPORTED SIGNAL INPUT MODES .......................................... 16
2D input modes ................................................................................... 16
3D input modes ................................................................................... 18
CONTROL CONNECTIONS ........................................................... 20
OPERATING GUIDE ................................................................................21
USING THE REMOTE CONTROL .................................................. 23
USING THE PROJECTOR ............................................................. 25
Main menu .......................................................................................... 25
Lens menu .......................................................................................... 26
Image menu ........................................................................................ 27
Image Mode ....................................................................................... 27
Brightness and Contrast ........................................................................ 27
Gamma ............................................................................................. 28
Dynamic Black .................................................................................... 28
Saturation, Hue, Sharpness and Noise Reduction ........................................ 28
Position and Phase .............................................................................. 29
Resync ............................................................................................. 29
Color menu.......................................................................................... 30
Color Space ....................................................................................... 30
Color Temperature ............................................................................... 31
Trim ................................................................................................. 32
Hue / Saturation / Gain .......................................................................... 32
Rev A January 2015
page iii
Page 5

Digital Projection E-Vision 6800 3D Series
CONTENTS (continued)
Geometry menu .................................................................................. 33
Aspect Ratio ....................................................................................... 33
H Keystone and V Keystone ................................................................... 34
Overscan ........................................................................................... 36
3D menu.............................................................................................. 37
The 3D Swap setting explained ............................................................... 37
3D types ............................................................................................ 38
Frame rate multiplication in 3D images ...................................................... 39
Lamps menu ....................................................................................... 40
Setup menu ......................................................................................... 41
Network ............................................................................................ 42
RS232 .............................................................................................. 42
Security ............................................................................................. 43
Filter ................................................................................................. 43
System ............................................................................................. 44
Information menu ................................................................................ 45
Source information ............................................................................... 45
MENU MAP .................................................................................. 46
COMMAND GUIDE ....................................................................... 53
Inputs .................................................................................................. 53
Test Patterns ....................................................................................... 53
Lens menu .......................................................................................... 53
Image menu ........................................................................................ 54
Color menu.......................................................................................... 55
Geometry menu .................................................................................. 55
3D menu.............................................................................................. 56
Lamps menu ....................................................................................... 56
Setup menu ......................................................................................... 57
Information menu ................................................................................ 57
WEB CONFIGURATION UTILITY .................................................. 58
Email settings ...................................................................................... 59
Projector controls ................................................................................ 60
PJLink security options ....................................................................... 61
REMOTE COMMUNICATIONS GUIDE ..........................................49
INTRODUCTION ........................................................................... 51
Network setup ..................................................................................... 51
Serial Port setup.................................................................................. 51
Protocol commands ............................................................................ 52
Examples .......................................................................................... 52
Responses ......................................................................................... 52
Rev A January 2015
page iv
Page 6

Digital Projection E-Vision 6800 3D Series
This page is intentionally left blank.
Page 7

E-Vision 6800 3D Series
LENS SHIFT
ZOOM
–
FOCUS
+
MENU
ENTER
RETURN
SOURCE
POWER
WARNING
LAMP1
LAMP2
AU
TO
High Brightness Digital Video Projector
4
INSTALLATION AND QUICK-START GUIDE
Rev A January 2015
Page 8

Digital Projection E-Vision 6800 3D Series
IN THIS GUIDE
IN THIS GUIDE
Getting To Know The Projector...................................................................... 3
Front and rear views ...................................................................................................3
Remote control ............................................................................................................3
Control panel and indicators .....................................................................................4
Changing The Lens, Lamps And Color Wheel ............................................ 5
Removing the lens ......................................................................................................5
Fitting the lens .............................................................................................................5
Changing the lamp ......................................................................................................6
Changing the color wheel ..........................................................................................7
Positioning The Screen And Projector ......................................................... 8
Operating The Projector ................................................................................... 9
Switching the projector on .........................................................................................9
Selecting an input signal or test pattern ...................................................................9
Input signal ........................................................................................................................ 9
Test pattern ....................................................................................................................... 9
Adjusting the lens .....................................................................................................10
Zoom ...............................................................................................................................10
Focus ..............................................................................................................................10
Shift .................................................................................................................................10
Adjusting the image ..................................................................................................10
Orientation ......................................................................................................................10
Aspect ratio .....................................................................................................................10
Picture .............................................................................................................................10
Switching the projector off .......................................................................................11
Installation and Quick-Start Guide
Rev A January 2015
Page 9
Digital Projection E-Vision 6800 3D Series
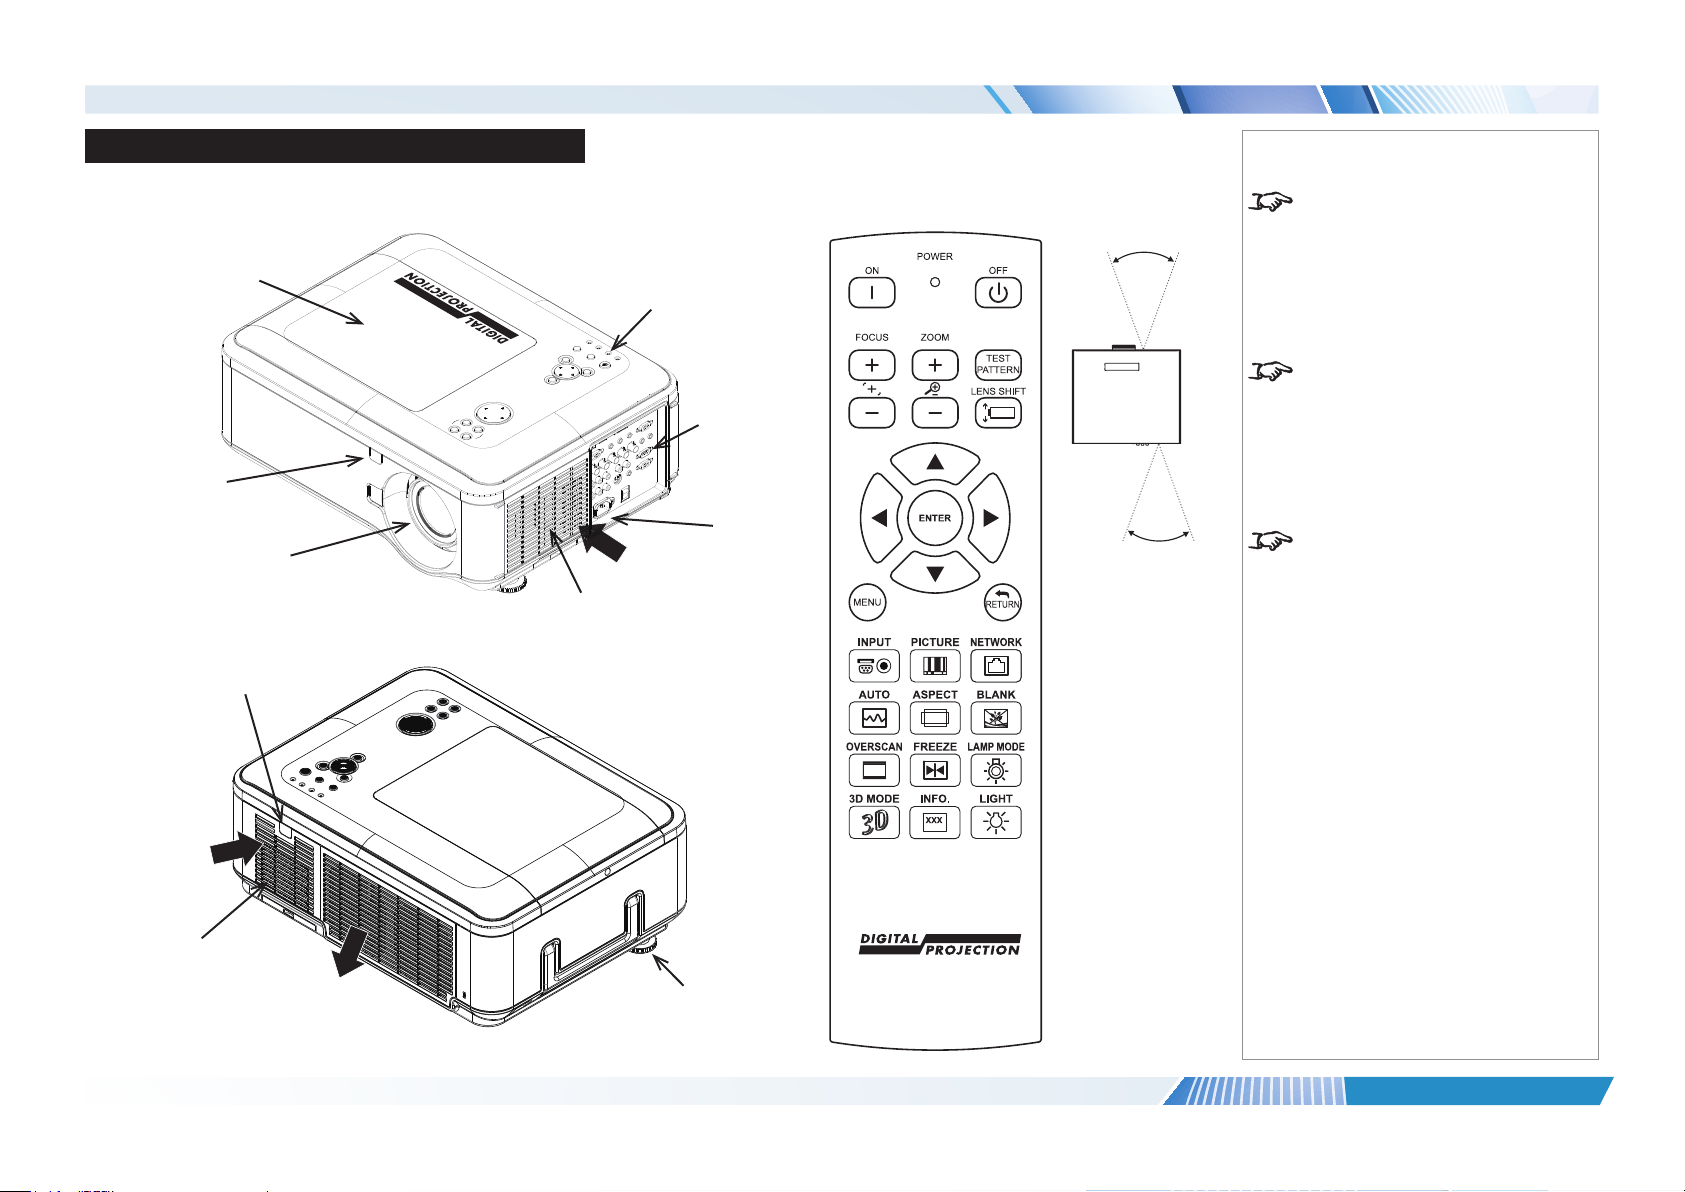
GETTING TO KNOW THE PROJECTOR
Getting To Know The Projector
Front and rear views
Lamp and color
wheel cover
–
ZOOM
+
FOCUS
Front
infra-red
window
Lens
Rear
infra-red
window
LENS SHIFT
LAMP2
AUTO
SOURCE
RETURN
ENTER
MENU
Air lter
cover
LAMP1
WARNING
Control
panel
POWER
Air
inlet
Connection
panel
Mains
input
Remote control
40°
40°
Infra-red
reception
Notes
The projector uses an infra-red
remote control.
Some of the controls are duplicated
on the projector control panel, as
shown on the next page.
Theairltersshouldbecleanedor
changed regularly, depending on the
installation environment.
Theltersshouldbechangedatthe
same time as the lamp is changed.
The projector lens is shipped
separately.
Air
inlet
Air lter
cover
Air
outlet
Installation and Quick-Start Guide
Adjustable
foot
Rev A January 2015
page 3
Page 10
Digital Projection E-Vision 6800 3D Series
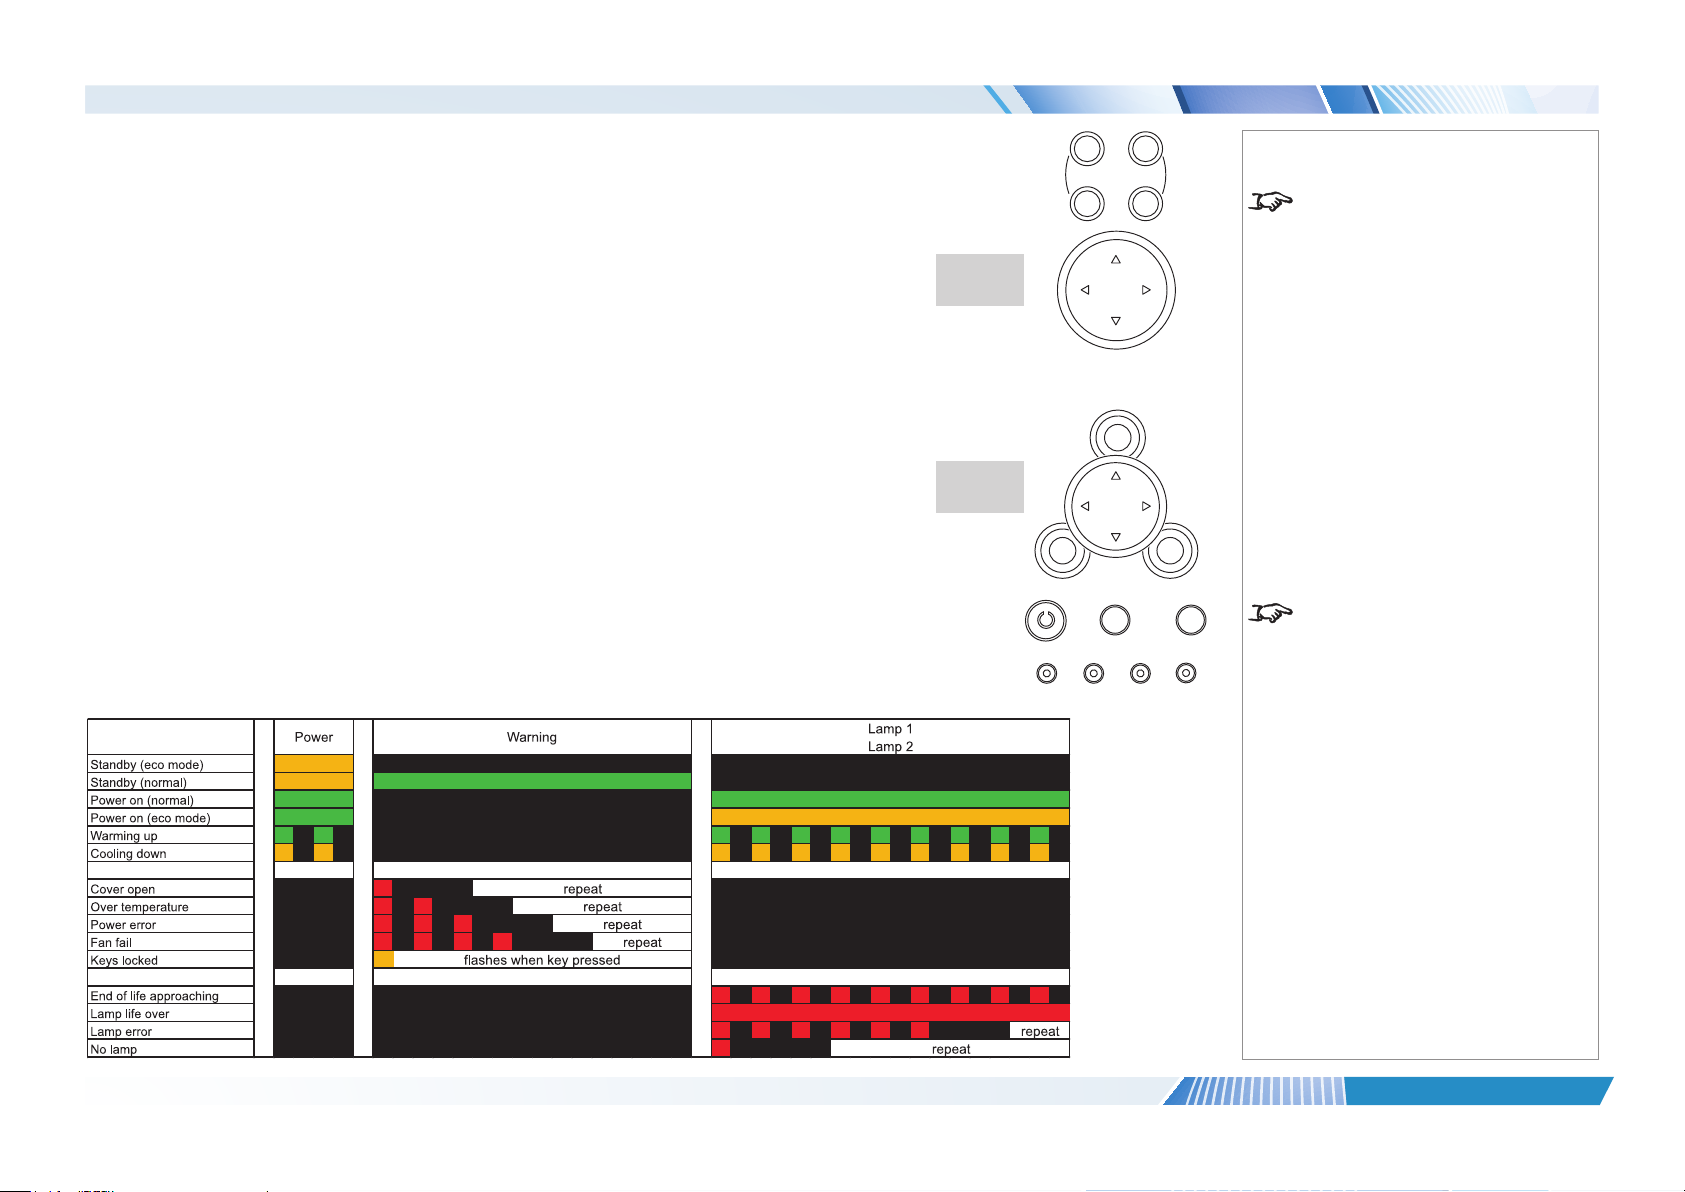
GETTING TO KNOW THE PROJECTOR
Control panel and indicators
Some of the controls from the remote control are duplicated on the projector control panel, as shown
on the right.
The SOURCE and AUTO buttons have the same function as the INPUT and AUTO SYNC buttons on
the remote control.
The Power indicator will show amber when in standby and green when the projector is on, and will
ash when the projector is warming up or cooling down.
The Warning indicator will ash to show any error situations.
The Lamp indicators will show which lamp is in use, and whether the projector is in Normal or Eco
mode, and will ash to show lamp status.
The chart below shows all possible combinations of indicator lamp color.
Lens
controls
Menu
controls
+
FOCUS ZOOM
-
LENS SHIFT
MENU
RETURNENTER
SOURCE AUTO
POWER WARNING LAMP1 LAMP2
Notes
For full details of how to use the
controls and the menu system, see
the Operating Guide.
The SOURCE and AUTO buttons
have the same function as the
INPUT and AUTO SYNC buttons on
the remote control.
Installation and Quick-Start Guide
Rev A January 2015
page 4
Page 11
Digital Projection E-Vision 6800 3D Series
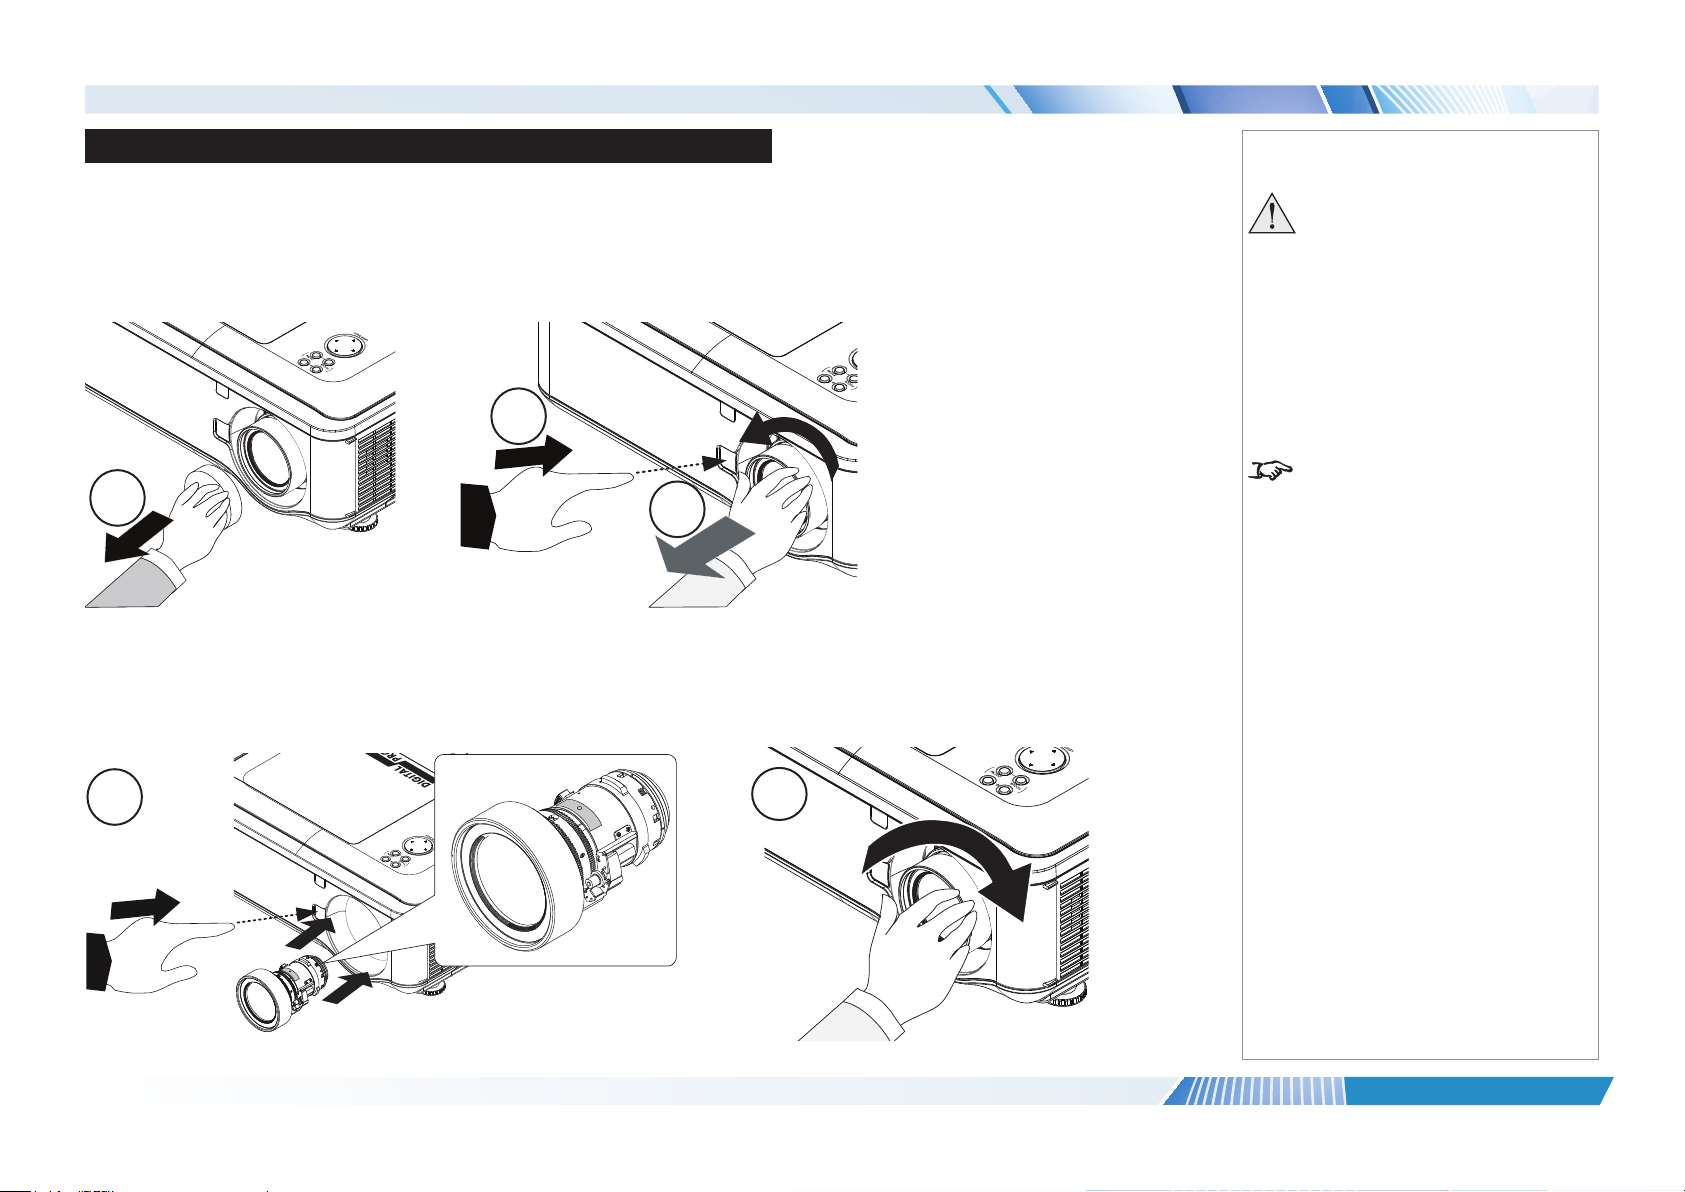
CHANGING THE LENS, LAMPS AND COLOR WHEEL
Changing The Lens, Lamps And Color Wheel
Removing the lens
1. Remove the lens cap.
2. Push in the lens release lever, and turn the lens anti-clockwise.
3. Remove the lens.
2
1
Fitting the lens
1. Position the lens so that the label marked ‘O’ is at the top, push in the lens release lever and and gently insert the lens all the way into the
lens mount.
2. Turn the lens clockwise until it clicks into place.
3
Notes
Always allow the lamp to cool for
5 minutes before:
- disconnecting the power
- moving the projector
The projector lens is shipped
separately.
1
Installation and Quick-Start Guide
2
Rev A January 2015
page 5
Page 12
Digital Projection E-Vision 6800 3D Series
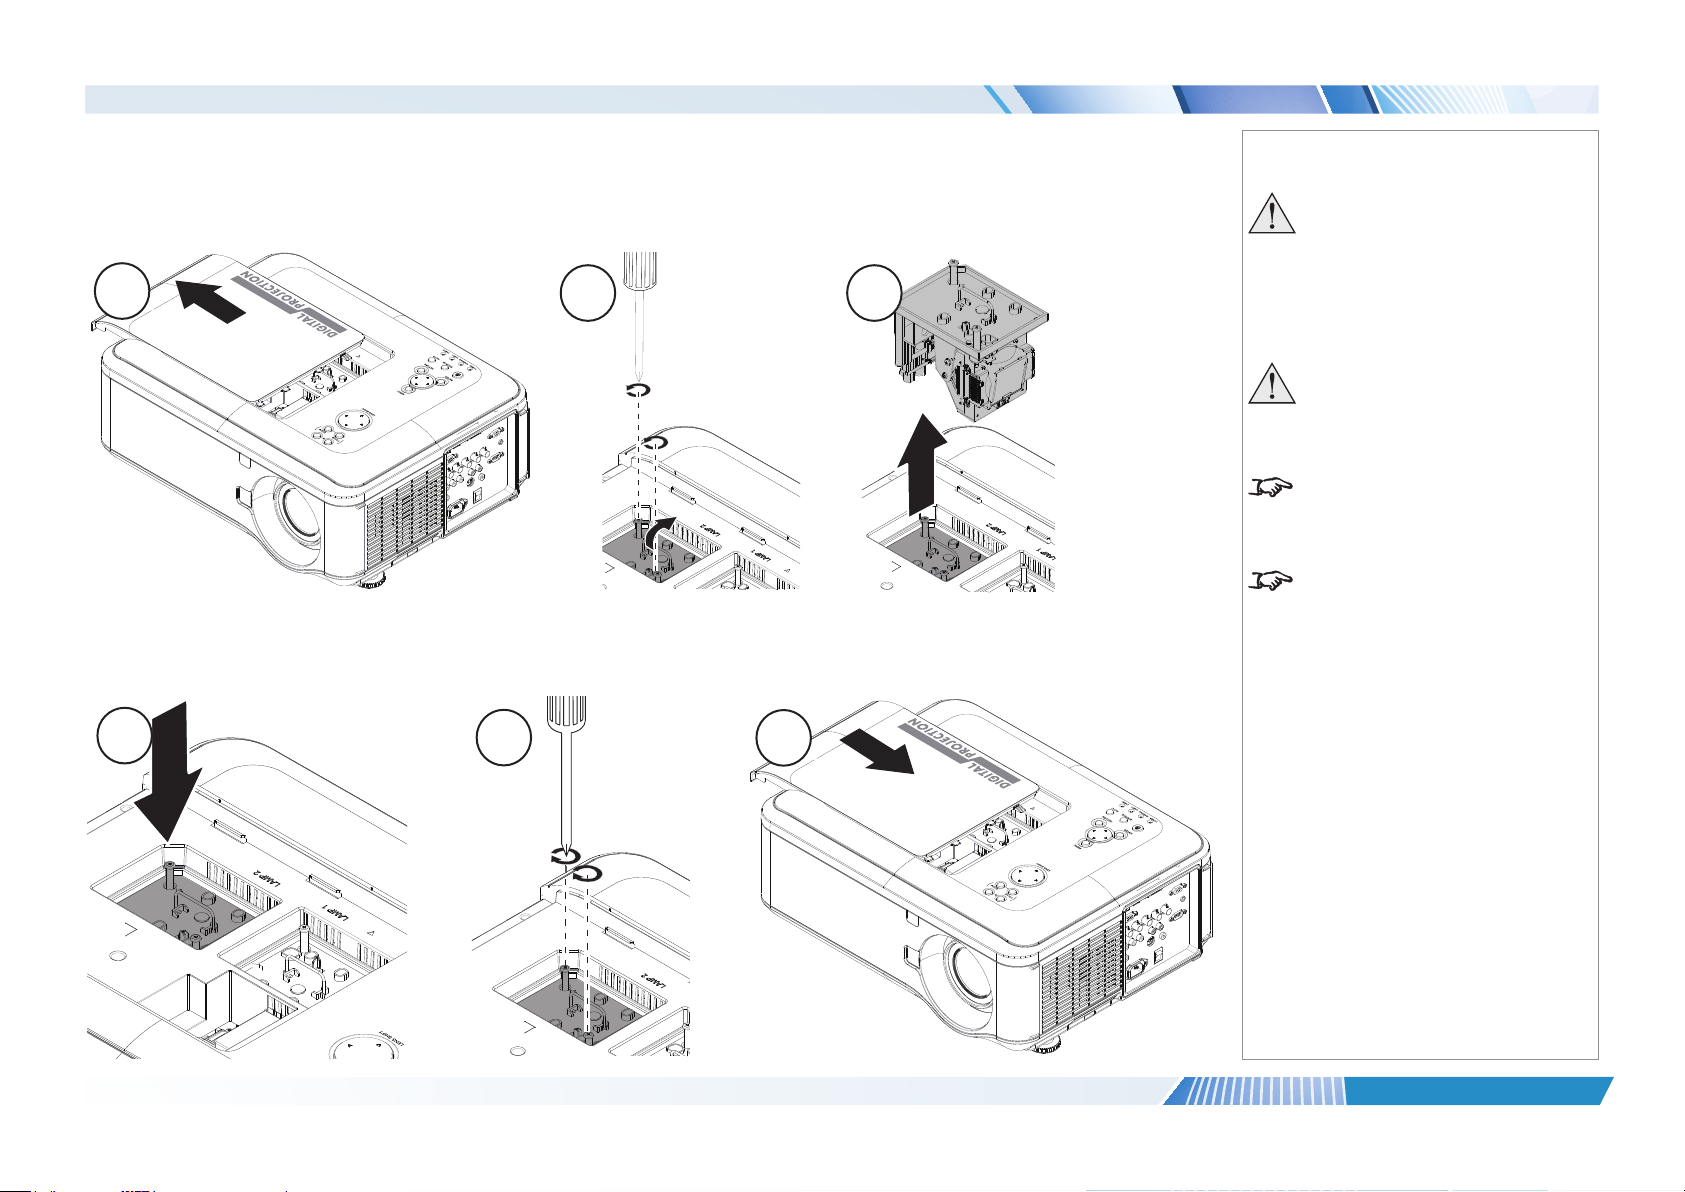
CHANGING THE LENS, LAMPS AND COLOR WHEEL
Changing the lamp
1. Slide open the lamp compartment cover as shown in the picture.
2. Unscrew the two captive screws securing the lamp module.
3. Pull rmly upwards on the handle to remove the lamp module.
1
4. Insert a new lamp module.
5. Fasten the screws.
6. Replace the lamp compartment cover.
2 3
Notes
Always allow the lamp to cool for
5 minutes before:
- disconnecting the power
- moving the projector
The lamp must be changed only
by suitably qualied personnel.
The projector will shut down if the
cover is opened whilst in operation.
Theltersshouldbechangedatthe
same time as the lamp is changed.
4
Installation and Quick-Start Guide
5
6
Rev A January 2015
page 6
Page 13
Digital Projection E-Vision 6800 3D Series
CHANGING THE LENS, LAMPS AND COLOR WHEEL
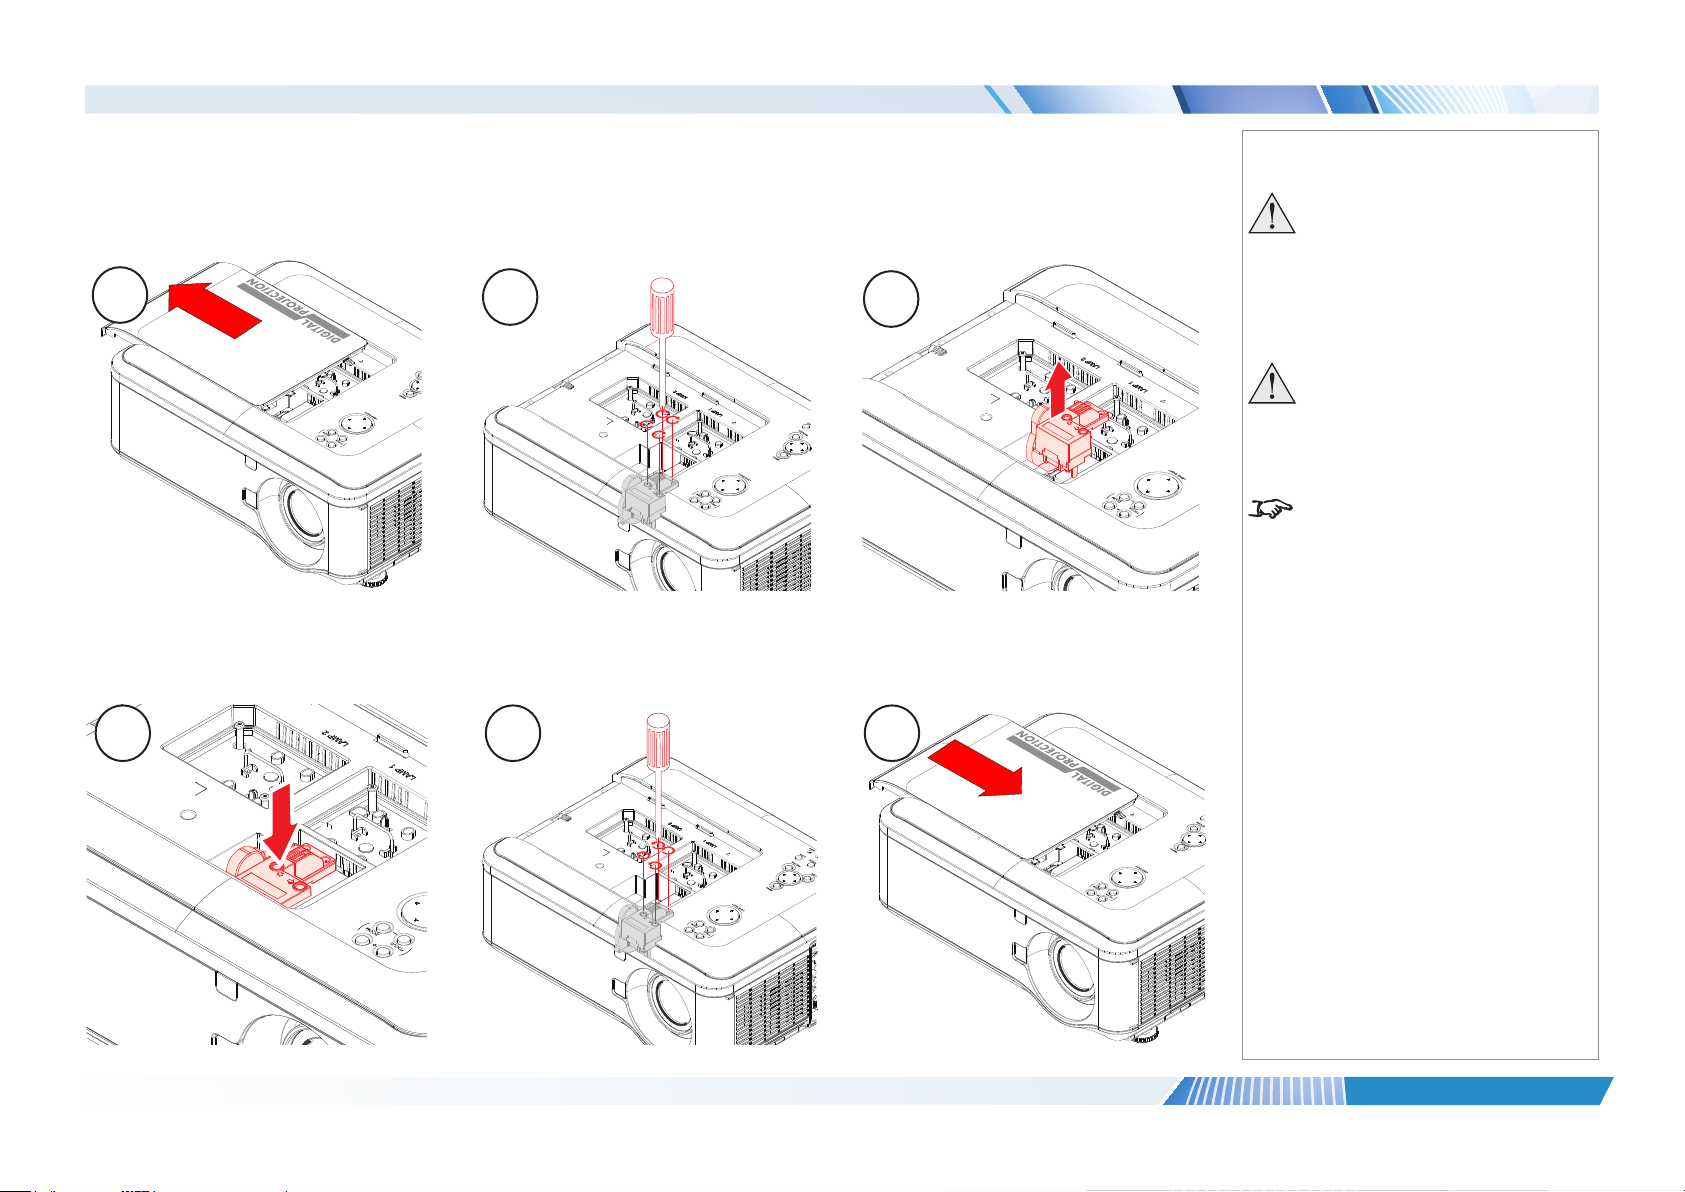
Changing the color wheel
1. Slide open the lamp compartment cover as shown in the picture.
2. Unscrew the four captive screws securing the color wheel.
3. Remove the color wheel.
1
4. Insert a new color wheel.
5. Fasten the screws.
6. Replace the lamp compartment cover.
2
Notes
Always allow the lamp to cool for
5 minutes before:
3
- disconnecting the power
- moving the projector
The color wheel must be changed
only by suitably qualied
personnel.
The projector will shut down if the
cover is opened whilst in operation.
4 5 6
Installation and Quick-Start Guide
Rev A January 2015
page 7
Page 14
Digital Projection E-Vision 6800 3D Series
POSITIONING THE SCREEN AND PROJECTOR
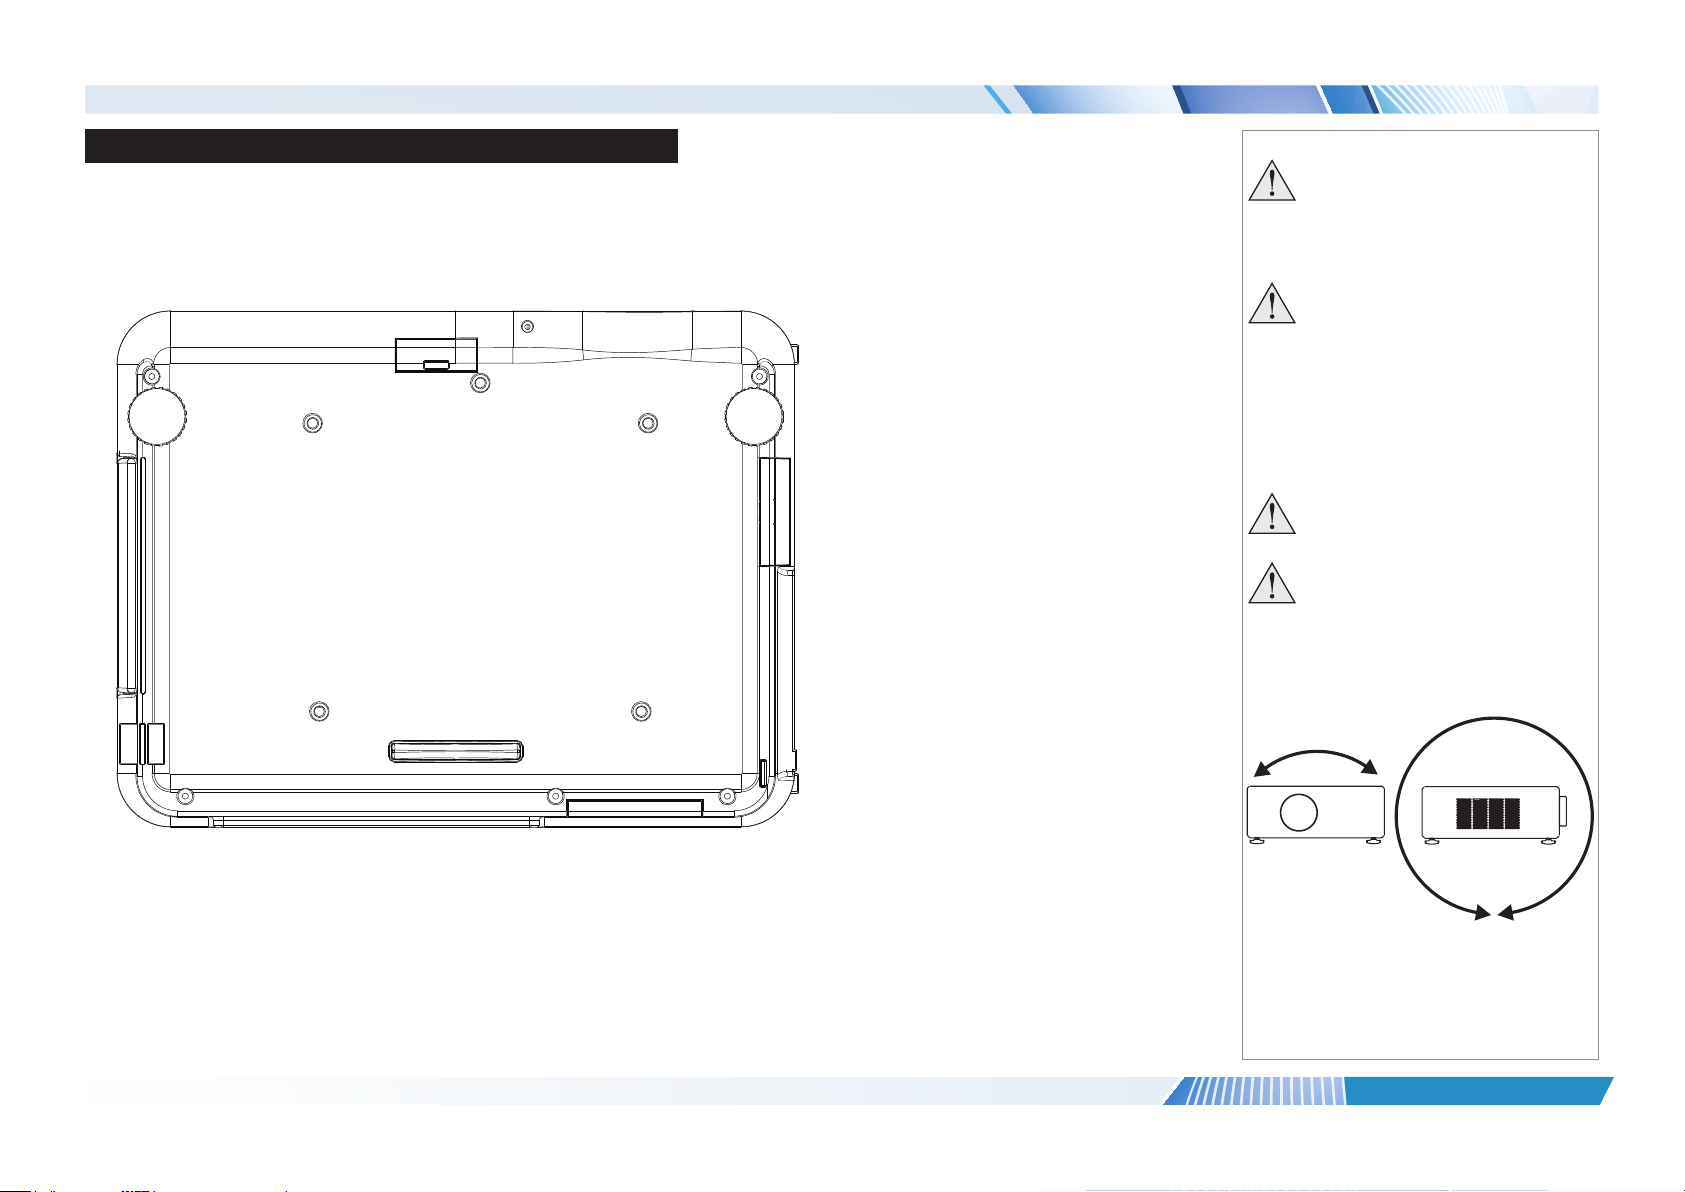
Positioning The Screen And Projector
1. Install the screen, ensuring that it is in the best position for viewing by your audience.
2. Mount the projector, ensuring that it is at a suitable distance from the screen for the image to ll the screen. Set the adjustable feet so that
the projector is level, and perpendicular to the screen.
Alternatively, ve M4 bolts (max length 12 mm [0.5 in]) can be used to attach the projector to a ceiling mount (optional accessory,).
2
1
3
Notes
Always allow the lamp to cool for
5 minutes before:
- disconnecting the power
- moving the projector
Ensure that there is at least
50cm (20in) of space between the
ventilation outlets and any wall,
and 10cm (4in) on all other sides.
If ceiling mounting, ensure there
is 30cm (12in) of space between
the projector and ceiling.
Do not stack the projectors.
Do not tilt the projector more than
±10° from side to side when in
use, as this may cause serious
lamp failure, damage the lamp
module and cause extra cost on
replacement.
4 5
Location of the ceiling mount holes at the bottom of the projector
Installation and Quick-Start Guide
±10°
±360°
Rev A January 2015
page 8
Page 15

Digital Projection E-Vision 6800 3D Series
OPERATING THE PROJECTOR
Operating The Projector
Switching the projector on
• Connect the power cable between the mains supply and the projector. Switch on at the switch next to the power connector.
• Wait until the self-test has completed and the Power indicator on the projector control panel shows amber. The lamp will be off and the
projector will be in STANDBY mode.
• Press on the control panel or POWER ON on the remote control.
The Power indicator on the control panel will ash green for a few seconds whilst the lamp comes up to full brightness. When the
projector is ready for use, the Power indicator will show steady green.
Selecting an input signal or test pattern
Input signal
• Connect an image source to the projector. The signal should be automatically detected by the projector, and should be displayed within a
two or three seconds.
• If more than one signal is connected, then select the image you want to display:
Press SOURCE on the control panel to cycle through the inputs,
or press INPUT on the remote control, then use the LEFT and RIGHT arrow buttons to cycle through the inputs.
Notes
Before switching on the projector
for the rst time, make sure
the electric circuit is grounded.
Poor grounding may damage the
projector.
Always allow the lamp to cool for
5 minutes before:
- disconnecting the power
- moving the projector
For full details of how to connect an
image source to the projector, see
the Connection Guide.
Test pattern
To display a test pattern, do either of the following:
• Press TEST PATTERN on the remote control, then use the LEFT and RIGHT arrow buttons to cycle through the patterns,
• Use the OSD (On-screen Display):
1. Open the Main menu, highlight Test Pattern and press ENTER to open the list of available test paterns.
2. Use the UP and DOWN arrow buttons to highlight the test pattern you wish to display and press ENTER.
Installation and Quick-Start Guide
For full details of how to use the
controls and the menu system, see
the Operating Guide.
Rev A January 2015
page 9
Page 16

Digital Projection E-Vision 6800 3D Series
OPERATING THE PROJECTOR
Adjusting the lens
Zoom
• Use the ZOOM +/− buttons on the control panel or on the remote control to adjust the lens so that the image lls the screen.
Focus
• Use the FOCUS +/− buttons on the control panel or on the remote control to adjust the lens until the image is sharp.
Shift
• Use the LENS SHIFT arrow buttons on the control panel to adjust the position of the image,
or press the LENS SHIFT button on the remote control then use the arrow buttons to adjust the position of the image.
Adjusting the image
Orientation
• Use the Orientation settings in the Setup menu.
Aspect ratio
• Press the ASPECT button on the remote control to cycle through all the available settings.
or use the Aspect Ratio setting in the Geometry menu.
Picture
• Press PICTURE on the remote control to open the Image menu, then use the sliders to adjust brightness, contract etc.
Notes
For full details of how to use the
controls and the menu system, see
the Operating Guide.
Installation and Quick-Start Guide
Rev A January 2015
page 10
Page 17

Digital Projection E-Vision 6800 3D Series
OPERATING THE PROJECTOR
Switching the projector off
• Press on the control panel or STANDBY on the remote control, then press the button a second time within 5 seconds to conrm your
intention to switch off.
The lamp will go off, and the Power indicator on the control panel will ash amber for a few seconds whilst the lamp cools. The Power
indicator on the control panel will then show amber and the projector will be in Standby mode.
• Switch off at the switch next to the power connector. Disconnect the power cable from the projector.
Notes
Always allow the lamp to cool for
5 minutes before:
- disconnecting the power
- moving the projector
Installation and Quick-Start Guide
Rev A January 2015
page 11
Page 18

Digital Projection E-Vision 6800 3D Series
This page is intentionally left blank.
Installation and Quick-Start Guide
Page 19
E-Vision 6800 3D Series
LENS SHIFT
ZOOM
–
FOCUS
+
MENU
ENTER
RETURN
SOURCE
POWER
WARNING
LAMP1
LAMP2
AU
TO
High Brightness Digital Video Projector
4
CONNECTION GUIDE
Rev A January 2015
Page 20

Digital Projection E-Vision 6800 3D Series
IN THIS GUIDE
IN THIS GUIDE
Signal Inputs And Outputs ............................................................................. 15
Supported Signal Input Modes ..................................................................... 16
2D input modes .........................................................................................................16
3D input modes .........................................................................................................18
Control Connections ........................................................................................ 20
Connection Guide
Rev A January 2015
Page 21
Digital Projection E-Vision 6800 3D Series
SIGNAL INPUTS AND OUTPUTS
Signal Inputs And Outputs
HDBaseT/LAN
1
2
3
4
5
6
7
8
9
Receives digital signal from HDBaseT-compliant
devices.
VGA
This input receives analog signals from a computer.
When using this input, it is best to use a fully wired
VGA cable to connect the source to the projector.
This will allow the source to determine the projector’s
capabilities via DDC and show an optimized image.
Such cables can be identied as they have a blue
connector shell.
Component 1
Connect a set of RGsB, RGBHV or YCbCr cables to
the BNC connectors.
Component 2
Connect a set of YPbPr or YCbCr cables to the RCA
phono connectors.
Video
Connect a composite video cable to the single RCA
phono connector.
S-Video
Connect an S-Video cable to the 4-pin mini-DIN
connector.
HDMI
This HDMI 1.4 input supports HDCP 1.1 and DVI 1.0.
DVI-D
This input can receive digital (DVI-D) signal from a
compatible source.
Supports HDCP.
Monitor Out
Connect an analog monitor cable (VGA) to the 15-pin
D-type connector.
Notes
For a complete listing of pin
congurationsforallsignaland
LAMP2
LAMP1
AUTO
WARNING
SOURCE
RETURN
POWER
ENTER
MENU
LENS SHIFT
–
ZOOM
+
FOCUS
1
2
3
4
5
6
7
8
9
control connectors, see Wiring
Details later in this Guide.
When Standby Mode is set to Eco:
the
Monitor Out connection is
disabled.
Connection Guide
Rev A January 2015
page 15
Page 22

Digital Projection E-Vision 6800 3D Series
SUPPORTED SIGNAL INPUT MODES
Supported Signal Input Modes
2D input modes
Signal Resolution Refresh Rate
( Hz )
SDTV 480i 720 x 480 59.94 525 15.73
576i 720 x 576 50.00 625 15.63
EDTV 480p59 720 x 480 59.94 525 31.47
480p60 720 x 480 60.00 525 31.50
576p50 720 x 576 50.00 625 31.25
HDTV 720p50 1280 x 720 50.00 750 37.50
720p59 1280 x 720 59.94 750 44.96
720p60 1280 x 720 60.00 750 45.00
1080p23 1920 x 1080 23.98 1125 26.97
1080p24 1920 x 1080 24.00 1125 27.00
1080p25 1920 x 1080 25.00 1125 28.13
1080p29 1920 x 1080 29.97 1125 33.72
1080p30 1920 x 1080 30.00 1125 33.75
1080i50 1920 x 1080 50.00 1125 28.13
1080p50 1920 x 1080 50.00 1125 56.25
1080i59 1920 x 1080 59.94 1125 33.72
1080p59 1920 x 1080 59.94 1125 67.43
1080i60 1920 x 1080 60.00 1125 33.75
1080p60 1920 x 1080 60.00 1125 67.50
continues on next page...
Total
number
of lines
Horizontal
Frequency
(kHz)
VIDEO /
S-VIDEO
ü ü
ü ü
ü ü
ü ü
ü ü
ü ü
ü ü
ü ü
ü ü
ü ü
ü ü
ü ü
ü ü
ü ü
ü ü ü
ü ü
ü ü ü
ü ü
ü ü ü
1 & 2
Component
VGA
HDMI /
HDBaseT
Notes
DVI (DVI-D)
Connection Guide
Rev A January 2015
page 16
Page 23

Digital Projection E-Vision 6800 3D Series
SUPPORTED SIGNAL INPUT MODES
Signal Resolution Refresh Rate
( Hz )
COMPUTER VGA59 640 x 480 59.94 525 31.47
VGA60 640 x 480 60.00 525 31.50
VGA75 640 x 480 75.00 500 37.50
SVGA60 800 x 600 60.32 628 37.88
SVGA75 800 x 600 75.00 625 46.88
SVGA85 800 x 600 85.06 631 53.67
XGA60 1024 x 768 60.00 806 48.36
XGA70 1024 x 768 70.07 806 56.48
XGA75 1024 x 768 75.03 800 60.02
WXGA50 1280 x 720 49.83 744 37.07
WXGA60 1280 x 768 59.87 798 47.78
WXGA75 1280 x 768 74.89 805 60.29
WXGA85 1280 x 768 84.84 809 68.63
WXGA60 1280 x 800 59.81 831 49.70
SXGA60 1280 x 1024 60.02 1066 63.98
SXGA75 1280 x 1024 75.02 1066 79.98
SXGA85 1280 x 1024 85.02 1072 91.15
SXGA+60 1400 x 1050 59.98 1089 65.32
UXGA60 1600 x 1200 60.00 1250 75.00
WSXGA+60 1680 x 1050 59.95 1089 65.29
FHD50 1920 x 1080 49.92 1114 55.62
WUXGA60 1920 x 1200 59.95 1235 74.04
Total
number
of lines
Horizontal
Frequency
(kHz)
VIDEO /
S-VIDEO
1 & 2
Component
ü ü ü
ü ü ü
ü ü ü
ü ü ü
ü ü ü
ü ü ü
ü ü
ü ü
ü ü
ü ü
ü ü
ü ü
ü ü
ü ü ü
ü ü ü
ü ü ü
ü ü ü
ü ü ü
ü ü ü
ü ü ü
ü ü
ü ü ü
VGA
HDMI /
HDBaseT
Notes
DVI (DVI-D)
Connection Guide
Rev A January 2015
page 17
Page 24

Digital Projection E-Vision 6800 3D Series
SUPPORTED SIGNAL INPUT MODES
3D input modes
Signal Resolution Refresh Rate
( Hz )
VGA59 Frame Sequential 640 x 480 59.94 525 31.47
SVGA60 Frame Sequential 800 x 600 60.32 628 37.88
XGA60 Frame Sequential 1024 x 768 60.00 806 48.36
XGA120 Frame Sequential 1024 x 768 120.00 813 97.55
WXGA60 Frame Sequential 1280 x 800 59.81 831 49.70
WXGA120 Frame Sequential 1280 x 800 119.90 847 101.56
SXGA60 Frame Sequential 1280 x 1024 60.02 1066 63.98
UXGA60 Frame Sequential 1600 x 1200 60.00 1250 75.00
WUXGA60 Frame Sequential 1920 x 1200 59.95 1235 74.04
720p50 Frame Packing 1280 x 720 50.00 1470 37.50
720p50 Side-by-Side (Half) 1280 x 720 50.00 1470 37.50
720p50 Top-and-Bottom 1280 x 720 50.00 750 37.50
720p50 Frame Sequential 1280 x 720 50.00 750 37.50
720p120 Frame Sequential 1280 x 720 120.00 750 90.00
1080i50 Side-by-Side (Half) 1920 x 1080 50.00 1125 56.25
1080i60 Side-by-Side (Half) 1920 x 1080 60.00 1125 67.50
1080p24 Frame Packing 1920 x 1080 24.00 2205 27.00
1080p24 Side-by-Side (Half) 1920 x 1080 24.00 2205 27.00
1080p24 Top-and-Bottom 1920 x 1080 24.00 2205 27.00
1080p24 Frame Sequential 1920 x 1080 24.00 2205 27.00
1080p50 Side-by-Side (Half) 1920 x 1080 50.00 1125 56.25
1080p50 Top-and-Bottom 1920 x 1080 50.00 1125 56.25
1080p50 Frame Sequential 1920 x 1080 50.00 1125 56.25
continues on next page...
Total
number
of lines
Horizontal
Frequency
(kHz)
HDMI /
HDBaseT
ü
ü
ü
ü
ü
ü
ü
ü
ü
ü
ü
ü
ü
ü
ü
ü
ü
ü
ü
ü
ü
ü
ü
DVI-D
Notes
Only the HDMI and HDBaseT inputs
support HDMI 1.4 3D formats.
Connection Guide
Rev A January 2015
page 18
Page 25

Digital Projection E-Vision 6800 3D Series
SUPPORTED SIGNAL INPUT MODES
Signal Resolution Refresh Rate
( Hz )
Total
number
of lines
Horizontal
Frequency
(kHz)
1080p60 Side-by-Side (Half) 1920 x 1080 60.00 1125 67.50
1080p60 Top-and-Bottom 1920 x 1080 60.00 1125 67.50
1080p60 Frame Sequential 1920 x 1080 60.00 1125 67.50
HDMI /
HDBaseT
ü
ü
Notes
DVI-D
Only the HDMI and HDBaseT inputs
support HDMI 1.4 3D formats.
ü
Connection Guide
Rev A January 2015
page 19
Page 26

Digital Projection E-Vision 6800 3D Series
CONTROL CONNECTIONS
Control Connections
HDBaseT/LAN
1
Receives digital signal from HDBaseT-compliant
devices.
All of the projector’s features can be controlled via a
LAN connection, using commands described in the
Remote Communications Guide.
3D Sync Out
2
Connect to a Z Screen or 3D IR emitter as
appropriate.
Service
3
4
5
6
The USB Service port is used for rmware updates
only.
Wired Remote
The remote control can be connected using a
standard TRS cable.
RS-232
All of the projector’s features can be controlled via a
serial connection, using commands described in the
Remote Communications Guide.
Screen Trigger
The Trigger output can be connected to an electrically
operated screen, automatically deploying the screen
when the projector is switched on, and retracting the
screen when the projector is switched to standby.
Notes
LAMP2
LAMP1
AUTO
WARNING
SOURCE
RETURN
POWER
ENTER
MENU
LENS SHIFT
–
ZOOM
+
FOCUS
Plugging in the remote control cable
will disable infrared transmission.
1
2
3
4
Connection Guide
5
6
Rev A January 2015
page 20
Page 27

E-Vision 6800 3D Series
LENS SHIFT
ZOOM
–
FOCUS
+
MENU
ENTER
RETURN
SOURCE
POWER
WARNING
LAMP1
LAMP2
AU
TO
High Brightness Digital Video Projector
4
OPERATING GUIDE
Rev A January 2015
Page 28

Digital Projection E-Vision 6800 3D Series
IN THIS GUIDE
IN THIS GUIDE
Using The Remote Control ............................................................................. 23
Using The Projector ......................................................................................... 25
Main menu .................................................................................................................25
Lens menu .................................................................................................................26
Image menu ...............................................................................................................27
Image Mode ....................................................................................................................27
Brightness and Contrast .................................................................................................27
Gamma ...........................................................................................................................28
Dynamic Black ................................................................................................................28
Saturation, Hue, Sharpness and Noise Reduction .........................................................28
Position and Phase .........................................................................................................29
Resync ............................................................................................................................29
Color menu ................................................................................................................30
Color Space ....................................................................................................................30
Color Temperature ..........................................................................................................31
Trim .................................................................................................................................32
Hue / Saturation / Gain ...................................................................................................32
Geometry menu .........................................................................................................33
Aspect Ratio ....................................................................................................................33
H Keystone and V Keystone ...........................................................................................34
Overscan .........................................................................................................................36
Setup menu ................................................................................................................41
Network ...........................................................................................................................42
RS232 .............................................................................................................................42
Security ...........................................................................................................................43
Filter ................................................................................................................................43
System ............................................................................................................................44
Information menu ......................................................................................................45
Source information ..........................................................................................................45
Menu Map............................................................................................................. 46
3D menu .....................................................................................................................37
The 3D Swap setting explained ......................................................................................37
3D types ..........................................................................................................................38
Frame rate multiplication in 3D images ...........................................................................39
Lamps menu ..............................................................................................................40
Operating Guide
Rev A January 2015
Page 29

Digital Projection E-Vision 6800 3D Series
USING THE REMOTE CONTROL
Using The Remote Control
1
Power ON
2
Power OFF
3
Lens controls: FOCUS and ZOOM
4
Navigation
Navigate through the menus with the arrows, conrm your choice with ENTER.
5
MENU
Access the projector OSD (on-screen display). If the OSD is open, press this button
to exit.
6
INPUT
Select from the available video input signals.
7
AUTO
The projector will re-synchronise with the current input signal.
Notes
1
2
11
3
4
5
6
7
12
13
14
15
16
17
Some options and controls may not
be available due to settings in the
menus.
For full details of how to use the
menu system, see later in this guide.
8
OVERSCAN
9
3D MODE
Access the 3D menu.
10
INFO
Access the Information menu.
continues on next page...
Operating Guide
8
9
10
18
19
20
Rev A January 2015
page 23
Page 30

Digital Projection E-Vision 6800 3D Series
USING THE REMOTE CONTROL
11
TEST PATTERN
Select from a list of available test patterns.
12
LENS SHIFT
Press this button, then adjust the lens position using the arrow buttons.
13
RETURN
Press this button to leave the current menu and go back one level.
14
NETWORK
Access the Network menu.
15
PICTURE
Access the Image menu.
16
BLANK
Switch the image off.
17
ASPECT
Select from a list of available aspect ratios.
18
LAMP MODE
Access the Lamps menu.
19
FREEZE
Freeze the current image.
Notes
1
2
11
3
4
5
6
7
12
13
14
15
16
17
Some options and controls may not
be available due to settings in the
menus.
For full details of how to use the
menu system, see later in this guide.
20
LIGHT
Press this button to illuminate the buttons on the remote control for 10 seconds.
Operating Guide
8
9
10
18
19
20
Rev A January 2015
page 24
Page 31

Digital Projection E-Vision 6800 3D Series
USING THE PROJECTOR
Using The Projector
Main menu
• Input
Press ENTER to open the list of available inputs.
Use the UP and DOWN arrow buttons to select an input from the list, then
press ENTER to conrm your choice.
Press MENU to return to the main menu.
• Test Pattern
Choose from:
...Off, White, Black, Red, Green, Blue, Crosshatch, Burst, H Ramp, Color
Bar, Checkerboard...
Use the LEFT and RIGHT arrow buttons to switch between values.
• Lens, Image, Color, Geometry, 3D, Lamps, Setup and Information
Press ENTER to open these menus and access various settings.
E-Vision 6800 WUXGA 3D
Input
Test Pattern
Lens
Image
Color
Geometry
3D
Lamps
Setup
Information
Select Item
E-Vision 6800 WUXGA 3D
Input
Test Pattern
Lens
Image
Color
Geometry
3D
Lamps
Setup
Information
[Enter] Submenu
[Menu] Exit
HDMI
DVI-D
HDBaseT
VGA
Component 1
Component 2
S-Video
Video
HDMI
Off
8
8
8
8
8
8
8
8
Notes
If no input is connected, the Image
menu will be unavailable.
Some settings are associated with
the current input and the value of
the Image Mode setting (Bright,
Presentation or Video). The
projector automatically stores values
of such settings to reuse when an
Input / Image Mode combination
is selected again. For example, if
you increase the Contrast value
while on the DVI-D input with Image
Mode set to Bright, the next time
you use the DVI-D input with Image
Mode set to Bright, the projector
will automatically set the same
Contrast value.
Settings NOT associated with an
Input / Image Mode combination
are called global settings and are
indicated with a globe icon
Menu Map further in this guide.
in the
Operating Guide
Select Item
[Enter] Execute
[RETURN] Back
Rev A January 2015
page 25
Page 32

Digital Projection E-Vision 6800 3D Series
USING THE PROJECTOR
Lens menu
Lens settings operate in Zoom/Focus and Shift mode.
When in Zoom/Focus mode:
• Use the UP and DOWN arrow buttons to adjust Zoom.
• Use the LEFT and RIGHT arrow buttons to adjust Focus.
When in Shift mode, use the arrow buttons to adjust Shift.
Press ENTER to switch between Shift and Zoom/Focus mode.
Lens Control
Zoom
Focus
Enter to Shift
Lens Control
Shift V
Shift H
Enter to Zoom/Focus
Notes
Operating Guide
Rev A January 2015
page 26
Page 33

Digital Projection E-Vision 6800 3D Series
USING THE PROJECTOR
Image menu
Image Mode
Choose from Bright, Presentation and Video.
Press ENTER to open the list.
Use the UP and DOWN arrow buttons to select an image mode from the list,
then press ENTER to conrm your choice.
Press MENU to return to the main menu.
Brightness and Contrast
Highlight the setting you wish to edit, and then press ENTER, or the LEFT or
RIGHT arrow button to open the slider.
Use the LEFT and RIGHT arrow buttons to adjust the slider.
Press MENU to close the slider.
Image >>
Image Mode
Brightness
Contrast
Gamma
Dynamic Black
Saturation
Hue
Sharpness
Noise Reduction
Position And Phase
Resync
Select Item
[Enter] Execute
Bright
Presentation
Video
[RETURN] Back
Image >>
Image Mode
Brightness
Contrast
Gamma
Dynamic Black
Saturation
Hue
Sharpness
Noise Reduction
Position And Phase
Resync Execute
Bright
100
100
2.2
Off
100
100
8
Notes
15
0
Operating Guide
Select Item
Brightness
Adjust
[RETURN] Back
100
Rev A January 2015
page 27
Page 34

Digital Projection E-Vision 6800 3D Series
USING THE PROJECTOR
Image menu continued from previous page
Gamma
Choose a de-gamma curve from 1.0, 1.8, 2.0, 2.2, 2.35 and 2.5.
Used correctly, the Gamma setting can improve contrast while maintaining good
details for blacks and whites.
If excess ambient light washes out the image and it is difcult to see details in dark
areas, lower the Gamma setting to compensate. This improves contrast while
maintaining good details for blacks. Conversely, if the image is washed out and
unnatural, with excessive detail in black areas, increase the setting.
Dynamic Black
Set to On to allow for increased contrast in darker scenes by modulating the light
source.
Image >>
Image Mode
Brightness
Contrast
Gamma
Dynamic Black
Saturation
Hue
Sharpness
Noise Reduction
Position And Phase
Resync
Select Item
[Enter] Execute
Notes
1.0
1.8
2.0
2.2
2.35
2.5
[RETURN] Back
Saturation, Hue, Sharpness and Noise Reduction
Highlight the setting you wish to edit, and then press ENTER, or the LEFT or
RIGHT arrow button to open the slider.
Use the LEFT and RIGHT arrow buttons to adjust the slider.
Press MENU to close the slider.
Operating Guide
Noise Reduction
0
Rev A January 2015
page 28
Page 35

Digital Projection E-Vision 6800 3D Series
USING THE PROJECTOR
Image menu continued from previous page
Position and Phase
Press ENTER to open a submenu.
• VGA Setup
H Total, H Start, H Phase, V Start
Adjust these settings as required to suit the incoming image.
• Digital Alignment
Digital Zoom, Digital Pan, Digital Scan
Select a digital alignment control.
Reset
Press ENTER to reset all Digital Alignment settings to zero.
• H/V Alignment
H Zoom, V Zoom, H Shift, V Shift
Select an alignment control.
Reset
Press ENTER to reset all H/V Alignment settings to zero.
Highlight the setting you wish to edit, and then press ENTER, or the LEFT or
RIGHT arrow button to open the slider.
Use the LEFT and RIGHT arrow buttons to adjust the slider.
Press MENU to close the slider.
Resync
Press ENTER to force the projector to resynchronize with the current input.
Image >> Position And Phase
VGA Setup
Digital Alignment
H/V Alignment
Select Item
[Enter] Submenu
[RETURN] Back
8
8
8
Image >>
Image Mode
Brightness
Contrast
Gamma
Dynamic Black
Saturation
Hue
Sharpness
Noise Reduction
Position And Phase
Resync Execute
Bright
100
100
2.2
Off
100
100
8
Notes
H Shift will only work if the image
has been reduced horizontally using
H Zoom. Likewise, V Shift will
only work once V Zoom has been
applied.
15
0
Operating Guide
Select Item
[Enter] Execute
[RETURN] Back
Rev A January 2015
page 29
Page 36

Digital Projection E-Vision 6800 3D Series
USING THE PROJECTOR
Color menu
Color Space
In most cases, the Auto setting determines the correct colorspace to use. If it
does not, you can choose a specic colorspace:
Choose from Auto, YPbPr, YCbCr, RGB-PC and RGB-Video.
Color >>
Color Space
Color Temperature
Trim
Hue / Saturation / Gain
Select Item
Color >>
Color Space
Color Temperature
Trim
Hue / Saturation / Gain
Adjust
Notes
Auto
6500K
8
8
[Menu] Exit
Auto
YPbPr
YCbCr
RGB-PC
RGB-Video
Operating Guide
Select Item
[Enter] Execute
[RETURN] Back
Rev A January 2015
page 30
Page 37

Digital Projection E-Vision 6800 3D Series
USING THE PROJECTOR
Color menu continued from previous page
Color Temperature
Choose a value from 5500K (warmer) to 9300K (cooler) or Native (no
correction).
Color >>
Color Space
Color Temperature
Trim
Hue / Saturation / Gain
Select Item
[Enter] Execute
Notes
Native
5500K
6500K
7800K
9300K
[RETURN] Back
Operating Guide
Rev A January 2015
page 31
Page 38

Digital Projection E-Vision 6800 3D Series
USING THE PROJECTOR
Color menu continued from previous page
Trim
Adjust the RGB lift and gain settings to improve the color balance of the projected
image.
Highlight the setting you wish to edit, and then either press ENTER to access it, or
use the LEFT and RIGHT arrow buttons to switch between values.
Hue / Saturation / Gain
Press ENTER to open a submenu, then use the LEFT and RIGHT arrow
buttons to move the sliders.
Hue
Adjust hue of the main color as shown below:
Main color Hue
R Magenta
G Yellow
B Cyan
C Green
M Blue
Y Red
Yellow
Cyan
Magenta
Blue
Red
Green
Color >> Trim
Red Lift
Green Lift
Blue Lift
Red Gain
Green Gain
Blue Gain
Select Item
Color >> Hue / Saturation / Gain
Red
Green
Blue
Cyan
Magenta
Yellow
White
Adjust
Notes
100
100
100
100
100
100
[RETURN] Back
8
8
8
8
8
8
8
Saturation
When you adjust the saturation of the main color, the selected color becomes
lighter or thicker.
Gain
When you adjust the gain of the main color, the selected color becomes brighter
or darker.
Operating Guide
Select Item
[Enter] Submenu
[RETURN] Back
Rev A January 2015
page 32
Page 39

Digital Projection E-Vision 6800 3D Series
USING THE PROJECTOR
Geometry menu
This menu allows you to compensate for image distortions caused by an unusual
projection angle or irregular screen surface.
Aspect Ratio
Choose from:
• 5:4
• 4:3
• 16:10
• 16:9
• 1.88:1
• 2.35:1
• Source
• Unscaled
Geometry >>
Aspect Ratio
H Keystone
V Keystone
Overscan
Select Item
Geometry >>
Aspect Ratio
H Keystone
V Keystone
Overscan
[Enter] Submenu
Notes
Source
0
0
Off
[RETURN] Back
5:4
4:3
16:10
16:9
1.88:1
2.35:1
Source
Unscaled
To change the aspect ratio:
1. From the Main menu, open Aspect Ratio.
2. From the list on the right, select a new aspect ratio and press
ENTER.
Operating Guide
Select Item
[Enter] Execute
[RETURN] Back
Rev A January 2015
page 33
Page 40

Digital Projection E-Vision 6800 3D Series
USING THE PROJECTOR
Geometry menu continued from previous page
H Keystone and V Keystone
Use the H Keystone and V Keystone settings to compensate for any distortion
caused by the projector being in a different horizontal or vertical plane to the screen.
Highlight the setting you wish to edit, and then press ENTER, or the LEFT or
RIGHT arrow button to open the slider.
Use the LEFT and RIGHT arrow buttons to adjust the slider.
Press MENU to close the slider.
Keystone example
1
The projector is positioned at an angle
2
The resulting image is distorted
3
The image is corrected when V Keystone is applied
H Keystone
V Keystone
Notes
0
0
1 2 3
Operating Guide
Rev A January 2015
page 34
Page 41

Digital Projection E-Vision 6800 3D Series
USING THE PROJECTOR
Geometry menu continued from previous page
Keystone settings
1
Projector to the left
The projector is positioned
to the left of the screen.
To correct, apply a positive
H Keystone value using
the RIGHT arrow button.
2
Projector to the right
The projector is positioned
to the right of the screen.
To correct, apply a negative
H Keystone value using
the LEFT arrow button.
3
Projector high
The projector is positioned
above the screen at a
downward angle.
To correct, apply a negative
V Keystone value using
the LEFT arrow button.
4
Projector low
The projector is positioned
below the screen at an
upward angle.
To correct, apply a positive
V Keystone value using
the RIGHT arrow button.
Notes
1
2
5
Projector straight
The projector is directly
opposite the screen at a
right angle both horizontally
and vertically.
No correction is needed.
Operating Guide
4
53
Horizontal and vertical keystone corrections
Rev A January 2015
page 35
Page 42

Digital Projection E-Vision 6800 3D Series
USING THE PROJECTOR
Geometry menu continued from previous page
Overscan
Set to On to compensate for noisy or badly dened image edges.
Geometry >>
Aspect Ratio
H Keystone
V Keystone
Overscan
Select Item
[Enter] Execute
Notes
Off
On
[RETURN] Back
Operating Guide
Image with noisy edges Overscanned image
Rev A January 2015
page 36
Page 43

Digital Projection E-Vision 6800 3D Series
USING THE PROJECTOR
3D menu
Use this menu to enable, disable and set up 3D input, as follows:
• 3D Format — Off, Auto, Side by Side, Top and Bottom and
Frame Sequential.
• DLP Link — On (if you are using 3D glasses that can utilise the
DLP Link® signal embedded in the image) and Off
• 3D Swap — Normal and Rever se (set to Reverse if the left- and
right-eye images are displayed in the wrong order)
• 3D 24Hz Display — set to 96Hz or 144Hz depending on the
source. This setting is disabled unless a 24Hz 3D input is detected.
The 3D Swap setting explained
The outgoing 3D frames are in pairs - the dominant frame being
presented rst. You can determine which frame should be the dominant
one.
By convention the default setting is Left.
3D >>
3D Format
DLP- Link
3D Swap
3D 24Hz Display
Select Item
Dominance Left
LEFT 1 RIGHT 1 LEFT 2 RIGHT 2 LEFT 3 RIGHT 3
Dominance Right
Item Adjust
[RETURN] Back
Normal
144 Hz
LEFT 3RIGHT 1 LEFT 1 RIGHT 2 LEFT 2 RIGHT 3
Off
Off
Notes
If 3D Format is set to Off, or if
no 3D signal is detected in Auto
mode, the other 3D settings will be
unavailable.
Frame Sequential is supported on
the DVI input only.
3D video is only possible on the
HDMI, HDBaseT and DVI inputs.
The Frame Packing format is
automatically detected by the
projector.
See also 3D types further in this
guide.
Operating Guide
Rev A January 2015
page 37
Page 44

Digital Projection E-Vision 6800 3D Series
USING THE PROJECTOR
3D menu continued from previous page
3D types
In most situations you can use the Auto setting to have the projector automatically detect the format.
Otherwise, consider the notes below to help you set up the 3D input manually.
The following 3D formats are supported:
• Frame Packing
This format will be detected, re-synchronised, frame-multiplied and displayed at 144 Hz with the left eye /
right eye dominance automatically extracted from the video data.
• Top and Bottom
Sets the projector to reformat the video frames and map them to the display with the left eye / right eye
dominance automatically extracted from the video data.
• Side by Side (Half): interlaced and progressive, 50 and 60Hz
The side-by-side image will be de-interlaced (if appropriate), resized and then sequentially displayed at
100 or 120 Hz. The left eye / right eye dominance will be automatically extracted from the video data.
• Frame Sequential
An example of Frame Sequential would be 60Hz (30 frames per eye in Left-Right sequence (L1, R1,
L2, R2…) with 2x Frame Rate Multiplication, resulting in a displayed sequence at 120 Hz (L1, R1, L1,
R1, L2, R2, L2, R2…). For sequential 3D, the projector will generate an output sync, but it may then be
necessary to manually reset the dominance each time the player is started.
Notes
L
R
Frame Packing
L
R
Top-and-Bottom
L R
Operating Guide
Side-by-Side (Half)
L R L R
Frame Sequential
Rev A January 2015
page 38
Page 45

Digital Projection E-Vision 6800 3D Series
USING THE PROJECTOR
3D menu continued from previous page
Frame rate multiplication in 3D images
When displaying a low frame rate 3D video, the projector
multiplies the frame rate to obtain a icker-free image. For
example, a 60Hz frame rate is doubled to 120 Hz, or a 48 Hz
frame rate is tripled to 144 Hz.
Frame rate multiplication is an automatic process. It occurs in
the background and cannot be modied by the user.
IN
OUT
L1
R1 L3
R1
L2 R2
L1L1R1 R2L2 L3R2
x2 example
L2
Notes
Operating Guide
Rev A January 2015
page 39
Page 46

Digital Projection E-Vision 6800 3D Series
USING THE PROJECTOR
Lamps menu
• Lamp Mode
Choose from Auto 1, Dual, Lamp 1 and Lamp 2.
• Power Mode
Eco will automatically set the lamp power to 80%. Normal will set the power
to 92%.Set to Custom if you wish to adjust the power manually, from 80% to
100%.
• Custom Power Level
Use the LEFT and RIGHT arrow buttons to set lamp power. This setting is
only available if Power Mode is set to Custom.
• High Altitude
On increases the fan speed to compensate for reduced air density at high
altitude.
The following menu items show information only:
• Lamp 1 Status, Lamp 2 Status
• Lamp 1 Time, Lamp 2 Time
• Lamp 1 Life Remaining, Lamp 2 Life Remaining
Lamps >>
Lamp Mode
Power Mode
Custom Power Level
High Altitude Off
Lamp 1 Status
Lamp 2 Status
Lamp 1 Time
Lamp 2 Time
Lamp 1 Life Remaining
Lamp 2 Life Remaining
Select Item
On
On
00031 [H]
00015 [H]
98%
99%
Adjust
[RETURN] Back
Dual
Normal
-----
Notes
Operating Guide
Rev A January 2015
page 40
Page 47

Digital Projection E-Vision 6800 3D Series
USING THE PROJECTOR
Setup menu
• Orientation
Choose from Desktop Front, Ceiling Front, Desktop Rear and
Ceiling Rear.
• Network
Set up a LAN network connection.
• RS232
Set up a serial connection.
• Security
Set up Control Panel Lock and Security Lock.
• Filter
Set up lter exchange intervals and reset the lter timer.
• System
Adjust various system settings.
• Factory Reset
Restore factory settings.
To restore the factory default settings:
1. Navigate to Factory Reset and press ENTER.
2. When prompted, use the LEFT and RIGHT arrow buttons to
highlight the OK button and then press ENTER to conrm your choice.
Setup >>
Orientation
Network
RS232
Security
Filter
System
Factory Reset
Select Item
Adjust
Reset Everything ?
CancelOK
Notes
Desktop Front
8
8
8
8
8
Execute
[RETURN] Back
Operating Guide
Rev A January 2015
page 41
Page 48

Digital Projection E-Vision 6800 3D Series
USING THE PROJECTOR
Setup menu continued from previous page
Network
Set DHCP to On if the IP address is to be assigned by a DHCP server, or Off if it
is to be set here.
• If DHCP is set to On, it will not be possible to edit IP Address, Subnet Mask,
Gateway or DNS.
• If DHCP is set to Off:
1. Edit IP Address, Subnet Mask, Gateway and DNS as required.
2. Select Apply and press ENTER.
Standby Power
If this setting is On, the LAN socket remains active when the projector is in
STANDBY mode. If the setting is Off, the LAN socket is disabled when the
projector is in STANDBY mode.
RS232
• Baud Rate
Choose between 38400, 19200 and 9600.
• Channel
Choose between Local and HDBaseT.
Setup >> Network
IP Address
Subnet Mask
Gateway
DNS
DHCP
Apply
Standby Power
MAC Address 00:18:37:16:ef:ca
Select Item
Setup >> RS232
Baud Rate 9600
Channel
Adjust
192.168.0.100
255.255.255.0
0.0.0.0
0.0.0.0
Off
8
On
[RETURN] Back
Local
Notes
Operating Guide
Select Item
Item Adjust
[RETURN] Back
Rev A January 2015
page 42
Page 49

Digital Projection E-Vision 6800 3D Series
USING THE PROJECTOR
Setup menu continued from previous page
Security
Control Panel Lock
Use this setting to lock the control panel keys.
To unlock the keys, press the DOWN arrow button and hold for 5 seconds.
Security Lock
When the Security Lock is enabled, a security password will need to entered
before the projector can be used, or before the lock can be disabled.
When setting the lock for the rst time, the password will need to be entered
twice, to ensure that it has been entered correctly.
Filter
This menu allows you to set up a reminder that the lters are due for replacement
and to reset the lter timer.
• Filter Message
Choose from Off, 100 hours, 200 hours, 500 hours and 1000 hours.
• Filter Reset
Press ENTER to reset the timer.
Setup >> Security
Control Panel Lock Off
Security Lock
Select Item
Password
Register Password
Confirm Password
[RETURN] Back
Setup >> Filter
Filter Message Off
Filter Reset
Item Adjust
[RETURN] Back
Execute
Notes
Off
The password consists of a
combinationofvepressesofthe
arrow keys.
Finddetailsaboutchanginglters
in the Installation and Quick-Start
Guide.
Operating Guide
Select Item
Item Adjust
[RETURN] Back
Rev A January 2015
page 43
Page 50

Digital Projection E-Vision 6800 3D Series
USING THE PROJECTOR
Setup menu continued from previous page
System
• Auto-Source
If this setting is On, the projector will automatically search for an active input
source.
• Auto Power Off
Set this to On if you want the projector to go into STANDBY mode when no
input source is detected for 20 minutes.
• Auto Power On
• Set this to On if you want the projector to start up immediately when the
mains is connected.
• Set this to Off if you want the projector to go into STANDBY mode when
the mains is connected. In this case, the projector will not start up until the
POWER button is pressed on the control panel or the remote control.
• Startup Logo
Set this to On if you want the DP logo to show when the projector is rst
switched on.
• Blank Screen
Choose from Logo, Blue and Black.
• Trigger
Choose from Screen, 16:9, TheaterScope, 4:3, 4:3 Narrow or RS232 to
determine what will cause the trigger output to activate.
• Infrared Sensor
Choose from Both, Front, Rear or HDBaseT.
• Resync Adjust
• Language
Change the OSD language.
Setup >> System
Auto Source
Auto Power Off
Auto Power On
Startup Logo
Blank Screen
Trigger
Infrared Sensor
Language
Select Item
Adjust
Notes
Off
Off
Off
Off
Logo
On
Both
AutoResync Adjust
8
[RETURN] Back
Operating Guide
Rev A January 2015
page 44
Page 51

Digital Projection E-Vision 6800 3D Series
USING THE PROJECTOR
Information menu
This menu gives information about software and hardware conguration, input
source and lamp operating times It also allows you to restore the factory default
settings.
Source information
This page provides information about the currently selected input source.
Information
Model:
Serial Number:
Software Version 1:
Software Version 2:
Filter Time:
Power On Time:
Source Information
Select Item
E-Vision 6800 WUXGA 3D
W444AAAAA0000
MD00-0000-AA00-AA00
SD00-AA00-0000
00005[H]
00005[H]
Adjust
[RETURN] Back
Notes
8
Operating Guide
Rev A January 2015
page 45
Page 52

Digital Projection E-Vision 6800 3D Series
MENU MAP
Menu Map
Menu Submenus and controls
INPUT
HDMI, DVI-D, HDBaseT, VGA, Component 1, Component 2, S-Video, Video
TEST PATTERN
Off, White, Black, Red, Green, Blue, Crosshatch, Burst, H Ramp, Color Bar, Checkerboard
LENS
Zoom, Focus, Shift V, Shift H (commands, adjustment via arrow buttons)
IMAGE
Image Mode : Bright, Presentation, Video
Brightness, Contrast: sliders, 0 to 200 (100)
Gamma: 1.0, 1.8, 2.0, 2.2, 2.35, 2.5
Dynamic Black: On, Off
Saturation, Hue: sliders, 0 to 200 (100)
Sharpness: slider, 0 to 31
Noise Reduction: slider, 0 to 15
Position And Phase
VGA Setup: H Total, H Start, H Phase, V Start: sliders, 0 to 200 (100)
Digital Alignment
Digital Zoom: slider
Digital Pan: slider
Digital Scan: slider
Reset (command)
H/V Alignment
H Zoom: slider
V Zoom : slider
H Shift: slider
V Shift: slider
Reset (command)
Resync (command)
Notes
Some of the information in this menu
map is summarised. See the actual
menu on the projector for full detail.
Some menu options and controls
may not be available due to settings
in other menus. These will be lighter
in color in the OSD.
Where it would be helpful, some
menu options are described in more
detail earlier in this operating guide.
Some settings are associated with
the current input and the value of
the Image Mode setting (Bright,
Presentation or Video). The
projector automatically stores values
of such settings to reuse when an
Input / Image Mode combination
is selected again. For example, if
you increase the Contrast value
while on the DVI-D input with I
Mode set to Bright, the next time
you use the DVI-D input with Image
set to Bright, the projector
Mode
will automatically set the same
Contrast value.
Settings NOT associated with an
Input / Image Mode combination
are called global settings and are
indicated with a globe icon
this section.
mage
in
Operating Guide
Rev A January 2015
page 46
Page 53

Digital Projection E-Vision 6800 3D Series
MENU MAP
Menu Submenus and controls
COLOR
Color Space: Auto, YPbPr, YCbCr, RGB PC, RGB Video
Color Temperature: Native, 5500K, 6500K, 7800K, 9300K
Trim: Red Lift, Green Lift, Blue Lift, Red Gain, Green Gain, Blue Gain: sliders, 0 to 200 (100)
Hue / Saturation / Gain
Red: Hue, Saturation, Gain: sliders, 0 to 200 (100)
Green: Hue, Saturation, Gain: sliders, 0 to 200 (100)
Blue: Hue, Saturation, Gain: sliders, 0 to 200 (100)
Cyan: Hue, Saturation, Gain: sliders, 0 to 200 (100)
Magenta: Hue, Saturation, Gain: sliders, 0 to 200 (100)
Yellow: Hue, Saturation, Gain: sliders, 0 to 200 (100)
White: Hue, Saturation, Gain: sliders, 0 to 200 (100)
GEOMETRY
Aspect Ratio: 5:4, 4:3, 16:10, 16:9, 1.88:1, 2.35:1, Source, Unscaled
H Keystone , V Keystone : sliders, -30 to 30 (0)
Overscan: On, Off
3D
3D Format: Off, Auto, Side by Side, Top and Bottom, Frame Sequential
DLP Link: On, Off
3D Swap : Normal, Reverse
3D 24Hz Display: 96Hz, 144Hz
LAMPS
Lamp Mode: Auto 1, Dual, Lamp 1, Lamp 2
Power Mode: Eco, Normal, Custom
Custom Power Level: 82% to 100%
High Altitude: On, Off
Information only: Lamp 1 Status, Lamp 2 Status
Lamp 1 Time, Lamp 2 Time
Lamp 1 Life Remaining, Lamp 2 Life Remaining
Notes
Some of the information in this menu
map is summarised. See the actual
menu on the projector for full detail.
Some menu options and controls
may not be available due to settings
in other menus. These will be
shaded grey on the actual menu.
Where it would be helpful, some
menu options are described in more
detail earlier in this operating guide.
Some settings are associated with
the current input and the value of
the Image Mode setting (Bright,
Presentation or Video). The
projector automatically stores values
of such settings to reuse when an
Input / Image Mode combination
is selected again. For example, if
you increase the
while on the DVI-D input with Image
Mode set to Bright, the next time
you use the DVI-D input with Image
Mode set to Bright, the projector
will automatically set the same
Contrast value.
Settings NOT associated with an
Input / Image Mode combination
are called global settings and are
indicated with a globe icon
this section.
Contrast value
in
Operating Guide
Rev A January 2015
page 47
Page 54

Digital Projection E-Vision 6800 3D Series
MENU MAP
Menu Submenus and controls
SETUP
Orientation: Desktop Front, Ceiling Front, Desktop Rear, Ceiling Rear
Network
IP Address: numeric input (default IP address is 192.168.0.100)
Subnet Mask, Gateway, DNS: numeric input
DHCP: On, Off
Apply (command)
Standby Power: On, Off
Information only: MAC Address
RS232
Baud Rate: 38400, 19200, 9600
Channel: Local, HDBaseT
Security
Control Panel Lock: On, Off
Security Lock: On, Off
Filter
Filter Message: Off, 100 hours, 200 hours, 500 hours, 1000 hours
Filter Reset (command)
System
Auto Source: On, Off
Auto Power Off: On, Off
Auto Power On: On, Off
Startup Logo: On, Off
Blank Screen: Logo, Blue, Black
Trigger: On, Off
Infrared Sensor: Both, Front, Rear
Resync Adjust: Always, Auto
Language: English, Français, Español, Deutsch, Português, 简体中文, 繁體中文, 日本語, 한국어
Factory Reset (command)
Notes
Some of the information in this menu
map is summarised. See the actual
menu on the projector for full detail.
Some menu options and controls
may not be available due to settings
in other menus. These will be
shaded grey on the actual menu.
Where it would be helpful, some
menu options are described in more
detail earlier in this operating guide.
Some settings are associated with
the current input and the value of
the Image Mode setting (Bright,
Presentation or Video). The
projector automatically stores values
of such settings to reuse when an
Input / Image Mode combination
is selected again. For example, if
you increase the
while on the DVI-D input with Image
Mode set to Bright, the next time
you use the DVI-D input with Image
Mode set to Bright, the projector
will automatically set the same
Contrast value.
Settings NOT associated with an
Input / Image Mode combination
are called global settings and are
indicated with a globe icon
this section.
Contrast value
in
INFORMATION
Operating Guide
Model, Serial Number, Software Version 1, Software Version 2, Filter Time, Power On Time
Source Information:
Active Source, Pixel Clock, Signal Format, H/V Refresh Rate, Sync Type, Sync Polarity, Scan
Type, Video Type
Rev A January 2015
page 48
Page 55

E-Vision 6800 3D Series
LENS SHIFT
ZOOM
–
FOCUS
+
MENU
ENTER
RETURN
SOURCE
POWER
WARNING
LAMP1
LAMP2
AU
TO
High Brightness Digital Video Projector
4
REMOTE COMMUNICATIONS GUIDE
Rev A January 2015
Page 56

Digital Projection E-Vision 6800 3D Series
IN THIS GUIDE
IN THIS GUIDE
Introduction ........................................................................................................ 51
Network setup ...........................................................................................................51
Serial Port setup ........................................................................................................51
Protocol commands ..................................................................................................52
Examples ........................................................................................................................52
Responses ......................................................................................................................52
Command Guide ................................................................................................ 53
Inputs .........................................................................................................................53
Test Patterns ..............................................................................................................53
Lens menu .................................................................................................................53
Image menu ...............................................................................................................54
Color menu ................................................................................................................55
Geometry menu .........................................................................................................55
3D menu .....................................................................................................................56
Lamps menu ..............................................................................................................56
Setup menu ................................................................................................................57
Information menu ......................................................................................................57
Web Conguration Utility ............................................................................... 58
Email settings ............................................................................................................59
Projector controls .....................................................................................................60
PJLink security options ............................................................................................61
Remote Communications Guide
Rev A January 2015
Page 57

Digital Projection E-Vision 6800 3D Series
INTRODUCTION
Introduction
The projector can be controlled by using an external control system or a PC via an RS232 or LAN interface, using a terminal-emulation
program.
Network setup
1. Connect the projector to a LAN network.
2. Open the Setup > Network menu and edit network settings. The default IP address is 192.168.0.100 and the TCP port number is 7000.
Serial Port setup
• Baud rate: 9,600 bps (default), 19,200 bps or 38,400 bps.
• Data length: 8 bits
• Stop bits: one
• Parity: none
• Flow control: none
Notes
Details of how to connect to
the projector using the LAN or
RS232 input, can be found in the
Connections Guide.
Furhter details about setting up
a LAN or Serial connection and
changing network settings can be
found in the Operating Guide.
Only one control path at a time
should be used for protocol control.
Attempts to send commands to both
serial and network ports at the same
time may result in unpredicatable
behaviour.
The baud rate can be adjusted. For
details, see the Operating Guide.
Remote Communications Guide
Rev A January 2015
page 51
Page 58

Digital Projection E-Vision 6800 3D Series
INTRODUCTION
Protocol commands
Commands are used to simulate menu operations and determine the settings of the projector, and use the following format:
• All commands consist of ASCII text strings starting with an asterisk and ending with an ASCII Carriage Return character
*command operator <value>
• The <command> string determines which setting the command will affect.
• Spaces are required before the operator and before the value.
• The <operator> string can take one of the following formats:
Command type <operator> Description
Set
Get
Execute Performs an action. No operator is entered for this type of command.
Examples
*orientation = 3
*aspect.ratio ? asks what the current aspect ratio is
*zoom.in commands the projector to zoom in
*orientation=3 is an invalid instruction because of the missing spaces before the operator and the value
= <value>
?
sets the orientation to Ceiling Rear (for a celing mounted projector positioned behind the screen)
Makes the setting take the <value>.
Asks what the current value is.
The value is returned as an ASCII text string.
(code 13):
Notes
To set the default value of a
command, simply enter the
command name and
an operator. For example
, without
*orientation will set the
orientation to 0 (Desktop Front).
You must wait for the complete
response to a command before
sending another command.
Responses
If the command has been successful, the projector response begins with ack (“acknowledged”). For example, if the command is *aspect.
ratio = 1
If the command has not been acknowledged, due to a syntax error or another problem, the projector response will be nack, followed by a
brief description of the problem.
Remote Communications Guide
, the projector will return ack aspect.ratio = 1 . The projector will then will change the aspect ratio accordingly.
Rev A January 2015
page 52
Page 59

Digital Projection E-Vision 6800 3D Series
COMMAND GUIDE
Command Guide
Protocol commands below are arranged in the order they appear in the OSD. Not all OSD settings have corresponding protocol commands.
<command> <operator> <value>
Inputs
input = ?
Test Patterns
test.pattern = ?
Lens menu
lens.left (execute)
lens.right (execute)
lens.up (execute)
lens.down (execute)
zoom.in (execute)
zoom.out (execute)
focus.near (execute)
focus.far (execute)
0 = HDMI
1 = DVI-D
2 = HDBaseT
3 = VGA
4 = Component 1
5 = Component 2
6 = S-Video
7 = Video
0 = Off
1 = White
2 = Black
3 = Red
4 = Green
5 = Blue
6 = Crosshatch
7 = Burst
8 = H Ramp
9 = Color Bar
10 = Checkerboard
Notes
Remote Communications Guide
Rev A January 2015
page 53
Page 60

Digital Projection E-Vision 6800 3D Series
COMMAND GUIDE
<command> <operator> <value>
Image menu
picture.mode = ?
brightness = ?
contrast = ?
gamma = ?
dblack = ?
sharpness = ?
nr = ?
resync (execute)
0 = Bright
1 = Presentation
2 = Video
0 to 200 (integer)
0 to 200 (integer)
0 = 1.0
1 = 1.8
2 = 2.0
3 = 2.2
4 = 2.35
5 = 2.5
0 = Off, 1 = On
0 to 31 (integer)
0 to 15 (integer)
Notes
Remote Communications Guide
Rev A January 2015
page 54
Page 61

Digital Projection E-Vision 6800 3D Series
COMMAND GUIDE
<command> <operator> <value>
Color menu
color.space = ?
color.temp = ?
red.lift = ?
red.gain = ?
green.lift = ?
green.gain = ?
blue.lift = ?
blue.gain = ?
0 = Auto
1 = YPbPr
2 = YCbCr
3 = RGB-PC
4 = RGB-Video
0 = Native
1 = 5500K
2 = 6500K
3 = 7800K
4 = 9300K
0 to 200 (integer)
0 to 200 (integer)
0 to 200 (integer)
0 to 200 (integer)
0 to 200 (integer)
0 to 200 (integer)
Geometry menu
aspect.ratio = ?
h.keystone = ?
v.keystone = ?
overscan = ?
0 = 5:4
1 = 4:3
2 = 16:10
3 = 16:9
4 = 1.88:1
5 = 2.35:1
6 = Source
7 = Unscaled
-30 to 30 (integer)
-30 to 30 (integer)
0 = Off, 1 = On
Notes
Remote Communications Guide
Rev A January 2015
page 55
Page 62

Digital Projection E-Vision 6800 3D Series
COMMAND GUIDE
<command> <operator> <value>
3D menu
3d.format = ?
3d.dlplink = ?
3d.dominance = ?
0 = Off
1 = Auto
2 = Side by Side
3 = Top and Bottom
4 = Frame Sequential
0 = Off, 1 = On
0 = Normal, 1 = Reverse
Lamps menu
lamp.mode = ?
power.mode = ?
lamp.power = ?
altitude = ?
lamp1.hours ?
lamp2.hours ?
lamp1.status ?
lamp2.status ?
0 = Auto 1
1 = Dual
2 = Lamp 1
3 = Lamp 2
0 = Eco, 1 = Normal, 2 = Custom
0 = Off, 1 = On
Notes
Remote Communications Guide
Rev A January 2015
page 56
Page 63

Digital Projection E-Vision 6800 3D Series
COMMAND GUIDE
<command> <operator> <value>
Setup menu
orientation = ?
lan.ip = ?
lan.subnet = ?
lan.gateway = ?
lan.dns = ?
lan.dhcp = ?
lan.standby = ?
auto.source = ?
auto.poweroff = ?
auto.poweron = ?
startup.logo = ?
blank.screen = ?
ir.enable = ?
trig.1 = ?
0 = Desktop Front
1 = Ceiling Front
2 = Desktop Rear
3 = Ceiling Rear
A valid IP address in the following format xxx.xxx.xxx.xxx
A valid subnet mask address in the following format xxx.xxx.xxx.xxx
A valid LAN gateway address in the following format x.x.x.x
A valid DNS address in the following format x.x.x.x
0 = Off, 1 = On
0 = Off, 1 = On
0 = Off, 1 = On
0 = Off, 1 = On
0 = Off, 1 = On
0 = Off, 1 = On
0 = Logo, 1 = Blue, 2 = Black
0 = Both, 1 = Front, 2 = Rear
0 = Off, 1 = On
Notes
Information menu
model.name ?
serial ?
sw.version ?
act.source ?
pixel.clock ?
h.refresh ?
v.refresh ?
power = ?
Remote Communications Guide
0 = Off, 1 = On
Rev A January 2015
page 57
Page 64

Digital Projection E-Vision 6800 3D Series
WEB CONFIGURATION UTILITY
Web Conguration Utility
Use the embedded Web Conguration
Utility to control the projector via a LAN
network:
1. Make sure the projector is connected to
a remote computer via LAN.
2. From the remote computer, access the
LAN IP address of the projector. The
Web Conguration Utility opens.
The utility’s features are arranged in the
following tabs:
Projector Status
1
View projector and network
information.
2
Alert Mail Setup
Set up error warnings and regular
status reports by email.
3
Crestron
Access various projector controls
via the embedded Crestron
RoomView® functionality.
Opens in a new browser page.
4
PJLink
Set up security options for PJLink.
Notes
If Standby Power is set to Off, the
LAN connection will be disabled
1
2
3
4
when the projector is in STANDBY
mode. To enable power on via LAN,
set Setup > Network > Standby
Power to On.
The default LAN IP address is
192.168.0.100.
If you suspect this has been
changed, then you can view the
current
Setup menu.
Network settings in the
For more information about
connecting the projector via LAN,
see the Connection Guide.
Remote Communications Guide
Rev A January 2015
page 58
Page 65

Digital Projection E-Vision 6800 3D Series
WEB CONFIGURATION UTILITY
Email settings
To receive error warnings and status reports
by email:
1. Navigate to the
Alert Mail Setup tab
2. Enter user credentials, SMTP settings,
email addresses and preferences as
required.
Optionally, click Send Test Mail to test
your email settings.
For assistance with your network settings,
consult your network administrator.
1
.
Notes
1
Remote Communications Guide
Rev A January 2015
page 59
Page 66

Digital Projection E-Vision 6800 3D Series
WEB CONFIGURATION UTILITY
Projector controls
To access projector controls, navigate
to the Crestron page.
From this page you can do the
following:
Power the projector ON/OFF
1
2
Select input source
3
Freeze the image
Adjust image settings:
4
Contrast, Brightness and
Sharpness.
Click a button to open a slider.
5
Zoom and shift the image
Click the edge of the ribbon to
access the Zoom control.
6
Change network settings
Click the Tools link.
7
Contact IT support
Click Contact IT Help if you
require assistance.
8
Access the OSD
Click these buttons as you
would press the buttons on
your remote control.
Notes
6
7
1
2
8
3
4
5
For further information, refer to the
Crestron documentation, or visit
www.crestron.com
Remote Communications Guide
Rev A January 2015
page 60
Page 67

Digital Projection E-Vision 6800 3D Series
WEB CONFIGURATION UTILITY
PJLink security options
To access PJLink security options, open the PJLink
page.
From this page you can enable or disable PJLink
security and set up a password.
Current PJLink specications can be found at
http://pjlink.jbmia.or.jp/english - navigate to the
Downloading tab.
Notes
The PJLink TCP Port number is
5450.
Remote Communications Guide
Rev A January 2015
page 61
Page 68

Contact Information:
Digital Projection Limited
Greenside Way, Middleton
Manchester M24 1XX, UK
Registered in England No. 2207264
RegisteredOfce:asabove
Tel (+44) 161 947 3300
Fax (+44) 161 684 7674
enquiries@digitalprojection.co.uk
service@digitalprojection.co.uk
www.digitalprojection.co.uk
Digital Projection Inc.
55 Chastain Road, Suite 115
Kennesaw, GA 30144, USA
Tel (+1) 770 420 1350
Fax (+1) 770 420 1360
powerinfo@digitalprojection.com
www.digitalprojection.com
116-281A E-Vision 6800 3D Series User Manual
Digital Projection China
中国 北京市 朝阳区 芍药居北里101号
世奥国际中心A座2006室(100029)
Rm A2006
ShaoYaoJu 101 North Lane
Shi Ao International Center
Chaoyang District
Beijing 100029, PR CHINA
Tel (+86) 10 84888566
Fax (+86) 10 84888566-805
techsupport@dp-china.com.cn
www.dp-china.com.cn
Digital Projection Asia
16 New Industrial Road
#02-10 Hudson Technocentre
Singapore 536204
Tel (+65) 6284-1138
Fax (+65) 6284-1238
www.digitalprojectionasia.com
 Loading...