


A4 Multi-Purpose
Rechargeable Scanner
User’s Guide
- 1 -
Supported Memory Devices
SD / SDHC / MMC / USB Flash Drive
System Requirements
IBM compatible PC 586, Pentium or higher
Windows XP, Vista or Windows 7
At least 100 MB of free hard disk space (500 MB is recommended)
At least 128 MB of system memory (512 MB of RAM is recommended)
At least 1 GB of RAM for Windows Vista/7
USB port 2.0 (compatible with USB 1.0)
What’s in the box?
1 x A4 EzyScan
3.7V 1700mAH Li-ion Battery
CD (Scan to PC Manager)
Y shape USB Cable
Dual USB AC Adapter
Calibration Card
Cleaning Swab
5‟‟ x 7‟‟ Scanning Pouch
2GB USB Flash Drive
Travel Bag
User Manual
Warranty Card
Product Registration Card
NOTE: Please retain packaging (including barcode and serial no label), manual and warranty card.
2
Contents
1.Introduction………………………………………………………3
2.Overview………………………………………………………….
2.1Front View………………………………………………..
2.2Rear View………………………………………………….
3.Installation & Operation……………………………………..
3.1Install the battery………………….
3.2Charge the battery …………….
3.3Insert a memory card or a USB flash drive…………..
3.4Turn on the scanner………
3.5Scan an original……………..
3.6Turn off the scanner……………..
4.Connecting To A Computer………………………………….
4.1Connect the scanner to a computer…….
4.2Disconnect the scanner from a computer…….
5.Scanning Documents To Your Computer……………..
5.1Starting the Scan To PC Manager…….
5.2Uninstalling the Scan To PC Manager……
6.Scanning Documents To IPAD…
7.Scanning Documents To Smart Phone………
8.Scanning Documents To A Macintosh Computer……
9.Maintenance………………………….
9.1Calibrating the scanner……….
9.2Cleaning the scanner glass……..
10.Troubleshooting……………….
10.1Frequently asked questions…….
10.2The system LED light pattern…….
11.Specifications………………………
3
1. Introduction
Congratulations on your purchase of a DigiFrame EzyScan. With this scanner, you can scan and store your photos & documents directly to your memory card or USB flash drive without connecting the scanner to a computer.
If you wish to store a document directly into your computer, just plug in a USB cable and/or use the supplied Scan to PC utility (Compatible with Windows
2000, XP, Vista & 7 )
Before you operate the product, please take a few minutes to read through this manual. It provides instructions for you to install, operate and maintain the product.
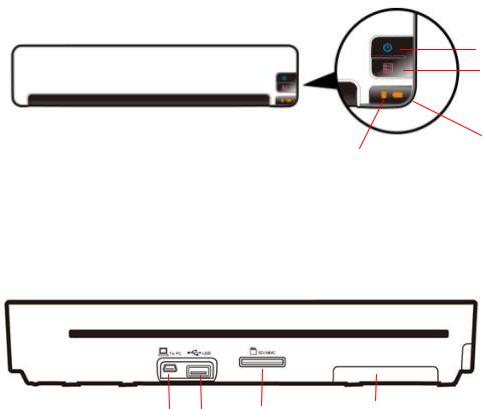
2. Overview
2.1 Front view
1
2
|
|
3 |
5 |
4 |
|
|
||
2.2 Rear view
6 |
7 |
|
8 |
9 |
|
|
|
|
|
|
|
|
|
|
4

|
|
|
|
Name |
|
|
Function/ Description |
|
|
1 |
|
|
Power Button |
|
|
Press to turn on or off. |
|
|
|
|
|
|
|
|||
|
|
|
|
|
|
|||
|
|
|
|
|
|
|
|
|
|
|
|
|
|
|
|
Press to start calibrating the scanner, |
|
2 |
|
Custom Button |
|
|
eject paper in paper jam condition, |
|
||
|
|
|
or switch your file format between JPEG |
|
||||
|
|
|
|
|
|
|
|
|
|
|
|
|
|
|
|
and PDF. |
|
|
|
|
|
|
|
|
|
|
|
|
|
|
|
|
|
Indicates the charge status of the |
|
|
|
|
|
|
|
|
battery: |
|
|
|
|
|
|
|
|
High – GREEN (45%-100% power) |
|
|
|
|
|
Battery LED |
|
|
|
|
|
3 |
|
|
|
|
|
||
|
|
|
|
|
|
|
Medium – ORANGE (25%-45% power) |
|
|
|
|
|
|
|
|
|
|
|
|
|
|
|
|
|
Low – RED (0%-25% power). |
|
|
|
|
|
|
|
|
|
|
|
|
|
|
|
|
|
Indicates the system status and the |
|
|
|
|
|
|
|
|
type of predefined scan settings. Switch |
|
|
|
|
|
|
|
|
to the other type of scan settings by |
|
|
|
|
|
|
|
|
pressing the Custom button ( ). |
|
|
|
|
|
|
|
|
Green LED: Indicate to scan using the |
|
4 |
|
System LED |
|
|
predefined scan settings for document, |
|
||
|
|
|
|
|
|
|
PDF, Gray mode, 300 dpi. |
|
|
|
|
|
|
|
|
Orange LED: Indicate the ready status |
|
|
|
|
|
|
|
|
and also to scan using the predefined |
|
|
|
|
|
|
|
|
scan settings for photo, JPEG, Color |
|
|
|
|
|
|
|
|
mode, 300 dpi. |
|
|
|
|
|
|
|
|
||
|
5 |
|
|
Feeding Slot |
|
|
Insert an original to start scanning. |
|
|
|
|
|
|
|
|||
|
|
|
|
|
|
|||
|
|
|
|
|
|
|
|
|
|
|
|
|
|
|
|
Connect the scanner to a computer via |
|
6 |
|
Mini USB Connector |
|
|
a Y shape USB cable for data |
|
||
|
|
|
|
|
|
|
transmission and battery charge. |
|
|
|
|
|
|
|
|
||
|
7 |
|
|
USB Drive Port |
|
|
Insert a USB flash drive. |
|
|
|
|
|
|
|
|
|
|
|
|
|
|
|
|
|
|
|
8 |
|
Memory Card Slot |
|
|
Insert a memory card. |
|
||
|
|
|
|
|
|
|
||
|
|
|
|
|
|
|
||
|
9 |
|
|
Battery Slot |
|
|
Insert a battery. |
|
|
|
|
|
|
|
|
|
|
|
|
|
|
|
|
|
|
|
5

3. Installation & Operation
Precautions
Keep the product out of direct sunlight. Direct exposure to the sun or excessive heat may cause damage.
Do not store/operate the product in humid or dusty conditions.
Place the product securely on an even, flat surface. Tilted or uneven surfaces may cause mechanical or paperfeeding problems.
Retain the product box and packing materials for shipping purposes.
3.1 Install the battery
To install the battery into the scanner:
Open the battery cover underneath the scanner.
Remove the plastic tab to connect battery and replace cover.
If you need to remove the battery take extra care that the copper contacts are not bent/damaged when replacing battery. (This type of damage is not covered under warranty)
Note:
6

The recommended battery is attached (3.7V 1700mAH)
3.2 Charge the battery
Important!
The scanner can be charged either with the Y shape USB cable connected to your computer, or the dual USB AC adapter.
Before using the scanner, please first charge the battery through the supplied Y shape USB cable. When charging the battery, be sure the scanner is turned off.
To charge the battery:
Connect the mini end of the supplied Y shape USB cable to the mini USB connector on the scanner.
Turn on your computer, and then connect the other two rectangle ends of the Y shape USB cable to two USB ports on your computer. Alternatively, you can use the supplied dual USB AC adapter instead of your computer.
During the charging process, the battery LED light will be lit in red. When the battery capacity is full, the battery LED light is extinguished.
Note:
7
For first-time use, please charge the battery for at least eight hours.
One end of the supplied Y shape USB cable including two rectangle USB connectors. These two connectors (one labeled “Power Cable”, the other labeled “Data Cable”) are used to connect to your computer at the same time to increase the transferring speed. However, if only one USB port is available from your computer, please plug the connector labeled “Power Cable” to computer while charging the battery and plug the connector labeled “Data Cable” to your computer while downloading the images.
If the battery is fully charged, an A4-size page can be scanned in colour 250 times.
If you are using the battery to start a scan without connecting the Y shape USB cable to your computer, the scan function may not work if there is not enough battery power. At this moment, the scanner will be automatically turned off.
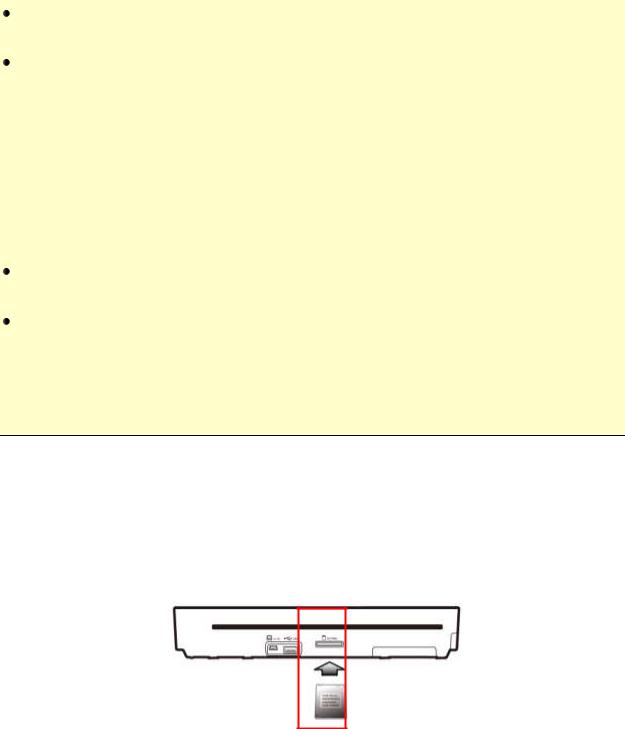
3.3 Insert a memory card or a USB flash drive
Insert a memory card (SD/SDHC/MMC card) into the memory card slot at the back of the scanner.
Or
Insert a USB flash drive into the USB flash drive port at the back of the scanner.
8
 Loading...