


5’’ PHOTO SCANNER
USER’S GUIDE
System Requirements
¾IBM compatible PC 586, Pentium or higher
¾Windows XP, Vista or Windows 7
¾At least 100 MB of free hard disk space (500 MB is recommended)
¾At least 128 MB of system memory (512 MB of RAM is recommended)
¾At least 1 GB of RAM for Windows Vista/7
¾USB port 2.0 (compatible with USB 1.0)
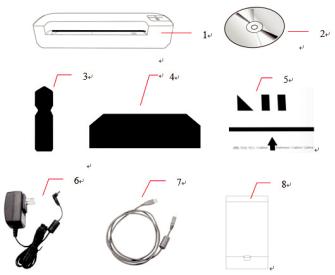
What’s in the box?
¾1. Photo scanner
¾2. CD (Scan to PC Manager)
¾3. Sensor cleaning swab
¾4. Roller cleaning tool
¾5. Calibration chart
¾6. AC adapter
¾7. USB cable
¾8. 5’’ x 7’’ plastic sheath
¾9. 2GB USB flash drive
Contents
1.Introduction…………………………………………………………….1
2.Overview………………………………………………………………….1
2.1Front view…………………………………………………………………………………1
2.2Rear view…………………………………………………………………………………1
3.Installation & Operation…………………………………………….3
3.1Initial setup………………………………………………………………………………3
3.2Scan an original………………………………………………………………………4
3.3Using plastic sheaths………………………………………………………………5
3.4Power off the scanner………………………………………………………………6
4.Connecting To A Computer…………………………………………7
4.1How to connect to a computer……………………………………………….7
4.2Disconnect the scanner from a computer ……………………………… 8
5.Scanning Photos To Your Computer …………………………… 9
5.1Starting the Scan To PC manager ……………………………………………9
5.2Uninstalling the Scan To PC manager…………………………………….10
6.Scanning Photos To iPad or A Macintosh Computer………11
6.1Scanning photos to iPad…………………………………………………………11
6.2Scanning photos to a Macintosh computer…………………………….12
7.Scanning Photos To Smart Phone………………………………12
8.Maintenance………………………………………………………..…13
8.1Cleaning the roller…………………………………………………………………13
8.2Calibrating the scanner…………………………………………………………14
8.2Cleaning the image sensor……………………………………………………14
9.Troubleshooting…………………………………………………..…15
9.1Frequently asked questions……………………………………………………15
9.2The system LED light pattern…………………………………………………17
10.Specifications…………………………………………………..…….18
1. Introduction
Congratulations on your purchase of a DigiFrame EzyScan. With this scanner, you can scan and store your photos & documents directly to your memory card or USB flash drive without connecting the scanner to a computer.
If you wish to store a document directly into your computer, just plug in a USB cable and/or use the supplied Scan to PC utility (Compatible with Windows 2000, XP, Vista & 7 )
Before you operate the product, please take a few minutes to read through this manual. It provides instructions for you to install, operate and maintain the product.
2. Overview
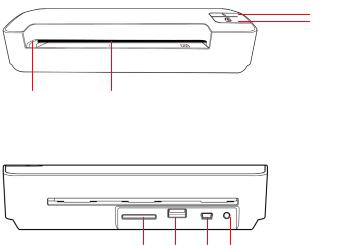
2.1 Front view
3
4
12
2.2Rear view
5 6 7 8
- 1 -

|
|
|
|
Name |
|
|
Function/ Description |
|
|
|
|
|
|
|
|
|
|
|
|
|
1 |
|
|
Indicator light |
|
|
Indicates the operating status and |
|
|
|
|
|
|
|
scanning resolution of the scanner. |
|
|||
|
|
|
|
|
|
|
|
|
|
2 |
|
|
Feeding Slot |
|
Insert an original to start scanning. |
||||
|
|
|
|
|
|
|
|
|
|
|
|
|
|
|
|
|
|
To turn the scanner ON and OFF. |
|
|
|
|
|
|
|
|
|
In ready mode, short press this button |
|
|
3 |
|
|
Power button( ) |
|
|
to switch the scanning resolution |
|
|
|
|
|
|
|
between 300dpi and 600dpi. |
|
|||
|
|
|
|
|
|
||||
|
|
|
|
|
|
|
|
|
|
|
|
|
|
|
|
|
|
Green LED: 300dpi |
|
|
|
|
|
|
|
|
|
Orange LED: 600dpi |
|
|
|
|
|
|
|
|
|
|
|
|
|
|
|
|
|
|
|
Press to start cleaning the scanner’s |
|
|
|
|
|
|
|
|
|
roller (Refer to the Cleaning the roller |
|
|
|
|
|
Function button |
|
section). |
|||
|
|
|
|
|
Press to eject paper during paper jam |
||||
4 |
|
|
|
|
|
|
condition. |
||
|
|
|
( |
) |
|
|
Press until the indicator light starts |
||
|
|
|
|
|
|
|
|
blinking to calibrate the scanner. |
|
|
|
|
|
|
|
|
|
(Refer to the Calibrating the scanner |
|
|
|
|
|
|
|
|
|
section). |
|
|
5 |
|
|
Memory Card Slot |
|
|
Insert a memory card. |
|
|
|
|
|
|
|
|
|
|
|
|
6 |
|
|
USB Flash Drive Port |
|
Insert a USB flash drive. |
||||
|
|
|
|
|
|
|
|
|
|
|
7 |
|
|
Mini USB Connector |
|
|
Connect the scanner to a computer via |
|
|
|
|
|
|
|
a supplied USB cable |
|
|||
|
|
|
|
|
|||||
8 |
|
|
Power jack |
|
To connect the supplied AC adapter to |
||||
|
|
|
the scanner. |
||||||
|
|
|
|
|
|
|
|
||
- 2 -

3. Installation & Operation
Precautions
Keep the product out of direct sunlight. Direct exposure to the sun or excessive heat may cause damage to the unit.
Do not install the product in a humid or dusty place.
Be sure to use the proper AC power source.
Place the product securely on an even, flat surface. Tilted or uneven surfaces may cause mechanical or paper-feeding problems.
Retain the product box and packing materials for shipping purposes.
3.1 Initial setup
Plug the small end of the AC adapter cable to the power jack on the scanner.
Plug the AC adapter into a power outlet. Press and hold the POWER button for 1-2 seconds. The indicator light on the scanner will blink in green and then in red.
Insert a memory card (SD/SDHC/MMC card) into the memory card slot, or insert a USB flash drive into the flash drive slot, the indicator light on the scanner stops blinking and stays on steadily, indicating the scanner is ready.
- 3 -
Press POWER button for 0.5 second to switch scanning resolution between 300dpi and 600dpi.
GREEN LED = 300dpi
ORANGE LED = 600dpi
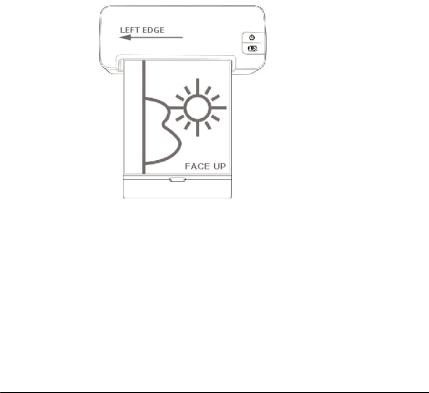
3.2 Scan an original
Insert your photo into the plastic sheath supplied with the scanner. (The detailed usage of the plastic sheath is described in the section 3.3.)
With the side to be scanned FACING UPWARD and align your photo to the far LEFT EDGE of the feeding slot as indicated.
Simply let go of the original when it begins to feed into the slot.
When the scan is completed, the scanner will automatically create a folder with its subfolder titled “DCIM\100Photo” on your memory card or flash card, which will hold the first 9999 scans. Then “DCIM\101Photo” folder will be created for the next 9999 scans, and so on.
(Each scanned image is given a file name with the prefix IMG followed by an underline and a 4- digit sequential number in the order the images are stored. For example, IMG_0001.jpg,
IMG_0002.jpg, etc.)
Note:
zDo not remove the memory card/USB flash drive or disconnect the power supply while the indicators are blinking after each scan.
-4 -
 Loading...