

Page 1
Page 2

Precautions
z Do not subject the device to severe impact
z Do not use the device in extreme hot or cold, dusty or damp
conditions. Do not expose it to direct sunshine.
z Avoid using the device in strong magnetic field.
z Keep the device away from water or other liquids. In the event
that water or other liquids enter the device, power off the
product immediately, and clean the device with soft cloth.
z Do not use chemical solution to clean the device in order to
avoid corrosion. Clean it with a dry cloth.
z We are not responsible for the damages or lost data caused by
malfunction, misusing, repairing the device or battery
replacement.
z Do not attempt to disassemble, repair or modify the product, or
it will be out of warranty.
z To prevent overheating, never block vents on the back of the
digital photo frame.
z This manual is subject to change without prior notification.
Functions or display of the actual product may be different
from what is described in this manual. Please refer to the
actual product.
Clean the LCD Screen
z Do not apply cleaning liquid to the LCD screen. The screen is
made of an acrylic material and may be easily scratched or
broken. Wipe the screen with a soft, non-abrasive cloth.
- 0 -
Page 3

TABLE OF CONTENTS
1 Product Overview.................................................................2
2 Key Features........................................................................2
3 Package Content.................................................................. 2
4 Buttons & Ports ....................................................................3
5 Remote Control .................................................................... 4
6 Getting Started ..................................................................... 4
Adjusting the stand..................................................... 4
Connect to a wall outlet via the DC adaptor ............... 4
Inserting a memory card/USB flash drive................... 5
7 Turn on or off the screen...................................................... 5
8 View Photos .........................................................................6
9 Calendar............................................................................... 8
10 System Settings ...................................................................9
11 Troubleshooting.................................................................. 12
12 Technical Specifications..................................................... 13
- 1 -
Page 4

1 Product Overview
The 7" Touch Pad enables you to view your photos on a
high-resolution LCD screen. Simply insert a USB flash drive or SD,
MMC or MS
MMC or MS memory card into the appropriate slot located on the back
back of the
of the frame and your pictures will be displayed on the screen.
2 Key Features
z 7.0-inch TFT screen with high-resolution of 480 x 234 pixels
z Image Viewer
z USB flash drive support
z SD/MMC/MS memory card support
z Automatic slide show
z Calendar and Time Clock
3 Package Content
• 7" Digital Picture Frame
• User manual
• DC Power Adaptor
• Remote Control
- 2 -
Page 5
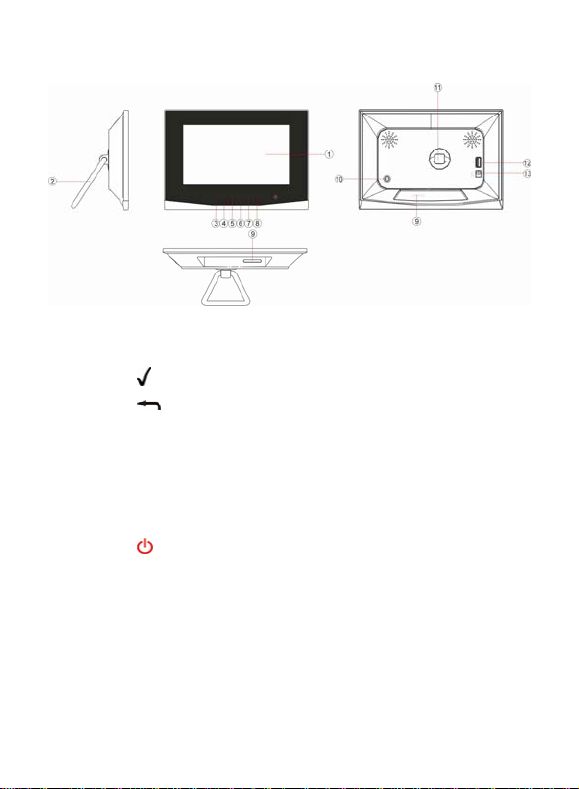
4 Buttons & Ports
1 LCD Display
2 Stand
3 – Confirm selection
4 – Return
5 Left/Previous – Move the cursor left.
6 Right/Next –Move the cursor right
7 Up – Move the cursor up
8 Down – Move the cursor down
9 Memory Card Slot – SD / MMS / MS
10
– Turn on or turn off the screen
11 Stand Bracket
12 USB port – Connect to a USB flash drive
13 DC IN port – Connect to the AC adaptor
- 3 -
Page 6

5 Remote Control
Key Function
SLIDE Enter the slide show mode
MODE Set aspect ratio as 4:3, 16:9 & Original
UP Move the cursor up
DOWN Move the cursor down
LEFT/ PREVIOUS Move cursor left or Show previous photo
RIGHT/ NEXT Move cursor right or Show next photo
ENTER Confirm a selection / Start slide show
ESC Return / Stop slide show
SETUP Enter system setting mode
TIME Display the calendar / Display the clock
ZOOM Zoom in the photo up to 6X
ROTATE Rotate clockwise 90°
6 Getting Started
Turn on or off the screen
z Adjusting the stand
To adjust the frame position, rotate the stand left or right, up or down.
z Connect to a wall outlet via the DC adaptor
The 7” Touch Pad is powered by 5V DC IN input. Connect the DC
adaptor to the DC IN port on the back of the frame and the wall
socket (see the following figure).
- 4 -
Page 7

z Inserting a memory card/USB flash drive
The device provides a card slot to support SD/MMC/MS memory
cards and a USB port for USB flash drives. Please follow these steps
to insert a memory card or USB flash drive:
(1) Find the card slot or USB port on the body of the machine.
(2) Insert a memory card into the slot with the face toward the back,
or insert a USB flash drive into the USB port.
7 Turn on or off the screen
When you do not want to view the photos momentarily, you can press
button to turn off the screen for saving power. To turn on the
the
screen, press the
button again.
- 5 -
Page 8

MENU:
Photo Display photos
Calendar Display c
Setting S
alendar
ystem Settings
8 View Photos Step 1: Connect the de
vice to a w
all outlet
Step 2: Power On
Step 3: Insert a USB
flash drive into the USB port or a memory card
into the card slot. (Note: If you insert both, only pictures stored in the
memory device that you inserted last are displayed.)
S
tep 3: Press the UP / DOWN button to select “Photo” and then
press the “
” / “ENTER” button to confirm to start viewing the
photos.
S
tep 4: Press the LEFT, RIGHT, UP and DOWN button to select a
photo from the thumbnail view mode, and then press “
” / “ENTER”
button to confirm to enlarge it to full screen.
- 6 -
Page 9

Previous/next
Press the LEFT button to display the previous photo.
Press the RIGHT button to display the next photo.
Rotate the picture
Press ROTATE on the remote control to rotate the picture clockwise
by 90°.
Change the Aspect Ratio
When you are viewing a photo, repeatedly press the MODE button to
change the aspect ratio between 4:3, 16:9 and Original Size.
Zoom in
Press the ZOOM button on the remote control to zoom in on the
picture up to 6X. When the photo is enlarged, you can press the
LEFT, RIGHT, U P and DOWN button to roam on the photo. Pressing
the ESC button will restore the picture to original size.
Slide Show
In the full screen mode, press ENTER/SLIDE to start the slide show.
Thumbnail View
Press ESC to return to the thumbnail view mode.
- 7 -
Page 10

Press LEFT, RIGHT, UP and DOWN to select a picture.
Press the “ ” / “ENTER” button to confirm your selection and
enlarge the photo to full screen.
Press the
/ ESC button to return to the main menu.
9 Calendar
The 7” Touch Pad can be used as a tabletop calendar and an alarm
clock. To enter the calendar view mode, select the “Calendar” from
the main menu, and then press the “
” / “ENTER” button to confirm.
The calendar and the time should display. At the same time, all
photos are displayed in a slide show in the left top corner.
Slide Show
Current Time
Alarm On/Off
Alarm Time
Press the LEFT, RIGHT, UP and DOWN button to select the date.
Press the
/ ESC button to exit and return to the main menu.
- 8 -
Page 11

Clock View
When you are viewing the calendar, you can press the TIME button
on the remote control to display the time as a clock.
Press the TIME button again to exit from the clock and return to the
calendar.
10 System Settings On the main menu, select “Setting” using the “
” button to enter the
system settings.
Press the UP / DOWN button to select a setting and press the “
” /
“ENTER” button to confirm the setting.
Press the
/ ESC button to exit from the settings mode.
Set the View mode
Select “Image Size” to set the view mode of the screen as Normal,
Pan Scan and Optimal.
Set the slide show effect
Select “Slide Show Effect” to set the transition effect of the slide
show.
- 9 -
Page 12

Set the slide show speed
Select “Slide Show Speed” to set time interval between slides.
Divide the screen into four display areas
Select “Split Screen” and then “ON”. In the slide show mode, the
photos will display separately in four areas of the screen.
Load to default
Select “Reset Settings” to restore the system settings to the default
settings.
Set Language
Select “Language” to set the language in which the on-screen text is
displayed.
If the wrong language is selected by accident;
- From the main menu, select the bottom option (the cog.)
- Choose the sixth option from the top.
- You are now in the languages, top to bottom they are
1. English
2. French
3. Italy
5. Espanola
6. Portugal
7. Dutch
4. German
Set the Date and Time
Select “SetTime/Set Alarm” then “SetTime” to set the date and
time.
- 10 -
Page 13

(1) Press the LEFT and RIGHT button to select among the time
setting items – hour, minute, second. Press the UP and DOWN
button to set the time.
(2) Press the LEFT and RIGHT to select “Save” and then press the
” / “ENTER” to confirm the date and time setting.
“
Set the Alarm
To enable the alarm,
(1) Press UP and DOWN button to select “SetTime/Set Alarm” and
then press the “
” / “ENTER” button to confirm.
(2) Press UP and DOWN button to select “Set Alarm”.
(3) Press the LEFT and RIGHT button to select “OFF” and then
press the UP / DOWN button to change “OFF” to “ON”.
(4) Press the LEFT and RIGHT button to select among the time
setting items – hour, minute, second. Press the UP and DOWN
button to set the time item.
(5) Press the LEFT and RIGHT button to select “Save” and then
press the “
” / “ENTER” to confirm the alarm time. The alarm
should ring at the specified time every day.
Note: The frame must be on for the alarm to go off, please see
the below (Auto On/Off) to set the time for the frame to turn on
so that the alarm can be of best use.
Set Auto-ON and Auto - OFF time
Select “Set ON/OFF Time” to set the time when the device powers on
or powers off automatically.
(1) Press the LEFT and RIGHT button to select among the time
setting items – hour, minute, second. Press the UP and DOWN
- 11 -
Page 14

button to set the time.
(2) Press the LEFT and RIGHT button to select “Save” and then
press the “
” / “ENTER” to confirm the date and time setting.
Set Brightness and Contrast
Select “Brightness / Contrast” to set the brightness and contrast of
the screen.
Press the UP/DOWN button to adjust the contrast. Press the
LEFT/RIGHT button to adjust the brightness.
Set Color and Tint of the image
Select “Color/Tint” to set the shade and tint of the image’s color.
Press the UP/DOWN button to adjust the shade of color. Press the
LEFT/RIGHT button to adjust the tint of color.
11 Troubleshooting
The digital picture
frame cannot be
powered on.
Remote control does
not work
The images can not
be displayed.
The image is distorted
or blurred.
The device responds
very slow to
· Make sure that the AC adapter is
connected securely to the frame and the
power source.
· Ensure that a working battery is
inserted
· Make sure the image file is in a
supported format.
· Resolution of the image is too low. Try
using a file with a higher resolution.
There are too many files on the memory
device.
commands.
- 12 -
Page 15

12 Technical Specifications
Item Description
Display 7.0-inch TFT LCD screen
USB Interface USB 2.0 Host (High Speed)
Photo Format JPEG
Clock & Calendar Available
Supported Memory Card SD / MMC / MS
Supported Language
English/French/Italian/German
/Spanish/Portuguese/Dutch
LCD Resolution 480X234 pixel
Memory Card Capacity MS/SD Up to 8GB, MMC Up to 2GB
USB Flash Drive Up to 8GB
Power Supply
AC Adapter, Input 100-240V, Output
5V
Storage Temp* -20% ~ +55%
Ambient Temp* 0 ℃ ~ +55%
Operation
Relative Humidity*
Storage
Relative Humidity*
20% ~ 90%(40℃)
20% ~ 93%(40℃)
- 13 -
 Loading...