

Page 1
Model DF-1710
©2002-2004 Digi-Frame Inc. 181 Westchester Ave. Suite 408, Port Chester, NY 10573
Tel: 914-937-4090 Fax: 914-937-0385 email: info@digi-frame.com, techsupport@digi-frame.com
Digi-Frame®, See it Now!®, The Missing Link in Digital Photography!® and the “D” logo are registered
trademarks of Digi-Frame Inc.
User’s Manual
Software Version 4.13
Page 2

Contents
1. Introduction..............................................................................................................................................................................3
Overview..................................................................................................................................................................................3
Package Contents......................................................................................................................................................................4
Unpacking and assembling your DF-1710.....................................................................................................................................5
Care of your DF-1710’s LCD Screen.............................................................................................................................................5
2. Controls and Ports.....................................................................................................................................................................6
Front Panel...............................................................................................................................................................................6
Rear Panel................................................................................................................................................................................7
Infrared Remote Control............................................................................................................................................................8
CD-ROM................................................................................................................................................................................... 9
3. Mounting/Hanging the DF-1710 ................................................................................................................................................10
Portrait and Landscape Orientation............................................................................................................................................10
Wire Routing Clips...................................................................................................................................................................11
Changing the Decorative Frame................................................................................................................................................12
Built-In Installations ................................................................................................................................................................14
4. Watching Slideshows ...............................................................................................................................................................15
View Previous or Next..............................................................................................................................................................15
Pause/Resume........................................................................................................................................................................15
Slideshow and Filename Information.........................................................................................................................................15
Audio Volume Adjustment........................................................................................................................................................15
Movie Fast Forward/Reverse.....................................................................................................................................................15
Menu (“D”).............................................................................................................................................................................15
Backlight On/Off .....................................................................................................................................................................15
5. On-Screen Menu System..........................................................................................................................................................16
Entering and exiting the menu system.......................................................................................................................................16
Main Menu .............................................................................................................................................................................16
Browse and Play Slideshows.....................................................................................................................................................16
Browse All Files.......................................................................................................................................................................16
Change Slideshow Defaults ......................................................................................................................................................17
Set/Clear Lockout Password .....................................................................................................................................................18
Scan Card or USB Disk.............................................................................................................................................................19
Set Audio Volume....................................................................................................................................................................19
Modify Network Settings ..........................................................................................................................................................19
Upgrade Software ...................................................................................................................................................................19
System and Network Information.............................................................................................................................................. 19
Browse the Internet ................................................................................................................................................................20
6. CD-ROM Operation..................................................................................................................................................................21
Loading Files from CD-ROM......................................................................................................................................................21
Appending CD-ROM Content to an Existing Slideshow .................................................................................................................22
CD-ROM Script Files ................................................................................................................................................................22
7. Memory Card Operation...........................................................................................................................................................23
8. Network Operation ..................................................................................................................................................................24
Overview................................................................................................................................................................................24
Testing Communication with Your DF-1710................................................................................................................................30
Wireless Networking................................................................................................................................................................31
Advanced Networking Topics....................................................................................................................................................33
9. Script Files and Slideshows.......................................................................................................................................................38
Basic Information About Script Files ..........................................................................................................................................38
Advanced Scripting Information................................................................................................................................................39
Script Options......................................................................................................................................................................... 43
Tutorial – Setting Up Simple Internet “Photo Sharing”.................................................................................................................47
10. Playing Media on the DF-1710.................................................................................................................................................49
Still Pictures............................................................................................................................................................................49
Video.....................................................................................................................................................................................49
Sounds ..................................................................................................................................................................................51
Macromedia Flash® Animation Files..........................................................................................................................................53
HTML Files .............................................................................................................................................................................54
Tutorial - Simple Animation with JPEG Still Images......................................................................................................................55
11. System Files..........................................................................................................................................................................56
12. Software Updates..................................................................................................................................................................56
13. Software Install/Restore.........................................................................................................................................................56
14. Troubleshooting ....................................................................................................................................................................57
15. Specifications........................................................................................................................................................................59
Index.........................................................................................................................................................................................60
2 User_Manual_RP3001k.doc
Page 3

1. Introduction
Congratulations on your purchase, and thank you for choosing the DF-1710 as part of your digital media
solution. More than just a digital picture frame, the DF-1710 is a powerful, reliable, third-generation Internetenabled digital multimedia appliance with many key features, including:
• Built-in CD-ROM (compatible with photo CDs from photo processors and user-burned CD-ROMs)
• Handheld Infrared Remote Control on on-screen user interface
• Flexible mounting and framing options
• Portrait and Landscape mode display
• Support for USB memory card readers and wireless 802.11b (“Wi-Fi”) adapters
• Remote administration over any TCP/IP network, including the Internet
• Powerful scripting language
• Internal hard disk from 12GB to 30GB
• JPEG still image display
• MPEG-1 and MPEG-4 movie playback
• MP3 audio playback for background music during still-image presentations
• WAV audio file playback
• Macromedia® Flash®-2 animation playback
• HTML web content display
• Stereo loudspeakers and stereo audio line-level output for external speakers
Overview
The DF-1710 is a self-contained flat-panel computer with pre-installed media player, CD-ROM and networking
software. Image, movie, and sound files can be loaded from a CD-ROM (or memory card via external USB card
reader, not included) or sent to it via ethernet. In both cases the images are stored on the Digi-Frame’s
internal hard drive. Playback is controlled by script files that are created automatically when a CD-ROM or
memory card is loaded, by script files present on the CD or memory card, by script files sent to the frame via
ethernet after being created on a desktop computer, or by script files generated on demand from any directory
contents. Any number of slideshows can be loaded and selected using the on-screen menu system. Slideshow
settings can be adjusted using the on-screen menu system or remotely via a network. The system has been
designed for maximum open-endedness and flexibility to accommodate most applications.
The basic steps to showing pictures or movies on the DF-1710 using a CD-ROM or memory card are as follows:
• Press the eject button on the CD-ROM tray, snap a CD-ROM onto the tray spindle (printed side towards
you, data side towards the back of the unit), and slide the tray closed. If you’re using a memory card,
insert the card into the reader and select “Scan USB” from the Main Menu.
• Choose a naming option from the menu that appears.
• Any media files found on the inserted CD or memory card will be copied to the DF-1710’s internal hard
drive in a new directory. A slideshow script file will be automatically created and will begin running
automatically. The CD will be automatically ejected and may be removed, or the memory card may be
removed from the reader.
The basic steps to showing pictures or movies on the DF-1710 using a network are as follows:
1) Establish an ethernet connection between a desktop computer and the DF-1710
2) Transfer the media files to the DF-1710 using an FTP client or web browser program
3) Write and transfer to the frame a script file specifying the media to be played, playback order and options,
or, have the DF-1710 create a script file for you by “Create Slideshow from Directory Contents” when the
directory is selected within the “Browse Hard Drive Contents” window.
3 User_Manual_RP3001k.doc
Page 4

Package Contents
Your DF-1710 package should include the following items:
• DF-1710 digital picture frame with mounting brackets, decorative frame, mat, and anti-glare plastic.
• Handheld IR remote control and 2 x AAA batteries.
• Standard and crossover ethernet cables (one each).
• Picture hanging wire.
• Wire routing clips.
• Software installation CD-ROM and instructions (Note: the DF-1710 is shipped with all software pre-
installed, the CD-ROM is included in the unlikely event that you may need to restore the software at
some time).
• This User’s Manual.
Included on the DF-1710’s internal hard drive are the following items:
• Preinstalled Digi-Frame media player and networking software.
• A copy of the Macintosh FTP client program “Transmit” from Panic Software. If you use this program
on an ongoing basis please support the authors by registering and paying for the program.
• An evaluation copy of CuteFTP, a Windows FTPclient program from GlobalSCAPE Inc. This program will
operate free of charge for 30 days from the date of installation on your computer.
• A copy of the Macintosh text editor BBEdit Lite from Bare Bones Software.
• This User Manual in PDF and Microsoft Word™ format.
• Media and script file for pre-loaded demonstration slideshows.
In addition, you’ll need:
• Media files on CD-ROM if you wish to load your files via the DF-1710’s CD-ROM drive.
• A USB card reader and memory cards if you wish to load files from memory cards.
If you intend to use your DF-1710’s ethernet capabilities you’ll need:
• A personal computer with an ethernet port. An Ethernet network (LAN) is optional.
• A web browser such as Internet Explorer or Netscape, or an FTP client program.
• JPEG, MP3, Flash®, MPEG-4 or MPEG-1 media files to play on your DF-1710.
• If you’re going to write your own script files, you’ll need a text editing program such as NotePad
(included with Microsoft Windows™) or BBEdit Lite (available for Macintosh from BareBones Software.
4 User_Manual_RP3001k.doc
Page 5

Unpacking and assembling your DF-1710
Carefully follow any unpacking and frame assembly instructions included separately with your DF-1710.
Important: Please save all shipping materials in the event that your DF-1710 needs to be transported or
shipped in the future. Digi-Frame Inc. will not be responsible for shipping damage due to improper packing,
and a packing material replacement charge may be incurred if you need to return the unit without the original
packaging. If your Digi-Frame arrives at significantly lower than room temperature it is suggested that you let
it warm up to room temperature (about four hours) before operating in case any condensation has formed in
any of its internal components.
Care of your DF-1710’s LCD Screen
Your DF-1710 is shipped with a sheet of non-glare acrylic plastic in front of its LCD screen for protection and
glare reduction. This plastic can be removed or replaced should you wish to do so (see section 3.4). If your
LCD screen needs cleaning use only wipes or cloths designed specifically for cleaning of LCD
screens. NEVER use paper towels to clean the LCD screen. Paper towels are abrasive and will
scratch the display screen. Never use alcohol, petroleum-based solvents, ammonia-based cleaners, or harsh
detergents to clean the plastic or the LCD screen. Never apply any liquids directly on the plastic or screen.
This includes nail polish remover, alcohol, turpentine, gasoline, lighter fluid, acetone, paint thinner, mineral
spirits, kerosene, ammonia, dishwashing soap, glass cleaner, vinegar, or any other commonly found household
cleaner.
5 User_Manual_RP3001k.doc
Page 6
2. Controls and Ports
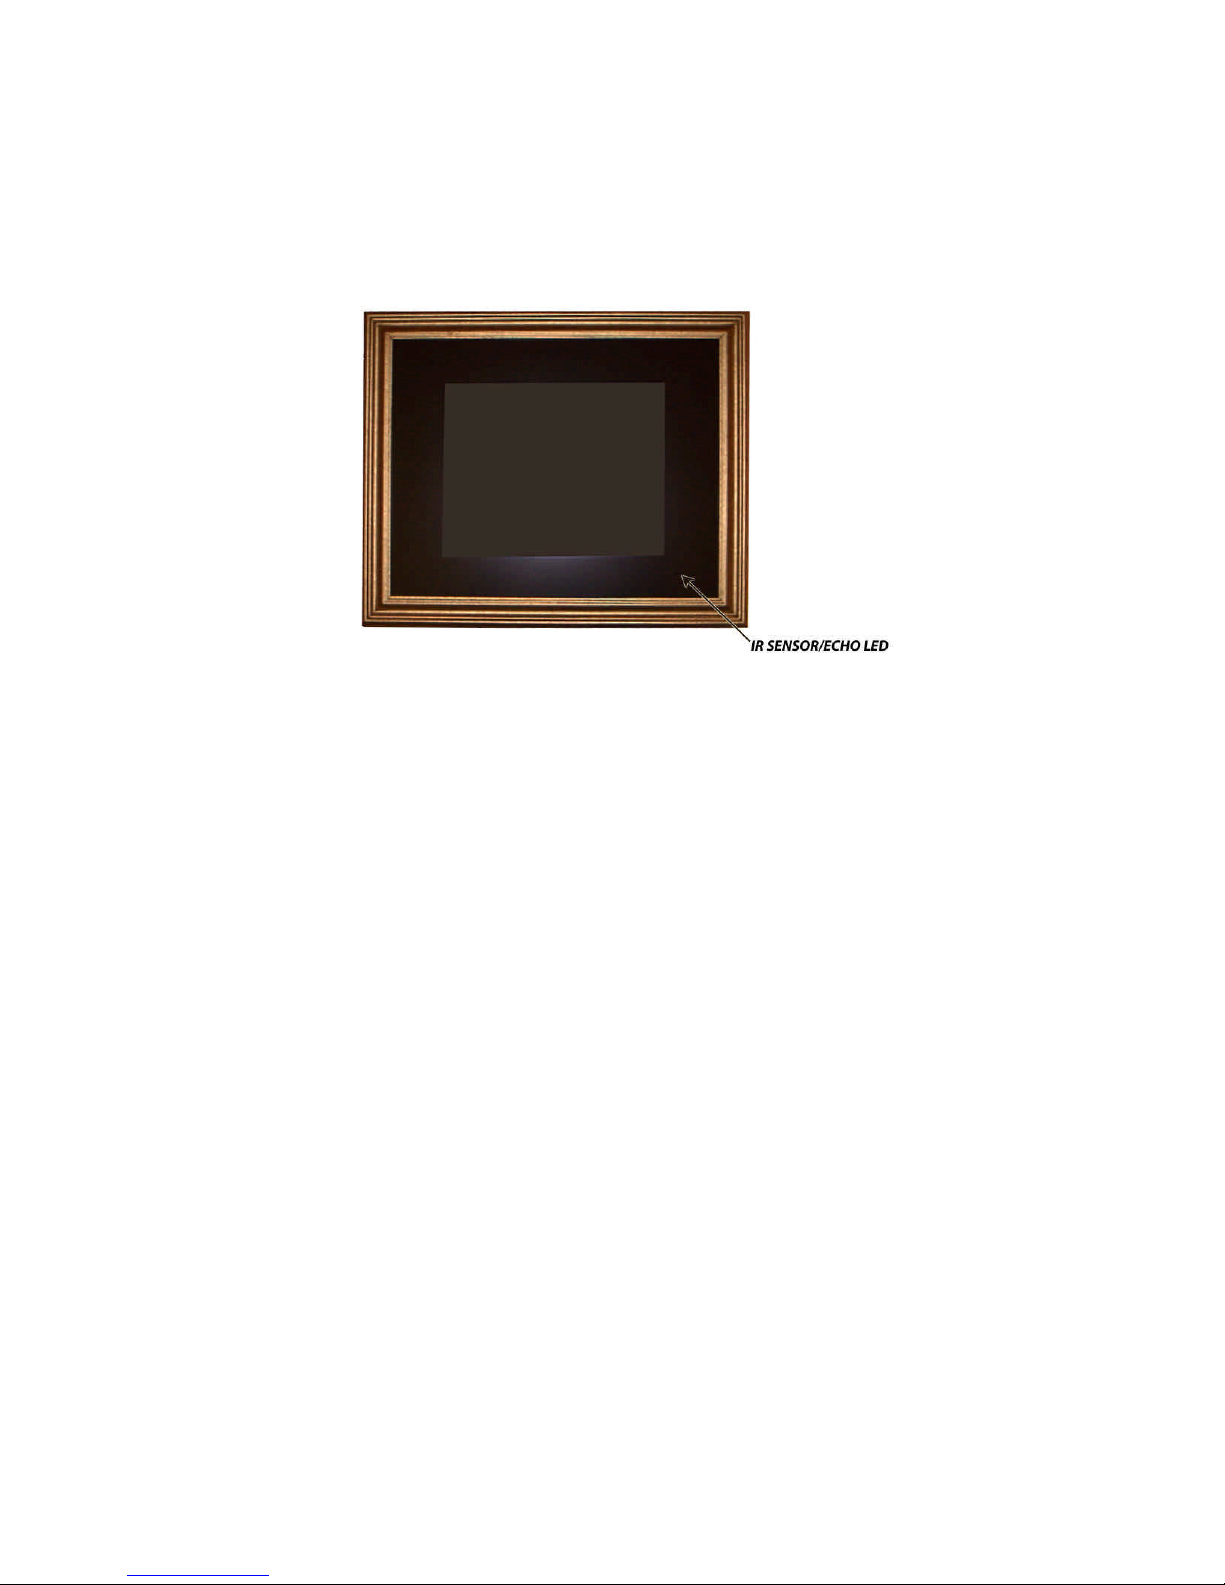
Front Panel
• The IR SENSOR and ECHO LED are located at the lower right-hand corner of the frame (in
landscape orientation). In order to use the remote control the sensor must not be blocked. A small
hole has been precut in the mat supplied with your DF-1710, if you change the mat or install the DF1710 in a wall or fixture please ensure that the sensor is not blocked. The Echo LED lights whenever a
signal is received from the remote control.
6 User_Manual_RP3001k.doc
Page 7

Rear Panel
Indicators:
• The Network Link LED glows green when the Ethernet cable is connected properly to your hub.
• The Network Activity LED will flash yellow indicating traffic on your network.
• The Power LED glows green as long as there is power available to the unit and it is switched on.
• The Hard Disk LED flashes yellow when the internal hard disk is being accessed.
Connectors:
• USB Ports – You can plug a USB memory card reader or wireless LAN (wi-fi) module into either port.
See the sections of this manual dealing with those features for information on
supported/recommended devices.
• Serial Port – This is used for factory service. It may also be used by optional peripherals in custom
applications.
• Ethernet – Connect your 10baseT or 100baseT Ethernet cable here. NOTE: Due to the orientation of
the ethernet connector, it may be difficult to access the release clip on some types of ethernet cables
in order to disconnect them. We suggest slipping a plastic knife blade, wooden popsicle stick, or similar
non-scratching implement between the release clip and the DF-1710 housing to facilitate connector
release.
• PS/2 – This connector is used for factory service and optional accessories.
• VGA Out – You may connect an external VGA monitor, VGA splitter or VGA-to-TV converter here to
repeat the DF-1710’s display on multiple devices.
• Reset – This button can be used to reset the DF-1710 if a problem is encountered. This should
normally not be necessary; this feature is intended for the convenience of third-party developers.
When planning your Digi-Frame installation, you do not need to allow access to this button.
• Audio Line Output – This jack accepts a standard 3.5 mm stereo plug and provides stereo line-level
audio outputs for connections to external powered speakers or other audio playback system.
• Power On/Off – Switches the DF-1710 on and off. When power is switched on the DF-1710’s
backlight will usually turn on automatically in a few seconds, if it does not, switch it on with the
backlight power button on the unit or remote control. You can switch power off at any time without
risk of software or hard disk damage.
• AC Cord – Connect the attached cord to an AC supply 90 – 240 V 50/60Hz.
7 User_Manual_RP3001k.doc
Page 8
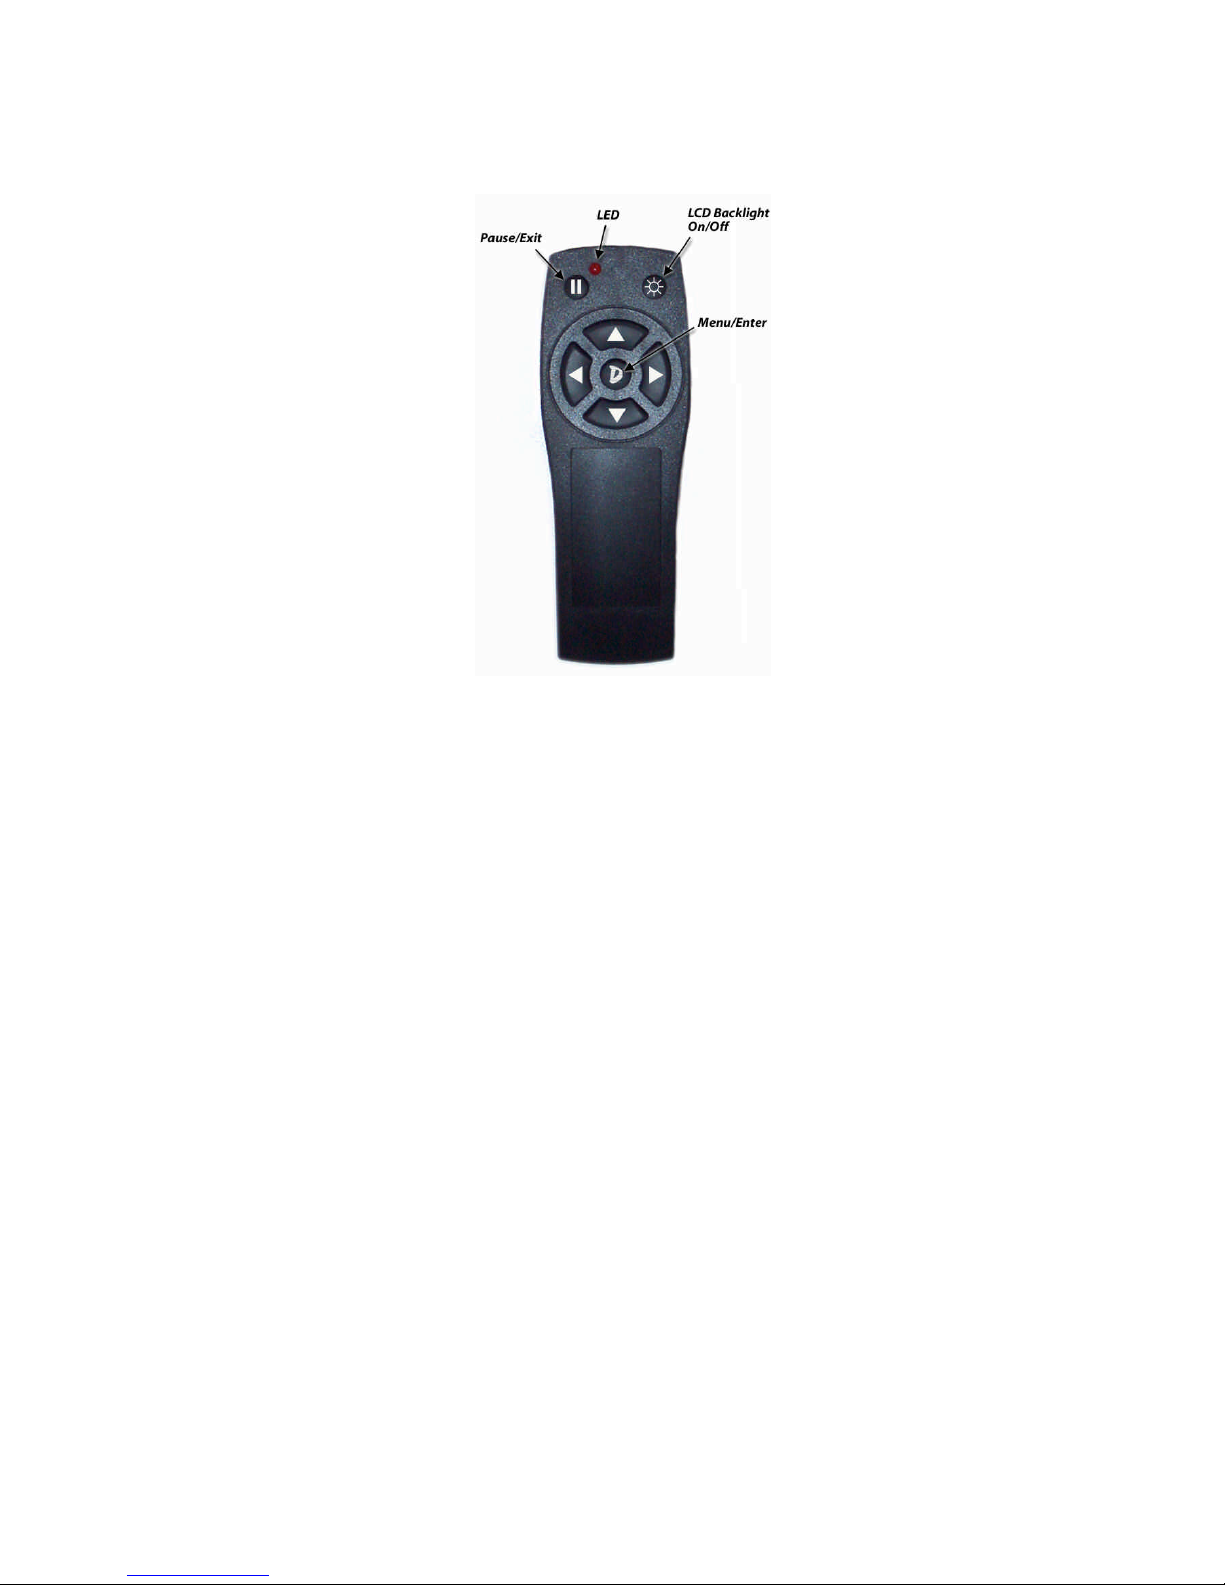
Infrared Remote Control
The DF-1710’s infrared remote control is pictured above. Install the two included AAA batteries in the battery
compartment, ensuring correct polarity.
• The LCD Backlight ON/OFF button toggles power to the LCD backlight and mutes the sound output
from the internal speakers, but not the external audio line output. To enable instant on/off
functionality, the computer runs as long as the power is connected. The Backlight Power button
switches power to the screen backlight only. You need only turn off the screen, NOT the computer
when the screen is not in use. We recommend turning off the backlight when not in use to conserve its
life, which is rated at 30,000 – 50,000 hours.
• When a slideshow is running the Menu/Enter button brings up the DF-1710’s on-screen menu
system. If a new image is loading when the button is pressed there may be a slight lag before the
menu appears. While in the menu system the Menu/Enter button functions as an “enter” key to
select a menu choice.
• When a slideshow is running the Left Arrow button moves the presentation back to the previous
item, or aborts any transition in progress.
• When a slideshow is running the Pause/Exit button stops the presentation until it is pressed again.
While in the menu system the Pause/Exit button exits the current menu.
• When a slideshow is running the Right Arrow button moves the presentation forward to the next
item, or aborts any transition in progress.
• Pressing the Up Arrow during still image display will show the slideshow name, image filename, and
paths, during movie playback it advances the movie forward several seconds. Pressing the Down
Arrow button during still image display brings up the audio volume adjustment, during movie playback
it moves the movie backwards several seconds.
• The Up, Down, Left, and Right Arrow buttons also perform menu navigation and have special
functions in some menus. Refer to the on-screen prompts for their use.
The LED lights whenever a key is pressed.
8 User_Manual_RP3001k.doc
Page 9
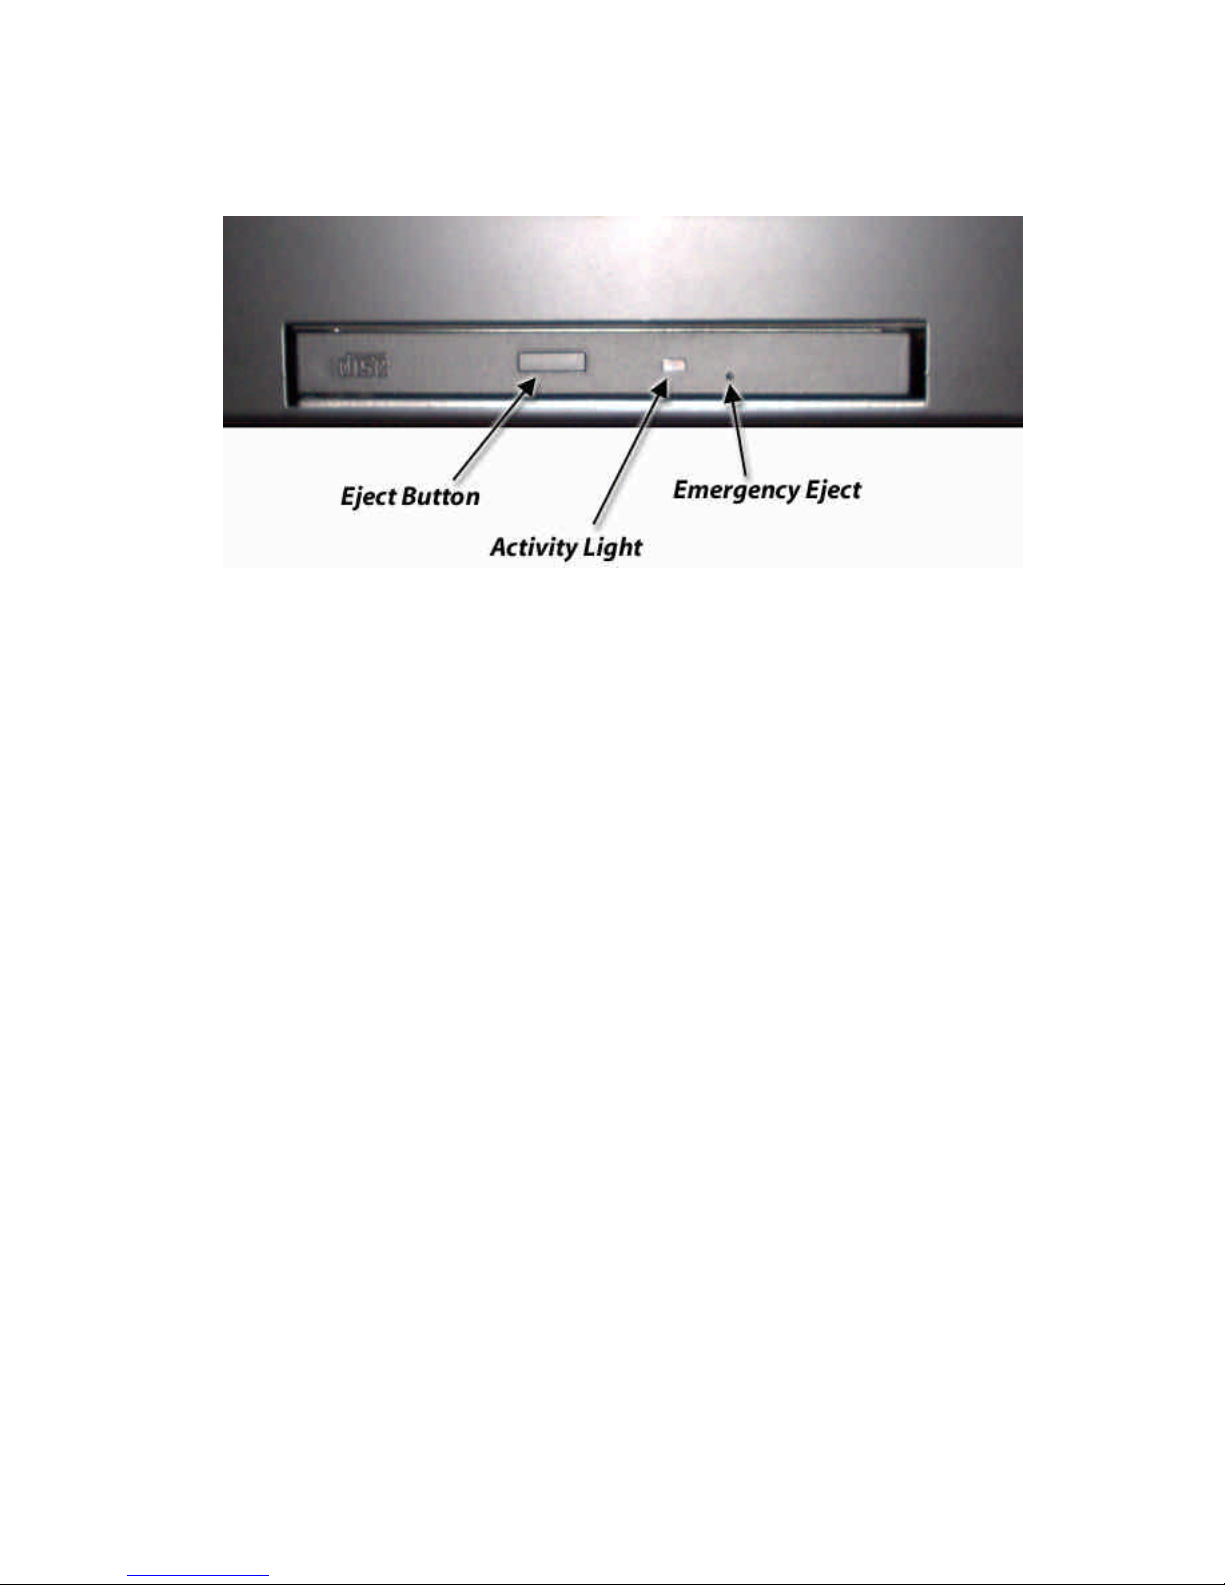
CD-ROM
The CD-ROM is located on the right side of the DF-1710 in landscape orientation, and on the bottom when it’s
in portrait orientation. Press the Eject Button to open the disc tray (the eject button will only operate when the
DF-1710 is powered on and it is not currently scanning or loading images from a CD). The Activity Light will
flash when the CD-ROM drive is accessing files. A paper clip can be inserted into the Emergency Eject hole to
open the tray in the unlikely event that the drive does not respond to the eject button for some reason.
CDs should be securely snapped into the tray’s spindle with the printed side towards you (data side towards
the back of the unit) and the tray gently pushed closed.
When you insert a CD-ROM into the DF-1710’s drive, any media files found on it are copied to a new directory
on the hard drive and a script file is automatically generated (see section 4, CD-ROM Operation, and Section 7,
Script Files). A message will appear on-screen during scanning and file copying. When file copying is complete
the CD-ROM slideshow will start, the tray will automatically open, and the disc may be removed.
Important Note on CD-ROMs: The DF-1710 recognizes only ISO9660-formatted CDs. Non-ISO9660formatted CDs may cause the unit to “hang” and require manual ejection of the CD with a paper clip and a reboot. Photo CDs supplied by commercial photo processors will always be ISO9660-formatted. If you are
burning your own CDs be sure to select “Hybrid PC/Mac” or other formatting selection in your CD-burning
software to ensure DOS/Linux compatibility. Mac-only CDs (pure HFS formatting) will not work with the DF-
1710.
9 User_Manual_RP3001k.doc
Page 10
3. Mounting/Hanging the DF-1710
The DF-1710 can be hung from standard picture hanging hardware, hooks, wire etc. by using the “keyhole”
slots or the picture wire hooks on the rear panel. If you use the included picture wire and hooks be sure to
wrap the picture wire around itself securely, multiple times. The DF-1710 weighs 19 pounds (about the same
weight as a 2-foot by 3-foot glass mirror) and so requires strong mounting hardware. The DF-1710 also
incorporates VESA-standard mounting holes on 100mm centers for use with any VESA-compatible monitor
mounting hardware such as that produced in a variety of configurations and styles by Ergotron Inc.
(http://www.ergotron.com). When using the VESA mounting option use machine screws with 8-32 threads (the
screws supplied with your third-party mounting hardware may not conform to this thread specification).
IMPORTANT: Ensure that the machine screws do not extend into the Digi-Frame casing more than
3/16”. Use of longer screws may cause damage!
Portrait and Landscape Orientation
The DF-1710 can be mounted vertically (portrait mode) or horizontally (landscape mode). Mounting the DF1710 in an orientation matching the majority of your images will maximize the size of your images on-screen
and minimize the “black bars” of unused screen area resulting from mismatched orientation. In portrait mode
the CD-ROM drive should be at the bottom of the unit. Image files can be automatically rotated by using the
Rotation option in the Slideshow Defaults menu, or via script options. The menus do not rotate at this time,
only the images. Rotation is not possible for movie, html, or Flash® playback.
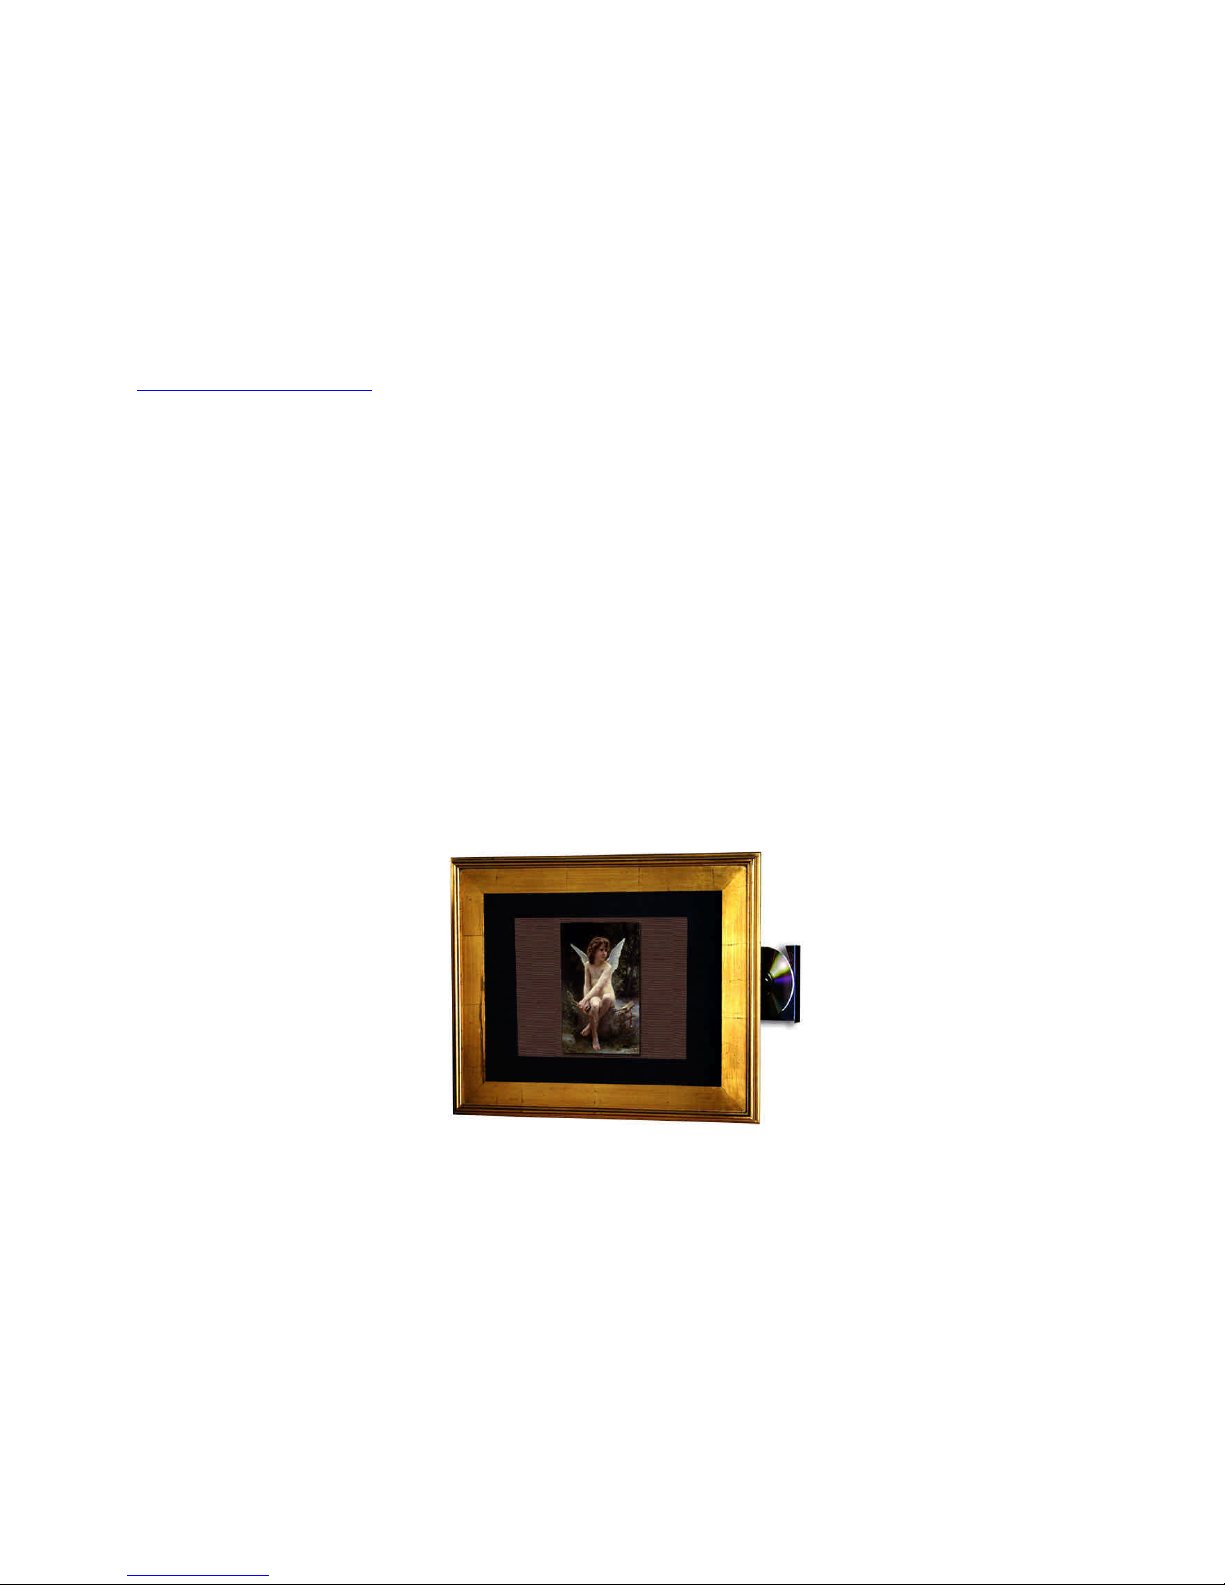
If you prefer to keep your DF-1710 in landscape orientation but have some portrait-oriented photos, they can
be nicely “matted” using an image-editing program such as Adobe Photoshop. Using Photoshop’s texturing
filters and drop shadow effects, you can create beautiful, natural, and 3-D looking mats for your images in any
color you wish! Here’s an example:
The steps in Photoshop are:
• Resize your image to something around 600-700 pixels vertically, so it will have a mat border around it.
• Select all, then “cut”.
• Resize the resulting blank canvas to 1024 x 768 pixels.
• Paste the image into the blank canvas. It will automatically go into a new layer. Center as necessary.
• Switch to the background layer and fill it with a solid color (the actual color is not very important).
• Add a texture using the “Texturizer” filter from the “Filter” menu. “Canvas” is nice.
• Select Image>Adjust>Hue, and play with the hue, saturation, and lightness controls to get a mat you like.
• Select the image layer’s effects or blending options and add a drop shadow for depth.
• Flatten the layers (Layer>Flatten) and save as a jpeg, or save a copy as a jpeg, and you’re done!
10 User_Manual_RP3001k.doc
Page 11
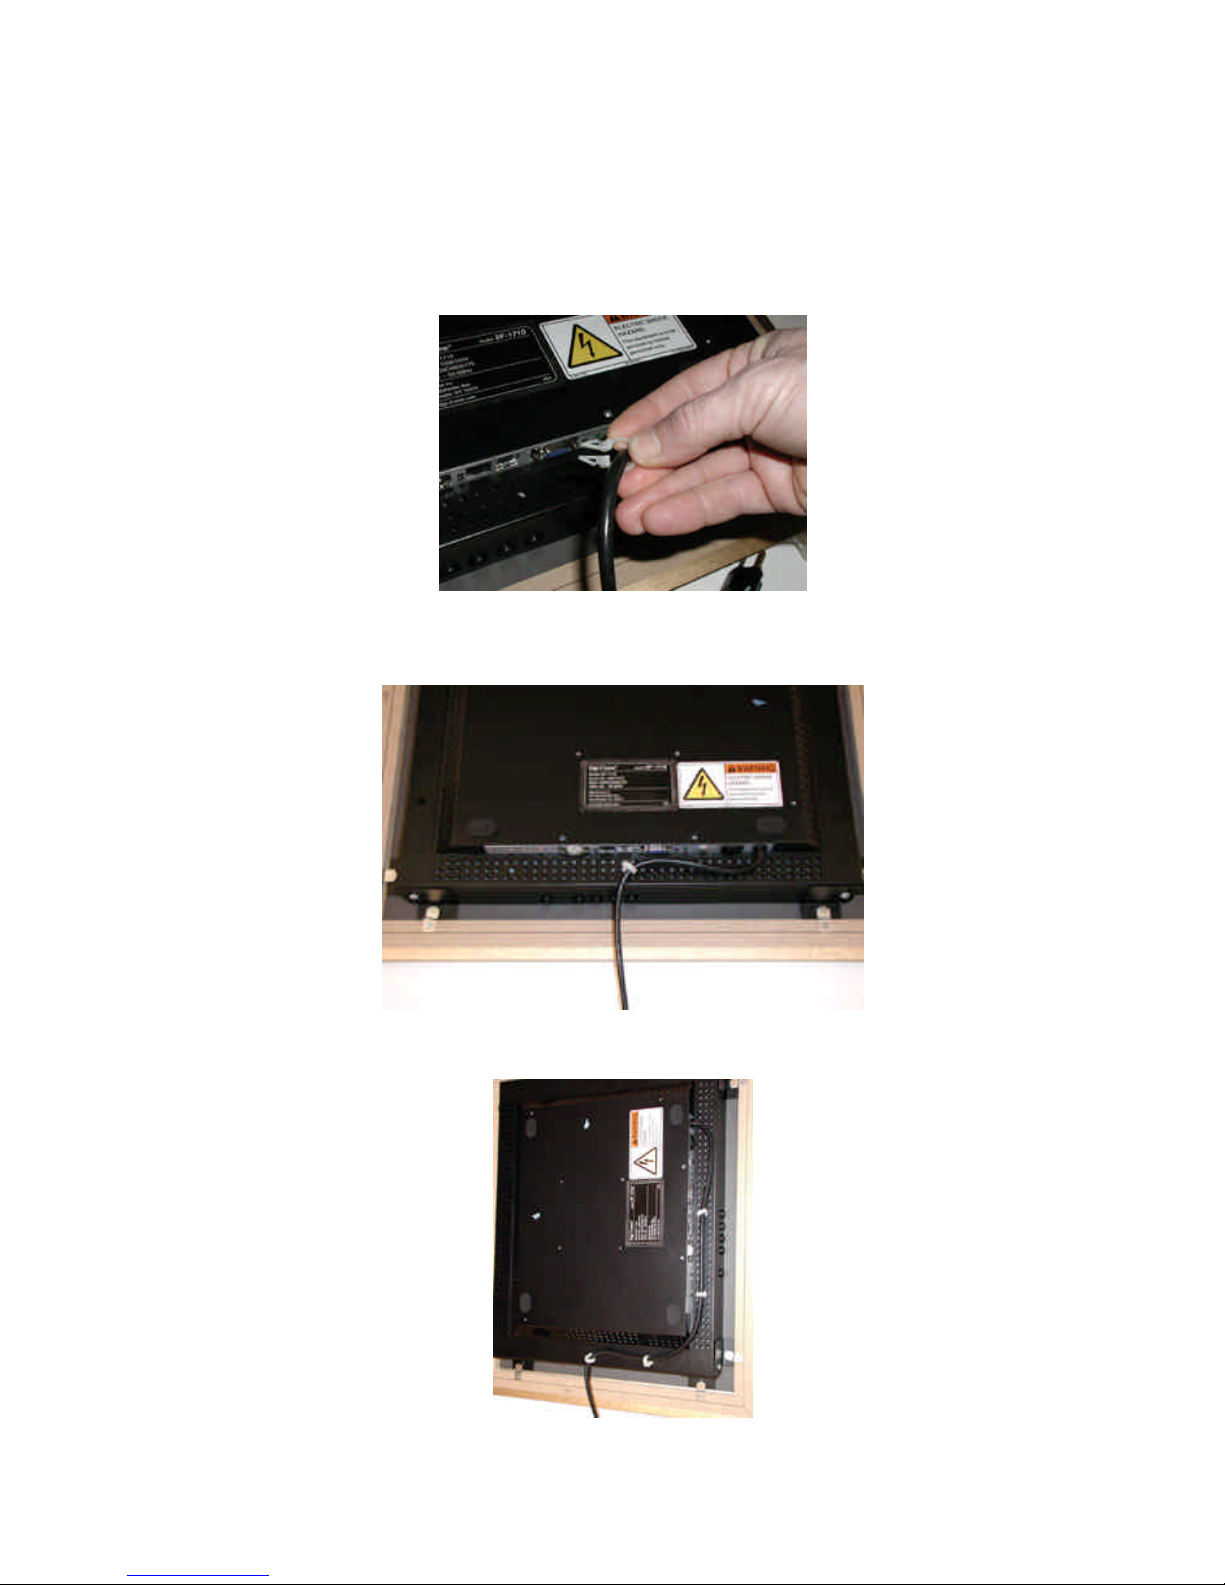
Wire Routing Clips
Your DF-1710 is supplied with four wire routing clips that can be used to route the power and other cables so
that they hang from center of the unit in either landscape or portrait mode.
Insert the wire or wires through the split barb of the clip:
Insert the barb of the clip into one of the four 1/4” holes in the DF-1710’s rear housing. These holes are
slightly larger than the surrounding ventilation holes. Use one clip for landscape mode:
Use four clips for portrait mode:
11 User_Manual_RP3001k.doc
Page 12
Changing the Decorative Frame
Always unplug your DF-1710 from the power source before removing the frame and/or mat to
prevent damage or injury.
The DF-1710 accepts most standard 16 x 20” decorative frames made of wood or other material that can be
screwed into. Change the frame by following these steps:
1) Lay the DF-1710 down flat on its face on a flat, clean surface, preferably covered with cloth or other nonscratching material.
2) Unscrew the eight wood screws holding the metal offset clips to the decorative frame and rotate the clips
out of the way.
3) Lift the DF-1710 out of the frame. Make sure that the picture mat and non-glare acrylic remain in the
frame and set the DF-1710 aside where its LCD screen will not be damaged.
4) Place your new frame face down on a flat, clean, soft surface. If you intend to use the picture mat and/or
non-glare acrylic supplied with the DF-1710, transfer these to your new frame. If you’re using your own
mat, make sure that a hole is cut at the remote control sensor location. A paper punch works well for this.
5) Loosen the machine screws holding the four black frame brackets to the sides of the DF-1710 so that the
brackets can slide.
6) After the protective glass or acrylic (if used) and mat are in your new frame (glass first, then mat). place
the DF-1710 on top of them. The edges of the DF-1710 frame brackets should go inside the rabbetted
notch in the picture frame.
7) Screw the eight metal offset clips into the back of your new frame such that they clamp the DF-1710
mounting brackets between themselves and the picture frame notch. Be sure that the screws used are not
so long that they break through the frame! Pilot holes can be drilled for ease and accuracy of screw
insertion.
8) Adjust the four black frame brackets in their slots so that they are snug against the inner surface of the
offset clips on the frame (this compensates for the varying notch depth of different frames and varying mat
and glass thicknesses) and re-tighten the machine screws holding the brackets to the DF-1710.
12 User_Manual_RP3001k.doc
Page 13
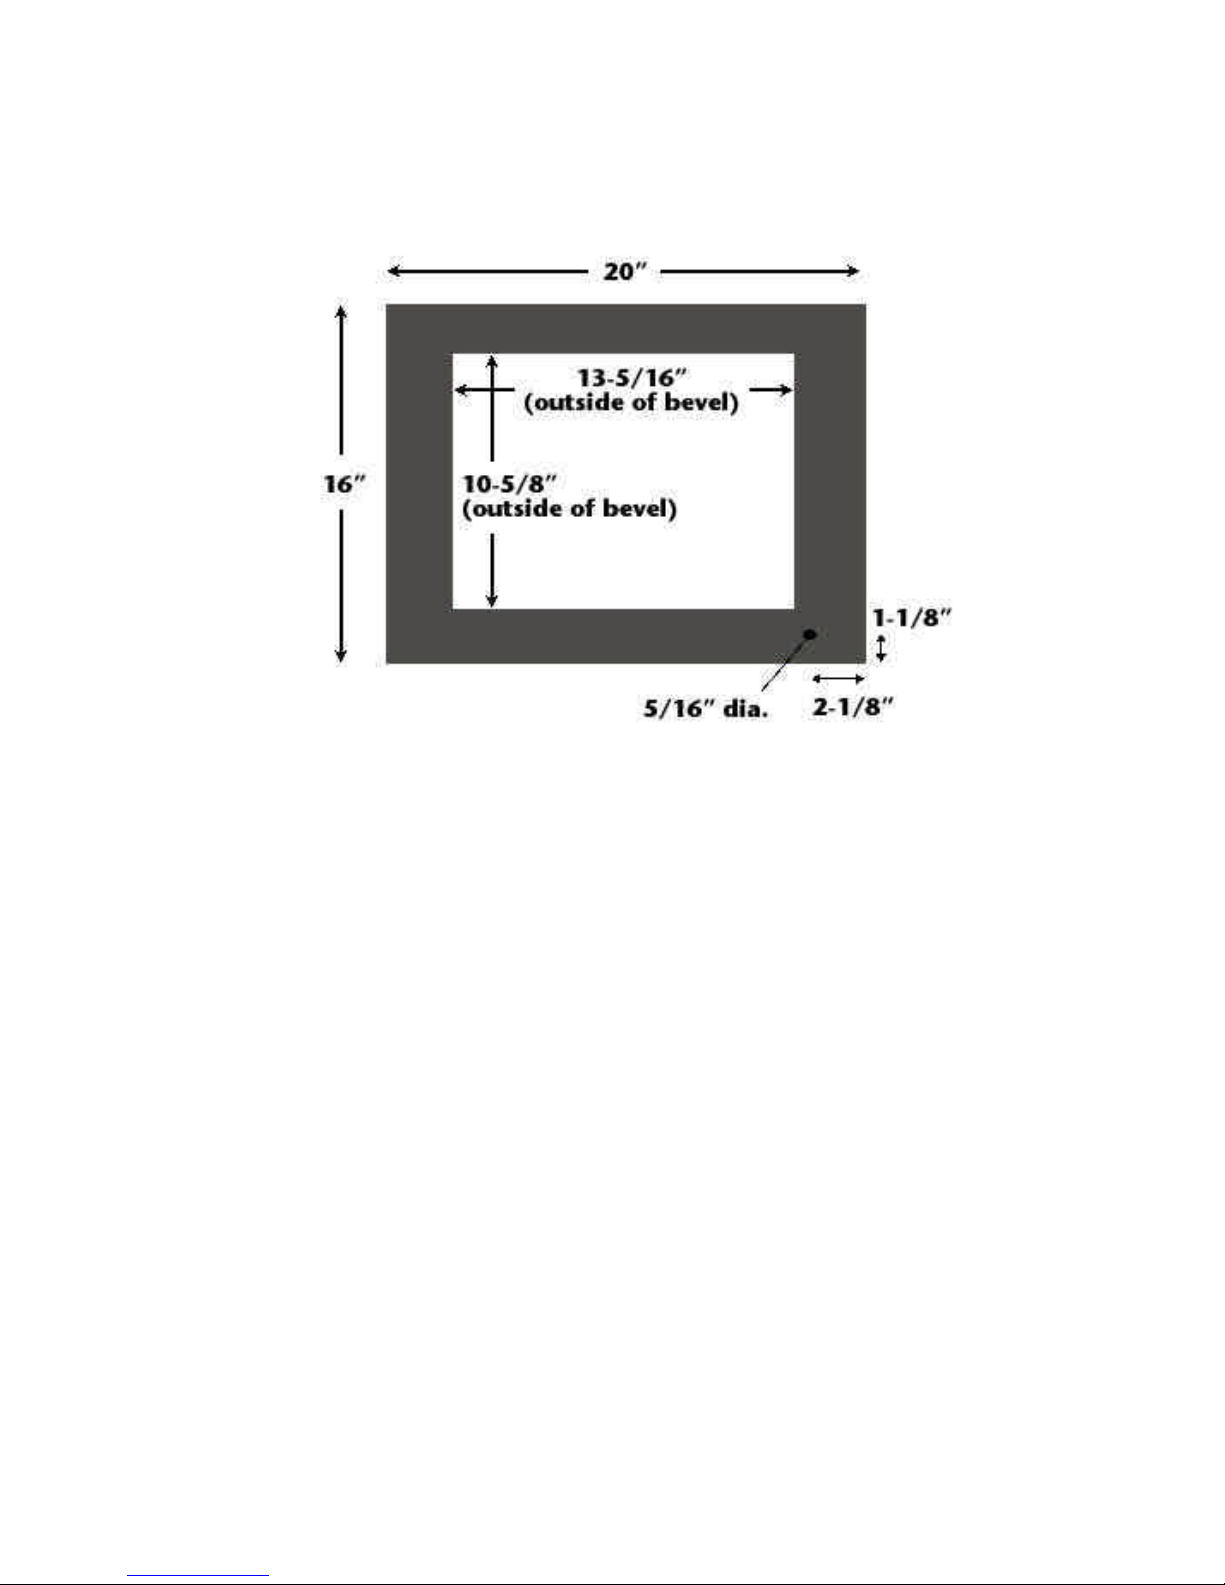
Mat Specifications
The illustration below shows the correct dimensions for the decorative mat should you wish to have your own
cut for you.
About the Non-Glare Acrylic
Your DF-1710 is supplied with a quality piece of protective non-glare acrylic plastic in front of its LCD screen.
This both protects the LCD from damage and reduces reflections and glare from its surface. It does, however,
cause a degree of “softening” of the clarity of the display. If you desire a different look or better display
sharpness you might want to try non-glare glass (available from framing shops in both standard and
“conservation” grade), standard glass, or no cover at all.
13 User_Manual_RP3001k.doc
Page 14
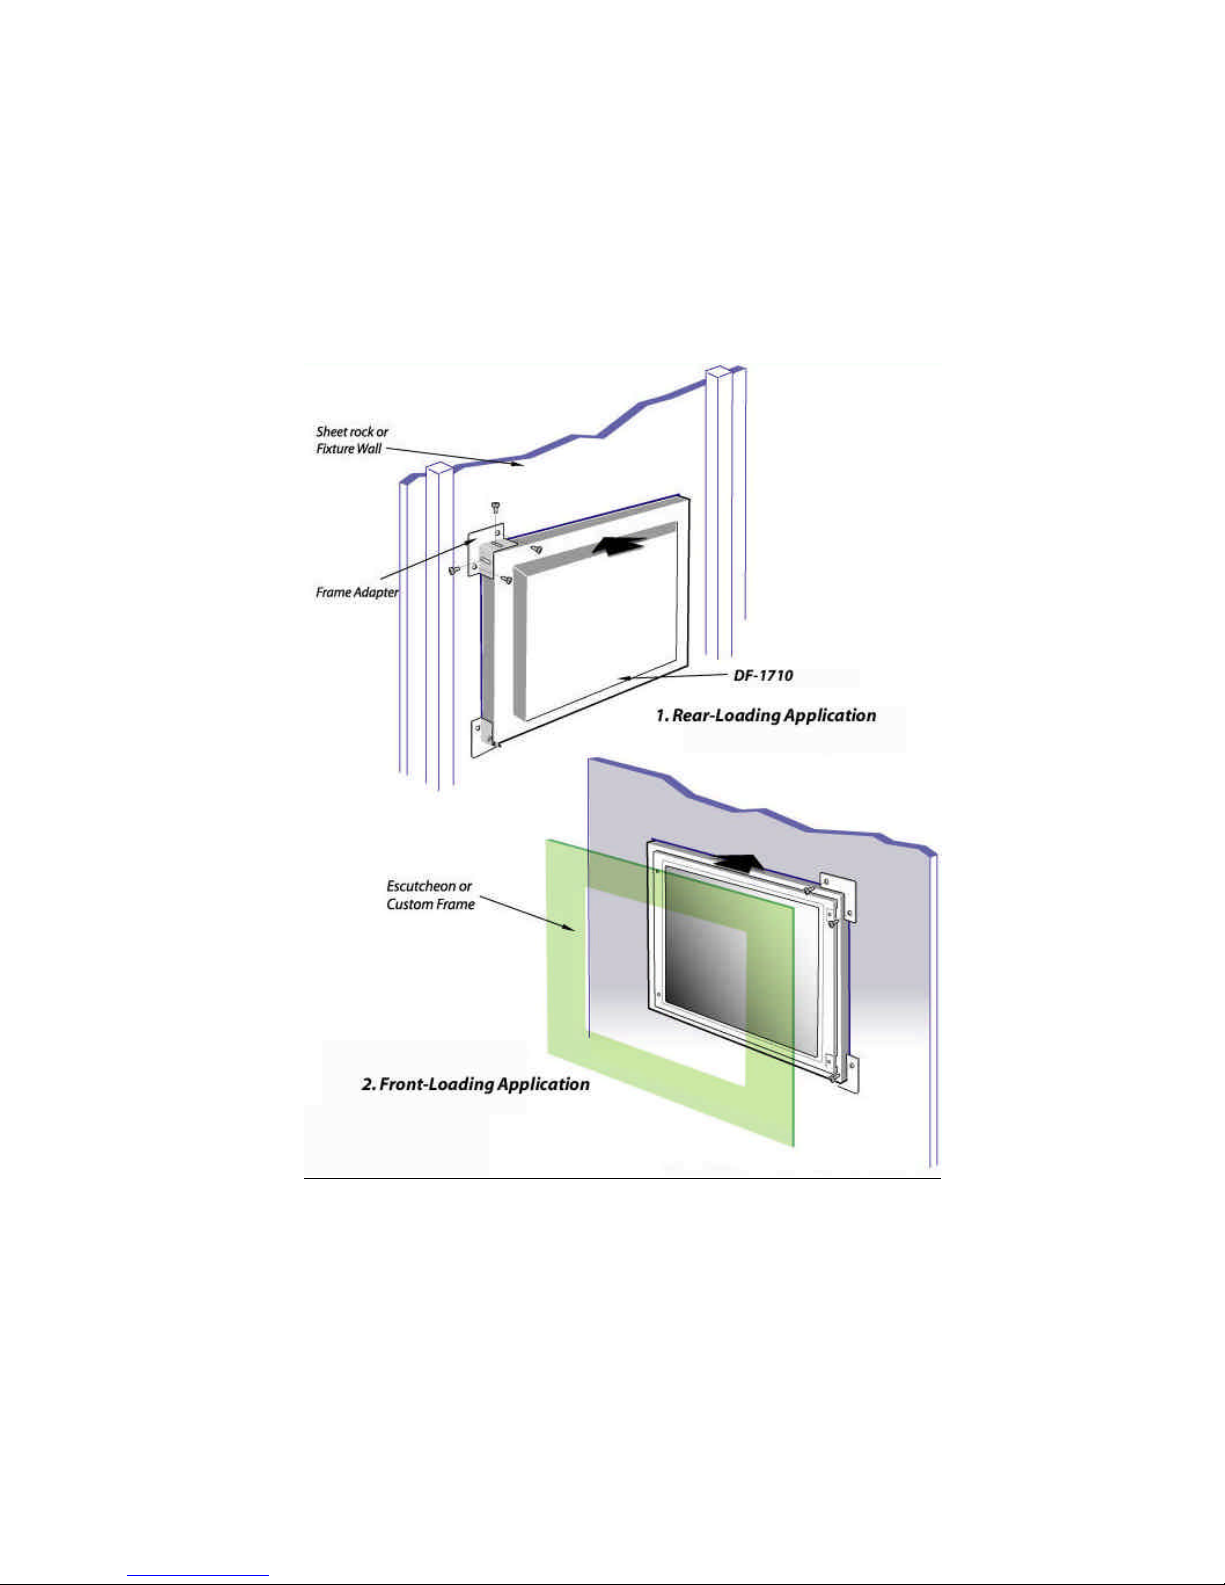
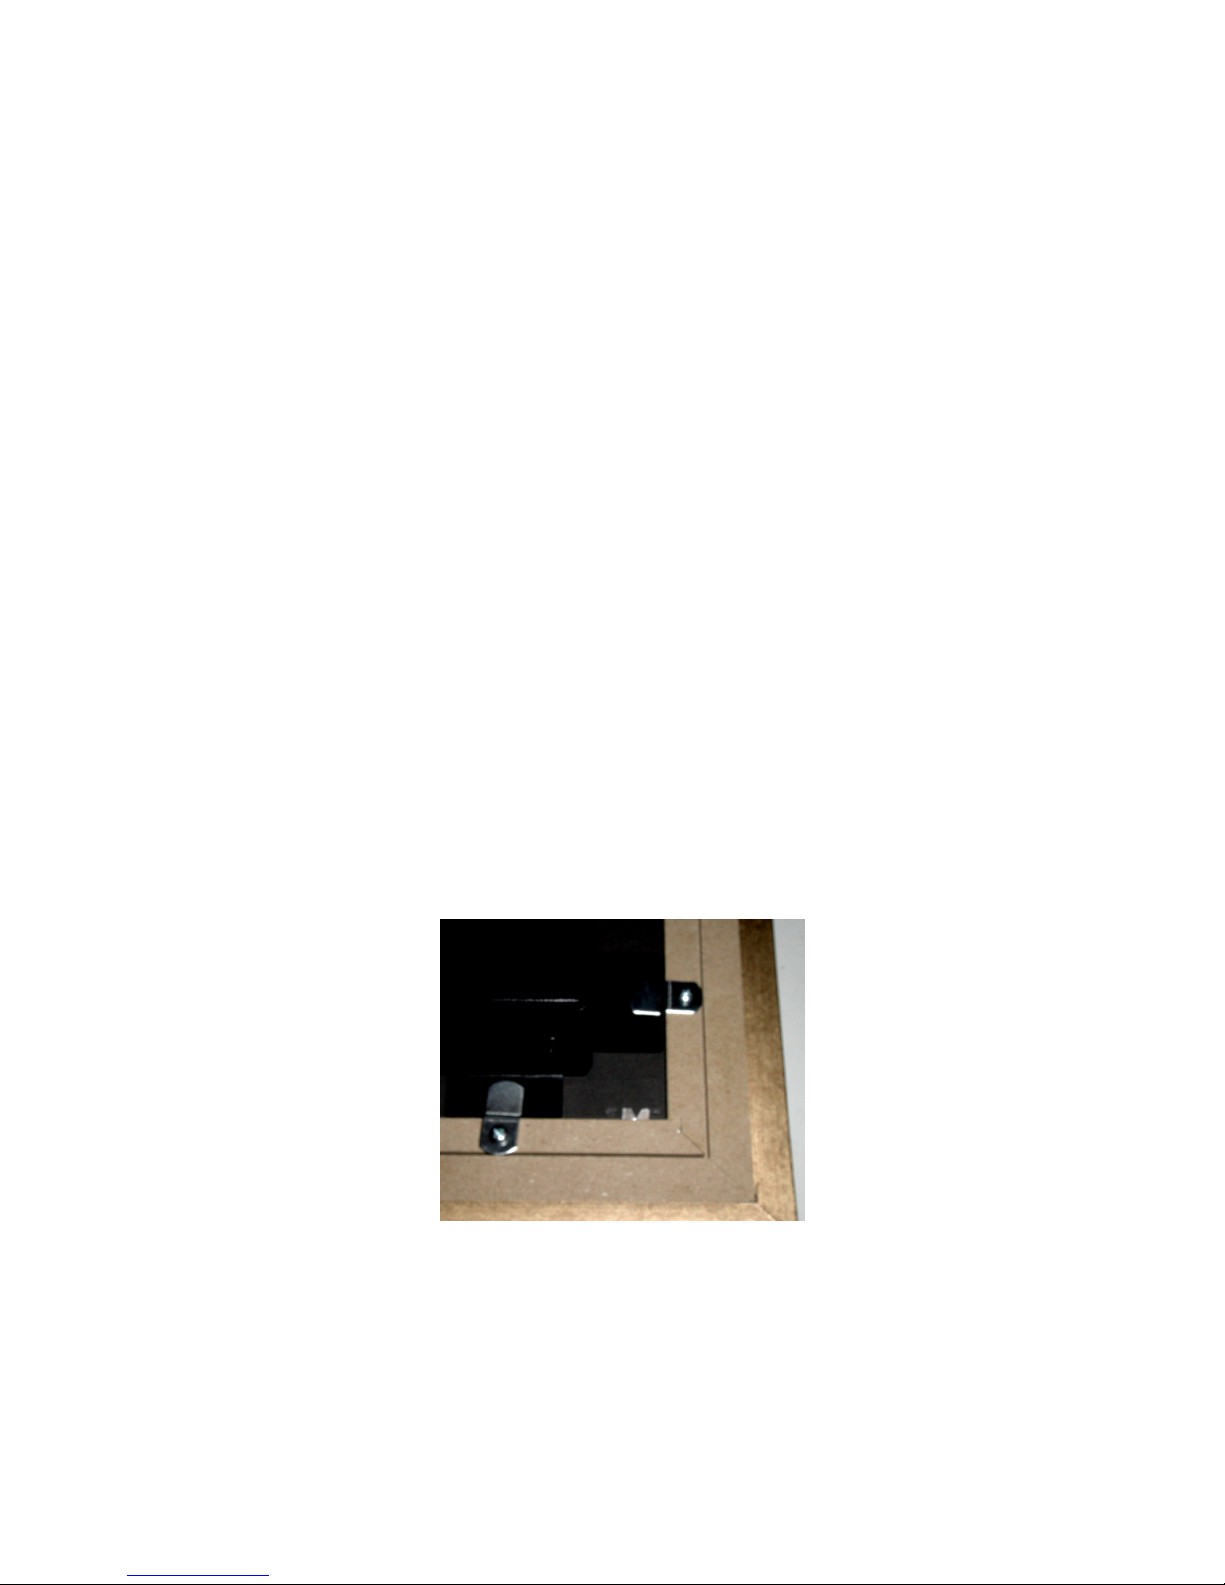
Built-In Installations
For built-in installations remove the decorative frame and mount the adjustable brackets to your installation as
shown below. The DF-1710 can be mounted from the front or rear in this type of installation. Note that the CDROM and main unit control buttons may not be useable unless you make special provision for access to them.
The bracket depth is adjustable to accommodate various wall thicknesses. The opening size for the main unit is
18-1/2“ x 15-1/8”, or 20“ x 16“ if the mounting brackets are intended to be within the opening.
14 User_Manual_RP3001k.doc
Page 15

4. Watching Slideshows
While watching slideshows you can perform the following functions using the remote control or main unit
buttons:
View Previous or Next
Press the left arrow to go back to the previous item or the right arrow to advance to the next. An indicator will
appear briefly showing the requested operation, and if the unit is paused that will be indicated as well.
If no transition effect is in progress when you press the button the previous or next image will be displayed
with whatever transition affect is being applied. If a transition is in progress when the button is pressed the
transition will be aborted and the image will be immediately displayed. Press the button once more to backstep
or advance to the desired image.
Pause/Resume
Pressing the Pause (||) button while a slideshow is running will cause it to enter pause mode, pressing while
paused will resume automatic playback. Indicators will appear briefly on-screen indicating the new status.
Slideshow and Filename Information
Pressing the up-arrow key on the remote control during jpeg image playback brings up a brief on-screen
display showing the directory path and name of the current slideshow the filename of the current image, its
path if it resides in a folder level below that of the script file, and “paused” if the slideshow is paused.
Audio Volume Adjustment
During still image playback, pressing the down-arrow key on the remote control brings up a volume adjustment
display. Use the left and right arrow keys to adjust the volume, then press the “D” button to save the volume
setting. To adjust audio volume during movie playback you must bring up the Main Menu and choosee the “Set
Audio Volume” selection.
Movie Fast Forward/Reverse
During movie playback, the up-arrow button advances ten seconds and the down-arrow button goes back 10
seconds.
Menu (“D”)
Pressing the “D” key brings up the Main Menu of the Menu System. If a media item is being loaded or
decompressed at the moment you press the button, there may be a slight time lag before the menu appears.
Backlight On/Off
Pressing the backlight On/Off button toggles power to the LCD backlight and mutes the sound output from the
internal speakers (but not the external audio line output). The LCD Backlight Power button switches power to
the screen backlight only, the computer continues to run. You need only turn off the backlight, NOT the
computer when the screen is not in use. We recommend turning off the backlight when not in use to conserve
backlight life, which is rated at a minimum of 30,000 - 50,000 hours.
15 User_Manual_RP3001k.doc
Page 16

5. On-Screen Menu System
Entering and exiting the menu system
Enter the menu system by pressing the Menu/Enter button on the main unit or remote control, which will bring
up the main menu. You may exit any menu by pressing the Pause/Exit (||) button. Pressing the Pause/Exit
button in the Main Menu will exit the menu system and resume the current default slideshow.
Main Menu
Use the up and down arrow keys on the remote control to highlight your desired selection from the Main Menu,
then press Menu/Enter to enter your selection. From the Main Menu you can select from the following:
Browse and Play Slideshows
Using this screen you can select which slideshow to run. The screen is divided into two panes, left and right.
The left-hand pane shows a list of the directories on the hard drive. The right-hand pane displays all text files
(with an extension of “.txt”) in the currently-selected directory. In order to make slideshow selection easier, no
subdirectories or non-text files are displayed in the right-hand pane. Scroll up and down in the left-hand pane
using the up and down arrow keys to navigate to the desired directory. To enter a subdirectory of the current
directory, press the “D” button. To go back up to the previous hierarchy level press the left-arrow button. Once
the desired slideshow is shown in the right-hand pane, use the right arrow key to move to the right-hand pane,
scroll up and down if necessary to highlight the desired text file, and press “D” for slideshow play options. You
can also view, rename, and delete text files using this screen.
Browse All Files
This screen allows you to browse files and folders on the DF-1710’s hard drive. You can perform the following
functions here:
• Select slideshow (set a text file as the default slideshow).
• Preview JPEG images in thumbnail view while browsing.
• Create slideshows (script files) automatically from the contents of any directory.
• Preview pictures and movies full-screen, and play MP3 files.
• View text and PDF files
• Delete files and folders (directories).
The screen is divided into two panes, left and right. In each pane, directories are indicated by names with
brackets around them, e.g. [demo]. Files do not have brackets around their names.
The left-hand pane shows all the subdirectories of the current directory, plus indicators for “[parent directory]”
(if you’re not already at the top folder level) and “[current directory]”. The right-hand pane shows the entire
contents of whatever directory is highlighted in the left-hand pane, including subdirectories and non-text files.
Using the up and down-arrow keys on the remote control you can scroll through the directories in the left-hand
pane and see the contents listing change in the right-hand pane. Using the left and right arrow keys you can
go back and forth between the two panes.
To delve a level deeper into the folder hierarchy, press “D” while a directory is selected in the left-hand pane,
or press the right-arrow key while a directory is selected in the right-hand pane. The selected directory will
“open” and become the current directory. To go back up a level in the folder hierarchy, press the left-arrow
key while in the left-hand pane, or press “D” while “[parent directory]” is highlighted.
16 User_Manual_RP3001k.doc
Page 17

To perform an operation on an item in the right-hand pane, scroll to the desired item until it ’s highlighted,
then press “D” to bring up a menu of operations that can be performed on that item, i.e. “Play Item” (if it’s a
playable media file), “Delete”, “Play slideshow from beginning” or “Resume slideshow” (if the selected item is a
text file), or “Create Automatic Slideshow for Directory” (if the item is a directory).
When a JPEG file is highlighted in the right-hand pane, a thumbnail view of the image is shown in the lower
right-hand corner of the screen. The thumbnail will be “stretched” regardless of the default scaling option.
Pressing the right-arrow key while in the right-hand pane will preview the highlighted item if it’s a playable
media file, or open the item if it’s a directory. While a JPEG or MPEG is being previewed, press the “D” button
to return to the browser screen. During MPEG preview, the up-arrow, down arrow, and pause keys perform
their normal playback functions. MP3 files will play to their end in the background when previewed.
Change Slideshow Defaults
This menu allows you to set the default pause time, transition effect, image rotation, image scaling mode,
globally for all images in all slideshows, to turn audio comments on and off, to select between random (shuffle)
or predetermined playback order, and to turn slideshow logging on and off.
These settings affects only the default settings, i.e. the settings that result when no option has been specified
in a script file. If an option has been specified in a script file it overrides the default setting for that option.
Options can be specified in script files to apply to individual media items, in which case the default settings will
still apply to other items. The global defaults can also be specified in a script file, in which case they will
override (and automatically change) the menu setting for that option. If you wish options in a slideshow
to be controllable from the menu system, do not specify those options in its script file. On the other
hand, if you do want your options to be predetermined and not overridden by the menu settings, then specify
them in your script file. See the Script File sections of this manual for more details.
The default settings are saved on the DF-1710’s hard drive in the dfos.ini file and restored whenever it is
rebooted.
The settings that can be controlled from the menu are:
Inter-Slide Pause Time
Sets the time that each jpeg image, Flash™ animation, or web page is displayed. Scroll to the desired
HH:MM:SS digit you want to change using the right and left arrow keys, then use the up and down arrow keys
to change the digit.
Transition
Select one of the transition effects offered.
Scaling Mode
Select between “Fit”, “Center”, and “Stretch”. “Fit” will expand or shrink the image so that the largest side fits
the screen while preserving the image’s proportions. “Center” will display the image at its actual size. If it’s
smaller than 1024x768 pixels a black border will be shown around it. If it’s larger than 1024x768 some of the
image will be off-screen. “Stretch” will expand or shrink the image so that both sides fit the screen exactly,
ignoring the proportions of the original image.
Shuffle Mode
17 User_Manual_RP3001k.doc
Page 18

Allows you to select random or predetermined playback order. If you select “Normal Mode”, the media in the
slideshow will be played in the order specified by its script file. If “Shuffle mode” is selected the image order
will be shuffled each time a slideshow is selected and also each time the end of the script file is reached. The
script file itself is unchanged, the shuffling takes place on a copy of the file in memory. Please note:
• All items in a script file are shuffled, including directives, MP3 playlists, etc., so if you have a script with
order-dependent features such as synchronized sound effects you may get undesired results.
• Any nested scripts referenced by the main script will also have their playback order shuffled.
• The forward and back arrows will go to the next and previous items, respectively, except when you are
"wrapping" around the end of the scriptfile (see below).
Rotation Angle
Sets image rotation to 0, 90, 180, or 270 degrees, clockwise. Set the rotation angle to 270 degrees if your DF-
1710 is mounted in portrait mode. This setting can also be used to compensate for camera orientation if all of
your pictures were taken with the same camera rotation. If only some images need to be rotated, use the
rotation paramater on selected images in a script file, or pre-rotate those images using an image editing
program prior to putting them on the Digi-Frame.
Play WAV Comments
Enables or disables automatic audio comments for pictures. If this feature is enabled and a file xxx.WAV exists
in the same directory, corresponding to the image file xxx.jpg, then the WAV file will be played immediately
after the jpeg is loaded. See the WAV audio section of the “Playing Media on the DF-1710” section of this
manual for more details.
Slideshow Log
When the Slideshow Log feature is turned on the DF-1710 will generate a text file listing each media item
played and a time/date stamp of when it was played. The log file is generated in the frame’s root directory and
called “log.out”. The log will hold up to 10,000 entries; when the log exceeds 10,000 entries the oldest entries
will be deleted to make room for new ones. The log file can be viewed on-screen by selecting it, pressing the
“D” button, and selecting “View text file” from the contextual menu. The file can be scrolled by using the
remote control’s arrow keys to the scrollbar controls at the right-hand side of the window.
Set/Clear Lockout Password
This option prevents unauthorized users from modifying any of the frame settings via the menu system. When
accessed for the first time, the user is prompted to enter his/her desired locking password. Entering a
password enables menu lockout. While lockout mode is enabled, attempting to exit a running slideshow by
pressing D for menus, or by inserting a CD-ROM, will result in a prompt for the current lockout password. The
user must enter the correct password using the onscreen keyboard. If an incorrect password is entered, the
slideshow begins again. If a CD was inserted, it is ejected.
On a locked frame, entering the Main Menu after entering the password and selecting the "Set/Clear Lockout
Password" item will result in the message "Password has been cleared. Press any button to continue." The
password feature is now disabled.
The lockout feature defaults to disabled (i.e. not protected).
18 User_Manual_RP3001k.doc
Page 19

Scan Card or USB Disk
After inserting a USB memory card or “Flash Disk”, select this menu item to scan the device for playable media
files. You will be presented with choices of making a new slideshow from the device contents, reformatting the
device, or cancelling the operation.
Set Audio Volume
Choosing this item brings up the software volume control setting and is the same as pressing the down-arrow
key during still image playback.
Modify Network Settings
This screen allows you to manually set the DF-1710’s wired and wireless IP addresses, network masks, network
gateway addresses, DNS addresses and wireless system ID (ESSID). These settings are for advanced users; if
you’re not using networking or are connecting your DF-1710 to a network with a DHCP server you won’t need
to use this menu. See the Wireless Networking and Advanced Networking Topics sections of this manual for
more information.
Upgrade Software
If your DF-1710 is connected to the internet, selecting this option will check for a software upgrade on DigiFrame’s website and install it if necessary. If no upgrade is required none will be performed. No personal data
or other information is transmitted or exchanged in this process. Typically the frame will reboot itself twice
during the upgrade process - allow it to complete the full process before switching it off manually.
System and Network Information
This screen displays information about the DF-1710’s current status, including its current network addresses
(wired and wireless), MAC address, screen resolution, and software version. While in this menu, some of the
remote control keys have special functions as indicated in the on-screen prompts:
1) Pressing the left-arrow key forces the DF-1710 to reacquire its IP address(es) from the DHCP server
(if present), which can be useful in some network administration situations.
2) Pressing the right-arrow key reboots the unit.
3) Pressing the up-arrow key brings up the monitor controls menu. This is a special menu that has a
different appearance from the rest of the Digi-Frame menus. It is generated by the DF-1710’s built-in
monitor, not the main computer.
Because Digi-Frame uses monitor controllers from a variety of manufacturers, we cannot include explicit
instructions on how to navigate the various monitor control menus. When the DF-1710 is turned on, the
monitor will perform an auto-calibration procedure and under normal circumstances no monitor settings will
need to be changed. If you do need to make changes some experimentation as to which buttons do what will
be required.
The monitor menu will disappear by itself after a period of inactivity, typically 30 seconds. To restore the autocalibrated settings, access the “auto” function, or if all else fails, restart your Digi-Frame. After the monitor
menu has been exited, press the Pause/Exit button to return to the Main Menu. If the monitor menu
disappears before you’re finished using it, you’ll need to exit the Digi-Frame menu by pressing the Pause/Exit
button, then re-enter the menu.
19 User_Manual_RP3001k.doc
Page 20

Browse the Internet
Selecting this choice opens a basic web browser window. The on-screen cursor can be moved around the
screen using the arrow keys on the remote control, and the “D” button performs a “mouse click” function. A
small icon in the lower right-hand corner of the screen toggles the browser control toolbar on and off. Please
note the following regarding the web browser:
• The default web page that will be displayed each time “Browse the Internet” can be changed by editing the
“dfos.ini” configuration file to specify the defaul home page as follows:
HOMEPAGE=xxx, where xxx is the URL of the desired homepage
• The included web browser does not support Flash, Java, Javascript, or any other plug-ins. Secure http
protocol is also not supported. The browser may display warnings when certain HTML tags are
encountered such as META REFRESH.
• Use the “||” (Pause) key to exit the browser.
20 User_Manual_RP3001k.doc
Page 21

6. CD-ROM Operation
The DF-1710 can play media files stored on CD-ROM. Most photo-processing operators offer pictures on CDROM at a reasonable added cost as an option when you drop off film for developing and/or printing. If you
have a computer with a CD-R or CD-R/W writer attached you can “burn” your own CDs with any digital picture,
MPEG1, MPEG-4, Flash®-2, and MP3 files that you have on your computer.
Loading Files from CD-ROM
Press the Eject button on the CD-ROM to open the disc tray, snap a CD-ROM disc containing recognized media
files securely into the tray’s spindle, and gently push the tray closed. There may be a delay of a few seconds
before the newly-inserted CD is recognized, depending on what the DF-1710 is doing at the time, after which a
menu will appear offering you the choices of:
Create slideshow with automatic name
Create new slideshow and name it
Eject the disc
Note: CD insertion may not be recognized during movie playback or while certain menus are displayed. If your
CD is not recognized, stop any movie in progress and go to the main menu.
If you select “Create slideshow with automatic name” a new directory is created for its contents on the DF1710’s internal hard drive, named with a date code in the format “removable-YYYYMMDD-HH.MM.SS“, so if you
insert a CD-ROM at exactly 10:15AM on Jan 10, 2003, for example, the directory will be named “removable20030110-10.15.00”. the DF-1710’s internal clock is set at the factory and periodically via its network
connection when connected to the internet. It has a 10-year battery.
To make it easier to identify and select CD slideshows you can choose “Create new slideshow and name it”. A
menu will appear allowing you to use the remote control keys to enter a name for the new directory on an onscreen “typewriter” style keyboard.
Immediately below the keyboard is the text-entry line. Move the highlight with the arrow keys and press the
“D” button on the remote control the enter the highlighted character.
The four special "keys" on the keyboard are:
"del" deletes the character at the end of the input line.
"enter" accepts your current input.
"spc" inserts a space.
"A/a" toggles the case of the last character on the input line.
To cancel the edit operation at any time, press the Pause button.
At this time it is only possible to name the directory; the automatically-generated script file will be named
“script.txt”.
After selecting a naming option and naming the directory if desired, a message will appear on-screen while files
are copied to the DF-1710’s hard drive. When file copying is complete the tray will automatically open and the
disc may be removed. The slideshow from the CD will automatically begin running
Regardless of whether directories are named automatically or with the menu, you can name later rename them
and/or any script files to more descriptive names using a PC and ethernet connection.
21 User_Manual_RP3001k.doc
Page 22

Appending CD-ROM Content to an Existing Slideshow
Content loaded from CD-ROM (or memory cards) can be “merged” with an existing slideshow. To do this,
select “Create Slideshow and Name It” when the CD is recognized or the memory card scanned. Enter the
name (exactly, including case) of the existing slideshow you wish the new content to be merged with. The new
content will be copied into the directory specified and a new slideshow will be automatically generated,
showing all of the content now in the directory. If the target directory is not at the root level of the hard drive,
you can specify the path to the directory, e.g. if you want to merge the CD contents with an existing slideshow
which is in a folder called “vacations”, which is inside a folder called “family”, you would enter
“family/vacations” as the name of the slideshow.
CD-ROM Script Files
A script file for CD-ROM contents is automatically generated at the time of disc loading and given the filename
“script.txt”. The ordering of files in the auto-generated script is alphabetical and no options are specified, i.e.
the default options (slide pause time, transition effect, etc.) will apply and can be changed using the menu
system.
You can also include your own script file(s) on CD’s you burn yourself, allowing images to be played in any
order and playback options specified on an image-by-image basis. Any text files (with a “.txt” extension) found
on the root directory of the CD are copied onto the hard drive. Any file found on root directory of the CD-ROM
named “script.txt” takes precedence over the others becomes the default script. If no file named “script.txt” is
found on the CD, the first file with a “.txt” extension will be deemed the current default script. If no files with a
“.txt” extension are found on the CD the auto-generated script becomes the default.
Any MP3 files found on the CD-ROM will be compiled into a playlist which will run in
“shuffledmusic/nointerrupt” mode starting at the beginning of the slideshow (see the “Advanced Scripting
Information” section of this manual for more details)
Important Note on CD-ROMs: The DF-1710 recognizes only ISO9660-formatted CDs. Non ISO9660formatted CDs may cause the unit to “hang” and require manual ejection of the CD with a paper clip and a reboot. Photo CDs supplied by commercial photo processors will always be ISO9660-formatted. If you are
burning your own CDs be sure to select “Hybrid PC/Mac” or another formatting selection in your CD-burning
software that ensures DOS/Linux compatibility. Mac-only CDs (pure HFS formatting) will not work with the DF-
1710.
Special characters such as #, &, ;, :, |, <, >, “, and , should be avoided in file and directory names.
22 User_Manual_RP3001k.doc
Page 23

7. Memory Card Operation
The DF-1710 can read media from memory cards by means of external USB card reader. The following card
readers have been tested and are known to work with the DF-1710. No software installation is required in the
DF-1710 to support these readers.
CompUSA CompactFlash™ USB Card Reader, SKU#51492.
Microtech Dazzle® ZiO!™ CompactFlash, SmartMedia™, Memory Stick™, and SD/MMC™ Reader/Writers. The
Dazzle® ZiO!™ series is compact enough to plug directly into the DF-1710’s USB slot and remain hidden
behind the decorative frame.
Digi-Frame will conduct ongoing tests of additional card readers and update the list of supported devices on
our website periodically. In general, single-slot card readers (and USB Flash “pen drives”) that do not require
driver installation under Mac OS 8.6-9.x or Windows2000®, Windows ME®, or WindowsNT® should work.
These card readers work with “generic” drivers supplied in the computer operating systems. Multi-slot readers
may or may not work, if they do, only the “first” slot, i.e. the one with the lowest DOS drive name, will
function.
The Dazzle® ZiO!™ CompactFlash™ Reader/Writer
Card Reader Installation
No driver or software installation is required in the Digi-Frame. Plug your card reader into the USB port in the
connector bay at the rear of the DF-1710. You do not need to turn off your Digi-Frame when plugging and
unplugging a card reader, however , if you’re unplugging one brand or model of card reader and plugging in a
different one, you will need to reboot the Digi-Frame for the new model to be recognized.
Card Reader Operation
Insert a memory card containing JPEG images, MPEG-1 movie files, and/or script files into your card reader.
Access the main menu and select “Scan Card or USB Disk”. Select “Create new slideshow from card contents”
from the submenu. After choosing a naming option a message will appear onscreen that the card is being
scanned and files copied. Once copying is complete the new slideshow will start automatically.
Memory card slide show directories and scripts are handled identically to CD-ROM slideshows. Please refer to
the CD-ROM sections of the User’s Manual for more detailed information.
23 User_Manual_RP3001k.doc
Page 24

8. Network Operation
Overview
In addition to loading images from CD-ROMs and memory cards, you can transfer files between a computer
your DF-1710 using an ethernet connection, either wired or wireless. Files transferred can be media files such
as images, movies, sounds, etc., or special files which allow the DF-1710’s operation to be controlled remotely.
If your computer is running Windows 95® or later, or Macintosh OSX or later, you can use SMB networking to
simply mount its internal hard drive on your desktop like any other disk, and drag and drop files to and from it.
If your operating system does not support SMB networking, or you are transferring files over the internet, files
can be transferred to and from the DF-1710 using FTP (File Transfer Protocol). To perform FTP transfers, the
DF-1710 continuously runs an FTP “Server” program, which communicates with FTP “Client” programs running
on other computers via a network connection. Graphical FTP client programs are built into Internet Explorer
and Netscape web browsers, and these can be used to transfer files to and from the DF-1710. Dedicated FTP
client programs such as CuteFTP for Windows from GlobalSCAPE Inc. and Transmit and NetFinder for
Macintosh can also be used, and provide some features that browsers do not. Demo copies of Transmit and
CuteFTP are included on your DF-1710’s hard drive and can be downloaded from there to your PC using a
browser. If you continue to use these programs please register them with the vendors to support their
development efforts.
Web browsers have advantages of ubiquity, a graphical interface and the ability to view media and scripts
instantly from within the browser by simply clicking on them. Dedicated FTP clients have the advantage of the
ability to easily delete and rename files and folders on the remote server (the DF-1710). Netscape cannot
rename or delete files on an FTP server, Internet Explorer needs to have “folder view” enabled in its FTP
preferences in order to do this.
Transferring files with either a web browser or an FTP client program is usually a matter of simply dragging file
icons from your computer desktop into the browser or FTP client window. Transfer will start automatically.
Consult your FTP client program’s documentation for further information.
The DF-1710 provides password protection for security. A user name and password must be supplied by the
browser or FTP client program in order to gain access to the DF-1710. You will use the username “df” and the
password “digiframe” to initially log into the DF-1710’s FTP server. See the “Password Security” section of this
manual for details of how to change the default password.
In order for messages to be sent and received correctly, each device on a TCP/IP network has a unique
identifying address, known as its IP address. To transfer content and/or scriptfiles to your DF-1710 (at least
initially), you’ll need to know its IP address. In a large network situation, or a network with a DSL or cable
modem connecting to the internet, IP addresses are usually assigned automatically to individual devices by a
special program called a DHCP (Dynamic Host Control Protocol) server. A DHCP server is often included in
network connection-sharing devices such as routers and DSL or cable modems (but not in most hubs). On
some networks the DHCP server is a component of software running on a file server computer.
When the DF-1710 starts up, it first looks for a DHCP server and if one is found, gets its IP address from it
(unless DHCP Override has been selected in the Network Settings menu). If you’re connecting your DF-1710
directly to a computer, or to a simple LAN without a router, there won’t be a DHCP server, so the DF-1710 will
use its default IP address. In either case, the frame’s IP addresses (one for its wired and one for its wireless
connection) can be viewed by selecting System and Network Information from the Main Menu. Once you know
your frame’s IP address you can type it into your browser or FTP client program’s address field and transfer
files as explained in later sections.
24 User_Manual_RP3001k.doc
Page 25

The following illustrations show various ways in which DF-1710s can be administered via ethernet. Figure 1
shows the simplest configuration. A single computer is connected directly to a DF-1710 by an ethernet
crossover cable. Files generated on the PC are sent to the DF-1710 at its default IP address, using FTP or SMB
networking. Media to be played resides on the DF-1710’s internal hard drive. Once the media and script file
have been transferred the network connection can be removed or left in place as desired.
Figure 1: Direct Connection to One DF-1710
Figure 2 shows a simple LAN setup with one DF-1710. This is almost the same as the direct configuration of
Figure 1, but since a hub is present standard ethernet cables are used instead of crossover cables. If a DHCP
server is present the DF-1710 will get its IP address from it, otherwise it will use its default IP address.
Figure 2: Small LAN Configuration
25 User_Manual_RP3001k.doc
Page 26

Figure 3 shows a configuration typical of many homes and businesses today. An internet connection is provided
by a cable or DSL modem, and the connection is shared among network users and devices by a router. In
some cases the router is built into the modem and in others it is a separate device. In most cases the router
contains a DHCP server. DF-1710s connected to this type of network will each receive a unique IP address
from the DHCP server when they boot up or when the IP address is refreshed manually using the menus.
Figure 3: LAN with Cable/DSL Modem and/or Router with DHCP Server
Figure 4 below shows remote administration of a DF-1710 on a remote LAN via the internet using “push” mode
content delivery. In order to “push” content to a DF-1710 its IP address must be known so that media and
script files can be sent to it via FTP. In some cases the remote LAN and devices within it may have fixed
addresses; in this case the DF-1710’s address can be known reliably and push mode can be used. Port
mapping for FTP access from outside the remote LAN may need to be configured within the remote LAN in
order to bypass whatever firewall protection may be in place. Note that the script file running on the DF-1710
directly references media files that have been transferred or “pushed” to its internal hard drive.
Figure 4: Remote Administration via the Internet using “Push” Mode
26 User_Manual_RP3001k.doc
Page 27

In many cases, remote LANs will use subnets and dynamically-assigned addresses internally, so the IP
addresses of DF-1710s on the remote LAN cannot be reliably or easily known. Furthermore, firewall and port
mapping issues can become complex, especially when multiple DF-1710s need to be administered on each
remote LAN. For these applications the DF-1710 has been designed to use a “pull” or “fetch” mode of
operation. In “pull” mode, the script file contains a list of internet URLs (addresses) which point to locations on
a web server rather than direct references to files residing on the DF-1710’s own hard disk.
Figure 5 below illustrates this mode. The main script and media files reside on a web server: your own, your
personal website space on your ISP’s server, or an independent website. A “fetch” script file is first written and
“pushed” to the DF-1710 locally, either before it’s installed at the remote location, with a local PC at the remote
location, or from a CD or memory card. This “fetch” script will typically consist of one line, which references the
“main” script on the server. Here’s an example:
http://www.myserver.com/frame0001/mainscript.txt
When the DF-1710 plays the “fetch” script, it will call the main script from the server as a “nested” script, in a
manner similar to a subroutine in a program.
Media references in the main (nested) script are relative to its location, i.e. if the main script contains the line
pictures/picture1.jpg
the file picture.jpg will be looked for on the server, in a directory called “pictures”, which is assumed to be a
subdirectory of “frame0001”, the directory on the server in which the main script file resides. This convention
allows script files to execute properly regardless of their location, provided the relative directory structure
between them and their media remains the same.
The advantages of the “Pull” mode method are that the IP addresses of remote DF-1710s do not need to be
known, and firewall issues are not a problem since no FTP access is required from outside the remote LANs. In
order to change what is displayed on the remote DF-1710(s) the media and script files are simply changed on
the server.
Pull mode is very powerful and flexible once you get the hang of it. Take a look at the “Photo Sharing” tutorial
in this manual for an example.
27 User_Manual_RP3001k.doc
Page 28

Figure 5: Remote Administration via the Internet using “Pull” Mode
28 User_Manual_RP3001k.doc
Page 29

Configuring Your Computer’s Network Settings
If you’re connecting your DF-1710 to an ethernet network that has a DHCP server on it and your computer is
already on that network, you don’t need to reconfigure anything on your computer – proceed to “Connecting
your DF-1710 to a Computer or Network” below.
Your computer must be configured to use TCP/IP networking in order to communicate with your DF-1710.
Some small networks using only a hub are configured to use Windows Networking or Appletalk instead of
TCP/IP. In these cases you’ll need to temporarily change your network settings to TCP/IP to communicate with
your DF-1710.
Connecting Your DF-1710 to a Computer or Network with Ethernet Cables
Once your computer is configured for TCP/IP networking, connect your DF-1710 as follows:
Connecting directly to a PC
If you are connecting directly to the DF-1710 from your computer without going through a hub, router, or
switch, connect your DF-1710’s ethernet port to your computer’s ethernet port using the included “crossover”
cable. There may be a label on the crossover cable denoting it as such, if not, refer to the photo below.
Connecting to a Network
If you’re connecting the DF-1710 to a network hub, router, or switch, connect your DF-1710’s ethernet port to
the network using the standard cable.
29 User_Manual_RP3001k.doc
Page 30

Testing Communication with Your DF-1710
Communicating Using SMB File Sharing
• Under Windows®, Open “Network Neighborhood” or “My Network Places” (depending on which version of
Windows you are running).
• You should see an item called df-xxxxxx, where “xxxxxx” will be a series of numbers unique to your Digi-
Frame. If df-xxxxxx does not appear in Network Neighborhood or My Network Places, double-click “Entire
Network”, where you should see an item called “WORKGROUP”, in which df-xxxxxx will appear.
• Double click df-xxxxxx and you will see an item called “HARDDISK”.
• Double Click “HARDDISK”, and you will be prompted for a username and password. Enter df for the
username and digiframe for the password. The Digi-Frame’s internal hard disk should open in a window
on your desktop, and you can copy files to and from it just like any other network volume.
• Under Mac OSX, open a window in the Finder. In the upper half of the left-hand pane there will be an Icon
labeled “Network”. Click the Network icon and in the right hand pane an item called “df-xxxxxx” should be
present, where “xxxxxx” is a series of numbers unique to your Digi-Frame.
• Double click df-xxxxxx and you will see an item called “HARDDISK”.
• Double Click “HARDDISK”, and you will be prompted for a username and password. Enter df for the
username and digiframe for the password. The Digi-Frame’s internal hard disk should open in a window
on your desktop, and you can copy files to and from it just like any other network volume.
Communicating Using FTP
Select “System and Network Information” from the Main Menu to see your Digi-Frame’s wired and wireless IP
addresses, and whether or not a DHCP server was found for each. If no ethernet connection is present or a
DHCP server is not found, the DF-1710 will use default IP addresses compliant with AutoIP standards for plugand-play networking on both Macintosh and Windows.
If you’re using a web browser to access your DF-1710, type “ftp://df:password@xxx.xxx.xxx.xxx” into your
browser’s “Address” (Explorer) or “Location” (Netscape) field, replacing, “password” with your password
(“digiframe” is the default password), and “xxx.xxx.xxx.xxx” with your Digi-Frame’s IP address. For example if
your Digi-Frame’s IP address is 192.168.0.25 and you haven’t changed the default password you should enter:
ftp://df:digiframe@192.168.0.25
into the browser’s address field. If you’re using an FTP client program, enter the IP address of your DF-1710 in
the appropriate field, enter “df” as the user name and “digiframe” as the password. No directory path should
be entered. If all goes well the browser window or FTP client will then display the contents of the “root”
directory on the DF-1710’s internal hard drive, and you can now drag and drop files to your browser or FTP
client window to transfer them to your Digi-Frame. If your web browser or FTP client program is unable to
establish communication with your DF-1710 please refer to the Troubleshooting section at the end of this
manual.
30 User_Manual_RP3001k.doc
Page 31

Wireless Networking
The DF-1710 is able to communicate over wireless ethernet (also known as “WLAN”, “802.11b” or “wi-fi”) by
means of an external USB receiver module.
Supported USB Modules
The DF-1710 is compatible only with those wireless USB modules using the Atmel AT76C503A and AT76C505
chipsets and certain radio chipsets. Following are USB modules known to use these chipsets:
Manufacturer Model Tested Works
Asante FriendlyNet AL2011 NO unknown
Belkin F5D6050 YES YES
Belkin F5D6050 Ver 2 YES YES
Belkin F5D6050 Ver 2000 YES YES
Compaq HWN-200 NO unknown
Dlink DWL-120 YES YES
Linksys WUSB11 v2.6 YES YES
Linksys WUSB11 v2.1 NO unknown
Linksys WUSB12 YES NO
Netgear MA101 YES YES
Netgear MA101 revB NO unknown
Netgear MA111 YES YES
SMC 2662W v.1 NO unknown
SMC 2662W v.2 NO unknown
SMC 2662W v.3 YES YES
SMC 2664W NO unknown
SMC 2632W v3.0 NO unknown
Xterasys XN-2122B YES YES
Note that the version numbers may be important; different versions of the same model may use different
chipsets. Usually the version number is shown with the model number on the manufacturer’s labeling.
The Xterasys and Netgear MA111 products are“pen” style devices that plug directly into the USB port without
a cable and will remain concealed behind the decorative frame.
In addition to the USB wireless module at the DF-1710, you will need a compatible wireless access point (WAP,
or Base Station) connected to your PC and/or network. Refer to the base station manufacturer’s instructions for
configuring your computer(s) and wireless network.
The USB wireless module should be connected to the DF-1710’s USB port before turning the frame on, or if it’s
already on, you will need to reboot by powering the unit off and on or by using the menu reboot. On powerup
or reboot, the USB module will attempt to communicate with the nearest base station and obtain a wireless IP
address. The wired Ethernet connection, if attached to a network, can be used simultaneously with the wireless
connection. The two ports have separate IP addresses and function totally independently, however, traffic is
not routed between the wired and wireless interfaces.
If the module is unplugged from the USB port for some reason while the frame is running, it will not
automatically come back online when you plug it back in - you must go to the System Information menu and
refresh its IP address by pressing the back arrow key, or you may need to reboot the frame.
31 User_Manual_RP3001k.doc
Page 32

Setting the USB Module’s ESSID
Each 802.11b wireless network has an “ESSID” (Extended System Station ID), which is analogous to a
“channel” in a cordless phone system. The ESSID of devices on your wireless network must match that of your
access point or base station. Typically manufacturer’s will set the default ESSID in their transceiver modules to
match that of their base stations, but if you’re mixing brands you may have to change the default. The default
ESSID in your DF-1710 is “lynksys”, and if you’re using all Lynksys components you will probably not need to
change this setting. If you do need to change it, choose “Set Wireless ESSID” from the “Modify Network
Settings” menu. Use the remote control keys to enter text on the on-screen “typewriter” style keyboard.
Immediately below the keyboard is the text-entry line, which shows (in yellow) the current ESSID. You edit
text by moving the highlight with the arrow keys and pressing the “D” button on the remote control. If the
currently highlighted item is a letter or other symbol, it will be added to the end of the input line.
The four special "keys" on the keyboard are:
"del" deletes the character at the end of the input line.
"enter" accepts your current input.
"spc" inserts a space.
"A/a" toggles the case of the last character on the input line.
To cancel the edit operation at any time, press the Pause button. The setting you were editing will be left
unchanged.
You may need to reboot the DF-1710 after changing the ESSID.
NOTES:
• The DF-1710 may perform more slowly than normal if the wireless module cannot find an access point in
range, because the software keeps searching for an access point to establish a communications link.
• Ad-hoc 802.11b networking is not currently supported. You must have an access point on your network.
• WEP (Wireless Encryption Protocol) is not currently supported.
32 User_Manual_RP3001k.doc
Page 33

Advanced Networking Topics
Password Security
Your DF-1710 is a UNIX-based system. There is a single user, named “df”, with a default password of
“digiframe”. These login details are required for authentication purposes when you connect to the frame to
upload new media or change settings. The user name cannot be changed.
To change your DF-1710’s FTP password, use Windows Notepad or another text editor to create a new text file
called “password.txt” containing your desired new password. (Ensure that there are no leading spaces or
other extraneous content in the file. If you upload a new password that is not what you thought it
was, you may not be able to re-establish communication with your Digi-Frame). Upload this file to
the DF-1710’s root directory using FTP. When the file is uploaded, the password will be changed automatically
and the “password.txt” file you uploaded will be deleted from the DF-1710’s hard drive.
Note: Password updates are processed only when a new media item is loaded. It may take up to ten seconds
after the update check is run for the password change to be accepted.
SMB Networking Details
Under Windows®, the DF-1710 The Digi-Frame will attempt to join workgroup WORKGROUP, with a computer
name of DF-xxyyzz (where xx, yy and zz are the last three bytes of the frame's MAC address, in hexadecimal).
There is a single sharepoint, named HardDisk. The username and password for the SMB sharepoint are df and
digiframe, respectively; these login details give unrestricted R/W access to the share. By default, the entire
user-accessible area of the hard drive is shared. You can optionally restrict SMB access to a single subdirectory,
or disable SMB sharing altogether, using the SMB* keywords in dfos.ini (see below).
Changing Slideshows and Settings Remotely
You can remotely change many of the DF-1710’ functions by creating a plain text file called “dfos.ini” (all
lowercase) and transferring it to the DF-1710’s root directory. Each setting in dfos.ini must be on a separate
line. Each line contains one parameter and its setting, separated by an equals sign. The parameter name must
be in uppercase. There must be no space between the parameter and the equals sign, or between the equals
sign and the value.
BLOCKSIZE=[1 to 256]
Sets the default block size for transition effects.
HDDSLEEP=[0 to 20]
Sets the disk idle time, in minutes, before the hard disk spins down. The default is 10 minutes. Specifying
an idle time of 0 disables automatic spindown; the hard disk will run continuously.
HDDQUIET=[0 or 1]
Enables (1) or disables (0) hard disk acoustic noise management features. The default is 0. The exact
effect of this setting varies according to the brand and model of hard disk in your Digi-Frame. In general,
setting this parameter to 1 will reduce seeking noise at the expense of some disk performance. If you
intend to play MPEG movies on your Digi-Frame, it is recommended to leave this setting at its default.
33 User_Manual_RP3001k.doc
Page 34

HOMEPAGE=url
Sets the default home page (visited when the user selects "Browse the Internet") to url.
LOGLEVEL=[0 or 1]
Enables (1) or disables (0) playback logging (for media play audit purposes).
PAUSE=[pause time in seconds]
Sets the default pause time between slides.
PLAYWAVES=[0 or 1]
Enables (1) or disables (0) playback of wave audio files associated with JPEG images. Default is 1.
ROTATE=[0, 90, 180 or 270]
Sets the default rotation angle for JPEG images.
SHUFFLE=[0 or 1]
Enables (1) or disables (0) shuffled playback mode.
SIZEMODE=[fit, center or stretch]
Sets the default scaling mode for JPEG images.
SLIDESHOW=url
Sets the default slideshow. This can either be a URL to a scriptfile on a remote server (e.g.
http://www.myserver.com/script.txt), or a local filename (e.g. /digiframe/script.txt). Note that the
/digiframe prefix must be supplied for scripts residing on the DF-1710’s local hard disk. Using dfos.ini to set
the default slideshow to a script file on a remote server is a more robust way of implementing “pull” mode
remote control of slideshows than the alternate method of referencing a remote nested script in a local
script, especially in slow network situations.
SMBNAME=computer-name
Assigns the network name computer-name to the DF-1710. This is the name that will appear in Network
Neighborhood. Effective only when SMB networking is enabled. The default name of the Digi-Frame is DF-
xxyyzz, where xx, yy, zz are the last three bytes of the frame's MAC address (in hexadecimal).
SMBNETWORK=[0 or 1]
Enables (1) or disables (0) SMB network sharing. Default is ENABLED.
34 User_Manual_RP3001k.doc
Page 35

SMBROOT=path
Sets the root location of the SMB share point, relative to the root location of the FTP server. The default is
an empty string, which equates to the same root location as the root of the FTP server. If you wish to
restrict SMB access to a single subdirectory, specify its name here (with a leading forward slash, e.g.
SMBROOT=/smb_dir). The directory must exist.
SMBWORKGROUP=workgroup-name
Sets the name of the workgroup the DF-1710 will join. Effective only when SMB networking is enabled.
Default is "WORKGROUP".
TRANSITION=[flip, dissolve, blocks or crossfade]
Sets the default inter-slide transition.
VOLUME=[0 to 100]
Sets audio volume, as a percentage of maximum.
The following dfos.ini directives specify advanced networking parameters:
DHCPOVERRIDE=[0 or 1] (default=0)
If set to 1, overrides DHCP and forces the frame to use its default IP address
DNS1=[0 to 255]
DNS2=[0 to 255]
DNS3=[0 to 255]
DNS4=[0 to 255]
DNS address, MSB – LSB, respectively. All default to 0.
WIREDIP1=[0 to 255] (default=169)
WIREDIP2=[0 to 255] (default=254)
WIREDIP3=[0 to 255] (default=second least-significant byte of the MAC address)
WIREDIP4=[0 to 255] (default=LSB of the MAC address)
Wired ethernet port IP address
WIREDNETMASK1=[0 to 255] (default=255)
WIREDNETMASK2=[0 to 255] (default=255)
WIREDNETMASK3=[0 to 255] (default=255)
WIREDNETMASK4=[0 to 255] (default=0)
Wired ethernet port net mask.
WIREDGATEWAY1=[0 to 255] (default=169)
WIREDGATEWAY2=[0 to 255] (default=254)
WIREDGATEWAY3=[0 to 255] (default=0)
WIREDGATEWAY4=[0 to 255] (default=1)
Wired ethernet port gateway address
35 User_Manual_RP3001k.doc
Page 36

USBIP1=[0 to 255] (default=169)
USBIP2=[0 to 255] (default=254)
USBIP3=[0 to 255] (default=third least-significant byte of the MAC address)
USBIP4=[0 to 255] (default=LSB of the MAC address)
Wired ethernet port IP address
USBNETMASK1=[0 to 255] (default=255)
USBNETMASK2=[0 to 255] (default=255)
USBNETMASK3=[0 to 255] (default=255)
USBNETMASK4=[0 to 255] (default=0)
Wired ethernet port net mask.
USBGATEWAY1=[0 to 255] (default=169)
USBGATEWAY2=[0 to 255] (default=254)
USBGATEWAY3=[0 to 255] (default=0)
USBGATEWAY4=[0 to 255] (default=1)
Wired ethernet port gateway address
Remote Rebooting
You can reboot a DF-1710 remotely by simply sending it a dummy file called “reboot.now”.
Your DF-1710’s MAC Address
Every ethernet device manufactured has a unique identifying address, called its MAC (Media Access Control)
address, which may be required for certain networking situations. DHCP servers, for instance, can often be
configured to assign specific IP addresses to specific devices, identified by their MAC addresses. The MAC
address of your Digi-Frame is printed on a label on the back of the unit, along with the product serial number.
Default Network Settings
If no DHCP server is found on your network or if “Override DHCP Server” is selected from the Network Settings
menu or specified in dfos.ini, the DF-1710 will initialize its network interfaces on boot-up with defaults selected
to facilitate simple home installations for users who intend to use SMB support. These users will generally not
need to know the frame's IP address; they will simply browse for the frame name in Network Neighborhood
(Windows) or Connect To Server (MacOS X).
The default IP address for the fixed Ethernet port is 169.254.x.y, where x and y are the least-significant two
bytes of the unit's MAC address. For example, if your MAC address (which is printed on the unit's serial number
plate in hexadecimal) is 00D0 1234 5678, the default wired Ethernet address will be 169.254.86.120 (56
hexadecimal = 86 decimal, 78 hexadecimal = 120 decimal).
The default IP address for the USB Ethernet pod is 169.254.z.y, where z is the third least significant byte and y
is the least-significant byte of the unit's MAC address. In the example above, the default wireless Ethernet
address will be 169.254.52.120 (34 hexadecimal = 52 decimal).
The netmask for both ports is 255.255.0.0 and the default gateway is 169.254.0.1.
36 User_Manual_RP3001k.doc
Page 37

Manually Configuring Network Settings
For special networking situations not using DHCP, you can manually set your DF-1710’s IP address, Network
Mask, Network Gateway, and DNS addresses for either wired and wireless ethernet connections by using either
the “Modify Network Settings” selection of the Main Menu, or by specifying them in dfos.ini.
Overriding DHCP
The presence of a DHCP server on the network at boot-up time will always override the manually-set addresses
unless “Override DHCP Server” is selected from the Network Settings menu or DHCPOVERRIDE=1 is specified
in dfos.ini, in which case the Digi-Frame will always use the manually-set IP address and ignore any DHCP
server on the network. Please note that if you override DHCP you must ensure that there are no duplicated
addresses on your network or communications will fail, and you must manually set all other network
configuration settings including DNS in order to be able to fetch remote media, webpages, and script files.
Refreshing IP Addresses from a DHCP Server
You can force the DF-1710 to reacquire an IP address from the DHCP server by going to “System Information”
in the Main Menu and pressing the back-arrow key.
DHCP Address Leases
By default, the Digi-Frame will cache DHCP leases across reboots. To override this behavior, you can connect
to the DF-1710 via ftp and create a dummy file in the root ftp directory named “dhcp.dyn”. If this file exists,
your DF-1710 will NOT cache its leased address; each time it reboots, it will request a new address from the
DHCP server. The behavioral difference between these two modes depends on your network configuration.
Most DHCP server products will attempt to reissue the same IP address to the same MAC address where
possible, so your DF-1710’s IP address should remain constant in either mode. Some DHCP products, however,
may issue a new address to the product each time it boots. This issue has been observed most frequently with
simple residential router boxes used to share a home DSL or cable modem connection. The best way to avoid
this type of problem is to use a more advanced DHCP product that is either linked to a DNS server (so that you
can use “friendly” names to access your frames, e.g. “digiframe-foyer”, “digiframe-managers-office”, etc) or
can be configured to reserve specific IP addresses for specific MAC addresses. Consult the documentation for
your DHCP/DNS server software for assistance on configuring these network parameters.
Firewall Issues
If your Internet connection passes through a firewall (such as a DSL/cable router that implements NAT), and
you need to be able to establish inbound (“push”) connections to Digi-Frames from outside the firewall, you’ll
need to establish port mapping so that you can connect to at least port 21 (ftp). For compatibility with future
software updates, we also suggest you make port 80 (http) accessible unless you have security concerns about
this action. To overcome firewall limitations the DF-1710 offers "pull" mode; see other sections of this manual
for more details.
Restoring the System Configuration File
If your DF-1710 freezes at the “Continuing” startup message or exhibits unreliable network behaviour, it may
be due to a corrupted system configuration file. To restore the system configuration file to default settings,
reboot the frame and hold down the Pause button on the remote control when the blue screen appears with a
prompt. You will be presented with a dialog box giving you the choice to restore the factory configuration
settings or to continue with normal boot-up.
37 User_Manual_RP3001k.doc
Page 38

9. Script Files and Slideshows
Basic Information About Script Files
The DF-1710 gets its information about the order and timing of media items to be played and any other special
instructions by means of text script files, either created by you and uploaded to the Digi-Frame via ethernet, or
automatically generated by the Digi-Frame when a CD-ROM or memory card is inserted. Using the on-screen
menu system and the remote control or control buttons you can select from among various script files present
on the DF-1710’s internal hard drive.
Script files are standard text files that can be created with Windows Notepad or, on Macintosh, with SimpleText
or other text editor such as BBEdit Lite from Bare Bones Software. In its simplest form, the scriptfile is simply a
list of media items, each one on a separate line, such as:
music.mp3
picture1.jpg
movie1.mpg
picture2.jpg
The DF-1710 processes the script file line-by line, displaying items in the order they are mentioned in the
scriptfile. Any invalid script lines or script lines referencing media items that cannot be found will be ignored.
When Digi-Frame reaches the end of the scriptfile, one of two things will happen:
• If at least one item in the scriptfile was played successfully, the Digi-Frame will start playing the
scriptfile again from the beginning.
• If no items in the script file could be played successfully, the Digi-Frame will halt with the message
“Slideshow or Media Error”. You can clear this error condition by selecting another slideshow, or by
correcting the script or loading missing media files and reselecting the script file.
The DF-1710 uses the current default settings for playback options (slide pause time, transition effect, etc.) as
set by the menu system unless they are overridden by specific options in the script file. See the Advanced
Scripting Information section of this manual to learn how to specify your own options that will override the
defaults.
Important Rules Regarding Script Files
• Filenames as typed in script files must be identical to the actual filenames in all respects, including
upper/lower case - “picture.jpg” is not the same as “picture.JPG”
• Filenames and directory (folder) names must not contain special characters such as #, &, ;, :, |, <, >, “,
and , .
• Script files must have an extension of “.txt”.
• Files referenced in script files are assumed to be located in the same directory as the script file. If you want
to reference media in other directories you must add path specifications to your script lines as described
elsewhere in this manual.
• MP3 playlist files must use DOS end-of-line characters. Playlist files generated with the Macintosh text
editor SimpleText will not work!
38 User_Manual_RP3001k.doc
Page 39

Advanced Scripting Information
Folder (directory) Path References in Script Files
Organizing your slideshows and media into folders is convenient and helpful but requires attention in script file
writing. All paths in scripts are relative to the directory that the main script file resides in, i.e. the DF-1710
assumes that the script and media are all in the same folder. If your media files are in the same directory
(folder) as your script file, then no paths need to be specified in the script file. If a script file references media
in other folders, the path to the media file needs to be specified in each script line referencing that media file.
To reference a media file in a directory other than the directory in which the script file resides, you must
specify a path relative to the directory in which the script file resides.
To reference a media file in a subfolder of the folder in which the script file resides, you add a “/” character for
each level of folder nesting. For example if your images are stored in a folder called “pictures”, which is inside
the folder that contains your script file like this
digi-frame root/
myscript.txt
pictures/
picture.jpg
your script file would reference the file picture.jpg inside the directory “pictures” as follows:
pictures/picture.jpg
To reference a media file in a directory entirely outside the one your script file is in, you need to use “../” to go
up as many levels as required, then “/” to go back down levels as required. For example, if your script file is in
a folder called “myshow”, which is at the digiframe root directory level, and you want to access a file called
picture.jpg which is in a folder called “pictures”, also at the digiframe root directory level, like this
digi-frame root/
myshow/
myscript.txt
pictures/
picture.jpg
your script line would look like this:
../pictures/picture.jpg
The “../” takes you out of “myshow” and up to the root directory, then the “pictures/” gets you down into
“pictures”.
The path rules as described above apply to all media types directly referenced by script files.
The rules regarding paths to MP3 files in playlist files are the same as those described above, but only if the
MP3 files are stored locally on the DF-1710 and not fetched from a remote server. If a playlist references
remotely-fetched MP3 files, then the internet URL must be specified for each MP3 file, e.g:
http://www.myserver.com/frame0001/song1.mp3
http://www.myserver.com/frame0001/song2.mp3
etc....
39 User_Manual_RP3001k.doc
Page 40

Comments in Script Files
Any line beginning with the character “#” is ignored by the DF-1710 and may be used for descriptive
comments in the script file.
Nested Script Files
Script files can reference other script files. This is referred to as “nesting” script files. The nested script files
must conform to the same format requirements as main script files, and have a file extension of “.txt”. Any
reference to a file with an extension of “.txt” encountered in a script file is treated as a nested script. When a
nested script is encountered it executes like a subroutine. Nested script files do not loop – they play once and
then return control to the main script file.
As an example of script file nesting, you might have a main script file script.txt something like this:
company_song.mp3
company_logo.jpg
../daily_stuff/todays_events.txt
campus_picture.jpg
mission_statement.jpg
../daily_stuff/todays_events.txt
presidents_message.mpg
Note that in this example the media files for the material to be updated daily, including the nested script
“todays_events.txt”, is stored in a directory called “daily_stuff”, while the introduction and end of the
presentation are stored in another directory at the same hierarchy level.
The nested script “todays_events.txt” might look like this:
visitors.jpg
softball_standings.jpg
sales_to_date.jpg
employee_of_the_day.jpg
Each time the nested script is referenced by the main script its items are played once through. In this example,
nesting the “daily stuff” keeps the main script cleaner and more organized by reducing it to one line each time
it repeats in the main script.
Referencing Remote Media Items and Scripts in Script Files
In addition to referencing locally-stored media items directly, script files can reference remotely-located media
items and scripts via http or ftp (see other sections for more information on “pull” mode).
You can reference a remotely-located media item in a local script as in the following example:
http://www.myserver.com/picture1.jpg
or, you can reference a script residing on a remote server:
http://www.myserver.com/remote.txt
40 User_Manual_RP3001k.doc
Page 41

Fetching scripts remotely as in the above example is the key to updating remote frames using “pull” mode. Any
remotely-referenced text file with an extension of “.txt” is treated as a nested script, i.e. it executes like a
subroutine. For example, if you have several DF-1710s that are at various locations and have unknown IP
addresses, you could control them remotely by initially loading to each one with the simple one-line “pull”
script file shown above, i.e.:
http://www.myserver.com/remote.txt
On your server www.myserver.com, you would put the actual media-playing script, “remote.txt”, which might
look something like this:
picture1.jpg
picture2.jpg,nocache
picture3.jpg
The remote script follows the path specification conventions described above for script files, i.e. it assumes that
files referenced in it reside in its directory unless other paths are explicitly defined. In the example just
presented, picture1.jpg, picture2.jpg, and picture3.jpg must reside in the same directory on the remote server
as the remote script file “remote.txt”.
By merely changing the single script file “remote.txt” and/or the media files referenced by it on your server you
will be updating the content on all the remotely-deployed frames that you originally initialized with the one-line
“pull” script.
An alternative method of referencing a remote script file is to use an “dfos.ini” text file to set the default
slideshow to a remote script (see “Advanced Networking Topics”). Using dfos.ini to set the default slideshow to
a script file on a remote server is a more robust way of implementing “pull” mode remote control of slideshows
in slow network situations. Another way to ensure that a slow network connection will never result in a
“Slideshow or Media Error” message due to a network timeout is to always include at least one local playable
item in your script.
Media items are cached by default unless the “nocache” option is specified. Caching minimizes network traffic
and speeds playback by eliminating unnecessary downloads. Since the DF-1710 stores, or “caches” copies of
fetched media and scripts, modifications made to remote media items on the server will not be seen on a
remote unit unless a) the unit is rebooted, b) the “nocache” option is specified in the script, which tells the DF1710 not to cache that particular item, or c) a “clearchache” directive is encountered in a script file. If you want
changes made to media files to be seen immediately on remote units you must use the nocache option or have
the frame execute a script containing a “clearchache” directive. If a script file calls a different media file (or the
same file with a different name), the changes will be seen immediately since the new file has not been
previously cached.
Even if “nocache” is specified, cached copies of media items will be displayed in the event the network
connection is lost, ensuring continuous playback.
Local controls such as pause, resume, previous, next, etc. continue to work with remote scripts and media
items.
41 User_Manual_RP3001k.doc
Page 42

Referencing HTML Files and Remote Web Pages in Script Files
Any script line ending in a forward slash (/) “.htm”, “.html”, “.shtml”, “.asp” or “.php” will be assumed to be a
reference to HTML content and passed to the DF-1710’s embedded web browser. Please note:
• Options can be specified on the script line, e.g. pause time, however transition effects will not be applied.
• It is not possible to pass URLs that include commas.
• Caching does not apply to HTML content.
• The embedded web browser does not support plugins, so some types of web content may not be
displayed. The browser may display warnings when certain HTML tags are encountered such as META
REFRESH.
• You cannot pause the slideshow while viewing a web page, but you can use the right and left-arrow keys
to jump forward or back.
• A black screen will be shown briefly before HTML content appears while the browser loads.
CD-ROM and Memory Card Script Files
Each time a CD-ROM or memory card is scanned, a new directory is created for its content on the DF-1710’s
internal hard drive. The directory can be automatically named with a time and date stamp or named using the
on-screen text entry system as described in the “CD-ROM operation” section of this manual.
A script file for CD-ROM or memory card contents is automatically generated at the time of disc loading and
given the filename “script.txt”. If you want to specify the playback sequence and/or playback options of the
media files on a CD or memory card, you can override the DF-1710’s automatic script-generating feature by
including script file(s) on the CD-ROM or memory card. Any files with a “.txt” extension found on the root
directory of the CD are also copied onto the hard drive. Any file found on the root directory of the CD-ROM
named “script.txt” or “SCRIPT.TXT” takes precedence over the others and becomes the default script. In order
to become the default script (i.e. to start running automatically), the script file must be located on the root
directory of the CD or memory card. If no file named “script.txt” or “SCRIPT.TXT” is found on the root directory
of the CD, the first file in the root directory with a “.txt” extension will be deemed the current default script.
Nested scripts called by the other scripts on removable media can be located at any directory level on the
removable media.
The ordering of files in the auto-generated script is alphabetical and no options are specified, i.e. the default
options (slide pause time, transition effect, etc.) will apply and can be changed using the menu system. Any
MP3 files found on the CD-ROM will be compiled into a playlist which will run in “shuffledmusic/nointerrupt”
mode starting at the beginning of the slideshow.
To make it easier to identify and select CD and memory card slideshows using the Select Slideshow menu, you
can rename their directories and/or script files to more descriptive names using a PC and ethernet connection.
Do not rename directories of slideshows containing MP3 playlists, however, or the playlist(s) will not work
unless the path specifications are changed also (see below).
42 User_Manual_RP3001k.doc
Page 43

Script Options
You can override Digi-Frame’s default options (parameters) by specifying your own. The general format of each
line in the scriptfile is a URL (local or remote) to the media item (image, movie or other playable file),
optionally followed by a comma, then a comma-delimited list of options (optionally with an equals sign and a
value to assign to the option), up to a total length of 2,048 characters (2Kbytes). This can be expressed more
formally as:
Media-URL[,option1[=value1],[…],optionn[=valuen]]
For example, to display a JPEG image residing on the Digi-Frame’s hard drive named picture1.jpg with a pause
time of 3 seconds and a dissolve transition, you would enter the following line in your script file:
picture1.jpg,pause=3,transition=dissolve
Options appearing on a line with a media item reference apply only to that media item. Options not explicitly
defined on a script line will use the system defaults for those options. System defaults can be set both by the
on-screen menu system and by script directives. To change the systemwide default of an option in a script, use
the “setdefault” directive on its own line like this:
setdefault,option1[=value1],[…],optionn[=valuen]]
For example, to set the default pause time to 5 seconds you would enter this line in your script file:
setdefault,pause=5
The setdefault directive sets a new system-wide default setting for the option(s) it specifies until overridden by
another setdefault directive or the manual default settings in the menu system.
Below is a list of options and directives supported by the current software. Future software versions will
support additional options. Note that options are case-sensitive.
backlight=[0 or 1]
Enables (1) or disables (0) the LCD backlight. For instance, you can turn the backlight off for one hour
with a line that reads:
dummy.jpg,backlight=0,pause=3600
(The dummy.jpg file does not need to exist). Remember to turn the backlight on again!
Hardware Note: On current production units, background audio will continue to play from internal
speakers while the backlight is off. On older production units, the internal speakers will cut out when
the backlight switches off. On all units, audio will continue to play on the line-out jack.
blocksize=[1 to 256]
Sets the block size for transitions that have configurable blocksize (currently, only the "blocks"
transition).
43 User_Manual_RP3001k.doc
Page 44

clearcache
Directs the DF-1710 to clear its cache folder.
Example: clearcache
forcetype=type
Forces the Digi-Frame to ignore the file name and extension of the media item, and treat it as an item
of type type. type is one of the following (these must be specified in lowercase, as shown below):
jpeg JPEG image
mpeg_video MPEG video file
mpeg_audio MP3 audio file
mpeg_playlist MP3 playlist
wave_audio WAV audio file
text Simple text file (opens in web browser)
html HTML file (opens in web browser)
flash Macromedia Flash® movie
script Subscript
pdf Adobe Acrobat® PDF file
This feature facilitates interoperability with server-side image engines and other content that cannot be
readily identified by the extension on the URL.
handler=local-path-to-handler
Specifies that a non-standard, user-supplied handler program must be used to play the specified item.
A space and the path of the media item are appended to the command line. For more information on
writing and installing custom handlers for your own media types, please contact Digi-Frame developer
support.
Example: myfile.xyz,handler=/usr/bin/myprogram –loud –fullscreen
Note: The command line for the handler may not contain a comma. Also note that if you specify a nonlocal file URL, your handler program is expected to handle the network transaction itself – the DigiFrame will not attempt to download or cache the content locally.
killsound
This option will stop any background music task when it is encountered in the scriptfile.
Example: picture.jpg,killsound
The killsound option can also be used by itself by specifying a null media file with a leading comma,
Example: ,killsound
Killsound can be used in conjunction with “nosound” to both stop background MP3 playback and inhibit
MPEG sound:
Example: movie.mpg,nosound,killsound
44 User_Manual_RP3001k.doc
Page 45

nocache
Applicable only to non-local Media-URLs, if you specify this option, the DF-1710 will attempt to
download a fresh copy of the specified file each time this line of the scriptfile is reached. If the network
or server is temporarily unavailable, the cached copy will be used. This option is used to ensure that
the latest version of a dynamic content item is always being displayed. A typical example of this type of
content is a satellite photograph on a weather-related Web site.
Example: http://www.site.com/weather.jpg,nocache
nointerrupt
Applicable only to MP3 playlists. If this option is specified, and there is already an MP3 playing when
this line is encountered again (when the script loops), the item currently playing will not be
interrupted. See “Playing Sounds on the DF-1710”, below, for more detailed information on the use of
this parameter.
Example: myplaylist.lst,nointerrupt
nosound
Applicable only to MPEG video playback; the specified video will be played back without its soundtrack.
Example: movie.mpg,nosound
Note: If nosound is specified (and “killsound” is not), background music MP3s will continue to play
throughout the MPEG movie.
pause=x
Specifies the time in seconds to pause before displaying the next item, from 0 to 2,147,483,648
(invalid values of x, such as “nothing”, are interpreted as 0). This pause time is measured starting from
the moment Digi-Frame begins to process the media item itself. For instance, this means that if you
specify a pause of 10 seconds and it takes Digi-Frame 5 seconds to download and display the image,
the image will only be onscreen for 5 seconds before Digi-Frame proceeds to the next line of the
scriptfile. The pause timing commences at the completion of any transition effects that are applied.
Pause timing is approximate and will be longer if MP3 playback is operating.
Example: picture1.jpg,pause=20
Note: The pause value is ignored for MPEG movies and, MP3 playlists, and MP3 audio files. The DF1710 will load the next item in the scriptfile immediately after the movie finishes. In the case of MP3
music, the DF-1710 will start playing the music and immediately proceed with the next item in the
scriptfile.
The pause time does apply to Macromedia Flash® animations. Since Flash animations either loop
indefinitely or wait for user input upon completion, the DF-1710 is designed to abort Flash playback at
the end of the pause time and proceed to the next item in the script file. You should specify a pause
time for each Flash animation that is long enough to allow the animation to play fully. If your
animation does not loop and the pause time is longer than the playing time of the animation, the final
frame of the animation will be displayed statically until the pause time has finished.
Note: The global default pause time can be set with the on-screen menu system. If you wish to be
able to control the pause time for all still images in your slideshow using the menu system, do not
specify any pause times in your script, because they would take precedence over the default.
rotate=[0, 90, 180 or 270]
Specifies the rotation angle for JPEG images (in degrees, clockwise). The default is 0.
45 User_Manual_RP3001k.doc
Page 46

scale=scale-mode
Choose scaling mode ‘scale-mode’, where scale-mode is either ‘center’ (do not resize the image at all;
center it onscreen – the image may have a border or may not all show onscreen), ‘fit’ (enlarge or
reduce the image isometrically so that it fits as well as possible onscreen without altering its aspect
ratio), or ‘stretch’ (resize the picture to the screen’s dimensions; this may distort the image).
Example: picture.jpg,scale=fit
Note: This setting is relevant only to still image formats. The default is ‘fit’. This is a good default.
However, some image sources may be close to but not exactly 4:3 aspect ratio. For these types of
images, ‘stretch’ may be a better choice as it will make the image occupy the entire screen area
without objectionable distortion. For images that are patently not 4:3 (e.g. portrait mode images),
‘center’ or ‘fit’ are better choices.
setdefault, option1[=value1],[…],optionn[=valuen]]
Sets a new system-wide default setting for the option(s) specified until overridden by another
setdefault directive or the manual default settings in the menu system.
Example: setdefault,pause=5
shuffledmusic
Applicable only to MP3 playlists. If this option is specified, the playlist will be shuffled and random
selections will be played continuously until another music line is encountered. This option gives you a
simple way to set up continuous, randomly varying background music for a slideshow without having
to script in music at specific points in the scriptfile. See “Playing Sounds on the DF-1710”, below, for
more detailed information on the use of this parameter.
Example: myplaylist.lst,shuffledmusic
transition=transition-type
Applicable only to still images; the new image will be transferred to the screen with the specified
transition effect. The default transition is “flip”. The transition option refers to the “incoming” image,
i.e. it will affect the transition to the image specified in the script line that the transition option
appears on.
Allowable values for transition-type are:
flip The new image appears immediately with no transition effect.
dissolve The new image is dissolved onto the screen one pixel at a time, scattered randomly.
blocks The new image appears onscreen one small square at a time, scattered randomly.
crossfade The new image is faded onto the screen, gradually replacing the old image.
Example: picture.jpg,transition=crossfade
Note: The global transition effect can be set with the on-screen menu system. If you wish to be able to
control the transition effect for all still images in your slideshow using the menu system, do not specify
any transition effects in your script, because they would take precedence over the default.
zoom
Applicable only to movies. Enlarges the movie to fill the screen as nearly as possible. Even with “zoom”
specified, your movie may not completely fill the screen - to ensure full-screen movie playback, encode
your video at 320 x 240 pixels.
Example: movie.mpg,zoom
46 User_Manual_RP3001k.doc
Page 47

Tutorial – Setting Up Simple Internet “Photo Sharing”
A popular application of digital picture frames has been to give one to a friend or relative for installation in their
home where you can send them pictures over the internet. You can do this with your DF-1710, and you won’t
have to pay any subscription fees! Here’s how:
You’ll need a web server, or more commonly, a personal website provided by your ISP. Most ISP’s, such as
AOL and Earthlink provide free website space with each access account. If you’ve already set up a personal
website then you probably know how to upload files to your web space and create directories in it.
The recipient needs to have a DSL or cable modem and an available ethernet port (either on their LAN or
directly on their DSL/Cable router) for connecting the DF-1710 to the internet.
First you’ll need to decide how you’re going to organize the pictures and scripts on the web server. You could
make a separate directory for each remote frame you’re going to control, or just put all the pictures in one
directory for all remote frames. In any case, it’s probably a good idea to keep the pictures in a directory
separate from your website files. Consult your ISP or server’s documentation on how to set up directories and
upload files to them.
If you’re using a free personal website provided by an ISP, the address of your website is usually a
“subdomain” of the ISP’s domain, for example http://hometown.aol.com/yourname. If you’ve registered your
own domain then your website has its own name of your choosing, like http://www.mywebsite.com. In this
example, we’ll assume you have a web domain called www.mywebsite.com, and that you’ve made a directory
on your site called “theirframe”.
While you still have the DF-1710 you want to place at a remote location, write the following script and load it
on the frame using FTP mode:
http://www.mywebsite.com/theirframe/remote.txt
You can give this script any name (it must end in “.txt”), such as “family.txt”. This is the name that will appear
in the “Select Slideshow” menu. This script tells the frame to download and execute the nested script
“remote.txt” from your website.
Once you’ve put “family.txt” (or whatever you named it) on the frame you can send it off to the recipient. The
recipient can use the DF-1710 to view their own slideshows at any time; your remote script will just be another
selectable slideshow in the menu system.
Next, decide what pictures you want displayed on the remote frame and upload them to the directory or
directories you’ve chosen on your web server. Let’s say want the recipient’s frame to show the following
pictures: picnic.jpg, wedding.jpg, and reunion.jpg.
Upload all of these picture files to the directory “theirframe” on your web server.
Now you need to write the actual script file that will be put on your server and control the slideshow,
“remote.txt”. Your script file might look like this:
picnic.jpg
wedding.jpg
reunion.jpg
Upload the script file to the directory “theirframe” on your web server, being sure to give it the same name you
specifed in the script on the frame, i.e. “remote.txt”.
47 User_Manual_RP3001k.doc
Page 48

When the recipient selects the script “family.txt” from their Select Slideshow menu (or when the unit is first
turned on, if “family.txt” was left as the last running slideshow), it will look for an internet connection, and if
one is found, execute the remote script (“remote.txt”), showing the pictures that you put on your web server.
You can change the pictures they’ll see by changing the script file “remote.txt” and/or the media it references
on your website.
The recipients will be able to use the controls on their Digi-Frame to scroll forward and back, pause the
images, set default options, etc. If the internet connection is lost or not found, the frame will display any
images from your slideshow that were cached locally before the connection was lost. The recipients can of
course use the frame to view other slideshows on the DF-1710 (for instance, those loaded using CD-ROM) by
selecting them in the Select Slideshow menu.
48 User_Manual_RP3001k.doc
Page 49

10. Playing Media on the DF-1710
Recognized File Types
The DF-1710 automatically identifies file contents by extension (this identification process is case-insensitive).
The file extensions recognized by the Digi-Frame are:
Extension(s) File type
.jpe, .jpeg, .jpg JPEG still image
.lst MPEG audio playlist
.mpe, .mpeg,
.mpg, .m1v
.avi, mp4 MPEG-4 motion video
.mp3 MPEG audio
.swf Flash® animation
.html, .htm, .asp,
.php, shtml
.wav Wave audio
Still Pictures
The DF-1710 recognizes only standard format JPEG files for still pictures. Important Note on JPEG Images:
There are two types of JPEG images, “standard” and “progressive”. The DF-1710 cannot display
JPEGs that have been saved in the “progressive” format, and there is no easy way to tell if an
image is progressive or not. If you’re having trouble seeing your images and are sure you’ve done
everything else right, try opening them in PhotoShop® or other image editing program and resaving them, making sure that they are saved in standard JPEG format.
MPEG motion video
HTML
The DF-1710 considers 1024 x 768 pixels to be “full-screen” image size. Depending on the scaling options
specified by the Change Slideshow Defaults menu or your script file, images larger or smaller than this can be
automatically scaled to fit the screen (maintaining proportions or not), or they can be displayed at actual size.
If you want your pictures to always be displayed in their entirety, at their best resolution and optimal file size,
use your image editing software to crop and/or size them to 1024 x 768 (or if they don’t have exactly 4:3
aspect ratios, set the longer sides to 1024 or 768, depending on the image and frame orientations).
Video
Supported Video Formats
The DF-1710 can play video movies in the MPEG-1 and MPEG-4 formats only. The DF-1710 cannot play DVD
(MPEG-2) movies or Apple QuickTime® - formatted movies.
MPEG-4 movies must have an extension of “.AVI”, “.avi”, “MP4” or “mp4”. MPEG-4 movies may lose audio sync
if the overall bitrate is too high. Try reducing video encoding “quality” parameters and/or reduce audio sample
rate and word width (set to 8 bits) to improve sync. Different MPEG-4 codecs may provide varying results, the
DivX™ codec gives good results, as does the 3ivX codec (www.3ivx.com) for Apple Quicktime™ and
Windows™. Reducing audio sample rate and word size will improve
Although MPEG-1 is the format used for VideoCD (VCD) you cannot simply copy the .DAT file from a VideoCD
and play it; you must use an extraction program such as VCDGear to convert the .DAT file to a standard
playable MPEG-1 file. Super-VideoCD (SVCD) uses MPEG-2 encoding, which is not supported at this time.
49 User_Manual_RP3001k.doc
Page 50

Video Frame Size
The DF-1710’s movie playback software has several video screen size modes that it can use for playing movies:
320x240 pixels
400x300 pixels
640x480 pixels
800x600 pixels
1024x768 pixels
When playing back a movie, the DF-1710 automatically selects the lowest possible video mode that will fit the
movie at its original size. The movie is centered onscreen, with black borders if necessary.
For the smoothest possible full-screen playback, you should encode your videos at 320x240 pixels. Content
that has been extracted from or encoded for Video CD (VCD) media will be at 352x240 or 352x288 pixels, and
consequently will be played in the 400x300 video mode with small borders around the edge.
You can scale content up to fill the screen (aspect ratio is preserved) by specifying the "zoom" option, e.g.:
mymovies/Demo.mpg,zoom
Using this parameter will, however, reduce the smoothness of playback and in extreme cases may cause loss
of audio sync.
The zoom option can be used in a setdefaults line and will be remembered correctly if you wish to scale up all
movies in a slideshow.
Notes:
(1) Although the DF-1710 can play back Super-VCD (480x480) type content, this format is not recommended,
as the aspect ratio will be wrong for the DF-1710's screen.
(2) Extremely large movies, particularly AVI files, may play back only the sound track, or may experience loss
of audio sync. This occurs because the DF-1710 tries to keep the video up with the audio by skipping video
frames. If the movie is sufficiently big and complicated, the decoder will never have enough free time to
update the screen, so the movie will appear not to be playing.
(3) It is normal for the video playback to "skip" somewhat while you are transferring files to or from the DF1710 over the network.
(4) While the DF-1710 is playing movies, it is slightly less responsive to button presses. You may need to hold
buttons down slightly longer than usual for the press to "register".
Transcoding to MPEG From Other Video Formats
The process of converting from one video format to another is referred to as transcoding. Various software
programs are available for performing this task, and using them you can convert your non-MPEG-1 video
content to MPEG-1. The details of the operation of these programs is beyond the scope of this manual, but
here are some guidelines to keep in mind when transcoding:
• The larger the video frame size, the slower playback will be. You may want to experiment with various
frame sizes 320 x 240 is optimal, as is a frame rate of 29.97 or 30 FPS. Frame rates higher than 30 fps are
50 User_Manual_RP3001k.doc
Page 51

not recommended, lower frame rates may play more smoothly. In any case the VCD-standard overall
bitrate of 1,150,000 bps should not be exceeded.
• If sound is not required for your presentation, transcode your video without sound, or use the “nosound”
option in your script file to conserve processing bandwidth and improve video smoothness.
You may have to experiment with the many settings offered by your transcoding program which will affect how
your MPEG video looks on the DF-1710.
Sounds
MP3 Sound File Playback
Your DF-1710 can play MP3 music files while running a slideshow. There are two ways to play MP3s:
synchronized with content, or as a “free running” playlist. In “synchronized” mode, the MP3s will be played as
they’re encountered in the script and will be interrupted when a new MP3, WAV or MPEG file is encountered in
the script file. In “background” mode, a separate playlist file is created which contains references to the MP3
files in the order they are to be played. The script file contains a reference to the playlist file, and options can
be added in the script file for uninterrupted and/or random-order playback.
Synchronized MP3 Playback
In synchronized mode you specify the names of your MP3 files directly in the scriptfile just as you do JPEG and
MPEG media items; a playing MP3 file will continue playing until the file is finished, or until a “killsound” option,
MP3, WAV, or MPEG file is encountered in the script.
Synchronizing sound files to specific pictures in your slideshow may require some planning for best results; you
need to make sure that you allow enough time for the sound item(s) to finish before proceeding with the next
image. For example, if your DF-1710 contains pictures of a baseball game and pictures of a birthday party, you
might create a scriptfile like this:
# Take Me Out to the Ballgame is 60 seconds long.
take_me_out_to_the_ball_game.mp3
baseball1.jpg,pause=30
baseball2.jpg,pause=30
# Happy Birthday is 30 seconds long.
happy_birthday.mp3
birthday1.jpg,pause=15
birthday2.jpg,pause=15
The above example plays “Take Me Out to the Ball Game” while the baseball pictures are onscreen, and
“Happy Birthday To You” while the birthday pictures are onscreen.
The rules regarding filenames, paths and directories for MP3 files in scripts are the same as those for other
media items such as JPEG and MPEG files (see Advanced Scripting Information). The path specification rules
for MP3s in playlists are different from those in scripts, see below.
Background (Non-Synchronized) MP3 Playback
For continuous background sound with no synchronization to the slideshow you need, in addition to your script
file, a “playlist“ file or files listing each of your MP3s on a separate line, for example:
music1.mp3
symphony.mp3
waltz.mp3
51 User_Manual_RP3001k.doc
Page 52

The MP3 playlist format is similar to a scriptfile, but the rules are slightly different: MP3 playlists cannot contain
any options, and they can reference only local files or HTTP (not FTP) URLs. If you specify a remote URL in a
playlist, the MP3 player will stream the MP3 file directly from the server; it will NOT attempt to download and
cache it. If you specify a remote URL to an MP3 file in the main script file, it will be downloaded and cached.
This playlist file must be saved with the extension .lst and uploaded to your DF-1710 in the usual way.
IMPORTANT: Playlist files must use DOS end-of-line characters. Playlist files generated with the Macintosh
Simpletext text editor will not work!
You reference this playlist file in your script file with a line similar to this:
myplaylist.lst
As in the case of script files and the image files they reference, path references to local MP3 files in playlist files
are relative to the directory in which the playlist resides, i.e. if your playlist and MP3s are in the same local
folder then you don’t need to specify paths to the MP3 files.
If a playlist references remotely-fetched MP3 files, then the full internet URL must be specified for each MP3
file, e.g:
http://www.myserver.com/frame0001/song1.mp3
http://www.myserver.com/frame0001/song2.mp3
etc....
If a playlist is referenced in a script file without any added parameters, the list of MP3s will play, in order, until
any of the following conditions occurs:
1. A “killsound” option is encountered in the scriptfile,
2. An MPEG video item is encountered in the scriptfile without the “nosound” option
3. A new music playback command is encountered in the scriptfile
4. The end of the playlist is reached
5. The end of the slideshow is reached, causing the playlist to be reloaded by the script file.
There are two parameters you can add to the playlist line in the script file to change the above behaviour:
"nointerrupt", and "shuffledmusic":
- "nointerrupt" will make the playlist continue uninterrupted, so if an MP3 is playing when the playlist
command is encountered as the script loops around it is ignored.
- "shuffledmusic" will make it play the MP3s in the playlist in random order
For example, a script file for random continuous music background would look like this:
playlist.lst,shuffledmusic,nointerrupt
picture1.jpg
picture2.jpg
If you specify "nointerrupt“ but you don't specify "shuffledmusic", the music will stop at the end of the
playlist until the playlist command is encountered again. When "shuffledmusic" is specified the playlist loops
immediately.
If you specify "shuffledmusic" but you don't specify "nointerrupt" the MP3 playlist will restart, interrupting the
current song, when the end of the script is reached.
52 User_Manual_RP3001k.doc
Page 53

Note: Changes to playlists that are playing may not be recognized right away (i.e. you edit a playlist file and reupload it with changes but the old playlist keeps playing). To force changes to a playlist to be recognized
immediately, go to the Select Slideshow menu and re-select the slideshow.
Playing Wave Audio Files
The DF-1710 can play back uncompressed Windows-compatible wave audio files (.WAV). This feature is useful
for adding descriptive “sound bites” to specific sections of your slideshow. To play a WAV file, simply specify it
as you would any other media item, for example:
company_logo.jpg
welcome.wav
beaverton.jpg,pause=15
Note: Wave audio playback is asynchronous. When the DF-1710 encounters a wave audio item, it starts
playing the sound and then immediately proceeds with the next item in the scriptfile. In the example above, as
soon as the voice-over starts playing, the DF-1710 will load and display the plant image. This behavior is
similar to MP3 playback in “synchronized” mode.
Audio Comments for Pictures
Many digital cameras have the ability to capture audio comments when a picture is taken; using the DF-1710’s
Audio Comments feature allows these comments to be played with the appropriate image without having to
write a script file. If the audio comments feature is enabled set in the Slideshow Setup menu or in the dfos.ini
file, the DF-1710 will look for a .WAV file in the same directory and with the same name as the JPEG file, and
play it if found. The comment file will be played after the image has fully transitioned onto the screen. By way
of example, if the image /digiframe/slideshow/my-image.jpg is being played, the DF-1710 will look for the
audio comment file as /digiframe/slideshow/my-image.WAV. Note: The .WAV extension MUST be in uppercase.
The Audio Comments feature works only with JPEGs on the DF-1710’s internal hard drive.
The slideshow will resume when the pause time for the image expires or when the audio comment finishes
playing, whichever occurs later.
When generating wave audio files to work with this feature, it is advisable to use a standard sampling rate
(11025, 22050 or 44100Hz), and uncompressed 16-bit stereo format. Playback of nonstandard sample rates
may be choppy.
Macromedia Flash® Animation Files
The DF-1710 can play animation files conforming to Macromedia Flash 2 format. Flash files must have a file
extension of “.swf”. Flash 4 features are not supported at this time. Morphing, vertical anti-aliasing, streamed
sound (interleaved data), and sound envelope (fading or balancing) are also not supported at this time.
Since Flash animations are generally designed to either loop continuously or play once and wait for user input,
the DF-1710 has been designed to terminate each Flash animation after the “pause time” has elapsed. You
should specify a pause time for each Flash animation that is long enough to allow the animation to play fully. If
your animation does not loop and the pause time is longer than the playing time of the animation, the final
frame of the animation will be displayed statically until the pause time is finished.
53 User_Manual_RP3001k.doc
Page 54

HTML Files
Any script line ending in a forward slash (/) “.htm”, “.html”, “.asp” or “.php” will be assumed to be a reference
to HTML content and passed to the DF-1710’s embedded web browser. Please note:
• Options can be specified on the script line, e.g. pause time etc., however transition effects will not be
applied.
• It is not possible to pass URLs that include commas.
• Caching is not applied to HTML content.
• The embedded web browser does not support plugins, so some types of web content may not be
displayed. The browser may display warnings when certain HTML tags are encountered such as META
REFRESH.
• You cannot pause the slideshow while viewing a web page, but you can use the right and left-arrow keys
to jump forward or back.
• A black screen will be shown briefly before HTML content appears while the browser loads.
54 User_Manual_RP3001k.doc
Page 55

Tutorial - Simple Animation with JPEG Still Images
You can produce simple “flip book” animation very easily using Adobe Photoshop® or other image editing
software. Animation, especially with fixed background elements, will be easier with a program such as
Photoshop® that supports multiple layers within documents.
To create animation, you produce a separate JPEG still image for each frame of the animation, then write a
script that plays them all in the proper sequence, specifying a pause value of 0 for each image. There will still
be some pause time for each image due to disk access and jpeg decompression time (and MP3 playback if
applicable), but a pause value of 0 will give you the fastest possible animation.
By creating each element in your animation in a separate layer in your graphic program you’ll be able to easily
and independently move them around from frame to frame. Keeping some elements in exactly the same
position from frame to frame will create a steady background and subjectively enhance the animation of those
elements that do move. Multi-layered documents in Photoshop® must be saved in Photoshop (.psd) format.
Save your “master” document in this format as you create it. Turn layer visibility on and off for each layer as
required for the frame you’re working on. When a frame is complete use Photoshop’s “Save a Copy…”
command to save a copy of the file in JPEG format. Photoshop® will “flatten” the image and save only the
visible layers. You can then continue to work on the multi-layered “master” document without having to reopen it.
Set your slideshow options for “flip” transition and 0 pause time.
55 User_Manual_RP3001k.doc
Page 56

11. System Files
The DF-1710 generates files that you may notice in your FTP root directory:
log.out is a comma-delimited text file containing a log of the last 10,000 media items played, in the following
format:
URL,pause time(in seconds),year,month,day,hour,minute,second
The log file can be deleted at any time without ill effects. Logging can be turned on and off via the Change
Slideshow Defaults menu.
digiframe.config contains the slideshow default settings and other system settings.
dfos.ini contains system configuration settings.
12. Software Updates
If your Digi-Frame has an active internet connection, the easiest way to upgrade is by selecting the Upgrade
Software option in the Main Menu. This will check for a software upgrade on Digi-Frame’s website and install it
if necessary. If no upgrade is required none will be performed. No personal data or other information is
transmitted or exchanged in this process.
If your DF-1710 is not connected to the internet you can update by downloading the upgrade file
digiframe.tar.gz from our website at ftp://www.digi-frame.com. Do not decompress or rename the “tar.gz”
archive file. To install the update, connect to the Digi-Frame via ethernet and upload the file to its root
directory. The Digi-Frame will detect the presence of the update, the new software will automatically be
extracted and installed. During the upgrade process the Digi-Frame will reboot itself twice, do not
interrupt the process until it is complete and the unit is functioning normally!
If you do not have an ethernet connection to your DF-1710 the upgrade file can be put onto a CD or memory
card, which is then simply inserted to initiate the upgrade process. The DF-1710 will go through two reboots as
described above. If the CD is not ejected and the installation confirmation dialog appreas again after the
second reboot, press “||” to cancel and then select “Eject Disk” to eject the upgrade CD.
13. Software Install/Restore
Your Digi-Frame was shipped with the latest version of operating system software already installed; no
installation is necessary to operate your frame. If for some reason the operating system software on your DigiFrame becomes damaged, it can be restored by using the included Software Install CD-ROM.
To install the software:
1. Backup any files that are on the DF-1710 that you want to save, the install process will erase the hard
drive!
2. Turn on your Digi-Frame if it’s not already on.
3. Press the eject button on the CD-ROM drive.
4. Turn the DF-1710 off, insert the software install CD into the drive and close the door.
5. Turn the DF-1710 back on again. The unit will boot from the CD-ROM and install the software
automatically. The process will take several minutes. When the installation is complete, the CD will be
ejected and the unit will re-boot with the new software. Ignore any text error messages that may
briefly appear on-screen while the unit is booting for the first time after the upgrade.
56 User_Manual_RP3001k.doc
Page 57

14. Troubleshooting
Problem: When I turn on the DF-1710 I hear a beep but the screen is dark. The LED’s in the
Input/Output bay are on.
Solution: Press the backlight power button on the main unit or the remote control. The DF-1710 usually
powers up with the backlight on but this may not always be the case.
Problem: Sometimes nothing seems to happen when I press buttons on the remote or the
main unit.
Solution: The Digi-Frame software is quite “busy” performing many tasks and sometimes cannot pay
attention to the user inputs. There is a slight time lag due to disk access and image
decompression when scrolling from picture to picture.
Solution: The sensor opening in the picture mat may not be properly aligned with the sensor. Make sure
the mat has not shifted in the frame and covered the sensor.
Solution: You may be too far from the frame. The infrared remote has a maximum range of 10 – 15
feet.
Solution: Check that the remote has batteries and that they’re good.
Problem: I cannot establish communication with the DF-1710 via ethernet.
Solution: Check to see that your TCP/IP settings are correct.
Solution: Make sure that you have correctly entered the IP address, user name (df) and password
(digiframe) in your browser or FTP client program.
Solution: Check the Digi-Frame’s IP address in the System and Network Information screen. If you re-
booted or refreshed the address it may have received a different address from the DHCP
server.
Solution: Check that you are using the correct type of ethernet cable. If you are trying to connect
directly to a computer without using a hub or network, you must use the special “crossover”
cable. If you are connecting to a network you must use the standard, non-crossover cable.
Solution: Check the green LED “link” lights on both the DF-1710 and your PC (if directly connecting to a
PC) or hub (if connecting to a LAN). The link LED’s should be lit on both ends of the
connection. If they are not, a fault in the network hardware or cabling is indicated.
Problem: When I try to access the DF-1710 I get a message “Log-in incorrect”.
Solution: Your user name and/or password have not been entered correctly in your browser or FTP
client program.
Problem: I can transfer files to the DF-1710 but no images are displayed.
Problem: One image is displayed but it never changes, even though my script file calls for
multiple images.
Problem: My slideshow is kind of working, but not all of my pictures are being displayed.
Solution: Make sure that your script file contains correct path references if media are stored in
directories other than the one in which the script file resides.
Solution: Make sure the filenames referenced in your script file are spelled exactly like the filenames as
they appear on your computer. They must match case as well, i.e. if your picture is called
Dog.JPG, the script file line must reference Dog.JPG, not dog.jpg.
Solution: Make sure none of your directory names or filenames contain special characters such as #, &,
;, :, |, <, >, “ or , .
Solution: Make sure all your JPEGs have been saved in standard JPEG format, not “progressive JPEG”
format.
Problem: My images look fine on my computer but display “garbage” on the DF-1710
Solution: It is likely that you are transferring your image data in “ASCII” or “Text” mode in your FTP
client program. Be sure your FTP client is set for “binary” file transfers. In Transmit for
Macintosh, this setting is under the File menu – ensure that “ASCII Mode” is un-checked.
57 User_Manual_RP3001k.doc
Page 58

Problem: My Digi-Frame gets stuck during startup at the point where the screen message
says “Continuing…”
Solution: This problem can be caused by a corrupted system configuration file. To restore the system
configuration file to default settings, reboot the frame and press the Pause button on the
remote control as soon as the blue screen appears with a prompt. You will be presented with a
dialog box giving you the choice to restore the factory configuration settings or to continue
with normal boot-up.
Problem: Movies play slowly or jerkily.
Solution: Digi-Frame is designed to play back MPEG movies formatted according to the parameters
specified in the “Supported Video Formats” section of this manual.
Problem: I extracted an MPEG movie file from a VideoCD, but it doesn’t play back properly
(or at all) on my Digi-Frame.
Solution: You cannot simply copy the .DAT file from a VideoCD and play it; you must use an extraction
program such as VCDGear to convert the .DAT file to a standard playable MPEG-1 file. If you
are sure the movie was extracted properly, your source medium is probably a Super-VideoCD
(SVCD). SVCD, like DVD, uses MPEG-2 encoding. For licensing reasons, Digi-Frame does not
support MPEG-2 at this time.
Problem: MP3 audio playback is stuttery.
Solution: Some other task is occupying your Digi-Frame’s CPU and intermittently preventing the MP3
playback task from running. There are several possible root causes of this; MP3s encoded at
too high a bit rate (the highest recommended rate is 128kbps, though Digi-Frame supports up
to 256kbps); network traffic (it is normal for MP3 audio to stutter occasionally while large file
transfers are taking place on your Digi-Frame) or unusually large/complex JPEG images taking
exceptionally long to decode (resize your JPEGs to at most 1280x1024 pixels).
Problem: My Digi-Frame’s LCD has dots that stay “on” or “off” all the time
Solution: LCD panels are delicate and difficult to manufacture. Each pixel on a color TFT LCD requires
three "sub-pixel" transistors: one red, one green and one blue, for a total of 2,359,296
transistors in the DF-1710’s screen. It’s not possible for LCD panel manufacturers to guarantee
100% perfection in those millions of tiny transistors while keeping the product affordable. This
is true of all devices using LCD technology, not just the Digi-Frame. “Stuck” pixels are not
usually objectionable with photographic or video images at normal viewing distances.
It is standard in the LCD-based product industry that a certain number of sub-pixel anomalies
(a pixel stuck on or off) is considered acceptable. Following are rough guidlelines as to
whether an LCD screen is considered to be defective as far as bad pixels is concerned. A bad
pixel is a pixel that always has the same color, regardless of what is on the screen.
4) If there are ten or more bad pixels the LCD is considered defective.
5) If there are six or more bad pixels of the same color, the screen is defective.
6) If two bad pixels adjoin horizontally and also have the same color, the screen is considered
to be defective. If they adjoin vertically, or if they have different colors, the screen is
considered to be OK.
Digi-Frame reserves the right to make final determination as to whether or not an LCD is
defective. If you believe your LCD is defective according to the above guidelines please contact
our customer service department for further information.
Dead pixels can also appear as a result of abuse. Digi-Frame is not responsible for damage to
LCD’s caused by mechanical abuse, mishandling, or exposure to excessive temperature
humidity, or condensation.
58 User_Manual_RP3001k.doc
Page 59

15. Specifications
Microprocessor 300MHz Pentium® MMX compatible
Network Interface 10/100baseT Ethernet
Still Image Formats JPEG/JFIF, JPEG/Exif2
LCD Resolution 2048 x 1024 pixels, driven by software at 1024 x 768 pixels
Still Image File Size Capacity Up to 8192 x 6144 pixels
Motion Video Formats MPEG-1, MPEG-4 (DivX™)
Motion Video Resolution At least 352x288@30fps (encoding dependent)
Audio Formats WAV, MPEG-1, MPEG-2, MPEG-2.5 Layer III up to 256kbps
Audio Capability 16-bit stereo, sample rate up to 44.1kHz (CD quality)
Supported Network Protocols DHCP, FTP, HTTP
Power Requirements 90 – 240 VAC, 50/60 Hz, 60W
Connections Ethernet, USB, PS/2 device, RS-232C (DB9), audio line out
Dimensions (WxHxD): 17.83" x 14.5" x 2.9" (excluding frame)
Weight: 19 pounds
59 User_Manual_RP3001k.doc
Page 60

Index
“Continuing...”
system freeze at, 58
802.11b. See Wireless Networking
Animation
creating, 55
Audio
comments for pictures, 53
Audio Output
jack, 7
muting, 8, 15
volume adjustment, 15, 19
BACK button
remote control, 8
Backlight
ON/OFF Button
remote control, 8, 15
script option for controlling, 43
Blocksize option, 43
cache
clearing, 44
Caching
remote items, 41
Case-Sensitivity, 38
CD-ROM
basic operation of, 9
detailed operation of, 21
Eject Button, 9
manual eject, 9
script files, 22
supported format, 9
clearcache directive, 44
Connectors, Rear Panel, 7
Controls
Front Panel, 6
Crossover cable, ethernet, 29
Default settings
restoring, 37, 58
Deleting files and folders, 16
dfos.ini, 20, 37
settings detail, 33
using for pull mode script reference, 41
DHCP, 37
overriding, 37
digiframe.config file, 56
ESSID, 19
Ethernet Cable
crossover, 29
standard, 29
Ethernet Port, 7
Flash® animation, 53
Forcetype option, 44
FORWARD button
remote control, 8
Frame, changing, 12
Gateway Address
manually setting, 36
handler option, 44
Hanging, 10
home page
default, 20
html
displaying, 42, 54
Internet
administering DF-1710s via, 26
IP address
defaults, 36
displaying, 19, 20
manually setting, 36
refreshing, 19, 20, 37
setting, 19
killsound option, 44
Landscape mode orientation, 10
LCD
“stuck” pixels, 58
care of, 5
doesn’t turn on, 57
LEDs, 7
Log
slideshow, 18
log.out file, 56
MAC address, about, 36
Mat
cutting specifications, 13
Media logging, 56
Memory Cards
scanning and creating slideshows from, 19
Menu System, 16
Menu/Enter button
remote control, 8
Mounting, 10
built-in, 14
flush, 14
horizontal, 10
vertical, 10
MP3 Files
playing, 51
problems playing, 58
MPEG Movies
problems playing, 58
supported video formats, 49
transcoding from other formats, 50
Net Mask
manually setting, 36
Netmask. See Net Mask
Networking
“pull” mode operation, 27, 40, 42, 47, 54
“push” mode operation, 26
address, displaying, 19, 20
60 User_Manual_RP3001k.doc
Page 61

basic setup for, 29
configurations, 24
connecting to, 29
problems establishing communication, 57
SMB, 24, 33
No Media Found error message, 38
nocache option, 45
nochache
script option, 41
nointerrupt option, 45
details of, 52
nosound option, 45
Password, 24
menu lockout, 18
pause option, 45
Pause Time
setting default, 17
Pause/Exit button
remote control, 8
PDF files
viewing, 16
Picture
show name of current, 15
Plastic, protective acrylic, 13
Playlists
MP3, detailed information on, 51
updating during MP3 playback, 53
Port Mapping, 37
Portrait mode orientation, 10
Power, On/Off Switch, 7
Previews
image, 16
movies and MP3, 16
PS/2 Port, 7
Rebooting, remote, 36
Remote Control
buttons and operation, 8
not responding, 57
sensor, 6
Reset Button, 7
Restoring software. See Software, restoring
rotation script option, 45
Router Address. See Gateway Address
scale option, 46
Scaling Mode
setting default, 17
Script Files
advanced information on, 39
basic information, 38
default option settings used in, 38
important rules for, 38
locations of, 42
nested, 40
on CD-ROM and memory cards, 42
option reference, 43
remote, 40, 42, 47, 54
updating during MP3 playback, 53
script options
default values, 43
Security
problems accessing the DF-1710, 57
Security, password, 33
Sensor, Infrared, 6
Serial Port, 7
setdefault directive, 43, 46
Settings
changing remotely, 33
Sharing
photo, 47
shuffle mode, 17
shuffledmusic option, 46
details of, 52
Slideshow
log, 18
Slideshow or Media Error, 41
Slideshows
advanced scripting information, 39
appending new content to, 22
changing remotely, 34
creating, 16
problems displaying images, 57
selecting, 16
show name of, 15
Software
installing, 56
restoring, 56
updating, 56
Sound
muting, 8, 15
Sound volume
adjustment, 8
System freeze at “continuing”, 58
TCP/IP
setting your computer for, 29
Text files
viewing, 16
Time
image display, 17
Transition Effect
setting default, 17
transition option, 46
Updates
software, 19, 56
User Name, 24
changing, 33
VESA mounting, 10
Video. See MPEG Movies
Video Output, 7
WAV audio file playback, 53
WAV files
comments for pictures, 53
web browser, 20
web pages
displaying, 42, 54
Wi-Fi. See Wireless Networking
Wire Routing Clips, 11
Wireless Networking, 31
WLAN. See Wireless Networking
Zoom option, 46, 50
Page 62

©2002 Digi-Frame Inc. 181 Westchester Ave. Suite 408, Port Chester, NY 10573
See it Now!®, The Missing Link in Digital Photography!® and the “D” logo are registered trademarks of Digi-Frame Inc.
914-937-4090
 Loading...