

Page 1
INSTRUCTIVO DE OPERACIÓN, CENTROS DE SERVICIO Y PÓLIZA
DE GARANTÍA. ADVERTENCIA: LÉASE ESTE INSTRUCTIVO ANTES
DE USAR EL PRODUCTO.
Si tiene dudas o comentarios, contáctenos.
If you have questions or comments, contact us.
Pour toute question ou tout commentaire, nous contacter.
1-800-4-DEWALT • www.dewalt.com
INSTRUCTION MANUAL
GUIDE D'UTILISATION
MANUAL DE INSTRUCCIONES
DEWALT Industrial Tool Co., 701 Joppa Road, Baltimore, MD 21286
(APR07) Form No. 651243-00 DW898 Copyright © 2002, 2005, 2007 DEWALT
The following are trademarks for one or more DEWALT power tools: the yellow and black color scheme; the
“D” shaped air intake grill; the array of pyramids on the handgrip; the kit box configuration; and the array of
lozenge-shaped humps on the surface of the tool.
Definitions: Safety Guidelines
The definitions below describe the level of severity for each signal word.
Please read the manual and pay attention to these symbols.
DANGER: Indicates an imminently hazardous situation which, if not
avoided, will result in death or serious injury.
WARNING: Indicates a potentially hazardous situation which, if not
avoided, could result in death or serious injury.
CAUTION: Indicates a potentially hazardous situation which, if not
avoided, may result in minor or moderate injury.
CAUTION: Used without the safety alert symbol indicates a poten-
tially hazardous situation which, if not avoided, may result in property
damage.
IF YOU HAVE ANY QUESTIONS OR COMMENTS ABOUT THIS OR ANY DEWALT TOOL,
CALL US TOLL FREE AT: 1-800-4-D
General Safety Rules – For All Tools
WARNING! Read all instructions. Failure to follow all instructions listed below
may result in electric shock, fire and/or serious injury. The term “power tool” in all
of the warnings listed below refers to your mains-operated (corded) power tool or
battery-operated (cordless) power tool.
SAVE THESE INSTRUCTIONS
1) WORK AREA SAFETY
a) Keep work area clean and well lit. Cluttered or dark areas invite accidents.
b) Do not operate power tools in explosive atmospheres, such as in the presence of
flammable liquids, gases or dust. Power tools create sparks which may ignite the dust
or fumes.
c) Keep children and bystanders away while operating a power tool. Distractions can
cause you to lose control.
2) ELECTRICAL SAFETY
a) Power tool plugs must match the outlet. Never modify the plug in any way. Do not
use any adapter plugs with earthed (grounded) power tools. Unmodified plugs and
matching outlets will reduce risk of electric shock
b) Avoid body contact with earthed or grounded surfaces such as pipes, radiators,
ranges and refrigerators. There is an increased risk of electric shock if your body is
earthed or grounded.
c) Do not expose power tools to rain or wet conditions. Water entering a power tool will
increase the risk of electric shock
d) Do not abuse the cord. Never use the cord for carrying, pulling or unplugging the
power tool. Keep cord away from heat, oil, sharp edges or moving parts. Damaged
or entangled cords increase the risk of electric shock. Replace or repair damaged cords.
Make sure your extension cord is in good condition. Use only 3-wire extension cords that
have 3-prong grounding-type plugs and 3-pole receptacles that accept the tool’s plug.
e) When operating a power tool outdoors, use an extension cord suitable for outdoor
use. Use of a cord suitable for outdoor use reduces the risk of electric shock. When using
an extension cord, be sure to use one heavy enough to carry the current your product will
draw. An undersized cord will cause a drop in line voltage resulting in loss of power and
overheating. The following table shows the correct size to use depending on cord length
and nameplate ampere rating. If in doubt, use the next heavier gauge. The smaller the
gauge number, the heavier the cord.
EWALT (1-800-433-9258)
DW898
14 Gauge Nibbler
Grignoteuse de calibre 14
Cortadora de lámina calibre 14
Volts Total Length of Cord in Feet
120V 0-25 26-50 51-100 101-150
240V 0-50 51-100 101-200 201-300
Ampere Rating
More Not more AWG
Than Than
0 - 6 18 16 16 14
6 - 10 18 16 14 12
10 - 12 16 16 14 12
12 - 16 14 12 Not Recommended
3) PERSONAL SAFETY
a) Stay alert, watch what you are doing and use common sense when operating a
power tool. Do not use a power tool while you are tired or under the influence of
drugs, alcohol or medication. A moment of inattention while operating power toolsmay
result in serious personal injury.
b) Use safety equipment. Always wear eye protection. Safety equipment such as
dust mask, non-skid safety shoes, hard hat, or hearing protection used for appropriate
conditions will reduce personal injuries.
c) Avoid accidental starting. Ensure the switch is in the off-position before plugging
in. Carrying power tools with your finger on the switch or plugging in power tools that have
the switch on invites accidents.
d) Remove any adjusting key or wrench before turning the power tool on. A wrench or
a key left attached to a rotating part of the power tool may result in personal injury.
e) Do not overreach. Keep proper footing and balance at all times. This enables better
control of the power tool in unexpected situations.
f) Dress properly. Do not wear loose clothing or jewellery. Keep your hair, clothing and
gloves away from moving parts. Loose clothes, jewellery or long hair can be caught in
moving parts. Air vents often cover moving parts and should also be avoided.
g) If devices are provided for the connection of dust extraction and collection facilities,
ensure these are connected and properly used. Use of these devices can reduce dust-
related hazards.
4) POWER TOOL USE AND CARE
a) Do not force the power tool. Use the correct power tool for your application. The
correct power tool will do the job better and safer at the rate for which it was designed.
b) Do not use the power tool if the switch does not turn it on and off. Any power tool that
cannot be controlled with the switch is dangerous and must be repaired.
c) Disconnect the plug from the power source and/or the battery pack from the power
tool before making any adjustments, changing accessories, or storing power tools.
Such preventive safety measures reduce the risk of starting the power tool accidentally.
d) Store idle power tools out of the reach of children and do not allow persons
unfamiliar with the power tool or these instructions to operate the power tool. Power
tools are dangerous in the hands of untrained users.
e) Maintain power tools. Check for misalignment or binding of moving parts, breakage
of parts and any other condition that may affect the power tools operation. If
damaged, have the power tool repaired before use. Many accidents are caused by
poorly maintained power tools.
f) Keep cutting tools sharp and clean. Properly maintained cutting tools with sharp cutting
edges are less likely to bind and are easier to control.
g) Use the power tool, accessories and tool bits etc., in accordance with these
instructions and in the manner intended for the particular type of power tool, taking
into account the working conditions and the work to be performed. Use of the power
tool for operations different from those intended could result in a hazardous situation.
5) SERVICE
a) Have your power tool serviced by a qualified repair person using only identical
replacement parts. This will ensure that the safety of the power tool is maintained.
Minimum Gauge for Cord Sets
Additional Specific Safety Instructions for Nibblers
• Hold tool by insulated gripping surfaces when performing an operation where the
cutting tools may contact hidden wiring or its own cord. Contact with a “live” wire will
make exposed metal parts of the tool “live” and shock the operator.
• Cut material at or below rated capacity. Remember, material thickness increases as
gauge number deceases (14 gauge is thicker than 16 gauge). 14 gauge thickness is
.075" (1.9 mm); 16 gauge is .060" (1.5 mm).
• NEVER have any part of your body near the blades. Serious personal injury may result.
• Keep hands away from cutting area. A moment of inattention while operating power tools
may result in serious personal injury.
• ALWAYS wear gloves when handling sheet metal. The edges are sharp and can cause serious personal injury.
• Firmly secure the piece of metal to be cut to prevent movement during cutting.
• ALWAYS start tool before engaging material to be cut.
• Always wear safety shoes to protect your feet from sharp metal debris on the floor.
• DO NOT use the nibbler with any kind of accessory or attachment.
• Keep all screws tight. Check periodically for loosening.
• Do not place anything into the motor housing openings.
• Clean out your tool often, especially after heavy use. Dust and grit containing metal
particles often accumulate on interior surfaces and could create an electric shock hazard.
• Stay clear of end pieces that may fall after being cut off. Contact with a sharp edge could
result in personal injury.
• Always keep the power cord away from the edge of the material being cut. Sharp edges
can result in the cord insulation being cut. This condition may create an electrical hazard.
WARNING: ALWAYS use safety glasses. Everyday eyeglasses are NOT safety glasses. Also
use face or dust mask if cutting operation is dusty. ALWAYS WEAR CERTIFIED SAFETY
EQUIPMENT:
• ANSI Z87.1 eye protection (CAN/CSA Z94.3),
• ANSI S12.6 (S3.19) hearing protection,
• NIOSH/OSHA/MSHA respiratory protection.
WARNING: Always wear proper personal hearing protection that conforms to ANSI
S12.6 (S3.19) during use. Under some conditions and duration of use, noise from this product
may contribute to hearing loss.
WARNING: Always use eye protection. All users and bystanders must wear eye protection
that conforms to ANSI Z87.1.
WARNING: Some dust created by power sanding, sawing, grinding, drilling, and other
construction activities contains chemicals known to cause cancer, birth defects, or other
reproductive harm. Some examples of these chemicals are:
• lead from lead-based paints,
• crystalline silica from bricks and cement and other masonry products, and
• arsenic and chromium from chemically-treated lumber (CCA).
Your risk from these exposures varies, depending on how often you do this type of work. To
reduce your exposure to these chemicals: work in a well ventilated area, and work with approved
safety equipment, such as those dust masks that are specially designed to filter out microscopic
particles.
• Avoid prolonged contact with dust from power sanding, sawing, grinding, drilling, and
other construction activities. Wear protective clothing and wash exposed areas with
soap and water. Allowing dust to get into your mouth, eyes, or lay on the skin may promote
absorption of harmful chemicals.
WARNING: Use of this tool can generate and/or disburse dust, which may cause serious and
permanent respiratory or other injury. Always use NIOSH/OSHA approved respiratory protection
appropriate for the dust exposure. Direct particles away from face and body.
• The label on your tool may include the following symbols. The symbols and their definitions
are as follows:
V .................... volts A ....................amperes
Hz .................. hertz W ...................watts
min ................ minutes
..................alternating current
Page 2
............. direct current
.................. Class I Construction ...................earthing terminal
...................... (grounded) ..................safety alert symbol
.................. Class II Construction …/min ............revolutions or
...................... (double insulated) .......................reciprocation per minute
BPM .............. beats per minute
n
o ..................no load speed
SAVE THESE INSTRUCTIONS
Motor
Your DEWALT tool is powered by a DEWALT-built motor. Be sure your power supply agrees with
the nameplate marking.
Voltage decrease of more than 10% will cause loss of power and overheating. D
are factory tested; if this tool does not operate, check power supply.
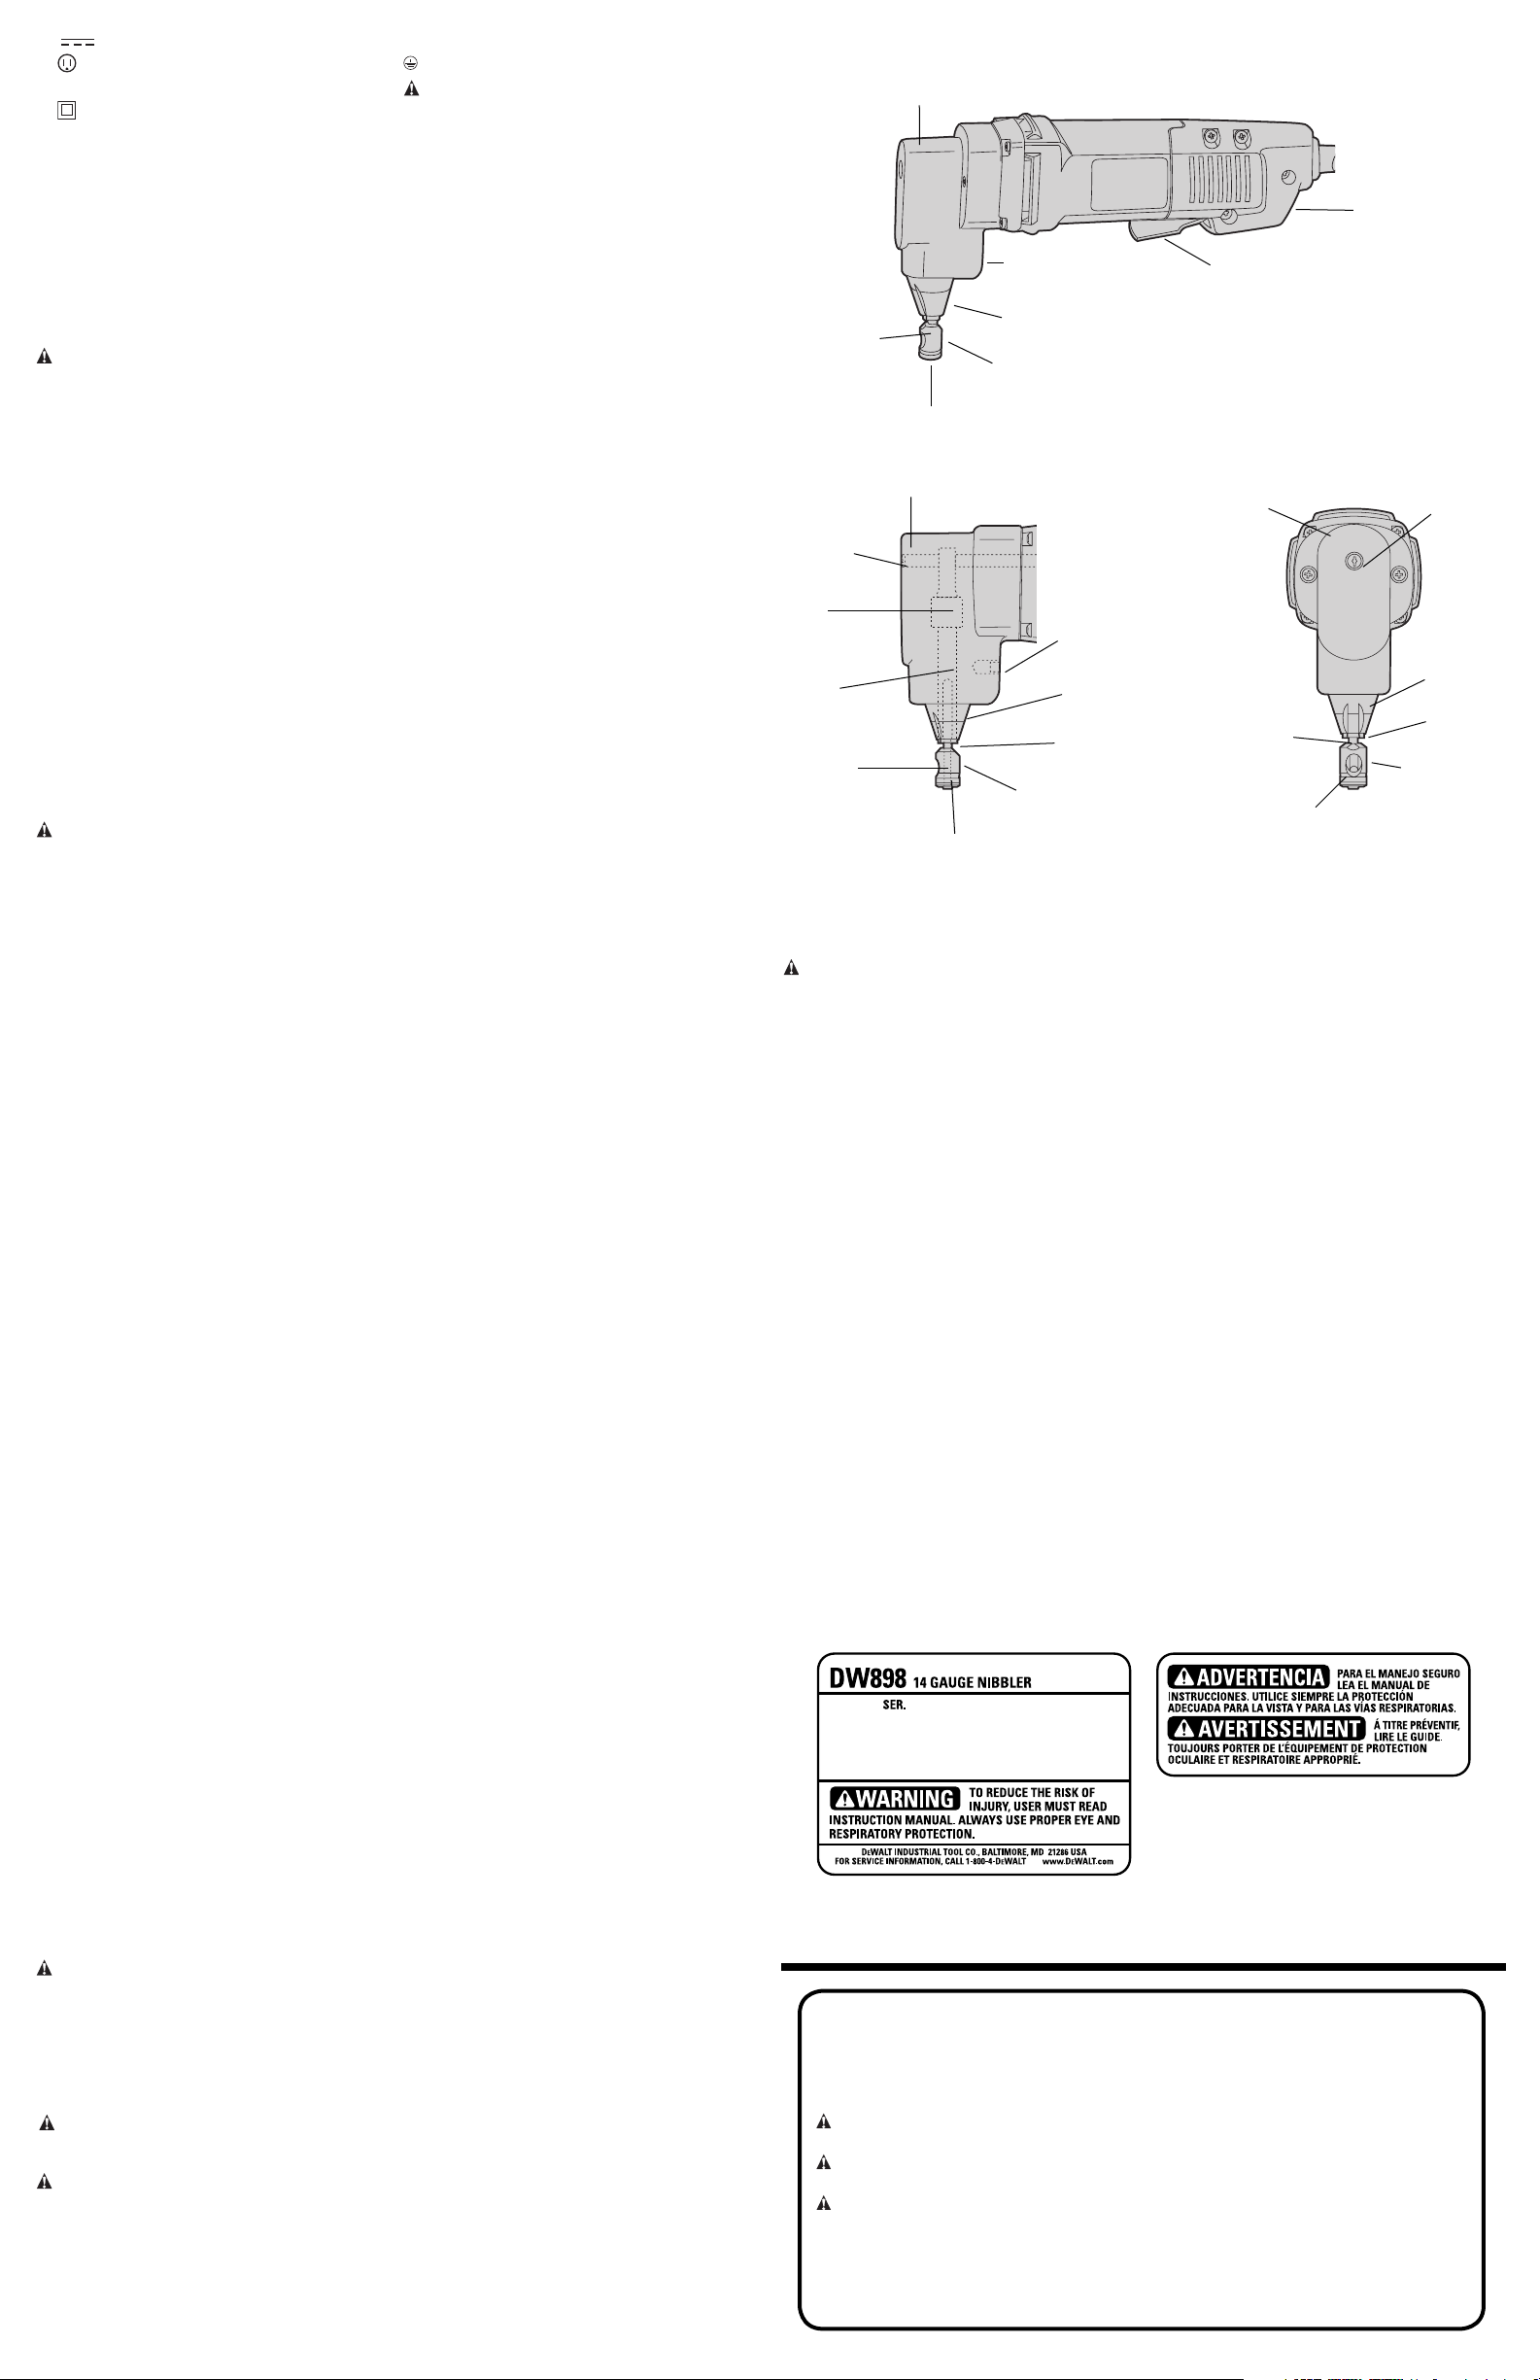
COMPONENTS (Fig. 1)
WARNING: Never modify the power tool or any part of it. Damage or personal injury could
result.
A. Head
B. Punch
C. Cover ring
D. Die
E. Housing
F. Paddle switch
G. Switch lock button
H. Set screw
INTENDED USE
The DW898 14-gauge nibbler is designed for professional cutting at various work sites (i.e.,
construction sites). DO NOT use under wet conditions or in presence of flammable liquids or
gases.
The14-gauge nibblers are professional power tools. DO NOT let children come into contact with
the tool. Supervision is required when inexperienced operators use this tool.
Switches (Fig. 1)
To start tool, depress the paddle switch (F). To turn the tool off, release the paddle. The paddle
switch can be locked on by engaging the lock button (G) located near the rear of the tool, while
holding the paddle depressed. Always be sure that the tool is not locked on before plugging in. To
turn the tool off when it is locked on, squeeze and release the paddle once.
OPERATION (Fig. 2, 3)
WARNING: To reduce the risk of serious personal injury, turn tool off and disconnect
tool from power source before making any adjustments or removing/installing attachments
or accessories.
Lubricate surface of material with oil. The nibbler is designed to cut flat and shallow corrugated
metal.
NOTE: Punch and die should be lubricated by immersing in a good quality cutting oil approximately every 30 feet (92 m) of cutting
The tool is factory assembled with the punch (B) oriented forward for cutting flat and shallow
corrugated material.
The head (A) can be aligned in three positions: left, forward, and right (See Fig. 2). To rotate the
head (A), loosen the set screw (H). Turn the head in the desired direction.
NOTE: Do not rotate the head in a complete circle as this will change the punch engagement
in the die.
Rotate the housing (E) in the head (A) and turn the set screw (H) in until you feel the set screw
engage a recess in the shoe. Tighten the set screw firmly. Periodically recheck this screw for
tightness.
The nibbler head (A) is designed to fit through a 3/4" (19 mm) diameter hole for starting a cut in
the middle of the work. Nibbling can be done in any direction from this hole. A punch width indicator is provided on the front of the housing to allow users to follow a line closely (Fig. 3).
The bottom of the housing has a .51" (13 mm) diameter template guide (L) to allow for use of
templates. See Figures 2 and 3 for template guide surface. The thickness of the template should
be such that the total thickness of the template and workpiece is 13/64" to 1/4" (5 to 6.5 mm).
The shape of the template must be .1" (2.5 mm) away from the shape to be nibbled. The tool
should be guided so that the outside diameter (.51" or 13 mm) of the housing always rests on
the template.
Changing Punches (Fig. 2)
Never cut with a blunt, dull punch. Punches can be sharpened until they reach a length of 2.72"
(69 mm). Shorter punches are unserviceable. To remove the punch (B), loosen the head set
screw (H) about 4–5 turns (See Fig. 2). Slide the housing (E) from the head (A). Unscrew the
punch (B) from the connecting rod bushing (J). Punch may be resharpened carefully on a bench
grinder with a fine grit wheel. Be careful that the punch does not become shorter than the minimum length. Punches shorter than this will not engage the die sufficiently and must be replaced.
The ground face must be square to the punch axis. After grinding, carefully stone the ground
edges to remove burrs. Do not round over corners.
Reassembly of Nibbler Head (Fig. 2)
Screw the punch (B) fully into the connecting rod bushing (J). Slide the housing (E) over the
end of the punch and into the head. Turn the housing (E) to desired cut orientation. Tighten set
screw (H). Next, check punch engagement.
Checking Punch Engagement (Fig. 2)
Since the punch (B) length is now changed, the punch engagement may have to be adjusted.
Check punch engagement by placing a flat blade screwdriver in the cam shaft (I) slot and turning the shaft (See Fig. 2). Punch should dip .020" to .06" (.5 to 1.15 mm) into the die at the full
down stroke position. Too much punch dip into the die will result in a loss of capacity (bottom of
punch will not clear die enough on up stroke.)
Punch Engagement Adjustment (Fig. 2)
If the punch engagement should need adjustment, loosen the set screw (H) and rotate shoe
either clockwise (punch deeper into die) or counterclockwise (punch out of die). Tighten set
screw firmly. Turn cam shaft (I) with screwdriver in slot to check punch engagement (moving
punch fully down). Repeat as necessary.
Die Replacement (Fig. 2)
If the die (D) becomes dull, replace it. Replace old die by pushing the cover ring (C) up and out
of the die groove. Knock out the retaining pin under the cover ring with a drift punch. Pull die off
the carrier shaft (K). Install new die (D) on carrier shaft (K). Align cross hole in die with groove in
carrier shaft. Install pin. Snap cover ring (C) over die in groove provided.
MAINTENANCE
WARNING: To reduce the risk of serious personal injury, turn tool off and disconnect
tool from power source before making any adjustments or removing/installing attachments
or accessories.
• Check that the punch and die are sharp. If either is dull, sharpen or replace.
• Periodically dip the shoe in oil.
• This is a precision tool. Use it carefully and store it in a protected place..
Cleaning
WARNING: Blow dirt and dust out of all air vents with dry air at least once a week. Wear
proper ANSI Z87.1 (CAN/CSA Z94.3) eye protection and proper NIOSH/OSHA/MSHA
respiratory protection when performing this.
WARNING: Never use solvents or other harsh chemicals for cleaning the non-metallic parts
of the tool. These chemicals may weaken the plastic materials used in these parts. Use a cloth
dampened only with water and mild soap. Never let any liquid get inside the tool; never immerse
any part of the tool into a liquid.
Lubrication
Self lubricating bearings are used in the tool and periodic relubrication is not required. However,
it is recommended that, once a year, you take or send the tool to a service center for a thorough
cleaning and inspection.
EWALT tools
FIG. 1
A
G
FIG 2
J
H
B
C
A
I
B
K
E
D
H
E
L
D
C
F
FIG 3
A
B
C
I
E
L
D
Accessories
WARNING: Since accessories, other than those offered by DEWALT, have not been tested
with this product, use of such accessories with this tool could be hazardous. To reduce the risk
of injury, only D
Recommended accessories for use with your tool are available at extra cost from your local
dealer or authorized service center. If you need assistance in locating any accessory, please
contact D
EWALT (1-800-433-9258) or visit our website www.dewalt.com.
D
EWALT, recommended accessories should be used with this product.
EWALT Industrial Tool Co., 701 East Joppa Road, Baltimore, MD 21286, call 1-800-4-
Repairs
To assure product SAFETY and RELIABILITY, repairs, maintenance and adjustments (including
brush inspection and replacement) should be performed by a D
a D
EWALT authorized service center or other qualified service personnel. Always use identical
replacement parts.
EWALT factory service center,
Three Year Limited Warranty
DEWALT will repair, without charge, any defects due to faulty materials or workmanship for
three years from the date of purchase. This warranty does not cover part failure due to normal
wear or tool abuse. For further detail of warranty coverage and warranty repair information, visit
www.dewalt.com or call 1-800-4-DEWALT (1-800-433-9258). This warranty does not apply to
accessories or damage caused where repairs have been made or attempted by others. This
warranty gives you specific legal rights and you may have other rights which vary in certain
states or provinces.
In addition to the warranty, D
D
EWALT will maintain the tool and replace worn parts caused by normal use, for free, any time
during the first year after purchase.
If you are not completely satisfied with the performance of your D
Nailer for any reason, you can return it within 90 days from the date of purchase with a receipt
for a full refund – no questions asked.
LATIN AMERICA: This warranty does not apply to products sold in Latin America. For
products sold in Latin America, see country specific warranty information contained either in the
packaging, call the local company or see website for warranty information.
FREE WARNING LABEL REPLACEMENT: If your warning labels become illegible or are
missing, call 1-800-4-D
EWALT tools are covered by our:
1 YEAR FREE SERVICE
90 DAY MONEY BACK GUARANTEE
EWALT Power Tool, Laser, or
EWALT for a free replacement.
Définitions : lignes directrices en
matière de sécurité
Les définitions ci-dessous décrivent le niveau de danger pour chaque mot-indicateur
employé. Veuillez lire le mode d’emploi et porter une attention particulière à ces
symboles.
DANGER : Indique une situation dangereuse imminente qui, si elle n’est pas
évitée, causera la mort ou des blessures graves.
AVERTISSEMENT : Indique une situation potentiellement dangereuse qui, si elle
n’est pas évitée, pourrait se solder par un décès ou des blessures graves.
MISE EN GARDE : Indique une situation potentiellement dangereuse
qui, si elle n’est pas évitée pourrait se solder par des blessures mineures ou
modérées.
MISE EN GARDE : Utilisé sans le symbole d’alerte à la sécurité, indique une situation
potentiellement dangereuse qui, si elle n’est pas évitée pourrait se solder par des
dommages à la propriété.
Page 3

POUR TOUTE QUESTION OU TOUT COMMENTAIRE RELATIF CET OUTIL OU À PROPOS
DE TOUT AUTRE OUTIL D
(1 (800) 433-9258)
EWALT, COMPOSER SANS FRAIS LE : 1 (800) 4-DEWALT
Règles générales de sécurité concernant
les outils à piles
AVERTISSEMENT : Lire toutes ces directives. Tout manquement aux directives
suivantes pose des risques de choc électrique, d’incendie et/ou de blessure
grave. Le terme « outil électrique » dans tous les avertissements ci-après se rapporte
à votre outil électrique à alimentation sur secteur (avec fil) ou par piles (sans fil).
CONSERVER CES DIRECTIVES
1) SÉCURITÉ - AIRE DE TRAVAIL
a) Maintenir l’aire de travail propre et bien éclairée. Les lieux encombrés ou sombres sont
propices aux accidents.
b) Ne pas faire fonctionner un outil électrique dans une atmosphère explosive, en
présence par exemple de poussières, gaz ou liquides inflammables. Les outils élec-
triques peuvent engendrer des étincelles qui pourraient enflammer toute émanation ou
poussière ambiante.
c) Tenir les enfants, ou toute autre personne, éloignés pendant l’utilisation d’un outil
électrique. Toute distraction pourrait vous faire perdre la maîtrise de ce dernier.
2) SÉCURITÉ – ÉLECTRICITÉ
a) La fiche électrique de l’outil doit correspondre à la prise murale. Ne jamais
modifier la fiche en aucune façon. Ne jamais utiliser de fiche d’adaptation avec un
outil électrique mis à la terre. L’utilisation de fiches d’origine et de prises appropriées
réduira les risques de choc électrique.
b) Éviter tout contact corporel avec des éléments mis à la terre comme tuyaux,
radiateurs, cuisinières ou réfrigérateurs. Les risques de choc électrique augmentent
lorsque le corps est mis à la terre.
c) Ne pas exposer les outils électriques à la pluie ou à l’humidité. Toute pénétration d’un
outil électrique par un liquide augmente les risques de choc électrique.
d) Ne pas utiliser le cordon de façon abusive. Ne jamais utiliser le cordon pour trans-
porter, tirer ou débrancher un outil électrique. Protéger le cordon de la chaleur,
de l’huile et de tout bord tranchant ou pièce mobile. Les cordons endommagés ou
emmêlés augmentent les risques de choc électrique. Remplacer ou faire réparer tout cordon endommagé. S’assurer que la rallonge est en bon état. N’utiliser que des rallonges
trifilaires munies de fiches tripolaires et des prises tripolaires acceptant la fiche de l’outil.
e) Lors de l’utilisation d’un outil électrique à l’extérieur, n’utiliser que des rallonges
conçues pour l’extérieur. L’utilisation d’une rallonge conçue pour l’extérieur réduit les
risques de choc électrique. En cas d’utilisation d’une rallonge, s’assurer que les valeurs
nominales de la rallonge utilisée correspondent bien à celles de l’outil alimenté. L’usage
d’une rallonge de calibre insuffisant causera une chute de tension entraînant perte de
puissance et surchauffe. Le tableau ci-dessous illustre les calibres à utiliser selon la longueur de rallonge et l’intensité nominale indiquée sur la plaque signalétique. En cas de
doutes, utiliser le calibre suivant. Plus le calibre est petit, plus la rallonge peut supporter
de courant.
Volts Longueur totale de la rallonge en pieds
120 V 0-25 26-50 51-100 101-150
240 V 0-50 51-100 101-200 201-300
Intensité nominale
Plus Pas plus AWG
de de
0 - 6 18 16 16 14
6 - 10 18 16 14 12
10 - 12 16 16 14 12
12 - 16 14 12 Non recommandé
3) SÉCURITÉ PERSONNELLE
a) Rester vigilant en tout temps et faire preuve de jugement pendant l’utilisation
d’un outil électrique. Ne pas utiliser d’outil électrique en cas de fatigue ou sous
l’influence de drogues, d’alcool ou de médicaments. Tout moment d’inattention
pendant l’utilisation d’un outil électrique pose des risques de blessure grave.
b) Utiliser le matériel de sécurité approprié. Toujours porter des lunettes de protection.
Le fait de porter un masque anti-poussières, des chaussures antidérapantes, un casque
de sécurité ou des protecteurs auditifs lorsque la situation le requiert réduira les risques de
blessure.
c) Éviter tout démarrage accidentel. S’assurer que l’interrupteur est en position
d’arrêt avant tout branchement. Transporter un outil le doigt sur l’interrupteur ou
brancher un outil électrique alors que l’interrupteur est en position de marche invite les
accidents.
d) Retirer toute clé de réglage avant de démarrer l’outil. Une clé laissée sur une pièce
rotative d’un outil électrique pose des risques de blessure.
e) Ne pas effectuer de travaux hors de portée. Les pieds doivent rester bien ancrés au
sol afin de maintenir son équilibre en tout temps. Cela permet de mieux maîtriser l’outil
électrique dans les situations imprévues.
f) Porter des vêtements appropriés. Ne pas porter de vêtements amples ni de bijoux.
Maintenir cheveux, vêtements et gants éloignés des pièces mobiles. Vêtements
amples, bijoux ou cheveux longs risquent de rester coincés dans ces pièces mobiles.
Prendre des précautions autour des évents car ils recouvrent des pièces mobiles.
g) Lorsque un dispositif de connexion à un système de dépoussiérage ou d’élimination
est fourni, s’assurer qu’il est connecté et utilisé correctement. L’utilisation de ces dis-
positifs peut réduire les risques engendrés par les poussières.
4) UTILISATION ET ENTRETIEN DES OUTILS ÉLECTRIQUES
a) Ne pas forcer un outil électrique. Utiliser l’outil approprié au travail en cours. L’outil
approprié effectuera un meilleur travail, de façon plus sûre et à la vitesse pour laquelle il a
été conçu.
b) Ne pas utiliser un outil électrique dont l’interrupteur est défectueux. Tout appareil
dont l’interrupteur est défectueux est dangereux et doit être réparé.
c) Débrancher la fiche du secteur et/ou le bloc-piles de l’outil électrique avant de
faire tout réglage ou changement d’accessoire, ou avant de ranger ce dernier. Ces
mesures préventives réduisent les risques de démarrage accidentel de l’appareil.
d) Après usage, ranger les outils électriques hors de la portée des enfants, et ne
permettre à aucune personne n’étant pas familière avec un outil électrique (ou son
manuel d’instruction) d’utiliser ce dernier. Les outils peuvent être dangereux entre les
mains des novices.
e) Entretenir les outils électriques. Vérifier les pièces mobiles pour s’assurer qu’elles
sont bien alignées et tournent librement, qu’elles sont en bon état et ne sont affectées d’aucune condition susceptible de nuire au bon fonctionnement de l’outil. En
cas de dommage, faire réparer l’outil électrique avant toute nouvelle utilisation. Bien
des accidents sont causés par des outils mal entretenus.
f) Maintenir tout outil de coupe bien aiguisé et propre. Les outils de coupe bien entrete-
nus et affûtés sont moins susceptibles de se coincer et sont plus faciles à contrôler.
g) Utiliser un outil électrique, ses accessoires, mèches, etc., conformément aux
présentes directives et suivant la manière prévue pour ce type particulier d’outil
électrique, en tenant compte des conditions de travail et du travail à effectuer.
L’utilisation d’un outil électrique pour toute opération autre que celle pour laquelle il a été
conçu est dangereuse.
5) RÉPARATION
a) Faire entretenir les outils électriques par un réparateur qualifié en n’utilisant que
des pièces de rechange identiques. Cela permettra d’assurer l’intégrité de l’outil élec-
trique et la sécurité de l’utilisateur.
Calibre minimum pour une rallonge
Directives de sécurité spécifiques supplémentaires pour
les grignoteuses
• Tenir l’outil par sa surface de prise isolée lors d’opérations où les outils de coupe
peuvent entrer en contact avec un câblage caché ou avec leur propre cordon
d’alimentation. Tout contact avec un fil « sous tension » mettra « sous tension » les pièces
métalliques exposées de l’outil et provoquera un choc électrique chez l’opérateur de l’outil.
• Couper le matériau en fonction de la capacité nominale de la grignoteuse ou sous
celle-ci. Se rappeler que plus un matériau est épais, plus son calibre est petit (ainsi,
un matériau de calibre 14 est plus épais qu’un autre de calibre 16). En effet, l’épaisseur
d’un matériau de calibre 14 est de 1,9 mm (0,075 po) et celui de calibre 16, de 1,5 mm
(0,06 po).
• NE JAMAIS mettre une partie du corps près des couteaux. Une telle pratique peut entraî-
ner des blessures corporelles graves.
• Éloigner les mains de la zone de découpe. Un simple moment d’inattention en utilisant un
outil électrique peut entraîner des blessures corporelles graves.
• TOUJOURS porter des gants lors de la manipulation de feuilles de métal. En effet, les bords
sont tranchants et peuvent infliger de graves blessures corporelles.
• Abloquer la pièce métallique à couper afin d’empêcher tout déplacement en cours de
coupe.
• TOUJOURS actionner l’outil avant d’insérer le matériau à couper.
• Toujours porter des chaussures de sécurité pour protéger les pieds contre les débris
métalliques pointus sur le plancher.
• NE PAS utiliser la grignoteuse avec des accessoires.
• S’assurer de serrer toutes les vis. Les vérifier régulièrement.
• Ne rien insérer dans les orifices du carter du moteur.
• Nettoyer l’outil régulièrement, particulièrement après une utilisation intensive. La
poussière et les saletés contenant des particules métalliques s’accumulent souvent sur les
surfaces internes de l’outil et pourraient créer un risque de choc électrique.
• Se tenir à l’écart des extrémités de la pièce, car des morceaux pourraient tomber après
la coupe. Un contact avec un bord tranchant risque de se solder par une blessure corpo-
relle.
• Toujours tenir le cordon d’alimentation à l’écart du bord du matériau coupé. Les bords
tranchants risquent de couper l’isolant du cordon d’alimentation et pourraient créer un risque
d’origine électrique.
AVERTISSEMENT : TOUJOURS porter des lunettes de sécurité. Les lunettes de vue ne
constituent PAS des lunettes de sécurité. Utiliser également un masque facial ou antipoussière si l’opération de découpe génère de la poussière. TOUJOURS PORTER UN
ÉQUIPEMENT DE PROTECTION HOMOLOGUÉ :
• protection oculaire conforme à la norme ANSI Z87.1 (CAN/CSA Z94.3),
• protection auditive conforme à la norme ANSI S12.6 (S3.19) et
• protection des voies respiratoires conformes aux normes NIOSH/OSHA/MSHA.
AVERTISSEMENT : TOUJOURS porter une protection auditive appropriée conformé-
ment à la norme ANSI S12.6 (S3.19) lors de l’utilisation du produit. Dans certaines condi-
tions et selon la durée d’utilisation, le bruit émis par ce produit peut contribuer à une perte
auditive.
AVERTISSEMENT : Toujours utiliser une protection oculaire. Tous les utilisateurs et per-
sonnes à proximité doivent porter une protection oculaire conforme à la norme ANSI Z87.1.
AVERTISSEMENT : Certaines poussières produites par les activités de ponçage, sciage,
meulage, perçage et autres activités de construction peuvent contenir des produits
chimiques pouvant causer le cancer, des anomalies congénitales ou d'autres problèmes liés aux
fonctions reproductrices. Voici quelques exemples de ces produits chimiques :
• le plomb contenu dans les peintures à base de plomb;
• la silice cristalline de la brique, du ciment et d'autres produits de maçonnerie; et
• l'arsenic et chrome provenant de bois traité chimiquement.
Les risques reliés à l'exposition à ces poussières varient selon la fréquence à laquelle
l'utilisateur travaille avec ce type de matériaux. Pour réduire votre exposition à ces
produits chimiques : travailler dans un endroit bien ventilé et porter un équipement de sécurité
approuvé comme un masque antipoussières conçu spécialement pour filtrer les particules
microscopiques.
• Éviter le contact prolongé avec les poussières produites par les activités de ponçage,
sciage, meulage, perçage et autres activités de construction. Porter des vêtements
de protection et laver les parties du corps exposées avec une solution d'eau et de
savon. Laisser la poussière pénétrer dans la bouche, les yeux ou reposer sur la peau peut
favoriser l'absorption de produits chimiques nocifs.
AVERTISSEMENT : L’utilisation de cet outil peut produire et/ou disperser des poussières
pouvant causer des problèmes respiratoires graves et permanents ou d’autres blessures.
Toujours porter une protection des voies respiratoires approuvée par la NIOSH/OSHA lors d’une
exposition à la poussière. Diriger les particules loin du visage et du corps.
• L'étiquette apposée sur votre outil peut comprendre les symboles suivants. Les symboles et
leurs définitions sont indiqués ci-après :
V .....................volts A ....................ampères
Hz ...................hertz W ...................watts
min .................minutes
..............courant continu
...................Construction de classe I
.......................(mis à la terre)
...................Construction de classe II …/min ............ rotations ou alternance
.......................(à double isolation) ...................... par minute
BPM ...............coups par minute
................. courant alternatif
n
o ..................vitesse à vide
................... borne de terre
..................symbole d'alerte à la sécurité
CONSERVER CES DIRECTIVES
Moteur
Un moteur DEWALT actionne l’outil DEWALT. S’assurer que le bloc d’alimentation est compatible
avec l’inscription de la plaque signalétique.
Une diminution de tension de plus de 10 % provoquera une perte de puissance et une surchauffe. LES OUTILS D
l’alimentation électrique.
EWALT sont testés en usine; si cet outil ne fonctionne pas, vérifier
COMPONENTS (fig. 1)
AVERTISSEMENT : Ne jamais modifier l’outil électrique ou l’une de ses parties. Une telle
pratique risque de provoquer des dommages matériels ou des blessures corporelles.
A. Tête
B. Poinçon
C. Anneau de couvercle
D. Matrice
E. Boîtier
F. Interrupteur à palette
G. Bouton de verrouillage de l’interrupteur
H. Vis de calage
UTILISATION PRÉVUE
La grignoteuse DW898 de calibre 14 est conçue pour la coupe professionnelle dans différents
chantiers. NE PAS utiliser dans des conditions humides ou en présence de liquides ou de gaz
inflammables.
Les grignoteuses de calibre 14 sont des outils électriques professionnels. NE PAS laisser
les enfants toucher à l’outil. Les opérateurs inexpérimentés doivent être supervisés lorsqu’ils
utilisent cet outil.
Interrupteur (fig. 1)
Pour mettre l’outil en marche, enfoncer l’interrupteur à bascule (F). Pour l’arrêter, relâcher
l’interrupteur à bascule. On peut verrouiller l’interrupteur en mode de fonctionnement en enfonçant le bouton de verrouillage (G) qui se trouve près de l’arrière de l’outil tout en maintenant
enfoncé l’interrupteur à bascule. Toujours s’assurer que l’outil ne se trouve pas en mode de
fonctionnement continu avant de le brancher. Pour arrêter l’outil lorsque ce dernier est en mode
de fonctionnement continu, il suffit d’enfoncer et de relâcher immédiatement l’interrupteur.
Page 4

FONCTIONNEMENT (fig. 2, 3)
AVERTISSEMENT : Pour réduire le risque de blessures corporelles graves, éteindre
l’outil et le débrancher avant d’effectuer tout réglage ou d’enlever ou d’installer des
accessoires.
Lubrifier la surface du matériau avec de l’huile. La grignoteuse est conçue pour découper du
métal plat et légèrement ondulé.
REMARQUE : il faut lubrifier le poinçon et la matrice en les immergeant dans de l’huile de coupe
de bonne qualité après environ chaque 9 m (30 pi) de coupe.
L’outil est monté en usine avec le poinçon (B) en position avant pour couper des matériaux plats
et légèrement ondulés.
La tête (A) se place dans l’une des trois positions : vers la gauche, vers l’avant et vers la droite
(consulter la fig. 2). Pour faire tourner la tête (A), desserrer la vis de calage (H). Faire tourner la
tête jusqu’à la position voulue.
REMARQUE : ne pas faire tourner complètement la tête sur elle-même au risque de modifier
l’insertion du poinçon dans la matrice.
Faire tourner le boîtier (E) dans la tête (A) et faire tourner la vis de calage (H) jusqu’à ce que la
vis s’insère dans un espace creux du patin. Serrer solidement la vis de calage. Vérifier régulièrement si cette vis est bien serrée.
La tête (A) de la grignoteuse est conçue pour s’insérer dans un trou de 19 mm (3/4 po) de
diamètre afin de pouvoir découper au milieu de la pièce. Le grignotage se fait dans un sens
ou l’autre dans le trou. À l’avant du boîtier, on retrouve un indicateur de la largeur du poinçon
permettant à l’utilisateur de suivre un tracé (fig. 3).
La face inférieure du boîtier comporte un guide pour gabarit de 13 mm (0,51 po) de diamètre
(L) prévu pour l’utilisation des gabarits. Consulter les figures 2 et 3 pour obtenir la surface du
guide de gabarit. L’épaisseur (totale) du gabarit et de la pièce doit se situer entre 5 et 6,5 mm
(13/64 et 1/4 po). La forme du gabarit doit se trouver à 2,5 mm (0,1 po) de la forme à grignoter.
Il faut guider l’outil de sorte que le diamètre extérieur (13 mm ou 0,51 po) du boîtier repose
toujours contre le gabarit.
Remplacement des poinçons (fig. 2)
Ne jamais couper avec un poinçon émoussé. On peut affûter les poinçons jusqu’à une longueur
minimale de 69 mm (2,72 po). Des poinçons plus courts ne peuvent être utilisés. Pour retirer le
poinçon (B), desserrer la vis de calage (H) de la tête d’environ 4 ou 5 tours (consulter la fig. 2).
Faire glisser le boîtier (E) hors de la tête (A). Dévisser le poinçon (B) de la douille de la bielle (J).
Il faut affûter avec soin les poinçons à l’aide d’une meuleuse d’établi munie d’une meule à grains
fins. S’assurer de ne pas raccourcir le poinçon au-delà de la longueur minimale. Un poinçon plus
court ne s’insérera pas suffisamment dans la matrice et devra être remplacé. La face meulée
doit être perpendiculaire à l’axe du poinçon. Après le meulage, ébarber soigneusement les
rebords affûtés à la meule. Ne pas en arrondir les coins.
Remontage de la tête de la grignoteuse (fig. 2)
Visser le poinçon (B) à fond dans la douille de la bielle (J). Faire glisser le boîtier (E) sur
l’extrémité du poinçon et dans la tête. Faire tourner le boîtier (E) jusqu’à la position de coupe
voulue. Serrer la vis de calage (H). Ensuite, vérifier l’insertion du poinçon.
Vérification de l’insertion du poinçon (fig. 2)
Puisque la longueur du poinçon (B) est maintenant différente, il faut peut-être régler l’insertion
du poinçon. La vérifier en plaçant un tournevis à lame plate dans la fente de l’arbre à cames
(I) et en faisant tourner l’arbre (consulter la fig. 2). Le poinçon devrait s’affaisser de 0,5 à
1,15 mm (0,020 à 0,06 po) dans la matrice à la position la plus basse de la course. Lorsque
l’affaissement du poinçon dans la matrice est trop grand, il en résulte une perte de rendement
(l’extrémité inférieure du poinçon ne se dégage pas suffisamment de la matrice au plus haut de
la course).
Réglage de l’insertion du poinçon (fig. 2)
Lorsqu’il faut régler l’insertion du poinçon, desserrer la vis de calage (H) et faire tourner le patin
dans le sens horaire (pour enfoncer davantage le poinçon dans la matrice) ou dans le sens
antihoraire (pour le faire sortir de la matrice). Serrer solidement la vis de calage. Faire tourner
l’arbre à cames (I) à l’aide du tournevis dans la fente afin de vérifier l’insertion du poinçon (en
abaissant le poinçon complètement). Répéter au besoin.
Remplacement de la matrice (fig. 2)
Lorsque la matrice (D) est émoussée, la remplacer. Remplacer l’ancienne matrice en poussant
l’anneau de couvercle (C) vers le haut, hors de la rainure de la matrice. Se servir d’un chassegoupille pour faire sortir la tige de retenue du dessous de l’anneau de couvercle. Retirer la
matrice de l’arbre-porteur (K). Insérer une matrice (D) neuve sur l’arbre-porteur (K). Aligner le
trou-guide de la matrice sur la rainure de l’arbre-porteur. Insérer la tige. Enclencher l’anneau de
couvercle (C) dans la rainure disponible.
ENTRETIEN
AVERTISSEMENT : Pour réduire le risque de blessures corporelles graves, éteindre
l’outil et le débrancher avant d’effectuer tout réglage ou d’enlever ou d’installer
des accessoires.
• S’assurer que le poinçon et la matrice sont affûtés. Lorsque l’un d’eux est émoussé, l’affûter
ou le remplacer.
• Tremper régulièrement le patin dans de l’huile.
• Il s’agit d’un outil de précision. S’en servir avec soin et le ranger dans un endroit protégé.
Nettoyage
AVERTISSEMENT : Enlever les saletés et la poussière hors des évents au moyen d’air comprimé sec, au moins une fois par semaine. Porter une protection oculaire conforme à la norme
ANSI Z87.1 (CAN/CSA Z94.3) et une protection des voies respiratoires conforme aux normes
NIOSH/OSHA/MSHA au cours de cette tâche de nettoyage.
AVERTISSEMENT : Ne jamais utiliser de solvants ni d’autres produits chimiques puissants
pour nettoyer les pièces non métalliques de l’outil. Ces produits chimiques peuvent affaiblir les
matériaux de plastique utilisés dans ces pièces. Utiliser un chiffon humecté uniquement d’eau
et de savon doux. Ne jamais laisser de liquide pénétrer dans l’outil et n’immerger aucune partie
de l’outil dans un liquide.
Lubrification
Tous les outils DEWALT sont lubrifiés en permanence en usine et ils sont prêts à servir. Les
outils devraient être lubrifiés régulièrement aux 60 jours à 6-mois, selon leur utilisation. Les
outils constamment utilisés pour la production ou pour des travaux intensifs et ceux exposés à
la chaleur peuvent nécessiter une lubrification plus fréquente. Seul le personnel qualifié d’un
centre de service D
EWALT peut lubrifier les outils.
Accessoires
AVERTISSEMENT : Puisque les accessoires autres que ceux offerts par DEWALT n’ont pas
été testés avec ce produit, leur utilisation pourrait s’avérer dangereuse. Pour réduire le risque
de blessures, utiliser exclusivement les accessoires D
produit.
Les accessoires recommandés pour votre outil peuvent être achetés auprès du distributeur local
ou d’un centre de réparation agréé. Si vous avez besoin d’assistance pour trouver un accessoire
pour votre outil, veuillez contacter D
MD 21286, États-Unis, composer le 1(800) 4-D
à www.dewalt.com.
EWALT Industrial Tool Co., 701 East Joppa Road, Baltimore,
EWALT (1-800-433-9258) ou visiter notre site Web
EWALT recommandés avec le présent
Réparations
Pour assurer la SÉCURITÉ et la FIABILITÉ du produit, les réparations, l’entretien et les réglages
(y compris l’inspection et le remplacement des balais) doivent être réalisés par un centre de
réparation en usine D
réparation professionnel. Toujours utiliser des pièces de rechange identiques.
EWALT, un centre de réparation autorisé DEWALT ou par un personnel de
Garantie limitée de trois ans
DEWALT réparera gratuitement tous les problèmes dus à des défauts de matériau ou de
fabrication pendant trois ans à compter de la date d'achat. Cette garantie ne couvre pas des
défaillances de pièce dues à une usure normale ou à une mauvaise utilisation de l'outil. Pour
plus de détails relatifs à la couverture de la garantie et aux réparations sous garantie, visiter le
site Web www.dewalt.com ou composer le 1-800-4-D
ne s'applique pas aux accessoires ni aux dommages causés par des réparations réalisées ou
tentées par des tiers. Cette garantie vous accorde des droits légaux spécifiques et il est possible
que vous ayez d'autres droits qui varient d'un État ou d'une province à l'autre.
EWALT (1-800-433-9258). Cette garantie
En plus de la garantie, les outils DEWALT sont couverts par notre :
SERVICE D'ENTRETIEN GRATUIT DE 1 AN
EWALT entretiendra l'outil et remplacera les pièces usées par une utilisation normale et ce,
D
gratuitement, à tout instant pendant la première année à compter de la date d'achat.
GARANTIE DE REMBOURSEMENT DE 90 JOURS
Si vous n'êtes pas entièrement satisfait des performances de votre outil électrique, laser ou
de votre marteau-cloueur D
accompagné d'un reçu dans les 90 jours suivant la date d'achat et nous vous rembourserons
entièrement - sans poser de questions.
AMÉRIQUE LATINE : cette garantie ne s'applique pas aux produits vendus en Amérique latine.
Pour ceux-ci, veuillez consulter les informations relatives à la garantie spécifique présente dans
l'emballage, appeler l'entreprise locale ou consulter le site Web pour les informations relatives
à cette garantie.
REMPLACEMENT GRATUIT DES ÉTIQUETTES D'AVERTISSEMENT : si les étiquettes
d'avertissement deviennent illisibles ou sont manquantes, composer le 1-800-4-D
en obtenir le remplacement gratuit.
EWALT pour quelque raison que ce soit, vous pouvez le retourner
EWALT pour
Definiciones: Normas de seguridad
Las siguientes definiciones describen el nivel de gravedad de cada palabra de
señal. Lea el manual y preste atención a estos símbolos.
PELIGRO: indica una situación de peligro inminente que, si no se evita,
provocará la muerte o lesiones graves.
ADVERTENCIA: indica una situación de peligro potencial que, si no se
evita, podría provocar la muerte o lesiones graves.
PRECAUCIÓN: indica una situación de peligro potencial que, si no se evita,
posiblemente provocaría lesiones leves o moderadas.
PRECAUCIÓN: cuando se utiliza sin el símbolo de alerta de seguridad indica
una situación de peligro potencial que, si no se evita, puede provocar daños
en la propiedad.
Reglas de seguridad generales
¡ADVERTENCIA! Lea todas las instrucciones. El incumplimiento con alguna de
las instrucciones enumeradas más abajo puede resultar en descarga eléctrica,
incendio y/o lesiones corporales serias. El uso del término “máquina herramienta” en
las advertencias que se encuentran a continuación, se refiere a su máquina
herramienta ya sea operada por la red de suministro (con cable de alimentación) o a
batería (inalámbrica).
CONSERVE LAS INSTRUCCIONES
1) SEGURIDAD EN EL ÁREA DE TRABAJO
a) Mantenga su área de trabajo limpia y bien iluminada. Los accidentes abundan en las
áreas de trabajo desordenadas u oscuras.
b) No opere máquinas herramienta en ambientes explosivos, tales como en presencia
de líquidos, gases o polvos inflamables. Las máquinas herramienta generan chispas
que pueden inflamar el polvo o los gases.
c) No use máquinas herramienta en presencia de niños u otras personas circunstan-
tes. Las distracciones pueden hacerle perder el control.
2) SEGURIDAD ELÉCTRICA
a) Los enchufes de las máquinas herramienta deben poder acoplarse a la toma de cor-
riente. Jamás modifique el enchufe de ninguna manera. No emplee adaptadores de
enchufe con máquinas herramienta conectadas a tierra. Los enchufes no modificados
y las tomas de corriente que correspondan al enchufe reducirán el riesgo de descarga
eléctrica.
b) Evite el contacto corporal con superficies conectadas a tierra, tales como tuberías,
radiadores, cocinas y refrigeradores. Existe un mayor riesgo de descarga eléctrica
cuando su cuerpo está conectado a tierra.
c) No exponga máquinas herramienta a condiciones lluviosas o húmedas. Si entra
agua a la máquina herramienta, aumentará el riesgo de descarga eléctrica.
d) No abuse del cable. Jamás transporte, arrastre o desenchufe la máquina
herramienta por el cable. Mantenga el cable alejado de fuentes de calor, aceite,
bordes afilados o piezas en movimiento. Los cables dañados o enredados aumentan
el riesgo de descarga eléctrica. Cambie o repare aquellos cables que estén dañados.
Verifique que su alargador esté en buenas condiciones. Utilice sólo alargadores de
3 hilos con enchufes de 3 patas, con conexión a tierra y tomas de corriente de 3 polos que
acepten el enchufe de la herramienta.
e) Cuando opere una máquina herramienta a la intemperie, use un alargador diseñado
para uso a la intemperie. El uso de un alargador diseñado para uso a la intemperie
reduce el riesgo de descarga eléctrica. Cuando use un alargador, asegúrese de usar uno
de un calibre suficiente como para cargar con la corriente que requerirá su producto. Un
alargador de menor calibre causará una caída en el voltaje de la línea lo que resultará
en pérdida de potencia y sobrecalentamiento. El siguiente cuadro muestra el tamaño
correcto a utilizar, dependiendo del largo del cable y el amperaje nominal. En caso
de duda, utilice el de mayor calibre. Mientras menor el número del calibre, mayor la
capacidad del cable.
Calibre mínimo para los juegos de cables
Voltios Largo total del cable en pies
120V 0-25 26-50 51-100 101-150
Capacidad nominal en amperio
3) SEGURIDAD PERSONAL
a) Manténgase alerta, fíjese en lo que está haciendo y utilice su sentido común
b) Use equipo de seguridad. Utilice siempre protección ocular. El uso de un equipo de
240V 0-50 51-100 101-200 201-300
Más No más AWG
que que
0 - 6 18 16 16 14
6 - 10 18 16 14 12
10 - 12 16 16 14 12
12 - 16 14 12 No recomendado
cuando opere una máquina herramienta. No utilice una máquina herramienta si
está cansado o bajo la influencia de drogas, alcohol o medicamentos Sólo hace falta
un momento de distracción durante la operación de máquinas herramienta para causar
lesiones corporales serias.
seguridad apropiado a las condiciones de trabajo, tal como máscaras antipolvo, calzado
de seguridad anti-derrapante, cascos o protección auditiva, reducirá la posibilidad de sufrir
lesiones corporales.
Page 5

c) Evite encender la máquina herramienta en forma accidental. Verifique que el
conmutador esté apagado antes de enchufar la máquina herramienta. El sujetar una
máquina herramienta con el dedo en el conmutador o enchufar máquinas herramienta con
el conmutador encendido se presta para que ocurran accidentes.
d) Retire toda llave de ajuste antes de encender la máquina herramienta. Si se deja
alguna llave en una pieza giratoria de la máquina herramienta, podría provocar lesiones.
e) No se sobreextienda. Manténgase siempre bien apoyado y equilibrado. Esto permite
tener un mayor control de la máquina herramienta en situaciones inesperadas.
f) Vístase debidamente. No se ponga ropa suelta o joyas. Mantenga su pelo, ropa y
guantes alejados de piezas móviles. La ropa suelta, las joyas y el pelo largo pueden
quedar atrapados en las piezas móviles. Los orificios de ventilación suelen cubrir piezas
en movimiento, por lo que también se deben evitar.
g) Si la máquina herramienta viene con al gún dispositivo de conexión para la
extracción y colección de polvo, asegúrese que este sea debidamente conectado
y utilizado. El uso de estos dispositivos puede reducir los peligros relacionados a la
generación de polvo.
4) USO Y CUIDADO DE LA MÁQUINA HERRAMIENTA
a) No fuerce la máquina herramienta. Use la máquina herramienta correcta para su
aplicación. La máquina herramienta apropiada hará un trabajo mejor y más seguro si se
usa de la forma para la cual fue diseñada.
b) No use la máquina herramienta si el conmutador no puede encenderla y apagarla.
Cualquier máquina herramienta que no pueda ser controlada con el conmutador es
peligrosa y debe ser reparada.
c) Desenchufe la máquina herramienta de la toma de corriente y/o de la unidad de
alimentación antes de ajustarla, cambiar de accesorio o guardarla. Estas medidas
de seguridad preventiva reducen el riesgo de poner en marcha la máquina herramienta
accidentalmente.
d) Guarde su máquina herramienta fuera del alcance de niños cuando no la esté
usando y no permita que personas que no estén familiarizadas con la máquina
herramienta o estas instrucciones la usen. Las máquinas herramienta son peligrosas
en manos de personas no capacitadas.
e) Mantenga su máquina herramienta. Revise la máquina herramienta para verificar
que no esté mal alineada, que sus piezas móviles no estén trabadas o rotas y que no
exista otra condición que pudiera afectar su operación. Si está dañada, haga reparar
la máquina herramienta antes de utilizarla. Muchos accidentes son causados por usar
máquinas herramienta que no han sido bien mantenidas.
f) Mantenga máquinas herramienta que son usadas para cortar afiladas y limpias. Las
máquinas herramienta de corte debidamente mantenidas y afiladas tienen menos probabilidades de trabarse y son más fáciles de controlar.
g) Use la máquina herramienta, sus accesorios, etc., en cumplimiento con estas
instrucciones y en la manera para la cual la máquina herramienta fue diseñada,
tomando en cuenta las condiciones de trabajo y el trabajo a realizar. El uso de una
máquina herramienta para operaciones fuera de aquellas para las que fue diseñada
podría resultar en una situación peligrosa.
5) SERVICIO
a) Haga reparar su máquina herramienta por un técnico de reparación calificado,
utilizando sólo repuestos originales. Esto garantizará la seguridad de la máquina
herramienta.
Instrucciones de seguridad adicionales específicas
para recortadoras
• Sostenga la herramienta por las superficies de agarre aisladas cuando realice
una operación en que las herramientas de corte puedan tocar cables eléctricos
escondidos o su propio cable. El contacto con un cable con corriente eléctrica hará que las
partes expuestas de la herramienta tengan corriente y que el operador reciba una descarga
eléctrica.
• Corte el material a la capacidad nominal o por debajo de ésta. Recuerde que el grosor
del material incrementa a medida que disminuye el número de calibre (el calibre 14 es
más grueso que el calibre 16). El grosor del calibre 14 es de 1,9 mm (0,075"); el calibre
16 es 1,5 mm (0,060").
• NUNCA se ubique de modo que alguna parte del cuerpo esté cerca de las hojas. Puede
causar lesiones personales graves.
• Mantenga las manos lejos de las zonas de corte. Un momento de descuido mientras se
opera una herramienta eléctrica podría provocar daños personales graves.
• SIEMPRE utilice guantes de protección cuando maneje láminas de metal. Los bordes son
filosos y pueden producir lesiones personales graves.
• Sujete con firmeza la pieza de metal que desee cortar para evitar movimientos durante el
corte.
• SIEMPRE encienda la herramienta antes de tocar el material que se va a cortar.
• Siempre use calzado de seguridad para proteger sus pies de los desechos de metal
afilado en el piso.
• NO use la recortadora con ningún accesorio ni dispositivo.
• Mantenga ajustados todos los tornillos. Revise el ajuste de la herramienta
periódicamente.
• No coloque ningún objeto en las aberturas del alojamiento del motor.
• Limpie su herramienta con frecuencia, especialmente después de un uso intensivo.
A menudo se acumulan sobre las superficies interiores polvo y suciedad que contienen
partículas metálicas, que pueden provocar riesgo de descarga eléctrica.
• Manténgase alejado de las piezas que puedan caerse después de realizar cortes. El
contacto con un borde filoso puede provocar lesiones personales.
• Mantenga siempre el cable eléctrico lejos del borde del material que va a cortar. Los
bordes filosos pueden cortar el aislamiento del cable. Esta situación podría provocar un
riesgo de descarga eléctrica.
ADVERTENCIA: Use SIEMPRE Lentes de seguridad. Los anteojos de uso diario NO
son lentes de seguridad. Utilice también máscaras faciales o para polvo si el corte produce
polvillo. UTILICE SIEMPRE EQUIPOS DE SEGURIDAD CERTIFICADOS:
• protección para los ojos ANSI Z87.1(CAN/CSA Z94.3),
• protección auditiva ANSI S12.6 (S3.19),
• protección respiratoria según las normas NIOSH/OSHA/MSHA..
ADVERTENCIA: Durante el uso, use siempre protección auditiva adecuada que cumpla
con la norma ANSI S12.6 (S3.19). Bajo ciertas circunstancias y según el período de uso, el
ruido producido por este producto puede contribuir a la pérdida de audición.
ADVERTENCIA: Utilice siempre protección para los ojos. Todos los usuarios y
espectadores deben utilizar protección para los ojos conforme con las normas ANSI Z87.1.
ADVERTENCIA: Algunas partículas originadas al lijar, aserrar, amolar, taladrar y realizar
otras actividades de construcción contienen productos químicos que producen cáncer,
defectos de nacimiento y otros problemas reproductivos. Algunos ejemplos de estos productos
químicos son:
• el plomo de las pinturas de base plomo,
• la sílice cristalina de ladrillos, cemento y otros productos de mampostería, y
• el arsénico y el cromo de la madera con tratamiento químico.
El riesgo derivado de estas exposiciones varía según la frecuencia con la que se realice este
tipo de trabajo. Para reducir la exposición a estos productos químicos, se recomienda trabajar
en áreas bien ventiladas y usar equipos de seguridad aprobados, como las máscaras para
polvo especialmente diseñadas para filtrar las partículas microscópicas.
• Evite el contacto prolongado con las partículas de polvo originadas al lijar, aserrar,
esmerilar, taladrar y realizar demás actividades de la construcción. Use indumentaria
protectora y lave las áreas expuestas con agua y jabón. Evite que el polvo entre en la
boca y en los ojos o se deposite en la piel, para impedir la absorción de productos químicos
nocivos.
ADVERTENCIA: El uso de esta herramienta puede generar o dispersar partículas de polvo,
que pueden causar lesiones respiratorias permanentes y graves u otras lesiones. Use siempre
protección respiratoria apropiada para la exposición al polvo aprobada por el Instituto Nacional
de Salud y Seguridad Ocupacional de EE.UU. y la Administración de Salud y Seguridad
Ocupacional de EE.UU. (NIOSH y OSHA respectivamente, por sus siglas en inglés). Aleje la
cara y el cuerpo del contacto con las partículas.
• La etiqueta de su herramienta puede incluir los siguientes símbolos. Los símbolos y sus
definiciones son los siguientes:
V .................. voltios A ................. amperios
Hz ................ hertz W ................ vatios
min .............. minutos
...........corriente directa
................Construcción Clase I ................ terminal a tierra
.................... (con conexión a tierra)
................ Construcción Clase II …/min ......... revoluciones o reciprocidad
.................... (con aislamiento doble) .................... por minuto
BPM ............ golpes por minuto
............... corriente alterna
n
o ................ velocidad sin carga
................ símbolo de alerta de seguridad
CONSERVE LAS INSTRUCCIONES
Motor
Su herramienta DEWALT está alimentada por un motor DEWALT. Asegúrese de que la fuente de
energía concuerde con lo que se indica en la placa.
Un descenso en el voltaje de más del 10% producirá una pérdida de potencia y
sobrecalentamiento. TODAS LAS HERRAMIENTAS D
esta herramienta no funciona, verifique el suministro eléctrico.
EWALT son probadas en fábrica; si
COMPONENTS (Fig. 1)
ADVERTENCIA: Nunca modifique la herramienta eléctrica ni ninguna pieza de ésta. Podría
ocasionar un daño o una lesión personal.
A. Cabezal
B. Punzón
C. Anillo de la cubierta
D. Troquel
E. Alojamiento
F. Interruptor de paleta
G. Botón de bloqueo del interruptor
H. Tornillo de sujeción
USO PREVISTO
La recortadora DW898 calibre 14 ha sido diseñada para realizar cortes profesionales en
diferentes áreas de trabajo (por ejemplo, sitios de construcción). NO use la herramienta en
condiciones de humedad o en presencia de gases o líquidos inflamables.
Las recortadoras calibre 14 son herramientas eléctricas profesionales. NO permita que los
niños tengan contacto con la herramienta. Se debe supervisar a los operadores inexpertos que
utilizan esta herramienta.
Interruptores (Fig. 1)
Para encender la herramienta, oprima el interruptor de paleta (F). Para apagarla, suelte el
interruptor. El interruptor de paleta puede bloquearse si mantiene presionado el interruptor de
paleta y, simultáneamente, pulsa el botón de bloqueo (G) ubicado cerca de la parte posterior
de la herramienta. Asegúrese siempre de que la herramienta no esté bloqueada en la posición
de encendido antes de enchufarla. Para apagar la herramienta mientras esté bloqueada en la
posición de encendido, oprima y libere el interruptor de paleta una vez.
FUNCIONAMIENTO (Figs. 2, 3)
ADVERTENCIA: Para reducir el riesgo de lesiones personales graves, apague la
herramienta y desconéctela de la fuente de alimentación antes de realizar ajustes o de
retirar o instalar cualquier dispositivo o accesorio.
Lubrique la superficie del material con aceite. La recortadora está diseñada para cortar metal
plano y corrugado hueco.
NOTA: El punzón y el troquel deben lubricarse. Para ello, sumérjalos en aceite de corte de
buena calidad aproximadamente cada 9,2 m (30 pies) de corte.
La herramienta se despacha de fábrica con el punzón (B) orientado hacia adelante para cortar
material plano y corrugado hueco.
El cabezal (A) puede alinearse en tres posiciones: izquierda, avance y derecha (Consulte
la Fig. 2). Para girar el cabezal (A), afloje el tornillo de sujeción (H). Gire el cabezal en la
dirección deseada.
NOTA: No gire el cabezal en un círculo completo, ya que esto modificará la posición del punzón
en el troquel.
Rote la cubierta (E) en el cabezal (A) y gire el tornillo de sujeción (H) hasta que sienta que
éste calza en una cavidad de la zapata. Apriete firmemente el tornillo de sujeción. Revise
periódicamente el ajuste de este tornillo.
El cabezal de la recortadora (A) está diseñado para caber en un orificio de 19 mm (3/4") con
el fin de poder comenzar un corte en la mitad del trabajo. Los recortes pueden realizarse en
cualquier dirección desde este orificio. La parte frontal del alojamiento proporciona un indicador
del ancho del punzón para permitir que los usuarios sigan una línea con precisión (Fig. 3).
La parte inferior del alojamiento tiene una guía de plantilla de 13 mm (0,51") de diámetro (L)
que posibilita el uso de plantillas. Consulte las Figuras 2 y 3 para la superficie de la guía de la
plantilla. La plantilla debe tener un grosor tal que, sumado al grosor de la pieza de trabajo, sea
de 5 a 6,5 mm (13/64" a 1/4"). La forma de la plantilla debe estar a 2,5 mm (0,1") de distancia
de la forma que debe recortarse. La herramienta debe guiarse de modo que el diámetro
exterior (13 mm o 0,51") del alojamiento siempre se apoye sobre la plantilla.
Cambio de punzones (Fig. 2)
Nunca corte con un punzón o troquel desafilado o redondeado. Los punzones pueden afilarse
hasta alcanzar una longitud de 69 mm (2,72"). Los punzones más cortos no pueden recibir
mantenimiento. Para retirar el punzón (B), afloje el tornillo de sujeción del cabezal (H) dándole
aproximadamente 4 a 5 vueltas (Consulte la Fig. 2). Deslice el alojamiento (E) del cabezal (A).
Desatornille el punzón (B) del buje de la varilla de conexión (J). El punzón puede volver a afilarse
con cuidado en una esmeriladora de banco con un disco de grano fino. Tenga cuidado de que
el punzón no esté más corto que la longitud mínima. Los punzones más cortos no se calzarán
en el troquel lo suficiente y deben reemplazarse. La cara esmerilada debe estar en posición perpendicular al eje del punzón. Después de esmerilar, lime con cuidado los bordes esmerilados
para retirar las rebabas. No redondee las esquinas.
Reensamblaje del cabezal de la recortadora (Fig. 2)
Atornille el punzón (B) por completo en el buje de la varilla de conexión (J). Deslice el alojamiento (E) sobre el extremo del punzón y hacia dentro del cabezal. Gire el alojamiento (E) a la
orientación de corte deseada. Apriete el tornillo de sujeción (H). A continuación, compruebe el
calce del punzón.
Comprobación del calce del punzón (Fig. 2)
Dado que la longitud del punzón (B) ahora se ha modificado, es probable que se deba ajustar
el calce del punzón. Compruebe el calce del punzón; para ello, coloque un destornillador de
hoja plana en la ranura del eje del árbol de levas (I) y gire el eje. (Consulte la Fig. 2). El punzón
debe introducirse entre 0,5 y 1,1 mm (0,020” y 0,06”) en el troquel en la posición de carrera
completamente hacia abajo. Introducir demasiado el punzón en el troquel provocará la pérdida
de capacidad (la parte inferior del punzón no permitirá un espacio suficiente del troquel en la
carrera hacia arriba).
Ajuste del calce del punzón (Fig. 2)
Si se debe ajustar el calce del punzón, afloje el tornillo de sujeción (H) y gire la zapata en el
sentido de las agujas del reloj (el punzón se introducirá aún más en el troquel) o en el sentido
contrario (el punzón saldrá del troquel). Apriete firmemente el tornillo de sujeción. Gire el eje
del árbol de levas (I) con un destornillador en la ranura para comprobar el calce del punzón (el
punzón se moverá completamente hacia abajo). Repita según sea necesario.
Reemplazo del troquel (Fig. 2)
Si el troquel (D) se redondea, reemplácelo. Reemplace el troquel anterior empujando el anillo
de la cubierta (C) hacia arriba y afuera de la ranura del troquel. Retire la clavija de retención
localizada debajo del anillo de la cubierta con un punzón de desplazamiento. Empuje el troquel
Page 6

hacia afuera del eje portador (K). Instale un nuevo troquel (D) en el eje portador (K). Alinee el
orificio transversal del troquel con la ranura del eje portador. Instale la clavija. Calce el anillo de
la cubierta (C) sobre el troquel en la ranura suministrada.
MANTENIMIENTO
ADVERTENCIA: Para reducir el riesgo de lesiones personales graves, apague la
herramienta y desconéctela de la fuente de alimentación antes de instalar y retirar
accesorios, antes de realizar ajustes o al realizar reparaciones.
• Verifique que el punzón y el troquel estén afilados. Si ambos o alguno de los dos están
desafilados, afílelos o reemplácelos.
• Sumerja periódicamente la zapata en aceite.
• Ésta es una herramienta de precisión. Úsela con cuidado y guárdela en un lugar
protegido.
Limpieza
ADVERTENCIA: Sople la suciedad y el polvo de todos los conductos de ventilación con aire
seco al menos una vez por semana. Use la adecuada protección para los ojos ANSI Z87.1
(CAN/CSA Z94.3) y la adecuada protección respiratoria NIOSH/OSHA/MSHA cuando realice
esta operación.
ADVERTENCIA: nunca utilice disolventes u otros químicos abrasivos para limpiar las piezas
no metálicas de la herramienta. Estos productos químicos pueden debilitar los materiales plásticos utilizados en estas piezas. Utilice un paño humedecido sólo con agua y jabón neutro. Nunca
permita que penetre líquido dentro de la herramienta ni sumerja ninguna de las piezas en
un líquido.
Lubricación
Las herramientas que se emplean constantemente en trabajos pesados o de producción, o
aquellas que se exponen al calor, requieren de lubricación más frecuente. Las herramientas que
se dejan “fuera de servicio” por periodos prolongados deben lubricarse antes de devolverlas al
trabajo.
Accesorios
ADVERTENCIA: Debido a que no se han probado con este producto otros accesorios que
no sean los que ofrece D
EWALT, el uso de dichos accesorios con esta herramienta podría ser
peligroso. Para reducir el riesgo de lesiones, con este producto deben usarse sólo los accesorios
recomendados por D
EWALT.
Los accesorios que se recomiendan para la herramienta están disponibles para la compra en su
distribuidor local o en el centro de mantenimiento autorizado. Si necesita ayuda para localizar algún
accesorio para su herramienta, comuníquese con D
EWALT Industrial Tool Co., 701 East Joppa
Road, Baltimore, MD 21286, llame al 1-800-4-DEWALT (1-800-433-9258) o visite nuestro sitio Web
www.dewalt.com.
Reparaciones
Para asegurar la SEGURIDAD y la CONFIABILIDAD del producto, las reparaciones, el mantenimiento y los ajustes (incluyendo revisión y cambio de los carbones) deben ser realizados por
un centro de servicio de fábrica D
EWALT, un centro de servicio autorizado DEWALT u otro
personal de mantenimiento calificado. Utilice siempre piezas de repuesto idénticas.
PARA REPARACIÓN Y SERVICIO DE SUS HERRAMIENTAS ELÉCTRICAS, FAVOR DE
DIRIGIRSE AL CENTRO DE SERVICIO MÁS CERCANO
CULIACAN, SIN
Av. Nicolás Bravo #1063 Sur - Col. Industrial Bravo (667) 7 12 42 11
GUADALAJARA, JAL
Av. La Paz #1779 - Col. Americana Sector Juárez (33) 3825 6978
MEXICO, D.F.
Eje Central Lázaro Cárdenas No. 18
Local D, Col. Obrera (55) 5588 9377
MERIDA, YUC
Calle 63 #459-A - Col. Centro (999) 928 5038
MONTERREY, N.L.
Av. Francisco I. Madero No.831 - Col. Centro (81) 8375 2313
PUEBLA, PUE
17 Norte #205 - Col. Centro (222) 246 3714
QUERETARO, QRO
Av. Madero 139 Pte. - Col. Centro (442) 214 1660
SAN LUIS POTOSI, SLP
Av. Universidad 1525 - Col. San Luis (444) 814 2383
TORREON, COAH
Blvd. Independencia, 96 Pte. - Col. Centro (871) 716 5265
VERACRUZ, VER
Prolongación Díaz Mirón #4280 - Col. Remes (229) 921 7016
VILLAHERMOSA, TAB
Constitución 516-A - Col. Centro (993) 312 5111
PARA OTRAS LOCALIDADES LLAME AL: (55) 5326 7100
Póliza de Garantía
IDENTIFICACIÓN DEL PRODUCTO:
Sello o firma del Distribuidor.
Nombre del producto: ____________________ Mod./Cat.: ___________________________
Marca: ____________________________ Núm. de serie:___________________________
(Datos para ser llenados por el distribuidor)
Fecha de compra y/o entrega del producto: _______________________________________
Nombre y domicilio del distribuidor donde se adquirió el producto:
_________________________________________________________________________
Este producto está garantizado por un año a partir de la fecha de entrega, contra cualquier
defecto en su funcionamiento, así como en materiales y mano de obra empleados para su fabricación. Nuestra garantía incluye la reparación o reposición del producto y/o componentes sin
cargo alguno para el cliente, incluyendo mano de obra, así como los gastos de transportación
razonablemente erogados derivados del cumplimiento de este certificado.
Para hacer efectiva esta garantía deberá presentar su herramienta y esta póliza sellada por
el establecimiento comercial donde se adquirió el producto, de no contar con ésta, bastará la
factura de compra.
EXCEPCIONES.
Esta garantía no será válida en los siguientes casos:
• Cuando el producto se hubiese utilizado en condiciones distintas a las normales;
• Cuando el producto no hubiese sido operado de acuerdo con el instructivo de uso que se
acompaña;
• Cuando el producto hubiese sido alterado o reparado por personas distintas a las enlistadas al final de este certificado.
Anexo encontrará una relación de sucursales de servicio de fábrica, centros de servicio autorizados y franquiciados en la República Mexicana, donde podrá hacer efectiva su garantía y
adquirir partes, refacciones y accesorios originales.
Garantía limitada de tres años
DEWALT reparará sin cargo cualquier defecto ocasionado por materiales defectuosos o mano
de obra, durante tres años a partir de la fecha de compra. Esta garantía no cubre fallas en las
piezas que resulten del desgaste normal de la herramienta o de su utilización inadecuada. Para
obtener información detallada sobre la cobertura de la garantía y sobre reparaciones, visite
nuestra página Web www.dewalt.com o llame al 1-800-4-D
garantía no se extiende a los accesorios o a los daños causados por terceros al intentar realizar
reparaciones. Esta garantía le concede derechos legales específicos; usted goza también de
otros derechos que varían según el estado o provincia.
Además de la garantía, las herramientas D
EWALT están cubiertas por nuestro:
SERVICIO GRATUITO DE 1 AÑO
D
EWALT realizará el mantenimiento de la herramienta y reemplazará las piezas gastadas tras
el uso normal, sin costo alguno, en cualquier momento durante el primer año después de la
compra.
EWALT (1-800-433-9258). Esta
GARANTÍA DE REEMBOLSO DE DINERO DE 90 DÍAS
Si por alguna razón no estuviera plenamente satisfecho con el rendimiento de la herramienta
eléctrica, el láser o la clavadora D
EWALT, puede devolver el producto dentro de los 90 días
siguientes a la fecha de compra acompañado del recibo de compra. De esta manera, se le
reintegrará el importe total del producto sin formularle pregunta alguna.
AMÉRICA LATINA: Esta garantía no se aplica a los productos que se venden en América
Latina. Para los productos que se venden en América Latina, debe consultar la información de
la garantía específica del país que viene en el empaque, llamar a la compañía local o visitar el
sitio Web a fin de obtener esa información.
REEMPLAZO GRATUITO DE LAS ETIQUETAS DE ADVERTENCIA: si sus etiquetas de
advertencia se tornan ilegibles o faltan, llame al 1-800-4-D
EWALT para que se las reemplacen
gratuitamente.
Especificaciones DW898
Tensión de alimentación 120 V AC ~
Consumo de corriente 6,5 A
Frecuencia de operación 60 Hz
Potencia nominal 225 W
Carreras por minuto 1 950 spm
IMPORTADOR: DEWALT S.A. DE C.V.
BOSQUES DE CIDROS ACCESO RADIATAS NO. 42
COL. BOSQUES DE LAS LOMAS, 3A. SECCIÓN, CP 05120
DELEGACIÓN CUAJIMALPA, MÉXICO, D.F
Para servicio y ventas consulte
“HERRAMIENTAS ELECTRICAS”
TEL. 5 326 7100
R.F.C.: BDE810626-1W7
en la sección amarilla.
 Loading...