

Page 1
DCR017
Page 2

Dansk(oversat fra original brugsvejledning) 3
Deutsch(übersetzt von den originalanweisungen) 13
English(original instructions) 24
Español(traducido de las instrucciones originales) 34
Français(traduction de la notice d’instructions originale) 45
Italiano(tradotto dalle istruzioni originali) 56
Nederlands(vertaald vanuit de originele instructies) 67
Norsk(oversatt fra de originale instruksjonene) 78
Português(traduzido das instruções originais) 88
Suomi(käännetty alkuperäisestä käyttöohjeesta) 99
Svenska(översatt från de ursprungliga instruktionerna) 109
Türkçe(orijinal talimatlardan çevrilmiştir) 119
Ελληνικά (μετάφραση από τις πρωτότυπες οδηγίες) 130
B
Copyright DEWALT
Page 3
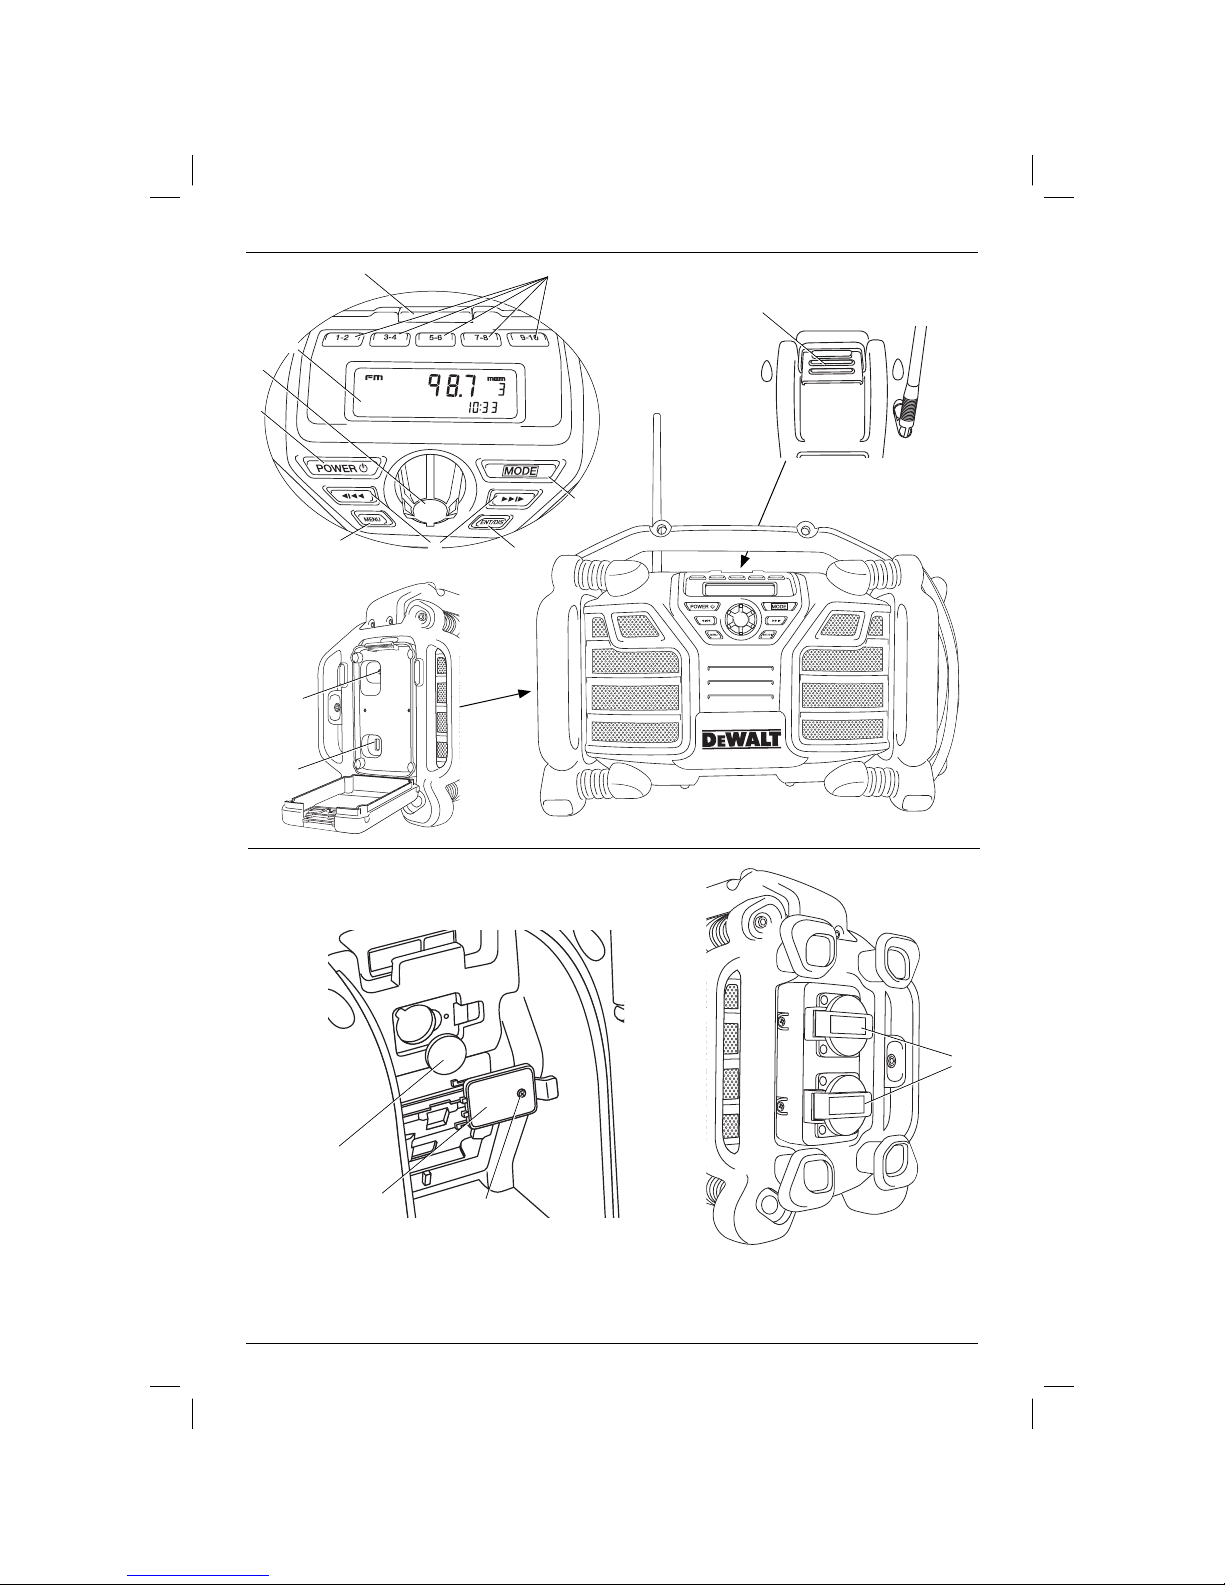
Figure 1
b
a
o
f
i
h
d
p
Figure 2
e
c
g
k
n
m
l
r
DCR017-GB
DCR017-QW
DCR017-BD
1
Page 4

Figure 3
Figure 4
s
t
j
DCR017
GB
DCR017
LX
2
DCR017
BD
DCR017
QW
Page 5
ENGLISH
CHARGER/RADIO
DCR017
Congratulations!
You have chosen a DEWALT product. Years of
experience, thorough product development and
innovation make DEWALT one of the most reliable
partners for professional power tool users.
Technical Data
DCR017
Power source AC/DC
Mains voltage VAC 230
(U.K. & Ireland only) VAC 230/110
Battery voltage VDC 10.8–18
Battery type Li-Ion
Approx. charging time min 45 –120
Charge current A 2.0
Weight kg 5.7
Fuses:
Europe 230 V 16 Amperes, mains
U.K. & Ireland 230/110 V 13 Amperes, in plugs
Battery pack DCB121 DCB123 DCB140 DCB141 DCB142 DCB180 DCB181 DCB182
Battery type Li-Ion Li-Ion Li-Ion Li-Ion Li-Ion Li-Ion Li-Ion Li-Ion
Voltage VDC 10.8 10.8 14.4 14.4 14.4 18 18 18
Capacity Ah 1.3 1.5 3.0 1.5 4.0 3.0 1.5 4.0 2.0
Weight kg 0.2 0.2 0.53 0.30 0.54 0.64 0.35 0.61 0.40
Defi nitions: Safety Guidelines
The definitions below describe the level of severity
for each signal word. Please read the manual and
pay attention to these symbols.
DANGER: Indicates an imminently
hazardous situation which, if not avoided,
will result in death or serious injury.
WARNING: Indicates a potentially
hazardous situation which, if not
avoided, could result in death or
serious injury.
CAUTION: Indicates a potentially
hazardous situation which, if not
avoided, may result in minor or
moderate injury.
NOTICE: Indicates a practice not
related to personal injury which, if
not avoided, may result in property
damage.
Denotes risk of electric shock.
Denotes risk of fire.
DCB183
Li-Ion
18
Charger DCR017
Mains voltage VAC 230V
Battery type Li-Ion
Approx. charging time min 45 60 90 120
(1.5 Ah (2.0 Ah (3.0 Ah (4.0 Ah
battery packs) battery packs) battery packs) battery packs)
Safety Instructions for
Charger/Radios
• Do not abuse cord. Never carry the charger/
radio by its cord. Never pull the cord to
disconnect from the socket. Keep the cord
away from heat, oil and sharp edges.
24
• Remove the battery pack. Switch off before
leaving it unattended. Remove the battery pack
when not in use, before changing accessories
or attachments and before servicing.
• This appliance is intended to be used in
moderate climates.
Page 6

ENGLISH
• This appliance is not intended for use by
persons(including children) with reduced
physical, sensory or mental capabilities, or lack
of experience and knowledge, unless they have
been given supervision or instruction concerning
use of the appliance by a person responsible for
their safety.
• Charger/radio shall not be exposed to dripping
or splashing; no objects filled with liquids, such
as vases, shall be placed on it.
• No exposed flame sources, such as lighted
candles, should be placed on the radio/charger.
• Mains plug is used as the disconnect device;
the disconnect device (plug) shall remain readily
operable.
Markings on Charger/Radio
The following pictograms are shown on the
charger/radio:
Read instruction manual.
Important Safety Instructions for
Charger/Radios
SAVE THESE INSTRUCTIONS: This manual
contains important safety and operating instruc tions
for the DCR017 charger/radio.
• Before using charger/radio, read all instructions
and cautionary markings on charger, battery
pack, and product using battery pack.
WARNING: Shock hazard. Do not allow
any liquid to get inside charger. Electric
shock may result.
CAUTION: Burn hazard. To reduce
the risk of injury, charge only DEWALT
rechargeable batteries. Other types of
batteries may burst causing personal
injury and damage.
CAUTION: Children should be
supervised to ensure that they do not
play with the appliance.
CAUTION: Danger of explosion if
internal battery is incorrectly replaced.
Replace only with the same or
equivalent type.
NOTICE: Under certain conditions, with
the charger plugged in to the power
supply, the exposed charging contacts
inside the charger can be shorted by
foreign material. Foreign materials of
a conductive nature such as, but not
limited to, steel wool, aluminum foil, or
any buildup of metallic particles should
be kept away from charger cavities.
Always unplug the charger from the
power supply when there is no battery
pack in the cavity. Unplug charger
before attempting to clean.
• DO NOT attempt to charge the battery pack
with any charger/radio other than the one in
this manual. The charger and battery pack are
specifically designed to work together.
• These charger/radios are not intended
for any uses other than charging D
rechargeable batteries. Any other uses
may result in risk of fire, electric shock or
electrocution.
• Do not expose charger/radio to rain or snow.
• Pull by plug rather than cord when
disconnecting charger. This will reduce risk
of damage to electric plug and cord.
• Make sure that cord is located so that it
will not be stepped on, tripped over, or
otherwise subjected to damage or stress.
• Do not use an extension cord unless it
is absolutely necessary. Use of improper
extension cord could result in risk of fire,
electric shock, or electrocution.
• Do not place any object on top of charger/
radio or place the charger/radio on a soft
surface that might block the ventilation slots
and result in excessive internal heat. Place
the charger/radio in a position away from any
heat source.
• Do not operate charger/radio with damaged
cord or plug — have them replaced
immediately.
• Do not operate charger/radio if it has
received a sharp blow, been dropped, or
otherwise damaged in any way. Take it to an
authorised service centre.
• Do not disassemble charger/radio; take it to
an authorised service centre when service or
repair is required. Incorrect reassembly may
result in a risk of electric shock, electrocution
or fire.
• Disconnect the charger from the outlet
before attempting any cleaning. This will
reduce the risk of electric shock. Removing
the battery pack will not reduce this risk.
• NEVER attempt to connect 2 chargers together.
EWALT
25
Page 7

ENGLISH
• The DCR017 charger/radio is designed
to operate on standard 230 V household
electrical power. Do not attempt to use it on
any other voltage. This does not apply to the
vehicular charger.
SAVE THESE INSTRUCTIONS
Grounding Instructions
The DCR017(230 V) charger/radio must be
grounded. In the event of malfunction or breakdown,
grounding provides a path of least resistance for
electric current to reduce the risk of electric shock.
The charger/radio is equipped with a cord having an
equipment-grounding conductor and a grounding
plug. The plug must be plugged into an appropriate
outlet that is properly installed and grounded in
accordance with all local codes and ordinances.
DANGER: Improper connection of the
equipment-grounding conductor can
result in a risk of electric shock. The
conductor with insulation having an
outer surface that is green with yellow
stripes is the equipment-grounding
conductor. If repair or replacement of
the cord or plug is necessary, do not
connect the equipment-grounding
conductor to a live terminal. Repairs
shall only be performed by a DEWALT
service agent. Do not modify the plug
provided with the charger/radio – if it will
not fit the outlet, have a proper outlet
installed by a DEWALT repair agent.
FOR GROUNDED, CORD-CONNECTED CHARGER/RADIO
RATED 16A AND LOWER AND INTENDED FOR USE ON A
NOMINAL 230 V SUPPLY CIRCUIT
The charger/radio is for use on a nominal 230 V
circuit, and has a grounding plug that looks like the
plug in the following illustration.
DCR017-LX DCR017-GBDCR017-BD, -QW
Charging Procedure (fi g.3)
1. Plug the charger into an appropriate 230V
outlet before inserting the battery pack.
2. Insert the battery pack (s) into the charger,
making sure the pack is fully seated in the
charger. The red (charging) light will blink
continuously indicating that the charging
process has started.
3. The completion of charge will be indicated by
the red light remaining ON continuously. The
pack is fully charged and may be used at this
time or left in the charger.
NOTE: To ensure maximum performance and life of
Li-Ion batteries, charge the battery pack fully before
first use.
Charging Process (Fig. 1)
Refer to the table below for the state of charge of
the battery pack.
The charge indicator light(o) will indicate the state of
charge of the battery pack, when a battery is being
charged.
State of charge Light indicator pattern
charging –– –– –– ––
fully charged –––––––––––––––––
hot/cold pack delay –– • –– • –– • –– •
x problem pack or charger • • • • • • • • • • • •
This charger will not charge a faulty battery pack.
The charger will indicate faulty battery by refusing to
light or by displaying problem pack or charger blink
pattern.
NOTE: This could also mean a problem with a
charger.
If the charger indicates a problem, take the charger
and battery pack to be tested at an authorised
service centre.
Chargers
The DCR017 charger/radio accepts 10.8–18 V
Li-Ion batteries.
This radio/charger requires no adjustment and is
designed to be as easy as possible to operate.
26
Hot/Cold Pack Delay
When the charger detects a battery that is too hot
or too cold, it automatically starts a hot/cold pack
delay, suspending charging until the battery has
reached an appropriate temperature. The charger
then automatically switches to the pack charging
mode. This feature ensures maximum battery life.
XR Li-Ion tools are designed with an Electronic
Protection System that will protect the battery
against overloading, overheating or deep discharge.
Page 8

ENGLISH
The tool will automatically turn off if the Electronic
Protection System engages. If this occurs, place the
Li-Ion battery on the charger until it is fully charged.
A cold battery pack will charge at about half the rate
of a warm battery pack. The battery pack will charge
at that slower rate throughout the entire charging
cycle and will not return to maximum charge rate
even if the battery warms.
Important Safety Instructions for All
Battery Packs
When ordering replacement battery packs, be sure
to include the catalog number and voltage.
The battery pack is not fully charged out of the
carton. Before using the battery pack and charger,
read the safety instructions below and then follow
the charging procedures outlined.
READ ALL INSTRUCTIONS
• Do not charge or use the battery pack
in explosive atmospheres, such as in the
presence of flammable liquids, gases or
dust. Inserting or removing the battery pack
from the charger may ignite the dust or fumes.
• Never force the battery pack into charger.
Do not modify the battery pack in any way
to fit into a non-compatible charger as
battery pack may rupture causing serious
personal injury.
• Charge the battery packs only in designated
DEWALT chargers.
• DO NOT splash or immerse in water or other
liquids.
• Do not store or use the tool and battery
pack in locations where the temperature
may reach or exceed 40˚C(105˚F)(such as
outside sheds or metal buildings in summer).
• Batteries shall not be exposed to excessive heat
such as sunshine, fire or the like.
• For best results, make sure the battery pack is
fully charged before use.
WARNING: Never attempt to open
the battery pack for any reason. If
the battery pack case is cracked or
damaged, do not insert it into the
charger. Do not crush, drop or damage
battery pack. Do not use a battery
pack or charger that has received a
sharp blow, been dropped, run over
or damaged in any way(e.g., pierced
with a nail, hit with a hammer, stepped
on). Electric shock or electrocution may
result. Damaged battery packs should
be returned to the service centre for
recycling.
CAUTION: When not in use, place
SPECIFIC SAFETY INSTRUCTIONS FOR LITHIUM ION
(Li-Ion)
• Do not incinerate the battery pack even
• If battery contents come into contact with
• Contents of opened battery cells may
tool on its side on a stable surface
where it will not cause a tripping or
falling hazard. Some tools with large
battery packs will stand upright on the
battery pack but may be easily knocked
over.
if it is severely damaged or is completely
worn out. The battery pack can explode in a
fire. Toxic fumes and materials are created when
lithium ion battery packs are burned.
the skin, immediately wash the area with
mild soap and water. If the battery liquid gets
into the eye, rinse water over the open eye for
15 minutes or until irritation ceases. If medical
attention is needed, the battery electrolyte
is composed of a mixture of liquid organic
carbonates and lithium salts.
cause respiratory irritation. Provide fresh air.
If symptoms persists, seek medical attention.
WARNING: Burn hazard. Battery liquid
may be flammable if exposed to spark
or flame.
Battery Pack
BATTERY TYPE
The DCR017 operates on 10.8 volt, 14.4 volt and
18volt XR Li-Ion battery packs.
The DCB121, DCB123, DCB140, DCB141,
DCB142, DCB180, DCB181, DCB182 and DCB183
battery packs may be used. Refer to Technical
Data for more information.
Storage Recommendations
1. The best storage place is one that is cool and
dry away from direct sunlight and excess heat
or cold. For optimum battery performance and
life, store battery packs at room temperature
when not in use.
2. For long storage, it is recommended to store a
fully charged battery pack in a cool, dry place
out of the charger for optimal results.
NOTE: Battery packs should not be stored
completely depleted of charge. The battery pack will
need to be recharged before use.
27
Page 9

ENGLISH
Labels on Charger and Battery Pack
In addition to the pictographs used in this manual,
the labels on the charger and the battery pack show
the following pictographs:
Read instruction manual before use.
Charging.
Fully charged.
Hot/cold pack delay.
Problem pack or charger.
x
Do not probe with conductive objects.
Do not charge damaged battery packs.
Use only with DEWALT battery packs.
Others may burst, causing personal injury
CR017
and damage.
Do not expose to water.
Have defective cords replaced
immediately.
Charge only between 4°C and 40°C.
Discard the battery pack with due care for
the environment.
Do not incinerate the battery pack.
Charges Li-Ion battery packs.
See Technical Data for charging time.
Package Contents
The package contains:
1 Charger/radio
1 Instruction manual
1 Exploded drawing
• Check for damage to the radio, parts or
accessories which may have occurred during
transport.
• Take the time to thoroughly read and
understand this manual prior to operation.
Description(fi g.1–3)
WARNING: Never modify the radio or
any part of it. Damage or personal injury
could result.
a. Power button
b. Volume dial
c. Arrow buttons
d. Mode button
e. Menu button
f. Memory buttons
g. Enter/Display button
h. LCD display
i. Battery compartment latch
j. Battery receptacle
k. Auxiliary port
l. Coin cell battery door
m. Coin cell battery
n. Outlets
o. Charging light
p. USB power output port
Electrical Safety
Always check that the battery pack voltage
corresponds to the voltage on the rating plate.
Also make sure that the voltage of your charger
corresponds to that of your mains.
WARNING: Risk of electric shock. Use
in dry locations only.
If the supply cord is damaged, it must be replaced
by a specially prepared cord available through the
DEWALT service organisation.
28
Page 10

ENGLISH
Mains Plug Replacement
(U.K. & Ireland Only)
If a new mains plug needs to be fitted:
• Safely dispose of the old plug.
• Connect the brown lead to the live terminal in
the plug.
• Connect the blue lead to the neutral terminal.
Follow the fitting instructions supplied with good
quality plugs. Recommended fuse: 13 A.
WARNING: No connection is to be
made to the earth terminal.
Using an Extension Cable
If an extension cable is required, use an approved
3–core extension cable suitable for the power input
of this tool (see Technical Data).The minimum
conductor size is 1.5 mm2; the maximum length
is 30 m.
When using a cable reel, always unwind the cable
completely.
ASSEMBLY AND ADJUSTMENTS
Inserting a Battery Pack(fi g.1, 3)
WARNING: Use only DEWALT battery
NOTE: Make sure your battery pack is fully charged.
If the battery pack does not produce sufficient
power, charge the battery pack following the
instructions in the manual of the charger.
NOTE: To ensure maximum performance and life of
Li-Ion batteries, charge the battery for a minimum of
10 hours before first use.
1. Release the latch(i) to open the battery
2. Insert the battery pack(s) into the receptacle(j)
3. Close and latch the battery compartment cover.
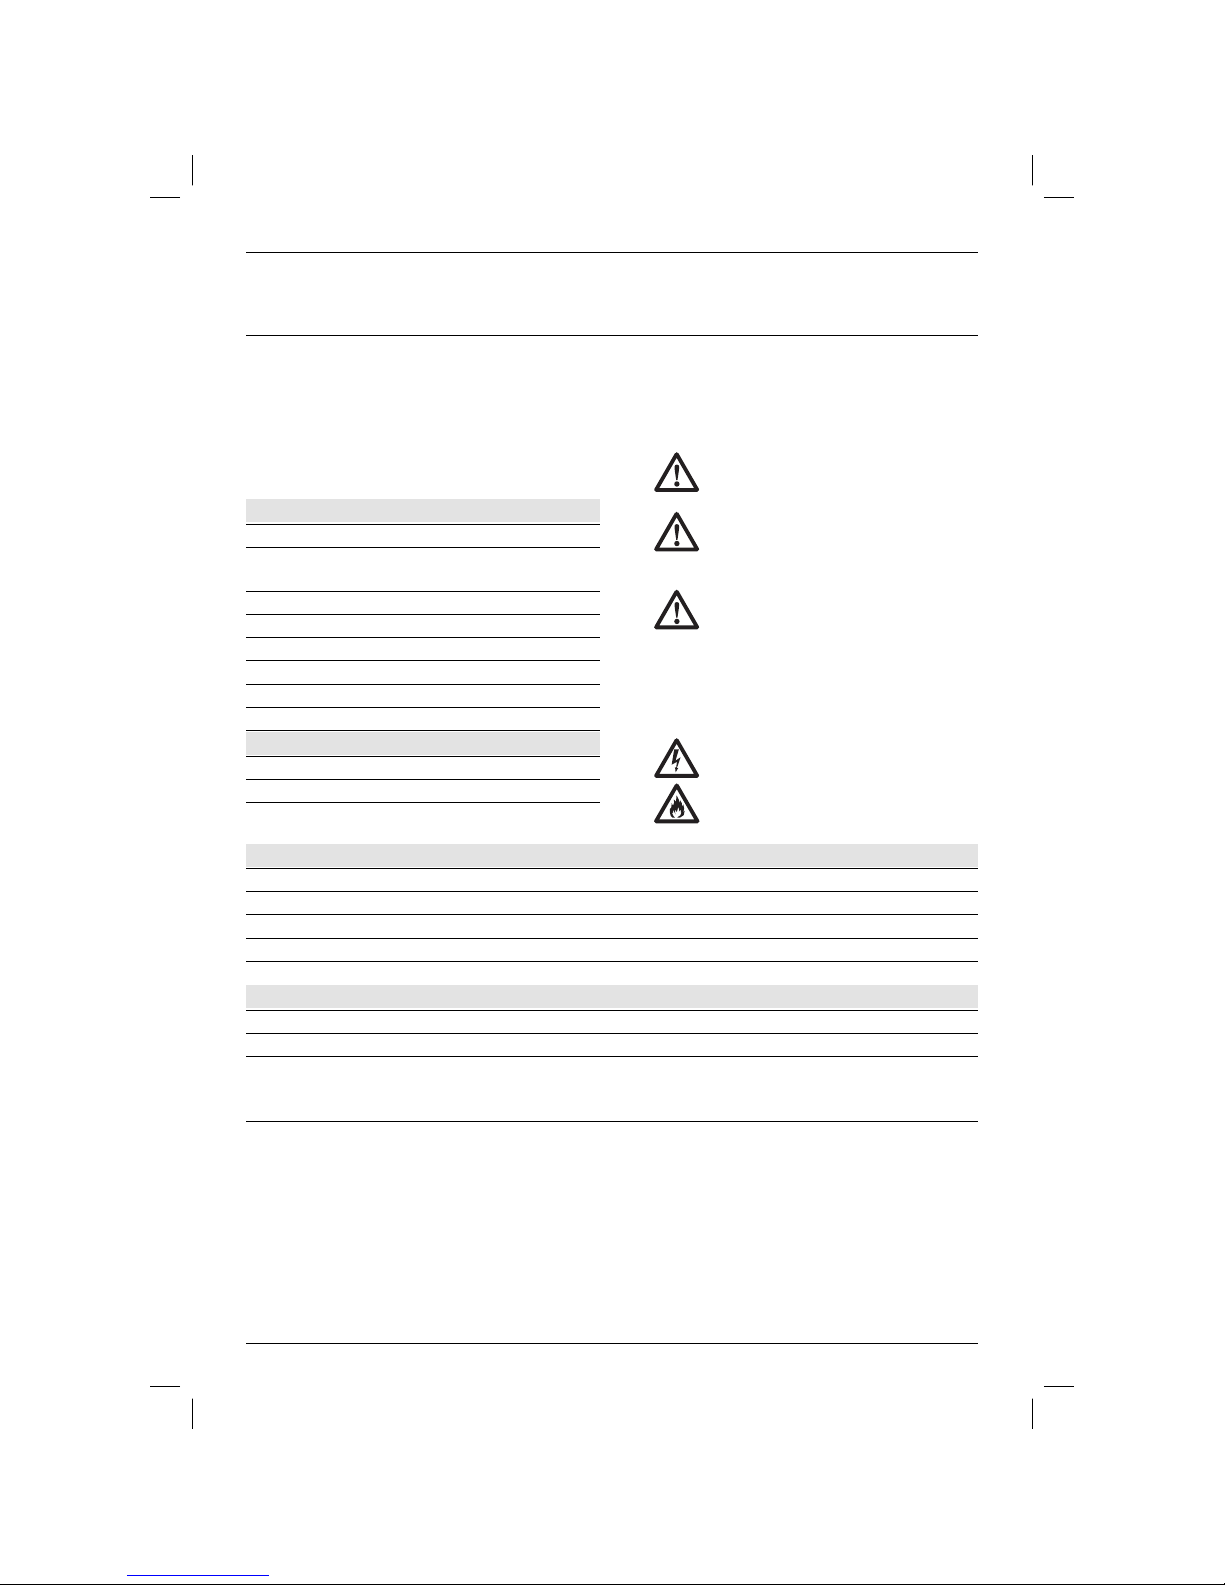
FUEL GAUGE BATTERY PACKS(FIG. 3)
Some DEWALT battery packs include a fuel gauge
which consists of three green LED lights that
indicate the level of charge remaining in the battery
pack.
To actuate the fuel gauge, press and hold the fuel
gauge button(t). A combination of the three green
LED lights will illuminate designating the level of
charge left. When the level of charge in the battery
is below the usable limit, the fuel gauge will not
illuminate and the battery will need to be recharged.
packs and chargers.
compartment cover.
until it is fully seated.
NOTE: The fuel gauge is only an indication of the
charge left on the battery pack. It does not indicate
tool functionality and is subject to variation based
on product components, temperature and end-user
application.
To Install the Coin Cell Battery
(fi g.1, 2)
WARNING: When replacing battery,
replace it with the same brand and type.
Observe correct polarity(+ and –) when
replacing batteries. Do not store or
carry batteries so that metal objects can
contact exposed battery terminals.
Your radio is equipped with memory capacity in
order to store the time and your selected memory
channels. When the radio is OFF, this memory
capacity is powered by one coin cell battery that is
included with the radio.
1. Turn the charger/radio off and unplug from the
power source.
2. Open the battery compartment by lifting the
battery compartment latch(i).
3. Unscrew the screw(r) on the battery door(l).
4. Press down on the battery door latch and pull
to open.
5. Install the coin cell battery(m) according to the
diagram inside the coin cell battery area.
6. Replace the battery door, insert screw and
tighten.
7. Securely close the battery compartment.
NOTE: To reset the LCD display, clock and presets,
remove the coin cell battery and re-install it. Follow
this procedure if the screen seems to lock in place.
OPERATION
Instructions for Use
WARNING: Always observe the safety
instructions and applicable regulations.
WARNING: Do not place the charger/
radio in locations where it may be
exposed to dripping or splashing.
AC Operation(fi g.4)
Unwrap power cord and plug into 110 or 230 V AC
wall outlet.
29
Page 11

ENGLISH
Operating the Radio(fi g.1)
POWER/VOLUME ADJUSTMENT
1. To turn the radio on, press the power button(a).
NOTE: When the radio is first used it will enter
DAB mode and automatically scan for stations.
It will then set the time and start playing the first
station it finds. If there is no time signal available
please refer to Programming The Clock to
manually set the time.
2. Turn the dial(b) clockwise to increase the
volume. To decrease the volume, turn anticlockwise.
MODE SELECTION
To choose one of the mode functions(DAB, FM,
or AUX) push the mode button(d) until the desired
function is found. For example, if the radio is on
DAB, seen in upper left portion of LCD display(h),
push the mode button twice to change to AUX.
DAB MODE - TUNING
When the unit is first switched on in DAB/DAB+
mode the radio will auto scan to find broadcast
stations in the local area.
Use the left or right arrow buttons(c) to scroll
through the stations.
NOTE: When moving locations or if reception was
poor in the original scan(possible if the antenna was
not up), this may result in an empty or incomplete list
of available stations. Manually running an Auto Scan
will find all available broadcast stations.
To Perform an Auto Scan:
1. Press the menu button(e), scroll through the
options by pressing the right arrow button(c)
until you reach Auto Scan and select this option
by pressing the Enter/Display button(g).
2. Press the right arrow button to select the Yes
option.
3. Press the Enter/Display button(g) to perform
the Auto Scan.
Once Auto Scan is complete the radio will play the
first station it finds.
To use presets please reference To Program the
Memory Buttons.
DAB MODE – STATION PRUNE
Some stations once received by your radio which
are no longer available may display with a ? after the
station name.
To remove these stations from the station list, use
the Prune function:
30
1. Press Menu(e) and scroll right to the Prune
option.
2. Press Enter/Display(g) to select.
3. Scroll right to the Yes option, then press the
Enter/Display(g) button to prune stations.
DAB MODE – DYNAMIC RANGE COMPRESSION(DRC)
This function reduces the difference between
the loudest and quietest audio being broadcast.
Effectively, this makes quiet sounds comparatively
louder, and loud sounds comparatively quieter.
The following options are available:
• 0 - broadcast DRC will be ignored
• 1/2 - sets DRC at half the level transmitted
• 1 - uses the DRC level transmitted
• 2 - doubles the DRC level transmitted
NOTE: DRC only works if it is enabled by the
broadcaster.
FM/AM MODE – TUNING
To Tune: Push the right arrow to move the tuner up
the frequency band, push the left arrow to move the
tuner down the frequency band.
To Seek: Press and hold the right arrow button(c)
once and release. The tuner frequency will increase
to seek the first radio station with acceptable clarity
and stop at that station. The right arrow button may
be pressed again to continue seeking a radio station
at higher frequencies. The left arrow button may be
pressed to seek radio stations at lower frequencies.
The seek function is available in AM and FM modes.
PROGRAMMING THE MEMORY BUTTONS
Ten DAB and ten FM radio stations may be
independently set. After programming the buttons,
pressing 1, 2, 3, 4 or 5 will instantly change the
frequency to the preset station.
1. Set the radio to desired station(see Tuning).
2. Press and hold one of the desired memory
buttons(f) until the preset number begins
flashing in the LCD display(h). Release the
button and wait for the preset display to stop
flashing.
3. Each memory button can store two preset
stations. To store a second preset repeat
step1.
4. Press and hold one of the desired memory
buttons(f) until the preset number begins
flashing in the LCD display(h). Press the preset
button a second time so that the next preset
number displays. Release the button and wait
for the preset display to stop flashing.
Page 12

ENGLISH
PROGRAMMING THE CLOCK
The time and date can be updated manually or
automatically synchronised with national time signals
broadcast over DAB(where available).
To Synchronise the Clock Automatically:
(DAB mode ONLY)
NOTE: When the radio is first used it will enter DAB
mode and automatically scan for stations.
1. Press the Menu button(e).
2. Use the arrow buttons(c) to scroll to Clock
Adjust and press the Enter/Display button(g).
3. Scroll to Sync Time Now press the Enter/
Display button to select. This automatically
synchronises clock with national time signals.
To Adjust the Clock Manually:
(FM and DAB mode)
1. Press the Menu button(e).
2. Use the arrow buttons(c) to scroll to Clock
Adjust on the LCD display and press the Enter/
Display button(g).
3. Scroll to Date & Time and press the Enter/
Display button(g).
4. Set the date and time using left and right arrow
buttons(c).
5. Once the desired time is set press the Enter/
Display(g) button to commit.
Other Clock Adjust menu options:
• Time format: Select a 12h or 24h time display
format
• Date format: Select the date display format,
MM/DD/YYYY, YYYY/MM/DD or DD/MM/YYYY.
TO ADJUST THE EQ
Sound can be adjusted by changing the equalization
of the bass or treble of the radio.
1. Press the Menu button(e) and scroll using the
left or right arrow buttons(c) to select Sound
EQ. Select by pressing the Enter/Display
button(g).
2. Press the right arrow button to increase the
bass or the left arrow button to decrease it.
3. Once desired adjustment is achieved, press the
Enter/Display button(g).
4. Repeat steps 2 and 3 for treble adjustment.
Important Radio Notes
1. The radio will run up to 8 hours on a fully
charged 4.0 amp hour battery. Using batteries
of lower voltage or capacity will result in less run
time.
2. Reception will vary depending on location and
strength of radio signal.
3. Certain generators may cause background
noise.
4. AM reception will most likely be clearer when
powered by a battery pack.
5. To use the auxiliary port(k), plug the output
jack from a CD or iPod
port(fig.1). The sound from the external source
plays through the speakers of the DCR017.
6. The USB power output port(p) is a connection
port for powering low power devices such as
mobile phones, CD and MP3 players.
* iPod is a registered trademark of Apple Inc.
®
*/MP3 player into the
MAINTENANCE
Your DEWALT radio has been designed to operate
over a long period of time with a minimum of
maintenance. Continuous satisfactory operation
depends upon proper care.
Service Notes
This product is not user serviceable. There are
no user serviceable parts inside the charger/
radio. Servicing at an authorised service centre is
required to avoid damage to static sensitive internal
components.
Cleaning
WARNING: Never use solvents or
other harsh chemicals for cleaning
the non-metallic parts of the charger/
radio. These chemicals may weaken
the materials used in these parts. Use
a cloth dampened only with water and
mild soap. Never let any liquid get inside
the charger/radio; never immerse any
part of the charger/radio into a liquid.
31
Page 13

ENGLISH
CHARGER/RADIO CLEANING INSTRUCTIONS
WARNING: Shock hazard. Disconnect
the charger from the AC outlet before
cleaning. Dirt and grease may be
removed from the exterior of the
charger/radio using a cloth or soft
non-metallic brush. Do not use water
or any cleaning solutions.
Optional Accessories
WARNING: Since accessories, other
Consult your dealer for further information on the
appropriate accessories.
than those offered by DEWALT, have not
been tested with this product, use of
such accessories with this charger/radio
could be hazardous. To reduce the risk
of injury, only DEWALT recommended
accessories should be used with this
product.
Protecting the Environment
Separate collection. This product must
not be disposed of with normal
household waste.
Should you find one day that your DEWALT product
needs replacement, or if it is of no further use to you,
do not dispose of it with household waste. Make this
product available for separate collection.
Separate collection of used products
and packaging allows materials to be
recycled and used again. Re-use of
recycled materials helps prevent
environmental pollution and reduces
the demand for raw materials.
Local regulations may provide for separate collection
of electrical products from the household, at
municipal waste sites or by the retailer when you
purchase a new product.
DEWALT provides a facility for the collection and
recycling of DEWALT products once they have
reached the end of their working life. To take
advantage of this service please return your product
to any authorised repair agent who will collect them
on our behalf.
You can check the location of your nearest
authorised repair agent by contacting your local
DEWALT office at the address indicated in this
manual. Alternatively, a list of authorised DEWALT
repair agents and full details of our after-sales
service and contacts are available on the Internet at:
www.2helpU.com.
Rechargeable Battery Pack
This long life battery pack must be recharged when
it fails to produce sufficient power on jobs which
were easily done before. At the end of its technical
life, discard it with due care for our environment:
• Run the battery pack down completely, then
remove it from the charger/radio.
• Li-Ion, NiCd and NiMH cells are recyclable. Take
them to your dealer or a local recycling station.
The collected battery packs will be recycled or
disposed of properly.
32
Page 14

GUARANTEE
DEWALT is confident of the quality of its
products and offers an outstanding guarantee
for professional users of the product. This
guarantee statement is in addition to and in
no way prejudices your contractual rights as a
professional user or your statutory rights as a
private non-professional user. The guarantee
is valid within the territories of the Member
States of the European Union and the
European Free Trade Area.
• 30 DAY NO RISK SATISFACTION GUARANTEE •
If you are not completely satisfied with the
performance of your D
return it within 30 days, complete with all
original components, as purchased, to
the point of purchase, for a full refund or
exchange. The product must have been
subject to fair wear and tear and proof of
purchase must be produced.
• ONE YEAR FREE SERVICE CONTRACT •
If you need maintenance or service for your
EWALT tool, in the 12 months following
D
purchase, you are entitled to one service free
of charge. It will be undertaken free of charge
at an authorised DEWALT repair agent. Proof
of purchase must be produced. Includes
labour. Excludes accessories and spare parts
unless failed under warranty.
• ONE YEAR FULL WARRANTY •
If your DEWALT product becomes defective
due to faulty materials or workmanship
within 12 months from the date of purchase,
DEWALT guarantees to replace all defective
parts free of charge or – at our discretion –
replace the unit free of charge provided that:
• The product has not been misused;
• The product has been subject to fair
wear and tear;
• Repairs have not been attempted by
unauthorised persons;
• Proof of purchase is produced;
• The product is returned complete with all
original components.
If you wish to make a claim, contact your
seller or check the location of your nearest
authorised D
EWALT catalogue or contact your DEWALT
D
EWALT repair agent in the
office at the address indicated in this manual.
A list of authorised D
full details of our after-sales service is available
on the Internet at: www.2helpU.com.
EWALT tool, simply
EWALT repair agents and
ENGLISH
33
 Loading...