

Page 1
IF YOU SHOULD EXPERIENCE A PROBLEM WITH YOUR DEWALT PUR-
CALL 1-800-4 DEWALT
IN MOST CASES, A DEWALT REPRESENTATIVE CAN RESOLVE
YOUR PROBLEM OVER THE PHONE.
IF YOU HAVE A SUGGESTION OR COMMENT, GIVE US A CALL.
YOUR FEEDBACK IS VITAL TO THE SUCCESS OF DEWALT'S
QUALITY IMPROVEMENT PROGRAM.
Questions? See us at www.dewalt.com
CHASE,
INSTRUCTION MANUAL
GUIDE D'UTILISATION
MANUAL DE INSTRUCCIONES
DC608
INSTRUCTIVO DE OPERACION, CENTROS DE SERVICIO
Y POLIZA DE GARANTiA. ADVERTENCIA: LI_ASE ESTE
INSTRUCTIVO ANTES DE USAR EL PRODUCTO.
®
18 Gauge Cordless Nailer
Cloueuse sans fil pour clou de calibre 18
Clavadora inal_mbrica de calibre 18
Page 2
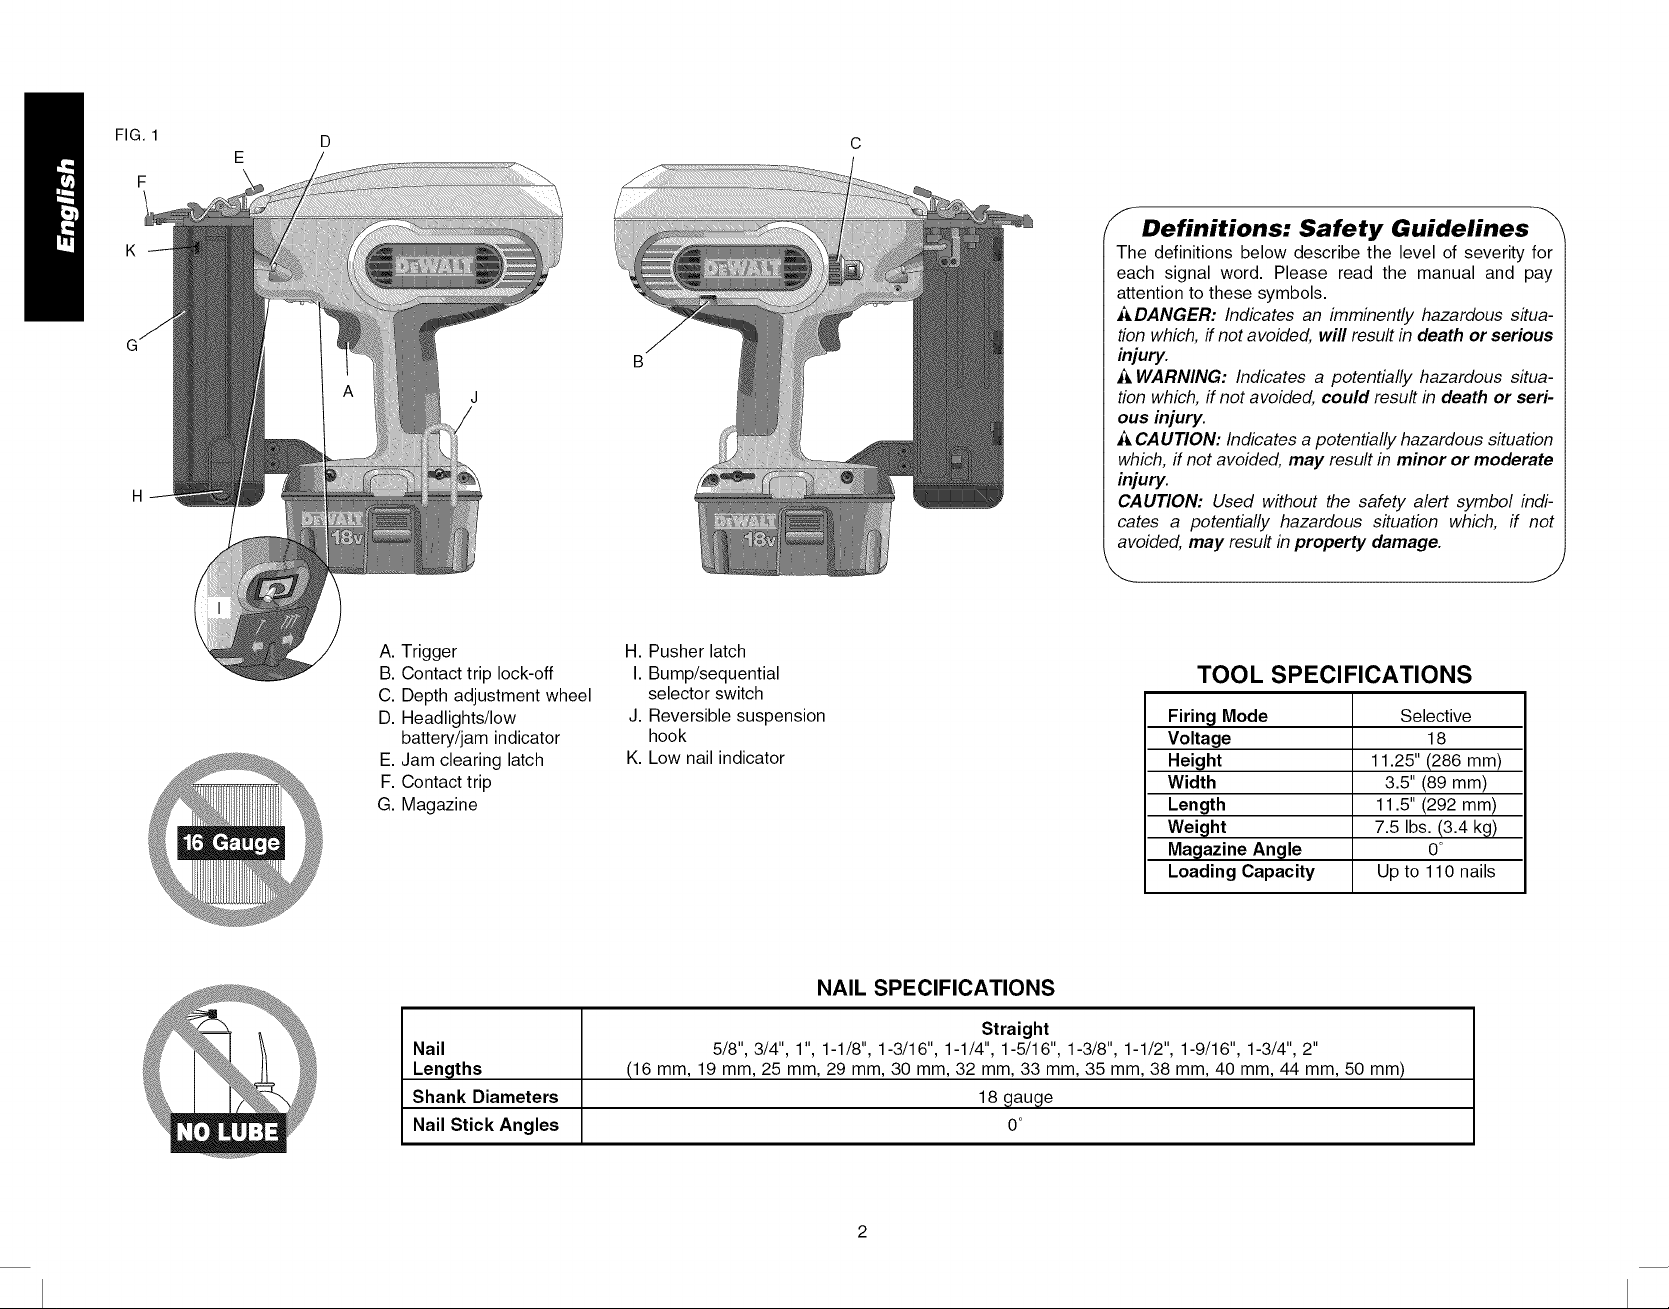
FIG. 1
F
K
f Definitions: Safety Guidelines
The definitions below describe the level of severity for
each signal word. Please read the manual and pay
attention to these symbols.
_IDANGER: Indicates an imminently hazardous situa-
tion which, ffnot avoided, will result in death or serious
injury.
=&WARNING: Indicates a potentially hazardous situa-
tion which, if not avoided, could result in death or seri-
ous injury.
CAUTION: Indicates a potentially hazardous situation
which, if not avoided, may result in minor or moderate
injury.
CAUTION: Used without the safety alert symbol indi-
cates a potentially hazardous situation which, if not
avoided, may result in property damage.
A. Trigger
B. Contact trip lock-off
C. Depth adjustment wheel
D. Headlights/low
battery/jam indicator
E. Jam clearing latch
F. Contact trip
G. Magazine
Nail
Lengths
Shank Diameters
Nail Stick Angles
H. Pusher latch
I. Bump/sequential
selector switch
J. Reversible suspension
hook
K. Low nail indicator
TOOL SPECIFICATIONS
Firing Mode Selective
Voltage 18
Height 11.25" (286 mm)
Width 3.5" (89 mm)
Length 11.5" (292 mm)
Weight 7.5 Ibs. (3.4 kg)
Magazine Angle 0°
Loading Capacity Up to 110 nails
NAIL SPECIFICATIONS
Straight
5/8", 3/4", 1", 1-1/8", 1-3/16", 1-1/4", 1-5/16", 1-3/8", 1-1/2", 1-9/16", 1-3/4", 2"
(16 mm, 19 mm, 25 mm, 29 mm, 30 mm, 32 mm, 33 mm, 35 mm, 38 mm, 40 mm, 44 mm, 50 mm)
18 gauge
0o
Page 3
IFYOUHAVEANYQUESTIONSORCOMMENTS
ABOUTTHISORANYDEWALTTOOL,CALLUS
TOLLFREEAT:1-800-4-DEWALT(1-800-433-9258)
General Safety Rules - For All
Battery Operated Tools
_ WARNING! Read and understand all
instructions. Failure to follow all
instructions listed below may result in electric
shock, fire and/or serious personal injury.
SAVE THESE INSTRUCTIONS
WORK AREA
• Keep your work area clean and well lit. Cluttered
benches and dark areas invite accidents.
• Do not operate power tools in explosive
atmospheres, such as in the presence of
flammable liquids, gases, or dusL Power tools
create sparks which may ignite the dust or fumes.
• Keep bystanders, children, and visitors away
while operating a power tool Distractions can
cause you to lose control.
ELECTRICAL SAFETY
• Do not abuse the cord. Never use the cord to
carry the tooL Keep cord away from heat, oil,
sharp edges or moving parts. Replace damaged
cords immediately. Damaged cords may create a
fire.
• A battery operated tool with integral batteries or
a separate battery pack must be recharged only
with the specified charger for the battery. A
charger that may be suitable for one type of battery
may create a risk of fire when used with another
battery.
• Use battery operated tool only with the
specifically designed battery pack. Use of any
other batteries may create a risk of fire.
PERSONAL SAFETY
• Stay alert, watch what you are doing and use
common sense when operating a power tool Do
not use tool while tired or under the influence
of drugs, alcohol, or medication. A moment of
inattention while operating power tools may result in
serious personal injury,
• Dress properly. Do not wear loose clothing
or jewelry. Contain long hair. Keep your hair,
clothing, and gloves away from moving parts.
Loose clothing, jewelry, or long hair can be caught
in moving parts. Air vents often cover moving parts
and should also be avoided.
• Avoid accidental starting. Be sure contact trip
lock-off is in the locked position before inserting
battery pack. Carrying tools with your finger on the
trigger or inserting the battery pack into a tool with
the trigger pulled invites accidents.
• Remove adjusting keys or wrenches before
turning the tool on. A wrench or key that is left
attached to a rotating part of the tool may result in
personal injury.
• Do not overreach. Keep proper footing and
balance at all times. Proper footing and balance
enables better control of the tool in unexpected
situations.
• Use safety equipment. Always wear eye
protection. Dust mask, non-skid safety shoes,
hard hat, or hearing protection must be used for
appropriate conditions.
TOOL USE AND CARE
• Use clamps or other practical way to secure
and support the workpiece to a stable platform.
Holding the work by hand or against your body is
unstable and may lead to a loss of control
• Do not force tool Use the correct tool for your
application. The correct tool will do the job better
and safer at the rate for which it is designed.
• Do not use tool ff switch does not turn it on
or off. Any tool that cannot be controlled with the
switch is dangerous and must be repaired.
• Disconnect battery pack from tool or place
the switch in the locked or off position before
making any adjustments, changing accessories,
or storing the tooL Such preventative safety
measures reduce the risk of starting the tool
accidentally.
• Store idle tools out of reach of children and
other untrained persons. Tools are dangerous in
the hands of untrained users.
• When battery pack is not in use, keep it away
from other metal objects like: paper clips, coins,
keys, nails, screws, or other small metal objects
that can make a connection from one terminal
to another. Shorting the battery terminals together
may cause sparks, bums, or a fire.
• Check for misalignment or binding of moving
parts, breakage of parts, and any other condition
that may affect the tool's operation, ff damaged,
have the tool serviced before using. Many
accidents are caused by poorly maintained tools.
• Use only accessories that are recommended by
the manufacturer for your model Accessories
that may be suitable for one tool, may become
hazardous when used on another tool
SERVICE
• Tool service must be performed only by
qualified repair personnel Service or maintenance
performed by unqualified personnel could result in a
risk of injury.
FIG. A
FIG. B
FIG. C
FIG. D
FIG. E
FIG. F
• When servicing a tool use only identical
replacement parts. Follow instructions in
the Maintenance section of this manual
Use of unauthorized parts or failure to follow
Maintenance Instructions may create a risk
of electric shock or injury.
Important Safety
Instructions for Nailers
WARNING: When using any nailer, all safety
..... precautions, as outlined below, should be
injury. Read and understand all instructions
| before operating the tool.
@ followed to avoid the risk of death or serious
......
• Hold tool by insulated gripping surfaces
when performing an operation where the
cutting tool may contact hidden wiring.
Contact with a "live" wire will make exposed
metal parts of the tool "live" and shock the
operator.
Actuating tool may result in flying debris,
collation material, or dust which could
harm operator's eyes. Operator and others
in work area MUST wear safety glasses
with side shields. These safety glasses
must conform to ANSI Z87.1 requirements
(approved glasses have "Z87" printed or
stamped on them. It is the employer's
responsibility to enforce the use of eye
protection equipment by the tool operator
and other people in the work area. (Fig. A)
• Always wear appropriate personal
hearing and other protection during use.
Under some conditions and duration of use,
noise from this product may contribute to
hearing loss. (Fig. A)
• Disconnect battery pack from the
tool when not in use. Always remove
battery pack and remove fasteners from
magazine before leaving the area or
passing the tool to another operator. Do
not carry tool to another work area in
which changing location involves the use
of scaffoldings, stairs, ladders, and the
like, with battery pack connected. Do not
make adjustments, perform maintenance
or clear jammed fasteners while battery
is in place.
• Do not remove, tamper with, or otherwise
cause the tool, trigger, contact trip lock-
off, or contact trip to become inoperable.
Do not tape or tie trigger or contact trip
in the ON position. Do not remove spring
from contact trip. Make daily inspections for
free movement of trigger and contact trip.
Uncontrolled discharge could result.
3
Page 4
• Inspecttoolbefore use. Do notoperate
atoolif any portion of the tool, trigger,
contact trip lock-off, or contact trip is
inoperable, disconnected, altered, or
not working properly. Damaged parts
or missing parts should be repaired or
replaced before use. Refer to Repairs.
• Do not alter or modify the tool in any
way.
• Always assume that the tool contains
fasteners.
• Do not point the tool at co-workers
or yourself at any time. No horseplay!
Work safe! Respect the tool as a working
implement. (Fig. B)
• Keep bystanders, children, and
visitors away while operating a power
tool Distractions can cause you to lose
control When tool is not in use, it should
be locked in a safe place, out of the
reach of children.
• Always use contact trip lock-off when
tool is not in immediate use. Using
the contact trip lock-off will prevent
accidental discharge.
• Do not overreach. Maintain proper
footing and balance at all times. Loss
of balance may cause personal injury.
(Fig. C)
• Use the tool only for its intended
use. Do not discharge fasteners
into open air, concrete, stone,
extremely hard woods, knots or any
material too hard for the fastener
to penetrate. Do not use the body
of the tool or top cap as a hammer.
Discharged fasteners may follow
unexpected path and cause injury.
(Figs. D, F)
• Always keep fingers clear of contact
trip to pre vent injury from inadvertent
release of the pusher (Fig. H)
• Refer to the Maintenance and Repairs
sections for detailed information on
the proper maintenance of the tooL
• Always operate the tool in a clean,
lighted area. Be sure the work surface
is clear of any debris and be careful not
to lose footing when working in elevated
environments such as rooftops.
• Do not drive fasteners near edge
of materiaL The workpiece may split
causing the fastener to ricochet, injuring
you or a co-worker. Be aware that
the nail may follow the grain of the
wood (shiner), causing it to protrude
FIG. G
FIG. H
FIG. J
FIG. K
FIG.
unexpectedly from the side of the work
material Drive the chisel point of the nail
perpendicular to the grain to reduce risk
of injury. (Figs. E, F, M)
• Do not drive nails onto the heads of
other fasteners or with the tool at
too steep an angle. Personal injury
from strong recoil, jammed fasteners,
or ricocheted nails may result.
(Fig. G)
• Keep hands and body parts clear of
immediate work area. Hold workpiece
with clamps when necessary to keep
hands and body out of potential harm. Be
sure the workpiece is properly secured
before pressing the nailer against the
material The contact trip may cause
the work material to shift unexpectedly.
(Fig. H)
• Do not use tool in the presence of
flammable dust, gases or fumes. The
tool may produce a spark that could
ignite gases causing a fire. Driving a
nail into another nail may also cause a
spark. (Fig. I)
• Keep face and body parts away from
back of the tool cap when working
in restricted areas. Sudden recoil can
result in impact to the body, especially
when nailing into hard or dense material
(Fig. J)
• Grip tool firmly to maintain control
while allowing tool to recoil away from
work surface as fastener is driven. In
Bump mode if contact trip is allowed to
recontact work surface before trigger is
released an unwanted fastener will be
fired.
• Choice of triggering method is
importanL Check the manual for
triggering options.
BUMP/SEQUENTIAL SELECTOR
SWITCH
Sequential Action /" (Fig. K)
• When using the tool in sequential
action, do not actuate the tool unless
the tool is placed firmly against the
workpiece.
Bump Action iii (Fig. L)
• When using the tool in bump action,
be careful of unintentional double
fires resulting from tool recoil.
Unwanted fasteners may be driven if
the contact trip is allowed to accidentally
re-contact the work surface.
FIG. M
FIG. N
FIG. O
i!!
, • Engage contact trip lock-off (Fig. N).
.....,,,,, ....... • Avoid contact with trigger during
..... adjustments
• Do not drive nails blindly into walls, floors or other work
areas. Fasteners driven into five electrical wires, plumbing, or
other types of obstructions can result in injury. (Fig. O)
• Stay alert, watch what you are doing and use common
sense when operating a power tool Do not use tool
while tired or under the influence of drugs, alcohol, or
medication. A moment of inattention while operating power
tools may result in serious personal injury.
A WARNING: Use of this product will expose you to chemicals
known to the State of California to cause cancer, birth defects
and other reproductive harm. Avoid inhaling vapors and dust,
and wash hands after using.
• Avoid prolonged contact with dust from power sanding,
sawing, grinding, drilling, and other construction
activities. Wear protective clothing and wash exposed
areas with soap and water. Allowing dust to get into your
mouth, eyes, or lay on the skin may promote absorption of
harmful chemicals.
A WARNING: Use of this tool can generate and/or disburse
dust, which may cause serious and permanent respiratory or
other injury. Always use NIOSH/OSHA approved respiratory
protection appropriate for the dust exposure. Direct particles
away from face and body.
_ WARNING: ALWAYS USE SAFETY GLASSES. Everyday
eyeglasses are NOT safety glasses. Also use face or dust mask
if operation is dusty. ALWAYS WEAR CERTIFIED SAFETY
EQUIPMENT:
• ANSI Z87.1 eye protection (CAN/CSA Z94.3),
• ANSI $12.6 ($3.19) hearing protection,
• NIOSH/OSHA/MSHA respiratory protection.
TO A VOID DOUBLE FIRES:
• Do not engage the tool against the
work surface with a strong force.
• Allow the tool to recoil fully after
each actuation.
• Use sequential action trigger.
• When "bump" actuating the brad
nailer, always keep tool in control
Inaccurate placement of tool can result
in misdirected discharge of a fastener.
• Do not drive nails onto the heads of
other fasteners. Strong recoil, jammed
fasteners, or ricocheted nails may result.
(Fig. M)
• Be aware of material thickness when
using nailer. A protruding nail may
cause injury.
• DEPTH ADJUSTMENT: To reduce
• Remove battery pack.
depth, AL WAYS;
Page 5
A CAUTION: When not in use, place tool on its side on
a stable surface where it will not cause a tripping or
falling hazard. Some tools with large battery packs will
stand upright on the battery pack but may be easily
knocked over.
• The labelon your toolmayinclude the following symbols.
The symbols and their definitions are as follows:
V. .......... volts
Hz......... hertz
min .......minutes
-- - ....direct current
(_) ......... Class I Construction
(grounded)
......... earthing terminal
[] ......... Class II Construction
(double insulated)
BPM .....beats per minute
BEFORE OPERATING THIS TOOL, CAREFULLY READ
AND UNDERSTAND ALL INSTRUCTIONS IN THE
"IMPORTANT SAFETY INSTRUCTIONS" SECTION.
A ............. amperes
W............ watts
........... alternating
current
no ........... no load
speed
A ........... safety alert
symbol
.../min .....revolutions or
reciprocation
per minute
Important Safety Instructions
for Battery Packs
Your tool uses a DEWALT battery pack. When ordering
replacement battery packs, be sure to include catalog
number and voltage: Extended Run-Time battery packs
deliver more run-time than standard battery packs. Consult
the chart at the end of this manual for compatibility of
chargers and battery packs.
NOTE: Your tool will accept either standard or Extended
Run Time battery packs. However, be sure to select proper
voltage. Batteries slowly lose their charge when they are
not on the charger, the best place to keep your battery is
on the charger at all times.
The battery pack is not fully charged out of the carton.
Before using the battery pack and charger, read the
safety instructions below. Then follow charging procedures
outlined.
READ ALL INSTRUCTIONS
DO NOT incinerate the battery pack even if # is
severely damaged or is completely worn out. The
battery pack can explode in a fire.
A small leakage of liquid from the battery pack cells
may occur under extreme usage or temperature
conditions. This does not indicate a failure. However,
if the outer seal is broken and this leakage gets on your
skin:
a. Wash quickly with soap and water.
b. Neutralize with a mild acid such as lemon juice or
vinegar.
c. If battery liquid gets into your eyes, flush them with
clean water for a minimum of 10 minutes and seek
immediate medical attention. (Medical note: The
liquid is 25-35% solution of potassium hydroxide.)
• Charge the batterypacks only in DEWALTchargers.
• DO NOT splash or immerse in water or other liquids.
• Do not store or use the tool and battery pack in
locations where the temperature may reach or
exceed 105°F (such as outside sheds or metal
buildings in summer).
J_DANGER: Electrocution hazard. Never attempt to open
the battery pack for any reason, ff battery pack case is
cracked or damaged, do not insert into charger. Electric
shock or electrocution may result. Damaged battery packs
should be returned to service center for recycling.
NOTE: Battery storage and carrying caps
are provided for use whenever the battery is
out of the tool or charger. Remove cap before
placing battery in charger or tool.
A WARNING: Fire hazard. Do not store or
carry battery so that metal objects can
contact exposed battery terminals. For example, do not
place battery in aprons, pockets, tool boxes, product kit
boxes, drawers, etc., with loose nails, screws, keys, etc.
without battery cap. Transporting batteries can possibly
cause fires if the battery terminals inadvertently come
in contact with conductive materials such as keys,
coins, hand tools and the like. The US Department of
Transportation Hazardous Material Regulations (HMR)
actually prohibit transporting batteries in commerce or on
airplanes (i.e., packed in suitcases and carry-on luggage)
UNLESS they are properly protected from short circuits. So
when transporting individual batteries, make sure that the
battery terminals are protected and well insulated from
materials that could contact them and cause a short
circuit.
_ CAUTION: Battery pack must be securely attached to
tool ff battery pack is detached, personal injury may result.
The RBRC TM Seal
The RBRC TM (Rechargeable Battery
Recycling Corporation) Seal on the nickel
cadmium and nickel metal hydride batteries
(or battery packs) indicate that the costs to
recycle these batteries (or battery packs) at
the end of their useful life have already been
paid by DEWALT. In some areas, it is illegal to place spent
nickel cadmium and nickel metal hydride batteries in the
trash or municipal solid waste stream and the RBRC
program provides an environmentally conscious
alternative.
RBRC TM in cooperation with DEWALT and other battery
users, has established programs in the United States and
Canada to facilitate the collection of spent nickel cadmium
and nickel metal hydride batteries. Help protect our
environment and conserve natural resources by returning
the spent nickel cadmium and nickel metal hydride batteries
to an authorized DEWALT service center or to your local
retailer for recycling. You may also contact your local
recycling center for information on where to drop off the
spent battery.
RBRCTM is a registered trademark of the Rechargeable Battery
RecyclingCorporation.
Important Safety Instructions for
Battery Chargers
SAVE THESE INSTRUCTIONS: This manual contains
important safety instructions for battery chargers.
• Before using charger, read allinstructions and cautionary
markings on charger, battery pack, and product using
battery pack.
A DANGER: Electrocution hazard. 120 volts are present at
charging terminals. Do not probe with conductive objects.
Electric shock or electrocution may result.
i_ WARNING: Shock hazard. Do not allow any liquid to get
inside charger. Electric shock may result.
A CAUTION: Bum hazard. To reduce the risk of injury,
charge only DEWALT nickel cadmium rechargeable
batteries. Other types of batteries may burst causing
personal injury and damage.
ACAUTION: Under certain conditions, with the charger
plugged in to the power supply, the exposed charging
contacts inside the charger can be shorted by foreign
material Foreign materials of a conductive nature such as,
but not limited to, steel wool, aluminum foil, or any buildup of
metallic particles should be kept away from charger cavities.
Always unplug the charger from the power supply when
there is no battery pack in the cavity. Unplug charger before
attempting to clean.
• DO NOTattempt to charge the batterypack with any
chargers other than the ones in this manuaL The
charger and battery pack are specifically designed to
work together.
• These chargers are not intended for any uses other
than charging DEWAL T rechargeable batteries. Any
other uses may result in risk of fire, electric shock or
electrocution.
• Do not expose charger to rain or snow.
• Pull by plug rather than cord when disconnecting
charger. This will reduce risk of damage to electric plug
and cord.
• Make sure that cord is located so that it will not be
stepped on, tripped over, or otherwise subjected to
damage or stress.
• Do not use an extension cord unless it is absolutely
necessary. Use of improper extension cord could result
in risk of fire, electric shock, or electrocution.
• An extension cord must have adequate wire size
(AWG or American Wire Gauge) for safety. The
smaller the gauge number of the wire, the greater the
capacity of the cable, that is 16 gauge has more capacity
than 18 gauge. When using more than one extension
to make up the total length, be sure each individual
extension contains at least the minimum wire size.
Page 6
Recommended Minimum Wire Size
for Extension Cords
Total Length of Cord
25ft. 50ft. 75ft. 100ft. 125ft. 150ft. 175ft.
7.6m 15.2m 22.9m 30.5m 38.1 m45.7m 53.3m
Wire Size AWG
18 18 16 16 14 14 12
• Do not place any object on top of charger or place
the charger on a soft surface that might block the
ventilation slots and result in excessive internal
heal Place the charger in a position away from any
heat source. The charger is ventilated through slots in
the top and the bottom of the housing.
• Do not operate charger with damaged cord or plug
-- have them replaced immediately.
• Do not operate charger if it has received a sharp
blow, been dropped, or otherwise damaged in any
way. Take it to an authorized service center.
• Do not disassemble charger; take it to an authorized
service center when service or repair is required.
Incorrect reassembly may result in a risk of electric
shock, electrocution or fire.
• Disconnect the charger from the outlet before
attempting any cleaning. This will reduce the risk
of electric shock. Removing the battery pack will not
reduce this risk.
• NEVER attempt to connect 2 chargers together.
• The charger is designed to operate on standard
household electrical power (120 Volts). Do not
attempt to use it on any other voltage. This does not
apply to the vehicular charger.
Using Automatic Tune-Up TM Mode
The automatic Tune-Up TM Mode equalizes or balances the
individual cells in the battery pack allowing it to function at
peak capacity. Battery packs should be tuned up weekly
or after 10 charge/discharge cycles or whenever the pack
no longer delivers the same amount of work. To use the
automatic Tune-Up TM, place the battery pack in the charger
and leave it for at least 8 hours. The charger will cycle
through the following modes.
1. The red light will blink continuously indicating that the
1-hour charge cycle has started.
2. When the 1-hour charge cycle is complete, the light
will stay on continuously and will no longer blink. This
indicates that the pack isfully charged and can be used
at this time.
3. If the pack is left in the charger after the initial 1-hour
charge, the charger will begin the Automatic Tune-Up
mode. This mode continues up to 8 hours or until the
individual cells in the battery pack are equalized. The
battery pack is ready for use and can be removed at
any time during the Tune-Up mode.
4. Once the Automatic Tune Up mode is complete, the
charger will begin a maintenance charge; the red
indicator will remain lit.
SAVE THESE INSTRUCTIONS
FOR FUTURE USE
Chargers
Your tool uses a DEWALT Charger. Your battery can
be charged in DEWALT 1 Hour Chargers, 15 Minute
Chargers or Vehicular 12 volt charger. Be sure to read all
safety instructions before using your charger. Consult the
chart on the back cover of this manual for compatibility of
chargers and battery packs.
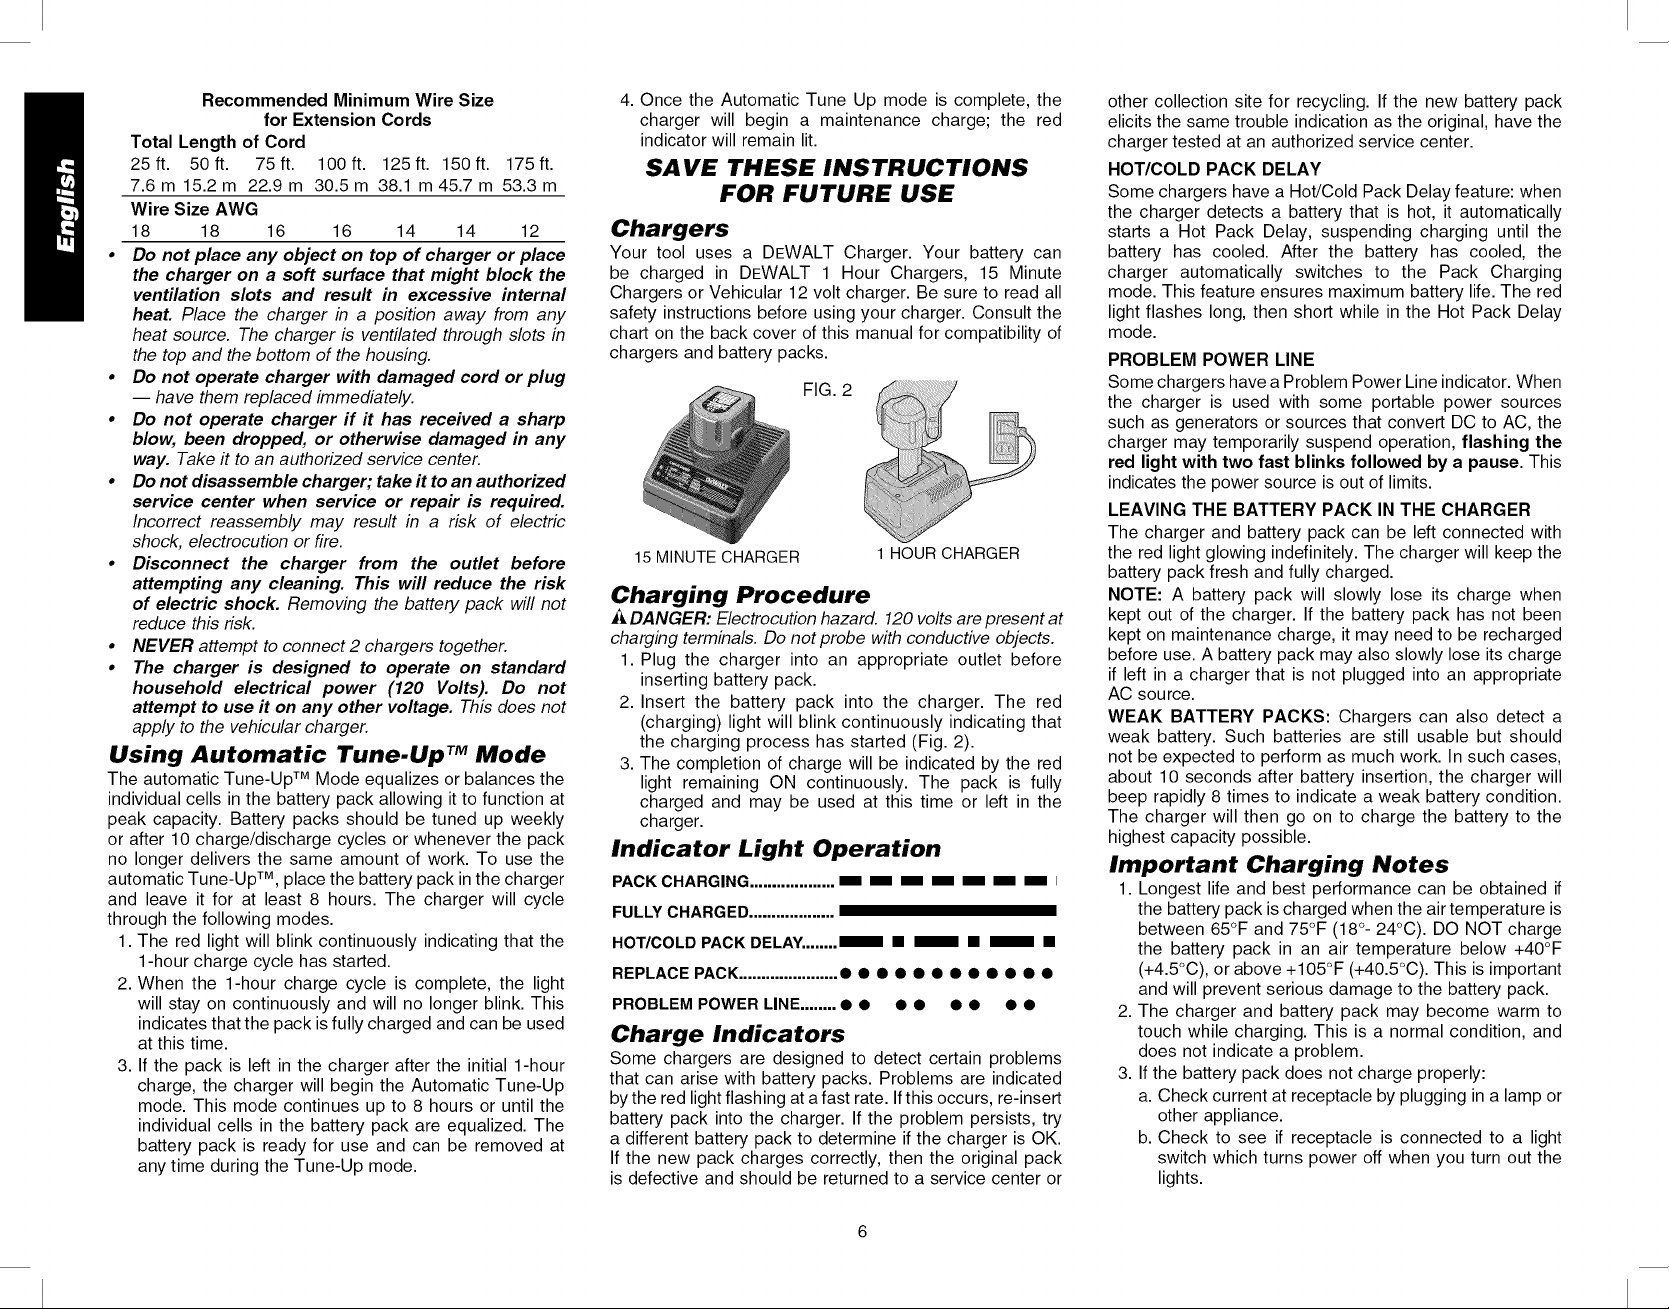
FIG. 2
15 MINUTE CHARGER
1 HOUR CHARGER
Charging Procedure
.&DANGER: Electrocution hazard. 120 volts are present at
charging terminals. Do not probe with conductive objects.
1. Plug the charger into an appropriate outlet before
inserting battery pack.
2. Insert the battery pack into the charger. The red
(charging) light will blink continuously indicating that
the charging process has started (Fig. 2).
3. The completion of charge will be indicated by the red
light remaining ON continuously. The pack is fully
charged and may be used at this time or left in the
charger.
Indicator Light Operation
PACK CHARGING ................... mm mm mm mm mm mm mm I
FUL_ CHARGED ...................
HOT/COLD PACK DELAY........ _ • _ • _ •
REPLACE PACK ...................... ••••••••••••
PROBLEM POWER LINE ........ • • • • • • • •
Charge Indicators
Some chargers are designed to detect certain problems
that can arise with battery packs. Problems are indicated
bythe red light flashing at a fast rate. If this occu rs, re-insert
battery pack into the charger. If the problem persists, try
a different battery pack to determine if the charger is OK.
If the new pack charges correctly, then the original pack
is defective and should be returned to a service center or
other collection site for recycling. If the new battery pack
elicits the same trouble indication as the original, have the
charger tested at an authorized service center.
HOT/COLD PACK DELAY
Some chargers have a Hot/Cold Pack Delay feature: when
the charger detects a battery that is hot, it automatically
starts a Hot Pack Delay, suspending charging until the
battery has cooled. After the battery has cooled, the
charger automatically switches to the Pack Charging
mode. This feature ensures maximum battery life. The red
light flashes long, then short while in the Hot Pack Delay
mode.
PROBLEM POWER LINE
Some chargers have a Problem Power Line indicator. When
the charger is used with some portable power sources
such as generators or sources that convert DC to AC, the
charger may temporarily suspend operation, flashing the
red light with two fast blinks followed by a pause. This
indicates the power source is out of limits.
LEAVING THE BATTERY PACK IN THE CHARGER
The charger and battery pack can be left connected with
the red light glowing indefinitely. The charger will keep the
battery pack fresh and fully charged.
NOTE: A battery pack will slowly lose its charge when
kept out of the charger. If the battery pack has not been
kept on maintenance charge, it may need to be recharged
before use. A battery pack may also slowly lose its charge
if left in a charger that is not plugged into an appropriate
AC source.
WEAK BATTERY PACKS: Chargers can also detect a
weak battery. Such batteries are still usable but should
not be expected to perform as much work. In such cases,
about 10 seconds after battery insertion, the charger will
beep rapidly 8 times to indicate a weak battery condition.
The charger will then go on to charge the battery to the
highest capacity possible.
Important Charging Notes
1. Longest life and best performance can be obtained if
the battery pack is charged when the air temperature is
between 65°F and 75°F (18°- 24°C). DO NOT charge
the battery pack in an air temperature below +40°F
(+4.5°C), or above +105°F (+40.5°C). This is important
and will prevent serious damage to the battery pack.
2. The charger and battery pack may become warm to
touch while charging. This is a normal condition, and
does not indicate a problem.
3. If the battery pack does not charge properly:
a. Check current at receptacle by plugging in a lamp or
other appliance.
b. Check to see if receptacle is connected to a light
switch which turns power off when you turn out the
lights.
Page 7
c.Movechargerandbatterypacktoalocationwhere
thesurroundingairtemperatureisapproximately
65OF_75OF(18°-24oc).
d.Ifchargingproblemspersist,takethetool,battery
packandchargertoyourlocalservicecenter.
4.Thebatterypackshouldberechargedwhenitfailsto
producesufficientpoweronjobswhichwereeasily
donepreviously.DONOTCONTINUEtouseunder
theseconditions.Followthechargingprocedure.You
mayalsochargeapartiallyusedpackwheneveryou
desirewithnoadverseaffectonthebatterypack.
5.Undercertainconditions,withthechargerplugged
intothepowersupply,theexposedchargingcontacts
insidethechargercanbeshortedbyforeignmaterial.
Foreignmaterialsofaconductivenaturesuchas,but
notlimitedto,steelwool,aluminumfoil,oranybuildup
ofmetallicparticlesshouldbekeptawayfromcharger
cavities.Alwaysunplugthechargerfromthepower
supplywhenthereis nobatterypackinthecavity.
Unplugchargerbeforeattemptingtoclean.
6.Donotfreezeorimmersechargerinwateroranyother
liquid.
•& WARNING: Shock hazard. Don't allow any liquid to get
inside charger. Electric shock may result. To facilitate the
cooling of the battery pack after use, avoid placing the
charger or battery pack in a warm environment such as in
a metal shed, or an uninsulated trailer.
_ CAUTION: Never attempt to open the battery pack for
any reason. If the plastic housing of the battery pack
breaks or cracks, return to a service center for recycling.
Installing and Removing the
Battery Pack
A CAUTION: Engage contact trip lock-off before removing
or installing battery.
FIG. 3 FIG. 4
M
NOTE: Make sure your battery pack is fully charged.
To install the battery pack into the tool handle, align the
base of the tool with the notch inside the tool's handle and
slide the battery pack firmly into the handle until you hear
the lock snap into place.
To remove the battery pack from the tool, press the
release buttons (M) and firmly pull the battery pack out of
the tool handle. Insert it into the charger as described in the
charger manual (Fig. 4).
COMPONENTS
A WARNING: Lock off trigger, disconnect battery pack
from tool and remove fasteners from magazine before
making adjustments or personal injury may result.
Refer to Figure 1 at the beginning of this manual for a
complete list of components.
OPERA TION
Z&WARNING: Read the section titled Important Safety
Instructions for Nailers at the beginning of this manual
Always wear eye and ear protection when operating this
tool Keep the nailer pointed away from yourself and
others. For safe operation, complete the following
procedures and checks before each use of the nailer.
1. Wear proper eye, hearing and respiratory protection.
2. Remove battery pack from tool
3. Lock the pusher in the back position and remove aft
fasteners from the magazine.
4. Check for smooth and proper operation of contact
trip and pusher assemblies. Do not use tool if either
assembly is not functioning properly. NEVER use
a tool that has the contact trip restrained in the up
position.
5. NEVER use a tool that has damaged parts.
A WARNING: To reduce the risk of personal injury,
disconnect battery pack from tool before performing
maintenance, clearing a jammed fastener, leaving work
area, moving tool to another location or handing the tool to
another person.
Mode Selection
•& WARNING: Always wear proper eye [ANSI Z87.1 (CAN/
CSA Z94.3)] and ANSI $12.6 ($3.19) hearing protection
when operating tool
The DEWALT cordless nailers are assembled in accordance
with the ANSI Standard SNT-101-2002.
Before operating this tool, look at the selector switch
to determine the actuation mode. Read all instructions
before selecting actuation mode.
i_ WARNING: Keep fingers AWAY from trigger when not
driving fasteners to avoid accidental firing. NEVER carry
tool with finger on trigger. In bump mode tool will fire a
fastener if safety is bumped while trigger is depressed.
SEQUENTIAL ACTION /
Use sequential action for intermittent nailing where very
careful and accurate placement and depth control is
desired.
7
To operate the nailer in sequential action mode:
1. Flip the switch located on the body
ofthe tool just between the trigger
and magazine to the left, as
shown in Figure 6.
2. Fully depress nosepiece against
the work surface (motor will
start).
3. Pull trigger (nail will drive into
work surface).
4. Release trigger.
5. Lift nosepiece off work surface.
6. Repeat steps 2 through 4 for next application.
ACAUTION: The contact trip needs to be depressed
followed by a trigger pull for each nail followed by a release
of both the contact trip and trigger after each nail.
BUMP ACTION ///
Bump action is intended for rapid nailing
on flat, stationary surfaces.
When using bump action, two methods
are available: place actuation and
bump actuation.
Flip the switch located on the body of
the tool just between the trigger and
magazine to the right as shown in
Figure 7.
To operate the tool using the PLACE ACTUATION
method:
WARNING: A nail will fire each time the trigger is
depressed as long as the contact trip remains depressed.
1. Depress the contact trip against the work surface.
2. Depress the trigger.
To operate the tool using the BUMP ACTUATION
method:
1. Depress the trigger.
2. Push the contact trip against the work surface. As long
as the trigger is depressed, the tool will fire a nail every
time the contact trip is depressed. This allows the user
to drive multiple nails in sequence.
A CAUTION: Do not keep trigger depressed when tool is
not in use. Keep the contact trip lock-off engaged in the
locked position when the tool is not in use.
Preparing the tool
.&CAUTION: NEVER spray or in
any other way apply lubricants or
cleaning solvents inside the tooL This
can seriously affect the life and
performance of the tooL
NOTE: The battery pack is not fully
charged out of the carton. Follow
instructions outlined (see Charging Procedures).
1. Read the Safety Instruction section of this manuaL
2. Wear eye and ear protection.
Page 8
3.RemovebatteryfromtooL
4.Ensuremagazineisemptyofallfasteners.
5.Checkfor smoothandproperoperationof contact
tripandpusherassemblies.Donotusetoolffeither
assemblyis notfunctioningproperly.NEVERusea
toolthathasthecontacttriprestrainedintheactuated
position.
6.Keeptoolpointedawayfromyourselfandothers.
7.Insertfullychargedbatterypack.
Using the Contact Trip Lock-off
(Fig. 8, 9)
WARNING: To reduce the risk of serious personal
injury, DO NOT keep trigger depressed when tool is not in
use. Keep the contact trip lock-off switch LOCKED (Fig. 8)
when the tool is not in use.
A WARNING: Toreduce the risk of serious personal injury,
lock off trigger, disconnect battery pack from tool and
remove fasteners from magazine before making adjustments.
Serious personal injury may result.
Each DEWALT nailer is equipped with
a contact trip lock-off (B) which when
pulled downward with the lock
symbol showing in Figure 8, prevents
the tool from firing a nail.
When the contact trip lock-off is
oriented as shown in Figure 9, the
tool will be fully operational. The
contact trip lock-off should
always be locked off (Fig. 8)
whenever any adjustments are
made or when tool is not in
immediate use.
NOTE: Tools equipped with selective
actuation, when in bump fire mode
will allow the motor to start upon
trigger pull. This is normal operation. The contact trip lock-
off constrains the contact trip from discharging a nail.
Loading the Tool
_ WARNING: Keep the tool pointed away from yourself
and others. Serious personal injury may result.
•_J,WARNING: Never load nails with the contact trip or
trigger activated. Personal injury may result.
A WARNING: Always remove battery pack before loading
or unloading nails. Serious personal injury may result.
_CAUTION: Keep fingers clear of pusher to prevent
injury.
A CAUTION: The contact trip lock-off should always be
locked off whenever any adjustments are made or when
tool is not in use.
1. Press pusher latch (H) and pull magazine back.
2. Insert fasteners into the side of the magazine. Be sure
the fasteners ride on their tips in the nail channel.
3. Push magazine closed until it locks into place.
UNLOADING
THE TOOL
A WARNING: The
contact trip lock-off
should always be
locked off whenever
any adjustments are
made or when tool is
not in use.
1. Press the nail
pusher latch
(H) and pull the
magazine (G)
rearward. H
2. Tip the tool up
until the nails
slide freely out of
the magazine.
3. Open the jam clear door on the nosepiece to verify
there are no nails remaining.
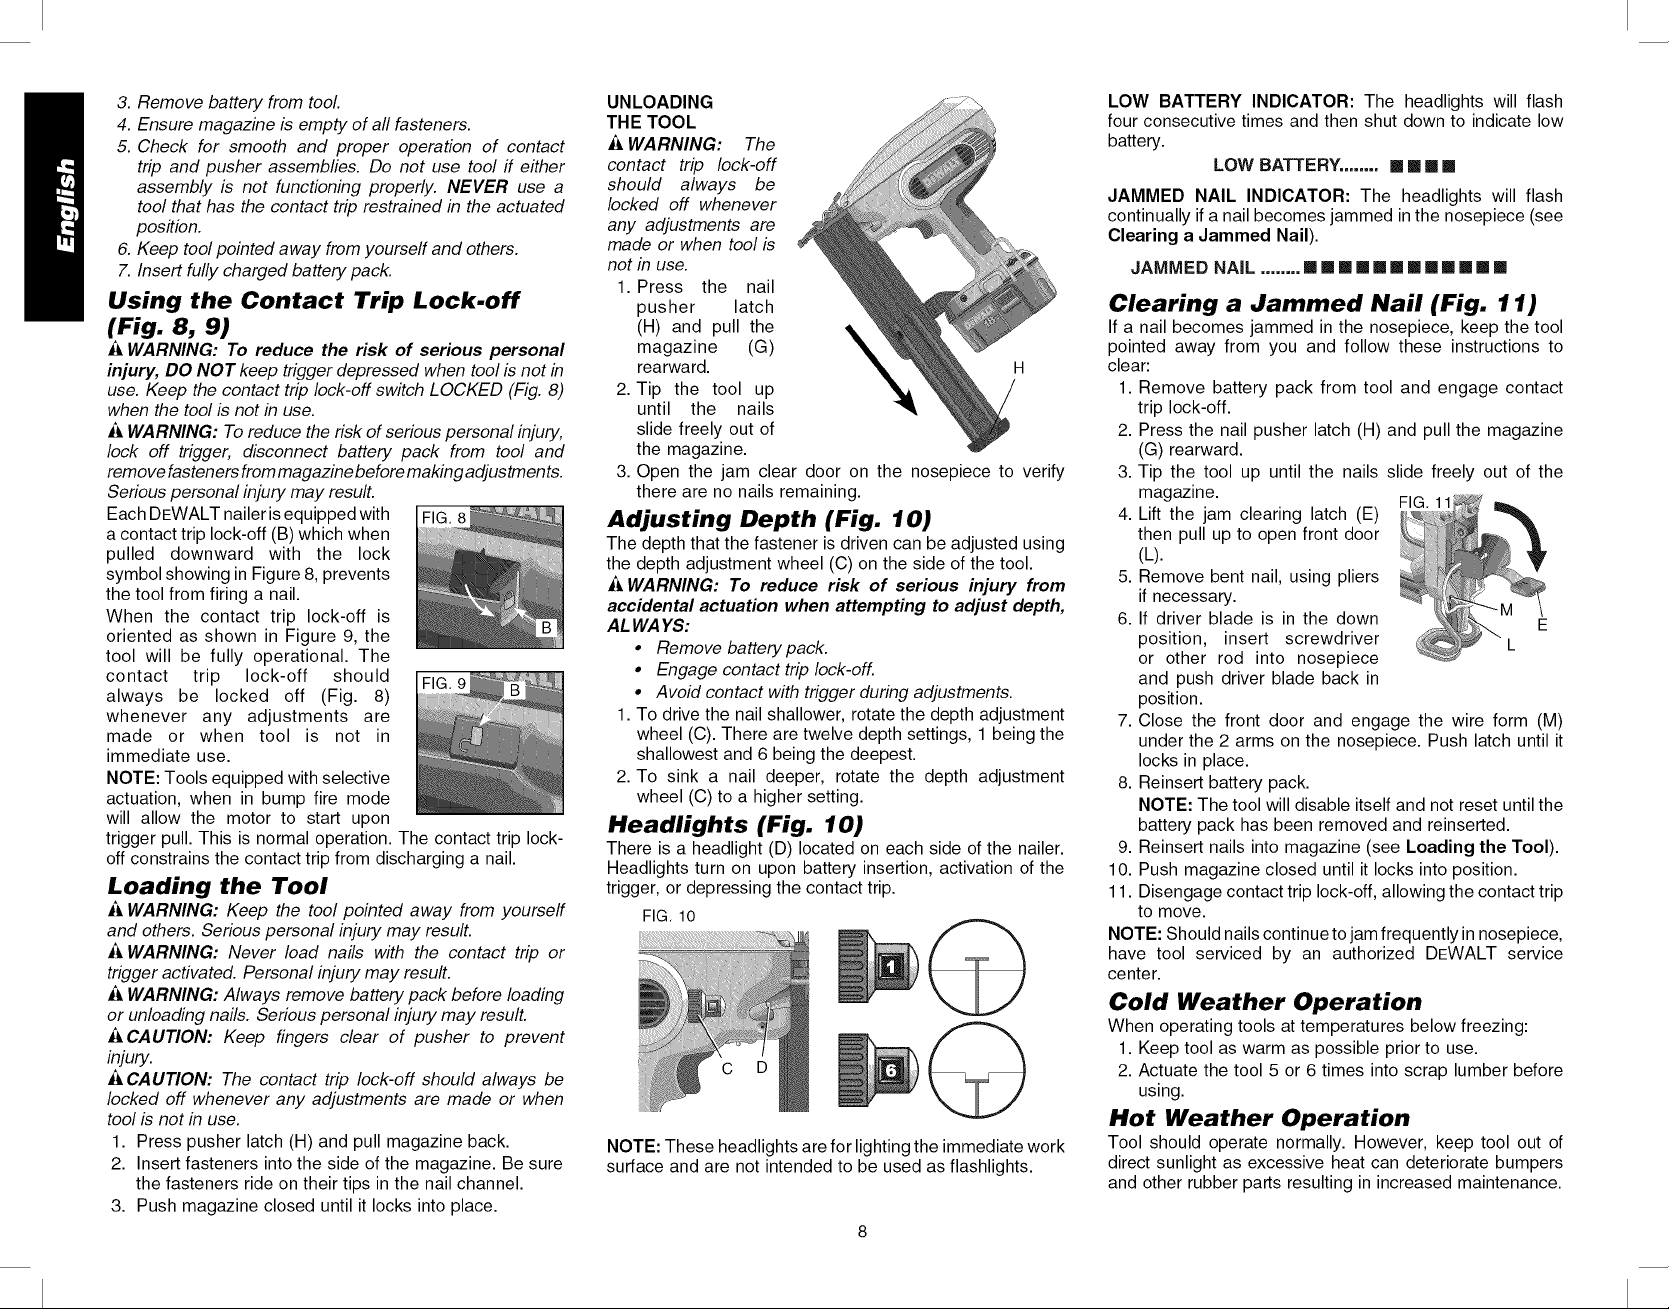
Adjusting Depth (Fig. 10)
The depth that the fastener is driven can be adjusted using
the depth adjustment wheel (C) on the side of the tool.
A WARNING: To reduce risk of serious injury from
accidental actuation when attempting to adjust depth,
AL WAYS:
• Remove battery pack.
• Engage contact trip lock-off.
° Avoid contact with trigger during adjustments.
1. To drive the nail shallower, rotate the depth adjustment
wheel (C). There are twelve depth settings, 1 being the
shallowest and 6 being the deepest.
2. To sink a nail deeper, rotate the depth adjustment
wheel (C) to a higher setting.
Headlights (Fig. 10)
There is a headlight (D) located on each side of the nailer.
Headlights turn on upon battery insertion, activation of the
trigger, or depressing the contact trip.
FIG, 10
NOTE: These headlights are for lighting the immediate work
surface and are not intended to be used as flashlights.
LOW BATTERY INDICATOR: The headlights will flash
four consecutive times and then shut down to indicate low
battery.
LOW BATTERY. ....... [] [] [] []
JAMMED NAIL INDICATOR: The headlights will flash
continually if a nail becomes jammed in the nosepiece (see
Clearing a Jammed Nail).
JAMMED NAiL ........ [][][][][][][][][][][][]
Clearing a Jammed Nail (Fig. 11)
If a nail becomes jammed in the nosepiece, keep the tool
pointed away from you and follow these instructions to
clear:
1. Remove battery pack from tool and engage contact
trip lock-off.
2. Press the nail pusher latch (H) and pull the magazine
(G) rearward.
3. Tip the tool up until the nails slide freely out of the
magazine.
4. Lift the jam clearing latch (E)
then pull up to open front door .......... -
5. Remove bent nail, using pliers
(L).
if necessary.
position, insert screwdriver
6. If driver blade is in the down L E
or other rod into nosepiece
and push driver blade back in
position.
7. Close the front door and engage the wire form (M)
under the 2 arms on the nosepiece. Push latch until it
locks in place.
8. Reinsert battery pack.
NOTE: The tool will disable itself and not reset until the
battery pack has been removed and reinserted.
9. Reinsert nails into magazine (see Loading the Tool).
10. Push magazine closed until it locks into position.
11. Disengage contact trip lock-off, allowing the contact trip
to move.
NOTE: Should nails continue to jam frequently in nosepiece,
have tool serviced by an authorized DEWALT service
center.
Cold Weather Operation
When operating tools at temperatures below freezing:
1. Keep tool as warm as possible prior to use.
2. Actuate the tool 5 or 6 times into scrap lumber before
using.
Hot Weather Operation
Tool should operate normally. However, keep tool out of
direct sunlight as excessive heat can deteriorate bumpers
and other rubber parts resulting in increased maintenance.
Page 9

Suspension Hook
(Fig. 12) FIG,12
A WARNING: Remove nails from
magazine before making any
adjustments or servicing this tool
Failure to do so may result in serious
injury.
A WARNING: To reduce the risk of J
serious personal injury, disconnect
battery pack from tool before making any adjustments,
changing accessories, servicing, or moving the tool.
Such preventative safety measures reduce the risk of
starting the tool accidentally.
A CAUTION: When not in use, place tool on its side on
a stable surface where it will not cause a tripping or
falling hazard. Some tools with large battery packs will
stand upright on the battery pack but may be easily
knocked over.
The DEWALT cordless nailers include an integrated
suspension hook (J) and can be attached to either side of
the tool to accommodate left- or right-handed users.
If the hook is not desired at all, it can be removed from
the tool.
TO REMOVE SUSPENSION HOOK
1. Remove battery pack from tool.
2. To switch the tool from right- to left-hand usage simply
remove the screw and reassemble on the other side.
3. Replace battery pack.
MAINTENANCE
A WARNING: To reduce the risk of serious personal
injury, disconnect battery pack from tool before making
any adjustments, changing accessories, servicing, or
moving the tool. Such preventative safety measures
reduce the risk of starting the tool accidentally.
Daily Maintenance Chart
ACTION
WHY
HOW
ACTION
WHY
HOW
Clean magazine, pusher, and contact trip
mechanism.
Permits smooth operation of magazine, reduces
wear, and prevents jams.
The use of oils, lubricants periodically or solvents is
not recommended as they tend to attract debris.
Before each use, check to insure all screws, nuts
and fasteners are tight and undamaged.
Prevents jams and premature failure of tool parts.
Tighten loose screws or other fasteners using the
appropriate Allen wrench or screwdriver
Cleaning
A WARNING: To reduce the risk of serious personal
injury, disconnect battery pack from tool before
cleaning and inspection. Make sure tool is in proper
working condition before placing the tool back in use or
serious personal injury may result.
A CAUTION: When cleaning, use only a damp cloth on
plastic parts. Many household cleaners contain chemicals
which could seriously damage plastic parts. Also, do not
use gasoline, turpentine, lacquer or paint thinner, dry
cleaning fluids or similar products which may seriously
damage plastic parts. Never let any liquid get inside the
tool; never immerse any part of the tool into a liquid.
CHARGER CLEANING INSTRUCTIONS
A WARNING: To reduce the risk of personal injury,
disconnect the charger from the AC outlet before cleaning.
Dirt and grease may be removed from the exterior of the
charger using a cloth or soft non-metallic brush. Do not use
water or any cleaning solutions
Lubrication
ACAUTION: NEVER spray or
in any other way apply lubricants or
cleaning solvents inside the tool This
can seriously affect the life and
performance of the tool
DEWALT tools are properly lubricated
at the factory and are ready for use.
However, it is recommended that, once a year, you take or
send the tool to a certified service center for a thorough
cleaning and inspection.
Repairs
A WARNING: To reduce the risk of serious personal
injury, remove nails from magazine before making any
adjustments or servicing this tool
To assure product SAFETY and RELIABILITY, repairs,
maintenance and adjustment (including brush inspection
and replacement) should be performed by a DEWALT
factory service center, a DEWALT authorized service
center or other qualified service personnel. Always use
identical replacement parts. Refer to the Troubleshooting
Guide at the end of this section.
Accessories
A WARNING: Since accessories, other than those offered
by DEWAL T, have not been tested with this product, use of
such accessories with this tool could be hazardous. To
reduce the risk of injury, only DEWAL T, recommended
accessories should be used with this product.
Recommended accessories for use with your tool are
available at extra cost from your local dealer or authorized
service center. If you need assistance in locating any
accessory, please contact DEWALT Industrial Tool Co.,
701 East Joppa Road, Baltimore, MD 21286, call 1-800-
4-DEWALT (1-800-433-9258) or visit our website www.
dewalt.com.
Three Year Limited Warranty
DEWALT will repair, without charge, any defects due to faulty
materials or workmanship for three years from the date of
purchase. This warranty does not cover part failure due to
normal wear or tool abuse. For further detail of warranty
coverage and warranty repair information, visit www.
dewalt.com or call 1-800-4-DEWALT (1-800-433-9258).
This warranty does not apply to accessories or damage
caused where repairs have been made or attempted by
others. This warranty gives you specific legal rights and
you may have other rights which vary in certain states or
provinces.
In addition to the warranty, DEWALT tools are covered by
our:
1 YEAR FREE SERVICE
DEWALT will maintain the tool and replace worn parts
caused by normal use, for free, any time during the first
year after purchase.
2 YEARS FREE SERVICE ON
DEWALT BATTERY PACKS
DC9096, DC9091, DC9071, DC9360 and DC9280
90 DAY MONEY BACK GUARANTEE
If you are not completely satisfied with the performance of
your DEWALT Power Tool, Laser, or Nailer for any reason,
you can return it within 90 days from the date of purchase
with a receipt for a full refund - no questions asked.
LATIN AMERICA: This warranty does not apply to products
sold in Latin America. For products sold in Latin America,
see country specific warranty information contained either
in the packaging, call the local company or see website for
warranty information.
FREE WARNING LABEL REPLACEMENT: Ifyour warning
labels (Fig. 24) become illegible or are missing, call 1-800-
4-DEWALT for a free replacement.
Page 10
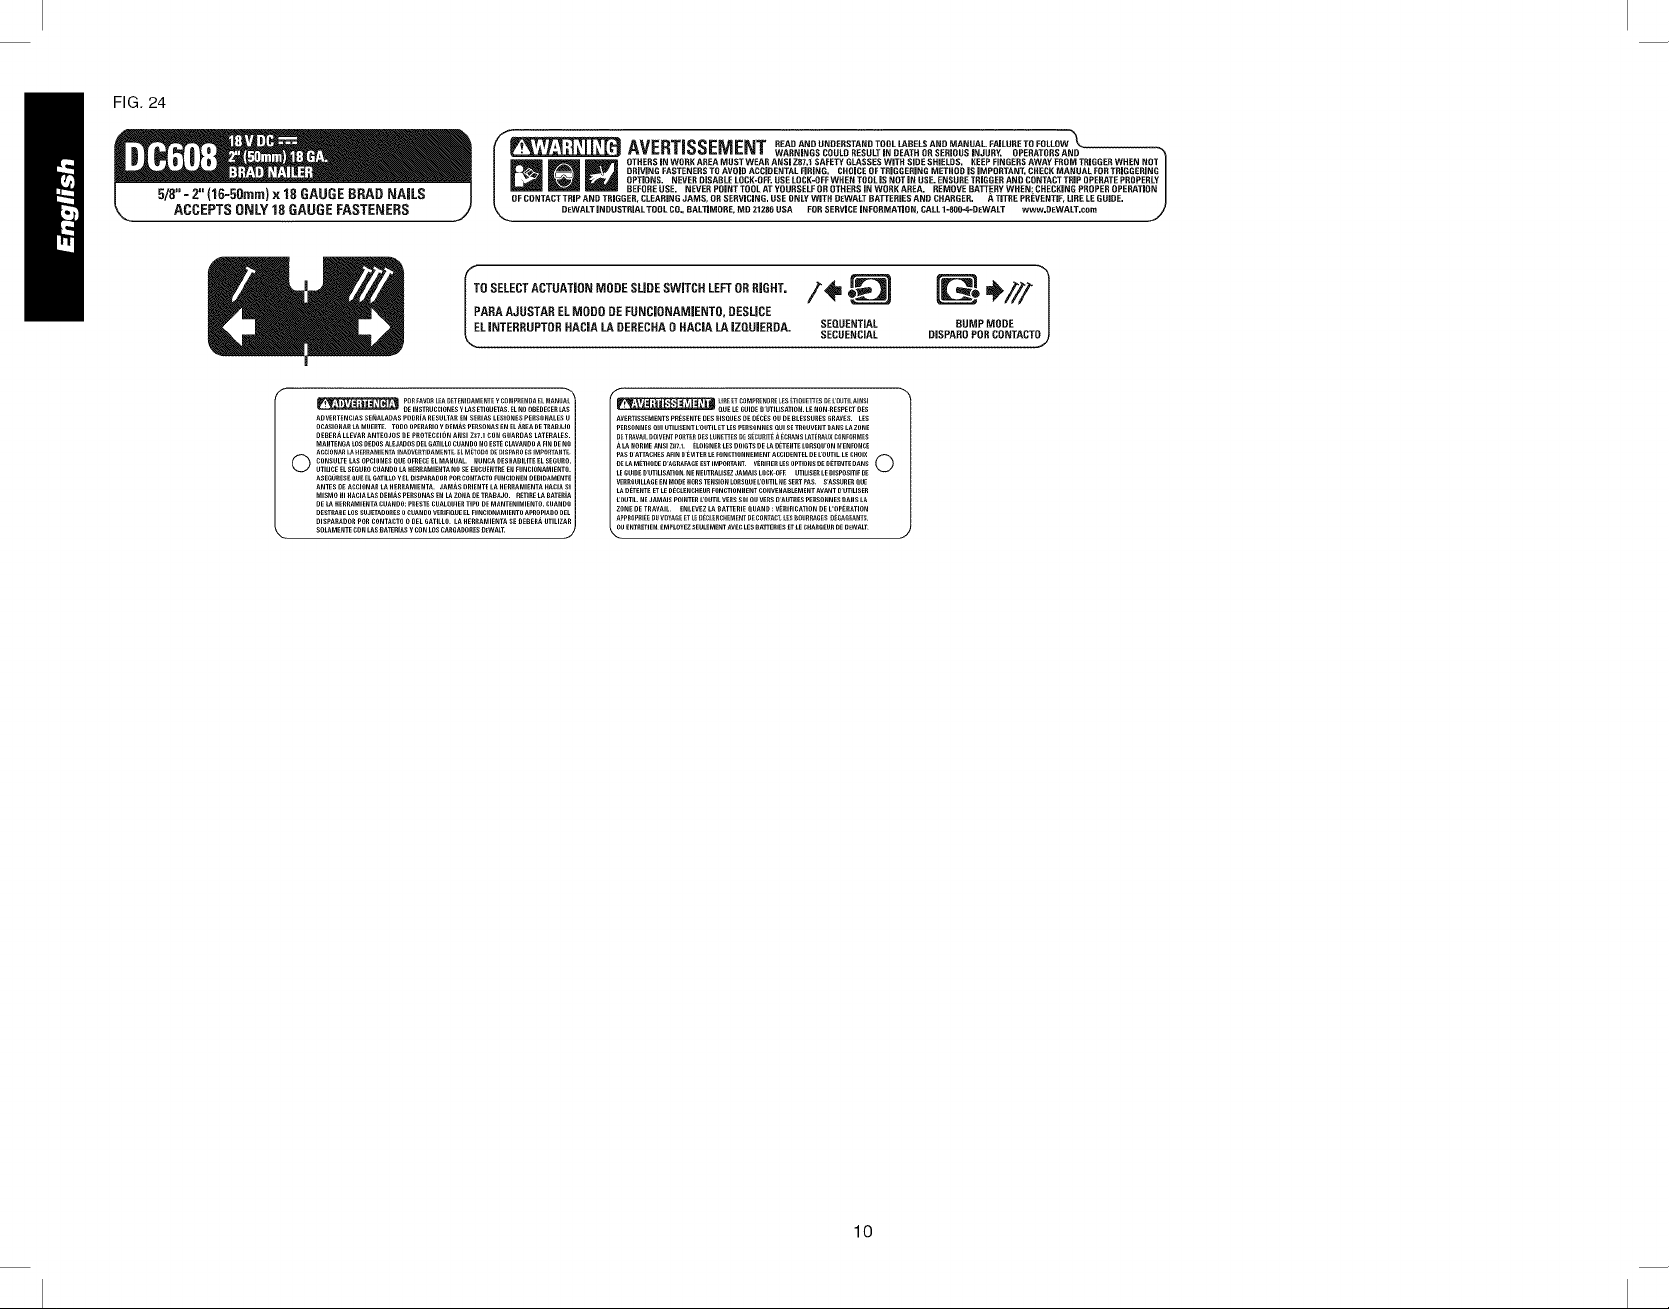
FIG. 24
f_ _ll_TICC_mml_KIT READANDUNDERSTANDTOOLLAIIELSANDMANUAL FAILURETOFOLLOW_
r_ m OTHERSIN WOBKAREAMUST WEAR ANSI 7,87.1SAFETYGLASSESWITH SIDE SHIELDS. KEEPFINGEBSAWAY FROM TRIGGERWHEN NOT
OFCONTACT TtlIP ANDTRIGGER, CLEARINGJAMS, 011SEttVICING. USEONLYWITff D_WALT ttATTEIIIES AND CttARGER. A TITHEPREVENTIF,LIRELEGUIBE.
r
TO SELECTACTIJATJONMODE SLIDE SWITCH LEFT OHRIGHT.
PARA A,IUSTAR EL MODO DE FUNCJONAMJENTO, DESLJCE
EL JlITERRUPTOIt HACJALA DERECHA O HACJALA IZQUJERDA.
AOVEeTENClASSE_ALADASPoOeiARESULTARENSERIASLESlONeSPERSONALESU
OCASIONARLAMUERTE.TOOO0PERARIOYOEMASPERSONAS_NELAREAOETRABAJ0
DEBERA LLEVAR ANTEOJOS DE PROTECCION ANSI Z87.1 C0N GUARDAS LATERALE$.
MANTENGA LOS DEDOS ALEJADO8 DEL GATILLO CUANDO NO [ST_ CLAVAND0 A FIN DE NO
ACCl0NA__ _E_RAMIEN1aINJ_DWRTIDAMENTEELI_TO_ODEDISPAR0ESIM_O_1AN1E
CONSULTE LAS OPCIO NES QUE OFREC[ EL MANUAL. NUNCA DES HABILITE EL SEGU[IO.
UTILICE EL SEGURO CUAND0 LA HERRAMIENTA N0 SE ENCUENTRE EN FUNCIONAMIENT0.
ASEGORESE QUE EL GATILLO Y ELDISPARADOR POR CONTACT0 FUNCIONEN DEE_IDAMENTE
ANTES DE ACCIONAll LA HERllAMIENTA. JAM_.S ORIENTE LA HERRAMIENTA HACIA SI
MISMO NI HACIA LAS DEM,_S pERSONA$ EN LA ZONA DE TRAE_AJO. I_ETIRE LA BATERiA
I© _ .........................................il
DE LA BERRAMIENTA CUANDO: pREST_ CUALQUIER TIP0 DE MANTENIMIENTO, CUAND0
DESTRABE LOS SUJETADORES 0 CUAND0 VERIFIQU[ EL FUNCIONAMIENT0 APROPIADO DEL
DISPARADOR pOR CONTACTO 0 OIL GATILL0. LA HERRAMIENTA SE DEBERA UTILIZAR
SOLAMENTECONLASBATERiAsY CONLOSCARGADORE_DEWALT
DE INST_UCCIONES Y LA$ [TIGUETAS ELNO OBEDECER LAS
1'41Vrrll|l_t_il-IvIr'nl§ WARNINGSCOULDRESilLTINDEATHO_ISEIIIOUSINJilIW. OPEIIATORSAND_
DRIVINGFASTENERSTOAVOID ACCIDENTALFIRING. CHOICE 0FTFIIGGERiNGMETHOD IS iMPORTANT. CHECI(MANUAL FORTRiGGERiNG
OPTIONS. NEVEtl DISABLELOCI,(-OFKUSELOCK-OFFWHEN TOOLISNOTIN USE. EIISUtlE TFIIGGEIIAND CONTACTTRIPOPERATEPROIPERLY
BEFOttEUSE. NEVEItPOINTTOOLATYOURSELFOROTHERSINWOItt(AREA. REMOVEtlATrEIIYWHEN_CttECKINGPIIOPEROPERATION
DEWALT iNDUSTRiAL TOOLCO., BALTIMORE,MD 21286USA FORSERVICEiNFORMATiON, CALL1-800.4-.DI:WALT www.DEWALT.com
13iI+/x!
SEQUENTIAL BUMP MODE
SECUENCiAL UISPAflO PUB CONTACT(
'-_ LiiiE[TooMI_ItENDIt[LE$ETI(IIJ_]_E$DELOIJTILAINSl
PERSONNES_UlUTILISENTLOUTIL_TLESPE_SONN_SQUISE T_OUVENTOANSLAZONE
D_TRAVAILDOIVE_T_O_T_DESLU_ErIESD_S_CU_IT_AEC_NS_aTE_U_CONFO_ME_
A_ NORM_ANSIZ_7.1. _LOIGN_RL_SOOI_TSOELAOET_NTELO_SQU'ONN'ENFONCE
WRTIS_EM_NTSp_SENTEOESRISt!U_SO_OEOESOUD__LESSUR_S_R_ES. LES
PAS0ArrAON_SAFIN0 EVlTERL_FONCTIONNEMENTACOIOENT_LO_L'OUTILLEC_OI×
ELAM_HODEO'A_RAFAGEESTIMPOR_NT_RIRERLESOPTIONSOEO_T_NT_OANS0
VERROUILLA__NMOOEHORST_NSlONLORS_UEL'OUTILNESE_TPAS S'ASSUR__UE
LAO_TENT__TLEOEOLENC_U_FONCTIONNENTCONVENABL_MENT_ANT0UTILISE_
_OUTIL.N_JAMAISPOINTERL'OUTILVE_SSOlOUWRS0 AUT_ESpE_SONN_SOANSLA
ZONEO_T_AVAIL.ENLEVEZLA_Arr_l_ _UAND: VERIFICATIOND_L'OPE_ATION
AP_O_I_ DUVOYagEETLED_L_NCHEMENTDECONTACT,LE__OU_ D_A_NT_
LI _UIO_DUTILIS_IONNENEUTRALISEZ_AMAISLO_-O_E UTILIS_RLEOISPOSlTIFOE
UENTRET_ENEMPLOY_ZSEULE_Em_EC LES_An'ERI_SET_ECHA_EU_OEO_WALT
QU_LE_UIOEOIUTILI_ATION.LENON_ESP_CTO_S
J
lO
Page 11
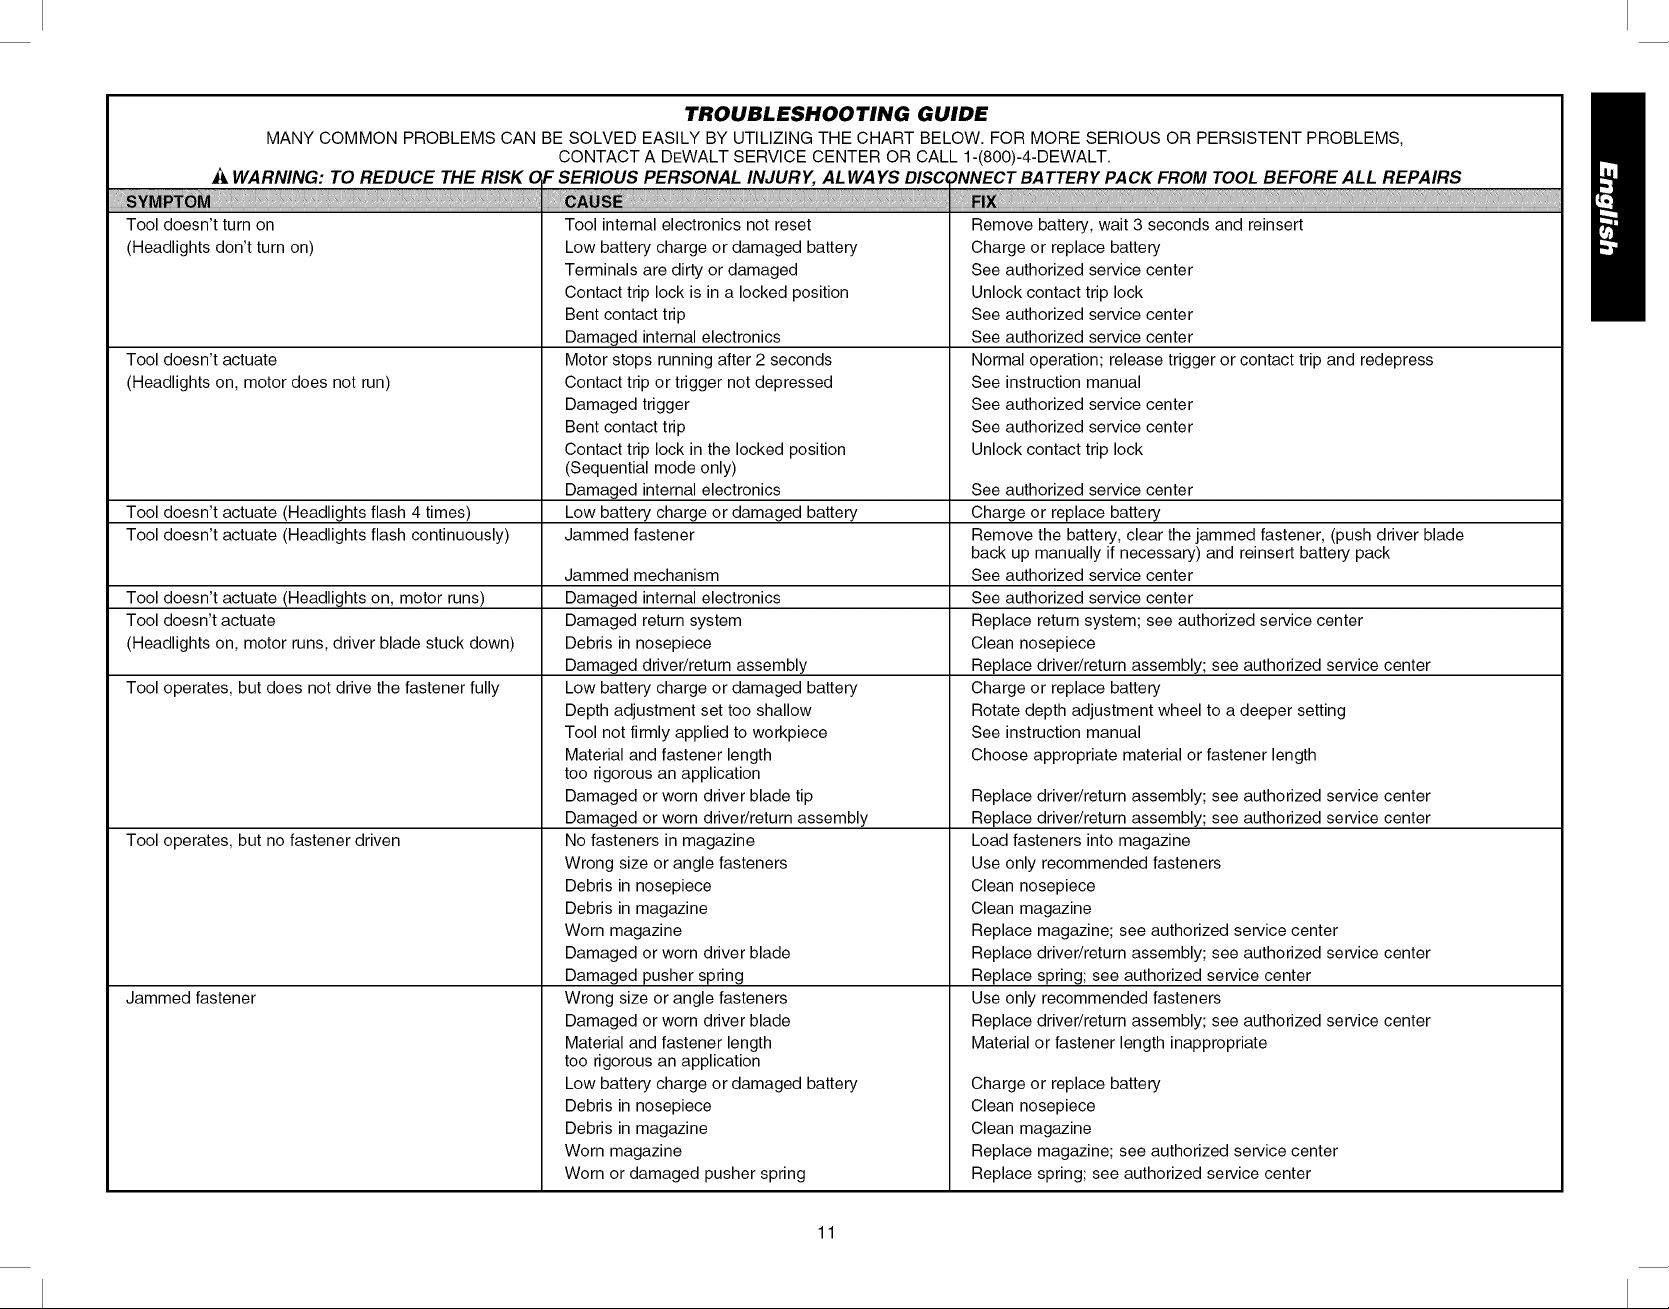
TROUBLESHOOTING GUIDE
MANY COMMON PROBLEMS CAN BE SOLVED EASILY BY UTILIZING THE CHART BELOW. FOR MORE SERIOUS OR PERSISTENT PROBLEMS,
CONTACT A DEWALT SERVICE CENTER OR CALL 1-(800)-4-DEWALT.
A WARNING: TO REDUCE THE RISK d =SERIOUS PERSONAL INJURY, ALWAYS DISC )NNECT BATTERY PACK FROM TOOL BEFORE ALL REPAIRS
Tool doesn't turn on
(Headlights don't turn on)
Tool doesn't actuate
(Headlights on, motor does not run)
Tool doesn't actuate (Headlights flash 4 times)
Tool doesn't actuate (Headlights flash continuously)
Tool doesn't actuate (Headlights on, motor runs)
Tool doesn't actuate
(Headlights on, motor runs, driver blade stuck down)
Tool operates, but does not drive the fastener fully
Tool operates, but no fastener driven
Jammed fastener
Tool internal electronics not reset
Low battery charge or damaged battery
Terminals are dirty or damaged
Contact trip lock is in a locked position
Bent contact trip
Damaged internal electronics
Motor stops running after 2 seconds
Contact trip or trigger not depressed
Damaged trigger
Bent contact trip
Contact trip lock in the locked position
(Sequential mode only)
Damaged internal electronics
Low battery charge or damaged battery
Jammed fastener
Jammed mechanism
Damaged internal electronics
Damaged return system
Debris in nosepiece
Damaged driver/return assembly
Low battery charge or damaged battery
Depth adjustment set too shallow
Tool not firmly applied to workpiece
Material and fastener length
too rigorous an application
Damaged or worn driver blade tip
Damaged or worn driver/return assembly
No fasteners in magazine
Wrong size or angle fasteners
Debris in nosepiece
Debris in magazine
Worn magazine
Damaged or worn driver blade
Damaged pusher spring
Wrong size or angle fasteners
Damaged or worn driver blade
Material and fastener length
too rigorous an application
Low battery charge or damaged battery
Debris in nosepiece
Debris in magazine
Worn magazine
Worn or damaged pusher spring
Remove battery, wait 3 seconds and reinsert
Charge or replace battery
See authorized service center
Unlock contact trip lock
See authorized service center
See authorized service center
Normal operation; release trigger or contact trip and redepress
See instruction manual
See authorized service center
See authorized service center
Unlock contact trip lock
See authorized service center
Charge or replace battery
Remove the battery, clear the jammed fastener, (push driver blade
back up manually if necessary) and reinsert battery pack
See authorized service center
See authorized service center
Replace return system; see authorized service center
Clean nosepiece
Replace driver/return assembly; see authorized service center
Charge or replace battery
Rotate depth adjustment wheel to a deeper setting
See instruction manual
Choose appropriate material or fastener length
Replace driver/return assembly; see authorized service center
Replace driver/return assembly; see authorized service center
Load fasteners into magazine
Use only recommended fasteners
Clean nosepiece
Clean magazine
Replace magazine; see authorized service center
Replace driver/return assembly; see authorized service center
Replace spring; see authorized service center
Use only recommended fasteners
Replace driver/return assembly; see authorized service center
Material or fastener length inappropriate
Charge or replace battery
Clean nosepiece
Clean magazine
Replace magazine; see authorized service center
Replace spring; see authorized service center
11
Page 12

FIG. 1
F
K
tf D_finitions : lignes directrices \
en mati_re de s_curit_
Les d6finitions ci-dessous d6crivent le niveau de danger
pour chaque mot-indicateur employ& Lire le mode d'emploi
et porter une attention particuli_re &ces symboles.
_DANGER : indique une situation dangereuse imminente
qui, si elle n'est pas evit6e, causera la mort ou des bles-
sures graves.
i_A VERTISSEMENT : indique une situation potentie//ement
dangereuse qui, si elle n'est pas evit6e, pourrait causer la
mort ou des blessures graves.
_,MISE EN GARDE : indique une situation potentie//ement
dangereuse qui, si elle n'est pas evit6e, peut causer des
blessures mineures ou moderees.
MISE EN GARDE : utilise sans le symbole d'alerte de
securite, indique une situation potentiellement dangereuse
qui, si elle n'est pas evit6e, peut causer des dommages
materiels.
A. D6tente
B. Dispositif de blocage du
d6clencheur
C. Molette de r6glage de
profondeur
D. T6moin indicateur du
syst_me d'6clairage/
de pile faible/de blocage
E. Loquet de d6gagement
F. D6clencheur par contact
Longueurs
des clous
Diam_tre de la tige
Angle de tir des clous
G. Chargeur
H. Dispositif de blocage du
poussoir
I. S61ecteur de mode choc/
s6quentiel
J. Crochet pour rangement,
&droite ou & gauche
K. Indicateur de bas niveau
de clous
SPE_ClFICATIONS RELATIVES AUX CLOUS
16 mm, 19 mm, 25 mm, 29 mm, 30 mm, 32 mm, 33 mm, 35 mm, 38 mm, 40 mm, 44 mm, 50 mm
(5/8 po, 3/4 po, 1 po, 1 1/8 po, 1 3/16 po, 1 1/4 po, 15/16 po, 1 3/8 po, 1 1/2 po, 1 9/16 po, 1 3/4 po, 2 po)
FICHE TECHNIQUE DE L'OUTIL
Mode de tir S61ectif
Tension 18
Hauteur 286 mm (11,25 po)
Largeur 89 mm (3,5 po)
Longueur 292 mm (11,5 po)
Poids 3,4 kg (7,5 Ib)
Angle du chargeur 0°
Capacit6 du chargeur jusqu'& 110 clous
Droits
calibre 18
0o
12
Page 13

POURTOUTEQUESTIONOUTOUTCOMMENTAIRE
SURCETOUTILOUSURTOUTAUTREOUTILDEWALT,
COMPOSERLENUMCROSANSFRAISSUIVANT:
1-800-4-DEWALT(1-800-433-9258).
R_gles g_n_rales de s_curit_
concernant les outils a piles
_ AVERTISSEMENT! Lire et assimiler
toutes les directives. Le non-respect de
toutes les directives indiquees ci-dessous peut
entra?ner des risques de decharge electrique,
d'incendie ou de blessures graves.
CONSERVER CES DIRECTIVES
ESPACE DE TRAVAIL
• Tenir I'espace de travail propre et bien eclaire. Les
etablis encombres et les endroits sombres sont souvent
propices aux accidents.
• Ne pas faire fonctionner d'outils electriques clans
un milieu deflagrant, par exemple en presence de
liquides, de gaz ou de poussieres inflammables.
Les outils electriques produisent des etincelles qui pour-
raient enflammer la poussiere ou les vapeurs.
• Eloigner les curieux, les enfants et les visiteurs Iors
de I'utilisation d'un outil electrique. Une distraction
pourrait vous en faire perdre la mMtrise.
SI_CURITI_ EN MATIERE D'I_LECTRICITI_
• Ne pas utiliser le cordon de fa_on abusive. Ne
jamais utiliser le cordon d'alimentation pour trans-
porter I'outil. Tenir le cordon eloigne de la chaleur,
de I'huile, des bords tranchants et des pieces
mobiles. Remplacer immediatement tout cordon
endommage. Un cordon d'alimentation endommage
peut provoquer un incendie.
• Un outil a piles integrees ou fonctionnant sur un
bloc-piles exteme doit _tre recharge uniquement au
moyen du chargeur prevu pour les piles utilisees.
L'utilisation d'un chargeur qui convient a un type de
bloc-piles risque de provoquer un incendie s'il est utilise
avec un autre type de bloc-piles.
• Utiliser I'outil fonctionnant sur piles uniquement
avec le bloc-piles con_u specialement pour I'outil.
L'utilisation de toute autre pile peut provoquer un
incendie.
S#CURIT# PERSONNELLE
• Rester vigilant, faire attention au travail en cours et
faire preuve de jugement clans I'utilisation de tout
outil electrique. Ne pas utiliser d'outil en cas de
fatigue ou sous I'emprise de drogues, d'alcool ou
de medicaments. Un simple moment d'inattention en
utilisant un outil electrique peut entrMner des blessures
graves.
• S'habiller de maniere appropriee. Ne pas porter de
v6tements amples ni de bijoux. Attacher les cheveux
longs. Tenir les cheveux, les v_tements et les gants
hors de portee des pieces en mouvement. Les
v6tements amples, bijoux ou cheveux longs pourraient
s'enchev6trer dans les pieces mobiles. Se tenir eloigne
des events puisque ces demiers recouvrent souvent
des pieces en mouvement.
• Eviter les demarrages intempestifs. S'assurer que le
dispositif de blocage du declencheur est en position
verrouillee avant d'inserer le bloc-piles. Transporter
un outil alors que votre doigt repose sur la detente ou
inserer le bloc-piles dans un outil alors que la detente est
en position marche risque de provoquer un accident.
• Retirer les cles de reglage ou les cles a ouverture
fixe avant de mettre I'outil en marche. Une cle
molette ou une cle de reglage qui est laissee fixee a une
partie mobile de I'outil peut entrafner des blessures.
• Ne pas trop tendre les bras. Conserver son equilibre
en tout temps. Un equilibre convenable permettra de
maftriser I'outil lots de situations inattendues.
• Utiliser un equipement de securite. Toujours
porter une protection oculaire. Selon les conditions,
porter un masque antipoussiere, des chaussures de
securite antiderapantes, un casque de securite ou une
protection auditive.
UTILISATION ET ENTRETIEN DE L'OUTIL
• Utiliser des brides de fixation ou tout autre dispositif
de fixation permettant de soutenir et de retenir la
piece sur une plate-forme stable. Tenir la piece avec
la main ou contre son corps est instable et risque de
provoquer une perte de maftrise de I'outil.
• Ne pas forcer I'outil. Utiliser le bon outil pour votre
application. L'outil approprie effectuera un meilleur
travail, de fa_on plus s_Jreeta la vitesse pour laquelle il
a ete congu.
• Ne pas utiliser I'outil si I'interrupteur ne fonctionne
pas. Tout outil qui ne peut 6tre regle par I'interrupteur
est dangereux et doit 6tre repare.
• Debrancher le bloc-piles de I'outil ou regler
I'interrupteur a la position de verrouillage ou
d'arr6t avant d'effectuer tout reglage, de changer
d'accessoire ou de ranger I'outil. De telles mesures
de securite preventives reduisent le risque de mettre
I'outil en marche accidentellement.
• Ranger les outils inutilises hors de portee des
enfants et des personnes non formees a leur
utilisation. Les outils sont dangereux entre les mains
d'utilisateurs inexperimentes.
• Lorsque le bloc-piles n'est pas utilise, le tenir
eloigne des objets metalliques, notamment des
trombones, de la monnaie, des cles, des clous, des
vis, etc., qui peuvent etablir une connexion entre les
deux bornes. Le court-circuit des bornes du bloc-piles
risque de provoquer des etincelles, des br_Jlures ou un
incendie.
13
• Verifier les pieces mobiles afin de s'assurer qu'elles
sont bien alignees et qu'elles ne restent pas grippees.
Verifier egalement les pieces afin de s'assurer
qu'il n'y a aucun bris ni aucune autre condition
susceptible de nuire au bon fonctionnement de
I'outil. En cas de dommages, faire reparer I'outil
avant de I'utiliser. Beaucoup d'accidents sont causes
par des outils mal entretenus.
• N'utiliser que les accessoires conseilles par le
fabricant pour le modele de I'outil. Des accessoires
qui conviennent a un outil peuvent devenir dangereux
Iorsqu'ils sont utilises avec un autre outil.
RE_PARATION
• Toute reparation de I'outil ne dolt 6tre effectuee que
par des reparateurs professionnels. Toute reparation
ou tout entretien realise par un personnel non forme
peut entrafner des risques de blessures.
• Pour reparer un outil, n'utiliser que des pieces de
rechange identiques. Suivre les directives figurant
la rubrique Entretien du mode d'emploL L'utilisation de
pieces non autorisees ou le non-respect des directives
d'entretien peuvent entrafner des risques de decharge
electrique ou de blessure.
Instructions de s_curit_
importantes pour les cloueuses
_A VERTISSEMENT : Iors de I'utilisation de tout modele de
cloueuse, suivre toutes les mesures de s6curit6, d6crites
ci-apres, pour eviter un risque de deces ou de blessures
graves. Lire et assimiler toutes les directives avant d'utiliser
I'outil.
• Tenir I'outil par sa surface de prise isolee clans une
situation oO I'outil de coupe peut entrer en contact
avec un c#blage dissimule. Tout contact avec un fil
, sous tension _ mettra _ sous tension _ les pieces
metalliques exposees de I'outil et provoquera une
decharge electrique chez I'operateur de I'outil.
• L'outilactionnepourraitprojeterdes
debris, de la coile d'assemblage ou
de la poussiere, qui peuvent tous
provoquer des lesions oculaires
FIG.A I'operateur. L'operateur et les autres
personnes oeuvrant dans la zone de
travail DOIVENT porter des lunettes de
securite munies deprotecteurs lateraux.
Ces lunettes de securite doivent 6tre
conformes aux exigences de la norme
ANSI Z87.1 (les lunettes homologuees
portent I'inscription , Z87 _ imprimee
ou estampillee). L'employeur a la
responsabilite d'imposer le port d'un
equipement de protection oculaire par
I'operateur de I'outil et toute personne
se trouvant dans la zone immediate de
travail. (fig. ,4)
Page 14

• Toujours porter une protection FIG.B
auditive et toute autre protection
convenable Iors de I'utilisation de
I'outil. Dans certaines conditions et
selon la duree d'utilisation, le bruit emis
par ce produit pourrait contribuer a une
perte auditive. (fig. A)
• Debrancher le bloc-piles de I'outil
Iorsque ce dernier est inutilise.
Toujours retirer le bloc-piles et les
attaches du chargeur avant de quitter FIG.C
la zone de travail ou de passer I'outil
un autre operateur. Nepas transporter
I'outil vers une autre zone de travail
qui comprend des echafaudages, des
marches, des echeiles, etc., avec le
bloc-piles insere. Ne pas effectuer de
reglages, d'entretien ou retirer des
attaches coincees avec le bloc-piles
insere.
• Ne pas retirer, modifier ou rendre FIG.D
inutilisable I'outil, la detente, le
dispositif de blocage du declencheur
par contact ou le declencheur par
contact de quelque fagon que ce soit.
Alepas appliquer de ruban ou d'attache
sur la detente ou le declencheur
pour la ou le maintenir en position de
MARCHE. Ale pas retirer le ressort du
declencheur. Inspecter quotidiennement
le bon fonctionnement de la detente FIG.E
et du declencheur. Une decharge non
contrOlee pourrait survenir.
• Inspecter I'outil avant de I'utiliser.
Ne pas utiliser un outil si une
quelconque partie de I'outil, de la
detente, du dispositif de blocage
du declencheur ou du declencheur
_•• ,• _ii_iii_!_
par contact n'est pas fonctionneile,
est debranchee ou modifiee ou ne
fonctionne pas correctement. Les FIG.F
pieces endommagees ou manquantes
doivent 6tre reparees ou remplacees
avant utilisation. Se reporter ala rubrique
Reparations.
• Ne jamais modifier ni alterer I'outil.
• Toujourspresumerquel'outilcontient
des attaches.
• Ne jamais pointer I'outil sur des
FIG. G
collegues ou sur soi-m6me. Pas de
bousculades! Travailler en toute securit6!
Traiter I'outil comme un instrument
essentiel de travail. (fig. t3)
• Eloigner les curieux, les enfants
et les visiteurs Iors de I'utilisation
d'un outil electrique. Une distraction
pourrait vous en faire perdre la maTtrise.
Verrouiller Ibutil dans un endroit sDr,
hors de la portee des enfants Iorsqu'il
n'est pas utilise.
Toujours utiliser le dispositif de
blocage du declencheur Iorsque
I'outil n'est pas destine a 6tre utilise
immediatement. L'utifisation du
dispositif de blocage du declencheur
previendra une decharge intempestive.
Ne pas trop tendre les bras.
Conserver son equilibre en tout
temps. Une perte d'equilibre risque
d'entra_ner une blessure. (fig. C)
Utiliser I'outil uniquement pour les
travaux pour lesquels il a ete congu.
Ne pas decharger les attaches
I'air libre ou clans des materiaux
trop durs comme le beton, la pierre,
le bois tres dur, les neeuds ou toute
autre matiere trop difficile a penetrer.
Ne pas utiliser le corps de I'outil ou son
couvercle superieur comme marteau.
Les attaches ejectees peuvent suivre
une trajectoire inattendue et provoquer
des blessures. (figs. D, F)
Toujours prendre soin d'eloigner les
doigts du declencheur par contact
pour prevenir une blessure en cas
de rel&chement involontaire du
poussoir (fig. H)
Se reporter a la rubrique Entretien
et Reparations pour obtenir de
plus amples renseignements sur
I'entretien approprie de I'outil.
Toujours utiliser I'outil clans un
endroit propre et eclaire. S'assurer
que la surface de travail est exempte de
debris et prendre soin de ne pas perdre
I'equilibre Iors de travaux en hauteur,
comme sur un toit.
Ne pas enfoncer d'attaches pres du
bord de la piece. La piece risque de se
fendre, faire ricocher I'attache et blesser
I'operateur ou un collegue de travail. II
est possible que le clou suive le fil du
bois et sorte inopinement sur le cbte de
la piece. Enfoncer la pointe biseautee
du clou perpendiculairement au fil du
bois pour reduire le risque de blessures.
(figs. E, F et M)
Ne pas enfoncer de clous sur les
t_tes d'autres attaches ou avec
I'outil a un angle trop aigu. Ceci
FIG. H
FIG. I
FIG. J
FIG. K
FIG. L
pourrait causer une blessure provoquee
par un recul, un coincement d'attache
ou un ricochet de clou. (fig. G)
• Garder les mains et les parties du
corps eloignees de la zone immediate
de travail. Le cas echeant, tenir la piece
I'aide de serres pour proteger les
mains et le corps de dangers potentiels.
S'assurer que la piece est bien fixe avant
d'appuyer la cloueuse contre celle-ci. La
force du declencheur peut entrafner le
deplacement inopine de la piece. (fig. H)
Ne pas utiliser d'outil en presence de
poussieres, de gaz ou d'emanations
inflammables. L'outil peut generer une
etincelle qui risque d'enflammer les
gaz, provoquant ainsi un incendie. Une
etincelle pourrait egalement 6tre produite
si un clou est enfonce sur un autre clou.
(fig. I)
Tenir le visage et le corps a I'#cart
de I'arriere du couvercle de I'outil
Iors de travaux clans des endroits
d'acces limite. En effet, un recu/ inopine
peut entrMner un impact au corps,
particulierement lots d'un clouage dans
une matiere dure ou dense. (fig. J)
• Saisir I'outil fermement pour en garder
la maitrise tout en lui permettant de
reculer hors de la surface de travail
Iorsque I'attache est enfoncee. En
,, mode d'actionnement par choc., si le
declencheur touche la piece de nouveau
avec la detente enfoncee, la cloueuse se
declenchera.
• Le choix de la methode de
declenchement est importanL
Consulter le manuel pour conna_tre les
options de declenchement.
SI_LEOTEUR DE MODE CHOC/
SI_QUENTIEL
Actionnement en mode sequentiel /"
(fig. K)
• Lorsqu'on utilise I'outil par
actionnement en mode sequentiel, ne
pas I'actionner a moins qu'il ne soit
fermement appuye contre la piece.
Actionnement par choc /77 (fig. L)
• Lors de I'utilisation de I'outil en mode
choc, 6tre prudent afin d' eviter le double
declenchement en raison du recul de
I'outil.On peut enfoncer involontairement
des clous si le declencheur touche de
nouveau la piece inopinement.
14
Page 15

FIG. M
FIG. N
FIG. 0
POUR EVlTER LES DOUBLES
DECLENCHEMENTS :
• Ne pas presser Ibutil contre
la piece avec trop de force.
• Permettre a Ibutil d'effectuer
completement son
mouvement de recul apres
chaque actionnement.
• Utiliser la detente pour
I'actionnement en mode
sequentieL
• Lorsqu'on utilise
I'_ actionnement par coup _,
de la cloueuse pour clous
de finition, il faut toujours
bien maitriser I'outil. Un
positionnement imprecis de I'outil
peut entrMner une decharge mal
dirigee d'une attache.
• Ne pas enfoncer de clous sur
les t6tes d'autres attaches. Cette
pratique risque de provoquer un
fort recul, de coincer des attaches
ou de faire ricocher des clous.
(fig.m)
• S'informer de I'epaisseur du materiau Iorsque vous
utilisez une cloueuse. Un c/ou en sai//ie peut causer
des blessures.
• REGLAGE DE LA PROFONDEUR : pour reduire les
risques de blessures graves Iors de I'actionnement
accidentel de I'outil Iorsqu'on tente de regler la
profondeur, TOUJOURS :
• Retirer le bloc-piles.
• Engager le dispositif de blocage du declencheur
(fig. N).
• Eviter tout contact avec la d#tente lots des
r#glages.
• Ne pas enfoncer des clous # I'aveuglette clans les
murs, les planchers et autres zones de travail. Des
attaches enfoncees dans des fils electriques sous
tension, de la plomberie ou d'autres types d'obstacles
peuvent entrafner des blessures. (fig. O)
• Rester vigilant, faire attention au travail en cours et
faire preuve de jugement clans I'utilisation de tout
outil electrique. Ne pas utiliser d'outil en cas de
fatigue ou sous I'emprise de drogues, d'alcool ou
de medicaments. Un simple moment d'inattention en
utilisant un outil electrique peut entrafner des blessures
graves.
AAVERTISSEMENT : I'utilisation de ce produit vous
exposera a des substances chimiques qui, dans I'Etat de
Califomie, sont reconnues cancerigene et susceptibles
d'entrMner des anomalies congenitales et d'autres dan-
gers relatifs a la reproduction. Ne pas inhaler les vapeurs
et la poussiere, et se laver les mains apres utilisation.
• Eviter tout contact prolonge avec la poussiere
soulevee par cet outil ou autres outils electriques.
Porter des v#tements de protection et nettoyer
les parties exposees du corps avec de I'eau
savonneuse. S'assurer de bien se proteger afin d'eviter
d'absorber par la bouche, les yeux ou la peau des
produits chimiques nocifs.
_ A VERTISSEMENT : Cet outil peut produire et repandre
de la poussiere susceptible de causer des dommages
serieux et permanents au systeme respiratoire. Toujours
utiliser un appareil respiratoire anti-poussieres approprie
approuve par le NIOSH ou I'OSHA. Diriger les particules
dans le sens oppose du visage et du corps.
_A VERTISSEMENT : TOUJOURS PORTER DES
LUNETTES DE SECURITE. Les lunettes ordinaires ne
constituent PAS des lunettes de securite. Utiliser egalement
un masque facial ou anti-poussiere si I'operation de
decoupe genbre de la poussiere. TOUJOURS PORTER
UN EQUIPEMENT DE PROTECTION HOMOLOGUE- :
• protection oculaire conforme a la norme ANSI Z87.1
(CAN/CSA Z94.3);
• protection auditive conforme a la norme ANSI $12.6
(S3.19);
• protection des voies respiratoires conforme aux
normes NIOSH/OSHA/MSHA.
_MISE EN GARDE : Iorsque I'outil n'est pas utilise, le
placer sur le cote, sur une surface stable, de maniere
ne faire trebucher ni tomber personne. Certains outi/s
presentant un gros bloc-piles reposeront sur ce dernier,
la verticale, mais risquent d'6tre facilement renverses.
• L'etiquette apposee sur votre outilpeut comprendre les
symboles suivants. Les symboles et leurs definitions
sont indiques ci-apres :
V............ volts A .........amperes
Hz.......... hertz W ........ watts
min ........ minutes "_ .......courant
--- ..... courant continu altematif
@ .......... Construction de classe I no ........ vitesse
(mis a la terre) vide
.......... borne de terre i_ ........ symbole
[] .......... Construction de classe II d'alerte a la
(a double isolation) securite
.../min ... rotations ou altemance
par minute
BPM ...... coups par minute
AVANT D'UTILISER L'OUTIL, LIRE ATTENTIVEMENT
ET BIEN ASSIMILER TOUTES LES INSTRUCTIONS
DE LA SECTION << CONSIGNES DE SI_CURITI_
IMPORTANTES ,,.
15
Consignes de s_curit_ importantes
concernant les bloc-piles
L'outil est aliment6 au moyen d'un bloc-pile de DEWALT.
Au moment de commander un bloc-pile de rechange,
s'assurer d'inclure le num6ro de catalogue et la tension
appropri6e. Les bloc-piles & dur6e prolong6e durent plus
Iongtemps que les bloc-piles standard. Consulter le dia-
gramme & la fin du pr6sent manuel afin de v6rifier la com-
patibilit6 du chargeur avec le bloc-pile.
REMARQUE : Bien que I'outil puisse fonctionner au moyen
de I'un ou I'autre de ces bloc-piles, on doit s'assurer d'en
choisir un de tension appropri6e. Un bloc-pile perd gradu-
ellement sa charge s'il n'est pas laiss6 dans le chargeur;
il est donc recommand6 de le laisser dans le chargeur en
tout temps.
Le bloc-pile n'est pas compl_tement charg6 au moment de
sa livraison. Avant d'utiliser le bloc-pile et le chargeur, lire
attentivement toutes les consignes de s6curit6 6num6r6es
ci-dessous et suivre les m6thodes de chargement pr6ci-
s6es ci-dessous.
LIRE TOUTES LES DIRECTIVES
• NEPASincinererlebloc-pilem#mes'ilestgravement
endommage ou completement use, car il pourra#
exploser en presence de flammes.
• Les ceilules peuvent subir une fuite legere par suite
d'un usage extr6me ou d'une exposition a certaines
temperatures; cela n'indique pas un probleme.
Cependant, si le scellant exteme est perce et le liquide
entre en contact avec la peau, on doit:
a. se laver rapidement la partie du corps touchee avec
de I'eau savonneuse;
b. neutraliser I'effet au moyen d'un acide doux tel que
du jus de citron ou du vinaigre;
c. si les yeux sont touches, les rincer a fond avec
de I'eau propre pendant au moins 10 minutes et
consulter immediatement un medecin. (Remarque
aux fins medicales : ce liquide contient une
solution composee de 25 a 35 % d'hydroxyde de
potassium).
• Ne recharger les blocs-piles que dans des chargeurs
DEWAL T.
• NE PAS immerger le chargeur ou le bloc-pile dans I'eau
ou tout autre liquide quelconque, ni I'eclabousser.
• Ne pas ranger ou utiliser I'outil et le bloc-pile I_ ob
la temperature ambiante peut exceder 40 °C (105 °F)
(comme des hangars ou des b#timents metailiques
en ete).
J},DANGER : Risques d'electrocution. Ne jamais tenter
d'ouvrir le bloc-pile pour quelque raison que ce soit. Si
le compartiment se rupture ou sub# des dommages, ne
pas I'inserer dans le chargeur afin d'eviter les risques.de
choc electrique ou d'electrocution. On doit retoumer les
bloc-piles endommages a un centre de service afin qu'ils
puissent 6tre recycles.
Page 16

REMARQUE: Un capuchon est fourni avec
le bloc-pile en vue d'6tre utilis6 chaque fois
qu'on retire ce dernier de I'outil ou du chargeur
en vue de le ranger ou de le transporter;
enlever le capuchon avant de remettre le
bloc-pile dans le chargeur ou dans I'outil.
AA VERTISSEMENT : S'assurer, au moment de ranger
ou de transporter un bloc-pile ou une pile, qu'aucun
objet metallique n'entre en contact avec leurs bornes
decouvert de celui-cL Par exemple, il faut eviter de placer
un bloc-pile ou une pile sans capuchon dans un tablier,
une poche, une bo_te a outils ou un tiroir (etc.) contenant
des objets tels que des clous, des vis ou des cles, car
tout contact entre les bornes a decouvert et un objet
metallique comme une cle, une piece de monnaie, un
outil a main. etc. pourrait causer un incendie. £n effet,
les reglements americains Hazardous Material Regulations
(HMR) du US Department of Transportation interdisent
le transport d'un bloc-pile ou d'une pile dans tout moyen
de transport commercial ou aeronef (clue ce soit dans
une valise ou le bagage de cabine) SAUF s'ils sont bien
proteges contre les courts-circuits. On doit donc s'assurer,
Iorsqu'on transporte un bloc-pile ou une pile separement,
de bien proteger et isoler les bomes contre tout materiau
qui risque d'entrer en contact avec eux et de causer un
court-circuit.
_,MISE EN GARDE : S'assurer de bien enfoncer le bloc-
pile dans Ibutil afin d'eviter les risques de blessure.
Le Sceau SRPRC TM
Le sceau SRPRC TM (Soci6t6 de recyclage
des piles rechargeables au Canada) appos6
sur les piles ou blocs-piles au nickel-cadmium
et & hydrure m6tallique de nickel indique que
DEWALT d6fraie le coot du recyclage de la
pile ou du bloc-piles & la fin de sa dur6e utile.
Le programme SRPRC TM offre une solution de rechange
pratique & la mise au rebut des piles au nickel-cadmium et
& hydrure m6tallique de nickel us6es, que ce soit & la
poubelle ou dans le syst_me municipale car cette mise au
rebut est ill6gale & certains endroits.
L'organisme SRPRC, TM en collaboration avec DEWALT
et d'autres utilisateurs de piles, a mis sur pieds des pro-
grammes aux 12tats-Unis et au Canada qui facilitent la col-
lecte des piles au nickel-cadmium et & hydrure m6tallique
de nickel 6puis6es. Pour aider &pr6server I'environnement
et &conserver les ressources naturelles, il suffit de retourn-
er les piles au nickel-cadmium et & hydrure m6tallique de
nickel us6es & un centre de r6parations DEWALT ou chez
le d6taillant de votre r6gion pour qu'elles soient recycl6es.
II est aussi possible de communiquer avec le centre de
recyclage de votre r6gion pour obtenir des informations sur
les lieux de d6p6t des piles 6puis6es.
SRPRCTM est une marque depos6e de la Societ6 de recyclage
despilesrechargeablesau Canada.
Consignes de s_curit_ importantes
concernant les chargeurs de piles
CONSERVER CES DIRECTIVES : Le present manuel
comprend d'importantes directives et consignes de securite
concemant les chargeurs de piles.
• Avant d'utiliser le chargeur, lire toute directive et etiquettes
de mise en garde apposees sur le chargeur, le bloc-pile
et le produit utilisant le bloc-pile.
ADANGER : Risques d'electrocution. Les bomes de
charge re_oivent une tension de 120 volts. Ne pas les
toucher avec des objets conducteurs.
AAVERTISSEMENT : Risques de choc electrique. Ne
laisser aucun liquide s'infiltrer clans le chargeur.
A MISE EN GARDE : Risques de br_lure. Pour reduire
les risques de blessures, ne charger que les piles au
rechargeables DEWALT. Les autres types de piles
risquent d'eclater, et d'entraTner ainsi des blessures et des
dommages.
_MISE EN GARDE : Sous certaines conditions, Iorsque
le chargeur est enfiche au bloc d'alimentation, les contacts
de charge exposes a I'interieur du chargeur peuvent 6tre
court-circuites par des corps etrangers. Les corps etrangers
de nature conductrice telle que, mais pas limite & la paille
de fer, les feuilles d'aluminium, ou tout accumulation de
particules metalliques doivent 6tre tenus eloignes des
cavites du chargeur. Toujours debrancher le chargeur du
bloc d'alimentation Iorsque le bloc-pile n'y est pas insere ou
avant de le nettoyer.
• NE PAS tenter de charger le bloc-piles avec des
chargeurs autres que ceux decrits clans ce manuel
Le chargeur et le bloc-pile sont congus specialement
pour 6tre utilises ensemble.
• Ces chargeurs n'ont pas ete con_us pour une
utilisation autre que recharger les piles rechargeables
DEWALT. Toute autre utilisation pose des risques
d'incendie, de choc electrique ou d'electrocution.
• Ne pas exposer le chargeur a la pluie ou a la neige.
• Debrancher le chargeur en saisissant la fiche, non
le cordon, afin de reduire les risques d'endommager la
fiche ou le cordon electrique.
• S'assurer que le cordon estplace de maniere a eviter
qu'il ne subisse des dommages ou des abus ou que
des personnes s'y prennent les pieds et trebuchenL
• Ne pas utiliser de rallonge a moins que cela ne soit
absolument necessaire, car I'usage d'une rallonge
ayant une puissance inadequate augmente les risques
d'incendie, de choc electrique ou d'electrocution.
• Afin d'assurer la securite de I'utilisateur, utiliser une
rallonge du calibre A WG approprie. Plus le calibre
est petit, plus la capacite est grande; autrement dit, une
rallonge de calibre 16 est plus puissante qu'une rallonge
de calibre 18. Lorsqu'on utilise plusieurs rallonges pour
obtenir la Iongueur voulue, s'assurer que chacune d'elles
presente les valeurs minimales requises.
16
Calibre minimal recommand6 pour les rallonges
Longueur totale de la rallonge
25 pi 50 pi 75 pi 100 pi 125 pi 150 pi 175 pi
7,6m 15,2m 22,9m 30,5m 38,1m 45,7m 53,3m
Calibre AWG
18 18 16 16 14 14 12
• Ne poser aucun objet sur le dessus du chargeur.
Ne pas mettre le chargeur sur une surface molle
qui pourrait bloquer les events et provoquer une
chaleur interne excessive. Mettre le chargeur
I'abri de toute source de chaleur. Le chargeur dispose
d'orifices d'aeration situes sur le dessus et le dessous
du boftier.
• Ne pas utiliser le chargeur avec un cordon ou une
fiche endommage; les faire changer immediatement.
• Ne pas utiliser le chargeur s'il a re_u un coup, fait
une chute ou a ete endommage de quelque fa_on
que ce soit. Sicela se produit, I'apporter a un centre de
service autorise.
• Ne pas demonter le chargeur; I'apporter a un centre
de service autorise pour tout service ou reparation.
Le fait de le reassembler de fa_on incorrecte augmente
les risques de choc electrique, d'electrocution et
d'incendie.
• Debrancher le chargeur de la prise murale avant de
proceder au nettoyage afin de reduire les risques
de chocs electriques. Le fait de retirer le bloc-pile ne
reduit pas ce risque.
• NE JAMAIS tenter de connecter 2 chargeurs
ensemble.
• Le chargeur est con_u pour 6tre utilise sur une prise
residentielle standard de 120 volts. Ne pas tenter
de le brancher sur une prise autre que celle pour
laquelle il a ete con_u. Cette directive ne s'applique
pas aux chargeurs pour vehicules.
Utilisation du mode Tune-up TM
Automatique
Le mode de Tune-Up TM Automatique 6galise ou 6quilibre
chaque cellule du bloc-piles pour lui permettre de
fonctionner & son rendement optimum. Les blocs-piles
doivent _tre r6gl6s chaque semaine ou apr_s une dizaine
de cycles de charges/d6charges ou chaque fois que la
dur6e de fonctionnement du bloc-piles diminue. Pour
utiliser le Tune-Up TM Automatique, mettre le bloc-piles dans
le chargeur et I'y laisser pendant au moins 8 heures. Le
chargeur passera par les modes suivants :
1. Le voyant rouge clignotera de fagon continue
indiquant que le cycle de chargement d'une heure a
commenc&
2. Lorsque ce dernier est termin6, le voyant restera
allum6 sans clignoter. Cela indique que le bloc-piles
est charg6 & plein et peut _tre alors utilis&
3. Chaque fois que le bloc-piles est laiss6 dans le chargeur
apr_s la charge initiale d'une heure, le chargeur se
mettra en mode de Tune-Up TM Automatique. Ce mode
peut durer jusqu'& 8 heures ou jusqu'& ce que chaque
Page 17

celluledubloc-pilessoit_galis_e.Lebloc-pilesest
pr6tpourI'utilisationetpeut6treretir_&toutmoment
Iorsqu'ilestenmodeTune-UpTM.
4. Une fois le mode de Tune-Up TM Automatique termin_,
le chargeur passera & un mode de maintenance de
charge; le voyant s'_teint Iorsque le mode de Tune-
Up TM Automatique est termin&
CONSERVER LES PRESENTES
DIRECTIVES
it TITRE DE REFERENCE
Chargeurs
L'outil utilise un chargeur DEWALT. Le bloc-piles peut 6tre
charg_ au moyen d'un chargeur 1 heure, d'un chargeur
15 minutes ou d'un chargeur 12 volts de v_hicule DEWALT.
S'assurer de bien lire toutes les directives de s6curit6 avant
d'utiliser le chargeur. Consulter le tableau figurant & la fin
du present manuel pour connaftre la compatibilit6 des char-
geurs et des blocs-piles.
FIG. 2 _
CHARGEUR15 CHARGEUR
MINUTES D'UNE HEURE
Procedure de charge
A DANGER : Risque d'electrocution. Les bomes de charge
presentent une tension de 120 V. Ne pas sonder les bomes
avec des objets conducteurs.
1. Brancher le chargeur dans une prise appropri_e avant
d'ins6rer le bloc-piles.
2. Ins6rer le bloc-piles dans le chargeur comme indiqu6
& la figure2, s'assurer qu'il est bien enfonc& Le
voyant rouge (charge) clignotera continuellement pour
indiquer que la charge a d_but&
3. La fin de la charge sera indiqu6e par le voyant rouge
qui demeurera allum& Le bloc-piles est charg_ & plein
et peut 6tre utilis6 ou laiss6 dans le chargeur.
Fonctionnement des voyants
CHARGEMENTDU
BLOC=PILES .................................. mlll mlllmlllmlllmlllmlllm
ENT|EREMENTCHARGE ...............
FONCTION DE SUSPENSION
DU BLOC=PILES CHAUD/FROID ..... _lm_m _m
REMPLACER LE BLOC=P|LES ........ O • • • ® • O • Q O •
PROBLEME AVEC
LE SECTEUR ................................... ® ® • • • ® • •
Voyants de charge
Certains chargeurs sont con_us pour d_tecter certains pro-
blames pouvant 6tre reli_s aux blocs-piles. Tout probl_me
est indiqu6 par le voyant clignotant rapidement. Dans cette
_ventualit6, r6ins_rer le bloc-pile dans le chargeur. Si le
probl_me persiste, essayer un autre bloc-pile pour d_ter-
miner si le chargeur fonctionne. Si le nouveau bloc-pile se
recharge correctement, le bloc-pile initial est endommag_
et doit 6tre retourn_ & un centre de service ou tout autre
site de r6cup_ration pour y 6tre recycl& Si le nouveau
bloc-pile provoque le m6me probl_me que le premier, faire
v_rifier le chargeur & un centre de service autoris&
DISPOSITIF DE D#TECTION DE PILES CHAUDES
OU FROIDES
Certains chargeurs sont munis d'un dispositif de d_tection
de piles chaudes ou froides. Lorsque le chargeur d_tecte
une pile chaude, il d_marre automatiquement le dispositif
de d_tection de piles chaudes, suspendant le chargement
jusqu'& ce que la pile refroidisse. Une fois la pile refroidie,
le chargeur se met automatiquement en mode de charge-
ment. Cette caract6ristique assure aux piles une dur_e de
vie maximale. Le voyant rouge clignote Ionguement, puis
bri_vement, en mode de d_tection de piles chaudes ou
froides.
PROBL#MES RELII_S A LA SOURCE DE COURANT
Certains chargeurs ont un voyant indiquant qu'il existe un
probl_me reli_ & la source de courant. Lorsque le chargeur
est utilis6 avec certaines sources de courant, telles que
les g_n_rateurs ou un convertisseur de courant continu
en courant alternatif, le chargeur peut alors suspendre
temporairement le chargement. En pr6sence d'un tel pro-
blame, le chargeur _met deux clignotements rapides,
suivis d'une pause, indiquant que le probl_me se situe
au niveau de la source de puissance.
BLOC-PILES LAISSI_ DANS LE CHARGEUR
Le chargeur et son bloc-piles peuvent rester connect6s
avec le voyant rouge allum_ ind_finiment. Le chargeur
maintiendra la pile pleinement charg&
REMARQUE : Un bloc-pile perdra graduellement sa
charge s'il est laiss_ hors du chargeur. Si le bloc-pile n'a
pas _t6 maintenu en mode de maintenance de charge,
il peut _tre n_cessaire de le recharger avant chaque
utilisation. Un bloc-pile peut aussi perdre sa charge gra-
duellement s'il est laiss_ dans un chargeur qui n'est pas
branch6 & une source de courant alternatif appropri_e.
BLOC-PILE FAIBLE : Les chargeurs peuvent aussi
d_tecter les piles faibles. Ces piles sont encore utilisables
mais leur dur6e d'utilisation sera courte. Dans ce cas, 10
secondes apr_s rinsertion de la pile, le chargeur _mettra
rapidement huit signaux sonores pour indiquer que la pile
est faible. Le chargeur se mettra ensuite &recharger la pile
& sa capacit_ maximale.
Notes importants concernant le
chargement
1. Pour une dur6e de vie prolong_e et des performances
optimales, recharger le bloc-piles & une temperature
ambiante de 18° & 24 °C (65 °F & 75 °F ). NE PAS
recharger le bloc-piles dans un lieu ot_ la temperature
ambiante est inf6rieure & +4.5 °C (+40 °F), ou
sup_rieure &+40.5 °C (+105 °F). C'est important pour
pr6venir tout dommage s6rieux au bloc-piles.
2. Le chargeur et son bloc-piles peuvent devenir chaud
au toucher pendant le rechargement. C'est normal et
ne repr6sente en aucun cas une d_faillance du produit.
Pour faciliter le refroidissement du bloc-piles apr_s
usage, _viter de laisser le chargeur ou le bloc-piles I&
ot_ la temperature ambiante est _lev_e comme dans un
hangar m_tallique ou une caravane non isol_e.
3. Si le bloc-piles ne se recharge pas correctement :
a. V_rifier le courant & la prise en y branchant une
lampe ou tout autre appareil.
b. V_rifier que la prise n'est pas command_e par un
interrupteur qui coupe le courant en _teignant les
lumi_res.
c. D_placer le chargeur et le bloc-piles dans un lieu ot_
la temperature ambiante est entre environ 18° et 24
°C (65 °F et 75 °F).
d. Si le probl_me persiste, ramener I'appareil, le bloc-
piles et le chargeur & un centre de service local.
4. Recharger le bloc-piles Iorsqu'il ne produit plus assez
de puissance pour effectuer un travail qu'il faisait
facilement auparavant. NE PAS CONTINUER &
utiliser dans ces conditions. Suivre la m_thode de
rechargement. II est aussi possible de recharger
partiellement un bloc-piles vide si n_cessaire sans effet
adverse pour le bloc-piles.
5. Sous certaines conditions, Iorsque le chargeur est
enfich_ au bloc d'alimentation, les contacts de charge
exposes & I'int_rieur du chargeur peuvent _tre court-
circuit6s par des corps _trangers. Les corps _trangers
de nature conductrice telle que, mais pas limit6 &,
la paille de fer, les feuilles d'aluminium, ou tout
accumulation de particules m_talliques doivent _tre
tenus _loign_s des cavit6s du chargeur. Toujours
d_brancher le chargeur du bloc d'alimentation Iorsque
le bloc-pile n'y est pas ins_r6 ou avant de le nettoyer.
6. Ne pas congeler ou immerger lechargeur de pile dans
I'eau ou tout autre liquide.
_A VERTISSEMENT : Risque de choc electrique. Eviter
la penetration de tout liquide dans le chargeur car cela
peut se solder par un choc electrique. Pour faciliter le
refroidissement du bloc-piles apres son utilisation, eviter de
mettre le chargeur ou le bloc-piles dans un endro# chaud
comme dans une remise metallique ou une remorque non
isolee.
17
Page 18

AMISE EN GARDE : Ne jamais tenter d'ouvrir le bloc-piles
pour quelque raison que ce soit. Si le boTtier plastique du
bloc-piles casse ou se fend, le retoumer a un centre de
service pour y 6tre recycle.
Installation et retrait du bloc-piles
_MISE EN GARDE : engager le dispositif de blocage
du declencheur Iors du retrait ou de I'insertion du bloc-
piles.
FIG. 3 FIG. 4
M
REMARQUE : s'assurer que le bloc-piles est enti_rement
charg6.
Pour ins6rer le bloc-piles darts la poign6e de I'outil,
aligner la base de I'outil avec rencoche situ6e & I'int6rieur
de la poign6e et glisser le bloc-piles fermement dans la
poign6e jusqu'& ce qu'on entende un d6clic indiquant qu'il
est bien enclench6.
Pour retirer le bloc-piles de I'outil, appuyer sur les bou-
tons de d6gagement (M) et tirer fermement le bloc-piles
hors de la poignee. L'inserer dans le chargeur selon les
directives figurant dans le manuel du chargeur (fig. 4).
COMPOSANTS
_A VERTISSEMENT : verrouiller ladetente, retirer le bloc-
piles de I'outil et les clous du chargeur avant de proceder
au reglage pour eviter une blessure corporelle.
Se reporter a la figure 1 au debut du present manuel pour
une liste complete des composants.
FONCTIONNEMENT
AAVERTISSEMENT : lire la rubrique ,, Consignes de
securite importantes pour les cloueuses . au debut du
mode d'emploi. Toujours porter une protection oculaire et
une protection auditive Iors de I'utilisation de I'outil. Ne pas
pointer la cloueuse dans votre direction ou celle d'autres
personnes. Pour une utilisation securitaire, effectuer toutes
les procedures et verifier tousles points qui suivent avant
chaque utilisation de la cloueuse.
1. Porter une protection oculaire, auditive et respiratoire
adequates.
2. Retirer le bloc-piles de I'outil.
3. Verrouiller le poussoir en position arriere et retirer
toutes les attaches du chargeur.
4. Verifier le bon fonctionnement regulier du declencheur
et des ensembles du poussoir. Ne pas utiliser I'outil
si un des ensembles ne fonctionne pas correcte-
ment. NE JAMAIS utiliser un outil dont le declencheur
est coince en position marche.
5. NE JAMAI$ utiliser un outil dont certaines pieces sont
endommagees.
_A VERTISSEMENT : pour reduire les risques de bles-
sures, retirer le bloc-piles de I'outil avant d'effectuer
I'entretien, de degager un clou bloque, de quitter lazone de
travail, de deplacer I'outil a un autre endroit ou de donner
I'outil a une autre personne.
S_lection du mode
A A VERTISSEMENT : toujours porter une protection ocu-
laire conforme a la norme [ANSI Z87.1 (CAN/CSA Z94.3)]
ainsi qu'une protection auditive conforme a la norme
[ANSI $12.6 ($3.19)] Iors de I'utilisation de I'outiL
Les cloueuses sans fil DEWALT sont assembl6es en con-
formit6 avec la norme ANSI SNT-101-2002.
Avant d'utiliser I'outil, v6rifier le s61ecteur pour d6terminer
le mode d'actionnement. Lire toutes les directives avant de
s61ectionner le mode d'actionnement.
•&AVERTISSEMENT: ELOIGNER les doigts de la detente
Iorsque vous n'enfoncez pas de clous pour eviter un tir
accidenteLNE JAMAI$ transporter I'outil avec le doigt sur
la detente. En , mode d'actionnement par choc ,,, I'outil tire
un clou si le mecanisme de securite est heurte pendant que
le declencheur est enfonce.
ACTIONNEMENT EN MODE S#QUENTIEL /
L'actionnement en mode s6quentiel permet le clouage
intermittent Iorsqu'un positionnement tr_s soign6 et pr6cis
est souhait6, ainsi qu'une bonne maftrise de la profondeur
de tir.
Fonctionnement de la cloueuse en mode
d'actionnement s6quentiel :
1. D6placer I'interrupteur, situ6 sur
le corps de I'outil, entre la d6tente
et le chargeur, vers la gauche
comme indiqu6 & la figure 6.
2. Enfoncer compl_tement le bec
contre la piece (le moteur se met
en marche).
3. Appuyer sur la d6tente (un clou
s'enfoncera dans la piece).
4. Rel&cher la d6tente.
5. D6coller le bec de la piece.
6. R6p6ter les 6tapes 2 & 4 pour le prochain clou.
AMISE EN GARDE : pour chaque clou, on doit d'abord
enfoncer le declencheur par contact puis engager la
detente suivi du relgchement du declencheur et de la
detente apres chaque clou.
18
ACTIONNEMENT PAR CHOC/#
L'actionnement par choc est con_u
pour un clouage rapide sur des surfac-
es planes et fixes.
Deux m6thodes de fonctionnement
sont disponibles dans ce mode:
fonctionnement intermittent et fonc-
tionnement continu.
D6placer I'interrupteur, situ6 sur le
corps de I'outil, entre la d6tente et le chargeur, vers la
droite comme indiqu6 & la figure 7.
Fonctionnement intermittent de I'outil :
_A VERTISSEMENT : I'outil enfonce un clou chaque fois
que la detente est enfoncee pourvu que le declencheur
demeure enfonce.
1. Presser le d6clencheur contre la surface de la piece.
2. Appuyer sur la d6tente.
Fonctionnement continu de I'outil :
1. Appuyer sur la d6tente.
2. Presser le d6clencheur contre la surface de la piece.
Chaque pression du d6clencheur enfoncera un clou,
et ce, dans la mesure oe la d6tente est enfonc6e.
L'utilisateur peut ainsi enfoncer plusieurs clous en
s6quence.
_MISE EN GARDE : relgcher la detente Iorsque I'outil
n'est pas utilise. Conserver le dispositif de blocage engage
en position verrouillee Iorsque I'outil est inutilise.
Preparation de I'outil
_MISE EN GARDE : NE JAMAIS pulveriser ou appliquer
un lubrifiant ou des solvants pour le nettoyage, d'une fa_on
ou d'une autre, a I'interieur de I'outiL Cette pratique peut
nuire serieusement a la duree de vie et au rendement de
I'outiL
REMARQUE : le bloc-piles n'est pas
compl_tement charg6 & la sortie de la
bofte pliante. Suivre les directives
d6crites (consulter la rubrique
Consignes de chargement).
1. Lire la rubrique Consignes de
securite du present manuel
2. Porter des protections oculaire et
auditive.
3. Retirer le bloc-piles de I'outiL
4. S'assurer que le chargeur est effectivement vide.
5. Verifier le bon fonctionnement regulier du declencheur
et des ensembles du poussoir. Ne pas utiliser Ibutil si
un des ensembles ne fonctionne pas correctement.
NE JAMAI$ utiliser un outil dont le declencheur est
coince en position de marche.
6. Ne pas pointer la cloueuse dans votre direction ou celle
d'autres personnes.
7. Inserer le bloc-piles completement charge.
Page 19

Fonctionnement du dispositif
de blocage du d_clencheur par
contact (fig. 8, 9)
AAVERTISSEMENT : pour reduire le risque de bles-
sures graves, re/_cher /a detente /orsque /'outi/ n'est
pas utilise. Tenir le dispositif de blocage du declencheur
VERROUILLE (fig. 8) Iorsque I'outil n'est pas utilise.
AA VERTISSEMENT : pour reduire le risque de blessures
graves, verrouiller la detente, retirer le bloc-piles de I'outil
et les clous du chargeur avant de proceder au reglage. Une
telle pratique peut entra_ner des blessures graves.
Chaque cloueuse DEWALT est
dot6e d'un dispositif de blocage du
d6clencheur (B) qui, Iorsque abaiss6
avec le symbole du cadenas tel
qu'illustr6 & la figure 8, emp6che
I'outil d'6jecter un clou.
Lorsque le dispositif de blocage du
d6clencheur est orient6 comme
indiqu6 & la figure 9, I'outil est
enti_rement fonctionnel, le disposi-
tif de blocage du d6clencheur
devrait toujours 6tre engag6 (fig. 8)
Iors de tout r6glage ou Iorsque
I'outil n'est pas utilis6 imm6diate-
ment.
REMARQUE : Iorsque la cloueuse est en mode choc, les
outils dot6s d'un d6clenchement s61ectif permettront le
d6marrage du moteur d_s que la d6tente est enfonc6e.
Ce fonctionnement est normal. Le dispositif de blocage du
d6clencheu r emp6che le d6clencheur parcontact d'enfoncer
un clou.
Chargement de I'outil
AAVERTISSEMENT: ne pas pointer I'outil clans votre
direction ou celle d'autres personnes. Une telle pratique
peut entrMner des blessures graves.
AA VERTISSEMENT : ne jamais charger les clous Iorsque
le declencheur par contact ou la detente est actionne(e).
Une telle pratique pourrait entraTner des blessures.
AAVERTISSEMENT : toujours retirer le bloc-piles avant
de charger ou de retirer des clous. Une telle pratique pour-
rait entra_ner des blessures graves.
AMISE EN GARDE : tenir les doigts a I'ecart du poussoir
pour prevenir toute blessure.
AMISE EN GARDE: le dispositif de blocage du
declencheur devrait toujours 6tre engage Iors de tout
reglage ou Iorsque I'outil n'est pas utilise immediatement.
1. Enfoncer le dispositif de blocage du poussoir (h) et
reculer le chargeur.
2. Ins6rer les clous par le c6t6 du chargeur. S'assurer que
les pointes des clous touchent le canal du chargeur.
3. Enfoncer le chargeur jusqu'& ce qu'il s'enclenche.
RETRAIT DES CLOUS DU CHARGEUR
AA VERTISSEMENT :
le dispositif de blocage
du declencheur devrait
toujours 6tre engage
lots de tout reglage ou
Iorsque I'outil n'est pas
utilise immediatement.
1. Presser le dis-
positif de blocage
du poussoir de la
cloueuse et reculer
le chargeurx (G).
2. Basculer I'outil
jusqu'& ce que
les clous glissent H
librement hors du
chargeur.
3. Ouvrir le comparti-
ment de d6blocage
du bec pour v6rifier la pr6sence de clous.
R_glage de la profondeur (fig. 10)
R6gler la profondeur & laquelle s'enfonce un clou avec la
molette de r6glage de profondeur (C) Iog6e sur le c6t6 de
I'outil.
A A VERTISSEMENT : pour reduire les risques de bles-
sures graves par actionnement accidentel de I'outil
Iorsqu'on tente de regler la profondeur, TOUJOURS :
• Retirer le bloc-piles.
• Engager le dispositif de blocage du declencheur.
• Eviter tout contact avec la detente Iors des
reglages.
1. Pour enfoncer le clou moins profond6ment, tourner la
molette de r6glage de profondeur (C). Douze r6glages
de profondeur sont offerts dont 1 est le moins profond
et 6, le plus profond.
2. Pour noyer le clou plus profond6ment, tourner la
molette de r6glage de la profondeur (C) & une valeur
plus 61ev6e.
Eclairage (fig. 10)
La cloueuse dispose d'un syst_me d'6clairage (D) bilat6ral.
L'6clairage se d6clenche Iors de I'insertion du bloc-piles,
de I'actionnement de la d6tente ou du d6clencheur par
contact.
FIG. 10
REMARQUE : le syst_me d'6clairage est congu pour illu-
miner la surface de travail adjacente et non pour _tre utilis6
comme une lampe de poche.
INDICATEUR DE BLOC-PILES FAIBLE: le syst_me
d'6clairage clignotera quatre fois cons6cutives, puis
s'6teindra pour indiquer que le bloc-piles est faible.
PiLE FAIBLE ........... [] [] [] []
INDICATEUR DE CLOU COINC# : le syst_me d'6clairage
clignotera continuellement si un clou se coince dans le
bec (consulter la rubrique <<D6gagement des clous
coinc6s >>).
CLOU COINC _'=....... [][][][][][][][][][][][]
Ddgagement des clous coincds
(fig. 11)
Si un clou se coince dans le bec de I'outil, pointer I'outil
dans la direction oppos6e & vous et proc6der comme suit
pour le d6gager :
1. Retirer le bloc-piles de I'outil et engager le dispositif de
blocage du d6clencheur.
2. Presser le dispositif de blocage du poussoir de la
cloueuse et reculer le chargeur (G).
3. Basculer I'outil jusqu'& ce que les clous glissent libre-
ment hors du chargeur.
4. Releverleloquetded6gagement FIG.!!
(E), puis tirer pour ouvrir le
compartiment avant (L).
5. Retirer le clou tordu & I'aide de
pinces le cas 6ch6ant.
Si la lame d'entrafnement est
ins6rer un tournevis ou une
descendue dans la colonne, L E
autre tige dans le bec et
repousser la lame d'entrafnement en position.
7. Puis, refermer le compartiment avant et glisser les fils
sous les 2 onglets (M) sur le bec. Remettre le Ioquet de
d6gagement en place.
8. R6ins6rer le bloc-piles.
REMARQUE: I'outil se bloquera de lui-m_me et
ne r6armera que Iorsque le bloc-piles est retir6 puis
r6ins6r&
9. Recharger les clous dans le chargeur (consulter la
rubrique Chargement de I'outil).
10. Enfoncer le chargeur jusqu'& ce qu'il s'enclenche.
11. Lib6rer le dispositif de blocage du d6clencheur pour
que le d6clencheur se d6place librement.
REMARQUE : dans le cas de coincements r6p6t6s des
clous dans le bec, confier la r6paration de I'outil & un centre
de r6parations agr66 DEWALT.
19
Page 20

Fonctionnement par temps froid
Lors de I'utilisation d'outils & des temp6ratures sous le
point de cong61ation, veuillez :
1. Tenir I'outil le plus possible au chaud.
2. Actionner I'outil 5 ou 6 fois sur un morceau de bois de
construction avant I'utilisation.
Fonctionnement par temps chaud
L'outil devrait fonctionner normalement. Toutefois, prot6ger
I'outil de la lumi_re directe du soleil, car la chaleur exces-
sive risque de d6t6riorer les amortisseurs et les autres
pi_ces en caoutchouc et se traduit par un accroissement
de I'entretien.
Crochet pour rangement (fig. 12)
_A VERTISSEMENT : retirer les clous FIG. 12
du chargeur avant tout r#glage ou
r#paration de Ibutil. Le non-respect de
cette mesure de s#curit# pourrait se
solder par une blessure grave.
_A VERTISSEMENT : pour r#duire le
risque de blessures graves, retirer le
bloc-pile de I'outil avant d'effectuer
des reglages, un changement
d'accessoire, une reparation ou avant de deplacer
I'outil. De telles mesures de securite pr6ventives reduisent
le risque de mettre Ibutil en marche accidentellement.
_MISE EN GARDE : Iorsque I'outil n'est pas utilise, le
placer sur le c6te, sur une surface stable, de maniere
ne faire trebucher ni tomber personne. Certains outils
presentant un gros bloc-piles reposeront sur ce dernier,
la verticale, mais risquent d'6tre facilement renverses.
Les cloueuses sans fil de DEWALT comprennent un crochet
pour rangement int6gr6 (J) qui s'attache d'un c6t6 ou de
rautre de routil pour une utilisation autant par les gauchers
que par les droitiers.
Si le crochet est superflu, il est possible de le d6monter
de I'outil.
RETRAIT DU CROCHET POUR RANGEMENT
1. Retirer le bloc-piles de I'outil.
2. Pour convertir I'outil & une utilisation par un gaucher,
retirer simplement la vis et r6assembler le crochet de
I'autre c8t6.
3. R6ins6rer le bloc-piles.
ENTRETIEN
AAVERTISSEMENT : pour reduire le risque de bles-
sures graves, retirer le bloc-pile de I'outil avant
d'effectuer des reglages, un changement d'accessoire,
une reparation ou avant de deplacer I'outil. De te//es
mesures de securite preventives reduisent le risque de
mettre Ibutil en marche accidentellement.
Tableau d'entretien quotidien
ACTION Nettoyerle chargeur, le poussoir etle m6canisme
POURQUOI Permet un fonctionnement en souplesse
COMMENT L'utilisation d'huiles et de lubrifiants sur une base
ACTION Avant chaque utilisation, contr61ertoutes les vis,
POURQUOI Pr6vient les coincements et la d6faillance
COMMENT Utiliser la cl6 ou le tournevis Allen appropri6
de d6clenchement par contact.
du chargeur, r6duit I'usure et pr6vient les
coincements.
r6guliere oude solvants n'est pasrecommand6e,
car ilstendent & attirer lesd6bris.
6crous et attaches pour vous garantir qu'ils sont
serr6s et intacts.
pr6matur6e des composants de I'outil.
pour serrer les vis ou autres attaches.
Nettoyage
•&AVERTISSEMENT : pour reduire le risque de bles-
sures, TOUJOURS retirer le bloc-piles de I'outil avant
toute reparation. S'assurer que I'outil est en parfait etat
de fonctionnement avant de le remettre en utilisation.
Cette pratique permettra d'eviter des blessures graves.
i_ MISE EN GARDE : Iors du nettoyage, utiliser exclusive-
ment un chiffon humide sur les composants en plastique.
Bon hombre de nettoyants domestiques renferment des
produits chimiques pouvant grandement endommager les
pieces de plastique. En outre, ne pas utiliser d'essence, de
ter6benthine, de diluant a peinture ou a laque, de liquides
pour nettoyage a sec ou tout autre produit semblable qui
pourrait endommager gravement les composants en plas-
tique. Ne jamais laisser de liquide penetrer dans I'outil et
n'immerger aucune pattie de I'outil dans un liquide.
INSTRUCTIONS DE NETTOYAGE DU CHARGEUR
•&A VERTISSEMENT: pour reduire le risque de blessures,
debrancher le chargeur de la prise de courant c.a. avant de
le nettoyer. La salete et la graisse peuvent 6tre enlevees
de la surface exterieure du chargeur au moyen d'un chif-
fon ou d'une brosse douce non metallique. Ne pas utiliser
d'eau ni d'autres solutions de nettoyage
Graissage
•&MISE EN GARDE : NE JAMAIS pulveriser ou appliquer
un lubrifiant ou des solvants pour le nettoyage, d'une
fa_on ou d'une autre, a I'interieur de I'outil. Cette pratique
peut nuire a la duree de vie et au rendement de I'outil.
Les outils DEWALT sont correctement
graiss6s en usine et sont pr6ts &
I'emploi. Toutefois, il est conseill6 de
ramener ou d'envoyer I'outil, une fois
par annie, & un centre de r6paration
pour un nettoyage complet et une
inspection approfondie.
Rdparations
AA VERTISSEMENT : pour reduire le risque de blessures
graves, retirer les clous du chargeur avant tout reglage ou
reparation de I'outil.
Pour assurer la S¢:CURIT¢: et la FIABILIT¢: du produit, les
r6parations, I'entretien et les r6glages (y compris I'inspection
et le remplacement de la brosse) doivent 6tre r6alis6s par
un centre de r6paration en usine DEWALT, un centre
de r6paration autoris6 DEWALT ou par un personnel de
r6paration professionnel. Toujours utiliser des pi_ces de
rechange identiques. Se reporter & la rubrique, Guide de
d6pannage ,, & la fin de cette section.
Accessoires
AAVERTISSEMENT: puisque les accessoires autres
que ceux offerts par DEWALT n'ont pas et6 testes avec ce
produit, I'utilisation de ceux-ci avec I'outil pourrait s'averer
dangereuse. Pour reduire le risque de blessures, utiliser
exclusivement les accessoires DEWALT recommandes
avec le present produit.
Les accessoires recommand6s pour utilisation avec routil
sont disponibles, & un cot]t suppl6mentaire, aupr_s du
distributeur ou du centre de r6paration autoris6 de votre
r6gion. Pour toute demande d'assistance pour trouver un
accessoire, communiquer avec DEWALT Industrial Tool
Co., 701 East Joppa Road, Baltimore, MD 21286, 12tats-
Unis, composer le 1-800-4-DEWALT (1-800-433-9258) ou
visiter le site Web www.dewalt.com.
Garantie limitde trois ans
DEWALT r6parera gratuitement tousles probl_mes dus &
des d6fauts de mat6riau ou de fabrication pendant trois ans
&compter de la date d'achat. Cette garantie ne couvre pas
des d6faillances de piece dues &une usure normale ou &
une mauvaise utilisation de I'outil. Pour plus de d6tails rela-
tifs & la couverture de la garantie et aux r6parations sous
garantie, visiter le site Web www.dewalt.com ou composer
le 1-800-4-DEWALT (1-800-433-9258). Cette garantie ne
s'applique pas aux accessoires ni aux dommages caus6s
par des r6parations r6alis6es ou tent6es par des tiers.
Cette garantie vous accorde des droits 16gaux sp6cifiques
et il est possible que vous ayez d'autres droits qui varient
d'un €:tat ou d'une province & I'autre.
En plus de la garantie, les outils DEWALT sont couverts
par notre :
SERVICE D'ENTRETIEN GRATUlT DE 1 AN
DEWALT entretiendra I'outil et remplacera les pi_ces
us6es par une utilisation normale et ce, gratuitement, &
tout instant pendant la premiere ann6e & compter de la
date d'achat.
CONTRAT D'ENTRETIEN GRATUIT DE DEUX ANS
SUR LES BLOC-PILES DEWALT
DC9096, DC9091, DC9071, DC9360 et DC9280 et la
2O
Page 21

GARANTIE DE REMBOURSEMENT DE 90 JOURS
Si vous n'Otes pas enti_rement satisfait des performances
de votre outil _lectrique, laser ou de votre marteau-cloueur
DEWALT pour quelque raison que ce soit, vous pouvez le
retourner accompagn_ d'un re_u dans les 90 jours suivant
la date d'achat et nous vous rembourserons enti_rement
- sans poser de questions.
AMI_RIQUE LATINE : cette garantie ne s'applique pas aux
produits vendus en Am_rique latine. Pour ceux-ci, veuillez
FIG. 24
ACCEPTS ONLY 18 GAUGE FASTENERS
_FC_NTACTTR_PANDTR_GGER`CLEAR_NGJAM_RSERV_CjNG_USE_NLYWjTHDEWALT_ATTER_ESANDC_ARGER_ A TJTRE PREVENTJF, LJRE LE GUIDE.
consulter les informations relatives & la garantie sp_cifique
prOsente dans I'emballage, appeler I'entreprise locale ou
consulter le site Web pour les informations relatives &cette
garantie.
REMPLACEMENT GRATUlT DES I_TIQUETTES
D'AVERTISSEMENT : si les _tiquettes d'avertissement
deviennent illisibles ou sont manquantes, composer le
1-800-4-DEWALT pour en obtenir le remplacement gratuit.
DRiViNGFASTENERSTOAVOID ACCIDENTALFIRING, CHOICE OFTRIGGERINGMETHOD IS iMPORTANT,CHECKMANUAL FORTRiGGERiNG
OPTIONS. NEVER DISABLE LOCK-OFE USE LOCK-OFF WffEN TOOL iS NOT JN USE. ENSURE TRIGGER AND CONTACT TRiP 0PERATE PROPERLY
BEFOREUSE. NEVERPOINTTOOLATYOURSELFOROTHERSJNWORKAREA. REMOVEBA'rI'.ERYWHEN;CHECKJNGPROPEROPERATJON
ARA AJUSTAR EL MODO DE FUNCJONAMJENTO, DESLJCE
O SELECT ACTUATION MODE SLIDE SWITCH LEFT OR RIGHT.
L JNTERRUPTOFIHACJALA DERECHA 0 HACJA LA JZQUJERDA,
A_V_RTENCIAS SEfiALADAS PODRJA RESULTAR _N SEPIAS LE$1ONE$ P_ESONALE$ U
ODASlONA_ LA MUE_TE. TODO OPERA_IO Y D_M_,S PERSONAS EN EL _,_EA D_ TRAaA_O
DE'ERA LLEVAR ANTEOJOS OE PROTECCION ANSI Z_7.1 DON GUAROAS LATERALES.
MANTENGA LOS DEDOS ALEJADOS D_L GATILLO CUANDO NO EST_ CLAVANDO A FIN Og NO
_cclo_ar_aNEr_AMIENT_I_Dw_TI_mENTEELNEIODOD_DIsParOEsINPOrTAN1E
CONSULTE LAS OPCIO NES QUE OFR_CE EL MAN UAL. NUNCA DESHABILITE EL SEGUEO.
UTILICE EL SEGURO CUANDO LA HEREAMIENTA NO SE _NCUENTRE EN FUNCIONAMIENTO.
AS_GORESE QUE EL GATILLO Y EL DISPARADOE POR CONTACTO FUNCIONEN DEE{IDANENTE
ANTES DE ACCIONAR LA HERllAMIENTA. JAM_.S ORIENTE LA HERRAMIENTA HACIA $1
MISNO NI HACIA LAS DEM,_S pERSONAS EN LA ZONA DE TRABAJO. RETIRE LA BATERJA
i O _ ..........................................i]
DE LA HERRAMI_NTA CUANDO: PRESTE CUALQUIER TIPO DE MANTENINIENTO, CUANDO
DESTRABE LOS SUJ_TADOE_S 0 CUANDO V_RIFIQUE EL FUNCIONANIENTO APROPIADO OEL
DISPARADOE POE CONTACTO O DEL GATILLO. LA HEREAMIENTA SE DEBERA IJTILIZAR
80LAMENTE CON LAS BATERiAs Y CON LOS CARGADOEES DEWALT
DE INSTRUCCIONES Y LAS ETIOUETAS EL NO OBEDECER LAS
SEQUENTIAL
SECUENCJAL D
_ , , , , UrE _T COmP_END_E LES ETIqUettES DE L OUTIL AINSI
AVERTISSEMENTS PRESENTE DES RISQUES DE DEDES OU DE BLESSURES GRAVES. LES
PERSONNES QUI UTILISENT L'O UTIL ET LES PERSONNES QUI _E TROUVENT DANS LA ZONE
A LA NORME ANSI ZST.I. ELOIGNER LES DOIGTS DE LA DETENTE LORSQU'ON N'ENFONCE
pAS O ATTACHES AFIN O EVITER LE FONCTIONNEMENT ACCIDENTEL DE L'OUTIL LE CNOIX
DELAM_TIIODED'AGRAFAGEESTIMpORTANT VERIFIERLESOPTIONSDEDETENTEDANS 0
LE GUIDE O UTiLISATiON NE NEUTEALISEZ JAMAIS LOCK-OFE UTILISER LE DISPOSITIF DE
VERROUILLAGE EN MODE HOES TENSION LOESQUE I_OUTIL NE S_RT pAS S'ASSURER QUE
LA DETENTE ET LE DECLENCNEUR FONCTIONNENT CONVENABLEMENT AVANT D'UTILISER
EOUTIL. NE JAMAI$ POINTER LOUTIL VERS SOl OU VERSO AUTRE$ PERSONNES OANS LA
ZONE DE TRAVAIL. ENLEVEZ LA BATTERIE QUAND : VERIFICATION DE L'OPERATIO N
APP_OP_I_ DU VOYAGE El LE D_CLENCH_ENI DE CON IAUL LES BOU}_RA_S D_GA_NTS
OU ENTRETIEN EMPLOY_Z SEULE_ENT AVEC LES _ATIERIE S ET LE CNARGEUR DE DEWALT
QUE LE GUIDE D UTILISATION LE NO N-RESPECT DES
21
Page 22

GUIDE DE DJ_PANNAGE
IL EST POSSIBLE DE RESOUDRE FACILEMENT LES PROBL#MES LES PLUS COMMUNS A L'AIDE DU TABLEAU CI-DESSOUS. POUR DES PROBL#MES PLUS GRAVES OU DES
PROBLEMES QUI PERSISTENT, COMMUNIQUER AVEC UN CENTRE DE RI_PARATION DEWALT OU COMPOSER LE 1-800-4-DEWALT.
AA VERTISSEMENT : POUR RL_DUIRE LE RISQUE DE BLESSURES CORPORELLES GRAVES, TOUJOURS RETIRER
SYMPT()ME CAUSE SOLUTION
L'outil ne s'allume pas
(Le syst_me d'_clairage ne s'allume pas)
L'outil refuse de se d_clencher
(12clairagefonctionne, le moteur refuse de
se mettre en marche)
L'outil refuse de se d_clencher
(syst_me d'_clairage clignote 4 fois)
L'outil refuse de se d_clencher
(le syst_me d'_clairage clignote en permanence)
L'outil refuse de se d_clencher
(_clairage fonctionnel et moteur en marche)
L'outil ne se d_clenche pas
(12clairagefonctionnel, moteur en marche, lame
d'entrafnement bloqu_ en bas)
L'outil fonctionne mais n'enfonce pas compl_tement les
attaches
LE BLOC-PILES DE L'OUTIL A VANT TOUTES RL_PARATIONS.
Composants _lectroniques internes d_sarm_s
Charge du bloc-piles faible ou bloc-piles endommag_
Les bornes sont sales ou endommag_es
Le dispositif de blocage du d_clencheur est bloqu_ en
)osition verrouill_e
D_clencheur par contact pli_
Composants _lectroniques internes endommaq_s
Le moteur s'arr6te apr_s 2 secondes
D_clencheur par contact ou g&chette non enfonc_(e)
G&chette endommag_e
D_clencheur par contact pli_
Le dispositif de blocage du d_clencheur est bloqu_ en
)osition verrouill_e (Actionnement s_quentiel seulement)
Composants _lectroniques internes endommaq_s
Charge du bloc-piles faible ou bloc-piles endommag_
Attache coinc_e
M_canisme coinc_
Composants _lectroniques endommag_s Consulter un centre de r_paration autoris_
Syst_me de rappel endommag_
D_bris dans le bec
Ensemble lame d'entrafnement/m_canisme de rappel
endommag_
Charge du bloc-piles faible ou bloc-piles endommag_
Profondeur d'enfoncement insuffisante
L'outil n'est pas bien appuy_ contre la piece
Longueur du materiel et des attaches Application trop
exigeante
Embout de la lame d'entrafnement endommag_ ou us_
Ensemble lame d'entrafnement/m_canisme de rappel
endommag_ ou us6
Retirer le bloc-piles, attendre 3 secondes et r6ins6rer
Charger ou remplacer le bloc-piles
Consulter un centre de r6paration autoris6
D_bloquer le dispositif de blocage du d_clencheur
Consulter un centre de r_paration autoris_
Consulter un centre de r_paration autoris_
Fonctionnement normal, rel&cher la g&chette et enfoncer de
nouveau
Consulter le manuel d'instructions
Consulter un centre de r_paration
Consulter un centre de r_paration
D_bloquer le dispositif de blocage
Consulter un centre de r6paration autoris6
Charger ou remplacer le bloc-piles
Retirer le bloc-piles, d_bloquer I'attache coinc6e (relever la
lame d'entrafnement & la main au besoin), et r6ins6rer le
bloc-piles
Consulter un centre de r6paration autoris6
Remplacer le syst_me de rappel; consulter un centre de
r6paration autoris_
Nettoyer le bec
Remplacer rensemble lame d'entrafnement/m_canisme de
rappel; consulter un centre de r6paration autoris6
Charger ou remplacer le bloc-piles
Tourner la molette de r6glage de profondeur & un param_tre
plus profond
Consulter le manuel d'instructions
Choisir le bon mat6riel ou la bonne Iongueur d'attache
Remplacer I'ensemble lame d'entrafnement/m_canisme de
rappel; consulter un centre de r6paration autoris6
Remplacer rensemble lame d'entrafnement/m_canisme de
rappel; consulter un centre de r6paration autoris6
autoris_
autoris_
du d_clencheur
22
Page 23

L'outilfonctionnemaisaucuneattachen'estenfonc6e
Attachescoinc6es
Aucunesattachesdanslechargeur
Attachesdedimensionsouangleerron6s
D6brisdanslebec
D6brisdanslechargeur
Chargeurus6
Emboutdelalamed'entrafnementendommag6ouus6
Ressortdupoussoirendommag6
Attachesdedimensionoud'angleerron6s
Emboutdelalamed'entrafnementendommag6ouus6
Longueurdumat6rieletdesattachesApplicationtrop
exigeante
Chargedubloc-pilesfaibleoubloc-pilesendommag6
D6brisdanslebec
D6brisdanslechargeur
Chargeurus6
Ressortdupoussoirendommag6ouus6
Aucuneattachedanslechargeur
Utiliseruniquementlesattachesrecommand6es
Nettoyerlebec
Nettoyerlechargeur
Remplacerlechargeur;consulteruncentreder6paration
autoris6
RemplacerI'ensemblelamed'entrafnement/m6canismede
rappel;consulteruncentreder6parationautoris6
Remplacerleressort;consulteruncentreder6paration
autoris6
Utiliseruniquementlesattachesrecommand6es
RemplacerI'ensemblelamed'entrafnement/m6canismede
rappel;consulteruncentreder6parationautoris6
Longueurdumat6rieloudeI'attacheinappropri6e
Chargerouremplacerlebloc-piles
Nettoyerlebec
Nettoyerlechargeur
Remplacerlechargeur;consulteruncentreder6paration
autoris6
Remplacerle ressort;consulteruncentreder6paration
autoris6
23
Page 24

FIG. 1
F
/_ Definiciones: Normas
de seguridad
K
A. Disparador
B. Bloqueo del interruptor
de contacto
C. Rueda de ajuste de la
profundidad
D. Faros/Indicador
de bateria bajaJatascos
E. Pasador para
desobstrucci6n
F. Activador por contacto
G. Dep6sito
H. Pasador del impulsor
I. Selector de
tope/secuencial
J. Gancho de suspensi6n
reversible
K. Indicador del nivel de
clavos
Las siguientes definiciones describen el nivel de gravedad
de cada palabra de sepal. Lea el manual y preste atenci6n a
estos simbolos.
_PELIGRO: indica una situacidn de peligro inminente que,
si no se evita, provocara la muerte o lesiones graves.
i_,ADVERTENCIA: Indica una situacidn de peligro potencial
que, si no se evita, podria provocar la muerte o lesiones
graves.
APRECAUCI6N: Indica una situacidn de peligro potencial
que, si no se evita, puede provocar lesiones leves o mod-
eradas.
PRECAUCION: Sin el sfmbolo de alerta de seguridad, indica
una situaci6n de peligro potencial que, si no se evita, puede
\provocar da#os a la propiedad.
ESPECIFICACIONES DE
LA HERRAMIENTA
Modo de disparo Selectivo
Voltaje 18
Altura 286 mm (11,25 pulg.)
Ancho 89 mm (3,5 pulg.)
Longitud 292 mm (11,5 pulg.)
Peso 3,4 kg (7,5 Ib)
Angulo del deposito 0°
Capacidad de carga Hasta 110 clavos
J
ESPECIFICACIONES DE LOS CLAVOS
Recto
16 mm, 19 mm, 25 mm, 29 mm, 30 mm, 32 mm, 33 mm, 35 mm, 38 mm, 40 mm, 44 mm, 50 mm
Clavo (5/8 pulg., 3/4 pulg., 1 pulg., 1-1/8 pulg., 1 3/16 pulg., 1-1/4 pulg., 1-5/16 pulg., 1-3/8 pulg., 1-1/2 pulg.,
Longitudes 1-9/16 pulg., 1-3/4 pulg., 2 pulg.)
Diametros del vastago Calibre 18
,&,ngulos de los clavos 0°
24
Page 25

Normas generales de seguridad
para todas las herramientas
accionadas a bateria
_I_ iADVERTENCIA! Lea y comprenda todas
las instrucciones. El incumplimiento de
cualquiera de las instrucciones enumeradas a
continuaci6n puede provocar una descarga
electrica, un incendio y/o lesiones personales
graves.
CONSERVE ESTAS
INSTRUCCIONES
AREA DE TRABAJO
• Mantenga el #rea de trabajo limpia y bien iluminada.
Los bancos de trabajo abarrotados y/as areas oscuras
propician accidentes.
• No opere herramientas electricas en atmosferas
explosivas, como ambientes donde se encuentran
liquidos, gases o polvo inflamables. Las herramientas
electricas originan chispas que pueden encender el
polvo o los vapores.
• Mantengaaespectadores, ni_osyvisitantesalejados
de la herramienta electrica en funcionamiento. Las
distracciones pueden provocar la perdida de control
SEGURIDAD ELI_CTRICA
• No maltrate el cable. Nunca use el cable para
transportar la herramienta. Mantenga el cable
alejado del calor, el ace#e, los bordes filosos y
las piezas moviles. Reemplace los cables da_ados
inmediatamente. Los cables dafiados pueden provocar
un incendio.
• Una herramienta accionada a baterias con baterias
integrales o un paquete de baterias separado debe
recargarse solo con el cargador especificado para
la bateria. Un cargador adecuado para un tipo de
baterfa puede crear un riesgo de incendio si se utiliza
con otra baterfa.
• Utilice la herramienta operada por bateria solo con
el paquete de baterias dise_ado especfficamente.
El uso de otro tipo de baterfa puede producir riesgo de
incendio.
SEGURIDAD PERSONAL
• Permanezca alerta, concentrese en Io que esta
haciendo y utilice el sentido comOn cuando emplee
una herramienta electrica. No utilice la herramienta
si esta cansado o bajo el efecto de drogas, alcohol o
medicamentos. Un momento de descuido mientras se
opera una herramienta electrica puede provocar dahos
personales graves.
• Use la vestimenta adecuada. No use ropas holgadas
o joyas. Sujete el cabello largo. Mantenga el cabello,
la ropa y los guantes alejados de las piezas en
movimiento. Las prendas holgadas, /as joyas o el
cabello largo pueden quedar atrapados en /as piezas en
movimiento. Los orificios de ventilacidn suelen cubrir
piezas en movimiento, por Io que tambien se deben
evitar.
• Evite el encendido por accidente. AsegOrese de
que el bloqueo del activador por contacto este
bloqueado antes de insertar el paquete de baterias.
Transportar la herramienta con el dedo en el interruptor
o insertar elpaquete de baterfas en una herramienta con
el interruptor encendido puede provocar accidentes.
• Retire las Ilaves de ajuste o de tuercas antes de
encender la herramienta. Una l/ave de tuercas o
clavija que se deja conectada a una pieza giratoria de la
herramienta podrfa provocar dahos personales.
• No se estire. Conserve el equilibrio y parese
adecuadamente en todo momento. Pararse
adecuadamente y mantener el equilibrio permiten
un mejor control de la herramienta en situaciones
inesperadas.
• Use equipo de seguridad. Siempre utilice
proteccion para los ojos. Se debe usar mascara para
polvo, calzado de seguridad antideslizante, casco o
proteccidn auditiva seg#n corresponda en cada caso.
USO Y CUlDADO DE LA HERRAMIENTA
• Utilice abrazaderas u otra forma practica para
asegurar y sostener la pieza de trabajo en una
plataforma estable. Sostener el trabajo con la mano
o contra el cuerpo no brinda la estabilidad requerida y
puede Ilevar a la perdida del control
• No fuerce la herramienta. Utilice la herramienta
correcta para el trabajo que realizara. La herramienta
correcta hara el trabajo mejor y de manera mas segura
a la velocidad para la que fue disehada.
• No utilice la herramienta si no se puede encender
o apagar con el interruptor. Toda herramienta que
no puede ser controlada mediante el interruptor es
peligrosa y debe set reparada.
• Desconecte elpaquete de baterias de la herramienta
o bloquee elinterruptor, o coloquelo en laposicion de
apagado antes realizar ajustes, cambiar accesorios
o almacenar la herramienta. Estas medidas de
seguridad preventivas reducen el riesgo de encender la
herramienta en forma accidental
• Guarde las herramientas que no estan en uso
fuera del alcance de los ni_os y de personas no
entrenadas. Son peligrosas en /as manos de usuarios
no entrenados.
• Cuando no utilice elpaquete de baterias, mantengalo
lejos de otros objetos metalicos como sujetapapeles,
monedas, Ilaves, clavos, tornillos u otros objetos
metalicos peque#os que puedan realizar una
conexion desde un terminal al otro. Los cortocircuitos
en los terminales de la baterfa pueden provocar chispas,
quemaduras o un incendio.
25
• Controle que no haya piezas en movimiento mal
alineadas o trabadas, piezas rotas y cualquier otra
situacion que pueda afectar el funcionamiento de
la herramienta. Si encuentra da#os, haga reparar la
herramienta antes de utilizarla. Muchos accidentes se
producen a causa de/as herramientas que carecen de
un mantenimiento adecuado.
• Utilice solo accesorios recomendados por el
fabricante para el modelo que posee. Los accesorios
que pueden ser aptos para una herramienta, pueden
convertirse en un factor de riesgo cuando se utilizan en
otra herramienta.
MANTENIMIENTO
• El mantenimiento de la herramienta debe ser
realizado Onicamente por personal de reparaciones
calificado. El mantenimiento realizado por personal
no calificado puede provocar riesgo de lesiones
personales.
• AI reparar una herramienta, solo utilice piezas de
repuesto identicas. Siga las instrucciones de la
seccion Mantenimiento de este manual El uso de
piezas no autorizadas o el incumplimiento de /as
instrucciones de mantenimiento pueden crear un riesgo
de descarga electrica o lesiones.
Instrucciones de seguridad
importantes para las clavadoras
_ADVERTENCIA: AI utilizar una clavadora, deben seguirse
todas /as precauciones de seguridad descritas a continu-
aci6n, a fin de evitar el riesgo de muerte o lesiones graves.
Lea y comprenda todas /as instrucciones antes de emplear
la herramienta.
• Sostenga la herramienta por las superficies de
agarre aisladas cuando realice una operacion en
la que la herramienta de corte pueda tocar cables
electricos ocultos. El contacto con un cable con cor-
riente electrica hara que /as partes expuestas de la her-
ramienta tengan corriente y que el operador reciba una
descarga electrica.
• La herramienta en funcionamiento
puede generar residuos volatiles,
materiales colacionados o polvo que
pueden da_ar los ojos del operador.
El operador y toda otra persona que se
FIG.A encuentre en el area de trabajo DEBEN
usar anteojos de seguridad con protec-
cidn lateral Estos anteojos de segu-
ridad deben cumplir con los requisitos
ANSI Z87.1 (los anteojos aprobados
tienen impreso o estampado "Z87"). Es
responsabilidad del empleador exigir el
uso de equipo de proteccidn para los
ojos por parte del operador de la her-
ramienta y de/as personas en el area
de trabajo. (Fig. A)
Page 26

• Siempre utilice la protecci6n audi-
tiva apropiada mientras usa la her-
ramienta. En ciertas circunstancias y
seg_n el perfodo de uso, el ruido de este
producto puede contribuir a la perdida
de audicidn. (Fig. A)
• Desconecte elpaquete de hater[as de
la herramienta cuando no la utilice.
Siempre retire el paquete de bat-
erias y los elementos de fijaci6n del
dep6sito antes de abandonar el area
o pasar la herramienta a otro opera-
dot. No #eve la herramienta a otra
area de trabajo en la que el cambio de
ubicaci6n involucre el uso de anda-
mios, escalones, escaleras, etc., con
el paquete de bater[as conectado. No
realice ajustes, #eve a cabo el man-
tenimiento ni retire los elementos de
fijaci6n atascados con el paquete de
bater(as insertado.
• No retire nada de la herramienta ni
trate de forzarla, de modo que esta, el
disparador, el bloqueo del activador
por contacto o el activador por con-
tacto dejen de funcionar. No sujete con
cinta ni ate el disparador o el activador
por contacto en la posicidn DE encendi-
do. No retire el resorte del activador por
contacto. Inspeccione diariamente para
ver si el disparador y el activador por
contacto se mueven libremente. Podrfa
producirse una descarga no controlada.
• Revise la herramienta antes de usar-
la. No opere una herramienta si algu-
na parte de esta, el disparador, el
bloqueo del activador por contacto o
el activador por contacto no funcio-
nan, estan desconectados o altera-
dos, o no funcionan correctamente.
Las piezas dahadas o faltantes deberan
repararse o reemplazarse antes del uso.
Consulte la seccidn Reparaciones.
• No altere ni modifique la herramienta
de ninguna forma.
• Siempre de por sentado que la her-
ramienta contiene elementos de
fijaci6n.
• No apunte la herramienta hacia sus
compa_eros de trabajo ni hacia usted
en ning_n momento, iNo la use a
modo de juego! Trabaje en forma segu-
ra. Respete la herramienta como un
elemento de trabajo. (Fig. B)
• Mantenga a espectadores, ni_os y
visitantes alejados de la herramienta
electrica en funcionamiento. Las dis-
FIG. G
FIG. B
FIG. C
FIG. D
FIG. E
FIG. F
tracciones pueden provocar la perdida
de control Cuando la herramienta no
este en uso, se debe guardarla en un
lugar seguro, fuera del alcance de los
nihos.
• Siempre use el bloqueo del activa-
dor por contacto si no utilizara la
herramienta inmediatamente. E/uso
de/ bloqueo del activador por con-
tacto evitara la descarga accidental.
No se estire. Conserve el equilibrio
y parese adecuadamente en todo
momento. La perdida del equilibrio
podrfa provocar una lesidn personal
(Fig. C)
Utilice la herramienta solo para la
funcion para la que fue dise_ada. No
descargue los elementos de fijaci6n
al aire, hormig6n, piedra, madera
muy dura, nudos o cualquier mate-
rial demasiado duro para que Io pen-
etren. No utilice el cuerpo de la her-
ramienta o la tapa superior como un
martillo. Los elementos de fijaci6n
descargados podr[an hacer un cami-
no inesperado y causar una lesi6n.
(Figs. D, F)
• Siempre deje los dedos lejos del
activador por contacto para evitar
que se produzcan lesiones por la
liberacion inadvertida del impulsor
(Fig. H)
• ConsultelasseccionesMantenimiento
y Reparaciones para obtener infor-
maci6n detallada sobre el manten-
imiento correcto de la herramienta.
• Opere siempre la herramienta en un
area limpia e iluminada. Aseg_rese de
que la superficie de trabajo esta libre de
cualquier residuo y tenga cuidado de no
perder el equilibrio cuando trabaja en
lugares altos, como techos.
No clave elementos de fijacion cerca
de los bordes del material La pieza
de trabajo puede partirse y hacer que el
elemento de fijacidn rebote y Io lesione
a usted o a un compahero de trabajo.
Tenga en cuenta que el clavo podrfa
seguir la veta de la madera y sobresalir
en forma inesperada del costado del
material de trabajo. Coloque la punta de
cincel del clavo en forma perpendicular
a la veta para reducir el riesgo de
lesiones. (Figs. E, F, M)
26
FIG. H
FIG. I
FIG. J
FIG. K
FIG. L
• No coloque clavos sobre otros ele-
mentos de fijacion, o con la her-
ramienta en un angulo demasiado
pronunciado. Podrfa producirse una
lesi6n personal a causa de un fuerte ret-
roceso, el atascamiento de los elemen-
tos de fijaci6n o el rebote de los clavos.
(Fig. G)
• Mantenga las manos y las partes
del cuerpo fuera del area de tra-
bajo inmediata. Sostenga la pieza de
trabajo con abrazaderas cuando sea
necesario para mantener /as manos y el
cuerpo alejados de dahos potenciales.
Aseg_rese de que la pieza de trabajo
este bien sujetada antes de presionar
_!_i_,¸
la clavadora en el material El activador
por contacto puede hacer que el mate-
rial de trabajo se mueva en forma ines-
perada. (Fig. H)
• No utilice la herramienta en presen-
cia de polvo, gases o vapores inflam-
ables. La herramienta puede producir
una chispa que le prenda fuego a los
gases y provoque un incendio. Clavar
un clavo sobre otro clavo tambien puede
producir una chispa. (Fig. 0
• Mantenga la cara y las partes del
cuerpo alejados de la parte posterior
de la tapa de la herramienta cuando
trabaje en areas restringidas. Un
retroceso repentino puede ocasionar
un impacto al cuerpo, especialmente
al clavar en materiales duros o densos.
(Fig. J)
• Agarre la herramienta con firmeza
para mantener el control pero permita
que la herramienta retroceda de la
superficie de trabajo cuando se clava
el elemento de fijaci6n. En el modo de
accionamiento de tope, si se permite que
el activador pot contacto vuelva a tocar
la superficie de trabajo antes de que se
suelte el disparador, se descargara un
elemento de fijaci6n innecesario.
• La elecci6n del metodo de disparo es
importante. Verifique /as opciones de
disparo en el manual
INTERRUPTOR SELECTOR
SECUENClAL/DE TOPE
Accion secuencial / (Fig. K)
• Cuando utilice el modo secuencial,
no opere la herramienta a menos
que este firmemente colocada
contra la pieza.
Page 27

FIG.M Accion de tope //'/" (Fig. L)
• Cuando utilice la herramienta
en el modo de tope, tonga
cuidado con los dobles
disparos involuntarios que
produce el retroceso de la
herramienta. Es posib/e que se
coloquen elementos de fijaci6n
innecesarios si el activador
FIG.N pot contacto vuelve a tocar
accidentalmente la superficie de
trabajo.
PARA EVlTAR LOS
DOBLES DISPAROS:
• No empuje la herramienta
contra la superficie del
FIG.0 trabajo con mucha fuerza.
i, retroceda completamente
ilI despuds de cadaengrapado.
_ • Utilice el disparador de
.... .... accidn secuencial.
• Cuando el "tope" active la clavadora, mantenga
siempre el control de la herramienta. La posicidn
inadecuada de la herramienta puede provocar una
descarga mal dirigida del elemento de fijaci6n.
• No coloque clavos en las cabezas deotros elementos
de fijacion. Podrfa producirse un fuerte retroceso, el
atascamiento de los elementos de fijacidn o el rebote de
los clavos. (Fig. M)
• Conozca el espesor del material cuando utilice la
clavadora. Un clavo que sobresale puede provocar una
lesidn.
• AJUSTE DE LA PROFUNDIDAD: Para reducir el
riesgo de lesiones graves debidas a una puesta en
marcha accidental al tratar de ajustar la profundidad,
SlEMPRE:
• Retire el paquete de baterfas.
• Trabe el bloqueo del activador por contacto
(Fig. N).
• Evite tocar el disparador durante los ajustes.
• No coloque clavos a ciegas en paredes, pisos u
otras areas de trabajo. Los elementos de fijacidn que
se colocan en cables electricos con corriente, caherfas
de agua u otros tipos de obstrucciones pueden provocar
lesiones. (Fig. O)
• Permanezca alerta, concentrese en Io que esta
haciendo y utilice el sentido comOn cuando emplee
una herramienta electrica. No utilice la herramienta
siesta cansado o bajo el efecto de drogas, alcohol
o medicamentos. Un momento de descuido mientras
se opera una herramienta electrica puede provocar
lesiones personales graves.
• Deje que la herramienta
_ADVERTENCIA: El uso de este producto Io expondra a
sustancias qufmicas que el Estado de California reconoce
que producen cancer, defectos de nacimiento y otros
dahos reproductivos. Evite la inhalacion de los vapores
y el polvo, y lavese las manos despues de su uso.
• Evite el contacto prolongado con las particulas de
polvo originadas al lijar, aserrar, esmerilar, taladrar
y realizar demas actividades de la construccion.
Use indumentaria protectora y lave las areas expu-
estas con agua y jabon. Evite que el polvo entre en la
boca y en los ojos o se deposite en la piel, para impedir
la absorcidn de productos qufmicos nocivos.
AADVERTENClA: El uso de esta herramienta puede
generar o dispersar partfculas de polvo, que pueden cau-
sar lesiones respiratorias permanentes y graves u otras
lesiones. Use siempre proteccidn respiratoria apropiada
para la exposicidn al polvo aprobada por el Instituto
Nacional de Salud y Seguridad Ocupacional de EE.UU. y
la Administracidn de Salud y Seguridad Ocupacional de
EE.UU. (NIOSH y OSHA respectivamente, por sus siglas
en ingles). Aleje la cara y el cuerpo del contacto con las
partfculas.
_ADVERTENClA: USE SIEMPRE LENTES DE
SEGURIDAD. Los anteojos de uso diario NO son lentes de
seguridad. Utilice tambien mascaras faciales o para polvo
si la operacidn produce polvillo. UTILICE SIEMPRE
EQUIPOS DE SEGURIDAD CERTIFICADOS:
• Proteccidn para los ojos ANSI Z87.1 (CAN/CSA
Z94.3),
• proteccidn auditiva ANSI $12.6 ($3.19),
• proteccidn respiratoria segEm las normas NIOSH/
OSHA/MSHA.
A PRECAUClON: Cuando no se utilice, coloque la her-
ramienta de costado en una superficie estable en la
que no provocara tropezones o caidas. Algunas herra-
mientas con paquetes de baterfas grandes permaneceran
en forma vertical, pero pueden ser derribadas facilmente.
• La etiqueta de su herramienta puede incluir los siguien-
tes sfmbolos. Los sfmbolos y sus definiciones son los
siguientes:
V............ voltios
Hz.......... hertz
min ........ minutos
--- ..... corriente directa
@ .......... Construccidn Clase I
(con conexidn a tierra)
[] .......... Construccidn Clase II
(con aislamiento doble)
.../min... revoluciones o
recA#rocidad por
minuto
BPM ...... golpes por minuto
27
A .......... amperios
W......... vatios
,x, ....... corriente
altema
no ........ velocidad
sin carga
G ......... terminal a
tierra
........ sfmbolo de
alerta de
seguridad
ANTES DE EMPLEAR ESTA HERRAMIENTA, LEA
DETENIDAMENTE TODAS LAS INSTRUCCIONES
DE LA SECCl0N "INSTRUCClONES DE SEGURIDAD
IMPORTANTES".
Instrucciones de seguridad
importantes para los
paquetes de bateria
Su herramienta utiliza un paquete de baterias DEWALT.
AI solicitar paquetes de baterias de repuesto, asegt]rese
de incluir el nt]mero de cat&logo y el voltaje: Los paquetes
de baterias de duraci6n prolongada brindan m&s tiempo
de funcionamiento que los paquetes de baterias est&ndar.
Consulte el gr&fico al final del manual para conocer la com-
patibilidad entre los cargadores y los paquetes de baterias.
NOTA: La herramienta aceptar& paquetes de baterias
est&ndar o de duraci6n prolongada. No obstante, asegt]rese
de seleccionar el voltaje adecuado. Las baterias pierden
lentamente su carga cuando no est&n en el cargador. El
mejor lugar para guardar su bateria en todo momento es
en el cargador.
El paquete de baterias incluido en la caja no est& comple-
tamente cargado. Antes de utilizar el paquete de baterias
y el cargador, lea las instrucciones de seguridad a continu-
aci6n. Luego siga los procedimientos de carga descriptos.
LEA TODAS LAS INSTRUCCIONES
• NO incinere el paquete de baterias, aun si tiene
da_os importantes o esta completamente desgasta-
do. El paquete de baterfas puede explotar en el fuego.
• Una peque_a perdida de liquido de las celdas del
paquete de bater(as puede presentarse en condicio-
nes de uso o temperatura extremas. Esto no indica
una falla. Sin embargo, si el sello externo esta roto y
esta perdida toca su pieh
a. Lave rapidamente con agua y jabdn.
b. Neutralice con un acido suave como jugo de limdn o
vinagre.
c. Si el Ifquido de la baterfa entra en contacto con sus
ojos, lavelos con agua limpia durante 10 minutos
como mfnimo y busque atencidn medica inmediata.
(Nota medica: El Ifquido es una solucidn de hidrdxido
de potasio a125%-35%).
• Cargue los paquetes de baterfas s61o con cargadores
DEWAL T.
• NO salpique o sumerja en agua u otros Ifquidos.
• No almacene ni utilice la herramienta y el paquete
de hater[as en lugares en los que la temperatura
puede Ilegar a o superar los 105 °F (como en toldos
al aire libre o construcciones de metal en verano).
•&PELIGRO: Riesgo de electrocucidn. Nunca intente abrir
el paquete de baterfas por ning#n motivo. Si la caja del
paquete de baterfas esta agrietada o dahada, no la intro-
duzca en el cargador. Esto puede provocar descargas
electricas o electrocuci6n. Los paquetes de baterfas daha-
dos deben devolverse al centro de mantenimiento para su
reciclado.
Page 28

NOTA: Seproveentapaspara almacenamiento
y transporte de las baterias, para utilizar
siempre que la bateria est6 fuera de la
herramienta o del cargador. Retire la tapa
antes de colocar la bateria en el cargador o
en la herramienta.
_ADVERTENCIA: Riesgo de incendio. No guarde o
transporte la bateria de ninguna manera que permita
que los terminales expuestos entren en contacto con
objetos met#lico. Por ejemplo, no coloque la baterfa en
delantales, bolsillos, cajas de herramientas, cajas de juegos
de productos, cajones, etc. con clavos, Ilaves, tomillos
sueltos, etc. sin la tapa. Transportar baterias puede
provocar incendios si los terminales de la bateria
entran en contacto accidentalmente con materiales
conductores como Ilaves, monedas, herramientas de
mano u objetos similares. Las Normas para Materiales
Peligrosos del Departamento de Transporte de los Estados
Unidos (HMR) concretamente prohfben transportar baterfas
comercialmente o en aviones (es decir, empacadas en
maletas y equipaje de mano) A MENOS que esten
debidamente protegidas de cortocircuitos. Por Io tanto,
cuando transporte baterfas individuales, aseg_rese de que
los terminales de la baterfa esten protegidos y bien aislados
de materiales que puedan hacer contacto y causar un
cortocircuito.
_PRECAUCION: El paquete de baterfas debe fijarse en
forma segura a la herramienta. Si el paquete de baterfa
esta sue#o, podrfa provocar una lesi6n personal
E1 sello RBRC TM
El sello RBRC TM (Corporaci6n de reciclado
de baterias recargables) que se encuentra
sobre las baterias (o paquetes de baterias)
de niquel-cadmio o de hidruro metalico de
niquel indica que los costos para reciclar
estas baterias (o paquetes de baterias) al final de su vida
t]til ya fueron pagados por DEWALT. En algunas zonas es
ilegal
tirar las baterias usadas de niquel-cadmio e hidruro metali-
co de niquel en la basura o en el dep6sito de desechos
s61idos del municipio. El programa RBRC proporciona
una alternativa de conciencia sobre el cuidado del medio
ambiente.
RBRCTM, en cooperaci6n con DEWALT y otros usuarios
de baterias, estableci6 programas en los Estados Unidos y
Canada para facilitar la recolecci6n de baterias de niquel-
cadmio e hidruro metalico de niquel usadas. Ayude a pro-
teger nuestro medio ambiente y a conservar los recursos
naturales: devuelva las baterias usadas de niquel-cadmio
e hidruro metalico de niquel a un centro de mantenimiento
DEWALT autorizado o a su comerciante minorista para que
sean recicladas. Tambi6n puede comunicarse con el centro
de reciclado local para obtener informaci6n sobre d6nde
dejar las baterias agotadas.
RBRCTM es una marca comercial registradade la Corporacidnde
recicladode baterfas recargables.
Instrucciones de seguridad
importantes para los cargadores
de baterias
CONSERVE ESTAS INSTRUCCIONES: Este manual
contiene instrucciones de seguridad importantes para los
cargadores de baterfas.
• Antes de utilizar el cargador, lea todas las instrucciones
y las prevenciones en el cargador, en el paquete de
baterfas y en el producto que utiliza el paquete de bat-
erfas.
A PELIGRO: Riesgo de electrocucidn. Hay 120 voltios en
los terminales de carga. No realice pruebas con objetos
conductores. Esto puede provocar descargas electricas o
electrocucidn.
_ADVERTENCIA: Riesgo de descarga electrica. No per-
mita que ning#n Ifquido entre en el cargador. Podrfa prom-
car descargas electricas.
_PRECAUClON: Riesgo de quemadura. Para reducir el
riesgo de lesiones, cargue solamente las baterfas recar-
gables de nfquel-cadmio de DEWAL T. Otros tipos de bat-
erfas pueden estallar y provocar dahos personales y
materiales.
_ PRECAUClON: En determinadas circunstancias, con el
cargador enchufado en el tomacorriente, algunos materia-
les extrahos pueden provocar un cortocircuito en los con-
tactos de carga expuestos dentro del cargador. Se deben
mantener lejos de las cavidades del cargador los materia-
les extrahos de naturaleza conductora, entre los que se
incluyen la lana de acero, el papel de aluminio o cualquier
acumulacidn de partfculas metalicas. Estos son s61oalgu-
nos ejemplos y no constituyen una lista taxativa Siempre
desenchufe el cargador del tomacorriente cuando no haya
un paquete de baterfas en la cavidad. Desenchufe el car-
gador antes de intentar limpiarlo.
• NO intente cargar elpaquete de baterias con carga-
dores distintos de aquellos mencionados en este
manual El cargador y el paquete de baterfas estan
especfficamente disehados para funcionar en con-
junto.
• Estos cargadores no est#n dise#ados para usos
distintos de la carga de baterias recargables de
DEWAL T. Otros usos pueden provocar riesgo de incen-
dio, descarga electrica o electrocucidn.
• No exponga el cargador a la Iluvia ni a la nieve.
• Tire del enchufe en lugar del cable al desconectar el
cargador. Esto reducira el riesgo de dahar el enchufe o
el cable.
• AsegOrese de que el cable este ubicado de modo
que no Io pise o se tropiece con el y que no este
sujeto a da#os o tensiones de alguna otra forma.
• No utilice un cable prolongador a menos que sea
absolutamente necesario. El uso de un cable pro-
Iongador incorrecto puede provocar riesgo de incendio,
descarga electrica o electrocucidn.
28
• Para garantizar la seguridad, un cable prolonga-
dor debe tener una medida de conductor adec-
uada (,4 WG o Medida de conductor estadounidense.
Cuanto mas pequefio sea el n_mero de calibre del
conductor, mayor sera la capacidad del cable; es decir,
un calibre 16 tiene mas capacidad que un calibre 18.
Cuando se utiliza mas de una prolongacidn para Iograr
la Iongitud total, asegOrese de que cada prolongacidn
tenga la medida mfnima del conductor.
Tamafio minimo recomendado del conductor
para cables prolongadores
Longitud total del cable
25 pies 50 pies 75 pies 100 pies 125 pies 150 pies 175 pies
7.6m 15.2m 22.9m 30.5m 38.1m 45.7m 53.3m
Wire SizeAWG
18 18 16 16 14 14 12
• No coloque objetos en la parte superior del carga-
dor ni coloque el cargador en una superficie blanda
que pueda bloquear las ranuras de ventilacion y
provocar un calor interno excesivo. Co/oque el car-
gador en una posicidn alejada de cualquier fuente de
calor. El cargador se ventila a traves de ranuras en la
parte superior e inferior de la unidad.
• No opere el cargador con un cable o enchufe da_a-
dos: reemplacelos de inmediato.
• No opere el cargador si este ha recibido un golpe
fuerte, se cayo o presenta algOn da#o. Llevelo a un
centro de mantenimiento autorizado.
• No desarme el cargador; cuando deba realizar un
mantenimiento o reparaciones, Ilevelo a un centro
de mantenimiento autorizado. El armado incorrecto
puede implicar un riesgo de descarga electrica, electro-
cucidn o incendio.
• Antes de limpiarlo, desconecte el cargador del
tomacorriente. Esto reducira el riesgo de descarga
electrica. Quitar el paquete de baterfas no reducira este
riesgo.
• NUNCA intente conectar 2 cargadores juntos.
• El cargador esta dise#ado para operar con corri-
ente electrica domestica estandar (120 voltios). No
intente utilizarlo con otro voltaje. Esto no se aplica al
cargador vehicular.
Utilizacidn del modo Tune-UprM
automdtico
El modo Tune-Up TM automatico iguala o equilibra las
c_lulas individuales en el paquete de baterias de modo
que permite que funcione a una capacidad maxima. Los
paquetes de baterias deben ajustarse semanalmente o
despu6s de 10 ciclos de carga/descarga o siempre que el
paquete ya no suministre la misma cantidad de potencia.
Para utilizar el Tune-Up TM automatico, coloque el paquete
de baterias en el cargador y d6jelo durante al menos 8
horas. El cargador utilizara los siguientes modos.
Page 29

1.Laluzrojaseencenderay apagaracontinuamente
paraindicarquesehainiciadoelciclodecargade
1hora.
2. Cuandoelciclodecargade1horasecomplete,laluz
permaneceraencendidaenformacontinuay yano
parpadear&Estoindicaqueelpaqueteestacompleta-
mentecargadoy sepuedeutilizarenestemomento.
3. Sisedejael paquetedebateriasenel cargador
despu_sdelciclodecargainicialde1 hora,elcar-
gadoriniciarael modoTune-Upautomatico.Este
modocontint]ahasta8horaso hastaquelasceldas
individualesdelpaquetedebateriasest6nigualadas.
Entonceselpaquetedebateriasestalistoparausar
y sepuederetirarencualquiermomentoduranteel
modoTune-up.
4. UnavezqueestacompletoelmodoTune-up,elcarga-
doriniciaraunacargademantenimiento;elindicador
rojoquedaraencendido.
CONSERVE ESTAS
INSTRUCCIONES PARA
FUTURAS CONSUL TAS
Cargadores
La herramienta utiliza un cargador DEWALT. Puede car-
gar la bateria en cargadores DEWALT de 1 hora, carga-
dores de 15 minutos o cargador vehicular de 12 voltios.
AsegQrese de leer todas las instrucciones de seguridad
antes de utilizar su cargador. Consulte el grafico en la
contratapa de este manual para conocer la compatibilidad
entre los cargadores y los paquetes de baterias.
FIG. 2
CARGADOR DE CARGADOR DE
15 MINUTOS 1 HORA
Procedimiento de carga
i_ PELIGRO: Riesgo de electrocucidn. Hay 120 voltios en
los terminales de carga. No realice pruebas con objetos
conductores.
1. Enchufe el cargador en un tomacorriente adecuado
antes de insertar el paquete de baterias.
2. Introduzca el paquete de baterias en el cargador. La
luz roja (cargando) se encendera y apagara en forma
continua indicando que el proceso de carga ha comen-
zado (Fig. 2).
3. Una luz roja fija indicara que la carga ha finalizado. El
paquete esta completamente cargado y puede utili-
zarse en este momento o dejarse en el cargador.
Operaci6n de la luz indicadora
PAQUETE CARGANDO .................. _ _ _ _ _ _ _
COMPLETAMENTE CARGADO ......
RIETRASO POR PAQUETE
CALIENTE/FRiO ............................. _ [] _ [] _ m []
REEMPLAZAR PAQUETE .............. ® ® ® ® @ ® @ ® @ ® @ @ ®
LINEA DE POTENCIA
CON PROBLEMAS ......................... ® @ ® ® @ ® @ @ ®
Indicadores de carga
Algunos cargadores estan dise_ados para detectar deter-
minados problemas que pueden surgir con los paquetes
de baterias. Los problemas se indican con una luz roja que
se encendera y apagara rapidamente. De ser asi, vuelva
a introducir el paquete de baterias en el cargador. Si el
problema persiste, intente utilizar un paquete de baterias
diferente para determinar si el cargador esta en buenas
condiciones. Si el nuevo paquete se carga correctamente
significa que el paquete original es defectuoso y debe
devolverse a un centro de mantenimiento u otro sitio de
recopilaci6n para su reciclado. Si el nuevo paquete de
baterias presenta el mismo problema que el original,
haga probar el cargador en un centro de mantenimiento
autorizado.
RETRASO POR PAQUETE CALIENTE/FR|O
Algunos cargadores pueden tener una funci6n de Retraso
por paquete caliente/frio: cuando el cargador detecta una
bateria caliente, enciende automaticamente un Retraso
por paquete caliente que suspende la carga hasta que
la bateria se enfria. Despu_s de que la bateria se ha
enfriado, el cargador cambia automaticamente al modo
de Paquete cargando. Esta funci6n garantiza la duraci6n
maxima de la bateria. La luz roja se enciende y apaga
durante largos periodos, luego cortos durante el modo de
Retraso para paquete caliente.
LJNEA DE POTENCIA CON PROBLEMAS
Algunos cargadores poseen un indicador de Linea de
potencia con problemas. Cuando el cargador se utiliza con
algunas fuentes de potencia portatiles como generadores
o fuentes que convierten CC a CA, el cargador puede
suspender temporalmente la operaci6n, ocasi6n en la
que la luz roja se encendera y apagara rapidamente dos
veces, seguido de una pausa. Esto indica que la fuente
de potencia esta fuera de los limites.
DEJAR EL PAQUETE DE BATER|AS EN EL
CARGADOR
El cargador y el paquete de baterias se pueden dejar
conectados con la luz roja encendida indefinidamente. El
cargador mantendra el paquete de baterias como nuevo y
completamente cargado.
NOTA: El paquete de baterias perdera lentamente su
carga si se mantiene fuera del cargador. Si el paquete de
baterias no ha permanecido en carga de mantenimiento,
podria ser necesario cargarlo nuevamente antes de su
uso. Un paquete de baterias tambi_n podria perder su
carga lentamente si se deja en un cargador que no est_
conectado a un suministro de CA apropiado.
Paquetes de baterias agotadas: Los cargadores tambi_n
pueden detectar una bateria agotada. Estas baterias aQn
se pueden utilizar, pero no se espera que realicen mucho
trabajo. En estos casos, el cargador emitira un sonido rapi-
do 8 veces para indicar una condici6n de bateria agotada
al cabo de unos 10 segundos de introducida la bateria. El
cargador continuara con la carga de la bateria a la maxima
capacidad posible.
Notas importantes sobre la carga
1. Obtendra una duraci6n mas prolongada y un mejor
rendimiento si el paquete de baterias se carga cuando
la temperatura ambiental esta entre 18 °C y 24 °C
(65 °F y 75 °F). NO cargue el paquete de bateria con
una temperatura ambiental por debajo de +4,5 °C
(+40 °F) o por encima de +40,5 °C (+105 °F). Esto es
importante y evitara da_os graves en el paquete de
baterias.
2. El cargador y el paquete de baterias pueden estar
calientes al tacto durante la carga. Esto es una
condici6n normal y no indica un problema.
3. Si el paquete de baterias no se carga
adecuadamente:
a. Revise el tomacorriente enchufando una lampara u
otro aparato
b. Verifique si el tomacorriente esta conectado a un
interruptor que corta la energia cuando usted apaga
la luz.
c. Mueva el cargador y el paquete de baterias a
un lugar donde la temperatura ambiental sea de
aproximadamente 18 °C a 24 °C (65 °F a 75 °F).
d. Si los problemas de carga persisten, Ileve la
herramienta, el paquete de baterias y el cargador al
centro de mantenimiento local.
4. Se debe recargar el paquete de baterias cuando
no produce energia suficiente para tareas que pre-
viamente realizaba con facilidad. NO CONTINUE
utilizando la herramienta en estas condiciones. Siga
el procedimiento de carga. Tambi_n se puede cargar
un paquete de baterias parcialmente usado cuando se
desee, sin ningQn efecto negativo sobre _stas.
29
Page 30

5. Endeterminadascondiciones,estandoel cargador
enchufadoenel tomacorriente,algunosmateriales
extraSospuedenprovocaruncortocircuitoenlos
contactosdecargaexpuestosdentrodelcargador.Se
debenmantenerlejosdelascavidadesdelcargador
los materialesextraSosde naturalezaconductora,
entrelosqueseincluyenlalanadeacero,elpapelde
aluminioocualquieracumulaci6ndeparticulasmetali-
cas.€:stos son s61oalgunos ejemplos y no constituyen
una lista taxativa Siempre desenchufe el cargador del
tomacorriente cuando no haya un paquete de baterias
en la cavidad. Desenchufe el cargador antes de inten-
tar limpiarlo.
6. No congele ni sumerja el cargador en agua ni en
ningt]n otro liquido.
I&ADVERTENClA: Riesgo de descarga electrica. No
permita que ning#n Ifquido entre en el cargador. Podrfa
provocar descargas electricas. Para facilitar el enfriado del
paquete de baterfas despues de su uso, evite colocar el
cargador o el paquete de baterfas en un ambiente calido,
como debajo de un toldo de metal o en un remolque sin
aislamiento.
_PRECAUCl6N: Nunca intente abrir el paquete de bat-
erfas por ning#n motivo. Si la caja protectora de plastico
del paquete de baterfas se rompe o agrieta, devuelvala a
un centro de mantenimiento para su reciclado.
Instalaci6n y extracci6n del
Paquetes de baterias
i_ PRECAUClON: Trabe el bloqueo del activador por con-
tacto antes de retirar o instalar la bated&
FIG. 3 FIG. 4
M
NOTA: Asegt]rese de que el paquete de baterias est6
completamente cargado.
Para instalar el paquete de baterias en el mango de
la herramienta, alinee la base de la herramienta con la
muesca dentro del mango de la herramienta y deslice el
paquete de baterias en el mango con firmeza hasta que
escuche que la traba haya calzado en su lugar.
Para retirar el paquete de baterias de la herramienta,
presione los botones de liberaci6n (M) y empuje con fir-
meza el paquete de baterias hacia afuera del mango de la
herramienta. Introdt]zcalo en el cargador de la forma que
se describe en el manual del cargador (Fig. 4).
COMPONENTES
_ADVERTENClA: Bloquee el disparador, desconecte el
paquete de baterfas de la herramienta y extraiga los ele-
mentos de fijaci6n del dep6sito antes de efectuar los
ajustes; caso contrario, podrfa producirse una lesi6n per-
sonal
Consulte la Figura 1 al comienzo de este manual para
obtener una lista completa de los componentes.
FUNCIONAMIENTO
AADVERTENClA: Lea la seccidn titulada Instrucciones
de seguridad importantes para clavadoras al principio de
este manual Siempre use proteccidn adecuada para ojos
y ofdos cuando use la herramienta. No dirija la herramienta
hacia usted o hacia otras personas. Para una utilizacidn
segura, Ileve adelante los siguientes procedimientos y con-
troles cada vez que vaya a usar la clavadora.
1. Use proteccidn ocular, auditiva y respiratoria adec-
uada.
2. Extraiga el paquete de baterfas de la herramienta.
3. Bloquee el impulsor en la posici6n hacia atr#s y extrai-
ga todos los elementos de fijaci6n del dep6sito.
4. Verifique que el activador por contacto y los conjuntos
del impulsador funcionen f#cil y correctamente. No use
la herramienta si algOn conjunto no funciona adec-
uadamente. NUNCA use una herramienta que tenga
el activador por contacto restringido en la posici6n
elevada.
5. NUNCA utilice una herramienta que tenga piezas
dafiadas.
AADVERTENClA: Para reducir el riesgo de lesiones per-
sonales, desconecte el paquete de baterfas de la herra-
mienta antes de realizar mantenimiento, extraer un ele-
mento de fijaci6n atascado, dejar el area de trabajo, mover
la herramienta a otra ubicaci6n o alcanzarle la herramienta
a otra persona.
Selecci6n de modos
AADVERTENClA: Siempre use la protecci6n adecuada
para los ojos [ANSI Z87.1 (CAN/CSA Z94.3)] y para los
ofdos ANSI $12.6 ($3.19) cuando utilice esta
herramienta.
Las clavadoras inalambricas DEWALT se fabrican de
acuerdo con la norma ANSI SNT-101-2002.
Antes de emplear esta herramienta, observe el interruptor
selector para determinar el modo de accionamiento. Lea
todas las instrucciones antes de seleccionar el modo de
accionamiento.
'ii
_&ADVERTENClA: Para evitar disparos accidentales,
mantenga los dedos ALEJADOS del disparador cuando no
este colocando elementos de fijaci6n. NUNCA transporte
la herramienta con el dedo en el disparador. En el modo de
accionamiento de tope, la herramienta disparara un ele-
mento de fijaci6n si se golpea el seguro mientras el dis-
parador esta oprimido.
ACCI(SN SECUENClAL /
Use la acci6n secuencial para una colocaci6n de clavos
intermitente en trabajos que requieren mayor precisi6n y
control de profundidad.
Para operar la clavadora en el modo secuencial:
1. Gire el interruptor ubicado en el
cuerpo de la herramienta entre el
disparador y el dep6sito hacia la
izquierda, como se muestra en la
Figura 6.
2. Oprima por completo la boquilla
contra la superficie de trabajo (el
motor arrancarA).
3. Oprima el disparador (el clavo
se introducirA en la superficie de trabajo).
4. Libere el disparador.
5. Levante la boquilla de la superficie de trabajo.
6. Repita los pasos 2 a 4 para la siguiente aplicaci6n.
A PRECA UClON: Primero debe oprimirse el activador por
contacto, despues se debe activar el disparador para cada
clavo y, finalmente, liberar ambos, tanto el activador por
contacto como el disparador para cada clavo.
ACCI(SN DE TOPE///
La acci6n de tope estA diseSada para
colocar clavos en forma rApida en
superficies planas y fijas.
AI utilizar esta acci6n, se pueden utili-
zar dos m6todos: accionamiento en
el lugar y accionamiento de tope.
Gire el interruptor ubicado en el cuerpo
de la herramienta entre el disparador
y el dep6sito hacia la derecha como se muestra en la
Figura 7.
Para usar la herramienta con el m6todo DE
ACClONAMIENTO en el lugar:
,&ADVERTENClA: Se dispara un clavo cada vez que se
presiona el disparador, siempre que el activador por con-
tacto permanezca presionado.
1. Presione el activador por contacto contra la superficie
de trabajo.
2. Oprima el disparador.
3O
Page 31

Para usar la herramienta con el m_todo de
ACCIONAMIENTO DE TOPE:
1. Oprima el disparador.
2. Empuje el activador por contacto contra la superficie
de trabajo. Siempre que el disparador permanezca
presionado, se disparara un clavo cada vez que se
presione el activador por contacto. Esto permite que el
usuario introduzca varios clavos en forma secuencial.
I&PRECAUCION: No mantenga el disparador oprimido
cuando la herramienta no se usa. Mantenga trabado el
bloqueo del activador por contacto cuando la herramienta
no se usa..
Preparacibn de la herramienta
_PRECAUCION: NUNCA rocfe ni
aplique de ninguna otra forma
lubricantes o solventes de limpieza en
el interior de la herramienta. Esto
puede afectar gravemente la duracidn
y el rendimiento de la herramienta.
NOTA: El paquete de baterias incluido
en la caja no esta completamente
cargado. Siga las instrucciones detalladas (consulte
Procedimientos de carga).
1. Lea la seccion Instrucciones de seguridad de este
manuaL
2. Utilice proteccidn auditiva y para los ojos.
3. Extraiga la baterfa de la herramienta.
4. Aseg#rese de que el depdsito no contenga elementos
de fijacidn.
5. Verifique que el activador por contacto y los conjuntos
del impulsador funcionen facil y correctamente. No
use la herramienta si alg#n conjunto no funciona
adecuadamente. NUNCA use una herramienta que
tenga el activador por contacto restringido en la
posicidn accionada.
6. No dirija la herramienta hacia usted o hacia otras
personas.
7. Introduzca el paquete de baterfas completamente
cargado.
Uso del bloqueo del activador por
contacto (Fig. 8, 9)
AADVERTENCIA: Para reducir el riesgo de lesiones
personales graves, no mantenga oprimido el disparador
cuando la herramienta no se usa. Mantenga el interruptor
de bloqueo del activador por contacto BLOQUEADO
(Fig. 8) cuando la herramienta no se usa.
_ADVERTENClA: Para reducir el riesgo de lesiones
personales graves, bloquee el disparador, desconecte el
paquete de baterfas de la herramienta y retire los elementos
de fijacidn del depdsito antes de realizar ajustes. Puede
causar lesiones personales graves.
Cada clavadora DEWALT viene con
un bloqueo del activador por contacto
(B) que, cuando se Io oprime con el
simbolo de bloqueo como se
muestra en la Figura 8, evita que la
herramienta dispare un clavo.
Cuando el bloqueo del activador
por contacto esta en la posici6n
que se muestra en la Figura 9, la
herramienta se puede usar. El
bloqueo del activador por contacto
debe estar bloqueado (Fig. 8)
siempre que se realicen ajustes o
cuando la herramienta no se utilice
de inmediato.
NOTA: Las herramientas con accionamiento selectivo,
cuando estan configuradas en el modo de accionamiento
de tope, permiten que el motor se encienda al oprimir el
disparador. Este es el funcionamiento normal. El bloqueo
del activador por contacto restringe el activador y evita la
descarga de clavos.
Carga de la herramienta
AADVERTENCIA: No dirija la herramienta hacia su per-
sona u otras personas. Puede causar lesiones personales
graves.
AADVERTENClA: Nunca cargue clavos con el activador
por contacto o el disparador activados. Puede causar
lesiones personales.
_ADVERTENClA: Siempre retire el paquete de baterfas
antes de cargar o descargar los clavos. Puede causar
lesiones personales graves.
A PRECAUCl6N: Mantenga los dedos lejos del impulsor
para evitar lesiones.
A PRECAUClON: El bloqueo del activador por contacto
siempre debe estar trabado cuando se realizan ajustes y
cuando la herramienta no se usa.
1. Pulse el pasador del impulsor (H) y tire el dep6sito
hacia atras.
2. Introduzca los elementos de fijaci6n en el costado del
dep6sito. AsegQrese de que los elementos de fijaci6n
queden con la punta hacia adelante en el canal para
clavos.
3. Empuje el dep6sito para cerrarlo hasta que encaje en
su lugar.
DESCARGA DE LA HERRAMIENTA
_ADVERTENCIA: El bloqueo del activador por contacto
siempre debe estar trabado cuando se realizan ajustes y
cuando la herramienta no se usa.
1. Pulse el pasador del impulsor de clavos (H) y tire el
dep6sito (G) hacia atras.
2. Incline la herramienta hacia arriba hasta que los clavos
salgan libremente del dep6sito.
3. Abra la puerta para desobstrucci6n de la boquilla para
verificar que no haya mAs clavos.
Ajuste de la profundidad (Fig. 10)
La profundidad a la que se clava el elemento de fijaci6n
puede regularse con el ajuste de la profundidad (C) que
esta junto al disparador de la herramienta.
_ADVERTENCIA: Para reducir el riesgo de lesiones
graves debidas a una puesta en marcha accidental al
tratar de ajustar la profundidad, SIEMPRE:
• Retire el paquete de baterfas.
• Active el bloqueo del activador por contacto.
• Evite tocar el disparador durante los ajustes.
1. Para sacar un poco el clavo introducido, gire la rueda
de ajuste de la profundidad (C). Hay doce ajustes de
profundidad, 1 es el menos profundo y 6 es el mas
profundo.
2. Para introducir una porci6n mas grande del clavo, gire
la rueda de ajuste de la profundidad (C) a una configu-
raci6n mas alta.
Faros (Fig. 10)
Hay un faro (D) ubicado a cada lado de la clavadora. Los
faros se encienden despu_s de introducir la bateria, activar
el disparador u oprimir el activador por contacto.
FIG. 10
Q
31
Page 32

NOTA: Estos faros estan diseSados para iluminar la super-
ficie de trabajo inmediata y no para ser utilizado como
linternas.
INDICADOR DE BATER|A BAJA: Los faros titilaran cuatro
veces consecutivas y luego se apagaran para indicar que
la bateria esta baja.
BATER(A BAJA ....... m mm m
INDICADOR DE CLAVOS ATASCADOS: Los faros titi-
lar&n continuamente si un clavo se atasca en la boquilla
(consulte Remocion de un clavo atascado).
CLAVO ATASCADO ...... [] [] [] [] [] [] [] [] [] [] [] []
Remoci6n de un clavo atascado
(Fig. 11)
Si un clavo queda atascado en la boquilla, deje la her-
ramienta apuntando hacia el lado contrario de donde esta
usted y siga estas instrucciones para extraerlo:
1. Retire el paquete de baterias de la herramienta y trabe
el bloqueo del activador por contacto.
2.
Pulse el pasador del impulsor de clavos (H) y tire el
dep6sito (G) hacia atras.
3.
Incline la herramienta hacia arriba hasta que los clavos
salgan libremente del dep6sito.
4.
Suba el pasador para FIG. 11'"_".....
desobstrucci6n (E) y tire hacia -
5.
SipinzasdelanteraarribaRetirela hojasielparafuera(L).delclavoimpulsorabrirnecesario,doblado;laestapuertauseen _ _ E
6.
la posici6n baja, introduzca un
destornillador u otra varilla en la
boquilla y empuje la hoja del impulsor hacia la posici6n
adecuada.
7. Cierre la puerta delantera y trabe el alambre (M) debajo
de los 2 brazos de la boquilla. Empuje el pasador hasta
que encaje en su lugar.
8. Vuelva a introducir el paquete de baterias.
NOTA: La herramienta se desactivara y no se restabl-
ecera hasta que haya retirado y vuelto a introducir el
paquete de baterias.
9. Vuelva a introducir clavos en el dep6sito (consulte la
secci6n Carga de la herramienta).
10. Empuje el dep6sito para cerrarlo hasta que quede fijo
en su lugar.
11. Destrabe el bloqueo del activador por contacto y deje
que el activador por contacto se mueva.
NOTA: En caso de que los clavos sigan atascandose con
frecuencia en la boquilla, Ileve la herramienta a un centro
de mantenimiento DEWALT autorizado para un servicio de
mantenimiento.
Operacibn en condiciones
climaticas frias
AI operar herramientas en temperaturas muy bajas:
1. Mantenga la herramienta Io mas calida posible antes
del uso.
2. Haga funcionar la herramienta 5 6 6 veces en madera
de desecho antes de usarla.
Operacibn en condiciones
climaticas calurosas
La herramienta deberia funcionar normalmente. Sin
embargo, mantenga la herramienta alejada del sol directo,
ya que el calor excesivo puede deteriorar los protectores
y otras piezas de goma, Io cual requeriria un mayor man-
tenimiento.
Gancho de suspensibn (Fig. 12)
_ADVERTENClA: Quite los clavos FIG. 12
del dep6sito antes de realizar ajustes
o el mantenimiento de la herramienta.
El incumplimiento de esta indicaci6n
podrfa provocar datios graves.
ikADVERTENClA: Para reducir el
riesgo de lesiones personales j
graves, desconecte el paquete de
baterias de la herramienta antes de
realizar ajustes, cambiar accesorios, realizar el man-
tenimiento o mover la herramienta. Estas medidas de
seguridad preventivas reducen el riesgo de encender la
herramienta en forma accidental
A PRECAUClON: Cuando no se utilice, coloque la her-
ramienta de costado en una superficie estable en la
que no provocara tropezones o caidas. Algunas herra-
mientas con paquetes de baterfas grandes permaneceran
en forma vertical sobre la baterfa, pero pueden ser derriba-
das facilmente.
Las clavadoras inalambricas DEWALT incluyen un gancho
de suspensi6n integrado (J) que se puede conectar a un
lado de la herramienta para adaptarse a los usuarios dies-
tros y zurdos.
Si no desea utilizar el gancho, se puede retirar de la her-
ramienta.
PARA RETIRAR EL GANCHO DE SUSPENSION:
1. Extraiga el paquete de baterias de la herramienta.
2. Si desea cambiar la herramienta para usarla con la
mano izquierda o derecha, simplemente retire el tor-
nillo del lado opuesto de la herramienta y vuelva a
colocarlo del otro lado.
3. Reemplace el paquete de baterias.
MANTENIMIENTO
_ADVERTENCIA: Para reducir el riesgo de lesiones
personales graves, desconecte el paquete de baterias
de la herramienta antes de realizar ajustes, cambiar
accesorios, realizar el mantenimiento o mover la her-
ramienta. Estas medidas de seguridad preventivas redu-
cen el riesgo de encender la herramienta en forma acci-
dental
Tabla de mantenimiento diario
ACCION Limpie el dep6sito, el impulsor y el
mecanismo del activador por contacto.
MOTIVO Permite que el dep6sito funcione
correctamente, reduce el desgaste y
previene los atascos.
PROCEDIMIENTO No se recomienda el uso peri6dico de
aceites, lubricantes ni solventes, ya que
tienen tendencia a atraer residuos.
ACClON Antes de cada uso, controle que todos los
tornillos, las tuercas y los elementos de
fijaci6n est6n ajustados y no presenten
daSos.
MOTIVO Evita atascamientos, p6rdidas y
fallas prematuras de las piezas de la
herramienta.
PROCEDIMIENTO Ajuste los tornillos u otros elementos
de fijaci6n flojos con la Ilave Allen o el
destornillador adecuado.
Limpieza
•&ADVERTENCIA: Para reducir el riesgo de lesiones
personales graves, desconecte el paquete de baterias
de la herramienta antes de limpiar e inspeccionar.
Aseg_rese de que la herramienta funcione adecuada-
mente antes de volver a ponerla en uso, o podrfa provo-
car una lesidn personal grave.
i_ PRECAUClON: Sdlo use una tecla hOmeda para limpiar
las partes plasticas. Muchos limpiadores para uso domesti-
co contienen sustancias qufmicas que podrfan datiar con-
siderablemente las piezas de plastico. Tampoco utilice
gasolina, aguarras, bamiz o solvente, Ifquidos para limp-
ieza en seco o productos similares, que podrfan datiar
seriamente las piezas de plastico. Nunca permita que pen-
etre Ifquido dentro de la herramienta ni sumerja ninguna de
las piezas en un Ifquido.
INSTRUCCIONES PARA LA LIMPIEZA DEL
CARGADOR
ikADVERTENCIA: Para reducir el riesgo de lesiones per-
sonales, desconecte el cargador del tomacorriente de CA
antes de limpiar. Se puede usar un patio o un cepillo
suave, que no sea metalico, para quitar la suciedad y la
grasa de la parte extema del cargador. No use agua ni
cualquier otra solucidn de limpieza.
32
Page 33

Lubricacidn
_PRECAUCICN: NUNCA rocfe ni
apfique de ninguna otra forma
lubricantes o solventes de limpieza
en el interior de la herramienta. Esto
puede afectar gravemente la duraciSn y
el rendimiento de la herramienta.
Las herramientas DEWALT son
lubricadas adecuadamente en fabrica
y estan listas para usar. No obstante, se recomienda que,
una vez al aSo, Ileve o envie la herramienta a un centro
de mantenimiento certificado para que le realicen una
limpieza e inspecciSn completas.
Reparaciones
._,ADVERTENClA: Para reducir el riesgo de lesiones per-
sonales graves, quite los clavos de/ depSsito antes de
realizar ajustes o reparar esta herramienta.
Para garantizar la SEGURIDAD y la CONFIABILIDAD, las
reparaciones, el mantenimiento y los ajustes (incluidos la
inspecciSn y el reemplazo de cepillos) deben ser realizados
por un centro de mantenimiento de fAbrica de DEWALT, un
centro de mantenimiento DEWALT autorizado u otro per-
sonal de mantenimiento calificado. Utilice siempre piezas
de repuesto id_nticas. Consulte la Guia para solucionar
problemas al final de esta secciSn.
Accesorios
AADVERTENCIA: Debido a que no se han probado con
este producto otros accesorios que no sean los que ofrece
DEWALT, el uso de dichos accesorios podrfa ser peligroso.
Para reducir el riesgo de lesiones, con este producto deben
usarse sSIo los accesorios DEWAL T recomendados.
Los accesorios que se recomiendan para utilizar con la
herramienta estAn disponibles a un costo adicional en su
distribuidor local o en un centro de mantenimiento autor-
izado. Si necesita ayuda para Iocalizar algQn accesorio,
comuniquese con DEWALT Industrial Tool Co., 701 East
Joppa Road, Baltimore, MD 21286, Ilame al 1-800-4-
DEWALT (1-800-433-9258) o visite nuestro sitio web www.
dewalt.com.
Garantia limitada de tres a_os
DEWALT reparara sin cargo cualquier defecto ocasionado
por materiales defectuosos o mano de obra, durante tres
aSos apartir de la fecha de compra. Esta garantia no cubre
fallas en las piezas que resulten del desgaste normal de la
herramienta o de su utilizaciSn inadecuada. Para obtener
informaciSn detallada sobre la cobertura de la garantia
y sobre reparaciones, visite nuestra pAgina Web www.
dewalt.com o Ilame al 1-800-4-DEWALT (1-800-433-9258).
Esta garantia no se extiende a los accesorios o a los daSos
causados por terceros al intentar realizar reparaciones.
Esta garantia le concede derechos legales especfficos;
usted goza tambi_n de otros derechos que varian segQn
el estado o provincia.
Ademas de la garantia, las herramientas DEWALT estAn
cubiertas por nuestro:
SERVIClO GRATUlTO DE 1 ANO
DEWALT realiza el mantenimiento de la herramienta y
reemplaza las piezas gastadas tras el uso normal, sin
costo alguno, en cualquier momento durante el primer
aSo despuSs de la compra.
2 ANOS DE SERVIClO GRATUlTO PARA UNIDADES
DE ALIMENTAClON DEWALT
DC9096, DC9091, DC9071, DC9360 y DC9280
GARANT|A DE REEMBOLSO DE DINERO DE 90 D|AS
If you are not completely satisfied with the performance of
your DEWALT Power Tool, Laser, or Nailer for any reason,
you can return it within 90 days from the date of purchase
with a receipt for a full refund - no questions asked.
AMI_RICA LATINA: Esta garantia no se aplica a los
productos que se venden en America Latina. Para los pro-
ductos que se venden en America Latina, debe consultar
la informaciSn de la garantia especffica del pais que viene
en el empaque, Ilamar a la compaSia local o visitar el sitio
Web a fin de obtener esa informaci6n.
REEMPLAZO GRATUlTO DE LAS ETIQUETAS DE
ADVERTENClA: Si sus etiquetas de advertencia se tornan
ilegibles o faltan, Ilame al 1-800-4-DEWALT para que se le
reemplacen gratuitamente.
FIG. 24
ACCEPTS ONLY 18 GAUGE FASTENERS
ADVERTE_IClASSE_ALADASPODRiARESULTAnENSERIASL_SlON_Sp_RSO_IAL_SU
OCASlO_IA_LAMUtaTE.TODOOP_ARIOVD_MASPERSONASENELARr_DET_BAJO
OE_E_ALL_W_ANTEOJOS_EPROTECClO__NSlZ_7.1CO_IGUA_O_SL_T_RALES.
MA_ITENGALOSDEDOSALEJ._DOSDELG_ILLOCU._O0NO_'_ CLA_IDOA FIN0_NO
0 CO_ISULT_LASOPClO_I_S_UEOF_EC__LMA_IUAL._IUNCADESHABlUT_ELSEGU_O.
UTILICE_LS_GUROCU_IDOLA,_AMIEmA NOS_E_ICUE_IT_E_IFUNClON_MIENTO.
ASEGORESE_UEEL_ILLOYELOISPA_ADORPO_¢O_IIAC_OFUNClO_IE_D_BIDAM_NTE
_NTESD_ACClO_IARLAHER_AMI_IIA..I_MASORl_m_LAH_R_AMIEm_HAClASl
MISMONIH_IAlaSD_MASPERSONASE_ILAZO_IADET_AB_JO._TIRELAB_TE_iA
OELAHERR_MIEm_CU_IDO:PREST_CUALQUI_TIPOOEMANTE_IMI_NTO,CUANO0
O_ST_ABELOSSUJ_ADO_ES0 CUA_IDOVERI_I_U_ELFUNClO_IAMIEgrOAPROPI_DOO_L
OISP_ADORPORCONT_CTO0 OE_GATI_LO.LAHE_MI_m_ S_O_E_AUTILIZA_
SOLAME_IT_CO_IlaS B_iAS YCONLOSCA_OOR_SD_W_L_
I_ AVERTISSEMENT GEAOANGONOE,STANOT00L_GELSANGMANUAL.E,I,UGETOFOLL0W___
OFCONTACTTRiPAND TRIGGER,CLEARINGJAMS, OR SERViCiNG.USEONLYWiTH DEWALT BATTERIESAND CHARGER. A TiTGEPREVENTiF,LiRE LEGUIDE.
ARA AJUSTAR EL MODO DE FUNCiONAMJENTO, DESLiCE |
LJNTER.UPTO. HACiA LA DE.ECHA 0 .ACJA LA IZQUJERDA. S_QUENNcTi|A_ DJSPARBoUMpoP.McODNEAcTOJ
o_ INSTRUCClO_IES¥ LAS_TI_U_TAS_LNOOBEDECERLAS
P01_FAVORL_ADEIENiDAM_TEYCOMpRENI)AEL MANUA1
OTHERSIN WORKAREAMUST WEAR ANSI Z87.1SAFETYSLASSES WITH SIDESHIELDS. KEEPFINGERSAWAY FROMTRIGGERWHEN NOT
DRIVING FASTENERS TO AVOID ACCIDENTAL FIRING. CHOICE OF TRiGGERiNG METHOD iS iMPORTANT. CHECK MANUAL FOR TRiGGERiNG
J WARNINGS COULD RESULTiN DEATHORSERIOUS iNJURY. OPERATORSAND
OPTIONS. NEVERDISABLELOCK-OFF,USE LOCK-OFFWREN TOOLiS NOT iN USE.ENSURETRIGGERAND CONTACTTRiPOPERATEPROPERLY
BEFOREUSE. NEVERPOiNTTOOLATYOURSELFOROTHERSiNWORKAREA. BEMOVEBATT_RYWHEN CREGKiNGPROPEGOPEGATiON
__OEWALT,N°USTN,ALTOOLCO.RALT,MORE.MD_,20°USA_0.SEGU,CE,NEORMAT,O..CALL,_0.-D_WALT....G_WALT.... J
i, ,Ifi
AW_TlSSEMENTSP_S_NTED_SRISQU_SD_DECESOUDEBL_SSURESGRAVES.LES
p_RSON_IES_UIUTILIS_NTLrOUTILETLESp_RSON_I_St/UlSET_OUWNTOANSL_ZON_
_ET_WlL_OIW_TPO_T_D_SLU_ETT_SDES_CU_ITE_ EC_S lar_ux CO_O_ME_
;_L__IORM__NSlZ_7.1.tLOI_NERLESDOIGTSOELAOETE_IT_LO_S_uroN_1E_FO_ICE
PASorArrACH_SAFINorWlT_ L_FONC_ION_IEM_NTACClD_NTELDE_OUTIL.L_C"OIX
OEL_MET,ODEDA_RAFA_E_STIMPORTAmVERI_I_RL_SOPTIO_ISO_D_TEgrEDA_S0
LE_UIDEDrtrrlus_loa NE_IEUT_ALISEZJAMAISLOCKkOFFUTILISERLEOISPOSlTIFDE
VE_OUlLL_EE_MODE,ORST_ISlO_ILORSQUELrOUTILNESERTpAS srAssu_E_QU_
LAD_ITE ETL__CLE_ICHEU_FONCTIO_I_I_NT¢O_IVE_BLEMENTAW_TDUTILISER
"__ LI_EETCOMP_EN_ELESETIOU_TT_D__0UT_LAiNSI 1
LOUTIL_IEJAM_ISpOI_IT_RLrOUTILVE_SSOlOUVERSDrAUTRESpERSO_IN_SOANSL_
i Qu_L_GUlD_OrUTILIS_IO_I.LENOel_ESPECTDES
ZON_0_ T_AVAIL.E_ILEWZLABATT_m_QUANO:V_mFICATIONOEL'OP_RATIO_I
_P_OP_I_ _UWYA_EE_L_DECLE_C_EM_NTD_CO_CTrLE__U_A_ES DE_E_IT_r
U_NT_TIE_I_MPLOYEZSEULEM_NTAWCL_SBAtterIESn"L_C,AR_UR0_ D_WA_
33
Page 34

GUJA DE DETEOOION DE PROBLEIVIA$
CON LA TABLA 81GUIENTE, PODRA 8OLUCIONAR MUCHO8 PROBLEMA8 COMUNE8 CON FACILIDAD. PARA PROBLEMA8 PERSISTENTE8 0 M,_$ GRAVES, PONGASE
EN CONTACTO CON EL CENTRO DE MANTENIMIENTO DEWALT O LLAME AL I-(800)-4-DEWALT.
_ADVERTENCIA: PARA REDUCIR EL RIESGO DE LESIONES PERSONALES GRAVES, DESCONECTE SIEMPRE EL
S|NTOMA .............................................................................. CAUSA ................................................................................. REPARACION
La herramienta no enciende (Los faros no encienden)
La herramienta no se acciona
Los faros estan encendidos, el motor no funciona)
La herramienta no se acciona (Las luces titilan 4 veces)
La herramienta no se acciona
Los faros titilan continuamente)
La herramienta no se acciona
los faros encienden, el motor arranca)
La herramienta no se acciona
(Los faros se encienden, el motor arranca, la hoja del
impulsor se atasca
La herramienta funciona pero no introduce el elemento de
fijaci6n por completo
PAQUETE DE BA TER[AS DE LA HERRAMIENTA ANTES DE REALIZAR REPARACIONES.
El sistema electr6nico interno de la herramienta no se
restablece
Carga de bateria baja o bateria daSada
Los terminales estan sucios o daSados
El bloqueo del activador por contacto esta activado
El activador por contacto esta doblado
Sistema electr6nico interno daSado
El motor deja de funcionar despu6s de 2 segundos
No oprimi6 el activador por contacto o el disparador
Disparador da_ado
El activador por contacto esta doblado
El bloqueo del activador por contacto esta activado
(Modo secuencial solamente)
Sistema electr6nico interno da_ado
Carga de bateria baia o bateria da_ada
Elemento de fijaci6n atascado
Mecanismo atascado
Sistema electr6nico interno da_ado
Sistema de retorno da_ado
Residuos en la boquilla
Conjunto de retorno/impulsor da_ado
Carga de bateria baja o bateria da_ada
El ajuste de profundidad esta configurado poco profundo
La herramienta no se apoya con firmeza en la pieza de
trabajo
Longitud del material y del elemento de fijaci6n aplicaci6n
que requiere demasiada precisi6n
Punta de la hoja del impulsor daSada o desgastada
Conjunto de retorno/impulsor da_ado o desgastado
Retire la bateria, espere 3 segundos y vuelva a introducirla
Cambie o reemplace la bateria
Consulte al centro de mantenimiento autorizado
Desactive el bloqueo del activador por contacto
Consulte al centro de mantenimiento autorizado
Consulte al centro de mantenimiento autorizado
Operaci6n normal; libere el disparador o el activador por
contacto y vuelva a oprimir
Consulte el manual de instrucciones
Consulte al centro de mantenimiento autorizado
Consulte al centro de mantenimiento autorizado
Desactive el bloqueo del activador por contacto
Consulte al centro de mantenimiento autorizado
Cambie o reemplace la bateria
Retire la bateria, extraiga el elemento de fijaci6n atascado,
(empuje la hoja del impulsor hacia atras manualmente, si es
necesario) y vuelva a introducir el paquete de baterias
Consulte al centro de mantenimiento autorizado
Consulte al centro de mantenimiento autorizado
Reemplace el sistema de retorno; consulte al centro de
mantenimiento autorizado
Limpie la boquilla
Reemplace el conjunto de retorno/impulsor; consulte al cen-
tro de mantenimiento autorizado
Cargue o reemplace la bateria
Gire la rueda de ajuste de profundidad hasta una configura-
ci6n mas profunda
Consulte el manual de instrucciones
Seleccione el material adecuado o una Iongitud mayor
Reemplace el conjunto de retorno/impulsor; consulte al cen-
tro de servicio autorizado
Reemplace el conjunto de retorno/impulsor; consulte al cen-
tro de mantenimiento autorizado
34
Page 35

LaherramientafuncionaperonosedescarganingQnele-
mentodefijaci6n
Elementodefijaci6natascado
Nohayelementosdefijaci6neneldep6sito
Elementosdefijaci6ndeangulootamaSoerr6neos
Residuosenlaboquilla
Residuoseneldep6sito
Dep6sitodesgastado
HojadelimpulsordaSadaodesgastada
ResortedelimpulsordaSado
Elementosdefijaci6ndeltama_ooanguloincorrectos
Hojadelimpulsorda_adaodesgastada
Longituddelmaterialydelelementodefijaci6naplicaci6n
querequieredemasiadaprecisi6n
Cargadebateriabajaobateriada_ada
Residuosenlaboquilla
Residuoseneldep6sito
Dep6sitodesgastado
Resortedelimpulsordesgastadooda_ado
Cargueelementosdefijaci6neneldep6sito
Uses61oelementosdefijaci6nrecomendados
Limpielaboquilla
Limpieeldep6sito
Reemplaceeldep6sito,consultealcentrodemantenimiento
autorizado
Reemplaceelconjuntoderetorno/impulsor;consultealcen-
trodemantenimientoautorizado
Reemplaceelresorte,consultealcentrodemantenimiento
autorizado
Uses61oloselementosdefijaci6nrecomendados
Reemplaceelconjuntoderetorno/impulsor;consultealcen-
trodemantenimientoautorizado
Longitudinadecuada
Cargueoreemplacelabateria
Limpielaboquilla
Limpieeldep6sito
Reemplaceeldep6sito,consultealcentrodemantenimiento
autorizado
Reemplaceelresorte,consultealcentrodemantenimiento
autorizado
35
Page 36

DeWALT Battery and Charger Systems
Syst_mes de batterie et de chargeur de DeWALT . Sistemas de la bateria y del cargador de DeWALT
Battery Output Chargers/Charge Time
Batterie Production Chargeurs/Dur6e de charge (Minutes)
Bateria Producci6n Cargadores de baterias/Tempo de carga (Minutos)
Cat Number Voltage 12 VoltsNoltios
ModUle Tension
Modelo Tensi6n DW0246 DW0249 DW9109
DW0242 24 X X X X X X X X X X 60 X 60
DC9096 18 X X X 60 60 60 20 60 60 X X 60 X
DW9096 18 X X X 60 60 60 20 60 60 X X 60 X
DW9098 18 X X X 30 30 30 12 30 30 X X 30 X
DW9099 18 X X X 45 45 45 15 45 45 X X 45 X
DC9091 14.4 90 115 60 60 60 60 20 60 60 X X 60 X
DW9091 14.4 45 90 45 45 45 45 15 45 45 X X 45 X
DW9094 14.4 60 60 30 30 30 30 12 30 30 X X 30 X
DC9071 12 90 115 60 60 60 60 20 60 60 X X 60 X
DW9071 12 60 90 45 45 45 45 15 45 45 X X 45 X
DW9072 12 45 60 30 30 30 30 12 30 30 X X 30 X
DW9050 12 40 X X X X X X X X X X X X
DW9061 9.6 60 90 45 45 45 45 15 45 45 X X 45 X
DW9062 9.6 45 60 30 30 30 30 12 30 30 X X 30 X
DW9048 9.6 40 X X X X X X X X X X X X
DW9057 7.2 45 60 30 30 30 30 12 30 30 X X 30 X
DC9360 36 X X X X X X X X X 60 X 60 X
DC9280 28 X X X X X X X X X 60 X 60 X
X indicates that the battery pack is not compatible with that specific charger.
X indique que le bloc-piles n'est pas compatible avec ce chargeur.
Una "X" indica que el paquete de baterias no es compatible con ese determinado cargador.
All charge times are approximate. Actual charge time may vary.
Read the instruction manual for more specific information,
Les durees de charge sont approximatives; la duree de charge retie peut varlet.
Life le manuel d'utilisation pour obtenir des renseignements plus precis,
El tiempo de duracidn de carga es aproximado; la duracidn de carga real puede variar.
Lea el manual de instrucciones para obtener informacidn mbs precisa,
DEWALT Industrial Tool Co., 701 East Joppa Road, Baltimore, MD 21286 (JUN07) Form No. 651444-00 DC608
Copyright © 2007 DEWALT
The following are trademarks for one or more DEWALT power tools: the yellow and black color scheme; the "D" shaped air intake grill; the array of pyramids on the handgrip; the kit box con-
figuration; and the array of lozenge-shaped humps on the surface of the tool.
 Loading...