

Page 1
LULU
C3£3
<69
-----W
.JI--
'0 Z
n<
>-0
O>
OF-
'"E
6969
LUz
123--
69w
©F-
Em
z t.t.l
1.1.169
o<
_t.l.l
Z_j
'S,i
rr z
WLIJ
a-_d
oQ:E
ujIJJ
n
©<©
> rr
V-<a_
O'F- J
_zLIJ
rr<
69<
z_69
7
.E
@
>
L,.
0 e-
eOLf) U)'_
_m_o
_E
o_OE
_ _=
eo eo ,_,,
tO _o _ _o
ooo_,
OtO00
DEWALT Industrial Tool Co., 701 East Joppa Road, Baltimore, MD 21286
Part No. 658028-00 DC820, etc. Copyright © 2007, 2008 DEWALT
The following are trademarks for one or more DEWALT power tools: the yellow and black
color scheme; the "D" shaped air intake grill; the array of pyramids on the handgrip; the kit box
configuration; and the array of lozenge-shaped humps on the surface of thetool.
F -y
Definitions: Safety Guidelines
The definitions below describe the level of severity for each signal word. Please read
the manual and pay attention to these symbols.
_,DANGER: Indicates an imminently hazardous sfuation which, if not avoided, will
result in death or serious injury.
_, WARNING: Indicates a potentially hazardous situation which, if not avoided, could
result in death or serious injury.
_CAUTION: Indicates a potentially hazardous situation which, if not avoided, may
result in minor or moderate injury.
CAUTION: Used without the safety alert symbol indicates a potentially hazardous
__situation which, if not avoided, may result in property damage.
IF YOU HAVE ANY QUESTIONS OR COMMENTS ABOUT THIS OR ANY DEWALT TOOL,
CALL US TOLL FREE AT: 1-800-4-DEWALT (1-800-433-9258).
_ WARNING: To reduce the risk of read the instruction manual.
injury,
General Power Tool Safety Warnings
A ARNIN!! Read all safety warnings and instructions Failure to follow the warnings
and instructions may result in electric shock, fire and/or serious injury,
SAVE ALL WARNINGS AND INSTRUCTIONS
FOR FUTURE REFERENCE
The term "power tool" in the warnings refers to your mains-operated (corded) power tool or
battery-operated (cordless) power tooL
1) WORK AREA SAFETY
a) Keep work area clean and well lit. Cluttered or dark areas invite accidents.
b) Do not operate power tools in explosive atmospheres, such as in the presence of
flammable liquids, gases or dust. Power tools create sparks which may ignite the dust
or fumes.
c) Keep children and bystanders away while operating a power tooL Distractions can
cause you to lose control.
2) ELECTRICAL SAFETY
a) Power tool plugs must match the outlet. Never modify the plug in any way. Do not
use any adapter plugs with earthed (grounded) power tools. Unmodified plugs and
matching outlets will reduce risk of electric shock.
b) Avoid body contact with earthed or grounded surfaces such as pipes, radiators,
ranges and refrigerators. There is an increased risk of electric shock if your body is
earthed or grounded.
c) Do not expose power tools to rain or wet conditions. Water entering a power tool will
increase the risk of electric shock.
d) Do not abuse the cord. Never use the cord for carrying, pulling or unplugging the
power tooL Keep cord away from heat, oil, sharp edges or moving parts. Damaged
or entangled cords increase the risk of electric shock.
e) When operating a power tool outdoors, use an extension cord suitable for outdoor
use. Use of a cord suitable for outdoor use reduces the risk of electric shock.
f) ff operating a power tool in a damp location is unavoidable, use a ground fault
circuit interrupter (GFCl) protected supply. Use of a GFCI reduces the risk of electric
shock.
3) PERSONAL SAFETY
a) Stay alert, watch what you are doing and use common sense when operating a
power tool. Do not use a power tool while you are tired or under the influence of
drugs, alcohol or medication. A moment of inattention while operating power tools may
result in serious personal injury,
b) Use personal protective equipment. Always wear eye protection. Protective
equipment such as dust mask, non-skid safety shoes, hard hat, or hearing protection
used for appropriate conditions will reduce personal injuries.
c) Prevent unintentional starting. Ensure the switch is in the off position before
connecting to power source and/or battery pack, picking up or carrying the tool
Carrying power tools with your finger on the switch or energising power tools that have
the switch on invites accidents.
d) Remove any adjusting key or wrench before turning the power tool on. A wrench or
a key left attached to a rotating part of the power tool may result in personal injury.
e) Do not overreach. Keep proper footing and balance at all times. This enables better
control of the power tool in unexpected situations.
f) Dress properly. Do not wear loose clothing or jewellery. Keep your hair, clothing and
gloves away from moving parts. Loose clothes, jewellery or long hair can be caught in
moving parts.
g) ff devices are provided for the connection of dust extraction and collection
facilities, ensure these are connected and properly used. Use of dust collection can
reduce dust-related hazards.
4) POWER TOOL USE AND CARE
a) Do not force the power tooL Use the correct power tool for your application. The
correct power tool will do the job better and safer at the rate for which it was designed.
b) Do not use the power tool if the switch does not turn it on and off. Any power tool
that cannot be controlled with the switch is dangerous and must be repaired.
c) Disconnect the plug from the power source and/or the battery pack from the power
tool before making any adjustments, changing accessories, or storing power tools.
Such preventive safety measures reduce the risk of starting the power tool accidentally,
d) Store idle power tools out of the reach of children and do not allow persons
unfamiliar with the power tool or these instructions to operate the power tool Power
tools are dangerous in the hands of untrained users.
e) Maintain power tools. Check for misallgnment or binding of moving parts, breakage
of parts and any other condition that may affect the power tool's operation. If
damaged, have the power tool repaired before use. Many accidents are caused by
poorly maintained power tools.
f) Keep cutting tools sharp and clean. Properly maintained cutting tools with sharp
cutting edges are less likely to bind and are easier to control
g) Use the power tool, accessories and tool bits, etc. in accordance with these
instructions, taking into account the working conditions and the work to be
performed. Use of the power tool for operations different from those intended could
result in a hazardous situation.
5) BATTERY TOOL USE AND CARE
a) Recharge only with the charger specified by the manufacturer. A charger that is
suitable for one type of battery pack may create a risk of fire when used with another
battery pack.
b) Use power tools only with specifically designated battery packs. Use of any other
battery packs may create a risk of injury and fire.
c) When battery pack is not in use, keep it away from other metal objects like paper
clips, coins, keys, nails, screws, or other small metal objects that can make a
connection from one terminal to another. Shorting the battery terminals together may
cause burns or a fire.
d) Under abusive conditions, liquid may be ejected from the battery; avoid contact, ff
contact accidentally occurs, flush with water, ff liquid contacts eyes, additionally
seek medical help. Liquid ejected from the battery may cause irritation or burns.
6) SERVICE
a) Have your power tool serviced by a qualified repair person using only identical
replacement parts. This will ensure that the safety of the power tool is maintained.
Additional Specific Safety Rules
• Hold power tools by insulated gripping surfaces when performing an operation where
the cutting tool may contact hidden wiring or its own cord. Contact witha "live" wire will
make exposed metal parts of the tool "live" and shock the operator.
• Use clamps or other practical way to secure and support the workpiece to a stable
platform. Holding the work by hand or against your body is unstable and may lead to loss of
control
• Wear safety goggles or other eye protection. Hammering and drilling operations cause
chips to fly, Flying particles can cause permanent eye damage.
• Bits, sockets and tools get hot during operation. Wear gloves when touching them.
• Do not operate this tool for long periods of time. Vibration caused by tool action may be
harmful to your hands and arms. Use gloves to provide extra cushion and limit exposure by
taking frequent rest periods.
WARNING: ALWAYS use safety glasses. Everyday eyeglasses are NOT safety glasses.
Also use face or dust mask if cutting operation is dusty, ALWAYS WEAR CERTIFIED SAFETY
EQUIPMENT:
• ANSI Z87.1 eye protection (CAN/CSA Z94.3),
• ANSI $12.6 ($3.19) hearing protection,
• NIOSH/OSHA/MSHA respiratory protection.
WARNING: Some dust created by power sanding, sawing, grinding, drilling, and other
construction activities contains chemicals known to cause cancer, birth defects or other
reproductive harm. Some examples of these chemicals are:
• lead from lead-based paints,
• crystalline silica from bricks and cement and other masonry products, and
• arsenic and chromium from chemically-treated lumber (CCA).
Your risk from these exposures varies, depending on how often you do this type of work.
To reduce your exposure to these chemicals: work in a well ventilated area, and work with
approved safety equipment, such as those dust masks that are specially designed to filter out
microscopic particles.
• Avoid prolonged contact with dust from power sanding, sawing, grinding, drilling, and
other construction activities. Wear protective clothing and wash exposed areas with
soap and water. Allowing dust to get into your mouth, eyes, or lay on the skin may promote
absorption of harmful chemicals.
WARNING: Use of this tool can generate and/or disburse dust, which may cause serious
and permanent respiratory or other injury, Always use NIOSH/OSHA approved respiratory
protection appropriate for the dust exposure. Direct particles away from face and body,
WARNING: Always wear proper personal hearing protection that conforms to ANSI
$12.6 (S3.19) during use. Under some conditions and duration of use, noise from this product
may contribute to hearing loss.
CAUTION: When not in use, place tool on its side on a stable surface where it will not
cause a tripping or falling hazard. Some tools with large battery packs will stand upright on
the battery pack but may be easily knocked over.
• The label on your tool may include the following symbols. The symbols and their definitions
are as follows:
V...................... volts
Hz.................... hertz
min .................. minutes
.... ............... direct current
@ .................... Class I Construction
(grounded)
[] .................... Class II Construction
(double insulated)
.../min ............. per minute
IPM .................. impacts per minute
A...................... amperes
W..................... watts
* ................... alternating current
................... alternating or direct current
no .................... no load speed
.................... earthing terminal
_, .................... safety alert symbol
BPM ................ beats per minute
RPM ................ revolutions per minute
Important Safety Instructions for All Battery Packs
When ordering replacement battery packs, be sure to include catalog number and voltage.
Consult the chart at the end of this manual for compatibility of chargers and battery packs.
The battery pack is not fully charged out of the carton. Before using the battery pack and
charger, read the safety instructions below. Then follow charging procedures outlined.
READ ALL INSTRUCTIONS
• Do not charge or use battery in explosive atmospheres, such as in the presence of
flammable liquids, gases or dust. Inserting or removing the battery from the charger may
ignite the dust or fumes.
• NEVER force battery pack into charger. DO NOT modify battery pack in any way
to fit into a non-compatible charger as battery pack may rupture causing serious
personal injury. Consult the chart at the end of this manual for compatibility of batteries and
chargers.
• Charge the battery packs only in DEWALT chargers.
• DO NOT splash or immerse in water or other liquids.
• Do not store or use the tool and battery pack in locations where the temperature may
reach or exceed 105°F (40°C) (such as outside sheds or metal buildings in summer).
ADANGER: Electrocution hazard. Never attempt to open the battery pack for any reason.
If battery pack case is cracked or damaged, do not insert into charger. Do not crush, drop or
damage battery pack. Do not use a battery pack or charger that has received a sharp blow,
been dropped, run over or damaged in any way (i.e., pierced with a nail, hit with a hammer,
stepped on). Electric shock or electrocution may result. Damaged battery packs should be
returned to service center for recycling.
NOTE: Battery storage and carrying caps are provided for use whenever the
battery is out of the tool or charger. Remove cap before placing battery in charger
or tool.
WARNING: Fire hazard. Do not store or carry battery so that metal
objects can contact exposed battery terminals. For example, do not place
battery in aprons, pockets, tool boxes, product kit boxes, drawers, etc., with loose nails, screws,
keys, etc. without battery cap. Transporting batteries can possibly cause fires if the battery
terminals inadvertently come in contact with conductive materials such as keys, coins,
hand tools and the like. The US Department of Transportation Hazardous Material Regulations
(HMR) actually prohibit transporting batteries in commerce or on airplanes (i.e., packed in
suitcases and carry-on luggage) UNLESS they are properly protected from short circuits. So
when transporting individual batteries, make sure that the battery terminals are protected and
well insulated from materials that could contact them and cause a short circuit.
SPECIFIC SAFETY INSTRUCTIONS FOR NICKEL CADMIUM (NiCd) OR NICKEL METAL
HYDRIDE (NiMH)
• Do not incinerate the batterypack even flit is severely damaged or is completely worn
out. The battery pack can explode in a fire.
• A small leakage of liquid from the battery pack cells may occur under extreme usage
or temperature conditions. This does not indicate a failure.
However, if the outer seal is broken:
a. and the battery liquid gets on your skin, immediately wash with soap and water for several
minutes.
b. and the battery liquid gets into your eyes, flush them with clean water for a minimum of
10 minutes and seek immediate medical attention. (Medical note: The liquid is 25-35%
solution of potassium hydroxide.)
SPECIFIC SAFETY INSTRUCTIONS FOR LITHIUM ION (LI-ION)
• Do not incinerate the battery pack even if it is severely damaged or is completely
worn out. The battery pack can explode in a fire. Toxic fumes and materials are created
when lithium ion battery packs are burned.
• ff battery contents come into contact with the skin, immediately wash area with
mild soap and water, ff battery liquid gets into the eye, rinse water over the open eye for
15 minutes or until irritation ceases, ff medical attention is needed, the battery electrolyte is
composed of a mixture of liquid organic carbonates and lithium salts.
• Contents of opened battery cells may cause respiratory irritation. Provide fresh air. If
symptoms persists, seek medical attention.
WARNING: Burn hazard. Battery liquid may be flammable if exposed to spark or flame.
The RBRC TM Seal
The RBRC TM (Rechargeable Battery Recycling Corporation) Seal on the nickel
cadmium, nickel metal hydride or lithium ion batteries (or battery packs) indicate
that the costs to recycle these batteries (or battery packs) at the end of their useful
life have already been paid by DEWALT. In some areas, it is illegal to place spent
nickel cadmium, nickel metal hydride or lithium ion batteries in the trash or
municipal solid waste stream and the RBRC program provides an environmentally
conscious alternative.
RBRC TM in cooperation with DEWALT and other battery users, has established programs in
the United States and Canada to facilitate the collection of spent nickel cadmium, nickel metal
hydride or lithium ion batteries. Help protect our environment and conserve natural resources
by returning the spent nickel cadmium and nickel cadmium, nickel metal hydride or lithium ion
batteries to an authorized DEWALT service center or to your local retailer for recycling. You may
also contact your local recycling center for information on where to drop off the spent battery.
RBRC TM is a registered trademark of the Rechargeable Battery Recycling Corporation.
Important Safety Instructions for All Battery Chargers
SAVE THESE INSTRUCTIONS: This manual contains important safety and operating instruc-
tions for battery chargers.
• Before using charger, read all instructions and cautionary markings on charger, batterypack,
and product using battery pack.
@,DANGER: Electrocution hazard. 120 volts are present at charging terminals. Do not probe
with conductive objects. Electric shock or electrocution may result.
_ WARNING: Shock hazard. Do not allow any liquid to get inside charger. Electric shock may
result.
_ CAUTION: Burn hazard. To reduce the risk of injury, charge only DEWALT rechargeable
batteries. Other types of batteries may burst causing personal injury and damage.
A CAUTION: Under certain conditions, with the charger plugged in to the power supply, the
exposed charging contacts inside the charger can be shorted by foreign material Foreign
materials of a conductive nature such as, but not limited to, steel wool, aluminum foil, or any
Page 2
buildupofmetallicparticlesshouldbekeptawayfromchargercavities.Alwaysunplugthe
chargerfromthepowersupplywhenthereisnobatterypackinthecavity.Unplugcharger
beforeattemptingtoclean.
• DO NOT attempt to charge the battery pack with any chargers other than the ones in
this manual The charger and batter y pack are specifically designed to work together.
• ThesechargersarenotintendedforanyusesotherthanchargingDEWALTrechargeable
batteries. Any other uses may result in risk of fire, electric shock or electrocution.
• Do not expose charger to rain or snow.
• Pull by plug rather than cord when disconnecting charger. This will reduce risk of
damage to electric plug and cord.
• Make sure that cord is located so that it will not be stepped on, tripped over, or
otherwise subjected to damage or stress.
• Do not use an extension cord unless it is absolutely necessary. Use of improper
extension cord could result in risk of fire, electric shock, or electrocution.
• When operating a power tool outdoors, use an extension cord suitable for outdoor
use. Use of a cord suitable for outdoor use reduces the risk of electric shock.
• An extension cord must have adequate wire size (AWG or American Wire Gauge) for
safety. The smaller the gauge number of the wire, the greater the capacity of the cable, that
is 16 gauge has more capacity than 18 gauge. An undersized cord will cause a drop in line
voltage resulting in loss of power and overheating. When using more than one extension to
make up the total length, be sure each individual extension contains at least the minimum
wire size. The following table shows the correct size to use depending on cord length and
nameplate ampere rating, ff in doubt, use the next heavier gauge. The smaller the gauge
number, the heavier the cord.
Recommended Minimum Wire Size for Extension Cords
Total Length of Cord
25 ft. 50 ft. 75 ft. 100 ft. 125 ft. 150 ft. 175 ft.
7.6 m 15.2 m 22.9 m 30.5 m 38.1 m 45.7 m 53.3 m
Wire Size AWG
18 18 16 16 14 14 12
• Do not place any object on top of charger or place the charger on a soft surface that
might block the ventilation slots and result in excessive internal heal Place the charger
in a position away from any heat source. The charger is ventilated through slots in the top and
the bottom of the housing.
• Do not operate charger with damaged cord or plug.
• Do not operate charger ff it has received a sharp blow, been dropped, or otherwise
damaged in any way. Take it to an authorized service center.
• Do not disassemble charger; take # to an authorized service center when service or
repair is required. Incorrect reassembly may result in a risk of electric shock, electrocution or
fire.
• Disconnect the charger from the outlet before attempting any cleaning. This will
reduce the risk of electric shock. Removing the battery pack will not reduce this risk.
• NEVER attempt to connect 2 chargers together.
• The charger is designed to operate on standard 120V household electrical power. Do
not attempt to use it on any other voltage. This does not apply to the vehicular charger.
Using Automatic Tune-Up TM Mode
The automatic Tune-Up TM Mode equalizes or balances the individual cells in the battery pack
allowing it to function at peak capacity. Battery packs should be tuned up weekly or after
10 charge/discharge cycles or whenever the pack no longer delivers the same amount of work.
To use the automatic Tune-Up TM, place the battery pack in the charger and leave it for at least 8
hours. The charger will cycle through the following modes.
1. The red light will blink continuously indicating that the 1-hour charge cycle has started.
2. When the 1-hour charge cycle is complete, the light will stay on continuously and will no
longer blink. This indicates that the pack is fully charged and can be used at this time.
3. If the pack is left in the charger after the initial 1-hour charge, the charger will begin the
Automatic Tune-Up TM mode. This mode continues up to 8 hours or until the individual cells
in the battery pack are equalized. The battery pack is ready for use and can be removed at
any time during the Automatic Tune-Up TM mode.
4. Once the Automatic Tune-Up TM mode is complete, the charger will begin a maintenance
charge; the red indicator will remain lit.
Chargers
Your tool uses a DEWALT 7.2, 9.6, 12, 14,4 or 18 volt charger. Be sure to read all safety
instructions before using your charger. Consult the chart at the end of this manual for compatibility
of chargers and battery packs.
Charging Procedure
A DANGER: Electrocution hazard. 120 volts present at charging terminals. Do not probe with
conductive objects. Danger of electric shock or electrocution.
1. Plug the charger into an appropriate outlet before inserting battery pack.
2. Insert the battery pack into the charger. The red (charging) light will blink continuously
indicating that the charging process has started.
3. The completion of charge will be indicated by the red light remaining ON continuously. The
pack is fully charged and may be used at this time or left in the charger.
Indicator Light Operation
PACK CHARGING ................... m m _ _ _ _ m _
PACK CHARGED .....................
HOT/COLD PACK DELAY ........ _ [] _ [] _ []
REPLACE PACK ...................... ® O®OOOOOOOOOO®®
PROBLEM POWER LiNE ........ • ® ® ® ® ® ® • • •
Charge Indicators
Some chargers are designed to detect certain problems that can arise with battery packs.
Problems are indicated by the red light flashing at afast rate. If this occurs, re-insert battery pack
into the charger. If the problem persists, try a different battery pack to determine ifthe charger is
OK. If the new pack charges correctly, then the original pack is defective and should be returned
to a service center or other collection site for recycling. If the new battery pack elicits the same
trouble indication as the original, have the charger tested at an authorized service center.
HOT/COLD PACK DELAY
Some chargers have a Hot/Cold Pack Delay feature: when the charger detects a battery that is
hot, it automatically starts a Hot Pack Delay, suspending charging until the battery has cooled.
After the battery has cooled, the charger automatically switches to the Pack Charging mode.
This feature ensures maximum battery life. The red light flashes long, then short while in the Hot
Pack Delay mode.
PROBLEM POWER LINE
Some chargers have a Problem Power Line indicator. When the charger is used with some
portable power sources such as generators or sources that convert DC to AC, the charger may
temporarily suspend operation, flashing the red light with two fast blinks followed by a
pause. This indicates the power source is out of limits.
LEAVING THE BATTERY PACK IN THE CHARGER
The charger and battery pack can be left connected with the red light glowing indefinitely. The
charger will keep the battery pack fresh and fully charged.
NOTE: A battery pack will slowly lose its charge when kept out of the charger. If the battery pack
has not been kept on maintenance charge, it may need to be recharged before use. A battery
pack may also slowly lose its charge if left in a charger that is not plugged into an appropriate
AC source.
WEAK BATTERY PACKS: Chargers can also detect a weak battery pack. Such batteries are
still usable but should not be expected to perform as much work. The charger will indicate to
replace battery pack.
Important Charging Notes
1. Longest life and best performance can be obtained if the battery pack is charged when the
air temperature is between 65°F and 75°F (18 °- 24°C). DO NOT charge the battery pack in
an air temperature below +40°F (+4.5°C), or above +105°F (+40.5°C). This is important and
will prevent serious damage to the battery pack.
2. The charger and battery pack may become warm to touch while charging. This is a normal
condition, and does not indicate a problem. To facilitate the cooling of the battery pack after
use, avoid placing the charger or battery pack in a warm environment such as in a metal
shed, or an uninsulated trailer.
3. If the battery pack does not charge properly:
a. Check current at receptacle by plugging in a lamp or other appliance;
b. Check to see if receptacle is connected to a light switch which turns power off when you
turn out the lights;
c. Move charger and battery pack to a location where the surrounding air temperature is
approximately 65°F - 75°F (18 °- 24°C);
d. If charging problems persist, take the tool, battery pack and charger to your local service
center.
4. The battery pack should be recharged when it fails to produce sufficient power on jobs which
were easily done previously. DO NOT CONTINUE to use under these conditions. Follow the
charging procedure. You may also charge a partially used pack whenever you desire with no
adverse affect on the battery pack.
5. Under certain conditions, with the charger plugged into the power supply, the exposed
charging contacts inside the charger can be shorted by foreign material. Foreign materials
of a conductive nature such as, but not limited to, grinding dust, metal chips, steel wool,
aluminum foil, or any buildup of metallic particles should be kept away from charger cavities.
Always unplug the charger from the power supply when there is no battery pack in the cavity.
Unplug charger before attempting to clean.
6. Do not freeze or immerse charger in water or any other liquid.
i_ WARNING: Shock hazard. Don't allow any liquid to get inside charger. Electric shock may
result.
_ CAUTION: Never attempt to open the battery pack for any reason, ff the plastic housing of
the battery pack breaks or cracks, return to a service center for recycling.
Storage Recommendations
1. The best storage place is one that is cool and dry away from direct sunlight and excess heat
or cold.
2. Long storage will not harm the battery pack or charger. Under proper conditions, they can
be stored for 5 years or more.
SAVE THESE INSTRUCTIONS FOR FUTURE USE
Motor
Voltage decrease of more than 10% will cause loss of power and overheating. All DEWALT tools
are factory tested; if this tool does not operate, check your battery pack.
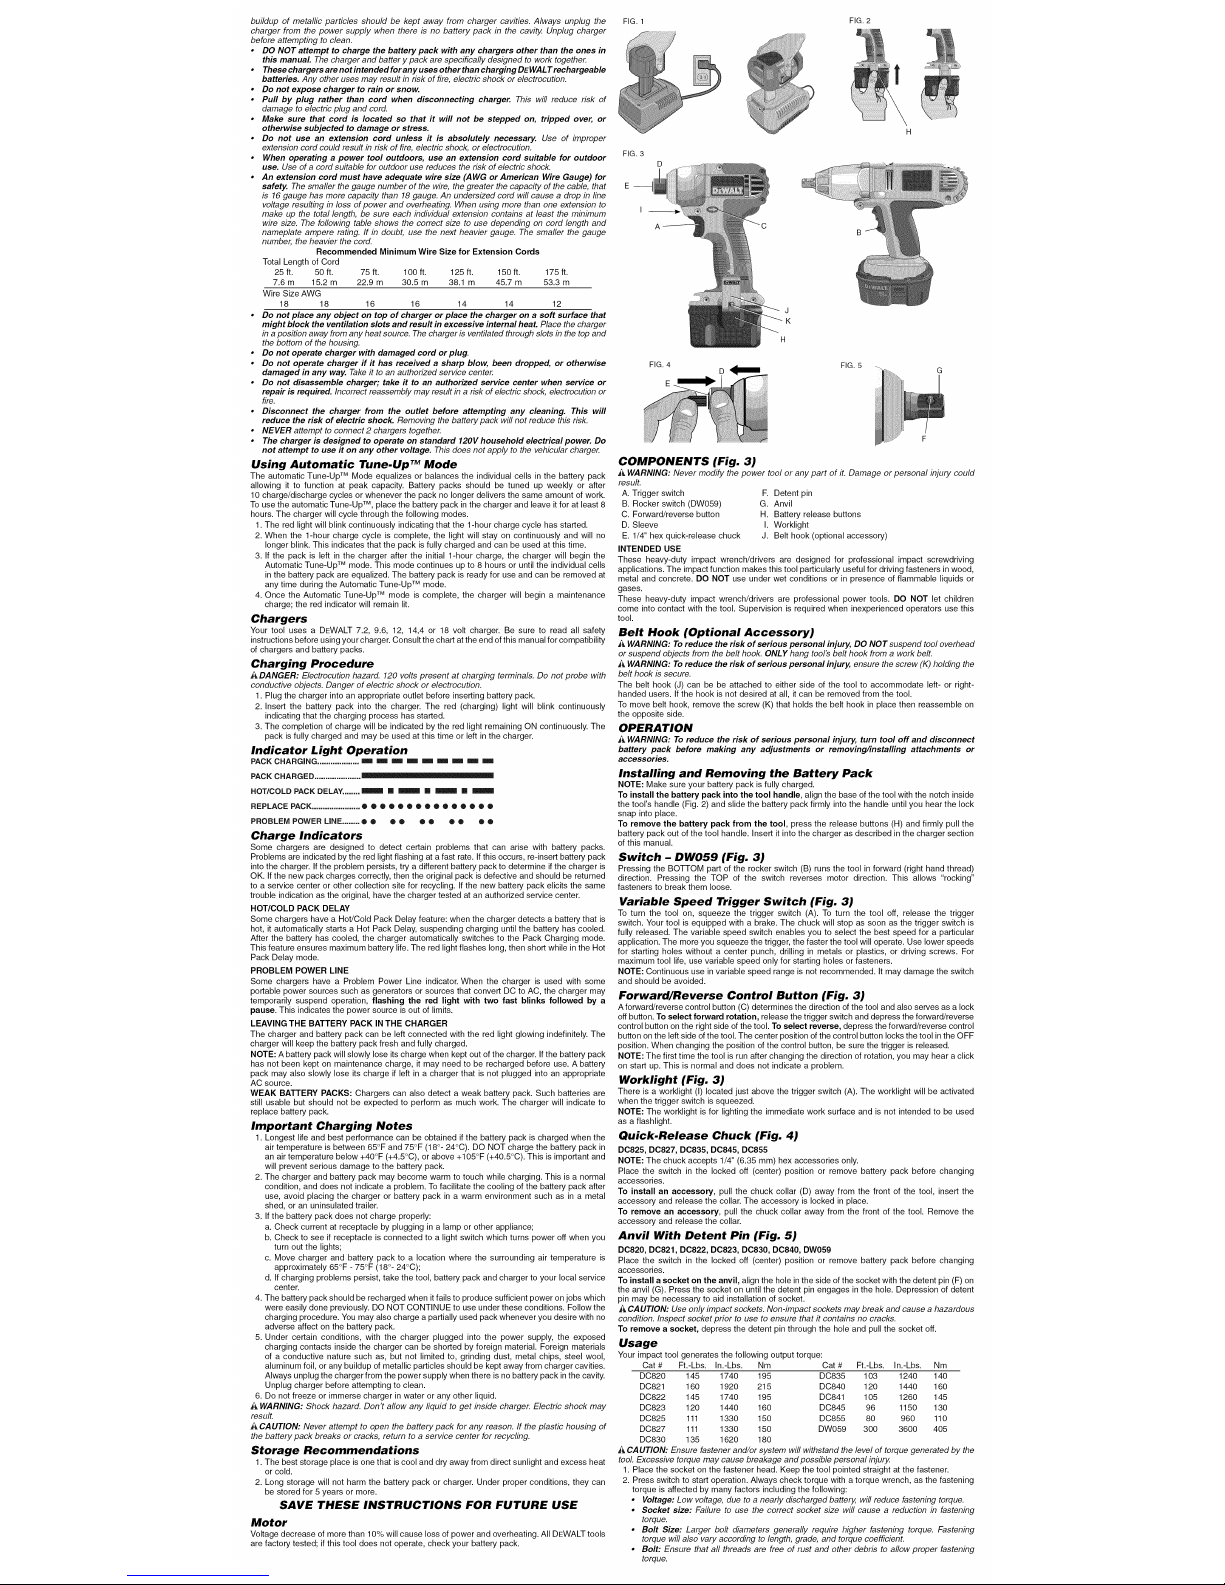
FIG. 1 FIG. 2
FIG. 3
J
K
FIG. 4
E
D
FIG. 5
COMPONENTS (Fig. 3)
i_ WARNING: Never modify the power tool or any part of it. Damage or personal injury could
result.
A. Trigger switch F. Detent pin
B. Rocker switch (DW059) G. Anvil
C. Forward/reverse button H. Battery release buttons
D. Sleeve I. Worklight
E. 1/4" hex quick-release chuck J. Belt hook (optional accessory)
INTENDED USE
These heavy-duty impact wrench/drivers are designed for professional impact screwdriving
applications. The impact function makes this tool particularly useful for driving fasteners in wood,
metal and concrete. DO NOT use under wet conditions or in presence of flammable liquids or
gases.
These heavy-duty impact wrench/drivers are professional power tools. DO NOT let children
come into contact with the tool. Supervision is required when inexperienced operators use this
tool.
Belt Hook (Optional Accessory)
i_ WARNING: Toreduce the risk of serious personal injury, DO NOT suspend tool overhead
or suspend objects from the belt hook. ONLY hang tool's belt hook from a work belt.
i_ WARNING: To reduce the risk of serious personal injury, ensure the screw (K) holding the
belt hook is secure.
The belt hook (J) can be be attached to either side of the tool to accommodate left- or right-
handed users. If the hook is not desired at all, it can be removed from the tool.
To move belt hook, remove the screw (K) that holds the belt hook in place then reassemble on
the opposite side.
OPERATION
i_ WARNING: To reduce the risk of serious personal injury, turn tool off and disconnect
battery pack before making any adjustments or removing/installing attachments or
accessories.
Installing and Removing the Battery Pack
NOTE: Make sure your battery pack is fully charged.
To install the battery pack into the tool handle, align the base of the tool with the notch inside
the tool's handle (Fig. 2) and slide the battery pack firmly into the handle until you hear the lock
snap into place.
To remove the battery pack from the tool, press the release buttons (H) and firmly pull the
battery pack out of the tool handle. Insert it into the charger as described in the charger section
of this manual.
Switch - DW059 (Fig. 3)
Pressing the BOTTOM part of the rocker switch (B) runs the tool in forward (right hand thread)
direction. Pressing the TOP of the switch reverses motor direction. This allows "rocking"
fasteners to break them loose.
Variable Speed Trigger Switch (Fig. 3)
To turn the tool on, squeeze the trigger switch (A). To turn the tool off, release the trigger
switch. Your tool is equipped with a brake. The chuck will stop as soon as the trigger switch is
fully released. The variable speed switch enables you to select the best speed for a particular
application. The more you squeeze the trigger, the faster the tool will operate. Use lower speeds
for starting holes without a center punch, drilling in metals or plastics, or driving screws. For
maximum tool life, use variable speed only for starting holes or fasteners.
NOTE: Continuous use in variable speed range is not recommended. It may damage the switch
and should be avoided.
Forward/Reverse Control Button (Fig. 3)
Aforward/reverse control button (C) determines the direction of the tool and also serves as a lock
off button. To select forward rotation, release the trigger switch and depress the forward/reverse
control button on the right side of the tool. To select reverse, depress the forward/reverse control
button on the left side of the tool. The center position of the control button locks the tool in the OFF
position. When changing the position of the control button, be sure the trigger is released.
NOTE: The first time the tool is run after changing the direction of rotation, you may hear aclick
on start up. This is normal and does not indicate a problem.
Worklight (Fig. 3)
There is a worklight (I) located just above the trigger switch (A). The worklight will be activated
when the trigger switch is squeezed.
NOTE: The worklight is for lighting the immediate work surface and is not intended to be used
as a flashlight.
Quick.Release Chuck (Fig. 4)
D0825, D0827, D0835, D0845, D0855
NOTE: The chuck accepts 1/4" (6.35 mm) hex accessories only.
Place the switch in the locked off (center) position or remove battery pack before changing
accessories.
To install an accessory, pull the chuck collar (D) away from the front of the tool, insert the
accessory and release the collar. The accessory is locked in place.
To remove an accessory, pull the chuck collar away from the front of the tool. Remove the
accessory and release the collar.
Anvil With Detent Pin (Fig. 5)
D0820, D0821, D0822, D0823, D0830, D0840, DW059
Place the switch in the locked off (center) position or remove battery pack before changing
accessories.
To install a socket on the anvil, align the hole in the side of the socket with the detent pin (F) on
the anvil (G). Press the socket on until the detent pin engages inthe hole. Depression of detent
pin may be necessary to aid installation of socket.
_ CAUTION: Use only impact sockets. Non-impact sockets may break and cause a hazardous
condition. Inspect socket prior to use to ensure that it contains no cracks.
To remove a socket, depress the detent pin through the hole and pull the socket off.
Usage
Your impact tool generates the following output torque:
Cat # Ft.-Lbs. In.-Lbs. Nm Cat # Ft.-Lbs. In.-Lbs. Nm
DC820 145 1740 195 DC835 103 1240 140
DC821 160 1920 215 DC840 120 1440 160
DC822 145 1740 195 DC841 105 1260 145
DC823 120 1440 160 DC845 96 1150 130
DC825 111 1330 150 DC855 80 960 110
DC827 111 1330 150 DW059 300 3600 405
DC830 135 1620 180
_ CAUTION: Ensure fastener and/or system will withstand the level of torque generated by the
tooL Excessive torque may cause breakage and possible personal injury.
1. Place the socket on the fastener head. Keep the tool pointed straight at the fastener.
2. Press switch to start operation. Always check torque with a torque wrench, as the fastening
torque is affected by many factors including the following:
• Voltage: Low voltage, due to a nearly discharged battery, will reduce fastening torque.
• Socket size: Failure to use the correct socket size will cause a reduction in fastening
torque.
• Bolt Size: Larger bolt diameters generally require higher fastening torque. Fastening
torque will also vary according to length, grade, and torque coefficient.
• Bolt: Ensure that all threads are free of rust and other debris to allow proper fastening
torque.
Page 3
• Material'. The type of material and surface finish of the material will affect fastening
torque.
• Fastening Time: Longer fastening time results in increased fastening torque. Using a
longer fastening time than recommended could cause the fasteners to be overstressed,
stripped or damaged.
MAINTENANCE
_ WARNING: To reduce the risk of serious personal injury, turn tool off and disconnect
battery pack before making any adjustments or removing/installing attachments or
accessories.
Cleaning
A WARNING: Blow dirt and dust out of all air vents with clean, dry aft at least once a week.
To minimize the risk of eye injury, always wear ANSI Z87. 1 approved eye protection when
performing this.
WARNING: Never use solvents or other harsh chemicals for cleaning the non-metallic parts
of the tooL These chemicals may weaken the plastic materials used in these parts. Use a cloth
dampened only with water and mild soap. Never let any liquid get inside the tool; never immerse
any part of the tool into a liquid.
CHARGER CLEANING INSTRUCTIONS
_,WARNING: Shock hazard. Disconnect the charger from the AC outlet before cleaning.
Dirt and grease may be removed from the exterior of the charger using a cloth or soft
non-metallic brush. Do not use water or any cleaning solutions.
Accessories
_WARNING: Since accessories, other than those offered by DEWALT, have not been tested
with this product, use of such accessories with this tool could be hazardous. Toreduce the risk
of injury, only DEWALT, recommended accessories should be used with this product.
Recommended accessories for use with your tool are available at extra cost from your local
service center. If you need any assistance in locating any accessory, please contact DEWALT
Industrial Tool Co., 701 East Joppa Road, Baltimore, MD 21286, call 1-800-4-DEWALT
(1-800-433-9258) or visit our website www.dewalt.com.
,&CAUTION: Use only impact sockets. Non-impact sockets may break and cause a
hazardous condition. Inspect socket prior to use to ensure that it contains no cracks.
Repairs
The charger is not serviceable. There are no serviceable parts inside the charger.
To assure product SAFETY and RELIABILITY, repairs, maintenance and adjustments (including
brush inspection and replacement) should be performed by a DEWALT factory service center,
a DEWALT authorized service center or other qualified service personnel. Always use identical
replacement parts.
Three Year Limited Warranty
DEWALT will repair, without charge, any defects due to faulty materials or workmanship for
three years from the date of purchase. This warranty does not cover part failure due to normal
wear or tool abuse. For further detail of warranty coverage and warranty repair information, visit
www.dewalt.com or call 1-800-4-DEWALT (1-800-433-9258). This warranty does not apply to
accessories or damage caused where repairs have been made or attempted by others. This
warranty gives you specific legal rights and you may have other rights which vary in certain
states or provinces.
In addition to the warranty, DEWALT tools are covered by our:
1 YEAR FREE SERVICE
DEWALT will maintain the tool and replace worn parts caused by normal use, for free, any time
during the first year after purchase.
2 YEARS FREE SERVICE ON DEWALT BATTERY PACKS
DC9071, DC9091, DC9096, DC9280, DC9360 and DC9180
90 DAY MONEY BACK GUARANTEE
If you are not completely satisfied with the performance of your DEWALT Power Tool, Laser, or
Nailer for any reason, you can return it within 90 days from the date of purchase with a receipt
for a full refund - no questions asked.
LATIN AMERICA: This warranty does not apply to products sold in Latin America. For products
sold in Latin America, see country specific warranty information contained either in the
packaging, call the local company or see website for warranty information.
FREE WARNING LABEL REPLACEMENT: If your warning labels become illegible or are
missing, call 1-800-4-DEWALT for a free replacement.
BCXXX
T0 REDUCE THE RiSK OF INJURY,
USER MUST READ INSTRUCTION
MANUAL USE ONLY WITH
DEWALTBATTERIES. ALWAYS USE PROPER EYE AND
RESPIRATORY PROTECTION.
BEWALTINOOSTRiALTOOLCO,,BALTIMORE,MB 21286O,S,A,
FORSERVICEiNFORMATION,CALL1-800-¢.DEWALTwww.D_WALT=com
r
Ddfinitions : lignes directrices en matidre
de sdcuritd
Les d6finitions ci-dessous d6crivent le niveau de danger pour chaque mot-
indicateur employ& Lire le mode d'emploi et porter une attention particuli_re &
ces symboles.
i_DANGER : indique une situation dangereuse imminente qui, si elle n'est pas
6vit6e, entrainera la mort ou des blessures graves
i_4VERTISSEMENT : indique une situation potentiellement dangereuse qui, si
elle n'est pas 6vit6e, pourrait entraTner la mort ou des blessures graves
_4TTENTION : indique une situation potentiellement dangereuse qui, si elle
n'est pas 6vit6e, pourrait entraTner des blessures legeres ou moderees.
ATTENTION : utilis6 sans le symbole d'alerte de s6curit6, indique une situation
potentiellement dangereuse qui, si elle n'est pas 6vit6e, pourrait entraTner des
dommages materiels.
J
POUR TOUTE QUESTION OU REMARQUE AU SUJET DE CET OUTIL OU DE TOUT
AUTRE OUTIL DEWALT, COMPOSEZ LE NUMERO SANS FRAIS • 1-800-4-DEWALT
(1-800-433-9258).
_ VERTISSEMENT : afin de r6duire le risque de blessures, lire le mode d'emploi de
IbutiL
Avertissements de sdcuritd gdndraux pour les outils
dlectriques
_ AVERTISSEMENT! Life tousles avertissements de securite et toutes les directives.
Le non-respect des avertissements et des directives pourrait se solder par un choc
61ectrique, un incendie et/ou une blessure grave.
CONSERVER TOUS LES AVERTISSEMENTS ET TOUTES
LES DIRECTIVES POUR UN USAGE ULTERIEUR
Le terme _ outi161ectrique _, cit6 dans les avertissements se rapporte a votre outi161ectrique
alimentation sur secteur (avec ill) ou par piles (sans ill).
1) S#CURIT# DU LIEU DE TRAVAIL
a) Tenir I'aire de travail propre et bien eclairee. Les lieux encombr6s ou sombres sont
propices aux accidents.
b) Ne pas faire fonctionner d'outils electriques clans un milieu deflagrant, tel qu'en
presence de liquides, de gaz ou de poussieres inflammables. Les outils 61ectriques
produisent des 6tincelles qui pourraient enflammer la poussibre ou les vapeurs.
c) Eloigner les enfants et les personnes a proximite pendant I'utilisation d'un outil
electrique. Une distraction pourrait en faire perdre la mMtrise a I'utilisateur.
2) SI_CURITI_ EN MATIERE D'I_LECTRICITI_
a) Les fiches des outils electriques doivent correspondre a la prise. Ne jamais
modifier la fiche d'aucune faFon. Ne jamais utiliser de fiche d'adaptation avec un
outil electrique mis a la terre. Le risque de choc 61ectrique sera r6duit par I'utilisation de
fiches non modifi#es correspondant a la prise.
b) E:viter tout contact physique avec des surfaces mises a la terre comme des tuyaux,
des radiateurs, des cuisinieres et des refrigerateurs. Le risque de choc #lectrique est
plus #lev# si votre corps est mis a la terre.
c) Ne pas exposer les outils electriques a la pluie ou a I'humidite. La p#n#tration de
I'eau dans un outil #lectrique augmente le risque de choc #lectrique.
d) Ne pas utiliser le cordon de faFon abusive. Ne jamais utiliser le cordon pour
transporter, tirer ou debrancher un outil electrique. Tenir le cordon eloigne de
la chaleur, de I'huile, des bords tranchants et des pieces mobiles. Les cordons
endommag#s ou enchev#tr#s augmentent les risques de choc #lectrique.
e) Pour I'utilisation d'un outil electrique a I'exterieur, se servir d'une rallonge
convenant a cette application. L'utilisation d'une rallonge con_ue pour I'ext#rieur r#duira
les risques de choc #lectrique.
f) S'il est impossible d'eviter I'utilisation d'un outil electrique clans un endroit
humide, brancher I'outil clans une prise ou sur un circuit d'alimentation dotes d'un
disjoncteur de fuite a la terre (GFCl). L'utilisation de ce type de disjoncteur r#duit les
risques de choc #lectrique.
3) SI_CURITI_ PERSoNNELLE
a) F:tre vigilant, surveiller le travail effectue et faire preuve de jugement Iorsqu'un outil
electrique est utilise. Ne pas utiliser d'outil electrique en cas de fatigue ou sous
I'influence de drogues, d'alcool ou de medicaments. Un simple moment d'inattention
en utilisant un outil #lectrique peut entrafner des blessures corporelles graves.
b) Utiliser des equipements de protection individuelle. Toujours porter une protection
oculaire. L'utilisation d'#quipements de protection comme un masque antipoussibre, des
chaussures antid#rapantes, un casque de s#curit# ou des protecteurs auditifs Iorsque la
situation le requiert r#duira les risques de blessures corporelles.
c) EmpOcher les demarrages intempestifs. S'assurer que I'interrupteur se trouve a la
position d'arrOt avant de relier I'outil a une source d'alimentation et/ou d'inserer un
bloc-piles, de ramasser ou de transporter I'outil. Transporter un outi/ #/ectrique a/ors
que le doigt repose sur I'interrupteur ou brancher un outil _lectrique dont I'interrupteur est
la position de marche risque de provoquer un accident.
d) Retirer toute cle de reglage ou cle avant de demarrer I'outil. Une cl# ou une cl# de
r#glage attach#e a une partie pivotante de I'outil #lectrique peut provoquer des blessures
corporelles.
e) Ne pas trop tendre les bras. Conserver son equilibre en tout temps. Cela permet de
mieux mMtriser I'outil #lectrique dans les situations impr#vues.
f) S'habiller de maniere appropriee. Ne pas porter de vOtements amples ni de bijoux.
Garder les cheveux, les vOtements et les gants a I'ecart des pieces mobiles. Les
v_tements amples, les bijoux ou les cheveux longs risquent de rester coinc_s dans les
pibces mobiles.
g) Sides composants sont fournis pour le raccordement de dispositifs de depoussierage
et de ramassage, s'assurer que ceux-ci sont bien raccordes et utilises. L'utilisation
d'un dispositif de d#poussi#rage peut r#duire les dangers engendr#s par les poussibres.
4) UTILISATION ET ENTRETIEN D'UN OUTIL #LECTRIQUE
a) Ne pas forcer un outil electrique. Utiliser I'outil electrique approprie a I'application.
L'outil #lectrique appropri# effectuera un meilleur travail, de fa_on plus sore eta la vitesse
pour laquelle il a#t# congu.
b) Ne pas utiliser un outil electrique dont I'interrupteur est defectueux. Tout outil
#lectrique dont I'interrupteur est d#fectueux est dangereux et doit _tre r#par#.
c) Debrancher la fiche de la source d'alimentation et/ou du bloc-piles de I'outil
electrique avant de faire tout reglage ou changement d'accessoire ou avant de
ranger I'outil. Ces mesures preventives r#duisent les risques de d#marrage accidentel
de I'outil #lectrique.
d) Ranger les outils electriques hors de la portee des enfants et ne permettre
aucune personne n'etant pas familiere avec un outil electrique ou son mode
d'emploi d'utiliser cet outil. Les outils #lectriques deviennent dangereux entre les mains
d'utilisateurs inexp#riment#s.
e) Entretien des outils electriques. Verifier si les pieces mobiles sont mal alignees ou
coincees, si des pieces sont brisees ou presentent toute autre condition susceptible
de nuire au bon fonctionnement de I'outil electrique. En cas de dommage, faire
reparer I'outil electrique avant toute nouvelle utilisation. Beaucoup d'accidents sont
causes par des outils #lectriques mal entretenus.
f) S'assurer que les outils de coupe sont aiguises et propres. Les outils de coupe
bien entretenus et affDt#s sont moins susceptibles de se coincer et sont plus faciles
ma ftrise r.
g) Utiliser I'outil electrique, les accessoires, les forets, etc. conformement aux
presentes directives en tenant compte des conditions de travail et du travail
effectuer. L'utilisation d'un outil #lectrique pour toute operation autre que celle pour
laquelle il a#t# con_u est dangereuse.
5) UTILISATION ET ENTRETIEN DU BLOC-PILES
a) Ne recharger I'outil qu'au moyen du chargeur precise par le fabricant. L'utilisation
d'un chargeur qui convient a un type de bloc-piles risque de provoquer un incendie s'il est
utilis# avec un autre type de b Ioc-piles.
b) Utiliser les outils electriques uniquement avec les blocs-piles conFus a cet effet.
L'utilisation de tout autre bloc-piles risque de causer des blessures ou un incendie.
c) Lorsque le bloc-piles n'est pas utilise, le tenir eloigne des objets metalliques,
notamment des trombones, de la monnaie, des cles, des clous, des vis ou autres
petits objets metalliques qui peuvent etablir une connexion entre les deux bornes.
Le court-circuit des bornes du bloc-piles risque de provoquer des brEflures ou un
incendie.
d) En cas d'utilisation abusive, le liquide peut gicler hors du bloc-piles; eviter tout
contact avec ce liquide. Si un contact accidentel se produit, laver a grande eau. Si
le liquide entre en contact avec les yeux, obtenir egalement des soins medicaux. Le
liquide qui gicle hors du bloc-piles peut provoquer des irritations ou des brE_lures.
6) R#PARATION
a) Faire reparer I'outil electrique par un reparateur professionnel en n'utilisant que des
pieces de rechange identiques. Ce/a permettra de maintenir une uti/isation s_curitaire
de I'outil _lectrique.
R_gles de s_curit_ particuli_res
• Tenir I'outil par les surfaces de saisie isolees pour les travaux ob I'outil de coupe
risque de toucher a des ills dissimules. Tout contact avec un fil "sous tension" provoquera
"l'#lectrisation" des parties m#talliques expos#es et I'#lectrocution de I'utilisateur.
• Utiliser des brides de fixation ou tout autre dispositif de fixation permettant de soutenir
et de retenir la piece sur une plate-forme stable. Tenir la pibce avec la main ou contre son
corps est instable et risque de provoquer une perte de maftrise de I'outiL
• Toujours porter des lunettes de protection ou toute autre protection oculaire. Lots du
martelage ou du per_age, des d#bris sont rejet#s dans I'air. Ces derniers peuvent causer des
dommages oculaires permanent.
• Meches, douilles ou outils peuvent chauffer pendant leur utilisation. Toujours porter des
gants avant de les manipuler.
• Ne pas utiliser cet outil pendant des periodes prolongees. Les vibrations caus_es par
I'outil peuvent poser des risques pour les mains ou les bras. Porter des gants pour amortir les
vibrations, et pour limiter les risques faire des pauses fr#quentes.
_&AVERTISSEMENT : TOUJOURS porter des lunettes de s#curit#. Les lunettes de vue
ne constituent PAS des lunettes de s#curit#. Utiliser #galement un masque facial ou anti-
poussibre si I'op#ration de d#coupe g#nbre de la poussibre. TOUJOURS UTILISER DE
L'EQUIPEMENT DE PROTECTION HOMOLOGUE :
• protection oculaire conforme a la norme ANSI Z87.1 (CAN/CSA Z94.3),
• protection auditive conforme a la norme ANSI $12.6 ($3.19) et
• protection des voies respiratoires conformes aux normes NIOSH/OSHA.
_AVERTISSEMENT : Certaines poussibres cr##es par le pon_age, le sciage, le meulage et
le forage m#caniques ainsi que d'autres activit#s de construction contiennent des produits
chimiques reconnus pour causer le cancer, des anomalies cong#nitales ou d'autres anomalies
li#es a la reproduction. Parmi ces produits chimiques, citons notamment :
• le plomb provenant des peintures au plomb ;
• la silice cristalline provenant des briques, du b#ton et d'autres mat#riaux de
ma_onnerie ;
• I'arsenic et le chrome provenant du bois trait# (ars#niate de cuivre et de chrome).
Le risque associ# aces expositions varie selon la fr#quence de ces types de travaux. Pour
r#duire I'exposition aux produits chimiques : travailler dans un local bien ventil# et utiliser du
materiel de s#curit# approuv#, comme les masques antipoussibres sp#cialement con_us pour
filtrer les particules microscopiques.
• Eviter le contact prolonge avec la poussiere provenant du ponFage, du sciage, du
meulage et du forage mecanique ainsi que d'autres activites de construction. Porter
des v_tements de protection et laver lee parties exposees au savon et a I'eau. La
poussibre qui pourrait p_n_trer clans la bouche et les yeux ou se d_poser sur la peau peut
favoriser I'absorption de produits chimiques nocifs.
_&AVERTISSEMENT : Cet outil peut produire et r#pandre de la poussibre susceptible de
causer des dommages s#rieux et permanents au systbme respiratoire. Toujours utiliser un
appareil respiratoire anti-poussibres approuv# par le NIOSH ou I'OSHA. Diriger les particules
dans le sens oppos# du visage et du corps.
_AVERTISSEMENT : TOUJOURS porter une protection auditive appropriee conformement
la norme ANSI $12.6 (S3.19) Iors de I'utilisation du produit. Dans certaines conditions et
selon la dur#e d'utilisation, le bruit #mis par ce produit peut contribuer a une perte auditive.
_ATTENTION : Apres utilisation, ranger I'outil sur son cote sur une surface stable la ob
il ne pourra faire ni trebucher ni tomber personne. Certains outils _quip_s d'un large bloc-
pile peuvent tenir a la verticale sur ce dernier mais ils sont alors facilement d_stabilis_s.
• L'#tiquette appos#e sur votre outil peut comprendre les symboles suivants. Les symboles et
leurs d#finitions sont indiqu#s ci-aprbs :
V.................. volts
Hz................ hertz
min .............. minutes
.... ........... courant continu
@ ................ Construction de classe I
(mis a la terre)
[] ................ Construction de classe II
(a double isolation)
RPM ............ rotations ou alternance
par minute
A................. ampbres
W................ watts
"_ .............. courant alternatif
_-, .............. courant alternatif ou continu
no ............... vitesse a vide
................ borne de terre
i_, ............... symbole d'alerte a la s#curit#
BPM ........... coups par minute
.../min ......... par minute
IPM ............. impacts par minute
Directives de sdcuritd importantes pour tous
les blocs-piles
Pour la commande d'un bloc-piles de rechange, s'assurer d'inclure le num6ro de catalogue
et la tension. Consulter le tableau figurant & la fin du pr6sent mode d'emploi pour connaftre la
compatibilit6 des chargeurs et des blocs-piles.
Le bloc-piles n'est pas compl_tement charg6 & la sortie de I'emballage. Avant d'utiliser le bloc-
piles et le chargeur, lire les directives de s6curit6 ci-apr_s. Respecter ensuite les consignes de
chargement d6crites.
LIRE TOUTES LES DIRECTIVES
• Ne pas charger ou utiliser un bloc-piles clans un milieu deflagrant, en presence
de liquides, de gaz ou de poussiere inflammables. InsUrer ou retirer un bloc-piles du
chargeur peut enflammer de la poussibre ou des _manations.
• NE JAMAIS forcer I'insertion d'un bloc-piles clans le chargeur. Ne pas modifier un
bloc-piles de quelque faFon que ce soit pour I'inserer clans un chargeur incompatible,
car il risque de se rompre et de provoquer de graves blessures corporelles. Consulter
le tableau figurant a la fin du present manuel pour connaftre la compatibilit# des piles et des
chargeurs.
• Charger les blocs-piles uniquement au moyen de chargeurs DEWALT.
• NE PAS #clabousser le bloc-piles ni I'immerger dans I'eau ou dans tout autre liquide.
• Ne pas ranger ni utiliser I'outil et le bloc-piles a un endroit ob la temperature peut
atteindre ou depasser les 40 °C (105 °F) (comme clans les remises exterieures ou les
b&timents metalliques I'ete).
,&DANGER : Risque d'_lectrocution. Ne jamais ouvrir le bloc-piles pour quelque raison que
ce soit. Si le bo#ier du bloc-piles est fissur# ou endommag#, ne pas I'ins#rer clans un chargeur.
Ne pas #craser, faire tomber ou endommager le bloc-piles. Ne pas utiliser un bloc-piles ou un
chargeur qui a regu un choc violent, qui est tomb#, a #t# #cras# ou est endommag# de quelque
manibre que ce soit (p. ex. perc# par un clou, frapp# d'un coup de marteau, pitting). En effet,
il y a risque de choc #lectrique ou d'#lectrocution. Les blocs-piles endommag#s doivent 6tre
envoy#s au centre de r#paration pour 6tre recycles.
REMARQUE : un boftier sp6cial et des capuchons de s6curit6 sont fournis
avec le bloc-piles pour utilisation chaque fois qu'on le retire de I'outil ou du
chargeur pour le ranger ou le transporter. Enlever le capuchon avant de remettre
le bloc-piles dans le chargeur ou I'outil.
_AVERTISsEMENT : Risque d'incendie. Ne pas ranger ni ne transporter les piles de
maniere a ce que des objets metalliques puissent entrer en contact avec les bornes
exposees des piles. On ne doit pas mettre, par exemple, le bloc-piles sans capuchon clans
un tablier, une poche, une bofte a outils, une bofte de n#cessaire de produit, un tiroir, etc. avec
des clous, des vis, des cl#s, etc. Le transport des piles peut causer un incendie si les
bornes des piles entrent en contact involontairement avec des matieres conductrices
comme des cles, de la monnaie, des outils manuels et d'autres elements semblables. La
Hazardous Material Regulations (r#glementation sur les produits dangereux) du d#partement
am#ricain des transports interdit en fait le transport des blocs-piles pour le commerce et dans les
avions (c.-a-d. clans des valises et les bagages a main) A MOINS qu'ils ne soient bien proteges
contre les courts-circuits. Pour le transport de piles individuelles, on doit donc s'assurer que les
bornes sont protegees et bien isol#es contre toute matibre pouvant entrer en contact avec elles
et provoquer un court-circuit.
Page 4

DIRECTIVES DE SECURITE SPECIFIQUES AUX PILES DE NICKEL-CADMIUM (NiCd) OU
._,L'HYDRURE METALLIQUE DE NICKEL (NiMH)
• Ne pas incinerer le bloc-piles, m_me s'il est tres endommage ou completement use,
car il pourrait exploser au contact de flammes.
• Une petite fuite de liquide peut se produire clans les cellules du bloc-piles en
cas d'utilisation extreme ou de conditions de temperature. Cela n'indique pas de
d6faillance.
Toutefois, si le joint d'6tanch6it6 ext6rieur est rompu :
a. et que le liquide entre en contact avec la peau, laver rapidement la zone touch6e au savon
eta I'eau pendant plusieurs minutes.
b. si le liquide du bloc-piles entre en contact avec les yeux, les rincer abondamment a I'eau
propre, pendant un minimum de 10minutes, et consulter imm6diatement un m6decin.
(Note medicale : le liquide est compos6 d'une solution comprenant de 25 % a 35 %
d'hydroxyde de potassium).
DIRECTIVES DE SI_CURITI_ SPI_ClFIQUES POUR LES PILES AU LITHIUM-ION (LI-ION)
• Ne pas incinerer le bloc-piles, m_me s'il est tres endommage ou completement use,
car il peut exploser au contact de flammes. Des vapeurs et des matibres toxiques sont
d6gag6es Iorsque les blocs-piles au lithium-ion sont incin6r6s.
• Si le contenu du bloc-piles entre en contact avecla peau, laver immediatement la zone
touchee au savon doux et a I'eau. Si le liquide de la pile entre en contact avec les yeux,
rincer I'oeil ouvert a I'eau pendant 15 minutes ou jusqu'a ce que I'irritation cesse. Si des
soins m6dicaux sont n6cessaires, 1'61ectrolyte du bloc-piles est compos6 d'un m61ange de
carbonates organiques liquides et de sels de lithium.
• Le contenu des cellules de pile ouvertes peut provoquer une irritation respiratoire.
Exposer la personne a de Fair frais. Si les sympt6mes persistent, obtenir des soins
m6dicaux.
i_AVERTISSEMENT : Risque de br_Jlure. Le liquide du bloc-piles peut s'enflammer s'il est
expos6 a des 6tincelles ou a une flamme.
Le sceau SRPRC TM
Le sceau SRPRC TM (Soci_t_ de recyclage des piles rechargeables au Canada)
appos_ sur les piles ou blocs-piles au nickel-cadmium, & hydrure m_tallique de
nickel ou au lithium-ion indique que DEWALT a d_j& pay_ les frais de recyclage de
la pile ou du bloc-piles &la fin de sa p_riode d'utilisation. Dans certaines r_gions,
il est illegal de jeter les piles ou blocs-piles au nickel-cadmium, & hydrure
m_tallique de nickel ou au lithium-ion & la poubelle ou dans le syst_me municipal de cueillette
des r_sidus solides. Le programme de la SRPRC repr_sente donc une alternative _cologique.
L'organisme SRPRC TM, en collaboration avec DEWALT et d'autres utilisateurs de piles, a mis sur
pied des programmes aux €:tats-Unis et au Canada qui facilitent la collecte des piles et blocs-
piles au nickel-cadmium, & hydrure m_tallique de nickel ou au lithium-ion _puis_es. Aidez-nous
& prot_ger I'environnement et & conserver nos ressources naturelles en renvoyant les piles
et blocs-piles au nickel cadmium, & hydrure m_tallique de nickel ou au lithium-ion _puis_es &
un centre de r_paration autoris_ DEWALT ou au d_taillant de votre r_gion afin qu'elles soient
recycl_es. On peut _galement communiquer avec le centre de recyclage de la r_gion pour savoir
o_ d_poser les piles us_es.
SRPRC TM est une marque de commerce d_pos_e de la Soci_t_ de recyclage des piles
rechargeables au Canada.
Directives de s_curit_ importantes pour tous les
chargeurs de piles
CONSERVER CES DIRECTIVES : le present mode d'emploi contient des directives de s_curit_
et de fonctionnement importantes sur les chargeurs de piles.
• Avant d'utiliser le chargeur, lire toutes les directives et tousles avertissements figurant sur le
chargeur, le bloc-piles et le produit utilis# avec le bloc-piles.
i_DANGER : Risque d'#lectrocution. Les bornes de charge pr#sentent une tension de
120 volts. Ne pas sonder les bornes avec des objets conducteurs. En effet, il y a risque de
choc #lectrique ou d'#lectrocution.
i_AVERTISSEMENT : Risque de choc #lectrique. Eviter la p#n#tration de tout liquide dans le
chargeur. Cela peut provoquer des chocs #lectriques.
i_A7TENTION : Risque de brEJlure.Pour r#duire le risque de blessures, charger uniquement
des piles ou bloc-piles rechargeables DEWALY D'autres types de piles peuvent exploser et
provoquer des blessures corporelles et des dommages.
i_A7TENTION : dans certaines circonstances, Iorsque le chargeur est branch# au bloc
d'alimentation, les contacts de chargement exposes a I'int#rieur du chargeur peuvent #tre
court-circuit, s par des corps #trangers conducteurs tels que, mais sans s'y limiter, la laine
d'acier, le papier d'aluminium, ou toute accumulation de particules m#talliques. IIs doivent #tre
maintenus a distance des ouvertures du chargeur. D#brancher syst#matiquement celui-ci si
aucun bloc-piles n'y est ins#r#. D#brancher le chargeur avant tout nettoyage.
• NE PAS charger le bloc-piles au moyen de tout autre chargeur que ceux qui sont
mentionnes clansle present mode d'emploL Le chargeur et le bloc-piles sont sp#cialement
congus pour #tre utilis#s ensemble.
• Ces chargeurs ne sontpas destines a #tre utilises a d'autres fins que celles de charger
les piles rechargeables DEWALT. Toute autre utilisation risque de provoquer un incendie,
un choc #lectrique ou une #lectrocution.
• Proteger le chargeur de la pluie et de la neige.
• Tirer sur la fiche plut6t que sur le cordon pour debrancher le chargeur. Cela permet de
r#duire le risque d'endommager la fiche ou le cordon d'alimentation.
• S'assurer que le cordon est situe en lieu sOr de maniere ace que personne ne marche
ni ne trebuche dessus ou a ce qu'il ne soit pas endommage ni soumis a une tension.
• Ne pas utiliser de rallonge a moins que cela ne soit absolument necessaire. L'uti/isation
d'une rallonge inadequate risque d'entrainer un incendie, un choc _lectrique ou une
#lectrocution.
• Lors de I'utilisation d'un outil electrique a I'exterieur, n'utiliser que des rallonges
conFues pour I'exterieur. L'utilisation d'une rallonge congue pour I'ext#rieur r#duit les
risques de choc #lectrique.
• Pour la securite de I'utilisateur, utiliser une rallonge de calibre adequat (AWG,
American Wire Gauge [calibrage americain normalise des ills]). Plus /e num_ro de
calibre de fil est petit et plus sa capacit_ est grande, par exemple un calibre 16 a plus de
capacit# qu'un calibre 18. L'usage d'une rallonge de calibre insuffisant causera une chute de
tension entrainant perte de puissance et surchauffe. Si plus d'une rallonge est utilis#e pour
obtenir la Iongueur totale, s'assurer que chaque rallonge pr#sente au moins le calibre de fil
minimum. Le tableau ci-dessous illustre les calibres a utiliser selon la Iongueur de rallonge et
I'intensit# nominale indiqu#e sur la plaque signal#tique. En cas de doutes, utiliser le calibre
suivant. Plus le calibre est petit, plus la rallonge peut supporter de courant.
Calibre de fil minimum recommand_ pour les rallonges
Longueur totale de la rallonge
25 pi 50 pi 75 pi 100 pi 125 pi 150 pi 175 pi
7,6 m 15,2 m 22,9 m 30,5 m 38,1 m 45,7 m 53,3 m
Calibre AWG
18 18 16 16 14 14 12
• Ne pas mettre d'objet sur le chargeur ni mettre ce dernier sur une surface molle
pouvant obstruer les fentes de ventilation et ainsi provoquer une chaleur interne
excessive. Eloigner le chargeur de toute source de chaleur. La ventilation du chargeur se
fait par les fentes pratiqu#es dans les parties sup#rieures et inf#rieures du boitier.
• Ne pas faire fonctionner le chargeur si la fiche ou le codon est endommage(e).
• Ne jamais se servir d'un chargeur qui a subi un choc violent, qui est tombe ou qui est
endommage. Le faire v#rifier dans un centre de r#paration autoris#.
• Ne pas demonter le chargeur; I'apporter a un centre de reparation autorise Iorsqu'un
entretien ou une reparation est requise. Le remontage non conforme du chargeur
comporte des risques de choc #lectrique, d'#lectrocution ou d'incendie.
• Debrancher le chargeur avant de le nettoyer. Cela reduira le risque de choc electrique.
Le risque ne sera pas #limin# en enlevant simplement le bloc-piles.
• NE JAMAIS tenter de relier deux chargeurs ensemble.
• Le chargeur est conFu pour #tre alimente en courant domestique standard de
120 volts. Ne pas utiliser une tension superieure pour le chargeur. Cela ne s'applique
pas au chargeur pour poste mobile.
Utilisation du mode Tune-up TM automatique
Le mode de Tune-Up TM automatique _galise ou _quilibre chaque cellule du bloc-piles pour lui
permettre de fonctionner & son rendement optimum. Les blocs-piles doivent _tre r_gl_s chaque
semaine ou apr_s une dizaine de cycles de charges/d_charges ou chaque fois que la dur_e
de fonctionnement du bloc-piles diminue. Pour utiliser le Tune-Up TM automatique, mettre le bloc-
piles dans le chargeur et I'y laisser pendant au moins 8 heures. Le chargeur passera par les
modes suivants :
1. Le voyant rouge clignotera de faqon continue indiquant que le cycle de chargement d'une
heure a commenc&
2. Lorsque ce dernier est termin_, le voyant restera allum_ sans clignoter. Cela indique que le
bloc-piles est charg_ & plein et peut _tre alors utilis&
3. Si le bloc-piles est laiss_ dans le chargeur apr_s la charge initiale de 1 heure, le chargeur
entrera en mode automatique de mise au point. Ce mode dure jusqu'& 8 heures ou jusqu'&
ce que les cellules du bloc-piles soient _quilibr_es. Le bloc-piles est pr6t & _tre utilis_ et peut
_tre enlev_ en tout temps durant le mode de mise au point.
4. Lorsque le mode automatique de mise au point est termin_, le chargeur d_bute une charge
d'entretien; le t_moin rouge demeurera allum&
Chargeurs
L'outil utilise un chargeur DEWALT de 7.2, de 9.6, de 12, de 14,4 ou de 18 volts. S'assurer de
bien lire toutes les directives de s_curit_ avant d'utiliser le chargeur. Consulter letableau figurant
& la fin du present mode d'emploi pour connaftre la compatibilit_ des chargeurs et des blocs-
piles.
Procedure de charge
i_DANGER : Risque d'_lectrocution. Tension de 120 V aux bornes de charge. Ne pas sonder
les bornes avec des objets conducteurs. Risque de choc #lectrique ou d'#lectrocution.
1. Brancher le chargeur dans une prise appropri_e avant d'ins_rer le bloc-piles.
2. InsUrer le bloc-piles dans le chargeur. Le voyant rouge (charge en cours) clignotera
continuellement pour indiquer que la charge a d_but&
3. La fin de la charge sera indiqu_e par le voyant rouge qui demeurera allum& Le bloc-piles
est charg_ & plein et peut _tre utilis_ ou laiss_ dans le chargeur.
Fonctionnement du voyant
CHARGEMENTDU
BLOC=PILES .................................. mm mm mm mm mm mm mm mm mm mm mm mm
ENTIEREMENT CHARGE ...............
FONCTION DE SUSPENSION
DUBLOC=PILESCHAUD/FROID ..... _ [] _ [] _ [] _ [] _ []
REMPLAcERLEBLOC=PILES ........ _ _ _ _ _ _ _ _ _ ® _ _ _ _ _ ® _ _ _
PROBLEME AVEC
LESEcTEUR ................................... _ _ _ _ _ _ _ _ _ _ _ _ _
Voyants de charge
Certains chargeurs sont conqus pour d_tecter certains troubles pouvant survenir avec les blocs-
piles. IIs sont indiqu_s par le clignotement rapide du voyant rouge. Dans ce cas, r_ins_rer le bloc-
piles dans le chargeur. Si le trouble persiste, essayer un bloc-piles different afin de d_terminer si
le chargeur est en bon _tat. Si le nouveau bloc-piles est charg_ correctement, cela signifie que le
bloc-piles initial _tait d_fectueux et qu'il doit _tre retourn_ & un centre de r_paration ou & un site de
collecte pour le recyclage. Si le nouveau bloc-piles pr_sente le m_me trouble que celui d'origine,
faire v_rifier le chargeur par un centre de r_paration autoris&
FONCTION DE SUSPENSION DU BLOC-PILES CHAUD/FROID
Certains chargeurs comportent une fonction de suspension du bloc-piles chaud/froid. En effet,
Iorsque le chargeur d_tecte un bloc-piles chaud, il suspend imm_diatement le chargement
jusqu'au refroidissement de celui-ci. Une fois le bloc-piles refroidi, le chargeur passe
automatiquement au mode de charge du bloc-piles. Cette fonction assure une dur_e de vie
maximale au bloc-piles. Le voyant rouge _met un clignotement long, puis court en mode de
suspension de bloc-piles chaud.
PROBLEME AVEC LE SECTEUR
Certains chargeurs pr_sentent un voyant pour tout probl_me avec le secteur. Lorsque le
chargeur est utilis_ avec des blocs d'alimentation portatifs comme des g_n_ratrices ou des
alternateurs, il pourrait temporairement s'arr_ter de marcher, auquel cas un voyant rouge _met
deux clignotements rapides suivis d'une pause. Cela indique que le bloc d'alimentation est hors
tolerance.
BLOC-PILES LAISS# DANS LE CHARGEUR
Le chargeur et le bloc-piles peuvent _tre laiss_s branch_s, le voyant rouge demeurant
ind_finiment allum& Le chargeur maintiendra le bloc-piles charg_ & plein et en bon _tat.
REMARQUE : le bloc-piles perdra lentement sa charge une fois retir_ du chargeur. Si le bloc-
piles n'a pas _t_ maintenu charg_ (charge d'entretien), il peut falloir le recharger avant de
I'utiliser. De plus, un bloc-piles peut perdre lentement sa charge s'il est laiss_ dans un chargeur
qui n'est pas branch_ & une source de c.a. appropri_e.
BLOCS-PILES FAIBLES : les chargeurs peuvent _galement d_tecter les blocs-piles faibles.
Ces blocs-piles peuvent encore _tre utilis_s, mais il faut s'attendre & un rendement moindre. Le
chargeur indiquera Iorsqu'il est temps de remplacer un bloc-pile.
Remarques importantes pour le chargement
1. Pour augmenter la dur_e de vie du bloc-piles et optimiser son rendement, le charger
& une temperature entre 18 et 24 °C (65 et 75 °F). NE PAS charger le bloc-piles & des
temperatures inf_rieures & 4,5 °C (40 °F) ou sup_rieures & 40,5 °C (105 °F). Ces consignes
sont importantes et permettent d'_viter d'endommager gravement le bloc-piles.
2. Le chargeur et le bloc-piles peuvent devenir chauds au toucher pendant la charge. IIs'agit
d'un _tat normal etcela n'indique pas un probl_me. Pour faciliter le refroidissement du bloc-
piles apr_s son utilisation, _viter de mettre le chargeur ou le bloc-piles dans un endroit chaud
comme dans une remise m_tallique ou une remorque non isol_e.
3. Si le bloc-piles ne se charge pas ad_quatement, on doit :
a. v_rifier le courant & la prise en branchant une lampe ou un autre appareil _lectrique ;
b. v_rifier si la prise est reli_e & un interrupteur de lumi_re qui la met hors tension Iorsque
vous _teignez les lumi_res ;
c. d_placer le chargeur et le bloc-piles & un endroit o_ la temperature ambiante est entre 18
et 24 °C (65 et 75 °F) ;
d. si le probl_me persiste, apporter ou envoyer I'outil, le bloc-piles et le chargeur au centre
de r_paration de votre r_gion.
4. Le bloc-piles doit _tre recharg_ Iorsqu'il n'arrive pas & produire suffisamment de puissance
pour des travaux qui _taient facilement r_alis_s auparavant. NE PAS CONTINUER &
utiliser le bloc-piles dans ces conditions. Suivre les procedures de charge. On peut
_galement recharger & tout moment un bloc-piles partiellement d_charg_ sans nuire & son
fonctionnement.
5. Dans certaines circonstances, Iorsque le chargeur est branch_ au bloc d'alimentation, les
contacts de chargement exposes & I'int_rieur du chargeur peuvent _tre court-circuit,s par
des corps _trangers conducteurs tels que, mais sans s'y limiter, la poussi_re provoqu_e
par le meulage, les copeaux m_talliques, la laine d'acier, le papier d'aluminium ou toute
accumulation de particules m_talliques. IIs doivent _tre maintenus &distance des ouvertures
du chargeur. D_brancher syst_matiquement celui-ci si aucun bloc-piles n'y est ins_r&
D_brancher le chargeur avant tout nettoyage.
6. Ne pas geler ni immerger le chargeur dans I'eau ou dans tout autre liquide.
i_AVERTISSEMENT : Risque de choc _lectrique. Eviter la p_n_tration de tout liquide dans le
chargeur. Cela peut provoquer des chocs #lectriques.
i_ATTENTION : ne jamais ouvrir le bloc-piles pour quelque raison que ce soit. Si le boitier de
plastique du bloc-piles est bris# ou fissure, le retourner a un centre de r#paration pour qu'il
soit recycle.
Recommandations d'entreposage
1. Le meilleur endroit de rangement est celui qui est frais et sec, loin de toute lumi_re directe
et prot_g_ d'une temperature extr6me (chaleur ou froid).
2. Un entreposage prolong_ ne nuira pas au bloc-piles ou au chargeur. Sous les conditions
ad_quates, on peut les entreposer pour une p_riode de cinq (5) ans ou plus.
CONSERVER CES CONSIGNES POUR
UTILISATION ULTERIEURE
Moteur
Une chute de tension de plus de 10% entrafnera une perte de puissance et une surchauffe. Tous
les outils DEWALT font I'objet d'essais en usine ; si I'outil ne fonctionne pas, v_rifier lebloc-piles.
COMPOSANTS (fig. 3)
_AVERTISSEMENT : ne jamais modifier I'outil _lectrique ou I'une de ses parties. Une telle
pratique risque de provoquer des dommages materiels ou des blessures corporelles.
A. D_tente
B. Commutateur & bascule (DW059)
C. Bouton marche avant/marche arri_re
D. Manchon
E. Mandrin & blocage rapide, & entrafnement
hexagonal de 0,63 cm (1/4 pc)
UTILISATION PREVUE
F. Cheville d'arr6t
G. Enclume
H. Boutons de d_gagement du bloc-piles
I. Lampe de travail
J. Crochet de ceinture (accessoire facultatif)
Ces cl_s et ces mandrins & chocs pour service intensif sont conqus pour des applications de
vissage professionnelles. La fonction de choc rend cet outil tout particuli_rement utile pour faire
p_n_trer les fixations dans le bois, le m_tal et le b_ton. NE PAS utiliser dans des conditions
humides ou en presence de liquides ou de gaz inflammables.
Ces cl_s et ces mandrins a chocs pour service intensif sont des outils _lectriques pour
professionnels. NE PAS mettre les enfants en contact avec I'outil. Les op_rateurs inexp_riment_s
doivent _tre supervises Iorsqu'ils utilisent cet outil.
Crochet de ceinture (accessoire facultatif)
i_AVERTISSEMENT : pour reduire le risque de blessures graves, NE PAS suspendre /'outi/
au-dessus de la t#te ou, ne pas suspendre d'objets au crochet. Utiliser le crochet de ceinture
UNIQUEMENT pour fixer I'outil a une ceinture de travail.
AAVERTISSEMENT : pour reduire le risque de blessures graves, s'assurer que la vis (K)
qui retient le crochet est solidement fix#e.
Le crochet de ceinture (J) se fixe d'un c6t_ ou de I'autre de I'outil pour une utilisation autant par
les gauchers que par les droitiers. Si le crochet est superflu, il est possible de le d_monter de
I'outil.
Pour changer de c6t_, retirer la vis (K) qui retient le crochet de ceinture en position puis le
r_assembler de I'autre c6t_ de I'outil.
FONCTIONNEMENT
_AVERTISSEMENT : pour reduire le risque de blessures corporelles graves, fermer
I'outil et retirer le bloc-piles avant d'effectuer tout reglage ou avant d'enlever ou
d'installer tout accessoire.
Installer et enlever le bloc-piles
REMARQUE : s'assurer que le bloc-piles est enti_rement charg&
Pour installer le bloc-piles darts la poign_e de I'outil, aligner la base de I'outil avec I'encoche
& I'int_rieur de la poign_e (fig. 2) et le glisser fermement dans la poign_e jusqu'& ce que vous
entendiez un bruit sec indiquant que le verrou est en place.
Pour retirer le bloc-piles de I'outil, appuyer sur les boutons de d_clenchement (H) et tirer
fermement le bloc-piles hors de la poign_e. L'ins_rer dans le chargeur selon les directives
d_crites & la rubrique de le manuel du chargeur.
Commutateur - DW059 (fig. 3)
Pour la marche AVANT (filetage du c6t_ droit), enfoncer la partie inf_rieure de I'interrupteur &
bascule (B). Inverser la DIRECTION de rotation moteur en appuyant sur la partie sup_rieure du
commutateur. Cela permet aux fixations _ & bascule ,_de les rel&cher.
Ddtente a vitesse variable (fig. 3)
Pour d_marrer I'outil, presser la d_tente (A). Pour I'_teindre, simplement la rel&cher. L'outil est
dot_ d'un frein, d_s le rel&chement complet de la d_tente, le mandrin s'arr6tera. L'interrupteur
de vitesse variable vous permet de choisir la vitesse convenant le mieux & une application
particuli_re. Plus la d_tente est enfonc_e, plus la vitesse de I'outil sera _lev_e.
REMARQUE : utiliser les vitesses plus basses pour d_buter le perqage d'un trou sans pointeau,
percer le m_tal, les plastiques ou la c_ramique et visser. Pour une dur_e de vie accrue de I'outil,
utiliser la fonction de vitesse variable uniquement pour commencer le vissage des fixations.
REMARQUE : un usage continu de la vitesse variable n'est pas recommand& Cette pratique
pourrait endommager la d_tente et devrait _tre _vit_e.
Bouton de commande marche avant/marche arri_re (fig. 3)
Un bouton de commande marche avant/marche arri_re (C) d_termine le sens de rotation de I'outil
et sert _galement de bouton de verrouillage. Pour s_lectionner la marche avant, rel&cher la
d_tente et enfoncer le bouton de commande marche avant/marche arri_re vers le c6t_ droit de
I'outil. Pour la marche arriere, enfoncer le bouton de commande marche avant/marche arri_re
vers le c6t_ gauche de I'outil. La position du centre du bouton de commande verrouille I'outil
en position D'ARRET. Toujours rel&cher la d_tente avant de changer la position du bouton de
commande.
REMARQUE : au premier d_marrage de I'outil apr_s un changement de direction, il est
possible qu'un d_clic se fasse entendre. Le d_clic est normal et n'indique pas de probl_me.
Lampe de travail (fig. 3)
II y a une lampe de travail (I) situ_e juste au-dessus de la d_tente (A). Elle s'active Iorsqu'on
presse la d_tente
REMARQUE : la lampe de travail permet d'_clairer la surface immediate et n'est pas destin_e
&servir de lampe de poche.
Mandrin a blocage rapide (fig. 4)
DC825, DC827, DC835, DC845, DC855
REMARQUE : le mandrin accepte seulement des accessoires de 6,35 mm (1/4 pc).
Positionner I'interrupteur en position d'arr6t (centrale) ou retirer le bloc-piles avant de changer
d'accessoires.
Pour installer un accessoire, _loigner le collet du mandrin (D) du devant de I'outil, insurer
I'accessoire et rel&cher le collet. L'accessoire est verrouill_ en place.
Page 5

Pour enlever I'accessoire, 61oigner lecollet du mandrin du devant de I'outil. Retirer I'accessoire,
puis rel&cher le collet.
Enclume avec goupille d'arr_t (fig. 5)
DC820, DC821, DC822, DC823, DC830, DC840, DW059
Avant de changer d'accessoire, mettez le commutateur en position d'arr6t (au centre) ou retirer
le bloc-piles.
Pour ins6rer une douille sur I'enclume, aligner le trou sur le c6t6 de la douille avec la cheville
d'arr6t (F) sur I'enclume (G). Enfoncer la douille jusqu'& ce que la goupille p6n_tre dans le trou.
II sera peut-_tre n6cessaire d'enfoncer la goupille d'arr6t pour faciliter I'installation de la douille.
i_ATTENTION : utiliser uniquement des douilles pour cl6 a choc. D'autres types de douilles
risqueraient d'6clater et de cr6er une situation dangereuse. Inspecter les douilles avant usage
pour toute trace de fissures.
Pour retirer la douille, enfoncer la cheville d'arr6t dans le trou et tirer sur la douille.
Utilisation
Voici le couple que votre outil & chocs g6n_re •
No de cat. pi/Ib, po/Ib Nm No de cat. pi/Ib po/Ib Nm
DC820 145 1740 195 DC835 103 1240 140
DC821 160 1920 215 DC840 120 1440 160
DC822 145 1740 195 DC841 105 1260 145
DC823 105 1260 145 DC845 96 1150 130
DC825 111 1330 150 DC855 80 960 110
DC827 111 1330 150 DW059 300 3600 405
DC830 135 1620 180
,&ATTENTION : s'assurer que le dispositif et/ou le systbme de fixation r6sistera au couple
produit par I'outiL Un couple excessif pourrait provoquer un bris et possiblement une blessure
corporelle.
1. Positionner ladouille sur la t6te de la vis ou du dispositif de fixation. Tenir I'outil perpendiculaire
& celui-ci.
2. Appuyer sur le commutateur pour d6marrer routil. Toujours v6rifier le couple avec une
cl6 dynamom6trique. En effet, le couple de serrage est influenc6 par plusieurs facteurs
notamment :
• La tension : une faible tension produite par un bloc-piles presque 6puis6 r6duira le couple
de serrage.
• La dimension de la douille : une douille inappropri6e causera une baisse du couple de
serrage.
• La dimension des boulons : les boulons de grand diambtre exigent normalement un
couple de serrage plus 61ev6. Le couple de serrage variera 6galement selon la Iongueur,
la qualit6 et le coefficient de couple
• Boulon : s'assurer que le filetage est exempt de rouille et d'autres salet6s pour bien
serrer au couple pr6vu.
• Materiau : le type de mat6riau et la surface de fin#ion influenceront le couple de serrage.
• Duree de serrage : une dur6e de serrage prolong6e produira un couple plus 61ev6. Une
dur6e de serrage exc6dant celle recommand6e pourrait soumettre le dispositif de fixation
a un effort excessif, le foirer ou I'endommager.
ENTRETIEN
_AVERTISSEMENT : pour reduire le risque de blessures corporelles graves, eteindre
I'outil et le debrancher avant d'effectuer tout reglage, ou d'enlever ou d'installer des
accessoires.
Nettoyage
,&AVERTISSEMENT : enlever les salet6s et la poussibre hors des 6vents au moyen d'air
comprim6 propre et sec, au moins une fois par semaine. Pour minimiser le risque de blessure
aux yeux, toujours porter une protection oculaire conforme a la norme ANSI Z87.1 Iors du
nettoyage.
,&AVERTISSEMENT : ne jamais utiliser de solvants ni d'autres produits chimiques puissants
pour nettoyer les pibces non m6talliques de I'outil. Ces produits chimiques peuvent affaiblir les
mat6riaux de plastique utilis6s dans ces pibces. Utiliser un chiffon humect6 uniquement d'eau
et de savon doux. Ne jamais laisser de liquide p6n6trer dans I'outil et n'immerger aucune partie
de I'outil dans un liquide.
INSTRUCTION DE NETTOYAGE DU CHARGEUR
,&AVERTISSEMENT : Risque de choc. D6brancher le chargeur de la prise de courant C.A. avant
de le nettoyer. La salet6 et la graisse peuvent #tre enlev6es de la surface ext6rieure du chargeur
au moyen d'un chiffon ou d'une brosse douce non m6tallique. Ne pas utiliser d'eau ni d'autres
solutions de nettoyage.
Accessoires
_AVERTISSEMENT : puisque les accessoires autres que ceux offerts par DEWALT n'ont pas
6t6 test6s avec ce produit, leur utilisation pourrait s'av6rer dangereuse. Pour r6duire le risque
de blessures, utiliser exclusivement les accessoires DEWALT recommand6s avec le pr6sent
produit.
Les accessoires recommand6s pour cet outil sont vendus s6par6ment au centre de service
de votre r6gion. Pour obtenir de I'aide concernant I'achat d'un accessoire, commun!quer avec
DEWALT Industrial Tool Co., 701 East Joppa Road, Baltimore, MD 21286 aux Etats-Unis;
composer le 1 (800) 4-DEWALT (1-800-433-9258) ou visiter notre site Web www.dewalt.com.
_ATTENTION : utiliser uniquement des douilles pour cl6 a choc. D'autres types de
douilles risquent d'6clater et de cr6er une situation dangereuse. Inspecter les douilles avant
usage pour toute trace de fissures.
R_parations
Le chargeur n'est pas r6parable. Aucune piece & I'int6rieur du chargeur ne peut _tre r6par6e.
Pour assurer la SI2CURITI 2et la FIABILITI2 du produit, les r6parations, I'entretien et les r6glages
doivent _tre r6alis6s (cela comprend I'inspection et le remplacement du balai) par un centre de
r6paration en usine DEWALT, un centre de r6paration agr66 DEWALT ou par d'autres techniciens
qualifi6s. Toujours utiliser des pi_ces de rechange identiques.
Garantie limit_e de trois ans
DEWALT r6parera, sans frais, tout produit d6fectueux caus6 par un d6faut de mat6riel ou de
fabrication pour une p6riode de trois ans& compter de la date d'achat. La pr6sente garantie
ne couvre pas les pi_ces dont la d6fectuosit6 a 6t6 caus6e par une usure normale ou I'usage
abusif de I'outil. Pour obtenir de plus amples renseignements sur les pi_ces ou les r6parations
couvertes par la pr6sente garantie, visiter le site www.dewalt.com ou composer le 1 800
433-9258 (1 800 4-DEWALT). Cette garantie ne s'applique pas aux accessoires et ne vise
pas les dommages caus6s par des r6parations effectu6es par un tiers. Cette garantie conf_re
des droits 16gaux particuliers & I'acheteur, mais celui-ci pourrait aussi b6n6ficier d'autres droits
variant d'un 6tat ou d'une province & I'autre.
En plus de la pr6sente garantie, les outils DEWALT sont couverts par notre :
CONTRAT D'ENTRETIEN GRATUlT D'UN AN
DEWALT entretiendra I'outil et remplacera les pi_ces us6es au cours d'une utilisation normale et
ce, gratuitement, pendant une p6riode d'un an & compter de la date d'achat.
CONTRAT D'ENTRETIEN GRATUlT DE DEUX ANS
SUR LES BLOC-PILES DEWALT
DC9071, DC9091, DC9096,
DC9280, DC9360 et DC9180 et la
GARANTIE DE REMBOURSEMENT DE 90 JOURS
Si I'acheteur n'est pas enti_rement satisfait, pour quelque raison que ce soit, du rendement de
I'outil 61ectrique, du laser ou de la cloueuse DEWALT, celui-ci peut le retourner, accompagn_
d'un regu, dans les 90 jours & compter de la date d'achat pour obtenir un remboursement
int6g.ral, sans aucun probl_me.
AMERIQUE LATINE : Cette garantie ne s'applique aux produits vendus en Am6rique latine.
Pour ceux-ci, veuillez consulter les informations relatives & la garantie sp6cifique pr6sente dans
I'emballage, appeler I'entreprise locale ou consulter le site Web pour les informations relatives
&cette garantie.
REMPLAOEMENT GRATUlT DES #TIQUETTES D'AVERTISSEMENT : Si les 6tiquettes
d'avertissement deviennent illisibles ou sont manquantes, composer le 1-800-4-DEWALT pour
en obtenir le remplacement gratuit.
DCXX×
TOREDUCETUERiSKOFiNJURY,
USERMUSTREADiNSTRUCTION
MANUALUSEONLYWITH
DEWALTBATTERIES.ALWAYSUSEPROPEREYEAND
RESPIRATORYPROTECTION.
OEWALTINDUSTRIAlT00LCO.,8aLTIMORE,_DZ1_6U_.a.
FORSE_VlC_INFORMATION.CA_Lla0C_-O_VALTwww.D_WA_co,i
J
l .........................1
Definiciones: Normas de seguridad
Las siguientes definiciones describen el nivel de gravedad de cada palabra de sepal.
Lea el manual y preste atenci6n a estos simbolos.
i_PELIGRO: indica una situacidn de peligro inminente que, si no se evita, provocara
la muerte o lesiones graves.
AADVERTENClA: indica una situacidn de peligro potencial que, si no se evita, podria
provocar la muerte o lesiones graves.
AATENCl6N: indica una situacidn de peligro potencial que, sino se evita, posiblemente
provocarfa lesiones leves o moderadas.
ATENClON: cuando se utiliza sin el sfmbolo de alerta de seguridad indica una situacidn
de peligro potencial que, si no se evita, puede provocar da#os en la propiedad.
J
Sl TIENE ALGUNA DUDA O ALGON COMENTARIO SOBRE 12STAU OTRA HERRAMIENTA
DEWALT, LLAMENOS AL NOMERO GRATUITO: 1-800-4-DEWALT (1-800-433-9258).
_ ADVERTENClA: Para reducir el riesgo de lesiones, lea el manual de instrucciones.
Advertencias generales de seguridad para herramientas
el_ctricas
_ iADVERTENCIA! Lea todas las advertencias de seguridad e instrucciones El
incumplimiento de las advertencias e instrucciones puede provocar descargas el#ctricas,
incendios o lesiones graves.
CONSERVE TODAS LAS ADVERTENCIAS E
INSTRUCCIoNES PARA FUTURAS CONSuLTAS
El t#rmino '#erramienta el#ctrica " incluido en las advertencias hace referencia alas herramientas
el#ctricas operadas con corriente (con cable el#ctrico) o a las herramientas el#ctricas operadas
con baterfas (inalambricas).
1) SEGURIDAD EN EL AREA DE TRABAJO
a) Mantenga el #rea de trabajo limpia y bien iluminada. Las areas abarrotadas y oscuras
propician accidentes.
b) No opere las herramientas electricas en atmosferas explosivas, como ambientes
donde haya polvo, gases o liquidos inflamables. Las herramientas e/_ctricas originan
chispas que pueden encender el polvo o los vapores.
c) Mantenga alejados a los nilus y a los espectadores de la herramienta electrica en
funcionamiento. Las distracciones pueden provocar la p_rdida de control.
2) SEGURIDAD EL#CTRICA
a) Los enchufes de la herramienta electrica deben adaptarse al tomacorriente. Nunca
modifique el enchufe de ninguna manera. No utilice ningOn enchufe adaptador con
herramientas electricas con conexion a tierra. Los enchufes no modificados y que se
adaptan a los tomacorrientes reduciran el riesgo de descarga el#ctrica.
b) Evite el contacto corporal con superficies con descargas a tierra como, por
ejemplo, tuberias, radiadores, cocinas electricas y refrigeradores. Existe mayor
riesgo de descarga el#ctrica si su cuerpo esta puesto a tierra.
c) No exponga las herramientas electricas a la Iluvia o a condiciones de humedad. Si
entra agua a una herramienta el#ctrica, aumentara el riesgo de descarga el#ctrica.
d) No maltrate el cable. Nunca utilice el cable para transportar, tirar o desenchufar
la herramienta electrica. Mantenga el cable alejado del calor, el ace#e, los bordes
filosos y las piezas moviles. Los cables dahados o enredados aumentan el riesgo de
descarga el#ctrica.
e) AI operar una herramienta electrica en el exterior, utilice un cable prolongador
adecuado para tal uso. Utilice un cable adecuado para uso en exteriores a fin de reducir
el riesgo de descarga el#ctrica.
f) Si el uso de una herramienta electrica en un lugar hOmedo es imposible de evitar,
utilice un suministro protegido con un interruptor de circuito por falla a tierra
(GFCl). El uso de un GFCI reduce el riesgo de descargas el#ctricas.
3) SEGURIDAD PERSONAL
a) Permanezca alerta, controle Io que esta haciendo y utilice el sentido comOn
cuando emplee una herramienta electrica. No utilice una herramienta electrica si
esta cansado o bajo el efecto de drogas, alcohol o medicamentos. Un momento de
descuido mientras se opera una herramienta el#ctrica puede provocar lesiones personales
graves.
b) Utilice equipos de proteccion personaL Siempre utilice proteccion para los ojos. En
las condiciones adecuadas, el uso de equipos deprotecci6n, como mascaras para polvo,
calzado de seguridad antideslizante, cascos o protecci6n auditiva, reducira las lesiones
personales.
c) Evite el encendido por accidente. AsegOrese de que el interruptor este en la
posici6n de apagado antes de conectarlo a la fuente de energia o paquete de
baterias, o antes de levantar o transportar la herramienta. Transportar herramientas
el_ctricas con el dedo apoyado en el interruptor o enchufar herramientas el_ctricas con el
interruptor en la posicidn de encendido puede propiciar accidentes.
d) Retire la clavija de ajuste o la Ilave de tuercas antes de encender la herramienta
electrica. Una Ilave de tuercas o una clavija de ajuste que quede conectada a una pieza
giratoria de la herramienta el#ctrica puede provocar lesiones personales.
e) No se estire. Conserve el equilibrio y pbrese adecuadamente en todo momento.
Esto permite un mejor control de la herramienta el#ctrica en situaciones inesperadas.
f) Use la vestimenta adecuada. No use ropas holgadas ni joyas. Mantenga el cabello,
la ropa y los guantes alejados de las piezas en movimiento. Las ropas holgadas, las
joyas o el cabello largo pueden quedar atrapados en las piezas en movimiento.
g) Si se suministran dispositivos para la conexion de accesorios con fines de
recolecci6n y extracci6n de polvo, asegOrese de que esten conectados y que se
utilicen correctamente. El uso de dispositivos de recolecci6n de polvo puede reducir los
peligros relacionados con el polvo.
4) USO Y MANTENIMIENTO DE LA HERRAMIENTA EL#CTRICA
a) No fuerce la herramienta electrica. Utilice la herramienta electrica correcta para
el trabajo que realizara. Si se la utiliza a la velocidad para la que fue dise5ada, la
herramienta el#ctrica correcta permite trabajar mejor y de manera mas segura.
b) No utilice la herramienta electrica si no puede encenderla o apagarla con el
interruptor. Toda herramienta el#ctrica que no pueda ser controlada mediante el
interruptor es peligrosa y debe repararse.
c) Desconecte el enchufe de la fuente de energia o el paquete de baterias de la
herramienta electrica antes de realizar ajustes, cambiar accesorios o almacenar
la herramienta electrica. Estas medidas de seguridad preventivas reducen el riesgo de
encender la herramienta el#ctrica en forma accidental
d) Guarde la herramienta electrica que no este en uso fuera del alcance de los ni#os y
no permita que otras personas no familiarizadas con ella o con estas instrucciones
operen la herramienta. Las herramientas el#ctricas son peligrosas si son operadas por
usuarios no capacitados.
e) Realice el mantenimiento de las herramientas electricas. Revise que no haya piezas
en movimiento mal alineadas o trabadas, piezas rotas o cualquier otra situacion
que pueda afectar el funcionamiento de la herramienta electrica. Si encuentra
da#os, haga reparar la herramienta electrica antes de utilizarla. Se producen muchos
accidentes a causa de las herramientas el#ctricas que carecen de un mantenimiento
adecuado.
f) Mantenga las herramientas de corte afiladas y limpias. Las herramientas de corte
con mantenimiento adecuado y con los bordes de corte afilados son menos propensas a
trabarse y son mas faciles de controlar.
g) Utilice la herramienta electrica, los accesorios y las brocas de la herramienta, etc.
de acuerdo con estas instrucciones y teniendo en cuenta las condiciones de trabajo
y el trabajo que debe realizarse. El uso de la herramienta el#ctrica para operaciones
diferentes de aqu#llas para las que fue dise#ada podrfa originar una situaci6n peligrosa.
5) USOY MANTENIMIENTO DE LA HERRAMIENTA CON BATER|AS
a) Recargue solamente con el cargador especificado por el fabricante. Un cargador
adecuado para un tipo de paquete de baterfas puede originar riesgo de incendio si se
utiliza con otro paquete de baterfas.
b) Utilice herramientas electricas solo con paquetes de baterias especificamente
dise#ados. El uso de cualquier otro paquete de baterfas puede producir riesgo de
incendio y lesiones.
c) Cuando no utilice el paquete de baterias, mantengalo lejos de otros objetos
metalicos como sujetapapeles, monedas, Ilaves, clavos, tornillos u otros objetos
metalicos peque#os que puedan realizar una conexion desde un terminal al
otro. Los cortocircuitos en los terminales de la baterfa pueden provocar quemaduras o
incendio.
d) En condiciones abusivas, el liquido puede ser expulsado de la bateria. Evite su
contacto. Si entra en contacto accidentalmente, enjuague con agua. Si el liquido
entra en contacto con los ojos, busque atencion medica. El Ifquido expulsado de la
baterfa puede provocar irritaci6n o quemaduras.
6) MANTENIMIENTO
a) Solicite a una persona calificada en reparaciones que realice el mantenimiento
de su herramienta electrica y que solo utilice piezas de repuesto identicas. Esto
garantizara la seguridad de la herramienta el#ctrica.
Normas especificas de seguridad adicionales para
sierras de vaiv_n
• Sostenga la herramienta por las superficies de agarre aisladas cuando realice una
operaci6n en la que la herramienta de corte pueda tocar cables electricos ocultos o
el cable de esta. El contacto con un cable con corriente el_ctrica hara que las partes expuestas
de la herramienta tengan corriente y que el operador reciba una descarga el#ctrica.
• Utilice abrazaderas u otra forma practica para asegurar y sostener la pieza de trabajo
en una plataforma estable. Sostener el trabajo con la mano o contra el cuerpo no brinda la
estabilidad requerida y puede Ilevar a la p#rdida del control
• Permita que el motor se detenga por completo antes de retirar la hoja de la linea de
corte. Las hojas en movimiento pueden impactar la pieza de trabajo y romperse, dahar la
pieza de trabajo o causar la p#rdida de control de la herramienta y posibles lesiones corpo-
rales.
• Mantenga las empu#aduras secas, limpias, libres de aceite y grasa. Esto permitira un
mejor control de la herramienta.
• Mantenga las hojas afiladas. Las hojas romas pueden hacer que la sierra se desvfe o
estanque bajo presidn.
• Limpie su herramienta con frecuencia, especialmente despues de usos prolongados.
El polvo y la arenilla que contienen partfculas metalicas se acumulan con frecuencia en las
superficies interiores y podrfan ocasionar peligro de descarga el#ctrica.
• No opere esta herramienta durante periodos largos de tiempo. La vibracidn causada por
la accidn de operacidn de esta herramienta puede causar lesiones permanentes a los dedos,
las manos y los brazos. Utilice guantes para una mayor amortiguacidn, tome descansos fre-
cuentes y limite el tiempo de uso diario.
i_,ADVERTENClA: Use SIEMPRE lentes de seguridad. Los anteojos de uso diario NO son
lentes de seguridad. Utilice tambi#n mascaras faciales o para polvo si el corte produce polvillo.
UTILICE SIEMPRE EQUIPOS DE SEGURIDAD CERTIFICADOS:
• Proteccidn para los ojos ANSI Z87. I(CAN/CSA Z94.3),
• Proteccidn auditiva seg#n la norma ANSI $12.6 ($3.19),
• Proteccidn respiratoria seg#n las normas NIOSH/OSHA/MSHA.
i_ADVERTENClA: Parte del polvo generado al lijar, serrar, esmerilar o taladrar, asf como al
realizar otras actividades del sector de la construccidn, contienen productos qufmicos que
pueden producir cancer, defectos cong#nitos u otras afecciones reproductivas. Ejemplos de
esas substancias qufmicas son:
• plomo procedente de pinturas basadas en plomo,
• dxido de silicio cristalino procedente de ladrillos, cemento y otros productos de
mamposterfa, y
• ars#nico y cromo procedentes de madera tratada qufmicamente (CCA).
El peligro derivado de estas exposiciones que usted enfrente varfa en funcidn de la frecuencia
con que se realice este tipo de trabajo. Para reducir la exposicidn a esas sustancias qufmicas:
trabaje en una zona bien ventilada y Ilevando equipos de seguridad aprobados, como mascarillas
antipolvo especialmente dise5adas para filtrar partfculas microscdpicas.
• Evite el contacto prolongado con el polvo procedente del lijado, serrado, esmerilado y
taladrado electricos, as( como de otras actividades del sector de la construccion. Lleve
ropa protectora y lave con agua y jabon las zonas expuestas. Si permite que el polvo se
introduzca en la boca u ojos o quede sobre la piel, puede favorecer la absorcidn de productos
qufmicos peligrosos.
_,ADVERTENClA: Toda persona que entre al area de trabajo debera usar una mascara anti-
polvo o proteccidn respiratoria. El filtro deberfa ser reemplazado a diario o cuando el usuario
tenga dificultad para respirar. Puede encontrar la mascara antipolvo apropiada aprobada por
NIOSH/OSHA en su ferreterfa local
AADVERTENClA: Durante el uso, use siempre proteccion auditiva adecuada que cumpla
con la norma ANSI $12.6 (S3.19). Bajo ciertas circunstancias y seg#n el perfodo de uso, el
ruido producido por este producto puede contribuir a la p#rdida de audicidn.
_,ATENcl6N: Cuando no se use, guarde la herramienta en posicion horizontal sobre
una superficie estable, donde no interrumpa el paso o provoque una caida. Algunas her-
ramientas con baterfas grandes se sostienen sobre la baterfa, pero pueden caer facilmente.
• La etiqueta de su herramienta puede incluir los siguientes sfmbolos. Los sfmbolos y sus
definiciones son los siguientes:
Page 6

V.................. voltios
Hz................ hertz
min .............. minutes
.... ........... corriente directa
(_) ................ Construccidn Clase I
(con conexidn a tierra)
[] ................ Construccidn Clase II
(con aislamiento doble)
RPM ............ revoluciones o reciprocidad
per minute
A ................. amperios
W ................ vatios
"_................ corriente alterna
_, ............... corriente alterna o directa
no ................ velocidad sin carga
................ terminal a tierra
A ................ sfmbolo de alerta de seguridad
.../min ......... por minute
BPM ............ golpes per minuto
IPM ............. impactos por minute
Instrucciones de seguridad importantes para todos los
paquetes de baterias
AI solicitar paquetes de baterias de repuesto, asegt_rese de incluir el nt_mero de catalogo y el
voltaje. Consulte el grafico al final del manual para conocer la compatibilidad entre los cargadores
y los paquetes de baterias.
El paquete de baterias incluido en la caja no esta completamente cargado. Antes de utilizar
el paquete de baterias y el cargador, lea las instrucciones de seguridad a continuaci6n. Luego
siga los procedimientos de carga descritos.
LEA TODAS LAS INSTRUCCIONES
• No cargue ni use la bateria en atmosferas explosivas, come ambientes en los que
hay Iiquidos, gases o polvo inflamables. /nsertar o retirar /a bater[a de/cargador puede
encender elpolvo o los vapores.
• NUNCA fuerce el paquete de bateria en el cargador. NO modifique el paquete de
bater(as de manera que se adapte a un cargador no compatible ya que el paquete de
baterias puede romperse y causar lesiones personales graves. Consu/te el grafico a/
final del manual para conocer la compatibilidad de las baterfas y los cargadores.
• Cargue los paquetes de baterfas s61ocon cargadores DEWALY
• NO salpique ni sumerja en agua u otros Ifquidos.
• No almacene ni utilice la herramienta y elpaquete de baterias en lugares en los que la
temperatura pueda alcanzar o superar los 40 °C (105 °F) (come en toldos al aire libre
o construcciones de metal en verano).
_, PELIGRO: Riesgo de electrocucidn. Nunca intente abrir el paquete de baterfas per ning_n
motivo. Si la caja del paquete de baterfas esta agrietada o dahada, no la introduzca en el
cargador. No comprima, deje caer ni dahe el paquete de baterfas. No utilice un paquete
de baterfas o un cargador que haya recibido un golpe fuerte, se haya cafdo, est6 agotado
o dahado de alguna forma (per ejemplo, perforado con un clave, golpeado con un martillo,
pisado). Esto puede provocar descargas el6ctricas o electrocucidn. Los paquetes de baterfas
dahados deben devolverse al centro de mantenimiento para su reciclado.
NOTA: Se proveen tapas para almacenamiento y transporte de las
baterias, para utilizar siempre cuando la bateria est6 fuera de la herramienta o
del cargador. Retire la tapa antes de colocar la bateria en el cargador o en la
herramienta.
AADVERTENCIA: Riesgo de incendio. No guarde o transporte la bateria de ninguna
manera que permita que los terminales expuestos de la bateria entren en contacto
con objetos met#licos. Per ejemplo, no coloque la baterfa en delantales, bolsillos, cajas
de herramientas, cajas de jueges de productes, cajones, etc., con claves, Ilaves, tornilles
sueltos, etc. sin la tapa. Transportar baterias puede provocar incendios si los terminales
de la bateria entran en contacto accidentalmente con materiales conductores come
Ilaves, monedas, herramientas de mane u objetos similares. Las Nermas para Materiales
Peligrosos del Departamente de Transporte de los EE.UU. (HMR) concretamente prohfben
transpertar baterfas comercialmente o en aviones (es decir, empacadas en maletas y equipaje
de mane) A MENOS que est6n debidamente pretegidas de cortocircuitos. Per Io tante, cuando
transporte baterfas individuales, aseg#rese de que los terminales de labaterfa est6n pretegides
y bien aislades de materiales que puedan hacer contacte y causar un cortecircuite.
INSTRUCClONES DE SEGURIDAD ESPECiFICAS PARA BATER|AS DE N|QUEL CADMIO
(NiCd) O HIDRURO METALICO DE N|QUEL (NiMH)
• No incinere elpaquete de baterias, aun sitiene da#os importantes o est# completamente
desgastado. El paquete de baterfas puede expletar en el fuego.
• Una peque#a perdida de liquido de las celdas delpaquete de baterias puede presentarse
en condiciones de use o temperatura extremas. Esto no indica una falla.
Sin embargo, si el sello externo esta rote:
a. y el Ifquido de la baterfa entra en contacte con su piel, lavese inmediatamente con agua
y jab6n durante varies minutes.
b. y el Ifquido de la baterfa entra en contacte con sus ojos, lavelos con agua limpia durante
al menos 10minutes y busque atenciSn m6dica inmediatamente. (Nota medica: el Ifquido
es una soluci6n de hidr6xido de potasio a125%-35%).
INSTRUCClONES DE SEGURIDAD ESPECiFICAS PARA BATER|AS DE IONES DE LITIO
(LI-ION)
• No incinere el paquete de baterias, aun si tiene da#os importantes o esta
completamente desgastado. El paquete de baterfas puede explotar en el fuego. Cuando
se queman paquetes de baterfas de ienes de fitie, se generan vaperes y materiales
t6xicos.
• Si el contenido de las baterias entra en contacto con la piel, lave el area de inmediato
con agua y jabon suave. Si el Ifquido de la baterfa entra en contacto con sus ojos,
enjuaguelos con agua durante 15 minutes e hasta que la irritaci6n cese. Si se necesita
atenciSn m6dica, el electrelite de la baterfa contiene una mezcla de carbonates erganicos
Ifquides y sales de litie.
• El contenido de las celulas de la bateria abierta puede generar irritacion respiratoria.
Respire aire fresco. Si los sfntemas persisten, busque atenciSn m6dica.
i_ADVERTENClA: Peligre de quemaduras. El Ifquido de la baterfa puede encenderse si se
expone a chispas o llamas.
E1 sello RBRC TM
El sello RBRC TM (Corporaci6n de reciclado de baterias recargables) en las
baterias (o paquetes de baterias) de niquel-cadmio, hidruro metalico de niquel o
iones de litio indica que los costos de reciclado de estas baterias (o paquetes de
baterias), al finalizar su vida t_til,ya los pag6 DEWALT. En algunas zonas, es ilegal
tirar las baterias usadas de niquel-cadmio, hidruro metalico de niquel o iones de litio en la
basura o en el flujo de desechos s61idos del municipio y el programa RBRC proporciona una
alternativa de conciencia sobre el cuidado del medio ambiente.
RBRC TM, en cooperaci6n con DEWALT y otros usuarios de baterias, estableci6 programas
en los Estados Unidos y Canada para facilitar la recolecci6n de baterias de niquel-cadmio,
hidruro metalico de niquel o iones de litio usadas. Ayude a proteger nuestro medio ambiente y
a conservar los recursos naturales devolviendo las baterias de niquel-cadmio, hidruro metalico
de niquel o iones de litio ya usadas a un centro de mantenimiento autorizado DEWALT o a un
comerciante minorista para que sean recicladas. Tambi6n puede comunicarse con el centro de
reciclado local para obtener informaci6n sobre d6nde dejar las baterias agotadas.
RBRC TM es una marca comercial registrada de la Corporacidn de reciclado de baterfas
recargables.
Instrucciones de seguridad importantes para todos los
cargadores de baterias
CONSERVE ESTAS INSTRUCCIONES: Este manual contiene instrucciones importantes de
seguridad y de eperaci6n para los cargadores de baterfas.
• Antes de utilizar el cargador, lea tedas las instruccienes y las prevenciones en el cargader,
en el paquete de baterfas yen el preducte que utiliza el paquete de baterfas.
i_ PELIGRO: Riesgo de electrocuciSn. Hay 120 velties en los terminales de carga. No realice
pruebas con objetes conducteres. Este puede prevecar descargas el6ctricas e electrocuciSn.
i_ADVERTENClA: Riesgo de descarga el6ctrica. No permita que ning#n Ifquido entre en el
cargador. Pedrfa prevecar descargas el6ctricas.
i_ATENCl6N: Riesgo de quemadura. Para reducir el riesgo de lesienes, cargue solamente
baterfas DEWALT recargables. Otres tipes de baterfas pueden estallar y prevecar daSes
personales y materiales.
i_ A TENCl6N: En determinadas circunstancias, con el cargador enchufado en el temacorriente,
algunos materiales extraSos pueden provocar un cortecircuito en los contactes de carga
expuestos dentre del cargador. Se deben mantener lejes de las cavidades del cargador
los materiales extraSos de naturaleza conductera, entre los que se incluyen la lana de
acero, el papel de aluminio o cualquier acumulaciSn de partfculas metalicas. Estos son s61o
algunos ejemplos y no constituyen una lista taxativa. Siempre desenchufe el cargador del
temacorriente cuando no haya un paquete de baterfas en la cavidad. Desenchufe el cargader
antes de intentar limpiarle.
• NO intente cargar el paquete de baterias con cargadores distintos de aquellos
mencionados en este manual El cargador y el paquete de baterfas estan especfficamente
diseSados para funcionar en conjunto.
• Estos cargadores no estan dise#ados para uses distintos de la carga de baterias
recargables de DEWALT. Otres uses pueden prevecar riesgo de incendie, descarga
el6ctrica e electrecuciSn.
• No exponga el cargador a la Iluvia ni a la nieve.
• Tire del enchufe en lugar del cable al desconectar el cargador. Este reducira el riesgo
de daSar el enchufe y el cable.
• Asegorese de que el cable este ubicado de mode que no Io pise o se tropiece con el
y que no este sujeto a da#os o tensiones de alguna otra forma.
• No utilice un cable prolongador a menos que sea absolutamente necesario. El use de
un cable prelongador incorrecte puede prevecar riesgo de incendie, descarga electrica e
electrecuci6n.
• Cuando opere una m#quina herramienta a la intemperie, use un alargador dise_ado
para use a la intemperie. El use de un alargador diseSado para use a la intemperie reduce
el riesgo de descarga el6ctrica.
• Para garantizar la seguridad, un cable prolongador debe tener un tamale de cable
adecuado (AWG o Calibre de conductor de Estados Unidos). Cuanto mas pequeSo sea
el n#mero de calibre del conductor, mayor sera la capacidad del cable; es decir, un calibre 16
tiene mas capacidad que un calibre 18. Un alargador de mener calibre causara una cafda en
el veltaje de la Ifnea Io que resultara en p#rdida de petencia y sobrecalentamiento. Cuando
se utiliza mas de una prolongaciSn para legrar la Iongitud total, aseg#rese de que cada
prelongaciSn tenga la medida mfnima del conductor. El siguiente cuadre muestra el tamaSo
cerrecto a utilizar, dependiende del largo del cable y el amperaje nominal En case de duda,
utilice el de mayor calibre. Mientras mener el n#mere del calibre, mayor la capacidad del
cable.
TamaSo minimo recomendado del conductor para los cables de extensi6n
Longitud total del cable
25 pies 50 pies 75 pies 100 pies 125 pies 150 pies 175 pies
7.6 m 15.2 m 22.9 m 30.5 m 38.1 m 45.7 m 53.3 m
Tamale AWG del conductor
18 18 16 16 14 14 12
• No coloque objetos en la parte superior del cargador ni coloque el cargador en una
superficie blanda que pueda bloquear las ranuras de ventilacion y provocar un calor
interne excesivo. Coloque el cargador en una posici6n alejada de cualquier fuente de calor.
El cargador se ventila a trav#s de ranuras en la parte superior e inferior de la cubierta.
• No utilice el cargador con un cable o enchufe da_ados.
• No opere el cargador si este ha recibido un golpe fuerte, se cayo o presenta algOn
da_o. Ll_velo a un centre de mantenimiento autorizado.
• No desarme el cargador; cuando deba realizar un mantenimiento o reparaciones,
Ilevelo a un centre de mantenimiento autorizado. El armado incorrecto puede imp/icar un
riesgo de descarga el_ctrica, electrocucidn o incendio.
• Antes de limpiarlo, desconecte el cargador del tomacorriente. Esto reducira el riesgo
de descarga electrica. Quitar el paquete de baterfas no reducira este riesgo.
• NUNCA intente conectar 2 cargadores juntos.
• El cargador esta dise#ado para funcionar con corriente electrica domestica estandar
de 120 V No intente utilizarlo con otro voltaje. Este no se aplica al cargador vehicular.
Utilizacidn del mode Tune-Up TM automdtico
El modo Tune-Up TM autom_ttico iguala o equilibra las c61ulas individuales en el paquete de
baterias de modo que permite que funcione a una capacidad maxima. Los paquetes de baterias
deben ajustarse semanalmente o despu6s de 10 ciclos de carga/descarga o siempre que el
paquete ya no suministre la misma cantidad de potencia. Para utilizar el Tune-Up TM automatico,
coloque el paquete de baterias en el cargador y d6jelo durante al menos 8 horas. El cargador
utilizara los siguientes modos.
1. La luz roja se encendera y apagara continuamente para indicar que se ha iniciado el ciclo
de carga de 1 hora.
2. Cuando el ciclo de carga de 1 hora se complete, la luz permanecera encendida en forma
continua y ya no parpadear& Esto indica que el paquete esta completamente cargado y se
puede utilizar en este momento.
3. Si se deja el paquete de baterias en el cargador despu6s del ciclo de carga inicial de 1 hora,
el cargador iniciara el modo Tune-Up automatico. Este modo contint_a hasta 8 horas o hasta
que las celdas individuales del paquete de baterias est6n igualados. Entonces el paquete
de baterias est& listo para usar y se puede retirar en cualquier momento durante el modo
Tune-up.
4. Unavez que esta completo el modo Tune-up, el cargador iniciara una carga de mantenimiento;
el indicador rojo quedara encendido.
Cargadores
Su herramienta utiliza un cargador DEWALT de 7.2, 9.6, 12, 14,4 o 18 voltios. Aseg_rese de leer
todas las instrucciones de seguridad antes de utilizar su cargador. Consulte el grafico al final del
manual para conocer la compatibilidad entre los cargadores y los paquetes de baterias.
Procedimiento de carga
PELIGRO: Riesgo de electrocucidn. Hay 120 voltios en los terminales de carga. No realice
pruebas con objetes conducteres. Riesgo de descarga el#ctrica o electrecucidn.
1. Enchufe el cargador en un tomacorriente adecuado antes de insertar el paquete de
baterias.
2. Introduzca el paquete de baterias en el cargador. La luz roja (cargando) se encendera y
apagara en forma continua indicando que el proceso de carga ha comenzado.
3. Una luz roja fija indicara que la carga ha finalizado. Elpaquete estA completamente cargado
y puede utilizarse en este memento o dejarse en el cargador.
Operacidn de la luz indicadora
PAQUETE CARGANDO .................. _ _ m m _ _ _ _ m _ _
COMPLETAMENTE CARGADO ......
RETRASO POR PAQUETE
CAL|ENTE/FR[O ............................. _ [] _ [] _ [] _ [] _ []
REEMPLAZARPAQUETE .............. _ ® _ ® _ _ 9) ® _ _ _ _ _ ® _ _ _ _ ® ®
L[NEA DE POTENCIA
CON PROBLEMAS ......................... ® • • ® • ® • ® • • _ • •
Indicadores de carga
Algunos cargadores estan dise_ados para detectar determinados problemas que pueden surgir
con los paquetes de baterias. Los problemas se indican con una luz roja que se encenderA y
apagarA rApidamente. De ser asi, vuelva a introducir el paquete de baterias en el cargador. Si el
problema persiste, intente utilizar un paquete de baterias diferente para determinar si el cargador
estA en buenas condiciones. Si el nuevo paquete se carga correctamente significa que el paquete
original es defectuoso y debe devolverse a un centre de mantenimiento u otro sitio de recopilaci6n
para su reciclado. Si el nuevo paquete de baterias presenta el mismo problema que el original,
haga probar el cargador en un centre de mantenimiento autorizado.
RETRASO PeR PAQUETE CALIENTE/FR|O
Algunos cargadores pueden tener una funci6n de Retraso per paquete caliente/frio: cuando el
cargador detecta una bateria caliente, enciende automAticamente un Retraso per paquete caliente
que suspende lacarga hasta que la bateria se enfria. Despu6s de que la bateria se ha enfriado,
el cargador cambia automAticamente al mode de Paquete cargando. Esta funci6n garantiza la
duraci6n maxima de la bateria. La luz roja se enciende y apaga durante periodos prolongados, y
durante periodos cortes durante el mode de Retraso per paquete caliente.
L|NEA DE POTENClA CON PROBLEMAS
Algunos cargadores tienen un indicador de Linea de potencia con problemas. Cuando el cargador
se utiliza con algunas fuentes de potencia portAtiles, come generadores o fuentes que convierten
CC a CA, el cargador puede suspender temporalmente el funcionamiento, ocasi6n en la que
la luz roja se encendera y apagara rapidamente dos veces, seguido de una pausa. Esto
indica que la fuente de alimentaci6n estA fuera de los limites.
DEJAR EL PAQUETE DE BATER|AS EN EL CARGADOR
El cargador y el paquete de baterias se pueden dejar conectados con la luz roja encendida
indefinidamente. El cargador mantendra el paquete de baterias come nuevo y completamente
cargado.
NOTA: El paquete de baterias perderA lentamente su carga si se mantiene fuera del cargador.
Si el paquete de baterias no ha permanecido en carga de mantenimiento, podria ser necesario
cargarlo nuevamente antes de su use. Un paquete de baterias tambi6n podria perder su
carga lentamente si se deja en un cargador que no est6 conectado a un suministro de CA
apropiado.
PAQUETES DE BATER|AS AGOTADAS: Los cargadores tambi6n pueden detectar un paquete
de baterias agotado. Estas baterias a_n se pueden utilizar, pero no se espera que realicen
mucho trabajo. El cargador indicara cuando reemplazar el paquete de baterias.
Notas importantes sobre la carga
1. ObtendrA una duraci6n mas prolongada y un mejor rendimiento si el paquete de baterias se
carga cuando la temperatura ambiental estA entre 18 °C y 24 °C (65 °F y 75 °F). NO cargue
el paquete de bateria con una temperatura ambiental per debajo de +4,5 °C (+40 °F) o per
encima de +40,5 °C (+105 °F). Esto es importante y evitarA daSos graves en el paquete de
baterias.
2. El cargador y el paquete de baterias pueden estar calientes al tacto durante la carga. Esto
es una condici6n normal y no indica un problema. Para facilitar el enfriado del paquete
de baterias despu6s de su use, evite colocar el cargador o el paquete de baterias en un
ambiente cAlido, come debajo de un toldo de metal o en un remolque sin aislamiento.
3. Si el paquete de baterias no se carga adecuadamente:
a. Revise el tomacorriente enchufando una IAmpara u otro aparato;
b. Verifique si el tomacorriente estA conectado a un interrupter que corta la energia cuando
usted apaga la luz;
c. Mueva el cargador y el paquete de baterias a un lugar donde la temperatura ambiental
sea de aproximadamente 18 °C a 24 °C (65 °F a 75 °F);
d. Si los problemas de carga persisten, Ileve la herramienta, el paquete de baterias y el
cargador al centre de mantenimiento local.
4. Se debe recargar el paquete de baterias cuando no produce energia suficiente para tareas
que previamente realizaba con facilidad. NO CONTINUE utilizando la herramienta en estas
condiciones. Siga el procedimiento de carga. Tambi6n se puede cargar un paquete de
baterias parcialmente usado cuando se desee, sin ning_n efecto negative sobre 6stas.
5. En determinadas condiciones, estando el cargador enchufado en el tomacorriente, algunos
materiales extraSos pueden provocar un cortocircuito en los contactos de carga expuestos
dentro del cargador. Se deben mantener lejos de las cavidades del cargador los materiales
extraSos de naturaleza conductora, entre los que se incluyen el polvo de esmerilar, las
astillas de metal, la lana de acero, el papel de aluminio o cualquier acumulaci6n de
part_culas metAlicas. €:stos son s61o algunos ejemplos y no constituyen una lista taxativa.
Siempre desenchufe el cargador del tomacorriente cuando no haya un paquete de baterias
en la cavidad. Desenchufe el cargador antes de intentar limpiarlo.
6. No congele ni sumerja el cargador en agua ni en ning_n otro liquido.
_ADVERTENClA: Riesgo de descarga el_ctrica. No permita que ning_n Ifquido entre en el
cargador. Podrfa prevecar descargas el#ctricas.
i_ATENClON: Nunca intente abrir el paquete de baterfas per ning#n motive. Si la caja
protectora de plastico del paquete de baterfas se rempe e agrieta, devu#lvala a un centre de
mantenimiente para su reciclade.
Recomendaciones con respecto al almacenamiento
1. El mejor lugar de almacenamiento es uno que sea fresco y seco fuera de la luz solar directa
y de un exceso de calor o frio.
2. El almacenamiento prolongado no daSarA el paquete de baterias o el cargador. En
condiciones adecuadas, pueden almacenarse durante 5 aSos o mAs.
GUARDE ESTAS INSTRUCCIONES
PARA VOLVER A CONSuLTAR EN EL FUTURO
Motor
Una reducci6n del voltaje superior al 10% provocara p6rdida de potencia y sobrecalentamiento.
Todas las herramientas DEWALT se prueban de fAbrica; si la herramienta nofunciona, compruebe
la bateria.
COMPoNENTES (Fig. 3)
_ADVERTENCIA: Nunca modifique la herramienta el_ctrica ni ninguna pieza de _sta. Puede
ocasionar un daSo o una lesidn personal.
A. Interrupter disparador
B. Conmutador oscilante (DW059)
C. Bot6n de avance/reversa
D. Manguito
E. Portabrocas hexagonal de
liberaci6n rApida de 6,4 mm (1/4")
use PREVISTO
R Perno de detenci6n
G. Yunque
H. Botones de liberaci6n de la bateria
I. Luz de trabajo
J. Gancho para cintur6n (accesorio opcional)
Estas Ilaves y destornilladores de impacto para trabajo pesado fueron diseSados para
aplicaciones de destornillado de impacto profesional. La funci6n de impacto hace que la
herramienta sea particularmente t_til para atornillar sujetadores en madera, metal o concreto.
NO use la herramienta en condiciones ht_medas o cuando liquidos o gases inflamables se
encuentran presentes.
Estas Ilaves y destornilladores de impacto para trabajo pesado son herramientas el6ctricas
profesionales. NO permita que los niSos tengan contacto con la herramienta. Se debe supervisar
a los operadores inexpertos que utilizan esta herramienta.
Gancho para cinturdn (accesorio opcional)
_ADvERTENCIA: Para reducir el riesgo de lesiones personales graves, NO cue/gue /a
herramienta a un nivel per encima de la cabeza ni cuelgue objetos del gancho para cinturSn.
UNIcAMENTE cuelgue el ganche para cintur6n de la herramienta en un cintur6n de trabaje.
Page 7

i_ADVERTENCIA: Para reducir el riesgo de lesiones personales graves, verifique que el
tornillo (K) que sujeta el gancho para cintur6n est6 bien ajustado.
El gancho para cintur6n (J) puede colocarse en cualquiera de los dos lados de la herramienta,
para adaptarse a usuarios diestros o zurdos. Si no desea utilizar el gancho, se puede retirar de
la herramienta.
Para mover el gancho para cintur6n, retire el tornillo (K) que sujeta el gancho y luego vuelva a
colocarlo en el lado contrario.
FUNCIONAMIENTO
_ADVERTENCIA: Para reducir el riesgo de lesiones personales graves, apague la
herramienta y desconecte el paquete de baterias antes de realizar ajustes o de retirar/
instalar cualquier dispositivo o accesorio.
Instalaci6n y retiro del paquete de baterias
NOTA: Aseg_rese de que el paquete de baterias est6 completamente cargado.
Para instalar el paquete de baterias en el mango de la herramienta, alinee la base de la
herramienta con la muesca dentro del mango de la herramienta (Fig. 2) y deslice el paquete
de bateHas firmemente dentro del mango, hasta que escuche que la traba haya calzado en su
lugar.
Para retirar el paquete de baterias de la herramienta, presione los botones de liberaci6n
(H) y tire con firmeza del paquete de baterias hacia afuera del mango de la herramienta.
Introd_zcalo en el cargador como se describe en la secci6n del cargador de este manual.
Conmutador: DW059 (Fig. 3)
AI presionar la PARTE INFERIOR del conmutador oscilante (B) la herramienta funciona hacia
adelante (rosca derecha). AI presionar la PARTE superior del conmutador, el motor funciona en
reversa. Esto permite que los sujetadores "oscilantes" queden libres.
Interruptor disparador de velocidad variable (Fig. 3)
Para encender la herramienta, oprima el interruptor disparador (A). Para apagar la herramienta,
suelte el interruptor disparador. La herramienta esta equipada con un freno. El portabrocas se
detendra cuando suelte completamente el interruptor disparador. El interruptor de velocidad
variable le permite seleccionar la mejor velocidad para una aplicaci6n en particular. Cuanto
mayor sea la presi6n sobre el disparador, mas rapido sera el funcionamiento de la herramienta.
Para comenzar orificios sin marcar el centro con un punz6n; taladrar en metal, plastico; o para
colocar tornillos, use velocidades bajas. Para una maxima duraci6n de la herramienta, utilice la
velocidad variable s61o para orificios y sujetadores de arranque.
NOTA: No se recomienda el uso continuo de la velocidad variable. Puede dafiar el interruptor
y debe evitarse.
Botdn de control de avance/reversa (Fig. 3)
El bot6n de control de avance/reversa (C) determina la direcci6n de la herramienta y tambi6n
sirve como bot6n de bloqueo. Para seleccionar la rotaci6n de avance, libere el interruptor
disparador y oprima el bot6n de control de avance/reversa que se encuentra en el lado derecho
de la herramienta. Para seleccionar la reversa, oprima el bot6n de control de avance/reversa
que se encuentra en el lado izquierdo de la herramienta. La posici6n central del bot6n de control
bloquea la herramienta en la posici6n DE apagado. AI cambiar la posici6n del bot6n de control,
aseg_rese de que el disparador est6 liberado.
NOTA: La primera vez que haga funcionar la herramienta luego de cambiar la direcci6n de la
rotaci6n tal vez escuche un "clic" al encenderla. Esto es normal y no indica un problema.
Luz de trabajo (Fig. 3)
La luz de trabajo (I) se encuentra justo por encima del Interruptor disparador (A). La luz de
trabajo se activa cuando se encuentra oprimido el interruptor disparador.
NOTA: La luz de trabajo sirve para iluminar la superficie de trabajo cercana y no fue disefiada
para utilizarse como linterna.
Portabrocas de liberacidn rdpida (Fig. 4)
DC825, DC827, DC835, DC845, DC855
NOTA: El portabrocas acepta s61o accesorios hexagonales de 6,4 mm (1/4").
Coloque el interruptor en la posici6n de bloqueo (central) o retire el paquete de baterias antes
de cambiar los accesorios.
Para instalar un accesorio, quite el anillo del portabrocas (D) de la parte frontal de la
herramienta, inserte el accesorio y libere el anillo. El accesorio esta fijo en su lugar.
Para quitar un accesorio, quite el anillo de la parte frontal de la herramienta. Quite el accesorio
y libere el anillo.
Yunque con perno de detencidn (Fig. 5)
DC820, DC821, DC822, DC823, DC830, DC840, DW059
Coloque el interruptor en la posici6n de bloqueo (central) o retire el paquete de baterias antes
de cambiar los accesorios.
Para instalar un enchufe en el yunque, alinee el orificio del costado del enchufe con el perno
de detenci6n (F) del yunque (G). Presione el enchufe hasta que el perno de detenci6n se trabe
en el orificio. Tal vez deba oprimir el perno de detenci6n para ayudar a instalar el enchufe.
_ATENCION: Utilice solamente enchufes de impacto. Los enchufes que no sean de impacto
se pueden romper y provocar una situacidn peligrosa. Inspeccione les enchufes antes de
utilizarlos para asegurarse de que no tengan grietas.
Para quitar un enchufe, oprima el perno de sujeci6n a trav6s del orificio y extraiga el enchufe.
Uso'.
La herramienta de impacto genera la siguiente torsi6n de salida:
N.-°de libras- libras- Nm N.-°de libras- libras- Nm
catalogo pies pulgadas catalogo pies pulgadas
DC820 145 1740 195 DC835 103 1240 140
DC821 160 1920 215 DC840 120 1440 160
DC822 145 1740 195 DC841 105 1260 145
DC823 105 1260 145 DC845 96 1150 130
DC825 111 1330 150 DC855 80 960 110
DC827 111 1330 150 DW059 300 3600 405
DC830 135 1620 180
i_ATENCI6N: Aseg#rese de que el sujetador o el sistema soporten el nivel de torsidn
generado por la herramienta. Una torsidn excesiva puede provocar roturas y posibles lesiones
personales.
1. Coloque el enchufe en la cabeza del sujetador. Mantenga la herramienta apuntando
directamente al sujetador.
2. Presione el interruptor para comenzar la operaci6n. Controle siempre la torsi6n con una
Ilave de torsi6n, ya que la torsi6n de ajuste se ve afectada por muchos factores, incluidos
los siguientes:
• Voltaje: El bajo voltaje, debido a una baterfa casi descargada, reducira la torsidn de
ajuste.
• Tama#o del enchufe: El no utilizar el tamaSo de enchufe correcto provocara una
reducci6n en la torsi6n de ajuste.
• Tama#o del pemo: Los pernos de di#metro grande generalmente requieren una torsi6n
de ajuste superior. La torsi6n de ajuste tambi6n variar# de acuerdo con el largo, el grado
y el coeficiente de torsi6n.
• Pemo: Aseg#rese de que todas las roscas est6n libres de 6xido y otros desechos para
permitir una torsi6n de ajuste adecuada
• Material'. El tipo de material y el acabado de la superficie del material afectar#n la torsi6n
de ajuste.
• Tiempo de ajuste: Cuanto mbs tiempo de ajuste, mayor sera la torsi6n de ajuste. Utilizar
un tiempo de ajuste mayor al recomendado podrfa provocar que los sujetadores sufran
una sobrecarga de tensi6n, se quiebren o se daSen.
MANTENIMIENTO
i_ADVERTENCIA: Para reducir el riesgo de lesiones personales graves, apague la
herramienta y desconectela de la fuente de alimentacion antes de realizar ajustes o de
retirar o instalar cualquier dispositivo o accesorio.
Limpieza
i_ADVERTENCIA: Sople la suciedad y el polvo de todos los conductos de ventilacidn con
aire seco, al menDs una vez por semana. Para reducir el riesgo de lesiones, utilice siempre
proteccidn para los ojos aprobada ANSI Z87.1 al realizar esta tarea.
i_ADVERTENClA: Nunca utilice solventes ni otros qufmicos abrasivos para limpiar las piezas
no metalicas de la herramienta. Estos productos qufmicos pueden debilitar los materiales
plasticos utilizados en estas piezas. Utilice un pa5o humedecido sdlo con agua y jabdn neutro.
Nunca permita que penetre Ifquido dentro de la herramienta ni sumerja ninguna de las piezas
en un Ifquido.
INSTRUCClONES DE LIMPIEZA DEL CARGADOR
,&ADVERTENClA: Riesgo de descarga el6ctrica. Desconecte el cargador del tomacorriente
de CA antes de limpiarlo. Se puede usar un pa5o o un cepillo suave, que no sea metalico,
para quitar la suciedad y la grasa de la parte externa del cargador. No use agua ni cualquier
otra solucidn de limpieza.
Accesorios
AADVERTENCIA: Debido a que no se han probado con este producto otros accesorios que
no sean los que ofrece DEWALT, el uso de dichos accesorios con esta herramienta podrfa ser
peligroso. Para reducir el riesgo de lesiones, con este producto deben usarse s61o los acce-
sorios recomendados por DEWALY
Los accesorios que se recomiendan para utilizar con la herramienta estan disponibles a un
costo adicional en su distribuidor local o en un centro de mantenimiento autorizado. Si necesita
ayuda para Iocalizar alg_n accesorio, p6ngase en contacto con DEWALT Industrial Tool Co.,
701 East Joppa Road, Baltimore, MD 21286, Ilame al 1-800-4-DEWALT (1-800-433-9258) o
visite nuestro sitio web www.dewalt.com.
AATENCl6N: Utilice solamente enchufes de impacto. Los enchufes que no sean de impacto se
pueden romper y provocar una situaci6n peligrosa. Inspeccione les enchufes antes de utilizarlos
para asegurarse de que no tengan grietas.
Reparaciones
El cargador no es _til. No hay partes _tiles dentro del cargador.
Para asegurar la SEGURIDAD y la CONFIABILIDAD del producto, las reparaciones, el man-
tenimiento y los ajustes deben (inclusive inspecci6n y cambio de carbones) ser realizados en
un centro de mantenimiento en la fabrica DEWALT, en un centro de mantenimiento autorizado
DEWALT u por otro personal de mantenimiento calificado. Utilice siempre piezas de repuesto
id6nticas.
PARA REPARAClON Y SERVIClO DE SUS HERRAMIENTAS ELI_CTRICAS, FAVOR DE
DIRIGIRSE AL CENTRO DE SERVIClO MAS CERCANO
CULIACAN, SIN
Blvd.Emiliano Zapata 5400-1 Poniente
Col. San Rafael (667) 717 89 99
GUADALAJARA, JAL
Av. La Paz #1779 - Col. Americana Sector Juarez (33) 3825 6978
MEXICO, D.F.
Eje Central Lazaro Cardenas No. 18
Local D, Col. Obrera (55) 5588 9377
MERIDA,YUC
Calle 63 #459-A - Col. Centro
MONTERREY,N.L
Av.FranciscoI. Madero 831 Poniente- Col. Centro
PUEBLA, PUE
17 Norte #205 -Col. Centro
QUERETARO,QRO
Av.San Roque 274 - Col.San Gregorio
SAN LUlS POTOSl,SLP
Av.Universidad1525 - Col. San Luis
TORREON,COAH
Blvd. Independencia,96 Pte. - Col. Centro
VERACRUZ,VER
Prolongaci6nDiaz Mir6n #4280 - Col. Remes
VlLLAHERMOSA, TAB
Constituci6n516-A - Col. Centro
PARAOTRAS LOCALIDADES:
Si se encuentra en M6xico, por favor Ilame al (55) 5326 7100
Si se encuentra en U.S.,por favor Ilame al
1-800-433-9258(1-800 4-DEWALT)
P61iza de Garantia
IDENTIFICACION DEL PRODUCTO:
Selloo firma del Distribuidor.
Nombre del producto: Mod./Cat.:
Marca: N_m. de serie:
(Datos para ser Ilenados por el distribuidor)
Fecha de compra y/o entrega del producto:
Nombre
y domicilio del distribuidor donde se adquiri6 el producto:
(999) 928 5038
(818) 375 23 13
(222) 246 3714
(442) 2 17 63 14
(444) 814 2383
(871) 716 5265
(229) 921 7016
(993) 312 5111
Este producto esta garantizado por un ariD a partir de la fecha de entrega, contra cualquier
defecto en su funcionamiento, asi como en materiales y mano de obra empleados para su fab-
ricaci6n. Nuestra garanfia incluye la reparaci6n o reposici6n del producto y/o componentes sin
cargo alguno para el cliente, incluyendo mano de obra, asi como los gastos de transportaci6n
razonablemente erogados derivados del cumplimiento de este certificado.
Para hacer efectiva esta garanfia debera presentar su herramienta y esta p61iza sellada por
el establecimiento comercial donde se adquiri6 el producto, de no contar con 6sta, bastara la
factura de compra.
EXOEPOIONES
Esta garanfia no sera valida en los siguientes casos:
• Cuando el producto se hubiese utilizado en condiciones distintas alas normales;
• Cuando el producto no hubiese sido operado de acuerdo con el instructivo de uso que se
acompafia;
• Cuando el producto hubiese sido alterado o reparado por personas distintas a las enlista-
das al final de este certificado.
Anexo encontrara una relaci6n de sucursales de servicio de fabric& centros de servicio autor-
izados y franquiciados en la RepOblica Mexicana, donde podra hacer efectiva su garanfia y
adquirir partes, refacciones y accesorios originales.
Garantia limitada por tres a_os
DEWALT reparara, sin cargo, cualquier falla que surja de defectos en el material o la fabricaci6n
del producto, por hasta tres afios a contar de la fecha de compra. Esta garanfia no cubre
fallas de las piezas causadas por su desgaste normal o abuso a la herramienta. Para mayores
detalles sobre la cobertura de la garanfia e informaci6n acerca de reparaciones realizadas
bajo garanfia, visitenos en www.dewalt.com o dirigase al centro de servicio mas cercano. Esta
garantia no aplica a accesorios o a dafios causados por reparaciones realizadas o intentadas
por terceros. Esta garanfia le otorga derechos legales especificos, ademas de los cuales puede
tener otros dependiendo del estado o la provincia en que se encuentre.
Ademas de la garanfia, las herramientas DEWALT estan cubiertas por:
1 ANO DE SERVlCIO GRATUlTO
DEWALT mantendra la herramienta y reemplazara las piezas gastadas por su uso normal, sin
cobro, en cualquier momento durante un ariD a contar de la fecha de compra. Los articulos
gastados por la clavadora, tales como la unidad de hoja y retorno del impulsador, no estan
cubiertas.
2 ANOS DE SERVlClO GRATUlTO PARA UNIDADES DE ALIMENTAOION DEWALT
DC9071, DC9091, DC9096, DC9280, DC9360 y DC9180
GARANT|A DE REEMBOLSO DE SU DINERO POR 90 D|AS
Si no esta completamente satisfecho con el desempefio de su maquina herramienta, laser
o clavadora DEWALT, cualquiera sea el motivo, podra devolverlo hasta 90 dias de la fecha
de compra con su recibo y obtener el reembolso completo de su dinero- sin necesidad de
responder a ninguna pregunta.
AMI_RICA LATINA: Esta garantia no se aplica a los productos que se venden en Am6rica
Latina. Para los productos que se venden en Am6rica Latina, debe consultar la informaci6n de
la garantia especffica del pais que viene en el empaque, Ilamar a la compafiia local o visitar el
sitio Web a fin de obtener esa informaci6n.
REEMPLAZO GRATUlTO DE LAS ETIQUETAS DE ADVERTENClAS: Si sus etiquetas de
advertencia se vuelven ilegibles o faltan, Ilame al 1-800-4-DEWALT para que se le reemplacen
gratuitamente.
"DCXXX
TOREDUCETHERISKOFINJURY
USERMUSTREADINRTRDC'_ON
MANUALUSEONLYWITH
REWALYRAIlrERIRS,ALWAYSUSEPROPERE¥[AND
RESPIRATORYPROTECTION.
O_WALTINOUSTRlaLTOOLCO.,BALTImOrE,MOZ1286U.S_.
FORSERVICEIN_O_A_ON,CArL1400-_O_WALT_ww._WA_om
ESPEClFICAClONES
DC820/DC822/DC823/
DC825/DC827 18 Volts
DC821 18 Volts
DW059 18 Volts
DC830/DC835 14,4 Volts
DC840/DC841/DC845 12 Volts
DC855 9,6 Volts
SOLAMENTE PARAPROPOSITO DE MC:XICO:
IMPORTADOPOR: DEWALTS.A. DE C.V.
BOSQUESDE CIDROS,ACCESO RADIATAS NO.42
3A. SECCION DE BOSQUES DE LAS LOMAS
DELEGACIONCUAJIMALPA,
05120, MC:XICO,D.R
TEL. (52) 555-326-7100
R.RC.: BDE810626-1W7
0-2 400 RPM; 0-2 700 IPM
0-2 100 RPM; 0-3 000 IPM
1 650 RPM; 2 600 IPM
0-2 400 RPM; 0-2 700 IPM
0-2 400 RPM; 0-2 700 IPM
0-2 400 RPM; 0-2 700 IPM
Para servicio y ventas consulte _".......'
"HERRAMIENTAS ELECTRICAS" SECCI@_
en la secci6n amarilla. AM!R!!LA
r_
I.=
,4
_×××o
8
_xxxg
_xxO×
X X o X
X XX °
X XX °
i lo o××
:_ x x x g
N
x xx o
xxxg
:!_ x xxg
::_× ×××
x x x x
N:
!iii_ii × × × ×
zo_o_g
XXXXXXXXXXXXXX
XXXXXXXXXXXXXX
XXXXXXXXXXXXXX
xxxxxg_°gx_gx_._
_ooo _
xxxxx:_x_x
xxxxxgoo_g_g__
g_goo_ _oOO g_gg
 Loading...