

Page 1
The Network Innovation
dLAN®
TV Sat 2400-CI+
Page 2

devolo dLAN® TV Sat 2400-CI+
Page 3

© 2012 devolo AG Aachen (Germany)
While the information in this manual has been compiled with great care, it may not be deemed an assurance of product characteristics. devolo shall be liable only
to the degree specified in the terms of sale and delivery.
The reproduction and distribution of the documentation and software supplied with this product and the use of its contents is subject to written authorization from
devolo. We reserve the right to make any alterations that arise as the result of technical development.
Trademarks
®
, the HDMI Logo and „High-Definition Multimedia Interface” are registered trademarks of HDMI Licensing LLC in USA and other countries.
HDMI
®
HomePlug
devolo, dLAN
is a registered trademark of HomePlug Powerline Alliance.
®
, Vianect® and the devolo logo are registered trademarks of devolo AG.
The firmware package from devolo contains files which are covered by different licenses, in particular under devolo proprietary license and under open source
license (GNU General Public License, GNU Lesser General Public License or FreeBSD License). The source code which is available for Open Source distribution
can be requested in writing from gpl@devolo.de.
All other names mentioned may be trademarks or registered trademarks of their respective owners. Subject to change without notice. No liability for technical errors
or omissions.
devolo AG
Charlottenburger Allee 60
52068 Aachen
Germany
www.devolo.com
Aachen, February 2012
40731
Page 4

Content
1 Preface . . . . . . . . . . . . . . . . . . . . . . . . . . . . . . . . . . . . . . . . . . . . . . . . . . . . . . . . . . . . . . . . . . . 5
1.1 Thank you for placing your trust in this devolo product . . . . . . . . . . . . . . . . . . . . . . . . . . . . . 5
1.1.1 About this manual . . . . . . . . . . . . . . . . . . . . . . . . . . . . . . . . . . . . . . . . . . . . . . . . 5
2 Introduction . . . . . . . . . . . . . . . . . . . . . . . . . . . . . . . . . . . . . . . . . . . . . . . . . . . . . . . . . . . . . . . 7
2.1 What exactly is dLAN? . . . . . . . . . . . . . . . . . . . . . . . . . . . . . . . . . . . . . . . . . . . . . . . . . . . . . 8
2.2 What does the dLAN TV Sat 2400-CI+ offer you? . . . . . . . . . . . . . . . . . . . . . . . . . . . . . . . . . 8
2.3 Sample applications . . . . . . . . . . . . . . . . . . . . . . . . . . . . . . . . . . . . . . . . . . . . . . . . . . . . . . . 9
3 Initial use . . . . . . . . . . . . . . . . . . . . . . . . . . . . . . . . . . . . . . . . . . . . . . . . . . . . . . . . . . . . . . . . 11
3.1 Package contents . . . . . . . . . . . . . . . . . . . . . . . . . . . . . . . . . . . . . . . . . . . . . . . . . . . . . . . 11
3.1.1 Starter kit . . . . . . . . . . . . . . . . . . . . . . . . . . . . . . . . . . . . . . . . . . . . . . . . . . . . . . 11
3.2 Indicators and connections of the dLAN TV Sat 2400-CI+ . . . . . . . . . . . . . . . . . . . . . . . . . . 12
3.2.1 Front panel . . . . . . . . . . . . . . . . . . . . . . . . . . . . . . . . . . . . . . . . . . . . . . . . . . . . . 12
3.2.2 Rear panel . . . . . . . . . . . . . . . . . . . . . . . . . . . . . . . . . . . . . . . . . . . . . . . . . . . . . 14
3.3 Indicators and connections of the dLAN 200 AVplus . . . . . . . . . . . . . . . . . . . . . . . . . . . . . 17
3.4 Connect the dLAN TV Sat 2400-CI+ to the TV set. . . . . . . . . . . . . . . . . . . . . . . . . . . . . . . . 19
3.4.1 Connection via HDMI . . . . . . . . . . . . . . . . . . . . . . . . . . . . . . . . . . . . . . . . . . . . . 19
3.4.2 Connection via SCART . . . . . . . . . . . . . . . . . . . . . . . . . . . . . . . . . . . . . . . . . . . . . 19
3.5 Remote control . . . . . . . . . . . . . . . . . . . . . . . . . . . . . . . . . . . . . . . . . . . . . . . . . . . . . . . . . 20
3.6 Connect the dLAN TV Sat Tuner . . . . . . . . . . . . . . . . . . . . . . . . . . . . . . . . . . . . . . . . . . . . . 21
3.7 Connect the dLAN TV Sat 2400-CI+ to the dLAN and the mains supply. . . . . . . . . . . . . . . . 21
3.7.1 First use . . . . . . . . . . . . . . . . . . . . . . . . . . . . . . . . . . . . . . . . . . . . . . . . . . . . . . . 22
4 TV and radio programme . . . . . . . . . . . . . . . . . . . . . . . . . . . . . . . . . . . . . . . . . . . . . . . . . . . . 23
4.1 First Time installation . . . . . . . . . . . . . . . . . . . . . . . . . . . . . . . . . . . . . . . . . . . . . . . . . . . . . 23
4.2 Menu structure and operation . . . . . . . . . . . . . . . . . . . . . . . . . . . . . . . . . . . . . . . . . . . . . . 25
4.2.1 Channel list . . . . . . . . . . . . . . . . . . . . . . . . . . . . . . . . . . . . . . . . . . . . . . . . . . . . 26
4.3 Recording . . . . . . . . . . . . . . . . . . . . . . . . . . . . . . . . . . . . . . . . . . . . . . . . . . . . . . . . . . . . . 29
4.3.1 Instant recording . . . . . . . . . . . . . . . . . . . . . . . . . . . . . . . . . . . . . . . . . . . . . . . . 29
4.3.2 Recording with EPG . . . . . . . . . . . . . . . . . . . . . . . . . . . . . . . . . . . . . . . . . . . . . . 29
devolo dLAN T V Sat 2400-CI+
Page 5

4.3.3 Timeshift recording . . . . . . . . . . . . . . . . . . . . . . . . . . . . . . . . . . . . . . . . . . . . . . . 30
4.3.4 Timer recording . . . . . . . . . . . . . . . . . . . . . . . . . . . . . . . . . . . . . . . . . . . . . . . . . 31
4.3.5 Switching during live recording . . . . . . . . . . . . . . . . . . . . . . . . . . . . . . . . . . . . . . 32
4.4 Settings . . . . . . . . . . . . . . . . . . . . . . . . . . . . . . . . . . . . . . . . . . . . . . . . . . . . . . . . . . . . . . . 33
4.4.1 Installation . . . . . . . . . . . . . . . . . . . . . . . . . . . . . . . . . . . . . . . . . . . . . . . . . . . . . 33
4.4.2 Configuration . . . . . . . . . . . . . . . . . . . . . . . . . . . . . . . . . . . . . . . . . . . . . . . . . . . 35
4.4.3 Language settings . . . . . . . . . . . . . . . . . . . . . . . . . . . . . . . . . . . . . . . . . . . . . . . 38
4.4.4 Recording configuration . . . . . . . . . . . . . . . . . . . . . . . . . . . . . . . . . . . . . . . . . . . 38
4.4.5 Internet settings . . . . . . . . . . . . . . . . . . . . . . . . . . . . . . . . . . . . . . . . . . . . . . . . . 39
4.4.6 Load settings . . . . . . . . . . . . . . . . . . . . . . . . . . . . . . . . . . . . . . . . . . . . . . . . . . . 40
4.4.7 Save settings . . . . . . . . . . . . . . . . . . . . . . . . . . . . . . . . . . . . . . . . . . . . . . . . . . . 40
4.5 Recordings . . . . . . . . . . . . . . . . . . . . . . . . . . . . . . . . . . . . . . . . . . . . . . . . . . . . . . . . . . . . 40
4.6 Media browser . . . . . . . . . . . . . . . . . . . . . . . . . . . . . . . . . . . . . . . . . . . . . . . . . . . . . . . . . 41
4.6.1 USB device . . . . . . . . . . . . . . . . . . . . . . . . . . . . . . . . . . . . . . . . . . . . . . . . . . . . . 41
4.6.2 Media server (DLNA) . . . . . . . . . . . . . . . . . . . . . . . . . . . . . . . . . . . . . . . . . . . . . . 43
4.6.3 Conditional access . . . . . . . . . . . . . . . . . . . . . . . . . . . . . . . . . . . . . . . . . . . . . . . 44
5 Appendix . . . . . . . . . . . . . . . . . . . . . . . . . . . . . . . . . . . . . . . . . . . . . . . . . . . . . . . . . . . . . . . . 45
5.1 Important safety instructions . . . . . . . . . . . . . . . . . . . . . . . . . . . . . . . . . . . . . . . . . . . . . . . 45
5.2 Bandwidth optimization . . . . . . . . . . . . . . . . . . . . . . . . . . . . . . . . . . . . . . . . . . . . . . . . . . . 47
5.3 The devolo remote control . . . . . . . . . . . . . . . . . . . . . . . . . . . . . . . . . . . . . . . . . . . . . . . . . 48
5.4 Disposal of old devices . . . . . . . . . . . . . . . . . . . . . . . . . . . . . . . . . . . . . . . . . . . . . . . . . . .49
5.5 Warranty conditions . . . . . . . . . . . . . . . . . . . . . . . . . . . . . . . . . . . . . . . . . . . . . . . . . . . . .49
devolo dLAN TV Sat 2400-CI+
Page 6
Preface 5
1Preface
1.1 Thank you for placing your trust in this devolo product
The dLAN 200 TV Sat 2400-CI+ makes complicated
wiring of satellite systems a thing of the past. The
devolo system uses your home's own electrical network to transmit the TV services. Installation is done
in next to no time: simply connect your satellite dish
(directly or via multi-switch) to the dLAN TV satellite
tuner and connect this to the mains supply. All you
have to do now is hook up a TV set in your house to
the dLAN 200 TV Sat 2400-CI+ and you can enjoy
TV entertainment, even in HD. For best signal transmission to your TV set and surround-sound system,
use an HDMI interface and digital audio output.
The dLAN 200 TV Sat 2400-CI+ is not only a new
generation DVB-S2 receiver but also a video recorder. Simply use external USB hard drives as storage
media. You can also receive encrypted programs,
HbbTV and DLNA.
your device. For information on the associated TV and
radio software, see Chapter 4. Tips for bandwidth optimisation, information about product safety and environmental compatibility of the device as well as our
warranty terms can be found in Chapter 5 and conclude the manual.
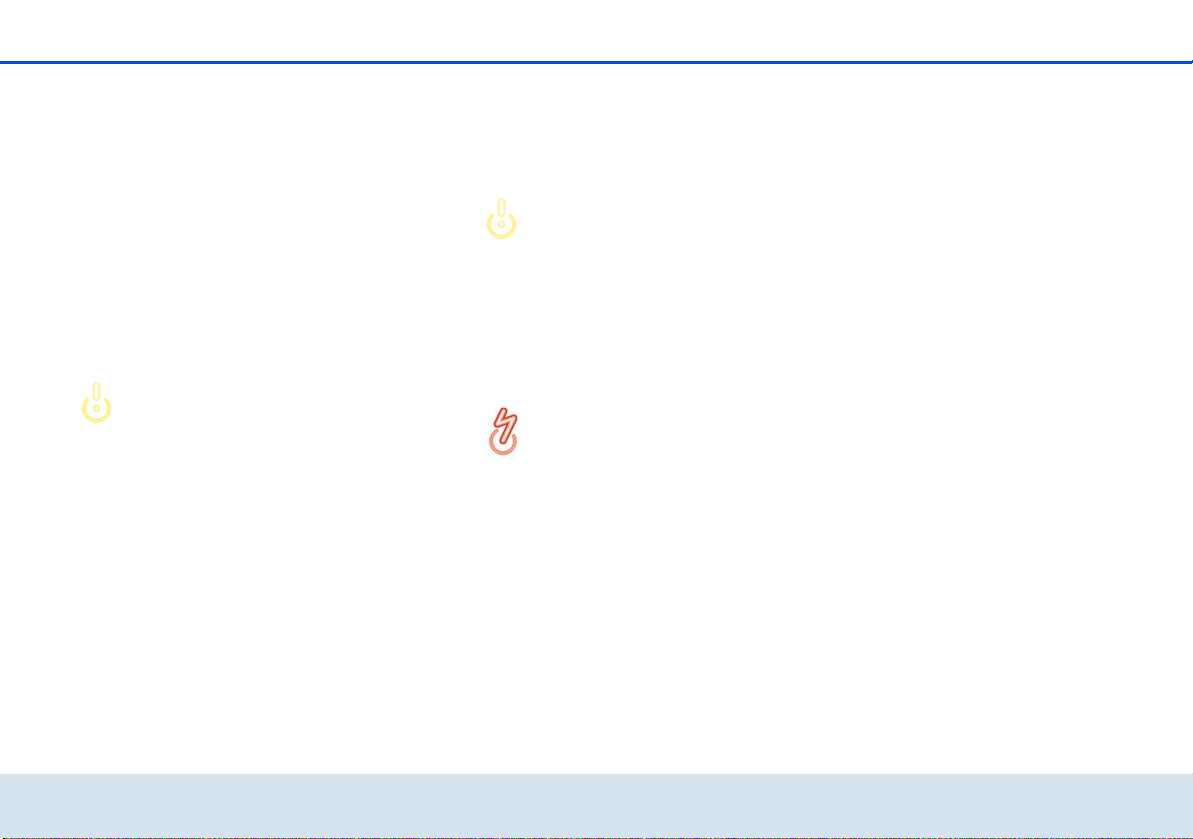
Description of the symbols
Here we briefly describe the meaning of the symbols
used in this manual.
Very important note. Failure to observe this note may result in damage.
Important note that should be observed.
Additional information, background material
and configuration tips for your device.
1.1.1 About this manual
After a brief introduction to "dLAN" and a short summary of dLAN 200 TV Sat 2400-CI+'s functions in
Chapter 2, Chapter 3 will cover successfully setting up
devol o dL AN 2 00 TV Sat 2400-CI+
Page 7

6 Preface
If you have any further ideas or suggestions related to
our products, we would be delighted to hear from you
at support@devolo.com
devolo on the Internet
For detailed information on our products, visit
www.devolo.com
contains product descriptions and documentation, but
also updates of devolo software and your device's firmware.
!
. The Service centre area not only
devolo dLAN 200 TV Sat 2400-CI+
Page 8
Introduction 7
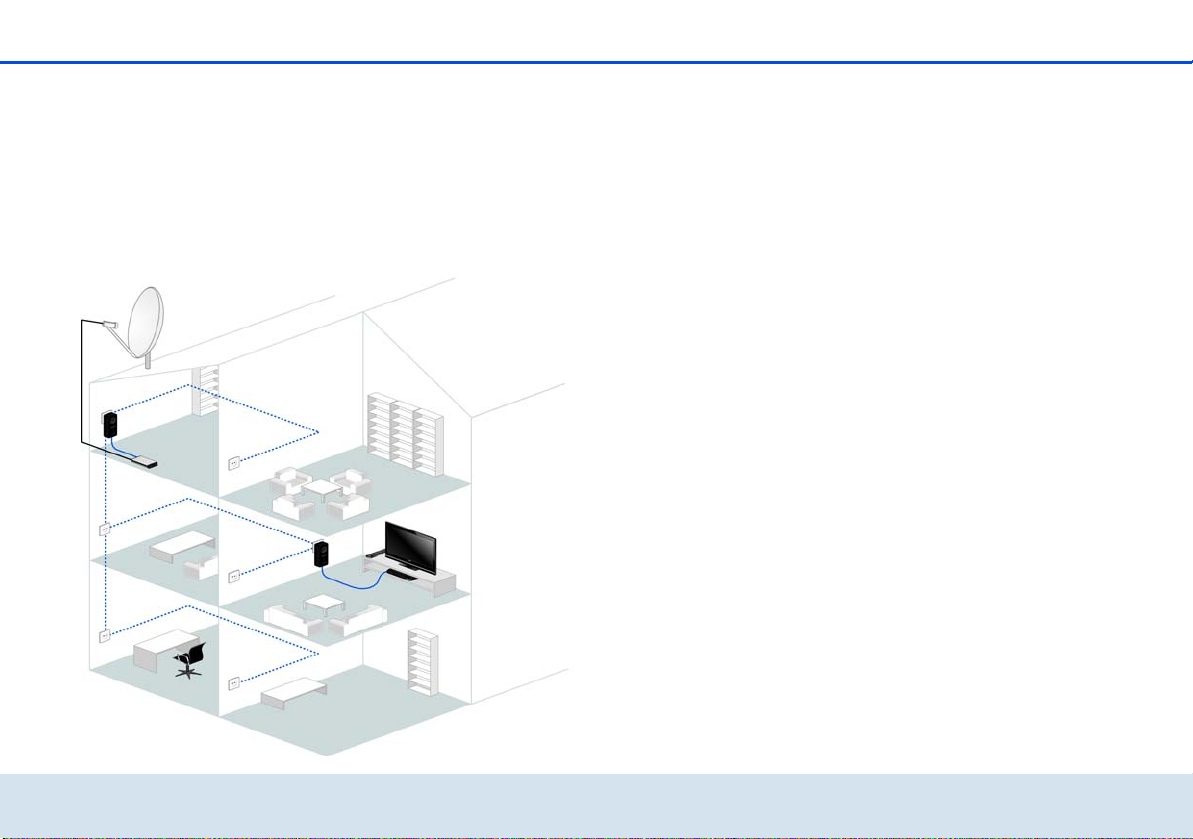
Fig. 1
2Introduction
dLAN is an intelligent, secure technology that lets you
set up a home network easily, quickly and economically via your household electrical wiring, without the
need for complex and expensive dedicated cabling.
The available performance and effort required for the
installation also compares favourably to traditional
methods—dLAN technology now attains speeds you
would expect from other LAN technologies, and installing it is a breeze!
devolo dLAN T V Sat 2400-CI+
Page 9

8 Introduction
2.1 What exactly is dLAN?
dLAN (direct Local Area Network) uses the household
power grid to transfer data between computers
equipped with suitable adapters and other network
components. As a result, any power outlet can be used
as a network access point. The data is modulated prior
to transfer and sent as a signal via household power
lines. State-of-the-art technology ensures that the
power and data networks do not interfere with one another. Networking via dLAN is fast and secure. The
data is encrypted using a key to prevent easy interception by third parties.
With dLAN adapters, not only network signals can easily be transferred via the mains supply. Video signals in
HD standard and audio signals in digital CD quality can
be quickly and easily distributed everywhere in the
house this way.
2.2 What does the dLAN TV Sat 2400-CI+ offer you?
The dLAN TV Sat 2400-CI+ is a digital receiver which
transfers video and audio signals via the network to the
attached TV set. The network interface enables transfer
rates of up to 200 Mbps in the HomePlug AV standard.
The device is combined with a TV and radio programme which enables you to watch TV programmes
and listen to radio on your television set.
The highlights:
쎲 Reception of digital satellite TV with encrypted
(pay TV) or unencrypted transmissions in full HD
to DVB S2 standard to any TV set in the home – all
without antenna cables
쎲 HbbTV—modern videotext sent from the Internet
by dLAN to the TV set; an extra dLAN AV adapter
is required.
쎲 Reception of DVB-S2 radio content
쎲 DLNA—dLAN networking with the media server,
e.g., for playing videos and/or music on the TV
set; an extra dLAN AV adapter is required.
쎲 Foolproof installation—connection of the
dLAN TV Sat 2400-CI+ to your TV set using a conventional HDMI or SCART cable. The connection
to the power and dLAN network is made using the
dLAN 200 AV adapter supplied by devolo and the
included power pack.
쎲 Watch TV and record simultaneously—simply
integrate a second dLAN TV Sat Tuner.
쎲 Electronic programme guide (EPG) for controlling
the integrated video recorder.
쎲 Record TV programmes on an external USB drive
devolo dLAN TV Sat 2400-CI+
Page 10
Introduction 9
쎲 Digital AV outputs such as HDMI and S/PDIF for
excellent signal transmission to TV and surround
sound system
To avoid damage to this or other devices, use the enclosed components only
for their intended purpose:
the dLAN TV Sat 2400-CI+ is intended
for the reception of DVB-S/S2 satellite
signals and their transfer to the connected TV set(s).
The dLAN 200 AVplus adapter is intended for connecting the
dLAN TV Sat 2400-CI+ to the dLAN
network.
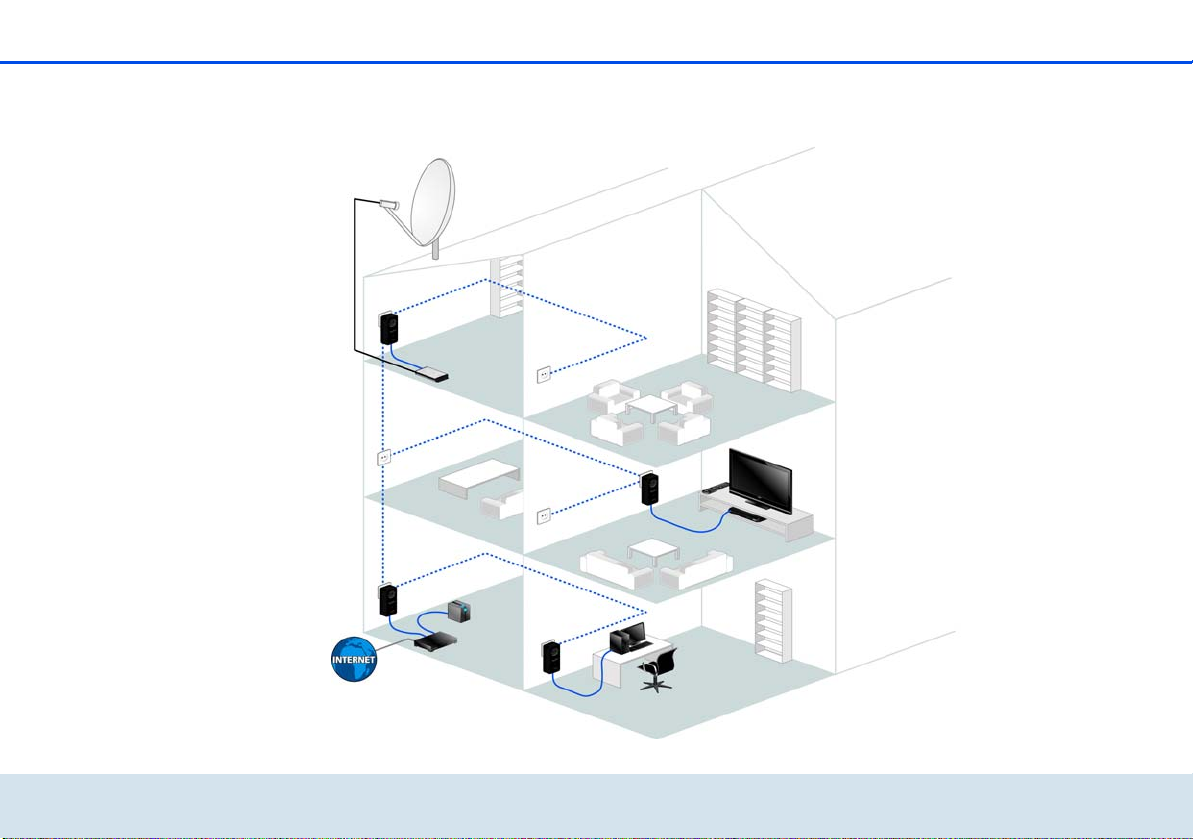
2.3 Sample applications
dLAN TV Sat 2400-CI+ and HbbTV via dLAN
HbbTV is a modern kind of video text from the Internet, sent to a TV set. You will need an existing Inter-
net connection which (as shown in figure 2) is
connected via another dLAN AV adapter to the
dLAN home network and therefore to the
dLAN TV Sat 2400-CI+ and dLAN TV Sat Tuner. This allows dLAN-technology signals and data to be exchanged via the electrical wiring, so the advanced
additional information from the transmitter can be
transferred from the Internet to the TV set. Currently,
not all countries and TV stations offer HbbTV.
You can read how the dLAN TV Sat 2400CI+ operates in Section 4.4.5 Internet set-
tings.
dLAN networking of the dLAN TV Sat 2400-CI+
with a media server (DLNA)
DLNA (Digital Living Network Alliance) is a
standard which simplifies the use of digital
electronic equipment and makes it easy for
them to be used with home networks. For
more information, go to www.dlna.org.
If a DLNA media server (e.g. PC with Windows 7 operating system, a router or NAS (Network Access Server))
is also connected by dLAN to your home network, you
can view photos or videos on your TV and listen to music files stored on this DLNA media server. (see Fig. 2)
Remember you will need an extra dLAN
AV adapter for this system.
devolo dLAN T V Sat 2400-CI+
Page 11
10 Introduction
Fig. 2
DLNA
DLNA
HbbTV
devolo dLAN TV Sat 2400-CI+
Page 12

Initial use 11
3Initial use
This chapter covers the hardware and software features, as well as the initial use of the
dLAN TV Sat 2400-CI+.
3.1 Package contents
Please ensure that the delivery is complete before beginning with the installation of your
dLAN TV Sat 2400-CI+.
3.1.1 Starter kit
쑗 devolo dLAN TV Sat 2400-CI+
쑗 devolo dLAN TV Sat Tuner
쑗 Two devolo dLAN 200 AVplus
쑗 Two power packs
쑗 Two network cables
쑗 Remote control, incl. batteries
쑗 Antenna cable (coax)
쑗 HDMI cable
쑗 Printed manual
devolo AG reserves the right to change the package
contents without prior notice.
devolo dLA N TV Sat 2400-CI+
Page 13
12 Initial use
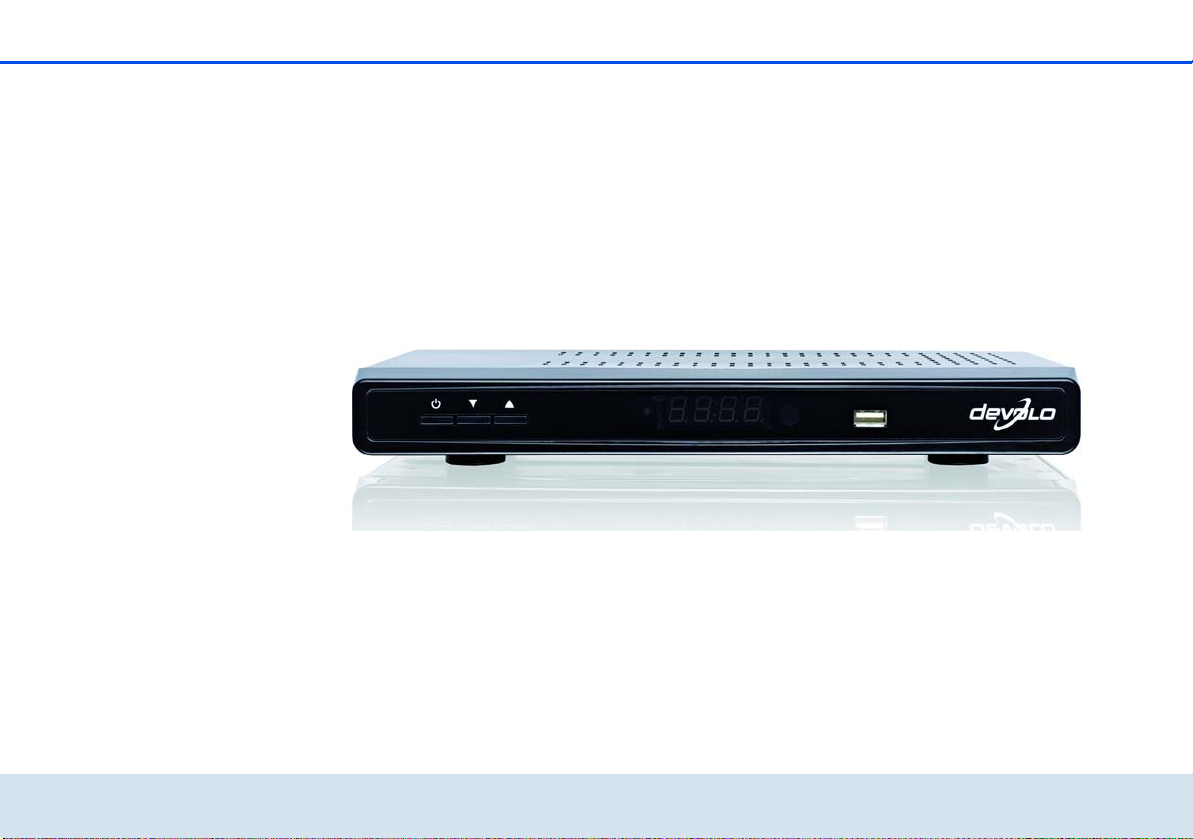
3.2 Indicators and connections of the dLAN TV Sat 2400-CI+
3.2.1 Front panel
The front panel of the device contains the ON/OFF button, the display, a USB port and the arrow keys.
devolo dLAN TV Sat 2400-CI+
Operating status display
쎲 Lights up green when the dLAN TV Sat 2400-CI+
is operational.
쎲 Lights up red when the dLAN TV Sat 2400-CI+ is
in stand-by mode or switched off.
The dLAN TV Sat 2400-CI+ complies with current EU
power-consumer directives and includes a stand-by
mode for lower power consumption (power-saving
mode). Four to five seconds after you switch off the
dLAN TV Sat 2400-CI+, the device changes by default
to power-saving mode and the display goes blank.
If power-saving mode is disabled, the time is shown on
the display when the dLAN TV Sat 2400-CI+ is
switched off.
Once the device is in power-saving mode, it takes a few
seconds to restart.
Page 14

Initial use 13
You can disable power-saving mode by
going in the menu to Settings Config-
uration Low Power. To save on energy
costs, we recommend leaving powersaving mode active.
Arrow keys
The arrow keys are used to select the desired programme.
Display
The display shows the status of the dLAN TV Sat 2400CI+.
USB port
You can connect an external USB hard drive (e.g., stick)
here to view images or play films on your TV set.
Please use a high-quality USB cable (in
acc. with USB specification).
devolo dLA N TV Sat 2400-CI+
Page 15

14 Initial use
3.2.2 Rear panel
The rear panel of the housing contains another USB
port, plus all the connections needed for connecting
CI/CI+ module socket
You can also receive encrypted programmes with the
dLAN TV Sat 2400-CI+ if the appropriate CI module
from a pay-TV provider is inserted in the card slot.
ANALOG AUDIO OUT
The AUDIO OUT socket is used to connect the
dLAN TV Sat 2400-CI+ to an analogue playback device
such as a stereo system or headphones.
HDMI
The HDMI cable supplied is used to connect the HDMI
socket on the dLAN TV Sat 2400-CI+ to your TV set.
the dLAN TV Sat 2400-CI+ to your TV set and the dLAN
and mains supply.
Ethernet
The network cable supplied is used to connect the LAN
socket on the dLAN TV Sat 2400-CI+ and the
dLAN 200 AVplus adapter to the network.
USB port
An external USB hard drive can be connected here for
saving TV programmes you want to view later.
Please note the following when connecting an external USB hard drive:
쎲 The first time a hard drive is inserted, the auto-
matic hard drive check may cause a delayed sys-
devolo dLAN TV Sat 2400-CI+
Page 16
Initial use 15
tem start of the dLAN TV Sat 2400-CI+. This may
take a few minutes.
쎲 Avoid inserting and removing USB devices in
quick succession. This may damage the USB
device. Do not remove the USB device while a file
is being played back or recorded.
쎲 Also note the following if a high-capacity drive
is used: so that the dLAN TV Sat 2400-CI+ can
identify a high-capacity drive correctly and without errors, wait about 30 seconds after connecting the two devices before switching the
dLAN TV Sat 2400-CI+ on again.
If you have not already done so, you
can go in the menu 4.4.4 Recording con-
figuration and format the detected
drive using the dLAN TV Sat 2400-CI+
to initialise it for recording. Drives intended for initialisation on a PC can be
formatted to FAT32 using one of the
freeware tools available on the Web.
Drives formatted in NTFS only provide
playback functions.
Scart (TV)
A Scart cable is used to connect the SCART output on
the dLAN TV Sat 2400-CI+ to your TV set.
DIGITAL AUDIO OUT (OPT./TOSLINK)
You connect the digital audio output on the
dLAN TV Sat 2400-CI+ to the corresponding electrical
S/PDIF input on an amplifier.
The sound is normally played back via
the audio output on the TV set. It is
also possible to connect an additional
audio device such as a hi-fi or digitalsurround system to handle playback.
When connecting a device, always
make sure that all other devices are
disconnected from the mains supply.
If you are connecting several devices,
be sure to use the power pack supplied
to provide the electrical device with
12 V DC. Make sure there is a separate
power supply when connecting several
devices.
12 V DC
This is where you connect the dLAN TV Sat 2400-CI+
to the mains supply.
devolo dLA N TV Sat 2400-CI+
Page 17

16 Initial use
To avoid electrical damage when connecting the dLAN TV Sat 2400-CI+, always use the power pack supplied. The
power pack is designed to supply electrical devices with 12 V DC.
devolo dLAN TV Sat 2400-CI+
Page 18

Initial use 17
3.3 Indicators and connections of the dLAN 200 AVplus
The dLAN 200 AVplus adapter has three control lamps
(LEDs), plus a network connection and encryption button.
devolo dLA N TV Sat 2400-CI+
Page 19

18 Initial use
Power
Lights up steady green if the
dLAN 200 AVplus is ready to operate;
flashes green if the dLAN 200 AVplus is in
stand-by mode.
dLAN
Green: the network connection is suitable
for HD video streaming; flashes when data
are being transmitted.
Orange: the network connection is suitable for HD video streaming and online
gaming; flashes when data are being transmitted.
Red: the network connection is suitable for
simple data transfer and Internet access;
flashes when data are being transmitted.
Ethernet
Green: there is a connection to the Ethernet network; flashes when data are being
transmitted.
Network connection
This is where you connect the dLAN 200 AVplus to the
dLAN TV Sat 2400-CI+ using the mains cable supplied.
Encryption button
Data encryption at the press of a button: for information on the operation of the encryption button, see the
devolo dLAN 200 AVplus manual on our Internet
site at www.devolo.com
Integrated electrical socket
Plug the power pack supplied with the
dLAN TV Sat 2400-CI+ into the socket on the
dLAN 200 AVplus. The integrated mains filter eliminates any noise of connected devices and significantly
improves data transmission in the home network.
.
devolo dLAN TV Sat 2400-CI+
Page 20

Initial use 19
3.4 Connect the dLAN TV Sat 2400CI+ to the TV set.
3.4.1 Connection via HDMI
For best results, use the HDMI cable supplied to connect the dLAN TV Sat 2400-CI+ to an HD TV set. Digital image and sound will be transferred
simultaneously via the HDMI cable. The
dLAN TV Sat 2400-CI+ also supports HD-ready video
(1440 x 720 resolution) and full HD (1920 x 1080).
3.4.2 Connection via SCART
For best results, use a SCART cable to connect the
dLAN TV Sat 2400-CI+ to an analogue TV set. Analogue image and sound will be transferred simultane-
ously by the SCART cable.
devolo dLA N TV Sat 2400-CI+
Page 21

20 Initial use
3.5 Remote control
You can use the infrared remote control supplied to operate all the main functions of the TV and radio programme:
Getting started requires just two easy steps:
쎲 Insert the two AAA batteries into the remote con-
trol in the correct position (follow the illustration
in the battery compartment). Using the batteries
incorrectly can damage the remote control.
쎲 Adjust the devices so that the internal receiver of
the dLAN TV Sat 2400-CI+ is within optical signal
range of the remote control.
Note that the remote control and receiver communicate using an infrared
connection. Therefore, always position
the receiver such that it is not being
blocked or covered by any objects and
can be seen from all desired positions
in the room. When pressing keys on the
remote control, always point it towards the receiver.
devolo dLAN TV Sat 2400-CI+
Page 22

Initial use 21
3.6 Connect the dLAN TV Sat Tuner
햲 Connect the satellite antenna to the antenna
input (LNB, multiswitch) of the dLAN TV Sat Tuner
using a coaxial cable with an F-connector.
햳 Connect the dLAN TV Sat Tuner to a
dLAN 200 AVplus adapter using the mains cable
supplied.
햴 Insert the plug on the power pack into the socket
on the dLAN 200 AVplus adapter.
햵 Plug the dLAN 200 AVplus adapter into a free
wall socket.
If two tuners are connected, they can
be used simultaneously for recording
and viewing TV—one for recording
and the other for TV.
3.7 Connect the dLAN TV Sat 2400CI+ to the dLAN and the mains
supply.
햲 Connect the dLAN TV Sat 2400-CI+ to a
dLAN 200 AVplus adapter using the mains cable
supplied.
The Ethernet plug (LAN) should only be
connected to a matching Ethernet socket.
햳 Insert the hollow plug on the power pack into the
12 V DC power socket on the dLAN TV Sat 2400CI+.
햴 Insert the plug on the power pack into the socket
on the dLAN 200 AVplus adapter.
햵 Then, plug the dLAN 200 AVplus adapter into a
free wall socket.
햶 The dLAN TV Sat 2400-CI+ is now connected to
the power and dLAN networks and can communicate by dLAN with the connected dLAN TV Sat
Tuner.
devolo dLA N TV Sat 2400-CI+
Page 23

22 Initial use
Note that you will need another dLAN
AV adapter in each case to connect
HbbTV and DLNA (media server) to the
dLAN network (see 2.3 Sample applica-
tions).
To avoid electrical damage when connecting the dLAN TV Sat 2400-CI+, always use the power pack supplied. The
power pack is designed to supply electrical devices with 12 V DC. Make sure
there is a separate power supply when
connecting several devices.
3.7.1 First use
햲 After you have successfully connected your
dLAN TV Sat 2400-CI+ to all components, switch
the device on.
햳 Then switch on the TV set.
If you have connected the devices by HDMI,
select the corresponding output to display
the TV image.
dLAN TV Sat 2400-CI+ will take a few seconds to
start.
햵 The TV and radio software assistant will then start
automatically. For more information, refer to the
next chapter 4 TV and radio programme.
devolo dLAN TV Sat 2400-CI+
햴 Press the button for the signal input on the TV set
(usually at the side) or on the remote control. The
Page 24

TV and radio programme 23
4 TV and radio programme
The dLAN TV Sat 2400-CI+ allows you to receive digital satellite (DVB-S) TV and radio programmes. Both
high-resolution and normal digital TV can be received.
The TV image can be output via HDMI (connection to
an HDTV-capable TV set) or SCART cables.
4.1 First Time installation
An installation assistant will take you through the necessary settings in just a few steps.
You mainly use the following buttons on the remote
control to proceed through the First Time installation
dialogue:
쎲 OK: to confirm a value or active control button
쎲 Arrow keys: to move between different selection
windows, options or buttons.
햲 When you switch the device on for the first time,
the installation assistant starts automatically with
the language selection.
Select the desired language and confirm with OK.
devolo dLA N TV Sat 2400-CI+
Page 25

24 TV and radio programme
햳 You are then taken automatically to country and
display settings.
쎲 Country
쎲 Time zone
쎲 TV type: Select “4:3” if you have a conventional
TV set or “16:9” if you have a broadband TV set
connected.
쎲 Display format:
쑗 Auto: automatic scaling of the screen format
to the previously set display format.
쑗 Pillar box: if you display "4:3" programme
content on a "16:9" TV set or vice versa, a
black border may appear on both sides of the
screen.
쑗 Zoom: Zoom is used to select what to do with
the black frames and how a "4:3" image
should be adapted to suit a "16:9" screen and
vice versa. Existing bars will be deleted and
the image will be scaled to the screen.
쎲 HD output resolution: this is where you select
the resolution.
After you have confirmed your settings with OK, the
Antenna configuration appears.
햴 Here you select the dLAN TV Sat Tuner. You use
the blue button on the remote control to search
for all dLAN TV Sat Tuner connections in the network.
devolo dLAN TV Sat 2400-CI+
Page 26

TV and radio programme 25
햵 The dLAN TV Sat 2400-CI+ loads the satellite and
transponder list. Select a satellite.
햶 You end installation by scanning for channels. The
installation assistant offers you different options
for channel scanning:
쎲 Load pre-programmed list: load the channel list
prepared by devolo.
쎲 Start regular search: the selected satellite is
scanned.
쎲 Search Astra service list: the channel list infor-
mation is downloaded from the satellite and the
channels sorted by LCN data.
You cannot move the channels using this option.
This scan process will take a few minutes. You can follow the scan progress on the display bar. The scan results are then displayed.
4.2 Menu structure and operation
All settings are selected via the menu in the
dLAN TV Sat 2400-CI+ using the remote control:
쎲 The layout of the remote control buttons and keys
is explained clearly in Section 5.3 The devolo
remote control.
쎲 You press the MENU button to access the main
menu.
쎲 Use the arrow keys to switch between selection
options or control buttons.
쎲 Press OK to confirm a value or activate a control
button.
쎲 Pressing MENU/BACK again takes you back to
the previous menu or quits the Menu. The software returns to the TV display.
쎲 All the functions or options available for the cur-
rent menu are explained at the bottom of the
screen.
The section below provides a summary of the TV and
radio functions. When you switch your receiver on, the
devolo dLA N TV Sat 2400-CI+
Page 27

26 TV and radio programme
software starts with the last selected TV or radio programme.
4.2.1 Channel list
Use the arrow buttons to select the Channel List menu
and confirm with OK. Press Exit to return to the selected programme. To call up the channel list for the current programme, press OK.
Select programme directly
You can also select a particular TV or radio programme
in your current channel list directly using the arrow
keys. Use the Red or Green buttons to scroll one page
up or down. The programme place number and the
number of the selected channel are displayed in the
channel list.
Please note that the place number for a particular programme may be different in different programme lists. You can sort the order
to suit your own preferences.
Channel lock
Channel lock (e.g., as parental settings) allows you to
make certain channels accessible only with a PIN code.
When the device is delivered, the child
safety code (PIN) is 0000. This PIN is set
and changed under Settings Configura-
tion PIN Settings.
devolo dLAN TV Sat 2400-CI+
Page 28

TV and radio programme 27
Highlight the channel you want to lock and select the
Lock option using the arrow keys. After you confirm
with OK, a window appears for you to enter the code
(PIN).
Enter the PIN code using the number keys on the remote control. A lock symbol (lock) appears next to the
selected channel. Follow the same procedure to unlock
the channel.
Creating a favourites list
You can add your favourite programmes in a favourites
list. You call up the favourites list either by selecting the
Favourites option and confirming with OK, or by
pressing the FAV button on the remote control. You
hide the list by pressing FAV again.
쎲 Adding a channel in the favourites list
쑗 Using the appropriate arrow key, highlight the
channel you want to add to the favourites list,
and confirm with OK. The favourite symbol
shows that a channel has been added in the
list.
쎲 Removing channels from the favourites list
쑗 Using the appropriate arrow key, highlight the
channel you want to remove from the favourites list, and confirm with OK.
devolo dLA N TV Sat 2400-CI+
Page 29

28 TV and radio programme
If you press OK again, the channel is added
again in the favourites list.
Moving channels
Using the arrow keys, highlight the channel you want
to move. Select the Move control button at the bottom
of the screen and confirm with OK.
Enter the number of the desired channel and confirm
with OK.
Deleting channels
Using the arrow keys, highlight the channel you want
to delete. Select the Delete button at the bottom of the
screen and confirm with OK.
Renaming channels
Using the arrow keys, highlight the channel you want
to rename. Select the Name button at the bottom of
the screen and confirm with OK.
You can use the left/right arrow keys to
move the entry point to the next or previous
character. To change the current character,
use the UP/DOWN keys. For example, you
press the DOWN key to change the letter 'b'
to an 'a’ and press the UP key to change it to
a ‘c’. By pressing the '0...9' keys, you can replace the highlighted character with the one
printed above the key.
devolo dLAN TV Sat 2400-CI+
Page 30

TV and radio programme 29
Channel list filter
You can activate a filter function for each of the options
in Section 4.2.1 Channel list by pressing P<P.
Please note: If the filter function is active,
only the filtered channels are displayed.
To view all channels you first have to deactivate the filter function. For more information, refer to Chapter Channel
lock.
4.3 Recording
A USB device or external USB drive
must be connected before you can record programmes.
There are four different recording options:
쎲 Instant recording of current programme
쎲 Recording with EPG
쎲 Time-shift recording
쎲 Timer recording
4.3.1 Instant recording
To record the current programme directly, you call up
the recordings menu, by pressing the record button
(red dot) on the remote control.
The record OSD then appears briefly and the current
programme is shown. The display on the
dLAN TV Sat 2400-CI+ indicates successful recording
with REC. Press STOP to stop instant recording.
4.3.2 Recording with EPG
An electronic programme guide (EPG) shows programme information, so you can quickly get an idea of
programmes and their content. You can also directly
devolo dLA N TV Sat 2400-CI+
Page 31

30 TV and radio programme
programme the recording of current or later broadcasts:
쎲 CH /\: shows the programmes from the previous
day.
It is not possible to view programme
information from several days ago.
You can only scroll back one day.
쎲 CH V: shows the programmes for the next day.
쎲 YELLOW (Zoom) button: reduces/enlarges the
info boxes.
쎲 BLUE button (Channel scan): displays the vari-
ous channel scan options.
쎲 OK: opens the Event options menu and shows
current programmes, or schedules reminders/
recording for programmes.
쎲 Info: shows programme information.
쎲 SUBT. (Select genre): Option for selecting the
genre.
쎲 LEFT double arrow button: goes back one page
쎲 RIGHT double arrow button: goes forwards one
page
쎲 Text: browses the programme guide.
4.3.3 Timeshift recording
In Timeshift mode, the current programme is stopped
and is simultaneously stored on the attached USB
drive.
쎲 Press Pause to switch to Timeshift mode.
쎲 Press Playback to continue viewing the pro-
gramme from the time of the break. Playback is at
normal playback speed x1. The time difference
devolo dLAN TV Sat 2400-CI+
Page 32

TV and radio programme 31
between the real time and timeshift programme is
shown on the info line.
쎲 Use the LEFT/RIGHT arrow keys to scroll for-
wards or back during the timeshift playback.
쎲 Press Stop to end Timeshift mode.
The maximum length of timeshift recording depends on the capacity of the
connected USB drive and your setting
(max. 1.5 hours) in the Settings Record-
ing settings Max. timeshift time menu
(see 4.4.4 Recording configuration).
4.3.4 Timer recording
The Timer function is used to record forthcoming programmes. Press Timer on the remote control or select
Menu Timer and confirm with OK to call up the cor-
responding menu.
devolo dLA N TV Sat 2400-CI+
Page 33

32 TV and radio programme
Press YELLOW to add a new timer. The Add Timer
window is displayed.
쎲 Channel: you use the LEFT/RIGHT arrow keys to
navigate through the TV or radio list.
쎲 Recording type: the recording type is displayed.
쎲 Date: the starting date is entered using the LEFT/
RIGHT arrow keys and the numeric pad.
쎲 Start: the starting time is entered using the LEFT/
RIGHT arrow keys and the numeric pad.
쎲 End: the end time is entered using the LEFT/
RIGHT arrow keys and the numeric pad.
쎲 Duration: duration between starting and end
times.
쎲 Repeat: you can set the Timer to repeat once,
daily or weekly.
쎲 Playback: you can use the parental control set-
tings or select Allow or Forbid.
쎲 Change/Delete: all changes can be allowed or
locked for other users.
쎲 You use the GREEN button to store or the RED
button to terminate the process. OK is used to
edit the list and the BLUE button to delete it.
4.3.5 Switching during live recording
Changing programmes between transponders will terminate the current recording.
Programmes highlighted in the programme list are inside a transponder, those with a symbol are outside
it.
devolo dLAN TV Sat 2400-CI+
Page 34

TV and radio programme 33
4.4 Settings
You will find the following parameters under Settings:
4.4.1 Installation
Under Installation you select settings to the
dLAN TV Sat 2400-CI+.
Astra Service List Update
If you have selected the Astra service list during the
First Time installation, you can update the channel
list using this setting.
Manual channel scan
This is where you manually enter all the details of the
desired channel.
쎲 You select the satellite name from the selection list
in the Satellite field.
쎲 You enter the frequency in the Frequency field
using number keys 0 to 9.
쎲 You select the polarisation from the selection list
in the Polarisation field.
devolo dLA N TV Sat 2400-CI+
Page 35

34 TV and radio programme
쎲 You enter the symbol rate in the Symbol rate field
using number keys 0 to 9.
쎲 You select the network number from the selection
list in the Network search field.
쎲 Channel scanning:
쑗 Yes: after one transponder has been set, the
parameters of other transponders are
retrieved from the NIT table (Network Infor-
mation Table) and the other transponders set.
Once the transponder frequency has been entered, the signal level and quality are displayed on the bars at the bottom of the
screen. The Signal quality bar shows the reception quality. The Signal level bar shows
the strength of the satellite signal.
You confirm all entries with OK.
Fast Channel Scan
You select Fast Channel Scan in the Installation
menu and confirm with OK. In this menu, you select
the satellites to be scanned.
You can set the satellite parameters to suit using the
navigation buttons:
쎲 Select the GREEN button to scan the selected
satellite.
쎲 Select the BLUE button to display the Tran-
sponder list.
쎲 Press OK to scan all satellites.
devolo dLAN TV Sat 2400-CI+
Page 36

TV and radio programme 35
4.4.2 Configuration
Go to Settings Configuration to select the settings
for the dLAN TV Sat 2400-CI+.
The Country displays the selection of countries found
during the initial set-up.
The Output settings allows you to select different options for displaying the image on your TV set.
Note that different TV sets respond differently to changed display parameters from the
dLAN TV Sat 2400-CI+ and may automatically change your own display mode. In this
case, refer to the manual for your TV set.
These output settings were applied when you
initially set up the device.
쎲 TV type: Select “4:3” if you have a conventional
TV set or “16:9” if you have a broadband TV set
connected.
쎲 Display format:
devolo dLA N TV Sat 2400-CI+
Page 37

36 TV and radio programme
쑗 Auto: automatic scaling of the display format
to the previously set format.
쑗 Pillar box: If you display "4:3" programme
content on a "16:9" TV set or vice versa, a
black border may appear on both sides of the
screen.
쑗 Zoom: Zoom is used to select what to do with
the black frames and how a "4:3" image
should be adapted to suit a "16:9" screen and
vice versa. This setting can also be directly
selected using the Videotext (yellow) key on
the remote control.
쑗 TV output (SCART): The receiver can output
video signals in RGB and CVBS format via the
TV SCART output. Although the RGB format
provides the best display quality, not all sets
can process this signal. Use the LEFT/RIGHT
arrow keys to select RGB or CVBS.
쎲 Prefer Dolby Digital: Use the UP/DOWN arrow
keys to select this option, and press the LEFT/
RIGHT arrow keys to change the setting to Yes or
No.
쎲 SPDIF Output:
쑗 LPCM—the dLAN TV Sat 2400-CI+ will out-
put stereo PCM
쑗 Dolby Digital—if Dolby Digital audio is avail-
able and selected, the dLAN TV Sat 2400-CI+
will output Dolby Digital.
쎲 HDMI Audio Output:
쑗 LPCM—the dLAN TV Sat 2400-CI+ will out-
put stereo PCM.
쑗 Dolby Digital—if Dolby Digital/Dolby Digi-
tal+ audio is available and selected, the
dLAN TV Sat 2400-CI+ will output Dolby Digital/Dolby Digital+.
This function is only available if the optical audio output is used.
쎲 The Software Version field displays the version
number.
쎲 The PIN Settings (parental settings) allows you to
make then accessible only by using a PIN code.
Select the PIN Settings field and confirm with
OK. If a code (PIN) has been assigned, it is now
requested and the following sub-menu opened:
쑗 Disabled: all menus are accessible.
쑗 All menus: all menus are only accessible with
a password.
쑗 Installation: the installation menu is locked.
The user cannot add channels.
When the device is supplied, the child
safety code (PIN) is 0000.
devolo dLAN TV Sat 2400-CI+
Page 38

TV and radio programme 37
Select the Time settings field and confirm with OK. Select the time zone from the following sub-menu.
First select the PowerSave mode field. You then activate power-saving mode by selecting Yes and disable
it with No.
The dLAN TV Sat 2400-CI+ complies
with current EU power-consumer directives and includes a stand-by mode for
lower power consumption (power-saving mode). Some seconds after you
switch off the dLAN TV Sat 2400-CI+,
device changes by default to powersaving mode and the display goes
blank. If power-saving mode is disabled, the time is shown on the display
when the dLAN TV Sat 2400-CI+ is
switched off. To save on energy costs,
we recommend leaving power-saving
mode active.
To activate Automatic Power Down, select the field
and choose Yes. The device will switch off automatically after 4 seconds if it has not been used during this
time.
devolo dLA N TV Sat 2400-CI+
Page 39

38 TV and radio programme
4.4.3 Language settings
The language selected is used for the menus and the
sound track on TV programmes. Select Settings Lan-
guage settings.
쎲 Menu: displays the currently set menu language.
쎲 Audio: displays the desired audio language.
쎲 Subtitle: displays the desired subtitle language.
쎲 Guide: displays the desired EPG language.
4.4.4 Recording configuration
A USB drive must be connected before
the recording configuration menu can
be displayed.
To set the recording parameters, go to Settings Recording configuration. The following menu is dis-
played for configuring recording.
쎲 Auto discard
If the USB drive is full and a recording timer has been
programmed, the satellite receiver automatically deletes older recordings in line with this setting. The following options can be selected:
쑗 Off: the satellite receiver does not delete
recordings, and the programmed recording
timer is not activated.
쑗 Oldest: recordings are deleted starting with
the oldest, to make room for the programmed
timer.
devolo dLAN TV Sat 2400-CI+
Page 40

TV and radio programme 39
쑗 Longest: recordings are deleted starting with
the longest, to make room for the programmed timer.
쑗 Shortest: recordings are deleted starting with
the shortest, to make room for the programmed timer.
쑗 Unplayed: If this option is set to Excluded,
recordings that have not been played back
will NOT be deleted. If it is set to Included
these recordings will also be deleted.
쎲 Format drive: If you want to delete all files on the
attached USB drive, you can use the Format disk
option. If you have problems with the USB drive,
you can try to fix these by reformatting the disk.
Normal operation of the USB drive can generally
be restored in most cases. However, any data
stored on the USB drive will be lost. Press OK
when the Format drive option is highlighted. A
menu appears and asks for a PIN code. If you
have not changed it, the code will be the default
0000. Start formatting with Yes and confirm with
OK.
쎲 Max. Timeshift: The maximum length of timeshift
recording depends on the capacity of the connected USB drive and your setting (max. 1.5
hours).
Before you format the USB drive, be sure to
make a backup of any important recordings.
4.4.5 Internet settings
Under Internet settings you select networks settings.
(see also 2.3 Sample applications)
dLAN TV Sat 2400-CI+ and HbbTV via
dLAN
HbbTV is a modern kind of video text from the Internet, sent to a TV set. You will need an existing Inter-
net connection which (as shown in figure 2) is
connected via another dLAN AV adapter to the
dLAN home network and therefore to the
dLAN TV Sat 2400-CI+ and dLAN TV Sat Tuner.
It is operated using the coloured buttons on the remote
control (YELLOW/GREEN/BLUE). The functions available under these buttons depend on the particular
transmitter but most are displayed on the screen. Currently, not all countries and TV stations offer HbbTV.
The Internet settings contain the IP address, the subnet
mask and the standard gateway for the
dLAN TV Sat 2400-CI+. The IP address may be either
static or dynamic. The Static option requires all entries
to be made manually.
devolo dLA N TV Sat 2400-CI+
Page 41

40 TV and radio programme
If the IP address is not known or if no specific address
will be used, select the Dynamic option. In this case,
the IP address and the other data will be sourced automatically from a DHCP server.
When the device is supplied, the dynamic IP
address is set.
Use the GREEN button to test the Internet velocity.
4.4.6 Load settings
This function allows you to reset the
dLAN TV Sat 2400-CI+ to its previously stored settings.
All current settings are lost when the device is reset.
4.4.7 Save settings
This function allows you to save your own settings to
the dLAN TV Sat 2400-CI+. When you confirm with
OK, all previous entries are overwritten.
4.5 Recordings
A USB drive must be connected to the
dLAN TV Sat 2400-CI+ before the recordings library can appear.
Select Recordings in the menu and confirm with OK.
The available recordings are displayed and managed
using the menu at the bottom of the screen:
devolo dLAN TV Sat 2400-CI+
Page 42

TV and radio programme 41
쎲 Blue (delete): delete the selected recording.
쎲 P<P (edit): edit selected recording.
쎲 TEXT (Sort): change order of recordings. You can
choose from a wide range of sorting options.
쎲 OK (play options): activates the Play Options
menu.
쑗 Play from start: plays the recording back
from the start.
쑗 Play from last stop: continues playback from
the last stop.
쑗 Play from offset: specifies a specific playback
point.
It is not possible to view the main
menu and menu options during playback.
쎲 Manage chapters: management of chapter high-
lights
쑗 -> (continue): continue recording.
쑗 INFO: displays the expanded short descrip-
tion.
4.6 Media browser
Select Media Browser in the menu and confirm with
OK. The menu options are displayed:
4.6.1 USB device
You can play music, images and video files from a USB
device.
If the USB device is not recognised after switching on or off, or after initial
set-up, remove it and switch the
dLAN TV Sat 2400-CI+ off and on
again. Then reinsert the USB device.
devolo dLA N TV Sat 2400-CI+
Page 43

42 TV and radio programme
Playing videos
Select Media Browser USB Device Videos; all
available videos will be displayed.
쎲 0...9 (jump): jumps to the file selected using the
number keys.
쎲 OK: plays the current file
쎲 BLUE: changes the medium type.
쎲 Playback button: play all media files in the folder,
starting with the selected file.
쎲 Pause button: pause the file playback.
쎲 Stop button: stop file playback.
쎲 Back button: start rewind.
쎲 Forwards button: start fast forward.
쎲 OPT: set subtitles/audio.
쎲 GREEN: jump to selected time.
쎲 YELLOW: set subtitle time correction.
쎲 RED: set subtitle position.
쎲 BLUE: set font size of subtitle.
쎲 EXIT: end video.
쎲 MENU: return to previous menu.
Video formats avi, mpg and mkv are
supported.
Displaying images
Select Media browser USB device Photos; all
available photo files will be displayed.
쎲 0...9 (jump): jump to file selected using number
keys.
쎲 OK: display selected photo full size
쎲 Playback button: start slideshow with all files in
folder
쑗 Pause button: pause slideshow.
쑗 Stop button: stop file playback.
쑗 GREEN: activate endless or random playback.
쑗 FORWARD/BACK arrow keys: jump to previ-
ous or next file in slideshow.
쑗 UP/DOWN arrow keys: turn photo.
쑗 AUDIO
쑗 INFO (he
: sort images by date
lp): activate function bar.
Use EXIT to quit the menu and return to the
file list.
devolo dLAN TV Sat 2400-CI+
Page 44

TV and radio programme 43
쎲 OPT: sort files by date
쎲 YELLOW: change display style.
쎲 BLUE: change medium type.
The JPG image format is supported.
Playing MP3 files
Select Media Browser USB Device Music; all
available music files will be displayed.
쎲 0...9 (jump): jump to file selected using number
keys.
쎲 OK: play selected file
쎲 Stop button: stop file playback.
쎲 Playback button: play back all media files in
folder, starting with selected file.
쎲 Pause button: pause file playback.
쎲 AUDIO: sort files.
쎲 INFO: activate endless/random playback.
쎲 BLUE: change medium type.
쎲 FORWARD/BACK arrow keys: jump to previous
or next file and plays it back.
Displaying all files
Select Media Browser USB Device All; all files will
be displayed.
4.6.2 Media server (DLNA)
DLNA (Digital Living Network Alliance) is a standard
which simplifies the use of digital electronic equipment
and makes it easy for them to be used with home networks. For more information, go to www.dlna.org.
If a DLNA media server (e.g., PC with Windows 7 operating system, a router or NAS) is also connected by
dLAN to your home network, you can view photos or
videos on your TV and listen to music files stored on
this DLNA media server (see 2.3 Sample applica-
tions).
In the menu, select Media Browser Media Server
and confirm with OK.
devolo dLA N TV Sat 2400-CI+
Page 45

44 TV and radio programme
4.6.3 Conditional access
You can also receive encrypted pay TV programmes
with the dLAN TV Sat 2400-CI+ if a CI module from a
pay-TV provider is inserted in the card slot.
Select Conditional access and confirm with OK.
To avoid damage to the module and the slot on the
dLAN TV Sat 2400-CI+, follow the installation tips below for the CI module:
If the module is inserted or removed,
the dLAN TV Sat 2400-CI+ MUST be
switched off or disconnected from the
mains supply.
햲 Switch the dLAN TV Sat 2400-CI+ off and remove
the plug from the socket.
햳 Without using force, insert the CI module correctly
and facing the right way.
햴 Connect the dLAN TV Sat 2400-CI+ again to the
mains supply and switch it on.
Activation of the module will take a
few moments.
It may be necessary to set up some CI modules using
the Conditional Access menu. To do so, open the
Conditional Access menu and confirm with OK.
devolo dLAN TV Sat 2400-CI+
Page 46

Appendix 45
5Appendix
5.1 Important safety instructions
All safety and operating instructions should be read
and understood before using the device, and should be
kept for future reference.
쎲 Never open the device. There are no user-service-
able parts inside the device.
Do not try to service this product yourself! Contact qualified technicians
each and every time your device needs
maintenance. There is a risk of electric
shock!
쎲 Use the device in a stable and dry location only.
쎲 Always use the included power plug to connect
the device. It is designed to supply an electrical
device with 12 V DC.
The dLAN TV Sat 2400-CI+ is intended
for the reception of DVB-S/S2 satellite
signals and their transfer to the connected TV set(s).
The dLAN 200 AVplus adapter is intended for connecting the
dLAN TV Sat 2400-CI+ to the dLAN
network.
쎲 To disconnect the device from the power supply
grid, pull the power plug. The power plug must be
easily accessible.
쎲 Do not insert any objects into the openings of the
device.
쎲 Do not keep the device in direct sunlight.
쎲 Slots and openings on the case serve as ventila-
tion. Never block or cover them.
쎲 Never set up the device near a heater or radiator.
쎲 Never set up the device near fire (e. g. a candle).
쎲 Never put any objects on the device.
쎲 The device should be located only where sufficient
ventilation can be ensured.
쎲 Disconnect the device from the power supply grid
before cleaning. Use a moist towel to clean the
device. Never use water, paint thinner, benzene,
alcohol or other strong cleaning agents when
cleaning the device, as these could damage the
case.
쎲 Never use the device with a power supply that
does not meet the specifications provided on the
rating plate.
쎲 In the event of damage, disconnect the device
from the power supply grid and contact customer
service. This applies, for example, if
쑗 the power cable or plug is damaged.
devolo dLA N TV Sat 2400-CI+
Page 47

46 Appendix
There is a risk of electric shock!
쑗 liquid has been spilled on the device or
objects have fallen into the device.
쑗 the device has been exposed to rain or water.
쑗 the device does not work, even though the
operating instructions have been followed
properly.
쑗 the device’s case is damaged.
devolo dLAN TV Sat 2400-CI+
Page 48

Appendix 47
5.2 Bandwidth optimization
To significantly improve the transmission capacity of
the network, we recommend that you comply with the
following "connection rules":
쎲 Plug the device directly into a wall socket.
쎲 To take full advantage of the filter function of the
dLAN AV adapter and to improve data transmission in the network, always plug the multiple
socket or the dLAN TV Sat 2400-CI+ into the electrical socket of the dLAN AV adapter.
devolo dLA N TV Sat 2400-CI+
Page 49

48 Appendix
5.3 The devolo remote control
The following is a brief explanation of the buttons on
the devolo remote control (from left to right):
ON/OFF switch the dLAN TV Sat 2400-CI+ on/off
Mute switch the mute on/off
HDMI change the resolution
FAV switch to the favourites list
TV/Radio switch between radio and TV
0...9 switch to the displayed channel number,
entry of letters
LIB switch to the recordings
MEDIA switch to the media browser
EPG call up the electronical program guide
Volume volume control
P<>P last viewed, filter
Program /\ V channel selection up/down
INFO call up information of a current program
Recording, playback, stop,
rewind, pause,
fast-forward
TEXT call up teletext
SUBT switch the subtitle on/off
AUDIO call up audio options
Coloured buttons EPG navigation buttons
start recording, playback records, stop
playback, rewind records, pause records,
fast-forward records
When inserting the batteries, ensure
that the polarity is correct. Using the
batteries incorrectly can damage the
remote control.
CE declaration and additional technical information of this product are separately included (in print).
devolo dLAN TV Sat 2400-CI+
EXIT, MENU,
BACK
Arrow keys, OK navigation buttons, confirm actions
quit the menu, call up menu, back to
menu
Page 50

Appendix 49
5.4 Disposal of old devices
To be used in the countries of the European Union and
other European countries with a separate collecting
system:
The icon with crossed-out
wastebasket on the device means
that this adapter is an electrical or
electronic device that falls within
the scope of application of the
German Electrical and Electronic
Equipment Act ("Elektrogesetz").
Since 24 March 2006, these types
of devices may no longer be
disposed of with household waste.
Rather, in Germany, they can be
given to a municipal collection
point free of charge. Contact your
municipal government to find out
the address and hours of the
nearest collection point.
5.5 Warranty conditions
The devolo AG warranty is given to purchasers of devolo products in
addition to the warranty conditions provided by law and in accordance with the following conditions:
1 Warranty coverage
a) The warranty covers the equipment delivered and all its parts.
Parts will, at devolo's sole discretion, be replaced or repaired
free of charge if, despite proven proper handling and adherence to the operating instructions, these parts became defective due to fabrication and/or material defects. Alternatively,
devolo reserves the right to replace the defective product with
a comparable product with the same specifications and features. Operating manuals and possibly supplied software are
excluded from the warranty.
b) Material and service charges shall be covered by devolo, but
not shipping and handling costs involved in transport from the
buyer to the service station and/or to devolo.
c) Replaced parts become property of devolo.
d) devolo is authorized to carry out technical changes (e.g. firm-
ware updates) beyond repair and replacement of defective
parts in order to bring the equipment up to the current technical state. This does not result in any additional charge for the
customer. A legal claim to this service does not exist.
2Warranty period
The warranty period for this devolo product is three years. This
period begins at the day of delivery from the devolo dealer. Warranty services carried out by devolo do not result in an extension of
the warranty period nor do they initiate a new warranty period. The
warranty period for installed replacement parts ends with the warranty period of the device as a whole.
devolo dLA N TV Sat 2400-CI+
Page 51

50 Appendix
3Warranty procedure
a) If defects appear during the warranty period, the warranty
claims must be made immediately, at the latest within a period
of 7 days.
b) In the case of any externally visible damage arising from trans-
port (e.g. damage to the housing), the person carrying out the
transportation and the sender should be informed immediately. On discovery of damage which is not externally visible,
the transport company and the sender are to be immediately
informed in writing, at the latest within 3 days of delivery.
c) Transport to and from the location where the warranty claim is
accepted and/or the repaired device is exchanged, is at the
purchaser's own risk and cost.
d) Warranty claims are only valid if a copy of the original pur-
chase receipt is returned with the device. devolo reserves the
right to require the submission of the original purchase receipt.
4 Suspension of the warranty
All warranty claims will be deemed invalid
a) if the label with the serial number has been removed from the
device,
b) if the device is damaged or destroyed as a result of acts of
nature or by environmental influences (moisture, electric
shock, dust, etc.),
c) if the device was stored or operated under conditions not in
compliance with the technical specifications,
d) if the damage occurred due to incorrect handling, especially to
non-observance of the system description and the operating
instructions,
e) if the device was opened, repaired or modified by persons not
contracted by devolo,
f) if the device shows any kind of mechanical damage, or
g) if the warranty claim has not been reported in accordance with
3a) or 3b).
5Operating mistakes
If it becomes apparent that the reported malfunction of the device
has been caused by unsuitable hardware, software, installation or
operation, devolo reserves the right to charge the purchaser for the
resulting testing costs.
6 Additional regulations
The above conditions define the complete scope of devolo's legal
liability.
a) The warranty gives no entitlement to additional claims, such as
any refund in full or in part. Compensation claims, regardless
of the legal basis, are excluded. This does not apply if e.g.
injury to persons or damage to private property are specifically
covered by the product liability law, or in cases of intentional
act or culpable negligence.
b) Claims for compensation of lost profits, indirect or consequen-
tial detriments, are excluded.
c) devolo is not liable for lost data or retrieval of lost data in
cases of slight and ordinary negligence.
d) In the case that the intentional or culpable negligence of
devolo employees has caused a loss of data, devolo will be liable for those costs typical to the recovery of data where periodic security data back-ups have been made.
e) The warranty is valid only for the first purchaser and is not
transferable.
f) The court of jurisdiction is located in Aachen, Germany in the
case that the purchaser is a merchant. If the purchaser does
not have a court of jurisdiction in the Federal Republic of Germany or if he moves his domicile out of Germany after conclusion of the contract, devolo's court of jurisdiction applies. This
is also applicable if the purchaser's domicile is not known at
the time of institution of proceedings.
g) The law of the Federal Republic of Germany is applicable. The
UN commercial law does not apply to dealings between devolo
and the purchaser.
devolo dLAN TV Sat 2400-CI+
Page 52

Index
A
Arrow keys 13
B
Bandwidth optimisation 45
Bandwidth optimization
Batteries
48
C
CE-Erklärungen 48
Connection of the dLAN TV Sat 2400-CI+
Control lamps (LEDs) of the dLAN 200 AVplus
D
Display 13
Disposal of old devices
DVB-S2 receiver
E
Encryption button 18
29
EPG
14
Ethernet
External hard drive
F
First use 22
H
HDMI 5, 9, 14, 19
Headphone socket
47
21
49
5
14
14
17
I
Infrared remote control 20
Instant recording
Integrated electrical socket
Integrated video recorder
Intended use
29
18
8
9
L
Language 38
M
Mains connection (12 V DC) 15
Module socket
14
N
Network connection 18
O
Operation 12
P
Package contents 11
Power pack
22
devolo dLAN TV Sat 2400-CI+
Page 53

S
S/PDIF 9
19
SCART
15
Scart
Standby mode
12
T
Timer 31
21
Tuner
U
USB 14
USB port (front)
13
W
Warranty 49
devolo dLAN TV Sat 2400-CI+
 Loading...