


 Loading...
dLAN® 500 AV Wireless+
The Network Innovation

devolo dLAN® 500 AV Wireless+

© 2013 devolo AG Aachen (Germany)
While the information in this manual has been compiled with great care, it may not be deemed an assurance of product characteristics. devolo shall be liable only to the degree specified in the terms of sale and delivery.
The reproduction and distribution of the documentation and software supplied with this product and the use of its contents is subject to written authorization from devolo. We reserve the right to make any alterations that arise as the result of technical development.
Trademarks
Android TM is a registered trademark of Open Handset Alliance. HomePlug® is a registered trademark of HomePlug Powerline Alliance. Linux® is a registered trademark of Linus Torvalds.
Ubuntu®is a registered trademark of Canonical Ltd.
Mac® and Mac OS X® are registered trademarks of Apple Computer, Inc. iPhone® and iPad® are registered trademarks of Apple Computer, Inc. Windows® and Microsoft® are registered trademarks of Microsoft, Corp.
Wi-Fi®, Wi-Fi Protected AccessTM, WPATM, WPA2TM and Wi-Fi Protected SetupTM are registered trademarks of the Wi-Fi Alliance®. devolo, dLAN®, Vianect® and the devolo logo are registered trademarks of devolo AG.
The firmware package from devolo contains files which are covered by different licenses, in particular under devolo proprietary license and under open source license (GNU General Public License, GNU Lesser General Public License or FreeBSD License). The source code which is available for Open Source distribution can be requested in writing from gpl@devolo.de.
All other names mentioned may be trademarks or registered trademarks of their respective owners. Subject to change without notice. No liability for technical errors or omissions.
devolo AG
Charlottenburger Allee 60 52068 Aachen
Germany www.devolo.com
Aachen, November 2013

Contents
Contents
1 Preface . . . . . . . . . . . . . . . . . . . . . . . . . . . . . . . . . . . . . . . . . . . . . . . . . . . . . . . . . . . . . . . . . . . 7
1.1 Thank you! . . . . . . . . . . . . . . . . . . . . . . . . . . . . . . . . . . . . . . . . . . . . . . . . . . . . . . . . . . . . . 7 1.1.1 About this manual . . . . . . . . . . . . . . . . . . . . . . . . . . . . . . . . . . . . . . . . . . . . . . . . 7 1.2 CE conformity . . . . . . . . . . . . . . . . . . . . . . . . . . . . . . . . . . . . . . . . . . . . . . . . . . . . . . . . . . . 8
2 Introduction . . . . . . . . . . . . . . . . . . . . . . . . . . . . . . . . . . . . . . . . . . . . . . . . . . . . . . . . . . . . . . . 9
2.1 What exactly is dLAN? . . . . . . . . . . . . . . . . . . . . . . . . . . . . . . . . . . . . . . . . . . . . . . . . . . . . . 9 2.2 What is WLAN? . . . . . . . . . . . . . . . . . . . . . . . . . . . . . . . . . . . . . . . . . . . . . . . . . . . . . . . . . . 9 2.2.1 Wi-Fi or WLAN? . . . . . . . . . . . . . . . . . . . . . . . . . . . . . . . . . . . . . . . . . . . . . . . . . . 9 2.3 dLAN 500 AV Wireless+ . . . . . . . . . . . . . . . . . . . . . . . . . . . . . . . . . . . . . . . . . . . . . . . . . . 10 2.3.1 dLAN Cockpit App . . . . . . . . . . . . . . . . . . . . . . . . . . . . . . . . . . . . . . . . . . . . . . . 10 2.3.2 WiFi Move Technology . . . . . . . . . . . . . . . . . . . . . . . . . . . . . . . . . . . . . . . . . . . . 10 2.3.3 Sample applications . . . . . . . . . . . . . . . . . . . . . . . . . . . . . . . . . . . . . . . . . . . . . . 11
3 Quick start . . . . . . . . . . . . . . . . . . . . . . . . . . . . . . . . . . . . . . . . . . . . . . . . . . . . . . . . . . . . . . . 13
3.1 Package contents . . . . . . . . . . . . . . . . . . . . . . . . . . . . . . . . . . . . . . . . . . . . . . . . . . . . . . . 13 3.2 System requirements . . . . . . . . . . . . . . . . . . . . . . . . . . . . . . . . . . . . . . . . . . . . . . . . . . . . . 13 3.3 Connecting the dLAN 500 AV Wireless+ . . . . . . . . . . . . . . . . . . . . . . . . . . . . . . . . . . . . . . 14 3.4 Installation of devolo software . . . . . . . . . . . . . . . . . . . . . . . . . . . . . . . . . . . . . . . . . . . . . . 16
4 Initial use . . . . . . . . . . . . . . . . . . . . . . . . . . . . . . . . . . . . . . . . . . . . . . . . . . . . . . . . . . . . . . . . 19
4.1 Package contents . . . . . . . . . . . . . . . . . . . . . . . . . . . . . . . . . . . . . . . . . . . . . . . . . . . . . . . 20 4.2 System requirements . . . . . . . . . . . . . . . . . . . . . . . . . . . . . . . . . . . . . . . . . . . . . . . . . . . . . 20 4.3 Functions . . . . . . . . . . . . . . . . . . . . . . . . . . . . . . . . . . . . . . . . . . . . . . . . . . . . . . . . . . . . . 21 4.3.1 Indicator lights . . . . . . . . . . . . . . . . . . . . . . . . . . . . . . . . . . . . . . . . . . . . . . . . . . 21 4.3.2 Buttons . . . . . . . . . . . . . . . . . . . . . . . . . . . . . . . . . . . . . . . . . . . . . . . . . . . . . . . 22 4.3.3 Network jacks . . . . . . . . . . . . . . . . . . . . . . . . . . . . . . . . . . . . . . . . . . . . . . . . . . . 24 4.3.4 WLAN antennas . . . . . . . . . . . . . . . . . . . . . . . . . . . . . . . . . . . . . . . . . . . . . . . . . 25 4.3.5 Integrated electrical socket . . . . . . . . . . . . . . . . . . . . . . . . . . . . . . . . . . . . . . . . . 25
4.4 Connecting the dLAN 500 AV Wireless+ . . . . . . . . . . . . . . . . . . . . . . . . . . . . . . . . . . . . . . 25 4.4.1 Software installation . . . . . . . . . . . . . . . . . . . . . . . . . . . . . . . . . . . . . . . . . . . . . . 26
devolo dLAN 500 AV Wireless+

Contents
5 dLAN network . . . . . . . . . . . . . . . . . . . . . . . . . . . . . . . . . . . . . . . . . . . . . . . . . . . . . . . . . . . . 29
5.1 dLAN network encryption at the touch of a button . . . . . . . . . . . . . . . . . . . . . . . . . . . . . . . 29 5.2 dLAN Cockpit App . . . . . . . . . . . . . . . . . . . . . . . . . . . . . . . . . . . . . . . . . . . . . . . . . . . . . . . 33 5.2.1 Overview page . . . . . . . . . . . . . . . . . . . . . . . . . . . . . . . . . . . . . . . . . . . . . . . . . . 33 5.2.2 Settings menu . . . . . . . . . . . . . . . . . . . . . . . . . . . . . . . . . . . . . . . . . . . . . . . . . . . 34 5.2.3 Menu on the bottom edge of the screen . . . . . . . . . . . . . . . . . . . . . . . . . . . . . . . 34
5.3 dLAN Cockpit . . . . . . . . . . . . . . . . . . . . . . . . . . . . . . . . . . . . . . . . . . . . . . . . . . . . . . . . . . 35 5.3.1 Encrypting a network with dLAN Cockpit . . . . . . . . . . . . . . . . . . . . . . . . . . . . . . . 38
6 Network configuration . . . . . . . . . . . . . . . . . . . . . . . . . . . . . . . . . . . . . . . . . . . . . . . . . . . . . . 41
6.1 Calling up the built-in configuration interface . . . . . . . . . . . . . . . . . . . . . . . . . . . . . . . . . . . 41 6.2 Menu description . . . . . . . . . . . . . . . . . . . . . . . . . . . . . . . . . . . . . . . . . . . . . . . . . . . . . . . 41 6.3 Status overview . . . . . . . . . . . . . . . . . . . . . . . . . . . . . . . . . . . . . . . . . . . . . . . . . . . . . . . . . 43 6.3.1 dLAN status . . . . . . . . . . . . . . . . . . . . . . . . . . . . . . . . . . . . . . . . . . . . . . . . . . . . 44 6.3.2 WLAN monitor . . . . . . . . . . . . . . . . . . . . . . . . . . . . . . . . . . . . . . . . . . . . . . . . . . 46 6.3.3 Ethernet status . . . . . . . . . . . . . . . . . . . . . . . . . . . . . . . . . . . . . . . . . . . . . . . . . . 46
6.4 Device configuration . . . . . . . . . . . . . . . . . . . . . . . . . . . . . . . . . . . . . . . . . . . . . . . . . . . . . 47 6.4.1 Security . . . . . . . . . . . . . . . . . . . . . . . . . . . . . . . . . . . . . . . . . . . . . . . . . . . . . . . 48 6.4.2 Network settings . . . . . . . . . . . . . . . . . . . . . . . . . . . . . . . . . . . . . . . . . . . . . . . . . 50 6.4.3 dLAN settings . . . . . . . . . . . . . . . . . . . . . . . . . . . . . . . . . . . . . . . . . . . . . . . . . . . 51 6.4.4 Time server . . . . . . . . . . . . . . . . . . . . . . . . . . . . . . . . . . . . . . . . . . . . . . . . . . . . . 52 6.4.5 LED settings . . . . . . . . . . . . . . . . . . . . . . . . . . . . . . . . . . . . . . . . . . . . . . . . . . . . 53
6.5 WLAN configuration . . . . . . . . . . . . . . . . . . . . . . . . . . . . . . . . . . . . . . . . . . . . . . . . . . . . . 54 6.5.1 Access point . . . . . . . . . . . . . . . . . . . . . . . . . . . . . . . . . . . . . . . . . . . . . . . . . . . . 56 6.5.2 Guest account . . . . . . . . . . . . . . . . . . . . . . . . . . . . . . . . . . . . . . . . . . . . . . . . . . 60 6.5.3 WLAN filters . . . . . . . . . . . . . . . . . . . . . . . . . . . . . . . . . . . . . . . . . . . . . . . . . . . 62 6.5.4 Parental controls . . . . . . . . . . . . . . . . . . . . . . . . . . . . . . . . . . . . . . . . . . . . . . . . . 64 6.5.5 WLAN time control . . . . . . . . . . . . . . . . . . . . . . . . . . . . . . . . . . . . . . . . . . . . . . . 67 6.5.6 Wi-Fi Protected Setup . . . . . . . . . . . . . . . . . . . . . . . . . . . . . . . . . . . . . . . . . . . . . 69 6.5.7 WiFi Move Technology . . . . . . . . . . . . . . . . . . . . . . . . . . . . . . . . . . . . . . . . . . . . 71
devolo dLAN 500 AV Wireless+

Contents
6.6 Management . . . . . . . . . . . . . . . . . . . . . . . . . . . . . . . . . . . . . . . . . . . . . . . . . . . . . . . . . . . 72 6.6.1 Resetting the configuration . . . . . . . . . . . . . . . . . . . . . . . . . . . . . . . . . . . . . . . . . 73 6.6.2 Saving a configuration file . . . . . . . . . . . . . . . . . . . . . . . . . . . . . . . . . . . . . . . . . 74 6.6.3 Restoring a configuration . . . . . . . . . . . . . . . . . . . . . . . . . . . . . . . . . . . . . . . . . . 75 6.6.4 Update firmware . . . . . . . . . . . . . . . . . . . . . . . . . . . . . . . . . . . . . . . . . . . . . . . . . 76
7 Appendix . . . . . . . . . . . . . . . . . . . . . . . . . . . . . . . . . . . . . . . . . . . . . . . . . . . . . . . . . . . . . . . . 77
7.1 Important safety instructions . . . . . . . . . . . . . . . . . . . . . . . . . . . . . . . . . . . . . . . . . . . . . . . 77 7.2 Disposal of old devices . . . . . . . . . . . . . . . . . . . . . . . . . . . . . . . . . . . . . . . . . . . . . . . . . . . 78 7.3 Warranty conditions . . . . . . . . . . . . . . . . . . . . . . . . . . . . . . . . . . . . . . . . . . . . . . . . . . . . . 78
devolo dLAN 500 AV Wireless+

Contents
devolo dLAN 500 AV Wireless+

|
|
|
|
|
|
Preface 7 |
|
|
|
|
|
|
|
||
1 Preface |
|
|
|
|
dLAN Cockpit App from the respective store. Chapter |
||
|
|
|
|
|
|
4 describes configuration options in detail for the built- |
|
1.1 Thank you! |
|
|
|
in configuration interface, including access to the |
|||
|
|
|
WLAN. What you need to do to integrate your |
||||
With the dLAN 500 AV Wireless+, you have chosen |
dLAN 500 AV Wireless+ into the dLAN network and |
||||||
how you can monitor it using dLAN Cockpit App and |
|||||||
a HomePlug AV device that combines the advantag- |
|||||||
dLAN Cockpit software is covered in Chapter 5. Infor- |
|||||||
es of the two network standards dLAN and WLAN. |
|||||||
mation about product safety and the environmental |
|||||||
In addition, the dLAN 500 AV Wireless+ has three |
|||||||
compatibility of the device and our warranty terms can |
|||||||
LAN ports for directly connecting computers or other |
|||||||
be found in Chapter 6 and conclude the manual. |
|||||||
network components. The dLAN 500 AV Wireless+ |
|||||||
|
|||||||
enables wireless surfing at transfer rates of up to |
Description of the symbols |
||||||
500 Mbps via dLAN and of up to 300 Mbps via |
|||||||
Here we briefly describe the meaning of the symbols |
|||||||
WLAN in every room of your building—even on the |
|||||||
other side of thick concrete walls! |
|
|
used in this manual. |
||||
You can have all of your home network's dLAN and |
Very important note. Failure to ob- |
||||||
serve this note may result in damage. |
|||||||
WLAN devices available at a glance anywhere and |
|||||||
|
|||||||
any time using dLAN Cockpit App for smartphones |
Important note that should be ob- |
||||||
and |
tablet |
PCs |
together |
with |
the |
||
served. |
|||||||
dLAN 500 AV Wireless+. |
|
|
|
||||
|
|
|
|
||||
1.1.1 |
About this manual |
|
|
Additional information, background material |
|||
|
|
and configuration tips for your device. |
|||||
In addition to a small introduction to the basics of |
|||||||
|
|||||||
"dLAN" and "WLAN" and a presentation of |
If you have any further ideas or suggestions related to |
||||||
dLAN 500 AV Wireless+ |
devolo |
products |
and |
our products, we would be delighted to hear from you |
|||
dLAN Cockpit App in Chapter 2, in Chapter 3 you will |
at support@devolo.com! |
||||||
learn about how to successfully |
start up |
the |
|
||||
dLAN 500 AV Wireless+ and how you can download |
|
||||||
devolo dLAN 500 AV Wireless+

8 Preface
devolo on the Internet
For detailed information on our products or "dLAN", visit www.devolo.com. The Service Centre area contains downloadable product descriptions and documentation, as well as updates to devolo software and device firmware.
1.2 CE conformity
This product complies with the technical requirements of the directive 1999/5/EC (R&TTE) and the other relevant provisions of the FTEG, and it is designed for use in the EU and Switzerland. The product is class A equipment. Class A devices may cause interference when used in residential environments.
"99/05/CE" (R&TTE directive) is a directive similar to the EMC directive. It applies to radio equipment and telecommunication terminal equipment.Observance of these directives is verified by the use of harmonized European norms.
For the CE declaration for this product, refer to the accompanying product CD under CE.
For the permitted voltage range for operating the device and the power consumption, refer to the label on the rear side of the device. Additional technical information is available at www.devolo.com.
devolo dLAN 500 AV Wireless+

|
Introduction 9 |
|
|
|
|
2 Introduction |
es. Such access points are frequently combined in a |
|
dLAN is an intelligent, secure technology that lets you |
single device with modems for Internet access and |
|
routers to manage network traffic. |
||
set up a home network easily, quickly and economical- |
The wireless network established by an access point |
|
ly via your household electrical wiring, without the |
||
using a specific channel (from 1 to 140) and name |
||
need for complex and expensive dedicated cabling. |
||
(SSID) has a limited range. The range of the access |
||
|
||
2.1 What exactly is dLAN? |
point, which is also known as a "radio cell", is impeded |
|
by building walls. In some cases, stable connections |
||
dLAN (direct Local Area Network) uses the household |
are often only possible between WLAN devices within |
|
a single room. |
||
power grid to transfer data between computers |
||
|
||
equipped with suitable adapters and other network |
As it is not possible to rely on hardware such as net- |
|
components. As a result, any power outlet can be used |
work cables (in a LAN) or household wiring (in a dLAN) |
|
as a network access point. The data is modulated prior |
to control access to a WLAN, wireless networking nat- |
|
to transfer and sent as a signal via household power |
urally presents special security challenges. WLANs |
|
lines. State-of-the-art technology ensures that the |
therefore use a number of security measures, such as a |
|
power and data networks do not interfere with one an- |
concealed network name, data encryption and access |
|
other. Networking via dLAN is fast and secure. The |
control via the MAC addresses of the network adapt- |
|
data is encrypted using a key to prevent interception by |
ers. |
|
third parties. |
|
2.2 What is WLAN?
WLAN (Wireless Local Area Network) refers to the use of radio technology to network computers and other devices. While it is possible to wirelessly connect computers in pairs (peer-to-peer, p2p), a central access point is required to set up a network of multiple devic-
2.2.1 Wi-Fi or WLAN?
Wi-Fi is an invented brand name of the Wi-Fi Alliance, a consortium that certifies devices with wireless interfaces. In many countries, Wi-Fi is also used synonymously with WLAN, which if taken strictly, is incorrect, because Wi-Fi designates the wireless standard and
WLAN the wireless network.
devolo dLAN 500 AV Wireless+
10 Introduction
2.3 dLAN 500 AV Wireless+ |
2.3.1 dLAN Cockpit App |
The dLAN 500 AV Wireless+ unites the technologies of LAN, WLAN (wireless) and dLAN in one case:
It has three LAN ports for directly connecting three network components.
The adapter provides an optimal connection for wireless terminal devices such as laptops, smartphones or tablet PCs (Apple/Android) via WLAN.
Using dLAN, different rooms can be made accessible via the mains supply without any problems and every power outlet is also the new
Wi-Fi access point—with WiFi Move Technology, you have optimal Wi-Fi reception for smartphones, laptops and tablets in the entire home – completely automatically (at least two dLAN 500 AV Wireless+ adapters required).
Power strips and other devices using up to 16 amps can be connected via the integrated power outlet.
dLAN 500 AV Wireless+ is the link between dLAN Cockpit App and the dLAN network. It collects all of the dLAN data in the local network and provides it to dLAN Cockpit App.
dLAN Cockpit App is devolo's free app, for checking and configuring WLAN, dLAN and LAN connections for the dLAN 500 AV Wireless+ (via smartphone or tablet PC). The smartphone or tablet PC connects to the dLAN 500 AV Wireless+ at home via WLAN.
2.3.2 WiFi Move Technology
WiFi Move Technology is a function of the dLAN 500 AV Wireless+ for automatic synchronisation
of |
the |
entire |
Wi-Fi |
settings |
of |
all |
dLAN 500 AV Wireless+ adapters connected |
to |
|||||
your home network. WiFi Move Technology is activated easily at the touch of a button on the adapter. For more information, refer to Chapter 3 Quick start.
devolo dLAN 500 AV Wireless+
Introduction 11
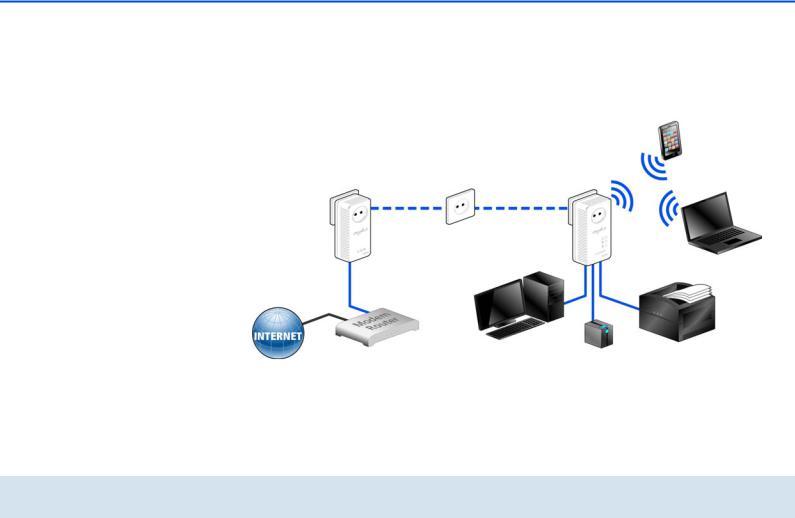
2.3.3 Sample applications |
work |
via |
Wi-Fi. |
Each |
additional |
On the one hand, you connect fixed network devices, |
dLAN 500 AV Wireless+ adapter (e.g. one |
on every |
|||
such as computers and Internet access devices, by |
storey) makes it easy for you to enable full Internet ac- |
|
cess everywhere in the home via Wi-Fi and/or dLAN. |
||
dLAN. On the other hand, you include devices such as |
||
|
||
smartphones, laptops and tablets in your home net- |
|
Fig. 1
devolo dLAN 500 AV Wireless+

12 Introduction
WiFi Move Technology
Thanks to WiFi Move Technology, an automatic synchronisation of the Wi-Fi settings takes place between all dLAN 500 AV Wireless+ adapters, freeing you of the hassle of configuring of each individual dLAN 500 AV Wireless+ adapter.
Fig. 2
For WiFi Move Technology at least two dLAN 500 AV Wireless+ adapters are required.
devolo dLAN 500 AV Wireless+

|
|
Quick start 13 |
|
|
|
|
|
3 Quick start |
|
CD containing software and online documen- |
|
This chapter covers everything you need to know to |
tation |
||
devolo AG reserves the right to change the package |
|||
quickly set up your dLAN 500 AV Wireless+ in |
the |
||
contents without prior notice. |
|||
dLAN and Wi-Fi network. In addition, we will lead you |
|||
|
|||
through the installation of the devolo software.
3.2 System requirements
3.1 Package contents
Please ensure that the delivery is complete before beginning with the installation of your dLAN 500 AV Wireless+.
Single Kit:
dLAN 500 AV Wireless+
Network cable
Hard copy of installation guide
CD containing software and online documentation
or
Starter Kit:
dLAN 500 AV Wireless+
dLAN 500 AVplus
Network cable
Hard copy of installation guide
Operating systems: Windows XP (32-bit), Windows Vista Home Premium (32-bit/64-bit), Windows 7 Home Premium (32-bit/64-bit), Linux (Ubuntu), Mac OS X
Network connection
Please note that your computer or other device must feature a network adapter with a network port.
To set up a dLAN (AV) network, you need at least two dLAN (AV) devices (200 Mbps or 500 Mbps).
devolo dLAN 500 AV Wireless+

14 Quick start
3.3Connecting the
dLAN 500 AV Wireless+
Expanding an existing dLAN network by adding a new dLAN 500 AV Wireless+ (single kit)
Take |
note |
of |
the |
dLAN 500 AV Wireless+ |
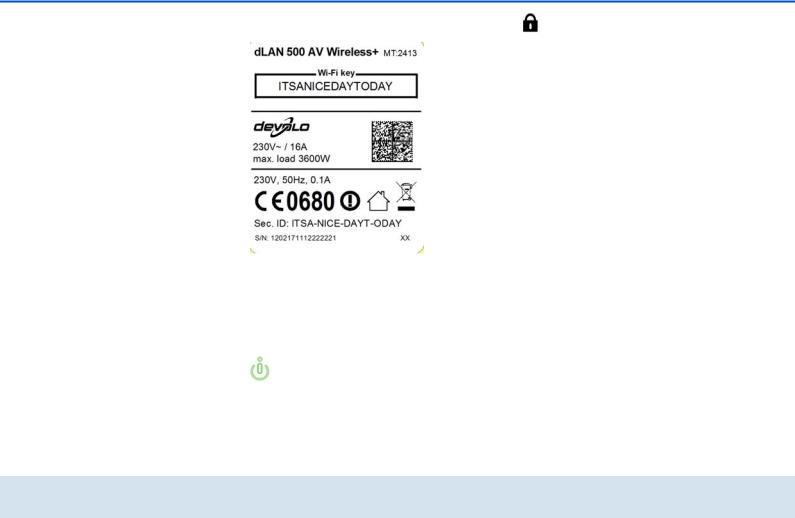
Wi-Fi key |
be- |
|
fore the networking procedure. You will find the unique adapter key on the label on the back of the housing.
Plug the dLAN 500 AV Wireless+ into a wall socket. As soon as the dLAN indicator light lights green (after approx. 45 seconds), the adapter is ready to operate.
If you only want to use the Wi-Fi function on the dLAN 500 AV Wireless+, plug the adapter into a power outlet, without any cables whatsoever. You can also connect the dLAN 500 AV Wireless+ to the network jack of a network device, such as a computer, with a commercially available network cable. (see 2.3.3 Sample applications)
The power outlet should be in range of the connected network device.
The dLAN 500 AV Wireless+ with the cable-based network device should be easy to access.
To switch off the dLAN 500 AV Wireless+ or disconnect it from the mains supply, pull the power plug out of the power outlet.
If you have already secured your existing dLAN network using the encryption button, use the same method to integrate further adapters. Once
you have successfully |
connected the new |
dLAN 500 AV Wireless+, |
first press the encryp- |
tion button (approx. 1 second) of one of your network's existing adapters, then press the encryption button (approx. 1 second) of your new dLAN 500 AV Wireless+ within two minutes.
That's it! The new dLAN 500 AV Wireless+ is now integrated into your existing dLAN network.
In order to connect the dLAN 500 AV Wireless+ with your laptop, tablet or smartphone by Wi-Fi, enter the previously noted Wi-Fi key as the network security key.
devolo dLAN 500 AV Wireless+

Quick start 15
Begin carrying out the configuration of your network in order to secure your Wi-Fi network in a customised manner. For more information, refer to Chapter
6 Network configuration.
Encrypting a new dLAN network with one or more dLAN 500 AV Wireless+s and a dLAN 500 AVplus (starter kit and single kit)
Note |
the |
Wi-Fi key |
of |
the |
dLAN 500 AV Wireless+ |
before |
the |
||
networking procedure. You will find the unique adapter key on the label on the back of the housing.
Connect the dLAN 500 AVplus to your Internet access device's network jack.
Plug the dLAN 500 AV Wireless+ into a wall socket. As soon as the dLAN indicator light lights green (after approx. 45 seconds), the adapter is ready to operate.
If you only want to use the Wi-Fi function on the dLAN 500 AV Wireless+, plug the adapter into a power outlet, without any cables whatsoever. You can also connect the dLAN 500 AV Wireless+ to the network jack of a network device, such as a computer, with a commercially available network cable (see 2.3.3 Sample applications).
The power outlet should be in range of the connected network device.
The dLAN 500 AV Wireless+ with the cable-based network device should be easily accessible.
To switch off the dLAN 500 AV Wireless+ or disconnect it from the mains supply, pull the power plug out of the power outlet.
After you have successfully connected both adapters, press first the encryption button of the dLAN 500 AVplus (approx. 1 second) and then
the |
dLAN |
button |
of |
the |
dLAN 500 AV Wireless+ (approx. |
1 second) |
|||
within two minutes. |
|
|
|
|
devolo dLAN 500 AV Wireless+

16 Quick start
That's it! Your dLAN network is now protected against unauthorised access.
In order to connect the dLAN 500 AV Wireless+ via Wi-Fi with your laptop, tablet or smartphone, enter the previously noted Wi-Fi key as the network security key.
Begin carrying out the configuration of your network in order to secure your Wi-Fi network in a customised manner. For more information, refer to Chapter
6 Network configuration.
WiFi Move Technology |
|
|
||
If |
you |
want to |
use |
the |
WiFi Move Technology |
function |
also |
||
with |
older |
dLAN 500 AV Wireless+ |
||
adapters, please update the firmware via the configuration interface of the dLAN 500 AV Wireless+ or by using the software dLAN Cockpit. More information can be found in Chapter 6.6.4 Update firmware and 5.3 dLAN Cockpit.
To integrate additional dLAN 500 AV Wireless+s into your home network, repeat step .
Within 2 minutes, first press the dLAN button
of the existing dLAN 500 AV Wireless+
(approx. 1 second) and finish by pressing the dLAN button of the new dLAN 500 AV Wireless+ (approx. 1 second).
The existing dLAN 500 AV Wireless+ transmits its entire Wi-Fi configuration to the new dLAN 500 AV Wireless+ adapter. The existing and the new dLAN 500 AV Wireless+ adapters are now continuously connected with each other, and from now on exchange changes to the Wi-Fi configuration automatically with each other.
For |
more |
information |
on |
the |
WiFi Move Technology, refer to |
Chapter 2 |
|||
Introduction and 6.5.7 WiFi Move Technology.
3.4 Installation of devolo software
Downloading dLAN Cockpit App
Download the dLAN Cockpit App to your smartphone or tablet computer from the corresponding store.
You can find the dLAN Cockpit App quickest by clicking on the magnifying glass in the store and searching directly for dLAN Cockpit.
devolo dLAN 500 AV Wireless+

|
|
|
Quick start 17 |
||
|
|
||||
dLAN Cockpit is placed in your smartphone's or |
You will be asked for permission to transfer anonymous |
||||
tablet app list as usual. Tapping on the |
performance data related to your dLAN adapter to |
||||
dLAN Cockpit icon brings you to the start menu. |
devolo. The data sent to devolo pertains only to the |
||||
You can find more information in Chapter 5.2 |
performance values of your dLAN devices. The data is |
||||
anonymised and will be used exclusively for statistical |
|||||
dLAN Cockpit App. |
|||||
purposes. By providing it, you can help us improve our |
|||||
|
|||||
Software for Windows |
products. You |
can find the |
installed |
software |
|
applications in the Start All Programs devolo |
|||||
The installation wizard installs the adapter's configura- |
|||||
program group. |
|
|
|
||
tion software as well as the devolo dLAN Cockpit on |
|
|
|
||
|
|
|
|
||
the Windows operating system. |
Software for Mac (OS X) |
|
|
||
The dLAN Cockpit software finds all accessible |
The software mac folder contains the dLAN config- |
||||
dLAN adapters in your dLAN network, displays |
uration software. |
|
|
||
information about these devices and encrypts your |
Software for Linux (Ubuntu) |
|
|
||
dLAN network individually. |
|
|
|||
The Software |
Linux folder |
contains |
the dLAN |
||
You can configure your Wi-Fi network, along with |
|||||
other actions, using the configuration inter- |
configuration software. |
|
|
face for your dLAN 500 AV Wireless+. |
|
To install the software, insert the included CD-ROM in |
|
the CD drive of your computer. |
|
If AutoPlay is active on your computer, the in- |
|
stallation will start automatically. Otherwise, |
|
open the directory with the Windows Explor- |
|
er by right-clicking on Start (or the Win- |
|
dows logo) and selecting Explorer from the |
|
context menu. Then start the installation wiz- |
|
ard manually. |
|
devolo dLAN 500 AV Wireless+

18 Quick start
devolo dLAN 500 AV Wireless+

|
Initial use 19 |
|
|
4 Initial use |
introduce the included devolo software and then guide |
This chapter covers everything you need to know to set |
you through its installation. |
|
|
up your dLAN 500 AV Wireless+. It will explain con- |
|
necting the device and its functions. We will also briefly |
|
Fig. 3
devolo dLAN 500 AV Wireless+
20 Initial use
4.1 Package contents
Please ensure that the delivery is complete before beginning with the installation of your dLAN 500 AV Wireless+.
Single Kit:
dLAN 500 AV Wireless+
Network cable
Hard copy of installation guide
CD containing software and online documentation
or
Starter Kit:
dLAN 500 AV Wireless+
dLAN 500 AVplus
Network cable
Hard copy of installation guide
CD containing software and online documentation
devolo AG reserves the right to change the package contents without prior notice.
4.2 System requirements
Operating systems: Windows XP (32-bit), Windows Vista Home Premium (32-bit/64-bit), Windows 7 Home Premium (32-bit/64-bit), Linux (Ubuntu), Mac OS X
Network connection
Please note that your computer or other device must feature a network adapter with a network port.
To set up a dLAN network, you need at least two dLAN devices (200 Mbps or 500 Mbps).
devolo dLAN 500 AV Wireless+

|
|
|
|
Initial use 21 |
|
|
|
|
|
4.3 Functions |
|
|
|
Check whether the adapter is connected to |
The dLAN 500 AV Wireless+ has |
the following |
ele- |
the mains supply correctly and whether the |
|
encryption process has been carried out suc- |
||||
ments: |
|
|
|
cessfully. For more information, refer to 4.4 |
4.3.1 Indicator lights |
|
|
|
Connecting the dLAN 500 AV Wireless+ |
|
|
|
and 5 dLAN network. |
|
The indicator lights (LEDs) show all of the statuses for |
Green: The network connection is suitable for HD |
|||
the dLAN 500 AV Wireless+ by |
illuminating and/or |
|||
flashing in different ways: |
|
|
|
video streaming; flashes when data is being trans- |
|
|
|
mitted. |
|
Power |
|
|
|
|
|
|
|
Orange: The network connection is suitable for |
|
Green flashing and illumination behaviour: |
|
|||
|
SD video streaming and online gaming; flashes |
|||
The LED lights up |
green |
when |
the |
when data is being transmitted. |
dLAN 500 AV Wireless+ is operational. |
|
Red: The network connection is suitable for sim- |
||
The LED flashes |
briefly, |
if |
the |
ple data transfer and Internet access; flashes |
dLAN 500 AV Wireless+ |
is in PowerSave |
when data is being transmitted. |
||
mode.
The LED flashes at quick, regular intervals, if the dLAN 500 AV Wireless+ is connecting to the dLAN network (pairing).
dLAN
Off: The LED does not light up. There is no connection to the dLAN network.
devolo dLAN 500 AV Wireless+

22 Initial use
WLAN
Off: The LED does not light up. The WLAN connection is disabled.
Green flashing and illumination behaviour:
The LED lights up when connected to the WLAN network at 2.4 GHz.
The LED flashes at quick, regular intervals when data is being transmitted.
The LED flashes briefly during WPS pairing.
Blue flashing and illumination behaviour
The LED lights up when connected to the WLAN network at 5 GHz.
The LED flashes at quick, regular intervals when data is being transmitted.
The LED flashes briefly during WPS pairing.
Ethernet
Off: The LED does not light up.
Check all of the cable connections and check if the connected network components are disabled.
4.3.2 Buttons
 ON/OFF
Use the ON/OFF button to switch the WLAN function on or off.
Make sure that the WLAN function in the factory defaults is enabled and the WLAN encryption is set to WPA2. The default WLAN key is the Wi-Fi key of
Green: Lit steady when a connection to the Ethernet network exists; flashes when data is being transmitted.
devolo dLAN 500 AV Wireless+
Initial use 23
the dLAN 500 AV Wireless+. You will find the |
dLAN |
|
key on the label on the back of the housing. |
||
Encrypting the dLAN network |
||
|
||
|
To encrypt your dLAN network individually, |
|
|
press each encryption button on the con- |
|
|
nected devices for approx. 1 second – within |
|
|
2 minutes. |
|
|
To remove a dLAN device from your network, |
|
|
press the encryption button on the corre- |
|
|
sponding device for at least 10 seconds |
|
|
(see 5.1 dLAN network encryption at the |
|
|
touch of a button). |
|
|
WiFi Move Technology |
 WPS
WPS
With the WPS (Wi-Fi Protected Setup) encryption button, you secure your WLAN network at the touch of a button.
WPS is one of the encryption standards developed by the Wi-Fi Alliance for increasing security in a WLAN home network. The objective of WPS is to make it easier to add devices to an existing network. For more detailed information, refer to Chapter 6.4.1 Security.
WiFi Move Technology is a function for synchronising the Wi-Fi settings of all dLAN 500 AV Wireless+ adapters connected to your home network.
Within 2 minutes first press the dLAN button of the existing dLAN 500 AV Wireless+ (approx. 1 second) and finish by pressing
the dLAN button of |
the new |
dLAN 500 AV Wireless+ |
(approx. |
1 second).
The existing dLAN 500 AV Wireless+ transmits its entire Wi-Fi configuration to the new dLAN 500 AV Wireless+ adapter. The existing and the new dLAN 500 AV Wireless+ adapters are now continuously connected
devolo dLAN 500 AV Wireless+

24 Initial use
with each other, and from now on exchange changes to the Wi-Fi configuration automatically with each other.
If |
you |
want to |
use |
the |
WiFi Move Technology |
function |
also |
||
with |
older |
dLAN 500 AV Wireless+ |
||
adapters, please update the firmware via the configuration interface of the dLAN 500 AV Wireless+ or by using the software dLAN Cockpit. More information can be found in Chapter 6.6.4 Update firmware and 5.3 dLAN Cockpit.
For |
more |
information |
on |
the |
WiFi Move Technology, refer |
to |
Chapter |
||
6.5.7 WiFi Move Technology. |
|
|
||
 Reset
Reset
The Reset button (on the side of the housing) has two different functions:
The device restarts if you press the Reset button for less than 10 seconds.
To change the |
configuration |
of the |
dLAN 500 AV Wireless+ |
back to the |
factory |
defaults, press the Reset button for more than 10 seconds. Keep in mind that all settings that have already been configured will be lost!
You can use the tip of a drawing pin to press the reset button.
4.3.3 Network jacks
The three LAN ports can be used to connect computers or other network devices to the
devolo dLAN 500 AV Wireless+
Loading...