

Page 1

devolo
BPL Modem MV
Page 2

BPL Modem MV
Page 3

© 2017 devolo AG Aachen (Germany)
While the information in this manual has been compiled with great care, it may not be deemed an assurance of product characteristics. devolo
shall be liable only to the degree specified in the terms of sale and delivery.
The reproduction and distribution of the documentation and software supplied with this product and the use of its contents is subject to written
authorization from devolo. We reserve the right to make any alterations that arise as the result of technical development.
Trademarks
devolo and the devolo logo are registered trademarks of devolo AG.
EICHHOFF and the EICHHOFF logo are registered trademarks of EICHHOFF Kondensatoren GmbH.
All other names mentioned may be trademarks or registered trademarks of their respective owners. Subject to change without notice. No liability
for technical errors or omissions.
devolo AG
Charlottenburger Allee 60
52068 Aachen
Germany
www.devolo.com/smart
Aachen, May 2017
Version 1.0_May 2017
Page 4

devolo BPL Modem MV
Contents
1 Intended use............................................................................................................................................ 5
2 Important safety notes ............................................................................................................................ 6
3 Installation .............................................................................................................................................. 6
4 Description of the connections ............................................................................................................... 7
5 Broadband Powerline communication (BPL) .......................................................................................... 8
6 Package contents .................................................................................................................................... 8
7 Basic structure of a BPL network in the medium-voltage infrastructure area ...................................... 9
8 Using the modems in the factory defaults ............................................................................................ 11
9 Management software properties ........................................................................................................ 13
10 Example application .............................................................................................................................. 14
11 Setting up the modem ........................................................................................................................... 17
12 Medium-voltage signal coupler installation ......................................................................................... 26
Page 5
devolo BPL Modem MV
5
This manual describes the properties,handling and basic installation steps. Carefully read all instructions before initial use of the device and store the manual for later reference.
Icons
This section contains a brief description of the icons used in this manual.
Very important note. Failure to observe this note may result in damage.
Important note that should be observed.
1 Intended use
Ensure that the BPL Modem MV is used according to its intended use in order to prevent damage
to this or other devices:
The intended use of the BPL Modem MV is the implementation of a PLC network of SMART GRID
devices in the medium-voltage grid in combination with inductive or capacitive medium-voltage signal couplers.
The BPL Modem MV is intended for installation on the DIN rail. The device is intended for blackoutsafe operation using a (network buffered) 24V DC nominal accumulator.
1.1 CE conformity
The product conforms to the requirements from the directives
쎲 2014/35/EU
The product is intended for operation in the EU, Switzerland and Norway.
This product is a Class A device.
쎲 RoHS 2011/65/EU
쎲 ErP 2009/125/EC and the other relevant provisions of the Radio and Telecommunications Ter-
minal Equipment Act (FTEG).
You can find the CE declaration for the product online at www.devolo.com/smart
.
1.2 Disposal of old devices
The WEEE Directive 2012/19/EU is used to prevent the occurrence of waste electrical and
electronic equipment and to reduce this type of waste through reuse, recycling and other
forms of utilisation. It establishes minimum standards for handling waste electrical and
electronic equipment in the EU.
Page 6
devolo BPL Modem MV
6
1.3 devolo on the Internet
For detailed information on our products, visit www.devolo.com/smart
.
The download area provides you not only with product descriptions and documentation, but also
updates for devolo software.
If you have any further ideas or suggestions related to our products, please don't hesitate to contact
us at sg-support@devolo.com
!
2 Important safety notes
It is essential to have read and understood all safety and operating instructions before the device is
used for the first time; these should then be kept safe for future reference.
Installation may only be carried out upon instruction of the respective power company and by an installation company registered in the power company's installation directory.
If possible, install the device when it is de-energised. Be aware of the relevant safety instructions, otherwise there is risk of electric shock or electric
arcing (risk of burns).
The line properties and cross-sections for connecting the BPL Modem MV
must be selected based on the fuse protection. The current value of the fuse
protection should be 2A.
Additional restrictions on installation authorisation may apply at the intended installation location. This requires co-ordination with the associated power company.
3 Installation
Install the BPL Modem MV properly on the top-hat rails. Take into account the vertical installation
alignment of the BPL Modem MV so that the mains power supply comes from below and the label
is legible in an upright position.
Page 7
devolo BPL Modem MV
7
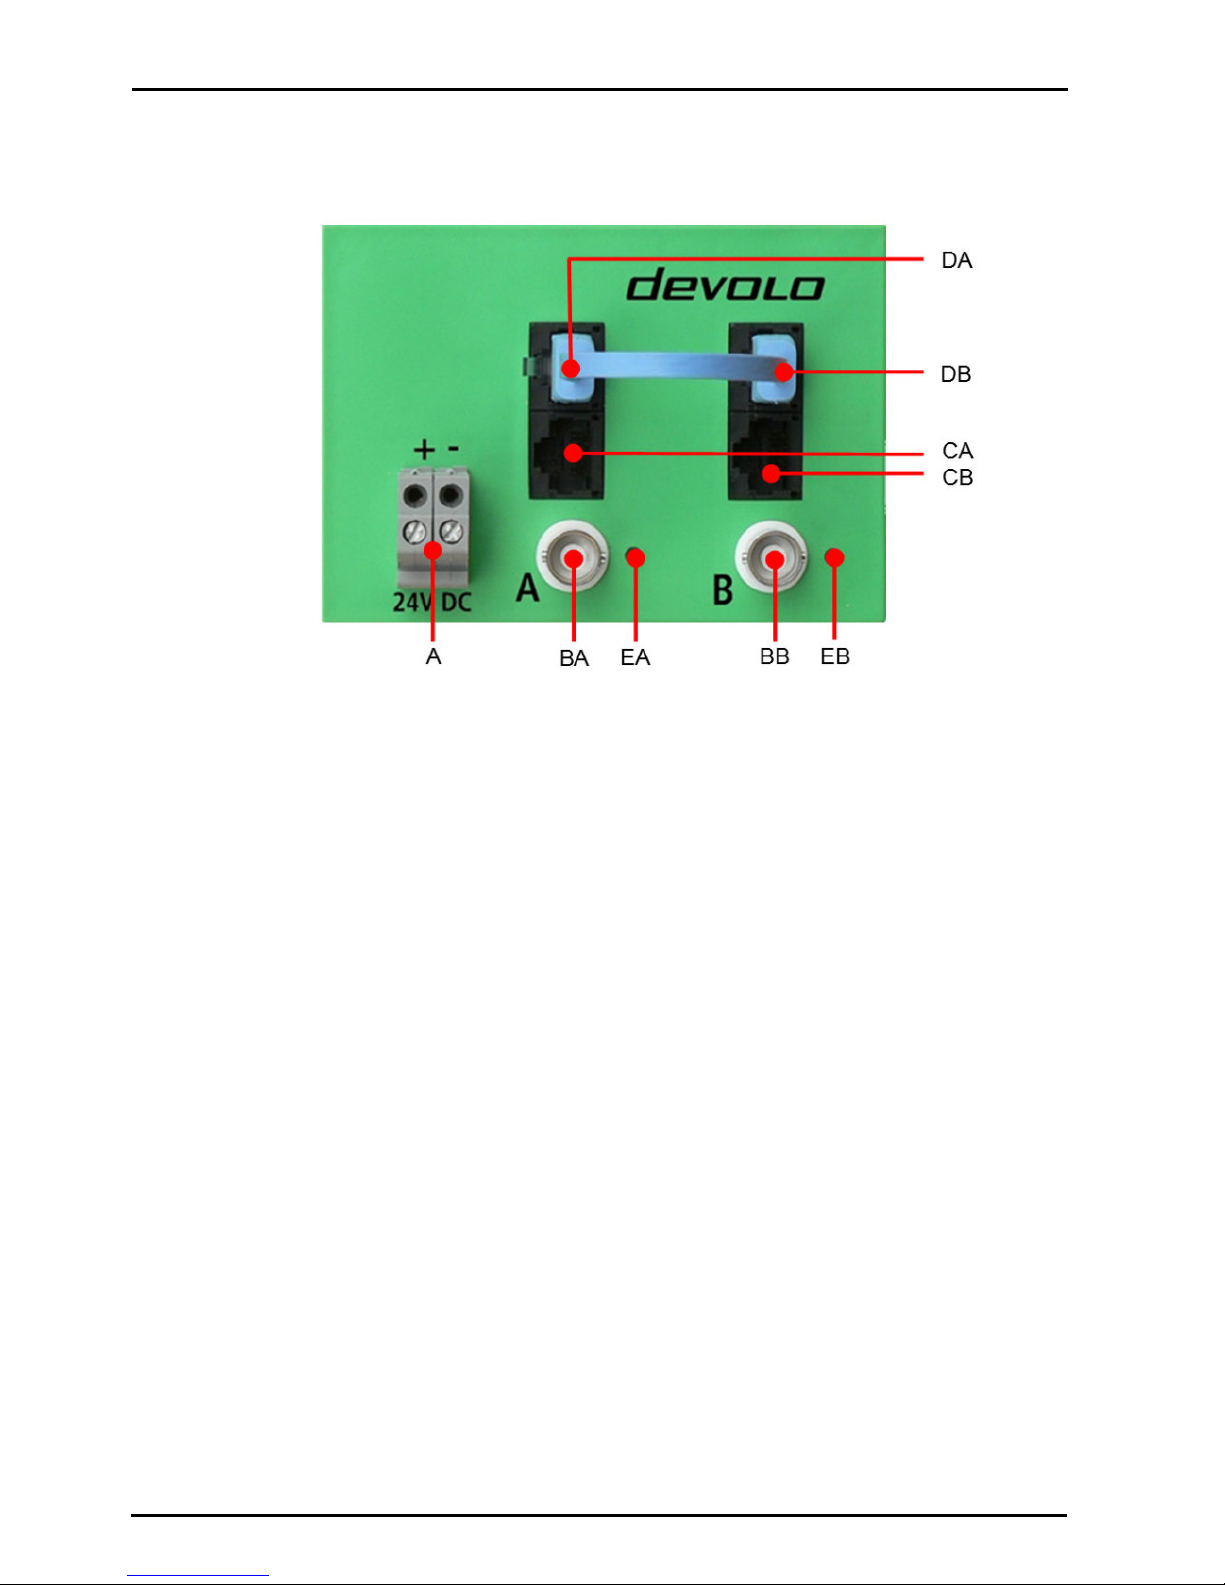
4 Description of the connections
A
Supply voltage connection – Connect the terminals to the corresponding DC current power
supply conductors here.
BA Part modem A BNC connection – Connect the BNC connections to the corresponding BNC
feed line to the medium-voltage signal couplers.
BB Part modem B BNC connection: Connect the BNC connections to the corresponding BNC
feed line to the medium-voltage signal couplers.
DA RJ45 Ethernet jack of part modem A – RJ45 Ethernet jack part modem A for the connec-
tion of compatible Ethernet devices over an RJ45 Ethernet cable.
DB RJ45 Ethernet jack of part modem B – RJ45 Ethernet jack part modem B for the connec-
tion of a compatible Ethernet device over an RJ45 Ethernet cable.
CA Back-To-Back connection of modem A – connect the BPL Modem MV to CB using the
included RJ45 patch cable.
CB Back-To-Back connection of part modem B – connect the BPL Modem MV to CA using
the included RJ45 patch cable.
EA Part modem A control display – is illuminated steady GREEN as soon as part modem A
has a PLC data connection.
EB Part modem B control display – is illuminated steady GREEN as soon as part modem B has
a PLC data connection.
Fig. 1: Description of the connections
Page 8
devolo BPL Modem MV
8
5 Broadband Powerline communication (BPL)
Broadband Powerline communication (BPL) for low-voltage and medium-voltage power line infrastructure is a reliable and secure technology for smart grids. It enables data connections for automation, control and monitoring in almost real time using the electrical wiring without the need to
route data cables.
The BPL Modem MV works with a data transmission method in accordance with the international
data transmission standard IEEE1901 and was specifically developed for the interference-resistant
inductive EICHHOFF signal coupler technology.
For this purpose, high-frequency currents with a smaller amplitude for data transmission are modulated directly onto the operating company mains.
The possible transmission paths between medium-voltage switchgear are up to approximately
800 m in conjunction with interference-suppressing, inductive EICHHOFF signal couplers and can
be expanded at any time by bridging the BPL Modem MV.
Data connections can be run so that they are blackout-safe via the BPL Modem MV thanks to the
provided (network buffered) DC power supply from the accumulators of 24V DC nominal.
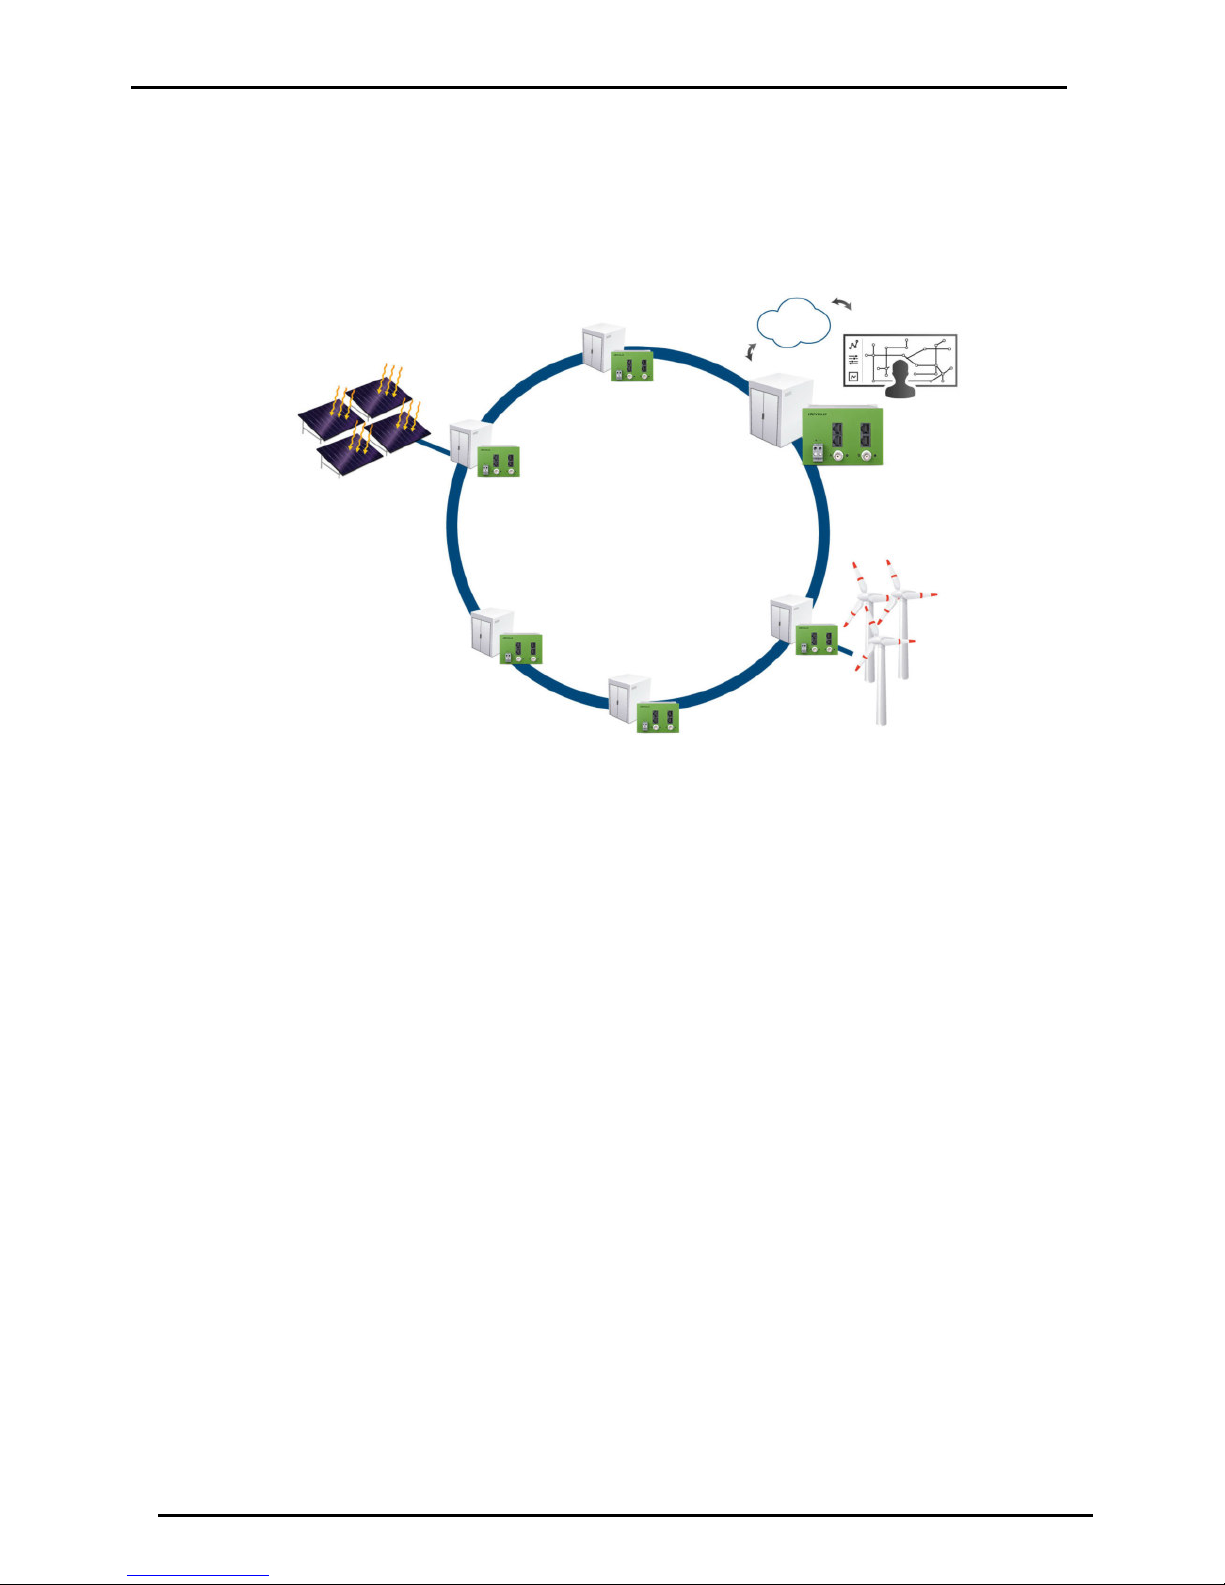
6 Package contents
The following components are contained within the devolo BPL Modem MV scope of delivery:
쎲 devolo BPL Modem MV
쎲 slim RJ45 patch cable, 10 cm
쎲 Installation flyer
Fig. 2: BPL medium-voltage ring
Page 9

devolo BPL Modem MV
9
7 Basic structure of a BPL network in the medium-volt-
age infrastructure area
A BPL network in the infrastructure area is always set up as a point-to-point data connection between switchgear and cable distribution points. This is fundamentally different than the PLC networks in the low-voltage area.
The primary goal of a BPL network in the medium-voltage infrastructure area is the maximum reliability of the data connection between switchgear and cable distribution points. A particularly high
transmission rate is only of secondary importance.
The basic structure of a BPL network designed for the reliability of the data connection in the
infrastructure area is to be illustrated based on a typical example from the medium-voltage
infrastructure area:
An open switch in the medium-voltage switchgear interrupts the Powerline
communication on the corresponding strand.
The BPL overall network is divided into route-related subnets in order to arrive at a clearly defined
structure:
The great advantage of splitting the overall BPL network into route-related subnets is that each
route-related subnet receives exactly one transmission task that can accurately be defined physically
and solved optimally on an individual basis.
Route-related subnet A connects the medium-voltage switchgear 4 and 1.
Route-related subnet B connects the medium-voltage switchgear 2 and 3.
Additional route-related subnets where the number is not limited.
The subnets are technically coupled to each other for data transmission using
RJ45 patch cables.
Fig. 3: BPL network
Page 10

devolo BPL Modem MV
10
This is the only network architecture that makes it possible to fully utilize the inductive power coupling with EICHHOFF signal couplers, which bundle the modem transmitting energy precisely to this
cable connection using a type of directional antenna.
The maximum reliability and range of BPL data connection is reached in combination with the simultaneously very high levels of suppression of interference signals via the EICHHOFF signal couplers developed specifically for BPL.
The technical implementation of the data connection of individual subnets takes place
using what is known as bridging with a short RJ45 patch cable (see scope of delivery):
Fig. 4: Bridging
Page 11

devolo BPL Modem MV
11
8 Using the modems in the factory defaults
The BPL Modem MV is already preconfigured in the factory defaults for simple data transmission
applications (as they appear in typical field tests for the evaluation of the technology).
Because you are the most familiar with your medium-voltage grid, you should also install the medium-voltage couplers yourself. We are, of course, available to assist you. As a reminder:
Each BPL Modem MV has two BNC sockets for connection of medium-voltage couplers. Two modems that are independent of each other are located behind these BNC sockets:
쎲 Modem A (marked with A)
쎲 Modem B (marked with B)
Note:
쎲 A modem A automatically connects to a modem A in the factory defaults.
쎲 A modem B automatically connects to a modem B in the factory defaults.
쎲 A modem A never connects to a modem B automatically in the factory defaults and vice versa.
Modem A and modem B have the same network name as these modems in the factory defaults.
It is essential to have read and understood all safety and operating instructions before the device is used for the first time; these should then be kept
safe for future reference (see Chapter 2 Important safety notes ).
Fig. 5: BPL Modem MV
Page 12

devolo BPL Modem MV
12
Example
Say the medium-voltage grid operator in „Example City“ wants to establish a BPL data connection
between ONS Seeweg 9 and ONS Fleischhauer Street 19 using two BPL Modem MVs, with factory
defaults unchanged.
햲 Install a BPL Modem MV in the ONS Seeweg 9 as well as the medium-voltage coupler on the
cable output to Fleischhauer Street 19.
햳 Connect part modem A (BNC socket A) to the medium-voltage couplers.
햴 Install a BPL Modem MV in the ONS Fleischhauer Street 19 as well as the medium-voltage cou-
pler at the cable output to Seeweg 9.
햵 Connect part modem A (BNC socket A) to the medium-voltage couplers.
햶 After a few seconds the LED on part modem A changes from flashing green to a (continuously)
illuminated status:
쑗 Green: Data rate over 40 Mbps
쑗 Orange: Data rate over 15 Mbps
쑗 Red: Insufficient connection stability
The modems are ready to operate and provide a transparent and encrypted TCP/IP connection between the Ethernet ports on part modem A.
Expand your BPL data transmission:
To connect the ONS Pharmacy to this BPL data transmission, for example, repeat the described operation with part modem B available in ONS Fleischhauer Street 19 and then to part modem B in
ONS Pharmacy.
IONS Fruchtallee 3
ONS Seeweg 9
ONS Fleischhauer Street 19
ONS Pharmacy
Fig. 6: Example of medium-voltage grid
Page 13

devolo BPL Modem MV
13
As soon as both part modems A and B are connected to ONS Fleischhauer Street 19 by a short RJ45
patch cable (included), you have established a BPL data connection between part modem A in the
ONS Seeweg 9 via ONS Fleischhauer Street 19 to part modem B of the ONS Pharmacy.
The following BPL network has been set up:
You can continue this operation as many times as you like by alternating the modem A and
modem B networks according to this installation scheme.
9 Management software properties
BPL Modem MV is set up and monitored by devolo dLAN AVpro manager software version 6.6.2 or
later:
쎲 Management software to support the user during configuration and monitoring
쎲 Global or individual assignment of security settings for databases and devices
쎲 Clearly arranged interface, simple drag & drop control
쎲 No interruption of operation during administration
쎲 Firmware upgrade function for all or individual adapters in the BPL network
쎲 Supports Windows® and Linux®
Fig. 7: BPL network
Page 14

devolo BPL Modem MV
14
10 Example application
In these configuration examples of a (very simple) data connection, a typical configuration that can
be expanded any way is displayed based on the network plan.
Task: Establishing a data connection between IONS Fruchtallee 3 and ONS Fleischhauer Str. 19.
Configure two Powerline networks for communication between the stations:
쎲 Network 1 connects ONS Fruchtallee 3 to ONS Seeweg 9.
쎲 Network 2 connects ONS Seeweg 9 to ONS Fleischhauer Street 19.
Two part modems are integrated in each BPL Modem MV:
쎲 Part modem A
쎲 Part modem B
IONS Fruchtallee 3
ONS Seeweg 9
ONS Fleischhauer Str. 19
ONS Pharmacy
Fig. 8: Network plan excerpt: Example City
Fig. 9: Powerline networks
Page 15

devolo BPL Modem MV
15
Determine which part modem of modems 1 through 3 you want to assign to which network. Both
part modems of each modem are equivalent, meaning their assignment can be freely selected.
The following assignment would be possible:
쎲 Part modem A of modem 1 and part modem A of modem 2 are assigned to network 1.
쎲 Part modem B of modem 2 and part modem B of modem 3 are assigned to network 2.
You can assign each part modem a name during the configuration – the tried-and-tested method is
using a descriptive name that does not need to be unique. Use the network name, for example, and
add either A or B for the part modem A or B:
쎲 A part modem with the name Network 1A would be a part modem A in network 1.
쎲 A part modem with the name Network 2B would be a part modem B in network 2.
Page 16

devolo BPL Modem MV
16
Now create "modem accompanying documents" which are attached to the modems and can additionally be stored in the network control room. The accompanying documents can have the following appearance:
The MAC addresses for part modem A and B are permanently recorded on a modem nameplate. For
modems 2 and 3, this looks as follows:
You can of course record additional pieces of important information on the accompanying documents. An alternative display as a 2D barcode is also possible.
Modem 1:
Fruchtallee 3 location
Part modem A:
Connection from Fruchtallee 3 to Seeweg 9
Network name: Network 1
Part modem name: Network 1A
Part modem B
Connection not used
Network name: not used
Part modem name: not used
Modem 2:
Seeweg 9 location
Part modem A:
Connection: from Fruchtallee 3 to Seeweg 9
Network name: Network 1
Part modem name: Network 1A
Part modem B
Connection: Seeweg 9 to Fleischhauer Street 19
Network name: Network 2
Part modem name: Network 2B
Modem 3:
Fleischhauer Str. 19 location
Part modem A:
Connection: not used
Network name: not used
Part modem name: not used
Part modem B
Connection: Seeweg 9 to Fleischhauer Street 19
Network name: Network 2
Part modem name: Network 2B
Page 17

devolo BPL Modem MV
17
11 Setting up the modem
The assignments described in Chapter 10 Example application must now be assigned to the modems. In the following section, we describe the basic steps for setting up a modem using the
dLAN AVpro manager program.
The preferred location for performing this work is at the workstation. Then, install the configured
modems in the stations.
11.1 Network 1 set-up (Fruchtallee 3 <-> Seeweg 9 connection)
햲 Connect part modem A of modem 1 to the computer and start the dLAN AVpro manager. The
connected modem is displayed in the Unused devices window.
햳 Assign the name for part modem A on modem 1 by right-clicking the device (Change device
data). In this example: Network 1A.
Fig. 10: Unused devices
Page 18

devolo BPL Modem MV
18
Creating a new network 1
햴 Create a new network using the Add network function. The peer-to-peer mode network
type is suitable for the typical application scenarios of the BPL Modem MV.
Fig. 11: Add network
Fig. 12: Add network
Page 19

devolo BPL Modem MV
19
햵 Now add part modem network 1A to network 1 via drag and drop.
This does not mean that device configuration is complete. The configuration
is only written to the device if the network is right-clicked (in this example,
network 1) and the Update network function is activated.
햶 Connect part modem A of modem 2 to the computer. The connected modem is displayed in the
Unused devices window.
햷 Assign the name for part modem A on modem 2 by right-clicking the device (Change device
data). In t
his example: Network 1A.
Fig. 13: Add network
Fig. 14: Connect part modem A of modem 2 to the computer
Page 20

devolo BPL Modem MV
20
햸 Now add part modem network 2A to network 1 via drag and drop.
This does not mean that device configuration is complete. The configuration
is only written to the device if the network is right-clicked (in this example,
network 1) and the Update network function is activated.
햹 The configuration of network 1 is now complete. If both devices are connected, part modem A
of modem 1 in Fruchtallee 3 network 1A should be connected to part modem A of modem 2 in
Seesweg 9 network 1A by Powerline.
Fig. 15: Add part modem to network 1
Page 21

devolo BPL Modem MV
21
Inspection
You can check the modem configuration as follows using dLAN AVpro manager:
햲 Connect part modem A of modem 1 to part modem A of modem 2 via a coaxial line.
햳 If both devices are connected, part modem A of modem 1 should have a data connection to
part modem A of modem 2 via the coaxial line.
햴 If the computer is connected to the dLAN AVpro manager, for example on part modem A of
modem 2, the following view appears:
햵 Both devices are marked with a green dot. This means the devices are accessible. The device
with the MAC address 30:D3:2D:08:78:0C is arranged "above" the other device. This means
this device is locally connected. The "lower" device is reached via BPL. Additionally, the gross
data rate is displayed during data communication (Tx [Mbps], Rx [Mbps]).
Fig. 16: Inspection of network 1
Page 22

devolo BPL Modem MV
22
11.2 Network 2 set-up (Seeweg 9 <-> Fleischhauer Street 19 connection)
햲 Connect part modem B of modem 2 to the computer and start dLAN AVpro manager. The con-
nected modem is displayed in the Unused devices window.
Creating a new network 2
햳 Create a new network using the Add network function.
Fig. 17: Unused devices
Fig. 18: Creating a new network
Page 23

devolo BPL Modem MV
23
햴 Assign a name for part modem B on modem 2 by right-clicking the device (Change device
data). In this example: Network 2B.
햵 Now add part modem network 2B of modem 2 to network 2 via drag and drop.
This does not mean that device configuration is complete. The configuration
is only written to the device if the network is right-clicked (in this example,
network 2) and the Update network function is activated.
Fig. 19: Changing device names
Fig. 20: Add part modem
Page 24

devolo BPL Modem MV
24
햶 Connect part modem B of modem 3 in Fleischhauer Str. 19 to the PC.
햷 Also assign the name for part modem B on modem 3 by right-clicking the device (Change
device data). In this example: Network 2B.
햸 Now add part modem network 2B to network 2 using drag and drop.
This does not mean that device configuration is complete. The configuration
is only written to the device if the network is right-clicked (in this example,
network 2) and the Update network function is activated.
햹 This ensures the configuration of network 2 is complete.
Inspection
You can check the modem configuration as follows using dLAN AVpro manager:
햺 Connect part modem B of modem 2 to part modem B of modem 3 via a coaxial line.
Fig. 21: Connect part modem to the computer
Fig. 22: Add part modem to network 2
Page 25

devolo BPL Modem MV
25
햻 If both devices are connected, part modem B of modem 2 should have a data connection to
part modem B of modem 3 via the coaxial line.
햽 If the computer is connected to dLAN AVpro manager, for example on part modem B of
modem 3, the following view appears:
햾 Both devices are marked with a green dot. This means the devices are accessible. The device
with the MAC address 30:D3:2D:08:49:CE is arranged "above" the other device. This means
this device is locally connected. The "lower" device is reached via BPL. Additionally, the gross
data rate is displayed during data communication (Tx [Mbps], Rx [Mbps]).
11.3 Implementation of the subnet connection
Now, connect both part modems of the BPL Modem MV using the provided Ethernet patch cable
(to ensure two of the four device Ethernet ports are occupied.). Then, connect one of the still available Ethernet ports to the local communication unit ("Kom.") of the switchgear or distribution station.
Fig. 22: Inspection of network 2
Fig. 23: Subnet connection
Page 26

devolo BPL Modem MV
26
12 Medium-voltage signal coupler installation
The medium-voltage signal coupler installation is switchgear and coupler-specific. For this reason,
we refer you to the installation instructions from the manufacturer of the medium-voltage signal
coupler.
 Loading...