

Page 1
®
INS-500/PM February 27, 2003
Detex Corporation, 302 Detex Drive, New Braunfels, Texas 78130 (830)629-2900 1-800-729-3839FAX (830)620-6711
E-Mail: [email protected] Internet: www.detex.com
INSTALLATION INSTRUCTIONS FOR THE EA-500 EXIT ALARM (POLYMER CASE)
THIS PRODUCT IS NOT FOR USE ON FIRE RATED DOORS.
NOTE TO THE INSTALLER.
These instructions contain information required by the owner.
Please deliver them to the owner
when the installation is complete.
Install the EA-500 on the latch side of
an out-swinging door.
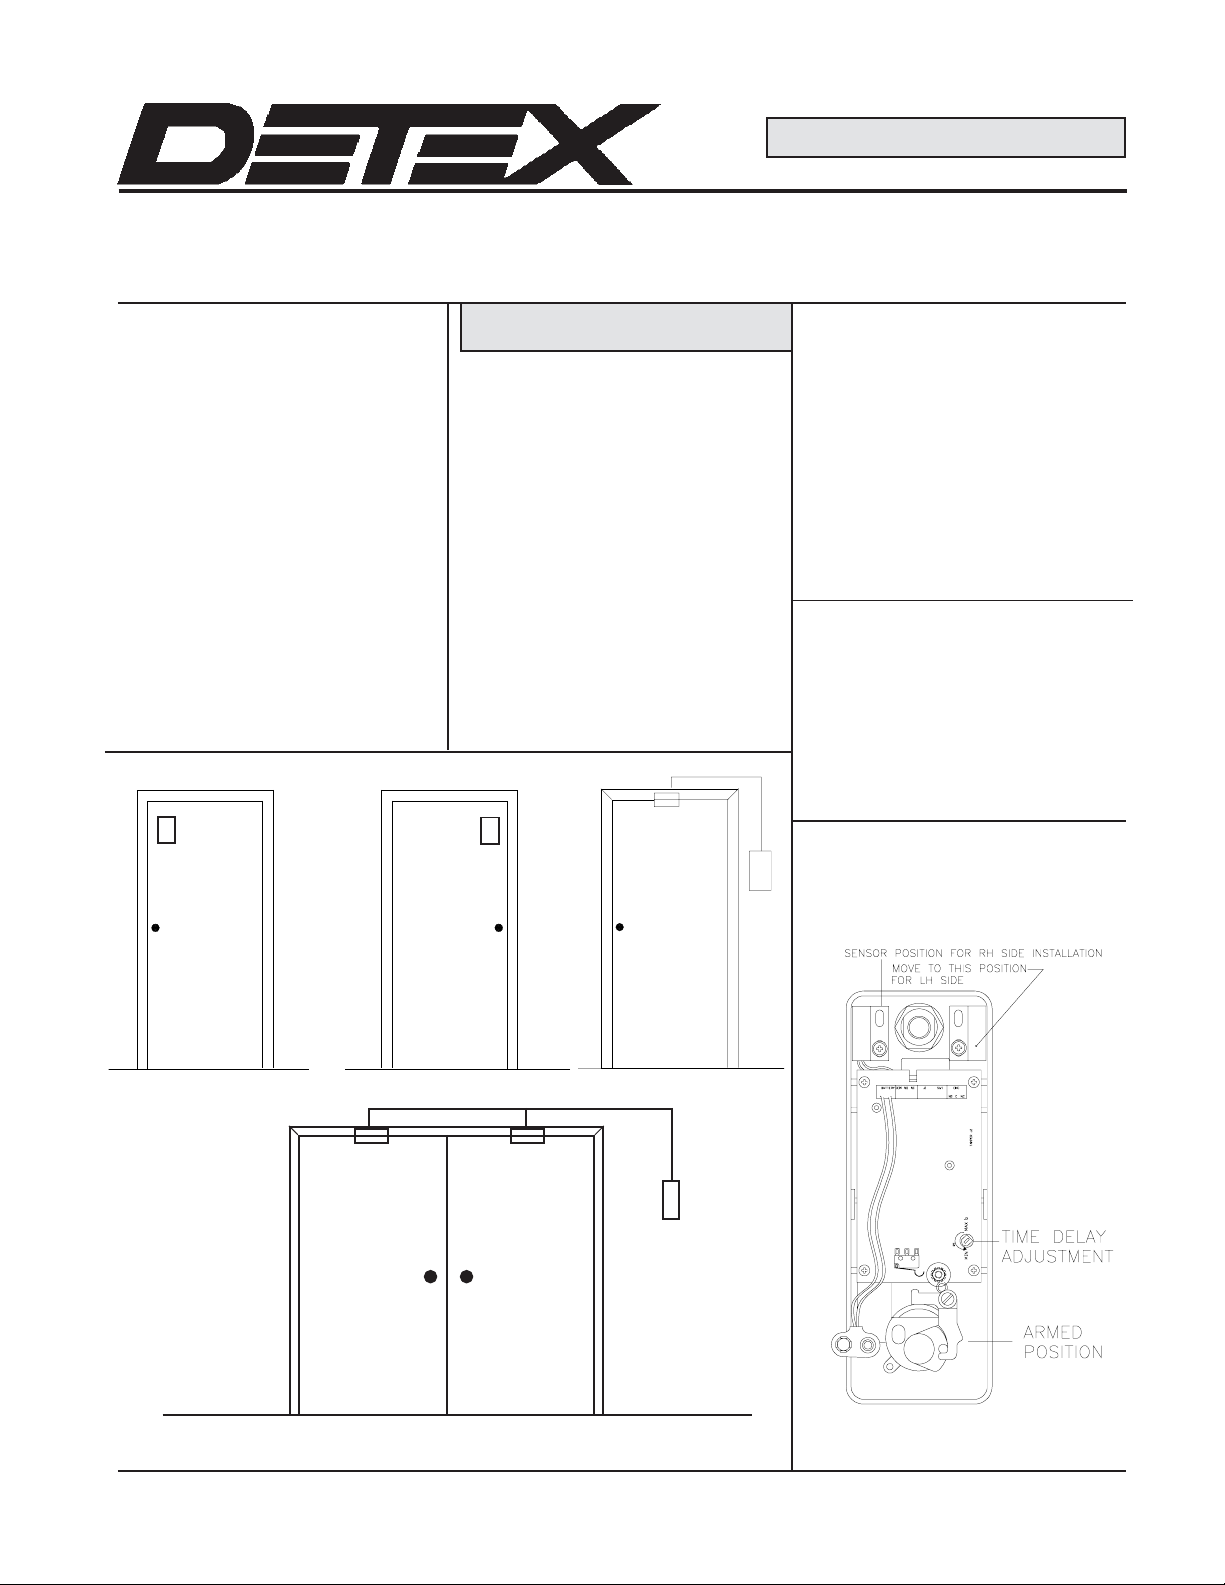
As-shipped, the EA-500 is assembled for installation on the right-hand
side of the door(FIG. 2) To install
on the left-hand side, (FIG 1) see the
instruction in column 3, FIG. 5. Figure 3 shows a door using an EA-500
unit with a MS-2049SI (Inswinging
door) or a MS-2049S (Outswinging
door).
OPTIONAL FEATURES
RESET/REARM*
REMOTE RELAY *
REMOTE BY-PASS/OUTSIDE
KEY CONTROL
MULTI-DOOR MONITORING
If these features (*) are to be installed, contact Customer Service at
1-800-729-3839 for instructions.
TIME DELAY ADJUSTMENT
This feature is explained later..
TOOLS AND SUPPLIES
Screwdriver, blade type, 5/16"
Screwdriver, blade type, 1/8"
Screwdriver, Phillips, #1
Linesman's pliers (to cut tailpiece)
Tape for securing the template
Drill motor and bits
Hammer
Center punch
Pencil
Use the faceplate lock key to unlock
the faceplate. Turn it about eight turns
CCW until the cylinder releases the
internal locking stud. Rap the bottom
edge upward to release it from the
internal retainer. Pull the top of the
faceplate away from the backbox.
FIGURE 1 FIGURE 2 FIGURE 3
NOTE
For installation on the left-hand side
of the door, change the position of the
magnetic sensor as follows.
FIGURE 4.- MONITORING TWO DOORS WITH ONE ALARM
SEE PAGE 3 FIG. 11 FOR WIRING
DETEX INS500 PAGE 1
FIGURE 5
Page 2
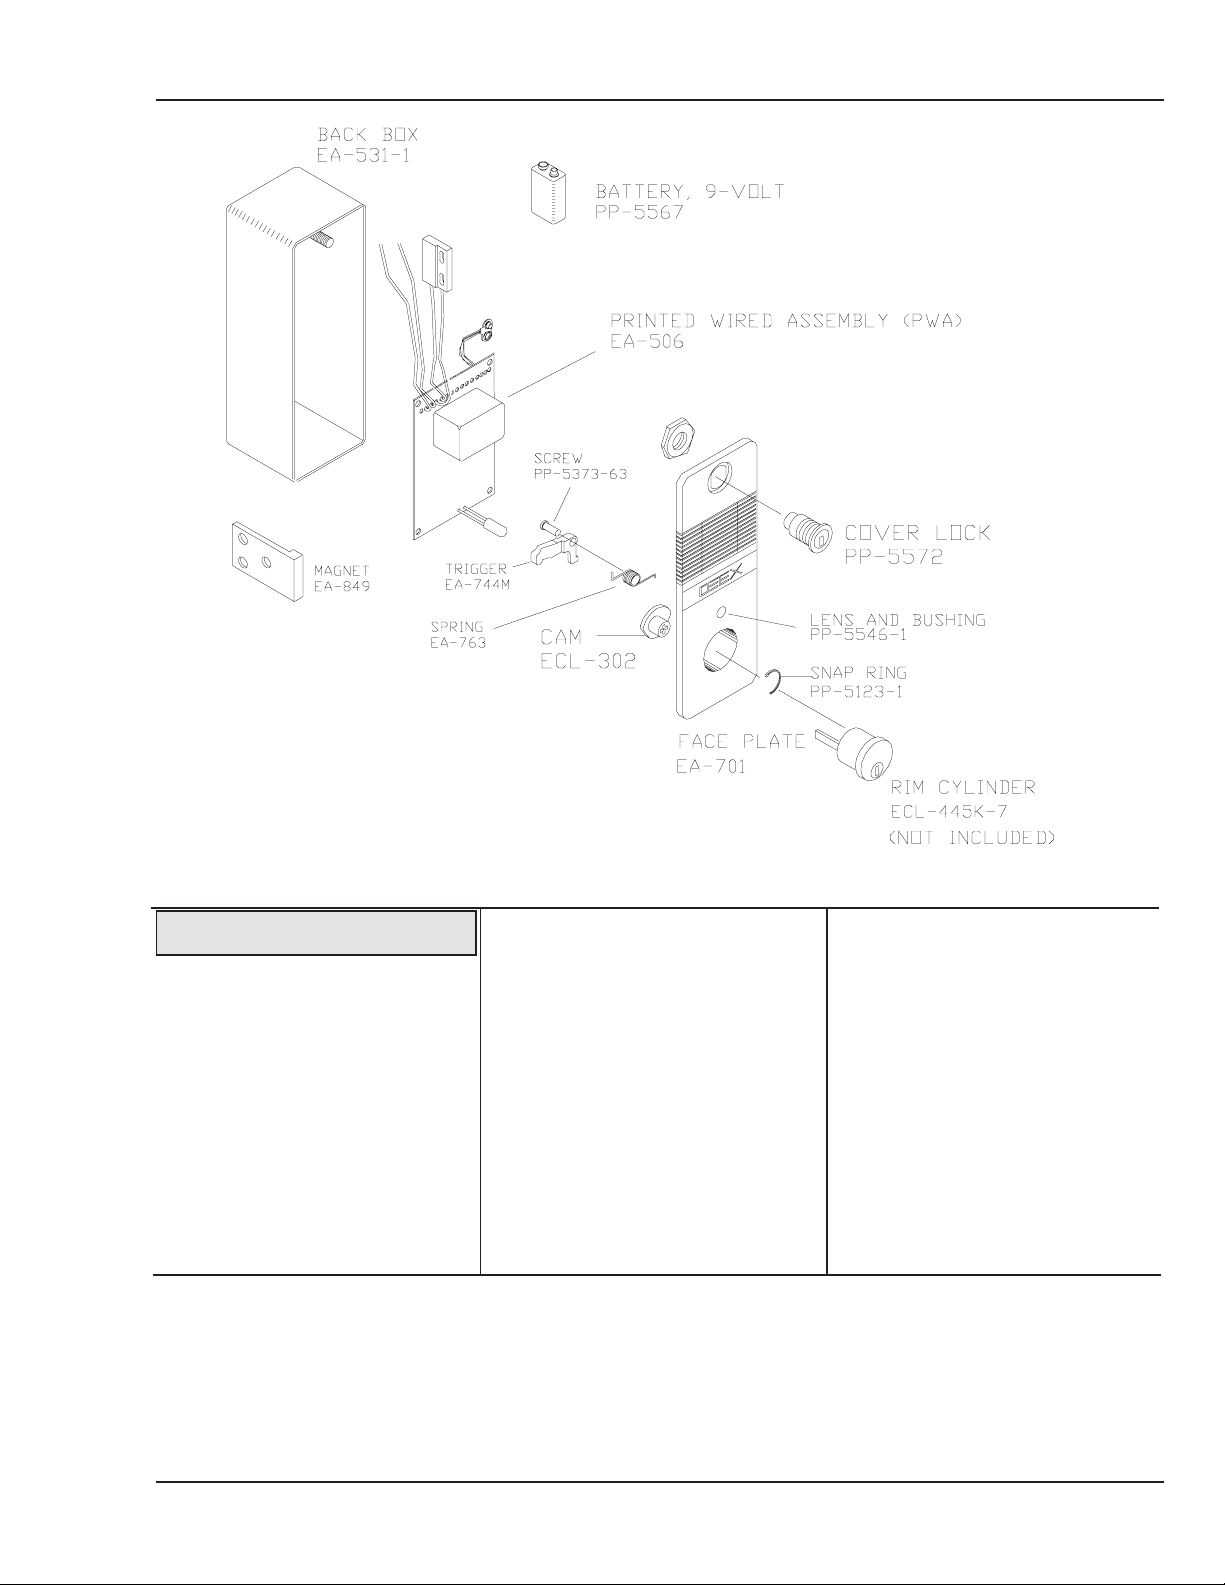
FIGURE 6.- ILLUSTRATED PARTS BREAKDOWN
MAINTENANCE
The EA-500 requires very little
care but, to ensure that the system
continues to provide the intended
security, a maintenance program
should be established, as follows:
KEYS
Two sets of keys are required;
one to arm the system and one to
lock the faceplate. Access to
these keys should be limited to
responsible people.
FUNCTIONAL VERIFICATION
Periodically, weekly or more often as
circumstances require, verify that the
system is working properly by
opening the door with the system
armed. Unit should sound.
BATTERY CHECK
The EA-500 contains a low-battery
indicator. As long as the battery is
OK and the unit is armed, the LED on
the faceplate will blink every 45
seconds. If the unit is armed and the
voltage drops to about 7.5 volts,
indicating a low battery, the unit will
blink every 45 seconds and issue
an audible chirp. If the unit is not
armed and the voltage drops to
about 7.5 volts, the unit will beep
every 45 seconds. To replace the
battery, disarm the unit, insert the
faceplate lock key in the cylinder
and turn it COUNTER-CLOCKWISE about eight turns until it
disengages the internal locking
stud. With the palm of the hand,
rap the bottom of the faceplate
upward to disengage the internal
retainer. The recommended battery
is ALKALINE.
WARRANTY
The Detex security hardware product you have purchased is warranted to be free of defects in material and workmanship
when properly installed, used and maintained according to instructions. We will, for a period of one (1) year from the date
of purchase, repair or replace any part which ,upon our examination, proves to be defective under normal use. This does
not apply to batteries or to damage from battery leakage. This warranty will be honored only upon presentation of proof
that the product covered thereby was purchased directly from an authorized Detex Distributor. WE SHALL NOT BE
LIABLE FOR ANY DIRECT, INCIDENTAL OR CONSEQUENTIAL LOSS OR DAMAGE ARISING OUT OF THE
FAILURE OF THIS DEVICE.
DETEX INS500 PAGE 2
Page 3
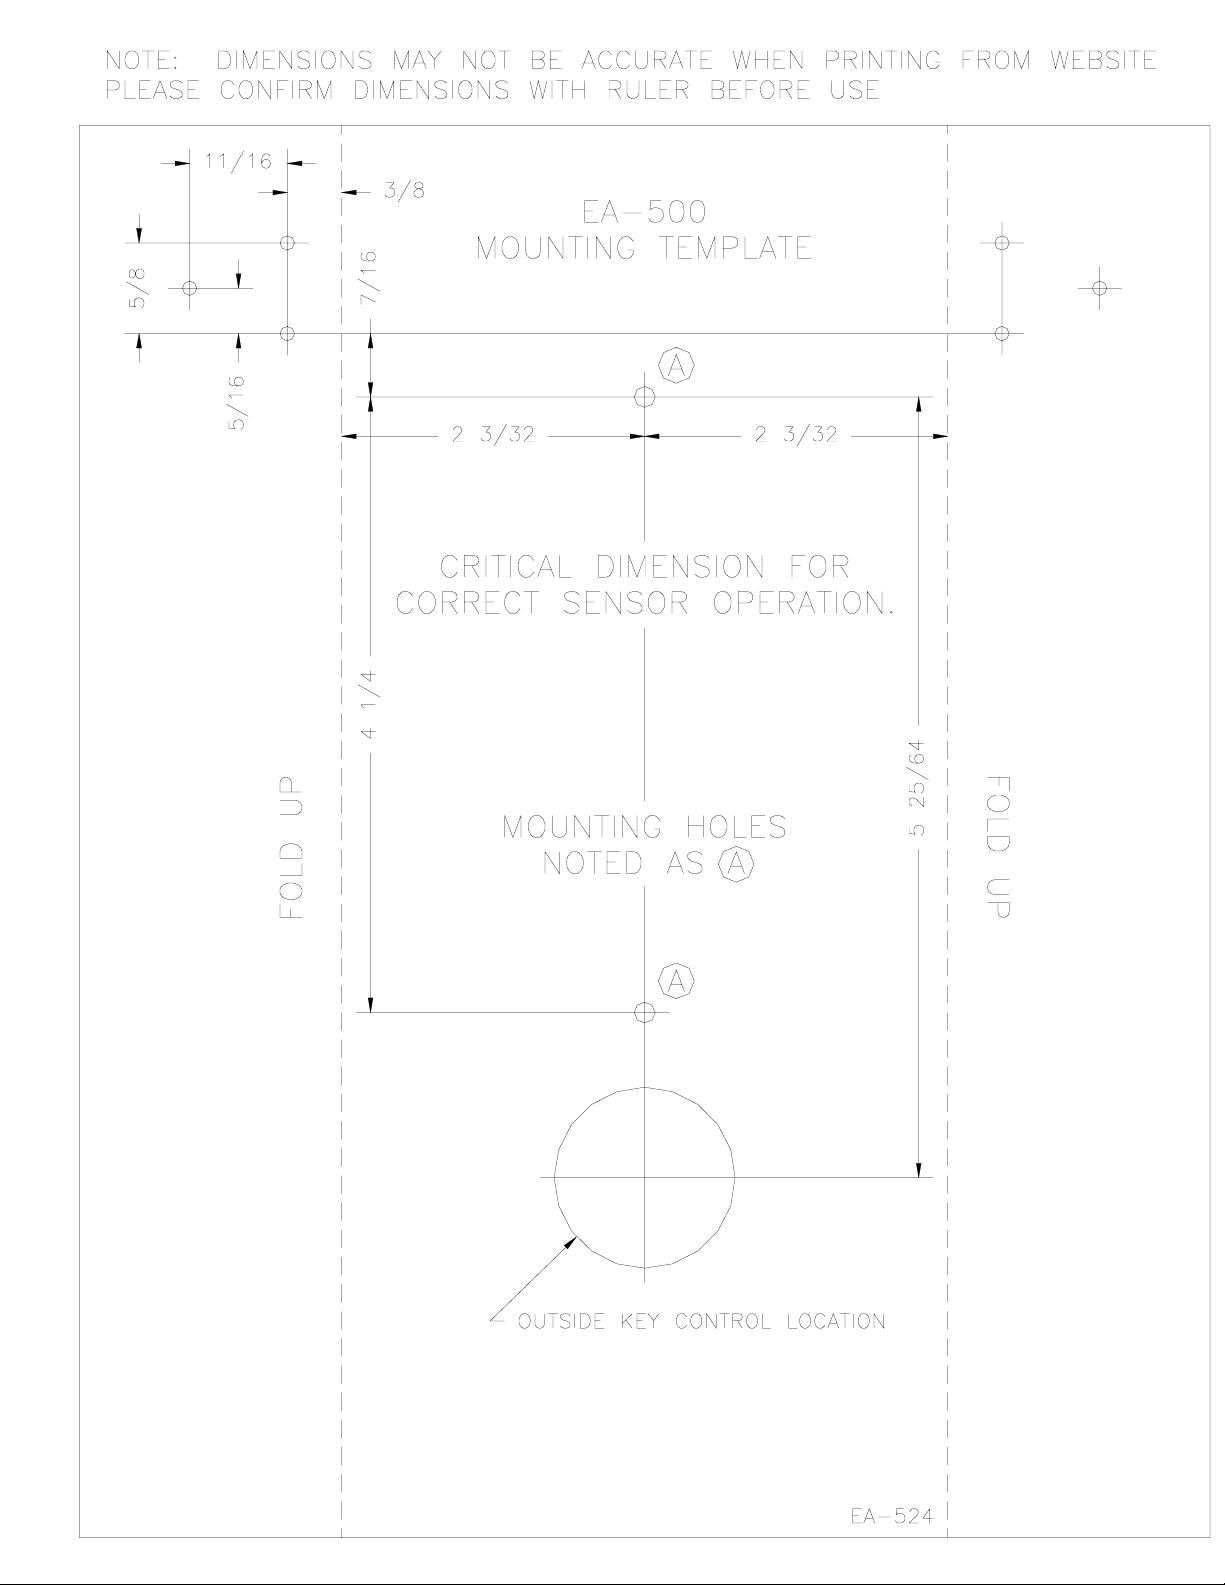
May 2, 2001
Page 4
 Loading...