

Page 1
Infra-Red
Tank Top Heater
Owner’s Manual
Models
HD24B and TT24B
e
o
b
l
j
e
i
u
s
l
k
l
;
l
d
p
;
;
e
;
g
o
l
;
,
,
e
l
k
o
k
i
l
;
h
l
l
d
k
p
e
;
o
;
b
e
l
j
;
e
g
i
o
u
l
;
s
,
l
,
k
e
l
k
o
k
i
h
l
k
e
o
b
l
j
e
i
u
s
l
k
l
;
l
d
p
;
;
e
;
G
IN
N
R
A
W
o
k
i
h
l
k
e
o
b
l
j
e
i
u
s
l
k
k
i
h
l
k
e
o
b
l
j
e
i
u
s
l
k
l
;
o
k
i
h
l
k
e
o
b
l
j
e
i
u
s
l
k
k
i
h
l
k
e
o
b
l
j
e
i
u
s
l
k
k
i
h
l
k
e
o
b
l
j
e
i
u
s
l
k
k
i
h
l
k
e
o
b
l
j
e
i
u
s
l
k
i
h
l
k
e
o
b
l
j
e
i
u
s
l
k
Heater Size: 8,000 – 24,000 Btu/Hr
l
d
p
;
;
e
;
g
o
l
;
,
,
e
l
k
o
k
i
h
l
k
e
o
b
l
j
e
i
u
l
;
s
l
l
d
k
p
l
;
;
;
l
d
e
p
;
;
;
g
o
l
e
;
;
,
,
g
o
e
l
l
;
,
k
,
o
e
k
l
i
k
h
l
k
e
o
b
l
j
e
i
u
s
l
k
l
l
;
;
l
l
d
d
p
p
;
;
;
;
e
e
;
;
g
g
o
o
l
l
;
;
,
,
,
,
e
e
l
l
k
k
o
o
k
i
h
l
k
e
o
b
l
j
e
i
u
s
l
l
;
k
l
l
d
;
l
p
;
d
;
p
;
;
e
;
g
e
;
o
l
g
;
,
o
,
l
;
,
e
,
l
k
e
l
o
k
k
i
h
l
k
e
o
b
l
j
e
i
u
s
l
l
;
k
l
l
d
;
l
p
;
d
;
p
;
;
e
;
g
e
;
o
l
g
;
,
o
,
l
;
,
e
,
l
k
e
l
o
k
k
o
i
h
l
k
e
o
b
l
j
e
i
u
s
l
k
l
;
l
d
p
;
;
e
;
g
o
l
;
,
,
e
l
k
o
e
l
k
o
e
l
k
o
k
l
;
l
l
d
;
l
p
;
d
;
p
;
;
e
;
g
e
;
o
l
g
;
,
o
,
l
;
,
e
,
l
k
o
k
i
h
l
k
e
o
b
l
j
e
i
u
s
l
k
l
;
l
d
p
;
;
e
;
g
o
l
;
,
,
Safety Information
Make certain you read and understand all warnings. Do not allow anyone who has not
read this manual to operate this heater. Keep this manual for reference. It is your guide
to safe and proper operation of this heater.
1. Read and understand this manual before assembling or using this heater. Improper
use of this heater can cause serious injury.
2. For outdoor use only. Do not use inside house, camper, tent, vehicle, or any type of
unvented or enclosed area.
3. Never operate heater while sleeping or unattended. Keep children and animals
away from heater.
4. WARNING: This product contains and/or generates chemicals known to the
State of California to cause cancer or birth defects, or other reproductive harm.
5. Minimum heater clearances from combustibles:
Top and Front: 5 Ft. Sides and Rear: 3 Ft.
6. Use only in well-vented areas.
7. Use only propane gas set up for vapor withdrawal.
8. Before connecting heater to propane tank, make sure heater regulator knob is in
the “OFF” position. Always connect and light heater in areas free of open flames.
9. Before each use, check heater for leaks. Never use an open flame to check for a
leak. Apply a mixture of liquid soap and water to all joints. Bubbles forming show a
leak. Correct all leaks at once.
10. Locate propane tank on a stable and level surface. The heater burners must be at
least two feet above the floor. Always attach heater to propane tank in an upright
position. Never operate heater on its side or attach to propane tank in a horizontal
position. This could lead to dangerous flare-ups or fire.
11. Do not use heater in basement or below ground level. Propane is heavier than air. If
a leak occurs, propane gas will sink to the lowest possible level. If you smell gas or
suspect a leak, shut off the propane tank valve at once and ventilate the area. Do
not strike match or create any flame or electric spark. Find and correct leak before
attempting to light any appliance. If you cannot correct leak, do not tamper with
heater. Return heater to nearest authorized service center or to address on back
page of this manual, freight prepaid.
12. Do not move or handle a hot or operating heater. Do not attach or remove a
propane tank from a hot or operating heater. Severe burns may result.
13. Always remove heater from propane tank after each use. Always store propane
tank outdoors. Never store propane tank in an enclosed area. Never store propane
tank near high heat, open flame, or where temperatures exceed 1000F.
14. Keep all connections and fittings clean. Make sure propane tank valve outlet is
clean. Check the “O” ring on the heater inlet fuel connector for damage before each
use. Replace if worn or damaged.
15. Do not attempt to light one burner off of the other. Use one match per burner.
16. Do not overlap or point burners at each other.
17. Do not raise burner heads and cover air inlet holes in mixing tube with burner
head bracket.
18. Wing nuts and burner heads become very hot during operation. Do not attempt to
adjust burner position while heater is operating. Allow 15 minutes to cool.
19. Check heater for damage before each use. Do not use a damaged heater. Do not
alter heater. Keep heater in its original state. Do not use heater if altered.
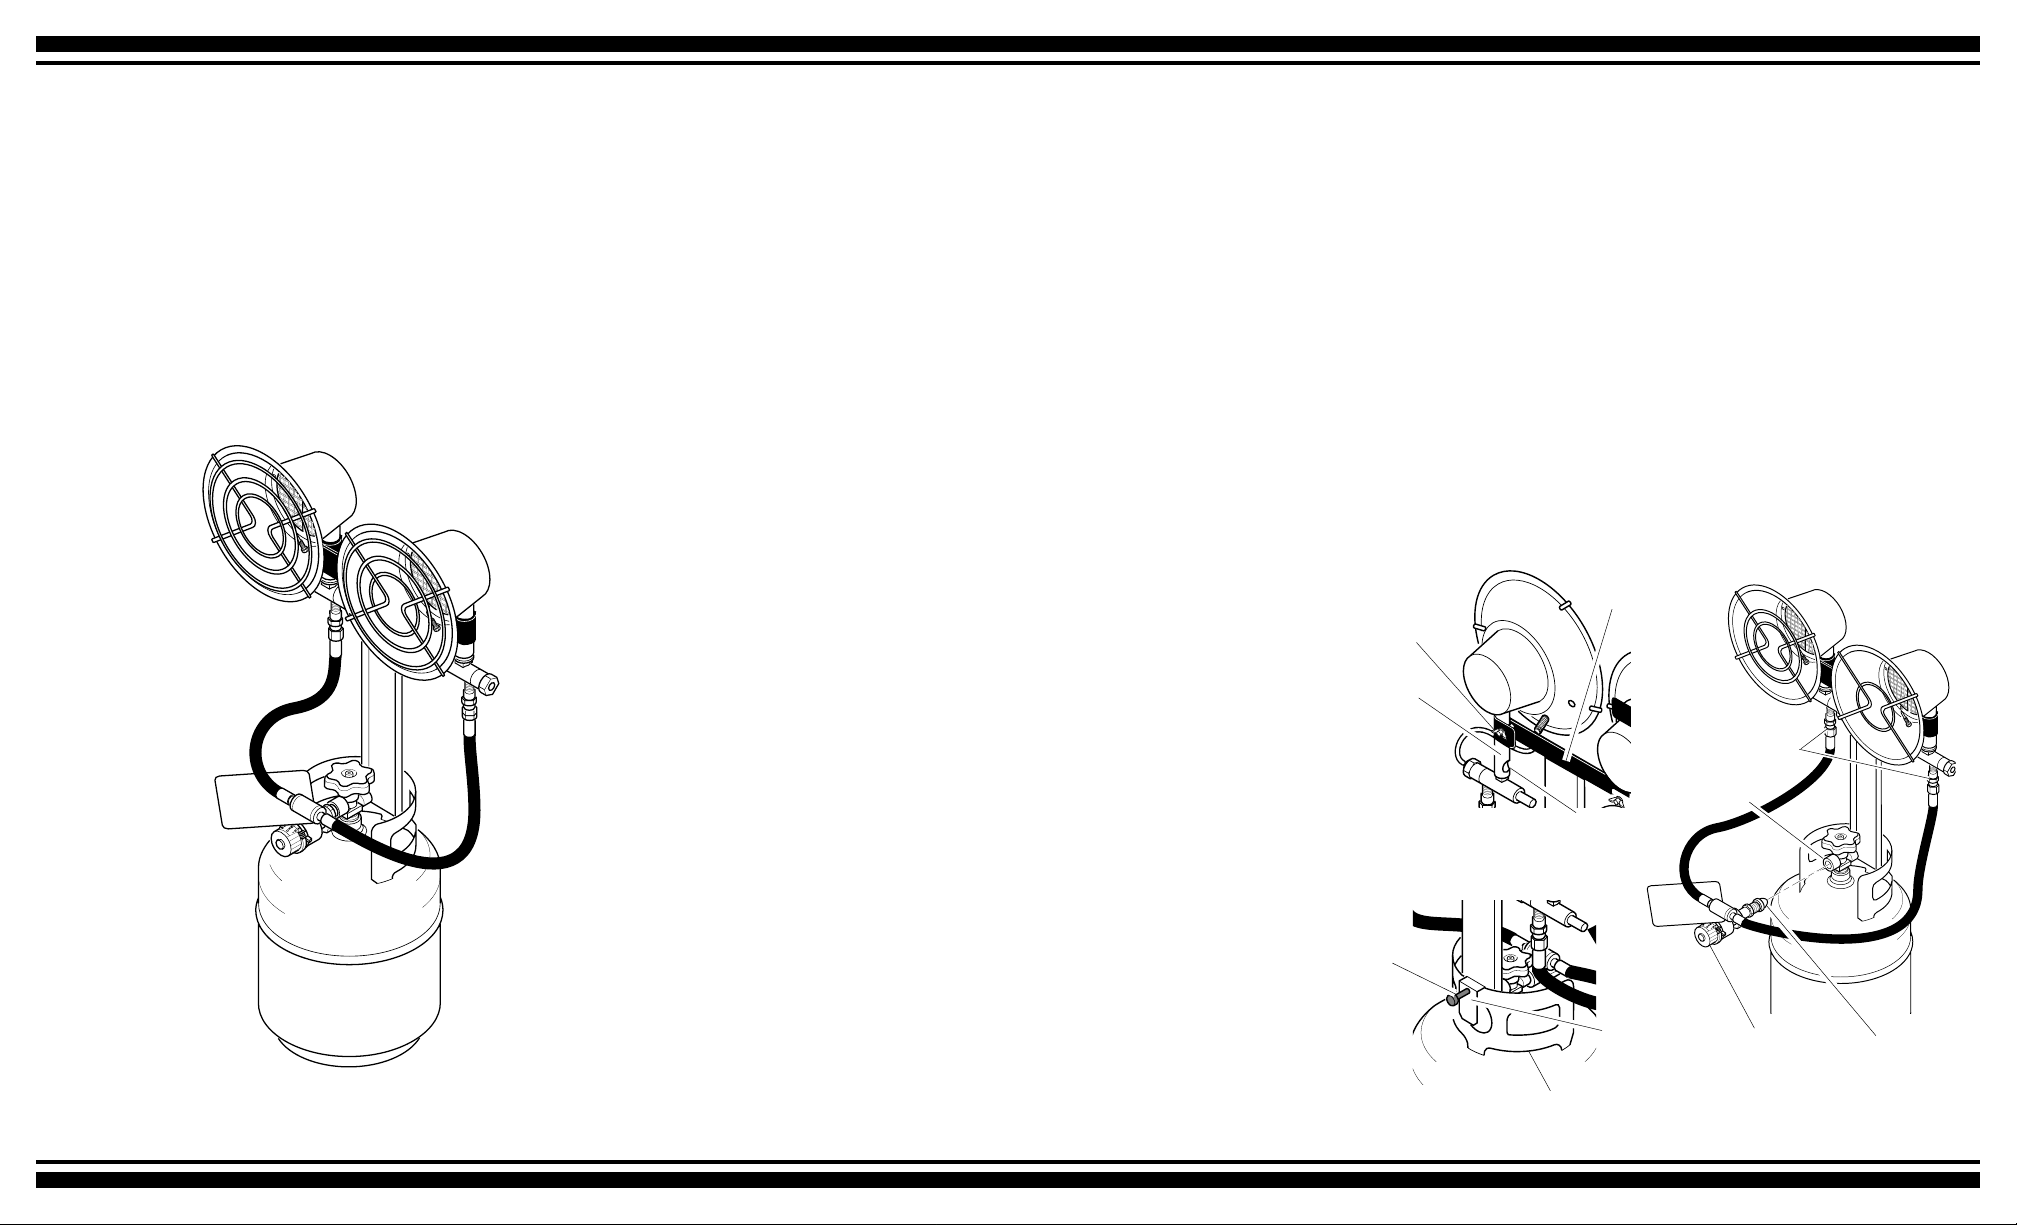
Assembly
1. Place each burner head onto the burner bracket as shown in Figure 1. CAUTION:
The burner heads should be positioned as far down on the burner bracket as
possible. Make sure the air inlet holes in the mixing tube on the burner head
are not covered by the burner bracket
Continued
2. Insert two bolts through square holes and then through round holes in burner bracket.
3. Place two flat washers onto bolts. Thread wing nuts onto bolts.
4. Carefully thread mounting bolt into tank collar bracket on the lower portion of the post.
Connecting Heater To Propane Tank
Read and understand all safety information before connecting heater to propane tank.
1. Place heater onto tank with tank collar bracket over tank collar (see Figure 2).
Mounting bolt should be positioned to the outside of tank collar.
2. Firmly secure to tank by hand-tighten mounting bolt. Do not over-tightening
mounting bolt.
3. Make sure heater regulator knob is in the “OFF” position.
4. Wrench tighten the fuel connector nut into the propane tank valve with both gas
hose fittings in a horizontal position (see Figure 3). Turn fuel connector nut
counterclockwise to tighten. Threads are left-handed.
5. Connect both hoses to inlet connectors (see Figure 3). Tighten firmly using wrench.
Make sure both hoses are connected before opening the tank valve.
6. Open propane tank valve slowly.
7. Check all fittings for leaks. Apply a mixture of liquid soap and water to all joints.
Bubbles forming show a leak. Correct all leaks at once. WARNING: Never use an
open flame to check for a leak.
8. Always remove propane tank from heater after each use. Do not store heater while
attached to propane tank.
Burner
Wing Nut
and Washer
Mixing
Tube
Figure 1 - Attaching
Heater to Bracket
Mounting
Bolt
Tank Collar
Figure 2 - Assembling Heater
Bracket
Air Inlet
Hole
Tank Collar
Bracket
Inlet Connectors
Propane
Tank Valve
e
o
b
l
j
ie
u
s
l
k
l
;
l
d
p
;
;
e
;
g
lo
;
,,
e
l
k
o
k
i
l
h
l;
l
k
d
e
p
;
o
;
lb
e
j
;
e
g
i
u
lo
;
ls
,,
k
e
l
k
o
i k
h
l
k
e
o
lb
j
ie
u
ls
lk
;
l
d
p
;
;
e
;
G
IN
N
R
A
W
l
d
;p
;
e
;
g
lo
;
,
,
le
k
o
k
i
h
l
k
e
o
jlb
ie
u
l
l;
ls
d
l k
;p
l;
;
d
e
;
;;p
g
e
lo
;
,;
g
,
le
,,;lo
k
o
le
k
k
i
o
lh
k
k
i
e
lh
o
k
e
jlb
o
e
i
u
jlb
ls
ie
k
u
ls
k
ls
k
;l
u
ls
k
u
ls
k
ls
k
ls
k
ls
k
l
l;l
l;
d
d
p
;p
;
;;
e
;e
;
g
g
lo
;lo
,
,,;
,
le
le
k
k
o
o
k
k
i
i
lh
lh
k
k
e
e
o
o
lb
j
jlb
ie
ie
u
u
ls
l
k
l;
l
d
l;
d
;p
;
;p
;
;e
e
g
;
g
lo
o
,;
,
,;l
,
le
k
le
o
k
o
i k
i k
lh
k
lh
e
k
o
e
o
jlb
jlb
ie
u
ie
ls
l
k
l;
l
d
l;
d
;p
;
;p
;
e
;
g
;e
g
;lo
lo
,,
;
e
,,
l
k
e
l
o
k
k
o
i
k
h
i
l
k
h
l
e
k
e
o
o
jlb
jlb
ie
u
ie
ls
l k
;
l
d
;;p
e
;
g
;lo
,
,
e
l
k
o
k
i
lh
k
e
o
jlb
ie
u
ie
u
ie
u
l
l;
d
l;l
d
;;p
p
;
;
e
;
g
;e
g
,;lo
lo
,
;
,,
le
k
le
o
k
o
k
i
k
i
lh
k
lh
e
k
o
e
o
jlb
jlb
ie
u
ls
l k
l;
d
;;p
e
;
g
lo
,;
,
le
k
o
k
i
lh
k
e
o
jlb
Heater
Regulator
Knob
Fuel
Connector
Nut
Figure 3 - Connecting
Heater to Propane Tank
Page 2
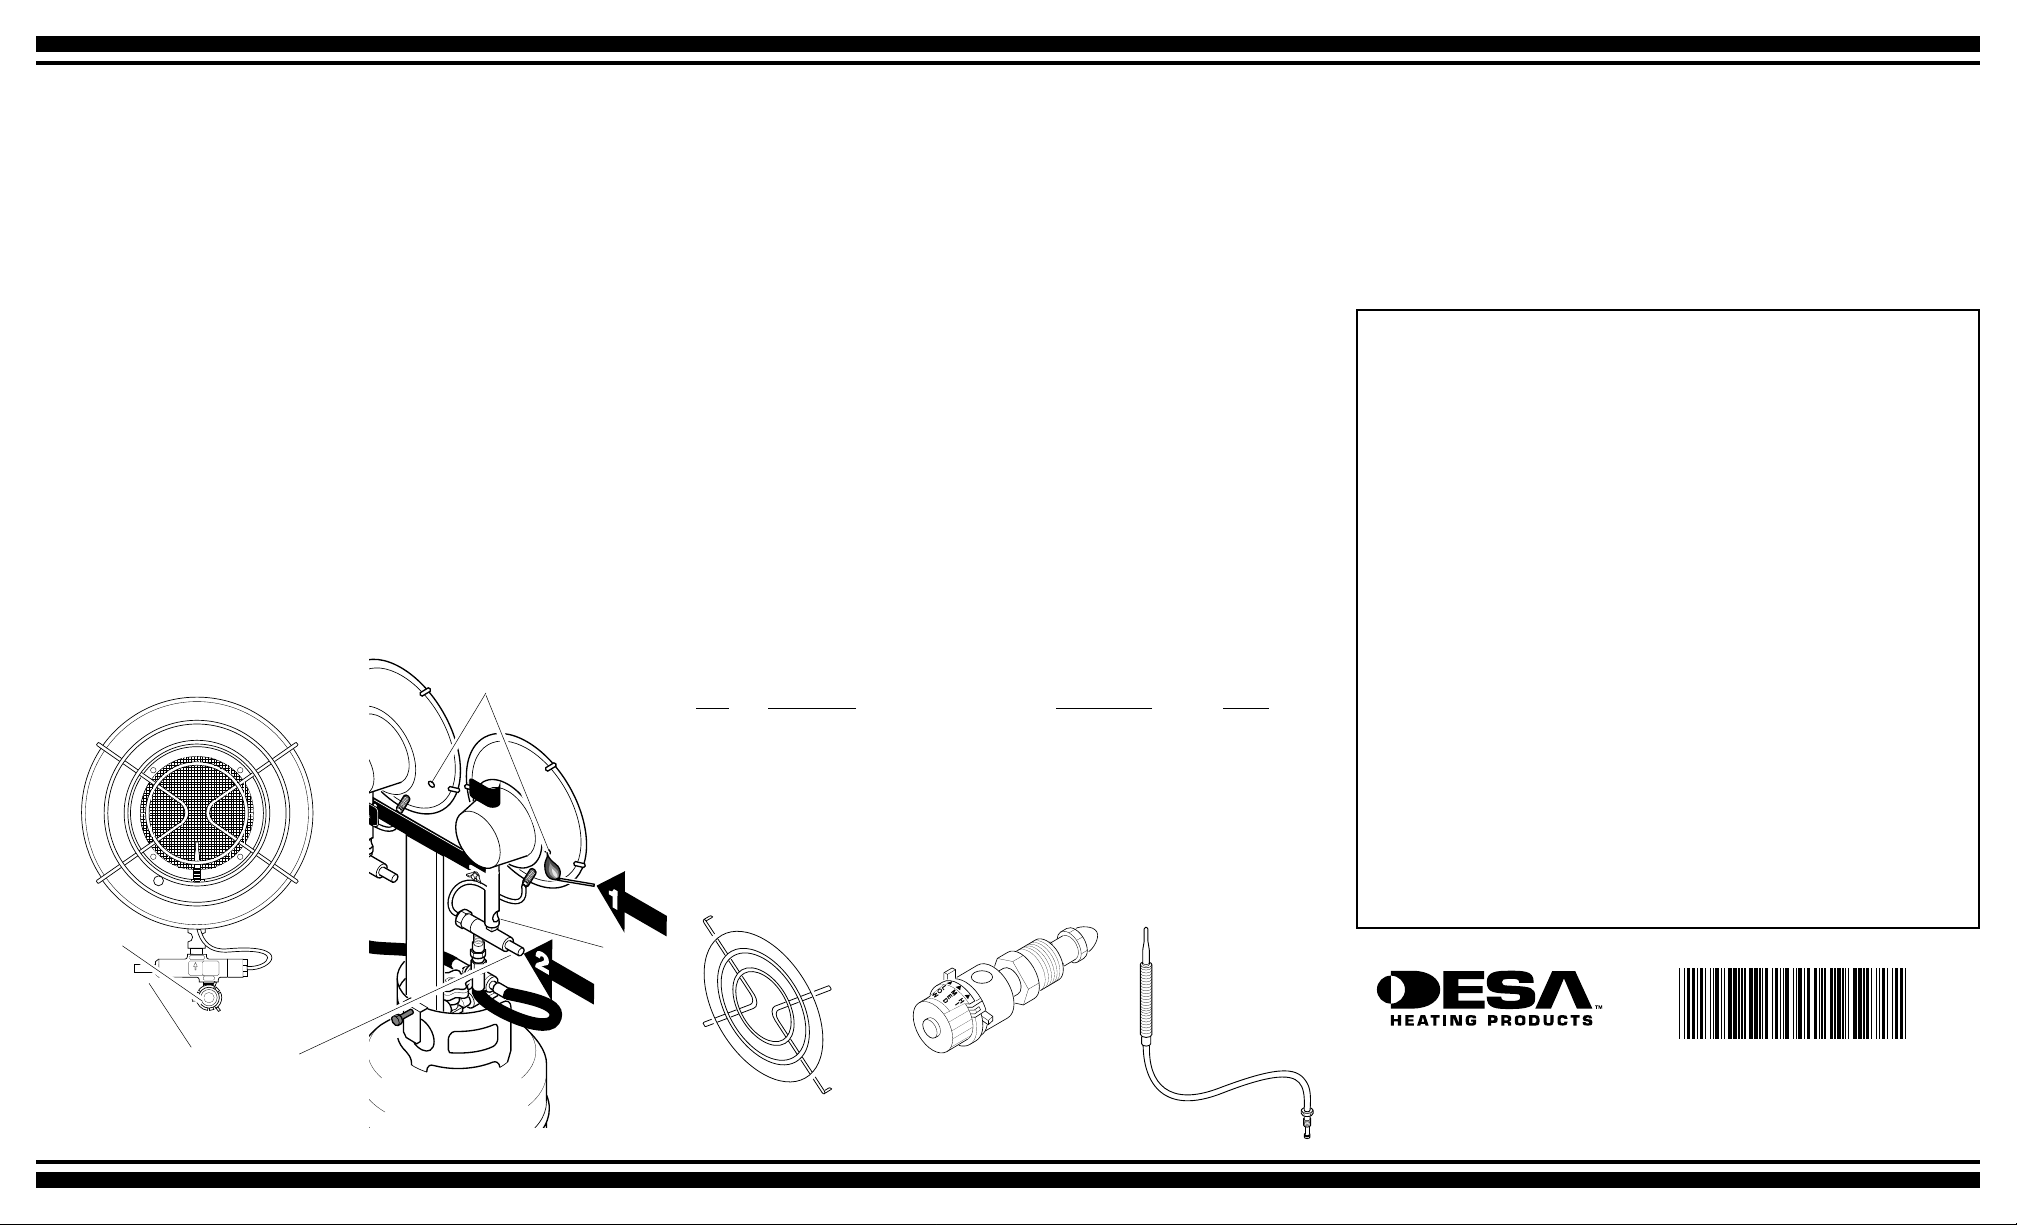
To Light Heater
Read and understand all safety information before operating heater.
1. Adjust burners to desired position by loosening wing nuts on back of burner head
bracket. WARNING: Wing nuts and burner heads become very hot during
operation. Do not attempt to adjust burner position while heater is operating.
Allow 15 minutes to cool. WARNING: Do not raise burner heads and cover air
inlet holes in mixing tube with burner bracket. Firmly tighten wing nuts to
secure burners. Do not overlap or direct burners at each other.
2. WARNING: Make sure there is no open flame in the area. Fully open the
propane tank valve.
3. Turn heater regulator knob counterclockwise to the “HI” position (see Figure 4).
4. WARNING: Stand to the side of unit while lighting. Do not stand or have any
part of your body over or in front of heater while lighting. Do not attempt to
light one burner off of the other. Use one match per burner. Locate ignition hole
in underside of burner (see Figure 5). Hold a lit match under ignition hole. CAUTION: Do not insert match into air inlet holes in mixing tube. Push in the safety
shutoff valve plunger (see Figure 5). W ARNING: Do not push in safety shutoff
valve plunger before inserting lit match. Burner should light. Mesh screen on
burner glows red when lit. After burner is lit, continue holding in safety shutoff valve
plunger (about 10 to 30 seconds) until heater stays lit.
5. If the burner does not light within 30 seconds, turn regulator knob to the “OFF”
position. Wait at least two minutes for the gas to dissipate before relighting.
6. If heater will not light after repeated tries, do not attempt to repair heater. Return
heater to nearest authorized service center or to address on back panel of this
manual, freight prepaid.
Burner Front
Heater
Regulator
Knob
Ignition Holes
Air Inlet
Hole
7. After burner lights, turn the heater regulator knob to the desired heat setting (LOW,
MED, or HI).
8. Light both burners when maximum heat is needed. Use one burner to conserve
fuel. Repeat above steps to light second burner.
To Turn Off Heater
1. Tightly close propane tank valve by turning clockwise.
2. Turn the heater regulator knob to the “OFF” position. Wait at least 15 minutes for
the heater to cool before handling heater.
3. Always remove the heater from the propane tank after each use. Do not store
heater while attached to propane tank. Always store propane tank outdoors. Never
store propane tank in an enclosed area.
Technical Service and Replacement Parts
For assistance in servicing your heater and parts under warranty, contact DESA Heating
Products’ Technical Service Department at 1-866-672-6040 or visit our web site at
www.desatech.com.
Parts Under Warranty: Contact authorized dealers of this product. If they can’t supply
original replacement parts, either contact your nearest authorized service center or call
DESA Heating Products’ Technical Service Department at 1-866-672-6040.
Parts Not Under Warranty: Contact authorized dealers of this product. If they can not
supply these accessories or parts, either contact your nearest Parts Central or DESA
Heating Products for referral information. Parts Centrals are listed in the Authorized Service Center booklet supplied with heater. Call DESA Heating Products at 1-866-672-6040
for referral information.
Replacement Parts
Item Description Part Number Model
1 Burner Guard 100911-01 All
2 Thermocouple 100886-01 All
3 Regulator with Fuel Gas Connector LPA2025 All
4 Hose Assembly (not shown) 101807-01 All
5 Owner’s Manual (not shown) 111680-01 All
6 Operation Tag (not shown) 101860-04 HD24B
101860-06 TT24B
7 Burner Replacement Kit* (not shown) LPA5050 All
Burner Guard
Thermocouple
Heater Information
Btu Input One Burner Two Burners
HI 12,000 Btu/Hr 24,000 Btu/Hr
MED 10,000 Btu/Hr 20,000 Btu/Hr
LOW 8,000 Btu/Hr 16,000 Btu/Hr
Length of Operation
20 lb. Propane Tank 36 hours 18 hours
Warranty Information
Propane Infra-Red Tank Top Heater
Limited Warranty
DESA Heating Products warrants this product and any parts thereof, to be free from defects
in material and workmanship for one year from the date of first purchase, provided that the
product has been properly installed, operated, and maintained in accordance with all applicable instructions. To make a claim under this warranty, the bill of sale or proof of purchase
must be presented.
This warranty is extended only to the original retail purchaser. This warranty covers only the
cost of parts required to restore this heater to proper operating condition. Warranty parts
must be obtained through authorized dealers of this product and/or DESA Heating Products
who will provide original factory replacement parts. Failure to use original factory replacement parts voids this warranty. The heater must be used in accordance with all local codes
and instructions furnished with the unit.
This warranty does not apply to parts that are not in original condition because of normal
wear and tear, or parts that fail or become damaged as a result of misuse, accidents, lack of
proper maintenance, alteration, tampering, contaminated fuels, or defects caused by improper installation. Travel, transportation and incidental costs associated with warranty repair are not reimbursable under this warranty and are the responsibility of the owner.
TO THE FULL EXTENT ALLOWED BY THE LAW OF THE JURISDICTION THAT GOVERNS THE SALE OF THE PRODUCT : THIS EXPRESS WARRANTY EXCLUDES ANY AND
ALL OTHER EXPRESSED WARRANTIES OF MERCHANTABILITY AND FITNESS FOR A
PARTICULAR PURPOSE TO ONE YEAR FROM THE DATE OF FIRST PURCHASE: AND
DESA HEA TING PRODUCTS’ LIABILITY IS HEREBY LIMITED TO THE PURCHASE PRICE
OF THE PRODUCT AND DESA HEATING PRODUCTS SHALL NOT BE LIABLE FOR ANY
OTHER DAMAGES WHATSOEVER INCLUDING INDIRECT, INCIDENTAL OR CONSEQUENTIAL DAMAGES.
Some states do not allow a limitation on how long an implied warranty lasts or an exclusion or
limitation of incidental or consequential damages, so the above limitation on implied warranties, or exclusion or limitation on damages may not apply to you.
This warranty provides the original retail p urchaser with specific legal rights. For specific
information regarding those rights, please consult the applicable state laws.
Safety Shutoff
Valve Plunger
Figure 4 Figure 5
Back View
Regulator
* Replaces burner screens that are worn, split or broken.
2701 Industrial Drive
P.O. Box 90004
Bowling Green, KY 42102-9004
www.desatech.com
100926 01
NOT A UPC
100926-01
Rev. J
05/03
 Loading...