

Page 1

r
r
CD32M(-1)(-2)
CD36M(-1)(-2)
CD42M
DIRECT VENT GAS FIREPLACE
INSTALLATION INSTRUCTIONS
This book is valuable. In addition to instructing you on how to install and maintain your appliance, it also contains information that will
enable you to obtain replacement parts or accessory items when needed. Keep it with your other important papers.
This fireplace may be installed as an OEM installation in a manufactured (mobile) home and must be installed in accordance with the
manufacturers instructions and the Manufactured Home Construction and Safety Standard, Title 24 CFR, Part 3280 in the United States o
the Mobile Home Standard, CAN/CSA Z240 MH Series, in Canada. This fireplace is only for use with the type(s) of gas indicated on the
rating plate. A conversion kit is supplied with the fireplace.
WARNING: This Direct Vent gas fireplace is intended for use with natural or propane gas only (depending on the type of gas you
particular model is approved for), do not attempt to burn any solid fuels in this fireplace.
G
I
S
E
N
D
C
E
D
R
E
I
T
F
I
This fireplace is manufactured for Stylecrest Inc. under the Coleman brand name by DESA International Inc.
DESA INTERNATIONAL
2701 INDUSTRIAL DRIVE P/N 109194-01
P.O. BOX 90024 REV D
BOWLING GREEN, KY 42101-9004 10/02
www.desatech.com
SAVE THIS BOOK
Page 2

CONTENTS
1. INTRODUCTION ------------------------------------------------------------ PG. 2
2. SELECTING LOCATION ------------------------------------------------------------- PG. 2
3. MINIMUM CLEARANCES ------------------------------------------------------------- PG. 3
4. VENT PIPE AND TERM. CLEARANCES ------------------------------------------------------------- PG. 3-4
5. VENTING INSTRUCTIONS ------------------------------------------------------------- PG. 5
6. FRAMING ------------------------------------------------------------- PG. 6
7. GAS SUPPLY TESTING AND HOOK-UP ------------------------------------------------------------- PG. 7
8. PILOT ADJUSTMENT ------------------------------------------------------------- PG. 8
9. SPECIFICATION TABLE ------------------------------------------------------------- PG. 8
10. GLASS PANEL REMOVAL ------------------------------------------------------------- PG. 9
11. LOG INSTALLATION ------------------------------------------------------------- PG. 9
12. BURNER FLAME ADJUSTMENT ------------------------------------------------------------- PG. 10
13. WIRING DIAGRAM ------------------------------------------------------------- PG. 10
14. LIGHTING INSTRUCTIONS ------------------------------------------------------------- PG. 11
15. CONVERSION KIT ------------------------------------------------------------- PG. 12-13
16. TROUBLESHOOTING ------------------------------------------------------------- PG. 14
17. ILLUSTRATED PARTS BREAKDOWN ------------------------------------------------------------- PG. 15-16
18. ILLUSTRATED PARTS LIST ------------------------------------------------------------- PG. 17
19. ACCESSORY AND REPLACEMENT PARTS ------------------------------------------------------------- PG. 18
- 1 - For more information, visit www.desatech.com
Page 3

r
d
n
N
p
r
d
• Do not store or use gasoline or any other flammable
vapors or liquids in the vicinity of this or any othe
appliance.
• Due to high temperatures, the appliance should be
located out of traffic and away from furniture an
draperies.
• Do not place clothing or other flammable materials o
or near the appliance.
EVER leave children unattended when a fire is
•
burning in the fireplace.
WHAT TO DO IF YOU SMELL GAS
• Do not try to light any appliance.
• Do not touch any electrical switch.
• Do not use any phone in your building.
• Immediately call your gas supplier from a neighbor’s
phone. Follow the gas supplier’s instructions.
• If you cannot reach your gas supplier, call the fire
department.
WARNING: Improper installation, adjustment,
alteration, service or maintenance can cause injury,
roperty damage, or loss of life. Refer to this manual fo
assistance or additional information. Consult a qualifie
installer or local distributor.
CHECK LOCAL CODES BEFORE
INSTALLING THIS FIREPLACE.
FOR YOUR SAFETY
FOR YOUR SAFETY
INTRODUCTION
Models CD32M series, CD36M series and CD42M are heat
circulating gravity direct vent gas fireplaces with sealed
combustion chamber. These fireplaces use millivolt gas
control valve and millivolt ignition system.
These fireplaces are convertible with the standard setup as
natural gas. Conversion may be performed by the O.E.M.
mobile home builder or by a qualified service person on-site.
If you are uncertain as to what gas your unit is equipped for,
pleas check the rating plate located in the interior of the
appliance opening or consult your mobile home supplier or
your local distributor of DESA/Coleman products.
BEFORE BEGINNING THE INSTALLATION OF THE
FIREPLACE, READ THESE INSTRUCTIONS THROUGH,
COMPLETELY.
♦ This DESA/Coleman fireplace and its components
are safe when installed according to this installation
manual. Unless you use DESA/Coleman components,
which has been designed and tested for the fireplace
system, you may cause a fire hazard.
♦ The DESA/Coleman warranty will be voided by and
DESA/Coleman disclaims any responsibility for the
following actions:
-2 - For more information, visit www.desatech.com
a) Modification of the fireplace, components, doors, blower,
fans, air inlet system and damper control.
b) Use of any component part not manufactured or approved
by DESA/Coleman in combination with a DESA/Coleman
fireplace system.
PROPER INSTALLATION is the most important step in
ensuring safe and continuous operation of the fireplace.
Consult the local building codes as to the particular
requirements concerned with the installation of all factory
built fireplaces. This fireplace, when installed, must be
electrically grounded in accordance with local codes, or in
absence of local codes, with the National Electrical Code
ANSI/NFPA 70 and CSA C22.2 Canadian electrical code for
Canada.
The installation must conform to local codes, or in the absence
of local codes, with the national Fuel Gas Code ANSI Z223.1
– current installation code CAN/CGA-B149. This appliance
complies with ANS Z21.88-2000/CSA 2.22-2000 VENTED
GAS FIREPLACE HEATERS.
SELECTING LOCATION
To determine the safest and most efficient location for the
fireplace, you must take into consideration the following
guidelines:
The location must allow for proper clearances (see
figure 1).
Consider a location were the fireplace would not be
affected by drafts, air conditioning ducts, windows or
doors.
A location that avoids the cutting of joists or roof
rafters will make installation easier.
Figure 1 COMMON FIREPLACE LOCATIONS
Flush installation
limited.
Projected installation
existing finished wall.
Corner installation
normally be used and provides a wider and more efficient
range for radiant heat transfer.
is recommended where living space is
may be ideal for a new addition on an
makes use of a space that may not
Page 4

In selecting a location, the following precautions must be
g
h
t
observed:
Do not connect this appliance to a chimney system
used for solid fuel burning fireplace.
Due to high temperatures, do not locate this appliance
in high traffic areas or near furniture and draperies.
Never obstruct the front opening of the appliance or
the flow of combustion and ventilation air. Keep
control compartments accessible.
Do not locate close to where gasoline or other
WARNING: Do not block required air space wit
insulation or any other material. Do not obstruc
effective opening of appliance with any type of facing
material.
VENT TERMINATION CLEARANCES
The final position of your fireplace depends on the location of
the vent termination in relation to the clearances that must be
observed as shown in figures 3 and 4.
flammable liquids may be stored. The appliance area
must be kept clear and free from these combustible
materials.
Do not use this appliance if any part has been under
water. Immediately contact a local service technician
to examine the fireplace and to replace any part of the
control ignition system and other related components
that has been submerged under water.
MINIMUM CLEARANCES TO COMBUSTIBLES
• Back and side of fireplace ------------------- 0”
• Floor ------------------------------------------ 0”
• Perpendicular wall --------------------------- 6”
• Front ------------------------------------------- 36”
• Top of Standoffs ----------------------------- 0”
MANTEL CLEARANCES
Woodwork, such as wood trims, mantels and other
combustible materials should be placed within the required
Figure 3 VENT CLEARANCES
clearance specified on figure 2.
Ref. Mantel Depth Ref. Mantel from top
114"A16"
212"B14"
310"C12"
48"D10"
56"E8"
64"F6"
72"G4"
of opening
Fi
ure 2 MANTEL CLEARANCES
Figure 4 VENT CLEARANCES
-3 - For more information, visit www.desatech.com
Page 5

VENT PIPE AND TERMINATION CLEARANCES
The final position of your appliance depends on the location of the termination in relation to the clearances that must be observed.
A= 12” (305mm) clearance above grade, veranda, porch, deck
or balcony. ***
B= 9” (229mm) clearance in U.S. and 12” (305mm) clearance
in Canada to window or door that may be closed.
C= 9” (229mm) clearance in U.S. and 12” (305mm) clearance
in Canada to permanently closed window or door that maybe
opened.
D= 18” (475mm) vertical clearance to ventilated and 12”
(305mm) to unventilated soffit located above the terminal
within a horizontal distance of 2 feet (610mm) from the
centerline of the terminal.
E= 12” (305mm) clearance below eaves.
F= 9” (229mm) clearance to outside corner.
G= 6” (15mm) clearance to inside corner.
H= not to be installed above a meter/regulator within 3 feet
(914mm) horizontally from the centerline of the regulator. ***
I= 36” (914mm) clearance in U.S. and 72” (1829mm) in
Canada to service regulator vent outlet. ***
J= 12” (305mm) clearance to non-mechanical air supply inlet
to building or the combustion air inlet to any other
appliance.***
K= 36” (914mm) clearance to a mechanical air supply inlet.
L= 84” (2134mm) clearance above paved sidewalk or paved
driveway located on public property. *
M= 12” (305mm) clearance under veranda, veranda, porch,
deck or balcony. **
* vent shall not terminate directly above a sidewalk or paved driveway that is located between two single-family dwellings and serves
both dwellings.
** only permitted if veranda, porch, deck or balcony is fully open on a minimum of two sides beneath the floor.
*** as specified in CGA-B149 installation codes (1991) for Canada or for U.S. installation follow the current National Gas Code,
ANS Z223.1. Note: Local codes or regulations may require different clearances
.
-4 - For more information, visit www.desatech.com
Page 6

VENT INSTALLATION INSTRUCTIONS
1. Install pipe to fireplace collar adapter located on back
of unit at a 45 deg. Angle. Connect our starting pipe
to a 45 deg. Starting section by sliding it over the
collar adapter on the fireplace. Twist-lock for proper
installation check to insure proper connection (see
figure 5).
Figure 5 VENT INSTALLATION
2. Once the elbow is properly fastened to the fireplace
adapter, continue to install the remainder of the pipe
for the desired installation.
3. Install every section of the pipe making sure that all
joints are properly twist-locked.
4. After steps 1, 2 and 3 are completed, install the vent
termination. Depending on location of termination,
you may use a vertical or horizontal termination.
5. Depending on the wall thickness, allow one inch to
protrude from internal wall as shown in figure 6.
6. For vertical venting application, install vertical flue
restrictor into inner collar of fireplace as shown in
figure 5.
Figure 6 VENT TERMINATION
7. An optional siding standoff may be installed between
the vent cap exterior wall. Secure horizontal top to
standoff and then secure the complete assembly to
wall (see figure 6). The vent termination must be
removable for service pipe inspection.
The vent system serves as the “chimney” as well as the
combustion air supply (air intake). The horizontal run must
have a rise of ¼” (6 mm) for every 1 foot (305 mm) of
horizontal run towards the termination. Never allow the vent
to run downward. The maximum horizontal run depends on
the vertical rise from fireplace adapter collar to the vent
termination (see table below).
VERTICAL HORIZONTAL
ft mm ft mm
0to1'305
1 305 to 4 1219
2 610 to 8 2438
3 914 to 12 3658
41219to164877
51524to154572
61829to144267
72134to133962
82438to123658
WARNING: Vent pipe air space clearances to
combustibles are 1” on all sides except on the horizontal
sections, which require 2” clearances from the top of the
pipe. Where the termination cap penetrates a combustible
wall, 1” air space clearance is required.
When installing length of pipe over 3 ft. (914 mm)
horizontally, support the pipe every 3 ft. (914 mm) using
metal straps. Vertical to horizontal pipe must be kept at a one
foot (305 mm) to 4 ft. (1219 mm) ratio with a maximum run
of no more than 20 ft.
If an offset is necessary in the attic to avoid obstruction, it is
important to support the vent pipe every 3 ft. (914 mm), to
avoid excessive stress on the elbows and possible separation
see figure 7).
Figure 7 OFFSET ELBOW
-5 - For more information, visit www.desatech.com
Page 7

Refer to the following table for clearance between roof and
termination.
ROOF PITCH
FLAT - 7/12 1 305
7/12 - 8/12 1.5 457
8/12 - 9/12 2 610
9/12 - 10/12 2.5 762
10/12 - 11/12 4 1219
12/12 - 14/12 5 1524
14/12 - 16/12 6 1829
16/12 - 18/12 7 2134
18/12 - 20/12 7.5 2286
20/12 - 21/12 8 2438
MINIMUM HEIGHT ABOVE ROOF
ft mm
FRAMING
Once the final location has been determined (observing
clearances for vent termination), you may construct framing
using dimensions shown in figures 8 and 9, depending on the
particular installation.
Figure 8 FRAMING DIMENSION
A 32-3/8" 36-1/8" 40-1/8"
B 34-5/8" 41-1/4" 48-1/4"
CD32M CD36M CD42M
If the appliance is to be installed directly on carpeting, tile
(other than ceramic), or any combustible material other than
wood flooring, the appliance must be installed upon a metal or
wood panel extending the full width and depth of the fireplace.
Figure 9 CORNER INSTALLATION
A 28-1/2" 35-3/4" 41-5/8"
B 13-5/8" 15" 21-5/8"
C 39-3/8" 49-5/8" 58-1/2"
D 9-1/2" 10-3/8" 13-1/2"
E 9-7/8" 13-3/4" 16-3/4"
F 34-1/2" 41-1/8" 48"
G 35-1/2" 42-1/8" 48-1/4"
H 54-3/8" 68-1/4" 81-1/2"
CD32M CD36M CD42M
ELECTRICAL HOOK-UP AND REMOTE RECEIVER
DIAGRAM
A wire way with two receptacles has been supplied for your
convenience and is located on the lower right hand side of the
appliance (see figure 10).
Figure 10 DUPLEX OUTLET
-6 - For more information, visit www.desatech.com
Page 8

The remote control receiver is factory wired and connected to
n
the convertible gas valve as shown in figure 11.
Figure 11 REMOTE CONTROL RECEIVER
GAS SUPPLY TESTING
NOTE: This section is intended as a guide for qualified
technicians installing gas to the appliance.
WARNING: Do not connect appliance before pressure
testing gas piping. Damage to gas valve may result and a
unsafe condition may be created.
The appliance and its individual shut-off valve must be
disconnected from the gas supply piping system during any
pressure testing of that system at test pressures in excess of ½
psig (3.5 kPa).
The appliance must be isolated from the gas supply piping
system by closing its individual manual shut-off valve during
any pressure testing of the gas supply piping system at test
pressures equal to or less than ½ psig (3.5 kPa).
The gas control valve is secured underneath the firebox. Two
1/8 NPT plugged tappings are provided on the gas control
valve for pressure test gauge connections (see figure 12).
GAS LINE HOOK-UP
Gas line hook-up should be done by your gas supplier or
licensed service technician.
NOTE: Before you proceed, make sure your gas supply is off.
A manual shut-off valve has been included in the fireplace’s
gas supply system. However, consider installing an extra
shut-off valve outside the appliance’s enclosure (check with
local codes), where it can be accessed more conveniently with
a key through a wall as shown in figure 13.
In conformance with local codes, route a ½” NPT gas line
towards the appliance coming in from either the left or right
side of the fireplace (see figure 14).
CAUTION: Do not kink flexible gas line.
Figure 12 GAS CONTROL VALVE
Figure 13 GAS LINE HOOK-UP
Figure 14 GAS LINE ROUTING
-7 - For more information, visit www.desatech.com
Page 9

Install a sediment trap between the incoming gas line and the
d
n
N
gas control box (see figure 15). The sediment trap should
extend down a minimum of 3 inches (76 mm) beyond the
center of the pipe.
Figure 15 SEDIMENT TRAP
When routing gas line through conduit sleeve, make sure to
repack insulation to fill gaps between gas line and conduit
sleeve. Compounds used on threaded joints of gas piping shall
be resistant to the action of propane or natural gas.
Compounds should be applied lightly to ensure excess sealant
does not enter the gas line.
Complete your gas line installation by connecting the
incoming gas line to flexible gas line. Secure tightly with a
wrench but do not over-tighten.
CAUTION: All gas piping and connections must be teste
for leaks after the installation is completed. After ensuring
that the gas valve is on, apply a commercial leak detectio
solution to all connections and joints. Bubbles forming
show a leak. Correct all leaks at once. DO NOT USE AN
OPEN FLAME FOR LEAK TESTING AND DO NOT
OPERATE ANY APPLIA
DETECTED. LEAK TESTING SHOULD BE DONE BY
A QUALIFIED SERVICE PERSON.
PILOT ADJUSTMENT
The pilot or electrode assembly is factory preset for the proper
flame height. Alterations to these settings may have occurred
during shipping and handling. If this is the case, some minor
readjustments may be necessary and should be done by a
qualified service technician. The proper settings for the
thermopile height should be at a distance of 3/8” (10mm) to
½” (13mm) from the pilot flame as shown in figure 16.
Figure 16 PILOT ASSEMBLY
CE IF A LEAK IS
SPECIFICATIONS
Gas Rate (natural) 16,000/23,000 Btu/hr 18,000/26,000 Btu/hr 25,000/35,000 Btu/hr
Gas Rate (propane) 15,000/21,000 Btu/hr 17,000/24,000 Btu/hr 23,000/33,000 Btu/hr
Ignition Piezo Piezo Piezo
Manifold Pressure 3.5" w.c. 3.5" w.c. 3.5" w.c.
Minimum Inlet Supply Pressure 4.5" w.c. 4.5" w.c. 4.5" w.c.
CD32M CD36M CD42M
-8 - For more information, visit www.desatech.com
Page 10

GLASS PANEL REMOVAL
Before proceeding, make sure gas control valve is in the
“OFF” position.
1. To remove louvers, pull both spring latches (located
in each end of louver) towards center of appliance
simultaneously until disengaged from locating holes.
Repeat for bottom end spring latches and pull louver
outward (see figure 17).
Figure 17 LOUVERS
2. Remove screen rod by removing rod loop from glass
door center bracket. Then slide the screen rod either
to the left or right of the fireplace until one of the rod
ends is free to completely remove the screen from the
fireplace.
3. To open the glass door, undo the latches located on
the top and bottom side of the firebox (see figure 18).
Carefully swing the door to the left. The glass is
securely mounted to the firebox by means of five
screws.
Figure 18 SPRING LATCHES
LOG INSTALLATION
Each log is marked with a number in the following diagrams.
These numbers will help in identifying the logs when
installed. It is very important to install these logs exactly as
instructed. Do not modify logs and only use logs supplied
with fireplace.
FOR MODELS CD32M AND CD36M SERIES
• Place log #1 (back log) on top of grate. Make sure
the notches in the bottom of the log fit over the grate.
• Rest log #2 (large front log) on the pins on the front
part of the grate.
• Place log #3 (C-shaped crossover log) onto the rear
and front logs. Make sure it is seated properly on the
smooth surface on the front log and on the pin on the
back log as shown below.
• Place log #4 (small, round log) on the pin on the right
side of front log as shown below.
• Place log #5 (small log) onto the front left part of the
grate making sure the notches fits over the prongs of
the grate.
• Place log #6 onto two pins on the left side of back
and front log.
• Place lava rock along sides and front of firebox
bottom in areas that are visible. It is not necessary to
use all of the lava rock provided.
FOR MODEL CD42M
• Place log #1 (base log) onto pin on left side of grate.
• Rest left side of log #2 (front log) onto top of log #1.
Place right side of log onto second pin located on the
right side of the grate.
Place log #3 (rear log) onto pins on rear of grate.
• Place log #4 (crossover log) onto pins from both logs
#2 and #3.
• Place log #5 (top log) onto right pin of front log (#2)
and the smooth surface of rear log (#3). Make sure it
is seated properly.
- 9 - For more information, visit www.desatech.com
Page 11

• Place log #6 (left log) onto left pin of front log (#2)
r
p
and the smooth surface of rear log (#3). Make sure it
is seated properly.
• Place log #7 onto right pin of top log (#5). Make sure
it is seated properly.
WARNING: Improper installation, adjustment,
alteration, service or maintenance can cause injury o
roperty damage. Refer to this manual for assistance.
Consult a qualified installer for additional information.
NOTICE: Do not put lava rock on or under the burner.
Placing lava rock on burner could cause performance
problems.
• Pull ember material apart into pieces no larger than a
dime. Place these pieces loosely and directly onto
the exposed section of the front burner and along the
space between the burner and grate prongs. These
will create the glowing ember appearance as the
flame touches the ember material. Do not block air
slots by using too much ember material in one area.
It is not necessary to use all of the ember material
provided.
• Close glass door, lock door latches and secure
louvers in place.
WARNING: The glass door must be securely in place
before operating the fireplace. Do not operate the fireplace
if glass is missing or broken.
BURNER FLAME ADJUSTMENT
The burner flame adjustment (shutter opening) is factory
preset (for natural gas) to the proper air-to-gas ratio. This ratio
results in an even and clean burning flame across the burner
(see figure 19).
Figure 20 AIR SHUTTER ADJUSTMENTS
DECORATIVE FACING
Any non-combustible material may be used as facing (glass,
tile, brick etc.) as long as the proper clearances are observed
(refer to section on clearances on page 3). Louvered openings
must not be obstructed and upper and lower panels must
remain accessible for service. Use only heat-resistant, noncombustible mortar or adhesive when securing decorative
facing materials.
OPERATING GUIDELINES
When lit for the first time, the fireplace may emit a slight odor
for about 16 to 24 hours. This is normal and is due to the
“curing” of the logs and the “burn-in” of internal paint and
lubricant used in the manufacturing process.
Keep compartments, logs, burners and area surrounding the
logs clean by vacuuming and brushing at least twice a year or
as necessary.
Turn off gas and remote wall switch before servicing
appliance. Any safety screen or guard removed for servicing
the fireplace must be replaced prior to operation. Have a
qualified agency periodically inspect the vent system at the
start of each heating season for any obstruction, which hinder
its normal operation. Never obstruct the flow of combustion
and ventilation air. Keep the front of the fireplace clear of all
obstacles and materials.
Figure 19 BURNER FLAME
If adjustment is necessary, you can restore the proper flame
setting by loosening the air shutter screw and rotating the air
shutter until proper setting is achieved (see figure 20). The
correct shutter opening is listed below.
MODEL
CD32M 0.188" MAX - CD36M 0.188" MAX - CD42M 0.188" 0.313" 0.188" 0.500"
AIR SHUTTER OPENINGS
TUBE BURNER PAN BURNER
NATURAL PROPANE NATURAL PROPANE
WIRING DIAGRAM
- 10 - For more information, visit www.desatech.com
Page 12

- 11 - For more information, visit www.desatech.com
Page 13
CONVERSION KIT
This conversion kit is packaged with the unit. Please check
the contents before beginning this conversion.
• Before proceeding, make sure the gas control valve is
in the “OFF” position and all electrical power to the
appliance is turned off.
• Wait five minutes to clear out any gas. Smell for any
gas odor especially near the floor. If any gas odor is
present, STOP! Refer to the lighting instructions
included in this manual.
• Locate the latch on the louver assembly. Remove the
top and bottom louver by pulling the spring latches
toward the center of the fireplace simultaneously
until they are disengaged from the locating holes.
• Undo the latches located on the top and bottom side
of the firebox and swing the door to the fully open
position.
• Carefully remove the log set and the ceramic fiber
embers from the burner and place them outside the
combustion chamber.
• Replace the main burner orifice with the burner
orifice included in the conversion kit (Model CD42M
contains two burner orifices).
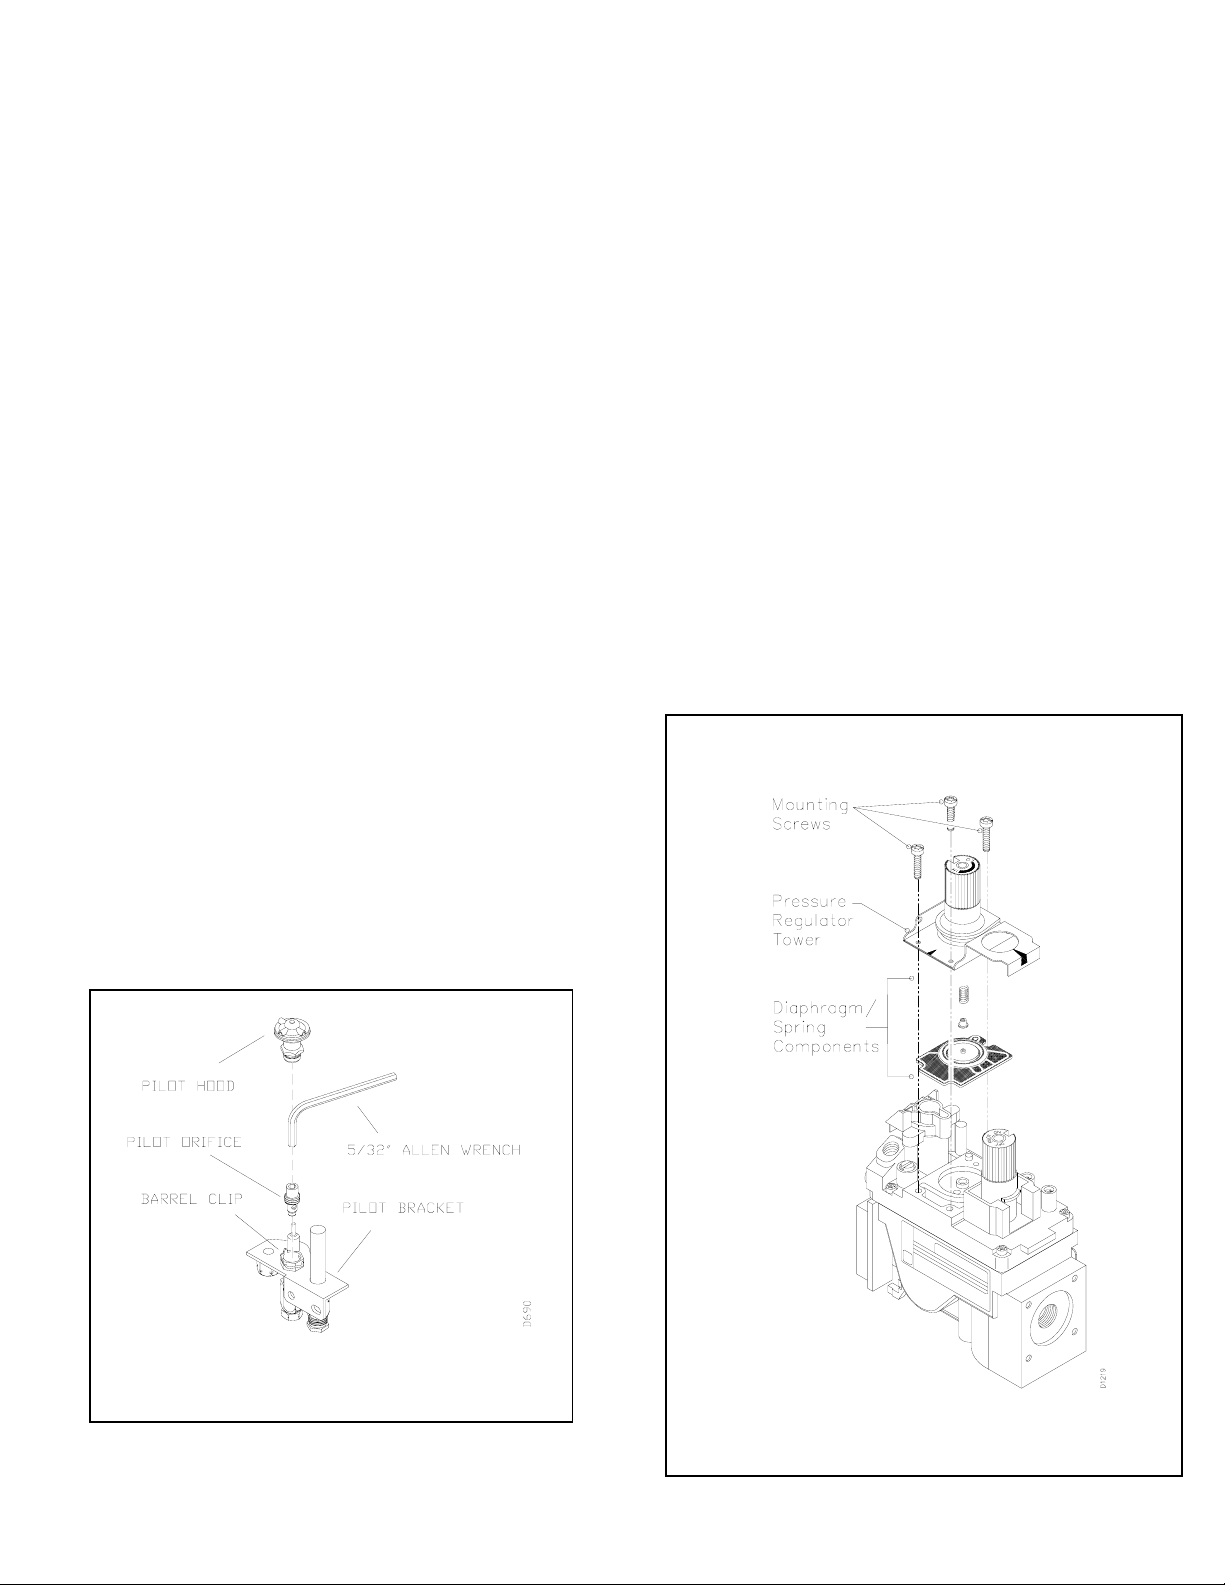
• Remove the pilot hood by pulling up until it
disengages from the barrel. Do not remove the
retainer clip (see figure 21).
• Remove the pilot orifice from inside the barrel using
a 5/32” allen wrench to unscrew the orifice.
Figure 21 PILOT ORIFICE
• Replace pilot orifice with LP orifice supplied with
this kit. The number 30 is stamped on the sleeve for
identification. Insert the small end of the new pilot
orifice into the barrel and thread until tight with the
allen wrench.
• Line up the notch on pilot hood to the positioning tab
on the barrel receiver and snap back into position.
IMPORTANT: Be careful not to bend or kink the aluminum
tubing during conversion. Make sure the pilot hood and orifice
are properly mated and aligned after finishing this conversion.
Convert the gas control valve by swapping out the valve
regulator portion of the gas valve.
• Using a TORX T20 or a slotted screwdriver, remove
and discard the three mounting screws, pressure
regulator tower, and diaphragm/spring components
(see figure 22).
• Insure that the rubber gasket is properly positioned
on the new pressure regulator assembly. Install the
new pressure regulator assembly to the valve using
the new mounting screws supplied with the kit.
Tighten the screws securely (approximately 25inlbs.) (see figure 23).
Figure 22 GAS CONTROL VALVE CONVERSION
- 12 - For more information, visit www.desatech.com
Page 14
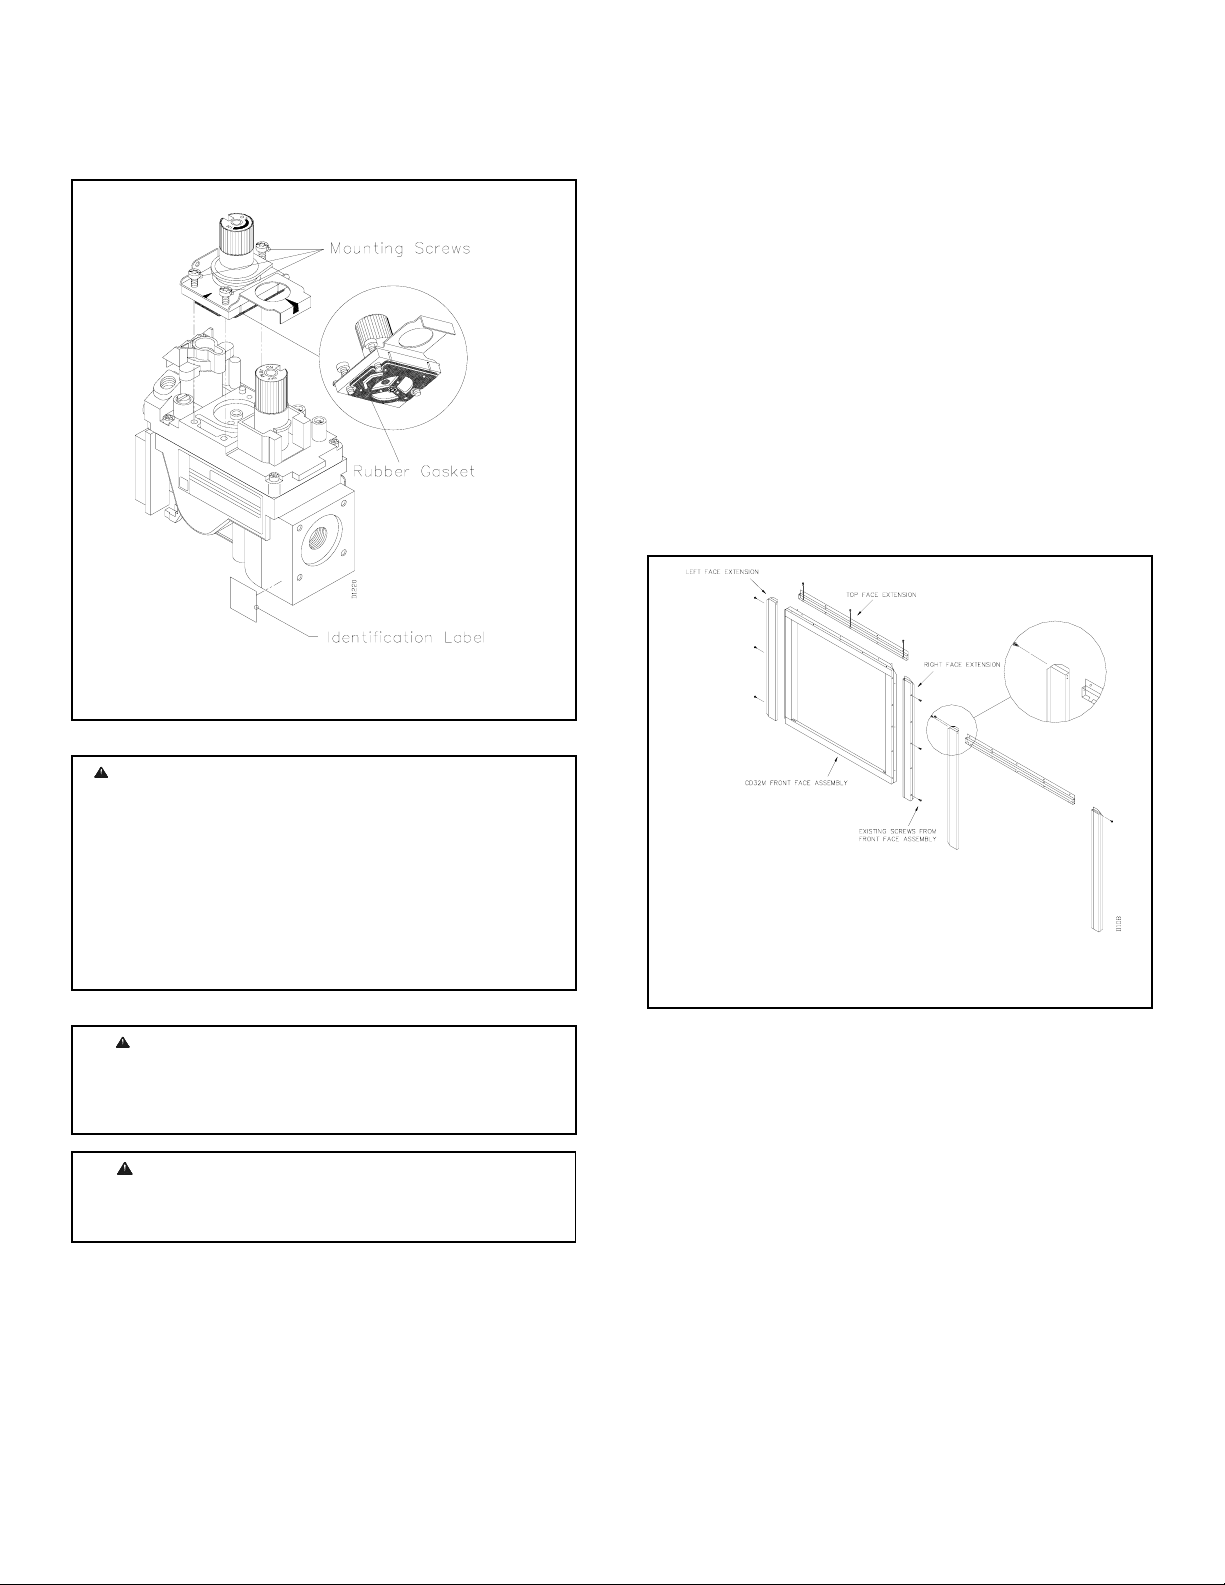
• Install the identification label enclosed with the
a
d
y
y
f
k
t
gas valve regulator to the valve body where it can
easily be seen (see figure 23).
Figure 23 GAS CONTROL VALVE CONVERSION
WARNING: The conversion kit must be installed by
qualified service technician in accordance with the
manufacturers instructions and all applicable codes an
requirements of the authority having jurisdiction. If an
information in these instructions is not followed correctly,
a fire, explosion or production of carbon monoxide ma
result causing property damage, personal injury or loss o
life. The qualified service technician is responsible for the
proper installation of this conversion kit.
FACE EXTENSION (FOR MODEL CD32M ONLY)
Model CD32M comes equipped with a front face extension.
The front face extension would add 3- ½” to the width and ¾”
to the height of the fireplace face.
To install the face extension:
• Remove the existing screws from front face assembly
as shown in figure 24.
• Align holes on top face extension (figure A) with
holes on the top side of the front face assembly and
secure with screws previously removed (follow this
step to install left and right face extension).
• Secure top face extension with left and right face
extensions with two sheet metal screws (figure B).
FIGURE A
FIGURE B
Figure 24 FRONT FACE EXTENSION
WARNING: Never use an open flame to chec
for a leak. Apply commercial leak test solution to all
gas joints. Bubbles forming show a leak. Correct all
leaks at once.
WARNING: Test all gas piping and connections
for leaks after installing or servicing. Correct leaks a
once.
- 13 - For more information, visit www.desatech.com
Page 15

OBSERVED PROBLEM POSSIBLE CAUSE REMEDY
• Pilot will not stay lit after
carefully following lighting
instructions.
• Pilot lit but no flame on the
burner.
• Frequent pilot outage problem.
• Defective pilot generator
(thermocouple).
• Remote or wires defective.
• Thermopile/Thermocouple not
generating sufficient millivoltage.
• Plugged burner orifice.
• Thermocouple not generating
sufficient millivoltage.
• Pilot flame maybe too low or
blowing (high) causing the valve
safety to drop out.
• Check pilot flame. It must
impinge on thermocouple.
• Clean or adjust pilot for
maximum flame impingement on
thermocouple.
• Ensure that the connection
between the valve and
thermocouple are tight and
secured.
• Check remote wires for proper
connections. Jumper wire across
terminals at remote control, if
burner comes on, replace
defective remote. If okay, jumper
wire across remote control at
valve, if burner comes on, wires
are faulty or connections are bad.
• Check thermopile with millivolt
meter. Take reading at
thermopile terminals of gas valve.
Should read 325 millivolts
minimum with remote control off.
Replace thermopile if reading is
below specified minimum.
• Check burner orifice for stoppage
and remove.
• Check thermocouple with
millivolt meter. Take reading at
thermocouple terminals of gas
valve. Should read 18 millivolts
minimum with remote control off.
Replace faulty thermocouple if
reading is below specified
minimum.
• Clean and/or adjust pilot flame
for maximum flame impingement
on thermocouple.
- 14 - For more information, visit www.desatech.com
Page 16

ILLUSTRATED PARTS BREAKDOWN
MODELS CD32M AND CD36M SERIES
- 15 - For more information, visit www.desatech.com
Page 17

ILLUSTRATED PARTS BREAKDOWN
MODEL CD42M
- 16 - For more information, visit www.desatech.com
Page 18

ILLUSTRATED PARTS LIST
ITEM DESCRIPTION QTY.
CD32M CD36M CD42M
1 108878-01 108008-01 108326-01 FIREBOX ASSEMBLY 1
2 108874-01 108009-01 108327-01 FACE WELDMENT 1
3 108892-01 108010-01 108328-01 DOOR ASSEMBLY 1
4 108903-01 108011-01 108331-01 PANEL ASSEMBLY LOUVER, FACE TOP 1
5 108903-02 108011-02 108331-03 PANEL ASSEMBLY LOUVER, FACE BOTTOM 1
6 108895-01 108015-01 108333-01 TOP, FIREPLACE 1
7 109096-01 108016-01 108336-01 INSULATION, FIREPLACE TOP 1
8 108896-01 108017-01 108334-01 SURROUND, FIREPLACE 1
9 108885-01 108074-01 108329-05 BURNER ASSEMBLY 1
10 108890-01 108076-01 108374-01 GASKET, BURNER BASE 1
**11 108897-01 108080-01 108351-01 REFRACTORY, REAR 1
**12 - 108081-01 108352-01 REFRACTORY, TOP 1
**13 108901-01 108082-01 108353-01 REFRACTORY, RIGHT 1
**14 108901-02 108083-01 108354-01 REFRACTORY, LEFT 1
15 11418 11418 11418 NUT, PUSH-ON 2
16 108440-01 12105 107840-01 SCREEN 2
17 108455-02 13113 108455-01 ROD, SCREEN 1
18 110037-01 110037-01 110037-01 ELECTRICAL DUCT ASSEMBLY 1
19 21171 21171 21171 COVER, GAS KNOCK-OUT 2
20 24460 24460 24460 CONDUIT ASSEMBLY, GAS 1
21 109082-03 109082-01 109082-02 HEAT SHIELD 1
22 27253 27253 27253 LABEL, NOTICE 1
*23 109222-01 109006-01 108778-01 LOG SET 1
24 11102 11102 11102 SCREW #8-32 x 3/8 PPH ZINC 2
25 11105 11105 11105 SCREW #10 x 1/2 ZINC 9
26 11179 11179 11179 SCREW #10-24 x 1/4 ZINC 4
27 11237 11237 11237 SCREW, TRILAB M4 x 8MM 1
28 14389 14389 14389 VALVE HI-LO SIT (NAT) 1
29 14492 14492 14492 IGNITOR, PIEZO 1
30 14500 14500 14500 FITTING, BRASS 2
31 14253 14253 14253 CONNECTOR, FLEXIBLE 1
32 14511 14511 14511 BRACKET, IGNITOR (SIT) 1
33 14528 14528 14528 FITTING, BRASS ELBOW 1
34 104506-25 104506-23 104506-25 ORIFICE 1
35 104509-02 14576 14544 TUBING ASSEMBLY, ALUMINUM 1
36 26808 26808 26808 BRACKET, VALVE 1
37 26827 26827 26827 BRACKET, SWITCH 1
38 108886-01 108077-01 108346-01 BASE, GRATE 1
39 108891-01 104504-03 108376-01 BURNER 1
40 108084-02 108084-02 108084-02 PILOT ASSEMBLY (NG) 1
41 108889-01 108075-01 108373-01 BURNER BASE ASSEMBLY 1
42 109699-01 - - FACE EXTENSION, RIGHT 1
43 109699-02 - - FACE EXTENSION, LEFT 1
44 109700-01 - - FACE EXTENSION, TOP 1
45 - - 108330-01 BURNER PAN ASSEMBLY 1
46 - - 104506-24 ORIFICE 1
*47 25487 25487 25487 LAVA ROCK/BAG ASSEMBLY 1
***48 110251-01 110251-01 110251-01 MICRO SWITCH ASSEMBLY 1
* ITEMS NOT SHOWN **OPTIONAL ITEMS *** FOR MODELS CD32M-2 & CD36M-2 ONLY
PART #
- 17 - For more information, visit www.desatech.com
Page 19

ACCESSORY AND REPLACEMENT PARTS
- 18 - For more information, visit www.desatech.com
 Loading...