

Page 1

1
El logotipo DERBI es marca registrada y propiedad de DERBI - Nacional Motor, S.A. Sociedad Unipersonal.
Prohibida la reproducción total o parcial de cualquier fotografía, gráfico o texto insertado en este manual.
© 2004 DERBI - Nacional Motor, S.A. Sociedad Unipersonal.
Impreso por Gràfiques Morán, S.L. - Palamós (Girona) Depósito Legal: GI - 711 - 2004
CODIGO MANUAL 0.0G.051.7.112.1
Page 2

2
DERBI - NACIONAL MOTOR, S.A.
Sociedad Unipersonal desea agradecerle la confianza depositada por Ud. en la
elección del modelo GP1.
En este manual se especifican los
principales detalles para el cuidado de
su scooter para que obtenga el mejor
funcionamiento y la mayor duración con
un mínimo coste. Cuide su scooer. La
calidad DERBI se encargará del resto,
con los recambios originales y una red
Nacional de más de cuatro mil Agentes
y talleres autorizados, estamos seguros
de que obtendrá plena satisfacción en el
uso del vehículo.
Ante qualquier problema, dirigirse al
representante más próximo.
Bienvenido a
DERBI
DERBI / NACIONAL MOTOR, S.A.
Sociedad Unipersonal vous remercie de
votre choix et de votre confiance en
votre nouveau scooter GP1.
Dans ce manuel sont spécifiés les
principaux détails pour l’entretien de
votre scooter afin d’obtenir le meilleur
fonctionnement et une plus grande
durée de vie au coût minimum. Prenez
soin de votre scooter, le département
qualité DERBI se chargera du reste,
avec les pièces de rechange originales
et un réseau national de plus de quatre
mille agents et garages autorisés, nous
sommes sûrs que vous obtiendrez la
pleine satisfaction dans l’utilisation de
votre véhicule.
En cas de problème, s’adresser au
représentant le plus proche.
Bienvenue chez
DERBI
Debido a su criterio de constante mejora en sus
productos, DERBI - NACIONAL MOTOR, S.A.
Sociedad Unipersonal se reserva el derecho de
introducir las modificaciones que crea oportunas,
sin previo aviso.
Etant donné le critère d’amélioration constante de
ses produits, DERBI / NACIONAL MOTOR, S.A.
Sociedad Unipersonal se réserve le droit
d’introduire les modifications qu’il jugerait
opportunes sans préavis.
Page 3

3
DERBI - NACIONAL MOTOR, S.A.
Sociedad Unipersonal desidera
ringraziare la fiducia che Lei ha posto
nella scelta del nuovo scooter
GP1 .
Nel presente manuale si specificano i
principali dettagli per la cura del suo
scooter, affinché possa ottenere il
miglior funzionamento e la maggior
durata con una spesa minima. Curi il
suo scooter, la qualità DERBI
s’incaricherà del resto, con i ricambi
originali ed una rete Nazionale di più di
quattromila Agenti ed officine
autorizzate, siamo sicuri del fatto che
otterrá piena soddisfazione dall’uso del
veicolo.
Per qualsiasi problema, rivolgersi al
rappresentante più vicino.
Benvenuto a
DERBI
DERBI - NACIONAL MOTOR, S.A.
Sociedad Unipersonal offers you our
thanks for the confidence you place in
us in your purchase of your new model
GP1.
This manual will explain the principal
details of how to maintain this scooter
so you can get a longer duration with a
minimum cost and the best performance. Take care of your engine. DERBI’s
quality will take care of everything else,
we are sure that you will get complete
satisfaction with the use of this vehicle,
with the original spare parts and a National web of more than four thousand
agents and shops.
If you encounter any problem, refer to
the nearest distributor.
Welcome to
DERBI
DERBI - NACIONAL MOTOR S.A.
Sociedad Unipersonal möchte Ihnen für
das Vertrauen, das Sie durch die Wahl
des neuen Mopeds
GP1
entgegenbringen, herzlichst danken.
In dieser Gebrauchsanweisung finden Sie
Ausführungen zu den wichtigsten
Einzelheiten, die für die Pflege Ihres
Mokick von Bedeutung sind. Durch
Einhaltung derselben sind optimale
Funktionstüchtigkeit und lange
Lebensdauer bei geringstem
Kostenaufwand gewährleistet. Pflegen Sie
Ihren Mopeds; die Qualität von DERBI
kümmert sich um alles übrige. Mit den
Original-Ersatzteilen und einem nationalen
Service-Netz von über 1000 autorisierten
Werkstätten sind wir sicher, daß Ihnen Ihr
Fahrzeug größte Freude bereiten wird.
Willkomen bei
DERBI
A causa del suo criterio di miglioramento costante
dei propri prodotti, DERBI - NACIONAL MOTOR,
S.A. Sociedad Unipersonal mantiene il diritto di
introdurre le modifiche che consideri necessarie,
senza avviso previo.
Due to its criterion of constant improvement of its
products, DERBI - NACIONAL MOTOR, S.A.
Sociedad Unipersonal reserves the right to
introduce any modifications it considers suitable,
without prior notice.
Im Hinblick auf die ständige Verbesserung ihrer
Produkte behält sich DERBI - NACIONAL MOTOR,
S.A. Sociedad Unipersonal das Recht vor, ohne
vorherige Ankündigung die als zweckmäßig
erachteten Änderungen einzuführen.
Page 4
4
❀
Así puede Vd. contribuir a
la conservación del medio
ambiente.
De su estilo de conducir depende
también el consumo de combustible
y, por lo tanto, el nivel de emisión
de contaminantes de su scooter.
Asimismo, la manera de tratar el
vehículo influye en el nivel de ruidos
y en el desgaste del mismo.
En este Manual de Instrucciones se
incluyen una serie de informaciones
sobre una conducción ecológica y al
mismo tiempo económica de su
scooter.
Sírvase tener en cuenta todos los
textos de este Manual marcados
con un
❀
Contamos con Vd.
¡Proteja el medio
ambiente !
Vous pouvez contribuer
à la conservation de
l’environnement.
De votre manière de conduire
dépend également la consommation
de combustible et, donc, du taux
d’émission d’agents contaminants
de votre scooter.
La manière de traiter votre véhicule
a des répercutions sur le niveau de
bruits et la vie de votre véhicule.
Ce Manuel d’Instructions donne une
série d’informations sur une conduite écologique et économique de
votre scooter.
Voyez tous les textes de ce Manuel
marqués d’une
❀
Nous avons confiance
en vous.
Protégez
l’environnement!
Page 5
5
Così può Lei contribuire
alla conservazione del
medio ambiente.
Dal suo modo di guidare dipende
pure il consumo di combustibile e,
quindi, il livello di emissione di contaminanti del suo scooter.
Inoltre, il modo in cui tratta il veicolo
influisce sul livello di rumore e nel
proprio logoramento.
In questo Manuale di Istruzioni si
allegano una serie di informazioni
sulla guida ecologica e contemporaneamente economica del suo scooter.
Voglia tener presente tutti i testi di
questo Manuale contrassegnati con
un
❀
Contiamo su di Lei.
Protegga il
medio ambiente!
This is how you can contribute to preserving the
environment.
The way you ride determines your
fuel consumption and therefore how
much your scooter pollutes the
atmosphere.
In the same way, the way you
treat your moped affects its noise
level and wear and tear on the vehicle.
In the Owner’s instruction handbook you will find a series of points of
information on how to ride in an ecologically sound manner, which will
also be the most economic way to
ride your scooter
Please pay attention to all the
points marked with a flower
❀
in
this handbook.
We are counting on you!
Protect the
environment!
So können Sie zum
Umweltschutz beitragen
Von Ihrem Fahrstil hängt unter
anderem der Benzinverbrauch und
daher auch die Schadstoffabgabe
Ihres scooter ab.
Auch hat die Art und Weise, wie
Sie das Fahrzeug behandeln, Einfluß auf seinen Geräuschpegel und
auf seine Abnutzung.
Diese Gebrauchsanweisung
enthält eine Reihe von Anweisungen für einen ökologisch verantworlichen und gleichzeitig wirtschaftlichen Fahrstil.
Bitte beachten Sie alle Abschnitte
dieser Gebrauchsanweisung, die mit
dem Symbol
❀
versehen sind.
Wir rechnen auf Sie.
Schonen die
die Umwelt!
Page 6

6
Page 7

Datos personales:
Données Personelles:
Dati personali:
Personal details:
Persönliche Angaben:
Nombre / Nom / Nome: / Name / Name
...................................................................
Dirección / Adresse / Indirizzo
Address / Adresse
...................................................................
Teléfono / Téléphone / Telefono
Tel. / Telefon
...................................................................
Compañía de seguros
Compagnie d'Assurances
Compagnia assicuratrice
Insurance Company:
Versicherungsgesellschaft
...................................................................
Póliza de seguros N.º
Police d'assurance n.º
Polizza di assicurazione nº:
Insurance Policy Nº
Versicherungspolice Nr.
...................................................................
Representante DERBI más cercano
Représentant DERBI le plus proche:
Concessionario DERBI più vicino:
Nearest DERBI Agent:
Nächste DERBI-Vertretung:
Nombre / Nom / Nome: / Name / Name
...................................................................
Dirección / Adresse / Indirizzo
Address / Adresse
...................................................................
Teléfono / Téléphone / Telefono
Tel. / Telefon
...................................................................
Jefe de Taller / Chef d'Atelier
Capo Officina Meccanica
Workshop Supervisor
Werkmeister
...................................................................
Teléfono / Téléphone / Telefono
Tel. / Telefon
...................................................................
Datos del Scooter:
Données du Scooter:
Dati del Scooter:
Details of your Scooter:
Angaben zum Scooter:
Designación de modelo
Désignation du modèle
Denominazione del modello
Model Name
Modellbezeichnung
...................................................................
Número de chasis
Numéro du châssis
Numero di telaio
Frame Number
Fahrgestellnummer
...................................................................
Número de motor
Numéro du moteur
Numero del motor
Engine Number
Motornummer
...................................................................
7
Page 8

8
Modo de orientarse en este libro de
instrucciones:
El sumario está dividido en cinco
capítulos como indica la tabla de materias adyacente. Dichos capítulos se
localizan mediante los cuadros de color
negro.
En la primera página de cada capítulo hay una introducción y un índice
detallado del capítulo.
Los
títulos que encabezan cada
página sirven para localizar determinado texto, hojeando rápidamente el libro.
En el
índice de la página 112 figura
la página en que se encuentra la información que se precisa.
Debido a su criterio de constante mejora en sus
productos, DERBI - NACIONAL MOTOR, S.A.
Sociedad Unipersonal se reserva el derecho de
introducir las modificaciones que crea oportunas,
sin previo aviso.
Comment utiliser ce manuel d’instructions:
Le sommaire est divisé en cinq cha-
pitres comme indique la table des matiè-
res ci-jointe. Ces chapitres se localisent
au moyen des
carrés noirs.
Sur la première page de chaque chapitre il y a une introduction et un
index
détaillé du chapitre.
Les
titres de chaque page servent à
localiser un texte déterminé, en feuilletant rapidement le manuel.
L’
index de la page 112 donne l’infor-
mation dont vous avez besoin et la page
où elle se trouve.
Etant donné le critère d’amélioration constante de
ses produits, DERBI / NACIONAL MOTOR, S.A.
Sociedad Unipersonal se réserve le droit
d’introduire les modifications qu’il jugerait
opportunes sans préavis.
Come orientarsi in questo libro di
istruzioni:
Il sommario è suddiviso in cinque
capitoli come indica la tavola di materie
adiacente.
I sopraddetti capitoli si localizzano
mediante i quadri
color nero.
Nella prima pagina di ogni capitolo
c’è una introduzione ed un
indice detta-
gliato
del capitolo.
I
titoli che intestano ogni pagina servono per localizzare un testo determinato, sfogliando rapidamente il libretto.
Nell’
indice di pagina 112 appare la
pagina dove c’è l’informazione di cui si
ha bisogno.
A causa del suo criterio di miglioramento costante
dei propri prodotti, DERBI - NACIONAL MOTOR,
S.A. Sociedad Unipersonal mantiene il diritto di
introdurre le modifiche che consideri necessarie,
senza avviso previo.
Page 9

9
How to use this instruction manual:
The summary is divided into five
chapters, as indicated in the adjoining
table of contents. These chapters are
located by means of the
black panels.
On the first page of each chapter
there is an introduction and a
detailed
index of the chapter.
The
titles heading each page serve
to locate a certain text by leafing quickly
through the book.
In the
index on page 112 you will find
the page number of the information you
need.
Due to its criterion of constant improvement of its
products, DERBI - NACIONAL MOTOR, S.A.
Sociedad Unipersonal reserves the right to
introduce any modifications it considers suitable,
without prior notice.
Zur Benutzung des vorliegenden
Bedienungshandbuches:
Wie aus dem unten angeführten
Inhaltsverzeichnis hervorgeht, besteht
die Zusammenfassung aus fünf
Kapiteln. Das Auffinden der jeweiligen
Kapitel erfolgt mit Hilfe der schwarzen
Farbfelder.
Die erste Seite eines jeden Kapitels
enthält eine Einleitung und ein
ausführliches Inhaltsverzeichnis.
Die Überschriften auf jeder Seite
dienen dem Auffinden eines bestimmten
Textes, indem man das Buch schnell
durchblättert.
Dem Inhaltsverzeichnis auf Seite 112
ist die Seite mit der gewünschten
Information zu entnehmen.
Im Hinblick auf die ständige Verbesserung ihrer
Produkte behält sich DERBI - NACIONAL MOTOR,
S.A. Sociedad Unipersonal das Recht vor, ohne
vorherige Ankündigung die als zweckmäßig
erachteten Änderungen einzuführen.
Mandos
Commandes
Comandi
Controls
Bedienungselemente
Equipo y accesorios
Équipement et accessoires
Dotazione ed accessori
Equipment and Accessories
Ausstattung und Zubehör
Arranque, conducción y rodaje
Démarrage, conduite et rodage
Avviamento, guida e rodaggio
Starting, Riding and running-in
Anlassen, Fahren und Einfahren
Mantenimiento
Entretien
Manutenzione
Maintenance
Wartung
Especificaciones
Spécifications
Specificazioni
Specifications
Technische Daten
13
29
33
45
99
Page 10
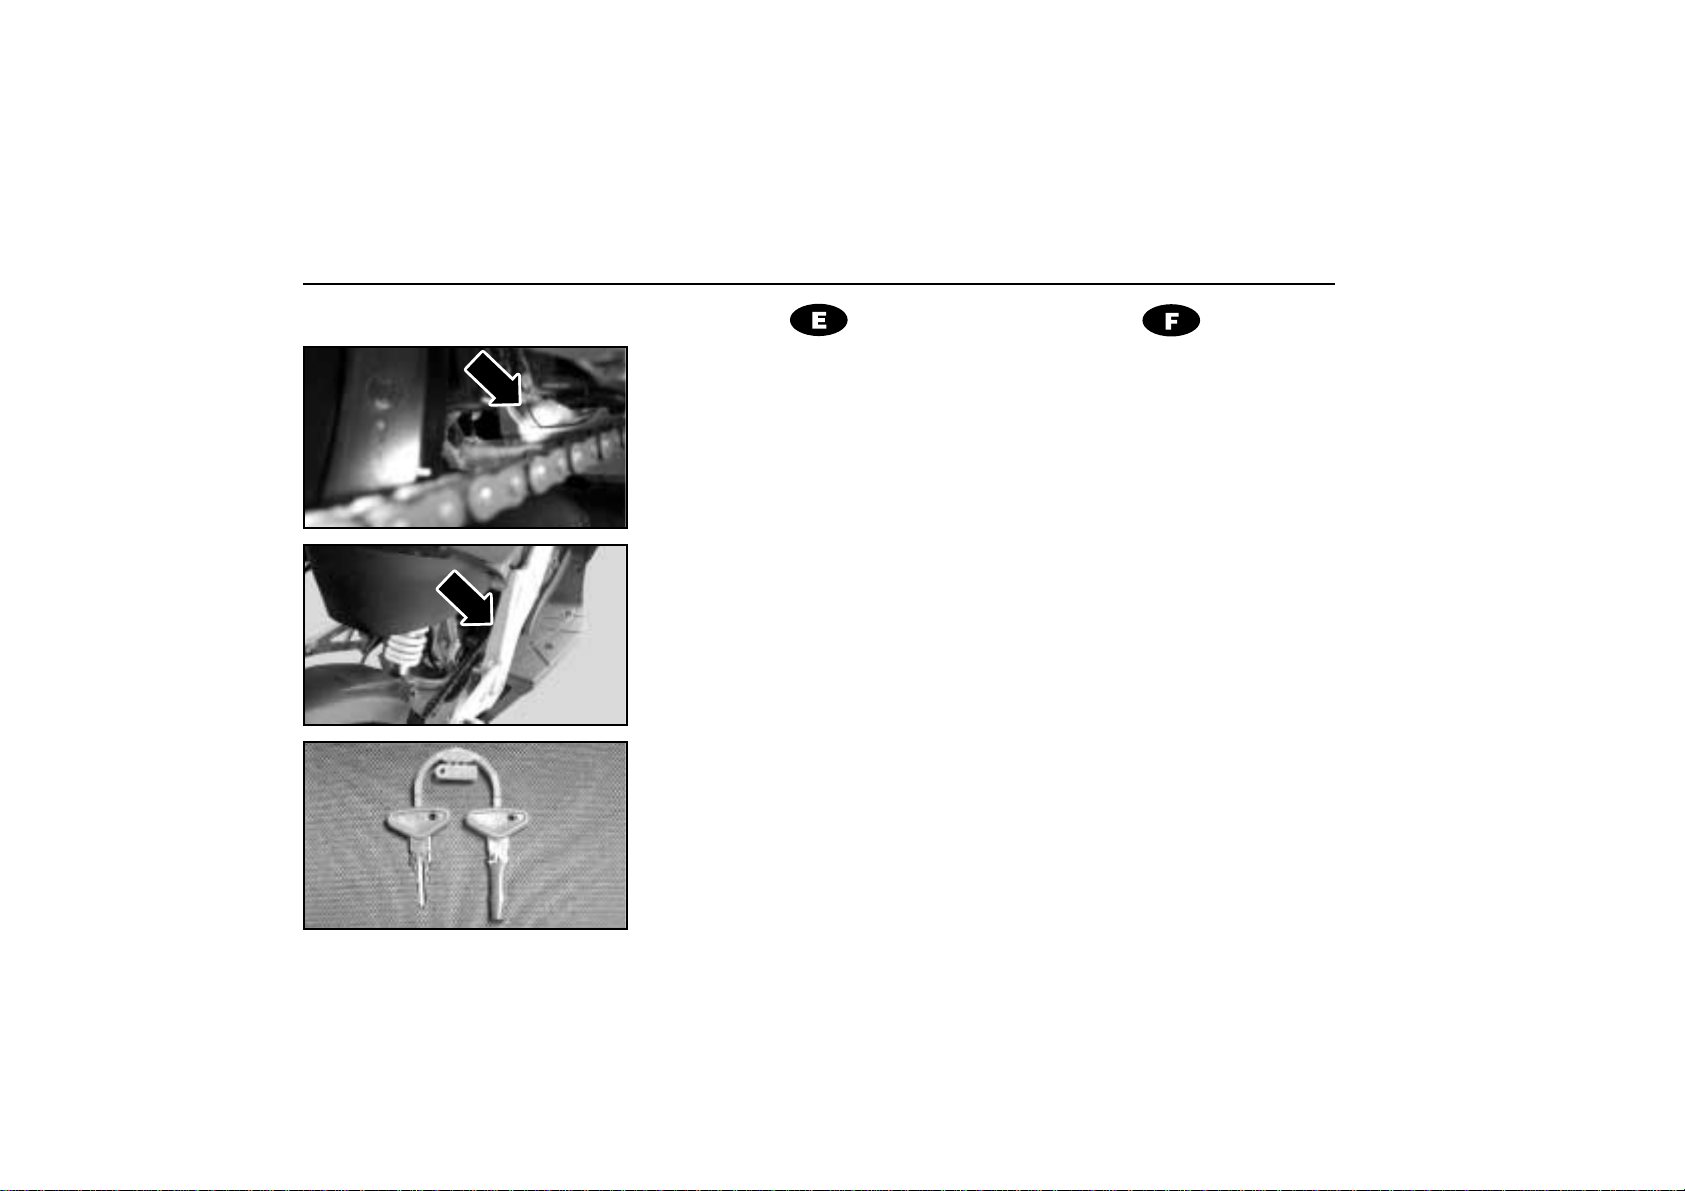
Número motor, bastidor - Llaves
Numero moteur, châssis - Clés
10
Emplazamiento del número de motor.
El número de motor está grabado en la
parte trasera del cárter izquierdo
Emplazamiento del número del chasis.
El número del chasis está grabado en
el tubo lateral derecho del chasis en su
parte trasera inferior a la altura del
travesaño.
Llaves
Con el scooter se entregan dos llaves
para la cerradura de contacto. Guarde la
llave de repuesto en un lugar seguro.
Atención
Para llamar la atención del lector sobre
puntos importantes se utilizan las siguientes indicaciones: "observación", "precau-
ción" y "aviso"
O
BSERVACION
:
Las observaciones dan consejos complementarios o explican el texto
¡Precaución!
Con este encabezamiento se advierte que
las maniobras en cuestión pueden ocasionar
deterioros en el vehículo o desgaste
prematuro.
¡Aviso!
00
Los avisos advierten que la maniobra es
peligrosa y que podría causar
lesiones.
Situation du numéro du moteur
Le numéro de moteur est inscrit sur la
partie arrière du carter gauche.
Situation du numéro du châssis
Le numéro du châssis est inscrit sur le
tube latéral droit du châssis sur sa partie
arrière inférieure à la hauteur de la
traverse du châssis.
Les clés
Deux clés de contact sont remises à la
livraison du scooter.
Attention!
L’attention du lecteur sur des points
importants sera sollicitée par les
indications suivantes: “observation”,
“précaution” et “avis”.
O
BSERVATION
:
Les observations fournissent des conseils
complémentaires ou expliquent le texte
Précaution!
C’est un avertissement indiquant que les
manoeuvres en question peuvent
endommager le véhicule ou provoquer
son usure prématurée.
Avis!
00
Avertissement qu’une manoeuvre est
dangereuse et qu’elle peut causer des
lésions.
Page 11
Numero motore, telaio - Chiavi • Engine, chassis number - Keys
Motornumber, Fahrgestellnumber - Schlüssel
11
Localizzazione del numero del
motore.
Il numero del motore è inciso nella parte
posteriore del carter sinistro.
Localizzazione del numero del
telaio.
Il numero del telaio è inciso nel tubo laterale destro del telaio nella sua parte posteriore inferiore, all’altezza della traversa.
Chiavi
Con lo scooter si consegnano due chiavi
per la serratura d’accensione.
Tenere la chiave di scorta in un luogo
sicuro.
Attenzione !
Per richiamare l'attenzione sui punti
importanti si usano i seguenti termini:
“osservazione”, “attenzione” e “avviso”.
O
SSERVAZIONE
:
Le osservazioni danno consigli comple-
mentari o spiegano il testo.
Attenzione!
Con questa intestazione si avverte che
le manovre in questione possono provocare
danni nel veicolo o logoramento pre-
maturo.
Avviso!
00
Gli avvisi avvertono che la manovra è
pericolosa e che potrebbe produrre
lesio-
ni.
Location of the engine number
The engine number is stamped on the
rear end of the left hand crankcase half.
Location of the frame number
The frame number is stamped on the
underneath at the rear of the front side
frame tube, at the level of the cross tube.
Keys
Two keys to fit the ignition lock are supplied with the scooter. Keep the spare key
in a safe place.
Important Note
To draw the reader’s attention to important points we use the following terms:
“Note”, “Caution”, and “Warning”
N
OTE
:
Notes give additional advice or further
explanation of the text
Caution!
This heading is to used to warn you that
carrying out the manoeuvres in question
may
damage the vehicle or cause it to
deteriorate more quickly.
Warning!
00
Warnings are used to draw your attention to dangerous manoeuvres which may
cause you personal
injury.
Motorkennzahl
Die Motorkennzahl befindet sich an der
Hinterseite der linken Gehäusehälfte.
Fahrgestellnummer
Die Fahrgestellnummer befindet sich
am rechten Seitenrohr des Fahrgestells
(hinten unten), auf der Höhe des
Querträgers.
Schlüssel
Mit dem Scooter werden zwei Schlüssel
übergeben für das Zündschloss.
Bewahren Sie den Ersatzschlüssel an
einer sicheren Stelle auf.
Achtung
Um den Leser auf wichtige Punkte
aufmerksam zu machen, werden die
folgenden Begriffe verwendet:
“Anmerkung”, “Vorsicht” und “Warnung”.
A
NMERKUNG
:
Die Anmerkungen geben zusätzliche
Hinweise oder erklären den Text.
Vorsicht!
Hierunter wird darauf aufmerksam
gemacht, daß die betreffenden Handgriffe
oder Manöver Schäden am Fahrzeug
oder frühzeitigen Verschleiß zur Folge
haben können.
Warnung!
00
Die Warnungen machen darauf
aufmerksam, daß das betreffende
Manöver gefährlich ist und Verletzungen
verursachen kann.
Page 12

12
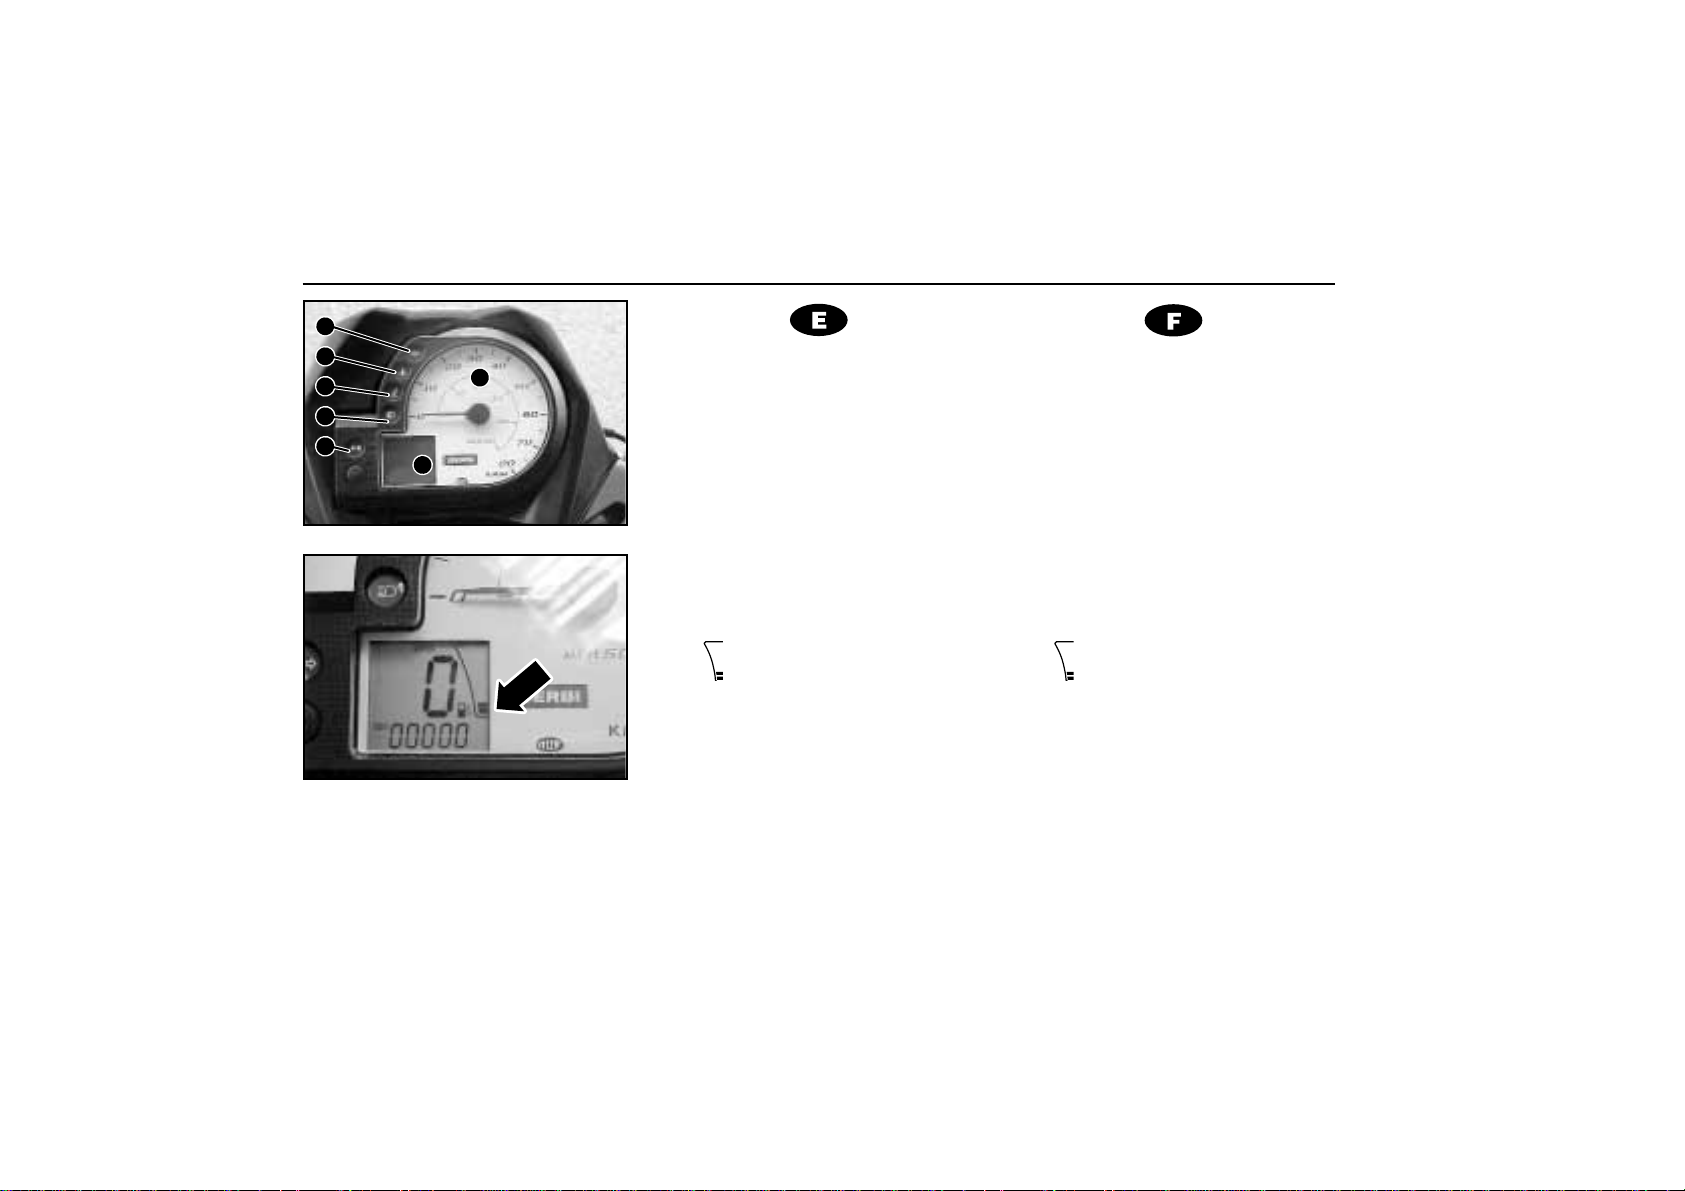
Instrumentos y mandos • Instruments et commandes • Strumenti e comandi
Instruments and controls • Instrumente und Bedienungselemente
1.- Tablier
2.- Mando freno delantero
3.- Mando de gas
4.- Pulsador arranque
5.- Cerradura contacto
6.- Mando freno trasero
7.- Conmutador
intermitentes
8.- Pulsador claxon
9.- Conmutador luces
10.- Pulsador ráfagas
11.- Pulsador paro motor
1.- Tableau de bord
2.- Commande de frein
avant
3.- Commande du gaz
4.- Bouton de démarrage
5.- Serrure de contact
6.- Commande frein arrière
7.- Commutateur des
clignotants
8.- Bouton poussoir du
Klaxon
9.- Interrupteur lumières
10.- Commande appel de
phare
11.- Bouton poussoir d’arrêt
du moteur
1.- Cruscotto
2.- Comando freno anteriore
3.- Comando
dell’acceleratore
4.- Pulsante d’avviamento
5.- Serratura d’accensione
6.- Comando freno posteriore
7.- Commutatore indicatori
direzione
8.- Pulsante avvisatore
acustico
9.- Commutatore luci
10.- Interruttore abbagliante
passing
11.- Pulsante aresto motore
1.- Instrument panel
2.- Front brake lever
3.- Throttle twist grip
4.- Electric starter button
5.- Ignition lock
6.- Rear brake lever
7.- Turn indicator switch
8.- Horn button
9.- Headlight dip switch
10.- Flash high beam switch
11.- Stop engine push button
1.- Intrumententafel
2.- Bremshebel
Vorderbremse
3.- Gasregler
4.- Anlasserknopf
5.- Zündschloß
6.- Bremshebel
Hinterbremse
7.- Blinklichtschalter
8.- Hupe
9.- Scheinwerfer-schalter
10.- Schalter für Lichhupe
11.- Ausschaltkopf
6 10
1
2
11
7
8
9
5 4 3
Page 13

13
Mandos
Commandes
Comandi
Controls
Bedienungselemente
Tablier
Tableau de bord
Cruscotto
Instrument panel
Instrumententafel
...................................14
Interrruptor de paro motor
Interrupteur d'arrêt moteur
Interruttore d'arresto motore
Engine shut-off switch
Motorausschalter
.................................22
Pulsador de arranque
Bouton de démarrage
Pulsante d’avviamento
Electric starter button
Anlasserknopf
.........................................22
Conmutador intermitentes
Commutateur clignotants
Commutatotre indicatori direzione
Turn indicator switch
Blinklichtschalter
....................................22
Pulsador claxon
Bouton poussoir Klaxon
Pulsante avvisatore acustico
Horn button
Hupe
........................................................22
Conmutador luces
Commutateur lumières
Commutatore luci
Headlight dip switch
Scheinwerferschalter
.............................24
Mando freno delantero
Commande frein avant
Comando freno anteriore
Front brake lever
Vorderbremshebel
.................................24
Mando freno trasero
Commande frein arrière
Comando freno posteriore
Rear brake lever
Hinterbremshebel
..................................24
Mando gas
Commande gaz
Comando dell’acceleratore
Throttle twist grip
Gasregler
................................................24
Cerradura de contacto
Serrure de contact
Serratura di accesione
Ignition lock
Zündschloß
.............................................26
Este capítulo contiene una
descripción detallada de todos
los instrumentos y mandos de
especial interés para el
usuario.
Ce chapitre contient une
description détaillée de tous
les instruments et des
commandes particulièrement
intéressantes pour l’utilisateur.
This chapter contains a
detailed description of all the
instruments and controls of
special interest for the user.
Questo capitolo contiene una
minuta descrizione di tutti gli
strumenti e comandi
d’interesse speciale per
l’utente.
Dieses Kapitel enthält eine
ausführliche Beschreibung
aller Instrumente und
Bedienungselemente, die für
den Anwender von Bedeutung
sind.
Indice del capítulo
Index du chapitre
Indice delcapitolo
Index of the chapter
Inhaltsverzeichnis des Kapitels
Page 14
Tablier
Tableau de bord
14
SRV (1)
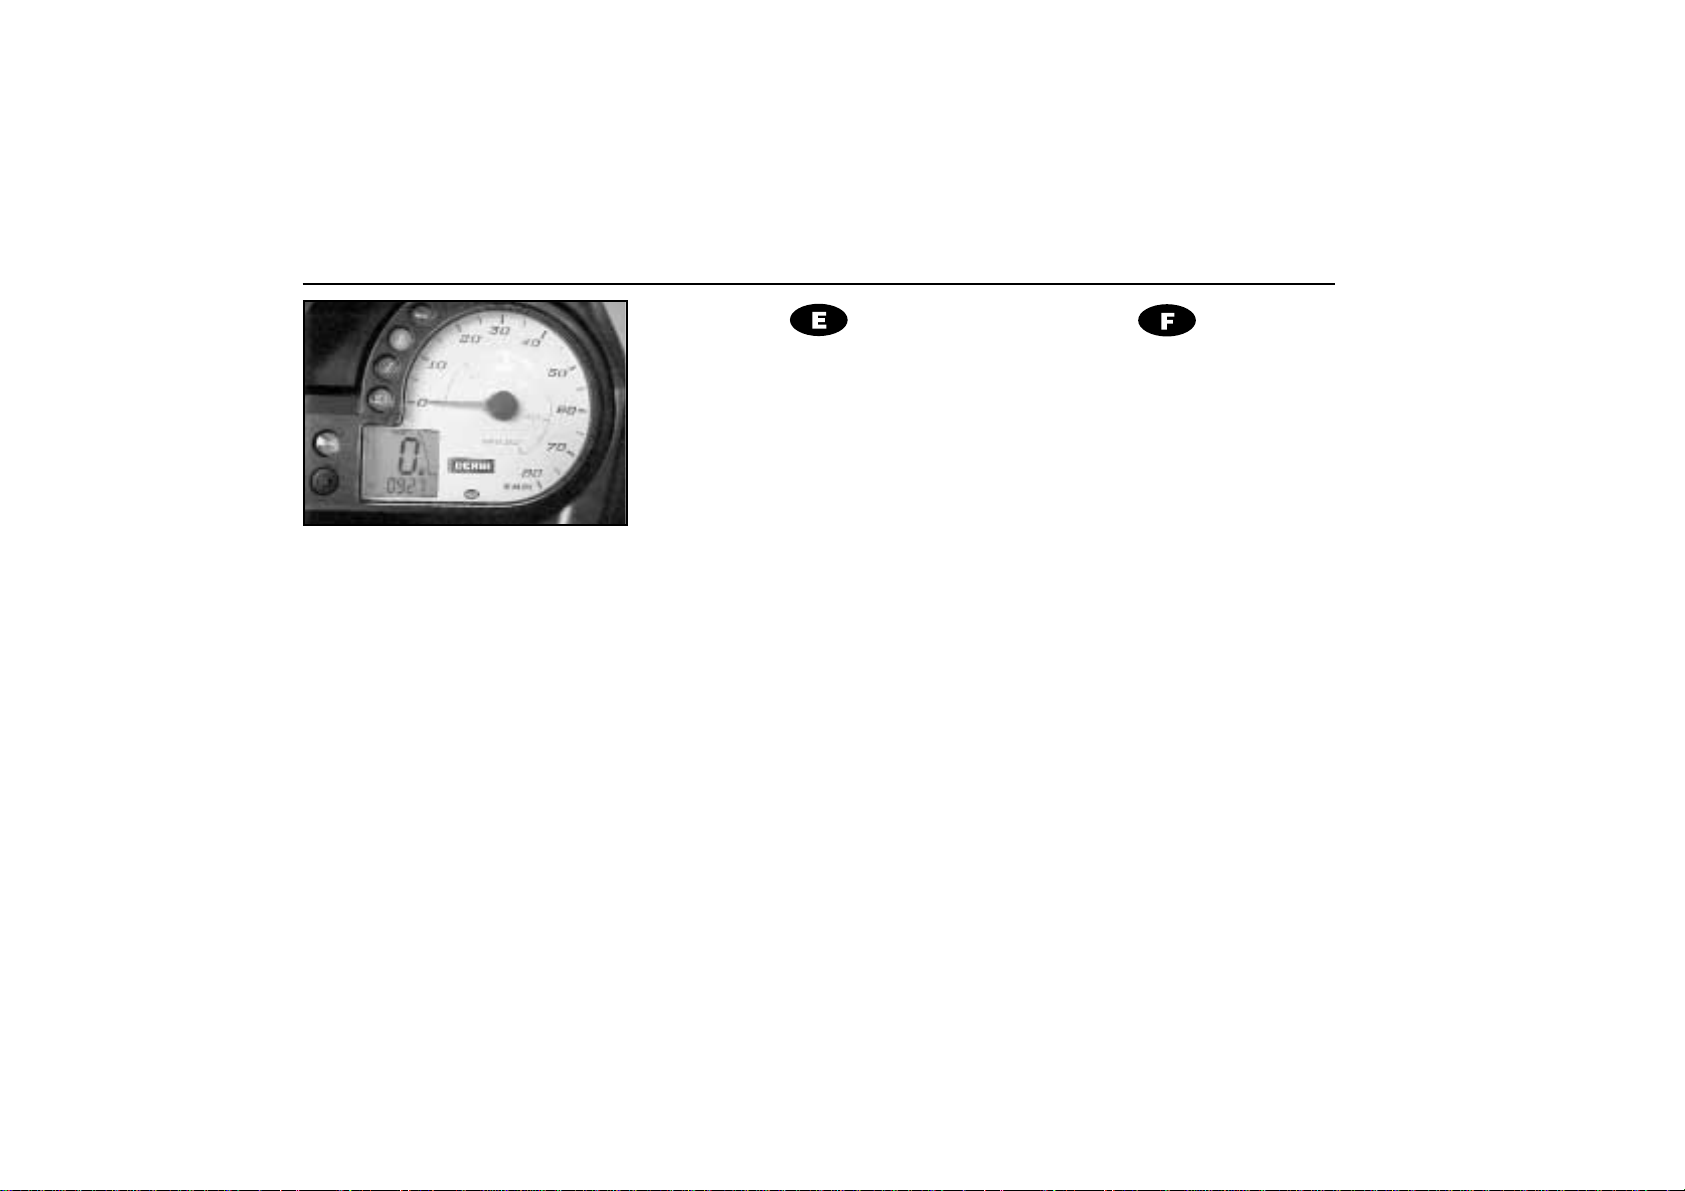
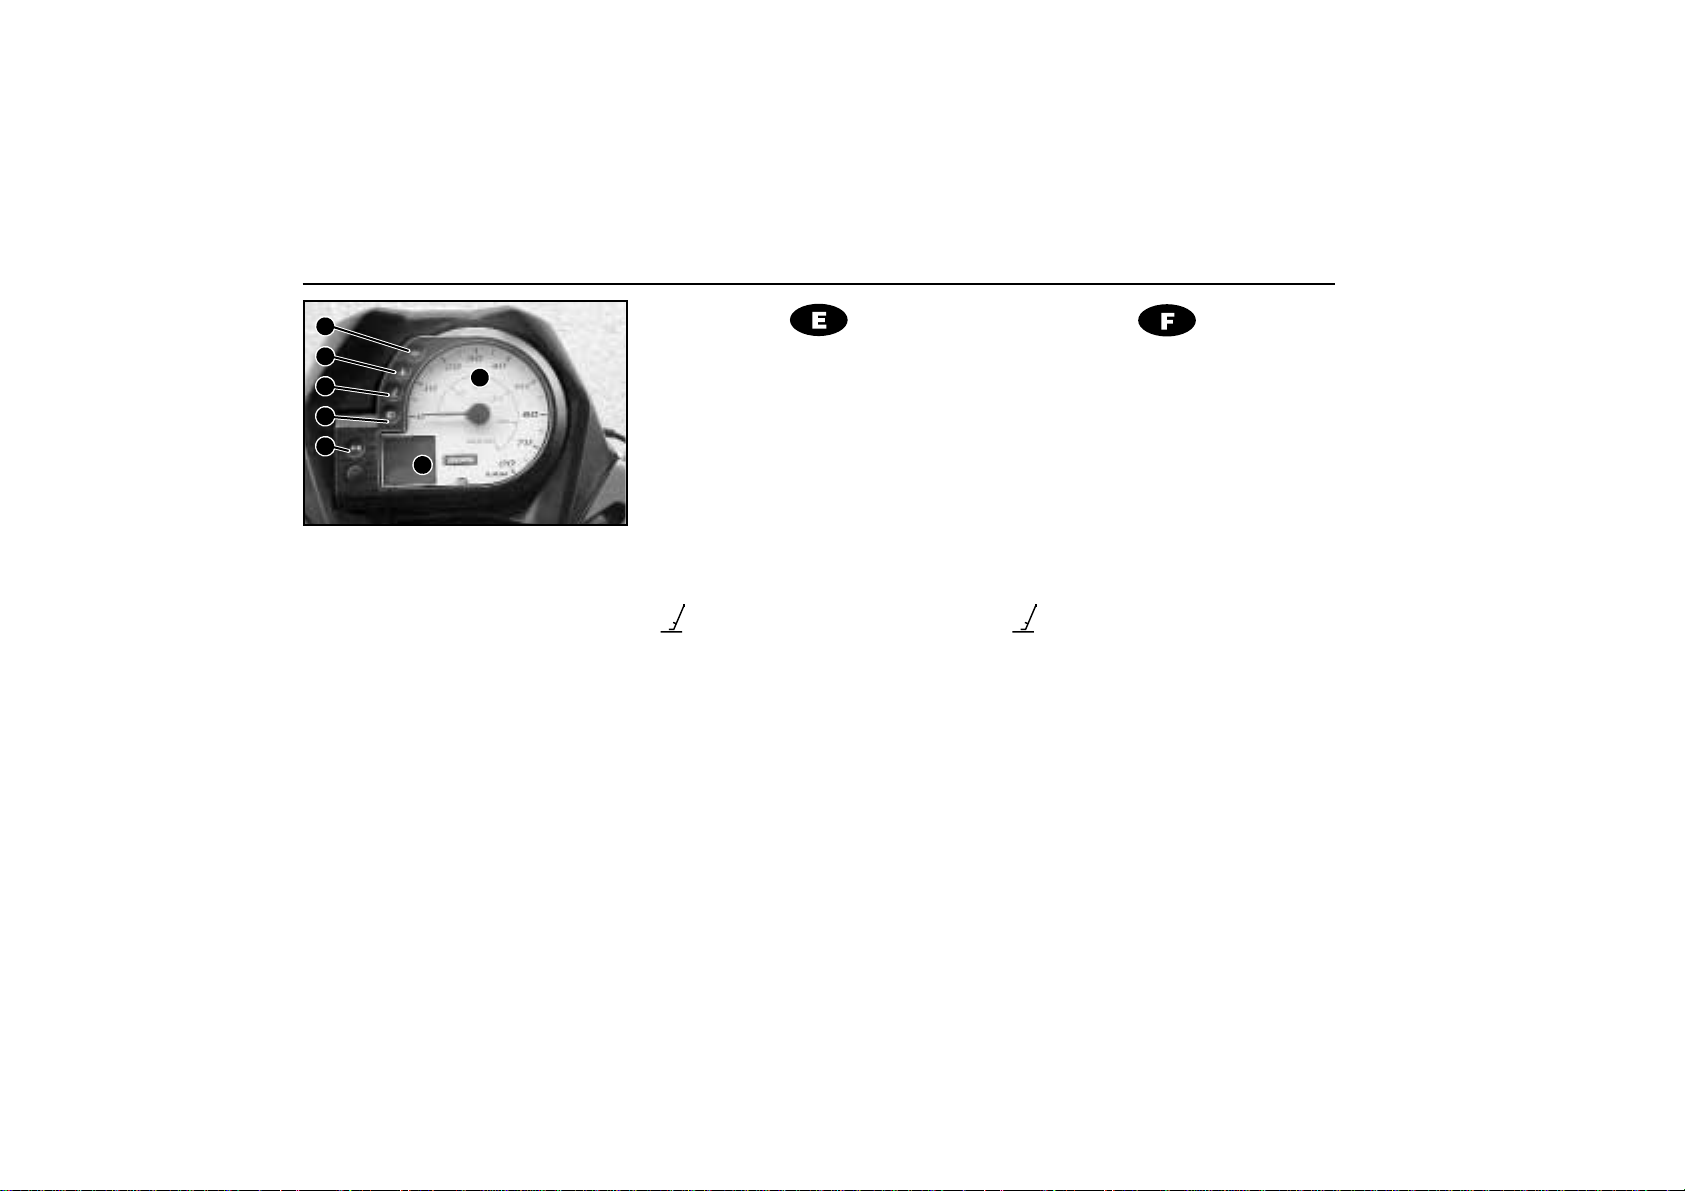
Contador de servicio:
Cada vez que se arranca el vehículo,
aparece durante 3 segundos la indicacion "SRV" y el numero de Kilometros
(o millas) que faltan para el próximo
servicio de mantenimiento.
Cuando se ha sobrepasado el limite,
la indicacion "SRV" permanece en pantalla.
1er servicio 1.000 Km o 600 Millas.
Siguientes: 5.000 Km o 3100 Millas.
A partir de la puesta a cero.
Puesta a cero del contador de servicio:
Mantener el pulsador mientras se arranca el instrumento.
Cuentakilómetros en Reserva (2)
Éste cuentakilómetros solamente
actúa cuando el vehículo se encuentra
en reserva. Cuando se llena el depósito
se pone a cero.
SRV (1)
Compteur de service:
À chaque démarrage du véhicule,
l’indication «SRV» apparaît pendant 3
secondes, de même que le nombre de
Kilomètres (ou de milles) qu’il manque
pour le prochain service d’entretien.
Lorsque la limite est dépassée, l’indication «SRV» s’affiche à l’écran de
façon permanente.
1er service: 1 000 Km ou 600 Milles.
Services suivants: 5 000 Km ou 3 100
Milles.
À partir de la mise à zéro.
Mise à zéro du compteur de service:
Maintenir le bouton-poussoir enfoncé
pendant la mise en marche de l’instrument.
Compteur kilométrique en
mode Réserve (2)
Ce compteur kilométrique fonctionne
uniquement lorsque le véhicule passe
en mode réserve. Lorsque l'on remplit le
réservoir, il se met à zéro.
Page 15

Cruscotto • Instrument Panel
Armaturenbrett
15
SRV (1)
Contatore di servizio:
Ogni volta che si avvia il veicolo
durante tre secondi appare la dicitura
"SRV" e il numero di chilometri (o
miglia) mancanti per il successivo servizio di manutenzione.
Quando si è superato il limite resta
comunque sullo schermo l’indicazione
"SRV".
1º servizio 1.000 Km o 600 miglia.
Successivi: 5.000 Km o 3.100 miglia.
A partire dall’azzeramento.
Azzeramento del contatore di servizio:
Mantenere il pulsante mentre si
accende lo strumento.
Contachilometri di Riserva (2)
Questo contachilometri è attivo soltanto qualora il veicolo è in riserva. Si
azzera quando il serbatoio viene riempito.
SRV (1)
Service Period Timer:
Every time the vehicle is started, the
sign “SRV” appears on the screen for 3
seconds, together with the number of
kilometres or miles remaining before the
next programmed maintenance service
visit.
When this limit is exceeded, the sign
“SRV” remains permanently visible on
the screen.
1st service 1,000 km, or 600 miles.
Subsequent services: 5,000 km, or
3,100 miles
counting from Service Timer reset.
Resetting the Service Timer:
Keep the push-button pressed while
the instrument starts.
Reserve Tank mileometer (2)
This mileometer is only activated
when the reserve tank is in use. It is
reset to zero when the tank is filled.
SRV (1)
Service-Zähler:
Bei jedem Fahrzeugstart erscheint 3
Sekunden lang die Anzeige "SRV" und
die Anzahl Kilometer (oder Meilen), bis
der nächste Wartungsservice fällig ist.
Sobald dieser Wert erreicht ist,
erscheint die Anzeige "SRV" dauerhaft
am Display.
1. Service: 1.000 Km bzw. 600 Meilen
Folgende: 5.000 Km bzw. 3.100 Meilen
gerechnet ab der Nullstellung.
Nullstellung des Service-Zählers:
Den Start beim Einschalten des
Instruments gedrückt halten.
Kilometerzähler in Reserve (2)
Dieser Kilometerzähler ist nur dann
in Betrieb, wenn sich das Fahrzeug im
Reservebetrieb befindet. Sobald der
Tank gefüllt wird, wird er auf Null
gestellt.
Page 16
Tablier
Tableau de bord
16
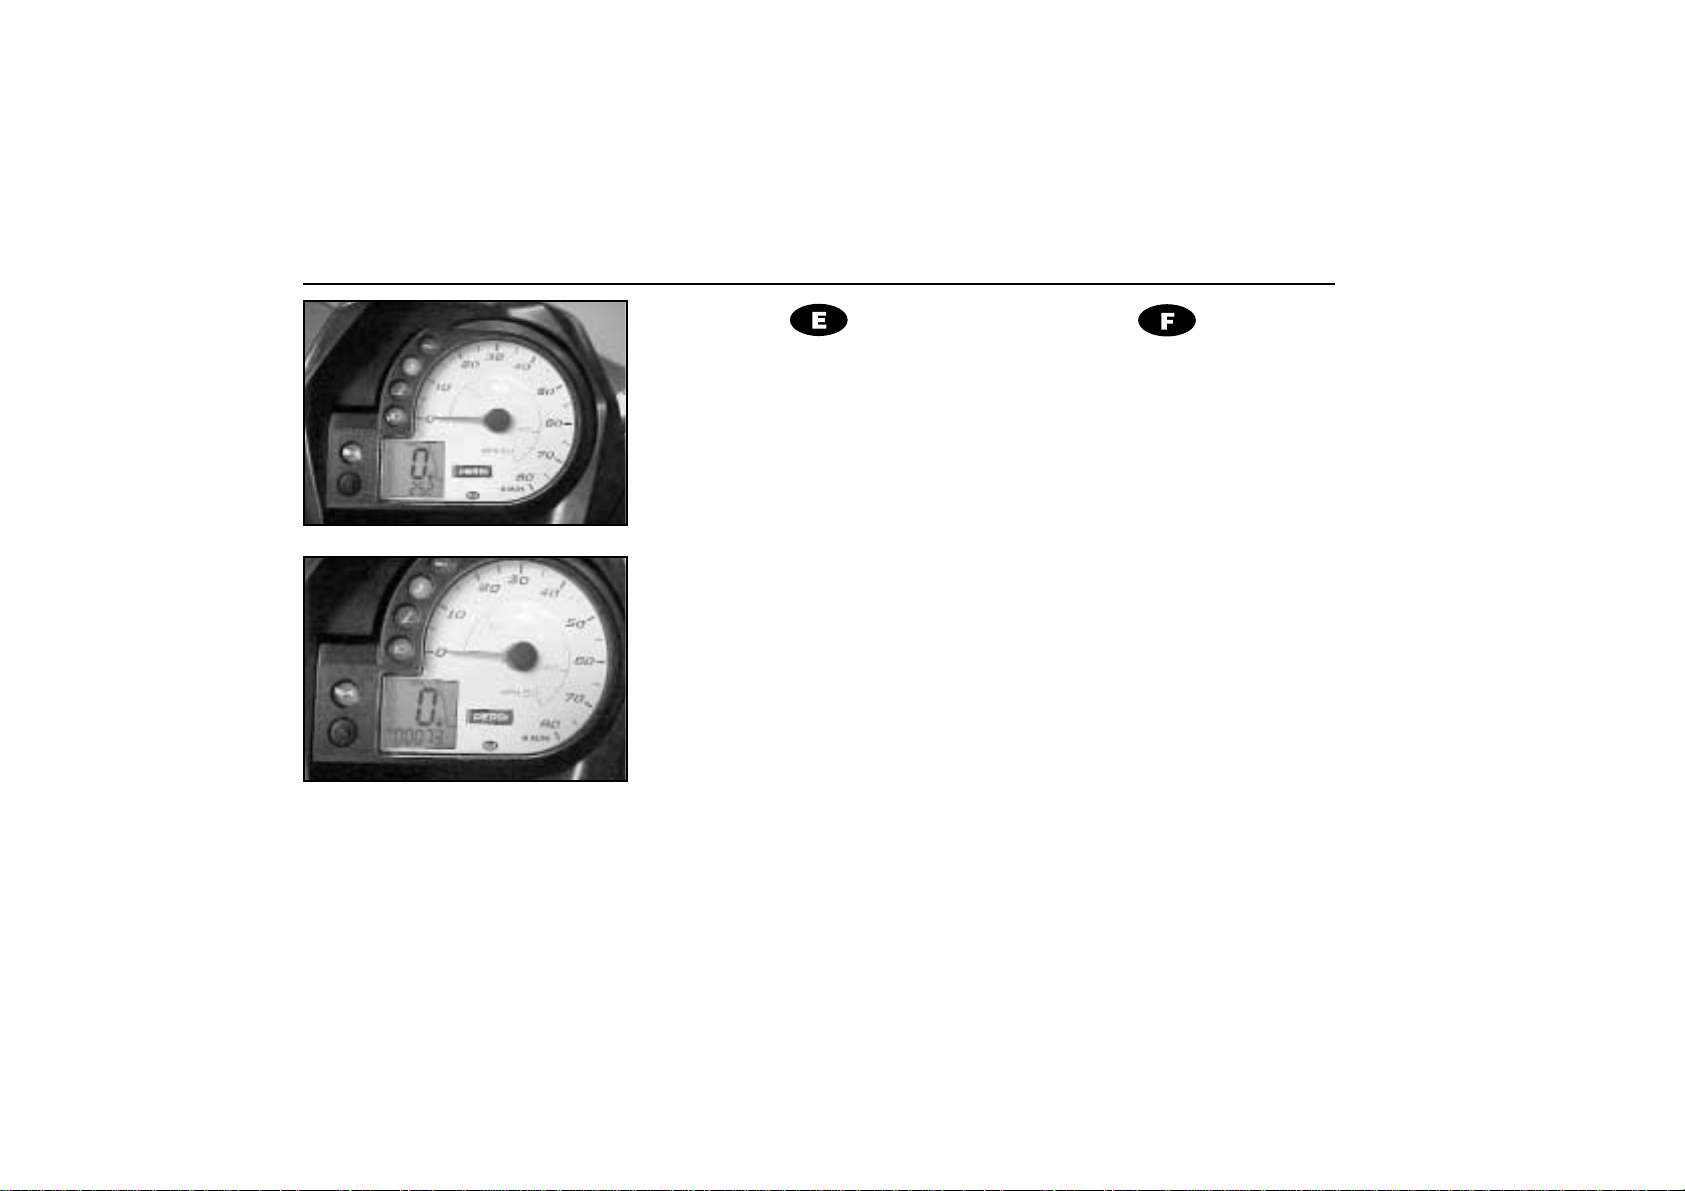
Cuentakilómetros total (3)
Pulsando el botón de la parte izquierda, muestra la distancia total que tiene
el vehículo.
Trip (4)
Cuentakilómetros parcial, pulsando
el botón de la parte izquierda, muestra
la distancia recorrida desde su puesta a
cero.
Para reponer a cero el cuentakilómetros parcial, pulse durante unos segundos el botón de la parte izquierda superior como muestra la imagen.
Reloj Horario (5)
Pulse el botón de la parte izquierda
como muestra la imagen, hasta que
parpadeen los Minutos, podrá así ajustar la Hora. Esperando unos segundos
sin pulsar, parpadearan las horas y pulsando el botón ajustara los minutos.
Velocímetro (6)
Pulsando el botón de la parte izquier-
da, muestra la velocidad y reloj horario.
Compteur kilométrique total (3)
Pour lire la distance totale parcourue
par le véhicule, appuyer sur le bouton
situé dans la partie gauche
Compteur kilométrique partiel (4)
Compteur kilométrique partiel. Pour
lire la distance parcourue depuis la dernière mise à zéro, appuyer sur le bou-
ton situé dans la partie gauche .
Pour remettre à zéro le compteur
kilométrique partiel, appuyer pendant
quelques secondes sur le bouton situé
dans la partie supérieure gauche
comme le montre l'image.
Montre Horaire (5)
Pour régler l´Heure, appuyer sur le
bouton situé dans la partie gauche,
comme l´indique l'image, jusqu'à ce que
les minutes clignotent. Pour régler les
minutes, attendre quelques secondes
jusqu´à ce que clignotent les Heures et
appuyer sur le bouton.
Compteur de vitesse (6)
Pour lire la vitesse et l´heure, appuyer sur le bouton situé dans la partie
gauche.
Page 17

Cruscotto • Instrument Panel
Armaturenbrett
17
Contachilometri totale (3)
Premendo il pulsante nella parte
sinistra, mostra la distanza totale che
ha percorso il veicolo.
Contachilometri parziale (4)
Contachilometri parziale, premendo il
pulsante nella parte sinistra, mostra la
distanza percorsa dal suo azzeramento.
Per riporre a zero il contachilometri
parziale, prema durante alcuni secondi
il pulsante nella parte sinistra superiore
come mostra l’immagine.
Orologio Orario (5)
Prema il pulsante nella parte sinistra
come mostra l’immagine, fino a che
lampeggiano i Minuti, potrà regolare
così l’Ora. Aspettando alcuni secondi
prima di premere, lampeggeranno le
Ore e premendo il pulsante regolerà i
Minuti.
Tachimetro (6)
Premendo il pulsante nella parte
sinistra, mostra la velocità ed orologio.
Odometer (3)
Pushing the left hand buttom, it
shows the total distance that the vehicle
has.
Trip (4)
Partial odometer, pushing the left
hand button it shows the distancce runned from it´s 0 reset.
To reset the partial odometer, you
must push the upper left hand button
during some seconds, like the picture
shows.
Clock time (5)
Push the left hand button, until the
minutes blinks. Then you can adjust the
time. Waiting for some seconds whithout pushing, then the hours will blink
and pushing the buttom you will adjust
the minutes.
Speedometer (6)
Pushing the left hand button, it
shows the speed and the clock time.
Kilometerzähler (3)
Nach Drücken auf den Einstellknopf
werden die Gesamtkilometer angezeigt.
Trip (4)
Tageskilometerzähler, nach Drücken
des Einstllknopfes werden die
Tageskilometer angezeigt.
Einige Sekunden den Einstellknopf
drücken um den Tageskilometerzähler
auf Null zu stellen.
Zeituhr (5)
Nach Drücken des linken, oberen
Einstellknopfes (siehe Bild) blinken die
Minuten-in diesem Modus können die
Stunden eingestellt werden.
Einige Sekunden warten bis die
Stunden blinken um die Minuten
einzustellen.
Tachometer (6)
Einstellknopf drücken um die
Geschwindigkeit und die Uhrzeit
anzuzeigen.
Page 18
Tablier
Tableau de bord
18
(1) Velocímetro. El velocímetro indica
la velocidad de marcha en kilómetros por hora.
(2)
Ordenador de a bordo.
)
3) Indicador de intermitentes.
-
(4) Indicador de luz intensiva.
&
(5) Indicador reserva gasolina. La
cantidad de gasolina se indica mediante
la barra progresiva de la parte derecha.
Cuando la barra indicadora de gasolina
parpadea (1 o 2 barras) el vehículo se
encuentra en reserva. Ésta tiene 1,5 l.
(1)
Vélocimètre. Le vélocimètre indi-
que la vitesse en kilomètre par
heure.
(2)
Ordinateur de bord.
)
(3) Témoin clignotants.
-
(4) Témoin lumière de phare.
&
(5) Indicateur de réserve d’essence.
La quantité d'essence dans le réservoir
est indiquée par la barre progressive à
droite. Lorsque la barre de niveau d'essence clignote (1 ou 2 barres), cela signifie que le véhicule est passé sur la
réserve. Celle-ci a une capacité de
1,5 l.
6
7
8
4
3
1
2
Page 19
Cruscotto • Instrument Panel
Armaturenbrett
19
(1) Tachimetro. Il tachimetro indica la
velocità della moto in chilometri
all’ora.
(2) Computer di bordo.
)
(3) Spia indicatori direzione.
-
(4) Indicatore luce abbagliante.
&
(5) Spia riserva benzina. La quantità di
benzina nel serbatoio è indicata tramite
il segmento progressivo del lato destro.
Qualora il segmento indicatore della
benzina lampeggia (1 o segmenti) il veicolo è ormai in riserva. Essa ha 1,5 l.
(1)
Speedometer. The speedometer
indicates the speed of the vehicle in
kilometres per hour
(2)
On-board computer.
)
(3) Direction indicator warning light
-
(4) High beam warning light
&
(5) Fuel reserve warning light. The
amount of petrol in the tank is shown by
the bar on the right-hand side.
When the petrol bar is flashing (1 or 2
lines), the vehicle is using the reserve
tank. The reserve tank has a capacity of
1.5 l.
(1)
Geschwindigkeitsmesser. Der
Geschwindigkeitsmesser gibt die
Fahrtgeschwindigkeit in
Stundenkilometern an.
(2)
Bordcomputer
)
(3) Blinklichtanzeige
-
(4) Fernlichtanzeige
&
(5) Benzinreserveanzeige Der
Kraftstoffvorrat im Tank wird über die
progressive Leiste auf de rechten Seite
angezeigt.
Wenn die Anzeigeleiste blinkt (1 bzw.
Leisten) befindet sich das Fahrzeug im
Reservebetrieb. Die Kraftstoffreserve
beträgt 1,5 l.
Page 20
Tablier
Tableau de bord
20
'
(6) Indicador reserva de aceite.
Cuando se enciende la luz de advertencia, la reserva de aceite es de 0,200
litros.
(
(7) Indicador de temperatura. Cuando
el indicador se enciende, la temperatura
del refrigerante sobrepasa los 105 ºC.
(8)
Indicador de caballete bajado.
'
(6) Indicateur réserve d’huile. Lors-
que la lampe témoin s’allume, la réserve d’huile est de 0,200 litres.
(
(7)
Indicateur de température Le
témoin s'allume lorsque la température
du liquide refroidissant dépasse 105º C.
(8)
Indicateur de béquille abaissée.
6
7
8
4
3
1
2
Page 21
Cruscotto • Instrument Panel
Armaturenbrett
21
'
(6) Spia riserva olio. Qualora si accen-
de la luce di avvertenza, la riserva
d'olio corrisponde a litri 0,200.
(
(7) Indicatore di temperatura Qualora
l’indicatore si accende, la temperatura
del refrigerante ha superato i 105ºC.
(8)
Indicatore di cavalletto aperto.
'
(6) Oil reserve warning light
When the oil pilot light comes on,
there is a reserve of 0.200 litres
(
(7) Temperature indicator When the
indicator lights up, the temperature
of the coolant has exceeded
105 °C.
(8)
Lowered stand warning light.
'
(6) Ölreserveanzeige
Wenn das Warnlicht aufleuchtet,
beträgt die Reserve 0,200 Liter.
(
(7) Temperaturanzeige
Leuchtet die Anzeige auf, so liegt die
Temperatur des Kühlmittels über 105º C.
(8) Anzeige für Ständer unten.
Page 22
Pulsador paro, arranque. Conmutador intermitentes luces y pulsador claxon
Poussoir dárrêt et démarrage. Commutateur clignotants et lumières et poussoir klaxon
22
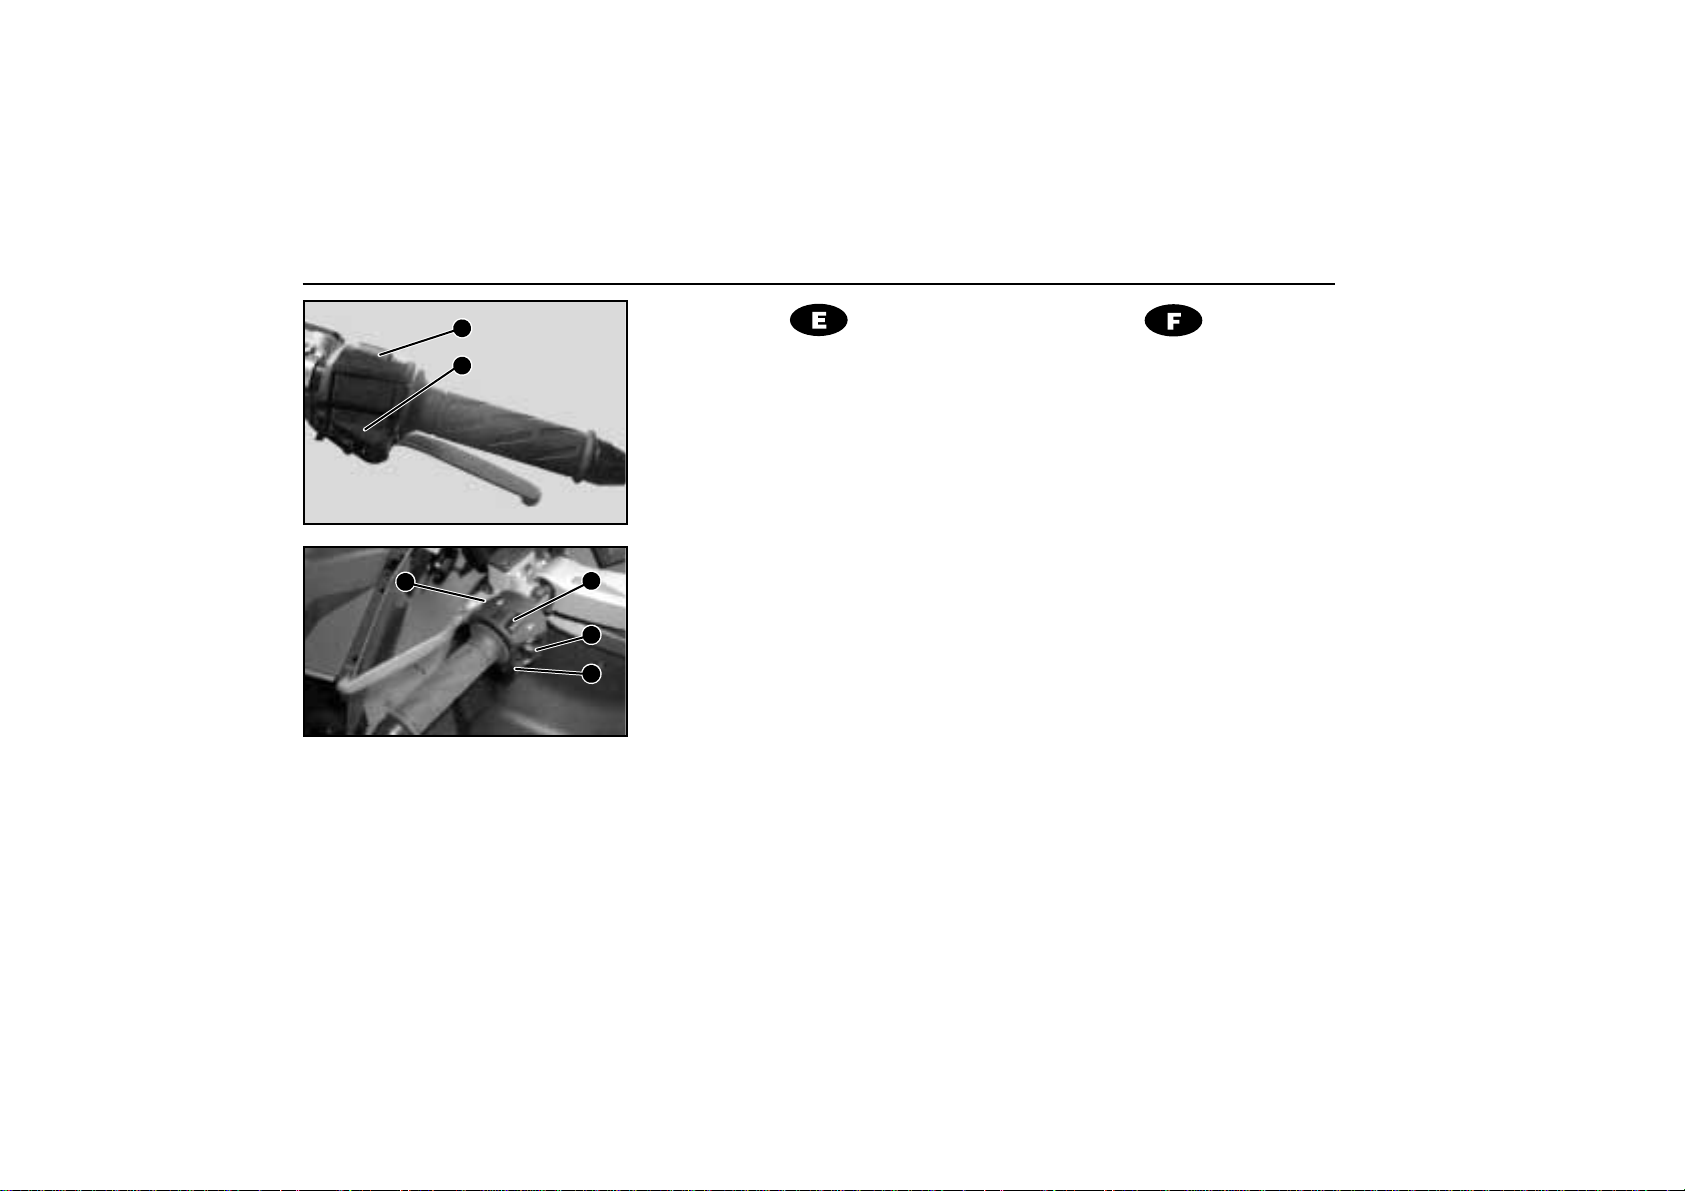
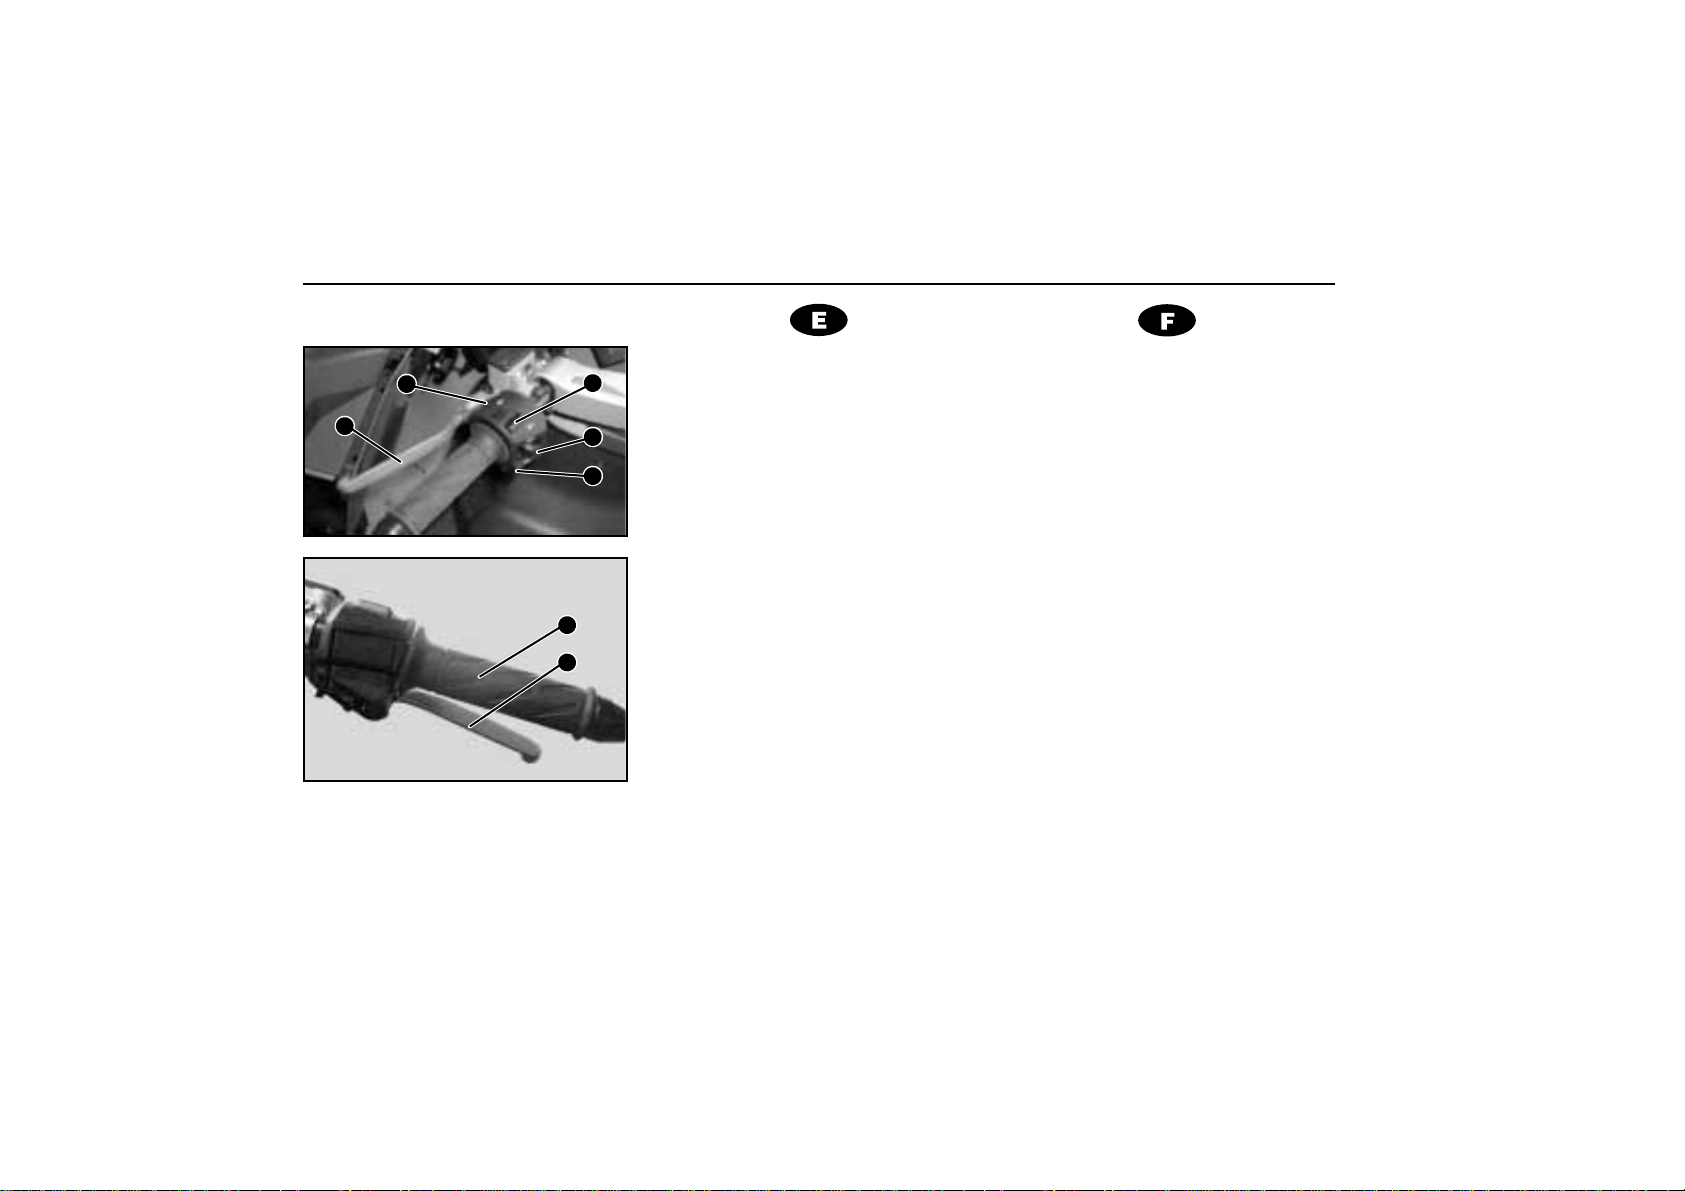
Interrruptor de paro motor #
Situado en el lado derecho del manillar (1). Cambiarlo de posición para apagar el motor.
Pulsador arranque "
Situado en el lado derecho del manillar (2). Pulsarlo en forma continuada
hasta que el motor se ponga en marcha. Ver las instrucciones de puesta en
marcha en el apartado de arranque,
página 34.
Pulsador claxon %
El pulsador claxon está situado en el
lado izquierdo del manillar (3)
Conmutador intermitentes )
Situado en el lado izquierdo del
manillar (4)
Centro - Intermitentes apagados
Derecha - Intermitentes lado
derecho encendidos
Izquierda - Intermitentes lado
izquierdo encendidos
El mando intermitentes después de
ser accionado a la derecha o izquierda, automáticamente vuelve a su
posición inicial. Para apagar los
intermitentes, apretar el mando hacia
abajo.
Interrupteur d'arrêt moteur #
Situé sur le côté droit du guidon (1).
Changez de position pour éteindre le
moteur.
Poussoir de démarrage "
Placé à droite du guidon (2). Maintenir appuyé jusqu’à ce que le moteur
démarre. Lire les instructions de démarrage au paragraphe “démarrage”, page
34.
Bouton klaxon %
Le bouton poussoir klaxon est situé
du côté gauche du guidon (3).
Commande des clignotants )
Située du côté gauche du guidon (4)
Centre - clignotants éteints
Droite - clignotants côté droit
allumés
Gauche - clignotants côté gauche
allumés
La commande des clignotants, après
avoir été actionnée à droite ou à gauche, revient automatiquement à sa position initiale. Pour éteindre les clignotants presser la commande vers le bas.
1
2
6
5
4
3
Page 23

Pulsante d’arresto e d'avviamento. Commutatore indicatori direzione e pulsante avvisatore acustico
Stop and Starter button. Indicator switch, horn button • Motorausschalter, Anlasserknopf, Hupknopf, Blinklichtschalter
23
Interruttore d'arresto motore #
Situato sul fianco destro del manubrio
(1). Cambiarne la posizione se si vuole
spegnere il motore.
Pulsante d'avviamento "
Situato sul lato destro del manubrio (2).
Premerlo in modo continuo finché il
motore si avvia. Vedi istruzioni
dell’avviamento nella sezione di accensione, pagina 34.
Pulsante avvisatore acustico %
Il pulsante avvisatore acustico è
situato sul lato sinistro del manubrio (3).
Commutatore indicatori
direzione
)
Situato sul lato sinistro del manubrio
(4).
Centro -Indicatori direzione spenti
Destra - Indicatori lato destro accesi
Sinistra - Indicatori lato sinistro accesi
Il comando indicatori direzione, dopo
essersi azionato a destra o a sinistra,
ritorna alla sua posizione di partenza.
Per spegnere gli indicatori di direzione,
premere il pulsante in giù.
Engine shut-off switch #
On the right-hand side of the
handlebars (1). Switch it off to turn the
engine off.
Starter button "
Located on the right hand side of the
handlebar (2). Press the button without
releasing until the engine starts. See
the starting instructions in the section
on Starting, on page 34.
Horn Button %
The horn button is located on the left
hand side of the handlebar (3).
Indicator switch )
Located on the left hand side of the
handlebar (4)
Centre - indicators off
Right - indicators flashing on the
right hand side
Left - indicators flashing on the
left hand side
The indicator switch returns automatically to the centre position after being
moved either to the left or to the right.
To turn the indicators off, push the indicator switch downwards.
Motorausschalter #
Dieser befindet sich auf der rechten
Seite des Lenkers (1). Diesen Schalter
zum Ausschalten des Motors betätigen.
Anlasserknopf "
An der rechten Seite des Lenkers (2).
Den Knopf gedrückt halten, bis sich der
Motor in Gang setzt. Siehe auch die
Anweisungen zum Starten im Kapitel
‘Starten und Fahren’, S. 34.
Hupknopf %
Der Hupknopf befindet sich am linken
Lenkerende (3)
Blinklichtschalter )
Am linken Lenkerende (4)
Mitte - Blinklichter aus
Rechts - Blinklichter rechts ein
Links - Blinklichter links ein
Nachdem der Blinklichtschalter nach
rechts oder nach links betätigt worden
ist, kehrt er automatisch in seine
Ausgangsstellung zurück. Um die
Blinklichter auszuschalten, den Knopf
nach unten drücken.
Page 24
Conmutador luces, ráfagas. Mando freno delantero, trasero y gas
Commutateur lumières, appel de phare. Commande freins avant, arrière et gaz
24
Conmutador luces
Situado en el lado izquierdo del
manillar (5).
-
- Luz intensiva.
.
- Luz de cruce.
Pulsador de ráfagas
Situado en el lado izquierdo del mani-
llar (6). Tirar de él hacia adentro para
hacer una ráfaga de luz.
Mando freno delantero
Situado en el lado derecho del manillar (7). Poner especial atención en su
uso procurando siempre evitar el bloqueo de la rueda.
Mando de gas
Situado en el lado derecho del manillar (8). Con la rotación hacia adentro
de la empuñadura se obtiene la apertura de la válvula del carburador.
Mando freno trasero
Situado en el lado izquierdo del manillar (9). Debe usarse preferentemente
cuando se desee reducir o detener
totalmente la velocidad del vehículo.
Combinar la utilización del freno tra-
sero con el delantero según necesidades, de esta forma obtendrán frenadas
más eficaces.
Commutateur lumières
Situé du côté gauche du guidon (5)
-
- Phare route
.
- Phare code
Bouton d'appel de phare
Situé sur le côté gauche du guidon (6).
Appuyez dessus pour envoyer un appel
de phare intense.
Commande frein avant
Située du côté droit du guidon (7). Ne
pas utiliser brusquement pour éviter le
blocage de la roue.
Commande du gaz
Située du côté droit du guidon (8). En
tournant la poignée vers l’intérieur on
obtient l’ouverture du clapet du carburateur.
Commande frein arrière
Situé du côté gauche du guidon (9).
Utiliser de préférence lorsqu’on veut
réduire ou arrêter totalement la vitesse
du véhicule.
Combiner l’utilisation du frein arrière
et avant selon les besoins pour augmenter l’efficacité du freinage.
9
6
5
4
3
8
7
Page 25

Commutatore luci, Pulsante delle raffiche, Comando freno anteriore, posteriore ed acceleratore • Dip Switch, Full-beam switch, Front brake
lever, rear brake lever, and throttle twist grip • Scheinwerferschalter, Lichthupentaster, Vorderbremshebel, Hinterbremshebel und Gasregler
25
Commutatore luci
Situato sul lato sinistro del manubrio (5)
-
- luce abbagliante
.
- luce anabbagliante
Pulsante delle raffiche
Situato sul fianco sinistro del manubrio
(6). Tirarlo in dentro per ottenere una
raffica di luce abbagliante.
Comando freno anteriore
Situato sul lato destro del manubrio
(7). Avere speciale cura nell’uso e cercare di evitare sempre il bloccaggio
della ruota.
Comando dell’acceleratore
Situato sul lato destro del manubrio
(8). Quando si gira verso l’interno la
manopola si provoca l’apertura della
valvola del carburatore.
Comando freno posteriore
Situato sul lato sinistro del manubrio
(9). Deve usarsi preferibilmente quando
si desideri ridurre o fermare completamente la velocità del veicolo.
Bisogna combinare l’uso del freno
posteriore con quello anteriore, a
seconda delle necessità: in questo
modo si otterranno delle frenate più efficaci.
Dip Switch
Located on the left hand side of the
handlebar (5).
-
- High beam
.
. Dipped beam
Full-beam switch
On the left-hand side of the handlebars
(6). Pull it towards you to put the
headlight on full beam.
Front brake lever
Located on the right hand side of the
handlebar (7). Be particularly careful to
avoid locking the wheel when operating
the brake lever.
Throttle twist grip
Located on the right hand side of the
handlebar (8). By rotating the twist grip
towards you the carburettor valve is
opened.
Rear brake lever
Located on the left hand side of the
handlebar (9). It should be used for preference when reducing the speed of the
scooter or when coming to a complete
stop.
Combine the use of the front and rear
brakes as conditions demand, and in
this way you will obtain a more efficient
braking action.
Scheinwerferschalter
Am linken Lenkerende (5)
-
- Oben, Fernlicht
. -
Unten, Abblendlicht
Lichthupentaster
Dieser befindet sich auf der linken Seite
des Lenkers (6). Zum Einschalten der
Lichthupe den Schalter nach innen
ziehen.
Vorderbremshebel
An der rechten Seite des Lenkers (7).
Vorsicht beim Bremsen mit der
Vorderbremse. Vermeiden Sie stets ein
Blockieren des Rades.
Gasregler
An der rechten Seite des Lenkers (8).
Durch Drehen des Griffs nach innen
öffnet sich der Gasschieber.
Hinterbremshebel
An der linken Seite des Lenkers (9).
Geben Sie dieser Bremse den Vorzug,
wenn Sie das Fahrzeug abbremsen
oder ganz zum Stehen bringen wollen.
Kombinieren Sie die Wirkung der
Hinterbremse mit der der Vorderbremse
je nach den Erfordernissen. Sie erzielen
so eine bessere Bremswirkung.
Page 26
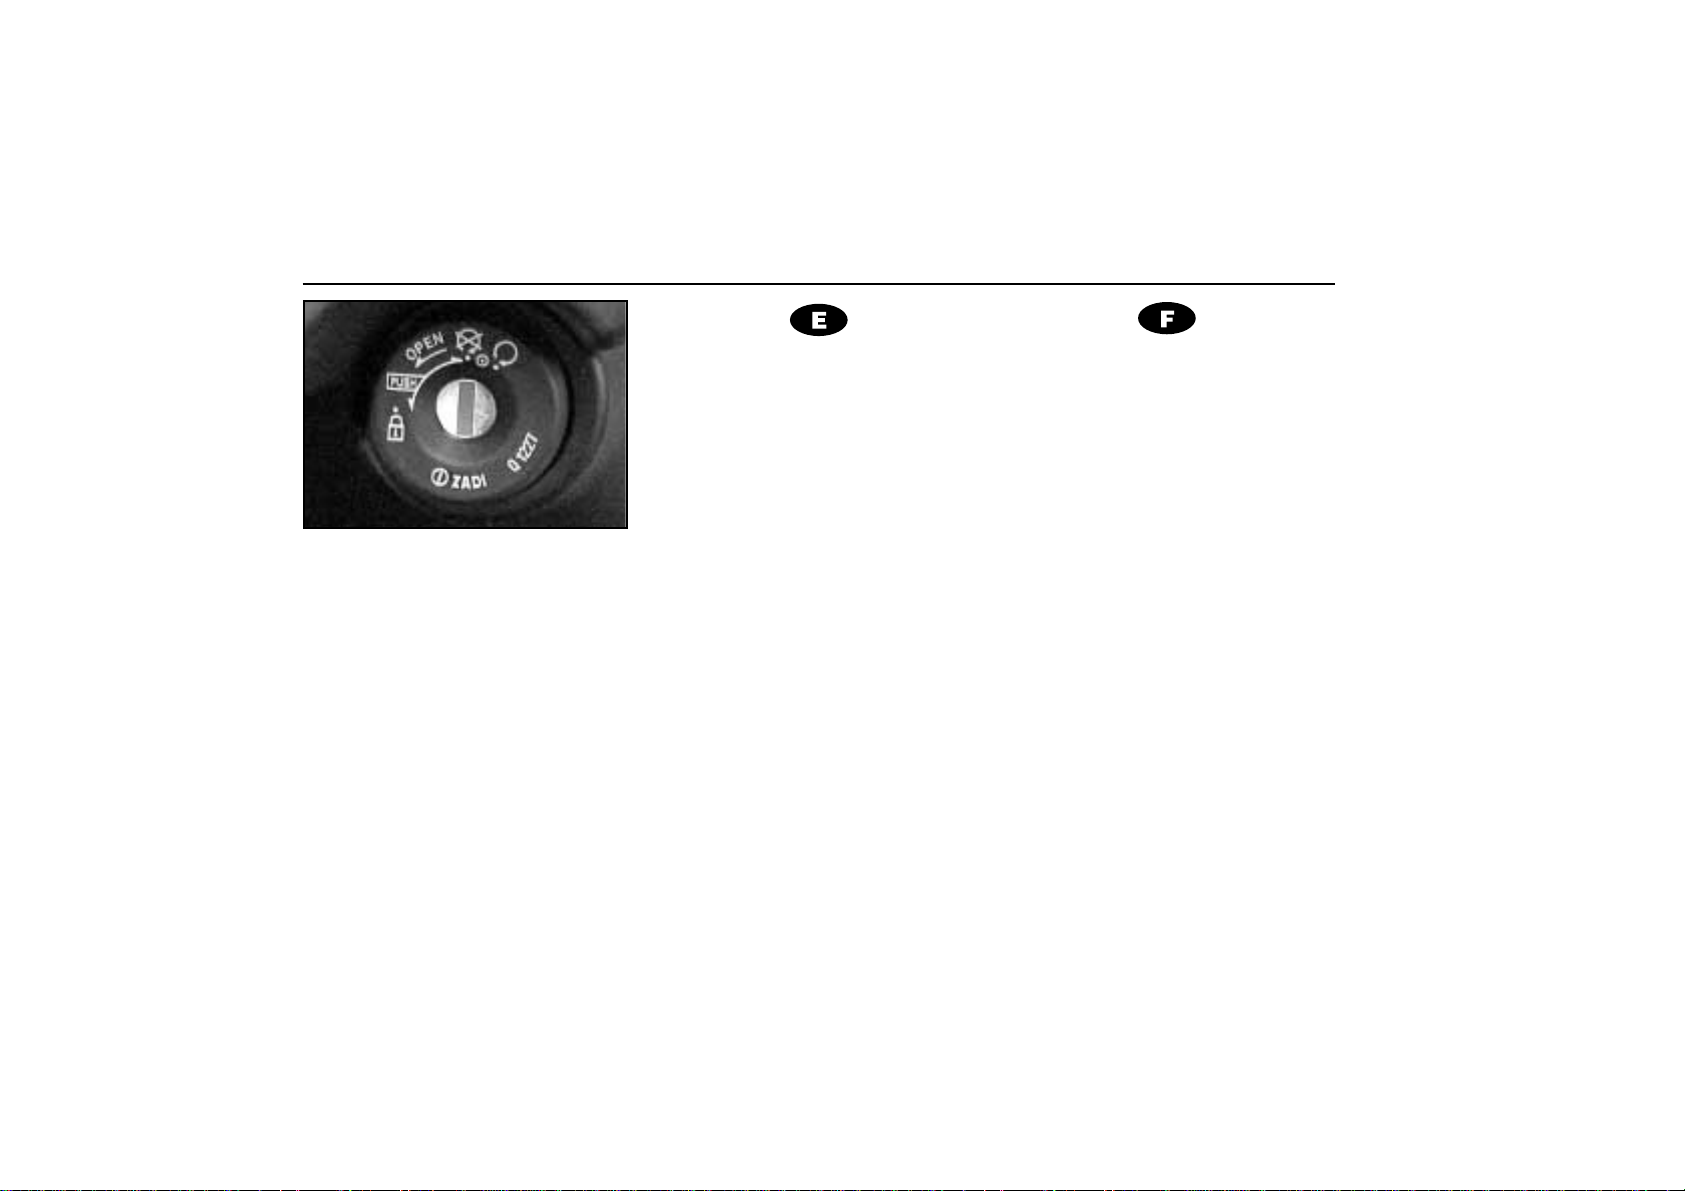
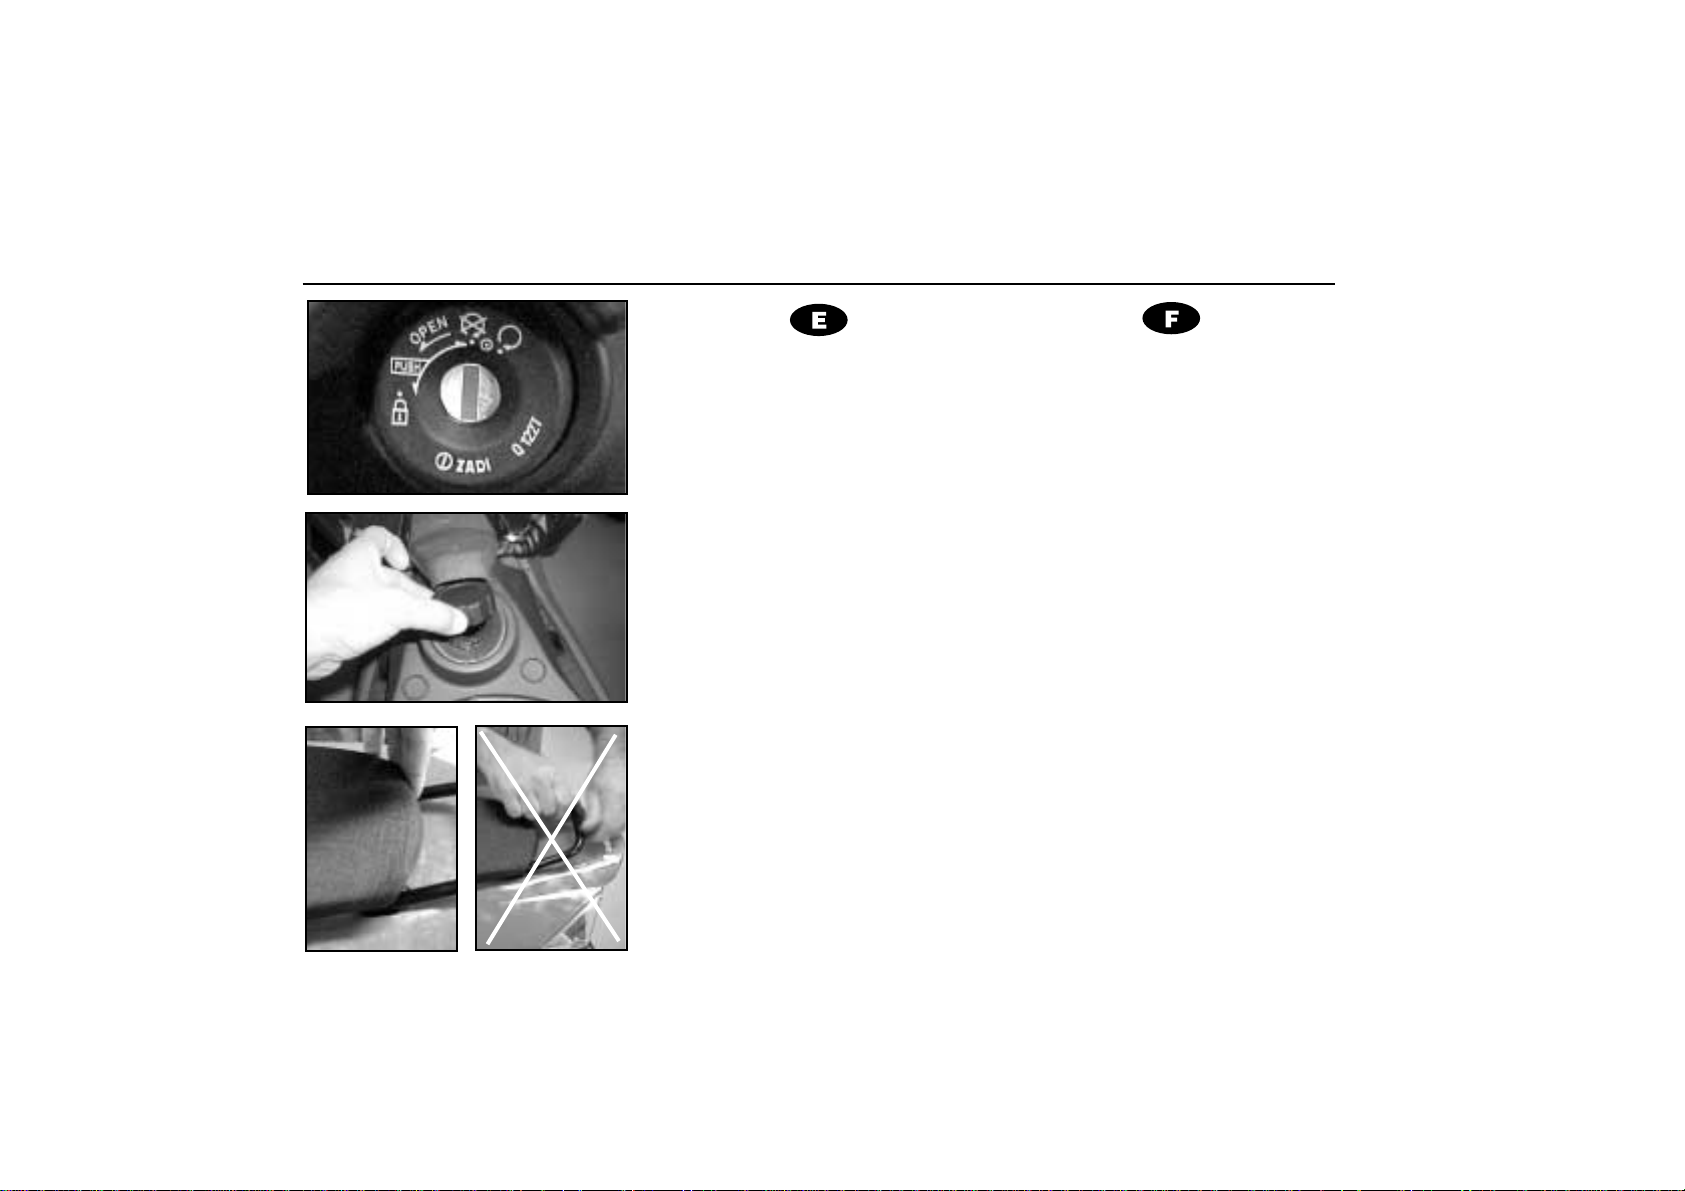
Cerradura de contacto
Serrure de contact
26
Cerradura de contacto
Posición de la llave
!
En esta posición, el circuito de
encendido se cierra y es posible
arrancar el motor. La llave no
podrá extraerse de la cerradura
de contacto en esta posición.
#
Motor parado y sin blocaje.
$
(bloqueo)
Para bloquear la dirección, gire
el manillar completamente hacia
la izquierda. Presione hacia
abajo la llave y después gírela
hasta la posición
$ y extráigala.
Para desbloquear, presione la
llave hacia abajo y gírela hacia
la derecha.
O
BSERVACION:
Antes de girar la llave hasta la posi-
ción
$ (bloqueo), ponga el scooter encima del caballete. No intente nunca
mover el scooter cuando la dirección
esté bloqueada, ya que podría perder el
equilibrio.
Serrure de contact
Position de la clé:
!
Sur cette position, le circuit
d’allumage se ferme et le
moteur peut démarrer. La clé ne
pourra pas être enlevée de la
serrure de contact sur cette
position.
#
Moteur arrêté et débloqué
$
(blocage)
Pour bloquer la direction, faire
tourner tout à fait le guidon vers
la gauche. Pressez la clé vers le
bas et ensuite faites-la tourner
jusqu’à la position
$ et ôtez-la
ensuite.
Pour la débloquer pressez la clé
vers le bas et faites-la tourner
vers la droite.
O
BSERVATION
Avant de faire tourner la clé jusqu’à la
position
$ (blocage), placer la scooter
sur son chevalet. Ne jamais tenter de
faire bouger la scooter
si la direction est
bloquée car il pourrait perdre l’équilibre.
Page 27

Blocchetto d’accensione • Ignition Lock
Zündschloß
27
Blocchetto d’accensione
Posizione della chiave
!
In questa posizione il circuito
d’accensione si chiude ed è
possibile mettere in moto il
motore. La chiave non potrà
estrarsi dalla blocchetto
d’accensione quando sia in
questa posizione.
#
Motore fermo e senza bloccaggio
$
(bloccaggio)
Per bloccare lo sterzo, girare
totalmente il manubrio verso
sinistra. Premere verso il basso
la chiave, poi girarla fino alla
posizione
$ ed estrarla. Per
sbloccare, premere la chiave
verso il basso e girarla a destra.
O
SSERVAZIONE:
Prima di girare la chiave fino alla posizione $ (bloccaggio) mettere lo scooter
sul cavalletto. Non tentare mai di muovere lo scooter quando lo sterzo è bloccato, poiché si potrebbe perdere l’equilibrio.
Ignition Lock
Key position
!
In this position, the ignition circuit is made and it is possible to
start the engine. The key cannot
be removed from the ignition
lock when in this position.
#
Engine stopped but steering not
locked
$
(steering lock)
To lock the steering, turn the
handlebar fully to the left. Then
press the ignition key right in
and turn to the locked position
$
Now withdraw the key. To
unlock, push the key in and turn
to the right.
NOTE:
Before turning the key to the $ (locked) position, put the scooter up on its
stand. Do not attempt to move the scooter with the steering locked, because it
can easily overbalance and fall.
Zündschloß
Position des Schlüssels
!
In dieser Stellung ist der
Zündkreis geschlossen und der
Motor kann angelassen werden.
In dieser Stellung kann der
Schlüssel nicht aus dem
Zündschloss gezogen werden.
#
Der Motor steht still und die
Lenkung ist nicht blockiert.
$ (Blockierung)
Um die Steuerung zu
blockieren, drehen Sie den
Lenker vollständig nach links.
Drücken Sie den Schlüssel
nach unten und anschließend
drehen Sie ihn bis zur Position $
und ziehen ihn ab. Zur
Aufhebung der Blockierung,
drücken Sie den Schlüssel nach
unten und drehen Sie ihn nach
rechts.
A
NMERKUNG:
Bevor Sie den Schlüssel in die Position
$ (Blockierung) drehen, stellen Sie das
Moped auf den Ständer. Versuchen Sie
niemals, das Moped zu bewegen,
während die Lenkung blockiert ist. Sie
könnten das Gleichgewicht verlieren.
Page 28

28
Page 29

29
Sillín
Selle
Sellino
Saddle
Sitz............................................................30
Depósito de gasolina
Réservoir à essence
Serbatoio benzina
Fuel tank
Kraftstofftank.............................................30
Este capítulo contiene una
descripción detallada de los
accesorios ubicados debajo
del sillín y puente antirrobo.
Ce chapitre contient une
description détaillée des
accessoires situés sous la
selle et pont antivol.
Questo capitolo contiene una
descrizione dettagliata degli
accessori situati sotto la sella e
del ponte antifurto.
This chapter contains a
detailed description of the
accessories
located underneath the saddle,
and the anti-theft shackle
Dieses Kapitel enthält eine
ausführliche Beschreibung des
Sitzes, der darunter
angeordneten Zubehörteile
sowie der Diebstahlsicherung.
Indice del capítulo
Index du chapitre
Indice delcapitolo
Index of the chapter
Inhaltsverzeichnis des Kapitels
Equipo y accesorios
Équipement et accessoires
Dotazione ed accessori
Equipment and Accessories
Ausstattung und Zubehör
Page 30
Cerradura sillín, depósito de gasolina y de aceite. Puente antirrobo
Serrure selle, réservoir d’essence et d’huile. Pont antivol
30
Cerradura sillín
Para abrir el sillín, introduzca la llave
en la cerradura de contacto y gírela
hacia la izquierda "OPEN". Debajo del
sillín hay un amplio hueco para el casco
(cabe un casco integral). También se
encuentra debajo del sillín, el depósito
de gasolina (2). Para cerrar, ponga el
sillín a su posición inicial y por la parte
trasera, presione hacia abajo.
Depósito de gasolina
El depósito de gasolina tiene una
capacidad de 6,2 litros y una reserva
de 1,5 litros.
ADVERTENCIA
Para abrir el sillín, tire de la parte
trasera de éste. En ningún caso de la
anilla de sujección del colín (ver
fotografias)
Serrure selle
Pour ouvrir la selle, introduire la clé
dans la serrure de contact en la faisant
tourner vers la gauche sur “OPEN”.
Sous la selle se trouve un large espace
pour le casque (un casque intégral).
Le réservoir à essence (2) se trouve
également sous la selle. Pour fermer
remettre la selle sur sa position initiale
et presser la partie arrière vers le bas.
Réservoir d’essence
Le réservoir d’essence a une capacité
de 6,2 litres et une réserve de 1,5 litres.
AVERTISSEMENT:
Pour ouvrir la selle, tirez sur sa partie
arrière. Ne tirez EN AUCUN CAS sur
l'anneau de fixation du dosseret (voir
photographies).
Page 31

Serratura sella, serbatoio carburante ed olio. Ponte antifurto • Saddle lock, fuel tank and oil reservoir. Anti-theft shackle
Sitzschloß, Benzintank und Ölbehälter. Diebstahlsicherung
31
Serratura sella
Per aprire la sella introdurre la chiave
nel blocchetto d'avviamento e girarla a
sinistra "OPEN". Sotto la sella c'è un
ampio vano per l'emetto (c'è posto pe
un elmetto integrale). Sotto la sella c'è
pure il serbatoio del carburante (2). Per
chiudere, mettere la sella nella sua
posizione iniziale e, dalla parte posteriore, premere verso il basso.
Serbatoio carburante
Il serbatoio del carburante ha una
capacità di litri 6,2 ed una riserva di litri
1,5.
AVVERTENZA:
Per aprire il sellino, tiratene la parte
posteriore. In NESSUN CASO tirare
dell'anello di sostegno del codino
(vedansi fotografie).
Saddle lock
In order to open the saddle, insert the
key in the ignition lock and turn to the
left to the “OPEN” position. Underneath
the saddle there is a generous space
for your helmet (with sufficient room for
a full-face helmet). Under the saddle
you can also find the following: the fuel
tank (2). To close the saddle drop it
back to its original position, place your
hand on the rear end and press down.
Fuel tank
The fuel tank has a capacity of 6,2
litres and a reserve of 1,5 litres.
WARNING:
Pull the rear of the saddle to open it.
UNDER NO CIRCUMSTANCES pull the
ring securing the seat cowl (see photo-
graphs).
Sitzschloss
Um den Sitz zu öffnen, stecken Sie
den Schlüssel in das Zündschloss und
drehen Sie ihn nach links bis zu
„OPEN“. Unter dem Sitz befindet sich
eine weiträumige Aussparung für den
Helm (es ist Platz für einen kompletten
Helm). Die Behälter für Benzin (2). Zum
Verschließen bringen Sie den Sitz in
seine Anfangsposition und drücken Sie
ihn an der Hinterseite nach unten.
Benzintank
Der Benzintank hat ein
Fassungsvermögen von 6,2 Litern und
eine Reserve von 1,5 Litern.
WARNHINWEIS:
Zum Öffnen des Sitzes den Sitz
hinten nach oben ziehen.
KEINESFALLS am Haltering des Sitzes
ziehen (siehe Abbildungen).
Page 32

32
Page 33

33
Arranque del motor
Démarrage du moteur
Avviamento del motore
Starting the engine
Anlassen des Motors ................................34
Instrucciones para una
correcta conducción
Instructions pour conduire correctement
Istruzioni per una guida corretta
Instructions for correct riding
Anweisungen für korrektes Fahren...........38
Instrucciones para el rodaje
Instructions pour le rodage
Istruzioni per il rodaggio
Instructions for running-in
Anweisungen für das Einfahren................42
Este capítulo trata el sistema
de arranque del motor con y
sin arranque eléctrico,
aspectos prácticos de
conducción y rodaje.
Ce chapitre traite le système
de démarrage du moteur, avec
ou sans démarreur électrique,
les aspects pratiques de
conduite et de rodage.
Questo capitolo tratta
dell'avviamento elettrico o a
pedale, degli aspetti pratici
della guida e del rodaggio.
This chapter contains a
detailed description of the
starting system, with or without
electric start, and practical
aspects of riding and running
in.
Dieses Kapitel handelt vom
Startersystem des Motors mit
und ohne elektrischen
Anlasser sowie von
praktischen Aspekten des
Fahrens und Einfahrens.
Indice del capítulo
Index du chapitre
Indice delcapitolo
Index of the chapter
Inhaltsverzeichnis des Kapitels
Arranque, conducción y rodaje
Démarrage, conduite et rodage
Avviamento, guida e rodaggio
Starting, Riding and running-in
Anlassen, Fahren und Einfahren
Page 34

Arranque del motor
Démarrage du moteur
34
Instrucciones para la puesta en marcha del motor (con arranque eléctrico)
- Accionar la llave de contacto en la
posición de la derecha !.
- Tener el puño de gas al mínimo.
- Accionar el mando freno trasero o
delantero.
Es muy importante, de lo
contrario el motor no se pone en
marcha.
- Accionar el pulsador de arranque "
mantenerlo pulsado hasta que el
motor se ponga en marcha al primer
intento.
- El tiempo necesario de accionamiento
del pulsador para una arrancada
suele ser de 1 a 2 segundos aproximadamente.
Instructions pour la mise en marche
du moteur
(avec démarreur électrique)
- Actionner la clé de contact dans le
sens vers la droite
!
- Garder la poignée de commande du
gaz au minimum.
- Actionner la commande du frein arriè-
re ou avant.
Ceci est très important
pour que le moteur se mette en
marche.
- Actionner le poussoir de démarrage "
et maintenir jusqu’à ce que le moteur
démarre au premier essai.
- Le temps de pression nécessaire du
poussoir pour un démarrage est
d’environ de 1 à 2 secondes.
Page 35

Avviamento del motore • Starting the engine
Anlassen des Motors
35
Istruzioni per l’avviamento del
motore
(con accensione elettrica)
- Agire sulla chiave di accensione nella
posizione della destra
!.
- Tenere la manopola comando gas al
minimo.
- Agire sul comando freno posteriore o
anteriore. È molto importante, altrimenti il motore non si avvia.
- Premere il pulsante di accensione
" e
mantenerlo così fino a che il motore si
avii al primo tentativo.
- Il tempo necessario in cui deve premersi il pulsante per l’accensione è, di
solito, da 1 a 2 secondi approssimativamente.
Instructions for starting the engine
(with electric starter)
- Put the key in the ignition lock and turn
to the right hand position
!.
- Keep the throttle twist grip in the slow
running position.
- Apply the front or the rear brake. This
is very important, because the engine
will not start without the brakes
applied.
- Press the starter button
", and keep it
pressed until the engine fires at the
first attempt.
- The time necessary to keep the starter
button pressed until the engine fires
will be approximately between 1 and 2
seconds.
Hinweise zum Ingangsetzen
des Motors
(mit elektrischem Anlasser)
- Den Schlüssel in das Kontaktschloß
einführen und nach rechts in die
Position !drehen.
- Den Gasgriff in leerlaufstellung halten.
- Den Hebel der Hinter- oder
Vorderbremse betätigen. Dies ist sehr
wichtig, weil sich sonst der Motor nicht
in Gang setzt.
- Den Anlasserknopf
"
drücken und
gedrückt halten, bis sich der Motor beim
ersten Versuch in Gang setzt.
- Um den Motor anzulassen, muß der
Anlasserknopf gewöhnlich ca. 1 bis 2
Sekunden gedrückt gehalten werden.
Page 36

Arranque del motor
Démarrage du moteur
36
❀ No tenga el motor en marcha sin
necesidad. Arranque en seguida.
¡Aviso!
00
Antes de iniciar la marcha, compruebe
que la cadena está tensa con el motor
parado. El incumplimiento de ésta
observación puede causar graves averias en el vehículo y daños al conductor.
❀ Ne laissez pas ronfler le moteur
inutilement. Démarrez aussitôt.
¡Avis!
00
Avant de démarrer, vérifiez que la
chaîne est tendue lorsque le moteur est
à l'arrêt.
Cette mesure vous permettra d'éviter de
sérieux dommages du véhicule et du
conducteur.
c
ADVERTÈNCIA
00
Abans d’iniciar la marxa, comprovar que
la cadena està tensada amb el motor
parat. L’incompliment d’aquesta observació pot causar avaries greus i danys
al conductor.
Page 37

Avviamento del motore • Starting the engine
Anlassen des Motors
37
❀ Non tenere il motore avviato senza
bisogno. Partire subito.
Avviso!
00
Prima di iniziare la marcia verificate,
con il motore spento, che la catena sia
tesa.
L'inadempimento di quest'osservazione
può arrecare danni gravi al veicolo e al
conducente.
❀ Do not keep the engine running
unnecessarily. Start when you
need to go.
Warning!
00
Before you start the engine make sure
the chain is taut while the engine is
stationary.
Failure to do this could cause serious
damage to the vehicle and serious
injury to the rider.
❀
Lassen Sie den Motor nicht unnötig
laufen. Fahren Sie sofort los.
Warnung!
00
Vor Fahrtantritt ist zu überprüfen, ob die
Kette bei ausgestelltem Motor gespannt
ist.
Die Nichtbeachtung dieses Hinweises
kann zu schweren Schäden am Motorrad
und Verletzungen des Fahrers Führen.
Page 38

Conducción
Conduite
38
Instrucciones para una correcta conducción.
La técnica del buen conductor, es el
arte que permite sacar el máximo rendimiento del vehículo sin obligar su
mecánica.
Nuestra experiencia nos permite
aconsejarle:
¡Precaución!
❀ Evite los acelerones. Dando gas
con tiento no sólo se logra reducir
considerablemente el consumo de
combustible, sino que también disminuyen la contaminación y el
desgaste.
❀ Lleve siempre el motor en aquel
punto (3/4 de gas) en que siempre
pueda dar algo más. Se ahorra combustible, se reducen los ruidos y se
alarga la vida del scooter.
Conseils pour une conduite correcte.
La technique du bon conducteur est
un art qui permet de tirer le meilleur rendement du véhicule sans forcer sa
mécanique.
Notre expérience nous permet quelques conseils:
Précaution!
❀ Évitez les accélérations brusques.
Actionnez le gaz avec douceur
pour réduire considérablement la
consommation de combustible et
diminuer la pollution et l’usure du
scooter.
❀
Le moteur doit toujours tourner au
point (3/4 du gaz) où on peut encore
le forcer pour ainsi consommer moins
de combustible, réduire l’émissionde
bruits et prolonger la vie du scooter.
Page 39

Guida • Riding
Fahren
39
Istruzioni per una guida corretta
- La tecnica della corretta guida è l’arte
che permette ottenere la massima efficenza del veicolo senza forzarne la
meccanica.
La nostra esperienza ci permette di
consigliarLe.
Attenzione!
❀ Evitare le forti accelerazioni. Acce-
lerando gradualmente, non soltanto si può ridurre altamente il consumo di combustibile, ma si diminuisce l’inquinamento ed il logoramento.
❀
Guidare sempre a 3/4 del gas. Si
risparmia combustibile, si riducono
i rumori e si allunga la vita dello
scooter.
Instructions for correct driving
Good driving technique is an art
which makes it possible to obtain the
maximum performance from the vehicle
without forcing the machinery.
Our experience makes it possible to
make the following suggestions:
Caution!
❀ Avoid sharp accelerations. Ope-
ning the throttle smoothly not only
reduces fuel consumption considerably, but also keeps down pollution levels and wear and tear on
the scooter.
❀
Always ride with the engine giving a
little less than full performance (3/4
throttle). This saves petrol, keeps
noise levels down, and lengthens the
life of your scooter.
Hinweise für gutes Fahren
Die Technik des guten Fahrens ist die
Kunst, das Beste aus dem Fahrzeug zu
holen, ohne seine Mechanik zu
forcieren. Aufgrund unserer Erfahrung
können wir Ihnen folgende Ratschläge
geben:
Vorsicht!
❀ Beschleunigen Sie nicht plötzlich.
Durch vernünftiges Gasgeben
verringern Sie nicht nur in
bemerkenswerter Weise den
Benzinverbrauch, sondern auch
die Umwelt-verschmutzung und die
Abnutzung des Fahrzeugs.
❀
Geben Sie immer nur soviel Gas
(etwa 3/4), daß Sie immer noch ein
wenig mehr geben können. Sie
sparen so Benzin, vermeiden zu
großen Lärm und verlängern die
Lebensdauer Ihres Mopeds.
Page 40

Conducción
Conduite
40
¡Aviso!
00
Al arrancar, en plena carga, es necesario evitar circular a baja velocidad y
poco gas, ya que en éstas condiciones, la
fricción centrífuga de la transmisión se
encuentra en condiciones de patinamiento, que puede ocasionar un recalentamiento temporal de la transmisión. Si se
produjera éste caso, pare el vehículo y
manténgalo al ralentí durante unos minutos antes de reprender la marcha.
- Al frenar cierre el gas.
- Frene con suavidad, vigilando el terreno
que pisa. En asfalto seco inicie la frenada con el freno delantero y acabe con
los dos. En terreno mojado, con arena o
gravilla, no utilice nunca el freno delantero y tome más distancia para detener
el scooter.
- Al arrancar, de gas suave y paulatinamente.
❀ Pare el motor en las ocasiones pro-
picias del tráfico.
Attention !
00
Lorsque vous êtes à pleine charge et
vous démarrez, évitez de circuler à une
vitesse trop basse et avec peu de gaz, pour
que la friction centrifuge de la transmission
ne se trouve pas en condition de produire
un échauffement temporaire de la transmission. Si cela se produisait, arrêtez le véhicule et maintenez le ralenti pendant quelques minutes avant de démarrer à nouveau.
- Pour freiner n’actionnez pas le gaz.
- Freinez en douceur en tenant compte du
terrain où vous roulez. Sur asphalte sec
commencez à freiner avec le frein avant
et terminez avec les deux freins. Sur
terrain mouillé, ensablé ou avec gravillons, n’utilisez jamais le frein avant et
prévoyez une distance plus grande pour
arrêter le scooter.
- Pour démarrer, actionnez le gaz en douceur et progressivement.
❀
Si vous vous trouvez pris dans un
bouchon de circulation arrêtez votre
moteur.
c
ADVERTÈNCIA
00
A l'engegar, en plena càrrega, és
necessari circular a baixa velocitat i poc
gas, ja que en aquestes condicions, la
fricció centrífuga de la transmissió es
troba en condicions de lliscament, que
poden produir un sobreescalfament
temporal de la transmissió. Si es donés
el cas, pari el vehicle i mantingui'l al
ralentí durant uns minuts abans de
reprendre la marxa.
Page 41

Guida • Riding
Fahren
Consigli pratici • Tips
Ratschläge
41
Avvertenza!
00
All'accensione in pieno carico bisogna evitare la circolazione a velocità
basse e poco gas perché in queste condizioni la frizione centrifuga è in situazione di slittamento, il che può provocare un riscaldamento temporale della
trasmissione. Nell'eventualità, fermate
l'autoveicolo e mantenetelo al minimo
prima di riprendere la marcia.
- Quando si frena, togliere il gas.
- Frenare con soavità, avendo cura del
fondo stradale. Sull’asfalto secco,
cominciare la frenata col freno anteriore e finirla con entrambi. Su terreno
bagnato, con sabbia o ghiaietto, non
usare mai il freno anteriore e mantenere più distanza dai veicoli che precedono per poter fermare lo scooter.
- Nell’avviamento dare il gas in modo
soave e progressivo.
❀ Arrestare il motore ove la situazio-
ne del traffico lo consenta.
Warning!
00
When starting the vehicle with it fully
loaded, avoid riding at low speed with little
throttle, as under these conditions, the centrifugal friction of the transmission makes
the clutch slip, which could cause the transmission to temporarily overheat. If this
occurs, stop the vehicle and let it idle for a
few minutes before putting it in gear again.
- When you use the brakes, close the throt-
tle.
- Brake smoothly, keeping an eye on the
type of surface you are on. On dry asphalt, start braking with the front brake, and
then use both brakes to come to a complete stop.
On wet surfaces, or on sand or gravel,
never use the front brake, and allow a
greater distance for coming to a complete
stop.
- When you move off, open the throttle
smoothly and slowly.
❀
Stop the engine when traffic conditions dictate.
Achtung!
00
Beim Anfahren mit voller Last ist zu
vermeiden, mit geringer Geschwindigkeit
und wenig Gas zu fahren, da die
Zentrifugalreibung des Getriebes unter
diesen Bedingungen in einen
Rutschzustand versetzt werden könnte,
der zu einer zeitweisen Überhitzung des
Getriebes führen kann. Sollte dieser Fall
eintreten, halten Sie das Fahrzeug an
und lassen Sie es vor der Weiterfahrt
einige Minuten im Leerlauf laufen.
-Nehmen Sie beim Bremsen das Gas
zurück.
-Bremsen Sie sanft und achten Sie auf
das Gelände, das Sie befahren. Auf
trockenem Asphalt starten Sie den
Bremsvorgang mit der Vorderbremse
und beenden ihn mit beiden Bremsen.
Auf nassem Grund, auf Sand oder auf
Kies benutzen Sie niemals die
Vorderbremse. Kalkulieren Sie auch
einen längeren Bremsweg ein.
-Geben Sie beim Starten zuerst sanft
und dann allmählich mehr Gas.
❀
Wenn der Verkehr es erfordert,
stellen Sie den Motor ab.
Page 42

Rodaje
Le Rodaje
42
Instrucciones para el rodaje
OBSERVACION:
- Para conseguir una duración máxima y
un funcionamiento suave del motor, se
recomienda poner en práctica durante el
período de rodaje, las siguientes medidas preventivas.
- Durante los primeros 1000 Kms. no utilizar el vehículo superando el 80% de la
velocidad máxima prevista. Evitar abrir
completamente el acelerador y no mantener una velocidad constante por largos
trozos de carretera. Después de los primeros 1000 Kms., aumentar progresivamente la velocidad hasta alcanzar las
prestaciones máximas.
- Durante este período, las piezas móviles
que forman la totalidad de sus mecanismos, se suavizan adaptándose unas
a otras hasta su perfecto acoplamiento.
- Deje que el motor funcione suficientemente al ralentí después de arrancarlo
en caliente o frío antes de acelerarlo.
Esto permitirá que el aceite lubricante
llegue a todos los componentes críticos
del motor.
- No efectuará un mejor rodaje por circular muy despacio, sino conduciendo con
suavidad y cuidado.
Instructions pour le rodage
OBSERVATION:
- Pour obtenir la durée de vie maximum et
un fonctionnement parfait du moteur, il
est recommandé de mettre à la pratique
les mesures de préventions suivantes:
- Durant les premiers 1000 kilomètres ne
pas dépasser 80% de la vitesse maximum prévue. Éviter d’actionner complè-
tement l’accélérateur et ne pas rouler à
une vitesse constante pendant de longs
parcours. Après les premiers 1000
kilomètres augmenter progressivement
la vitesse pour atteindre les prestations
maximum.
- Pendant cette période, les pièces mobiles formant la totalité de ses mécanis-
mes, s’adoucissent en s’adaptant parfaitement les unes aux autres.
- Laissez le moteur fonctionner suffisamment au ralenti après le démarrage à
chaud ou à froid avant de l’accélérer.
Ceci permet que l’huile lubrifiante arrive
à tous les composants critiques du
moteur.
- Le rodage ne se fera pas mieux si vous
circulez très lentement, il faut conduire
avec attention et sans brusquerie.
Page 43

Rodaggio • Running-in
Einfahren
43
Istruzioni per il rodaggio.
OSSERVAZIONE:
- Per ottenerne la massima durata ed un
funzionamento regolare del motore si
consiglia di adopttare durante il periodo
di rodaggio le seguenti misure preventive:
- Quando si usa il veicolo durante i primi
1.000 Km non superare l’80% della velocità massima prevista. Evitare di aprire
totalmente l’acceleratore e non mantenere una velocià costante durante lunghi
tratti di strada. Dopo i primi 1.000 Km
aumentare progressivamente la velocità
fino a raggiungere le massime prestazioni.
- Le parti mobili, durante il rodaggio, si
adattano le une alle altre fino a raggiungere un perfetto accoppiamento.
- Lasciare girare il motore al minimo per
un certo tempo prima di accelerare dopo
overlo messo in moto a caldo o a freddo.
Ciò permetterà che l’olio lubrificante raggiunga tutti i componenti del motore.
- Non si realizzerà un rodaggio migliore
circolando troppo lentamente, ma con
una guida morbida ed attenta.
Instructions for running in
NOTE:
- To ensure that your engine runs as smoothly as possible and that it lasts as long
as possible, it is recommended to put
into practice the following preventative
measures during the running-in period:
- During the first 1,000 kilometres, do not
exceed 80% of the recommended maximum speed. Avoid opening the throttle
fully, and do not maintain a constant
speed for long stretches of road. After
the first 1,000 kilometres, progressively
increase the speed you use until you
reach the recommended maximum.
- During this period, the moving parts
which make up the totality of the various
mechanisms, wear smooth and adapt to
each other until they fit perfectly.
- Allow the engine to run a sufficient time
at idle after starting either hot or cold,
before accelerating. This is to permit the
lubricating oil to reach all the critical
components of the engine.
- The best running in is performed by
riding smoothly and carefully, not by driving slowly.
Hinweise zum Einfahren
ANMERKUNG:
- Zur Erzielung der maximalen
Lebensdauer und um einen sanften Lauf
des Motors zu gewährleisten, empfehlen
wir, während des Einfahrens die
folgenden vorbeugenden Maßnahmen
zu beachten:
-Während der ersten 1000 Km sollten
80% der vorgesehenen
Höchstgeschwindigkeit nicht
überschritten werden. Drehen Sie das
Gas nicht ganz auf und vermeiden Sie
es, über längere Strecken mit konstanter
Geschwindigkeit zu fahren. Nach den
ersten 1000 Km die Geschwindigkeit
schrittweise erhöhen, bis die maximale
Leistung erreicht wird.
-Während dieses Zeitraums entspannen
sich die die den Gesamtmechanismus
bildenden beweglichen Teile und passen
sich einander an, bis sie vollständig
aufeinander abgestimmt sind.
- Lassen Sie den Motor nach dem Warmoder Kaltstart genügend lange im
Leerlauf laufen. Das Schmieröl gelangt
auf diese Weise an alle kritischen Teile
des Motors.
- Gutes Einfahren bedeutet nicht sehr
langsames, sondern sanftes und
vorsichtiges Fahren.
Page 44

44
Control del líquido refrigerante
Contrôle du liquide refroissant
Controllo liquido refrigerante
Coolant check
Kontrolle des Kühlmittels
.......46
Lubrificación separada
Lubrification séparée
Lubrificazione separata
Separate lubrication
Getrennte Schmierung
............50
Carburador
Carburateur
Carburatore
Carburettor
Vergaser
....................................52
Filtro de aire
Filtre à air
Filtro aria
Air filter
Luftfilter
......................................54
Fusible
Fusible
Fusibile
Fuse
Sicherung
..................................58
Batería
Batterie
Batteria
Battery
Batterie
......................................60
Este capítulo trata el sistema de
mantenimiento y controles de rutina
que pueden efectuarse para tener la
seguridad de que el scooter está en
perfectas condiciones mecánicas.
Ce chapitre traite le système
d'entretien et les contrôles de routine
qui peuvent être effectués pour
s'assurer que le scooter est en
parfaites conditions mécaniques.
Questo capitolo tratta sull sistema di
manutenzione e controlli periodici che
possono realizzarsi per avere la
sicurezza che il scooter si trovi in
perfette condizioni meccaniche.
This chapter deals with the system of
routine checks and maintenance
operations which you can carry out in
order to be sure that your scooter is in
perfect mechanical condition.
Dieses Kapitel handelt vom
Wartungssystem und den
Routinekontrollen, die man
vornehmen kann, um
sicherzustellen, daß sich das Moped
in einwandfreiem mechanischen
Zustand befindet.
Presión de los neumáticos
Pression des pneumatiques
Pressione dei pneumatici
Tyre pressures
Reifendruck
............................................64
Bujía
Bougie
Candela
Spark plug
Zündkerze
..............................................68
Faro delantero
Phare avant
Faro anteriore
Headlight
Scheinwerfer
..........................................70
Características del freno de disco
Caractéristiques du frein à disque
Caratteristiche del freno a disco
Characteristics of the disc brake
Eigenschaften der Scheibenbremse........72
Page 45

45
Indice del capítulo
Index du chapitre
Indice delcapitolo
Index of the chapter
Inhaltsverzeichnis des Kapitels
Mantenimiento freno de disco
Entretien du frein à disque
Manutenzione freno a disco
Maintenance of the disc brake
Wartung der Scheibenbremsen
..........74
Aceite del motor
Huile du moteur
Sostituzione olio motore
Crankcase oil
Entleeren und Auffüllen des Motoröles....78
Cadena transmisión
Chaîne Secondaire
Catena Trasmissione
Transmission chain
Antiebskette
...........................................80
Cuadro de mantenimiento períodico
Tableau d’entretien périodique
Tabella di manutenzione periodica
Maintenance Table
Inspektionsintervalle
.............................83
Limpieza del scooter
Nettoyage du scooter
Pulizia dello scooter
Cleaning your scooter
Reinigung des Mopeds
........................88
Conservación del scooter en largos
períodos de inactividad
Conservation pendant de longues
périodes d’inactivité
Conservazione dello scooter durante
lunghi periodi di inattività
Storing your scooter during long
periods of disuse
Pflege des Mopeds bei längerem
Nichtbenutzen
...................................90
Anomalías en ruta
Anomalies sur la route
Anomalie in viaggio
Breakdowns on the road
Störungen während der Fahrt...........92
Mantenimiento
Entretien
Manutenzione
Maintenance
Wartung
Page 46

Control líquido refrigerante
Contrôle du liquide refroidissant
46
Acceso al control del líquido
refrigerante y aceite
Para poder controlar los niveles de
líquido refrigerante y aceite, se debe
retirar la tapa que los cubre (quitar tornillos 1 y 2)
Control líquido refrigerante
Cada 1.000 Km. o después de largos
viajes se debe controlar con el motor en
frio, el nivel del líquido de refrigeración.
El depósito tiene un indicador de
máximo y mínimo, el nivel del líquido
refrigerante tiene que estar situado
siempre ligeramente por debajo del
nivel de máximo. Jamás por encima.
¡Aviso!
00
No tener NUNCA el nivel por encima
del indicador de máximo. Con el motor
caliente podría saltar el tapon y causaría graves averias en el vehículo y
daños al conductor.
.
Accès au contrôle liquide
réfrigérant et huile
Pour pouvoir contrôler les niveaux de
liquide réfrigérant et d'huile, vous
devrez retirer le couvercle (ôter les vis 1
et 2).
Contrôle du liquide
refroidissant
Tous les 1.000 km ou après de longs
voyages il faut, le moteur froid, vérifier
le niveau du liquide refroidissant.
Le réservoir dispose d'un indicateur
de niveau maximum et minimum. Le
niveau de liquide réfrigérant doit toujours être situé légèrement au-dessous
du niveau maximum. Jamais au-dessus.
AVERTISSEMENT:
00
Le niveau ne doit JAMAIS se trouver
au-dessus du niveau maximum.
Lorsque le moteur est chaud, le
couvercle pourrait sauter et provoquer
des dommages irréparables du véhicule
et du conducteur.
Pour changer le liquide refroidissant,
cADVERTÈNCIA
00
No tenir MAI el nivell del refrigerant
per sobre de l’indicador de màxim. Amb
el motor calent podria saltar el tap i
causar avaries greus i danys al
conductor.
1 2
Page 47

Controllo liquido refrigerante • Checking the cooling liquid
Überprüfung des Kühlmittelstandes
47
Accesso al controllo del
liquido refrigerante e olio
Per poter controllare i livelli del liquido refrigerante e dell'olio, deve
rimuoversi il coperchio che li copre (sfilate le viti 1 e 2).
Controllo liquido refrigerante
Ogni 1.000 Km o dopo lunghi viaggi
deve controllarsi il livello del liquido
refrigerante, con motore a freddo.
Il serbatoio ha un indicatore di massimo e di minimo: il livello del liquido
refrigerante deve essere sempre situato
leggermente al di sotto del livello del
massimo, in nessun caso al di sopra.
AVVERTENZA:
00
Non averlo MAI al di sopra del livello
del massimo. Con il motore caldo il
tappo potrebbe saltare via e produrre
dei danni non riparabili nel veicolo e nel
conducente.
Accessing the coolant and oil
level indicators
To check the level of coolant and oil,
remove the cap on top (remove screws
1 and 2).
Checking the cooling liquid
Every 1.000 kilometres, or after long
trips, the level of the cooling liquid
should be checked when the engine is
cold.
The tank has a maximum and
minimum indicator. The coolant must
always be slightly below the maximum
level, never above it.
WARNING:
00
NEVER fill it above the maximum
level. When the engine heats up, the
cap could come flying off and cause
irreparable damage to the vehicle and
injure the rider.
Zugang zur Prüfung des
Kühlmittel- und Ölstands
Zur Prüfung des Kühlmittel- und
Ölstands muss der Deckel
abgenommen werden (Schrauben 1
und 2 herausdrehen).
Überprüfung des
Kühlmittelstandes
Alle 1.000 Km oder nach einer langen
Reise muß bei kaltem Motor der
Kühlmittelstand überprüft werden.
Der Behälter hat eine Anzeige für
Max. und Min. Der Kühlmittelstand
muss immer geringfügig unter der
Anzeige Max. liegen. Niemals darüber.
WARNHINWEIS:
00
Der Stand darf NIE die Markierung
Max. überschreiten. Bei warmem Motor
könnte sich der Deckel lösen und nicht
reparierbare Schäden am Motor und
Verletzungen des Fahrers verursachen.
Page 48

Control líquido refrigerante
Contrôle du liquide refroidissant
48
Para cambiar el líquido refrigerante,
sacar el tapón del depósito de expansión y desmontar el tornillo vaciado del
tubo refrigeración bomba radiador,
vaciando de esta manera todo el líquido. Después de montar de nuevo el tornillo, llenar todo el circuito con líquido
refrigerante de punto de congelación
–18ºC. a través del orificio del depósito
de expansión, teniendo la precaución
de que el líquido refrigerante no sobresalga del indicador de máximo. Un
exceso de líquido provocaría que este
saliese por el tapón durante el uso del
vehículo.
La capacidad del circuito de refrigeración es de 1,100 litros.
déboucher le réservoir d’expansion et
dévisser et enlever la vis de fixation du
tube de réfrigération pompe radiateur
pour vider ainsi tout le liquide.
Ensuite remettre la vis et remplir à
nouveau tout le circuit avec du liquide
refroidissant du point de congelation
–18ºC. par l’orifice du réservoir d’expansion en sorte que le liquide ne dépasse
pas l’indication de maximum. Un excès
de liquide provoquerait son débordement par le bouchon lors de l’utilisation
du véhicule.
La capacité du circuit de refroidissement est de 1,100 litres.
Page 49

Controllo liquido refrigerante • Checking the cooling liquid
Überprüfung des Kühlmittelstandes
49
Per cambiare il liquido refrigerante
estrarre il tappo del serbatoio di espansione e smontare la vite di fissaggio del
tubo refrigerazione alla pompa del
radiatore, svuotandone così tutto il liquido. Dopo aver montato la vite, riempire
tutto il circuito con liquido refrigerante di
punto di congelamento –18ºC. attraverso il foro del serbatoio di espansione,
avendo cura che il liquido refrigerante
non superi l’indicatore di massimo. Un
eccesso di liquido causerebbe che
questo ne fuoriuscisse durante l’uso del
veicolo.
La capacità del circuito di refrigerazione è di litro 1,100.
To change the cooling liquid, remove
the expansion tank filler cap and unscrew the securing screw for the coolant
hose which goes from the water pump
to the radiator, thus draining all the
liquid. After first refitting the securing
screw, refill the system with freezing
point –18ºC. antifreeze liquid, pouring
the liquid in through the water filler cap
in the expansion tank, being careful that
the cooling liquid does not pass the
maximum level. Excess liquid causes
an overflow through the filler cap when
the motorcycle is running.
The capacity of the cooling system is
1,100 litres.
Zum Auswechseln des Kühlmittels
den Deckel des Entspannungsbehälters
abnehmen und die Schraube lösen, die
sich unterhalb des Kühlers befindet.
Lassen sie die Flüssigkeit ganz
ablaufen. Nachdem Sie die Schraube
erneut festgeschraubt haben, füllen sie
den Kühlmittelkreislauf über die Öffnung
des Entspannungsbehälters mit neuem
Kühlmittel Gefrierpunkt –18ºC. Achten
Sie darauf, daß das Kühlmittel die
Maximalanzeige nicht überschreitet. Bei
Überschreiten dieser Menge könnte das
Kühlmittel während der Fahrt
überlaufen. Der Kühlmittelkreislauf hat
ein Fassungsvermögen von
1,100 Litern.
Page 50

Lubrificación separada
Lubrification séparée
50
Lubrificación separada
Este scooter está dotado de un sistema de lubrificación separada, el cual
tiene un depósito de aceite situado bajo
el escudo frontal y una bomba de alimentación situada en el cárter izquierdo.
El depósito con capacidad de 1,7
litros está dotado de un indicador de
reserva, que cuando quedan solamente
0,200 litros de lubricante hace que se
encienda el testigo de reserva de aceite
situado sobre el tablier.
Lubrification séparée
Ce scooter est doté d'un système de
lubrification séparé, dont le réservoir
d'huile se trouve au-dessus du bouclier
avant, et d'une pompe d'alimentation
située sur le carter gauche.
Le réservoir, avec 1,7 litres de capacité est muni d’un indicateur de réserve
qui allume le pilote de réserve d’huile
situé sur le tableau de bord lorsque le
lubrifiant descend à 0,200 litres.
Page 51

Lubrificazione separata • Separate lubrication
Getrennte Schmierung
51
Lubrificazione separata
Questo scooter è munito di un sistema di lubrificazione separata che ha un
serbatoio d'olio sotto lo scudo frontale e
una pompa d'alimentazione situata nel
carter sinistro.
Il serbatoio, con capacità di litri 1,7, è
dotato di un indicatore di riserva che fa
accendersi la spia di scorta dell’olio,
situata sul cruscotto, qualora rimangono
soltanto litri 0,200 di lubrificante.
Separate lubrication
This scooter has a separate lubrication system, which has an oil tank under
the front shield and an intake pump on
the left-hand crankcase.
The reservoir, which has a capacity of
1,7 litres, is fitted with a reserve indicator which causes the oil reserve warning
light on the instrument panel to light up
when the level of the lubricant falls to
only 0.200 litres.
Getrennte Schmierung
Dieser Scooter ist mit einem
separaten Schmiersystem ausgestattet.
Dazu verfügt er über einen Ölbehälter
unter dem Frontschutz und eine
Förderpumpe im linken Gehäuse.
Der Ölbehälter mit einem
Fassungsvermögen von 1,7 l ist mit
einem Reserveanzeiger ausgerüstet,
der die Öl-Kontrollampe auf der
Instrumententafel aufleuchten läßt,
sobald nur noch 0,200 l Öl im Behälter
verbleiben.
Page 52

Carburador
Carburateur
52
Carburador
Una carburación sin problemas es la
base de un buen rendimiento del motor.
El carburador ha sido ajustado en fábrica
para ofrecer la mejor carburación. No
intente alterar este ajuste.
O
BSERVACION
Periódicamente es conveniente realizar una limpieza del carburador, empleando gasolina limpia y aire a presión.
Regulación del ralentí
El tornillo regulación es accesible por
el lado derecho del scooter.
El ajuste del ralentí debe efectuarse
con el motor caliente y las luces encendidas. Atornillar o destornillar el botón
regulación hasta alcanzar un régimen del
ralentí regular sin que la rueda trasera
sea puesta en movimiento por el motor.
Para cualquier otra regulación del car-
burador le aconsejamos se dirija a un
Servicio Oficial DERBI.
Precaución!
El ajuste del ralentí del motor, hágalo
siempre con el motor caliente.
Ajuste juego maneta del gas.
Después de ajustar la marcha en
vacío, regule el juego de la maneta del
gas. Éste se regula mediante una tuerca
situada en la unión del cable con la
maneta. El mando del gas debe tener un
juego de 2 ÷ 3 mm.
Carburateur
Une carburation sans problèmes est
essentielle pour le bon rendement du
moteur. Le carburateur a été réglé en
fabrique pour offrir la meilleure carburation. N’essayez pas de modifier ce réglage.
O
BSERVATION:
Périodiquement il est recommandé de
nettoyer le carburateur en utilisant de
l’essence propre et de l’air sous pression.
Réglage du ralenti:
La vis de réglage est accessible du
côté droit du scooter.
Réglez le ralenti avec le moteur à
chaud et les lampes allumées. Visser ou
dévisser le bouton de réglage jusqu'à
atteindre un régime régulier sans que la
roue arrière ne soit entraînée par le
moteur.
Pour tout autre réglage du carburateur
il est préférable que vous vous adressiez
au Service Officiel DERBI.
Attention!
Le réglage du ralenti du moteur doit
toujours être réalisé lorsque le moteur est
chaud.
Ajustage du jeu de la manette de gaz
Après le réglage de la vitesse le
moteur tournant à vide, réglez le jeu de la
manette du gaz au moyen de l'écrou
situé à la jonction du câble avec la
manette. Le jeu de la commande du gaz
doit être de 2 ÷ 3 mm.
Page 53

Carburatore • Carburettor
Vergaser
53
Carburatore
Una carburazione senza problemi è la
base di un buon rendimento del motore. Il
carburatore è stato regolato in fabbrica
per fornire la miglior carburazione. Non
cerchi di alterare questa regolazione.
O
SSERVAZIONE:
È conveniente effettuare periodicamente una pulizia del carburatore, con l’uso di
benzina pulita ed aria a pressione
Regolazione del minimo
La vite di regolazione è accessibile dal
lato destro dello scooter.
La regolazione del minimo è da farsi
con il motore caldo e con le luci accese.
Avvitare o svitare il bottone di
regolazione fino a raggiungere un regime
del minimo regolare senza che la ruota
posteriore sia messa in moto dal motore.
Per qualsiasi altra regolazione del
carburatore Vi consigliamo di rivolgerVi a
un Servizio Ufficiale DERBI.
Attenzione!
Effettuare sempre la regolazione del
minimo del motore quando questo sia
caldo.
Regolazione gioco manopola del gas
Dopo aver regolato la marcia a vuoto,
regolate il gioco della manopola del gas.
Ciò si fa tramite un dado situato
nell'unione del cavo e la manopola. Il
comando del gas deve avere un gioco di
2-3 mm.
Carburettor
A perfectly operating carburettor is the
basis of good performance from the engine.
The carburettor has been adjusted in the
factory to give the best possible carburation. Do not attempt to alter this adjustment.
N
OTE
:
It is a good idea to clean the carburettor
periodically using clean petrol and high
pressure air.
Adjusting the idling.
The adjustment screw is accessed from
the right-hand side of the scooter.
Adjust the idling with the engine and
lights on. Screw or unscrew the adjustment
button until the engine is ticking over regularly and the rear wheel is not being moved
by the engine.
For any other regulation of the carburettor we advise contacting a DERBI Official
Service Centre.
Caution!
Adjustment of the idle speed must be
carried out when the engine is hot.
Adjusting the throttle play.
After adjusting the idling, alter the play of
the throttle. It is altered with a screw located where the cable joins the throttle. The
throttle must have 2-3 mm of play.
Vergaser
Eine einwandfreie Gemischbildung ist
Voraussetzung für eine gute Motorleistung.
Der Vergaser ist im Werk so eingestellt
worden, daß er eine optimale Gemischbildung
bietet. Versuchen Sie nicht, diese Einstellung
zu verändern.
A
NMERKUNG
:
Wir empfehlen, den Vergaser in
regelmäßigen Zeitabständen mit sauberem
Benzin und Druckluft zu reinigen.
Leerlaufeinstellung
Die Regulierschraube ist von der rechten
Seiten des Scooters her zugänglich.
Die Leerlaufeinstellung muss mit warmem
Motor und eingeschaltetem Licht vorgenommen
werden. Den Einstellknopf entweder
herausdrehen oder festdrehen, bis ein
regelmäßiger Leerlauf erreicht wird, ohne dass
das Hinterrad von dem Motor in Bewegung
gesetzt wird.
Für jegliche sonstige Einstellung des
Vergasers wenden Sie sich bitte an einen
Vertragshändler von DERBI.
Vorsicht!
Nehmen Sie die Einstellung des Leerlaufs
immer bei warmem Motor vor.
Einstellung der Gasgeberhebel
Nach Regulierung des Leerlaufs sind die
Gasgeberhebel einzustellen. Die Einstellung
erfolgt mit einer Mutter, die auf der Verbindung
zwischen Kabel und Hebel vorgesehen ist. Die
Gasbetätigung muss ein Spiel von 2 ÷ 3 mm
aufweisen.
Page 54

Filtro de aire y conducto de aire secundario
Filtre à air et conduite d’air secondaire
54
Limpieza filtro de aire
La espuma del filtro del aire está dentro de la caja de filtro, que está situada
en el lado derecho del scooter.
O
BSERVACION
Si la espuma se ha obstruido con
polvo, aumentará la resistencia de admisión con una pérdida resultante de potencia de salida y un incremento en el consumo de combustible. Se recomienda
limpiar la espuma cada 5.000 Km. de
acuerdo al procedimiento siguiente.
- Extraiga los tornillos fijación tapa caja
filtro y desmonte la misma.
- Extraiga la espuma filtro.
- Llene un recipiente con un líquido limpiador no inflamable. Sumerja la espuma varias veces hasta que quede totalmente limpia.
- Expulse el líquido limpiador presionando varias veces el filtro con las palmas
de las manos. No doble o estruje el filtro, ya que ello ocasionará fisuras en
él.
- Sumerja la espuma filtro en un recipiente lleno de aceite AGIP FILTER
Nettoyage du filtre à air
La mousse du filtre à air se trouve à
l'intérieur de la caisse de filtre, située
sur le côté droit du scooter.
OBSERVATION
Si la mousse est obstruée par la poussière, la résistance d’admission d’air augmentera et entraînera une perte de puissance de sortie et une augmentation de
consommation de combustible. Il est
souhaitable de nettoyer la mousse du filtre tous les 5.000 km en procédant
comme suit:
- Dévisser les vis de fixation couvercle
boîte filtre et démontez celle-ci.
- Extraire la mousse-filtre.
- Remplir un récipient avec un liquide net-
toyant non inflammable. Enfoncer dans
le liquide la mousse plusieurs fois
jusqu’à ce qu’elle soit parfaitement propre.
- Expulser le liquide nettoyant en pres-
sant plusieurs fois le filtre avec les paumes des mains. Ne pas plier ou tordre
le filtre pour ne pas produire de fissures
dans le filtre.
- Immerger la mousse filtre dans un réci-
pient rempli d’huile AGIP FILTER OIL
1
Page 55

Filtro aria e condotto aria secondaria • Air filter and secundary air tube
Luftfilter
55
Cleaning the air filter
The air filter foam is inside the filter
casing, which is on the right-hand side of
the scooter.
N
OTE:
If the filter foam becomes blocked with
dust, resistance to the intake of air will
increase, and this will cause a reduction
in the power output and an increase in
the fuel consumption. It is recommended
to clean the filter foam every 5,000 kilometres, following the steps below:
- Unscrew the screws securing the filter
box cover.
- Remove the filter foam.
- Fill a container with non-inflammable
cleaning fluid. Submerge the foam a
number of times until it is perfectly
clean.
- Squeeze out the cleaning fluid pressing
a number of times between the palms of
the hands. Do not fold or wring out the
filter, since to do so would cause it to
tear.
- Submerge the filter foam in a container
filled with AGIP FILTER OIL and then
press a number of times between the
palms of the hands to squeeze out the
excess oil.
Reinigen des Luftfilters
Der Schaumstoff des Luftfilters
befindet sich im Filtergehäuse auf der
rechten Mopedsseite.
A
NMERKUNG:
Ist der Schaum mit Staub verschmutzt,
so nimmt der Einlaßwiderstand zu, was
wiederum eine Minderung der
Ausgangsleistung und einen vermehrten
Benzinverbrauch zur Folge hat. Es wird
empfohlen, den Schaum alle 5000 Km
wie folgt zu reinigen:
- Entfernen Sie die beiden
Befestigungsschrauben des
Filtergehäusedeckels und demontieren
Sie diesen.
- Nehmen Sie den Filterschaum heraus.
-Füllen Sie ein Gefäß mit einem nicht
brennbaren Reinigungsmittel. Tauchen
Sie den Schaum mehrere Male ein, bis
er vollkommen sauber ist.
- Treiben Sie das Reinigungsmittel aus
dem Filter, indem Sie diesen mehrmals
zwischen den Handflächen
zusammendrücken. Knicken oder
quetschen Sie den Filter nicht. Es
können Risse entstehen.
- Tauchen Sie den Filterschaum in ein mit
Pulizia spugna filtro aria
L'espanso del filtro d'aria è all'interno
della scatola del filtro, che ha la propria
sede nel lato destro dello scooter.
O
SSERVAZIONE:
Se la spugna è ostruita dalla polvere,
aumenterà la resistenza all'aspirazione e
conseguente perdita di potenza ed
aumento del consumo di carburante. Si
consiglia pulire l’espanso ogni 5.000 Km,
nel modo seguente:
- Estrarre le viti di fissaggio del coperchio
della cassa filtro e smontarla.
- Estrarre la spugna filtro.
- Riempire un recipiente con un liquido
detergente non infiammabile. Immergere l’espanso diverse volte, fino che ne
esca totalmente pulito.
- Espellere il liquido detergente premen-
do diverse volte il filtro con le palme
delle mani. Non piegare o strizzare il filtro, poichè ciò provocherebbe fessure.
- Immergere la spugna in un recipiente
pieno d’olio AGIP FILTER OIL e premerlo diverse volte con le palme delle
mani fino ad espellerlo.
Page 56

Filtro de aire y conducto de aire secundario
Filtre à air et conduite d’air secondaire
56
OIL y después con las palmas de las
manos presionar repetidamente hasta
expulsar el aceite.
- Una vez tenga la espuma limpia, món-
tela siguiendo el orden inverso de desmontaje.
- Es muy importante también limpiar todo
el sistema del conducto de aire secundario, situado en el lado derecho del
motor (2). Esta operación debe ser realizada en un Servicio Oficial DERBI.
¡Precaución!
- Antes y durante la limpieza examine
minuciosamente la espuma filtro aire, si
ve que está deficiente, debe reemplazarla por una nueva.
- Si conduce por carreteras polvorientas,
debe limpiar la espuma filtro aire más
frecuentemente. Asegúrese siempre
que la espuma esté en excelentes
condiciones. La vida del motor depende mayormente de este componente.
NUNCA HAGA FUNCIONAR EL
MOTOR SIN ESPUMA FILTRO AIRE.
et ensuite avec les paumes des mains
presser plusieurs fois jusqu’à expulsion
de l’huile.
- Une fois la mousse propre, montez-la
en suivant l’ordre inverse à celui du
démontage.
- Il est très important de nettoyer également tout le système de conduction
d’air secondaire qui est situé du côté
droit du moteur (2). Cette opération doit
être réalisée par un Service Officiel
DERBI.
Attention!
- Avant et pendant le nettoyage vérifier
soigneusement la mousse filtre à air et
si vous observez des déficiences vous
devez la remplacer.
- Si vous conduisez sur des routes poussiéreuses vous devez nettoyer le filtre à
air plus souvent. Assurez-vous que la
mousse se trouve en parfaites conditions. La vie du moteur dépend en
grande partie de ce composant. NE
JAMAIS FAIRE TOURNER LE
MOTEUR SANS MOUSSE FILTRE
AIR.
Page 57

Filtro aria e condotto aria secondaria • Air filter and secundary air tube
Luftfilter
57
- Once the filter foam is clean, fit it again,
following the reverse order to disassembly.
- It is also extremely important to clean
the entire secondary airway system,
which is located on the right-hand side
of the engine (2). This operation should
be performed at an Official Derbi Service Agent.
Caution!
- Both before and during the cleaning
process, examine the air filter foam thoroughly, and if any defects are found,
do not fail to replace it with a new one.
- If you drive on dusty roads, the air filter
foam should be cleaned more frequently. Always make sure that the air
filter foam is in excellent condition. The
life of the engine depends particularly
on this component. NEVER DRIVE THE
MOTORCYCLE WITHOUT THE AIR
FILTER FOAM IN PLACE.
AGIP FILTER OIL angefülltes Gefäß
und drücken Sie ihn anschließend
mehrmals zwischen den Handflächen
zusammen, bis das Öl ausgetrieben ist.
- Ist der Schaum sauber, montieren Sie
ihn wieder, indem Sie in umgekehrter
Reihenfolge vorgehen.
- Ebenfalls ist es sehr wichtig, daß das
komplette System der
Sekundärluftleitungen auf der rechten
Motorseite (2) gereinigt wird. Diese
Arbeiten müssen von einer offiziellen
Kundendienststelle von DERBI
ausgeführt werden.
Vorsicht!
- Untersuchen Sie vor und während des
Reinigens den Luftfilterschaum
gewissenhaft. Ist er schadhaft, müssen
Sie ihn durch einen neuen ersetzen.
- Wenn Sie oft auf staubigen Straßen
fahren, müssen Sie den
Luftfilterschaum öfter reinigen. Achten
Sie stets auf den einwandfreien Zustand
des Schaumes. Die Lebensdauer des
Motors hängt weitgehend von diesem
Teil ab. SETZEN SIE DEN MOTOR
NIEMALS OHNE
LUFTFILTERSCHAUM IN GANG!
- Qualora la spugna sia pulita, montarla
seguendo l’ordine inverso di smontaggio.
- È inoltre assai importante pulire tutto il
sistema della condotta d’aria secondaria, situata nel lato destro del motore
(2). Questa operazione dev’essere
effettuata presso un Servizio Ufficiale
DERBI.
Attenzione!
- Prima e durante la pulizia controllare
attentamente la spugna filtro aria: se
fosse usurata occorre sostituirla.
- Se circola lungo strade polverose, deve
pulire l’espanso filtro aria più frequentemente. Occorre sincerarsi che l'espanso sia sempre in perfette condizioni. La
vita del motore dipende grandemente
da questo elemento. NON FACCIA MAI
FUNZIONARE IL MOTORE SENZA
SPUGNA FILTRO ARIA.
Page 58

Fusible
Fusible
58
Fusible
En el caso de tener que cambiar el
fusible del sistema eléctrico por haberse fundido, cerciorarse siempre que sea
del mismo amperaje o sea de 7,5 A.
El fusible se encuentra dentro del alojamiento de la batería; para su sustitu-
ción, quitarlo del soporte y cambiarlo
por uno nuevo.
¡Precaución!
No emplee nunca un fusible que no
sea de 7,5 A. ya que podría dañar la
parte eléctrica. En el caso que esto le
suceda en un corto período de tiempo,
deberá consultar a un Servicio Oficial
DERBI.
Fusible
Si le fusible du système électrique a
sauté il faut le remplacer en veillant que
le nouveau fusible ait le même ampérage, c’est à dire 7,5 A.
Le fusible est situé dans le logement
de la batterie. Pour le remplacer il faut
l’extraire de son support et en remettre
un nouveau.
Attention!
Ne jamais employer un fusible autre
que celui de 7,5 A. pour ne pas endommager le système électrique. Si cela se
produit souvent en un court laps de
temps, il faut s’adresser à un Service
Officiel DERBI.
Page 59

Fusibile • The fuse
Sicherung
59
Fusibile
In caso si debba sostituire il fusibile
del sistema elettrico perché bruciato,
bisogna sempre accertarsi che sia dello
stesso amperaggio, ossia, di 7,5 A.
Il fusibile è situato dentro la sede
della batteria: per sostituirlo basta levarlo dal suo supporto e cambiarlo con uno
nuovo.
Attenzione!
Non usare mai un fusibile che non sia
di 7,5 A. poiché potrebbe recare danni
alla parte elettrica. Nel caso in cui ciò
avvenisse occorre consultare tempestivamente un Servizio Ufficiale DERBI.
The fuse
If the fuse in the electrical system has
to be changed because it has blown, be
sure to replace it with one of equal
amperage, that is, 7,5 A.
The fuse is located inside the battery
compartment; to change it, take it out of
its support and put the new one in its
place.
Caution!
Never use a fuse higher than 7,5 A.
because to do so can cause damage to
the electrical system. If the fuse blows
again within a short period of time, consult your Official DERBI Service Agent.
Sicherung
Sollte ein Auswechseln der Sicherung
des elektrischen Systems nötig sein,
stellen Sie sicher, daß die neue
Sicherung die gleiche Amperezahl, d.h.
7,5 A. hat.
Die Sicherung befindet sich im
Inneren der Batteriehalterung; zum
Auswechseln die Sicherung aus der
Halterung entfernen und durch eine
neue ersetzen.
Vorsicht!
Verwenden Sie nur eine
7,5 A. Sicherung. Das Elektrosystem
könnte sonst Schaden erleiden. Sollte
dies nach kurzer Zeit geschehen,
wenden Sie sich bitte an eine offizielle
DERBI-Servicestelle.
Page 60

Batería
Batterie
60
Instrucciones de montaje de la batería
Levantar el sillín. El alojamiento de la
batería se encuentra debajo de éste.
Cubierto por una tapa, que se debe retirar levantando los clips que la sostienen
(1) y tirando de ella hacia delante del
vehículo.
Mantenimiento batería
- La batería cuando no se usa se descarga aproximadamente entre un 0,5%
y un 1% diario. Este promedio aumenta
con la temperatura. Para compensar
debe hacerse una vez al mes una
carga de recuperación.
- Una batería contiene ácido sulfúrico.
Evítese el contacto con la piel, ojos y
ropa.
¡Precaución!
Al recargar no deberá sobrepasarse la
intensidad de máximo 0,5 ÷ 1 Amperios
hora, pues destruiría la batería.
Instructions de montage de la
batterie
Soulevez la selle. Le logement de la
batterie se trouve à l'intérieur. Il est doté
d'un couvercle qu'il faut retirer en soulevant les clips qui le soutiennent (1) et en
tirant dessus vers l'avant du véhicule.
Entretien de la batterie
- La batterie non utilisée se décharge
entre 0,5 et 1% par jour environ. Cette
moyenne augmente par temps chaud.
Pour compenser il faut la charger une
fois par mois.
- La batterie contient de l’acide sulfuri-
que. Eviter tout contact avec la peau,
les yeux et les vêtements.
Attention!
Pour charger la batterie veiller à ne pas
dépasser l’intensité maximum de 0,5 ÷ 1
A par heure pour ne pas l’inutiliser.
1
1
Page 61

Batteria • Battery
Batterie
61
Istruzioni per il montaggio della
batteria
Alzate il sellino. La sede della batteria è sotto, coperta da un coperchio che
deve rimuoversi alzando i fermagli che
la sostengono (1) e tirandola verso la
parte anteriore del veicolo.
Manutenzione batteria
- La batteria, se non usata, si scarica tra
un 0,5% e un 1% ogni giorno. Questa
media aumenta con la temperatura. Per
compensare bisogna procedere alla
ricarica una volta al mese.
- Una batteria contiene acido solforico.
Evitare il contatto con la pelle, occhi ed
indumenti.
Attenzione!
Quando si ricarica la batteria non si
deve superare l’intensità massima di 0,5
÷ 1 Ao, altrimenti si distruggerebbe la
batteria.
Battery installation instructions
Lift up the saddle. The battery housing
is underneath it. There is a cover on top
that must be removed by raising the clips
holding it in place (1) and pulling it
towards the front of the vehicle.
Maintenance of the battery
- When not in use, the battery will dis-
charge at a rate of about 0.5% and 1%
daily. This average increases with the
temperature. The battery should be
given a top-up charge every month to
compensate for this loss.
- A battery contains sulphuric acid. Avoid
contact with the skin, the eyes, and clothing.
Caution!
When recharging, do not exceed the
maximum rate of 0.5 to 1 amps per hour,
or the battery will be destroyed.
Montageanleitungen für die Batterie
Den Sitz anheben. Die
Batteriehalterung befindet sich unter dem
Sitz. Sie wird durch eine Abdeckung
abgedeckt, die durch Lösen der
Halteclips (1) und Ziehen in Richtung
Vorderseite des Motorrads abgenommen
werden muss.
Wartung der Batterie
- Wird sie nicht benutzt, entlädt sich die
Batterie täglich um ca. 0,5% bis 1%.
Dieser Durchschnittswert erhöht sich
mit zunehmender Temperatur. Zum
Ausgleich muß die Batterie einmal im
Monat aufgeladen werden.
- Eine Batterie enthält Schwefelsäure.
Vermeiden Sie den Kontakt mit der
Haut, den Augen und der Kleidung.
Vorsicht!
Beim Aufladen die maximale Stromstärke
von 0,5 ÷ 1A pro Stunde nicht
überschreiten, da dies die Batterie
zerstören würde.
Page 62

Batería
Batterie
62
Cambio de la Batería
Si hubiera que cambiar la batería,
habría que hacerlo por otra de igual
capacidad y tensión de 12 V 6 Ah.
❀
A causa del problema que representa el desecho de baterías viejas,
lo mejor es hacer sustituir la batería
por algún Servicio Oficial DERBI.
Las baterías contienen entre otras
sustancias, ácido sulfúrico y en ningún caso deberán arrojarse a la
basura doméstica.
Changement de la Batterie
S’il fallait changer la batterie veiller à la
remplacer par une batterie de même
capacité et tension de 12 V 6 Ah.
❀
Il vaut mieux faire remplacer la batterie par un Service Officiel DERBI
à cause du problème des déchets
car les batteries contiennent entre
autres substances, de l’acide sulfurique à ne jeter en aucun cas dans
la poubelle domestique.
Page 63

Batteria • Battery
Batterie
63
Changing the battery
If the battery has to be changed, it
must be replaced with one of equal capacity and voltage: 12 V 6 Ah.
❀
Disposal of old batteries is a problem. It is therefore better to entrust
the replacement of your battery to
your Official DERBI Service Agent.
Batteries contain, among other
substances, sulphuric acid, and
should never be put in with domestic
rubbish.
Auswechseln der Batterie
Sollte ein Auswechseln der Batterie
nötig sein, verwenden Sie eine neue
Batterie mit derselben Kapazität und
einer Spannung von 12V 6Ah
❀
Aufgrund der Schwierigkeiten, die
die Entsorgung alter Batterien mit
sich bringt, ist es ratsam, den Batteriewechsel bei einer offiziellen
DERBI-Servicestelle vornehmen zu
lassen. Die Batterien enthalten u.a.
Schwefelsäure und sollten auf keinen Fall auf den Hausmüll geworfen
werden.
Sostituzione della batteria
Se fosse necessario sostituire la batteria occorre montarne un'altra di pari
capacità e tensione: 12V, 6AH.
❀
Per un corretto smaltimento della
baterria esausta, si consiglia di farla
sostituire la batteria da un Servizio
Ufficiale DERBI.
Le batterie contengono, tra altre
sostanze, acido solforico e in nessun caso si devono gettare nei contenitore di rifiuti organici.
Page 64
Presión de los neumáticos
Pression des pneus
64
Presión de los neumáticos
Una presión distinta a la señalada en
este apartado puede ser motivo de
defectos en la conducción del vehículo.
De ahí que resulte muy aconsejable el
controlar y corregir con frecuencia estas
presiones.
Observación.
La corrección de la presión de inflado
se hará solamente cuando los neumáticos estén fríos. Si están calientes, la
modificación de inflado se hará sólo en
los casos en que la presión sea demasiado baja.
La presión de aire insuficiente en los
neumáticos no sólo acelera el desgaste
del neumático, sino que también afecta
seriamente a la estabilidad del scooter.
Asegúrese de que la presión de los
neumáticos esté dentro de los límites
especificados en el recuadro.
❀
Un neumático con una presión
excesivamente baja, aumenta el
consumo de combustible, repercutiendo ello innecesariamente en el
medio ambiente.
Pression des pneus
Une pression différente de celle indiquée dans ce paragraphe peut entraî-
ner une conduite dangereuse du véhi-
cule. Il est donc indispensable de véri-
fier et de corriger souvent ces pressions.
O
BSERVATION
La correction de la pression de gonflage doit se faire lorsque les pneus
sont froids. Le gonflage à chaud peut
être réalisé uniquement dans les cas où
la pression est trop basse.
Si la pression de gonflage est insuffisante l’usure des pneus est plus grande
et la stabilité du scooter est moindre.
Vérifier que la pression des pneus se
situe dans les limites spécifiées dans le
tableau.
❀
Si la pression des pneus est trop
faible, la consommation de combustible augmente et provoque
une pollution de l’environnement.
Presión de inflado en frio
Pression de gonflage à froid
Pressione di gonfiaggio a freddo
Cold tyre inflation pressure
Reifendruck bei kaltem Reifen
Neumático
delantero
Pneu avant
Pneumatico
anteriore
Front tyre
Vorderreifen
Neumático
trasero
Pneu arrière
Pneumatico
posteriore
Rear Tyre
Hinterreifen
Solo
Conducteur
seul
Solo
Rider only
Allein
1,9 Kg/cm
190 kPa
2
Con pasajero
Avec passager
Con passegero
Rider and
pillion passenger
Mit Beifahrer
2,0 Kg/cm
200 kPa
2
2,0 Kg/cm
200 kPa
2
2,2 Kg/cm
220 kPa
2
Page 65

Pressione dei pneumatici • Tyre pressures
Reifendruck
65
Pressione dei pneumatici
Una pressione diversa da quella indicata in questo capitolo può essere
causa di difficoltà nella guida del veicolo. Perciò si raccomanda di controllare e
di regolare frequentemente la pressione.
O
SSERVAZIONE:
La regolazione della pressione di
gonfiaggio si farà soltanto a pneumatici
freddi. Se sono caldi, la modifica del
gonfiaggio si farà soltanto nei casi in cui
la pressione sia troppo bassa.
La pressione d’aria insufficente nei
pneumatici non soltanto accelera il
logoramento dello pneumatico, ma
influisce seriamente sulla stabilità dello
scooter. Bisogna assicurarsi che la
pressione degli pneumatici sia dentro
dei limiti specificati nel riquadro.
❀
Un pneumatico con la pressione
eccessivamente bassa aumenta il
consumo di combustibile ed incide
sull'ambiente senza necessità.
Tyre pressures
Different tyre pressures from those
indicated may adversely affect the ride
of the motorcycle. It is therefore extremely advisable to check and correct the
tyre pressures frequently.
N
OTE:
Correcting the tyre pressures should
only be carried out when the tyres are
cold. When they are hot, the tyres
should only be adjusted if the pressures
are too low.
Riding with the tyres insufficiently
inflated not only causes excessive wear
but also seriously affects the stability of
the motorcycle. Ensure that the tyre
pressures are within the limits set out in
the table.
❀
Tyres which are excessively underinflated increase petrol consumption and therefore have an unnecessarily adverse effect on the
environment.
Reifendruck
Ein von dem in diesem Abschnitt
angebenen abweichender Reifendruck
kann das Fahrverhalten des Fahrzeugs
beeinträchtigen. Es ist daher sehr
empfehlenswert, diese Drücke in
regelmäßigen und nicht zu langen
Abständen zu überprüfen und ggf. zu
berichtigen.
A
NMERKUNG:
Die Korrektur des Reifendrucks darf
nur vorgenommen werden, wenn die
Reifen kalt sind. Sind die Reifen warm,
darf nur ein zu geringer Reifendruck
verändert werden. Ein ungenügender
Reifendruck beschleunigt nicht nur die
Abnutzung des Reifens, sondern
beeinträchtigt auch besonders die
Stabilität des Mopeds. Vergewissern
Sie sich, daß sich der Reifendruck in
den in der Tabelle angegebenen
Grenzen hält.
❀
Ein Reifen mit zu geringem Luftdruck erhöht den Benzinverbrauch
und schadet so unnötigerweise der
Umwelt.
Page 66

Presión de los neumáticos
Pression des pneus
66
¡Precaución!
Procure circular siempre con los neumáticos en buenas condiciones, ya que
si lo hace con neumáticos excesivamente desgastados reducirá la estabilidad de conducción y puede llevarle a
una pérdida de control. Se recomienda
que el neumático delantero se cambie
cuando la profundidad de las estrías
sea de 1,6 mm. o menos. Para evitar el
desgaste innecesario de los neumáticos
se recomienda:
- Llevar siempre los neumáticos con la
presión de inflado adecuada.
- Conducir suavemente evitando los
acelerones y los frenados bruscos.
- Procurar de no rozar los bordillos de
las aceras con las ruedas.
Précaution!
Roulez toujours avec les pneus en
bonnes conditions. Si les pneus sont
trop usés la conduite devient instable et
vous pouvez arriver à perdre le contrôle
de votre véhicule. Il est recommandé de
remplacer le pneumatique avant dès
que la profondeur des stries du dessin
est de 1,6 mm ou moins. Pour éviter
l’usure prématurée des pneus il est conseillé de:
- Veiller à ce que la pression de gonfla-
ge soit toujours correcte.
- Conduire sans brusquerie, sans accé-
lérations et sans freinages brusques.
- Veiller à ne pas frôler les bords des
trottoirs avec les roues.
cADVERTÈNCIA
00
Procuri circular sempre amb els
pneumàtics en bones condicions. Els
pneumàtics molt desgastats redueixen
l'estabilitat de la conducció i poden
ocasionar pèrdua de control. Es
recomana que el pneumàtic davanter
es canviï quan la profunditat de les
estries sigui d’1,6 mm. o inferior. Per
evitar el desgast innecessari dels
pneumàtics es recomana:
- Portar sempre els pneumàtics amb la
pressió d'inflat adequada.
- Conduir suaument evitant les
accelerades i les frenades brusques.
- Procurar no tocar les voreres amb les
rodes.
Page 67

Pressione dei pneumatici • Tyre pressures
Reifendruck
67
Attenzione!
Circolare sempre con pneumatici in
perfette condizioni poiché l'eccessiva
usura riduce la stabilità di guida e favorisce la perdita di controllo del veicolo.
Si consiglia la sostituzione del pneumatico anteriore quando la profondità delle
scanalature sia inferiore o uguale a 1,6
mm.
Per evitare il logoramento inutile degli
pneumatici, si consiglia:
- Circolare sempre con i pneumatici alla
corretta pressione di gonfiaggio.
- Guidare soavemente ed evitare le
accelerazioni e frenate brusche.
- Fare attenzione a non sfregare i cor-
doli dei marciapiedi con le ruote.
Caution!
Ensure that you always ride with your
tyres in good condition, because riding
with excessively worn tyres adversely
affects the stability of the motorcycle
and may lead to a loss of control. We
recommend that you change the front
tyre when the tread is worn down to a
depth of 1.6 mm or less. In order to
avoid unnecessary wear and tear on the
tyres we recommend that you:
- always keep the tyres correctly inflated
to the recommended pressures;
- drive smoothly and avoid brusque
acceleration and braking;
- be careful not to touch the kerb with
the tyres.
Vorsicht!
Achten Sie stets darauf, daß sich die
Reifen in einwandfreiem Zustand
befinden. Wenn Sie mit zu sehr
abgenutzten Reifen fahren, vermindern
Sie die Fahrstabilität. Sie könnten dann
die Kontrolle über das Fahrzeug
verlieren. Es wird empfohlen, den
Vorderreifen auszuwechseln, wenn die
Tiefe der Riefen 1,6 mm oder weniger
beträgt. Um eine unnötige Abnutzung
der Reifen zu verhindern, empfehlen
wir:
-Immer mit dem angemessenen
Reifendruck fahren
-Sanft fahren. Vermeiden Sie
plötzliches Beschleunigen und
scharfes Bremsen.
-Vermeiden Sie ein Streifen des
Bordsteines mit den Rädern.
Page 68

Bujía
Bougie
68
Bujía
Marca de Bujía:
CHAMPION RN1C
Periódicamente desmonte la bujía, limpie los electrodos y observe su desgaste. Verifique que la separación de los
electrodos sea de 0,45 ÷ 0,55 mm.
empleando un calibre de espesores
para bujías. La bujía deberá cambiarla
cada 5.000 Kms. utilizando las marcas
mencionadas.
Para acceder a la bujía debe girar
hacia un lado la rueda delantera y acceder por el espacio que queda entre el
guardabarros y el escudo frontal (ver
fotografia)
¡Precaución!
La utilización de una bujía inadecua-
da puede conducir a averías severas
del motor.
¡Precaución!
Si la separación de los electrodos es
superior a 1mm, reemplace la bujía.
Nunca limpie el electrodo con una
espátula metálica ni modifique la posición de éste para que cumpla la especificación.
Bougie
Marques de Bougie:
CHAMPION RN1C
Périodiquement démontez la bougie,
nettoyez les électrodes et contrôlez-en
l’usure. Vérifiez que la séparation des
électrodes est de 0,45 ÷ 0,55 mm, en
utilisant une jauge d’épaisseurs pour
bougies. Il faut remplacer la bougie tous
les 5.000 km en utilisant les marque
indiquées.
Pour accéder à la bougie, vous devrez tourner la roue avant d'un côté et
passer par l'espace libre entre le gardeboue et le bouclier avant (voir photographie).
Attention!
L’utilisation d’une bougie ne convenant pas peut provoquer de graves
dommages dans le moteur.
Précaution !
Remplacez la bougie dès que la
séparation des électrodes dépasse 1
mm. Ne jamais nettoyer l'électrode avec
une spatule métallique. Afin de respecter la spécification ne jamais modifier la
position de l'électrode.
0,5 mm.
Page 69

Candela • Spark plug
Zündkerze
69
Candela
Tipi di candela:
CHAMPION RN1C
Smontare periodicamente la candela,
pulirne gli elettrodi ed osservarne il
logoramento. Verificare con un calibro a
spessori per candele che la separazione tra i due elettrodi sia pari a 0,45 ÷
0,55 mm. Si dovrà cambiare la candela
ogni 5.000 Km ed usare i tipi sopraddetti.
Per raggiungere alla candela dovete
girare verso un lato la ruota anteriore e
accedere attraverso l'intercapedine che
esiste tra il parafanghi e lo scudo anteriore (vedasi fotografia).
Attenzione!
L’uso di una candela non adeguata
può provocare gravi danni al motore.
Attenzione!
Se la separazione tra gli elettrodi è
superiore a 1 mm, sostituite la candela.
Non nettate mai l'elettrodo con una spatola metallica né modificatene la posizione per farla adempiere le specifiche.
Spark plug
Makes of spark plug:
CHAMPION RN1C
Take the spark plug out from time to
time, clean the electrodes and check
them for wear. Check that the gap between the electrodes is 0,45 ÷ 0,55 mm,
using a feeler gauge intended for spark
plugs. The spark plug should be changed every 5.000 kilometres using the
makes listed above.
To reach the spark plug, turn the front
wheel to one side and access it through
the space between the mudguard and
the front shield (see photograph).
Caution!
Using an incorrect spark plug can
cause serious damage to the engine.
Caution!
If the electrodes are more than 1mm
apart, replace the spark plug. Never
clean the electrode with a metal spatula
or modify its position to make it comply
with the specifications.
Zündkerze
Zündkerzenmarken:
CHAMPION
RN1C
Bauen Sie die Zündkerze regelmäßig
aus, reinigen Sie die Elektroden und
beobachten Sie die Abnutzung. Stellen
Sie sicher, daß der Abstand zwischen
den Elektroden 0,45 ÷ 0,55 mm beträgt.
Verwenden Sie hierzu eine Dickenlehre
für Zündkerzen. Die Zündkerze sollte
alle 5000 Km ausgewechselt werden.
Halten Sie sich dabei an die genannten
Marken.
Für den Zugang zur Kerze muss das
Vorderrad auf einer Seite gedreht
werden und durch den freien Raum
zwischen dem Schutzblech und dem
Frontschutz (siehe Abbildung)
zugegangen werden.
Vorsicht!
Die Verwendung einer ungeeigneten
Zündkerze kann zu ernsthaften
Schäden am Motor führen.
Achtung!
Beträgt der Abstand zwischen den
Elektroden über 1 mm, ist die Kerze
auszutauschen. Reinigen Sie die
Elektrode niemals mit einem
Metallspachtel. Ändern Sie auch nicht
die Position der Elektrode, um diese
Bedingung erfüllen zu können.
Page 70

Faro delantero
Phare avant
70
Faro delantero
Para cambiar la lámpara del faro,
póngase al lado de la lámpara a cambiar y pase la mano por debajo del frontal. A continuación gire el portalámpa-
ras hacia la izquierda y tire de él.
El faro debe estar orientado a la altura correcta para una conducción nocturna segura y no causar molestias a los
vehículos que circulan en dirección contraria.
Para orientar el faro, basta con ir
aflojando o apretando el tornillo situado
en la parte inferior interior (en ambos
lados) de cada faro, con la herramienta
especialmente diseñada para ello (1)
(ubicada en el vano casco) y situar el
faro de manera que a una distancia de
5 metros de una pared vertical, el centro del haz de luz del faro coincida con
la altura del centro del faro al suelo, con
el scooter bajado del caballete y el conductor montado. Dicho de otra manera,
el eje del haz de luz debe ser paralelo
al suelo.
Phare avant
Pour changer une lampe du phare,
mettez-vous à côté de la lampe à
changer et passez la main sous l'écu
frontal. Tournez ensuite le porte-lampe
vers la gauche et tirez dessus.
Le phare doit être orienté à la
hauteur correcte afin de conduire en
toute sécurité pendant la nuit et pour ne
pas éblouir les véhicules qui circulent
en sens contraire.
Pour orienter le phare, il suffit de
dévisser ou de resserrer la vis située
dans la partie inférieure intérieure (des
deux côtés) de chaque phare, avec
l'outil spécialement conçu à cet effet (1)
(situé dans le porte-casque) et de situer
le phare de manière qu’à une distance
de 5 mètres d’un mur vertical, le centre
du faisceau de lumière du phare
coïncide avec la hauteur du centre du
phare jusqu’au sol, le scooter ne
reposant pas sur son chevalet et le
conducteur étant sur la selle. C’est à
dire que l’axe du faisceau de lumière
doit être parallèle au sol.
5 m.
H
1
Page 71

Faro anteriore • Headlight
Vorderer Scheinwerfer
71
Faro anteriore
Per sostituire una lampadina del faro,
collocatevi a fianco della lampadina da
sostituire e passate la mano sotto il
frontale. Girate dopo il portalampadine
verso sinistra e tiratelo in fuori.
Il faro deve orientarsi all’altezza
corretta per una guida notturna sicura e
non causare molestie ai veicoli che circolano in senso contrario.
Per orientare il faro basta allentare o
stringere la vite situata nella parte interna (di entrambi lati) di ogni faro con l'utensile specialmente concepito in merito
(1) (ubicato nel vano del casco). Posizionare poi il faro in modo che, a una
distanza di metri 5 da una parete verticale, il centro del fascio della luce del
faro coincida con l’altezza del faro rispetto al suolo, con lo scooter abbassato
dal cavalletto e il conducente a bordo.
Detto in un altro modo, l’asse del fascio
di luce deve essere parallelo al suolo.
Headlight
To change a bulb, move to the same
side as the lamp and insert your hand
under the front, then turn the bulb holder to the left and pull it.
The headlight should be adjusted to
the correct height so as to ensure safe
riding at night and to avoid dazzling drivers of vehicles coming in the opposite
direction.
To align the lamp you simply need to
loosen or tighten the screw (on both
sides) underneath and inside each lamp
using the tool specially designed for that
purpose (1) (located in the helmet holder).
Position the scooter such that, when
the headlight is 5 metres from a vertical
wall, the centre of the beam is at the
same height as the centre of the headlight from the ground. The scooter
should be off the centre stand and with
the rider sitting on the saddle. In other
words, the headlight beam should be
parallel to the ground.
Vorderer Scheinwerfer
Zum Ersetzen der Scheinwerferlampe
stellen Sie sich auf die Seite der Lampe,
die ausgetauscht werden soll und führen
die Hand unter der Frontseite ein.
Anschließend drehen Sie die
Lampenfassung nach links und ziehen
daran.
Um die Glühbirne herauszunehmen,
genügt es sie nach innen zu drücken und
nach links zu drehen.
Für ein sicheres Fahren bei Nacht und
um die Ihnen entgegekommenden Fahrer
nicht zu belästigen, muß der Scheinwerfer
auf die richtige Höhe eingestellt werden.
Zum Ausrichten des Scheinwerfers
muss einfach nur die Schraube auf der
Unterseite von jedem Scheinwerfer (auf
beiden Seiten) mit dem Spezialwerkzeug
(1)
(im Helmfach) gelöst bzw. angezogen
werden, daß sich das Zentrum des auf
eine 5 m entfernte senkrechte Wand
projizierten Lichtstrahls auf derselben
Höhe über dem Boden befindet wie das
Zentrum des Scheinwerfers selbst über
dem Boden, wobei das Moped nicht auf
seinem Ständer stehen darf und der
Fahrer aufsitzen muß. In anderen Worten:
der Lichtstrahl muß parallel zum Boden
verlaufen.
Page 72

Características del freno de disco
Caractéristiques du frein à disque
72
Caractéristiques du frein à disque
Par rapport aux freins à tambour, les
freins à disque présentent les caracté-
ristiques et les avantages suivants :
- L’échauffement des surfaces de fric-
tion s’évite parfaitement car les disques tournent en contact direct avec
l’air. La capacité de freinage est constante même en sollicitant les freins
plusieurs fois de suite à haute vitesse.
Le risque de “fadding” est bien moins
élevé.
- Aucune des pièces du frein à disque
n’est exposée aux déformations sous
l’effet des températures élevées.
- Le changement des plaquettes de
frein est simple et ne requiert pas de
réglages compliqués.
- Un fonctionnement régulier des freins
est assuré même si le disque est
mouillé lorsqu’on roule par temps pluvieux, la capacité de récupération de
la force de freinage est excellente
étant donné les caractéristiques de
pression extrême des plaquettes de
frein.
- Le contact est souple car la zone de
friction est petite mais suffisante.
Características del freno de disco
Los frenos de disco comparados con
los de tambor tienen las siguientes
características y ventajas:
- La evacuación de calor de las superficies de fricción es muy eficaz, ya que
los discos giran en contacto directo
con el aire. Por este motivo siempre
tenemos una capacidad de frenada
estable, aún usando el freno repetidamente a altas velocidades. Dicho de
otra manera el riesgo de “Fadding” es
muy inferior.
- Ninguna de las piezas del freno de
disco está expuesta a deformación
alguna, por las elevadas temperaturas.
- El cambio de las pastillas de freno es
simple y no requiere ajustes complicados.
- Se asegura un funcionamiento constante de los frenos, ya que aún estando el disco mojado, durante la marcha
en tiempo lluvioso, la capacidad de
recuperación de la fuerza de frenado
es excelente, debido a las características de extrema presión de las pastillas de freno.
- Tiene un tacto suave, ya que sólo
tiene una pequeña, pero suficiente,
zona de fricción.
Page 73

Caratteristiche del freno a disco • Characteristics of the disc brake
Eigenschaften der Scheibenbremse
73
Caratteristiche del freno a disco
I freni a disco, se si confrontano con
quelli a tamburo, hanno le seguenti
caratteristiche e vantaggi:
-L’evacuazione di calore dalle superfici
di attrito è molto efficace, poichè i dischi girano a contatto diretto con l’aria.
Per questo motivo abbiamo sempre
una capacità di frenata stabile, anche
quando si usa ripetutamente il freno
ad alte velocità. Detto in altro modo, il
rischio di “fadding” è molto inferiore.
- Nessuno dei componenti del freno a
disco è esposto ad alcuna deformazione dovuta alle temperature elevate.
- La sostituzione delle pastiglie freno è
semplice e non richiede regolazioni
complicate.
- Si assicura un costante funzionamen-
to dei freni poichè, pur bagnandosi i
dischi in caso si pioggia, la capacità di
recupero della forza di frenata è eccellente, dovuto alle caratteristiche
d’estrema pressione delle pastiglie
freno.
- Possiede un tatto soave poichè ha
una piccola, ma sufficente, zona
d’attrito.
Characteristics of the disc brake
Disc brakes show the following characteristics and advantages when compared with drum brakes:
- Dissipation of heat from the friction
surfaces is very efficient, since the
disc rotates in direct contact with the
air. This means that we always have
available a stable braking capacity,
even when using the brake repeatedly
at high speeds. In other words, the risk
of “Fading” is very much less.
- None of the parts of a disc brake are
exposed to any kind of deformation
due to high temperatures.
- Changing the brake pads is simple
and does not required complicated
adjustments.
- The operation of the brake is constant,
and even when wet as a result of driving through wet conditions, the capacity for recovery of braking is excellent, due to the extremely high braking
pressure exerted by the brake pads.
- The disc brake has a smooth feel
since the friction surface is small, although sufficient.
Eigenschaften der Scheibenbremse
Im Vergleich zur Trommelbremse
haben Scheibenbremsen folgende
Eigenschaften und Vorteile:
-Die Wärmeableitung an den Reibflächen
ist sehr wirksam, da sich die Scheiben in
unmittelbarem Luftkontakt drehen. Daher
bleibt das Bremsvermögen durchgehend
stabil, selbst wenn bei hoher
Geschwindikeit mehrmals hintereinander
gebremst wird. Anders ausgedrückt: Das
Risiko des ‘Fading’ ist sehr viel geringer.
-Kein Bestandteil der Scheibenbremse ist
der Verformung durch Wärmeeinwirkung
ausgesetzt.
-Das Auswechseln der Bremsbeläge ist
einfach und erfordert keinerlei
komplizierte Einstellungen.
-Eine konstante Funktionstüchtigkeit der
Bremsen ist gewährleistet, denn selbst
wenn bei Regenwetter die Scheibe naß
wird, ist die Rückgewinnung der
Bremskraft dank der extremen
Druckverhältnisse, unter denen die
Bremsbacken arbeiten, vorzüglich.
-Es bremst sich leicht und ohne
Anstrengung, denn die Reibfläche ist
klein, wenngleich vollkomen
ausreichend.
Page 74

Mantenimiento freno de disco
Entretien des freins à disque
74
Mantenimiento freno de disco
Líquido de freno:
Comprobar periódicamente el nivel del
depósito de líquido de freno situado en el
manillar. Reponerlo de ser necesario con
líquido hidráulico DOT 4, no mezcle
nunca diferentes tipos de líquidos.
Con el depósito abierto no apriete la
maneta de freno, de lo contrario podría
derramar el líquido y éste deteriorar las
superficies pintadas y los cristales.
Tenga cuidado no se mezcle agua con
el líquido de freno.
Debido a la absorción de humedad es
recomendable cambiar el líquido cada
dos años.
Tubos flexibles y racordaje:
Comprobar periódicamente los tubos
hidráulicos flexibles, no se hayan deteriorado y que el racordaje no tenga pérdi-
das.
Pastillas de freno:
Cuando el freno chirrie, puede ser moti-
vado por las causas:
1.- Funcionamiento incorrecto del freno.
2.- Desgaste de las pastillas. Estas llevan
un sistema para avisar de su desgaste
excesivo, que llegado el momento
hace chirriar el freno. En ambos casos
Entretien des freins à disque
Liquide de frein:
Vérifier périodiquement le niveau du
liquide de frein dans le réservoir situé
dans le guidon. En rajouter si nécessaire avec du liquide hydraulique DOT 4,
et ne jamais mélanger différents types
de liquides.
Ne jamais serrer la manette du frein si
le réservoir est ouvert pour que le liquide ne se répande pas car il pourrait
endommager les surfaces peintes et
celles en verre.
Prendre soin de ne pas mélanger de
l’eau au liquide de frein.
Il est recommandé de remplacer le
liquide de frein tous les deux ans car il
absorbe de l’humidité.
Tubes flexibles et raccords:
Vérifier périodiquement que les tubes
hydrauliques flexibles ne sont pas dété-
riorés et que les raccords ne fuient pas.
Plaquettes de frein:
Lorsque le frein grince cela peut être
dû aux causes suivantes:
1.- Fonctionnement incorrect du frein.
2.- Usure des plaquettes. Les plaquet-
tes sont munies d’un système
Page 75

Manutenzione freni a disco • Maintenance of the disc brake
Wartung der Scheibenbremse
75
Manutenzione freni a disco
Liquido per freni
Verificare periodicamente il livello del
serbatoio del liquido per freni, situato
nel manubrio. Riempirlo se necessario
con liquido idraulico DOT 4. Non mescolare mai diversi tipi di liquidi.
Col serbatoio aperto non azionare la
leva del freno, altrimenti potrebbe versare il liquido e questo danneggerebbe
le superfici verniciate ed i vetri.
Fare attenzione a non mescolare
acqua col liquido per freni.
Dovuto all’assorbimento dell’umidità,
si consiglia di cambiare il liquido ogni
due anni.
Tubi flessibili e raccordi:
Verificare periodicamente che i tubi
idraulici flessibili non siano deteriorati e
che i raccordi non presentino trafilamenti di liquido.
Pastiglie freno:
Qualora il freno strida, può essere
dovuto alle seguenti cause:
1- Funzionamento non corretto del
freno.
2- Usura della pastiglie freno. Questi
Maintenance of the disc brake
Brake fluid:
Check the level of the brake fluid from
time to time in the brake fluid reservoir,
which is located on the handlebar. Top up
the brake fluid reservoir when necessary,
with DOT 4 hydraulic fluid, and never mix
different types of fluid.
When the reservoir is open, never
apply the brake, since to do so will cause
the brake fluid to overflow, causing damage to painted surfaces and components
made of glass.
Take care that water does not get
mixed with the brake fluid.
Brake fluid absorbs water from the
atmosphere; it is therefore prudent to
change the brake fluid once every two
years.
Flexible hoses and couplings:
Check the flexible hydraulic hoses from
time to time, to ensure that they have not
deteriorated, and that the couplings are
not leaking.
Brake pads:
When the brake squeals, this may be
caused by one of these reasons:
1. Brake not operating correctly.
Wartung der Scheibenbremse
Bremsflüssigkeit:
Überprüfen Sie regelmäßig den Stand
im Bremsflüssigkeitsbehälter. Dieser
befindet sich rechts am Lenker. Falls
notwendig, füllen Sie ihn mit
Bremsflüssigkeit DOT 4 auf. Mischen Sie
niemals verschiedene Typen von
Bremsflüssigkeit.
Betätigen Sie bei offenem Behälter
nicht den Bremshebel. Die Flüssigkeit
könnte herauslaufen und die lackierten
Oberflächen und Kunststoffteile
beschädigen.
Achten Sie darauf, daß die
Bremsflüssigkeit nicht mit Wasser
vermischt wird.
Aufgrund der Feuchtigkeitsaufnahme ist
es ratsam, die Bremsflüssigkeit einmal im
Jahr auszuwechseln.
Schläuche und Stutzen:
Überprüfen Sie regelmäßig, ob sich die
Hydraulikschläuche in einwandfreiem
Zustand befinden und stellen Sie sicher,
daß die Stutzen keine Undichtheiten
aufweisen.
Bremsbacken:
Wenn die Bremse quietscht, kann das
folgende Ursachen haben:
Page 76

Mantenimiento freno de disco
Entretien des freins à disque
76
d’avertissement de l’usure excessive produisant le grincement du
frein. Dans les deux cas il faut vous
se rendre au Service Officiel DERBI.
Air dans le système de freinage:
Si le parcours du levier de frein est
trop long ou si le contact est trop doux
ou spongieux il faut effectuer une purge
d’air dans le système de frein.
Purge d’air:
Monter un tube de plastique transparent dans le purgeur pour éviter que le
liquide résiduel ne salisse le système
de freinage. Serrer la manette de frein
au maximum, desserrer le purgeur et le
serrer à nouveau, lâcher la manette de
frein. Procéder ainsi jusqu’à élimination
de l’air du système de freinage.
Après cette opération remplir le réservoir de liquide hydraulique DOT 4.
Disque de frein:
Éliminer toute trace d’huile de la surface
du disque au moyen d’un chiffon doux
imbibé d’alcool.
acuda a un SERVICIO OFICIAL
DERBI.
Aire en el sistema de frenado:
Si el recorrido de la palanca de freno se
hace excesivo o la palanca tiene un tacto
excesivamente blando o esponjoso, se
debe realizar una purga de aire del sistema de freno.
Purga de aire:
Montar un tubo de plástico transparente
en el purgador para evitar que el líquido
residual ensucie el sistema de frenado.
Apretar la maneta freno al máximo, aflojar
el purgador y volverlo a apretar, dejar de
apretar la maneta freno. Así sucesivamente hasta eliminar el aire existente en
el sistema de frenado. Una vez eliminado
el aire reponer el depósito de líquido
hidráulico DOT 4.
Disco de freno:
La superficie del disco debe estar libre
de aceite. Para limpiarlo utilice alcohol y
un trapo suave.
Page 77

Manutenzione freni a disco • Maintenance of the disc brake
Wartung der Scheibenbremse
77
sono munite di un sistema per allertare del loro logoramento eccessivo:
quando arriva il momento fanno stridere il freno. In entrambi i casi, rivolgersi ad un SERVIZIO UFFICIALE
DERBI.
Aria nell'impianto freno:
Se la corsa della leva del freno diventa eccessiva oppure spugnosa, si deve
realizzare lo spurgo dell’aria del sistema
freni.
Spurgo dell’aria.
Montare un tubo di plastica trasparente nel becco di spurgo, onde evitare che
il liquido residuale sporchi l'impianto
freno. Tirare la leva al massimo, allentare lo spurgo, serrarlo ed rilasciare la
leva del freno. Così di seguito fino ad
eliminare l’aria esistente nell'impianto
freno. Dopo aver eliminato l’aria, riempire il serbatoio con liquido idraulico
DOT 4.
Disco del freno
La superficie del disco deve essere
esente d’olio. Per pulirlo usare alcool e
uno straccio morbido.
2. Brake pad wear. The pads have a
system which gives warning of excessive wear by squealing when the pads
need to be changed. In both cases it
is necessary to entrust the work to the
OFFICIAL DERBI SERVICE AGENT.
Air in the brake system:
If the brake lever has excessive travel,
or if the lever feels too soft and spongy,
there is air in the system and it should be
bled out.
Bleeding air from the brake system:
Fit a transparent plastic tube over the
bleed nipple, so as to avoid residual
brake fluid from dirtying the brake system.
Squeeze the brake lever fully home, loosen the bleed nipple and tighten again,
and then release the brake lever. Carry
out these steps repeatedly until such time
as the air has been completely eliminated
from the system. Once the air has been
eliminated, refill the brake fluid reservoir
with DOT 4.
Brake disc:
The brake disc must be free of oil.
Clean it with alcohol and a soft cloth.
1. Die Bremse funktioniert nicht richtig.
2. Abnutzung der Bremsbeläge. Diese
sind mit einem System ausgerüstet,
das den Fahrer vor übermäßiger
Abnutzung warnt, die die Bremse
schließlich quietschen läßt. In beiden
Fällen wenden Sie sich bitte an eine
offizielle DERBI-Servicestelle.
Luft im Bremssystem:
Wenn der Weg des Bremshebels
allmählich zu lang wird oder wenn sich
der Hebel zu weich oder zu schaumig
anfühlt, muß Luft aus dem Bremskreislauf
abgelassen werden.
Luftentleerung:
Am Ablaßhahn einen durchsichtigen
Kunststoffschlauch anbringen, um zu
verhindern, daß die Restflüssigkeit das
Bremssystem verunreinigt. Den
Bremshebel ganz durchdrücken, den
Ablaßhahn lösen und wieder anziehen,
dann den Bremshebel loslassen. Den
Vorgang wiederholen, bis die Luft im
Bremssystem vollständig beseitigt ist.
Anschließend den Behälter mit
Bremsflüssigkeit DOT 4 auffüllen.
Scheibenbremse:
Die Scheibenoberfläche muß frei von Öl
sein. Zum Reinigen verwenden Sie
Alkohol und einen weichen Lappen.
Page 78

Aceite del motor
Huile du carter
78
Huile du carter
Le RÉDUCTEUR de ce scooter
requiert un entretien périodique.
L'huile devra être remplacée tous les 10
000 km et son niveau devra être vérifié
à chaque révision du véhicule.
REMARQUE: Ces opérations
doivent être réalisées par un Distributeur Agréé Derbi.
L'huile à mettre dans le RÉDUCTEUR est de type SAE 75W/90 ou
équivalent.
❀
Il ne faut en aucun cas jeter l’huile
vidangée à l’égout ou à terre. Étant
donné les problèmes d’élimination
des déchets et la nécessité d’outils
spéciaux, le changement d’huile devrait être réalisé dans un Service Officiel DERBI.
Aceite del motor
El reductor de éste scooter requiere
un mantenimiento periódico
. El aceite
deberá ser sustituido cada 10.000 Km. y
su nivel comprobado en cada revisión
que se efectúe al vehículo.
Nota: Estas operaciones han de ser
realizadas por un Distribuidor Oficial
Derbi
El aceite que se debe poner en el
reductor es del tipo SAE 75W/90 o equivalente.
❀ En ningún caso se echará aceite en
la canalización ni en la tierra. Por el
problema de la eliminación de desechos y por el hecho de precisar
herramientas, el cambio del aceite
debiera hacerse realizar en un Servicio Oficial DERBI.
Page 79

Olio del motore • Crankcase oil
Entleeren und Auffüllen des Motoröles
79
Olio del carter.
Il riduttore di questo scooter richiede
una manutenzione periodica
. L'olio deve
essere sostituito ogni 10.000 km e il suo
livello deve essere controllato in ogni revisione realizzata al veicolo.
N.B.: Queste operazioni devono essere effettuate da un Distributore Ufficiale
Derbi.
L'olio da versare nel RIDUTTORE è del
tipo
SAE 75W/90
o equivalente.
❀
In nessun caso si verserà olio nelle
fogne o in terra. A causa del problema
dell’eliminazione dei rifiuti, e dovuto al
fatto di aver bisogno di ferri , il cambio
dell’olio dovrebbe farsi presso un Servizio Ufficiale DERBI.
Crankcase oil
This scooter's DIFFERENTIAL requires
regular maintenance
. The oil must be
replaced every 10,000 km and the level
must be checked every time the vehicle is
serviced.
N.B.: These tasks must be carried out
by a Derbi Authorised Dealer.
The oil that must be put in the DIFFE-
RENTIAL is
SAE 75W/90
or an equivalent.
❀
Under no circumstances should engine oil be poured into the drains or
onto the ground. Because of this problem of disposing of waste oil and
because of the need for specialist
tools, changing the oil should always
be entrusted to your Official DERBI
Service Agent.
Öls der Ölwanne
Das Getriebe dieses Scooters erfordert
eine regelmäßige Wartung. Das Öl muss
alle 10.000 km gewechselt und der Ölstand
bei jeder Servicearbeit am Motorrad
überprüft werden.
HINWEIS: Diese Arbeiten müssen von
einem Offiziellen Derbi-Händler
ausgeführt werden.
Das Getriebeöl ist Typ
SAE 75W/90
oder
ein entsprechendes Öl.
❀
Das Öl darf in keinem Fall in die
Kanalisation oder in die Erde gegossen
werden. Angesichts der
Schwierigkeiten der
Schadstoffentsorgung und aufgrund
der Tatsache, daß für diesen Vorgang
Werkzeuge benötigt werden, sollte der
Ölwechsel bei einer offiziellen DERBIServicestelle vorgenommen werden.
Page 80

Cadena Transmision
Chaîne Secondaire
80
Chaîne Secondaire
- Vérifier si la chaîne est bien tendue. Son
jeu en appuyant avec le doigt doit être
de 12 ÷ 18 mm. S'il fallait procéder à la
tendre il faut le faire de la manière
suivante: desserrer l'écrou de l'axe de la
roue, et agissez sur les tendeurs, en
faisant tourner l'écrou dans le sens des
aiguilles d'une montre, en faisant tourner
autant de fois l'écrou de droite que celui
de gauche. Ainsi la roue sera en ligne.
Serrez l'écrou de l'axe de la roue.
- Étant donné les caractéristiques
géométriques du véhicule la tension de
la chaîne doit être vérifié régulièrement
e le pilote étant assis sur la selle
toujours.
3. Piñón cadena
4. Plato arrastre
Cadena Transmision
- Comprobar la tensión de la cadena. Su
juego al apretar con el dedo debe ser
de 12 ÷ 18 mm. Caso de tener que
efectuar su tensado, proceda de la
siguiente manera. Afloje la tuerca eje
rueda, y actue sobre los tensores,
girando la tuerca en el sentido de las
agujas del reloj, procurando dar las
mismas vueltas a la tuerca de la
derecha como a la de la izquierda. De
esta forma la rueda quedará alineada.
Apriete la tuerca eje rueda.
- Debido a las características geométricas
del vehículo se debe verificar la tensión
de la cadena regularmente y siempre
con el piloto sobre el vehículo.
Page 81

Catena Transmissione • Transmission Chain
Antriebskette
81
Catena Transmissione
- Verificare la tensione della catena.
Quando si preme con il dito, il suo gioco
deve essere compreso tra y 12 e y 18
mm. Se dovesse tendersi, effettuarlo nel
seguente modo: Allentare il dado asse
ruota ed agire sui tensori, girando il
dado nel senso delle lancette
dell’orologio. Deve aversi cura di dare lo
stesso numero di giri sia al dado della
destra come a quello della sinistra. In
questo modo la ruota sarà allineata.
Serrare il dado asse ruota.
- A causa delle caratteristiche geometriche dell'autoveicolo bisogna verificare
regolarmente la tensione della catena
sempre con il conducente sul veicolo.
Transmission Chain
- Check the drive chain tension. When
pressed with a finger, there should be a
play of 12 ÷ 18 mm. If adjustment is
needed, proceed as follows: loosen the
wheel nut and adjust the tensors by
turning them clockwise, giving the same
number of turns to the right and left
tensors. In this way the wheel will be
correctly aligned. Tighten the wheel nut.
- Due to the geometrical features of the
vehicle the tightness of the chain must
be checked regularly with the rider
sitting on the vehicle always.
Antriebskette
- Die Spannung der Kette überprüfen.
Drückt man mit dem Finger darauf, soll
das Spiel von 12 bis 18 mm. sein. Sollte
es notwendig sein, die Kette zu
spannen, ist folgendermaßen
vorzugehen. Lösen Sie die Mutter der
Radachse und wirken Sie auf die
Spanner ein, indem Sie die Mutter im
Uhrzeigersinn drehen. Geben Sie
beiden Muttern -der linken wie der
rechten- die gleiche Anzahl von
Umdrehungen. Auf diese Weise wird
das Rad korrekt ausgerichtet. Ziehen
Sie die Mutter der Radachse fest.
- Unter Geometrie Berücksichtigung der
gegebenen Fahrzeugmerkmale
überprüft regelmäßig man die
Kettenspannung, wenn der Fahrer auf
dem Motorrad sitzt immer.
Page 82

82
Page 83

Período: Según los kilómetros
Km / Meses
1.000 / 2 5.000 / 12 10.000 / 24 15.000 / 36 20.000 / 48 25.000 / 60
recorridos o el tiempo en meses
ACEITE CARTER Sustituir Comprobar Sustituir Comprobar Sustituir Comprobar
BLOQUEOS DE SEGURIDAD
Comprobar Comprobar Comprobar
(soporte motor, ejes rueda y suspensiones).
BOMBA DE ACEITE/REGISTRO CABLE GAS
Comprobar Comprobar Comprobar Comprobar Comprobar Comprobar
BUJIA Comprobar Sustituir Sustituir Sustituir Sustituir Sustituir
CARBURADOR
Reglaje Reglaje Reglaje Reglaje Reglaje Reglaje
Limpiar Limpiar Limpiar Limpiar Limpiar Limpiar
CORREA BOMBA ACEITE/AGUA Comprobar Comprobar Comprobar Sustituir Comprobar
CORREA VARIADOR Comprobar Comprobar Sustituir Comprobar Comprobar
CULATA, CILINDRO Y PISTON (Depósitos).
Limpiar Limpiar
EQUIPOS DE FRENO (Comprobar fugas).
Comprobar Comprobar
FARO DELANTERO (Regulación) Ajustar Ajustar
FILTRO DE ACEITE Sustituir Sustituir
FILTRO DE AIRE Limpiar Limpiar Limpiar Limpiar Limpiar Limpiar
FILTRO DE AIRE SECUNDARIO Limpiar Limpiar Limpiar Limpiar Limpiar
INSTALACION ELECTRICA Y BATERIA
Comprobar Comprobar Comprobar Comprobar Comprobar Comprobar
(Nivel y corrosión terminales).
LAMINAS DE ADMISION Comprobar Comprobar
LIQUIDO DE FRENO SUSTITUIR CADA 2 AÑOS SUSTITUIR CADA 2 AÑOS
LIQUIDO REFRIGERANTE Comprobar Comprobar Comprobar Comprobar Comprobar Comprobar
MANILLAR Comprobar Comprobar Comprobar
NEUMATICOS (Condiciones y Uso) Comprobar Comprobar Comprobar Comprobar Comprobar
NEUMATICOS (Presión). Comprobar Comprobar Comprobar Comprobar Comprobar Comprobar
NIVEL LIQUIDO DE FRENO Comprobar Comprobar Comprobar Comprobar Comprobar Comprobar
PALANCAS DE FRENO Lubricar Lubricar Lubricar Lubricar Lubricar Lubricar
PASTILLAS DE FRENO Comprobar Comprobar Comprobar Comprobar Comprobar
RADIADOR / LIMPIEZA EXTERNA Limpiar Limpiar
REENVIO KM.* Lubricar Lubricar Lubricar
RODAMIENTOS DE RUEDA Comprobar Comprobar Comprobar Comprobar Comprobar
RODILLOS VARIADOR Comprobar Sustituir Comprobar Sustituir
SUSPENSION DELANTERA (juego de dirección)
Comprobar Comprobar Comprobar Comprobar Comprobar Comprobar
SUSPENSION TRASERA Comprobar Comprobar
TUBOS GASOLINA Y ACEITE Comprobar Comprobar Sustituir Comprobar Sustituir Comprobar
TUERCA Y TORNILLOS DE CULATA Comprobar Comprobar Comprobar Comprobar
PRUEBA DEL VEHICULO Y FRENOS Comprobar Comprobar Comprobar Comprobar Comprobar Comprobar
CADENA TRANSMISION
Lubricar Lubricar Lubricar Lubricar Lubricar Lubricar
(sustituir si es necesario)
CADENA DE TRANSMISION (Tension) Comprobar Comprobar Comprobar Comprobar Comprobar Comprobar
BATERÍA (estado de carga) Comprobar Comprobar Comprobar Comprobar Comprobar Comprobar
CABLE ACELERADOR Lubricar Lubricar Lubricar Lubricar Lubricar Lubricar
83
Cuadro de mantenimiento y engrase
Tableau d'entretien et de graissage
e
Page 84

Período: Según los kilómetros
Km /
Mois
1.000 / 2 5.000 / 12 10.000 / 24 15.000 / 36 20.000 / 48 25.000 / 60
HUILE CARTER Remplacer Vérifier Remplacer Vérifier Remplacer Vérifier
BLOCAGE DE SÉCURITÉ
(support moteur, axes roues et suspensions)
Vérifier Vérifier Vérifier
POMPE À HUILE/REGISTRO CÂBLE GAZ
Vérifier Vérifier Vérifier Vérifier Vérifier Vérifier
BOUGIE Vérifier Remplacer Remplacer Remplacer Remplacer Remplacer
CARBURATEUR
Régler Régler Régler Régler Régler Régler
Nettoyer Nettoyer Nettoyer Nettoyer Nettoyer Nettoyer
COURROIE POMPE HUILE/EAU Vérifier Vérifier Vérifier Remplacer Vérifier
COURROIE VARIATEUR Vérifier Vérifier Remplacer Vérifier Vérifier
CULASSE, CYLINDRE
ET PISTON (Réservoirs).
Nettoyer Nettoyer
SYSTÈMES DE FREINS (Vérifier fuites). Vérifier Vérifier
PHARE AVANT (Réglage). Ajuster Ajuster
FILTRE À HUILE Remplacer Remplacer
FILTRE À AIR Nettoyer Nettoyer Nettoyer Nettoyer Nettoyer Nettoyer
FILTRE À AIR SECONDAIRE Nettoyer Nettoyer Nettoyer Nettoyer Nettoyer
INSTALLATION ÉLECTRIQUE ET
BATTERIE
(Niveau et corrosion terminaux).
Vérifier Vérifier Vérifier Vérifier Vérifier Vérifier
LAMES D’ADMISSION Vérifier Vérifier
LIQUIDE DE FREIN Remplacer TOUS LES 2 ANS Remplacer TOUS LES 2 ANS
LIQUIDE REFROIDISSANT Vérifier Vérifier Vérifier Vérifier Vérifier Vérifier
GUIDON Vérifier Vérifier Vérifier
PNEUS (Conditions et usure). Vérifier Vérifier Vérifier Vérifier Vérifier
PNEUS (Pression). Vérifier Vérifier Vérifier Vérifier Vérifier Vérifier
NIVEAU LIQUIDE DE FREIN Vérifier Vérifier Vérifier Vérifier Vérifier Vérifier
LEVIER DE FREIN Huiler Huiler Huiler Huiler Huiler Huiler
PLAQUETTES DE FREIN Vérifier Vérifier Vérifier Vérifier Vérifier
RADIATEUR Nettoyer Nettoyer
RENVOI KM.* Huiler Huiler Huiler
ROULEMENT DE ROUE Vérifier Vérifier Vérifier Vérifier Vérifier
ROULEAUX VARIATEUR Vérifier Remplacer Vérifier Remplacer
SUSPENSION AVANT (jeu de direction) Vérifier Vérifier Vérifier Vérifier Vérifier Vérifier
SUSPENSION ARRIÈRE Vérifier Vérifier
TUBES ESSENCE ET HUILE Vérifier Vérifier Remplacer Vérifier Remplacer Vérifier
ÉCROU ET VIS DE CULASSE Vérifier Vérifier Vérifier Vérifier
ESSAI DU VÉHICULE ET FREINS Vérifier Vérifier Vérifier Vérifier Vérifier Vérifier
CHAIN SECONDAIRE Huiler Huiler Huiler Huiler Huiler Huiler
CHAIN SECONDAIRE (Tension) Vérifier Vérifier Vérifier Vérifier Vérifier Vérifier
BATTERIE (état de charge) Vérifier Vérifier Vérifier Vérifier Vérifier Vérifier
CABLE ACCÉLÉRATEUR Huiler Huiler Huiler Huiler Huiler Huiler
Période: cette période peut être évaluée
en kilomètres parcourus ou en mois.
84
f
Cuadro de mantenimiento y engrase
Tableau d'entretien et de graissage
Page 85

i
Período: Según los kilómetros
Km /
Mesi
1.000 / 2 5.000 / 12 10.000 / 24 15.000 / 36 20.000 / 48 25.000 / 60
OLIO CARTER Sostituire Verificare Sostituire Verificare Sostituire Verificare
BLOCCAGGI DI SICUREZZA
(supporto motore, assali e sospensione)
Verificare Verificare Verificare
POMPA D’OLIO/REGISTRO CAVO GAS Verificare Verificare Verificare Verificare Verificare Verificare
CANDELA Verificare Sostituire Sostituire Sostituire Sostituire Sostituire
CARBURATORE
Regolazione Regolazione Regolazione Regolazione Regolazione Regolazione
Nettare Nettare Nettare Nettare Nettare Nettare
CINGHIA POMPA OLIO/ACQUA Verificare Verificare Verificare Sostituire Verificare
CINGHIA VARIATORE Verificare Verificare Sostituire Verificare Verificare
CULATA, CILINDRO
E PISTONE (Serbatoi).
Nettare Nettare
ATTREZZATURE FRENO (Verificare fughe)
Verificare Verificare
FARO ANTERIORE (Regolazione). Regolare Regolare
FILTRO DELL’OLIO Sostituire Sostituire
FILTRO DELL’ARIA Nettare Nettare Nettare Nettare Nettare Nettare
FILTRO D’ARIA SECONDARIO Nettare Nettare Nettare Nettare Nettare
IMPIANTO ELETTRICO E BATTERIA
(Livello e corrosione morsetti). Verificare Verificare Verificare Verificare Verificare Verificare
LAMELLE AMMISSIONE Verificare Verificare
LIQUIDO FRENI SOSTITUIRE OGNI 2 ANNI SOSTITUIRE OGNI 2 ANNI
LIQUIDO REFRIGERANTE Verificare Verificare Verificare Verificare Verificare Verificare
MANUBRIO Verificare Verificare Verificare
PNEUMATICI (Stato e usura). Verificare Verificare Verificare Verificare Verificare
PNEUMATICI (Pressione). Verificare Verificare Verificare Verificare Verificare Verificare
LIVELLO LIQUIDO FRENI Verificare Verificare Verificare Verificare Verificare Verificare
MANOPOLE DEL FRENO lubrificare lubrificare lubrificare lubrificare lubrificare lubrificare
PASTIGLIE DEL FRENO Verificare Verificare Verificare Verificare Verificare
RADIATORE Nettare Nettare
RINVIO KM.* lubrificare lubrificare lubrificare
CUSCINETTI RUOTA Verificare Verificare Verificare Verificare Verificare
RULLI VARIATORE Verificare Sostituire Verificare Sostituire
SOSPENSIONE ANTERIORE (gruppo sterzo)
Verificare Verificare Verificare Verificare Verificare Verificare
SOSPENSIONE POSTERIORE Verificare Verificare
TUBI BENZINA E OLIO Verificare Verificare Sostituire Verificare Sostituire Verificare
DADO E VITI TESTATA Verificare Verificare Verificare Verificare
COLLAUDO VEICOLO E FRENI Verificare Verificare Verificare Verificare Verificare Verificare
CATENA TRANSMISSIONE lubrificare lubrificare lubrificare lubrificare lubrificare lubrificare
CATENA TRANSMISSIONE (Tensione) Verificare Verificare Verificare Verificare Verificare Verificare
BATTERIA (stato di carica) Verificare Verificare Verificare Verificare Verificare Verificare
CAVO ACCELERATORE lubrificare lubrificare lubrificare lubrificare lubrificare lubrificare
Periodo: questo periodo può valutarsi secondo i
chilometri percorsi o il tempo in mesi
Tabella di manutenzione e ingrassaggio • Maintenance and Lubrication Chart
Inspektionsintervalle
85
Page 86

Período: Según los kilómetros
Km /
Months
1.000 / 2 5.000 / 12 10.000 / 24 15.000 / 36 20.000 / 48 25.000 / 60
CRANKCASE OIL Replace Check Replace Check Replace Check
SAFETY LOCKS
(engine bracket, axles, and suspensions)
Check Check Check
OIL PUMP/FUEL CABLE PORT Check Check Check Check Check Check
SPARK PLUG Check Replace Replace Replace Replace Replace
CARBURETTOR
Adjust Adjust Adjust Adjust Adjust Adjust
Clean Clean Clean Clean Clean Clean
OIL/WATER PUMP BELT Check Check Check Replace Check
VARIABLE SPEED DRIVE BELT Check Check Replace Check Check
CYLINDER HEAD, CYLINDER,
AND PISTON
(Carbon deposits)
Clean Clean
BRAKE SYSTEM (Check for leaks) Check Check
FRONT HEADLIGHT (Adjustment) Adjust Adjust
OIL FILTER Replace Replace
AIR FILTER Clean Clean Clean Clean Clean Clean
SECONDARY AIR FILTER Clean Clean Clean Clean Clean
ELECTRICAL SYSTEM AND BATTERY
(Electrolyte level, and corrosion on terminals)
Check Check Check Check Check Check
INLET REED VALVE Check Check
BRAKE FLUID REPLACE EVERY 2 YEARS REPLACE EVERY 2 YEARS
COOLING LIQUID Check Check Check Check Check Check
HANDLEBAR Check Check Check
TYRES (Condition and Use) Check Check Check Check Check
TYRES (Pressure) Check Check Check Check Check Check
BRAKE FLUID LEVEL Check Check Check Check Check Check
BRAKE LEVERS Lubricate Lubricate Lubricate Lubricate Lubricate Lubricate
BRAKE PADS Check Check Check Check Check
RADIATOR Clean Clean
SPEEDOMETER TRANSFER BOX* Lubricate Lubricate Lubricate
WHEEL BEARINGS Check Check Check Check Check
VARIABLE SPEED DRIVE ROLLERS Check Replace Check Replace
FRONT SUSPENSION (steering play) Check Check Check Check Check Check
REAR SUSPENSION Check Check
FUEL AND OIL HOSES Check Check Replace Check Replace Check
CYLINDER HEAD NUT AND SCREWS Check Check Check Check
VEHICLE AND BRAKE TEST Check Check Check Check Check Check
TRANSMISSION CHAIN Lubricate Lubricate Lubricate Lubricate Lubricate Lubricate
TRANSMISSION CHAIN (Tension) Check Check Check Check Check Check
BATTERY (charging status) Check Check Check Check Check Check
ACCELERATOR CABLE Lubricate Lubricate Lubricate Lubricate Lubricate Lubricate
Period: this period may be calculated
either by kilometres run or by time in months.
g
86
Tabella di manutenzione e ingrassaggio • Maintenance and Lubrication Chart
Inspektionsintervalle
Page 87

d
Período: Según los kilómetros
Km /
Monate
1.000 / 2 5.000 / 12 10.000 / 24 15.000 / 36 20.000 / 48 25.000 / 60
Motoröl Ersetzen Prüfen Ersetzen Prüfen Ersetzen Prüfen
Sicherheitsfixierungen
(Motorträger, Radachsen und Aufhängungen)
Prüfen Prüfen Prüfen
Ölpumpe/Register Gaszug Prüfen Prüfen Prüfen Prüfen Prüfen Prüfen
Zündkerze Prüfen Ersetzen Ersetzen Ersetzen Ersetzen Ersetzen
Vergaser
Einstellung Einstellung Einstellung Einstellung Einstellung Einstellung
Reinigen Reinigen Reinigen Reinigen Reinigen Reinigen
Riemen Öl-/Wasserpumpe Prüfen Prüfen Prüfen Ersetzen Prüfen
Riemen Wandler Prüfen Prüfen Ersetzen Prüfen Prüfen
Zylinderkopf, Zylinder
und Kolben (Behälter)
Reinigen Reinigen
Bremsanlage (Leckprüfung). Prüfen Prüfen
Scheinwerfer (Einstellung). Einstellen Einstellen
Ölfilter Ersetzen Ersetzen
Luftfilter Reinigen Reinigen Reinigen Reinigen Reinigen Reinigen
Sekundärluftfilter Reinigen Reinigen Reinigen Reinigen Reinigen
Elektrische Anlage und Batterie
(Flüssigkeit und Korrosion an Anschlüssen)
Prüfen Prüfen Prüfen Prüfen Prüfen Prüfen
Einlasslamellen Prüfen Prüfen
Bremsflüssigkeit Alle 2 Jahre ersetzen Alle 2 Jahre ersetzen
Kühlmittel Prüfen Prüfen Prüfen Prüfen Prüfen Prüfen
Lenker Prüfen Prüfen Prüfen
Reifen (Zustand und Abnutzung). Prüfen Prüfen Prüfen Prüfen Prüfen
Reifen (Druck). Prüfen Prüfen Prüfen Prüfen Prüfen Prüfen
Bremsflüssigkeitsstand Prüfen Prüfen Prüfen Prüfen Prüfen Prüfen
Bremsgriffe Schmieren Schmieren Schmieren Schmieren Schmieren Schmieren
Bremsbeläge Prüfen Prüfen Prüfen Prüfen Prüfen
Kühler Reinigen Reinigen
Umlenkelement KM.* Schmieren Schmieren Schmieren
Radlager Prüfen Prüfen Prüfen Prüfen Prüfen
Wandlerrollen Prüfen Ersetzen Prüfen Ersetzen
Vorderradaufhängung (Lenkspiel) Prüfen Prüfen Prüfen Prüfen Prüfen Prüfen
Hinterradaufhängung Prüfen Prüfen
Benzin- und Ölleitungen Prüfen Prüfen Ersetzen Prüfen Ersetzen Prüfen
Muttern und Schrauben des Zylinderkopfs
Prüfen Prüfen Prüfen Prüfen
Test des Motorrads und der Bremsen Prüfen Prüfen Prüfen Prüfen Prüfen Prüfen
Antriebskette Schmieren Schmieren Schmieren Schmieren Schmieren Schmieren
Antriebskette (Spannung) Prüfen Prüfen Prüfen Prüfen Prüfen Prüfen
Batterie (Ladezustand) Prüfen Prüfen Prüfen Prüfen Prüfen Prüfen
Gaszug Schmieren Schmieren Schmieren Schmieren Schmieren Schmieren
Zeitraum: dieser Zeitraum kann nach zurückgelegten Kilometern oder abgelaufener Zeit in Monaten gewählt werden
87
Tabella di manutenzione e ingrassaggio • Maintenance and Lubrication Chart
Inspektionsintervalle
Page 88

88
Limpieza
Nettoyage
Limpieza
El mantenimiento general de su
scooter es sencillo. Si además de
cumplir las instrucciones dadas en este
libro, limpian periódicamente su scooter,
el rendimiento será todavía superior.
- Para las superficies esmaltadas y de
plástico NO EMPLEE jamás gasolina,
petróleo etc. frótelas con esponja y
séquelas con gamuza. Se puede, una
vez secas, pasar alguna pasta o
abrillantador de los empleados en las
carrocerías de los automóviles,
efectuándolo con trapo de lana.
- Caso de que sea sorprendido por la
lluvia, es recomendable limpiar y secar
el vehículo inmediatamente y engrasar
todos los cables.
❀
Al comprar productos de conservación habría que elegir los que sean
ecológicos. Los residuos de los
mismos no deberán echarse a la
basura doméstica.
❀
En interés del medio ambiente, el
scooter debiera lavarse sólo en
lugares especialmente previstos
para ello. Lavar un vehículo fuera
de estas condiciones puede incluso estar prohibido en determinadas zonas.
Nettoyage
L’entretien gènèral de votre scooter
est simple. Si vous respectez les instructions de ce manuel et si en plus
vous nettoyez périodiquement votre
scooter son rendement sera encore
meilleur.
- Pour les surfaces émaillées et celles
en plastique N’EMPLOYEZ JAMAIS
d’essence ni de pétrole, etc., frottezles avec une éponge humide et
séchez-les avec une peau de chamois. Après séchage, vous pouvez
passer une cire pour carrosseries auto
et faire briller avec un chiffon en laine.
- Si vous avez roulé sous la pluie, netto-
yez et séchez immédiatement votre
scooter et graissez tous les câbles.
❀
Achetez de préférence des produits d’entretien écologiques. Les
résidus ne doivent pas être jetés
dans la poubelle.
❀
Pour ne pas polluer l’environnement il est souhaitable de laver le
scooter dans des endroits spécia-
lement prévus pour cette opéra-
tion. Laver un véhicule dans
n’importe quelles conditions peut
être défendu dans certains
endroits.
Page 89

89
Pulizia • Cleaning
Reinigen
Pulizia
La manutenzione generale del Suo
scooter è semplice. Se, oltre a seguire
le istruzioni date in questo libretto, Lei
pulisce periodicamente il suo scooter, il
rendimento sarà ancora maggiore.
- Sulle superfici verniciate e di plastica
NON UTILIZZARE mai benzina, petrolio, ecc. Strofinare con spugna ed
asciugare con un panno di camoscio.
Sulle superfici asciutte si può applicare, usando un panno di lana, pasta
lucidante usata per la carrozzeria delle
vetture.
- Dopo una pioggia, si raccomanda puli-
re ed asciugare immediatamente il
veicolo ed ingrassare tutti i cavi.
❀
Per la cura dello scooter Utilizzare
preferibilmente prodotti ecologici e
non gettarne i residui nella spazzatura domestica.
❀
Per prevenire l'inquinamento
ambientale lavare lo scooter nei
luoghi predisposti a tale fine. Lavare il vehicolo fuori da questi luoghi
può essere vietato dalla legge.
Cleaning
General maintenance of your scooter
is easy. If, as well as following the instructions given in this manual, you clean
your scooter regularly, its performance
will be even better.
- NEVER USE petrol, paraffin, etc. on
enamelled and plastic surfaces: rub
them with a wet sponge and dry with a
chamois leather. Once dry, they can
be treated with a cleaning paste or
polish such as are used for car bodywork, polishing with a woollen cloth.
- If you are caught out in the rain, it is
recommended to clean and dry the
vehicle immediately and to grease all
the cables.
❀
When purchasing cleaning material always buy ecological products. What remains should not be
thrown away with the domestic
rubbish.
❀
In order to protect the environment, the scooter should only be
washed in places which are specially prepared for this purpose.
Washing a vehicle outside these
places may even be against the
law in some areas.
Reinigen
Die allgemeine Wartung Ihres Mopeds
ist einfach. Wenn Sie zusätzlich zu den
Anweisungen dieses Buches Ihr Fahrzeug
regelmäßig reinigen, werden Sie noch
mehr Freude daran haben.
- Verwenden Sie für die lackierten
Oberflächen und für die aus Kunststoff
NIEMALS Benzin, Petroleum o.ä.
Reiben Sie sie mit einem Schwamm ab
und trocknen Sie sie mit einem
Putzleder. Nach dem Trocknen kann
noch ein Glanzmittel (wie für
Autokarosserien verwendet) aufgetragen
werden. Benutzen Sie dafür einen
Wollappen.
- Sollten Sie vom Regen überrascht
werden, ist es ratsam, das Fahrzeug
sofort zu reinigen und abzutrocknen und
sämtliche Kabel einzuschmieren.
❀
Geben Sie bei der Auswahl der Pflegemittel den umweltfreundlichen
Produkten den Vorzug. Die Pflegemittelreste sollten nicht in den Hausmüll gegeben werden.
❀
Im Interesse der Umwelt sollten Sie
das Moped nur an solchen Stellen
waschen, die speziell dafür vorgesehen sind. In bestimmten Gebieten
kann das Waschen von Fahrzeugen
sogar ausdrücklich verboten sein.
Page 90

90
Conservación en largos períodos de inactividad
Conservation lors de longues périodes d’inactivité
Conservación del scooter en largos
períodos de inactividad
- Limpieza general y secado.
- Vaciar el depósito de gasolina, depósi-
to de aceite y carburador.
- Vaciar el aceite del motor. No colocar
el tapón de vaciado, en su lugar tapar
con un trapo limpio.
- Sacar la bujía. Por su alojamiento
introducir 10 ÷ 15 c.c. de aceite anticorrosivo. Hacer girar el motor para
que quede todo impregnado y protegido.
- Engrasar todas las partes metálicas
con grasa antioxidante; actualmente
existen en el mercado unos sprays
muy adecuados para este tipo de protección.
- Proteger el scooter con un plástico,
para evitar la acumulación de polvo.
- Extraiga la batería del scooter y límpie
todo el exterior con detergente suave y
elimine cualquier corrosión de los terminales y las conexiones del conjunto
de conductores.
Es conveniente para el buen mantenimiento de la batería hacer una vez al
mes una carga de recuperación (ver
pág. 60)
Conservation du scooter lors de
longues périodes d’inactivité
- Nettoyage général et séchage
- Vider le réservoirs d’essence, d’huile
et carburateur.
- Vider l’huile du moteur. Ne pas remettre le bouchon de vidange mais boucher au moyen d’un chiffon propre.
- Enlever la bougie. Mettre dans son
logement 10 à 15 cm3. d’huile anticorrosion. Faire tourner le moteur pour
que tout soit imprégné et protégé.
- Graisser toutes les parties métalliques
avec de la graisse anti-oxyde; il existe
actuellement sur le marché des sprays
convenant parfaitement à ce type de
protection.
- Protéger le scooter avec une toile
plastifiée pour éviter l’accumulation de
poussière.
- Enlever la batterie du scooter et nettoyer l’extérieur avec un détergent doux
et éliminer toute trace de corrosion
des terminaux et des connexions de
l’ensemble des conducteurs.
Il est recommandé pour un parfait
entretien de la batterie de la recharger
une fois par mois (voir page 60).
Page 91

91
Conservazione durante lunghi periodi d’inattività • Storing during long periods of disuse
Pflege des Mopeds bei längerem Nichtbenutzen
Storing during long periods of disuse
- General clean and dry
- Drain the fuel tank, oil reservoir and
carburettor.
- Drain the oil from the engine. Do not
replace the drain plug, but instead
plug the drain hole with clean cloth.
- Remove the spark plug. Pour in
through the spark plug hole 10 to 15
cc of anti-corrosion oil through the
spark plug hole. Turn the engine over
until it is entirely coated and protected.
- Grease all metal parts with an anti-oxidant grease; nowadays there are
sprays on the market which are perfect for this purpose.
- Cover the scooter with a plastic sheet,
to prevent the build up of dust.
- Remove the battery from the scooter
and clean the entire outside surface
thoroughly with a mild detergent,
removing all traces of corrosion from
the terminals and the conductors in
the connector set.
In the interests of conserving the battery properly, it is advisable to give it a
top-up charge once a month (please
see page 60)
Pflege des Mopeds bei längerem
Nichtbenutzen
- Allgemeines Reinigen und Trocknen.
- Den Benzintank, den Ölbehälter und
den Vergaser leeren.
- Das Öl entleeren. Den Ölablaßstopfen
nicht aufsetzen, stattdessen mit einem
sauberen Tuch zustopfen.
- Die Zündkerze herausnehmen. In ihre
Lagerung 10 - 15 ccm
Korrosionsschutzöl geben. Den Motor
laufen lassen, damit alle Teile benetzt
und geschützt werden.
- Alle Metallteile mit Oxydationschutzfett
einschmieren. Auf dem Markt sind
Sprays erhältlich, die hierfür sehr
geeignet sind.
- Das Moped mit einer Plastikschutzhülle
abdecken, um es vor Staub zu
schützen.
- Nehmen Sie die Batterie heraus und
reinigen Sie die Außenflächen mit
einem leichten Reinigungsmittel.
Entfernen Sie von den Klemmen und
von den Anschlüssen des
Leiteraggregats sämtliche Spuren von
Korrosion. Für eine gute Wartung der
Batterie ist es angebracht, diese einmal
im Monat aufzuladen (s. S. 60).
Conservazione dello scooter durante
lunghi periodi d’inattività
- Pulizia generale ed asciugatura.
- Svuotare il serbatoio della benzina,
dell’olio ed il carburatore.
- Svuotare l’olio del motore. Non mettere il tappo di svuotamento, ma tappare
con uno straccio pulito.
- Togliere la candela. Attraverso la sua
sede introdurre 10 a 15 cc. di olio anticorrosivo. Far girare il motore per
impregnarlo d'olio e proteggerlo.
- Ingrassare tutte le parti metalliche con
grasso antiossidante; attualmente
esistono nel mercato alcuni sprays
molto adatti per questo tipo di protezione.
- Proteggere lo scooter con un telo
plastico, per evitare l’accumularsi della
polvere.
- Estrarre la batteria dello scooter e
pulirne l’esterno con un detersivo
soave. Eliminare qualsisi corrosione
dai terminali e dalle connessioni elettriche.
Per mantenere efficiente la batteria,
sottoporla a ricarica una volta al mese.
(vedi pag. 60).
Page 92

92
Anomalías en ruta
Anomalies sur la route
¡Precaución!
Al desmontar la batería cerciórese de
desconectar primero el terminal negativo
y después el positivo.
Anomalías en ruta
No es probable que se presente una
avería en ruta si el scooter está bien
conservado y se ha tratado con el debido cuidado.
Si, en cambio, puede presentarse en
un momento dado, que el vehículo se
detenga bruscamente y no haya forma
de ponerlo en marcha. En este caso, el
conductor que no posea unos amplios
conocimientos de mecánica, sólo debe
comprobar los siguientes puntos, que
son generalmente los que provocan la
detención sin que por ello el vehículo
esté averiado.
- Comprobar si hay suficiente combustible en el depósito y si llega al carburador. Una vez comprobado que la
gasolina llega al carburador, verifique
si el fusible se ha fundido. El fusible lo
encontrará dentro del alojamiento de
la batería, desmontando previamente
los tres tornillos del cuerpo inferior
sillín.
- Comprobar si el vehículo tiene buena
chispa, es decir si a través del cable
Précaution!
Pour démonter la batterie il faut
déconnecter la borne négative avant la
borne positive.
Anomalies sur la route
Il est peu probable qu’une panne se
produise pendant que vous roulez si le
scooter est bien entretenu et soigné.
Cependant, il peut arriver que le scooter s’arrête brusquement et qu’il soit
impossible de démarrer. Dans ce cas, le
conducteur qui n’est pas très fort en
mécanique doit vérifier les points qui,
en général, provoquent l’arrêt du
moteur sans qu’il s’agisse vraiment
d’une panne:
- Vérifier s’il reste du carburant dans le
réservoir et s’il arrive bien au carburateur. Si l’essence arrive bien au carburateur, vérifiez si le fusible est fondu.
Le fusible se trouve dans le logement
de la batterie et pour y accéder il suffit
de démonter les trois vis du corps
supérieur de la selle.
- Vérifier si une bonne étincelle se pro-
duit, c’est à dire si le courant électri-
Page 93

93
Anomalie in viaggio • Breakdowns on the road
Störungen während der Fahrt
Precauzione!
Quando si smonti la batteria assicurarsi di staccare prima il terminale negativo e poi quello positivo.
Anomalie in viaggio
É improbabile che si verifichi una anomalia in viaggio se lo scooter è stato
regolarmente sottoposto alla manutenzione ed utilizzato con cura.
Comunque può accadere che il veicolo si fermi bruscamente e non ci sia
modo di metterlo in moto. In questo
caso, il conducente che non sia munito
di ampie conoscenze nel campo della
meccanica deve soltanto verificare due
punti, che sono quelli che provocano
generalmente l’arresto senza che questo implichi che il veicolo sia in panne.
- Verificare se c’è abastanza combusti-
bile nel serbatoio e se arriva fino al
carburatore. Dopo aver verificato che
la benzina arriva al carburatore,
bisogna verificare se il fusibile è bruciato. Il fusibile si trova dentro dell'alloggiamento della batteria a cui si
accede smontando le tre viti che fissano il corpo inferiore della sella.
- Verificare se c’è buona scintilla, cioè,
se mediante il cavo d’alta tensione
Caution!
When removing the battery take care
to detach the negative terminal first, and
then the positive battery.
Breakdowns on the road
It is unlikely that any problems will
occur on the road if the scooter has
been properly looked after and treated
with due care.
It is possible, however, that the vehicle may suddenly stop and be impossible to restart. In this case, the rider who
does not possess a wide knowledge of
mechanics should only check two
points, which are what generally cause
the vehicle to stop if there is no major
breakdown.
- Check that there is sufficient petrol in
the fuel tank and that it flows down
from the tank to the carburettor. After
checking that the petrol reaches the
carburettor, see if the fuse has blown.
The fuse is to be found in the battery
compartment, after first removing the
three saddle body securing screws.
- Check that the vehicle has a good
Vorsicht!
Achten Sie beim Ausbauen der Batterie
darauf, zuerst den negativen und dann
den positiven Pol abzuklemmen.
Störungen während der Fahrt
Wenn das Moped gut gepflegt und
richtig behandelt wird, ist es nicht
wahrscheinlich, daß sich während der
Fahrt Störungen einstellen.
Gelegentlich kann es allerdings
vorkommen, daß das Fahrzeug plötzlich
stehenbleibt und in keiner Weise wieder
in Gang gebracht werden kann. Falls der
Fahrer nicht über umfassende
Kenntnisse der Mechanik verfügt, reicht
es aus, wenn er die folgenden zwei
Punkte überprüft, auf die das
Stehenbleiben des Fahrzeugs für
gewöhnlich zurückzuführen ist, ohne daß
dies zwangsläufig einen Schaden am
Moped darstellen muß.
- Überprüfen Sie, ob Benzin vom Benzin-
tank bis zum Vergaser gelangt. Nachdem Sie sich dessen vergewissert
haben, prüfen Sie nach, ob die Sicherung durchgebrannt ist. Sie finden die
Sicherung im Batteriekasten, nachdem
Sie vorher die drei Schrauben des Sitzbodens aufgeschraubt haben.
- Überprüfen Sie, ob die Maschine “rich-
tig funkt”, d.h. ob über das Hochspan-
Page 94

94
Anomalías en ruta
Anomalies sur la route
de alta tensión que va conectado a la
bujía llega la corriente eléctrica necesaria para producir la chispa entre los
electrodos de la bujía. Extraiga la
bujía y vuelva a conectarla al conjunto
pipa bujía. Sujete la bujía firmemente
contra el motor, pulse el botón de
arranque con la llave de contacto a la
posición
! y si el sistema de encendido está funcionando adecuadamente,
deberá saltar una chispa azul entre
los electrodos de la bujía. Si no hay
chispa, consulte en un Servicio Oficial
DERBI.
Realizando estas pequeñas comprobaciones, resolverán el problema en la
mayoría de los casos.
¡Precaución!
Procurar al hacer esta revisión de no
poner la bujía cerca del orificio de la
misma, ya que el vapor de gasolina del
interior del cilindro podría encenderse,
creando el riesgo de incendio. Haga la
revisión haciendo masa en la culata.
El vehículo va equipado con neumáticos del tipo Tubeless (sin cámara de
aire).
En caso de pinchazo, contrariamente
a lo que ocurre a un neumático con
que nécessaire pour produire l’étince-
lle entre les électrodes de la bougie
arrive bien par le câble de haute tension connecté à celle-ci. Extraire la
bougie et connectez-la à nouveau à
l’ensemble pipe bougie. Placez fermement la bougie contre le moteur, pressez le bouton de démarrage avec la
clé de contact sur la position
! et si le
système d’allumage fonctionne correctement, une étincelle bleue doit se
produire entre les électrodes de la
bougie.
En effectuant ces petites vérifications,
les problèmes seront résolus, dans la
plupart des cas.
Précaution!
En faisant cette révision veiller à ne
pas placer la bougie près de son orifice
car la vapeur d’essence de l’intérieur du
cylindre pourrait s’enflammer et provoquer un incendie.
Faites cette révision en faisant masse
sur la culasse.
Le véhicule est équipé de pneus
Page 95

95
Anomalie in viaggio • Breakdowns on the road
Störungen während der Fahrt
che è collegato alla candela arriva la
corrente elettrica necessaria per produrre la scintilla tra i due elettrodi della
candela.
- Estrarre la candela e collegarla
all’insieme pipetta-candela. Premere
saldamente la candela contro il motore, premere il pulsante di avviamento
con la chiave d’accensione nella posizione
! e, se il sistema d’accensione
funziona in modo corretto, scatterà
una scintilla azzurra tra gli elettrodi
della candela. Se non c’è scintilla,
consultare un Servizio Ufficiale
DERBI.
Se si realizzano queste piccole verifiche, si risolverà il problema nella maggior parte dei casi.
Avviso!
Quando si fa questa verifica, cercare
di non mettere la candela vicino al suo
foro poiché il vapore di benzina
dell’interno del cilindro potrebbe accendersi e creare il rischio di incendio. Fare
il controllo facendo massa sulla testata.
spark: in other words, if sufficient electric current reaches the spark plug
along the high tension cable so as to
cause a spark between the electrodes
of the plug. Undo the spark plug, and
fit the spark plug cap on it again. Hold
the plug firmly against the engine,
press the starter button with the ignition key in position ", and if the ignition
system is operating correctly, a blue
spark should be seen to jump across
the gap between the electrodes of the
spark plug. If there is no spark, take
the scooter to your Official DERBI Service Agent.
By making these simple checks, you
will be able to solve the problem in the
great majority of cases.
Caution!
When carrying out this check, be
careful not to place the spark plug too
close to its seating hole, since the petrol
vapour from the inside of the cylinder
may ignite, with consequent risk of fire.
Perform the check by earthing the plug
on the cylinder head.
nungskabel, das an die Zündkerze
angeschlossen ist, genug Strom hereinkommt, um den Funken zwischen den
Elektroden der Zündkerze zu erzeugen.
Nehmen Sie die Zündkerze heraus und
schließen Sie sie erneut an das Zündkerzenaggregat an. Halten Sie die
Zündkerze fest gegen den Motor und
drücken Sie den Anlasserknopf. Der
Schlüssel muß sich in der Position !
befinden. Wenn das Zündsystem einwandfrei funktioniert, springt zwischen
den Elektroden der Zündkerze ein
blauer Funke. Bleibt der Funke aus,
wenden Sie sich bitte an eine offizielle
DERBI-Servicestelle.
Durch diese einfachen Überprüfungen
kann das Problem in den meisten Fällen
beseitigt werden.
Vorsicht!
Achten Sie darauf, bei dieser
Überprüfung die Zündkerze nicht zu nah
an das Zündkerzenloch zu bringen, da
sich der aus dem Zylinderinneren
aufsteigende Benzindampf entzünden
könnte. Brandgefahr! Stellen Sie für
diese Überprüfung eine
Masseverbindung mit dem Zylinderkopf
her.
Page 96

96
Anomalías en ruta
Anomalies sur la route
cámara de aire, el desinflado es muy
lento, es decir hay una mayor seguridad
de conducción. Un desinflado lento
además da la posibilidad de recurrir en
caso de emergencia a la utilización de
bombonitas "hincha y repara". De todas
maneras se aconseja una reparación
definitiva o su sustitución en un Servicio
Oficial DERBI.
¡Aviso!
00
Debido a las altas temperaturas que
alcanza el catalizador, poner especial
atención al aparcar el vehículo, evitan-
do que el silencioso entre en contacto
con materiales inflamables, y también
con el fin de evitar graves quemaduras
en partes del cuerpo.
Tubeless (sans chambre à air).
En cas de crevaison, le dégonflage est
très lent, contrairement à ce qui se
produit avec les pneus à chambre à air.
Il en résulte plus de sécurité pour la
conduite. Une réparation temporaire
peut se faire à l'aide d'une bombe de
"GONFLAGE ET RÉPARATION". Il est
toutefois conseillé d'effectuer une
réparation définitive ou un changement
de pneu auprès d'un
Service Officiel
DERBI.
Précaution!
00
Etant donée les températures élevées
pouvant être atteintes dans le
catalyseur, veiller, en garant le véhicule,
à ce que le pot d'échappement n'entre
pas en contact avec des matériaux
inflammables, ni avec des parties du
corps sous peine de graves brûlures.
cADVERTÈNCIA
00
Degut a les altes temperatures del
catalitzador, posar especial cura quan
aparqui el vehicle, evitant que
l’escapament entri en contacte amb
materials inflamables, i també amb la fi
d’evitar greus cremades al cos.
Page 97

97
Anomalie in viaggio • Breakdowns on the road
Störungen während der Fahrt
Il veicolo monta pneumatici Tubeless. In
caso di foratura, contrariamente a quanto avviene per un pneumatico con
camera d'aria, lo sgonfiamento è molto
lento. Il che si traduce in una maggiore
sicurezza di guida.
Un sgonfiamento lento dà inoltre la possibilità di intervenire, in caso di emergenza. ricorrendo a bombolette "GONFIA E RIPARA".
Si consiglia comunque una riparazione
definitiva o una sostituzione presso un
Punto di Assistenza DERBI.
Attenzione!
00
Causa le alte temperature che si possono raggiungere nel catalizzatore, porre
attenzione, nel parcheggiare il veicolo,
che la marmitta non venga in contatto
con materiali infiammabili, o al fine di
evitare gravi ustioni con parti del corpo.
Your scooter has tubeless tyres,
which, unlike tyres with an inner tube,
tend to deflate slowly when punctured,
so road safety is improved.
If the tyre has a slow puncture you
can make a temporary repair using a
pressurised repair/inflate canister.
Have the tyre repaired or changed
professionaly as soon as possible at an
Official DERBI Service Agent.
Warning!
00
Due to the hight temperatures that
can be reached in the catalyst, ensure
that when the vehicle is parked, the
muffler does not come into contact with
inflammable materials or with parts of
the body as to avoid serious burns.
Das Fahrzeug ist mit schlauchlosen
Reifen ausgerüstet (Tubeless).
Anders als bei einem Reifen mit
Schlauch entweicht die Luft bei einem
Loch im Reifen aus dem schlauchlosen
Reifen wesentlich langsamer. Dies
bedeutet eine größere Fahrsicherheit. Ein
vorübergehende Reparatur kann auch
mit Hilfe eines
"REIFENREPARATURSPRAYS" oder
eines Reparatursets für schlauchlose
Reifen erfolgen. Für eine dauerhafte
Reparatur oder einen Reifenwechsel
empfehlen wir Ihnen sich an eine
offiziellen DERBI. Servicestelle
vorgenommen werden.
Warnung!
00
DER KATALYSATOR WIRD SEHR
HEIß. ACHTEN SIE BEIM ABSTELLEN
DES FAHRZEUGS UNBEDINGT
DARAUF, DAß DER AUSPUFF KEINE
BRENNBAREN MATERIALIEN
BERÜHRT. VERBRENNUNGSGEFAHR
BEI BERÜHREN DES AUSPUFFS.
Page 98

98
Page 99

Indice del capítulo
Index du chapitre
Indice delcapitolo
Index of the chapter
Inhaltsverzeichnis des Kapitels
99
Características técnicas
Caractéristiques techniques
Caratteristiche tecniche
Technical characteristics
Technische Daten...................................100
Esquemas electricos
Echemas electriques
Squema electrico
Electrical Wiring Diagram
Elektroschema........................................108
Indice
Index
Indice
Index
Inhaltsverzeichnis ...................................112
En las páginas siguientes de
este capítulo, se describen las
especificaciones técnicas y el
índice.
Les pages de ce chapître
décrivent les spécifications
techniques et donnent l'index.
Nelle pagine seguenti di
questo capitolo si descrivono
le specificazioni tecniche e
l’indice.
This chapter includes the
technical specifications of the
moped and the Index of this
manual.
Dieses Kapitel enthält die
technischen Daten, und das
Inhaltsverzeichnis.
Especificaciones
Spécifications
Specificazioni
Specifications
Technische Daten
Page 100

100
Características técnicas
Caractéristiques techniques
Motor
Número de cilindros ......1
Ciclo ..............................2 tiempos.
Diámetro x carrera.........40 x 39,3 mm.
Cilindrada......................49 c.c.
Admisión........................Por láminas
directas al
cárter.
Relación de compresión
..12 : 1 (± 0,8)
Sistema de arranque.....Eléctrico
Refrigeración del motor.Líquido
refrigerante
Carburante ....................Eurosuper 95
NO (sin plomo).
Sistema de lubricación..Aceite
mezclado
automaticamente
por bomba
Carburador
Tipo ...............................DELL'ORTO
PHVA 17,5
Transmisión primaria
Por correa trapezoidal con variador
automático de velocidad.
Transmisión secundaria
Por cadena.
Moteur
Nombre de cylindres .....1
Cycle ............................. 2 temps
Alésage et course..........40 x 39,3 mm
Cylindrée.......................49 cm
3
.
Admission......................Par lames
directes au
carter
Rapport de compression
...12 : 1 (± 0,8)
Système de démarrage.Électrique
Réfroidissement
du moteur:.....................Líquide
réfroidissement
Carburant ......................Sans Plomb.
Système de lubrification
..Huile mélangée
automatiqueme
nt au moyen de
pompe
Carburateur
Type ..............................DELL'ORTO
PHVA 17,5
Transmission primaire
Par courroie trapézoïdale avec variateur
automatique de vitesse
Transmission secondaire
Par chaîne
 Loading...