

Page 1

El logotipo DERBI es marca registrada y propiedad de DERBI - Nacional Motor, S.A. Sociedad Unipersonal.
Prohibida la reproducción total o parcial de cualquier fotografía, gráfico o texto insertado en este manual.
© 2005 DERBI - Nacional Motor, S.A. Sociedad Unipersonal.
Impreso por Gràfiques Morán, S.L. - Palamós (Girona) Depósito Legal: GI - 622 - 2005
CODIGO MANUAL 0.0H.051.6.012.1
1
Page 2

DERBI - NACIONAL MOTOR, S.A.
Sociedad Unipersonal desea agradecerle la confianza depositada por Ud. en la
elección del modelo X-TREME R/SM •
X-RACE
En este manual se especifican los
principales detalles para el cuidado de
su ciclomotor, para que obtenga el
mejor funcionamiento y la mayor duración con un mínimo coste. Cuide su
ciclomotor, La calidad DERBI se encargará del resto, con los recambios originales y una red Nacional de más de
cuatro mil Agentes y talleres autorizados, estamos seguros de que obtendrá
plena satisfacción en el uso del vehículo.
Ante qualquier problema, dirigirse al
representante más próximo.
DERBI / NACIONAL MOTOR, S.A.
Sociedad Unipersonal vous remercie de
votre choix et de votre confiance en
votre nouveau cyclomoteur
X-TREME R/SM • X-RACE
Dans ce manuel sont spécifiés les
principaux détails pour l’entretien de
votre cyclomoteur afin d’obtenir le meilleur fonctionnement et une plus grande
durée de vie au coût minimum. Prenez
soin de votre cyclomoteur, le département qualité DERBI se chargera du
reste, avec les pièces de rechange originales et un réseau national de plus de
quatre mille agents et garages autorisés, nous sommes sûrs que vous
obtiendrez la pleine satisfaction dans
l’utilisation de votre véhicule.
En cas de problème, s’adresser au
représentant le plus proche.
Bienvenido a
Debido a su criterio de constante mejora en sus
productos, DERBI - NACIONAL MOTOR, S.A.
Sociedad Unipersonal se reserva el derecho de
introducir las modificaciones que crea oportunas,
sin previo aviso.
2
DERBI
Bienvenue chez
Etant donné le critère d’amélioration constante de
ses produits, DERBI / NACIONAL MOTOR, S.A.
Sociedad Unipersonal se réserve le droit
d’introduire les modifications qu’il jugerait
opportunes sans préavis.
DERBI
Page 3
DERBI - NACIONAL MOTOR, S.A.
Sociedad Unipersonal desidera
ringraziare la fiducia che Lei ha posto
nella scelta del nuovo modello
X-TREME R/SM • X-RACE
Nel presente manuale si specificano i
principali dettagli per la cura del suo
ciclomotore, affinché possa ottenere il
miglior funzionamento e la maggior
durata con una spesa minima. Curi il
suo ciclomotore, la qualità DERBI
s’incaricherà del resto, con i ricambi
originali ed una rete Nazionale di più di
quattromila Agenti ed officine
autorizzate, siamo sicuri del fatto che
otterrá piena soddisfazione dall’uso del
veicolo.
Per qualsiasi problema, rivolgersi al
rappresentante più vicino.
DERBI - NACIONAL MOTOR, S.A.
Sociedad Unipersonal offers you our
thanks for the confidence you place in
us in your purchase of your new model
X-TREME R/SM • X-RACE
This manual will explain the principal
details of how to maintain this moped so
you can get a longer duration with a
minimum cost and the best performance. Take care of your engine. DERBI’s
quality will take care of everything else,
we are sure that you will get complete
satisfaction with the use of this vehicle,
with the original spare parts and a National web of more than four thousand
agents and shops.
If you encounter any problem, refer to
the nearest distributor.
DERBI - NACIONAL MOTOR S.A.
Sociedad Unipersonal möchte Ihnen für
das Vertrauen, das Sie durch die Wahl
des neuen Mokicks X-TREME R/SM
X-RACE
entgegenbringen, herzlichst danken.
In dieser Gebrauchsanweisung finden Sie
Ausführungen zu den wichtigsten
Einzelheiten, die für die Pflege Ihres
Mokick von Bedeutung sind. Durch
Einhaltung derselben sind optimale
Funktionstüchtigkeit und lange
Lebensdauer bei geringstem
Kostenaufwand gewährleistet. Pflegen Sie
Ihren Mokick; die Qualität von DERBI
kümmert sich um alles übrige. Mit den
Original-Ersatzteilen und einem nationalen
Service-Netz von über 1000 autorisierten
Werkstätten sind wir sicher, daß Ihnen Ihr
Fahrzeug größte Freude bereiten wird.
Benvenuto a
A causa del suo criterio di miglioramento costante
dei propri prodotti, DERBI - NACIONAL MOTOR,
S.A. Sociedad Unipersonal mantiene il diritto di
introdurre le modifiche che consideri necessarie,
senza avviso previo.
DERBI
Welcome to
Due to its criterion of constant improvement of its
products, DERBI - NACIONAL MOTOR, S.A.
Sociedad Unipersonal reserves the right to
introduce any modifications it considers suitable,
without prior notice.
DERBI
Willkomen bei
Im Hinblick auf die ständige Verbesserung ihrer
Produkte behält sich DERBI - NACIONAL MOTOR,
S.A. Sociedad Unipersonal das Recht vor, ohne
vorherige Ankündigung die als zweckmäßig
erachteten Änderungen einzuführen.
DERBI
3
Page 4
❀
Así puede Vd. contribuir a
la conservación del medio
ambiente.
De su estilo de conducir depende
también el consumo de combustible
y, por lo tanto, el nivel de emisión
de contaminantes de su ciclomotor.
Asimismo, la manera de tratar el
vehículo influye en el nivel de ruidos
y en el desgaste del mismo.
En este Manual de Instrucciones se
incluyen una serie de informaciones
sobre una conducción ecológica y al
mismo tiempo económica de su
ciclomotor.
Sírvase tener en cuenta todos los
textos de este Manual marcados
con un
❀
Vous pouvez contribuer
à la conservation de
l’environnement.
De votre manière de conduire
dépend également la consommation
de combustible et, donc, du taux
d’émission d’agents contaminants
de votre cyclomoteur.
La manière de traiter votre véhicule
a des répercutions sur le niveau de
bruits et la vie de votre véhicule.
Ce Manuel d’Instructions donne une
série d’informations sur une conduite écologique et économique de
votre cyclomoteur.
Voyez tous les textes de ce Manuel
marqués d’une
❀
Contamos con Vd.
Nous avons confiance
en vous.
¡Proteja el medio
ambiente !
4
Protégez l’environne-
ment!
Page 5
Così può Lei contribuire
alla conservazione del
medio ambiente.
Dal suo modo di guidare dipende
pure il consumo di combustibile e,
quindi, il livello di emissione di contaminanti del suo ciclomotore.
Inoltre, il modo in cui tratta il veicolo
influisce sul livello di rumore e nel
proprio logoramento.
In questo Manuale di Istruzioni si
allegano una serie di informazioni
sulla guida ecologica e contemporaneamente economica del suo ciclomotore.
Voglia tener presente tutti i testi di
questo Manuale contrassegnati con
un
❀
This is how you can contribute to preserving the
environment.
The way you ride determines your
fuel consumption and therefore how
much your moped pollutes the
atmosphere.
In the same way, the way you
treat your moped affects its noise
level and wear and tear on the vehicle.
In the Owner’s instruction handbook you will find a series of points of
information on how to ride in an ecologically sound manner, which will
also be the most economic way to
ride your moped.
Please pay attention to all the
points marked with a flower
this handbook.
❀
in
So können Sie zum
Umweltschutz beitragen
Von Ihrem Fahrstil hängt unter
anderem der Benzinverbrauch und
daher auch die Schadstoffabgabe
Ihres Mokicks ab.
Auch hat die Art und Weise, wie
Sie das Fahrzeug behandeln, Einfluß auf seinen Geräuschpegel und
auf seine Abnutzung.
Diese Gebrauchsanweisung
enthält eine Reihe von Anweisungen für einen ökologisch verantworlichen und gleichzeitig wirtschaftlichen Fahrstil.
Bitte beachten Sie alle Abschnitte
dieser Gebrauchsanweisung, die mit
dem Symbol
versehen sind.
❀
Contiamo su di Lei.
Protegga il
medio ambiente!
We are counting on you!
Protect the
environment!
Wir rechnen auf Sie.
Schonen die
die Umwelt!
5
Page 6

6
Page 7

Datos personales:
Données Personelles:
Dati personali:
Personal details:
Persönliche Angaben:
Representante DERBI más cercano
Représentant DERBI le plus proche:
Concessionario DERBI più vicino:
Nearest DERBI Agent:
Nächste DERBI-Vertretung:
Datos del Ciclomotor:
Données du cyclomoteur:
Dati del ciclomotore:
Details of your moped:
Angaben zum Mokick:
Nombre / Nom / Nome: / Name / Name
...................................................................
Dirección / Adresse / Indirizzo
Address / Adresse
...................................................................
Teléfono / Téléphone / Telefono
Tel. / Telefon
...................................................................
Compañía de seguros
Compagnie d'Assurances
Compagnia assicuratrice
Insurance Company:
Nombre / Nom / Nome: / Name / Name
...................................................................
Dirección / Adresse / Indirizzo
Address / Adresse
...................................................................
Teléfono / Téléphone / Telefono
Tel. / Telefon
...................................................................
Jefe de Taller / Chef d'Atelier
Capo Officina Meccanica
Workshop Supervisor
Werkmeister
Versicherungsgesellschaft
...................................................................
...................................................................
Póliza de seguros N.º
Teléfono / Téléphone / Telefono
Tel. / Telefon
Police d'assurance n.º
Polizza di assicurazione nº:
...................................................................
Insurance Policy Nº
Versicherungspolice Nr.
...................................................................
Designación de modelo
Désignation du modèle
Denominazione del modello
Model Name
Modellbezeichnung
...................................................................
Número de chasis
Numéro du châssis
Numero di telaio
Frame Number
Fahrgestellnummer
...................................................................
Número de motor
Numéro du moteur
Numero del motor
Engine Number
Motornummer
...................................................................
7
Page 8

Modo de orientarse en este libro de
instrucciones:
Comment utiliser ce manuel d’instructions:
Come orientarsi in questo libro di
istruzioni:
El sumario está dividido en cinco
capítulos como indica la tabla de materias adyacente. Dichos capítulos se
localizan mediante los cuadros de color
negro.
En la primera página de cada capítulo hay una introducción y un índice
detallado del capítulo.
títulos que encabezan cada
Los
página sirven para localizar determinado texto, hojeando rápidamente el libro.
índice de la página 112 figura
En el
la página en que se encuentra la información que se precisa.
Debido a su criterio de constante mejora en sus
productos, DERBI - NACIONAL MOTOR, S.A.
Sociedad Unipersonal se reserva el derecho de
introducir las modificaciones que crea oportunas,
sin previo aviso.
8
Le sommaire est divisé en cinq cha-
pitres comme indique la table des matiè-
res ci-jointe. Ces chapitres se localisent
au moyen des
carrés noirs.
Sur la première page de chaque chapitre il y a une introduction et un
index
détaillé du chapitre.
titres de chaque page servent à
Les
localiser un texte déterminé, en feuilletant rapidement le manuel.
index de la page 112 donne l’infor-
L’
mation dont vous avez besoin et la page
où elle se trouve.
Etant donné le critère d’amélioration constante de
ses produits, DERBI / NACIONAL MOTOR, S.A.
Sociedad Unipersonal se réserve le droit
d’introduire les modifications qu’il jugerait
opportunes sans préavis.
Il sommario è suddiviso in cinque
capitoli come indica la tavola di materie
adiacente.
I sopraddetti capitoli si localizzano
mediante i quadri
color nero.
Nella prima pagina di ogni capitolo
c’è una introduzione ed un
del capitolo.
gliato
titoli che intestano ogni pagina ser-
I
indice detta-
vono per localizzare un testo determinato, sfogliando rapidamente il libretto.
indice di pagina 113 appare la
Nell’
pagina dove c’è l’informazione di cui si
ha bisogno.
A causa del suo criterio di miglioramento costante
dei propri prodotti, DERBI - NACIONAL MOTOR,
S.A. Sociedad Unipersonal mantiene il diritto di
introdurre le modifiche che consideri necessarie,
senza avviso previo.
Page 9

How to use this instruction manual:
Zur Benutzung des vorliegenden
Bedienungshandbuches:
Mandos
Commandes
Comandi
Controls
Bedienungselemente
13
The summary is divided into five
chapters, as indicated in the adjoining
table of contents. These chapters are
located by means of the
black panels.
On the first page of each chapter
there is an introduction and a
detailed
index of the chapter.
titles heading each page serve
The
to locate a certain text by leafing quickly
through the book.
index on page 113 you will find
In the
the page number of the information you
need.
Due to its criterion of constant improvement of its
products, DERBI - NACIONAL MOTOR, S.A.
Sociedad Unipersonal reserves the right to
introduce any modifications it considers suitable,
without prior notice.
Wie aus dem unten angeführten
Inhaltsverzeichnis hervorgeht, besteht
die Zusammenfassung aus fünf
Kapiteln. Das Auffinden der jeweiligen
Kapitel erfolgt mit Hilfe der schwarzen
Farbfelder.
Die erste Seite eines jeden Kapitels
enthält eine Einleitung und ein
ausführliches Inhaltsverzeichnis.
Die Überschriften auf jeder Seite
dienen dem Auffinden eines bestimmten
Textes, indem man das Buch schnell
durchblättert.
Dem Inhaltsverzeichnis auf Seite 113
ist die Seite mit der gewünschten
Information zu entnehmen.
Im Hinblick auf die ständige Verbesserung ihrer
Produkte behält sich DERBI - NACIONAL MOTOR,
S.A. Sociedad Unipersonal das Recht vor, ohne
vorherige Ankündigung die als zweckmäßig
erachteten Änderungen einzuführen.
Equipo y accesorios
Équipement et accessoires
Dotazione ed accessori
Equipment and Accessories
Ausstattung und Zubehör
Arranque, conducción y rodaje
Démarrage, conduite et rodage
Avviamento, guida e rodaggio
Starting, Riding and running-in
Anlassen, Fahren und Einfahren
Mantenimiento
Entretien
Manutenzione
Maintenance
Wartung
Especificaciones
Spécifications
Specificazioni
Specifications
Technische Daten
25
29
41
99
9
Page 10
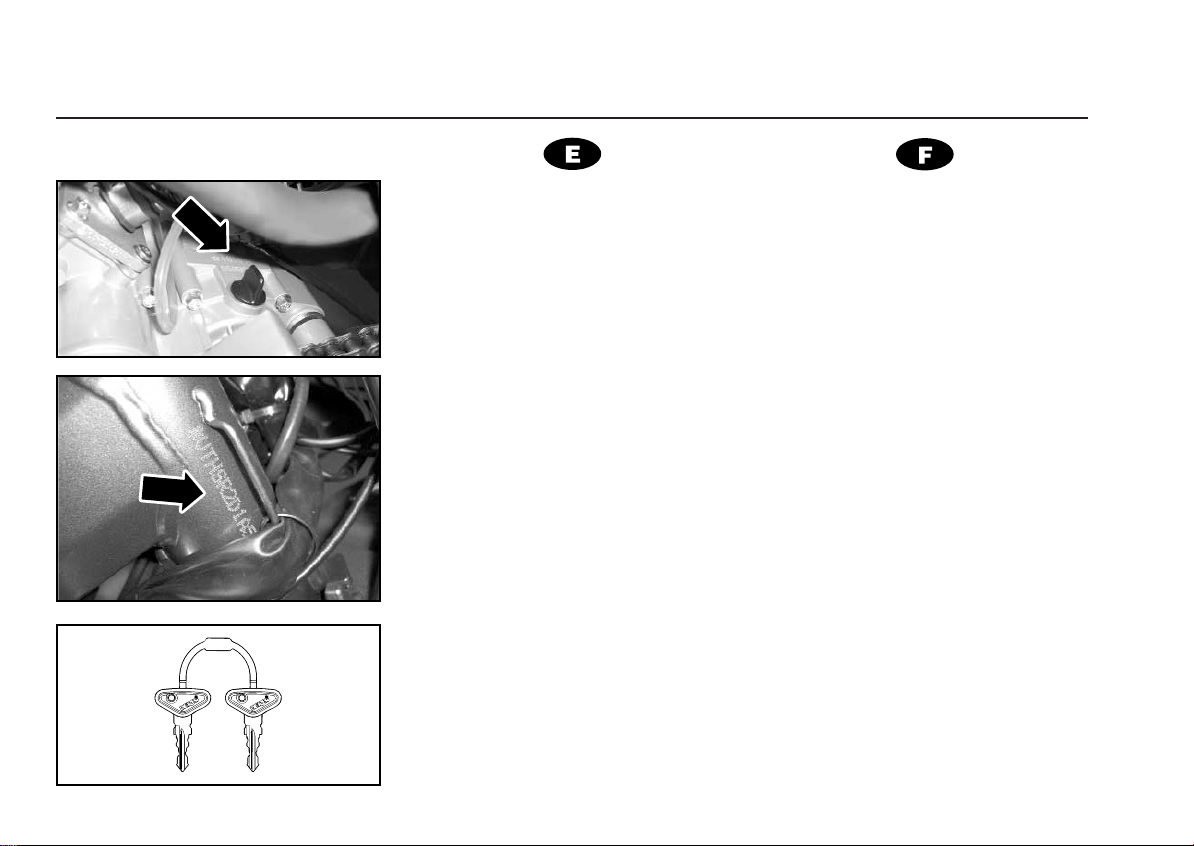
Número motor, bastidor - Llaves
Numero moteur, châssis - Clés
10
Emplazamiento del número de motor.
El número de motor está grabado en
la parte superior del cárter izquierdo.
Emplazamiento del número del
bastidor
El número del bastidor está grabado
en el lado derecho del tubo de
dirección.
Llaves
Con el ciclomotor se entregan dos llaves que sirven indistintamente para la
cerradura de contacto y tapa depósito
gasolina.
Atención
Para llamar la atención del lector
sobre puntos importantes se utilizan las
siguientes indicaciones: "observación",
"precaución" y "aviso"...
OBSERVACION:
Las observaciones dan consejos
complementarios o explican el texto.
¡Precaución!
Con este encabezamiento se advierte
que las maniobras en cuestión pueden
ocasionar
desgaste prematuro.
¡Aviso!
Los avisos advierten que la maniobra
es peligrosa y que podría causar
nes
deterioros en el vehículo o
00
lesio-
Situation du numéro du moteur
Le numéro de moteur est inscrit sur la
partie supérieure du carter gauche.
Situation du numéro de châssis
Le numéro de châssis est inscrit sur
le côté droit du tube de direction.
Clés
Deux clés sont remises avec le
cyclomoteur à utiliser indistinctement
pour la serrure de contact et celle du
bouchon du réservoir à essence.
Attention!
Pour attirer l’attention du lecteur sur
des points importants les indications
suivantes: “observation”, “précaution” et
“avis” sont utilisées.
OBSERVATION:
Les observations fournissent des conseils complémentaires ou expliquent le
texte.
Précaution!
Il s’agit d’un avertissement indiquant
que les manoeuvres en question peuvent provoquer des
véhicule ou une usure prématurée.
Avis!
Avertissement d’une manoeuvre dangereuse pouvant provoquer des
lésions.
dommages sur le
00
Page 11

Numero motore, telaio - Chiavi • Engine, chassis number - Keys
Motornumber, Fahrgestellnumber - Schlüssel
Situazione del numero del motore.
Il numero del motore è inciso nella
parte superiore del carter sinistro.
Situazione del numero
del telaio.
Il numero del telaio è inciso sul lato
destro del tubo dello sterzo.
Chiavi
Col ciclomotore si consegnano due
chiavi che servono indifferentemente
per la serratura d’accensione, e per il
coperchio del serbatoio benzina.
Attenzione !
Per portare l’attenzione dell’amabile
lettore sui punti importanti si usano i
seguenti termini: “osservazione”, “attenzione” e “avviso”.
OSSERVAZIONE:
Le osservazoni danno consigli complementari o spiegano il testo.
Attenzione!
Con questa intestazione si avverte
che le manovre in questione possono
provocare
mento prematuro.
Avviso!
Gli avvisi avvertono che la manovra è
pericolosa e che potrebbe produrre
lesioni.
panne nel veicolo o logora-
00
Position of the engine number
The engine number is engraved on
the top of the left-hand crankcase.
Position of the chassis number
The chassis number is engraved on
the right-hand side of the steering
column.
Keys
A set of two keys is delivered with the
moped. Either key may be used equally
for the ignition lock and for the fuel tank
cover.
Attention
In order to call the reader’s attention
to important points, the following
indications are used: ‘note’, ‘caution’
and ‘warning’.
NOTE:
The notes give complementary advice
or explain the text.
CAUTION!
This heading warns that the
manoeuvres in question may cause
damage or premature wear to the
vehicle.
WARNING!
The warnings indicate that the
manoeuvre is dangerous and may
cause injuries.
00
Lage der Motornummer
Die Motornummer befindet sich am
oberen Teil der linken Gehäusehälfte.
Lage der Fahrgestellnummer
Die Fahrgestellnummer befindet sich
an der rechten Seite des Lenkrohrs.
Schlüssel
Das Moped wird mit zwei Schlüsseln
geliefert, die beide für das Zündschloß
und den Benzintankdeckel vorgesehen
sind.
Achtung!
Um die Aufmerksamkeit des Lesers
auf bestimmte wichtige Punkte zu
lenken, werden die folgenden Hinweise
verwendet: "Anmerkung", "Vorsicht" und
"Achtung"...
ANMERKUNG:
Die Anmerkungen geben zusätzliche
Ratschläge oder erläutern den Text.
Vorsicht!
Mit dieser Überschrift wird darauf
hingewiesen, daß die beschriebenen
Vorgänge Fahrzeugschäden oder
vorzeitigen Verschleiß zur Folge haben
können.
Achtung!
Diese Warnungen weisen darauf hin,
daß der Vorgang gefährlich ist und
Verletzungen verursachen könnte.
00
11
Page 12
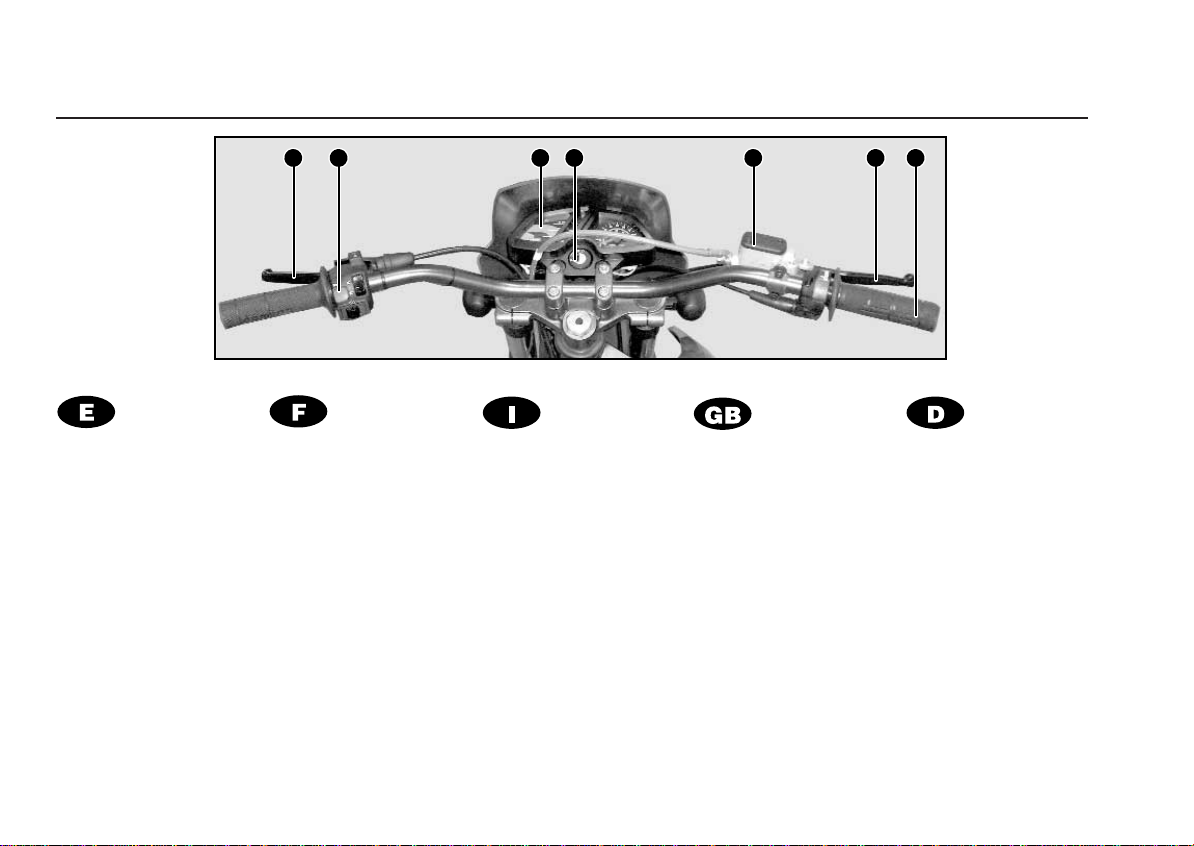
Instrumentos y mandos • Instruments et commandes • Strumenti e comandi
Instruments and controls • Instrumente und Bedienungselemente
6 2 1 5 7 3 4
1.- Tablier
2.- Interruptor luces,
claxon y stop
3.- Mando freno
delantero
4.- Mando de gas
5.- Cerradura
contacto
6.- Mando embrague
7.- Depósito líquido
freno
delantero
12
1.- Tableau de bord
2.- Commandes
phares, klaxon et
stop
3.- Commande frein
avant
4.- Commande gaz
5.- Serrure contact
6.- Commande
embrayage
7.- Réservoir liquide
frein avant
1.- Cruscotto
2.- Interruttore luci,
avvisatore
acustico ed stop
3.- Comando freno
anteriore
4.- Comando
dell’acceleratore
5.- Serratura
d’accensione
6.- Comando frizione
7.- Serbatoio liquido
freno anteriore
1.- Instrument panel
2.- Lights, horn and
stop switch
3.- Front brake lever
4.- Accelerator
5.- Ignition lock
6.- Clutch lever
7.- Front brake fluid
tank
1.- Armaturenbrett
2.- Schalter für
Lichter,
Hupe und Stop
3.- Hebel
Vorderbremse
4.- Gasgriff
5.- Zündschloß
6.- Kupplungshebel
7.- Behälter für
Bremsflüssigkeit
Vorderbremse
Page 13

Este capítulo contiene una
descripción detallada de todos
los instrumentos y mandos de
especial interés para el
usuario.
Ce chapitre contient une
description détaillée de tous
les instruments et des
commandes particulièrement
intéressantes pour l’utilisateur.
This chapter contains a
detailed description of all the
instruments and controls of
special interest for the user.
Questo capitolo contiene una
minuta descrizione di tutti gli
strumenti e comandi
d’interesse speciale per
l’utente.
Dieses Kapitel enthält eine
ausführliche Beschreibung
aller Instrumente und
Bedienungselemente, die für
den Anwender von Bedeutung
sind.
Indice del capítulo
Index du chapitre
Indice delcapitolo
Index of the chapter
Inhaltsverzeichnis des Kapitels
Tablier
Tableau de bord
Cruscotto
Instrument panel
Armaturenbrett .........................................14
Interruptor luces, claxon y stop
Commutateur phares, klaxon et stop
Interruttore luci,avvisatore acustico ed stop
Lights, horn and stop switch
Schalter für Lichter, Hupe und Stop..........16
Cerradura contacto
Serrure contact
Serratura d’accensione
Ignition lock
Zündschloß...............................................16
Mando freno delantero
Commande frein avant.
Comando freno anteriore
Front brake lever
Hebel Vorderbremse ................................18
Mando de gas
Commande gaz
Comando dell’acceleratore
Accelerator
Gasgriff ....................................................18
Mandos
Commandes
Comandi
Controls
Bedienungselemente
Mando embrague
Commande embrayage
Comando frizione
Clutch lever
Kupplungshebel........................................18
Mando freno trasero
Commande frein arrière
Comando freno posteriore
Rear brake pedal
Hebel Hinterbremse..................................20
Palanca de arranque
Levier de démarrage
Pedale di avviamento
Kick-starter
Kickstarter.................................................20
Palanca del cambio
Levier de la boîte à vitesses
Pedale del cambio
Gear-change pedal
Schalthebel...............................................22
Mando aire carburador
Commande air carburateur
Comando starter carburatore
Choke
Hebel für Vergaser-Luftzufuhr...................24
13
Page 14
Tablier
7 6 5 4 3 2 1
786 5 4 3 2 1
Tableau de bord
7 6 5 4 3 2 1
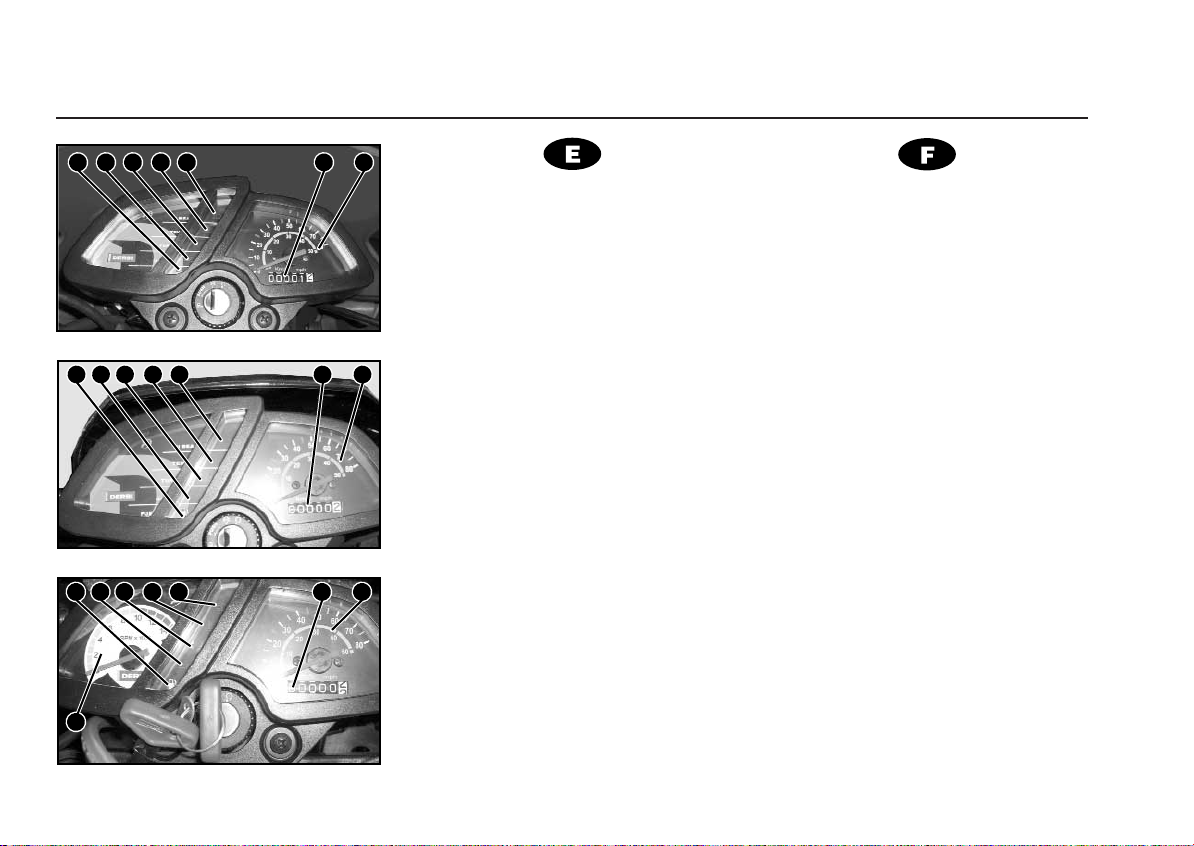
SENDA R - SENDA SM
(1) Velocímetro
El velocímetro indica la velocidad de
marcha en Kilómetros por hora.
(2) Cuentakilómetros
Totalidad de kilómetros recorridos. La
cifra del extremo derecho indica el
número de hectómetros.
- (3) Indicador luz intensiva
(1) Le Compteur de vitesse
Le compteur de vitesse indique la
vitesse en kilomètre par heure.
(2) Compte-kilomètres
Indique les kilomètres parcourus.
Le chiffre à droite indique les
hectomètres.
- (3) Témoin lumière de phare
X-TREME R
X-TREME SM
14
(
Cuando el indicador se enciende, la
temperatura del refrigerante sobrepasa
los 105 ºC.
(4) Indicador de temperatura
)(5) Indicador Intermitentes
' (6) Indicador reserva aceite
Cuando se enciende la luz de advertencia, la reserva contiene 0,25 litros.
&
Cuando se enciende la luz indicador
gasolina, en el depósito queda una
reserva de 2 litros.
(8) Cuentavueltas
El cuentavueltas muestra la velocidad
del motor en revoluciones por minuto.
(7) Indicador reserva gasolina
(SENDA SM • X-TREME SM)
( (4) Indicateur de température
Le témoin s'allume lorsque la tempé-
rature du liquide refroidissant dépasse
105º C.
)(5) Témoin des clignotants
'
ne contient que 0,25 litres.
&
ne contient que 1,3 litres.
(8) Le Compte-tours
(6) Témoin de réserve d’huile
Le témoin s'allume lorsque la réserve
(7) Témoin de réserve d'essence.
Le témoin s'allume lorsque la réserve
(SENDA SM • X-TREME SM)
Le compte-tours indique la vitesse
du moteur en tours par minute.
Page 15

Cruscotto • Instrument Panel
Armaturenbrett
(1) Tachimetro
Il tachimetro indica la velocità di moto in
chilometri all'ora.
(2) Contachilometri
Totale di chilometri percorsi. La cifra
dell’estremo destro indica il numero di
ettometri.
-
(3) Indicatore luce abbagliante
( (4) Indicatore di temperatura
Qualora l’indicatore si accende, la temperatura del refrigerante ha superato i
105ºC.
)(5) Spia indicatori direzione
' (6) Spia riserva olio
Qualora si accende la luce indicatore
d'olio, nel serbatoio rimane una scorta
di litri 0,25.
& (7) Spia riserva benzina
Qualora si accende la luce indicatore
benzina, nel serbatoio rimane una scorta di litri 1,5.
(8) Contagiri
(SENDA SM • X-TREME SM)
Il contagiri indica la velocità del motore
in giri per minuto.
(1) Speedometer
The speedometer indicates the running
speed in kilometres / hour.
(2)
Kilometre counter
(Mph Models USA)
Total number of kilometres run. The
number on the far right indicates the
number of hectometres.
- (3) High-beam indicator
( (4) Temperature indicator
When the indicator lights up, the
temperature of the coolant has
exceeded 105 °C.
)(5) Indicator warning lihgt
' (6) Oil Reserve
When this warning light comes on there
are 0,25 litres left in reserve.
&
When the fuel indicator lights up, a
reserve of 1,3 litres remains in the tank.
(8)
The tachometer (rev counter) shows the
rotation speed of the engine in
revolutions per minute.
(7) Reserve fuel tank indicator
Tachometer
(SENDA SM • X-TREME SM)
(1)Geschwindigkeitsmesser
Der Geschwindigkeitsmesser gibt die
Fahrtgeschwindigkeit in
Stundenkilometern an.
(2) Kilometerzähler
Gesamtheit der zurückgelegten
Kilometer. Die Ziffer ganz rechts gibt die
zurückgelegten Hektometer an.
- (3) Fernlichtanzeige
( (4) Temperaturanzeige
Leuchtet die Anzeige auf, so liegt die
Temperatur des Kühlmittels über 105º C.
)(5) Blinkanzeige
' (6) Ölreserveanzeige
Wenn das Warnlicht aufleuchtet, enthält
die Reserve 0,25 Liter.
& (7) Kraftstoffanzeige
Wenn das Warnlicht aufleuchtet, so
verbleibt im Tank eine Reserve von 1,3
Litern.
(8) Drehzahlmesser
(SENDA SM • X-TREME SM)
Der Drehzahlmesser gibt die
Drehgeschwindigkeit des Motors in
Umdrehungen pro Minute an.
15
Page 16
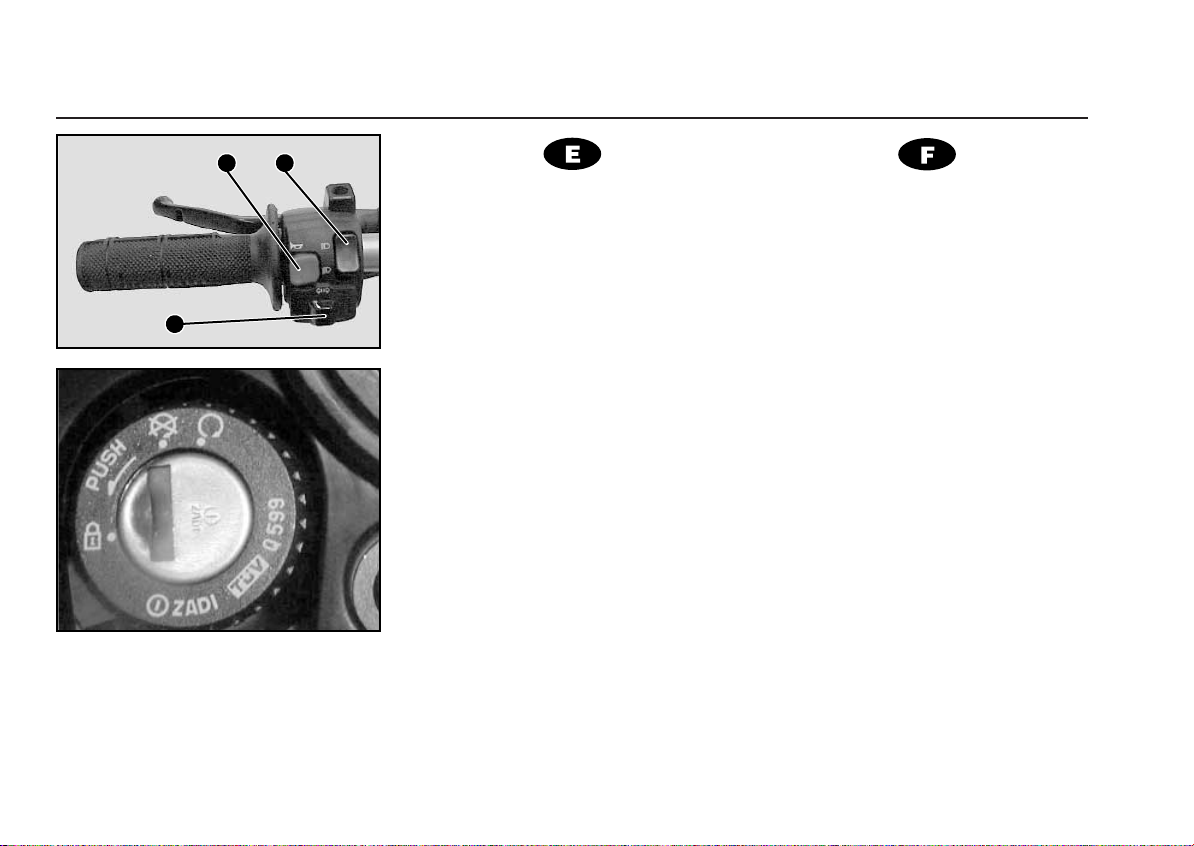
Mando luces, claxon y stop - Cerradura de contacto
Commandes lumières, klaxon et stop - Serrure du contact
2 1
Mando luces, claxon e intermitentes
Grupo conmutador, situado en el lado
izquierdo del manillar.
Mando luces (1)
Tiene dos posiciones:
3
16
Abajo, luz de cruce
Arriba, luz intensiva.
Para que este mando funcione, poner
antes la llave de contacto en posición
(motor en marcha)
Pulsador acústico claxon (2)
Mando intermitentes (3)
Centro - Intermitentes apagados
Derecha - Intermitentes lado
derecho encendidos
Izquierdo - Intermitentes lado
izquierdo encendidos
Cerradura de contacto
Posición de la llave
# - Motor parado y sin blocaje.
! - Posición arranque motor.
$ - Para bloquear la dirección, gire
el manillar completamente hacia
la derecha o izquierda. Presione
hacia abajo la llave dejando que
vuelva a su lugar, y después
gírela hasta la posición
extráigala.
Commandes lumières, klaxon et
clignotants
Groupe commutateur situé du côté
gauche du guidon.
Commandes lumières (1)
Deux positions:
vers le bas: Lumière courtes
vers le haut: phare route
Avant d'actionner cette commande
/
mettre la clé de contact en position
(moteur en marche)
Bouton acoustique klaxon (2)
Commandes clignotants (3)
Centre: clignotants éteints
Droite: clignotants côté droit allumés
gauche: clignotants côté gauche
Serrure du contact
Position de la clé
allumés
# - Moteur arrêté, sans blocage
! - Position de démarrage du moteur
$ - Pour bloquer la direction, faire
tourner le guidon tout à fait à
droite ou à gauche. Pousser la
clé vers le bas en la laissant
retourner à sa position initiale et
$y
tourner jusqu'à la position
sortez-la.
/
$ et
Page 17
Comando luci, avvisatore acustico ed stop - Serratura d’accensione • Lights, horn and stop switch - Ignition lock
Schalter für Lichter, Hupe und Stop - Zündschloß
Comando luci, avvisatore acustico
ed indicatori direzione
Gruppo commutatore, situato nel lato
sinistro del manubrio.
Comando luci (1)
Ha due posizioni:
In basso, luce anabbagliante
In alto, luce abbagliante
Affinché questo comando funzioni,
girare la chiave d'accensione in posizione /(motore acceso)
Pulsante avvisatore acustico (2)
Comando indicatori direzione (3)
Centro - Indicatori direzione spenti
Destra - Indicatori lato destro accesi
Sinistra - Indicatori lato sinistro accesi
Serratura d’accensione
Posizione della chiave
# - Motore spento e senza
bloccaggio
! - Posizione avviamento motore
$ - Per bloccare la sterzo, girare
completamente il manubrio verso
destra o sinistra. Pressionare la
chiave in fondo e lasciare che
ritorni alla sua posizione, girarla
fino alla posizione
$ ed estrarla.
Lights, horn and indicator switch
This switch group is located at the
left-hand end of the handlebar.
(1) Headlight Dip Switch
The dip switch has two positions:
Down - dipped beam
Up - full beam
For this switch to operate, the
ignition key must be in the / position
(engine on).
(2) Horn button
(3) Indicator switch
Middle = indicators off
Right = right-hand indicators on
Left = left-hand indicators on
Ignition lock
Key position
# - Engine off, steering unlocked
! - Engine start position
$ - To lock the steering, turn the
handlebar all the way to left or
right. Press the key downwards,
turn it to the
remove it.
$ position and
Schalter für Lichter, Hupe und
Blinklichter
Umschaltgruppe an der linken Seite
des Lenkers.
(1) Lichtschalter
Zwei Positionen:
Unten: Abblendlicht
Oben : Fernlicht
Damit dieser Schalter funktioniert,
muß vorher der Zündschlüssel in die
Position / (Motor ein) gebracht werden.
(2) Hupknopf
(3) Blinklichtschalter
Mitte: Blinklichter aus
Rechts: Blinklichter rechts ein
Links: Blinklichter links ein
Zündschloß
Position des Schlüssels
# - Motor aus, ohne Blockierung
! - Position zum Anlassen des
Motors
$ - Um die Lenkung zu blockieren,
drehen Sie den Lenker ganz
nach rechts oder nach links.
Drücken Sie den Schlüssel nach
unten und lassen Sie ihn wieder
in seine alte Position
zurückkehren. Drehen Sie ihn bis
in die Position
ihn heraus.
$ und ziehen Sie
17
Page 18
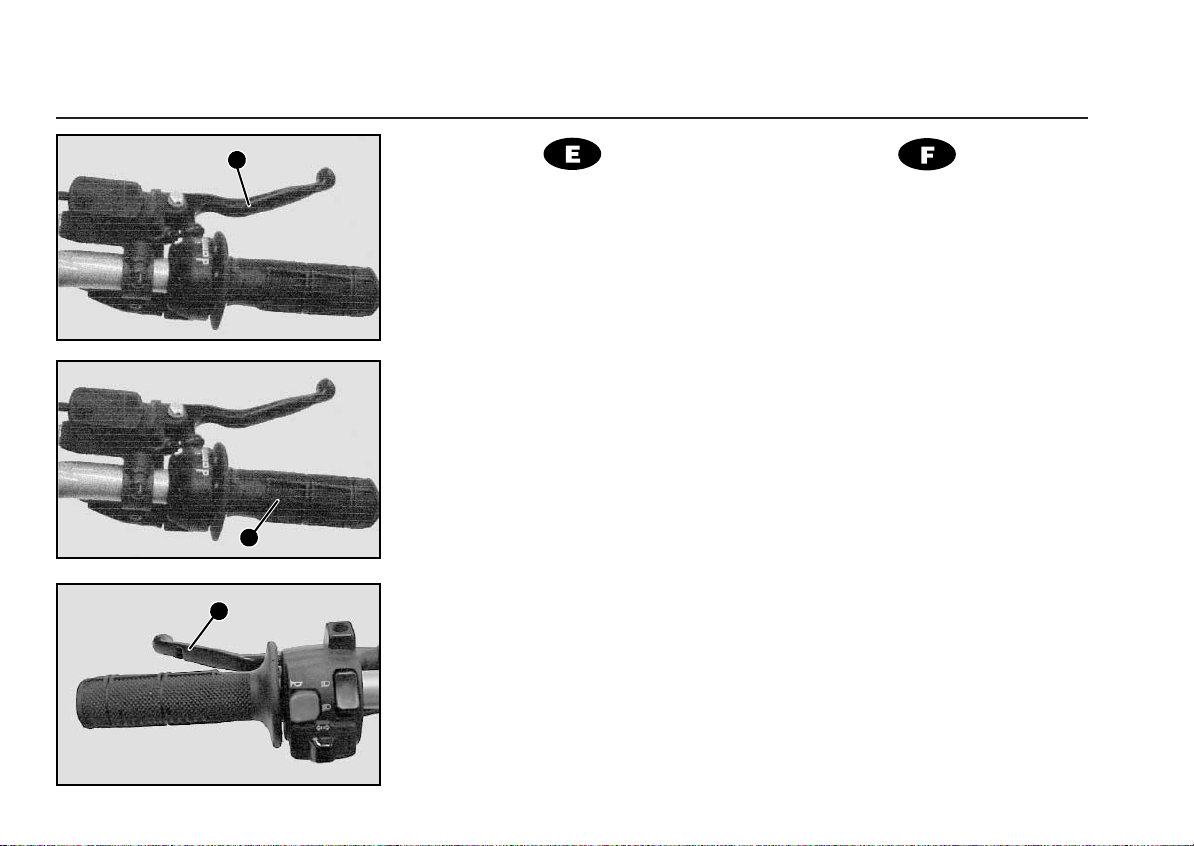
Mando freno delantero, gas y embrague
Commande frein avant, gaz et embrayage
2
1
2
18
Mando de freno delantero
El mando freno delantero, está
situado en el lado derecho del manillar
(2). Poner especial atención en su uso
y utilizar el freno delantero sin
brusquedades y dosificando la fuerza
gradualmente, según las condiciones
del terreno, procurando siempre evitar
el bloqueo de la rueda.
Mando de gas
Situado en el lado derecho del manillar (1). Con la rotación hacia adentro
de la empuñadura, se obtiene la apertura de la válvula del carburador.
Mando de embrague
La maneta del mando de embrague
está situada en el lado izquierdo del
manillar (2). Apretando a fondo dicha
maneta contra el manillar, se desconecta el embrague, liberando la transmisión
del motor.
Dejando suavemente la maneta se
conecta el embrague uniendo el motor
a la transmisión, que con una marcha
engranada transmite a través del cambio, la fuerza del motor a la rueda trasera.
Commande frein avant
La commande du frein avant est
située du côté droit du guidon (2). Il faut
avoir la précaution d'utiliser le frein
avant sans brusquerie, en dosant la
force graduellement selon les conditions du terrain pour éviter le blocage
de la roue.
Commande du gaz.
Cette commande est située du côté
droit du guidon (1). Si on tourne la
poignée vers l'intérieur on obtient
l'ouverture du boisseau du carburateur.
Commande de l'embrayage
La manette de commande de
l'embrayage est située du côté gauche
du guidon (2).
En serrant à fond cette manette contre le guidon on déconnecte l'embrayage et on libère la transmission du
moteur.
En lâchant progressivement la manette on connecte l'embrayage et on relie
le moteur à la transmission qui avec
une vitesse engagée transmet au
moyen de la boîte à vitesses la force du
moteur à la roue arrière.
Page 19

Comando freno anteriore, acceleratore e frizione • Front brake lever, Accelerator and clutch control
Betätigung Vorderbremse, Gasgriff und Kupplungshebel
Comando freno anteriore
Il comando freno anteriore è situato
nel lato destro del manubrio (2). Avere
speciale cura quando lo si usi, usare il
freno anteriore in modo non brusco,
dosificare gradatamente la forza, a
seconda delle condizioni del terreno, e
fare in modo di evitare sempre il bloccaggio della ruota.
Comando dell’acceleratore
Situato nel lato destro del manubrio
(1). Quando si gira verso l’interno la
manopola, si provoca l’apertura della
valvola del carburatore.
Comando frizione
La leva del comando frizione è situata
al lato destro del manubrio (2). Quando
si serra completamente la sopraddetta
leva contro il manubrio, si disinserisce
la frizione e si libera la trasmissione del
motore.
Se si allenta soavemente la leva, si
inserisce la frizione che unisce il motore
e la trasmissione che, con una marcia
ingranata, trasmetterà la forza del motore alla ruota posteriore mediante il cambio.
Front brake lever
The front brake lever is located at the
right-hand end of the handlebar (2). It should
be used with care, pulling it smoothly and
gradually, in accordance with the ground
conditions, taking care always to avoid locking
the front wheel.
Engine running and stop button (Models
USA)
The engine running and stop button is loca-
ted on the right hand side of the handlebar (3)
# Above position: Engine Stop
! Down position: Engine running.
Accelerator
This is situated at the right-hand end of
the handlebar (1). Twisting the grip inwards
opens the carburettor valve and accelerates
the engine.
Clutch lever
The clutch control lever is situated at the
left-hand end of the handlebar (2). Pressing
the lever all the way, until it touches the
handlebar, disengages the clutch and
releases the engine transmission.
Releasing the lever gently engages the
clutch and connects the engine with the
transmission, which, with a gear selected,
transmits the power of the engine through the
gearbox to the rear wheel.
Hebel Vorderbremse
Der Hebel zur Betätigung der
Vorderbremse befindet sich an der
rechten Seite des Lenkers (2). Diese
Bremse ist mit äußerster Vorsicht zu
benutzen. Nicht jäh abbremsen, sondern
die Kraft je nach Beschaffenheit des
Bodens dosieren. Man achte darauf, daß
das Rad nicht blockiert wird.
Gasgriff
An der rechten Seite des Lenkers (1).
Mit der Drehung des Handgriffs zum
Fahrer hin wird die Öffnung des
Vergaseschiebers bewirkt.
Kupplungshebel
Der Hebel für die Kupplungsbetätigung
befindet sich an der linken Seite des
Lenkers (2). Indem man diesen Hebel
voll gegen den Lenker durchdrückt, wird
die Kupplung gelöst und der Motorantrieb
freigesetzt.
Durch langsames Loslassen des
Hebels wird die Kupplung wieder
eingeschaltet und der Motor mit dem
Antrieb verbunden. Über den
eingeschalteten Gang wird die Motorkraft
auf das Hinterrad übertragen.
19
Page 20

Mando freno trasero y palanca de arranque
Commande frein arrière et levier de démarrage
1
2
c
Atenció a l'estat del terreny. Sobretot
si està asfaltat i moll o hi ha pedretes.
20
Mando freno trasero
El pedal de mando del freno trasero,
está situado en la parte derecha del
ciclomotor, a la altura del motor (2).
Debe ser accionado con la punta del
pie gradualmente. Combinar la
utilización del freno trasero con el
delantero según necesidades, de esta
forma obtendrán frenadas más
eficaces.
¡Atención al estado del terreno!
sobre todo si éste es asfaltado y está
mojado o existe gravilla.
Palanca de arranque
La palanca de arranque está situada
en el lado derecho del motor (1) para
los modelos que la equipen. Para poner
en funcionamiento el motor, basta con
actuar sobre la palanca accionándola
hacia atrás con el pie.
No tenga el motor en marcha sin
❀
necesidad.
¡Aviso!
Es muy importante comprobar antes de
poner el motor en marcha, que la palanca cambio esté en punto muerto. (Ver
apartado palanca de cambio.)
00
Commande frein arrière
La pédale de commande du frein
arrière est située sur la partie droite du
cyclomoteur, à la hauteur du moteur (2).
Elle doit être actionnée graduellement
avec la pointe du pied. Combiner l'utilisation du frein arrière et du frein avant,
selon les besoins pour obtenir des freinées plus efficaces.
Attention à l'état du terrain, surtout
l'asphalte mouillé ou le gravier.
Levier de démarrage
Le levier de démarrage est situé du
côté droit du moteur (1). Pour mettre en
fonctionnement le moteur il suffit de
mener le levier vers l'arrière avec le
pied.
Ne pas faire tourner inutilement le
❀
moteur.
Attention!
Il est très important de vérifier avant
de faire démarrer le moteur si le levier
de vitesses se trouve en point mort.
(Voir paragraphe " Levier de la boîte à
vitesses")
00
Page 21

Comando freno posteriore e pedale di avviamento • Rear brake pedal and start lever
Pedal Hinterbremse und Anlasserhebel
Comando freno posteriore
Il pedale del comando del freno posteriore è situato nella parte destra del
ciclomotore, al livello del motore (2).
Deve azionarsi gradatamente con la
punta del piede. Bisogna combinare
l’uso del freno posteriore con quello
anteriore, a seconda delle necessità: in
questo modo si otterranno delle frenate
più efficaci.
Attenzione allo stato del terreno! In
particolare se è asfaltato ed è bagnato
o c’è ghiaietto.
Pedale di avviamento
Il pedale di avviamento è situata nel
lato destro del motore (1). Per avviare il
motore, basta agire sul pedale, azionandolo indietro col piede.
Non tenere il motore avviato senza
❀
bisogno.
Avviso!
È assai importante verificare che la
leva del cambio sia nel punto morto
prima di avviare il motore. (Vedasi
punto Pedale del cambio.)
00
Rear brake pedal
The rear brake pedal is situated on
the right-hand side of the moped, at the
height of the engine (2). It should be
pressed gradually with the front of the
foot. Combine the use of the front and
rear brakes according to needs, in order
to achieve more efficient braking.
CAUTION! Pay attention to the state
of the ground, especially if it is
asphalted and there is water or gravel.
Kick-starter
The kick-starter is situated on the
right-hand side of the engine (1). To
start the engine, press the lever
backwards with your foot.
Do not allow the engine to run
❀
when it is not necessary.
WARNING!
It is very important before starting
the engine to check that the gear lever
is in the neutral position. (See section
on Gear-change pedal.)
00
Betätigung Hinterbremse
Das Pedal für die Betätigung der
Hinterbremse befindet sich an der
rechten Seite des Mokicks, auf der
Höhe des Motors (2). Dieses Pedal ist
stufenweise mit der Fußspitze zu
betätigen. Werden Vorder- und
Hinterbremse den Erfordernissen
entsprechend kombiniert, kann eine
optimale Bremswirkung erzielt werden.
Achten Sie auf die Beschaffenheit
des Geländes, vor allem, wenn dieses
asphaltiert und naß ist oder wenn Kies
vorhanden ist!
Kickstarter
Der Kickstarter befindet sich an der
rechten Seite des Motors (1). Um den
Motor in Gang zu setzen, ist der Hebel
mit dem Fuß nach hinten zu drücken.
Lassen Sie den Motor nicht
❀
unnötig laufen.
Achtung!
Vor dem Anlassen des Motors ist
unbedingt sicherzustellen, daß sich das
Getriebe im Leerlauf befindet. (Siehe
Abschnitt Starthebel.)
00
21
Page 22

Palanca de cambio
Levier de la boîte à vitesses
1
c
IMPORTANT:
La palanca de canvi s'ha d'accionar
sempre després d'haver desembragat i
teduït al mínim el comandament del
gas.
Palanca de cambio
La palanca de cambio está situada
en el lado izquierdo el motor (1) Se
acciona con el pie y debe acompañarse
con decisión hacia el engrabe de la
marcha. Después de haber efectuado el
cambio de marcha, retirar el pie del
pedal, el cual retornará a su posición
primitiva automáticamente.
Partiendo del punto muerto, las
marchas se introducen de la siguiente
manera:
- Empujando la palanca hacia abajo se
introduce la 1.ª marcha.
- Empujando la palanca hacia arriba, se
introducen la 2.ª, 3.ª , 4.ª, 5.ª y 6.ª
marcha.
Para reducir, accionar la palanca
hacia abajo.
IMPORTANTE:
La palanca de cambio debe
accionarse siempre después de haber
desembragado y reducir al mínimo el
mando del gas.
Levier de la boîte à vitesses
Le levier du changement de vitesses
est situé du côté gauche du moteur (1).
Il faut l'actionner avec le pied et ne pas
le lâcher avant que la vitesse ne soit
engagée. Ensuite, après avoir passé de
vitesse, enlever le pied de la pédale qui
retournera à sa position initiale automatiquement. En partant du point mort, les
vitesses s'engagent ainsi:
- En poussant le levier vers le bas, on
engage la première vitesse.
- En poussant le levier vers le haut, on
engage la 2ème, la 3ème, la 4ème, la
5ème et la 6ème vitesse.
Pour réduire il faut actionner le levier
vers le bas.
IMPORTANT:
Le levier de changement de vitesses
doit toujours être actionné après avoir
débrayé en réduisant au minimum l'action sur la commande du gaz.
22
Page 23

Pedale del cambio • Gear-change pedal
Schalthebel
Pedale del cambio
Il pedale del cambio è situato nel lato
sinistro del motore (1). Si aziona col
piede e devesi accompagnare
decisamente verso l'ingrano della
marcia. Dopo aver realizzato il cambio
di marcia, togliere il piede dal pedale e
quest'ultimo ritornerà automaticamente
alla sua posizione iniziale. Se si parte
dal punto morto, le marce si introducono nel seguente modo:
- Spingendo il pedale in giù s'introduce
la 1ª marcia.
- Spingendo il pedale in su si introduco-
no le marcie 2ª, 3ª, 4ª 5ª e 6ª.
Per ridurre, azionare il pedale verso il
basso.
IMPORTANTE:
Il pedale del cambio devesi sempre
azionare dopo aver disinnestato la marcia ed aver ridotto al minimo il comando
dell'acceleratore.
Gear-change pedal
The gear-change pedal is situated
on the left-hand side of the engine (1).
To change gear, push the pedal firmly
until the gear engages, then remove
your foot from the pedal, which will
automatically return to its original
position. Starting from neutral, the gears
are engaged as follows:
- Pushing the lever downwards
engages 1st gear.
- Pushing the lever upwards engages
2nd, 3rd, 4th, 5th and 6th gears. To
change down a gear, push the
pedal downwards.
IMPORTANT:
The gear-change pedal must always
be activated after disengaging the
clutch and returning the accelerator to
its minimum position.
Schalthebel
Der Schalthebel befindet sich an der
linken Seite des Motors (1). Er wird mit
dem Fuß bedient und muß mit
Entschlossenheit bis zum Einrücken
des Ganges betätigt werden. Nach dem
Gangwechsel den Fuß vom Pedal
nehmen, welches automatisch in seine
alte Position zurückkehrt. Vom Totpunkt
aus gesehen werden die Gänge wie
folgt eingeschaltet:
- Den Hebel nach unten drücken: Es
wird der erste Gang eingeschaltet.
- Den Hebel nach oben drücken: Es
werden der zweite, dritte, vierte, fünfte
und sechste Gang eingeschaltet.
Um zurückzuschalten ist der Hebel
nach unten zu drücken.
WICHTIG:
Der Schalthebel darf erst dann betätigt
werden, wenn die Kupplung ausgerückt
und die Gasbetätigung aufs Minimum
reduziert worden ist.
23
Page 24
Mando aire carburador • Commande air carburateur
Comando starter carburatore • Choke • Hebel für Vergaser-Luftzufuhr
2
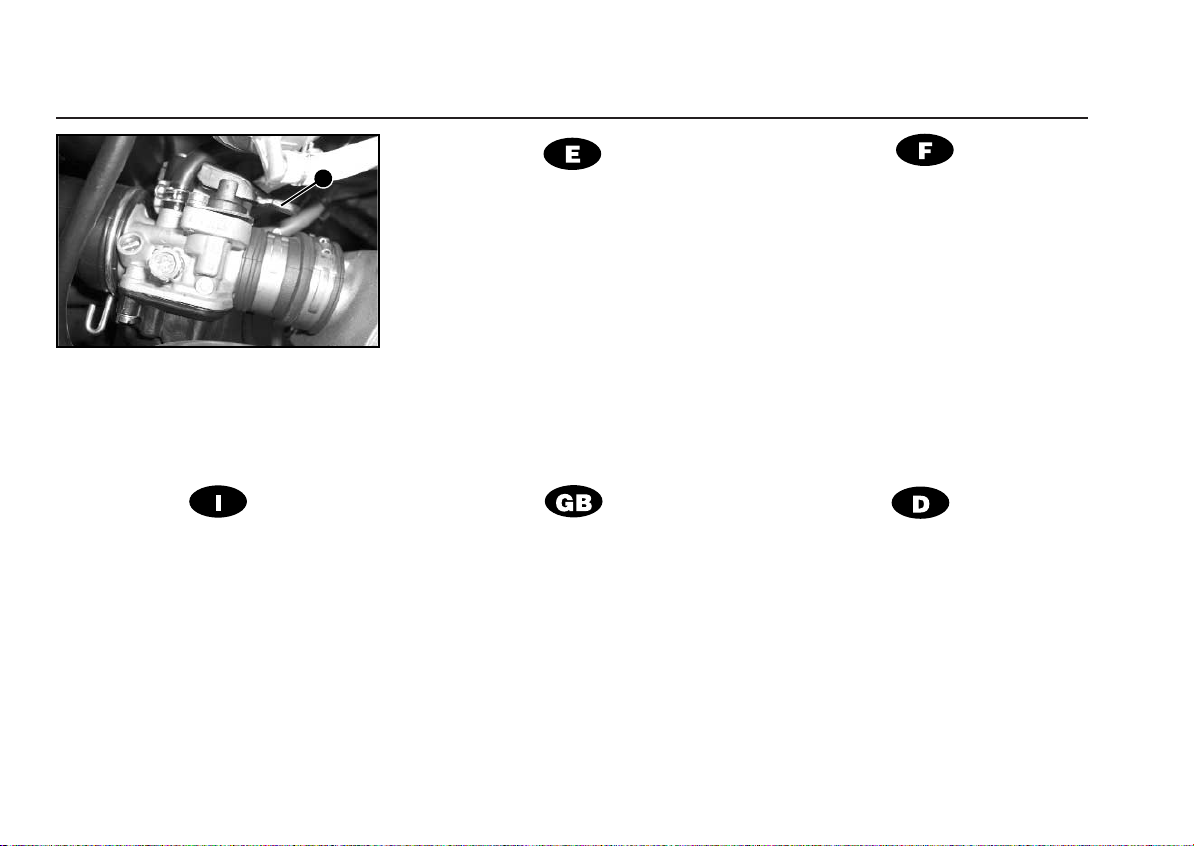
Comando starter carburatore
È situato sul lato destro del carburatore (1), ed è facilmente raggiungibile con
la mano del medesimo lato. Ha due
posizioni:
Leva su: Avviamento a freddo.
Leva giù: Avviamento in condizioni
normali.
Questo comando ha come unico
scopo rendere più facile l'avviamento.
Utilizzarlo soltanto quando IL MOTORE
SIA FREDDO.
24
Mando aire carburador
Está situado en el lado derecho del
carburador (1) de fácil acceso con la
mano del mismo lado. Tiene dos
posiciones:
Palanca arriba: Arranque en frio.
Palanca abajo: Arranque en
condiciones normales.
Este mando sólo tiene la finalidad
de facilitar el arranque. Emplear sólo
cuando el MOTOR ESTE FRIO.
Choke
The choke is situated on the
righthand side of the carburettor (1),
within easy reach of your right hand. It
has two positions:
Lever up: Starting when cold.
Lever down: Starting in normal
conditions.
This control is only to be used for
making starting easier. USE ONLY
WHEN THE ENGINE IS COLD.
Commande air carburateur
Il est situé de côté droit du carburateur
(1) facilement accessible à la main. Il a
deux positions:
Levier vers le haut: Démarrage à
froid.
Levier vers le bas: Démarrage dans
des conditions
normales.
Cette commande n'a d'autre finalité que
faciliter le démarrage. NE L'UTILISER
QUE LORSQUE LE MOTEUR EST
FROID.
Hebel für Vergaser-Luftzufuhr
Er befindet sich an der rechten Seite
des Vergasers (1) und ist mit der Hand
leicht zu erreichen. Er hat zwei
Positionen:
Hebel oben: Kaltstart.
Hebel unten: Starten unter
Normalbedingungen.
Einziger Zweck dieses Hebels ist es,
das Anlassen des Motors zu erleichtern.
Nur benutzen, wenn der MOTOR KALT
IST.
Page 25

Este capítulo contiene una
descripción detallada del sillín,
depósito gasolina y aceite.
Ce chapitre décrit de façon
détaillée la selle et le réservoir
Indice del capítulo
Index du chapitre
Indice delcapitolo
Index of the chapter
Inhaltsverzeichnis des Kapitels
Questo capitolo contiene una
descrizione dettagliata del
sella, serbatoio benzina e olio.
This chapter contains a
detailed description of the
saddle.
Dieses Kapitel enthält eine
ausführliche Beschreibung des
Sitzes.
Equipo y accesorios
Équipement et accessoires
Dotazione ed accessori
Equipment and Accessories
Ausstattung und Zubehör
Sillín
Selle
Sellino
Saddle
Sitz............................................................26
Depósito de gasolina
Réservoir à essence
Serbatoio benzina
Fuel tank
Kraftstofftank.............................................26
Depósito de aceite
Réservoir d’huile
Serbatoio olio
Oil tank
Ölbehälter .................................................26
25
Page 26
Sillín, depósito de gasolina y de aceite
Selle, réservoir à essence et d'huile
26
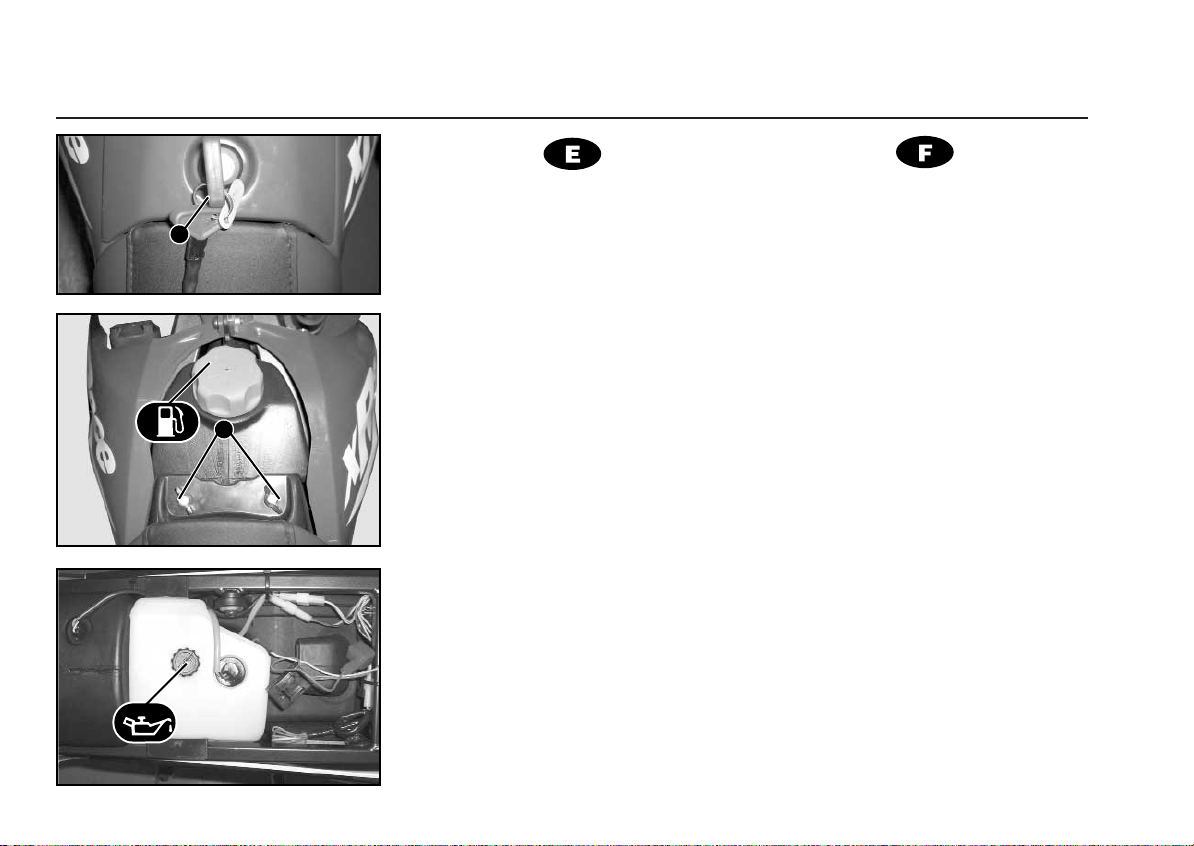
Sillín
Para desmontar el sillín, introduzca
1
2
la llave en la cerradura de la tapa del
depósito (1) y mientras gira la llave a la
derecha levante la tapa hacia arriba.
Seguidamente desmonte las dos palomillas fijación sillín (2).
Debajo del sillín se encuentra el
depósito de aceite, la batería y el alojamiento portaherramientas.
Depósito de gasolina
El depósito de gasolina tiene una
capacidad de 7 litros y una reserva de
1,30 litros. Para repostar, introduzca la
llave en la cerradura de la tapa depósito
y mientras gira la llave a la derecha,
levante la tapa hacia arriba.
Utilice solo gasolina sin plomo.
❀
Depósito de aceite
El depósito de aceite tiene una
capacidad de 1 litros y una reserva de
0,25 litros. Utilizar aceite sintético
SAE 30.
Selle
Démonter la selle en introduisant la
clé dans la serrure du bouchon du
réservoir (1), la faire tourner vers la
droite tout en soulevant la couvercle
vers le haut. Démonter les deux papillons de fixation de la selle (2).
Sous la selle se trouvent le réservoir
à huile, la batterie et le logement porteoutils.
Réservoir à essence
La capacité du réservoir à essence
est de 7 litres avec une réserve de 1,30
litres. Pour prendre de l'essence introduire la clé dans la serrure du couvercle
du réservoir et pendant que vous tournez la clé vers la droite soulevez le couvercle vers le haut.
Employez seulement essence sans
❀
plomb
Réservoir d’huile
La capacité du réservoir d’huile est de
1 litre et la réserve est de 0,25 litres.
Utiliser de l’huile synthétique type
SAE 30.
Page 27

Sellino, serbatoio benzina e olio • Saddle, fuel tank and oil tank
Sitz, Kraftstofftank und Ölbehälter
Sellino
Per smontare il sellino, introdurre la
chiave nella serratura del coperchio del
serbatoio (1) e, mentre si gira la chiave
a destra, alzare in alto il coperchio.
Dopodiché, smontare i due dadi ad alette di fissaggio del sellino (2).
Sotto il sellino c'è il deposito d'olio, la
batteria e il vano portasacco ferri.
Serbatoio benzina
Il serbatoio benzina ha una capacità
di litri 7 e una scorta di litri 1,30. Per
fare il pieno, introdurre la chiave nella
serratura del coperchio del serbatoio e,
mentre si gira la chiave a destra, sollevare il coperchio verso l’alto.
Utilizzare benzina senza piombo.
❀
Serbatoio olio
Il serbatoio olio ha una capacità di litri
1 e una scorta di litri 0,25. Usare Olio
Sintetico SAE 30.
Saddle
To remove the saddle, put the key in
the fuel tank cover lock (1), and turn the
key to the right, while lifting the cover
upwards. Then it is possible to unscrew
the two wing nuts which secure the
saddle (2).
The oil reservoir, the battery, and the
tool kit compartment are located
underneath the saddle.
Fuel tank
The fuel tank has a capacity of 7
litres and a reserve of 1.30 litres. To
refuel, insert the key in the filler cap lock
and, while turning the key to the right,
lift the cap upwards.
Use only unleaded fuel.
❀
Oil tank
The oil tank has a capacity of 1 litre
and a reserve of 0,25 litres. Use only
SAE 30.
Sitz
Zum Öffnen des Sitzes den Schlüssel in
das Benzitankdeckelschloß einführen
(1). Während Sie den Schlüssel nach
rechts drehen, heben Sie den Sitz nach
oben ab. Demontieren Sie
anschließend die beiden
Befestigungsschrauben (2).
Unter dem Sitz befinden sich der
Ölbehälter, die Batterie und das
Werkzeugabteil.
Kraftstofftank
Der Kraftstofftank hat ein
Fassungsvermögen von 7 Litern und
eine Reserve von 1,3 Litern. Zum
Tanken führen Sie den Schlüssel in das
Schloß des Tankdeckels und, während
Sie den Schlüssel nach rechts drehen,
ziehen Sie den Deckel nach oben.
Nur Gebrauch
❀
Ölbehälter
Der Ölbehälter hat ein
Fassungsvermögen von 1 Litern und
eine Reserve von 0,25 Litern. Benutzen
Sie SAE 30.
Bleifrei.
27
Page 28

28
Page 29

Este capítulo trata el sistema
de arranque, aspectos
prácticos de conducción,
rodaje y combustible.
Ce chapitre traite du système
de démarrage,
des conseils pour bien
conduire, du rodage et du
carburant.
Questo capitolo tratta sul
sistema di avviamento, aspetti
pratici della guida e rodaggio.
This chapter deals with the
starter system, practical
aspects of riding and runningin.
Dieses Kapitel befaßt sich mit
dem Anlassersystem des
Motors un dem praktischen
Aspekten des Fahrens und des
Einfahrens.
Indice del capítulo
Index du chapitre
Indice delcapitolo
Index of the chapter
Inhaltsverzeichnis des Kapitels
Arranque del motor
Démarrage du moteur
Avviamento del motore
Starting the engine
Anlassen des Motors ................................30
Instrucciones para una
correcta conducción
Instructions pour conduire correctement
Istruzioni per una guida corretta
Instructions for correct riding
Anweisungen für korrektes Fahren...........32
Instrucciones para el rodaje
Instructions pour le rodage
Istruzioni per il rodaggio
Instructions for running-in
Anweisungen für das Einfahren................36
Arranque, conducción y rodaje
Démarrage, conduite et rodage
Avviamento, guida e rodaggio
Starting, Riding and running-in
Anlassen, Fahren und Einfahren
Consejos que prolongarán la vida
de su ciclomotor
Conseils pour prolonger la vie
de votre cyclomoteur
Consigli che prolungheranno la
vita del suo ciclomotore
Tips for prolonging the life
of your moped
Ratschläge zur Verlängerung
der Lebensdauer Ihres Mokicks...........38
29
Page 30

Arranque del motor
Démarrage du moteur
30
Instrucciones para la puesta en marcha del motor:
- Accionar la llave de contacto a la posición
!.
- Apretar hacia arriba la palanca de
mando aire del carburador (especialmente cuando el motor esté frío), de
esta manera el aire queda cerrado, facilitando la puesta en marcha.
- Dar un poco de gas, como máximo 1/4
de su recorrido.
- Actuar sobre la palanca de arranque
accionándola hacia atrás con el pié.
- Una vez en funcionamiento el motor
mantenerlo durante unos segundos a
medio gas, hasta que el motor aumente
un poco su temperatura.
- Transcurrido este período de tiempo,
bajar la palanca aire manualmente (aire
abierto).
Si al realizar esto se para el motor, es
debido a que aun está demasiado frío.
Volver a cerrar el aire y repetir la
maniobra anterior.
- Una vez montado en el ciclomotor y a
punto para emprender la marcha, basta
con introducir las velocidades, para que
el ciclomotor le proporcione un viaje de
verdadero placer.
Instructions pour la mise en marche
du moteur:
- Situer la clé de contact sur la position
!.
- Actionner vers le haut le levier de commande de l’air au carburateur (surtout
lorsque le moteur est froid), ainsi l’arrivée de l’air est fermé ce qui facilite la
mise en marche.
- Donner un peu de gaz, 1/4 de son parcours tout au plus.
- Agir sur le levier de démarrage en le
menant vers l'arrière avec le pied.
- Une fois le moteur en marche, maintenir quelques secondes le gaz moyen
jusqu'à ce que le moteur soit plus
chaud.
- Après ce temps, baisser le levier de
commande d’air manuellement (arrivée
air ouverte).
- Si, en faisant cela, le moteur s'arrête
c'est qu'il est encore trop froid. Il faut
refermer le passage d'air et recommencer le manoeuvre.
- Une fois le conducteur assis et prêt à
rouler, il suffit d'introduire les vitesses
pour conduire le cyclomoteur avec un
vrai plaisir.
Page 31

Avviamento del motore • Starting the engine
Anlassen des Motors
Istruzioni per l’avviamento del motore:
- Azionare la chiave d’accensione nella
posizione
- Spingere su la leva del comando starter
del carburatore (in particolare qualora il
motore fosse freddo). In questo modo
l’aria viene chiusa e facilita l’avviamento.
- Dare un po’ di gas, al massimo 1/4 del
suo percorso.
- Agire sulla pedale di avviamento, azionandolo col piede verso dietro.
- Quando il motore sia ormai avviato,
mantenerlo a mezzo gas durante alcuni
secondi, intanto che il motore non
aumenti un po’ la sua temperatura.
- Quando sia trascorso questo periodo di
tempo, abbassare manualmente il
comando starter (aria aperta).
Se quando si realizza questa operazione il motore si fermasse, questo è dovuto al fatto che è ancora troppo freddo.
Chiudere l’aria e ripetere la manovra
anteriore.
- Dopo essere salito sul ciclomotore ed
essere pronti ad iniziare il viaggio, è soltanto necessario innestare le velocità
affinchè il ciclomotore le rechi un viaggio di vero piacere.
!.
Instructions for starting the engine:
- Turn the ignition key to the ! position.
- Press downwards the choke control of
the carburettor (especially when the
engine is cold): this will restrict the air
flow and facilitate starting.
- Twist the accelerator grip slightly, to no
more than 1/4 of its travel.
- Press the start lever backwards with
your foot.
- Once the engine is running, keep it at
half-speed for a few seconds, until it
warms up.
- After a few seconds, press the choke
control downwards with your hand, to
open the air flow. If the engine stops, it
is too cold: close the choke again and
repeat the previous operation.
- Once you are seated on the saddle
and ready to set off, you have only to
engage the gear for the moped to take
you on a journey of real enjoyment.
Anweisungen zur Ingangsetzung des
Motors
- Den Zündschlüssel in die Position !
bringen.
- Den Hebel für die Vergaser-Luftzufuhr
nach oben drücken (vor allem wenn
der Motor kalt ist), um die Luftzufuhr zu
unterbrechen und so das Anfahren zu
erleichtern.
- Ein wenig Gas geben (höchstens zu
einem Viertel aufdrehen).
- Den Kickstarter betätigen, indem man
ihn mit dem Fuß nach hinten drückt.
- Den Motor einige Sekunden lang bei
halbem Gas laufen lassen, bis seine
Temperatur etwas gestiegen ist.
- Danach den Hebel für die Vergaser Luftzufuhr nach unten drucken
(Luftzufuhr geöffnet).
Geht der Motor dabei aus, so liegt es
daran, daß er noch zu kalt ist.
Unterbrechen Sie erneut die Luftzufuhr
und wiederholen Sie den Vorgang.
- Haben Sie auf dem Mokick Platz
genommen und sind zum Anfahren
bereit, müssen Sie nur noch einen
Gang einlegen, und das Mokick
bereitet Ihnen den höchsten
Fahrgenuß.
31
Page 32

Conducción
Conduite
c
¡Avis!
És molt important comprovar abans de
posar en marxa el motor que la palanca
de canvi estigui en punt mort.
Precaució!
- Per introduir les velocitats, accionar la
palanca de canvi situada a l'esquerra
del motor, a la vegada que es pressiona
la maneta de l'embragatge (esquerra) i
es treu una mica de gas.
- La primera marxa entra cap avall i les
altres cap amunt.
- Aquest moviments s'han de fer amb
rapidesa però sense precipitació, per
evitar que el motor pateixi durant la realització d'aquestes maniobres i sempre
amb la maneta de l'embragatge accionada.
32
00
No tenga el motor en marcha sin
❀
necesidad. Arranque en seguida.
¡Aviso!
Es muy importante comprobar antes de
poner el motor en marcha, que la palanca cambio esté en punto muerto.
Instrucciones para una correcta
conducción.
- La técnica del bien conducir, es el arte
que permite sacar el máximo
rendimiento del vehículo sin obligar su
mecánica. Nuestra experiencia nos
permite aconsejarle:
¡Precaución!
- Para introducir las velocidades, accionar con el pie la palanca de cambio
situada a la izquierda del motor, a la
vez que se presiona la maneta de
embrague (izquierda) y se corta un
poco de gas.
- La primera entra hacia abajo y las otras
hacia arriba.
- Estos movimientos deben hacerse con
rapidez pero sin precipitación, para evitar que el motor sufra durante la realización de estas maniobras y siempre
00
Ne pas faire tourner inutilement le
❀
moteur. Démarrez tout de suite.
Attention!
Il est très important de vérifier avant de
faire démarrer le moteur si le levier de
vitesses se trouve en point mort.
Conseils pour une bonne conduite.
- La technique du bon conducteur est un
art qui permet de tirer le meilleur ren-
dement du véhicule sans forcer sa
mécanique. Notre expérience nous
permet de vous donner quelques con-
seils:
Précaution!
- Pour engager les vitesses, actionner
avec le pied le levier de changement
situé à gauche du moteur, tout en fai-
sant pression sur la manette de l'em-
brayage (gauche) et en ne donnant
pas trop de gaz.
- La première s'engage vers le bas et les
autres vitesses vers le haut.
- Ces mouvements doivent se faire avec
rapidité mais sans précipitation -pour
éviter que le moteur ne souffre pendant
la réalisation de ces manoeuvres- tout
en actionnant la manette de l'embraya-
ge.
00
Page 33

Guida • Riding
Fahren
Non tenere il motore avviato senza
❀
bisogno. Partire subito.
Avviso!
È assai importante verificare che la
leva del cambio sia nel punto morto
prima di avviare il motore.
Istruzioni per una guida corretta.
- La tecnica della corretta guida è l’arte
che permette ottenere la massima efficenza del veicolo senza forzarne la
meccanica. La nostra esperienza ci permette consigliarle:
Attenzione!
- Per innestare le velocità, azionare col
piede il pedale del cambio situato nella
parte sinistra del motore e, allo stesso
tempo, premere la leva della frizione
(sinistra) e togliere un po’ di gas.
- La prima marcia si inserisce verso il
basso e le altre verso l’alto.
- Questi movimenti devono farsi con rapi-
dità, ma senza precipitarsi, per evitare
che il motore patisca durante l’esecuzione di queste manovre e devesi attuare sempre sulla leva della frizione.
- Questo cambio, di nuovo disegno, ha
00
Do not allow the engine to run when
❀
it is not necessary. Start only when
you mean to set off.
WARNING!
It is very important before starting the
engine to check that the gear lever is in
the neutral position.
Instructions for correct riding
- The technique of good riding is an art
that will enable you to get the most out
of your vehicle without overexerting its
parts. Our experience allows us to give
you the following advice:
CAUTION!
- To engage the gears, push the gear-
change pedal on the left-hand side of
the engine with your foot while pulling
the clutch lever (left) and reducing
acceleration.
- First gear is engaged by pushing the
gear-change pedal downwards, and
the remaining gears by pushing it
upwards.
- These movements should be made
quickly but smoothly, and always
00
Lassen Sie den Motor nicht unnötig
❀
laufen. Fahren Sie sofort los.
Achtung!
Vor dem Anlassen des Motors ist
unbedingt sicherzustellen, daß sich das
Getriebe im Leerlauf befindet.
Anweisungen für korrektes Fahren
- Die Technik des guten Fahrens ist die
Kunst, aus dem Fahrzeug das Beste
herauszuholen, ohne seine Mechanik zu
überlasten. Unsere Erfahrung erlaubt es
uns, Ihnen folgende Empfehlungen zu
geben:
Vorsicht!
- Um die Gänge einzulegen, betätigen Sie
mit dem Fuß den Schalthebel an der linken Seite des Motors, während Sie gleichzeitig den Kupplungshebel (links) drücken
und das Gas zurücknehmen.
- Der erste Gang wird durch Drücken des
Schalthebels nach unten, die übrigen
durch Drücken des Schalthebels nach
oben eingelegt.
- Diese Bewegungen sollen schnell, aber
nicht überstürzt ausgeführt werden.
Andernfalls könnte der Motor durch den
Schaltvorgang beeinträchtigt werden.
00
33
Page 34

Conducción
Conduite
c
-Aquest canvi, de nou disseny, necessita
poca pressió del peu per a canviar de
marxa. Es recomana no accionar la
palanca amb massa força, ja que això
només perjudica els mecanismes.
- Per a circular per pendents, tingui en
compte que per mantenir molt de temps
la mateixa marxa, el rendiment del ciclomotor no és l’òptim.
- Quan noti que malgrat donar gas, la
velocitat disminueix, canviï a una marxa
inferior; notarà que el ciclomotor agafa
de nou i augmenta la velocitat. Aquest
canvi s'ha de fer amb rapidesa per que
el vehicle no perdi excessiva velocitat.
-No baixar les pendents en punt mort, es
desaprofita l’efecte de fre del motor.
S'han de baixar les pendents amb la
mateixa marxa que s'utilitzaria per pujar
la pendent. El contrari va contra el Codi
de Circulació.
- Quan realitzi descensos prolongats,
recordi donar gas de tant en tant per
lubricar el motor.
accionando la maneta de embrague.
- Este cambio, de nuevo diseño, precisa
poca presión del pie para que entren
las marchas. Se recomienda no accionar la palanca con fuerza excesiva la
cual sólo perjudica los mecanismos.
- Para circular por pendientes, tenga en
cuenta que no por mantener mucho
tiempo una misma marcha, el rendimiento de su ciclomotor es el óptimo.
Cuando note que a pesar de dar más
gas, la velocidad disminuye, cambie a
la marcha inmediatamente inferior;
notará que el ciclomotor vuelve a reemprender y aumenta su velocidad. Este
cambio debe realizarse con rapidez, a
fin de que el vehículo no pierda excesiva velocidad.
- No bajar una pendiente en punto muerto, de hacerlo desaprovecha el efecto
de frenado del motor. Debe bajar con la
misma marcha que debiera emplear si
subiera la pendiente. Lo contrario va
contra lo dispuesto en el Código de Circulación.
- Cuando realice descensos prolongados
recuerde dar gas de vez en cuando a
fin de lubricar el motor.
- La conception nouvelle de ce changement de vitesses fait qu'il suffit d'une
faible pression du pied pour engager
les vitesses. Il ne faut pas actionner le
levier avec trop de force pour ne pas
endommager les mécanismes.
- Pour circuler dans les pentes, il ne faut
pas croire qu'en restant trop longtemps
sur une même vitesse vous obtiendrez
un meilleur rendement de votre cyclomoteur.
- Si vous constatez qu'en donnant plus
de gaz votre vitesse diminue, changez
à la vitesse immédiatement inférieure;
le cyclomoteur reprend de la vitesse et
fonce. Ce changement de rapport doit
s'effectuer très rapidement pour que le
véhicule ne perde pas trop sa vitesse.
- Ne pas rouler sur une pente en point
mort car l'effet de freinage du moteur
n'agirait pas. Vous devez descendre la
pente avec le même rapport que vous
utiliseriez si vous deviez monter cette
même pente. Si vous ne le faites pas
ainsi vous allez contre les normes du
Code de la Route.
- Lorsque vous circulez sur de longues
descentes rappelez-vous qu'il faut donner du gaz de temps en temps afin de
lubrifier le moteur.
34
Page 35

Guida • Riding
Fahren
bisogno di poca pressione del piede per
innestare le marce.Si consiglia non
agire sul pedale con una eccessiva
forza che può soltanto danneggiare i
meccanismi.
- Per circolare in discesa ricordi che il
fatto di mantenere una stessa marcia
durante molto tempo non implica che
l’efficenza del suo ciclomotore sia ottima.
Quando si avveda che, sebbene dia più
acceleratore la velocità diminuisce,
cambi alla marcia immediatamente inferiore; noterà che il ciclomotore si ricupera ed aumenta la propria velocità.
Questo cambio deve farsi con rapidità,
affinchè il veicolo non perda eccessiva
velocità.
- Non scendere una discesa in punto
morto: se fa così, spreca l’effetto di frenata del motore. Deve scendere con la
stessa marcia che userebbe se volesse
montare la salita. Il contrario è contro
quello stabilito nel Codice Stradale.
- Quando esegua discese prolungate si
ricordi di dare gas ogni tanto, per lubricare il motore.
operating the clutch lever, so that the
engine and transmission do not suffer
any strain.
- This newly-designed gear-change
system requires very little foot
pressure to engage the gears. It is
recommended not to use excessive
force on the pedal, as this will only
harm the mechanisms.
- When going up a slope, remember that
maintaining the same gear for a long
time does not necessarily get the best
performance out of the moped. When
you notice that, in spite of accelerating,
the speed decreases, change down
one gear: you will feel the moped
revive and increase its speed. This
change must be done quickly in order
not to lose too much speed.
- Do not go downhill in neutral, because
you lose the braking effect of the
engine - it is also a contravention of
the Highway Code. Use the same gear
as you would if you were climbing the
same incline.
- When going down long inclines,
remember to accelerate occasionally in
order to lubricate the engine.
Stets den Kupplungshebel betätigen.
- Bei dieser neuentwickelten Gangschaltung reicht ein geringer Druck des Fußes
aus, um die Gänge einzulegen. Es wird
empfohlen, bei der Betätigung des Schalthebels nicht allzu viel Kraft anzuwenden,
da dadurch nur die Mechanismen geschä-
digt würden.
- Wenn Sie Steigungen hinauffahren, denken Sie daran, daß die Leistung Ihres
Mokicks nicht unbedingt optimal ist, wenn
Sie lange Zeit im gleichen Gang fahren.
Sobald Sie bemerken, daß sich die
Geschwindigkeit verringert, obwohl Sie
mehr Gas geben, schalten Sie in den
nächsttieferen Gang zurück. Das Mokick
gewinnt so neue Kraft und seine Geschwindigkeit nimmt wieder zu. Dieser Gangwechsel sollte schnell ausgeführt werden,
damit das Fahrzeug nicht zuviel Geschwindigkeit verliert.
- Einen Abhang nicht im Leerlauf
hinunterfahren, da so die Bremswirkung
des Motors nicht ausgenutzt wird. Sie
sollten in demselben Gang
hinunterfahren, den Sie einlegen würden,
wenn Sie den Hang hinaufführen.
Andernfalls verstoßen Sie gegen die
Straßenverkehrsordnung.
- Bei längeren Talfahrten geben Sie hin und
wieder Gas, um den Motor zu ölen.
35
Page 36

Rodaje
Rodage
Instrucciones para el rodaje
BSERVACION:
O
- La duración y rendimiento de su ciclomotor dependen en mucho del trato que
reciba durante el período de rodaje.
Durante este período, las piezas móviles que forman la totalidad de sus
mecanismos, se suavizan, adaptándose
unas a otras hasta su perfecto acoplamiento.
- No efectuará un mejor rodaje por circular muy despacio, sino conduciendo con
suavidad y cuidado.
Durante este período, es recomendable
conducir a 3/4 de gas del acelerador,
procurando en casos en que resulte
preciso marchar gas a fondo (adelantamientos, cuestas pronunciadas, etc.),
que el tiempo de funcionamiento a tope,
sea lo más corto posible.
- Recorridos los 1000 primeros Kms.
debe cambiar el aceite del cárter. Utilizar aceite SAE 10W/40 cantidad 0,650
litros. También a los primeros
1000 Kms. deberá proceder a una revisión de la puesta a punto en cualquier
agencia DERBI. Es muy importante.
Instructions pour le rodage
O
BSERVATION:
- La durée et le rendement de votre
cyclomoteur dépend beaucoup du traitement qu'il reçoit pendant le rodage.
Pendant cette période, les pi èces
mobiles qui forment la totalité de ses
mécanismes, se polissent jusqu'à leur
adaptation parfaite.
- Le rodage ne se fera pas mieux si vous
circulez très lentement, il faut conduire
sans brusquerie et avec attention.
Pendant cette période, il ne faut accé-
lérer qu'à 3/4 de la possibilité de l'accélérateur, tout donnant à fond du gaz
quand cela est nécessaire (dépassements, côtes prononcées, etc.). Veiller
que le temps de fonctionnement à fond
soit le plus court possible.
- Une fois les premiers 1000 km parcourus il faut remplacer l'huile du carter.
Utiliser de l'huile SAE 10W/40, volume
0,650 litres. De même il est très important qu'après les 1000 premiers km de
procéder à faire une révision de la
mise à point dans n'importe quelle
Agence DERBI.
36
Page 37

Rodaggio • Running-in
Einfahren
Istruzioni per il rodaggio.
O
SSERVAZIONE:
- La durata ed efficenza del suo ciclomotore dipendono grandemente della cura
che riceva durante il periodo di rodaggio.
Durante questo periodo, le parti mobili
che costituiscono la totalità dei suoi
meccanismi si soavizzano, adattandosi
le une alle altre fino al suo perfetto
accoppiamento.
- Non realizzerà un miglior rodaggio se
circola molto lentamente, ma se guida
con soavità e cura.
Durante questo periodo si raccomanda
guidare ai 3/4 del gas dell’acceleratore.
Nei casi in cui sia necessario correre a
pieno gas (sorpassi, salite marcate,
ecc.) abbia cura che il tempo di funzionamento al massimo sia il più corto
possibile.
- Dopo aver percorso i primi 1.000 Km
devesi cambiare l’olio del carter. Usare
olio SAE 10W/40 quantità litri 0,650.
Durante i primi 1.000 km dovrà pure
realizzare un controllo della messa a
punto in qualsiasi agenzia DERBI. È
molto importante.
Instructions for running-in
NOTE:
- The duration and performance of your
moped depend greatly on the
treatment it receives during running-in.
During this period, the moving parts
which make up all of its mechanisms
gradually loosen up, adapting to each
other to form perfect connections.
- Good running-in does not mean riding
very slowly, but smoothly and carefully.
During this period, it is advisable to
travel at 3/4 acceleration, limiting to the
minimum possible time those moments
when it is necessary to accelerate fully
(overtaking, steep inclines, etc).
- After the first 1,000 km, the crankcase
oil must be changed. Use only
SAE 10W/40, in a quantity of
650 ml. Also after the first 1,000 km, it
is very important to take the moped to
any DERBI agency for servicing and
retuning.
Anweisungen für das Einfahren
Anmerkung:
- Die Lebensdauer und Leistung Ihres
Mokicks hängen stark davon ab, wie
das Fahrzeug während der Einfahrzeit
behandelt wird.
-Während dieser Zeit laufen sich die
beweglichen Teile, aus denen sich die
Mechanismen zusammensetzen, ein
und passen sich bis zur vollkommenen
gegenseitigen Abstimmung aneinander
an.
- Gutes Einfahren bedeutet nicht,
langsam zu fahren, sondern sanft und
vorsichtig.
Es wird empfohlen, während dieses
Zeitraums das Gas nur zu drei Vierteln
aufzudrehen. In den Fällen, in denen
Vollgas notwendig ist (Überholen, steile
Abhänge usw.), sollte die
entsprechende Zeit möglichst kurz
gehalten werden.
- Nach den ersten 1000 Km ist das Öl
auszuwechseln. Verwenden Sie
SAE 10W/40, 0,650 Liter. Nach den
ersten 1000 Km ist auch eine
Überprüfung der Einstellung bei einem
DERBI-Händler vorzunehmen. Dies ist
sehr wichtig.
37
Page 38

Consejos
Conseils
38
Consejos que prolongarán la vida de
su ciclomotor.
- No mantenga gas a tope durante mucho
tiempo.
Lleve siempre el motor en aquel
❀
punto (3/4 de gas) en que siempre
pueda dar algo más. Economizará
gasolina y alargará la vida del motor.
- Al frenar cierre el gas.
- Frene con suavidad, vigilando el terreno
que pisa. En asfalto seco inicie la frenada con el freno delantero y acabe con los
dos. En terreno mojado, con arena o gravilla, no utilice nunca el freno delantero y
tome más distancia para detener el ciclomotor.
- Al arrancar, dé gas suave y paulatinamente soltando el embrague progresivamente.
- En las curvas no incline en exceso, déje-
se llevar por su DERBI, mantenga el trazado y la máquina le indicará su posición.
- En curvas, cierre el gas antes de empezar la curva, en la mitad de la curva,
cuando pueda ver el final, empiece a
abrir gas y el motor responderá agradablemente.
Pare el motor en las ocasiones propi-
❀
cias del tráfico.
Conseils pour prolonger la vie de votre
cyclomoteur.
- Ne pas donner de gaz à fond pendant trop
longtemps.
Portez le moteur au point (3/4 de gaz)
❀
où vous pouvez toujours foncer plus.
Vous économiserez de l'essence et
vous prolongerez la vie du moteur.
- En freinant fermez le gaz.
- Freinez en douceur, en tenant compte de
l'état du sol sur lequel vous circulez. Sur
asphalte sec commencez la manoeuvre
avec le frein avant et terminez avec les
deux freins. Sur sol mouillé, ensablé ou
avec des gravillons, ne jamais utiliser le
frein avant et prenez une distance plus
grande pour arrêter le cyclomoteur.
- Au démarrage, donnez du gaz sans brusquerie et peu à peu et lâchez progressivement l'embrayage.
- Dans les virages ne vous inclinez pas trop,
laissez-vous conduire par votre DERBI,
maintenez le tracé et la machine vous indiquera votre meilleure position.
- Dans les virages coupez le gaz avant de
les commencer, une fois à la moitié du
virage, lorsque vous voyez la fin, commencez l'ouverture du gaz et le moteur répondra agréablement.
Si vous vous trouvez pris dans un bou-
❀
chon de circulation arrêtez votre
moteur.
Page 39
Consigli pratici • Tips
Ratschläge
Consigli che allungheranno la vita
del suo ciclomotore.
- Non mantenere il gas al massimo
durante molto tempo.
Portare sempre il motore in quel
❀
punto (3/4 del massimo) in cui può
sempre dare un po’ di più. Si risparmierà benzina ed allungherà la
vita del motore.
- Quando si frena, togliere il gas.
- Frenare con soavità, avendo cura del
terreno che si calpesta. Sull’asfalto
secco, cominciare la frenata col freno
anteriore e finirla con entrambi. Su
terreno bagnato, con sabbia o ghiaietto, non usare mai il freno anteriore e
mantenere più distanza per poter fermare il ciclomotore.
- Nell’avviamento dare il gas in modo
soave e progressivo, allentando la frizione gradualmente.
- In curva non piegarsi eccessivamente,
lasciarsi portare dalla sua DERBI,
mantenere il tracciato e la macchina le
indicherà la sua posizione.
Fermare il motore nelle situazioni
❀
propizie del traffico.
Tips for prolonging the life of your
moped
- When starting off, accelerate smoothly
and progressively, and release the
clutch gradually.
Do not accelerate fully for a long
❀
time.
- Always ride the vehicle at a point (3/4
power) where it has acceleration to
spare: this will save fuel and prolong
the life of the engine.
- When braking, release the accelerator.
- Brake smoothly, paying attention to the
state of the ground. On dry asphalt,
begin braking with the front brake and
finish with both. On wet ground, or on
sand or gravel, never use the front
brake, and leave more distance to stop
the moped.
- Do not lean into curves excessively:
keep to the correct line and your DERBI
will indicate to you the best position.
- Release the accelerator before entering
a curve: when you are at the middle of
the curve and can see the exit, begin
accelerating and the engine will respond satisfactorily.
Stop the engine when traffic condi-
❀
tions require.
Ratschläge zur Verlängerung der
Lebensdauer Ihres Mokicks
- Fahren Sie nicht zu lange mit Vollgas.
Fahren Sie stets so (Gas zu 3/4 aufge-
❀
dreht), daß Sie noch ein wenig mehr Gas
geben können. Sie sparen so Kraftstoff
und schonen den Motor.
- Beim Bremsen drehen Sie das Gas zu.
- Bremsen Sie sanft und achten Sie auf den Boden,
den Sie befahren.
Auf trockenem Asphalt beginnen Sie mit der
Vorderbremse und beenden den Vorgang mit
beiden Bremsen. Auf nassem, mit Sand oder Kies
bedecktem Gelände verwenden Sie niemals die
Vorderbremse und schätzen Sie eine größere
Entfernung für das vollständige Abstoppen des
Fahrzeugs ein.
- In Kurven neigen Sie sich nicht zu weit. Lassen
Sie sich von Ihrem Mokick leiten. Geben Sie nur
die Richtung an, das Mokick findet seine optimale
Lage.
- Beim Anfahren geben Sie sanft und allmählich
Gas, während Sie die Kupplung stufenweise
loslassen.
- Drehen Sie vor einer Kurve das Gas zu. Haben
Sie die Hälfte der Kurve zurückgelegt und sehen
ihr Ende, geben Sie wieder Gas. Der Motor wird
optimal reagieren.
Lassen Sie den Motor nicht unnötig laufen.
❀
Fahren Sie sofort los.
39
Page 40

Este capítulo trata el sistema de
mantenimiento y controles de rutina
que pueden efectuarse para tener la
seguridad de que el ciclomotor está
en perfectas condiciones mecánicas.
Ce chapitre traite le système
d'entretien et les contrôles de routine
qui peuvent être effectués pour
s'assurer que le cyclomoteur est en
parfaites conditions mécaniques.
Questo capitolo tratta sull sistema di
manutenzione e controlli periodici che
possono realizzarsi per avere la
sicurezza che il ciclomotore si trovi in
perfette condizioni meccaniche.
This chapter deals with the system of
routine checks and maintenance
operations which you can carry out in
order to be sure that your moped is in
perfect mechanical condition.
Dieses Kapitel handelt von dem
Wartungssystem und den
routinemäßigen Kontrollmaßnahmen,
die durchgeführt werden können, um
eine optimale mechanische Funktion
des Mokicks sicherzustellen.
40
Batería
Batterie
Batteria
Battery
Batterie...................................42
Lubricación separada
Lubrification séparée
Lubricazione separata
Separate lubrication
Getrenntschmierung...............46
Filtro aire
Filtre à air
Filtro aria
Air filter
Luftfilter ..................................50
Carburador
Carburateur
Carburatore
Carburettor
Vergaser.................................54
Bujía
Bougie
Candela
Spark plug
Zündkerze..............................56
Lubricación y engrase
Lubrification et graissage
Lubrificazione e ingrassaggio
Lubrication and greasing
Schmierung...............................................58
Admisión por láminas
Admission par clapets
Ammissione a lamine
Inlet ports
Lamelleneinlaß..........................................60
Regulaciones
Réglages
Regolazioni
Adjustments
Einstellungen ............................................62
Características del freno de disco
Caractéristiques du frein à disque
Carateristiche del freno a disco
Characteristics of the disc brake
Eigenschaften der Scheibenbremse.........64
Mantenimiento frenos
Entretien des freins
Manutenzione freni
Brake maintenance
Wartung der Bremsen...............................66
Page 41

Indice del capítulo
Index du chapitre
Indice delcapitolo
Index of the chapter
Inhaltsverzeichnis des Kapitels
Faro delantero
Phare avant
Faro anteriore
Headlight
Vorderer Scheinwerfer..............................70
Presión de los neumáticos
Pression des pneumatiques
Pressione degli pneumatic
Tyre pressure
Reifendruck...............................................72
Control líquido refrigerante
Contrôle liquide refroidissant.
Controllo liquido refrigerante
Coolant check
Kontrolle des Kühlmittels ..........................76
Cuadro de mantenimiento y engrase
Tableau de entretien et graissage
Tabella di manutenzione e
ingrassaggio
Maintenance and lubrication chart
Inspektionsintervalle .................................80
Limpieza
Nettoyage
Pulizia
Cleaning
Säuberung ................................................84
Conservación en largos periodos
de inactividad
Conservation lors de longues
périodes d'inactivité
Conservazioni durante lunghi
periodi di inattività
Conservation during long periods
of inactivity
Pflege bei längerem Nichtgebrauch..........86
Prevención contra la corrosión
Comment éviter la corrosion
Prevenzione contro la corrosione
Precautionary measure against corrosion
Korrosionsschutz ......................................88
Anomalías en ruta
Anomalies sur la route
Anomalie in viaggio
Problems on the road
Störungen während der Fahrt...................92
Mantenimiento
Entretien
Manutenzione
Maintenance
Wartung
41
Page 42

Batería
Batterie
Instrucciones de montaje de la batería
- Introduzca la llave en la cerradura de la
tapa depósito, gire la llave a la derecha y
levante la tapa hacia arriba.
- Desmonte las dos palomillas fijación sillín
y extraiga el mismo. Debajo del sillín se
encuentra el alojamiento de la batería.
- Colocar la batería en su alojamiento.
- Conectar los bornes positivo y negativo.
Mantenimiento batería
El buen mantenimiento de la batería debe
incluir:
- Mantener siempre el nivel del agua entre
las líneas superior e inferior de la parte
frontal del recipiente. De ser necesario
reponerlo con agua destilada. Evitar la
sobrecarga.
- Mantener los tapones de los vasos perfectamente cerrados. Es importante.
- Mantener la parte superior completamente limpia, seca y libre de materias corrosivas, los bornes de la batería deben estar
limpios y engrasados, para evitar la
corrosión.
- Comprobar la capacidad residual de la
batería con un densímetro. Una densidad
de 1,265 ó superior es buena, de ser
Instructions pour le montage de la
batterie.
- Introduire la clé dans la serrure du bouchon du réservoir, faire tourner la clé vers
la droite et soulever le bouchon.
-Démonter les deux papillons de fixation
de la selle et extraire celle-ci. Sous la
selle se trouve la place pour loger la batterie.
- Placer la batterie dans son logement.
- Connecter les bornes positive et négative.
Entretien de la batterie
Pour entretenir parfaitement la batterie il
faut:
- Faire en sorte que le niveau d’eau soit
compris entre les lignes supérieure et
inférieure de la partie frontale du récipient. Si nécessaire rajouter de l’eau distillée. Éviter d’en mettre trop.
- Les bouchons des vases doivent être par-
faitement fermés. C’est important.
- Veiller à la parfaite propreté de la partie
supérieure, la maintenir sèche et libre de
matières corrosives; les bornes de la batterie doivent être toujours propres et
graissées pour éviter la corrosion.
- Vérifier la capacité résiduelle de la batte-
42
Page 43
Batteria • Battery
Batterie
Istruzioni per il montaggio della batteria
- Introdurre la chiave nella serratura del
coperchio del serbatoio, girare la chiave a
destra e alzare in alto il coperchio.
- Smontare i due dadi ad alette di fissaggio
del sellino ed estrarlo. Sotto il sellino c’Ë il
vano della batteria.
- Collocare la batteria nel proprio vano.
- Collegare gli spinotti positivo e negativo.
Manutenzione batteria
La buona manutenzione della batteria
deve includere:
- Mantenere sempre il livello liquido tra le
linee superiore ed inferiore della parte
frontale del recipiente. Se fosse necessario, riempire con acqua distillata. Evitare
rabbocchi eccessivi.
- Mantenere perfettamente chiusi i tappi dei
vasi. È importante.
- Mantenere completamente pulita la parte
superiore, secca ed esente di materie corrosive. I terminali della batteria devono
essere puliti ed ingrassati per evitarne la
corrosione.
- Verificare con un densimetro la capacità
residuale della batteria. Una densità relativa di 1,265 o superiore è buona: se è
inferiore si deve caricare la batteria. La
How to fit the battery
- Place the key in the fuel tank cover lock,
turn the key to the right, and pull the cover
upwards.
- Undo the two saddle securing wing nuts,
and remove the saddle. Thew battery
compartment is located underneath the
saddle.
- Place the battery in its compartment.
- Connect up the positive and negative terminals.
Maintenance of the battery
Good maintenance of the battery should
include:
- Always keep the water level between the
upper and lower marks on the front of the
battery case. If necessary top up with distilled water. Avoid over-filling.
- Keep the caps of the cells completely closed. This is important.
- Keep the upper surface of the battery
completely clean and dry and free of
corrosive materials; the terminals should
be kept clean and greased so as to avoid
corrosion.
- Check the residual capacity of the battery
using a densitometer. A density of 1.265
or above is good, but if it is lower, rechar-
Anweisungen zur Montage der Batterie
Führen Sie den Schlüssel in das
Benzintankdeckelschloß ein, drehen Sie den
Schlüssel nach rechts und heben Sie den
Deckel nach oben ab.
Entfernen Sie die beiden
Befestigungsschrauben und nehmen Sie den
Sitz ab. Unter dem Sitz befindet sich das
Batteriefach.
Setzen Sie die Batterie in ihre Halterung.
Schließen Sie den positiven und den
negativen Pol an.
Wartung der Batterie
Zu einer guten Wartung der Batterie gehört:
- Darauf achten, daß der Wasserstand stets
zwischen der oberen und der unteren Linie
an der Vorderseite des Behälters liegt. Falls
notwendig, mit destilliertem Wasser
nachfüllen. Vermeiden Sie ein Überfüllen.
- Die Stopfen der Gefäße geschlossen halten.
Dies ist wichtig.
- Die Oberseite stets sauber, trocken und frei
von ätzenden Stoffen halten; die Klemmen
der Batterie müssen sauber und gut
geschmiert sein, um der Korrosion
vorzubeugen.
- Mit einem Dichtemesser die Restkapazität
der Batterie überprüfen. Eine Dichte von
1,265 oder darüber ist angemessen. Sollte
43
Page 44

Batería
Batterie
c
Precaució
Al carregar la bateria no s'haurà de
sobrepassar la intensitat del màxim
0,5 ÷ 1 Ampers / hora, doncs podria
destruir-se.
44
inferior cárguese la batería. La corriente
recomendada de carga es de 0,5 ÷ 1 A.
máximo, hasta que se consiga la densidad recomendada.
- La batería cuando no se usa se descarga
aproximadamente entre un 0,5% y un 1%
diario. Este promedio aumenta con la
temperatura. Para compensar debe hacerse una vez al mes una carga de recuperación.
- Una batería contiene ácido sulfúrico. Eví-
tese el contacto con la piel, ojos y ropa.
¡Precaución!
Al recargar no deberá sobrepasarse la
intensidad de máximo 0,5 ÷ 1 Amperios
hora, pues destruiría la batería.
Cambio de la Batería
Si hubiera que cambiar la batería, habría
que hacerlo por otra de igual capacidad y
tensión de 12 V 4 Ah.
A causa del problema que representa
❀
el desecho de baterías viejas, lo mejor
es hacer sustituir la batería por algún
Servicio Oficial DERBI. Las baterías
contienen entre otras sustancias, ácido
sulfúrico y en ningún caso deberán
arrojarse a la basura doméstica.
rie avec un densimètre. Une densité
1,265 ou plus est correcte, si elle est infé-
rieure il faut recharger la batterie. Le courant recommandé de charge est de 0,5 ÷
1A maximum jusqu’à arriver à la densité
recommandée.
- La batterie non utilisée se décharge entre
0,5 et 1% par jour environ. Cette moyenne augmente par temps chaud. Pour
compenser il faut la charger une fois par
mois.
- La batterie contient de l’acide sulfurique.
Eviter tout contact avec la peau, les yeux
et les vêtements.
Attention!
Pour charger la batterie veiller à ne pas
dépasser l’intensité maximum de 0,5 ÷ 1A
par heure pour ne pas l’inutiliser.
Changement de la Batterie
S’il fallait changer la batterie veiller à la
remplacer par une batterie de même capacité et tension de 12 V 4 Ah.
Il vaut mieux faire remplacer la batterie
❀
par un Service Officiel DERBI à cause
du problème des déchets car les batteries contiennent entre autres substances, de l’acide sulfurique à ne jeter en
aucun cas dans la poubelle domestique.
Page 45

Batteria • Battery
Batterie
corrente consigliabile per ricaricare è di
0,5 ÷ 1 Ao massimo, fino ad ottenere la
densità consigliata.
- La batteria, se non usata, si scarica tra un
0,5% e un 1% ogni giorno. Questa media
aumenta con la temperatura. Per compensare bisogna procedere alla ricarica
una volta al mese.
- Una batteria contiene acido solforico. Evitare il contatto con la pelle, occhi ed indumenti.
Attenzione!
Quando si ricarica la batteria non si deve
superare l’intensità massima di 0,5 ÷ 1 Ao,
altrimenti si distruggerebbe la batteria.
Sostituzione della batteria
Se fosse necessario sostituire la batteria
occorre montarne un'altra di pari capacità e
tensione: 12V, 4AH.
Per un corretto smaltimento della bate-
❀
rria esausta, si consiglia di farla sostituire la batteria da un Servizio Ufficiale
DERBI.
Le batterie contengono, tra altre sostanze, acido solforico e in nessun
caso si devono gettare nei contenitore
di rifiuti organici.
ge the battery. The recommended charging current is from 0.5 to 1 amp maximum, until the required charge is obtained.
- When not in use, the battery will discharge at a rate of about 0.5% and 1% daily.
This average increases with the temperature. The battery should be given a top-up
charge every month to compensate for
this loss.
- A battery contains sulphuric acid. Avoid
contact with the skin, the eyes, and clothing.
Caution!
When recharging, do not exceed the
maximum rate of 0.5 to 1 amps per hour, or
the battery will be destroyed.
Changing the battery
If the battery has to be changed, it must
be replaced with one of equal capacity and
voltage: 12 V 4 Ah.
Disposal of old batteries is a problem.
❀
It is therefore better to entrust the
replacement of your battery to your
Official DERBI Service Agent. Batteries contain, among other substances,
sulphuric acid, and should never be
put in with domestic rubbish.
der Wert niedriger sein, laden Sie die
Batterie wieder auf. Der empfohlene
Ladestrom beträgt maximal 0,5 ÷ 1A, bis die
empfohlene Dichte erreicht ist.
- Wird sie nicht benutzt, entlädt sich die
Batterie täglich um ca. 0,5% bis 1%. Dieser
Durchschnittswert erhöht sich mit
zunehmender Temperatur. Zum Ausgleich
muß die Batterie einmal im Monat
aufgeladen werden.
- Eine Batterie enthält Schwefelsäure.
Vermeiden Sie den Kontakt mit der Haut,
den Augen und der Kleidung.
Vorsicht!
Beim Aufladen die maximale Stromstärke von
0,5 ÷ 1A pro Stunde nicht überschreiten, da
dies die Batterie zerstören würde.
Auswechseln der Batterie
Sollte ein Auswechseln der Batterie nötig
sein, verwenden Sie eine neue Batterie mit
derselben Kapazität und einer Spannung von
12V 4Ah
Aufgrund der Schwierigkeiten, die die
❀
Entsorgung alter Batterien mit sich
bringt, ist es ratsam, den Batteriewechsel
bei einer offiziellen DERBI-Servicestelle
vornehmen zu lassen. Die Batterien enthalten u.a. Schwefelsäure und sollten auf
keinen Fall auf den Hausmüll geworfen
werden.
45
Page 46

Lubricación separada
A
B
Lubrification séparée
Lubricación separada
El sistema de lubricación separada
está formado por el depósito del aceite,
situado debajo del sillín y junto al depó-
sito del combustible y la bomba de alimentación, situada en la tapa cárter
derecho.
El depósito, con capacidad de 1 l.
tiene un indicador de reserva que
enciende el chivato rojo de reserva de
aceite situado sobre el tablero, cuando
el lubricante llega a unos 0,25 litros.
Eventualmente se puede proceder a
la purga del aire de la bomba de aceite.
Dicha operación es necesaria cada
vez que se desmonta la bomba, o se
desconecta el tubo de alimentación del
aceite o cuando el depósito del lubricante se ha quedado completamente
vacío.
En tal caso proceder a las siguientes
operaciones:
Lubrification séparée
Ce modèle est muni d'un système de
lubrification séparée, formée par le
réservoir d'huile, situé près du réservoir
à essence et la pompe d'alimentation
située sur le couvercle du carter droit.
La capacité du réservoir d'huile est de 1
litre et le réservoir est muni d'un témoin
de réserve dont la lampe, située sur le
tableau de bord, s'allume lorsqu'il ne
reste que 0.25 litres de lubrifiant.
On peut éventuellement procéder à
purger l'air de la pompe à huile.
Cette opération est nécessaire chaque fois que la pompe est démontée ou
chaque fois que le tube d'alimentation
d'huile est déconnecté ou lorsque le
réservoir de lubrifiant est tout à fait vide.
Pour effectuer la purge il faut procé-
der selon les opérations suivantes:
46
Page 47

Lubricazione separata • Separate Lubrication
Getrenntschmierung
Lubricazione separata
Il sistema di lubrificazione separata è
formato dal serbatoio dell'olio, posto
sotto il sellino e a fianco del serbatoio di
combustibile, e la pompa di alimentazione, situata nel coperchio destro del carter.
Il serbatoio, con una capacità di litri 1
ha un indicatore di scorta che accende
la spia rossa di scorta d’olio situata nel
cruscotto quando il lubricante raggiunge
i 0,25 l.
Eventualmente può realizzarsi lo
spurgo dell’aria della pompa dell’olio.
La sopraddetta operazione è necessaria qualora si smonta la pompa o si
disinserisce il tubo alimentazione d’olio,
oppure quando il serbatoio del lubricante è rimasto completamente vuoto.
In tale caso, effettuare le seguenti
operazioni:
Separate Lubrication
The oil system is made up of the oil
reservoir, which is located underneath
the saddle beside the fuel tank, and the
feed pump, which is located in the right
hand crankcase cover. The tank, with a
capacity of 1 litre, has a reserve indicator which lights up the red oil-reserve
warning light on the instrument panel
when the lubricant level decreases to
approximately 0,25 litres.
When necessary, air can be bled
from the oil pump. This operation is
necessary each time the pump is removed, the oil feed pipe is disconnected,
or the oil tank has become totally
empty.
In this case carry out the following
operations:
- Empty the fuel tank and fill it with 2-3
litres of 1% mixture of SAE 30 type
synthetic oil.
Getrenntschmierung
Bei diesem Fahrzeugmodell kommt
ein Getrenntschmierungssystem zum
Einsatz, das aus dem unter dem Sitz
und neben dem Benzintank
angeordneten Ölbehälter und der
Zuführpumpe am Deckel der rechten
Gehäusehälfte besteht.
Die Einfüllöffnung des separaten
Ölbehälters, mit einem Inhalt von 1 l,
befindet sich unter der Tankklappe.
Unterschreitet die Ölmenge 0,25 l,
brennt die rote Warnlampe.
Sollte der Ölbehälter entleert oder
die Ölpumpe demontiert werden, so ist
vor Inbetriebnahme des Fahrzeuges
diese grundsätzlich nach folgender
Reihenfolge zu entlüften:
- Kraftstoffbehälter entleeren und mit
ca. 3 Liter Mischung 1:100 (bleifrei)
wieder befüllen.
- Ölbehälter befüllen.
- Motor auf Standgas laufen lassen.
47
Page 48

Lubricación separada
Lubrification séparée
- Vaciar el depósito de gasolina y
llenarlo con 2 ó 3 litros de mezcla al
1% de aceite sintético SAE 30.
- Poner en marcha el motor y hacerlo
girar al ralentí.
- Aflojar el tornillo de purga (A) y al
mismo tiempo hacer girar con la mano
la palanca de mando (B) de la bomba
de aceite hasta que salga un flujo de
aceite continuo y sin burbujas.
- A continuación apretar el tornillo de
purga (A).
Nota: Para mayor seguridad, se aconseja utilizar la mezcla puesta en el
depósito y sólo después rellenar con
gasolina sin plomo.
- Vider le réservoir à essence et le
remplir avec 2 ou 3 litres du mélange
à 1% d'huile synthétique SAE 30.
- Mettre en marche le moteur et le faire
tourner au ralenti.
- Desserrer la vis de purge (A) et en
même temps faire tourner à la main le
levier de commande (B) de la pompe
à huile jusqu'à obtenir un débit d'huile
continu et sans bulles d'air.
- Ensuite serrer la vis vidange (A).
Note: Pour plus de sûreté il est consei-
llé d'utiliser le mélange contenu dans le
réservoir et c'est uniquement après qu'il
faut faire le plein avec de l'essence
Sans Plomb.
48
Page 49

Lubricazione separata • Separate Lubrication
Getrenntschmierung
- Vuotare il serbatoio benzina e riempirlo con 2 o 3 litri di miscela all’1% d’olio
sintetico SAE 30.
- Avviare il motore e farlo girare al minimo.
- Allentare la vite di spurgo (A) e simultaneamente far girare colla mano la
leva di comando (B) della pompa
dell’olio, fino che esca un flusso continuo d’olio senza bolle.
- Dopo di ciò, serrare la vite di spurgo
(A)
Nota: Per maggiore sicurezza si raccomanda utilizzare la miscela con cui s’è
riempito il serbatoio e, soltanto dopo,
riempirlo con benzina senza piombo.
- Start the engine and run it at idling
speed.
- Slacken the bleed screw (A) and at the
same time turn the control lever (B) of
the oil pump by hand, until a
continuous bubble-free oil flow
emerges.
- Tighten the bleed screw (A).
Note: For greater safety it is advised to
use the indicated mixture in the tank,
and only afterwards to fill up with Unleaded Fuel.
- die Entlüftungsschraube (A) öffnen
und gleichzeitig mit der Hand den
Steuerhebel (B) der Ölpumpe solange
drehen, bis Öl ohne Luftblasen
gefördert wird.
- Entlüftungsschraube (A) festziehen
- die Einstellung der Ölpumpe
kontrollieren. Bei Leerlauf müssen die
Markierungen des Steuerhebels (B)
mit der des Pumpenkörpers (A)
übereinstimmen.
Achtung: Sicherheitshalber sollte die in
den Kraftstoffbehälter eingefüllte
Mischung verbraucht werden. Beim
nächsten Tanken wird dann wieder
ausschließlich Bleifrei.
49
Page 50

Filtro de aire
2
1
Filtre à air
Limpieza filtro de aire
La espuma filtro aire está dentro de la
caja filtro situada en el lado derecho del
ciclomotor.
OBSERVACION:
Si la espuma se ha obstruido con
polvo, aumentará la resistencia de
admisión con una pérdida resultante de
potencia de salida y un incremento en
el consumo de combustible. Se recomienda limpiar la espuma cada 5.000
Km. de acuerdo al procedimiento
siguiente.
- Desmonte la tapa lateral del lado
derecho (1)
- Extraiga los tornillos fijación tapa caja
filtro (2) y desmonte la misma.
- Extraiga la espuma filtro.
- Llene un recipiente con un líquido limpiador no inflamable. Sumerja la
espuma varias veces hasta que
quede totalmente limpia.
50
- Expulse el líquido limpiador presionando varias veces el filtro con las
palmas de las manos. No doble o
estruje el filtro, ya que ello ocasionará
fisuras en él.
Nettoyage du filtre à air
L'éponge du filtre à air se trouve dans
la boîte-filtre située du côté droit du
cyclomoteur.
OBSERVATION:
Si l'éponge est obstruée par la poussière, la résistance dans l'admission
d'air augmentera et entraînera une
perte de puissance de sortie et une
augmentation de consommation en carburant. Il est souhaitable de nettoyer l'é-
ponge du filtre tous les 5.000 km selon
le procédé suivant:
- Démonter le couvercle latéral du côté
droit (1)
- Enlever les vis de fixation du couver-
cle de la boîte-filtre (2) et la démonter.
- Extraire l'éponge-filtre.
- Remplir un récipient avec un liquide
nettoyant non inflammable. Immergez
le filtre-éponge plusieurs fois jusqu'à
ce qu'il soit tout à fait propre.
- Faire égoutter le liquide nettoyant en
pressant plusieurs fois avec les pau-
mes de la main. Ne pas plier ni tordre
le filtre pour ne pas provoquer des fis-
sures.
Page 51

Filtro aria • Air filter
Luftfilter
Pulizia filtro aria
L’espanso filtro aria si trova dentro la
cassa filtro posta nel lato destro del
ciclomotore.
OSSERVAZIONE:
Se l’espanso è ostruito dalla polvere,
aumenterà la resistenza di ammissione,
con una perdita risultante di potenza di
uscita e un incremento del consumo di
combustibile. Si consiglia pulire l’espanso ogni 5.000 Km, nel modo seguente:
- Smontare il coperchio laterale del lato
destro (1)
- Estrarre le viti di fissaggio del coper-
chio della cassa filtro (2) e smontarla.
- Estrarre l’espanso.
- Riempire un recipiente con un liquido
nettante non infiammabile. Immergere
l’espanso diverse volte, fino che ne
esca totalmente pulito.
- Espellere il liquido nettante premendo
diverse volte il filtro con le palme delle
mani. Non piegare o strizzare il filtro,
poichè questo ne provocherebbe fessure.
- Immergere l’espanso in un recipiente
pieno d’olio per filtros e premerlo
Cleaning the air filter
The air filter foam is inside the filter
case situated on the right-hand side of
the moped.
NOTE:
If the foam is obstructed with dust,
this will increase the resistance to the
intake of air, resulting in a loss of power
and an increase in fuel consumption. It
is recommended to clean the foam
every 5,000 km by the following
procedure:
- Remove the right-hand side cover (1).
- Remove the filter cover fixing bolts (2)
and the cover.
- Remove the filter foam.
- Fill a recipient with a non-inflammable
cleaning liquid. Submerge the foam in
this several times until it is totally
clean.
- Press the filter between the palms of
your hands several times to squeeze
out the cleaning liquid. Do not fold or
twist the filter, as this could cause
cracks in it.
- Submerge the filter foam in a
recipient filled with filteroil. Then
Säuberung des Luftfilters
Der Schaum des Luftfilters befindet
sich in der Filtergehäuse an der rechten
Seite des Mokicks.
Anmerkung:
Ist der Schaum mit Staub verstopft,
nimmt der Ansaugwiderstand zu, was
einen entsprechenden Verlust der
Ausgangsleistung und einen
vermehrten Kraftstoffverbrauch zur
Folge hat. Es wird empfohlen, den
Schaum alle 5.000 Km folgendermaßen
zu reinigen:
- Demontieren Sie den rechten
Seitendeckel (1).
- Entfernen Sie die Schrauben des
Filtergehäuses (2) und nehmen Sie
den Deckel ab.
- Nehmen Sie den Filterschaum heraus.
-Füllen Sie einen Behälter mit einem
nicht brennbaren Reinigungsmittel.
Tauchen Sie den Schaum mehrmals
hinein, bis er vollkommen sauber ist.
- Treiben Sie das Reinigungsmittel aus
dem Filter, indem Sie mehrmals mit
der flachen Hand darauf drücken.
Knicken oder quetschen Sie es nicht,
51
Page 52

Filtro de aire
Filtre à air
c
Precaució!
- Abans i durant la neteja examini
acuradament l'escuma del filtre d'aire,
si està defectuosa, s'ha de canviar per
una de nova.
- Si condueix per carreteres amb pols,
s'ha de netejar l’escuma del filtre
d'aire més sovint. Asseguri’s sempre
que l'escuma està en excel.lents
condicions. La vida del motor depèn
molt d'aquest component. MAI FACI
FUNCIONAR EL MOTOR SENSE
L'ESCUMA DEL FILTRE D'AIRE.
- Sumerja la espuma filtro en un recipiente lleno de aceite para filtros y
después con las palmas de las manos
presionar repetidamente hasta expulsar el aceite.
- Una vez tenga la espuma límpia,
móntela siguiendo el orden inverso de
desmontaje.
¡Precaución!
- Antes y durante la limpieza examine
minuciosamente la espuma filtro aire,
si ve que está deficiente, debe reemplazarla por una nueva.
- Si conduce por carreteras polvorientas, debe limpiar la espuma filtro aire
más frecuentemente. Asegúrese
siempre que la espuma esté en excelentes condiciones. La vida del motor
depende mayormente de este componente. NUNCA HAGA FUNCIONAR
EL MOTOR SIN ESPUMA FILTRO
AIRE.
- Immerger l'éponge-filtre dans un récipient rempli de d'huile pour filtres et
ensuite avec les paumes des mains
presser plusieurs fois jusqu'à égoutter
l'huile.
- Une fois l'éponge-filtre propre, remettez-là en suivant l'ordre inverse à
celui du démontage.
Attention!
Avant et pendant le nettoyage vérifier
soigneusement l'éponge filtre à air et s'il
y a des déficiences vous devez la remplacer.
- Si vous conduisez sur des routes
poussièreuses vous devez nettoyer le
filtre à aire plus souvent. Assurezvous que la mousse est en excellentes conditions. La vie du moteur
dépend en grande partie de cette
pièce. NE JAMAIS FAIRE TOURNER
LE MOTEUR SANS MOUSSE FILTRE A AIR.
52
Page 53

Filtro aria • Air filter
Luftfilter
diverse volte con le palme delle mani
fino ad espellerlo.
- Qualora l’espanso sia pulito, montarlo
seguendo l’ordine inverso di smontaggio.
Attenzione!
- Prima e durante la pulizia esaminare
con dettaglio l’espanso: se vedesse
che è deficente, dovrebbe sostituirlo
per uno nuovo.
- Se guida lungo strade polverose, deve
pulire l’espanso filtro aria più spesso.
Deve essere sicuro che l’espanso si
trova in eccellenti condizioni. La vita
del motore dipende grandemente da
questo elemento. NON FACCIA MAI
FUNZIONARE IL MOTORE SENZA
ESPANSO FILTRO ARIA.
squeeze out the oil by pressing the
foam between the palms of your
hands several times.
- When the foam is clean, replace it in
the filter case by following the above
procedure in the reverse order.
CAUTION!
- Before and during the cleaning
operation, examine the air filter foam
carefully: if you see that it is
defective, replace it with a new one.
- If you ride regularly on dusty roads,
you should clean the air filter foam
more frequently. Always make sure
that the foam is in excellent condition:
the life of the engine depends greatly
on this component. NEVER
OPERATE THE ENGINE WITHOUT
THE AIR FILTER FOAM.
dies würde Risse im Schaum
verursachen.
- Tauchen Sie den Filterschaum in
einen Behälter voll Filteröl und
drücken Sie anschließend mehrmals
mit der flachen Hand auf das Filter,
bis das Öl ausgetrieben ist.
- Ist der Schaum sauber, montieren Sie
ihn in umgekehrter Reihenfolge
wieder ein.
Vorsicht!
- Untersuchen Sie vor und während der
Säuberung sorgfältig den
Luftfilterschaum. Ein fehlerhafter
Schaum ist durch einen neuen zu
ersetzen.
- Fahren Sie auf staubigen Straßen,
sollten Sie den Luftfilterschaum
häufiger reinigen. Halten Sie den
Schaum stets in allerbestem
Zustand. Die Lebensdauer des
Motors hängt weitgehend von diesem
Teil ab. SETZEN SIE DEN MOTOR
NIEMALS OHNE
LUFTFILTERSCHAUM IN GANG.
53
Page 54

Carburador
Carburateur
c
Precaució!
L'ajustament del ralentí s'ha de fer
sempre amb el motor calent.
54
Carburador
Una carburación sin problemas es la
base de un buen rendimiento del motor.
El carburador ha sido ajustado en fábrica para ofrecer la mejor carburación.
No intente alterar este ajuste.
OBSERVACION:
Periódicamente es conveniente reali-
zar una limpieza del carburador, empleando gasolina límpia y aire a presión.
Regulación del ralentí
Esta operación debe realizarse con el
motor caliente, punto muerto y sin dar
gas, gire el tornillo regulación ralentí
hacia adentro o hacia afuera hasta que
el ralentí del motor llegue a un punto en
el que el motor casi se pare, pero que
vaya redondo. Para cualquier otra regulación del carburador le aconsejamos
se dirija a un Servicio Oficial DERBI.
¡Precaución!
El ajuste del ralentí del motor, hágalo
siempre con el motor caliente.
Carburateur
Une carburation sans problèmes est
essentielle pour le bon rendement du
moteur. Le carburateur a été réglé en
fabrique pour offrir la meilleure carburation. Ne modifiez surtout pas ce réglage.
OBSERVATION:
Périodiquement il est convenable de
réaliser un nettoyage du carburateur en
utilisant de l'essence propre et de l'air
sous pression.
Réglage du ralenti:
Cette opération soit être effectuée
avec le moteur chaud, en point mort et
sans pousser le gaz, faire tourner la vis
de réglage du ralenti vers l'intérieur ou
vers l'extérieur jusqu'à ce que le ralenti
du moteur arrive à un point où le moteur
est presque arrêté, tout en tournant parfaitement.
Pour tout autre réglage du carburateur
nous vous conseillons de vous adresser
à un Service Officiel DERBI.
Attention!
Le réglage du ralenti du moteur doit
s'effectuer lorsque le moteur est chaud.
Page 55

Carburatore • Carburettor
Vergaser
Carburatore
Una carburazione senza problemi è la
base di un buon rendimento del motore.
Il carburatore è stato regolato in fabbrica per fornire la miglior carburazione.
Non provi di alterare questa regolazione.
OSSERVAZIONE:
È conveniente effettuare periodicamente una pulizia del carburatore, con
l'uso di benzina pulita ed aria a pressione.
Regolazione del minimo
Questa operazione deve effettuarsi
col motore caldo, punto morto e senza
dare gas girare la vite regolazione minimo verso l'interno o verso l'esterno,
finchè il minimo del motore arrivi ad un
momento in cui il motore sia sul punto di
fermarsi, ma funzioni con normalità. Per
qualsiasi altra regolazione del carburatore, le consigliamo recarsi da un Servizio Ufficiale DERBI.
Attenzione!
Effettuare sempre la regolazione del
minimo del motore quando questo è
caldo.
Carburettor
Trouble-free carburation is the key to
good engine performance. The carburettor has been factory-adjusted to give
the best carburation. Do not attempt to
alter this adjustment.
NOTE:
It is advisable to clean the carburettor periodically, using clean petrol and
compressed air.
Adjustment of the idling speed
This operation must be carried out
with the engine warm, in neutral and
without using the accelerator. Turn the
idling adjustment screw inwards or outwards until the idling speed reaches a
point where the engine almost stops
but still runs smoothly. For any other
adjustment of the carburettor, we
recommend that you contact an Official
DERBI Service Centre.
CAUTION!
Always adjust the idling speed with
the engine warm.
Vergaser
Eine reibungslose Vergasung ist die
Voraussetzung für eine optimale
Motorleistung. Der Vergaser ist im Werk
so eingestellt worden, daß er die
bestmögliche Vergasung gewährleistet.
Versuchen Sie nicht, diese Einstellung zu
verändern.
ANMERKUNG:
Es ist zweckmäßig, den Vergaser
regelmäßig mit sauberem Benzin und
Druckluft zu reinigen.
Leerlaufregelung
Dieser Vorgang ist stets mit warmem
Motor durchzuführen. Ohne Gas zu
geben, drehen Sie die
Leerlaufregulierschraube die sich auf der
linken Seite des Vergasers befindet, nach
innen oder nach außen, bis der Motor im
Leerlauf beinahe stehenbleibt, aber
trotzdem kräftig weiterläuft. Für alle
weiteren Einstellungen des Vergasers
empfehlen wir Ihnen, sich an einen
offiziellen DERBI-Händler zu wenden.
Vorsicht!
Für die Leerlaufregulierung muß der
Motor stets warm sein.
55
Page 56

Bujía
0,6 ÷ 0,7 mm.
Bougie
c
Precaució!
L'ús d'una bugia inadequada pot
produir mals greus al motor.
Bujía
Bujía recomendada y separación de
electrodos:
NGK B8ES / 0.6 ÷ 0.7 mm
Mantenimiento de la bujía:
Periódicamente desmonte la bujía,
limpie los electrodos y observe su desgaste. Empleando un calibre de espesores, verifique que la separación de
los electrodos sea la correcta. Sustituya
la bujía en los periodos que estipule la
tabla de mantenimiento del vehículo.
¡Precaución!
La utilización de una bujía inadecuada puede conducir a daños severos del
motor.
Bougie
Bougie recommandée et séparation
entre électrodes:
NGK B8ES / 0.6 ÷ 0.7 mm
Entretien de la bougie:
Démontez périodiquement la bougie,
nettoyez les électrodes et vérifiez
l'usure. Au moyen d'un calibre
d'épaisseurs, veillez à ce que la
séparation des électrodes soit correcte.
Remplacez la bougie en respectant les
marques indiquées et les périodes
stipulées dans le tableau d'entretien du
véhicule.
Attention!
L'utilisation d'une bougie ne
convenant pas peut provoquer de
graves dommages au moteur.
56
Page 57

Candela • Spark plug
Zündkerze
Candela
Candela consigliata e separazione
degli elettrodi:
NGK B8ES / 0.6 ÷ 0.7 mm
Manutenzione della candela:
Smontate periodicamente la candela,
nettate gli elettrodi e osservatene
l'usura. Usate uno spessimetro e
controllate che la separazione tra gli
elettrodi sia quella corretta. Sostituite le
candele usando i marchi consigliati
nelle scadenze indicate nella tabella di
manutenzione del veicolo.
Attenzione!
L'uso di una candela non appropiata
può provocae gravi danni al motore.
Spark plug
Recommended spark plug and gap
between electrodes:
NGK B8ES / 0.6 ÷ 0.7 mm
Spark plug maintenance:
Remove the spark plug from time to
time, clean the electrodes and check
how worn they are with a thickness
gauge and ensure that the gap between
the electrodes is correct. Replace the
spark plug with the brands and
frequency stipulated in the vehicle
maintenance table.
CAUTION!
The use of an inappropriate spark plug
may cause serious damage to the
engine.
Zündkerze
Empfohlene Zündkerze und
Elektrodenabstand:
NGK B8ES / 0.6 ÷ 0.7 mm
Wartung der Zündkerze:
Die Zündkerze in regelmäßigen
Abständen ausbauen, die Elektroden
reinigen und den Verschleiß
kontrollieren. Mit einer
Tiefenlehreprüfen, ob der
Elektrodenabstand in Ordnung ist. In
den Abständen, wie sie in der
Wartungstabelle des Fahrzeugs
angegeben sind, die Zündkerze durch
eine neue Markenkerze ersetzen.
Vorsicht!
Die Verwendung einer
ungeeigneten Zündkerze kann zu
ernsthaften Motorschäden führen.
57
Page 58
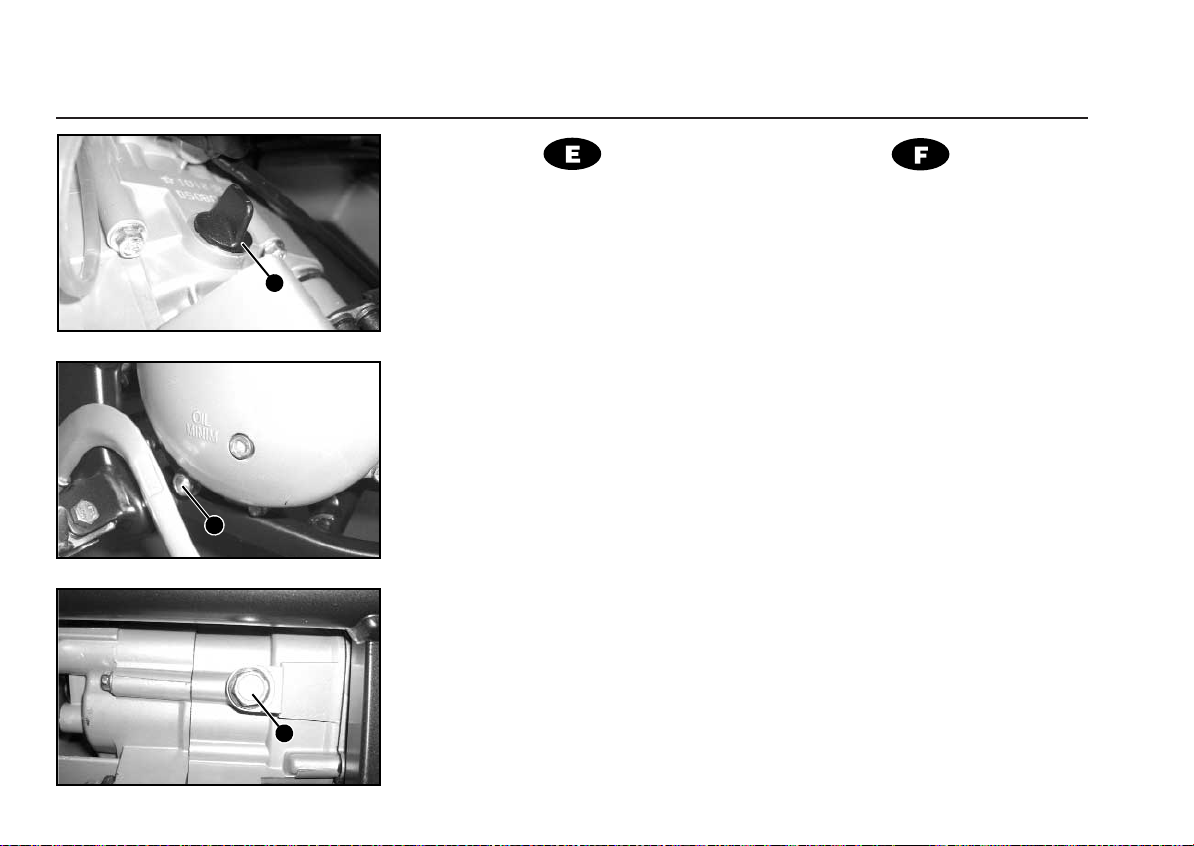
Lubricación y engrase
1
2
3
Lubrification et graissage
Lubricación y engrase
Aceite para el cárter:
• Viscosidad: SAE 10W 40
• Calidad: API GL4
• Capacidad: 650 c.c. (0.65 l)
Revise el nivel de aceite en los periodos que recomienda la tabla de mantenimiento del vehículo. Para hacerlo, asegú-
rese de que la moto está en posición vertical y extraiga el tornillo de nivel mínimo
(OIL MIN), situado en la tapa derecha del
motor (2). Este nivel indica el mínimo
aceite indispensable para el correcto funcionamiento del motor, pero recuerde que
el nivel de aceite recomendado sería
superior a este, por lo que es aconseja
comprobar que existen 650 c.c. de aceite
en el cárter. Siempre que tenga que aña-
dir aceite, utilice aceite de idénticas
características al que hay en el cárter.
El aceite de cárter se deberá sustituir
en los periodos apuntados en la tabla de
mantenimiento del vehículo. Para ello,
con el motor caliente, extraiga el tapón de
vaciado aceite de la tapa cárter derecha
58
Lubrification et graissage
Huile pour le carter :
• Viscosité : SAE 10W 40
• Qualité : API GL4
• Capacité : 650 c.c. (0.65 l)
Vérifiez le niveau de l'huile dans les
périodes recommandées sur le tableau
d'entretien du véhicule. Pour le faire, il
faut s'assurer que la moto se trouve en
position verticale avant d'extraire la vis de
niveau minimum (OIL MIN), située sur le
couvercle droit du moteur (2). Ce niveau
indique le niveau minimum de l'huile indispensable pour le fonctionnement correct
du moteur mais n'oubliez pas que le niveau d'huile recommandé est supérieur et il
est conseillé de vérifier qu'il y a bien 650
c.c. d'huile dans le carter. Lorsque vous
ajoutez de l'huile il faut utiliser une huile
aux caractéristiques identiques à celle qui
est dans le carter.
L'huile du carter devra être remplacée
dans les périodes indiquées sur le tableau
d'entretien du véhicule. Pour cette opération, le moteur étant chaud, extraire le
Page 59

Lubrificazione ed ingrassaggio • Lubrication and greasing
Schmierung
Lubrificazione ed ingrassaggio
Olio per il carter:
• Viscosità SAE 10W 40
• Qualità: API GL4
• Capacità: 650 c.c. (0,65 l)
Controllate il livello dell'olio nelle scadenze consigliate nella tabella di manutenzione del veicolo. Per fare ciò, assicuratevi che la motocicletta sia in posizione
verticale e sfilate la vite di livello minimo
(OIL MIN) situata nel coperchio destro del
motore (2). Questo livello indica il minimo
olio indispensabile per il funzionamento
corretto del motore, ma ricordate che il
livello d'olio consigliato sarebbe al di
sopra di questo, per cui è consigliabile
controllare che esistano 650 c.c. d'olio nel
carter. Sempre che dobbiate aggiungere
dell'olio, usate olio delle stesse caratteristiche di quello che è ormai nel carter.
L'olio del carter dovrà essere sostituito
nei tempi segnati nella tabella di manutenzione del veicolo. Per farlo, con il motore
caldo, sfilate il tappo di svuotamento
dell'olio del coperchio del carter destro (3)
Lubrication and greasing
Oil for the crankcase:
•
Viscosity: SAE 10W 40
•
Quality: API GL4
•
Capacity: 650 c.c. (0.65 l)
Check the oil with the frequency
recommended in the vehicle's maintenance table. When doing this, make
sure the motorbike is vertical and remove the minimum level screw (OIL MIN)
on the right-hand cap on the engine (2).
This level shows the minimum amount
of oil needed for the engine to work properly, but remember that the recommended oil level would be higher than
that, so it is worth making sure there is
650 c.c. of oil in the crankcase. Whenever you have to add oil, use oil with the
same characteristics as the oil that is
already in the crankcase.
The oil in the crankcase must be
replaced with the frequency shown in
the vehicle maintenance table. In order
to do this, with the engine running,
Schmierung
Öl für die Ölwanne:
•
Viskosität: SAE 10W 40
•
Qualität: API GL4
•
Fassungsvermögen: 650 cm3 (0,65 l)
Den Ölstand in den Intervallen der
Wartungstabelle des Fahrzeugs
kontrollieren. Dabei beachten, dass das
Motorrad senkrecht steht und die Schraube
für Mindestölstand (OIL MIN) an der
rechten Motorabdeckung (2) herausdrehen.
Dieser Ölstand entspricht dem
Mindestölstand für den korrekten Betrieb
des Motors, beachten Sie jedoch, dass der
empfohlene Ölstand über diesem Ölstand
liegt, weshalb kontrolliert werden sollte,
dass sich 650 cm3 Öl in der Ölwanne
befinden. Wenn Öl nachgefüllt werden
muss, Öl mit der gleichen Qualität wie das
Öl in der Ölwanne einfüllen.
Das Öl in der Ölwanne muss in den
Intervallen der Wartungstabelle des
Fahrzeugs gewechselt werden. Dazu bei
betriebswarmem Motor den Ölablassdeckel
an der rechten Ölwannenabdeckung (3)
59
Page 60

Lubricación y engrase
1
2
3
Lubrification et graissage
(3) y del cárter central (4), deje vaciar
todo el aceite. Volver a montar los tapones de vaciado y a través del orificio de
llenado (1) introducir 0,650 litros del aceite adecuado.
PRECAUCIÓN
El aceite motor es tóxico. Dispóngalo
de forma adecuada
Aceite para la mezcla de motores 2t:
Rellene el depósito de aceite de mezcla con el aceite recomendado el la tabla
de características del vehículo.
bouchon de vidange d'huile du couvercle
carter droite (3) et du carter central (4).
Une fois toute l'huile vidangée, remettre
les bouchons de vidange et par l'orifice de
remplissage (1) remplir avec 0.650 litres
de l'huile adéquate.
ATTENTION
L'huile du moteur est toxique. Procé-
dez avec précaution.
Huile de mélange pour moteur à 2 t:
Remplissez le moteur avec le mélange
d'huile selon les recommandations du
tableau indiquant les caractéristiques du
véhicule.
60
Page 61

Lubrificazione ed ingrassaggio • Lubrication and greasing
Schmierung
e del carter centrale (4) e lasciate scolare
tutto l'olio. Ricollocate i tappi di svuotamento e attraverso il foro di riempimento
(1) introducete 0,650 litri dell'olio idoneo.
PRECAUZIONE
L'olio motore è tossico. Smaltitelo in
maniera idonea
Olio per la miscela di motori 2T:
Riempite il serbatoio d'olio di miscela
con l'olio consigliato nella tabella di caratteristiche del veicolo.
remove the oil drainage stopper from
the right-hand crankcase (3) and middle
crankcase (4) cap and let all the oil
drain out. Put the drainage stoppers
back on and pour 0.65 litres of the right
oil through the filling hole (1).
CAUTION
Engine oil is toxic. Dispose of it
appropriately
Oil for 2-stroke engine mixes:
Fill the oil mix tank with the oil
recommended in the vehicle's table of
characteristics.
und der mittleren Ölwannenabdeckung (4)
öffnen und das gesamte Öl ablassen. Die
Ölablassdeckel wieder anbringen und über
die Einfüllöffnung (1) 0,650 Liter geeignetes
Öl einfüllen.
VORSICHT
Das Motoröl ist giftig. Es muss
vorschriftsmäßig entsorgt werden.
Motoröl für die 2-Takt-Mischung:
Den Mischölbehälter mit dem in der
Tabelle der technischen Merkmale des
Fahrzeug empfohlenen Öl füllen.
61
Page 62

Regulaciones
Réglages
Regulaciones
Después del período de rodaje y periódicamente es necesario:
- Regular el mando del embrague, si
fuera necesario, actuando sobre el tensor de la maneta de manera que quede
un pequeño juego controlable fácilmente
desde la maneta. Se recomienda un
juego de 2 a 3 mm. Es importante la
correcta regulación de este juego.
- Regular el mando de gas actuando
sobre el tensor situado en el puño de
gas y sobre el situado en el carburador.
- Comprobar la tensión de la cadena. Su
juego al apretar con el dedo debe ser de
30 ÷ 45 mm. Caso de tener que efectuar
su tensado, proceda de la siguiente
manera. Afloje la tuerca eje rueda, y
actue sobre los tensores, girando la
tuerca en el sentido de las agujas del
reloj, procurando dar las mismas vueltas
a la tuerca de la derecha como a la de la
izquierda. De esta forma la rueda quedará alineada. Apriete la tuerca eje
rueda.
- A los primeros 1.000 Kms. y períodos de
tres meses, reapretar las tuercas de los
radios de las ruedas.
Réglages
Périodiquement, après la période de
rodage il faut:
-Régler la commande de l'embrayage, si
nécessaire, en agissant sur le tenseur
de la manette de façon à ce qu'il y un
petit jeu facilement contrôlable depuis la
manette. On recommande un jeu de 2 à
3 mm. Le réglage correct de ce jeu est
important.
-Régler la commande du gaz en agissant
sur le tenseur situé sur la poignée du
gaz et sur celui situé sur le carburateur.
-Vérifier si la chaîne est bien tendue. Son
jeu en appuyant avec le doigt doit être
de 30 ÷ 45 mm. S'il fallait procéder à la
tendre il faut le faire de la manière suivante: desserrer l'écrou de l'axe de la
roue, et agissez sur les tendeurs, en faisant tourner l'écrou dans le sens des
aiguilles d'une montre, en faisant tourner
autant de fois l'écrou de droite que celui
de gauche. Ainsi la roue sera en ligne.
Serrez l'écrou de l'axe de la roue.
- Resserrer les écrous des rayons des
roues, après les premiers 1000 km et
tous les trois mois.
62
Page 63

Regolazioni • Adjustments
Einstellungen
Regolazioni
Dopo il periodo di rodaggio e periodicamente è necessario:
- Regolare il comando della frizione, se
fosse necessario, agendo sul tensore
della leva, in modo che rimanga un piccolo gioco facilamente controllabile dalla
leva. Si consiglia un gioco di 2 a 3 mm.
È importante la corretta regolazione di
questo gioco.
- Regolare il comando dell'acceleratore,
agendo sul tensore situato nella manopola dell'acceleratore e su quello situato
nel carburatore.
- Verificare la tensione della catena.Quando si preme con il dito, il suo gioco deve
essere compreso tra y 30 e y 45 mm. Se
dovesse tendersi, effettuarlo nel seguente modo: Allentare il dado asse ruota ed
agire sui tensori, girando il dado nel
senso delle lancette dell'orologio. Deve
aversi cura di dare lo stesso numero di
giri sia al dado della destra come a quello della sinistra. In questo modo la ruota
sarà allineata. Serrare il dado asse
ruota.
-Dopo i primi 1000 Km ed ogni tre
mesi,serrare i dadi dei raggi delle ruote.
Adjustments
At the end of the running-in period, and
periodically thereafter, it is necessary to
carry out the following operations:
- Adjust the clutch control, if necessary,
by means of the lever tensor, to leave a
small play which is easily controlled from
the lever. A play of 2-3 mm is recommended. It is important to adjust this
play correctly.
- Adjust the acceleration by means of the
tensors on the accelerator grip and on
the carburettor.
- Check the drive chain tension. When
pressed with a finger, there should be a
play of 30-45 mm. If adjustment is needed, proceed as follows: loosen the
wheel nut and adjust the tensors by turning them clockwise, giving the same
number of turns to the right and left tensors. In this way the wheel will be
correctly aligned. Tighten the wheel nut.
- After the first 1,000 km, and every three
months thereafter, tighten the wheel
spoke nuts.
Einstellungen
Nach dem Einfahren sind regelmäßig
folgende Einstellungen notwendig:
- Einstellung des Kupplungshebels, falls
notwendig, indem die Einstellschraube
soweit verdreht wird, daß ein Spiel von 2
bis 3 mm verbleibt. Die korrekte
Einstellung dieses Spiels ist wichtig.
- Gaseinstellung durch Einwirkung auf die
Spanner am Gasgriff und am Vergaser.
- Die Spannung der Kette überprüfen.
Drückt man mit dem Finger darauf, soll
das Spiel von 30 bis 45 mm. sein. Sollte
es notwendig sein, die Kette zu
spannen, ist folgendermaßen
vorzugehen. Lösen Sie die Mutter der
Radachse und wirken Sie auf die
Spanner ein, indem Sie die Mutter im
Uhrzeigersinn drehen. Geben Sie
beiden Muttern -der linken wie der
rechten- die gleiche Anzahl von
Umdrehungen. Auf diese Weise wird
das Rad korrekt ausgerichtet. Ziehen
Sie die Mutter der Radachse fest.
- Nach den ersten 1.000 Km oder 3
Monaten Fahrtzeit ziehen Sie die
Muttern der Radspeichen an.
63
Page 64

Características del freno de disco
Caractéristiques du frein à disque
64
Características del freno de disco
Los frenos de disco comparados con
los de tambor tienen las siguientes características y ventajas:
- La evacuación de calor de las superfi-
cies de fricción es muy eficaz, ya que
los discos giran en contacto directo con
el aire. Por este motivo siempre tenemos una capacidad de frenada estable,
aún usando el freno repetidamente a
altas velocidades. Dicho de otra manera
el riesgo de “Fadding” es muy inferior.
- Ninguna de las piezas del freno de disco
está expuesta a deformación alguna,
por las elevadas temperaturas.
- El cambio de las pastillas de freno es
simple y no requiere ajustes complicados.
- Se asegura un funcionamiento constan-
te de los frenos, ya que aún estando el
disco mojado, durante la marcha en
tiempo lluvioso, la capacidad de recuperación de la fuerza de frenado es excelente, debido a las características de
extrema presión de las pastillas de
freno.
- Tiene un tacto suave, ya que sólo tiene
una pequeña, pero suficiente, zona de
fricción.
Caractéristiques du frein à disque
Les caractéristiques des freins à disque et les avantages sont différents de
ceux des freins à tambour et ce sont les
suivants:
-L'évacuation de la chaleur des surfaces
de friction est très efficace car les
disques tournent en contact direct avec
l'air. C'est pourquoi nous avons toujours
une capacité de freinage stable, même
en utilisant le frein plusieurs fois à
grande vitesse. Le risque de "fadding"
est bien moindre.
- Aucune des pièces du frein à disque ne
se trouve exposée à des déformations à
cause des températures élevées.
- La remplacement des plaquettes de
frein est simple et ne requiert pas
réglages compliqués.
- Un fonctionnement constant des freins
est assuré puisque même si le disque
est mouillé, en roulant par temps
pluvieux, la capacité de récupération de
la force de freinée est excellente étant
donné les caractéristiques de forte
pression des plaquettes de frein.
- Le contact est doux car la zone de
friction est réduite mais suffisante.
Page 65

Caratteristiche del freno a disco • Characteristics of the disc brake
Eigenschaften der Scheibenbremse
Caratteristiche del freno a disco
I freni a disco, se si comparano con
quelli a tamburo, hanno le seguenti caratteristiche e vantaggi:
-L’evacuazione di calore dalle superfici di
attrito è molto efficace, poichè i dischi
girano a contatto diretto con l’aria. Per
questo motivo abbiamo sempre una
capacità di frenata stabile, anche
quando si usa ripetutamente il freno ad
alte velocità. Detto in altro modo, il
rischio di “fadding” è molto inferiore.
- Nessuno dei pezzi del freno a disco è
esposto a nessuna deformazione
dovuta alle temperature elevate.
- Il cambio dei tamponi frenanti è
semplice e non richiede regolazioni
complicate.
- Si assicura un costante funzionamento
dei freni poichè, pur essendo i dischi
bagnati in tempo piovoso, la capacità di
recupero della forza di frenata è
eccellente, dovuto alle caratteristiche
d’estrema pressione dei tamponi
frenanti.
- Possiede un tatto soave poichè ha una
piccola, ma sufficente, zona d’attrito.
Characteristics of the disc brake
In comparison with drum brakes, disc
brakes have the following characteristics
and advantages:
- The heat dissipation from the friction
surfaces is very efficient, since the discs
turn in direct contact with the air. For this
reason the braking capacity is always
stable, even when the brake is applied
repeatedly at high speeds. In other
words, the risk of brake fading is much
lower.
- None of the parts of a disc brake are
exposed to deformation through high
temperature.
- Changing the brake pads is simple and
does not require complicated
adjustments.
- The constant operation of the brakes is
assured, since even when the disc is
wet when riding in the rain, the recovery
of braking force is excellent, due to the
very high pressure of the brake pads.
- The disc brake has a smooth action,
since it has only one small but sufficient
area of friction.
Eigenschaften der Scheibenbremse
Im Vergleich zur Trommelbremse weist
die Scheibenbremse folgende
Eigenschaften und Vorteile auf:
- Die Wärmeableitung der
Reibungsoberflächen ist äußerst
wirksam, da sich die Scheibe in
unmittelbarem Luftkontakt dreht. Aus
diesem Grunde bietet dieses Mokick
eine stabile Bremsleistung, selbst wenn
die Bremse mehrmals hintereinander bei
hoher Geschwindigkeit betätigt wird. Mit
anderen Worten: das Risiko des
"Fadding" ist sehr viel geringer.
- Keines der Teile, aus denen sich die
Scheibenbremse zusammensetzt, ist
der Verformung durch hohe
Temperaturen ausgesetzt.
- Das Auswechseln der Bremsbeläge ist
einfach und erfordert keinerlei
komplizierten Einstellungen.
- Eine beständige Funktion der Bremsen
ist sichergestellt, denn sogar wenn die
Scheibe beim Fahren im Regen naß
wird, ist die Fähigkeit, die Bremsleistung
wiederherzustellen, ausgezeichnet. Dies
ist den extremen Druckeigenschaften
der Bremsbeläge zu verdanken.
- Die Bremse fühlt sich sanft an, dank der
kleinen und dennoch ausreichenden
Reibfläche.
65
Page 66

Mantenimiento frenos de disco
Entretien des freins à disque
Mantenimiento frenos de disco
Líquido de freno:
Comprobar periódicamente el nivel del
depósito de líquido de freno. Reponerlo
de ser necesario con líquido hidráulico
DOT 4, no mezcle nunca diferentes tipos
de líquidos.
Con el depósito abierto no apriete la
palanca de freno, de lo contrario podría
derramar el líquido y éste deteriorar las
superficies pintadas y los cristales.
Tenga cuidado no se mezcle agua con
el líquido de freno.
Debido a la absorción de humedad es
recomendable cambiar el líquido cada
dos años.
Tubos flexibles y racordaje:
Comprobar periódicamente los tubos
hidráulicos flexibles, no se hayan deteriorado y que el racordaje no tenga pérdi-
das.
Pastillas de freno:
Cuando el freno chirrie, puede ser
motivado por las causas:
Entretien des freins à disque
Liquide de frein
Vérifier périodiquement le niveau du
réservoir du liquide de frein. Remettre si
nécessaire du liquide hydraulique
DOT 4, ne jamais mélanger différents
types de liquides.
Avec le réservoir ouvert ne pas pousser le levier du frein pour ne pas perdre
de liquide car il détériore les surfaces
peintes et les glaces.
Attention qu'il ne tombe pas d'eau
dans le liquide de frein.
Il est recommandé de remplacer le
liquide tous les deux ans, car il se
dégrade avec l'humidité.
Tubes flexibles et raccords:
Vérifier périodiquement si les tubes
hydrauliques flexibles ne sont pas abî-
més et si les raccords ne fuient pas.
Plaquettes de frein:
Si les freins grincent: les causes peuvent être les suivantes:
1.- Fonctionnement incorrect du frein.
66
Page 67

Manutenzione freni a disco • Maintenance of disc brakes
Wartung der Scheibenbremsen
Manutenzione freni a disco
Liquido per freni
Verificare periodicamente il livello del
serbatoio del liquido per freni. Riempirlo
se necessario con liquido idraulico
DOT 4. Non mescolare diversi tipi di liquidi.
Col serbatoio aperto non serrare la
leva del freno, altrimenti potrebbe versare
il liquido e questo guasterebbe le superfici verniciate ed i vetri.
Fare attenzione a non mescolare
acqua col liquido per freni.
A causa dell'assorbimento di umidità,
si raccomanda cambiare il liquido ogni
due anni.
Tubi flessibili e insieme giunti:
Verificare periodicamente che i tubi
idraulici flessibili non siano deteriorati e
che l’insieme dei giunti non abbia fuoriuscite.
Tamponi frenanti:
Qualora il freno strida, può essere
dovuto alle seguenti cause:
1- Funzionamento non corretto del freno
2- Logoramento dei tamponi frenanti.
Questi sono muniti di un sistema per
Maintenance of disc brakes
Brake fluid:
Periodically check the level of the
brake fluid deposit. Top up if necessary
with DOT 4 hydraulic fluid: do not mix
different types of fluid.
When the deposit is open, do not
press the brake lever, as this could spill
the fluid and deteriorate the paintwork
and glass surfaces.
Be careful not to mix water with the
brake fluid.
It is advisable to change the fluid
every two years due to the absorption of
moisture.
Flexible tubes and joints:
Periodically check the flexible
hydraulic tubes for wear, and the joints
for leaks.
Brake pads:
When the brake squeaks, this could
be due to two causes:
1. Incorrect operation of the brake.
2. Wear of the pads. These have a sys-
tem for warning of excess wear,
which will eventually make the pads
Wartung der Scheibenbremsen
Bremsflüssigkeit:
Den Stand der Bremsflüssigkeit im
Behälter regeläßig überprüfen. Falls
notwendig, mit der Bremsflüssigkeit DOT 4
auffüllen. Mischen Sie niemals verschiedene
Typen von Flüssigkeiten.
Ist der Tank offen, betätigen Sie nicht
den Bremshebel, da sonst die Flüssigkeit
auslaufen und die lackierten bzw. Glasteile
beschädigen könnte.
Achten Sie darauf, daß die
Bremsflüssigkeit nicht mit Wasser vermischt
wird.
Aufgrund der Feuchtigkeitsaufnahme
wird empfohlen, die Bremsflüssigkeit einmal
im Jahr auszuwechseln.
Schläuche und Anschlußstutzen:
Überprüfen Sie regelmäßig die flexiblen
Hydraulikschläuche auf Beschädigungen
und stellen Sie sicher, daß die Anschluß-
stutzen nicht lecken.
Bremsbeläge:
Wenn die Bremse quietscht, so kann das
folgende Gründe haben:
1 Fehlerhaftes Funktionieren der Bremse.
67
Page 68

Mantenimiento frenos de disco
Entretien des freins à disque
68
1.- Funcionamiento incorrecto del freno.
2.- Desgaste de las pastillas. Estas llevan
un sistema para avisar de su desgaste
excesivo, que llegado el momento
hace chirriar el freno. En ambos casos
acuda a un SERVICIO OFICIAL
DERBI.
Aire en el sistema de frenado:
Si el recorrido de la palanca de freno
se hace excesivo o la palanca tiene un
tacto excesivamente blando o esponjoso,
se debe realizar una purga de aire del sistema de freno.
Purga de aire:
Montar un tubo de plástico transparente en el purgador para evitar que el líquido residual ensucie el sistema de frenado.
Apretar la maneta freno al máximo, aflojar
el purgador y volverlo a apretar, dejar de
apretar la maneta freno. Así sucesivamente hasta eliminar el aire existente en
el sistema de frenado. Una vez eliminado
el aire reponer el depósito de líquido
hidráulico DOT 4.
Disco de freno:
La superficie del disco debe estar libre
de aceite. Para limpiarlo utilice alcohol y
un trapo suave.
2.- Usure des plaquettes. Elles sont
munies d'un système indicateur d'usure qui produit un grincement. Dans
les deux cas il faut aller à un SERVICE OFFICIEL DERBI.
Air dans le système de frein:
Si le parcours du levier du frein est
trop mou ou spongieux il faut effectuer
purger l'air du système de frein.
Purge d'air:
Mettre un tube en plastique transparent dans le purgeur pour éviter que le
liquide résiduel ne salisse le système
de frein. Serrer la manette-frein au
maximum, desserrer le purgeur et le
resserrer, lâcher la manette frein. Ainsi
de suite jusqu'à éliminer l'air existant
dans le système de frein. Une fois l'air
éliminé remettre dans le réservoir du
liquide hydraulique DOT 4.
Disque de frein:
La surface du disque ne doit pas
avoir été en contact avec de l'huile.
Pour la nettoyer utiliser de l'alcool et un
chiffon doux.
Page 69

Manutenzione freni a disco • Maintenance of disc brakes
Wartung der Scheibenbremsen
allertare del loro logoramento eccessivo: quando arriva il momento fanno
stridere il freno. In entrambi i casi,
rivolgersi ad un SERVIZIO UFFICIALE DERBI.
Aria nel sistema freni.
Se il percorso della leva del freno
diventa eccessivo oppure la leva ha un
tatto eccessivamente molle o sprimacciato, devesi realizzare uno spurgo dell’aria
del sistema freni.
Spurgo dell’aria.
Montare un tubo di plastica trasparente nel becco di spurgo, onde evitare che il
liquido residuale sporchi il sistema freni.
Serrare la leva al massimo, allentare lo
spurgo, serrarlo ed allentare la leva del
freno. Così di seguito fino ad eliminare
l’aria esistente nel sistema freni. Dopo
aver eliminato l’aria, riempire il serbatoio
con liquido idraulico DOT 4.
Disco del freno
La superficie del disco deve essere
esente d’olio. Per pulirlo usare alcool e
uno straccio soave.
squeak. In both cases, take your
moped to an Official DERBI Service
Centre.
Air in the braking system:
If the travel of the brake lever becomes excessive, or its action becomes
excessively soft or spongy, air must be
bled from the braking system.
Air bleeding:
Fit a transparent plastic tube to the
bleed outlet to prevent the residual fluid
from polluting the braking system. Press
the brake lever all the way; slacken off
the bleed outlet and re-tighten it; release the brake lever. Repeat this operation until all air has been removed from
the braking system. Finally, top up the
brake fluid deposit with DOT 4.
Brake disc:
The surface of the disc must be free
of oil. To clean it, use alcohol and a soft
cloth.
2 Verschleiß der Beläge. Diese sind so
entwickelt worden, daß sie die Bremse
bei übermäßigem Verschleiß der Beläge
quietschen lassen. Wenden Sie sich in
beiden Fällen an einen DERBI-Händler.
Luft im Bremssystem:
Wird der Weg des Bremshebels zu lang
oder fühlt sich der Hebel zu weich oder zu
schaumig an, so muß eine Bremsentlüftung
vorgenommen werden.
Bremsentlüfung:
An den Entluftungsnippel einen
durchsichtigen Kunststoffschlauch
anbringen, um zu verhindern, daß die
Restflüssigkeit das Bremssystem
verschmutzt. Den Bremsgriff ganz
andrücken, den Entluftungsnippel lösen und
wieder anziehen, den Bremsgriff loslassen,
und so fort, bis die in dem Bremssystem
vorhandene Luft ganz entwichen ist. Nach
Entfernung der Luft den Bremsmittelbehälter
mit DOT 4 auffüllen.
Bremsscheibe:
Die Scheibenoberfläche muß frei von Öl
sein. Verwenden Sie zur Reinigung Alkohol
und einen weichen Lappen.
69
Page 70

Faro delantero
Phare avant
5 m
Para cambiar la lámpara, desmonte
las gomas fijación soporte faro y el
muelle portalámparas.
H
Para sacarla basta con apretarla
hacia adentro y girar hacia la izquierda.
El faro debe estar orientado a la altura correcta para una conducción nocturna segura y no causar molestias a los
vehículos que circulan en dirección contraria.
Para orientar el faro, basta con ir aflojando o apretando el tornillo fijación
óptica, situado en la parte inferior del
faro y situar el faro de manera que a
una distancia de 5 metros de una pared
vertical, el centro del haz de luz del faro
coincida con la altura del centro del faro
al suelo, con el ciclomotor bajado del
caballete y el conductor montado. Dicho
de otra manera, el eje del haz de luz
debe ser paralelo al suelo.
Pour remplacer l’ampoule, desserrer
les fixations en caoutchouc du support
du phare et démonter le ressort portelampes.
Pour l’enlever il suffit de la pousser
vers le fond et de la faire tourner vers la
gauche.
Le phare doit être orienté à la hauteur
correcte pour une bonne conduite nocturne, sure et ne pas gêner les conducteurs circulant en direction contraire.
Pour orienter le phare il suffit de
desserrer ou de serrer la vis de fixation
optique, située sur la partie inférieure
du phare et situer le phare de façon
qu’à une distance de 5 mètres d’un mur
vertical, le centre du faisceau de
lumière du phare coïncide avec la
hauteur du centre du phare au sol, le
cyclomoteur ne reposant pas sur sa
béquille et le conducteur étant assis sur
la selle. Autrement dit, l’axe du faisceau
de lumière doit être parallèle au sol.
70
Page 71

Faro anteriore • Headlight
Scheinwerfer
Per sostituire la lampada del faro,
smontare le gomme di fissaggio del
supporto del faro e la molla portalampade.
Per estrarla, basta premerla in den-
tro e girare a sinistra.
Il faro deve orientarsi all’altezza
corretta per una guida notturna sicura e
non causare molestie ai veicoli che circolano in senso contrario.
Per orientare il faro è necessario soltanto allentare o serrare la vite di fissaggio dell’ottica, situata nella parte inferiore del faro. Situare, poi, il faro in modo
che a una distanza di metri 5 da una
parete verticale il centro del fascio della
luce del faro coincida con l’altezza del
faro rispetto il suolo, con lo ciclomotore
abbassato dal cavalletto e il conducente
montato. Detto in un altro modo, l’asse
del fascio di luce deve essere parallelo
al suolo.
In order to change the bulb, remove
the rubber headlight bracket fastenings
and the bulbholder spring.
To remove the bulb it is only
necessary to push it in and turn it to the
left.
The headlight must be properly
adjusted to the correct height for safe
night time driving, and to avoid dazzling
oncoming traffic.
To adjust the headlight, just turn the
optics securing screw in or out. This
screw is located on the under side of
the headlight. In this way it is possible
to raise or lower the headlight beam so
that the centre of the beam is at the
same height as the centre of the
headlight when focused on a vertical
wall at a distance of five metres. The
motorbike must be off the stand and the
rider sitting in the normal riding position.
In other words, the headlight beam
should be parallel to the ground.
Zum Auswechseln der Lampe die
Gummihalterungen und die Feder des
Lampenhalters demontieren (nach
innen drücken und nach links drehen).
Für ein sicheres Fahren bei Nacht
und um die Ihnen entgegekommenden
Fahrer nicht zu belästigen, muß der
Scheinwerfer auf die richtige Höhe
eingestellt werden.
Zum Einstellen des Scheinwerfers die
Optik-Befestigunsschraube, die sich an
der Unterseite des Scheinwerfers
befindet, lösen bzw. anziehen und so
einstellen, daß sich das Zentrum des
auf eine 5 m entfernte senkrechte Wand
projizierten Lichtstrahls auf derselben
Höhe über dem Boden befindet wie das
Zentrum des Scheinwerfers selbst über
dem Boden, wobei das Moped nicht auf
seinem Ständer stehen darf und der
Fahrer aufsitzen muß. In anderen
Worten: der Lichtstrahl muß parallel
zum Boden verlaufen.
71
Page 72

Presión de los neumáticos
Presión de inflado en frio
Pression de gonflage à froid
Pressione di gonfiaggio a freddo
Cold tyre inflation pressure
Reifendruck bei kaltem Reifen
Neumático
delantero
Pneu avant
Pneumatico
anteriore
Front tyre
Vorderreifen
Neumático
trasero
Pneu arrière
Pneumatico
posteriore
Rear Tyre
Hinterreifen
Solo
Conducteur
seul
Solo
Rider only
Allein
1,0 Kg/cm
100 kPa
2
Con pasajero
Avec
passager
Con
passegero
Rider and
pillion
passenger
Mit Beifahrer
1,2 Kg/cm
120 kPa
2
SENDA R
X-TREME R
SENDA SM
X-TREME SM
SENDA R
X-TREME R
SENDA SM
X-TREME SM
1,7 Kg/cm
170 kPa
2
2,0 Kg/cm
200 kPa
2
1,1 Kg/cm
110 kPa
2
1,3 Kg/cm
130 kPa
2
1,8 Kg/cm
180 kPa
2
2,2 Kg/cm
220 kPa
2
Pression des pneumatiques
72
Presión de los neumáticos
Una presión distinta a la señalada en
este apartado puede ser motivo de
defectos en la conducción del vehículo.
De ahí que resulte muy aconsejable el
controlar y corregir con frecuencia estas
presiones.
OBSERVACION:
La corrección de la presión de inflado se hará solamente cuando los neumáticos estén fríos. Si están calientes,
la modificación de inflado se hará sólo
en los casos en que la presión sea
demasiado baja.
La presión de aire insuficiente en los
neumáticos no sólo acelera el desgaste
del neumático, sino que también afecta
seriamente a la estabilidad del ciclomotor.
Asegúrese de que la presión de los
neumáticos esté dentro de los límites
especificados en el recuadro.
Un neumático con una presión
❀
excesivamente baja, aumenta el
Pression des pneumatiques
Une pression différente de celle indiquée dans ce chapitre peut entraîner
une conduite dangereuse du véhicule. Il
est indispensable de vérifier et de corriger souvent les pressions des pneumatiques.
OBSERVATION:
Pour corriger la pression de gonflage
il faut attendre que les pneumatiques
soient froids. On peut modifier le gonflage à chaud uniquement dans les cas où
la pression est trop basse.
Une pression d'air insuffisante
accelère l'usure des pneumatiques et
désestabilise sérieusement le cyclomoteur.
Vérifier que la pression des pneumatiques soit comprise dans les limites
spécifiées dans le tableau.
Pneumatique avec la pressión
❀
excessivement basse augmente le
consommation de combustible et
déteriore l’environnement.
consumo de combustible, repercutiendo ello innecesariamente en el
medio ambiente.
Page 73

Pressione degli pneumatici • Tyre pressures
Reifendruck
Pressione degli pneumatici
Una pressione diversa da quella indicata in questa sezione può essere
causa di difetti nella guida del veicolo.
Perciò si raccomanda assai controllare
e correggere frequentemente queste
pressioni.
OSSERVAZIONE:
La correzione della pressione di gonfiaggio si farà soltanto quando gli pneumatici siano freddi. Se sono caldi, la
modifica del gonfiaggio si farà soltanto
nei casi in cui la pressione sia troppo
bassa.
La pressione d’aria insufficente negli
pneumatici non soltanto accelera il
logoramento dello pneumatico, ma
anche interviene seriamente nella stabilità del ciclomotore.
Bisogna assicurarsi che la pressione
degli pneumatici sia dentro dei limiti
specificati nel riquadro.
Uno pneumatico con la pressione
❀
eccessivamente bassa aumenta il
consumo di combustibile ed incide
sul medio ambiente senza necessità.
Tyre pressures
If the tyre pressures are different
from those indicated in this section, the
behaviour of the vehicle could be affected. Consequently it is highly advisable
to check and correct these pressures
frequently.
NOTE:
The pressures should only be corrected when the tyres are cold. If they are
warm, the pressure should be altered
only if it is too low.
Insufficient air pressure not only
accelerates wear on the tyres, but also
seriously affects the stability of the
moped.
Make sure that the tyre pressures
are within the limits specified in the
table.
Tyre pressures that are too low
❀
increase fuel consumption and therefore increase pollution levels
unnecessarily.
Reifendruck
Ein von den in diesem Abschnitt
genannten Werten abweichender
Reifendruck kann ein Grund für
mangelhaftes Fahrverhalten sein. Es
wird daher empfohlen, diese Drücke
regelmäßig zu überprüfen und ggf. zu
korrigieren.
Anmerkung:
Die Korrektur des Reifendrucks wird
nur dann vorgenommen, wenn die
Reifen kalt sind. Mit warmen Reifen wird
der Druck nur in den Fällen verändert,
in denen er zu gering ist.
Ein unzureichender Reifendruck
beschleunigt nicht nur den Verschleiß
der Reifen, sondern beeinträchtigt auch
ernsthaft die Stabilität des Mokicks.
Stellen Sie sicher, daß der Reifendruck
die in der folgenden Tabelle
aufgeführten Werte einhält.
Ein Reifen mit zu geringem Luft-
❀
druck erhöht den Benzinverbrauch
und schadet so unnötigerweise der
Umwelt.
73
Page 74

Presión de los neumáticos
Pression des pneumatiques
c
Precaució!
Procuri circular sempre amb els
pneumàtics en bones condicions. Els
pneumàtics molt desgastats redueixen
l'estabilitat de la conducció i poden
ocasionar pèrdua de control. Es
recomana que el pneumàtic davanter
es canviï quan la profunditat de les
estries sigui d’1,6 mm. o inferior. Per
evitar el desgast innecessari dels
pneumàtics es recomana:
- Portar sempre els pneumàtics amb la
pressió d'inflat adequada.
- Conduir suaument evitant les
accelerades i les frenades brusques.
- Procurar no tocar les voreres amb les
rodes.
¡Precaución!
Procure circular siempre con los neumáticos en buenas condiciones, ya que
si lo hace con neumáticos excesivamente desgastados reducirá la estabilidad de conducción y puede llevarle a
una pérdida de control. Se recomienda
que el neumático delantero se cambie
cuando la profundidad de las estrías
sea de 1,6 mm. o menos. Para evitar el
desgaste innecesario de los neumáticos
se recomienda:
- Llevar siempre los neumáticos con la
presión de inflado adecuada.
- Conducir suavemente evitando los
acelerones y los frenados bruscos.
- Procurar de no rozar los bordillos de
las aceras con las ruedas.
Attention!
Circulez toujours avec les pneumatiques en bonnes conditions. Si les
pneus sont trop usés la conduite est
instable et vous pouvez perdre le
contrôle du cyclomoteur. Remplacez le
pneumatique avant dès que la profondeur des stries du dessin arrive à 1,6
mm ou moins. Pour éviter l'usure pré-
maturée des pneumatiques il faut:
- Que la pression de gonflage soit
toujours correcte.
- Conduire sans brusquerie, sans
accélérations et sans freinées
brusques.
- Essayer de ne pas frôler les bords des
trottoirs avec les roues.
74
Page 75

Pressione degli pneumatici • Tyre pressures
Reifendruck
Attenzione!
Fare in modo di circolare sempre con
gli pneumatici in ottime condizioni,
poichè se si fa con gli pneumatici
eccessivamente usati si riduce la stabilità di guida e può aversi una perdita di
controllo. Si consiglia che lo pneumatico
anteriore si cambi quando la profondità
delle scanalature sia di 1,6 mm o minore. Per evitare il logoramento inutile
degli pneumatici, si consiglia:
- Portare sempre gli pneumatici con la
corretta pressione di gonfiaggio.
- Guidare soavemente ed evitare le
accelerazioni e frenate brusche.
- Fare attenzione a non sfregare i
cordoli dei marciapiedi con le ruote.
CAUTION!
Always travel with the tyres in good
condition, since worn tyres reduce stability and can cause a loss of control. It
is recommended to change the front
tyre when the depth of the tread is 1.6
mm or less. To avoid undue wear on
the tyres, it is recommended:
- to keep the tyres always at the correct
pressure;
- to drive smoothly, avoiding abrupt
acceleration and braking;
- not to rub the tyres against the kerb.
Vorsicht!
Achten Sie darauf, daß Ihre Reifen
sich stets in bestem Zustand befinden,
denn beim Fahren mit übermäßig
abgenutzten Reifen wird die
Fahrstabitlität vermindert und es ist
möglich, daß Sie die Kontrolle über das
Fahrzeug verlieren. Der Vorderreifen
sollte ausgewechselt werden, sobald
die Rillen 1,6 mm oder weniger tief sind.
Um die Reifen vor unnötigem
Verschleiß zu bewahren, empfehlen wir:
- Stets mit dem angemessenen
Reifendruck fahren.
- Sanft fahren, nicht jäh beschleunigen
oder bremsen.
- Aufpassen, daß die Räder nicht den
Bordstein streifen.
75
Page 76

Control líquido refrigerante
Contrôle du liquide refroidissant
Control líquido refrigerante
Cada 1.000 Km. o después de largos
viajes se debe controlar con el motor en
frio, el nivel del líquido de refrigeración,
que debe situarse entre un 60 ó 70 %
de la capacidad total del depósito de
expansión. En los depósitos con indicador de máximo y mínimo, el nivel del
líquido refrigerante tiene que estar
situado a la posición de máximo.
Para cambiar el líquido refrigerante,
sacar el tapón del depósito de expansión y desconectar el manguito que lo
une a la bomba de agua, vaciando de
esta manera, todo el líquido.
Después de empalmar de nuevo el
manguito, rellenar todo el circuito con
líquido refrigerante punto de congelación –18 ºC a través del orificio del
depósito de expansión, situado en el
lado izquierdo del ciclomotor debajo de
la tapa delantera, teniendo la precaución de que el depósito quede al 60 ó
70 % de su capacidad. En los depósitos con indicador, procurar que el líquido refrigerante no sobresalga del indi-
Contrôle du liquide refroidissant
Tous les 1000 km ou après de longs
voyages il faut vérifier, le moteur froid,
le niveau du liquide de refroidissement.
Le volume du liquide doit être compris
entre 60 et 70% de la capacité totale du
réservoir d'expansion.
Pour remplacer le liquide refroidissant, il faut enlever le bouchon du
réservoir à expansion. Débrancher le
manchon qui le joint à la pompe à eau
pour vider tout le liquide.
Une fois la jonction du manchon est
effectuée, remplir tout le circuit avec du
liquide refroidissant du point du congelation –18 ºC par l’orifice du réservoir
d’expansion situé sur le côte gauche du
cyclomoteur sous le couvercle avant, en
veillant à ce que le réservoir se remplisse à 60 ou 70% de sa capacité. Une
excès de liquide pourrait provoquer des
fuites au niveau du bouchon lors de
l’utilisation du véhicule.
La capacité approximative du circuit
de refroidissement est de 1.100 c.c.
76
Page 77

Controllo liquido refrigerante • Coolant check
Kontrolle des Kühlmittels
Controllo liquido refrigerante
Ogni 1.000 km o dopo lunghi viaggi
si deve controllare, con il motore freddo,
il livello del liquido di refrigerazione, che
deve trovarsi tra un 60% e un 70% della
capacità totale del serbatoio di espansione. Nei vasi con indicatore di massima e di minima, il livello del liquido refrigerante deve trovarsi nella posizione
massima.
Per sostituire il liquido refrigerante,
togliere il tappo del serbatoio di espansione e disinserire il manicotto che lo
unisce alla pompa dell'acqua, svuotando cosí tutto il liquido.
Dopo aver inserito di nuovo il manicotto, riempire tutto il circuito con liquido
refrigerante di punto di congelamento
–18 ºC dal foro del serbatoio di espansione, situato sul lato sinistro dello scooter sotto il coperchio anteriore, con la
cura di avere il serbatoio soltanto al
60% o 70% della priopria capacità.
Nei serbatoi con indicatore, cercare
che il liquido refrigerante non superi l'indicatore di massima. Un eccesso di
liquido ne provocherebbe la fuoriuscita
Coolant check
Every 1,000 km or after long trips the
level of the coolant should be checked
when the engine is cold. The level
should be about 60 to 70% of the total
capacity of the expansion reservoir. If
the reservoir has maximum and minimum marks, the coolant should be at
the maximum mark.
To change the coolant, remove the
expansion reservoir filler cap and disconnect the hose connecting the expansion reservoir to the water pump. All the
liquid will drain out.
After connecting the hose up again,
fill the system with freezing point –18 ºC
antifreeze liquid coolant through the
filler cap hole on the expansion reservoir, which is located on the left-hand
side of the vehicle, underneath the front
cover. Take care to ensure that the coolant reaches the level of 60 to 70 % of
full capacity If the reservoir has indicator marks, ensure that the cooling liquid
does not go over the maximum mark.
Overfilling with coolant will cause the
liquid to escape through the filler cap
Kontrolle des Kühlmittels
Alle 1000 Km oder nach langen
Reisen muß bei kaltem Motor der
Kühlmittelstand überprüft werden. Das
Kühlmittel soll ungefähr 60-70% des
Entspannungsbehälters einnehmen. Bei
Behältern mit Höchst- und
Mindestanzeige sollte der
Kühlmittelstand stets die
Maximalstellung zeigen.
Um das Kühlmittel auszuwechseln,
entfernen Sie den Deckel des
Entspannungsbehälters und die Muffe,
die diesen mit der Wasserpumpe
verbindet. Lassen Sie dann das
Kühlmittel vollständig ablaufen.
Nach Wiedereinsetzen der Muffe den
Kreislauf mit Kühlmittel vom Typ
Gefrierpunkt –18 ºC über die Öffnung
(an der linken Fahrzeugseite, unterhalb
des Vorderdeckels) des
Entspannungsbehälters auffüllen. Den
Behälter ungefähr zu 60-70% auffüllen.
Bei Behältern mit
Flüssigkeitsstandsanzeige darauf
achten, daß das Kühlmittel nicht über
den Maximalstand hinausläuft. Ein
77
Page 78

Control líquido refrigerante
Contrôle du liquide refroidissant
cador de máximo. Un exceso de líquido
provocaría que éste saliese por el tapón
durante el uso del vehículo.
La capacidad aproximada del circuito
de refrigeración, es de 1100 c.c.
OBSERVACION:
- Verificar el estado de los manguitos.
- Si durante el uso normal del
ciclomotor se le enciende el indicador
de temperatura, parar el motor y
esperar a que se enfríe el líquido
refrigerante, a continuación con el
motor frio comprobar el nivel del
líquido refrigerante y eventualmente
rellenar. No extraiga nunca el tapón
del depósito de expansión con la
temperatura del líquido refrigerante
caliente.
- El rellenado del líquido refrigerante
hay que efectuarlo con el motor frío.
OBSERVATION:
-Vérifier l’état des manchons.
- Si pendant l’utilisation normale du
cyclomoteur l’indicateur de la température s’allume, arrêter le moteur et
attendre que la température du liquide
refroidissant baisse, ensuite avec le
moteur froid vérifier le niveau du liquide refroidissant et remplir si nécessaire. Ne jamais enlever le bouchon du
réservoir d’expansion si le liquide est
chaud.
- Le remplissage du liquide refroidissant
doit être effectué lorsque le moteur est
froid.
78
Page 79

Controllo liquido refrigerante • Coolant check
Kontrolle des Kühlmittels
dal tappo durante l'uso del veicolo.
La capacità approssimativa del cir-
cuito di refrigerazione è di 1.100 c.c.
OBSERVAZIONE:
- Verificare lo stato dei manicotti.
- Se durante l’uso normale del
ciclomotore si accende l’indicatore di
temperatura, spegnere il motore ed
aspettare che si raffreddi il liquido
refrigerante. Dopo di che, col motore
freddo, verificare il livello del liquido
refrigerante ed, eventualmente,
riempire. Non estrarre mai il tappo del
serbatoio ad espansione con la
temperatura del liquido refrigerante
calda.
- Per riempire ill liquido refrigerante,
deve farsi col motore freddo.
when the vehicle is running.
The total capacity of the cooling sys-
tem is about 1,100 cc.
NOTE:
- Check the condition of the tubes.
- If during normal use of the moped the
temperature indicator lights up, stop
the engine and wait for the coolant to
cool down. Then, with the engine cool,
check the level of coolant and top up if
necessary. NEVER remove the cap
from the overflow tank while the
coolant is still hot.
- The coolant liquid must be topped-up
with the engine cool.
Flüssigkeitsüberschuß würde während
der Fahrt ein Austreten der Flüssigkeit
am Deckel zur Folge haben.
Der Kühlkreislauf hat ein
Fassungsvermögen von ca. 1100 ccm.
Anmerkung:
- Werden Sie vom Regen überrascht,
so ist es angeb
- Den Zustand der Muffen überprüfen.
- Wenn beim normalen Gebrauch des
Fahrzeugs die Temperaturanzeige
aufleuchtet, muß der Motor
abgeschaltet werden, damit die
Kühlflüssigkeit abkühlen kann.
Bei abgekühltem Motor prüfen, ob die
Menge Kühlflüssigkeit ausreichteventuell nachfüllen.
Den Expansionsbehälter nie öffnen
bevor die Temperatur der
Kühlflüssigkeit lauwarm ist.
- Das Nachfüllen von Kühlmittel ist bei
kaltem Motor durchzuführen.
79
Page 80

Cuadro de mantenimiento y engrase
Tableau d'entretien et de graissage
Período: este período puede valorarse en kilómetros o en meses
Période: Peut être évaluée selon les km parcourus ou le temps en mois
Periodo: Chilometri percorsi o tempo in mesi
25.000 km - 60 m
20.000 km - 48 m
15.000 km - 36 m
10.000 km - 24 m
5.000 km - 12 m
1000 km - 2 m
LIQUIDO REFRIGERANTE
LIQUIDE REFROIDISSANT
LIQUIDE DI RAFFRADAMENTO ABABAB
COOLING FLUID
KÜHLFLÜSSIGKEIT
FILTRO DE AIRE
FILTRE Á AIR
FILTRO ARIA IIIIII
AIR FILTER
LUFTFILTER
RADIADOR/ limpieza externa
RADIATEUR/ nettoyage externe
RADIATORE/ pulizia esterna II
RADIATOR/ external cleanin
KÜHLER/ Aubenreinigung
REENVIO KM*
RENVOI COMPTEUR KM*
RINVIO CONTA KM* EEE
ODOMETER RETURN*
TACHORITZEL*
80
Period:kilometres on the clock or months since last check
Intervall: Dieses intervall kann je nach kilometerstand oder nach monaten
bewertet werden.
25.000 km - 60 m
20.000 km - 48 m
15.000 km - 36 m
10.000 km - 24 m
5.000 km - 12 m
1000 km - 2 m
MANILLAR
DIRECTION
STERZO BBB
STEERING
LENKUNG
PALANCAS DE FRENO
POIGNÉES DE FREINS
LEVE COMANDO EEvEEEE
FRENIBRAKE COMMAND
LEVERSBREMSHEBEL
PASTILLAS DE FRENO
PLAQUETTES DE FREIN
PASTIGLIE FRENO BBBBBB
BRAKE LINING
BREMSBELÄGE
LATIGUILLOS DE FRENO
TUBES FLEXIBLES DES FREINS
TUBAZIONI FLESSIBILI DEI FRENI BB
BRAKE HOSE
SBREMSLEITUNGEN
Page 81

Tabella di manutenzione e ingrassaggio • Maintenance and Lubrication Chart
25.000 km - 60 m
20.000 km - 48 m
15.000 km - 36 m
10.000 km - 24 m
5.000 km - 12 m
1000 km - 2 m
NIVEL LIQUIDO DE FRENO
NIVEAU D'HUILE FREINS
LIVELLO OLIO FRENI BBB
BRAKE OIL LEVEL
BREMSFLÜSSIGKEITSSTND
BLOQUEOS DE SEGURIDAD
BLACAGES DE SÉCURITÉ
BLOCCAGGI DI SICUREZZA BBB
SAFETY LOCKS
SICHERHEITS-ANZUGSMOMENTE
10.000 km - 24 m
5.000 km - 12 m
1000 km - 2 m
Inspektionsintervalle
25.000 km - 60 m
20.000 km - 48 m
15.000 km - 36 m
LIQUIDO DE FRENOS
HUILE FREINS
OLIO FRENI A
BRAKE OIL
BREMSFLÜSSIGKEIT
CADENA TRANSMISION
CHAîNE SECONDAIRE
CATENA TRASMISSIONE EEEEEE
TRANSMISSION CHAINE
ANTRIEBSKETTE
CADENA TRANSMISION (tensión)
CHAîNE SECONDAIRE (tensión)
CATENA TRASMISSIONE (tensione
TRANSMISSION CHAINE (tension)
ANTRIEBSKETTE (spannung)
) BBABA B
CADA 2 AÑOS
TOUS LES 2 ANS
OGNI 2 ANNI
EVERY 2 YEARS
ALLE 2 JAHRE
SUSP. DELANT. (aceite hidráulico)
FOURCHE AV. (huile hydráulique)
FOCELLA ANT. (olio idraulico) BBABA B
FRONT FORKS (hydraulic fluid)
VORDERE SCHALTGABEL (HIDRAULIKÖL)
SUSPENSION TRASERA
AMORTISSEUR ARRIÉRE
AMMORTIZZATORE POSTERIORE BB
REAR SHOCK ABSORBER
HINTERER SCHWINGUNGSDÄMPFER
INST.ELECTRICA Y BATERIA (nivel)
CIR. ELECTRÍQUE ET BATTERÍE (niveau)
IMP. ELETTRÍCO E BATTERIA (livello)
ELECTRIC SYSTEM AND BATTERY
ELEKTRICHE ANLAGE UN BATTERIE
BBBBBB
81
Page 82

Cuadro de mantenimiento y engrase
Tableau d'entretien et de graissage
25.000 km - 60 m
20.000 km - 48 m
15.000 km - 36 m
10.000 km - 24 m
5.000 km - 12 m
FARO DELANTERO
FARE AVANT
PROIETTORE HH
HEADLIGHT
SCHEINWERFER
NEUMATICOS (condiciones y uso)
PNEUMATIQUES (conditions et usure)
PNEUMATICI (controllo condizione e usura
TYRE (condition and wear)
REIFENZUSTAND UND ABNUTZUNG
RUEDAS (tension radios)
ROUE (tension rayon)
RUOTA (verifica tension raggio) BBB
WHEEL
SPOKERADSPEICHE
NEUMATICOS (presión)
PNEUMATIQUES (pression)
PNEUMATICI (pressione) BBBBBB
TYRE (pressure)
REIFENDRUCK
FILTRO DE ACEITE
FILTRE HUILE
FILTRO OLIO AA
OIL FILTER
ÖLFILTER
82
1000 km - 2 m
) BBBvBB
TUBOS GASOLINA Y ACEITE
TUBE ESSENCE OU HUILE
TUBI BENZINA E OLIO BBABA B
FUEL AND OIL HOSE
BENZIN-ODER ÖLROHR
PRUEBA DEL VEHICULO Y FRENOS
ESSAI DU VÉHICULE ET CIRCUIT FREINS
PROVA VEICOLO E IMPIANTO FRENI
ON THE ROAD VEHICLE AND BRAKING PROBE
FAHRT UND BREMSPRÜFUNG
ACEITE CARTER
HUILE CARTER
OLIO MOTORE ABABAB
ENGINE OIL LEVEL
ÖL IN ÖLWANNEl
BUJIA / distancia electrodo
BOUGIE / encartement Électrodes
CANDELA/ distanza electtrodi BAAAA A
SPARK PLUG/ electrodes distance
ZÜNDKERZE/ elektrodenabstand
CARBURADOR
CARBURATEUR
CARBURATORE HHHHHH
CARBURETTOR
VERGASER
1000 km - 2 m
BBBBBB
25.000 km - 60 m
20.000 km - 48 m
15.000 km - 36 m
10.000 km - 24 m
5.000 km - 12 m
Page 83

Tabella di manutenzione e ingrassaggio • Maintenance and Lubrication Chart
Sustituir
Remplacer
Sostituire
Remplace
Ersetzen
Comprobar
Vérifier
Verificare
check
Prüfen
Limpiar
Nettoyer
Pulire
clean
Reiningen
lubricar
lubrification
lubrificazione
lubrication
Schmieren
Ajustar
Ajuster
Regolare
Adjustment
Einstellen
10.000 km - 24 m
5.000 km - 12 m
1000 km - 2 m
PALANCA DE EMBRAGUE
LEVE COMANDO FRIZIONE
LEVIER COMMANDE EMBRAYAGE
CLUTCH CONTROL
LEVERKUPPLUNGSHEBEL
CULATA Y CILINDRO
(boca de escape)
CULASSE ET CYLINDRE
(bouche de fuite)
TESTATA E CILINDRO
(boca di fuga) I
BRERCH AND CYLINDER
(escape mouth)
ZYLINDERKOPF UND ZYLINDER
(Mund von Flucht)
PISTÓN COMPLETO
PISTON COMPLET
PISTONE COMPLETO A
FULL PISTON
KOLBEN KOMPLETT
HHHHHH
25.000 km - 60 m
20.000 km - 48 m
15.000 km - 36 m
Inspektionsintervalle
83
Page 84

Limpieza
Nettoyage
Limpieza
El mantenimiento general de su ciclomotor es sencillo. Si además de cumplir las instrucciones dadas en este libro, limpian
periódicamente su ciclomotor, el rendimiento será todavía superior.
- Para las superficies esmaltadas y de
plástico NO EMPLEE jamás gasolina,
petróleo etc. frótelas con esponja y
séquelas con gamuza. Se puede, una vez
secas, pasar alguna pasta o abrillantador
de los empleados en las carrocerías de los
automóviles, efectuándolo con trapo de
lana. Solo en piezas pintadas brillantes,
las piezas con pintura mate no deben
traterse con abrillantadores, pulimentos ni
ceras.
- Para superficies de plástico no pintadas,
chasis y basculantes de aluminio, no
emplear productos que puedan atacar el
plástico no pintado, como gasolina,
petróleo o cualquier tipo de disolvente o
producto no adecuado para tal fin.
- Para lavar bien las superficies pintadas
usar agua con jabón neutro para
reblandecer la suciedad mediante una
esponja suave, enjuagar a fondo y
finalmente secar con una gamuza. No
utilizar acciones mecánicas (como frotar)
Nettoyage
L'entretien général de votre cyclomoteur
est simple. Si vous respectez les instructions de ce manuel et si vous nettoyez périodiquement votre cyclomoteur son rendement
sera encore meilleur.
- Pour les surfaces émaillées et celles en
plastique N'EMPLOYEZ JAMAIS
d'essence, de pétrole, etc. mais frottez
avec un éponge humide et séchez avec un
chiffon. On peut après séchage frotter
avec une pâte ou cire pour carrosseries
auto avec un chiffon en laine. Uniquement
pour les pièces revêtues de peinture
brillante, les pièces revêtues de peinture
mate ne doivent être traitées ni avec des
produits de lustrage, ni avec des cires.
- En ce qui concerne les surfaces en
plastique non peintes, le châssis et les
pièces basculantes en aluminium, ne pas
utiliser de produits susceptibles d’attaquer
le plastique non peint, tels que l’essence,
le pétrole ou tout autre genre de
dissolvants ou de produits non-conçus à
cette fin.
- Pour bien laver les surfaces peintes,
utiliser de l’eau et du savon neutre pour
84
Page 85

Pulizia • Cleaning
Säuberung
Pulizia
La manutenzione generale del suo ciclomotore è semplice. Se, oltre a seguire le
istruzioni date in questo libretto, Lei pulisce
periodicamente il suo ciclomotore, il rendimento sarà ancora maggiore.
- Sulle superfici verniciate e di plastica NON
UTILIZZARE mai benzina, petrolio, ecc.
Strofinare con spugna ed asciugare con un
panno di camoscio. Quando sono ormai
secche può spalmarsi una pasta o lucido di
quelli usati per le carrozzerie delle
automobili, mediante uno straccio di lana.
Soltanto nei pezzi verniciati brillanti, i pezzi
con vernice opaca non si devono trattare
con lucidi o cere.
- Per le superfici di plastica non verniciata,
telaio e oscillanti in alluminio, non usare
prodotti che possano attaccare la plastica
non verniciata, come la benzina il petrolio
o qualsiasi tipo di solvente o prodotto non
idoneo a questo uso.
- Per lavare bene le superfici verniciate,
usare acqua con sapone neutro per
rammollire lo sporco con una spugna
soave, sciacquare ripetutamente e
asciugare infine con un panno di
camoscio. Non usare azioni meccaniche
(come strofinare) sulla plastica verniciata,
perché la superficie ne rimarrà deteriorata.
Cleaning
The overall maintenance of your moped
is simple. If, in addition to carrying out the
instructions given in this manual, you clean
the vehicle periodically, its performance will
be even better.
- To clean the enamel-painted and plastic
surfaces, NEVER use petrol, oil, etc. Wipe
them with a sponge and dry them with a
chamois cloth. Once they are dry, an
automobile bodywork polish can be applied
with a wool cloth. Only on painted parts
with a gloss finish, parts with a matt paint
finish should not be treated with gloss
enhancers, polish, or wax.
- For unpainted plastic surfaces, the frame,
and aluminium swinging elements, do not
use any products which may attack
unpainted plastic, such as petrol,
kerosene, or any type of solvent or product
not suitable for this purpose.
- For thorough washing of painted surfaces,
use a soft sponge to apply water and a
neutral soap to soften the dirt, then rinse
thoroughly, and finally dry with a chamois
leather. Do not use any mechanical
Säuberung
Die allgemeine Wartung Ihres Mokicks ist
einfach. Wenn Sie die in diesem Buch
gegebenen Anweisungen befolgen und Ihr
Mokick außerdem regelmäßig reinigen,
werden die Leistungen des Fahrzeugs noch
besser sein.
-Für die lackierten Oberflächen oder
Kunststoffteile VERWENDEN SIE
NIEMALS Benzin, Petroleum oder
ähnliches. Reiben Sie sie mit einem
Schwamm ab und trocknen Sie sie mit
einem Waschleder. Nach dem Abtrocknen
kann eine Paste oder ein Poliermittel (wie
sie für Autokarosserien verwendet werden)
aufgetragen werden. Tun Sie dies mit
einem Wolltuch. Nur bei glanzlackierten
Teilen, die Teile mit Mattlackierung dürfen
nicht mit Poliermitteln, Wachs oder
ähnlichem behandelt werden.
-Für nicht lackierte Kunststoffflächen,
Chassis und Teile aus Aluminium, keine
Produkte wie Benzin, Öl oder
Lösungsmittel bzw. generell ungeeignete
Mittel verwenden, die nicht lackierte
Kunststoffteile angreifen.
-Für eine gute Reinigung der lackierten
Flächen Wasser mit neutraler Seife
verwenden, um den Schmutz mit einem
weichen Schwamm aufzuweichen, danach
85
Page 86

Limpieza
Nettoyage
sobre el plástico no pintado ya que se
deteriora su superficie.
- Nota: Las piezas de plástico no pintadas
no deben tratarse con abrillantadores,
pulimentos ni ceras.
- Caso de que sea sorprendido por la lluvia,
es recomendable limpiar y secar el
vehículo inmediatamente y engrasar todos
los cables.
Al comprar productos de conservación
❀
habría que elegir los que sean ecológicos. Los residuos de los mismos no
deberán echarse a la basura doméstica.
En interés del medio ambiente, el
❀
ciclomotor debiera lavarse sólo en los
lugares especialmente previstos para
ello. Lavar un vehículo fuera de estas
condiciones puede incluso estar prohibido en determinadas zonas.
ramollir la saleté ; savonner au moyen
d’une éponge douce, bien rincer, puis
sécher au moyen d’une peau de chamois.
Ne pas réaliser d’actions mécaniques
(comme frotter) sur le plastique non peint
car cela en détériore la surface.
- Note: Les pièces en plastique non peintes
ne doivent être traitées ni avec des
produits de lustrage, ni avec des cires.
- Si votre cyclomoteur se mouille sous la
pluie, il faut le nettoyer et le sécher tout de
suite et il faut graisser tous les câbles.
Il vaut mieux acheter des produits de
❀
nettoyage écologiques. Ne pas les
jeter dans la poubelle domestique.
Le cyclomoteur doit être lavé dans des
❀
endroits prévus. Laver un véhicule
n'importe où peut être défendu dans
certains endroits.
86
Page 87

Pulizia • Cleaning
Säuberung
- N.B.: I pezzi di plastica non verniciati non
si devono trattare con lucidi o cere.
- Nel caso in cui lei sia sorpreso dalla
pioggia, si raccomanda pulire ed asciugare
immediatamente il veicolo ed ingrassare
tutti i cavi.
Quando compri prodotti di conserva-
❀
zione si dovrebbero preferire quelli che
sono ecologici. Comunque i loro residui non dovranno buttarsi nella spazzatura domestica.
In favore del medio ambiente lo ciclo-
❀
motore dovrebbe lavarsi soltando in
luoghi previsti a questo fine. Lavare un
veicolo all'infuori di queste condizioni
può addirittura essere vietato in determinate zone.
cleaning process (such as rubbing) on
unpainted plastic: doing so will only
damage the surface.
- Note: Unpainted plastic parts should not
be treated with gloss enhancers, polish, or
wax.
- If the moped is exposed to rain, it is
advisable to clean and dry it immediately
and lubricate all the cables.
When purchasing cleaning products,
❀
select those which do least damage to
the environment. Never throw the
remains into your domestic rubbish.
In the interests of the environment the
❀
moped should only be cleaned in specially prepared facilities. It is even possible that it is illegal to clean a vehicle
outside such a facility in some areas.
gründlich spülen und schließlich mit einem
Ledertuch trocknen. Nicht mechanisch auf
die nicht lackierten Kunststoffteile
einwirken (z. B. abreiben), da dies die
Oberfläche beeinträchtigt.
- Anmerkung: Die nicht lackierten
Kunststoffteile dürfen nicht mit
Poliermitteln, Wachs oder ähnlichem
behandelt werden.
- Werden Sie vom Regen überrascht, so ist
es angebracht, das Fahrzeug sofort zu
reinigen und zu trocknen und alle Kabel zu
schmieren.
Geben Sie bei der Auswahl der
❀
Pflegemittel den umweltfreundlichen
Produkten den Vorzug. Die
Pflegemittelreste sollten nicht in den
Hausmüll gegeben werden.
Im Interesse der Umwelt sollten Sie
❀
Ihren Roller nur an solchen Stellen
waschen, die speziell dafür
vorgesehen sind. In bestimmten
Gebieten kann das Waschen von
Fahrzeugen sogar ausdrücklich
verboten sein.
87
Page 88

Limpieza
Nettoyage
88
Lavado del vehículo
Mantenga el vehículo limpio y lávelo
regularmente.
Los casos siguientes pueden causar
debilidad de la pintura en el vehículo.
- Cuando circule por zonas costeras
- Cuando se haya adherido alquitrán,
savia de árboles, excrementos de
pájaros e insectos muertos.
- Cuando circule por lugares en los que
hay mucho humo, suciedad, polvo y
sustancias químicas.
- Cuando el vehículo se haya ensuciado
mucho con polvo y barro.
Lave el vehículo lo antes posible:
El lavado nunca debe ser efectuado al
Sol, especialmente en verano cuando la
carrocería está todavía caliente, pues los
jabones se secan antes de enjuagar, lo
que puede provocar daños en la pintura
y barniz protector del cromado.
No es recomendable el lavado automático. Lávelo a mano.
AVISO
❀
Los detergentes contaminan las
aguas. El lavado del vehículo debe efectuarse en zonas equipadas para la recuperación o eliminación de los detergentes
empleados para el lavado.
Lavage du véhicule
Veillez à la propreté de votre véhicule
en le lavant régulièrement.
Dans les situations suivantes, la peinture du véhicule est particulièrement exposée.
- Lorsque vous circulerez sur la côte.
- Lorsqu’il y a adhérences de goudron, de
sève de végétaux, d’excréments
d’oiseaux et d’insectes morts.
- Après avoir circulé dans des endroits
avec beaucoup de fumée, de poussière,
de saleté ou pollués par des substances
chimiques.
- Si le véhicule s’est beaucoup sali de
poussière et de boue.
Lavez votre véhicule dès que possible.
Le lavage ne devra jamais se faire sous
le soleil, spécialement en été : la carrosserie étant chaude, les savons sèchent avant
le rinçage, endommageant la peinture et le
vernis des pièces chromées.
Le lavage à main est de loin préférable
au lavage automatique.
Précaution!
❀
Les détergent polluent l’eau. Lavez le
véhicule dans des zones préparées pour
récupérer ou éliminer les détergents
employés pour le lavage.
Page 89

Pulizia • Cleaning
Säuberung
Lavaggio del veicolo
Mantenete il veicolo pulito e lavatelo
regolarmente.
Le circostanze sotto indicate possono
rovinare la vernice del veicolo.
- Qualora si circoli in zone limitrofe al
mare.
- Qualora la vernice del veicolo venga
intaccata dal catrame, dalla linfa degli
alberi, da escrementi di uccelli ed insetti
morti.
- Qualora si circoli in zone in cui c’è molto
fumo, polvere e sostanze chimiche.
- Qualora il veicolo si sia sporcato con
della polvere o del fango.
Lavate il veicolo al più presto:
Il lavaggio non dovrà avvenire sotto il
sole, in maniera particolare d’estate,
quando la carrozzeria è ancora calda,
dato che i detergenti si asciugano prima
del risciacquo, ed in tal caso si può danneggiare la tinta e la vernice che protegge la cromatura.
Si sconsiglia il lavaggio automatico.
Lavate a mano.
AVVISO
❀
I detersivi inquinano le acque. Il lavaggio del veicolo va eseguito in zone
attrezzate per il recupero o la dispersione
dei detersivi utilizzati per il lavaggio.
Washing the vehicle
Keep the vehicle clean and wash it
regularly.
The following circumstances may
affect the paintwork of the vehicle adversely.
- Riding in coastal areas
- Adhesion of tar, sap from trees, bird
droppings, and dead insects.
- Riding in areas with heavy smoke, dirt,
dust and chemical content in the air.
- Leaving the vehicle very dirty with dust
and mud.
Wash the vehicle as quickly as possi-
ble:
Washing should never be carried out
in direct sunlight, particularly in the summer when the bodywork is still hot,
because the soap will dry before it can be
rinsed off, and this may cause damage to
the paintwork and to the varnish protecting the chromed parts.
It is not recommended to use automatic washes. Wash the vehicle by hand.
WARNING
❀
Detergents pollute the ground water.
Washing vehicles should be carried out in
areas specifically equipped for recovering
or eliminating the detergents used when
washing the vehicle.
Das Waschen des Fahrzeugs
Halten Sie das Fahrzeug sauber und
reinigen Sie es regelmäßig.
In folgenden Fälle kann die Lackierung
am Fahrzeug angegriffen werden:
- bei Fahrten in Küstenregionen;
- bei anhaftendem Teer, Pflanzensaft der
Bäume, Vogelkot und toten Insekten;
- bei Fahrten an Orten mit viel Rauch,
Schmutz, Staub und chemischen
Substanzen;
- wenn das Fahrzeug sehr mit Staub und
Schlamm verschmutzt ist.
In diesen Fällen sollte das Fahrzeug so
schnell wie möglich.
Waschen Sie das Fahrzeug nie im
direkten Sonnenlicht, besonders nicht im
Sommer, wenn die Karosserie noch warm
ist, da die verwendete Seife noch vor dem
Spülen trocknet, was zu einer
Beschädigung des Lacks und des
Schutzlacks der Chromteile führen kann.
Das Waschen in Waschstraßen wird
nicht empfohlen. Waschen Sie das
Fahrzeug von Hand.
WARNHINWEIS
❀
Das Waschmittel verunreinigt das
Grundwasser. Das Fahrzeug darf nur
dort gewaschen werden, wo man über
Einrichtungen zur Aufbereitung des
Waschwassers oder zur Eliminierung der
beim Waschen verwendeten Mittel
verfügt.
89
Page 90
Prevención contra la corrosión
Comment éviter la corrosion
90
Lavado de piezas cromadas
Lave frecuentemente usando espuma
de jabón suave, agua templada y una
esponja. Use espuma de jabón suave
limpiando todo el chasis con una esponja
para quitar la suciedad. No frote fuerte.
Aclarar con agua templada y secar. Asegúrese que después de la limpieza las
piezas estén completamente secas para
evitar manchas de agua.
AVISO
No use disolventes, diluyentes, gasolina o limpiadores abrasivos que pudieran
deteriorar el barniz protector del cromado
Retoque de barniz protector
Aplique el barniz protector en cuando
aparezca el deterioro para que no se
corroa. Para que quede mejor use un
pincel pequeño y agite el barniz. Asegú-
rese que la superficie esté limpia y seca .
Aplíquese donde se haya producido el
deterioro. No aplique en la superficie
alrededor de donde falta o esté rayado.
Encerado.
El encerado de las partes pintadas
mantiene el brillo original del vehículo.
Debe hacerse siempre precedido por
el lavado.
Use ceras silicónicas de buena calidad y siga con exactitud las instrucciones
y precauciones del fabricante.
Nettoyage des pièces cromées
Lavez-les régulièrement en utilisant une
mousse de savon doux, de l’eau tiède et
une éponge. Avec la mousse, nettoyez le
châssis à l’aide d’une éponge, en évitant de
trop frotter. Rincez à l’eau tiède et séchez.
Assurez-vous que après le nettoyage, les
pièces sont complètement sèches, pour
éviter les taches de calcaire.
Précaution!
Ne pas utiliser de solvants ni essence ni
abrasifs qui pourraient endommager le vernis protecteur des pièces chromées.
Retouches avec du vernis protecteur
Appliquez le vernis de protection dès
l’apparition d’une légère détérioration pour
éviter toute corrosion. Utilisez un pinceau
fin, et remuez le vernis avant emploi. Assurez-vous que la surface à vernir est propre
et sèche. Appliquez celui-ci sur la surface
endommagée, sans déborder sur les zones
non rayées ou endommagées.
Cirage
Le cirage des pièces peintes conserve
l’éclat d’origine du véhicule. Il doit toujours se
faire après avoir bien nettoyé le véhicule.
Utilisez des cires de silicone de qualité
et suivez exactement les instructions facilitées par le fabricant.
Page 91
Prevenzione contro la corrosione • Precautionary measure against corrosion
Korrosionsschutz
Lavaggio di componenti cromati
Lavate spesso utilizzando la schiuma di
sapone non aggressivo, acqua tiepida ed una
spugna. Utilizzate schiuma di sapone, pulendo l’intero telaio con una spugna per togliere
la sporcizia. Non sfregate molto energicamente. Risciacquate con dell’acqua tiepida e
asciugare.
Accertatevi che, una volta terminata la
pulizia asciugare completamente i componenti, per evitare le macchie d’acqua.
AVVISO
Non utilizzare dissolventi, diluenti, benzina
o altri detersivi abrasivi che possano danneggiare la vernice protettiva della cromatura.
Rifiniture di vernice protettiva
Applicate la vernice protettiva non appena
si fanno evidenti i segni del degrado, affinché
non si corroda. Per ottenere un’ottima rifinitura, vi consigliamo di utilizzare un pennello di
ridotte dimensioni e di agitare la vernice.
Accertatevi che la superficie è pulita e asciutta.
Applicate nella zona dove sono evidenti i
segni del deterioro. Non applicate sulla superficie intorno al posto dove manca o è graffiato.
Strato incerata.
Lo strato incerato dei pezzi verniciati mantiene la lucentezza originale del veicolo.
Bisogna lavare sempre prima il veicolo.
Utilizzate sempre cere al silicone di buona
qualità e eseguite esattamente le istruzioni e
precauzioni del fabbricante.
Washed of chromed components
Wash frequently with mild soap suds,
using a sponge and warm water. Use the
soap suds to wash the entire frame with the
sponge to remove dirt. Do not rub hard.
Rinse with warm water and dry. Ensure that
after washing, the componets must be completely dried, so as to avoid creating water
stains.
WARNING
Do not use solvents, thinners, gasoline,
or abrasive cleaners which could damage
the varnish protecting the chromed parts.
Touching up the protective varnish
Apply protective varnish as soon as any
damage is detected in order to avoid corrosion. For best results, use a small brush
and shake the varnish well. Ensure that the
surface to be varnished is clean and dry.
Apply the varnish only where the coating is
damaged. Do not apply around the area
where the varnish has been removed or is
scratched.
Waxing.
Waxing painted parts will maintain the
original shine of the vehicle.
Waxing should only be applied after the
vehicle has been cleaned.
Use silicon waxes of good quality, and
follow the manufacturer’s instructions and
precautions precisely.
Reinigung verchromter bauteile
Wir empfehlen ein häufiges Waschen mit sanftem
Seifenschaum, lauwarmem Wasser und einem
Schwamm. Verwenden Sie einen sanften
Seifenschaum und waschen Sie das ganze
Chassis mit einem Schwamm, um den Schmutz zu
entfernen. Nicht zu kräftig reiben. Mit lauwarmem
Wasser spülen und abtrocknen. Nach der
reinigung die bauteile komplett abtrocknen, um
Wasserflecken zu vermeiden.
WARNHINWEIS
Verwenden Sie keine Lösungsmittel,
Verdünner, Reinigungsbenzin oder abreibenden
Reinigungsmittel, die den Schutzlack der
Chromteile beschädigen könnten.
Ausbesserung des Chromschutzlacks
Tragen Sie den Schutzlack an verschlissenen
Stellen auf, damit dort kein Rost auftritt. Am besten
verwenden Sie dazu einen kleinen Pinsel und
schütteln vorher den Lack. Achten Sie darauf, daß
die Oberfläche sauber und trocken ist. Nur an
Stellen auftragen, wo ein Verschleiß vorhanden ist.
Nicht auf die Flächen um die
Stellen ohne Schutzlack oder Kratzer herum
auftragen.
Einwachsen.
Das Einwachsen der lackierten teile bewahrt
den Originalglanz des Fahrzeugs.
Vor dem Einwachsen muß das Fahrzeug
immer erst gewaschen werden.
Verwenden Sie ein Silikonwachs von guter
Qualität und halten Sie die Anweisungen und
Vorsichtsmaßnahmen des Herstellers strikt ein.
91
Page 92

Conservación en largos periodos de inactividad
Conservation dans de longues périodes d'inactivité
Conservación del ciclomotor en largos períodos de inactividad
- Limpieza general y secado.
- Vaciar los depósitos de gasolina,
aceite y líquido refrigerante.
- Sacar la bujía. Por su alojamiento
introducir 10 ÷ 15 c.c. de aceite anticorrosivo. Hacer girar el motor para
que quede todo impregnado y
protegido.
- Vaciar el aceite del motor. No colocar
el tapón de vaciado, en su lugar tapar
con un trapo limpio.
- Engrasar todas las partes metálicas
con grasa antioxidante; actualmente
existen en el mercado unos sprays
muy adecuados para este tipo de
protección.
- Proteger el ciclomotor con un plástico,
para evitar la acumulación de polvo.
- Es conveniente que los neumáticos no
toquen al suelo.
Conservation du cyclomoteur soumis à un long temps d'inactivité.
- Nettoyage général et séchage
- Vider le réservoir à essence, huile et
liquide refroidissant.
- Enlever la bougie et mettre dans son
logement 10 à 15 c.c. d'huile anticorrosion. Faire tourner le moteur pour
que tout soit imprégné et protégé.
- Vider l'huile du moteur. Ne pas mettre
le bouchon de vidange, et boucher
avec un chiffon propre.
- Graisser toutes les parties métalliques
avec de la graisse anti-oxyde; il existe
actuellement sur le marché des sprays
convenant parfaitement à ce type de
protection.
- Protéger le cyclomoteur avec une toile
plastifiée pour éviter l'accumulation de
la poussière.
- Il vaut mieux éviter que les
pneumatiques ne touchent le sol.
92
Page 93

Conservazione durante lunghi periodi d'inattività • Conservation during long periods of inactivity
Pflege bei längerem Nichtgebrauch
Conservazione del ciclomotore
durante lunghi periodi d’inattività
- Pulizia generale ed asciugare.
- Svuotare il serbatoio della benzina e
del liquido refrigerante.
- Togliere la candela. Attraverso la sua
sede introdurre 10 a 15 cmc di olio
anticorrosivo. Far girare il motore per
farlo imbibire e proteggerlo.
- Svuotare l’olio del motore. Non
mettere il tappo di svuotamento, ma
tappare con uno straccio pulito.
- Ingrassare tutte le parti metalliche con
grasso antiossidante; atttualmete
esistono nel mercato alcuni “sprays”
molto adatti per questo tipo di
protezione.
- Proteggere il ciclomotore con un telo
plastico, per evitare l’accumularsi della
polvere.
- È conveniente che gli pneumatici non
tocchino il suolo.
Conservation during long periods of
inactivity.
- Clean and dry the moped.
- Empty the fuel, oil and coolant tanks.
- Remove the spark plug. Introduce 1015 ml of anti-rust oil. Turn the engine
over so that all of its parts become
impregnated and protected.
- Drain the engine oil. Do not replace
the drain plug: stop the hole with a
clean cloth.
- Grease all the metal parts with antirust grease: some very suitable sprays
for this type of protection now exist on
the market.
- Protect the moped with a plastic sheet
to prevent the accumulation of dust.
- It is advisable that the tyres do not
touch the floor.
Pflege des Mokicks bei längerem
Nichtgebrauch
- Allgemeine Reinigung und Trocknen.
- Den Kraftstofftank entleeren.
-Die Zündkerze herausnehmen. In die
Öffnung 10 - 15 Kubikzentimeter
Korrosionsschutzöl geben. Den Motor
drehen, damit alle Teile getränkt und
geschützt werden.
- Das Öl aus dem Motor leeren. Den
Ablaßstopfen nicht aufsetzen,
stattdessen mit einem sauberen Tuch
abdecken.
- Alle Metallteile mit Rostschutzfett
einschmieren; der Markt bietet derzeit
verschiedene Sprühmittel an, die für
einen solchen Schutz sehr geeignet
sind.
- Das Mokick mit einer Plastikhülle
abdecken, um Staubansammlungen
zu verhindern.
- Es ist ratsam, daß die Reifen den
Boden nicht berühren.
93
Page 94

Anomalías en ruta
Anomalies sur la route
Anomalías en ruta.
No es probable que se presente una
avería en ruta si el ciclomotor está bien
conservado y se ha tratado con el debido cuidado.
Si, en cambio, puede presentarse en
un momento dado, que el vehículo se
detenga bruscamente y no haya forma
de ponerlo en marcha. En este caso, el
conductor que no posea unos amplios
conocimientos de mecánica, sólo debe
comprobar dos puntos, que son generalmente los que provocan la detención
sin que por ello el vehículo esté averia-
do.
Compruebe si baja gasolina desde el
depósito hasta el carburador.
Una vez comprobado que la gasoli-
na desciende, sólo falta comprobar si la
máquina tiene buena chispa, es decir si
a través del cable de alta tensión, que
va conectado a la bujía, llega la
corriente eléctrica necesaria para producir la chispa entre los electrodos de
la bujía.
Para efectuar esta comprobación,
Anomalies sur la route
Il est difficile qu'une panne se produise pendant que vous roulez sur la route
si le cyclomoteur est bien soigné.
Cependant, il peut arriver que le
cyclomoteur s'arrête brusquement et
qu'il soit impossible de le remettre en
marche. Dans ce cas, le conducteur qui
n'a pas de grandes connaissances en
mécanique doit vérifier deux points qui,
généralement, produisent l'arrêt du
moteur sans que ce soit une panne à
proprement parler.
Vérifier que l'essence passe bien du
réservoir jusqu'au carburateur.
Si l'essence descend il suffit de vérifier si la machine produit une bonne
étincelle, c'est à dire si par le câble de
haute tension en connexion avec la
bougie le courant électrique nécessaire
pour produire l'étincelle entre les électrodes de la bougie arrive.
Pour effectuer cette vérification
démonter la bougie en utilisant la clé
adéquate qui est livrée avec la trousse
à outils du cyclomoteur.
94
Page 95

Anomalie in viaggio • Problems on the road
Störungen während der Fahrt
Anomalie in viaggio
Non è probabile che si produca una
panna in viaggio se il ciclomotore è
correttamente conservato e si ha trattato con la dovuta cura.
Comunque può accadere in un dato
istante che il veicolo si fermi bruscamente e non ci sia modo di metterlo in
moto. In questo caso, il conducente che
non sia munito di ampie conoscenze nel
campo della meccanica deve soltanto
verificare due punti, che sono quelli che
provocano generalmente l’arresto
senza che questo implichi che il veicolo
è in panna.
Verificare se scende la benzina dal
serbatoio fino al carburatore.
Dopo aver verificato che la benzina
scende, bisogna soltanto verificare se la
macchina ha una buona scintilla, cioè,
se mediante il cavo d’alta tensione che
è collegato alla candela arriva la corrente elettrica necessaria per produrre la
scintilla tra i due elettrodi della candela.
Per fare questa verifica, smontare la
candela mediante la chiave che si con-
Problems on the road
It is improbable that you will have a
breakdown on the road if your moped
has been well kept and maintained.
However, it can happen at one
moment that the vehicle suddenly stops
and is impossible to restart. In this case,
the rider who does not have great
mechanical knowledge need only check
the two points which are the usual
cause of stoppage without the vehicle
being defective.
Check that the fuel is flowing from
the tank to the carburettor. If this is so,
check that the engine has a good spark
- that is to say, that the high-voltage
cable is sending the necessary electric
current to produce the spark between
the electrodes of the spark plug.
To carry out this check, remove the
spark plug, using the appropriate spanner supplied in the moped’s tool kit.
Examine the plug to see if there are car-
Störungen während der Fahrt
Wenn das Mokick in gutem Zustand
ist und entsprechend gepflegt wird, ist
es nicht wahrscheinlich, daß sich wäh-
rend der Fahrt Pannen einstellen.
Es kann allerdings vorkommen, daß
das Fahrzeug plötzlich anhält und es in
keiner Weise wieder in Gang zu bringen
ist. In einem solchen Falle raten wir
dem Fahrer, der über keine umfassenden mechanischen Kenntnisse verfügt,
die beiden folgenden Punkte zu über-
prüfen, die im allgemeinen den Stillstand hervorrufen, ohne daß deswegen
ein Schaden vorliegt.
Feststellen, ob Kraftstoff vom Tank
zum Vergaser gelangt. Steht der Motor
still, gelangt kein Benzin in den Vergaser, da der Benzinhahn nur mit laufendem Motor funktioniert.
Ist einmal sichergestellt, daß der
Kraftstoff in den Vergaser gelangt, muß
nur noch überprüft werden, ob das
Fahrzeug gut zündet, d. h. ob über das
an die Zündkerze angeschlossene
Hochspannungskabel genügend Strom
95
Page 96

Anomalías en ruta
Anomalies sur la route
desmonte la bujía, utilizando la llave
que para tal fin se entrega con el equipo de herramientas del ciclomotor.
Una vez desmontada la bujía observe si presenta la “perla”, que no es otra
cosa que alguna partícula de carbonilla
depositada entre los electrodos de la
bujía. De ser así, utilice un cuchillo o
una hoja de papel para eliminarla.
Monte de nuevo la bujía para que el
ciclomotor se ponga en marcha.
Si por el contrario al desmontar la
bujía la nota engrasada, es decir, con
una capa de aceite que recubre los
electrodos, sustituya la bujía por otra
(que deberá llevar siempre de recam-
bio, en la caja de herramientas) y hágala desengrasar en un taller.
Une fois la bougie démontée observez si la "perle" est présente, c'est une
particule de charbon entre les électrodes de la bougie. Utilisez un couteau ou
une feuille de papier pour l'éliminer.
Replacer la bougie pour que le cyclomoteur puisse démarrer.
Si la bougie est encrassée, c'est à
dire si une couche de graisse recouvre
les électrodes remplacer la bougie par
une bougie neuve (vous devez toujours
en avoir de rechange dans la boîte à
outils) et faites dégraisser la vieille chez
un mécanicien.
96
Page 97

Anomalie in viaggio • Problems on the road
Störungen während der Fahrt
segna con l’insieme dei ferri del ciclomotore.
Smontata la candela, osservare se si
produce la “perla”, che non è altro che
qualche particola di fuliggine deposta
tra gli elettrodi della candela. Se fosse
così, predere un coltello o un foglio di
carta per eliminarla. Montare nuovamente la candela per far avviare il ciclomotore.
Se, contrariamente, quando si smonta la candela questa è oliosa, cioè, con
uno strato d’olio che ricopre gli elettrodi,
si deve cambiare la candela per un’altra
(che deve portare sempre come scorta,
nella scatola degli utensili) e farla sgrassare da un meccanico.
bon deposits between the electrodes: if
there are, remove them with a knife or a
sheet of paper. Replace the spark plug
and start up the moped.
If, on other hand, on examining the
spark plug you see that it is oily, that is,
with a layer of oil covering the electrodes, replace it with a new spark plug
(which should always be carried as a
spare in the tool kit), and have the old
one cleaned in a repair shop.
zugeführt wird, um den Funken zwischen den Elektroden der Zündkerze zu
erzeugen. Nehmen Sie dazu die Zündkerze mit Hilfe des zu diesem Zweck
mitgelieferten Schlüssels heraus. Stecken Sie die Zünd kerze in den kerzenstecker Legen Sie das ganze aufdas
Motorgehäuse und betätigen Sie den
Kickstarter. Dabei muß der Funke der
Kerze überspringen. Versuchen sie die
Kerze zu reinigen, oder besser durch
eine neue ersetzen.
Bauen Sie die Zündkerze wieder ein,
um das Mokick in Gang zu setzen.
97
Page 98

98
Page 99

En las páginas siguientes de
este capítulo, se describen las
especificaciones técnicas y el
índice.
Les pages de ce chapître
décrivent les spécifications
techniques et donnent l'index.
Nelle pagine seguenti di
questo capitolo si descrivono
le specificazioni tecniche e
l’indice.
This chapter includes the
technical specifications of the
moped and the Index of this
manual.
Dieses Kapitel enthält die
technischen Daten, und das
Inhaltsverzeichnis.
Indice del capítulo
Index du chapitre
Indice delcapitolo
Index of the chapter
Inhaltsverzeichnis des Kapitels
Características técnicas
Caractéristiques techniques
Caratteristiche tecniche
Technical characteristics
Technische Daten.....................................98
Esquema eléctrico
Echema electrique
Squema elettrico
Electrical wiring diagram
Elektroschema .......................................106
Indice
Index
Indice
Index
Inhaltsverzeichnis ...................................104
Especificaciones
Spécifications
Specificazioni
Specifications
Technische Daten
99
Page 100

Características técnicas
Caractéristiques techniques
Motor
Número de cilindros
Un cilindro de aluminio con recubrimiento interior de niquel y carburos
de silicio
Ciclo: Dos tiempos.
Diámetro por carrera: 39,86 x 40 mm.
Cilindrada: 49 c.c.
Relación de compresión: 11,5 : 1
Sentido de giro: Izquierdo lado volante
magnético
Refrigeración del motor: Con líquido
anticongelante
Sistema de lubricación: Mezcla de
gasolina y aceite con lubricación
mediante bomba.
Carburante: Gasolina sin plomo
Carburador
Tipo: Dell'Orto PHVA - 17.5 con
starter manual
Embrague
Tipo: A discos múltiples en baño de
aceite.
Transmisión primaria: Por engrana-
jes. 21/78
Admisión: Por láminas directas al
cárter.
Moteur
Nombre de cylindres: Un cylindre en
aluminium avec couverture intérieu-
re en nickel et carbures de silicium.
Cycle: A deux temps
Alésage et course: 39,86 x 40 mm
Cylindrée: 49 c.c.
Rapport de compression: 11,5:1
Sens du tour: Gauche côté volant
magnétique
Réfroidissement du moteur: Liquide de
réfroidissement
Système de lubrification: Huile mélan-
gée automatiquement au moyen de
pompe
Carburant: Essence sans plomb
Carburateur
Type: Dell'Orto PHVA - 17,5 avec
starter manuel
Embrayage
Type: A disques multiples dans un
bain d'huile.
Transmission primaire: Par engre-
nages rectifiés. 21/78
Admission: Par clapets directs au
carter.
100
 Loading...