


Denver Instrument P-114, P-214, P-314, PI-225D, P-203 Instruction Manual
...
Pinnacle Series
Operation Manual
|
-01 |
-03 |
|
11 |
|
12:00:00 |
|
120g P-114Max .1mg d=0
h |
.0127 |
||
Weig |
|||
|
|||
100 |
|
h |
|
|
|
Smit |
|
|
|
:J. |
|
|
User |
|
|
g
oz 3.52781
TARE
602631.1 Rev. B

Disclaimer
•Calibrate your balance using reference weights of the appropriate tolerance (class). An instrument can be no more accurate than the standard to which it has been compared. For assistance in the selection of reference weights, please contact Denver Instrument Company.
•Changes or modifications not expressly approved by the manufacturer could void the user’s authority to operate this equipment.
•Use of this product in a manner not specified by the manufacturer may impair any safety protection provided by the equipment.
•Do not drop objects on the pan of the balance.
•Never lift balance by the weighing pan as this may cause damage to internal mechanism. Always lift and transport the balance by its base, including removal from packing materials.
•If load exceeds 115% of maximum capacity, damage to the balance may occur.
Warnings and Safety
Information
Read the entire Operation Manual prior to attempting to operate your precision balance. Connect only Denver Instrument accessories as these are designed for optimal performance.
•Make sure the voltage rating printed on the AC adapter is identical to your local line voltage.
•Do not use this balance in a hazardous location.
•The only way to turn the power completely off is by disconnecting the AC adapter from the balance.
•Protect the AC adapter from contacts with liquids.
•This product intended for indoor use.
!
WARNING!
This unit has no user serviceable parts! Do not open the balance housing, as this will void the manufacturer’s warranty.

Table of Contents
Specifications . . . . . . . . . . . . . . . . . . . . . . . . . . . . . . . . . . . . . . . . . . . .ii Introduction . . . . . . . . . . . . . . . . . . . . . . . . . . . . . . . . . . . . . . . . . . . . .1 Getting Started . . . . . . . . . . . . . . . . . . . . . . . . . . . . . . . . . . . . . . . . . .1 Installation Instructions . . . . . . . . . . . . . . . . . . . . . . . . . . . . . . . . . . . .2 Pan Assembly . . . . . . . . . . . . . . . . . . . . . . . . . . . . . . . . . . . . . . . . .2 Connecting to AC Power . . . . . . . . . . . . . . . . . . . . . . . . . . . . . . . .5 Leveling your balance . . . . . . . . . . . . . . . . . . . . . . . . . . . . . . . . . .6 Operation . . . . . . . . . . . . . . . . . . . . . . . . . . . . . . . . . . . . . . . . . . . . . . .7 Simple weighing . . . . . . . . . . . . . . . . . . . . . . . . . . . . . . . . . . . . . . .8 Fine-Dynamic Dual-Range Balances . . . . . . . . . . . . . . . . . . . . . . .9 Units . . . . . . . . . . . . . . . . . . . . . . . . . . . . . . . . . . . . . . . . . . . . . . . . . . .9 Setting the weigh units . . . . . . . . . . . . . . . . . . . . . . . . . . . . . . . . .9 Calibration . . . . . . . . . . . . . . . . . . . . . . . . . . . . . . . . . . . . . . . . . . . . . .11 Counting Mode . . . . . . . . . . . . . . . . . . . . . . . . . . . . . . . . . . . . . . . . . .15 Target/Percentage Weighing . . . . . . . . . . . . . . . . . . . . . . . . . . . . . . .18 Check Weighing . . . . . . . . . . . . . . . . . . . . . . . . . . . . . . . . . . . . . . . . .19 Formulation . . . . . . . . . . . . . . . . . . . . . . . . . . . . . . . . . . . . . . . . . . . .20 Animal Weighing . . . . . . . . . . . . . . . . . . . . . . . . . . . . . . . . . . . . . . . .21 Statistics . . . . . . . . . . . . . . . . . . . . . . . . . . . . . . . . . . . . . . . . . . . . . . .23 GLP/ISO . . . . . . . . . . . . . . . . . . . . . . . . . . . . . . . . . . . . . . . . . . . . . . .25 Setting Date . . . . . . . . . . . . . . . . . . . . . . . . . . . . . . . . . . . . . . . . . .26 Setting Time . . . . . . . . . . . . . . . . . . . . . . . . . . . . . . . . . . . . . . . . . .76 Setting Sample ID . . . . . . . . . . . . . . . . . . . . . . . . . . . . . . . . . . . . .74 Setting Sample Number . . . . . . . . . . . . . . . . . . . . . . . . . . . . . . .29 Print . . . . . . . . . . . . . . . . . . . . . . . . . . . . . . . . . . . . . . . . . . . . . . . . . . .29 USB . . . . . . . . . . . . . . . . . . . . . . . . . . . . . . . . . . . . . . . . . . . . . . . . . . .31 Ethernet . . . . . . . . . . . . . . . . . . . . . . . . . . . . . . . . . . . . . . . . . . . . . . .32 Environmental Settings . . . . . . . . . . . . . . . . . . . . . . . . . . . . . . . . . . .34 Setting the Stability icon . . . . . . . . . . . . . . . . . . . . . . . . . . . . . . .35 Auto Zero . . . . . . . . . . . . . . . . . . . . . . . . . . . . . . . . . . . . . . . . . . . .35 System . . . . . . . . . . . . . . . . . . . . . . . . . . . . . . . . . . . . . . . . . . . . . . . .36 To set password . . . . . . . . . . . . . . . . . . . . . . . . . . . . . . . . . . . . . . .36 RS232 . . . . . . . . . . . . . . . . . . . . . . . . . . . . . . . . . . . . . . . . . . . . . . .36 To Set Bits/Parity . . . . . . . . . . . . . . . . . . . . . . . . . . . . . . . . . . . . . .37 To Set Beep . . . . . . . . . . . . . . . . . . . . . . . . . . . . . . . . . . . . . . . . . .38
To Set Display . . . . . . . . . . . . . . . . . . . . . . . . . . . . . . . . . . . . . . . .39
Standby . . . . . . . . . . . . . . . . . . . . . . . . . . . . . . . . . . . . . . . . . . . . . . . .39 Restoring Factory Defaults . . . . . . . . . . . . . . . . . . . . . . . . . . . . . . . .40 Menu Tree . . . . . . . . . . . . . . . . . . . . . . . . . . . . . . . . . . . . . . . . . . . . . .41 Cleaning and Maintenance . . . . . . . . . . . . . . . . . . . . . . . . . . . . . . . .43 Troubleshooting . . . . . . . . . . . . . . . . . . . . . . . . . . . . . . . . . . . . . . . . .44
Serial Commands for Serial Interface . . . . . . . . . . . . . . . . . . . . . . .45
Accessories . . . . . . . . . . . . . . . . . . . . . . . . . . . . . . . . . . . . . . . . . . . . .46 Warranty Instructions . . . . . . . . . . . . . . . . . . . . . . . .inside back cover
i

Specifications
Precision Analytical Balances
Models |
P-114* |
P-214* |
P-314* |
PI-225D |
Capacity |
110 g |
210 g |
310 g |
60/220 g |
Readability |
0.1 mg |
0.1 mg |
0.1 mg |
0.01/0.1 mg |
Taring Range |
0 to 110 g |
0 to 210 g |
0 to 310 g |
0 to 60/220 g |
Repeatability, (s) |
0.1 mg |
0.1 mg |
0.1 mg |
0.02/0.1 mg |
Linearity |
0.2 mg |
0.2 mg |
0.2 mg |
0.03/0.2 mg |
Stabilization Time |
3 seconds |
3 seconds |
3 seconds |
4 seconds |
Pan Size |
3.1" dia. |
3.1" dia. |
3.1" dia. |
3.1” dia. |
|
(79mm) |
(79mm) |
(79mm) |
(79mm) |
Precision Toploading Balances
Models |
P-203* |
P-403* |
P-603D* |
P-402* |
P-602* |
P-2002* |
Capacity |
200 g |
400 g |
100/600 g |
400 g |
600 g |
2000g |
Readability |
0.001 g |
0.001 g |
0.001/0.01g |
0.01g |
0.01g |
0.01 g |
Taring Range |
0 to 200 g |
0 to 400 g |
0 to 600 g |
0 to 400 g |
0 to 600 g |
0 to 2000g |
Repeatability, (s) |
0.001 g |
0.001 g |
0.002/0.01 g |
0.01 g |
0.01 g |
0.01 g |
Linearity |
0.002 g |
0.002 g |
0.003/0.02 g |
0.02 g |
0.02 g |
0.02 g |
Stabilization Time |
3 seconds |
3 seconds |
4 seconds |
3 seconds |
3 seconds |
3 seconds |
Pan Size |
4.5 " dia. |
4.5 " dia. |
4.5 " dia. |
4.5 " dia. |
4.5 " dia. |
7.0 x 7.0" |
|
(114mm) |
(114mm) |
(114mm) |
(114mm) |
(114mm) |
(178 x 178mm) |
Models |
P-4002* |
P-4002D* |
P-8002D |
P-6001* |
P-8001 |
Capacity |
4000 g |
400/4000 g |
800/8000 g |
6000 g |
8000 g |
Readability |
0.01 g |
0.01/0.1 g |
0.01/0.1 g |
0.1 g |
0.1 g |
Taring Range |
0 to 4000 g |
0 to 4000 g |
0 to 8000 g |
0 to 6000 g |
0 to 8000 g |
Repeatability, (s) |
0.01 g |
0.02/0.1 g |
0.02/0.1 g |
0.1 g |
0.1 g |
Linearity |
0.02 g |
0.03/0.2 g |
0.03/0.2 g |
0.1 g |
0.1 g |
Stabilization Time |
3 seconds |
4 seconds |
4 seconds |
3 seconds |
3 seconds |
Pan Size |
7.0 x 7.0" |
7.0 x 7.0" |
7.0 x 7.0" |
7.0 x 7.0" |
7.0 x 7.0" |
|
(178 x 178mm) |
(178 x 178mm) |
(178 x 178mm) |
(178 x 178mm) |
(178 x 178mm) |
Common Specifications |
*PI models with internal calibration |
Dimensions (LxWxH) Analyticals: |
14.6 x 9.4 x 13.3" (371 x 239 x 338mm) |
Dimensions (LxWxH) Toploaders: |
14.6 x 9.4 x 3.8" (371 x 239 x 97mm) |
Weighing Chamber Dimensions: |
8.3 x 8.0 x 9.8” (211 x 203 x 249mm) |
Operating Temperature: |
10° - 30°C (50° - 86°F) |
Storage Temperature: |
-10° - 30°C (14° - 86°F) |
Humidity: |
< 90% RH |
Net Weight (Analyticals): |
15 lbs (6.80kg) |
Net Weight (Toploaders): |
10 lbs (4.54kg) |
Electrical Requirements: |
AC: 115V 50/60Hz, other voltages available. |
|
DC: +5V 2.5A |
|
+15V 0.5A |
|
-15V 0.3A |
!
CAUTION!
Use AC adaptor supplied with unit only!
Contact Denver Instrument for replacement.
ii

Introduction
Thank you for selecting a precision Denver Instrument Company balance. The Pinnacle Series is a culmination of precision weighing technology, superior user interface and highest manufacturing standards. These balances have features including:
•Efficient filtering-out of unfavorable ambient conditions such as vibrations and drafts.
•Stable and reproducible results.
•Easy to use menu operation.
•Multiple weigh units, with two displayed simultaneously.
•Rugged, durable construction for all types of environmental conditions.
•Advanced applications such as counting, percent/target weighing, animal weighing and formulation.
Getting Started
Unpacking your balance
Carefully remove your balance from the packing material. The weigh pan assembly and power transformer are removed from the balance for shipping.
Please retain all original packing material for shipment in case of repair.
Be sure that you have received each of the following items with your balance:
•Balance
•Brief Operation Manual
•Warranty Registration Card
•Round Pan (3.1” or 4.5”) and Drip Ring OR Square Pan
•Power Adapter
•Power Cord
•CD including detailed operation manual, HyperTerminal templates, and USB Application
Next follow the instructions for installing your balance. To take advantage of its many features, carefully read your operating manual. It contains step-by-step procedures, examples and other vital information.
Finally, remember to return your completed warranty card within ten days and retain a record of all purchase information. Also take a moment to record the model and serial number of your balance for future reference.
1

Installation Instructions
When choosing a location to set up your new balance, observe the following conditions to optimize ease and speed of use:
•Set up the balance on a stable, rigid and level surface.
•Avoid locations subject to extremes in heat or direct exposure to sunlight.
•Room temperatures above 86°F (30°C) or below 50°F (10°C) could affect balance operation and accuracy.
•Protect the balance from direct exposure to drafts.
•Protect the balance from aggressive chemical vapors.
•Avoid strong magnetic fields present from other devices.
•Avoid locations subject to vibration.
•Avoid exposing the balance to excessive moisture for extended periods.
•For best results, allow the balance to adjust to room temperature before connecting to power source, for at least two hours.
•Line voltage to the balance should be reasonably constant and free from fluctuations.
Pan Assembly
Please observe the following precautions when handling the weighing pans:
•Do not apply manual pressure to the weighing pan at any time.
•Do not bump the pan.
•Do not drop objects onto the pan.
•Do not attempt to clean or vigorously wipe the pan while it is installed on the balance.
•When removing the pan, pull the pan straight up (pulling the pan at an angle could result in mechanical breakage).
To avoid damage to your precision balance during shipping, the pan assembly components were packed separately.
2
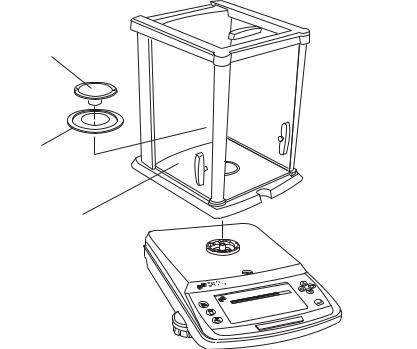
Weighing pan
Drip ring |
|
Place the draft |
|
|
shield on the |
|
|
balance so the |
|
|
grooves line up |
Stainless steel |
|
approximately |
platform |
|
at a 30° angle |
|
-01 |
|
|
11-03 |
:00 |
|
12:00 |
|
|
g |
|
|
ax120 |
|
M |
|
|
P-114 |
g |
|
0.1m |
|
|
d= |
|
|
|
|
g |
Weigh |
.0127 |
|
|
100 ith |
|
|
J.Sm |
|
User: |
|
1oz |
78 |
|
3.52 |
|
E
TAR
Analytical Balances and Draft Shield
To attach draft shield, place it upon the balance so the grooves line up when the draft shield is approximately at a 30° angle. Pull the pin at the rear of the draft shield and turn clockwise until it is in line with the balance. Release the pin. Place the components listed below inside the chamber in the order given:
•Stainless steel platform
•Drip Ring
•Weighing Pan
3
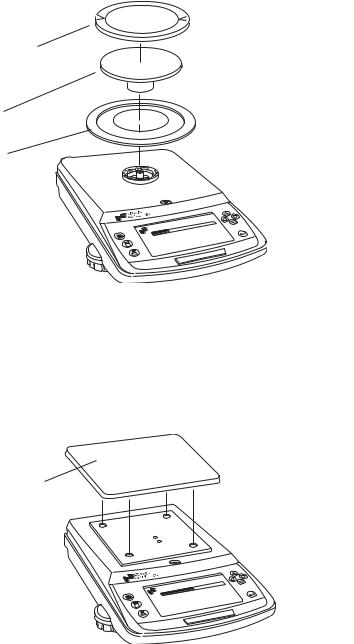
Weighing pan
Sub pan
Drip ring
|
-01 |
-03 |
|
11 |
|
12:00:00 |
|
400g P-403Max .001g d=0
Weigh
.724 96
J.Smith
User:
Grams
.02carats 483
TARE
Toploading Balances with Round Pan
Place the components listed below on
•DripRing
•Sub Pan
•Weighing Pan
•Draft Ring (Optional)
•Draft Ring Cover (Optional)
Weighing pan
the balance in the order given:
Place the weighing pan on the balance so the rubber feet line up with the holes
|
-01 |
-03 |
|
11 |
|
12:00:00 |
|
Max6000g P-6001 .1g d=0
Weigh
.1 3003 h :J.Smit User
Grams
s 6.0Pound
TARE
Toploading Balances with Square Pan
• Weighing Pan
4

Connecting the Balance to AC Power
When your balance has reached room temperature, simply plug the AC adapter into the rear of the balance and plug into an appropriate AC outlet. The balance will turn on automatically. For best results, the balance should be left plugged in at all times.
USB |
RS232 |
Ethernet |
Power Lock-Down |
Connection |
Interface |
Connection |
for cable |
|
|
|
and lock |
Connecting the PI-225D to AC Power
1.Wait for balance and external electronic box to reach room temperature.
2.Attach the external electronics box to the cable on the rear of balance.
3.Plug the two-part AC adapter into the balance.
4.Plug the AC adapter into an appropriate AC wall outlet.
5.The balance will turn on automatically.
6.Wait at least 6 hours for warm-up to assure accurate results. To avoid extensive warm-up periods the balance should remain attached to the external electronic box and the box should be plugged in.
Balance
AC Wall
Adapter
External
Electronics
Box
5

 The external electronic box is powered by the balance and Note: the box should always be attached to the balance.
 Each balance has its own external electronic box. These Note: boxes are not interchangeable.
Leveling your Balance
It is necessary to level the balance whenever the balance is moved. Do not turn the balance over.
The number of feet varies on each model:
Analytical models: 2 adjustable front feet, one fixed rear foot. Toploading models with round pan: 2 front feet, one rear fixed foot.
Toploading models with square pan: 4 adjustable feet, one in each corner.
To level your balance:
1.Turn all leveling feet counterclockwise until the feet are fully retracted into the base of the balance.
2.Note the location of the bubble in relation to the circle. For maximum weighing accuracy, the bubble should be located inside the black ring.
3.Begin with the foot that is opposite of the location of the bubble and turn clockwise until the bubble is moved into the black ring. If necessary, repeat this step with the other leveling feet until the bubble is positioned in the center of the black ring.
4.Make sure that all feet are touching the countertop and no rocking occurs when the corners of the balance are pressed.
The bubble moves TOWARDS a foot when that foot is turned
Note: CLOCKWISE. The bubble moves AWAY from a foot when that foot is turned COUNTERCLOCKWISE.
6
Operation
MENU Key |
CAL (Calibration) Key |
Navigational |
Arrows |
|
|
|
|
|
|
|
|
|
|
P-602 max 600g |
10 : 17 am |
|
|
|
|
|
|
|
|
|
|
||
|
|
|
|
|
|
|
|
|
|
d=0.01g |
01 - 24 - 02 |
|
|
|
|
|
|
|
|
|
|
|
|
|
|
|
|
|
|
|
|
|
|
|
|
|
|
|
|
|
|
|
|
|
|
|
|
|
|
|
|
|
|
|
|
|
|
|
|
0.00 g
WEIGH |
0.0000 |
oz |
TA R E
PRINT Key |
TARE (Zero) Key |
ENTER Key |
Warm-up Time
To deliver accurate results, the balance must warm-up (be attached to AC power) for at least 2 hours (6 hours for PI-225D). Only after this time will the balance have reached the required operating temperature. It is advised to leave the unit plugged in at all times so that all components are warm and the balance is ready to weigh.
Taring the Balance
1.Place a container on the weighing pan. The balance will register the weight of the container.
2.Press the TARE key.
3.The “TARING” on the screen indicates that the balance is waiting for a stable reading before taring.
4.The balance will read 0.0000 grams (or selected units to the designated resolution) after successful taring.
5.When the reading is stable, the Denver Instrument icon appears in the top, left of the display. When unstable, a “U” appears.
7
Model, Maximum |
Graphic |
Current Time |
Capacity |
||
Capacity and Resolution |
Indicator |
and Date |
|
|
|
|
|
|
P-602 max 600g |
10 : 17 am |
||
|
|
|
|
|
|
||||
Stability |
|
|
|
|
|
d=0.01g |
01 - 24 - 02 |
|
|
|
|
|
|
|
|
||||
|
|
|
|
|
|
|
|
|
|
|
|
|
|
|
|
|
|
|
|
Icon |
|
|
|
|
|
|
|
|
|
|
|
|
|
|
0.00 g |
||||
|
|
|
|
|
|
||||
|
|
WEIGH |
|
0.0000 |
oz |
||||
|
|
|
|
|
|
|
|
|
|
|
|
|
|
Status |
Primary Weight |
Secondary Weight |
|||
|
|
|
|
|
|
and Units |
and Units |
||
Measurement Screen
Simple Weighing
For optimum accuracy, place your samples in the center of the weighing pan. Your balance is designed to provide accurate measurements regardless of where you place the sample on the pan; however, repeatability, accuracy and stabilization time are optimized if the load is placed as close to the center of the pan as possible.
1.Press the TARE key.
2.Add your sample to the center of the pan.
3.When the reading is stable, the balance displays the units of measurement as well as the Denver Instrument icon in the top, left of display.
|
|
|
|
|
|
|
|
|
|
Applications |
|
|
|
Normal Mode |
|
|
|
Units |
|
|
|
Count Mode |
|
|
|
Environment |
|
|
|
Check Weigh |
|
|
|
GLP/ISO |
|
|
|
Animal Mode |
|
|
|
|
|
|
Target Weigh |
|
|
|
|
Language |
|
|
|
Statistics |
|
|
|
System |
|
|
|
Formulation |
|
|
|
Standby |
|
|
|
|
|
|
|
|
|
|
|
||
|
|
|
|
|
|
|
|
|
|
|
|
|
|
|
|
|
|
|
Main Menu Screen |
||||
8

Fine-Dynamic Dual-Range
Balances
Three of the Pinnacle Series Balances (P/PI-603D, P/PI-4002D and P/PI-8002D) feature fine-dynamic dual range. These balances allow you to tare along the entire weighing spectrum and measure with the highest readability of the balance. For example on a P-603D you can weigh up to 100 grams with a readability of 0.001 grams. When the reading reaches 100 grams the balance readability changes to 0.01 grams up to a total capacity of 600 grams. However if you put a beaker that weighs 153.02 grams, when you tare you get 0.001 grams readability so you can measure a sample at 15.068 grams.
Units
The Pinnacle Series features 16 different weigh units. The units and their multiplication factor:
Name |
Symbol |
Conversion factor |
Unit Index |
|
|
(1 gram = ) |
|
Grams |
g |
1.0 |
1 |
Carats |
ct |
5.0 |
9 |
Grains |
gr |
15.43235835 |
7 |
Kilograms |
kg |
0.001 |
2 |
Milligrams |
mg |
1000.0 |
3 |
Mommes |
m |
0.2667 |
13 |
Ounces |
oz |
0.035273962 |
4 |
Pennyweights |
dwt |
0.643014931 |
8 |
Pounds |
lb |
0.0022046226 |
6 |
Drams |
dr |
0.56438331 |
14 |
Baht |
bat |
0.06596306 |
15 |
TaelsTiawan |
tlt |
0.02645547175 |
12 |
TalesHK |
tlh |
0.02671725 |
10 |
TalesSingapore |
tls |
0.02646063 |
11 |
Tola |
tol |
0.0857333381 |
16 |
Troy ounces |
ozt |
0.032150747 |
5 |
The unit index can be printed with data points. See page 29 for more information.
Selecting Weigh Units
You can display one unit or two units simultaneously. The primary unit along with its measurement is displayed as large digits while the secondary unit and measurement is shown on the bottom right of the display.
9
Pressing the TARE key will exit from any menu without Note: saving changes.
When selecting your units, it is necessary to scroll through
Note: several screens. To see the next screen, press the until “more” is highlighted and press ENTER.
To select the primary unit:
1.Press MENU.
2.Press the until “Units” is highlighted.
3.Press and the until “Primary” is highlighted.
4.Press and the until the desired primary unit is highlighted.
5.Press ENTER to accept and TARE to return to the measurement screen.
Applications
Units
Environment
GLP/ISO
Language
System
Standby
Primary
Secondary
To select the secondary unit:
1.Press MENU.
2.Press the until the “Units” is highlighted.
3.Press and the until “Secondary” is highlighted.
4.Press and the until the desired secondary unit is highlighted.
5.Press ENTER to accept and TARE to return to the measurement screen or the to return to the main menu.
 To disable the secondary unit, simply set the secondary unit Note: the same as the primary unit.
10
Primary
Secondary
Grams Kilograms Milligrams Ounces Troy ounces Pounds
Grains more
Toggling between Primary and Secondary Unit
Press ENTER to exchange the primary and secondary units while on the measurement screen.
Calibration
Your balance was calibrated at the factory; however, it is necessary to re-calibrate upon setup and on a regular basis thereafter. The factory recommendation for calibration is once per week using a permissible weight standard or the internal calibration (on PI models). Reasons for more frequent calibration include:
•Moving the balance
•Significant temperature changes
•Removing the balance from AC power
•Procedures to meet ISO/GLP procedures
11

Note:
Note:
Recommended Calibration Weight and Class
P-114 |
100g |
Class 1 or better |
P-214 |
200g |
Class 1 or better |
P-314 |
200g |
Class 1 or better |
PI-225D |
200g |
Class 1 or better |
P-203 |
200g |
Class 2 or better |
P-403 |
200g |
Class 2 or better |
P-603D |
200g |
Class 2 or better |
P-402 |
200g |
Class 4 or better |
P-602 |
500g |
Class 4 or better |
P-2002 |
2kg |
Class 2 or better |
P-4002 |
2kg |
Class 2 or better |
P-4002D |
2kg |
Class 2 or better |
P-8002D |
5kg |
Class 1 or better |
P-6001 |
5kg |
Class 3 or better |
P-8001 |
5kg |
Class 3 or better |
For the PI-225D calibration should be performed in the range most commonly weighed in. If measurements are taken from 0 to 60 grams, calibrate the 0.1mg range with a 50 gram, Class 1 or better weight. If measurements are taken across the entire weighing spectrum calibrate with a 200 gram, Class 1 or better weight.
Other external calibration weights can be used for calibration. You should always calibrate at the maximum weight typically measured.
External Calibration Procedure
1.Remove all items from the balance.
2.Press TARE.
3.Gently place the weight in the center of the pan.
4.Press the Calibration softkey.
5.The unit will display “CAL External” and the calibration weight.
6.When calibration is complete the reading of the weight will be displayed and the unit will return to measurement mode.
 Error messages will be displayed if calibration cannot be Note: completed. See Troubleshooting Guide for more
information.
Internal Calibration Procedure (PI Series only)
1.Remove all items from the balance.
2.Press TARE.
3.Press the Calibration softkey.
4.“CAL Internal” will be displayed during calibrtion.
5.When calibration is complete the unit will return to measurement mode.
12
 Loading...