

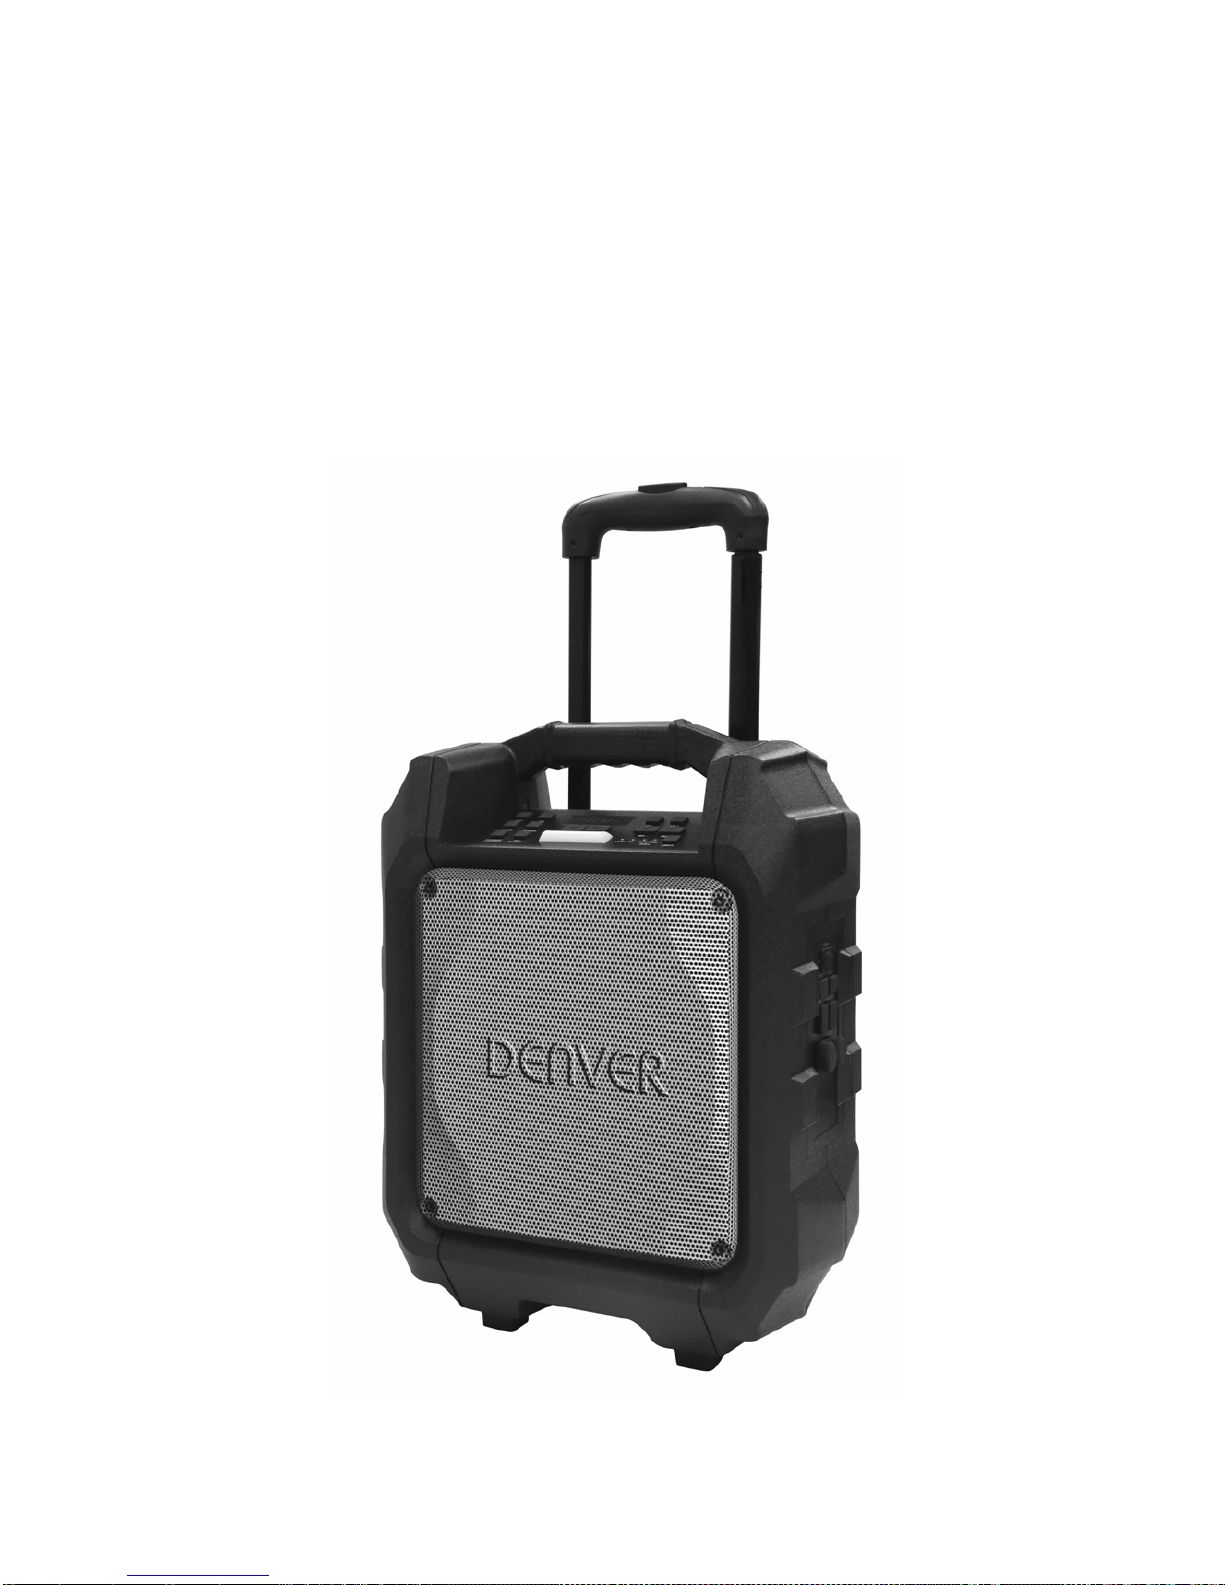
Denver TSP-303 User Manual
TSP-303
BLUETOOTH TROLLEY
SPEAKER
USER MANUAL


EN-1
P ART DESCRIPTIONS ................................................................................................. 2
SAFETY INSTRUCTIONS ............................................................................................ 3
POWER CONNECTION ............................................................................................... 4
RECHARGING ............................................................................................................... 4
BLUETOOTH CONNECTION ...................................................................................... 5
FM RADIO ...................................................................................................................... 5
USB PORT ...................................................................................................................... 5
LINE IN ............................................................................................................................ 6
SMARTPHONE / TABLETS RECHARGING ............................................................. 6
SING-A-SONG ............................................................................................................... 6
SOUND EFFECTS ......................................................................................................... 7
TROUBLE SHOOTING ................................................................................................. 7
CAUTION ........................................................................................................................ 8
T ABLE OF CONTENTS

EN-2
1. HANDLE
2. RUGGED CASING
3. POWER ON/OFF KEY
4. LINE IN
5. DC(15V
, 1.5A ) INPUT
6. USB PORT
7. 1A CHARGER (5V)
8. MIC PORT1
9. MIC PORT2
10. TUNING DOWN/
11. TUNING UP/
12. REPEAT KEY
13. EQ KEY
14. LED DISPLAY
15. ECHO DOWN
16. ECHO UP
17. SOURCE
18. PAUSE/PLAY/BT OFF
(DISCONNECT) KEY
19. VOLUME (UP/DOWN) KEY
20. LED LANTERN
21. MIC VOLUME (UP/DOWN)
22.POWER INDICATOR
23. BLUETOOTH INDICATOR
24. BATTERY (LOW/FULL) INDICATOR
25. TROLLEY HANDLE
PART DESCRIP T IONS

EN-3
To ensure proper operation of the products and prevent fire or shock hazard, please
carefully read all information contained in these Safety instr uc tions.
The lightning flash with
arrowhead symbol, within
an equilateral triangle, is
intended to alert the user
to the presence of
uninsulated "dangerous
voltage" within the
product's enclosure that
may be of sufficient
magnitude to constitute a
risk of electric shock to
persons.
WARNING: TOREDUCE
THE RISK OF ELECTRIC
SHOCK, DO NOT REMOVE
COVER (ORBACK). NO
USER-SERVICEABLE
PARTS INSIDE. REFER
SERVICING TO QUALIFIED
SERVICE PERSONNEL.
The exclamation point
within an equilateral
triangle is intended to
alert the user to the
presence of important
operating and
maintenance (servicing)
instructions in the
literature accompanying
the appliance.
UNPACKING:
Check that all the following items should be included in the bo x.
- Main Unit
- AC Power Adaptor
- User Manual
IMPORTANTS INSTRUCTIONS:
1. Ensure the plug is fully inserted into the wall outlet and the product is operated on an
electric power source matched to its rated voltage.
2. Never operate the product if the cord or adaptor is damaged or overly hot.
3. Do not modify the cord or damage it in any way such as by bending, twisting or
pulling on it unnecessarily.
4. Do not attempt to modify, repair or in any way dismantle the product, other than
when discarding it at t he end of its useful life.
5. Never unplug this product with wet hands.
6. Unplug the product from the wall outlet before cleaning and maintenance. Do not
use liquid cleaners or aer osol cleaners.
7. The power cord should be unplugged from the wall out let when unused for a long
period of time.
8. Keep and store this product in dry and moisture-free areas at all times.
9. Do not use this product near water, or any other heat sources or other apparatus
that produce heat.
SAFETY INSTRUCTIONS
EN-4
10. Battery shall not be directly exposed to sunshine and fire.
11. Do not attempt to replace the battery. For repairing and servicing, please consult the
store of purchase or custom er service centre designated by the store.
CAUTION: Danger of explosion if battery is incorrectly replaced.
12. Do not use any other power supply other than the one specially designed for this
product.
13. Keep this operating instruction in a safe place.
14. Contact an author i zed service centre if you have any inquiry about this product.
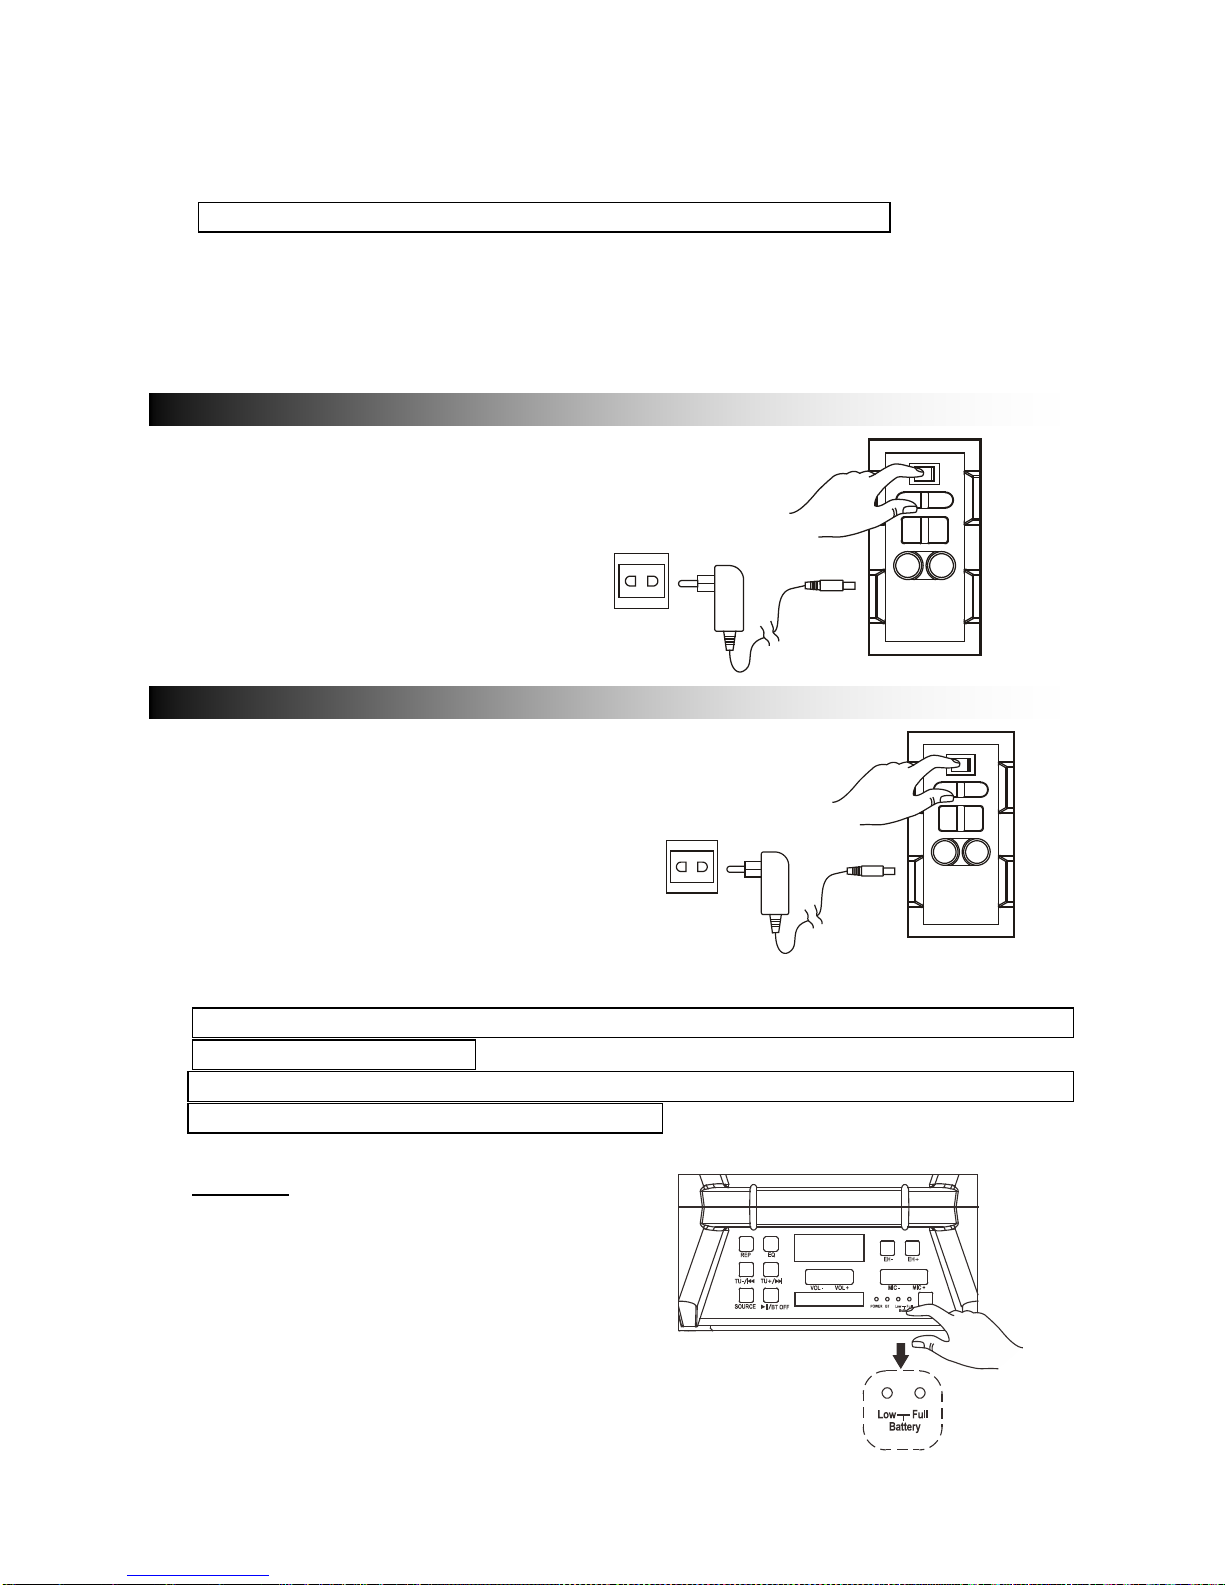
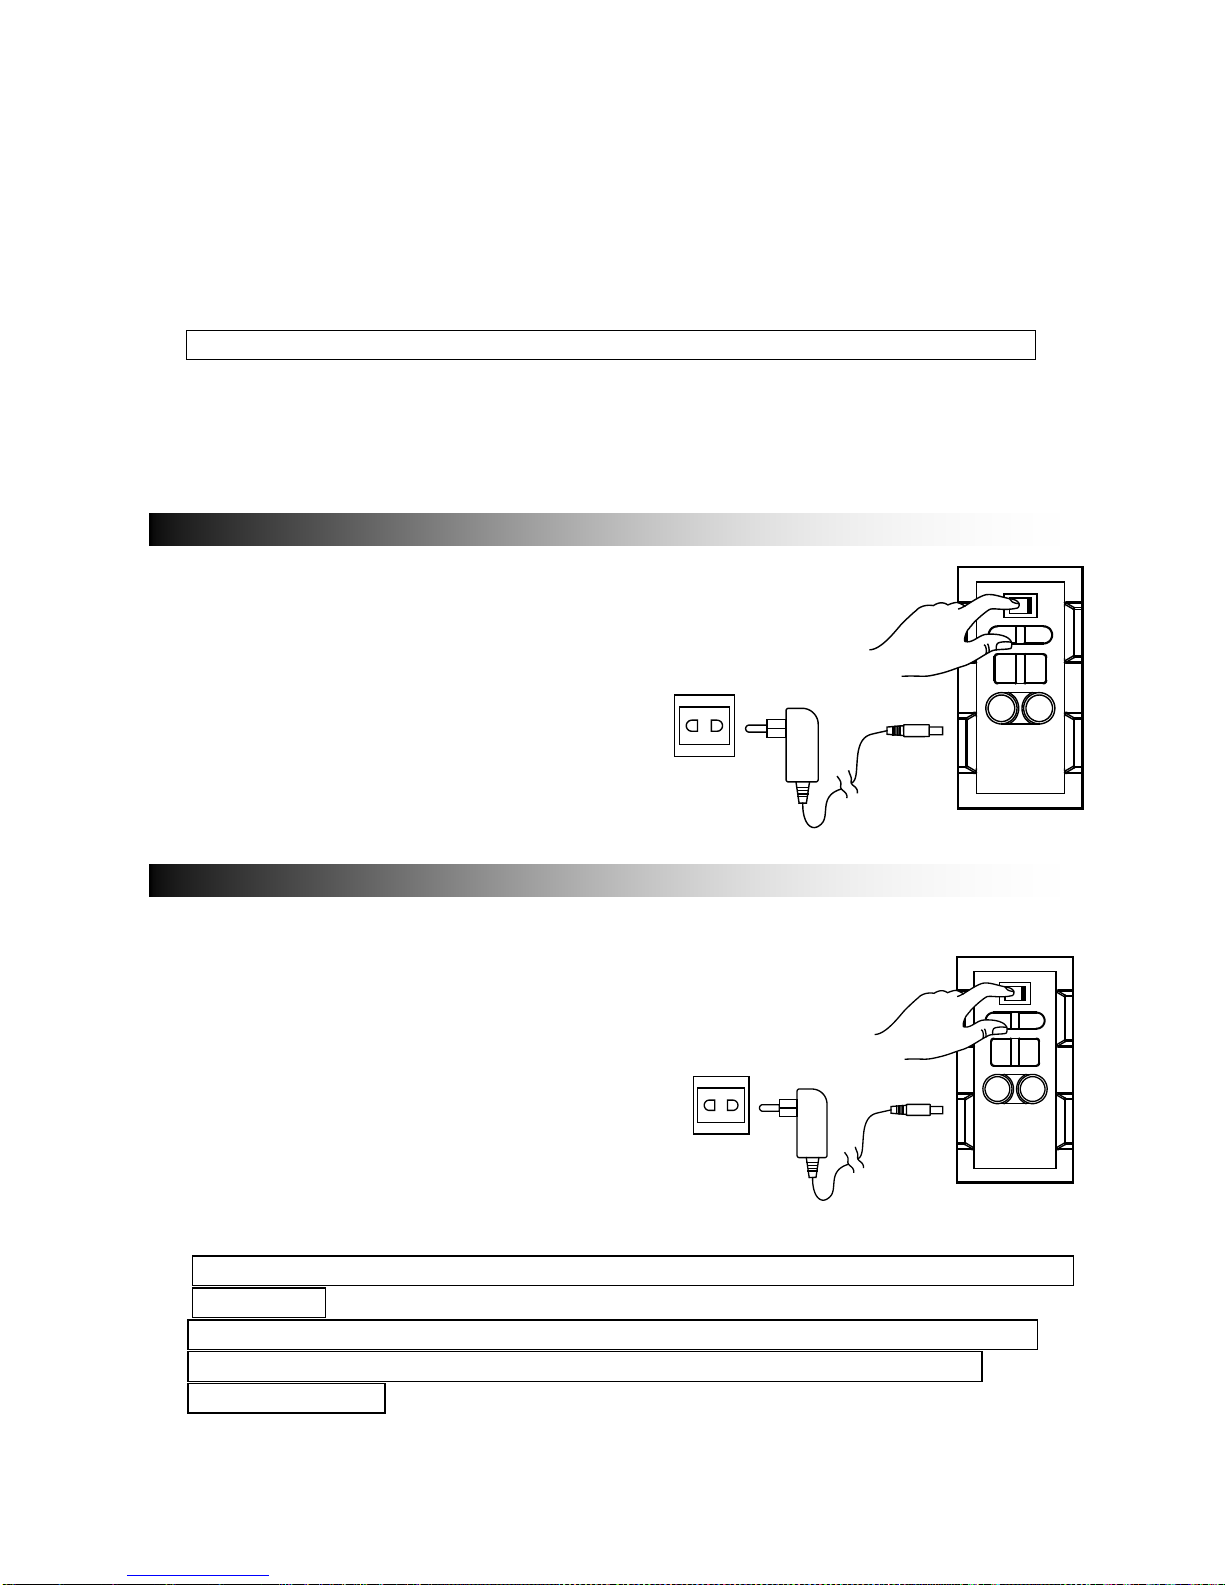
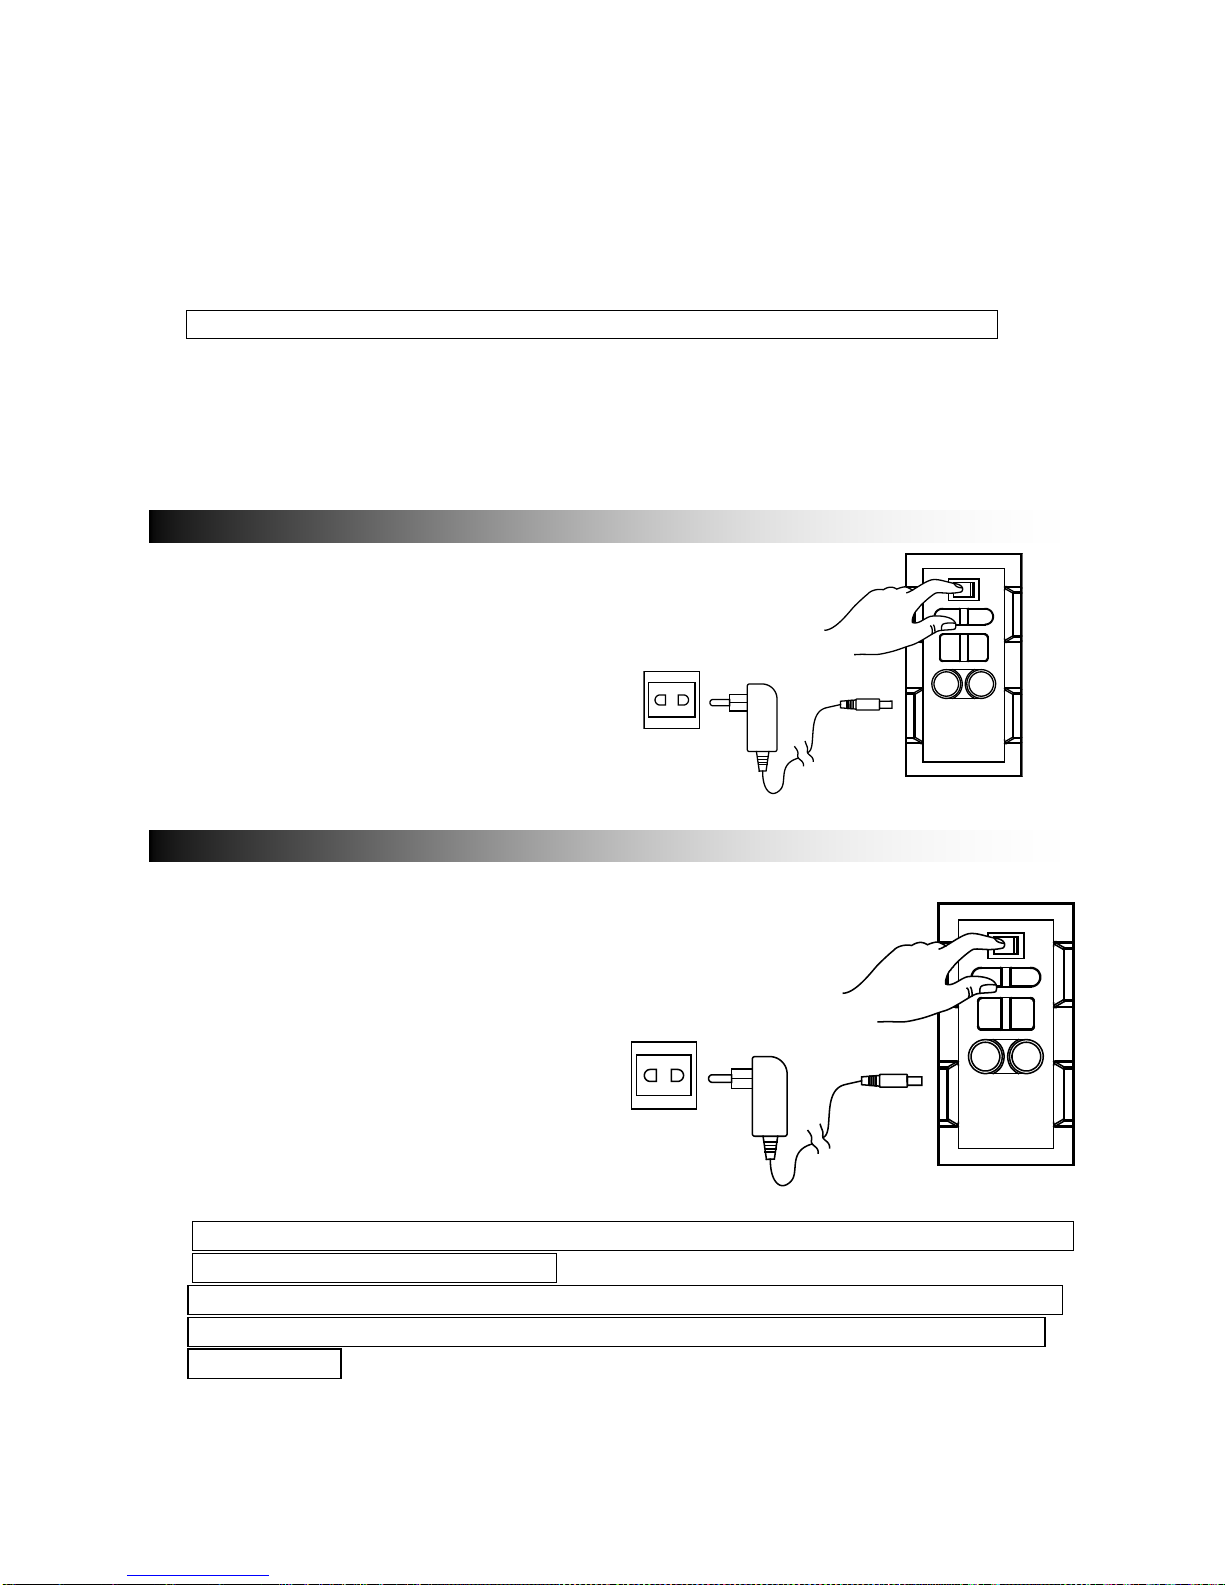
- Unpack this product, ensure the
power ON/OFF switch is on "OFF".
- Connect the supplied AC adaptor to
this product, plug the AC adaptor to
the wall outlet.
- Battery GREEN LED indicato r will
turn to orange.
- Unit comes with a battery indicator alert.
- If Battery Low LED flash, it means the
battery level is low and recharging is
required.
- By connecting the AC power, the Battery
Full LED will turn orange, it means the
unit is under recharging.
- The Battery Full LED become green, it
means the level of battery is fully charged.
It is recommended to charge the battery about 6 hours before you start using
the unit for the first time.
Energy Saving: If this product is idle for about 20 minutes, it will go to standby
mode automatically. It will auto power off.
Caution: To keep and protect the
rechargeable battery in good condition,
users should check the unit and be sure to
turn the Power On/Off switch on the side
panel to "Off" every time after using and
before storage, it is highly recommended
that users should fully recharge the
battery at least once in every two months.
POWER CONNECTION
POWER
LINE IN
DC JACK
USB 1A CHARGER
MIC 1
ON
OFF
MIC 2
RECHARGING
POWER
LINE IN
DC JACK
USB 1A CHARGER
MIC 1
ON
OFF
MIC 2
EN-5
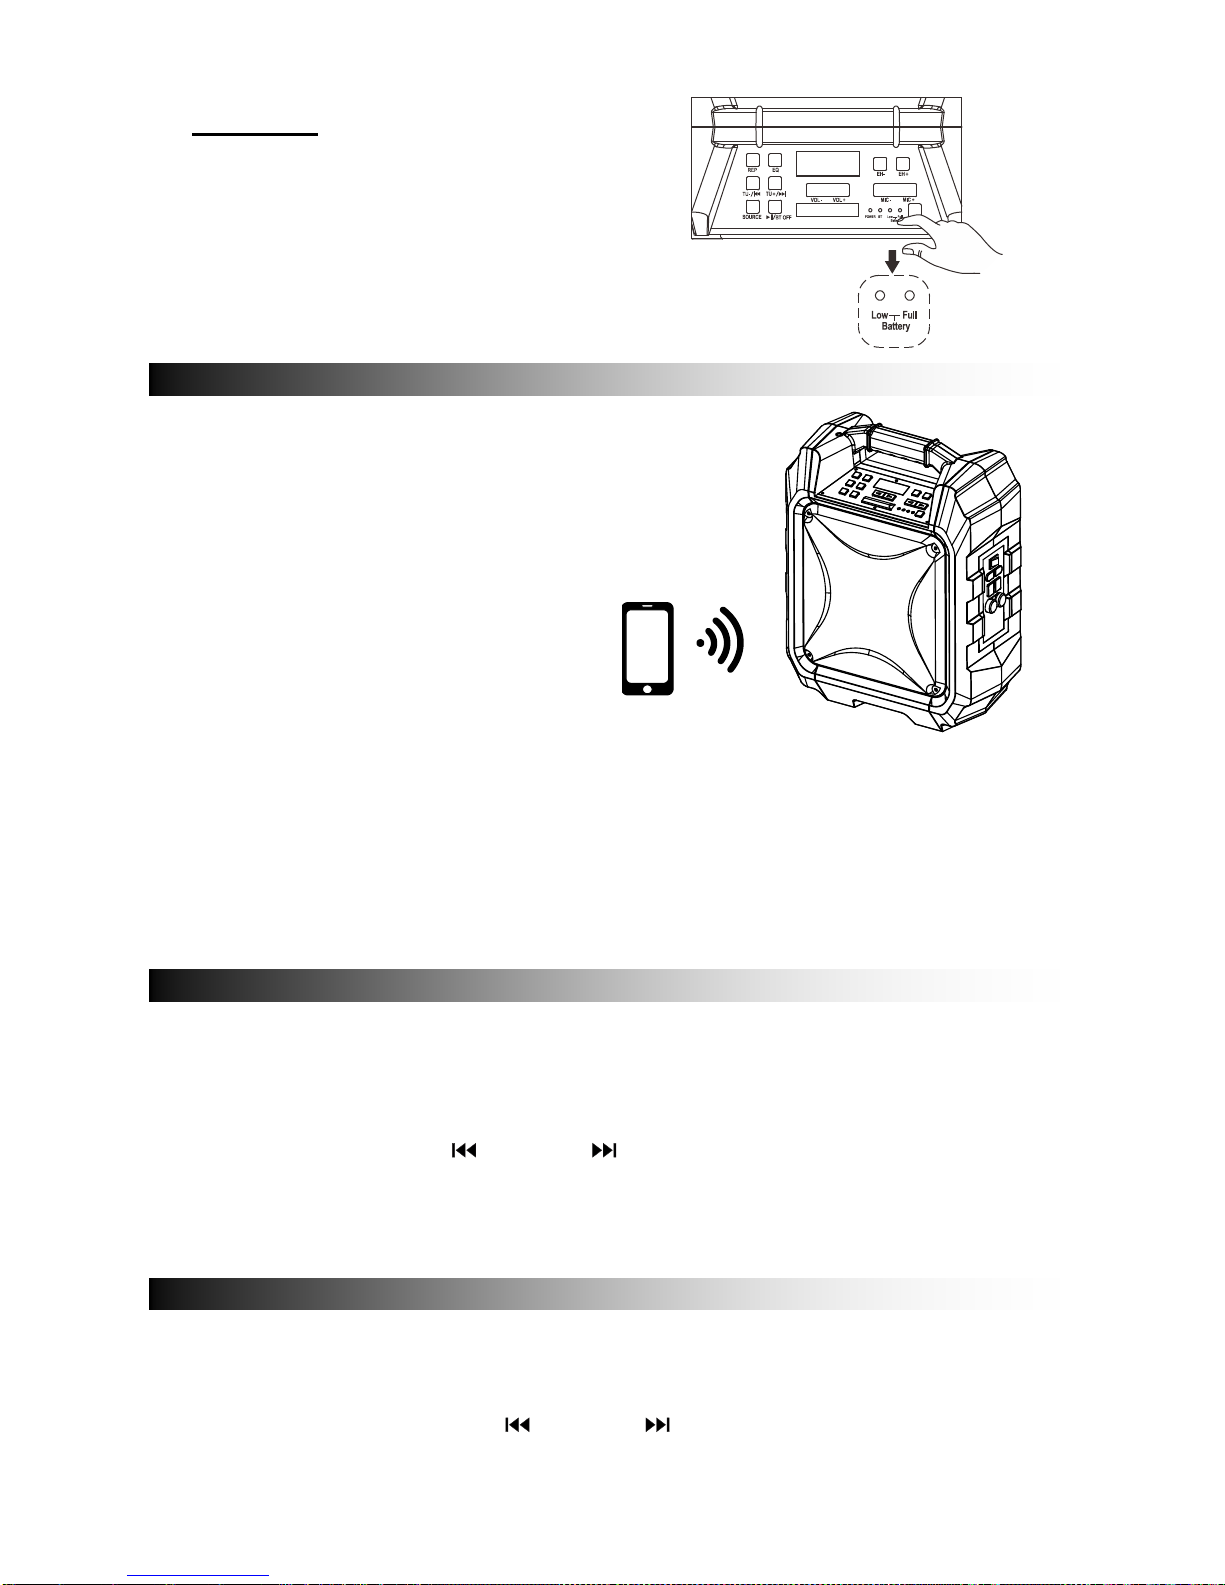
- Once the power switch is turned to "On",
Bluetooth "BT" mode is set as default
- Blue LED indicator will flas h in pairing mode.
The RED LED display will show "bt"
- Turn on the Bluetooth funct ion on your dev ice
and search for " TSP-303 " then press to
connect.
- Connected sound signal will be heard and
the blue led connection indicator will stop
blinking and stay steady.
- Bluetooth connection is completed.
- Select the music from your Bluetooth device
and start playing.
- Hold the BT DISCONNECT(BT OFF) key to disconnect paired device and enter
pairing mode.
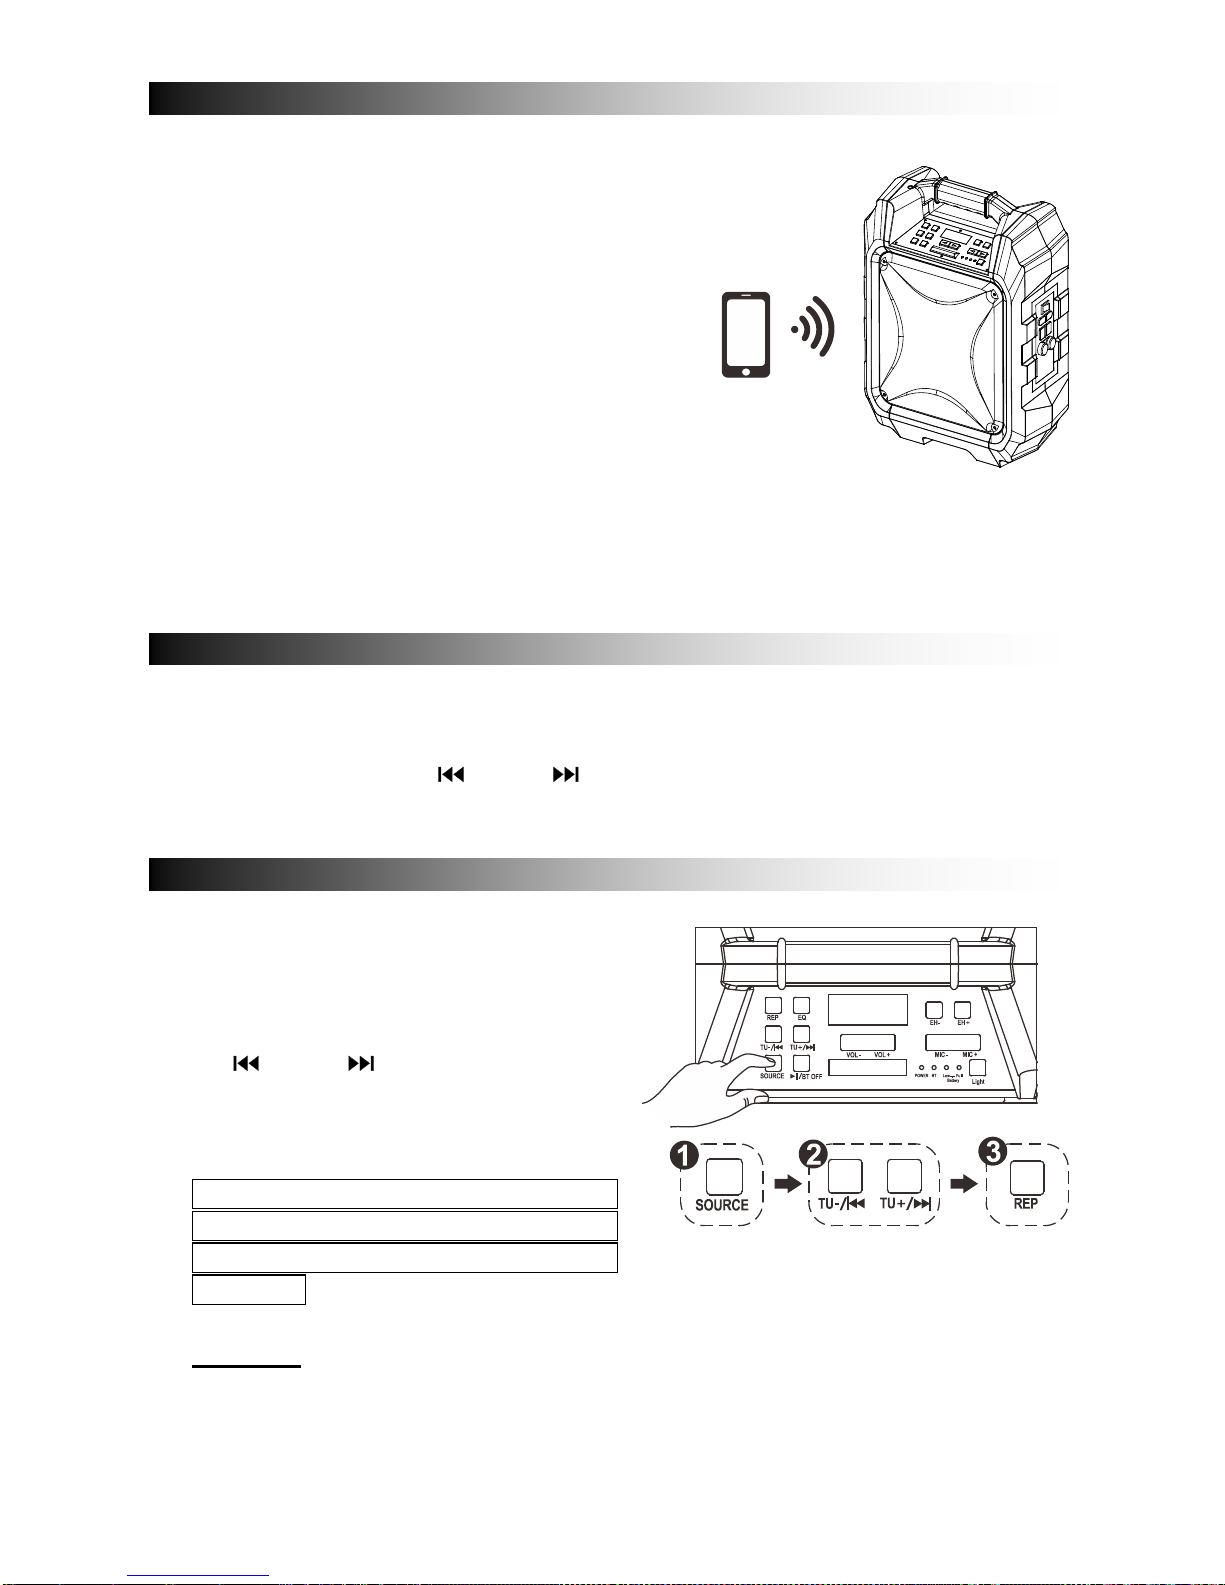
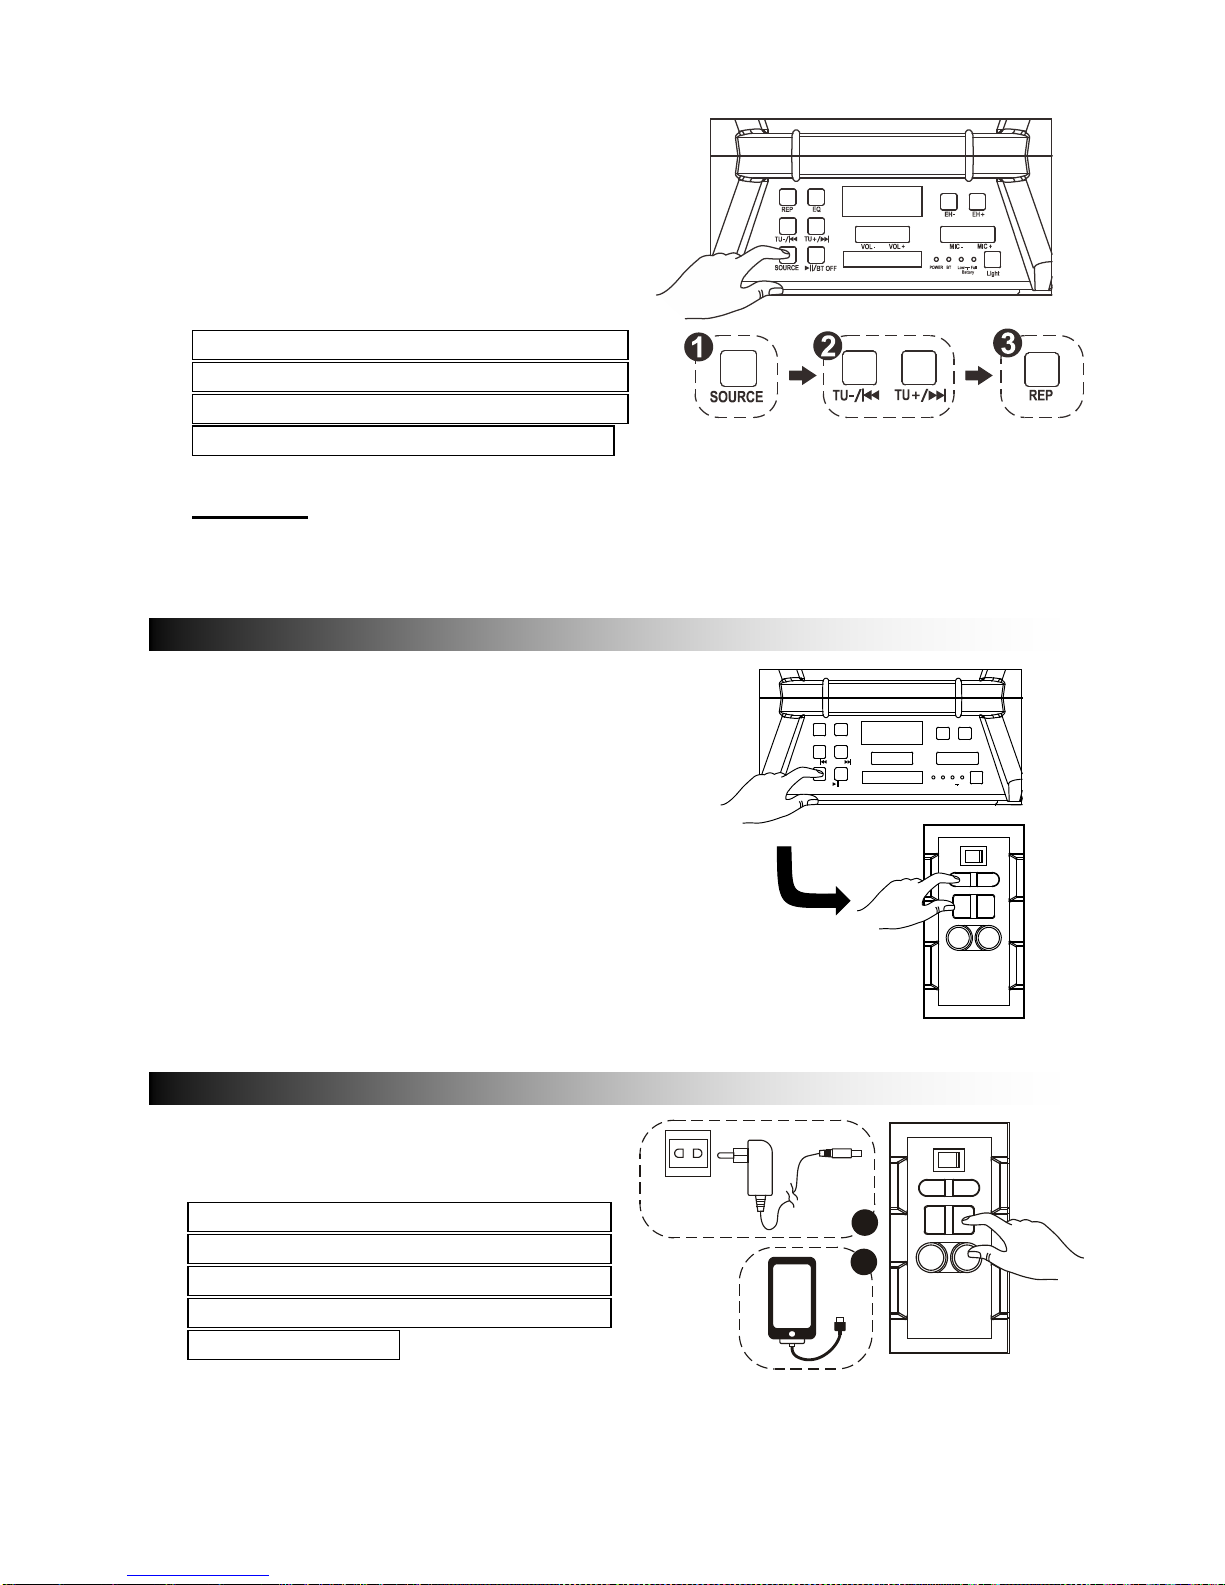
- Press the "Source" Button and select Radio, the F M Radio Frequency will show on
the RED LED display.
- Hold play/pause key to auto search and store.
- Press and hold the TU
or TU buttons for choosing the next stored available
station. Short press them to fine tune.
- Press the "Source" Button and select to
USB, USB will show on the RED LED
display.
- Insert the USB stick.
- Select your favorite music by pressing
TU
or TU .
- Press "REP” to repeat once for the
current song, Press again "REP" to
repeat all songs.
If unit is playing on Bluetooth mode
“BT”, it will automatically switch to
USB mode when the USB stick is
inserted.
Important: The USB port is intended for data transfer only, Other devices cannot be
used with this USB connection. The use of USB extension cords is not
recommended
BLUETOOTH CONNECTION
FM RADIO
USB PORT
EN-6
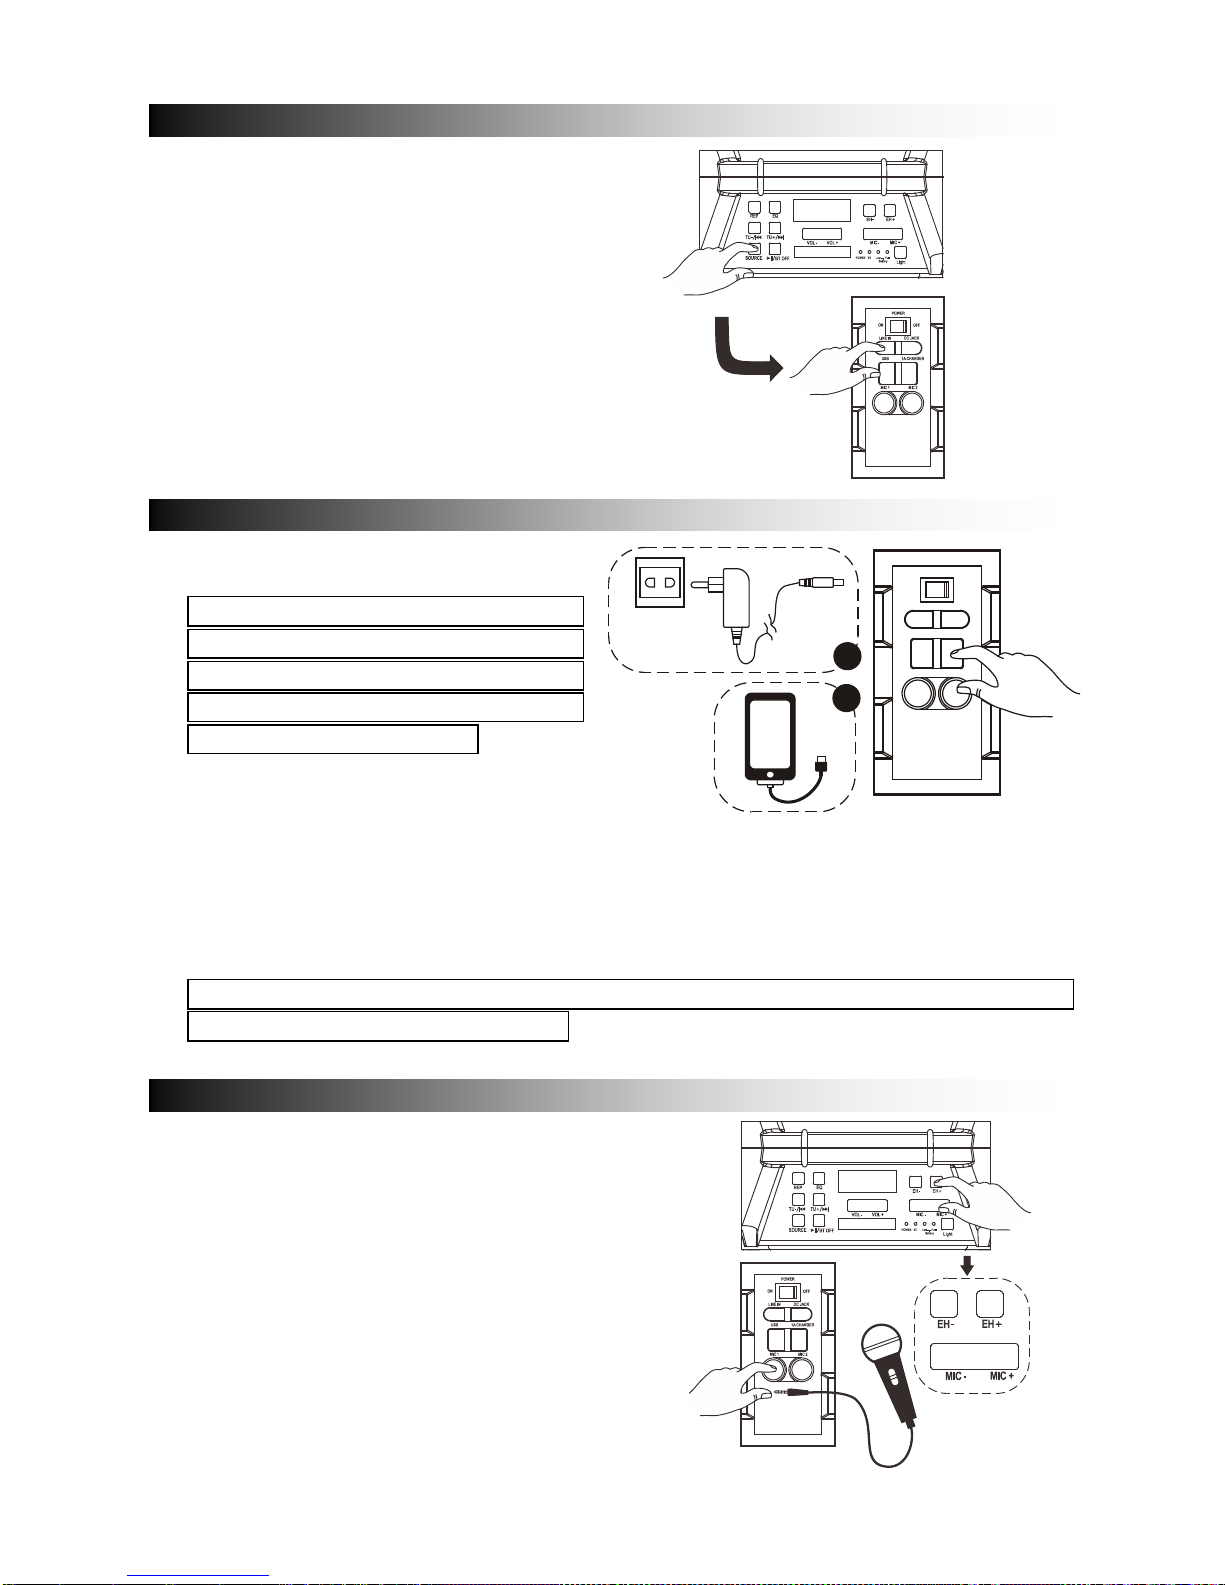
- Press the "Source" Button and select
LINE, LINE will show on the RED LED
display.
- Plug in your 3.5mm cable into the
LINE IN put on the side panel and the
unit will enter into LINE IN mode.
- You can connect any audio device
that has 3.5mm audio output jack and
playback any audio from the
connected device.
- Smartphones recharging works on
both AC power and DC power.
CAUTION: When the low battery red
indicator lights up, that means
product needs to be recharged and
smartphones recharging can only be
done by AC power adaptor.
- Plug in the Power AC Adaptor to the
wall outlet.
- Plug in your smart phones/tablets
USB recharging cable into the side panel marked "1A charger".
- Connect the recharging cable to your smart phones/tablets. Recharging starts.
- Unplug your USB recharging cable when your smart phones / tablets are fully
recharged.
This jack is only designed for charging devices requiring 5V and 1A.
Otherwise it may lead to damage.
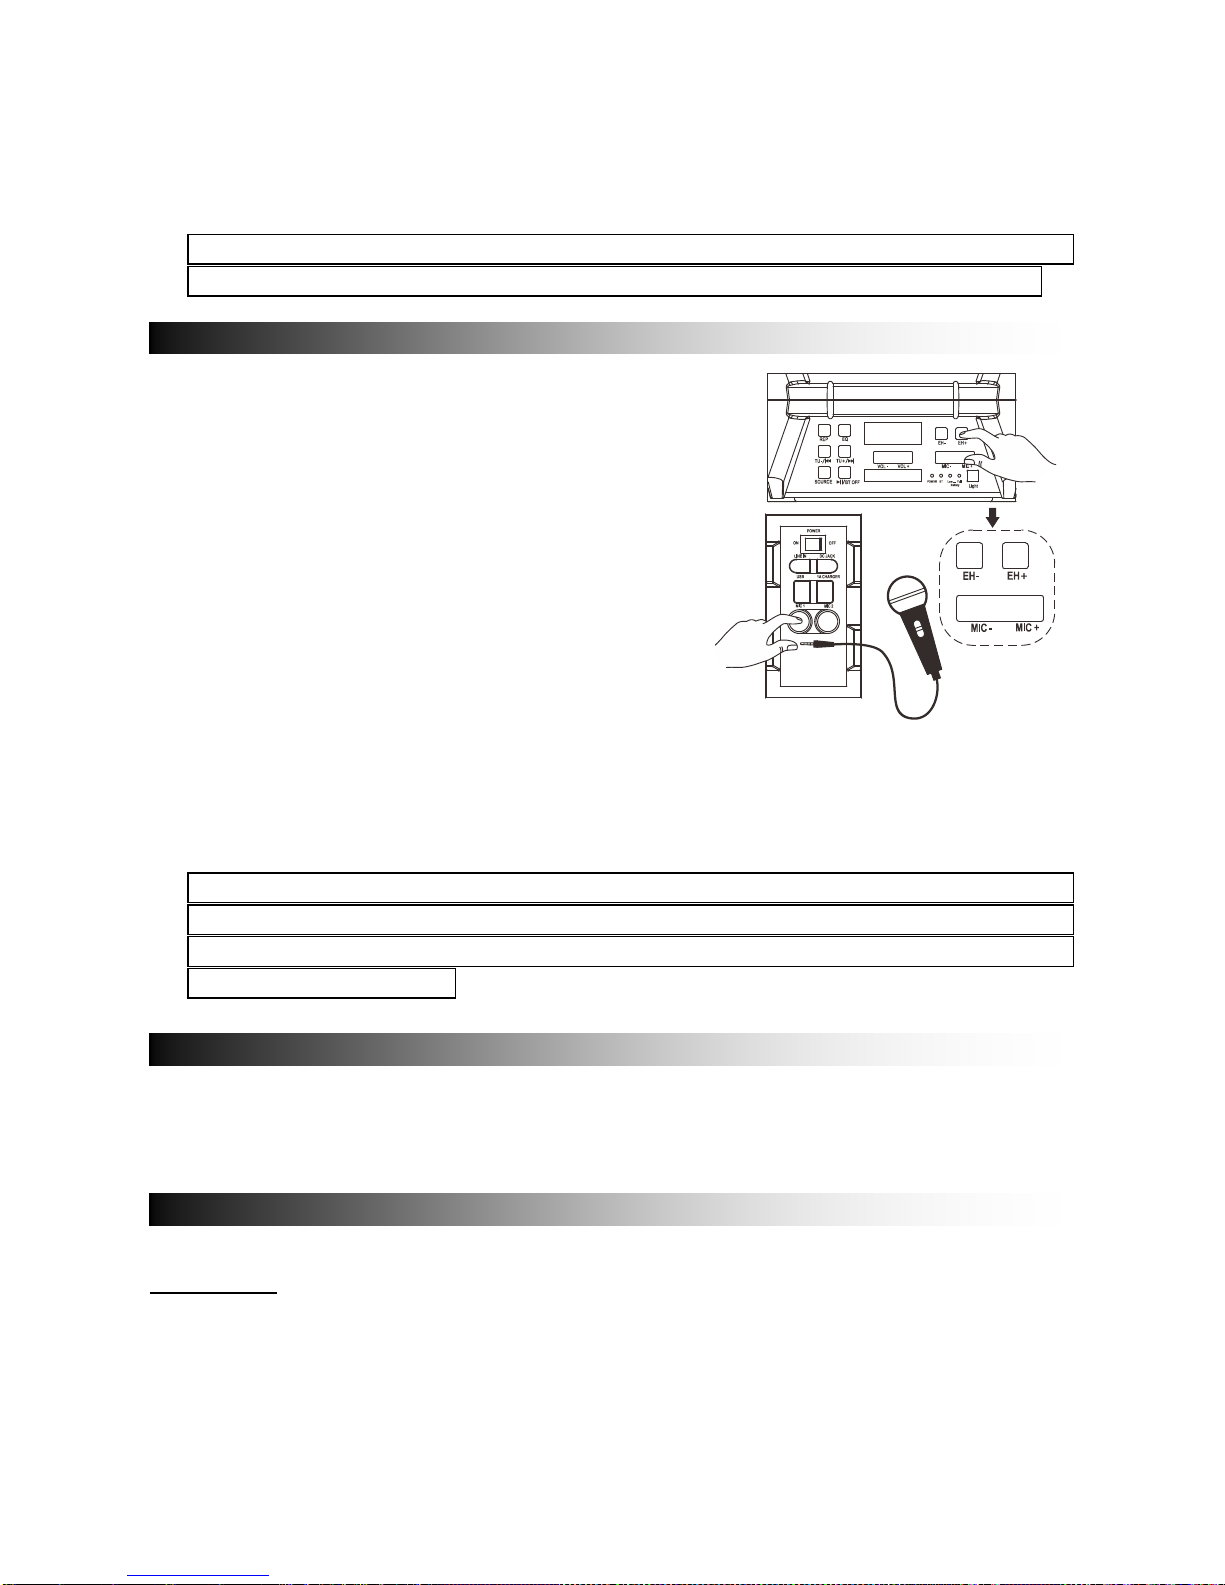
- This product allows you to sing-a-long with
the songs playing either o n BT, USB or LINE
IN mode and allow 2 microphones at the
same time.
- Plug in your Microphone cable into the side
panel marked "MIC 1" and /or "MIC 2".
- Adjust the MIC Volume "MIC + / MIC – " or
main volume on the top control panel.
- Adjust the Echo level " EH + /EH – ".
- Start to sing
SMART PHONES/TABLETS RECHARGING
SING-A-SONG
LINE IN
POWER
LINE IN
DC JACK
USB 1A CHARGER
MIC 1
ON
OFF
MIC 2
1
2

EN-7
WARNING: - If the MIC Volume and ECHO levels are set too high or to the
maximum, you may hear a high pitch feedback tone. Lower the volume
quickly to avoid damage.
- " Customer’s mode l " has a built in Equalizer
- Press and select the preset sound effect for your music; FLAT, CLASSIC, POP,
ROCK and JAZZ
General
No power
- Check that AC power cord is securely inserted in the unit and the electrical outlet.
- Check the Power On/Off switch is turn to On position.
- If battery is flat Plug in the AC Power cord to charge and operate.
Keys no response
- Turn the Power On/Off s witch to Off, and then On again to reset the unit.
- Unplug the AC Power cord and plug it back again.
No sound heard
- Make sure the LINE connected volume is turned to a reasonable level.
- Make sure the Bluetooth connected device output the audio via BT out.
- Make sure the Bluetooth connected device volume is turned to a r easonable level.
Bluetooth Operations
Audio quality is poor
- Bluetooth reception is poor. Move the Bluetooth device nearer to the Speaker.
Cannot pair to Bluetooth device
- Make sure both Bluetooth device and Speaker is not connected to an y other
Bluetooth device.
- Make sure the Bluetooth On/Off switch located below Speaker is slide to On
position.
- Make sure the Blue LED on the Speaker is fast flashing (Pai r i ng mode).
- Turn Power switch to Off, and then On again, Press and hold BT button for 2
seconds to enter into pairing mode.
SOUND EFFECTS
TROUBLESHOOTING

EN-8
CAUTION:
- The AC/DC adaptor and main unit shall not b e exposed to dripping or splashing an d
that no objects filled with liquids, such as vases, shall be placed on the apparatus
and AC/DC adaptor.
- Minimum distances 10 cm around the apparatus for sufficient ventilation.
- The ventilation should n ot be impeded by covering the ventilation openings with
items, such as newspapers, table-cloths, curtains, etc.
- No naked flame sources, suc h as lighted candles, should be placed on the
apparatus.
- When the mains plug of AC/DC Adaptor is used as the disconnect device, the
disconnect device shall remain readily operable.
To be completely disco nnected the power input, the AC/DC adaptor shall be
disconnected from the mains completely.
- The AC/DC adaptor should not be obstructed or should be easily accessed during
intended use.
- The use of apparatus in tropical climates.
About Sealed Lead-Acid Battery:
This unit works either on the battery pack (Model no.: Tianchang 6-FM-2.6, 12V,
2600mAh) or the AC po wer: unplug the AC Power adapter from the DC input jack to
work on the battery pack (after fully charg ed); plugg ing th e AC Po wer adapter while the
battery pack is attached initiates the charging of this battery. The charged LED indicator
lights red during charging, when the bat ter y is full y charged t he indic at or is Green. Fully
charging a run-out battery pack may take 3 hours, A fully charged battery pack can
endure approximately 2 hours of continu ous playback. T his playing time m ay vary with
the surrounding environment, the volume level of the speaker and the battery condition.
It is advised that you wait 10-20 minutes before recharging the battery pack if it has
turned flat during operation.

EN-9
ALL RIGHTS RESERVED, COPYRIGHT DENVER ELECTRONICS A/S
Electric and electronic e quipment and included batteries contains materials,
components and substances that can be hazardous to your health and the environment,
if the waste material (discarded electric and electronic equipment and batteries) is not
handled correctly.
Electric and electronic equipment and batteries is marked with the crossed out trash can
symbol, seen below. This symbol signifies that electric and el ec tronic equipment and
batteries should not be disposed of with other household waste, but should be disposed
of separately.
As the end user it is important that you submit your used batteries to the approriate and
designated facility. In this manner you make sure that the batteries are recycled in
accordance with legislature and will not harm the environment.
All cities have established collection points, where electric and electr onic equipment
and batteries can either be submitted free of charge at recycling stations and other
collection sites, or be collected from the households. Additional information is available
at the technical department of your city.
Imported by:
DENVER ELECTRONICS A/S
Omega 5A, Soeften
DK-8382 Hinnerup
Denmark
www.facebook.com/denverelectronics
Hereby, Inter Sales A/S declares that the radio equipment type TSP-303 is in
compliance with Directive 2014/53/EU. The full text of the EU declaration of conformity
is available at the following internet address:
http://www.denver-electronics.com/denver-tsp-303/

TSP-303
MOBILE LAUTSPRECHERBOX
MIT BLUETOOTH
BEDIENUNGSANLEITUNG


DE-1
ÜBERSICHT DES GERÄTS ...................................................................... 2
SICHERHEITSHINWEISE .......................................................................... 3
ANSCHLUSS AN DIE STROMVERSORGUNG ........................................ 4
AUFLADEN ................................................................................................ 4
BLUETOOTH-ANSCHLUSS ...................................................................... 5
UKW-RADIO .............................................................................................. 5
USB-PORT ................................................................................................. 5
LINE-EINGANG ......................................................................................... 6
SMARTPHONE/T ABLETS AUFLADEN .................................................... 6
MITSINGEN ............................................................................................... 7
SOUNDEFFEKTE ...................................................................................... 7
STÖRBEHEBUNG ..................................................................................... 7
VORSICHT ................................................................................................. 9
INHALTSVERZEICHNIS

DE-2
1. GRIFF
2. ROBUSTES GEHÄUSE
3. EIN/AUS-TASTE
4. LINE-EINGANG
5. DC-EINGANG (15V 1,5A
)
6. USB-ANSCHLUSS
7. 1A LADEGERÄT (5V)
8. MIC-PORT 1
9. MIC-PORT 2
10. SENDERSUCHE ABWÄRTS/
11. SENDERSUCHE AUFWÄRTS/
12. WIEDERHOLUNGSTASTE
13. EQ-TASTE
14. LED-DISPLAY
15. E CHO REDUZIEREN
16. E CHO ERHÖHEN
17. QUELLE
18. PAUSE/WIEDERGABE/BT AUS
(TRENNEN)
19. LAUTSTÄRKE
(ERHÖHEN/REDUZIEREN)
20. LED-ANZEIGE
21. MIC-LAUTSTÄRKE
(ERHÖHEN/REDUZIEREN)
22. STATUS-LED
23. BLUETOOTH-ANZEIGE
24. BATTERIEANZEIGE
(NIEDRIG/VOLL)
25. KOFFERGRIFF
10
17 18 19
12
13 11
14 15
16 21
20
22
23 24
1
2
2
3
4
5
6
7
8
9
25
ÜBERSICHT DES GERÄTS
DE-3
Um einen ordnungsgemäßen Betrieb des Geräts zu gewährleisten und um Feuer sowie
Stromschläge zu vermeiden, lesen Sie alle Informationen in diesen
Sicherheitshinweisen s or gfältig durch.
Der Blitz mit Pfeilspitze
im gleichseitigen Dreiec k
soll den Benutzer vor
nicht isolierter
gefährlicher Spannung im
Gehäuse des Geräts
warnen, die so hoch ist,
dass die Gefahr von
Stromschlägen besteht.
WARNUNG: UM DIE
GEFAHR VON
STROMSCHLÄGEN ZU
VERMEIDEN, DIE
ABDECKUNG (ODER
RÜCKSEITE) NICHT
ÖFFNEN. ES BEFINDEN
SICH KEINE DURCH DEN
ANWENDER ZU
WAR TENDEN TEILE IM
INNEREN. REPARATUR
UND WARTUNG NUR
DURCH FACHPERSONAL.
Das Ausrufezeichen im
gleichseitigen Dreieck
soll den Benutzer auf
wichtige Gebrauchs-
und
Wartungsanleitungen in
der Begleitliteratur des
Geräts hinweisen.
AUSPACKEN:
Überprüfen Sie den Verpackungsinhalt auf Vollständigkeit.
- Hauptgerät
- Steckernetzteil
- Bedienungsanleitung
- Schulterriemen
WICHTIGE ANLEITUNGEN:
1. Vergewissern Sie sich, dass der Stecker vol lständig in der Steckdose steckt und die
Stromversorgung mit den Spannungsangaben auf dem Typenschild übereinstimmt.
2. Verwenden Sie das Produkt nicht, falls das Netzkabel oder das Netztei l beschädigt
oder sehr heiß sind.
3. Modifizieren oder beschädigen Sie das Kabel nicht; vermeiden Sie, das Kabel
unnötig zu knicken, zu drehen oder daran zu ziehen.
4. Versuchen Sie nicht, das Produkt zu modifizieren, zu reparieren oder
auseinanderzubauen, es s ei denn das Gerät hat das Ende seiner Nutzungsdauer
erreicht und wird entsorgt.
5. Trennen Sie den Netzstecker ni c ht mit nassen Händen.
6. Trennen Sie den Netzstecker, bevor Sie das Gerät reinigen oder warten. Keine
Flüssigreiniger oder Sprühreiniger verwenden.
7. Trennen Sie das Netzkabel während längerer Zeiten des Nicht gebrauchs.
SICHERHEITSHINWEISE
STROMSCHLAGGEFAHR
NICHT ÖFFNEN
DE-4
8. Lagern Sie das Gerät während des Nichtgebrauchs an einem trockenen Ort.
9. Verwenden Sie das Produkt nicht in der Nähe von Wasser, Wärm equellen oder
wärmeerzeugenden Geräten.
10. Schützen Sie die Batterie vor direkter Sonneneinstrahlung oder Feuer.
11. Ersetzen Sie nicht die Batterie. Wenden Sie sich zwecks Repar atur und Wartung an
das Geschäft, in dem Sie das Gerät erworben haben, oder an den vom Geschäft
ernannten Kundendienst.
VORSICHT: Explosionsgefahr, wenn Batterien nicht korrekt eingesetzt werden.
12. Verwenden Sie nur das für dieses Gerät bestimmte Netzkabel.
13. Bewahren Sie diese Bedienungsanleitung gut auf.
14. Wenden Sie sich an einen autorisierten Kundendienst, falls Sie Fragen zum Produkt
haben.
- Pac k en Sie das Gerät aus.
Vergewissern Sie sich, dass der
EIN/AUS-Schalter auf der Pos ition
„OFF“ steht.
- Sc hließen Sie das mitgelieferte
AC-Netzteil an das Gerät und dann an
eine Steckdose an.
- Die GRÜNE LED-Anzeige leuchtet
orange.
-
Das Gerät verfügt über eine
Batteriestatusanzeige.
- Falls die LED-Batterieanzeige blinkt, ist
die Batteriekapazität gering und die
Batterie muss aufgeladen werden.
-
Wenn Sie das Gerät an die
AC-Stromversorgung anschließen,
leuchtet die LED-Batterie anzeige rot und
weist somit auf den Ladevorgang hin.
- Wenn die LED-Anzeige grün leucht et, ist
die Batterie vollständig geladen.
Es wird empfohlen, die Batterie ca. 6 Stunden vor dem erstmaligen Gebrauch
aufzuladen.
Energieeinsparung: Falls 20 Minuten lang keine Funktion ausgeführt wird,
aktiviert das Gerät automatisch den Standby-Modus. Es schaltet sich
automatisch aus.
POWER
LINE IN
DC JACK
USB 1A CHARGER
MIC 1
ON
OFF
MIC 2
POWER
LINE IN
DC JACK
USB 1A CHARGER
MIC 1
ON
OFF
MIC 2
AUFLADEN
ANSCHLUSS AN DIE STROMVERSORGUNG
DE-5
Vorsicht: Um die wiederaufladbare
Batterie in einem guten Zustand zu
halten, stellen Sie den Ein/Aus-Schalter
nach jedem Gebrauch und vor der
Lagerung auf die „Off“-Position. Es wird
empfohlen, die Batterie mindestens
einmal alle zwei Monate aufzuladen.
- Wenn Sie den Betriebsschalter auf die
„On“-Position stellen, aktiviert das
Gerät automatisch den
Bluetooth-Modus „BT“.
- Aktivieren Sie an Ihrem externen
Gerät die Bluetooth-Funktion und
suchen Sie „TSP-303“; drücken Sie
die entsprechende Option zum
Verbinden.
- Das verbundene Tonsignal wird
wiedergegeben und die blaue
LED-Anzeige hört auf zu blinken und leuchtet stetig.
- Die Bluetooth-Verbindung ist nun abg eschlossen.
- Wählen Sie an Ihrem externen Bluetooth-Gerät die gewünschte Musik aus und
starten Sie die Wiedergabe.
- Halt en Sie die Taste BT OFF gedrückt, um das gek oppelte Gerät zu trennen und
den Kopplungsmodus zu aktivieren.
- Drücken Sie die Taste „Source“ zur Auswahl des Radio-Modus. Im LED-Display
erscheint die UKW-Radiofrequenz.
- Drücken Sie die Taste Wiedergabe/Pause, um Sender automatisch zu suchen und
zu speichern.
- Halten Sie die Taste TU
oder TU gedrückt, um den näch s ten verfügbaren
gespeicherten Radiosender zu suchen. Drücken Sie die Tasten kurz für die
Feineinstellung.
- Drücken Sie die Taste „Source“ zur Auswahl des USB-Modus. Im roten LED-Display
erscheint die Anzeige USB.
- Schließen Sie einen USB-Sti ck an das Gerät an.
- Wählen Sie mit der Taste TU
oder TU die M us i k i nhalte aus.
USB-PORT
UKW-RADIO
BLUETOOTH-ANSCHLUSS
DE-6
- Drücken Sie die Taste „REP“ einmal, um
den aktuellen Titel wiederholt
abzuspielen. Drücken Sie „REP“ erneut,
um alle Titel wiederholt abzuspielen.
Drücken Sie die Tast e ein drittes M al, um
alle Titel in willkürlicher Reihenfolge
abzuspielen.
Wenn Sie während der Wiedergabe im
Bluetooth-Modus „BT“ einen
USB-Stick anschließen, aktiviert das
Gerät automatisch den USB-Modus.
Wichtig: Der USB-Port ist nur für die Datenübertragung geeignet. Der
USB-Anschluss unterstütz t nicht die Verwendung anderer Gerät e. Die Verwendung
von USB-Verlängerungskabeln wird nicht empfohlen
-
Drücken Sie die Taste „Source“ zur
Auswahl des LINE-Eingangsmodus. Im
roten LED-Display ersche int die Anzeige
LINE.
- Schließen sie Ihr 3,5 mm Kabel an den
LINE-
Eingang an der Rückseite des
Geräts an; das Gerät aktiviert den
LINE-Eingangsmodus.
- Sie können nun ein Audiogerät mit 3,5
mm Audioausgang anschließen und
Musikinhalte vom angeschlossenen
Gerät abspielen.
- Smartphones können sowohl via ACals auch via DC-Stromversorgung
aufgeladen werden.
VORSICHT: Wenn die Batterieanzeige
rot aufleuchtet, muss das Gerät
aufgeladen werden. Smartphones
können nur noch via AC-Netzadapter
aufgeladen werden.
- Schließen Sie den AC-Netzadapter an
die Steckdose an.
- Schließen Sie das USB-Ladekabel Ihres Smartphones/Tablets an den mit „1A
Ladegerät“ markierten Anschluss an der Seite des Geräts an.
POWER
REP
SOURCE
Low
BT
Battery
MIC -
MIC +
VOL +
VOL -
Light
Full
TU-/
TU+/
EQ
EH+
EH-
/
BTOFF
POWER
LINE IN
DC JACK
USB 1A CHARGER
MIC 1
ON
OFF
MIC 2
LINE-EINGANG
POWER
LINE IN
DC JACK
USB 1A CHARGER
MIC 1
ON
OFF
MIC 2
1
2
SMARTPHONES/TA BLETS AUFLADEN
DE-7
- Verbinden Sie das Ladekabel dann mit Ihrem Smartphone/Tablet. Der Ladevorgang
startet.
- Trennen Sie das USB-Ladekabel, nachdem Ihr Smartphone/Tablet vollständig
geladen ist.
Der Stecker ist nur zum Aufladen von Geräten mit einer Leistungsaufnahme
von 5V und 1A geeignet. Anderenfalls können Schäden verursacht werden.
- Dieses Gerät verfügt über eine
Karaoke-Funktion für die Wiedergabe im BT-,
USB- oder LINE-Eingangsmodus; es können
bis zu 2 Mikrofone gleichzeitig angeschlossen
werden.
- Schließen Sie das Mikrofonkabel an die mit
„MIC 1“ und/oder „MIC 2“ markierte Buchse an.
- Dieses Produkt ermöglicht Ihnen, in den Modi
BT, USB und LINE zur Musik mitzusingen.
- Schließen Sie Ihr Mikrofonkabel an den mit
„MIC“ markierten Anschluss an der Seite des
Geräts an.
- Stellen Sie die Mikrofonlautstärke mit den Tasten „MIC +/MIC -“ oder die
Hauptlautstärke mit den Tasten an der Oberseite des Geräts an.
- Stellen Sie das Echo mit den Tasten „EH +/EH -“ ein.
- Sie können nun mitsingen.
WARNUNG: - Falls die MIC-Lautstärke oder der ECHO-Pegel zu hoch oder mit
dem Höchstwert eingestellt wurden, ist möglicherweise ein hoher
Rückkopplungston zu hören. Reduzieren Sie die Lautstärke umgehend, um
Schäden zu vermeiden.
- Das „Kundenmodell“ verfügt über einen integrierten Equalizer.
- Drücken Sie die Taste, um einen der voreingestellten Soundeffekte auszuwählen:
FLACH, KLASSIK, POP, ROCK und JAZZ.
Allgemein
Kein Strom
- Überprüfen Sie, ob das AC-Netzteil sicher am Gerät und an der Steckdose
angeschlossen ist.
- Vergewissern Sie sich, dass der Ein/Aus-Schalter auf der Ein-Position steht.
- Falls die Batterie leer ist, schließen Sie das AC-Netzteil an, um die Batterie
aufzuladen und das Gerät mi t Strom zu versorgen.
STÖRBEHEBUNG
SOUNDEFFEKTE
MITSINGEN

DE-8
Tasten ohne Funktion
- Stellen Sie den Ein/Aus-Sc halter auf die Aus-Position und dann wieder auf die
Ein-Position, um das Gerät zurückzusetzen.
- Trennen Sie das AC-Netztei l und s chließen Sie es dann erneut an.
Kein Ton
- Vergewissern Sie sich, dass die Lautstärke des mit dem LINE -Eingang
verbundenen Geräts angemes s en eingestellt ist.
- Vergewissern Sie sich, dass die Musik des verbundenen Bluetooth-Geräts via BT
wiedergegeben wird.
- Vergewissern Sie sich, dass die La utstärke des via Bluetooth verbunde nen Geräts
angemessen eingestellt is t.
Bluetooth-Betrieb
Schlechte Audioqualität
- Schlechter Bluetooth-Empfang. Stellen Sie das Bluetooth-Gerät näher an den
Lautsprecher heran.
Bluetooth-Gerät kann nicht gekoppelt werden
- Stellen Sie sicher, dass weder das Bluetooth-Gerät noch der Lautsprecher mit
anderen Bluetooth-Geräten verbunden ist.
- Vergewissern Sie sich, dass die blaue LED-Anzeige am Lautsprecher zügig blinkt
(Kopplungsmodus).
- Stellen Sie den Betriebssc halter auf die Aus-Position und dann wieder auf die
Ein-Position. Halten Sie die Taste Bluetooth Aus 2 Sekunden lang gedrückt, um den
Kopplungsmodus zu aktiv ieren.

DE-9
VORSICHT:
- Das AC/DC-Netzteil und das Gerät sind weder spritz- noch tropfwasserdicht. Stellen
Sie keine mit Flüssigkeit gefüllten Gegenstände wie Vasen auf das Gerät oder das
AC/DC-Netzteil.
- Halten Sie rings um das Gerät einen Abstand von mindestens 10 c m für
ausreichende Belüftung.
- Behindern Sie eine ausreic hende Ventilation nicht, indem Sie das Gerät mit
Zeitungen, einem Tischtuch, Gardinen usw. abdecken.
- Stellen Sie keine offenen Flammen (wie brennende Kerzen) auf dem Gerät ab.
- Falls der Netzstecker des AC/DC-Netzteils als Trennvorrichtung verwendet wird,
muss diese Trennvorrichtung jederzeit einsat zfähig sein.
Zum vollständigen Abtrennen des Geräts vom Stromnetz muss das Netzteil
abgezogen werden.
- Das AC/DC-Netzteil darf nicht blockiert werden und muss wä hrend des normalen
Gebrauchs immer frei zugä nglich sein.
- Verwenden Sie das Gerät nicht in tropischen Klimazonen.
Hinweise zur verschlossenen Bleisäurebatterie:
Das Gerät kann via Batterie betrieben werden (Modell-Nr.: Tianchang 6-FM-2.6, 12V,
2600mAh). Trennen Sie das AC-Netzteil vom DC-Eingang des Geräts, um den
Batteriebetrieb zu ermög li c hen (nach vollständiger Aufladung); falls Sie das AC-Netzteil
während des Batteriebetriebs anschließen, wird die Batterie aufgeladen. Die
LED-Ladeanzeige leuchtet während des Ladevorgangs rot und leuchtet grün, sobald
die Batterie vollständig geladen ist. Es dauert ca. 3 Stunden, die Batterie vollständig
aufzuladen. Eine vollständig geladene Batterie ermöglicht einen Betrieb von ca. 2
Stunden bei kontinuierlicher Wiedergabe. Die Wiedergabedauer kann je nach
Umgebungsfaktoren, Lautstärkeeinstellung und Batteriezustand variieren. Es wird
empfohlen, mit dem Aufladen der Batterie 10-20 Minuten zu warten, falls diese während
des Betriebs vollständig entleert wurde.

DE-10
ALLE RECHTE VORBEHALTEN, URHEBERRECHTE DENVER
ELECTRONICS A/S
Elektrische und elektroni s che Geräte sowie Batterien enthalten Materialien,
Komponenten und Substanzen, welche für Sie und Ihre Umwelt s chädlich sein können,
sofern die Abfallmaterialien (entsorgte elektrische und elektronische Altgeräte sowie
Batterien) nicht korrekt gehandhabt werden.
Elektrische und elektroni s che Geräte sowie Batterien sind mit der durchgestrichenen
Mülltonne, wie unten abgebildet, kenntlich gemacht. Dieses Symbol bedeutet, dass
elektrische und elektronische Altgeräte sowie Batterien nicht mit dem Hausmüll entsorgt
werden dürfen, sie müssen separat entsorgt werden.
Als Endverbraucher ist es notwendig, dass Sie Ihre erschöpf ten Batterien bei den
entsprechenden Sammelstellen abgeben. Auf diese Weise stellen Sie sicher, dass die
Batterien entsprechend der Gesetzgebung recycelt werden und keine Umweltschäden
anrichten.
Städte und Gemeinden habe n Sammelstellen eingerichtet, an denen elektrische und
elektronische Altgeräte sowie Batterien kostenfrei zum Recycling abgegeben werden
können, alternativ erfol gt auch Abholung. Weitere Informationen er halten Sie bei der
Umweltbehörde Ihrer Gemei nde.
Importeur:
DENVER ELECTRONICS A/S
Omega 5A, Soeften
DK-8382 Hinnerup
Dänemark
www.facebook.com/denverelectronics
Hiermit erklärt Inter Sales A/S, dass der Funkanlagentyp TSP-303 der Richtlinie
2014/53/EU entspricht. Der vollständige Text der EU-Konformitätserklärung ist unter der
folgenden Internetadresse verfügbar:
http://www.denver-electronics.com/denver-tsp-303/

TSP-303
BLUETOOTH TROLLEY
LUIDSPREKER
GEBRUIKSHANDLEIDING


NL-1
BESCHRIJVING VAN ONDERDELEN ...................................................... 2
VEILIGHEIDSINSTRUCTIES ..................................................................... 3
VOEDINGSAANSLUITING ........................................................................ 4
OPLADEN .................................................................................................. 4
BLUETOOTH-VERBINDING...................................................................... 5
FM-RADIO ................................................................................................. 5
USB-POORT .............................................................................................. 5
LIJN IN ....................................................................................................... 6
SMARTPHONES/TABLETS OPLADEN .................................................... 6
KARAOKE ................................................................................................. 7
GELUIDSEFFECTEN ................................................................................. 7
PROBLEEMOPLOSSING .......................................................................... 7
OPGELET .................................................................................................. 9
INHOUDSOPGAVE
NL-2
1. HANDGREEP
2. STUGGE BEHUIZING
3. AAN-/UIT-TOETS
4. LIJN IN
5. DC (15V 1,5A
) INGANG
6. USB-POORT
7. 1A LADER (5V)
8. MIC-POORT 1
9. MIC-POORT 2
10. OMLAAG AFSTEMMEN/
11. OMHOOG AFSTEMMEN/
12. HERHAALTOETS
13. EQ-TOETS
14. LED-DISPLAY
15. ECHO VERLAG EN
16. E CHO VERHOGEN
17. BRON
18. PAUZE/START/BT UIT
(ONTKOPPELEN)
19. VOLUMETOETS
(OMHOOG/OMLAAG)
20. LED-ZAKLANTAARN
21. MIC-VOLUME
(OMHOOG/OMLAAG)
22. AAN/UITINDICATOR
23. BLUETOOTH-INDICATOR
24. B ATTERIJINDICATOR (LAAG/VOL)
25. TROLLEYHENDEL
10
17 18 19
12
13 11
14 15
16 21
20
22
23 24
1
2
2
3
4
5
6
7
8
9
25
BESCHRIJVING VAN ONDERDELEN

NL-3
Lees a.u.b. zorgvuldig alle inf ormatie in dez e veiligheidsi nstruct ies, zodat u het produc t
correct weet te gebruiken en het risico op brand of schokken wordt voorkomen.
De bliksemschicht
binnenin een gelijkzijdi ge
driehoek is bestemd de
gebruiker te wijzen op de
aanwezigheid van
ongeïsoleerde
"gevaarlijke spanning"
binnenin de
productbehuizing die
voldoende krachtig kan
zijn om een risico op
elektrische schokken te
vormen.
WAARSCHUWING: OM
HET RISICO OP
ELEKTRISCHE SCHOKKEN
TE VOORKOMEN, OPEN
NOOIT DE BEHUIZING (OF
ACHTERZIJDE). BINNENIN
BEVINDEN ZICH GEEN
ONDERDELEN DIE DOOR
DE GEBRUIKER
ONDERHOUDEN KUNNEN
WORDEN. VERWIJS
ONDERHOUD DOOR NAAR
GEKWALIFICEERD
ONDERHOUDSPERSONEE
L.
Het uitroepteken binnen
een gelijkzijdige
driehoek is bedoeld om
de gebruiker te
waarschuwen op de
aanwezigheid van
belangrijke gebruik- en
onderhoudsinstructies
in de documentatie die
met het apparaat
meekomen.
UITPAKKEN:
Verifieer dat de doos de volgende onderdelen bevat.
- Hoofdeenheid
- AC-adapter
- Gebruikshandleiding
- Schouderriem
BELANGRIJKE INSTRUCTIES:
1. Zorg ervoor de stekker volledig in het stopcontact te steken en dat het product wordt
gevoed door een elektricit eitsbron met een spanningsspecificatie die overeenkomt
met de nominale spanning van het product.
2. Gebruik het product nooit als de kabel of adapter beschadigd of te heet is.
3. De kabel mag op geen enkele wijze worden gemodificeerd of beschadigd door deze
bijvoorbeeld te verbuigen, verdraaien of er onnodig aan te trekk en.
4. Probeer het product op geen enkele wijze te modificeren, repareren of ontmantelen,
behalve wanneer u het product aan het einde van de levensduur ervan af dankt.
5. Haal nooit de stekker uit het stopcontact met natte handen.
6. Haal de stekker uit het stopcontact voorafga and aan reiniging en onderhoud.
Gebruik geen vloeibare reinigingsmiddelen of spuitmiddelen.
7. Haal de stekker uit het stopcontact wanneer u het pr oduct voor langere tijd niet
gebruikt.
VEILIGHEIDSINSTRUCTIES
RISICO OP ELEKTRISCHE
SCHOK
NL-4
8. Berg dit product op in een droge ruimte wanneer niet i n gebruik.
9. Gebruik dit pr oduct niet in de buurt van water, hittebronnen of andere
hittegenererende apparatuur.
10. Batter i jen mogen niet worden blootgesteld aan direct zonlicht of vuur.
11. Probeer de batterij niet te vervangen. Raadp leeg voor reparatie en service a.u.b. de
winkel waar u het product hebt aangeschaft of een klantendienst toegewezen door
de winkel.
OPGELET: Gevaar op ontploffing wanneer de batterij incorrect is geplaatst.
12. Gebruik geen enkele andere voedingsbron dan die specifiek ontworpen voor dit
product.
13. Bewaar deze gebruiksaanwijzingen op een veilige plek.
14. Neem contact op met een geautoriseerd servicecentrum als u nog vragen hebt over
dit product.
- Pak het product uit en zorg ervoor dat
de aan-/uitschakelaar op “OFF” staat.
- Sluit de meegeleverde AC adapter
aan op het product en steek de AC
adapter vervolgens in het
stopcontact.
- De groene LED-batterijindicator zal
op oranje springen.
- Dit apparaat verstrekt een notificatie
d.m.v. een batterijindicator.
- Als de batterijindicator knippert, bekent
dit dat het batterijvermog en laag is en
de batterij moet worden opg eladen.
-
Wanneer de AC voeding is
aangeslot
en, zal de batterijindicator
rood branden om aan te geven dat het
apparaat wordt opgeladen.
- Zodra de batterij volledig is opgeladen,
zal de batterijindicator op groen
springen.
Wij raden u aan de batterij ongeveer 6 uur op te laden voordat u het apparaat
voor het eerst in gebruik neemt.
Energiebesparing: Als het product ongeveer 20 minuten niet wordt gebruikt,
zal deze automatisch op stand-by schakelen. Het apparaat zal automatisch
uitschakelen.
POWER
LINE IN
DC JACK
USB 1A CHARGER
MIC 1
ON
OFF
MIC 2
POWER
LINE IN
DC JACK
USB 1A CHARGER
MIC 1
ON
OFF
MIC 2
OPLADEN
VOEDINGSAANSLUITING
 Loading...