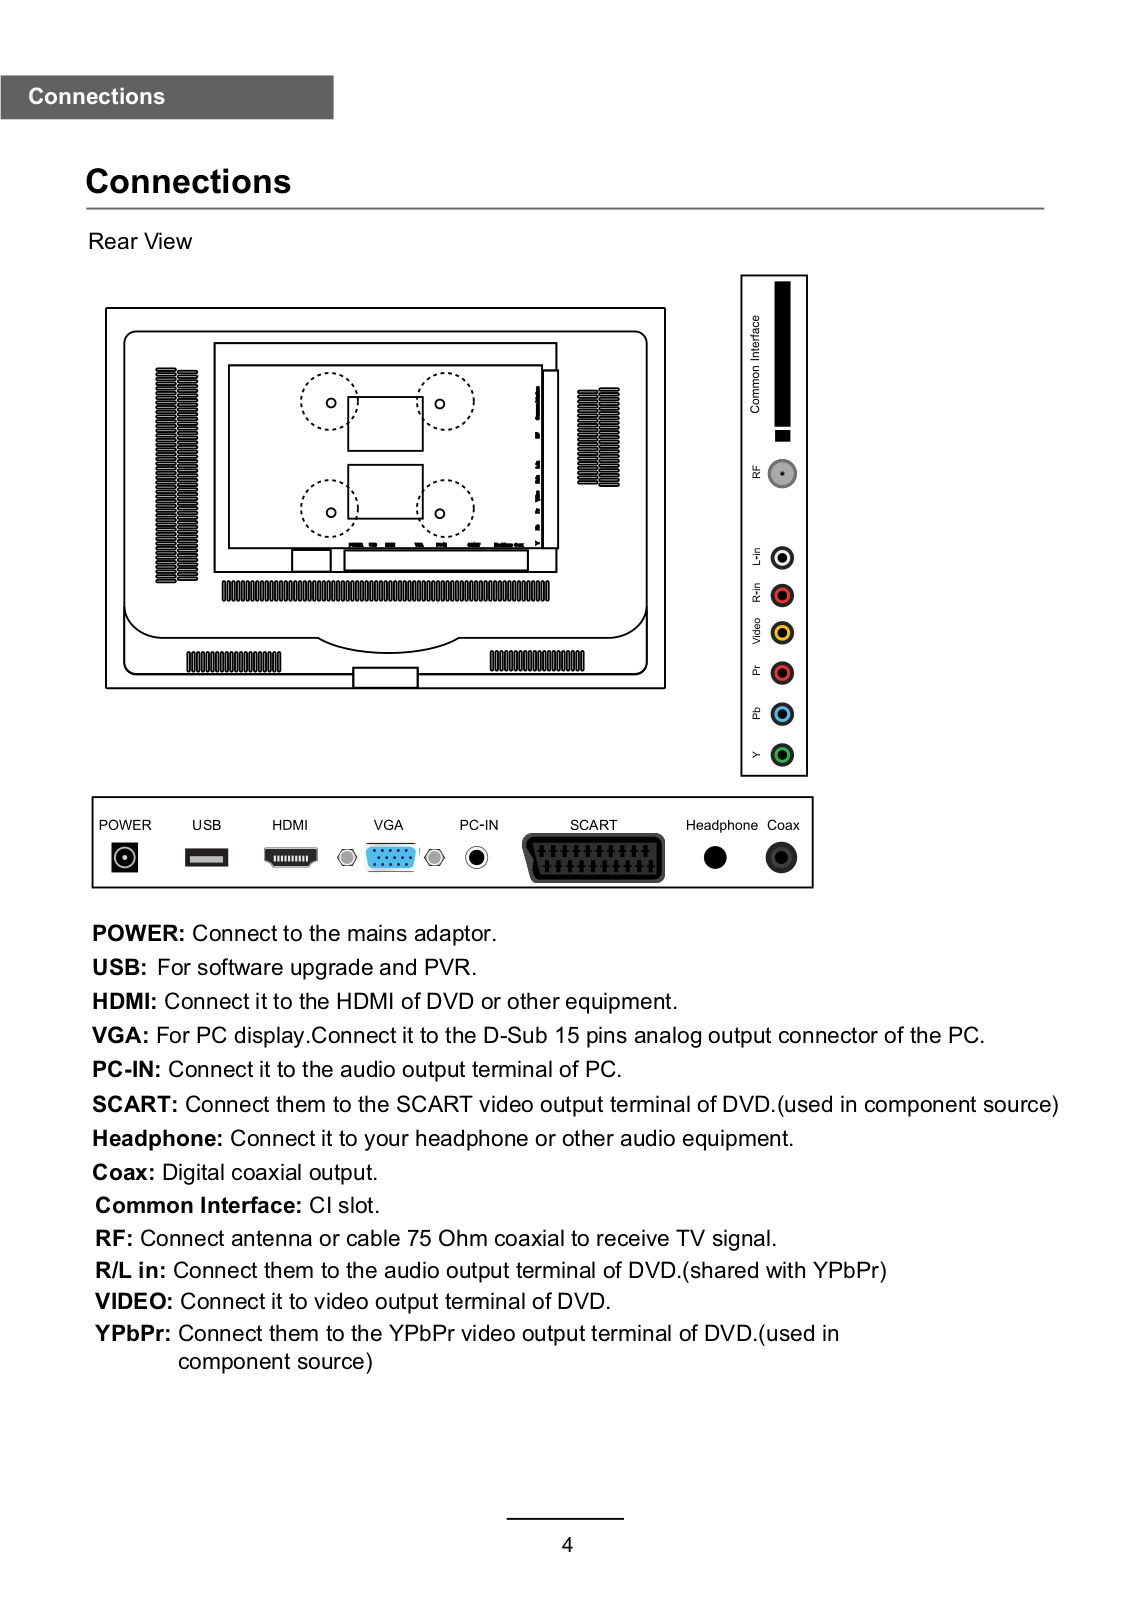
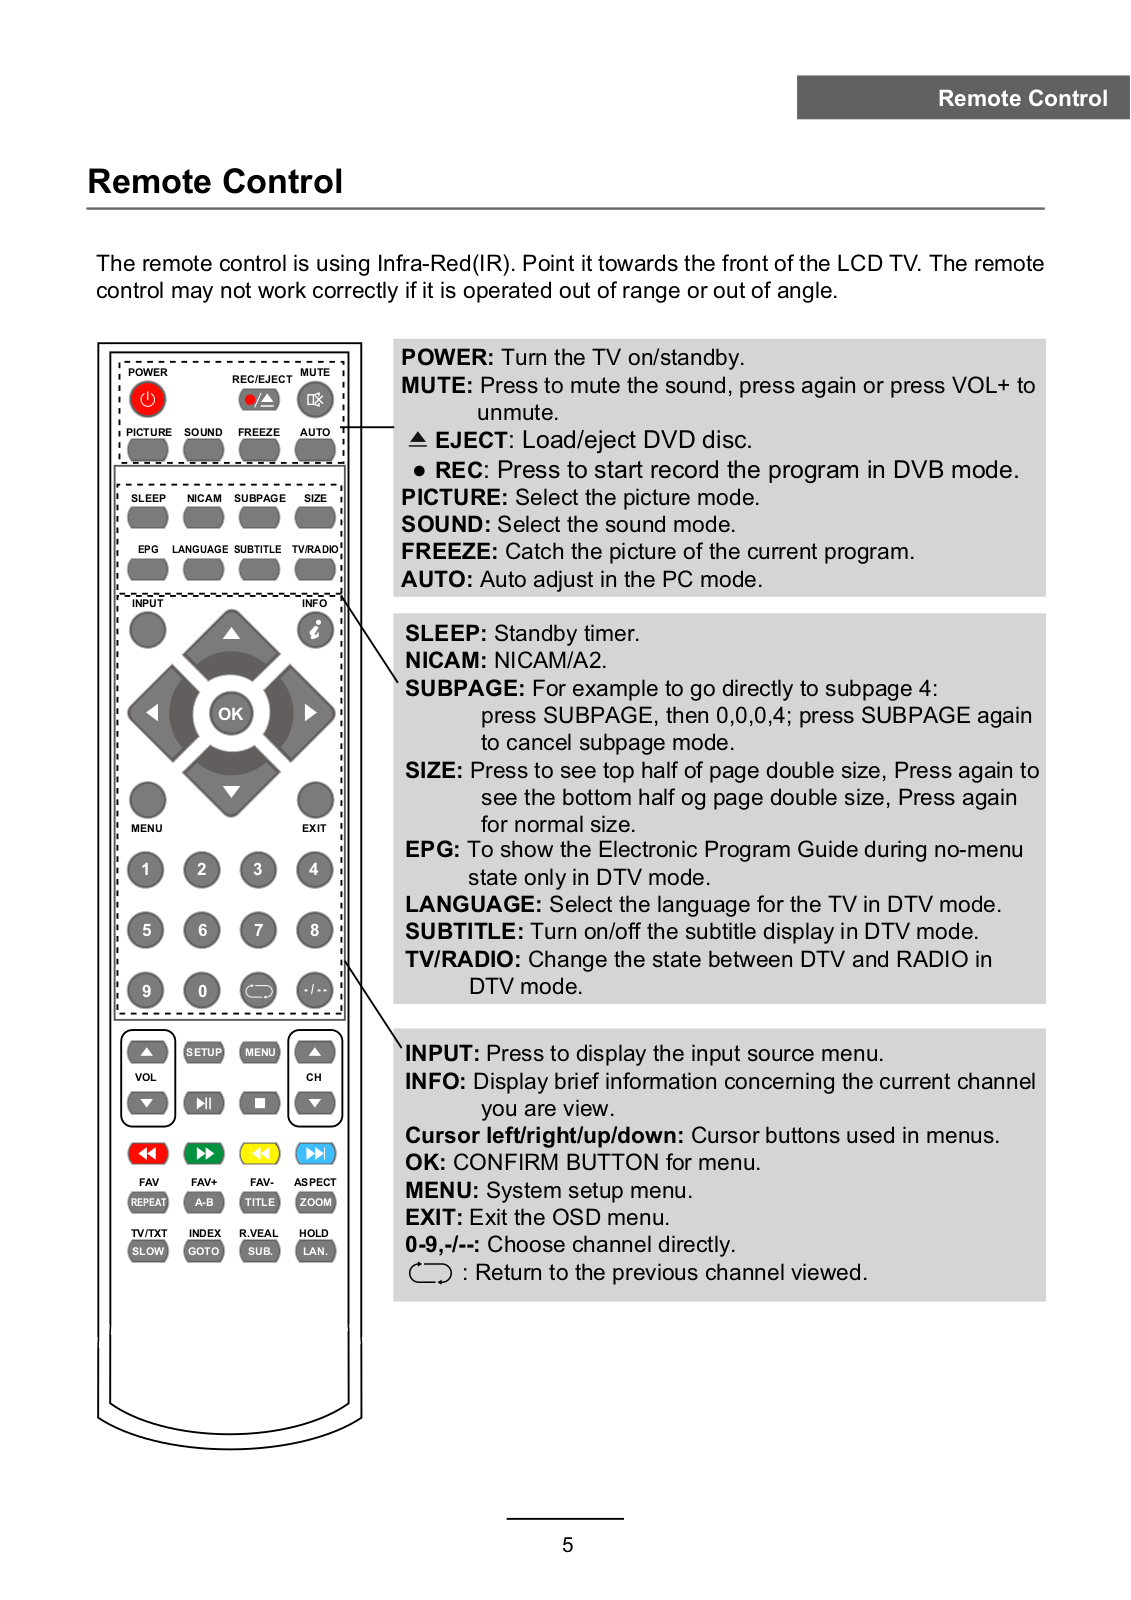
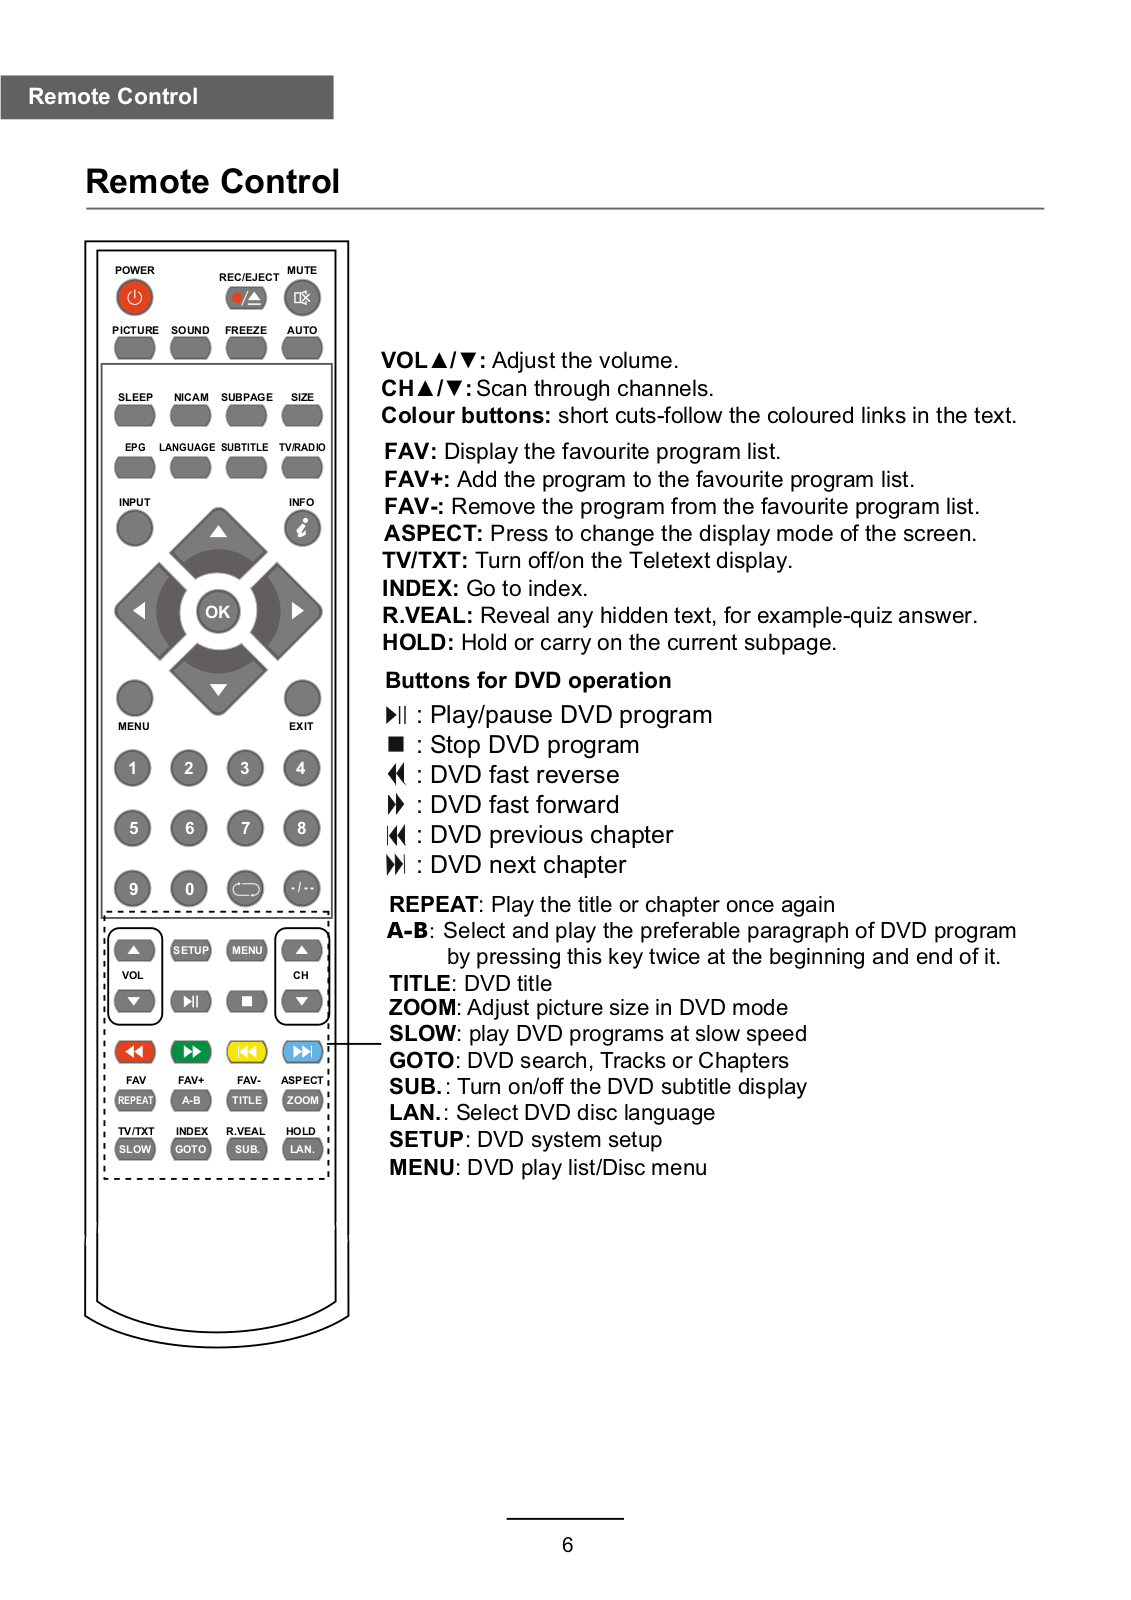
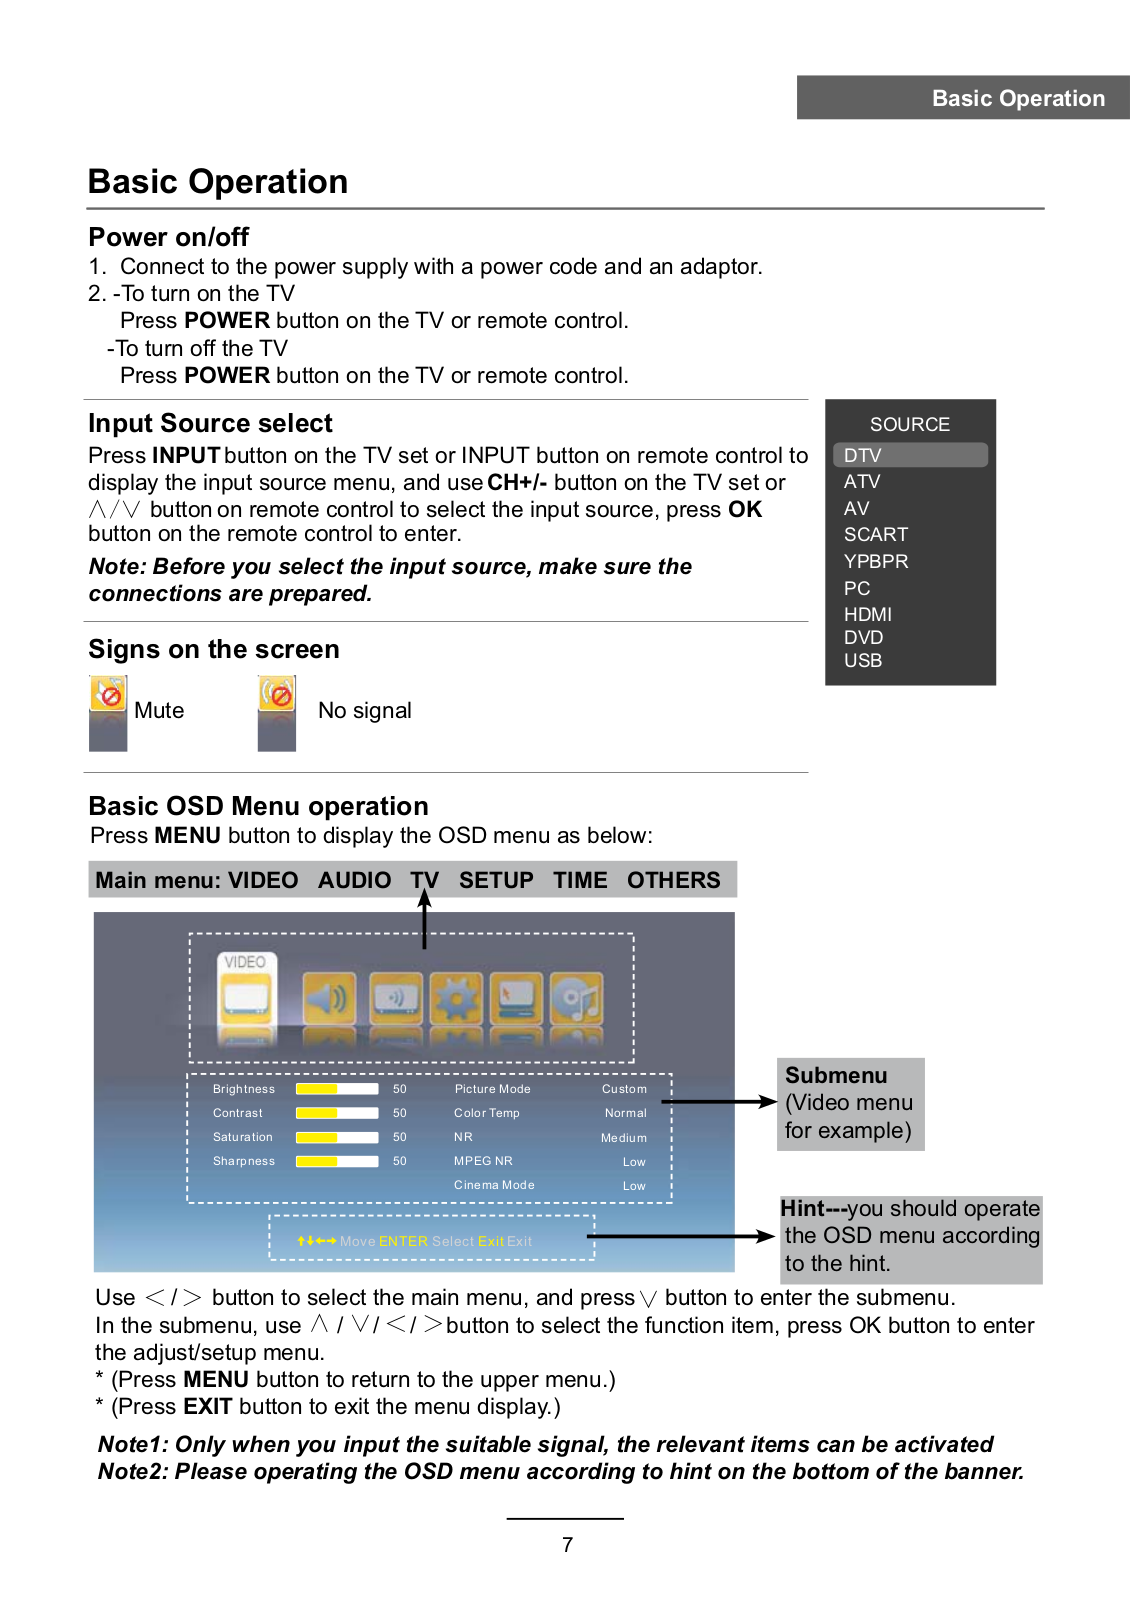
19”LED TV WITH MPEG4 DVBT/C & DVD
Model NO.: LDD-1953MC
Instruction Manual
Contents
Caution |
1 |
Safety Information |
2 |
|
|
Product Introduction |
3 |
Front View |
3 |
|
|
Connections |
4 |
Rear View |
4 |
|
|
Remote Control |
5-6 |
|
|
Basic Operation |
7 |
|
|
OSD Menu |
8-16 |
1. Video menu |
8 |
2. Audio menu |
9 |
3. TV menu |
10-12 |
4. Setup menu |
13 |
5. Time menu |
14 |
6. Others menu |
15 |
7. PC menu |
16 |
|
|
USB Operation |
17 |
|
|
PVR Operation |
18 |
|
|
DVD Basic Operation |
19-25 |
|
|
Simple Troubleshooting |
26 |
|
|
Caution
Caution
The lightening flash with arrowhead symbol, within an equilateral triangle is intended to alert the user to the presence of un-insulated “dangerous voltage” within the products enclosure that may be of sufficient magnitude to constitute a risk of electric shock to the persons.
The exclamation point within an equilateral triangle is intend to alert the user to the presence of important operating and maintenance (servicing) instructions in the literature accompanying the appliance.
Correct disposal of this Product
(Waste Electrical & Electronic Equipment (WEEE)
Your product is designed and manufactured with high quality materials and components which can be recycled and reused.
This symbol means that electrical and electronic equipment, at their end- of-life should be disposed of separately from your household waste. Please dispose of this equipment at your local community waste collection/ recycling centre.
In the USA there are separate collection systems for used electrical and electronic products. Please help us to conserve the environment we live in!
directives.
1
Safety Information
Safety Information
To ensure reliable and safe operation of this equipment, please read carefully all the instructions in this user guide, especially the safety information below.
Electrical safety
•The TV set should only be connected to a mains supply which matches that stated on the label on the mains adaptor.
•To prevent overload, don't share the same mains supply socket with too many other items of equipment.
-Do not place any connecting wires where they may be stepped on or tripped over.
-Do not place heavy items on the leads, which may damage them.
-Hold the Mains plug, not the wires, when removing from a socket.
-During a thunderstorm or while leaving the TV for long periods, disconnect the aerial (if outdoor) and mains adaptor from the supply.
-Do not allow water or moisture to enter the TV or mains adaptor. Do NOT use in wet or moist areas such as Bathrooms, steamy kitchens or near swimming pools.
•Pull the plug out immediately, and seek professional help if:
-the mains plug or cable is damaged.
-liquid is spilt onto the set, or if it is accidentally exposed to water or moisture.
-anything accidentally penetrates the ventilation slots.
-the set does not work normally.
-Do NOT remove the safety covers. There are no user serviceable parts inside. You may invalidate the warranty. Qualified personnel only are permitted to service this apparatus.
-To avoid battery leakage, remove exhausted batteries from the remote control handset, or when not using for along period.
-Do NOT break open or throw exhausted batteries on a fire.
Physical safety
•Do NOT block ventilation slots in the back cover. You may place the TV in a cabinet, but ensure at least 5cm (2") clearance all around the unit.
•Do NOT tap or shake the TV screen, you may damage the internal circuitry. Take good care of the remote control, do not drop it or allow it to come into contact with liquids.
•To clean the TV use a soft dry cloth. Do NOT use solvents or petrol based fluids. For stubborn stains, you may use a damp soft cloth with diluted detergent.
2
Product Introduction
Introduction
Front View
Insert a 12cm disc according to the silk.
Remote Control window
POWER to turn on and off.
Null
The effective receiving range for the signal is 5-8 metres from the front of the remote control window, and 300 to the left or right side and 200 above or below the remote control window.
INPUT:
MENU:
CH+/-: Press to scan through channels.
VOL+/-:
PLAY: Play/Pause DVD program.
EJECT: Load/eject DVD disc.
POWER:
3
Connections
Connections
Rear View
|
|
|
|
|
|
|
|
|
|
|
|
|
|
|
|
|
|
|
|
|
|
|
|
|
|
|
|
|
|
|
|
|
|
|
|
|
|
|
|
|
|
|
|
|
|
|
|
|
|
|
|
|
|
|
|
|
|
|
|
|
|
|
|
|
|
|
|
|
|
|
|
|
|
|
|
|
|
|
|
|
|
|
|
|
|
|
|
|
|
|
|
|
|
|
|
|
|
|
|
|
|
|
|
|
|
|
|
|
|
|
|
|
|
|
|
|
|
|
|
|
|
|
|
|
|
|
|
|
|
|
|
|
|
|
|
|
|
|
|
|
|
|
|
|
|
|
|
|
|
|
|
|
|
|
|
|
|
|
|
|
|
|
|
|
|
|
|
|
|
|
|
|
|
|
|
|
|
|
|
|
|
|
|
|
|
|
|
|
|
|
|
|
|
|
|
|
|
|
|
|
|
|
|
|
|
|
|
|
|
|
|
|
|
|
|
|
|
|
|
|
|
|
|
|
|
|
|
|
|
|
|
|
|
|
|
|
|
|
|
|
|
|
|
|
|
|
|
|
|
|
|
|
|
|
|
|
|
|
|
|
|
|
|
|
|
|
|
|
|
|
|
|
|
|
|
|
|
|
|
|
|
|
|
|
|
|
|
|
|
|
|
|
|
|
|
|
|
|
|
|
|
|
|
|
|
|
|
|
|
|
|
|
|
|
|
|
|
|
|
|
|
|
USB |
|
|
|
|
|
|
|
|
|
SCART |
|
|
|
|||
|
|
|
|
|
|
|
|
|
|
|
|
|
|
|
|
|
|
|
|
|
|
|
|
|
|
|
|
|
|
|
|
|
|
|
|
|
|
|
|
|
|
|
|
|
|
|
|
|
|
|
|
|
|
|
|
|
|
|
|
|
|
|
|
|
|
|
|
|
|
|
|
|
|
|
|
|
|
|
|
|
|
|
|
|
|
|
|
|
|
|
|
|
|
|
|
|
|
|
|
|
|
|
|
|
|
|
|
|
|
|
|
|
|
|
|
|
|
|
|
POWER: Connect to the mains adaptor.
USB: For software upgrade and PVR.
HDMI: Connect it to the HDMI of DVD or other equipment.
VGA: For PC display.Connect it to the D-Sub 15 pins analog output connector of the PC.
PC-IN: Connect it to the audio output terminal of PC.
SCART: Connect them to the SCART video output terminal of DVD.(used in component source)
Headphone: Connect it to your headphone or other audio equipment.
Coax: Digital coaxial output.
Common Interface: CI slot.
RF: Connect antenna or cable 75 Ohm coaxial to receive TV signal.
R/L in: Connect them to the audio output terminal of DVD.(shared with YPbPr) VIDEO: Connect it to video output terminal of DVD.
YPbPr: Connect them to the YPbPr video output terminal of DVD.(used in component source)
4
Remote Control
Remote Control
The remote control is using Infra-Red(IR). Point it towards the front of the LCD TV. The remote control may not work correctly if it is operated out of range or out of angle.
POWER |
REC/EJECT MUTE |
PICTURE SOUND FREEZE AUTO
SLEEP |
NICAM |
SUBPAGE |
SIZE |
EPG |
LANGUAGE SUBTITLE |
TV/RADIO |
|
INPUT |
|
|
INFO |
|
OK |
|
|
MENU |
|
|
EXIT |
1 |
2 |
3 |
4 |
5 |
6 |
7 |
8 |
9 |
0 |
|
- / - - |
SETUP MENU
VOL |
CH |
FAV |
FAV+ |
FAV- |
ASPECT |
REPEAT |
A-B |
TITLE |
ZOOM |
TV/TXT |
INDEX |
R.VEAL |
HOLD |
SLOW |
GOTO |
SUB. |
LAN. |
POWER: Turn the TV on/standby.
MUTE: Press to mute the sound, press again or press VOL+ to unmute.
EJECT: Load/eject DVD disc.
REC: Press to start record the program in DVB mode.
PICTURE: Select the picture mode. SOUND: Select the sound mode.
FREEZE: Catch the picture of the current program. AUTO: Auto adjust in the PC mode.
SLEEP: Standby timer. NICAM: NICAM/A2.
SUBPAGE: For example to go directly to subpage 4:
press SUBPAGE, then 0,0,0,4; press SUBPAGE again to cancel subpage mode.
SIZE: Press to see top half of page double size, Press again to see the bottom half og page double size, Press again for normal size.
EPG: To show the Electronic Program Guide during no-menu state only in DTV mode.
LANGUAGE: Select the language for the TV in DTV mode. SUBTITLE: Turn on/off the subtitle display in DTV mode. TV/RADIO: Change the state between DTV and RADIO in
DTV mode.
INPUT: Press to display the input source menu.
INFO: Display brief information concerning the current channel you are view.
Cursor left/right/up/down: Cursor buttons used in menus.
OK: CONFIRM BUTTON for menu. MENU: System setup menu. EXIT: Exit the OSD menu.
0-9,-/--: Choose channel directly.
: Return to the previous channel viewed.
5
Remote Control
Remote Control
POWER |
5(& (-(&7 |
MUTE |
PICTURE SOUND |
FREEZE |
AUTO |
SLEEP |
NICAM |
SUBPAGE |
SIZE |
(3* /$1*8$*( 68%7,7/( 79 5$',2 |
|||
INPUT |
|
|
INFO |
|
OK |
|
|
MENU |
|
|
(;,7 |
1 |
2 |
3 |
4 |
5 |
6 |
7 |
8 |
9 |
0 |
|
|
SETUP MENU
VOL |
CH |
FAV |
FAV+ |
FAV- |
ASPECT |
REPEAT |
A-B |
TITLE |
ZOOM |
79 7;7 ,1'(; 5 9($/ +2/'
SLOW GOTO SUB. LAN.
92/Ÿ źAdjust the volume. &+Ÿ źScan through channels.
&RORXU EXWWRQV short cuts-follow the coloured links in the text.
)$9 Display the favourite program list.
)$9 Add the program to the favourite program list. )$9 Remove the program from the favourite program list. $63(&7 Press to change the display mode of the screen. 79 7;7 Turn off/on the Teletext display.
,1'(; Go to index.
5 9($/ Reveal any hidden text, for example-quiz answer. +2/' Hold or carry on the current subpage.
Buttons for DVD operation
: Play/pause DVD program
: Stop DVD program
: DVD fast reverse
: DVD fast forward
: DVD previous chapter : DVD next chapter
REPEAT: Play the title or chapter once again
A-B: Select and play the preferable paragraph of DVD program by pressing this key twice at the beginning and end of it.
TITLE: DVD title
ZOOM: Adjust picture size in DVD mode SLOW: play DVD programs at slow speed GOTO: DVD search, Tracks or Chapters SUB.: Turn on/off the DVD subtitle display LAN.: Select DVD disc language SETUP: DVD system setup
MENU: DVD play list/Disc menu
6
Basic Operation
Basic Operation
Power on/off
1.Connect to the power supply with a power code and an adaptor.
2.-To turn on the TV
Press POWER button on the TV or remote control. -To turn off the TV
Press POWER button on the TV or remote control.
Input Source select
Press INPUTbutton on the TV set or INPUT button on remote control to display the input source menu, and useCH+/- button on the TV set or
button on remote control to select the input source, press OK button on the remote control to enter.
Note: Before you select the input source, make sure the connections are prepared.
Signs on the screen
Mute |
No signal |
Basic OSD Menu operation
Press MENU button to display the OSD menu as below:
SOURCE
DTV
ATV
AV
SCART
YPBPR
PC
HDMI
DVD
USB
Main menu: VIDEO AUDIO TV SETUP TIME OTHERS
Brightness |
50 |
Picture Mode |
Custom |
Submenu |
|||
(Video menu |
|||||||
Contrast |
50 |
Color Temp |
|
|
|
||
Normal |
|||||||
Saturation |
50 |
NR |
Medium |
for example) |
|||
Sharpness |
50 |
MPEG NR |
Low |
|
|||
|
|
Cinema Mode |
Low |
|
Move ENTER Select Exit Exit
Hint---you should operate the OSD menu according
to the hint.
Use / button to select the main menu, and press button to enter the submenu.
In the submenu, use / / / button to select the function item, press OK button to enter the adjust/setup menu.
*(Press MENU button to return to the upper menu.)
*(Press EXIT button to exit the menu display.)
Note1: Only when you input the suitable signal, the relevant items can be activated Note2: Please operating the OSD menu according to hint on the bottom of the banner.
7