

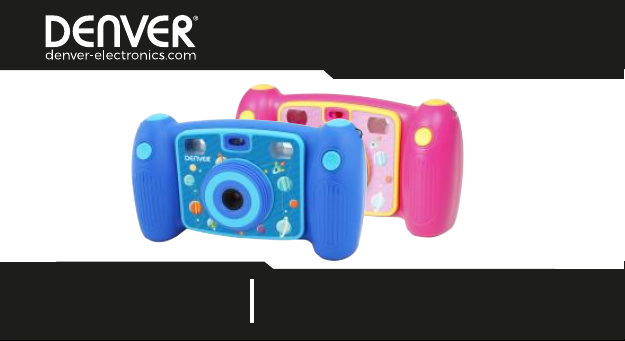
KIDS CAMERA
KCA-1310
www.facebook.com/denverelectronics


Contens
English -------------------------------------------------- 02
German ------------------------------------------------- 13
Spainish ------------------------------------------------- 24
French -------------------------------------------------- 35
Italian --------------------------------------------------- 46
Dutch --------------------------------------------------- 57
_
_
ENG 01
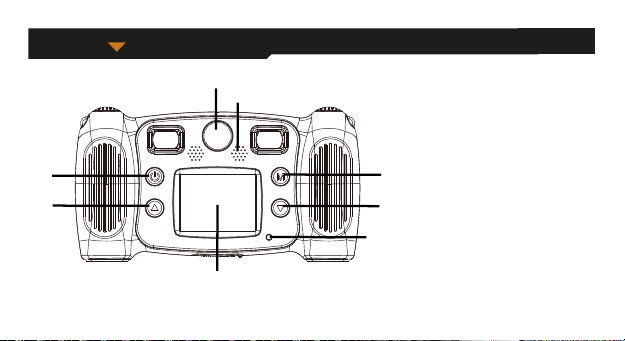
Appearance
1
2
8
7
4
6
5
1. Power Button
2. Page Up Button
3. LCD
4. Busy indicator light
5. Page Down Button
6. Mode Button
7. Speaker
8. Front Lens
3
_
_
ENG 02
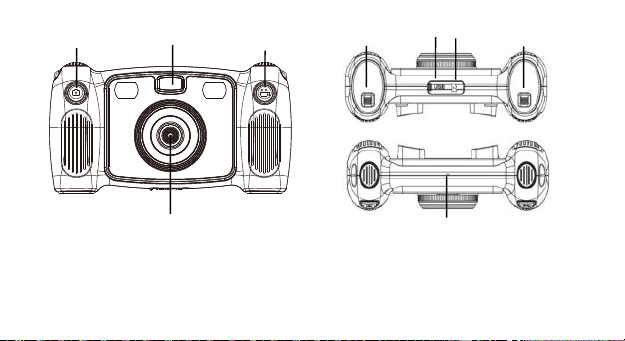
13
9
10
11
16
14
15
12
9. Take Photo Button 10. Fill Light
11. Recording Button 12. The Rear Lens
17
13. Micro USB 14. Micro SD Card
15. Battery Door switch 16. Battery Door switch
17. Microphone
_
_
ENG 03
Start to use
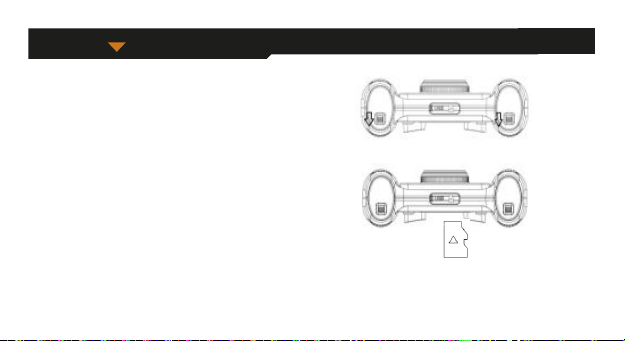
1.Replace AA *4 battery(not incl.)
1.1. You can switch the battery do switch to open the battery
door as shown in the figure below.
1.2. Please put AA*4 battery in the right way into the camera.
2.How to use the memory card
2.1. Properly insert the TF card into the card holder as per
the intructions near the card holder.
2.2. To remove teh TF card, press the end of memory card gently,
the card will be ejected.
Note: The camera is not equipped with built-in memory. Please insert memory card before using. Before using the camera, it is
a must to format the memory card on the camera.
_
ENG 04
_
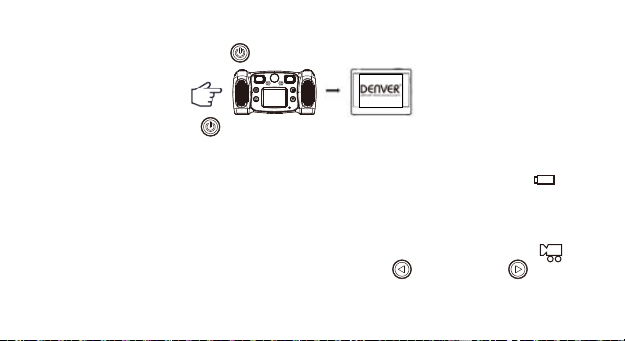
3.Power on/off
3.1.
Power on: Short-press the power Button
3.2. Power off: Hold on Power Button for 3 seconds when the camera is in the idle state to turn it off.
3.3. Auto screen off: The screen will be turned off automatically when the time that the camera is in the idle state for automatic
screen off to save power..
3.4. Power off when the camera is lack of electricity. When electrical quantity of the battery is very low, an icon of will be
displayed on the LCD screen, prompting you to charge it in time. When the icon flickers the camera will be turned off automatically.
the screen will be on and the camera will be started.
4.Recording mode ,photo mode,playback mode and system settings
4.1. Recording Mode
After power is on,the camera will enter video recording mode directly and in preview mode,short-press Recording Button to
start video recording; short-press it again to stop shooting.Short-press page up button or page down button to choice color
effect of images.there are seven kinds of color effects,such as normal,black and white,retro,negative,red,green,blue.
_
ENG 05
_

4.2. Photo Mode
When you turn on your camera,you can short-press the take photos button to enter photo mode, short-press it again to
capture your photo. Then short-press page up button or page down button to join different frames. And you can
long-press the mode button to entry into take photo for timing 5s.
Tips: You can turn on the fill light by long-pressing the recording button when the light is dark. When you want to self timer, you
can long-press the take photo button to toggle the front lens. you can entry into digital zoom by long-press page up button.
Long-press page up button to enlarge, and long press-page down button to minify.
4.3. Playback mode
In recording mode or photo mode,you can short-press the mode button .The LCD display will show as follow:
_
_
ENG 06
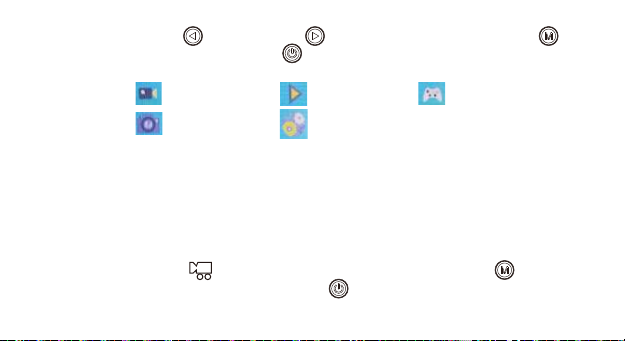
You can short-press page up button and page down button to change modes .Then short-press mode button to
confirm mode you choice .then short-press power on button to exit it.
: Recording mode
: photo mode
You view the captured videos and photos in one of the following ways:
1.Please press button enter the Playback mode as above steps,then press down button to select the video or photo as desired.
To playback a video,press mode button to start, press mode button again to pause playing videos and press power button to
stop playing videos.In playback section ,press page up button or page down button to scroll the photos and videos.you can
press mode button to enter to the mode choice.
2.Connect your camera to a computer using the supplied USB cable to view your captured videos and photos.
3.Short -press the recording button to entry to delete menu.and you can short-press mode button confirm you
choice to delete one or all files.and press the short-power button to exit menu.
: playback mode
: system settings
_
ENG 07
_
: game

System settings
4.4.
You can enter to system settings as above steps,short-press page up button or page down button to choice and
short-press the mode button to confirm.then short-press power on button to exit menu.
The functions as follows:
1. Resolution :1.3M(1280×960), 3M(2048×1536), 5M(2592×1944)
2. Movie Size: FHD(1920×1080),HD(1280×720),640(640×480)
3. Power frequency:50HZ ,60HZ
4. Power save:Select OFF/1 min/3 min/5 min/Exit.To conserve battery power.the camera will shut off if no key are pressed within
the selected time
5. Date Stamp: off ,Date,Date&Time
6. Date&Time:setting the date and time of the cameras
7. Language: setting the language of the cameras
8. Format:Erase all data on the SD Card
9. Reset All:Reset settings of the camera to factory default
_
ENG 08
_
5. Connect to PC
The camera has a plug-and-play function. Connect the power-on device to the computer with the USB cable, and the mode can
be automatically switched to the removable hard disk. Removable disk icon will appear in the "My Computer" window. The pictures
and video files you shot stored in the removable disk H: \ DCIM\100MEDIA folder (H is this equipment removable disk);
Note: During file downloading, it is prohibited to disconnect USB connection, and plugging out the memory card when
USB connected is also prohibited to avoid loss of data.
Technical parameters
Image sensor 1.3 mega-pixel CMOS image sensor
Function mode Recording, photo, playback
LCD screen 2.0'' LCD Screen
Picture resolution 1.3M(1280×960), 3M(2048×1536), 5M(2592×1944)
_
_
ENG 09

Video resolution
HD(1280×720),640(640×480)
Storage medium TF card (Maximum supporting 32GB)
USB port USB 2.0
Power supply External AA*4 battery
Menu language English/German/Spanish/French/Italian/Dutch
Power Save 1 min. / 3 min./5 min./ OFF
Operating system
requirements
Note: The product design specification is made based on updated information when compiling this product manual. The specification
is subject to change without further notice. The product is subject to the actual camera. When the camera is crashed from drop
and pls restart the camera.
Windows XP/Vista/7/8, Mac 10.8
_
_
ENG 10

ALL RIGHTS RESERVED, COPYRIGHT
DENVER ELECTRONICS A/S
_
_
ENG 11

Electric and electronic equipment and included batteries contains materials, components and substances that can be hazardous
to your health and the environment, if the waste material (discarded electric and electronic equipment and batteries) is not handled correctly.
Electric and electronic equipment and batteries is marked with the crossed out trash can symbol, seen below. This symbol signifies
that electric and electronic equipment and batteries should not be disposed of with other household waste, but should be disposed
of separately.As the end user it is important that you submit your used batteries to the appropriate and designated facility. In this
manner you make sure that the batteries are recycled in accordance with legislature and will not harm the environment. All cities
have established collection points, where electric and electronic equipment and batteries can either be submitted free of charge
at recycling stations and other collection sites, or be collected from the households. Additional information is available at the
technical department of your city.
Imported by:
DENVER ELECTRONICS A/S
Omega 5A,Soeften
DK-8382 Hinnerup
Denmark
www.facebook.com/denverelectronics
Service telephone numbers
Netherlands: 0900-3437623 (NL) (€ 0,15/min. + regular costs)
Belgium: +32 380-80793 (BE) (only local costs)
_
ENG 12
_

Übersicht
1
2
8
7
4
6
5
1. Betriebstaste
2. Seite-hoch-Taste
3. Display
4. Betriebsanzeige
5. Seite-runter-Taste
6. Modus-Taste
7. Lautsprecher
8. Frontobjektiv
3
_
_
GER 13

13
9
10
11
16
14
15
12
9. Auslöser 10. Aufhellleuchte
11. Videoaufnahmetaste 12. Rücklinse
17
13. Micro-USB 14. Micro-SD-Karten
15. Schalter Batteriedeckel
16. Schalter Batteriedeckel 17. Mikrofon
_
_
GER 14

Inbetriebnahme
1.Ersetzen der 4 Mignonzellen (nicht enthalten)
1.1. Verschieben Sie den Schalter für den Batteriedeckel, um diesen
wie nachstehend gezeigt zu öffnen.
1.2. Legen Sie 4 Mignonzellen polrichtig in die Kamera ein.
2.Verwenden der Speicherkarte
2.1. Legen Sie die TF-Speicherkarte so in den Kartenschacht ein, wie
auf der Anleitung nahe dem Kartenschacht angegeben ist.
2.2. Drücken Sie leicht gegen die TF-Speicherkarte, dann wird die Karte
freigegeben, so dass Sie diese anschließend entnehmen können.
Hinweis: Die Kamera besitzt keinen internen Speicher. Bitte legen Sie die Speicherkarte vor der Benutzung der Kamera ein.
Bevor Sie die Kamera verwenden, muss die in die Kamera eingelegte Speicherkarte noch formatiert werden.
_
GER 15
_

3.Ein-/Ausschalten
3.3. Bildschirm automatisch ausschalten: Um Zeit zu sparen, wird der Bildschirm im Ruhezustand der Kamera automatisch ausgeschaltet.
3.1.
Einschalten: Wenn Sie die EIN/AUS-Taste lang drücken, dann schaltet sich das Display ein und die Kamera wird gestartet.
3.2. Ausschalten: Halten Sie im Untätigkeitsmodus der Kamera den Kamera-Einschalter für 3 Sekunden gedrückt, um die
Kamera auszuschalten.
3.4. Abschaltung bei unzureichender Energieversorgung. Falls der Batteriestatus sehr gering ist, erscheint das Icon auf
em LCD und weist darauf hin, dass die Batterie geladen werden muss. Wenn das Symbol blinkt, wird die Kamera automatisch
d
ausgeschaltet.
4.Videoaufnahme-, Fotografie-und Wiedergabemodus und Systemeinstellungen
4.1. Videoaufnahmemodus
Nach Einschalten der Kamera wechselt diese automatisch in den Videoaufnahme-Vorschaumodus. Drücken Sie kurz die
Videoaufnahmetaste , um die Videoaufnahme zu starten. Nochmaliges Drücken dieser Taste beendet die Videoaufnahme. Drücken
Sie kurz die Seite-hoch-Taste oder Seite-runter-Taste , um zwischen verschiedenen Bildfarbeffekten auszuwählen. Die
Kamera besitzt die sieben Bildfarbeffekte normal, Schwarz-Weiß, Retro, Negativ, Rot, Grün und Blau.
_
GER 16
_

4.2. Fotografiemodus
Wenn Sie Ihre Kamera einschalten, können Sie in den Fotografiemodus wechseln, indem Sie den Auslöser drücken. Drücken
Sie ihn noch einmal, um ein Foto aufzunehmen. Drücken Sie kurz die Seite-hoch-Taste oder Seite-runter-Taste , um
verschiedene Rahmen auszuwählen. Sie können auch die Modus-Taste lange drücken, um ein Foto mit der Selbstauslösung
5 s aufzunehmen.
TIPPS: Wenn das Umgebungslicht zu schwach ist, können Sie die Aufhellleuchte durch langes Drücken der Aufnahmetaste
einschalten. Wenn Sie ein Selfie machen möchten, dann können Sie durch langes Drücken des Auslösers zwischen den
Objektiven umschalten. Sie können den Digitalzoom durch langes Drücken der Seite-hoch-Taste aktivieren. Drücken Sie die
Seite-hoch-Taste zum Heran- und die Seite-runter-Taste zum Herauszoomen.
4.3. Anzeigemodus
Sowohl im Aufzeichnungsmodus als auch im Fotografie-Modus können Sie kurz die Taste drücken. Daraufhin zeigt das
LCD-Display an:
_
_
GER 17
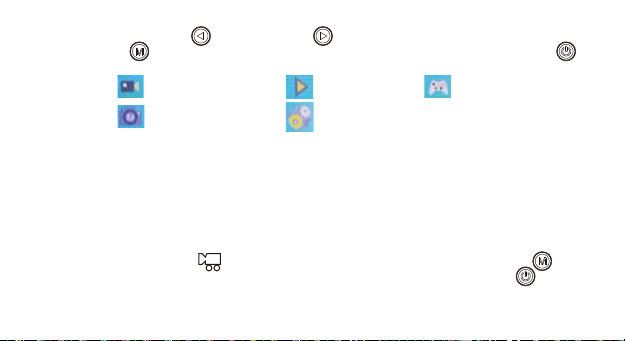
Durch Drücken der Seite-hoch-Taste und Seite-runter-Taste können Sie den Modus ändern. Drücken Sie anschließend
kurz die Modus-Taste , um den ausgewählten Modus zu bestätigen. Durch kurzes Drücken des Kamera-Einschalter
beenden Sie die Auswahl.
: Videoaufnahmemodus
: Fotomodus
Über einen der nachstehenden Wege können Sie aufgenommene Bilder und Videos ansehen:
1.Drücken Sie die Taste, um analog den obenstehenden Schritten in den Wiedergabemodus zu wechseln. Drücken Sie
anschließend die Seite-runter- oder Seite-hoch-Taste, um das gewünschte Foto bzw. Video auszuwählen.
Drücken Sie die Taste, um die Wiedergabe des Videos zu starten. Erneutes Drücken der Taste pausiert die Wiedergabe und
das Drücken der EIN/AUS-Taste beendet die Videowiedergabe. Drücken Sie bei der Anzeige der Videos und Fotos die
Seite-hoch- und Seite-runter-Taste, um durch die Liste der Fotos und Videos zu scrollen. Sie können die Modus-Taste drücken,
um zur Modusauswahl zu gelangen.
2.
Verbinden Sie Ihre Kamera über das mitgelieferte USB-Kabel mit einem Computer, um die aufgenommenen Videos und Bilder anzusehen.
3.Drücken Sie kurz die Aufnahmetaste , um ins Löschmenü zu gelangen. Hier können Sie kurz die Modustaste drücken,
um zwischen dem Löschen einer Datei oder aller Dateien auszuwählen. Drücken Sie kurz die EIN/AUS-Taste , um das
Menü zu verlassen.
: Anzeigemodus
: Systemeinstellungen
_
_
GER 18
: Spiele

Systemeinstellungen
4.4.
Wie obenstehend beschrieben können Sie auch zu den Systemeinstellungen gelangen. Drücken Sie für die Auswahl kurz die
Seite-hoch-Taste oder Seite-runter-Taste und anschließend kurz die Modus-Taste , um die Auswahl zu
bestätigen. Drücken Sie abschließend die EIN/AUS-Taste , um das Menü wieder zu verlassen.
Folgende Optionen stehen zur Verfügung:
1. Auflösung: 1.3M(1280×960), 3M(2048×1536), 5M(2592×1944)
2. Videogröße: FHD(1920×1080),HD(1280×720),640(640×480)
3. Netzfrequenz: 50 Hz, 60 Hz
4. Energie sparen: Auswahl von AUS / 1 min / 3 min / 5 min / Beenden. Um die Batterie zu schonen, schaltet sich die Kamera
aus, wenn innerhalb der ausgewählten Zeit keine Taste gedrückt wurde.
5. Zeitstempel: Aus, Datum, Datum & Uhrzeit
6. Datum und Uhrzeit: Einstellen des Datums und der Uhrzeit der Kamera
7. Sprache: Einstellen der Sprache der Kamera
8. Formatieren: Löschen aller Daten auf der TF-Karte
9. Alles Zurücksetzen: Zurücksetzen der Kameraeinstellungen auf Werkseinstellung
_
GER 19
_
5. Anschluss an den PC
Die Kamera ist Plug-and-Play-fähig. Schließen Sie die eingeschaltete Kamera über das USB-Kabel an einem Computer an. Der
Wechseldatenträger wird automatisch vom Computer erkannt und angezeigt. Das Wechseldatenträgersymbol wird auf dem
"
Arbeitsplatz" angezeigt. Die aufgenommenen Bilder und Videos befinden sich auf dem Wechseldatenträger H:
im Verzeichnis \DCIM\100MEDIA (H steht für den Laufwerksbuchstaben des Computers).
Hinweis: Ziehen Sie niemals das USB-Kabel während des Herunterladens von Dateien ab und entnehmen Sie auch
währenddessen nicht die TF-Speicherkarte, weil dies Datenverlust zur Folge haben kann.
Technische Angaben
Bildsensor 1,3 Megapixel CMOS-Bildsensor
Funktionsmodi Videoaufnahme, Fotoaufnahme, Videowiedergabe, Fotoanzeige
LCD-Display 2,0 Zoll LCD-Display
Bildauflösung 1.3M(1280×960), 3M(2048×1536), 5M(2592×1944)
_
_
GER 20
 Loading...