

Denver IR-100 User Manual

ENG-1
DENVER IR-100
SAFETY PRECAUTIONS
- Read all the instructions carefully before using the unit and keep them for future reference.
- Check that the voltage marked on the rating label matches your mains voltage.
Location of Unit
- The unit must be placed on a flat stable surface and should not be subjected to vibrations.
- Do not place the unit on sloped or unstable surfaces as the unit may fall off or tip over.
- The mains socket must be located near the unit and should be easily accessible.
- Avoid extreme degrees of temperature, either hot or cold Place the unit well away from heat sources
such as radiators or gas/electric fires. Avoid exposure to direct sunlight and other sources of heat.
- Never place any type of candle or naked flame on the top of or near the unit.
- To reduce the risk of fire, electric shock or product damage, do not expose this unit to rain, moisture,
dripping or splashing. No objects filled with liquids, such as vases, should be placed on the unit.
- If you spill any liquid into the unit, it can cause serious damage. Switch it off at the mains
immediately. Withdraw the mains plug and consult your dealer.
- To prevent the risk of electric shock or fire hazard due to overheating, ensure that curtains and other
materials do not obstruct the ventilation vents.
- Do not install or place this unit in a bookcase, built-in cabinet or in another confined space, ensure
that a minimum of 10cm should be kept around the apparatus for ventilation.
Safety
- Always disconnect the unit from the mains supply before connecting/disconnecting other devices or
moving the unit.
- Unplug the unit from the mains socket during a lightning storm.
- This unit will become warm when used for a long period of time. This is normal and does not
indicate a problem with the unit.
CAUTION CAUTION
RISK OF ELECTRIC SHOCK
DO NOT OPEN
RISK OF ELECTRIC SHOCK
DO NOT OPEN
DANGEROUS VOLTAGE
Conductor dangerous voltage, that may be of sufficient magnitude to constitute a risk of electric
shock to persons is present within this product's enclosure.
ATTENTION
The owner's manual contains important operating and maintenance instructions, for your
safety, it is necessary to refer to the manual.
Mains Cable
- Make sure the unit is not resting on top of the mains cable, as the weight of the unit may damage the
mains cable and create a safety hazard.
- If the mains cable is damaged it must be replaced by the manufacturer, its service agent, or similarly

ENG-2
qualified persons in order to avoid a hazard.
Interference
- The normal function of the product may be disturbed by Strong Electro Magnetic Interference. If so,
simply reset the product to resume normal operation by following the instruction manual. In case the
function could not resume, please use the product in other location.
- This unit includes micro-processors which may malfunction as a result of external electrical
interference/noise or electrostatic discharge. If the unit is not working properly, disconnect the power
source and then reconnect it.
Supervision
- Children should be supervised to ensure that they do not play with the unit.
- Never let anyone especially children push anything into the holes, slots or any other openings in the
case-this could result in a fatal electric shock.
Service/Maintenance
- To reduce the risk of electric shock, do not remove screws. The unit does not contain any
user-serviceable parts. Please leave all maintenance work to qualified personnel.
- Do not open any fixed covers as this may expose dangerous voltages.
- Ensure to unplug the unit from the mains socket before cleaning.
- Do not use any type of abrasive pad or abrasive cleaning solutions as these may damage the unit's
surface.
- Do not use liquids to clean the unit.
ENG-3
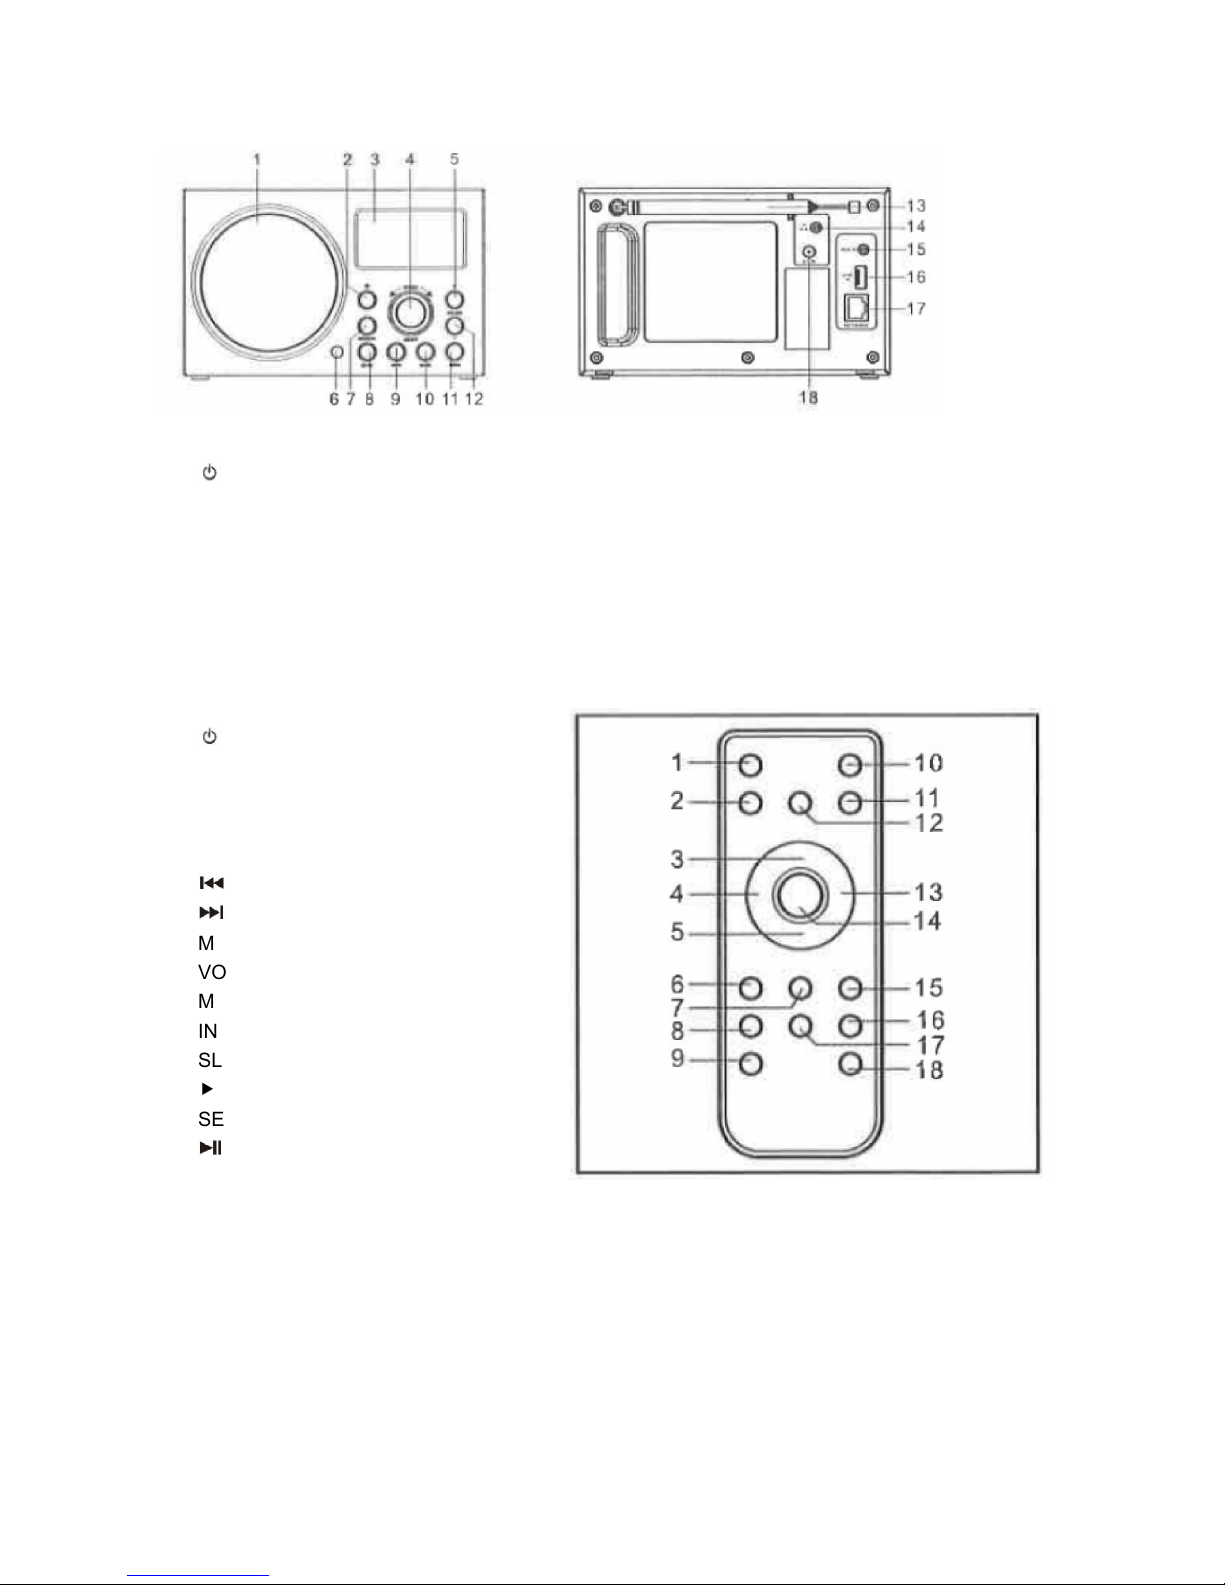
FEATURES AND CONTROLS
1. SPEAKER
2. BUTTON
3. LCD DISPLAY
4. SCROLL CONTROL/
SELECT BUTTON
5. VOLUME+ BUTTON
6. IR SENSOR
7. MEMORY BUTTON
8. MODE BUTTON
9. INFO BUTTON
10. BACK BUTTON
11. MENU BUTTON
12. VOLUME- BUTTON
13. ROD ANTENNA
14. HEADPHONE JACK
15. AUX IN JACK
16. USB DEVICE IN PORT
17. NETWORK SOCKET
18. DC CORD SOCKET
REMOTE CONTROL
1. BUTTON
2. MENU BUTTON
3. BUTTON
4. BUTTON
5. BUTTON
6. BUTTON
7. BUTTON
8. MUTE BUTTON
9. VOLUME- BUTTON
10. MODE BUTTON
11. INFOBUTTON
12. SLEEP/SNOOZE BUTTON
13. BUTTON
14. SELECT BUTTON
15. BUTTON
16. ALARM BUTTON
17. MEMORY BUTTON
18. VOLUME+ BUTTON
REMOTE SENSOR
To operate the unit with the remote control, point the remote at the Remote Sensor on the front of the
main unit and press the appropriate button. The remote control has an effective operating range of
approximately 20 feet and an angle of no more than 30º.
NOTE: Bright sunlight may interfere with the operation of the remote control.
ENG-4
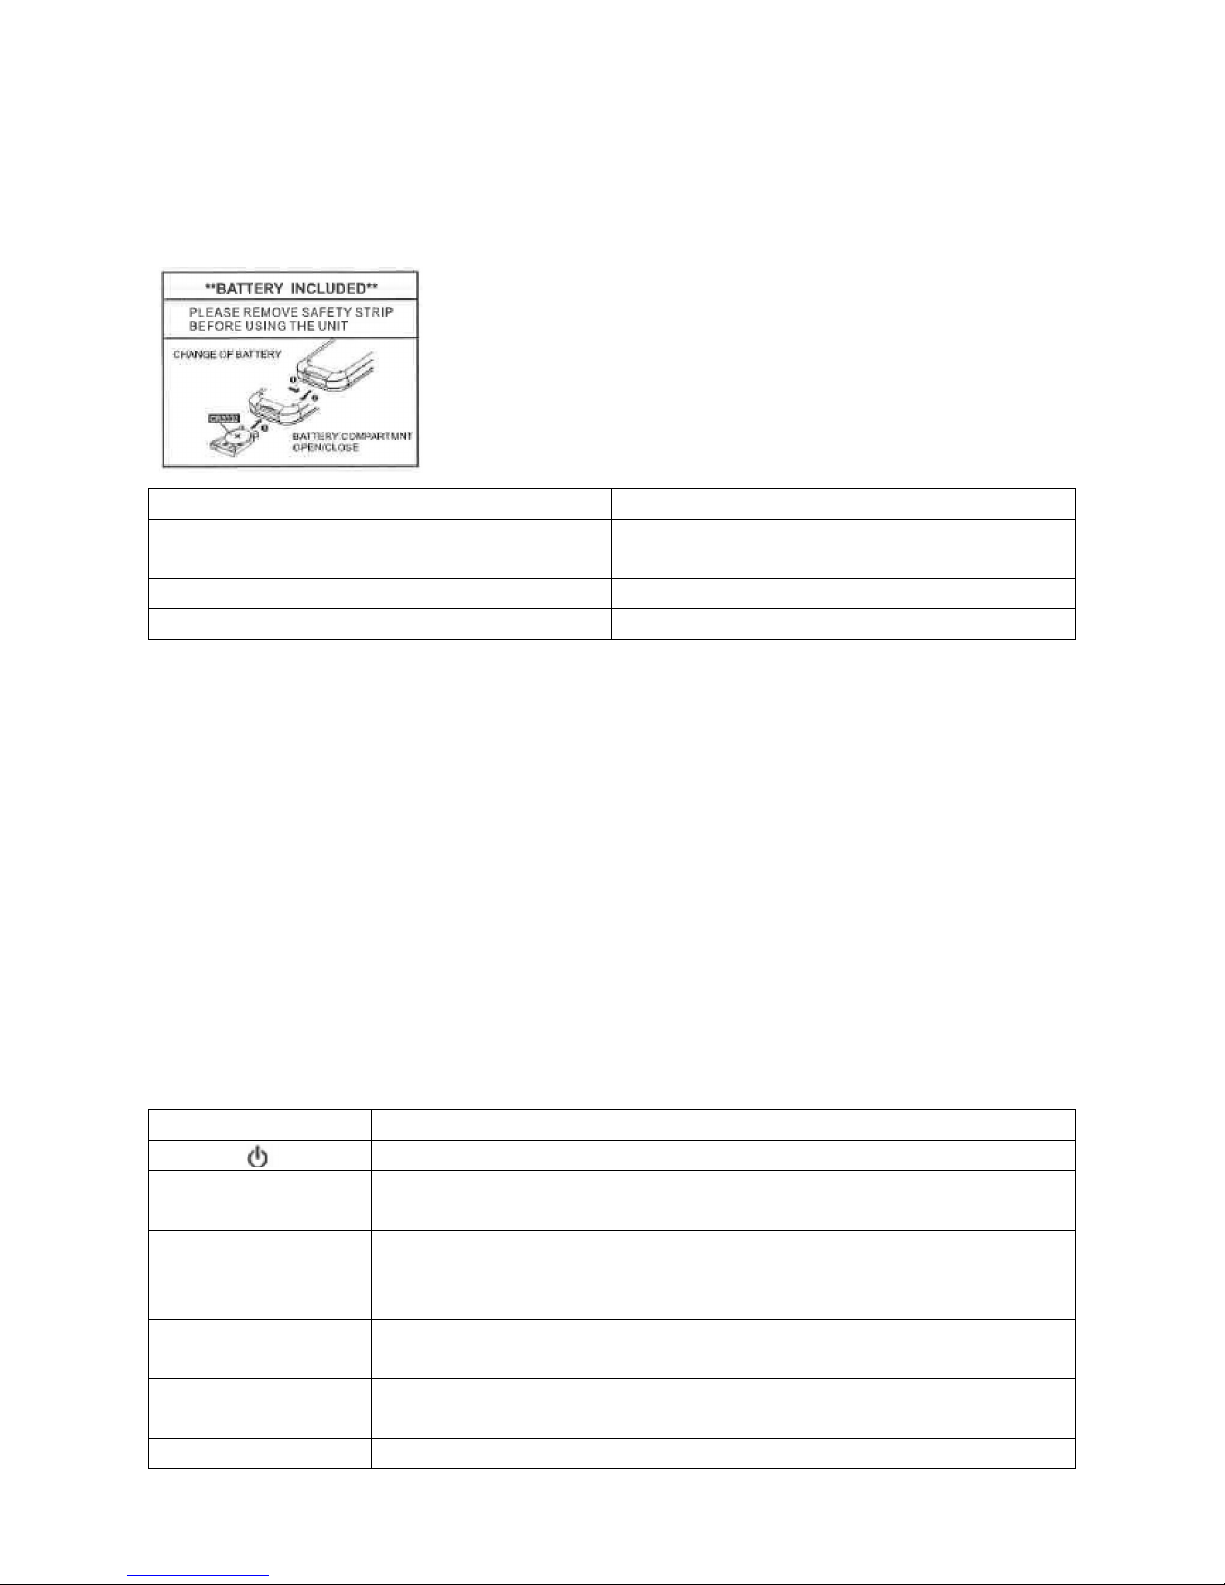
PUTTING THE BATTERY INTO THE REMOTE CONTROL
1. Press the battery compartment gently according to the direction indicated in the illustration.
2. Slide to open the battery compartment.
3. Insert the supplied CR2032 battery into the compartment according to the polarity markings ("+" and
"-") inside the compartment and on the battery. Replace the battery compartment until it clicks.
**BATTERY INCLUDED** **BATTERY INCLUDED**
PLEASE REMOVE SAFETY STRIP BEFORE
USING THE UNIT
PLEASE REMOVE SAFETY STRIP BEFORE
USING THE UNIT
CHANGE OF BATTERY CHANGE OF BATTERY
BATTERY COMPARTMENT OPEN/CLOSE BATTERY COMPARTMENT OPEN/CLOSE
BATTERY PRECAUTIONS
Follow these precautions when using a battery in this device:
1. Warning-Danger of explosion if battery is incorrectly replaced. Replace only with the same or
equivalent type.
2. Use only the size and type of battery specified.
3. Be sure to follow the correct polarity when installing the battery as indicated in the Battery
Compartment. A reversed battery may cause damage to the device.
4. If the device is not to be used for a long period of time, remove the battery to prevent damage or
injury from possible battery leakage.
5. Do not try to recharge a battery not intended to be recharged; it can overheat and rupture. (Follow
battery manufacturer's directions.)
6. Battery shall not be exposed to excessive heat such as sunshine, fire or the like.
SUMMARY OF CONTROLS-UNIT AND REMOTE
Control Function
Press to turn on or back to standby mode (showing clock and date).
MODE
Press to cycle through the modes: Internet radio, Music player, DAB radio, FM
radio, Aux in.
INFO
Press to view more information about the station or track playing. Press again
to cycle through further information screens then return to the normal Now
playing screen.
MENU
Press to show menu for the current mode. Press again to show Now playing
screen.
BACK
Press to return to previous screen. In play mode, this button may be used to
return to the last track list or station list.
ALARM Press to enter alarm wizard, turn off alarm (when alarm is sounding) and
ENG-5
toggles between alarms in standby.
SLEEP/SNOOZE
When playing, standby after a set time.
When alarm is sounding, snooze for a set time.
MEMORY
Press for the Preset recall/Save menu, Scroll up/down to select the preset
number then press Select to confirm.
SCROLL/SELECT
On unit, Turn to scroll through a menu or station list. The chosen option is
highlighted in reverse text (white characters on a dark background). Press to
select.
Press to previous track or hold to scan down/rewind.
Press to next track or hold to scan up/fast forward.
Press to play or pause.
VOLUME+ Press to increase volume.
VOLUME- Press to decrease volume
MUTE Press to mute audio output.
Press to scroll up through a menu or station list.
Press to scroll down through a menu or station list.
Press to scroll back screen.
Press to scroll forward screen.
SELECT On remote, press to select the chosen option.
Most of the functions of this unit can be operated by pressing the buttons on the front panel or the
corresponding buttons on the remote control handsel.

ENG-6
SET UP & CONNECTION
Mains Connection
1. Connect the AC power cord to the unit via the AC socket at the back.
2. Plug the AC power cord to the AC mains outlet.
Network Connection
Wired network
1. Check first of all whether the control lamps (LINK/ACT) of your LAN connection or your router light
up.
2. Use an Ethernet cable with RJ45 connector to connect the NETWORK socket of the radio with the
LAN port of your router.
3. Proceed for the operation as described in the below "GETTING STARTED". But no need to run
through the setup wizard
Note: Information on the LAN connection can be obtained from the user manual of the router
manufacturer.
Wireless network
1. Check first of all whether the control lamps (LINK/ACT) of your WLAN connection or your router light
up.
2. Proceed for the operation as described in the below "GETTING STARTED". It is highly
recommended to run through the setup wizard in the system settings section.
Note: Information on the WLAN/WiFi network connection can be obtained from the user manual of the
router manufacturer.
Walls or other obstacles may influence the WiFi range. Try to find the best location to avoid interruption
and interference while operating.
GETTING STARTED
Press the button once to switch on the radio, the display will show the main menu. To go to a function
or open a sub-menu, rotate the SELECT control followed by pressing on it to confirm. Each function is
selected via a menu consisting of several levels.
Main menu
The following modes can be selected in the main menu:
Internet radio, Music player, DAB radio, FM radio, AUX in, Sleep, Alarms, System settings.
To select your desired function, rotate the SELECT control followed by pressing on it to confirm.
System settings
Setup wizard
The setup wizard is available in the system settings section, you can run through this to configure
settings for date/time and network, once this has finished, your radio is ready to use.
Note: No need to run through the setup wizard if a wired network is used.
12/24 hour display
To select your preference between 12 or 24 hour clock display format-rotate the SELECT control
followed by pressing on it to confirm.
Time/Date
The time and date can be manually set or automatically via the network, DAB or FM.
 Loading...