

Denver DAB-43 PLUS Instruction Manual
ENGLISH
DAB-43 PLUS
DAB+/ DAB (BAND III) / FM RA DIO
INSTRUCTI ON MANUAL
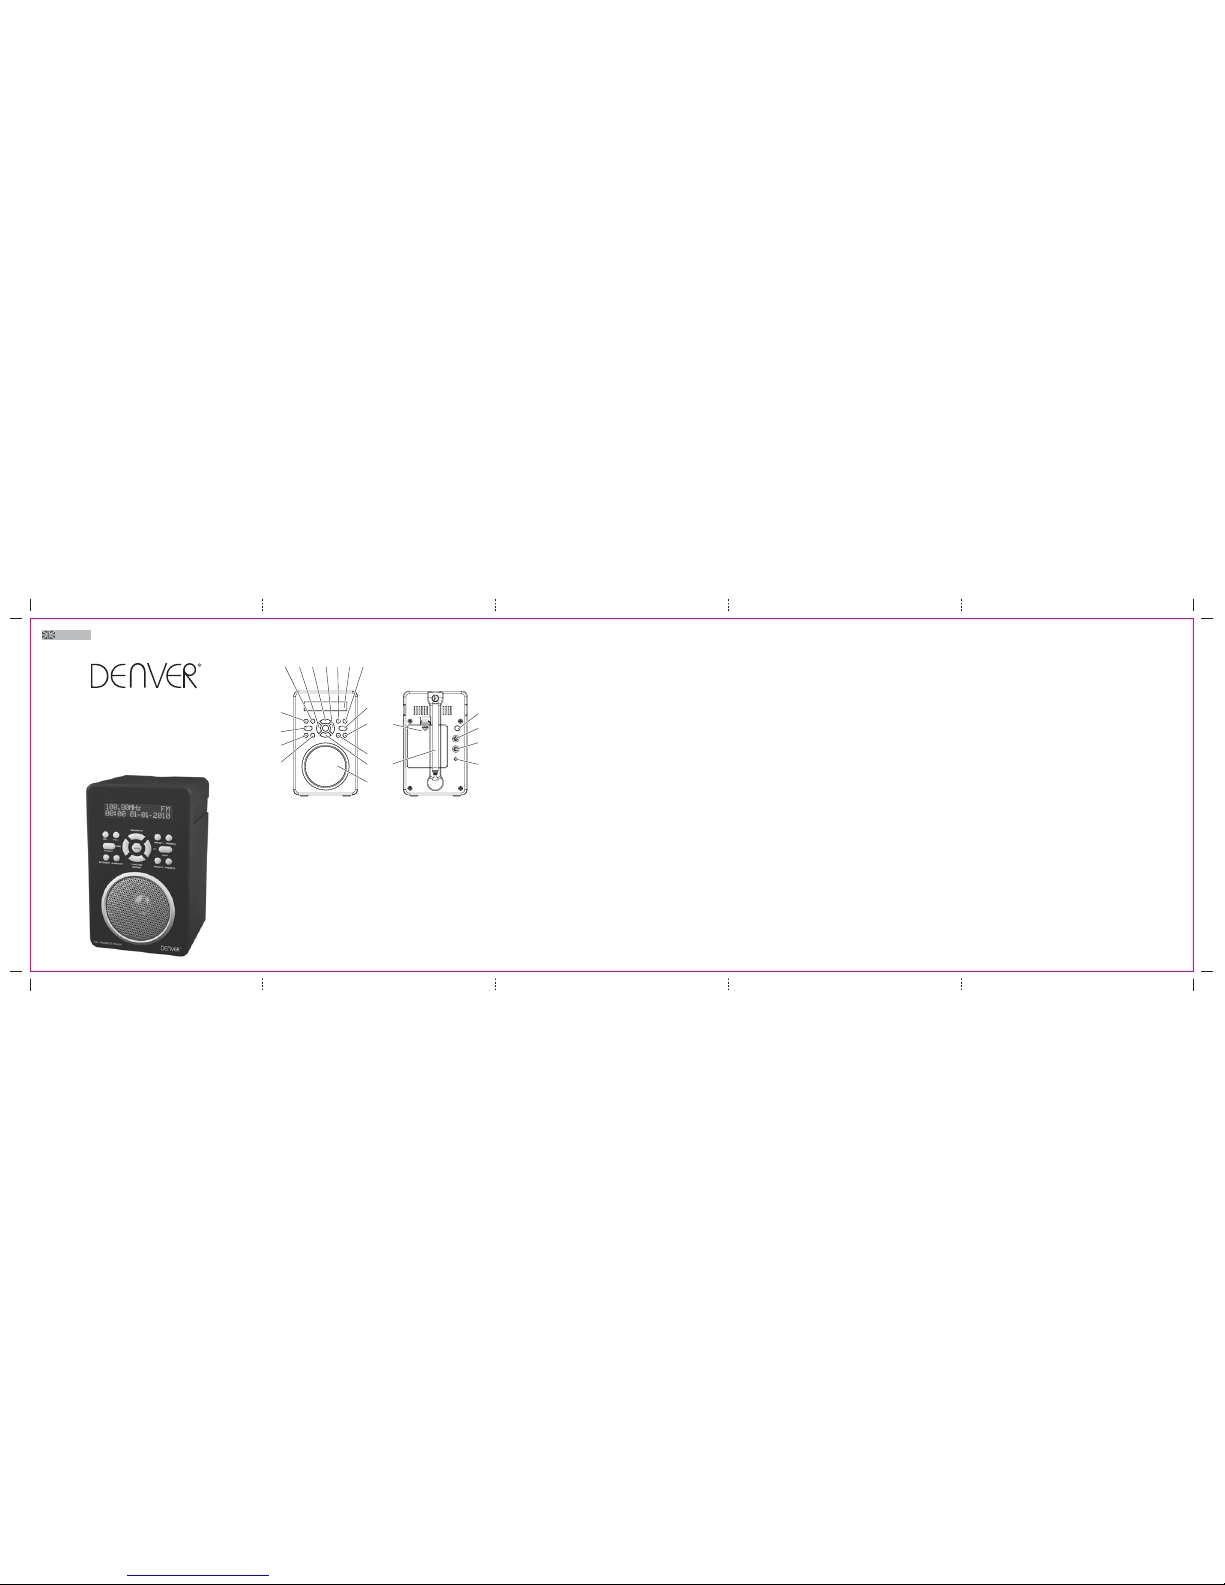
LOCATION OF CONTRO LS
Setup
For use with b attery power, remove the Battery Compartment Cover and inse rt six
“AA” size alkali ne batteries , observing the proper po larity (+/–) as indicated inside the
Battery Com partment. R eattach Batte ry Compart ment Cover.
For use with e lectrical AC power, plu g the AC Power Cord int o a standard 230-volt AC
electrical o utlet.
1. VOL+ BUTTON
2. DOWN BUTTON
3. INFO/SETUP B UTTON
4. UP BUTTON
5. PRESET1 BUTTON
6. LCD DISPLAY
7. PRESET2 BUTTON
8. SHIFT
9. PRESET4 BUTTON
10. SPEAKER
11. PRESET3 BUTTON
12. FUNCTION/SNO OZE BUTTON
13. ALARM/SLEEP BUTTON
14. AUTO SCAN BUTTON
15. STANDBY BUTTON
16. VOL- BUTTON
17. POWER (ON/OFF) BUTTON
18. AUX IN JACK
19. PHONES JACK
20. DC 6V JACK
21. BATTERY DOOR
22. FM TELESCOPIC ANT ENNA
POWER SUPPLY
OPERATING THE UNIT O N AC POWER
Insert one end at the supplied power cord to the DC 6V IN J ack located at the rear of the
unit and the other end i nto the Wall outle t.
When the First ti me used the cord ha s to be firmly pushed into the s ocket if does not wor k
on AC, to try ag ain to be su re for a posi tive connectio n.
OPERATING THE UNIT O N BATTERIES
1. To play your unit on batt eries, the AC power c ord must be disconnected from the player.
2. Unplu g the AC power cord from the unit an d insert 4 size “AA” batt eries (not provided )
in the compa rtment.
3. Close the battery compartmen t door.
Note:
Check your ba tteries regul arly. Old or disch arged batteri es should be replaced. If the unit
is not to be used for so metime or is being run exclusively on AC electri cal current, re move
batteries fr om the batte ry compartm ent to avoid le akage.
Warning: Before using the unit. Check that the loc al mains sup ply is compati ble with the
Unit Do not plug or unpl ug the power cable when your han ds wet.
When plannin g not to use t his unit for long periods of time (i.e. Vacation etc.) disco nnect
the plug fro m the wall out let.
BATTERY SAFETY PRECAUTION S:
• Keep batteri es away from chil dren and pets .
• Insert the b atteries observing the proper polarity (+/–). Failure to prop erly ali gn the
battery pol arity can ca use personal injury and/o r property damage.
• Remove old or dis charged ba tteries f rom the product. Remove the batteries when the
product wil l not be u sed for ext ended period s of time to prevent da mage due t o rusted
or corrode d batteries
• Never throw ba tteries into a fire, d o not expose b atteries to fire or ot her heat sou rces
• Battery Dispo sal: Old or discharged batteries must be proper ly disposed of and recycled
in compliance with all appli cable laws. For detailed informat ion, contact your local solid
waste authori ty
• Follow the batt ery manufac turer’s safety, usage, a nd disposal instructions .
FUNCTION DES CRIPTION
short press------- ---- ind icates that you should press and release the key to activate the
function
long press - -----------in dicates that you should pre ss and hold t he key until t he function i s
acti
vated
POWER (ON/OFF) SWITCH
Press it to switch th e unit between OFF and STANDBY. The press act ion also control s
functions su ch as SNOOZE and SLEEP Timer cancel.
VOLUME BUTTON
Press the vol ume button t o adjust the volume. VOL+ to inc rease and VOL– to decrease.
This BUTTON al so controls t he volume of the headphone output.
UP & DOWN BUTTON
These button s are used t o set the Alar m and Sleep t imer
ENTER BUTTON
The ENTER BU TTON is used to
-confirm station sel ection in DAB m ode
-Change audi o mode in FM mode
-Confirm Alarm and Sle ep settings
INFO/SETUP B UTTON
Short press the INFO/ SETUP button to change t he type of information shown on the display
FUNCTION/SNO OZE BUTTON
Short press the FUNCTIO N/SNOOZE butt on to change between DAB and FM
PRESET1,PRES ET2,PRESET3 & PRESET4 BUT TONS
These keys ar e used to sto re and recal l station pre sets in DAB an d FM modes
ALARM/SLEEP BUTTON
Short press to select t he Alarm setup menu
In radio on mode,Long pr ess to select the sleep s etup menu
AUTO SCAN BUTTON
In DAB mode, A sh ort press s tarts a quic k DAB scan ,A long press fo r a full DAB s can
In FM mode, A s hort press starts a FM scan
HEADPHONES
A 3. 5mm s ocket for connectin g a set of stereo headp hones (not include d). The inte rnal
loudspeaker is muted when headphones a re plugged-in .
Avoid listening to headphones a t high volume levels to preven t possible he aring damage.
AUX LINE INPUT
This 3.5mm socket i s for co nnecting an external source su ch as an MP3 player, CD player,
TV or comput er.
DC 6V JACK
Connect to t he UNIT power ad apter.
STANDBY MODE
1. Press POWER (ON/OFF) switch to “ON” position.
2. The d isplay on the U NIT will lig ht and display ‘Welcome! Digital Radio’
3. After 2-3s the display lig ht dims, the message changes t o ‘Standby’ an d then goe s to the
Time screen.
Time and date will automatically update on-air, when the radi o is operated .
OPERATING THE UNIT I N DAB MODE
AUTO SCAN
1. Fully e xtend the tel escopic ante nna.
2. Shor t press the S TANDBY button to switch on the radio.
3. The first t ime the r adio is p owered and sw itched on, it will automatical ly select DAB
mode and start a scan of the DAB channe ls to search for availa ble stations. Ple ase leave
it to comple te this proc ess otherwise no DAB statio ns will be st ored for lat er selection.
During the scan t he displ ay shows the sc an progr ess, cha nnel num ber, the multiplex
name and the n the total number of sta tions.
4. When the scan is complete, the UNIT will a utomatically tune to the f irst stat ion in the
list. Statio ns are liste d in numeric- alpha order i.e. from 0 t o 9 and then A to Z.
5. If no station s are detected during the scan the display will show ‘NO SIGNAL DAB’ ,in
this case, reposition t he unit and /or the aeri al and shor t press th eAUTO SCAN butt on
to start an other scan.
Note: Like Digital TV there are some areas where it may still be diff icult t o get a good
DAB signal. The broad casters are con stantly improving DAB c overage so in some cas es it
may be neccesary to wait before some or all DAB servic es become available. You can check
coverage for you r area .
SELECTING A STATION
1. Short press either the UP or DOWN button to scr oll throug h the avai lable stat ion list
and stop at the required station.
2. The display may show ‘SEARCHIN G …’ while the radio selects the new sta tion. If after
selecting a station, ‘not available’ is shown, try relocating the radio to improve recepti on.
SECONDARY STATIONS
Some station s have one or m ore secondar y services associated wi th them. When
secondary s tations are available a > sig n is shown aft er the statio n name.
BBC5Live> >BBC Sport Extr a
BBC National DAB BBC Natio nal DAB
PRESETS
TO STORE A STATION PRESET
1. Select a DAB station as described ab ove.
2. Press and hold one of the Preset ke ys until the display shows ‘P reset x store d’.
TO RECALL A PRESE T STATION
Short press the require d Preset key.
Note: The unit can store 8 stations for DAB & 8 statio ns for FM
Note: To use m emory 5~8 function, you shall press the shift key first and then press the
PRESET1~4 bu ttons togethe r.
1 2 3 4 5 6 7
8
17
18
19
20
21
22
9
11
13
14
15
16
12
10
DAB-43 PLUS (English_2014) (495 x 150 mm) • 10 Feb 2014 • AT

INFO
The UNIT has DAB infor mation modes which are shown on the bottom lin e of the display.
Short press the INFO key to see the avai lable types.
1. progra m type
Displays the type o f station con tent being b roadcast e.g. Classic, Pop, News, etc.
2. Ensem ble Freq.
Displays the DAB stat ion frequency such as 13F 239.200MHz.
3. Audio Bit Rate
Displays the data r ate in kilo B its per seco nd and the au dio mode e.g . Stereo.
4. Ensem ble name
Displays the name of the multiplex to which the Digital1 Network current station belo ngs
5. Signa l strength
Displays the signal strength for the station being listen ed to.
6. Time/Da te
Displays current t ime and date , received off-a ir.
7. DLS ( Dynamic Link Segment)
Scrolling text wh ich inclu des mess ages suc h as Ar tist an d track name, phone numbers,
program deta ils, etc.
FINDING NEW STATIONS
As and when new stations are intro duced it wi ll be neces sary to do an auto-sc an in order
to detect and s tore the new stati ons. Shor t press the Auto-tu ne button on th e rear of the
unit to star t an auto-sc an. DAB servic es are genera lly localised, so if you move the UNIT
to a different are a it will be necess ary to do an auto- scan in order to pi ck up stations in the
new local.
MANUAL TUNE
Manual tunin g allows you to tune directly to a DAB stati on.
1. Long pres s the ENTER button until the display sh ows ‘Manual Tune’
2. Short pr ess the UP o r DOWN key to sele ct a differen t channel num ber
Please note: You may have to wait for the UNIT to tune in to the new channel.
OPERATING THE UNIT I N FM MODE
1. Fully extend the te lescopic ant enna.
2. Press the POWER (ON/O FF) switch to ”ON” positio n to enter st andby mode.
3. Shor t press the S TANDBY button to switch the un it on.
4. If the UNIT is in DAB mode, shor t press the FUNCTION/SNOOZE BUTTON to change
to FM.
The UNIT reme mbers the sele cted source whe n switched to S tandby and auto matically
selects it the next tim e it is switch ed on. If the power is disconne cted the UNIT will
always select DAB m ode when f irst switched on.
5. The d isplay shows the current tun ing frequency and inform ation line.
SELECTING A STATION
MANAUL TUNING
Short press the UP or D OWN BUTTON to chang e the tuning frequency.
note: Wait for a second or so between each p ress for the UNIT to re-t une.
PRESETS
TO STORE A STATION PRESET
1. Selec t an FM or DAB station as d escribed above.
2. Press and hold one of the Preset keys (for approxi mately 3s) until the display shows “Pre set
1 stored”
TO RECALL A STATION PRESET
1. Shor t press the r equired pres et key.
Please note: 8 presets a re available in b oth DAB and FM modes.
You can overwri te any of the presets at any time by holdi ng the preset key until ‘Preset x
stored’ is shown.
AUDIO MODE
Normally, the UNIT will aut omatically select M ono or Stereo m ode depen ding on what is
being broadca st and the sign al strength. However if a stereo stat ion is being re ceiv
ed and the
signal is weak, som e hiss may be audible. To reduce the hiss it is possi ble to switch the UNIT
from Auto to Mo no mode.
1. Shor t press the E NTER button to display the Audio Mode scre en.
2. Shor t press the ENT ER button to sw itch between Auto a nd Mono modes . The new setting
is shown for a short time and then the display retur ns to the Ra dio screen.
INFO
The UNIT has si x FM informati on modes which ar e shown on the bott om line of the di splay.
Short press the INFO/SE TUP button to see the availa ble types.
1. PTY ( program type)
Displays the type o f station con tent being b roadcast e.g. Classic, Pop, News, etc.
2. Signa l strength
Displays the signal strength for the station being listen ed to.
3. Time an d Date
Displays current t ime and date , received off-a ir.
4. Stati on frequency
Displays the freque ncy of the sta tion being l istened to.
5. Audio mode
Displays the curre nt audio mod e setting i.e . Auto(Stereo) or Mono.
6. Radio Text
Scrolling text which includes messages such as Artis t and track name, ph one num bers,
program deta ils, etc.
USING THE AUX INPUT
1. Conne ct the AUX connect wi re from the out jack of your Perso nal Player such as portable
MP3 player to t he AUX input jack.
2. Power on th e unit by pres sing the STANDBY button
3. Turn on yo ur Personal Pl ayer to begin pl aying, adjust the volume to desire liste ning level.
4. Adjus t the volume by pressing the Vol + or Vol – button
Note: Once the AUX jack is inserted wit h the aux plug, The FM /DAB sound is muted but the
display will n ot be change d.
SETTING AND USIN G THE ALARM
VIEW ALARM SETTI NGS
With the UNIT switch ed on, or in S tandby, short press th e ALARM/SLEEP button. T he
display shows the current ALARM s ettings for 5s and then retur ns to the prev ious screen.
From Stand by, the displ ay will l ight, show the setti ngs for about 5s and then go bac k to
Standby.
SET THE ALARM 1
1. With the UNIT switched ON, o r in Standby m ode, pre ss the A LARM/SLEEP button
until the Alar m1 menu is s hown.
2. OFF or ON i s flashing to i ndicate that it can be chang ed. Short pr ess the UP or D OWN
button to ch ange between O FF and ON an d short pres s ENTER to co nfirm
3. The hour dig its are now fla shing. Use th e UP or DOWN butt on to set the required tim e
and short press the EN TER button t o confir m. Short p ress the UP or DOWN button to
change the hour se tting in one hour inc rements or long pre ss either key to scrol l quickly
to the requi red setting.
4. The minutes can now be set , as describ ed above and the n short pres s ENTER butt on to
confirm.
5. Alarm source (BEEP1,BEEP2,FM or DAB) is now flashing. Short press the UP or DOWN
button to selec t and short press ENTER bu tton to confi rm. The display continues to
show the
ALARM settin gs for a sho rt time and then exits th e Alarm menu.
SET THE ALARM 2
1. With the U NIT switched ON, or in Standby mode , press the ALARM/SLEEP button 2
times until the Alarm2 men u is shown.
2. OFF or ON i s flashing to i ndicate that it can be chang ed. Short pr ess the UP or D OWN
button to ch ange between O FF and ON an d short pres s ENTER butt on to conf irm
3. The hour dig its are now fla shing. Use th e UP or DOWN butt on to set the required tim e
and short press the EN TER button t o confir m. Short p ress the UP or DOWN button to
change the hour se tting in one hour inc rements or long pre ss either key to scrol l quickly
to the requi red setting.
4. The minutes can now be set , as describ ed above and the n short pres s ENTER butt on to
confirm.
5. Alarm source (BEEP1,BEEP2,FM or DAB) is now flashing. Short press the UP or DOWN
button to selec t and short press ENTER bu tton to confi rm. The display continues to
show the ALARM se ttings for a short time and then exit s the Alarm me nu.
Note: The ALARM1 or ALARM2 symbol is sh own in the t op right hand corner of t he
display when th e unit is in Standby mode.
In sta ndby mode, the alarm (BEE P1,BEEP2,FM o r DAB) will so und automatic ally at
your desried alarm setti ng time.
CHANGE THE ALARM SO UND
The Alarm soun d on the UNI T can be chan ged to an el ectronic beep tone if pre ferred.
1. At step 5 (above) i.e. when FM is flashing, s hort press either the UP or DOWN b utton
to change t he setting t o BEEP tone1 or BEEP to ne2. Short press the E NTER button to
confirm.
If you have selected a DAB sta tion as the Alarm sound and for any reason the stat ion is
not available e. g. is off-air, t he BUZZ sound will be hea rd when the Alar m activates.
ALARM ON-OFF
With the Alarm set to ON, it will sound each day at th e set time. To turn the Alarm OF F,Short
press the AL ARM/SLEEP b utton and while the Alar m settings are still on screen , press t he
UP or DOWN butt on to select alarm OFF t hen press ENT ER button to confirm .
This can be done with th e UNIT switche d ON or in S tandby mode.
ALARM CANCEL
To cancel the Alarm when it has activated. Press ALARM/SLEEP butto n or STANDBY button
to stop the alarm sound .
The Alarm will a utomatically switch o ff after 59 mun ites unle ss cancel led or switched off
manually.
SNOOZE
The UNIT inc ludes a 9 mi nute snooze t imer.
When the Alar m activates, short press the FUNCTI ON/SNOOZE bu tton to sta rt the Sno oze
timer. The UNIT g oes to Standby.
SETTING AND USIN G THE SLEEP TIMER
VIEW SLEEP TIME R SETTINGS
With the UNIT sw itched ON, pre ss and hold th e ALARM/SLEEP b utton to view t he current
Sleep timer settings.
SET THE SLEEP TIME R
1. With t he UNIT switched ON and playing any of th e inputs i.e. DAB, FM or AUX, long
press the SL EEP key until the Sleep me nu is shown.
2. The minutes are now flashing. Shor t press ALARM/SLEEP button to change the Sleep time
(such as 15m ins, 30mins ,45mins, 60mi ns & 90mins)
3. Available Sleep ti me is 15 to 90 minutes , in 15 min utes increme nts. Set the required t ime
and short p ress ENTER b utton to conf irm.
4. The display conti nues to show the set tings for 3s and then returns t o the Radio scre en. The
UNIT plays for the selecte d time and th en switches t o Standby.
CANCEL SLEEP TIMER
1. With t he UNIT switched ON and playing any of th e inputs i.e. DAB, FM or AUX, long
press the SL EEP key until the Sleep me nu is shown.
2. The minutes are now flashing. Shor t press ALARM/SLEEP button to change the Sleep time
to OFF.
SYSTEM RESET
System Reset can be used to clear the station list, the presets and all Alarm and Sleep se ttings.
This is useful if you move the UNIT to a different location (when you move house for instance)
as some stat ions may not b e available in th e new area.
1. In DAB & FM mode , long press th e FUNCTION/SN OOZE button unt il the display sh ows
“Press Enter Key to Reset” .
2. Short pr ess the ENTE R button. The d isplay now shows ‘ System Reset’ .
3. The UNIT wi ll now clear th e internal memory and a utomatically s tart a quic k scan.
Electric and electronic equipment contains mater ials, components and substances
that can be h azardous to yo ur health and the environment , if the waste material
(discarded e lectric and electronic eq uipment) is not handled c orrectly.
Electric and electro nic e quipment is marked with the crossed out trash can
symbol, seen below. This symbol signifi es that electric and electroni c equipment
should not be dispos ed of wit h other ho usehold wast e, but sh ould be d isposed
of separately.
All cities have estab lished coll ection poin ts, where electr ic a nd e lectron ic
equipment can ei ther be submitte d free of charge at re cycling station s and other
collection s ites, or be c ollected from the househol ds. Additional i nformation i s
available at the technical d epartment of your city.
DAB-43 PLUS (English_2014) (495 x 150 mm) • 10 Feb 2014 • AT
Imported by:
DENVER ELECT RONICS A/S
Stavneagervej 22
DK-8250 Egaa
Denmark
www.facebook.com /denverelectron ics
ALL RIGHTS RES ERVED, COPYRIGHT DENVER ELECTR ONICS A/S
www.denver-electroni cs.com
 Loading...