

Denver CRP-718 User Manual
DENVER CRP-718
ENGLISH
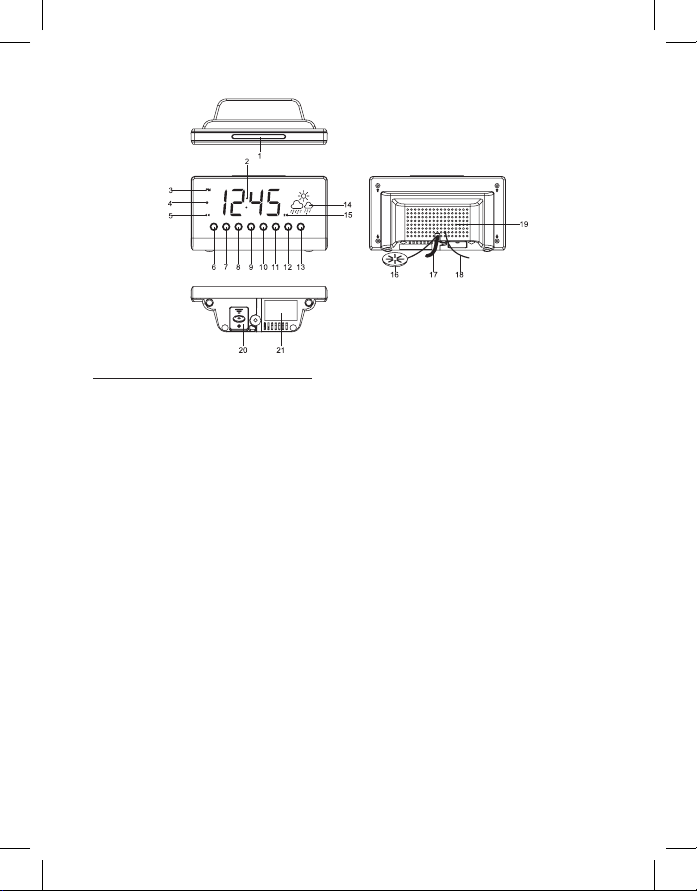
FUNCTION AND CONTROLS
1. SNOOZE / SLEEP / DIMMER
2. DISPLAY
3. PM INDICATOR
4. STANDBY INDICATOR
5. ALARM 1 INDICATOR
6. ALARM 1 ON / OFF SET
7. ALARM 2 ON / OFF SET
8. << / TUNE - / YEAR/MONTH/DAY / C-F
9. >> / TUNE + / DST
10. VOLUME DOWN / DISPLAY LIGHT AUTO ON-OFF
11. VOLUME UP / TOGGLE BETWEEN DISPLAY CONTENTS ON OFF
12. CLOCK ADJ. / MEM.SET / M+ / NAP
13. ON / OFF RADIO / ALARM OFF
14. WEATHER FORECAST
15. ALARM 2 INDICATOR
16. TEMPERATURE SENSOR (IN DOOR) / HUMIDITY SENSOR
17. AC POWER CORD
18. FM ANTENNA
19. SPEAKER
20. BATTERY COMPARTMENT
21. R ATING LABEL
ENG-1
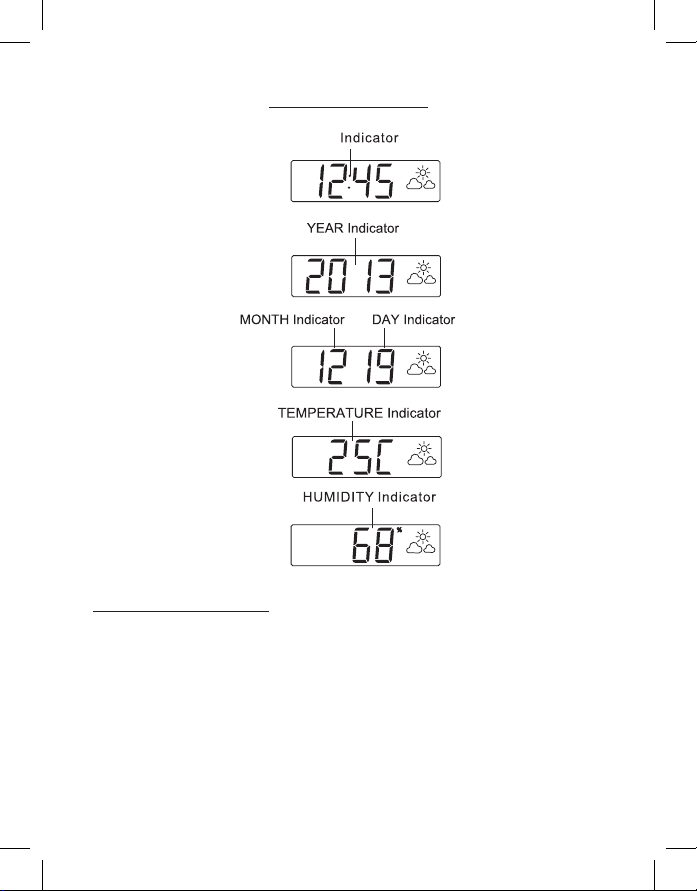
LED DISPLAY MODE
TIME
POWER CONNECTION
Plug the AC power cord to a household outlet AC source. This unit
is equipped with a battery back up system, it requires a 3V CR2032
at lithium battery (not included). Insert the battery in the battery
compartment, making certain that the positive and negative (+ and -)
battery terminals are attached to the corresponding terminals on the
plate in the battery compartment. If an AC power failure occurs, the
clock automatically switches to the battery power supply, the clock and
timer memory continue running. When the AC power resumes, the
clock switches back to AC again.
ENG-2

TIME AND CALENDAR MANUAL SETTING
Setting Time and Calendar
Press Clock ADJ. (12) button in standby mode and keep depress over
2 seconds to enter time set mode, after enter the setting mode, press
Clock ADJ. button (12) to change the mode cycle as follows:
Normal → Year → Month → Day → 12/24 H format → Real time Hour
→ Real time Min → Normal
Action (during data adjustment):
- Press << / Tune - button (8) to adjust data backward.
- Press >> / Tune + button (9) to adjust data forward.
- Keep depressed << or >> button for 2 seconds to enable auto
forward.
- Use Clock ADJ. (12) button to conrm each setting.
ALARM SETTING
Setting Alarm 1 and Alarm 2
Press the alarm set button (6/7) during normal mode to show
the alarm time. Afterwards keep depress the alarm set button
(6/7) over 2 seconds to enter the alarm set mode. After enter
the setting mode, press the alarm set button (6/7) to change the
mode cycle as follows :
Normal → ALARM 1 Hour → ALARM 1 Min → ALARM 1 weekday
Alarm → ALARM 1 wake beep → ALARM 1 wake radio → ALARM 1
wake radio volume →Normal.
Normal → ALARM 2 Hour → ALARM 2 Min → ALARM 2 weekday
Alarm → ALARM 2 wake beep → ALARM 2 wake radio → ALARM 2
wake radio volume →Normal.
Select alarm weekday mode as follows:
1-5: Monday to Friday
1-7: Whole week
6-7: Saturday & Sunday
1-1: One day of week
ENG-3
 Loading...